Embed Size (px)
Citation preview

First Year Camper Program Guide
Written by Nate Caldwell for Camp Olmsted

First Year Camper Guide 2
Written by Nate Caldwell for Camp Olmsted

First Year Camper Guide 3
TrailsHead Program Guide
Table of Contents
Introduction 3 Equipment Checklist 4 Staff Training 6 Games 7 Merit Badges 9
• Sports 9 • Fingerprinting 12 • Mammals Study 13
Schedule 15
• Monday 15 • Tuesday 20 • Wednesday 24 • Thursday 28 • Friday 32
Miscellaneous 35
• Sunday Evening Information Session 35 • Five Mile Hike Supplemental 36 • Overnighter Supplemental 38 • Evening Activities 39 • Afternoon Activities 40
Appendix A – Poisonous Plants 41

First Year Camper Guide 4
TrailsHead Program Guide
Introduction Hello and welcome! What you are about to leaf through is the First Year Camper Program Guide for Camp Olmsted in Goshen Scout Reservation of the National Capital Area Council. Since such a title is really long, not to mention boring and confusing, this manual is entitled the TrailsHead Program Guide as TrailsHead is the name of Olmsted’s first year camper program. Within this guide lays enticing schedules, tips, and methods to run a first year camper program. But as you read through this guide, no doubt rapturing in the bliss that is TrailsHead, you will probably find some faults with the program, or know how to do something better. If such is the case, by all means tell the first year camper director to improve it as this is only a guide. There are many things that have been left out and there are other things which probably shouldn’t have been covered at all. This guide is written for the director, and is meant to provide the director with some sort of structure to work within and without. But this guide can also be used to show leaders everything that TrailsHead does, and how we go about doing it. And it is important for all to realize that the ultimate goal of TrailsHead is for the scouts to have fun. Obviously obtaining skills needed for advancement is an important goal to strive for, but if a scout does not have fun his first year at summer camp, then he will not remain a scout. It is the job of the first year camper director to ensure that each scout is having a memorable experience at summer camp. Since the director is charged with such a huge responsibility, there are certain aspects of the job that no other staff member has to even think about. Certainly a director should be concerned with paperwork and managing the staff, but a TrailsHead director also has to manage the scouts. The director of a first year camper program is a bit like the concierge at a hotel; he is responsible for keeping all guests happy and making sure their stay is enjoyable. Scouts are also going to look up to the TrailsHead staff as a whole, and many will want to become your friend. Scouts are going to follow you around, and you should make sure each scout loves camp and scouting. Being a first year camper director is tough work. Sometimes you may even have find yourself with 60 scouts but no one else to help out. But, it’s also the most enjoyable job in camp for there is absolutely no other position where the program director or adult leaders will let you get away with supersoaker fights, practical jokes, random games, etc. during program time.
First Year Camper Guide 5
TrailsHead Program Guide
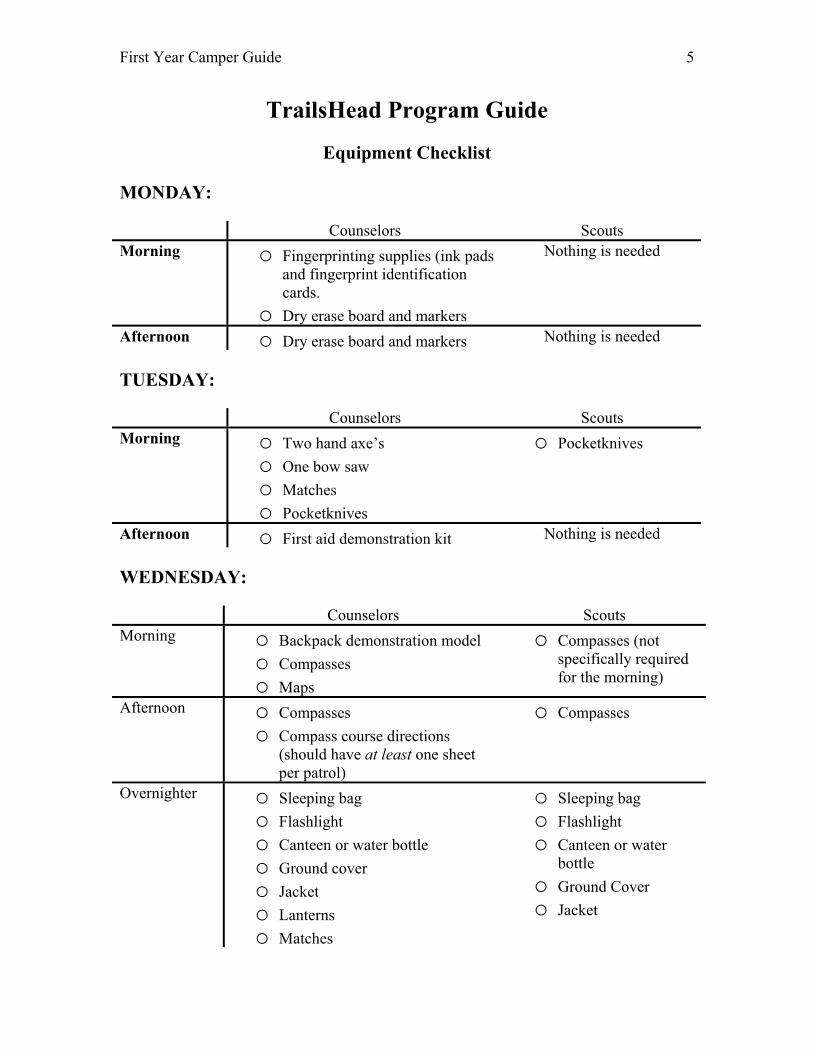
Equipment Checklist
MONDAY:
Counselors Scouts Morning o Fingerprinting supplies (ink pads
and fingerprint identification cards.
o Dry erase board and markers
Nothing is needed
Afternoon o Dry erase board and markers Nothing is needed TUESDAY:
Counselors Scouts Morning o Two hand axe’s
o One bow saw o Matches o Pocketknives
o Pocketknives
Afternoon o First aid demonstration kit Nothing is needed WEDNESDAY: Counselors Scouts Morning o Backpack demonstration model
o Compasses o Maps
o Compasses (not specifically required for the morning)
Afternoon o Compasses o Compass course directions
(should have at least one sheet per patrol)
o Compasses
Overnighter o Sleeping bag o Flashlight o Canteen or water bottle o Ground cover o Jacket o Lanterns o Matches
o Sleeping bag o Flashlight o Canteen or water
bottle o Ground Cover o Jacket

First Year Camper Guide 6
THURSDAY:
Counselors Scouts Morning o Rope (make sure this rope can be
easily untied) Nothing is needed
Afternoon o All the rope that can be had! o Logs and whatever other
materials will be needed in order to complete the pioneering projects.
o Animal paw prints bandana. o Dry erase board and markers. o Leaves from different trees.
Nothing is needed
FRIDAY: Counselors Scouts Morning o Paper and pens
o Paperwork o Whatever materials
will be necessary to complete unfinished merit badges
Five-mile Hike o Canteen or water bottle o Towel o Swimming suit o Trail mix o Water shoes o Extra water for thirsty scouts o Map of Goshen (as many as
possible) o Compasses
o Canteen or water bottle
o Towel o Swimming suit o Trail mix o Water shoes o Compass o Map of Goshen (if
available)

First Year Camper Guide 7
TrailsHead Program Guide
Staff Training Intro: Staff training is perhaps the most essential part to running TrailsHead for you’ll have to rely on your staff for most of the activities. That is, have a well-trained staff and you’ll have an excellent program; but have a poorly-trained staff, and you’ll have a sub par program. Yet, training staff, especially for TrailsHead, is not easy. It’s not like the other program areas where the counselors come up with lesson plans and they have everything that they will say already written down for TrailsHead is very fluid and requires more than just basic knowledge. Not only that, but a TrailsHead staff member must be taught how to deal with scouts (patiently and no name-calling!). The following is a schedule that you may find useful for staff training during staff week. Oh, and never assume that a staff member already knows how to do something – make him/her prove it! First Day: Whenever you start staff training, use the first day to set up TrailsHead – it shouldn’t take too long, and, after you’re done, start teaching the skills. Most of these skills should not take long to do, and most of the staff will simply be relearning what they already know/knew. What you want to make sure is that each staff member knows the first aid, knows how to complete a compass course, and knows how to tie the different knots. Also, make sure their knowledge of each is known by heart (they cannot be using a book). Second Day: Use this day to finish up whatever skills you couldn’t cover the first day, and then move on to how to teach the skills. Basically, just explain that you have to assume the scouts know absolutely nothing and that some scouts will need individual instruction. But more important, go over with the staff on how to make a presentation on a skill interesting; that is, add stories, make up jokes, play games related to the skill. Third Day: If you get a third day, you may wish to use it to go over how to deal with scouts. This means being patient with scouts, never insulting them, and just being nice to them. In other areas of the camp, it’s important to be smiling and appear cheerful even when you’re having the worst day of your life, but in TrailsHead it is vital to appear cheerful, and even excited on each new skill. You may even go over hypothetical situations involving homesick scouts, a scout that desperately wants to be your best friend, and when a scout reveals he is being abused.

First Year Camper Guide 8
TrailsHead Program Guide
Games During the course of the week, you will find that there will be plenty of times when there is simply nothing to do; everything has already been covered for the day and there is not enough time to start on anything else. Sometimes when this happens, you may want to just dismiss the scouts. However, you cannot always let the scouts out early as this may upset some leaders. There also may be a time when you sense the scouts are losing interest and need something to get their energies back up, or you may want to reward the scouts for what was a hard day. In these cases, it’s good to play a game. You may even want to play games just as an ice-breaker. In addition to games, riddles and stupid jokes are also a good way to entertain the scouts. Silent Speedball: This is a TrailsHead director favorite since during the course of the game, players must be silent or they get thrown out! Scouts also seem to love it, so this is a very good game to play. What you will need is one volleyball or beach ball, and then gather everyone into circle (everyone must be standing). The players then throw the ball from one to another until there is only one person left. Rules for the game are:
1. No passing to the person next to you until there are only five people left. 2. The ball must be passed within five seconds of being caught. 3. There is no pegging, or throwing below the waist or above the head. 4. If the receiver touches but does not catch the ball, he is out. 5. If the receiver could have caught the ball, but fails to do so, he is out. 6. If the ball is going toward the head of the receiver, he can move his hands
to block the ball and will not be out even if he fails to catch the ball. 7. And, my favorite, no talking!
If the game starts going on for too long, you can make it extra difficult by forcing players to jumping on one leg, close one eye, etc. Jimmy, Jimmy, Zoom: Sometimes this is called Johnny, Johnny, Whoops, and it is a great way to help scouts get comfortable in TrailsHead. To do it, hold up one hand. Touch each finger, each time saying “Jimmy.” Between the index finger and the thumb, though, trace down like a slide between the two and say “Zooooom.” Repeat this once by going backwards along the hand. At the end, clasp your hands together at waist level. Ask the scouts to repeat what you just did, and they’ll think, “Oh, this is so stupid. This is so easy!” But, the trick is getting the handclasp at the end. The Jimmy Zoom part does not matter at all; as long as they clasp their hands at the end, they get it right. It’ll take a while before they start getting it, but while they’re doing so, start acting silly and say stuff “Why can’t you scouts just pay attention!” For fun, you can also do Jimmy Zoom silently, in slow motion, and in fast motion. This is a great riddle for scouts to do.

First Year Camper Guide 9
Capture the Flag: Everyone knows this game. You have two teams split up on two sides of the field. On each side of the field, you have a prison and a flag. The goal is to get the other team’s flag and bring it back to your side. However, if you get caught on the opponent’s side, you must go to prison. This is a fun game to play, but it takes up a lot of time and a lot of energy. Crossed or Uncrossed?: In this game, you take two sticks and ask scouts if the sticks are crossed or uncrossed. The trick here is that it doesn’t matter if the sticks are crossed or uncrossed. It merely matters if your arms or your legs are crossed or uncrossed! First Aid Relay: This is your basic relay where patrols compete against each other. Set up anywhere from 3 to 5 stations for each patrol. At each station, there should be a scout from the patrol as well as a counselor. Once a scout and tags the hand of the scout waiting at the station, the scout who has been waiting must answer a first aid question before leaving. There are a number of ways to run this game, but it can be hard to get off the ground if it’s a big week. Knot Rope: This is for patrols to do by themselves (with their counselor of course). To do this game, you will need a long piece of rope tied together by the different knots that the scouts have been learning. Or, you can just tie the knots and leave them by themselves. In any case, the knots should be placed in a line. The scouts then travel this line and look at each knot. At the end, they must recite each knot, in the order they saw it, to the counselor. The scout who gets the most right wins. Orienteering Competition: This is great because it combines a lot. On Wednesday afternoon, the scouts will be doing an orienteering course that should be one-mile long. At each stop along this course, though, there should be an envelope with a question that deals with what they have learned, in it. One question may be “How do you treat for frostbite,” or “How do you find the North Star?” They can also be challenges such as “Tie a bowline,” or “Show the fireman’s carry.” Scouts cannot proceed with the course until everyone has completed the question/challenge. And since a counselor will be traveling with each patrol, it is the counselor’s job to make sure each scout answers sufficiently enough. At the end, the patrol that completes the course in the fastest time, wins. This is also fulfills requirement #5 for sports merit badge. One Step Forward, Two Steps Backwards: Each scout lines up along a line. The counselor then reads off a statement. If the statement is true, the scout may take one step forward. If a scout goes ahead when the statement is false, then he must go two steps backward. The “race” goes on until someone wins. For statements, relate it to the merit badges.

First Year Camper Guide 10
Participation Pudding: I’ve never done this at TrailsHead, but it’s great fun to do if you can. For it, everyone will need some sort of cover that they don’t mind getting dirty (trash bags work great). Scouts are then blindfolded, and each scout is given a cup of pudding and a spoon. Scouts stay in their patrols, but patrols must compete against each other. For this game, there are two awards: the patrol that does it fastest, and the patrol that is the cleanest at the end. Also, it does not need to be pudding and anything that can get messy will do. You may also prefer to buy the mix and make it yourself since buying pre-made pudding is expensive. And a few jokes for when everyone is tired… Why did the duck not want to cross the ice? He was afraid he would quack it! If athletes get athletes foot, then what do fighter pilots get? Missile-toe! What does it say on a robot’s tombstone? Rust in peace! What do you get when you grill a Barbie doll? A Barbie-que! What goes zzub, zzub, zzub? A bee flying backwards! What is the best hand to write with? Neither, it’s best to write with a pen! Why was the Egyptian girl freaked out? Because her daddy was a mummy! What language do they speak in Cuba? Cubic! What happens when you throw a green stone into the red sea? It gets wet!

First Year Camper Guide 11
TrailsHead Program Guide
Merit Badges Sports
Note: Sports and Fingerprinting are two merit badges offered in Camp Olmsted that only first year scouts can learn. So if anybody outside of TrailsHead ask if they can earn Sports or Fingerprinting, the answer is no. There are many requirements needed to complete the Sports merit badge, but most of these are redundant with what is already offered in TrailsHead. For instance, requirement #1 is the same first aid the scouts have to learn anyway, sportsmanship can be tied into the buddy system, and one of the competitive events (orienteering) ties specifically into what will be covered on Wednesday afternoon. Most of these other requirements can be covered during Monday afternoon. Everyone should get into their patrols, discuss what sports they have played in the past, and then review the rules for those sports and how the sports are played. Requirement #5 will probably end up taking the most time as it requires some writing, so be sure all counselors devote enough time to it. Also, make sure this writing is done during TrailsHead since the scouts will already have more than enough homework to do. Below are the requirements for Sports merit badge. Notice that in requirement #5, the only writing needed is the record keeping part, and this should ideally be done before the scouts come to camp.
1. Show that you know first aid for injuries or illnesses that could occur while playing sports, including hypothermia; heatstroke; heat exhaustion; frostbite; dehydration; sunburn; blisters; hyperventilation; bruises; strains; sprains; muscle cramps; broken, chipped, loosened, or knocked-out teeth; bone fracture; nausea; and suspected injuries to the back, neck, and head.
2. Explain sportsmanship. Tell why it is important. Give several examples of good sportsmanship in sports. Relate at least one of these to everyday citizenship off the sports field.
3. Take part for one full season as a member of an organized team in ONE of the following sports: baseball, basketball, bowling, cross-country, diving, fencing, field hockey, football, golf, gymnastics, ice hockey, lacrosse, rugby, skating (ice or roller), soccer, softball, swimming, team handball, tennis, track and field, volleyball, water polo, or wrestling (or any other recognized team sport approved in advance by your counselor, except boxing and karate).

First Year Camper Guide 12
4. Take part in ONE of the following sports on a competitive basis in two organized meets or tournaments: archery, badminton, bait or fly casting, bowling, canoeing, cycling, diving, fencing, fishing, golf, gymnastics, handball, horsemanship, horseshoes, judo, orienteering, paddleball, rifle or shotgun shooting, sailing, skating (ice or roller), skiing, swimming, table tennis, tennis, track and field, waterskiing, or wrestling (or any other recognized sport approved in advance by your counselor, except boxing and karate).
o This cannot be the same sport used to meet requirement 3. 5. Make a set of training rules for the sports you picked. Tell why these rules are
important. Follow these rules. Design exercises for these sports. Keep a record of how you do in these sports for one season. Show how you have improved.
6. Show proper techniques in your two chosen sports. 7. Explain the attributes (qualities) of a good team leader and a good team player. 8. Draw diagrams of the playing areas for your two sports. 9. Explain the rules and etiquette for your two sports. List the equipment needed.
Describe the protective equipment. Tell why it is needed. Tell what it does.

First Year Camper Guide 13
TrailsHead Program Guide
Merit Badges Fingerprinting
Note: Sports and Fingerprinting are two merit badges offered in Camp Olmsted that only first year scouts can learn. So if anybody outside of TrailsHead ask if they can earn Sports or Fingerprinting, the answer is no. For fingerprinting, you’ll definitely need the merit badge book as there is a fingerprinting quiz in the back of the book that the scouts need to take. Fingerprinting is probably the easiest of all merit badges to earn, and most of the stuff can be earned Monday morning. Requirement #1, though, is difficult to obtain the supplies for, but you can substitute the fingerprint identification cards with normal index cards. On Monday, split everyone into two groups. One group will get their fingerprints taken. The second group will go over requirements #2, #3, and #4. For #3, review the fingerprint patterns but do not give out the quiz on it just yet. Instead, do that on Friday morning. Below are the requirements for fingerprinting merit badge:
1. Take a clear set of prints. Use both rolled and plain impressions. Make these on an 8-by-8 inch fingerprint identification card, available from your local police department or counselor.
2. Do the following: a. Name the surfaces of the body where friction or papillary ridges are found. b. Explain why plain impressions must be taken on a card.
3. Show you can identify the eight types of fingerprint patterns. 4. Give a short history of fingerprinting. Tell the difference between civil and
criminal identification. Point out the purposes of each.

First Year Camper Guide 14
TrailsHead Program Guide
Merit Badges Mammals Study
Mammals Study is the easiest of the five merit badges that a scout can earn through TrailsHead. But, it does require some homework and scouts will not appreciate that. However, they must come up with an essay about a mammal (req. 3c), and two food chains (req. 4g). Tell them about this homework on Monday when you start going over Mammals Study, and tell them to turn it in by Thursday. It’s okay, of course, to turn it on Friday, but if you tell them Thursday more of them will get it done. The rest of the requirements are covered in the schedule, but they may as well be written again. Requirement one is the easiest of all, and you merely have to make sure each scout understands the meaning of the four words. To do this, you can ask random scouts each day for the definition. Requirement #2 is a bit more difficult, but you can go over it in-depth with the scouts. After you classify the three mammals of your/their choosing (there are three given in the schedule for Monday at 11 am), you can make it more fun by making up an animal and then classifying it. The final requirement, requirement #5, is done by having the scouts build a mammal shelter, which is done by building a ring of sticks around the base of a tree and piling pine needles on top. For the shelters, it’s good to have a few demos already down so the scouts know what to do. Below are the requirements for Mammals Study (the ones in bold are the requirements we concentrate on):
1. Explain the meaning of "animal," "invertebrate," "vertebrate," and "mammal." Name three characteristic that distinguish mammals from all other animals.
2. Explain how the animal kingdom is classified. Explain where mammals fit in the classification of animals. Classify three mammals from phylum through species.
3. Do ONE of the following: a. Spend 3 hours in each of two different kinds of natural habitats or at
different elevations. List the different mammal species and individual members that you identified by sight or sign. Tell why all mammals do not live in the same kind of habitat.
b. Spend 3 hours on each of 5 days on at least a 25-acre area. List the mammal species you identified by sight or sign.
c. From study and reading, write a simple history of one nongame mammal that lives in your area. Tell how this mammal lived before its habitat was affected in any way by man. Tell how it reproduces, what it eats, what eats it, and its natural habitat. Describe its dependency upon plants, upon other animals (including man), and how they depend upon it. Tell how it is helpful or harmful to man.

First Year Camper Guide 15
4. Do ONE of the following: a. Under the guidance of a nature center or natural history museum, make
two study skins of rats or mice. Tell the uses of study skins and mounted specimens respectively.
b. Take good pictures of two kinds of mammals in the wild. Record light conditions, film used, exposure, and other factors, including notes on the activities of the pictured animals.
c. Write a life history of a native game mammal that lives in your area, covering the points outlined in requirement 3c. List sources for this information.
d. Make and bait a tracking pit. Report what mammals and other animals came to the bait.
e. Visit a natural history museum. Report on how specimens are prepared and cataloged. Explain the purposes of museums.
f. Write a report of 500 words on a book about a mammal species. g. Trace two possible food chains of carnivorous mammals from soil
through four stages to the mammal. 5. Work with your counselor, select and carry out one project that will
influence the numbers of one or more mammals.

First Year Camper Guide 16
TrailsHead Program Guide
Monday 9:00 am Swimming Merit Badge
9:00 – Call scouts to the buddy board and have them move toward the far side of the beach. Ideally, you should have one person doing the buddy board and another person taking attendance over on the far side of the beach. The person at the buddy board should ask scouts to organize themselves by troop number before entering, and the person taking attendance should do so by troop. This should be happening simultaneously. If that is not possible and there is only one person doing buddy board and attendance, then attendance should be taken at the buddy board so as to maximize use of program time. Be vigilant in regards to keeping scouts sitting down on the beach and not playing with the sand. 9:10 – Begin program time by introducing the staff and then talking about PDQ Balls. This acronym stands for physical fitness, discipline, qualified supervision, buddy system, ability groups, lookout, lifeguard, safe swimming area. After this go over PPP Q Beads for safety afloat. This acronym stands for physical fitness, personal flotation device (PFD), planning, qualified supervision, buddy system, equipment, ability to swim, discipline, and skill proficiency. To teach this in a fun and enjoyable manner, go over it with the scouts then have them stand up and shout it at the top of their lungs so as to disrupt Bowman’s swimming merit badge class. If attendance is not finished by 9:10 then do it while one the instructors are teaching the acronyms. 9:25 – Organize scouts by patrols. Keep scouts within their own troops and, if possible, keep patrols to no more than 10 scouts. After this, it is time to jump in the water. The activities to cover include back-float, survival float (dead-man’s float), cannonball position, and huddle position. Go over each of these activities first on the land, and then hold a demo in the water. After the demo is done, tell the scouts to slide in the water by first sitting on the side of the dock then sliding on in. JUMPING IS NOT ALLOWED! Be sure to stress that in addition to not going underneath the water unless it is specifically specified by the instructor. 9:45 – If all is done, have the scouts get out of the water and do a quick review of everything covered. Send them on their way while making sure each takes his tag off the buddy board. And remember be friendly and always have a smile on your complexion!

First Year Camper Guide 17
TrailsHead Program Guide
Monday 10:00 am Trailshead Introductions
Note: TrailsHead is set up such that the scouts need not arrive from swimming merit badge to the regular program area until 10:15 am. Make sure the scouts know this, but do not tell them they have time to get dry clothes on. Merely tell them to can take their time getting there. If you do tell them that they can change, then you will not have the entire class there until 10:30 (if you’re lucky). 10:15 – TrailsHead staff introduction. Make sure each and every single staff member’s name is said at least twice. Also, quickly explain what TrailsHead is and the goals of TrailsHead, but do not go over the program schedule. That is done on Sunday night and thus becomes a rather superfluous task. 10:20 – Begin with a game, preferably Jimmy Jimmy Zoom. This can serve as an icebreaker. If the scouts (remember, never call a scout a kid because kids are baby goats) already know this game, which can happen, play the sticks uncrossed, crossed game. 10:30 – Handicrafts demo and short camp tour. Get all the scouts to line up on the path and start walking toward the handicrafts shelter, where the first year camper area director should have already informed/warned the handicrafts people. And make sure the handicrafts people actually go into good detail about what is required in ONLY leatherworks and basketry (no woodcarving!). After this, take the scouts to the totem pole and tell them that we will meet there for the overnighter and for the five mile hike (explain both briefly). Now return to TrailsHead. 10:50 – Begin fingerprinting by going over the requirements in a concise, tidy manner. Then split the scouts into two groups, sending one to get their prints done and the others to learn the history of fingerprint. The first group (getting their prints) should be sent over to the picnic tables, where everyone but one person on staff should be so that the process shall be expedited. The second group should learn the history from someone who has rehearsed before. Reading from the merit badge book is not necessary!

First Year Camper Guide 18
TrailsHead Program Guide
Monday 11:00 am Trailshead Loves Mammals
11:00 – At this point in time, you should still be working on the fingerprinting. However, if groups have not been switched yet, you will have to find an interesting activity for the scouts in the history group to do since they will be the first to finish. Best time waster would be to quiz them on what they just learned, but do not play silent speedball, capture the flag, taps, etc. Doing so could have scouts thinking TrailsHead is all games (leading to undesirable outcomes) and suspicions among the scoutmasters that TrailsHead is really a day care center (leading to adverse outcomes, especially since TrailsHead is not a licensed day care center). After an activity with the history group is going on, the person in charge of group should make sure the printing group is almost done. If not done by 11:10, change groups anyway and have the remainder stay later to get their prints done. 11:20 – By the time that fingerprinting is done, everyone should gather back around the circle. It is now time to learn about mammals! Requirement 1 is the only necessary item to go over at this time, and it details that the scout must be able to explain the definition of an animal (cannot produce its own food), invertebrate (no backbone), and vertebrate (has a backbone). Also, scouts must be able to name the three characteristics of a mammal (has fur, produces milk for its young, and is warm blooded). Remember, giving live birth is not a prerequisite for being a mammal! God’s joke, the Platypus, gives birth in eggs, and yet, it is considered to be a mammal. 11:30 – Mammals Study requirement #2 states that three mammals should be classified according to the kingdom, phylum, class, order, family, genus, and species system. For simplification, have the scouts remember it as: King Philip Came Over For Good Soup. Then choose three mammals, and a few are done below! Dog Lion Human Kingdom Animal Animal Animal Phylum Chordata Chordata Chordata Class Mammals Mammals Mammals Order Carnivora Carnivora Primates Family Canidae Felidae Bipedilia Genus Canis Panthera Homo Species Domesticus Leo Sapiens Latin pronunciations are not obligatory, so you may substitute appropriate English. And pay heed that the scouts are not required to write them, just merely to learn them. Also, while this is admittedly dry material, you can make it fun. Have the scouts shout out Kingdom, Phylum, and so on while you say the acronym, King Philip… You can also even come up with a TrailsHead only animal that the scouts dream up.

First Year Camper Guide 19
TrailsHead Program Guide
Monday 2:00 TrailsHead Athletes Program
2:00 – Separate the TrailsHead scouts into patrols. As in swimming, keep them to their troops, and, if possible, use the same patrols as in swimming merit badge. Each patrol should have at least one staff member who is exclusively devoted (body and mind, if not soul) to that patrol. Ideally, each patrol should have no more than 10 scouts, and if this is not possible due to either staff shortage or if there is a huge troop, then use common sense. 2:05 – Explain the sports merit badge. This can be done by anybody, but it should preferably be the first year camper director. At this point in time, though, only go over the requirements regarding sportsmanship, what a good leader is, and what is required for the merit badge. 2:15 – Have the scouts separate into their patrols with their appointed counselors. Make sure each group is also far enough away from one another so that they won’t interfere with each other’s groups. For instance, keep only one group in the world brotherhood circle (sometimes known as the friendship circle, sometimes just as the circle). Then send the other groups to wherever (each group must be within sight and must stay within the area!). Right now, just have them come up with names for their patrol. 2:20 – By now, everyone should be settled, and now everyone should start covering the requirements for sports merit badge that cover sports you have played, and the rules for the sport. Have the counselor start off, then have each scout talk about sports they have played in the past and talk about the rules for that sport. If all patrols end up finishing before 3:00, come back to the circle and review Mammals Study from the morning session.

First Year Camper Guide 20
TrailsHead Program Guide
Monday 3:00 TrailsHead + Mammals 4eva
3:00 – By this time, all the groups should be done, so it is time to reconvene in the circle. It is now time for Mammals Study requirement number 5, and, as everyone knows, TrailsHead loves mammals. Requirement number 5 concerns the building of the mammal shelter, and you should already have a demonstration model set up. Basically, the shelter is a ring of sticks (kind of in the form of a tepee) around a tree. On top of the sticks, you place a layer of pine needles. The area between the sticks and the tree should be wide enough to fit one’s hand through, and there should be only one entrance. Tell the scouts that they must build one of these shelters and they can split up into groups of two or three people. Occasionally, you may have to separate up groups. Also, encourage the scouts to go wild with this. Tell them they can build mammal shelters as big as they want, and even add in a swimming pool for the rodent that will surely move in! 3:05 to 3:50 – The scouts have half an hour to build their shelters, and this will not be enough time for some of them. For these scouts, make sure you tell them that they will have to finish it later. There will also be scouts who will be done after only ten minutes, so make sure you have a game or something else for them to work on. You may even tell them to add on to their shelter, but if the shelter is fine and they don’t want to do anything else to it then don’t force them. Also, make sure counselors are not using this time to sit down and chat about different ways they can have fun at Wal-Mart. Each counselor should be walking around, seeing if anybody needs help. 3:50 – By this time, most scouts should be done. Have everyone come back to the circle and explain what is happening at four o’clock. One half of the patrols will have free time, which is preferably spent at the handicrafts lodge. The other half shall be separated into two groups: one group will be going to the archery range, and the other group will be going to riflery. Go over the schedule for the entire week, and explain how the two halves of TrailsHead will switch starting Wednesday. Make sure the two groups of scouts heading toward shooting sports will be led by a counselor. For additional information, refer to the Afternoon Activities section on page 39.
First Year Camper Guide 21
TrailsHead Program Guide
Tuesday 9:00 am Swimming Merit Badge
9:00 – Do the same thing as on Monday with regards to the buddy board; that is, call the scouts taking swimming merit badge to the board, have them line up single file and come in one by one, making sure all the while that they are putting their tags on the board. Remember, be vigilant in this task! However, by now everyone should be organized by patrol, so have the scouts come in organized by patrol and have them sit by patrol. Also, if they have not already come up with a name, have them do so now. And make sure that the rules are followed once they come to the beach; that is, no playing with the sand and sitting down. Don’t be harsh, though. If the sun is in their eyes, allow them to sit facing away from the sun. 9:05 – After Monday, the buddy board and getting everyone organized should be done quickly and take no more than five minutes. If it takes longer than this, you are cutting into program time and consequently hurting not only yourself but the scouts as well. Once all is done, you may want to reintroduce yourself and the staff. This is not necessary, however, and the more important thing to do is going over the swimming homework; scouts will need to turn in by Thursday a physical fitness plan involving swimming as well as a place in their area where they can do this. The plan should incorporate at least five parts: stretching before to avoid cramps afterwards, warm-up in the water such as an easy 50 meter breaststroke or elementary backstroke, then the main exercise such as 500 meter freestyle or 100 meter butterfly, a cold-down similar to the warm-up, and finally stretching to once again avoid cramps. Keep in mind that the homework can be turned in by Friday, but do not tell the scouts this until Thursday! This way, even the procrastinators can earn the merit badge, and it’ll mean less paperwork on frantic Friday. 9:15 – Now it’s time for the discussion of what will be happening today. The scouts will be learning three strokes: freestyle, breaststroke, and elementary backstroke. These are all simple strokes, and most should already know them, but go over them in detail on the beach (having them practice them there) and then demonstrate it in the water (either you or somebody else). When walking out on the dock, have them go out by patrols and led by their counselor. Remember no jumping or going under the water once out on the docks. When they start doing the strokes themselves, first do only to the rope and back, and do not send everyone out at once! Separate everyone by one’s and two’s and have them go out by whether they are a one or a two. 9:50 – If you finish with the strokes early, merely have them do it over and over again until it is 9:50. At this time, have them get out of the water and return to the beach. Review everything you did today, and remind them about the homework in addition to telling them to make it to TrailsHead as fast as possible. After this, everyone may leave, but only one at a time lining up in single file in front of the buddy board. Once again, always wear a smile!

First Year Camper Guide 22
TrailsHead Program Guide
Tuesday 10:00 – 11:50 am TrailsHead Goes A-Choppin’
10:00 – Before any scouts show up, you should have three separate areas of TrailsHead marked off for today (preferably already done by this time!). One area will be the axe yard; here, scouts will learn about hand axe and bow saw safety. The second area, usually placed at the picnic tables, is pocketknife safety. The third area, at the fire ring, is fire safety. Each of these areas must have all equipment placed before the scouts show up. This equipment, though, cannot be placed in the areas until this time. If you do this on Monday night, you risk the chance of having the tools rust up. 10:15 – You must start at 10:15 today because there is so much work to get done. Indeed, Tuesday morning is the low point of the week because of all the work required for today; TrailsHead must cover hand ax, bow saw, and pocket knife safety as well as fire safety. Before you start, give the scouts a very quick run down of what is happening today. 10:20 – The scouts need to be divided up into three groups for this morning; it will be easiest to do this by patrol. Each of this three groups will get a chance to go to all stations, and you should always each station occupied during this time. For instance, group 1 goes to the axe yard. Group 2 goes to pocketknives and general safety. Group 3 goes to fire safety. After all are completely done, groups will switch. Group 1 goes to pocketknives, 2 goes to fire safety, and 3 goes to the axe yard. And so on and so forth. This will go on until 11:50, and you will need all the time you can get. For the axe yard, each scout must have a chance with the hand axe and the bow saw. But just let each of them have only a few swings; any more, and you will not get anything done. 11:50 – Once everything is done, just let the scouts go. There is no need to hold them back or go over a review session. If at this time, some scouts are done and others aren’t, let the ones who finished go back to camp. Do not let the ones who haven’t finished leave until they have completed everything. At 12:15, though, you must adjourn!

First Year Camper Guide 23
TrailsHead Program Guide
Tuesday 2:00 pm First Aid
2:00 – The morning was hectic, exhausting, and needlessly difficult. No matter. The morning is over, and now you’re just as cheerful as ever. Once all scouts have arrived, it’s time to review what happened this morning. How do you hold a hand axe? Have a scout demonstrate. What’s a blood circle? How much area must be cleared around the fire ring? Etc., etc., etc. Make sure this review does not go over five minutes, though. Any more, and you won’t have time for anything else. 2:05 – Time for first aid. Each patrol will go with their appointed counselor away from the brotherhood circle, although one may stay, to learn about tenderfoot and first class first aid. Second class first aid should be nothing more than a quick review since the scouts will have covered it already Monday night at the first aid/CPR session in the dining hall for swimming merit badge. The counselors must be thorough, and, if you can, it’s a good idea to go around making sure they are covering everything in detail. To keep the scouts’ attention, teach your counselors certain stories: scouts love stories. For frostbite, tell them the short story by Jack London, “To Build a Fire.” In it, a guy is hiking in the Yukon wilderness with only his dog. It’s forty degrees below zero outside, and he is five miles away from base camp. But, he’s an experienced woodsman and is very prepared: he has food, matches, and warm clothing. Nevertheless, he missteps and falls through the ice of a shallow creek. Only his foot his wet, but at this temperature, if he does not get dry, he will die very soon. So he builds a fire, but once he does so, a clump of snow from a branch overhead falls on it. He has more matches, but his hands are numb and so he fumbles with them and loses all. Now all he can do is lay down and die. This story is an important reminder to never travel alone. Do not come up with a story for all first aid, though, only for a few. These stories are also preferably stuff the counselors have experienced, or can act like they experienced it.
First Year Camper Guide 24
TrailsHead Program Guide
Tuesday 3:00 pm First Aid Skits Are Fun
3:15 – By this time, all the first aid should be covered. But to help teach the information, have the scouts make up skits. Each patrol should come up with their own skit, or they can separate into no less than groups of 4 to come up with a skit. The counselor for the patrol should also give each group a specific example of first aid; this way nothing is repeated and the scouts won’t spend twenty minutes arguing about which is better: frostbite or snake bites. Groups should be given 15 minutes to come up with their skit, and skits should only be two to three minutes long. Also, the skits can be funny, but they must show how to treat the first aid. 3:30 – Call everyone back to the brotherhood circle and start the skits. This can be done by however you like, but if a skit begins to drag on, stop it. And if a skit is confusing, have the scouts involved recite how to treat the first aid shown – after the skit. But remember, these skits are really just for fun. 4:00 – Make sure each patrol knows where they are supposed to go. If they are going to the rifle range, or to archery, make sure a counselor goes with them until they get there (it is not necessary, unless requested by the shooting sports staff, for the counselor to stay). For those who have free time, remind them to use this time to do basketry.

First Year Camper Guide 25
TrailsHead Program Guide
Wednesday 9:00 am Swimming Merit Badge
9:00 – Follow same instructions as Tuesday. Wednesday does not have as much being taught as the other days, and so you may find your job to be easier. But, by now the scouts will be used to you and may start acting up more than they did on the previous two days. You will also find yourself less willing to go around wrecking sandcastles or telling a scout to sit down, and to an extent this is alright. But, by being aware of it, you can avoid any excessive rule-breaking. 9:05 – By now, everyone should already be organized by patrol without any prodding. But, still make sure everyone is. After this is done, it’s time to review what will be happening today: sidestroke and racing backstroke. Racing backstroke all the scouts should know, but sidestroke will be hard. On the beach, have them practice each, and with sidestroke teach them that it is like pulling an apple from the tree then putting it into the basket. If you don’t understand it, don’t worry; you’ll know what it means when you start doing sidestroke in the water. The kick is hard to do, and you won’t be able to do it on land. Merely tell them it is like a scissors kick. 9:10 – After the review, go out to the docks, once again organized by patrol. Have someone demonstrate the strokes in the water, and then allow the scouts to slide into the water. Do the same as yesterday and have them do the strokes separated into one’s and two’s, and have them only swim to the rope and back. After both strokes are done, have them practice them again. After this is done, have them practice the strokes they learned yesterday, and then alternate. If someone is having trouble, work with them. 9:50 – By now, everything should be done. Have them return to the beach, and merely remind them about the homework and answer any questions that they may have. Otherwise, let them leave and tell them to be at TrailsHead by 10:15.

First Year Camper Guide 26
TrailsHead Program Guide
Wednesday 10:00 am Overnighter Preparation
10:15 – Once all scouts have arrived, it’s time to talk about the overnighter. Over the week, you should have been discussing intermittently; mentioning what will be needed, where it will happen, and what will happen. Now it’s time to go over it in more detail. For today, you should have a backpack to demonstrate how to properly pack for an overnighter. That is, heaviest stuff goes on the bottom and lightest stuff should go on top; you want most of the weight to be carried around your waist; and you should try to pack all loose items and clothes into ziploc bags. If there’s enough time, you might even have some scouts try the pack on and let them walk around with it. Be careful though; if you let a few try it on, all of them may want to try it on so you might want to bring more than just one if it’s a big week. 10:35 – Since you’ve been covering the overnighter all week, you shouldn’t need too much time to cover it, although sometimes the question and answer period can take a very long time. But you do need to get started on orienteering at some point, so the latest the overnighter stuff should run to is 10:45. By the time you finish, split off everyone into their patrols and have the counselors start going over directions without using a compass (you’ll do directions with a compass later). Go over it using a few well-known constellations such as Orion rises in the southwest on winter evenings, and how to use the big dipper to find the north star. During the day, you can talk about using the sun (the moon also rises in the east and sets in the west), and the shadow stick method. Also, dispel some myths such as moss does not grow only on the north side of trees, and the water stick method. And tell them that if they ever are lost, the best thing you can do is just sit down and wait for help.

First Year Camper Guide 27
TrailsHead Program Guide
Wednesday 11:00 am Compass and Maps
11:05 – Going over directions without using a compass can take a surprisingly long time, and it’s a good idea to get the scouts to use some of the methods right away such as the shadow stick method. After you’re done going over and reviewing how to get by without a compass, it’s time to do some general map work. For this activity, it’s best to give out maps of Goshen, although that’s not necessary. In any case, every single patrol should have at least one map. Have the counselors go over map symbols, contour lines, and how to use features on the map to find out where you are. Each scout should then be given an activity to find as many different map symbols as possible on the map, and then perhaps give a short talk (in front of their patrol) on the prominent features of the given area. 11:35 – After scouts are done with the maps, have them go over compass work. Preferably, scouts should have their compasses with them, although they probably won’t, and this is okay for the morning session. Just tell them how to use a compass. After they have learned this, teach them how to orient a map using a compass and then have each one do it by themselves. 11:50 – Today may run longer than usual, but it’ll be alright as long as it does not stretch past 12:10 or so. When everyone is ready to dismiss, there is no need to call everyone back into the circle. But, make sure the counselors tell their patrols that each scout needs to bring a compass for the afternoon. If a scout does not have a compass, it’ll be alright, but as many as possible need to bring their compass if they have it.

First Year Camper Guide 28
TrailsHead Program Guide
Wednesday Afternoon Compass Course
Note: The compass course will only take one hour to complete, and since this is the only thing scheduled for this afternoon, you may want to take an amount of time to cover things you do not think were covered sufficiently enough during the past week. 2:00 – When all scouts show up, once again go over the overnighter as well as the five mile hike. By now, the information needed for them to know should be drilled into their brains and they should be able to recite it for years to come. 2:10 – Tell the scouts they are going to be doing a compass course today. The course should be about a mile in length, but should not be overly difficult. Markers for the course should be prominent figures, such as flagpoles, and marked off with a blue piece of tape (not spray paint!). Tell them this, then separate them into patrols. Patrols should complete the course with their counselor, but the counselor should follow a hands off policy and only start advising them when they get way off course. 2:15 – Once everyone understands the course, let patrols go at five minute intervals, or until they are far enough away that they cannot be seen. While a patrol is waiting to go, just have them play a game. 2:45 – By this time, everyone should be gone. If anyone on staff is left behind, get to work on paperwork! There will be almost no time on Friday to do this! 3:15 – Around this time, patrols should be showing back up. Congratulate them and tell them they do not need to stay, but make sure they know where to go at 4 pm.
First Year Camper Guide 29
TrailsHead Program Guide
Thursday 9:00 am Swimming Merit Badge
9:00 – Same as the past few days. Have the scouts come in, place their buddy tags on the board, and then have them sit down on the beach. 9:05 – At this time, it’s time to collect homework, and some scouts may have already turned it in. Be sure the scouts have their homework with them as they come in for swimming merit badge; that way you will not have to deal with scouts running in and out of the swimming area. If a scout does not have his homework, do not worry; the scout can turn it in tomorrow. However, the absolute latest is Friday at noon, and you may have to work individually with a few scouts to get the homework done. Do not take up too much time though – there’s a lot of stuff to get done today and not a whole lot of time to do it in. 9:07 – Once all homework is collected, start the review session. Today the scouts will be doing a number of things: the 150 meter swim, the reach poles and grabs, and the ring buoy. For this, you will need to separate the scouts into three groups. To dampen any confusion, keep patrols together, although this is not absolutely necessary. The groups will alternate between the three activities. Of these activities, the ring buoy will be the most frustrating and time consuming for all involved so as many counselors as possible most be present, but not at the expense of the other activities. The counselors present will have to very carefully show the scouts how to throw and pull in a ring buoy, and then work with each scout as he pulls in the buoy. In the swimming portion, the scouts should alternate between strokes, practicing each stroke that they learned over the week at least once, every 25 meters. Scouts should go in one at a time, with a small distance in between each other. The reach poles and grabs should be fairly easy for all, and the most important thing here is for the scout to realize that when rescuing someone, the rescuer will be do the best job by remaining on the dock when possible. Remember, the majority of drownings or accidents in the water occur less than ten feet away from safety. For this and the ring buoys, the scouts will have to separate into groups of two, and each person must play the role of the rescuer and the victim. Also, keep in mind that the scouts should not be shouting “Help!” or “I’m drowning!” Instead, tell them to yell out something like “Watermelons!” 9:55 – Today will probably run behind schedule. This is alright, but the majority of scouts should be done by 10. Tell them TrailsHead will start at the normal time, but it’s alright if they show up a little bit late.

First Year Camper Guide 30
TrailsHead Program Guide
Thursday 10:00 – 11:50 am Knots
10:00 – Once you get back from the waterfront, get all of the tying rope out of the shed. This tying rope should not be something like sisal or twine. Instead, the rope should be something like shoelaces: easy to undo knots. You absolutely do not want rope that is hard to untie or you’ll be babying scouts who can’t get their knots undone. Once you have the rope, make sure you have everything laid out so that you can get started right away once the scouts start showing up. 10:15 – Give each counselor the amount of ropes they will need for their patrol. Then once again tell the scouts what is happening today, and let them go off into their separate patrols and with their counselor. 10:20 – Each group needs to review the following knots: two-half hitch, taut line hitch, clove hitch, timber hitch, and bowline. Although it will probably be asked, do not cover the square knot. It is a cubscout knot, and so they should already know it. Of the knots covered, the two-half hitch and the bowline will be the hardest. For the two-half hitch, the counselor may have to work individually with each scout. But, once a scout gets it, have him help out and show the others how to do it. Once a scout gets the two-half hitch, he should be able to get the taut line hitch with little trouble. The clove hitch is fairly easy and scouts should be able to get it quickly, although there will certainly be at least one who will have trouble with it. The timber hitch is the easiest of these knots, and you do not need each scout to do it. Merely have the counselor demonstrate the knot, perhaps twice since scouts will not be doing it. The bowline is going to be the hardest, and it may take scouts a while to get it. For this knot, use the bunny story (the bunny comes out of his hole, goes around the tree, and back into the hole). If the rope is long enough, have the scouts tie the bowline around their waist. As each knot is taught, the counselor should talk about when to use the particular knot, and what situations it will be useful in. If there is time, you can play a knot game with the scouts. 11:40 – Bring all scouts back to the circle and review the knots. Go over their uses, and go over why a boy scout, or anybody for that matter, needs to know how tie a knot. As a bonus, if you can, quickly go over the one handed bowline. This is a neat trick to do, but you don’t need to teach the scouts. However, you may tell the scouts that if any of them want to stay a little later, you will teach them the one handed bowline.

First Year Camper Guide 31
TrailsHead Program Guide
Thursday 2:00 pm Pioneering
2:00 – For Wednesday afternoon, the scouts will be doing pioneering projects around the TrailsHead area. You and the counselors need to come up with the projects, though, and need to provide all supplies needed for them. For instance, if you want one patrol to build a tripod, then the counselors need to find three suitable logs as well as the rope that will be used. Some great projects are adding on to the gateway, replacing the rope around the axe yard with logs, a fence around the area made by attaching logs to trees, and especially benches as these can be used in the circle. Whatever project you choose, keep it simple (i.e., nothing like a monkey bridge or a tower). Also, go over each project and what you want it to look like when it’s done. Also tell the scouts that this is their project and the counselors have been instructed to keep their hands of the rope. Tell counselors they can demonstrate the lashing needed, and they can guide the scouts, but this is a project made by the scouts. As thus, only the scouts should be building it. 2:05 – Once you have a project for each patrol (some projects may be big and require two or more patrols), give them the rope needed and send them on their way. Remember, during the next hour as the scouts are working on the projects, you and the counselors are to be hands off. During this time, though, you will have to make sure each patrol is doing a proper job. Some slack should be given as they are first year campers, but the scouts will not learn unless they do it properly.

First Year Camper Guide 32
TrailsHead Program Guide
Thursday 3:00 pm Pioneering & Ecology
3:05 – By this time, all projects should be done; no project should be so big that it takes more than an hour to do. Bring all scouts back to the circle and comment on the projects. There is no need to criticize and project, but merely review what lashings were needed for certain things. 3:15 – Time for nature! For this, you will be covering how to spot evidence of an animal/plant, how to identify an animal/plant, and point out specific plants in the TrailsHead area. Most of this stuff can be found in the Boy Scout handbook, but you should not be reading off how to spot evidence. Ask the scouts how one can tell an animal has been here, and how you can tell which animal it was. Essentially, lead a discussion, but make sure certain things are covered: animal habitats, animal tracks, and poisonous plants. Poisonous plants in particular should be covered in detail, and there are plenty of examples of poison ivy in the area to help. Draw pictures on the board of every poisonous plant. 3:30 – After you have sufficiently covered animals and poisonous plants, go over the rest of the plant kingdom. Ask scouts what type of pine trees are in the TrailsHead area, and identify other trees nearby. Go over how you can identify a tree by taking its leaf, drawing a sketch of it, and checking it in a book later. 3:40 – In the final minutes, go on a nature hike toward the pond and into ecology. Stop at the pond and ask scouts to identify some of the plants and animals seen there. At ecology, just let them look around, although you need to send a counselor to warn ecology about the impending rush of scouts. They’re usually understanding, albeit lazy, people at ecology, so you’ll have no problem getting the scouts in. 3:55 – At this time, it’s time to get back to TrailsHead. Bring everyone back with you as sometimes scoutmasters will be annoyed if you don’t dismiss the scouts from the circle itself. Make sure everyone knows what it is they will be doing, and send them on their way.

First Year Camper Guide 33
TrailsHead Program Guide
Friday 9:00 am Swimming Merit Badge
9:00 – Today will be your last time with the scouts in swimming merit badge, and all those who became swimmer by Wednesday morning should be getting the merit badge, unless other difficulties developed. However, a review session is not needed unless time permits. Merely have the scouts come in, put their tags on the buddy board, and have them wait on the beach until everyone is in. 9:05 – Once everyone is in, review with the scouts what will be happening today: dives. Go over the feet first dive, the head first dive, and the long shallow dive. For now, a short explanation of each will do. 9:10 – Time to go on out. Once again, tell them to organize into patrols and then head on out to the docks. Once out on the docks, have a counselor demonstrate the three dives. 9:15 – Now it’s time for the dives: the feet first dive, the head dive, and the long, shallow dive. Every counselor should be very alert during this time as the scouts will be going under water. And as such, the scouts should be told to take three breast strokes away from the dock when doing the first two dives. The feet first dive and the head dive are both done in the water; the former being when the scout is vertical in the water and pushes water up past his head, and the latter being when the scout actually swims down to the bottom head first. In the latter, the scout should bring sand back up. For the long, shallow dive, have scouts go out in groups of five toward either of the floating platforms, where counselors should already be waiting. The long shallow dive should be done last and only when the other two are completed. As scouts finish, have them do practice laps of one of the strokes learned during the week. 9:40 – Everyone should be done by this time. Bring all scouts to the beach and start going over the health benefits of swimming. Also at this time, it is a good idea to cover snorkels.
First Year Camper Guide 34
TrailsHead Program Guide
Friday 10 – 11 am Trailshead Does Paperwork Too
10:15 – As scouts file in, tell them what merit badges they have gotten and what they still need to do for those they have not received. Get blue cards as needed. If a scout has not finished one of the merit badges, with the exception of swimming, you need to get a counselor to work with the scout individually so that the badge is completed. Trailshead always goes for and gets 100% completion on the three merit badges we teach. Do not start pulling scouts aside, though, until you have talked with all about the five mile hike. Review what will be needed, what will happen, and where everyone will meet. Also, go over the buddy system and do the fingerprinting quiz that can be found in the back of the fingerprinting merit badge book. After this is done, scouts who have finished all merit badges are dismissed to the handicrafts lodge since almost all of them will not have finished leatherworks or basketry by this time. Scouts who have not finished Mammals Study, Public Speaking, and/or Fingerprinting must stay. 10 thru 11- You’ll only need a few counselors devoted to helping scouts with unfinished merit badges, but it’s no time to rest for the others. It’s Friday and paperwork must be completed before the five mile hike starts. Get everyone together, gather around the picnic table, and enjoy a morning that is filled with the scribble scrabble of pens running across blue cards and orange sheets rather than the riffle raffle of scouts yelling. Remember, you’ll have no time to do paperwork after the five mile hike, so it must get done now!

First Year Camper Guide 35
TrailsHead Program Guide
Friday Afternoon Swinging Bridge is Really Swingin’
1:00 – You should be the first one at the totem pole. This means leaving lunch early and making sure you have everything prepared already. By the time lunch is over, you should already be standing next to the totem pole with your stuff packed and a pen and paper in hand for attendance. All scouts must check out before leaving as you will be leaving the comfort of Camp Olmsted. 1:20 – You told the scouts you would leave at 1:15, with or without everybody. Give them an additional five minutes to get there, but by 1:20, it’s time to leave. This is the beginning of the hike, and along the way you should take compass readings and as many people as possible should have a map. My favorite places for compass readings are at the following places: the Camp Olmsted sign, Family Dock, end of the Dam bridge, right before Camp Bowman, and again before you cross Swinging Bridge. You can cram in more, but be careful: if you keep on stopping, the scouts will start whining. Stop enough, and the leaders will whine too. On the way to Swinging Bridge, always walk on the left side of the road. This rule is broken, though, going across the Dam. Here, walk on the right side where there is a small sidewalk. Have the scouts walk across the sidewalk single file and get across as quickly as possible. Since the Dam bridge is in the open sun, you will be tested for your leadership skills. Hopefully you won’t be found wanting! 2:30 – By now you should be at Swinging Bridge! But don’t jump in just yet… before the scouts jump in, go over the boundaries: no going further than the place where the creek splits upriver, and don’t go any further downriver than the mossy rock in the middle of the creek. This should be enough, and have counselors posted on each end to monitor the scouts. The counselors can join in too, though. But they have to keep an eye on the scouts. Since you need to be back by 5, it’s a good idea to leave by 3:45 and have scouts out of the water by 3:30. Have fun and get wet! The scouts love it when they see the counselors splashing in the water. Have a good sense of humor, though; they also love to splash the counselors with even more water. 4:45 – Well, by now you should be coming up to Family Dock, and it’s a good idea to stop here and just let everyone go. Gather them all up first, though, and tell them what a great group they’ve been and what a fantastic week it’s been. Now let them go, and tell them that if they just follow the path along the lake they will return to Camp Olmsted. And now you can rest easy too. No more actual program until Monday morning!

First Year Camper Guide 36
TrailsHead Program Guide
Sunday Evening TrailsHead Gets Introduced
For those troops interested in TrailsHead, you should set up an information session on the program and how Camp Olmsted (pride!) runs this exemplary program. Either as troops trickle in during the day, or during the dinner, inform them that sign-up for TrailsHead as well as the information session will be held after dinner (usually at 7 or 7:30 pm in the brotherhood circle across from the dining hall). It is not required, however, for troops to come to this session, and indeed many won’t, but it will be very useful for them. It is also a good idea for scouts to come along so that they can get an idea for what will be happening during the week. For this session, no one else besides the director from the TrailsHead staff is required to attend, although it is a good to have at least one additional staff member to tag along. When the session starts, introduce yourself and give a brief run-down of the rest of the staff. Then move into what will be happening during the week, in addition to merit badges. For the merit badges, tell them they will earn at least four, and can earn up to five. These merit badges are swimming, mammals study, fingerprinting, public speaking, and either basketry or leatherworks. For the last two, scouts cannot be expected to earn both and so should only concentrate on one or the other. After you have finished this, start passing a sign-up sheet around for scouts to jot down their names. But since scouts have notoriously bad handwriting, you may request that only leaders jot down the names of the scouts or have someone from staff do it. In any case, while the sheet is going around, open it up to Q&A, which can take a very long time. As a note, scouts will be particularly interested in shooting rifles, but since that’s not a TrailsHead area, you do not need to answer any questions about rifles or shotguns. One more piece of very important info: make sure the leaders understand that the TrailsHead staff cannot sign off on any of the tenderfoot, second class, or first class requirements. Only the troop can do this! At TrailsHead, we give them exposure to the skills needed to the advance, but the scouts must demonstrate to their leaders that they have learned these skills. In regards to information that must be covered during this time:
• Five mile hike • Overnighter • The 4 pm to 5 pm non-TrailsHead activities time slot • Merit badges
First Year Camper Guide 37
TrailsHead Program Guide
Five Mile Hike Note: This is a supplement to that which can be found on the schedule for Friday afternoon. While that was primarily concerned with the details of doing the hike, this will discuss the details of preparing for the hike. Intro: What is the 5 mile hike you may ask? Well it’s just the most fun you’ll have during the entire week! It starts at the totem pole in Camp Olmsted (pride!) and ends at Swinging Bridge, which is a great swimming hole. You’ll head out of camp, make a left at the Camp Olmsted sign, continue across the dam, make your first right after the dam into Bowman’s shooting sports, and then continue on for another mile and a half until you come across a bridge on your right. Cross this bridge and you’re at the Swinging Bridge Resort (at least, it’ll start seeming like a resort after five weeks at camp). On the way there, you’ll have to establish some rules. First of all, always walk on the left side of the road. Second of all, even though we all know that Camp Olmsted is better than Camp Bowman, the scouts must be quiet when crossing through Bowman’s shooting sports. You’ll also need to set boundaries for the swimming area at Swinging Bridge, which you can either use your own judgment on or refer to the Friday afternoon schedule. Preparation: But preparation for the hike begins on Monday. Every day you will need to remind the scouts that it is coming up, and remind them of what to bring. This list contains six items: towel, swimming suit, water shoes, trail mix, compass, and WATER! If a scout does not bring water with him, he cannot go on the hike – make sure everyone understands this. We cannot afford to have a dehydrated scout! Going back to the list, the only real important part is the swimming suit; that is, if they are going swimming. A towel is not needed (just a comfort), water shoes are nice to have, but not a necessity, and trail mix is really just included on the list to get scouts used to packing for day hikes. A compass is also very important as one will need it to complete the five mile hike requirement for first class, but it’s also not absolutely required as a scout can share with others. One more thing… you can also tell the scouts that anybody can come along with them. Indeed, bring the whole troop! Location & Time: In addition to the list, every scout needs to know the location and time by heart as well. You’ll want to leave as soon as possible after lunch (preferably by 1:15). To meet, a good place is the totem pole because everyone knows where it is from day one, and you’ll need a place close to admin because you need to drop off a list of who’s going in the office. The circle of brotherhood works out alright too, but the totem pole is more convenient. But, be sure everyone knows where your meeting and at what time. Also, do not tell them you’re not leaving until 1:15 (or 1:25 most likely), but that you’re leaving right after lunch and everyone should bring their daypack with them to lunch.

First Year Camper Guide 38
Miscellaneous: The director of TrailsHead needs to be the first one at the totem pole. As director, then, you should have everything ready long before the hike begins, and it’s a good idea to leave your supplies for the hike in admin before you leave for lunch. You may even choose to skip lunch, but be sure you bring trail mix in that case. Once at the totem pole, though, you should have a paper and pen ready and write those names down of people who are going as they show up. Once everyone who is going (usually everyone involved in TrailsHead) shows up, place the time you’re leaving at the top of the paper, and drop it off in the Admin office. And as people show up, make sure everyone has a bottle of water. There are always a few who won’t, so come prepared with some water bottles that they can fill up. Now I know I just said a scout shouldn’t go if they don’t have water, but that’s all a show. If someone wants to go on the hike, let them. Just be prepared with plenty of water.

First Year Camper Guide 39
TrailsHead Program Guide
Overnighter
Note: This is a supplement to that which can be found on the schedule for Wednesday. Intro.: The overnighter is one of those things does not happen very often. Sometimes it will be the lack of a proper campsite, and other times it will be because of ominous weather. So if you need to cancel the overnighter, go ahead and do so; it’s better to have disappointed scouts than wet and grouchy scouts. But occasionally, there is an overnighter. It starts on Wednesdays at 5:30 pm, if not sooner. Since this will be taking place the same time as foil dinner night, TrailsHead can grab food from the mess hall for the overnighter. Scouts do not need to bring any food with them since all food will be provided by the mess hall! Preparation: When the overnighter does happen, TrailsHead will have to be very prepared. It’s a good idea to go during siesta on Wednesday and check out the campsite for yourself. Make sure everything is clear (no trash on ground), and that the fire rings are looking good. Basically, just make sure everything is looking good. You may also wish to leave some lanterns down there and other supplies that will be needed so you’re not carrying them down later that day. Also, during the course of the week, continually remind the scouts (and the staff!) of what will be needed: sleeping bag, flashlight, ground cover, canteen or water bottle, and a jacket since it gets cold in the morning. A lot of scouts will not have a ground cover, so you may have to provide something for them. If the overnighter is at Club Med, have the scouts without any ground cover sleep underneath the shelter. In addition to all this, the staff needs to bring the food from the dining hall, plenty of matches, lanterns, an alarm clock, and a first aid kit. It’s also a good idea to keep a car near the campsite in case of emergency (as well as to transport the food). Location & Time: As mentioned, the overnighter will begin at 5:30 so that scouts will have plenty of time to get ready. You should have everyone meet at the totem pole and then leave from there at 5:45. For scouts who are running late, leave one counselor behind until 6:00. If the campsite is inside Olmsted, a sheet for everyone’s name is not needed. However, it is still a good idea to have such a sheet and to get a head count of who’s coming. Miscellaneous: Once everyone gets to the campsite, have them unroll their sleeping bags then go and get wood. Since everyone will need to cook their food, it is important to get the fires going as quickly as possible. But, the overnighter should also be a fun experience. Let the scouts organize games, cook marshmallows, and tell ghost stories. Get to bed by about 11:00, though, because everyone will need to start waking up by 6:45 am.

First Year Camper Guide 40
TrailsHead Program Guide
Evening Activities Because Aquatics and TrailsHead are one at Night
With the exception of Wednesday and Thursday, TrailsHead and Aquatics have the same evening program. Following is a short list of what TrailsHead will be helping Aquatics out on:
• Monday evening – First aid/CPR session • Tuesday evening – Clothes Flotation night • Friday evening – TrailsHead boating
Monday Evening: As part of the swimming merit badge, and for some second class requirements, each TrailsHead scout is required to attend the first aid/CPR session. However, the TrailsHead staff will not be concerned with covering the information as Aquatics will take care of it. All TrailsHead is needed for is to help out with the CPR dummy’s, and to take care of the sign-out forms, which will ensure that every scout that needed the session will get the requirement signed off if they showed up. Tuesday Evening: Once again, Aquatics will take care of most of the work here, but some staff from TrailsHead will be needed to help supervise and to take of the buddy board as well as the sign-out sheets. Friday Evening: If you’re lucky, nobody will even come and you can just spend the time resting on the beach. But, if people do come, TrailsHead will need to help out Aquatics with whatever they need.

First Year Camper Guide 41
TrailsHead Program Guide
Everyday 4:00 – 5:00 pm Afternoon Activities
After 4:00, TrailsHead still continues, but not at TrailsHead. Instead, scouts go on to one of three separate activities:
• Rifle shooting • Archery • Free time
At rifle and archery, the scouts will get to shoot. Free time means there is no structured activity for those scouts who get it, but they should use that time to go to Handicrafts and start/finish either leatherworks or basketry. To determine who goes to what each day, split TrailsHead into four roughly equal groups, but keep troops together unless they are unusually large. Starting on Monday, send two groups to either rifle or archery, and then send the other two groups off to free time. Then on Tuesday, switch up the groups that went to shooting sports and send them to the opposite activity. That is, if group A went to rifle on Monday while group B went to archery, then group A should go to archery on Tuesday while group B goes to rifle. Then Wednesday, switch up the groups entirely and send A & B off to free time and C & D to shooting sports. At the end of each day of TrailsHead, make sure each group knows and understands where it is that they are going. When you send the two groups to shooting sports, make sure a counselor goes with them. But, the counselor does not need to stay with the scouts once they arrive at their appointed activity, unless it is requested by the shooting sports staff. Beware, though, because it is somewhat of a tradition for TrailsHead and Archery to have some sort of friction. This is due to a number of things, but it will help smooth things out if a TrailsHead counselor stays with the scouts while they are at Archery.

First Year Camper Guide 42
TrailsHead Program Guide
Appendix A Poisonous Plants
If you go to look up poisonous plants in the Boy Scout handbook, you’ll find out they give you scant information on the subject and little hand drawn pictures where it’s impossible to make out any details. It doesn’t even give a description of the plants. Since this is one of the subjects the handbook does not deal with very well, I’ve gone ahead and compiled a list of information on the three types of poisonous plants: poison ivy, poison oak, and poison sumac. Poison Ivy Quick! What does poison ivy look like!? If you take more than one second to answer that question, you’ve failed! In any case, poison ivy has three leaves, and in the center of the three leaves is a red dot. Now if you take look at it, you’ll notice the two side leaves are completely identical but are only jagged on the outside and smooth on the inside. The center leaf, though, is jagged on both sides (complete symmetry). But, as poison ivy grows up, the jagged edges of the side leaves will smooth out. Also, it is a vine and will grow up the sides of trees and buildings; if you see what looks like a furry vine, then that is mature poison ivy. Be very wary of such vines! Another vaguely interesting factoid… there is actually only one leaf on poison ivy and the three leaves are actually three leaflets! Cool, eh? Poison Oak Ever seen that episode of Malcolm in the Middle where Malcolm starts crying and uses poison oak to wipe away his tears? Why would Malcolm do such a thing you may ask… Well, the answer is simple: Malcolm is not a Boy Scout! If he were, he would know that poison oak has three, and occasionally five, leaves (actually leaflets), looks like an oak leaf, and is glossy. Also, while during the spring and summer these leaflets are green, during the fall they turn red. And although poison oak can be found in both low and high shrubs in the west, it is primarily in low lying shrubs in the east. Poison Sumac Poison sumac has seven to thirteen staggered leaflets with one growing on the tip of it, and can be found as either a shrub of small tree. It’s mostly in the eastern US, but is usually only found in swamps. It can also grow fruit that will be found between the leaf and the branch. Since this is perhaps the most confusing explanation of the three, you can find an illustration of it (if you haven’t already!) to the right of this paragraph.

First Year Camper Guide 43
Questions on Poisonous Plants Why are poisonous plants poisonous??? The rashing and itching attributed to the poisonous plants is caused by an oil called urushiol. The oil is actually harmless, but the human body reacts in such a way as to attack the portion of the skin where the oil is bound. Thus, itching and swelling occur. This is an allergic reaction, and will not happen to everyone. But, urushiol allergy is the most common allergy in America (85%). Is the rash contagious??? No. The rash itself is not contagious, however, the oil from the plant is. But since you can’t tell how much oil is on the skin even after you get the rash, it’s still not a good idea to go around rubbing your rash on everyone else (however much fun it may be). More than likely, your skin has already soaked up all the oil, but it’s better safe than sorry. I’ve rolled around in poison ivy before but didn’t get it so I know I can’t get poison ivy. Wrong! Allergies change over time, even over as short a period as a month. Just because you didn’t get it when you were ten doesn’t mean you won’t get it when you’re 20. Even if you are part of the 15% of America that is not allergic to urushiol oil, it’s still best not to go around rubbing poison ivy all over you. If the oil is on your hands and you shake hands with someone else before the oil binds to your skin, then you just gave the other person poison ivy. I just touched poison something! What do I do??? If you run the affected part of the body under water and wash it with soap less than twenty minutes after contact, you will not get an allergic reaction. But, if you are unable to do so, you can buy cortisone cream that will alleviate the itching. Where are these poisonous plants found??? Poison ivy grows all over the United States as well as southern Canada. Poison oak is pretty much only found in the Pacific Northwest and British Columbia in Canada, and poison sumac is found in the eastern United States. At Goshen, you can find poison ivy almost anywhere, and you can also find poison sumac in a few places. It really itches!!! Can I scratch the rash??? Scratching will not spread the rash twenty minutes after contact, but it’s still not a good idea. You may pop a blister and then risk infection.

First Year Camper Guide 44
How to use a compass
Using the compass alone
This is a very easy lesson, and I would say, not sufficient for those who would like to travel safely in unfamiliar terrain.
The first thing you need to learn, are the directions. North, South, East and West. Look at the figure and learn how they are. North is the most important. There are several kinds of compasses, one kind to attach to the map, one kind to attach to your thumb. The thumb-compass is used mostly by orienteers who just want to run fast, and this is the kind of compass I normally use. But not in this tutorial. I would recommend the third kind of compass. Let's take a look at it:
You see this red and black arrow? We call it the compass needle. Well, on some compasses it might be red and white for instance, but the point is, the red part of it is always pointing towards the earth's magnetic north pole. Got that? That's basically what you need to know. It's as simple as that.
But if you don't want to go north, but a different direction? Hang on and I'll tell you. You've got this turnable thing on your compass. We call it the Compass housing. On the edge of the compass housing, you will probably have a scale. From 0 to 360 or from 0 to 400. Those are the degrees or the azimuth (or you may also call it the bearing in some contexts). And you should have the letters N, S, W and E for North, South, West and East. If you want to go in a direction between two of these, you would combine them. If you would like to go in a direction just between North and West, you simply say: "I would like to go Northwest ".

First Year Camper Guide 45
Let's use that as an example: You want to go northwest. What you do, is that you find out where on the compass housing northwest is. Then you turn
the compass housing so that northwest on the housing comes exactly there where the large direction of travel-arrow meets the housing.
Hold the compass in your hand. And you'll have to hold it quite flat, so that the compass needle can turn. Then turn yourself, your hand, the entire compass, just make sure the compass housing doesn't turn, and turn it until the compass needle is aligned with the lines inside the compass housing. Now, time to be careful!. It is extremely important that the red, north part of the compass needle points at north in the compass housing. If south points at north, you would walk off in the exact opposite direction of what you want! And it's a very common mistake among beginners. So always take a second look to make sure you did it right! A second problem might be local magnetic attractions. If you are carrying something of iron or something like that, it might disturb the arrow. Even a staple in your map might be a problem. Make sure there is nothing of the sort around. There is a possibility for magnetic attractions in the soil as well, "magnetic deviation", but they are rarely seen. Might occur if you're in a mining district.
When you are sure you've got it right, walk off in the direction the direction of travel-arrow is pointing. To avoid getting off the course, make sure to look at the compass quite frequently, say every hundred meters at least. But you shouldn't stare down on the compass. Once you have the direction, aim on some point in the distance, and go there. But this gets more important when you use a map.
There is something you should look for to avoid going in the opposite direction: The Sun. At noon, the sun is roughly in South (or in the north on the southern hemisphere), so if you are heading north and have the sun in your face, it should ring a bell.

First Year Camper Guide 46
When do you need this technique? If you are out there without a map, and you don't know where you are, but you know that there is a road, trail, stream, river or something long and big you can't miss if you go in the right direction. And you know in what direction you must go to get there, at least approximately what direction. Then all you need to do, is to turn the compass housing, so that the direction you want to go in, is where the direction of travel-arrow meets the housing. And follow the above steps. But why isn't this sufficient? It is not very accurate. You are going in the right direction, and you won't go around in circles, but you're very lucky if you hit a small spot this way. And that's why I'm not talking about declination here. And because that is something connected with the use of maps. But if you have a mental image of the map and know what it is, do think about it. But I think you won't be able to be so accurate so the declination won't make a difference.
If you are taking a long hike in unfamiliar terrain, you should always carry a good map that covers the terrain. Especially if you are leaving the trail. It is in this interaction between the map and a compass, that the compass becomes really valuable.

First Year Camper Guide 47
Using the compass in interaction with a map
This is the important lesson, and you should learn it well. It's when you use both compass and map the compass is really good, and you will be able to navigate safely and accurately in terrain you've never been before without following trails. But it'll take some training and experience, though.
I am not covering map reading here, guess you would have to consult other sources for that, but the lesson will be useful if you have a sense of what a map says.
First, a quick summary of what you will learn in this lesson:
1. Align the edge of the compass with the starting and finishing point. 2. Rotate the compass housing until the orienting arrow and lines point N on the
map. 3. Rotate the map and compass
together until the red end of the compass needle points north.
4. Follow the direction of travel arrow on the compass, keeping the needle aligned with the orienting arrow on the housing.
Here is our compass again:

First Year Camper Guide 48
The principles are much the same as in lesson 1 but this time, you are using the map to tell you which way is correct instead of your intuition.
Take a map. In our first example, we look at a map made for orienteering, and it is very detailed. Well, not really. We look at a fictitious map I drew myself, but never mind. To the point. You want to go from the trail-crossing at A, to the rock at B. Of course, to use this method successfully, you'll have to know you really are at A. What you do, is that you put your compass on the map so that the edge of the compass is at A. The edge you must be using, is the edge that is parallel to the direction of travel arrow. And then, put B somewhere along the same
edge, like it is on the drawing. Of course, you could use the direction arrow itself, or one of the parallel lines, but usually, it's more convenient to use the edge. At this point, some instructors say that you should use a pencil and draw a line along your course. I would recommend against it. First, it takes a lot of time, but offers no enhancement in accuracy of the method. Second, if you have wet weather, it may destroy your map, or if it is windy, you may loose it. You should keep your map (preferably in a sealed) transparent plastic bag, and if it is windy, tied up, so it can't blow away. But most important is that any drawings may hide important details on the map. Time to be careful again! The edge of the compass, or rather the direction arrow, must point from A to B! And again, if you do t his wrong, you'll walk off in the exact opposite direction of what you want. So take a second look. Beginners often make this mistake as well.
Keep the compass steady on the map. What you are going to do next is that you are going to align the orienting lines and the orienting arrow with the meridian lines of the map. The lines on the map going north, that is. While you have the edge of the compass carefully aligned from A to B, turn the compass housing so that the orienting lines in the compass housing are aligned with the meridian lines on the map. During this process, you don't mind what happens to the compass needle. There are a number of serious mistakes that can be made here. Let's take the problem

First Year Camper Guide 49
with going in the opposite direction first. Be absolutely certain that you know where north is on the map, and be sure that the orienting arrow is pointing towards the north on the map. Normally, north will be up on the map. The possible mistake is to let the orienting arrow point towards the south on the map. And then, keep an eye on the edge of the compass. If the edge isn't going along the line from A to B when you have finished turning the compass housing, you will have an error in your direction, and it can take you off your course.
When you are
sure you have the compass housing right, you may take the compass away from the map. And now, you can in fact read the azimuth off the housing, from where the housing meets the direction arrow. Be sure that the housing doesn't turn, before you reach your target B! The final step is similar to what you did in lesson 1. Hold the compass in your hand. And now you'll have to hold it quite flat, so that the compass needle can turn. Then turn yourself, your hand, the entire compass, just make sure the compass housing doesn't turn, and turn it until the compass needle is aligned with the lines inside the compass housing. The mistake is again to let the compass needle point towards the south. The red part of the compass needle must point at north in the compass housing, or you'll go in the opposite direction.
It's time to walk off. But to do that with optimal accuracy, you'll have to do that in a special way as well. Hold the compass in your hand, with the needle well aligned with the orienting arrow. Then aim, as careful as you can, in the direction the direction of travel-arrow is pointing. Fix your eye on some special feature in the terrain as far as you can see in the direction. Then go there. Be sure as you go that the compass housing doesn't turn. If you're in a dense forest, you might need to aim several times. Hopefully, you will reach your target B when you do this.
At this time, you may want to go out and do some training, so you could check out some suggested exercises.

First Year Camper Guide 50
Unfortunately, sometimes, for some quite often, it is even more complicated. There is something called magnetic declination. And then, for hiking, you wouldn't use orienteering maps.
Magnetic Declination
Unfortunately, sometimes, for some quite often, it is even more complicated. There is something called magnetic declination. You see, the compass is pointing towards the magnetic northpole, and the map is pointing toward s the geographic northpole, and that is not the same place. To make things even more complicated, there is on most hiking-maps something (that is very useful) called the UTM-grid. This grid doesn't have a real north pole, but in most cases, the lines are not too far away from the other norths. Since this grid covers the map, it is convenient to use as meridians.
On most orienteering maps (newer than the early 70's), this is corrected, so you won't have to worry about it. But on topographic maps, this is a problem.
First, you'll have to know how large the declination is, in degrees. This depends on where on the earth you are. So you will have to find out before you leave home. Or somewhere on the map, it says something about it. One thing you have to remember in some areas, the declination changes significantly, so you'll need to know what it is this year.
If you are using a map with a "UTM-grid", you want to know how this grid differs from the magnetic pole.
When you are taking out a course, you will do that more or less as described in lesson 2, but this time, you must also look out so that you don't align the orienting lines with the grid lines pointing west or east, or south for that matter. When you have taken out a course like you've learned, you must add or subtract an angle, and that angle is the angle you found before you left home, the angle between the grid lines or meridians and the magnetic north.
The declination is given as e.g. "15 degrees east". When you look at the figure, you can pretend that plus is to the right, or east, and minus is to the left and west. Like a curved row of numbers. So when something is more than zero you'll subtract to get it back to zero. And if it is less, you'll add. So in this case you'll subtract 15 degrees to the azimuth, by turning the compass housing, according to the numbers on the housing. Now, finally,

First Year Camper Guide 51
the direction of travel-arrow points in the direction you want to go. Again, be careful to aim at some distant object and off you go.
You may not need to find the declination before you leave home, actually. There is a fast and pretty good method to find the declination where ever you are. This method has also the advantage that corrects for local conditions that may be present (I am thankful towards Jim Cross who pointed this out to me). This is what you do:
1. Determine by map inspection the grid azimuth from your location to a know, visible, distant point. The further away, the more accurate it gets. This means you have to know where you are, and be pretty sure about one other feature in the terrain.
2. Sight on that distant point with the compass and note the magnetic azimuth. You do that by turning the compass housing so that it is aligned with the needle. You may now read the number from the housing where it meets the base of the direction of travel-arrow.
3. Compare the two azimuths. The difference is the declination. 4. Update as necessary. You shouldn't need to do this very often, unless you travel in
a terrain with lots of mineral deposits.
There are a few riddles and rhymes to help you remember whether you should add or subtract. I don't know them. If you live in an area where you don't go far for it to change between east and west, it is so small you wouldn't need to worry about it anyway. So it's best to just remember whether you should add or subtract. Nevertheless, I have collected some of the rhymes people use.
Uncertainty
You can't always expect to hit exactly what you are looking for. In fact, you must expect to get a little off course.
How much you get off course depends very often on the things around you. How dense the forest is, fog, visibility is a keyword. And of course, it depends on how accurate you are. You do make things better by being careful when you take out a course, and it is important to aim as far ahead as you can see.
In normal forest conditions we say that as a rule of thumb, the uncertainty is one tenth of the distance traveled. So if it is like in the figure, you go 200 meters on course, it is possible that you end up a little off course, 20 meters or so. If you're looking for something smaller than 20 meters across, there is a chance you'll miss. If you want to hit that rock in our example you'll need to keep the eyes open!
In the open mountain areas, things are of course a lot easier when you can see far ahead of you.

First Year Camper Guide 52
This was the last of the lessons you should know. But more lessons are upcoming. Now it is time to log out and get into the backyard, and then backcountry. Try it out! That is after all, the only way to learn this properly. Good Luck!
I said navigating in the mountains is easier. Well that is until the fog comes. Fog can make orienteering in the mountains and in the forest extremely difficult, and therefore, it can also be dangerous to the inexperienced. The principles of orienteering are still the same, but there are a few hints in the next lesson that will help you get trained.
Suggested Exercises
OK, so I read the pages, and I am going to teach kids this, what do I do? This page has a few suggested exercises, and this page is intended for coaches and educators who have themselves some experience. Anybody can be taught using this page, of course, but it is principally aimed at teaching kids.
First, there are some very important considerations to make. The feeling of being lost is something that may be very stressful to a child, and if stressed too much, a child may never learn to love the backcountry. Some children are perfectly capable of coping with the feeling of being lost, for others coping with this feeling may take a very long time, but once achieved I believe it is a considerable survival skill that may help save somebody's life some day.
As a coach, you need to be aware of this situation, and be very cautious until you know the children you are coaching. It is of great importance that the exercises in the forest are planned with this in mind.
Now to the exercises: For the absolute beginners, it is important that they master the techniques described in lesson 1 and 2. This can be done partially with practise without going anywhere, but that gets boring pretty fast, you could let the kids do it a few times. In this first exercise the aim is solely to choose the right control from several you can see. This way, you get practice, but need not fear getting lost. It requires some work done, however. Check out this figure:

First Year Camper Guide 53
To the right is a map of your backyard. In the middle is a symbol , which is a symbol used in orienteering to denote start and finish when they are at the same place (Othervise, start is a triangle, and finish two concentric circles). There are controls all around you, and all of them can be seen from this center. A control, as used in orienteering, looks like
, and they are placed in all the circles. The map here is of course an imaginary map, and you would have to draw a map of your own back yard. The scale isn't very important, but it has to be correct with regards to the compass. Also on the figure above is a detail from the upper left corner of the map as it would look in the real (imaginary...) world. You should draw all buildings, large rocks, bushes and trees and other features you see, like you see from the detail.
The kids are going to choose the right control using the map you drew, and the compass. The first time you do this, you should take your time, and help each one of the kids with taking the compass course. When they have taken the course, they decide which control is the right one, run or walk up to it, and come back. Then they do the same with the next control. The sequence each kid does this, is however, unique.

First Year Camper Guide 54
The second time, it is time to do some more fun. Here is one example. Make it a treasure hunt! This is the plan: At each control, put a bag of some treasure on the control, one for each kid and unique to the control. Take for example, starting in the upper left corner by the north arrow, a bag of bananas by the bushes, a bag of oranges by the corner of the house, a bag of apples by the tree and so on. Each one of the kids is going to fetch the treasures, in a unique sequence, as fast as they can, they are supposed to be running back and forth to the strating point between each control. The
controls are numbered, and each kid gets the sequence he or she is going to run to the controls in, and which treasure is at which control, so if he or she finds the wrong type of treasure, he or she knows it is the wrong control. You are standing there checking everybody got the right sequence. Which means you get a hard time... This is going to be chaotic, everybody running in different directions, and chaos is fun!
For small kids, it is important that everybody is a winner, and although somebody is going to be fastest, nobody is a loser when they get all these treasures.
There are of course, many possible variations of this method, relays, take as many treasures as you can in a specified time, and so on. Lots of fun! You should continue with variations of this method, maybe taking them out in the forest, until everybody feels confident they can use the compass safely and accurately, This may take some time. In a proper orienteering course, compass usage is of course only a small part of it. Consequently, you may use the two first exercises (this one and the next), for the compass part of the course for a full year, but with variations of course.
Let's move to the bush. Compass usage is most important when you haven't got any other features to guide you, such as paths, streams etc. So to get proper training, the kids have to go where they don't follow paths and such. This makes things more difficult, of course, and it is easier to get lost. Which means we are talking about the feared "feeling of being lost". Therefore, it is essential, assuming the kids have not yet got all the confidence they need to be out there completely on their own, to plan the exercises with a "security net", so that they cannot get really lost. This is achieved by ensuring there are features like roads, large paths, streams etc. that they can't miss, if (when) they miss the control.
It may be a good idea to put the start at a point that is visible from quite a distance, like a tower, for instance (the 'T' in the start symbol means tower). This time, the place you use should be covered by a real map, preferably with a large scale. Two controls are indicated as examples. Neither of the controls are visible from the start, which means the kids would need to use more techniques to get there. Before you start, you would need to instruct the kids what to do if the miss the control. If they think they cannot go right back to the start, they should just proceed until they find the road, and take one of the large paths back.

First Year Camper Guide 55
While only two controls are indicated here, there are supposed to be controls all the way around, like in the previous example. And also like in the previous example, they are supposed to run back and forth. The distance from the start should be around 100 meters, and must not be more than 200 meters.
The first times you are out this way, it may be a good idea to follow the kids around. In this case, you may not need to go back and forth, but go a course with 100-200 meters between the controls. Let the kids do the orienteering. Then you can again arrange treasure hunts, relays and such as the kids run back and forth. As the kids build up confidence, some will surely do this faster than others, they may take two controls for each time they run out, so they won't have to run the same path back and forth.
Hopefully, during this process, the kids will build up confidence in themselves, and know what to do when they miss. Eventually, they will be able to cope with the feeling of being
lost, and then they may proceed to greater challenges.
This is the greater challenge. This is a real orienteering map, "Eggemoen", published by Ringerrike Orienteringslag©, used here with permission. It illustrates how one uses a black pen to make parts of the map unreadable, which forces the runner to use the compass. In general, this method is regarded too difficult for beginners, but I have made some simplifying additions to the method, so I believe it is now appropriate for second-year beginners. It is, however, important that the kids have learned to cope with the feeling of being lost, it is nothing they fear anymore, because anybody who uses this method will get lost once in a while.
As you can see, I have made a course on the map, and there are different levels of difficulty associated with each of the controls. The first control is the easiest. One crosses several roads and paths on the way to the control, and there are paths leading into the control from each side. The crossing of roads has mainly two purposes: The child can see how far he or she has got, and secondly, it helps to build confidence. It doesn't play a very important role in finding the control, because the compass is supposed to play the main role in that. It can be used to correct the bearing if it is obviously wrong though. The control has also a "security net" - the road just after the control. If the control is missed, it provides a way to get back in, a detail that cannot easily be mistaken. The red arrow indicates such a detail.
The second control is a little more difficult. There are, contrary to the first control, few crossings. A few details are allowed to be visible though, so that the child can check his

First Year Camper Guide 56
or her bearing and make sure he or she hasn't gone very wrong. The control has still a security net, the red arrow indicates a good place to get into it again.
The third control has only the security net left, even the road that is crossed is blacked out. This is pretty difficult, and suited to teens that are getting experienced are about to move up to more difficult courses.
So is the fourth control. The kids who can run courses with this kind of controls are confident in the forest, has already been doing a lot of missing, and has analytical experience enough to find back without aid.
The fifth control is a control that may be good for experienced orienteers for this kind of training.
For all levels, the distance between controls shouldn't be more than 200 meters, a good deal less for the kids. This map has been enlarged for instructional purpose. Also, the blackout here is somewhat transparent, this is also for instructional purpose. In a real
exercise, it should be completely black where it is grey here.
Finding the directions without a compass
You are lost. I mean really lost. Standing in the middle of nowhere, and you have no idea where to go. If you are really in trouble, remember two things first
of all: stay calm, think rationally, and you can survive a long time without food. What you need is to drink.
Further thoughts about extreme survival skills is beyond the scope of this page, seek advice elsewhere beyond this introduction. This page deals with the

First Year Camper Guide 57
situation of finding your way, without the aid of a compass. What you have, is the sun, the stars, and the nature around you.
This page is mainly about the northern hemisphere of the earth, actually north of 23.5 °, because I have never been to the southern hemisphere myself (would like to go there of course!). The methods described do of course apply to the southern hemisphere as well, but in some places there may be a need to swap north and south to get it right. I hope you are able to figure it out.
For a start, it may be a good idea to climb a hill, and get a good look around. Try to see traces of human activity. If you see nothing, you should try to figure out in what direction would be the best to travel. If you haven't got a map, try to draw one if you can of the terrain in front of you, and try to mark off where north is, using the methods below. If you have got a map, try to determine where you are. Remember, you don't want to climb more hills than you have to. Also you should carefully consider not to climb if you are very tired. In that case you should consider staying where you are. Consult other sources for information on how to make it easy for rescuers.
Let us start with the most accurate method. This method requires that you have a pretty clear sky, though, and takes a lot of time. One of the advantages is that you don't need any equipment. You would need a straight pole about 1 meter (or a yard) long, two small sticks or rocks, another stick (or rock) that needs to be a little sharp, and something that can act as a string.
In the morning, at least before noon, the trick starts. Stick the long pole in the ground, upright. The ground around the pole needs to be horizontal. Now, you can place one of the little sticks in the ground exactly where the shadow of the pole ends, like on the figure. Then tie the string to the base of the pole, and tie the little, sharp stick, to the other end, so that when the string is stretched it reaches exactly the little stick standing there in the soil. Then, scratch half a circle in the soil with your sharp little stick, and wait... Wait. Wait until the evening. During the day, the shadow will get shorter and shorter, until noon, when it gets longer again. At noon, when the shadow is at its shortest, you may want to mark the point. The shadow is now pointing north (if you are north of 23.5 ° north). It is however not very easy to see exactly when this is, but it is useful anyway. Finally, the shadow reaches your circle again, and when it does, place your other little stick at the spot where the shadow ends. If you haven't got a string, you could use a pole that has the right length, or try to come up with some other improvised solution. Just make sure what you draw is a circle. Now, the line from the first stick to the second is west-east, like on the figure. Actually, you may want to mark points regularly, because any two points that have exactly the same distance from the base of the pole will give the West-East line. If it is partly cloudy, this may be a good idea.
There is a short, fast version of this one as well. This is only approximate, though, and the further away from the equator you get, the more inaccurate is it. You don't need the sharp stick and the string. Just wait 20 minutes between placing each of the sticks, and
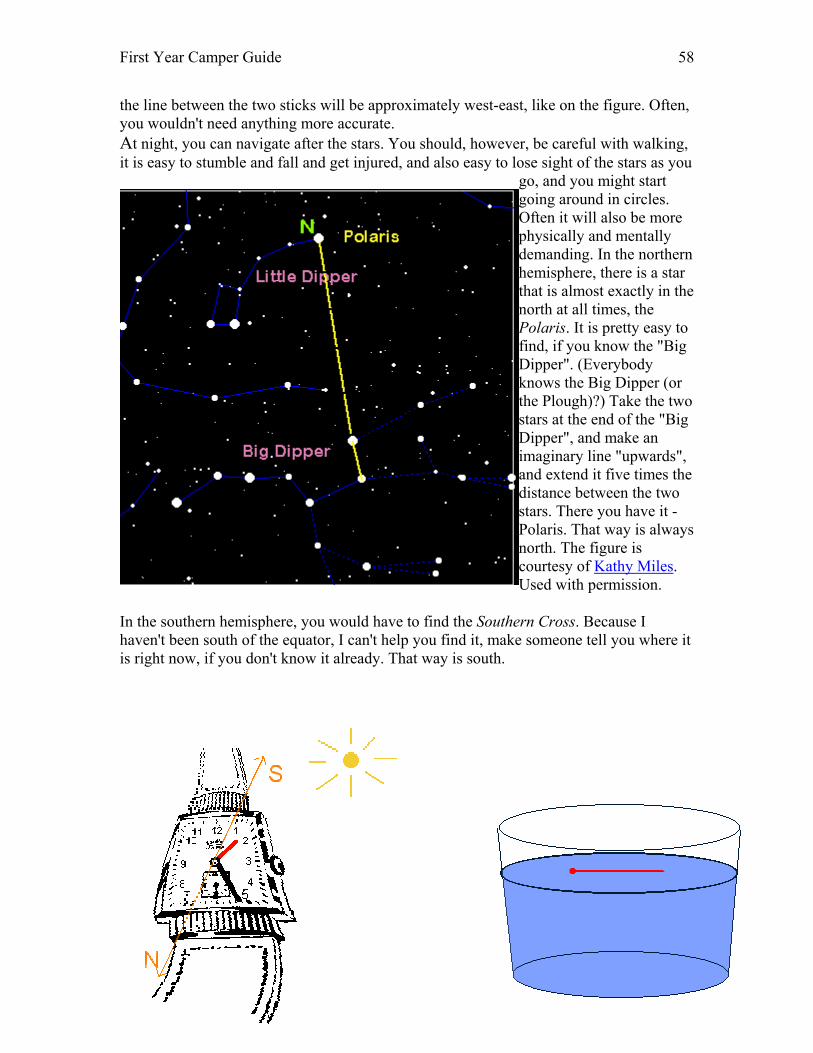
First Year Camper Guide 58
the line between the two sticks will be approximately west-east, like on the figure. Often, you wouldn't need anything more accurate. At night, you can navigate after the stars. You should, however, be careful with walking, it is easy to stumble and fall and get injured, and also easy to lose sight of the stars as you
go, and you might start going around in circles. Often it will also be more physically and mentally demanding. In the northern hemisphere, there is a star that is almost exactly in the north at all times, the Polaris. It is pretty easy to find, if you know the "Big Dipper". (Everybody knows the Big Dipper (or the Plough)?) Take the two stars at the end of the "Big Dipper", and make an imaginary line "upwards", and extend it five times the distance between the two stars. There you have it - Polaris. That way is always north. The figure is courtesy of Kathy Miles. Used with permission.
In the southern hemisphere, you would have to find the Southern Cross. Because I haven't been south of the equator, I can't help you find it, make someone tell you where it is right now, if you don't know it already. That way is south.

First Year Camper Guide 59
If you have an analog wrist watch, you can use the time to find north. Hold your watch up in front of you, and let the short hand, red on the figure, that indicates hours point at the sun. While holding it like this, cut the angle between the red arrow and 12 o'clock in two, (noonwards if the time is before 6am or after 6pm), that way is south. (The reason you need to cut it in two, is because the clock takes two rotations while the sun takes one around the earth, it is of course the other way around, but never mind.)
Many people wear digital watches these days (I do myself, if I wear one at all). If you do, draw an analog watch face on a piece of paper, and then mark the hour hand on using the digital watch. The rest of the method is identical.
This method can be used even when it is pretty foggy. Although you may not be able to see the sun, it may still cast a shadow. If you take up a straw or a tiny stick, and you may see a shadow. You just have to remember that the shadow points the opposite way from the sun, but the rest of it is quite similar as above.
Want to make your own compass? Sure. You need a needle and a glass of water. A needle can in fact float on the water, or that is, on the surface tension forces if put carefully on the surface. Just put it carefully down on the surface of the water. This demands a lot of patience though. There are three tricks that makes it go easier. One: Put the needle on a piece of paper. If the paper floats too, there is no problem, and if the paper sinks, it'll probably leave the needle. If you put some grease on the needle that isn't water-based, it'll go easier, or if you put it carefully down with a fork or something. Once it has got there, it stays there pretty good.
If the needle is magnetic, it will act as a normal compass and be very accurate. A problem is though, that you don't know north from south. All you know is that it lays north-south. You would have to use one of the other techniques to find out, or make a good guess.
The greatest problem with this is: Not many needles are made of magnetic materials these days.... You can't just use any needle. You may just have to look around to see what you can find, if you want to make a yourself a compass.
What if there is no shadow? Then, there are a few methods based on natural signs. I will deal with the ones I have checked myself.

First Year Camper Guide 60
It is very much about trees. First of all, there will be fewer branches to the north. This is usually easiest to see if you look up along the trunk of the tree. The north face of the tree would be more humid than the south face, which is something most species of lichen (or moss) likes, and consequently, there will be more of it on the north face. On the image above, you can also see that ants likes to build their nests on the south side of the tree.
It is also worthwhile to look at how snow melts. In the spring in the mountains, snow will melt faster on the south face of rocks, or in south faced slopes. Also, vegetation and undergrowth will typically be thicker on the South facing slopes, and also fruits ripen earlier on the South facing slopes.
These methods are not very reliable, I am afraid. Winds may alter the average conditions significantly, and cause deviations. If you use natural signs, you should use as many signs as you can before you draw a conclusion.
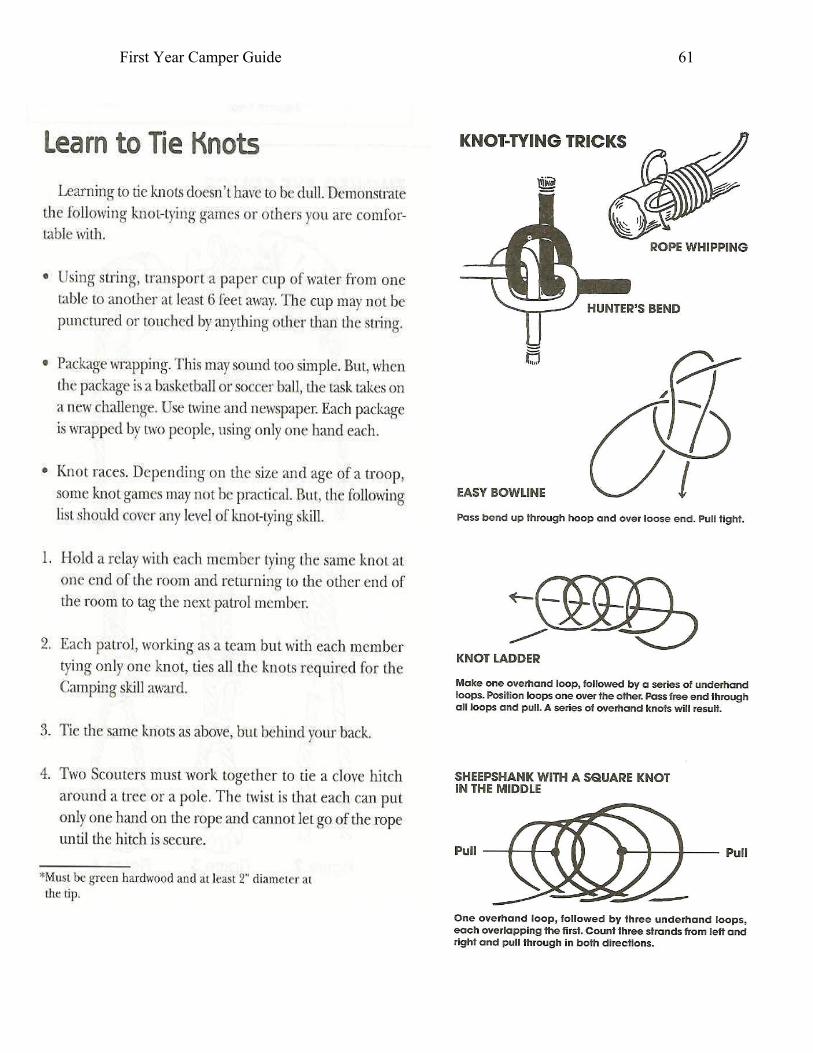
First Year Camper Guide 61

First Year Camper Guide 62
Sealing Food In Aluminum Foil 1. Cut piece of foil that will be large enough to make your seal. If you are using regular, not heavy-duty, foil, have a piece large enough to fold in half for double thickness. A good idea is to cut one piece first and check the size before you cut all you need. Do not skimp on the amount of aluminum foil you use to make your seal.
2. Place food in center of foil. 3. Bring sides of foil up over the food loosely.
4. Fold the top half inch down on itself. This can be creased. 5. Fold the top down again on itself. Do not crease.
6. Fold the top down flat. Also press ends together. 7. Fold corners over, as shown by dotted lines.
8. Fold pointed ends over, about one-half inch, 9. Fold ends over again. as shown by dotted lines 10. Put foil package on the coals.
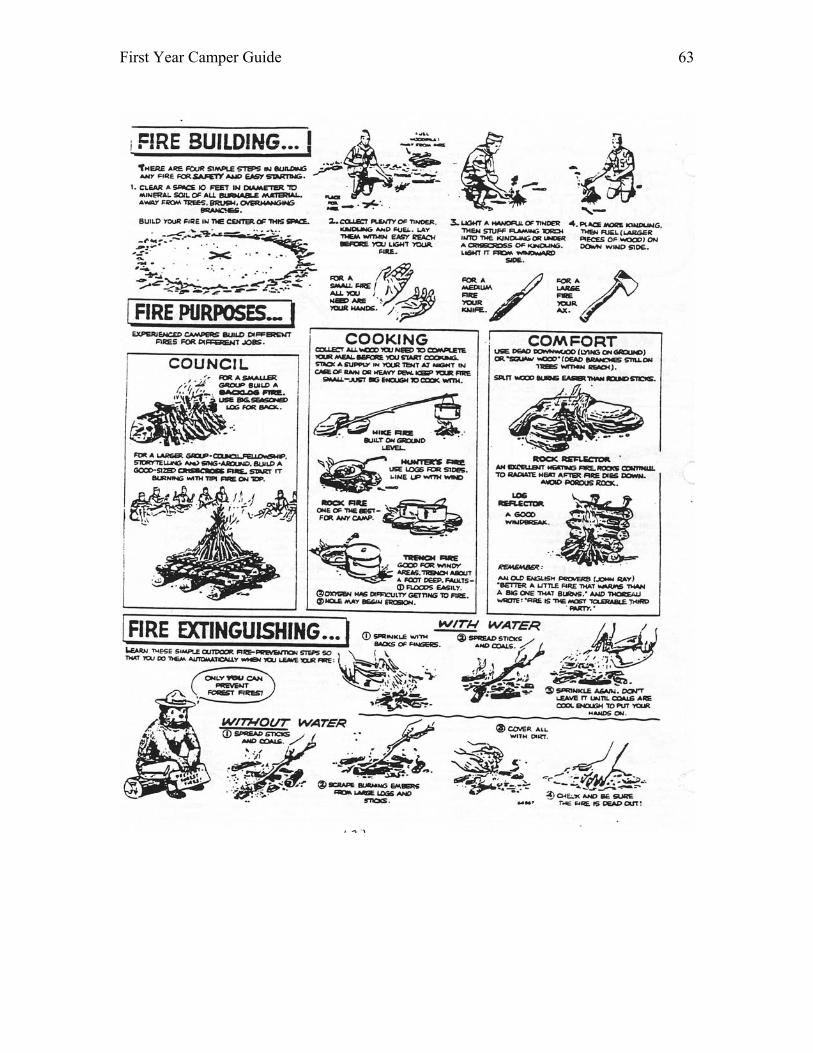
First Year Camper Guide 63