Embed Size (px)
Citation preview

2 Last Updated: February 10 ,2017

3 Last Updated: February 10 ,2017
Table of Contents Table of Contents ........................................................................................................................................ 3
Introduction ................................................................................................................................................. 4
HIRING EMPLOYEES ..................................................................................................................................... 5
Accessing ePAF ........................................................................................................................................ 5
Candidate Search: Checking if the person already exists on HRMS ........................................................ 6
No Matches: ............................................................................................................................................ 9
Contact Information .............................................................................................................................. 10
Job Information ..................................................................................................................................... 13
Compensation ....................................................................................................................................... 14
Additional Pay ........................................................................................................................................ 16
Finalizing the Form ................................................................................................................................ 17
Attaching Documents ............................................................................................................................ 18
Comments ............................................................................................................................................. 19
WORKFLOW: What Happens Next ............................................................................................................ 21
TEACHING ASSISTANTS – Steps, FTE and Compensation .......................................................................... 22
“Per Period” amounts for TAs ............................................................................................................... 23
SAVE FOR LATER ........................................................................................................................................ 24
REAPPOINTMENTS, EXTENSIONS, AND CONCURRENT JOBS .................................................................... 25
Extensions .............................................................................................................................................. 26
Transfers (Moving to Another Position) ................................................................................................ 26
Adding a Concurrent Job ....................................................................................................................... 27
Changing Existing Jobs ........................................................................................................................... 28
Viewing a Change Form ......................................................................................................................... 31
TERMINATIONS & LEAVES: Status Change Form ....................................................................................... 32
Actions ................................................................................................................................................... 33
Attachments .......................................................................................................................................... 34
WORKLISTS AND VIEWING FORMS ........................................................................................................... 35
View a Form ........................................................................................................................................... 35
Worklists ................................................................................................................................................ 38

4 Last Updated: February 10 ,2017
Introduction Electronic Personnel Action Forms (ePAF) is used as online forms and workflow approvals for an
employee’s hires and payroll changes. This electronic workflow process creates greater institutional
efficiencies as well as reducing the carbon footprint.
You can use E-PAF for hires that do not need to be posted, such as students, staff positions of less than 3
months duration, staff leave replacements, and honorary faculty appointments and re-appointments.
e-PAF is designed to be used for:
New hires and Re-hires
Terminations
Job code changes
Account code changes
Leaves
If you need assistance with ePAF
Please contact the Payroll dept HRMS Helpdesk: [email protected]

5 Last Updated: February 10 ,2017
HIRING EMPLOYEES
Accessing ePAF Sign onto HRMS with your normal CWL (http://www.msp.ubc.ca). Select Department Self Service »Click on ePAF Home Page:
Click on Start a New ePAF
This option is used for starting any of the 3 forms (Hire an Employee, Job Change Existing Job form or Change Employment Status form)

6 Last Updated: February 10 ,2017
Select Hire an Employee. This is used for Hiring, Rehiring or Reappointing someone into your dept that does NOT require a job posting.
Candidate Search: Checking if the person already
exists on HRMS The first step in hiring an employee is to check if they already exist on the
HRMS. For existing employees, check by Employee ID Number. For new
hires, enter the Social Insurance Number, Name and Birthdate
FOR ALL JOBS THAT NEED TO BE POSTED, YOU MUST USE eRECRUIT. What jobs don’t need posting? Student Hires/Rehires
Staff Positions of less
than 3 months
Staff Leave
Replacements
Faculty honorary
appointments and
reappointments
When searching for an employee, these fields may be used together or independently.
Search by emplid if you have it (existing employees).
If not, search by SIN + name + birthdate

7 Last Updated: February 10 ,2017
1. Enter Employee ID for Existing Employees
If you have their employee id, enter it, and it will bring up their
current active and inactive job records.
Exception: If an emplid # has been assigned using Early ID
assignment but the employee is not yet in HRMS, the system
will not find the employee at this point. You need to enter
Name, SIN and Birthdate (see below)
However, it will grab the correct number from Early ID
once the e-form has been saved and submitted for
approval by matching the SIN you enter.
There is no need to go to Early ID assignment -- this
procedure will do it for you.
2. Check by Social Insurance Number + Name + Birthdate
If you are hiring a new employee, you must have their SIN.
If SIN brings up no match, it is possible that they were
employed under a different SIN (a temporary one, for
example), therefore the last step is:
First (at least Initial) & Last Names are mandatory for a
name search.
You may use the % sign as a wildcard under either field.
Sample Results:
Your search will display any existing employees that match your criteria.
Partial Matches (SIN+Name+Birthdate Search)
SIN+Name + Birthdate searches will not display a SIN if there is no SIN match – it will show name and birthdate, however. If the name and birthdate match, then it is possible that:
You have the wrong SIN – contact your new employee to verify
your employee exists on HRMS with a temporary SIN (ie was here on a work permit). Obtain the new SIN and Permanent Resident papers from the employee, and send them to Payroll for processing.
Matches: Selecting An Employee
For each person matched, it will list each job record on HRMS, both active and inactive.
Quick Summary
Check if the employee
already exists on the
system by SIN, name and
birthdate
If yes, pick the
employee/employment
record, and their personal
data will be populated by
what is already in the
system – update it if
necessary.
If not, continue to Add a
new employee
If you change any of the
search criteria, you need to
click the button
again, or it will not update.

8 Last Updated: February 10 ,2017
In the example, the filled box (green) indicates an active job:
The unfilled boxes (red/white) indicate inactive jobs. The last entry has no emplid # assigned – this indicates a new hire in process. Click on the in the Results column to see more information about that job to assist you in selecting one. Click on the triangle in the Person Column to select a job to be rehired. The following will be displayed:
Click on (Note: If you select a line with a green box , the system will skip the personal data and take you directly to Step 2 – Job Information.) The system will take you to the HIRE page and display the name that was entered on the search page.
Carefully check the Names and Date of Birth for a match! Our database has over 125000 people in it – the possibility of a match on name alone is high – please check birthdate, and SIN too, to confirm that it actually is the same person.
ePAF and the Early
Assignment of Employee
ID system
If an emplid # has been
assigned using Early ID
assignment but the employee
is not yet in HRMS, the
system will not find the
employee, because they have
no record in HRMS.
What happens is this:
Once you complete the ePAF
form and Submit it, ePAF will
look up the employee in the
Early ID system, and will grab
the correct emplidl by
matching the SIN you enter.

9 Last Updated: February 10 ,2017
No Matches: If no one appears from your search result, or the results that do appear are
not your hire, click the button:
SINs and Honorary Appts Honorary faculty are not required to supply a SIN, as UBC is not paying them. However, if the employee supplies the SIN, it should be entered as:
Aids in identification
Is already in the system if a payment does need to be made
If Early ID was used, you must enter the SIN in ePAF
Honorary Appts and the
Early Assignment of
Employee ID system
If you enter the SIN into Early ID, you must enter it into ePAF. Otherwise ePAF will not find the original emplid and will assign a new one.

10 Last Updated: February 10 ,2017
Contact Information
Enter the rest of the personal information. Fields marked with an asterisk are required fields.
Identity:
Upon Clicking , one of two different panels will be displayed depending on whether the employee has a permanent or temporary SIN #.
If there is more than one e-mail &/or phone, check the “Add” boxes and enter the data
NOTE: If the Contact info is not in Canada, the field names (Province and Postal Code) will not change to that country’s format
From this step forward, all the screens have a “Save for Later” button.
If you save the form, it will take you out of the page. When returning to the form, you will need an identifier such as form ID#, SIN # or name.
To pick up where you left off, go back to Start a NEW ePAF>Hire an Employee and hit through the pages until reaching where you stopped.
11 Last Updated: February 10 ,2017
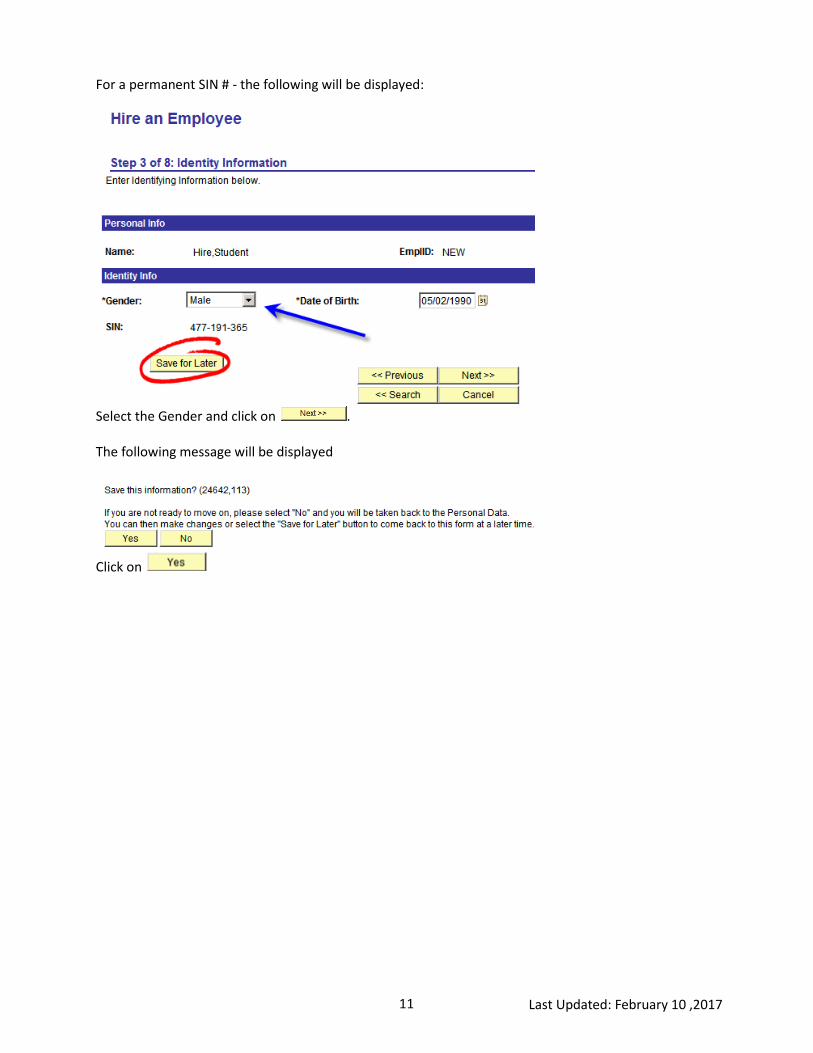
For a permanent SIN # - the following will be displayed:
Select the Gender and click on . The following message will be displayed
Click on

12 Last Updated: February 10 ,2017
For a temporary SIN (SINs starting with a 9) - the following extra box will be displayed:
Enter the Citizenship & Visa Info. All fields are required.
Dates of employment must be within the period of the work visa. In other words: The appt dates must match the dates of the job
OR be later than the visa issue date and before the visa expiration date.
Click on The following message will be displayed
Click on
It’s a good idea to scan and save (on your computer or a local server) a copy of the Work Permit, as it will need to be attached to the form at the end of the process.
When entering the Visa Info, make sure you select the correct Visa/Permit type – Work Permit or Study Permit

13 Last Updated: February 10 ,2017
Job Information Depending on the employee selected, as well as the field data selected on the form, various fields will appear or disappear (such as Step, FTE, and Extension and Recall options).
Enter data into all the fields with asterisks or use the drop down boxes. If you enter the Position# (which is optional for student appointments), then the next 5 fields are defaulted in for you The Job Families displayed are dependent on the Empl Group chosen The job codes displayed in the drop-down are dependent on the Job Family chosen:
CLONING
When hiring several employees into the same job type, using the Clone feature will save time. Once one employee in your dept has been hired, you may “clone” the job information from that form. Create and enter a new employee, and enter the personal information. When arriving at Step 2 (this page), enter the eForm # of the data you want to copy.
The screen will automatically populate the “Job Data” and “Compensation and Funding” fields for you when you tab out of the Clone field. Any of the fields may be then overwritten if required (for example, if everything is the same except the Speedchart, the information can be cloned, and then the Speedchart can be changed)
Position Numbers: Cloning will not copy the position number.
Note: TAs have additional rules re: FTE. See the included section/handout on student appts

14 Last Updated: February 10 ,2017
Click on
Compensation For the employee’s compensation, there are 2 options for a salaried employee – if they are on a set salary scale (eg CUPE 2950), the Monthly Rate is defaulted in.
If they are not on a set salary scale (eg M&P), then enter the rate:
CAUTION
If you select Faculty as the “Empl Category” in error and have also accidently checked the “Honorary Non-Paid Appointment?” box, ENSURE that the box is unclicked before you correct your Empl Category.
If you correct the Empl Category first, the box disappears but stays clicked on. This will cause it to error when Payroll tries to authorize it. The form will need to be recycled back to the initiator for correction.
Honorary Appointments
For honorary appointments, such as Adjunct or Clinical Faculty, check the Honorary Non-Paid Appointment option. This will cause the eform to skip over the Compensation screens.

15 Last Updated: February 10 ,2017
“Per Period” Amounts
There are some jobcodes (faculty and certain student jobs) that allow you
to designate a fixed amount for the period of the job. The system will
calculate the monthly salary that will equal the per period amount over this
period of time.
Check the “Per Period” box
Enter the “Per Period Amount”
Note that the dates it uses are the date of the job from the previous panel,
not the dates of the individual funding lines.
Funding Information:
Enter the Begin (and End date if it is a term appt) of the funding source. If there is only one distribution line, the Begin (and End if applicable) dates will always be the same as the Appt Start & End Date.
Enter the Earnings Code & Speedchart (note that the Account defaults) and then enter either
the percent (100% if only one distribution line) OR
the dollar amount (same as monthly rate if only one distribution line).
Multiple Distribution Lines
If the employee is to be paid from more than one Speedchart for exactly the
same period, then click on the plus sign next to the annual rate and
enter the next earns code and speedchart. Click on the minus sign to delete any extra rows within the date range.
Amount: Lines must total the Monthly rate.
Percent: Lines must total 100%.

16 Last Updated: February 10 ,2017
Differences: The Total PCT line will show that if you have correctly distributed the amount for the date range and display a difference if there is one.
You will not be able to move on if there is a difference. A quick way to
resolve differences is to click on the reconcile button next to one of the lines. This will increase or decrease the line Percent/Amount to make everything add up to the total.
If you have more than one date range, each range needs to be reconciled.
Adding Earnings Periods
If the employee is to be paid at a different rate, or from different Speedchart(s), then additional date ranges can be inserted at this point.
Click the box:
The dates must:
have no overlaps
no gaps
be within the start and end dates of the job
If you need to delete a row, click on the garbage can
When you are finished, click on
Additional Pay If an employee is to receive additional money for a Car Allowance or an Industrial First Aid Certificate, please check the appropriate box. The system
Hourly Acct Splits
If you have more than one chartfield
on an hourly position, the display is
somewhat misleading.
It shows that each account will be
charged a percentage of the hourly
rate. This is not in fact the case – it
will charge the full hourly rate to
whichever account you submit hours
for on the person’s timesheet.

17 Last Updated: February 10 ,2017
will open up dialog boxes for Start Date, End Date and Rate:
If not applicable, click on
Finalizing the Form
On this page, the Action & Reason codes that will be added to HRMS are displayed.
If the employee has a SIN # beginning with ‘9’ (indicating it is temporary), then this Message will appear. You must acknowledge that you will upload a copy of the Work Permit.

18 Last Updated: February 10 ,2017
Attaching Documents Certain documents may be required with a hire or rehire:
CUPE2278 Compression Agreement: UBC-V only
CUPE2278 Union Agreement: UBC-V only
Curriculum Vitae: Required for new Faculty Hires
Photocopy of SIN card: not required, but recommended (the employer must be shown the SIN card by law)
Direct Deposit: Mandatory condition of employment. Have the employee fill out this form, otherwise their first cheque will be mailed to their home. An email will be sent to the Dept and the employee requesting direct deposit information.
Work / Study Permit: If the employee has a SIN beginning with ‘9’, the system will require a Work/Study permit be uploaded
Offer Letter: (For Faculty only)
TD1: Employee’s taxation form If documents need to be added, scan them and save them to a file on your computer or local server. Select the Description of the file before attaching it.
Pressing the Upload button will allow you to select the file (click on Browse). Once the file is selected, press Upload again:
More than one may be added if necessary.
If an attachment is required (such as a Work Permit) and not attached, the Payroll rep will “recycle” it back to the initiator for the attachment. The form will then have to be re-approved before resubmitting to Payroll.

19 Last Updated: February 10 ,2017
Comments Add any needed comments (these are available for everyone to see) :
If you are finished your form, click on . The following message will appear.
If ready, click on . The following message will be displayed.:

20 Last Updated: February 10 ,2017
HRMS assigns the Emplid # and the CWL signup PIN # Click on the Return to Hire link.
Congratulations - you are now finished this form. To start a new one, click on Go To ePAF Home Page.
Don’t forget to pass along the employee ID and PIN to your new employee! They will need it to set up their CWL account
If you want to see
a summary of
your form – click
on
“View This Form”

21 Last Updated: February 10 ,2017
WORKFLOW: What Happens Next When a form is submitted, a notification will automatically be e-mailed to the next approver (unless the approver requests “No Notification” on their access application form).
If the Approver clicks on “recycle” or “deny”, the initator will receive an email notification. A “recycled” ePAF will show on the initiator’s worklist.
If you want to see who the form has actually been sent to - click on View This Form – HRMS will display a 2 page form:
Click on
Then click on Who can work this form? to see the actual names of the Dept Approvers:

TEACHING ASSISTANTS – Steps, FTE and Compensation As per their Collective Agreement – Teaching Assistants are to be paid under the agreed pay scales and therefore should not be paid as “Per Period” amounts (see next page however). When entering a TA appt into an ePAF, the rate will default for you from the salary table after the Step and FTE have been entered.
Please note that for job codes 279903 & 279904, ePAF will display the 80% REG & 20% FEL lines for you. If you go back and change the FTE, when this page is displayed again, the percentages will not be correct and you will need to reset to 80/20. If you forget, the system will display an error when you hit NEXT.
If hiring an hourly TA, the system will split the hourly rate into the 80/20 % split.

23 Last Updated: February 10 ,2017
“Per Period” amounts for TAs While technically TAs are not be paid as “Per Period” amounts , departments often hire with a specific amount of funds available, and wish to pay the TA for hours up to this amount.
Payroll has built an FTE calculator to assist with these - click on the calculator icon next to the FTE field:
Enter the dollar amt or total hours to be worked for the period, select the TA level, start & end dates and hit Calculate. The correct FTE will be displayed. This is the FTE to be entered onto the ePAF.
Calculations are based on the current BCGEU (Letter of Understanding #2 – Teaching Assistants) and on a fulltime work week of 12 hours.
If you wish to use the calculator separately from ePAF, then use the link below. http://www.finance.ubc.ca/payroll/admin/salarycalculator.htm
Enter the dates in
mm/dd/yyyy format.
The calculator
transforms it to a text
format after you enter
it (so you can verify
that it is correct).

24 Last Updated: February 10 ,2017
SAVE FOR LATER
Click on the and the following will appear: Click on .
While working on an ePAF, you may hit the Save for Later button.
Only you, as the initiator, may continue the form at a later time.
When you want to return to a form you have Saved for Later, go back to the original Start a New ePAF link, enter the SIN# or name (for a brand new employee since if you Saved for Later they don’t yet have an employee ID) or an emplid # for an existing/previous employee:
WARNING:
Save for Later should only be used for just that: saving an incomplete form for later.
Do NOT: Save forms that
you have submitted or have
been recycled to you. It
puts the form into a dual
Saved/Submitted status that
the system cannot resolve.

REAPPOINTMENTS, EXTENSIONS, AND CONCURRENT JOBS
Rehiring an employee back into the same job is considered a
Rehire or Extension
Hiring an employee who is active in one department into another
is a transfer if the original appointment is to be terminated.
If you are hiring an employee into a position where they are not
terminating their existing position, it is an Additional Hire into a
concurrent job.
Begin the ePAF as you would a normal Hire:
Go to(Department Self Service>ePAF Home Page>Start a New EPAF>Hire
an Employee
Enter the emplid # of the employee being extended/transferred/hired
concurrently.
If the Act (Active) box is (green), the employee is still active
and the system will bypass the personal data.
If the Act box is white (the employee is not active as of today), it
will require you to verify/amend the personal information.
Enter the Start Date, Appt End Date (if applicable) and the Empl
Category. ePAF will open up an Other Job Actions dialog box:

26 Last Updated: February 10 ,2017
Extensions If you click on “Extending an appointment”, the system will respond with
one of 2 options:
If the employee only has one employment record, the system
will default in most of the job information from that position.
If the employee has more than one employment record, the
system will display any jobs eligible for reappointment regardless
of Empl Category:
It will not display any ongoing positions but will display any active term
positions and any terminated job records.
Click on the box beside the job you are extending and most of the job
information will default in.
Transfers (Moving to Another Position) If you click on “Moving to another position”, the system will open some
dialog boxes and display any active positions as of the start date you
entered. (Positions terminated as of this date do not display as they
would need to be “rehired” and not transferred. )
Be Careful With Start Dates!
A break in service (even one
day) should be a Rehire action,
not an Extension.
Example: If the previous job
ended Feb 28 and it doesn’t re-
start until Mar 9, DO NOT check
the “extension box” or ePAF will
default in Mar 1.
Weekends
ANY break in service (even one
day) can affect seniority,
vacation entitlements, etc.
If the job ends on a weekend,
then you should start the new
job with no break in service.
(Don’t worry - HRMS is smart
enough to only pay Staff
Appointments from Monday to
Friday.)
Blue Circled
‘Blue circled’ employees show a
“B” under the Empl Class field.
The correct salary for that
employee is displayed, but it
does not match the Grade/Step
table for that Union. You may
not change the rate – contact
your HR Advisor for any
questions

27 Last Updated: February 10 ,2017
If more than one employment record displays, select the one that is
transferring.
Click on Temporary Promotion or Secondment if appropriate.
The system will read the information entered and determine whether
the action will be Transfer or Promotion.
The action of Recall will only be displayed when the employee is
unionized and currently in a layoff status.
Adding a Concurrent Job If the job you are hiring the employee into is to be in addition to their
existing positions (i.e. they are not leaving an existing position), then
leave both “Extending an appointment” and “Moving to another
position” blank.
Complete the rest of thejob information in the same way as a Hire and
submit the form.

28 Last Updated: February 10 ,2017
Changing Existing Jobs The Change Existing Job Form is used to change an employee’s current job. Examples would be
Temporary Promotions
Pay Rate Changes
FTE changes
Increased Workload
Job Reclass
Staff Job Change Form is only to be used for ACTIVE employees. Navigate to Department Self Service > ePAF Home Page > Start a New ePAF > Change Existing Job:
Enter an EMPLID #, SIN # or Name, just as you would for a Hire. If an employee cannot be located, it may be because they are no longer active (an employee is no longer active when the Termination Date is less than the current date). If there is only one active job then ePAF will display it. Otherwise, a list will be presented. Click on the job you are changing
Don’t use the Change Form
to change End Date of
someone’s job
If you are extending someone
past their original end date,
then you need to use the Hire
form, and submit an Extension.

29 Last Updated: February 10 ,2017
1. Enter the Start date (and End date if required) 2. Click on any of the applicable boxes under Other Job Actions if
appropriate - these boxes are used to help determine the Action/Reason.
These additional actions are not applicable to student positions, and will not display
3. Click on
Be Careful With End Dates!
An employee who has an end-
date to their job (ie a term
employee), must have the End
Date entered, and it should be
the same as the end date of the
job
However, an ongoing employee
should not have the end date
entered unless it is a Temporary
Promotion. If an end date is
entered for any other action, it
will cause their job to be
Terminated as of the End Date!

30 Last Updated: February 10 ,2017
Enter:
current or new Monthly Rate
Begin date
End date (if required)
amend the Speedchart info if this is an earnings distribution change.
Click on
The system will determine the Action based on what you have entered: If there is a pay rate change, a Pay Reason drop down will appear. You need to specify a reason from the drop down box:
Now that you are finished, click on
Students cannot have FTE
changes
Do not select ‘FTE Change’ for
Student employees.
Student employees (except
Teaching Assistants) do not
have FTEs other than 1 and are
not changeable. If you select
‘FTE Change’ epaf will error
because the FTE has not
actually been changed.

31 Last Updated: February 10 ,2017
Viewing a Change Form When viewing a Change Form – the top area “Current Job Info” is the
current HRMS status as of today’s date. The “Current Job Information”
shown under the Actions & Reasons, is that status as of the effective
date.
ePAF will display the Action & Reason for the Job Change and highlight
the fields that have been changed:

32 Last Updated: February 10 ,2017
TERMINATIONS & LEAVES: Status Change Form The Staff Status Change Form is used to change the status of an employee’s current job. Examples would be
Leaves
Return from Leaves
Terminations Navigate to Department Self Service > ePAF Home Page > Start a New ePAF > Change Employment Status:
Enter an EMPLID #, SIN # or Name. Format for name is “Last Name,First Name”. If there is only one job then ePAF will display it. Otherwise, a list will be presented. ePAF will display all Job Records (including Terminated). Look at the Payroll Status column, and select the appropriate one:
Terminated Employees
You can retroactively change an
employee’s job, however:
If an employee is terminated as
of the date you are initiating
the form, you will not be able to
submit a Change.
In such cases, you will have to
submit the retroactive change
on paper.

33 Last Updated: February 10 ,2017
After selecting the employee’s record, ePAF will display the current information. The form data will have different check boxes depending on the Employment category of the employee.
Actions
Cancelling
If cancelling an appointment that was issued in error (that has already been executed to HRMS), click on the “Appointment being cancelled?” box.
Union Layoffs
If a union employee is going on layoff and onto the recall list, click on the “Employee going on Recall List?” checkbox (this option will not be visible for nonunion employees). If neither of the check boxes apply to your action, select an Action and then a Reason from the drop down lists. Depending on what Action is selected, the date fields will change and other boxes will appear and disappear. Enter the Action, Reason and Date fields and any other appropriate fields/check boxes.

34 Last Updated: February 10 ,2017
When you select the Action – Termination, Layoff, or Retirement, options
become available regarding vacation pay:
If these dialog boxes are clicked, then more boxes are available.
Attachments Resignations require a copy of the resignation letter be attached:
When your form is complete, click on .
This is a freeform field to enter a
speedchart if vacation is to be paid from
a different PG than the normal salary.
Address Upon Termination
It is very important that
employees terminating or going
on leave from UBC have an up to
date home address.
T4 slips, ROEs, Leave of Absence
invoices, etc. are mailed out to
the address on file. You have the
opportunity to update the
address at the time of
termination:
Employees can also do so
through Faculty and Staff Self
Service (www.msp.ubc.ca)

WORKLISTS AND VIEWING FORMS
View a Form
If at any time you need to view a form, go to the ePAF Home Page and click on “View an ePAF”. This is also where to go to see what stage the form is at.
Any of the above fields may be used to search for a form. The “NAME” field is used to search by First Name followed by a Middle Name (if applicable) followed by Last Name.

36 Last Updated: February 10 ,2017
The “LAST NAME” field is for Last Name only - do not add any other data – it will corrupt the search. HRMS will display a summary of the form.
Click on to see the Form History and status.
Tracking ePAFs.
You can always pull up individual
ePAFs by ePAF form number, by
employee ID or even name using
the View an ePAF link.
By entering filtering criteria, you
can pull up just incomplete forms
(e.g. Status not equal to
Executed), or other ways of
looking at your forms.

37 Last Updated: February 10 ,2017
Here you can see a complete history of the form:
Note that it shows who worked the form and how long each step took. Once it reaches the System (with a green check mark), it has been entered into HRMS.

38 Last Updated: February 10 ,2017
Worklists
Initiator
The only time an initiator will need the worklist is when a form is recycled back to you. You must access your worklist through the first option described below
Approvers
Approvers have two ways of navigating to their worklist.
1. Click on the “Worklist” link on the HRMS header
Items that need action will display on the worklist. By clicking on an item in the Link column, HRMS will respond with a view of the form entitled – Evaluate a Hire. Evaluate a Hire displays a single-screen summary of the information on the form for review by the Approver:

39 Last Updated: February 10 ,2017
At this point, the Approver can pick one of four options:
Will forward to next approver (PG approver, Dept Head, HR, Payroll etc). When a form is approved, a notification will automatically be emailed to the next valid approver (except for HR/Payroll)
Permanently stopped. Initiator will receive an e-mail notification
Places on hold awaiting further action

40 Last Updated: February 10 ,2017
Sends back to initiator for further action – will be resent to approver upon resubmitting
When using the DENY, HOLD OR RECYCLE buttons, comments should be added as to the reason why the action has taken place.
2. Approvers can also access their worklist on the ePAF homepage:
Leave all fields blank, and click on Search

41 Last Updated: February 10 ,2017
Everything routed to you will be displayed. Criteria may be entered into any of the boxes under Find an Existing Value to narrow your search. Items that need action will display on the worklist. Click on an item in any row. HRMS will respond with the Evaluate a Hire page.