Embed Size (px)
Citation preview

1
FinalEvaluationofStudentsintheInstructorDevelopmentCourse
TheFinalEvaluation(finalexam)fortheIDcourseisdesignedtoassessthestudent’sabilitytoplanforandsuccessfullyteachUSPScoursesandseminars.Itconsistsoftwo,equallyimportantparts:
1. Evaluationofthestudent’s15-minutepresentationbythelocalinstructoraccordingtothechecklistandcriteriaintheInstructorManualandontheIDCoursewebpage,and
2. EvaluationandReviewofthestudent’s1-hourlessonplan,theresponsibilityforwhichissharedbythelocalinstructorandthenationalIDCommittee.Thelocalinstructorshouldrevieweachstudent’slessonplanandprovidefeedbackbeforeitissubmittedtoIDCom.Thelessonmustbeonaboatingrelatedtopic.
ThepurposeoftheIDcourseistohelpthosenewtoteachingbuildtheskillsandknowledgeneededforsuccessfulteaching.Thisincludesanabilitytoplanandorganizematerialsandtechniquesthatresultsinastronglearningenvironment.
Thesquadronevaluationofthe15-minutepresentationistoinsurethatthestudentinstructorhasthenec-essarypresentationskillstosuccessfullycommunicatelessoncontentinawaymeaningfultothestudent.Thesquadronevaluationofthe1-hourlessonplanmeasureshowwellthestudentinstructorcanapplythelearningprinciplestaughtinthecourseinplanningalesson.ThelessonplanreviewconductedbythenationalIDCommitteeistoinsurethatthelevelofthestudentinstructor’sunderstandingofthelearningprinciplesmeetsthestandardssetbyUSPSandNASBLA.
Pleaserefertothe“Instructions”documentthatcanbedownloadedfromtheInstructorDevelopmentCoursewebpageathttp://www.usps.org/national/eddept/id/idcourse.htmfordetailsonhowtoconductandsubmitthenecessarydocumentsforthefinalevaluation.
Note:NationalcommitteesdeveloptheobjectivesandcontentofUSPScoursesandseminars.Whileguide-linesareprovided,itisthelocalinstructor’sresponsibilitytoadjustthecontenttothestudentsinhisorherclass,whilestillteachingthekeyconceptsandskillscoveredinStudentManual.
ExamplesofLessonPlans
Therearemanywaystowriteasuccessful1-hourlessonplan.ThethreeexamplesthatfollowareonesactuallysubmittedbystudentscompletingtheIDcourseandusedwiththeirpermission.
Exampleofa1-HourLessonPlanThatNeededRevision page2
ExampleofStrong1-HourLessonPlan page5
AnotherExampleofaStrong1-HourLessonPlan page10
(Revised:12April2016)

2
Lesson Plan
[Name removed] Planning a Great Loop
Cruise Overall Presentation Time = 60 Minutes
Materials Required: PowerPoint Presentation, Internet Connection, Handouts, Large Map
Instructional Purpose
Actions and Details: Instructional method, examples, questions to ask
Teaching Aids, Resources and Notes
Gain Attention,
Motivation Time: 1 minute
Ask question: Have any of you ever taken an extended trip on
your boat? Or dreamed of taking a year from your job and traveling on your boat?
Have website video playing in the background
State Goal or Objective
Time: 30 seconds
The objective of this lesson is to describe the process of planning a Great Loop Cruise. We'll discuss what is the Great
Loop, planning the timing of the trip, purchasing the right boat, and provisioning for the trip.
What is the Great Loop?
Time: 10 minutes
What is the Great Loop? Explain the route, giving the
alternative routes that are available. Travel counterclockwi se, starting in Stuart Florida, up the lntracoastal waterway, though Chesapeake Bay, back to the ICW, to New York
Harbor. Then the Hudson River to the Erie Canal and through the Great Lakes. The route continues to Chicago, the Illinois River then onto the Mississippi River. The loop then follows the Ohio and Tennessee Rivers to Mobile, Alabama, and then
back to Florida.
What are alternative routes?
Time: 5 minutes
Some loopers add 1500 miles to trip by heading North from New York harbor to the St. Lawrence River to Lake Ontario.
Some loopers stay on the Mississippi through New Orleans. In Florida, either take the Okeechobee canal back to Stuart, or
travel through the Keys to return to the East Coast.
Show alternatives on Map
Example of a 1-Hour Lesson Plan That Needed Revision
The following 1-hour lesson plan received a score of 62 the first time it was submitted. The person who evaluated it said in their comments, “Lesson content provides good information. The focus of the lesson plan appears to be on the information and not the learner’s understanding of the information. The instructor does not indicate how a personal delivery would strengthen audience understanding.” The evaluator continues with 5 additional paragraphs of specific suggestions on how the lesson plan could be strengthened. The student revised their initial lesson plan, resubmitted it, received a passing score of 92, and passed the course.
Large Map to show route

3
Planning your Trip Time: 15 minutes
How much time do you have? Some loopers do the trip all in one year, others break it up into parts, storing the boat and going back to work in between legs of the journey.
If you decide to do in one trip, you must plan carefully as the northernmost section of the trip has a very short window of navigation, July 1st through August 30th. Before or after those dates, the weather is too cold for comfortable cruising. Also need to avoid hurricane season in Florida to avoid the storms.
Show "climate" map, determining when you should travel in each
section
Your budget determines whether you will be "roughing it" (anchoring) or staying in marinas. I t will also determine the speed at which you travel, since your boat may be more efficient at slower speeds. It will also determine the route you take and the amount of time you spend cruising. a 20 week trip can cost almost $19K, while a 54 week trip could cost $46K. About $900 per week.
What do you think is the cost of such a trip?
Study current maps and charts. This will help you plan for fuel stops, marinas for overnight stays, locks and bridge openings. You'll also need to check for any hazards to navigation.
Medial Summary Time: 1 minute
Brief summary: Plan your trip carefully, including establishing a budget, a time table, and your chosen route.
Selecting a boat Time: 10 minutes
There is no such thing as the perfect boat for doing the Great Loop. Every choice is a compromise. Get to know your boat before you start your trip.
People have made the loop in yachts, and in kayaks and jet skis. Most people choose a trawler type boat that is comfortable enough to live on for an extended period of time. Recommendations: Single engine boat is better (less maintenance), don't leave without an autopilot.
Don't attempt this trip unless one of you can fix stuff on the boat. Doesn't matter if the boat is old or new, things will break. If you buy an old boat, buy a quality brand like Grand Banks or Hatteras.

4
Provisioning your boat Time: 10
minutes
Spare parts are crucial,as emergency repairs may need to be made when far from the nearest marina.
Stock of food is not necessary for the whole trip, as you will be visiting marinas quite often and can restock your larders when at the marina.
You don't need equipment such as washer dryer, ice maker, water maker, trash compactor, etc. More stuff to break and isn't necessary since you'll be visiting marinas often.
Where to get more information
Time: 5 minutes
There are a multitude of books, eds, websites, etc. to help you plan your trip. There is also Support Groups such as the AGLCA (America's Great Loop Cruisers Association) that give you assistance.
Handout with books, websites, etc.
Final Summary Time: 30 seconds
Selecting your boat is crucial, old or new doesn't matter. You will spend more to maintain and older boat, so buy a quality brand. At least one crew member should be able to fix things that go wrong, and don't go overboard on food provisioning as you will be able to restock frequently.
5
Example of Strong 1-Hour Lesson Plan
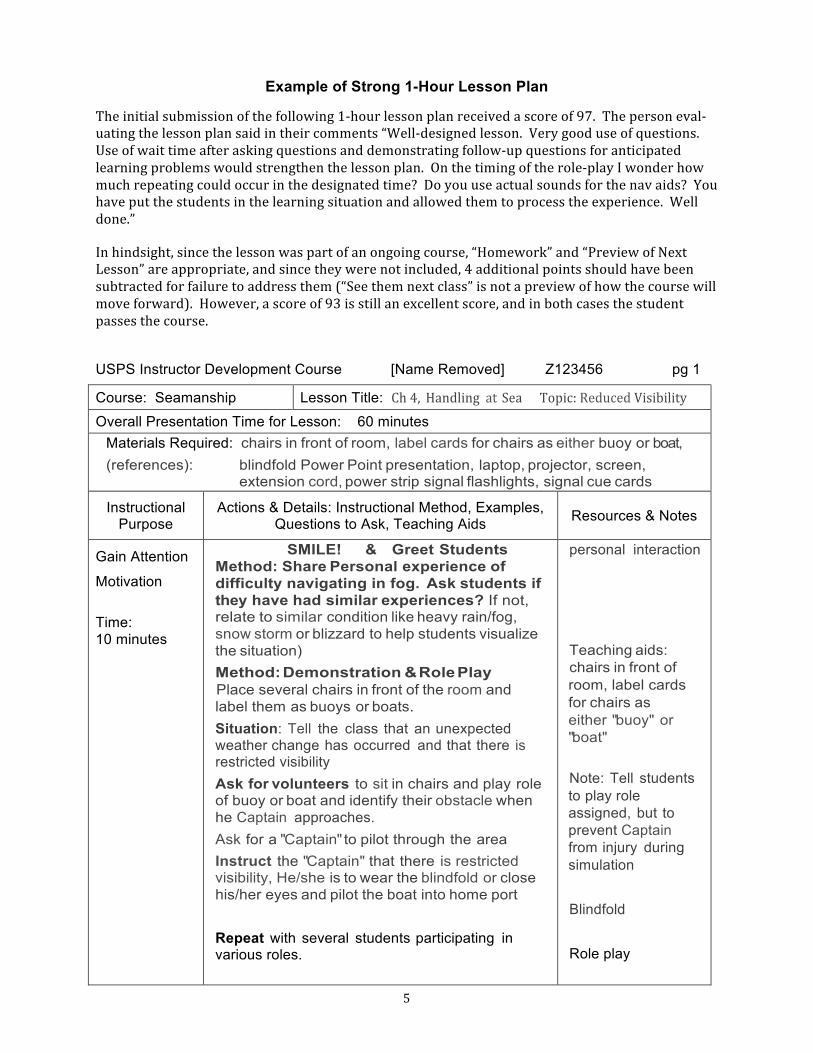
Theinitialsubmissionofthefollowing1-hourlessonplanreceivedascoreof97.Thepersoneval-uatingthelessonplansaidintheircomments“Well-designedlesson.Verygooduseofquestions.Useofwaittimeafteraskingquestionsanddemonstratingfollow-upquestionsforanticipatedlearningproblemswouldstrengthenthelessonplan.Onthetimingoftherole-playIwonderhowmuchrepeatingcouldoccurinthedesignatedtime?Doyouuseactualsoundsforthenavaids?Youhaveputthestudentsinthelearningsituationandallowedthemtoprocesstheexperience.Welldone.”
Inhindsight,sincethelessonwaspartofanongoingcourse,“Homework”and“PreviewofNextLesson”areappropriate,andsincetheywerenotincluded,4additionalpointsshouldhavebeensubtractedforfailuretoaddressthem(“Seethemnextclass”isnotapreviewofhowthecoursewillmoveforward).However,ascoreof93isstillanexcellentscore,andinbothcasesthestudentpassesthecourse.
USPS Instructor Development Course [Name Removed] Z123456 pg 1
Course: Seamanship Lesson Title: Ch4, Handling at Sea Topic:ReducedVisibility Overall Presentation Time for Lesson: 60 minutes
Materials Required: chairs in front of room, label cards for chairs as either buoy or boat, (references): blindfold Power Point presentation, laptop, projector, screen,
extension cord, power strip signal flashlights, signal cue cards
Instructional Purpose
Actions & Details: Instructional Method, Examples, Questions to Ask, Teaching Aids Resources & Notes
Gain Attention
Motivation
Time: 10 minutes
SMILE! & Greet Students Method: Share Personal experience of difficulty navigating in fog. Ask students if they have had similar experiences? If not, relate to similar condition like heavy rain/fog, snow storm or blizzard to help students visualize the situation) Method: Demonstration & Role Play Place several chairs in front of the room and label them as buoys or boats. Situation: Tell the class that an unexpected weather change has occurred and that there is restricted visibility Ask for volunteers to sit in chairs and play role of buoy or boat and identify their obstacle when he Captain approaches. Ask for a "Captain" to pilot through the area Instruct the "Captain" that there is restricted visibility, He/she is to wear the blindfold or close his/her eyes and pilot the boat into home port Repeat with several students participating in various roles.
personal interaction
Teaching aids: chairs in front of room, label cards for chairs as either "buoy" or "boat" Note: Tell students to play role assigned, but to prevent Captain from injury during simulation Blindfold Role play

6
Ask group about the difficulty encountered in piloting the boat
discussion
State Goal or Objective
Time: 3 minutes
Method: Presentation, Tell the students that after this class they will have practical knowledge to navigate safely in restricted visibility situations. Students will verbalize and demonstrate: - What aids to navigation are designed for restricted visibility - How to aids to navigation are used to make safe passage - Actions to be taken when encountering restricted visibility
Power Point slides of class Goal & Objectives Reinforce material from ABC Course and Seamanship chapters and builds on prior knowledge
Recall Prerequisites
Time: 5 minutes
Method: Students read assigned homework Chapter 4 pre/post class & have life experience in situations Method: Question & Answer, Discussion Q: On the highway, what informs drivers of unsafe driving conditions? What are the aids to driving? A: (Students respond) Possible responses might include: Slippery when wet, Bridge freezes, Electronic Reduce Speed signs, Road conditions changing, "Bump ahead", Curve ahead (often visual rather than sound) Q; What are some examples of aids to boaters for navigation hazards? A: (Students response) Possible responses might include: Buoys, beacons & markers, navigation charts, Q: What are useful in restricted visibility? A : (Students response) Light & sounds signals, navigation lights, navigation charts
Text read & homework Establish a comparison between familiar "land" aids and ''water" aids PowerPoint slides of buoys, beacons.
Navigation chartsshowinghazards
Present Information
Time: 15 minutes
Method:Presentation&discussionusingPowerPointslidescoveringthefollowinginformation:
Aids to Navigation light & sound signals in restricted visibility in conjunction with nautical charts, tell you (1) where you are, (2) help you reach your destination safely (3) serve as collision avoidance Review: Lighted Marks -how to identify aid lighted for visibility * Lights on lateral marks match the color of the mark-red or green * Lights on preferred-channel marks have light color matching top band of color * Lights on safe-water and isolated- danger buoys have white
PowerPoint slides of buoy/beacons. showing types & symbols on chart Slides for safe actions to be taken Slides of Vessel sound signals Review reinforces previous knowledge and association of information about navigation aids and

7
lights * Special-purpose buoys have yellow lights Aids to Navigation Buoys & Beacons sound signals shown on charts, Sound signals for Boats in restricted Visibility: Horn or bell Review vessel Sound Signals: Power boat making way; 1 Long blast,
interval at least every 2 minutes Power boat stopped; 2 Long blasts
interval at least every 2 minutes Sail, Towing, unable to maneuver, disabled;
1 Long & 2 short blasts interval
at least every 2 minutes
DANGER,Indoubtordisagree;5+shortblasts
meaning with their role in a practical situation of restricted visibility, ie: warns of danger, aids in finding position, helps pilot a safe course & reinforces action plan to be followed Power Point Presentation of information for visual and audio sensory component Discussionofmaterial
Elicit Student Engagement And Provide for Practice
Time: 10 minutes
Method: Demonstration & Role Play - Repeat above group activity exercise with addition of new material presented Setupdemonstration: Placechairsinfrontoftheroomandlabelthemas"buoys"or"boats"withcuecardsspecifyingthedesignatedlight&soundsignals.Askforavolunteerstositinchairsandplayroleof"buoy"or"boat"andtofollowthesignalpatterndesignatedonthecuecardwithflashlight&/orsound. Askfora"Captain"topilotthroughtheareaInstruct (the situation) Tell the class that unexpected weather change has occurred and that there is restricted visibility, but this time there will be navigational aids to assist. The "Captain" is to wear the blindfold or close his/her eyes and pilot the boat into home port Repeatwithseveralstudentsinvariousroles.
Role play & demonstration of material presented Teaching aids: chairs in front of room, label cards for chairs as either "buoy" or "boat" Cue cards with light & sound signals for "buoys" & "boats" Flashlight for light signal Note : Tell students to play role assigned, but to prevent Captain from injury during simulation blindfold
Feedback and Medial Summary
Time: 4 minutes
Method: Discussion and Q&A about the above activity which serves as an enactment & summary of presentation information. Ask the students about the difficulty and differences encountered in piloting the boat through each exercise.
Discussion,feedback

8
Q; How difficult was it to navigate through the first exercise? Q: How much difference did the addition of the light &soundcuesmakeinthesecondexercise?
Check for Understanding
Time: 5 minutes
Method: Discussion and Q&A, Presentation Let 's see how well we understand what we have learned so far: Q What is role of ATONs and vessel actions in these situations? A: (expected student responses) light & sound signals, charts and navigation tools help the Captain when visibility is restricted. Boaters need to know waters they are traveling, how to execute and understand the signals Now that we learned about aids to navigation during restricted visibility, let's consider what other actions can/should be taken by the prudent captain? Actions to be taken: Q: What should the Captain do in advance? A: Monitor weather conditions, instruct crew & guests, don PFDs (& safety harness), tum on navigation lights Q: When Restricted visibility conditions occur what needs to be done? A: Reduce speed (able to stop in ½ distance), Post look outs-Look for signal lights, Listen for sound signals Monitor VHF Radio CH16, NOAA weather, radar, GPS Q: What else if it becomes difficult to proceed? A: Plot/note position periodically, if necessary; anchor safely & OUT of Traffic lane, continue sound signals. Always take the safest action and alert others via radio and signals
provides an opportunity for feedback and review of material Questions prompt students to draw on previous knowledge and relate it to the restricted visibility situation presented PowerPointslidesofactionsandequipmentonboattouse
Conclusion Including Student Responses & Performance Assessment
Time: 8 minutes
Method: Discussion and Q&A In this class, we discussed navigation issues in restricted visibility situations. Wediscussedtheneedforknowledgeoftheweather,localwaters,hazardsandaids.
We discussed and practiced using sight and sound signals and the actions that should be taken by Captain, crew and guests on board.
Discussion to summarize and Review of information presented and integrate with information in other sections/courses, ie: ABC course,
signaling, weather,

9
Q: What would be prudent actions for the "Captain" prior to or anticipating these situations? Q What would be the first actions the "Captain" implements when encountering restricted visibility? Q: What other action(s) should be taken? Q: Can anyone tell us what the sound signal for a power boat underway in restricted visibility is? Q: What is the sound signal indicating danger or unclear message? Q: Are there any other questions/comments? Q: Was exercise helpful? Suggestions for future classes?
safety measures Elicitstudentfeedbackoneffectivenessofteachingmethods&material
Thank students for participating. See them next class!

10
Another Example of a Strong 1-Hour Lesson Plan
Theinitialsubmissionofthefollowing1-hourlessonplanreceivedascoreof95.Thepersonwhoevaluatedthelessonplansaidintheircomments“Verygoodlessonplan,lotsofinteraction.Goodquestions.Iwouldliketoseeafinerbreakdownoftimeratherthan30min.tocoverfullarea.”Onepointwassubtractedfor“GainAttentionTechnique,”“Motivation”and“ElicitStudentEngagement/Questions,”andtwopointsweresubtractedfor“CheckingforUnderstanding.”
NOTE:Includinganimageofindividualslides,wheneverpossible(itisrealizedthatstudentshavedifferentlevelsofcomputerproficiency),isextremelyhelpfulinevaluatingalessonplan.Wheninsertinganimageisnotfeasible,abriefverbaldescriptionofwhatisontheslideishelpful.Asdiscussedinthecourse,PowerPoint®isnotinitselfateachingaid;ratheritiswhatisontheslidesthatdeterminesiftheslideisarelevantteachingaid.Aslidecontainingonlybulletsandwordsisnotconsideredtobeateachingaid.
Course: Low Cost Navigation Solution – Seminar
Lesson Title: What’s on Your iPad?
Overall Presentation Time: 60 Minutes Materials Required: Two (2) Apple iPads (with IOS 7.1 installed), iPad Water Proof Cover, 20 PIN to USB Apple projector interface cable, iPad AC Power adapter, Laser Pointer, Student Hand-Outs, Laptop, Projector, Extension Cord, Power strip.
Instructional Purpose
Actions & Details: Instructional Method, Examples, Questions to Ask
Teaching Aids, Resources & Notes
GainAttentionMotivation (8 minutes)
SMILE – WELCOME EVERYONE! PRIOR to class ensure iPad, external GPS receiver are interfaced – GPS position obtained and connected to projector – test interfaces and film clip • Have the 3 minute clip from ‘Perfect Storm” running as
studentsenterclassroom• Afterclipfinishes- Introductiontomaterial–KeyElement
–“ItDoesn’tCostaLottobeaSafeBoater”• Introductionsofyourselfandaskquestionstotheclass–Q “How many of you have electronics installed on your boat?” Q “How many of you would like a low cost solution to display electronic charts, hazards, tides, currents?”
• EastCoastCoastalCruiserChart,3rdEditionVisualAidtoshowstudentswhattheywillsee
• iPadw/IOS7.1• Waterproofcover!!• ExternalGPSReceiver• StudentHandouts:
o DualWi-FiGPSReceiverSatelliteStatusPage
o NAVIMATICSChartingsoftwarescreenshowingVersionID
o WebSiteaddresslistingforsoftwareused
StateGoalorObjective (1 minute)
Students will have acquired an understanding of: • Studentswillhaveanunderstandingofchartsymbols,basic
navigationprincipalspriortoclassviaemailcontainingon-linestudyreferences
• Howtoacquirelowcostnavigation,tidesandcurrentsapplicationsforyouriPad
• Howtousetheseapplicationstoenhancetheboatingexperienceandsafetyonthewater
Each student should have reviewed study guide PRIOR to class to re-enforce chart symbols that will be used tonight.
• HaveonestudentvolunteertobringtheiriPad–instructorloadsallappsonthatiPad
RecallPrerequisites
Q “When you are on the water – what do you use to know where you are located? Responses (R) could include:

11
(3 minutes)
• LAT/LONG• BuoyNumbers• Landmarks(LocalKnowledge)
Q “How do you obtain a latitude and longitude position?” Responses could be:
• HandheldGPS• Installeddisplay• Mycellphone(howaccurateisit?)• Ihavenoidea!
Wouldn’t something like this be useful – point to screen showing iPad display
iPad screen showing: • LAT/LONGDisplay
superimposedoncurrentchart–locationbeingdowntownWilmington,NC
PresentInformation (30 minutes)
Method: Instructor presents real time electronic charts on an iPad projected - to teach the use of low cost Apple iPad maritime charting, tides/currents, hazards and safety solutions. Instructor will present the following information. iPad Requirements • Modelindependent• IOS7.1installed• ExternalGPSReceiver
o Why?CellularcapableiPadisnotrequired–Wi-Fimodelworksverywell(lowestcostmodel)
o CellularGPSisn’taccurateenoughfornavigationaluses
o Presenttheself-containedDualXGPS150asanexampleofalowcost($99.00)veryaccurate–within3meters–geo-positionalreceiver
o Capableofreceivingsignalsfrom14satelliteso Explaina“lockedon”satelliteo Themoresatellitelocksyouhavethemore
accurateyourpositionwillbecome–need6satellitestohave3meteraccuracy
• Beforejumpingintochartingapplicationlet’sreview–o Q-WhatdoesachartsymbolshowingFLG614s
mean?o R-4secondflashinggreen#61o Q-WhatdoeschartsymbolR62mean?o R-Red62channelbuoy
• Nextsoftwareapplicationisthechartplottingapplicationo Describethe“free”NAVIMATICSchartingpackage
sponsoredbyActiveCaptain! Supportsroutes,waypoints,elapsedtime
calculations,ICWmarkers! Hazardidentificationtoinclude
commentsfromcruisers–nearrealtime“localknowledge”
! Allinformation/datapresentedonthescreen
iPad Screen: • ShowingDualGPSReceiver
“satellitestatus”page• Describesignalstrengthand
pointoutthosesatellitesthathavelockedontoreceiver
• PointouttheLAT/LONreadoutforWilmington
LAT: 34°14.112’N LON: 77°57.013’W • Positionaccuracy–3meters • Pointtochannelbuoysonthe
screen
• Pointouthighlightsfromthe
NAVIMATICSEastCoastchartshowingCapeFearRiver
o Hazardsmarkingso Channelbuoyso Depthso CurrentandTide
Stations

12
o ExplainActiveCaptain–ComposedofAtlanticICWcruiserswhoreporthazards,marinareviewsandsafetyrecommendations
o WiththeiPadonandprojected–movetoandshowhowto:
! Enter/positioncursorforwaypointcreationandnaming
! Connectingwaypointstocreatearouteandnaming–storageofroutes
! Demonstratehowtoretrievearoute–showscreenwithroutesuperimposed
• ShowETA(estimatedtimeofarrival–ifmoving)
SOLICIT QUESTIONS ON CHART DISPLAY, BUOYS, WAYPOINTS OR ROUTE CREATION AND DISPLAY – Before Moving Forward • Let’snowlookatthehazardreportingfeaturesofthe
NAVIMATICSapplicationo Pointtothe“yellowsquare”onthedisplayed
screeno DoubleclickandshowtheIDofthehazard–in
thiscaseitsshoalingatSnow’sCuto ShowtheLAT/LONofthehazardonthedisplayo Doubleclickonthe“yellowsquare”andshowthe
“Comments”–madebyothermarinersaboutthehazard–inthiscaseon3/19/14vesselStevedorereportedhaving8feetofwaterbetweenR172andR174
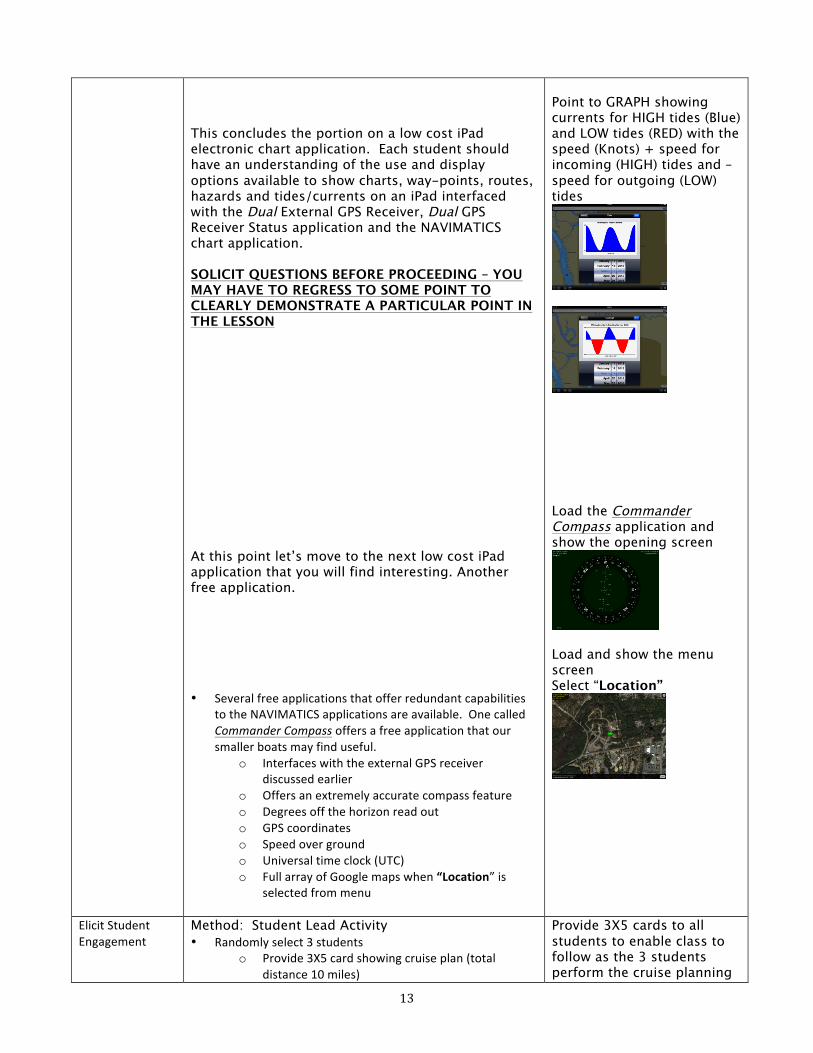
• Let’snowmovetohowdoyoufindaccuratetidesandcurrentinformation
o PositionthescreencursoronthebluetrianglewiththeT–doubleclick
o Choosetoday’sdate• Currents
o PositionscreencursoronthebluetrianglewiththeC–doubleclick
Q “What time is the next HIGH tide today at this tide station on the Cape Fear River?” R “About 2:45PM” Q “And what is the current speed at the next LOW tide at this CURRENT station?” R “Negative 2.5 knots”
• Showway-pointandroute
directoryo Pickarouteand
pointouthowitisdisplayedonthechart
Show chart with Snows Cut channel to Cape Fear River southbound – point to “yellow square” on chart
Highlight how useful this type of data would be if you were cruising this area – for the first time Show the Tides station symbol – T inside a Blue Triangle Point to GRAPH showing HIGH tides (Blue) and LOW tides (Red) and times Show the Current station symbol – C inside a Blue Triangle
13
This concludes the portion on a low cost iPad electronic chart application. Each student should have an understanding of the use and display options available to show charts, way-points, routes, hazards and tides/currents on an iPad interfaced with the Dual External GPS Receiver, Dual GPS Receiver Status application and the NAVIMATICS chart application. SOLICIT QUESTIONS BEFORE PROCEEDING – YOU MAY HAVE TO REGRESS TO SOME POINT TO CLEARLY DEMONSTRATE A PARTICULAR POINT IN THE LESSON At this point let’s move to the next low cost iPad application that you will find interesting. Another free application. • Severalfreeapplicationsthatofferredundantcapabilities
totheNAVIMATICSapplicationsareavailable.OnecalledCommanderCompassoffersafreeapplicationthatoursmallerboatsmayfinduseful.
o InterfaceswiththeexternalGPSreceiverdiscussedearlier
o Offersanextremelyaccuratecompassfeatureo Degreesoffthehorizonreadouto GPScoordinateso Speedovergroundo Universaltimeclock(UTC)o FullarrayofGooglemapswhen“Location”is
selectedfrommenu
Point to GRAPH showing currents for HIGH tides (Blue) and LOW tides (RED) with the speed (Knots) + speed for incoming (HIGH) tides and – speed for outgoing (LOW) tides
Load the Commander Compass application and show the opening screen
Load and show the menu screen Select “Location”
ElicitStudentEngagement
Method: Student Lead Activity • Randomlyselect3students
o Provide3X5cardshowingcruiseplan(totaldistance10miles)
Provide 3X5 cards to all students to enable class to follow as the 3 students perform the cruise planning

14
(10minutes)
o Studentsaretoplotcoursefromhomemarinatodestinationmarina
o Plotminimumof5way-pointsandenterrouteo ShowHIGH/LOWtidetimeso ShowrouteCURRENTS
task on the iPad while their actions are being projected on the screen and to perform the same tasks on the second iPad that was pre-loaded with the apps covered in this lesson
ProvideforPracticeandFeedback(4minutes)
Accomplished by the above activity Solicit any questions from the students who were not at the iPad • Askthemtohighlightany
issuestheywitnessed• Wastheapplicationeasyto
use,fromtheirperspective?ConclusionIncludingStudentResponses&PerformanceAssessment (4minutes)
Tonight we discussed and demonstrated how effective and low cost your iPad can be for on-board navigation. Q- How would you rate the usefulness of the applications? Q- Do you think, based on the return on your investment, do these application answer your boating needs? Q- How do you think these applications enhance your safety on the water?
Questions allow for both feedback and effectiveness of the instructional material.