Embed Size (px)
Citation preview

Files and Mastercam


m a s t e r c a m x g e t t i n g s t a r t e d t u t o r i a l s
Be sure you have the latest information!
Information might have been changed or added since this document was published. Contact your local Reseller for the latest information.
Files and MastercamDecember 2011

II • FILES AND MASTERCAM
Mastercam® X6 Files & Mastercam
Date: December 2011Copyright © 2011 CNC Software, Inc.— All rights reserved.First Printing: December 2011Software: Mastercam X6
TERMS OF USE Use of this document is subject to the Mastercam End User License Agreement. A copy of the Mastercam End User License Agreement is included with the Mastercam product package of which this document is part. The Mastercam End User License Agreement can also be found at: www.mastercam.com/legal/licenseagreement/

Contents
Introduction ....................................................................................................... 1
Tutorial Goals................................................................................................. 1
1. Opening Files......................................................................... 5Lesson Goals ................................................................................................. 5Exercise 1: Opening a Mastercam Version 9 File .................................. 5Exercise 2: Opening Other File Types.................................................... 7Exercise 3: Setting the Default Editor.................................................... 9Exercise 4: Importing Multiple Files .................................................... 13
2. Saving Files......................................................................... 17
Lesson Goals ............................................................................................... 17Exercise 1: Saving Patterns (Save Some) ........................................... 17Exercise 2: Setting Up AutoSave and Backup..................................... 19
3. Exporting Files .................................................................... 23
Lesson Goals ............................................................................................... 23Exercise 1: Exporting a single file........................................................ 23Exercise 2: Exporting multiple files .................................................... 25
Conclusion ......................................................................................................... 27
Mastercam Resources ............................................................................... 27Mastercam Documentation ....................................................................... 29

IV • FILES AND MASTERCAM

I N T R O D U C T I O N
A core function of most software is the ability to save and load files. Mastercam not only saves and loads its own file types, but also many other common file formats, including, but not limited to, the following:
Loading and saving native Mastercam files is as easy as selecting one of the file commands, shown to the right. Opening and saving other types of files, although the files must be converted, is almost as easy.
Note: Loading and saving native Mastercam files is as easy as selecting one of the file commands, shown to the right. Opening and saving other types of files, although the files must be converted, is almost as easy.
Tutorial GoalsOpen older Mastercam files.
Open files from other software packages such as SolidWorks®.
Select a default editor for external (non-Mastercam) files.
Save selected geometry to a file.
Set up Mastercam to save and backup files automatically.
Export Mastercam files to different file types.
SolidWorks CATIA
AutoCAD IGES
Parasolid Pro/E
Solid Edge Alibre
Autodesk Inventor Cadkey
SpaceClaim Rhino

2 • TUTORIAL GOALS
FILES AND MASTERCAM
IMPORTANT: Screen colors in the tutorial pictures were modified to enhance image quality; they may not match your Mastercam settings or the tutorial results. These color differences do not affect the lesson or the exercise results.
General Tutorial RequirementsAll Mastercam tutorials have the following general requirements:
You must be comfortable using the Windows® operating system.
The tutorials cannot be used with Mastercam Demo/Home Learning Edition (HLE). The Demo/HLE file format (EMCX-6) is different from Mastercam (MCX-6), and basic Mastercam functions, such as file conversions and posting, are unavailable.
Each lesson in the tutorial builds on the mastery of preceding lesson’s skills. We recommend that you complete them in order.
Focus Series and Exploring Series tutorials require, at minimum, a mastery of the basic Mastercam skills taught in the Getting Started Series modules. A general knowledge of machining principals and practices is also required.
You must have a seat of Mastercam X6 Design or higher to complete most of the tutorials in the Getting Started Series.
The Basic 2D Machining module in the Getting Started Series requires, at minimum, a seat of Mill Entry or Router Entry.
The Basic 3D Machining module in the Getting Started Series requires Mill Level 3 or Router Pro.
Additional files may accompany a tutorial. Unless the tutorial provides specific instructions on where to place these files, store them in a folder that can be accessed from the Mastercam workstation, either with the tutorial or in any location that you prefer.
The Getting Started Series tutorials are available in an Adobe® Flash® compatible video format. Additional tutorial videos may also be available. Contact your local Mastercam Reseller for more information.
You must install Adobe Flash Player to display tutorial videos. You can download Adobe Flash Player from www.adobe.com.

INTRODUCTION • 3
FILES AND MASTERCAM
All Mastercam tutorials require you to configure Mastercam to work in a default metric or English configuration. The tutorial provides instructions for loading the appropriate configuration file.

4 • TUTORIAL GOALS
FILES AND MASTERCAM
L E S S O N 1
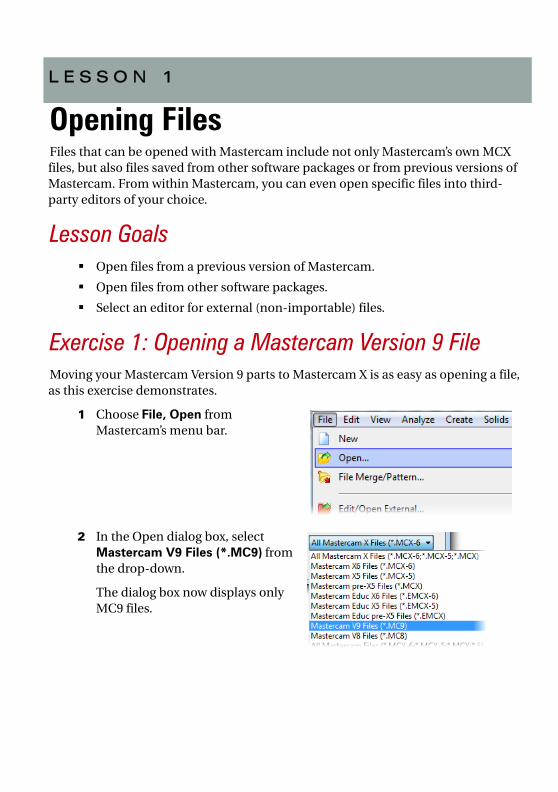
1Opening FilesFiles that can be opened with Mastercam include not only Mastercam’s own MCX files, but also files saved from other software packages or from previous versions of Mastercam. From within Mastercam, you can even open specific files into third-party editors of your choice.
Lesson GoalsOpen files from a previous version of Mastercam.
Open files from other software packages.
Select an editor for external (non-importable) files.
Exercise 1: Opening a Mastercam Version 9 FileMoving your Mastercam Version 9 parts to Mastercam X is as easy as opening a file, as this exercise demonstrates.
1 Choose File, Open from Mastercam’s menu bar.
2 In the Open dialog box, select Mastercam V9 Files (*.MC9) from the drop-down.
The dialog box now displays only MC9 files.

6 • OPENING A MASTERCAM VERSION 9 FILE
FILES AND MASTERCAM
3 Navigate to Housing_MM.MC9, which was provided with this tutorial.
4 Double-click the file, or single-click the file and click Open.
Note: If you did not switch to a metric configuration file, Mastercam prompts you to switch to metric. Click OK to continue.
Mastercam converts and loads the file, including not only geometry, but also machining operations, as seen in the following picture.
TIP: To convert all the files in a folder, choose File, Update Folder from the Mastercam menu.

OPENING FILES • 7
FILES AND MASTERCAM
Exercise 2: Opening Other File TypesImporting files from other applications such as SolidWorks is similar to opening native Mastercam files. You might, however, need to specify how Mastercam imports elements of the file. In this exercise, you learn how file importing works, as you convert a SolidWorks file to a Mastercam part.
1 Choose File, Open from Mastercam’s menu bar.
2 In the Open dialog box, select SolidWorks Files (*.SLDPRT;*.SLDASM) from the drop-down.
The dialog now displays only SolidWorks parts.
3 Navigate to the tutorial part Collet_2005.SLDPRT.
4 Click the file to select it. (Do not double-click.)
5 Click the Options button.
6 In the SolidWorks File Parameters dialog box, set Scale to Inches to MM.

8 • OPENING OTHER FILE TYPES
FILES AND MASTERCAM
This setting converts an inch file to a millimeter file.
7 Notice the other SolidWorks parameters that you can control. To learn more, click the dialog box’s Help button.
8 Click OK to close the dialog box and finalize your choices.
9 In the Open dialog box, click Open. Mastercam converts and opens the part.

OPENING FILES • 9
FILES AND MASTERCAM
10 From the Mastercam menu, choose View, Standard Views, Isometric (WCS) and then View, Fit to see the entire part in Mastercam’s graphics window.
For more information on views, please refer to Mastercam Help or to the Working in the Graphics Window tutorial, also part of the Getting Started series.
Exercise 3: Setting the Default EditorSometimes, you need to open a file type not supported by Mastercam. In this instance, you can choose an editor to associate with the file. This exercise shows how.
1 From the Mastercam menu, choose File, Edit/Open External.

10 • SETTING THE DEFAULT EDITOR
FILES AND MASTERCAM
2 In the Open dialog box, click the Editor button.
3 In the Choose File Editor dialog box, select Notepad from the drop-down list, and click OK.
4 Navigate to and select the tutorial file EditBosses.vbs, and click Open.
Mastercam opens the file in Notepad, as shown in the following picture.
5 Close Notepad by clicking the red X button in the upper right corner of the dialog box.

OPENING FILES • 11
FILES AND MASTERCAM
6 Choose File, Edit/Open External again.
7 In the Open dialog box, click the Editor button.
8 Select Mastercam from the drop-down list, and click OK.
9 Navigate to and select the tutorial file EditBosses.vbs again, and click Open.

12 • SETTING THE DEFAULT EDITOR
FILES AND MASTERCAM
10 Mastercam now opens the file in Mastercam X Editor, as shown in the following picture.
11 Close Mastercam Editor by clicking the red X button in the upper right corner of the dialog box.
TIP: To automatically open a file with its associated editor (for example, to open a .DOC file with Microsoft Word), set the Open dialog box’s Open as option to Auto.

OPENING FILES • 13
FILES AND MASTERCAM
Exercise 4: Importing Multiple FilesWhen you have many files to import into Mastercam, you can convert them all at once using the Import folder command.
1 From the Mastercam menu, choose File, Import folder.
2 In the Import folder dialog box, select SolidWorks Files (*.SLDPRT;*.SLDASM) from the Import from files of type drop-down list.

14 • IMPORTING MULTIPLE FILES
FILES AND MASTERCAM
3 Click the Browse button to the right of the From this folder box.
4 Use the Browse For Folder dialog box to select the location where you stored the tutorial files, and click OK.
5 Click the Browse button to the right of the To this folder box.

OPENING FILES • 15
FILES AND MASTERCAM
6 Select your Mastercam installation’s \mcx directory located within your \My Documents\my mcamx6 folder, and click OK.
7 Click Import in the Import folder dialog box.
Mastercam converts all SolidWorks files in the selected tutorial files directory, but does not display the converted files in the graphics window. (In this instance, there is only one.) You can find the resulting MCX files in the \mcx folder.

16 • IMPORTING MULTIPLE FILES
FILES AND MASTERCAM

L E S S O N 2
2Saving FilesUsually, you use the File, Save or File, Save As commands to save a Mastercam part file. As you see in this lesson, however, Mastercam can save files in several different formats.
Lesson GoalsSave only selected entities to a file.
Set up Mastercam to save files automatically.
Keep backups of previous versions of your files.
Store AutoSave and Backup settings for future Mastercam sessions.
Exercise 1: Saving Patterns (Save Some)A pattern is a set of reusable entities. For example, you may have a bolt that you use in many different parts. By saving that bolt as a pattern, you can merge it with your other parts as needed. For more information on patterns, please see Mastercam Help.
When you save a Mastercam part, you can choose to save the entire file or to save only selected entities. Saving a set of selected entities is one way to create a pattern from a part file. This exercise demonstrates the File, Save Some command, which lets you choose the entities to save.
1 Open the tutorial part 2D_CHAMFER_MM.MCX-6.
Note: In the Open dialog box, you might first need to change your Files of type setting back to Mastercam X6 Files (*.MCX-6).)

18 • SAVING PATTERNS (SAVE SOME)
FILES AND MASTERCAM
2 Choose File, Save Some from Mastercam’s menu bar.
3 Click the five arcs shown in the picture below. The arcs change color once they are selected.
4 Press [Enter] to accept the selection.
5 In the Save As dialog box’s File name field, enter 2D_CHAMFER_ARCS.MCX-6.
6 Click Save, or press [Enter], to save the file. Mastercam saves only the selected arcs.

SAVING FILES • 19
FILES AND MASTERCAM
7 Open 2D_CHAMFER_ARCS.MCX-6, and notice that it contains only the arcs that you selected.
Note: If you are prompted to save changes to the 2D_CHAMFER_MM.MCX-6 file, choose No.
Exercise 2: Setting Up AutoSave and BackupWhen working on a part, you might forget to save the file as often as you should. Luckily, Mastercam can save your work for you, at intervals that you specify. Mastercam can even save different versions of your files as backups. Complete the following exercise to see how Mastercam’s AutoSave and Backup features work.
1 Choose Settings, Configuration from the Mastercam menu.

20 • SETTING UP AUTOSAVE AND BACKUP
FILES AND MASTERCAM
2 Expand the Files category in the System Configuration dialog box, and select the AutoSave/Backup subentry.
3 Perform the following actions:
Select the AutoSave check box to activate the AutoSave options.
Type 10 into the Interval (in minutes) field.
Select the MCX Backup Files check box to activate the automatic backup feature.
4 Click the Help button to learn more about the AutoSave and Backup options.
5 Close the Help window.

SAVING FILES • 21
FILES AND MASTERCAM
6 Click OK in the System Configuration dialog box, and answer Yes when Mastercam asks if you want to save your settings.
You have now set up Mastercam as follows:
Mastercam will save your work automatically every 10 minutes.
Mastercam will keep the 10 most recent versions of your file.
Mastercam will use the new AutoSave and Backup settings for all sessions that use this configuration file.
TIP: You can find your backup files in the folder specified on the Files page of the System Configuration dialog box, as shown below. Click the numbered items to see the path displayed in the Selected Item box.

22 • SETTING UP AUTOSAVE AND BACKUP
FILES AND MASTERCAM

L E S S O N 3
3Exporting FilesExporting a file from Mastercam to a format compatible with another software package is similar to saving a regular Mastercam file. When exporting, however, you might need to set a few options so that you get the type of file you expect. (In most cases, you need only select the software version to which you are exporting the file.) In this lesson, you learn to convert files from one format to another.
Lesson GoalsSave a single file in a format other than Mastercam MCX.
Set file options for specific file types.
Convert a set of files to another format.
Exercise 1: Exporting a single file1 Open the tutorial file
2D_CHAMFER_MM.MCX-6.
2 Choose File, Save As from Mastercam’s menu.
3 In the Save As dialog box, select StereoLithography Files (*.STL) in the Save as type drop-down list.

24 • EXPORTING A SINGLE FILE
FILES AND MASTERCAM
4 Click the Options button.
5 In the Save as an STL File dialog box, select the ASCII option.
6 Click the dialog box’s Help button to learn more about the STL options.
7 Close the Help window.
8 Click OK to close the Save as an STL File dialog box.
9 Click Save in the Save As dialog box.
Mastercam saves the file in ASCII StereoLithography format.
EXPORTING FILES • 25
FILES AND MASTERCAM
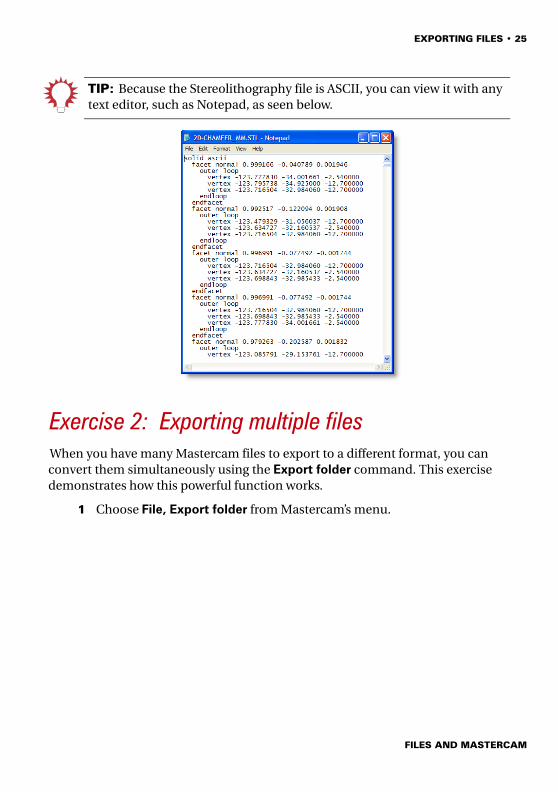
TIP: Because the Stereolithography file is ASCII, you can view it with any text editor, such as Notepad, as seen below.
Exercise 2: Exporting multiple filesWhen you have many Mastercam files to export to a different format, you can convert them simultaneously using the Export folder command. This exercise demonstrates how this powerful function works.
1 Choose File, Export folder from Mastercam’s menu.

26 • EXPORTING MULTIPLE FILES
FILES AND MASTERCAM
2 In the Export folder dialog box, choose StereoLithography Files (*.STL) from the Export to files of type drop-down list.
3 Click the Browse button to the right of the From this folder box.
4 Use the Browse For Folder dialog box to select the directory where you stored the tutorial parts, and click OK.
5 Click the Browse button to the right of the To this directory box.
6 Select your Mastercam installation’s \mcx directory, and click OK.

EXPORTING FILES • 27
FILES AND MASTERCAM
7 Click Export in the Export folder dialog box.
Mastercam converts the files in the selected tutorial folder. You can find the resulting STL files in your \mcx folder.
ConclusionCongratulations! You have completed the Files and Mastercam tutorial. Now that you have mastered the skills in this tutorial, explore Mastercam’s other features and functions. Additional tutorials may be available in this or other series.
This is a module of the Mastercam Getting Started Tutorial Series. The series intro-duces general Mastercam functions and teaches basic skills for getting started with Mastercam. Other tutorial series include:
Focus Series: Focuses on a specific Mastercam feature—for example, Setup Sheets or FBM Drill, and teaches basic and advanced skills.
Exploring Series: Explores a single Mastercam product—for example
Mastercam® for SolidWorks® or Mastercam Swiss Expert, and teaches in-depth skills for working with the product.
The Mastercam tutorial series is in continual development, and we will add modules as we complete them. For information and availability or for further training, please contact your local Mastercam Reseller.
Mastercam ResourcesEnhance your Mastercam experience by using the following resources:
Mastercam Help—Access Mastercam Help by selecting Help, Contents from Mastercam’s menu bar or by pressing [Alt+H] on your keyboard. Also, most

28 • MASTERCAM RESOURCES
FILES AND MASTERCAM
dialog boxes and ribbon bars feature a Help button that opens Mastercam
Help directly to related information.
Mastercam Reseller—Your local Mastercam Reseller can help with most questions about Mastercam.
Technical Support—CNC Software’s Technical Support department (860-875-5006 or [email protected]) is open Monday through Friday from 8:00 a.m. to 5:30 p.m. USA Eastern Standard Time.
Mastercam University—CNC Software sponsors Mastercam University, an affordable online learning platform that gives you 24/7 access to Mastercam training materials. Take advantage of more than 180 videos to master your skills at your own pace and help prepare yourself for Mastercam Certification. For more information on Mastercam University, please contact your Authorized Mastercam Reseller, visit www.mastercamu.com, or email [email protected].
Online communities—You can search for information or ask questions on the Mastercam Web forum, located at www.emastercam.com. You can also find a wealth of information, including many videos, at www.mastercam.com and www.mastercamedu.com.
For tech tips and the latest Mastercam news, you can join us on Facebook (www.facebook.com/mastercam), follow us on Twitter (www.twitter.com/mastercam), and subscribe to our blog, Mastercam Xtras (http://

EXPORTING FILES • 29
FILES AND MASTERCAM
blog.mastercam.com). Visit our YouTube channel to see Mastercam in action (www.youtube.com/user/MastercamCadCam)!
Mastercam DocumentationMastercam installs the following documents in the \Documentation folder of your Mastercam installation:
Mastercam X6 Quick Start
Mastercam X6 Administrator Guide
Mastercam X6 Transition Guide
Mastercam X6 Quick Reference Card
Mastercam X6 File Location Card
Mastercam X6 Post Debugger User’s Guide
Contact UsFor questions about this or other Mastercam documentation, contact the Technical Documentation department by email at [email protected].

30 • MASTERCAM DOCUMENTATION
FILES AND MASTERCAM


671 Old Post RoadTolland, CT 06084 USAwww.mastercam.com
Printed in the USA on 100% Post Consumer Waste, FSC Stocks
Attention! Updates may be available. Go to Mastercam.com/Support for the latest downloads.