Embed Size (px)
Citation preview
Field Techniques Used by Missouri Botanical Garden Compiled by R. Liesner with suggestions from MO staff and others.
These notes have been compiled to aid people in collecting and preparing high quality botanical specimens more effectively. In some cases, such as field book size, rather than make a recommendation, the advantages and disadvantages of different options are discussed.
FIELD BOOK
Warning First and foremost, be legible! We do make MO collectors rewrite their field book if necessary. Since numerous people work from or need to consult field books, the more legible and precise the data, the easier it is to transcribe or extract.
Size of Field Book The advantage of a smaller field book lies in the fact that one does not carry as much information into the field, so that if it is lost, the total data lost would not be as great. Experience has shown that it is easier to write into and type labels from a larger field book. Better quality paper is more readily available in larger field books. It is important to have a size that can be photocopied easily.
Paper The quality of paper in field books is highly variable, and may be dependent on what is available locally. Ideally, they should contain pages of acid-free, long-lasting paper written in permanent ink. Field books should be prepared with permanent, archival storage in mind, since they may contain notes and marginalia which do not appear on labels.
Pencils, Pens, and Inks Pencil lead is permanent and can be erased and changed. It is, however, more difficult to read and at times impossible to photocopy. Fountain pens and rapidographs have better ink but they tend to leak when one changes altitude rapidly. Ball points with black or dark ink can be photocopied and do not leak, but they are not permanent. Over time some ball point inks will fade or etch into the paper (especially in poor quality field books), while some inks run if the field book becomes wet.
Care of Field Books During field work, carrying field books in clear plastic bags will provide extra protection in case of sudden showers or immersions. Remove field books from luggage when in cars or hotels in case the luggage might be stolen. Most thieves would not bother with a loose book. Care must be taken, however, to remember where you put the field books for safekeeping, and not forget them when traveling.
Arrangement of Information in Field Books Field books should be arranged for optimal scanning by label typists. They should be legibly written, and without abbreviations (except metric) and compass directions, e.g. N, S, NW, etc. Be especially careful to correctly spell all proper names. All localities should have latitude, longitude, and elevation. If exact figures are unknown, use the best approximation.

2
Field data should contain the following information at a minimum:
Locality Data: Locality data should be as specific as possible and applies to a range of collection numbers made sequentially. Someone reading the locality data should ideally be able to find their way to that general site using your description alone.
- Country: State, province or county. - Distance and direction (km or mi, N-S-E-W not "from", or "near") from nearest city or major landmark that would appear on a map (smaller geographical localities are not on most maps). - Habitat or vegetation type. Dominant, typical, or associated species if possible. - Note if plants were preserved in alcohol, or received any other chemical treatment before drying. - Latitude/Longitude and/or Township/Range; altitude (m or ft); GPS reading if available. - Date. - Collector(s). For Each Collection: - FAMILY (capitalized). - Genus species Author (Leave space if unidentified, and for future changes); det. by: - Tree, shrub, liana, vine, etc. Flower and/or fruit color, scent, height, and unusual features, such as shaggy bark, buttressed trunk, colored sap, any attribute which cannot be obtained from the prepared specimen. - More specific notes on locality and habitat (near stream, on rock, in water, etc. [information that is specific to this number]). Marginal Notes for Each Collection: (noted when describing and pressing plants). - Coll. No. (periodically check to make sure these remain sequential) - Number of sets and sheets contained in each set. For example: (1 set of 3, 1 set of 2, 2 sets of 3)** - L-3: This indicates the number of live specimens made. - C-2: This indicates the number of color pictures made. - P-3: This indicates the number of black and white pictures taken. - A : Indicates if material was preserved in alcohol [pickled]. - Chem: Indicates if the material is a voucher for chemical analysis.
* This is the total number of labels needed for each collection number, including all labels needed for multiple sheets; separate large parts, pickled material, or wood samples, etc.
Determine the number of labels that are needed and place the number in the margin under the collection number. If it is entered as you are writing the field notes, then the labels can be produced without a re-examination of the collections. The label count should reflect the actual number of mounted specimens (large collections requiring two or more sheets should be labeled "l of 2," and "2 of 2," etc.). If you dry parts separately to insure better drying but they will be mounted with the leaves, don't include them in the label count. In other words, imagine the end result, not just the number of newspapers you are drying.
** For multiple sheet specimens also indicate in the margin the number of sheets for each set.
In locality descriptions, do not use "above town" to tell direction unless you also give a compass direction. "Above town" only indicates direction to people who know the locality.
3
Always write out the complete locality each time it is used. It is not correct to write "Same data as No. _____" or "as above". When collecting over extended distances along trails or when making transects, the general area should be stated in the locality data with more precise locations for individual collections given under their respective collection numbers, e.g., Locality: 13.7 km NW of San Pedro on the road to Incahuara, trail to 12 de Octubre. Specific Information: Ca. 2 km N of trail head. Clarity is very important because of the number of people, not necessarily trained as botanists, who will handle the field book and collections (i.e., typists, plant processor, volunteers, etc.)
Abbreviations should not be encouraged. Typists should be typing, not looking up abbreviations and spellings. Specimens are sent on exchange to many parts of the world and your standard abbreviations e.g.: BCI (Barro Colorado Island) may not be readily understood.
Always leave one or two blank lines between collection numbers in the field book so that the original identification, and later name changes and notes can be added.
It is useful to include information about live specimens, color or black and white photographs, pickled parts, seeds, phytochemical material, or any special collections in the specific information so that it is included in label.
The collecting institutions and their acronym(s) should be on the label. That will make it easier to return determinations later.
Begin numbering your collections with 1 and continue sequentially throughout your botanically active life. Do not start over when collecting with other people or in another country or when beginning a new year. Especially, do not use a complicated formula or letters (except for A. B. C. suffixes for divided collections). See Gentry, 1984 (Taxon 33: 355-358).
When mass collecting, write the field book clearly and without delay. Do not depend on "remembering" field data hours or days later. It is always inefficient to rewrite field notes.
4
FINDING SPECIMENS
Localities Try to cover as many different habitats as possible: in forest, stream edge, ridge top, slope, stone outcrops, cultivated areas, roadside, edge of forest, etc. Even though there are often fewer things to be found easily inside the best primary forest, the rarest plants often turn up there. The roadsides and edges of cultivated areas usually have the most common plants, but may turn up occasional waifs that represent significant distributional records. Frequently the primary forest trees, lianas, and shrubs have their lowest branches at the margin of the forest, so do not neglect this area. It is important to check tree falls; they often bring down branches or twigs of canopy species, as well as epiphytes and lianas. In open areas with more light, plants sometimes flower and fruit which wouldn't otherwise.
Teams If two or more collectors are working together, it is more efficient if they go to different habitats or agree ahead of time to concentrate on different life forms, i.e., trees, lianas, epiphytes, ferns, etc. Avoid two collectors collecting the same plants in the same area, on the same day.
Hints Areas that are being logged or where new roads are under construction, are generally good places to collect, always watching out for falling trees, of course! Trees, lianas, and epiphytes that are ordinarily confined to the canopy are often readily accessible. In areas where the natural vegetation is likely to be destroyed, one should not be too concerned about depleting populations of species. On the other hand, collecting in any conservation unit (park, reserve, etc.) should be made with care and conscious consideration of population sizes. Be open and friendly with local people. Always be ready to explain what you are doing in terms that they will be most likely to understand. If you stop collecting or look furtive, it may be interpreted that you are doing something wrong. They will also feel less threatened if you acknowledge their presence and are friendly.
Common vs. Rare It is better to make more duplicate specimens of rare species and fewer of common ones. ("Rare species" means those that are rare in the herbarium, they may actually be abundant locally.) This is especially true for perennial plants or abundant herbs, in which collecting will not significantly affect the population. For example, it is better to prepare only three sheets of a very common plant and 11 sheets of something rare; not seven of each. Both ways require the same effort and occupy the same space in the press. Collect a minimum of three sheets whenever possible (one to remain in the country of origin, one for your home institution, and one for a specialist).
It is more important to get collections of species that are poorly represented in the herbarium, than those that are well represented. But geography also must be taken into consideration, a species may be well collected in one area and be of relatively low interest there, but it may be poorly collected in another area and be of very high interest there. More specimens are needed to document the range of variation in variable species than uniform ones. Also more specimens are needed to understand the differences between very similar species than more distinct ones.
Rare and New Species Rare or little known plants and new species tend to occur together. If species are found that are rare or new, it is usually worthwhile collecting longer in that area. More often than not, other interesting species will be found.
If you have seen most species at least two or three times in an area, it means you have a rather high percentage of those species. If you have seen a significant percentage only once, it means there are probably numerous other species that haven't been collected yet.
5
Developmental Stages Always recollect the same species if you find it in a different developmental stage or in better condition. Also, it is generally worthwhile recollecting species to show extremes in the size of parts, coloration, or other characters. Collect both sexes of dioecious species. One might even tag a plant or population to be certain of getting the same species at different stages. Collect the two or three (depending on group) stylar forms of heterostylous species, when this is known, e.g. Erythroxylum, Oxalis, Eichhornia, Rubiaceae, etc. Each should be collected under a different number.
Unicates and Duplicates If the collection is a unicate, look around a few minutes for more specimens. Frequently after a careful search, you will find the plant isn't as rare as it first appeared. Specimens are needed for the country of origin, specialists, and exchange. Sets of 5 to 10 or more are most desirable.
It is very useful to mark labels "unicate." But if one specimen has been left in the country of origin, and/or one has been sent to the specialist, the single sheet at your institution should not be marked "unicate." Unicate means there are no duplicates anywhere else.
When there is only a unicate, one can often make a second fragmentary specimen. For example, one might take one or two flowers from a multiflowered inflorescence of an orchid and combine it with a leaf or two and a pseudobulb. If you add a photocopy of the good specimen it is even better. If it should be the only representative of the species in the herbarium it would be a valuable addition even though fragmentary. Often a fruit or inflorescence can be cut in half to make an adequate representation for two specimens, e.g., Cyclanthaceae. Combined with a piece of stem and leaves it is a useful specimen, but it is important to indicate on the label it has been divided if that is not obvious.
Some plants are found only as unicates, and are found at another locality also as a unicate. If unicates are not all kept in the country of origin, recollect it even if it is not needed at your institution. Mark the newspaper and the corresponding specific information as to where it is to be deposited, for example, "Unicate for CR."
6
COLLECTING
Tools It is recommended that you have a sheath for your clippers and machete, making both hands available, for safer and more efficient collecting. Some botanists attach hand tools to a belt with pull chains to prevent losing or forgetting them in the field. There is risk of getting the chain caught in vegetation or hung up on a limb when climbing with this latter approach and is not recommended. Additionally, the use of lanyards or wrist ties will allow a tool to swing back into the body and should not be used.
Well maintained tools make your work much easier. Equipment should always be inspected before use. Defective or damaged equipment, especially ropes, harnesses, and securing straps, should be repaired or replaced immediately. Always use proper safety equipment. Whenever purchasing equipment, ergonomical hand grips should be acquired as they provide greater grip strength and reduce fatigue and possible injury.
Improving Collections It is acceptable to make a skimpy specimen if that is all the material there is. But if sufficient material is available, it requires little more effort to make ample sheets. If only skimpy fertile material is available, the sheet can often be improved by adding extra sterile material. Since the objective of a good specimen is to provide in a convenient form an adequate representation of a plant, one should always include the full range of characters exhibited by the plant, including such things as the largest and smallest leaves, young leaves to show pubescence, stipules, etc. Specimens should always be improved by adding extra flowers or fruits and inflorescences. There is no reason to include only one inflorescence or one flower per specimen when there is an abundance of material at hand.
Fertile and Sterile Vouchers It is very important to collect fertile material if at all possible. Collect flowers and if possible fruits for each specimen. If you have sterile vouchers for ecological or anthropological studies, make another collection of fertile material of the same species. Thus the voucher can be matched and verified with the fertile collection because the fertile specimen can be determined much more easily. Do not ignore vegetative characters. If there are different types of leaves, show that. Get mature and immature twigs, especially in vines, etc. Sap shoots or stump sprouts and saplings often have very different characters from mature material, and can be very useful.
Pre-Pressing Strict field pressing is usually less efficient than collecting in plastic bags. Fragile material can be placed in a field press and sturdy things held in a plastic bag for later pressing. Always carry small plastic bags or newspaper for wrapping smaller or more fragile plants. These can then be put into a larger bag. As an alternative to using small bags, small samples can be wrapped in any large leaf, such as Heliconia.
Bags When collecting in plastic bags, fold the specimens to the correct length for a herbarium sheet and place them firmly, but carefully, into the bag. Don't just drop them in. This way separate collections will not become tangled and there will be less damage. Later when emptying the bag, turn it upside down and carefully dump it all out if they are tangled. Don't try to pull material out of the bag. This usually breaks up the specimens. It is preferable to use large bags rather than small ones, as there will be less damage to the plants. If you have large, heavy plants, it is best to put them into a separate bag as they may damage other more delicate plants in the bag. This is especially true for palms and large aroids.
7
To prevent significant wilting, plants may be wrapped in moist newspaper and placed in a plastic bag, which should be kept shaded. When mass collecting in tropical areas, this is not always feasible.
Special Cases Mosses, cones, fruits, Cuscuta flowers, cacti, and some other succulents, can be put in small paper bags, each numbered on the front, and dried unpressed. If stored in plastic bags, they rapidly mold, even after drying.
Shrinkage During Drying Plants shrink on drying, which is especially true of more succulent plants. Keep this in mind when collecting and pressing. What may appear to be ample material when fresh may be skimpy once it is dried.
Habit Information and Tags When collecting actually look at the plant to estimate height or note other characters. Many who have trouble remembering this information never closely examined the plant in the first place. If you have trouble remembering details, carry a small notebook or a marking pen to write directly on the leaves. For example, E could stand for epiphyte, t for terrestrial, s-2 for shrub 2 meters, t-4 for tree 4 meters, etc. Alternatively, write on the edge of the newspaper as you are pressing the plants. Many collectors tag their collections to prevent later mix-ups. Small white tags should be securely tied to stems or fruits, with the collector's name, collection number, and a field determination written in permanent ink or pencil. Other collectors have used stick-on type tags. These techniques become difficult to use if field conditions are rugged, or if it rains.
Clipper Poles Clipper (pruning) poles are very useful, if not essential when working in forested areas. The standard MO pole set consist of two nested poles whose combined length, when locked, is about 3.6 m. By adding extra poles one can work relatively easily with up to six poles for a total of about 10.5 m. After locking together several pole segments, the pole must be kept vertical and new pole units added from the bottom. Because of the flexibility of the poles and joints, the clipper head will sway unless the pole is vertical or well supported. The pole can be made more stable by leaning it against a branch while other poles are added or to guide the clipper head to the desired limb. A few people have successfully added a seventh or eighth pole, but this requires a fair amount of strength and skill and is not recommended.
Field Poles Poles and other extendable collecting equipment are difficult to carry. As an alternative, one can cut a long, slender, sturdy sapling with a fork on the end. By inserting it among smaller branches and twisting, one can frequently get samples from up to 6 m above the ground. If you cut one of the forks half way and bend it against the other one and tie it, you can form a hook that is useful for pulling down epiphytes. In most areas this will have little significant ecological impact, but do not use it in an area where there will be many botanists working in a relatively small area, or where long-term ecological studies are underway.
Saws Shooting a lead weight attached to fishing line over a branch using a hunting-type sling shot is another method. One then uses the fishing line to pull back over the branch a strong, slender rope with a piece of chain saw blade in the middle of it. Two people standing a little apart can then pull back and forth and saw through the branch. It is more difficult for one person alone. A modification is to cut a 4 to 6 foot length of chain saw blade in half. By riveting these two pieces together with one-half up and one-half down, one is assured of having a cutting edge facing the correct direction when it is used. Caution is needed to insure you are not positioning yourself in the path of any debri or large specimens as they may fall. A bit of pink or bright colored flagging at each end of the blade helps in positioning the blade.
8
Tree Climbing Techniques A sling shot or arrow may also be used to shoot a slender line across a large branch. Then twine is attached and pulled over the branch, and finally the twine is attached to a mountaineer's rope. With the rope one is able to climb using mountaineering techniques and to descend the same way. It is very important to always use a safety belt or harness when moving around in the canopy. Lanyards or vertical lifelines should not be of natural fiber rope, and should be rated at sustaining 5,000 pounds. D rings and snap hooks should be steel or equivalent and protected from corrosion.
Climbing Irons Regular tree climbing irons (linemen's spikes) and belt are better for large trees, and French climbing irons are better for smaller trees. One can combine the use of irons for ascending the tree with mountaineering ropes for descending the tree, which is the most difficult and dangerous part with climbing irons.
Tree Climbing Bicycles The tree climbing bicycle is another method. These are climbing irons with adjustable bands going around the tree. The only way that it is similar to a bicycle is that it requires a pumping action to ascend and descend. This equipment is easier and probably safer to use than climbing irons but it is heavier and much bulkier to transport.
Climbing and Clipper Poles Combining climbing together with clipper poles has been very successful. Once one is positioned near the canopy, one can pull up the clipper pole and can usually reach branches of a number of different trees accessible from the same point. Always remember to tie the clipper pole rope to your belt before ascending.
Guns A few people have used quality target guns to shoot branches down. This requires great skill and special permits are needed in most places to carry guns. Also, local people are much more concerned about strangers when they are carrying guns. Except in very special circumstances, firearms are not recommended.
Hints It is necessary to balance the equipment carried (which helps you collect plants) and the distance you are able to cover, because you are less encumbered, thus being able to collect more species and possibly able to get into more places. Also, one has to find a balance between struggling for one particular plant and traveling a greater distance, with the possibility of finding the same plant in a more accessible place. Rarely collected species are certainly worth more effort than commonly collected ones. Species that are often found near the ground are worth less effort than ones never found near the ground. During the first days in a new area it is better to not expend too much effort on any particular species, because with familiarity you will improve chance of finding the same plant in a more convenient place.
9
PRESSING PLANTS
Use of the End Piece of Press While pressing use the plywood press end to hold down the pile and keep it orderly. Move the board up as needed. This leaves both hands free. It is also a good cutting surface in fancy hotels when you need to section fruits or thick stems.
Order of Sheets While Pressing If you do not write the field notes as you are pressing plants, reverse every other collection (consisting of one or more duplicates). Then it will not be necessary to open every sheet when you are counting them, writing up the field notes, and writing the numbers on the sheets. Always keep the upper surface of the specimen up.
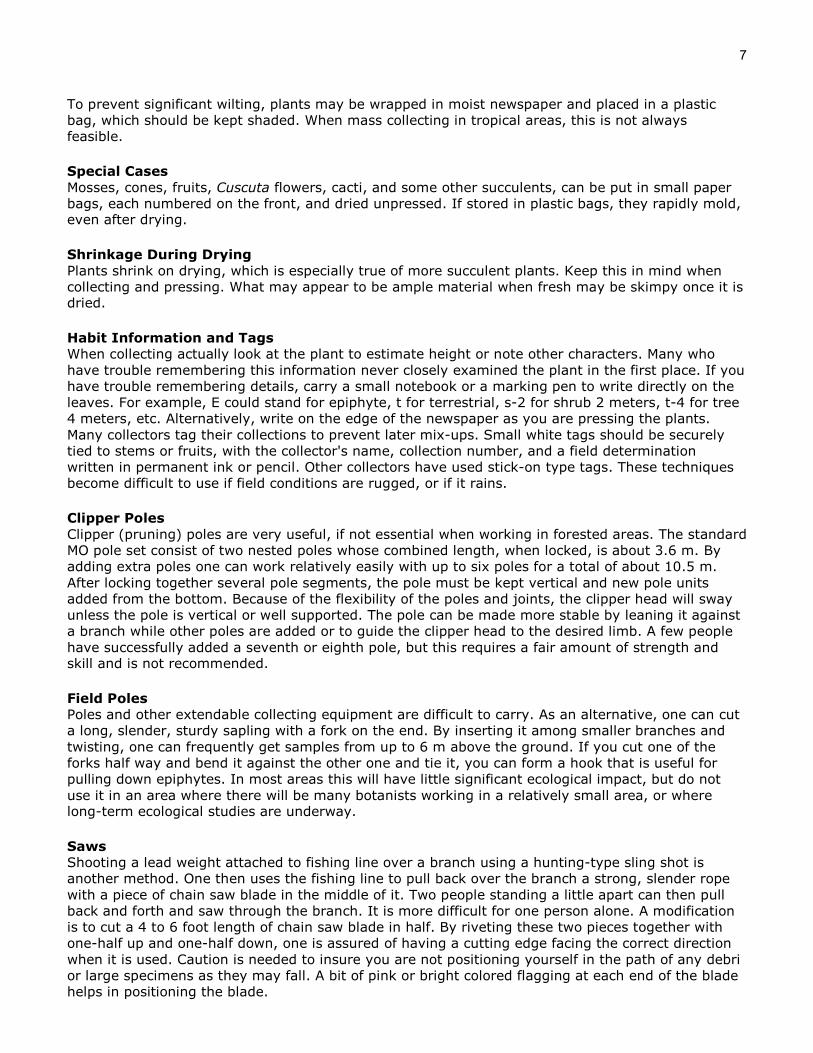
Numbering It is very helpful if the collector's initials are placed by the number, i.e., A.G. 45038. If labels are lost, or collections mixed up, it is much easier to recapture the missing data or return the specimen to its proper place. This saves time if you are collecting or processing your plants together with someone else using the same number range, aids in replacing lost labels, and saves confusion if several collections are shipped together. Put the number in the same place on the newspaper each time, preferably along one edge. It is much easier to sort them.
After the sheets are numbered, put all or half of the bundle with the folds in the same direction. Do not flip half of the bundle upside down to balance the packet--this just makes it more complicated to process the plants later.
Complete Collections Make each specimen for any given number as complete as possible. If both flowers and fruits (or different leaf shapes, etc.) are available, each sheet or set should be representative. After drying, combine parts that were dried separately to form complete specimens before packaging and shipping.
Size Constraints on Specimens Make the specimens shorter than the mounting paper! More damage is done if they must be refolded later and any parts which extend beyond the newspaper will break off and be lost. Always keep in mind what the material will look like once it is a mounted specimen, not merely getting the plant into the newspaper any which way. Mounting paper at MO is 29 cm (11 1/2 inches) wide by 42 cm (16 1/2 inches) long.
10
Wilting When wilting is a problem, collect for awhile, then press in a convenient spot, then collect again, etc. Wilting can be reduced by sprinkling the bags with water and keeping them in the shade, or placing wet newspaper or towels inside the bags; but remember the sun shifts. If available, white opaque plastic bags do not produce as great a green-house effect. Back at the base camp, wilting can be reduced by putting the bags in an air-conditioned room or in a refrigerator if available, but seal them because the chilled air is often dryer.
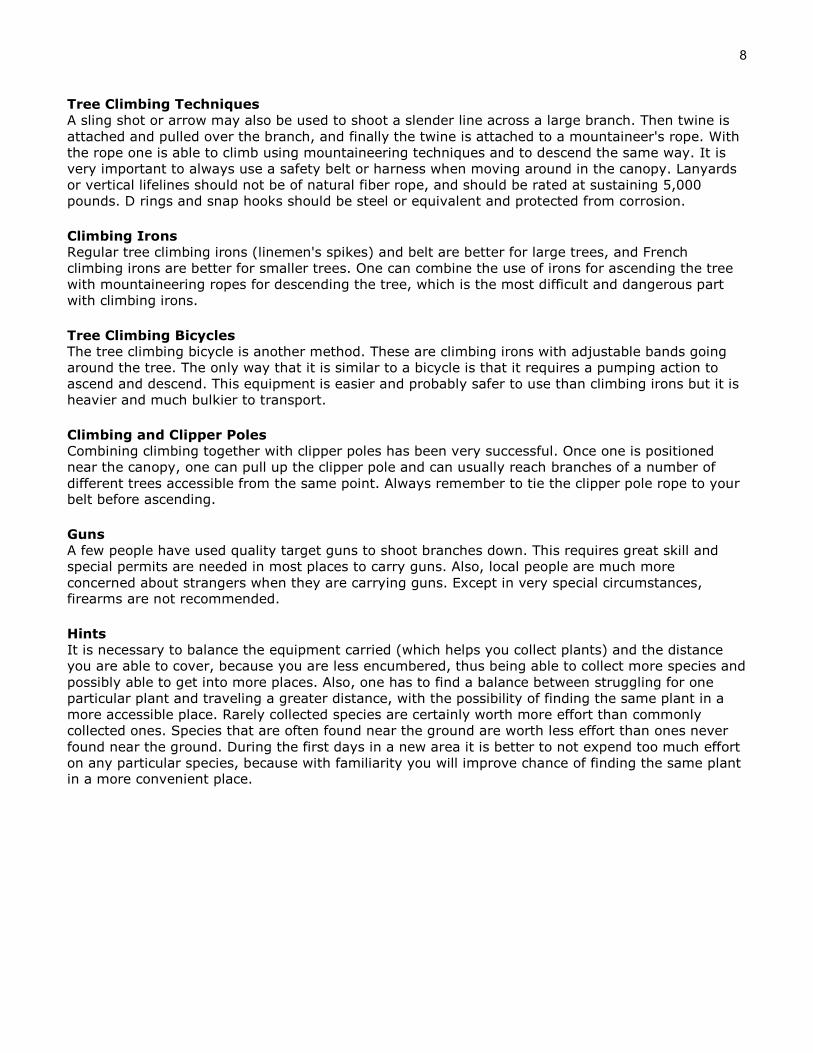
Except for vines, slightly break stems and fold them into a "V" or "N" rather than curve them:
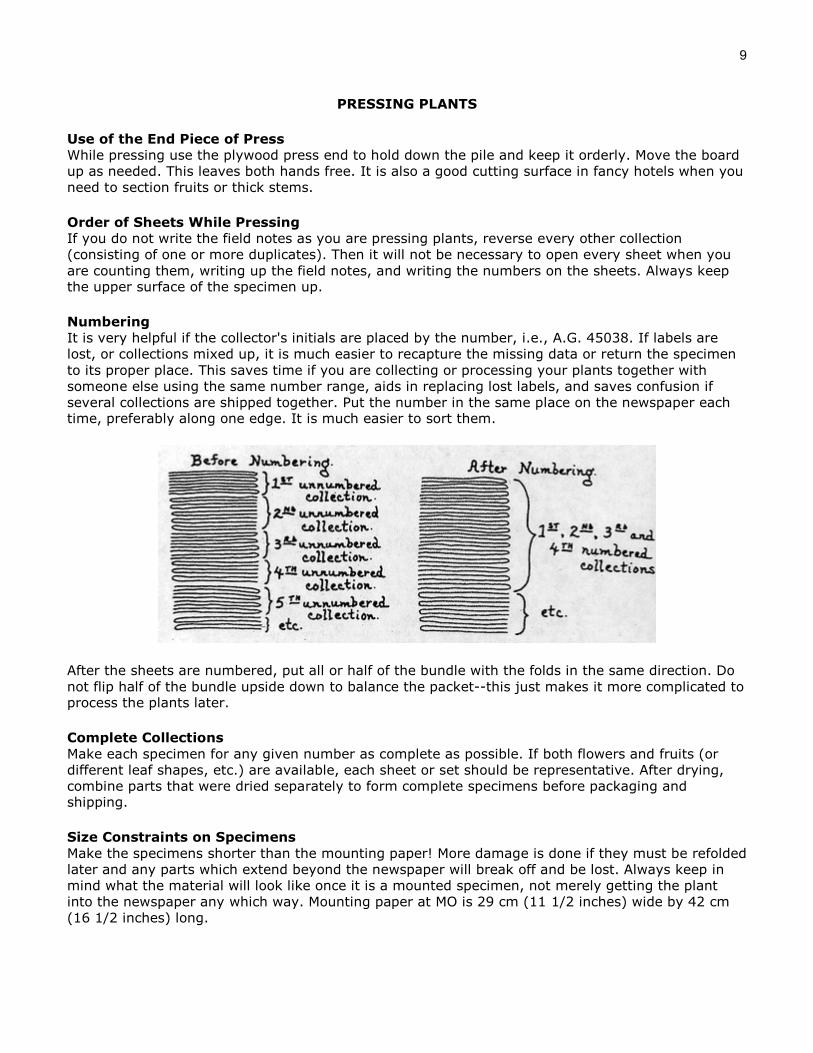
If plants are small, put several on the sheet to fill it up:
Balance the quality of individual plants on each sheet, some nice, some poor (if not all in prime shape). Otherwise you may end up with the poorest sheet for your own institution. It simplifies later processing if the collector designates the chosen home institution sheet.
Grasses and other herbs should not be "top-snatched." Always collect the full specimen, roots and all; dig deep enough to find rhizomes or other underground parts if they are present. Be certain to remove the soil from the roots by shaking or washing.
It is best to arrange plants for pressing with the same surface facing upwards as will be seen once the specimen is mounted. Always keep that side up during pressing, numbering, drying, and sorting.

11
Arrange plants before drying to clearly show both surfaces of leaves and reproductive structures, paying particular attention to ferns. Press some flowers open, and some closed, and others split to show the internal structures (especially in Polemoniaceae and monocots). Phyllaries (bracts) in the capitula of Asteraceae are very important, and should be pressed so some can be clearly seen. Pubescence, stomata, and other characters are frequently more important on lower leaf surfaces than upper. If only one large leaf or fern frond sample is available, it should be folded so part of both surfaces can be seen.
Do not cover flowers, fruits, or stems with leaves; either spread the leaves away from the other plant parts, or fold the leaf underneath them. When folding leaves, keep the larger part underneath so that you can still measure length, width, etc.:
Cut or break off excess leaves, but always keep part of the petiole to show the position:
Never cut off the petiole base and the stem attachment of a compound leaf. If possible, keep some of the petiole bases of the other leaves and the apex of the stem. Do not mistake a large compound leaf for a branch with simple leaves. Do not split the twig, because the opposite or alternate arrangement of the leaf will no longer be evident. A specimen of two sheets or more may be necessary with very large leaves.

12
HOW TO RECOGNIZE COMPOUND LEAVES VS A BRANCH WITH SIMPLE LEAVES
1. Petiolules of leaflets are usually not round in cross-section, while true petioles tend to be round. 2. If the "leaves" appear opposite, but the branches are alternate, then the leaf is probably compound. 3. Leaflets in a compound leaf are spread in a single plane while leaves on a branch tend to be in different planes. 4. The terminal leaflet of a compound leaf is truly terminal, while a terminal leaf on a branch will tend to be offset from the apex to a greater or lesser degree.. 5. Leaflets do not have buds in their axils while simple leaves on a branch tend to have them. 6. If there are inflorescences in the leaf axils, then it is a branch rather than a compound leaf. 7. In compound leaves, the color and texture of the petiole and rachis tend to be different from that of the branch while the color and texture of a branch tends to be the same as that of thicker branches.
It is usually easier to fold the stem than to try to fold all of the leaves:
If the leaf tips stick out of the newspaper, fold them over or they will be broken off and lost. If you fold large leaves, one can sometimes put two large leaves on a sheet rather than one. Length, width, shape, upper surface, and lower surface are still observable:

13
With the long leaves of palms and large ferns, take an apical section, a mid-section, and a basal portion with pinnae. State in the field notes the length of the leaf, length of the petiole, number of pinnae, and the arrangement of the pinnae (i.e., regular, staggered, or irregularly spaced) if the specimen does not show it. For palms, describe the position of the inflorescence in relation to the leaves, also whether species are solitary or colonial, and include samples of stem spines and bark. Each specimen, at a minimum, should consist of an apex, a base, a mid-section, selected parts of the inflorescence, stem, and petiole base. Photographs are very useful.
A representative specimen of large plant may require additional sheets for completeness. Even some temperate plants, such as Heracleum (Apiaceae) require several sheets for representative parts of leaves, stems, flowers and fruits. In general do not overcrowd sheets. Multiple-sheet specimens contain far more information than fewer overcrowded sheets.
Large fruits should be cut into one inch thick slices, both longitudinally and transversely. It is preferable to have the fruits attached to the branches when the specimen is mounted. The one inch has been established as the maximum recommended thickness for mounted specimens at MO.
It is useful to mark multiple sheets of the same specimen with the same letter. This letter is not put in the label data, rather it is used simply to facilitate reassembling the collections after they are dried. Put the letter anywhere on the sheet, but not after the number (i.e., 1832A) as this designates a mixed and divided collection.

14
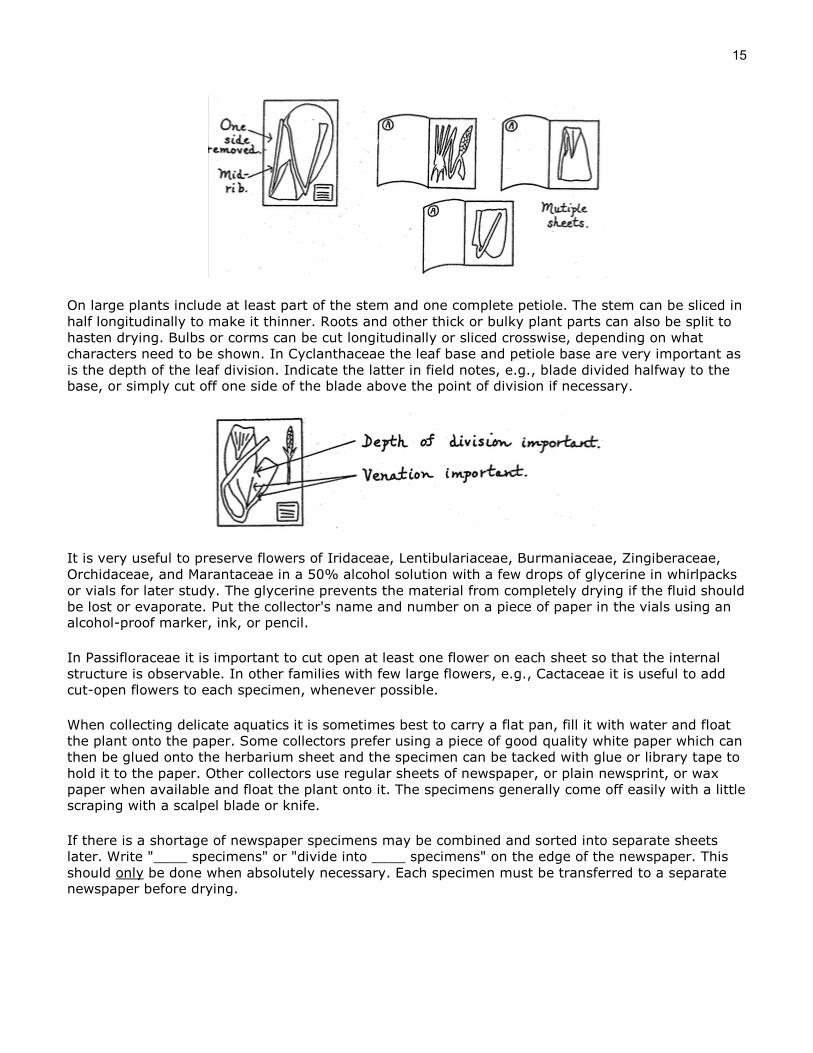
Fold large leaves so base and apex can be seen:
Part of the inflorescence, stem, flowers, etc., may be put on top of a leaf without losing any information as long as the shape, dimensions, and surface of the leaf can be seen. Even if parts are dried separately, they can be mounted together.
When folding large leaves, always start with the largest portion of the leaf, and then the smaller parts on top; e.g., large cordate leaf: base, fold apex, then petiole and inflorescence on top. For leaves with basal lobes, do not fold the base over, it makes it more difficult to see the shape of the leaf and to measure the lobes. Start folding large leaves with the lower surface up. The lower surface generally has more taxonomic characters than the upper.
For large symmetrical leaves such as Araceae, one side of the blade up to the midrib may be removed. In the field notes describe the cross section of the petiole, whether round or flattened, and whether it has ribs or sharp angles (particularly in Anthurium and Philodendron (Araceae). Sometimes it is necessary to use multiple sheets.
15
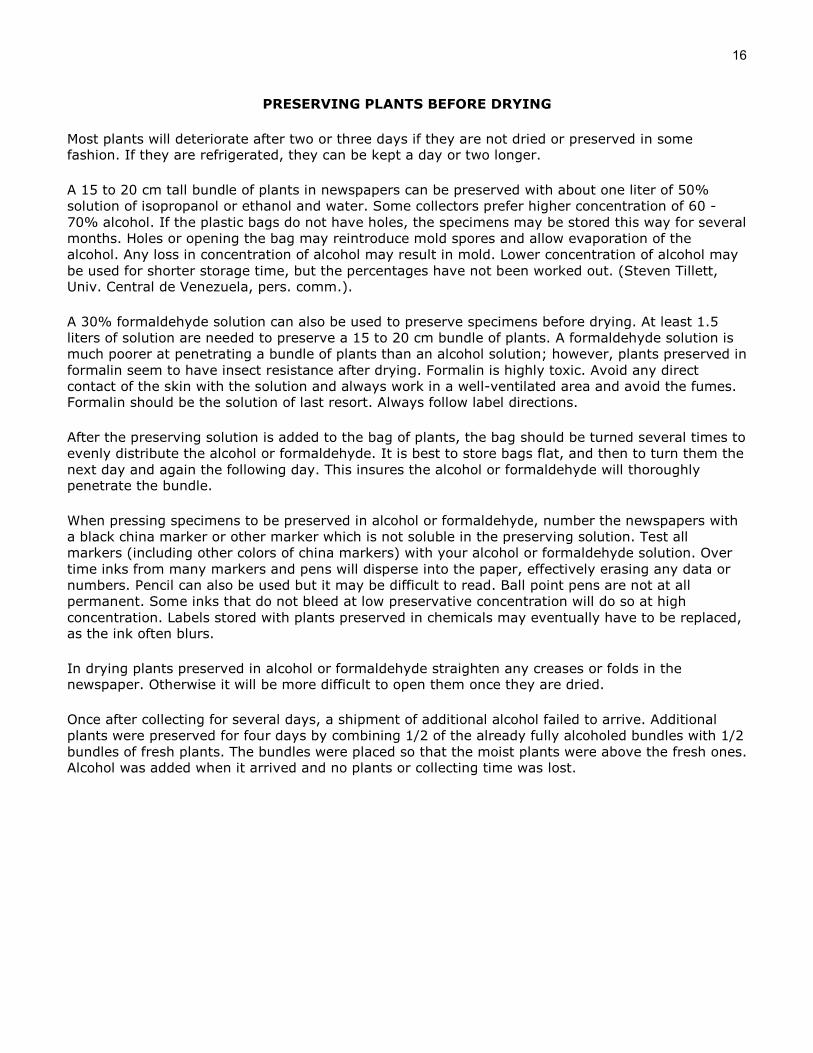
On large plants include at least part of the stem and one complete petiole. The stem can be sliced in half longitudinally to make it thinner. Roots and other thick or bulky plant parts can also be split to hasten drying. Bulbs or corms can be cut longitudinally or sliced crosswise, depending on what characters need to be shown. In Cyclanthaceae the leaf base and petiole base are very important as is the depth of the leaf division. Indicate the latter in field notes, e.g., blade divided halfway to the base, or simply cut off one side of the blade above the point of division if necessary.
It is very useful to preserve flowers of Iridaceae, Lentibulariaceae, Burmaniaceae, Zingiberaceae, Orchidaceae, and Marantaceae in a 50% alcohol solution with a few drops of glycerine in whirlpacks or vials for later study. The glycerine prevents the material from completely drying if the fluid should be lost or evaporate. Put the collector's name and number on a piece of paper in the vials using an alcohol-proof marker, ink, or pencil.
In Passifloraceae it is important to cut open at least one flower on each sheet so that the internal structure is observable. In other families with few large flowers, e.g., Cactaceae it is useful to add cut-open flowers to each specimen, whenever possible.
When collecting delicate aquatics it is sometimes best to carry a flat pan, fill it with water and float the plant onto the paper. Some collectors prefer using a piece of good quality white paper which can then be glued onto the herbarium sheet and the specimen can be tacked with glue or library tape to hold it to the paper. Other collectors use regular sheets of newspaper, or plain newsprint, or wax paper when available and float the plant onto it. The specimens generally come off easily with a little scraping with a scalpel blade or knife.
If there is a shortage of newspaper specimens may be combined and sorted into separate sheets later. Write "____ specimens" or "divide into ____ specimens" on the edge of the newspaper. This should only be done when absolutely necessary. Each specimen must be transferred to a separate newspaper before drying.
16
PRESERVING PLANTS BEFORE DRYING
Most plants will deteriorate after two or three days if they are not dried or preserved in some fashion. If they are refrigerated, they can be kept a day or two longer.
A 15 to 20 cm tall bundle of plants in newspapers can be preserved with about one liter of 50% solution of isopropanol or ethanol and water. Some collectors prefer higher concentration of 60 - 70% alcohol. If the plastic bags do not have holes, the specimens may be stored this way for several months. Holes or opening the bag may reintroduce mold spores and allow evaporation of the alcohol. Any loss in concentration of alcohol may result in mold. Lower concentration of alcohol may be used for shorter storage time, but the percentages have not been worked out. (Steven Tillett, Univ. Central de Venezuela, pers. comm.).
A 30% formaldehyde solution can also be used to preserve specimens before drying. At least 1.5 liters of solution are needed to preserve a 15 to 20 cm bundle of plants. A formaldehyde solution is much poorer at penetrating a bundle of plants than an alcohol solution; however, plants preserved in formalin seem to have insect resistance after drying. Formalin is highly toxic. Avoid any direct contact of the skin with the solution and always work in a well-ventilated area and avoid the fumes. Formalin should be the solution of last resort. Always follow label directions.
After the preserving solution is added to the bag of plants, the bag should be turned several times to evenly distribute the alcohol or formaldehyde. It is best to store bags flat, and then to turn them the next day and again the following day. This insures the alcohol or formaldehyde will thoroughly penetrate the bundle.
When pressing specimens to be preserved in alcohol or formaldehyde, number the newspapers with a black china marker or other marker which is not soluble in the preserving solution. Test all markers (including other colors of china markers) with your alcohol or formaldehyde solution. Over time inks from many markers and pens will disperse into the paper, effectively erasing any data or numbers. Pencil can also be used but it may be difficult to read. Ball point pens are not at all permanent. Some inks that do not bleed at low preservative concentration will do so at high concentration. Labels stored with plants preserved in chemicals may eventually have to be replaced, as the ink often blurs.
In drying plants preserved in alcohol or formaldehyde straighten any creases or folds in the newspaper. Otherwise it will be more difficult to open them once they are dried.
Once after collecting for several days, a shipment of additional alcohol failed to arrive. Additional plants were preserved for four days by combining 1/2 of the already fully alcoholed bundles with 1/2 bundles of fresh plants. The bundles were placed so that the moist plants were above the fresh ones. Alcohol was added when it arrived and no plants or collecting time was lost.
17
DRYING AND SORTING
When building a press, always keep the numbered side of the sheets up. It saves time in the long run. Mark the press so you know which side is the top without opening it (always placing the straps on the same way is one method).
Do not turn around every other sheet to balance the press. It wastes time. Do 20 to 40 sheets and then reverse the direction of the newspaper folds as necessary. Try to make the change at the end of a collection number. It helps as you are pressing to put large fruits, stems, etc., on different parts of the sheet to balance them.
When breaking down a press, keep separate any sheets not fully dried with their corrugates, etc., as a unit. Do not scatter them in among another press that is being built. Two sequences interspersed are more time consuming to sort numerically later.
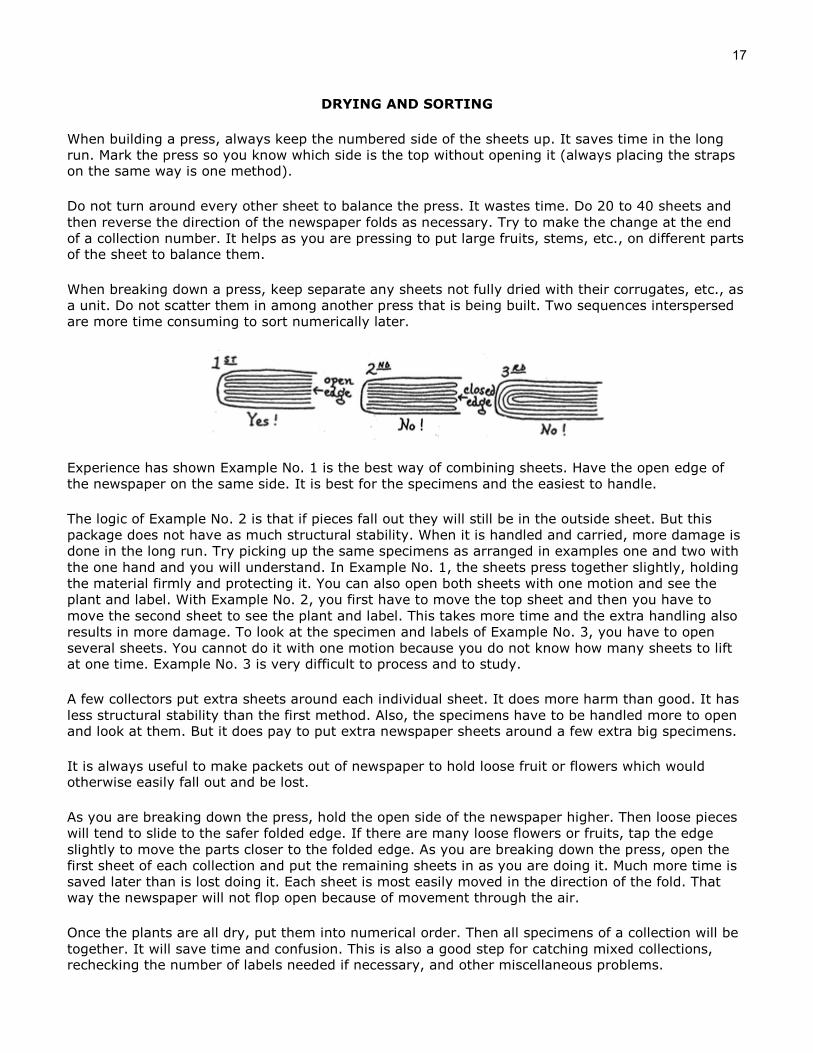
Experience has shown Example No. 1 is the best way of combining sheets. Have the open edge of the newspaper on the same side. It is best for the specimens and the easiest to handle.
The logic of Example No. 2 is that if pieces fall out they will still be in the outside sheet. But this package does not have as much structural stability. When it is handled and carried, more damage is done in the long run. Try picking up the same specimens as arranged in examples one and two with the one hand and you will understand. In Example No. 1, the sheets press together slightly, holding the material firmly and protecting it. You can also open both sheets with one motion and see the plant and label. With Example No. 2, you first have to move the top sheet and then you have to move the second sheet to see the plant and label. This takes more time and the extra handling also results in more damage. To look at the specimen and labels of Example No. 3, you have to open several sheets. You cannot do it with one motion because you do not know how many sheets to lift at one time. Example No. 3 is very difficult to process and to study.
A few collectors put extra sheets around each individual sheet. It does more harm than good. It has less structural stability than the first method. Also, the specimens have to be handled more to open and look at them. But it does pay to put extra newspaper sheets around a few extra big specimens.
It is always useful to make packets out of newspaper to hold loose fruit or flowers which would otherwise easily fall out and be lost.
As you are breaking down the press, hold the open side of the newspaper higher. Then loose pieces will tend to slide to the safer folded edge. If there are many loose flowers or fruits, tap the edge slightly to move the parts closer to the folded edge. As you are breaking down the press, open the first sheet of each collection and put the remaining sheets in as you are doing it. Much more time is saved later than is lost doing it. Each sheet is most easily moved in the direction of the fold. That way the newspaper will not flop open because of movement through the air.
Once the plants are all dry, put them into numerical order. Then all specimens of a collection will be together. It will save time and confusion. This is also a good step for catching mixed collections, rechecking the number of labels needed if necessary, and other miscellaneous problems.
18
If there are specimens without numbers, write "specimen in bundle between number XX and number XX." This is especially important when sorting someone else's plants if you cannot solve all of the problems. Otherwise, the collector may not be able to solve the problem later, either.
After they are in numerical order, pull out the set that is to stay in the country of origin. In some cases all specimens are shipped out of the country first, then after processing a return-to-country-of-origin set (RTCO) is returned by mail later. Almost always, it is better to leave the set in the country, avoiding all the costs and problems of shipping, customs, accidents, etc. Be certain to keep both sets in numerical order as you are doing this. Always note in your field book if you have left a set or will mail a set, and if extra labels are needed for the set left in the country of origin.
Mark each collection minus the institution that has received a specimen (i.e., -CR, if a set was left there). At later steps always mark the remaining sheets minus the sheet that was pulled out (i.e., -MO if MO's sheet was mounted, -US if a sheet was sent to a specialist at US), this prevents duplicates from being sent on exchange to institutions that already have a sheet.
Send all of the specimens and separate fruits of a collection in the same shipment. Once a collection is identified, one specimen is mounted, and the balance are sent on exchange. If additional sheets or separate fruits from the same collection are received later, it is impossible to know where the collection was previously sent. It helps in sorting if "Separate Fruit or parts" is marked on the newspaper.
If there is a possibility that the plants will be fumigated later with a microwave oven, do not use staples, paper clips, or other metal objects.
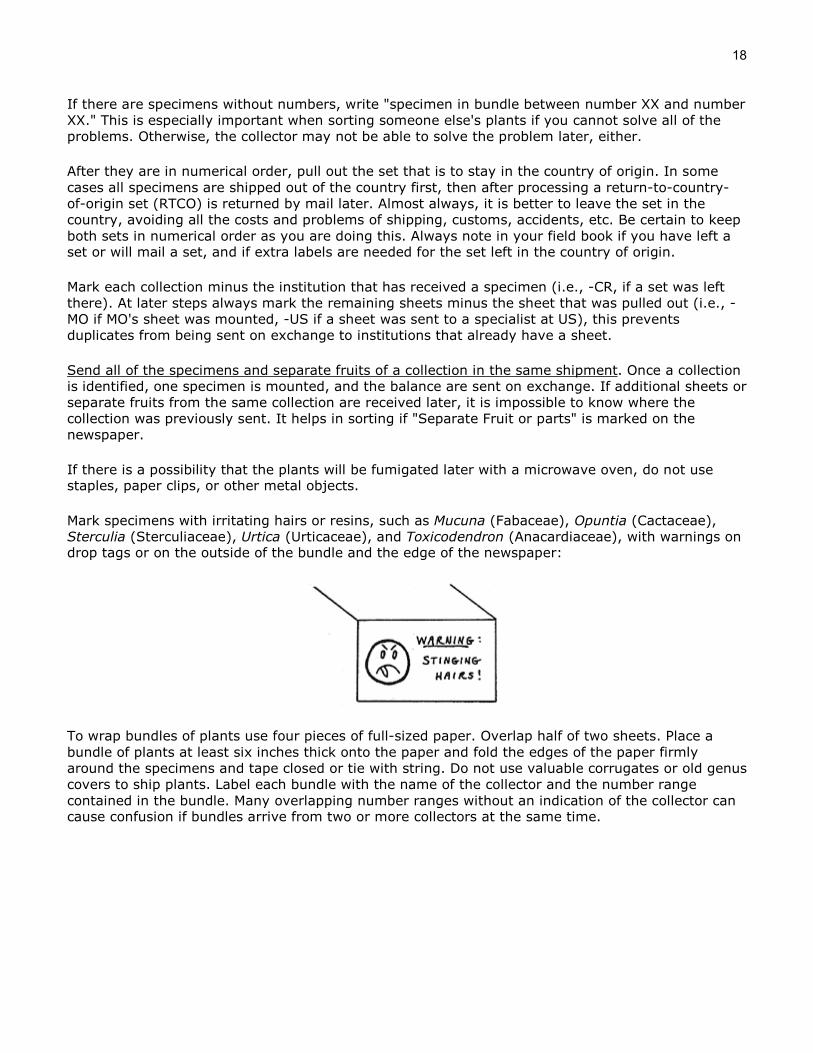
Mark specimens with irritating hairs or resins, such as Mucuna (Fabaceae), Opuntia (Cactaceae), Sterculia (Sterculiaceae), Urtica (Urticaceae), and Toxicodendron (Anacardiaceae), with warnings on drop tags or on the outside of the bundle and the edge of the newspaper:
To wrap bundles of plants use four pieces of full-sized paper. Overlap half of two sheets. Place a bundle of plants at least six inches thick onto the paper and fold the edges of the paper firmly around the specimens and tape closed or tie with string. Do not use valuable corrugates or old genus covers to ship plants. Label each bundle with the name of the collector and the number range contained in the bundle. Many overlapping number ranges without an indication of the collector can cause confusion if bundles arrive from two or more collectors at the same time.

19
One method of wrapping:
When shipping plants in newspaper, pack bundles of wrapped plants tightly in boxes rather than loosely. Even though a slight amount of damage may be incurred when packing the boxes tightly, plants in loosely packed boxes are much more easily damaged during shipping and the boxes more prone to being crushed.
Reheating the paper wrapped bundles over dryers, packing them in tightly sealed boxes or plastic bags (with PDB or Napthalene if available) reduces insect damage during storage or during the long trip back to the home institution. Always pack specimens to withstand the possibility of moisture or pest damage. Surface mail from some countries may be 3 to 12 months.
With the shipment send details of any special arrangements made with the host country and or other collectors (such as where duplicates are located or where they are promised to be distributed). Project coordinators need to know these arrangements before they process the plants, not after they are distributed and not available to satisfy agreements made by the collector. MO sometimes stamps special agreements on the edge of the newspaper of each collection.
With the shipment, also include some kind of shipping invoice so that the receiving institution knows what is in the boxes and why they are being sent. These invoices should include the sender's name and address, receiver's name and address, list of enclosed items, number of boxes (copies of the invoice should be in each box), and any special instructions or conditions. It is also helpful to know how the plants have been chemically treated (i.e., formaldehyde, alcohol, insecticides, etc.).
20
DRYING SYSTEMS
Warning Fire is a constant danger. If the drying system is close to where you are sleeping or working, TAKE a smoke detector. It is best if the plants can be dried in a separate building or fireproof area. If not, extraneous flammable materials such as paper or alcohol should be kept out of the area. Closely monitor presses and dryers if placed in or near private homes or field stations; fires do happen.
Types of Systems There are basically two types of drying systems. The first is a convection system, which is easier and cheaper to build, and can use a wider variety of heat sources. The second is a forced-air system, which is more complicated and expensive to build but tends to be safer, and when properly designed is usually more efficient.
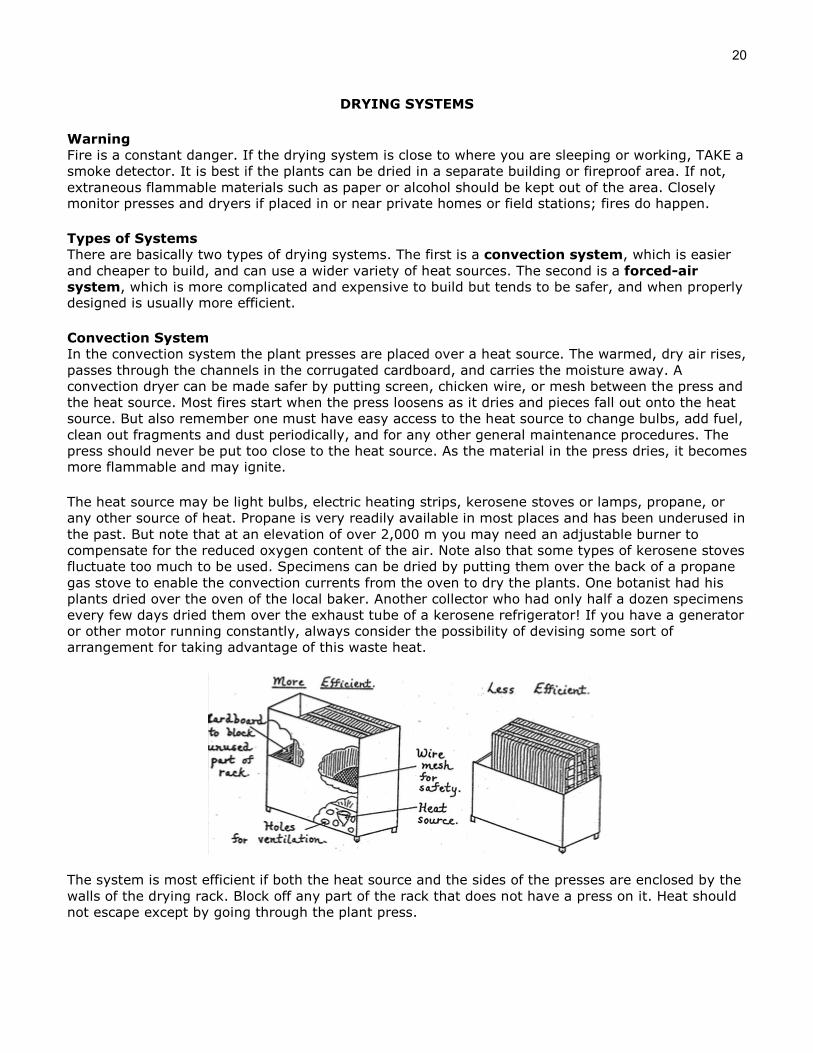
Convection System In the convection system the plant presses are placed over a heat source. The warmed, dry air rises, passes through the channels in the corrugated cardboard, and carries the moisture away. A convection dryer can be made safer by putting screen, chicken wire, or mesh between the press and the heat source. Most fires start when the press loosens as it dries and pieces fall out onto the heat source. But also remember one must have easy access to the heat source to change bulbs, add fuel, clean out fragments and dust periodically, and for any other general maintenance procedures. The press should never be put too close to the heat source. As the material in the press dries, it becomes more flammable and may ignite.
The heat source may be light bulbs, electric heating strips, kerosene stoves or lamps, propane, or any other source of heat. Propane is very readily available in most places and has been underused in the past. But note that at an elevation of over 2,000 m you may need an adjustable burner to compensate for the reduced oxygen content of the air. Note also that some types of kerosene stoves fluctuate too much to be used. Specimens can be dried by putting them over the back of a propane gas stove to enable the convection currents from the oven to dry the plants. One botanist had his plants dried over the oven of the local baker. Another collector who had only half a dozen specimens every few days dried them over the exhaust tube of a kerosene refrigerator! If you have a generator or other motor running constantly, always consider the possibility of devising some sort of arrangement for taking advantage of this waste heat.
The system is most efficient if both the heat source and the sides of the presses are enclosed by the walls of the drying rack. Block off any part of the rack that does not have a press on it. Heat should not escape except by going through the plant press.

21
Portable Convection Systems People have made portable convection driers from numerous different materials. If you use canvas for the sides, fire resistant canvas, which is available in the U.S., is less of a hazard. Canvas has a tendency to be blown against the heat source and to ignite. Botanists who are traveling cross-country with intermittent stops for collecting have tied their presses upright on the roof of the vehicle to let the presses air dry. This may not work with some aluminum corrugates. Sometimes it is possible to mount presses in front of a car radiator to take advantage of air movement when the vehicle is in motion, and radiated heat from the radiator when the vehicle has stopped (some botanists put canned food in the engine compartment to heat while driving, and stop for lunch without setting up the stove!).
Baffle System If the heat is not evenly distributed in the dryer, an aluminum panel constructed above the heat source will allow better distribution. This aluminum baffle must either be well supported throughout its length or have the edges turned up to prevent it from sagging. A double baffle system distributes the heat still more evenly or allows a reduced distance between heat source and press.
Forced-air System In the forced-air system the heat source is separate from the specimens and a fan is used to blow the air across the heat source and then through the presses. It is safer because the heat source does not have to be directly under the presses.
Catalytic Driers Catalytic driers, which should be the safest, have been completely unusable in the tropics. The fuel has been unavailable or it has been so dirty that it ruined the catalyst immediately.
Oven Drying Placing presses inside a closed oven is not feasible. Oven heat is often too moist and will encourage mold. The temperature cannot be satisfactorily regulated - if not dried long enough the plants will mold, if dried at too high a temperature, too fast or too long the plants will darken and crumble. Utilizing the warm air from the oven by placing the press above the open oven door may work.
Space Limitations within the Press When press materials are the limiting factor, one may be able to dry a few more specimens by putting two thin specimens, such as thin grasses, Utricularia, small herbs, or small ferns, together between the blotters. If you use this method with thicker stems or fruits, it will result in shriveled leaves and unevenly pressed specimens. Also, if you double up too many specimens, even the thin sheets may not dry occupying the press materials for another day.
Space Limitations within the Dryer If drying space is a problem, make a special effort to section thick fruits, stems, etc. It will speed drying. It will also result in fewer shriveled leaves and flatter specimens. A second layer of presses can be put over the first if they are separated by sticks laid lengthwise.
22
SORTING AT MO
If you have to work on the specimens before they are labeled, add the collector's name to the newspaper. If the collections from several collectors are mixed together, two months or two years later it may be impossible to determine whose collection are which. They then become so much useless trash.
It is most efficient to sort the plants to family at the same time the labels are inserted. Combining the two steps takes only slightly longer than either step by itself.
The first step is to put all the labels of a number with any separate fruits, stem sections, etc. Then when going through the collection, you will be reminded there are separate parts, etc., when there are no labels for the collection.
It is much more efficient sorting specimens on herbarium carts than on an equal amount of counter space. Sitting at a table with a cart beside the table, there are 14 linear feet of space within reach. Fourteen feet at a counter means walking up to 14 feet every time a specimen is sorted. Separate stacks of larger families (Rubiaceae, Fabaceae, Asteraceae, ferns, Melastomataceae) are placed on a table next to the work space. On the cart the rest of the families are intercalated in alphabetical order.
Always keep the numbered side of the newspaper up. Frequently notes are written on the edge of the newspaper and it is time consuming to check both sides, or they are missed.
Never separate the only label to be sent with the gift for determination, etc., and leave behind specimens without labels. Not only is it more difficult to get a label made without the original, frequently it is impossible, particularly on older collections. Often it is not even known whose collection it is. Replacing labels is becoming much easier with computer label production, but it is nearly impossible to replace labels if the collector is unknown or if the collection originated at another institution.
With multiple-sheet specimens or separate fruits, each component should have a label before they are sent to mounting or to another institution.
When working with specimens always keep the newspaper, the plant, and labels together. If you take only the plant to another area, an interruption may occur that will cause you not to be able to put the label and plant back together.
Sorting plants to family and working on all of one family at a time is more efficient than working on a few at a time. It also puts less wear and tear on the herbarium and literature. Determinations tend to be more accurate and one can update the herbarium at the same time.
MOUNTING NOTES
Always use the best quality materials available for mounting specimens. Since the lifetime of a specimen is nearly indefinite if properly stored, it only makes sense to use mounting materials (label paper, mounting paper, glue, etc.) which will not deteriorate over time and will last as long as the specimen.
If working on an ecological or anthropological project in which a reference herbarium is to be established, it is recommended that only good quality 100% rag mounting paper be used. It is better to store plants in newspaper than to mount them on poor quality paper. Never mount plants with scotch tape or other kinds of temporary tapes, and never staple plants to the mounting paper. Acid-free rag paper and permanent ink should be used for making labels.

23
PACKING CHECKLIST
General: Passport and Visa Hand Lens Airline Ticket Entry Permit Travelers Checks Collecting Permit Money and Credit Cards Vehicle Papers First Number Business Cards Field Book Ruler Paper and Envelopes
Maps Keys Pens, Pencils and Eraser Spare Glasses Markers Expense Notebook Tags for Living Collections Language Dictionary Address Book Book or Reading Material (something to do while waiting) Medicines (antibiotics, malaria pills, etc.)
Field Day Checklist: Hand Lens Day bag or Vest with Pockets Hat Compass, Map, and Altimeter Clippers and Sheath GPS Receiver Machete and Sheath Pocket Knife Knife and Sheath File Raincoat Canteen or Water Bottle Snake Antivenom or Serum Binoculars Watch String Jacket Emergency Kit Fish Hooks Lighter or Matches
Lunch, Candy Insect Repellent (good for starting a fire in an emergency) Suntan Lotion Collecting Bags Newspaper or Small Plastic Bags (for small specimens) Camera and Extra Batteries Film Small Field Notebook Climbing Equipment Clipper Poles Vials for Flowers, etc. Needle and Thread Safety Pins Small Flashlight Tissues Field Press Strap Bandaids Moleskin for blisters Emergency Space Blanket (also good for signaling help in emergencies)
Sleeping Supplies: Sleeping Bag & Pillow Air Mattress, Pad, or Camp Cot Hammock and Rope for Hammock Mosquito Net Pajamas Alarm Clock Plastic or Tarp Ground Cloth Rope
Collecting Supplies: Newspaper String Large Plastic Bags Extra Collecting Bags Small Plastic Bags Burlap Bags for Bundles Alcohol or Formaldehyde
24
Miscellaneous Supplies: Backpack Flashlights Extra Light Nylon Duffle Bag Batteries Lantern Mantles Cook Stove Immersable Heating Coil (for boiling water)
Fuel Tent Duct Tape Sewing Kit Safety Pins Cup, Bowl, Plate, Spoon, Fork, Knife Water Filter Purifying Tablets
Toilet Articles: Toothbrush Toothpaste Dental Floss Soap Deodorant Wash Cloths
Shaver Shaving Lotion Towels Laundry Soap Toilet Paper Feminine Needs
Clothes: Short Sleeve Field Shirt Field Shirts Field Pants Field Socks Underwear Shoes & Tennis Shoes Thongs or Flip-flops Boots Handkerchiefs
Sweat Shirts T-shirts Sweaters Coat or Jacket Leather Field Belt Swim Suit Dress Pants Dress Socks Dress Shirts

25
RECOMMENDED READING
Compiled by Mary Susan Taylor, Missouri Botanical Garden, 1990.
Standard References - Fosberg, F. R. & M. Sachet. 1965. Manual for tropical herbaria. I.B.P.T. and N. Regnum Veget. 39: 1-132. - Hicks, A. J. & P. H. Hicks. 1978. A selected bibliography of plant collection and herbarium curation. Taxon 27(1): 63-99. - Jain, S. K. 1977. A handbook of field and herbarium methods. Today and Tomorrow Printers & Publ., New Delhi. 157 p. - Letouzey, R. (trans. R. Huggett). 1986. Manual of forest botany. Tropical Africa, vol. 1; general botany. Centre Technique Forestier Tropical, Nogent- sur-Marne, France. - Lot, A. & F. Chang. 1986. Manual de herbario, administracion y manejo de colecciones, tecnicas de recoleccion y preparacion de ejemplares bot nicos. Consejo Nacional de la Flora de Mexico, Mexico. 142 pp. - Saville, D. B. O. 1962. Collection and care of botanical specimens. Canad. Dept. Agric., Publ. Res. Branch 1113: 1-124. - Skvortsov, A. K. 1977. The herbarium; handbook of methods and techniques. Acad. Sci. USSR, Moscow. 200 pp. (in Russian). - Wagstaffe, R. & J. H. Fidler. 1968. The preservation of natural history specimens. Vol. 2, Part 3 - Botany. H. F. and G. Witherby Ltd., London. 404 p. - Womersley, J. S. 1980. Manual for plant collecting and herbarium development. FAO, Field Doc. 23: 1-147. 1981: FAO Plant Production and Protection Paper 33: 1-l37.
Collecting - Archer, W. A. 1945. Collecting data and specimens for study of economic plants. U.S. Department of Agriculture, Misc. Publ. 568: 1-52. - Barghoorn, E. S. 1943. Collecting and preserving botanical materials of archaeological interest. American Antiquity 9: 289-294. - Bogyo, Thomas P. et al. 1980. Analysis of sampling strategies for collecting genetic material. Econ. Bot. 34(2): 160-174. - Collins, D. G. & J. W. E. Harris. 1973. Line throwing gun and cutter for obtaining branches from tree crowns. Canadian Journal of Forestry Research 3: 149-154. - Corner, E. J. H. 1940. Botanical monkeys. M.A.H.A. Magazine 10: 147-149. 1946: Zoo Life, Bull. Zool. Soc. London 1: 89-93. - Coville, F. V. n.d. Directions for collecting specimens and information illustrating the aboriginal uses of plants. U.S. National Museum, Bull. 39(Part J): 1-8. - Culberson, W. L. 1976. Water purification for field botanists. Systematic Botany 1: 194. - Derr, H. B. & C. H. Lane. 1914. Collection and preservation of plant material for use in the study of agriculture. U.S. Department of Agriculture, Farmer's Bull. 586: 1-24. - Englemann, G. 1986. Instructions for the collection and preservation of botanical specimens. Ann. Missouri Bot. Gard. 73: 504-507. - Fosberg, F. R. 1939. A collection manual for field anthropologists. Philadelphia, PA. 22 pp. - Fosberg, F. R. 1960. Plant collecting as an anthropological field method. El Palacio 67(4): 125-139. - Hyland, B. P. M. 1972. A technique for collecting botanical specimens in rain forest. Flora Meles. Bull. 26: 2038-2040. - Kajewski, S. F. 1933. Botanical collecting in the tropics. Contributions Arnold Arboretum 4: 103-108. - Malcolm, C. V. & A. J. Clarke. 1970. Plant collecting for saltland revegetation and soil conservation. W. Australia Agric. Tech. Bull. 21. - McCain, J. W. & J. F. Hennen. 1986. Collection and plant materials damaged by pathogens: an expression of support. Taxon 35(1): 119-121. - Mirov, N. T. & C. J. Kraebel. 1939. Collecting and handling seeds of wild plants. Civilian Conservation Corps, Forestry Publ. 5: 1-42, Washington, D.C.
26
- Mori, S. A. 1984. Use of 'swiss tree grippers' for making botanical collections of tropical trees. Biotropica 16: 79-80. - Oskins, W. 1982. Collecting plant specimens (an outline with appendices). Erigenia 1: 9-21. - Polunin, N. 1949. Instructions for collecting and preserving plant specimens in the Arctic and Subarctic. Arctic Unfolding: 308-312. - Robertson, K. R. 1980. Observing, photographing and collecting plants. Circ. Illinois Nat. Hist. Surv. 55: 1-62. - Saville, D. B. O. 1962. Collection and care of botanical specimens. Canad. Dept. Agric., Publ. Res. Branch 1113: 1-124. - Thomas, R. D. l971. Collecting vascular plants in the habitat near the ground, or, locating and collecting belly plants. Castanea 36(2): 148-149.
Pressing - B, M. S. 1876. How to apply pressure in making botanical specimens. Botanical Gazette 1(6): 21. - Bessey, E. 1886. Disposition of thick specimens. Botanical Gazette 11(6):157. - Chmielewski, J. G. & G. S. Ringius. 1986. Polyurethane foam: an alternative plant pressing material especially suitable for population-based studies. Taxon 35(1): 106-107. - DeLanghe, J. E. 1972. Preparation of thick or succulent plants for the herbarium. Nat. Belg. 53: 508-509. - Logan, J. 1986. A pre-pressing treatment for Begonia species and succulents. Taxon 35(4): 671. - Nichols, G. S. & H. St. John. 1918. Pressing plants with double-faced corrugated paper boards. Rhodora 20: 153-160. - Stevens, F. L. 1926. Corrugated aluminium sheets for the botanists press. Botanical Gazette 82: 104-106.
Drying Plants - Bacci, M. & M. R. Palandri. 1985. Microwave drying of herbarium specimens. Taxon 34(4): 649-653. - Beard, J. S. 1968. Drying specimens in humid weather. Taxon 17: 744. - Botha, D. J. & J. Coetzee. 1976. A portable drier for herbarium specimens. South African Journal of Botany 42: 41-44. - Buchholz, J. T. 1931. A practical drier for botanical specimens. Transactions Illinois Academy of Science 24: 103-107. - Croat, T. B. 1979. Use of a portable propane gas oven for field drying plants. Taxon 28: 573-580. - DeWit, H. C. D. 1980. Drying herbarium specimens in moist tropical conditions. Bol. Soc. Brot., ser. 2, 53: 549-553. - Fuller, T. C. & G. D. Barbe. 1981. Drying herbarium specimens in moist tropical conditions. Bol. Soc. Brot, ser. 2, 53: 549-553. - Gates, B. N. 1950. An electrical drier for herbarium specimens. Rhodora 52: 129-134. - Hale, A. M. 1976. A portable electric herbarium dryer. Rhodora 78: 135-140. - Halle, N. 1961. Un s‚choir … gas butane pour la preparation des herbiers. JATBA 8: 70-71. - Jenne, G. 1968. A portable forced air plant dryer. Taxon 17: 184-185. - Leuenberger, B. E. 1982. Microwaves: a modern aid in preparing herbarium specimens of succulents. Cact. Succul. J. (Great Britain) 44: 42-43. - MacDaniels, L. H. 1930. A portable plant drier for tropical climates. Amer. J. Bot. 17: 669-670. - Motley, J. 1857. Drying of fleshy plants. Hooker's Journal of Botany Kew Gardens Miscellany 9: 149. - Perdue, R. E., Jr., 1982. Field drying plant material collected for chemical and biological screening, I. Portable facility for sun drying. Econ. Bot. 36(4): 369-372. - Sinnott, Q. P. 1983. A solar thermoconvective plant drier. Taxon 32: 611-613. - Tillett, S. S. 1977. Technical aids for systematic botany: new models of plant-press driers. Taxon 26: 553-556. - Van der Merwe, P. & P. J. Grobler. 1969. Electric drying press for herbarium specimens. Plant Life 25: 132-135.
27
Collecting and Pressing Specific Plants - Ceska, A. & O. Ceska. 1986. More on the techniques for collecting aquatic and marsh plants. Ann. Missouri Bot. Gard. 73: 825-827. - Croat, T.B. 1985. Collecting and preparing specimens of Araceae. Ann. Missouri Bot. Gard. 72: 252-8. - Dransfield, J. 1986. A guide to collecting palms. Ann. Missouri Bot. Gard. 73: 166-76. - Griffiths, D. 1907. Preparation of specimens of Opuntia. Plant World 9: 278-284. - Hammel, B. E. 1987. The origami of Botany: A guide to collecting and mounting specimens of Cyclanthaceae. Ann. Missouri Bot. Gard. 74: 897-902. - Haynes, R. R. 1984. Techniques for collecting aquatic and marsh plants. Ann. Missouri Bot. Gard. 71: 229-231. - Jorgensen, P. M., J. E. Lawesson & L. B. Holm-Nielsen. 1984. A guide to collecting passionflowers. Ann. Missouri Bot. Gard. 71: 1172-1174. - Jorgensen, V. 1972. The preparing, pressing and mounting of bromeliads. J. Bromel. Soc. 23(6): 211-214. - Logan, J. 1986. A pre-pressing treatment for Begonia species and succulents. Taxon 35(4): 671. - MacDougall, T. 1947. A method for pressing cactus flowers. Cactus and Succulent Journal 19: 188. - Major, A. P. 1975. Collecting and studying mushrooms, toadstools and fungi. J. Bartholomew, Edinburgh. 268 pp. - Mori, S. & G. T. Prance. 1987. A guide to collecting Lecythidaceae. Ann. Missouri Bot. Gard. 74: 321-30. - Soderstrom, T. R. & S. M. Young. 1983. A guide to collecting bamboos. Ann. Missouri Bot. Gard. 70: 128-136. - Stone, B. C. 1983. A guide to collecting Pandanaceae (Pandanus, Freycinetia, and Sararanga). Ann. Missouri Bot. Gard. 70: 137-145.