Embed Size (px)
Citation preview

P a t e n t e d
Made in USAThe ULTIMATE Trauma Bleeding Simulation System (TBSS)™
DEDICATED TO THE “WARFIGHTER MEDICTM”
P a t e n t e d
Made in USA
FIELD EXPEDIENT BLEEDING SIMULATION SYSTEMTM
FEBSS HydraSim
® & HydraSim
® SP
Information and Instructions
The ULTIMATE Trauma Bleeding Simulation System (TBSS)™
®
WWW.SKEDCO.COMSAVING LIVES SINCE 1981
HydraSim® HydraSim® SP

1– 3 gallon refill tank
FS-10041– MultiSim® Injury Fabrication Kit
FS-1005
1–Re-chargeable Battery Pack1–Battery Charger
FS-1002 NSN: 6910-01-566-4378
FEBSS HydraSim® Remote Control
Transmitters
FEBSS HydraSim® Basic Kit (FS-2000B-CB, FS-2000B-BL)
FS-2001
1–HydraSim® Field Pack
FS-2003-BL
Packing List
2–Simulaid Simulation Blood Packets
No. 225
NSN: 6910-01-623-8532
FS-2000B-CB
FEBSS HydraSim® Basic Kit -- Coyote Brown Color--
NSN: 6910-01-623-8530
FS-2000B-BL
FEBSS HydraSim® Basic Kit -- Black Color -- NSN: 6910-01-623-8652
FS-2001-BLNSN: 6910-01-623-8639
FS-2001-CB

1–Storm Case
IM2750-000001–ACU Simulation Blouse
FS-1006
2–SOF-T Tourniquets
OP-SOF-T
1–ACU Simulation Trouser
FS-1007
2–Emergency Trauma Dressings
OP-FCP-05
Velcro Seam
FEBSS HydraSim® Deluxe Kit
The HydraSim® Deluxe Kit includes all items in the HydraSim® Basic Kit plus these additional items.
2–QuikClot Combat Gauze moulage Trainer
OP-170
Deluxe Packing List
FS-2000D-CB NSN: 6910-01-566-1811FS-2000D-BL

FEBSS HydraSim® Single Port SystemPacking List
1– 3 gallon refill tank
FS-10041–HydraSim® Field Pack
FS-2003-BL2–Simulaid Simulation Blood Packets
No. 225
1–Re-chargeable Battery Pack1–Battery Charger
FS-1002NSN: 6910-01-566-4378
1–Packable GSW to the thigh
T3M010
FS-2500D-CB
FEBSS HydraSim® SP System-- Coyote Brown Color--
FS-2500D-BL
FEBSS HydraSim® SP System-- Black Color --
FS-2501
FEBSS HydraSim® Remote Control
Transmitters
HydraSim® SP
NSN: 6910-01-625-8171
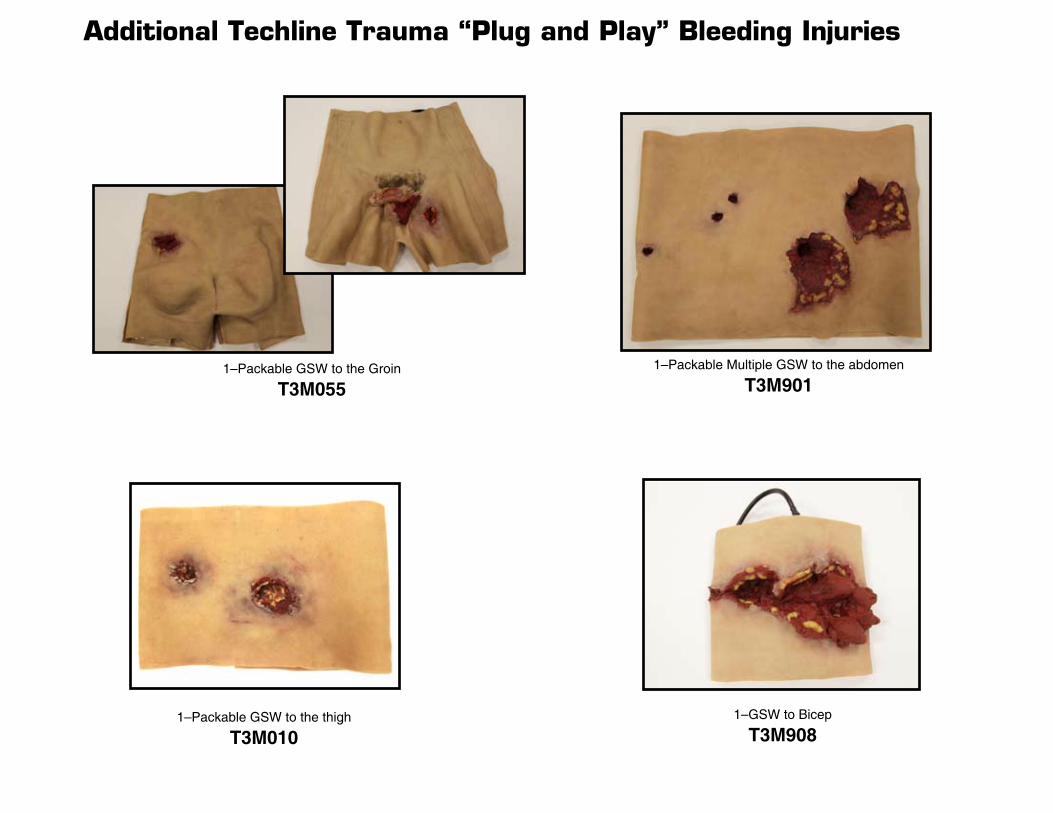
Additional Techline Trauma “Plug and Play” Bleeding Injuries
1–Packable GSW to the thigh
T3M010
1–Packable GSW to the Groin
T3M0551–Packable Multiple GSW to the abdomen
T3M901
1–GSW to Bicep
T3M908
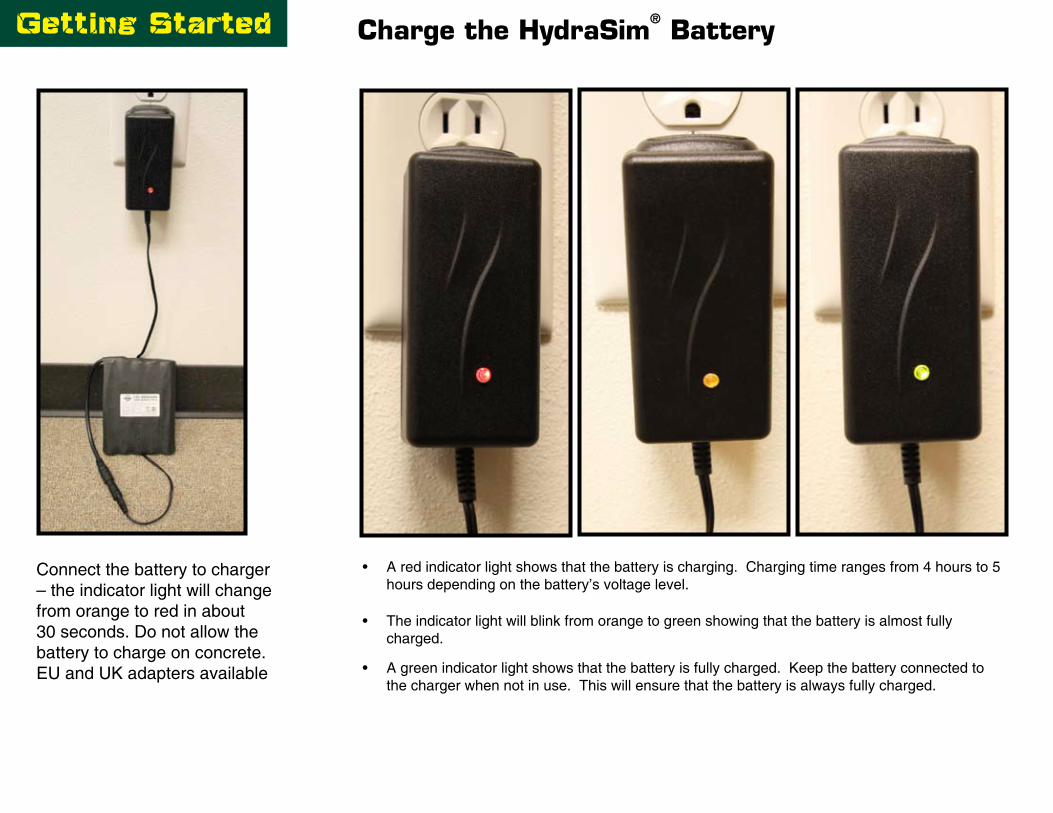
Getting Started Charge the HydraSim® Battery
Connect the battery to charger – the indicator light will change from orange to red in about 30 seconds. Do not allow the battery to charge on concrete. EU and UK adapters available
A red indicator light shows that the battery is charging. Charging time ranges from 4 hours to 5 • hours depending on the battery’s voltage level.
The indicator light will blink from orange to green showing that the battery is almost fully • charged.
A green indicator light shows that the battery is fully charged. Keep the battery connected to • the charger when not in use. This will ensure that the battery is always fully charged.

About the HydraSim® Control System
To increase realism, the arterial control system within the HydraSim® and HydraSim® SP pulsates at approximately 60 pulses per minute. If bleeding continues the pulsation rate will increase to nearly 200 pulses per minute to simulate the body compensating for blood loss.
If the system is accidentally activated, the HydraSim® will automatically shut down after approximately 20 minutes to conserve power. To reset, disconnect and reconnect the battery to the HydraSim®.
To conserve power, the HydraSim® will shut down after approximately 8 hours without use. To reset, disconnect and reconnect the battery from the power cord of the Control Pack.
Unzip the HydraSim® and connect the battery to the power cord.
Carefully place the battery inside the battery pocket and close the flap.
**Helpful Hints: The battery can be used for approximately 8hrs of intermittent use.
HydraSim® HydraSim® SP
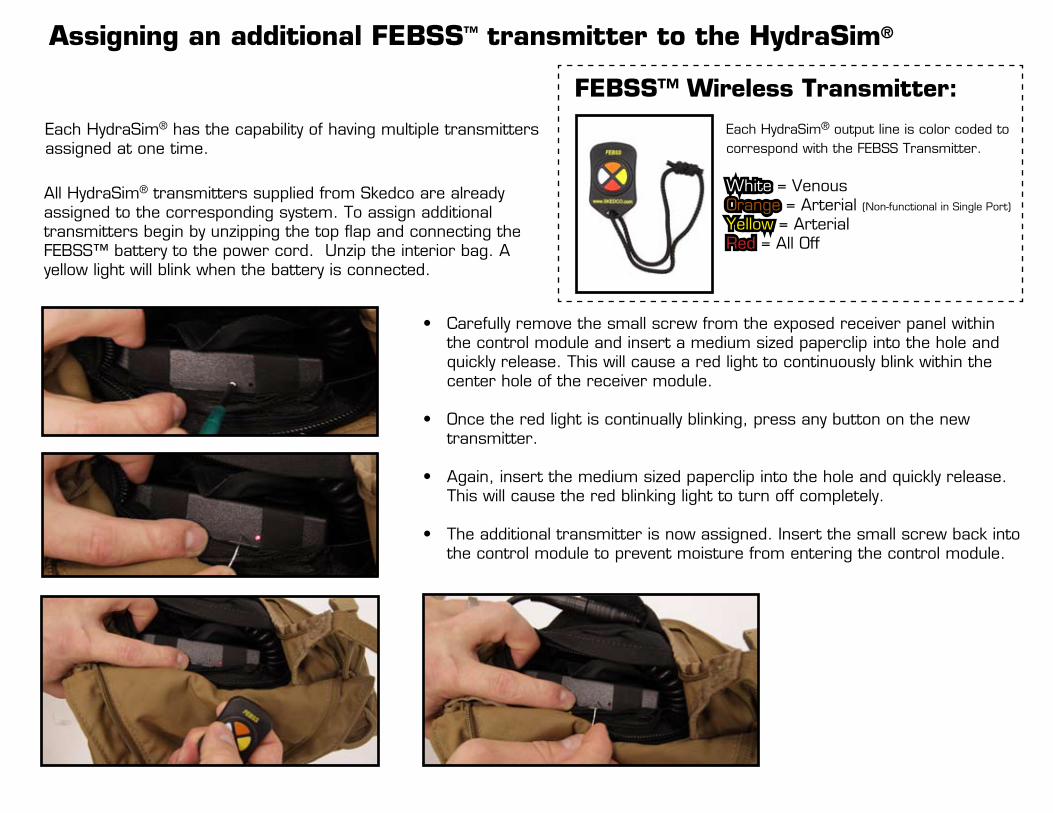
Assigning an additional FEBSS™ transmitter to the HydraSim®
Each HydraSim® has the capability of having multiple transmitters assigned at one time.
All HydraSim® transmitters supplied from Skedco are already assigned to the corresponding system. To assign additional transmitters begin by unzipping the top flap and connecting the FEBSS™ battery to the power cord. Unzip the interior bag. A yellow light will blink when the battery is connected.
Each HydraSim® output line is color coded to correspond with the FEBSS Transmitter.
White = VenousOrange = Arterial (Non-functional in Single Port)
Yellow = ArterialRed = All Off
FEBSS™ Wireless Transmitter:
Carefully remove the small screw from the exposed receiver panel within • the control module and insert a medium sized paperclip into the hole and quickly release. This will cause a red light to continuously blink within the center hole of the receiver module.
Once the red light is continually blinking, press any button on the new • transmitter.
Again, insert the medium sized paperclip into the hole and quickly release. • This will cause the red blinking light to turn off completely.
The additional transmitter is now assigned. Insert the small screw back into • the control module to prevent moisture from entering the control module.

Removing a FEBSS Transmitter from the HydraSim®
• To remove a transmitter from operating the HydraSim®, insert a medium sized paperclip into the hole on the back of the transmitter marked “ADD” and quickly release. A LED will blink when the button is released.
• Next, push all of the buttons on the transmitter. This will assign the functionality of each button on the transmitter. Once all of the buttons have been pressed, insert the paperclip into the hole on the back of the transmitter marked “ADD” and quickly release. This will cause the LED to stop blinking. The LED will also stop blinking automatically after 17 seconds.
• The transmitter has now been removed from the control pack. To assign the transmitter, please reference the section marked “Assigning additional transmitters to the HydraSim®.”

Using the Refill Tank:
Remove the pump assembly from the refill tank by turning it counter-clockwise.
Remove the refill tank from the Field Pack and fill with cold water to the MAX FILL LINE. Never use flammable, caustic, or corrosive (i.e. acids, chlorines and bleach), heated or self-heated fluids with this refill tank.
Add roughly half of the Simulaids Blood Powder to the full refill tank – using less of the powder will lighten the color of the simulation blood but it will be easier to wash out of the garment. Add 1/4 cup of dish soap (preferably Dawn® dish soap) to improve laundering.
Screw the pump assembly back into the tank by turning it clockwise. Firmly hand tighten. Place the refill tank back into the Field Pack and close the bag. Shake the tank from side to side for one minute in order to completely mix the blood powder.
Place the Refill Tank into the Field Pack and close the pack. Use the outside pocket of the Field Pack to protect the refill handle from damage.
**Helpful Hint: To help in the laundering process, add ¼ cup of dish soap to the refill tank once the simulation blood is mixed – this may cause irritation if exposed to the eyes or mouth.
MAX

Pressurize the Refill Tank:
To operate the pump, unlock the pump handle by turning it counter-clockwise. Be careful not to loosen the pump from the tank. To create pressure, pump the handle 20-30 times or until pressure
release is heard from the pressure governor. As the fluid level goes down, additional compressions of the pump handle will be needed to maintain fluid movement. Lock the pump handle back into the pump assembly when finished by turning the handle clockwise.
**WARNING!!! To prevent ejected pump assembly and/or solution from striking or injuring you, never stand with your face or body directly over the top of the tank when pumping or loosening the pump. Always depressureize the refill tank before removing the pump handle: Turn yellow knob on the tank body untill all the air pressure is gone.
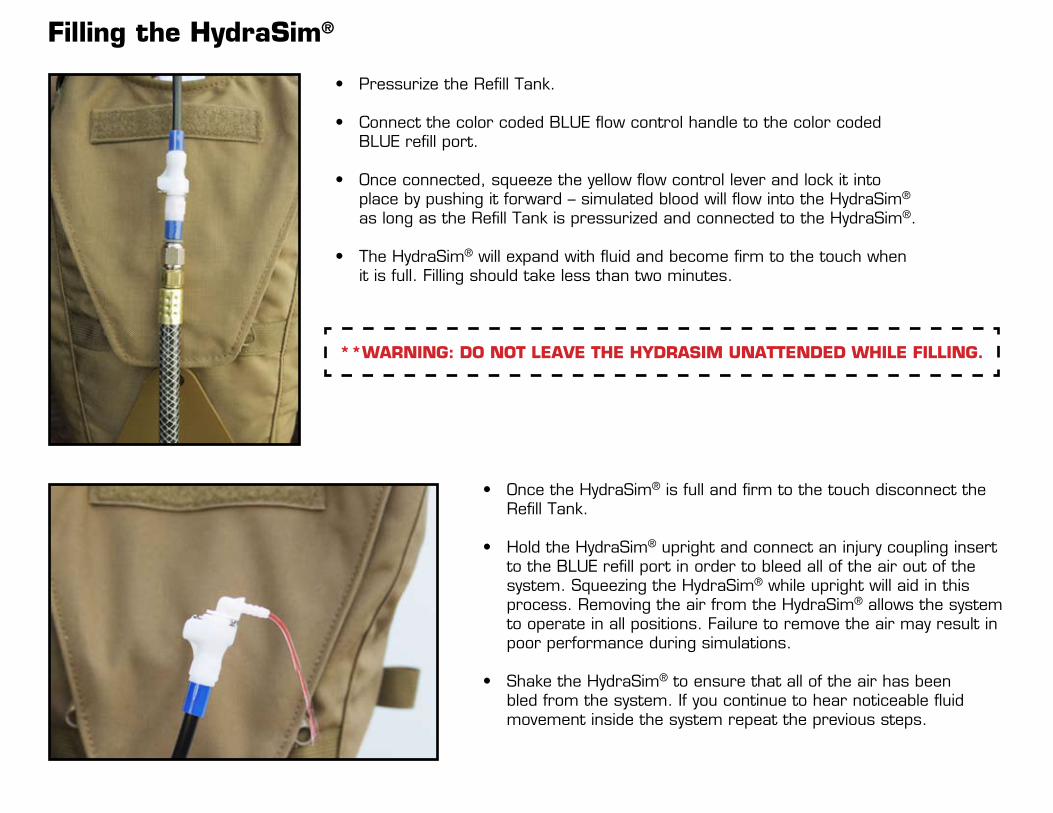
Filling the HydraSim®
Pressurize the Refill Tank.•
Connect the color coded BLUE flow control handle to the color coded • BLUE refill port.
Once connected, squeeze the yellow flow control lever and lock it into • place by pushing it forward – simulated blood will flow into the HydraSim® as long as the Refill Tank is pressurized and connected to the HydraSim®.
The HydraSim• ® will expand with fluid and become firm to the touch when it is full. Filling should take less than two minutes.
Once the HydraSim• ® is full and firm to the touch disconnect the Refill Tank.
Hold the HydraSim• ® upright and connect an injury coupling insert to the BLUE refill port in order to bleed all of the air out of the system. Squeezing the HydraSim® while upright will aid in this process. Removing the air from the HydraSim® allows the system to operate in all positions. Failure to remove the air may result in poor performance during simulations.
Shake the HydraSim• ® to ensure that all of the air has been bled from the system. If you continue to hear noticeable fluid movement inside the system repeat the previous steps.
**WARNING: DO NOT LEAVE THE HYDRASIM UNATTENDED WHILE FILLING.
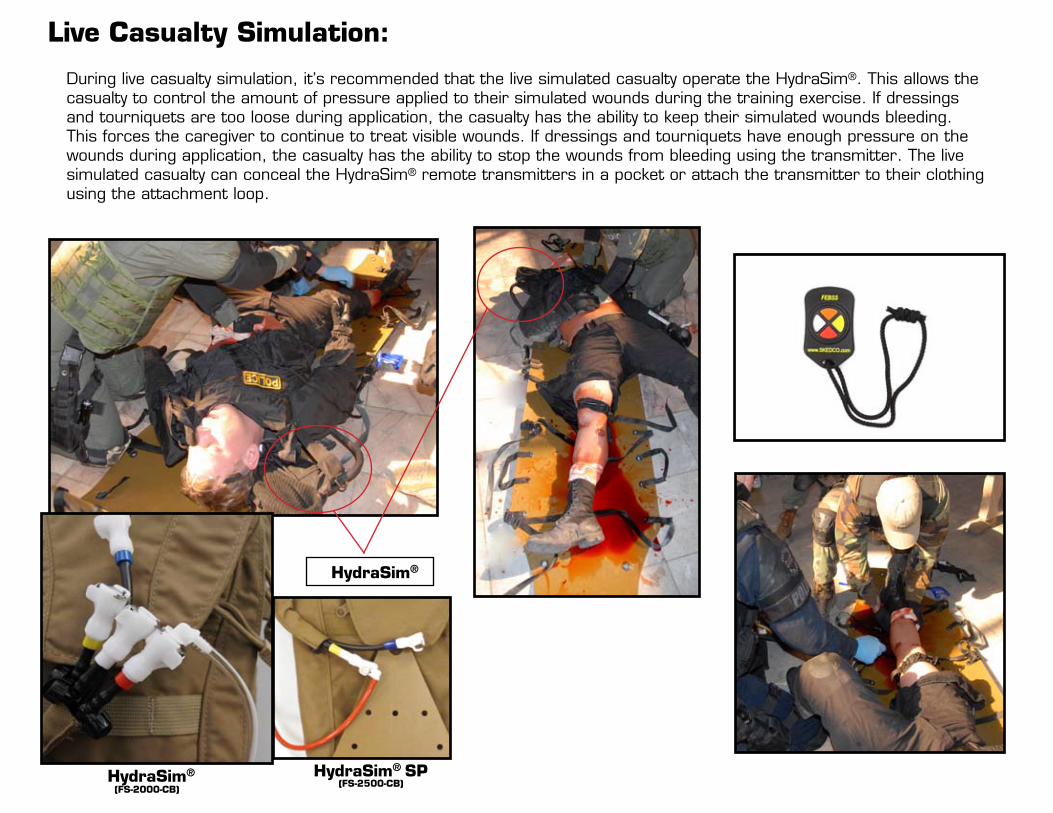
Live Casualty Simulation:
During live casualty simulation, it’s recommended that the live simulated casualty operate the HydraSim®. This allows the casualty to control the amount of pressure applied to their simulated wounds during the training exercise. If dressings and tourniquets are too loose during application, the casualty has the ability to keep their simulated wounds bleeding. This forces the caregiver to continue to treat visible wounds. If dressings and tourniquets have enough pressure on the wounds during application, the casualty has the ability to stop the wounds from bleeding using the transmitter. The live simulated casualty can conceal the HydraSim® remote transmitters in a pocket or attach the transmitter to their clothing using the attachment loop.
HydraSim®
(FS-2000-CB)(FS-2500-CB)HydraSim® HydraSim® SP

Manikin Casualty Simulation The HydraSim® has the capability of attaching to multiple simulation manikins allowing the user to “recycle” training equipment they already have. The HydraSim® is worn by live simulated casualties and manikin simulated casualties in the same manner. The blood lines are routed underneath the manikin’s clothing and connected to a series of predetermined injuries. MultiSim® Fabricated Injuries can be applied to training manikins in the same manner as live simulated casualties. The user is responsible for remotely activating and deactivating bleeding wounds during the simulation exercise. Skedco also offers a manikin modification and repair kit in order to retrofit hollow manikin simulators. Contact Skedco for more information.
Repaired Laerdal Crash Kelly – missing left leg and left hand
Maintenance GuidelinesSKEDCO INC. products are designed to last and we stand behind our one year factory warranty. However, any tampering or activity outside the instructed use will void the warranty for this product. Normal wear and tear is taken into account regarding our warranty. Items and situations not covered include: Discolorations and staining, rips or tears of external equipment, and batteries.
Battery MaintenanceDisconnect the HydraSim® battery and recharge after each use.**Keep the battery connected to the charger at all times when not in use. Failure to do so may result in damage to the battery.
HydraSim® Transmitter Battery Replacement MaintenanceThe HydraSim® transmitter utilizes a standard CR2032 lithium button cell. In normal use, it will provide 1 to 2 years of operation. Access for replacement is accomplished by gently prying apart the two halves of the Keyfob at the seam (fingernails or a coin will do). Once the unit is open, remove the battery by sliding it out from beneath the retainer. There may be the risk of explosion if the battery is replaced by the wrong type. Replace it with the same type of battery while observing the polarity shown in the adjacent figure.
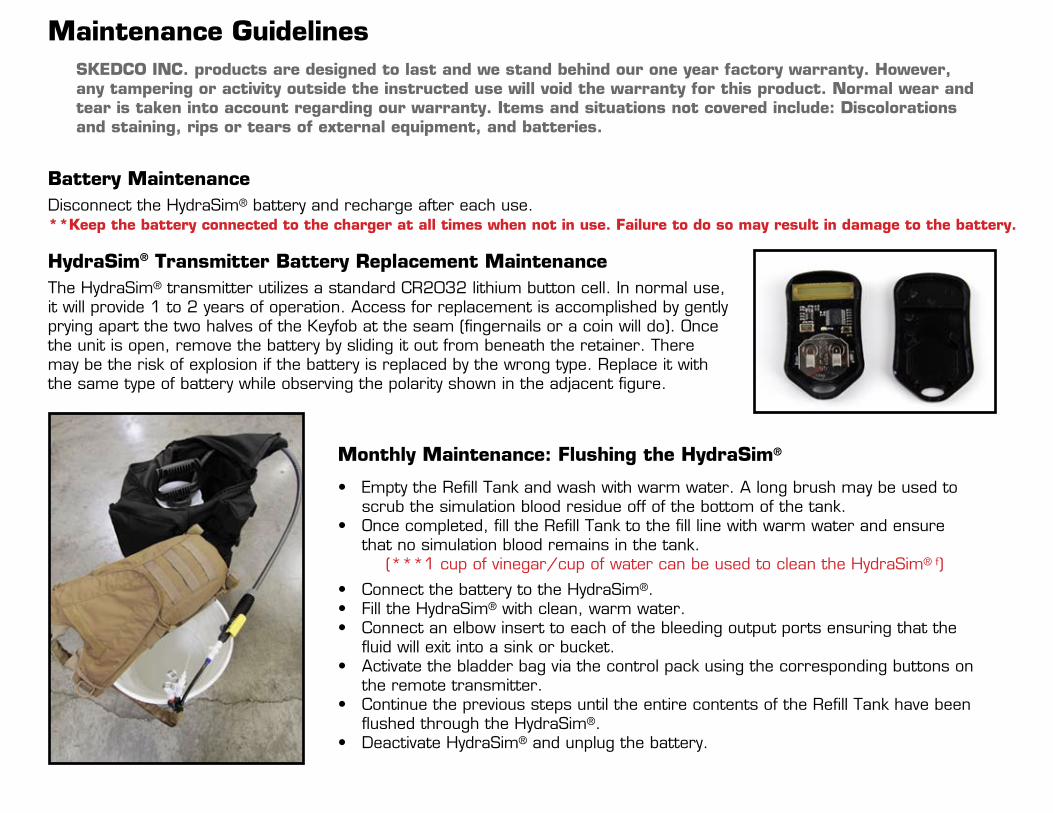
Monthly Maintenance: Flushing the HydraSim®
Empty the Refill Tank and wash with warm water. A long brush may be used to • scrub the simulation blood residue off of the bottom of the tank.Once completed, fill the Refill Tank to the fill line with warm water and ensure • that no simulation blood remains in the tank.
(***1 cup of vinegar/cup of water can be used to clean the HydraSim® f)
Connect the battery to the HydraSim• ®.Fill the HydraSim• ® with clean, warm water.Connect an elbow insert to each of the bleeding output ports ensuring that the • fluid will exit into a sink or bucket.Activate the bladder bag via the control pack using the corresponding buttons on • the remote transmitter.Continue the previous steps until the entire contents of the Refill Tank have been • flushed through the HydraSim®.Deactivate HydraSim• ® and unplug the battery.

“This pain that you hear in someone’s voice when they’re hit and disbelief… You just didn’t want to hear anyone scream anymore. That was the big difference between training and the reality.”
SGT Keni ThomasU.S. Army Ranger
Operation Gothic SerpentOctober 3, 1993
Mogadishu, Somalia
SKEDCO INC.
Copyright 2013 Skedco Inc. All rights reserved
PO Box 339010505 SW Manhasset DriveTualatin, OR 97062Web Site: www.skedco.com
Tel: 503.691.7909Fax: 503.691.7973
Order: 800.770.SKED (7533)E-mail: [email protected]
The ULTIMATE Trauma Bleeding Simulation System (TBSS)™™
®