Embed Size (px)
Citation preview

F R E E P A T T E R N
f e a t u r i n g P A N D A L I C I O U S C O L L E C T I O N B Y K A T A R I N A R O C C E L L A
Panda smilesD E S I G N E D B Y A G F S T U D I O

PND-10120BAMBOO SHOOTS LIGHT
PND-20120BAMBOO SHOOTS COOL
PND-10125HIDDEN PANDA COTTONBUD
PND-20124HIDDEN PANDA LEAF
PND-10121ZHU NECTAR
PND-20121ZHU MIST
PND-10126GANSU VILLAGE CLOUDWHITE
PND-20126GANSU VILLAGE MINTGLOW
PND-10122PANDALINGS POD ASSURED
PND-20122PANDALINGS POD NIGHT
PND-10127PANDA SAYS YUM
PND-20128PANDALINGS POD SHADOW
PND-10123NI HAO FAIRIES YU
PND-20123NI HAO FAIRIES HU
PND-10129PANDA PATCHES CONTRAST
PND-20129PANDA PATCHES BLUE
PND-10124YINGHUA CHERRYLIGHT
PND-20124YINGHUA RAIN WATER
PND-10130PANDAGARDEN RECESS
PND-20130PANDAGARDEN NAPTIME
© 2016 Courtesy of Art Gallery Quilts LLC. All Rights Reserved.
BA
O B
AO
S
WE
ET
TIA
N T
IAN
B
RE
EZ
E
F A B R I C S D E S I G N E D B Y K A T A R I N A R O C C E L L A
D E S I G N E D B Y A G F S T U D I O
Panda smiles

ar tga l le ry fabr ics.com
FINISHED SIZE | 16" x 16"
FABR IC REQUIREMENTS
CUTT ING D IRECT IONS
Fabric A PND-20129 ½ yd. Fabric B PE-413 ½ yd. Fabric C PE-408 ½ yd.
CONSTRUCT ION
Sew all rights sides together with ½"seam allowance.
Cut from Fabric A: One (1) 17" square.Two (2) 17" x 11" rectangles.Two (2) Pattern Piece A (One left side, one Right side).
Cut from Fabric B: One (1) 17" squareTwo (2) 17" x 11" rectangles.Two (2) Pattern Piece A2 (One left side, one Right side).Two (2) Pattern Piece B.Two (2) Pattern Piece C.Two (2) Pattern Piece E.
Cut from Fabric C: Two (2) Pattern Piece D.Two (2) Pattern Piece F.
Panda smiles
• This pillow is made with fusible web which is a double sided adhesive used for appliqué. Read the product instructions along with these steps.
•After cutting the squares and the rectangles from fabrics A and B take the left over piece of fabric, peel off one of the papers of the fusible web and fuse it to wrong side of the fabric, by pressing it lightly with the iron.
• Trace with a pencil each pattern piece on the paper side of the fusible. Make sure every piece is cut on the correct fabric and cut neatly on the line.
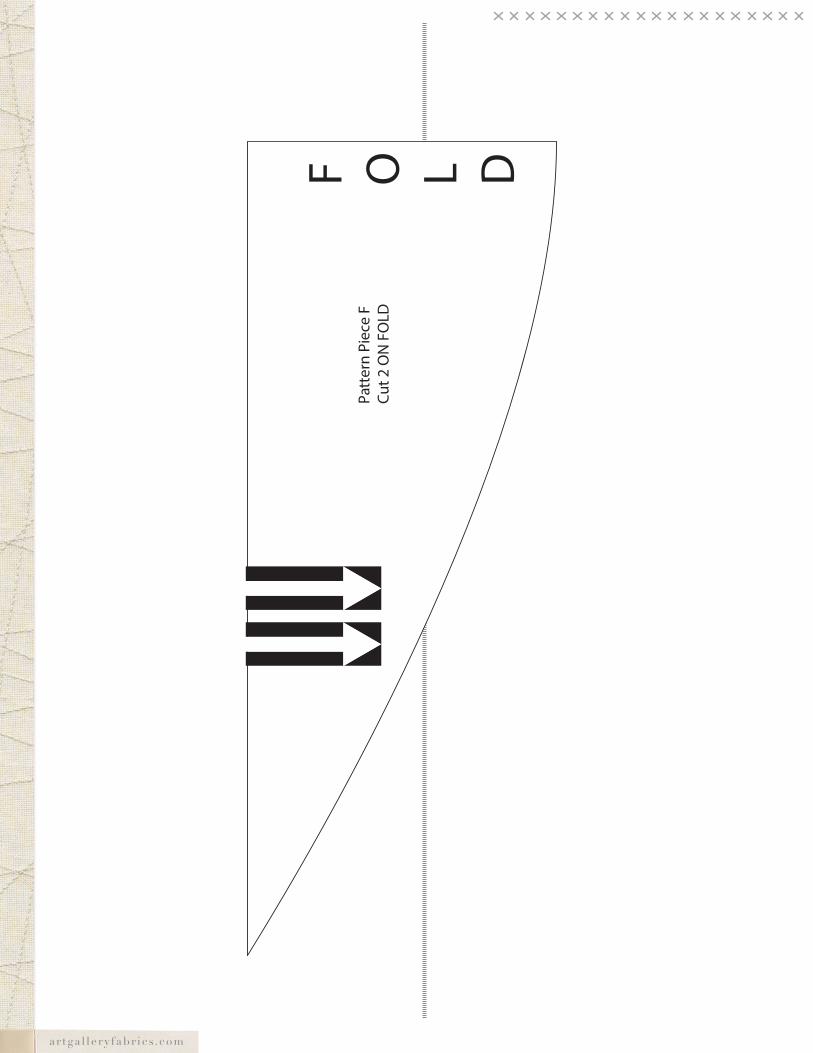
•On Fabric C notice the pattern Piece F is divided in two, Join them with tape using the arrows as notch-es then trace it and cut it like the other pieces..
•When all the pieces are cut assemble the face of the pillow in this order:
• 17" Square
•Pattern Piece F
•Pattern Piece A (or A2)
•Pattern Piece B
•Pattern Piece C (or D+E)
•Peel paper away and leave the adhesive on the fabric.
•Position the design with the glue side down and press smooth out. Now Iron.
• Cut out a piece of batting 18" x 18", smooth fabric top over it and pin in place.
•Although you can use fusible web for seams without sewing we recommend you sew the raw edges, especially on the big pieces (Pattern Piece F and A). Use a stitch that will prevent the pieces from fraying, like a zig-zag stitch or an appliqué stitch.

ar tga l le ry fabr ics.com
ASSEMBLY
Sew rights sides together.
• These pillows have an envelope style back.
• Lay your pillow top right side facing up and layer the back pieces on top, right sides facing down. Make sure the hemmed edges are overlapping each other and match the top and back edges together.
•Pin and sew together at ½" seam allowance.
• Flip right side out, making sure the corners are turned out nicely and stuff with your 16" pillow forms.
•Congrats! Time to snuggle up with your new pillows!
NOTE: While all possible care has been taken to ensure the accuracy of this pattern, We are not responsible for printing errors or the way in which individual work varies.Please read instructions carefully before starting the construction of this quilt. If desired, wash and iron your fabrics before starting to cut.
ar tga l le ry fabr ics.com
© 2016 Courtesy of Art Gallery Quilts LLC. All Rights Reserved.

ar tga l le ry fabr ics.com
Pattern Piece A
Pattern Piece A
Pattern Piece B
ar tga l le ry fabr ics.com
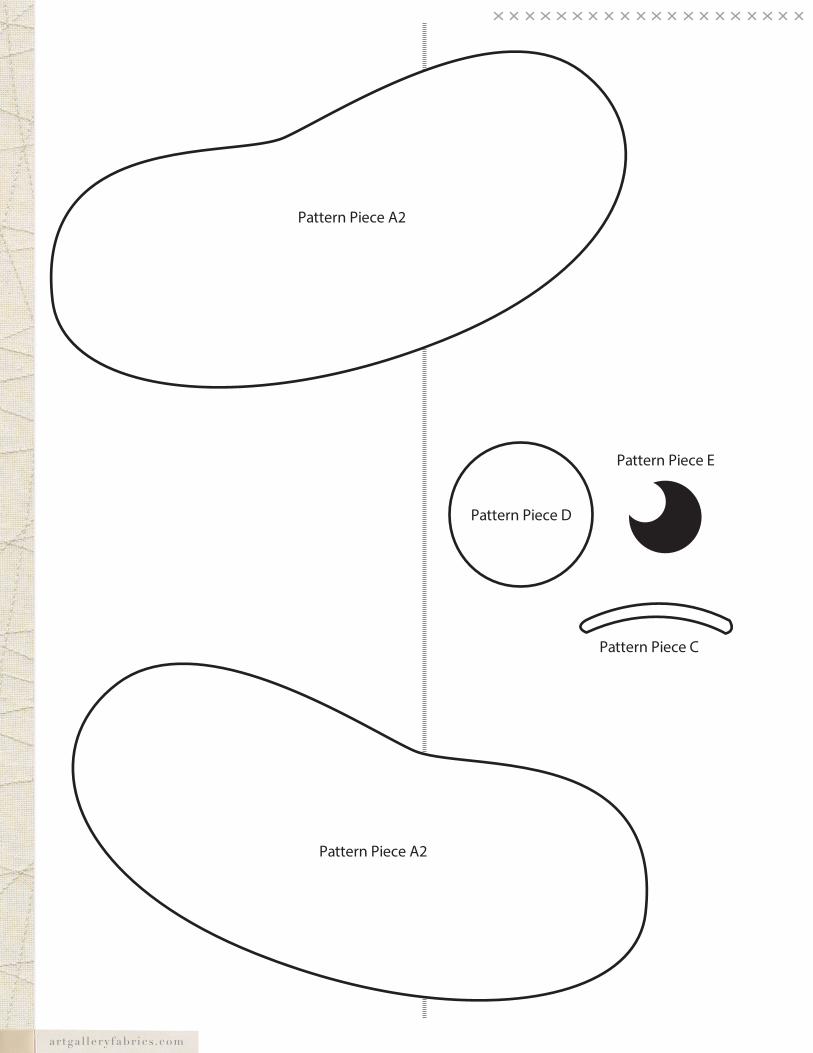
Pattern Piece A2
Pattern Piece A2
Pattern Piece C
Pattern Piece E
Pattern Piece D

ar tga l le ry fabr ics.com
Pattern Piece FCut 2 ON FOLD
FOLD
ar tga l le ry fabr ics.com
Patt
ern
Piec
e F
Cut 2
ON
FO
LD
F O L D