Embed Size (px)
Citation preview
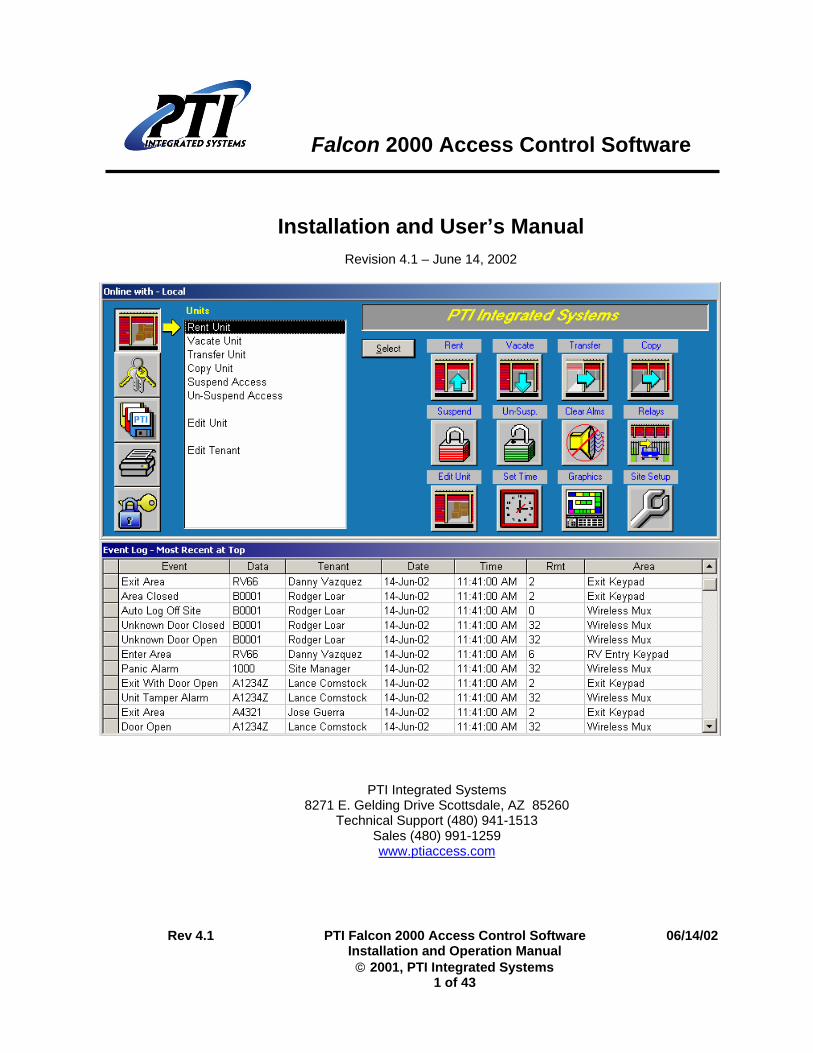
Falcon 2000 Access Control Software
Installation and User’s Manual
Revision 4.1 – June 14, 2002
PTI Integrated Systems 8271 E. Gelding Drive Scottsdale, AZ 85260
Technical Support (480) 941-1513 Sales (480) 991-1259 www.ptiaccess.com
Rev 4.1 PTI Falcon 2000 Access Control Software 06/14/02 Installation and Operation Manual © 2001, PTI Integrated Systems
1 of 43
Rev 4.1 PTI Falcon 2000 Access Control Software 06/14/02 Installation and Operation Manual © 2001, PTI Integrated Systems
2 of 43
Contents at a Glance
1 Installation 5
2 Getting started 9
3 Setting up Falcon 2000 10
4 Accounting software interface 28
5 Remote properties using a modem 29
6 Daily Functions 30
7 General Functions 37
8 Sound Events 40
9 Contacting PTI 41
Copyright © 2001-2002 PTI Integrated Systems All Rights Reserved
PTI Integrated Systems 8271 East Gelding Drive Scottsdale, AZ. 85260 Sales: 480-991-1259 Support: 480-941-1513 www.ptiaccess.com The Falcon 2000 Access Control Software Installation and Operations Manual is copyrighted and all rights are reserved. No part of this manual may be copied, photocopied, reproduced, translated or reduced to any electronic medium without the prior written consent of Preferred Technology Inc. Similarity to any person or entity seen or referred to in this manual is unintended and purely coincidental.
Table of Contents
Installation 5 System Requirements ..................................................................................... 5 Installing Falcon 2000 Access Control Software ............................................. 6 Falcon Server ................................................................................ 7 Registering Falcon 2000.................................................................................. 8
Getting started 9 Main menu overview........................................................................................ 9
Setting up Falcon 2000 10 Using protected site setup ............................................................................. 10
Unit configuration .................................................................................... 11 Remote Station Setup............................................................................. 12 Types: ..................................................................................................... 12 Functions:................................................................................................ 12 Lighting and Relay control setup............................................................. 14 Relay controls can be used for: .............................................................. 14 Elevator control setup ............................................................................. 15 Mux and channel assignment ................................................................. 16 Unit Alarm Control................................................................................... 17 Clear all information ................................................................................ 19 Print all units with passcodes.................................................................. 19 Setting up the Falcon base unit .............................................................. 20
Using standard site setup .............................................................................. 21 Time zone setup...................................................................................... 22 Holiday setup .......................................................................................... 23 Edit relays to trigger ................................................................................ 24 Edit unit sizes and prices ........................................................................ 24 Send all to the Falcon ............................................................................. 25 Retrieve all from the Falcon .................................................................... 25 Edit company settings............................................................................. 26 Print system setup................................................................................... 27
Accounting software interface 28
Remote properties using a modem 29
Daily Functions 30 Renting a unit................................................................................................. 30
Additional users per unit ......................................................................... 31 Editing Tenant Information...................................................................... 32 Single Use Unit ....................................................................................... 33 Single Use Unit ....................................................................................... 33 Ignore On-Site Doors .............................................................................. 33
Vacating a unit ............................................................................................... 34 Transferring a unit ......................................................................................... 34 Copying a unit................................................................................................ 34 Suspending a unit .......................................................................................... 34
Rev 4.1 PTI Falcon 2000 Access Control Software 06/14/02 Installation and Operation Manual © 2001, PTI Integrated Systems
3 of 43
Unsuspending a unit...................................................................................... 35

Rev 4.1 PTI Falcon 2000 Access Control Software 06/14/02 Installation and Operation Manual © 2001, PTI Integrated Systems
4 of 43
Clearing Alarms ............................................................................................. 35 Triggering relays............................................................................................ 35 Updating graphics.......................................................................................... 36 Setting the Falcons time................................................................................ 36 Editing a Unit ................................................................................................. 36
General Functions 37 Units menu..................................................................................................... 37 Manual operations menu ............................................................................... 37 Backup and restore menu ............................................................................. 38 Printing reports .............................................................................................. 38 Event log screen............................................................................................ 39
Sound Events 40
Contacting PTI 41
Index 42
Rev 4.1 PTI Falcon 2000 Access Control Software 06/14/02 Installation and Operation Manual © 2001, PTI Integrated Systems
5 of 43
Installation
System Requirements
Recommended system requirements for Falcon 2000 • PC with a Pentium II 500 MHz or higher processor • Microsoft Win98, Win2000, or WinXP • 128 MB of RAM or more • 350 MB of available hard-disk space • Working available serial communications port (9-pin) • Falcon gate access system and base unit version 2.12 or higher with built in interface. Upgrades
are available on most older Falcon versions. • PTI serial cable; do not use a standard serial cable. • CD-ROM drive • SVGA or higher-resolution graphics card • Mouse or compatible pointing device • Sound card and speakers for Falcon 2000 sound events (not required) • PC Anywhere for Windows (not required but is used for dial in technical support) • Modem (Refer to remote site specification for more details)
If you are using any other software along with the Falcon 2000, make sure your computer exceeds the requirements for all of your software.

Rev 4.1 PTI Falcon 2000 Access Control Software 06/14/02 Installation and Operation Manual © 2001, PTI Integrated Systems
6 of 43
Installing Falcon 2000 Access Control Software
1. Before installing, we recommend closing all open applications. 2. Place the Falcon 2000 Access Control Software CD in the CD-ROM drive and then close
the drive. If your CD-ROM has the AutoPlay option turned on, the installation program will begin at this point.
3. If the installation program does not start automatically, click on the Start Button and select “Run”. At the Run prompt type D:\Setup and click OK. If D: is not the drive letter of your CD-ROM drive, type the appropriate drive letter in its place. The installation program will begin.
4. Click on the Next button two times and the files will begin to be copied to your hard drive. 5. After the Falcon 2000 files are copied, the Accounting Software Link Program install will
begin with a warning note. Please read the message and click OK to continue with installation.
6. Next, decide which folder you want the program in. The default folder is C:\PTI. It is recommended that the default folder be used. If you have multiple accounting software databases or multiple PTI gate access systems the Link program can be installed multiple times in separate folders. If you wish to install the program to a different folder, type in your own folder or click the Browse button to find a different folder. Click the Next button to continue.
7. After the installation is complete you will be prompted to reboot your computer. Please reboot before attempting to start the Falcon 2000 software.
8. The installation program will copy files from the CD-Rom to your hard drive. The program needs less than 10MB of room on your hard drive but much more room is recommended for Windows.
9. To run the program, just click of the new “Falcon 2000” icon on your Desktop or click on the Start Button and then click on Programs > Falcon 2000 > Falcon 2000.
Falcon Server
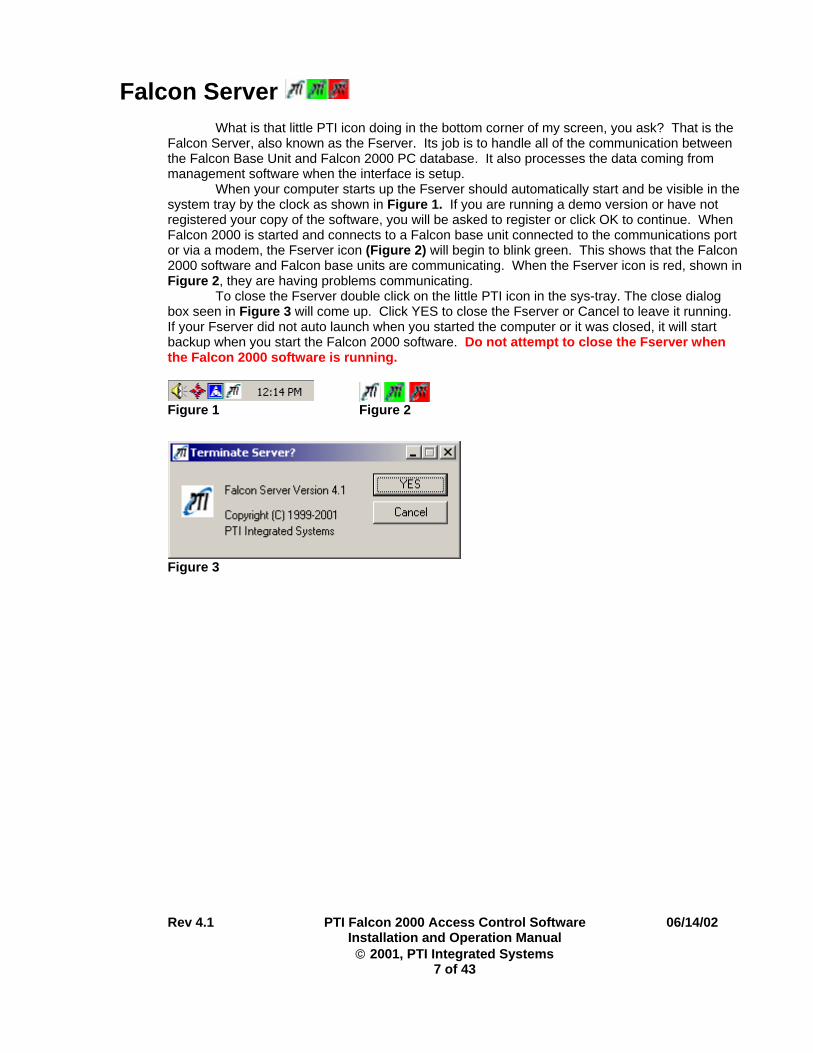
What is that little PTI icon doing in the bottom corner of my screen, you ask? That is the Falcon Server, also known as the Fserver. Its job is to handle all of the communication between the Falcon Base Unit and Falcon 2000 PC database. It also processes the data coming from management software when the interface is setup.
When your computer starts up the Fserver should automatically start and be visible in the system tray by the clock as shown in Figure 1. If you are running a demo version or have not registered your copy of the software, you will be asked to register or click OK to continue. When Falcon 2000 is started and connects to a Falcon base unit connected to the communications port or via a modem, the Fserver icon (Figure 2) will begin to blink green. This shows that the Falcon 2000 software and Falcon base units are communicating. When the Fserver icon is red, shown in Figure 2, they are having problems communicating.
To close the Fserver double click on the little PTI icon in the sys-tray. The close dialog box seen in Figure 3 will come up. Click YES to close the Fserver or Cancel to leave it running. If your Fserver did not auto launch when you started the computer or it was closed, it will start backup when you start the Falcon 2000 software. Do not attempt to close the Fserver when the Falcon 2000 software is running.
Figure 1 Figure 2
Figure 3
Rev 4.1 PTI Falcon 2000 Access Control Software 06/14/02 Installation and Operation Manual © 2001, PTI Integrated Systems
7 of 43
Rev 4.1 PTI Falcon 2000 Access Control Software 06/14/02 Installation and Operation Manual © 2001, PTI Integrated Systems
8 of 43
Registering Falcon 2000 Demo Version If the Falcon 2000 software was sent to you as a demo version, you will have 30 days to examine the program. After the 30 days, the software will not run and must be uninstalled. When the Falcon Server starts, it will ask for an activation code. Click OK to continue without registering the software. If you would like to purchase the software, contact the Business Development Department at PTI. After the software has been purchased, you will be given an activation code that will make the demo a full version. Full Version After the installation of the software and the computer reboots, you will be asked to provide an activation code. Call PTI Technical Support Department and provide them with the site name, address, and purchase information. Once the purchase is verified, you will be asked for the 8-digit serial number and given an activation code. When the proper code is entered, the 30-day demo count down will stop and become a permanent full version of the software for the computer it was installed on. The activation code is computer specific and will not work on a second computer. If it is not convenient to contact PTI at the time of installation to register the software, it can be ran as a demo for up to 30-days. See Demo Version explanation above.
Getting started
This operations manual will help you through the following topics: • The initial setup is done with the protected site setup menu. • The remainder of the setup is done with the standard site setup menu. • The Falcon 2000 software can be linked to Accounting software and receive rental information that
will be passed to the Falcon base unit. • The final part of the manual will explain how to use the Falcon 2000 software.
If the setup has already been done go to the section about “Using Falcon 2000”.
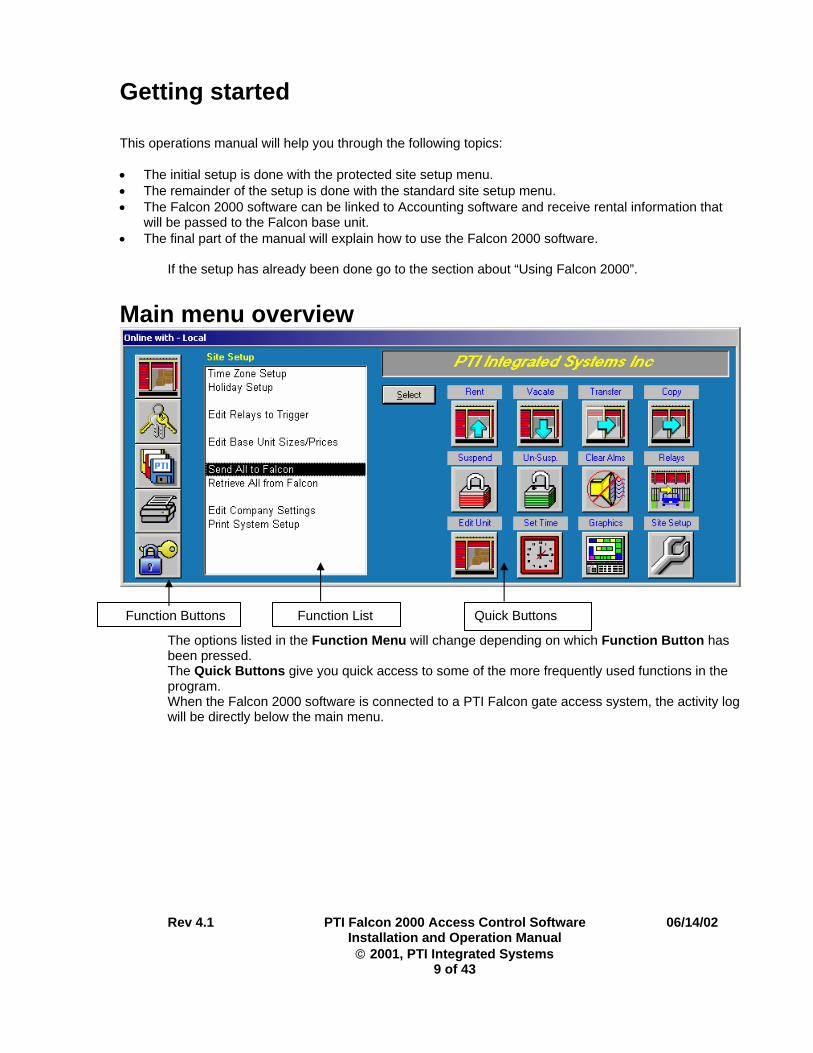
Main menu overview
Quick Buttons
Function ButtonsRev 4.1
The options listed been pressed. The Quick Buttonprogram. When the Falcon 2will be directly belo
Function List
PTI Falcon 2000 Access Control Software 06/14/02 Installation and Operation Manual © 2001, PTI Integrated Systems
9 of 43
in the Function Menu will change depending on which Function Button has
s give you quick access to some of the more frequently used functions in the
000 software is connected to a PTI Falcon gate access system, the activity log w the main menu.
Setting up Falcon 2000
Using protected site setup
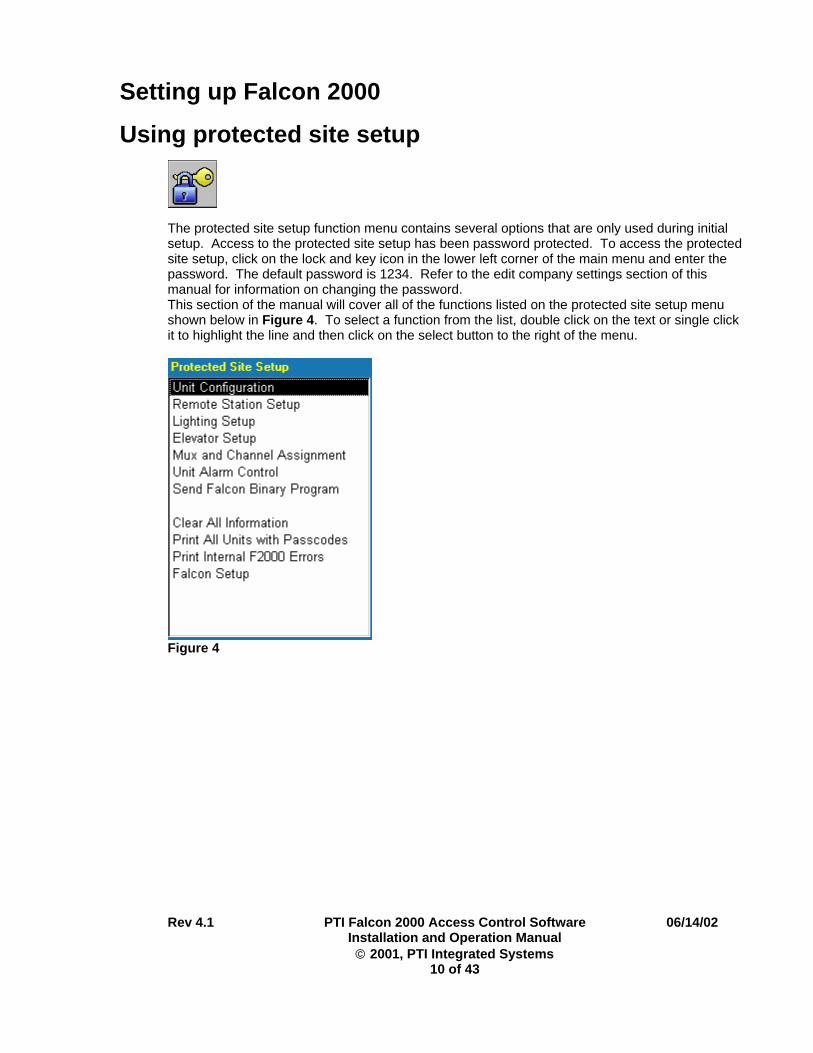
The protected site setup function menu contains several options that are only used during initial setup. Access to the protected site setup has been password protected. To access the protected site setup, click on the lock and key icon in the lower left corner of the main menu and enter the password. The default password is 1234. Refer to the edit company settings section of this manual for information on changing the password. This section of the manual will cover all of the functions listed on the protected site setup menu shown below in Figure 4. To select a function from the list, double click on the text or single click it to highlight the line and then click on the select button to the right of the menu.
Figure 4
Rev 4.1 PTI Falcon 2000 Access Control Software 06/14/02 Installation and Operation Manual © 2001, PTI Integrated Systems
10 of 43
Unit configuration Setting up units can be done two different ways. The units can be added automatically when information is downloaded from compatible accounting software that is interfaced to the Falcon 2000 or setup in advance using the unit configuration screen. The automatic setup from accounting software is recommended. To setup the interface link, see the Accounting software interface section.
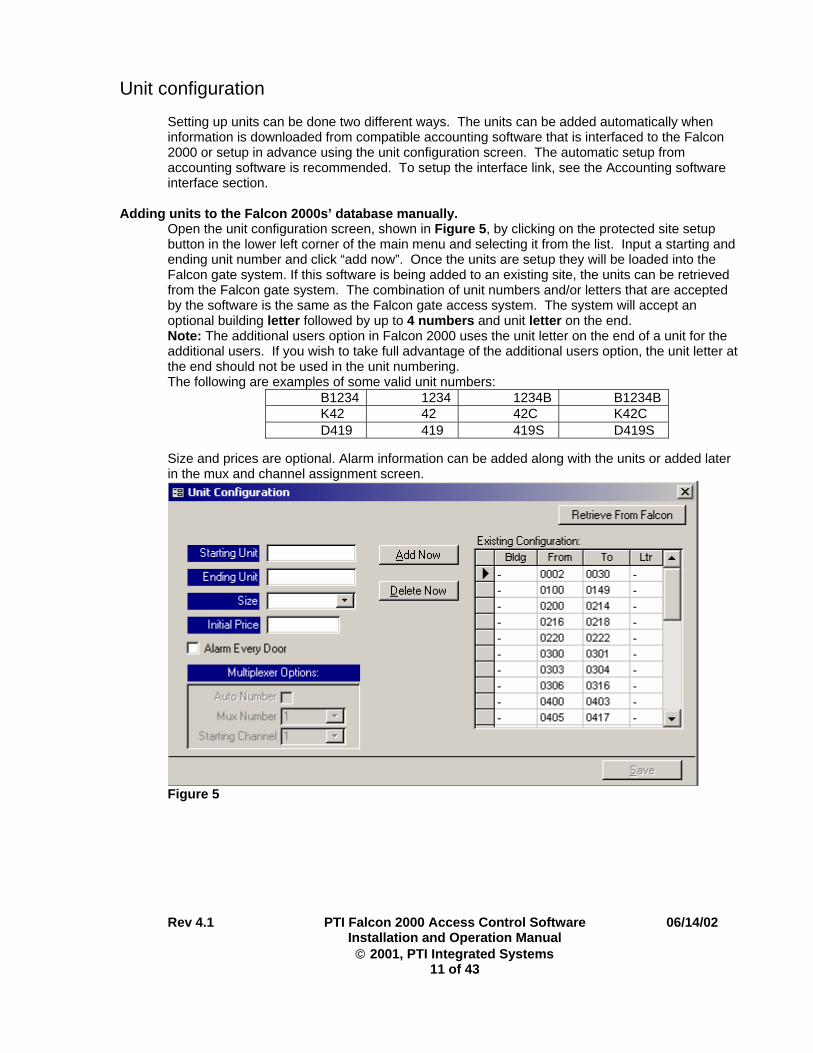
Adding units to the Falcon 2000s’ database manually. Open the unit configuration screen, shown in Figure 5, by clicking on the protected site setup button in the lower left corner of the main menu and selecting it from the list. Input a starting and ending unit number and click “add now”. Once the units are setup they will be loaded into the Falcon gate system. If this software is being added to an existing site, the units can be retrieved from the Falcon gate system. The combination of unit numbers and/or letters that are accepted by the software is the same as the Falcon gate access system. The system will accept an optional building letter followed by up to 4 numbers and unit letter on the end. Note: The additional users option in Falcon 2000 uses the unit letter on the end of a unit for the additional users. If you wish to take full advantage of the additional users option, the unit letter at the end should not be used in the unit numbering. The following are examples of some valid unit numbers:
B1234 1234 1234B B1234BK42 42 42C K42C D419 419 419S D419S
Size and prices are optional. Alarm information can be added along with the units or added later in the mux and channel assignment screen.
Figure 5
Rev 4.1 PTI Falcon 2000 Access Control Software 06/14/02 Installation and Operation Manual © 2001, PTI Integrated Systems
11 of 43

Rev 4.1 PTI Falcon 2000 Access Control Software 06/14/02 Installation and Operation Manual © 2001, PTI Integrated Systems
12 of 43
Remote Station Setup All the remote devices on the PTI Falcon access control system are setup using this screen. You will be telling the system what type of remote it is and what it will be used for. This also defines what it will be referred to as by the system. Open the remote station setup screen, shown in Figure 6, by clicking on the protected site setup button in the lower left corner of the main menu and selecting it from the list. Choose the Remote number to be setup from the pull down list. Select the Type of remote device that the remote number is. If the remote is an access point check the Function that it will be performing. The access points can also be set to trip the relay on itself or another remote device. This feature can be used to eliminate the need for the gate open trip wires being run to the entrance keypad. The gate open wires can be ran to the exit keypad only and the entrance setup to open the gate with the exit keypads relay. This configuration offers higher security by not running the gate open wires to the outside of the site. The default is for the access points to trip themselves. Log On/Off Site must be checked if the access point is the main way to get into the property and PTI individual door alarms are being used. When a user is logged onsite the unit alarm will be deactivated and the unit will show the onsite color on the PTI site graphics display, if applicable. Relay Times are how long the remote device holds its relay to trip an access device (gate motor, barrier arm or door strike). 2 seconds is the default for access points and should be long enough for gate motors. The amount of time a gate motor stays open for once it has been told to open is set in the gate motor and will not be affected by the relay time. If the access point is tripping a door strike, the relay time will need to be extended. The Description, if one is typed, will be displayed in the event log. If the remotes have already been setup with function 18 on an existing Falcon gate access system, the settings can be retrieved. The description field will not be retrieved. Types and Functions of the remote stations are explained on the next page.
Types: • Keypad, Card Swipe, or Wiegand are three types of access devices for the system. • Apex is the next generation of access devices from PTI. It has many additional features that the
Keypad and Card Swipe don’t have. Contact PTI for more details. • Relay Board is used with Lighting/Relay. For Elevator Controls, the relay times may need to be
set longer. • Multiplexer is the alarm board for the individual unit door alarms. • Intercom Mux is used to introduce intercom calls as events into the access system. Used with
NEM style intercoms only. • Wireless Mux this is our next generation of wireless door alarms for more info Contact PTI.
Functions: • Exit and Entry are set so the system knows if the user is entering or exiting the site. • Log On/Off Site This box MUST be checked when using door alarms both wireless and wired.
This turns the unit alarm Off when the customer enters the facility and On when they leave. This should only be checked for the two main keypads.
• Both is checked when the access device will be an entry the first time a user enters their code and an exit the next time. This is also known as a Dual-Function access device.
• Elevator is checked when the access device is used at an elevator. The internal relay is disabled on these devices it must use a relay board to activate the floor buttons. Requires configuring Elevator Setup.
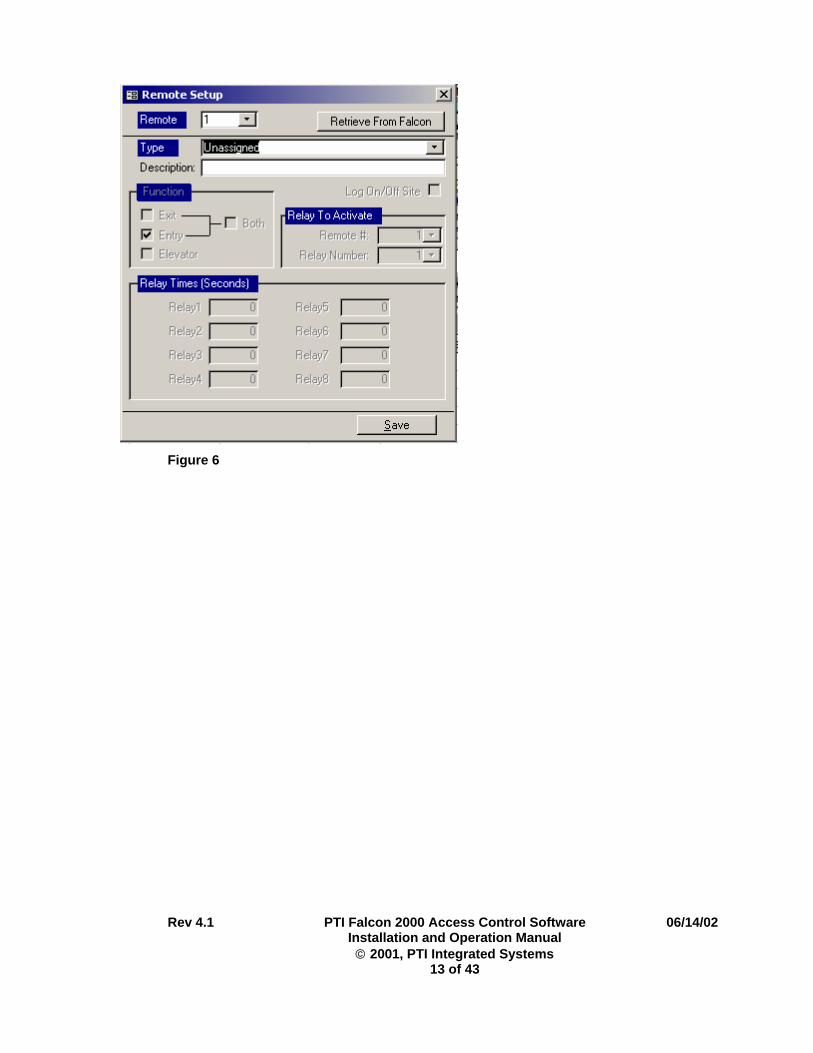
Figure 6
Rev 4.1 PTI Falcon 2000 Access Control Software 06/14/02 Installation and Operation Manual © 2001, PTI Integrated Systems
13 of 43

Lighting and Relay control setup
Relay boards can be added to control various devices that are attached to the system. Up to 64 Lighting/Relay control zones can be defined. Each zone must control its own relay; so 64 zones would require 8 – 8 channel relay boards. Please refer to the Falcon access system hardware installation manual for more details. A unit number range is assigned to a relay board and a relay on that board. When a user logs onto the property the system will activate the relay based on the users unit number. The relay will be held until all users for that zone have logged out. A relay release delay can be set so users can exit an area that is protected by motion sensors or perimeter beams before arming them. Open the lighting setup screen, shown in Figure 7, by clicking on the protected site setup button in the lower left corner of the main menu and selecting it from the list. If the Lighting/Relay controls have already been setup with function 20 on an existing Falcon gate access system, the settings can be retrieved. This form also shows the number of zones enabled in the Falcon. To enable more zones contact PTI Tech Support.
Relay controls can be used for: • Turning on and off area lights • Shunting perimeter beams • Shunting motion sensors
• Activating a CCTV recorder • And many more
Figure 7
Rev 4.1 PTI Falcon 2000 Access Control Software 06/14/02 Installation and Operation Manual © 2001, PTI Integrated Systems
14 of 43

Elevator control setup
The elevator controls are setup similar to the relay controls using unit number ranges and relay boards. This option will tell the system which floor the user is to be taken to after they have logged in at the elevator. The system will support up to 8 elevators with up to 9 floors each, any combination of buildings and floors. Open the elevator setup screen, shown in Figure 8, by clicking on the protected site setup button in the lower left corner of the main menu and selecting it from the list. Floor 1 is the first floor above the ground level. Find out the Relay Board number and relay being used from your hardware installation company. Enter the range of units that are on Floor 1 with the Starting Unit and Ending Unit fields. Continue this for the other floors that will be controlled. Remember that the access device at the elevator must be defined as used for elevator control and which elevator it is controlling. If you are using Lighting/Relay Controls and Elevator Controls, the Keypad at the elevator should not be set to log on/off site. Each elevator must have its own access point. The normal place for it is in the elevator cab installed with a 12-conductor traveling cable. The PTI 8-channel relay board is installed in or near the elevator control room. The relay board is normally connected to the floor buttons in series. This will allow the floor buttons in the cab to be pressed and not pressed for the user. If the tenant requires access to multiple floors, they can choose the one they need at that time. If the elevator controls have already been setup with function 19 on an existing Falcon gate access system, the settings can be retrieved.
Figure 8
Rev 4.1 PTI Falcon 2000 Access Control Software 06/14/02 Installation and Operation Manual © 2001, PTI Integrated Systems
15 of 43
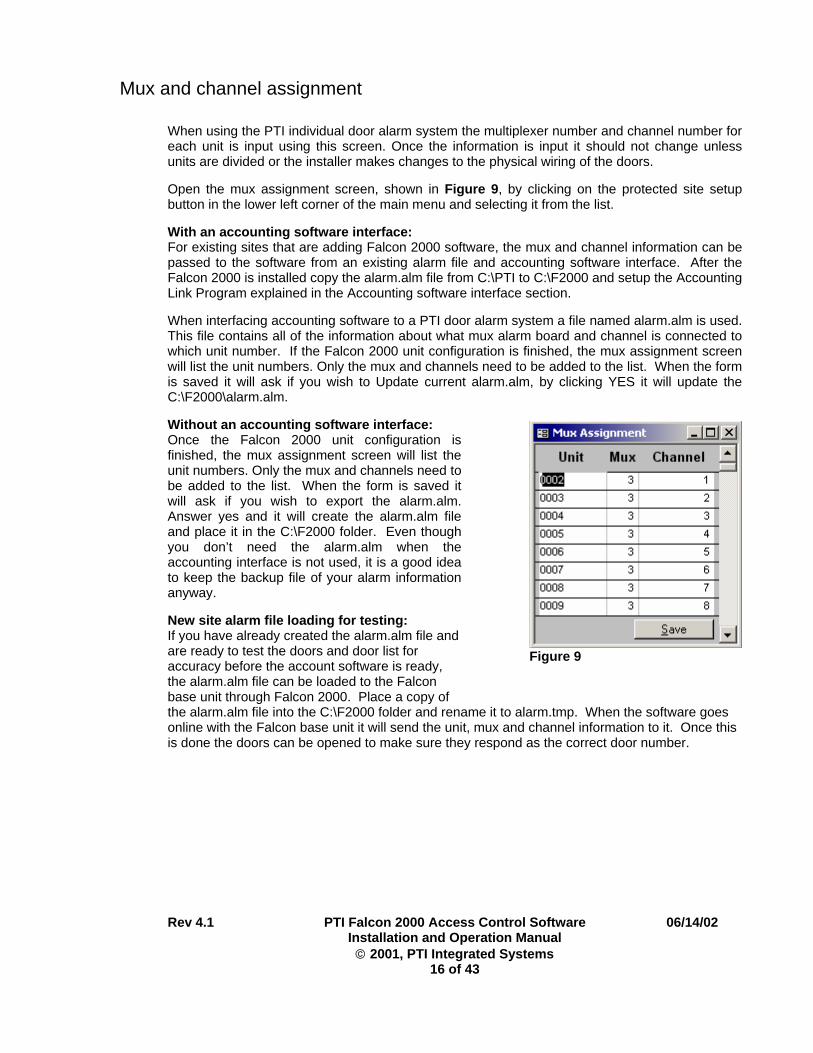
Mux and channel assignment
When using the PTI individual door alarm system the multiplexer number and channel number for each unit is input using this screen. Once the information is input it should not change unless units are divided or the installer makes changes to the physical wiring of the doors. Open the mux assignment screen, shown in Figure 9, by clicking on the protected site setup button in the lower left corner of the main menu and selecting it from the list. With an accounting software interface: For existing sites that are adding Falcon 2000 software, the mux and channel information can be passed to the software from an existing alarm file and accounting software interface. After the Falcon 2000 is installed copy the alarm.alm file from C:\PTI to C:\F2000 and setup the Accounting Link Program explained in the Accounting software interface section. When interfacing accounting software to a PTI door alarm system a file named alarm.alm is used. This file contains all of the information about what mux alarm board and channel is connected to which unit number. If the Falcon 2000 unit configuration is finished, the mux assignment screen will list the unit numbers. Only the mux and channels need to be added to the list. When the form is saved it will ask if you wish to Update current alarm.alm, by clicking YES it will update the C:\F2000\alarm.alm. Without an accounting software interface:
Rev 4.1 PTI Falcon 2000 Access Control Software 06/14/02 Installation and Operation Manual © 2001, PTI Integrated Systems
16 of 43
Once the Falcon 2000 unit configuration is finished, the mux assignment screen will list the unit numbers. Only the mux and channels need to be added to the list. When the form is saved it will ask if you wish to export the alarm.alm. Answer yes and it will create the alarm.alm file and place it in the C:\F2000 folder. Even though you don’t need the alarm.alm when the accounting interface is not used, it is a good idea to keep the backup file of your alarm information anyway. New site alarm file loading for testing: If you have already created the alarm.alm file and are ready to test the doors and door list for accuracy before the account software is ready, the alarm.alm file can be loaded to the Falcon base unit through Falcon 2000. Place a copy of the alarm.alm file into the C:\F2000 folder and rename it to alarm.tmp. When the software goes online with the Falcon base unit it will send the unit, mux and channel information to it. Once this is done the doors can be opened to make sure they respond as the correct door number.
Figure 9

Unit Alarm Control When using the PTI individual door alarm system the alarm for each unit can be turned either ON or OFF in this function. To use this feature it requires that your Falcon hardware version be V4.04 or higher. You can select a single unit or multiple units by holding either the Shift or Control button while selecting units. An event is put into the Event Log whenever a units alarm is turned ON or OFF, if multiple units are selected it will create an event for each unit. By clicking on the Toggle button this will toggle the unit alarm to either ON or OFF depending on its current state. The state of the unit alarm is displayed on the right column showing either ON or OFF. If you click on the Alarm On button it will turn the unit alarm ON no matter what the previous state was. If you click on the Alarm Off button it will turn the unit alarm OFF no matter what the previous state was. These buttons will also work if you have multiple units selected.
Rev 4.1 PTI Falcon 2000 Access Control Software 06/14/02 Installation and Operation Manual © 2001, PTI Integrated Systems
17 of 43
Rev 4.1 PTI Falcon 2000 Access Control Software 06/14/02 Installation and Operation Manual © 2001, PTI Integrated Systems
18 of 43
Send Falcon Binary Program Update Note: This is not for upgrading the Falcon 2000 software, this is for the hardware only.
Warning: When reprogramming the Falcon base unit there is always a risk of it not accepting the new program properly and leaving you without an operating access and security system. PTI recommends having the upgrades done by PTI only.
Note: 4.0 and higher version Falcon base units have a new Non-Volatile memory and a real time clock. Non-Volatile memory means no more losing unit information during extended power outages. Real time clock means that when the power comes back on, the time and date are still correct and the system begins normal operation, even in the middle of the night. Due to this change in memory types, older Falcons cannot be reprogrammed to version 4.0 or higher and Version 4.x Falcons cannot be downgraded to Version 3.10 or lower. If you have an existing 16 function Falcon or 24 function Falcon versions 2.12 or 3.10 and would like to upgrade to 4.x with the non-volatile memory you must contact PTI to make arrangements for the unit to be sent in for upgrade. Rental equipment may be available from PTI during the upgrade. At times there are changes to the Falcon base units internal software. When a change is made to the Falcon base units program the update will be available on our web page. None of these changes are mandatory for your system to continue working properly. To send the hardware update, click on the protected site setup button in the lower left corner of the main menu and select it from the list. This field has been password protectd to prevent anyone from reprogramming the falcon to obtain this password please call PTI Tech Support. A dialog box will open where you can locate the correct program file to use. When the file is selected the reprogramming will begin. It will take 2-3 minutes to complete this process, on V4.x of falcons the display will show “Loading Firmware Update”. During this time the PTI access and security system will not function. Once the reprogramming is finished you will need to power down the falcon, close Falcon 2000, and the Falcon Server. Once that has been done turn the Falcon back on restart the Falcon 2000 software and send all of the unit information to the Falcon base unit using the “Send All to Falcon” function in Site Setup.

Rev 4.1 PTI Falcon 2000 Access Control Software 06/14/02 Installation and Operation Manual © 2001, PTI Integrated Systems
19 of 43
Clear all information This option will clear information out of specific areas of the Falcon 2000 software and the Falcon base unit. You will be asked the following questions. If you answer yes to any of the questions you will be asked to confirm your answer. To start clearing information, click on the protected site setup button in the lower left corner of the main menu and select it from the list.
Clear all units in the Falcon? This will clear all user codes and unit data from the Falcon base unit.
Clear all units in the PC database? This will clear all user codes and unit data from the
Falcon 2000 software. Clear all tenant in the PC database? This will clear all user names and codes from the Falcon
2000 software but leave the units available to rent. Delete event data on or before date? This will ask you for a date and then delete all activity on
or before that date. This activity cannot be restored after deleting.
Restore PC database to defaults? This will reset all remotes, time zones, units, elevators
etc… to the installed defaults. Print all units with passcodes
This option will show all the unit data with the passcodes in a print preview window and allow you to send it to a printer.
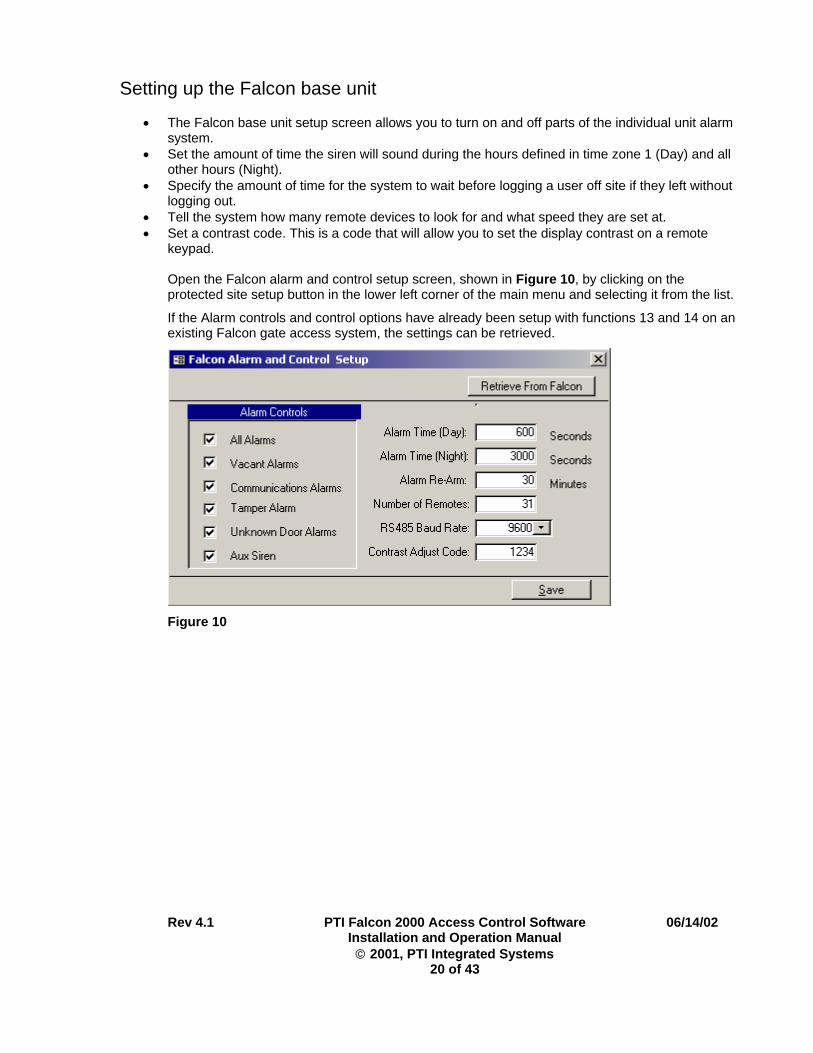
Setting up the Falcon base unit
• The Falcon base unit setup screen allows you to turn on and off parts of the individual unit alarm system.
• Set the amount of time the siren will sound during the hours defined in time zone 1 (Day) and all other hours (Night).
• Specify the amount of time for the system to wait before logging a user off site if they left without logging out.
• Tell the system how many remote devices to look for and what speed they are set at. • Set a contrast code. This is a code that will allow you to set the display contrast on a remote
keypad. Open the Falcon alarm and control setup screen, shown in Figure 10, by clicking on the protected site setup button in the lower left corner of the main menu and selecting it from the list.
If the Alarm controls and control options have already been setup with functions 13 and 14 on an existing Falcon gate access system, the settings can be retrieved.
Figure 10
Rev 4.1 PTI Falcon 2000 Access Control Software 06/14/02 Installation and Operation Manual © 2001, PTI Integrated Systems
20 of 43
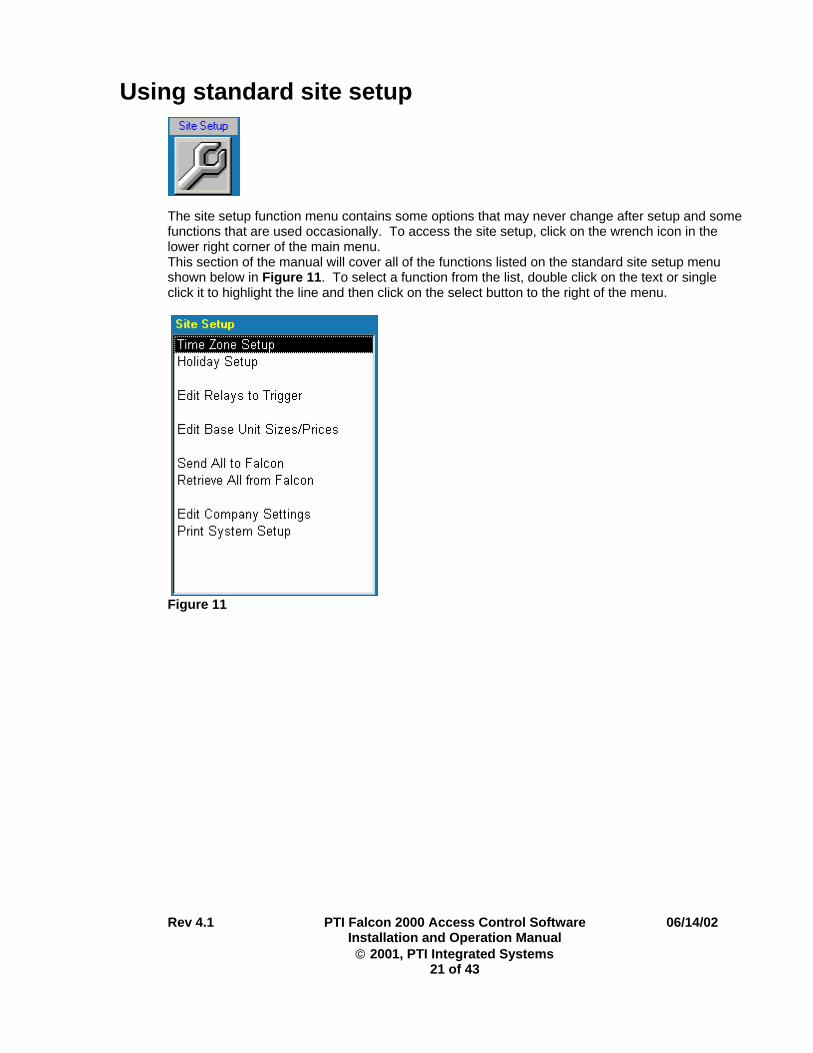
Using standard site setup
The site setup function menu contains some options that may never change after setup and some functions that are used occasionally. To access the site setup, click on the wrench icon in the lower right corner of the main menu. This section of the manual will cover all of the functions listed on the standard site setup menu shown below in Figure 11. To select a function from the list, double click on the text or single click it to highlight the line and then click on the select button to the right of the menu.
Figure 11
Rev 4.1 PTI Falcon 2000 Access Control Software 06/14/02 Installation and Operation Manual © 2001, PTI Integrated Systems
21 of 43
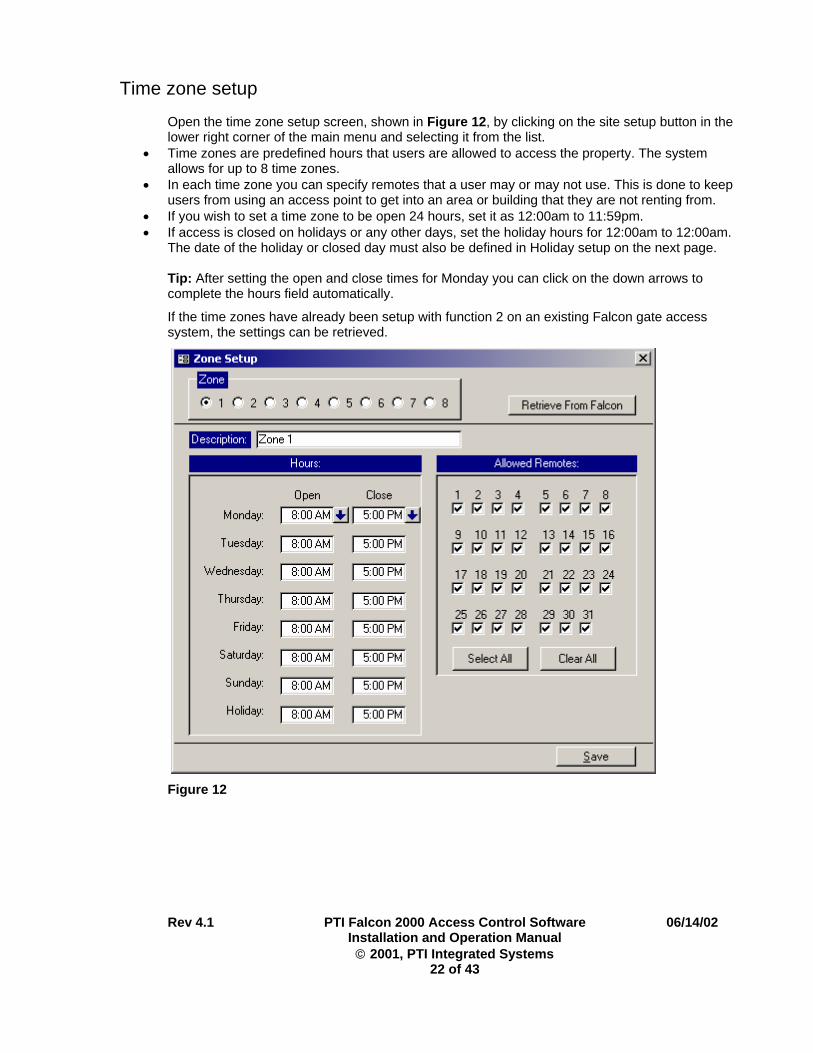
Time zone setup Open the time zone setup screen, shown in Figure 12, by clicking on the site setup button in the lower right corner of the main menu and selecting it from the list.
• Time zones are predefined hours that users are allowed to access the property. The system allows for up to 8 time zones.
• In each time zone you can specify remotes that a user may or may not use. This is done to keep users from using an access point to get into an area or building that they are not renting from.
• If you wish to set a time zone to be open 24 hours, set it as 12:00am to 11:59pm. • If access is closed on holidays or any other days, set the holiday hours for 12:00am to 12:00am.
The date of the holiday or closed day must also be defined in Holiday setup on the next page. Tip: After setting the open and close times for Monday you can click on the down arrows to complete the hours field automatically.
If the time zones have already been setup with function 2 on an existing Falcon gate access system, the settings can be retrieved.
Figure 12
Rev 4.1 PTI Falcon 2000 Access Control Software 06/14/02 Installation and Operation Manual © 2001, PTI Integrated Systems
22 of 43
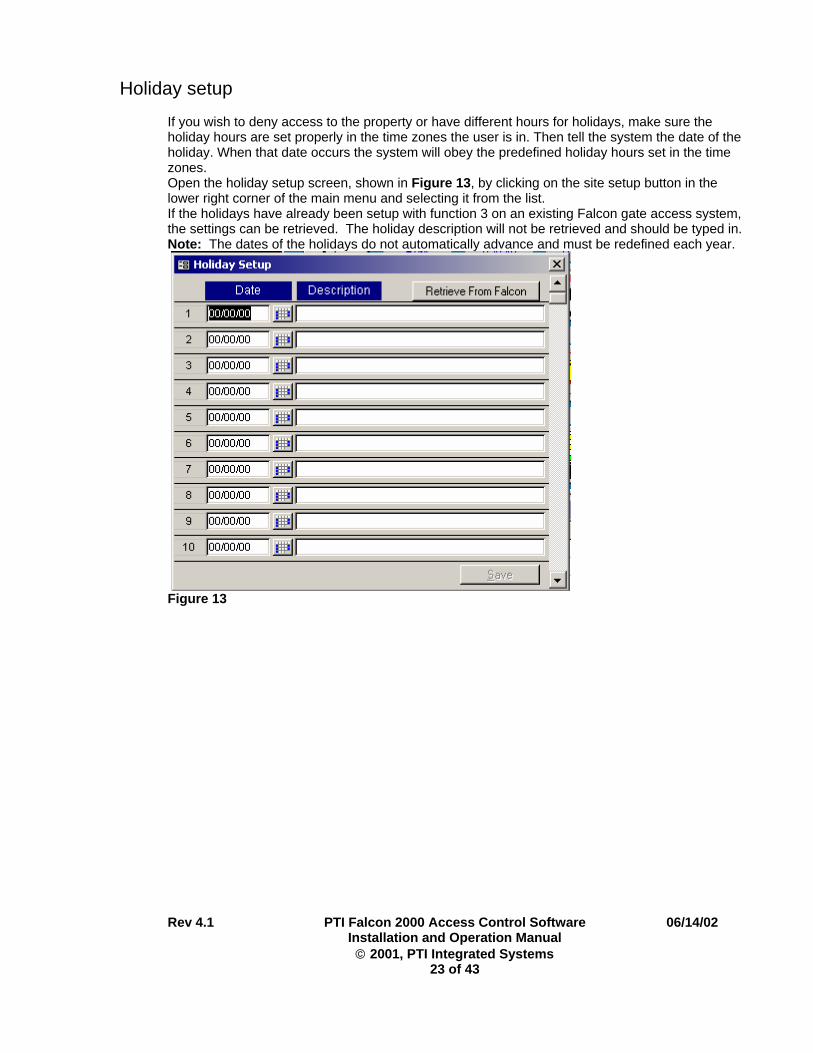
Holiday setup If you wish to deny access to the property or have different hours for holidays, make sure the holiday hours are set properly in the time zones the user is in. Then tell the system the date of the holiday. When that date occurs the system will obey the predefined holiday hours set in the time zones. Open the holiday setup screen, shown in Figure 13, by clicking on the site setup button in the lower right corner of the main menu and selecting it from the list. If the holidays have already been setup with function 3 on an existing Falcon gate access system, the settings can be retrieved. The holiday description will not be retrieved and should be typed in. Note: The dates of the holidays do not automatically advance and must be redefined each year.
Figure 13
Rev 4.1 PTI Falcon 2000 Access Control Software 06/14/02 Installation and Operation Manual © 2001, PTI Integrated Systems
23 of 43
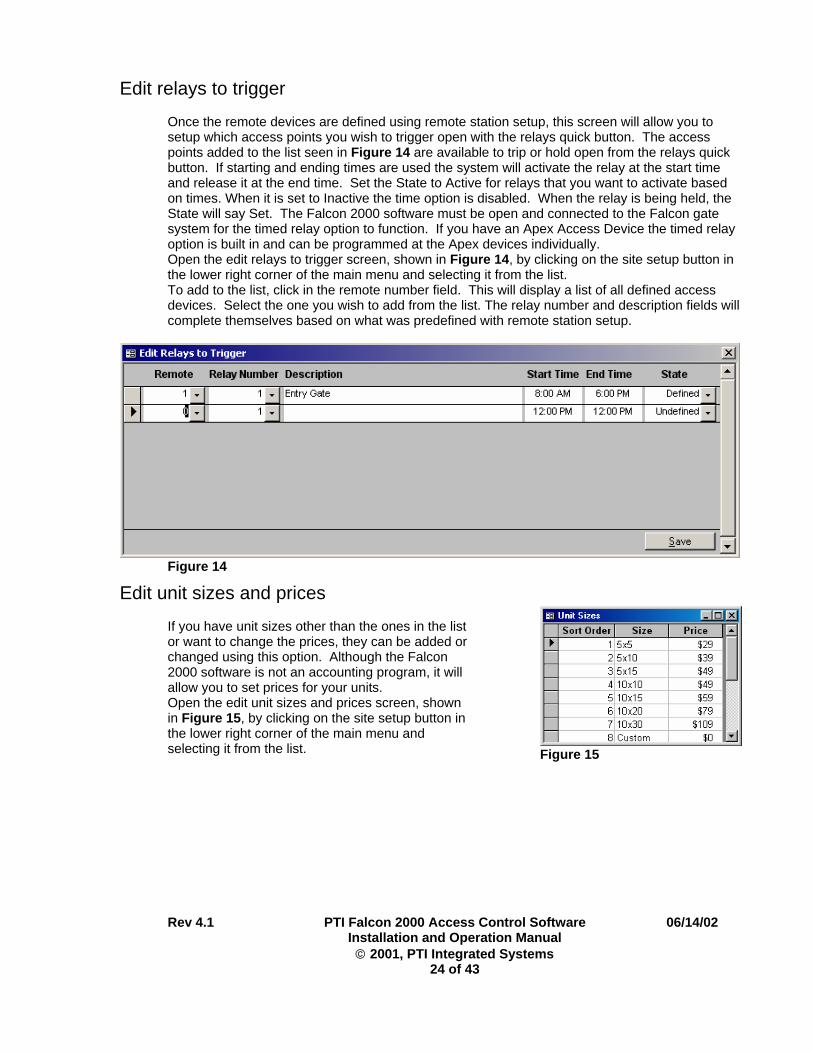
Edit relays to trigger Once the remote devices are defined using remote station setup, this screen will allow you to setup which access points you wish to trigger open with the relays quick button. The access points added to the list seen in Figure 14 are available to trip or hold open from the relays quick button. If starting and ending times are used the system will activate the relay at the start time and release it at the end time. Set the State to Active for relays that you want to activate based on times. When it is set to Inactive the time option is disabled. When the relay is being held, the State will say Set. The Falcon 2000 software must be open and connected to the Falcon gate system for the timed relay option to function. If you have an Apex Access Device the timed relay option is built in and can be programmed at the Apex devices individually. Open the edit relays to trigger screen, shown in Figure 14, by clicking on the site setup button in the lower right corner of the main menu and selecting it from the list. To add to the list, click in the remote number field. This will display a list of all defined access devices. Select the one you wish to add from the list. The relay number and description fields will complete themselves based on what was predefined with remote station setup.
Figure 14
Edit unit sizes and prices
Figure 15
If you have unit sizes other than the ones in the list or want to change the prices, they can be added or changed using this option. Although the Falcon 2000 software is not an accounting program, it will allow you to set prices for your units. Open the edit unit sizes and prices screen, shown in Figure 15, by clicking on the site setup button in the lower right corner of the main menu and selecting it from the list.
Rev 4.1 PTI Falcon 2000 Access Control Software 06/14/02 Installation and Operation Manual © 2001, PTI Integrated Systems
24 of 43

Rev 4.1 PTI Falcon 2000 Access Control Software 06/14/02 Installation and Operation Manual © 2001, PTI Integrated Systems
25 of 43
Send all to the Falcon When you select this option the system will load all of the unit information as well as remote configurations, time zones and other setup data from the Falcon 2000 software into the Falcon base unit. You will be asked if you want to clear all units in the Falcon first. If you have all the unit information in the software then it is safe to clear the Falcon first. When you clear the units in the Falcon you will be removing old units that may not be used anymore. To send all of the information to the Falcon base unit, click on the site setup button in the lower right corner of the main menu and selecting it from the list. Caution: If the information in the software is not correct or nonexistent, the Falcon base unit is still overwritten with this data. Send all to the Falcon only if the Falcon 2000 is current. If the Falcon 2000 has no data but the Falcon base unit does, you can retrieve the data from the base unit into the Falcon 2000 software.
Retrieve all from the Falcon When you select this option the system will upload all of the unit information as well as remote configurations, time zones and other setup data from the Falcon base unit into the software. To retrieve all of the information from the Falcon base unit, click on the site setup button in the lower right corner of the main menu and selecting it from the list. Caution: If the information in the Falcon base unit is not correct or nonexistent, the Falcon 2000 software is still overwritten with this data. Retrieve all from the Falcon only if it has information that is more current than the software. If the Falcon 2000 has no data but the Falcon base unit does, you can retrieve the data from the base unit into the Falcon 2000 software.
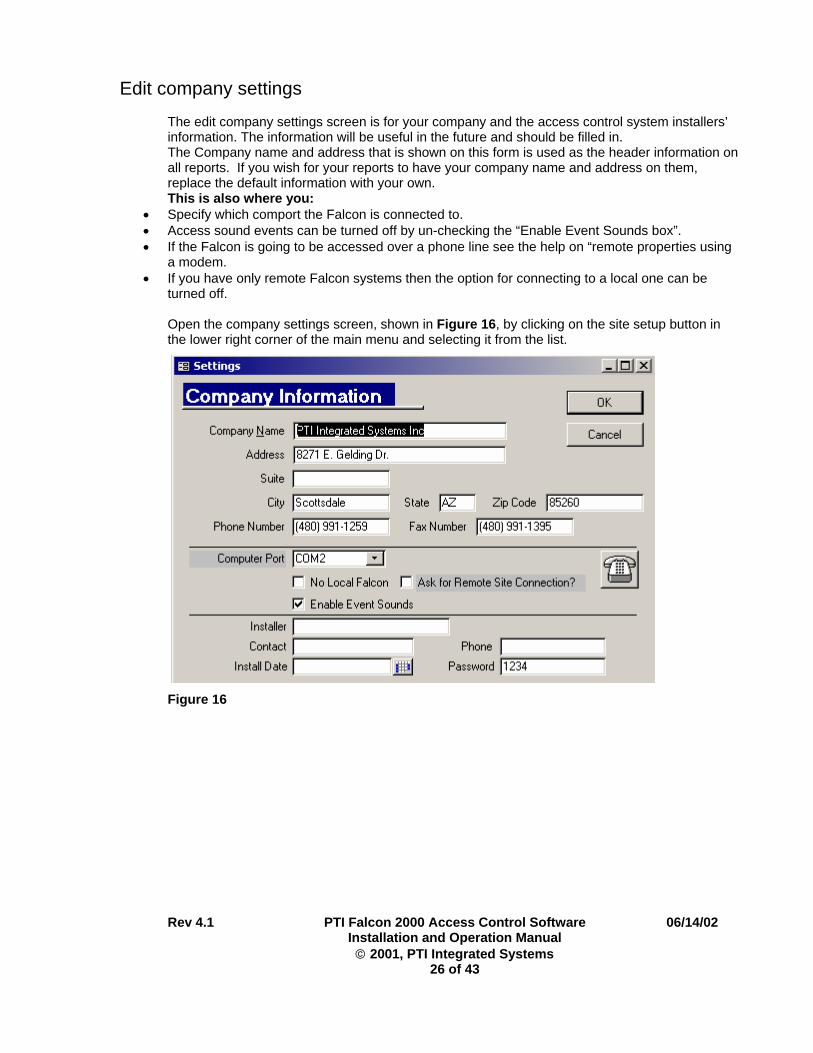
Edit company settings The edit company settings screen is for your company and the access control system installers’ information. The information will be useful in the future and should be filled in. The Company name and address that is shown on this form is used as the header information on all reports. If you wish for your reports to have your company name and address on them, replace the default information with your own. This is also where you:
• Specify which comport the Falcon is connected to. • Access sound events can be turned off by un-checking the “Enable Event Sounds box”. • If the Falcon is going to be accessed over a phone line see the help on “remote properties using
a modem. • If you have only remote Falcon systems then the option for connecting to a local one can be
turned off. Open the company settings screen, shown in Figure 16, by clicking on the site setup button in the lower right corner of the main menu and selecting it from the list.
Figure 16
Rev 4.1 PTI Falcon 2000 Access Control Software 06/14/02 Installation and Operation Manual © 2001, PTI Integrated Systems
26 of 43
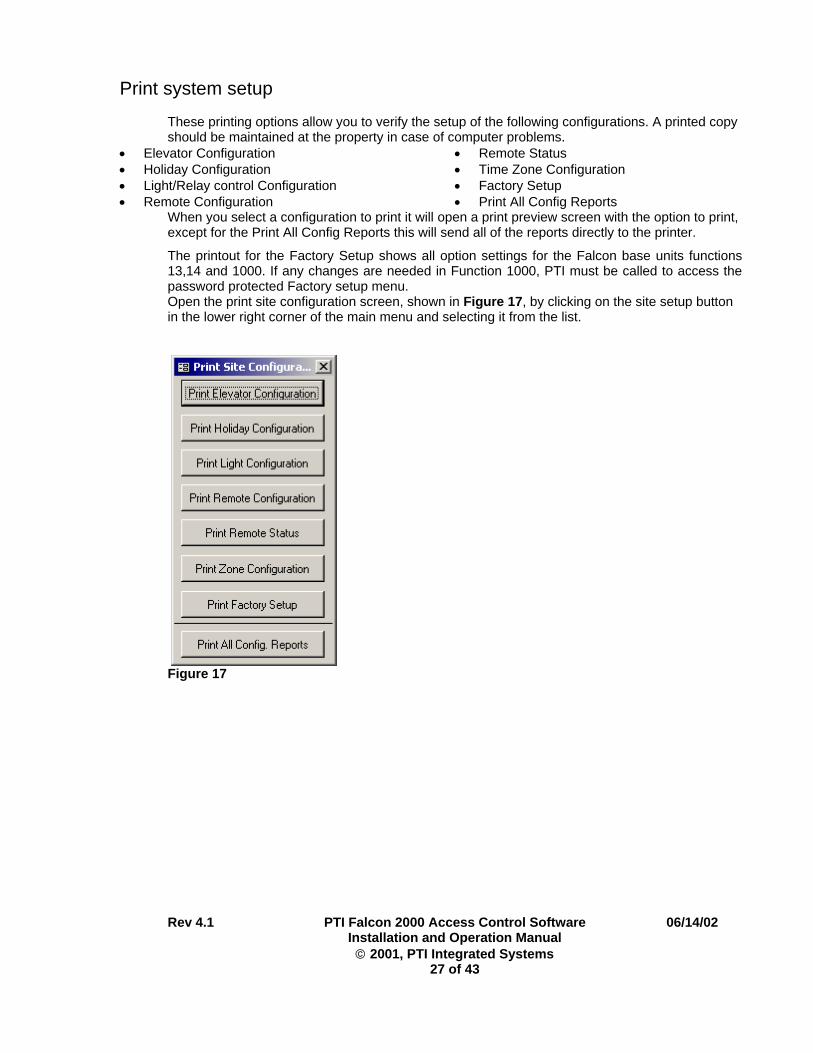
Print system setup These printing options allow you to verify the setup of the following configurations. A printed copy should be maintained at the property in case of computer problems.
• Elevator Configuration • Holiday Configuration • Light/Relay control Configuration • Remote Configuration
• Remote Status • Time Zone Configuration • Factory Setup • Print All Config Reports
When you select a configuration to print it will open a print preview screen with the option to print, except for the Print All Config Reports this will send all of the reports directly to the printer.
The printout for the Factory Setup shows all option settings for the Falcon base units functions 13,14 and 1000. If any changes are needed in Function 1000, PTI must be called to access the password protected Factory setup menu. Open the print site configuration screen, shown in Figure 17, by clicking on the site setup button in the lower right corner of the main menu and selecting it from the list.
Figure 17
Rev 4.1 PTI Falcon 2000 Access Control Software 06/14/02 Installation and Operation Manual © 2001, PTI Integrated Systems
27 of 43
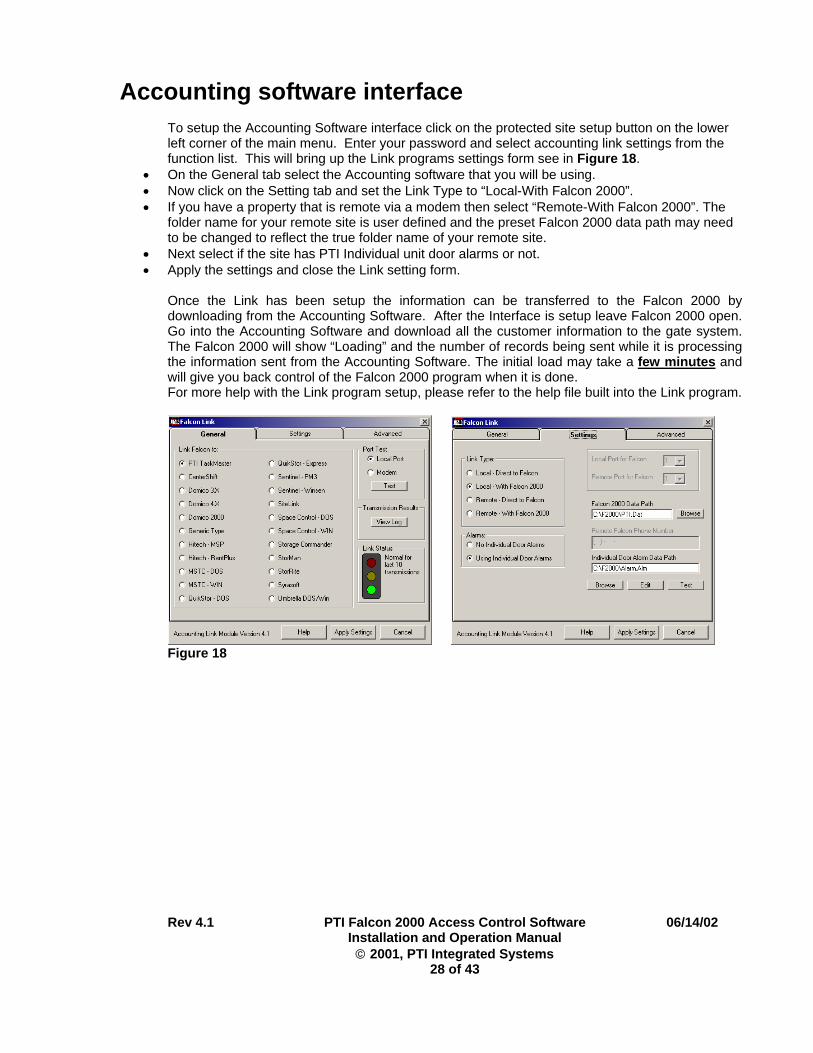
Accounting software interface To setup the Accounting Software interface click on the protected site setup button on the lower left corner of the main menu. Enter your password and select accounting link settings from the function list. This will bring up the Link programs settings form see in Figure 18.
• On the General tab select the Accounting software that you will be using. • Now click on the Setting tab and set the Link Type to “Local-With Falcon 2000”. • If you have a property that is remote via a modem then select “Remote-With Falcon 2000”. The
folder name for your remote site is user defined and the preset Falcon 2000 data path may need to be changed to reflect the true folder name of your remote site.
• Next select if the site has PTI Individual unit door alarms or not. • Apply the settings and close the Link setting form.
Once the Link has been setup the information can be transferred to the Falcon 2000 by downloading from the Accounting Software. After the Interface is setup leave Falcon 2000 open. Go into the Accounting Software and download all the customer information to the gate system. The Falcon 2000 will show “Loading” and the number of records being sent while it is processing the information sent from the Accounting Software. The initial load may take a few minutes and will give you back control of the Falcon 2000 program when it is done. For more help with the Link program setup, please refer to the help file built into the Link program.
Figure 18
Rev 4.1 PTI Falcon 2000 Access Control Software 06/14/02 Installation and Operation Manual © 2001, PTI Integrated Systems
28 of 43
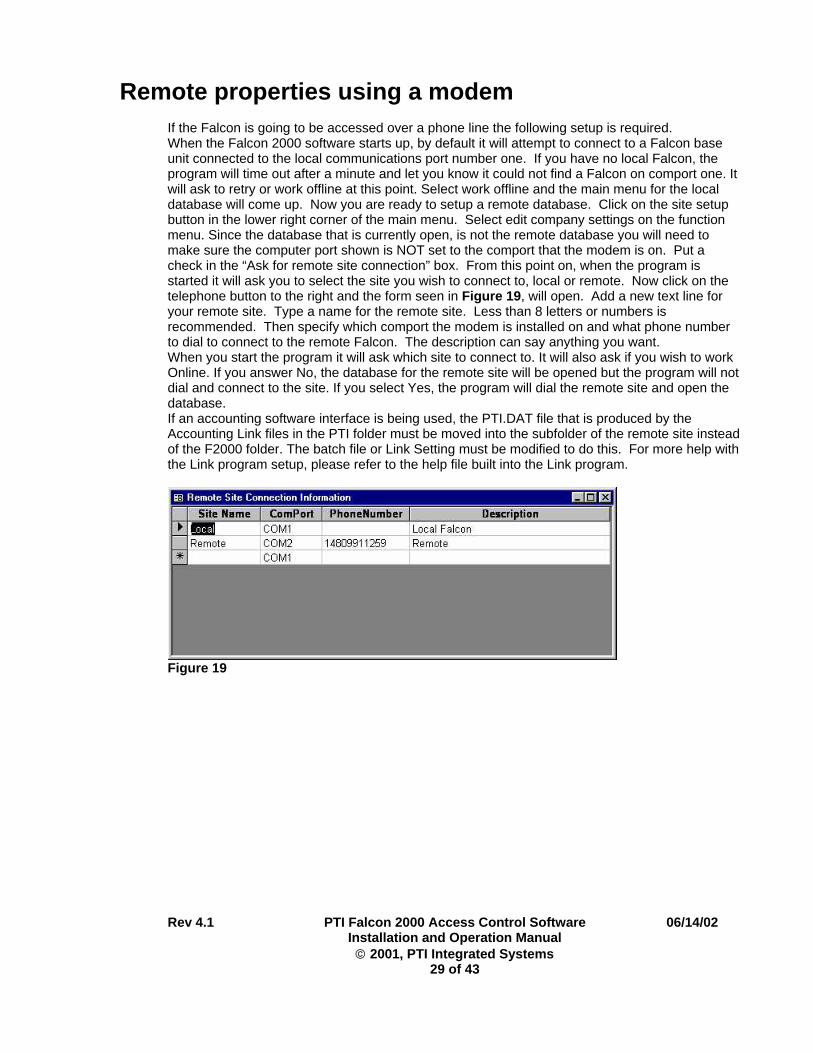
Remote properties using a modem If the Falcon is going to be accessed over a phone line the following setup is required. When the Falcon 2000 software starts up, by default it will attempt to connect to a Falcon base unit connected to the local communications port number one. If you have no local Falcon, the program will time out after a minute and let you know it could not find a Falcon on comport one. It will ask to retry or work offline at this point. Select work offline and the main menu for the local database will come up. Now you are ready to setup a remote database. Click on the site setup button in the lower right corner of the main menu. Select edit company settings on the function menu. Since the database that is currently open, is not the remote database you will need to make sure the computer port shown is NOT set to the comport that the modem is on. Put a check in the “Ask for remote site connection” box. From this point on, when the program is started it will ask you to select the site you wish to connect to, local or remote. Now click on the telephone button to the right and the form seen in Figure 19, will open. Add a new text line for your remote site. Type a name for the remote site. Less than 8 letters or numbers is recommended. Then specify which comport the modem is installed on and what phone number to dial to connect to the remote Falcon. The description can say anything you want. When you start the program it will ask which site to connect to. It will also ask if you wish to work Online. If you answer No, the database for the remote site will be opened but the program will not dial and connect to the site. If you select Yes, the program will dial the remote site and open the database. If an accounting software interface is being used, the PTI.DAT file that is produced by the Accounting Link files in the PTI folder must be moved into the subfolder of the remote site instead of the F2000 folder. The batch file or Link Setting must be modified to do this. For more help with the Link program setup, please refer to the help file built into the Link program.
Figure 19
Rev 4.1 PTI Falcon 2000 Access Control Software 06/14/02 Installation and Operation Manual © 2001, PTI Integrated Systems
29 of 43
Daily Functions
Renting a unit
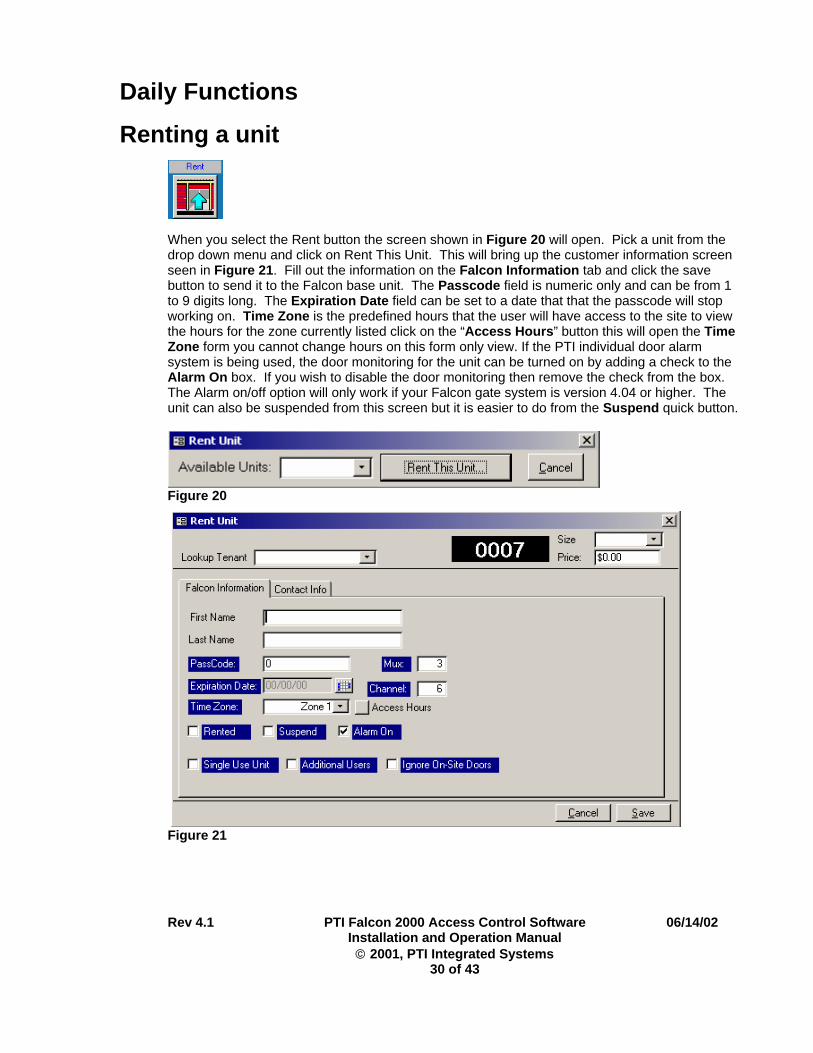
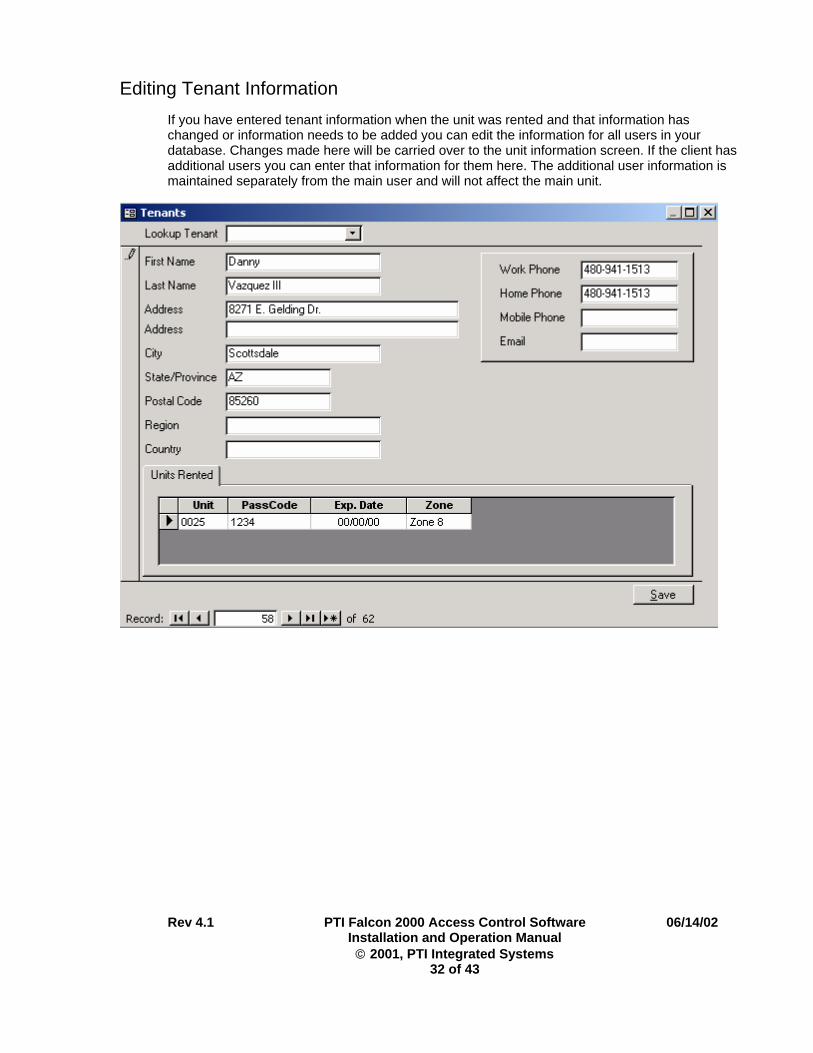
When you select the Rent button the screen shown in Figure 20 will open. Pick a unit from the drop down menu and click on Rent This Unit. This will bring up the customer information screen seen in Figure 21. Fill out the information on the Falcon Information tab and click the save button to send it to the Falcon base unit. The Passcode field is numeric only and can be from 1 to 9 digits long. The Expiration Date field can be set to a date that that the passcode will stop working on. Time Zone is the predefined hours that the user will have access to the site to view the hours for the zone currently listed click on the “Access Hours” button this will open the Time Zone form you cannot change hours on this form only view. If the PTI individual door alarm system is being used, the door monitoring for the unit can be turned on by adding a check to the Alarm On box. If you wish to disable the door monitoring then remove the check from the box. The Alarm on/off option will only work if your Falcon gate system is version 4.04 or higher. The unit can also be suspended from this screen but it is easier to do from the Suspend quick button.
Figure 20
Figure 21
Rev 4.1 PTI Falcon 2000 Access Control Software 06/14/02 Installation and Operation Manual © 2001, PTI Integrated Systems
30 of 43

Additional users per unit To add an additional user to the unit, check the additional users box to turn on the option. Click on the Additional User tab seen in Figure 22 and fill in the name, access code and time zone for each user being added to the main unit. The program will automatically assign the additional user to the same unit but with an alpha character on the end. The alpha on the end will start with Z and increment backwards so it will not interfere with units that may already have an alpha on the end. When the additional user accesses the property the event will be recorded as the main unit number but show the additional users name. Access reports can be ran to see access to the unit by all users (report by unit number) or just the access for a single user (report by user name). If the Falcon 2000 is interfaced to compatible accounting software and the Tenant goes delinquent or needs to be locked out, ALL additional users for that unit will also be denied access to the property. When the unit is vacated all additional users access codes are also removed from the system. When renting a new unit in your accounting software, additional users are not added to the Falcon 2000. Additional users must be added to the new unit in Falcon 2000 through Edit Unit.
Figure 22
Rev 4.1 PTI Falcon 2000 Access Control Software 06/14/02 Installation and Operation Manual © 2001, PTI Integrated Systems
31 of 43
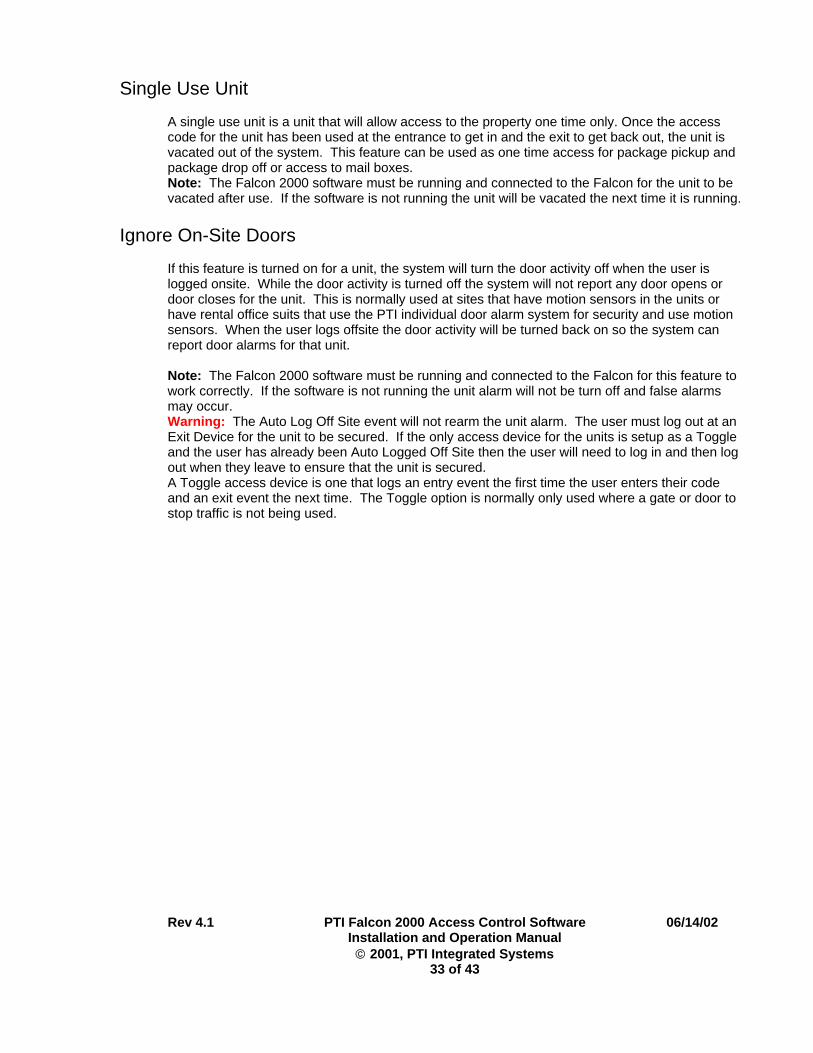
Editing Tenant Information If you have entered tenant information when the unit was rented and that information has changed or information needs to be added you can edit the information for all users in your database. Changes made here will be carried over to the unit information screen. If the client has additional users you can enter that information for them here. The additional user information is maintained separately from the main user and will not affect the main unit.
Rev 4.1 PTI Falcon 2000 Access Control Software 06/14/02 Installation and Operation Manual © 2001, PTI Integrated Systems
32 of 43
Rev 4.1 PTI Falcon 2000 Access Control Software 06/14/02 Installation and Operation Manual © 2001, PTI Integrated Systems
33 of 43
Single Use Unit A single use unit is a unit that will allow access to the property one time only. Once the access code for the unit has been used at the entrance to get in and the exit to get back out, the unit is vacated out of the system. This feature can be used as one time access for package pickup and package drop off or access to mail boxes. Note: The Falcon 2000 software must be running and connected to the Falcon for the unit to be vacated after use. If the software is not running the unit will be vacated the next time it is running.
Ignore On-Site Doors
If this feature is turned on for a unit, the system will turn the door activity off when the user is logged onsite. While the door activity is turned off the system will not report any door opens or door closes for the unit. This is normally used at sites that have motion sensors in the units or have rental office suits that use the PTI individual door alarm system for security and use motion sensors. When the user logs offsite the door activity will be turned back on so the system can report door alarms for that unit. Note: The Falcon 2000 software must be running and connected to the Falcon for this feature to work correctly. If the software is not running the unit alarm will not be turn off and false alarms may occur. Warning: The Auto Log Off Site event will not rearm the unit alarm. The user must log out at an Exit Device for the unit to be secured. If the only access device for the units is setup as a Toggle and the user has already been Auto Logged Off Site then the user will need to log in and then log out when they leave to ensure that the unit is secured. A Toggle access device is one that logs an entry event the first time the user enters their code and an exit event the next time. The Toggle option is normally only used where a gate or door to stop traffic is not being used.
Vacating a unit
When you select vacate, a screen comes up to select the unit you want to vacate. Once you have selected the unit click on the vacate button. All additional users will be removed when the main unit is vacated.
Transferring a unit
When you select transfer, a split screen comes up to select the unit you want to transfer and which unit you want to transfer it to. Once you have selected the unit click on the transfer button. This will move the user out of one unit and into the other. All additional users will follow the main unit and will not have to be reentered.
Copying a unit
When you select copy, a split screen comes up to select the unit you want to copy and which unit or units you want to copy it to. Once you have selected the unit click on the copy button. This will copy the user to one or more other units. All additional users will follow the main unit and will not have to be reentered.
Suspending a unit
When you select suspend, a screen comes up to select the unit you want to suspend. Once you have selected the unit click on the suspend button. When a unit is suspended, they will not be able to access the site with the code assigned to the unit. Additional users will automatically be suspended when the main unit is.
Rev 4.1 PTI Falcon 2000 Access Control Software 06/14/02 Installation and Operation Manual © 2001, PTI Integrated Systems
34 of 43
Unsuspending a unit
When you select unsuspend, a screen comes up to select the unit you want to unsuspend. Once you have selected the unit click on the unsuspend button. Once the unit is unsuspended, the user will be able to access the site normally. Additional users will automatically be suspended when the main unit is.
Clearing Alarms
When a PTI door alarm goes into the alarm condition the manager must acknowledge it by clicking on the Clear Alarms button. This will reset/rearm the door and silences the siren if it is still sounding.
Triggering relays
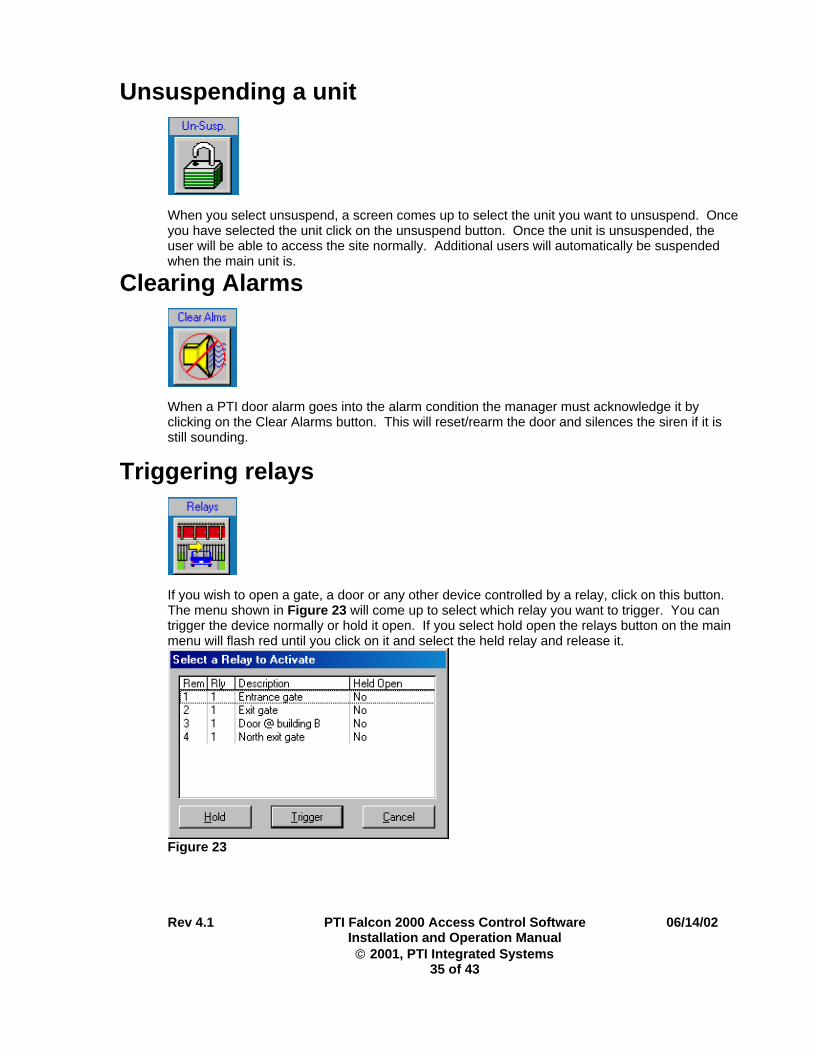
If you wish to open a gate, a door or any other device controlled by a relay, click on this button. The menu shown in Figure 23 will come up to select which relay you want to trigger. You can trigger the device normally or hold it open. If you select hold open the relays button on the main menu will flash red until you click on it and select the held relay and release it.
Figure 23
Rev 4.1 PTI Falcon 2000 Access Control Software 06/14/02 Installation and Operation Manual © 2001, PTI Integrated Systems
35 of 43
Updating graphics
If you are using the PTI security graphics option click on the button to re-send the status colors to the graphics screen. This is normally only done when the graphics is first started or after it has been reset.
Setting the Falcons time
This button sends the computers date and time to the Falcon base unit.
Editing a Unit
This button will bring up a search window to help find the unit you wish to edit. Once the unit has been found you can change the access code, tenants name, access hour, access status and more. Additional users for the unit can also be added or removed. See the section for renting a unit for more help with editing.
Rev 4.1 PTI Falcon 2000 Access Control Software 06/14/02 Installation and Operation Manual © 2001, PTI Integrated Systems
36 of 43

General Functions
Units menu
Figure 24
Figure 25
The options in this menu are the same as the quick buttons with the same name with the exception of editing a unit or tenant. To get help on the quick buttons options see the Daily operations section in this manual.
• Edit a unit will give information about only that one unit and the user.
• Edit a tenant will give information about the user and the unit or units the user is renting. Refer to Edit Tenant Info for more information.
Manual operations menu
The options in this menu are the same as the qbuttons with the same name with the exceptClear user from site.
uick ion of
To get help on the quick buttons options see the Daily operations section in this manual. The Clear users option will log all users off the site. This will set door alarms and release any held control relays.
Rev 4.1 PTI Falcon 2000 Access Control Software 06/14/02 Installation and Operation Manual © 2001, PTI Integrated Systems
37 of 43
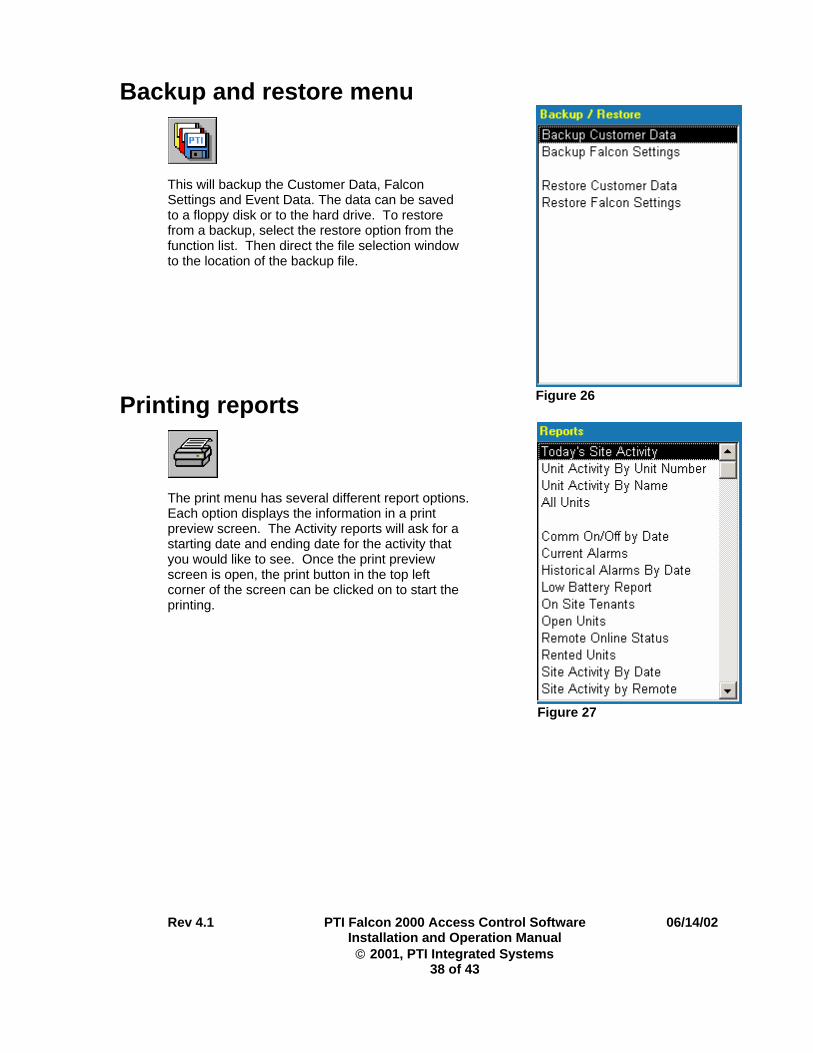
Backup and restore menu
Figure 26
This will backup the Customer Data, Falcon Settings and Event Data. The data can be saved to a floppy disk or to the hard drive. To restore from a backup, select the restore option from the function list. Then direct the file selection window to the location of the backup file.
Printing reports
Figure 27
The print menu has several different report oEach option displays the information in a print preview screen. The Activity reports will ask for a starting date and ending date for the activity that you would like to see. Once the print preview screen is open, the print button in the top left corner of the screen can be clicked on to start the printing.
ptions.
Rev 4.1 PTI Falcon 2000 Access Control Software 06/14/02 Installation and Operation Manual © 2001, PTI Integrated Systems
38 of 43
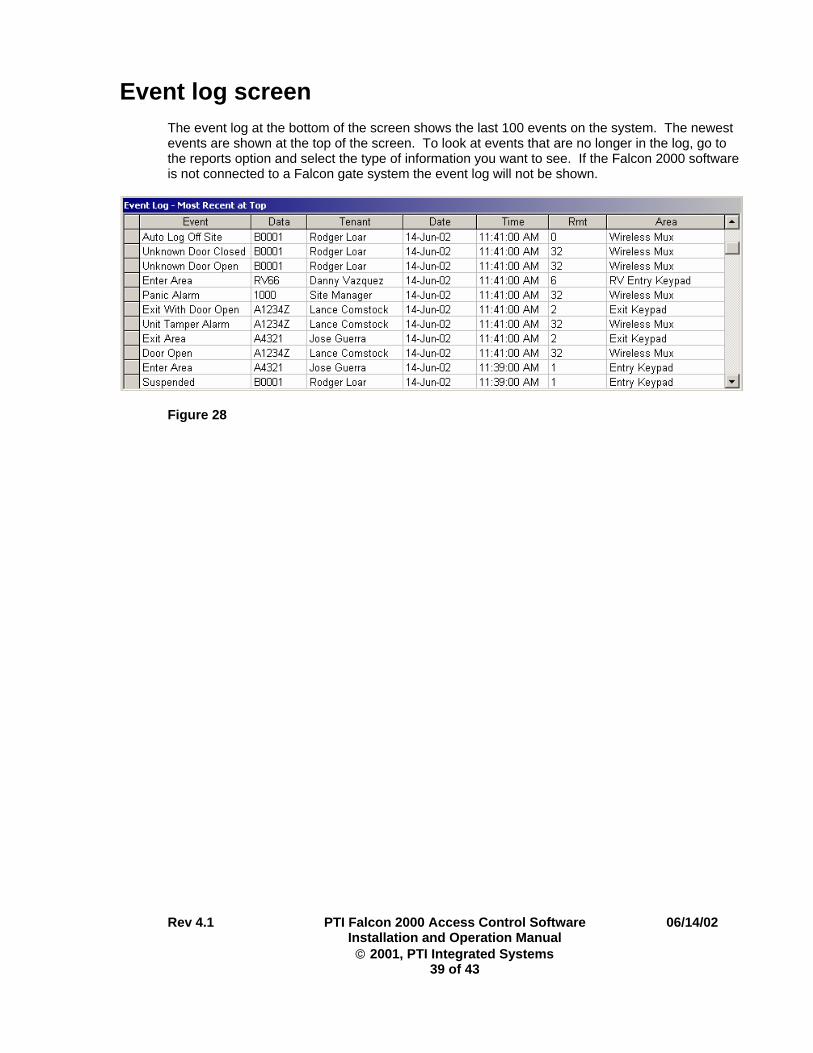
Event log screen The event log at the bottom of the screen shows the last 100 events on the system. The newest events are shown at the top of the screen. To look at events that are no longer in the log, go to the reports option and select the type of information you want to see. If the Falcon 2000 software is not connected to a Falcon gate system the event log will not be shown.
Figure 28
Rev 4.1 PTI Falcon 2000 Access Control Software 06/14/02 Installation and Operation Manual © 2001, PTI Integrated Systems
39 of 43
Sound Events The Falcon 2000 software has the ability to play sounds through you PC speakers when an access event occurs.
Rev 4.1 PTI Falcon 2000 Access Control Software 06/14/02 Installation and Operation Manual © 2001, PTI Integrated Systems
40 of 43
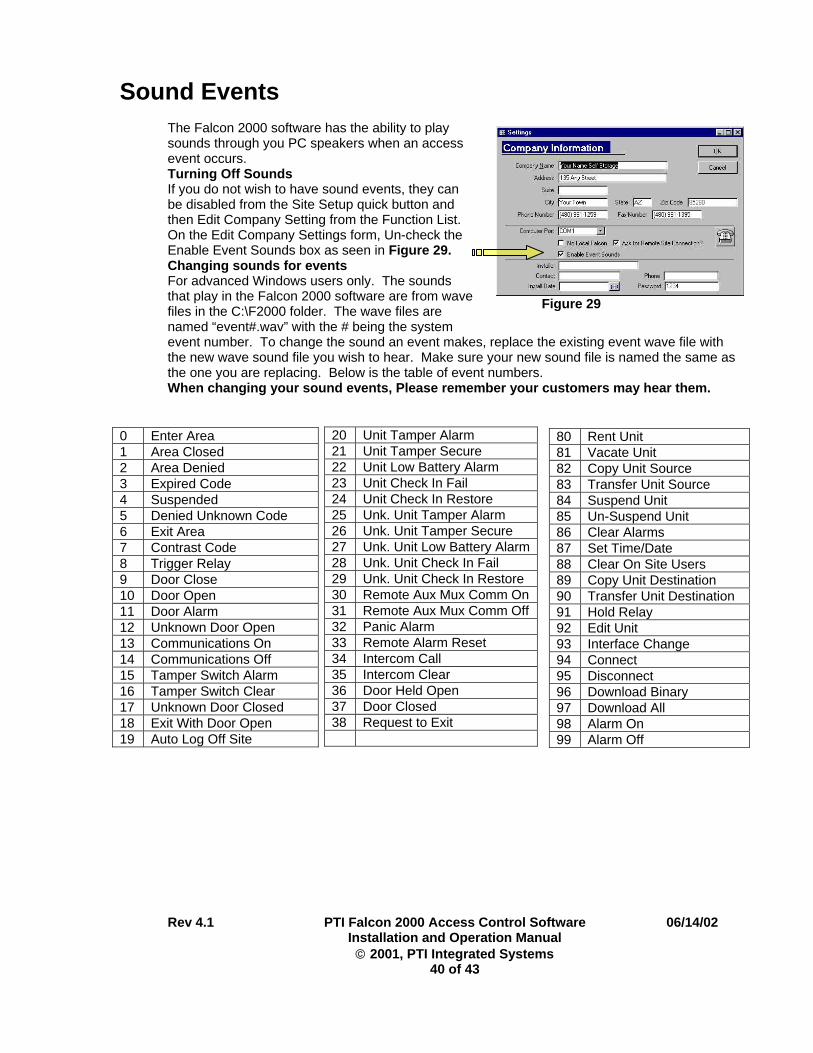
Turning Off Sounds If you do not wish to have sound events, they can be disabled from the Site Setup quick button and then Edit Company Setting from the Function List. On the Edit Company Settings form, Un-check the Enable Event Sounds box as seen in Figure 29. Changing sounds for events For advanced Windows users only. The sounds that play in the Falcon 2000 software are from wave files in the C:\F2000 folder. The wave files are named “event#.wav” with the # being the system event number. To change the sound an event makes, replace the existing event wave file with the new wave sound file you wish to hear. Make sure your new sound file is named the same as the one you are replacing. Below is the table of event numbers.
Figure 29
When changing your sound events, Please remember your customers may hear them.
20 Unit Tamper Alarm 21 Unit Tamper Secure 22 Unit Low Battery Alarm 23 Unit Check In Fail 24 Unit Check In Restore 25 Unk. Unit Tamper Alarm 26 Unk. Unit Tamper Secure 27 Unk. Unit Low Battery Alarm28 Unk. Unit Check In Fail 29 Unk. Unit Check In Restore 30 Remote Aux Mux Comm On 31 Remote Aux Mux Comm Off 32 Panic Alarm 33 Remote Alarm Reset 34 Intercom Call 35 Intercom Clear 36 Door Held Open 37 Door Closed 38 Request to Exit
0 Enter Area 1 Area Closed 2 Area Denied 3 Expired Code 4 Suspended 5 Denied Unknown Code 6 Exit Area 7 Contrast Code 8 Trigger Relay 9 Door Close 10 Door Open 11 Door Alarm 12 Unknown Door Open 13 Communications On 14 Communications Off 15 Tamper Switch Alarm 16 Tamper Switch Clear 17 Unknown Door Closed 18 Exit With Door Open 19 Auto Log Off Site
80 Rent Unit 81 Vacate Unit 82 Copy Unit Source 83 Transfer Unit Source 84 Suspend Unit 85 Un-Suspend Unit 86 Clear Alarms 87 Set Time/Date 88 Clear On Site Users 89 Copy Unit Destination 90 Transfer Unit Destination 91 Hold Relay 92 Edit Unit 93 Interface Change 94 Connect 95 Disconnect 96 Download Binary 97 Download All 98 Alarm On 99 Alarm Off
Rev 4.1 PTI Falcon 2000 Access Control Software 06/14/02 Installation and Operation Manual © 2001, PTI Integrated Systems
41 of 43
Contacting PTI
Address: PTI Integrated Systems 8271 East Gelding Drive Scottsdale, AZ. 85260
Sales: [email protected] or 480-991-1259 Support: [email protected] or 480-941-1513 Web: www.ptiaccess.com

Rev 4.1 PTI Falcon 2000 Access Control Software 06/14/02 Installation and Operation Manual © 2001, PTI Integrated Systems
42 of 43
Index A A Accounting software interface setup ............................................................................................. 28 Additional users per unit ................................................................................................................ 31 B Backup and restore ....................................................................................................................... 37 C Changing sounds for events.......................................................................................................... 39 Clear all information....................................................................................................................... 19 Clear Users from Site .................................................................................................................... 36 Clearing Alarms ............................................................................................................................. 34 Contacting PTI ............................................................................................................................... 40 Copying a unit................................................................................................................................ 33 Customer information screen ........................................................................................................ 30 D Demo Version.................................................................................................................................. 9 Door alarm information .................................................................................................................. 17 E Edit company settings ................................................................................................................... 26 Edit company settings screen........................................................................................................ 26 Edit unit sizes and prices............................................................................................................... 24 Editing a Unit ................................................................................................................................. 35 Editing relays to trigger.................................................................................................................. 24 Editing relays to trigger screen...................................................................................................... 24 Elevator control setup.................................................................................................................... 16 Elevator control setup screen........................................................................................................ 16 Event log screen............................................................................................................................ 38 F Falcon base unit setup .................................................................................................................. 20 Falcon base unit setup screen....................................................................................................... 20 Falcon Server .................................................................................................................................. 8 Fserver............................................................................................................................................. 8 Full Version...................................................................................................................................... 9 G Getting Started .............................................................................................................................. 10 H Holiday setup................................................................................................................................. 23 Holiday setup screen ..................................................................................................................... 23 I Installing Falcon 2000...................................................................................................................... 7 Interface......................................................................................................................................... 28 L Lighting and Relay control setup ................................................................................................... 15 Little PTI icon................................................................................................................................... 8 M Main menu overview...................................................................................................................... 10 Manual operations menu ............................................................................................................... 36 Mux and Channel assignment ....................................................................................................... 17 P Print system setup ......................................................................................................................... 27 Print system setup screen ............................................................................................................. 27

Rev 4.1 PTI Falcon 2000 Access Control Software 06/14/02 Installation and Operation Manual © 2001, PTI Integrated Systems
43 of 43
Printing all units with passcodes.................................................................................................... 19 Printing reports .............................................................................................................................. 37 Printing reports function screen..................................................................................................... 37 R Registering Falcon 2000.................................................................................................................. 9 Relay control setup screen............................................................................................................ 15 Remote properties using a modem ............................................................................................... 29 Rent a unit with additional users ................................................................................................... 31 Renting a unit................................................................................................................................. 30 Retrieving all from Falcon.............................................................................................................. 25 S Send all to the Falcon.................................................................................................................... 25 Setting the Falcons time ................................................................................................................ 35 Setting up Falcon 2000.................................................................................................................. 11 Setting up Remote Stations........................................................................................................... 13 Single Use Unit .............................................................................................................................. 32 Site setup quick button .................................................................................................................. 21 Site setup screen........................................................................................................................... 21 Suspending a unit .......................................................................................................................... 33 System Requirements ..................................................................................................................... 6 T Table of Contents ............................................................................................................................ 4 Time zone setup ............................................................................................................................ 22 Time zone setup screen ................................................................................................................ 22 Transfering a unit........................................................................................................................... 33 Triggering relays............................................................................................................................ 34 Triggering relays menu.................................................................................................................. 34 Turning Off Sounds ....................................................................................................................... 39 U Unit Configuration.......................................................................................................................... 12 Units menu..................................................................................................................................... 36 Unsuspending a unit...................................................................................................................... 34 Updating graphics.......................................................................................................................... 35 Updating the Falcons program ...................................................................................................... 18 Using protected site setup ............................................................................................................. 11 V Vacating a unit ............................................................................................................................... 33 Viewing the event log .................................................................................................................... 38