Embed Size (px)
Citation preview

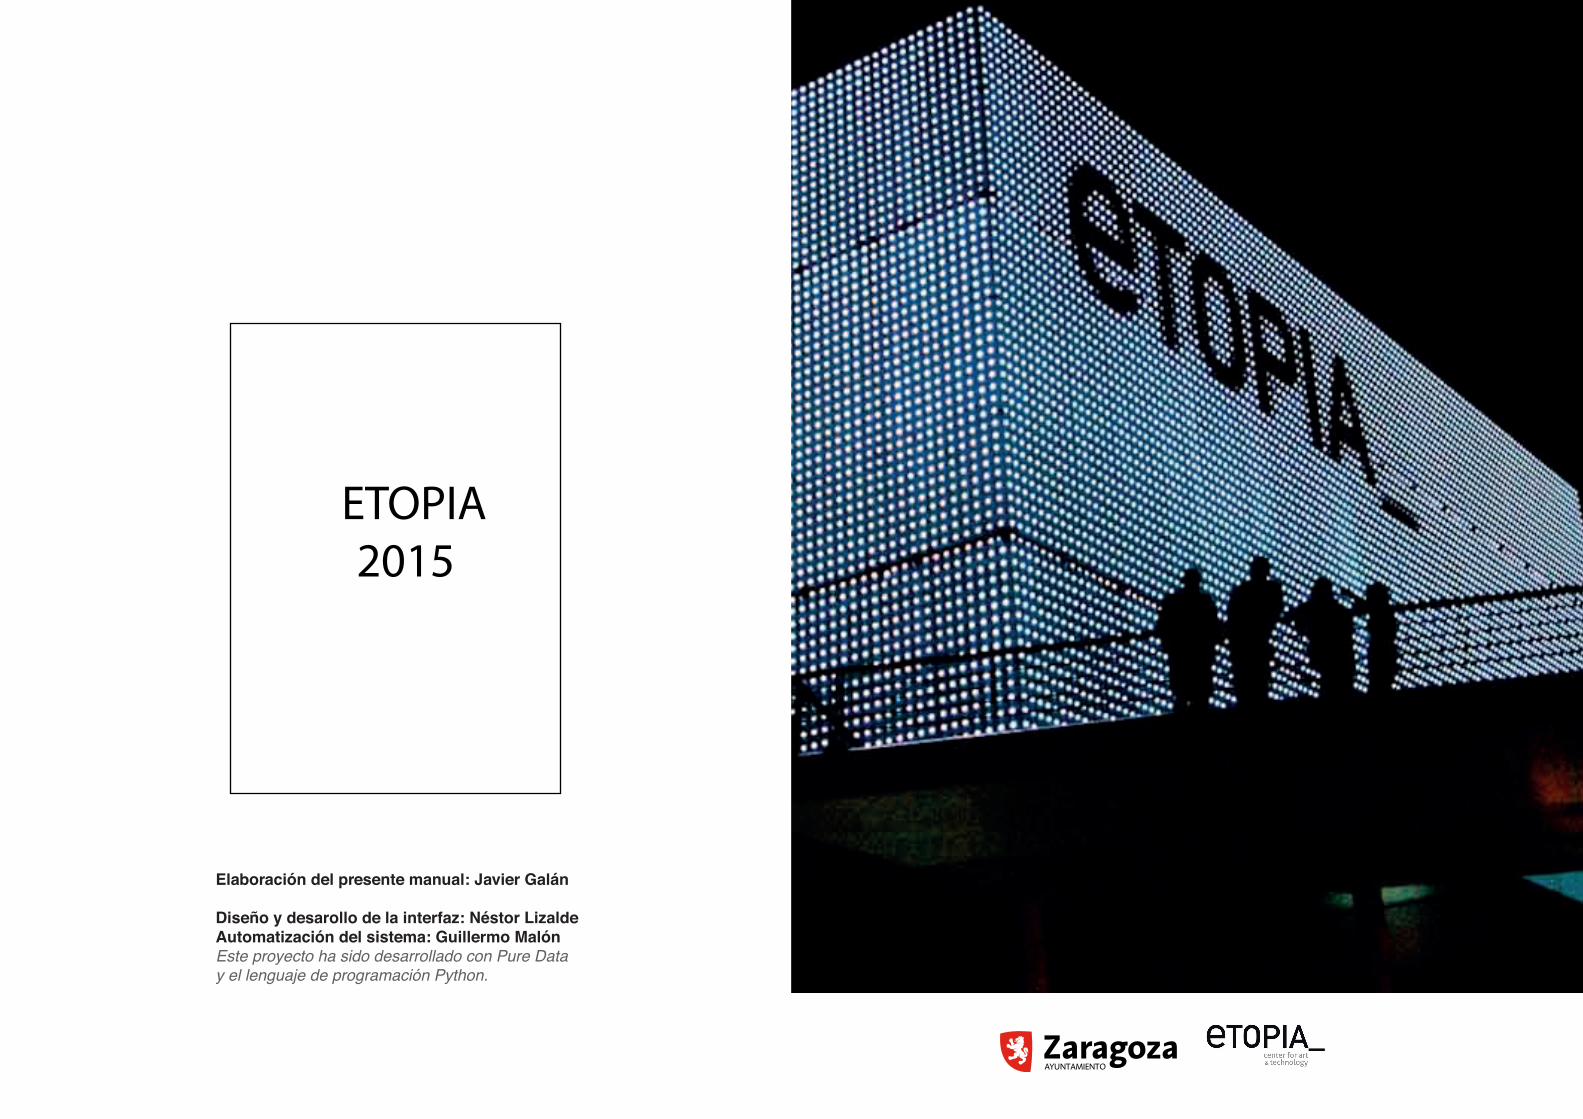
FACHADA-MEDIA manual de uso
MEDIA-FAÇADE handbook
FACHADA-MEDIA manual de uso
MEDIA-FAÇADE handbook
texto en español
text in english
Hola:
Tienes en tus manos el manual de la fachada–media del Centro de Arte y Tecnología de Zaragoza. Con este documento adquirirás el conocimiento básico sobre los pasos imprescindibles para poder trabajar con la misma.
Tómatelo con calma, las posibilidades de la fachada–media son casi infinitas, y probablemente se te ocurran multitud de nuevos experimentos mientras vayas leyendo las funciones que aquí se describen. Léelo hasta el final.
¡Que lo disfrutes!
El equipo de Etopia.
Hi:
What you hold in your hands is the media-façade handbook of the Art and Technology Center of Zaragoza. With this document you will acquire basic knowledge about the essential steps in order to work with it.
Take it easy, the chances of the media-façade are almost endless, and probably you will many many new experiments while reading the functions described herein. Read it to the end.
Enjoy it!
The Etopia team.
etopia y sus alrededores Etopia – Centro de Arte y Tecnología es un edificio de nue
va planta con tres núcleos interconectados en planta 0 y +1 que albergan usos administrativos, expositivos, artísticos, formativos, de residencia, emprendimiento y showroom, así como un auditorio, un teatro al aire libre denominado “teatro del agua” en el exterior y una fachada-media de luces LED.
Ubicado en las coordenadas 41º 39’ 34,12”N de latitud y 0º 54’ 26,37”W de longitud, arranca desde la misma cota en plano a 201msnm. Posee accesos al complejo desde esa misma altura en plazoleta de intersección de los tres edifiios, en la altura +1 desde la Avda. Ciudad de Soria y en la +2 desde la pasarela peatonal que arranca en el frontis del vestíbulo de llegadas de la Estación Central de Delicias. Se accede por vía rodada cruzando el acceso habilitado desde la c/ Francia.
En las inmediaciones se encuentran el edificio Cero-Emisiones
etopia and its surroundings Etopia - Center for Art and Technology is a new building
with three cores interconnected at floor 0 and +1, housing administrative, exhibition, artistic, educational, artist residence, entrepreneurship and showroom uses, as well as an auditorium, an open air theater called “water theater” on the outside and a LED lights media façade.
Located at the coordinates 41º 39 ‘34.12 “N latitude and 0 ° 54’ 26.37” W longitude, starts from the same dimension in plane 201mosl. It has an access to the complex from the same height in the intersection square of the three buildings, at the height +1 from the Avda. Ciudad de Soria and the +2 from the pedestrian walkway that starts at the front of the arrivals hall of the Central Railway Station of Delicias. It is has car access across the one enabled at the c/ Francia.
In the vicinity are the Zero Emissions Building CIEM (Business
CIEM (Centro de Incubación empresarial), la lanzadera del tele cabina erigida para la EXPO del año 2008 y un centro de Salud.
Asimismo, toda la superfiie referida forma parte de la zona más al oeste del barrio de la Almozara. Los usos de los edifiios más cercanos son viviendas con locales y bajeras dedicados al pequeño comercio y almacenaje al por menor, una gran superfiie de aparcamientos que alberga dos veces por semana un mercadillo al aire libre, un hotel, dos supermercados, una iglesia y el Digital Water Pavilion.
En un plano mayor, Etopia es un hito que abre la Milla Digital, según se accede a Zaragoza desde la autopista vasco-aragonesa A-68 / E-804 y la circunvalación de Zaragoza A2/Z40 – E90. La Milla Digital es una planifiación que aúna los usos de acceso a la ciudad y asociación de los barrios de la Almozara y las Delicias, conocidos el primero por su rico pasado industrial (su denominación popular es “Barrio de la Química”) y el segundo por tratarse del más popular de la ciudad, con más de 110.000 habitantes y un 21% de población no nacional.
Incubation Centre), the shuttle cabin erected for the EXPO 2008 and a Health Center.
In addition, all referred surface is part of the area to the west of the district of the Almozara. The uses of the closest buildings are homes with several premises of small businesses and retail storages, a large car park which houses a twice weekly outdoor flea market, a hotel, two supermarkets, a church and the Digital Water Pavilion.
In the bigger picture, Etopia is a milestone that opens the Digital Mile, as it is accessed from the Aragonese-Basque A-68 / E-804 motorway and the Zaragoza ring A2 / Z40 - E90. The Digital Mile is a urban plan that combines the uses of access to the city as well as the association the areas of the Almozara and Delicias districts, the first one is known for its rich industrial past (its popular name is “Barrio of Chemistry”) and the second is the most populated of the city, with more than 110,000 inhabitants, having around the 21% of non-national population.

Una vez concluida su construcción en el medio y largo plazo, la Milla Digital arrancará desde el Oeste en los terrenos ubicados entre las vías del AVE y las grandes superficies comerciales del final de la Avda. Navarra, desde el Norte a la salida del Pabellón Puente en la margen derecha del río Ebro uniendo el recinto Expo y el Palacio de Congresos con el inicio de la antigua campa vegetada de la Almozara, la Avda. de la Almozara y la c/ Francia, y desde el Sureste a partir del trapecio conformado por los terrenos de la antigua Estación del Portillo y actual parada “El Portillo” de la línea 1 de Cercanías y edificio del Caixa Fórum.
Es por tanto un proyecto multi-distrito que anuda toda una jerarquía de concepciones y criterios de planifiación urbana de Zaragoza como la smart-city y los espacios públicos dotados de infrastructuras tecnológicas. Polo de desarrollo tecnológico, industrial y creativo de última generación.
After completing its construction in the medium and long term, the Digital Mile will boot from the West in the land located between the AVE railroad and the large commercial Malls at the end of Avda. Navarra, from the North at the exit the Bridge Pavilion on the right bank of the river Ebro joining the Expo and Congress Centre with the start of the former vegetated campaign of the Almozara District, the Avda. de la Almozara and c / Francia, and from the East at the trapezoid formed by El Portillo grounds of the old station and current stop “El Portillo” of the line 1 of suburban train and the CaixaFórum building.
It is therefore a multi-district project, knotting a hierarchy of concepts and criteria of urban planning of Zaragoza as smart-city and public spaces equipped with technological infrastructures. Technological pole, devoted to industrial and creative development of art.
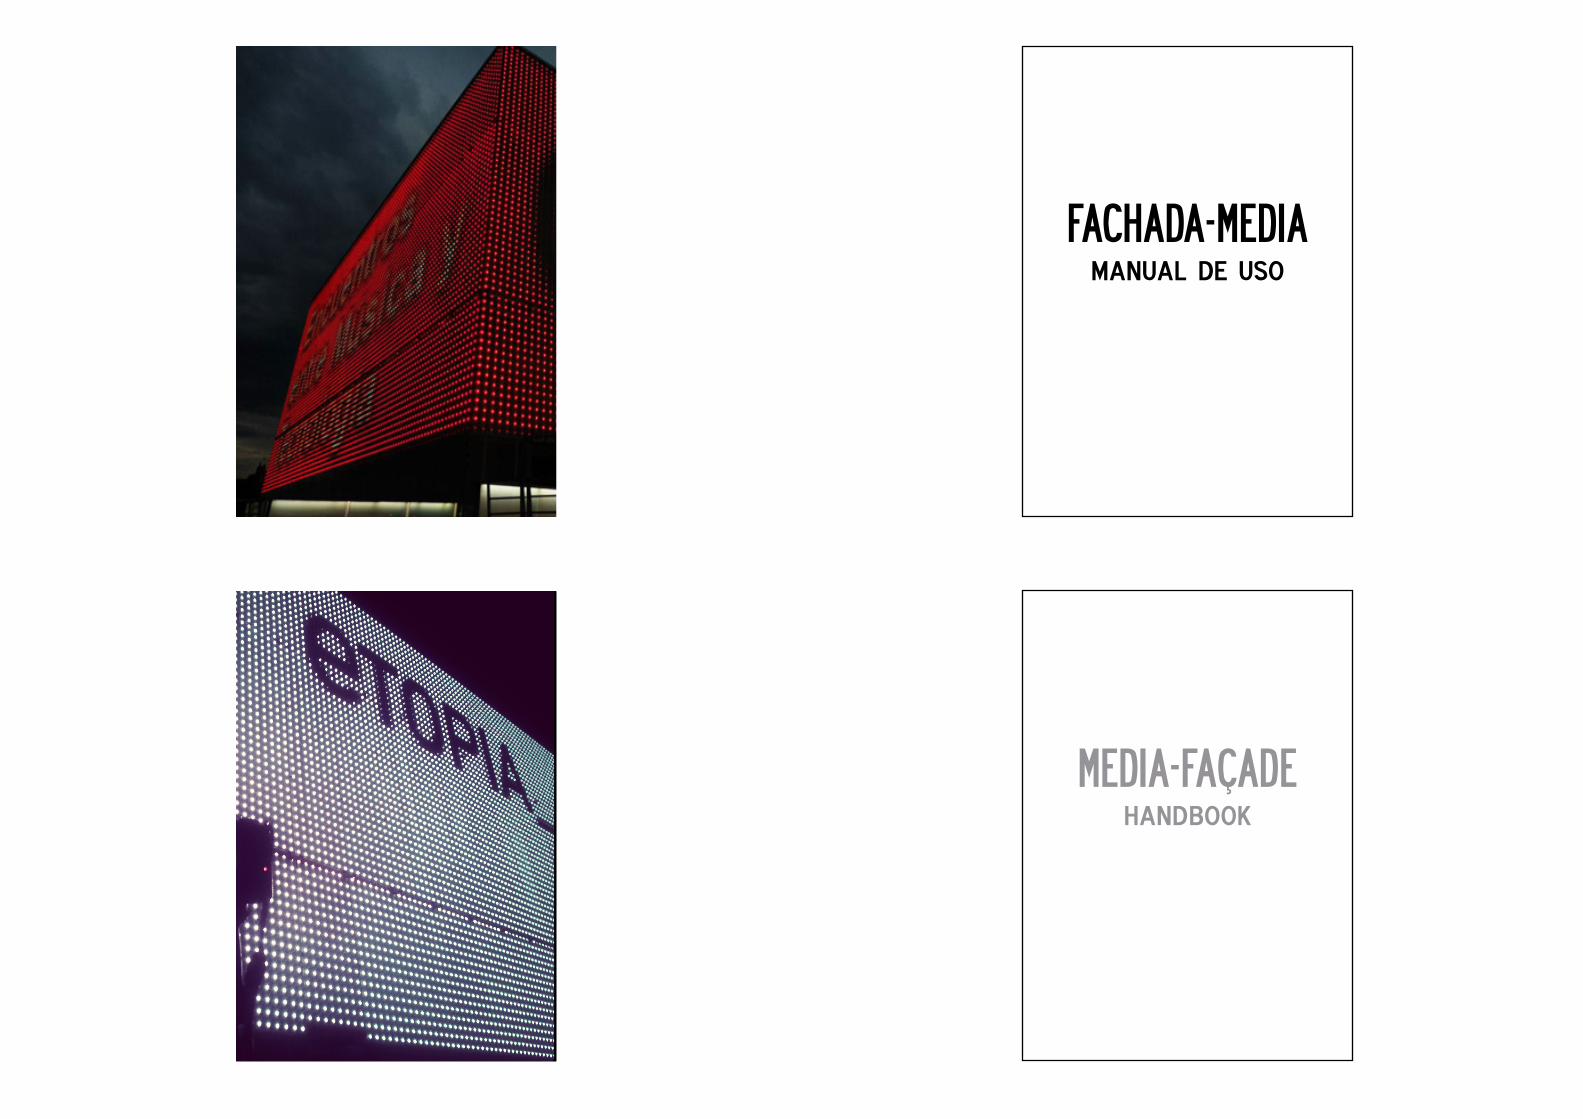
qué es y cómo funciona esta fachada-media La fachada media de Etopia es de la marca PHILLIPS, mod.
iColor Flex, y comprende las caras oeste y sur del edificio más al oeste del Centro (núcleo E1). Éstas son percibidas en un radio de 180º y comprobada su visibilidad y legibilidad desde los 1,084Kms. correspondientes a la esquina del edificio 65D del Complejo Dinamiza en el recinto Expo (La correspondiente al antiguo pabellón de México), los 981mts. desde la pendiente de entrada en subida de la vasco-aragonesa y los 477mts. de la confluencia de la c/ Rioja con la Avda. de Navarra. Fuera de esos límites y en condiciones de visibilidad despejada se perciben juegos de luminancia desde la propia A2/Z40, resultando de gran contraste dentro del skyline nocturno en la parte Oeste de Zaragoza.
what is & how does this media-facade work Etopia’s media-façade is a PHILLIPS trademark product,
iColor Flex model, and comprises the west and south sides of the building located more to the west of the complex. They are perceived within a radius of 180º and tested its visibility and legibility from 1,084kms. corresponding to the corner of the building 65D of the Dinamiza Complex on the campus of the former International Expo 2008 in Zaragoza (Corresponding to the former Pavilion of Mexico - United Mexican States), the 981mts. from the uphill entrance slope of the Basque-Aragonese motorway and the 477mts. from the confluence of Rioja Street with Navarra Avenue. Outside these limits and under conditions of clear visibility perceived luminance games from the highway-beltway of the city itself A2 / Z40, resulting in great contrast within the night skyline in the western part of Zaragoza.
La resolución total de la fachada es de 268x63 pixels o leds operativos en superficie, repartida desigualmente entre las dos caras: 132x63 en la cara sur, 136x63 en la cara oeste.
El Pixel Pitch, la distancia entre leds, es de 20 cms. Se encuentra montada en sets de diversas cajas de luces led, a partir de ahora “módulos” de control, cuyo cableado transita por patinillo hasta un rack conectado al mismo en una sala operativa libre de conexión a internet, a la que se accede desde la sala de exposiciones en la altura +2 del núcleo E1.
El sistema de la fachada media se compone de una serie de herramientas, interconectadas entre sí, con las cuales el usuaria podrá generar contenidos, previsualizarlos, emitirlos y monitorizarlos.
The complete resolution of the façade is 268x63 pixels or operating LED lights along its surface, unevenly distributed between the two sides: 132x63 on the south side, 136x63 on the west side.
The Pixel Pitch, the distance between LEDs is 20 cms. It is assembled in sets of several cases of LED lights, which wiring passes through a shaft/riser up to a rack connected to it in a free-of-internet operating room, which is accessed from the exhibition hall at the height +2 of the building E1.
The media-façade system consists of a number of tools, interconnected with each other, with which the user can generate content, preview, broadcast and monitor them.
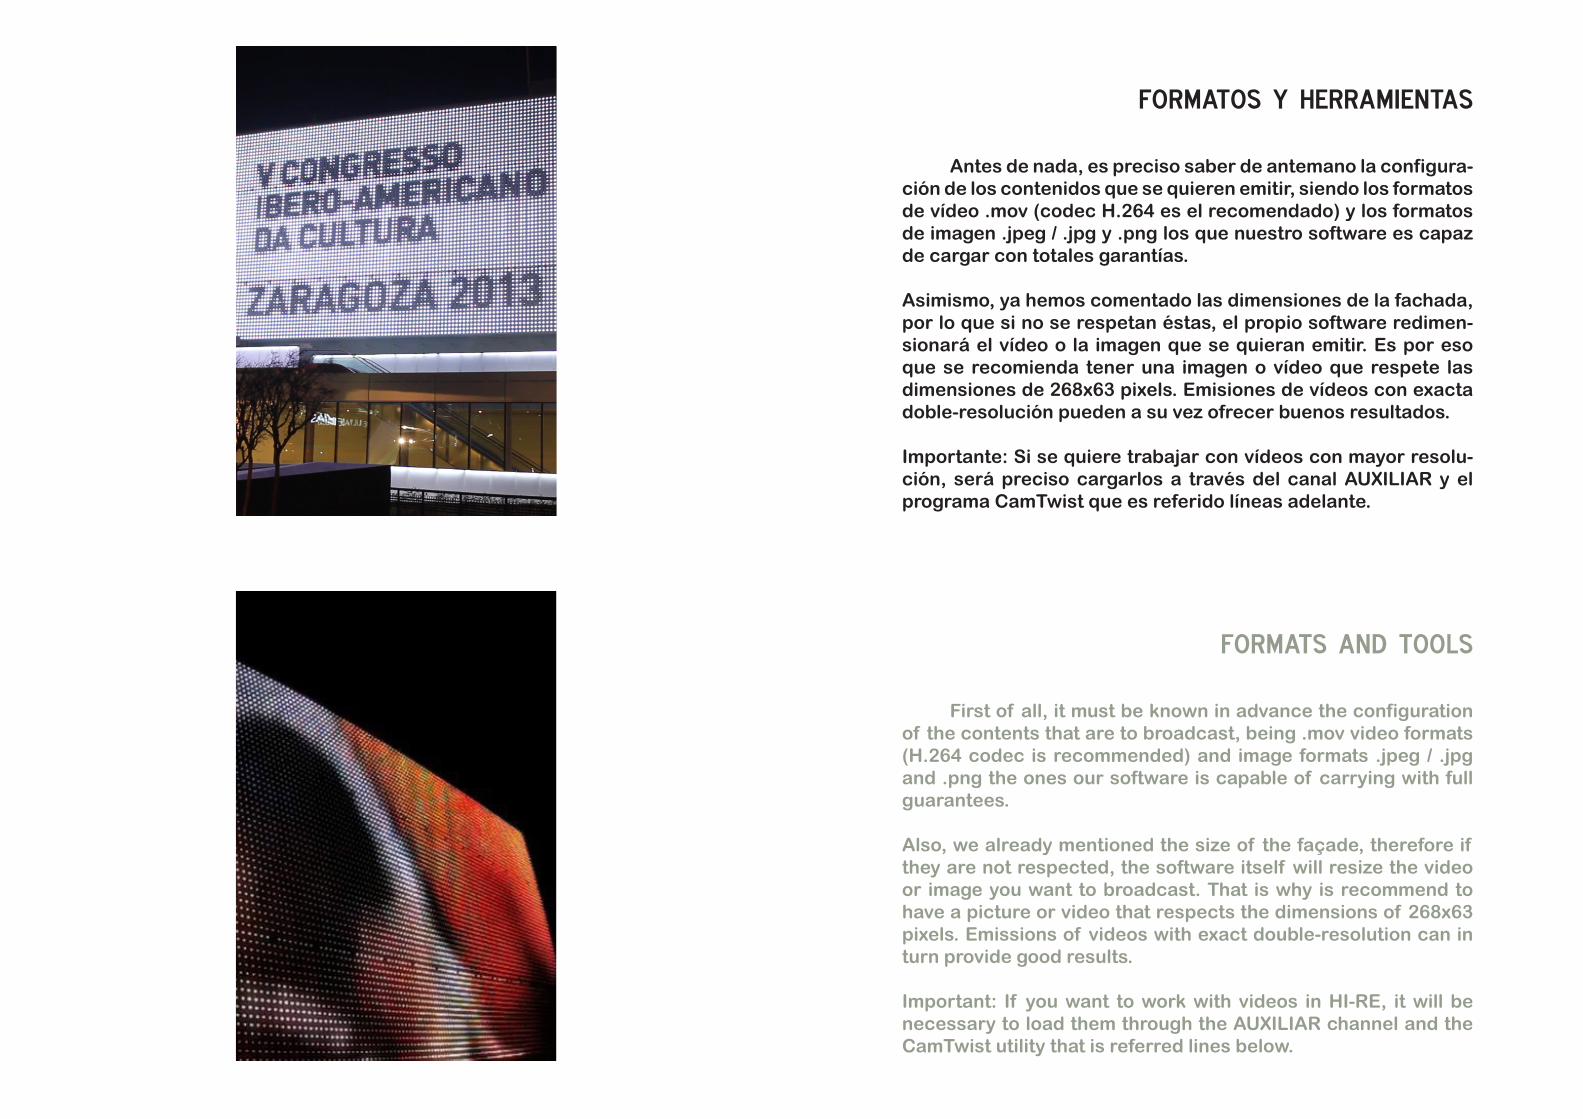
formatos y herramientas Antes de nada, es preciso saber de antemano la configura
ción de los contenidos que se quieren emitir, siendo los formatos de vídeo .mov (codec H.264 es el recomendado) y los formatos de imagen .jpeg / .jpg y .png los que nuestro software es capaz de cargar con totales garantías.
Asimismo, ya hemos comentado las dimensiones de la fachada, por lo que si no se respetan éstas, el propio software redimensionará el vídeo o la imagen que se quieran emitir. Es por eso que se recomienda tener una imagen o vídeo que respete las dimensiones de 268x63 pixels. Emisiones de vídeos con exacta doble-resolución pueden a su vez ofrecer buenos resultados.
Importante: Si se quiere trabajar con vídeos con mayor resolución, será preciso cargarlos a través del canal AUXILIAR y el programa CamTwist que es referido líneas adelante.
formats and tools First of all, it must be known in advance the configuration
of the contents that are to broadcast, being .mov video formats (H.264 codec is recommended) and image formats .jpeg / .jpg and .png the ones our software is capable of carrying with full guarantees.
Also, we already mentioned the size of the façade, therefore if they are not respected, the software itself will resize the video or image you want to broadcast. That is why is recommend to have a picture or video that respects the dimensions of 268x63 pixels. Emissions of videos with exact double-resolution can in turn provide good results.
Important: If you want to work with videos in HI-RE, it will be necessary to load them through the AUXILIAR channel and the CamTwist utility that is referred lines below.
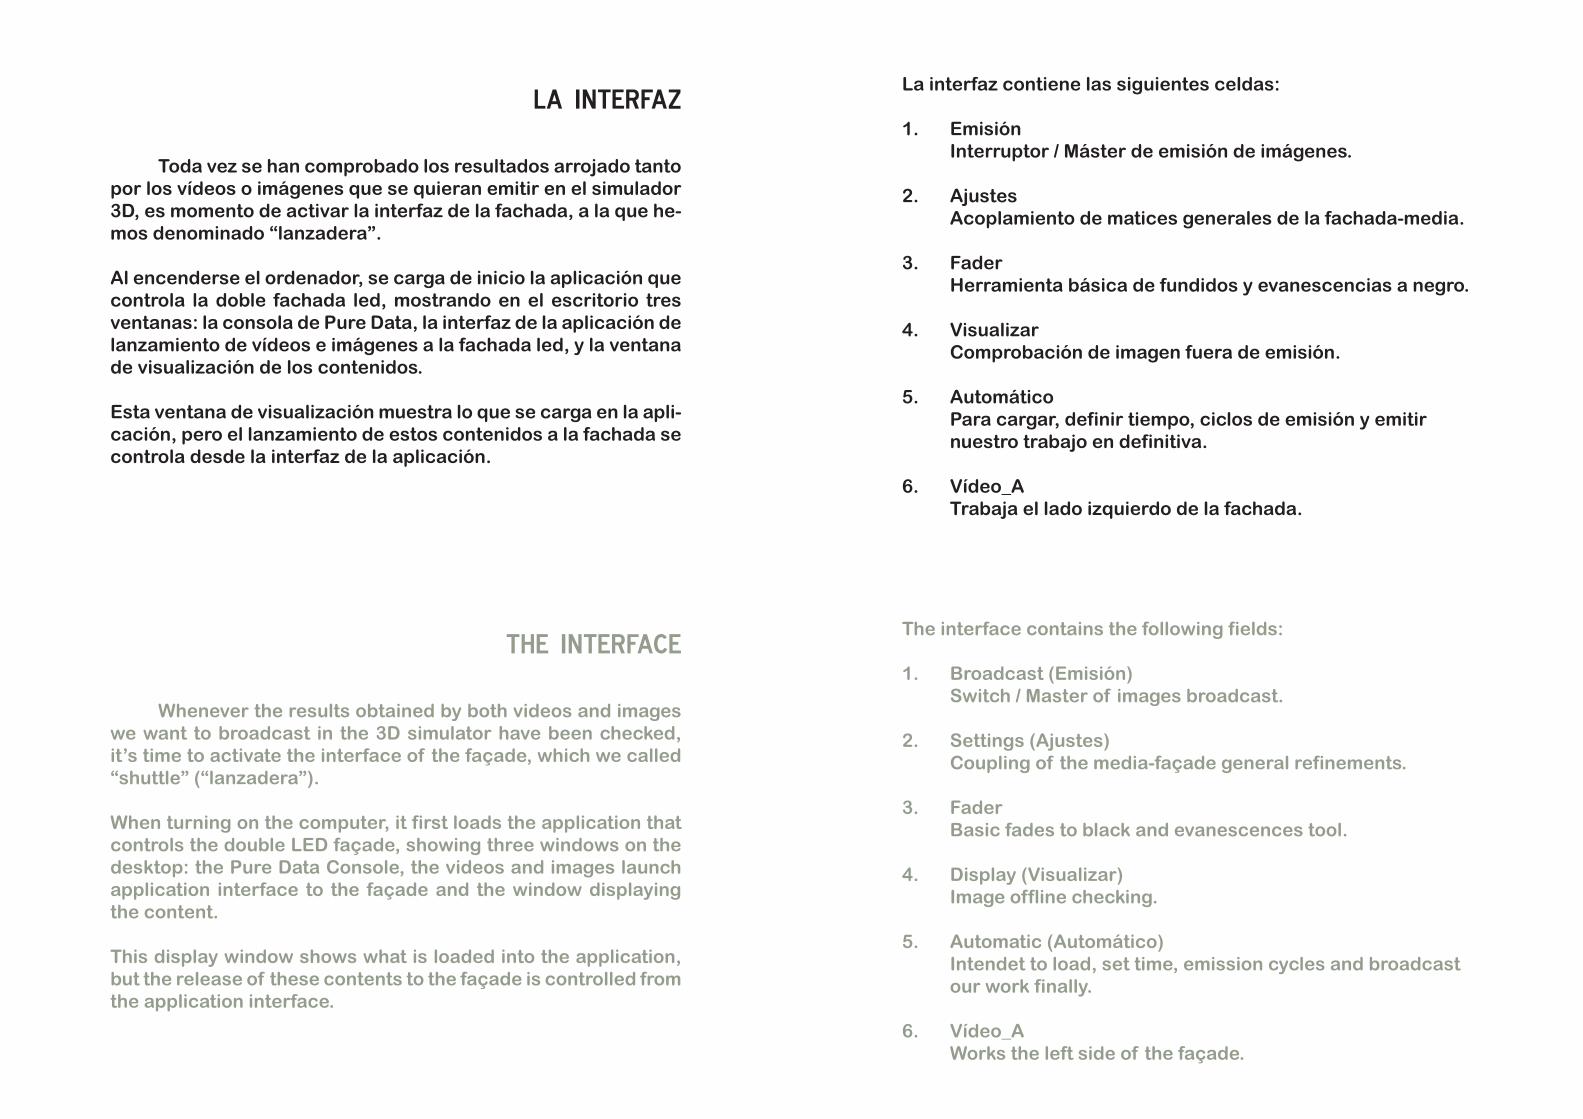
la interfaz Toda vez se han comprobado los resultados arrojado tanto
por los vídeos o imágenes que se quieran emitir en el simulador 3D, es momento de activar la interfaz de la fachada, a la que hemos denominado “lanzadera”.
Al encenderse el ordenador, se carga de inicio la aplicación que controla la doble fachada led, mostrando en el escritorio tres ventanas: la consola de Pure Data, la interfaz de la aplicación de lanzamiento de vídeos e imágenes a la fachada led, y la ventana de visualización de los contenidos.
Esta ventana de visualización muestra lo que se carga en la aplicación, pero el lanzamiento de estos contenidos a la fachada se controla desde la interfaz de la aplicación.
the interface Whenever the results obtained by both videos and images
we want to broadcast in the 3D simulator have been checked, it’s time to activate the interface of the façade, which we called “shuttle” (“lanzadera”).
When turning on the computer, it first loads the application that controls the double LED façade, showing three windows on the desktop: the Pure Data Console, the videos and images launch application interface to the façade and the window displaying the content.
This display window shows what is loaded into the application, but the release of these contents to the façade is controlled from the application interface.
La interfaz contiene las siguientes celdas:
1. Emisión Interruptor / Máster de emisión de imágenes.
2. Ajustes Acoplamiento de matices generales de la fachada-media.
3. Fader Herramienta básica de fundidos y evanescencias a negro.
4. Visualizar Comprobación de imagen fuera de emisión.
5. Automático Para cargar, definir tiempo, ciclos de emisión y emitir nuestro trabajo en definitiva.
6. Vídeo_A Trabaja el lado izquierdo de la fachada.
The interface contains the following fields:
1. Broadcast (Emisión) Switch / Master of images broadcast.
2. Settings (Ajustes) Coupling of the media-façade general refinements.
3. Fader Basic fades to black and evanescences tool.
4. Display (Visualizar) Image offline checking.
5. Automatic (Automático) Intendet to load, set time, emission cycles and broadcast our work finally.
6. Vídeo_A Works the left side of the façade.
1
3
5
6
7
1
3
5
6
7
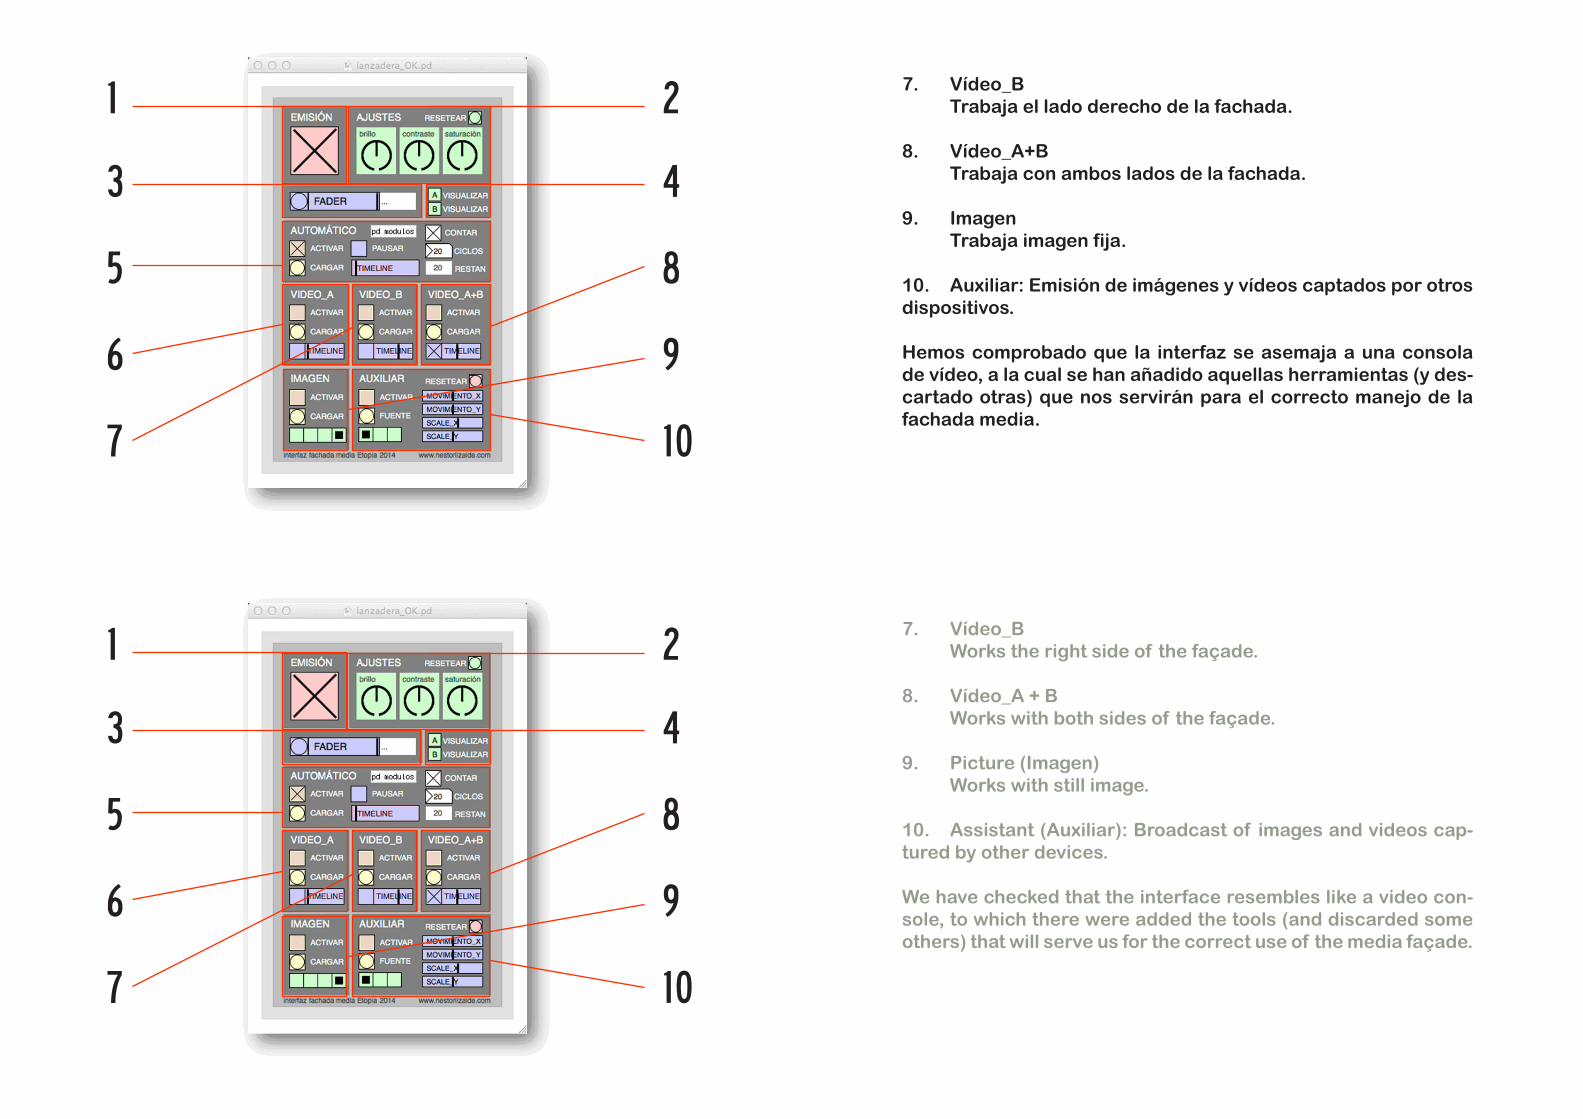
7. Vídeo_B2 Trabaja el lado derecho de la fachada.
4 8. Vídeo_A+B
Trabaja con ambos lados de la fachada.
9. Imagen Trabaja imagen fija.
8 10. Auxiliar: Emisión de imágenes y vídeos captados por otros dispositivos.
9 Hemos comprobado que la interfaz se asemaja a una consola de vídeo, a la cual se han añadido aquellas herramientas (y descartado otras) que nos servirán para el correcto manejo de la fachada media.
10
7. Vídeo_B2 Works the right side of the façade.
4 8. Vídeo_A + B
Works with both sides of the façade.
9. Picture (Imagen) Works with still image.
8 10. Assistant (Auxiliar): Broadcast of images and videos captured by other devices.
9 We have checked that the interface resembles like a video console, to which there were added the tools (and discarded some others) that will serve us for the correct use of the media façade.
10
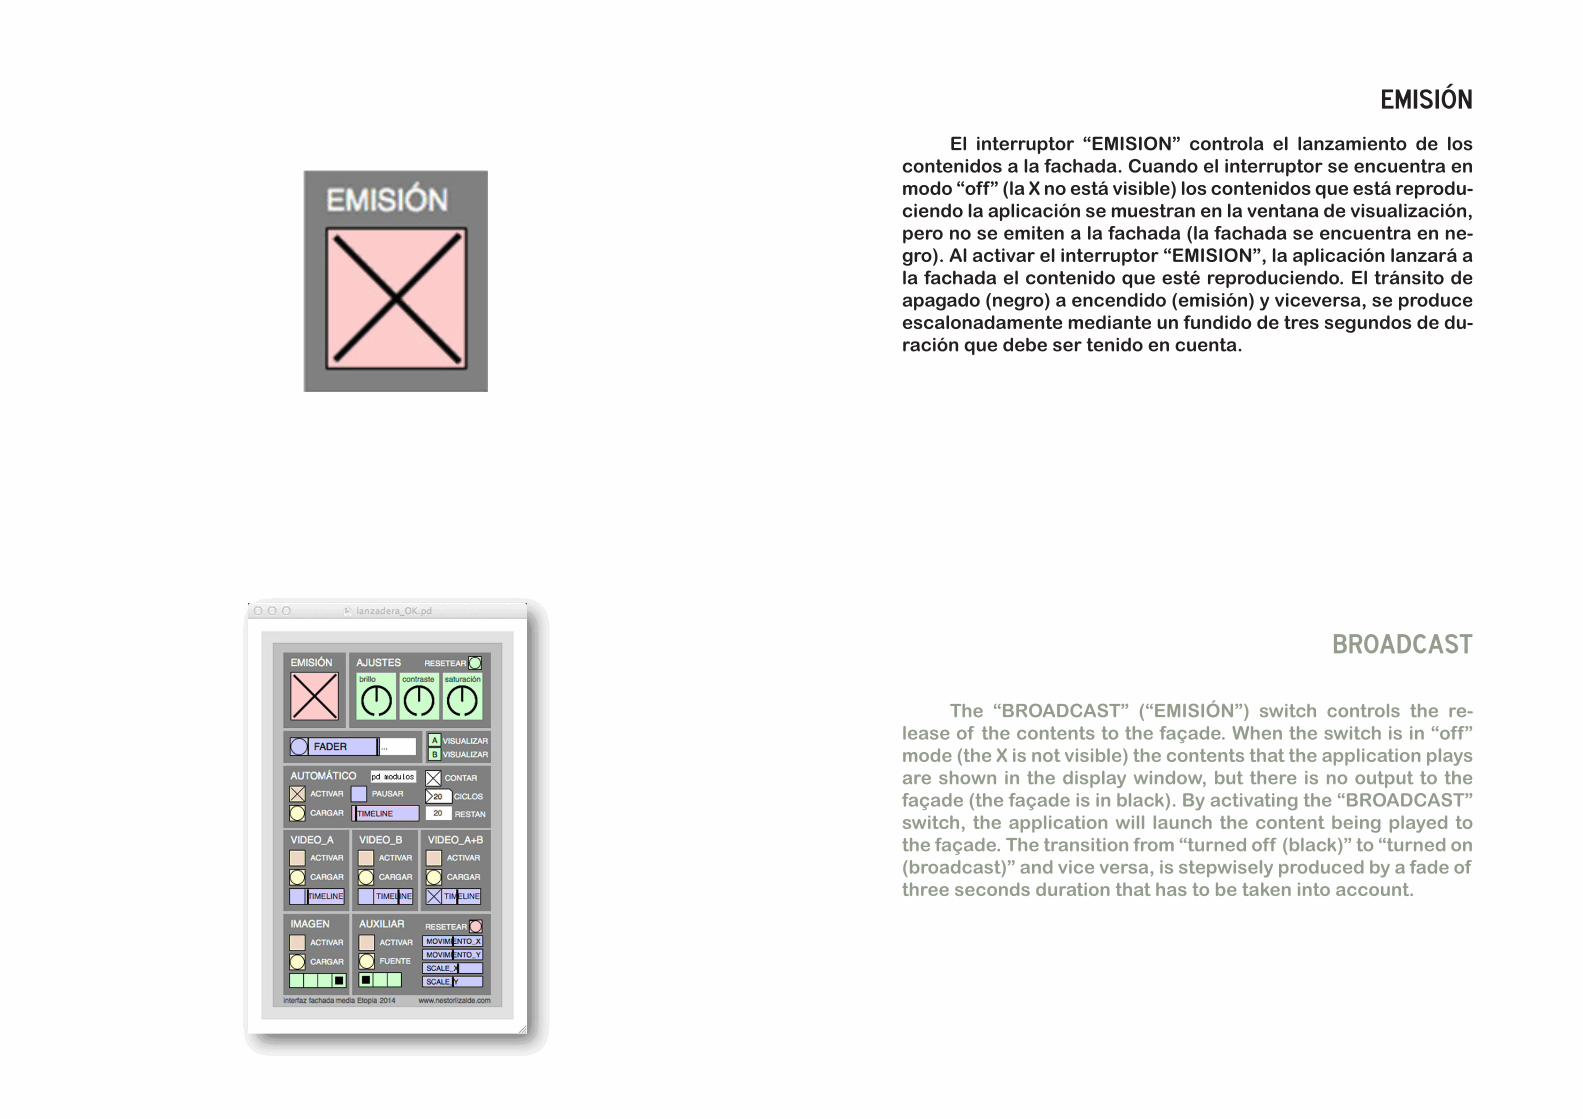
emisión El interruptor “EMISION” controla el lanzamiento de los
contenidos a la fachada. Cuando el interruptor se encuentra en modo “off” (la X no está visible) los contenidos que está reproduciendo la aplicación se muestran en la ventana de visualización, pero no se emiten a la fachada (la fachada se encuentra en negro). Al activar el interruptor “EMISION”, la aplicación lanzará a la fachada el contenido que esté reproduciendo. El tránsito de apagado (negro) a encendido (emisión) y viceversa, se produce escalonadamente mediante un fundido de tres segundos de duración que debe ser tenido en cuenta.
broadcast The “BROADCAST” (“EMISIÓN”) switch controls the re
lease of the contents to the façade. When the switch is in “off” mode (the X is not visible) the contents that the application plays are shown in the display window, but there is no output to the façade (the façade is in black). By activating the “BROADCAST” switch, the application will launch the content being played to the façade. The transition from “turned off (black)” to “turned on (broadcast)” and vice versa, is stepwisely produced by a fade of three seconds duration that has to be taken into account.

ajustes Este sector de la aplicación cuenta con tres parámetros
básicos de ajuste de imagen: Brillo, Contraste y Saturación. Por defecto, estos controles están a cero (con el secundero de la perilla o fader hacia arriba) reproduciendo el vídeo tal y como viene de origen.
Si se desea realizar un ajuste y que éste quede guardado, se debe realizar el ajuste deseado con los controles e ir a menú/ archivo/guardar. La próxima vez que se abra, la aplicación cargará esta configuración.
La fachada es un equipamiento de gran potencia, así que los cambios en estos tres ámbitos de emisión han de considerarse mucho antes. Una excesiva luminosidad, por ejemplo, de seguro afectará a matices de color, expresión o aceptabilidad de la obra. Si se desea pasar a “ajustes de fábrica”, con todas las perillas a cero, se puede marcar la opción “resetear” en la parte superior derecha de esta celda.
settings This part of the application has three basic parameters of
image adjustment: Brightness, Contrast and Saturation. By default, these controls are set to zero (with knob or fader set up) playing the video as it comes of origin.
If we want to make an adjustment and that the latter is saved, you must perform the desired controls setting and go to menu / file / save. The next time it is opened, the application will load this configuration.
The façade is a powerful equipment, therefore the changes in these three areas broadcast have to be considered much earlier. An excessive brightness, for example, will affect surely nuances of color, expression or acceptability of the work. If one wants to set to “factory settings” with all the knobs to zero, it can be made “reset” on the top right of this cell option.
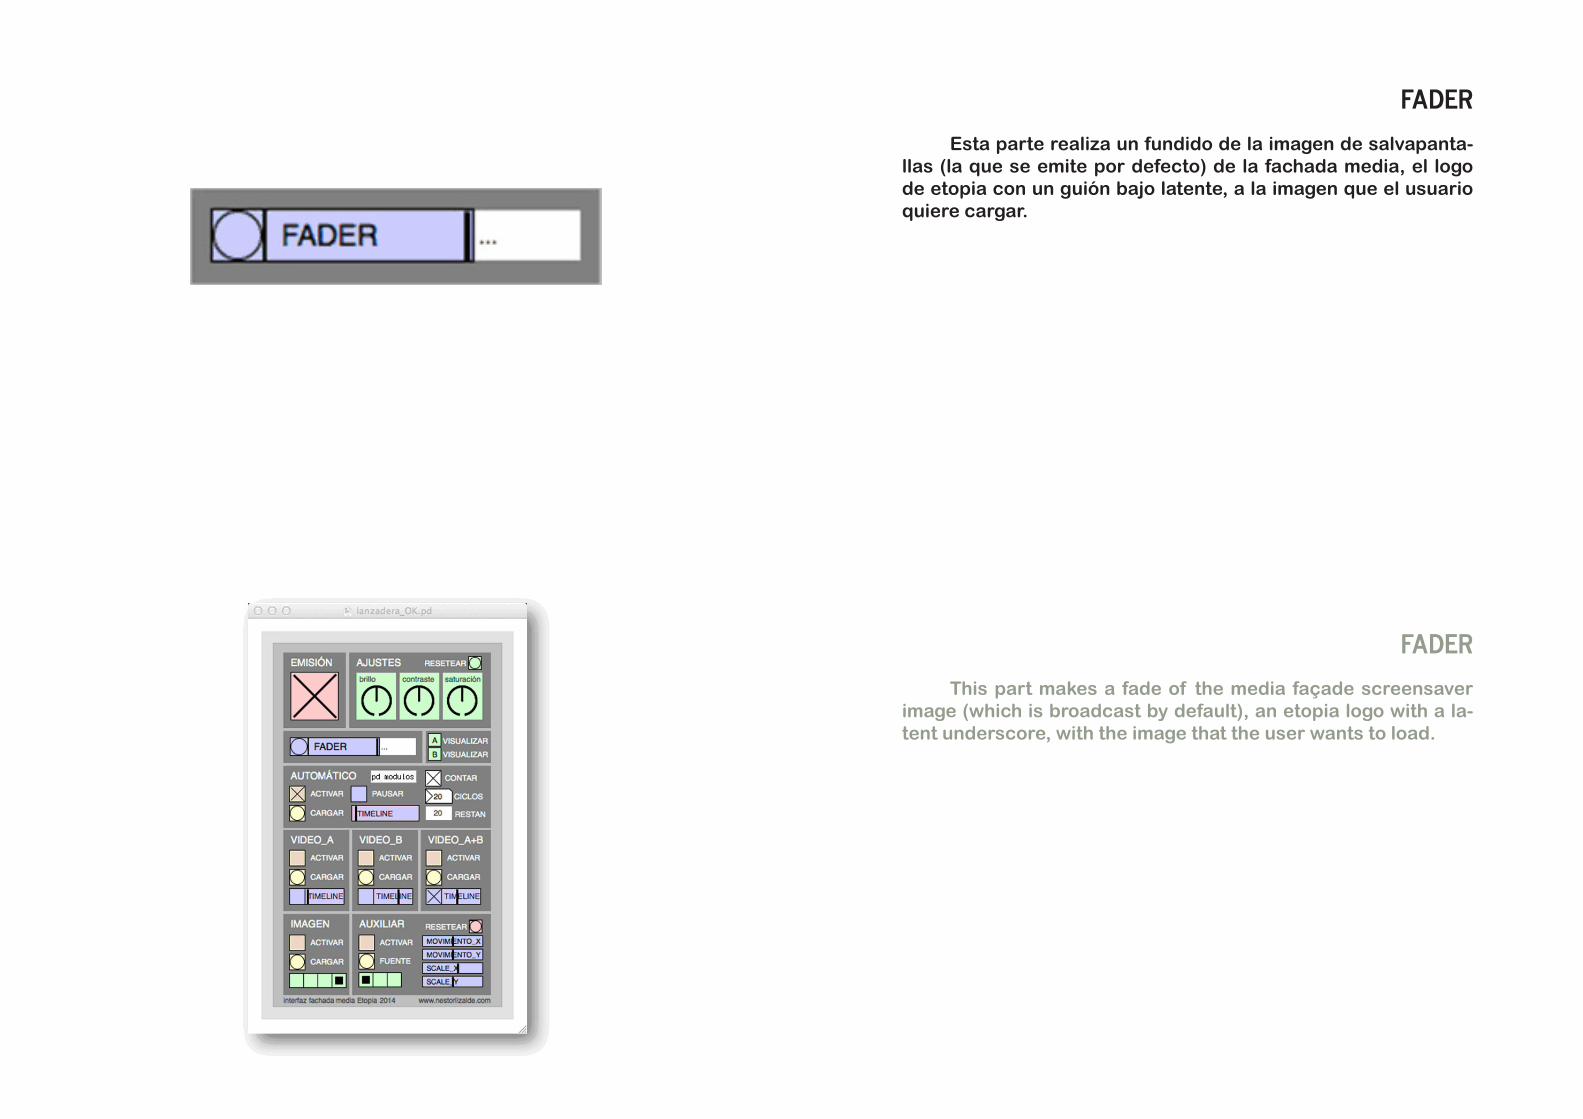
fader Esta parte realiza un fundido de la imagen de salvapanta
llas (la que se emite por defecto) de la fachada media, el logo de etopia con un guión bajo latente, a la imagen que el usuario quiere cargar.
fader This part makes a fade of the media façade screensaver
image (which is broadcast by default), an etopia logo with a latent underscore, with the image that the user wants to load.
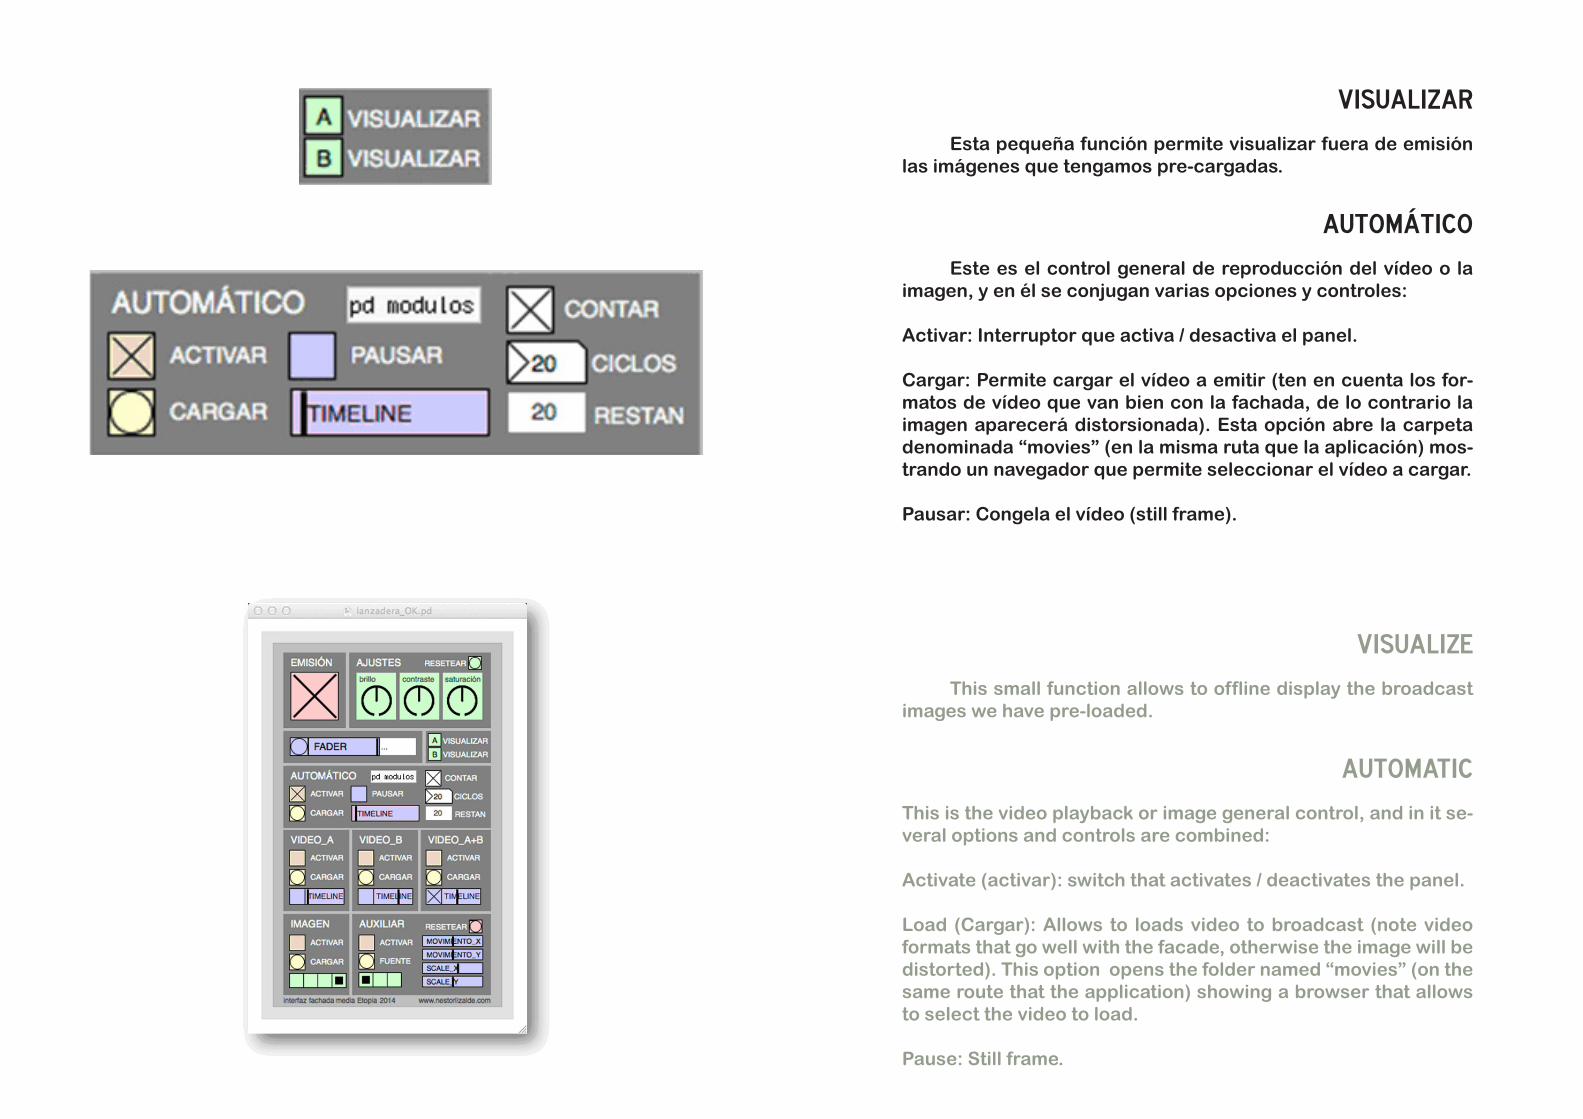
visualizar Esta pequeña función permite visualizar fuera de emisión
las imágenes que tengamos pre-cargadas.
automático Este es el control general de reproducción del vídeo o la
imagen, y en él se conjugan varias opciones y controles:
Activar: Interruptor que activa / desactiva el panel.
Cargar: Permite cargar el vídeo a emitir (ten en cuenta los formatos de vídeo que van bien con la fachada, de lo contrario la imagen aparecerá distorsionada). Esta opción abre la carpeta denominada “movies” (en la misma ruta que la aplicación) mostrando un navegador que permite seleccionar el vídeo a cargar.
Pausar: Congela el vídeo (still frame).
visualize This small function allows to offline display the broadcast
images we have pre-loaded.
automatic This is the video playback or image general control, and in it several options and controls are combined:
Activate (activar): switch that activates / deactivates the panel.
Load (Cargar): Allows to loads video to broadcast (note video formats that go well with the facade, otherwise the image will be distorted). This option opens the folder named “movies” (on the same route that the application) showing a browser that allows to select the video to load.
Pause: Still frame.
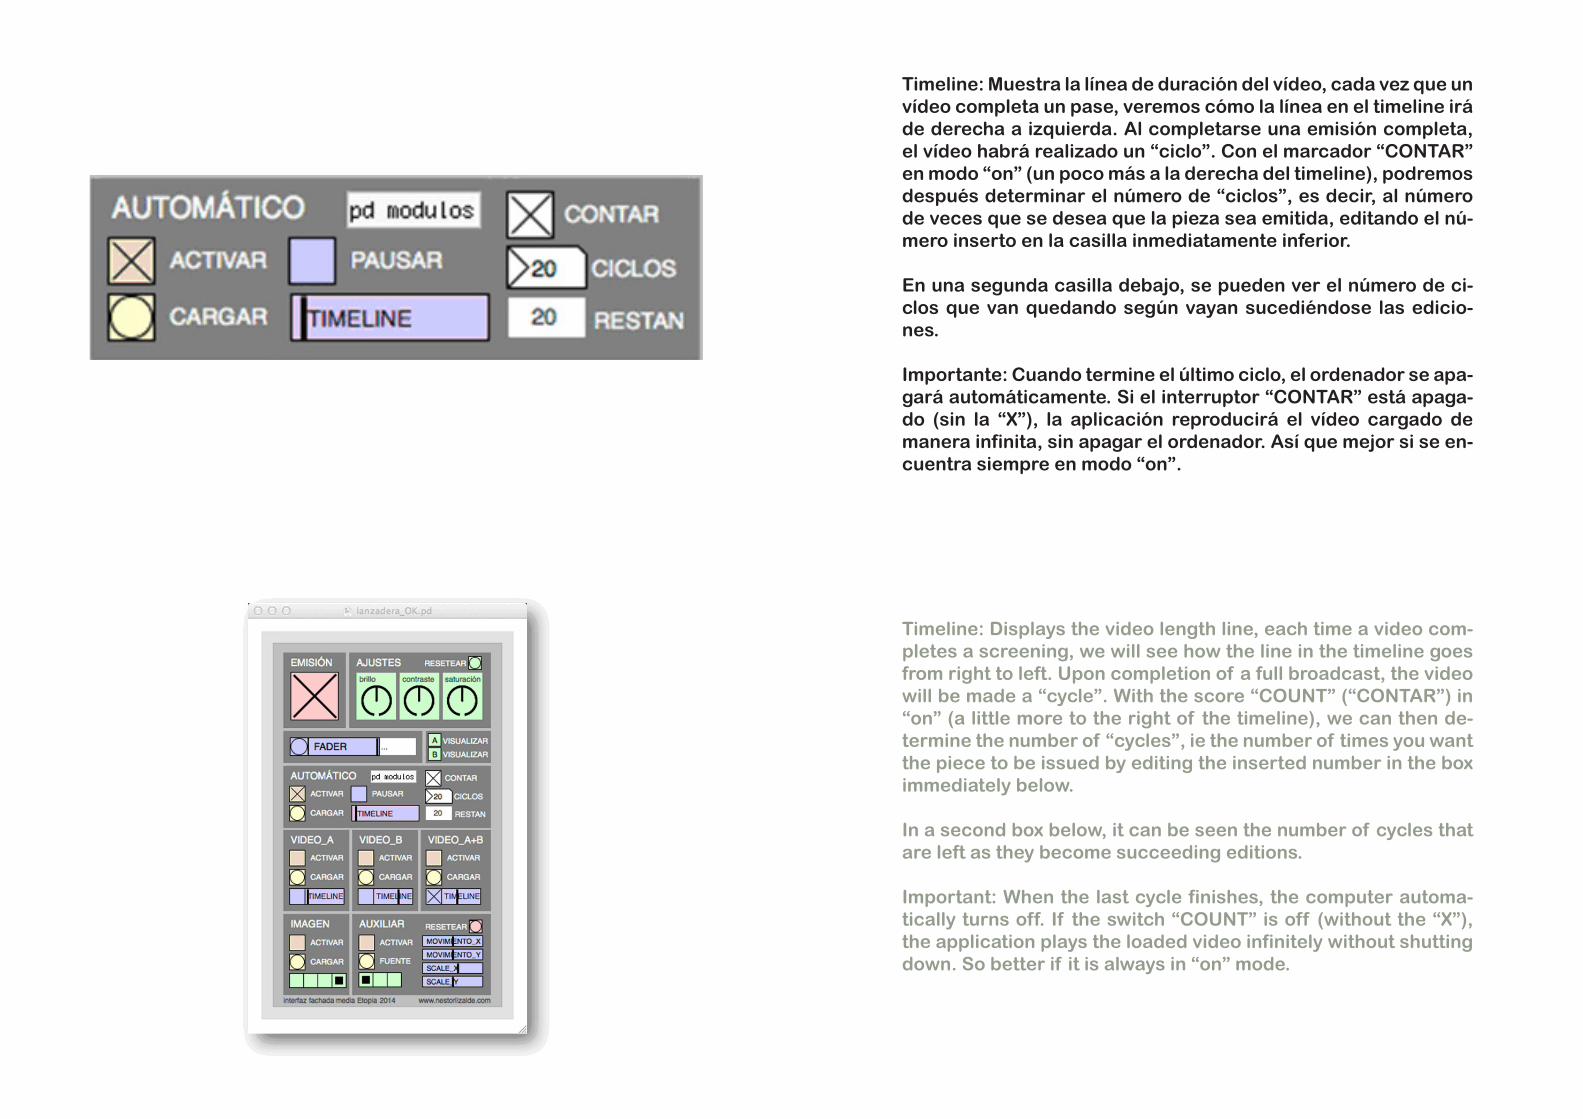
Timeline: Muestra la línea de duración del vídeo, cada vez que un vídeo completa un pase, veremos cómo la línea en el timeline irá de derecha a izquierda. Al completarse una emisión completa, el vídeo habrá realizado un “ciclo”. Con el marcador “CONTAR” en modo “on” (un poco más a la derecha del timeline), podremos después determinar el número de “ciclos”, es decir, al número de veces que se desea que la pieza sea emitida, editando el número inserto en la casilla inmediatamente inferior.
En una segunda casilla debajo, se pueden ver el número de ciclos que van quedando según vayan sucediéndose las ediciones.
Importante: Cuando termine el último ciclo, el ordenador se apagará automáticamente. Si el interruptor “CONTAR” está apagado (sin la “X”), la aplicación reproducirá el vídeo cargado de manera infinita, sin apagar el ordenador. Así que mejor si se encuentra siempre en modo “on”.
Timeline: Displays the video length line, each time a video completes a screening, we will see how the line in the timeline goes from right to left. Upon completion of a full broadcast, the video will be made a “cycle”. With the score “COUNT” (“CONTAR”) in “on” (a little more to the right of the timeline), we can then determine the number of “cycles”, ie the number of times you want the piece to be issued by editing the inserted number in the box immediately below.
In a second box below, it can be seen the number of cycles that are left as they become succeeding editions.
Important: When the last cycle finishes, the computer automatically turns off. If the switch “COUNT” is off (without the “X”), the application plays the loaded video infinitely without shutting down. So better if it is always in “on” mode.
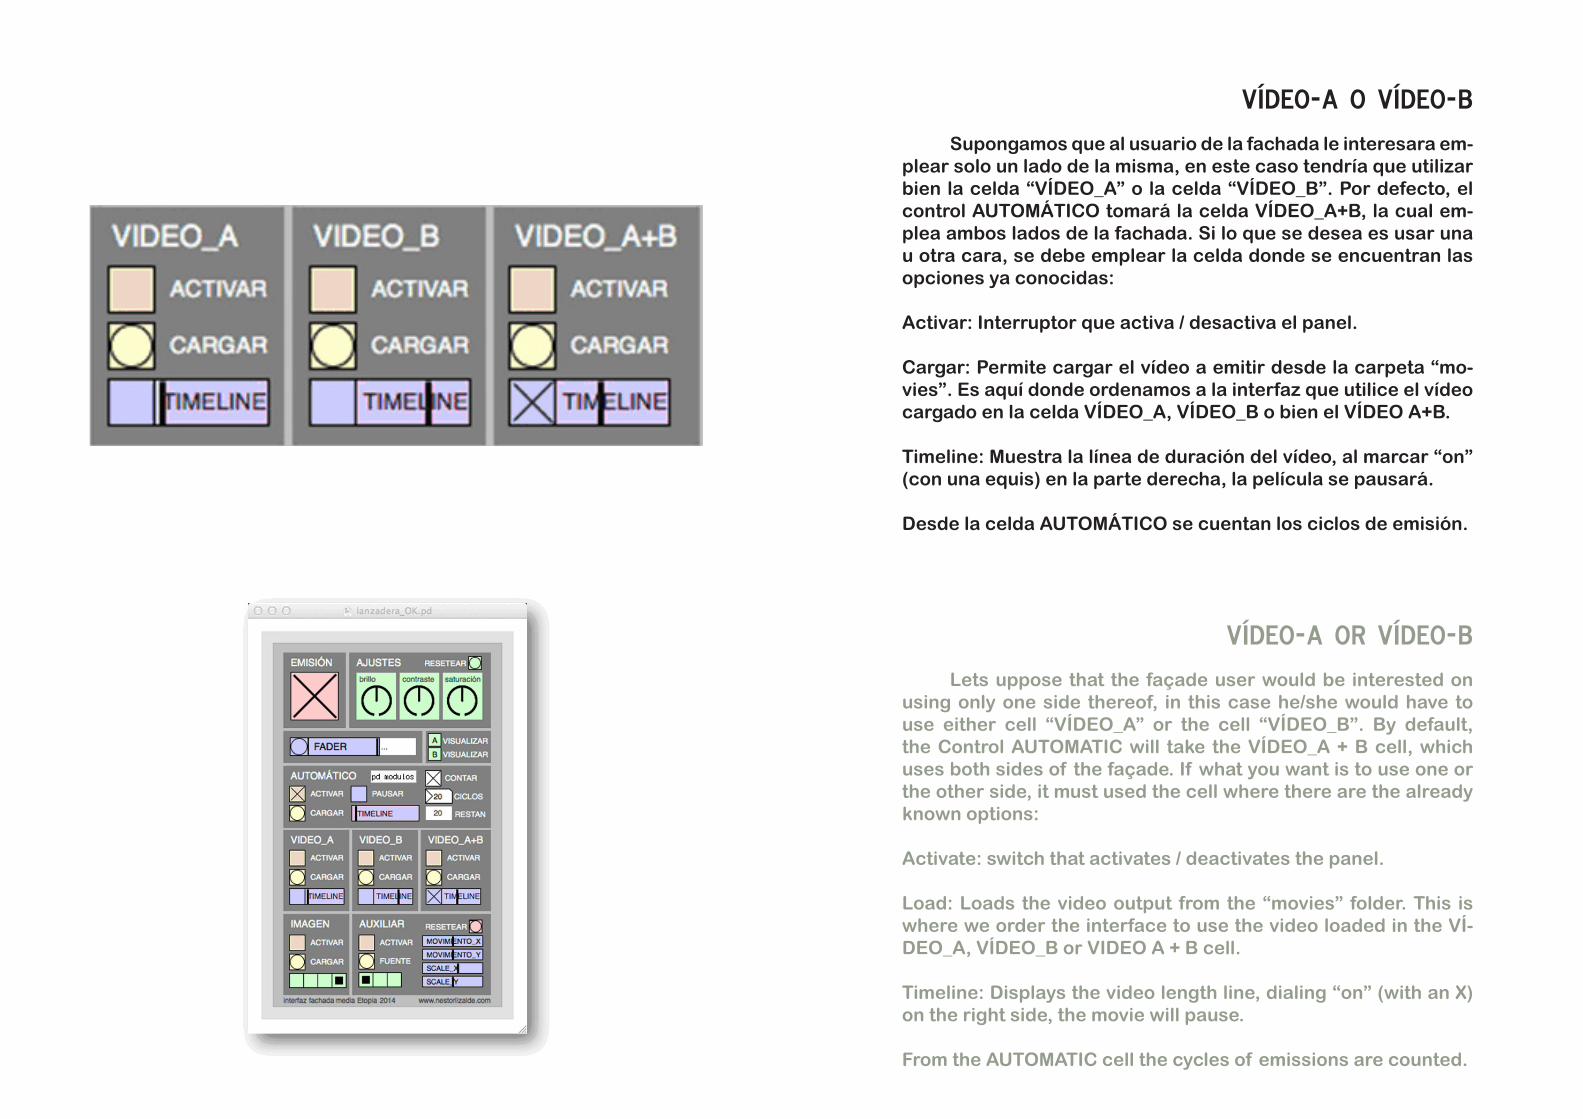
vídeo_a o vídeo_b Supongamos que al usuario de la fachada le interesara em
plear solo un lado de la misma, en este caso tendría que utilizar bien la celda “VÍDEO_A” o la celda “VÍDEO_B”. Por defecto, el control AUTOMÁTICO tomará la celda VÍDEO_A+B, la cual emplea ambos lados de la fachada. Si lo que se desea es usar una u otra cara, se debe emplear la celda donde se encuentran las opciones ya conocidas:
Activar: Interruptor que activa / desactiva el panel.
Cargar: Permite cargar el vídeo a emitir desde la carpeta “movies”. Es aquí donde ordenamos a la interfaz que utilice el vídeo cargado en la celda VÍDEO_A, VÍDEO_B o bien el VÍDEO A+B.
Timeline: Muestra la línea de duración del vídeo, al marcar “on” (con una equis) en la parte derecha, la película se pausará.
Desde la celda AUTOMÁTICO se cuentan los ciclos de emisión.
vídeo_a or vídeo_b Lets uppose that the façade user would be interested on
using only one side thereof, in this case he/she would have to use either cell “VÍDEO_A” or the cell “VÍDEO_B”. By default, the Control AUTOMATIC will take the VÍDEO_A + B cell, which uses both sides of the façade. If what you want is to use one or the other side, it must used the cell where there are the already known options:
Activate: switch that activates / deactivates the panel.
Load: Loads the video output from the “movies” folder. This is where we order the interface to use the video loaded in the VÍDEO_A, VÍDEO_B or VIDEO A + B cell.
Timeline: Displays the video length line, dialing “on” (with an X) on the right side, the movie will pause.
From the AUTOMATIC cell the cycles of emissions are counted.

imagen Esta celda controla la emisión de imagen fija, siguiendo el
mismo lenguaje que las celdas VÍDEO.
Activar: Interruptor que activa / desactiva el panel.
Cargar: Abre la carpeta “imágenes” (en la misma ruta que la aplicación) mostrando un navegador que permite seleccionar la imagen a cargar.
La diferencia radica en que, en vez de presentar un timeline, se dispone de cuatro pequeños recuadros. Marcando sobre cada uno de ellos se presentan las siguientes opciones:
1. Imagen emitida en toda la fachada media. 2. Imagen emitida en el lado izquierdo. 3. Imagen emitida en el lado derecho. 4. Imagen emitida por duplicado en ambos lados.
image This cell controls the emission of still image, using the same
language that the cells VIDEO.
Activate: switch that activates / deactivates the panel.
Load: Open the “images” folder (on the same route that the application) showing a browser that allows you to select the image to load.
The difference is that instead of presenting a timeline, there are four small boxes. Marking on each of the following options are presented:
1. Image shown in all media façade. 2. Image shown on the left side. 3. Image shown on the right side. 4. Image shown duplicated on both sides.
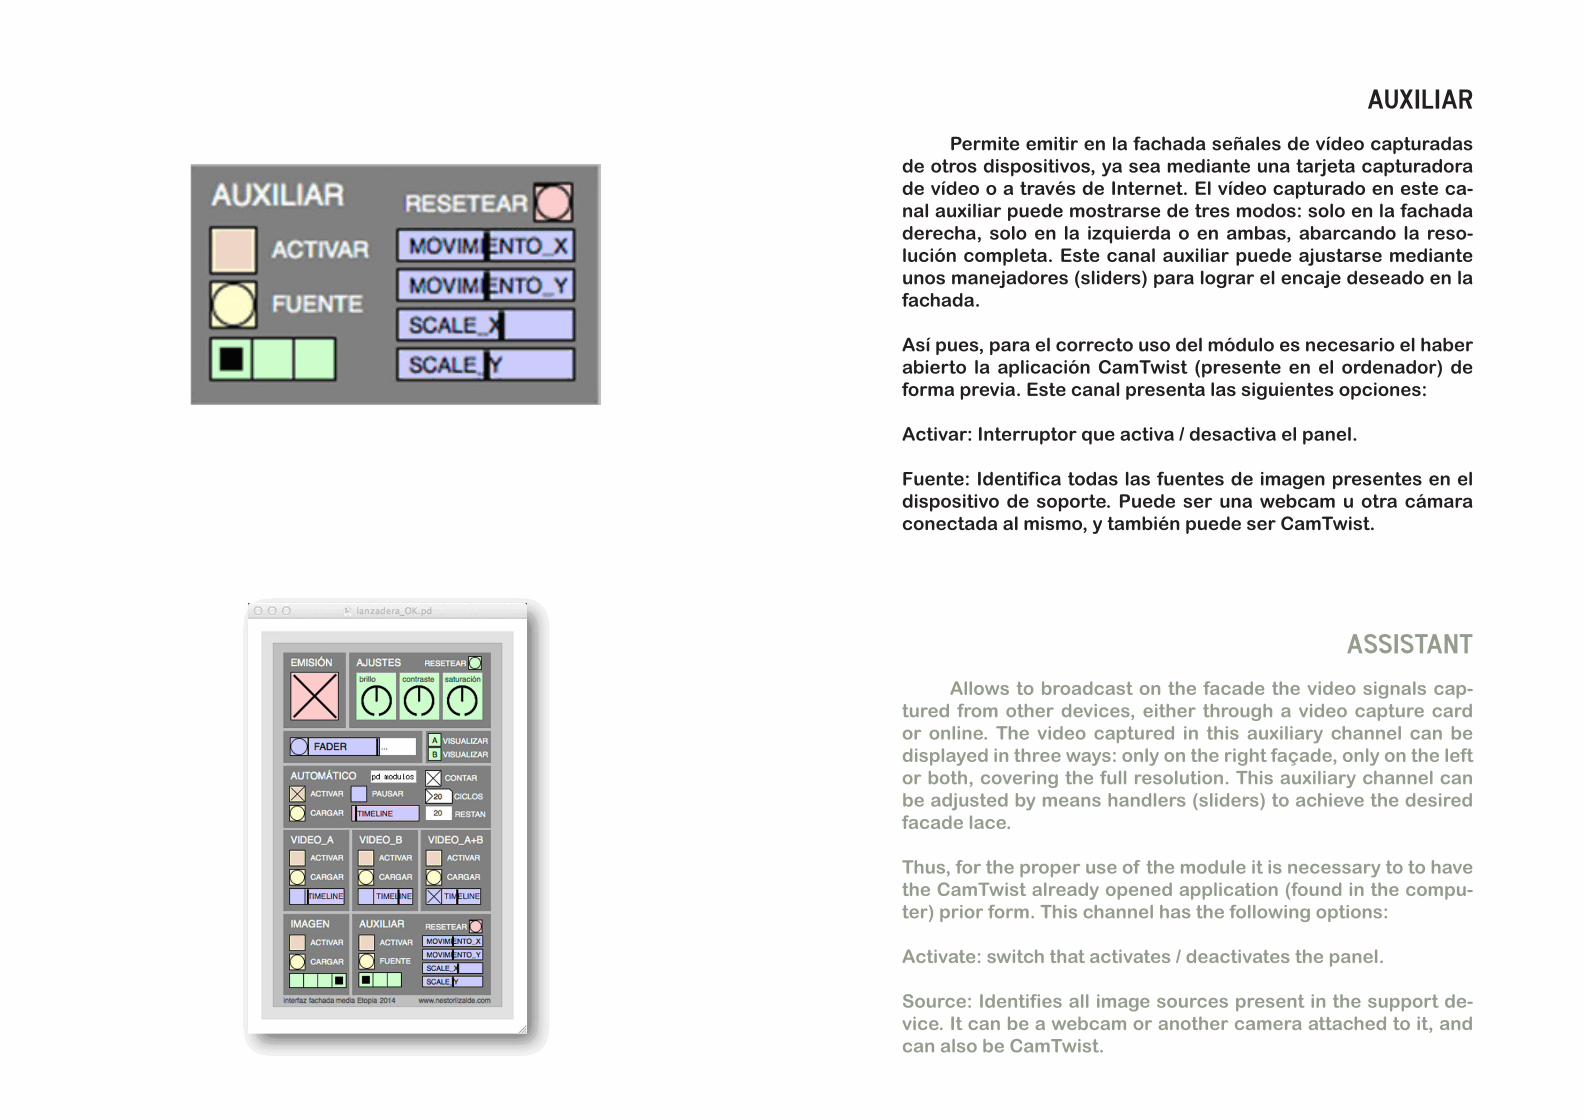
auxiliar Permite emitir en la fachada señales de vídeo capturadas
de otros dispositivos, ya sea mediante una tarjeta capturadora de vídeo o a través de Internet. El vídeo capturado en este canal auxiliar puede mostrarse de tres modos: solo en la fachada derecha, solo en la izquierda o en ambas, abarcando la resolución completa. Este canal auxiliar puede ajustarse mediante unos manejadores (sliders) para lograr el encaje deseado en la fachada.
Así pues, para el correcto uso del módulo es necesario el haber abierto la aplicación CamTwist (presente en el ordenador) de forma previa. Este canal presenta las siguientes opciones:
Activar: Interruptor que activa / desactiva el panel.
Fuente: Identifica todas las fuentes de imagen presentes en el dispositivo de soporte. Puede ser una webcam u otra cámara conectada al mismo, y también puede ser CamTwist.
assistant Allows to broadcast on the facade the video signals cap
tured from other devices, either through a video capture card or online. The video captured in this auxiliary channel can be displayed in three ways: only on the right façade, only on the left or both, covering the full resolution. This auxiliary channel can be adjusted by means handlers (sliders) to achieve the desired facade lace.
Thus, for the proper use of the module it is necessary to to have the CamTwist already opened application (found in the computer) prior form. This channel has the following options:
Activate: switch that activates / deactivates the panel.
Source: Identifies all image sources present in the support device. It can be a webcam or another camera attached to it, and can also be CamTwist.
cam twist NOTA: En el momento de escribir este manual, la versión
estable de CamTwist es la 2.5., es decir, la subida a la red de CamTwist el 13 de noviembre de 2013.
Este programa es en origen una herramienta pensada para realizar videoconferencias, y que aplicada a interfaz de la fachada media le dota de la versatilidad que quizá un usuario avanzado no podría encontrar con todas las opciones anteriores.
Principalmente, usaremos este programa para “capturar” imagen que se esté produciendo en un tercer espacio, es decir: una web o el escritorio de un tercer usuario. De ese modo, podremos tomar la imagen, adaptarla con los sliders de nuestra interfaz y emitirla online a través de la fachada.
Tutorial de camtwist: http://camtwiststudio.com/category/tutorial/
cam twist NOTE: At the time of this writing, the stable version of Cam-
Twist is the 2.5, which is the one uploaded to the CamTwist site on November 13, 2013.
This program is a tool originally designed for videoconferencing, and as applied to the interface of the media façade provides it with the versatility that perhaps an advanced user might not find with all of the above explained.
Mainly, we will use this program to “capture” image being produced in a third space, ie a web or desktop of a third user. Thus, we may take the image with sliders and adapt it to our interface and broadcast it online via the façade.
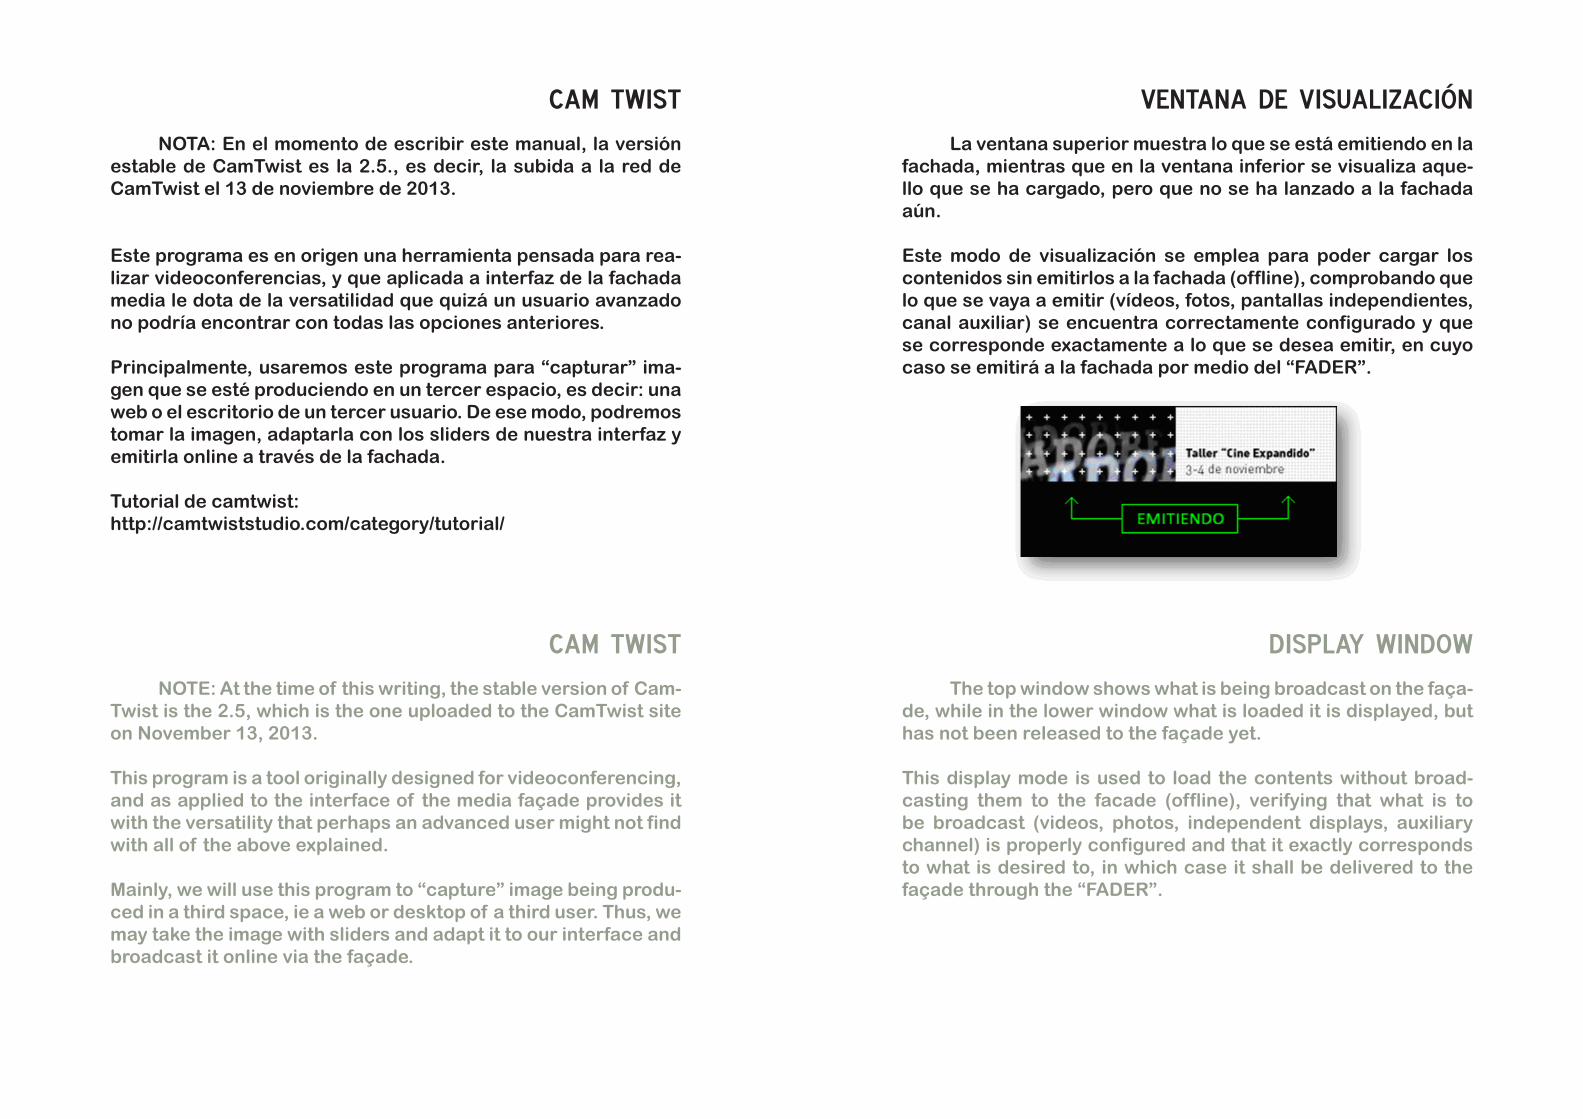
ventana de visualización La ventana superior muestra lo que se está emitiendo en la
fachada, mientras que en la ventana inferior se visualiza aquello que se ha cargado, pero que no se ha lanzado a la fachada aún.
Este modo de visualización se emplea para poder cargar los contenidos sin emitirlos a la fachada (offline), comprobando que lo que se vaya a emitir (vídeos, fotos, pantallas independientes, canal auxiliar) se encuentra correctamente configurado y que se corresponde exactamente a lo que se desea emitir, en cuyo caso se emitirá a la fachada por medio del “FADER”.
display window The top window shows what is being broadcast on the faça
de, while in the lower window what is loaded it is displayed, but has not been released to the façade yet.
This display mode is used to load the contents without broadcasting them to the facade (offline), verifying that what is to be broadcast (videos, photos, independent displays, auxiliary channel) is properly configured and that it exactly corresponds to what is desired to, in which case it shall be delivered to the façade through the “FADER”.
automatización de encendido 1. Abrir el panel “Preferencias del sistema”. 2. Clicar en el icono “Economizador”. 3. En el panel “Economizador” clicar el botón “Programar”. 4. Activar “Arrancar o activar” y poner la hora a la que se desea que se encienda el ordenador todos los días, iniciando automáticamente la aplicación que emite el vídeo sobre la fachada.
apagado automático Cada vez que se encienda el ordenador a la hora progra
mada, la aplicación lanzadora de vídeo reproducirá en bucle el vídeo que tenga cargado el número de veces indicado en “CICLOS”. Al terminar el último ciclo de reproducción, el ordenador se apagará automátiamente, poniendo la fachada en negro hasta que el ordenador se vuelva a encender al día siguiente a la hora programada.
power automation 1. Open the “System Preferences” panel. 2. Click on the “Saver” icon. 3. In the “Saver” panel click the “Set” button. 4. Enable “Starting or activate” and set the time when is desired that computer to power up every day, automatically starting the application that broadcasts the video on the façade.
automatic shutdown Each time the computer at the scheduled time is turned
on, the video application will play in a loop the video you have uploaded the number of times indicated in “Cycles”. At the end of the last cycle of reproduction, the computer automatically turns off, setting the façade led to black until the computer is turned on again the next day at the scheduled time.
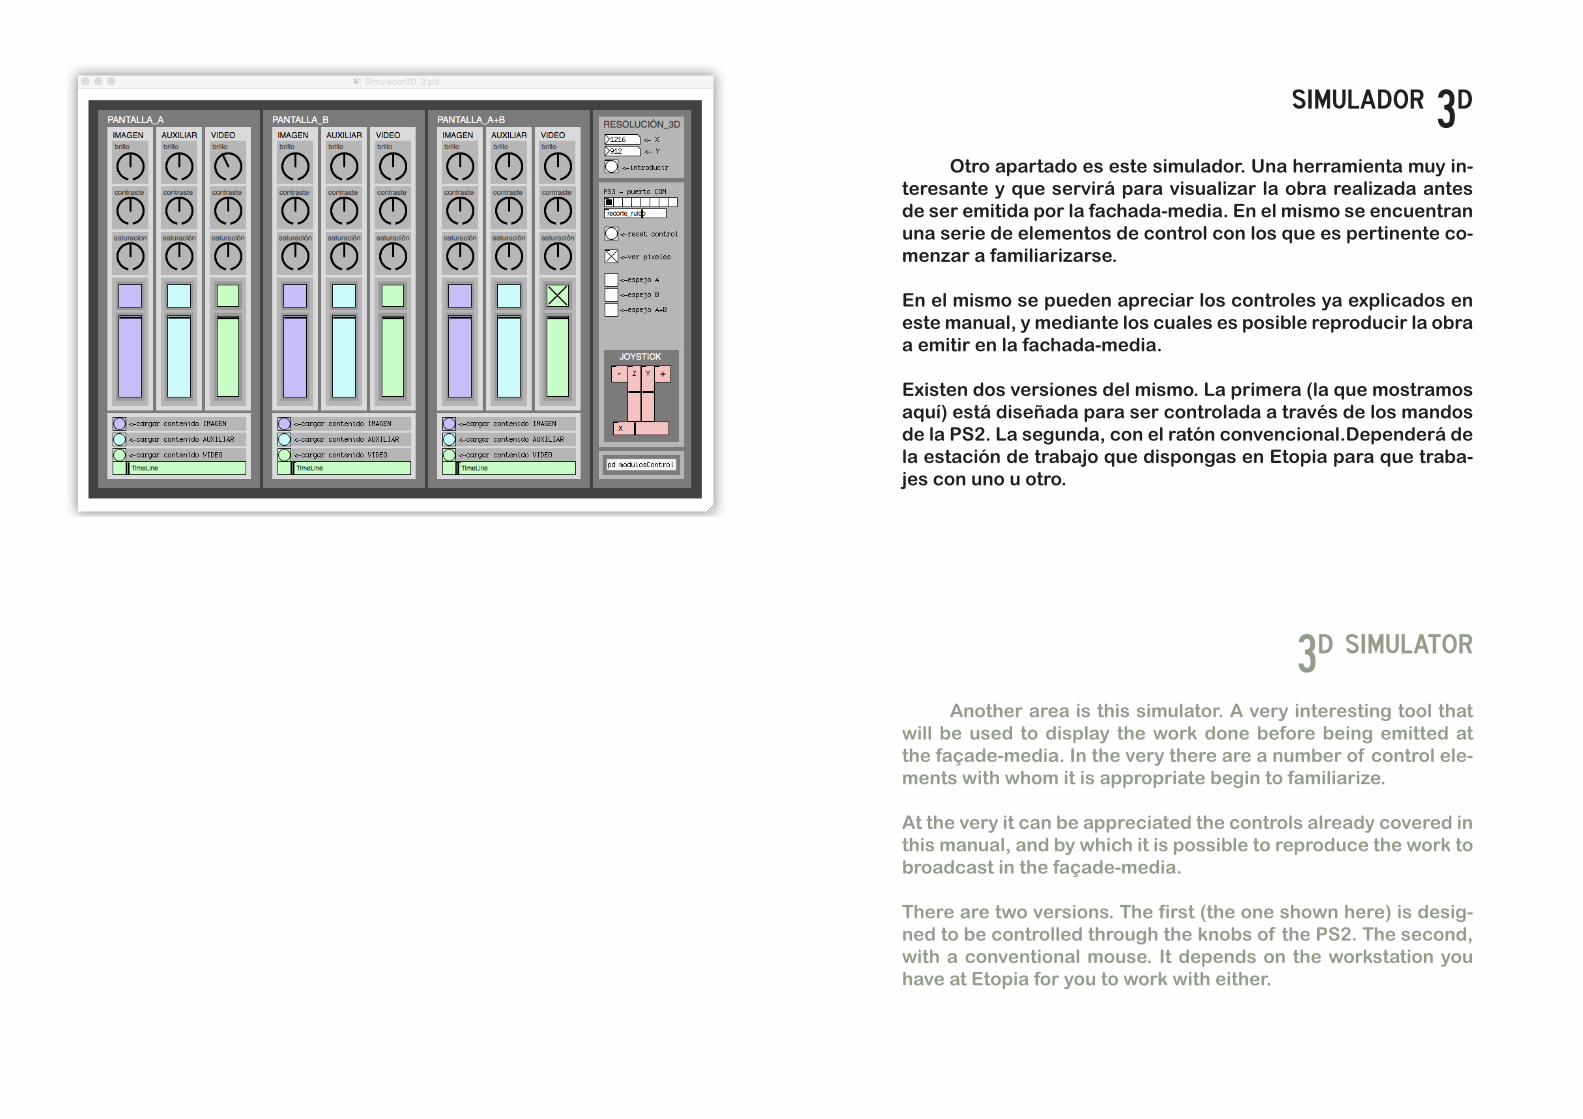
simulador 3d Otro apartado es este simulador. Una herramienta muy in
teresante y que servirá para visualizar la obra realizada antes de ser emitida por la fachada-media. En el mismo se encuentran una serie de elementos de control con los que es pertinente comenzar a familiarizarse.
En el mismo se pueden apreciar los controles ya explicados en este manual, y mediante los cuales es posible reproducir la obra a emitir en la fachada-media.
Existen dos versiones del mismo. La primera (la que mostramos aquí) está diseñada para ser controlada a través de los mandos de la PS2. La segunda, con el ratón convencional.Dependerá de la estación de trabajo que dispongas en Etopia para que trabajes con uno u otro.
3d simulator Another area is this simulator. A very interesting tool that
will be used to display the work done before being emitted at the façade-media. In the very there are a number of control elements with whom it is appropriate begin to familiarize.
At the very it can be appreciated the controls already covered in this manual, and by which it is possible to reproduce the work to broadcast in the façade-media.
There are two versions. The first (the one shown here) is designed to be controlled through the knobs of the PS2. The second, with a conventional mouse. It depends on the workstation you have at Etopia for you to work with either.
ETOPIA 2015
Elaboración del presente manual: Javier Galán
Diseño y desarollo de la interfaz: Néstor LizaldeAutomatización del sistema: Guillermo Malón Este proyecto ha sido desarrollado con Pure Datay el lenguaje de programación Python.


![Europerfil FACHADAS.ppt [Sólo lectura] · Dpto.Marketing - EUROPERFIL, S.A. FACHADAS METÁLICAS 1. Introducción 2. Ámbito de aplicación 3. Elementos de Fachada 4. Normas de producto](https://img.pdfslide.us/doc/110x75/5ba3bb5209d3f214538c4648/europerfil-solo-lectura-dptomarketing-europerfil-sa-fachadas-metalicas.jpg)