Embed Size (px)
DESCRIPTION
Bicycle Riding Safety Group Riding and Pacelines. ExxonMobil Cycling Team 2005. Before we get on the bicycle. Safety Equipment Ready? Helmet inspected & on your head Have your i.d. Bicycle Ready? Tires inflated & inspected Quick releases tight Brakes working Rider ready? - PowerPoint PPT Presentation
Citation preview
1
ExxonMobil Cycling Team
2005
Bicycle Riding SafetyGroup Riding and Pacelines
2
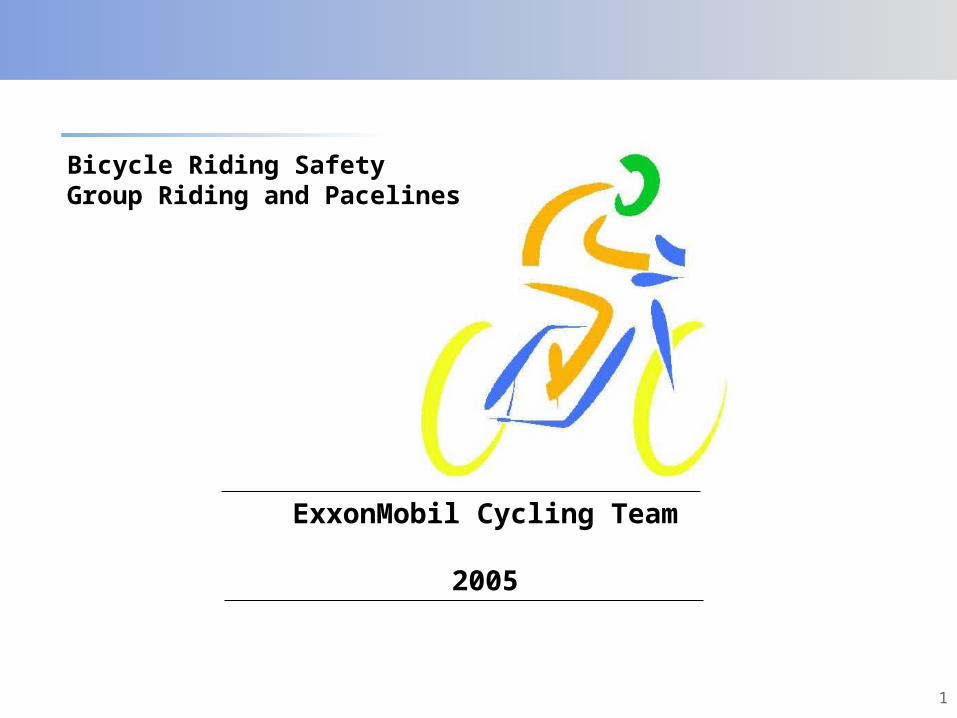
• Safety Equipment Ready?– Helmet inspected & on your head– Have your i.d.
• Bicycle Ready?– Tires inflated & inspected– Quick releases tight– Brakes working
• Rider ready?– Obey traffic laws– Be assertive & confident– Don’t impede traffic– No headphones– No talking on the cell phone
Before we get on the bicycle....Before we get on the bicycle....Before we get on the bicycle....Before we get on the bicycle....
3
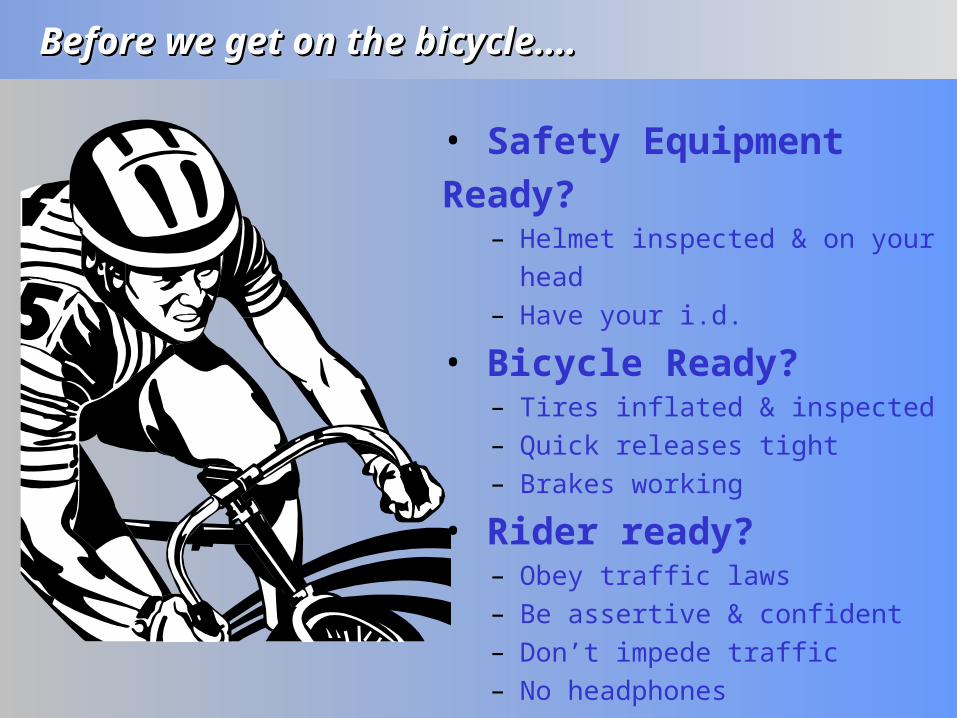
Group Riding BasicsGroup Riding BasicsGroup Riding BasicsGroup Riding Basics
Why ride in a group?– Ride farther, faster
• Use less energy- 30% savings!• Allows time to recuperate
– More visible to motorists– Camaraderie!
Group riding can also be dangerous!– Many riders, various abilities, potential
for contact– Limited line of sight for riders in the
pack
A few guidelines can increase the safety
4
Riding in a GroupRiding in a GroupRiding in a GroupRiding in a Group
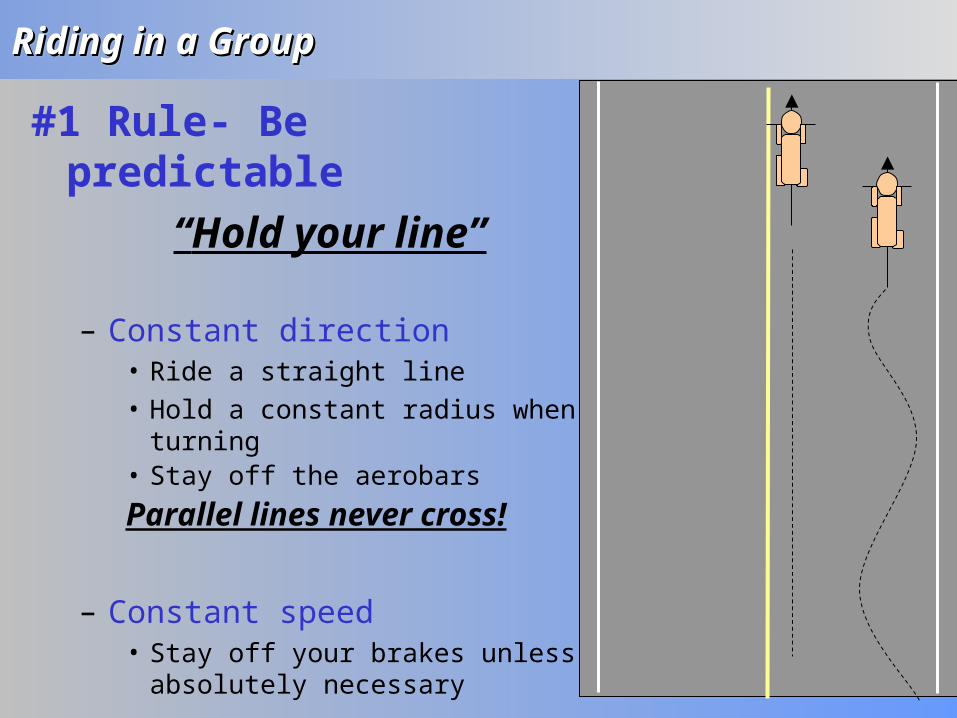
#1 Rule- Be predictable
“Hold your line”
– Constant direction• Ride a straight line• Hold a constant radius when turning• Stay off the aerobars
Parallel lines never cross!
– Constant speed• Stay off your brakes unless
absolutely necessary
5
Riding in a GroupRiding in a GroupRiding in a GroupRiding in a Group
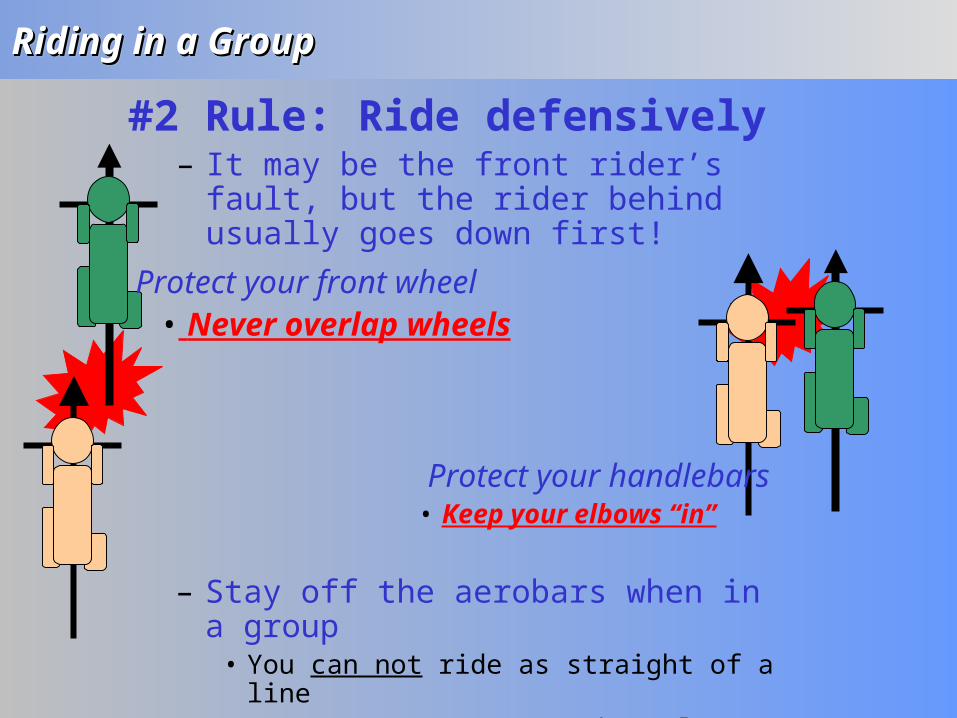
#2 Rule: Ride defensively– It may be the front rider’s fault, but the
rider behind usually goes down first!
Protect your handlebars• Keep your elbows “in”
Protect your front wheel• Never overlap wheels
– Stay off the aerobars when in a group• You can not ride as straight of a line• You can not react to obstacles as fast

6
Riding in a GroupRiding in a GroupRiding in a GroupRiding in a Group
#3. Be the eyes & ears for those behind– Call out when slowing, stopping, or turning– Communicate Road Hazards
• Holes, water, cars, bumps, other riders, etc.• Call: “OBSTACLE, LOCATION”
GLASS RIGHT!
7
Group Riding- Pacelines!Group Riding- Pacelines!Group Riding- Pacelines!Group Riding- Pacelines!
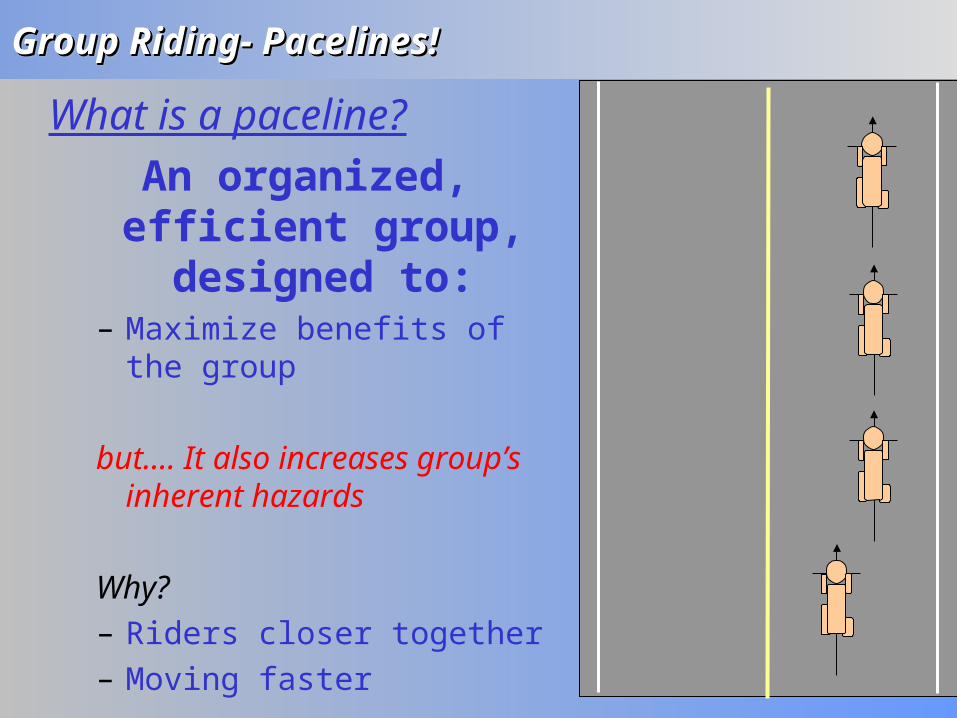
What is a paceline?
An organized, efficient group, designed to:
– Maximize benefits of the group
but.... It also increases group’s inherent hazards
Why?– Riders closer together– Moving faster
8
Group Riding- Pacelines!Group Riding- Pacelines!Group Riding- Pacelines!Group Riding- Pacelines!
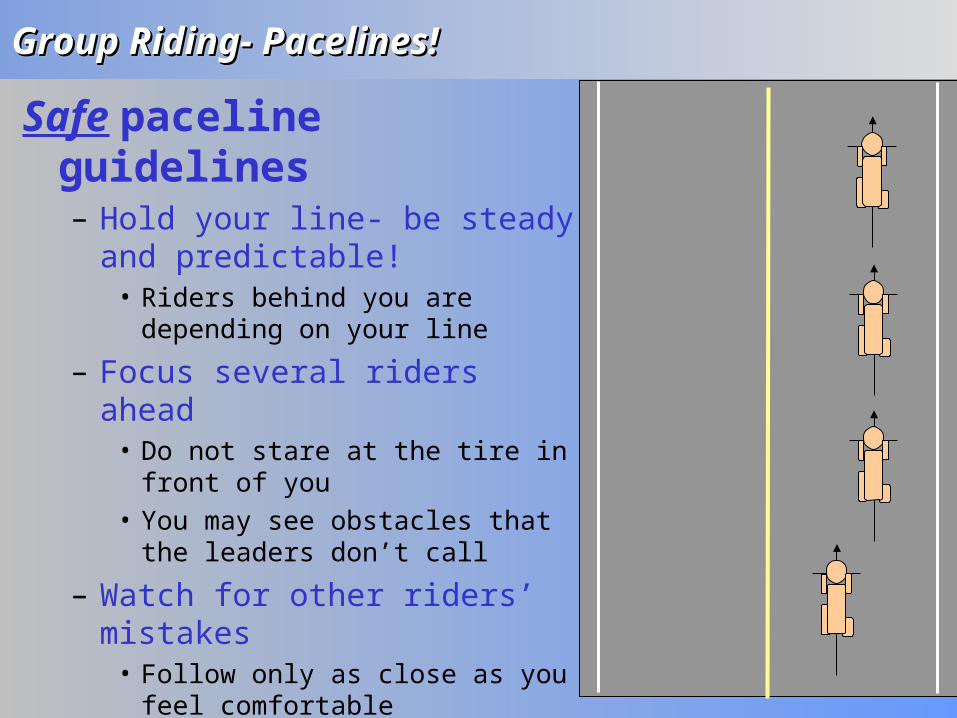
Safe paceline guidelines– Hold your line- be steady and
predictable!• Riders behind you are depending on
your line
– Focus several riders ahead• Do not stare at the tire in front of you• You may see obstacles that the
leaders don’t call
– Watch for other riders’ mistakes• Follow only as close as you feel
comfortable• Try to ride with people you know• Always leave a “way out”
9
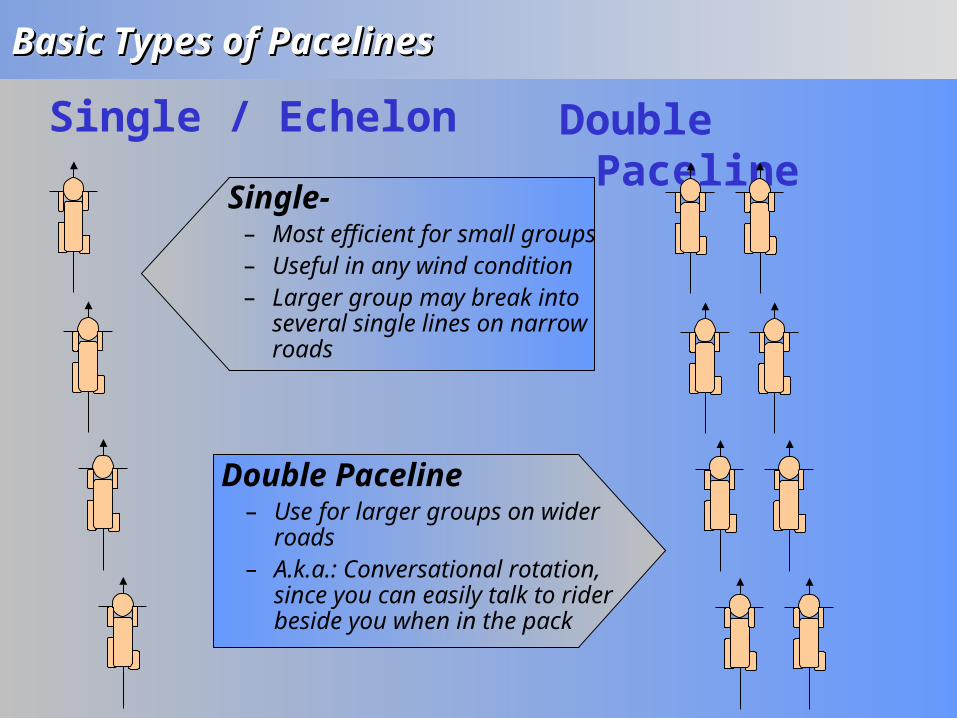
Basic Types of PacelinesBasic Types of PacelinesBasic Types of PacelinesBasic Types of Pacelines
Single / Echelon Double Paceline
Single-– Most efficient for small groups– Useful in any wind condition– Larger group may break into
several single lines on narrow roads
Double Paceline– Use for larger groups on wider
roads– A.k.a.: Conversational rotation,
since you can easily talk to rider beside you when in the pack

10
Single Paceline How-To
11
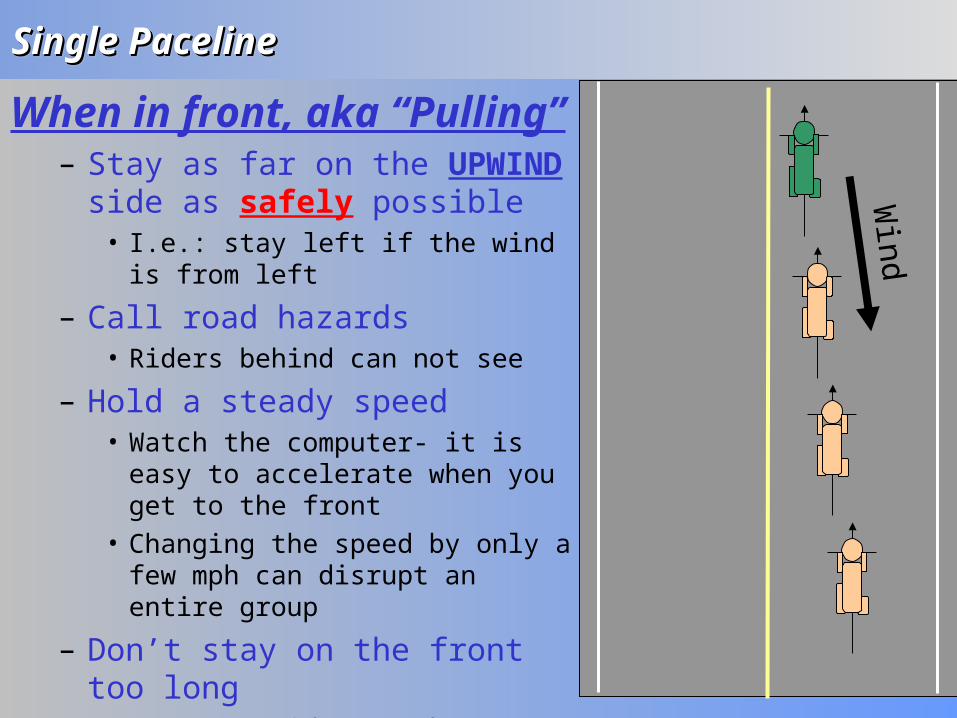
Single PacelineSingle PacelineSingle PacelineSingle PacelineWind
When in front, aka “Pulling”– Stay as far on the UPWIND side
as safely possible • I.e.: stay left if the wind is from left
– Call road hazards• Riders behind can not see
– Hold a steady speed• Watch the computer- it is easy to
accelerate when you get to the front• Changing the speed by only a few
mph can disrupt an entire group
– Don’t stay on the front too long• Many new riders work too long on the
front, and are soon dropped• Your line will suffer as you tire
12
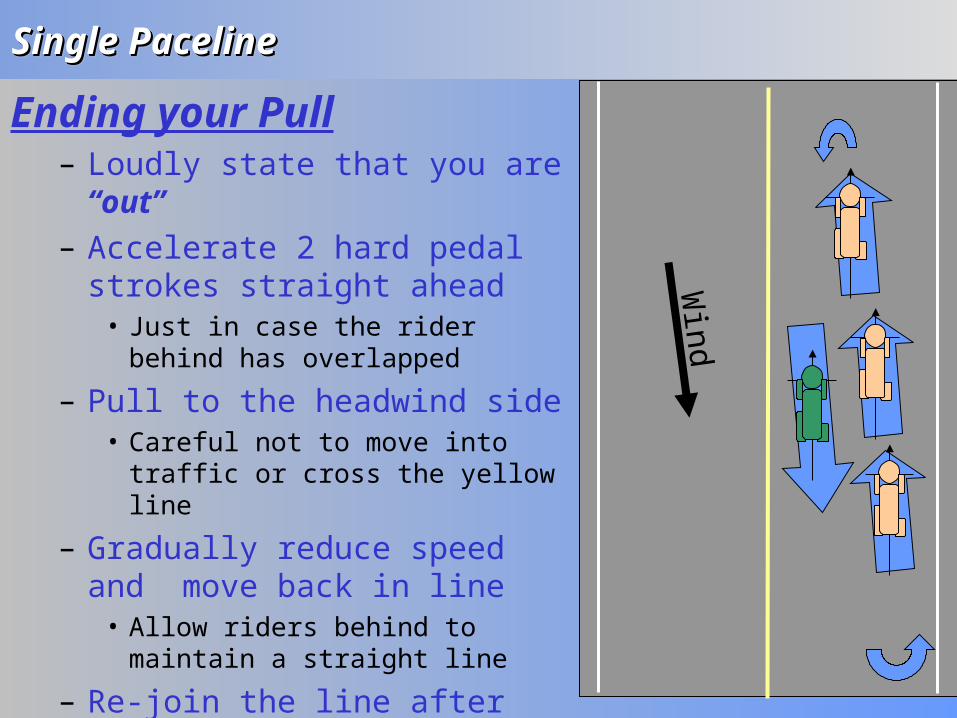
Single PacelineSingle PacelineSingle PacelineSingle Paceline
Wind
Ending your Pull– Loudly state that you are “out”– Accelerate 2 hard pedal strokes
straight ahead• Just in case the rider behind has
overlapped
– Pull to the headwind side• Careful not to move into traffic or
cross the yellow line
– Gradually reduce speed and move back in line
• Allow riders behind to maintain a straight line
– Re-join the line after the last rider
13
Single PacelineSingle PacelineSingle PacelineSingle Paceline
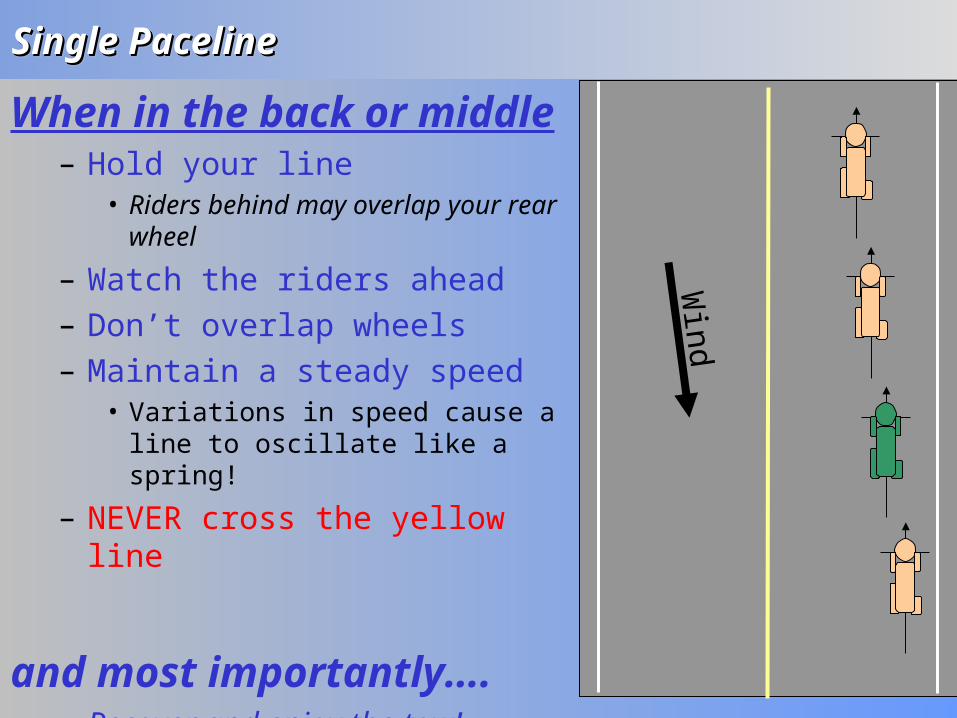
Wind
When in the back or middle– Hold your line
• Riders behind may overlap your rear wheel
– Watch the riders ahead– Don’t overlap wheels– Maintain a steady speed
• Variations in speed cause a line to oscillate like a spring!
– NEVER cross the yellow line
and most importantly….– Recover and enjoy the tow!
14
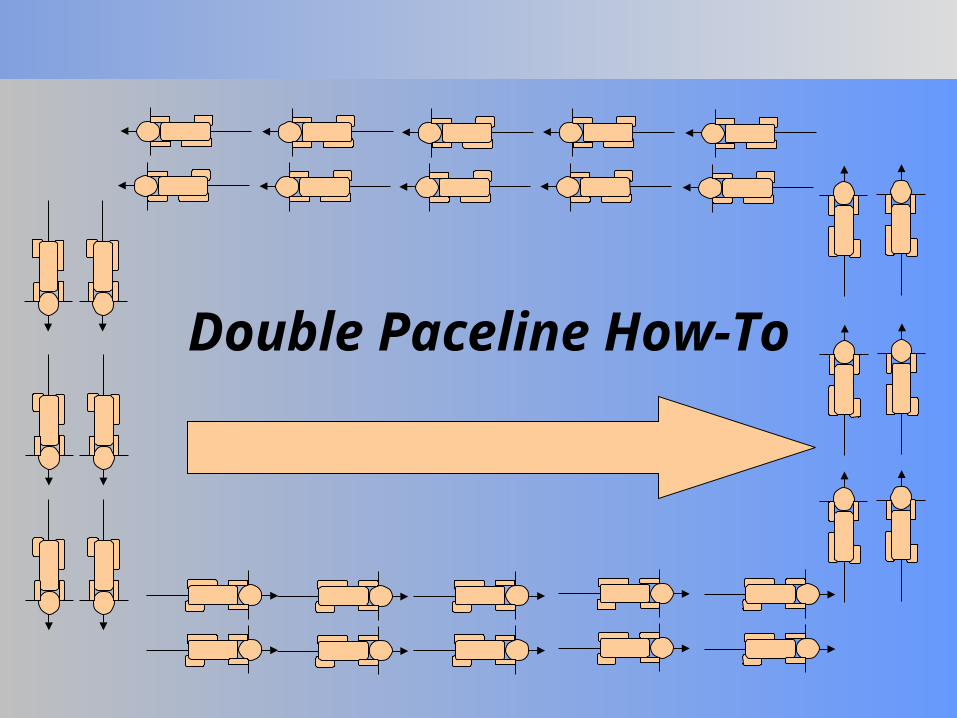
Double Paceline How-To

15
Double PacelineDouble PacelineDouble PacelineDouble Paceline
Wind
When in front, aka “Pulling”
Same Rules apply: – Hold a steady speed– Don’t pull to exhaustion- even if
pulling with a stronger rider– Call road hazards for those behind
Don’t “Half-Wheel”– Keep your front wheel even with
your partner, don’t ride a “half wheel” ahead
16
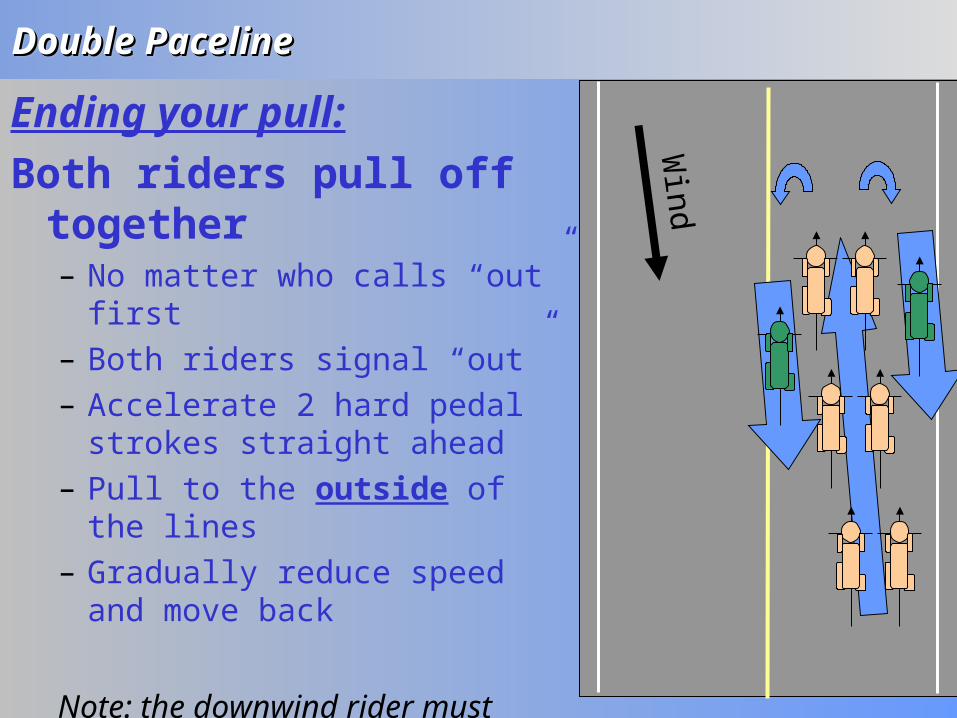
Double PacelineDouble PacelineDouble PacelineDouble Paceline
Wind
Ending your pull:
Both riders pull off together– No matter who calls “out” first– Both riders signal “out”– Accelerate 2 hard pedal strokes
straight ahead– Pull to the outside of the lines– Gradually reduce speed and move
back
Note: the downwind rider must continue moving away, as the line trails downwind
17
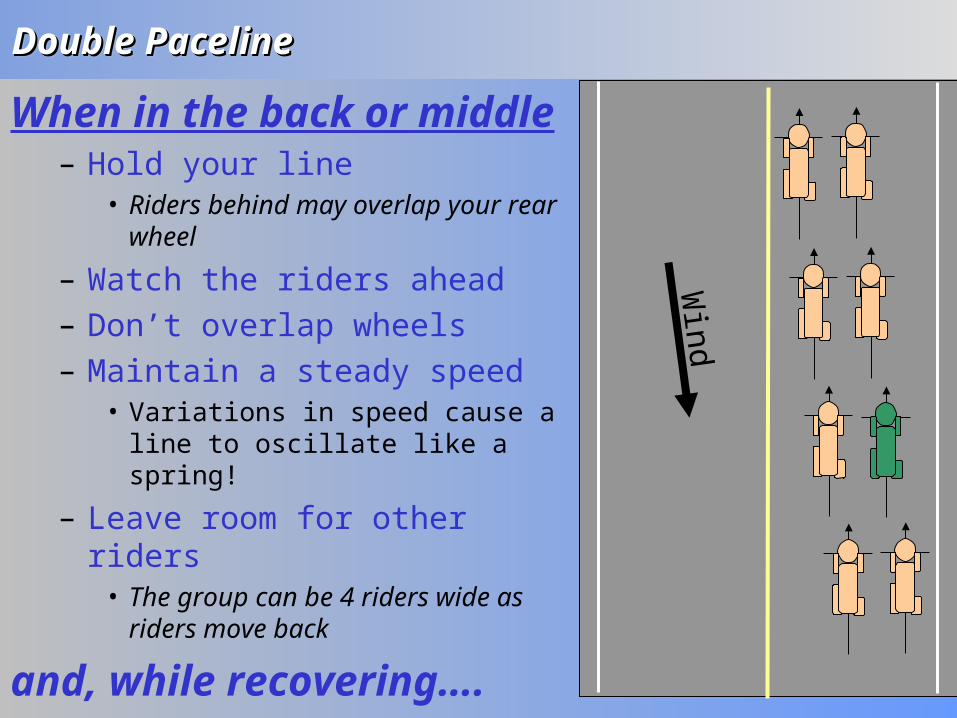
Double PacelineDouble PacelineDouble PacelineDouble Paceline
Wind
When in the back or middle– Hold your line
• Riders behind may overlap your rear wheel
– Watch the riders ahead– Don’t overlap wheels– Maintain a steady speed
• Variations in speed cause a line to oscillate like a spring!
– Leave room for other riders• The group can be 4 riders wide as
riders move back
and, while recovering….– Get to know those around you!
18
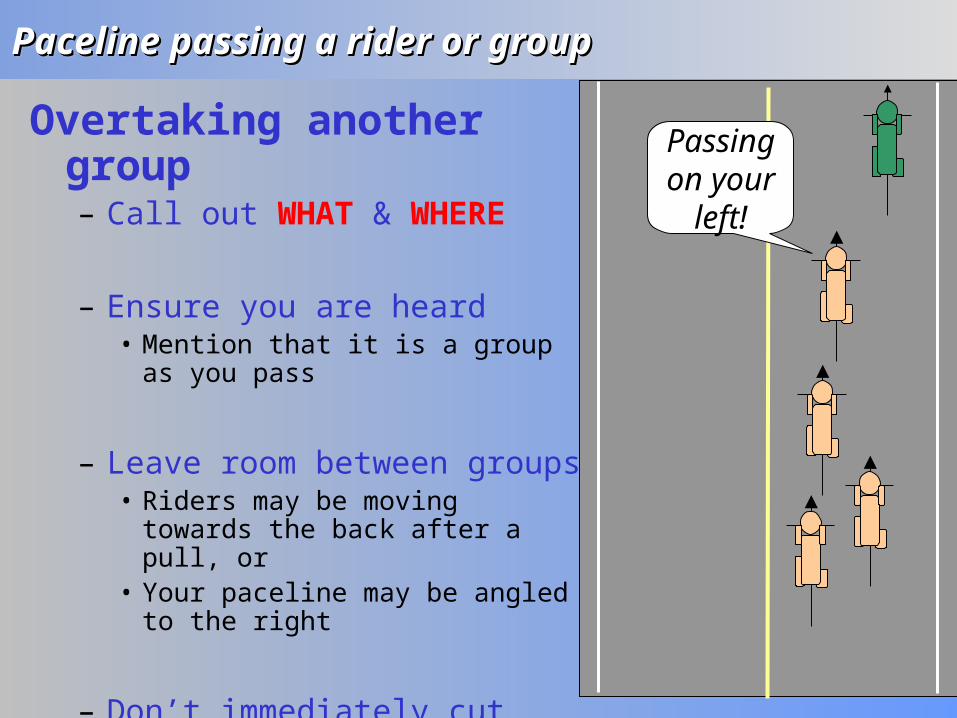
Paceline passing a rider or groupPaceline passing a rider or groupPaceline passing a rider or groupPaceline passing a rider or group
Overtaking another group– Call out WHAT & WHERE
– Ensure you are heard• Mention that it is a group as you
pass
– Leave room between groups• Riders may be moving towards the
back after a pull, or• Your paceline may be angled to the
right
– Don’t immediately cut back• Remember the riders behind you
Passing on your
left!
19
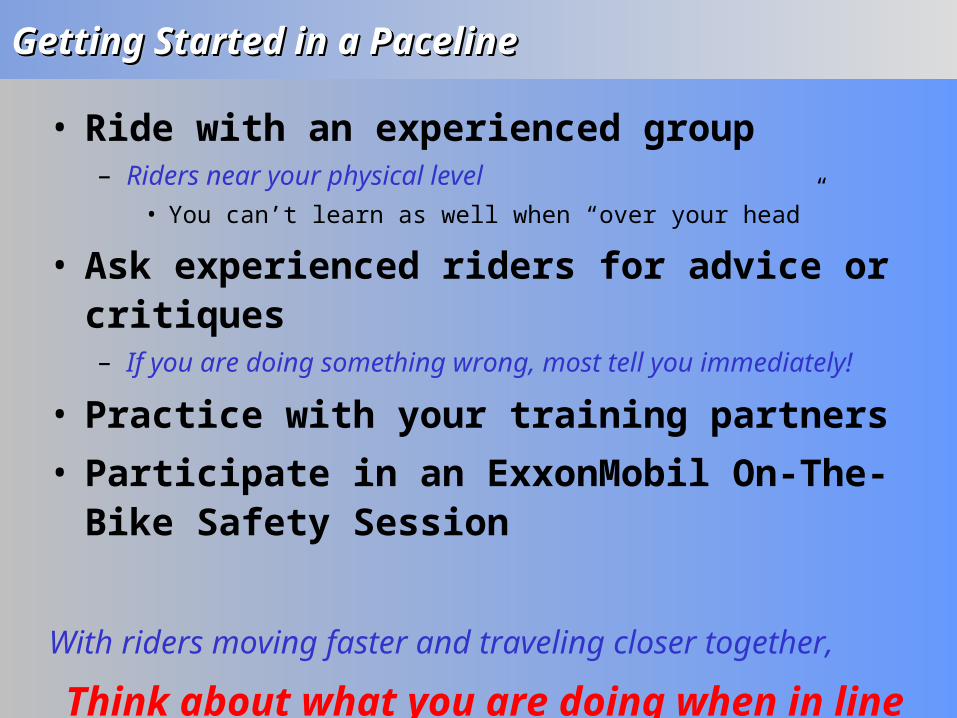
Getting Started in a PacelineGetting Started in a PacelineGetting Started in a PacelineGetting Started in a Paceline
• Ride with an experienced group– Riders near your physical level
• You can’t learn as well when “over your head”
• Ask experienced riders for advice or critiques– If you are doing something wrong, most tell you immediately!
• Practice with your training partners
• Participate in an ExxonMobil On-The-Bike Safety Session
With riders moving faster and traveling closer together,
Think about what you are doing when in line
20
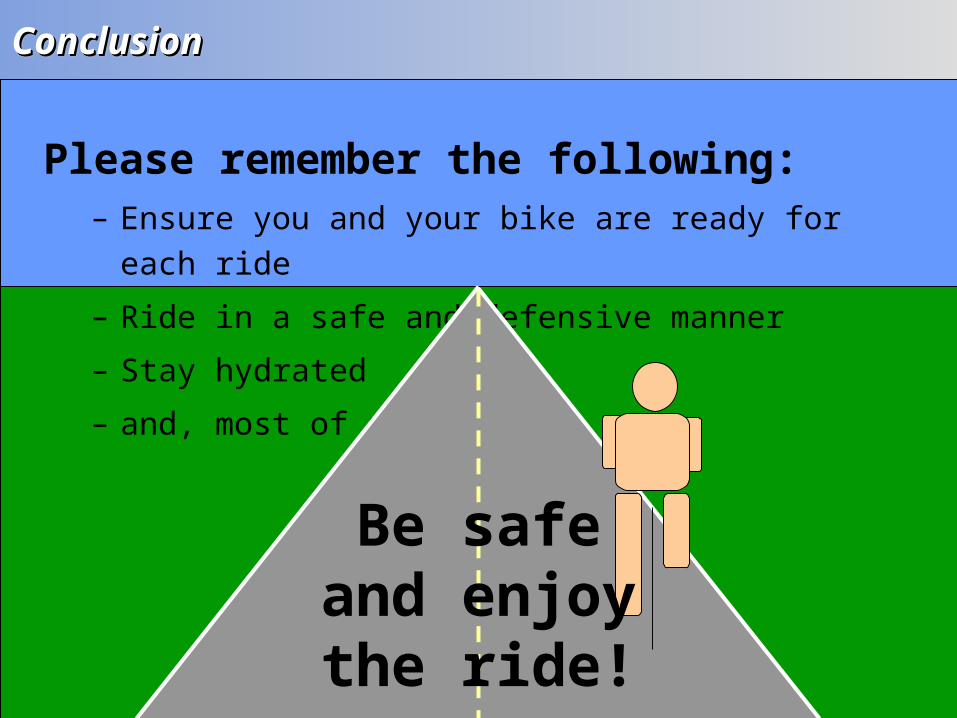
ConclusionConclusionConclusionConclusion
Please remember the following:– Ensure you and your bike are ready for each ride
– Ride in a safe and defensive manner
– Stay hydrated
– and, most of all,
Be safe and enjoy the ride!
21
References:References:References:References:
ExxonMobil Cycling Team Website:– http://www.emcycling.com
ExxonMobil Communications group:– http://groups.yahoo.com/group/emcycling/
BP MS-150:– http://www.ms150.org/ms150/
Questions/comments: J. M. Wright, 281-834-0992