Embed Size (px)
Citation preview
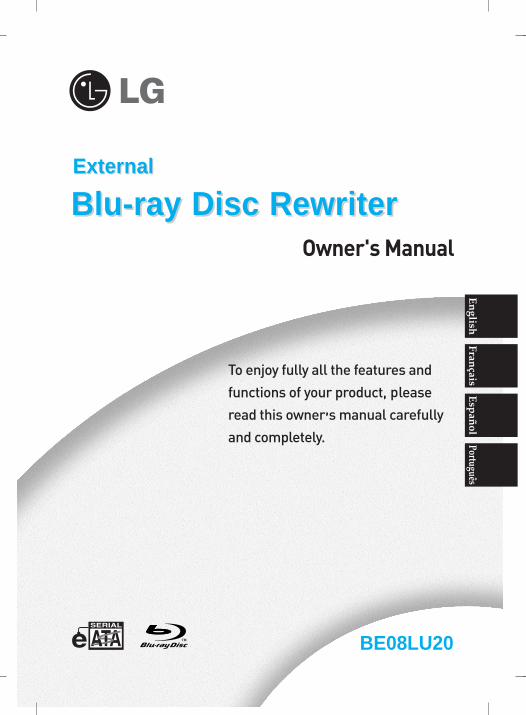
ExternalExternal
Blu-ray Disc Rewriter Blu-ray Disc Rewriter
BE08LU20
En
glishFran
çaisE
spañ
olPortuguês
i
CAUTION : The laser used in the External Blu-ray Disc Rewriter can damage youreyes. Do not attempt to open the cover.To reduce the risk of electric shock, do not remove the cover (or back).There are no user-serviceable parts inside.Refer servicing to qualified service personnel.
Use of controls or performance of procedures other than those specified herein may result in hazardous radiation exposure.
WARNING : To reduce the risk of fire or electric shock, do not expose this applianceto rain or moisture
Industry Canada requirement
This class B digital apparatus complies with Canadian ICES-003.Cet appareil numérique de la classe B est conforme à la norme NMB-003 du Canada.
FCC COMPLIANCE STATEMENTNote : This equipment has been tested and found to comply with the limits for a Class
B digital device, pursuant to Part 15 of the FCC Rules.These limits are designed to provide reasonable protection against harmfulinterference in a residential installation. This equipment generates, uses, andcan radiate radio frequency energy and, if not installed and used in accordancewith the instructions, may cause harmful interference to radio communications. However, there is no guarantee that interference will not occur in a particularinstallation. If this equipment does cause harmful interference to radio or television reception, which can be determined by turning the equipment off andon, the user is encouraged to try to correct the interference by one or more ofthe following measures:
- Reorient or relocate the receiving antenna.- Increase the separation between the equipment and receiver.- Connect the equipment into an outlet on a circuit different from that to which the
receiver is connected.- Consult the dealer or an Authorized Service Center for help.
• FCC WARNINGChanges or modifications not expressly approved by the party responsible for compliance could void the user’s authority to operate the equipment.
• This External Blu-ray Disc Rewriter is for use only with UL listed personal comput-ers that have installation instructions detailing user-installation of card cage accessory.
ii
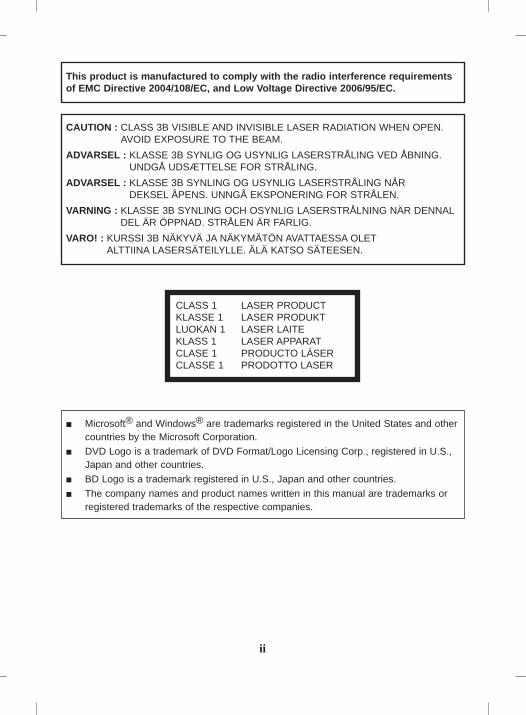
This product is manufactured to comply with the radio interference requirementsof EMC Directive 2004/108/EC, and Low Voltage Directive 2006/95/EC.
CAUTION : CLASS 3B VISIBLE AND INVISIBLE LASER RADIATION WHEN OPEN.AVOID EXPOSURE TO THE BEAM.
ADVARSEL : KLASSE 3B SYNLIG OG USYNLIG LASERSTRÅLING VED ÅBNING.UNDGÅ UDSÆTTELSE FOR STRÅLING.
ADVARSEL : KLASSE 3B SYNLING OG USYNLIG LASERSTRÅLING NÅR DEKSEL ÅPENS. UNNGÅ EKSPONERING FOR STRÅLEN.
VARNING : KLASSE 3B SYNLING OCH OSYNLIG LASERSTRÅLNING NÄR DENNALDEL ÄR ÖPPNAD. STRÅLEN ÄR FARLIG.
VARO! : KURSSI 3B NÄKYVÄ JA NÄKYMÄTÖN AVATTAESSA OLETALTTIINA LASERSÄTEILYLLE. ÄLÄ KATSO SÄTEESEN.
CLASS 1 LASER PRODUCTKLASSE 1 LASER PRODUKTLUOKAN 1 LASER LAITEKLASS 1 LASER APPARATCLASE 1 PRODUCTO LÁSERCLASSE 1 PRODOTTO LASER
■ Microsoft® and Windows® are trademarks registered in the United States and other countries by the Microsoft Corporation.
■ DVD Logo is a trademark of DVD Format/Logo Licensing Corp., registered in U.S.,Japan and other countries.
■ BD Logo is a trademark registered in U.S., Japan and other countries.
■ The company names and product names written in this manual are trademarks orregistered trademarks of the respective companies.
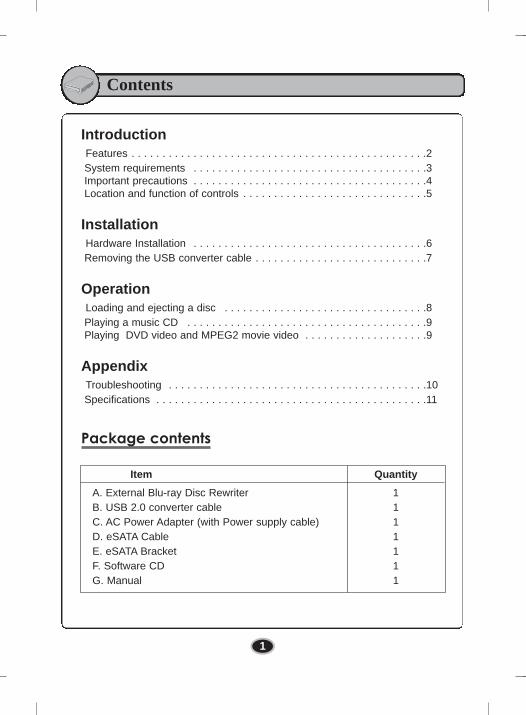
IntroductionFeatures . . . . . . . . . . . . . . . . . . . . . . . . . . . . . . . . . . . . . . . . . . . . . . . .2System requirements . . . . . . . . . . . . . . . . . . . . . . . . . . . . . . . . . . . . . .3Important precautions . . . . . . . . . . . . . . . . . . . . . . . . . . . . . . . . . . . . . .4Location and function of controls . . . . . . . . . . . . . . . . . . . . . . . . . . . . . .5
InstallationHardware Installation . . . . . . . . . . . . . . . . . . . . . . . . . . . . . . . . . . . . . .6Removing the USB converter cable . . . . . . . . . . . . . . . . . . . . . . . . . . . .7
OperationLoading and ejecting a disc . . . . . . . . . . . . . . . . . . . . . . . . . . . . . . . . .8Playing a music CD . . . . . . . . . . . . . . . . . . . . . . . . . . . . . . . . . . . . . . .9Playing DVD video and MPEG2 movie video . . . . . . . . . . . . . . . . . . . .9
AppendixTroubleshooting . . . . . . . . . . . . . . . . . . . . . . . . . . . . . . . . . . . . . . . . . .10Specifications . . . . . . . . . . . . . . . . . . . . . . . . . . . . . . . . . . . . . . . . . . . .11
Package contents
Contents
1
Item Quantity
A. External Blu-ray Disc Rewriter 1B. USB 2.0 converter cable 1C. AC Power Adapter (with Power supply cable) 1D. eSATA Cable 1E. eSATA Bracket 1F. Software CD 1G. Manual 1
Thank you for purchasing the LG External Drive.
Features
• eSATA & Universal Serial Bus (USB) 2.0 interface• Buffer Under Run error protection technology• Emergency eject support• Bear media loading with power eject.• CD-R/RW, DVD-R/RW/+R/RW/+/-R DL, DVD-RAM, BD-R/RE(SL/DL) read and write
compatible, CD Family, DVD-ROM and BD-ROM read compatible.• Supports region playback control Phase II.• Supports LightScribe Direct Label Printing Technology.• To achieve maximum Record & Write speed your system may require data to be
copied first to the computer’s hard drive rather than directly from another sourcedisc or drive.
Introduction
2
System meeting the following requirements is needed in order to use USB 2.0operation with this drive.• Computer that is equipped with a USB 2.0 – compliant USB connector or PCI
adapter card, and on which the USB 2.0 EHCI (Enhanced Host ControllerInterface) driver software 1) has been installed.1) The USB 2.0 EHCI driver software is supplied with currently available PCIadapter cards that conform to USB 2.0. Further, Microsoft has released the USB2.0 EHCI driver software for Windows XP, therefore it is also possible to use thisdriver software with Windows XP. If you want to know in detail, please contact your USB 2.0 adapter dealer or consultyour PC manufacturer, or consult the Microsoft Corporation Web site.
• Please note: Certain software (i.e. particularly those including Video playback) mayrequire a considerably increased specification PC to give acceptable results. Whilethis Blu-ray Disc Rewriter can read DVD-video or BD-MV(BD-ROM) discs, decoding them to display on your pc’s monitor requires separate MPEG, H.264 orVC-1 decoding that is done by separate hardware (either an MPEG, H.264 or VC-1decoder card or MPEG, H.264 or VC-1 decoding done by your video card), or separate software that you install to do MPEG, H.264 or VC-1 decoding. For furtherdetails, refer to the documentation that comes with MPEG, H.264 or VC-1 software.
Cautions
3
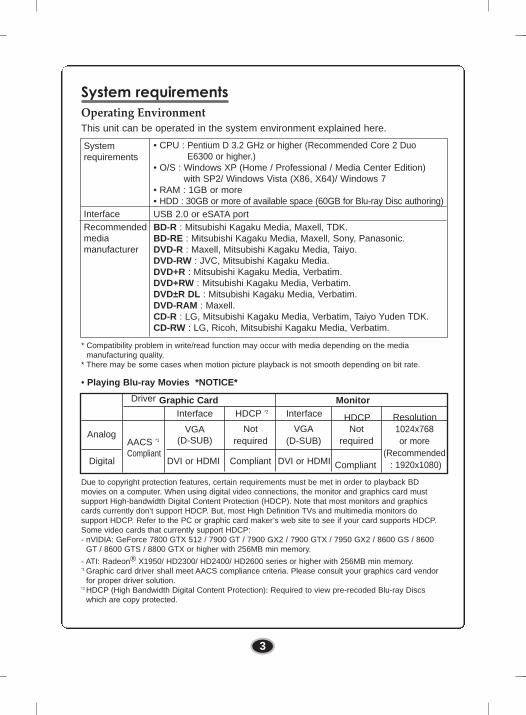
System requirementsOperating EnvironmentThis unit can be operated in the system environment explained here.
* Compatibility problem in write/read function may occur with media depending on the media manufacturing quality.
* There may be some cases when motion picture playback is not smooth depending on bit rate.
• Playing Blu-ray Movies *NOTICE*
Due to copyright protection features, certain requirements must be met in order to playback BDmovies on a computer. When using digital video connections, the monitor and graphics card must support High-bandwidth Digital Content Protection (HDCP). Note that most monitors and graphicscards currently don’t support HDCP. But, most High Definition TVs and multimedia monitors do support HDCP. Refer to the PC or graphic card maker’s web site to see if your card supports HDCP. Some video cards that currently support HDCP:- nVIDIA: GeForce 7800 GTX 512 / 7900 GT / 7900 GX2 / 7900 GTX / 7950 GX2 / 8600 GS / 8600
GT / 8600 GTS / 8800 GTX or higher with 256MB min memory.
- ATI: Radeon® X1950/ HD2300/ HD2400/ HD2600 series or higher with 256MB min memory.*1 Graphic card driver shall meet AACS compliance criteria. Please consult your graphics card vendor
for proper driver solution.*2 HDCP (High Bandwidth Digital Content Protection): Required to view pre-recoded Blu-ray Discs
which are copy protected.
• CPU : Pentium D 3.2 GHz or higher (Recommended Core 2 DuoE6300 or higher.)
• O/S : Windows XP (Home / Professional / Media Center Edition)with SP2/ Windows Vista (X86, X64)/ Windows 7
• RAM : 1GB or more• HDD : 30GB or more of available space (60GB for Blu-ray Disc authoring)USB 2.0 or eSATA portBD-R : Mitsubishi Kagaku Media, Maxell, TDK.BD-RE : Mitsubishi Kagaku Media, Maxell, Sony, Panasonic.DVD-R : Maxell, Mitsubishi Kagaku Media, Taiyo.DVD-RW : JVC, Mitsubishi Kagaku Media.DVD+R : Mitsubishi Kagaku Media, Verbatim.DVD+RW : Mitsubishi Kagaku Media, Verbatim.DVD±R DL : Mitsubishi Kagaku Media, Verbatim.DVD-RAM : Maxell.CD-R : LG, Mitsubishi Kagaku Media, Verbatim, Taiyo Yuden TDK.CD-RW : LG, Ricoh, Mitsubishi Kagaku Media, Verbatim.
System requirements
InterfaceRecommendedmedia manufacturer
Graphic Card Monitor
VGA(D-SUB)
VGA(D-SUB)
Notrequired
Notrequired
1024x768or more
(Recommended: 1920x1080)
AACS *1
Compliant
Analog
Digital
Driver
Interface HDCP *2 Interface HDCP Resolution
DVI or HDMI Compliant DVI or HDMI Compliant
4
Important precautions
Follow these precautions when handling the drive or discs.
PrecautionsPlease note that the manufacturer of this equipment does not offer any warrantyagainst data loss due to inappropriate installation, handling, direct or indirectdamages. Please note that the manufacturer will bear no responsibility for director indirect damages (including lost data)caused by the use of this product or itsmalfunction.
Please backup(copy) all important data as protection against data loss.
InstallationAvoid placing the drive in a location subject to:- high humidity - high temperature - excessive dust- mechanical vibration - direct sunlight
OperationDon’t move the drive suddenly from a cold place to warm one. Condensation may cause abnormal operation.Make sure to remove the disc before moving the drive to prevent the possibledamage to the disc.Prevent foreign objects, such as liquids or metal, from entering the drive and inthe case a foreign object enters the drive, please consult the dealer where thedrive was purchased.Don’t interrupt the electric power while the drive is operating.While drive is operating, don’t move the drive or give a shock to the drive, since itcan cause damages to the disc.Please pay attention to handling Electrostatic Sensitive Devices, you may useanti-static products such as wrist straps, heel straps, mats to protect your bodyfrom electrostatic.
AC AdapterDon’t plug in or remove the AC adapter using wet hands.Don’t damage the AC adapter by scratching, modifying, or bending its prongs.Use only supplied AC adapter. Don’t disassemble the AC adapter.
Operation through a USB hub cannot be guaranteed.When connecting with USB1.1 interface, picture and sound may be disruptedwhile watching DVD Video due to lack of data transfer speed. For smoother playback of DVDs, high-speed USB 2.0 should be used.
5
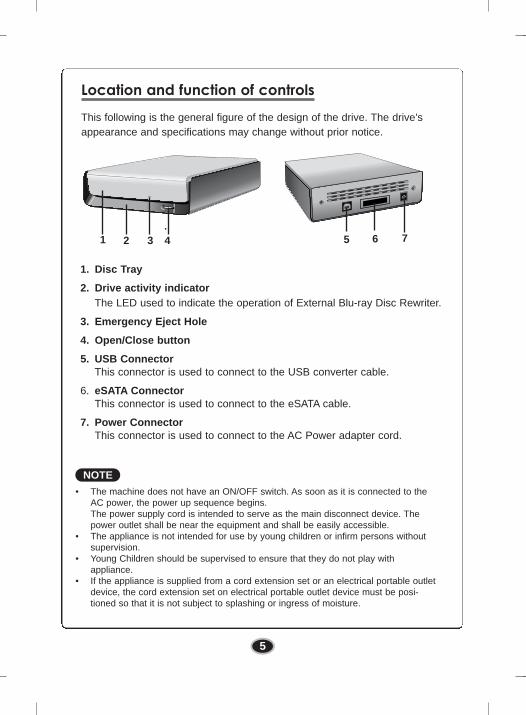
Location and function of controls
This following is the general figure of the design of the drive. The drive’sappearance and specifications may change without prior notice.
1 3 42 7
1. Disc Tray
2. Drive activity indicatorThe LED used to indicate the operation of External Blu-ray Disc Rewriter.
3. Emergency Eject Hole
4. Open/Close button
5. USB Connector This connector is used to connect to the USB converter cable.
6. eSATA ConnectorThis connector is used to connect to the eSATA cable.
7. Power Connector This connector is used to connect to the AC Power adapter cord.
• The machine does not have an ON/OFF switch. As soon as it is connected to theAC power, the power up sequence begins. The power supply cord is intended to serve as the main disconnect device. Thepower outlet shall be near the equipment and shall be easily accessible.
• The appliance is not intended for use by young children or infirm persons withoutsupervision.
• Young Children should be supervised to ensure that they do not play with appliance.
• If the appliance is supplied from a cord extension set or an electrical portable outletdevice, the cord extension set on electrical portable outlet device must be posi-tioned so that it is not subject to splashing or ingress of moisture.
NOTE
5 6

6
Installation
Hardware Installation
• Make sure you have a personal computer with an open USB port or eSATA port before connecting the driveto your computer.
• Power for all device should be turn offbefore attaching the cables.
Connect the drive to the computer asshown in figure.
1. Connect the USB converter cable (or eSATA cable) to the External Drive.
2. Connect the other end of the USBconverter cable (or eSATA cable) toyour computer.
3. Connect the AC adapter plug to thepower connector at the rear of thedrive. Attach the AC adapter to the AC walloutlet.
4. When the computer is ready, confirmthat the drive is detected. And then,insert the supplied software CD intothe External Drive and install the software.
• Please do not connect the AC adapter and USB 2.0 converter cable by any meansother than specified above.
• For optimal performance, using the ‘USB Booster Program’ in the Software CD isrecommended when you connect the USB cable.
• For optimal performance, using the SATA to eSATA Bracket is recommended whenyou connect your old Desktop PC.
Connecting to computer NOTES
NOTES
To AC walloutlet.
USB 2.0 Convertercable
eSATAcable
or
7
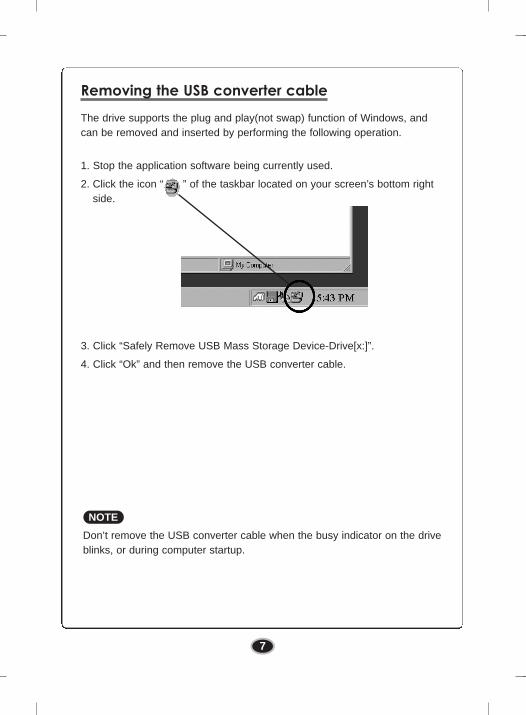
Removing the USB converter cable
The drive supports the plug and play(not swap) function of Windows, andcan be removed and inserted by performing the following operation.
1. Stop the application software being currently used.
2. Click the icon “ ” of the taskbar located on your screen’s bottom rightside.
3. Click “Safely Remove USB Mass Storage Device-Drive[x:]”.
4. Click “Ok” and then remove the USB converter cable.
Don’t remove the USB converter cable when the busy indicator on the driveblinks, or during computer startup.
NOTE
8
Operation
Loading and ejecting a discRemember - AC adapter must be connected.Make sure the power is turned on.
Loading a disc
1. Touch the Eject Button to open the Disc tray.2. Load a disc. (Label facing up.)3. Close the Disc tray.
Ejecting a disc
1. Touch the Eject Button to open the Disc tray.2. Removing the disc. 3. Close the Disc tray after removing the disc.
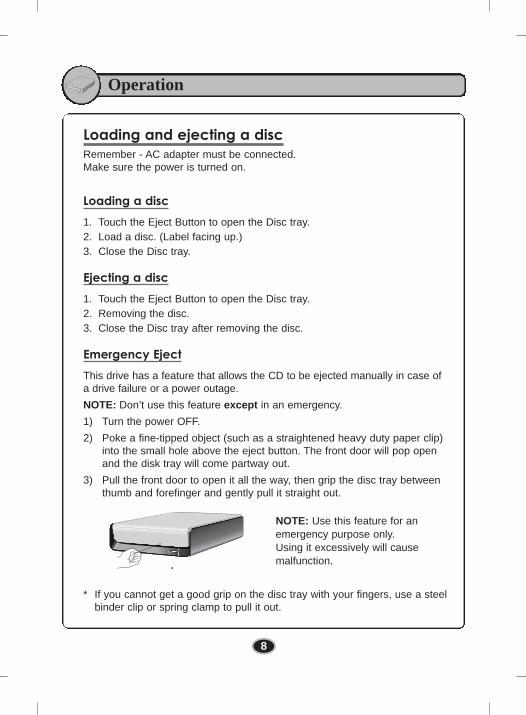
Emergency Eject
This drive has a feature that allows the CD to be ejected manually in case ofa drive failure or a power outage.
NOTE: Don’t use this feature except in an emergency.
1) Turn the power OFF.
2) Poke a fine-tipped object (such as a straightened heavy duty paper clip)into the small hole above the eject button. The front door will pop openand the disk tray will come partway out.
3) Pull the front door to open it all the way, then grip the disc tray betweenthumb and forefinger and gently pull it straight out.
* If you cannot get a good grip on the disc tray with your fingers, use a steelbinder clip or spring clamp to pull it out.
NOTE: Use this feature for anemergency purpose only.Using it excessively will cause malfunction.
9
Playing a music CD
Listening to sound
When connected to a computer, you can play audio CD’s through your computer’s audio system after setting Digital Audio mode.
Check your Windows or “Windows Media Player” manual for detail.
Playing DVD video and MPEG2 movie video
The drive must be connected to a computer, and basic installation alreadydone. Install the ‘PowerDVD’ software to your PC.Inserting the disc will automatically start installation. Follow the wizard.After installation, remove the PowerDVD software and put it away for safekeeping.Inserting a DVD Video disc into the drive and it will play automatically.
• DVD video region code:
Each region around the world has a different region number on the DVDvideo movies being sold in a region.The region code can be changed to other regions up to 5 times by usingthe software decoder (PowerDVD).If you change the region code 5 times, the drive will lock onto the last (5thchange) region code, and cannot change the drive to another region code.This limitation is a requirement as licensees of DVD drive technology.
• When connecting with USB1.1 interface, due to it’s slow transfer time,picture and sound may be disrupted when trying to view a DVDmovie.
NOTES
Appendix
10
TroubleshootingIf you are experiencing problems with the drive, verify the following items.Since the problem may be caused by a device other than the drive, checkother things such as system settings or other software being used, etc.If you cannot resolve the problem after verifying these items, contact yourdealer or our customer service department.
Problem
Cannot play a DVD,CD or BD in thedrive or certain typesof discs cannot beread in the drive.
Disc tray cannot beopened
Drive is not detectedby the system.
Drive will not playmedia or certaintypes of CD, DVD orBD media.
1. The disc is not insertedcorrectly.
2. The disc is dirty.3. The pick-up lens is dirty.4. The disc is scratched or
warped.5. The disc uses a region
code that cannot beplayed on the drive.
1. AC Plug is not connectedto AC outlet.
1. The USB 2.0 convertercable or eSATA cable isnot properly connected.
1. The disc doesn’t matchyour system. Is the mediadisc the correct format forthe type of system thatyou are using.
2. Virus possibility.
1. Reinsert the disc correctly.
2. Clean the disc surface.3. Clean the pick-up lens.4. Change the disc.
5. Refer to your system manual for help.
1. Connect the AC plug tightly.
1.Make sure USB 2.0 convertercable or eSATA cable is connected properly and re-install the device driver.
1. Check the disc format.(on a PC an ISO 9660 IBMcompatible PC format asopposed to Apple/Mac HFSdisc or UNIX disc formats will not function)
2. Has the Windows DVD-ROMsoftware driver programbeen corrupted by a virus?Run a Virus Scan programand repair if possible.
Possible Cause Possible Solution
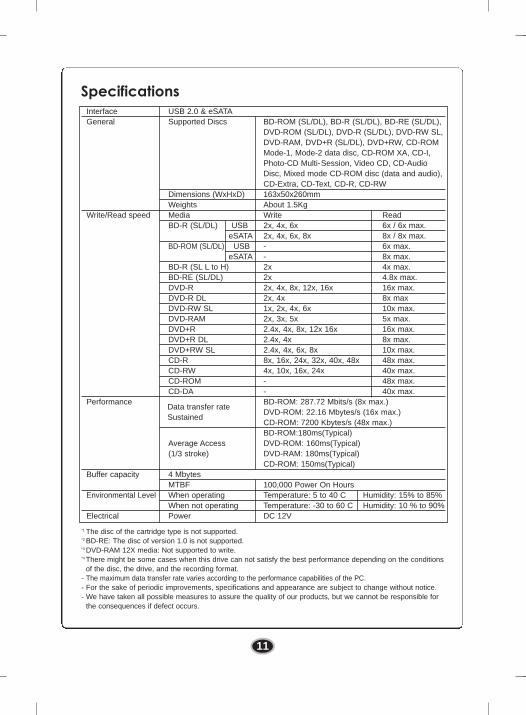
Interface USB 2.0 & eSATAGeneral Supported Discs BD-ROM (SL/DL), BD-R (SL/DL), BD-RE (SL/DL),
DVD-ROM (SL/DL), DVD-R (SL/DL), DVD-RW SL,DVD-RAM, DVD+R (SL/DL), DVD+RW, CD-ROM Mode-1, Mode-2 data disc, CD-ROM XA, CD-I, Photo-CD Multi-Session, Video CD, CD-Audio Disc, Mixed mode CD-ROM disc (data and audio), CD-Extra, CD-Text, CD-R, CD-RW
Dimensions (WxHxD) 163x50x260mmWeights About 1.5Kg
Write/Read speed Media Write ReadBD-R (SL/DL) USB 2x, 4x, 6x 6x / 6x max.
eSATA 2x, 4x, 6x, 8x 8x / 8x max.BD-ROM (SL/DL) USB - 6x max.
eSATA - 8x max.BD-R (SL L to H) 2x 4x max.BD-RE (SL/DL) 2x 4.8x max.DVD-R 2x, 4x, 8x, 12x, 16x 16x max.DVD-R DL 2x, 4x 8x maxDVD-RW SL 1x, 2x, 4x, 6x 10x max.DVD-RAM 2x, 3x, 5x 5x max.DVD+R 2.4x, 4x, 8x, 12x 16x 16x max.DVD+R DL 2.4x, 4x 8x max.DVD+RW SL 2.4x, 4x, 6x, 8x 10x max.CD-R 8x, 16x, 24x, 32x, 40x, 48x 48x max.CD-RW 4x, 10x, 16x, 24x 40x max.CD-ROM - 48x max.CD-DA - 40x max.
Performance BD-ROM: 287.72 Mbits/s (8x max.)DVD-ROM: 22.16 Mbytes/s (16x max.)CD-ROM: 7200 Kbytes/s (48x max.)BD-ROM:180ms(Typical)
Average Access DVD-ROM: 160ms(Typical)(1/3 stroke) DVD-RAM: 180ms(Typical)
CD-ROM: 150ms(Typical)Buffer capacity 4 Mbytes
MTBF 100,000 Power On Hours Environmental Level When operating Temperature: 5 to 40 C Humidity: 15% to 85%
When not operating Temperature: -30 to 60 C Humidity: 10 % to 90%Electrical Power DC 12V
Data transfer rateSustained
11
Specifications
*1 The disc of the cartridge type is not supported.*2 BD-RE: The disc of version 1.0 is not supported. *3 DVD-RAM 12X media: Not supported to write.*4 There might be some cases when this drive can not satisfy the best performance depending on the conditions
of the disc, the drive, and the recording format.- The maximum data transfer rate varies according to the performance capabilities of the PC.- For the sake of periodic improvements, specifications and appearance are subject to change without notice.- We have taken all possible measures to assure the quality of our products, but we cannot be responsible for
the consequences if defect occurs.
Caution!The disc rotates at high speed in the drive unit. Use of worn, damaged, or non-standard discs canadversely affect the drive and cause the disc toshatter or crush while in use. Disc crush can only occur when you use a damaged disc in the drive. It is an extremely rare occurrence,but there are steps which can be taken to prevent it.
Always check your discs before inserting theminto the drive.1. Take care not to use worn, cracked, damaged,
warped or poor quality discs, as this maycause damage to your drive.
2. Check the clear plastic on the center of thedisc, cracks here are the main cause of disccrush.
3. Do not play discs which are a non-standard(I.e. non-circular)shape, such as heart shapeddiscs, or discs in the shape of a businesscard.
How can you keep your discs from becomingdamaged?1. When not in use, remove discs from the drive.2. Keep discs in the packaging supplied with
them and out of direct sunlight and away fromheat sources.
Excessive vibration or a sudden jolt to the drive during operation may cause a malfunction. Avoid exposing the drive to sudden changes intemperature as it may cause condensation to collectinside the drive.
Copyright © 2009
©2009 Made by
Please visit www.lgservice.com and install the automatic firmwaredownload program, “LG ODD Online F/W update.” This programwill automatically check for new firmware releases and downloadthem. It is also included on the software discs that accompany ourdrives.
P/NO. 3828HM1060N A