Embed Size (px)
Citation preview

Aseptic Technique and Culturing MicrobesHands-On Labs, Inc. Version 42-0239-00-02
Review the safety materials and wear goggles when working with chemicals. Read the entire exercise before you begin. Take time to organize the materials you will need and set aside a safe work space in which to complete the exercise.
Experiment Summary:
You will outline aseptic techniques and describe safe handling of microbes. You will identify plating techniques and media for various types of bacterial cultures. You will aseptically transfer microbes between various media forms. You will observe microbial growth on solid and liquid media. You will incubate and store pure cultures for use in future experiments.
EXPERIMENT
© Hands-On Labs, Inc. www.HOLscience.com 1

ObjectivesUpon completion of this laboratory, you will be able to:
● Outline aseptic techniques and describe safe handling of microbes.
● Identify plating techniques and media for microbial cultures.
● Describe the biology of Escherichia coli, Saccharomyces cerevisiae, and Staphylococcus epidermidis.
● Apply aseptic technique to transfer microbes between media forms.
● Examine microbial growth on solid and liquid media.
● Create pure cultures of bacteria and yeast and isolate individual colonies.
Time Allocation: 4 hours + 4 day incubation period
www.HOLscience.com 2 ©Hands-On Labs, Inc.
Experiment Aseptic Technique and Culturing Microbes

www.HOLscience.com 3 ©Hands-On Labs, Inc.
Experiment Aseptic Technique and Culturing Microbes
MaterialsStudent Supplied Materials
Quantity Item Description1 Bleach1 Camera, digital or smartphone1 Coffee mug2 Disposable cup1 Electric light or bright window for observing culture broths1 Hand soap1 Isopropyl alcohol (rubbing)1 Large cooking pot (at least 8” deep)1 Match or lighter1 Oven mitt1 Permanent marker1 Roll of paper towels1 Source of tap water1 Stove
HOL Supplied Materials
Quantity Item Description1 Apron1 E. coli tablet in vial1 Face mask with ear loops3 Inoculation loops2 Nutrient agar-18 mL tubes6 Nutrient broth-5mL tubes1 Pair of gloves3 Petri dish-60 mm1 S. epidermidis tablet in vial1 Safety goggles1 Small graduated pipet-5 mL2 Tea candles1 Test tube clamp1 Test tube rack, 6 x 21 mm1 Thermometer1 Yeast packet

www.HOLscience.com 4 ©Hands-On Labs, Inc.
Experiment Aseptic Technique and Culturing Microbes
Note: To fully and accurately complete all lab exercises, you will need access to:
1. A computer to upload digital camera images.
2. Basic photo editing software, such as Microsoft Word® or PowerPoint®, to add labels, leader lines, or text to digital photos.
3. Subject-specific textbook or appropriate reference resources from lecture content or other suggested resources.
Note: The packaging and/or materials in this LabPaq kit may differ slightly from that which is listed above. For an exact listing of materials, refer to the Contents List included in your LabPaq kit.

www.HOLscience.com 5 ©Hands-On Labs, Inc.
Experiment Aseptic Technique and Culturing Microbes
BackgroundAseptic Techniques
When working with microorganisms, the goal is to transfer the bacterium of interest to various media without introducing other unwanted microbes into the culture. In addition, aseptic technique provides a safe working environment. Aseptic techniques are the techniques needed to prevent the accidental or inadvertent spread of microorganisms beyond the intended working environment. Aseptic techniques are vital when isolating a pure culture from a mixed or contaminated culture.
1. Hands must be washed, surfaces must be cleared of unnecessary items, and work surfaces must be sterilized with a 10% bleach solution or a bleach-based cleaner before beginning the Experimentation. See Figure 1.
Figure 1. Washing hands. Proper hand-washing before and after an experiment can greatly reduce the risk of contaminating both you and your results. © Andrew Bassett
2. The equipment used to isolate cultures has to be sterilized. Either an open flame or isopropyl alcohol may be used to eliminate contamination that is naturally picked up from the environment. In campus laboratories, equipment is often sterilized with an autoclave or micro-incinerator.
3. When opening cultures or sterile media:
● Work quickly and efficiently.
● Do not talk or breath over the culture.

www.HOLscience.com 6 ©Hands-On Labs, Inc.
Experiment Aseptic Technique and Culturing Microbes
● When tubes and vials are open, keep them tilted away from the mouth and nose.
● Never lay caps or lids on a bench or work area, as these areas most likely have contaminants.
● When working with a culture, ensure the instruments used are sterile. This will include inoculation loops and swabs. Sterile instruments are provided by Hands-On Labs, Inc. (HOL) You must work to maintain the instruments’ sterility.
4. Some general precautions include the following:
● Avoid producing aerosols (anything that can be introduced into the air). This includes avoiding splashing when pipetting media and inoculating cultures.
● Keep the lid to the culture closed whenever possible.
● Incubate plates inverted (agar side up). Agar contains a lot of water. When plates are incubated with the lid side up, water will condense on the lids; this condensation can drip back onto the agar plate and possibly contaminate and/or smear the results.
● Always write on the bottoms of the plates, not the lids. This will prevent unlabeled plates if lids are misplaced.
● When not in use, tubes and plates should be properly stored away from children and pets.
● All equipment and work surfaces should be cleaned with a 10% bleach solution or bleach based cleaning product at the end of the experiment.
Media and Its Uses
HOL provides various forms of media that grow cultures of microbes. In general, media exist in two major forms: liquid and solid. One liquid type of media is broth, which is depicted in Figure 2. A microbiologist uses a broth primarily to increase the number of microorganisms.
Figure 2. Broth, a type of liquid media.

www.HOLscience.com 7 ©Hands-On Labs, Inc.
Experiment Aseptic Technique and Culturing Microbes
Solid media is prepared as either slants or plates. See Figures 3 and 4. The most common solidifying agent in both slants and plates is agar. Agar does not melt until it reaches a temperature of about 80°C (176°F). Conversely, once it has melted, it can be cooled to about 45°C (113°F) before it solidifies. In addition, agar has the ability to grow microorganisms over a large temperature range.
Figure 3. Slant, a type of solid media.
Slants are primarily used for storage and transport of microorganisms. Organisms stabbed into the media are protected from desiccation, allowing them to survive much longer. Slants can be stored for weeks, even months, without significant death to the organisms that they house. The screw cap and the small size of the vial allow a scientist to easily transport a culture from one place to another.
Figure 4. Plate containing agar media.
www.HOLscience.com 8 ©Hands-On Labs, Inc.
Experiment Aseptic Technique and Culturing Microbes
Plates provide a larger surface area for culturing microbes than slants. See Figure 4. Plates are commonly used for isolating microbes. Culture samples taken from individuals or the environment contain many types of microbes. These mixed cultures must be separated into individual colonies of only one type of microbe to be successfully analyzed. A pure culture contains only one species of microorganism. Proper use of aseptic techniques prevents pure cultures from being contaminated. A contaminated culture occurs when unknown microorganisms are inadvertently introduced often via poor technique. In addition, bacterial colony morphology (the shape of a group of bacteria) can help distinguish among different species when using a plate.
Secondary descriptive terms are often used when describing various media. Some media are described as a general purpose media. These media contain a rich variety of nutrients that will facilitate the growth of a wide range or microorganisms and is therefore ideal for generalized growth. One example of general purpose media is a Nutrient Agar plate or NA plate, which will be used during this laboratory. In future laboratories, more specialized media that select for specific types of microorganisms will be introduced which can aid in microbe species identification.
Over the last 100 years, thousands of different media formulations have
been created for growing a huge variety of microorganisms. With the advent of DNA
technology, it is estimated that we have only grown and discovered a mere one percent of the microorganisms living on
this planet.
Isolation Techniques
The streak plate is the primary mechanism for isolating bacteria. This technique utilizes a four quadrant dilution that systematically reduces bacterial numbers until they are diluted enough to form isolated colonies. The procedure is shown in Figure 5 and can be separated into four defined steps. Carefully read the following steps as you will be streaking a number of plates during this experiment.

www.HOLscience.com 9 ©Hands-On Labs, Inc.
Experiment Aseptic Technique and Culturing Microbes
Figure 5. Bacterial isolation with a streak plate. A. A collected bacteria sample is spread over one quadrant of the agar plate. B. A sterilized inoculation loop is used to move a small portion
of sample from the first quadrant to a second quadrant. C. A small portion of the second quadrant is moved to the third quadrant. D. A small portion from the third quadrant is moved to
the fourth quadrant.
1. A bacterial sample must be collected. The bacterial sample may be collected by rubbing a sterile cotton swab over a test area, such as an elevator button or a place on the human body. Alternately, the bacterial sample may be obtained from a previous culture. Using aseptic methods, the sample is spread over a small portion of the plate, usually about ¼ of the plate size. This first inoculation may be referred to as the “first quadrant” and is shown in Figure 5A.
2. A small portion of the bacteria from the first quadrant is then spread to a second quadrant of the plate so as to isolate and “dilute” a portion of the microorganisms. An instrument called an inoculation loop is sterilized and then placed flat in the center edge of the first quadrant. The inoculation loop is used to spread a small portion of the organism from the first quadrant into the second quadrant, as shown in Figure 5B. Notice in the figure that it is only necessary to move into the first quadrant a few times. The second quadrant is created with a small amount of sample that is pulled out from the first quadrant. It is recommended that you work from the middle of the plate each time to maximize the amount of surface area used. Using the complete plate will optimize the dilution effect.
3. The microorganisms are again spread using the inoculation loop. After sterilizing, the loop is used again to spread a portion of the sample from quadrant two into a new, third quadrant

www.HOLscience.com 10 ©Hands-On Labs, Inc.
Experiment Aseptic Technique and Culturing Microbes
of the plate. Again, it is recommended that you work from the middle of the plate to cover as much surface as possible. See Figure 5C.
4. The microorganisms are spread into the final quadrant using the sterilized inoculation loop. Care must be taken to avoid accidently coming into contact with the other previously formed quadrants. If the loop accidentally comes in contact with the first and second quadrants, the dilution is lost.
Once the process of dilution is complete, bacteria are allowed to develop and reproduce. Figure 6 shows bacterial colonies on a streak plate. Notice that the bacterial colonies have grown the most abundant in the first quadrant and become less abundant in each subsequent quadrant. The fourth quadrant hosts isolated colonies as compared to smeared bacteria in the other quadrants. Individual colonies that develop on a plate are called colony forming units (CFUs) because each colony develops from an isolated or genetically identical clump of microorganisms.
Figure 6. Dilution of bacteria on a plate. © Alina Cardiae
Morphology
Morphology is the size, shape, and other physical characteristics that can be used to identify microorganisms. Even without a microscope, information about microbes can be acquired through observation on a plate. As shown in Figure 7, different microorganisms can have different sizes, shapes, and colors that can be seen on the plate. Additional morphological characteristics include whether the edge of the colony is smooth or rough and whether the centers of the colony are raised or indented. A certain species will always show this same morphology on a particular media. Attention to detail allows the creation of pure cultures and eventual identification of a microorganism. As you perform the Experimentation, pay very close attention and try to note the differences you see in the isolated colonies you create.

www.HOLscience.com 11 ©Hands-On Labs, Inc.
Experiment Aseptic Technique and Culturing Microbes
Figure 7. Examples of various morphologies. © Michal Kowalsky
Microbes for Cultures
In this laboratory and others you will be culturing three microbe species: Escherichia coli, Saccharomyces cerevisiae, and Staphylococcus epidermidis. Each of these microbes is significant to the history and study of microbiology and are used as model organisms in microbiology labs around the world.
Escherichia coli is a rod-shaped bacteria commonly found in the lower intestine of warm-blooded organisms. See Figure 8. Most E. coli strains, including the one provided from HOL, are harmless and part of the normal flora of the gut. E. coli was one of the first organisms to have its genome sequenced and is a model organism for studies involving bacterial conjugation, genetics, and evolution.
Figure 8. Escherichia coli. © Michelangelus

www.HOLscience.com 12 ©Hands-On Labs, Inc.
Experiment Aseptic Technique and Culturing Microbes
Saccharomyces cerevisiae, also known as baker’s yeast, is an ovoid single-celled fungi found on ripe fruits in nature. See Figure 9. S. cerevisiae is harmless to most humans, but has been shown to irritate the digestive system of individuals suffering from Crohn’s disease and ulcerative colitis. S. cerevisiae is one of the most intensively studied eukaryotes and serves as a model organism for studies involving fermentation, proteins, genetics, and aging.
Figure 9. Saccharomyces cerevisiae. © Krnorre
Staphylococcus epidermidis is a coccus-shaped bacteria commonly found on the skin of humans. See Figure 10. S. epidermidis is harmless to most individuals and considered part of the normal skin flora. S. epidermidis has been linked to infections in individuals with catheters or other surgical implants. S. epidermidis is a model organism for study of osmotic pressure regulation, antibiotic resistance, and biofilms.
Figure 10: Staphylococcus epidermidis. © Sebastian Kaulitzki

www.HOLscience.com 13 ©Hands-On Labs, Inc.
Experiment Aseptic Technique and Culturing Microbes
Exercise 1: Culturing Microbes in BrothIn this exercise, you will inoculate nutrient broths with the inactive microbe samples from your HOL kit using aseptic technique. The broths will be incubated and examined for signs of microbial growth.
1. Gather three nutrient broth tubes, the graduated pipet, the alcohol, disposable cups, the E. coli and S. epidermidis vials, yeast packet, candle, a match or lighter, permanent marker, paper towels, 10% bleach solution, safety gloves, face mask, apron, and goggles.
2. Wash your hands thoroughly with soap and warm water.
3. Put on the safety gloves, face mask, apron, and goggles.
4. Disinfect the work surface by wiping the area with a 10% bleach solution.
5. Carefully pour some undiluted bleach into the bucket for waste disposal. Anything that is exposed to microorganisms needs to be treated with undiluted bleach before disposal.
6. Fill a small disposable cup half full with the alcohol and place it on the work surface.
7. Place the pipet in a cup of alcohol making sure the alcohol enters the stem of the pipet.
8. Place a candle on the work surface and ignite the wick using a match or lighter.
9. Using the permanent marker, label a nutrient broth tube E. coli.
10. Place the E. coli vial and labeled nutrient broth on the work surface near the candle.
11. Remove the pipet from the cup and expel the alcohol inside the pipet back into the cup by squeezing the bulb.
12. Shake the pipet while continuing to squeeze the bulb until no alcohol remains inside the pipet. The pipet is now sterile.
13. While holding the pipet, pick up the labeled nutrient broth and gently remove the cap.
14. Pass the lip of the broth tube through the flame of the candle to sterilize the surface. See Figure 11.

www.HOLscience.com 14 ©Hands-On Labs, Inc.
Experiment Aseptic Technique and Culturing Microbes
Figure 11. Sterilizing broth tube opening. Note the culture vial also near candle.
15. Place the uncapped broth tube on the work surface and repeat steps 13-14 for the E. coli culture vial. See figure 12.
Figure 12. Sterilizing culture vial lip.
16. Pipet .25 mL of broth from the nutrient tube into the culture vial. Be careful not to touch the sterilized rim of either container with the tip of the pipet or your gloves. See Figure 13.

www.HOLscience.com 15 ©Hands-On Labs, Inc.
Experiment Aseptic Technique and Culturing Microbes
Figure 13. Pipetting the broth into the culture vial.
17. Replace the lid on the culture vial and shake vigorously until the tablet dissolves. See Figure 14.
Figure 14. Dissolved pellet in the culture vial.
18. Pipet the dissolved tablet solution from the culture vial into the broth tube being careful not to touch the rim of the broth tube with the tip of the pipet or your gloves. See Figure 15.

www.HOLscience.com 16 ©Hands-On Labs, Inc.
Experiment Aseptic Technique and Culturing Microbes
Figure 15. Transferring tablet solution to broth tube.
19. After transferring all of the solution from the culture vial, flame the lip of the broth tube to sterilize before screwing on the cap. See figure 16.
Figure 16. Sterilizing broth tube rim before screwing on cap.
20. Set the inoculated broth aside and place the pipet into the disposable cup containing the alcohol. Make sure to draw alcohol into the stem of the pipet.
21. Repeat steps 9-20 for the S. epidermidis culture vial using a new broth tube labeled S. epidermidis.
22. Open the yeast packet and carefully place approximately ½ teaspoon of the powdered contents into an empty disposable cup. Retain the remainder of the packet for future experiments.
23. Add approximately ¼ cup of warm tap water to the yeast and swirl until dissolved.

www.HOLscience.com 17 ©Hands-On Labs, Inc.
Experiment Aseptic Technique and Culturing Microbes
24. Allow the cup to sit for 10 minutes until it begins to froth. See Figure 17.
Figure 17. Yeast mixture ready for transfer to broth.
25. Label a new broth tube S. cerevisiae.
26. Repeat steps 11-14 for the S. cerevisiae broth tube.
27. Pipet .25 mL of the yeast mixture from the cup into the broth tube being careful not to touch the rim of the tube with the pipet or your gloves.
28. After transferring the yeast solution, flame the lip of the broth tube to sterilize before screwing on the cap. See Figure 16.
29. Extinguish the candle.
30. Sterilize the pipet in alcohol and store with the candle, safety goggles, mask, and apron for use in Exercise 2.
31. Pour the remaining alcohol from the cup into a sink. You may rinse, dry, and reuse this cup for Exercise 2.
32. Place the two empty culture vials with lids and the disposable cup containing the yeast solution in a bucket of undiluted bleach for 30 minutes. The items may then be removed and disposed of in the garbage.
33. Wipe down the work area with a 10% bleach solution.

www.HOLscience.com 18 ©Hands-On Labs, Inc.
Experiment Aseptic Technique and Culturing Microbes
34. Identify a location in your home where the broth tubes can incubate, upright and untouched, for approximately 48 hours. The location should be room temperature (21°C-25°C), away from heating or air-conditioning vents, out of direct sunlight, and secure from children and pets. An empty cabinet works well. If a counter top is used, place cultures in a box, such as your empty HOL box. Use the thermometer to determine whether the location meets the requirement of 21°C-25°C, if not, identify a new location.
35. Incubate the nutrient broth cultures for 48 hours.
36. After 48 hours, inspect cultures for microbe growth by holding the nutrient tubes near a light source.
37. Developed cultures will either appear turbid (cloudy), see Figure 18, or exhibit flocculent growth at the bottom of the tube, see Figure 19.
Figure 18. Turbid broth from microbial growth. Compare color and clarity to Figure 19.

www.HOLscience.com 19 ©Hands-On Labs, Inc.
Experiment Aseptic Technique and Culturing Microbes
Figure 19. Flocculent microbial growth in bottom of nutrient broth tube.
38. If cultures show no signs of growth after 48 hours, incubate for an additional 24 hours.
39. Take a digital photograph of each of your three developed broths.
40. Resize the images and upload into Data Table 1 of your Laboratory Report Assistant. Refer to the appendix entitled “Resizing an Image” for guidance with resizing an image.
41. Describe each broth related to turbidity and flocculent growth in the space provided in Data Table 1.
42. The developed broths will be used in Exercise 2 of this experiment.
Note: If Exercise 2 is not to begin immediately, return the culture tubes to the incubation location for up to 2 additional days. If Exercise 2 will be conducted more than 2 days after Exercise 1 has been completed, store the tubes in the refrigerator to preserve the cultures.
QuestionsA. What is the purpose of wiping down your work area with bleach before and after an
experiment?
www.HOLscience.com 20 ©Hands-On Labs, Inc.
Experiment Aseptic Technique and Culturing Microbes
B. List five safety precautions you used to protect yourself while culturing microbes.
C. What is the purpose of a broth in a microbiology laboratory?
D. Did each of your cultures develop at the same rate? Why might your incubation environment favor one microbe over another?

www.HOLscience.com 21 ©Hands-On Labs, Inc.
Experiment Aseptic Technique and Culturing Microbes
Exercise 2: Isolating Individual Colonies
1. Approximately 1 hour before you begin this exercise, pour 4 agar plates. Refer to the appendix entitled “Pouring Agar Plates” for guidance with this procedure.
Note: Plates may be poured in advance, stored in an airtight bag, and refrigerated for future use.
2. Gather the developed cultures of E. coli, S. cerevisiae, and S. epidermidis, three plastic inoculation loops, candle and lighter, three poured nutrient agar plates, a disposable cup, alcohol, paper towels, bleach, a permanent marker, gloves, mask, apron, and goggles.
3. Wash your hands thoroughly with soap and warm water.
4. Put on the gloves, goggles, apron, and face mask.
5. Wipe down your work surface with a 10% bleach solution.
6. Fill a small disposable cup half full with the alcohol and place it on the work surface. Put the three inoculation loops into the cup.
7. Label the agar side of each plate with the permanent marker for the microbe it will contain: E. coli, S. cerevisiae, or S. epidermidis. Lay each plate on the work surface.
8. Put the corresponding cultured nutrient broth near each labeled agar plate.
9. Place one plastic inoculation loop into the cup of alcohol.
10. Light the candle and place it on the work surface.
11. Remove one inoculation loop from the alcohol and shake briskly to dry.
12. While holding the sterile loop, remove the cap from the E. coli broth and pass the lip through the flame to sterilize. See Figure 20.
Figure 20. Sterilizing tip of broth tube. Note proximity of agar plate.

www.HOLscience.com 22 ©Hands-On Labs, Inc.
Experiment Aseptic Technique and Culturing Microbes
13. Insert the sterile loop into the broth being careful not to touch the rim with the loop or your gloves. See Figure 21.
Figure 21. Inserting inoculation loop into broth.
14. Submerge the loop into the broth.
15. Immediately transfer the broth adhering to the loop into one quadrant of the agar plate using a zigzag motion. See Figure 22 and Figure 23.

www.HOLscience.com 23 ©Hands-On Labs, Inc.
Experiment Aseptic Technique and Culturing Microbes
Figure 22. Inoculating agar plate with loop.
16. Place the lid on the agar plate.
17. Put the inoculation loop into the cup of alcohol.
18. Flame the lip of the broth tube and replace the cap on the tube.
19. Remove the inoculation loop from the alcohol and shake to dry.
20. Open the lid of the agar plate and touch the loop to the edge of the inoculated quadrant to transfer microbes to the adjacent quadrant of the plate. See Figure 24.
21. Return the lid to the agar plate.
22. Put the inoculation loop into the cup of alcohol.
23. After 20 seconds, remove the inoculation loop from the alcohol and shake to dry.
24. Repeat steps 20-22 so that all four quadrants have been streaked. See Figure 23.

www.HOLscience.com 24 ©Hands-On Labs, Inc.
Experiment Aseptic Technique and Culturing Microbes
Figure 23. Bacterial isolation with a streak plate. A. A collected bacteria sample is spread over one quadrant of the agar plate. B. A sterilized inoculation loop is used to move a small portion
of sample from the first quadrant to a second quadrant. C. A small portion of the second quadrant is moved to the third quadrant. D. A small portion from the third quadrant is moved to
the fourth quadrant.
25. Place the used inoculation loop in undiluted bleach for 30 minutes. It may then be disposed of in the garbage.
26. Select a new inoculation loop from the cup of alcohol.
27. Gather the S. cerevisiae broth and labeled agar plate and repeat steps 11-26.
28. Gather the S. epidermidis broth and labeled agar plate and repeat steps 11-26.
29. Extinguish and store the candle, safety goggles, mask, and apron for use in future experiments.
30. Pour the remaining alcohol from the cup into a sink and dispose of the cup.
31. Wipe down your work area with a 10% bleach solution.
32. Identify a location in your home where the inoculated agar plates can incubate agar-side up (inverted) for approximately 48 hours. The location should be room temperature (21°C-25°C), away from heating or air-conditioning vents, out of direct sunlight, and secure from children and pets. An empty cabinet works well. If a counter top is used, place cultures in a box such, as your empty HOL box. Use the thermometer to determine whether the location meets the requirement of 21°C-25°C, if not, identify a new location.
www.HOLscience.com 25 ©Hands-On Labs, Inc.
Experiment Aseptic Technique and Culturing Microbes
33. Place the broth tubes containing live cultures into the refrigerator to preserve for future experiments.
34. Incubate the agar plates for 48 hours.
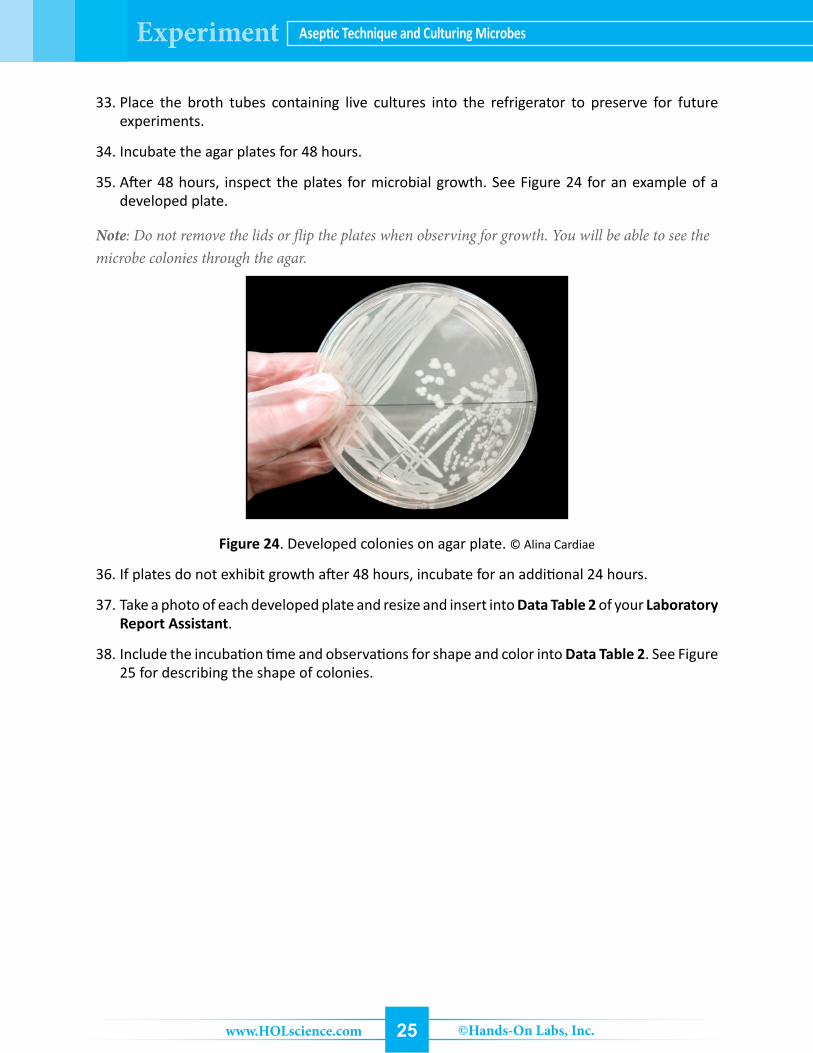
35. After 48 hours, inspect the plates for microbial growth. See Figure 24 for an example of a developed plate.
Note: Do not remove the lids or flip the plates when observing for growth. You will be able to see the microbe colonies through the agar.
Figure 24. Developed colonies on agar plate. © Alina Cardiae
36. If plates do not exhibit growth after 48 hours, incubate for an additional 24 hours.
37. Take a photo of each developed plate and resize and insert into Data Table 2 of your Laboratory Report Assistant.
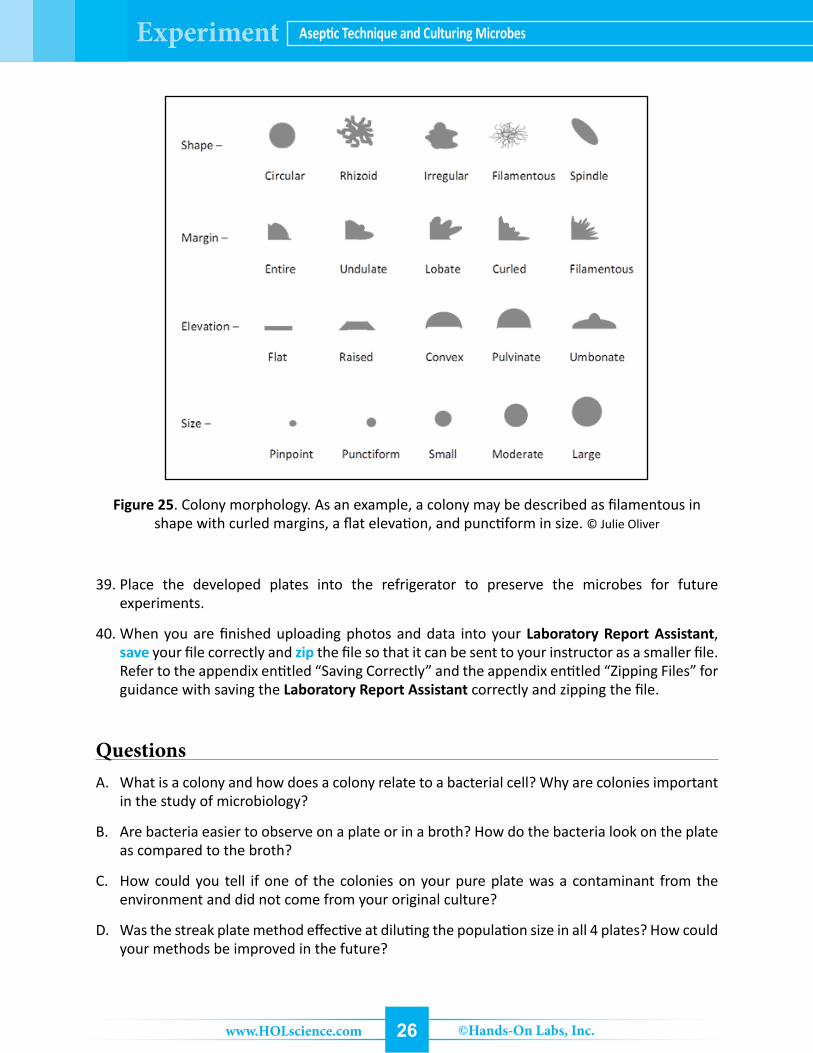
38. Include the incubation time and observations for shape and color into Data Table 2. See Figure 25 for describing the shape of colonies.
www.HOLscience.com 26 ©Hands-On Labs, Inc.
Experiment Aseptic Technique and Culturing Microbes
Figure 25. Colony morphology. As an example, a colony may be described as filamentous in shape with curled margins, a flat elevation, and punctiform in size. © Julie Oliver
39. Place the developed plates into the refrigerator to preserve the microbes for future experiments.
40. When you are finished uploading photos and data into your Laboratory Report Assistant, save your file correctly and zip the file so that it can be sent to your instructor as a smaller file. Refer to the appendix entitled “Saving Correctly” and the appendix entitled “Zipping Files” for guidance with saving the Laboratory Report Assistant correctly and zipping the file.
QuestionsA. What is a colony and how does a colony relate to a bacterial cell? Why are colonies important
in the study of microbiology?
B. Are bacteria easier to observe on a plate or in a broth? How do the bacteria look on the plate as compared to the broth?
C. How could you tell if one of the colonies on your pure plate was a contaminant from the environment and did not come from your original culture?
D. Was the streak plate method effective at diluting the population size in all 4 plates? How could your methods be improved in the future?