Embed Size (px)
Citation preview
Escan Technologies Corporation
Exeba®-TAMS™ User Guide
Escan Technologies Corp. 12140 Severn Way
Riverside, CA 92503 Phone (909) 270-0043 • Fax (909) 270-0920
E S C A N T E C H N O L O G I E S C O R P O R A T I O N
Exeba®-TAMS™ User Guide
The Exeba®-TAMS™ user documentation has been written by Escan Technologies Corp. No part of this publication may be reproduced or distributed in any form or by any means without the prior written permission of Escan Technologies Corp. We welcome your suggestions and comments regarding improvements to Exeba®-TAMS™ or this manual. Changes will be incorporated in the new editions of this manual and in new versions of Exeba®-TAMS™ Escan Technologies Corp. reserves the right to make improvements or changes to this product at any time without notice. While every reasonable precaution has been taken in the preparation of this manual and software, Escan Technologies Corp. assumes no responsibility or liability of any kind for errors or omissions, or for the consequences of such errors. Exeba®-TAMS™ is provided “as is” without warranty of any kind. The entire risk as to the quality and performance of Exeba®-TAMS™ is on the user. This documentation was last updated for Version 3.0 of Exeba®-TAMS™. Serial Number:
1
License Agreement This license agreement is your proof of license. Please treat it as valuable property. This is an agreement between you (either individual or entity), the end user, and Escan Technologies Corp. If you do not agree to the terms of this agreement, promptly return the disk package and accompanying items (including written materials and binders or other containers) to the place you obtained them for a full refund. 1. GRANT OF LICENSE. This License Agreement permits you to use one copy of the specified version of the Exeba®-TAMS™ software product identified above ("SOFTWARE") on any single computer, provided the SOFTWARE is in use only on one computer at any time. If you have multiple Licenses for the SOFTWARE, then at any time you may have as many copies of the SOFTWARE in use as you have Licenses. The SOFTWARE is "in use" on computer when it is loaded into the temporary memory (i.e. RAM) or installed into the permanent memory (e.g. hard disk, CD-ROM, or other storage device) of that computer, except that a copy installed on a network server for the sole purpose of distribution to other computers is not "in use". If the anticipated number of users of the SOFTWARE will exceed the number of applicable Licenses, then you must have a reasonable mechanism or process in place to assure that the number of persons using the SOFTWARE concurrently does not exceed the number of Licenses. If the SOFTWARE is permanently installed on the hard disk or other storage device of a computer (other than a network server) and one person uses that computer more than 80% of the time it is in use, then that person may also use the SOFTWARE on the portable or home computer. 2. COPYRIGHT. The SOFTWARE is owned by Escan Technologies Corp. or its suppliers and is protected by United States copyright laws and International treaty provisions. Therefore, you must treat the SOFTWARE like any other copyrighted material (e.g. book or musical recording) except that you may either (a) make one copy of the SOFTWARE solely for backup or archival purposes, or (b) transfer the SOFTWARE to a single hard disk provided you keep the original solely for backup or archival purposes. You may not copy the written materials accompanying the SOFTWARE. 3. OTHER RESTRICTIONS. This Exeba®-TAMS™ License Agreement is your proof of license to exercise the rights granted herein and must be retained by you. You may not rent or lease the SOFTWARE, but you may transfer your rights under this Exeba®-TAMS™ License Agreement on a permanent basis provided you transfer this License Agreement, the SOFTWARE, and all accompanying written materials and retain no copies, and the recipient agrees to the terms of this Agreement. You may not reverse engineering, decompile, or disassemble the SOFTWARE. Any transfer of the SOFTWARE must include the most recent update and all prior versions. 4. DUAL MEDIA SOFTWARE. If the SOFTWARE package contains both 3.5-inch disks and CD-ROM, then you must use only the media appropriate for your single designated computer or network server. You must not use the other media on another computer or computer networks, or loan, rent, lease, or transfer them to another user except as part of a transfer or other use as expressly permitted by this Exeba®-TAMS™ License Agreement. LIMITED WARRANTY LIMITED WARRANTY. Escan Technologies Corp. warrants that (a) the SOFTWARE will perform substantially in accordance with the accompanying written materials for a period of thirty (30) days from the date of receipt; and (b) any hardware accompanying the SOFTWARE will be free from defects in materials and workmanship under normal use and service for a period of one (1) year from the date of receipt. Any implied warranties on the SOFTWARE and hardware are limited to thirty (30) days and one (1) year, respectively. Some states do not allow limitations on duration of an implied warranty, so the above limitation may not apply to you. CUSTOMER REMEDIES. Escan Technologies Corp.'s entire liability and your exclusive remedy shall be, at Escan Technologies Corp.'s option, either (a) return of the price paid or (b) repair or replacement of the SOFTWARE or hardware that does not meet Escan Technologies Corp.'s Limited Warranty and that is returned to Escan Technologies Corp. with a copy of your receipt. This limited warranty is void if failure of the SOFTWARE or hardware had resulted from accident, abuse, or misapplication. Any replacement SOFTWARE will be warranted for the remainder of the original warranty period or thirty (30) days, whichever is longer. Neither
2
these remedies nor any product support services offered by Escan Technologies Corp. are available for this U.S.A. version product outside of the United States of America. NO OTHER WARRANTIES. Escan Technologies Corp. Disclaims all other warranties, either express or implied, including but not limited to implied warranties of merchantability and fitness for a particular purpose, with respect to the SOFTWARE, the accompanying written materials, and any accompanying hardware. This limited warranty gives you specific legal rights. You may have others, which may vary from state to state. NO LIABILITY FOR CONSEQUENTIAL DAMAGES. In no event shall Escan Technologies Corp. or its suppliers be liable for any damages whatsoever (including, without limitation, damages for loss of business profits, business interruption, loss of business information, or other pecuniary loss) arising out of the use of or inability to use this Escan Technologies Corp. product, even if Escan Technologies Corp. has been advised of the possibility of such damages. Because some states do not allow the exclusion or limitation of liability for consequential damages, the above limitation may not apply to you. U.S. GOVERNMENT RESTRICTED RIGHTS This SOFTWARE and documentation are provided with RESTRICTED RIGHTS. Use, duplication, or disclosure by the Government is subject to restrictions as set forth in subparagraph (c)(1)(ii) of the Rights in Technical Data and Computer Software clause at DFARS 252.227-7013 or subparagraphs (c)(1) and (2) of the Commercial Computer Software--Restricted Rights at 48 CFR 52-227-19, as applicable. This Agreement is governed by the laws of the State of California. COPYRIGHT Information in this document is subject to change without notice and does not represent a commitment on the part of Escan Technologies Corp. The software described in this document is subject to the license agreement that is included with Exeba®-TAMS™, in whole or in part, in print, or in any other storage and retrieval system is prohibited. No part of this publication may be reproduced, transmitted, transcribed, stored in a retrieval system, or translated into any language in any form by any means for any purpose other the purchaser's personal use without express written permission of Escan Technologies Corp. Copyright 2003 Escan Technologies Corp. All rights reserved. Printed in the United States of America. This manual was produced using Microsoft Word for Windows. January 1999 (first printing), May 1999 (second printing), July 1999 (third printing), April 2001 (fourth printing), June 2003 (fifth printing) TRADEMARKS Exeba and the Exeba logo are registered trademarks of Escan Technologies Corporation. Microsoft and Windows are registered trademarks of Microsoft Corporation. Visual Basic is registered trademark of Microsoft Corporation. True DBGrid Pro 7.0 is registered trademark of ComponentOne LLC Crystal Reports is registered trademark of Seagate Software Inc.
3
Table of Contents Serial Number: ............................................................................................................................................ 1
LICENSE AGREEMENT ...................................................................................................................................... 2 LIMITED WARRANTY .................................................................................................................................. 2
U.S. GOVERNMENT RESTRICTED RIGHTS ............................................................................................ 3
COPYRIGHT .................................................................................................................................................... 3
FEATURES........................................................................................................................................................ 7 GENERAL SOFTWARE FEATURES...................................................................................................................... 7 SCHEDULE FEATURES....................................................................................................................................... 7 TIME & ATTENDANCE FEATURES..................................................................................................................... 7 REPORT FEATURES........................................................................................................................................... 7 OTHER FEATURES ............................................................................................................................................ 7 DATA ENTRY OPTIONS..................................................................................................................................... 8
INSTALLING EXEBA®-TAMS™ ................................................................................................................. 9 SYSTEM REQUIREMENTS .................................................................................................................................. 9 INSTALLATION ................................................................................................................................................. 9
UNLOCK SOFTWARE.................................................................................................................................. 10
MAIN WINDOW ............................................................................................................................................ 13
PASSWORD SETUP....................................................................................................................................... 14
LOG ON ........................................................................................................................................................... 15
COMPANY SETUP ........................................................................................................................................ 17
DEPARTMENT SETUP................................................................................................................................. 19
HOLIDAY SETUP .......................................................................................................................................... 21
HOLIDAY LISTING ...................................................................................................................................... 22
SCHEDULE SETUP ....................................................................................................................................... 23
MESSAGE SETUP.......................................................................................................................................... 25
EMPLOYEE SETUP ...................................................................................................................................... 27
EMPLOYEE LISTING................................................................................................................................... 30
EMPLOYEE SEARCH................................................................................................................................... 32
PRINT EMPLOYEE ID ................................................................................................................................. 34
TIME SHEET.................................................................................................................................................. 36
IMPORT TIME SHEET................................................................................................................................. 38
4
ABSENCE SETUP .......................................................................................................................................... 39
ABSENCE REPORT ...................................................................................................................................... 41
EXCEPTION REPORT.................................................................................................................................. 43
TIME & ATTENDANCE REPORTS ........................................................................................................... 45
ARCHIVE........................................................................................................................................................ 47
DE-ARCHIVE ................................................................................................................................................. 48
CLOCK CONFIGURATION......................................................................................................................... 50
TAMS CLOCK................................................................................................................................................ 51 USING THE MSR100 OR RS2000.................................................................................................................... 51
COMPACT AND REPAIR DATABASE...................................................................................................... 53
IMPORT DATABASE.................................................................................................................................... 54
IMPORT DATA .............................................................................................................................................. 55 DATA FILE FORMAT....................................................................................................................................... 55
ON-LINE HELP.............................................................................................................................................. 61
USER DOCUMENTATION .......................................................................................................................... 61
CUSTOMER SUPPORT ................................................................................................................................ 62
ON-LINE SUPPORT ...................................................................................................................................... 64
5
Chapter
1
Introduction
E XEBA-TAMS™ Time & Attendance software is a time and attendance system that is easy to use and customize. The software is designed to run seamlessly with a variety of data collection terminals including the ATS line of time clocks, and IBC swipe readers. In this chapter you will learn,
► about Exeba®-TAMS™’s main features
► how to install the software
► how to unlock the software
6
Features Exeba®-TAMS™ has the following features.
General Software Features
Allows the user to customize the workweek such as start date. Creates and keeps track of employee data, schedules, departments, employee absence, and
company holidays. Automates weekly payroll calculations.
Schedule Features
Schedules employees for every day of the week. Prevents early & late clock times. Provides on-line schedule checking. Reports out-of-schedule clock in/out. Adds a grace period to the scheduled time
Time & Attendance Features
Defines attendance rules such as rounding total time, grace period, workweek definition, overtime and double time.
Keeps track of employee absence. Keeps track of company holiday. Allows editing of time sheet data. Archives and de-archives time and attendance data. Imports and exports employee and time sheet data.
Report Features
Allows filtering of report data by department, employee, schedule, and date. Includes the following time and attendance reports: Daily, Weekly, Summary, Exceptions,
Absences Report In addition to the following listing reports: Department, Employees, Schedule, Messages,
and Holidays. Other Features
Imports and exports employee, schedule, department, and messages data in text format. Allows selection of data fields and format when exporting or importing data. Customizes employee messages.
7

Creates Employee Bar-coded Badges. Limits user access to the software through password security.
Data Entry Options
IBC Readers ATS Data Collection Terminal RS2000 Reader MSR100 Reader NMR Reader PC Keyboard/ Bar Code Scanner Hand Held Barcode Reader Magnetic Stripe / Slot Reader
8
Installing Exeba®-TAMS™
The installation program allows you to install Exeba®-TAMS™ from a CD. Before you begin, verify that your computer meets the requirements listed below.
System Requirements Exeba®-TAMS™ has the following system requirements:
An IBM PC or compatible computer.
Microsoft Windows 95/98, 2000, NT, or XP.
A Pentium processor.
Approximately 20 MB of available disk space.
Installation
1. Start Microsoft Windows.
2. Close other applications
3. Insert the Exeba®-TAMS™ CD-ROM into your CD-ROM drive.
4. If the installation program did not start automatically, choose Run from the Start menu.
5. When the Run dialog box appears, type x:\setup (substitute the letter of your CD-ROM for x) and press Enter.
6. Follow the on-screen instructions.
9
Unlock Software
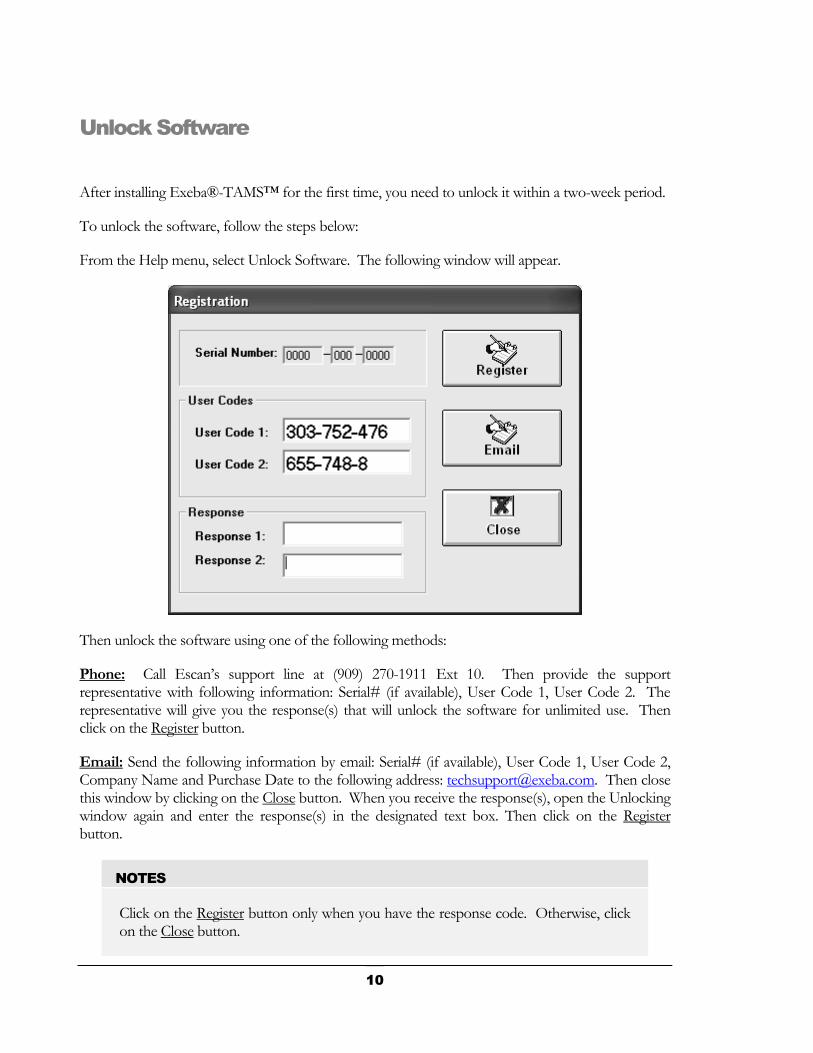
After installing Exeba®-TAMS™ for the first time, you need to unlock it within a two-week period.
To unlock the software, follow the steps below:
From the Help menu, select Unlock Software. The following window will appear.
Then unlock the software using one of the following methods:
Phone: Call Escan’s support line at (909) 270-1911 Ext 10. Then provide the support representative with following information: Serial# (if available), User Code 1, User Code 2. The representative will give you the response(s) that will unlock the software for unlimited use. Then click on the Register button.
Email: Send the following information by email: Serial# (if available), User Code 1, User Code 2, Company Name and Purchase Date to the following address: [email protected]. Then close this window by clicking on the Close button. When you receive the response(s), open the Unlocking window again and enter the response(s) in the designated text box. Then click on the Register button.
NOTES
Click on the Register button only when you have the response code. Otherwise, click on the Close button.
10

11
Chapter
2
Getting Started
You are now ready to use Exeba®-TAMS™. In this chapter, you will be introduced to the main tools that will help you setup the application.
Basically, you will learn,
► How Exeba®-TAMS’s main window is organized
► How to setup a password
12
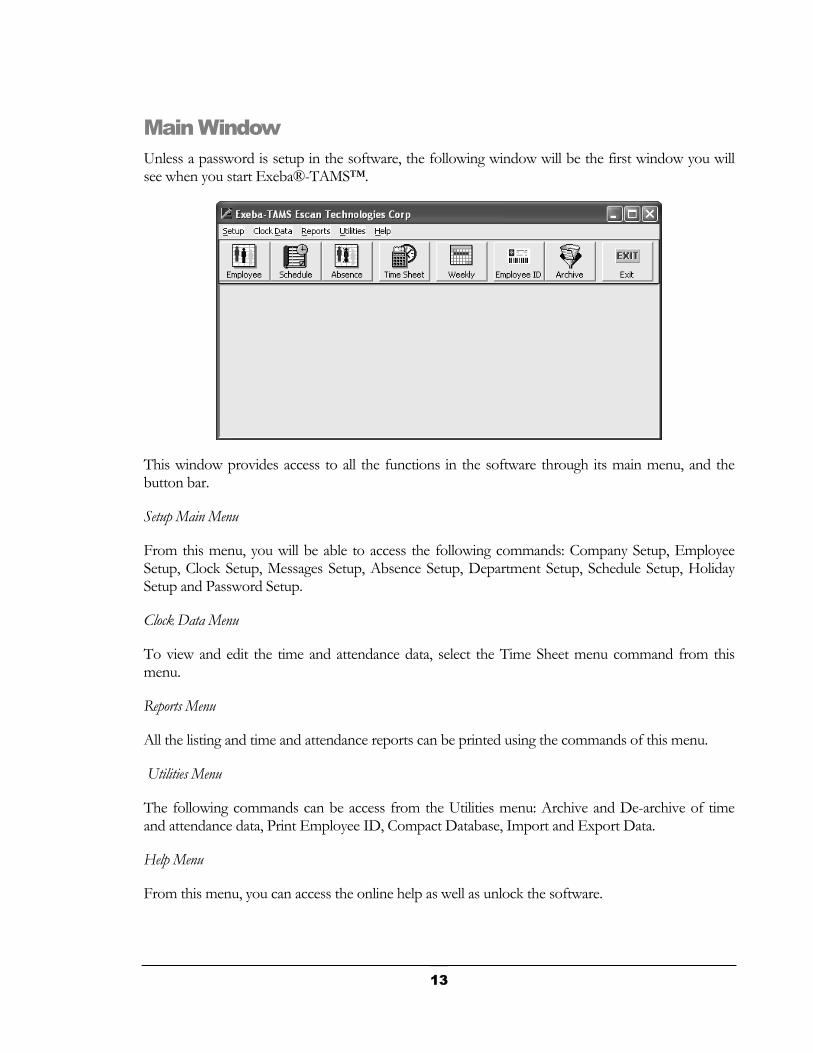
Main Window Unless a password is setup in the software, the following window will be the first window you will see when you start Exeba®-TAMS™.
This window provides access to all the functions in the software through its main menu, and the button bar.
Setup Main Menu
From this menu, you will be able to access the following commands: Company Setup, Employee Setup, Clock Setup, Messages Setup, Absence Setup, Department Setup, Schedule Setup, Holiday Setup and Password Setup.
Clock Data Menu
To view and edit the time and attendance data, select the Time Sheet menu command from this menu.
Reports Menu
All the listing and time and attendance reports can be printed using the commands of this menu.
Utilities Menu
The following commands can be access from the Utilities menu: Archive and De-archive of time and attendance data, Print Employee ID, Compact Database, Import and Export Data.
Help Menu
From this menu, you can access the online help as well as unlock the software.
13
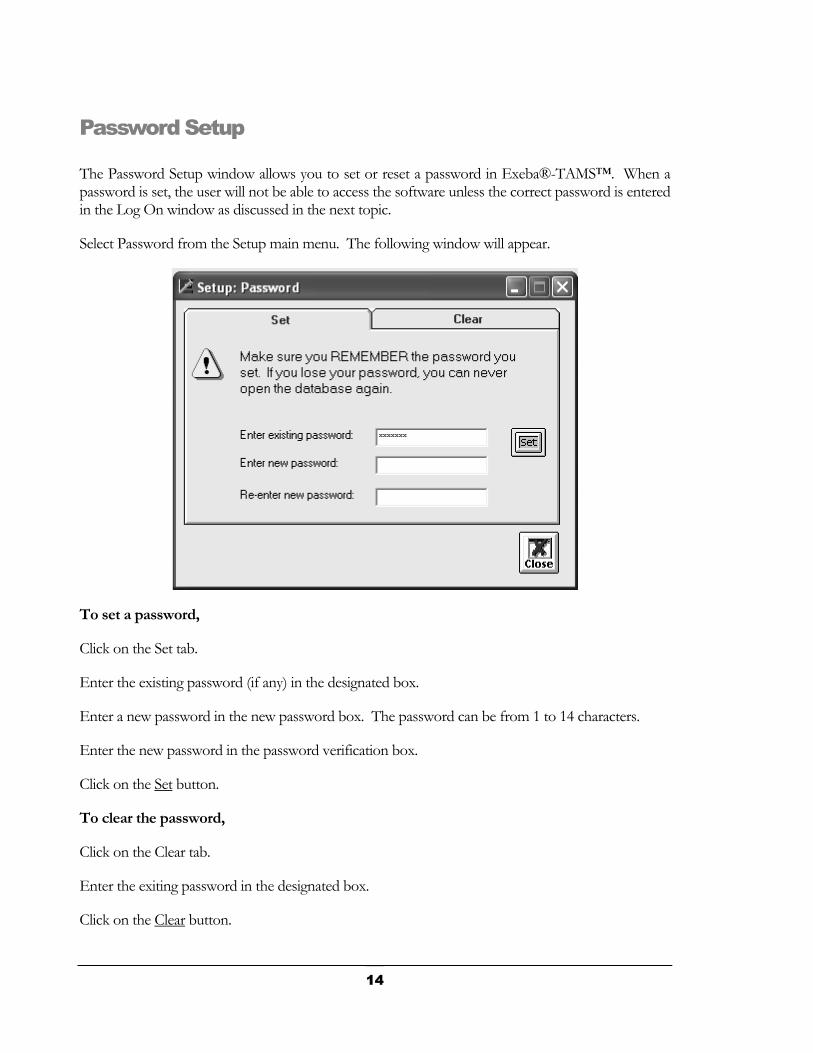
Password Setup The Password Setup window allows you to set or reset a password in Exeba®-TAMS™. When a password is set, the user will not be able to access the software unless the correct password is entered in the Log On window as discussed in the next topic.
Select Password from the Setup main menu. The following window will appear.
To set a password,
Click on the Set tab.
Enter the existing password (if any) in the designated box.
Enter a new password in the new password box. The password can be from 1 to 14 characters.
Enter the new password in the password verification box.
Click on the Set button.
To clear the password,
Click on the Clear tab.
Enter the exiting password in the designated box.
Click on the Clear button.
14
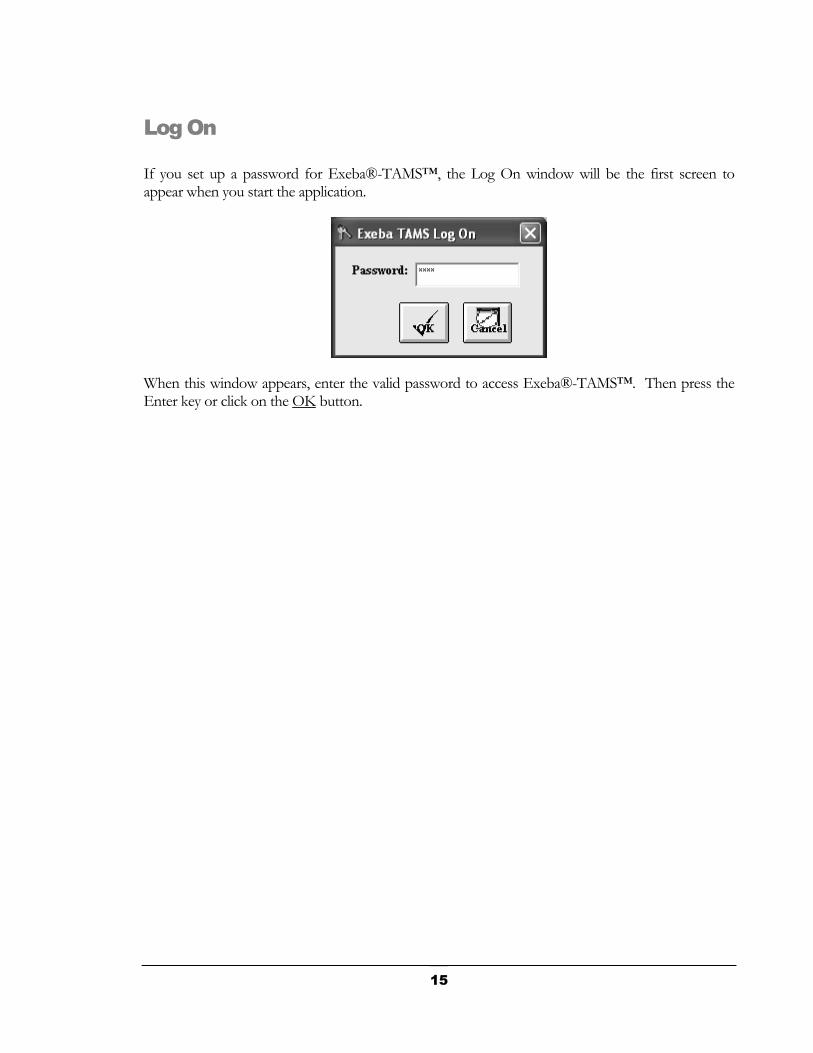
Log On If you set up a password for Exeba®-TAMS™, the Log On window will be the first screen to appear when you start the application.
When this window appears, enter the valid password to access Exeba®-TAMS™. Then press the Enter key or click on the OK button.
15
Chapter
3
General Setup
B efore you start using Exeba®-TAMS™, you may need to change the default application parameters as well as create the following,
► Employee departments
► Company holidays
► Employee messages
16
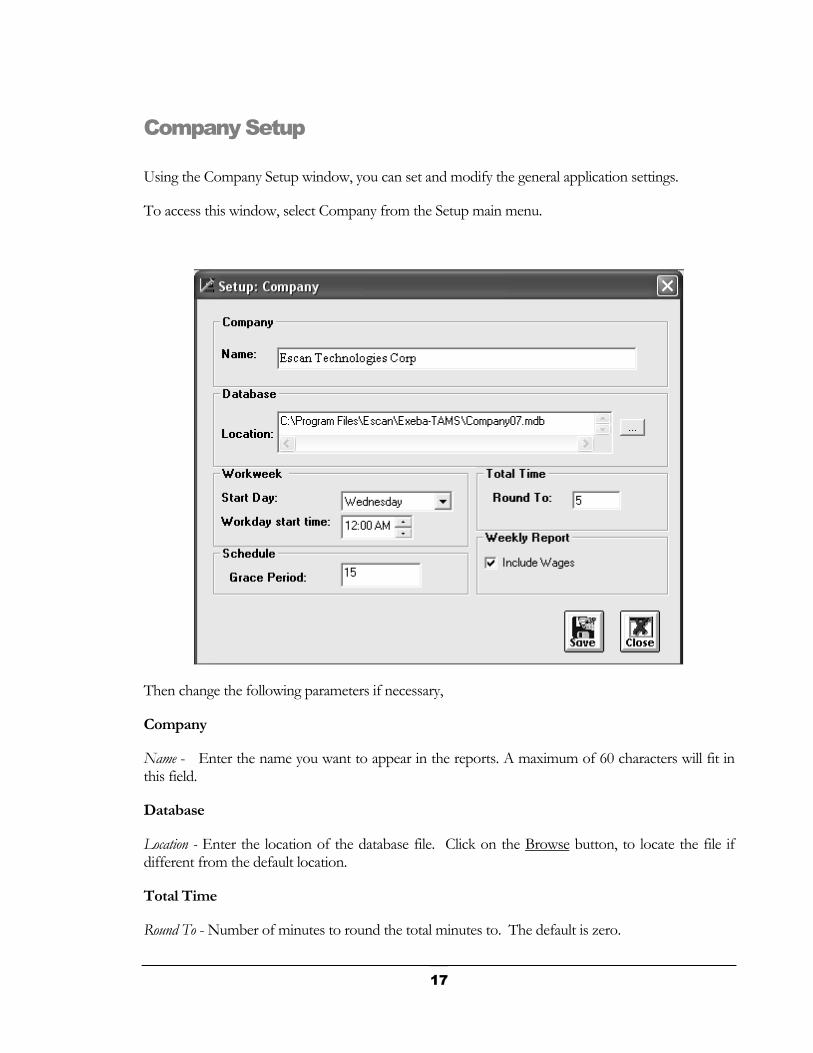
Company Setup Using the Company Setup window, you can set and modify the general application settings.
To access this window, select Company from the Setup main menu.
Then change the following parameters if necessary,
Company
Name - Enter the name you want to appear in the reports. A maximum of 60 characters will fit in this field.
Database
Location - Enter the location of the database file. Click on the Browse button, to locate the file if different from the default location.
Total Time
Round To - Number of minutes to round the total minutes to. The default is zero.
17
Workweek
Start Day - Choose the first day for the company's workweek. The default is Monday.
Workday Start Time - Enter the time the workday starts (hh:mm AM/PM). The workday is any consecutive 24-hour period beginning at the same time on each calendar day. The default is 12:00 AM. Although Exeba®-TAMS™ allows you to change this field anytime, you should customize it before the employees start clocking in and out, thereafter, leave it unchanged.
Schedule
Grace Period - The number of minutes you allow an employee to clock in or out before and after the scheduled shift. The default is set to "0".
Reports
Include Wages - If this option is checked, the employee wages will appear in the weekly report.
Button Function
When you make the necessary changes to the above parameters, click on the Save button.
Click on the Close button to close this window.
18
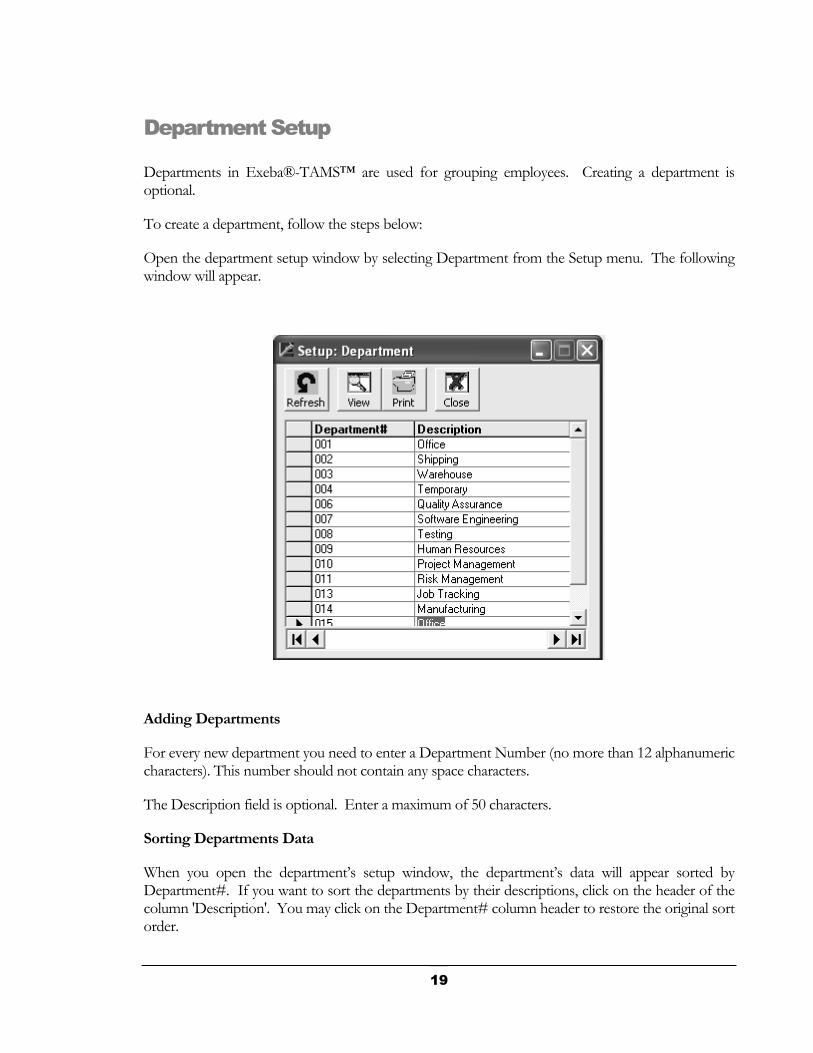
Department Setup Departments in Exeba®-TAMS™ are used for grouping employees. Creating a department is optional.
To create a department, follow the steps below:
Open the department setup window by selecting Department from the Setup menu. The following window will appear.
Adding Departments
For every new department you need to enter a Department Number (no more than 12 alphanumeric characters). This number should not contain any space characters.
The Description field is optional. Enter a maximum of 50 characters.
Sorting Departments Data
When you open the department’s setup window, the department’s data will appear sorted by Department#. If you want to sort the departments by their descriptions, click on the header of the column 'Description'. You may click on the Department# column header to restore the original sort order.
19
Buttons Function
You may choose to preview a list of the department numbers and their descriptions, sorted by department#, by clicking on the View button.
To print the department listing report, click on the Print button.
To close the window, click on the Close button. Any modifications made to department setup will be saved automatically.
NOTE
If you wish to assign an employee to a certain department, you need to create that department first. Then using the Employee setup window, assign a department to the employee.
20
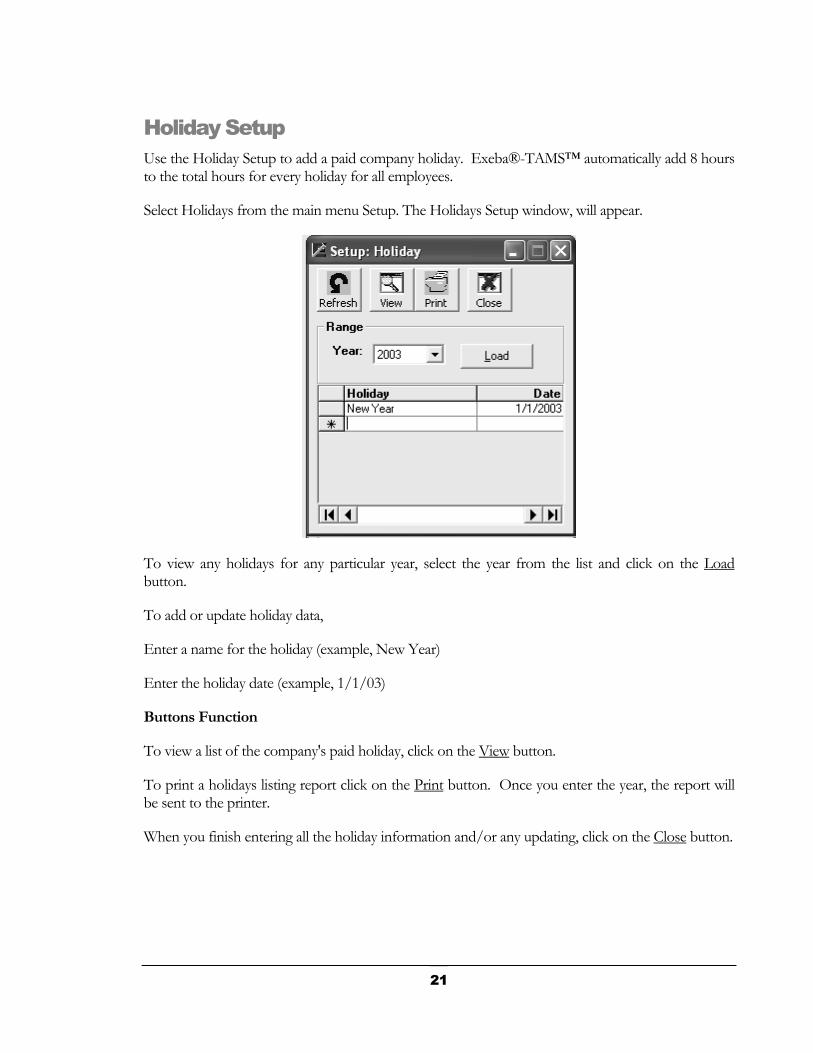
Holiday Setup Use the Holiday Setup to add a paid company holiday. Exeba®-TAMS™ automatically add 8 hours to the total hours for every holiday for all employees.
Select Holidays from the main menu Setup. The Holidays Setup window, will appear.
To view any holidays for any particular year, select the year from the list and click on the Load button.
To add or update holiday data,
Enter a name for the holiday (example, New Year)
Enter the holiday date (example, 1/1/03)
Buttons Function
To view a list of the company's paid holiday, click on the View button.
To print a holidays listing report click on the Print button. Once you enter the year, the report will be sent to the printer.
When you finish entering all the holiday information and/or any updating, click on the Close button.
21

Holiday Listing The Holidays Listing report is a listing of the company holidays. Simply enter the year you would like to see a report for, and print the report.
To see a selected Holiday Listing, choose Reports, Holidays Listing from the main menu options.
22
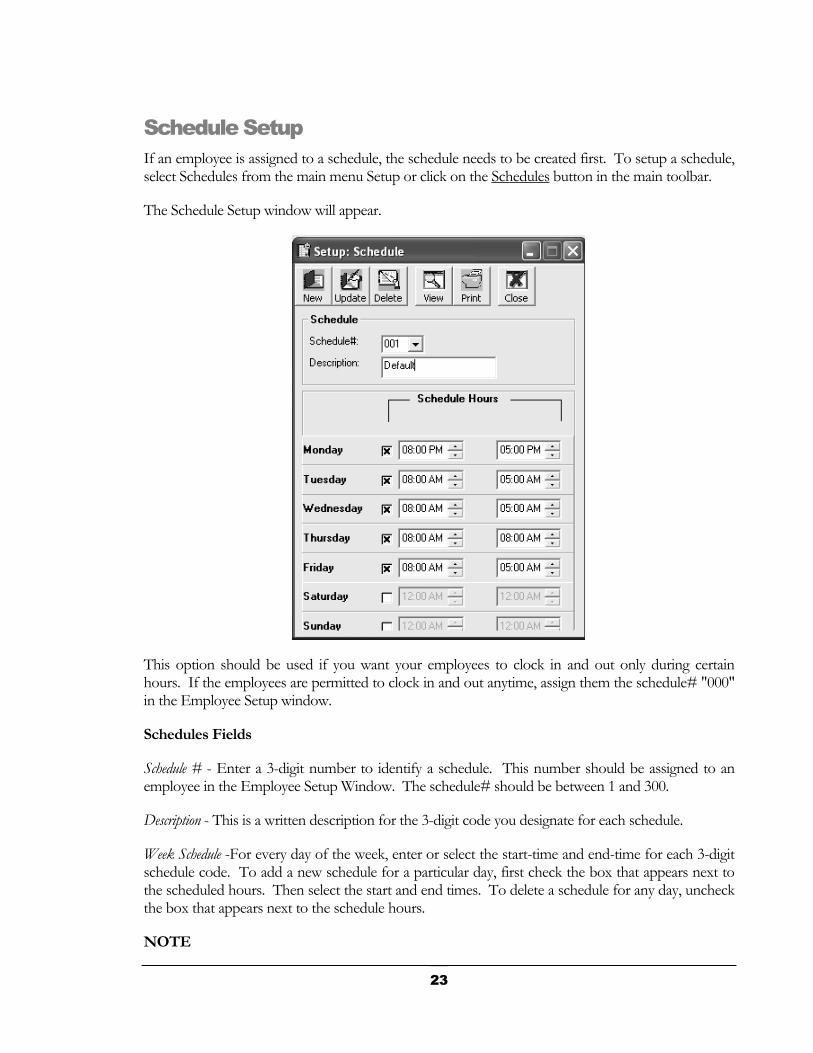
Schedule Setup If an employee is assigned to a schedule, the schedule needs to be created first. To setup a schedule, select Schedules from the main menu Setup or click on the Schedules button in the main toolbar.
The Schedule Setup window will appear.
This option should be used if you want your employees to clock in and out only during certain hours. If the employees are permitted to clock in and out anytime, assign them the schedule# "000" in the Employee Setup window.
Schedules Fields
Schedule # - Enter a 3-digit number to identify a schedule. This number should be assigned to an employee in the Employee Setup Window. The schedule# should be between 1 and 300.
Description - This is a written description for the 3-digit code you designate for each schedule.
Week Schedule -For every day of the week, enter or select the start-time and end-time for each 3-digit schedule code. To add a new schedule for a particular day, first check the box that appears next to the scheduled hours. Then select the start and end times. To delete a schedule for any day, uncheck the box that appears next to the schedule hours.
NOTE
23
The only way Exeba®-TAMS™ identifies a schedule that ends the next day is if the End Time is less than or equal to the Start Time. For example, if Monday's Start Time is 07:00 PM and End Time is 05:00 AM, then an employee will be able to clock in and out between 7 PM on Monday until 5 AM on Tuesday (including the grace period).
Schedules Setup Utilities
To enter a new 3-digit schedule code, click on New button.
When you need to update or change an existing schedule code, choose that code from the drop-down menu, make the necessary changes, and then click on the Update button.
If you need to delete an existing schedule, select or enter that schedule from the drop-down menu, and click on the Delete button. Exeba®-TAMS™ will double-check to make sure you intended to delete that schedule by asking if you want to "Delete Current Schedule?” click "Yes" to confirm deletion. Keep in mind, you cannot delete a schedule if you have assigned an employee to it. You need to delete the employee record first and then delete the schedule.
You may view a list of the schedules by clicking the View button.
To print the schedules listing report click on the Print button.
When you finish with the Schedule Setup Window, click on the Close button.
24
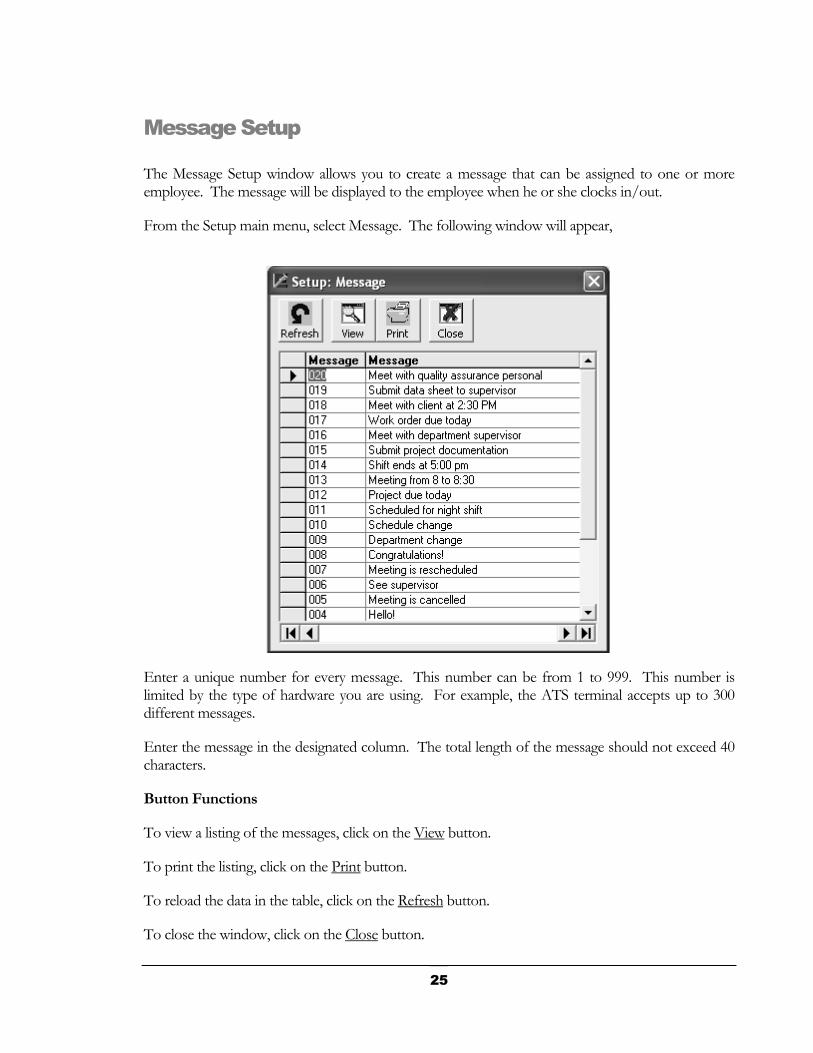
Message Setup The Message Setup window allows you to create a message that can be assigned to one or more employee. The message will be displayed to the employee when he or she clocks in/out.
From the Setup main menu, select Message. The following window will appear,
Enter a unique number for every message. This number can be from 1 to 999. This number is limited by the type of hardware you are using. For example, the ATS terminal accepts up to 300 different messages.
Enter the message in the designated column. The total length of the message should not exceed 40 characters.
Button Functions
To view a listing of the messages, click on the View button.
To print the listing, click on the Print button.
To reload the data in the table, click on the Refresh button.
To close the window, click on the Close button.
25
Chapter
4
Employee
T he employee record need to be created first in Exeba®-TAMS™ before working with the time and attendance data.
In this chapter, you will learn,
► How to create and update an employee record
► How to search for a specific record
► How to print a bar-code employee ID
26
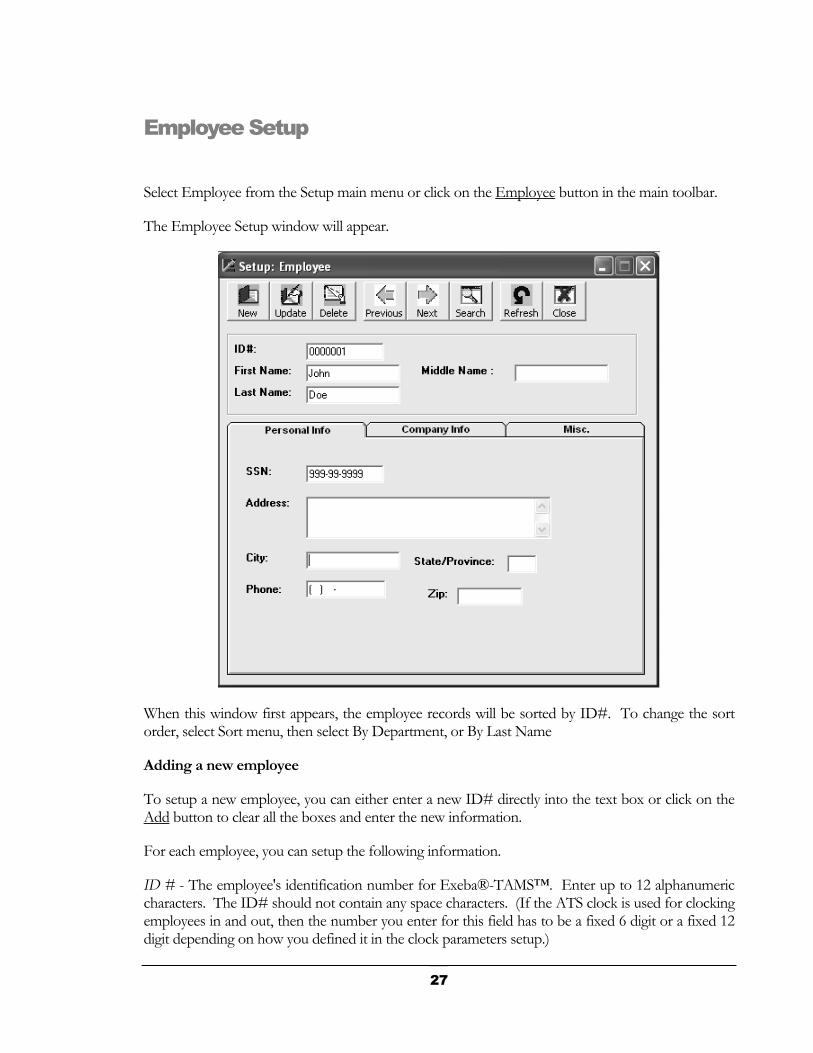
Employee Setup
Select Employee from the Setup main menu or click on the Employee button in the main toolbar.
The Employee Setup window will appear.
When this window first appears, the employee records will be sorted by ID#. To change the sort order, select Sort menu, then select By Department, or By Last Name
Adding a new employee
To setup a new employee, you can either enter a new ID# directly into the text box or click on the Add button to clear all the boxes and enter the new information.
For each employee, you can setup the following information.
ID # - The employee's identification number for Exeba®-TAMS™. Enter up to 12 alphanumeric characters. The ID# should not contain any space characters. (If the ATS clock is used for clocking employees in and out, then the number you enter for this field has to be a fixed 6 digit or a fixed 12 digit depending on how you defined it in the clock parameters setup.)
27
First - The employee's first name, up to 15 characters.
Last - The employee's last name, up to 15 characters.
Address - The employee's street address, up to 50 characters.
City - The employee's city, up to 15 characters.
State - The employee's state, up to 2 characters.
Zip - The employee's zip code, up to 15 characters.
Phone - The employee's home telephone number.
Rate - The employee's hourly pay rate. Default is 0.
Department - From the drop-down list, select the employee's department which was previously entered in the Department Setup window.
Schedule - From the drop-down list, select the employee's 3-digit schedule code which was previously entered in the Schedule Setup Window. If the employee is permitted to clock in and out anytime, choose the default "000".
Message - If you want to display a message to the employees when they scan their card, select the 3-digit message code.
Hire Date - Enter the date the employee was hired.
Position - Enter the employee's position in the company.
Notes - You may enter useful employee notes, up to 255 characters.
Supervisor Level - Choose the security level you desire. Please refer to the ATS command set for a detailed explanation of this field.
Status - Is this employee active or inactive? Click the appropriate selection on the right side of your screen. (The Active/Inactive choice on the left side of your screen allows you to toggle between active and inactive employees. For example, if you select the Active option, you will be able to view the active employees only.)
Update an Employee Record
When you finish entering the employee record, select the Update button to save the information. This button allows you to update an existing employee record or add a new employee record.
When you need to make changes to the employee's record, select the employee using the Search button or enter the ID#. When the changes are made, click on the Update button.
Delete an Employee Record
28
If you need to delete an existing employee record, select the employee using the Search button or enter the ID# in the ID# text box, and click on the Delete button. Exeba®-TAMS™ will double-check to make sure you intended to delete that employee by asking you if you want to "Delete current employee record?” click "Yes" to confirm deletion. Please note that deleting an employee will delete all the attendance and absence information on that employee also.
Navigating
The Previous button allows you to see the previous employee record.
The Next button allows you to see the next employee record.
The Search button allows you to find a specific employee record based on a certain criteria. When you click on this button, the Employee Search window will appear.
Refresh the department/schedule list
You can add a new department to the list as follows:
1. Open the Department Setup window.
2. Enter the information for the new department.
3. Close the Department Setup window.
4. Click on the Refresh button.
You will see that the new department is added to the list. The same applies to the schedules and messages.
View Employee Report
You may view a detailed report for a specific employee by clicking on the View button.
Print the Employee Report
Alternatively, you may want to send the report directly to the printer. In this case, click on the Print button.
Exit the Employee Setup Window
When you finish entering all the employee's information and/or any updating, click on the Close button.
29

Employee Listing
The Employee List Print window allows you to select the range, type, and sort the order of employee records for printing. To access this window, select Employee Reports from the Reports main menu.
You might want to start by selecting the range of records you want to print.
All - Select All if you want to print all employee records.
Employee - Select an Employee from the list to print a single report on a specific employee.
Department - Select the Department from the list to print reports on all the employees belonging to a particular department.
You can choose between two types of reports.
List - a report in which the employee ID, first and last name, status, department#, supervisor level and message# appear all on one row, for every employee selected.
Detailed - a report in which all the employee information appears with each field in one row.
You also have the option to print employees by their status.
Active - only active employee records will appear in the report.
Inactive - only inactive employee records will appear in the report.
30
Both - both active and inactive employee records will appear in the report.
You may want your listing report to be sorted by:
ID# - Employee ID# (default).
Last Name - Employee last name.
Department - Department#.
Button Function
When you have made your selections for the Employees Report, click on the View button.
If you are ready to print the report(s), click on the Print button.
When you finish with all the Employee reports, click on the Close button.
31
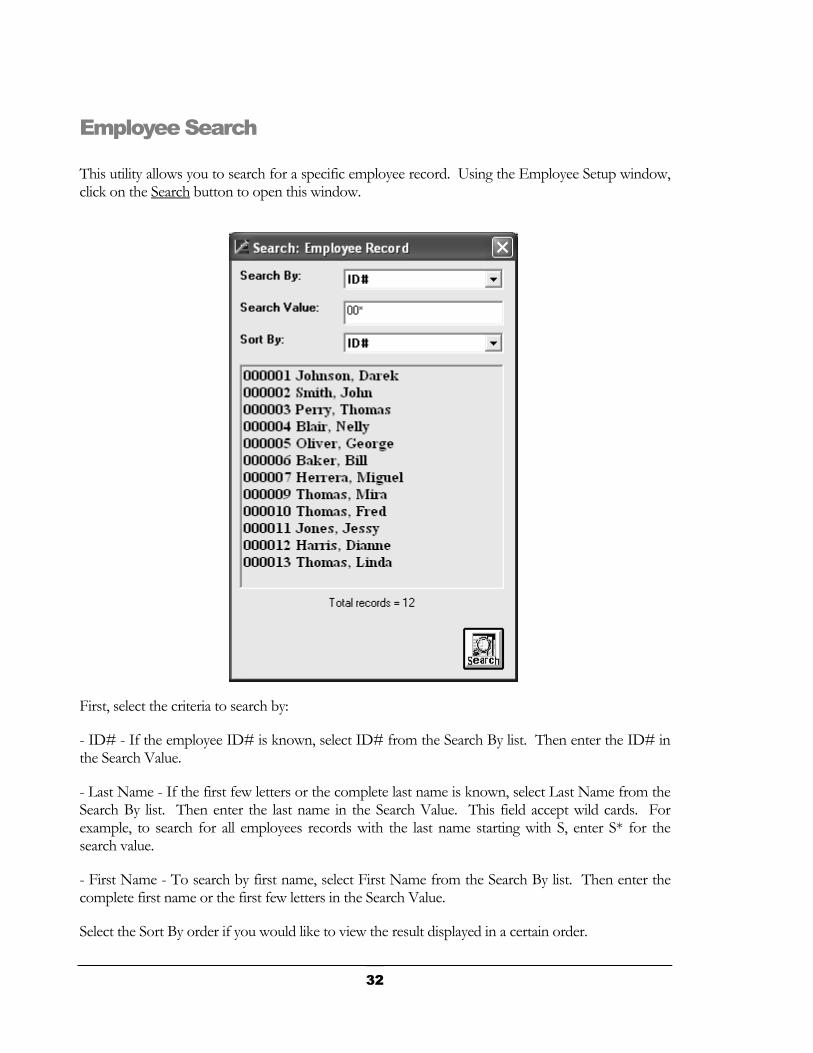
Employee Search This utility allows you to search for a specific employee record. Using the Employee Setup window, click on the Search button to open this window.
First, select the criteria to search by:
- ID# - If the employee ID# is known, select ID# from the Search By list. Then enter the ID# in the Search Value.
- Last Name - If the first few letters or the complete last name is known, select Last Name from the Search By list. Then enter the last name in the Search Value. This field accept wild cards. For example, to search for all employees records with the last name starting with S, enter S* for the search value.
- First Name - To search by first name, select First Name from the Search By list. Then enter the complete first name or the first few letters in the Search Value.
Select the Sort By order if you would like to view the result displayed in a certain order.
32

Then click on the Search button.
If any matching records were found, the result will appear in the list. Double click on the record you need. It will then appear in the Employee Setup window.
33
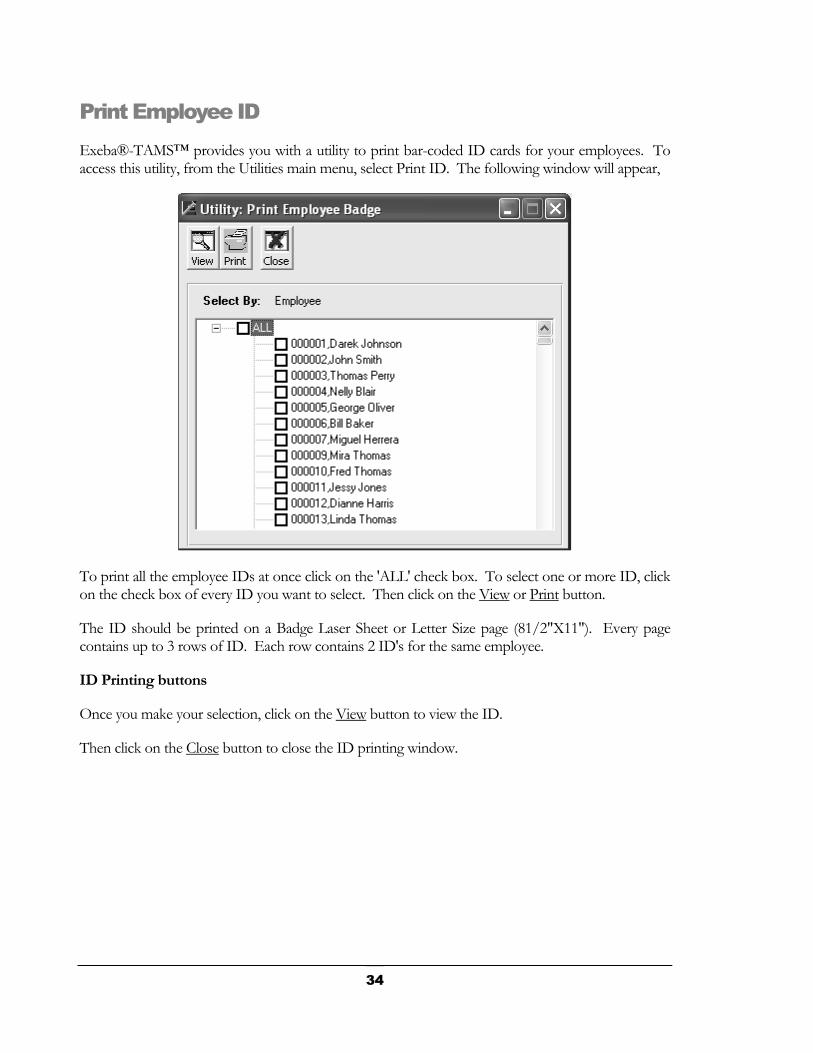
Print Employee ID Exeba®-TAMS™ provides you with a utility to print bar-coded ID cards for your employees. To access this utility, from the Utilities main menu, select Print ID. The following window will appear,
To print all the employee IDs at once click on the 'ALL' check box. To select one or more ID, click on the check box of every ID you want to select. Then click on the View or Print button.
The ID should be printed on a Badge Laser Sheet or Letter Size page (81/2"X11"). Every page contains up to 3 rows of ID. Each row contains 2 ID's for the same employee.
ID Printing buttons
Once you make your selection, click on the View button to view the ID.
Then click on the Close button to close the ID printing window.
34
Chapter
5
Time & Attendance
T his chapter covers all the topics that are related to the employee time and attendance data as well as absence data.
Specifically, it covers the following topics,
► Viewing and editing time and attendance records
► Importing time and attendance records
► Entering absence data
► Printing absence report
► Printing exceptions report
► Printing time and attendance reports
► Archiving and de-archiving time and attendance records
35
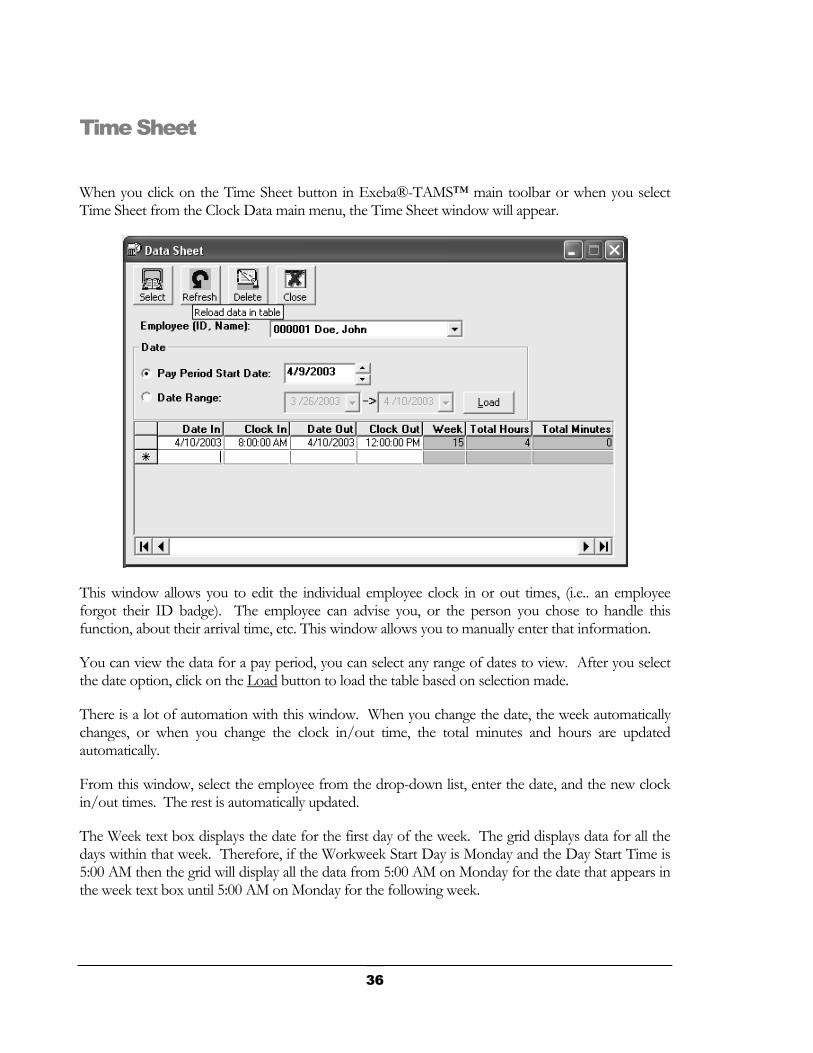
Time Sheet
When you click on the Time Sheet button in Exeba®-TAMS™ main toolbar or when you select Time Sheet from the Clock Data main menu, the Time Sheet window will appear.
This window allows you to edit the individual employee clock in or out times, (i.e.. an employee forgot their ID badge). The employee can advise you, or the person you chose to handle this function, about their arrival time, etc. This window allows you to manually enter that information.
You can view the data for a pay period, you can select any range of dates to view. After you select the date option, click on the Load button to load the table based on selection made.
There is a lot of automation with this window. When you change the date, the week automatically changes, or when you change the clock in/out time, the total minutes and hours are updated automatically.
From this window, select the employee from the drop-down list, enter the date, and the new clock in/out times. The rest is automatically updated.
The Week text box displays the date for the first day of the week. The grid displays data for all the days within that week. Therefore, if the Workweek Start Day is Monday and the Day Start Time is 5:00 AM then the grid will display all the data from 5:00 AM on Monday for the date that appears in the week text box until 5:00 AM on Monday for the following week.
36
Button Function
For single deletion, click on the delete key from your keyboard, for single/multiple deletions click on the Delete button.
You may choose to print a list of your employee clock in/out records by clicking on the View button. This button will open the time & attendance report print query window.
When you finish entering/updating all the employee clock in/out records, click on the Close button.
37
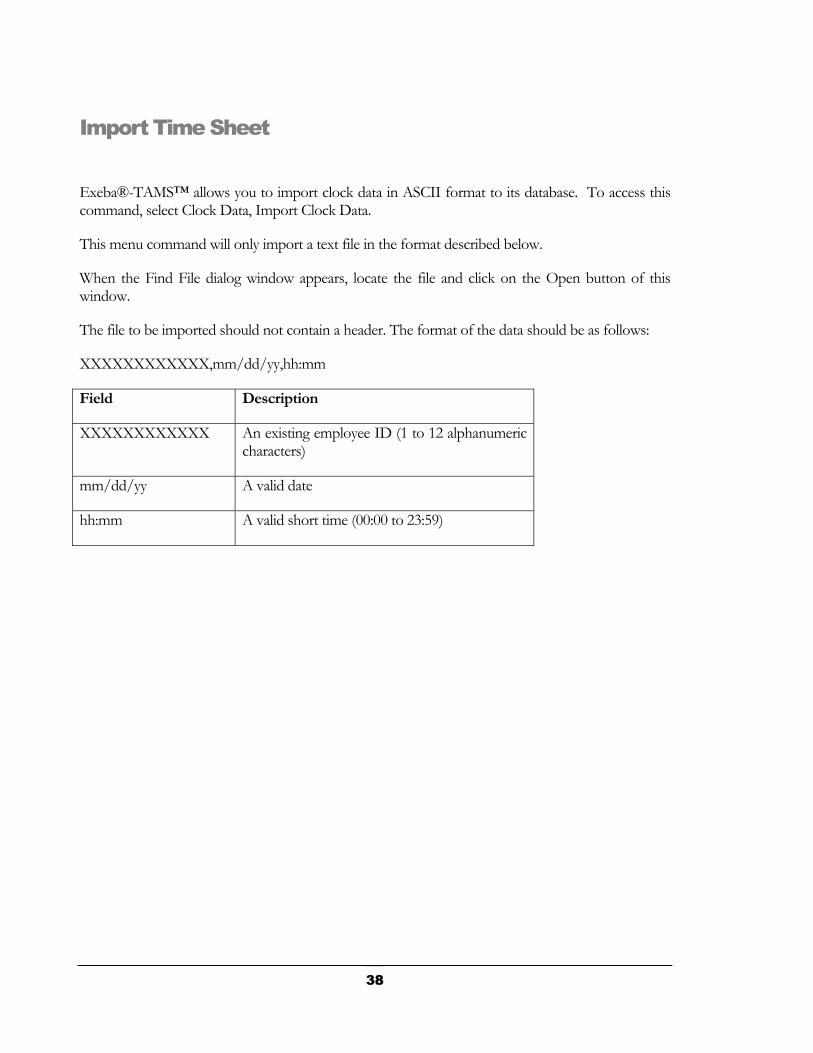
Import Time Sheet
Exeba®-TAMS™ allows you to import clock data in ASCII format to its database. To access this command, select Clock Data, Import Clock Data.
This menu command will only import a text file in the format described below.
When the Find File dialog window appears, locate the file and click on the Open button of this window.
The file to be imported should not contain a header. The format of the data should be as follows:
XXXXXXXXXXXX,mm/dd/yy,hh:mm
Field Description
XXXXXXXXXXXX An existing employee ID (1 to 12 alphanumeric characters)
mm/dd/yy A valid date
hh:mm A valid short time (00:00 to 23:59)
38
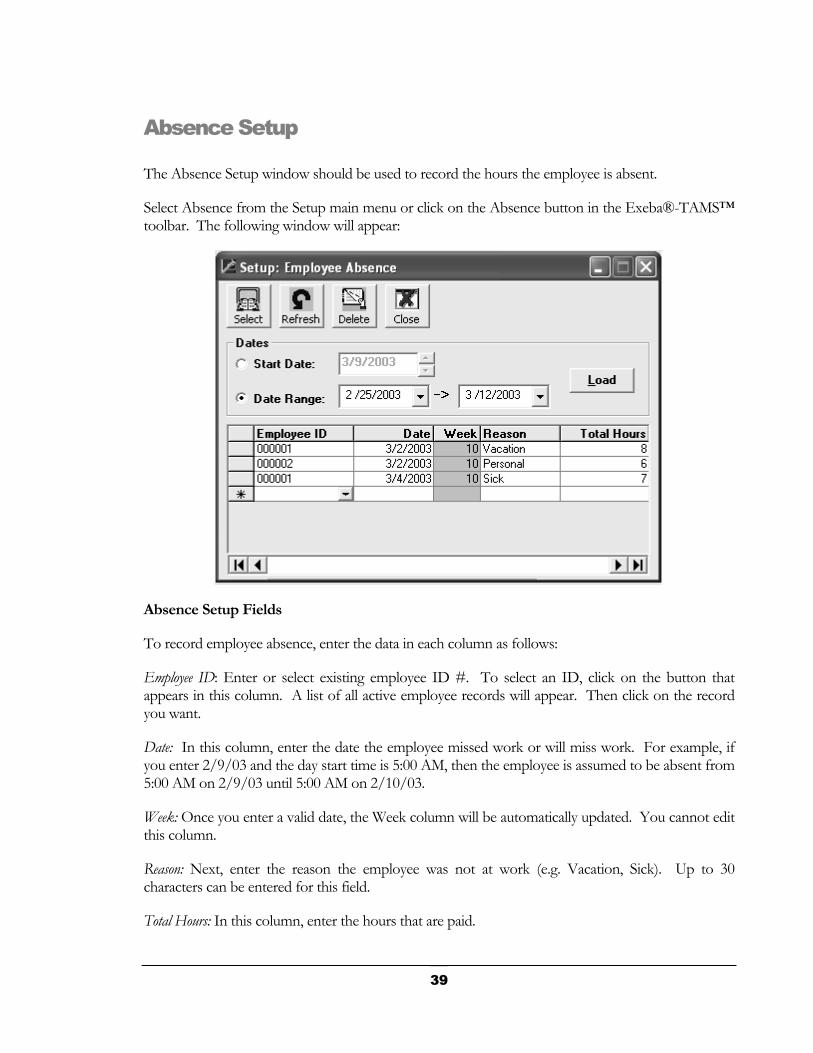
Absence Setup The Absence Setup window should be used to record the hours the employee is absent.
Select Absence from the Setup main menu or click on the Absence button in the Exeba®-TAMS™ toolbar. The following window will appear:
Absence Setup Fields
To record employee absence, enter the data in each column as follows:
Employee ID: Enter or select existing employee ID #. To select an ID, click on the button that appears in this column. A list of all active employee records will appear. Then click on the record you want.
Date: In this column, enter the date the employee missed work or will miss work. For example, if you enter 2/9/03 and the day start time is 5:00 AM, then the employee is assumed to be absent from 5:00 AM on 2/9/03 until 5:00 AM on 2/10/03.
Week: Once you enter a valid date, the Week column will be automatically updated. You cannot edit this column.
Reason: Next, enter the reason the employee was not at work (e.g. Vacation, Sick). Up to 30 characters can be entered for this field.
Total Hours: In this column, enter the hours that are paid.
39
NOTE: When you click on the header of any column the data in the table will appear sorted by that column.
Date Range
You can limit the range of records that are displayed in the table by selecting a range of dates. There are two options:
Start Date - If you select this option, the records displayed will be limited to the payroll period that starts on the Start Date you enter in the designated box. If the payroll period is weekly, then the data for a single week that starts on the Start Date will appear. Enter a Start Date or click on the up and down arrow keys to change the date.
Date Range - This option allows you to view any range of dates. Select a start and end date and click on the Load button.
IMPORTANT - Do NOT forget to click on the Load button to reload the data when you select a different range of dates.
Buttons function
The Select button opens the Absence Report selection window. By using the print window, you can view/print a list of the employee absences you have entered.
The Delete button deletes a single or range of records that you select.
The Refresh button reloads the data in the table.
The Close button closes the window.
40
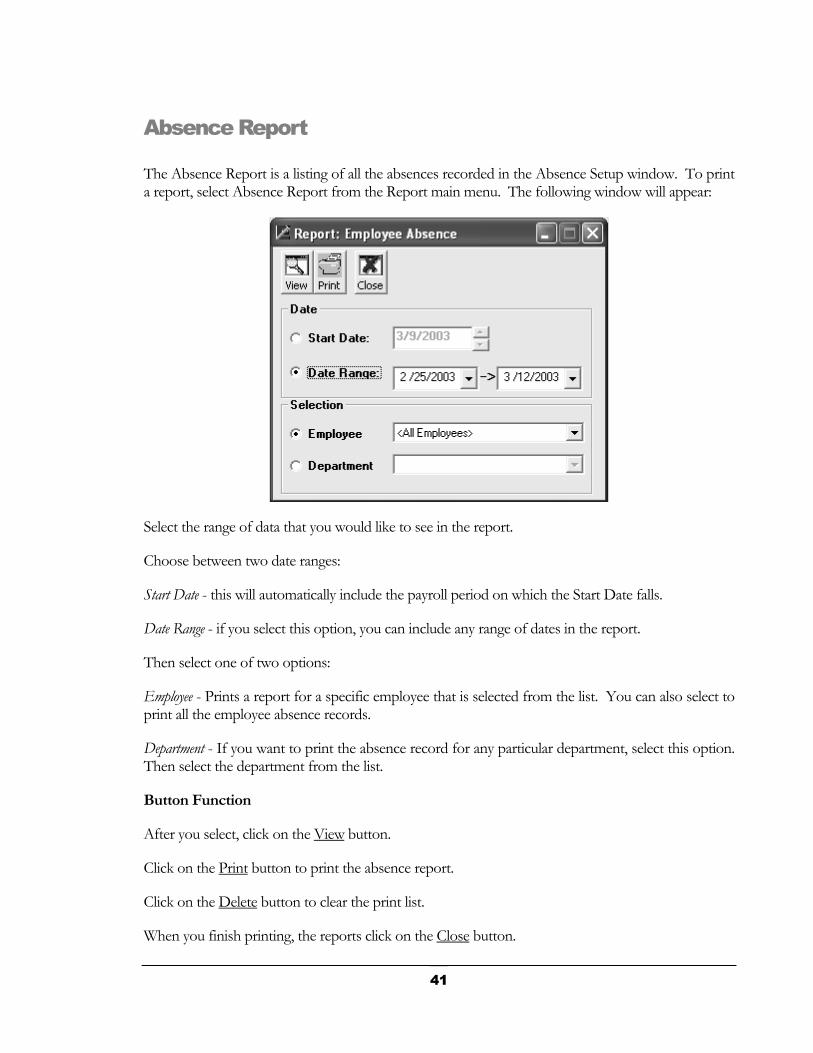
Absence Report The Absence Report is a listing of all the absences recorded in the Absence Setup window. To print a report, select Absence Report from the Report main menu. The following window will appear:
Select the range of data that you would like to see in the report.
Choose between two date ranges:
Start Date - this will automatically include the payroll period on which the Start Date falls.
Date Range - if you select this option, you can include any range of dates in the report.
Then select one of two options:
Employee - Prints a report for a specific employee that is selected from the list. You can also select to print all the employee absence records.
Department - If you want to print the absence record for any particular department, select this option. Then select the department from the list.
Button Function
After you select, click on the View button.
Click on the Print button to print the absence report.
Click on the Delete button to clear the print list.
When you finish printing, the reports click on the Close button.
41

42
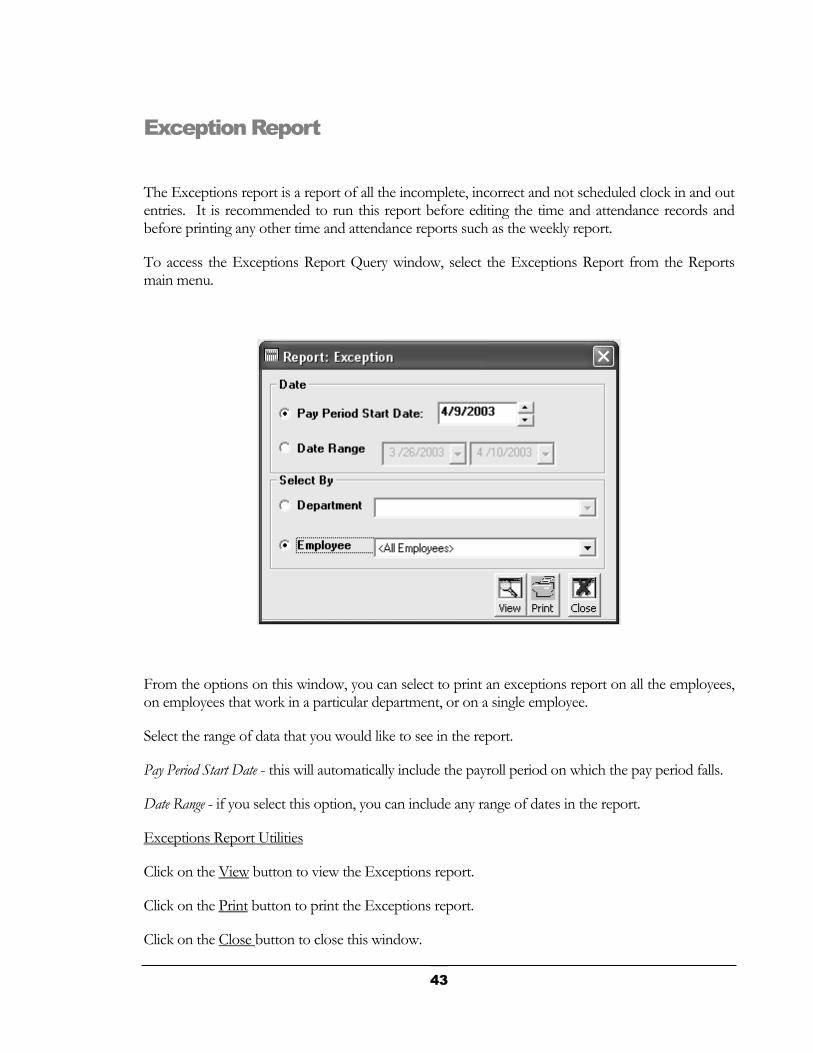
Exception Report
The Exceptions report is a report of all the incomplete, incorrect and not scheduled clock in and out entries. It is recommended to run this report before editing the time and attendance records and before printing any other time and attendance reports such as the weekly report.
To access the Exceptions Report Query window, select the Exceptions Report from the Reports main menu.
From the options on this window, you can select to print an exceptions report on all the employees, on employees that work in a particular department, or on a single employee.
Select the range of data that you would like to see in the report.
Pay Period Start Date - this will automatically include the payroll period on which the pay period falls.
Date Range - if you select this option, you can include any range of dates in the report.
Exceptions Report Utilities
Click on the View button to view the Exceptions report.
Click on the Print button to print the Exceptions report.
Click on the Close button to close this window.
43
Exceptions Types
The following is an interpretation of the type of exceptions that you will see in the report.
Missed Clock Out : Employee did not Clock Out.
Incorrect Clock In/Out: Clock Out is less than Clock In - the total hours are negative.
Not Scheduled: Employee is not scheduled to work on that day or employee clocked in before or clocked out after the scheduled time.
Employees that are not assigned to a schedule will not be included in the "Not Scheduled" and "Missed Clock In/Out" exceptions, since their schedules are not defined.
44
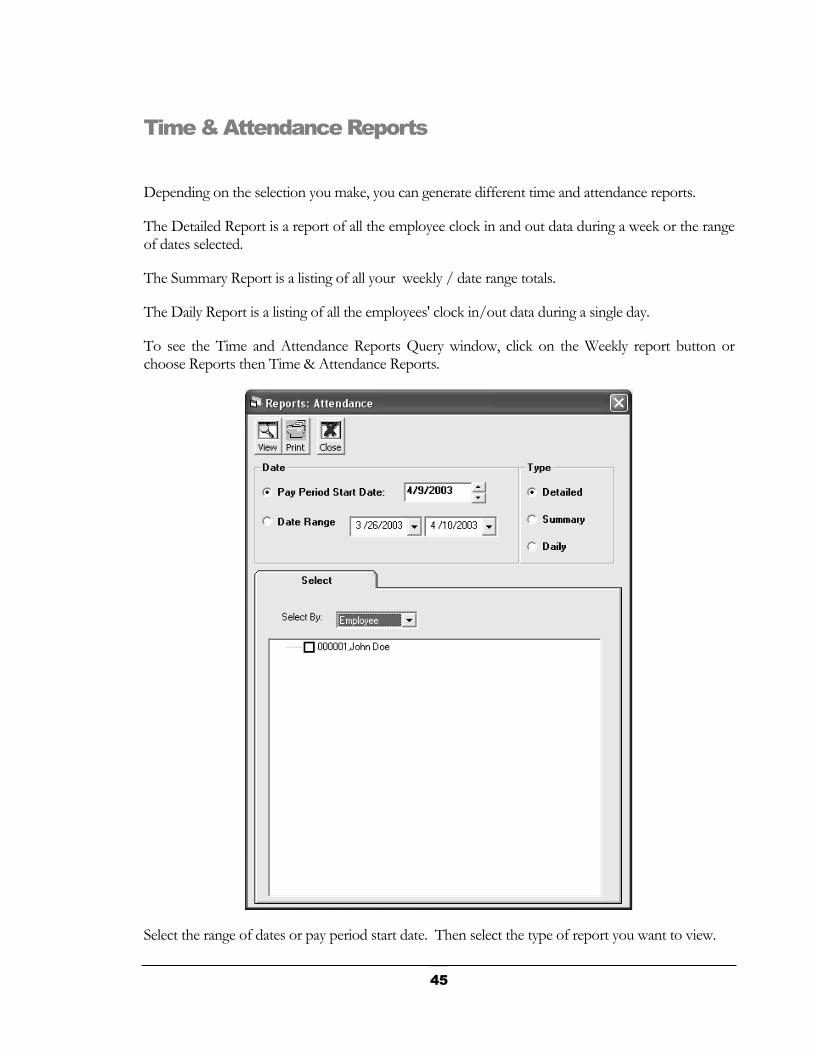
Time & Attendance Reports
Depending on the selection you make, you can generate different time and attendance reports.
The Detailed Report is a report of all the employee clock in and out data during a week or the range of dates selected.
The Summary Report is a listing of all your weekly / date range totals.
The Daily Report is a listing of all the employees' clock in/out data during a single day.
To see the Time and Attendance Reports Query window, click on the Weekly report button or choose Reports then Time & Attendance Reports.
Select the range of dates or pay period start date. Then select the type of report you want to view.
45

Select the employee records that you want to view a report on. You can select a complete department, or schedule or select each record individually.
Time and Attendance Report buttons
To view your report(s), click on the View button.
When you finish, click on the Close button.
46
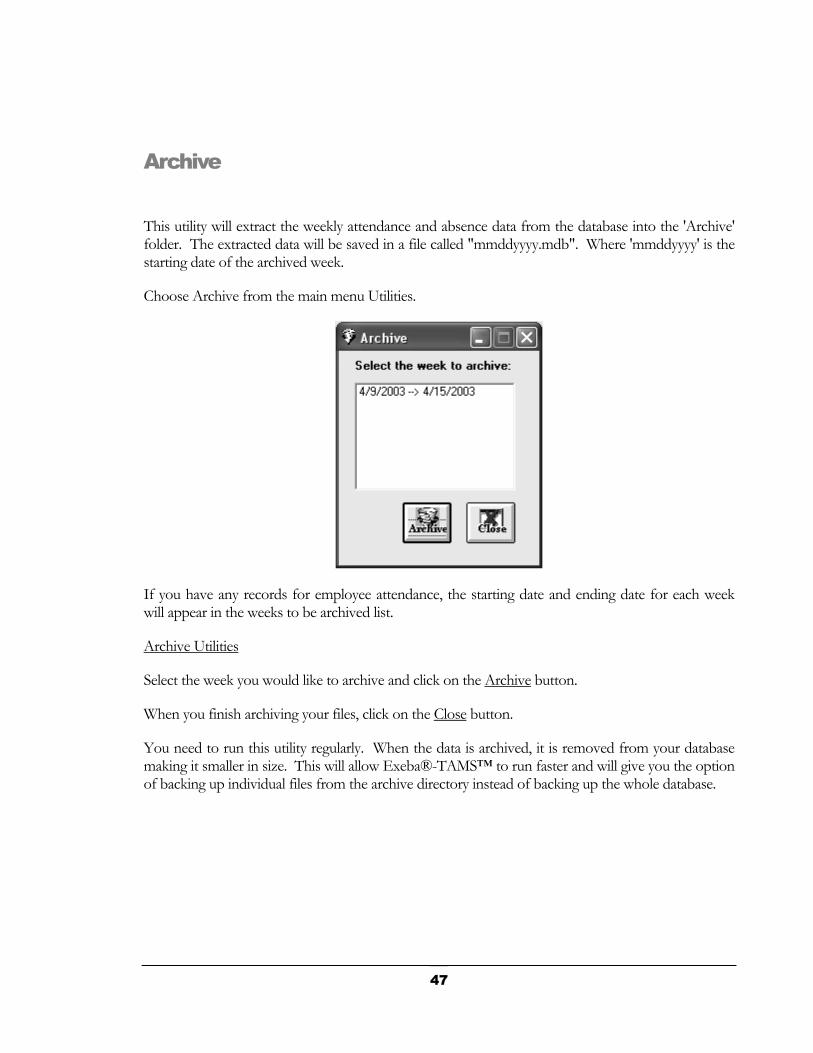
Archive
This utility will extract the weekly attendance and absence data from the database into the 'Archive' folder. The extracted data will be saved in a file called "mmddyyyy.mdb". Where 'mmddyyyy' is the starting date of the archived week.
Choose Archive from the main menu Utilities.
If you have any records for employee attendance, the starting date and ending date for each week will appear in the weeks to be archived list.
Archive Utilities
Select the week you would like to archive and click on the Archive button.
When you finish archiving your files, click on the Close button.
You need to run this utility regularly. When the data is archived, it is removed from your database making it smaller in size. This will allow Exeba®-TAMS™ to run faster and will give you the option of backing up individual files from the archive directory instead of backing up the whole database.
47
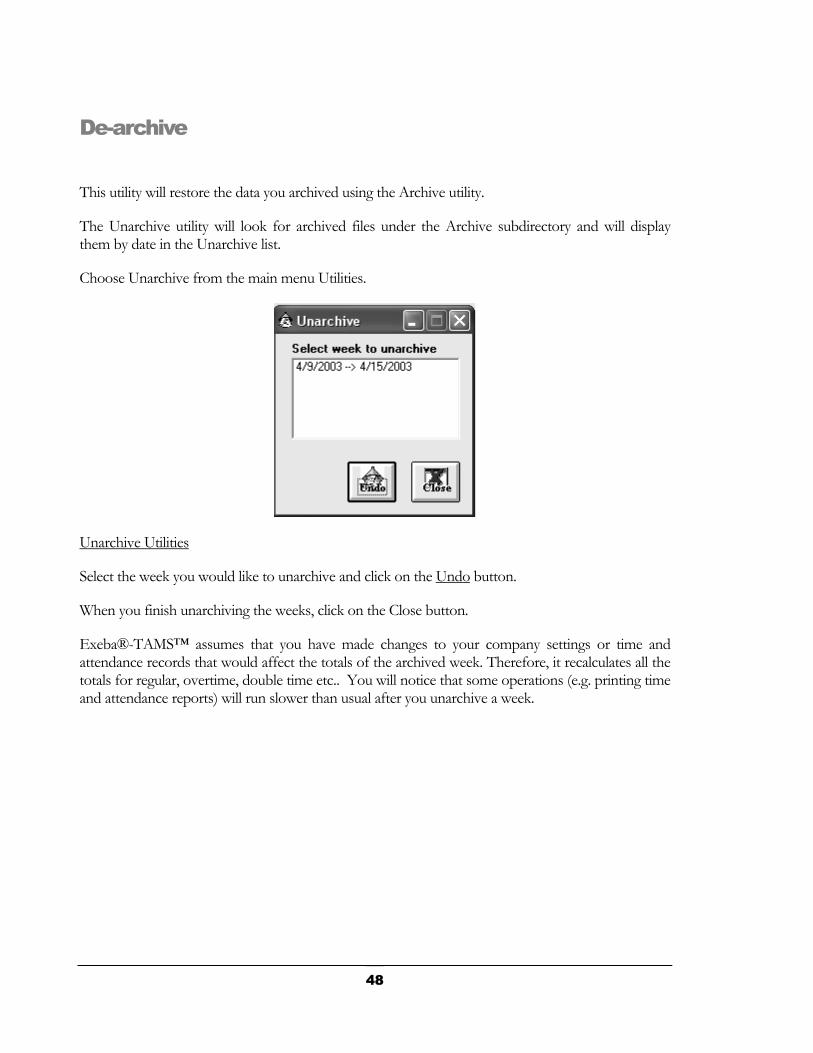
De-archive
This utility will restore the data you archived using the Archive utility.
The Unarchive utility will look for archived files under the Archive subdirectory and will display them by date in the Unarchive list.
Choose Unarchive from the main menu Utilities.
Unarchive Utilities
Select the week you would like to unarchive and click on the Undo button.
When you finish unarchiving the weeks, click on the Close button.
Exeba®-TAMS™ assumes that you have made changes to your company settings or time and attendance records that would affect the totals of the archived week. Therefore, it recalculates all the totals for regular, overtime, double time etc.. You will notice that some operations (e.g. printing time and attendance reports) will run slower than usual after you unarchive a week.
48
Chapter
6
Exeba®-TAMS™ Clock
E xeba®-TAMS™ can also be used with or without a time & attendance data terminal for
clocking employees in or out. In this chapter, you will learn how to,
Setup the clock parameters
Use the Exeba®-TAMS™ clock to clock employees for time and attendance
49
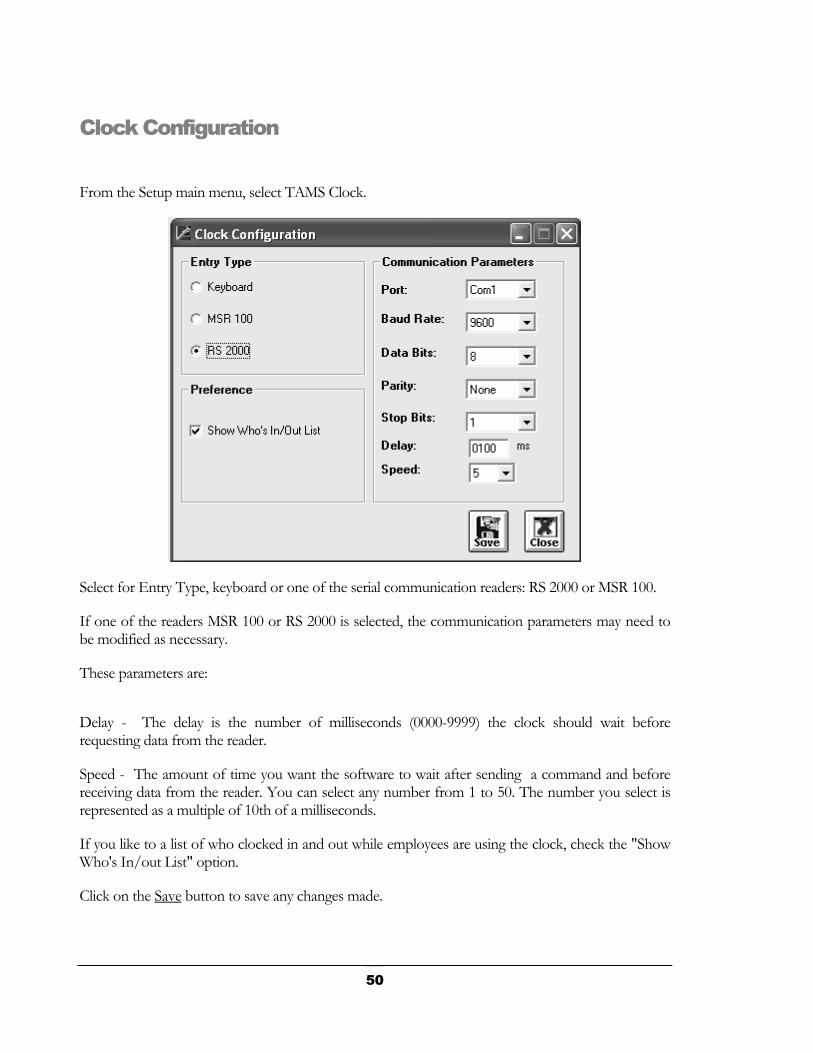
Clock Configuration
From the Setup main menu, select TAMS Clock.
Select for Entry Type, keyboard or one of the serial communication readers: RS 2000 or MSR 100.
If one of the readers MSR 100 or RS 2000 is selected, the communication parameters may need to be modified as necessary.
These parameters are:
Delay - The delay is the number of milliseconds (0000-9999) the clock should wait before requesting data from the reader.
Speed - The amount of time you want the software to wait after sending a command and before receiving data from the reader. You can select any number from 1 to 50. The number you select is represented as a multiple of 10th of a milliseconds.
If you like to a list of who clocked in and out while employees are using the clock, check the "Show Who's In/out List" option.
Click on the Save button to save any changes made.
50
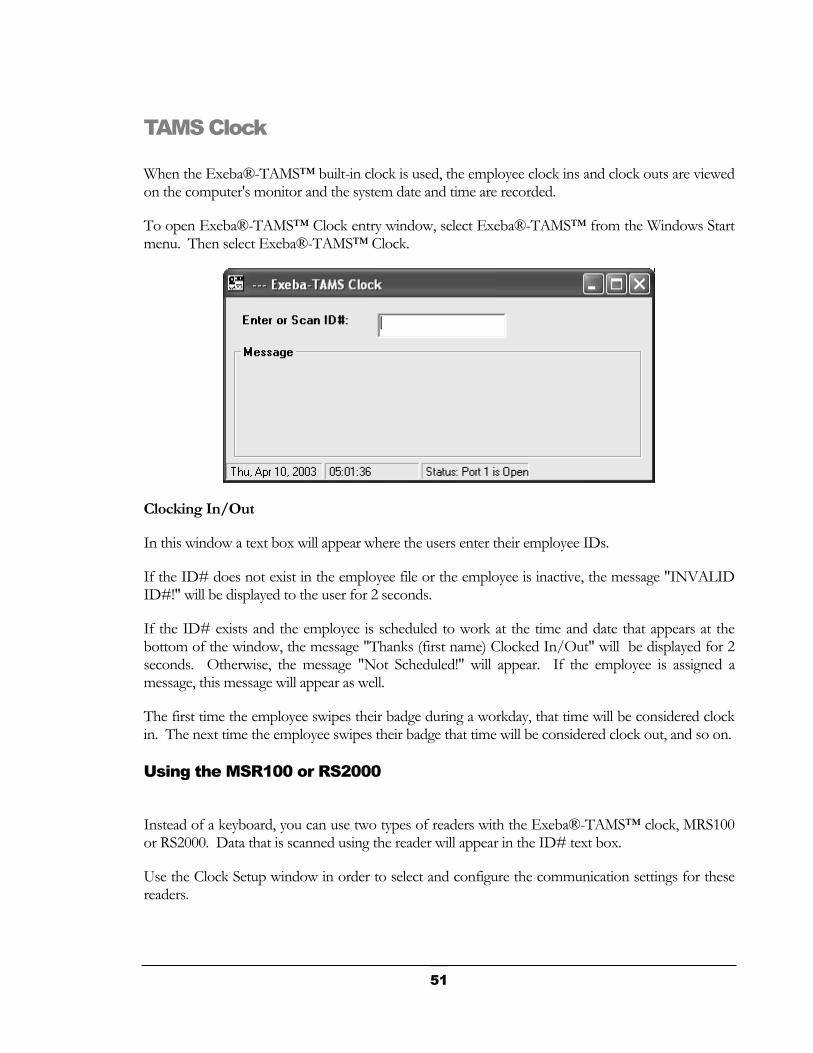
TAMS Clock When the Exeba®-TAMS™ built-in clock is used, the employee clock ins and clock outs are viewed on the computer's monitor and the system date and time are recorded.
To open Exeba®-TAMS™ Clock entry window, select Exeba®-TAMS™ from the Windows Start menu. Then select Exeba®-TAMS™ Clock.
Clocking In/Out
In this window a text box will appear where the users enter their employee IDs.
If the ID# does not exist in the employee file or the employee is inactive, the message "INVALID ID#!" will be displayed to the user for 2 seconds.
If the ID# exists and the employee is scheduled to work at the time and date that appears at the bottom of the window, the message "Thanks (first name) Clocked In/Out" will be displayed for 2 seconds. Otherwise, the message "Not Scheduled!" will appear. If the employee is assigned a message, this message will appear as well.
The first time the employee swipes their badge during a workday, that time will be considered clock in. The next time the employee swipes their badge that time will be considered clock out, and so on.
Using the MSR100 or RS2000
Instead of a keyboard, you can use two types of readers with the Exeba®-TAMS™ clock, MRS100 or RS2000. Data that is scanned using the reader will appear in the ID# text box.
Use the Clock Setup window in order to select and configure the communication settings for these readers.
51
Chapter
7
Exeba®-TAMS™ Data
T his chapter covers the following topics,
Database compact and repair
Import database utility
Import data from text files
Export data to text files
52
Compact and Repair Database The size of the database file grows with the time, as its data is update. The Compact Database utility compacts and repairs the database, thus making it smaller in size and allows all the functions in the software to run faster.
To compact the database, select Utilities->Database->Compact.
Before you run this utility, make sure all the windows in the software are closed and only a single user is running the software.
If the database is corrupt, the Compact Database utility will attempt to repair it. However, it is recommended to always back-up the database files to avoid unrecoverable data loss since this utility cannot fix all the possible forms of database corruption.
53
Import Database
The Import Database utility imports the data from an older version of Exeba®-TAMS™.
To import a database, select Utilities->Database->Import.
Enter the location and name of the old database file. Click on the Open button of the Get File dialog window.
54
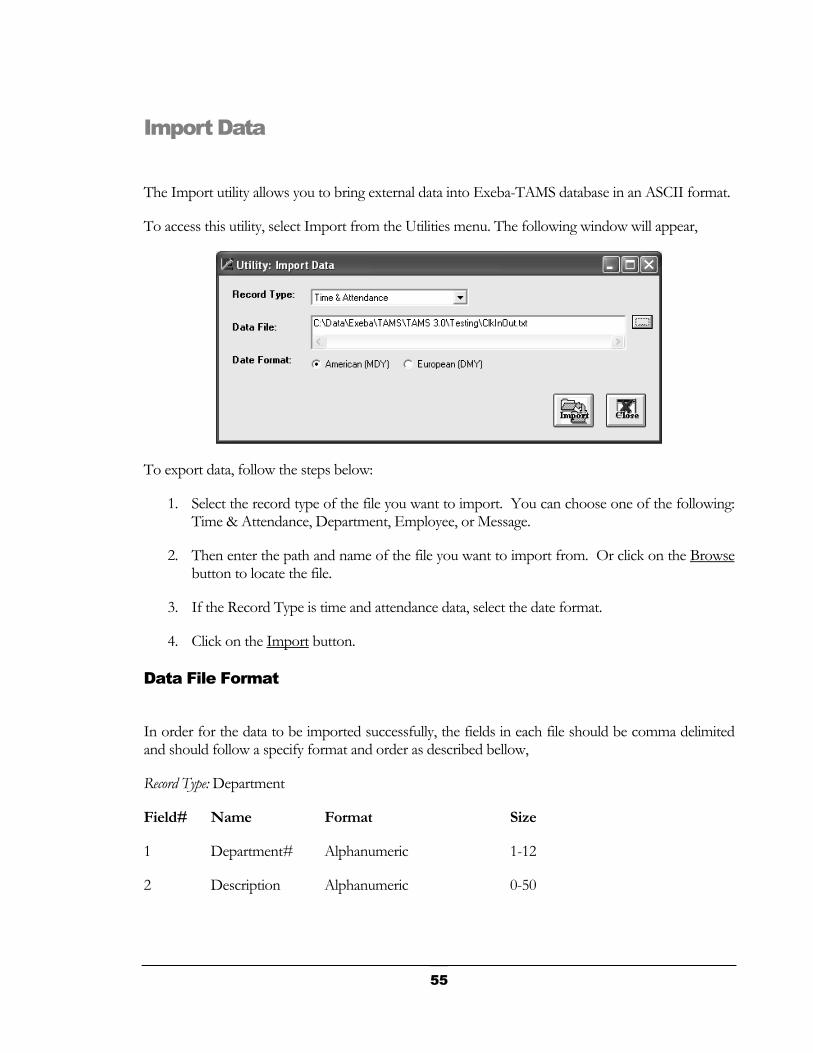
Import Data
The Import utility allows you to bring external data into Exeba-TAMS database in an ASCII format.
To access this utility, select Import from the Utilities menu. The following window will appear,
To export data, follow the steps below:
1. Select the record type of the file you want to import. You can choose one of the following: Time & Attendance, Department, Employee, or Message.
2. Then enter the path and name of the file you want to import from. Or click on the Browse button to locate the file.
3. If the Record Type is time and attendance data, select the date format.
4. Click on the Import button.
Data File Format
In order for the data to be imported successfully, the fields in each file should be comma delimited and should follow a specify format and order as described bellow,
Record Type: Department
Field# Name Format Size
1 Department# Alphanumeric 1-12
2 Description Alphanumeric 0-50
55
Example:
D001,Software Engineering
D002,
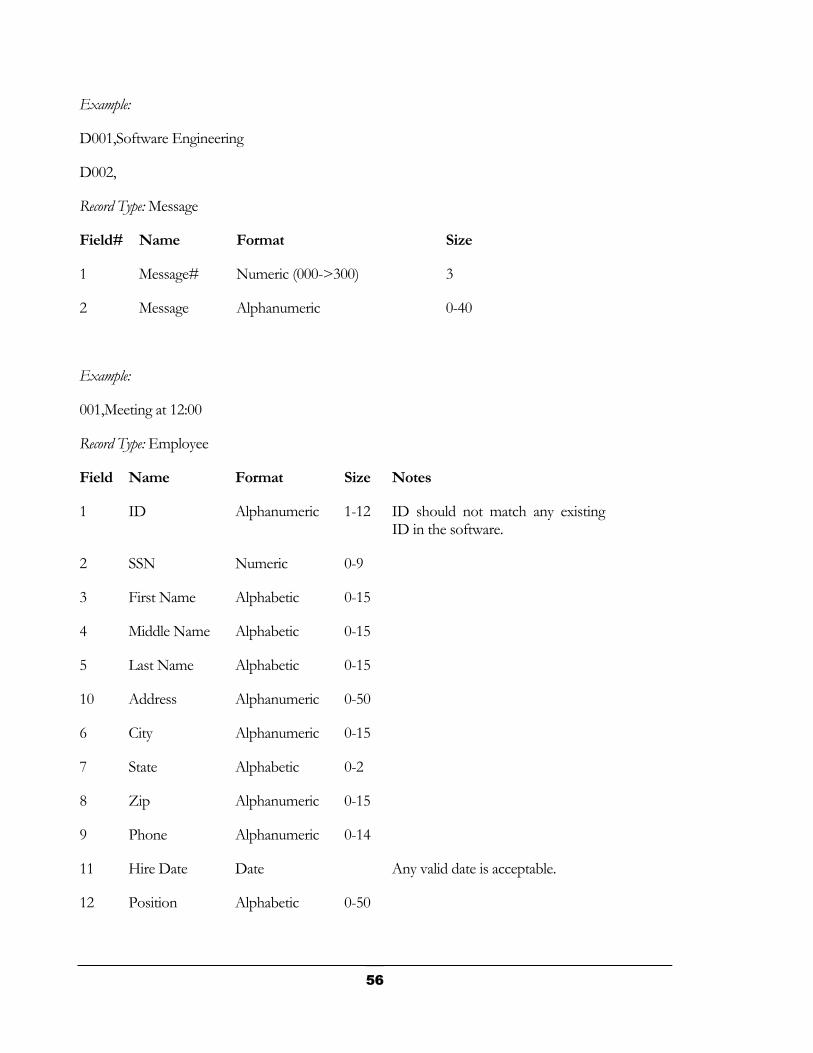
Record Type: Message
Field# Name Format Size
1 Message# Numeric (000->300) 3
2 Message Alphanumeric 0-40
Example:
001,Meeting at 12:00
Record Type: Employee
Field Name Format Size Notes
1 ID Alphanumeric 1-12 ID should not match any existing ID in the software.
2 SSN Numeric 0-9
3 First Name Alphabetic 0-15
4 Middle Name Alphabetic 0-15
5 Last Name Alphabetic 0-15
10 Address Alphanumeric 0-50
6 City Alphanumeric 0-15
7 State Alphabetic 0-2
8 Zip Alphanumeric 0-15
9 Phone Alphanumeric 0-14
11 Hire Date Date Any valid date is acceptable.
12 Position Alphabetic 0-50
56
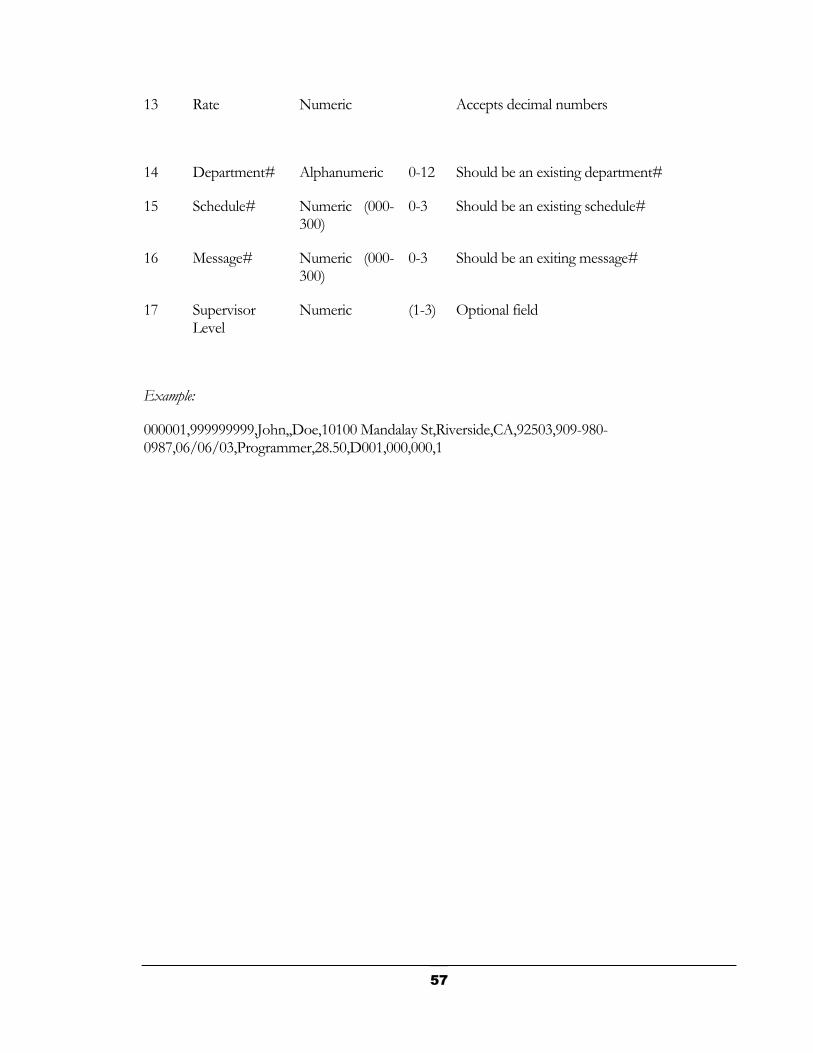
13 Rate Numeric Accepts decimal numbers
14 Department# Alphanumeric 0-12 Should be an existing department#
15 Schedule# Numeric (000-300)
0-3 Should be an existing schedule#
16 Message# Numeric (000-300)
0-3 Should be an exiting message#
17 Supervisor Level
Numeric (1-3) Optional field
Example:
000001,999999999,John,,Doe,10100 Mandalay St,Riverside,CA,92503,909-980-0987,06/06/03,Programmer,28.50,D001,000,000,1
57
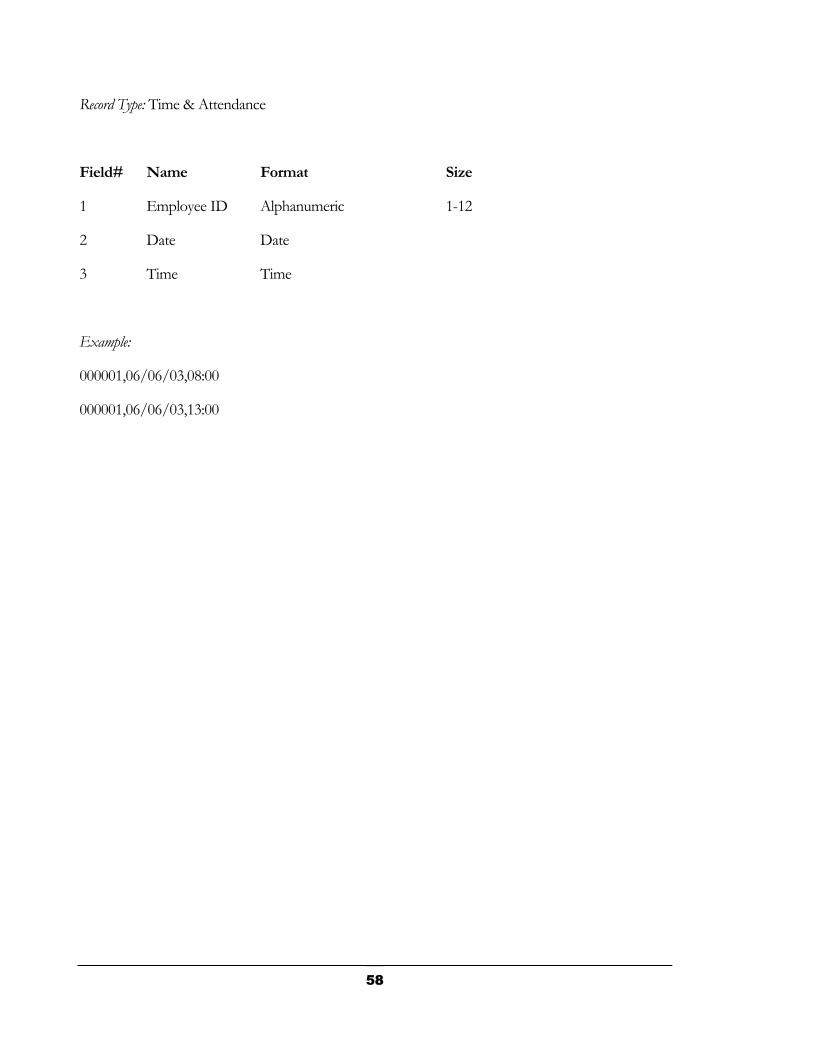
Record Type: Time & Attendance
Field# Name Format Size
1 Employee ID Alphanumeric 1-12
2 Date Date
3 Time Time
Example:
000001,06/06/03,08:00
000001,06/06/03,13:00
58
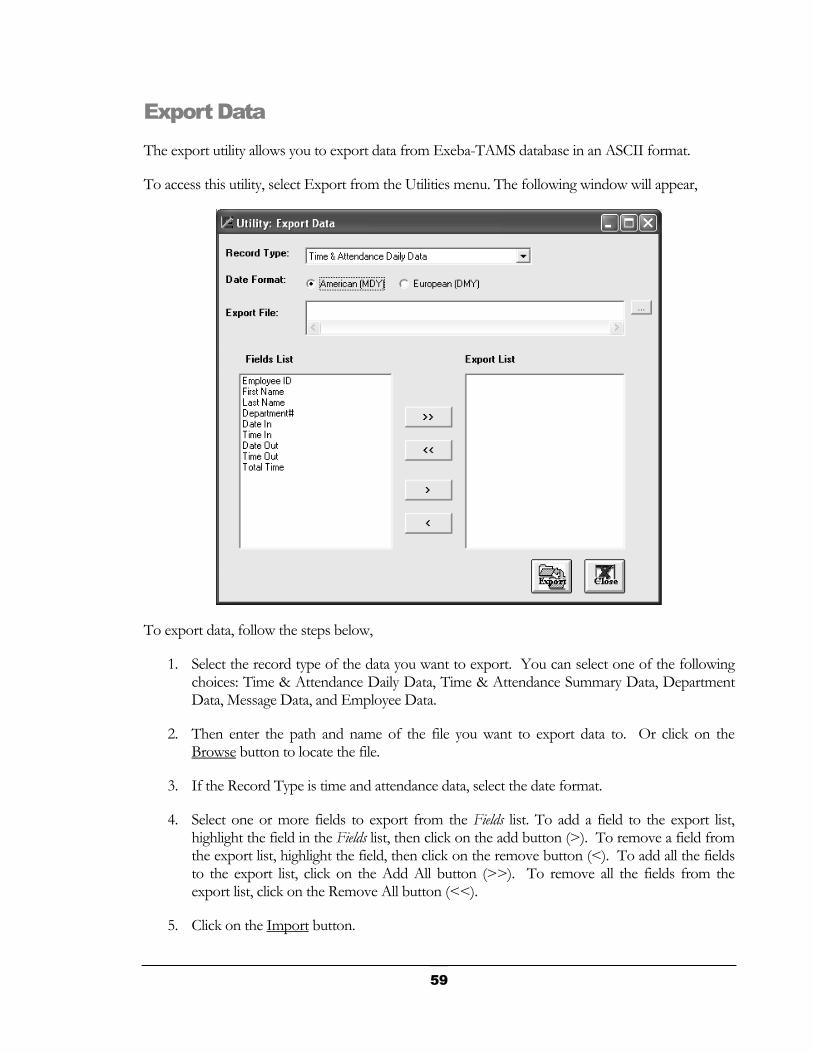
Export Data The export utility allows you to export data from Exeba-TAMS database in an ASCII format.
To access this utility, select Export from the Utilities menu. The following window will appear,
To export data, follow the steps below,
1. Select the record type of the data you want to export. You can select one of the following choices: Time & Attendance Daily Data, Time & Attendance Summary Data, Department Data, Message Data, and Employee Data.
2. Then enter the path and name of the file you want to export data to. Or click on the Browse button to locate the file.
3. If the Record Type is time and attendance data, select the date format.
4. Select one or more fields to export from the Fields list. To add a field to the export list, highlight the field in the Fields list, then click on the add button (>). To remove a field from the export list, highlight the field, then click on the remove button (<). To add all the fields to the export list, click on the Add All button (>>). To remove all the fields from the export list, click on the Remove All button (<<).
5. Click on the Import button.
59
Appendix
A
Product Support
Avariety of resources are available to help you use Exeba®-TAMS™. These resources are
covered in this appendix and can be divided into three main sections:
On-line documentation
User Guides
On-line support
Escan Support
60
On-line help Exeba®-TAMS™ has a comprehensive on-line help system that allows you to locate information quickly and easily. On-line help can be accessed from the Start menu. You can also access it while working with Exeba®-TAMS™, by selecting Help from the main menu.
User documentation This manual contains detailed information on how to use Exeba®-TAMS™. For commands and questions related to the hardware, you should consult the manufacturer’s User Guide that is included with this software purchase.
61
Customer Support If you would like to purchase any of the hardware described in this help file, you may contact us for the current price and availability.
In order to be eligible for technical support, you must register your version of Exeba®-TAMS™ with Escan Technologies Corp. In addition to technical support, you will receive updates as to what is new in the upcoming versions of Exeba®-TAMS™.
If you have a question, a comment or a suggestion Escan Technologies Corp. welcomes your inputs regarding improvements to Exeba®-TAMS™ and/or this manual. These comments can be mailed to Escan Technologies Corp., or sent electronically via e-mail or via our World Wide Web (WWW) site. If you have a bug report that requires immediate attention, please contact us as soon as possible.
When reporting a problem, please include the following information:
Company
Mailing Address
Phone Number
Your Name/Contact Person
E-mail Address (if available)
Exeba®-TAMS™ Serial Number
Date of Purchase
Version of Windows
Where to send your registration/correspondence:
Email Address:
[email protected] (Putting "TAMS" in the subject header will ensure a quick response.)
Telephone:
(909) 270-0043 (9:00 am - 4:00 PM PST)
Fax:
(909) 270-0920(24 hours - 7 days a week)
Standard Mailing Address:
62

Escan Technologies Corp.
12140 Severn Way
Riverside, CA 92503
As an alternative to mailing your registration, you may contact our WWW sites. In addition to online registration, you will find an area to post comments or suggestions, look at what is upcoming for Exeba®-TAMS™ and related software, and download up-to-date files. Connect to the web and click one of the following addresses:
www.e-scan.com
www.exeba.com
63

On-line Support As an alternative to mailing your registration, you may contact our WWW site. In addition to on-line registration, you will find an area to post comments or suggestions, read about upcoming versions of Exeba®-TAMS™ and related software, and download up-to-date files. Our WWW site is at the following addresses:
http://www.e-scan.com http://www.exeba.com
64

65
Notes


![IG Publishing E-Book License Agreement - CAUL · Web viewIG Publishing E-Book License Agreement This License Agreement (the “Agreement”) is made effective as of _____ [date] (the](https://img.pdfslide.us/doc/110x75/5ae191e87f8b9a097a8bdb89/ig-publishing-e-book-license-agreement-viewig-publishing-e-book-license-agreement.jpg)