Embed Size (px)
Citation preview


Exact Globe 2003 | E-Cash Flow Management
release 370

II
The information provided in this manual is intended for internal use by or within the organization of the customer only. Exact GroupB.V. has carefully selected the content of this document. However, the content may not always represent reality or may becomeout-dated. Information may be changed or updated without notice. Exact Group B.V. may also make improvements and/orchanges in the products, prices and/or the programs described in this manual at any time without notice.
Exact Group B.V. shall not be liable for the accuracy of any of the examples included and procedures described in this document,nor shall Exact be liable for any ensuing damage or loss of any nature whatsoever arising from or relating to its use.
No part of this manual may be reproduced, published and/or transmitted in any form or in any way, electronically, by printphotocopy, microfilm or any other means, without the prior written consent of Exact Group B.V.
© Copyright Exact Group B.V. All rights reserved. All trademarks mentioned herein belong to their respective owners. Exact andExact Software are a registered trademarks of Exact Group B.V.
EXAC
TG
LOB
E 2003 | E-CA
SH
FLOW
MA
NA
GEM
ENT

III
This guide provides the information you need to work effectively with Exact Globe 2003. It is part of the series of userguides for Exact Globe 2003. The goal of this documentation is to help you to get quickly acquainted with the product andthe possibilities it offers. It will help all users, especially those without much experience with our software, to get startedwith and benefit from the product straightaway.
Exact Globe 2003 is an integrated software solution; its modules of related business processes function together in anintegrated manner. Besides the user guides, there are several information sources, related to the software, available toyou. You can access online help documents on Exact Globe 2003 functionalities while working with the software by justpressing the F1 key. The list of help document also contains release notes related to the product. They inform you of theimprovements and functional additions in the various releases of the product.
You can also access the help documents, release notes and other related documents online through the Exact CustomerPortal on www.exactsoftware.com. The Customer Portal is a protected part of the Exact Software internet site, which hasbeen specially developed to provide you with information and to help you get the maximum yield from your software. Thisportal informs you about our contacts, downloads, FAQs, and the latest product news. We invite you to use the portal asoften as you wish!
We value your comments and feedback. We hope that you will use the reader's feedback form at the end of this user guideto tell us how we can improve this manual. Please take a few minutes to fill in the form and return it to us.
Thank you for using Exact Globe 2003 and this user guide!
Welcome to Exact Globe 2003! EXAC
TG
LOB
E 2003 | E-CA
SH
FLOW
MA
NA
GEM
ENT
IVEXA
CT
GLO
BE 2003 | E-C
AS
H FLO
WM
AN
AG
EMEN
T

V
The health of an organization is measured by the liquidity of its assets. The ability to quickly convert its assets to cash ensuresits survival in bad times. Being able to manage the organization's cash flow is an important factor in ensuring cash liquidity.
The E-CCash FFlow MManagement module of Exact GGlobe 22003 helps to effectively balance and reconcile an organization'sbank statements as well as track the inflow and outflow of cash. This will help in determining the cash status of theorganization at any point in time.
The advantages of E-CCash FFlow MManagement are:
• Making cash flow information available in real-time at one central locationPayment commitments and conditions are recorded at the source of the action. For example, the entries of purchaseorders, sales orders, rentals and employee salary payment are registered together with the terms of payment and duedates. This gives a clear insight on incoming and outgoing payment at any time. The instant processing of transactionand payment details means reports will always reflect the current situation.
• Powerful and flexible matching featureThe task of matching an organization's cash movement with its invoices is a complex task. E-CCash FFlow MManagementhelps to make this task easier by providing automatic and manual matching of transactions. This way, an organizationhas the flexibility to determine the payment made or received for the relevant sales or purchase invoice.
• Able to take into account payment in transitIn order to further view cash movements accurately, an organization needs to take into account any payment made orreceived but not recorded by the bank yet. E-CCash FFlow MManagement is able to record this information and make itreadily available.
This user guide will cover the following chapters:
• Chapter 1: Setting Up • Chapter 2: Cash Flow Process• Chapter 3: Cash Flow Management• Chapter 4: Advanced Features
Introduction EXAC
TG
LOB
E 2003 | E-CA
SH
FLOW
MA
NA
GEM
ENT

VIEXA
CT
GLO
BE 2003 | E-C
AS
H FLO
WM
AN
AG
EMEN
T

VII
EXAC
TG
LOB
E 2003 | E-CA
SH
FLOW
MA
NA
GEM
ENT
Welcome
Introduction
Chapter 1: Setting Up 1.1 System Settings
Chapter 2: Cash Flow Process2.1 Cash Instruments2.2 Purchase Flow (Cash Outflow) Process2.3 Sales Flow (Cash Inflow) Process2.4 Cash Inflow and Cash Outflow Process
Chapter 3: Cash Flow Management3.1 Accounts Receivable/Payable Administration3.2 Cash Flow Reports
11
11
16
26
31
43
43
46
Chapter 4: Advanced Features4.1 Handling Payment Differences When Receiving Cash 4.2 Correcting Wrong or Bounced Payment4.3 Matching Cash Flow Transactions to Other Debtor/Creditor
Invoices or Installments4.4 Handling Prepayment and Interbank Transfers4.5 Advanced Management of Letters of Credit and Cheques
53
53
57
58
59
63
III
V
3
3
Contents
VIIIEXA
CT
GLO
BE 2003 | E-C
AS
H FLO
WM
AN
AG
EMEN
T

Chapter 1 | Setting Up

2C
HA
PTER 1 | SETTIN
G U
P
System Settings
SETTING UP

3
CH
APTER 1 | S
ETTING
UP
System settings are used to determine the process flow or the financial transactions that will be created during the cash flow process.
1.1 System Settings
The following topics are relevant to this section:
• Bank settings• Documents settings• General ledger settings
Bank settings
The cash flow process generally includes cash and bank transactions. Exact GGlobe 22003 allows you to pay and receive cashthrough electronic fund transfers (EFT) through the bank. You have to define the bank settings before you can properly use theE-CCash FFlow MManagement module.
1. Setting Up

To define bank settings:
1. Go to System/General/Settings, and select Bank ssettings.2. Under the General section at Limit fforeign ppayments, type the amount in the default currency, which in this example is
Euro, to set the amount limit that allows foreign payment. For example, you set Limit fforeign ppayments to Euro 500,000and the amount for that creditor's invoice is Euro 550,000. Hence, the amount will be settled through foreign payment.
3. In Import ddirectory and Export ddirectory, type or select the directory you wish to use to import or export the electronicbank files. You use the import and export directories to import and export bank statements, payment orders, andcollection orders from and to the third party electronic banking software. These two directories must be separate and thesystem will create an individual subdirectory for each bank of every country in both the import and export directories.
4. At Deduction mmanagement, select the check box if you want to use the deduction management function in the matchingprocess through the Advanced button. Deduction management will match invoices with a value that is different from thepayment or receipt and write off the difference according to the selected type. By default, this check box is not selected,so you will not see the Advanced button during the matching process in Cash fflow/Entries/Cash fflow.
5. Select the check box to improve the bank statement import by matching the lump sum payment or receipts for multipleinvoices at Extra mmatching. By default, this check box is not selected. If the Extra mmatching check box is selected, the Extra mmatching button will be available in Cash FFlow/Cash IInstrument/Maintain under the Settings tab, and also atCash FFlow/Entries/Import.
6. At Advanced: IInstrument hhandling, select the check box if you want to use the advanced bill of exchange functionality.This provides you with integrated handling and processing of invoice payment with the bank instruments including the billof exchange. It also provides you with advanced features in handling cash inflow and outflow functions for cheques andletters of credit at Cash fflow/Miscellaneous/Instrument sstatus.
7. Under the Payment ddate ccalculation ((days ffrom ddue ddate) section at Collection, select Prior or Future to calculate thecollection date. Type the number of days from the due date in the box on the right.
8. At Payroll, select Prior or Future to calculate the payroll date. Type the number of days from the due date in the boxon the right.
9. At Other, select Prior or Future to calculate the payment date. Type the number of days from the due date in the box onthe right.
10. Under the Payments: OOther section at Journalize ppayments, select the check box if you want to create journal entries whenthe system processes a payment at Cash fflow/Payments/Process (cash outflow) or Cash fflow/Miscellaneous/Collection(cash inflow). These payment journal entries created are registered in the general journal that you fill in at the Generaljournal box.
11. At General jjournal, type or select the general journal number to be used in journalizing payment. This option is enabledonly if you have selected Journalize ppayments.
12. At Payments iin ttransit, select the check box if you want to register the payment journal entries created in the payment intransit account (that you fill in at Payment iin ttransit aaccount) to allow matching with later imported payment installmentsor manual entries of payment installments.
13. Type or select the account number at Payment iin ttransit aaccount. This option is enabled only if you have selectedPayments iin ttransit.
14. Under the Payments: CCash, Letter oof ccredit, Cheque section, select the required option(s) to determine how you want thesystem to create the journal entries for payment made through cash, letter of credit, and cheques. You select the settingshere as you did for the Payments: OOther section described above.
4C
HA
PTER 1 | SETTIN
G U
P

5
CH
APTER 1 | S
ETTING
UP
15. Under the Payment sspecification section at Print: PPayment sspecification, select the check box to automatically print thepayment specification when a payment installment is processed into an export file. In general, a payment specification isan overview of the payment details such as the payment date, run number, name of the creditors/debtors involved in thepayment transactions, payment reference, and payment amount.
16. At Print: GGrouped ppayments only, select the check box if you do not want to print the payment specification whenprocessing single payment.
17. Under the Matching: OOverwrite OOffset aaccount section, select Never if you never want to overwrite the original offsetaccount, Always if you always want to overwrite the original offset account even if mismatching occurs in a closed period,and Only iin oopen pperiods if you want to overwrite the offset account only when mismatching occurs in an open period.The original offset account refers to the debtor/creditor G/L account of the invoice. This function determines how thesystem will handle the original offset G/L account during the matching process. Based on this setting, the system will orwill not overwrite the debtor/creditor's GL account of the cash payment/receipt with the debtor/creditor's GL account ofthe invoice if the debtor/creditor's GL account is different in the cash payment/receipt and invoice.
18. Under the Deposit nnumber section at Auto ggenerate, select the check box to generate the deposit number automatically inCash fflow/Entries/Cash fflow. The automatically-generated deposit number will be the last used deposit number +1. Eventhough you select this function, you can still manually type in the deposit number. However, if you type a number thatwas used before, you will see the following message "Already used: Deposit number, Continue?" Click Yes to continueusing the same deposit number or No to change the deposit number.
19. Click Save to save all the changes you have made in Bank ssettings and Close to exit.
Examples of financial transactions based on the bank settings
The following provides examples of the financial transactions that are generated based on the bank settings.
Case 11: Journalize ppayments - clear; Payments iin ttransit - not available
When you What happens The system credits and debits as follows:
Process a payment The system makes no journal entry.
Import or manually enter a cash flow transaction data
Before the cash flow transaction is allocatedto any debtor or creditor (unknown or notfound by the system).
Inflow Debit: Bank/cash G/L accountCredit: Unallocated G/L account
Outflow Debit: Unallocated G/L accountCredit: Bank/cash G/L account
Allocate a cash flow transaction Once the cash flow transaction is allocatedto a debtor or creditor, the debtor or creditorG/L account replaces the unallocated G/Laccount.
Inflow Debit: Bank/cash G/L accountCredit: Debtors G/L account
Outflow Debit: Creditors G/L accountCredit: Bank/cash G/L account
Match a cash flow transaction The system makes no changes to the journal entry. The cash flow transaction matches the installment.

Case 22: Journalize ppayments - selected; Payments iin ttransit - clear
Note: When you have not matched a journal entry of a cash flow transaction with any invoices or installments, the systemgenerates double-entries for the unallocated, or debtors or creditors general ledger account, instead of payments in transitgeneral ledger account. Only after you have matched the journal entry with invoices or installments will the system transfer it tothe payments in transit account.
6C
HA
PTER 1 | SETTIN
G U
P
When you What the system does
Process a payment Inflow Debit: Bank/cash G/L accountCredit: Unallocated G/L account
Outflow Debit: Creditors G/L accountCredit: Bank/cash G/L account
Import or manually enter a cashflow transaction data
This step is not necessary because the system has generated all thenecessary journal entries when you process payments.
Case 33: JJournalize ppayments - selected; Payments iin ttransit - selected
When you What the system does
Process a payment Inflow Debit: Payment in transit G/L accountCredit: Debtors G/L account
Outflow Debit: Creditors G/L accountCredit: Payments in transit G/L account
Import or manually enter a cash flow transaction data
Inflow Debit: Bank/cash G/L accountCredit: Payments in transit G/L account
Outflow Debit: Payment in transit G/L accountCredit: Bank/cash G/L account
Tip: The following provides advice on the preferred set-up of the cash flow management functionality. Take notethat there are no standard settings for the cash flow management that apply to all legislations as each countryhas a different legislation on the cash flow requirements:
1. Cash flow transactions can be created in two different ways:• by importing the cash flow transaction based on a file that is provided by your bank, or • by registering the cash flow transaction directly when it occurs. For example, when making a payment.
2. If your bank can supply you with a file containing the cash flow transactions that have been confirmed bythem, then it is recommended to use the first scenario (provided your bank is supported), as you can then be assured that you have all the cash flow transactions in your cash flow system.
3. This also means that you cannot (and should not) register the cash flow transactions when for example, making a payment, as otherwise you would register the cash flow transaction twice.
4. You can still keep track of your payments that are in transit as all invoices or installments that have been paid are marked as being in transit, so they cannot be authorized and processed twice. Furthermore, the cash instruments balance list can also show you the correct balance amount based on the payments thatare in transit.

7
CH
APTER 1 | S
ETTING
UP
Documents settings
In Exact GGlobe 22003, you can set your preferred layouts for your documents. For this section, only documents under the Cashflow section will be described.
To define documents settings:
1. Go to System/General/Settings, and select Documents ssettings.2. Under the Cash fflow section at Payment, select the standard layout for your payments by clicking Select.
This layout will be used for the payment process in Cash fflow/Payments/Process. This is the cheque document. 3. At Payment sspecification, select the standard layout for payment specification by clicking Select. This layout is used
for printing of the payment specification which is defined at Cash FFlow/Payments/Payment sspecification. Click Link llayouts tto ccreditors to link the payment specification layout to specific creditors.
4. Select the layout for receipts by clicking Select at Receipt. This layout is used in Cash fflow/Entries/Cash fflow. 5. At Deposit rreport, select the deposit report layout by clicking Select. This layout is used in Cash fflow/Miscellaneous/
Instrument sstatus.6. Click Save to save all the changes you have made in Documents ssettings and Close to exit.

8C
HA
PTER 1 | SETTIN
G U
P
General ledger settings
Before you start to record financial entries in Exact GGlobe 22003, you need to set the general ledger settings. In this section, onlyPayment ddifferences and Bank ccosts will be described.
To define general ledger settings:
1. Go to System/General/Settings, and select General lledger ssettings.2. Under the General lledger section at Payment ddifferences, click Details. Type or select the G/L accounts used to record
discounts, payment differences, credit surcharges, and financial charges. For more details, see 1.3 Chart of GeneralLedgers - Setting Up General Ledger Settings of the Financial user guide.
3. At Bank ccosts, type or select the G/L account used to record the banking fees. 4. Click Save to save all the changes you have made in General lledger ssettings, or Close to exit.
Chapter 2 | Cash Flow Process

10C
HA
PTER 2 | CA
SH
FLOW
PROCESS
Cash Instruments
Sales Flow (Cash Inflow) Process
Purchase Flow (Cash Outflow) Process
Cash Inflow and Cash Outflow Process
CASH FLOW PROCESS

11
CH
APTER 2 | C
AS
H FLO
WPRO
CESS
In Exact GGlobe 22003, the cash flow process means cash out from the company due to purchase, and cash in due to sales. Thiscash flow process is maintained through cash instruments.
2.1 Cash Instruments
The following topics are relevant to this section:
• Types of cash instruments• Creating, editing, deleting, recoding, viewing, and making a transfer balance to a cash instrument• Linking cash instruments to journals and general ledger accounts
Types of cash instruments
Cash instruments are used to register cash flow transactions. Among the types of cash instruments are:
• Bank accountsBank accounts are commonly used in cash flow management. A bank keeps your money in a bank account in a specificcurrency. You have an agreement with the bank specifying under which conditions the bank account can be used.
• Credit cardsCredit cards are issued by a credit card company and serve as a payment method. Credit cards that are issued by a bankare called debit cards. The credit card is issued to a person and that person is authorized to pay with the card. The creditlimit of the card can be restricted to a maximum amount.
• Cash registersA cash register is a machine in a shop or business that records sales and in which money received is placed.
• Petty cash Petty cash is a small amount of money kept in an office for buying inexpensive items.
2. Cash Flow Process

Creating cash instruments
The Cash iinstruments screen consists of six tabs:
• Basics - This displays the basic information of the cash instrument such as the cash instrument number, G/L details, bankdetails, resource responsible for the cash instrument, and more.
• Conditions - This displays information on the cost and interests such as the agreed debit/credit interest percentage orrate per year for the cash instrument and the processing cost per payment/receipt transaction, and more.
• Settings - This displays information pertaining to identification such as the SWIFT and BIC codes, file directories, limitedamount, cheques and letter of credit, bill of exchange, and more.
• Cash rregister - This displays information regarding the cash register such as the EFT terminal, card reader, cash count,cashier, debtor, and more. The fields in this tab are activated only if Cash rregister is selected in Type under the Basics tab. This Cash rregister tab is also available only if you have the E-PPOS module.
• Documents - This displays the imported bank files. The bank files are available only if you have imported them throughCash fflow/Entries/Import.
• Rights - This displays the user rights relevant to the cash instrument. You will not be able to add user rights if Cashregister is selected in Type under the Basics tab.
To create a new cash instrument:
1. Go to Cash fflow/Cash iinstruments/Maintain and click New. You will see the Cash iinstruments screen at the Basics tab. 2. At Bank aaccount or Instrument nno., type the bank account or instrument number that will be used by this new cash
instrument. Changes from Bank aaccount to Instrument nno. and vice versa depends on your selection in Type.
12C
HA
PTER 2 | CA
SH
FLOW
PROCESS

13
CH
APTER 2 | C
AS
H FLO
WPRO
CESS
3. Type or select the country code at Country where the cash instrument is located in. The selected country influences the listof supported banks at Bank.
4. You can type or select the journal number at Journal, to which this cash instrument will be linked. Financial transactionsthat are generated after importing bank statements will be posted to this journal. If this journal does not exist when yousave a new cash instrument, you will see a screen asking if you want to generate the journal. Next to the Journal box, youwill see a Currency box. In Currency, type or select the currency of the cash instrument. The currency must be defined asActive at System/General/Countries/Currencies.
5. At Bank, type or select the bank name. This is activated only when Bank or Credit ccard has been selected in Type. 6. Select the type of cash instrument at Type. You can choose from Bank, Cash, Cash rregister, or Credit ccard. When Cash or
Cash rregister is selected, you will see a new section known as the Responsible section. When Credit ccard is selected, youwill see a new section known as the Credit ccard section.
7. Type important notes pertaining to this cash instrument at Notes. 8. Click Picture to insert, delete, or save the logo of the Bank, Cash, Cash rregister, or Credit ccard. 9. Under the G/L section at G/L, type or select the relevant account number. G/L is enabled only when a non-existent journal
has been selected. Otherwise the G/L linked to the selected journal will be used. If the journal does not exist yet, anygeneral ledger account can be entered here. If the selected general ledger account is not defined as a Bank lledger type,the general ledger type will be automatically set to Bank. If a non-existent general ledger account number is filled in hereand you save the changes, it will be generated automatically.
10. At Unallocated, type or select the offset general ledger account number that is used when cash flow transactions aremanually entered or imported but are not allocated to a debtor or creditor.
11. Under the Bank section at Creditor, type or select the relevant creditor if you have already filled in your creditor details atCRM/Accounts/Maintain aaccounts or Finance/Accounts ppayable/Maintain. Other creditor details such as the contact,address, phone number, job title, and others will then be filled in automatically.
12. If you have not created any creditors, click New in the Creditors screen to create a creditor. Each cash instrument has to belinked to a creditor, which is usually the bank. For Credit ccards, this is the credit card company and for type Cash andCash rregister, this is usually your own company.
13. Under the General section at Status, you will see the status of the cash instrument.14. Select the check box at Blocked to temporarily block a cash instrument. When this is done, you will see Blocked under
Status. If the check box is not selected, you will see Active under Status. 15. At Active ffrom, type or select the range of dates for which the cash instrument can be used. Cash instruments outside this
range will be inactive. 16. Under the Responsible section (this section is available only if Cash or Cash rregister is selected in Type) at Resource, type
or select the employee or resource ID of the person who is responsible for the cash instrument. 17. Under the Credit ccard section (this section is available only if Credit ccard is selected in Type) at Responsible, type or
select the employee or resource ID of the person who is responsible for the cash instrument. 18. Type or select the expiry date of the credit card at Expiry ddate. 19. At Supplier, type or select the supplier of the credit card. For example, the bank that supplies the VISA or MasterCard. 20. Type or select the cash instrument number to which the credit card is linked at Cash iinstrument. This is applicable if the
supplier is a bank and not the credit card company. 21. At Credit ccard ttype, click the applicable credit card.

Editing cash instruments
After creating a cash instrument, you may need to make changes such as adding notes or blocking the cash instrument.
To edit a cash instrument:
1. Go to Cash fflow/Cash iinstruments/Maintain and select the cash instrument you want to edit. 2. Click Open. 3. Make the necessary changes to the cash instrument and click Save.
Recoding cash instruments
Once you have created a cash instrument, you may want to recode the cash instrument number. This function is useful if youprefer to use the present number for a different cash instrument.
To recode a cash instrument:
1. Go to Cash fflow/Cash iinstruments/Maintain and select the cash instrument to be recoded. 2. Click Recode and a message "This process may take some time. Continue?" will be displayed. 3. Click Yes to continue with the recoding process. 4. In the next screen, enter the new cash instrument number and click Recode.
Deleting cash instruments
It is possible to delete a cash instrument. When you do this, the cash instrument is deleted and cannot be retrieved from the system.
To delete a cash instrument:
1. Go to Cash fflow/Cash iinstruments/Maintain and select the cash instrument to be deleted. 2. Click Delete, and a message "Delete: Cash instrument, 2324 - Bank?" will be displayed if the cash instrument is not in
use. If the cash instrument is in use, a message "In use: Cash instrument: 2324 Delete?" will be displayed. 3. Click Yes to delete the selected cash instrument.
14C
HA
PTER 2 | CA
SH
FLOW
PROCESS

15
CH
APTER 2 | C
AS
H FLO
WPRO
CESS
Transferring balance of cash instruments
You can transfer the balance of a cash instrument from its current general ledger to a new one.
To transfer the balance of a cash instrument:
1. Go to Cash fflow/Cash iinstruments/Maintain and select the cash instrument you wish to make the transfer for. 2. Click Transfer bbalance and a message "This process may take some time. Continue?" will be displayed. 3. Click Yes to continue the process of transferring the balance. 4. In the next screen, type or select the new general ledger account number and click Transfer bbalance.
Viewing the cash flow of cash instruments
Once a cash instrument is created and there are cash inflows and outflows relating to the cash instrument, you may want toview all the cash flows.
To view the cash flow of a cash instrument:
1. Go to Cash fflow/Cash iinstruments/Maintain and select the cash instrument for which you want to view the cash flow.2. Click Cash fflow and you will see a screen with search criteria. 3. Fill in the appropriate criteria and click Refresh to view all the relevant cash flow entries.4. Click Close in the Cash fflow screen to exit.
Linking cash instruments to journals and general ledger accounts
After creating a new cash instrument, the system will automatically create a general ledger account and a journal based on thevalue that you filled in at G/L under the Basics tab. This is provided the G/L account does not exist yet.
Financial journals
The following financial journals are involved in the cash flow process and can be created and/or maintained atSystem/Finance/Journals.
• For Cash jjournal, all cash flow transactions resulting from the petty cash or cash register will be posted in it. The samecash journal can be linked to a cash instrument and a cash G/L can be linked to the cash journal. When creating a newcash instrument of the Cash or Cash rregister type, a financial journal will be created automatically and linked to the newcash instrument.
• For Bank jjournal, all cash flow transactions using cash instruments of the Bank or Credit ccard type will be posted in it. Thesame bank journal can be linked to a cash instrument and a bank G/L can be linked to the bank journal. Similar to cashjournals, when creating a new cash instrument of the Bank or Credit ccard type, a financial journal will be createdautomatically and linked to the new cash instrument.

• The General jjournal is only used for special entries like writing off payment differences that occur during matching, (bank)cost, and others. Depending on your bank settings, financial transactions for payment and collections will also begenerated in the general journal.
General ledger accounts
The following general ledger accounts are involved in the cash flow process:
• Cash lledger is used to register all petty cash or cash register transactions. The cash ledger should be linked to a cashinstrument and a cash journal. It can be created manually at Finance/General lledger/Maintain or automatically whendefining a new cash instrument of the Cash type (by specifying a new journal) through Cash fflow/Cashinstruments/Maintain.
• Bank lledger is used to register all financial transactions that occur to a bank account. Each bank ledger must be linked toa cash instrument and bank journal.
• Neutral lledger is used for the Unallocated general ledger account of the cash instrument. Depending on the company'sdefinitions of cost and revenue, the payment differences, discounts, and surcharges can also be registered as neutral ledgers.
• Debtor/Creditor lledger is used when allocating a cash flow transaction to a debtor or creditor. The moment the debtor orcreditor is allocated and the cash flow transaction is saved, the related financial transaction is modified and theUnallocated general ledger account is replaced by the applicable debtor or creditor ledger.
2.2 Purchase Flow (Cash Outflow) Process
This section describes the purchase cash outflow process such as order entries, invoice entries, and others. It also shows howthe cash outflow is affected by payment conditions in the purchase process. Payment conditions are the agreed upon paymentterms between you and your creditors.
The following topics are relevant to this section:
• Purchase order entry - payment conditions• Purchase invoice entry - payment conditions• Printing of payment advice list• Authorizing payment• Processing payment and exporting the bank file• Recreating exported bank files• Controlling
Purchase order entry - payment conditions
In order to start the cash outflow process, the conditions and installments that are agreed upon between you and the suppliermust first be registered. This can be done by creating a purchase order or a purchase invoice. A purchase order can only becreated if you have the E-PPurchase module.
16C
HA
PTER 2 | CA
SH
FLOW
PROCESS

17
CH
APTER 2 | C
AS
H FLO
WPRO
CESS
To create payment conditions in purchase orders:
1. Go to Purchase/Entries/Purchase oorders. 2. Click New to display the Purchase oorder screen. After filling in the initial purchase order details, the Conditions
button will be enabled. 3. Click Conditions. 4. Under the Payment ddata section at Currency, type or select the relevant currency.5. At Payment ccondition, type or select the appropriate payment condition. The appropriate installments will then be displayed. 6. Add, edit, or delete the payment installments by clicking , , or on the left.
The Payment ddate column is empty when the purchase order is entered. This is logical, as you haven't received the purchaseinvoice yet that specifies when you have to pay. However, the Due ddate column is not empty. The initial due date is calculatedbased on the purchase order date and the number of days that are specified in the supplier's payment conditions. This due datecan give you an indication as to when you have to pay. It can also be used in cash flow planning reports.

To create new payment conditions in purchase orders:
1. Go to Purchase/Entries/Purchase oorders. 2. Click New to display the Purchase oorder screen. After filling in the initial purchase order details, the Conditions
button will be enabled. 3. Click Conditions. 4. Under the Payment ddata section at Currency, type or select the relevant currency.5. At Payment ccondition, click to display the Payment cconditions screen.6. Click New to create a new payment condition.7. Type a unique code for the payment condition at Payment ccondition.8. Type the description of the payment condition at Description. For example, 2 terms of 50%.9. Select the type of calculation you want to use to generate the due date at Due ddate ccalculation ttype.10. At Discount/Surcharge, select Settlement ddiscount if the payment condition involves giving a discount when payment
is settled, or select Credit ssurcharge if the payment condition involves a surcharge when payment is delayed.11. Type the number of days after which a discount or credit surcharge is applicable at Number oof ddays. 12. Type the applicable percentage of discount or credit surcharge at Perc.. 13. At Item ggroup, type or select the grouping of the items in the purchase order. Once all criteria are defined, the payment
terms/installments will be listed in a table below Item ggroup.14. Add, edit, or delete the terms by clicking Add, Edit, or Delete on the right.
To create prepayment terms in purchase orders:
1. Go to Purchase/Entries/Purchase oorders. 2. Click New to display the Purchase oorder screen. After filling in the initial purchase order details, the Conditions
button will be enabled. 3. Click Conditions. 4. Select the first term/installment and click on the left. 5. At Payment ddate, type or select the agreed payment date.6. At %, type the percentage of the first term/installment if it is different from the installment amount.7. Click Save to save all changes.
18C
HA
PTER 2 | CA
SH
FLOW
PROCESS
19
CH
APTER 2 | C
AS
H FLO
WPRO
CESS
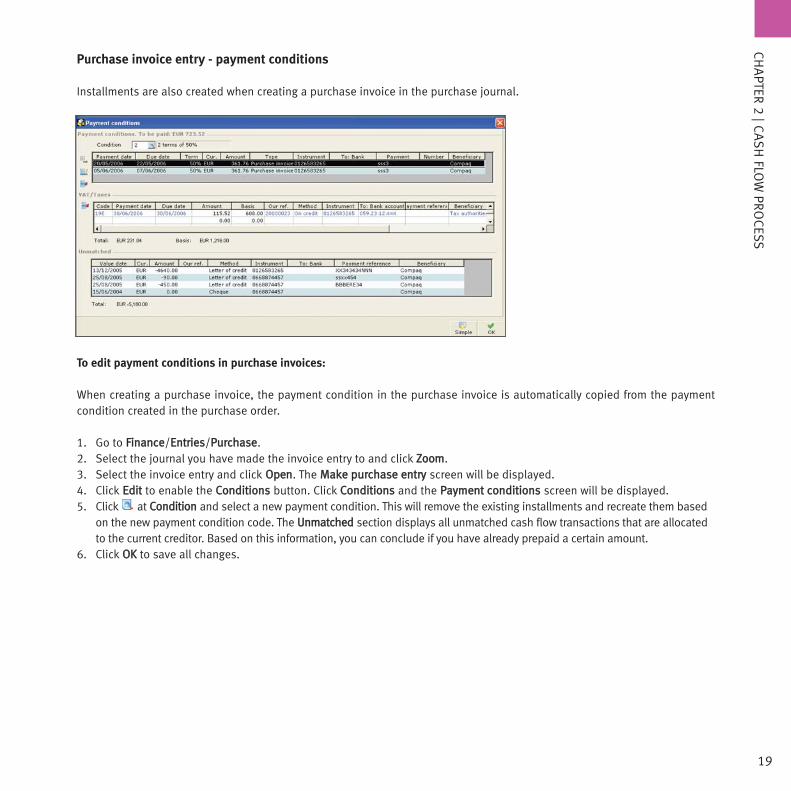
Purchase invoice entry - payment conditions
Installments are also created when creating a purchase invoice in the purchase journal.
To edit payment conditions in purchase invoices:
When creating a purchase invoice, the payment condition in the purchase invoice is automatically copied from the paymentcondition created in the purchase order.
1. Go to Finance/Entries/Purchase. 2. Select the journal you have made the invoice entry to and click Zoom.3. Select the invoice entry and click Open. The Make ppurchase eentry screen will be displayed.4. Click Edit to enable the Conditions button. Click Conditions and the Payment cconditions screen will be displayed. 5. Click at Condition and select a new payment condition. This will remove the existing installments and recreate them based
on the new payment condition code. The Unmatched section displays all unmatched cash flow transactions that are allocatedto the current creditor. Based on this information, you can conclude if you have already prepaid a certain amount.
6. Click OK to save all changes.

Printing of payment advice list
Usually the payment advice list is used to determine the payment you want to make before authorizing and processing them.However, this step is not obligatory and can be skipped if desired.
To print the payment advice list:
1. Go to Cash fflow/Miscellaneous/Advice llist. 2. Define the relevant criteria and click Start to generate the advice list.3. In the Advice llist screen, click Print to print the advice list. Click Printer settings if you want to define other criteria for printing.4. Click Close to exit.
20C
HA
PTER 2 | CA
SH
FLOW
PROCESS

21
CH
APTER 2 | C
AS
H FLO
WPRO
CESS
Authorizing payment
When the purchase invoice is entered and the installments are defined, it is possible to pay your creditors. This can be done byauthorizing and then processing the payment.
To authorize payment:
1. Go to Cash flow/Payments/Authorize. 2. Define the relevant search criteria and click Display. The Authorize screen will be displayed.3. Select the To bbe aauthorized check box to display payment that needs to be authorized. 4. Select a payment that you want to authorize and click Authorize. If you want to authorize all payment together,
click Select aall and then click Authorize. 5. If you want to remove the authorization for a specific installment, select the Already aauthorized check box to display authorized
payment. Select the payment and click the Authorized box in the purchase process flow to remove the authorization. 6. Click Close to exit.
Tip: To be able to authorize payment, there should be rights granted for the cash instrument under the Rightstab when you click Open to open the selected cash instrument at Cash FFlow/Cash iinstruments/Maintain.

Processing payment and exporting bank file
All authorized invoices and installments need to be processed after authorization.
To process payment and export the bank file:
1. Go to Cash fflow/Payments/Process. 2. Define the relevant criteria and click Display. The Process screen will be displayed.3. Select the Already aauthorized check box to display payment that is already authorized and need to be processed. 4. Select a payment that you want to process and click Process. If you want to process all payment together, click Select aall
and then click Process. The Enter: DDocument nnumber screen will be displayed if a cheque, letter of credit, or cash is usedas the payment method. The CLIEOPO3 screen will be displayed if EFT (available only if you have the E-PPOS module), oncredit, or collection (applicable to installments in the sales flow and available only if you have the E-CCollection module) isused as the payment method (and will result in an export of a file). The export file will be generated in the export directorythat you have defined in System/General/Settings/Bank ssettings. The method this file is sent to your bank depends onthe way you usually handle electronic payment within your organization. For example, by using third party electronicbanking software from your bank or uploading it to your bank's web site.
5. In the Enter: DDocument nnumber screen at First: DDocument nnumber (this is predefined but you can change the information),type the document number.
6. At Layout nname (this is predefined but you can change the information), type or select the layout name. 7. In both the Enter: DDocument nnumber and CLIEOPO3 screens, click OK to display the Process rreport.8. Click Close to exit.
22C
HA
PTER 2 | CA
SH
FLOW
PROCESS

23
CH
APTER 2 | C
AS
H FLO
WPRO
CESS
Recreating exported bank files
All exported bank files can be recreated. This is useful if the export file was accidentally deleted before being imported into yourbank's electronic banking software.
To recreate the exported bank file:
1. Go to Cash fflow/Payments/Created bbank files.2. Define the relevant criteria and click Start. The Created bbank ffiles screen will be displayed.3. Select the bank file you want to recreate and click Recreate. The CLIEOPO3 screen will be displayed.4. Click OK to display the Process rreport. 5. Click Close to exit.

24C
HA
PTER 2 | CA
SH
FLOW
PROCESS
Controlling
After you have processed the payment, the exported file can be imported into the third party electronic banking software andyou can check if everything has been imported into the bank software correctly. For example, by comparing the total amountand quantity of the imported transactions from the summary report (that is printed for each exported run) with the data suppliedby the third party electronic banking software. Run number is the batch serial number.
It is also important to verify that the payment you have made is still in process with the bank or have yet to be matched with acash flow transaction. If that is the case, the payment is still in transit.
To validate the total amount of the payment run:
1. Go to Cash fflow/Statistics/Who pprocessed.2. Define the relevant criteria and click Display. The Who pprocessed screen will be displayed.3. At Group bby, select Run nnumber to review the run specific information.4. Select the Payments iin ttransit check box. You can then compare the total amount in your banking software with the
balance of the run number in the Who pprocessed screen.5. Click Close to exit.

25
CH
APTER 2 | C
AS
H FLO
WPRO
CESS
To control payment in transit:
1. Go to Cash fflow/Payments/Payment iin ttransit. The Payments iin ttransit screen will be displayed. 2. Select an entry and click Details to view further information about the payment in transit. 3. Select an entry and click Reverse aauth. to reverse the authorization process. This does not remove the payment from the
export file, so you have to delete it after you import the export file in the third party banking software.
Tip: This procedure depends on your bank settings. If it is defined in the bank settings that you want financialtransactions to be posted directly to the G/L of the cash instrument when processing installments (in whichcase only the Journalize ppayments setting is enabled in the bank settings), this procedure does not apply as thepayment is not considered to be in transit. You should use the reconciliation statement function in Cashflow/Entries/Reconciliation sstatement to keep track of the unreconciled payment instead.

2.3 Sales Flow (Cash Inflow) Process
This section describes the sales cash inflow process such as quotations, order entries, invoice entries, and others. It also showshow the cash inflow is affected by payment conditions in the sales process. Payment conditions are the agreed upon paymentterms between you and your debtors.
The following are the topics relevant to this section:
• Sales quotation entry - payment conditions• Sales order entry - payment conditions• Sales invoice entry - payment conditions• Collection processing and generating export files for electronic collection• Checking
Sales quotation entry - payment conditions
A sales quotation is generated when there is an enquiry from a company or person who is interested in your products orservices. It describes the product, its sales price, and the terms of the sale and payment. A sales quotation can only be createdif you have the E-QQuotation module.
To create payment conditions in sales quotations:
1. Go to CRM/Entries/Quotations. 2. Click New to display the Quotations screen. After filling in the initial sales quotation details, the Conditions button
will be enabled. 26
CH
APTER 2 | C
AS
H FLO
WPRO
CESS

27
CH
APTER 2 | C
AS
H FLO
WPRO
CESS
3. Click Conditions. 4. Under the Payment ddata section at Currency, type or select the relevant currency.5. At Payment ccondition, type or select the appropriate payment condition. The appropriate installments will then be displayed. 6. Add, edit, or delete the payment installments by clicking , , or on the left.
The Payment ddate column is empty when the sales quotation is entered. This is logical, as you haven't received the sales invoiceyet that specifies when you have to pay. However, the Due ddate column is not empty. The initial due date is calculated basedon the sales quotation date and the number of days that are specified in the debtor's payment conditions. This due date cangive you an indication as to when you will receive payment. It can also be used in cash flow planning reports.
To create new payment conditions in sales quotations:
1. Go to CRM/Entries/Quotations. 2. Click New to display the Quotations screen. After filling in the initial purchase order details, the Conditions button
will be enabled. 3. Click Conditions. 4. Under the Payment ddata section at Currency, type or select the relevant currency.5. At Payment ccondition, click to display the Payment cconditions screen.6. Click New to create a new payment condition.7. Type a unique code for the payment condition at Payment ccondition.8. Type the description of the payment condition at Description. For example, 2 terms of 50%.9. Select the type of calculation you want to use to generate the due date at Due ddate ccalculation ttype.10. At Discount/Surcharge, select Settlement ddiscount if payment condition involves giving a discount when payment is
settled, or select Credit ssurcharge if payment condition involves a surcharge when payment is delayed.11. Type the number of days after which a discount or credit surcharge is applicable at Number oof ddays. 12. Type the applicable percentage of discount or credit surcharge at Perc..13. At Item ggroup, type or select the grouping of the items in the purchase order. Once all criteria are defined, the payment
terms/installments will be listed in a table below Item group.14. Add, edit, or delete the terms by clicking Add, Edit, or Delete on the right.
To create prepayment terms in sales quotations:
1. Go to CRM/Entries/Quotations. 2. Click New to display the Quotations screen. After filling in the initial purchase order details, the Conditions button
will be enabled. 3. Click Conditions. 4. Click Prepayment and the Prepayment screen will be displayed.5. At Prepayment, type the amount to be prepaid or at Percentage, type the percentage to be prepaid. You need to fill in
either Prepayment or Percentage only. 6. At Payment ddate, type or select the payment date of the prepayment. 7. Click Save to save the entered data. The message "Reason: All installment information will be lost. Continue?"
will be displayed.8. Click Yes to continue or No to stop the process. 9. Click Close in the Sales oorders screen to exit.

Sales order entry - payment conditions
In order to start the cash outflow process, the conditions and installments that are agreed upon between you and the suppliermust first be registered. This can be done by creating a sales order or sales invoice. A sales order can only be created if you havethe E-SSales oorder module.
You can create payment conditions and prepayment terms in a sales order at Order/Entries/Sales oorders and the processes areexactly the same as in Sales quotation entry - payment conditions.
Sales invoice entry - payment conditions
Installments are also created when creating a sales invoice. A sales invoice can be created if you have the E-IInvoice module.
In the sales invoice, the creation of payment conditions at Invoice/Entries/Invoices is exactly the same as in Sales quotationentry - payment conditions.
A sales invoice can also be created at Finance/Entries/Sales if you have the E-FFinance module.
To edit payment conditions in sales invoices (in the E-Finance module):
When creating a sales invoice, the payment condition in the sales invoice is automatically copied from the payment conditioncreated in the sales order.
1. Go to Finance/Entries/Sales. 2. Select the journal you have made the invoice entry to and click Zoom.3. Select the invoice entry and click Open. The Make ssales eentry screen will be displayed.4. Click Edit to enable the Conditions button. Click Conditions and the Payment cconditions screen will be displayed.
28C
HA
PTER 2 | CA
SH
FLOW
PROCESS

29
CH
APTER 2 | C
AS
H FLO
WPRO
CESS
5. Click at Condition and select a new payment condition. This will remove the existing installments and recreate them basedon the new payment condition code. The Unmatched section displays all unmatched cash flow transactions that are allocatedto the current creditor. Based on this information, you can conclude if you have already prepaid a certain amount.
6. Click OK to save all changes.
Processing collection and generating export files for electronic collection
If you have the E-CCollection module, it is possible to export electronic collection files. This is useful if you want to be in controlof the payment that your customers have to make (depending on the conditions you have agreed upon with your customers).
Before generating the export files for electronic collection, you first need to enter a sales order. In the Sales oorders screen, clickConditions, and type or select the Payment ccondition. Then, edit the installment entry by clicking on the left. The Salesinvoice screen will be displayed. Type or select the Payment ddate, and choose Collection in Method. Then save the changes.You now need to authorize and confirm the sales order (if those steps are in your sales flow) and enter a sales invoice. Lastly,authorize and process the sales invoice.
Tip: There is an important difference between the sales and purchase flow and that is the moment the paymentdate is determined. In the purchase flow, the payment date (and due date) is determined the moment thepurchase invoice is entered. In the sales flow, this is the same when the sales invoice is directly entered as afinancial transaction in a sales journal at Finance/Entries/Sales.
However, when the sales invoice is created at Invoice/Entries/Invoices or generated from Order/Entries/Salesorders by fulfilling the sales order, the due date is already fixed but the payment date will be determined onlywhen the final invoice is printed. The reason for this is that until the final invoice is printed and sent, theinstallments do not have to be paid yet (unless you require a prepayment).
To generate export files for electronic collection:
1. Go to Cash fflow/Miscellaneous/Collection. 2. Define the relevant criteria and click Display. The Collection screen will be displayed.3. Select the Collect check box to view outstanding invoices or installments that use the collection payment method.4. Select an entry that you want to process and click Process. The Process report will be generated.5. Click Print in the Report screen to print the process report or click Close to exit.

Checking
It is possible to check the invoice on the debtor card. Here you can view the general information about the invoices thathave been sent.
30C
HA
PTER 2 | CA
SH
FLOW
PROCESS
To check invoices:
1. Go to Finance/Accounts rreceivable/Cards. 2. Select the debtor whose invoice you want to check and click Display. The Debtor ccard screen will be displayed. 3. At Display, select Receivables to view outstanding installments with the correct due dates or Invoice llist to view the
general information about the invoice sent. Select All if you have multiple installments and want an overview of allinstallments pertaining to this invoice.
4. Click Close to exit.

31
CH
APTER 2 | C
AS
H FLO
WPRO
CESS
2.4 Cash Inflow and Cash Outflow Process
The following topics are relevant to this section:
• Importing the bank statement• Manual entry of bank/credit card statement, deposit of cheques/letters of credit, petty cash and other cash flow transactions• Booking bank cost• Booking interbank transfer transactions• Allocation of payment/receipts• Matching of payment/receipts• Reconciliation of the bank statement
Importing bank statement
Payment/receipts that have been processed by the bank will be confirmed via a bank statement. If the bank can deliver thisstatement electronically and if the format is supported by your software, it can be imported into Exact GGlobe 22003. The bankstatement file will be imported from the Import ddirectory as specified in System/General/Settings/Bank ssettings.
To import bank statement:
1. Go to Cash fflow/Entries/Import. 2. Define the relevant criteria such as the Statement ddate, Date iimport and Bank aaccount. 3. Click Search to search for the bank statement file from the import directory. 4. At the Import ddirectory, double click on the bank statement file to open the Bank nname screen. 5. In the Bank nname screen, select the relevant bank and click OK. The Bank iimport screen will be displayed. 6. Choose the type of matching you want during bank import and click Select. Matching is the linking of the created or
imported cash flow transaction to the invoices (or installments). During bank import, the system will trigger the allocationof the debtor/creditor by searching for the offset bank account in debtor/creditor maintenance.

To verify and repair imported bank statement:
1. Go to Cash fflow/Entries/Import. 2. Define the relevant criteria such as the Statement ddate, Date iimport and Bank aaccount. 3. Click Refresh to display the imported bank statements. 4. Select a bank statement and click Analysis. The Import AAnalysis screen will be displayed. 5. Select the statement you wish to repair and click Repair. The Repair button will only be enabled if you have a statement
to repair. For example, after importing a bank statement, you delete a transaction that is related to it at Cash flow/Entries/Cash fflow. This will enable the Repair button. Once you select the statement you wish to repair and click Repair, the deleted transaction will be available at Cash fflow/Entries/Cash fflow again.
6. Click Close to exit.
Manual entry of bank/credit card statement, deposit of cheques/letters of credit, petty cash and other cashflow transactions
When you do not register the payment/receipts based on the bank statement (because the statement arrives only once a month andyou want to register your receipts/payment sooner), you can enter them manually the moment the receipt/payment is received.
To create payment/receipts manually:
1. Go to Cash fflow/Entries/Cash fflow, and click New. The Entry screen will be displayed. 2. At To CCash iinstrument, type or select the bank account number that you want to make the receipt or payment to.
32C
HA
PTER 2 | CA
SH
FLOW
PROCESS

33
CH
APTER 2 | C
AS
H FLO
WPRO
CESS
3. Type the amount of the receipt or payment at Amount/Currency, and select the corresponding currency. To enter apayment, type a negative amount (for example, -90.00). To enter a receipt, type a positive amount (for example, 90.00).
4. Type or select the date of the payment/receipt at Date.5. At Bank rreference, type a suitable reference such as "receipt from company xxx". 6. Under the Statement section at Statement nnumber, type or select the statement number of the payment/receipt. 7. Type or select the statement date of the payment/receipt at Statement ddate. 8. At Type/Method/No, select the way you want the payment/receipt to be made, the method used, and the number of the
cash instrument used to make payment/receipt.
Note: Statement ddate, Statement nnumber, Date, Type, and Method will be remembered and pre-filled in the cash flow entrywhen a new entry is created. This is applicable for a single administration only, which means if a different administration isused, it will not remember the details from the previous administration.
9. At Maturity ddate, type or select the maturity date of the letter of credit. Maturity ddate is available only if Bank sstatement isselected at Type and Letter oof ccredit is selected at Method.
10. Type or select the bank name used for making payment/receipts at Instrument bbank. Instrument bbank is available only ifBank sstatement or Cash is selected at Type and Letter oof ccredit or Cheque is selected at Method.
11. Type or select the deposit number of the cheque, cash, or letter of credit at Deposit nnumber. Deposit nnumber is availableonly if you have selected Bank sstatement, Cash, or Office at Type and Cheque, Cash, or Letter oof ccredit at Method. Deposit nnumber is only available when creating receipts.
12. At Deposit ddate, type or select the deposit date of the cheque, cash, or letter of credit. Deposit ddate is available only ifyou have selected Bank sstatement, Cash, or Office at Type and Cheque, Cash, or Letter oof ccredit at Method. Deposit ddateis only available when creating receipts.
13. Under the Allocation section at Name, type or select the name of the person or company to whom you want thepayment/receipt allocated to. Name changes to Debtor or Creditor according to your selected name. When the name istyped or selected, all boxes under the Allocation section will be pre-filled and G/L will change to Creditor aaccount/Debtoraccount based on the selected name.
14. Under the Detailed iinformation section, all information are pre-filled except for Attachment. 15. At Attachment, click to attach documents that are relevant to this entry. 16. If a foreign currency is used, then the Foreign ccurrency section becomes available. To use foreign currencies, you first
need to activate the currency at System/General/Countries/Currencies. Under the Foreign ccurrency section, all fields willbe pre-filled according to your earlier selections. However, in Bank sstatement, you can change the XRate. When theexchange rate changes, the amount in the default currency also changes accordingly.
Creating the payment/receipt manually will be completed at this stage but you can proceed with matching the payment/receiptto the relevant invoice(s). If you do not want to match the payment/receipt in the Entry screen, you can also do it at Cashflow/Entries/To bbe mmatched. For further details, see Matching of payment/receipts.

To match payment/receipt with invoices (from the Entry screen):
1. Click Match tto iinvoices under the Matching && PProcessing section and the Matching screen will be displayed. 2. Select the correct data (line) from the Cash/bank section and the Invoices section. 3. Click Match/Process to perform the matching process. 4. If matching is for a VAT term and VAT return has not been generated yet, you need to type a password before you are able
to perform the match/process function. If the balance amount that appears at the top center of the Cash/bank andInvoices section is zero, the selected transactions will be matched and is removed from the screen. If there are differencesto be settled with the invoice amount, the decision must be made on how to write off these differences. If there aredifferences to be settled, the Process screen will be displayed.
5. Select the relevant options such as Balance, Payment ddifference, Refund, Discount, and more and click Process. 6. Click Close in the Matching screen to exit.
To edit payment/receipts:
1. Go to Cash fflow/Entries/Cash fflow, and select the cash flow entry to be edited. 2. Click Edit. The Entry screen will be displayed.3. Make the necessary changes to the entry and click Save.4. Click Close to exit.
To delete payment/receipts:
1. Go to Cash fflow/Entries/Cash fflow, and select the cash flow entry to be deleted. 2. Click Delete, and a message "Delete the data selected?" will be displayed.3. Click Yes to delete the selected cash flow entry. 4. Click Close to exit.
34C
HA
PTER 2 | CA
SH
FLOW
PROCESS

35
CH
APTER 2 | C
AS
H FLO
WPRO
CESS
Booking bank cost
Bank cost comes about because banks will often charge you for keeping an account or as fees for the processing of transactions.There are several scenarios for the bank cost. The most common one is that the bank includes an additional line for bank coston the bank statement. When creating, importing and processing the bank statement, there is no invoice with which to settlethe bank cost. This means that the cash flow transaction will initially be unallocated.
To book bank cost:
1. Go to Cash fflow/Entries/Cash fflow.2. Click New, or select a cash flow entry and click Edit. The Entry screen will be displayed. 3. After filling in the relevant information (only if it is a new entry), click Book costs under the Matching && PProcessing
section. The Book ccosts screen will be displayed. 4. Select Bank ccosts. 5. At G/L, type or select the general ledger account you want to book the bank cost to. By default, you will see the G/L
account defined in Bank ccosts at System/General/Settings/General lledger ssettings filled here. 6. Type the bank cost amount at Amount. The amount can be divided over three different general ledger accounts. When you
adjust the amount, the second line will allow you to specify to which general ledger account the remaining amount has tobe booked. The sum of the amounts has to be equal to the amount of the cash flow transaction as you cannot leave adifference. The Amount iin DDC will only be enabled if a foreign currency is used. When that happens, it will display theamount in the default currency.
7. At Tax, type or select the tax code that is relevant to this transaction. The Tax aamount will only be enabled if a tax code ofmore than 0% is selected. It will also show the tax amount based on the tax code.
8. Click Advanced to display more criteria. 9. Type or select the Project, Cost center, Cost uunit, Item ccd. and Resource which you want to allocate the bank cost to.10. Click OK to process the defined information.

Booking interbank transfer transactions
The booking of interbank transfer transactions is used to automatically match the cash flow transaction with the processedtransfers (from cash instrument A to cash instrument B) that are created at Cash fflow/Payments/Prepayments && ttransfers.
After the bank has processed the transfer and you have registered/imported the bank statements for both cash instruments,you can proceed to do the matching.
Before you start, make sure the cash flow transaction is allocated to the default company account code (defined atSystem/General/Settings/Company ddata ssettings).
To book interbank transfer transactions:
1. Go to Cash fflow/Entries/Cash fflow.2. Select a payment or receipt entry relating to the transfer and click Edit. The Entry screen will be displayed.3. Click Interbank under the Matching && PProcessing section. 4. Under the Cash/bank section, the entries are automatically displayed. 5. Select either the payment entry (negative amount) or the receipt entry (positive amount) and click Automatically.
Both the payment and receipt entries that relate to the transfer will be matched and removed from the screen. 6. Click Close to exit.
36C
HA
PTER 2 | CA
SH
FLOW
PROCESS

37
CH
APTER 2 | C
AS
H FLO
WPRO
CESS
Allocation of payment/receipts
Allocation of payment is the process in which you identify which creditor/debtor is responsible for a payment/receipt. Importedor manually created bank statements in which no debtor or creditor is registered are unallocated. If allocation is not done duringbank import or during the manual creation of payment/receipts, you can do it at Cash fflow/Entries/To bbe aallocated.
Matching of payment/receipts
The matching process is the linking of the created or imported cash flow transaction to the invoices (or installments). Before acash flow transaction can be matched, it must be allocated. If matching is not done during bank import or during the manualcreation of payment/receipts, you can do it at Cash fflow/Entries/To bbe mmatched.
To allocate payment/receipts:
1. Go to Cash fflow/Entries/To bbe aallocated. 2. Define the relevant criteria such as Date, Own bbank aaccount, Type, Statement, and more and click Refresh. Cash flow entries
that match the criteria will be displayed. 3. Select the cash flow entry that you wish to make allocation for and click Edit. The Entry screen will be displayed. 4. Under the Allocation section at Name, type or select the debtor/creditor responsible for the payment/receipt. 5. Click Close to exit.

To match payment/receipts:
1. Go to Cash fflow/Entries/To bbe mmatched. 2. Define the relevant criteria such as Date, Own bbank aaccount, Type, and more and click Refresh. Cash flow entries that
match the criteria will be displayed. 3. Select the cash flow entry that you wish to match and click Match. The Matching screen will be displayed. 4. Select the correct entry (line) from the Cash/bank section and the Invoices section. 5. Click Match/Process to perform the matching process. If matching is for a VAT term and VAT return has not been generated
yet, you need to type a password before you are able to perform the match/process function. If the balance amount thatappears at the top center of the Cash/bank and Invoices section is zero, then the selected transactions will be matchedand be removed from the screen. If there are differences to be settled with the invoice amount, the decision must bemade on how to write off these differences. If there are differences to be settled, the Process screen will be displayed.
6. Select the relevant options such as Balance, Payment ddifference, Refund, Discount, and more and click Process. 7. Click Close in the Matching screen to exit.
Reconciliation of bank statements
Reconciling is necessary when your company's records show a difference of the balance of cash at bank from that in the bankstatement. The aim of reconciliation is to ensure that discrepancies that occur are not due to timing but due to error(s).
To reconcile the bank statement (excluding Dutch license):
1. Go to Cash fflow/Entries/Reconciliation sstatement. 2. Define the relevant criteria such as Cash iinstrument, Date, and Statement nnumber and click Refresh. Statements that
match the search criteria will be displayed.3. Select a statement and click Open. The Bank aaccount rreconciliation screen will be displayed. 4. Under the Transactions tab, click any view (Cash iin, Cash oout, or All).5. Under the Reconciled column, select the check box of the transaction you wish to reconcile or clear the check box to undo
the reconciliation of a particular transaction. 6. Click Finished to complete the reconciliation process once you have reconciled all deposits and payment. 7. If the statement is not fully reconciled, a message "Your statement is not fully reconciled. Do you still wish to finish?"
will be displayed. 8. Click Yes to mark the statement as Finished. Click No to go to the Balance tab. You can make adjustments to the Opening
balance or Closing bbalance if there are errors. Alternatively, you can click Finish llater to finish the reconciliation at a latertime and to exit.
38C
HA
PTER 2 | CA
SH
FLOW
PROCESS

39
CH
APTER 2 | C
AS
H FLO
WPRO
CESS
To automatically reconcile the bank statement (excluding Dutch license):
1. Go to Cash fflow/Entries/Reconciliation sstatement. 2. Define the relevant criteria such as Cash iinstrument, Date, and Statement nnumber and click Refresh. Statements that
match the search criteria will be displayed.3. Select a statement and click Auto rreconcile. The Auto rreconcile screen will be displayed. 4. Type or select the Cash iinstrument nnumber and type a Statement nnumber prefix (to be used in the bank transaction table
for the auto reconciled transactions). Type or select a date (where all transactions prior to it will be reconciled) and selectwhether you want to include finished statements.
5. Click OK to finish the auto reconciliation process.
To create a new statement for reconciliation (excluding Dutch license):
1. Go to Cash fflow/Entries/Reconciliation sstatement. 2. Click New and the Statement IInformation screen will be displayed. 3. Type or select the Cash iinstrument number, Statement number, Statement ddate, Opening bbalance and Closing bbalance. 4. Click OK to save the information.
To reconcile the bank statement (all license):
1. Go to Cash fflow/Entries/Cash fflow.2. Define the relevant criteria such as Date, Own bbank aaccount, Type, and more and click Refresh. The transactions that
match the search criteria will be displayed. 3. Select a transaction you want to reconcile and click Edit. The Entry screen will be displayed. 4. Type or select the correct Statement nnumber and Statement ddate for the selected transaction. 5. Click Save to save the information.6. After saving the information, you will notice that the Reconciled and Finished process steps (under the Info tab) will have
a green check mark with the word Yes.

40C
HA
PTER 2 | CA
SH
FLOW
PROCESS

Chapter 3 | Cash Flow Management

42C
HA
PTER 3 | CA
SH
FLOW
MA
NA
GEM
ENT
Accounts Receivable/Payable Administration
Cash Flow Reports
CASH FLOW MANAGEMENT

43
CH
APTER 3 | C
AS
H FLO
WM
AN
AG
EMEN
T
Cash flow management requires you to manage, analyze and adjust your business cash flow to ensure liquidity. This is why youneed to carefully monitor and manage the cash inflow and cash outflow. In Exact GGlobe 22003, this can be done through theaccounts receivable/payable administration and the cash flow reports.
3.1 Accounts Receivable/Payable Administration
The following topics are relevant to this section:
• Balance list• Managing accounts receivable/payable• Accounts receivable/payable card
Balance list
The accounts receivable/payable balance list allows you to quickly check all receivables/payables for payment in transit. It willalso show you if there are any unmatched invoices or installments.
To generate balance list:
1. Go to Finance/Accounts RReceivable/Balance llist or Finance/Accounts PPayable/Balance llist. 2. Under the Group section, select To bbe iinvoiced to display orders that have yet to be invoiced.
3. Cash Flow Management

3. Click Additional ccriteria under the Account section.4. Go to Payments iin ttransit under the Filter section and select Including to include invoices and installments that are in
transit, Excluding to exclude invoices and installments that are in transit, or Payments iin ttransit to show only invoices andinstallments that are in transit.
5. Select the To bbe mmatched check box to display only invoices and installments that have yet to be matched. This is usefulfor verifying the accounts receivable/payable that consists of unmatched transactions. It also functions as a to-do list.
6. Define additional criteria if needed or click Close to exit the Additional criteria screen.7. Define the rest of the relevant criteria where applicable and click Display to display the Balance llist screen. 8. If the check box in the Payments iin ttransit column is selected for the selected invoice, this means that the invoice has
been received (for accounts receivable) or paid (for accounts payable) but not processed by the bank or matched with thecash flow transaction yet. If the check box is cleared, there is no payment in transit and all invoices and installments havebeen processed by the bank or matched with the cash flow transaction.
9. Click Close to exit.
Managing accounts receivable/payable
To manage your receivables/payables, you can print a report showing all invoices or installments that have yet to be paid.
To manage accounts receivable/payable:
1. Go to Finance/Accounts rreceivable/Receivables/ Receivables or Finance/Accounts ppayable/Payables/ Payables.
44C
HA
PTER 3 | CA
SH
FLOW
MA
NA
GEM
ENT

45
CH
APTER 3 | C
AS
H FLO
WM
AN
AG
EMEN
T
2. Under the Layout section at Report, select List if you want to display the receivables/payables list or select Details todisplay an extensive report that includes information about outstanding items and associated debtors/creditors. If thereis a red asterisk * at the end of a line in the report, this means that a payment is in transit for that invoice or installment. If there is a blue asterisk * next to the Our rref number, it means that the invoice is blocked.
3. Define other relevant criteria and click Start to display the Outstanding items ddebtors report or Outstanding iitemscreditors report.
4. Click Print to print the report or click Close to exit.
The accounts receivable/payable card
The accounts receivable/payable card is the central point that provides all the information about the receivables/payablesstatus. From the card, you can also generate reports, view the transaction details, edit information, and search for transactionsinvolving a creditor/debtor based on specific criteria.
To manage the accounts receivable/payable card:
1. Go to Finance/Accounts rreceivable/Cards or Finance/Accounts ppayable/Cards. 2. Define the relevant criteria and click Search. Debtors/creditors that match the search criteria will be displayed. 3. Select a debtor/creditor and click Display to display the Debtor ccard/Creditor ccard. 4. Click . At Display, select Receivables for debtors or Payables for creditors. You will see the Payments iin ttransit box. 5. At Payments iin ttransit, select Exclusive to display only payment that is in transit, Exclude to display payment that is not in
transit, and All to display both the payment that is in transit and not in transit. 6. Click Close to exit.

3.2 Cash Flow Reports
The following topics are relevant to this section:
• Cash instruments balance list• Cash flow statement• Graph of cash flow transactions• Cash flow planning• Reproducing bank statements
Cash instruments balance list
The balance list displays your current and expected income/expenses. Here you will be able to view information about thenumber of cash flow transactions, the balance as a result of these cash flow transactions, the average exchange rate (in caseof foreign currency cash flow transactions), the total amount of the payment that is in transit, and the total balance amountincluding the payment in transit.
To view cash instruments balance list:
1. Go to Cash fflow/Reports/Balance llist. 2. Define the relevant criteria and click Display. The Cash bbalance screen will be displayed. At Group bby, select the required
option to display the cash instrument balance list. You can choose from Details, Currency ccode, Bank nname, Type andGeneral lledger. You can view further information relating to the cash instrument balance list such as the general ledgercard, cash flow, bank statement and payment in transit by clicking the relevant buttons.
3. Click Close to exit.
46C
HA
PTER 3 | CA
SH
FLOW
MA
NA
GEM
ENT

47
CH
APTER 3 | C
AS
H FLO
WM
AN
AG
EMEN
T
Cash flow statement
The cash flow statement provides an overview of all your payment and receipts for a certain period of time. In addition, you canview the payment and receipts for a different second period, and then compare the two periods.
To view cash flow statement:
1. Go to Cash fflow/Reports/Cash fflow sstatement. The Cash fflow screen will be displayed automatically. 2. Under the Range 11 section at Date, type or select the date range.3. Under the Range 22 section, select the Use check box if you want to use the second range. This will enable Date.
Type or select the date range and click Refresh to view the cash flow statement. 4. Click Details to display the Details screen where you can view the breakdown of the selected cash flow. You can also edit
the details on this screen. Click Configuration to display the Configuration screen where you can assign the specific typeof general ledger accounts for G/L codes with unknown types or even change the type of general ledger account.
5. Click Close to exit.

Graph of cash flow transactions
It is possible to generate a graph of the developments (cash flow transaction history) for all or one specific cash instrument.
To generate cash flow transaction graph:
1. Go to Cash fflow/Reports/Graph. 2. Define the relevant criteria and click Start. The cash flow transaction of the specific cash instrument or the account
balance of all cash instruments will be displayed in the graph generated. 3. Click Close to exit.
48C
HA
PTER 3 | CA
SH
FLOW
MA
NA
GEM
ENT

49
CH
APTER 3 | C
AS
H FLO
WM
AN
AG
EMEN
T
Cash flow planning
The cash flow planning provides an overview of your expected income (cash inflow) and expenditure (cash outflow). The planningcan help you to predict possible deficits and/or temporary surpluses, and adapt to them.
Cash flow planning has its advantages. For example, with the information obtained, you can quickly identify a shortage orsurplus on a specific cash instrument. This in turn, can help you to decide on making an interbank transfer to update thebalance. A temporary surplus in the current bank account can be transferred to a savings account. You can also prevent ashortage on a cash instrument by doing an interbank transfer, so you do not have to pay interest. Another possibility is that youcan decide to take out a new loan to cover the (temporary) shortage.
To generate cash flow planning:
1. Go to Cash fflow/Reports/Various/Planning. 2. Define the relevant criteria and click Start. The cash flow planning will be displayed. Negative balances are displayed in red.
The expected inflow and outflow are displayed per cash instrument. In addition, the balance per cash instrument and the totalexpected balance are also displayed.
3. Click Close to exit.

50C
HA
PTER 3 | CA
SH
FLOW
MA
NA
GEM
ENT
Reproducing bank statements
Bank statements that have been imported can be reproduced. Importing of bank statements has been discussed in 2.4 CashInflow and Cash Outflow Process.
To reproduce bank statements:
1. Go to Cash fflow/Cash iinstruments/Bank sstatement.2. Define the relevant criteria and click Start. The Report screen will be displayed with the bank statement(s). You can click
Print to print the bank statement or click Printer ssettings to adjust the printer settings before printing.3. Click Close to exit.

Chapter 4 | Advanced Features

52C
HA
PTER 4 | MA
NA
GIN
G M
ORE EXCEPTIO
NA
LS
CENA
RIOS
Handling Payment Differences When Receiving Cash
Matching Cash Flow Transactions to OtherDebtor/Creditor Invoices or Installments
Advanced Management of Letters of Credit and Cheques
Correcting Wrong or Bounced Payment
Handling Prepayment and Interbank Transfers
ADVANCED FEATURES

53
CH
APTER 4 | M
AN
AG
ING
MO
RE EXCEPTION
AL
SCEN
ARIO
S
This section explains a number of special scenarios that occur during the cash flow process. Some of the examples would behandling payment differences when receiving cash, correcting wrong or bounced payment, handling prepayment and interbanktransfers, and others. These are not explained in the cash flow process because they occur only under certain circumstances.
4.1 Handling Payment Differences When Receiving Cash
When customers settle invoices or installments, they might not pay the full amount. Sometimes they deduct a settlementdiscount or do not include a credit surcharge for late payment. This receipt can be registered similarly to other cash flowtransactions by manually entering or importing it. However when you match this cash flow transaction with the applicableinvoices or installments, a difference can occur depending on the invoice registered. This difference needs to be processed.
The following topics are relevant to this section:
• Expected settlement discount/credit surcharge• Unexpected settlement discount/credit surcharge
Expected settlement discount/credit surcharge
When you agree on a settlement discount/credit surcharge with your debtor in advance, you first have to create this paymentcondition. Creating the payment condition has been explained in 2.2 Purchase Flow (Cash Outflow) Process and 2.3 Sales Flow(Cash Inflow) Process.
When customers are entitled to a discount or need to pay a surcharge, the amount they pay will not equal the created invoice.The receipt of the payment and the payment difference need to be registered and matched with the original invoice.
4. Advanced Features

54C
HA
PTER 4 | MA
NA
GIN
G M
ORE EXCEPTIO
NA
LS
CENA
RIOS
To handle payment differences with expected settlement discount/credit surcharge:
1. Create an invoice for a debtor that uses the agreed payment condition. For example, it uses the settlement discount of10% if paid within 14 days. The entry application will then automatically generate two installments; one for thesettlement discount and one for the invoice amount. Both installments will have the same due dates but the paymentdates differ because in order to enjoy the discount, you need to pay up within 14 days after the invoice date.
2. When the debtor pays the invoice and deducts the discount, create the receipt in Cash fflow/Entries/Cash fflow or import itthrough Cash fflow/Entries/Import.
3. Go to the Matching screen by clicking Match tto iinvoices under the Matching && PProcessing section (in the Entry screen atCash fflow/Entries/Cash fflow). You can also match the receipt to the invoice at Cash fflow/Entries/To bbe mmatched. The Entry screen at Cash fflow/Entries/Cash fflow applies to all legislations except for the US which has a differentcash flow entry screen to cater to local requirements.
4. Select the receipt and invoice (excluding discount) to be matched and click Match/Process. The Write ooff: DDiscount screenwill be displayed.
5. Click Write ooff to write off the discount if the debtor had paid within the agreed payment date, or Cancel to keep thediscount installment if the debtor did not pay within the agreed payment date and to exit the Write ooff: DDiscount screen.This will bring you back to the Matching screen.
6. If the discount was written off, click Close in the Matching screen to exit. If the discount was not written off, select thediscount installment and click Match/Process. The Process screen will be displayed.
7. You now need to decide what to do with the difference by selecting one of the options provided in the Process screen andclicking Process to process the difference. • Balance/Compress - Select this to process the difference as balance that the debtor needs to pay.• Payment ddifference - Select this to process the difference as a payment difference between what the debtor
has to pay and what has been paid. • Discounts - Select this to write off the invoice amount to the general ledger account (if the debtor paid within the
agreed payment date). • Discounts ((Including: TTax) - There are two available options when this is selected. Select Adjust: RRevenue to adjust the
revenue and tax (the system will correct the tax as it reverses the financial transactions of the original invoice for the difference amount) or Write ooff ddiscount to write off the discount to a specified G/L account.
• Other - Select this if the difference does not fall within any of the available options and click to select a G/L to allocate the invoice/installment to.
Note: If the debtor paid the full invoice amount and did not take the discount (although he paid within the agreed paymentdate), match the receipt with both the invoice and discount installments at the same time. You can also decide to keep theinstallment for the outstanding settlement discount without matching or writing it off if the debtor did not pay on time and istherefore not entitled to the discount.8. Click Close to exit.
Tip: If you select Payment ddifference, Discounts, Discounts ((Including: TTax) or Other, you can define or changethe write-off date, reporting date, cost center, cost unit, and project code of the transaction under theTransaction section.
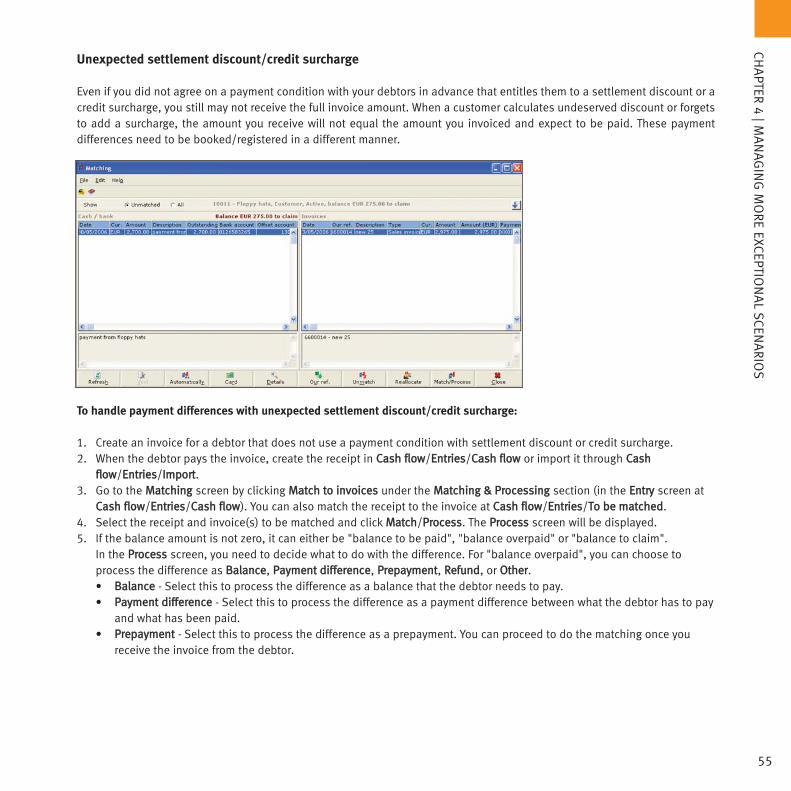
55
CH
APTER 4 | M
AN
AG
ING
MO
RE EXCEPTION
AL
SCEN
ARIO
S
Unexpected settlement discount/credit surcharge
Even if you did not agree on a payment condition with your debtors in advance that entitles them to a settlement discount or acredit surcharge, you still may not receive the full invoice amount. When a customer calculates undeserved discount or forgetsto add a surcharge, the amount you receive will not equal the amount you invoiced and expect to be paid. These paymentdifferences need to be booked/registered in a different manner.
To handle payment differences with unexpected settlement discount/credit surcharge:
1. Create an invoice for a debtor that does not use a payment condition with settlement discount or credit surcharge. 2. When the debtor pays the invoice, create the receipt in Cash fflow/Entries/Cash fflow or import it through Cash
flow/Entries/Import. 3. Go to the Matching screen by clicking Match tto iinvoices under the Matching && PProcessing section (in the Entry screen at
Cash fflow/Entries/Cash fflow). You can also match the receipt to the invoice at Cash fflow/Entries/To bbe mmatched. 4. Select the receipt and invoice(s) to be matched and click Match/Process. The Process screen will be displayed. 5. If the balance amount is not zero, it can either be "balance to be paid", "balance overpaid" or "balance to claim".
In the Process screen, you need to decide what to do with the difference. For "balance overpaid", you can choose toprocess the difference as Balance, Payment ddifference, Prepayment, Refund, or Other. • Balance - Select this to process the difference as a balance that the debtor needs to pay.• Payment ddifference - Select this to process the difference as a payment difference between what the debtor has to pay
and what has been paid.• Prepayment - Select this to process the difference as a prepayment. You can proceed to do the matching once you
receive the invoice from the debtor.

• Refund - Select this to process the difference as a refund. In the Matching screen, the payment under the Cash/banksection will be removed and the invoice under the Invoices section will no longer display the full amount but the difference that needs to be refunded. You then go to Cash fflow/Miscellaneous/Refund and define the relevant criteria.Click Additional ccriteria to define the additional criteria and then click Close to close the Additional ccriteria screen. Click Display to display the transactions according to the defined criteria. Select the To bbe aauthorized check box to display the transactions that need to be authorized. Select a transaction and click the Authorized box on the left. Then select the Already aauthorized check box to display the transactions that are authorized but not processed. Select a transaction and click the Processed box on the left. You have now authorized and processed the refund. You can then go to Cash fflow/Entries/Cash fflow and make the refund (payment) to the debtor. This will create a payment under the Cash/bank section in the Matching screen. You can now automatically match the payment with the invoice (that displays the difference that needs to be refunded).
• Other - Select this if the difference does not fall within any of the available options and click to select a G/L to allocate the invoice/installment to.
For "balance to be paid" and "balance to claim", you can choose to process the difference as Balance/Compress, Paymentdifference, Discounts, Discount ((Including: TTax), or Other. Select an option in the Process screen and click Process to processthe difference or click Cancel to cancel the process and to exit the screen. 6. Click Close to exit.
56C
HA
PTER 4 | MA
NA
GIN
G M
ORE EXCEPTIO
NA
LS
CENA
RIOS

57
CH
APTER 4 | M
AN
AG
ING
MO
RE EXCEPTION
AL
SCEN
ARIO
S
To correct wrong or bounced payment:
1. Go to Cash fflow/Payments/Payments iin ttransit. The Payments iin ttransit screen will be displayed.2. At Group bby, select the required option to group the processed payment according to Accounts, Cash iinstruments,
Payment rreference, Payment ddate, Run nnumber, or Details. If you group by Accounts, you will see an additional fieldcalled Name and a search button next to Group bby. Here, you can type the account name at Name and click Search todisplay the relevant payment in transit.
3. Select a payment that you wish to correct and click Reverse aauth. to remove the payment from the Payments iin ttransitscreen. The selected payment will be undone and the invoices or installments that were paid will be reopened. Thesereopened invoices or installments can again be authorized and processed. The payment will also no longer appear in therun in which it was processed. Therefore, after resetting the status, everything is back to the stage before the payment isprocessed. If any financial transactions were generated during the processing of the payment, then these will be removedor voided if the final posting has already occurred.
4. Click Close to exit.
4.2 Correcting Wrong or Bounced Payment
In daily practice, mistakes can happen during a payment process. Before you send the payment to the bank (for example,electronically) or to your creditor (for example, by cheque) you may discover that you have made a mistake while processing thepayment for a certain invoice or installment and want to process the payment again.
Another possibility is that after you have sent the payment to the bank or to your creditor, you found out that your payment hasbounced and for certain reasons, the bank could not process your payment. Another incident could be that your creditor nevergot your payment by cheque. In this case, the payment must be cancelled. These "bounced" payment are not included on thebank statement.

4.3 Matching Cash Flow Transactions to Other Debtor/Creditor Invoices or Installments
In various cases, it is possible that an invoice has been sent to/received from one debtor/creditor but payment is made toanother. A typical example is a head office of a corporation paying for an invoice you have sent to their subsidiary. The following topic is relevant to this section:
• Reallocation of debtor/creditor
Reallocation of debtor/creditor
When you receive money from one company but have invoiced another, reallocation of the debtor/creditor is necessary becausecash flows can only be matched to invoices or installments listed to the same debtor/creditor.
To reallocate debtor/creditor:
1. Go to Finance/Accounts rreceivable/Cards or Finance/Accounts ppayable/Cards.2. Define the relevant criteria and click Search. A list of debtors/creditors that match the criteria will be displayed. 3. Select the debtor/creditor for which you wish to reallocate the invoice/installment and click Display. The Debtor ccard or
Creditor ccard screen will be displayed with information such as the G/L number, G/L description, debit amount, creditamount and balance amount.
4. Select a G/L and click Match. The Matching screen will be displayed. 5. In the Matching screen, click Reallocate to display the Reallocate screen.6. In the Reallocate screen, all information under the To section will be pre-filled (depending on the debtor/creditor
selected) except Suspense aaccount. At Suspense aaccount, type or select the suspense G/L account. The suspenseaccount is used to transfer the invoice/installment from one debtor/creditor to the other.
58C
HA
PTER 4 | MA
NA
GIN
G M
ORE EXCEPTIO
NA
LS
CENA
RIOS

59
CH
APTER 4 | M
AN
AG
ING
MO
RE EXCEPTION
AL
SCEN
ARIO
S
7. Under the From section at Account, type or select the debtor/creditor account from which reallocation is to be made.Account will then change to Debtor or Creditor according to your selection and all invoices/installments related to thataccount will be displayed.
8. Select an invoice/installment and click Process. The invoice/installment will then be automatically displayed in theMatching screen.
9. In the Matching screen, select the invoice/installment and click Match/Process. The Process screen will be displayed. 10. In the Process screen, select Other and click to select the correct G/L account. The invoice/installment will then be
automatically removed from the Matching screen. 11. Click Close to exit.
4.4 Handling Prepayment and Interbank Transfers
The following topics are relevant to this section:
• Handling prepayment• Handling interbank transfers
Handling prepayment
A prepayment involves creating and making a payment prior to receiving/sending the purchase/sales invoice. The prepaid termthen needs to be authorized and processed. Prepayment is created in the purchase/sales orders. It can also be created in thecash flow module.

60C
HA
PTER 4 | MA
NA
GIN
G M
ORE EXCEPTIO
NA
LS
CENA
RIOS
To create prepayment:
1. Go to Cash fflow/Payments/Prepayments && ttransfers.2. Click New to display the Prepayment screen. This is the default screen. In this screen, fill in the relevant information about
the prepayment you wish to make such as the cash instrument from which payment is made, the amount, currency,payment reference, the purchase order number, and others.
3. Click Save to save the information and Close to exit.
To authorize prepayment:
1. Go to Cash fflow/Payments/Authorize.2. Define the relevant criteria. Click Additional ccriteria to define more criteria, and then Close to close the Additional
criteria screen.3. Click Display to display the transactions in the Authorize screen according to the defined criteria. 4. Select the Prepayment check box to view prepayment transactions. 5. Select a transaction and click Authorize. 6. Click Close to exit.
To process prepayment:
1. Go to Cash fflow/Payments/Process.2. Define the relevant criteria. Click Additional ccriteria to define more criteria, and then Close to close the Additional
criteria screen.3. Click Display to display the transactions in the Process screen according to the defined criteria. 4. Select the Prepayment check box to view prepayment transactions. 5. Select a transaction and click Process.6. Click Close to exit.
After the bank has processed the prepayment and you have manually registered the entry or imported the bank statement, youcan proceed to do the matching.
To match prepayment:
1. Go to Cash fflow/Payments/Authorize or Cash fflow/Payments/Process. Click Display to display the Authorize or Processscreens respectively.
2. Select the Prepayment check box to display the prepayment.3. Select a transaction and click Match. The Matching screen will be displayed. 4. Click Automatically to match the transactions automatically. They will then be removed from the Matching screen. 5. Click Close to exit.

61
CH
APTER 4 | M
AN
AG
ING
MO
RE EXCEPTION
AL
SCEN
ARIO
S
Handling interbank transfers
Transfers refer to Electronic Funds Transfer (EFT). EFT enables corporations and individuals to provide secure direct paymentelectronically without issuing paper cheques or moving cash monies.
To create interbank transfers:
1. Go to Cash fflow/Payments/Prepayments && ttransfers.2. Click New to display the Prepayment screen. This is the default screen. 3. At Entry, select Transfer and fill in the relevant information about the transfer you wish to make such as the cash
instrument from which payment is to be made, the cash instrument to which payment is to be received, the amount,currency, date of transfer, payment reference, and others.
4. Click Save to save the information, and then Close to exit.
To authorize interbank transfers:
1. Go to Cash fflow/Payments/Authorize and define the relevant criteria.2. Click Additional ccriteria to define more criteria, and then Close to close the Additional ccriteria screen.3. Click Display to display the transactions in the Authorize screen according to the defined criteria. 4. Select the To bbe aauthorized check box to view transactions that need to be authorized. 5. Select a transaction and click Authorize.6. Click Close to exit.

To process interbank transfers:
1. Go to Cash fflow/Payments/Process.2. Define the relevant criteria. Click Additional ccriteria to define more criteria, and then Close to close the Additional
criteria screen.3. Click Display to display the transactions in the Process screen according to the defined criteria. 4. Select the Already aauthorized check box to view transactions that are already authorized but need to be processed. 5. Select a transaction and click Process.6. Click Close to exit.
After the bank has processed the transfer and you have manually registered the entry or imported the bank statements for bothcash instruments, you can proceed to do the matching. Before matching, make sure both the cash flow transactions (paymentand receipt) are allocated to the default company account code at Systems/General/Settings/Company ddata ssettings.
To match interbank transfers:
1. Go to Cash fflow/Entries/Cash fflow.2. Define the relevant criteria and click Refresh to view the transfer transactions.3. Select the transfer you wish to match and click Edit. This displays the Entry screen.4. Under the Matching && PProcessing section, click Interbank. This displays the Matching screen.5. Click Automatically so both the payment and receipt will be automatically matched and removed from the Matching screen. 6. Click Close to exit.
62C
HA
PTER 4 | MA
NA
GIN
G M
ORE EXCEPTIO
NA
LS
CENA
RIOS

63
CH
APTER 4 | M
AN
AG
ING
MO
RE EXCEPTION
AL
SCEN
ARIO
S
4.5 Advanced Management of Letters of Credit and Cheques
It is possible to generate an overview of all cheques or letters of credit in your administration that have been used to make orreceive payment. This enables you to quickly see the outgoing and incoming cash flow through the payment instrument. Youcan also manage letters of credit and cheques at an advanced level such as authorizing, matching, processing payment tocreditors or receiving, depositing, settling payment from debtors.
For advance management of instruments, select the Advanced: IInstrument hhandling check box at System/General/Settings/Banksettings under the General section.
To authorize payment:
1. Go to Cash fflow/Miscellaneous/Instrument sstatus. 2. Under the Range section at Type, select Letter oof ccredit or Cheque.3. At Show, select Cash oout, and then select Prepayment or Invoices below Show. Define other relevant criteria.4. Click Advanced to display the Filter section. Define the relevant criteria.5. Select a transaction you want to authorize and click Authorize. The authorized transaction will appear if Authorized is
selected. If you have authorized the wrong transaction, you can undo the mistake by selecting the wrongly authorizedtransaction and clicking Reverse aauth.. The transaction will now reappear if Prepayment or Invoices is selected.
6. Click Close to exit.

To match payment:
1. Go to Cash fflow/Miscellaneous/Instrument sstatus. 2. Under the Range section at Type, select Letter oof ccredit or Cheque.3. At Show, select Cash oout, and then select Prepayment, Invoices, Authorized, Printed, or Payment iin ttransit below Show.
Define other relevant criteria. 4. Click Advanced to display the Filter section. Define the relevant criteria. 5. Select a transaction you want to match and click Match. The Matching screen will be displayed. 6. Click Automatically to automatically match the payment and invoice(s) or click Match/Process to manually perform the
matching process. If matching is for a VAT term and VAT return has not been generated yet, you need to type a passwordbefore you are able to perform the match/process function. If the balance amount that appears at the top center of theCash/bank and Invoices section is zero, the selected transactions will be matched and removed from the screen. If thereare differences to be settled with the invoice amount, the decision must be made on how to write off these differences. Ifthere are differences to be settled, the Process screen will be displayed.
7. Select the relevant options such as Balance, Payment ddifference, Refund, Discount and more, and then click Process. 8. Click Close to exit.
To process payment:
1. Go to Cash fflow/Miscellaneous/Instrument sstatus. 2. Under the Range section at Type, select Letter oof ccredit or Cheque. 3. At Show, select Cash oout, and then select Authorized below Show. Define other relevant criteria.4. Click Advanced to display the Filter section. Define the relevant criteria. 5. Select a transaction from those displayed and click Process. The Enter: IInstrument nnumber screen or the Earned
discount/Write ooff: CCredit ssurcharge screen (applicable for invoices with discounts/credit surcharge) will be displayed. Inthe Earned ddiscount/Write ooff: CCredit ssurcharge screen, click OK to proceed or Cancel to exit. If you proceed, the Enter:Instrument nnumber screen will be displayed.
6. At First: IInstrument nnumber and Layout nname, you can edit the pre-filled options. 7. Click OK to proceed or Cancel to exit. 8. If you choose to proceed, the Instrument sstatus screen will be displayed with the message "Trial print?" Click Yes for a trial
print, No for an actual print, or Cancel to exit. 9. The Instrument sstatus screen will again be displayed with the message "Print job successful?" Click Yes if printing was
successful or No to reprint. If you choose to reprint, the Reprint screen will be displayed. Here you have the option toreprint, delete, or void the document. Once the document has been printed, it will appear if Printed is selected. If youhave accidentally processed the wrong document, you can undo the mistake by selecting the processed document andclicking Reverse aauth.. The document will reappear if Invoices or Prepayment is selected. You can also void the processeddocument by selecting the processed document and clicking Void. Once the document has been voided, it will appear ifVoided is selected.
10. Click Close to exit.
64C
HA
PTER 4 | MA
NA
GIN
G M
ORE EXCEPTIO
NA
LS
CENA
RIOS

65
CH
APTER 4 | M
AN
AG
ING
MO
RE EXCEPTION
AL
SCEN
ARIO
S
To receive payment:
1. Go to Cash fflow/Miscellaneous/Instrument sstatus. 2. Under the Range section at Type, select Letter oof ccredit or Cheque. 3. At Show, select Cash iin, and then select Invoices or Printed below Show. Define other relevant criteria.4. Click Advanced to display the Filter section. Define the relevant criteria. 5. Select a transaction from those displayed and click Receive. The Received: BBill oof eexchange screen will be displayed for
letters of credit and the Received: CCheque screen will be displayed for cheques. 6. Make sure the information on the screen is correct (some of the information can be edited) and click OK to receive the
payment or Cancel to exit. Payment that has been received will now appear if Received is selected. If you received thewrong payment and wish to undo the mistake, select the received payment and click Delete. The payment will nowreappear if Invoices is selected.
7. Click Close to exit.
To deposit payment:
1. Go to Cash fflow/Miscellaneous/Instrument sstatus. 2. Under the Range section at Type, select Letter oof ccredit or Cheque. 3. At Show, select Cash iin, and then select Received below Show. Define other relevant criteria.4. Click Advanced to display the Filter section. Define the relevant criteria. 5. Select a transaction from those displayed and click Deposit. The Deposit: BBill oof eexchange screen will be displayed for
letters of credit and the Deposit: CCheque screen will be displayed for cheques. 6. Under the Deposit section at Deposit FFor (only enabled for letters of credit), select Collection or Discount. 7. At To ccash iinstrument, type or select the cash instrument number. 8. Click Deposit to deposit the payment or Cancel to exit. The Bill ssettlement: CCash iinstrument screen will be displayed if
Deposit is clicked.9. Type or select the Cash iinstrument number. 10. Click OK to proceed or Cancel to exit. Payment that has been deposited will now appear if To bbe ddiscounted (this is only
applicable for letters of credit that have been used for discounted payment) or To bbe ccollected is selected. When To bbecollected is selected, you can reverse the deposited date by selecting the payment and clicking Reverse. The Reverse DDatescreen will be displayed. At Reverse DDate, type or select the new date. Click OK to proceed or Cancel to exit. Payment withreversed dates will now reappear if Received is selected.
11. Click Close to exit.

To settle the record of payment that has been collected:
1. Go to Cash fflow/Miscellaneous/Instrument sstatus. 2. Under the Range section at Type, select Letter oof ccredit or Cheque. 3. At Show, select Cash iin, and then select To bbe ccollected or Bank sstatement below Show. Define other relevant criteria.4. Click Advanced to display the Filter section. Define the relevant criteria. 5. Select a transaction from those displayed and click Settle. The Settle: BBill oof eexchange screen will be displayed for letters
of credit and the Settle: CCheque screen will be displayed for cheques. 6. Make sure the information on the screen is correct (some of the information can be edited) and click Settle to settle the
payment or Cancel to exit. Payment that has been settled will still appear if To bbe ccollected is selected. You can reversethe settlement by selecting the settled payment and clicking Unsettle.
7. Click Close to exit.
To bounce payment:
1. Go to Cash fflow/Miscellaneous/Instrument sstatus. 2. Under the Range section, at Type, select Letter oof ccredit or Cheque. 3. At Show, select Cash iin, and then select To bbe ccollected or To bbe ddiscounted (only applicable for letters of credit with
discount or credit surcharge) below Show. Define other relevant criteria.4. Click Advanced to display the Filter section. Define the relevant criteria. 5. Select a transaction from those displayed and click Bounce. The Bounce: BBill oof eexchange screen will be displayed for
letters of credit and the Bounce: CCheque screen will be displayed for cheques. 6. Make sure the information on the screen is correct (some of the information can be edited) and click Bounce to bounce
the payment or Cancel to exit. Payment that has been bounced will appear if Bounced is selected. 7. Click Close to exit.
To confirm the letter of credit that needs to be discounted:
1. Go to Cash fflow/Miscellaneous/Instrument sstatus. 2. Under the Range section at Type, select Letter oof ccredit. 3. At Show, select Cash iin, and then select To bbe ddiscounted below Show. Define other relevant criteria.4. Click Advanced to display the Filter section. Define the relevant criteria. 5. Select a transaction from those displayed and click Confirm. The Finance: BBill oof eexchange screen will be displayed. 6. Fill in information such as Discount %%/Amount and Bank ccosts/VAT if applicable. 7. Click Accept to accept the discounted letter of credit or Reject to reject the letter of credit. Rejected letters of credit will
reappear if Received is selected. 8. Click Close to exit.
66C
HA
PTER 4 | MA
NA
GIN
G M
ORE EXCEPTIO
NA
LS
CENA
RIOS

67
CH
APTER 4 | M
AN
AG
ING
MO
RE EXCEPTION
AL
SCEN
ARIO
S
To print payment invoices using letters of credit:
1. Go to Cash fflow/Miscellaneous/Instrument sstatus. 2. Under the Range section at Type, select Letter oof ccredit. 3. At Show, select Cash iin, and then select Invoices below Show. Define other relevant criteria. 4. Click Advanced to display the Filter section. Define the relevant criteria. 5. Select a transaction from those displayed and click Print. The Enter: IInstrument nnumber screen or the Earned
discount/Write ooff: CCredit ssurcharge screen (applicable for invoices with discounts/credit surcharge) will be displayed. In the Earned ddiscount/Write ooff: CCredit ssurcharge screen, click OK to proceed or Cancel to exit. If you choose to proceed,the Enter: IInstrument nnumber screen will be displayed.
6. At First: IInstrument nnumber and Layout nname, you can edit the pre-filled options. 7. Click OK to proceed or Cancel to exit. 8. If you choose to proceed, the Instrument sstatus screen will be displayed with the message "Trial print?" Click Yes for a trial
print, No for an actual print, or Cancel to exit. 9. The Instrument sstatus screen will again be displayed with the message "Print job successful?" Click Yes if printing was
successful or No to reprint. If you choose to reprint, the Reprint screen will be displayed. Here you have the option toreprint, delete, or void the document. Once the document has been printed, it will appear if Printed is selected. If youhave accidentally printed the wrong document, you can undo the mistake by selecting the printed document and clickingDelete. The document will now reappear if Invoices is selected.
10. Click Close to exit.


1. Contents
a. Breadth: How well has the document covered the desired scope of the subject?
b. Depth: How complete have the different sections covered their topics?
2. Quality
a. Language: How is the overall standard of the language used?
b. Graphics: How is the overall standard of the graphic contents of the document?
c. Presentation: How is the overall standard of the presentation (layouts) of the document?
3. User-friendliness
a. Structure: Is the overall structure or flow used useful for the readers to understand the topics described?
b. Descriptions: Overall, are the topics being described in an easy-to-understand manner?
4. Other comments What features did you like most about this User Manual? What did you like least about it?
Provide any other comments you have relating to the document evaluated.
Product Type Exact Globe 2003 - Release 370 Item Code HE1031EN01
User Manual Type E-Cashflow Management
Exact SSoftware welcomes your comments and suggestions on the quality and usefulness of this publication. Your input is an important part of the information we use for
revision. Please take a few minutes of your time to read through the document to be evaluated as thoroughly as you can. Then use your fair judgment to rate the evaluation
criteria in the questionnaire basing on the following five-point scores.
1. Extremely SSatisfied - exceeds all expectations
2. Very SSatisfied - has a very high standard
3. Satisfied - meets the expectations
Questionnaire
Reader's Name: Designation:
Company:
Address:
Other comments:
Email: Telephone: Fax:
Thank you for helping us to improve our service.Mail your feedback to the following address or e-mail to [email protected]. You can also fill in an online evaluation form at the customer portal.
Marketing Services, User Manuals FeedbackExact Asia Development Center Sdn Bhd, Level 34, Tower 2, Petronas Twin Towers, Kuala Lumpur City Centre 50088 Kuala Lumpur, Malaysia Tel: 603-2179 4242 Fax: 603-2179 4255
4. Dissatisfied - does not meet the expectations
5. Very DDissatisfied - needs a lot of improvement
6. Extremely DDissatisfied - clearly not up to the mark
1 2 3 4 5 6
1 2 3 4 5 6
1 2 3 4 5 6
1 2 3 4 5 6
1 2 3 4 5 6
1 2 3 4 5 6
1 2 3 4 5 6
1 2 3 4 5 6
score
Reader's Feedback