Embed Size (px)
Citation preview

Rev A 12/20/06 33 - 1
ETHERNET WEATHER STATION CONNECTIONS Application Note 33
With WeatherLink® and a Device Server INTRODUCTION It is possible to substitute an Ethernet connection for the direct USB or serial connection that WeatherLink normally uses to communicate with a weather station. An Ethernet connection refers to a connection using the TCP/IP protocol for communication over the Internet or on a Local Area Network [LAN]. A LAN is normally within the confines of a building or group of buildings, while communication over the Internet is across a router which separates the LAN from the Internet. The concept is similar to using a remote telephone modem except that a device server takes the place of the remote telephone modem. The device server converts the serial or USB data signals to TCP/IP to allow transmission over the Internet or a LAN. This document will provide general guidelines for setting up this kind of connection on a LAN and enabling access over the Internet. Please note that due to the variety of device servers and routers on the market, it is nearly impossible to document all the possible issues that you may encounter. Additionally, more detailed instructions on how to setup a Lantronix device server and a LinkSys router will be provided. GENERAL INSTRUCTIONS To set up this kind of connection, you will need a device server (not a print server, as these as specially designed for printers only!) that is either USB or Serial, WeatherLink software, a CAT-5 network cable, and a functional Ethernet network with a switch or a router. For access over the Internet, you will also need a high-speed (broadband) Internet connection. Be sure to get the same kind of device server as the type of WeatherLink you have or plan to buy. Generally, devices of this type will be around $100 and are rarely available at most consumer electronics stores. You will probably need to purchase the item online or go to a store that specializes in products for Information Technology or Networking. Many device servers come with multiple serial or USB ports. You only need one port per weather station. For a USB device server, the WeatherLink USB connector plugs into the USB connector on the device server. Depending upon the design of the device server, the WeatherLink serial adapter may or may not be an appropriate connector. If the connection is male (like on a PC serial port), then the WeatherLink adapter should work. If the connection is female, you will need to get a Telephone Modem Adapter (#6533 for Vantage Pro2 and Vantage Pro; #7870 for Wizard III®, Monitor II® and Perception II®) to make the serial connection. This is the case for the Lantronix device server (to be discussed later). The other connector accepts the CAT-5 network cable that connects the device server to the router. The device server includes driver software to install on your computer that converts the Internet connection to your weather station to one that emulates a USB or serial connection. From a computer on the local LAN, you will need to use the software provided with the device server to set the communications settings including the Baud Rate to match the settings on the weather station. The software from the device server manufacturer will generally install a virtual serial port (such as COM10) or virtual USB connection on your PC. If you are using a USB WeatherLink, you would then install the USB driver at this time. Finally, you need to configure the WeatherLink software to use the virtual serial port to connect to your console. If you wish to access the device server and your console from the internet (on the network beyond the local router), you will need to configure your router. You will need to know the IP address assigned to
33 - 2 Rev A 12/20/06
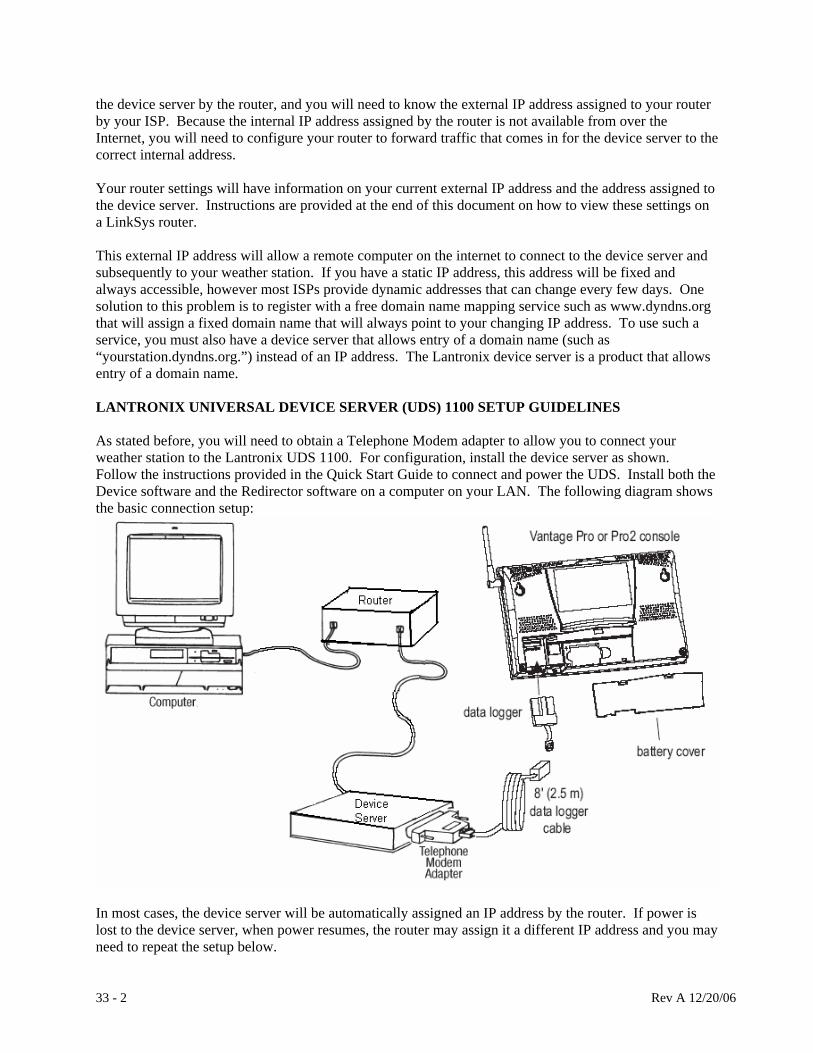
the device server by the router, and you will need to know the external IP address assigned to your router by your ISP. Because the internal IP address assigned by the router is not available from over the Internet, you will need to configure your router to forward traffic that comes in for the device server to the correct internal address. Your router settings will have information on your current external IP address and the address assigned to the device server. Instructions are provided at the end of this document on how to view these settings on a LinkSys router. This external IP address will allow a remote computer on the internet to connect to the device server and subsequently to your weather station. If you have a static IP address, this address will be fixed and always accessible, however most ISPs provide dynamic addresses that can change every few days. One solution to this problem is to register with a free domain name mapping service such as www.dyndns.org that will assign a fixed domain name that will always point to your changing IP address. To use such a service, you must also have a device server that allows entry of a domain name (such as “yourstation.dyndns.org.”) instead of an IP address. The Lantronix device server is a product that allows entry of a domain name. LANTRONIX UNIVERSAL DEVICE SERVER (UDS) 1100 SETUP GUIDELINES As stated before, you will need to obtain a Telephone Modem adapter to allow you to connect your weather station to the Lantronix UDS 1100. For configuration, install the device server as shown. Follow the instructions provided in the Quick Start Guide to connect and power the UDS. Install both the Device software and the Redirector software on a computer on your LAN. The following diagram shows the basic connection setup:
In most cases, the device server will be automatically assigned an IP address by the router. If power is lost to the device server, when power resumes, the router may assign it a different IP address and you may need to repeat the setup below.

Rev A 12/20/06 33 - 3
Run the DeviceInstaller application on the Lantronix installation CD. The IP address of the device (if it was automatically assigned by the router) will be indicated. This address will appear on the right. Don’t confuse this with the address on the left. The address on the left is the IP address of your PC. The hardware address of the device will also appear on the right. Double-clicking on the device listed on the right will bring up more information on the settings and allow to configure your device.
Click the Web Configuration Tab and then the Go button. A web page that allows you to configure the communication settings of the device server should appear. A dialog box asking you to enter a username and password will appear. Just press OK without entering anything. (You can also use an Internet browser and type in the IP address the device server was assigned in the URL window.) A page will appear as shown below:

33 - 4 Rev A 12/20/06
Click on Serial Settings on the left and enter the baud rate setting on your weather station. The communications settings should be 8 data bits, 1 stop bit, and no parity. Normally, the baud rate is 2400 for Monitor/Wizard/Perception stations, and 19200 for Vantage Pro2 and Vantage Pro stations. Press OK to enter these settings at the bottom of the page. The message “Done!” will appear to the right of the OK button. Then, click Apply Settings on the left to save these settings. A message will appear indicating that the device will reboot and apply these settings. This will take a few seconds. Wait until the main web page appears again to verify the changes were successful before exiting your browser.
The default factory settings will have the username and password functions disabled. You can click Connection to enter a required username and password if you want to limit access to the configuration settings of this device. All settings will be saved even if the device loses power. If you want to configure these settings over the Internet, you will need to set your router IP address settings to automatically route traffic on Port 80 (Web Port) to the device server. Specific instructions for a LinkSys router are provided later in this document. It is highly recommended that you create a password for your device server if you allow access to it from over the internet.

Rev A 12/20/06 33 - 5
Next, run the Lantronix Redirector software. An unused COM port on your PC will be indicated (This is automatically assigned). Make sure the COM port number is between 1 and 18. WeatherLink only works with COM ports 1 through 18. You can click the Com Setup button to change the COM port that the device server uses. COM ports already assigned to other devices (both physical and virtual) will be grayed out.
You will need to click the Add IP button to enter the IP address and port assignment of the device server (usually automatically assigned by the router as described previously). If you are connecting within a LAN, you can enter the IP address of the device. If you are connecting from another computer over the Internet, you will need to enter the external IP address of your router or a domain name that is mapped to this address (through a service such as from dyndns.org). Enter this IP address in the host section and, as suggested by Lantronix, enter 10001 for the TCP Port value and press OK.

33 - 6 Rev A 12/20/06
The IP address will then appear in the Redirector software’s main dialog box.
Press the Port Settings button and check Raw Mode. This is required for this particular model (UDS) of Lantronix device server as per their documentation. Press the OK button to save this setting and exit the dialog box.
Press the Save button in the Redirector software’s main dialog box to preserve the settings you just entered. A message indicating that the connection will work when the COM port is reopened next will appear. If properly connected and your driver software properly configured, your device server will show up as COM port (for serial devices) or as a USB connection (for USB devices) in your Device Manager. Right click on My Computer, then select the Hardware tab, and click the Device Manager button to view this dialog box in Windows XP. An example is shown below (Lantronix ComPort Redirector Device):

Rev A 12/20/06 33 - 7
Device Manager screen showing correct installation of the ComPort Redirector

33 - 8 Rev A 12/20/06
Make sure the device server is properly connected and appears in the Device Manager before attempting to “Test” communications in WeatherLink. Select the COM port assigned to the Lantronix ComPort Redirector and press test - you should get a message that connection was successful. Additional dialog boxes from the Lantronix software will also appear indicating the status of the connection to the device server. If properly connected, but the connection fails, make sure the COM port assignments in WeatherLink and your Redirector software match and that you are using the correct IP address. Re-run the Lantronix DeviceInstaller application if necessary to verify the settings and the device's IP address.
WeatherLink Communications screen for testing the connection

Rev A 12/20/06 33 - 9
LINKSYS ROUTER SETUP GUIDELINES The following guidelines can be used to configure a Linksys router to properly direct Internet traffic to your device server. Like your device server, there will be an IP address you can enter into your Internet browser’s URL window to configure your router. To determine that IP address, press the Start Menu button in the lower left hand corner, and then select Run.
Type “cmd” in the window.

33 - 10 Rev A 12/20/06
A DOS window will appear. At the prompt, type “ipconfig”. A window similar to the one below will appear:
Make note of the “Default Gateway” address. This is the address you will use to access your router. The addresses that will most commonly appear are “192.168.0.1” or “192.168.1.1”.

Rev A 12/20/06 33 - 11
Enter the Default Gateway address in your Internet browser. A password prompt will appear. If the Linksys router settings are factory default, there is no username and the password is “admin”. The following web page should appear. If not, check the address again and make sure your computer is connected directly to your router.

33 - 12 Rev A 12/20/06
Click on Applications & Gaming. On the page that appears, you will need to tell the router where to forward traffic for the device server. A "port" is used to indicate traffic type, and 10001 is the default and recommended value for the Lantronix UDS 1100. In this case traffic for the Lantronix server is being forwarded on port 10001 to 192.168.1.100, the IP address of the device server which we got from the Device Installer application. If power is lost, your router may assign a different address to the Lantronix and you may need to go back, check and re-enter the new settings. Since your device server uses only one port, both the Start and End port settings values should be the same. For Internet security purposes, it is highly recommended that you only allow port forwarding to specific known devices. Click Enable to the right and then the Save Settings button at the bottom of the page to enable these settings. You can put any text in the "Application" field to help you remember the purpose of this forward.

Rev A 12/20/06 33 - 13
If you want to configure your device server remotely, you will need to add another setting to forward the configuration (not communication) traffic properly. The following screen shows this additional setting (the second line item). A web browser is used to configure the device server and web traffic, by convention is usually on Port 80. Here it is being forwarded to same the IP address of the Lantronix UDS:

33 - 14 Rev A 12/20/06
If you need to view the External IP address for Internet connections (connections from outside your LAN), you can click on Status to view it under “IP Address” – this is the external address of your router. This is the address you would enter into a remote installation of the ComPort redirector to access your station from over the internet.