Embed Size (px)
Citation preview
EFM 2.0 User Manual Table of Contents
Table of Contents
1 : I N T R O D U C T I O N 3
2 : F I R S T L O O K 4
Browsing 4 List view 4
Large & small thumbnails 5
Supported file formats 6
Other features 7 Descriptions 7 Plot File Viewing & Printing 7
3 : M A N A G I N G Y O U R F I L E S 8
Filtering 8
Basic operations 10 Right-click pop-up 10
Sort by > 10Open as > 10Describe 10Hot Directories 11Print Selected File 11MSE context 12
Toolbar tools 13
Delete 13Find 13External app buttons 15Bottom Bar 15Rename 15Copy 15Move 15Delete 16
Viewers 18 DWG Viewer 18
HPGL Viewer 20
The Graphics Preview 21
4 : M E N U S 2 2
File 22 New Folder 22Delete Folder 22Rename Folder 22
Report 22Create HTML 23Send *.plt to plotter: 24
Edit 25 Find 25Copy to clipboard 25Paste from clipboard 25Select All 25
Invert Selection 25Describe File 25Describe Directory 25Import Descriptions 25
View 26 Sort by 26 Hide Tree 26
1
Copyright © 2001 EteCad Ltd. All rights reserved.
EFM 2.0 User Manual Table of Contents
Hide BottomBar 26 Refresh 26
Configuration 27 Appearance 27
Applications 27
Files 28
Plotting 28
Internal Viewer 28
Report 29
Shortcuts 29
Tools 30 Map Network Drive 30Disconnect Network Drive 30Copy Disk 30
Format Disk: 30AutoCAD Batch Processor 31Capture Image 31
5 : W O R K I N G W I T H A U T O C A D 3 3
Bottom Bar 33 Open 33
Insert 33
Xref 33
Plot 33
Working with BlockLibraries 33
Recommended settings 34
6 : T R O U B L E S H O O T I N G & T I P S 3 5
FAQ 35 Hot-key shortcuts 36
A P P E N D I X 3 7Sample LISP script 37
I N D E X 3 8
2
Copyright © 2001 EteCad Ltd. All rights reserved.
EFM 2.0 User Manual 1: Introduction
1: Introduction
EFM is a complete MS Windows Explorer replacement - with added features forhandling CAD and image Þles. These include:¥ Displaying directories of most CAD-related Þles in thumb-view mode ¥ Full-screen viewers for most CAD-related documents¥ Ability to attach descriptions to Þles and directories¥ Direct access to AutoCAD/IntelliCAD commands (Open, Insert, XREF, Plot)¥ Block management within AutoCAD/IntelliCAD¥ Power search for documents (Þles) based on Þle properties and keywords in
their descriptions¥ Reports¥ Batch processing with AutoCAD/IntelliCAD.
In addition it offers:¥ Thumbnail views in two sizes - large and small¥ File descriptions in list views of directories¥ Two methods for Þle manipulation (Copy, Move):
- the MS Explorer way (drag and drop, Copy/Paste with clipboard) - the more robust DOS method (with dialogs)
¥ The ability to retrieve deleted Þles from the Recycle Bin of other machines onthe network to the local computer
¥ Power search for documents (Þles) based on Þle properties and keywords indescriptions, with preview of found Þles and ability to jump to their location
¥ The ability to send PLT Þles directly to plotter¥ The ability to add external program icons to the button bar and execute them
within user-deÞned parameters.¥ The ability to run external programs from a command line and drag and drop
Þles as command line parameters into it from the Browse panel.
In this manual, we aim to demonstrate the wide range of things EFM can do andhow it can help you in your work. Enjoy
- EteCAD Ltd.
3
Copyright © 2001 EteCad Ltd. All rights reserved.
EFM 2.0 User Manual 2: First look • Browsing
2: First look
• Browsing
List view
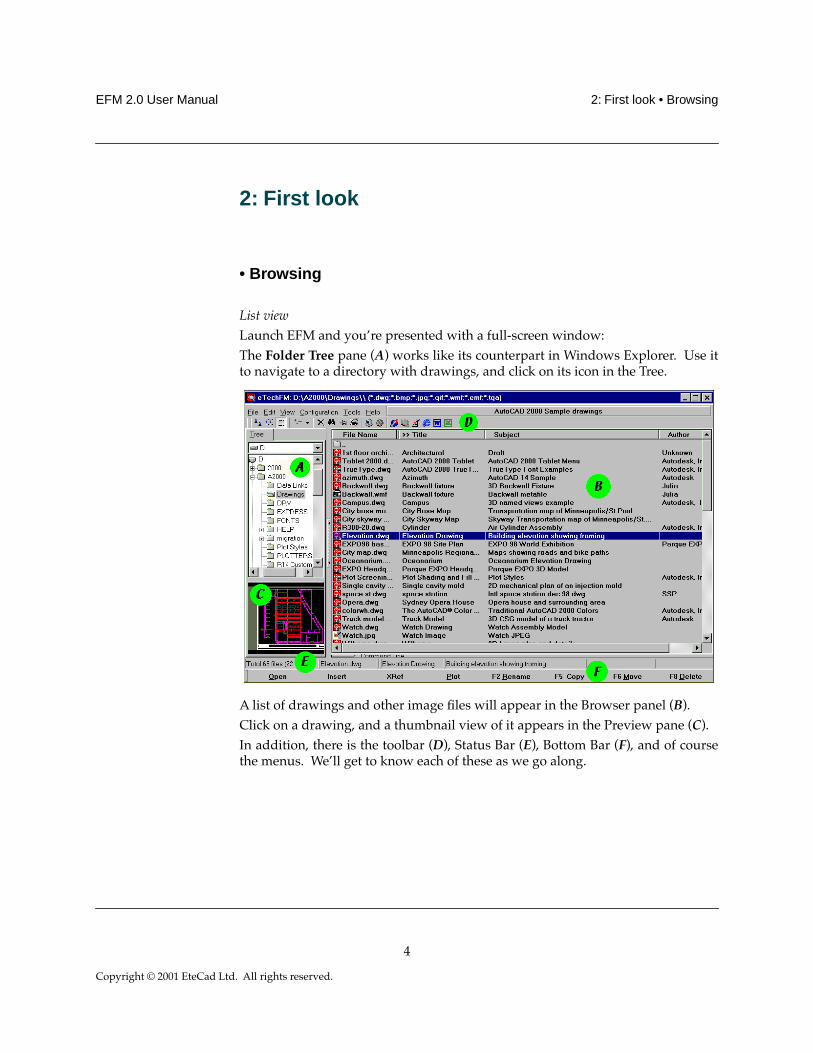
Launch EFM and youÕre presented with a full-screen window:The Folder Tree pane (A) works like its counterpart in Windows Explorer. Use itto navigate to a directory with drawings, and click on its icon in the Tree.
A list of drawings and other image Þles will appear in the Browser panel (B). Click on a drawing, and a thumbnail view of it appears in the Preview pane (C). In addition, there is the toolbar (D), Status Bar (E), Bottom Bar (F), and of coursethe menus. WeÕll get to know each of these as we go along.
4
Copyright © 2001 EteCad Ltd. All rights reserved.
EFM 2.0 User Manual 2: First look • Browsing
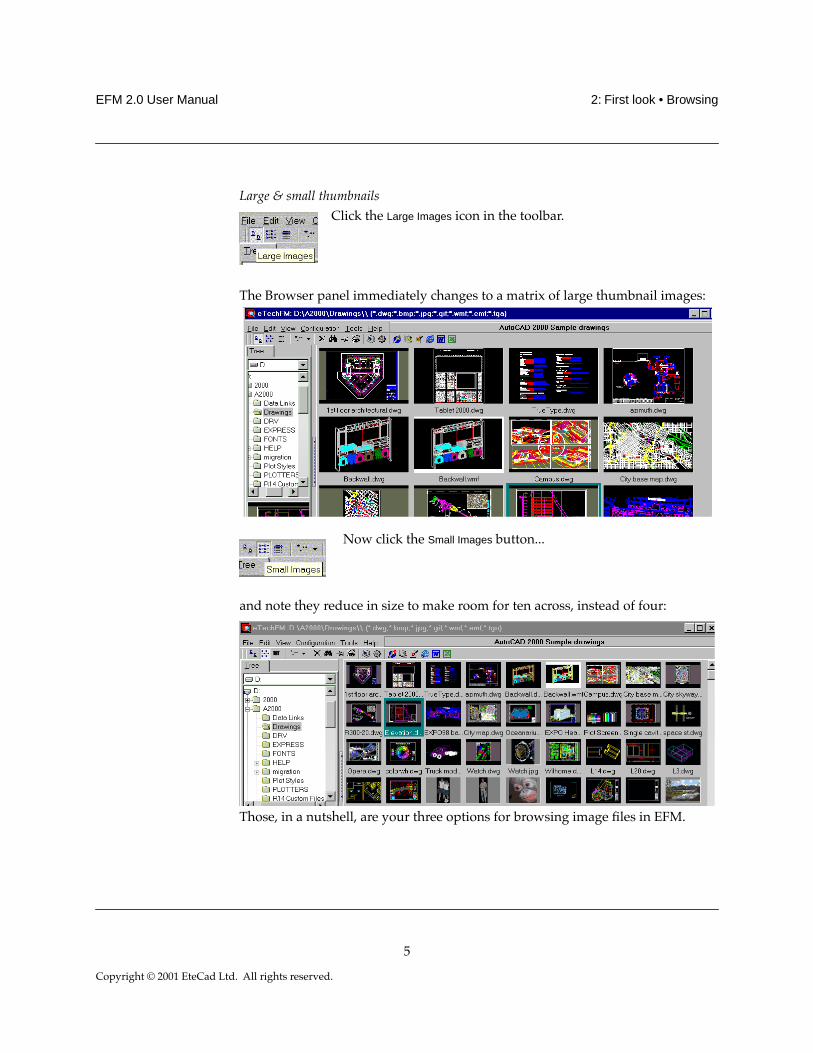
Large & small thumbnails
Click the Large Images icon in the toolbar.
The Browser panel immediately changes to a matrix of large thumbnail images:
Now click the Small Images button...
and note they reduce in size to make room for ten across, instead of four:
Those, in a nutshell, are your three options for browsing image Þles in EFM.
5
Copyright © 2001 EteCad Ltd. All rights reserved.
EFM 2.0 User Manual 2: First look • Browsing
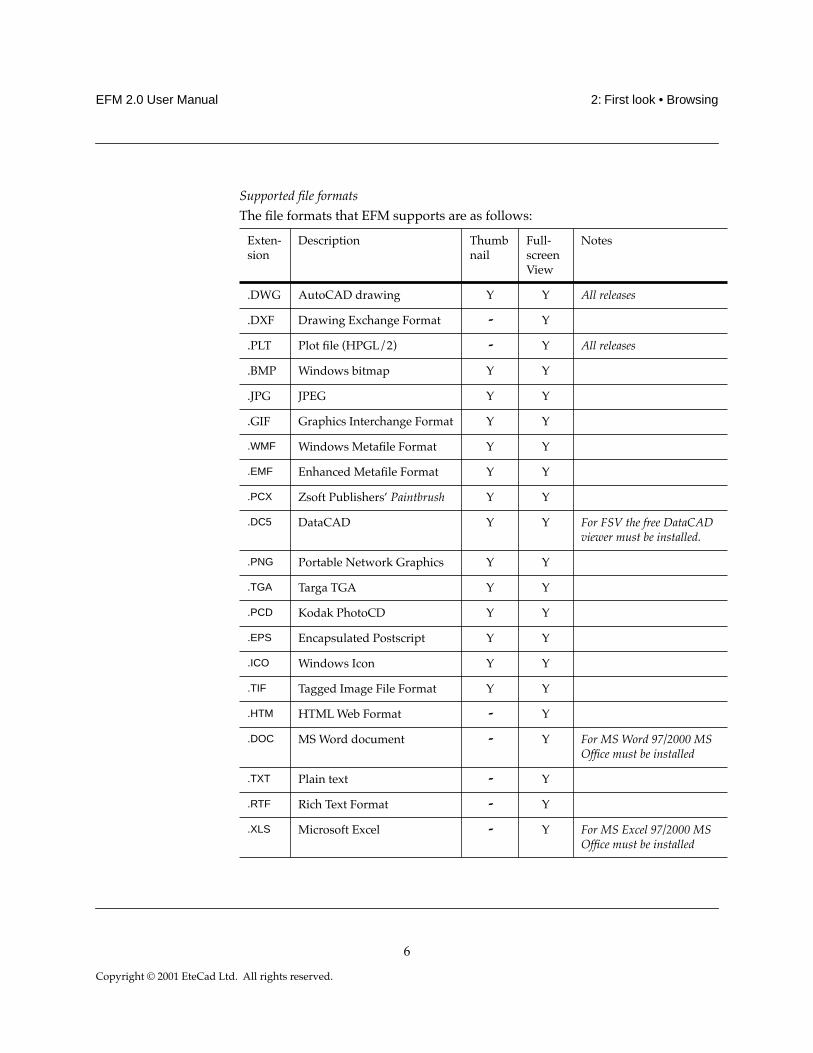
Supported Þle formats
The Þle formats that EFM supports are as follows:
Exten-sion
Description Thumbnail
Full-screen View
Notes
.DWG AutoCAD drawing Y Y All releases
.DXF Drawing Exchange Format Ð Y
.PLT Plot Þle (HPGL/2) Ð Y All releases
.BMP Windows bitmap Y Y
.JPG JPEG Y Y
.GIF Graphics Interchange Format Y Y
.WMF Windows MetaÞle Format Y Y
.EMF Enhanced MetaÞle Format Y Y
.PCX Zsoft PublishersÕ Paintbrush Y Y
.DC5 DataCAD Y Y For FSV the free DataCAD viewer must be installed.
.PNG Portable Network Graphics Y Y
.TGA Targa TGA Y Y
.PCD Kodak PhotoCD Y Y
.EPS Encapsulated Postscript Y Y
.ICO Windows Icon Y Y
.TIF Tagged Image File Format Y Y
.HTM HTML Web Format Ð Y
.DOC MS Word document Ð Y For MS Word 97/2000 MS OfÞce must be installed
.TXT Plain text Ð Y
.RTF Rich Text Format Ð Y
.XLS Microsoft Excel Ð Y For MS Excel 97/2000 MS OfÞce must be installed
6
Copyright © 2001 EteCad Ltd. All rights reserved.
EFM 2.0 User Manual 2: First look • Other features
• Other features
Descriptions
A crucial feature of EFM is the ability to attach descriptions and notes to Þles andfolders. These are available by a few other application programs, too, but are notsupported directly by Windows. Descriptions allow you to:a. Sort Þles by certain Þeldb. Find Þles by keywordsc. Produce reports on drawing or image collections.These Þle descriptions are stored in a Þle called Efmdesc.stg. There is one such Þlefor each folder. If you copy, move or rename Þles using EFM, the Þle descriptionsremain attached to this Þle.We will see in a moment how this feature works.
Plot File Viewing & Printing
Although thumbnail viewing of plot (.PLT/HPGL-2) Þles is not possible, you canview and print such Þles within EFMÕs own HPGL Viewer - providing a facilitynot available in AutoCAD or most other CAD applications. See p 20 for moredetails.
7
Copyright © 2001 EteCad Ltd. All rights reserved.
EFM 2.0 User Manual 3: Managing your files • Filtering
3: Managing your files
• Filtering
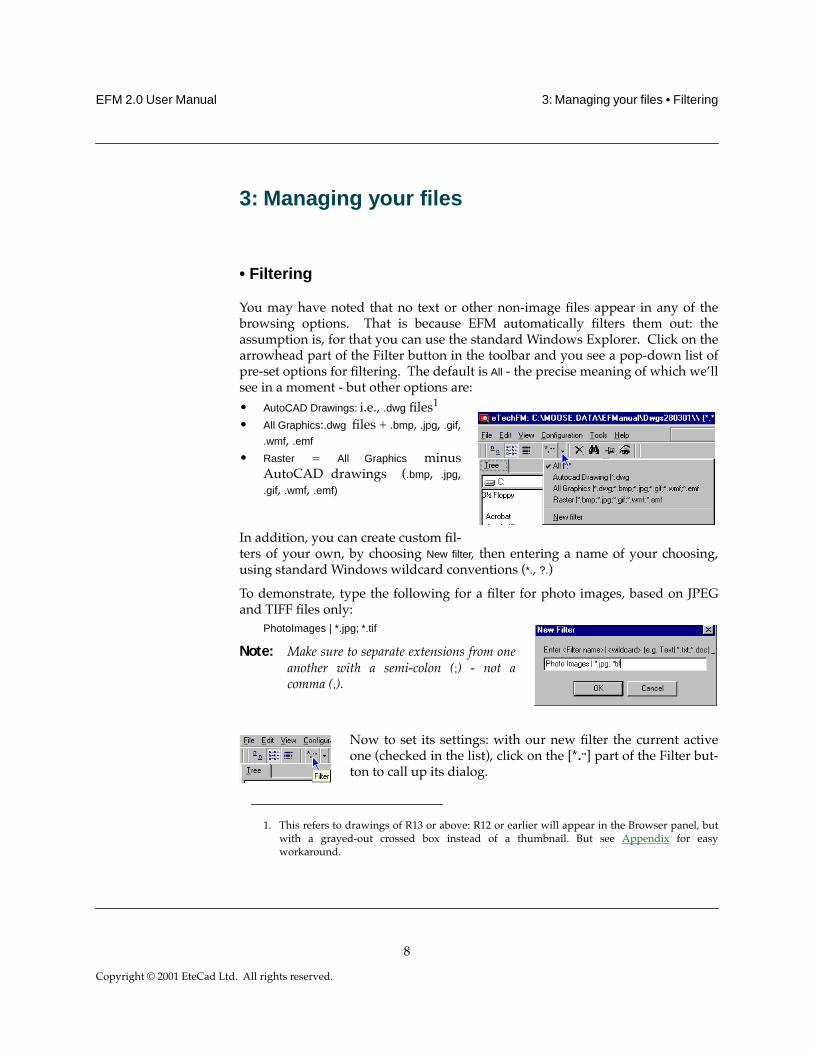
You may have noted that no text or other non-image Þles appear in any of thebrowsing options. That is because EFM automatically Þlters them out: theassumption is, for that you can use the standard Windows Explorer. Click on thearrowhead part of the Filter button in the toolbar and you see a pop-down list ofpre-set options for Þltering. The default is All - the precise meaning of which weÕllsee in a moment - but other options are:¥ AutoCAD Drawings: i.e., .dwg Þles1
¥ All Graphics:.dwg Þles + .bmp, .jpg, .gif,.wmf, .emf
¥ Raster = All Graphics minusAutoCAD drawings (.bmp, .jpg,.gif, .wmf, .emf)
In addition, you can create custom Þl-ters of your own, by choosing New filter, then entering a name of your choosing,using standard Windows wildcard conventions (*., ?.)
To demonstrate, type the following for a Þlter for photo images, based on JPEGand TIFF Þles only:
PhotoImages | *.jpg; *.tif
Note: Make sure to separate extensions from oneanother with a semi-colon (;) - not acomma (,).
Now to set its settings: with our new Þlter the current activeone (checked in the list), click on the [*...] part of the Filter but-ton to call up its dialog.
1. This refers to drawings of R13 or above: R12 or earlier will appear in the Browser panel, butwith a grayed-out crossed box instead of a thumbnail. But see Appendix for easyworkaround.
8
Copyright © 2001 EteCad Ltd. All rights reserved.
EFM 2.0 User Manual 3: Managing your files • Filtering
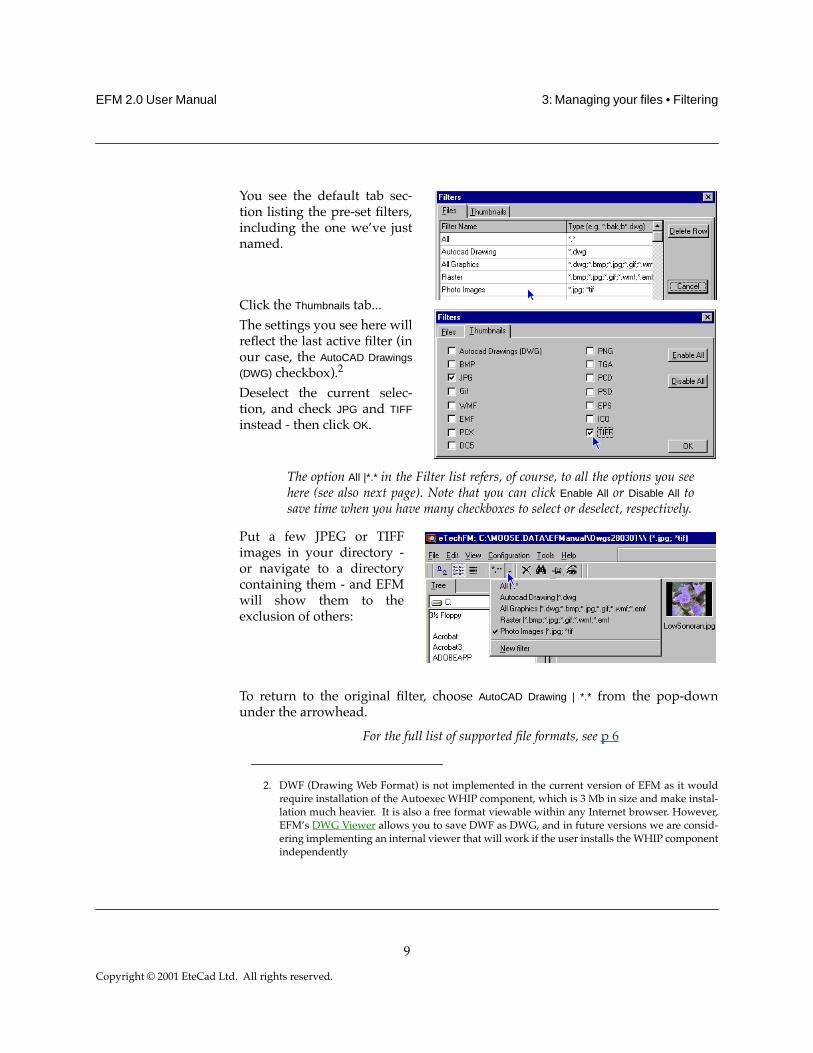
You see the default tab sec-tion listing the pre-set Þlters,including the one weÕve justnamed.
Click the Thumbnails tab... The settings you see here willreßect the last active Þlter (inour case, the AutoCAD Drawings
(DWG) checkbox).2
Deselect the current selec-tion, and check JPG and TIFF
instead - then click OK.
The option All |*.* in the Filter list refers, of course, to all the options you seehere (see also next page). Note that you can click Enable All or Disable All tosave time when you have many checkboxes to select or deselect, respectively.
Put a few JPEG or TIFFimages in your directory -or navigate to a directorycontaining them - and EFMwill show them to theexclusion of others:
To return to the original Þlter, choose AutoCAD Drawing | *.* from the pop-downunder the arrowhead.
For the full list of supported Þle formats, see p 6
2. DWF (Drawing Web Format) is not implemented in the current version of EFM as it wouldrequire installation of the Autoexec WHIP component, which is 3 Mb in size and make instal-lation much heavier. It is also a free format viewable within any Internet browser. However,EFMÕs DWG Viewer allows you to save DWF as DWG, and in future versions we are consid-ering implementing an internal viewer that will work if the user installs the WHIP componentindependently
9
Copyright © 2001 EteCad Ltd. All rights reserved.
EFM 2.0 User Manual 3: Managing your files
• Basic operations
Right-click pop-up
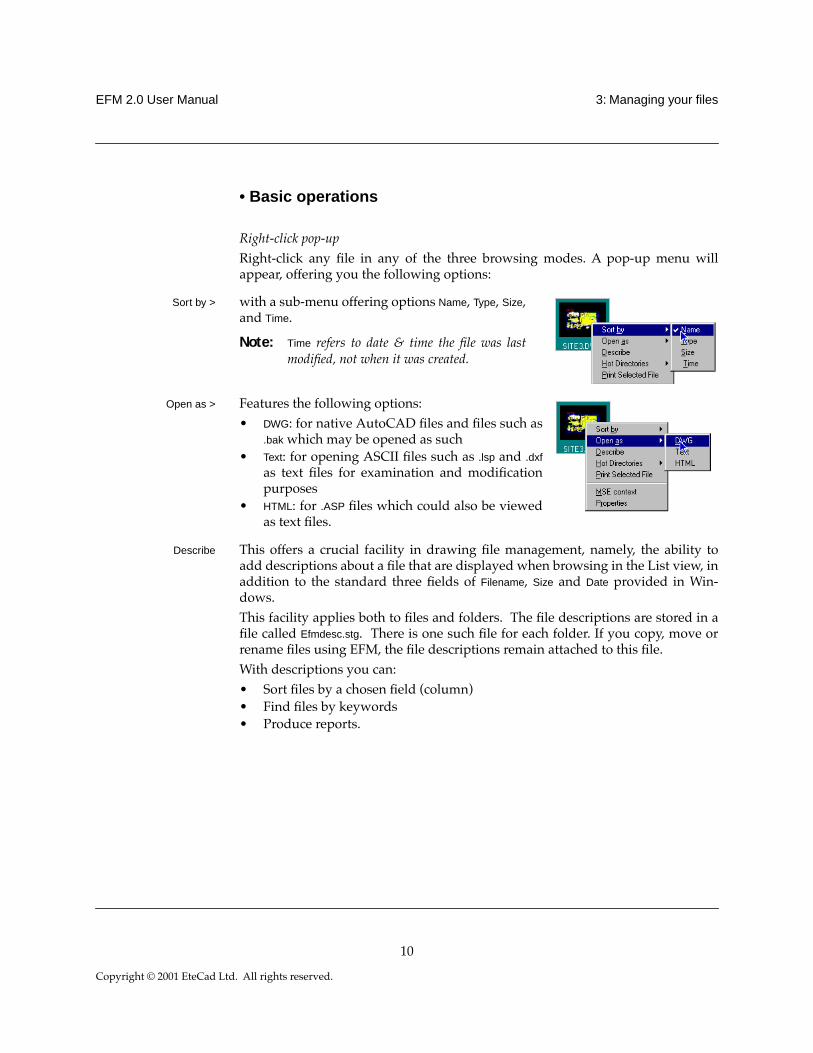
Right-click any Þle in any of the three browsing modes. A pop-up menu willappear, offering you the following options:
Sort by > with a sub-menu offering options Name, Type, Size,and Time.
Note: Time refers to date & time the Þle was lastmodiÞed, not when it was created.
Open as > Features the following options: ¥ DWG: for native AutoCAD Þles and Þles such as
.bak which may be opened as such¥ Text: for opening ASCII Þles such as .lsp and .dxf
as text Þles for examination and modiÞcationpurposes
¥ HTML: for .ASP Þles which could also be viewedas text Þles.
Describe This offers a crucial facility in drawing Þle management, namely, the ability toadd descriptions about a Þle that are displayed when browsing in the List view, inaddition to the standard three Þelds of Filename, Size and Date provided in Win-dows.This facility applies both to Þles and folders. The Þle descriptions are stored in aÞle called Efmdesc.stg. There is one such Þle for each folder. If you copy, move orrename Þles using EFM, the Þle descriptions remain attached to this Þle.With descriptions you can:¥ Sort Þles by a chosen Þeld (column)¥ Find Þles by keywords¥ Produce reports.
10
Copyright © 2001 EteCad Ltd. All rights reserved.
EFM 2.0 User Manual 3: Managing your files
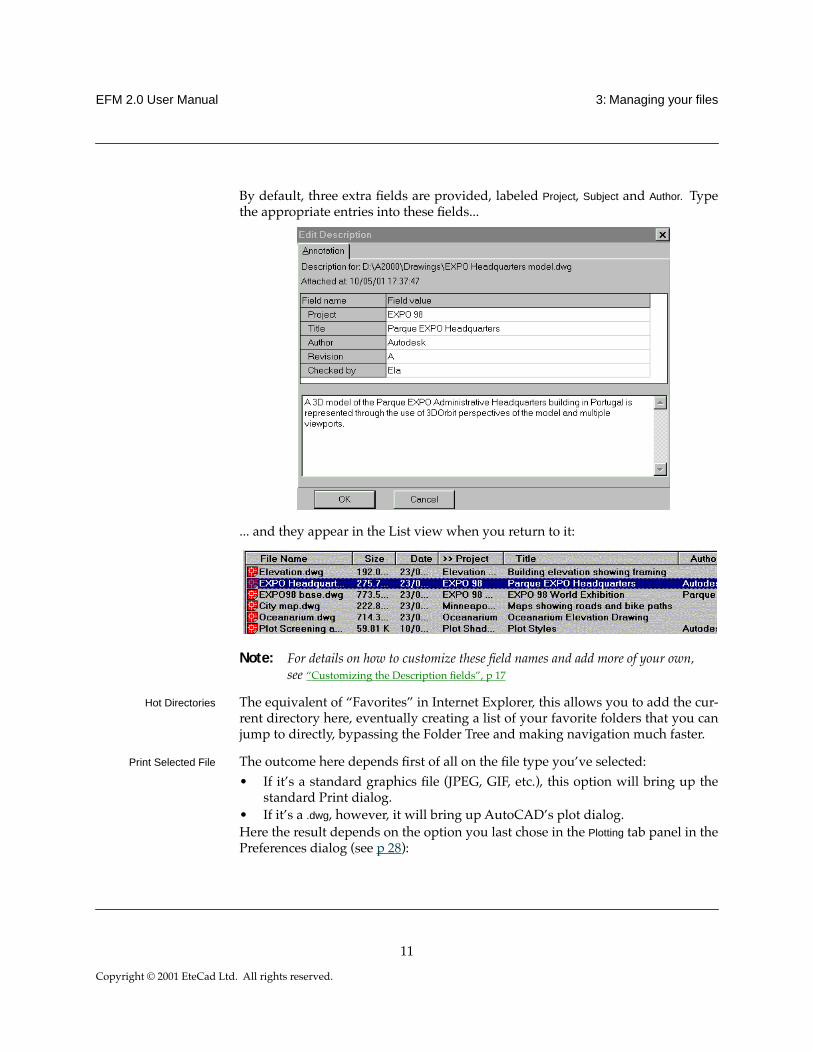
By default, three extra Þelds are provided, labeled Project, Subject and Author. Typethe appropriate entries into these Þelds...
... and they appear in the List view when you return to it:
Note: For details on how to customize these Þeld names and add more of your own,see ÒCustomizing the Description ÞeldsÓ, p 17
Hot Directories The equivalent of ÒFavoritesÓ in Internet Explorer, this allows you to add the cur-rent directory here, eventually creating a list of your favorite folders that you canjump to directly, bypassing the Folder Tree and making navigation much faster.
Print Selected File The outcome here depends Þrst of all on the Þle type youÕve selected:¥ If itÕs a standard graphics Þle (JPEG, GIF, etc.), this option will bring up the
standard Print dialog.¥ If itÕs a .dwg, however, it will bring up AutoCADÕs plot dialog.Here the result depends on the option you last chose in the Plotting tab panel in thePreferences dialog (see p 28):
11
Copyright © 2001 EteCad Ltd. All rights reserved.
EFM 2.0 User Manual 3: Managing your files
¥ If you chose AutoCAD plotting (the default), it will bring up the AutoCAD PrintDialog with reference to the current selected Þle.
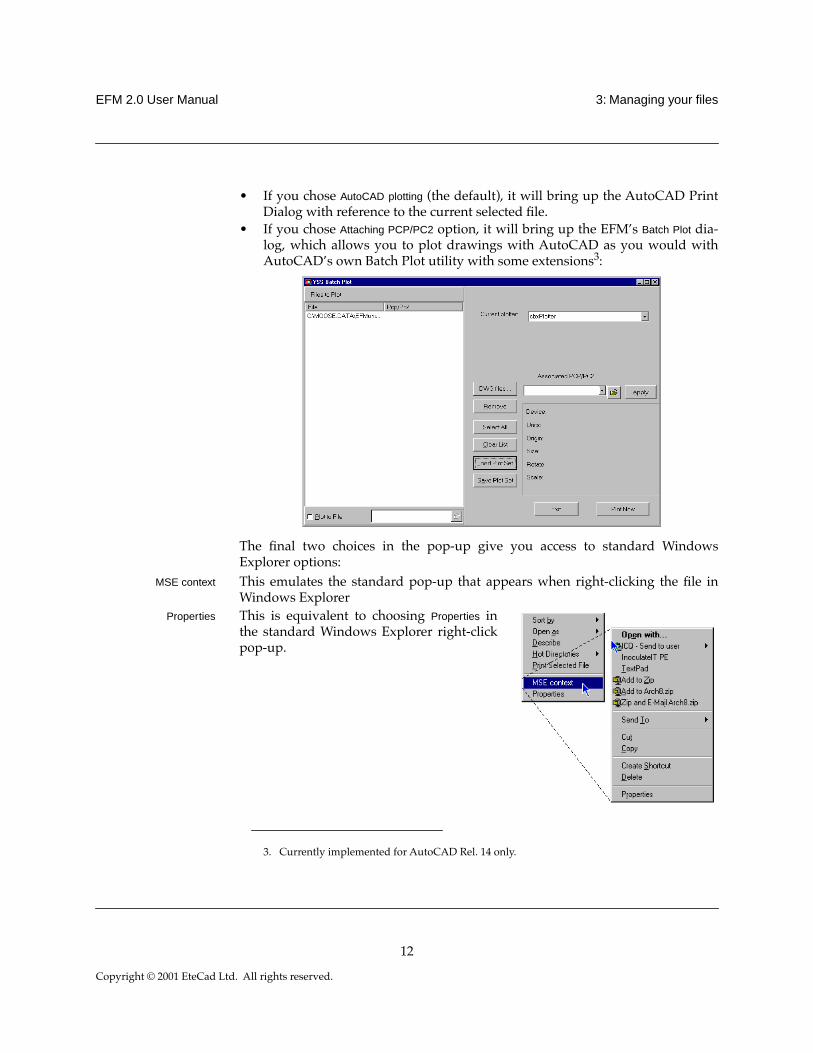
¥ If you chose Attaching PCP/PC2 option, it will bring up the EFMÕs Batch Plot dia-log, which allows you to plot drawings with AutoCAD as you would withAutoCADÕs own Batch Plot utility with some extensions3:
The Þnal two choices in the pop-up give you access to standard WindowsExplorer options:
MSE context This emulates the standard pop-up that appears when right-clicking the Þle inWindows Explorer
Properties This is equivalent to choosing Properties inthe standard Windows Explorer right-clickpop-up.
3. Currently implemented for AutoCAD Rel. 14 only.
12
Copyright © 2001 EteCad Ltd. All rights reserved.
EFM 2.0 User Manual 3: Managing your files
Toolbar tools
Two Þle management tools are available in the toolbar:
Delete The Delete tool (shortcut: F8) works on the Þle(s) currently selected inthe Browser panel. Like the standard Windows Explorer Delete, itsends them to the Recycle Bin Bin and asks you to conÞrm this beforeacting on it.
However, unlike the standard Windows Explorer Delete, even Þles deleted fromother drives on your local network are sent to your local Recycle Bin. This meansthat they remain recoverable if necessary - whereas deleting without EFM meanssuch Þles are lost irretrievably.
Note: This is one of EFMÕs most valuable featuresÑone which one network administratoris quoted saying is alone worth the price of the package.
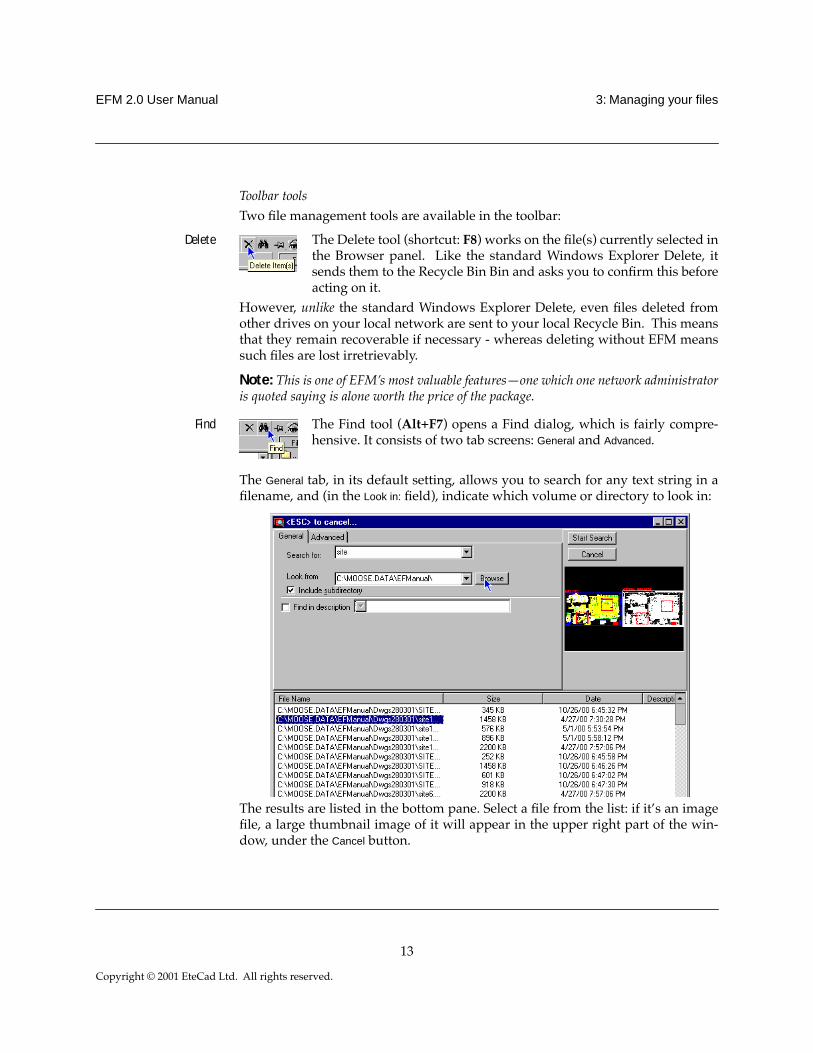
Find The Find tool (Alt+F7) opens a Find dialog, which is fairly compre-hensive. It consists of two tab screens: General and Advanced.
The General tab, in its default setting, allows you to search for any text string in aÞlename, and (in the Look in: Þeld), indicate which volume or directory to look in:
The results are listed in the bottom pane. Select a Þle from the list: if itÕs an imageÞle, a large thumbnail image of it will appear in the upper right part of the win-dow, under the Cancel button.
13
Copyright © 2001 EteCad Ltd. All rights reserved.
EFM 2.0 User Manual 3: Managing your files
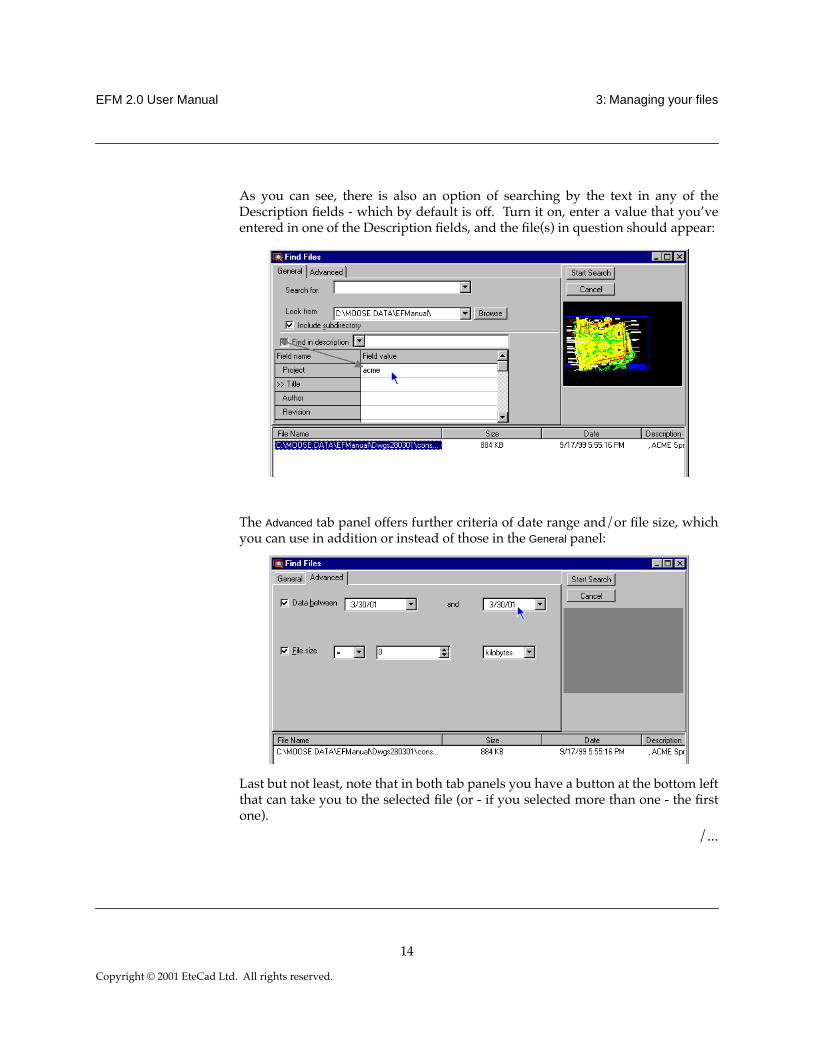
As you can see, there is also an option of searching by the text in any of theDescription Þelds - which by default is off. Turn it on, enter a value that youÕveentered in one of the Description Þelds, and the Þle(s) in question should appear:
The Advanced tab panel offers further criteria of date range and/or Þle size, whichyou can use in addition or instead of those in the General panel:
Last but not least, note that in both tab panels you have a button at the bottom leftthat can take you to the selected Þle (or - if you selected more than one - the Þrstone).
/...
14
Copyright © 2001 EteCad Ltd. All rights reserved.

EFM 2.0 User Manual 3: Managing your files
External app buttons You can customize the toolbar to include buttons for launching external applica-tions. To do so, simply drag any executable Þle (application) from any sourceÑwithin the EFM Browser panel, or from MS Explorer or even an icon on the desk-top)Ñand drop it onto EFM Upper Button Bar. The Parameter dialog appears:
Select the type of parameter you want: it will be attached to the application.After clicking OK, a new button with an icon of the application will appear in thetoolbar. Clicking it will launch the application in question, with the selectedÞle(s) in the Browser panel as parameter(s).You can remove the button from the toolbar by right-clicking and choosing Delete
from the pop-up.
Bottom Bar
In addition to the standard Windows Explorer Copy/Paste or drag-and-drop,EFM offers more traditional (and ÒsaferÓ) Þle operations via four of the BottomBar buttons:
Rename Renames the selected Þle(s) in the Browser panel (shortcut: F2).
Copy Copies the selected Þle(s) in the Browser panel to another folder (F5).
Move Moves the selected Þle(s) in the Browser panel to another folder (F6).The latter two involve the EFM Copy/Move dialog:
15
Copyright © 2001 EteCad Ltd. All rights reserved.

EFM 2.0 User Manual 3: Managing your files
As you can see, there is a history box on the left that allows for fast access to a tar-get directory bypassing the tree navigation. You can also use MS-DOS wildcards(e.g. *.dwg) as well.
Note: If the checkbox With description is marked, the EFM Þle description will be alsobe copied in the process.
Delete Precisely the same as EFMÕs Delete in the toolbar: deletes the selected Þle(s) fromthe Browser panel (F8 / Delete key)
16
Copyright © 2001 EteCad Ltd. All rights reserved.

EFM 2.0 User Manual 3: Managing your files
Customizing the Description fields
The Description Þeld names may be changed, andyou can even add more of your own, by openingthe EFM ConÞguration INI Þle (EFMcfg.ini) in theapplicationÕs folder:
Note that for these changes to take effect, you mustsave the INI Þle, and relaunch EFM:
Naturally, the Description dialog changes, too:
We trust you will Þnd this fully-customizable Description facility handy in managing yourdrawing Þles.
17
Copyright © 2001 EteCad Ltd. All rights reserved.
EFM 2.0 User Manual 3: Managing your files • Viewers
• Viewers
DWG Viewer
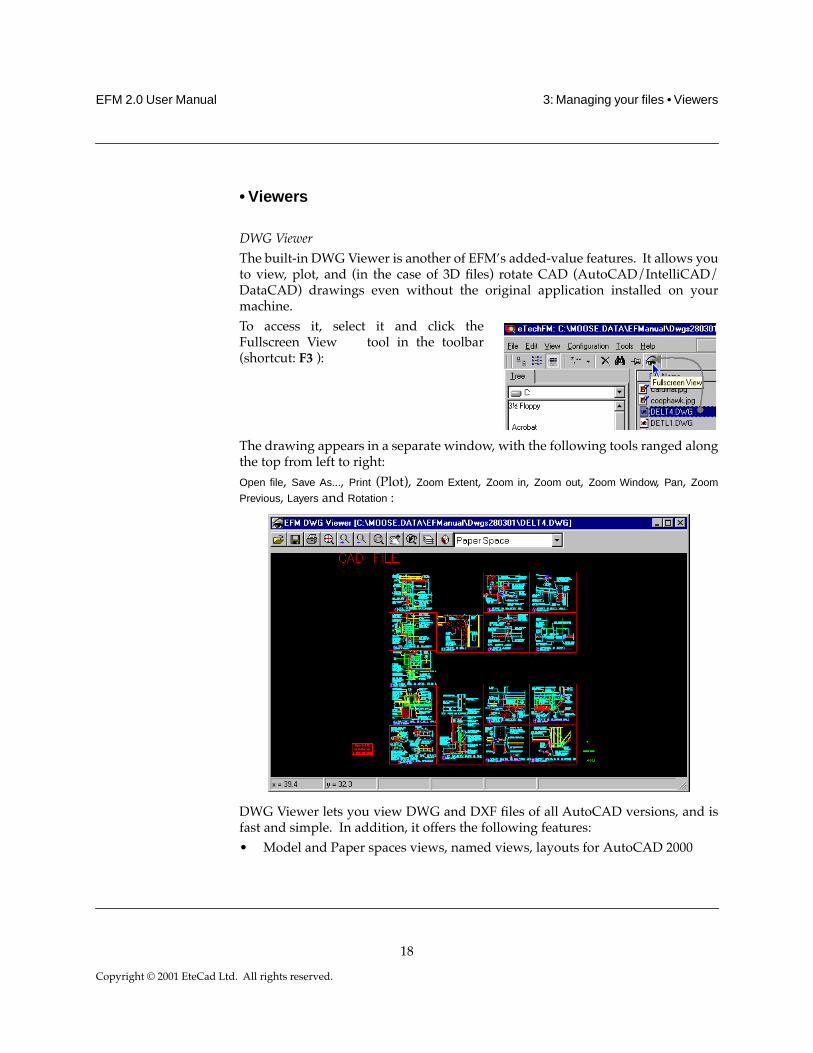
The built-in DWG Viewer is another of EFMÕs added-value features. It allows youto view, plot, and (in the case of 3D Þles) rotate CAD (AutoCAD/IntelliCAD/DataCAD) drawings even without the original application installed on yourmachine. To access it, select it and click theFullscreen View tool in the toolbar(shortcut: F3 ):
The drawing appears in a separate window, with the following tools ranged alongthe top from left to right: Open file, Save As..., Print (Plot), Zoom Extent, Zoom in, Zoom out, Zoom Window, Pan, Zoom
Previous, Layers and Rotation :
DWG Viewer lets you view DWG and DXF Þles of all AutoCAD versions, and isfast and simple. In addition, it offers the following features:¥ Model and Paper spaces views, named views, layouts for AutoCAD 2000
18
Copyright © 2001 EteCad Ltd. All rights reserved.
EFM 2.0 User Manual 3: Managing your files • Viewers
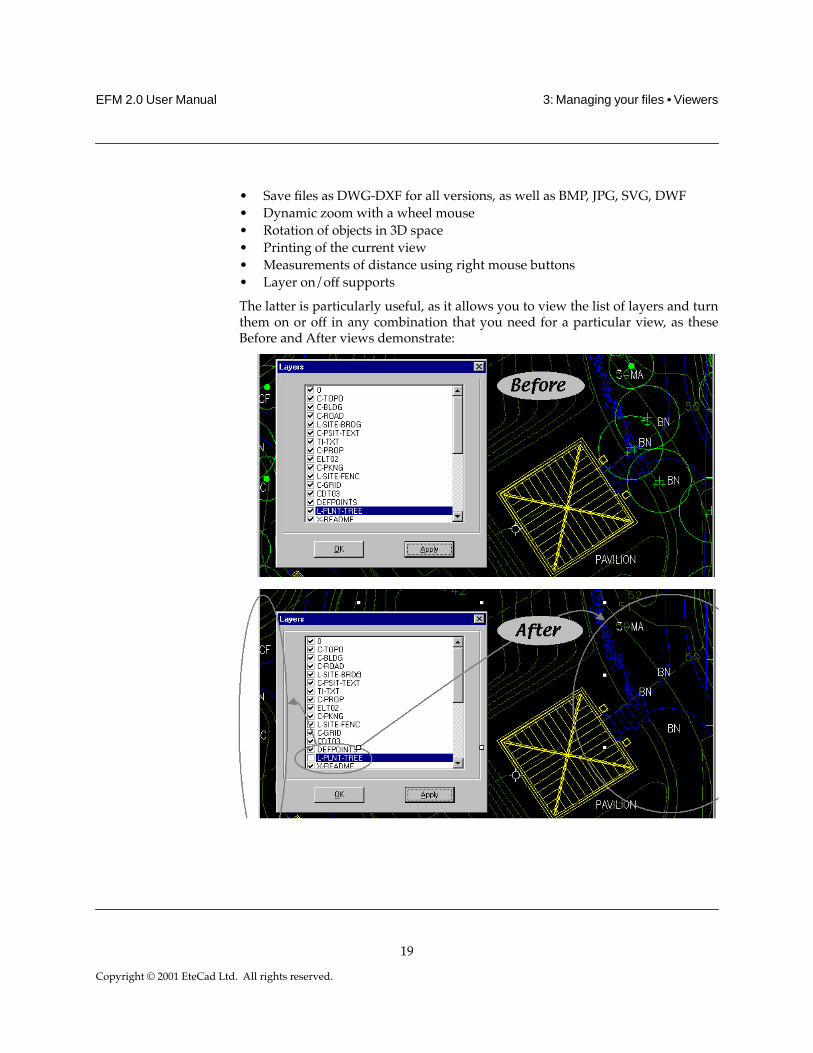
¥ Save Þles as DWG-DXF for all versions, as well as BMP, JPG, SVG, DWF¥ Dynamic zoom with a wheel mouse¥ Rotation of objects in 3D space¥ Printing of the current view¥ Measurements of distance using right mouse buttons¥ Layer on/off supports
The latter is particularly useful, as it allows you to view the list of layers and turnthem on or off in any combination that you need for a particular view, as theseBefore and After views demonstrate:
19
Copyright © 2001 EteCad Ltd. All rights reserved.
EFM 2.0 User Manual 3: Managing your files • Viewers
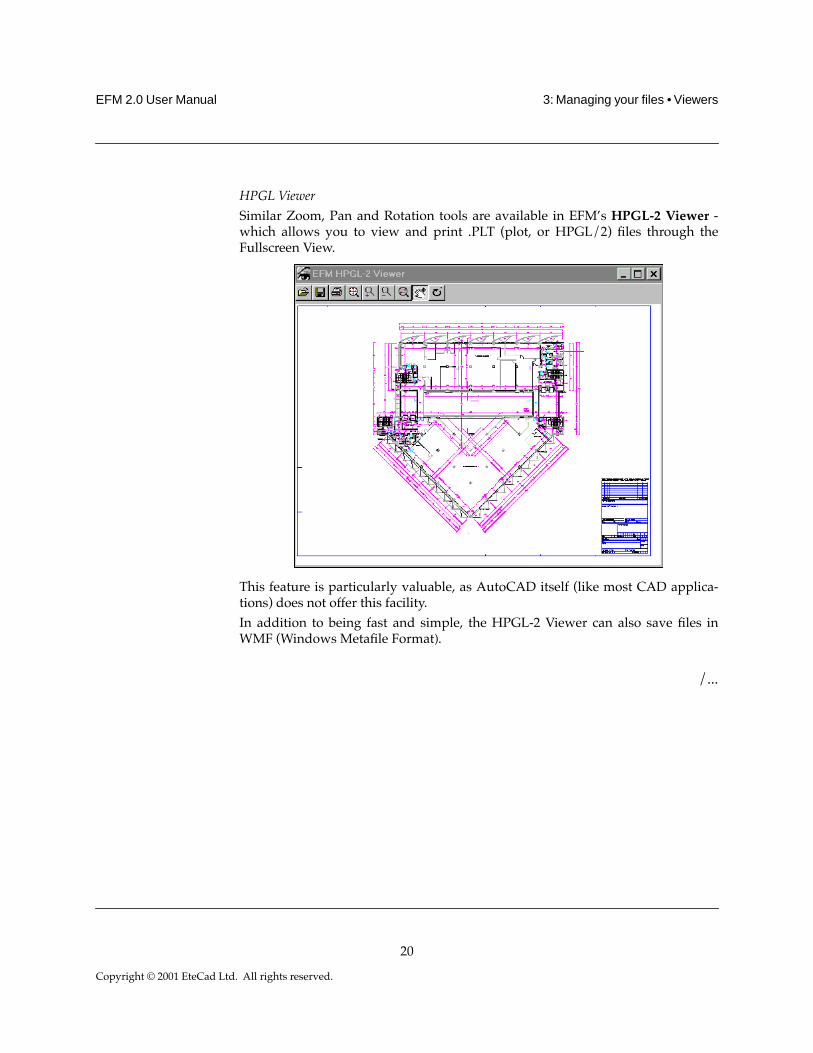
HPGL Viewer
Similar Zoom, Pan and Rotation tools are available in EFMÕs HPGL-2 Viewer -which allows you to view and print .PLT (plot, or HPGL/2) Þles through theFullscreen View.
This feature is particularly valuable, as AutoCAD itself (like most CAD applica-tions) does not offer this facility. In addition to being fast and simple, the HPGL-2 Viewer can also save Þles inWMF (Windows MetaÞle Format).
/...
20
Copyright © 2001 EteCad Ltd. All rights reserved.
EFM 2.0 User Manual 3: Managing your files • Viewers
The Graphics Preview
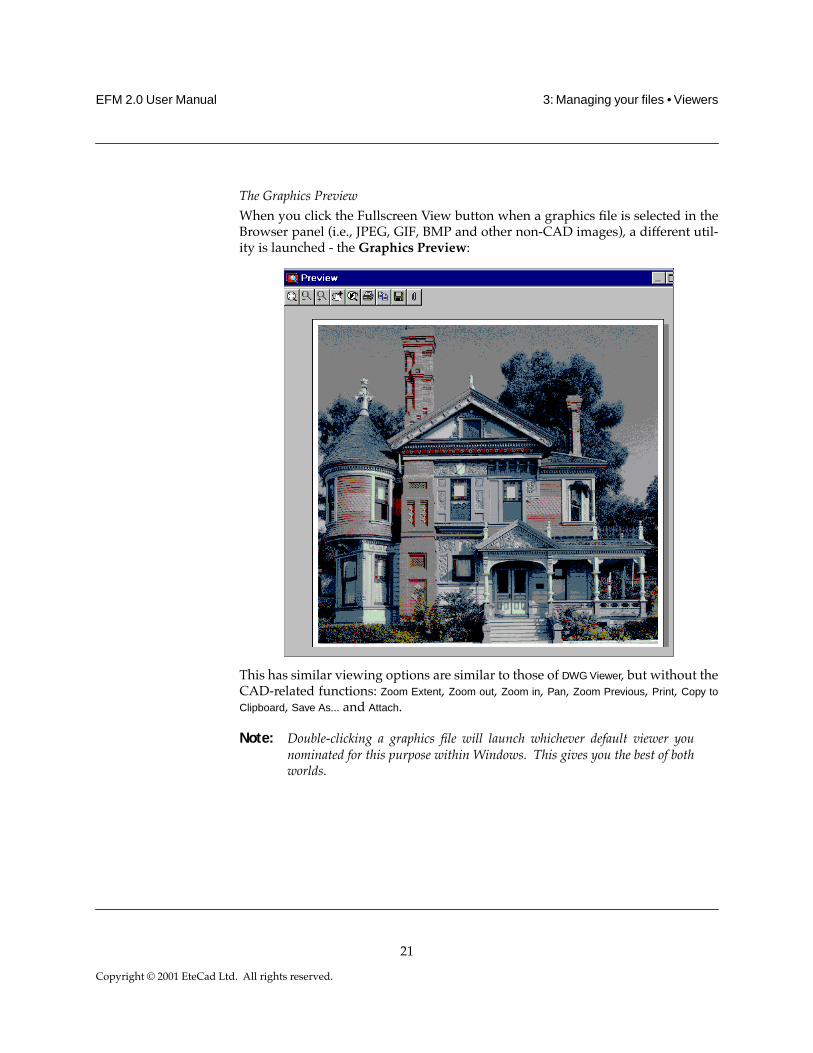
When you click the Fullscreen View button when a graphics Þle is selected in theBrowser panel (i.e., JPEG, GIF, BMP and other non-CAD images), a different util-ity is launched - the Graphics Preview:
This has similar viewing options are similar to those of DWG Viewer, but without theCAD-related functions: Zoom Extent, Zoom out, Zoom in, Pan, Zoom Previous, Print, Copy to
Clipboard, Save As... and Attach.
Note: Double-clicking a graphics Þle will launch whichever default viewer younominated for this purpose within Windows. This gives you the best of bothworlds.
21
Copyright © 2001 EteCad Ltd. All rights reserved.
EFM 2.0 User Manual 4: Menus • File
4: Menus
• File
New Folder Creates a new folder as a sub-directory in thecurrent directory, with a dialog for naming it. This is faster and more convenient than theequivalent procedure in Windows Explorer - somuch so, you may make it your preferredmethod for creating new folders in general(shortcut: F7)
Delete Folder Referring to the directory you are currently browsing, it passes the request on tothe standard Windows Explorer Delete function, which asks you to conÞrm yourrequest to send it to the Recycle Bin before acting.
Rename Folder Equivalent to selecting the current directoryÕs title in the Folder panel or Win-dows Explorer and typing a new name. (Shortcut: F2)
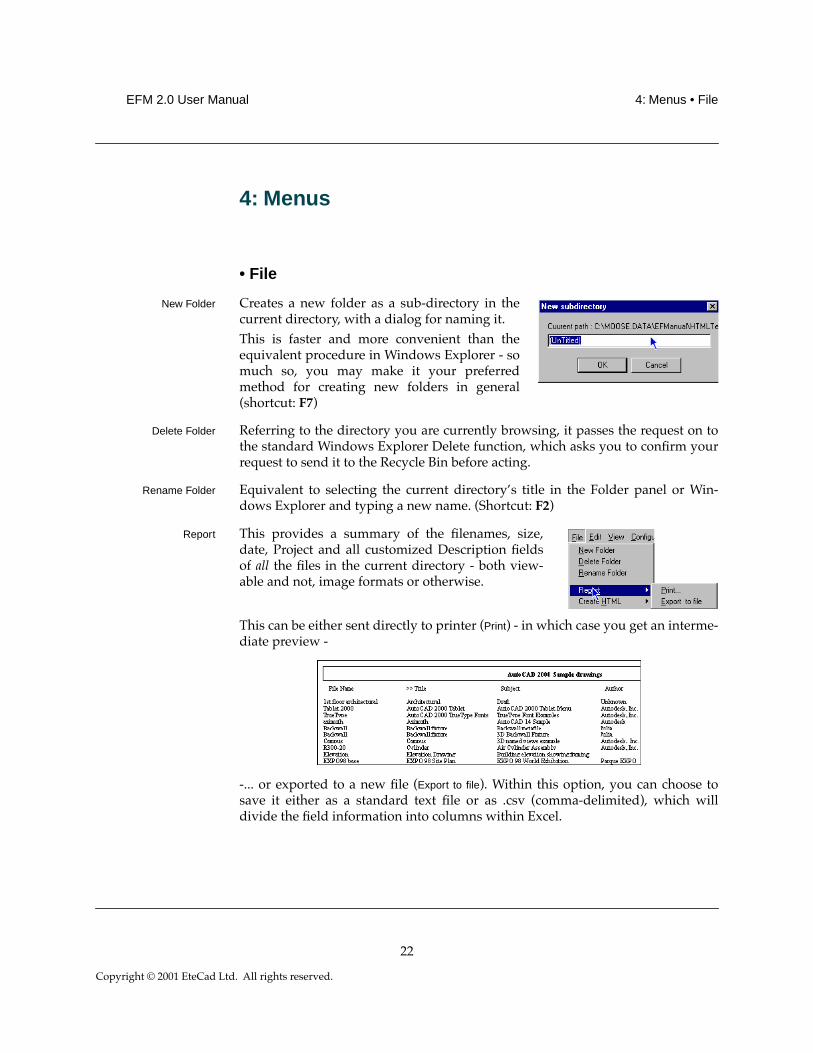
Report This provides a summary of the Þlenames, size,date, Project and all customized Description Þeldsof all the Þles in the current directory - both view-able and not, image formats or otherwise.
This can be either sent directly to printer (Print) - in which case you get an interme-diate preview -
-... or exported to a new Þle (Export to file). Within this option, you can choose tosave it either as a standard text Þle or as .csv (comma-delimited), which willdivide the Þeld information into columns within Excel.
22
Copyright © 2001 EteCad Ltd. All rights reserved.
EFM 2.0 User Manual 4: Menus • File
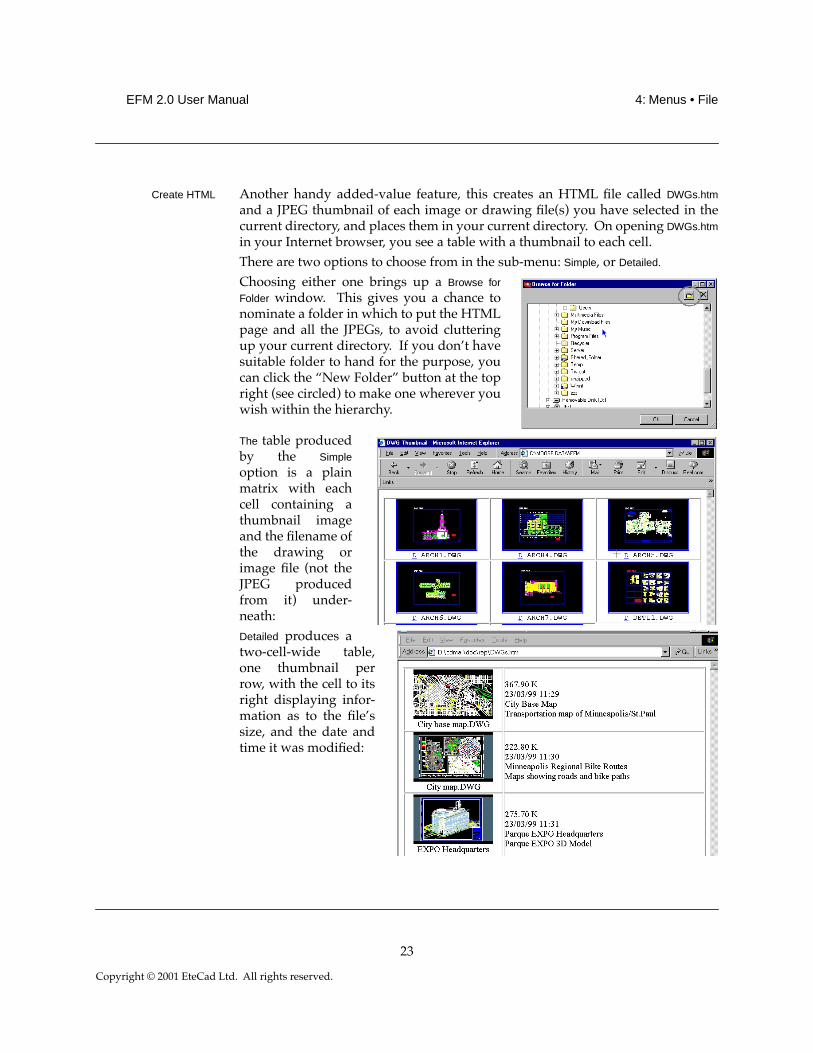
Create HTML Another handy added-value feature, this creates an HTML Þle called DWGs.htm
and a JPEG thumbnail of each image or drawing Þle(s) you have selected in thecurrent directory, and places them in your current directory. On opening DWGs.htm
in your Internet browser, you see a table with a thumbnail to each cell. There are two options to choose from in the sub-menu: Simple, or Detailed.
Choosing either one brings up a Browse for
Folder window. This gives you a chance tonominate a folder in which to put the HTMLpage and all the JPEGs, to avoid clutteringup your current directory. If you donÕt havesuitable folder to hand for the purpose, youcan click the ÒNew FolderÓ button at the topright (see circled) to make one wherever youwish within the hierarchy.
The table producedby the Simple
option is a plainmatrix with eachcell containing athumbnail imageand the Þlename ofthe drawing orimage Þle (not theJPEG producedfrom it) under-neath:Detailed produces atwo-cell-wide table,one thumbnail perrow, with the cell to itsright displaying infor-mation as to the ÞleÕssize, and the date andtime it was modiÞed:
23
Copyright © 2001 EteCad Ltd. All rights reserved.
EFM 2.0 User Manual 4: Menus • File
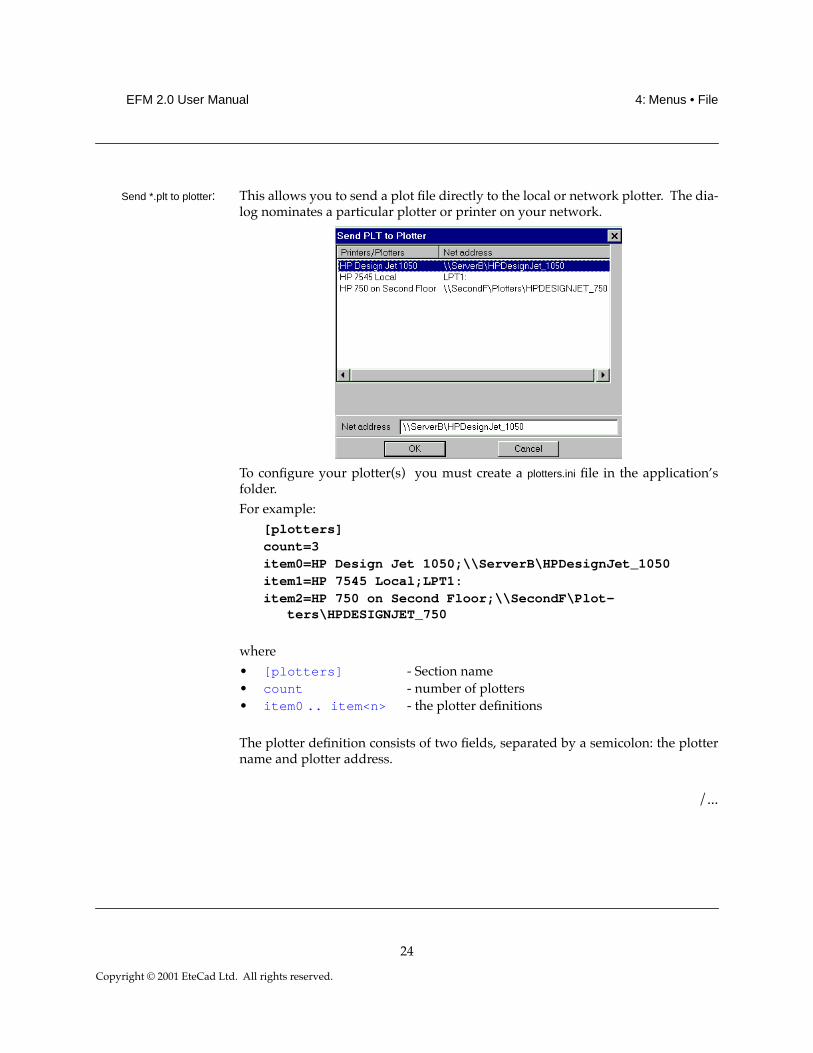
Send *.plt to plotter: This allows you to send a plot Þle directly to the local or network plotter. The dia-log nominates a particular plotter or printer on your network.
To conÞgure your plotter(s) you must create a plotters.ini Þle in the applicationÕsfolder. For example:
[plotters]count=3item0=HP Design Jet 1050;\\ServerB\HPDesignJet_1050item1=HP 7545 Local;LPT1: item2=HP 750 on Second Floor;\\SecondF\Plot-
ters\HPDESIGNJET_750
where ¥ [plotters] - Section name¥ count - number of plotters¥ item0 .. item<n> - the plotter deÞnitions
The plotter deÞnition consists of two Þelds, separated by a semicolon: the plottername and plotter address.
/...
24
Copyright © 2001 EteCad Ltd. All rights reserved.

EFM 2.0 User Manual 4: Menus • Edit
• EditFind Equivalent to clicking the Find tool in the toolbar (shortcut: Alt+F7).
Copy to clipboard Copies the actual drawing or image Þle in preparation for transfer to anotherdirectory
Paste from clipboard Places the drawing or image Þles copied using Copy to Clipboard.
Select All Selects all displayed Þles.
Invert Selection (Ctrl+R) Inverts any Þle selection just made: the selected is de-selected, and theunselected selected:
Describe File Equivalent to choosing Describe from the pop-up menu produced on right-clickinga Þle in the Browser panel (see p 10).
Note: When applying this to a multi-Þle selection, the description applies only tothe last Þle selected.
Describe Directory Brings up a dialog for describing the wholedirectory:
The result appears in the title bar of theBrowser panel, and in any Report made of that directory:
Import Descriptions This might be used in a scenario where youÕve exported descriptions. It acceptsASCII Þles in the same format as "export".
Selection Invert Selection
25
Copyright © 2001 EteCad Ltd. All rights reserved.
EFM 2.0 User Manual 4: Menus • View
A typical scenario: "export" description (or file list with empty fields)
of the directoryto "Excel"; attach (edit) description; import them back.
• View
Sort by This is equivalent to choosing Sort by from the pop-up menu that appears on right-clicking a Þle in the Browser panel (see p 10). Choose between Name, Type, Size, Time
- where Time refers to date & time the Þle was last modiÞed, not the date & time itwas created.
Hide Tree Removes the Folder Tree from view, to make more room for the Browser panelcontents. Typically used to accommodate many Description Þelds in a List view,or for working with Block Libraries.
Hide BottomBar Hides the BottomBar, with its AutoCAD commands
Refresh Updates the current view.
/...
26
Copyright © 2001 EteCad Ltd. All rights reserved.
EFM 2.0 User Manual 4: Menus • Configuration
• Configuration
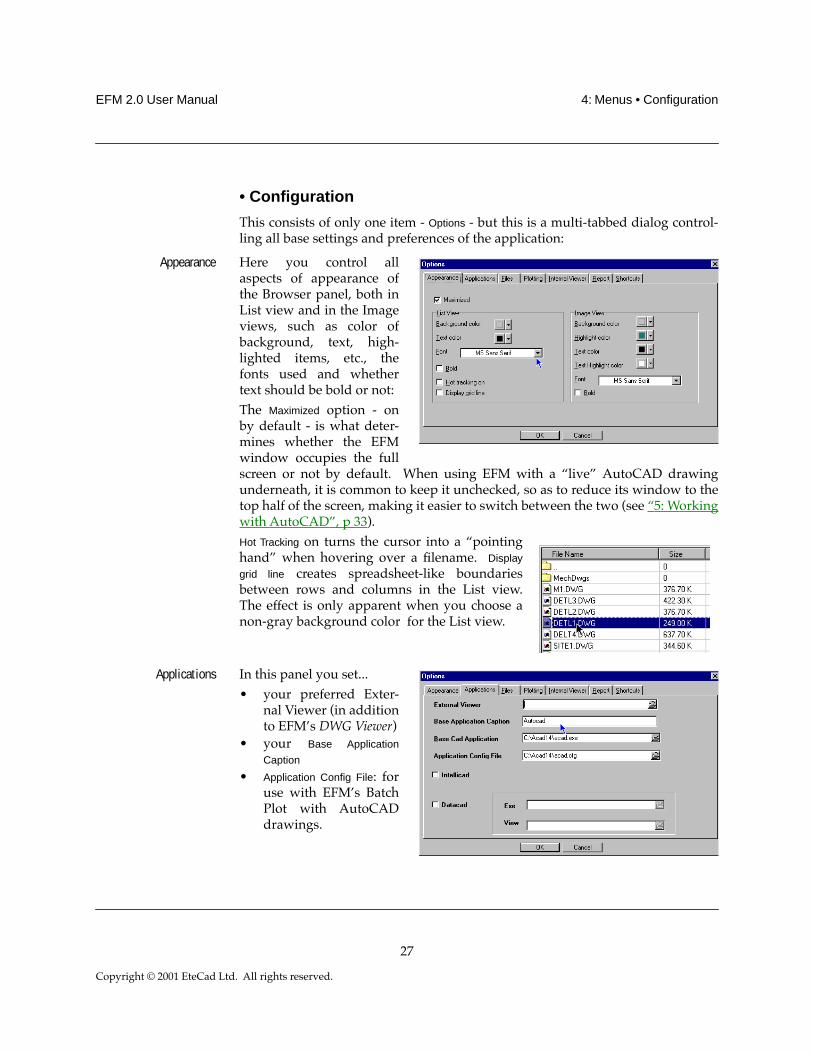
This consists of only one item - Options - but this is a multi-tabbed dialog control-ling all base settings and preferences of the application:
Appearance Here you control allaspects of appearance ofthe Browser panel, both inList view and in the Imageviews, such as color ofbackground, text, high-lighted items, etc., thefonts used and whethertext should be bold or not: The Maximized option - onby default - is what deter-mines whether the EFMwindow occupies the fullscreen or not by default. When using EFM with a ÒliveÓ AutoCAD drawingunderneath, it is common to keep it unchecked, so as to reduce its window to thetop half of the screen, making it easier to switch between the two (see Ò5: Workingwith AutoCADÓ, p 33).Hot Tracking on turns the cursor into a ÒpointinghandÓ when hovering over a Þlename. Display
grid line creates spreadsheet-like boundariesbetween rows and columns in the List view.The effect is only apparent when you choose anon-gray background color for the List view.
Applications In this panel you set...¥ your preferred Exter-
nal Viewer (in additionto EFMÕs DWG Viewer)
¥ your Base Application
Caption
¥ Application Config File: foruse with EFMÕs BatchPlot with AutoCADdrawings.
27
Copyright © 2001 EteCad Ltd. All rights reserved.

EFM 2.0 User Manual 4: Menus • Configuration
¥ IntelliCAD: turn on this option to make the commands in the Bottom Bar (p15) relate to IntelliCAD rather than AutoCAD.
¥ DataCAD: Unlike IntelliCAD, the application (.exe) and its free viewer appare not located automatically by EFM, and you must set their location manu-ally.
Files This panel determines thelocation of the programÕsCache Þle - a fast-accessmemory store that helpsEFM speed up thumbnailbrowsing.
By default this is in theEFM application folder -but you can move it else-where if you wish.
Plotting Here you can determineyour preferred method forusing the Plot command.Choose between plottingthrough the AutoCAD Plotcommand or via EFMÕsBatch Plot facility (see p 7).
Internal Viewer This allows you to set thelocation of the AutoCADfonts for use with EFMÕsDWG Viewer.
28
Copyright © 2001 EteCad Ltd. All rights reserved.

EFM 2.0 User Manual 4: Menus • Configuration
Report Here you decide which ofthe default Þelds should beincluded in the Reportsgenerated by EFM,whether for print or as anexported Þle.In the latter case, pay par-ticular attention towhether to enclose eachÞeld value in quotationmarks, and which delim-iter to use.
To view the Þelds as separate columns within Excel or a database, chooseComma or Tab as your delimiter, rather than the default Blank..
Shortcuts This is for setting the hot-key combination for EFMÕsbuilt-in Capture Imagefunction (see p 31). Thedefault is Ctrl-Shift-F5,but you can change this fora combination of your ownchoosing.
◊
29
Copyright © 2001 EteCad Ltd. All rights reserved.

EFM 2.0 User Manual 4: Menus • Tools
• Tools
Map Network Drive Opens the standard Windows Map Network drive dialog that allows you to mapa network drive.
Disconnect NetworkDrive
Opens the standard Windows Map Network drive dialog that allows you to dis-connect a mapped network drive.
Copy Disk Opens the standard Windows Copy Disk dialog which allows you to copy anentire ßoppy or other removable disk (e.g. Zip):
Format Disk: Opens the standard Windows Format Disk dialog which allows you to format aßoppy disk.
30
Copyright © 2001 EteCad Ltd. All rights reserved.
EFM 2.0 User Manual 4: Menus • Tools
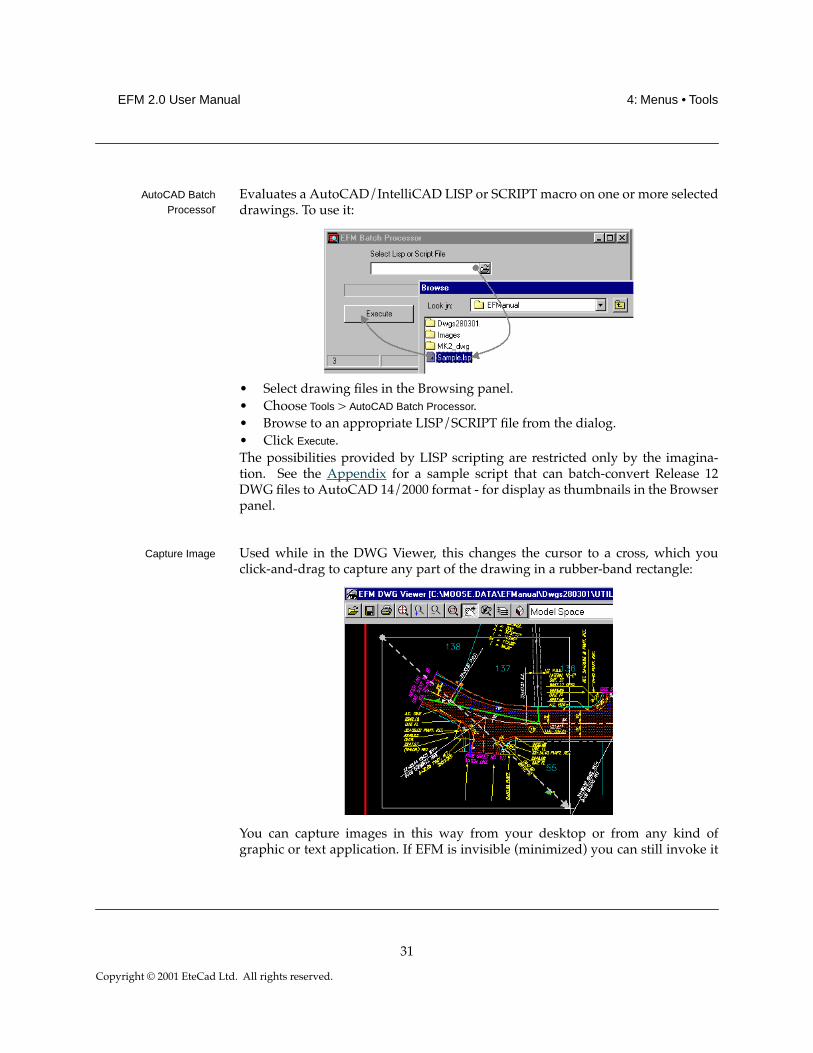
AutoCAD BatchProcessor
Evaluates a AutoCAD/IntelliCAD LISP or SCRIPT macro on one or more selecteddrawings. To use it:
¥ Select drawing Þles in the Browsing panel. ¥ Choose Tools > AutoCAD Batch Processor. ¥ Browse to an appropriate LISP/SCRIPT Þle from the dialog. ¥ Click Execute.The possibilities provided by LISP scripting are restricted only by the imagina-tion. See the Appendix for a sample script that can batch-convert Release 12DWG Þles to AutoCAD 14/2000 format - for display as thumbnails in the Browserpanel.
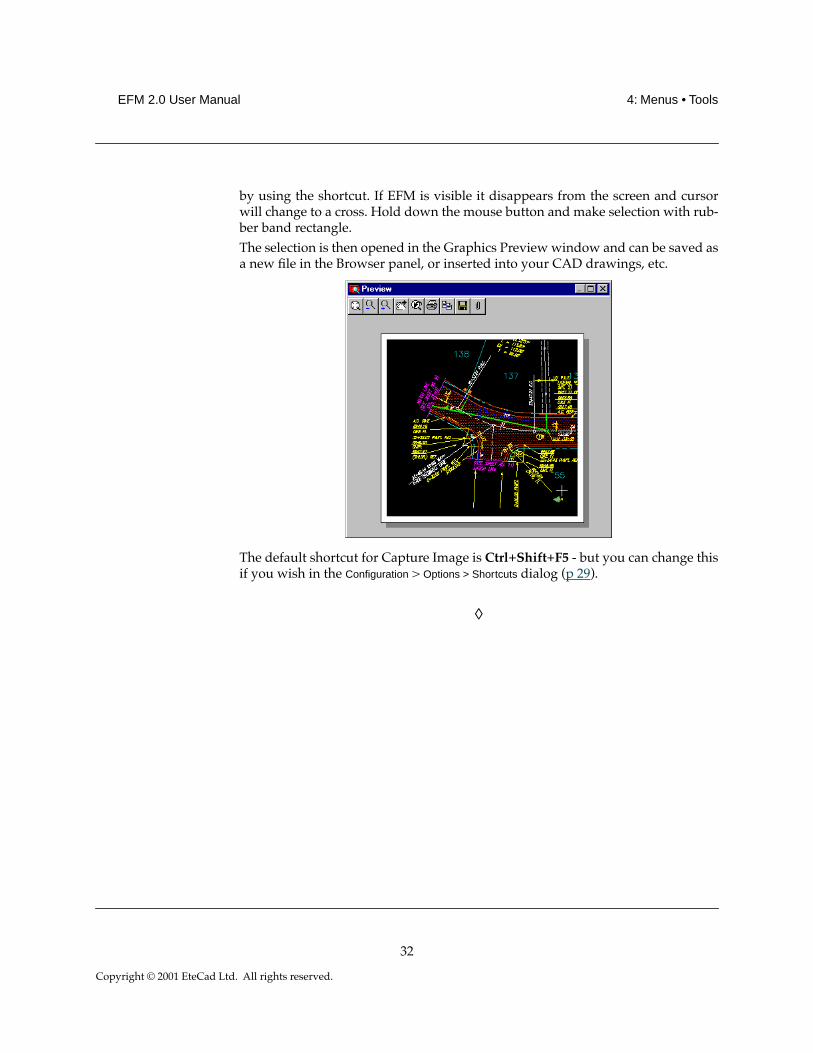
Capture Image Used while in the DWG Viewer, this changes the cursor to a cross, which youclick-and-drag to capture any part of the drawing in a rubber-band rectangle:
You can capture images in this way from your desktop or from any kind ofgraphic or text application. If EFM is invisible (minimized) you can still invoke it
31
Copyright © 2001 EteCad Ltd. All rights reserved.
EFM 2.0 User Manual 4: Menus • Tools
by using the shortcut. If EFM is visible it disappears from the screen and cursorwill change to a cross. Hold down the mouse button and make selection with rub-ber band rectangle. The selection is then opened in the Graphics Preview window and can be saved asa new Þle in the Browser panel, or inserted into your CAD drawings, etc.
The default shortcut for Capture Image is Ctrl+Shift+F5 - but you can change thisif you wish in the Configuration > Options > Shortcuts dialog (p 29).
◊
32
Copyright © 2001 EteCad Ltd. All rights reserved.
EFM 2.0 User Manual 5: Working with AutoCAD • Bottom Bar
5: Working with AutoCAD
• Bottom Bar
Open Opens the selected DWG Þle within the CAD application. If the CAD applicationisnÕt open, it launches it.
If in the case of AutoCAD: if it is active, it closes the current AutoCAD Þleand opens a new one (Rel 14 and LT), or just opens a new window(AutoCAD 2000).
Insert Inserts the selected DWG Þle as a block into the active drawing Þle:
Xref Inserts the selected DWG Þle as an External Reference Þle.
Plot Plots the DWG Þle through AutoCAD (see ¥ ConÞguration).
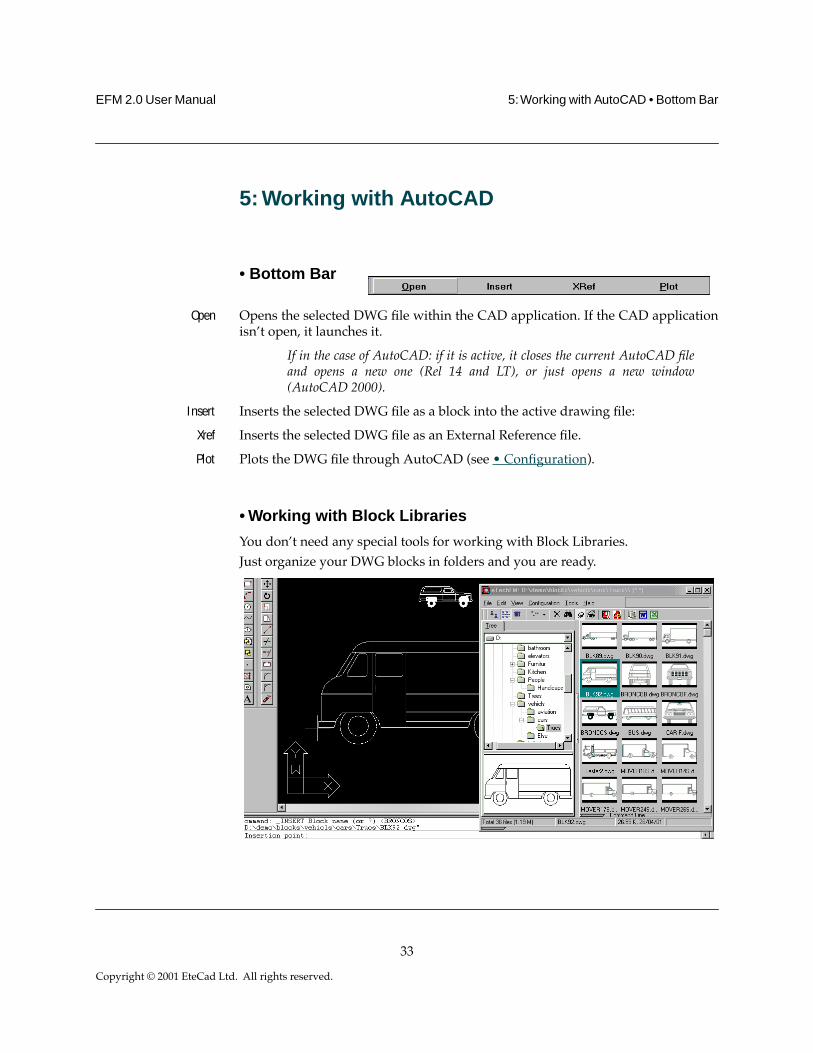
• Working with Block Libraries
You donÕt need any special tools for working with Block Libraries. Just organize your DWG blocks in folders and you are ready.
33
Copyright © 2001 EteCad Ltd. All rights reserved.
EFM 2.0 User Manual 5: Working with AutoCAD
Select the block image you want. You can use the Insert command or drag-and-drop the selected item into the AutoCAD workspace.
Note for IntelliCAD users: You have to set the DRAGOPEN system variable to1(Dropped drawing will be inserted).
Recommended settings
For easy drag-and-drop moving of Þles to and from the Browser panel to the CADdrawing, we recommend you do two things:¥ Set EFM be in non-Maximized state (Configuration > Options > Appearance). This
allows you to reduce the size of the window to, say, the top half of the screen,giving ready access to the drawing.
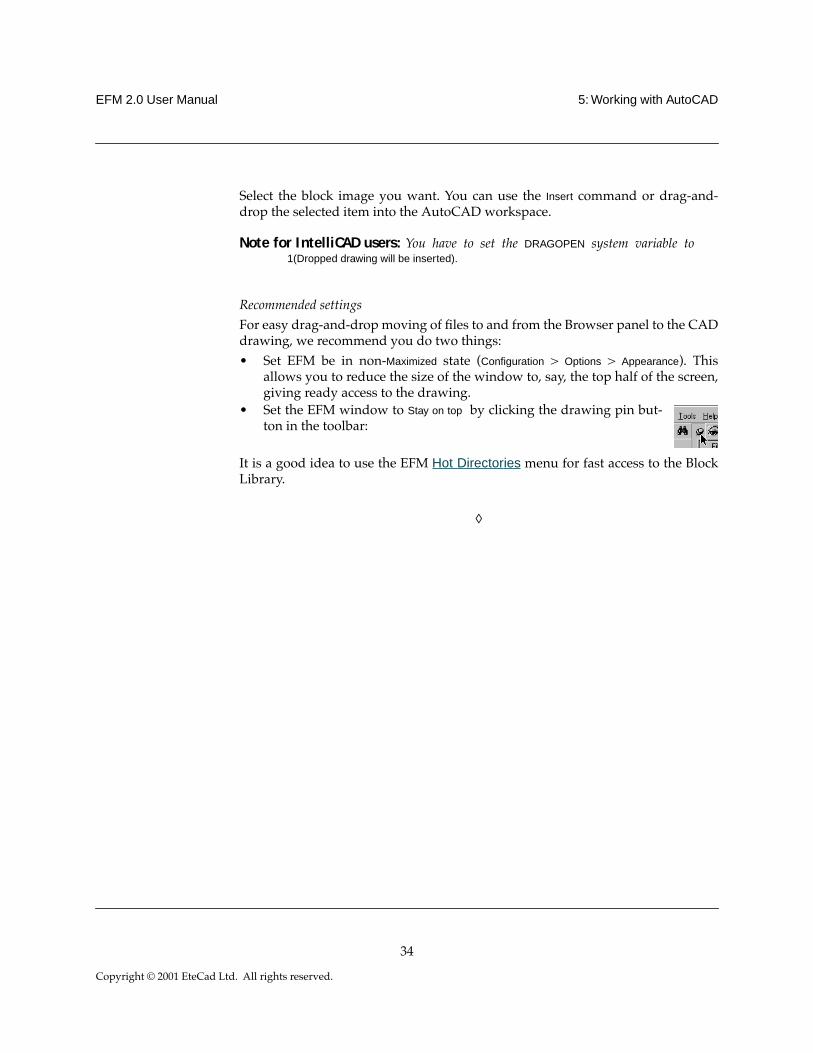
¥ Set the EFM window to Stay on top by clicking the drawing pin but-ton in the toolbar:
It is a good idea to use the EFM Hot Directories menu for fast access to the BlockLibrary.
◊
34
Copyright © 2001 EteCad Ltd. All rights reserved.
EFM 2.0 User Manual 6: Troubleshooting & Tips • FAQ
6: Troubleshooting & Tips
• FAQ
Q: I see Òquestion marksÓ instead of text inside the DWG Viewer.
A: Go to Configuration->Options->Internal Viewer.
Click Add button and select the directory with your AutoCAD (.shx) fonts folderusing the Browse to Folder dialog (see p 28) A typical fullpath: ÒC:\Program files\AutoCAD 2000\FontsÓ.
Q: I canÕt see Plot Þles and DXF Þles.
A: EFM can show AutoCAD DXF Þles and HPGL/2 plotter (.plt ) files only via theinternal viewer. They lack the necessary information to be previewed as thumb-nails, but they can be seen in the List view:¥ Set the Filter to view DXF (PLT) Þles (p 7)¥ Change to List view (p 4). ¥ Set the Filter to view DXF (PLT) Þles (see p 7)¥ Change to List view (see p 4) ¥ Select Þle you want.¥ Press the View button (F3).
Q: The application is repeatedly crashing and seems generally to be unstable.
A: It is likely that your Cache Þle is corrupted. Delete it (itÕs called eTechFM.ech andis in the EFM application directory - unless it was moved to another location viaConfiguration > Options > Files): a new one will be created automatically.
35
Copyright © 2001 EteCad Ltd. All rights reserved.
EFM 2.0 User Manual 6: Troubleshooting & Tips • FAQ
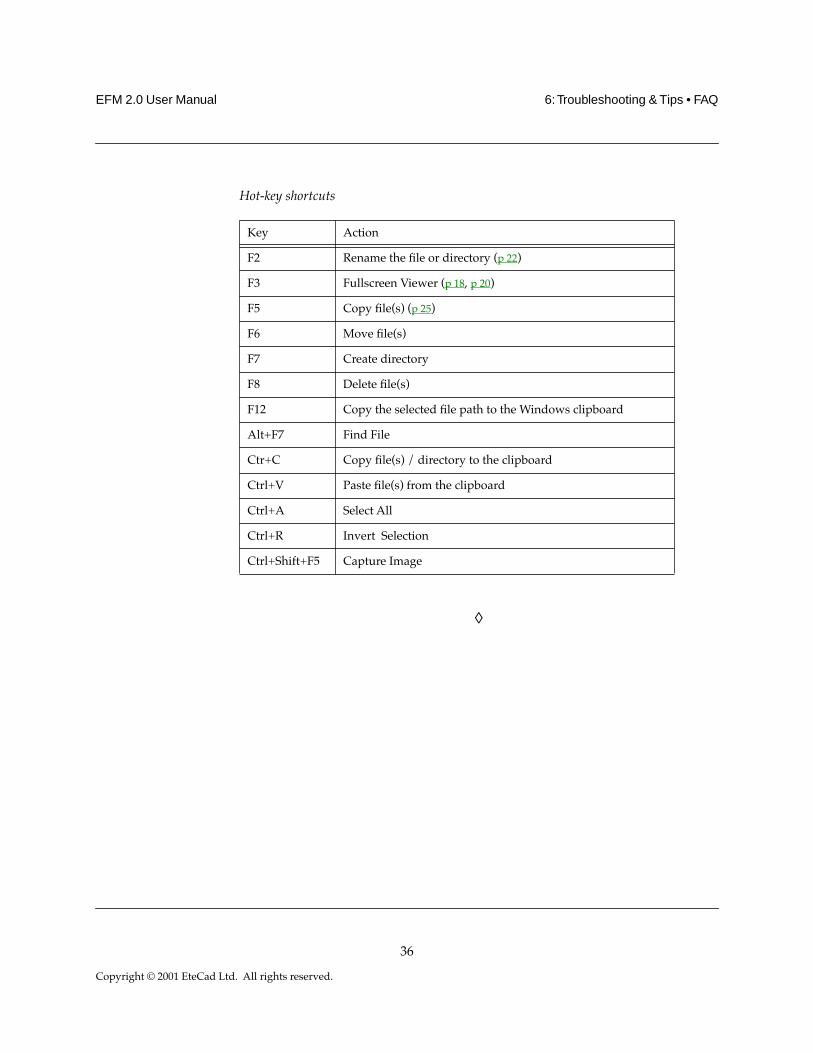
Hot-key shortcuts
◊
Key Action
F2 Rename the Þle or directory (p 22)
F3 Fullscreen Viewer (p 18, p 20)
F5 Copy Þle(s) (p 25)
F6 Move Þle(s)
F7 Create directory
F8 Delete Þle(s)
F12 Copy the selected Þle path to the Windows clipboard
Alt+F7 Find File
Ctr+C Copy Þle(s) / directory to the clipboard
Ctrl+V Paste Þle(s) from the clipboard
Ctrl+A Select All
Ctrl+R Invert Selection
Ctrl+Shift+F5 Capture Image
36
Copyright © 2001 EteCad Ltd. All rights reserved.
EFM 2.0 User Manual Appendix • FAQ
Appendix
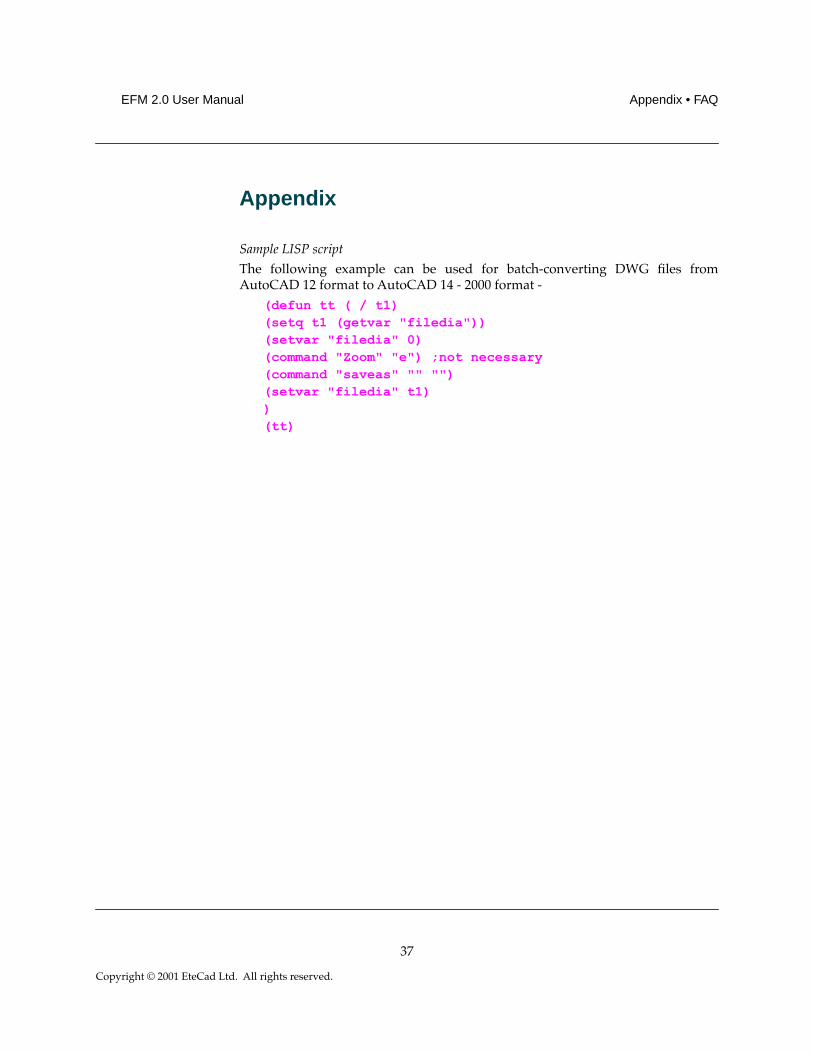
Sample LISP script
The following example can be used for batch-converting DWG Þles fromAutoCAD 12 format to AutoCAD 14 - 2000 format -
(defun tt ( / t1)(setq t1 (getvar "filedia"))(setvar "filedia" 0)(command "Zoom" "e") ;not necessary(command "saveas" "" "")(setvar "filedia" t1))(tt)
37
Copyright © 2001 EteCad Ltd. All rights reserved.
EFM 2.0 User Manual Index
Index
(Page numbers are hyperlinks)
Symbols.bak 10.bmp 8
see also BMP.csv 22.DOC (viewing options) 6.dwg 8, 11
see also DWG.dxf 10
see also DXF.emf 8.gif 8
see also GIF.HTM
see also HTML 6viewing options 6
.ICO (viewing options) 6
.jpg 8see also JPEG
.lsp 10 see also LISP 10
.PCD viewing options 6
.PLT 7, 24, 35file printing/plotting 20viewing options 6
.plt 35
.RTF (viewing options) 6
.TIF see also TIFF 6viewing options 6
.TXT (viewing options) 6
.wmf 8
.wmf see also WMF 8
.XLS (viewing options) 6
Numerics3D
files 18rotation in 19
AAppearance preferences 27Applications preferences 27ASCII
files for descriptions 25opening 10
ASP files 10Attach Note 21Author (description field) 11AutoCAD 3, 7, 8, 10, 18, 20, 28, 33,35
, working with 27, 332000 18Batch Processor 31commands 26drawing format 6DWG filter option 9fonts in DWG Viewer 28format 9plotting 12, 28R12 conversion 38Rel 14/2000 31, 33script 31workspace 34
Autoexec WHIP 9
BBase Application Caption 27Batch Plot 12, 27, 28block libraries 33BMP 21
, Saving as 19viewing options 6
BMP see also .bmpBottom Bar 4, 15, 28
, Hide 26
38
Copyright © 2001 EteCad Ltd. All rights reserved.

EFM 2.0 User Manual Index
Browser panel 4, 5, 8, 13, 15, 21, 25,26, 31, 32
preferences 27
CCache file 28, 35CAD
, non-~ images 21application 7, 20, 33-related functions 21
CAD drawings 3, 18, 32, 34Cancel 13Capture 36Capture Image 29, 31, 32Capture image shortcut 36Configuration
menu 27, 32, 34, 35of INI file 17
Copy/Move 15/Paste 15Disk 30file 36file or directory to clipboard 36to another folder 15to clipboard 21, 25, 36
Ddatabase 29DataCAD 6, 18, 28
viewer 6date
modified 10range 14
Date (description field) 10DC5
viewing options 6Delete 16, 22, 36
external app launch button 15folder 22in Windows Explorer 13
key and shortcut 16tool 13
delimiterin Report 29
Describe(command) 10, 25Directory 25
Descriptiondialog 17
Description see file descriptions 17Disable All (formats) 9DOS 16
copy/paste method 3drawing 4, 27
file 25DWF 9
, Saving as 19Save as DWG 9
DWG 18, 23, 31, Open as 10, Saving as 19as External Reference 33batch converting R12 38blocks organization 33filter option 9inserting as block 33Viewer see DWG Viewer 18viewing options 6
DWG Viewer 9, 18, 21, 27, 31, 35DXF 18, 35
, Saving as 19viewing options 6, 35
EEMF (viewing options) 6Enable All (formats) 9Encapsulated Postscript 6EPS 6Excel 6, 22, 29Explorer
, Internet 11
39
Copyright © 2001 EteCad Ltd. All rights reserved.
EFM 2.0 User Manual Index
, Windows 3, 4, 8, 12, 13, 15, 22, Windows see also Windows Ex-
plorerexport to file 22external application launching 15External Viewer 27
Ffile descriptions 3, 7, 10, 25, 26
copying with the file 16customizing 11, 17dialog 17fields 22, 26importing 25searching by 14
file size, sorting by 14Filename 13
(description field) 10Files (preferences) 28filtering 8, 35
pre-set options 8, 9Find
by text by keyword 14File command 25File dialog 13File shortcut 36files by keyword 7
Folder Tree 4, 11, Hide 26
fontin DWG Viewer 28, 35preferences 27
Format Disk 30Save file as... 19Fullscreen View 6, 20, 21, 36
GGIF 11, 21
see also .gifviewing options 6
graphics file 21
Graphics Interchange Format see GIF6Graphics Preview 21, 32grid line 27
HHide 26Hot Directories 11, 34Hot Tracking 27HPGL Viewer 7, 20HPGL/2 7, 35HTML 10, 23
, Create 23Web Format 6
Iimage
file 5, 13, 25view in Browser panel 27
INI file (configuration) 17Insert (as block) 33IntelliCAD 3, 18, 28, 34
option in preferences 28script 31
Internet Explorer see Explorer, Inter-net 11Invert Selection 25
shortcut 36
JJPEG 6, 8, 11, 21, 23
see also JPG & .jpgJPG
, Saving as 19filter for 9viewing options 6
KKodak PhotoCD 6
40
Copyright © 2001 EteCad Ltd. All rights reserved.
EFM 2.0 User Manual Index
LLarge Images see thumbnailsLayers 18
, selective viewing of 19LISP 31
see also .lsp 31List view 4, 10, 11, 26, 35
preferences 27
MMap Network Drive 30Maximized 27measuring distances 19menus 4Model Space view 18Move file 15, 36MS-DOS 16MSE context 12
NName, sort by 10, 26network drive, Map 30
OOptions dialog 27
PPan
in DWG Viewer 18in Graphics Preview 21in HPGL Viewer 20
Paper Space view 18Parameters (of external apps) 15Paste file from clipboard 25, 36PCX (viewing options) 6photo images 8Plot 18, 28
, AutoCad 28, Batch 27, 28, canÕt see ~ files 35
command 28files 6, 7
plotter configuration 24Plotting
DWG through AutoCAD 33preferences 11
PNG (viewing options) 6Portable Network Graphics 6Preferences 11, 27Preview
, Print 22pane 4
Print 21, 22current view 19dialog 11selected file 11
Project (description field) 11Properties 12
RR12/R13 (AutoCAD releases) 8raster files 8Recycle Bin 3, 13, 22Refresh 26Rename
file 15folder 22, 36
Report 7, 25preferences 29
Rich Text Format 6Rotation 18, 19
in HPGL Viewer 20
SSave As 18, 21Select All 25
shortcut 36Size
(description field) 10, sort by 10, 26
Small Images see thumbnails
41
Copyright © 2001 EteCad Ltd. All rights reserved.
EFM 2.0 User Manual Index
Sort 10, 26files by field 7
Status Bar 4Subject (description field) 11SVG, Saving as 19
TTagged Image File Format 6Targa TGA 6text
color 27files 8in DWG Viewer 35
thumbnails 4, 6, 9, 31, 35in exported HTML 23in Find File dialog 13in HTML output 23large vs. small 5of plot files 7
TIFsee also TIFF and .tif 6
TIFF 8, 9filter for 9
Time, sort by 10, 26toolbar 4, 8, 15
tools 13Tools menu 30
Type, sort by 10, 26
WWHIP 9Windows 10
bitmap format 6Explorer 3, 4, 8, 12, 13, 15, 22Icon format 6Map Network 30Metafile Format 6Metafile Format see also WMF 20
WMF 20viewing options 6
Word, MS 6
XXref 33
ZZoom 18
, dynamic 19in DWG Viewer 18in Graphics Preview 21in HPGL Viewer 20
42
Copyright © 2001 EteCad Ltd. All rights reserved.

EFM 2.0 User Manual Index
43
Copyright © 2001 EteCad Ltd. All rights reserved.

EFM 2.0 User Manual Index
44
Copyright © 2001 EteCad Ltd. All rights reserved.

EFM 2.0 User Manual Index
45
Copyright © 2001 EteCad Ltd. All rights reserved.