Embed Size (px)
Citation preview
Episerver CommerceUser Guide

© Episerver 2018
Episerver Commerce User Guide 18-4
© Episerver 2018
Table of Contents | 3
Table of contents
Introduction 21
Features, licenses and releases 22
Copyright notice 22
What's new? 24
Legacy documentation 24
About Episerver 26
The Episerver Digital Experience platform 26
Episerver CMS 27
Episerver Commerce 27
Episerver Find 27
Episerver Insight 28
Episerver Campaign 28
Episerver Perform 28
Episerver Reach 29
Episerver Add-ons 29
Getting started 30
Logging in 30
Accessing features 30
Navigation 31
Next steps 31
User interface 32
General features 33
Panes 35
Left-hand navigation pane 35
Right-hand assets pane 36
Editing 37
Real-time Updates 39
Network problems 39
WebSocket support 40
My settings 40
Add-ons 41
Roles and tasks 42
Visitor 43
Community member 43
Content editor 43
Marketer 43
Merchandiser 44
Website owner 44
Administrator 44
Developer 45
© Episerver 2018
4 | Episerver Commerce User Guide 18-4

© Episerver 2018
Table of Contents | 5
Shopping flow 46
Catalogs 51
Catalog structure 51
Meta-classes and meta-fields 52
Importing and exporting a catalog 52
When to import or export 52
Import and export methods 52
Importing or exporting catalog data 53
Importing a catalog 53
Exporting a catalog 54
Importing a catalog using CSV files 55
Using the CSV import feature 55
Sample CSV files 58
CSV File type 1—Category file 58
CSV File Type 2—Entry files 59
CSV File Type 3—Entry relations file 60
CSV file type 4—Associations file 61
CSV file type 5—Pricing/inventory file 61
CSV file type 6—Sale price file 61
Browsing and searching catalogs 62
Browsing catalogs 62
Searching for catalog entries 64
Accessing products in CMS 65
Creating and editing a catalog 65
Deleting a catalog 67
Working with catalog entries 67
Creating a catalog entry 67
Types of catalog entries 69
Editing catalog entries 70
Catalog-specific editing options 70
Editing multiple catalog entries 71
Updating multiple catalog entries at once 72
Sorting catalog entries 74
Notes about sorting 75
Sorting variants 75
Duplicating catalog entries 76
Moving catalog entries 77
Deleting catalog entries 78
Translating catalog entries 79
Catalog entry properties 79
Header 79
Content tab 80
© Episerver 2018
6 | Episerver Commerce User Guide 18-4
© Episerver 2018
Table of Contents | 7
Belongs To tab 81
Pricing (for variants) 82
Viewing prices 83
Adding and editing prices 84
Setting customer group pricing 85
Inventory (for variants) 85
Inventory screen 86
Edit inventory screen 87
Variants (for products) 89
Assets tab 89
Related entries tab 90
Settings tab 91
Working with categories 91
Creating a category 92
Viewing an item's categories 93
View items assigned to a category 94
Editing a category 94
Deleting a category 94
Primary and additional categories 95
Assigning a primary category 96
Changing a catalog entry's primary category 96
How changing an item's primary category affects its variants 97
Assigning additional categories 99
Editing additional categories 100
Assigning a category to another category 100
Packages and bundles 101
Working with packages 101
Working with bundles 102
Deleting a package or bundle 103
How the Campaigns feature considers packages and bundles 104
Orders 105
Meta-classes and meta-fields 105
Browsing orders 105
Searching and viewing orders 106
Order summary preview 106
Viewing orders by time range or status 107
Viewing orders per market 108
Creating an order 108
Creating an order from order list 109
Creating an order within a contact 113
Processing an order 114
Splitting a shipment 117
© Episerver 2018
8 | Episerver Commerce User Guide 18-4
© Episerver 2018
Table of Contents | 9
Setting up a payment plan 120
Payment plan order detail page explained 123
Editing and canceling a payment plan 124
Creating a recurring payment plan using Authorize.Net 124
Editing, canceling, and deleting orders 125
Editing an order 125
Canceling an order 125
Deleting an order 126
Shipping and receiving 126
Creating a picklist 128
Completing a shipment 129
Method 1 130
Method 2 131
Printing a picklist and packing slip 132
Removing items and deleting picklists 134
Removing items from a picklist 134
Deleting picklists 134
Shopping carts 134
Creating a shopping cart 135
Converting a shopping cart 135
Returns and exchanges 137
Initiating a return 138
Initiating an exchange order 141
Customers 145
Organizations 145
Contacts 146
Organizations 146
Browsing organizations 147
Viewing organization details 147
Searching for an organization 148
Customizing views for browsing organizations 148
Editing and deleting views 151
Customized view example 151
Printing a list of organizations 153
Creating or editing an organization 153
Creating an organizational hierarchy 155
Deleting an organization 156
Adding dictionary values for an organization 158
Creating, editing and deleting business categories 160
Contacts 160
Browsing contacts 160
Searching for a contact 162
© Episerver 2018
10 | Episerver Commerce User Guide 18-4

© Episerver 2018
Table of Contents | 11
Customizing views for browsing contacts 163
Editing and deleting views 166
Printing a list of contacts 166
Creating a contact with an account 167
Editing or deleting a contact and account 172
Adding dictionary values for a contact 173
Roles and tasks 176
Visitor 176
Community member 176
Content editor 176
Marketer 177
Merchandiser 177
Website owner 177
Administrator 177
Developer 178
Markets 179
How markets are used 180
Browsing markets 180
Creating or editing a market 181
Deleting a market 184
Marketing 185
Campaigns and discounts 186
Campaign view 186
Understanding the Campaign View 187
Campaign View facets and search 188
Search tips 190
Creating a campaign 190
Effects of choosing markets 193
Editing a campaign 194
Deleting a campaign 194
Discounts 194
Discount colors 195
Creating a discount 197
Example: Buy three items, get cheapest free 200
Selecting discount-eligible items 201
Editing a discount 202
Deleting a discount 202
How Episerver Commerce determines which items to discount 203
Example 203
Using promotion codes 204
Applying redemption limits 205
Combining redemption limits 207
© Episerver 2018
12 | Episerver Commerce User Guide 18-4
© Episerver 2018
Table of Contents | 13
Viewing the number of redeemed discounts 207
Built-in discounts 208
Cheapest items for free 209
Example 209
Most expensive items for free 210
Buy products for fixed price 211
Buy products for discount from other selection 214
Buy products for discount on all selections 216
Buy products for discount in same categories 218
Spend for discounted selection 219
Spend for free items 223
Spend for discount on order 224
Examples 226
Buy products and get discount on order 226
Spend for discount on shipping cost 228
Buy products for discount on shipping cost 230
Buy products for free shipping 232
Spend for free shipping 233
Prioritizing discounts 235
Adjusting discount priorities 235
How prioritization works 236
Discount exclusions 237
Additional notes about exclusions 238
Campaigns (Legacy) 239
Browsing campaigns (Legacy) 240
Managing campaigns (Legacy) 241
Deleting a campaign 244
Promotions (Legacy) 244
Browsing promotions (Legacy) 245
Creating an entry-level promotion (Legacy) 247
Example: Build your own discount - "40% off wine decanter" 247
Example: Buy catalog entry X, get catalog entry Y at a discount 250
Example: Buy X get $ off discount 251
Creating an order-level promotion (Legacy) 252
Example: Buy X, get N quantity of Y at a discount 252
Example: Order Sub Total Volume Discount 253
Example: Build Your Own Discount 254
Creating a shipping-level promotion (Legacy) 254
Example: buy N quantity get % off shipment discount 255
Creating a custom promotion (Legacy) 255
Setting customer group promotions (Legacy) 256
Editing and activating promotions (Legacy) 260
© Episerver 2018
14 | Episerver Commerce User Guide 18-4
© Episerver 2018
Table of Contents | 15
Editing a promotion 260
Activating and inactivating promotions 261
Deleting a promotion 262
Creating an expression (Legacy) 262
Creating a policy (Legacy) 265
Customer segments (Legacy) 267
Browsing customer segments (Legacy) 268
Creating or editing a customer segment (Legacy) 269
Creating a customer segment with conditions 271
Deleting a customer segment (Legacy) 272
Reporting 273
Managing reports 273
Administration 275
System settings 276
Dictionaries 277
Adding a country to dictionaries 277
Adding a currency to dictionaries 279
Creating a return reason 281
Deleting a return reason 282
Logging 282
System log 283
Application log 283
Common settings 284
Business foundation 285
Creating a business object 286
Creating a contract business object 287
Customizing a business object 288
Editing an existing business object 288
Editing an existing field of a business object 289
Adding fields to a business object 290
Customizing a form 293
Editing a form 294
Editing a form's layout 295
Adding a section 296
Editing a section 297
Adding a field to a section 298
Editing a field 300
Re-arranging fields 300
Deleting a section or field 301
Recreating a form 302
Relating business objects 303
Adding a one-to-many relationship 303
© Episerver 2018
16 | Episerver Commerce User Guide 18-4
© Episerver 2018
Table of Contents | 17
Adding a many-to-one relationship 307
Adding a many-to-many relationship 309
Publishing business objects 312
Deleting business objects 313
Updating a catalog search index 314
Customizing the left menu 315
Adding a left menu item 315
Catalog system administration 320
Warehouses 321
Deleting a warehouse 324
Tax categories 324
Deleting a tax category 325
Catalog meta-classes and meta-fields 325
Creating a catalog meta class 325
Creating a catalog meta field 327
Applying meta fields to a meta class 330
Order system administration 331
Payments 332
Setting up a payment 333
Editing payment methods 337
Deleting payment methods 338
Using nSoftware-provided payment gateways 338
Shipping 341
Shipping methods 342
Customizing shipping methods 343
Deleting shipping methods 346
Shipping providers 347
Customizing a shipping provider 347
Deleting shipping providers 347
Configuring taxes 348
Configuring taxes manually 348
Configuring taxes using CSV import 350
Sample CSV files and scenarios 351
Order meta-classes and meta-fields 352
Creating an order meta-class 352
Creating an order meta field 353
Applying meta fields to a meta-class 357
Scheduled jobs 358
Subscription payment plans 359
Remove expired carts 359
Full search index 359
Incremental search index 359
© Episerver 2018
18 | Episerver Commerce User Guide 18-4
© Episerver 2018
Table of Contents | 19
Draft store migration 359
Find catalog URI conflicts 359
Shipment releasing 360
Rotate encryption keys 360
Export product feed 360
Maintain database indexes 360
Index 364

© Episerver 2018
Introduction | 21
Introduction
Online help describes the features and functionality of the Episerver platform, and
covers CMS for content management, Commerce for e-commerce functionality,
Find for extended search, and Episerver add-ons. You access it from within the
Episerver platform or from Episerver World. The online help is also available in
PDF format for users who prefer PDF or want to print the documentation.
This PDF describes the features and functionality of Episerver Commerce which
you can find on Episerver World. Developer guides and technical documentation
also are found on Episerver World.
The user documentation is intended for editors, administrators, marketers and mer-
chandisers, working with tasks as described in Roles and tasks.
© Episerver 2018
22 | Episerver Commerce User Guide 18-4
Features, licenses and releases
The user documentation is continuously updated and covers the latest releases for
the Episerver platform.
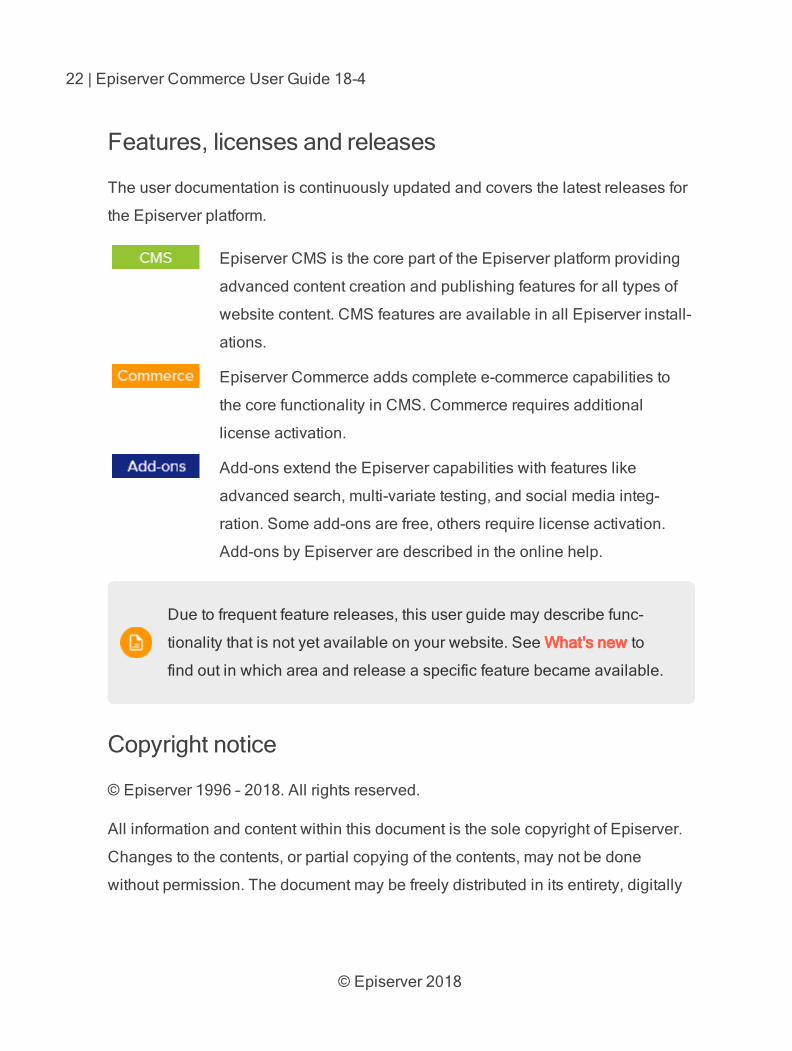
Episerver CMS is the core part of the Episerver platform providing
advanced content creation and publishing features for all types of
website content. CMS features are available in all Episerver install-
ations.
Episerver Commerce adds complete e-commerce capabilities to
the core functionality in CMS. Commerce requires additional
license activation.
Add-ons extend the Episerver capabilities with features like
advanced search, multi-variate testing, and social media integ-
ration. Some add-ons are free, others require license activation.
Add-ons by Episerver are described in the online help.
Due to frequent feature releases, this user guide may describe func-
tionality that is not yet available on your website. See What's new to
find out in which area and release a specific feature became available.
Copyright notice
© Episerver 1996 – 2018. All rights reserved.
All information and content within this document is the sole copyright of Episerver.
Changes to the contents, or partial copying of the contents, may not be done
without permission. The document may be freely distributed in its entirety, digitally

© Episerver 2018
Introduction | 23
or in printed format, to all users of Episerver Software. Episerver assumes no liab-
ility or responsibility for any errors or omissions in the content of this document.
Episerver reserves the right to alter functionality and technical system requirements.
Episerver is a registered trademark of Episerver AB. Ektron is a registered trade-
mark of Episerver Inc.
© Episerver 2018
24 | Episerver Commerce User Guide 18-4
What's new?
The Episerver user guide describes features in the Episerver platform, including
CMS for content management and Commerce for e-commerce management, and
add-ons from Episerver. New features are continuously made available through
Episerver updates.
Due to frequent feature releases, this user guide may describe func-tionality that is not yet available on your website.
This user guide (18-4) describes features added up until and including update
2xx for Episerver; see Episerver World for previous user guide versions.
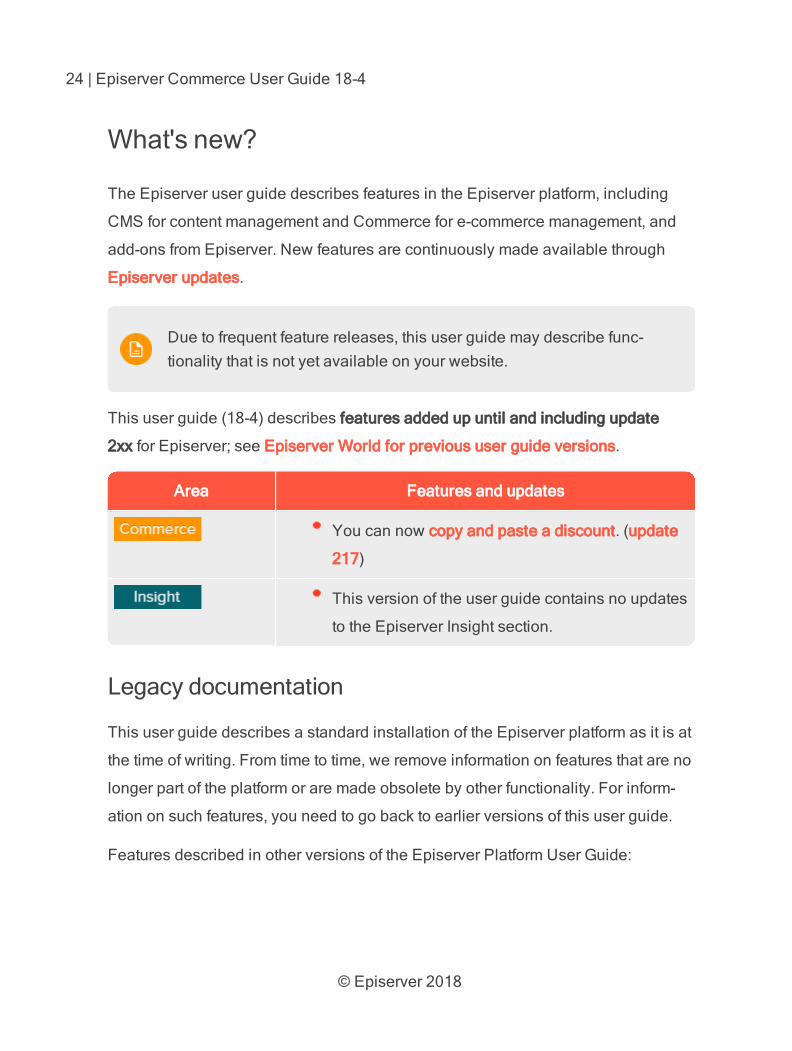
Area Features and updates
You can now copy and paste a discount. (update
217)
This version of the user guide contains no updates
to the Episerver Insight section.
Legacy documentation
This user guide describes a standard installation of the Episerver platform as it is at
the time of writing. From time to time, we remove information on features that are no
longer part of the platform or are made obsolete by other functionality. For inform-
ation on such features, you need to go back to earlier versions of this user guide.
Features described in other versions of the Episerver Platform User Guide:
© Episerver 2018
What's new? | 25
The built-in forms functionality to build web forms, see version 18-2 or
earlier.
Dynamic content, see version 18-2 or earlier.
Customizing the rich text-editor TinyMCE v1, see version 18-2 or earlier.
© Episerver 2018
26 | Episerver Commerce User Guide 18-4
About Episerver
The features of the are described in this user guide. Note that all parts described here may not be implemented on your website. Check with your system administrator to find out what is available to you.
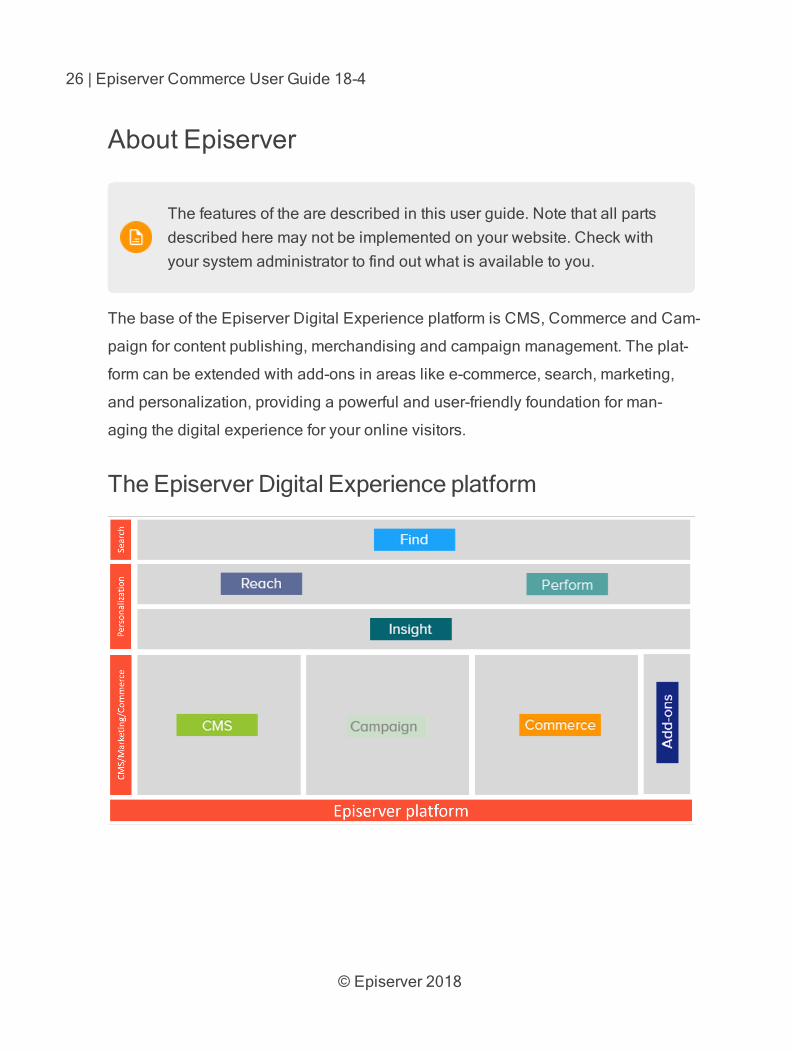
The base of the Episerver Digital Experience platform is CMS, Commerce and Cam-
paign for content publishing, merchandising and campaign management. The plat-
form can be extended with add-ons in areas like e-commerce, search, marketing,
and personalization, providing a powerful and user-friendly foundation for man-
aging the digital experience for your online visitors.
The Episerver Digital Experience platform
© Episerver 2018
About Episerver | 27
Episerver CMS
Episerver CMS is a powerful yet easy to use web content management system,
based on cutting edge technology. The intuitive user interface and superior usab-
ility of Episerver CMS allow both experienced and occasional users to efficiently
manage website content. Episerver CMS is the foundation for the Episerver Digital
Experience platform, and is required for most Episerver products and extensions.
See the CMS section in the Episerver Platform User Guide.
Episerver Commerce
Adding Episerver Commerce to your CMS solution brings e-commerce functionality
such as catalog, customer and order management, combining the powerful content
publishing and display features of CMS with advanced back-end online store man-
agement. Episerver Commerce is part of the Episerver Digital Experience platform.
It requires a specific installation and license. See the Commerce section in the
Episerver Platform User Guide.
Episerver Find
Episerver Find adds advanced search functionality to websites. Episerver Find
bases search functionality on visitor search behavior and website statistics. Using
this information, you can add automatic landing pages, adaptive navigation, and
guided search to increase website traffic and boost conversion rates. Episerver
Find is part of the Episerver Digital Experience platform. It requires a specific install-
ation and license. See the Find section in the Episerver Platform User Guide.

© Episerver 2018
28 | Episerver Commerce User Guide 18-4
Episerver Insight
Episerver Insight is a user interface for viewing and filtering visitor profiles, and cre-
ating customer segments that can be used in your omnichannel marketing cam-
paigns. The Insight information is based on tracking of the behavior of your online
visitors, for example when viewing content, or products on an e-commerce site.
Episerver Insight is part of the Episerver Digital Experience platform. It requires a
specific installation and license. See the Insight section in the Episerver Platform
User Guide.
Episerver Campaign
With Episerver Campaign you can orchestrate multichannel campaigns from a
single screen, and send triggered emails based on real-time behavior. You can
coordinate and segment large volumes of messages, including personalized
product recommendations. Episerver Campaign is part of the Episerver Digital
Experience platform. It requires a specific installation and license. See the
Episerver Campaign User Guide.
Episerver Perform
Episerver Perform lets you create and configure a merchandising campaign with
personalized product recommendations. Wherever you display your products—on
the web or on a mobile device—Episerver optimizes the ranking for every visitor,
including behavioral data and merchandising strategies. Episerver Perform is part
of the Episerver Digital Experience platform. It requires a specific installation and
license. See the Personalization section in the Episerver Platform User Guide.
© Episerver 2018
About Episerver | 29
Episerver Reach
Episerver Reach lets you include personalized product recommendations in any
email, including cart abandonment and retargeting emails. You can also work with
behavioral triggers to detect on site behaviors and act upon them through auto-
mated personalized emails. Episerver Reach is part of the Episerver Digital Exper-
ience platform. It requires a specific installation and license. See the
Personalization section in the Episerver Platform User Guide.
Episerver Add-ons
There are many add-ons made by Episerver and third-parties, available for extend-
ing your Episerver Digital Experience solution. The add-ons from Episerver
described here add features such as search analytics, and social media and mar-
keting tool integrations. Add-ons require separate installations, and some also
require a specific license. See each add-on for details.
© Episerver 2018
30 | Episerver Commerce User Guide 18-4
Getting started
This section describes how to log in to an Episerver website, access features and
navigate the different views. The login procedure may be different from what is
described here, depending on how your website and infrastructure are set up. The
examples described here are based on a “standard” installation of Episerver with
sample templates.
Logging in
As an editor or administrator, you usually log in to your website using a specified
URL, a login button or link. Enter your user name and password in the Episerver
login dialog, and click Log In.
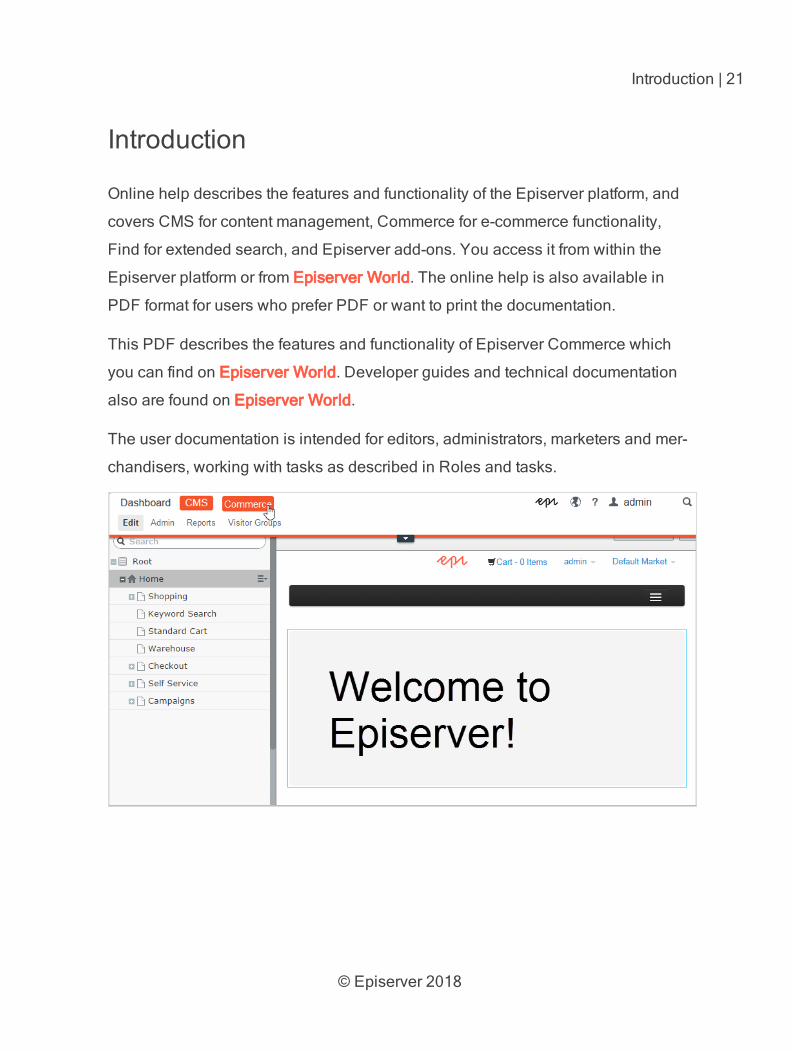
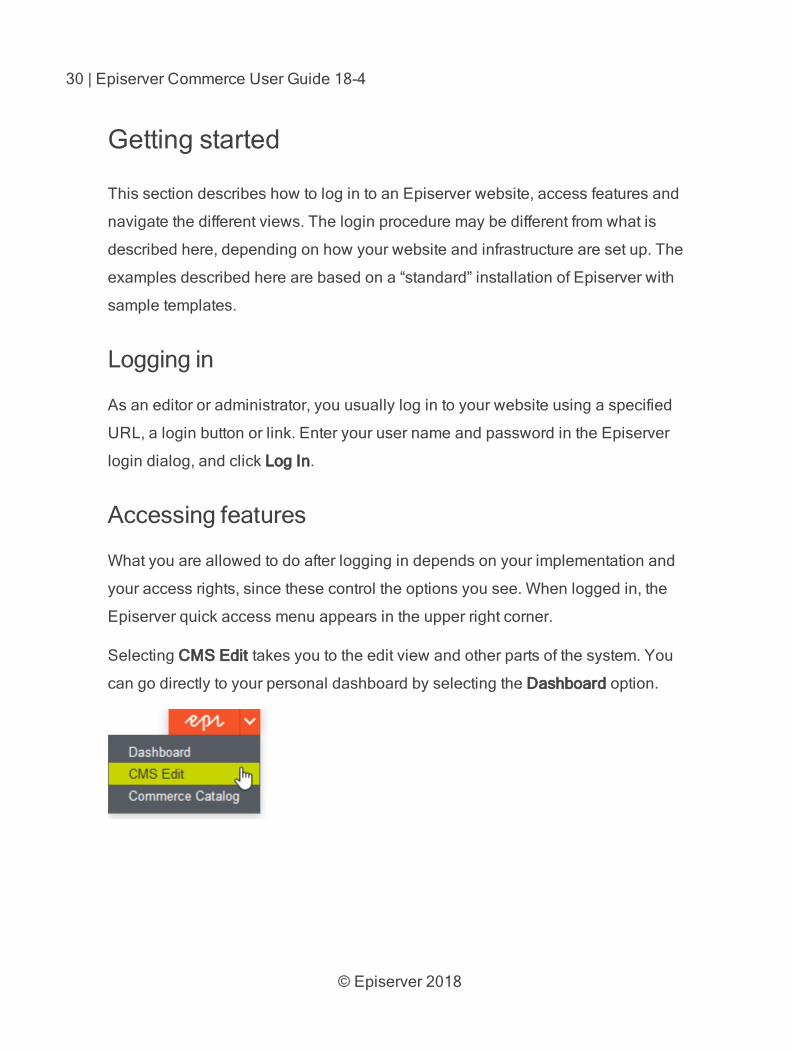
Accessing features
What you are allowed to do after logging in depends on your implementation and
your access rights, since these control the options you see. When logged in, the
Episerver quick access menu appears in the upper right corner.
Selecting CMS Edit takes you to the edit view and other parts of the system. You
can go directly to your personal dashboard by selecting the Dashboard option.
© Episerver 2018
Getting started | 31
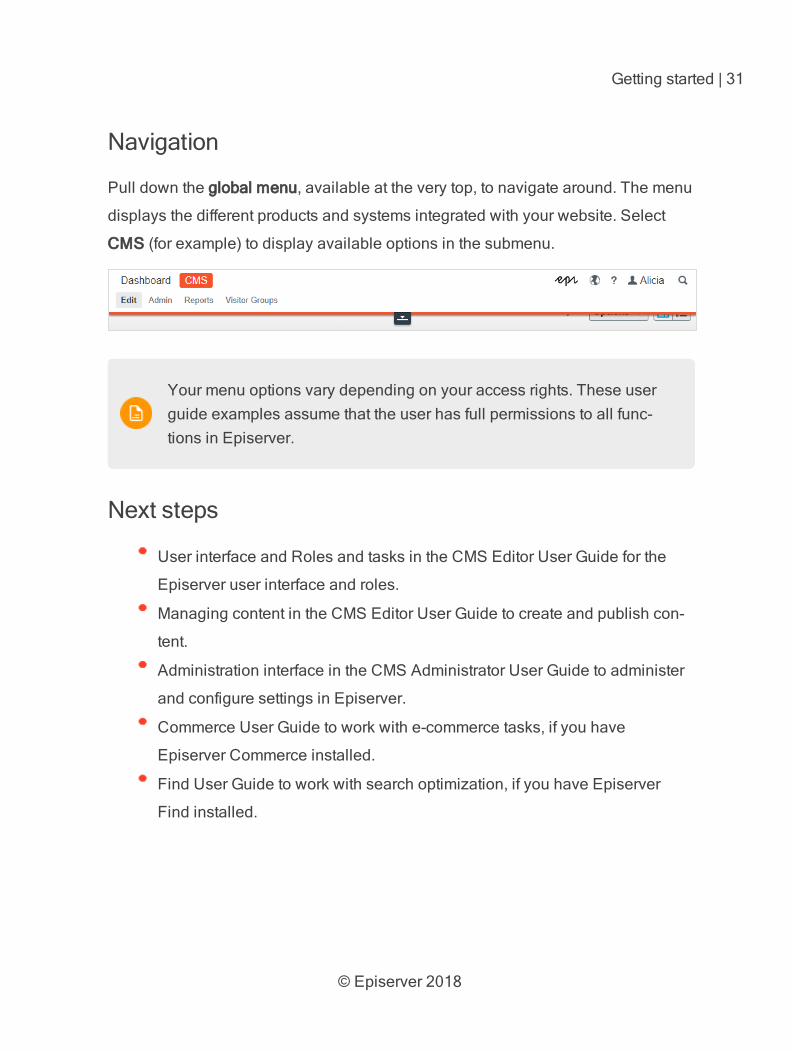
Navigation
Pull down the global menu, available at the very top, to navigate around. The menu
displays the different products and systems integrated with your website. Select
CMS (for example) to display available options in the submenu.
Your menu options vary depending on your access rights. These user guide examples assume that the user has full permissions to all func-tions in Episerver.
Next steps
User interface and Roles and tasks in the CMS Editor User Guide for the
Episerver user interface and roles.
Managing content in the CMS Editor User Guide to create and publish con-
tent.
Administration interface in the CMS Administrator User Guide to administer
and configure settings in Episerver.
Commerce User Guide to work with e-commerce tasks, if you have
Episerver Commerce installed.
Find User Guide to work with search optimization, if you have Episerver
Find installed.
© Episerver 2018
32 | Episerver Commerce User Guide 18-4
User interface
The Episerver user interface is flexible allowing developers to plug-in customized features when implementing websites. This description refers to a “standard installation” of Episerver without customizations.
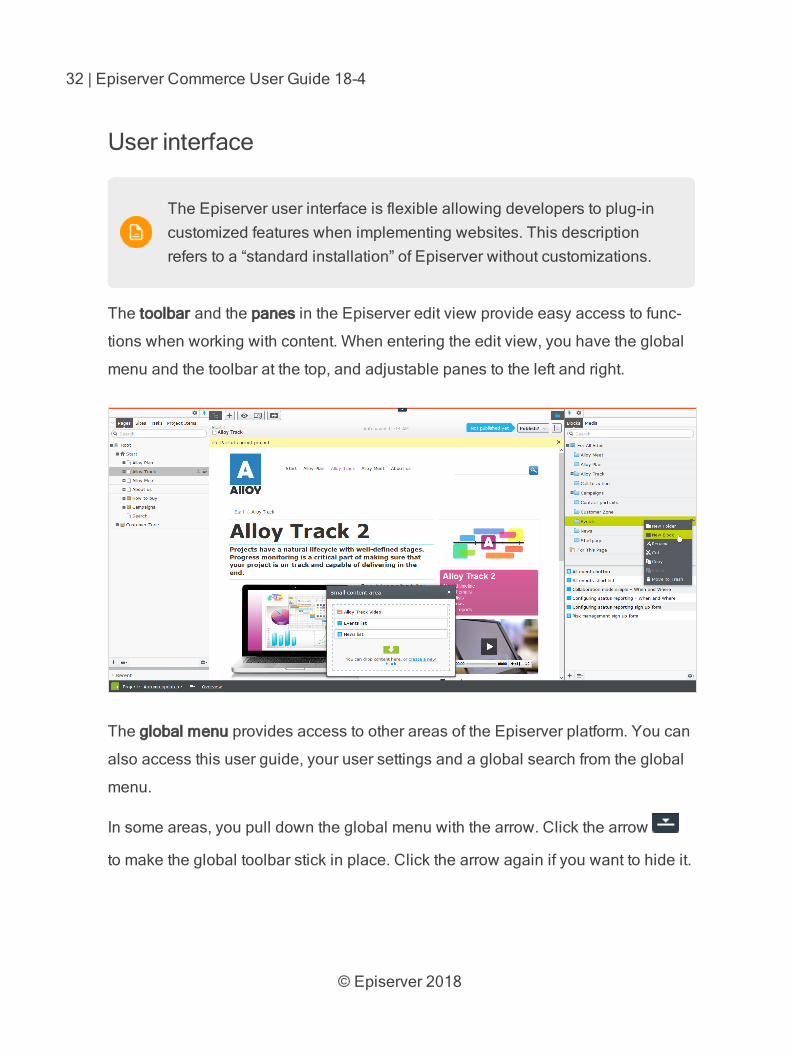
The toolbar and the panes in the Episerver edit view provide easy access to func-
tions when working with content. When entering the edit view, you have the global
menu and the toolbar at the top, and adjustable panes to the left and right.
The global menu provides access to other areas of the Episerver platform. You can
also access this user guide, your user settings and a global search from the global
menu.
In some areas, you pull down the global menu with the arrow. Click the arrow
to make the global toolbar stick in place. Click the arrow again if you want to hide it.
© Episerver 2018
Getting started | 33
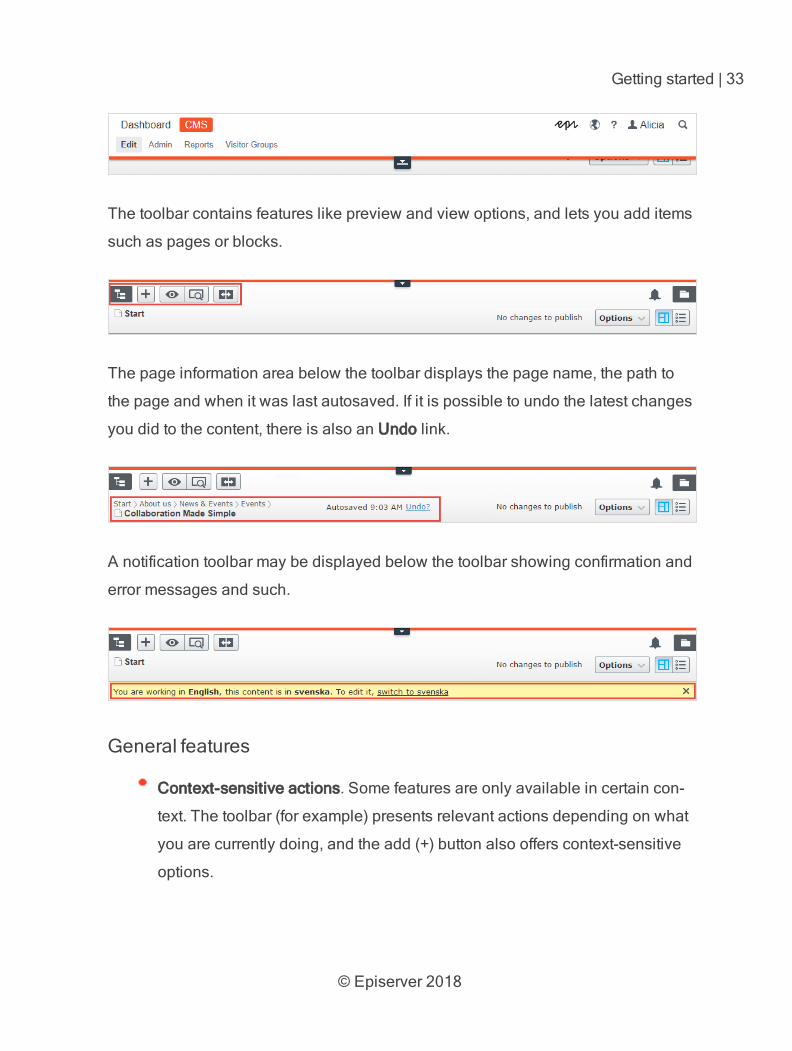
The toolbar contains features like preview and view options, and lets you add items
such as pages or blocks.
The page information area below the toolbar displays the page name, the path to
the page and when it was last autosaved. If it is possible to undo the latest changes
you did to the content, there is also an Undo link.
A notification toolbar may be displayed below the toolbar showing confirmation and
error messages and such.
General features
Context-sensitive actions. Some features are only available in certain con-
text. The toolbar (for example) presents relevant actions depending on what
you are currently doing, and the add (+) button also offers context-sensitive
options.
© Episerver 2018
34 | Episerver Commerce User Guide 18-4
Primary actions. Some actions open in a new window, for example, a page
delete confirmation. The background is then dimmed, meaning that you must
finish the primary action to continue.
Action feedback and notifications. Successful actions are confirmed by a
message in the notification bar. A notification may also appear in case of an
error requiring you to take action.
Drag-and-drop operations. Drag-and-drop is supported in many areas. For
example, you can drag pages, media files and blocks into the rich-text area
or content areas, or re-arrange the page tree structure using drag-and-drop.
Tooltips. Hover the mouse over a button or field and a short tooltip appears.
Keyboard commands. Standard keyboard commands are supported in
many areas, such as when you move pages in the page tree or in the rich-
text editor.
Search. Supported in many areas to locate, such as pages in the page tree
or media in the folder structure.
Adaptable work environment. Resize and pin the panes depending on what
you are currently doing, and add and remove gadgets of your choice for
quick access to functionality.
Support for time zones. Publishing actions in the edit view are done in your
local time zone, whereas administrative actions are based on server time.
Context menus are available in many areas, such as in the panes, the page
tree and in item listings. The menu displays different available options
depending on where in the interface you are and what you are doing.
© Episerver 2018
Getting started | 35
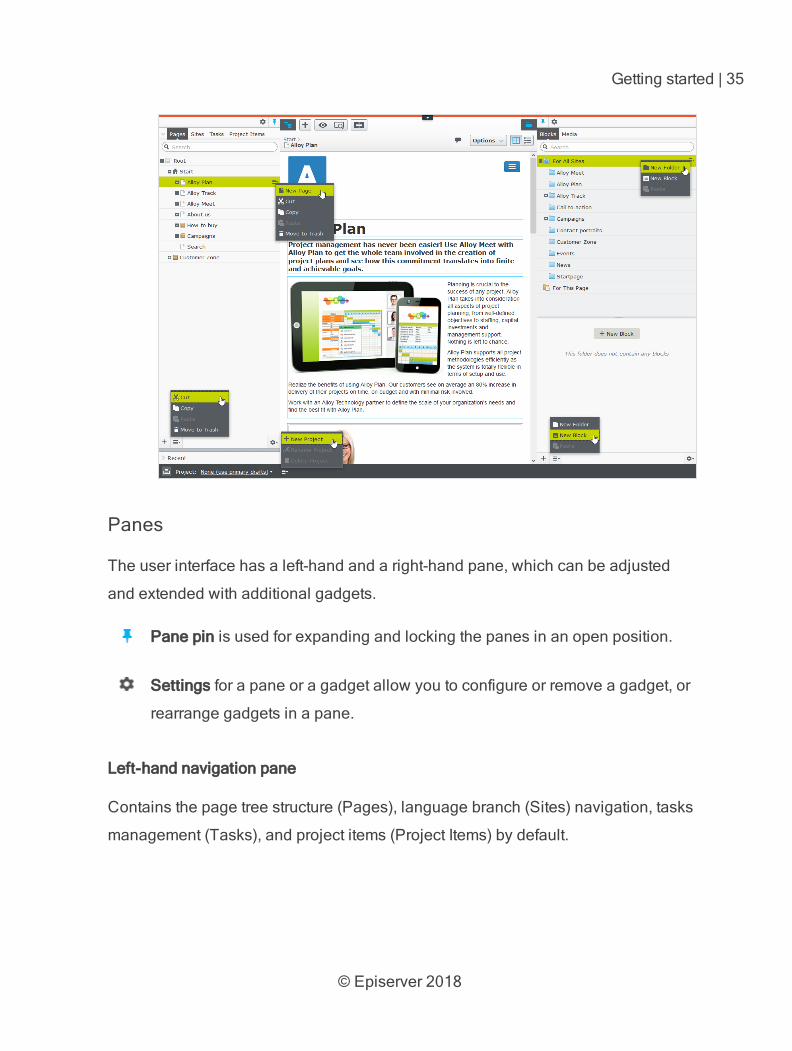
Panes
The user interface has a left-hand and a right-hand pane, which can be adjusted
and extended with additional gadgets.
Pane pin is used for expanding and locking the panes in an open position.
Settings for a pane or a gadget allow you to configure or remove a gadget, or
rearrange gadgets in a pane.
Left-hand navigation pane
Contains the page tree structure (Pages), language branch (Sites) navigation, tasks
management (Tasks), and project items (Project Items) by default.

© Episerver 2018
36 | Episerver Commerce User Guide 18-4
Right-hand assets pane
Contains the Media and Blocks folder structures by default. Drag and drop one or
multiple items from the assets pane into the content you are currently working on.
You can also drag and drop multiple items within the assets pane, and delete, cut
or copy and paste them, from the context menu or with standard keyboard shortcuts.
Any unselected children folders are also moved, copied or deleted.
If you copy and paste multiple folders on different levels, they will be on the same level when pasted.
© Episerver 2018
Getting started | 37
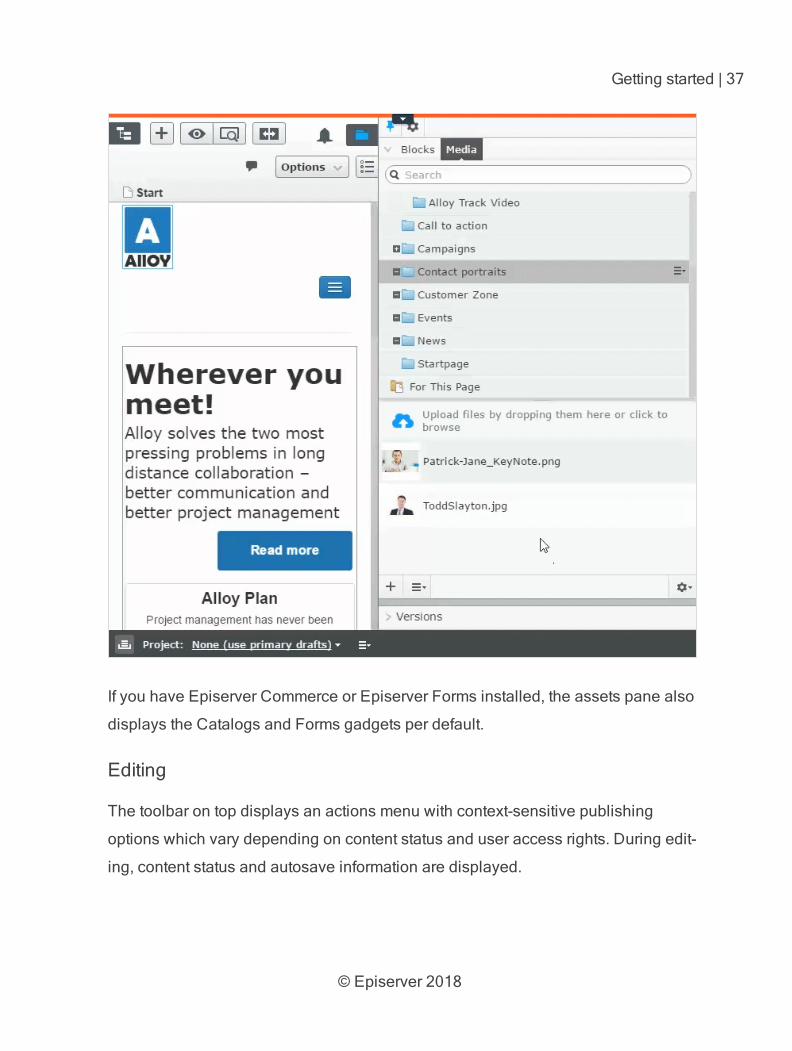
If you have Episerver Commerce or Episerver Forms installed, the assets pane also
displays the Catalogs and Forms gadgets per default.
Editing
The toolbar on top displays an actions menu with context-sensitive publishing
options which vary depending on content status and user access rights. During edit-
ing, content status and autosave information are displayed.

© Episerver 2018
38 | Episerver Commerce User Guide 18-4
When working with content such as pages and blocks in CMS, or catalog content in
Commerce, there are two editing views, On-Page Editing and All Properties, with
buttons to switch between them.
On-Page Editing view provides quick access to direct editing of a selection
of content properties.
All Properties view provides access to all available properties including
more advanced ones such as access rights and language settings.
When editing content properties, these options are common when adding, deleting,
or selecting items:
Click to select (a category, for example).
Click to select (an image in a media folder, or a page in the page tree).
© Episerver 2018
Getting started | 39
Click to remove (a category, for example).
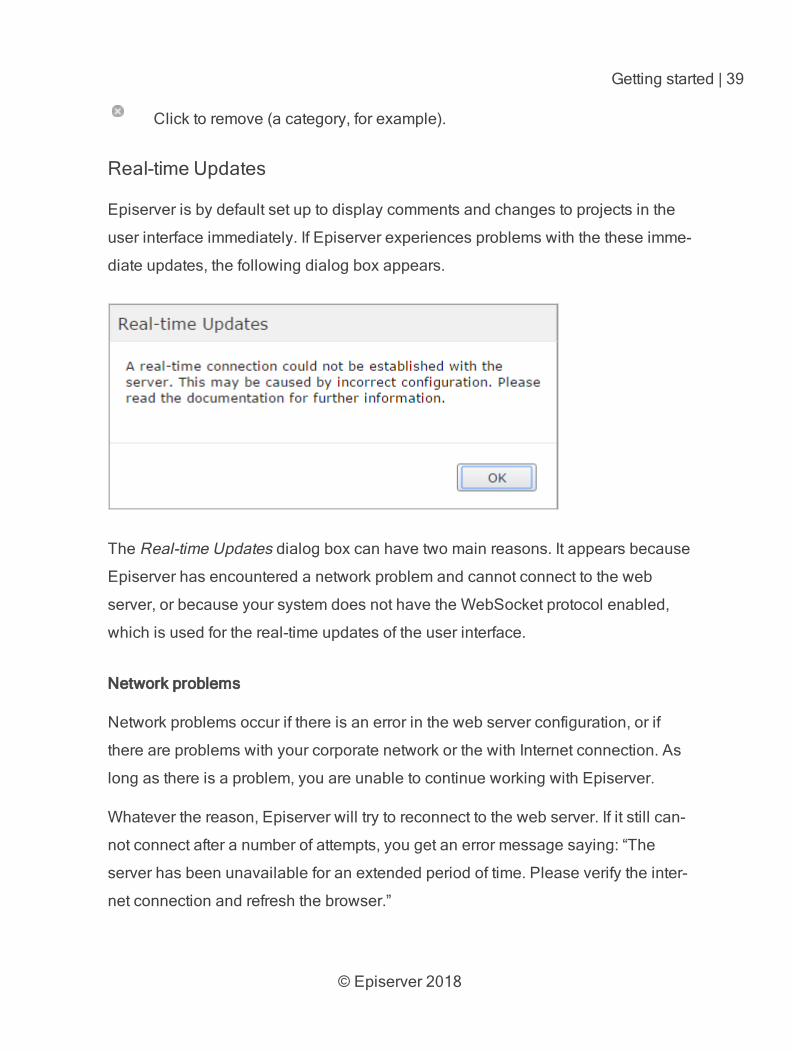
Real-time Updates
Episerver is by default set up to display comments and changes to projects in the
user interface immediately. If Episerver experiences problems with the these imme-
diate updates, the following dialog box appears.
The Real-time Updates dialog box can have two main reasons. It appears because
Episerver has encountered a network problem and cannot connect to the web
server, or because your system does not have the WebSocket protocol enabled,
which is used for the real-time updates of the user interface.
Network problems
Network problems occur if there is an error in the web server configuration, or if
there are problems with your corporate network or the with Internet connection. As
long as there is a problem, you are unable to continue working with Episerver.
Whatever the reason, Episerver will try to reconnect to the web server. If it still can-
not connect after a number of attempts, you get an error message saying: “The
server has been unavailable for an extended period of time. Please verify the inter-
net connection and refresh the browser.”
© Episerver 2018
40 | Episerver Commerce User Guide 18-4
Contact your IT department or Internet service provider if the problem persists.
WebSocket support
WebSocket is an Internet protocol used to automatically update the Episerver user
interface.
If you are using the projects feature, the WebSocket protocol is used to check for
new or updated comments and project items from other users. As soon as one of
your colleagues adds a comment or project item, Episerver automatically updates
your user interface and displays the comment or item (assuming you have the pro-
jects interface open).
However, the WebSocket protocol must be enabled for your system by an admin-
istrator for the real-time updates to work. If it was not enabled, you can still work
with Episerver and with projects and comments but you need to manually refresh
the user interface with the Refresh button to see new comments or items.
Depending on the system configuration when the WebSocket protocol is disabled,
you may or may not see the Real-time Updates dialog box.
My settings
Under the global menu > your user name > My settings, you can change some of
your account settings. User name and password are usually set in an external sys-
tem, such as Windows or an SQL database, and cannot be changed in Episerver in
that case.
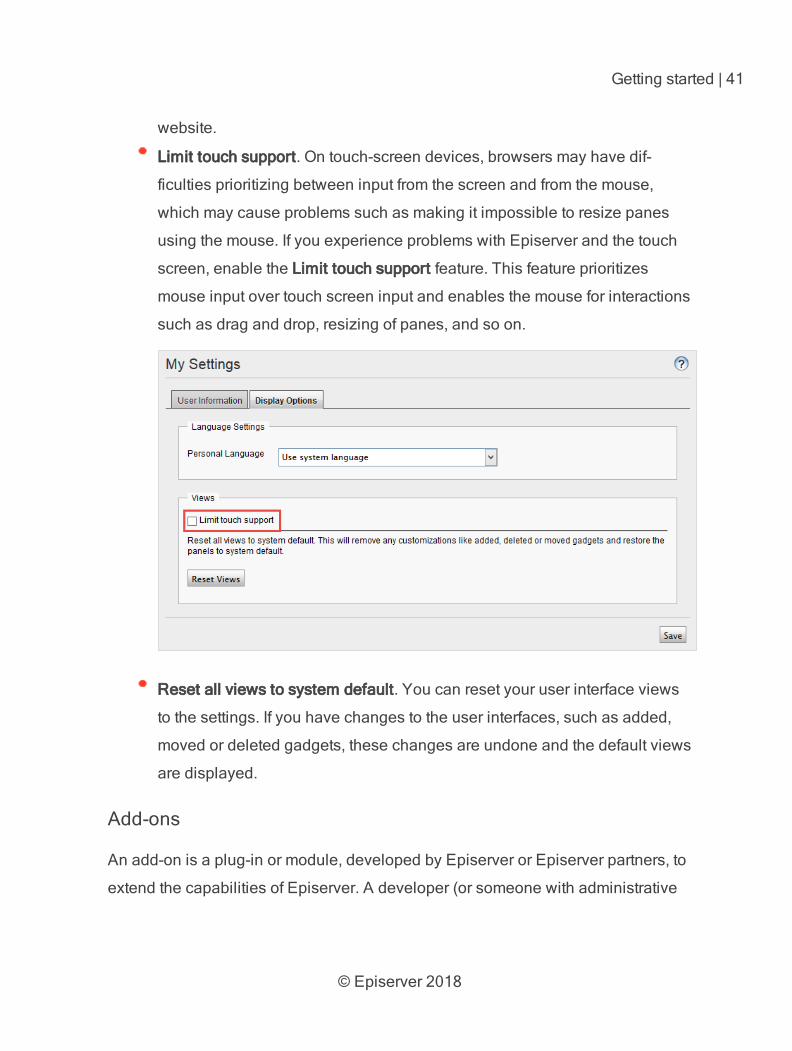
In the Display Options tab, you find the following settings:
Personal language. Select your desired user interface language from the
drop-down. This settings affects the language of the user interface, such as
texts in buttons and dialog boxes. It does not affect the language of your
© Episerver 2018
Getting started | 41
website.
Limit touch support. On touch-screen devices, browsers may have dif-
ficulties prioritizing between input from the screen and from the mouse,
which may cause problems such as making it impossible to resize panes
using the mouse. If you experience problems with Episerver and the touch
screen, enable the Limit touch support feature. This feature prioritizes
mouse input over touch screen input and enables the mouse for interactions
such as drag and drop, resizing of panes, and so on.
Reset all views to system default. You can reset your user interface views
to the settings. If you have changes to the user interfaces, such as added,
moved or deleted gadgets, these changes are undone and the default views
are displayed.
Add-ons
An add-on is a plug-in or module, developed by Episerver or Episerver partners, to
extend the capabilities of Episerver. A developer (or someone with administrative
© Episerver 2018
42 | Episerver Commerce User Guide 18-4
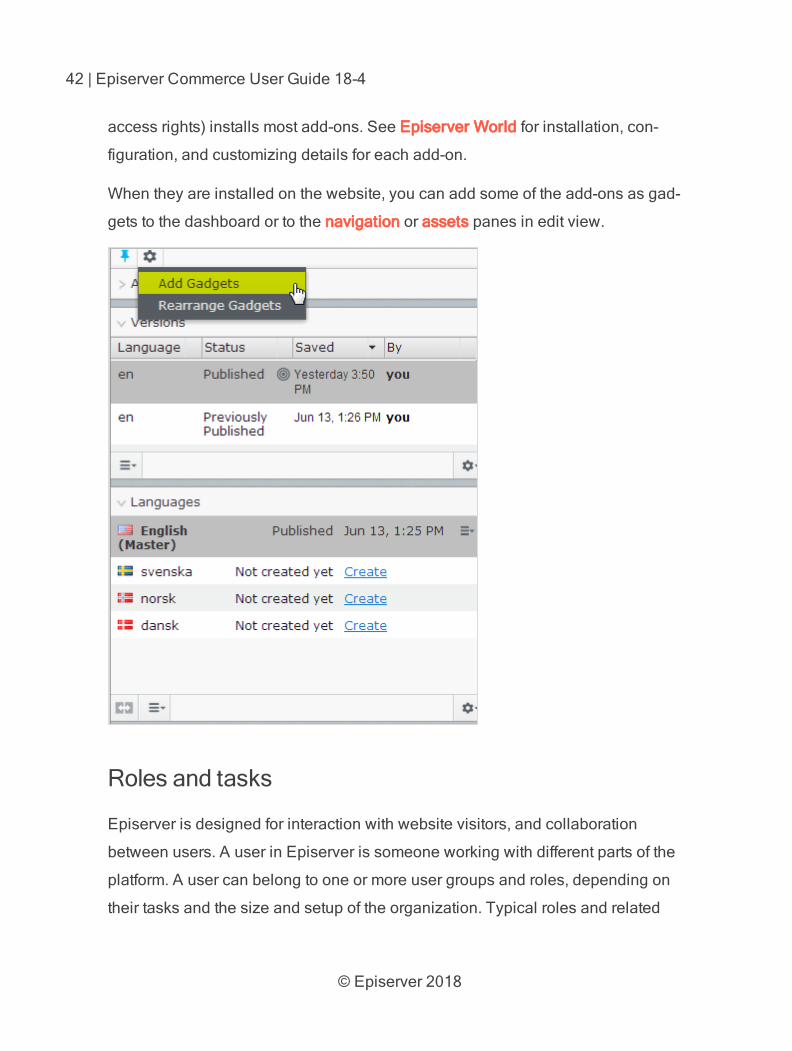
access rights) installs most add-ons. See Episerver World for installation, con-
figuration, and customizing details for each add-on.
When they are installed on the website, you can add some of the add-ons as gad-
gets to the dashboard or to the navigation or assets panes in edit view.
Roles and tasks
Episerver is designed for interaction with website visitors, and collaboration
between users. A user in Episerver is someone working with different parts of the
platform. A user can belong to one or more user groups and roles, depending on
their tasks and the size and setup of the organization. Typical roles and related
© Episerver 2018
Getting started | 43
tasks are described below. See Setting access rights in the CMS Administrator
User Guide to configure user groups and roles in Episerver.
Visitor
A visitor is someone who visits the website to find information or to use available
services, on an e-commerce website possibly with purchasing intentions. Purchas-
ing on an e-commerce website can be done "anonymously" (payment and shipping
details provided), or by registering an account. Visitors may also contribute to web-
site content as community members, which usually requires registration of an
account profile.
Community member
Content may be added by visitors or community members, if social features and
community functionality are available for the website. This content includes forum
and blog postings, reviews, ratings and comments, in which case there might be a
need for monitoring this type of content on the website. Monitoring can be done by
an editor, or a specific moderator role for large websites and online communities.
Content editor
A content editor is someone with access to the editorial interface who creates and
publishes content on the website. Content editors with good knowledge of the web-
site content work with search optimization for selected content in search results.
Editors may also want to follow-up on content with unusually high or low con-
version rate to update or delete this content.
Marketer
A marketer creates content and campaigns with targeted banner advertisements to
ensure customers have consistent on site experience of the various marketing
© Episerver 2018
44 | Episerver Commerce User Guide 18-4
channels. Furthermore, the marketer monitors campaign KPI to optimize page con-
version. A marketer with good knowledge of the website content may also want to
monitor search statistics to optimize search for campaigns and promote content.
Merchandiser
A merchandiser typically works with stock on an e-commerce website to ensure that
the strongest products are put in focus. This role also creates landing pages, sets
product pricing, coordinates cross-product selling, oversees delivery and dis-
tribution of stock, and deals with suppliers. This user wants to identify search quer-
ies with unusually high or low conversion rates, to adjust the search or the product
line.
Website owner
A website owner is someone with overall responsibility for the content and per-
formance of one or more websites. This user monitors website activities such as
page conversions, customer reviews or sales progress. Rarely creates content but
can be involved in the approval of content created by others. A website owner may
have administrative access rights and may install selected add-ons on the website.
Administrator
An administrator works with configuration of various system settings from the admin-
istration user interface, including search, languages, user access rights and visitor
groups for personalized content. Administrators may also install add-ons on the
website. Administrators usually have extended access rights compared to other
user groups, and can access all parts of the Episerver platform.
© Episerver 2018
Getting started | 45
Developer
A developer is someone with programming skills working with the setup and imple-
mentation of the website, and maintenance and development of new functionality.
Creates the content templates for pages, blocks and catalog content used by edit-
ors in CMS and Commerce, configures e-commerce settings, and manages the
index and customized search features in Find. Developers may also install add-ons
on the website.
© Episerver 2018
46 | Episerver Commerce User Guide 18-4
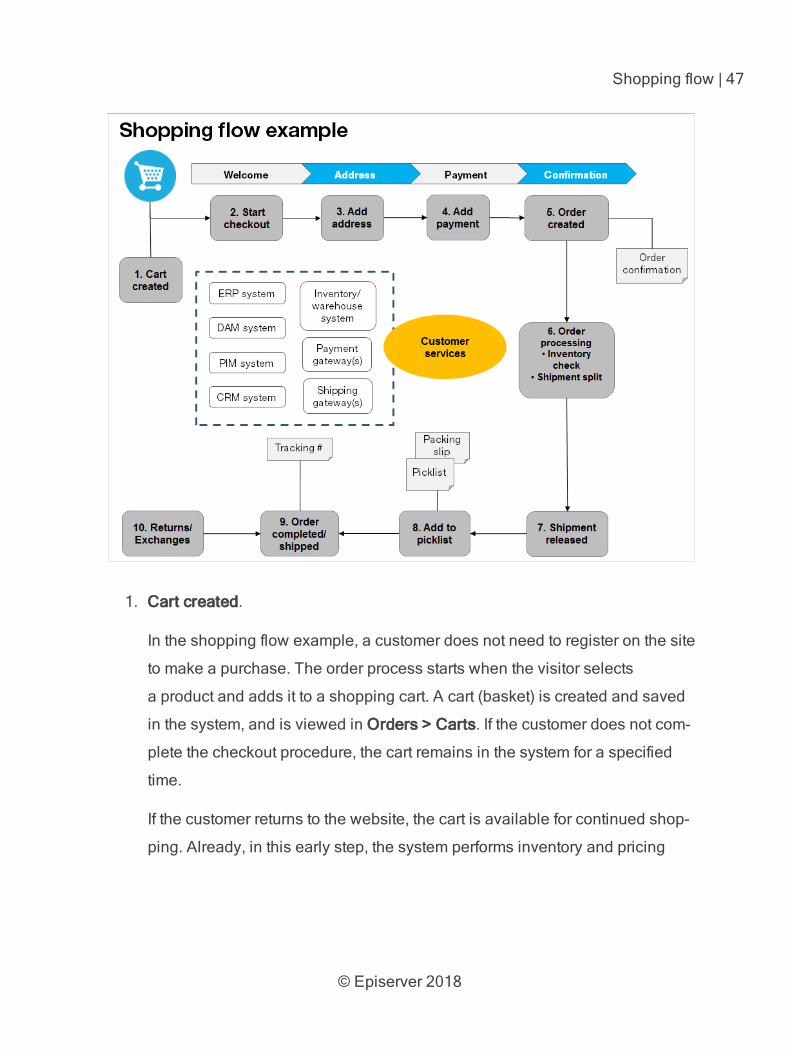
Shopping flow
The two most common types of e-commerce websites are:
Business-to-Consumer (B2C): designed for selling goods and services to
consumers.
Business-to-Business (B2B): used to build strategic relationships with other
businesses, and to ease the supply and procurement processes that char-
acterize trade among those organizations.
Sites can have multiple roles, and a single site can provide several functions.
Episerver Commerce is a flexible platform allowing for seamless integration with
external systems such as financial, CRM, inventory, warehouse, and customer ser-
vice systems.
A typical B2C shopping flow involves a number of interactions between a site vis-
itor, Episerver Commerce, and any integrated external system. You can automate
the shopping flow so that it requires little manual attention. But if needed, you can
monitor, access, and manually handle a purchase order from the Orders system.
The following example shows a B2C shopping flow and the actions and tasks
involved.
© Episerver 2018
Shopping flow | 47
1. Cart created.
In the shopping flow example, a customer does not need to register on the site
to make a purchase. The order process starts when the visitor selects
a product and adds it to a shopping cart. A cart (basket) is created and saved
in the system, and is viewed in Orders > Carts. If the customer does not com-
plete the checkout procedure, the cart remains in the system for a specified
time.
If the customer returns to the website, the cart is available for continued shop-
ping. Already, in this early step, the system performs inventory and pricing
© Episerver 2018
48 | Episerver Commerce User Guide 18-4
checks for warehouse availability and discounts for products in the cart.
These checks are updated if the customer returns to the cart.
2. Start checkout.
When the customer completes the purchase and proceeds to checkout, the
first step of the checkout procedure is initiated.
3. Add address.
The shipping and billing address information is added together with the pre-
ferred type of delivery (First class, Express, and so on). An anonymous cus-
tomer can add the address information manually; a registered and logged-in
customer can populate the address information automatically. You can also
set up the system to split shipments and ship to different addresses.
4. Add payment.
The payment is added to the purchase order-to-be. The system calculates the
total, including purchase amount and shipping fee. The customer selects a
payment method, such as credit card or PayPal. The payment is registered
and verified. Payment can happen instantly or after a specified time, depend-
ing on how the payment process is set up and the solution type (B2C or B2B).
You can also set up split payments, if the system is configured for this.
5. Order created.
Usually, the purchase order is created in the system when the payment is
settled. In the last checkout step, a purchase order number is created, the cus-
tomer confirms the purchase, and an order confirmation is sent to the cus-
tomer. The shopping cart is converted to a purchase order, which is visible
with status In Progress in Orders > Purchase Orders.
© Episerver 2018
Shopping flow | 49
6. Order processing.
After the order is created, order processing starts to check the warehouse
and inventory status for the products in the order, and creates the
actual shipment. Inventory status for the products may split the order into more
than one shipment.
7. Shipment released.
After the shipment is verified, it is released. The purchase order now appears
in Orders > Shipping/Receiving with the status Released for Shipping.
8. Add to picklist.
Warehouse personnel use a picklist to create the physical shipping of the
order's products, and produce a packing slip that is attached to the package.
9. Order completed/shipped.
After the system creates picklists with different orders and their respective
packing slips, the order is set to Completed by creating a shipment validation
number that is associated with a tracking number. You can enter the tracking
number manually, or automatically if such an integration exists. The tracking
number connects the physical package with the shipping provider for the deliv-
ery, and tracks the package on its way to the delivery address. The purchase
order appears in Orders > Purchase Orders again, with status Completed.
10. Return/Exchanges.
Only completed orders are subject to a return or exchange. You can create
returns automatically or manually by replacing a delivered product with
another one in exchange, or a payment refunds, or both. When you create a
return, it appears in Orders > Shipping/Receiving > Returns. Order status
may be Awaiting Exchange.
© Episerver 2018
50 | Episerver Commerce User Guide 18-4
If the return involves replacement of a new product, the shipping procedure is
initiated again. The return also may involve receiving a faulty product, in
which case a receiving procedure is initiated involving the acknowledgment
of a receiving receipt for the returned product.
© Episerver 2018
Catalogs | 51
Catalogs
A catalog consists of products and variants (SKUs) organized into a structure based
on product categories or nodes. Products and variants have associated information
such as:
pricing
markets
inventories
warehouses
assets, such as images and documents
A product can exist in one or more catalogs. Catalogs are independent from one
another. You can create as many catalogs as you want and assign them to one or
more websites. And while you often import product catalogs from an externally integ-
rated system, you can create them manually. Further, you can define dates when a
catalog is available, so you can prepare future revisions to items, and review them
in advance of the release date.
This documentation describes examples from the sample catalog
delivered with the Episerver Commerce sample site. Your installation
may look different from the sample catalog.
Catalog structure
A catalog is the top-level container for all types of products. You can structure a
catalog in a number of ways. For example, your site has several brands or product
lines, and each brand or product line has its own catalog. Or, a retailer may have

© Episerver 2018
52 | Episerver Commerce User Guide 18-4
multiple suppliers, and you can segment each supplier into its own catalog. See
also: Working with catalog entries.
Meta-classes and meta-fields
You can define meta-classes and meta-fields for both catalogs and orders in the
Administration part of Commerce Manager. For example, you create a meta-class
called Wine. Then, add meta-fields to capture characteristics of wine, such as color,
taste, vintage and maturity.
Importing and exporting a catalog
You can import a product catalog from an external system into Episerver Com-
merce. You can also export a catalog.
When to import or export
When setting up an e-commerce site, you need to get the products into the system.
You may also need to import a product catalog as new items are added to an
external system's catalog. Or, you might want to move or copy catalogs between
websites.
While you can manually create a catalog and add catalog entries, that option is
less useful with a large catalog. Instead, use one of the import or export methods to
efficiently move products into and out of a catalog.
Import and export methods
Import/Export feature. Export a product catalog or import a .zip file into
Episerver Commerce.
CSV Import. Manage a product catalog in bulk using the Import via
CSV files, which uses an Excel spreadsheet saved as a .csv file. Before the
© Episerver 2018
Catalogs | 53
import or export, the product types are mapped to the catalog structure and
format. You can use the CSV import feature for your entire catalog, or just
portions of it.
Depending on the import or export setup, you may need to manually edit the inform-
ation for imported products (such as adding images, documents, and associations)
and their variations to complete the task.
Importing or exporting catalog data
The Import/Export feature imports .zip files exported from Commerce Manager. It is
a quick way to import catalogs from other websites and start with a base for expand-
ing a catalog.
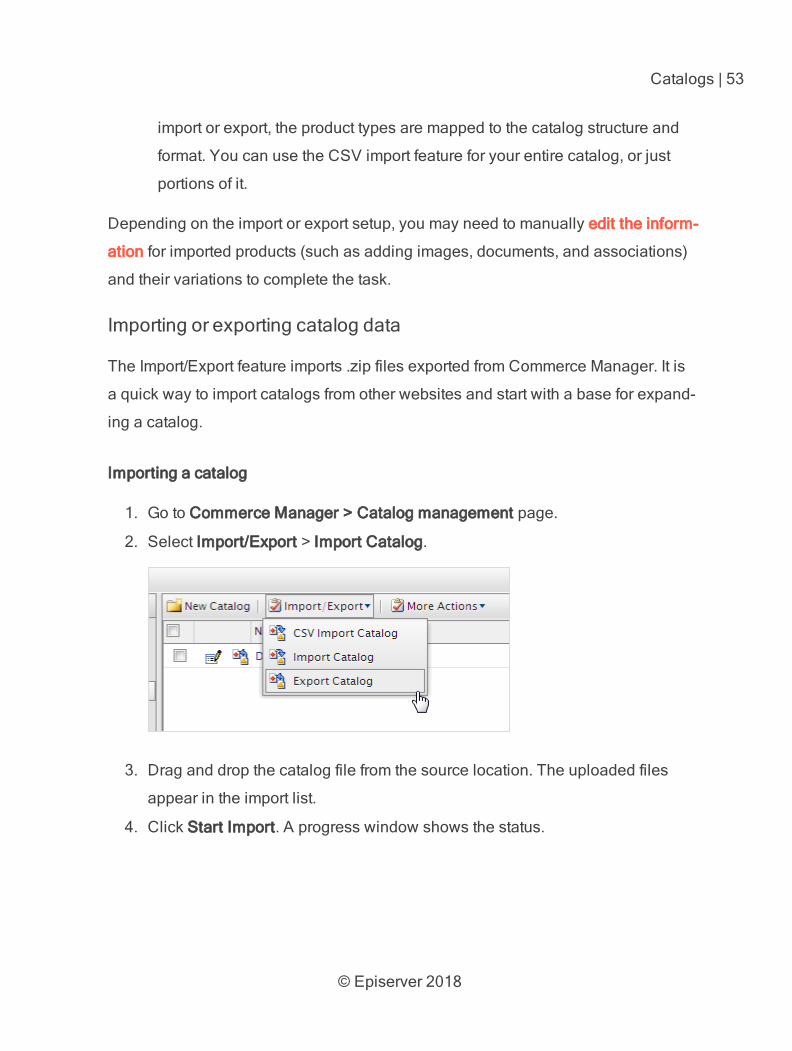
Importing a catalog
1. Go to Commerce Manager > Catalog management page.
2. Select Import/Export > Import Catalog.
3. Drag and drop the catalog file from the source location. The uploaded files
appear in the import list.
4. Click Start Import. A progress window shows the status.
© Episerver 2018
54 | Episerver Commerce User Guide 18-4
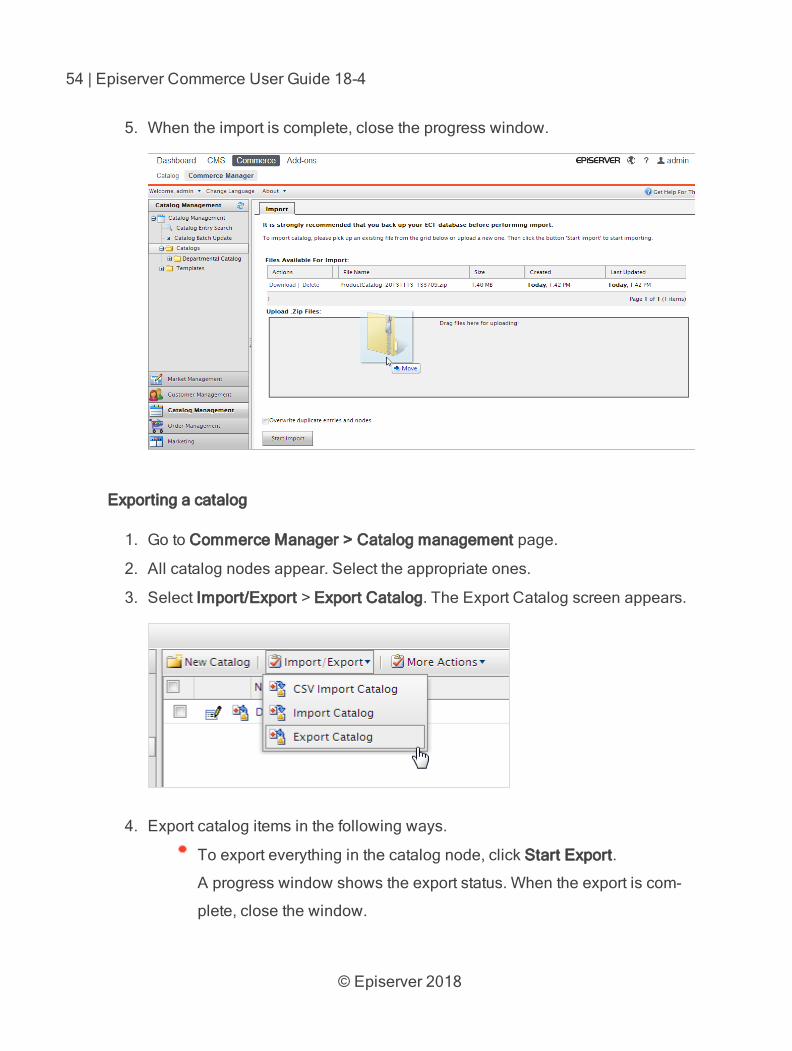
5. When the import is complete, close the progress window.
Exporting a catalog
1. Go to Commerce Manager > Catalog management page.
2. All catalog nodes appear. Select the appropriate ones.
3. Select Import/Export > Export Catalog. The Export Catalog screen appears.
4. Export catalog items in the following ways.
To export everything in the catalog node, click Start Export.
A progress window shows the export status. When the export is com-
plete, close the window.
© Episerver 2018
Catalogs | 55
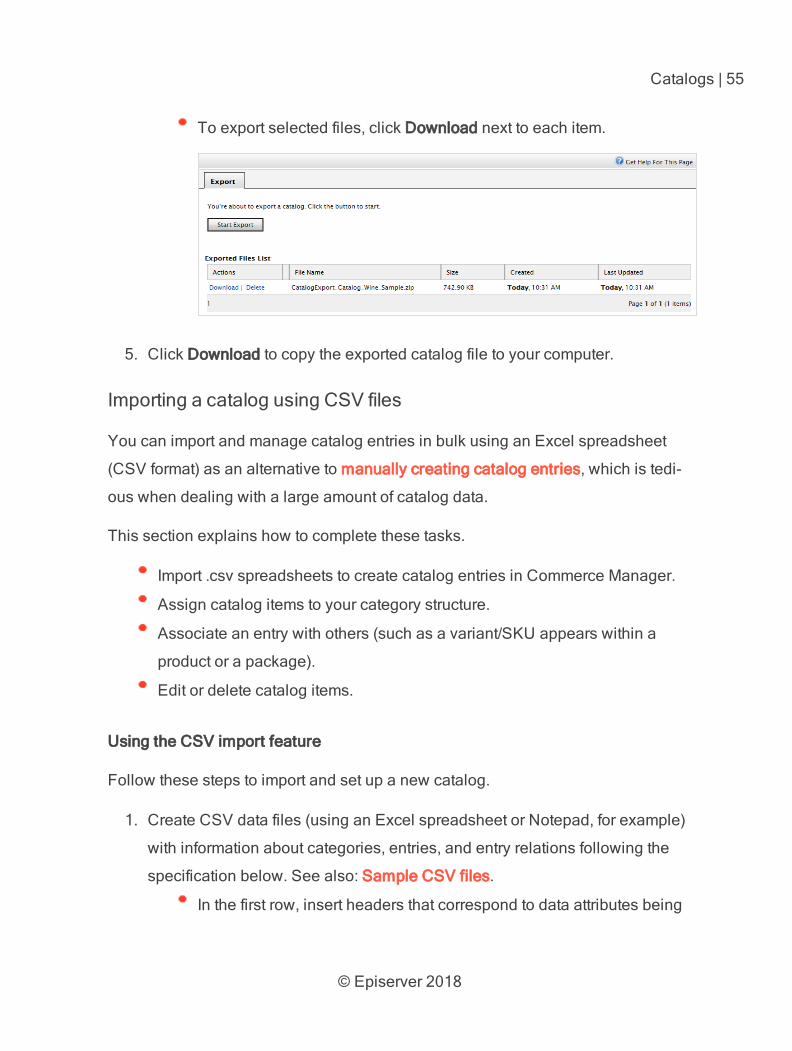
To export selected files, click Download next to each item.
5. Click Download to copy the exported catalog file to your computer.
Importing a catalog using CSV files
You can import and manage catalog entries in bulk using an Excel spreadsheet
(CSV format) as an alternative to manually creating catalog entries, which is tedi-
ous when dealing with a large amount of catalog data.
This section explains how to complete these tasks.
Import .csv spreadsheets to create catalog entries in Commerce Manager.
Assign catalog items to your category structure.
Associate an entry with others (such as a variant/SKU appears within a
product or a package).
Edit or delete catalog items.
Using the CSV import feature
Follow these steps to import and set up a new catalog.
1. Create CSV data files (using an Excel spreadsheet or Notepad, for example)
with information about categories, entries, and entry relations following the
specification below. See also: Sample CSV files.
In the first row, insert headers that correspond to data attributes being
© Episerver 2018
56 | Episerver Commerce User Guide 18-4
imported (for example, product name, price, description, image file loc-
ation).
Use the following attributes to identify each item being imported.
Code. A unique code to identify each category or entry.
Name. A unique name for each data row.
Entry Type. (for catalog entries only) In each row, insert one of
the following terms to indicate entry type.
Variation
Product
Package
Bundle
Parent & Child Entry Code (for entry relations only). Specify the
relationship between entries (for example, to display product
variations). Although, the following attribute is:
Action. Specify the import action.
Insert
Update
Delete
You must specify a command for each row
of the CSV file.
If you enter Insert for data that already
exists, or Update if no data exists, an error
occurs during import, and those rows are
not imported.
Category Code (by comma). Specify the entry's category.
© Episerver 2018
Catalogs | 57
SEO URL. A unique URL for each catalog item.
An error occurs if you import a file that contains
more than one occurrence of the same URL.
2. Create necessary meta fields for the new catalog entries. See also: Creating
a catalog meta class.
3. For each CSV file, create a mapping file, which links data in the CSV file to
Commerce Manager attributes.
Select the type of mapping file you need.
Mapping file
typeUsed to specify Example
Category w/
Meta Data
Data for categories or subcategories
within a catalog
CSV File type 1—
Category file
Entry w/ Meta
Data
Data for catalog entries (packages,
products, variant/SKUs, and bundles)
CSV File Type 2—
Entry files
Entry Relation Relationships between entries. For
example, many SKUs to one product,
or several SKUs and products to a
package.
CSV File Type 3—
Entry relations file
Entry Asso-
ciation
Associations among entries (such as,
advertising other items under text like
"You may also be interested in...")
CSV file type 4—
Associations file
variant w/
Inventory
Information for the Inventory tab. CSV file type 5—
Pricing/inventory
© Episerver 2018
58 | Episerver Commerce User Guide 18-4
Mapping file
typeUsed to specify Example
file
Sale Price Information for the Pricing tab. CSV file type 6—
Sale price file
For each mapping file type, the view displays a different set of fields and attrib-
utes. You manually assign attributes to each CSV file data column.
4. In Commerce Manager > Catalog Management, choose an existing catalog
folder or create a new one to which to import.
5. Choose Import/export > CSV Import.
6. Drag and drop the CSV files you created in step 1.
7. Import the CSV files and their corresponding mapping files.
Sample CSV files
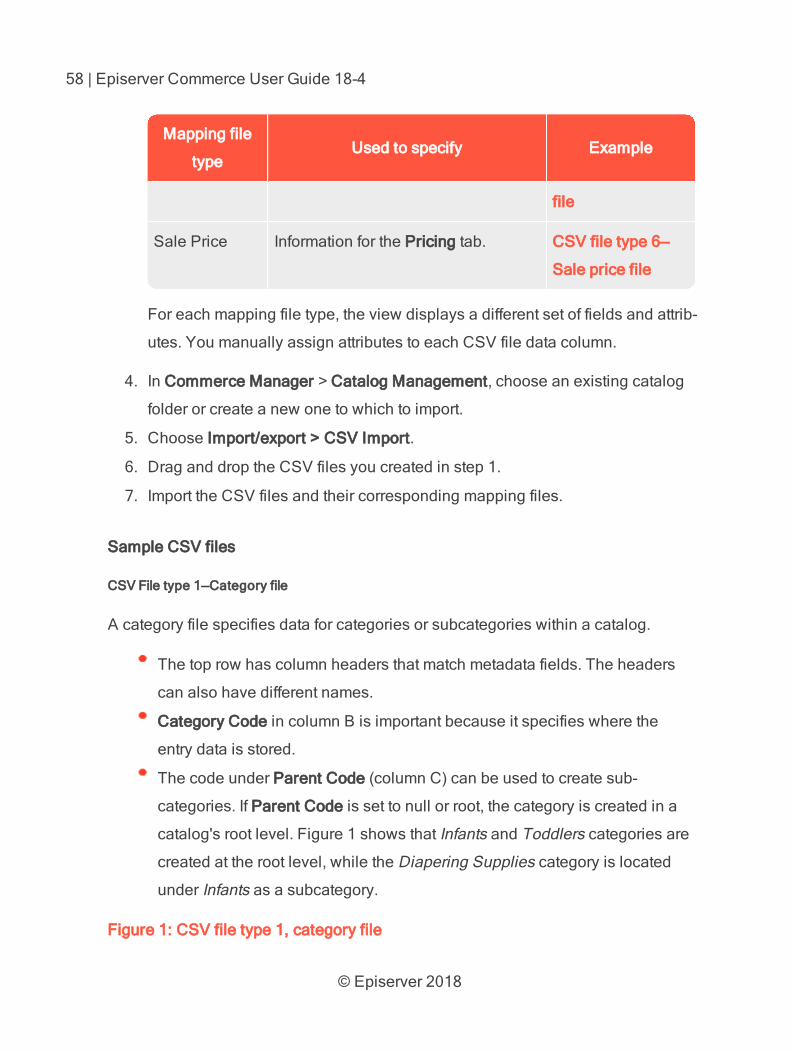
CSV File type 1—Category file
A category file specifies data for categories or subcategories within a catalog.
The top row has column headers that match metadata fields. The headers
can also have different names.
Category Code in column B is important because it specifies where the
entry data is stored.
The code under Parent Code (column C) can be used to create sub-
categories. If Parent Code is set to null or root, the category is created in a
catalog's root level. Figure 1 shows that Infants and Toddlers categories are
created at the root level, while the Diapering Supplies category is located
under Infants as a subcategory.
Figure 1: CSV file type 1, category file
© Episerver 2018
Catalogs | 59
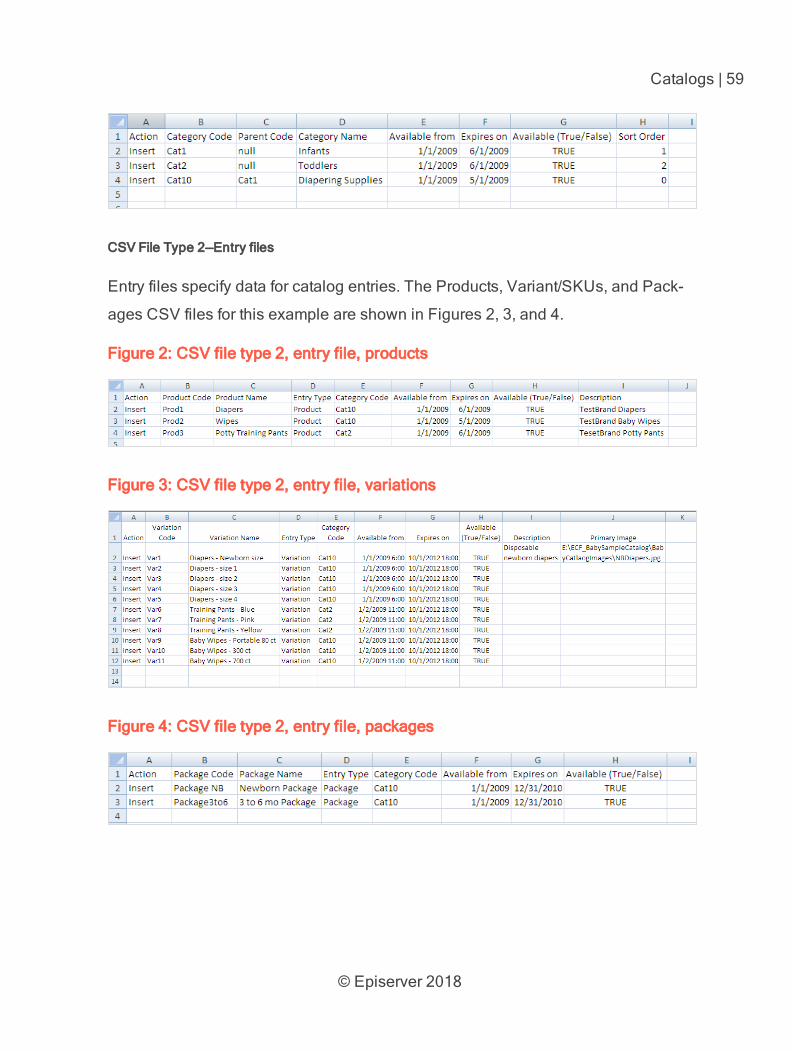
CSV File Type 2—Entry files
Entry files specify data for catalog entries. The Products, Variant/SKUs, and Pack-
ages CSV files for this example are shown in Figures 2, 3, and 4.
Figure 2: CSV file type 2, entry file, products
Figure 3: CSV file type 2, entry file, variations
Figure 4: CSV file type 2, entry file, packages
© Episerver 2018
60 | Episerver Commerce User Guide 18-4
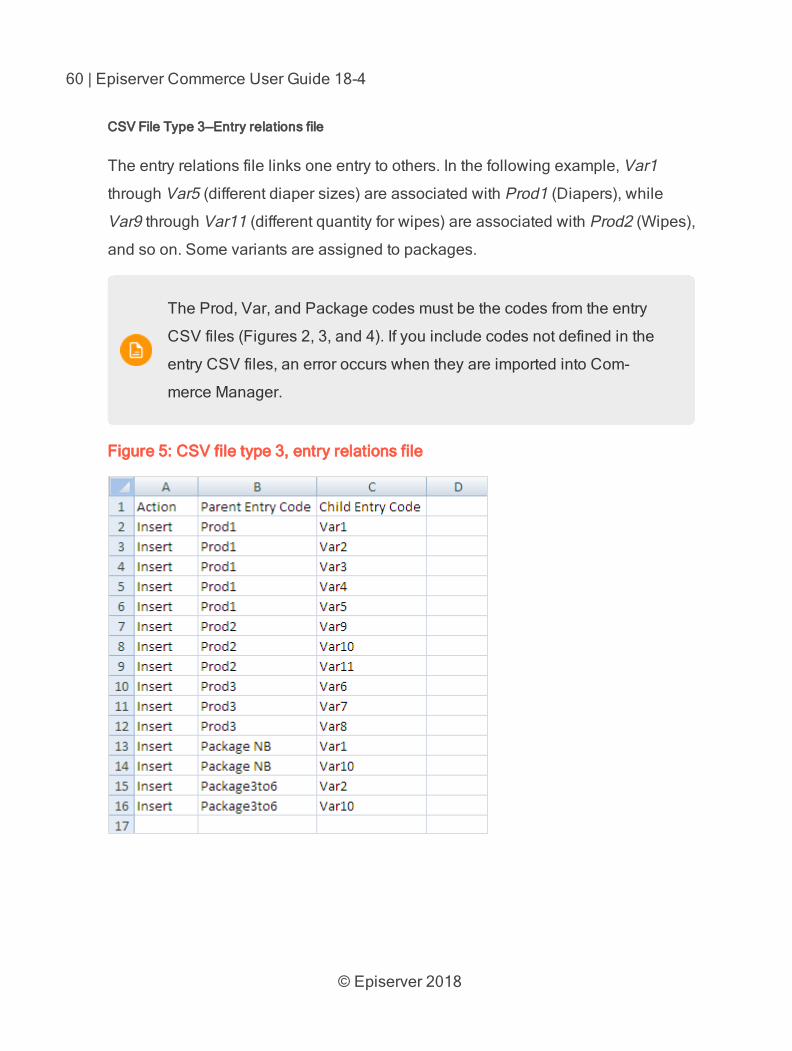
CSV File Type 3—Entry relations file
The entry relations file links one entry to others. In the following example, Var1
through Var5 (different diaper sizes) are associated with Prod1 (Diapers), while
Var9 through Var11 (different quantity for wipes) are associated with Prod2 (Wipes),
and so on. Some variants are assigned to packages.
The Prod, Var, and Package codes must be the codes from the entry
CSV files (Figures 2, 3, and 4). If you include codes not defined in the
entry CSV files, an error occurs when they are imported into Com-
merce Manager.
Figure 5: CSV file type 3, entry relations file
© Episerver 2018
Catalogs | 61
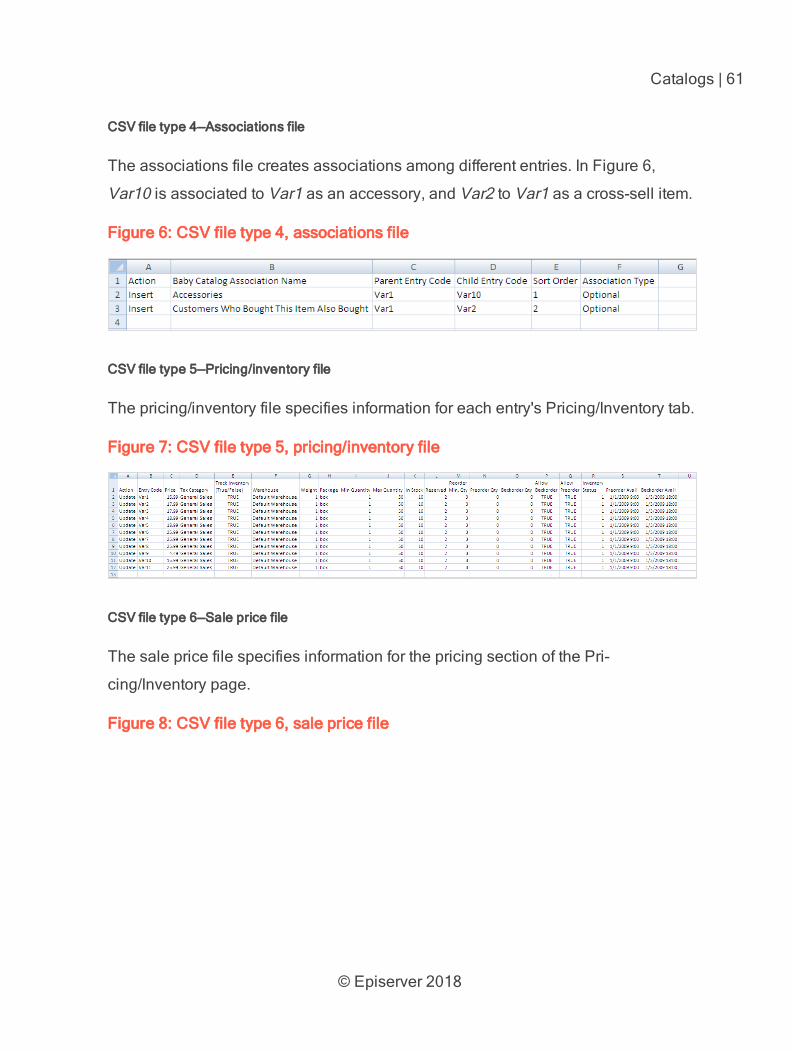
CSV file type 4—Associations file
The associations file creates associations among different entries. In Figure 6,
Var10 is associated to Var1 as an accessory, and Var2 to Var1 as a cross-sell item.
Figure 6: CSV file type 4, associations file
CSV file type 5—Pricing/inventory file
The pricing/inventory file specifies information for each entry's Pricing/Inventory tab.
Figure 7: CSV file type 5, pricing/inventory file
CSV file type 6—Sale price file
The sale price file specifies information for the pricing section of the Pri-
cing/Inventory page.
Figure 8: CSV file type 6, sale price file
© Episerver 2018
62 | Episerver Commerce User Guide 18-4
Browsing and searching catalogs
Go to Commerce > Catalog to browse catalogs and their related categories,
products, and variants. You can also search for catalog entries.
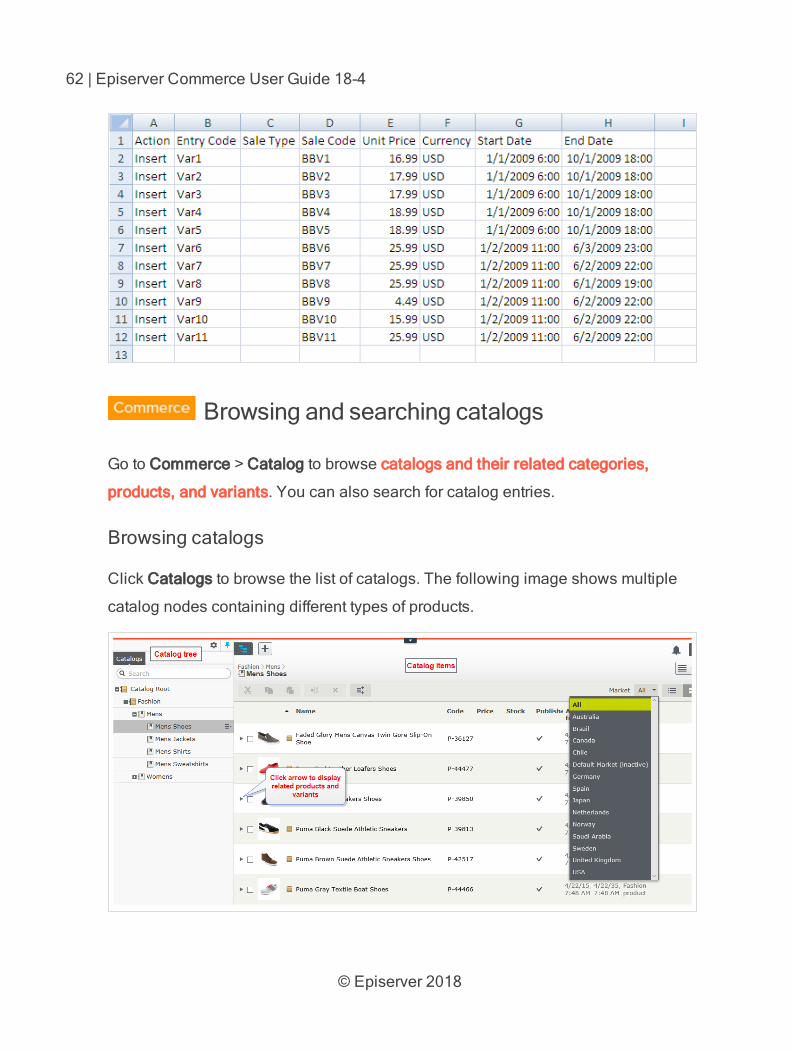
Browsing catalogs
Click Catalogs to browse the list of catalogs. The following image shows multiple
catalog nodes containing different types of products.
© Episerver 2018
Catalogs | 63
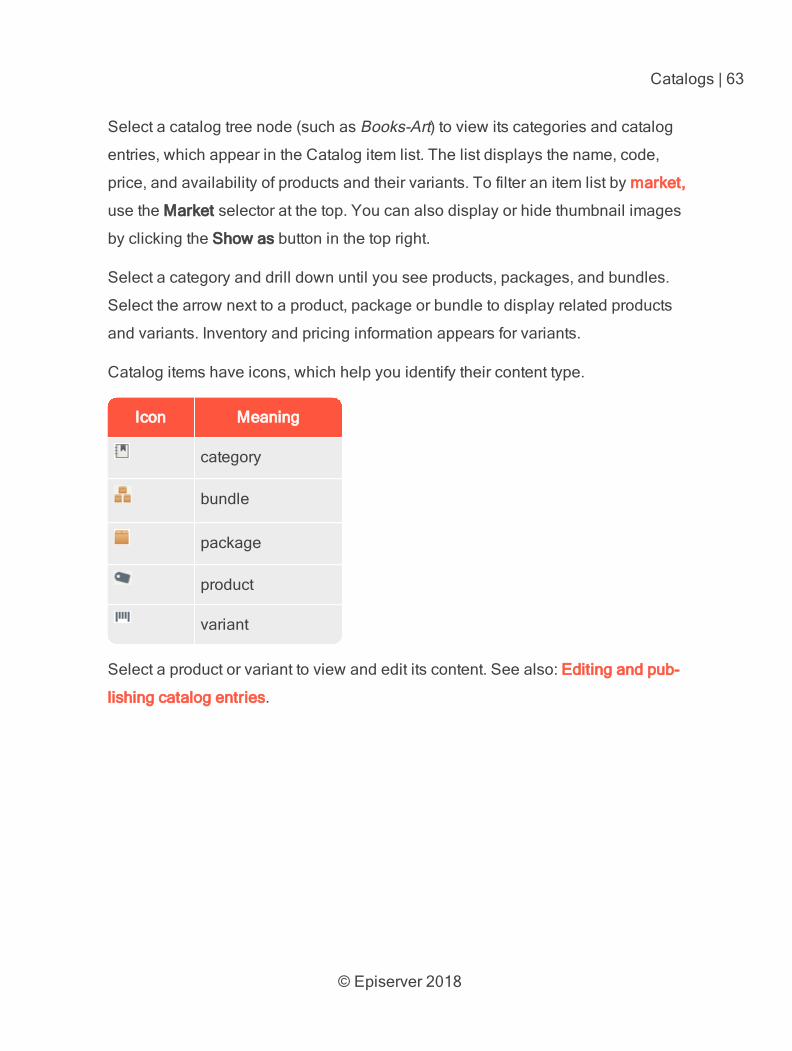
Select a catalog tree node (such as Books-Art) to view its categories and catalog
entries, which appear in the Catalog item list. The list displays the name, code,
price, and availability of products and their variants. To filter an item list by market,
use the Market selector at the top. You can also display or hide thumbnail images
by clicking the Show as button in the top right.
Select a category and drill down until you see products, packages, and bundles.
Select the arrow next to a product, package or bundle to display related products
and variants. Inventory and pricing information appears for variants.
Catalog items have icons, which help you identify their content type.
Icon Meaning
category
bundle
package
product
variant
Select a product or variant to view and edit its content. See also: Editing and pub-
lishing catalog entries.
© Episerver 2018
64 | Episerver Commerce User Guide 18-4
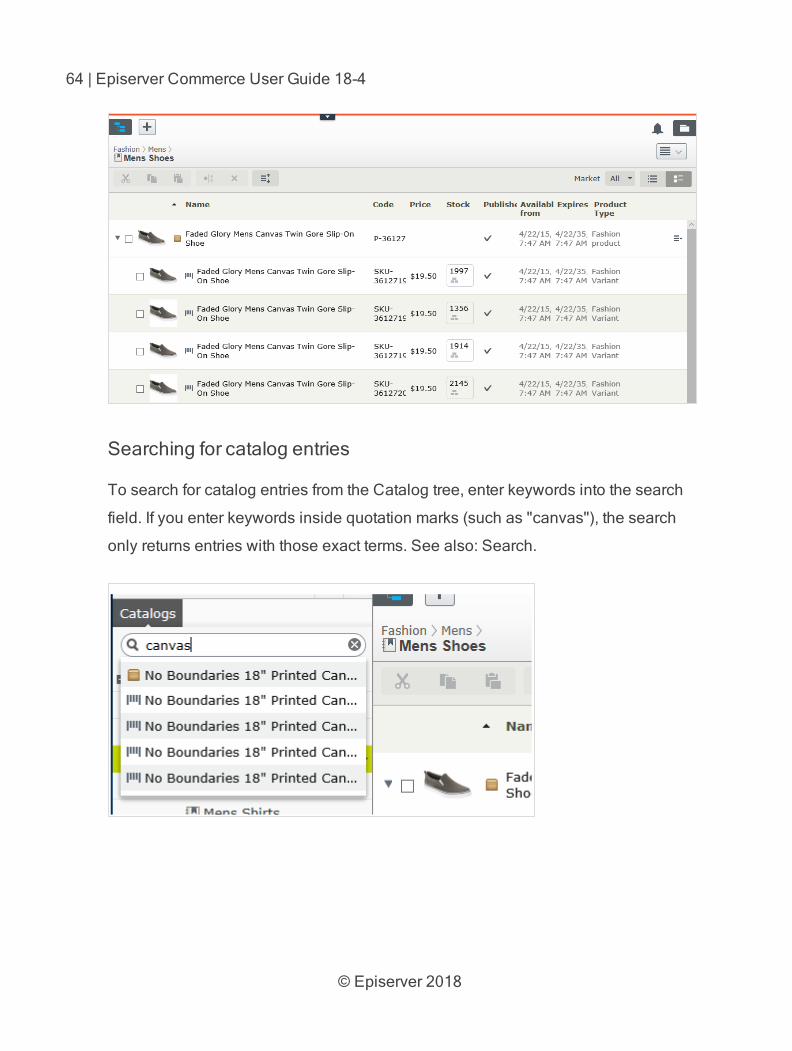
Searching for catalog entries
To search for catalog entries from the Catalog tree, enter keywords into the search
field. If you enter keywords inside quotation marks (such as "canvas"), the search
only returns entries with those exact terms. See also: Search.
© Episerver 2018
Catalogs | 65
Accessing products in CMS
You can also access catalog entries from edit view through the Catalogs gadget in
the assets pane. The gadget is useful when dragging-and-dropping catalog entries
into content areas. See also: Managing content.
Creating and editing a catalog
To manually create a catalog, define its properties then add catalog entries, such
as products and variants. You can create a catalog only under the catalog root
level. (Alternatively, you can import catalog content from an external source.)
When creating a catalog structure, carefully consider its maintenance
and performance aspects. Do not build hierarchies of categories,
products and variants that are too deep. On the other hand, a flat cata-
log structure with too many entries in the same category can negatively
impact performance.
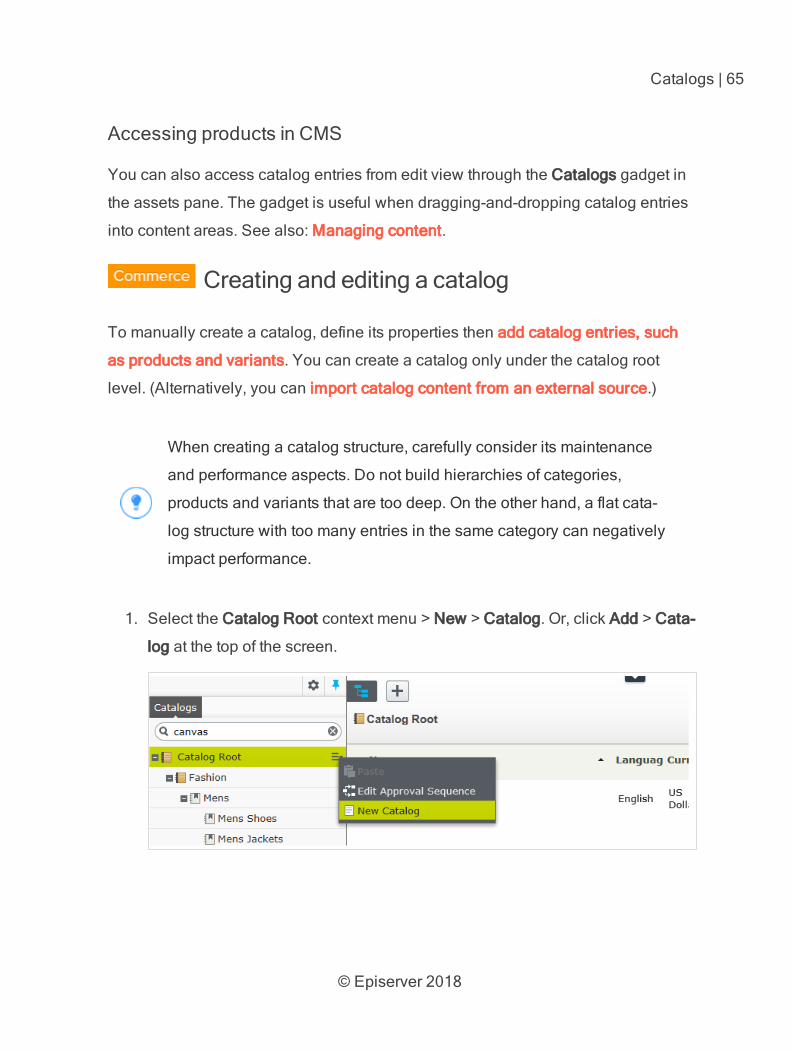
1. Select the Catalog Root context menu > New > Catalog. Or, click Add > Cata-
log at the top of the screen.
© Episerver 2018
66 | Episerver Commerce User Guide 18-4
2. Enter the catalog details. The system automatically saves the catalog, but it is
not available on the website until published. See Working with versions.
Name. Enter the name to appear in the catalog listing.
Name in URL. Automatically created link, based on name and place in
the navigation; depends on the implementation if this is visible in links
on the site.
Default currency. Enter the default currency for this catalog's entries.
See available currency options.
Default language. Enter the default (master) language for this catalog's
entries.
Base weight. Enter the standard weight unit applied to catalog entries
when calculating weight values for shipping totals in the checkout.
Available languages. Select languages (in addition to the master lan-
guage) for this catalog's content. See Managing website languages.
Catalog properties are global, meaning catalog entries inherit settings
from the default (master) language catalog. You can edit properties
only from the default (master) language, so if you need to edit prop-
erties, switch to the default language. The default language is usually
the first language listed next to Languages in the header.
Changing a catalog's default language is rarely needed.
But if you do, some catalog properties might have empty
values.
© Episerver 2018
Catalogs | 67
Deleting a catalog
Deleting a catalog may cause things to stop working on your site.
Before doing so, you may want to export it and save it for future use.
Also, the delete operation may take some time, depending on catalog
size.
1. Select the desired catalog in the catalog tree.
2. Click Delete in the context menu.
3. Click Delete Catalog.
Working with catalog entries
The Catalog interface in Episerver Commerce enables you to work with catalog
data. Marketers may want to create new products and variants, and merchandisers
may want to enrich products as they are added to e-commerce channels. E-com-
merce solutions integrated with an external ERP system may have products with
core data that only needs to be completed within Episerver Commerce. In other
scenarios, you can create new products from scratch.
When working with catalog entries, you typically complete the following tasks.
Locate incomplete products added from integrated systems, add content and
media, then categorize and publish them.
Create products, add content and media from external sources, then publish
them.
Add missing information to variants: product codes, internal and display
names, properties, media, pricing, and inventory information.
Creating a catalog entry
© Episerver 2018
68 | Episerver Commerce User Guide 18-4
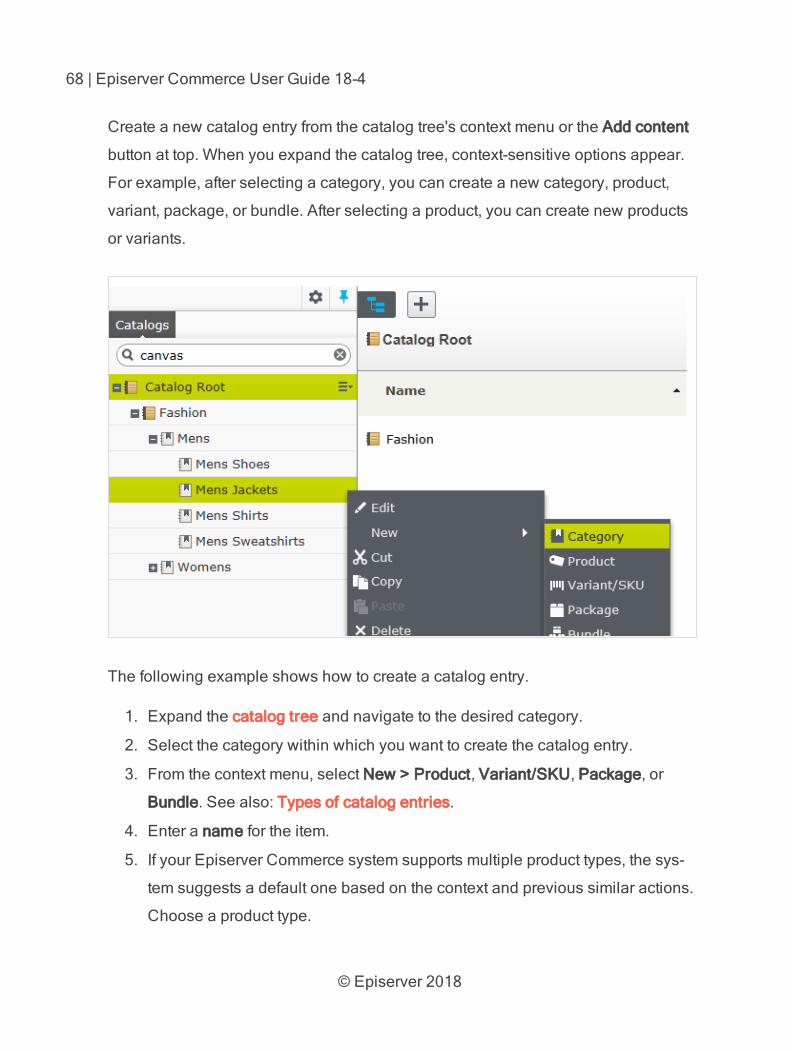
Create a new catalog entry from the catalog tree's context menu or the Add content
button at top. When you expand the catalog tree, context-sensitive options appear.
For example, after selecting a category, you can create a new category, product,
variant, package, or bundle. After selecting a product, you can create new products
or variants.
The following example shows how to create a catalog entry.
1. Expand the catalog tree and navigate to the desired category.
2. Select the category within which you want to create the catalog entry.
3. From the context menu, select New > Product, Variant/SKU, Package, or
Bundle. See also: Types of catalog entries.
4. Enter a name for the item.
5. If your Episerver Commerce system supports multiple product types, the sys-
tem suggests a default one based on the context and previous similar actions.
Choose a product type.
© Episerver 2018
Catalogs | 69
6. Complete the product's or variant's properties. See also: Catalog entry prop-
erties. Episerver Commerce saves the item automatically but it is not avail-
able on the website until published.
Because variants belong to the lowest level in the product hierarchy, you cannot
add sub-entries for them; you only can edit them.
The catalog tree does not display products or variants; only category
nodes. Use the catalog item list to work with products and variants.
To learn about other catalog entry tasks, such as editing, deleting, moving and so
on, see Editing catalog entries
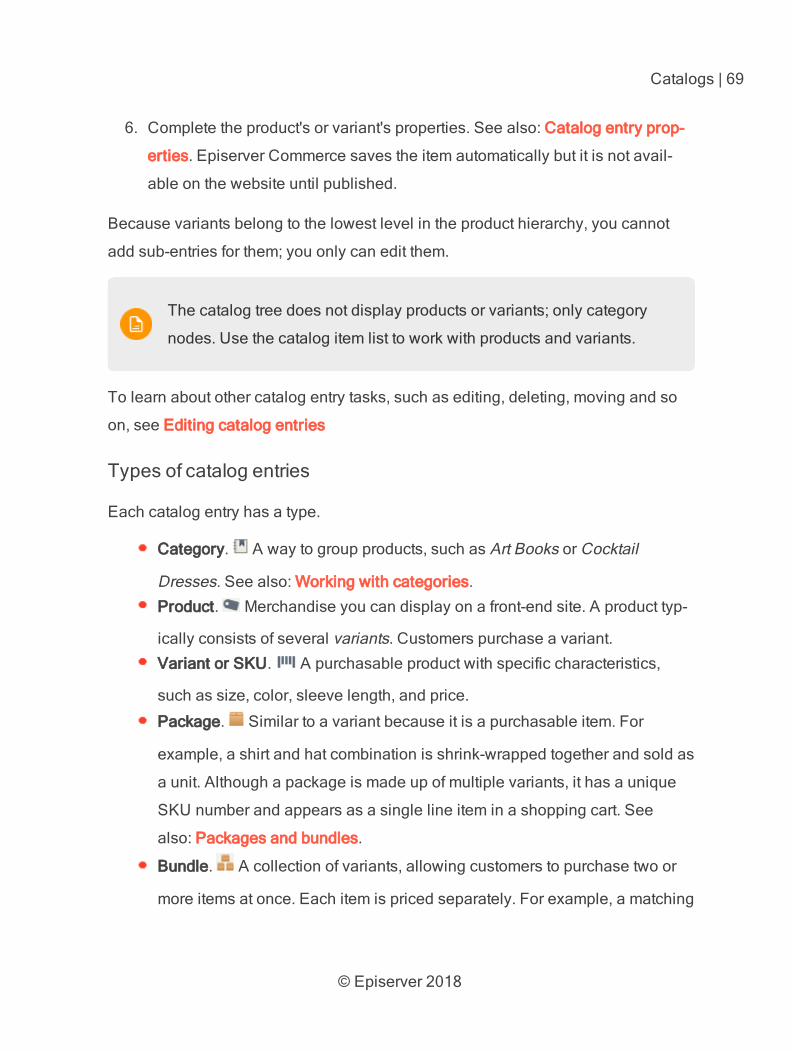
Types of catalog entries
Each catalog entry has a type.
Category. A way to group products, such as Art Books or Cocktail
Dresses. See also: Working with categories.Product. Merchandise you can display on a front-end site. A product typ-
ically consists of several variants. Customers purchase a variant.Variant or SKU. A purchasable product with specific characteristics,
such as size, color, sleeve length, and price.
Package. Similar to a variant because it is a purchasable item. For
example, a shirt and hat combination is shrink-wrapped together and sold as
a unit. Although a package is made up of multiple variants, it has a unique
SKU number and appears as a single line item in a shopping cart. See
also: Packages and bundles.
Bundle. A collection of variants, allowing customers to purchase two or
more items at once. Each item is priced separately. For example, a matching
© Episerver 2018
70 | Episerver Commerce User Guide 18-4
shirt and hat, presented together on the front-end so a user can buy both
items at once. Each item appears on its own line in a shopping cart. See
also: Packages and bundles.
Editing catalog entries
After you import products and variants, you can add to, edit or delete them.
Properties for products and variants are similar, but pricing and inventory inform-
ation is only defined for variants. See also: Catalog entry properties
Changes to related entries, pricing and inventory information are imme-
diately published and visible on the website, and are not part of the
publishing flow.
Changes to content and assets must be published to become visible
on the website. See Working with versions for publishing information.
Catalog-specific editing options
The catalog item list has a Select view with additional editing options. Use these to
edit and access the Pricing, Inventory, Categories, or Related Entries views.

© Episerver 2018
Catalogs | 71
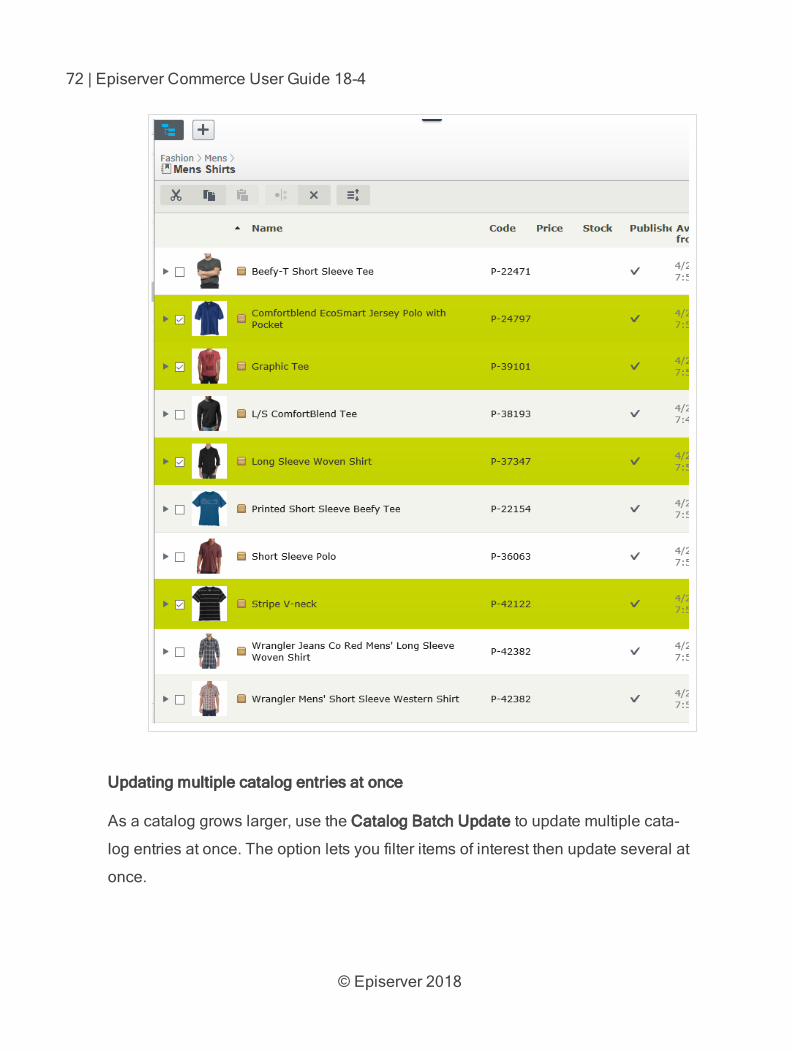
Editing multiple catalog entries
You can work with several catalog entries at once by
1. Selecting items.
2. Clicking toolbar buttons, such as cut, copy, paste, or delete.
© Episerver 2018
72 | Episerver Commerce User Guide 18-4
Updating multiple catalog entries at once
As a catalog grows larger, use the Catalog Batch Update to update multiple cata-
log entries at once. The option lets you filter items of interest then update several at
once.
© Episerver 2018
Catalogs | 73
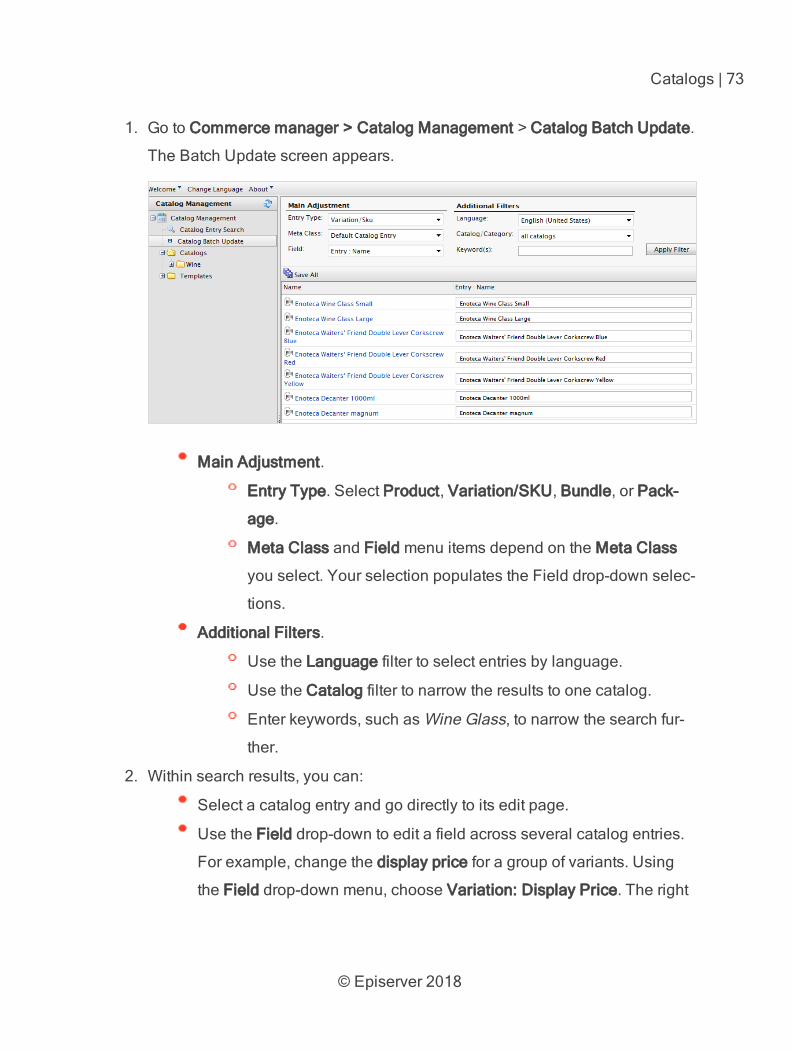
1. Go to Commerce manager > Catalog Management > Catalog Batch Update.
The Batch Update screen appears.
Main Adjustment.
Entry Type. Select Product, Variation/SKU, Bundle, or Pack-
age.
Meta Class and Field menu items depend on the Meta Class
you select. Your selection populates the Field drop-down selec-
tions.
Additional Filters.
Use the Language filter to select entries by language.
Use the Catalog filter to narrow the results to one catalog.
Enter keywords, such as Wine Glass, to narrow the search fur-
ther.
2. Within search results, you can:
Select a catalog entry and go directly to its edit page.
Use the Field drop-down to edit a field across several catalog entries.
For example, change the display price for a group of variants. Using
the Field drop-down menu, choose Variation: Display Price. The right
© Episerver 2018
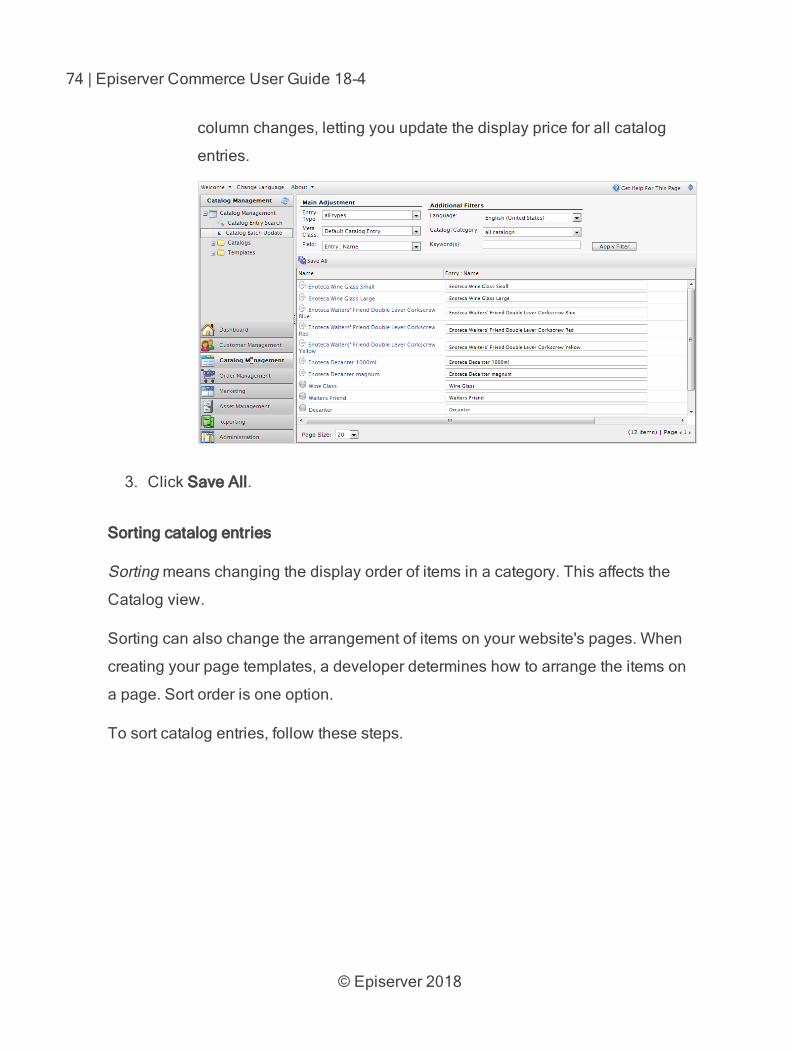
74 | Episerver Commerce User Guide 18-4
column changes, letting you update the display price for all catalog
entries.
3. Click Save All.
Sorting catalog entries
Sorting means changing the display order of items in a category. This affects the
Catalog view.
Sorting can also change the arrangement of items on your website's pages. When
creating your page templates, a developer determines how to arrange the items on
a page. Sort order is one option.
To sort catalog entries, follow these steps.
© Episerver 2018
Catalogs | 75
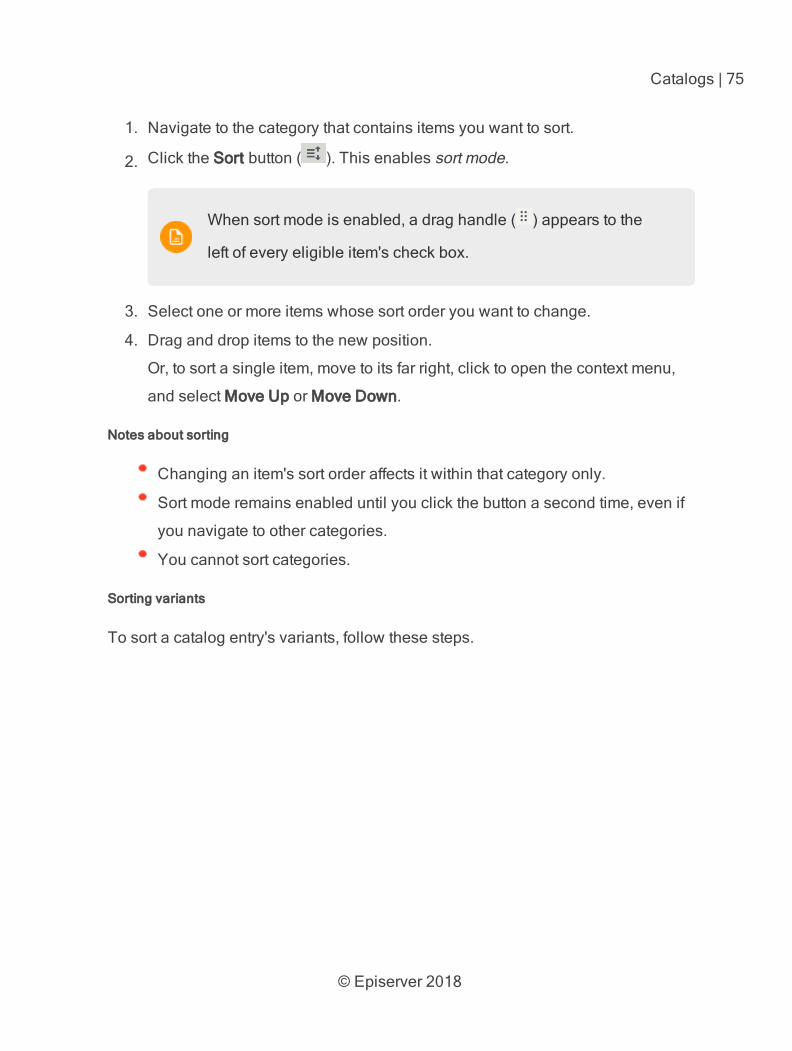
1. Navigate to the category that contains items you want to sort.
2. Click the Sort button ( ). This enables sort mode.
When sort mode is enabled, a drag handle ( ) appears to the
left of every eligible item's check box.
3. Select one or more items whose sort order you want to change.
4. Drag and drop items to the new position.
Or, to sort a single item, move to its far right, click to open the context menu,
and select Move Up or Move Down.
Notes about sorting
Changing an item's sort order affects it within that category only.
Sort mode remains enabled until you click the button a second time, even if
you navigate to other categories.
You cannot sort categories.
Sorting variants
To sort a catalog entry's variants, follow these steps.
© Episerver 2018
76 | Episerver Commerce User Guide 18-4
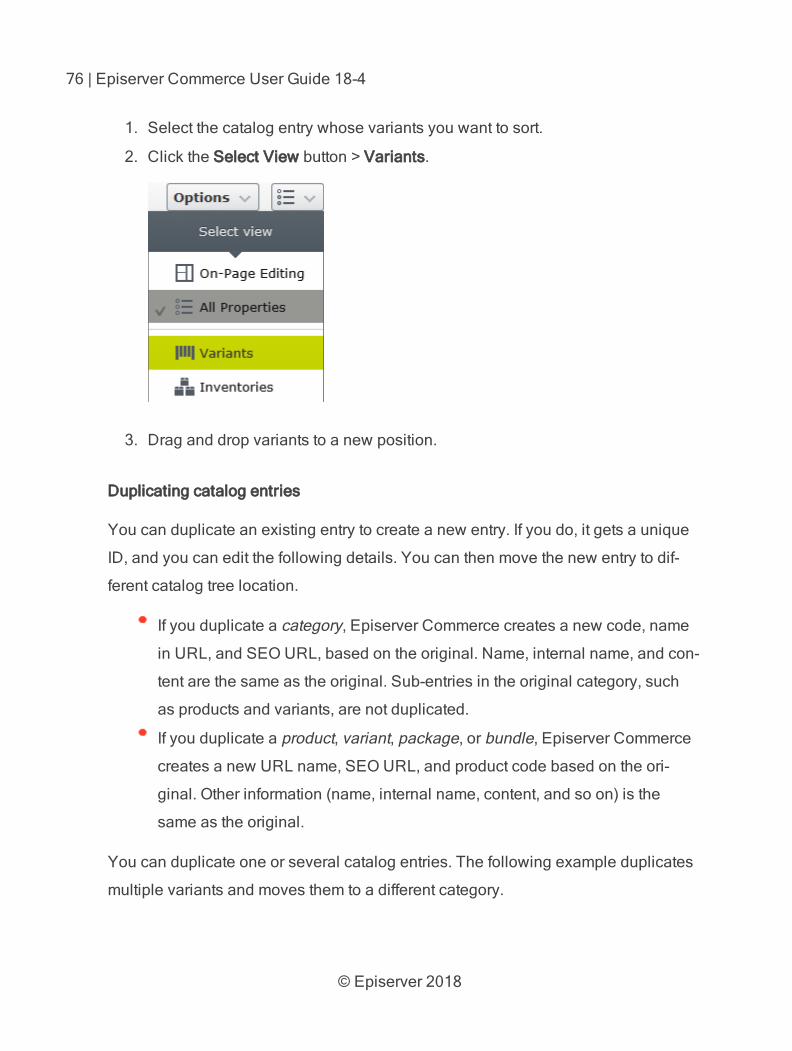
1. Select the catalog entry whose variants you want to sort.
2. Click the Select View button > Variants.
3. Drag and drop variants to a new position.
Duplicating catalog entries
You can duplicate an existing entry to create a new entry. If you do, it gets a unique
ID, and you can edit the following details. You can then move the new entry to dif-
ferent catalog tree location.
If you duplicate a category, Episerver Commerce creates a new code, name
in URL, and SEO URL, based on the original. Name, internal name, and con-
tent are the same as the original. Sub-entries in the original category, such
as products and variants, are not duplicated.
If you duplicate a product, variant, package, or bundle, Episerver Commerce
creates a new URL name, SEO URL, and product code based on the ori-
ginal. Other information (name, internal name, content, and so on) is the
same as the original.
You can duplicate one or several catalog entries. The following example duplicates
multiple variants and moves them to a different category.
© Episerver 2018
Catalogs | 77
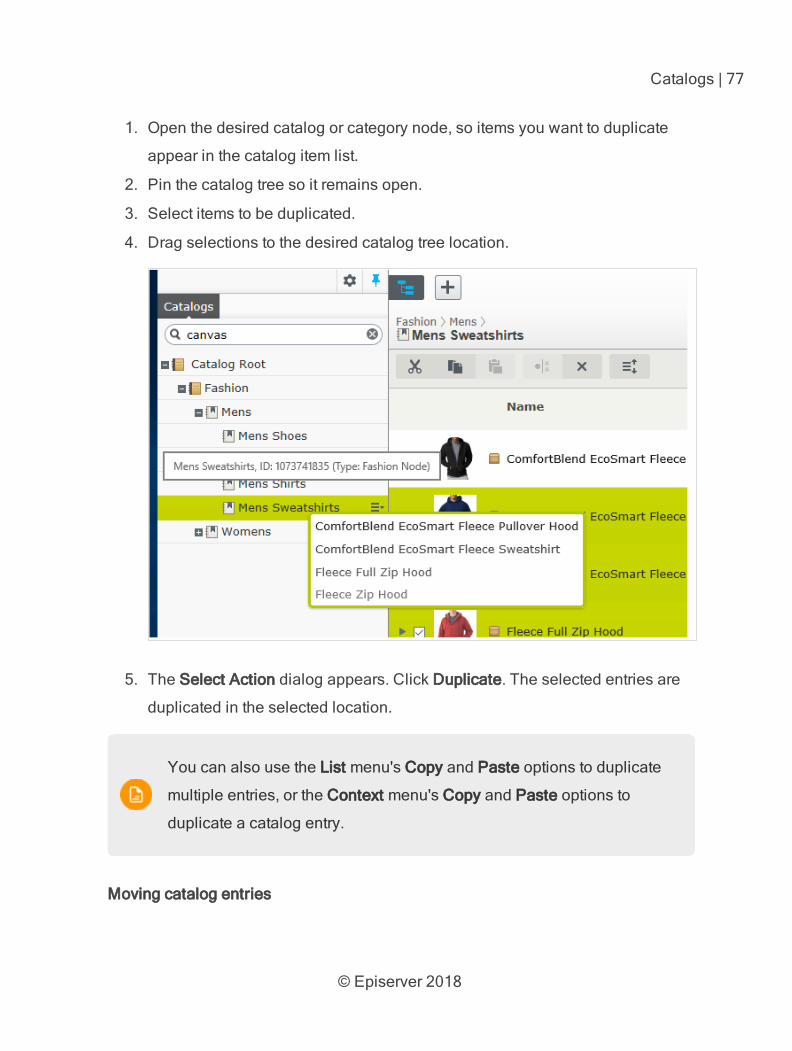
1. Open the desired catalog or category node, so items you want to duplicate
appear in the catalog item list.
2. Pin the catalog tree so it remains open.
3. Select items to be duplicated.
4. Drag selections to the desired catalog tree location.
5. The Select Action dialog appears. Click Duplicate. The selected entries are
duplicated in the selected location.
You can also use the List menu's Copy and Paste options to duplicate
multiple entries, or the Context menu's Copy and Paste options to
duplicate a catalog entry.
Moving catalog entries
© Episerver 2018
78 | Episerver Commerce User Guide 18-4
Moving a catalog entry is the same as assigning it to a different primary category.
See Changing a catalog entry's primary category.
Deleting catalog entries
When deleting a product or a variant, the following happens depending on how the
deleted entry is related to other catalog entries:
If a product or variant is deleted, all links from other catalog entries to it are
removed.
If a product with associated variants is deleted, the variants are left asso-
ciated with the deleted product's category.
See also: Deleting a package or bundle
You cannot undo the deletion of catalog entries.
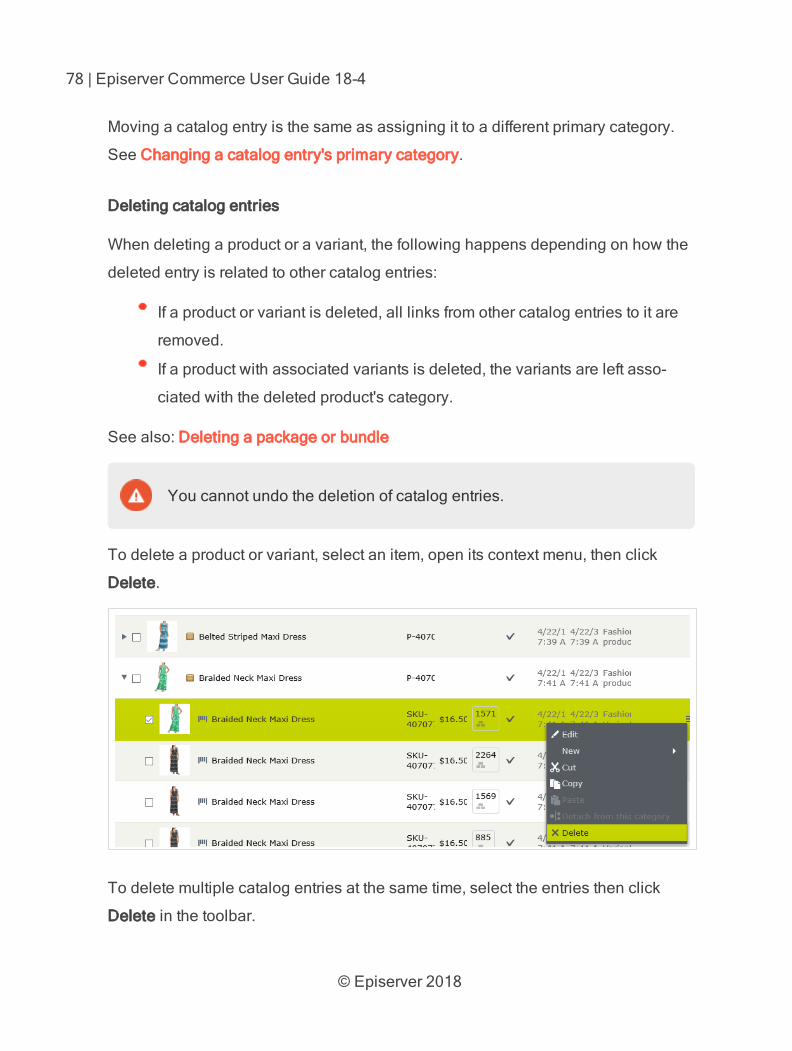
To delete a product or variant, select an item, open its context menu, then click
Delete.
To delete multiple catalog entries at the same time, select the entries then click
Delete in the toolbar.
© Episerver 2018
Catalogs | 79
Translating catalog entries
Like other types of content, catalog entries can exist in multiple languages. See
Multi-language management.
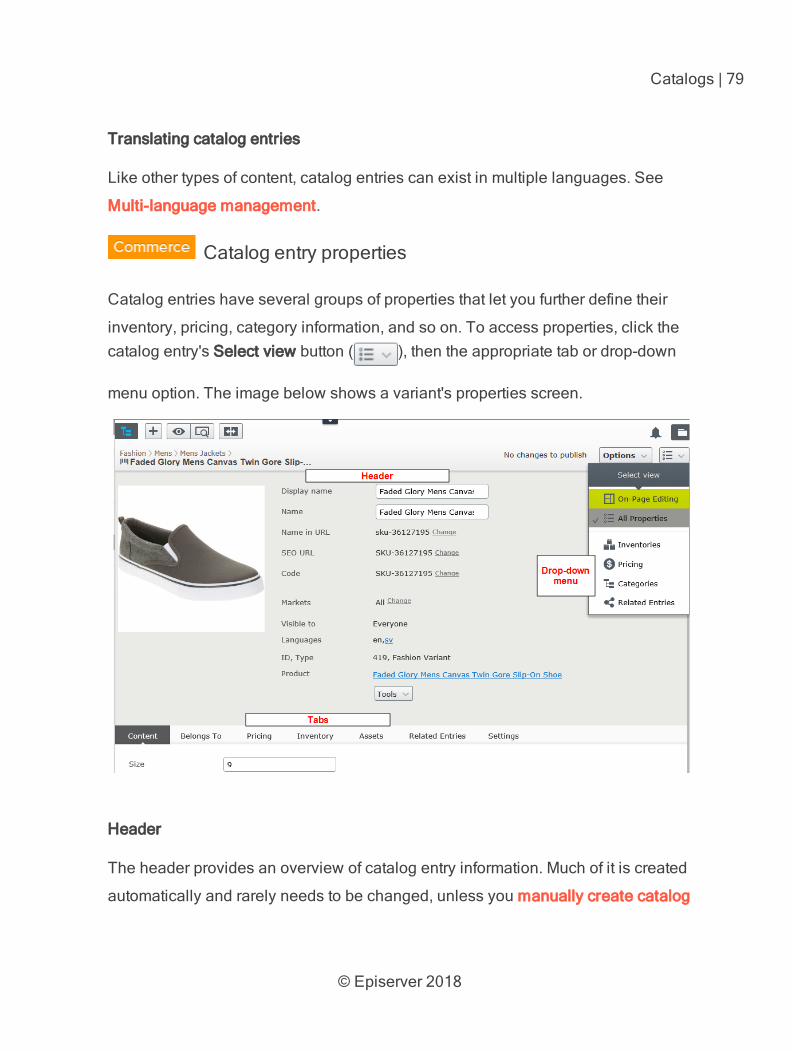
Catalog entry properties
Catalog entries have several groups of properties that let you further define their
inventory, pricing, category information, and so on. To access properties, click the catalog entry's Select view button ( ), then the appropriate tab or drop-down
menu option. The image below shows a variant's properties screen.
Header
The header provides an overview of catalog entry information. Much of it is created
automatically and rarely needs to be changed, unless you manually create catalog
© Episerver 2018
80 | Episerver Commerce User Guide 18-4
entries. In the top left, a clickable structure path shows the product hierarchy.
Header properties are described below.
Change appears next to some properties. Click it to edit a property
value.
Display name. Name on the content display page.
Name. Name in catalog item list.
Name in URL. URL automatically created, based on name and place in the
navigation; whether it is visible in site links depends on implementation.
SEO URL. Automatically created based on Name; whether it is visible in
site links depends on implementation.
Code. Product code/identification key, often provided by an external system.
Market. Markets where the item is available. By default, a product or variant
is available in all markets.
Visible to. Which users and groups can see the item. By default, catalog con-
tent is publicly visible and editable by CommerceAdmins group members.
Languages. The content is available in the displayed languages. The active
language is not underlined.
ID, Type. The ID set by the system; the content type upon which the item is
based.
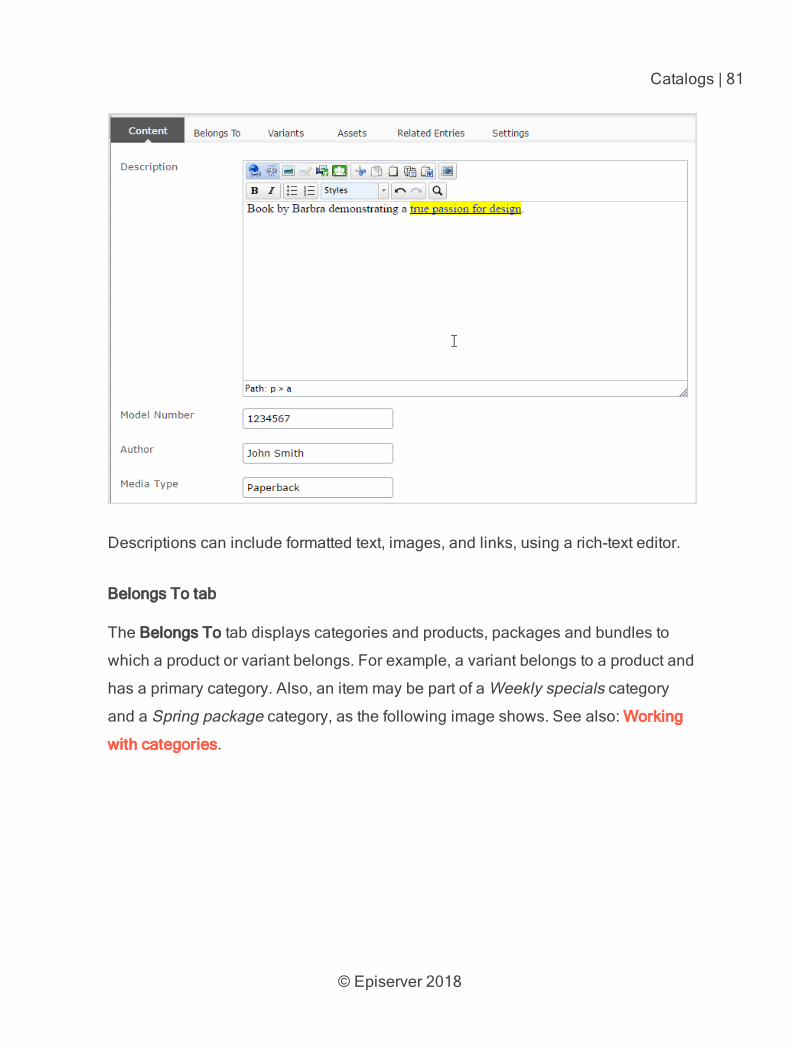
Content tab
The content tab properties depend on the product or variant. For example, a book
product might have media type and author fields, as shown in the following image.
© Episerver 2018
Catalogs | 81
Descriptions can include formatted text, images, and links, using a rich-text editor.
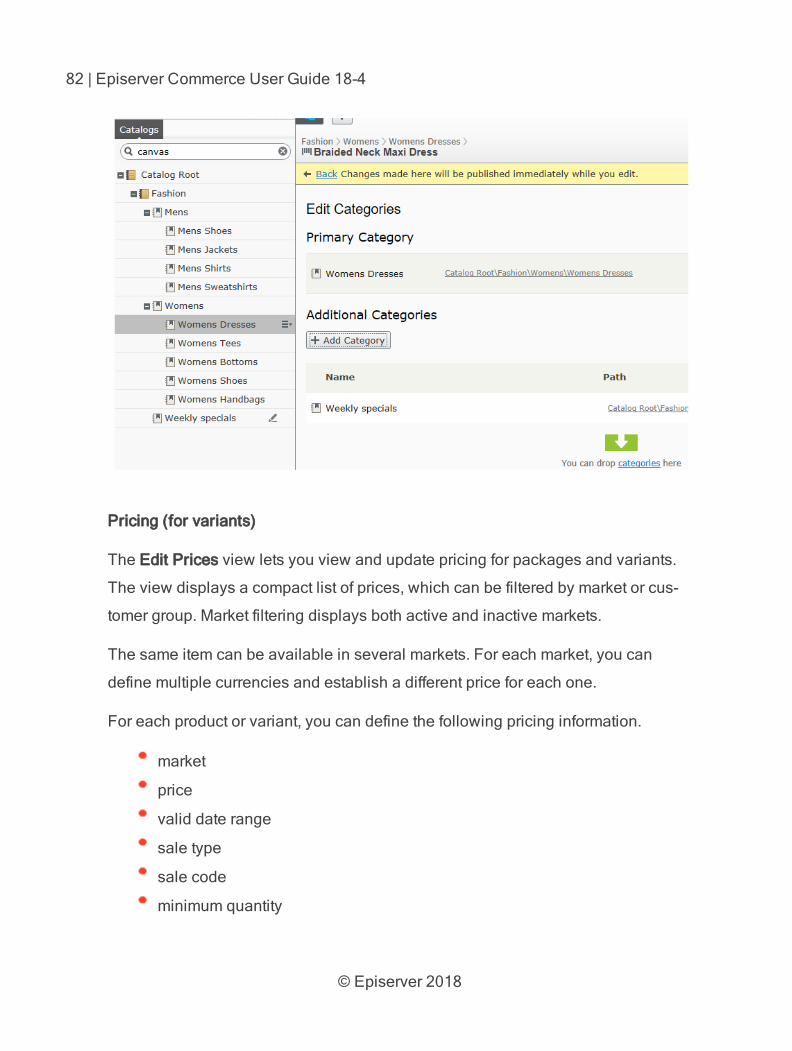
Belongs To tab
The Belongs To tab displays categories and products, packages and bundles to
which a product or variant belongs. For example, a variant belongs to a product and
has a primary category. Also, an item may be part of a Weekly specials category
and a Spring package category, as the following image shows. See also: Working
with categories.
© Episerver 2018
82 | Episerver Commerce User Guide 18-4
Pricing (for variants)
The Edit Prices view lets you view and update pricing for packages and variants.
The view displays a compact list of prices, which can be filtered by market or cus-
tomer group. Market filtering displays both active and inactive markets.
The same item can be available in several markets. For each market, you can
define multiple currencies and establish a different price for each one.
For each product or variant, you can define the following pricing information.
market
price
valid date range
sale type
sale code
minimum quantity
© Episerver 2018
Catalogs | 83
In many cases, pricing information comes from an external system,
which may prohibit modifications in Episerver Commerce.
Price changes are immediately available on the website. They are not
part of a product's publishing workflow.
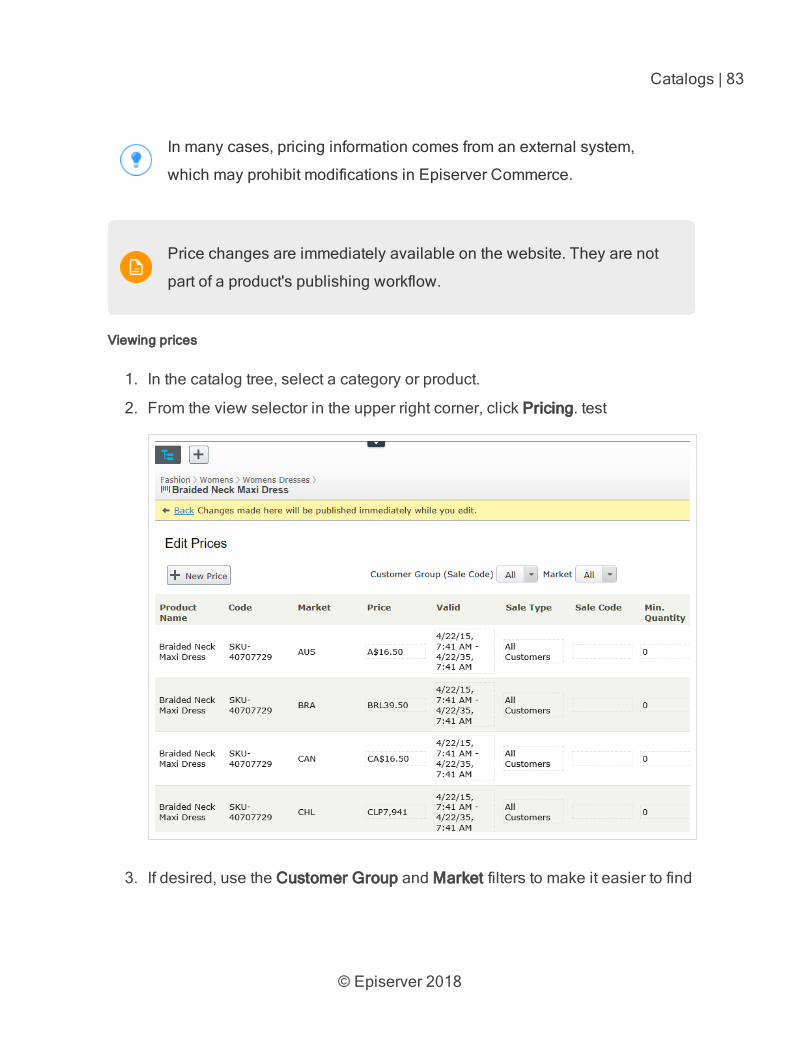
Viewing prices
1. In the catalog tree, select a category or product.
2. From the view selector in the upper right corner, click Pricing. test
3. If desired, use the Customer Group and Market filters to make it easier to find
© Episerver 2018
84 | Episerver Commerce User Guide 18-4
pricing information.
Only packages or variants with a price appear on the list.
Adding and editing prices
Follow the steps in Viewing prices to access the Edit Prices view. From there, you
can complete these tasks.
To adjust a product's or variant's price information, modify these fields.
Market. Associate the price with a market.
Price. The item's price and currency for that market.
The list of currencies is determined by those available
for the selected market.
Valid. The time interval when this price is available.
To create a future price change.
1. Select the item.
2. Click Duplicate from the context menu.
3. Change the new item's pricing information.
4. Set the new available dates.
Sale Type. Make the price available to All Customers, a specific Cus-
tomer, or a Customer Price Group. With the last option, you can cre-
ate tiered pricing (also known as differentiated pricing).
Sale Code. Use this field to assign a price to a specific customer
group. For example, create a new price, select Customer Price
Group as its Sale Type, then insert the customer group name into
the Code field.
© Episerver 2018
Catalogs | 85
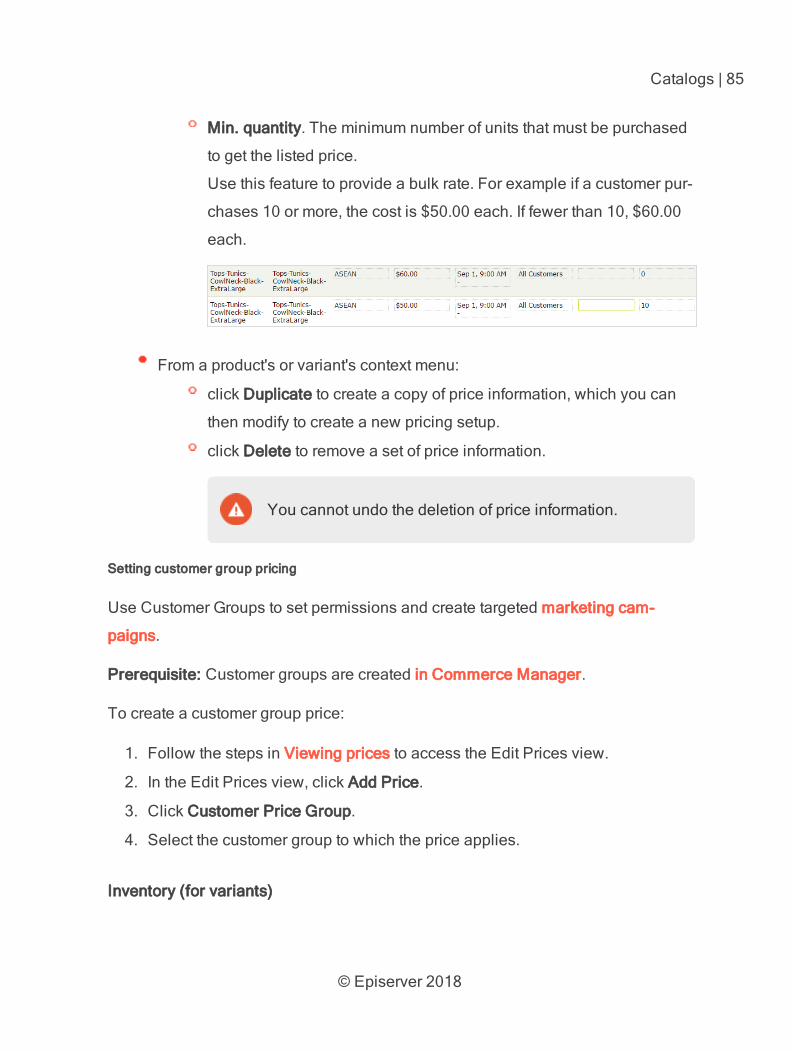
Min. quantity. The minimum number of units that must be purchased
to get the listed price.
Use this feature to provide a bulk rate. For example if a customer pur-
chases 10 or more, the cost is $50.00 each. If fewer than 10, $60.00
each.
From a product's or variant's context menu:
click Duplicate to create a copy of price information, which you can
then modify to create a new pricing setup.
click Delete to remove a set of price information.
You cannot undo the deletion of price information.
Setting customer group pricing
Use Customer Groups to set permissions and create targeted marketing cam-
paigns.
Prerequisite: Customer groups are created in Commerce Manager.
To create a customer group price:
1. Follow the steps in Viewing prices to access the Edit Prices view.
2. In the Edit Prices view, click Add Price.
3. Click Customer Price Group.
4. Select the customer group to which the price applies.
Inventory (for variants)
© Episerver 2018
86 | Episerver Commerce User Guide 18-4
Inventory information is often transferred from an external system, so you rarely
need to change it. Sometimes you cannot edit it. On other sites, you can update
quantities but the other information is read-only.
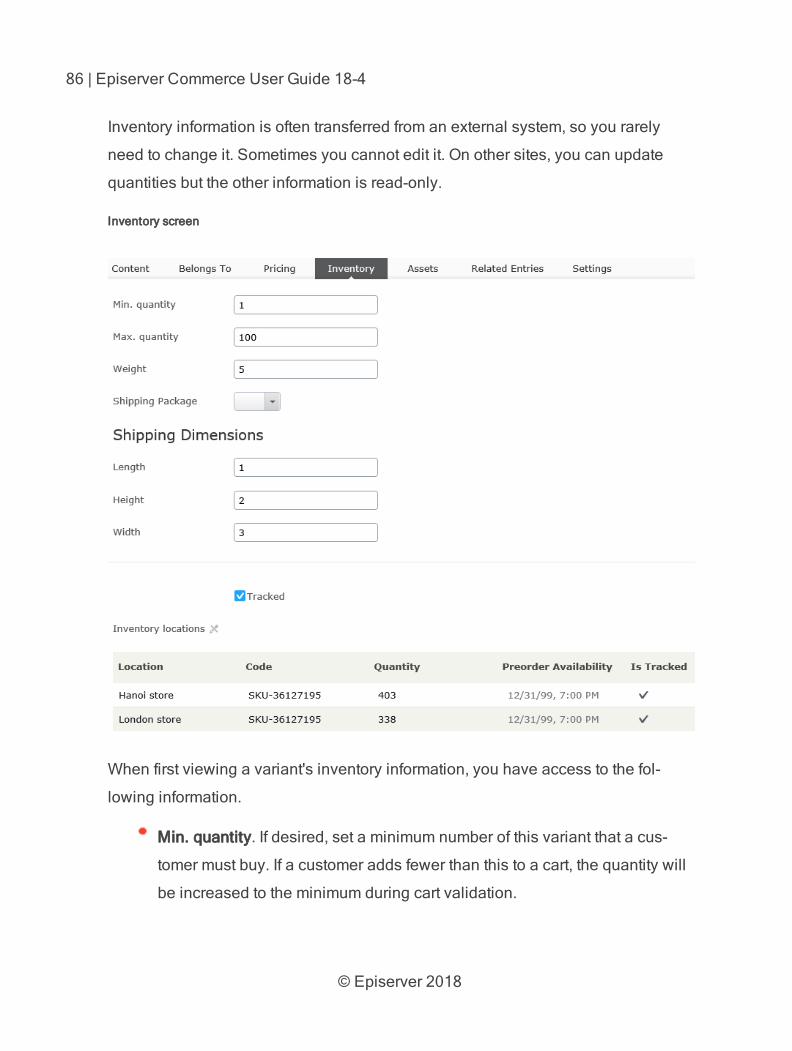
Inventory screen
When first viewing a variant's inventory information, you have access to the fol-
lowing information.
Min. quantity. If desired, set a minimum number of this variant that a cus-
tomer must buy. If a customer adds fewer than this to a cart, the quantity will
be increased to the minimum during cart validation.
© Episerver 2018
Catalogs | 87
Max. quantity. If desired, set a maximum number of this variant that a cus-
tomer can buy. If a customer adds more than this to a cart, the quantity will
be decreased to the maximum during cart validation.
Weight. Enter the variant’s weight in your system's weight unit. Weight is
used to calculate shipping costs.
Weight unit (kilograms or pounds) is set in Administration > Sys-
tem Settings > Common settings.
Shipping Dimensions
Length, Height, Width. Enter the variant’s length, height and weight
in your system's length unit. These properties may be used to cal-
culate shipping costs.
Length unit (centimeters or inches) is set in Administration >
System Settings > Common settings
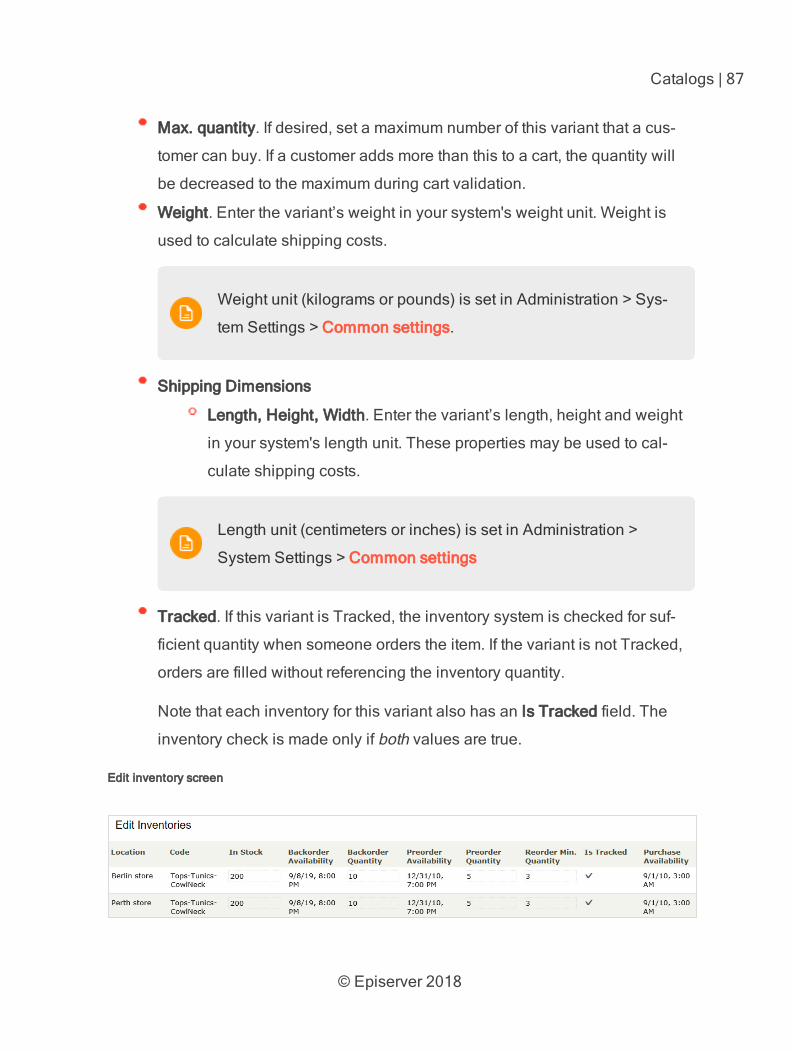
Tracked. If this variant is Tracked, the inventory system is checked for suf-
ficient quantity when someone orders the item. If the variant is not Tracked,
orders are filled without referencing the inventory quantity.
Note that each inventory for this variant also has an Is Tracked field. The
inventory check is made only if both values are true.
Edit inventory screen
© Episerver 2018
88 | Episerver Commerce User Guide 18-4
You can view (and possibly edit) the following inventory properties for a product or
variant.
Location. The physical stock location of the inventory, as defined in ware-
house settings.
Code. Product code/identification key; often provided by an external system.
Read only.
In Stock. The quantity of in-stock items for an inventory.
Backorder Availability. If customers can backorder this item, enter the first
date when it is possible.
Backorder Quantity. The quantity of this item which may be backordered.
Preorder Availability. If customers can preorder this item, enter the first date
when it is possible.
Preorder Quantity. The quantity of this item which may be preordered.
Reorder Min. Quantity. The in-stock quantity level at which items should be
reordered. For example, when an inventory location has three or fewer
items, it is time to order more.
The Low Stock Report uses this value to inform a merchandiser that it is time
to reorder. Also, a custom implementation could send email or another alert
when in-stock quantity reaches this amount.
Is Tracked. If selected, shoppers can only complete orders for this pro-
duct/variant if you provide inventory information from the Inventory Loca-
tions. If Is Tracked is not selected, orders can be placed without inventory
amounts.
Note that each variant also has an Is Tracked field. The invent-
ory check is made only if the variant-level Is Tracked field and
this one are true.
© Episerver 2018
Catalogs | 89
Purchase Availability. First date and time when this item can be sold from
this inventory.
Variants (for products)
A variant is a version of a catalog entry with specific characteristics, such as price,
size, and color. You can perform most of the tasks on a variant that you can perform
on a catalog entry. See also: Working with catalog entries.
Assets tab
Use the Assets tab to link a catalog entry to a media file, such as an image or a doc-
ument (PDF for example). For example, you want to assign a picture to a catalog
entry to accompany its website description.
To add a media file, open the Assets tab, then drag the file from the Media tab to
the Assets tab. Or, click Add Media and select the file.
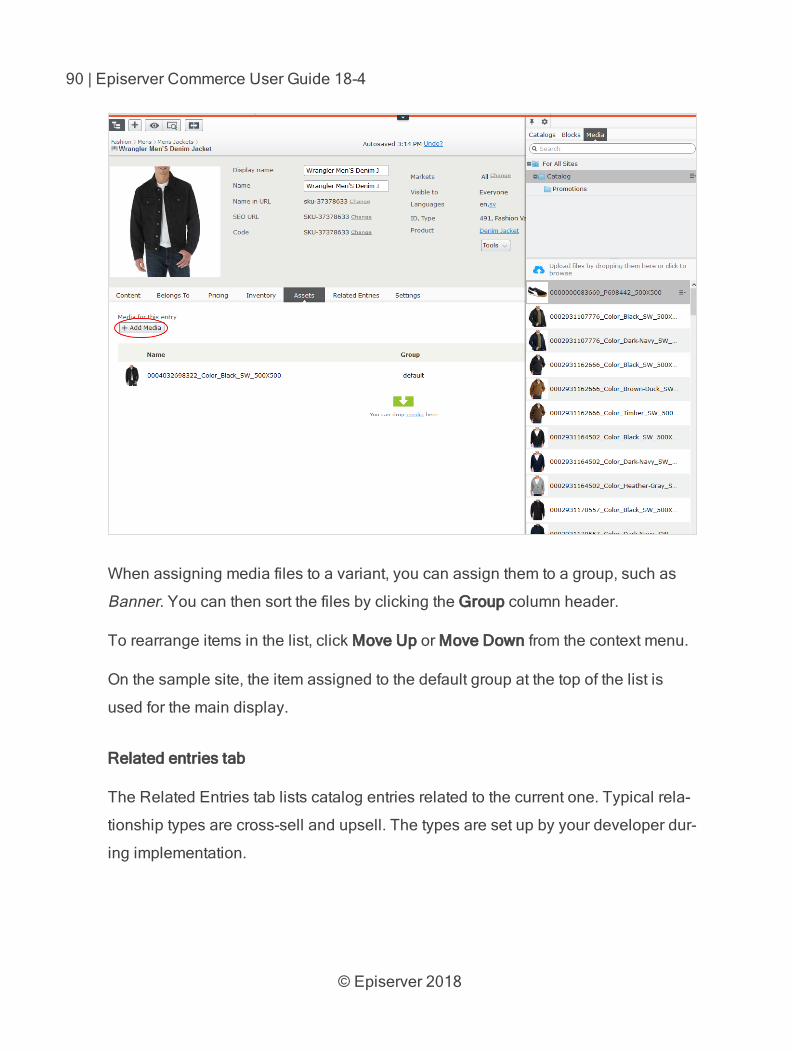
© Episerver 2018
90 | Episerver Commerce User Guide 18-4
When assigning media files to a variant, you can assign them to a group, such as
Banner. You can then sort the files by clicking the Group column header.
To rearrange items in the list, click Move Up or Move Down from the context menu.
On the sample site, the item assigned to the default group at the top of the list is
used for the main display.
Related entries tab
The Related Entries tab lists catalog entries related to the current one. Typical rela-
tionship types are cross-sell and upsell. The types are set up by your developer dur-
ing implementation.
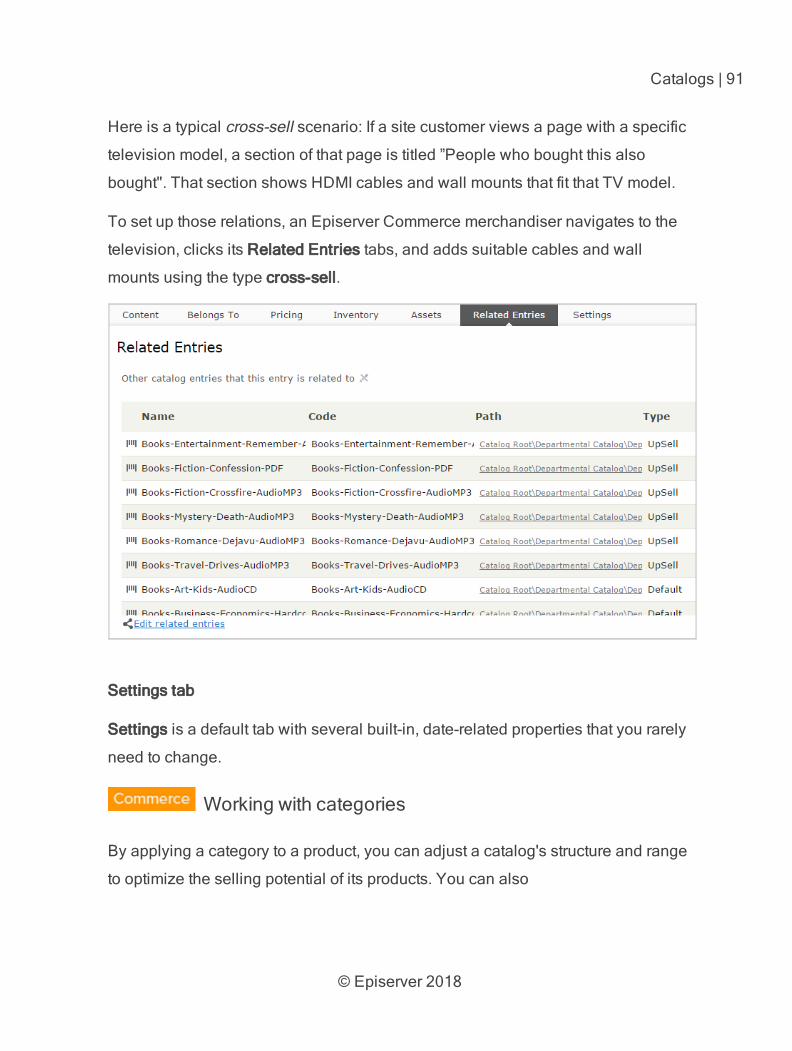
© Episerver 2018
Catalogs | 91
Here is a typical cross-sell scenario: If a site customer views a page with a specific
television model, a section of that page is titled ”People who bought this also
bought". That section shows HDMI cables and wall mounts that fit that TV model.
To set up those relations, an Episerver Commerce merchandiser navigates to the
television, clicks its Related Entries tabs, and adds suitable cables and wall
mounts using the type cross-sell.
Settings tab
Settings is a default tab with several built-in, date-related properties that you rarely
need to change.
Working with categories
By applying a category to a product, you can adjust a catalog's structure and range
to optimize the selling potential of its products. You can also

© Episerver 2018
92 | Episerver Commerce User Guide 18-4
Create new categories
Edit or delete existing categories
Change a product's primary and secondary categories
When managing a catalog, consider the maintenance and per-
formance of its structure. Do not create hierarchies of categories,
products, or variants that are too deep. On the other hand, a flat catalog
structure with too many entries in a category can negatively impact per-
formance.
Categorization involves the following tasks.
Move. Lets you restructure a catalog by moving a catalog entry to another
primary category; related products and variants are also moved. Links to
other categories and catalog entries are kept intact. See Moving catalog
entries.
Duplicate. Creates a copy of a catalog entry in a new catalog location. See
Duplicating catalog entries.
Link. Another term for or assigning additional categories. See Assigning
additional categories.
Detach. Removes a link.
Creating a category
A category is typically used to organize catalog entries. For example, women's
shoes. Categories can also have their own rich content, including assets and
descriptions of wine regions for a subset of wine products.
1. From the Commerce > Catalog interface, navigate to the catalog or category
node where you want to create the new category.
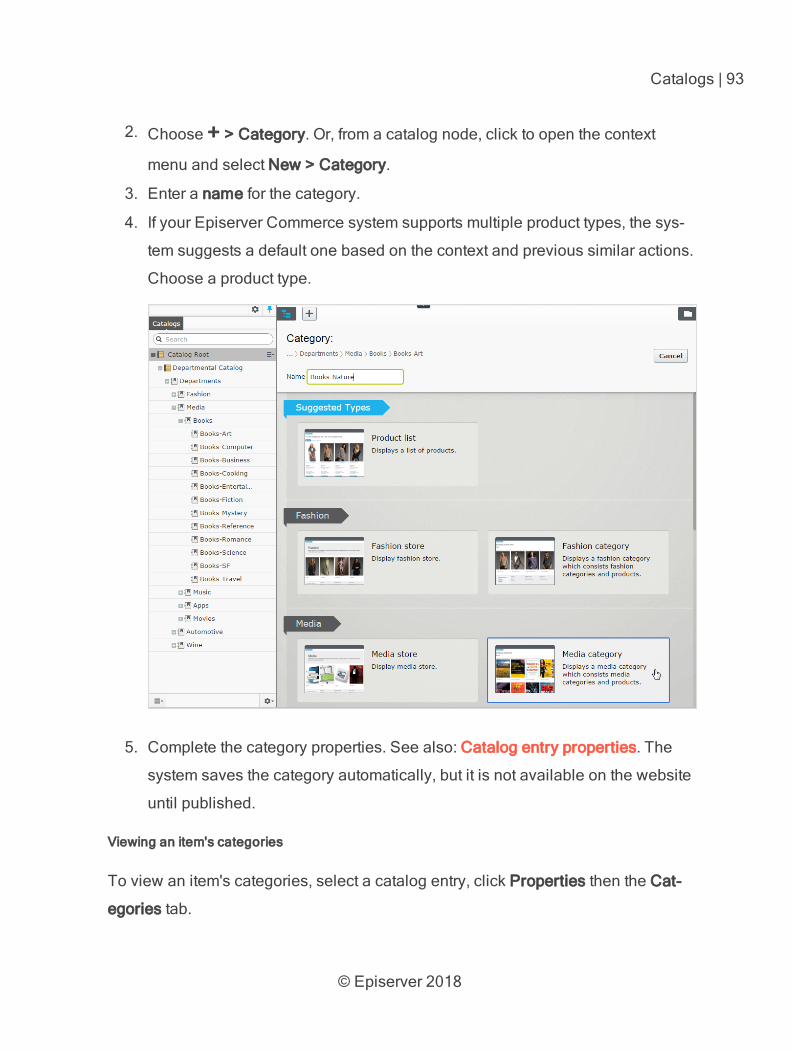
© Episerver 2018
Catalogs | 93
2. Choose + > Category. Or, from a catalog node, click to open the context menu and select New > Category.
3. Enter a name for the category.
4. If your Episerver Commerce system supports multiple product types, the sys-
tem suggests a default one based on the context and previous similar actions.
Choose a product type.
5. Complete the category properties. See also: Catalog entry properties. The
system saves the category automatically, but it is not available on the website
until published.
Viewing an item's categories
To view an item's categories, select a catalog entry, click Properties then the Cat-
egories tab.
© Episerver 2018
94 | Episerver Commerce User Guide 18-4
View items assigned to a category
To view all items assigned to a category, select it from the catalog tree. Its items
appear in the center of the screen.
Editing a category
1. In the Catalog tree, select the desired category.
2. From the context menu, click Edit.
3. Update the category information you want to change, such as the name,
SEO information, or description. See Catalog entry properties for information
about editable properties.
4. Publish the changes, or schedule for later publishing using the save and pub-
lish flow for content.
Deleting a category
If you delete a category, the following happens, depending on how the category is
linked to catalog entries or other categories.
If a category is linked to other categories, links to that category are removed,
while other category links are left intact.
Categories, product, and variant that are linked only to the category being
deleted (and no other categories) are also deleted.
After deleting a catalog entry, you cannot recover it.
If you delete a category with many subitems, the deletion may take a
while.
To delete a category, select it in the catalog tree, click Delete from the context
menu, and click Delete. Alternatively, you can click Delete from the context menu in
the catalog item list, or from the upper menu.
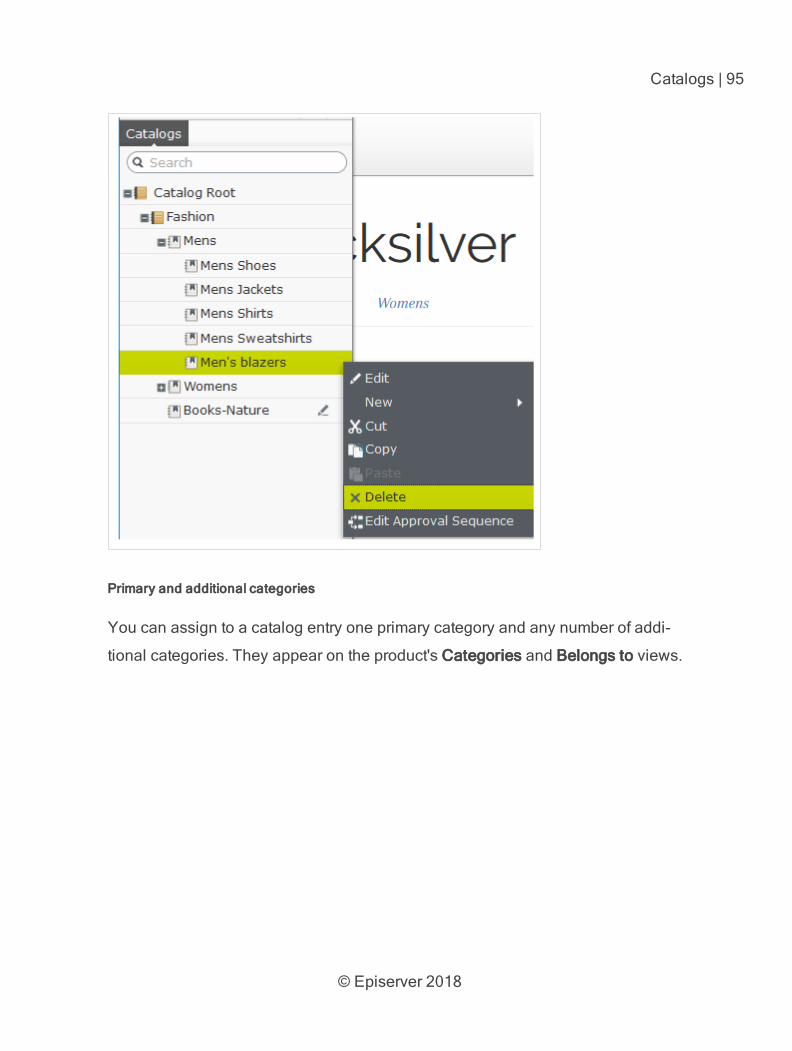
© Episerver 2018
Catalogs | 95
Primary and additional categories
You can assign to a catalog entry one primary category and any number of addi-
tional categories. They appear on the product's Categories and Belongs to views.
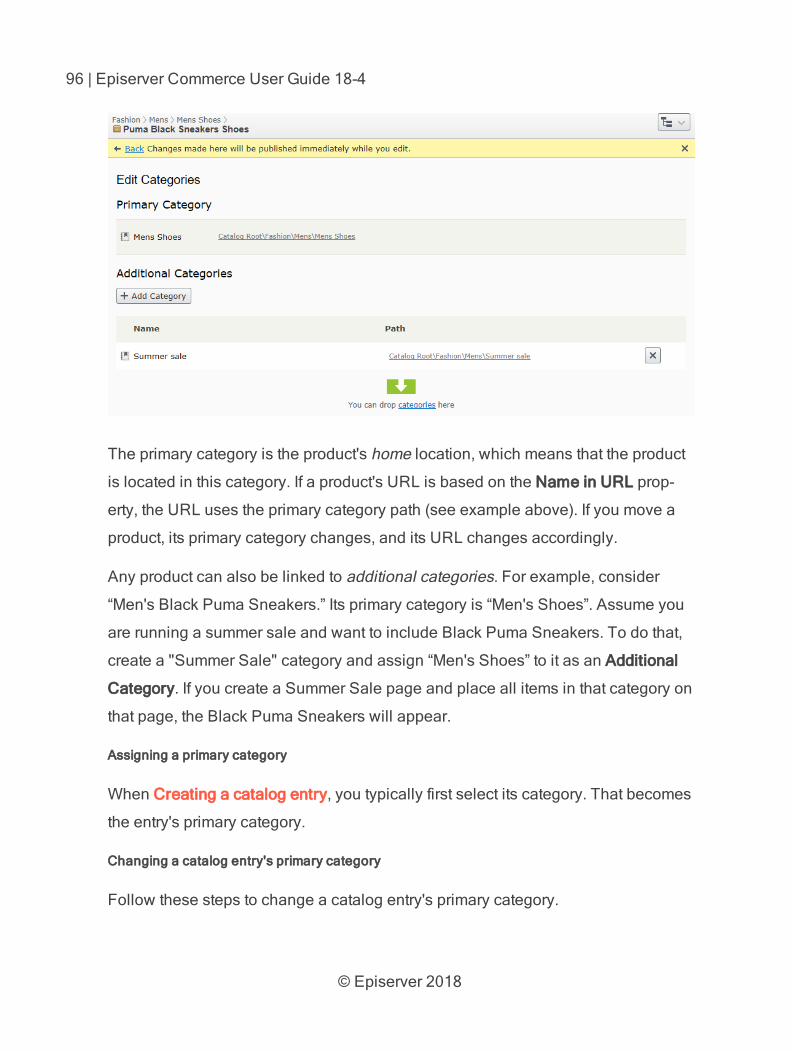
© Episerver 2018
96 | Episerver Commerce User Guide 18-4
The primary category is the product's home location, which means that the product
is located in this category. If a product's URL is based on the Name in URL prop-
erty, the URL uses the primary category path (see example above). If you move a
product, its primary category changes, and its URL changes accordingly.
Any product can also be linked to additional categories. For example, consider
“Men's Black Puma Sneakers.” Its primary category is “Men's Shoes”. Assume you
are running a summer sale and want to include Black Puma Sneakers. To do that,
create a "Summer Sale" category and assign “Men's Shoes” to it as an Additional
Category. If you create a Summer Sale page and place all items in that category on
that page, the Black Puma Sneakers will appear.
Assigning a primary category
When Creating a catalog entry, you typically first select its category. That becomes
the entry's primary category.
Changing a catalog entry's primary category
Follow these steps to change a catalog entry's primary category.
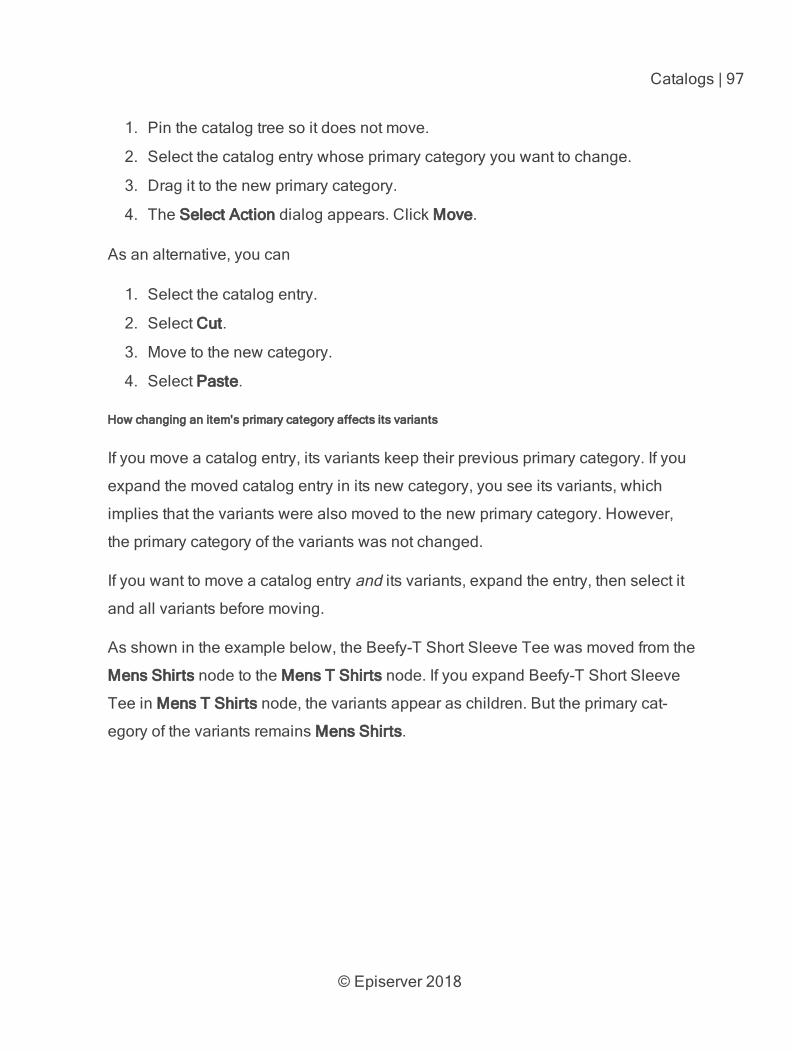
© Episerver 2018
Catalogs | 97
1. Pin the catalog tree so it does not move.
2. Select the catalog entry whose primary category you want to change.
3. Drag it to the new primary category.
4. The Select Action dialog appears. Click Move.
As an alternative, you can
1. Select the catalog entry.
2. Select Cut.
3. Move to the new category.
4. Select Paste.
How changing an item's primary category affects its variants
If you move a catalog entry, its variants keep their previous primary category. If you
expand the moved catalog entry in its new category, you see its variants, which
implies that the variants were also moved to the new primary category. However,
the primary category of the variants was not changed.
If you want to move a catalog entry and its variants, expand the entry, then select it
and all variants before moving.
As shown in the example below, the Beefy-T Short Sleeve Tee was moved from the
Mens Shirts node to the Mens T Shirts node. If you expand Beefy-T Short Sleeve
Tee in Mens T Shirts node, the variants appear as children. But the primary cat-
egory of the variants remains Mens Shirts.
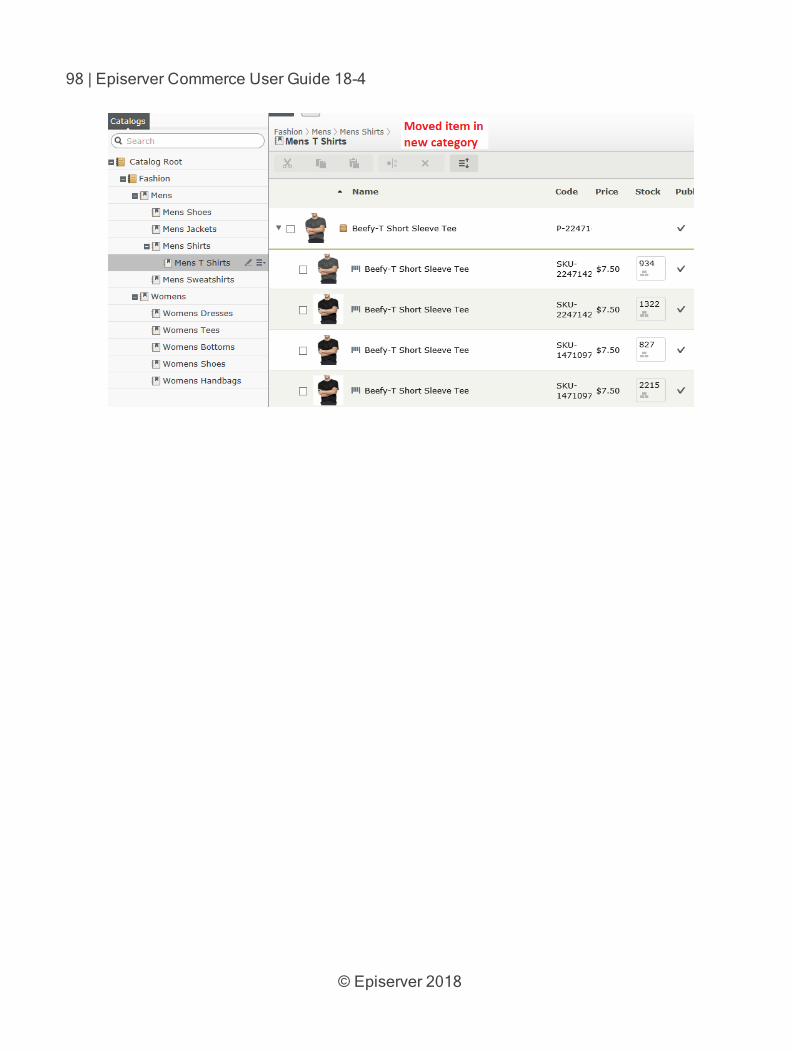
© Episerver 2018
98 | Episerver Commerce User Guide 18-4
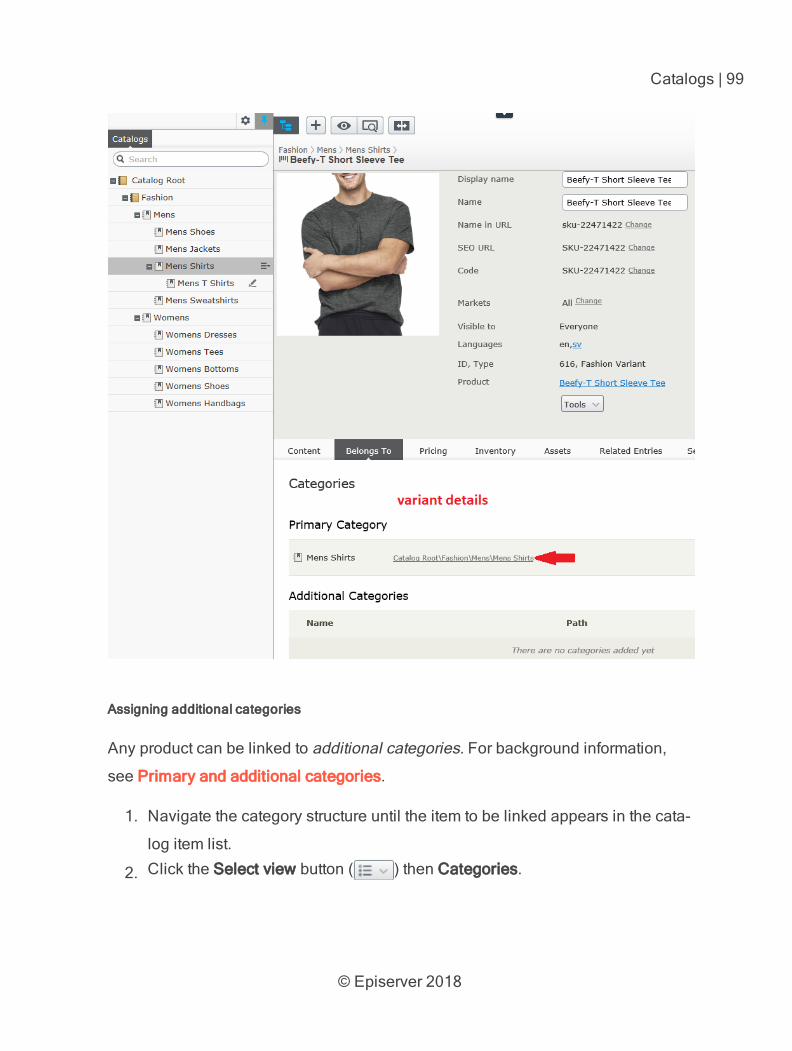
© Episerver 2018
Catalogs | 99
Assigning additional categories
Any product can be linked to additional categories. For background information,
see Primary and additional categories.
1. Navigate the category structure until the item to be linked appears in the cata-
log item list.
2. Click the Select view button ( ) then Categories.
© Episerver 2018
100 | Episerver Commerce User Guide 18-4
3. Click + Add Category.
4. Navigate to the category you want to add and click Add.
As an alternative, you can
1. Select the catalog entry.
2. Select Copy.
3. Move to the new category.
4. Select Paste.
5. On the Select Action dialog, choose Link.
Editing additional categories
To edit a category entry's additional categories, follow these steps.
1. Navigate to the category entry whose additional categories you want to edit.
2. Click the Select view button ( ) then Categories.
3. To add an additional category, click + Add Category.
To remove an additional category, click the corresponding Remove button.
Assigning a category to another category
You can assign a category to another category. If you do, all catalog entries linked
to the original category are also linked to the new category. See also: Primary and
additional categories.
To assign a category to another category, follow these steps.
1. Navigate to the category to which you want to assign an additional category.
2. Click the Select view button ( ) then Categories.
3. Click + Add Category.
4. Navigate to the category you want to add and click Add.
© Episerver 2018
Catalogs | 101
Packages and bundles
Packages and bundles let you combine several items under one "umbrella" item.
But their behavior and usage are quite different.
A package contains one or more variants, other packages or both, and has a
single SKU and price. A package is a single line item in a shopping cart.
A bundle is a collection of packages, products, and variants, each of which
is priced individually, allowing customers to purchase several items at once.
Each item in a bundle is a separate line item in a shopping cart. Once added
to a cart, a bundle item is treated like any other cart item.
Working with packages
Like other catalog entries, package have tabs and menu options that let you view
and edit their information. To learn about most settings, see Catalog entry prop-
erties. Because packages have an SKU and price, the Pricing and Inventory tabs
are available with them.
The Package Entries tab, unique to packages, shows the variants and other pack-
ages that make up a package. On that tab, click Edit entries to update a package's
items.
Click Manage Entry Groups to add entry groups with which to associate a pack-
age's items.

© Episerver 2018
102 | Episerver Commerce User Guide 18-4
Working with bundles
Like catalog entries, bundles have tabs and menu options that let you view and edit
their information. To learn about most settings, see Catalog entry properties.
Because bundles do not have an SKU or price, the Pricing and Inventory tabs are
not available with them. You can associate bundle entries with entry groups as you
can with packages.
The Bundle entries tab, unique to bundles, shows the entries included in a bundle.
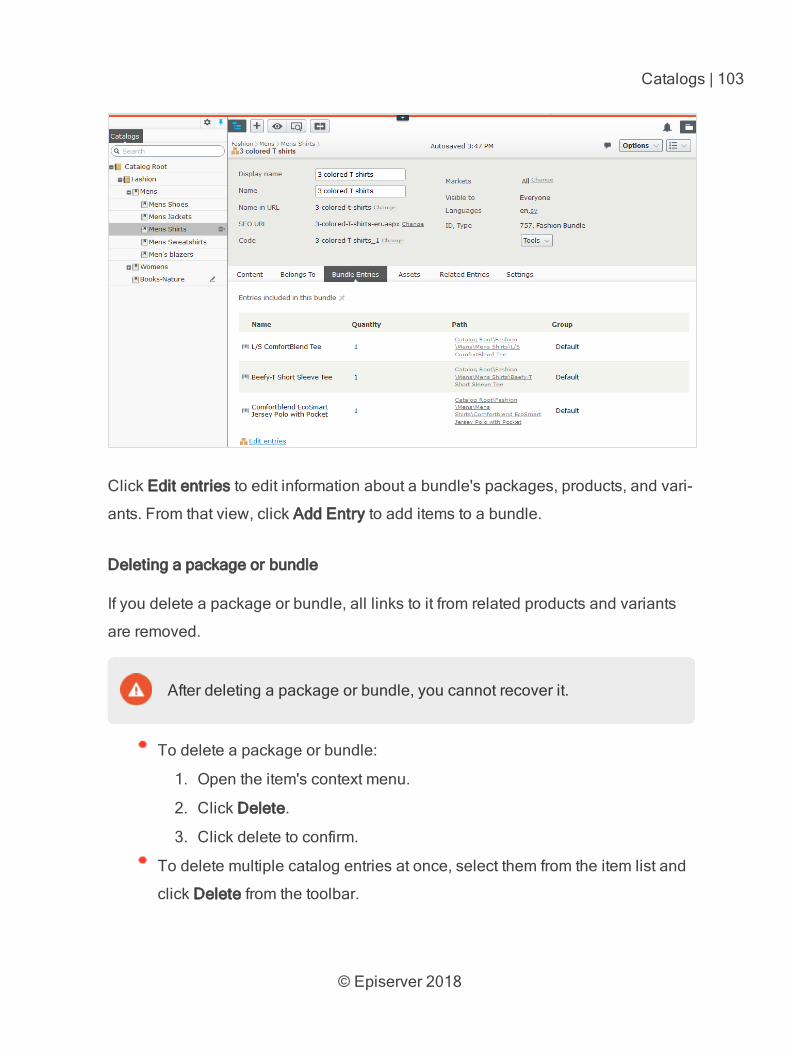
© Episerver 2018
Catalogs | 103
Click Edit entries to edit information about a bundle's packages, products, and vari-
ants. From that view, click Add Entry to add items to a bundle.
Deleting a package or bundle
If you delete a package or bundle, all links to it from related products and variants
are removed.
After deleting a package or bundle, you cannot recover it.
To delete a package or bundle:
1. Open the item's context menu.
2. Click Delete.
3. Click delete to confirm.
To delete multiple catalog entries at once, select them from the item list and
click Delete from the toolbar.
© Episerver 2018
104 | Episerver Commerce User Guide 18-4
How the Campaigns feature considers packages and bundles
The Campaigns feature treats a package like any other SKU. Since a package has
its own price and quantity, any reductions are made to the package. The Cam-
paigns feature ignores the individual items in a package.
The Campaigns feature does not recognize bundles. It only recognizes the indi-
vidual SKUs that make up a bundle.
© Episerver 2018
Orders | 105
Orders
Order management is a central part of the e-commerce system. Since the majority
of orders are created from the front-end site, the ordering process is usually auto-
matic following an order management workflow. In some cases, orders need to be
manually managed. Order Management in Commerce Manager provides
shopping cart (baskets), order capture, order fulfillment, payment functions and
item return or exchange support.
Meta-classes and meta-fields
You can define your own meta-classes and meta-fields for both product and orders
in Commerce Manager. For example, if you create a meta-class called Wine, you
want to add meta-fields that are characteristic for wine, such as color, taste, vintage
and maturity.
When you create meta-fields and meta-classes, you can use them in
the product catalog. Meta-classes and meta-fields for catalogs are defined in the
Catalog System part of System Administration. See also: Catalog meta-classes
and meta-fields.
Browsing orders
Customers create the majority of orders on the front-end in an online store, and you
likely have a significant amount of orders in your system. Episerver Commerce lets
you browse and search orders in several ways.
Filter and search orders by customer, status, market, date range and other
properties.
Use wild cards to limit search results.
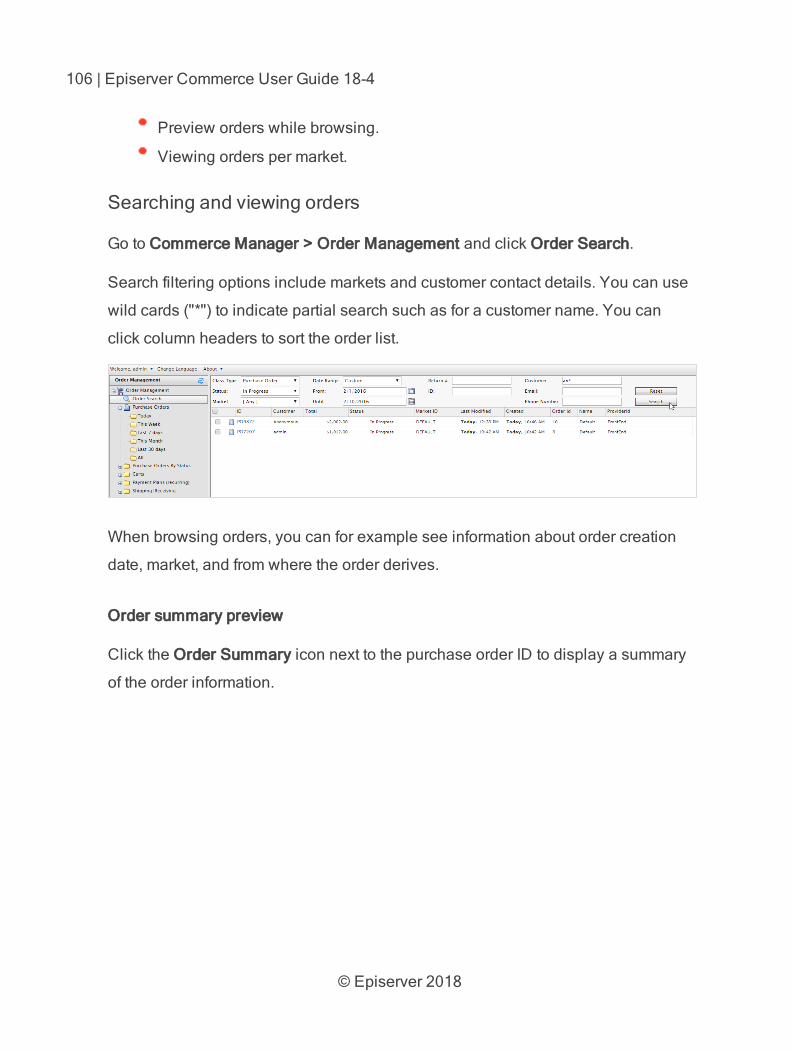
© Episerver 2018
106 | Episerver Commerce User Guide 18-4
Preview orders while browsing.
Viewing orders per market.
Searching and viewing orders
Go to Commerce Manager > Order Management and click Order Search.
Search filtering options include markets and customer contact details. You can use
wild cards ("*") to indicate partial search such as for a customer name. You can
click column headers to sort the order list.
When browsing orders, you can for example see information about order creation
date, market, and from where the order derives.
Order summary preview
Click the Order Summary icon next to the purchase order ID to display a summary
of the order information.
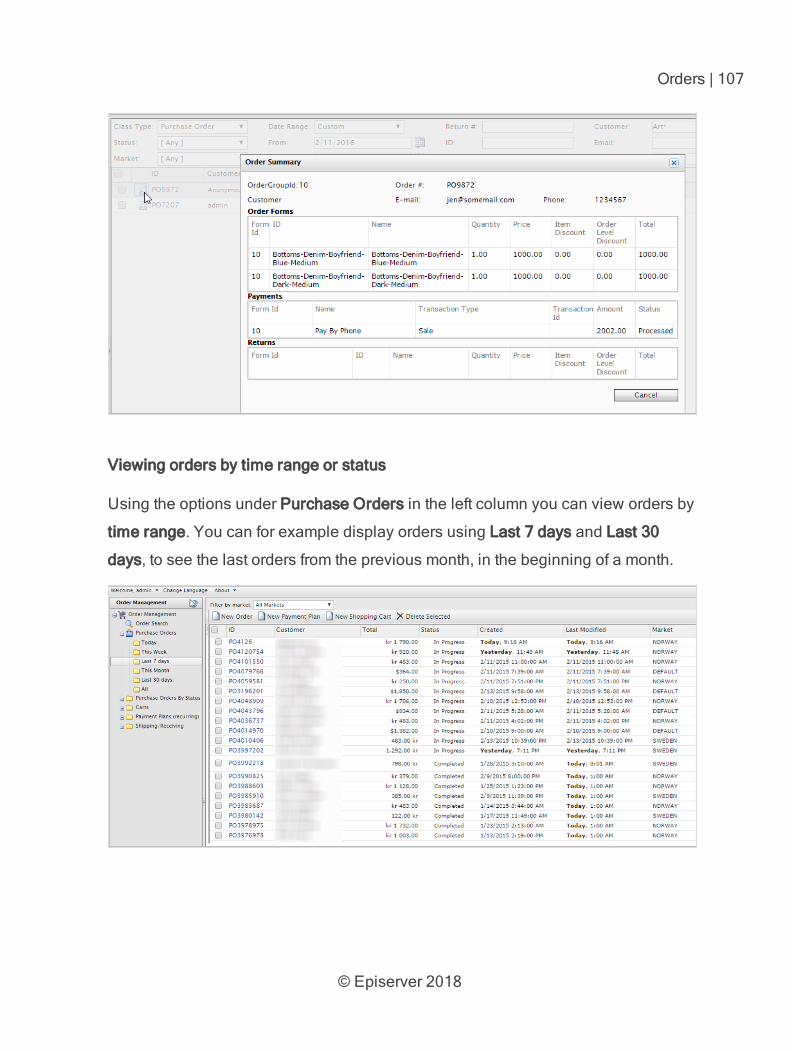
© Episerver 2018
Orders | 107
Viewing orders by time range or status
Using the options under Purchase Orders in the left column you can view orders by
time range. You can for example display orders using Last 7 days and Last 30
days, to see the last orders from the previous month, in the beginning of a month.
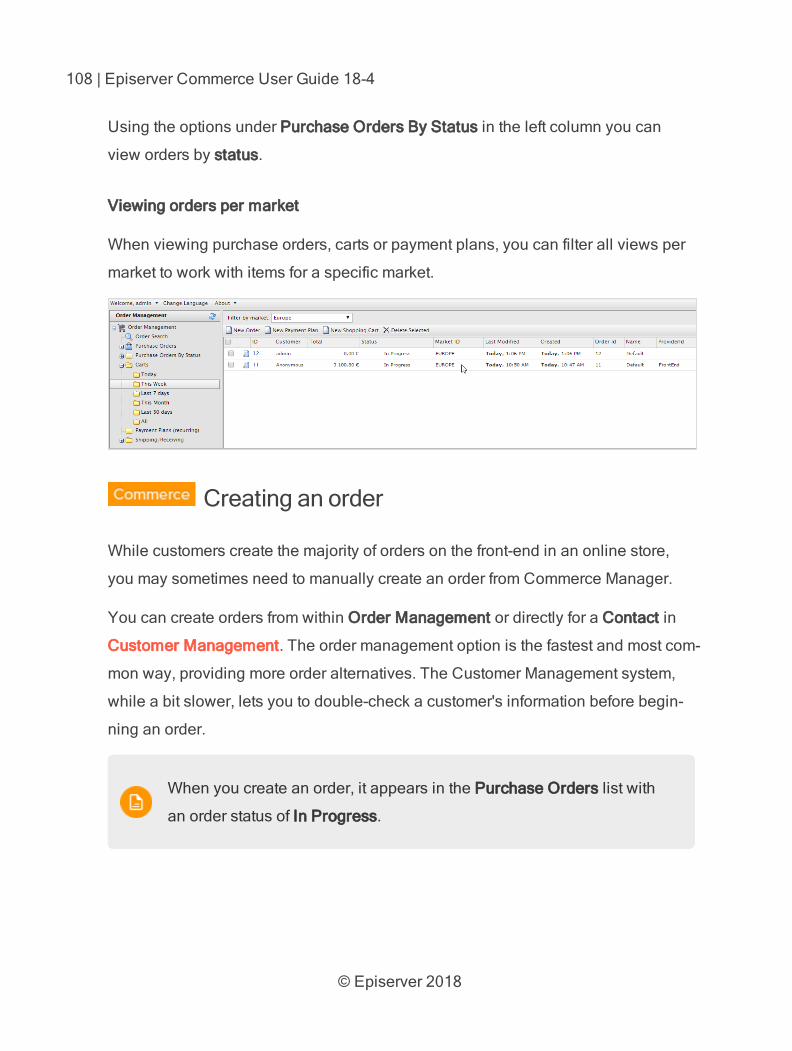
© Episerver 2018
108 | Episerver Commerce User Guide 18-4
Using the options under Purchase Orders By Status in the left column you can
view orders by status.
Viewing orders per market
When viewing purchase orders, carts or payment plans, you can filter all views per
market to work with items for a specific market.
Creating an order
While customers create the majority of orders on the front-end in an online store,
you may sometimes need to manually create an order from Commerce Manager.
You can create orders from within Order Management or directly for a Contact in
Customer Management. The order management option is the fastest and most com-
mon way, providing more order alternatives. The Customer Management system,
while a bit slower, lets you to double-check a customer's information before begin-
ning an order.
When you create an order, it appears in the Purchase Orders list with
an order status of In Progress.
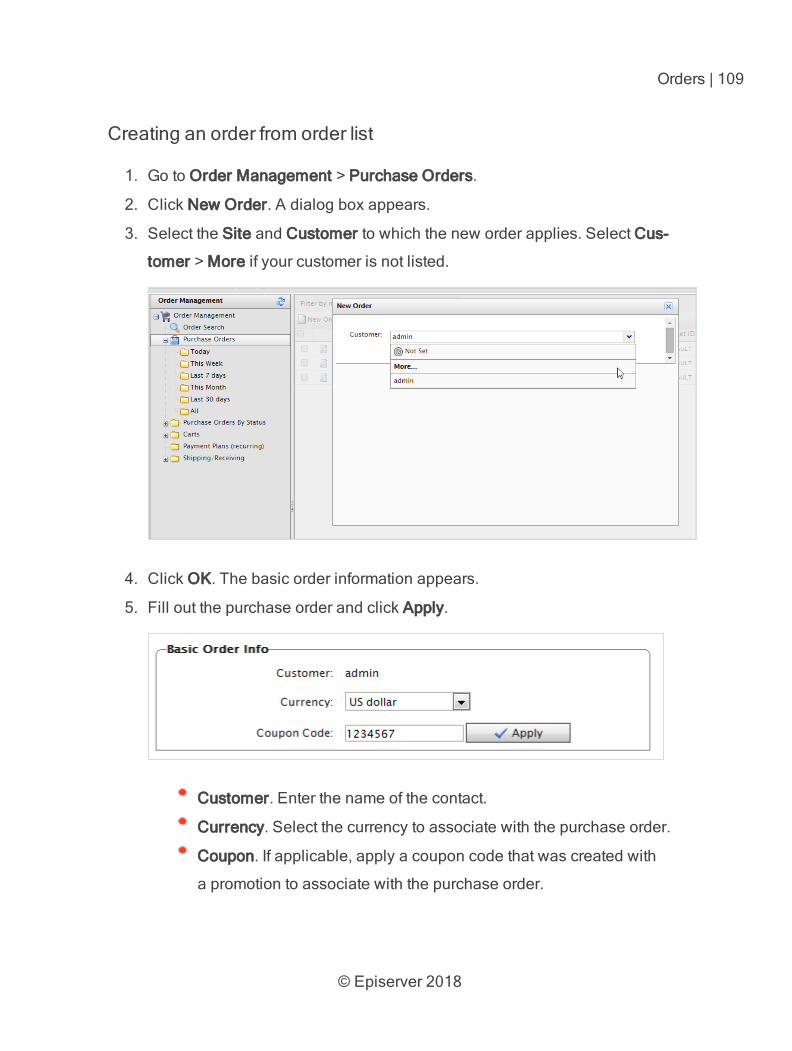
© Episerver 2018
Orders | 109
Creating an order from order list
1. Go to Order Management > Purchase Orders.
2. Click New Order. A dialog box appears.
3. Select the Site and Customer to which the new order applies. Select Cus-
tomer > More if your customer is not listed.
4. Click OK. The basic order information appears.
5. Fill out the purchase order and click Apply.
Customer. Enter the name of the contact.
Currency. Select the currency to associate with the purchase order.
Coupon. If applicable, apply a coupon code that was created with
a promotion to associate with the purchase order.
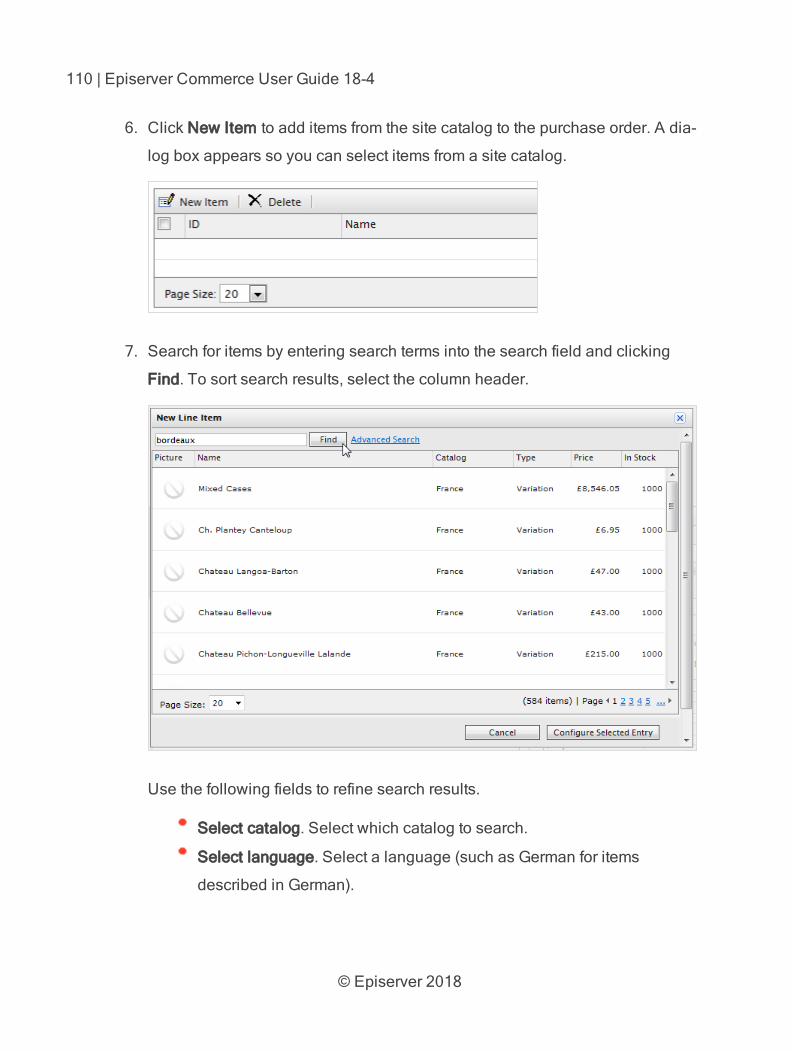
© Episerver 2018
110 | Episerver Commerce User Guide 18-4
6. Click New Item to add items from the site catalog to the purchase order. A dia-
log box appears so you can select items from a site catalog.
7. Search for items by entering search terms into the search field and clicking
Find. To sort search results, select the column header.
Use the following fields to refine search results.
Select catalog. Select which catalog to search.
Select language. Select a language (such as German for items
described in German).
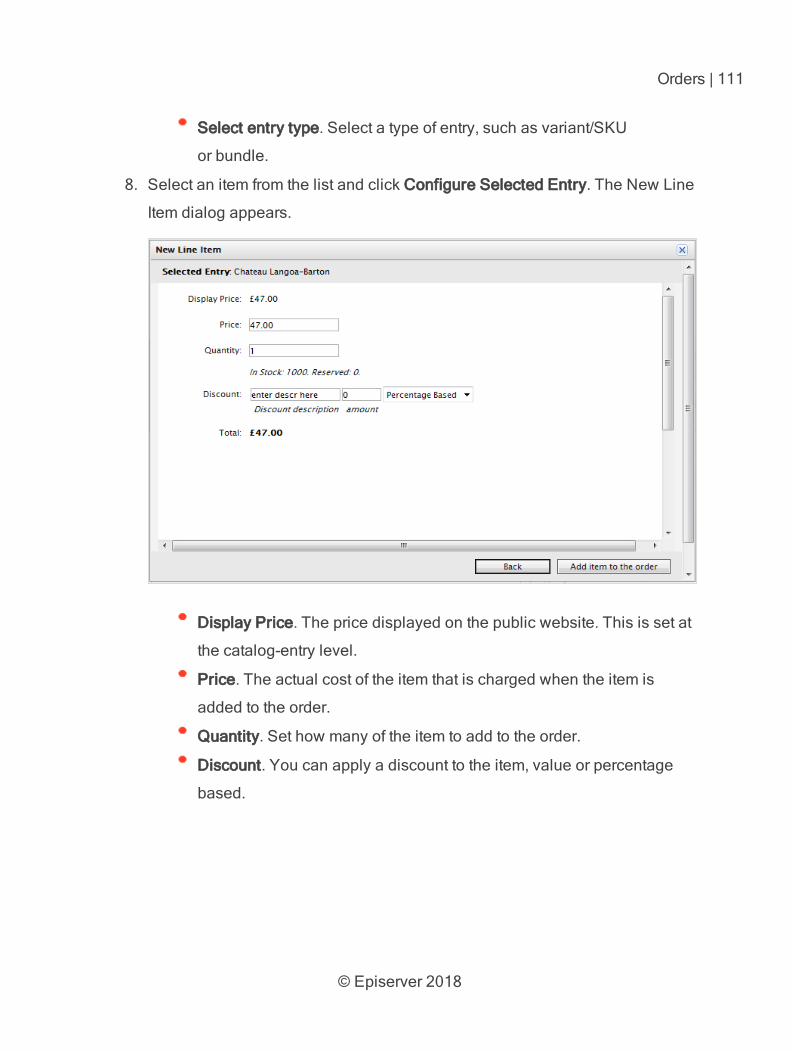
© Episerver 2018
Orders | 111
Select entry type. Select a type of entry, such as variant/SKU
or bundle.
8. Select an item from the list and click Configure Selected Entry. The New Line
Item dialog appears.
Display Price. The price displayed on the public website. This is set at
the catalog-entry level.
Price. The actual cost of the item that is charged when the item is
added to the order.
Quantity. Set how many of the item to add to the order.
Discount. You can apply a discount to the item, value or percentage
based.
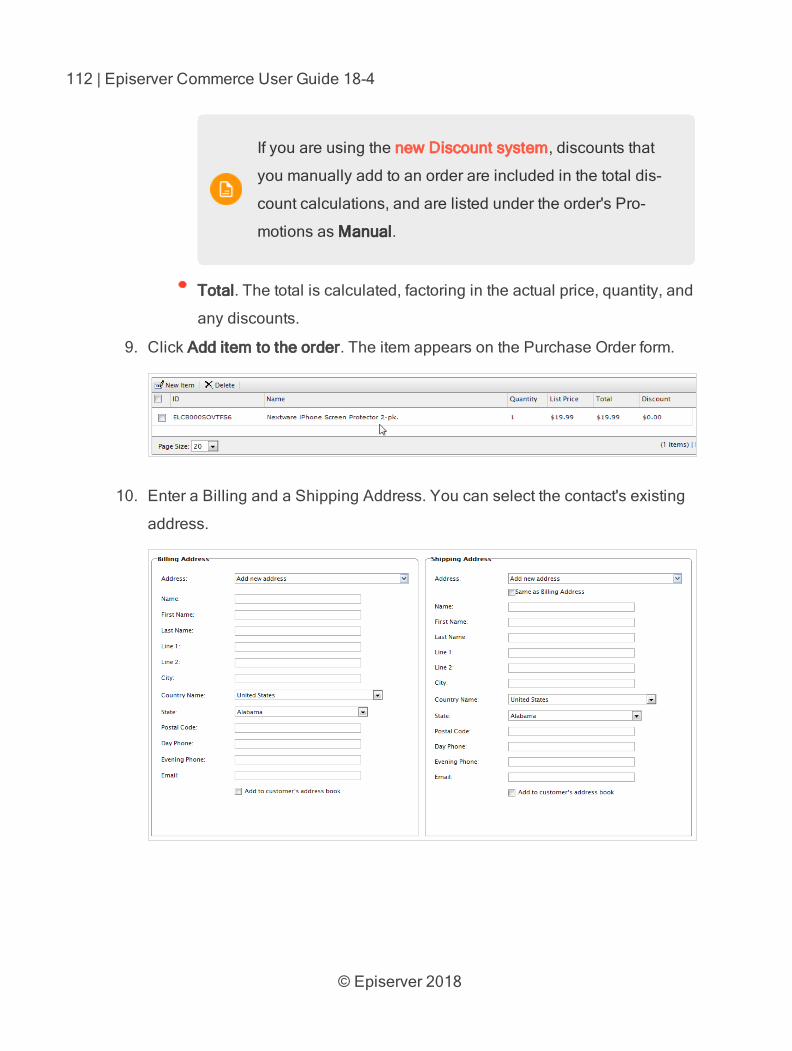
© Episerver 2018
112 | Episerver Commerce User Guide 18-4
If you are using the new Discount system, discounts that
you manually add to an order are included in the total dis-
count calculations, and are listed under the order's Pro-
motions as Manual.
Total. The total is calculated, factoring in the actual price, quantity, and
any discounts.
9. Click Add item to the order. The item appears on the Purchase Order form.
10. Enter a Billing and a Shipping Address. You can select the contact's existing
address.
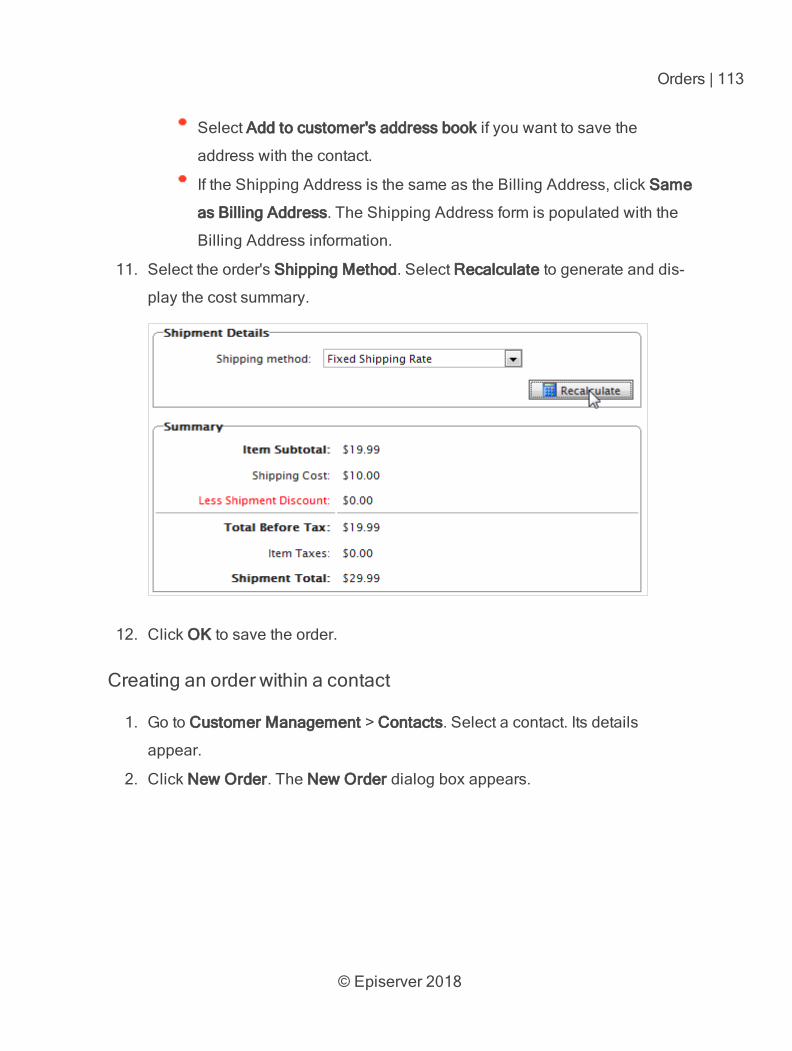
© Episerver 2018
Orders | 113
Select Add to customer's address book if you want to save the
address with the contact.
If the Shipping Address is the same as the Billing Address, click Same
as Billing Address. The Shipping Address form is populated with the
Billing Address information.
11. Select the order's Shipping Method. Select Recalculate to generate and dis-
play the cost summary.
12. Click OK to save the order.
Creating an order within a contact
1. Go to Customer Management > Contacts. Select a contact. Its details
appear.
2. Click New Order. The New Order dialog box appears.
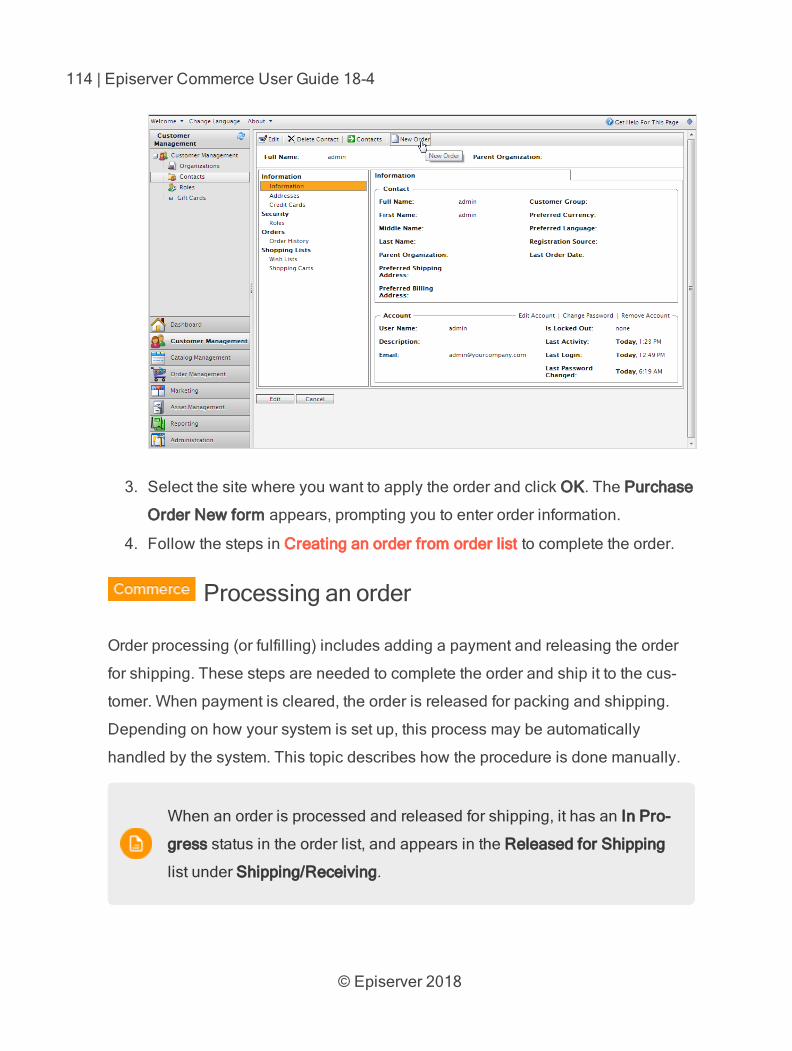
© Episerver 2018
114 | Episerver Commerce User Guide 18-4
3. Select the site where you want to apply the order and click OK. The Purchase
Order New form appears, prompting you to enter order information.
4. Follow the steps in Creating an order from order list to complete the order.
Processing an order
Order processing (or fulfilling) includes adding a payment and releasing the order
for shipping. These steps are needed to complete the order and ship it to the cus-
tomer. When payment is cleared, the order is released for packing and shipping.
Depending on how your system is set up, this process may be automatically
handled by the system. This topic describes how the procedure is done manually.
When an order is processed and released for shipping, it has an In Pro-
gress status in the order list, and appears in the Released for Shipping
list under Shipping/Receiving.
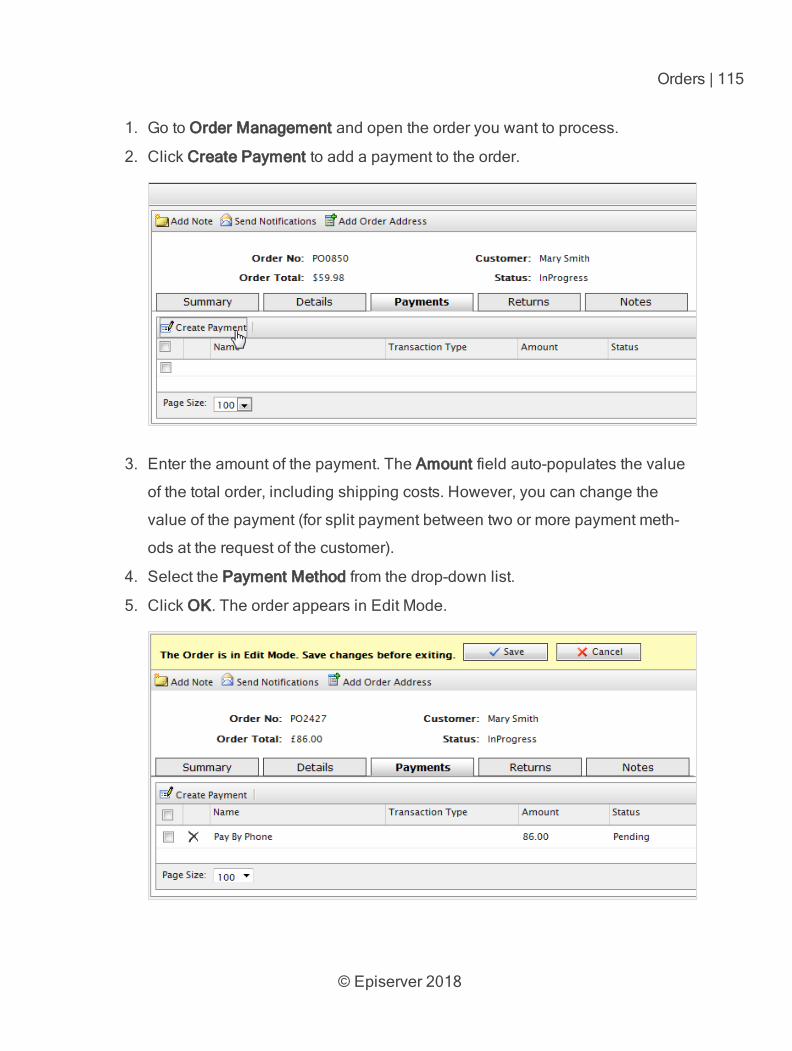
© Episerver 2018
Orders | 115
1. Go to Order Management and open the order you want to process.
2. Click Create Payment to add a payment to the order.
3. Enter the amount of the payment. The Amount field auto-populates the value
of the total order, including shipping costs. However, you can change the
value of the payment (for split payment between two or more payment meth-
ods at the request of the customer).
4. Select the Payment Method from the drop-down list.
5. Click OK. The order appears in Edit Mode.
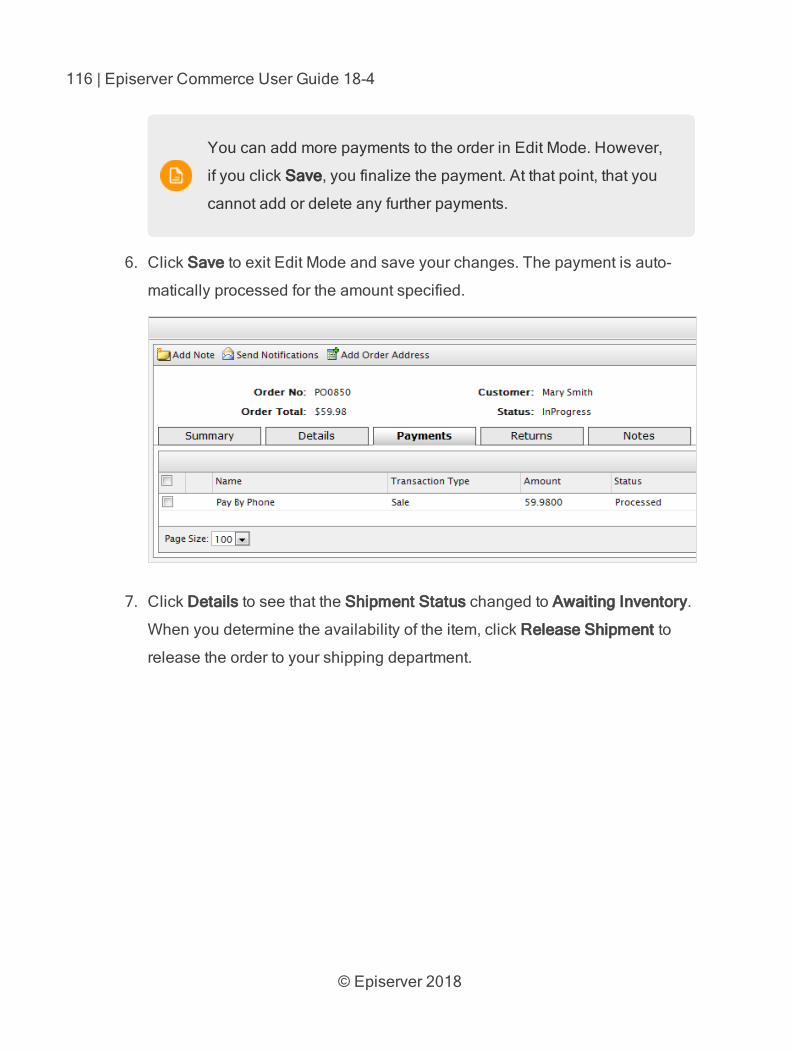
© Episerver 2018
116 | Episerver Commerce User Guide 18-4
You can add more payments to the order in Edit Mode. However,
if you click Save, you finalize the payment. At that point, that you
cannot add or delete any further payments.
6. Click Save to exit Edit Mode and save your changes. The payment is auto-
matically processed for the amount specified.
7. Click Details to see that the Shipment Status changed to Awaiting Inventory.
When you determine the availability of the item, click Release Shipment to
release the order to your shipping department.
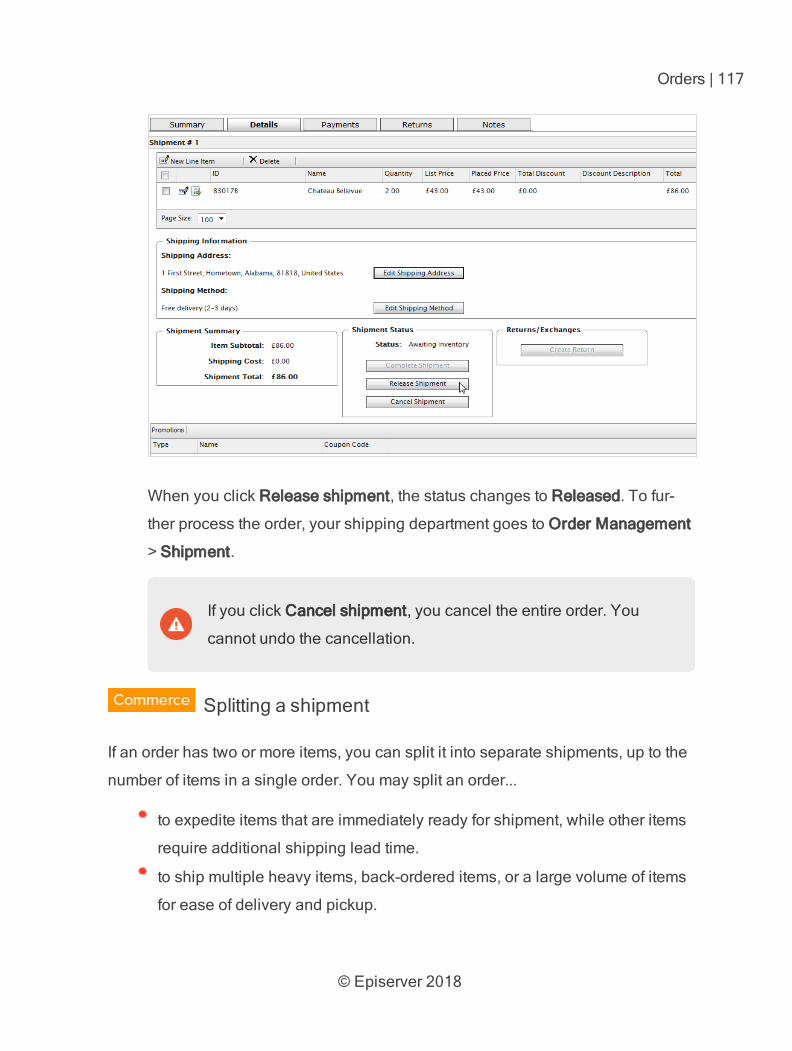
© Episerver 2018
Orders | 117
When you click Release shipment, the status changes to Released. To fur-
ther process the order, your shipping department goes to Order Management
> Shipment.
If you click Cancel shipment, you cancel the entire order. You
cannot undo the cancellation.
Splitting a shipment
If an order has two or more items, you can split it into separate shipments, up to the
number of items in a single order. You may split an order...
to expedite items that are immediately ready for shipment, while other items
require additional shipping lead time.
to ship multiple heavy items, back-ordered items, or a large volume of items
for ease of delivery and pickup.
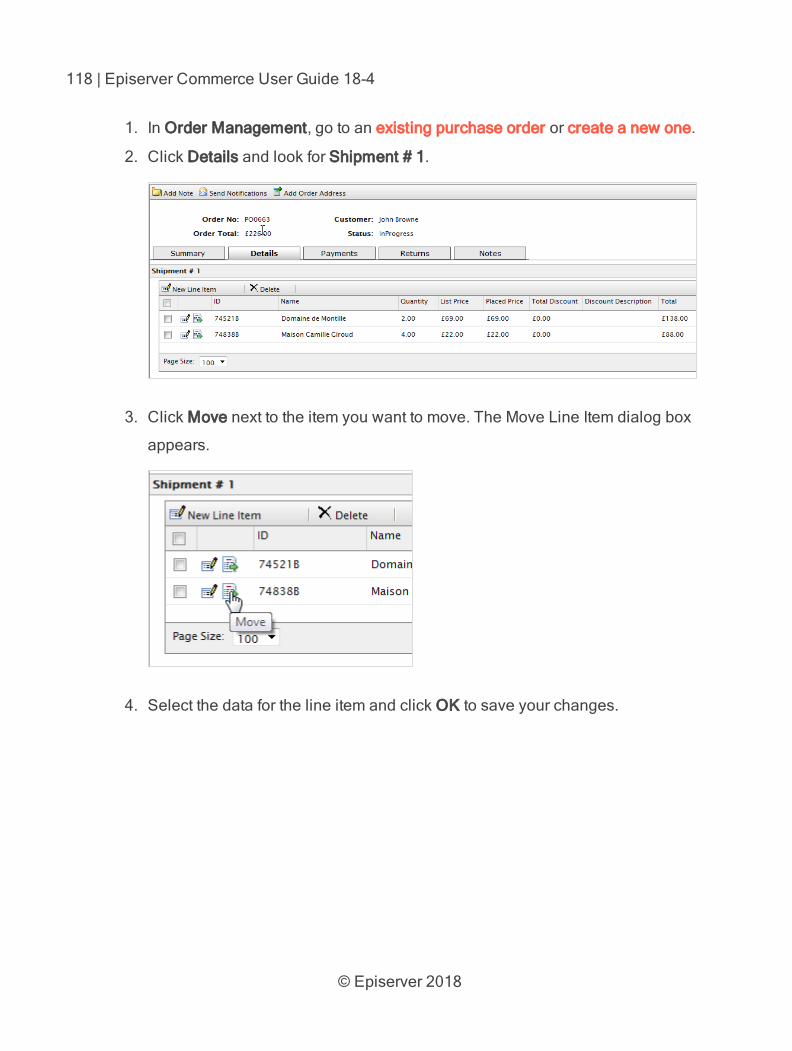
© Episerver 2018
118 | Episerver Commerce User Guide 18-4
1. In Order Management, go to an existing purchase order or create a new one.
2. Click Details and look for Shipment # 1.
3. Click Move next to the item you want to move. The Move Line Item dialog box
appears.
4. Select the data for the line item and click OK to save your changes.
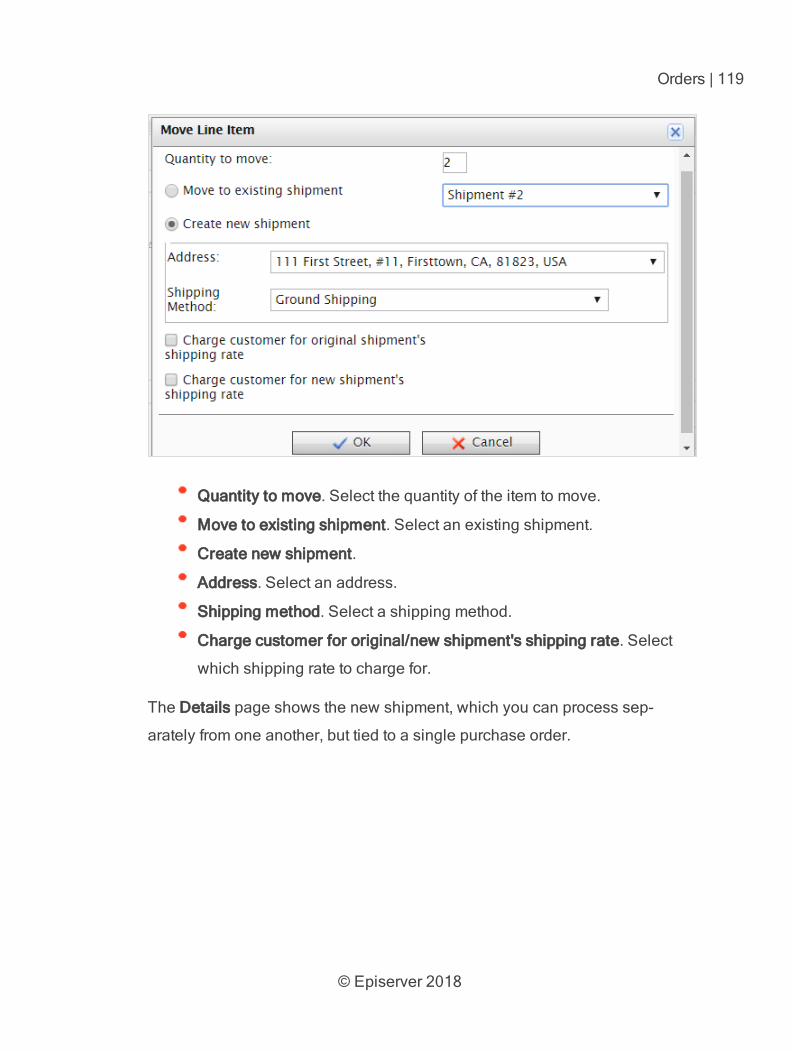
© Episerver 2018
Orders | 119
Quantity to move. Select the quantity of the item to move.
Move to existing shipment. Select an existing shipment.
Create new shipment.
Address. Select an address.
Shipping method. Select a shipping method.
Charge customer for original/new shipment's shipping rate. Select
which shipping rate to charge for.
The Details page shows the new shipment, which you can process sep-
arately from one another, but tied to a single purchase order.
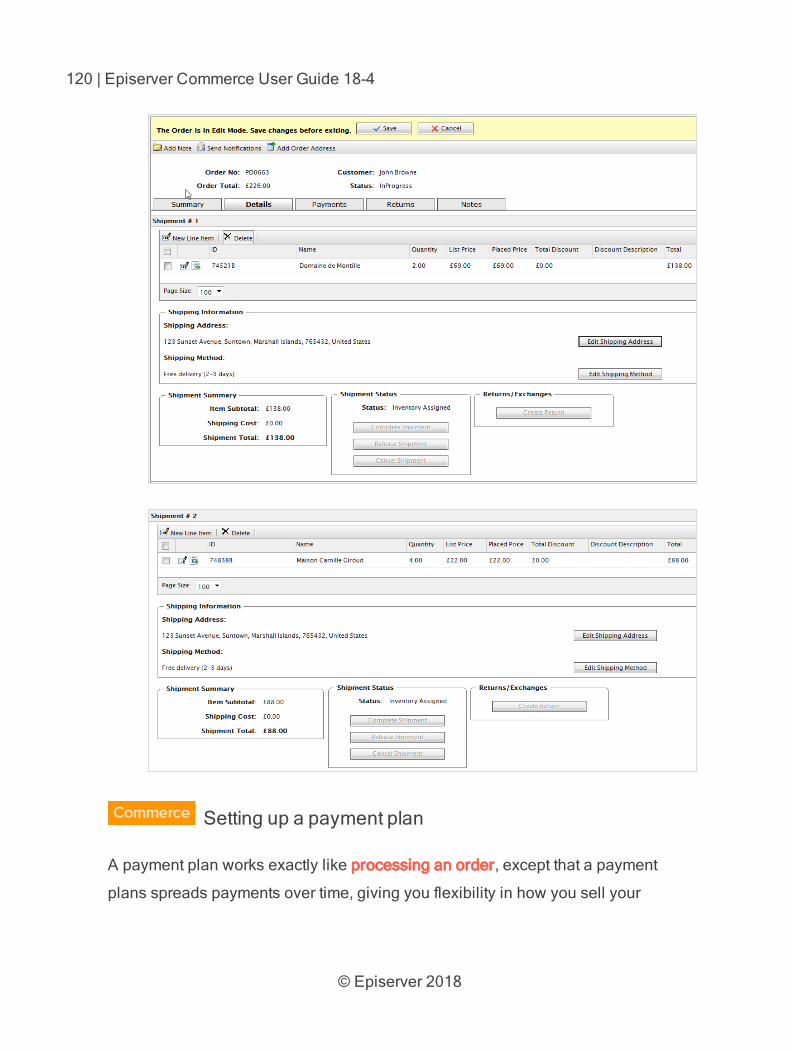
© Episerver 2018
120 | Episerver Commerce User Guide 18-4
Setting up a payment plan
A payment plan works exactly like processing an order, except that a payment
plans spreads payments over time, giving you flexibility in how you sell your
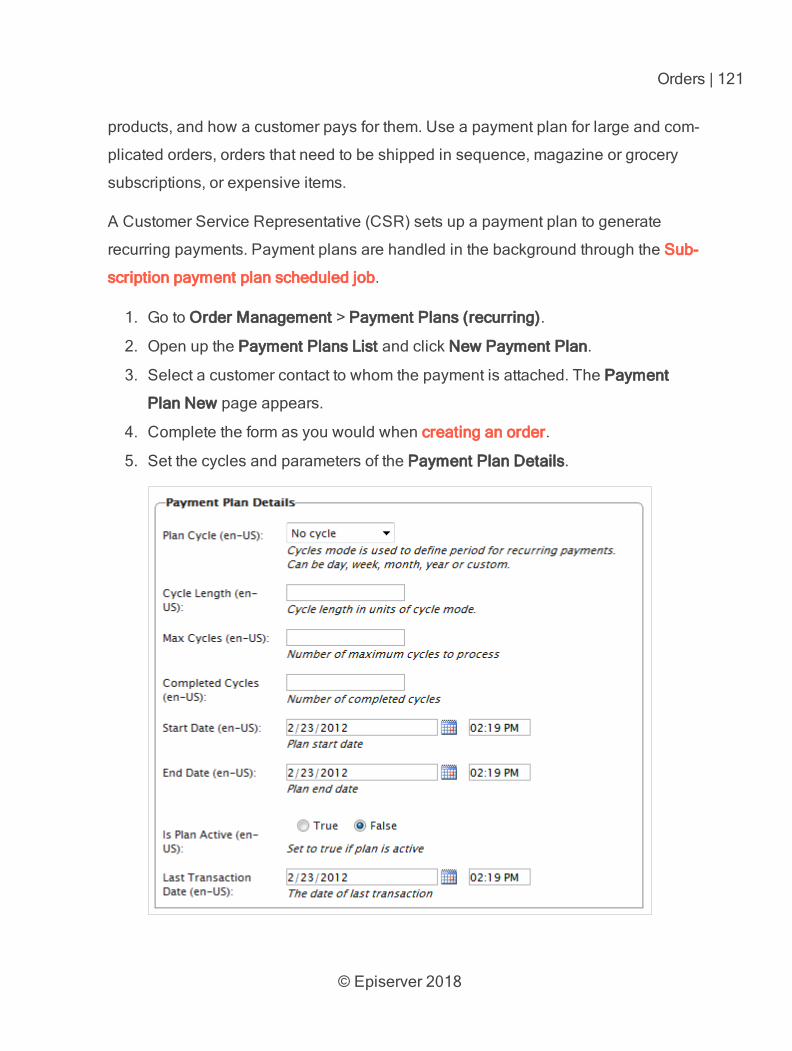
© Episerver 2018
Orders | 121
products, and how a customer pays for them. Use a payment plan for large and com-
plicated orders, orders that need to be shipped in sequence, magazine or grocery
subscriptions, or expensive items.
A Customer Service Representative (CSR) sets up a payment plan to generate
recurring payments. Payment plans are handled in the background through the Sub-
scription payment plan scheduled job.
1. Go to Order Management > Payment Plans (recurring).
2. Open up the Payment Plans List and click New Payment Plan.
3. Select a customer contact to whom the payment is attached. The Payment
Plan New page appears.
4. Complete the form as you would when creating an order.
5. Set the cycles and parameters of the Payment Plan Details.
© Episerver 2018
122 | Episerver Commerce User Guide 18-4
Plan Cycle. (Cycle Mode)
You can choose from the following plan cycles, which determine how
often the customer is charged.
No Cycle. No recurring payment is created. The customer is
charged once when the initial purchase order is created.
Daily Cycle. Recurring payment happens daily from start date.
Weekly Cycle. Recurring payment happens weekly from start
date.
Monthly Cycle. Recurring payment happens monthly from start
date.
Custom1/Custom2. These are placeholders for developers to
create custom cycles within the Mediachase.Com-
merce.Orders.PaymentPlanCycle class.
Cycle Length. Entering a value of 1 or higher determines the unit of
time for the Plan Cycle. For example, if the Plan Cycle is Daily, and the
Cycle Length is 3, a transaction occurs every three days. If the Plan
Cycle is Monthly and the Cycle Length is 1, a transaction occurs each
month.
Max Cycles. Determines the maximum number of cycles to run for this
payment plan. For example, if the Max Cycles is set to 2, payment plan
stops after two transaction cycles. If you want the plan to go on indef-
initely, set Max Cycles to 0.
Completed Cycles. This tallies the number of completed cycles since
the payment plan was created. When initially creating the payment
plan, set this field to 0.
Start Date. Set the start date and time when recurring transactions
begin.
© Episerver 2018
Orders | 123
End Date. Set the end date and time when recurring transactions end.
Is Plan Active. True enables the payment plan. Set False to create the
payment plan but keep it inactive.
Last Transaction Date. Logs the last transaction date. Leave the date
and time fields as is when you create the payment plan.
6. Click OK.
Payment plan order detail page explained
The payment plan begins when the first purchase order is generated. You can cre-
ate the purchase order manually (by clicking Create First Purchase Order) or auto-
matically by the payment plans scheduled job.
After you create a new payment plan, a new Order page appears. This is slightly
altered from the original Order detail page that appears after creating a new order.
The changes include:
Inability to manage shipment (release shipments for further processing).
An Orders tab that shows a history of processed purchase orders from this
payment plan.
A Create First Purchase Order button that a CSR clicks to create the first
purchase order related to this payment plan. The button disappears after cre-
ating the first purchase order manually, or if the payment plan scheduled job
runs and generates the first purchase order. The payment plan goes into
effect after the first purchase is generated.
The generated purchase order number includes the parent ID of the pay-
ment plan. For example, if the payment plan parent ID is 35, subsequent pur-
chase orders are numbered as PO35XXX.
When a payment is added to a payment plan, the customer is not charged.
The payment plan simply collects payment information until converted to a
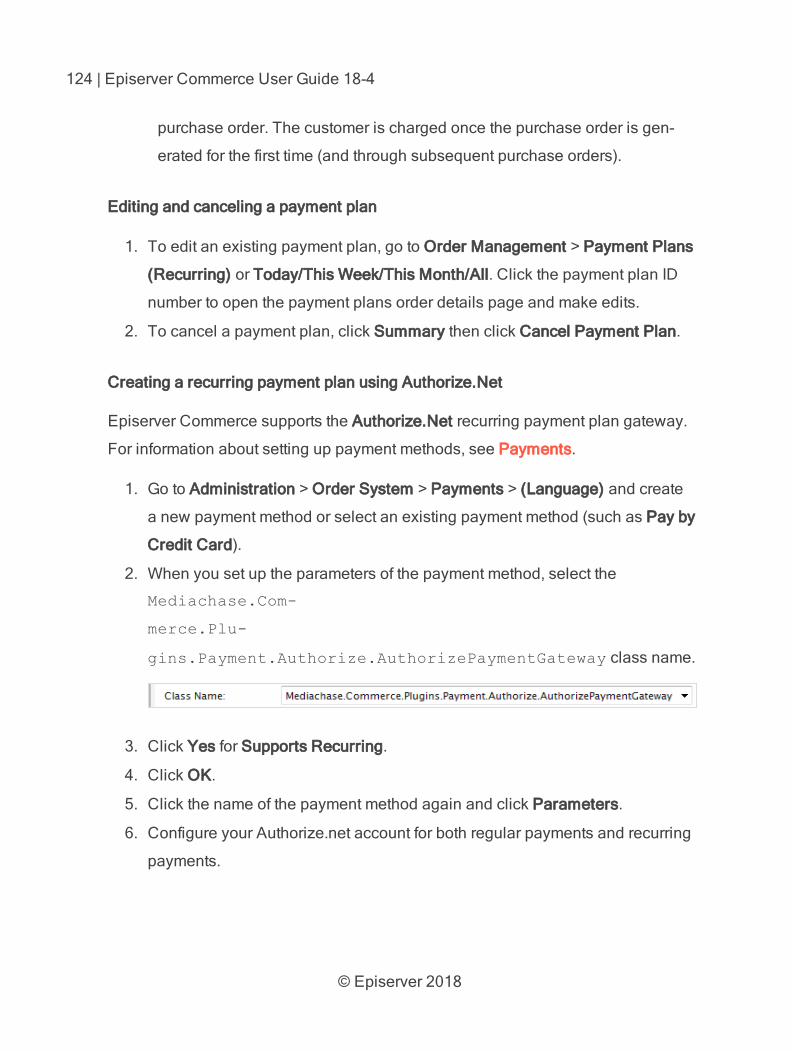
© Episerver 2018
124 | Episerver Commerce User Guide 18-4
purchase order. The customer is charged once the purchase order is gen-
erated for the first time (and through subsequent purchase orders).
Editing and canceling a payment plan
1. To edit an existing payment plan, go to Order Management > Payment Plans
(Recurring) or Today/This Week/This Month/All. Click the payment plan ID
number to open the payment plans order details page and make edits.
2. To cancel a payment plan, click Summary then click Cancel Payment Plan.
Creating a recurring payment plan using Authorize.Net
Episerver Commerce supports the Authorize.Net recurring payment plan gateway.
For information about setting up payment methods, see Payments.
1. Go to Administration > Order System > Payments > (Language) and create
a new payment method or select an existing payment method (such as Pay by
Credit Card).
2. When you set up the parameters of the payment method, select the
Mediachase.Com-
merce.Plu-
gins.Payment.Authorize.AuthorizePaymentGateway class name.
3. Click Yes for Supports Recurring.
4. Click OK.
5. Click the name of the payment method again and click Parameters.
6. Configure your Authorize.net account for both regular payments and recurring
payments.
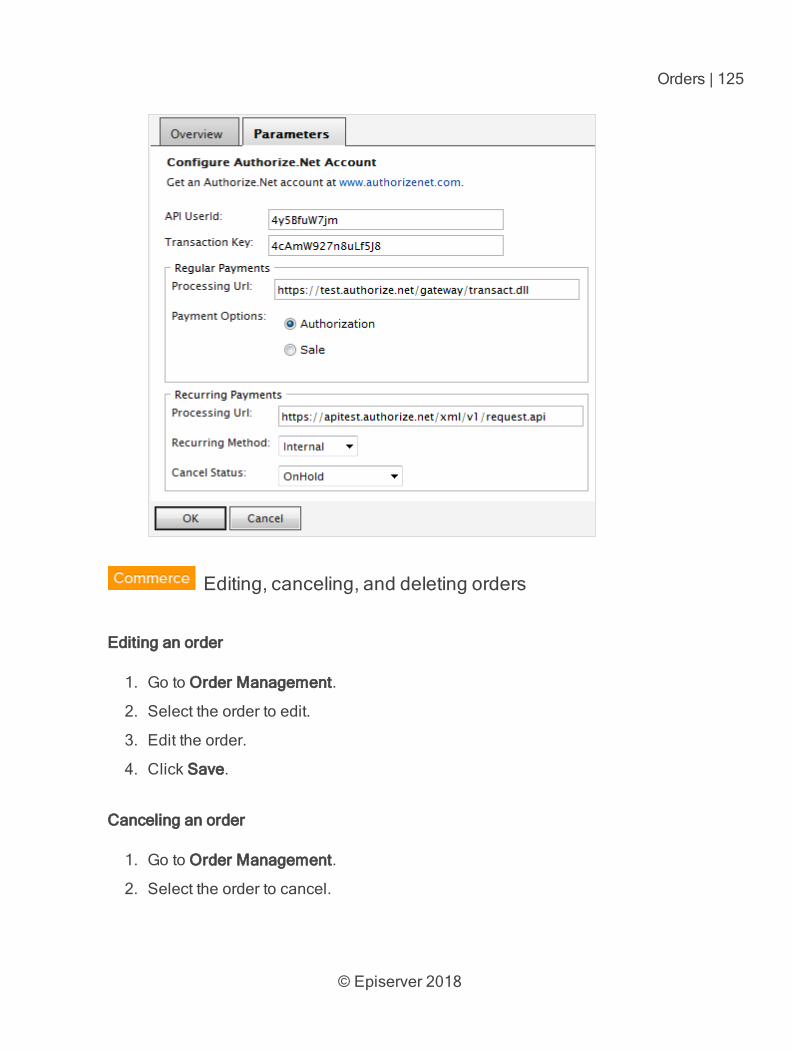
© Episerver 2018
Orders | 125
Editing, canceling, and deleting orders
Editing an order
1. Go to Order Management.
2. Select the order to edit.
3. Edit the order.
4. Click Save.
Canceling an order
1. Go to Order Management.
2. Select the order to cancel.
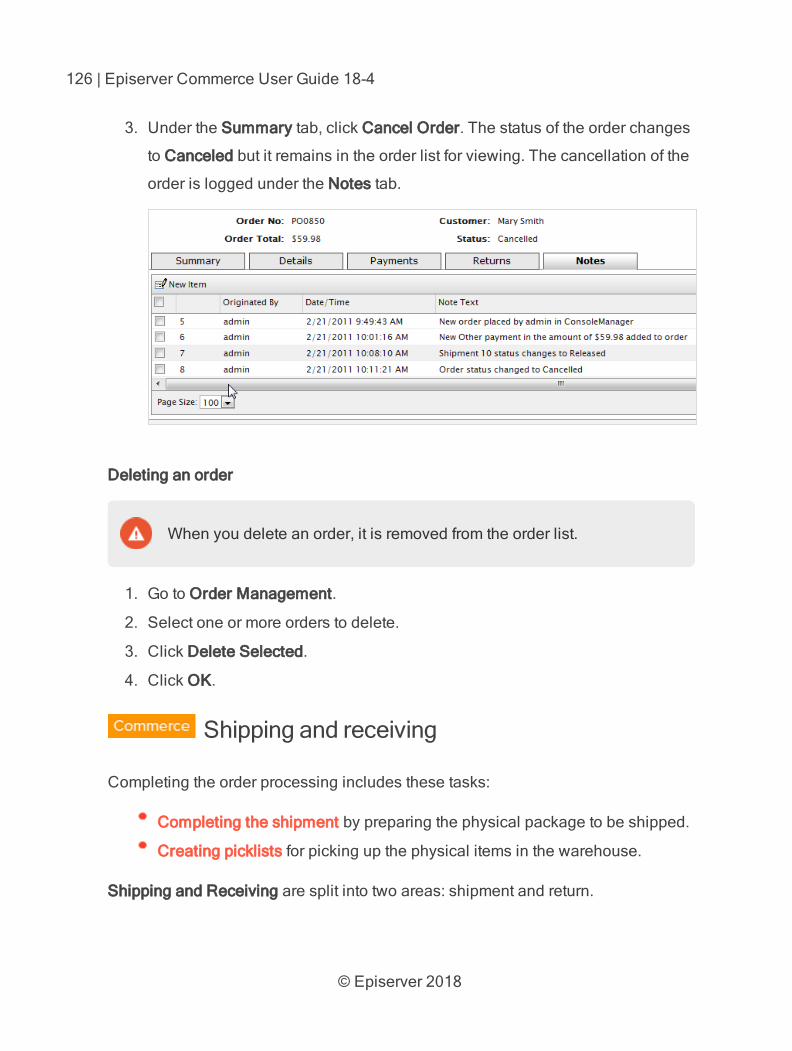
© Episerver 2018
126 | Episerver Commerce User Guide 18-4
3. Under the Summary tab, click Cancel Order. The status of the order changes
to Canceled but it remains in the order list for viewing. The cancellation of the
order is logged under the Notes tab.
Deleting an order
When you delete an order, it is removed from the order list.
1. Go to Order Management.
2. Select one or more orders to delete.
3. Click Delete Selected.
4. Click OK.
Shipping and receiving
Completing the order processing includes these tasks:
Completing the shipment by preparing the physical package to be shipped.
Creating picklists for picking up the physical items in the warehouse.
Shipping and Receiving are split into two areas: shipment and return.
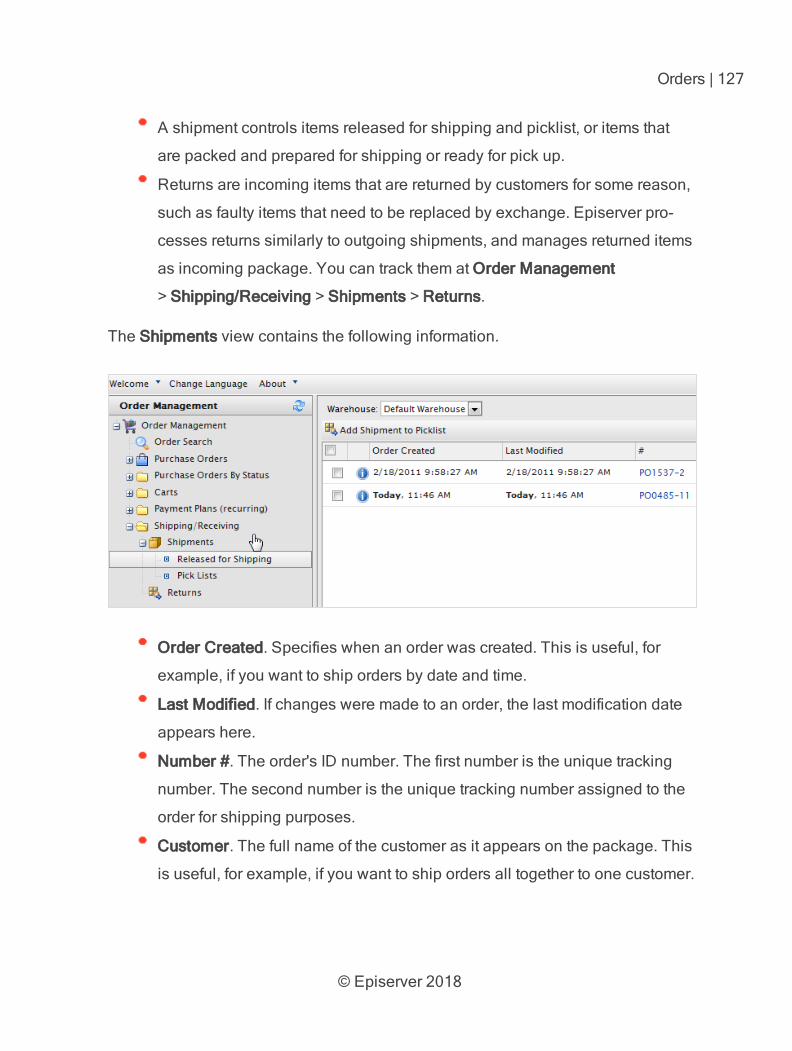
© Episerver 2018
Orders | 127
A shipment controls items released for shipping and picklist, or items that
are packed and prepared for shipping or ready for pick up.
Returns are incoming items that are returned by customers for some reason,
such as faulty items that need to be replaced by exchange. Episerver pro-
cesses returns similarly to outgoing shipments, and manages returned items
as incoming package. You can track them at Order Management
> Shipping/Receiving > Shipments > Returns.
The Shipments view contains the following information.
Order Created. Specifies when an order was created. This is useful, for
example, if you want to ship orders by date and time.
Last Modified. If changes were made to an order, the last modification date
appears here.
Number #. The order's ID number. The first number is the unique tracking
number. The second number is the unique tracking number assigned to the
order for shipping purposes.
Customer. The full name of the customer as it appears on the package. This
is useful, for example, if you want to ship orders all together to one customer.
© Episerver 2018
128 | Episerver Commerce User Guide 18-4
Shipping Method. Specifies the order's shipping method. Shipping methods
are specified in the Administration > Shipping methods section of Com-
merce Manager.
Address. The address that the package is being shipped to.
Warehouse. A warehouse is (most likely) a physical location where you
store goods before delivery. You can select any warehouse in the system.
Remember to select the correct one when attempting to check for shipments.
You can change the Default Warehouse in the Administration section of the
Commerce Manager. If you have only digital products, the default ware-
house is adequate.
Creating a picklist
After you create and process an order, its status is Released for Shipping. Before
you can complete or ship an order, you must add it to an existing picklist or create a
new picklist. After adding a shipment to a picklist, you select the warehouse where
the physical item is packed and shipped.
After an order is added to a picklist, its status is In Progress in the
order list. It disappears from the Release for Shipping list and appears
in the Picklist listing, under Shipping/Receiving.
1. Go to Order Management > Shipping/Receiving > Shipments > Released for
Shipping. The Released Shipments list appears.
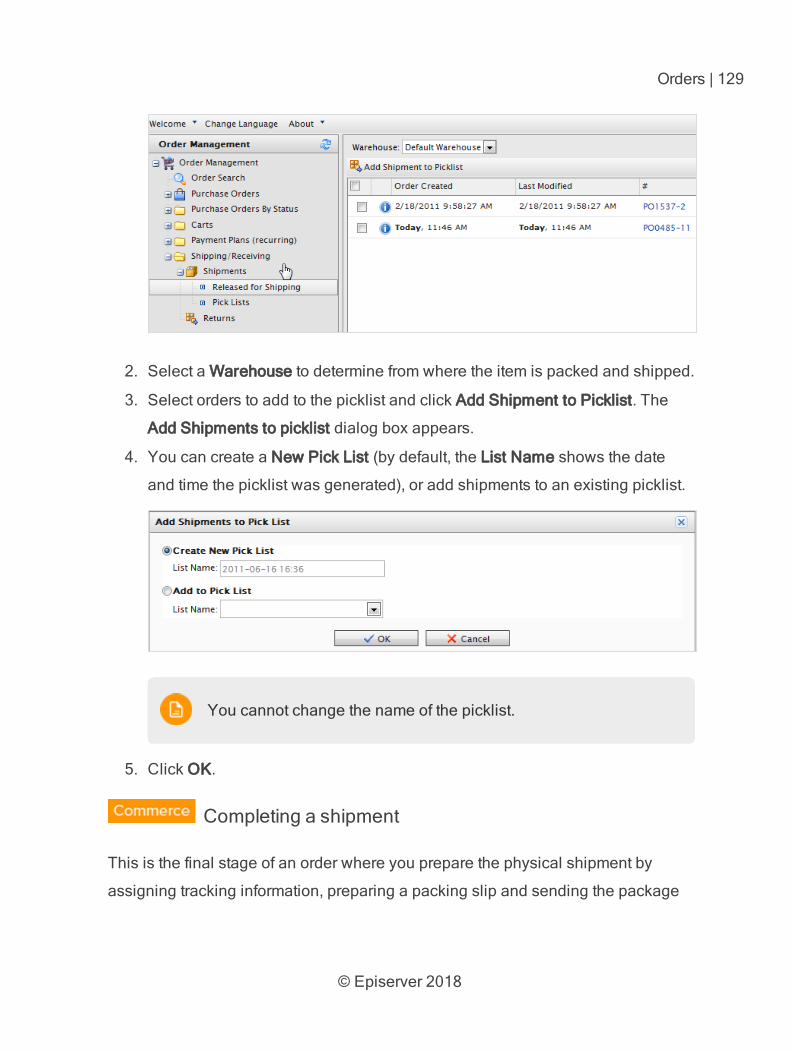
© Episerver 2018
Orders | 129
2. Select a Warehouse to determine from where the item is packed and shipped.
3. Select orders to add to the picklist and click Add Shipment to Picklist. The
Add Shipments to picklist dialog box appears.
4. You can create a New Pick List (by default, the List Name shows the date
and time the picklist was generated), or add shipments to an existing picklist.
You cannot change the name of the picklist.
5. Click OK.
Completing a shipment
This is the final stage of an order where you prepare the physical shipment by
assigning tracking information, preparing a packing slip and sending the package
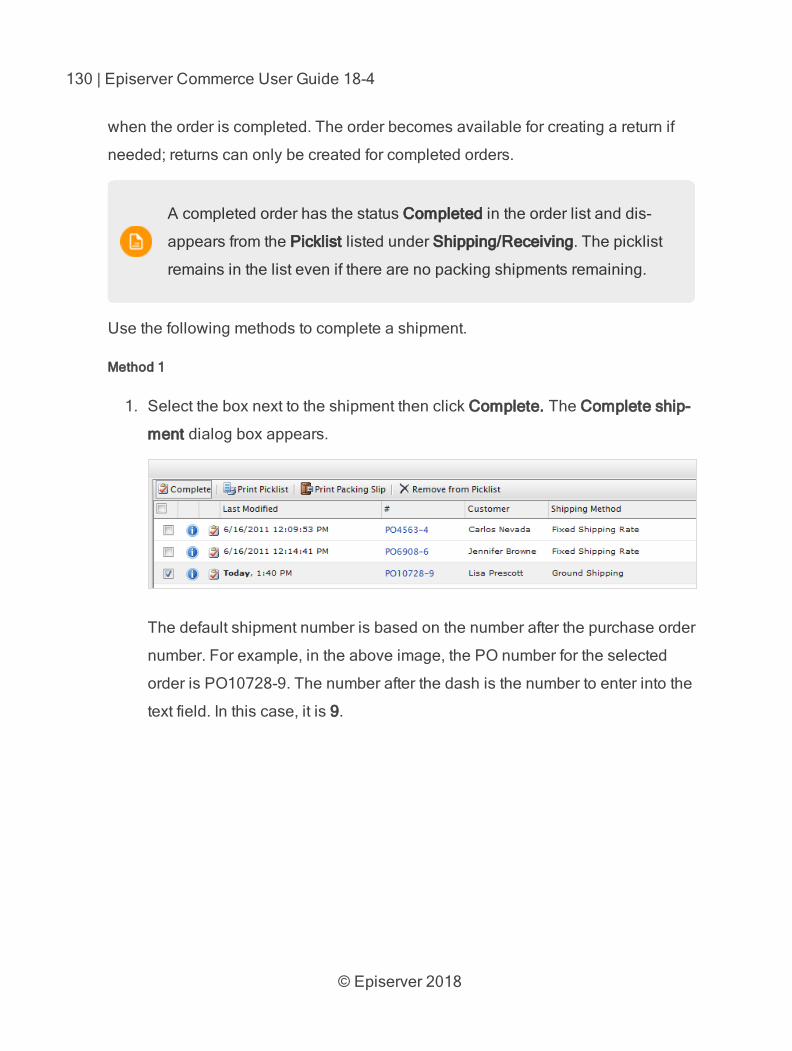
© Episerver 2018
130 | Episerver Commerce User Guide 18-4
when the order is completed. The order becomes available for creating a return if
needed; returns can only be created for completed orders.
A completed order has the status Completed in the order list and dis-
appears from the Picklist listed under Shipping/Receiving. The picklist
remains in the list even if there are no packing shipments remaining.
Use the following methods to complete a shipment.
Method 1
1. Select the box next to the shipment then click Complete. The Complete ship-
ment dialog box appears.
The default shipment number is based on the number after the purchase order
number. For example, in the above image, the PO number for the selected
order is PO10728-9. The number after the dash is the number to enter into the
text field. In this case, it is 9.
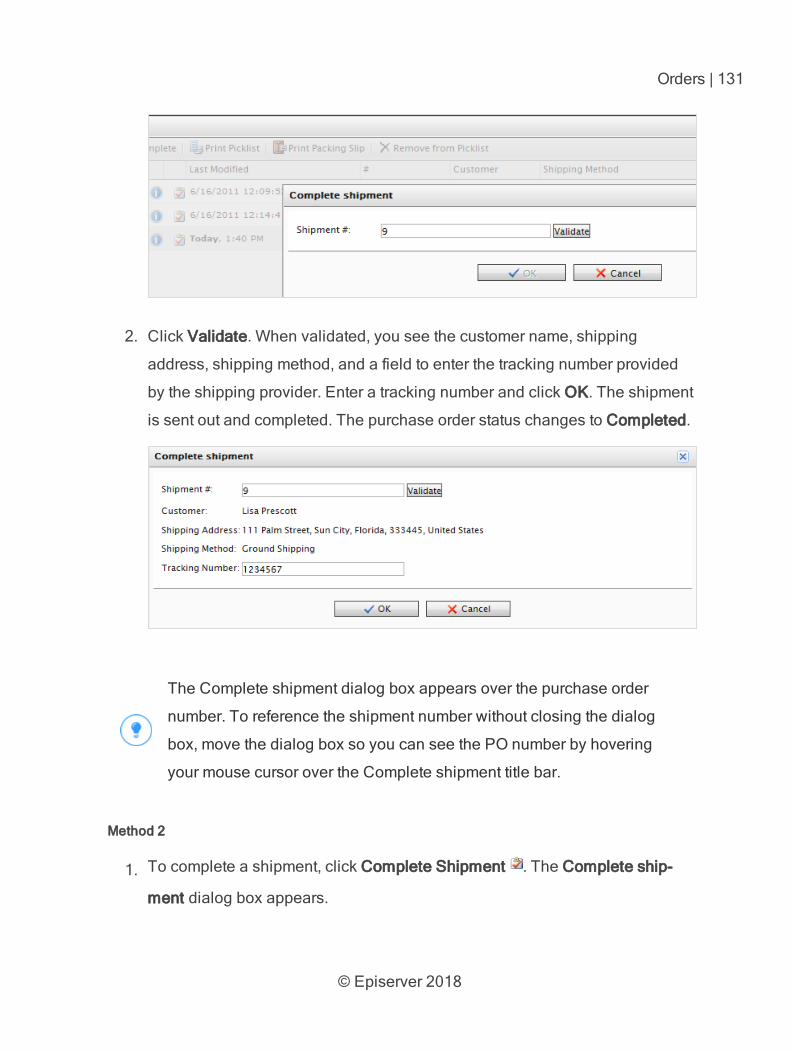
© Episerver 2018
Orders | 131
2. Click Validate. When validated, you see the customer name, shipping
address, shipping method, and a field to enter the tracking number provided
by the shipping provider. Enter a tracking number and click OK. The shipment
is sent out and completed. The purchase order status changes to Completed.
The Complete shipment dialog box appears over the purchase order
number. To reference the shipment number without closing the dialog
box, move the dialog box so you can see the PO number by hovering
your mouse cursor over the Complete shipment title bar.
Method 2
1. To complete a shipment, click Complete Shipment . The Complete ship-
ment dialog box appears.
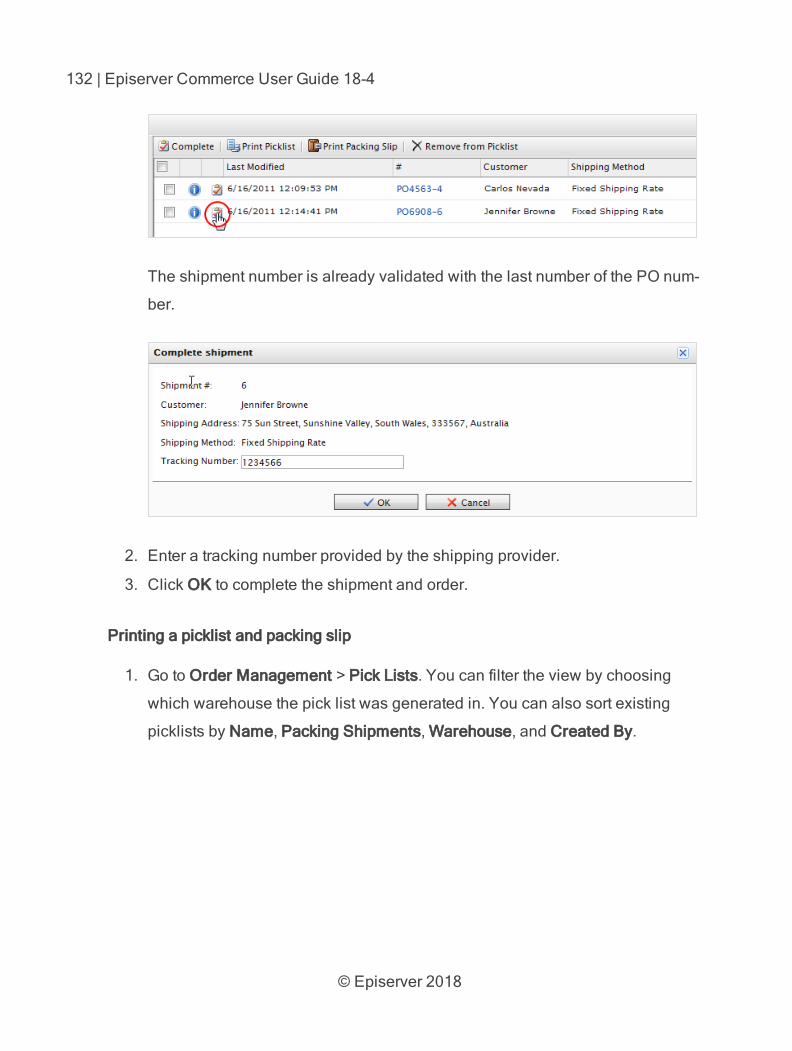
© Episerver 2018
132 | Episerver Commerce User Guide 18-4
The shipment number is already validated with the last number of the PO num-
ber.
2. Enter a tracking number provided by the shipping provider.
3. Click OK to complete the shipment and order.
Printing a picklist and packing slip
1. Go to Order Management > Pick Lists. You can filter the view by choosing
which warehouse the pick list was generated in. You can also sort existing
picklists by Name, Packing Shipments, Warehouse, and Created By.
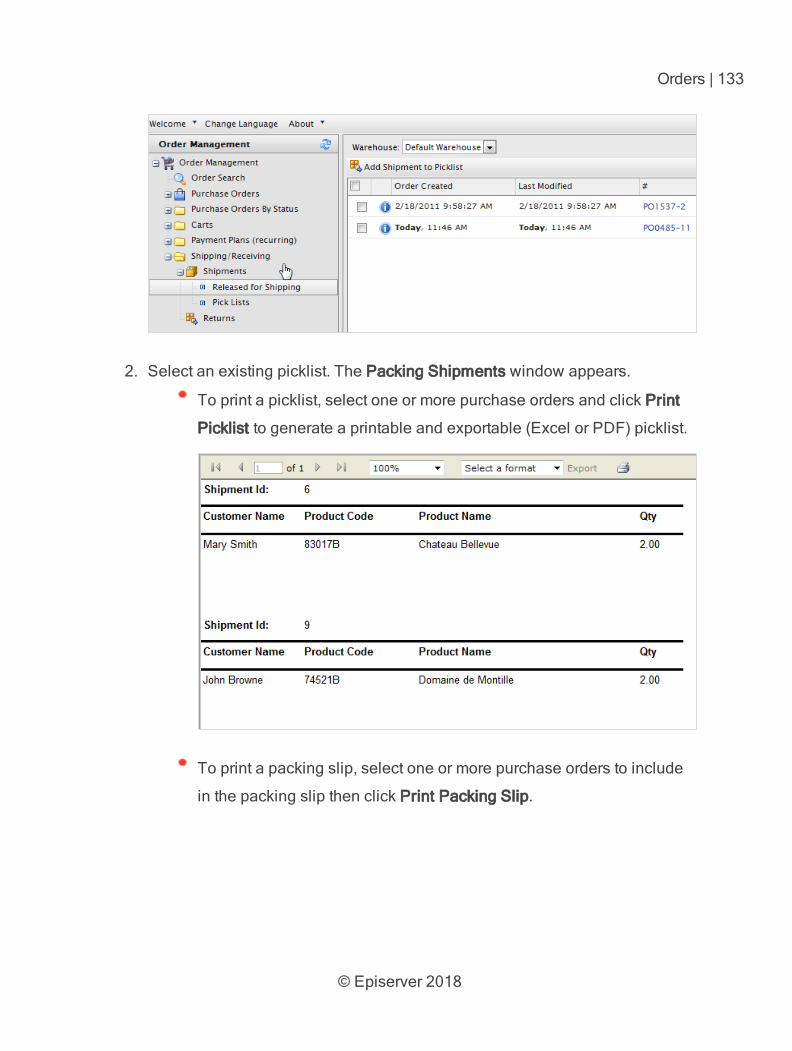
© Episerver 2018
Orders | 133
2. Select an existing picklist. The Packing Shipments window appears.
To print a picklist, select one or more purchase orders and click Print
Picklist to generate a printable and exportable (Excel or PDF) picklist.
To print a packing slip, select one or more purchase orders to include
in the packing slip then click Print Packing Slip.
© Episerver 2018
134 | Episerver Commerce User Guide 18-4
Removing items and deleting picklists
Removing items from a picklist
1. Go to Order Management > Picklists > Shipping/Receiving.
2. Select a picklist to display the related order shipment.
3. Select the shipments you want to remove and click Remove from Pick List.
4. Click OK.
Deleting picklists
A picklist must be empty of packing shipments (0 shipments remain-
ing) before you can delete it.
1. Go to Order Management > Picklists > Shipping/Receiving.
2. Select one or more picklists.
3. Click Delete Selected.
4. Click OK.
Shopping carts
A visitor creates a shopping cart when the visitor clicks Add to basket option on any
page. You can manually create and manage a shopping cart from Order Man-
agement > Carts where you can view registered and anonymous customer carts
and manually convert a cart into a purchase order. See also: Shopping process
flow.
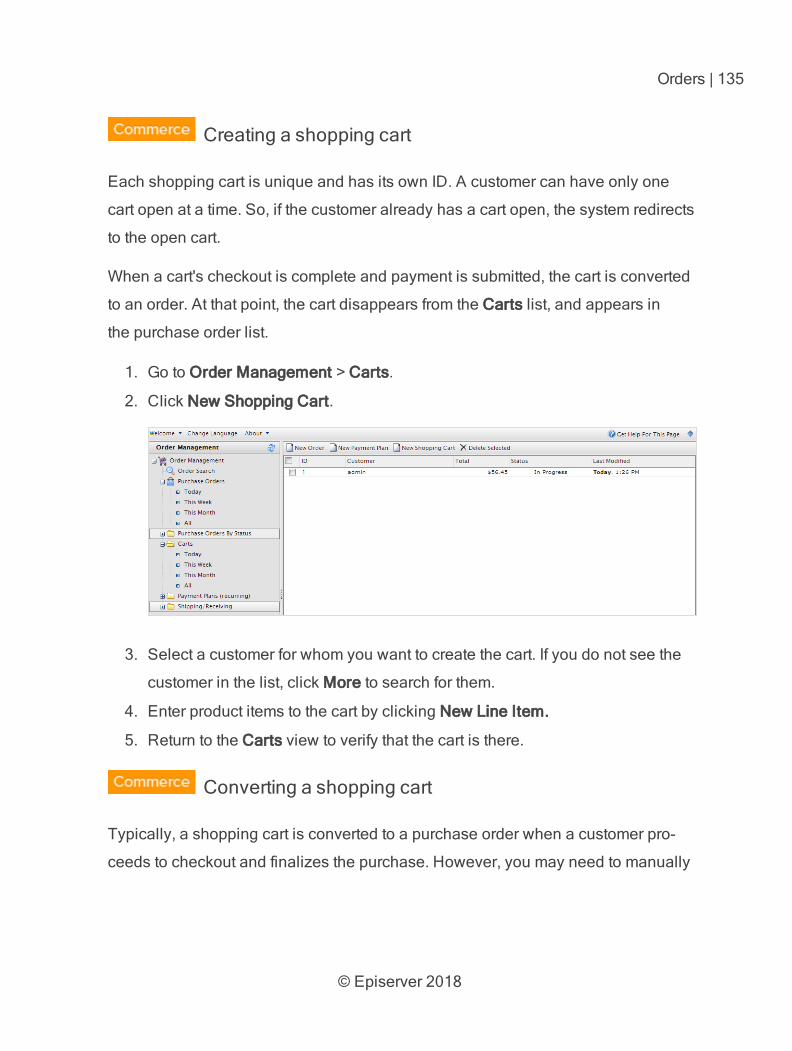
© Episerver 2018
Orders | 135
Creating a shopping cart
Each shopping cart is unique and has its own ID. A customer can have only one
cart open at a time. So, if the customer already has a cart open, the system redirects
to the open cart.
When a cart's checkout is complete and payment is submitted, the cart is converted
to an order. At that point, the cart disappears from the Carts list, and appears in
the purchase order list.
1. Go to Order Management > Carts.
2. Click New Shopping Cart.
3. Select a customer for whom you want to create the cart. If you do not see the
customer in the list, click More to search for them.
4. Enter product items to the cart by clicking New Line Item.
5. Return to the Carts view to verify that the cart is there.
Converting a shopping cart
Typically, a shopping cart is converted to a purchase order when a customer pro-
ceeds to checkout and finalizes the purchase. However, you may need to manually
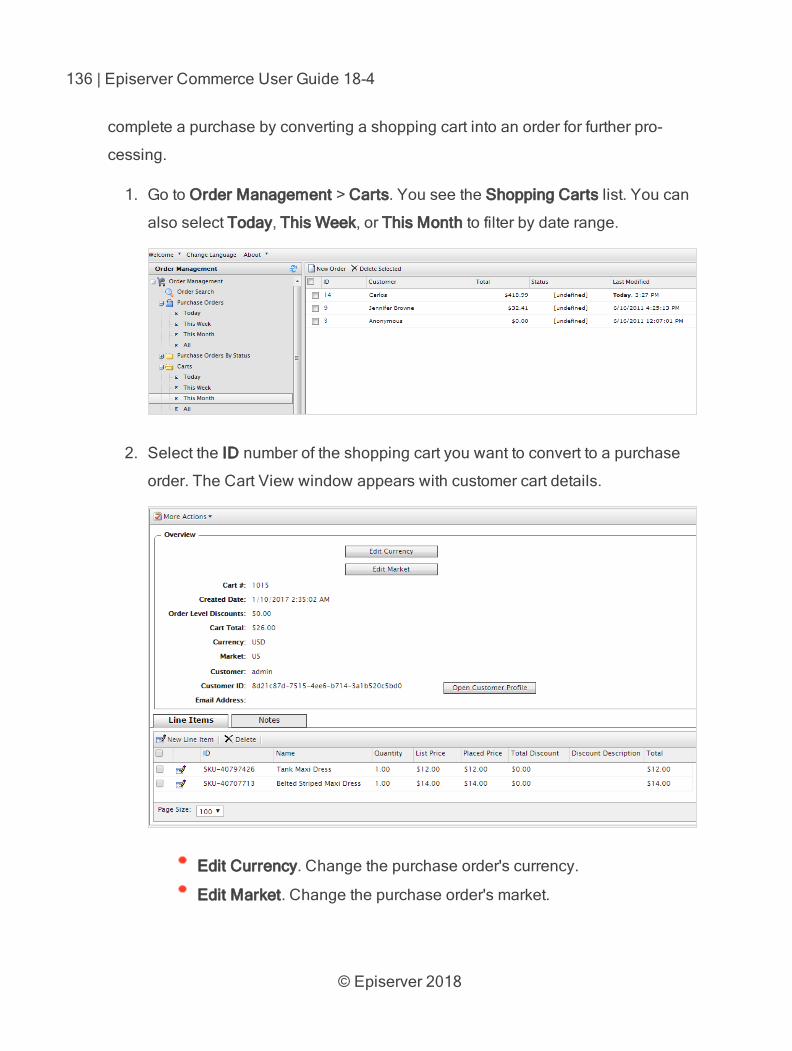
© Episerver 2018
136 | Episerver Commerce User Guide 18-4
complete a purchase by converting a shopping cart into an order for further pro-
cessing.
1. Go to Order Management > Carts. You see the Shopping Carts list. You can
also select Today, This Week, or This Month to filter by date range.
2. Select the ID number of the shopping cart you want to convert to a purchase
order. The Cart View window appears with customer cart details.
Edit Currency. Change the purchase order's currency.
Edit Market. Change the purchase order's market.
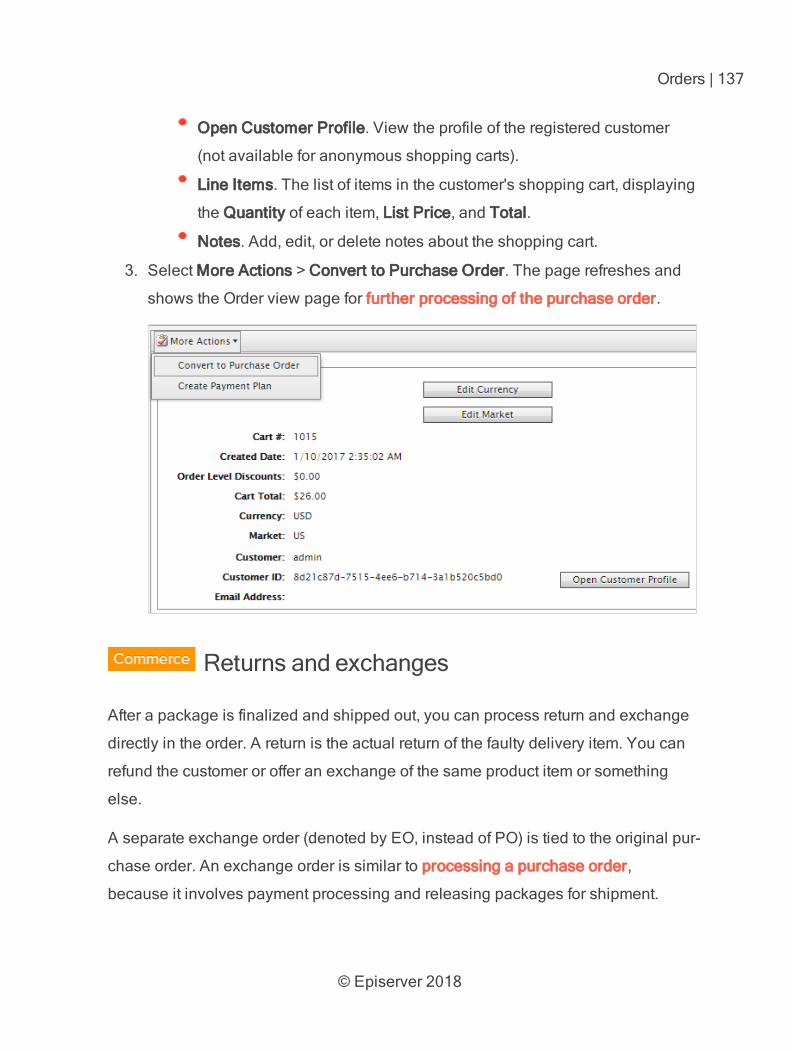
© Episerver 2018
Orders | 137
Open Customer Profile. View the profile of the registered customer
(not available for anonymous shopping carts).
Line Items. The list of items in the customer's shopping cart, displaying
the Quantity of each item, List Price, and Total.
Notes. Add, edit, or delete notes about the shopping cart.
3. Select More Actions > Convert to Purchase Order. The page refreshes and
shows the Order view page for further processing of the purchase order.
Returns and exchanges
After a package is finalized and shipped out, you can process return and exchange
directly in the order. A return is the actual return of the faulty delivery item. You can
refund the customer or offer an exchange of the same product item or something
else.
A separate exchange order (denoted by EO, instead of PO) is tied to the original pur-
chase order. An exchange order is similar to processing a purchase order,
because it involves payment processing and releasing packages for shipment.
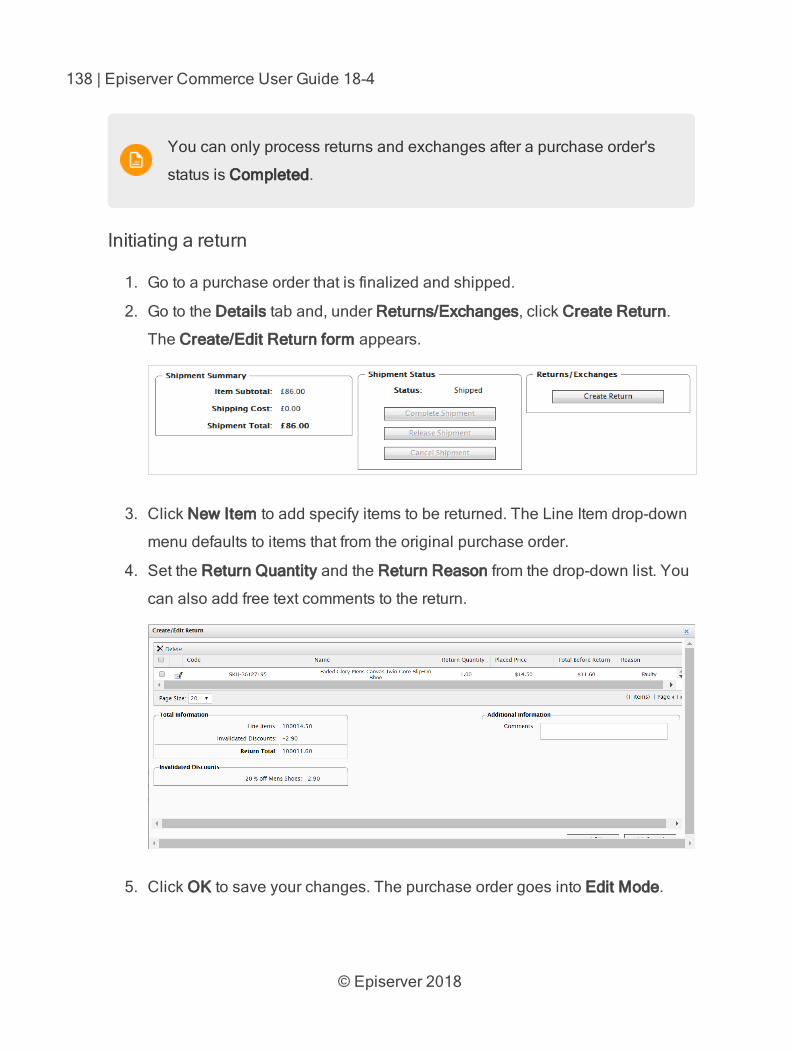
© Episerver 2018
138 | Episerver Commerce User Guide 18-4
You can only process returns and exchanges after a purchase order's
status is Completed.
Initiating a return
1. Go to a purchase order that is finalized and shipped.
2. Go to the Details tab and, under Returns/Exchanges, click Create Return.
The Create/Edit Return form appears.
3. Click New Item to add specify items to be returned. The Line Item drop-down
menu defaults to items that from the original purchase order.
4. Set the Return Quantity and the Return Reason from the drop-down list. You
can also add free text comments to the return.
5. Click OK to save your changes. The purchase order goes into Edit Mode.
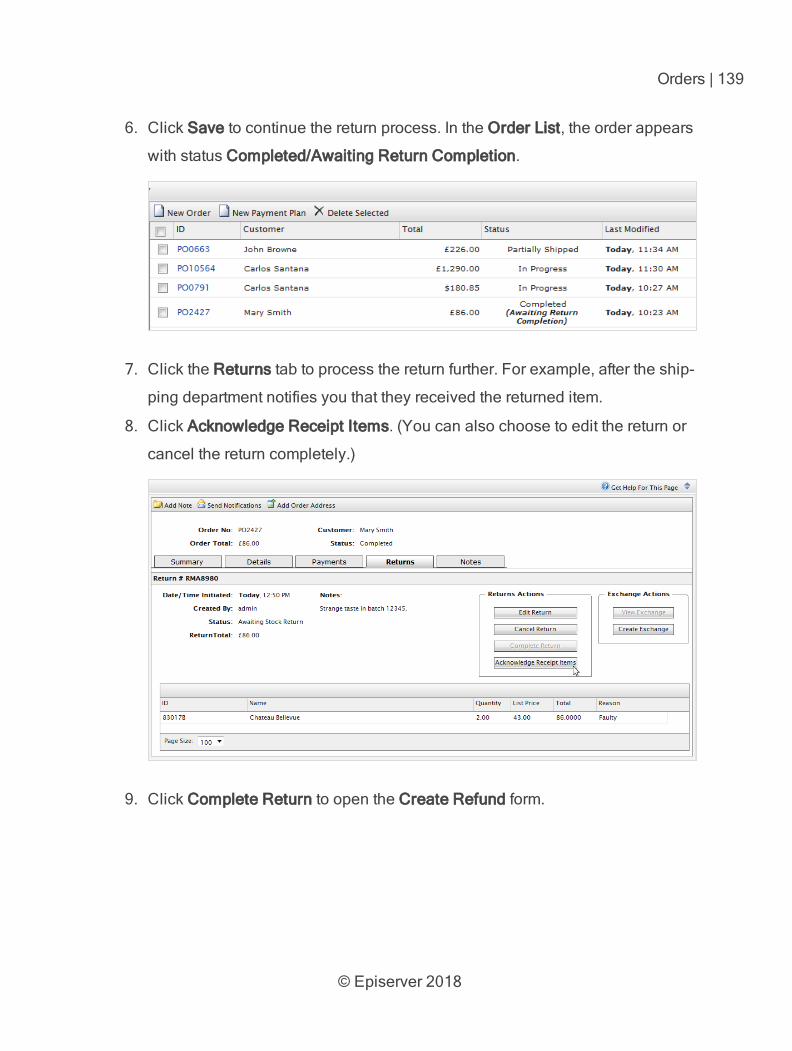
© Episerver 2018
Orders | 139
6. Click Save to continue the return process. In the Order List, the order appears
with status Completed/Awaiting Return Completion.
7. Click the Returns tab to process the return further. For example, after the ship-
ping department notifies you that they received the returned item.
8. Click Acknowledge Receipt Items. (You can also choose to edit the return or
cancel the return completely.)
9. Click Complete Return to open the Create Refund form.
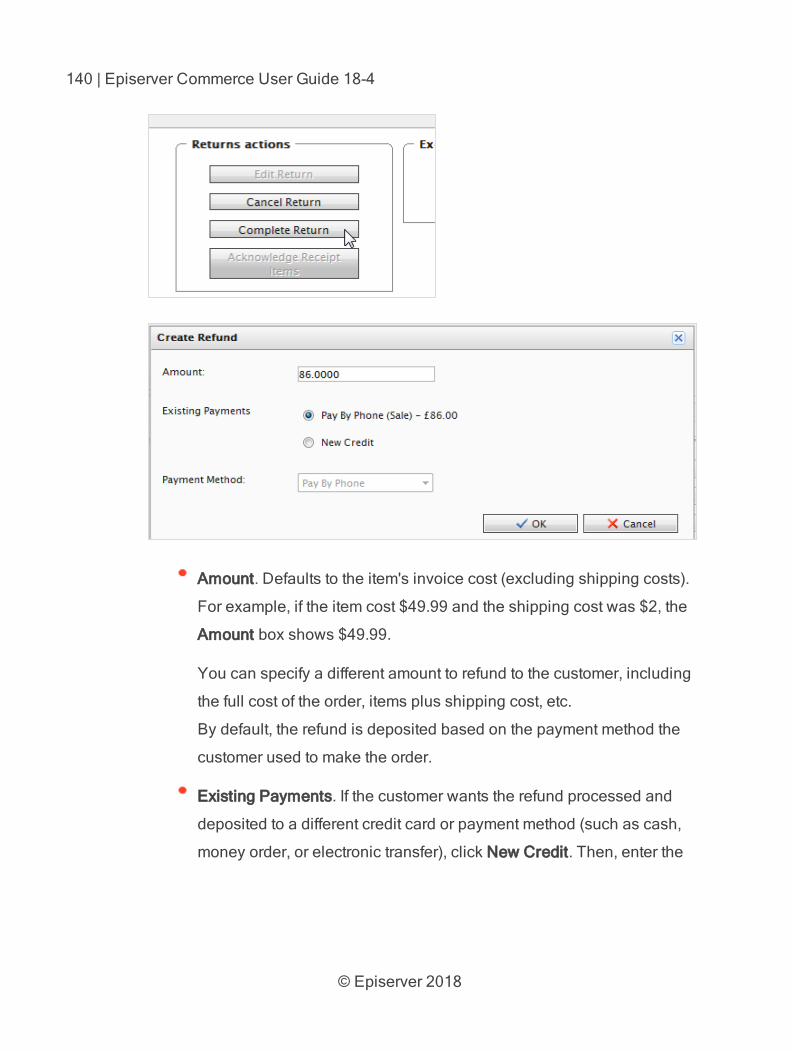
© Episerver 2018
140 | Episerver Commerce User Guide 18-4
Amount. Defaults to the item's invoice cost (excluding shipping costs).
For example, if the item cost $49.99 and the shipping cost was $2, the
Amount box shows $49.99.
You can specify a different amount to refund to the customer, including
the full cost of the order, items plus shipping cost, etc.
By default, the refund is deposited based on the payment method the
customer used to make the order.
Existing Payments. If the customer wants the refund processed and
deposited to a different credit card or payment method (such as cash,
money order, or electronic transfer), click New Credit. Then, enter the
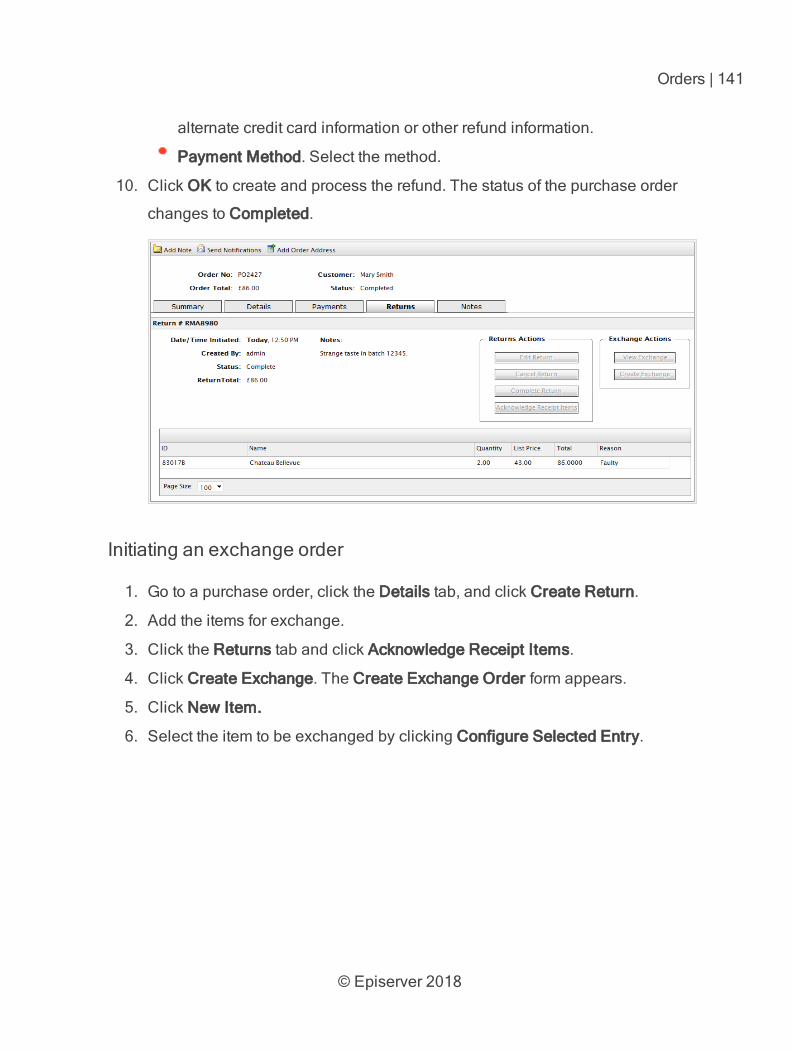
© Episerver 2018
Orders | 141
alternate credit card information or other refund information.
Payment Method. Select the method.
10. Click OK to create and process the refund. The status of the purchase order
changes to Completed.
Initiating an exchange order
1. Go to a purchase order, click the Details tab, and click Create Return.
2. Add the items for exchange.
3. Click the Returns tab and click Acknowledge Receipt Items.
4. Click Create Exchange. The Create Exchange Order form appears.
5. Click New Item.
6. Select the item to be exchanged by clicking Configure Selected Entry.
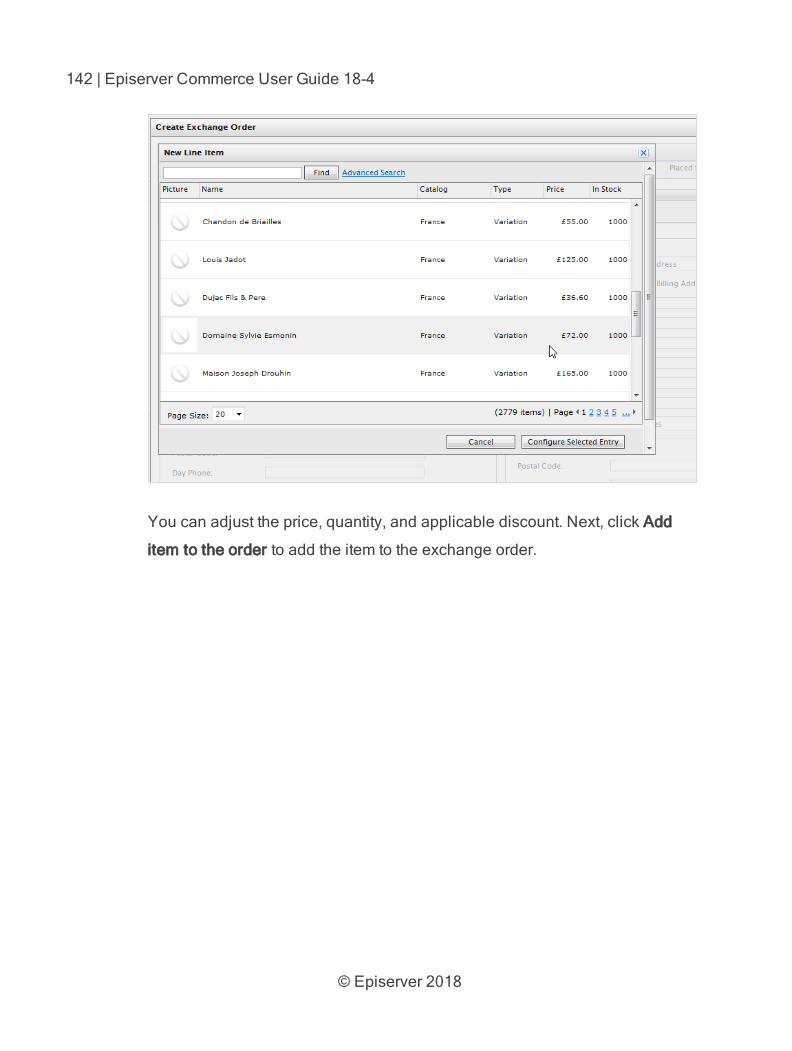
© Episerver 2018
142 | Episerver Commerce User Guide 18-4
You can adjust the price, quantity, and applicable discount. Next, click Add
item to the order to add the item to the exchange order.
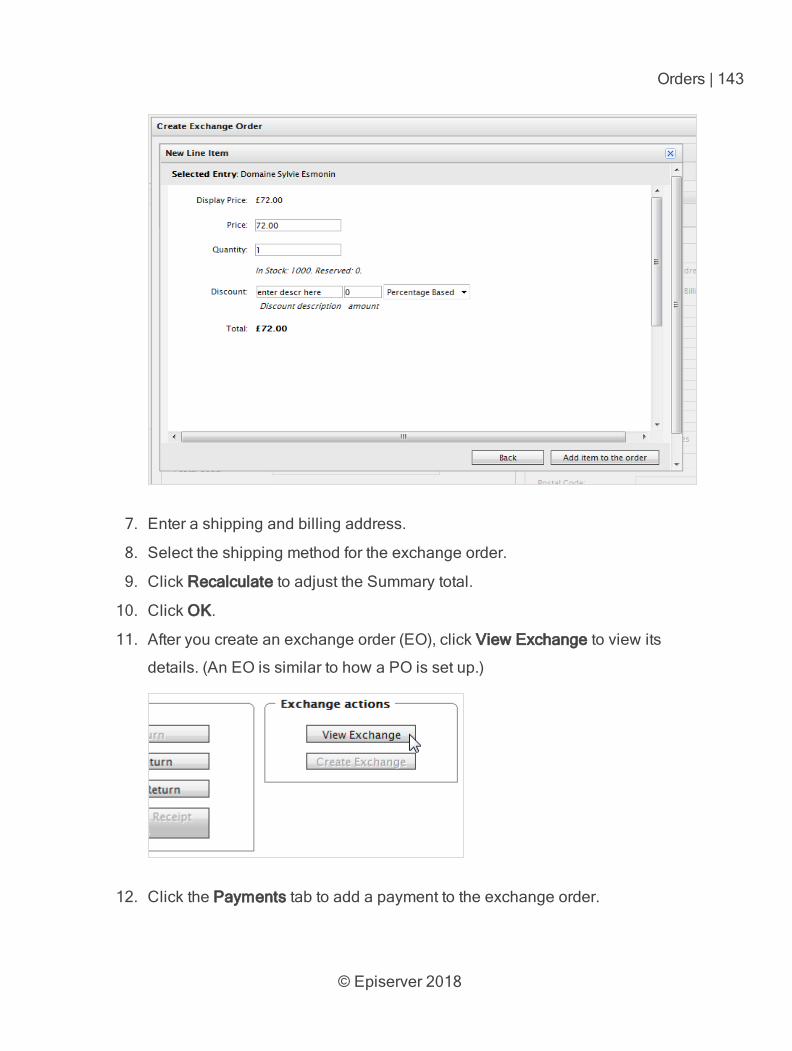
© Episerver 2018
Orders | 143
7. Enter a shipping and billing address.
8. Select the shipping method for the exchange order.
9. Click Recalculate to adjust the Summary total.
10. Click OK.
11. After you create an exchange order (EO), click View Exchange to view its
details. (An EO is similar to how a PO is set up.)
12. Click the Payments tab to add a payment to the exchange order.
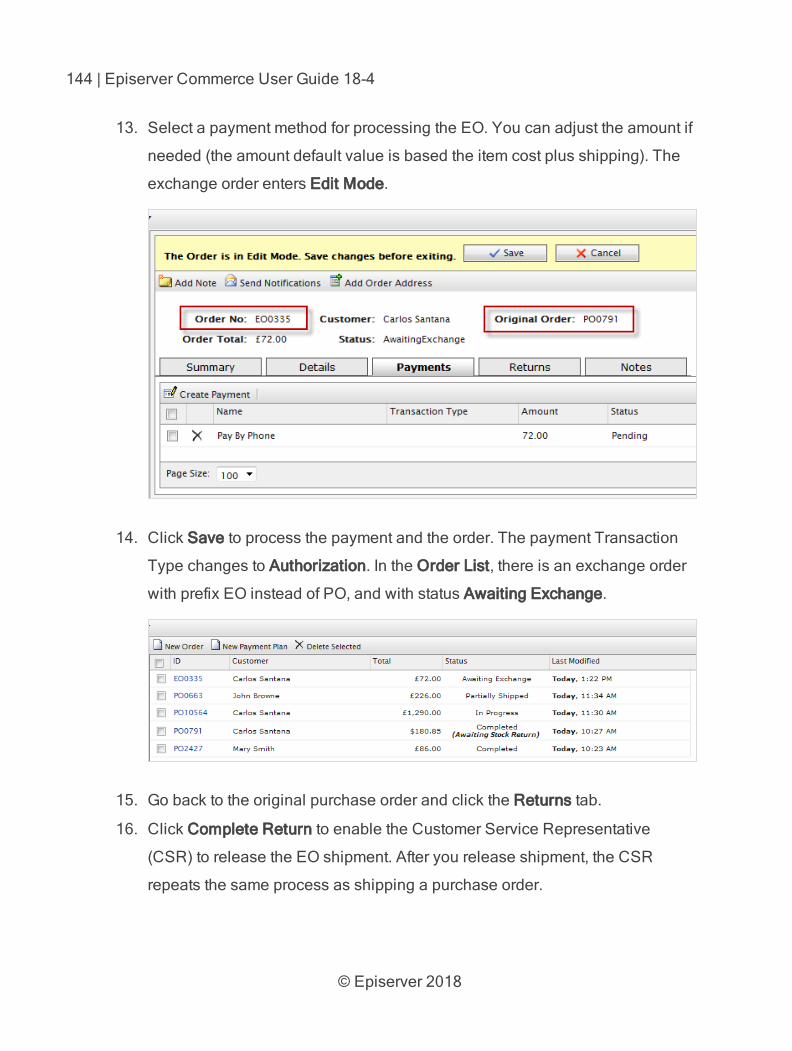
© Episerver 2018
144 | Episerver Commerce User Guide 18-4
13. Select a payment method for processing the EO. You can adjust the amount if
needed (the amount default value is based the item cost plus shipping). The
exchange order enters Edit Mode.
14. Click Save to process the payment and the order. The payment Transaction
Type changes to Authorization. In the Order List, there is an exchange order
with prefix EO instead of PO, and with status Awaiting Exchange.
15. Go back to the original purchase order and click the Returns tab.
16. Click Complete Return to enable the Customer Service Representative
(CSR) to release the EO shipment. After you release shipment, the CSR
repeats the same process as shipping a purchase order.
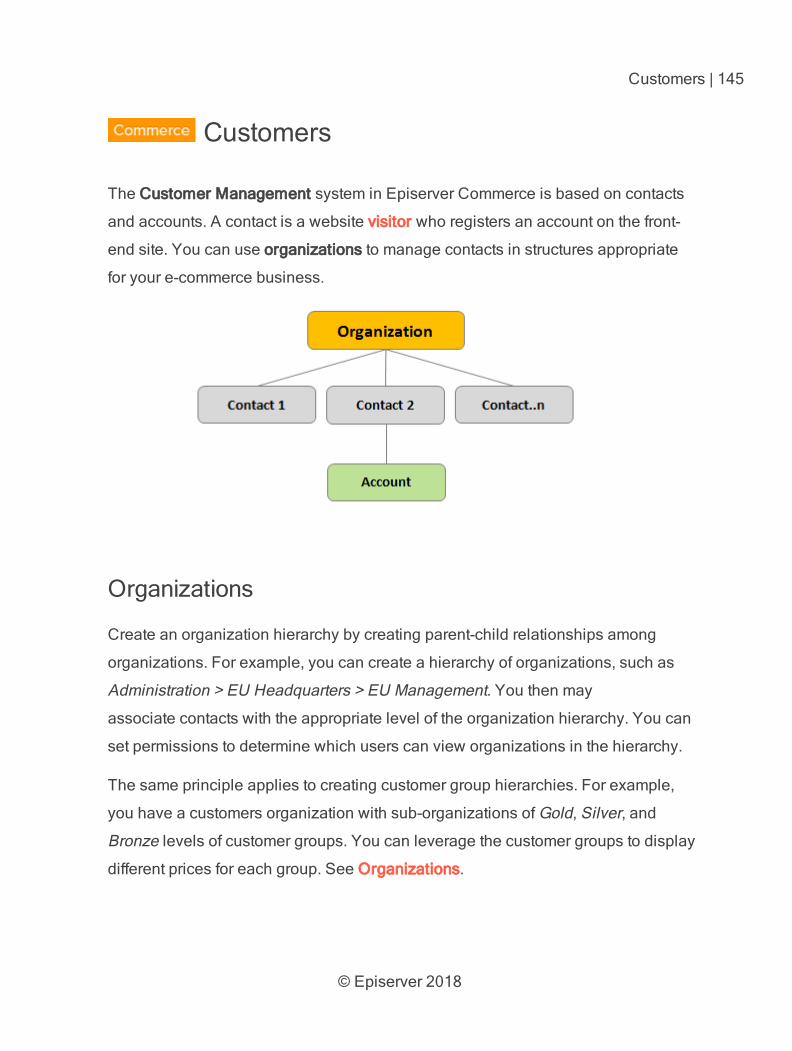
© Episerver 2018
Customers | 145
Customers
The Customer Management system in Episerver Commerce is based on contacts
and accounts. A contact is a website visitor who registers an account on the front-
end site. You can use organizations to manage contacts in structures appropriate
for your e-commerce business.
Organizations
Create an organization hierarchy by creating parent-child relationships among
organizations. For example, you can create a hierarchy of organizations, such as
Administration > EU Headquarters > EU Management. You then may
associate contacts with the appropriate level of the organization hierarchy. You can
set permissions to determine which users can view organizations in the hierarchy.
The same principle applies to creating customer group hierarchies. For example,
you have a customers organization with sub-organizations of Gold, Silver, and
Bronze levels of customer groups. You can leverage the customer groups to display
different prices for each group. See Organizations.
© Episerver 2018
146 | Episerver Commerce User Guide 18-4
Contacts
When a visitor registers on a site's front-end (for example, to make a purchase), a
contact and account are automatically created. You can manage contacts within
customer groups and organizations, to which you can apply specific pricing
and personalization. See Contacts.
The default implementation of Episerver Commerce supports anonym-
ous shopping. This means that customers are not required to create an
account to purchase. Anonymous customers are not available as con-
tacts.
Organizations
Under Organizations, you can create new organizations. Categorize organizations
into different types, such as regional branches and departments, and also business
categories, such as Computer and Electronics or Clothing and Accessories.
You can assign an organization to a customer group, to which you can apply spe-
cific pricing and personalization.
You can structure an organization as a tree, with sub-units and different per-
missions assigned to each branch. For example, you can set up your company as a
parent-level organization while setting up departments, such as Sales & Marketing,
IT/Development, and Operations, as organization units. Within this scenario, you
can restrict the access of users in each department to appropriate systems, screens,
and functionality within Commerce Manager.
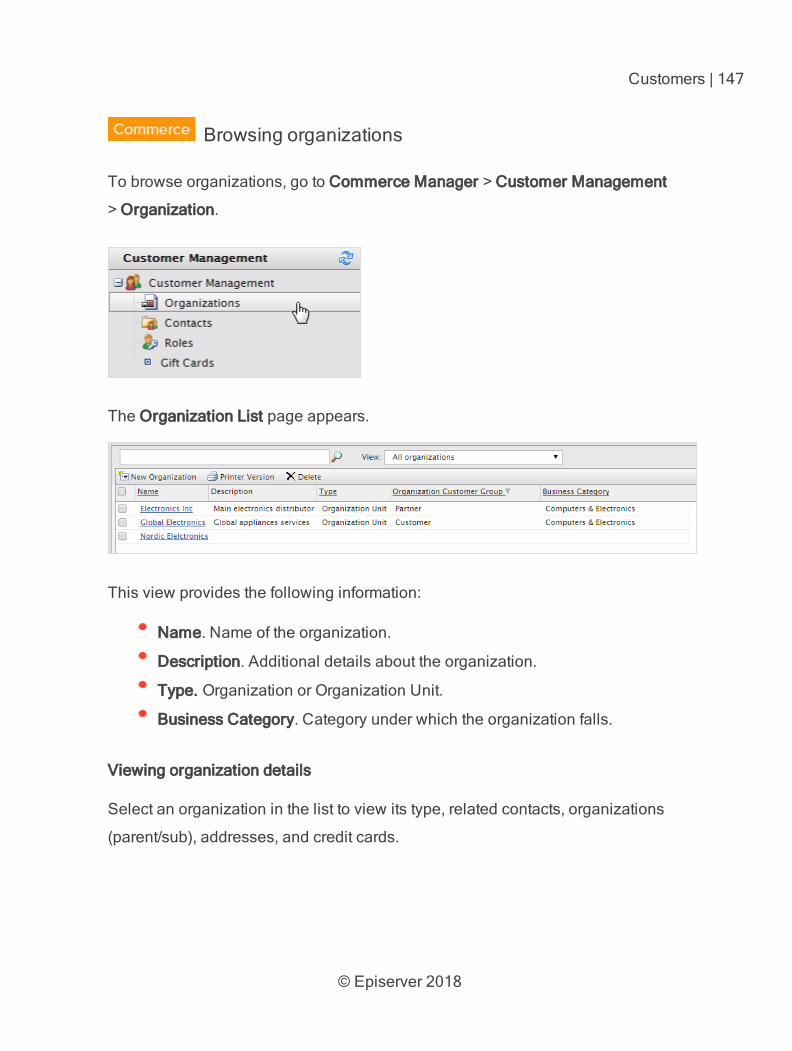
© Episerver 2018
Customers | 147
Browsing organizations
To browse organizations, go to Commerce Manager > Customer Management
> Organization.
The Organization List page appears.
This view provides the following information:
Name. Name of the organization.
Description. Additional details about the organization.
Type. Organization or Organization Unit.
Business Category. Category under which the organization falls.
Viewing organization details
Select an organization in the list to view its type, related contacts, organizations
(parent/sub), addresses, and credit cards.
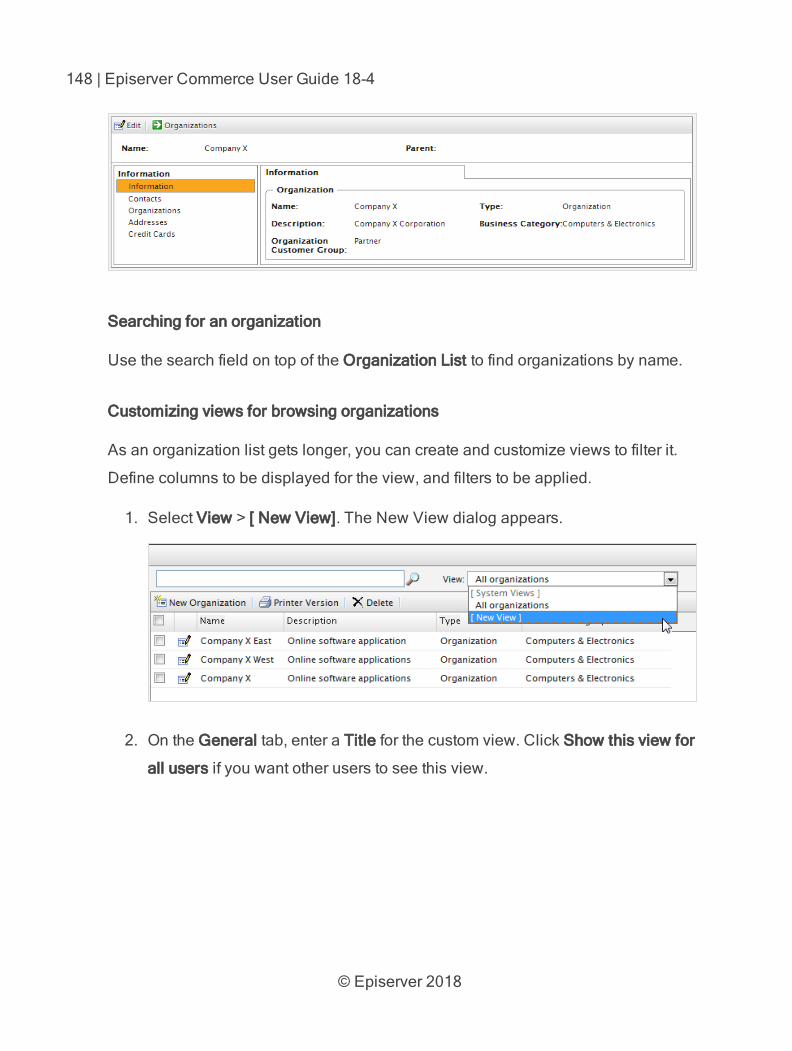
© Episerver 2018
148 | Episerver Commerce User Guide 18-4
Searching for an organization
Use the search field on top of the Organization List to find organizations by name.
Customizing views for browsing organizations
As an organization list gets longer, you can create and customize views to filter it.
Define columns to be displayed for the view, and filters to be applied.
1. Select View > [ New View]. The New View dialog appears.
2. On the General tab, enter a Title for the custom view. Click Show this view for
all users if you want other users to see this view.
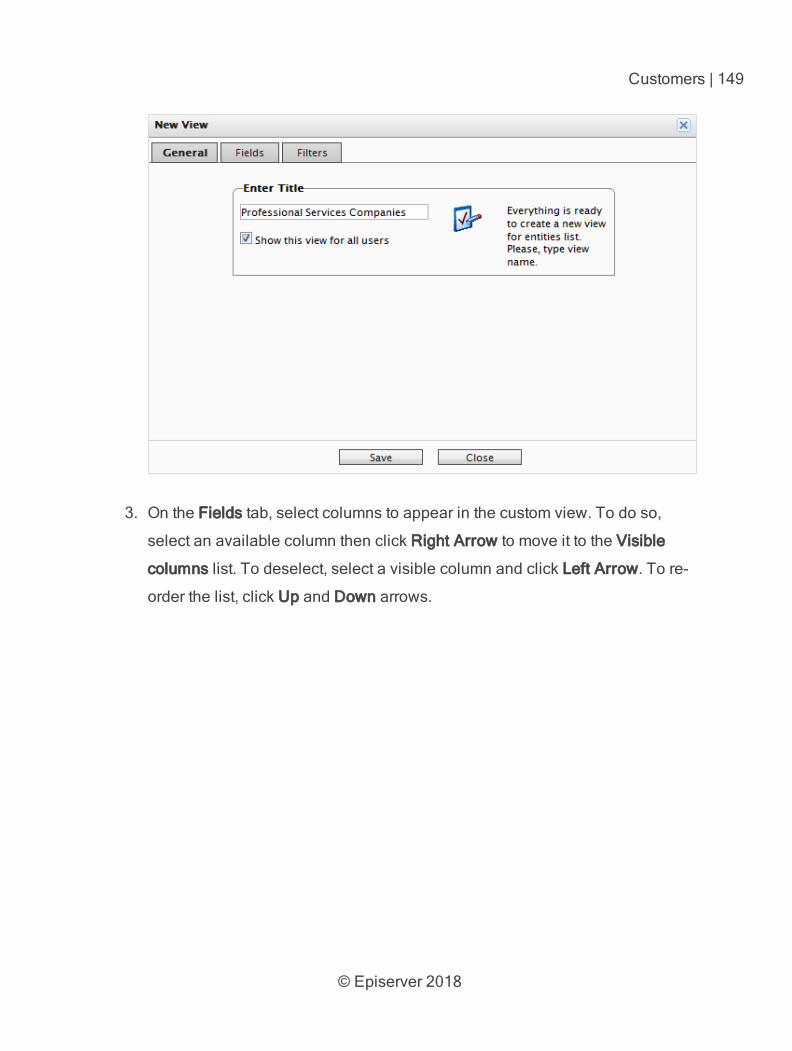
© Episerver 2018
Customers | 149
3. On the Fields tab, select columns to appear in the custom view. To do so,
select an available column then click Right Arrow to move it to the Visible
columns list. To deselect, select a visible column and click Left Arrow. To re-
order the list, click Up and Down arrows.
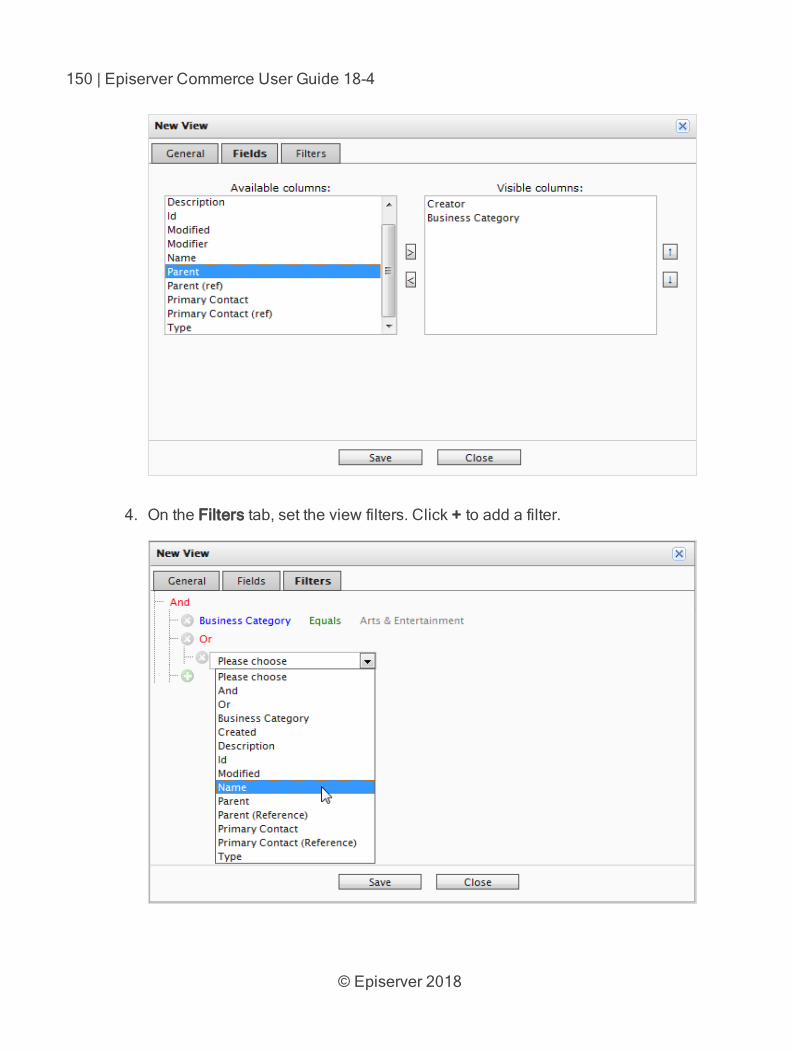
© Episerver 2018
150 | Episerver Commerce User Guide 18-4
4. On the Filters tab, set the view filters. Click + to add a filter.
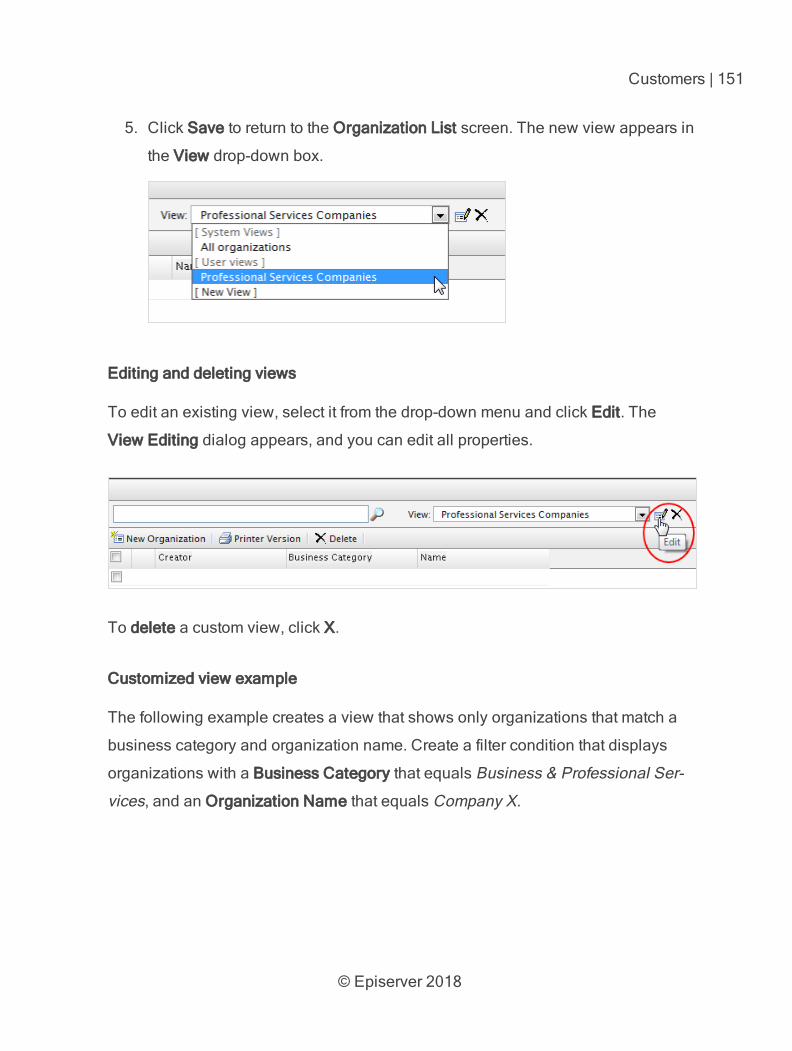
© Episerver 2018
Customers | 151
5. Click Save to return to the Organization List screen. The new view appears in
the View drop-down box.
Editing and deleting views
To edit an existing view, select it from the drop-down menu and click Edit. The
View Editing dialog appears, and you can edit all properties.
To delete a custom view, click X.
Customized view example
The following example creates a view that shows only organizations that match a
business category and organization name. Create a filter condition that displays
organizations with a Business Category that equals Business & Professional Ser-
vices, and an Organization Name that equals Company X.
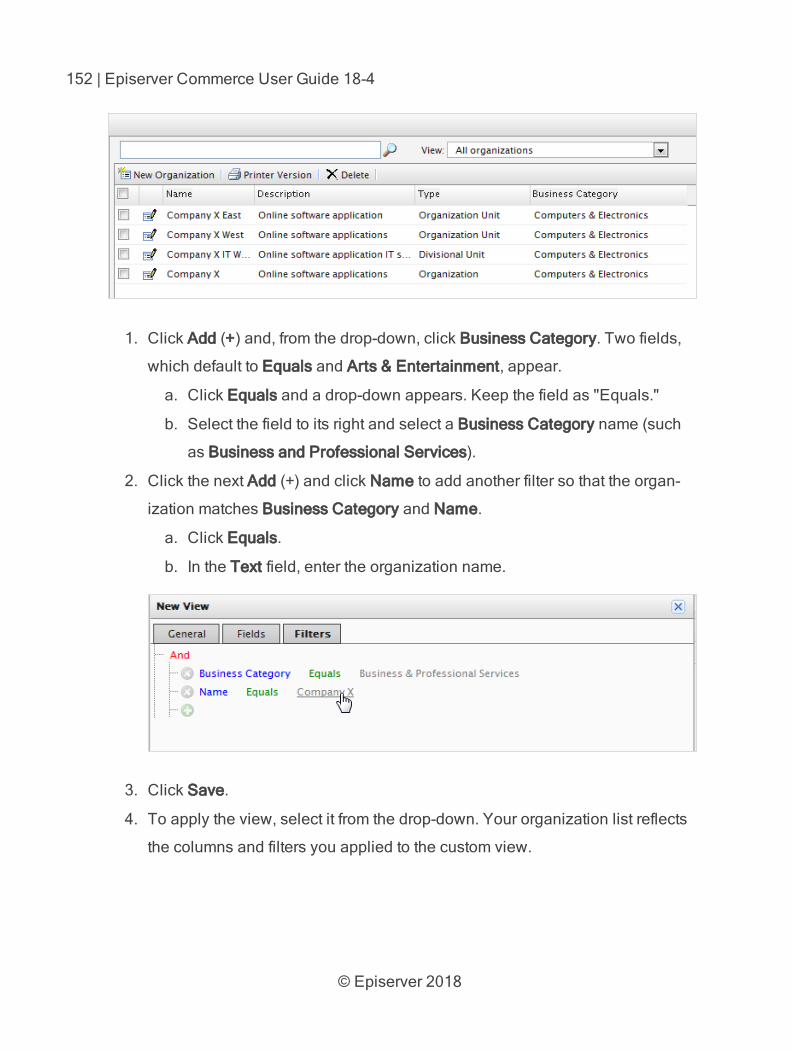
© Episerver 2018
152 | Episerver Commerce User Guide 18-4
1. Click Add (+) and, from the drop-down, click Business Category. Two fields,
which default to Equals and Arts & Entertainment, appear.
a. Click Equals and a drop-down appears. Keep the field as "Equals."
b. Select the field to its right and select a Business Category name (such
as Business and Professional Services).
2. Click the next Add (+) and click Name to add another filter so that the organ-
ization matches Business Category and Name.
a. Click Equals.
b. In the Text field, enter the organization name.
3. Click Save.
4. To apply the view, select it from the drop-down. Your organization list reflects
the columns and filters you applied to the custom view.
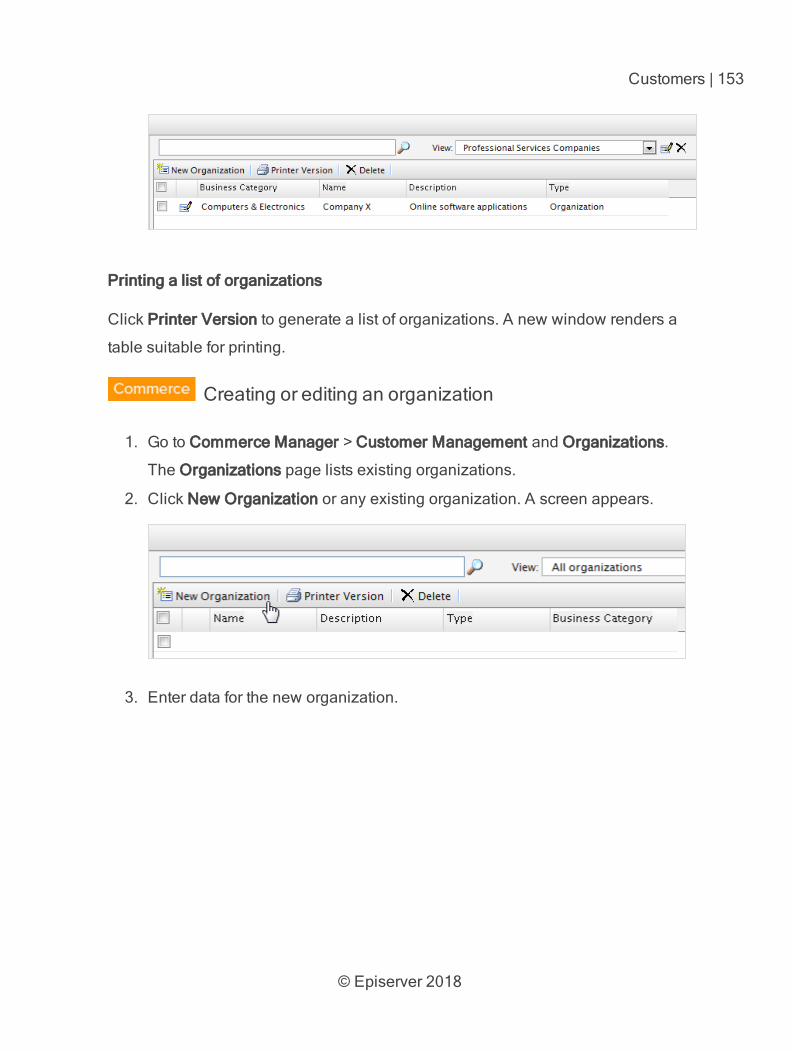
© Episerver 2018
Customers | 153
Printing a list of organizations
Click Printer Version to generate a list of organizations. A new window renders a
table suitable for printing.
Creating or editing an organization
1. Go to Commerce Manager > Customer Management and Organizations.
The Organizations page lists existing organizations.
2. Click New Organization or any existing organization. A screen appears.
3. Enter data for the new organization.
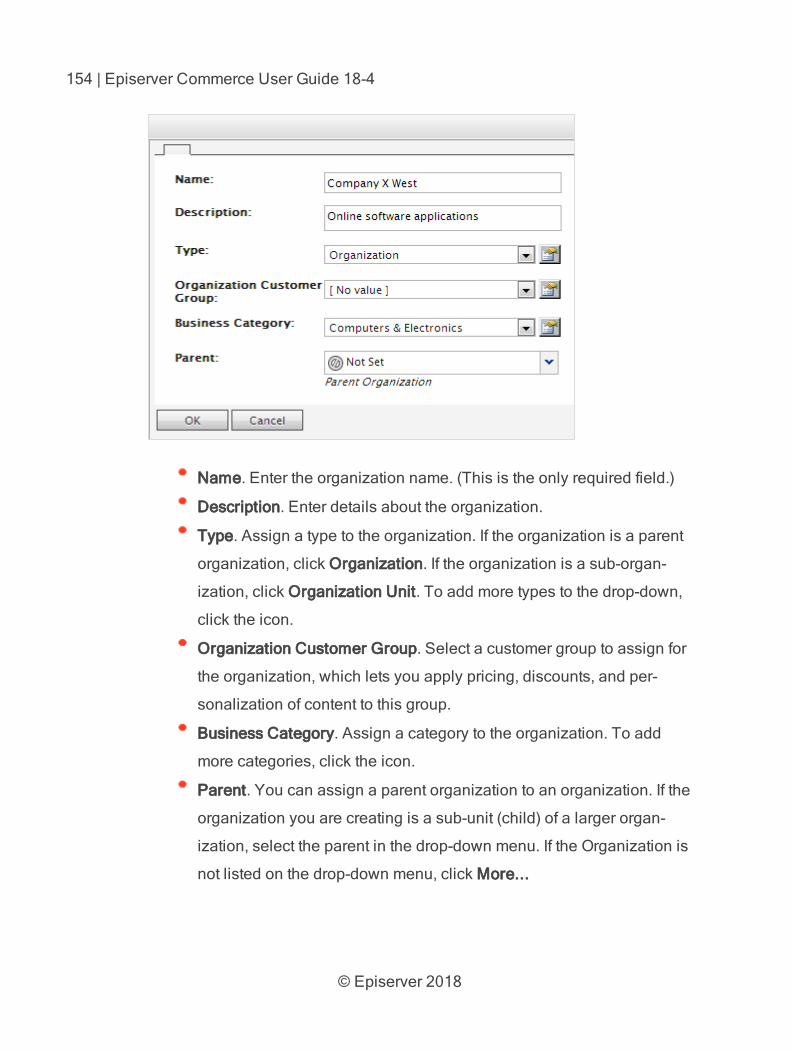
© Episerver 2018
154 | Episerver Commerce User Guide 18-4
Name. Enter the organization name. (This is the only required field.)
Description. Enter details about the organization.
Type. Assign a type to the organization. If the organization is a parent
organization, click Organization. If the organization is a sub-organ-
ization, click Organization Unit. To add more types to the drop-down,
click the icon.
Organization Customer Group. Select a customer group to assign for
the organization, which lets you apply pricing, discounts, and per-
sonalization of content to this group.
Business Category. Assign a category to the organization. To add
more categories, click the icon.
Parent. You can assign a parent organization to an organization. If the
organization you are creating is a sub-unit (child) of a larger organ-
ization, select the parent in the drop-down menu. If the Organization is
not listed on the drop-down menu, click More...
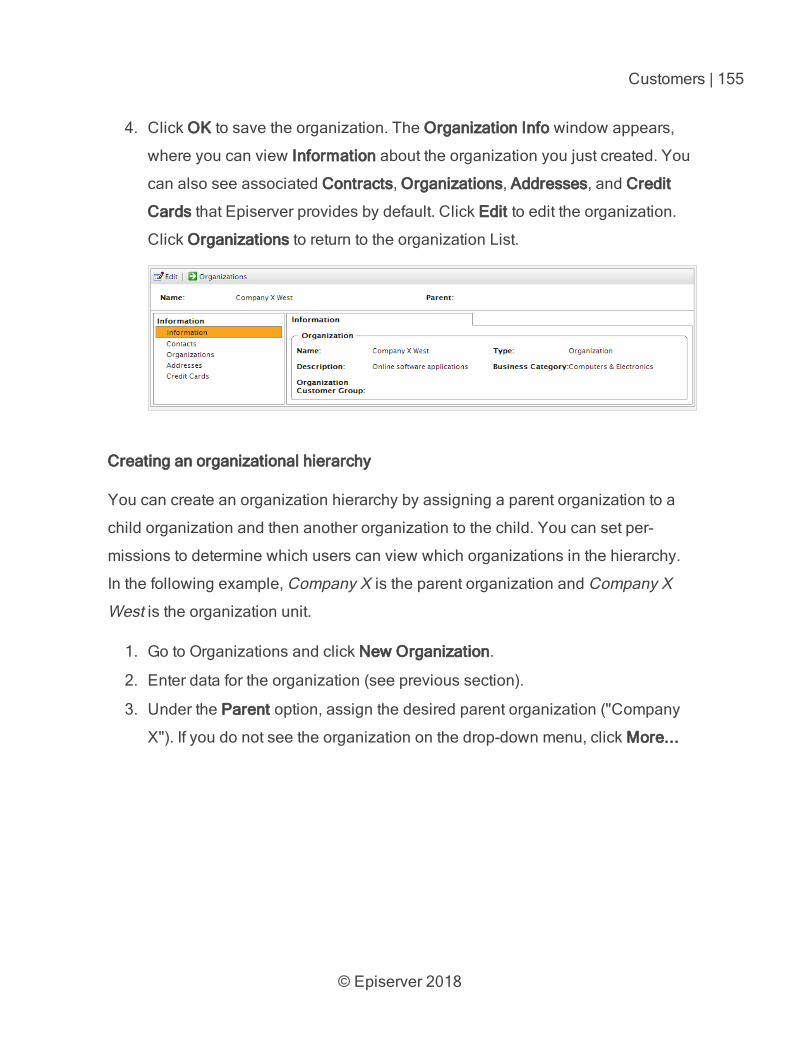
© Episerver 2018
Customers | 155
4. Click OK to save the organization. The Organization Info window appears,
where you can view Information about the organization you just created. You
can also see associated Contracts, Organizations, Addresses, and Credit
Cards that Episerver provides by default. Click Edit to edit the organization.
Click Organizations to return to the organization List.
Creating an organizational hierarchy
You can create an organization hierarchy by assigning a parent organization to a
child organization and then another organization to the child. You can set per-
missions to determine which users can view which organizations in the hierarchy.
In the following example, Company X is the parent organization and Company X
West is the organization unit.
1. Go to Organizations and click New Organization.
2. Enter data for the organization (see previous section).
3. Under the Parent option, assign the desired parent organization ("Company
X"). If you do not see the organization on the drop-down menu, click More...
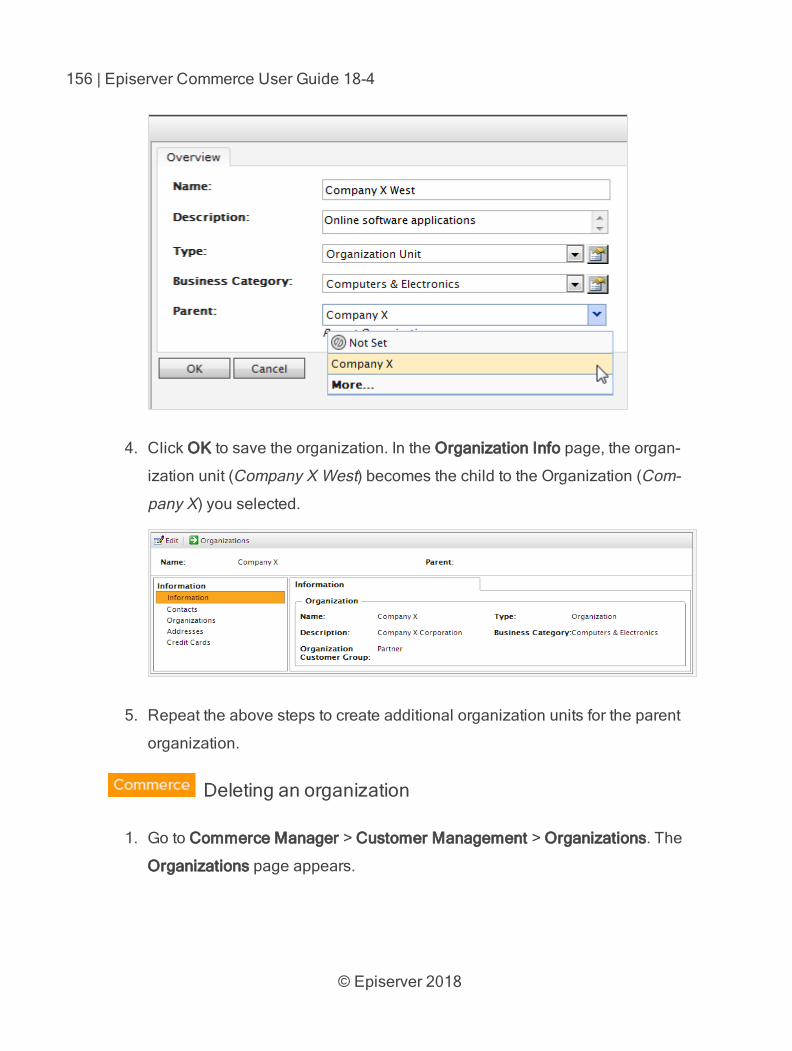
© Episerver 2018
156 | Episerver Commerce User Guide 18-4
4. Click OK to save the organization. In the Organization Info page, the organ-
ization unit (Company X West) becomes the child to the Organization (Com-
pany X) you selected.
5. Repeat the above steps to create additional organization units for the parent
organization.
Deleting an organization
1. Go to Commerce Manager > Customer Management > Organizations. The
Organizations page appears.

© Episerver 2018
Customers | 157
2. Select the organization to delete and click Delete. A confirmation message
appears.
3. Select Delete Organizations Only or Delete Organizations, Child Organ-
izations and Contacts and click OK to complete the deletion.
You can delete organizations with children without deleting the child organ-
izations and contacts with no repercussions. This leaves the contacts and
child organizations as orphans. You can later reassign them, as described in
Creating an organization.
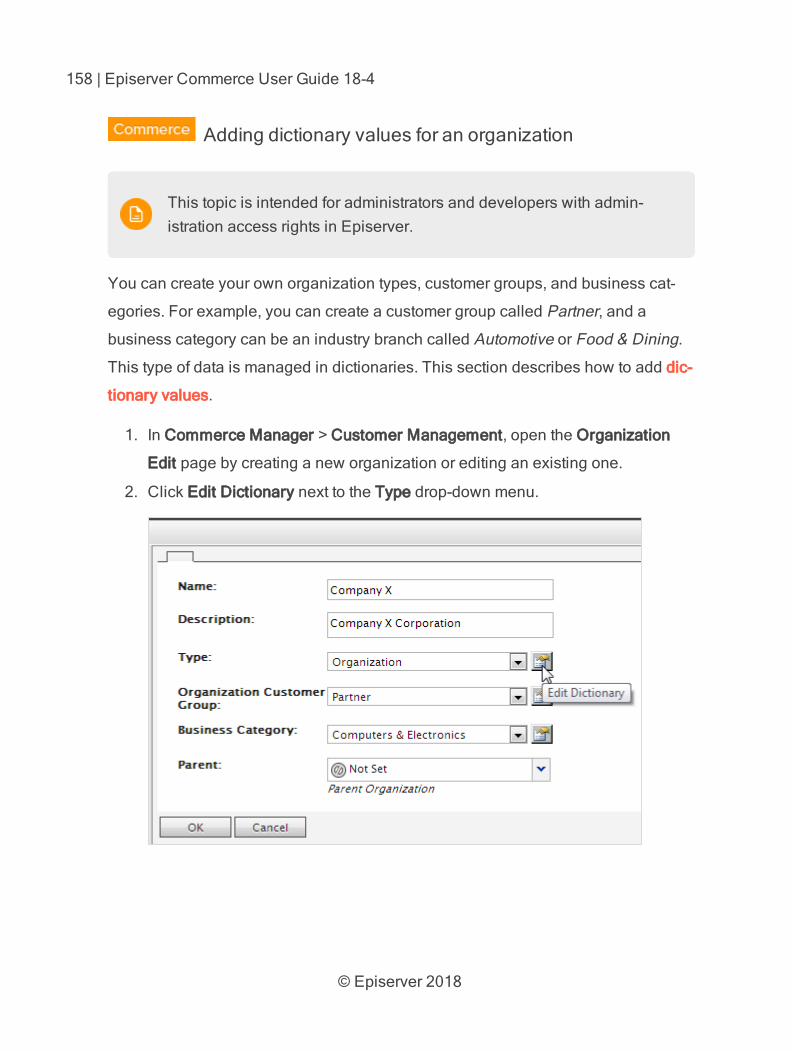
© Episerver 2018
158 | Episerver Commerce User Guide 18-4
Adding dictionary values for an organization
This topic is intended for administrators and developers with admin-istration access rights in Episerver.
You can create your own organization types, customer groups, and business cat-
egories. For example, you can create a customer group called Partner, and a
business category can be an industry branch called Automotive or Food & Dining.
This type of data is managed in dictionaries. This section describes how to add dic-
tionary values.
1. In Commerce Manager > Customer Management, open the Organization
Edit page by creating a new organization or editing an existing one.
2. Click Edit Dictionary next to the Type drop-down menu.
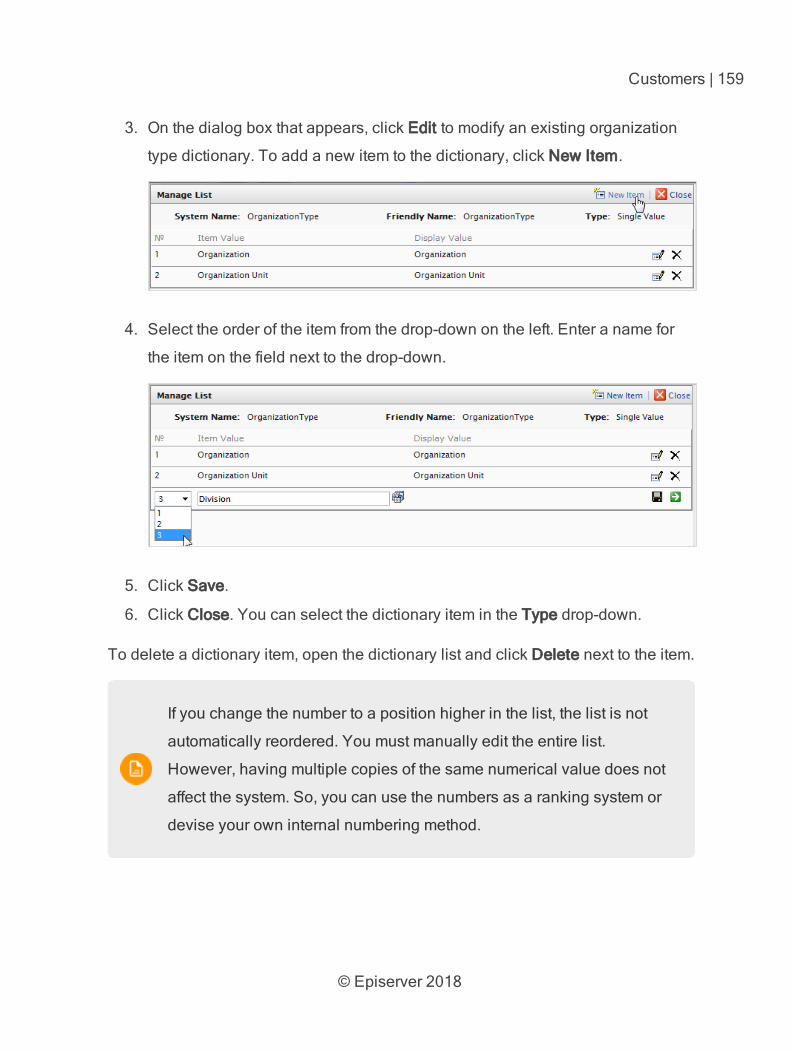
© Episerver 2018
Customers | 159
3. On the dialog box that appears, click Edit to modify an existing organization
type dictionary. To add a new item to the dictionary, click New Item.
4. Select the order of the item from the drop-down on the left. Enter a name for
the item on the field next to the drop-down.
5. Click Save.
6. Click Close. You can select the dictionary item in the Type drop-down.
To delete a dictionary item, open the dictionary list and click Delete next to the item.
If you change the number to a position higher in the list, the list is not
automatically reordered. You must manually edit the entire list.
However, having multiple copies of the same numerical value does not
affect the system. So, you can use the numbers as a ranking system or
devise your own internal numbering method.
© Episerver 2018
160 | Episerver Commerce User Guide 18-4
Creating, editing and deleting business categories
Episerver provides a list of categories that you can assign to an organization. You
can add categories the same way you add organization types.
1. Click Edit Dictionary next to the Business Category drop-down menu.
2. On the resulting dialog box, click Edit to modify existing business categories.
Click New Item to add a new item to the dictionary. Click Delete to delete an
item from the list.
3. Select the order of the item from the drop-down on the left and enter a name
for the item on the field next to the drop-down.
4. Click Save. You can select the new business category in the Business Cat-
egory drop-down menu.
Contacts
A contact and a related account are created automatically when a visitor registers
on the public front-end site. You can also manually create a contact from Com-
merce Manager.
You can assign a contact to customer groups and organization customer groups. A
customer group is assigned to an organization, which may determine eligibility for
prices that are different from other users. A contact in an organization is a member
of that organization's customer group, even if the contact is assigned individually to
a different customer group.
Browsing contacts
To browse contacts, go to Commerce Manager >Customer Management >
Contacts.
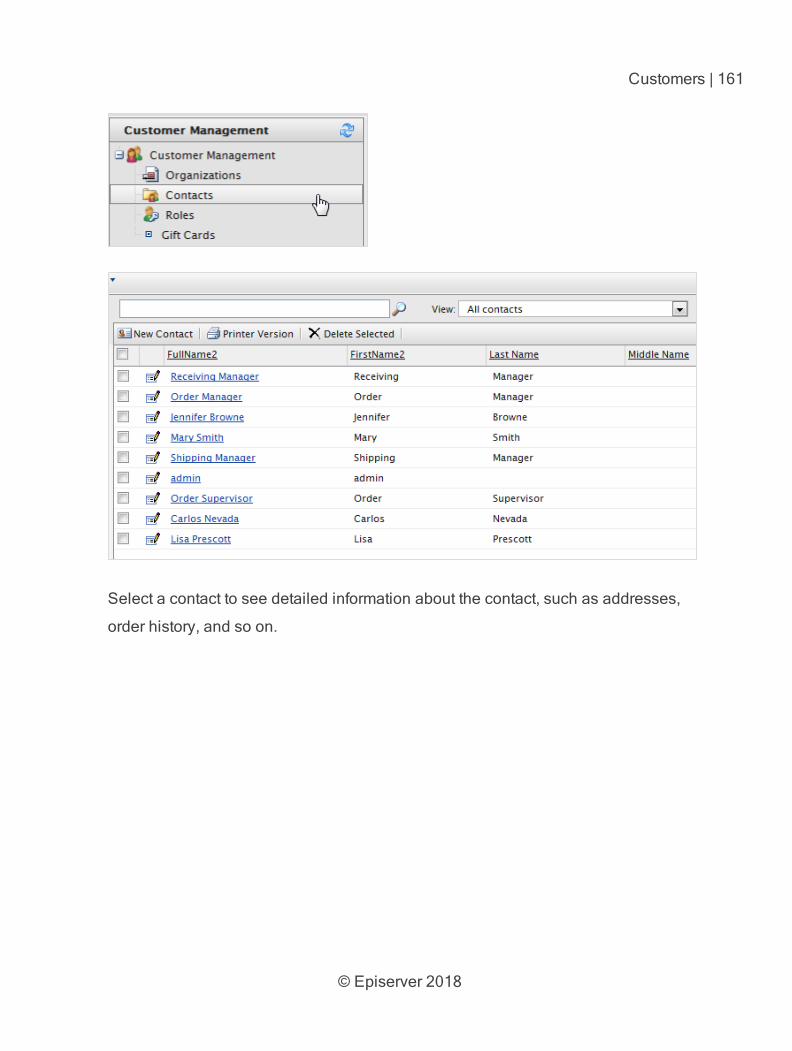
© Episerver 2018
Customers | 161
Select a contact to see detailed information about the contact, such as addresses,
order history, and so on.
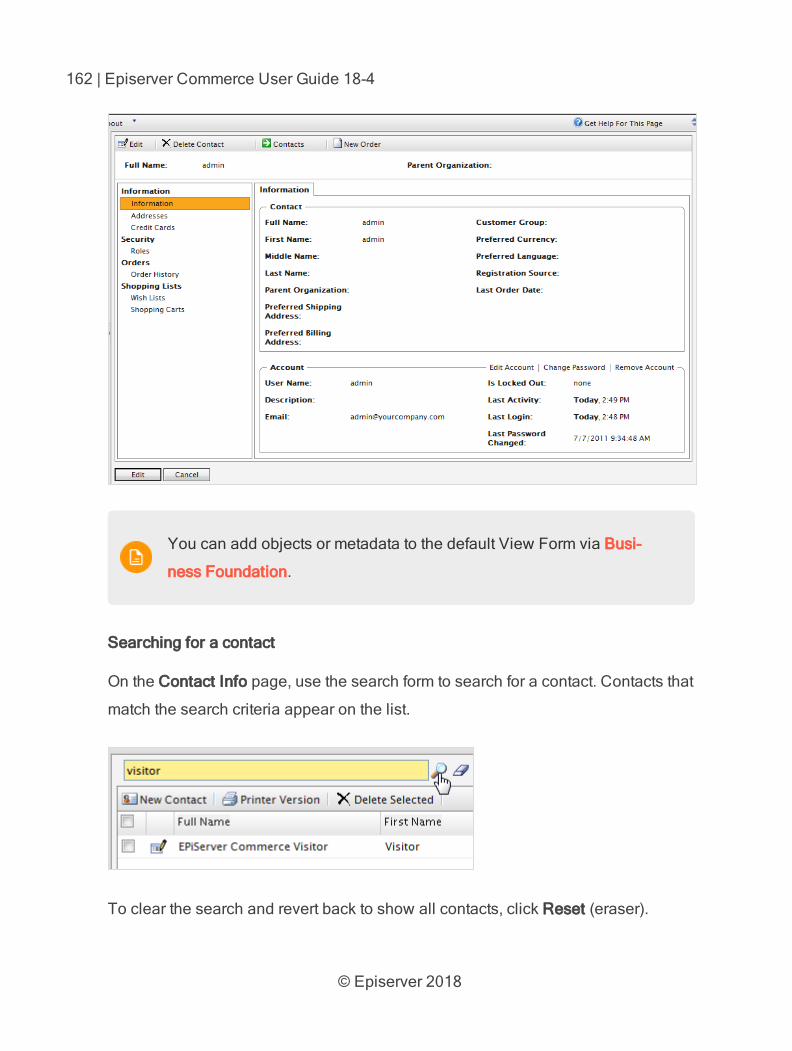
© Episerver 2018
162 | Episerver Commerce User Guide 18-4
You can add objects or metadata to the default View Form via Busi-
ness Foundation.
Searching for a contact
On the Contact Info page, use the search form to search for a contact. Contacts that
match the search criteria appear on the list.
To clear the search and revert back to show all contacts, click Reset (eraser).
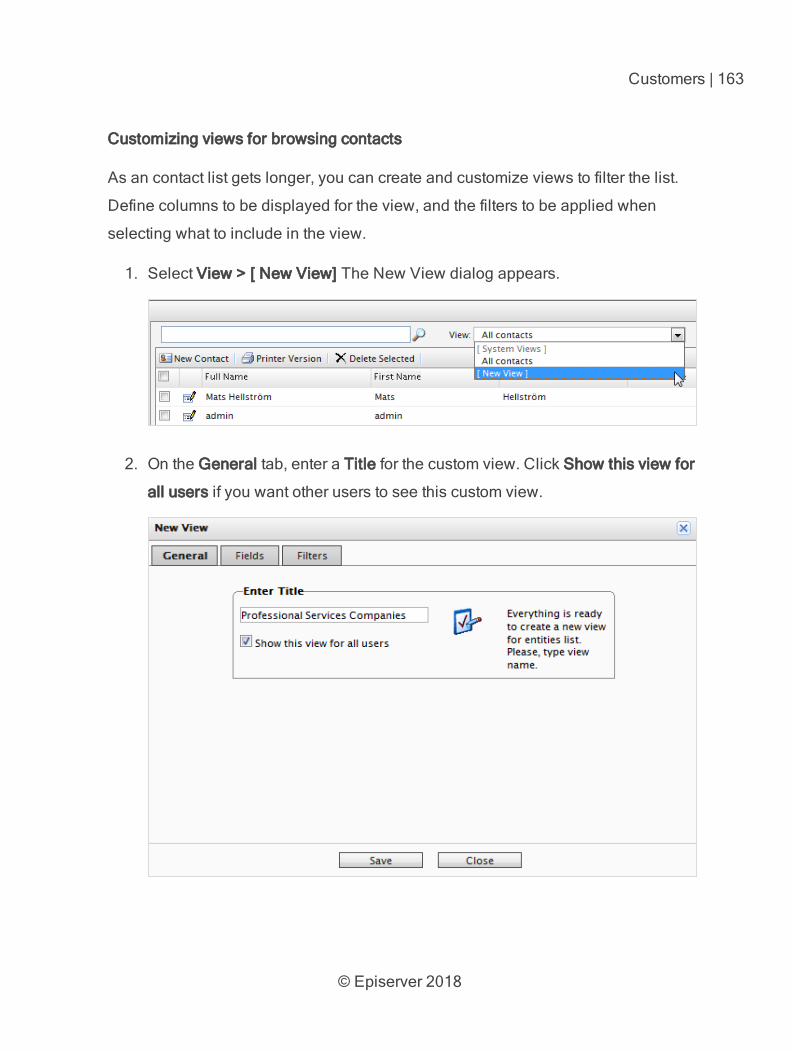
© Episerver 2018
Customers | 163
Customizing views for browsing contacts
As an contact list gets longer, you can create and customize views to filter the list.
Define columns to be displayed for the view, and the filters to be applied when
selecting what to include in the view.
1. Select View > [ New View] The New View dialog appears.
2. On the General tab, enter a Title for the custom view. Click Show this view for
all users if you want other users to see this custom view.
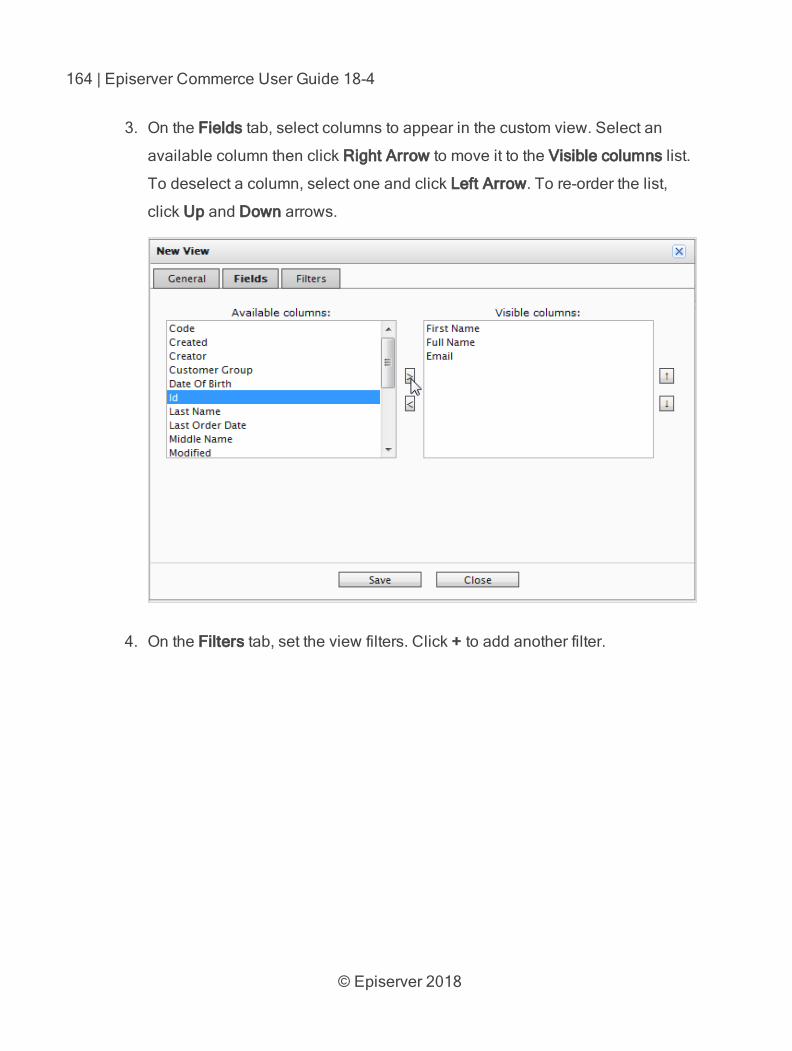
© Episerver 2018
164 | Episerver Commerce User Guide 18-4
3. On the Fields tab, select columns to appear in the custom view. Select an
available column then click Right Arrow to move it to the Visible columns list.
To deselect a column, select one and click Left Arrow. To re-order the list,
click Up and Down arrows.
4. On the Filters tab, set the view filters. Click + to add another filter.
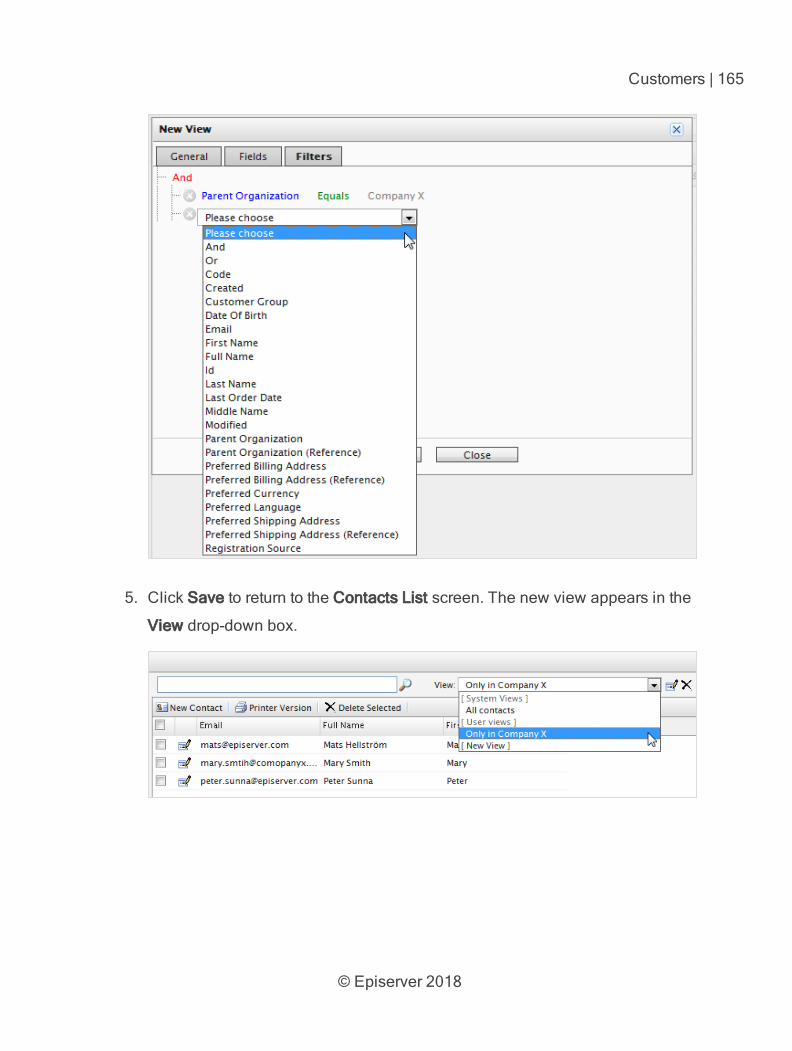
© Episerver 2018
Customers | 165
5. Click Save to return to the Contacts List screen. The new view appears in the
View drop-down box.
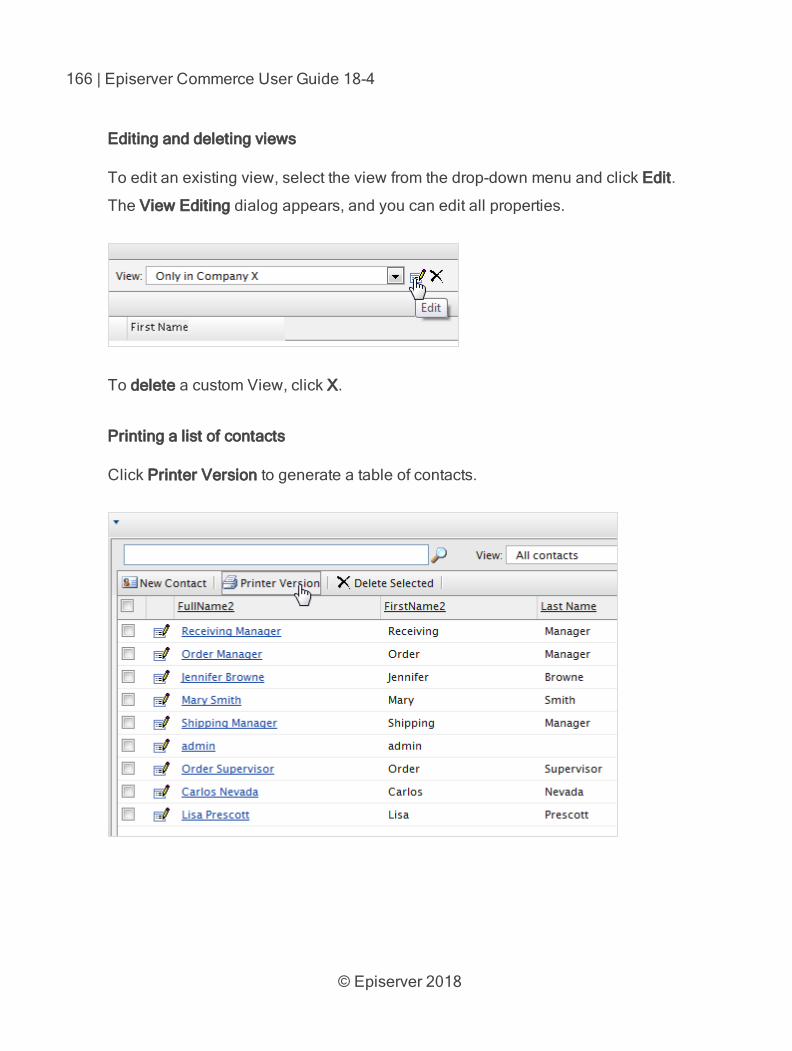
© Episerver 2018
166 | Episerver Commerce User Guide 18-4
Editing and deleting views
To edit an existing view, select the view from the drop-down menu and click Edit.
The View Editing dialog appears, and you can edit all properties.
To delete a custom View, click X.
Printing a list of contacts
Click Printer Version to generate a table of contacts.
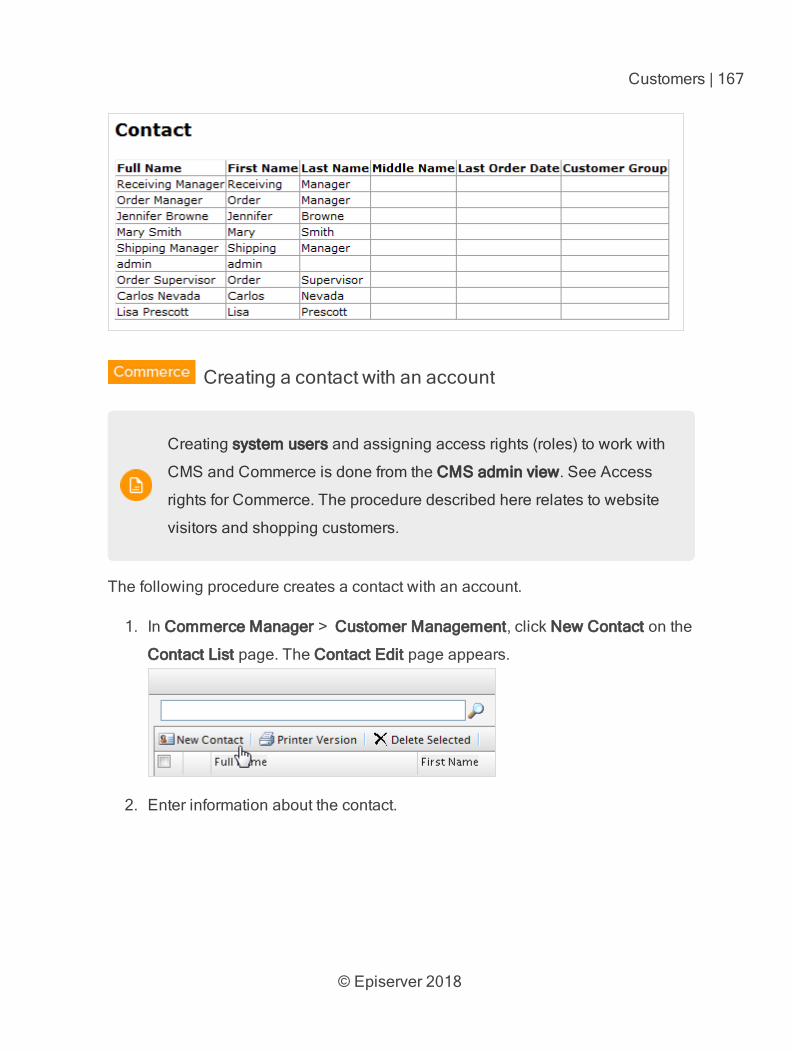
© Episerver 2018
Customers | 167
Creating a contact with an account
Creating system users and assigning access rights (roles) to work with
CMS and Commerce is done from the CMS admin view. See Access
rights for Commerce. The procedure described here relates to website
visitors and shopping customers.
The following procedure creates a contact with an account.
1. In Commerce Manager > Customer Management, click New Contact on the
Contact List page. The Contact Edit page appears.
2. Enter information about the contact.
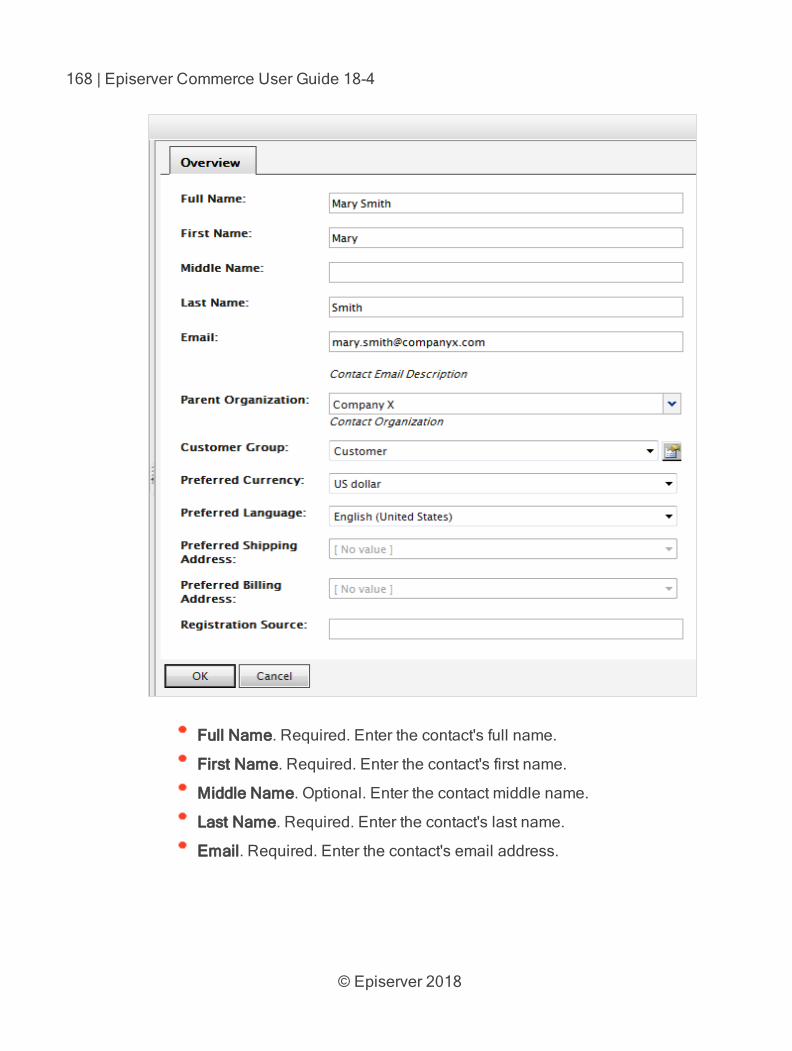
© Episerver 2018
168 | Episerver Commerce User Guide 18-4
Full Name. Required. Enter the contact's full name.
First Name. Required. Enter the contact's first name.
Middle Name. Optional. Enter the contact middle name.
Last Name. Required. Enter the contact's last name.
Email. Required. Enter the contact's email address.
© Episerver 2018
Customers | 169
Parent Organization. Optional. Select a parent organization to which
the contact is assigned .
Customer Group. Optional. Select a customer group to which the con-
tact is assigned. You can add customer groups by editing the Cus-
tomer group dictionaries. Customer groups are useful for targeted
Marketing campaigns.
Preferred Currency. Optional. Select a currency for the contact. For
example, if the contact is in France, select the Euro currency. You set
available currency options in Administration > System Settings > Dic-
tionaries > Currencies.
Preferred Language. Optional. Select a language for the contact. You
set available languages in Administration > System Settings > Dic-
tionaries > Languages.
Preferred Shipping Address. Automatic; related to company accounts.
Preferred Billing Address. Automatic; related to company accounts.
Registration Source. Optional. Enter notes about the contact (such as
the website under which the contact is currently registered).
The Registration Source field is automatically filled when
a user creates a new account from the public website.
3. Click OK to save the contact. The Contact Information form appears. To dis-
play the Contacts List, click Contacts or Cancel.
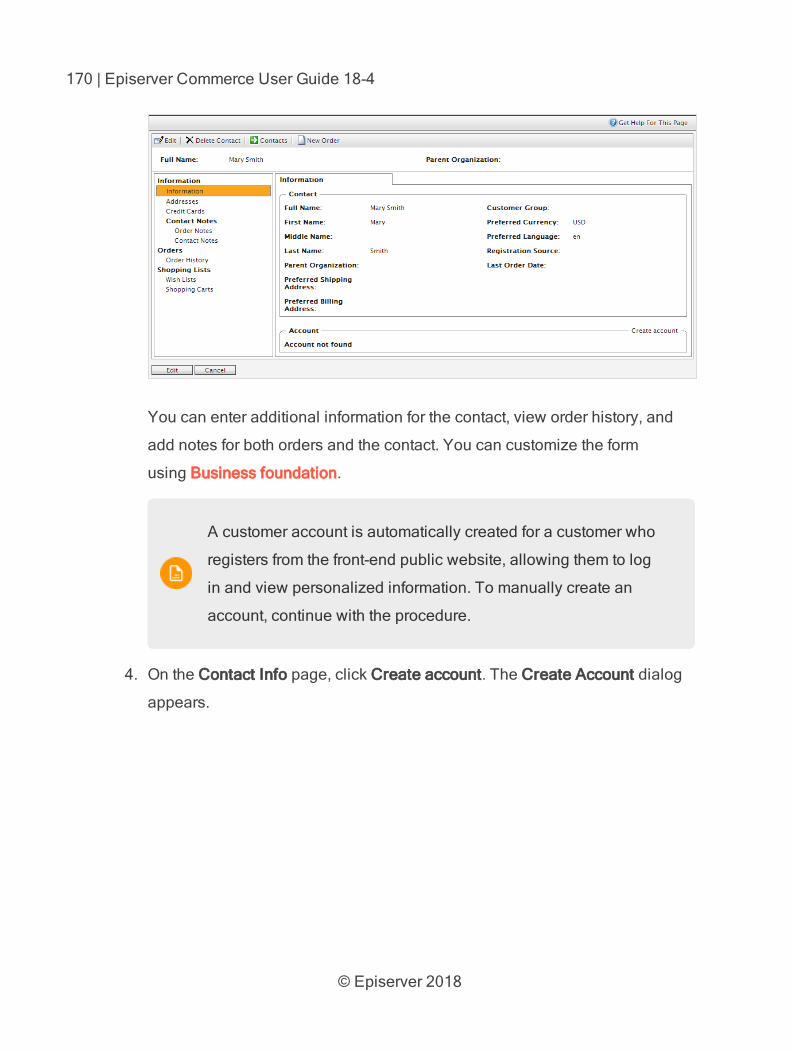
© Episerver 2018
170 | Episerver Commerce User Guide 18-4
You can enter additional information for the contact, view order history, and
add notes for both orders and the contact. You can customize the form
using Business foundation.
A customer account is automatically created for a customer who
registers from the front-end public website, allowing them to log
in and view personalized information. To manually create an
account, continue with the procedure.
4. On the Contact Info page, click Create account. The Create Account dialog
appears.
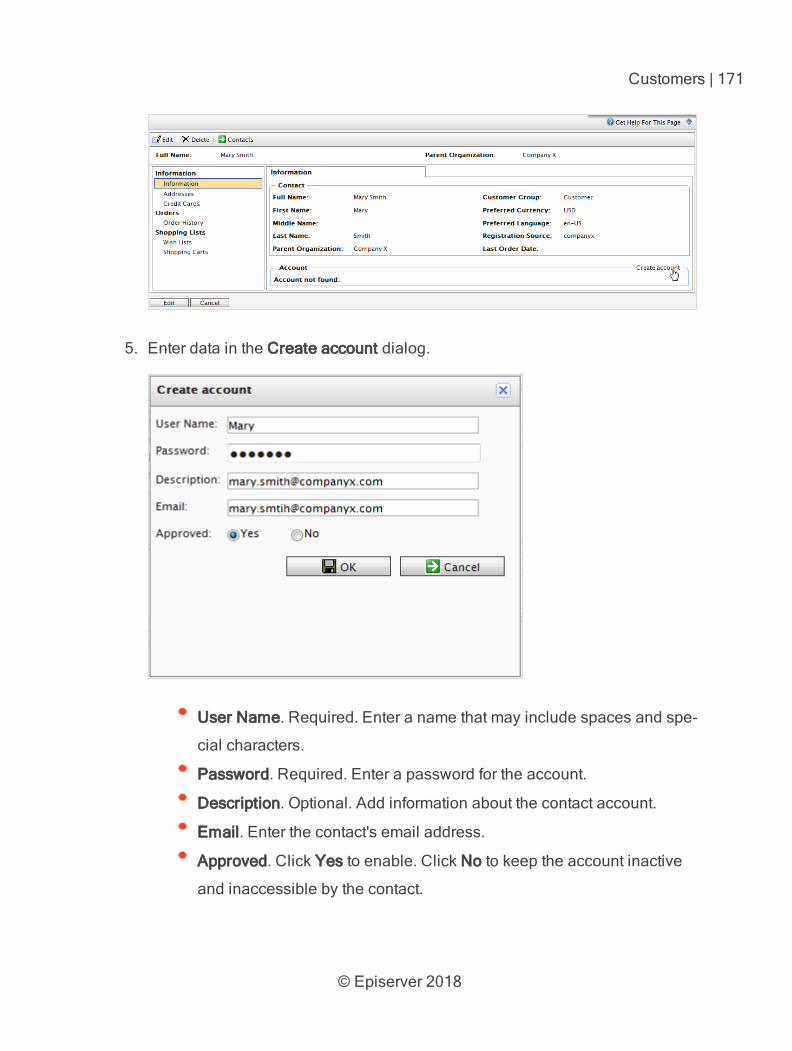
© Episerver 2018
Customers | 171
5. Enter data in the Create account dialog.
User Name. Required. Enter a name that may include spaces and spe-
cial characters.
Password. Required. Enter a password for the account.
Description. Optional. Add information about the contact account.
Email. Enter the contact's email address.
Approved. Click Yes to enable. Click No to keep the account inactive
and inaccessible by the contact.
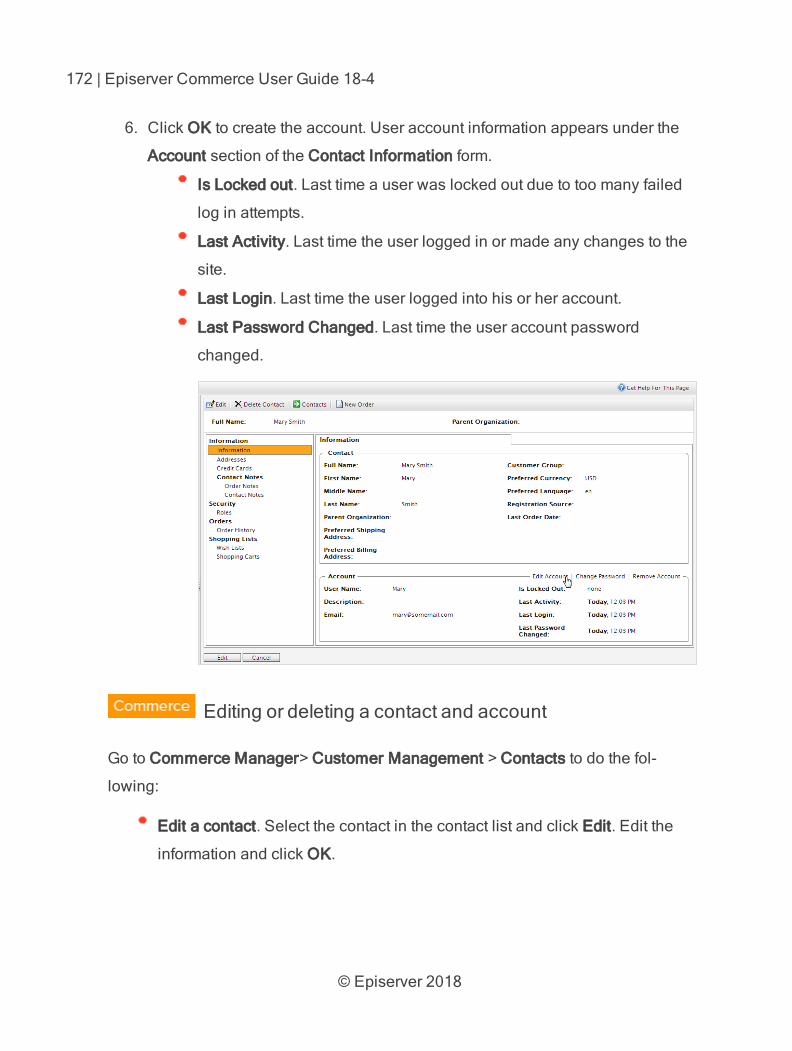
© Episerver 2018
172 | Episerver Commerce User Guide 18-4
6. Click OK to create the account. User account information appears under the
Account section of the Contact Information form.
Is Locked out. Last time a user was locked out due to too many failed
log in attempts.
Last Activity. Last time the user logged in or made any changes to the
site.
Last Login. Last time the user logged into his or her account.
Last Password Changed. Last time the user account password
changed.
Editing or deleting a contact and account
Go to Commerce Manager> Customer Management > Contacts to do the fol-
lowing:
Edit a contact. Select the contact in the contact list and click Edit. Edit the
information and click OK.
© Episerver 2018
Customers | 173
Edit an account. Select the related contact in the contact list and select the
Edit Account option in the lower part of the dialog box. Edit the information
and click OK.
You cannot change the User Name unless you remove the
account and recreate the same account again.
Delete a contact. Select the contact in the list of contacts click Delete. Click
OK to confirm.
Delete an account. Select the related contact in the contact list and click
Remove Account in the lower part of the dialog.
Adding dictionary values for a contact
You can create your own customer (contact) groups that you can apply when you
add contacts to your organization. By default, customer groups can be of type Cus-
tomer, Partner or Distributor. This type of data is managed in dictionaries. You can
use customer groups when you define pricing or restrict promotions.
1. In Commerce Manager > Customer Management, open the Contacts Edit
page by creating a new contact or editing an existing one. Click Edit Dic-
tionary next to the Customer Group drop-down menu.

© Episerver 2018
174 | Episerver Commerce User Guide 18-4
2. On the dialog box that appears, click Edit to modify an existing customer
group dictionary. To add a new item to the dictionary, click New Item.
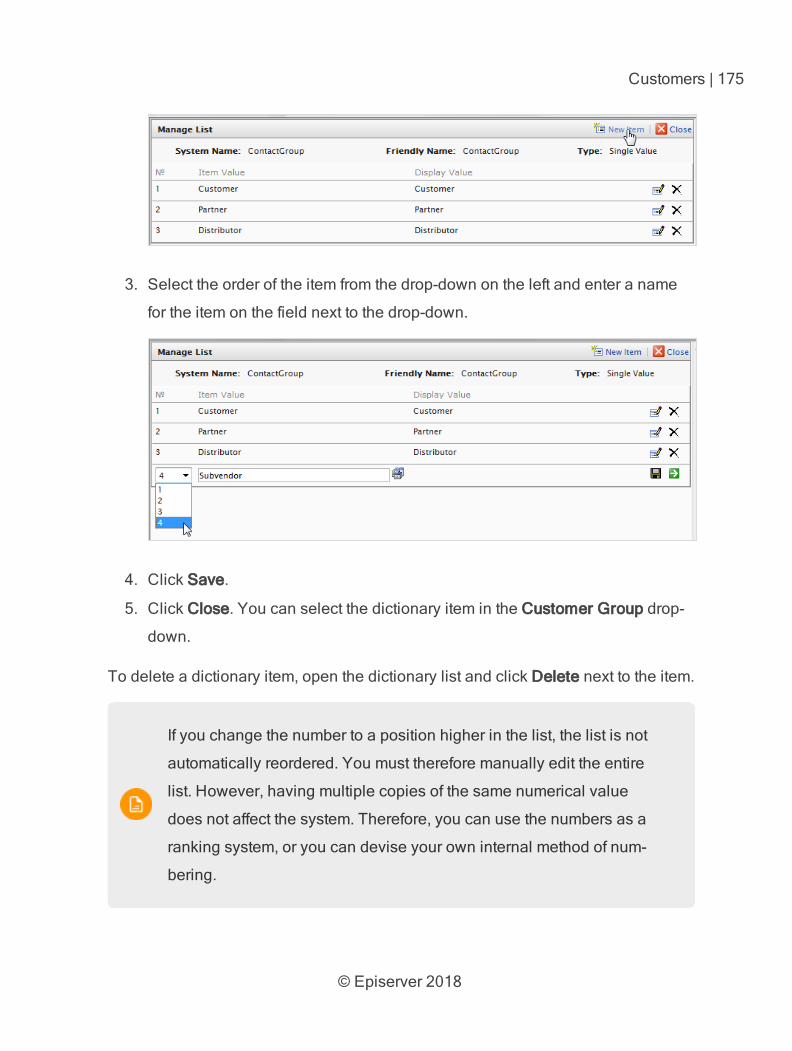
© Episerver 2018
Customers | 175
3. Select the order of the item from the drop-down on the left and enter a name
for the item on the field next to the drop-down.
4. Click Save.
5. Click Close. You can select the dictionary item in the Customer Group drop-
down.
To delete a dictionary item, open the dictionary list and click Delete next to the item.
If you change the number to a position higher in the list, the list is not
automatically reordered. You must therefore manually edit the entire
list. However, having multiple copies of the same numerical value
does not affect the system. Therefore, you can use the numbers as a
ranking system, or you can devise your own internal method of num-
bering.
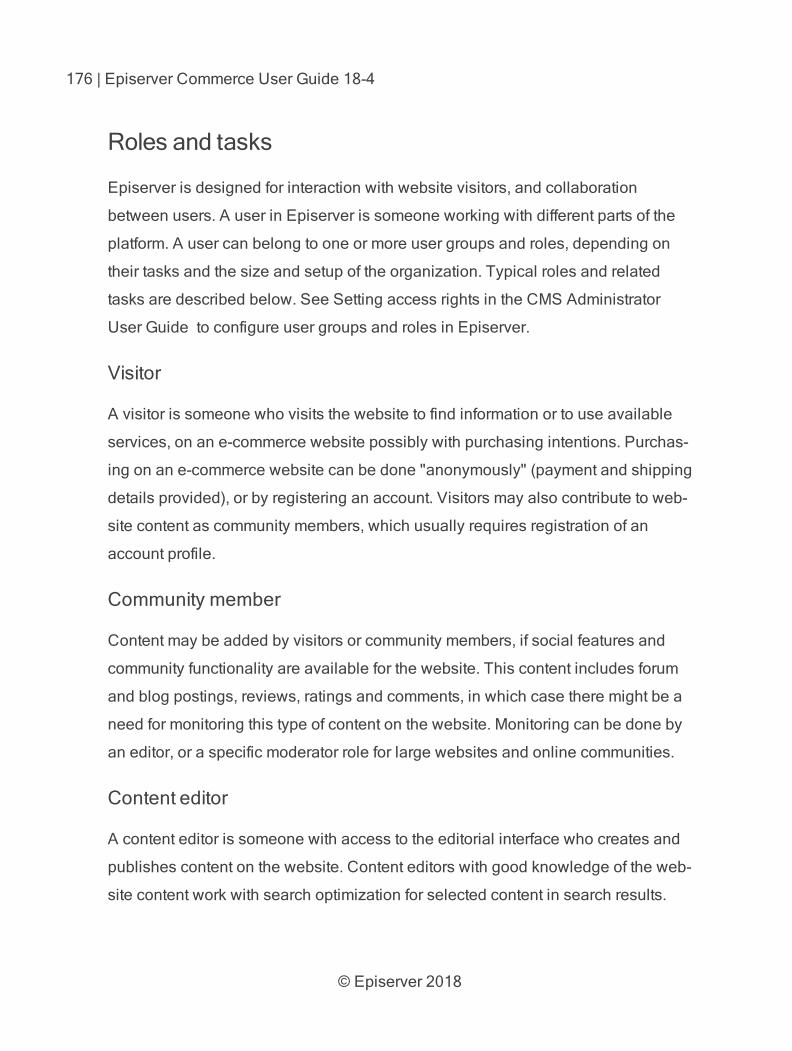
© Episerver 2018
176 | Episerver Commerce User Guide 18-4
Roles and tasks
Episerver is designed for interaction with website visitors, and collaboration
between users. A user in Episerver is someone working with different parts of the
platform. A user can belong to one or more user groups and roles, depending on
their tasks and the size and setup of the organization. Typical roles and related
tasks are described below. See Setting access rights in the CMS Administrator
User Guide to configure user groups and roles in Episerver.
Visitor
A visitor is someone who visits the website to find information or to use available
services, on an e-commerce website possibly with purchasing intentions. Purchas-
ing on an e-commerce website can be done "anonymously" (payment and shipping
details provided), or by registering an account. Visitors may also contribute to web-
site content as community members, which usually requires registration of an
account profile.
Community member
Content may be added by visitors or community members, if social features and
community functionality are available for the website. This content includes forum
and blog postings, reviews, ratings and comments, in which case there might be a
need for monitoring this type of content on the website. Monitoring can be done by
an editor, or a specific moderator role for large websites and online communities.
Content editor
A content editor is someone with access to the editorial interface who creates and
publishes content on the website. Content editors with good knowledge of the web-
site content work with search optimization for selected content in search results.
© Episerver 2018
Customers | 177
Editors may also want to follow-up on content with unusually high or low con-
version rate to update or delete this content.
Marketer
A marketer creates content and campaigns with targeted banner advertisements to
ensure customers have consistent on site experience of the various marketing chan-
nels. Furthermore, the marketer monitors campaign KPI to optimize page con-
version. A marketer with good knowledge of the website content may also want to
monitor search statistics to optimize search for campaigns and promote content.
Merchandiser
A merchandiser typically works with stock on an e-commerce website to ensure that
the strongest products are put in focus. This role also creates landing pages, sets
product pricing, coordinates cross-product selling, oversees delivery and dis-
tribution of stock, and deals with suppliers. This user wants to identify search quer-
ies with unusually high or low conversion rates, to adjust the search or the product
line.
Website owner
A website owner is someone with overall responsibility for the content and per-
formance of one or more websites. This user monitors website activities such as
page conversions, customer reviews or sales progress. Rarely creates content but
can be involved in the approval of content created by others. A website owner may
have administrative access rights and may install selected add-ons on the website.
Administrator
An administrator works with configuration of various system settings from the admin-
istration user interface, including search, languages, user access rights and visitor
© Episerver 2018
178 | Episerver Commerce User Guide 18-4
groups for personalized content. Administrators may also install add-ons on the
website. Administrators usually have extended access rights compared to other
user groups, and can access all parts of the Episerver platform.
Developer
A developer is someone with programming skills working with the setup and imple-
mentation of the website, and maintenance and development of new functionality.
Creates the content templates for pages, blocks and catalog content used by edit-
ors in CMS and Commerce, configures e-commerce settings, and manages the
index and customized search features in Find. Developers may also install add-ons
on the website.
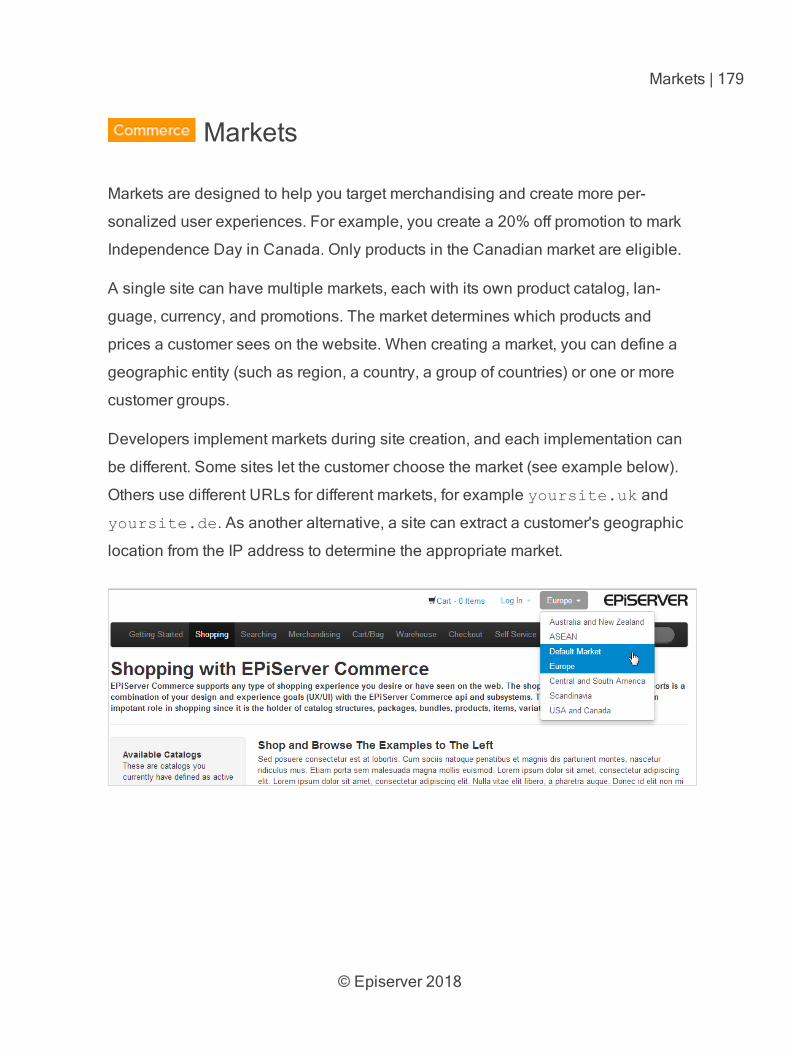
© Episerver 2018
Markets | 179
Markets
Markets are designed to help you target merchandising and create more per-
sonalized user experiences. For example, you create a 20% off promotion to mark
Independence Day in Canada. Only products in the Canadian market are eligible.
A single site can have multiple markets, each with its own product catalog, lan-
guage, currency, and promotions. The market determines which products and
prices a customer sees on the website. When creating a market, you can define a
geographic entity (such as region, a country, a group of countries) or one or more
customer groups.
Developers implement markets during site creation, and each implementation can
be different. Some sites let the customer choose the market (see example below).
Others use different URLs for different markets, for example yoursite.uk and
yoursite.de. As another alternative, a site can extract a customer's geographic
location from the IP address to determine the appropriate market.
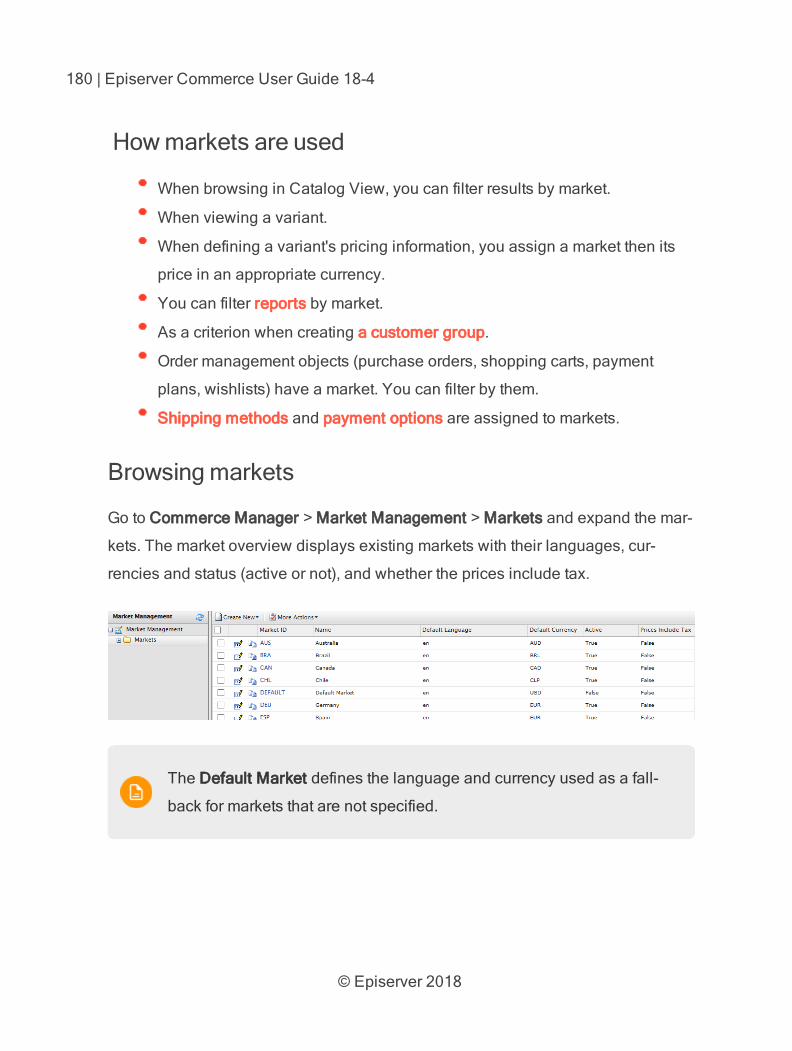
© Episerver 2018
180 | Episerver Commerce User Guide 18-4
How markets are used
When browsing in Catalog View, you can filter results by market.
When viewing a variant.
When defining a variant's pricing information, you assign a market then its
price in an appropriate currency.
You can filter reports by market.
As a criterion when creating a customer group.
Order management objects (purchase orders, shopping carts, payment
plans, wishlists) have a market. You can filter by them.
Shipping methods and payment options are assigned to markets.
Browsing markets
Go to Commerce Manager > Market Management > Markets and expand the mar-
kets. The market overview displays existing markets with their languages, cur-
rencies and status (active or not), and whether the prices include tax.
The Default Market defines the language and currency used as a fall-
back for markets that are not specified.
© Episerver 2018
Markets | 181
Creating or editing a market
1. Go to Commerce Manager > Market Management > Markets. The markets
list appears.
2. Select Create New > New Market, or select an existing market from the list.
The Market Overview tab appears.
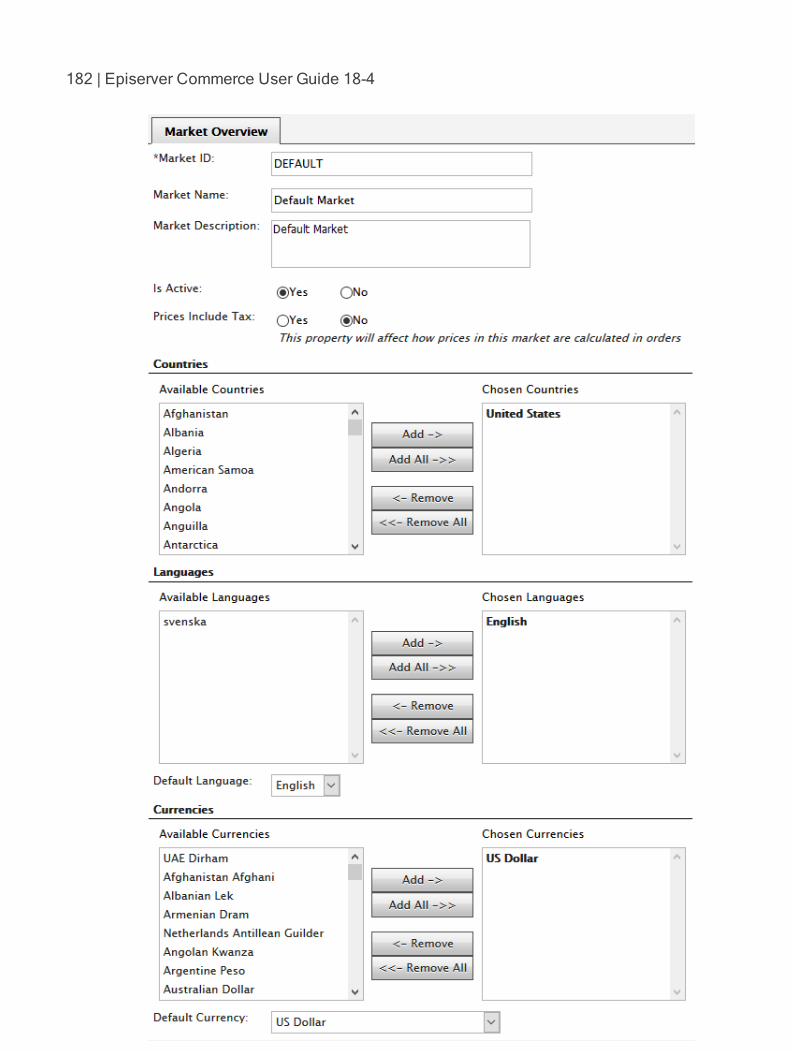
© Episerver 2018
182 | Episerver Commerce User Guide 18-4
© Episerver 2018
Markets | 183
Market ID. Enter an identifier for the market.
Market Name. Enter the name that appears in the markets list.
Market Description. Enter free-text notes about the market.
Is Active. Yes to activate; No to deactivate. Only active markets can be
used by visitors when shopping.
Prices Include Tax. Check Yes to indicate that the prices returned for
this market include tax. You would typically do this for markets where
customers usually see and shop with prices that include tax (for
example, most EU countries).
You might want to do this to send a tax-included price to the front-end
site, so a customer can see the price including tax when shopping. At
checkout, when the Commerce system has enough information to
accurately calculate the tax, you can implement business logic to sub-
tract the included tax amount from the actual tax.
Countries. Select each country you want and click Add.
A developer can use a market's country to build site features. For
example, you define a Nordics market that includes all European
Union countries. If a site visitor’s IP address belongs to Sweden, he or
she belongs to the EU market.
Languages. Select each language you want and click Add.
A developer can use a market's language to build site features. For
example, in the Quicksilver sample site, a site visitor's market determ-
ines the default language for that user.
A website can support several languages. By defining a
market's language, you allow a market to display content
© Episerver 2018
184 | Episerver Commerce User Guide 18-4
in that language.
For example, if you select English as the preferred lan-
guage, it does not automatically mean that a visitor
belongs to the US or UK markets. You can provide con-
tent in English for a Swedish market, for non-Swedish
speaking visitors in Sweden.
Currencies. For each currency you want, select the currency and click
Add.
Default currency. Set the default fallback currency.
3. Click OK.
Deleting a market
1. Go to Commerce Manager > Market Management > Markets. The markets
list appears.
2. Select the check box next to the market you want to delete.
3. Select More Actions > Delete Selected.
4. Click OK.
© Episerver 2018
Marketing | 185
Marketing
The marketing system provides a new Campaigns user interface, in
addition to the legacy campaign system, for managing campaigns and
discounts.
Use Episerver's Marketing system to create discount and promotion that can be
applied to product, orders, or shipping. Typically, promotions are created and man-
aged by marketing and catalog managers, and other users who handle pricing and
discounts.
The marketing features allow you to create campaigns with unique and compelling
discounts. Discounts are typically based on a percentage or fixed value. You can
target discounts to specific customers, time periods, or markets.
Common marketing tasks are listed below. Available tasks depend on whether you
are using the new Marketing system, or the legacy marketing system.
Marketing view
Creating and managing campaigns.
Creating discounts.
Prioritizing discounts.
Discount exclusions.
Built-in discounts
Marketing system in Commerce Manager (Legacy)
Creating and managing campaigns, which can be targeted to specific
groups of users.
© Episerver 2018
186 | Episerver Commerce User Guide 18-4
Configuring customer segments, for targeting of promotions to specific
groups of users and customers.
Creating different types of promotions with discounts and coupons.
Configuring expressions and policies for defining additional rules and pro-
motion types.
Campaigns and discounts
The marketing system provides a new Campaigns user interface, in
addition to the legacy campaign system, for managing campaigns and
discounts.
In Episerver Commerce, you use campaigns to manage discount when deploying
targeted marketing efforts. You can assign a campaign to a specific market, to serve
local needs, or to all markets. You can also limit a campaign to members of selec-
ted visitor group.
When setting up a campaign, you define its essential information, such as active
date range, target market, eligible visitor groups, and discounts.
Campaign view
To view existing campaigns or create new ones, go to the global menu and select
Marketing. The Campaign view displays each campaign's status and discounts.
From Campaign view, you can perform tasks such as create new campaigns, edit
existing ones, create and edit discounts, and so on.
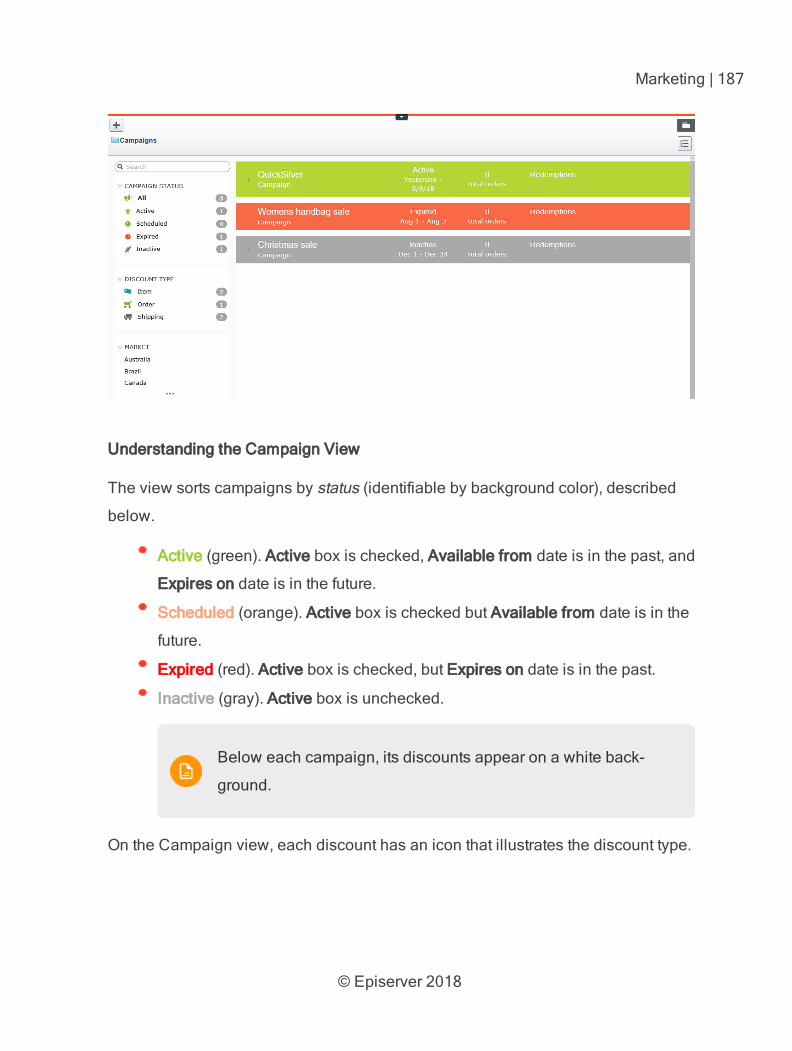
© Episerver 2018
Marketing | 187
Understanding the Campaign View
The view sorts campaigns by status (identifiable by background color), described
below.
Active (green). Active box is checked, Available from date is in the past, and
Expires on date is in the future.
Scheduled (orange). Active box is checked but Available from date is in the
future.
Expired (red). Active box is checked, but Expires on date is in the past.
Inactive (gray). Active box is unchecked.
Below each campaign, its discounts appear on a white back-
ground.
On the Campaign view, each discount has an icon that illustrates the discount type.
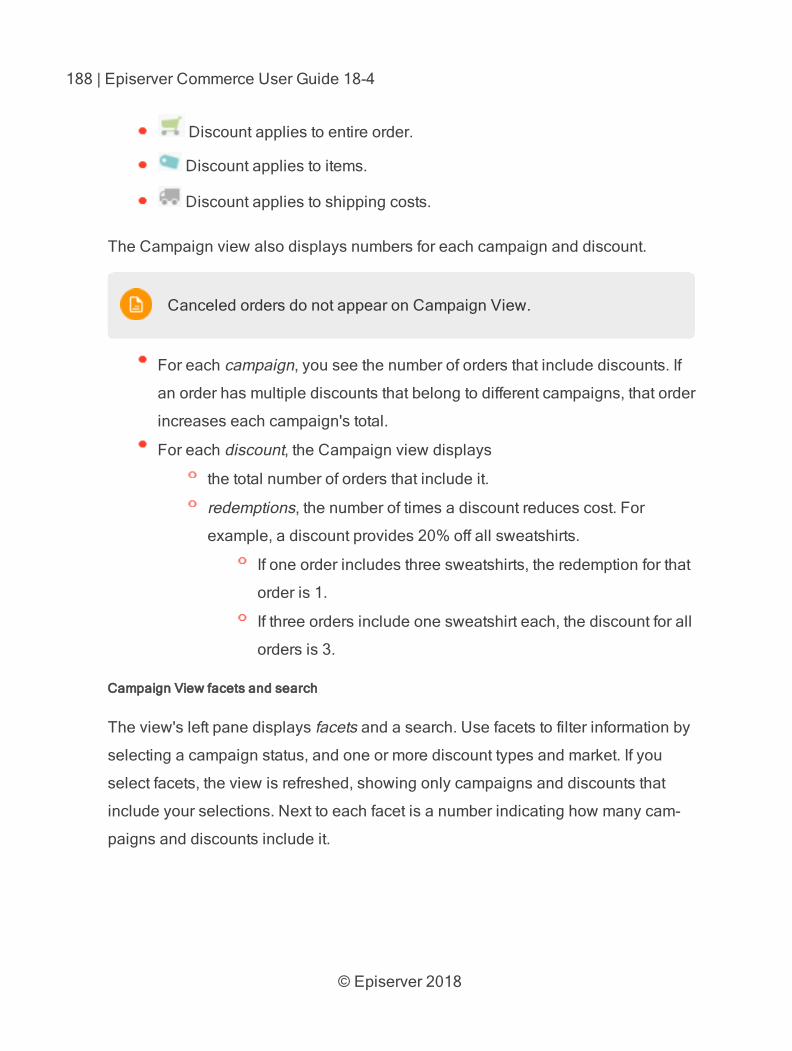
© Episerver 2018
188 | Episerver Commerce User Guide 18-4
Discount applies to entire order.
Discount applies to items.
Discount applies to shipping costs.
The Campaign view also displays numbers for each campaign and discount.
Canceled orders do not appear on Campaign View.
For each campaign, you see the number of orders that include discounts. If
an order has multiple discounts that belong to different campaigns, that order
increases each campaign's total.
For each discount, the Campaign view displays
the total number of orders that include it.
redemptions, the number of times a discount reduces cost. For
example, a discount provides 20% off all sweatshirts.
If one order includes three sweatshirts, the redemption for that
order is 1.
If three orders include one sweatshirt each, the discount for all
orders is 3.
Campaign View facets and search
The view's left pane displays facets and a search. Use facets to filter information by
selecting a campaign status, and one or more discount types and market. If you
select facets, the view is refreshed, showing only campaigns and discounts that
include your selections. Next to each facet is a number indicating how many cam-
paigns and discounts include it.
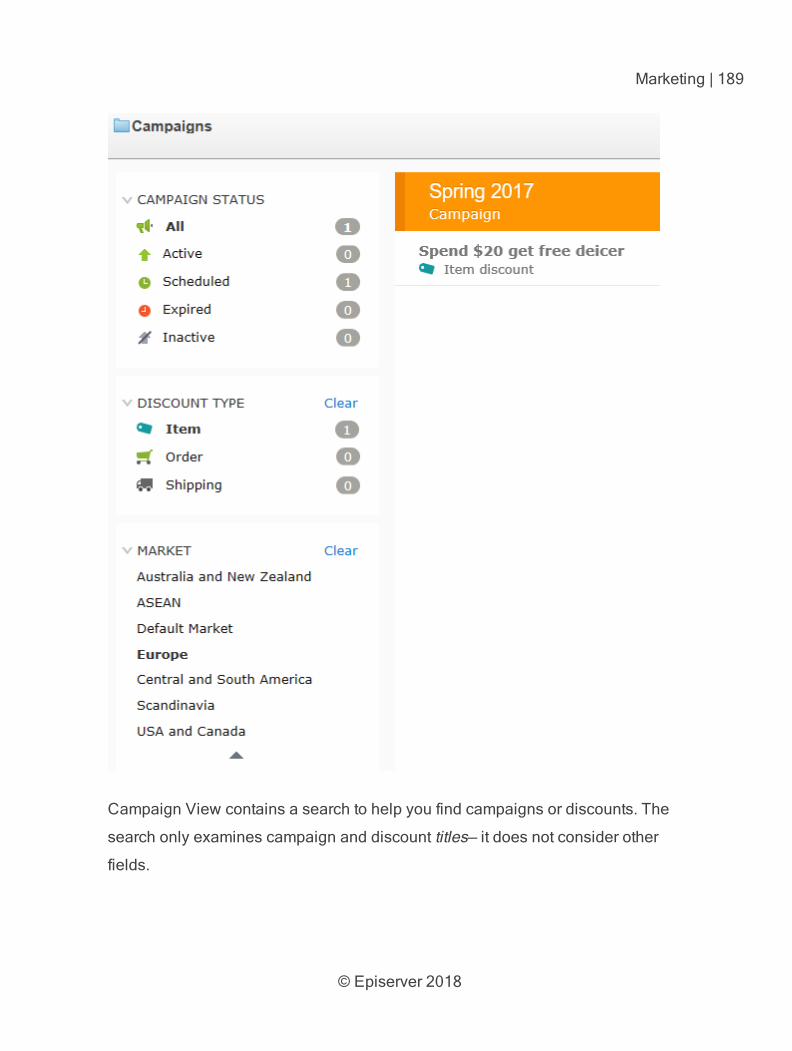
© Episerver 2018
Marketing | 189
Campaign View contains a search to help you find campaigns or discounts. The
search only examines campaign and discount titles— it does not consider other
fields.
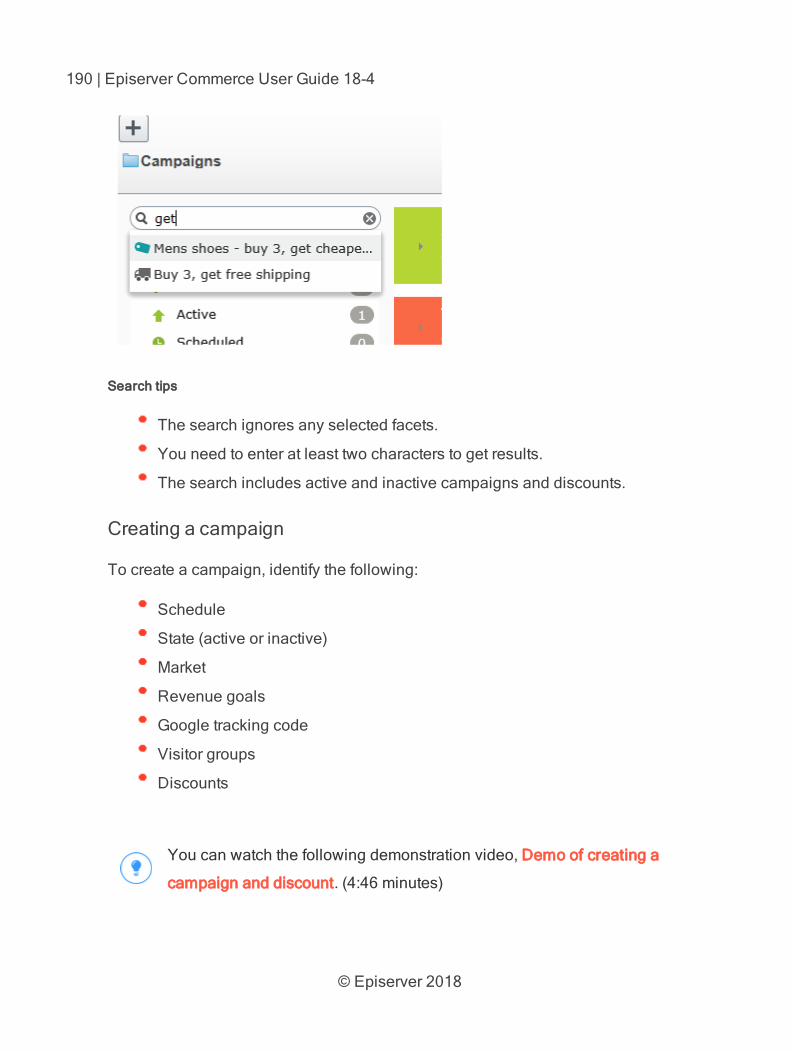
© Episerver 2018
190 | Episerver Commerce User Guide 18-4
Search tips
The search ignores any selected facets.
You need to enter at least two characters to get results.
The search includes active and inactive campaigns and discounts.
Creating a campaign
To create a campaign, identify the following:
Schedule
State (active or inactive)
Market
Revenue goals
Google tracking code
Visitor groups
Discounts
You can watch the following demonstration video, Demo of creating a
campaign and discount. (4:46 minutes)
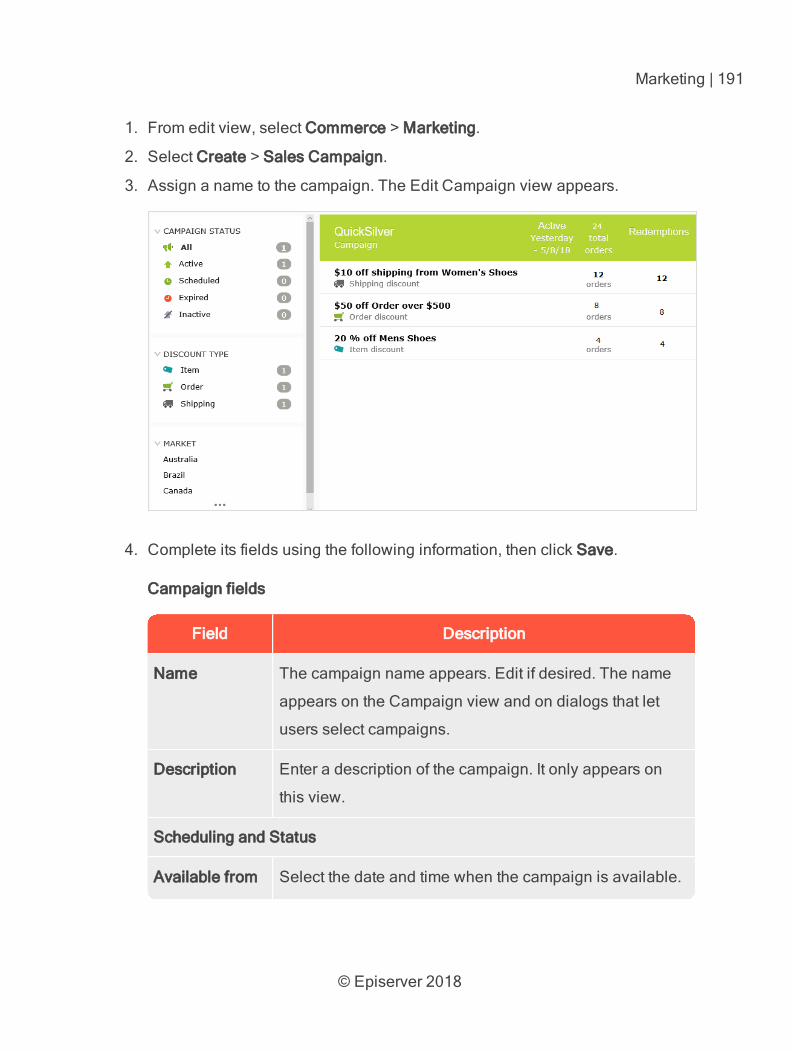
© Episerver 2018
Marketing | 191
1. From edit view, select Commerce > Marketing.
2. Select Create > Sales Campaign.
3. Assign a name to the campaign. The Edit Campaign view appears.
4. Complete its fields using the following information, then click Save.
Campaign fields
Field Description
Name The campaign name appears. Edit if desired. The name
appears on the Campaign view and on dialogs that let
users select campaigns.
Description Enter a description of the campaign. It only appears on
this view.
Scheduling and Status
Available from Select the date and time when the campaign is available.
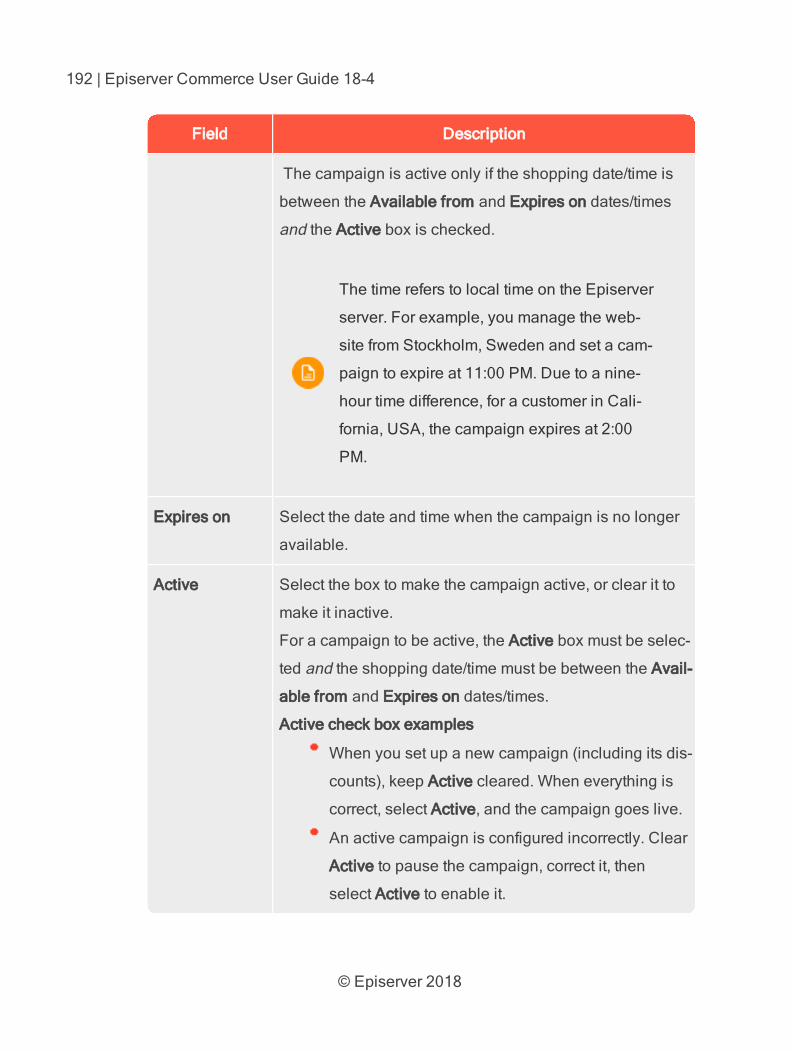
© Episerver 2018
192 | Episerver Commerce User Guide 18-4
Field Description
The campaign is active only if the shopping date/time is
between the Available from and Expires on dates/times
and the Active box is checked.
The time refers to local time on the Episerver
server. For example, you manage the web-
site from Stockholm, Sweden and set a cam-
paign to expire at 11:00 PM. Due to a nine-
hour time difference, for a customer in Cali-
fornia, USA, the campaign expires at 2:00
PM.
Expires on Select the date and time when the campaign is no longer
available.
Active Select the box to make the campaign active, or clear it to
make it inactive.
For a campaign to be active, the Active box must be selec-
ted and the shopping date/time must be between the Avail-
able from and Expires on dates/times.
Active check box examples
When you set up a new campaign (including its dis-
counts), keep Active cleared. When everything is
correct, select Active, and the campaign goes live.
An active campaign is configured incorrectly. Clear
Active to pause the campaign, correct it, then
select Active to enable it.
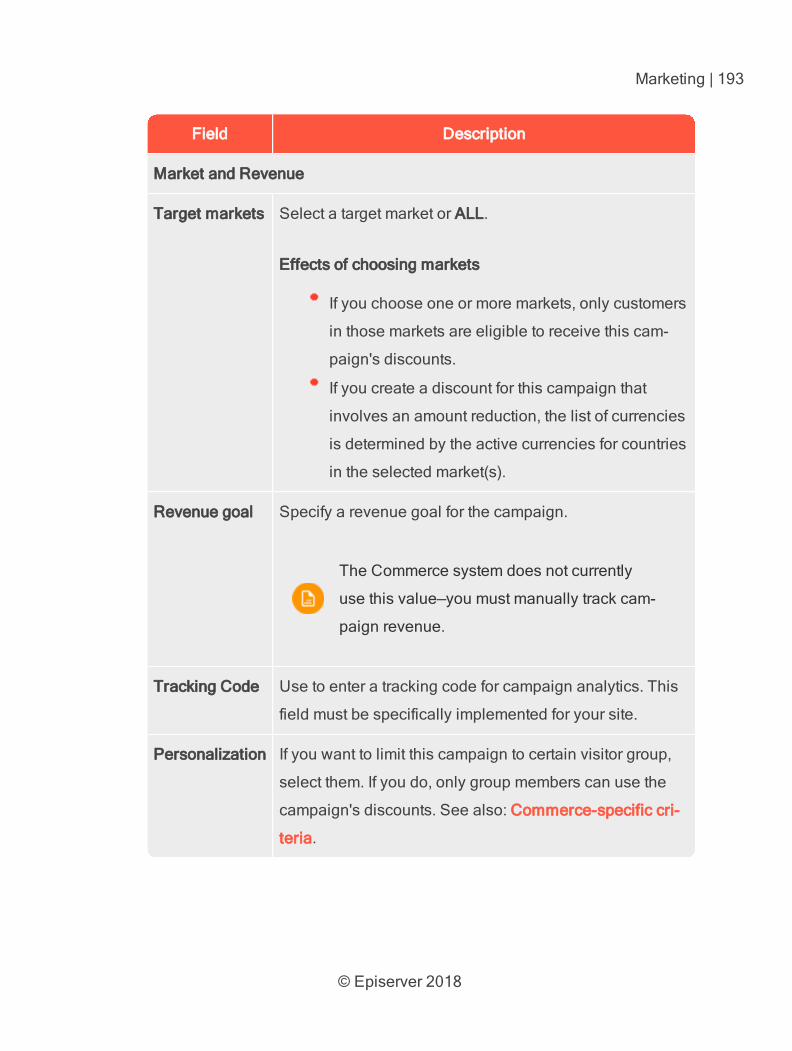
© Episerver 2018
Marketing | 193
Field Description
Market and Revenue
Target markets Select a target market or ALL.
Effects of choosing markets
If you choose one or more markets, only customers
in those markets are eligible to receive this cam-
paign's discounts.
If you create a discount for this campaign that
involves an amount reduction, the list of currencies
is determined by the active currencies for countries
in the selected market(s).
Revenue goal Specify a revenue goal for the campaign.
The Commerce system does not currently
use this value—you must manually track cam-
paign revenue.
Tracking Code Use to enter a tracking code for campaign analytics. This
field must be specifically implemented for your site.
Personalization If you want to limit this campaign to certain visitor group,
select them. If you do, only group members can use the
campaign's discounts. See also: Commerce-specific cri-
teria.

© Episerver 2018
194 | Episerver Commerce User Guide 18-4
Field Description
If more than two visitor groups are selected,
hover over the ellipsis to see them all.
Discounts See Discounts
Editing a campaign
1. From the Campaign view, hover over a campaign. On the far right side, a con-
text menu appears.
2. Select Edit.
3. Modify the fields.
Deleting a campaign
1. From the Campaign view, hover over a campaign. On the far right side, a con-
text menu appears.
2. Select Delete.
Deleting a campaign cannot be undone, and all discounts created for
the campaign are also deleted.
See also: Discounts
Discounts
Episerver Commerce has a powerful and flexible feature for applying discounts to
create targeted campaigns. Episerver Commerce offers a set of standard
© Episerver 2018
Marketing | 195
discounts, featuring the most common setups, which you can easily customize to
accommodate specific campaigns.
Discount colors
A discount is color-coded to help you identify its components.
Gray. Products or categories from which purchases must be made to activ-
ate the discount.
Blue. Discounted items.
Green. Discount amount or percentage.
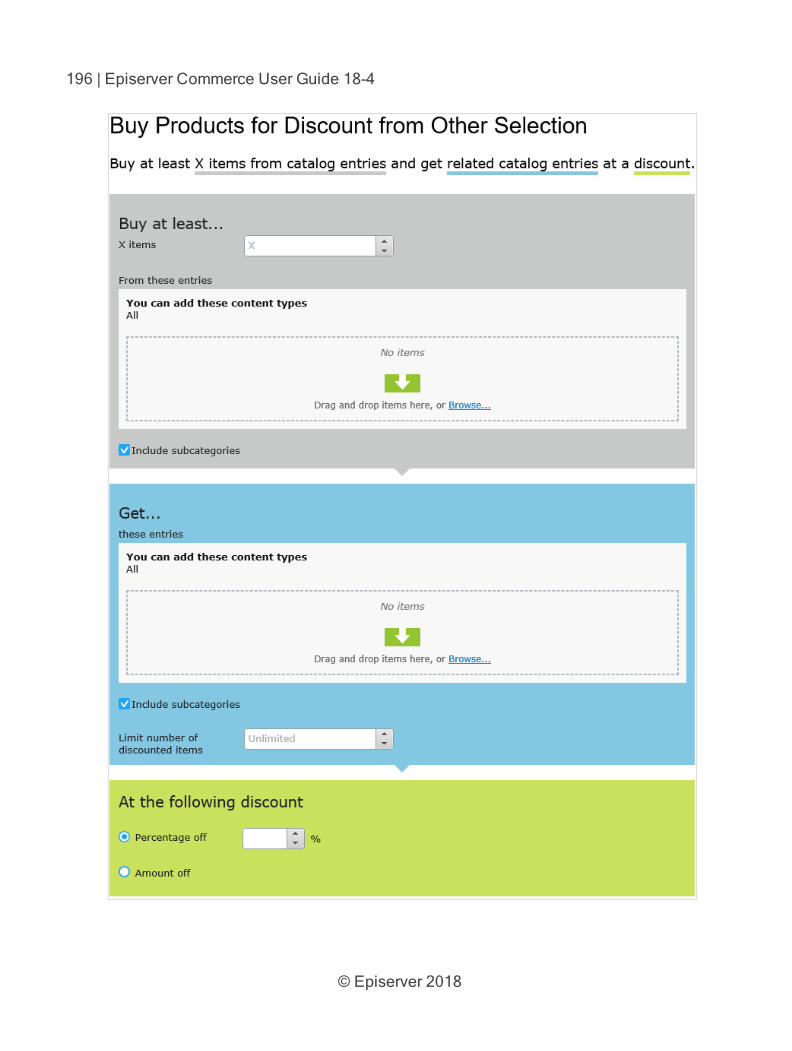
© Episerver 2018
196 | Episerver Commerce User Guide 18-4
© Episerver 2018
Marketing | 197
Creating a discount
Discounts are a key component of an effective marketing campaign, for example
"buy 3, get the cheapest for free."
If you create several concurrent promotions that apply to one line item
with quantity greater than one, be sure you understand the impact of all
promotions on an order.
Prerequisite: A campaign. If no campaigns exist, create one.
You can watch the following demonstration video, Demo of creating a
campaign and discount. (4:46 minutes)
1. Access the Discount view using any method listed below.
From the Campaigns view's top left corner, select Create > Discount.
When using this option, you select a campaign then
define the discount.
From a campaign's context menu, select New Discount.
While editing a campaign or creating a new one, select + New Dis-
count.
2. Assign a name to the discount.
3. Choose a discount type. (See Built-in discounts.) The Edit Discount view
appears.
4. Complete the fields using the following information, then click Save.
Discount fields

© Episerver 2018
198 | Episerver Commerce User Guide 18-4
Field Description
Name Enter the name of the discount.
Description Enter a description of the discount. The description
only appears on this view. Use it to communicate
the discount's purpose to other merchandisers.
Banner Image If you want to use a banner image with this dis-
count, upload it to the Episerver media folder, then
select it here. See also: Uploading media.
The image can illustrate the discount on the web
page. Your developer determines how to display
the banner.
Scheduling and Status—By default, a discount's start and end dates match
its campaign's dates. To change the discount's active dates, click Different
start and end dates, within the campaign dates and complete the following
fields.
Available from Select the date and time when the discount is avail-
able.
The discount is active only if the shopping date/time
is between the Available from and Expires on
dates/times, and the Active box is selected.
The time refers to local time on the
Episerver server. For example, you
manage the website from Stockholm,
Sweden and set a campaign to expire

© Episerver 2018
Marketing | 199
Field Description
at 11:00 PM. Due to a nine-hour dif-
ference, for a customer in California,
USA, the campaign expires at 2:00
PM.
Expires on Select the date and time when the discount is no
longer available.
Active For a discount to be active, the shopping date/time
must be between the available and expiration
dates/times, and the active box must be selected.
Active check box examples
While setting up a new discount, keep Active
cleared. When everything is correct, select
Active, and the discount is live.
An active discount is configured incorrectly.
Clear Active to pause it, correct it, then
select Active to enable the discount.
Promotion codes If applicable, enter a promotion code for this dis-
count. Promotion codes as also known as coupons.
See also: Using promotion codes.
Discount
Complete the information to define the discount. See Example: Buy three
items, get cheapest free and Built-in discounts.
© Episerver 2018
200 | Episerver Commerce User Guide 18-4
Field Description
Redemption limits If applicable, enter one or more redemption limits for
this discount; that is, the maximum number of times
a discount can be redeemed. See also: Applying
redemption limits.
Example: Buy three items, get cheapest free
Assume you want to implement the following discount: If a customer buys 3 auto-
motive accessories, the least expensive item is free. To create that discount, follow
these steps.
Prerequisite: A campaign. If no campaigns exist, create one.
1. From the Campaigns view's top left corner, select Add > Discount.
2. Select the campaign to which the discount will belong.
3. Assign the name AutoAcc Buy 3 get cheapest free.
4. For Type, select Get Cheapest for Free.
5. At the Scheduling and Status area, select the discount's beginning and end-
ing dates and whether the discount is active.
6. This example assumes that the discount does not use a Promotion code, so
ignore that field. See also: Using promotion codes
7. At the Buy... at least X items field, enter 3.
8. From the top right corner of the view, click Catalogs .
9. Select Automotive > Accessories then drag and drop it to the area below
from these categories/entries. See also: Selecting discount-eligible items.
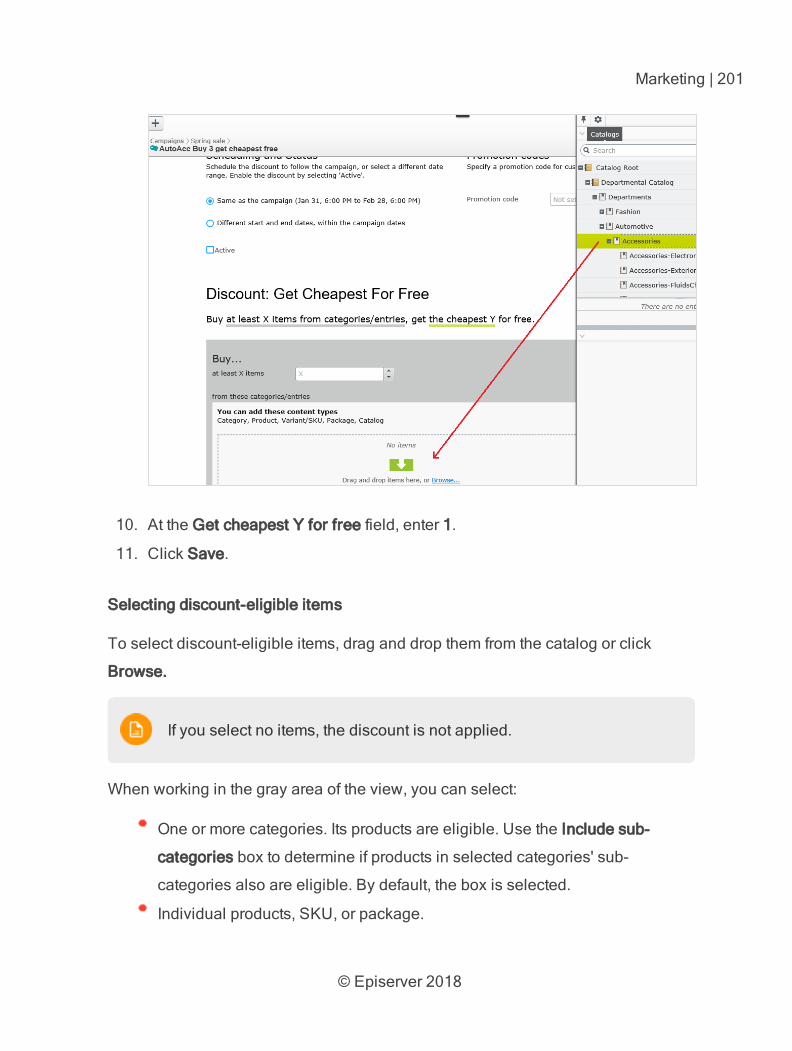
© Episerver 2018
Marketing | 201
10. At the Get cheapest Y for free field, enter 1.
11. Click Save.
Selecting discount-eligible items
To select discount-eligible items, drag and drop them from the catalog or click
Browse.
If you select no items, the discount is not applied.
When working in the gray area of the view, you can select:
One or more categories. Its products are eligible. Use the Include sub-
categories box to determine if products in selected categories' sub-
categories also are eligible. By default, the box is selected.
Individual products, SKU, or package.
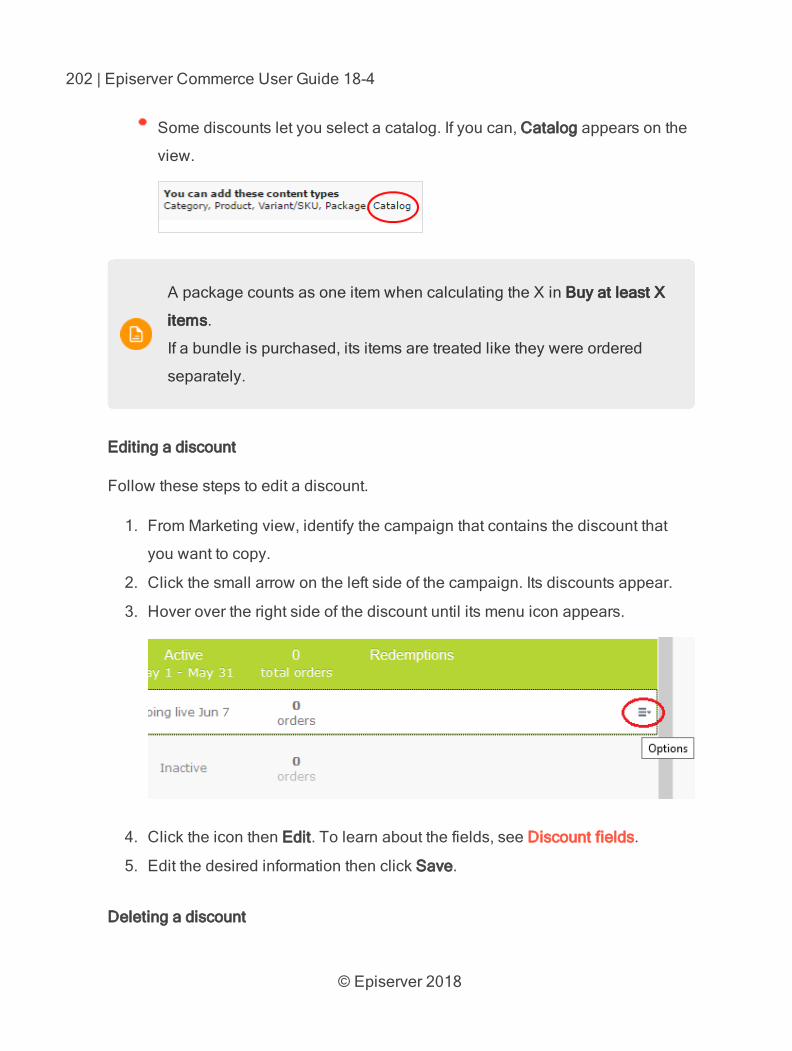
© Episerver 2018
202 | Episerver Commerce User Guide 18-4
Some discounts let you select a catalog. If you can, Catalog appears on the
view.
A package counts as one item when calculating the X in Buy at least X
items.
If a bundle is purchased, its items are treated like they were ordered
separately.
Editing a discount
Follow these steps to edit a discount.
1. From Marketing view, identify the campaign that contains the discount that
you want to copy.
2. Click the small arrow on the left side of the campaign. Its discounts appear.
3. Hover over the right side of the discount until its menu icon appears.
4. Click the icon then Edit. To learn about the fields, see Discount fields.
5. Edit the desired information then click Save.
Deleting a discount
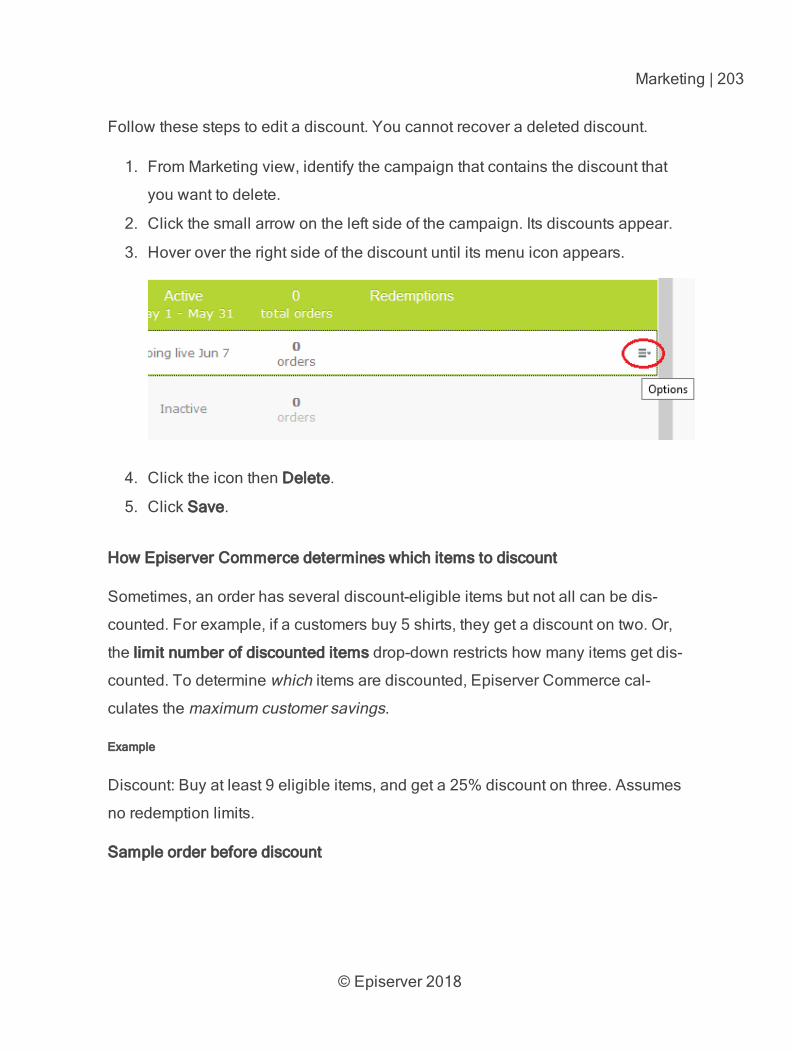
© Episerver 2018
Marketing | 203
Follow these steps to edit a discount. You cannot recover a deleted discount.
1. From Marketing view, identify the campaign that contains the discount that
you want to delete.
2. Click the small arrow on the left side of the campaign. Its discounts appear.
3. Hover over the right side of the discount until its menu icon appears.
4. Click the icon then Delete.
5. Click Save.
How Episerver Commerce determines which items to discount
Sometimes, an order has several discount-eligible items but not all can be dis-
counted. For example, if a customers buy 5 shirts, they get a discount on two. Or,
the limit number of discounted items drop-down restricts how many items get dis-
counted. To determine which items are discounted, Episerver Commerce cal-
culates the maximum customer savings.
Example
Discount: Buy at least 9 eligible items, and get a 25% discount on three. Assumes
no redemption limits.
Sample order before discount
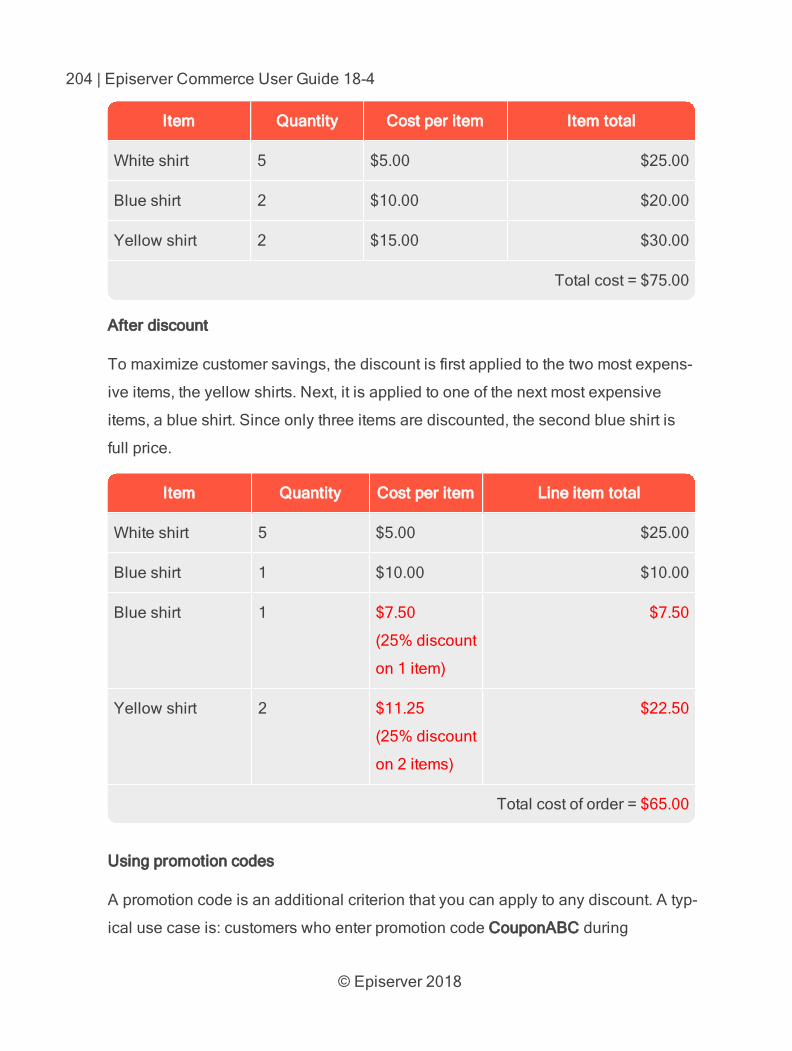
© Episerver 2018
204 | Episerver Commerce User Guide 18-4
Item Quantity Cost per item Item total
White shirt 5 $5.00 $25.00
Blue shirt 2 $10.00 $20.00
Yellow shirt 2 $15.00 $30.00
Total cost = $75.00
After discount
To maximize customer savings, the discount is first applied to the two most expens-
ive items, the yellow shirts. Next, it is applied to one of the next most expensive
items, a blue shirt. Since only three items are discounted, the second blue shirt is
full price.
Item Quantity Cost per item Line item total
White shirt 5 $5.00 $25.00
Blue shirt 1 $10.00 $10.00
Blue shirt 1 $7.50
(25% discount
on 1 item)
$7.50
Yellow shirt 2 $11.25
(25% discount
on 2 items)
$22.50
Total cost of order = $65.00
Using promotion codes
A promotion code is an additional criterion that you can apply to any discount. A typ-
ical use case is: customers who enter promotion code CouponABC during
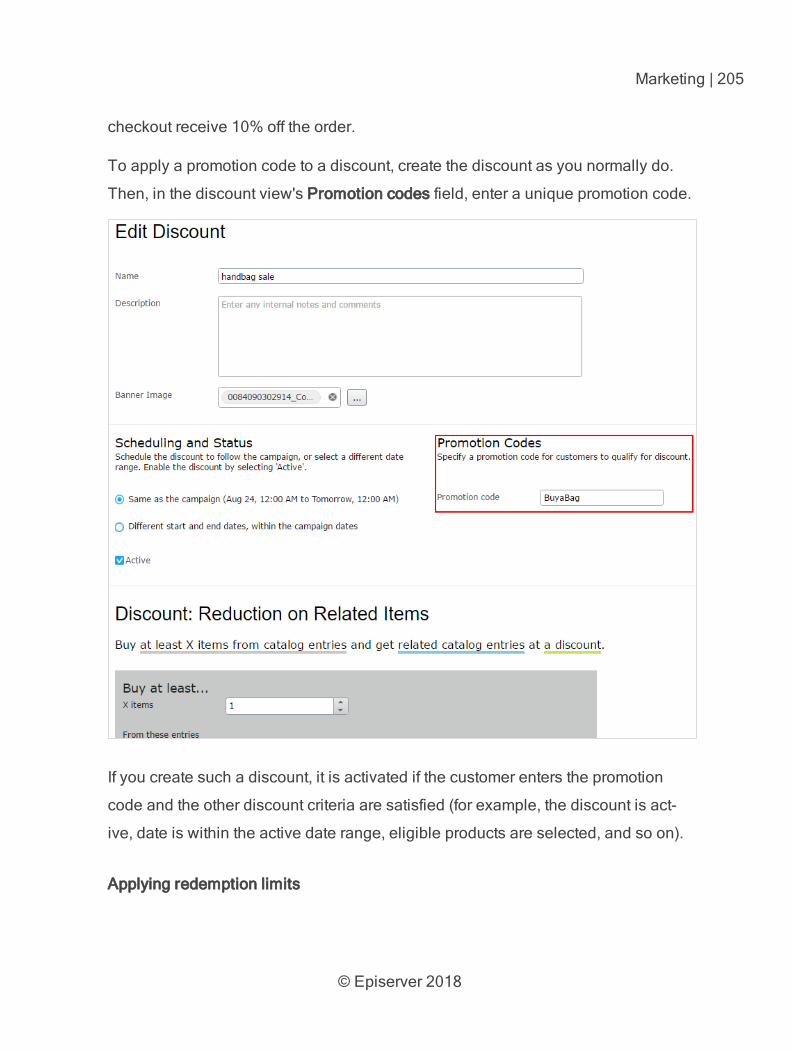
© Episerver 2018
Marketing | 205
checkout receive 10% off the order.
To apply a promotion code to a discount, create the discount as you normally do.
Then, in the discount view's Promotion codes field, enter a unique promotion code.
If you create such a discount, it is activated if the customer enters the promotion
code and the other discount criteria are satisfied (for example, the discount is act-
ive, date is within the active date range, eligible products are selected, and so on).
Applying redemption limits
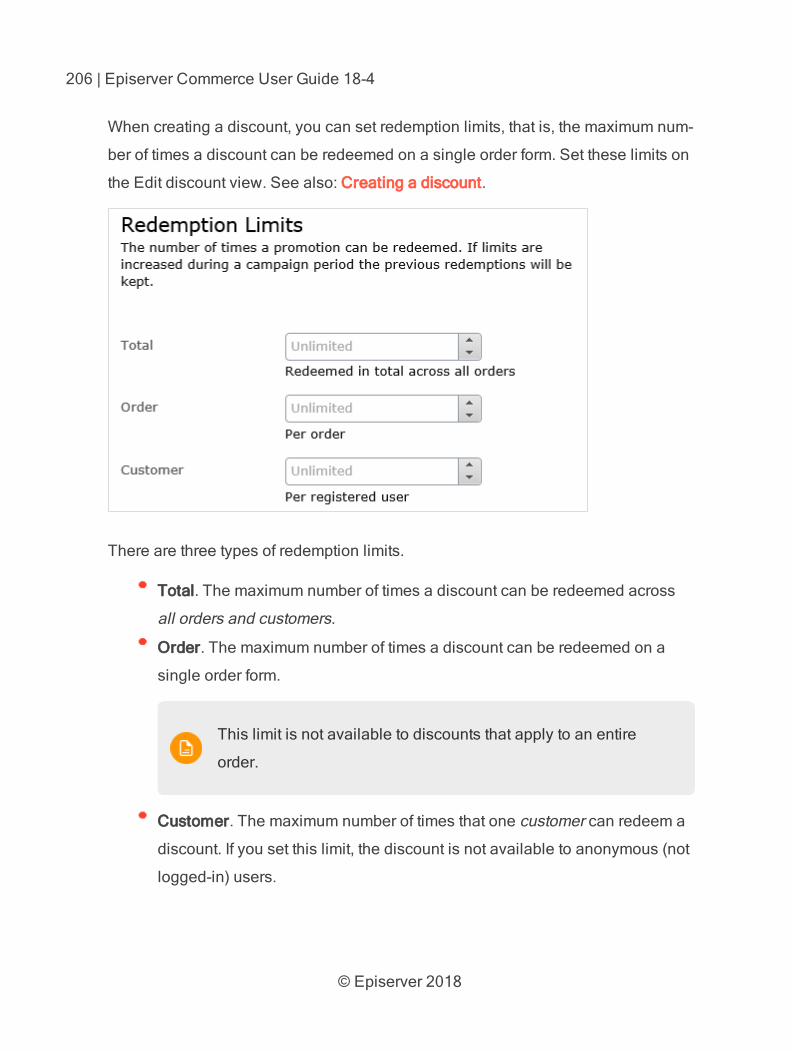
© Episerver 2018
206 | Episerver Commerce User Guide 18-4
When creating a discount, you can set redemption limits, that is, the maximum num-
ber of times a discount can be redeemed on a single order form. Set these limits on
the Edit discount view. See also: Creating a discount.
There are three types of redemption limits.
Total. The maximum number of times a discount can be redeemed across
all orders and customers.
Order. The maximum number of times a discount can be redeemed on a
single order form.
This limit is not available to discounts that apply to an entire
order.
Customer. The maximum number of times that one customer can redeem a
discount. If you set this limit, the discount is not available to anonymous (not
logged-in) users.
© Episerver 2018
Marketing | 207
You can adjust redemption limits at any time during a campaign. If you do, it does
not affect the number of redeemed discounts.
Built-in order and shipping promotions have a default value of one
redemption per order.
Combining redemption limits
You can set a redemption limit on the total number of discounts, or per order, or per
customer. And, you can combine limits. If you set more than one, during validation,
the lowest number of available discounts determines if the discount is still avail-
able. For example, a discount has three limits:
Per discount: 500
Per customer: 10
Per order: 5
If a discount was redeemed 497 times, and the logged-in customer has not
redeemed it yet, and the discount was not used on this order, the maximum number
of redemptions is 3.
To continue the example, once the discount is redeemed 500 times, it is no longer
available.
Here is another example.
Per discount: unlimited
Per customer: 10
Per order: 2
If a customer creates an order and tries to apply this discount to three items, only
two items (the per order limit) are discounted. The third item is full price.
Viewing the number of redeemed discounts
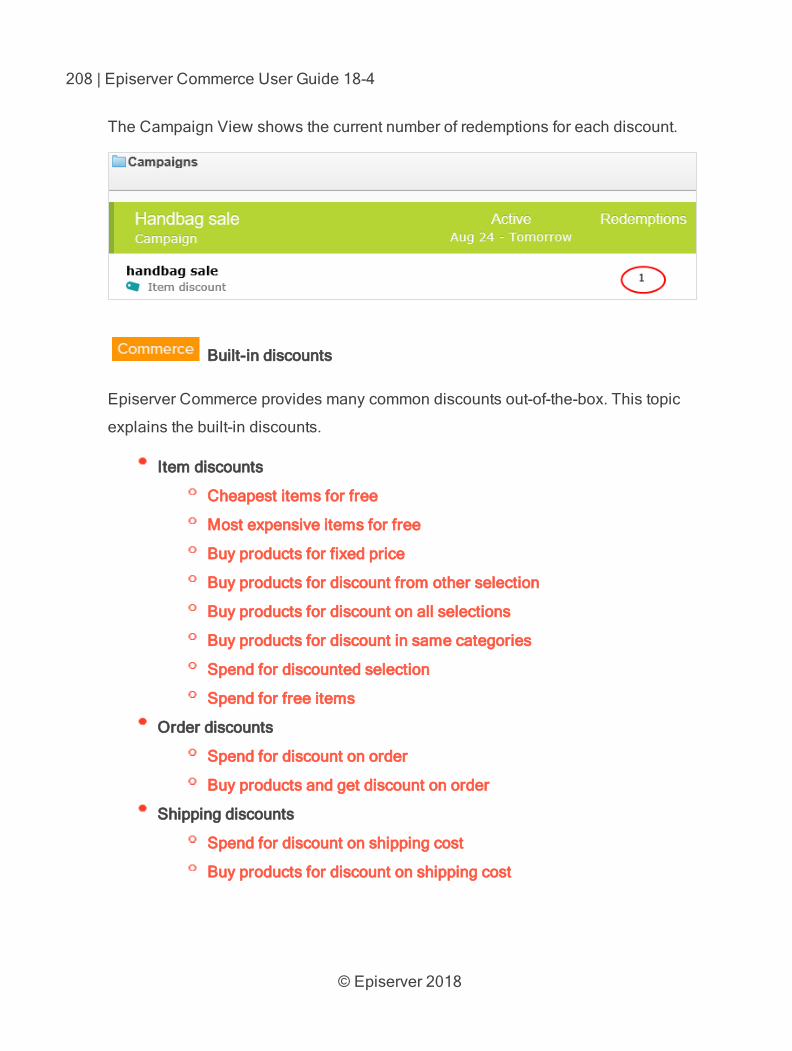
© Episerver 2018
208 | Episerver Commerce User Guide 18-4
The Campaign View shows the current number of redemptions for each discount.
Built-in discounts
Episerver Commerce provides many common discounts out-of-the-box. This topic
explains the built-in discounts.
Item discounts
Cheapest items for free
Most expensive items for free
Buy products for fixed price
Buy products for discount from other selection
Buy products for discount on all selections
Buy products for discount in same categories
Spend for discounted selection
Spend for free items
Order discounts
Spend for discount on order
Buy products and get discount on order
Shipping discounts
Spend for discount on shipping cost
Buy products for discount on shipping cost
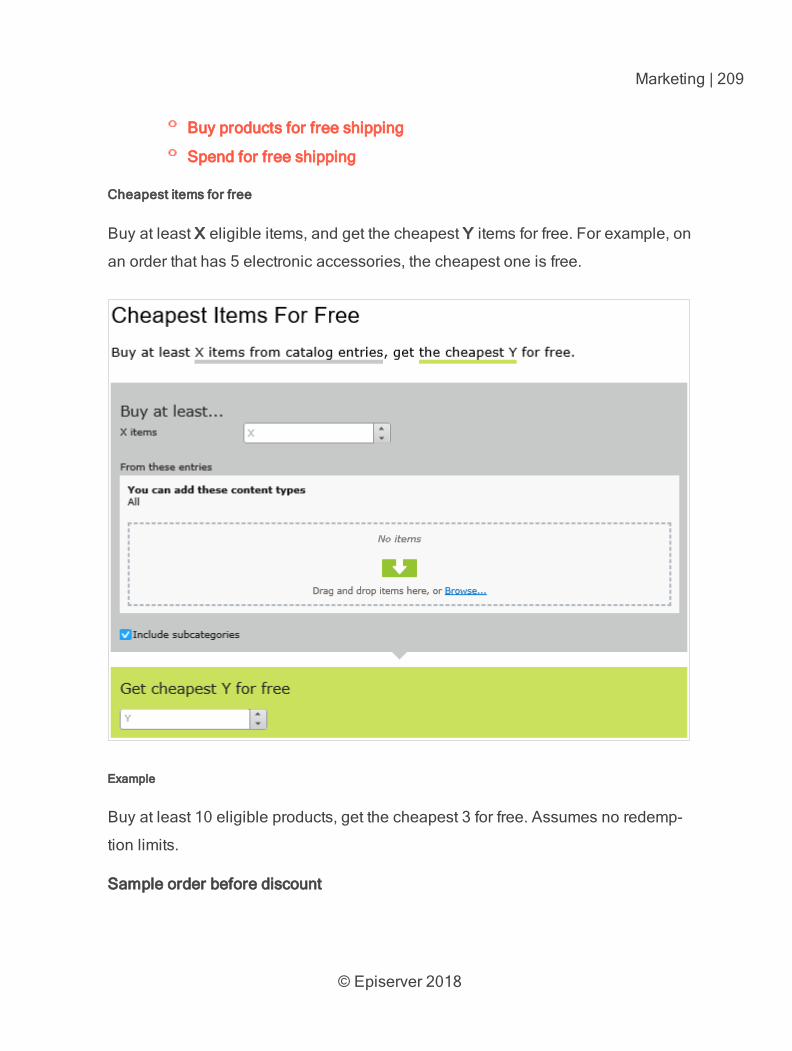
© Episerver 2018
Marketing | 209
Buy products for free shipping
Spend for free shipping
Cheapest items for free
Buy at least X eligible items, and get the cheapest Y items for free. For example, on
an order that has 5 electronic accessories, the cheapest one is free.
Example
Buy at least 10 eligible products, get the cheapest 3 for free. Assumes no redemp-
tion limits.
Sample order before discount

© Episerver 2018
210 | Episerver Commerce User Guide 18-4
Product Quantity Cost per product Line total
White shirt 5 $5.00 $25.00
Blue shirt 3 $10.00 $30.00
Yellow shirt 3 $15.00 $45.00
Total cost of order = $100.00
After discount
Product Quantity Cost per product Line total
White shirt 5 $5.00 $10.00; 3 of 5
shirts are free
Blue shirt 3 $10.00 $30.00
Yellow shirt 3 $15.00 $45.00
Total cost of order = $85.00
The view has two sections:
Buy at least X items.... Enter the number of items then the categories,
products, and so on from which customers may pick. See also: Selecting dis-
count-eligible items.
Get the cheapest Y for free. Enter the number of items to which no charge
will be applied at checkout. Only this number of the cheapest items will be
free.
Most expensive items for free
Buy at least X eligible items, and get the most expensive Y items for free. For
example, if an order includes 5 hardcover books, the most expensive one is free.
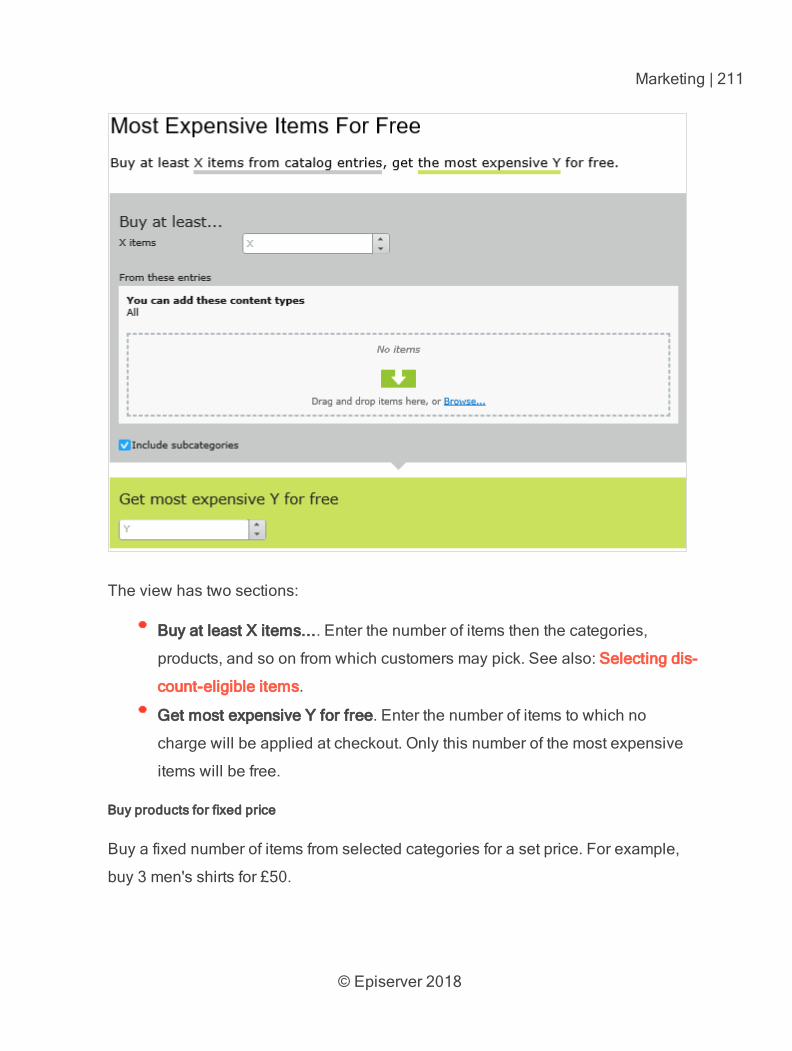
© Episerver 2018
Marketing | 211
The view has two sections:
Buy at least X items.... Enter the number of items then the categories,
products, and so on from which customers may pick. See also: Selecting dis-
count-eligible items.
Get most expensive Y for free. Enter the number of items to which no
charge will be applied at checkout. Only this number of the most expensive
items will be free.
Buy products for fixed price
Buy a fixed number of items from selected categories for a set price. For example,
buy 3 men's shirts for £50.
© Episerver 2018
212 | Episerver Commerce User Guide 18-4
The discount is applied only if the fixed price is less than the items' cost. For
example, you create a fixed price discount: Buy 2 from Top-Tunics for $250.
Buyer A selects two Top-Tunics items: $150 each, $300 total. In this case,
the discount is applied, because the fixed price ($250) is less than the $300
total.
Buyer B selects two Top-Tunics items: $100 each, $200 total. In this case,
the discount is not applied, because the fixed price ($250) exceeds the $200
total.

© Episerver 2018
Marketing | 213
The view has two sections:
© Episerver 2018
214 | Episerver Commerce User Guide 18-4
Buy at least X items.... Enter the number of items then the categories,
products, and so on from which customers may pick. See also: Selecting dis-
count-eligible items.
Receive catalog entries at fixed price. For the above items, enter a fixed
price for each currency. If no amount is entered for a currency, no discount is
available for it.
The list of currencies is determined by the campaign's target
market.
Buy products for discount from other selection
Buy a minimum amount from a group of items to get a discount on a second group
of items. For example, customers who purchase a winter coat get a 30% discount
on scarves, gloves, and hats. There is no relationship between the first set of items
and the second.
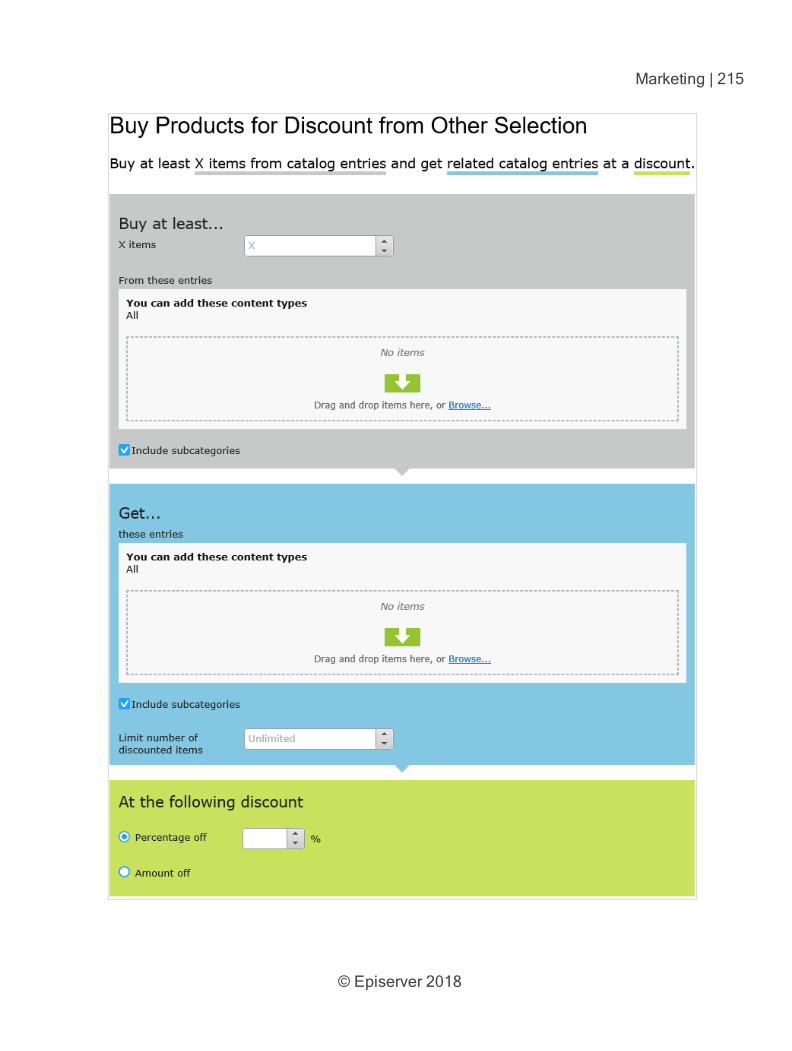
© Episerver 2018
Marketing | 215
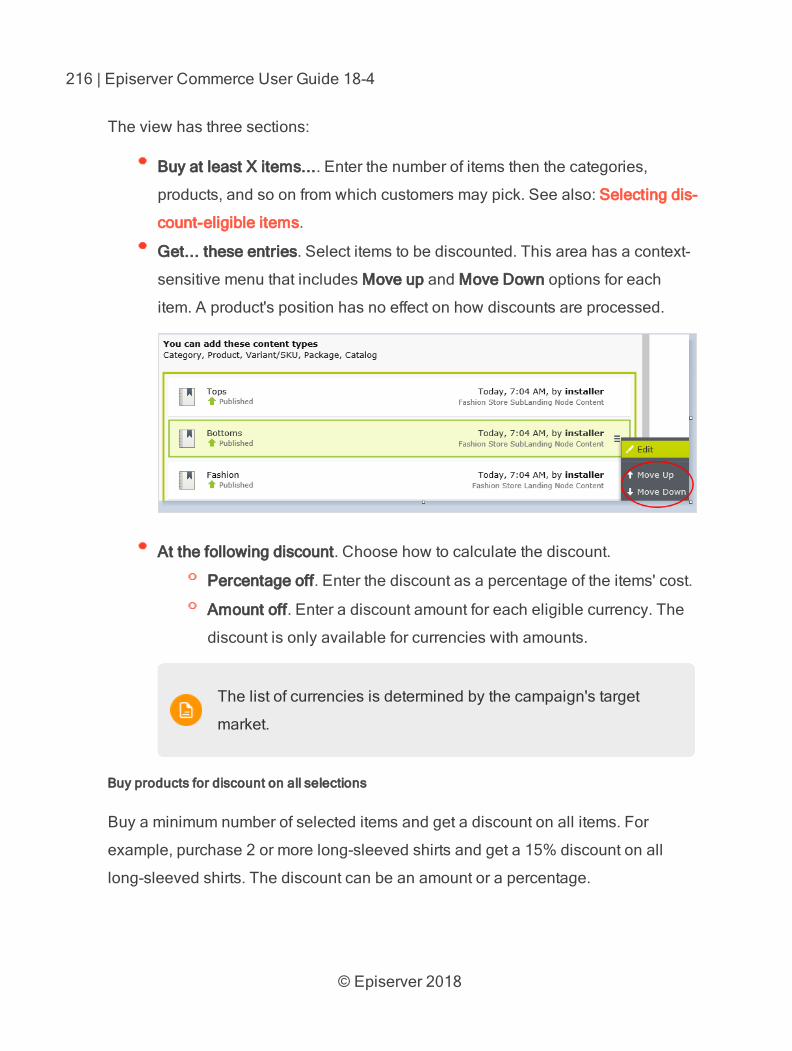
© Episerver 2018
216 | Episerver Commerce User Guide 18-4
The view has three sections:
Buy at least X items.... Enter the number of items then the categories,
products, and so on from which customers may pick. See also: Selecting dis-
count-eligible items.
Get... these entries. Select items to be discounted. This area has a context-
sensitive menu that includes Move up and Move Down options for each
item. A product's position has no effect on how discounts are processed.
At the following discount. Choose how to calculate the discount.
Percentage off. Enter the discount as a percentage of the items' cost.
Amount off. Enter a discount amount for each eligible currency. The
discount is only available for currencies with amounts.
The list of currencies is determined by the campaign's target
market.
Buy products for discount on all selections
Buy a minimum number of selected items and get a discount on all items. For
example, purchase 2 or more long-sleeved shirts and get a 15% discount on all
long-sleeved shirts. The discount can be an amount or a percentage.
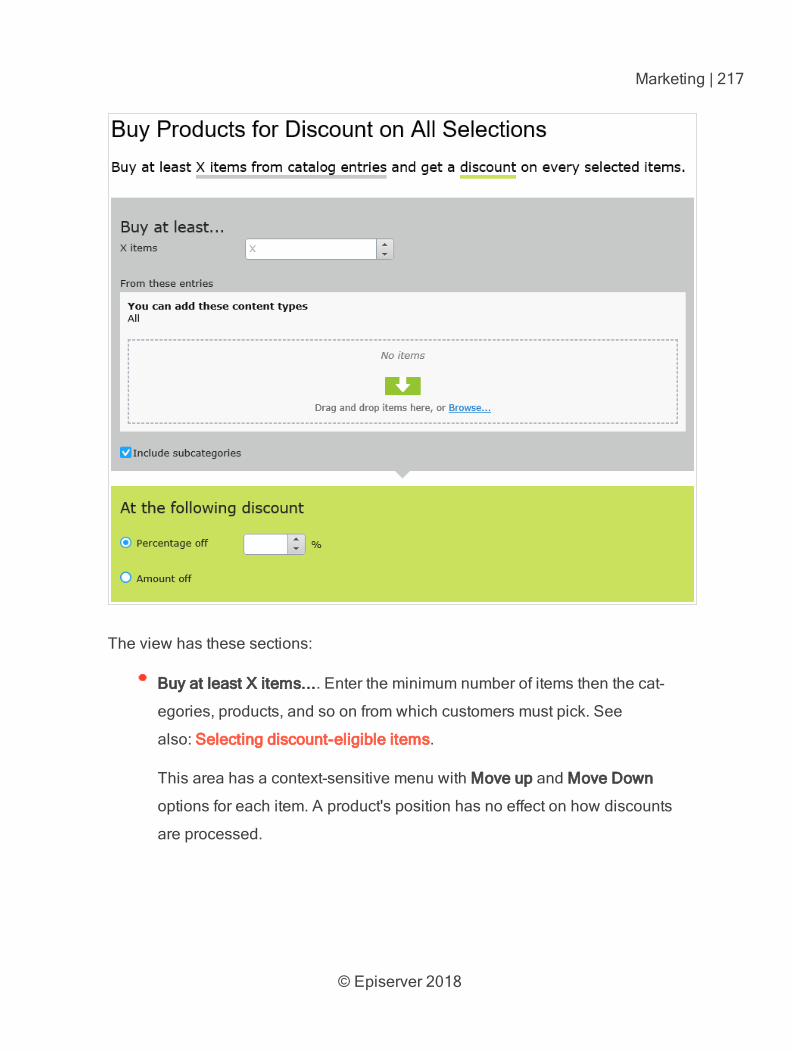
© Episerver 2018
Marketing | 217
The view has these sections:
Buy at least X items.... Enter the minimum number of items then the cat-
egories, products, and so on from which customers must pick. See
also: Selecting discount-eligible items.
This area has a context-sensitive menu with Move up and Move Down
options for each item. A product's position has no effect on how discounts
are processed.
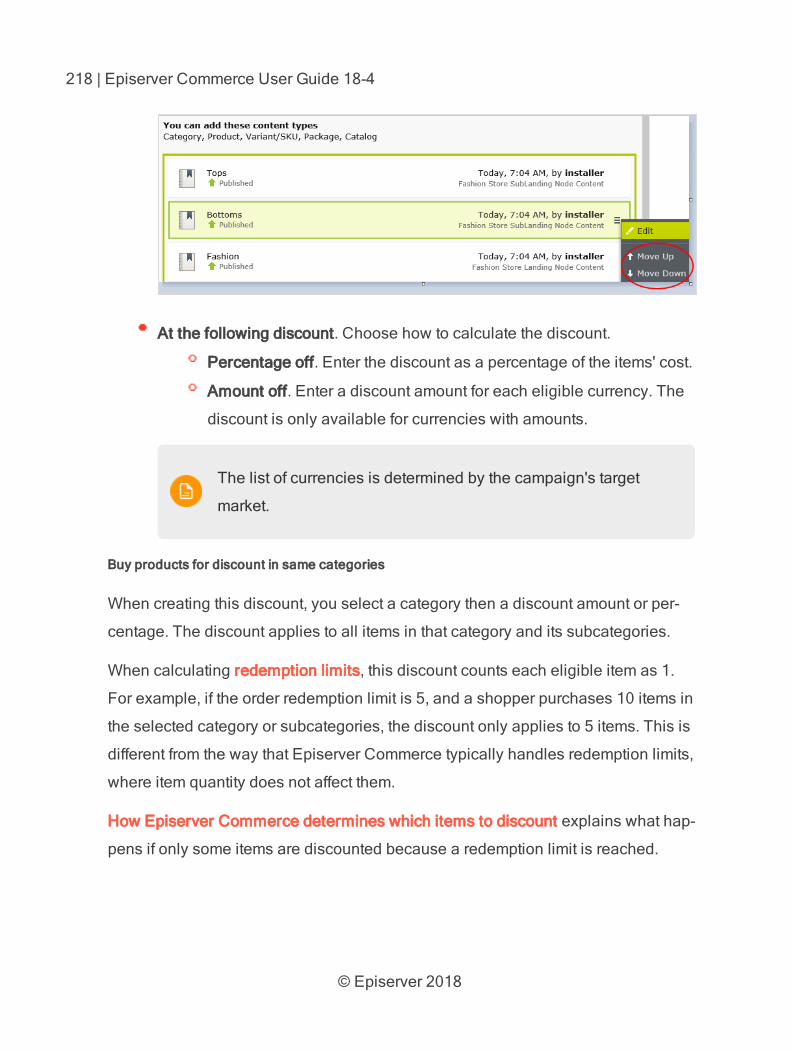
© Episerver 2018
218 | Episerver Commerce User Guide 18-4
At the following discount. Choose how to calculate the discount.
Percentage off. Enter the discount as a percentage of the items' cost.
Amount off. Enter a discount amount for each eligible currency. The
discount is only available for currencies with amounts.
The list of currencies is determined by the campaign's target
market.
Buy products for discount in same categories
When creating this discount, you select a category then a discount amount or per-
centage. The discount applies to all items in that category and its subcategories.
When calculating redemption limits, this discount counts each eligible item as 1.
For example, if the order redemption limit is 5, and a shopper purchases 10 items in
the selected category or subcategories, the discount only applies to 5 items. This is
different from the way that Episerver Commerce typically handles redemption limits,
where item quantity does not affect them.
How Episerver Commerce determines which items to discount explains what hap-
pens if only some items are discounted because a redemption limit is reached.
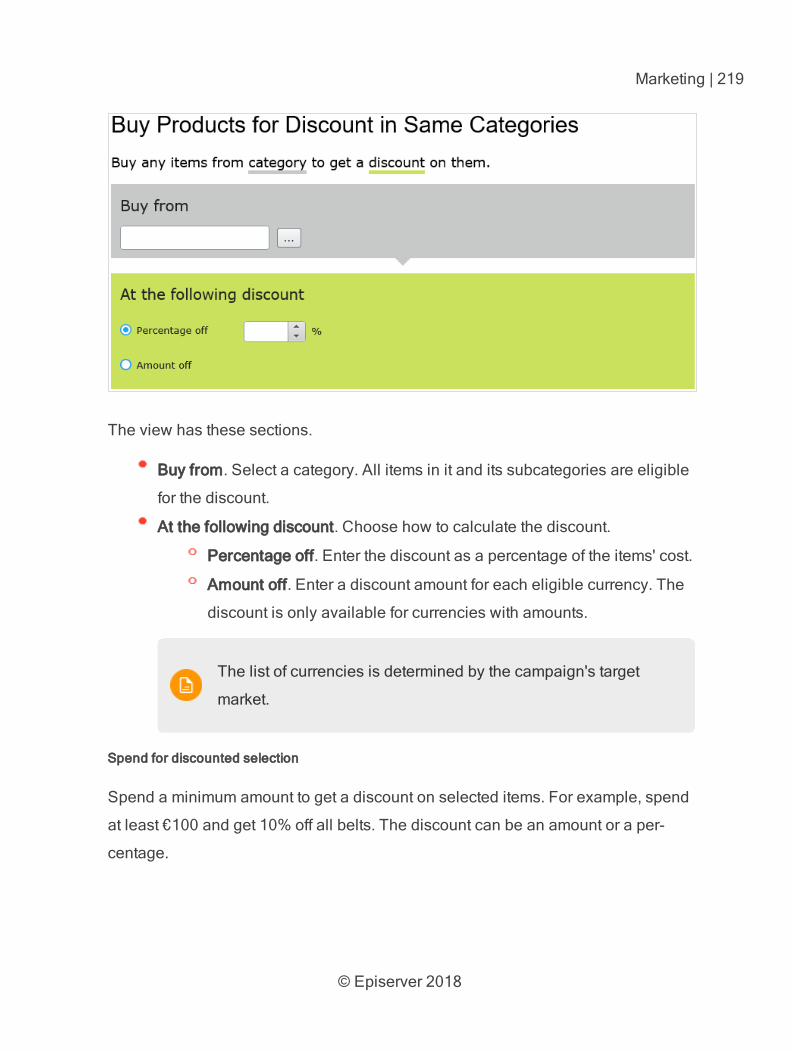
© Episerver 2018
Marketing | 219
The view has these sections.
Buy from. Select a category. All items in it and its subcategories are eligible
for the discount.
At the following discount. Choose how to calculate the discount.
Percentage off. Enter the discount as a percentage of the items' cost.
Amount off. Enter a discount amount for each eligible currency. The
discount is only available for currencies with amounts.
The list of currencies is determined by the campaign's target
market.
Spend for discounted selection
Spend a minimum amount to get a discount on selected items. For example, spend
at least €100 and get 10% off all belts. The discount can be an amount or a per-
centage.
© Episerver 2018
220 | Episerver Commerce User Guide 18-4
The second group of items is independent of the first group. You have total flex-
ibility in determining both groups.

© Episerver 2018
Marketing | 221
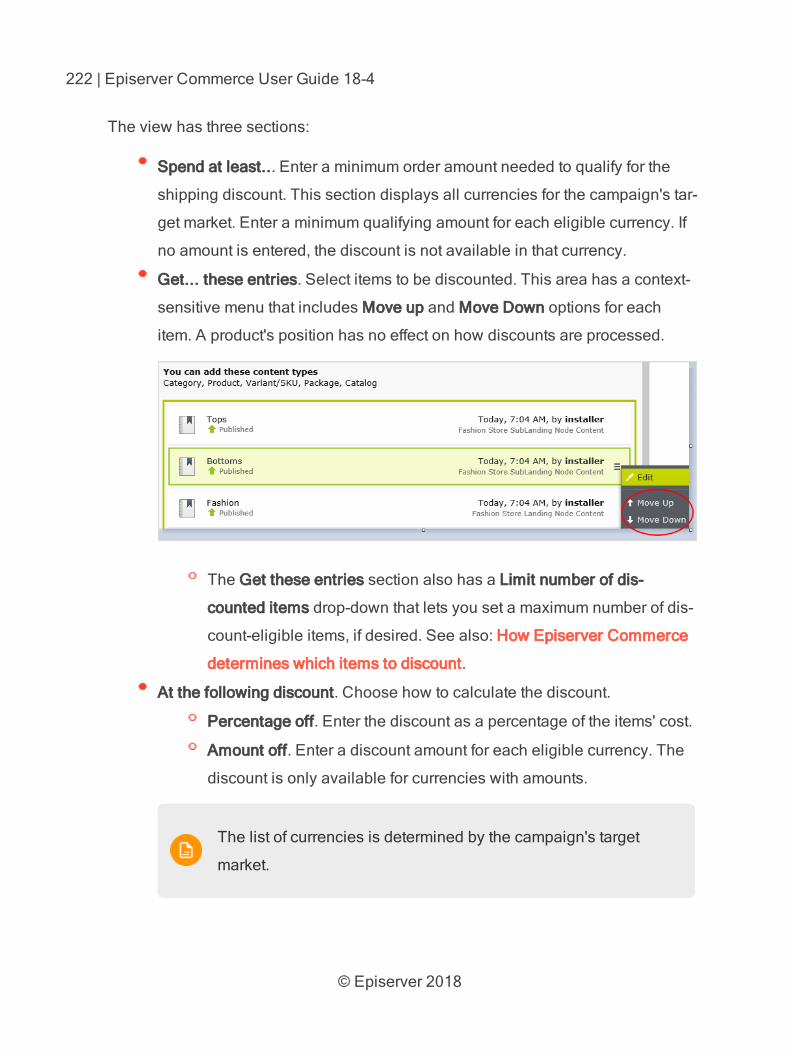
© Episerver 2018
222 | Episerver Commerce User Guide 18-4
The view has three sections:
Spend at least... Enter a minimum order amount needed to qualify for the
shipping discount. This section displays all currencies for the campaign's tar-
get market. Enter a minimum qualifying amount for each eligible currency. If
no amount is entered, the discount is not available in that currency.
Get... these entries. Select items to be discounted. This area has a context-
sensitive menu that includes Move up and Move Down options for each
item. A product's position has no effect on how discounts are processed.
The Get these entries section also has a Limit number of dis-
counted items drop-down that lets you set a maximum number of dis-
count-eligible items, if desired. See also: How Episerver Commerce
determines which items to discount.
At the following discount. Choose how to calculate the discount.
Percentage off. Enter the discount as a percentage of the items' cost.
Amount off. Enter a discount amount for each eligible currency. The
discount is only available for currencies with amounts.
The list of currencies is determined by the campaign's target
market.

© Episerver 2018
Marketing | 223
Spend for free items
Spend a minimum amount on an order and get free items.
The view has two sections:
© Episerver 2018
224 | Episerver Commerce User Guide 18-4
Spend at least.... Displays all currencies for the campaign's target market.
Enter a minimum qualifying amount for each eligible currency. If no amount
is entered, the discount is not available for that currency.
Get free items. Select variants/SKUs or packages that are automatically
added to an order when the minimum amount is spent.
To give away the same product more than once, select it multiple times.
Spend for discount on order
Spend a minimum amount to get a discount on an entire order. For example, spend
at least €100 and get 10% off the order total.
Shipping and taxes excluded from the calculation of the order total. Also, if other dis-
counts are applied to an order before this discount which reduce the order total
below the minimum, this discount is not applied.
With this discount, you typically set a redemption limit of 1 per order.
See Applying redemption limits.
For example, you create the discount "Spend at least $1000 and get
$100 discount off total order amount" but set no redemption limits. If a
customer purchases $2000 worth of items, a discount of $200 is
applied. To limit the discount to $100, set a redemption limit of 1.
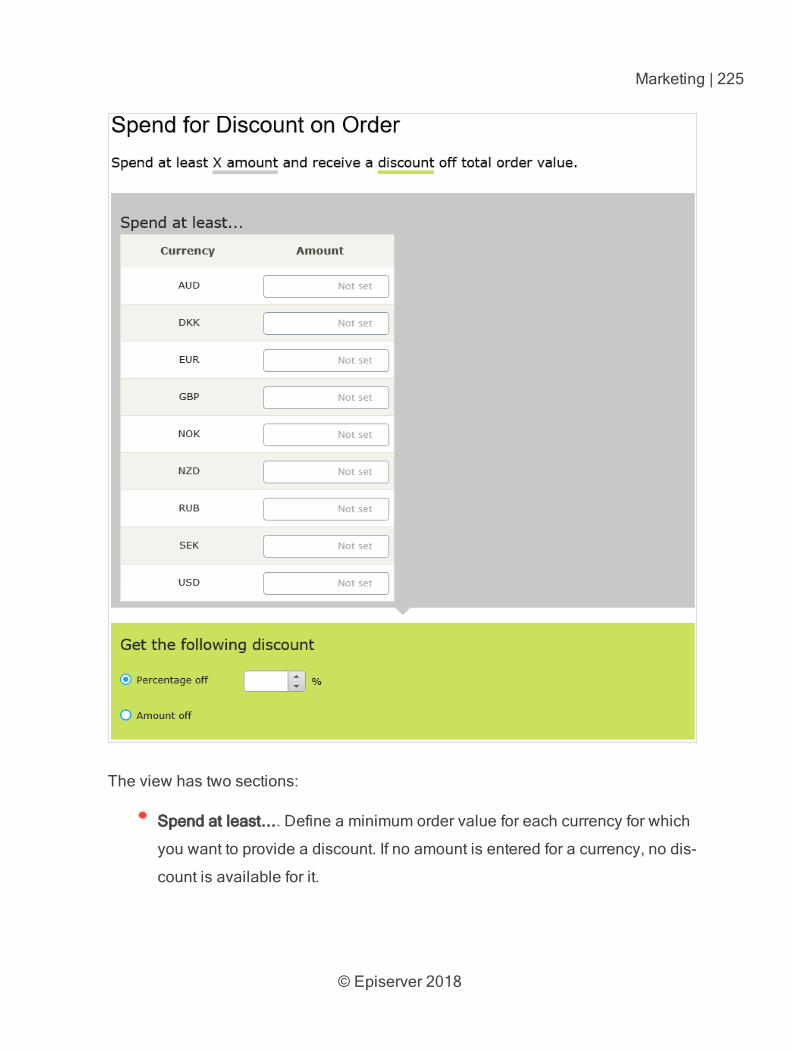
© Episerver 2018
Marketing | 225
The view has two sections:
Spend at least.... Define a minimum order value for each currency for which
you want to provide a discount. If no amount is entered for a currency, no dis-
count is available for it.
© Episerver 2018
226 | Episerver Commerce User Guide 18-4
At the following discount. Choose how to calculate the discount.
Percentage off. Enter the discount as a percentage of the items' cost.
Amount off. Enter a discount amount for each eligible currency. The
discount is only available for currencies with amounts.
The list of currencies is determined by the campaign's target
market.
Examples
Spend at least $1000 and get $100 discount off total order amount.
Customer buys a projector for $1000. There are no shipping costs or taxes.
No other discounts or coupons are applied. Customer gets $100 discount,
so order total is reduced to $900.
Customer buys a tablet for $999. The order has a shipping cost of $20 and
taxes of $10. Customer does not get the $100 discount because the order
total (excluding shipping and taxes) is less than the minimum.
Customer buys a laptop for $1010. There are no shipping costs or taxes.
The order has a promotional code worth $50, which is applied before this dis-
count. Since the adjusted order total, $960, is less than the minimum, the
customer does not get the $100 discount.
Buy products and get discount on order
Buy a minimum number of products and reduce the cost of the order. You determine
which products are eligible, and whether the discount is an amount or a per-
centage.

© Episerver 2018
Marketing | 227
The view has two sections:
Buy at least X items.... Enter the number of items then the categories,
products, and so on from which customers may pick. See also: Selecting dis-
count-eligible items.
Get the following discount. Define the discount as an amount or a per-
centage
If an amount, enter an amount for each currency for which you want to
provide a discount.
© Episerver 2018
228 | Episerver Commerce User Guide 18-4
The list of currencies is determined by the campaign's
target market.
If a percentage, it applies to all available currencies.
Spend for discount on shipping cost
Spend a minimum amount on an order and get discounted shipping costs. The dis-
count can be an amount or a percentage. Also, you choose which shipping meth-
ods qualify.
With this discount, you typically set a redemption limit of 1 per order.
See Applying redemption limits.
For example, you create the discount "Spend at least $100 and get
25% off shipping cost" but set no redemption limits. If a customer pur-
chases $200 worth of items, he gets a 25% discount for each $100, so
a 50% discount. To limit the discount to 25%, set a order redemption
limit of 1.
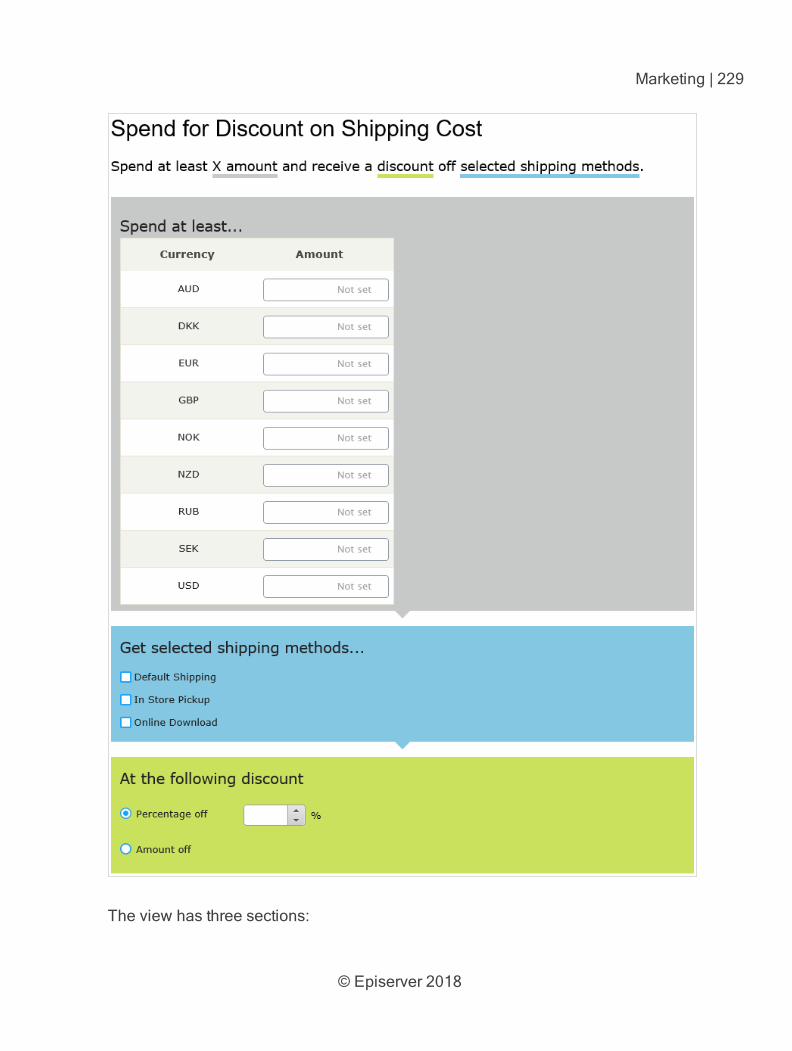
© Episerver 2018
Marketing | 229
The view has three sections:
© Episerver 2018
230 | Episerver Commerce User Guide 18-4
Spend at least... Enter a minimum order amount needed to qualify for the
shipping discount. This section displays all currencies for the campaign's tar-
get market. Enter a minimum qualifying amount for each eligible currency. If
no amount is entered, the discount is not available in that currency.
Get selected shipping methods.... Select shipping method eligible for a dis-
count. This section displays all shipping methods for a campaign's target
market.
At the following discount. Choose how to calculate the discount.
Percentage off. Enter the discount as a percentage of the items' cost.
Amount off. Enter a discount amount for each eligible currency. The
discount is only available for currencies with amounts.
The list of currencies is determined by the campaign's target
market.
Buy products for discount on shipping cost
Buy a minimum number of items to get a reduction in shipping cost. For example,
buy at least 3 shirts and get 25% off shipping. You determine which shipping meth-
ods are eligible, and whether the price reduction is an amount or a percentage.
With this discount, you typically set a redemption limit of 1 per order.
See Applying redemption limits.
For example, you create the discount "Buy at least three items and get
25% off shipping cost" but set no redemption limits. If a customer pur-
chases six items, he gets a 25% discount for each three items, so a
50% discount. To limit the discount to 25%, set a redemption limit of 1.
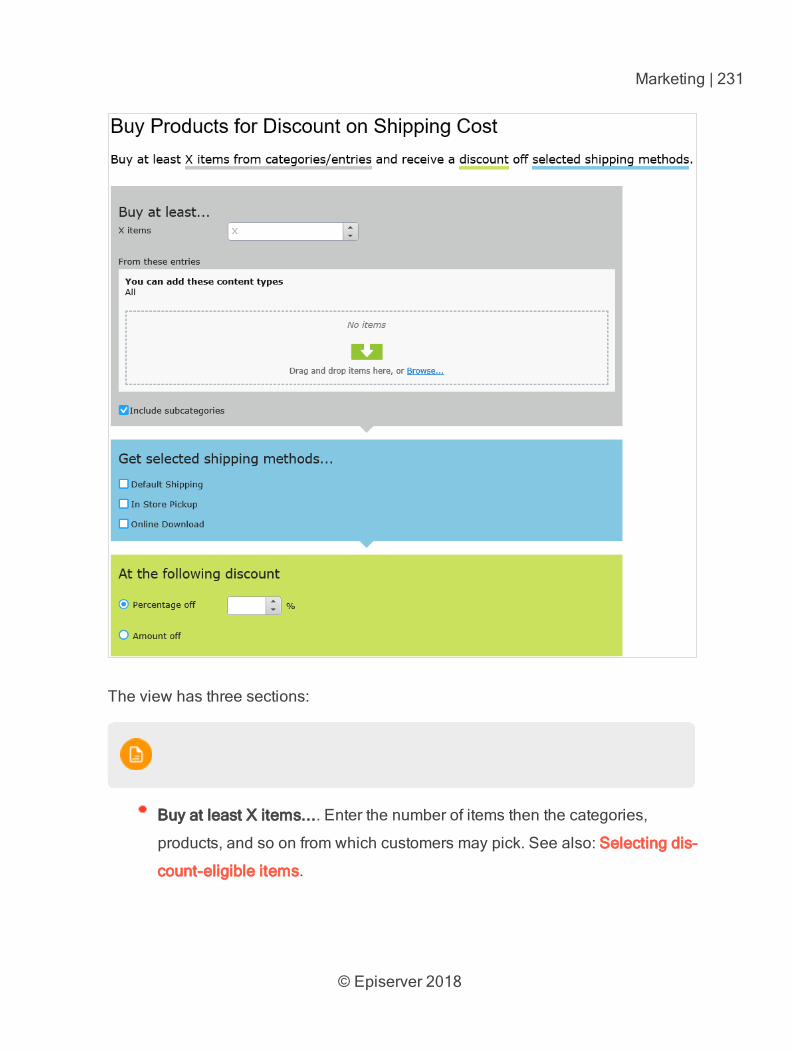
© Episerver 2018
Marketing | 231
The view has three sections:
Buy at least X items.... Enter the number of items then the categories,
products, and so on from which customers may pick. See also: Selecting dis-
count-eligible items.
© Episerver 2018
232 | Episerver Commerce User Guide 18-4
Get selected shipping methods.... Select shipping method eligible for a dis-
count. This section displays all shipping methods for a campaign's target
market.
At the following discount. Choose how to calculate the discount.
Percentage off. Enter the discount as a percentage of the items' cost.
Amount off. Enter a discount amount for each eligible currency. The
discount is only available for currencies with amounts.
The list of currencies is determined by the campaign's target
market.
Buy products for free shipping
Buy a minimum number of items to get free shipping. For example, buy at least 3
ties and get free shipping. You determine which shipping methods are eligible.
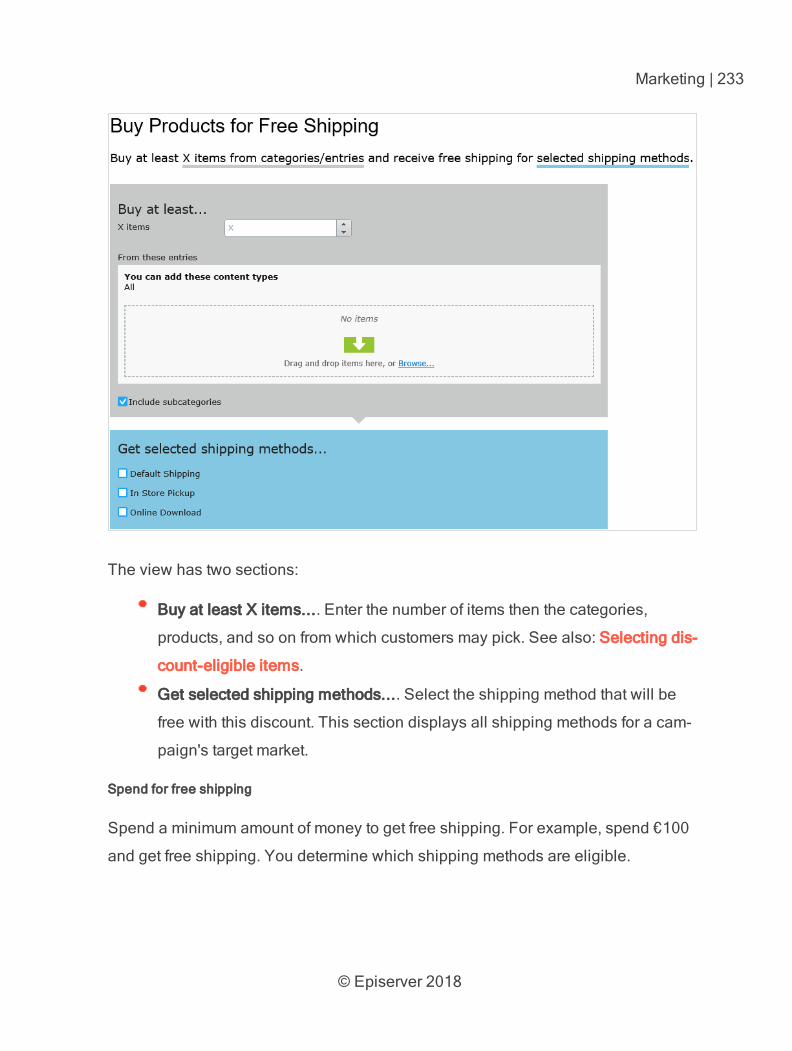
© Episerver 2018
Marketing | 233
The view has two sections:
Buy at least X items.... Enter the number of items then the categories,
products, and so on from which customers may pick. See also: Selecting dis-
count-eligible items.
Get selected shipping methods.... Select the shipping method that will be
free with this discount. This section displays all shipping methods for a cam-
paign's target market.
Spend for free shipping
Spend a minimum amount of money to get free shipping. For example, spend €100
and get free shipping. You determine which shipping methods are eligible.

© Episerver 2018
234 | Episerver Commerce User Guide 18-4
The view has two sections:
Spend at least.... Enter a minimum order amount needed to qualify for free
shipping. This section displays all currencies for the campaign's target mar-
ket. Enter a minimum qualifying amount for each eligible currency. If no
amount is entered, the discount is not available in that currency
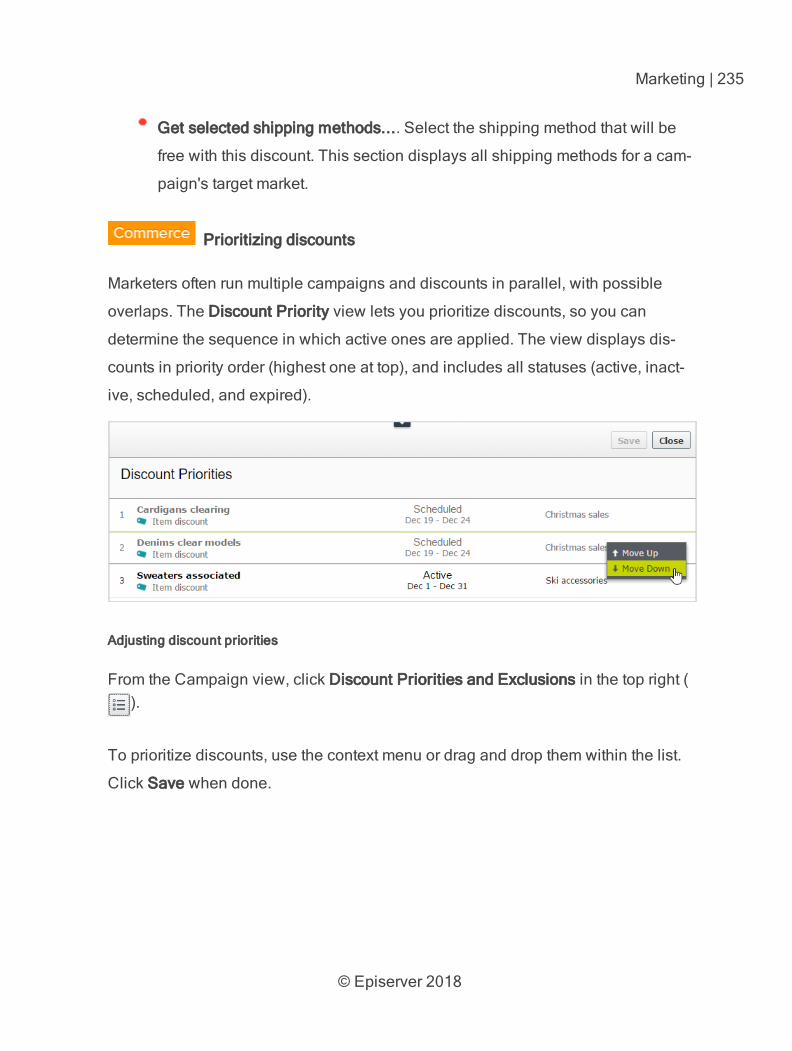
© Episerver 2018
Marketing | 235
Get selected shipping methods.... Select the shipping method that will be
free with this discount. This section displays all shipping methods for a cam-
paign's target market.
Prioritizing discounts
Marketers often run multiple campaigns and discounts in parallel, with possible
overlaps. The Discount Priority view lets you prioritize discounts, so you can
determine the sequence in which active ones are applied. The view displays dis-
counts in priority order (highest one at top), and includes all statuses (active, inact-
ive, scheduled, and expired).
Adjusting discount priorities
From the Campaign view, click Discount Priorities and Exclusions in the top right ().
To prioritize discounts, use the context menu or drag and drop them within the list.
Click Save when done.
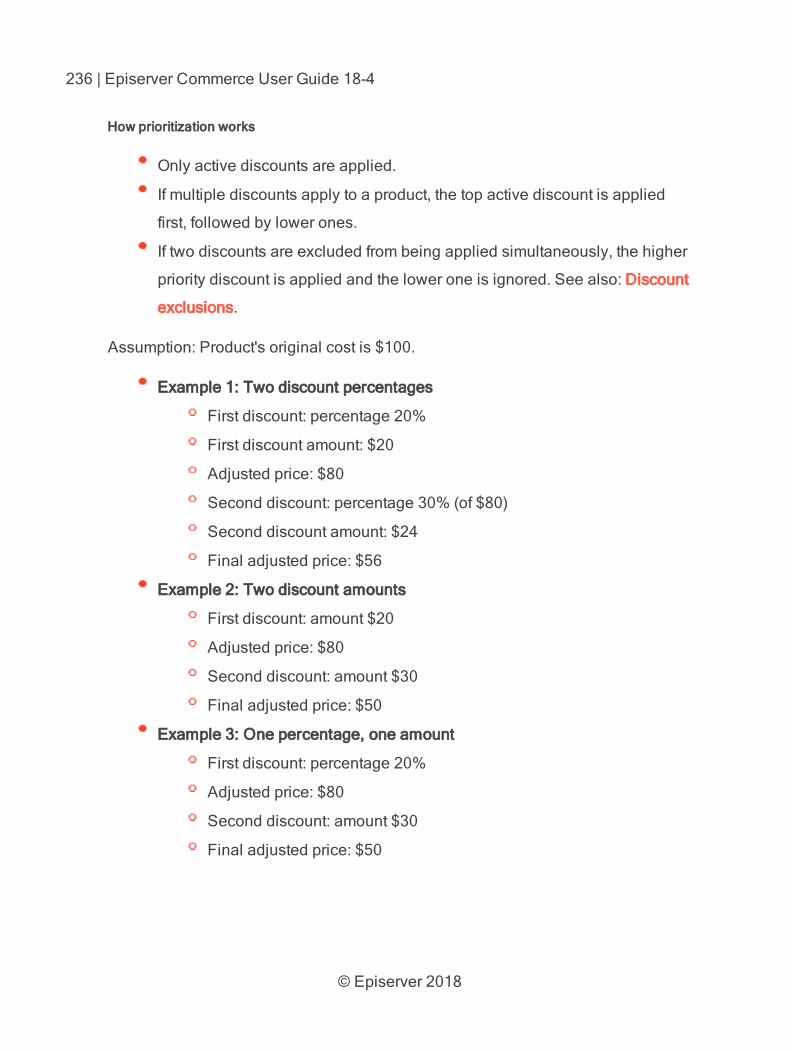
© Episerver 2018
236 | Episerver Commerce User Guide 18-4
How prioritization works
Only active discounts are applied.
If multiple discounts apply to a product, the top active discount is applied
first, followed by lower ones.
If two discounts are excluded from being applied simultaneously, the higher
priority discount is applied and the lower one is ignored. See also: Discount
exclusions.
Assumption: Product's original cost is $100.
Example 1: Two discount percentages
First discount: percentage 20%
First discount amount: $20
Adjusted price: $80
Second discount: percentage 30% (of $80)
Second discount amount: $24
Final adjusted price: $56
Example 2: Two discount amounts
First discount: amount $20
Adjusted price: $80
Second discount: amount $30
Final adjusted price: $50
Example 3: One percentage, one amount
First discount: percentage 20%
Adjusted price: $80
Second discount: amount $30
Final adjusted price: $50
© Episerver 2018
Marketing | 237
Example 4: One amount, one percentage
First discount: amount $30
Adjusted price: $70
Second discount: percentage 20%
Second discount amount: $14
Final adjusted price: $56
Discount exclusions
To any discount, you can apply exclusions: campaigns or discounts that cannot be
combined with the current discount. You can apply an exclusion to individual dis-
counts, all discounts in one more campaigns, or all other discounts.
For example, you are running a sale where automotive supplies are 20% off. Cus-
tomers should not be able to combine this discount with the Get cheapest item free
discount. To create this exclusion, follow these steps.
1. From Campaign view, click Discount Priorities and Exclusions in the top right
( ).
2. Select the discount to which you will apply exclusions. To continue the above
example, select automotive supplies 20% off.
3. Click Add to the right of the Cannot be combined with field.
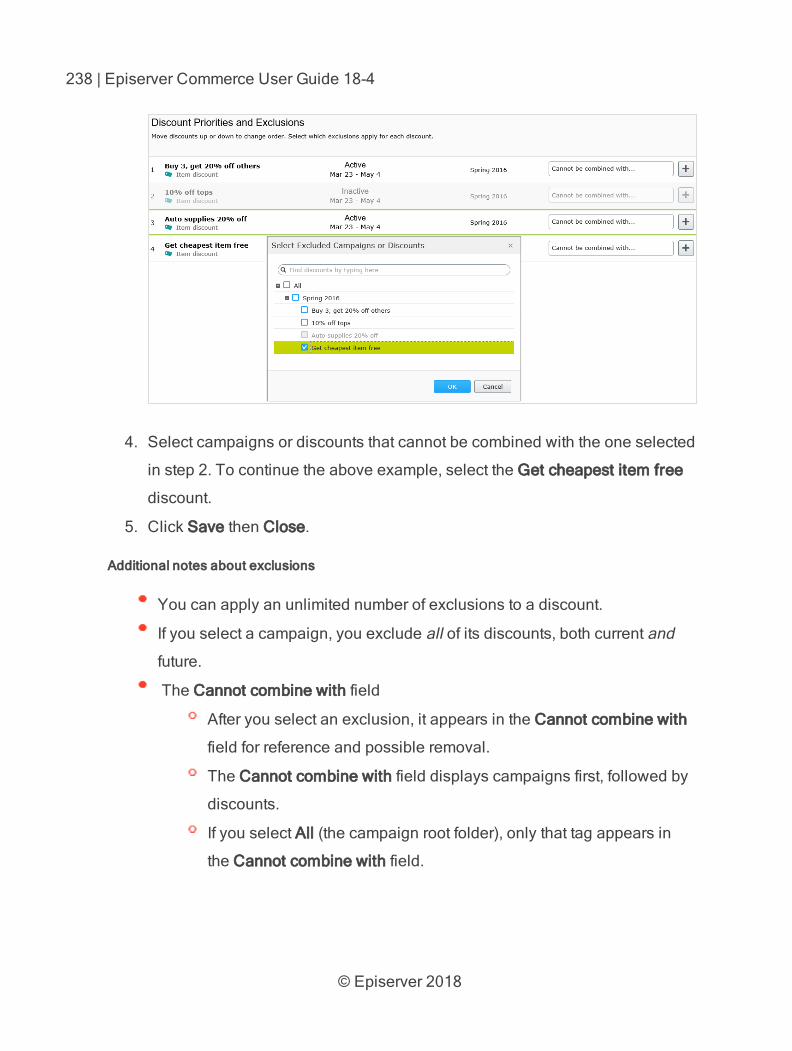
© Episerver 2018
238 | Episerver Commerce User Guide 18-4
4. Select campaigns or discounts that cannot be combined with the one selected
in step 2. To continue the above example, select the Get cheapest item free
discount.
5. Click Save then Close.
Additional notes about exclusions
You can apply an unlimited number of exclusions to a discount.
If you select a campaign, you exclude all of its discounts, both current and
future.
The Cannot combine with field
After you select an exclusion, it appears in the Cannot combine with
field for reference and possible removal.
The Cannot combine with field displays campaigns first, followed by
discounts.
If you select All (the campaign root folder), only that tag appears in
the Cannot combine with field.
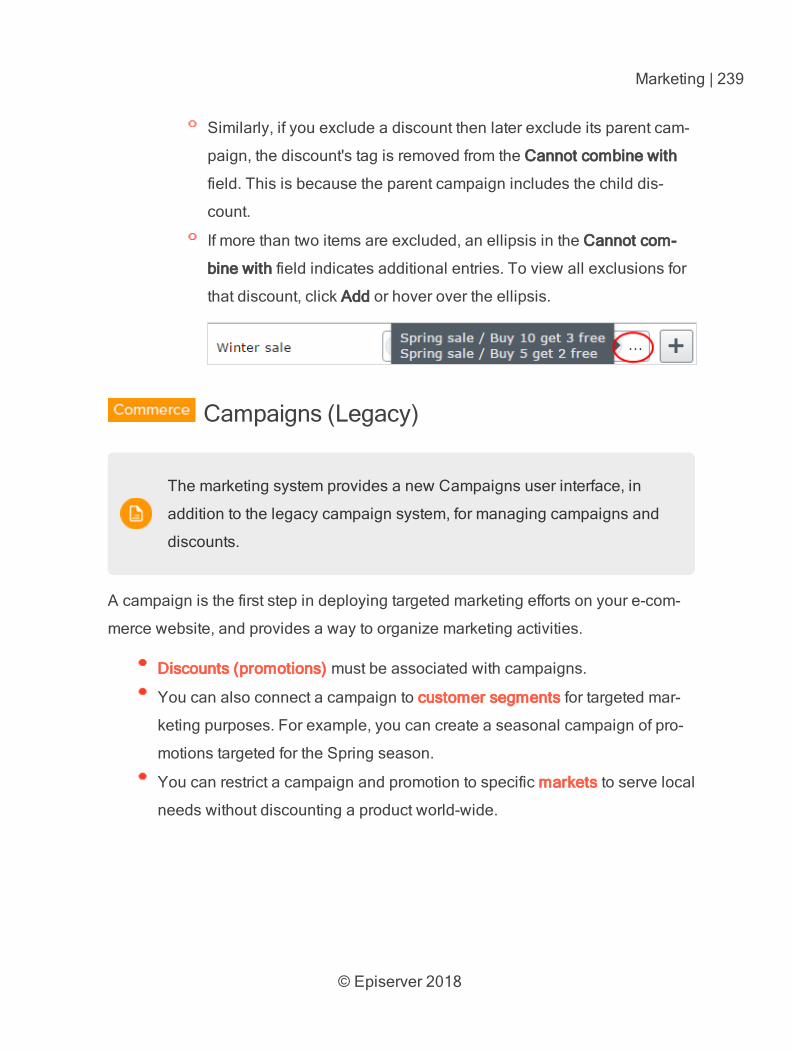
© Episerver 2018
Marketing | 239
Similarly, if you exclude a discount then later exclude its parent cam-
paign, the discount's tag is removed from the Cannot combine with
field. This is because the parent campaign includes the child dis-
count.
If more than two items are excluded, an ellipsis in the Cannot com-
bine with field indicates additional entries. To view all exclusions for
that discount, click Add or hover over the ellipsis.
Campaigns (Legacy)
The marketing system provides a new Campaigns user interface, in
addition to the legacy campaign system, for managing campaigns and
discounts.
A campaign is the first step in deploying targeted marketing efforts on your e-com-
merce website, and provides a way to organize marketing activities.
Discounts (promotions) must be associated with campaigns.
You can also connect a campaign to customer segments for targeted mar-
keting purposes. For example, you can create a seasonal campaign of pro-
motions targeted for the Spring season.
You can restrict a campaign and promotion to specific markets to serve local
needs without discounting a product world-wide.
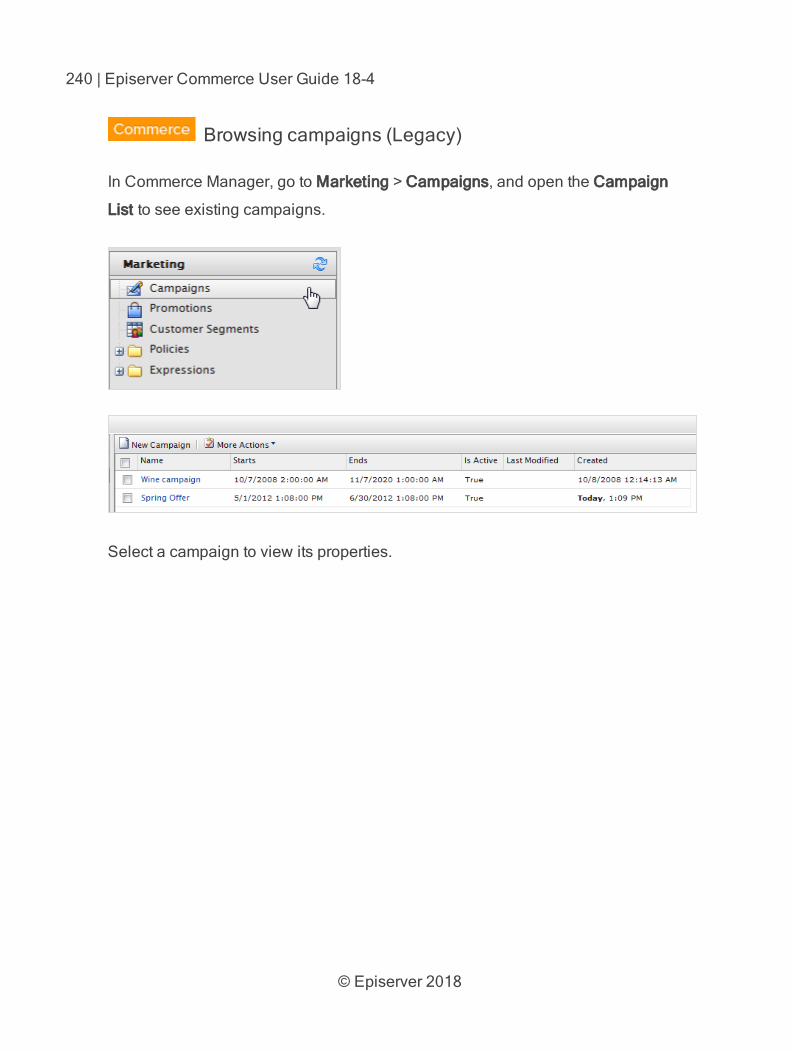
© Episerver 2018
240 | Episerver Commerce User Guide 18-4
Browsing campaigns (Legacy)
In Commerce Manager, go to Marketing > Campaigns, and open the Campaign
List to see existing campaigns.
Select a campaign to view its properties.
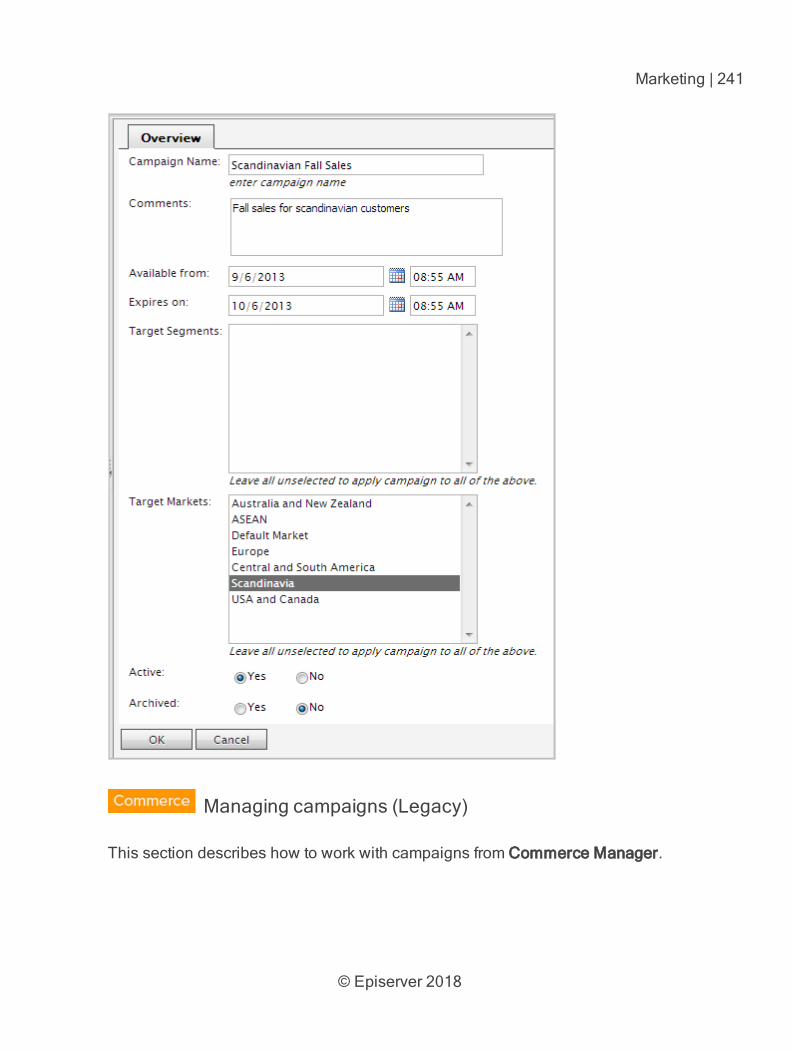
© Episerver 2018
Marketing | 241
Managing campaigns (Legacy)
This section describes how to work with campaigns from Commerce Manager.
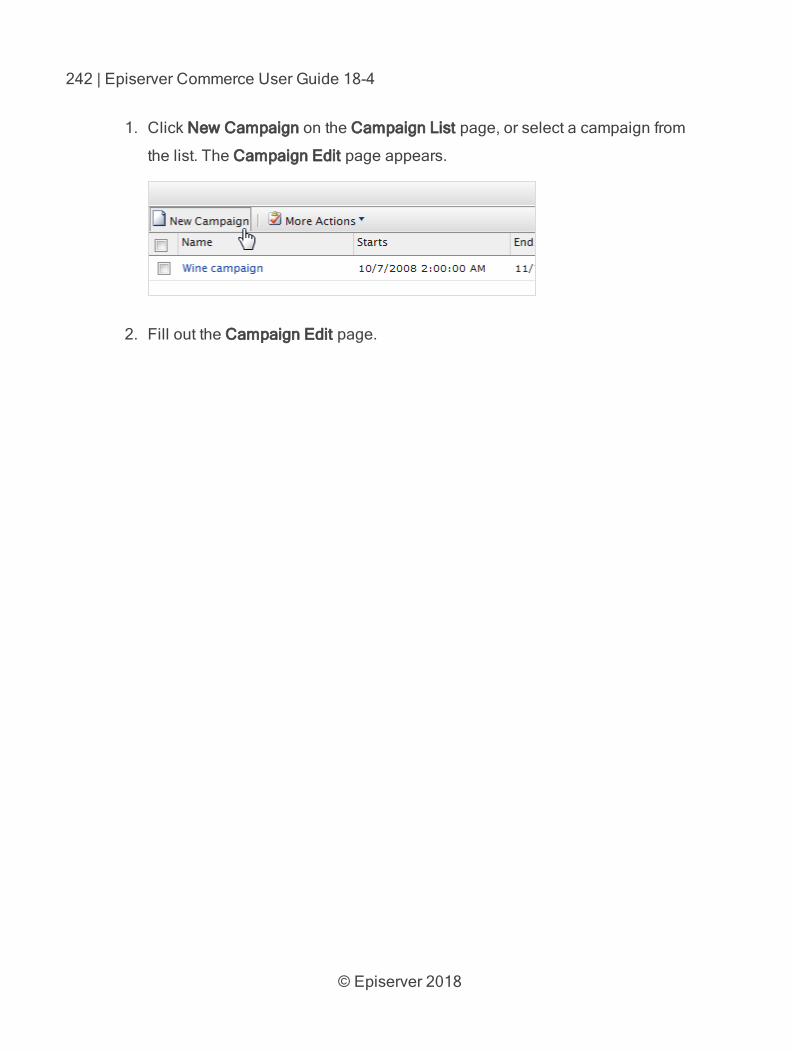
© Episerver 2018
242 | Episerver Commerce User Guide 18-4
1. Click New Campaign on the Campaign List page, or select a campaign from
the list. The Campaign Edit page appears.
2. Fill out the Campaign Edit page.
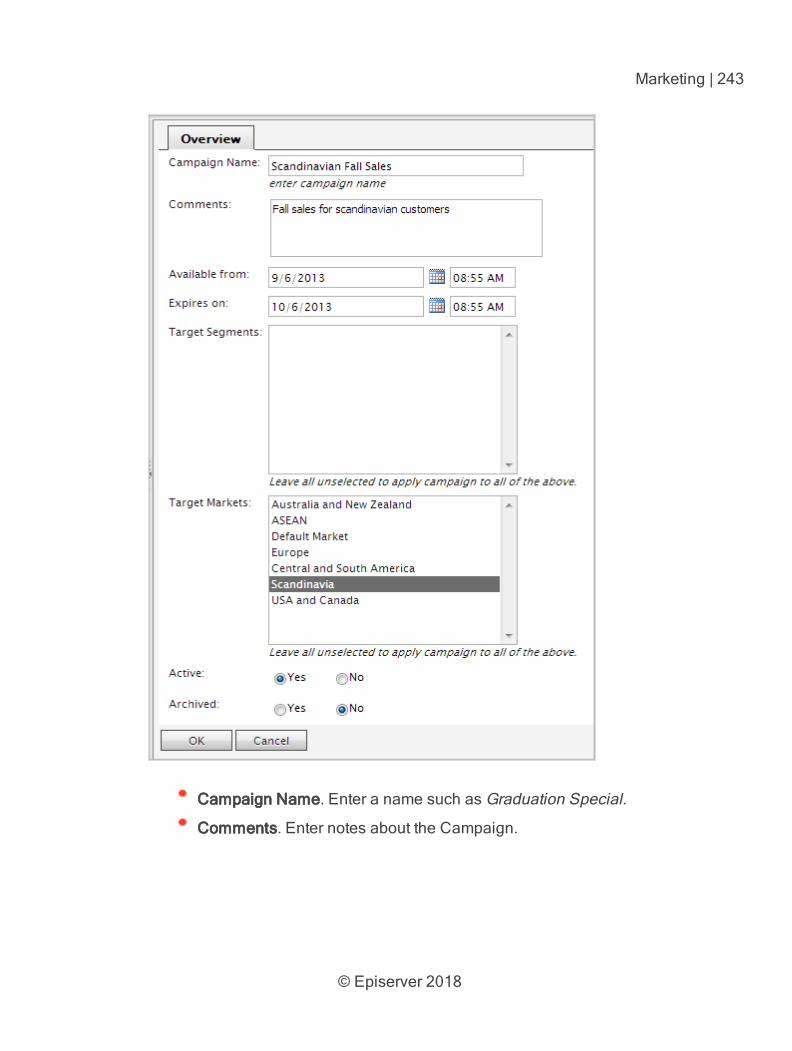
© Episerver 2018
Marketing | 243
Campaign Name. Enter a name such as Graduation Special.
Comments. Enter notes about the Campaign.
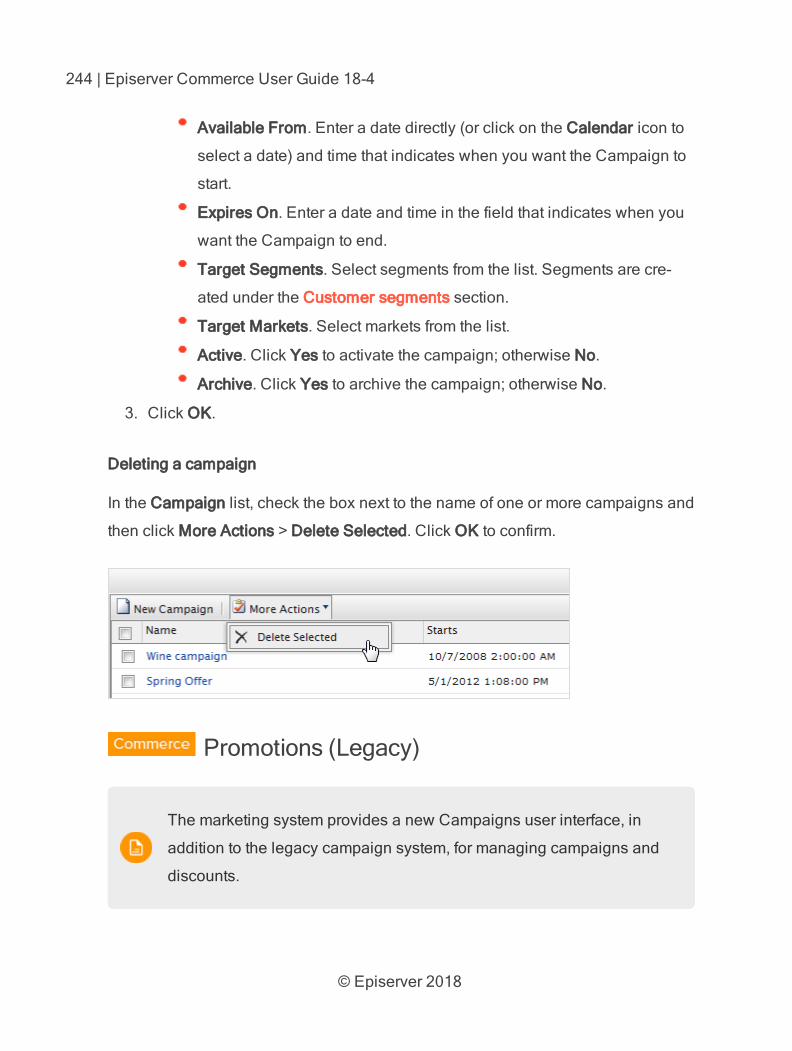
© Episerver 2018
244 | Episerver Commerce User Guide 18-4
Available From. Enter a date directly (or click on the Calendar icon to
select a date) and time that indicates when you want the Campaign to
start.
Expires On. Enter a date and time in the field that indicates when you
want the Campaign to end.
Target Segments. Select segments from the list. Segments are cre-
ated under the Customer segments section.
Target Markets. Select markets from the list.
Active. Click Yes to activate the campaign; otherwise No.
Archive. Click Yes to archive the campaign; otherwise No.
3. Click OK.
Deleting a campaign
In the Campaign list, check the box next to the name of one or more campaigns and
then click More Actions > Delete Selected. Click OK to confirm.
Promotions (Legacy)
The marketing system provides a new Campaigns user interface, in
addition to the legacy campaign system, for managing campaigns and
discounts.
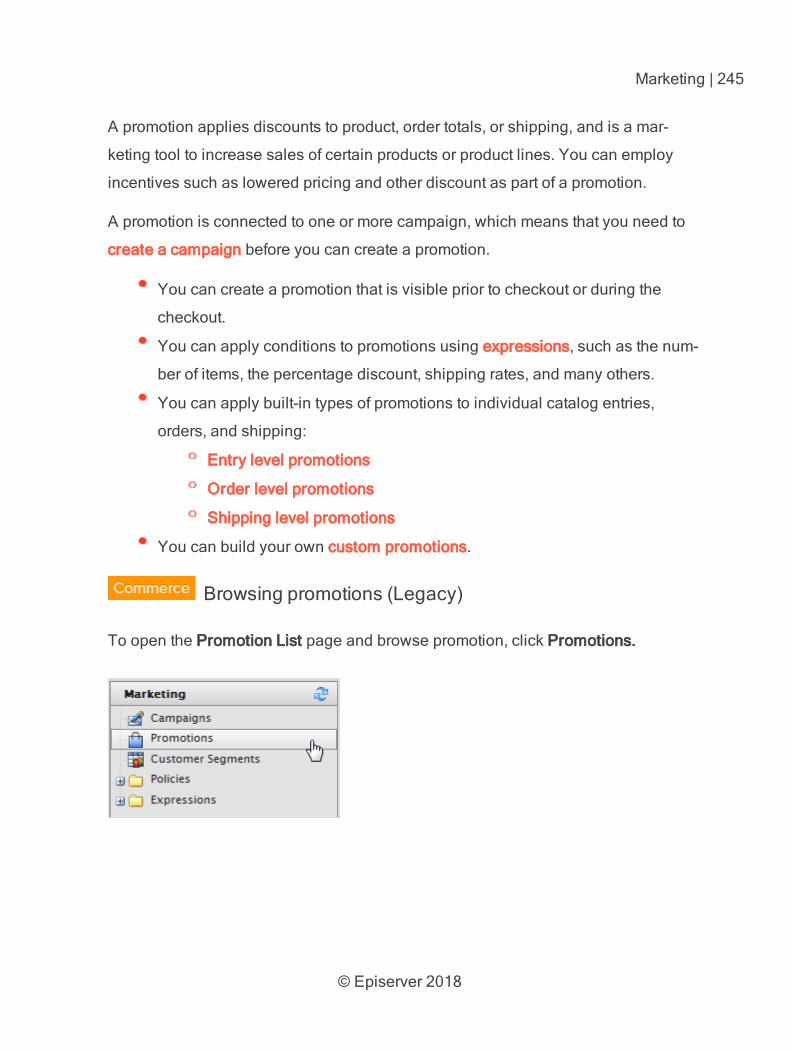
© Episerver 2018
Marketing | 245
A promotion applies discounts to product, order totals, or shipping, and is a mar-
keting tool to increase sales of certain products or product lines. You can employ
incentives such as lowered pricing and other discount as part of a promotion.
A promotion is connected to one or more campaign, which means that you need to
create a campaign before you can create a promotion.
You can create a promotion that is visible prior to checkout or during the
checkout.
You can apply conditions to promotions using expressions, such as the num-
ber of items, the percentage discount, shipping rates, and many others.
You can apply built-in types of promotions to individual catalog entries,
orders, and shipping:
Entry level promotions
Order level promotions
Shipping level promotions
You can build your own custom promotions.
Browsing promotions (Legacy)
To open the Promotion List page and browse promotion, click Promotions.
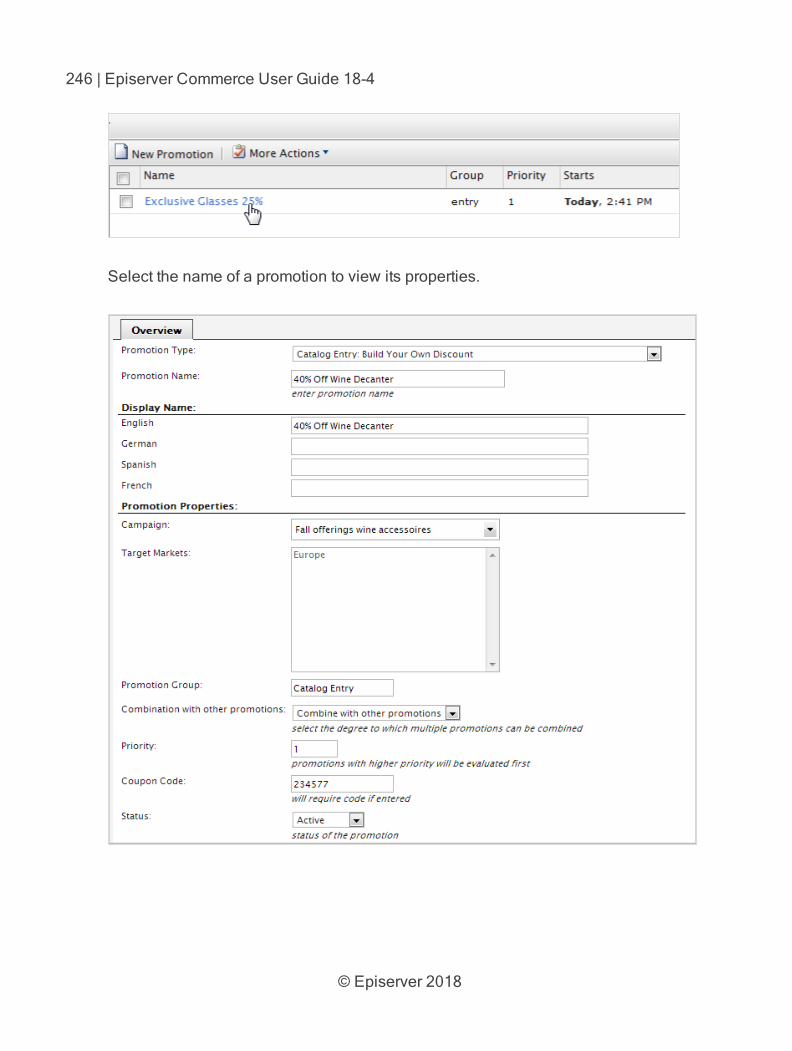
© Episerver 2018
246 | Episerver Commerce User Guide 18-4
Select the name of a promotion to view its properties.
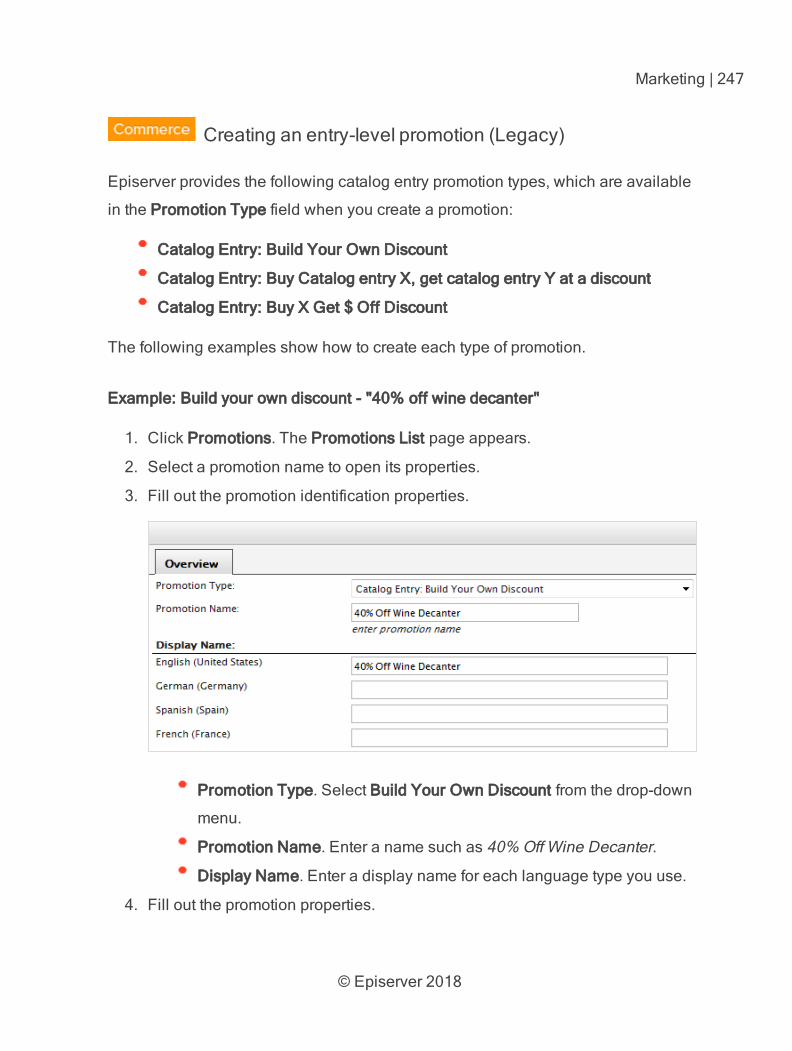
© Episerver 2018
Marketing | 247
Creating an entry-level promotion (Legacy)
Episerver provides the following catalog entry promotion types, which are available
in the Promotion Type field when you create a promotion:
Catalog Entry: Build Your Own Discount
Catalog Entry: Buy Catalog entry X, get catalog entry Y at a discount
Catalog Entry: Buy X Get $ Off Discount
The following examples show how to create each type of promotion.
Example: Build your own discount - "40% off wine decanter"
1. Click Promotions. The Promotions List page appears.
2. Select a promotion name to open its properties.
3. Fill out the promotion identification properties.
Promotion Type. Select Build Your Own Discount from the drop-down
menu.
Promotion Name. Enter a name such as 40% Off Wine Decanter.
Display Name. Enter a display name for each language type you use.
4. Fill out the promotion properties.
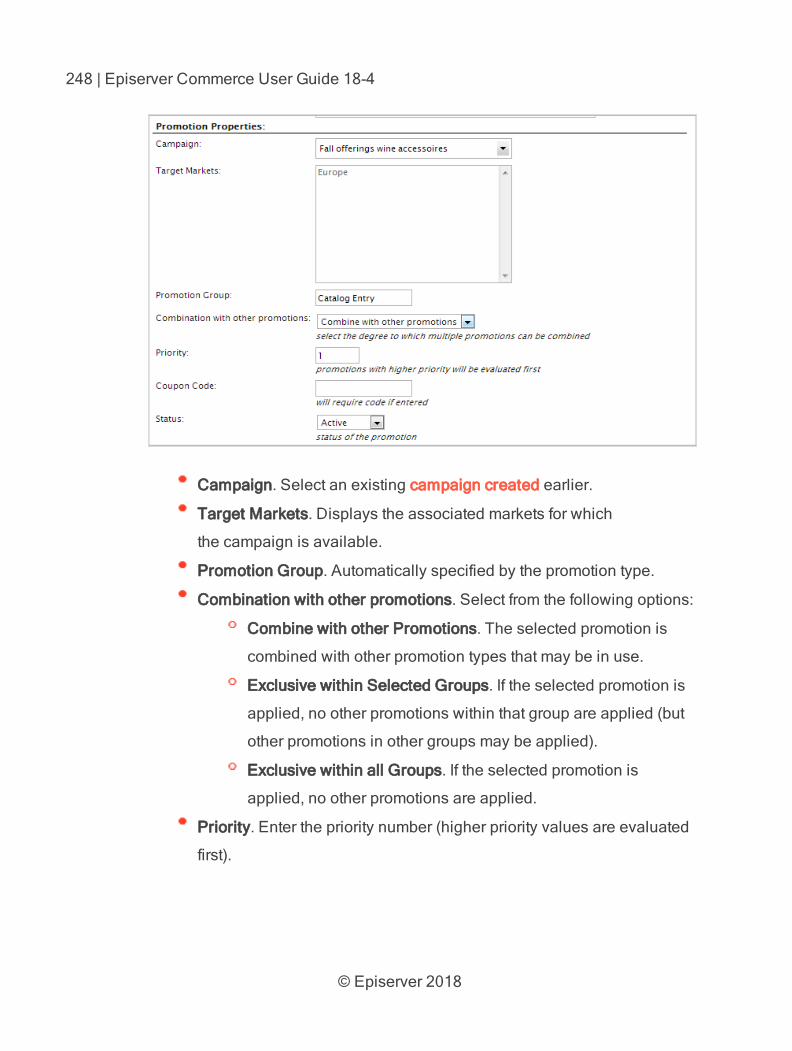
© Episerver 2018
248 | Episerver Commerce User Guide 18-4
Campaign. Select an existing campaign created earlier.
Target Markets. Displays the associated markets for which
the campaign is available.
Promotion Group. Automatically specified by the promotion type.
Combination with other promotions. Select from the following options:
Combine with other Promotions. The selected promotion is
combined with other promotion types that may be in use.
Exclusive within Selected Groups. If the selected promotion is
applied, no other promotions within that group are applied (but
other promotions in other groups may be applied).
Exclusive within all Groups. If the selected promotion is
applied, no other promotions are applied.
Priority. Enter the priority number (higher priority values are evaluated
first).
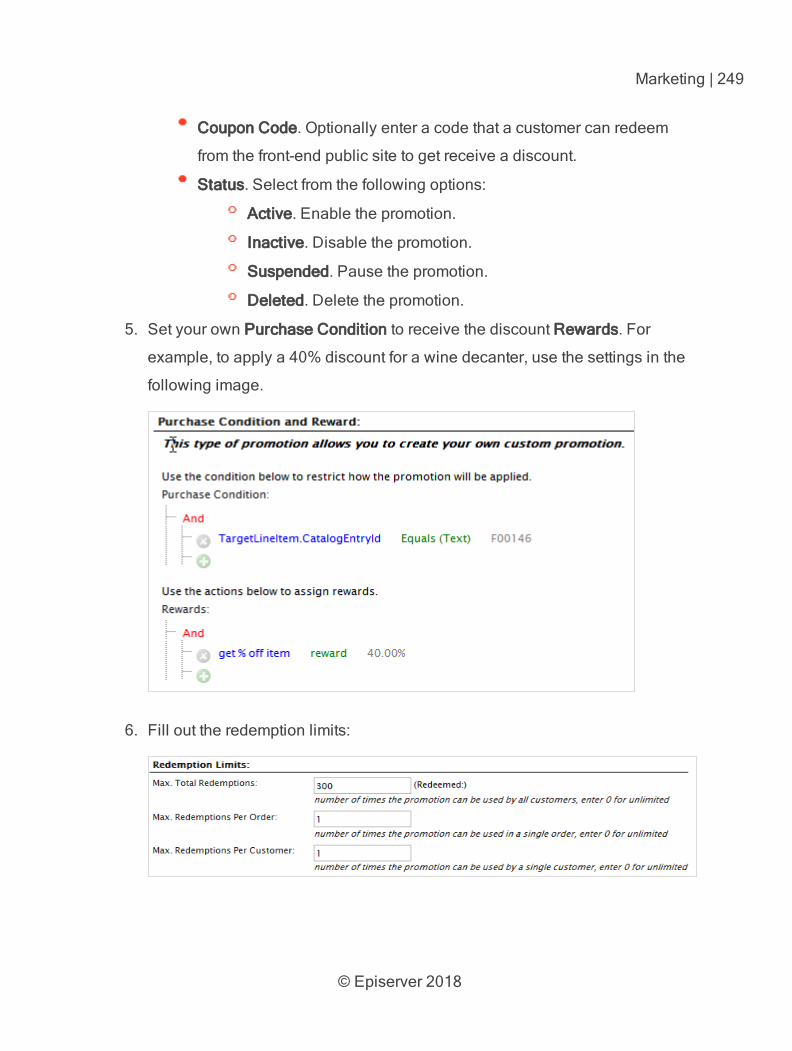
© Episerver 2018
Marketing | 249
Coupon Code. Optionally enter a code that a customer can redeem
from the front-end public site to get receive a discount.
Status. Select from the following options:
Active. Enable the promotion.
Inactive. Disable the promotion.
Suspended. Pause the promotion.
Deleted. Delete the promotion.
5. Set your own Purchase Condition to receive the discount Rewards. For
example, to apply a 40% discount for a wine decanter, use the settings in the
following image.
6. Fill out the redemption limits:
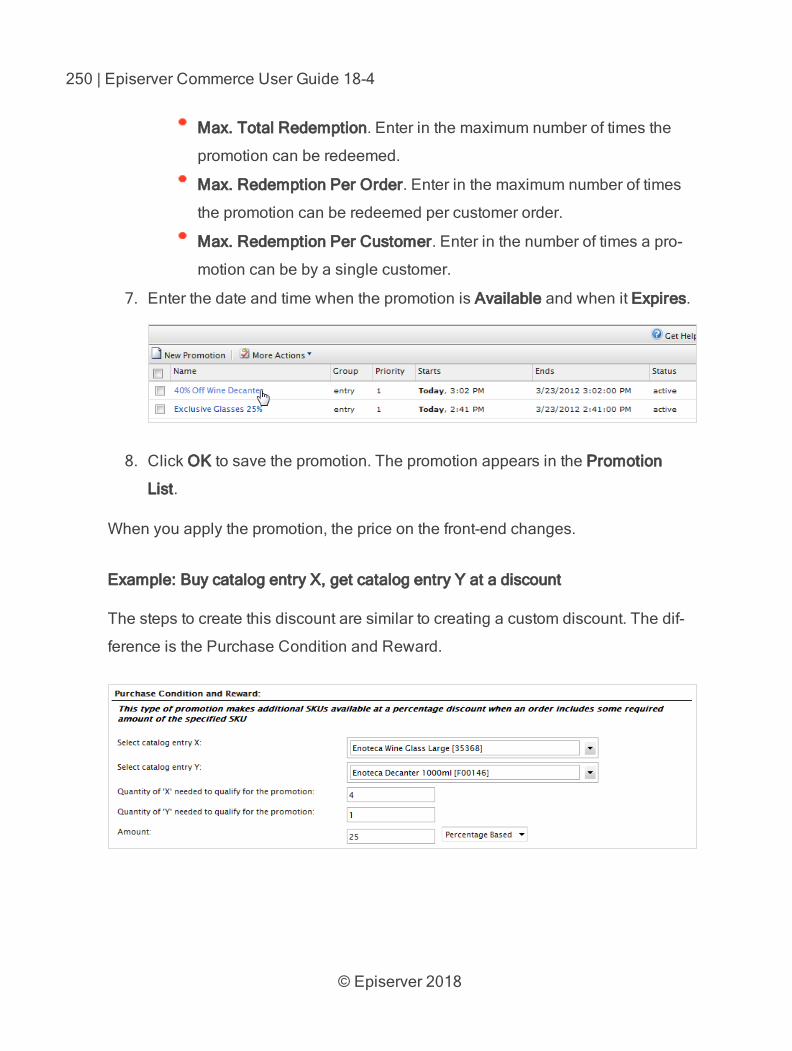
© Episerver 2018
250 | Episerver Commerce User Guide 18-4
Max. Total Redemption. Enter in the maximum number of times the
promotion can be redeemed.
Max. Redemption Per Order. Enter in the maximum number of times
the promotion can be redeemed per customer order.
Max. Redemption Per Customer. Enter in the number of times a pro-
motion can be by a single customer.
7. Enter the date and time when the promotion is Available and when it Expires.
8. Click OK to save the promotion. The promotion appears in the Promotion
List.
When you apply the promotion, the price on the front-end changes.
Example: Buy catalog entry X, get catalog entry Y at a discount
The steps to create this discount are similar to creating a custom discount. The dif-
ference is the Purchase Condition and Reward.
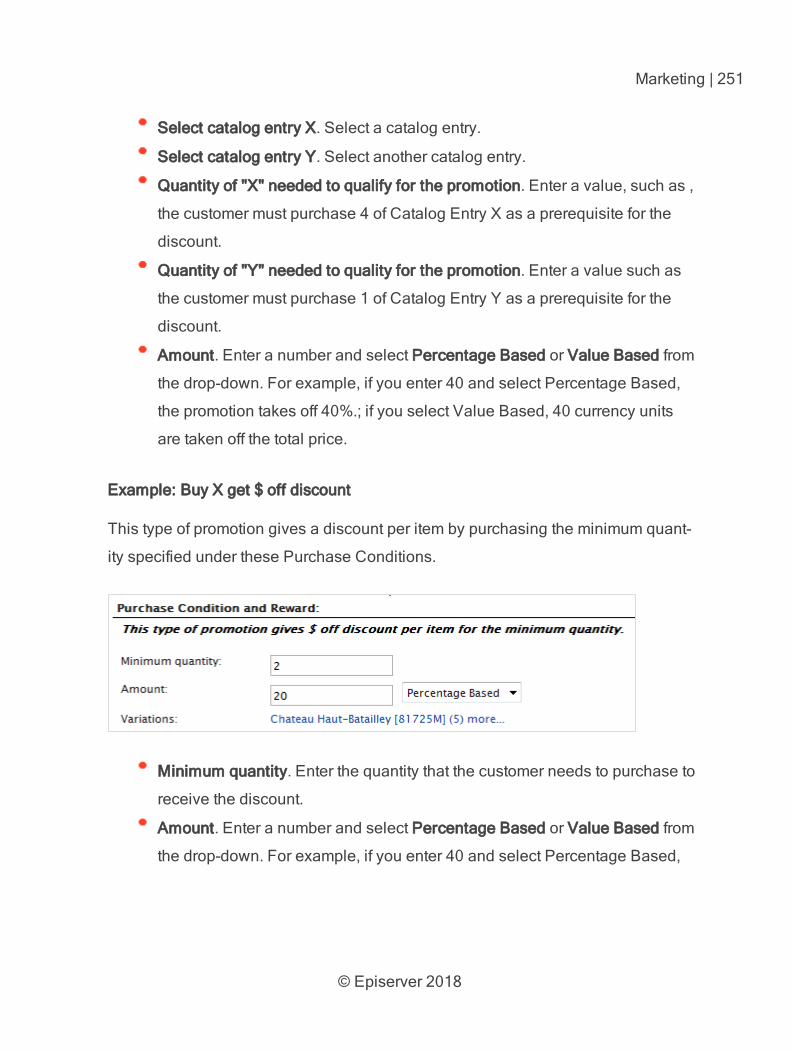
© Episerver 2018
Marketing | 251
Select catalog entry X. Select a catalog entry.
Select catalog entry Y. Select another catalog entry.
Quantity of "X" needed to qualify for the promotion. Enter a value, such as ,
the customer must purchase 4 of Catalog Entry X as a prerequisite for the
discount.
Quantity of "Y" needed to quality for the promotion. Enter a value such as
the customer must purchase 1 of Catalog Entry Y as a prerequisite for the
discount.
Amount. Enter a number and select Percentage Based or Value Based from
the drop-down. For example, if you enter 40 and select Percentage Based,
the promotion takes off 40%.; if you select Value Based, 40 currency units
are taken off the total price.
Example: Buy X get $ off discount
This type of promotion gives a discount per item by purchasing the minimum quant-
ity specified under these Purchase Conditions.
Minimum quantity. Enter the quantity that the customer needs to purchase to
receive the discount.
Amount. Enter a number and select Percentage Based or Value Based from
the drop-down. For example, if you enter 40 and select Percentage Based,
© Episerver 2018
252 | Episerver Commerce User Guide 18-4
the promotion takes off 40%.; if you select Value Based, 40 currency units
are taken off the total price.
Variations. Select a variant from the drop-down menu and click add vari-
ation. Repeat this for as many variants as you want to add. Click X next to
the Variation to delete it.
Creating an order-level promotion (Legacy)
An order-level promotion is a discount applied if the overall order satisfies the con-
ditions specified by the promotion.
Episerver provides the following order-level promotion types, which are available in
the Promotion Type field when you create a promotion:
Order: Buy X, get N quantity of Y at a discount
Order: Sub Total Volume Discount. If the order subtotal minimum is met,
then the customer receives the discount.
Build Your Own Discount. You can create a custom order-level promotion
based on a range of purchase conditions and rewards (similar to creating a
custom catalog entry discount).
The following examples show how to create each type of promotion.
Example: Buy X, get N quantity of Y at a discount
The following promotion lets a customer buy a designated number of items at a
reduced price.
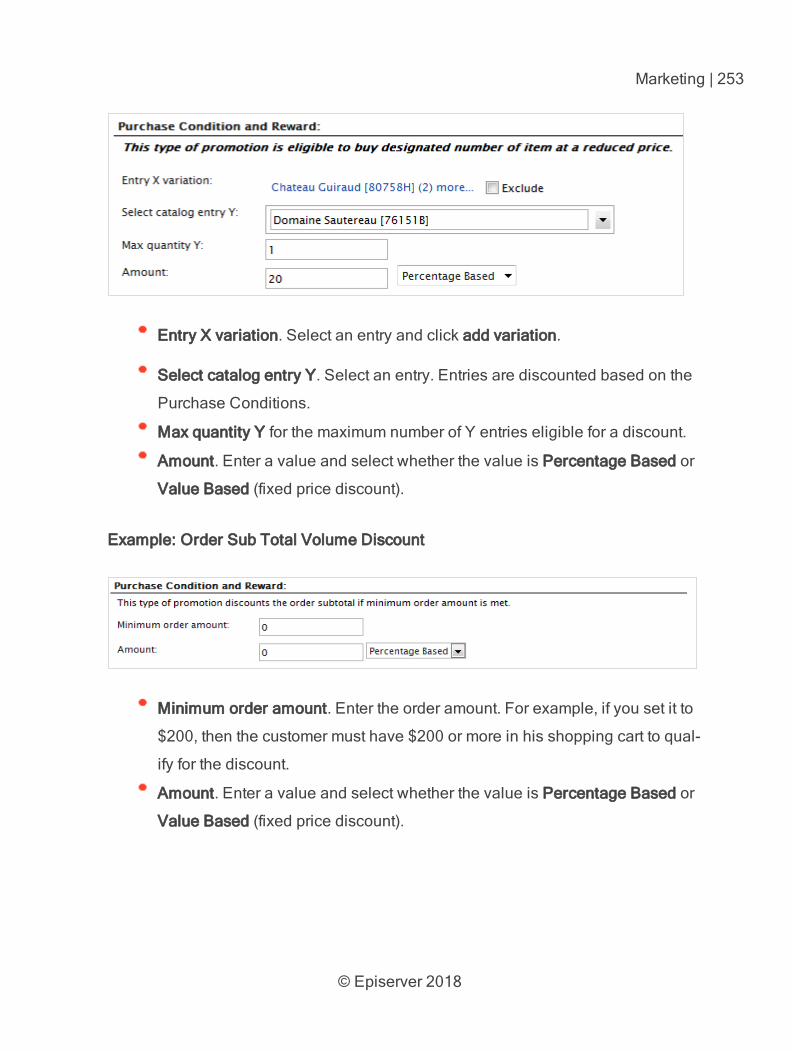
© Episerver 2018
Marketing | 253
Entry X variation. Select an entry and click add variation.
Select catalog entry Y. Select an entry. Entries are discounted based on the
Purchase Conditions.
Max quantity Y for the maximum number of Y entries eligible for a discount.
Amount. Enter a value and select whether the value is Percentage Based or
Value Based (fixed price discount).
Example: Order Sub Total Volume Discount
Minimum order amount. Enter the order amount. For example, if you set it to
$200, then the customer must have $200 or more in his shopping cart to qual-
ify for the discount.
Amount. Enter a value and select whether the value is Percentage Based or
Value Based (fixed price discount).
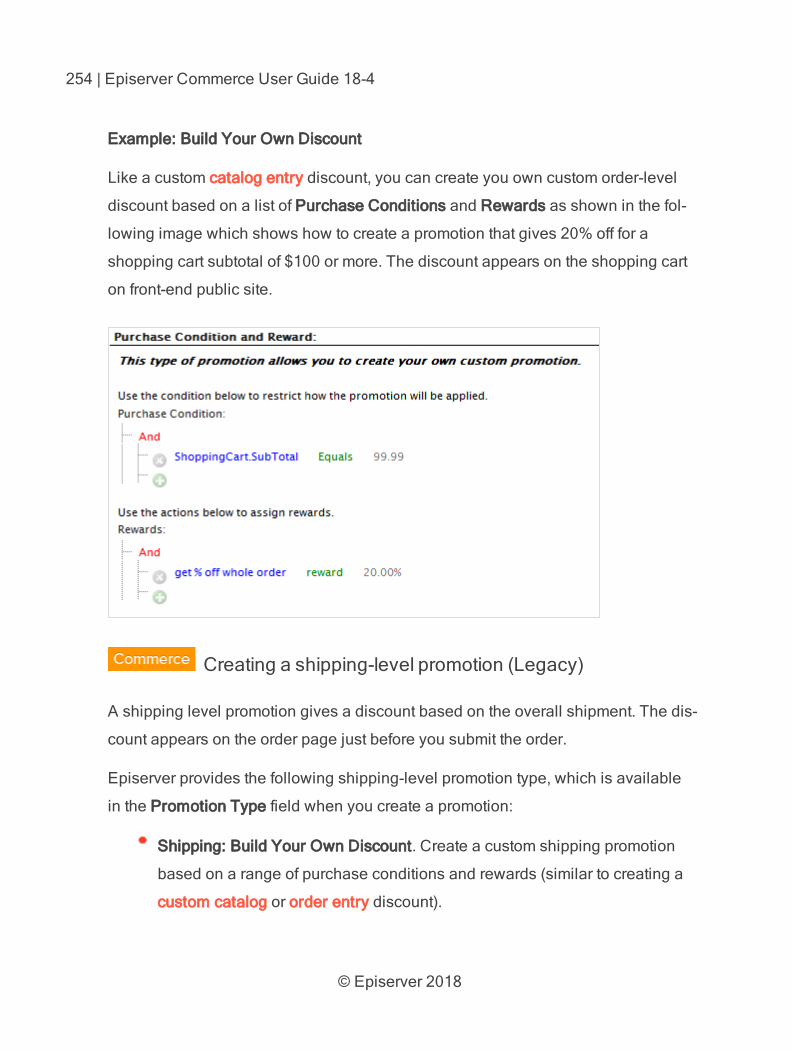
© Episerver 2018
254 | Episerver Commerce User Guide 18-4
Example: Build Your Own Discount
Like a custom catalog entry discount, you can create you own custom order-level
discount based on a list of Purchase Conditions and Rewards as shown in the fol-
lowing image which shows how to create a promotion that gives 20% off for a
shopping cart subtotal of $100 or more. The discount appears on the shopping cart
on front-end public site.
Creating a shipping-level promotion (Legacy)
A shipping level promotion gives a discount based on the overall shipment. The dis-
count appears on the order page just before you submit the order.
Episerver provides the following shipping-level promotion type, which is available
in the Promotion Type field when you create a promotion:
Shipping: Build Your Own Discount. Create a custom shipping promotion
based on a range of purchase conditions and rewards (similar to creating a
custom catalog or order entry discount).

© Episerver 2018
Marketing | 255
Example: buy N quantity get % off shipment discount
Creating a custom promotion (Legacy)
You can create a custom promotion for a catalog, order, or shipping level.
The following example builds a promotion that gives a $10 discount to customers
who order products that contain Bordeaux or Sauternes in the display name.
Using the Catalog Entry:Build Your Own Discount promotion type, construct the
purchase condition as follows to use Bordeaux or Sauternes.
And (Or (DisplayName = Bordeaux, DisplayName =
Sauternes))
The formula is translated by the rules engine to the following formula:
And (DisplayName = Bordeaux Or DisplayName =
Sauternes)
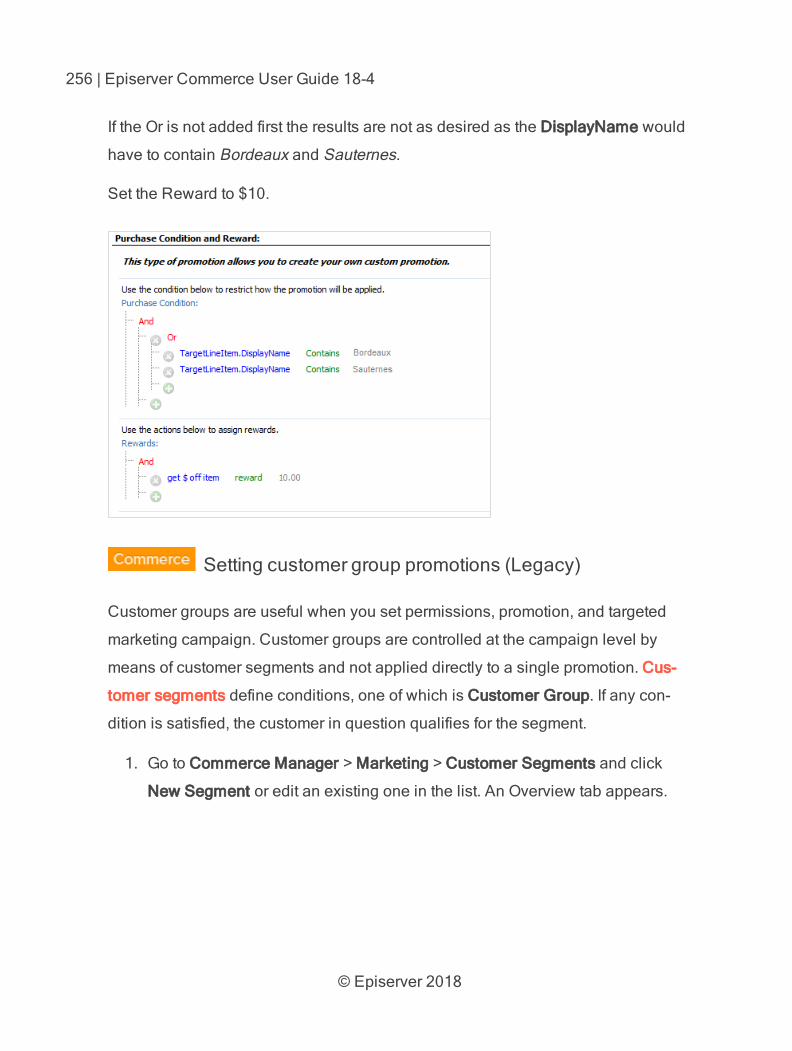
© Episerver 2018
256 | Episerver Commerce User Guide 18-4
If the Or is not added first the results are not as desired as the DisplayName would
have to contain Bordeaux and Sauternes.
Set the Reward to $10.
Setting customer group promotions (Legacy)
Customer groups are useful when you set permissions, promotion, and targeted
marketing campaign. Customer groups are controlled at the campaign level by
means of customer segments and not applied directly to a single promotion. Cus-
tomer segments define conditions, one of which is Customer Group. If any con-
dition is satisfied, the customer in question qualifies for the segment.
1. Go to Commerce Manager > Marketing > Customer Segments and click
New Segment or edit an existing one in the list. An Overview tab appears.
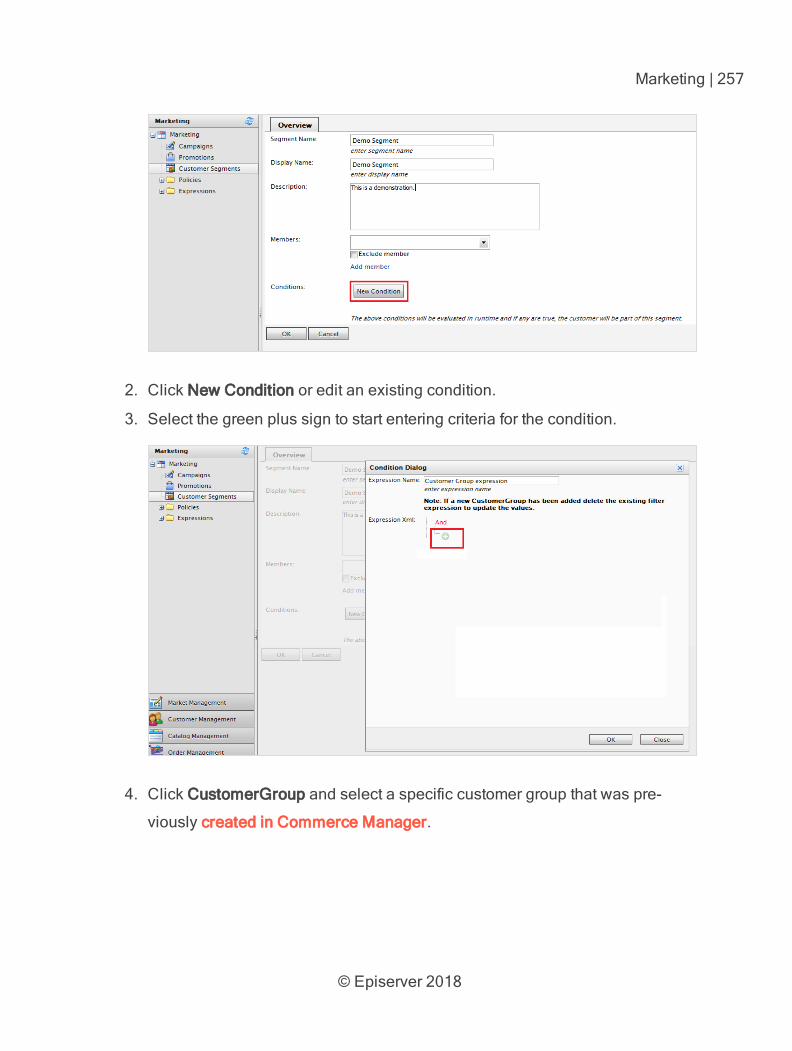
© Episerver 2018
Marketing | 257
2. Click New Condition or edit an existing condition.
3. Select the green plus sign to start entering criteria for the condition.
4. Click CustomerGroup and select a specific customer group that was pre-
viously created in Commerce Manager.
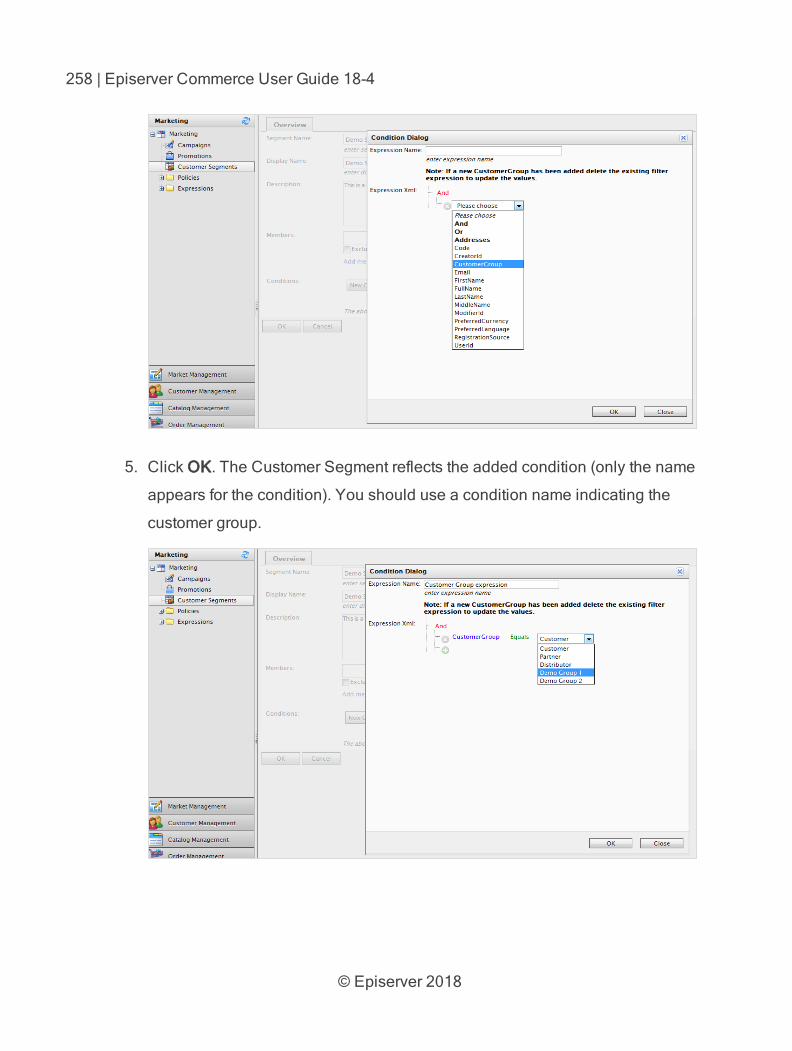
© Episerver 2018
258 | Episerver Commerce User Guide 18-4
5. Click OK. The Customer Segment reflects the added condition (only the name
appears for the condition). You should use a condition name indicating the
customer group.
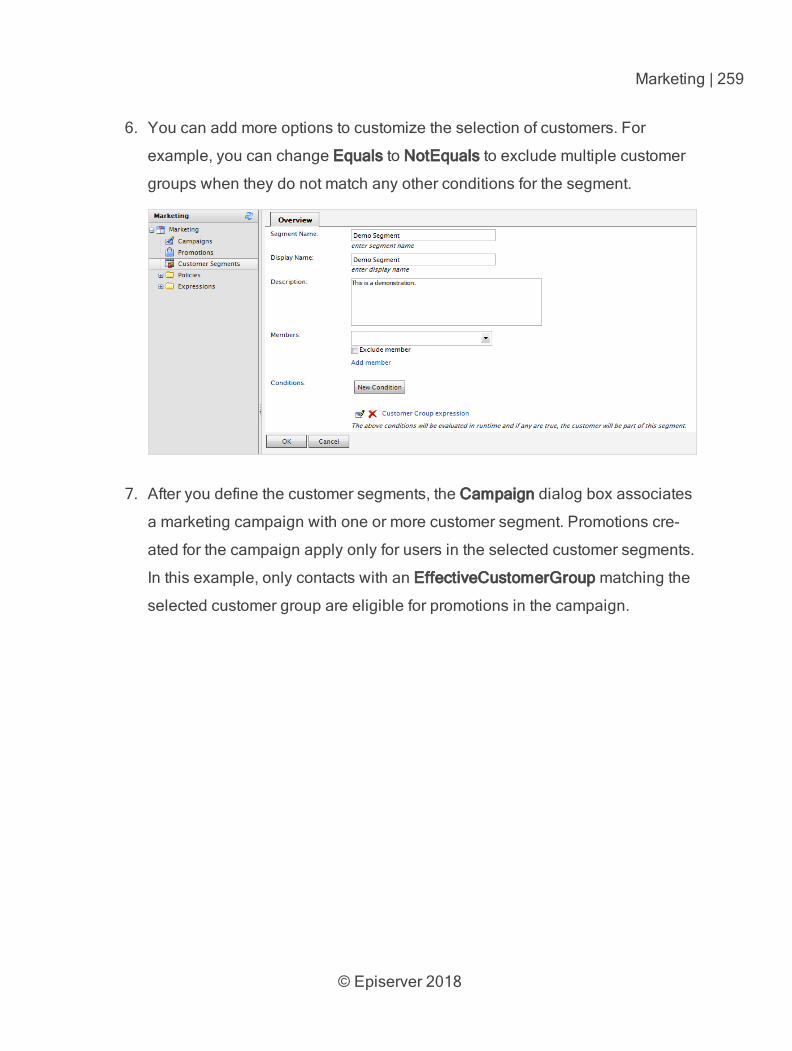
© Episerver 2018
Marketing | 259
6. You can add more options to customize the selection of customers. For
example, you can change Equals to NotEquals to exclude multiple customer
groups when they do not match any other conditions for the segment.
7. After you define the customer segments, the Campaign dialog box associates
a marketing campaign with one or more customer segment. Promotions cre-
ated for the campaign apply only for users in the selected customer segments.
In this example, only contacts with an EffectiveCustomerGroup matching the
selected customer group are eligible for promotions in the campaign.
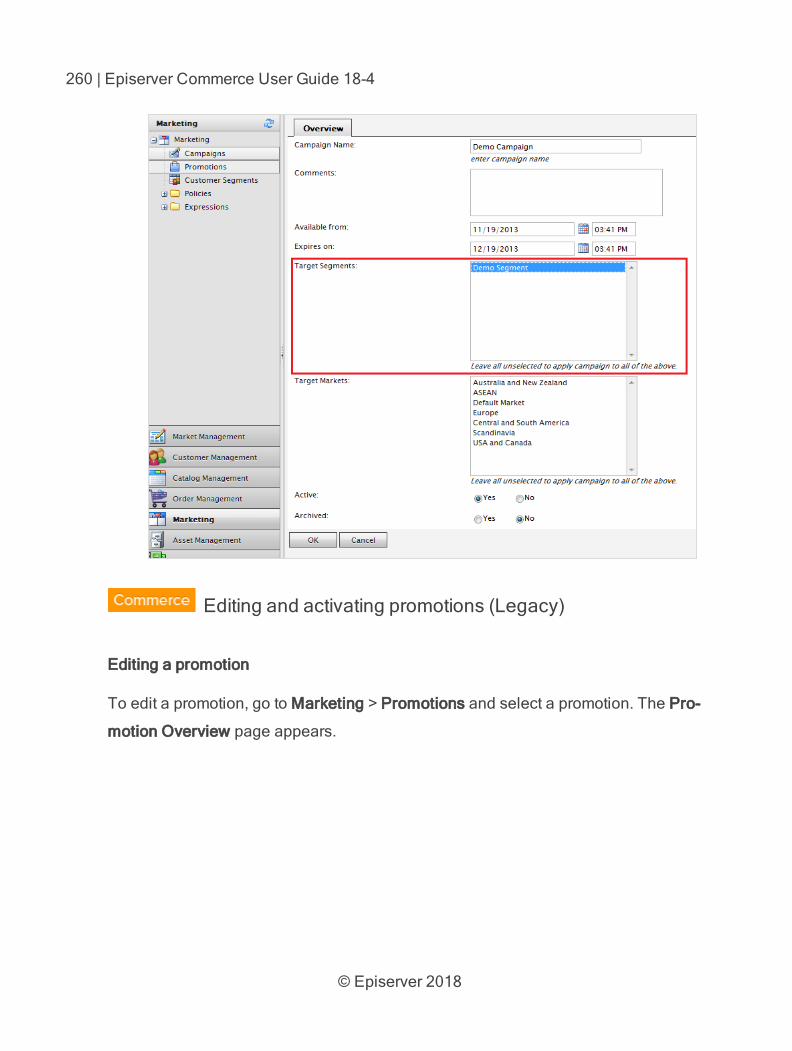
© Episerver 2018
260 | Episerver Commerce User Guide 18-4
Editing and activating promotions (Legacy)
Editing a promotion
To edit a promotion, go to Marketing > Promotions and select a promotion. The Pro-
motion Overview page appears.
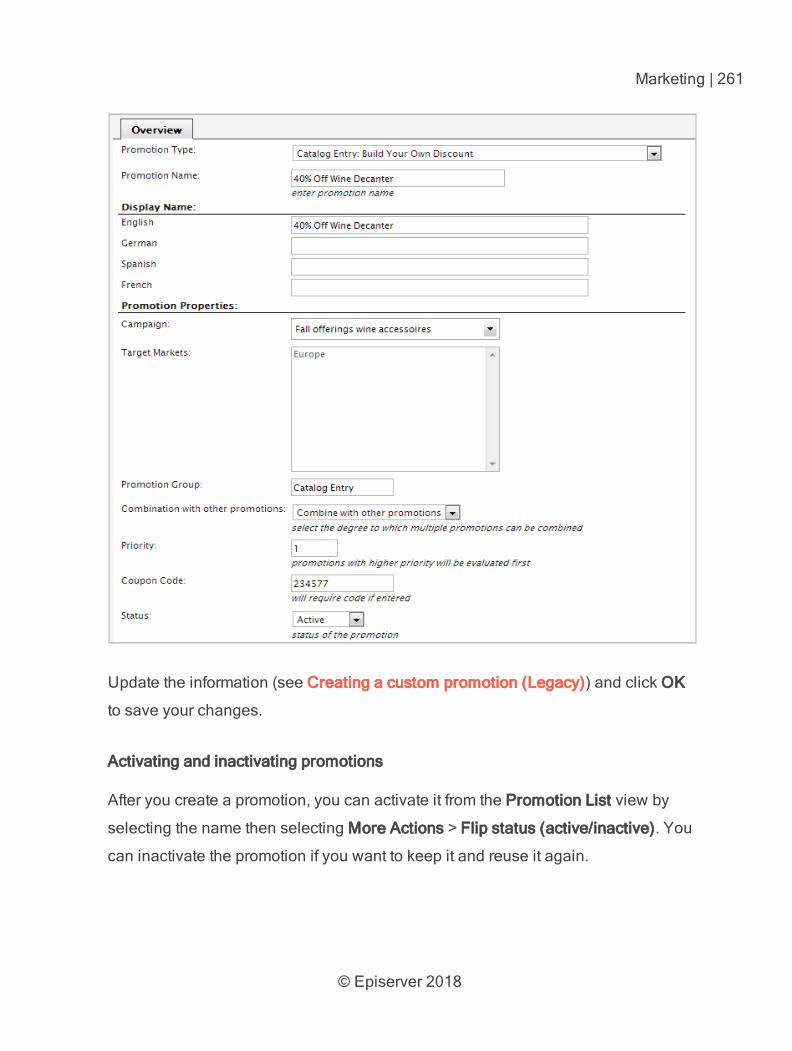
© Episerver 2018
Marketing | 261
Update the information (see Creating a custom promotion (Legacy)) and click OK
to save your changes.
Activating and inactivating promotions
After you create a promotion, you can activate it from the Promotion List view by
selecting the name then selecting More Actions > Flip status (active/inactive). You
can inactivate the promotion if you want to keep it and reuse it again.
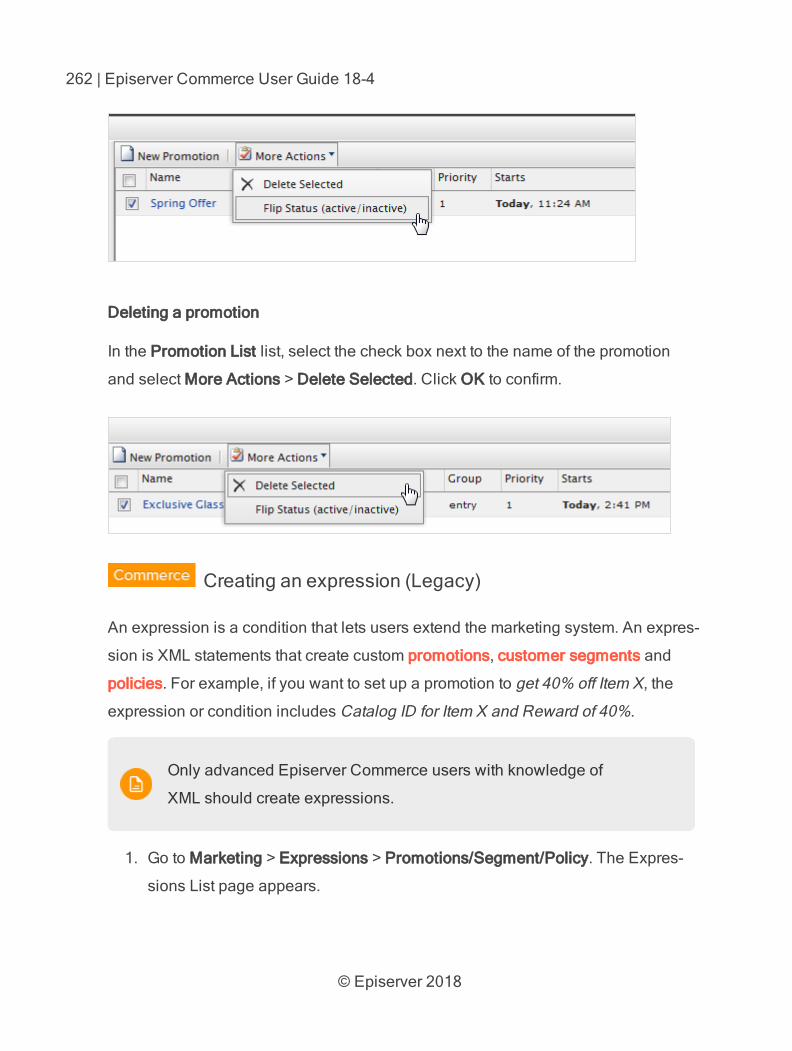
© Episerver 2018
262 | Episerver Commerce User Guide 18-4
Deleting a promotion
In the Promotion List list, select the check box next to the name of the promotion
and select More Actions > Delete Selected. Click OK to confirm.
Creating an expression (Legacy)
An expression is a condition that lets users extend the marketing system. An expres-
sion is XML statements that create custom promotions, customer segments and
policies. For example, if you want to set up a promotion to get 40% off Item X, the
expression or condition includes Catalog ID for Item X and Reward of 40%.
Only advanced Episerver Commerce users with knowledge of
XML should create expressions.
1. Go to Marketing > Expressions > Promotions/Segment/Policy. The Expres-
sions List page appears.
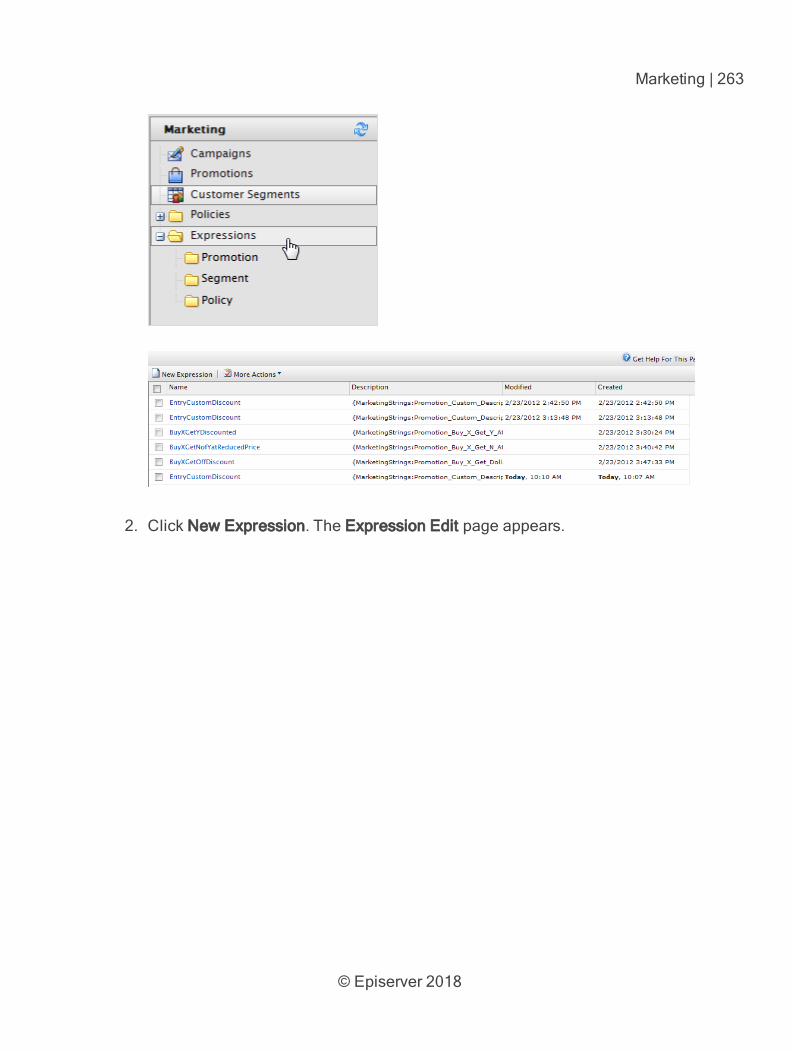
© Episerver 2018
Marketing | 263
2. Click New Expression. The Expression Edit page appears.
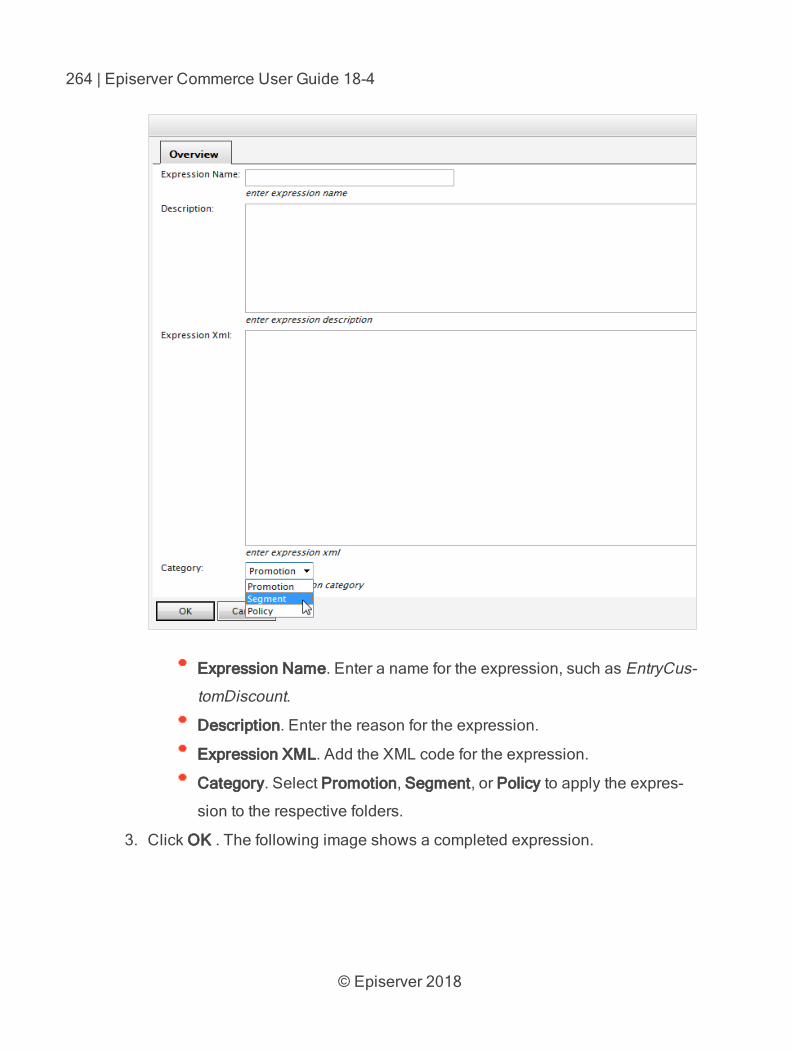
© Episerver 2018
264 | Episerver Commerce User Guide 18-4
Expression Name. Enter a name for the expression, such as EntryCus-
tomDiscount.
Description. Enter the reason for the expression.
Expression XML. Add the XML code for the expression.
Category. Select Promotion, Segment, or Policy to apply the expres-
sion to the respective folders.
3. Click OK . The following image shows a completed expression.
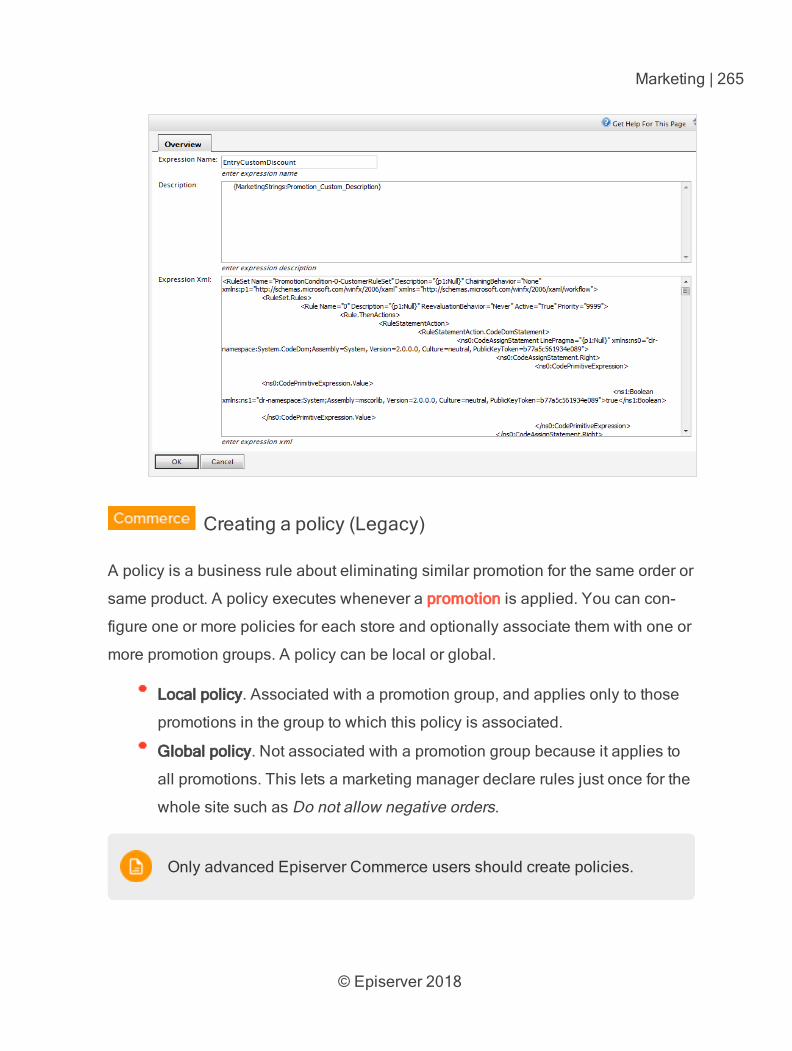
© Episerver 2018
Marketing | 265
Creating a policy (Legacy)
A policy is a business rule about eliminating similar promotion for the same order or
same product. A policy executes whenever a promotion is applied. You can con-
figure one or more policies for each store and optionally associate them with one or
more promotion groups. A policy can be local or global.
Local policy. Associated with a promotion group, and applies only to those
promotions in the group to which this policy is associated.
Global policy. Not associated with a promotion group because it applies to
all promotions. This lets a marketing manager declare rules just once for the
whole site such as Do not allow negative orders.
Only advanced Episerver Commerce users should create policies.
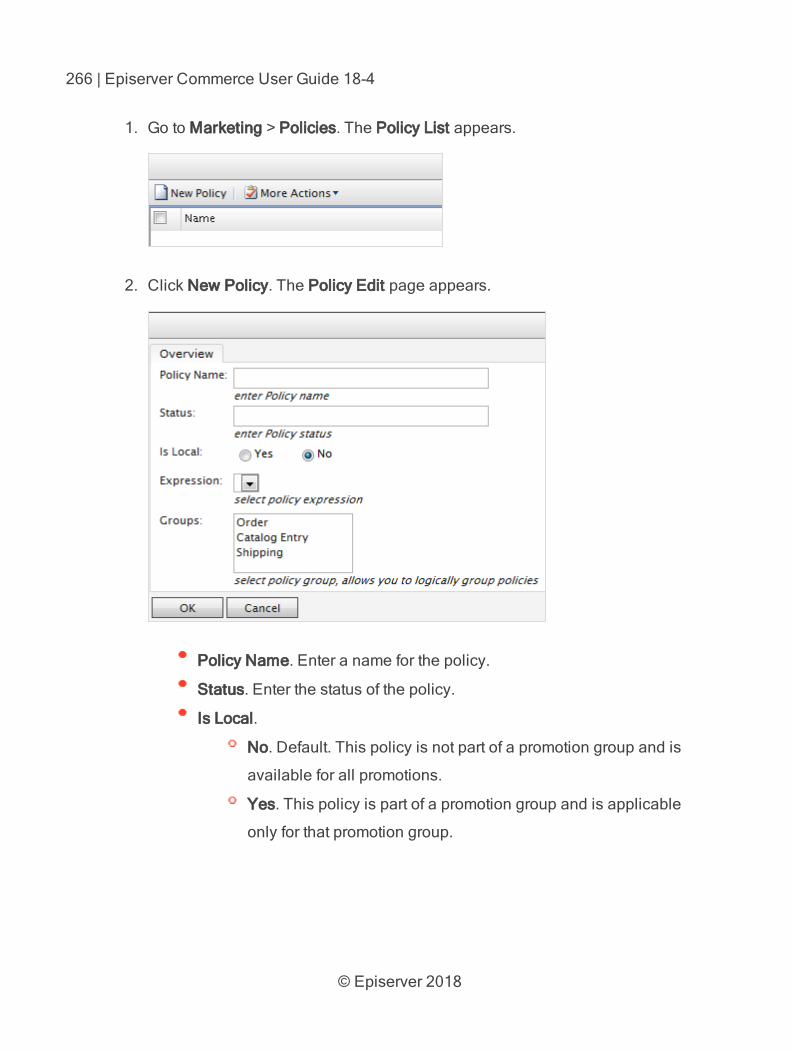
© Episerver 2018
266 | Episerver Commerce User Guide 18-4
1. Go to Marketing > Policies. The Policy List appears.
2. Click New Policy. The Policy Edit page appears.
Policy Name. Enter a name for the policy.
Status. Enter the status of the policy.
Is Local.
No. Default. This policy is not part of a promotion group and is
available for all promotions.
Yes. This policy is part of a promotion group and is applicable
only for that promotion group.

© Episerver 2018
Marketing | 267
Status and Is Local are global, meaning they cannot be
limited to a promotion group.
Expression. Select an existing policy expression.
Groups. Select the groups to which this policy applies.
3. Click OK.
Customer segments (Legacy)
The marketing system provides a new Campaigns user interface, in
addition to the legacy campaign system, for managing campaigns and
discounts.
A customer segment determines the target audience for promotions or campaigns.
Within a campaign, a promotion is applied to whatever customer segments are
associated with the same campaign.
You can define the member groups of customer segments or you can use expres-
sions to create dynamic groups whenever you run a promotion. For example, you
can have a customer segment that targets users from the Los Angeles area, then
create an expression that includes the customers whose home city is Los
Angeles. So when a visitor from Los Angeles registers on the site, the visitor imme-
diately becomes part of the target customer segment.
You can create a customer segment and manually assign specific contacts to the
customer segment, or you can use conditions to apply rules that automatically make
selected customers become part of the customer segment.
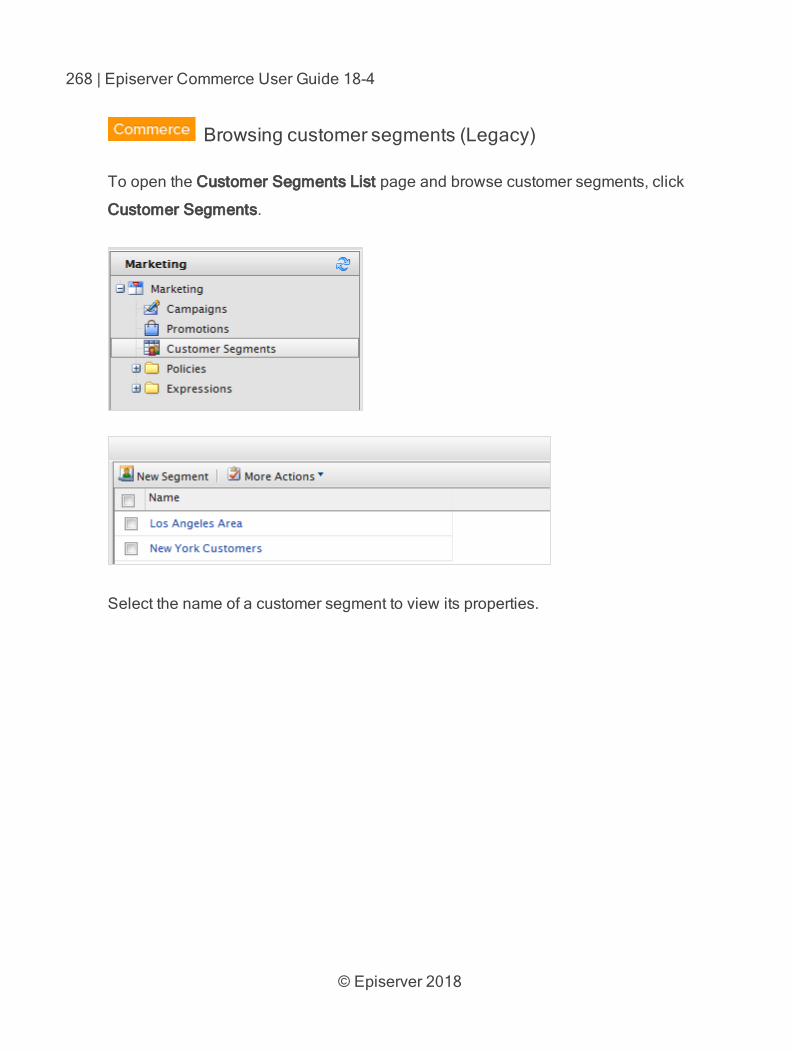
© Episerver 2018
268 | Episerver Commerce User Guide 18-4
Browsing customer segments (Legacy)
To open the Customer Segments List page and browse customer segments, click
Customer Segments.
Select the name of a customer segment to view its properties.
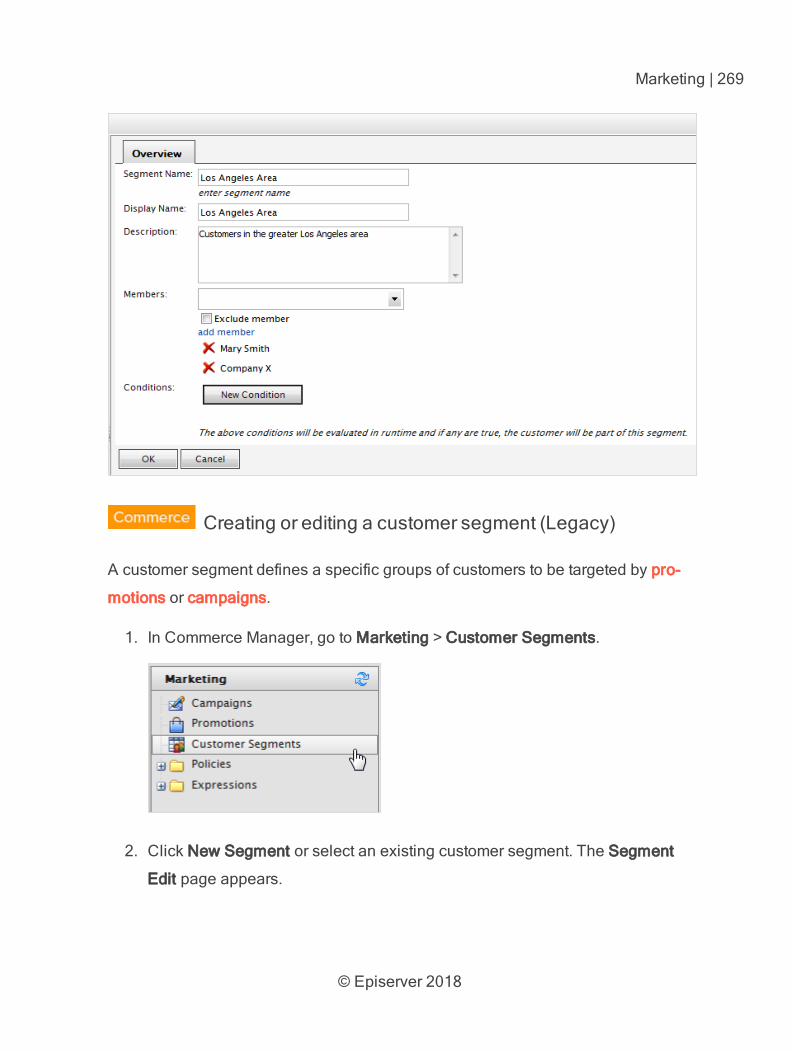
© Episerver 2018
Marketing | 269
Creating or editing a customer segment (Legacy)
A customer segment defines a specific groups of customers to be targeted by pro-
motions or campaigns.
1. In Commerce Manager, go to Marketing > Customer Segments.
2. Click New Segment or select an existing customer segment. The Segment
Edit page appears.
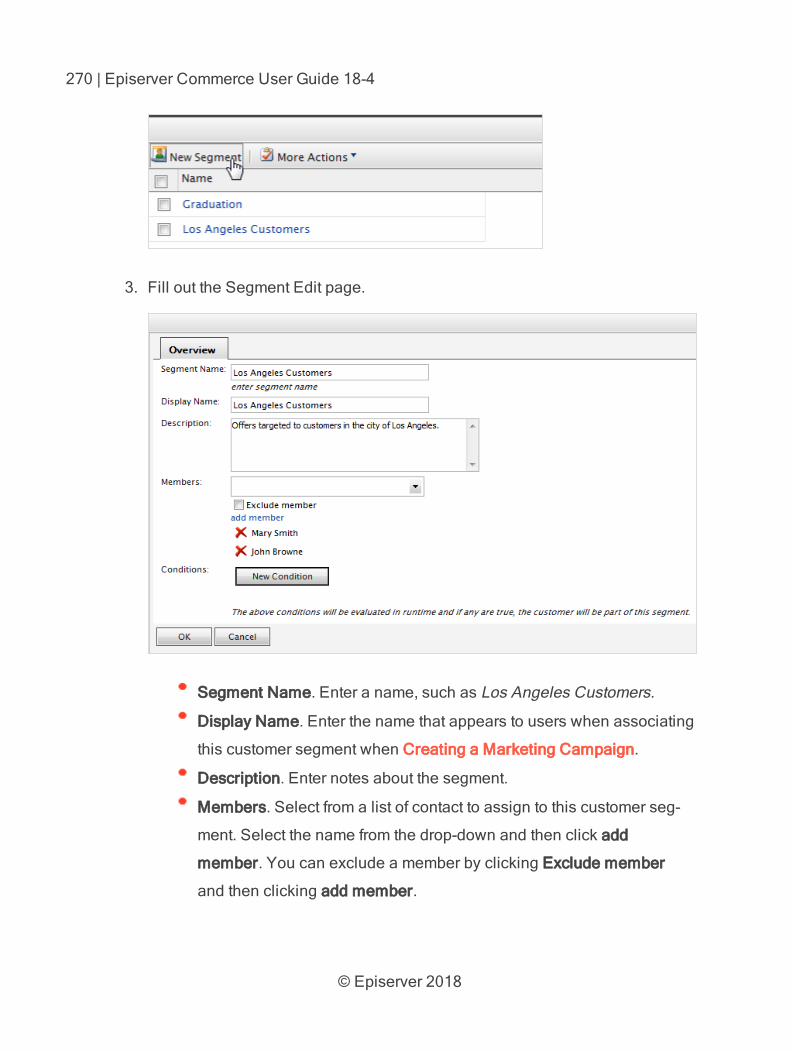
© Episerver 2018
270 | Episerver Commerce User Guide 18-4
3. Fill out the Segment Edit page.
Segment Name. Enter a name, such as Los Angeles Customers.
Display Name. Enter the name that appears to users when associating
this customer segment when Creating a Marketing Campaign.
Description. Enter notes about the segment.
Members. Select from a list of contact to assign to this customer seg-
ment. Select the name from the drop-down and then click add
member. You can exclude a member by clicking Exclude member
and then clicking add member.
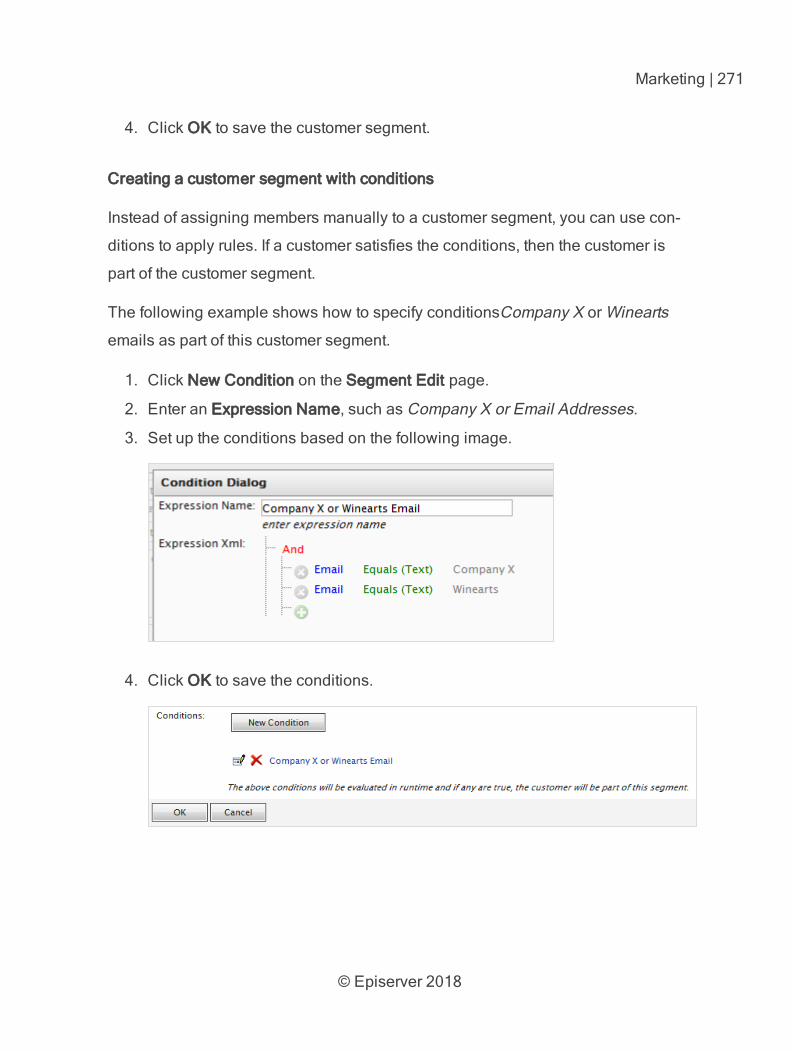
© Episerver 2018
Marketing | 271
4. Click OK to save the customer segment.
Creating a customer segment with conditions
Instead of assigning members manually to a customer segment, you can use con-
ditions to apply rules. If a customer satisfies the conditions, then the customer is
part of the customer segment.
The following example shows how to specify conditionsCompany X or Winearts
emails as part of this customer segment.
1. Click New Condition on the Segment Edit page.
2. Enter an Expression Name, such as Company X or Email Addresses.
3. Set up the conditions based on the following image.
4. Click OK to save the conditions.
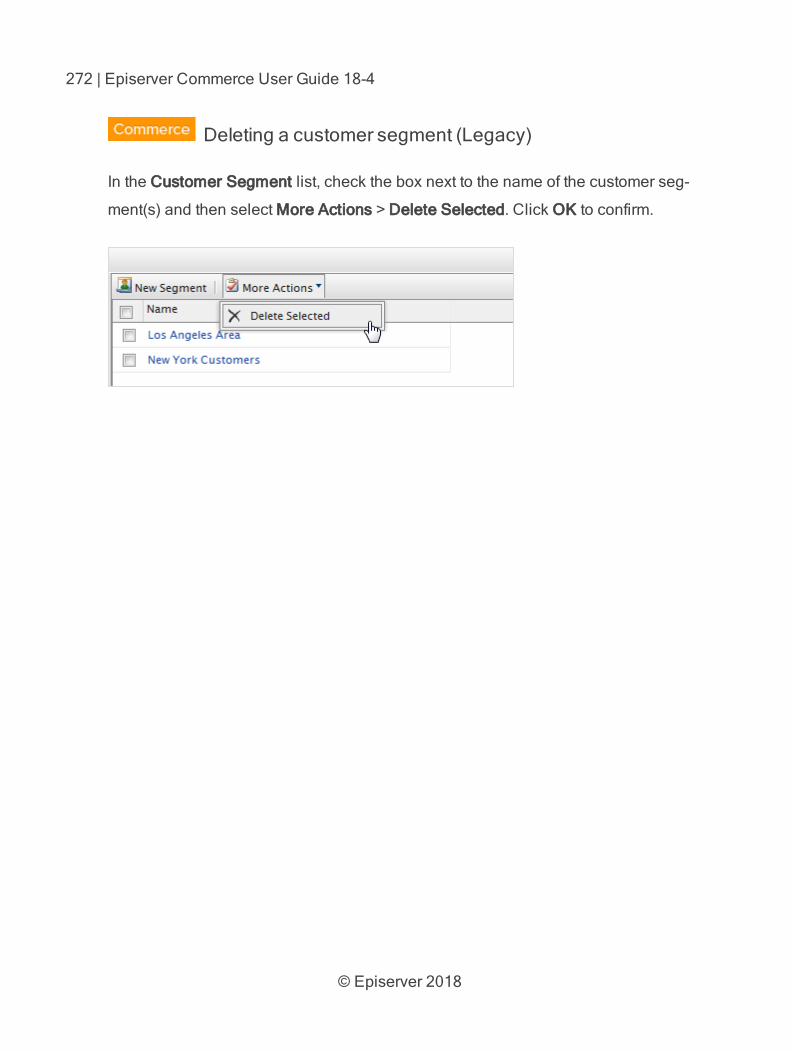
© Episerver 2018
272 | Episerver Commerce User Guide 18-4
Deleting a customer segment (Legacy)
In the Customer Segment list, check the box next to the name of the customer seg-
ment(s) and then select More Actions > Delete Selected. Click OK to confirm.
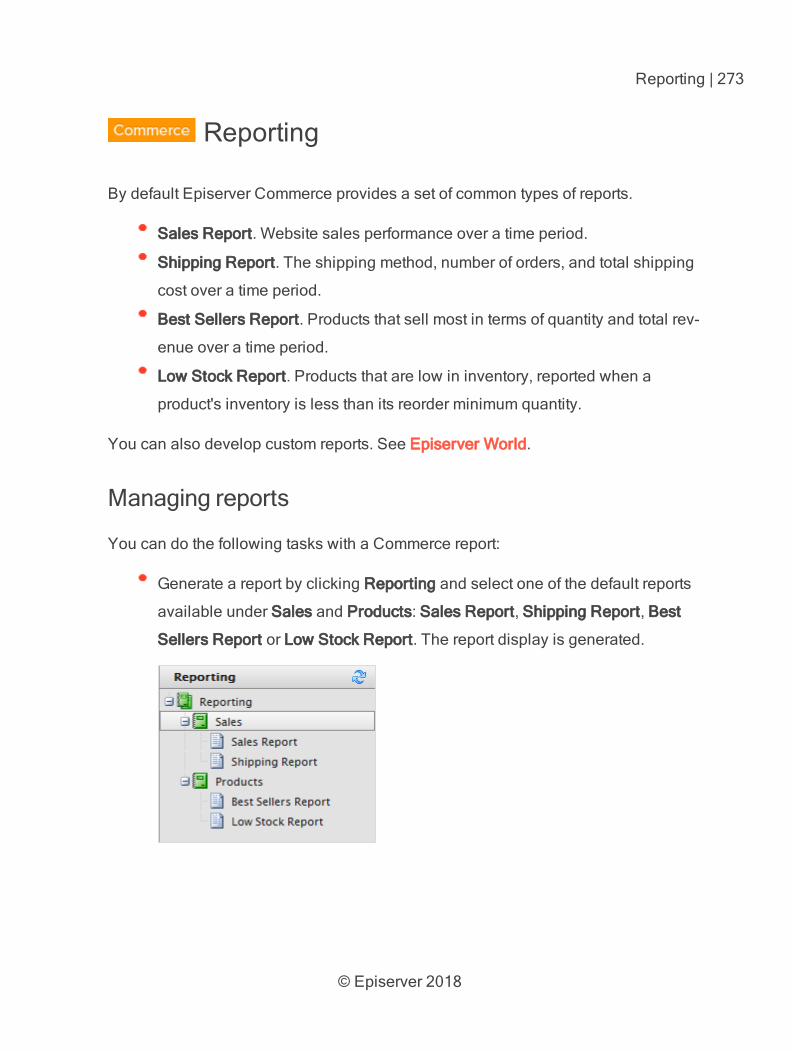
© Episerver 2018
Reporting | 273
Reporting
By default Episerver Commerce provides a set of common types of reports.
Sales Report. Website sales performance over a time period.
Shipping Report. The shipping method, number of orders, and total shipping
cost over a time period.
Best Sellers Report. Products that sell most in terms of quantity and total rev-
enue over a time period.
Low Stock Report. Products that are low in inventory, reported when a
product's inventory is less than its reorder minimum quantity.
You can also develop custom reports. See Episerver World.
Managing reports
You can do the following tasks with a Commerce report:
Generate a report by clicking Reporting and select one of the default reports
available under Sales and Products: Sales Report, Shipping Report, Best
Sellers Report or Low Stock Report. The report display is generated.
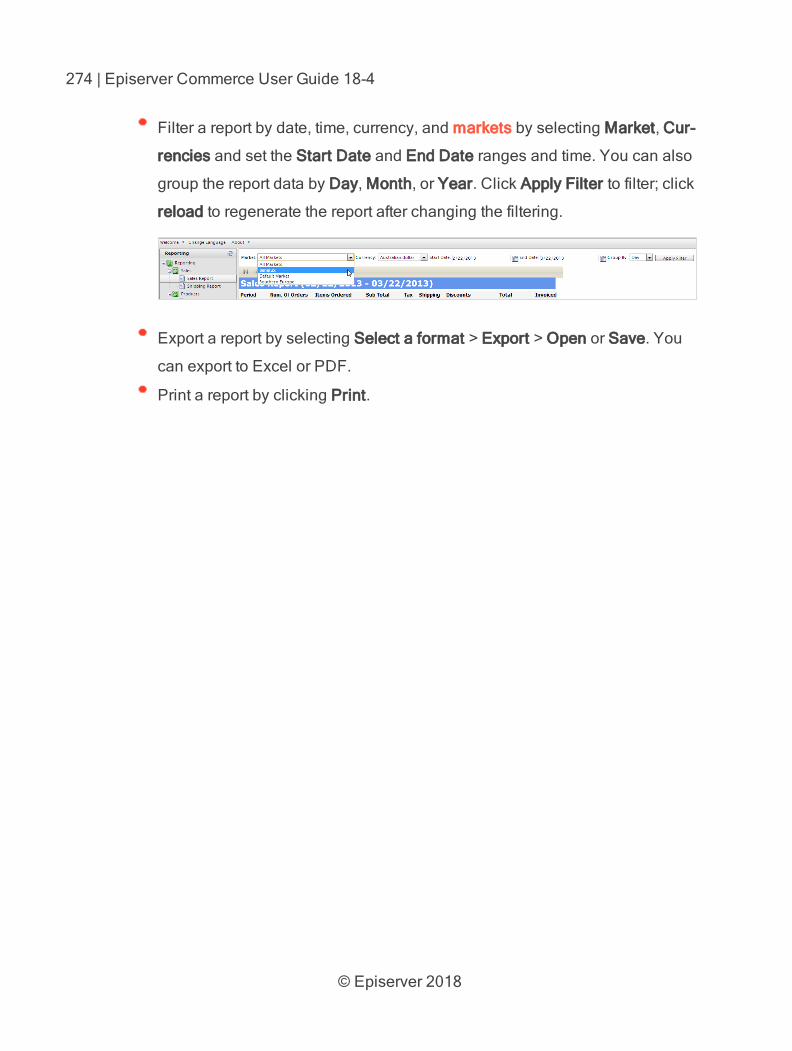
© Episerver 2018
274 | Episerver Commerce User Guide 18-4
Filter a report by date, time, currency, and markets by selecting Market, Cur-
rencies and set the Start Date and End Date ranges and time. You can also
group the report data by Day, Month, or Year. Click Apply Filter to filter; click
reload to regenerate the report after changing the filtering.
Export a report by selecting Select a format > Export > Open or Save. You
can export to Excel or PDF.
Print a report by clicking Print.
© Episerver 2018
Administration | 275
Administration
This topic is intended for administrators and developers with admin-istration access rights in Episerver.
You can configure and administer Episerver Commerce through general settings for
the entire system, and specific settings for parts of the system, such as Catalog and
Order management.
Languages supported by Commerce are added from the Episerver
CMS administration and edit views, as described in Managing website
languages in the CMS Administrator User Guide.
You can do the following from the administration interface:
Add countries, currencies, and return reasons to the e-commerce system,
which is done through Dictionaries.
Track changes and monitor system activities through the log features.
Configure common settings such as default language, currency, and length
and weight units to be used by Episerver Commerce.
Customize, create and publish business objects to extend the attributes of
the Customer Management system, and provide more flexibility for fields and
attributes displayed and collected.
Update the search index for the website to reflect changes to the
product catalog.
Customize the left menu by adding your own menu items.
Define warehouses, tax categories, and meta-classes and meta fields used
by the Catalog Management system.
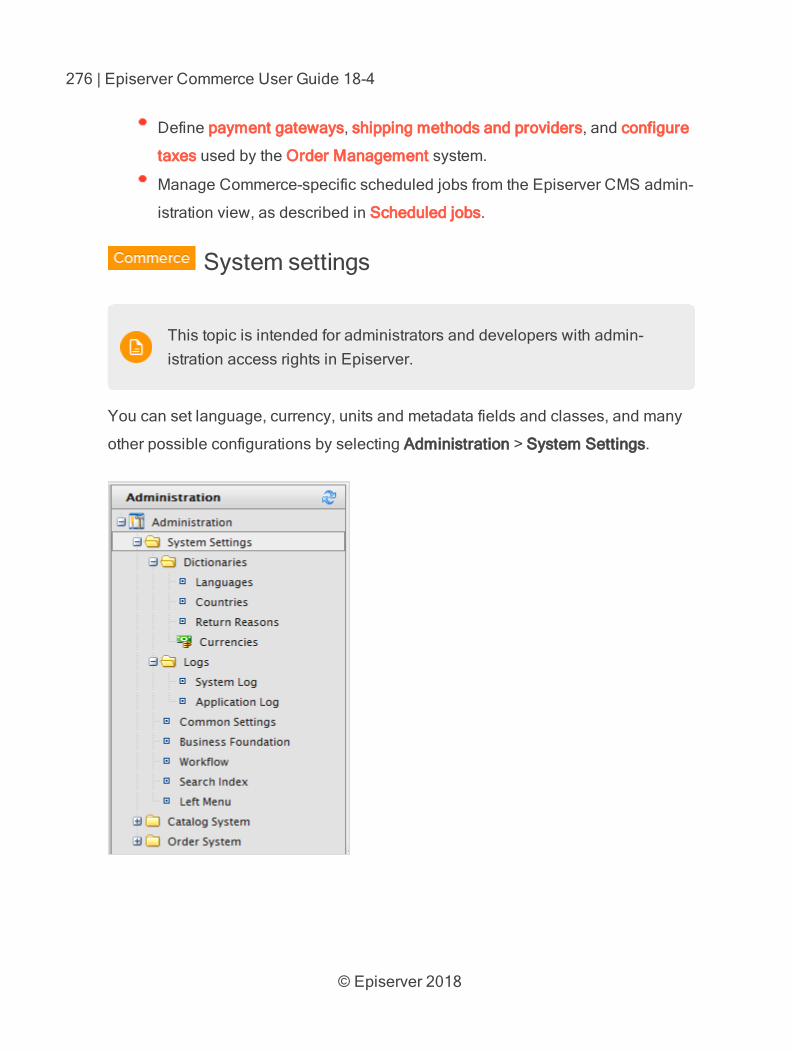
© Episerver 2018
276 | Episerver Commerce User Guide 18-4
Define payment gateways, shipping methods and providers, and configure
taxes used by the Order Management system.
Manage Commerce-specific scheduled jobs from the Episerver CMS admin-
istration view, as described in Scheduled jobs.
System settings
This topic is intended for administrators and developers with admin-istration access rights in Episerver.
You can set language, currency, units and metadata fields and classes, and many
other possible configurations by selecting Administration > System Settings.
© Episerver 2018
Administration | 277
You add languages in Commerce from the Episerver CMS admin-
istration and edit views, as described in Managing website languages
in the CMS Administrator User Guide.
Dictionaries
This topic is intended for administrators and developers with admin-istration access rights in Episerver.
Dictionaries and dictionary values enrich data when you work with currencies,
countries, customer organization, customer contact groups, return reasons, and
catalog content.
You add languages in Commerce from the Episerver CMS admin and
edit views, as described in Managing website languages in the CMS
Administrator User Guide.
Adding a country to dictionaries
This topic is intended for administrators and developers with admin-istration access rights in Episerver.
A country helps to define a market.
1. Open Commerce Manager and go to Administration > System Settings > Dic-
tionaries > Countries.

© Episerver 2018
278 | Episerver Commerce User Guide 18-4
2. Click New Country and fill in the following displayed in the Overview tab:
Overview tab
Country Name. Enter a name of the country.
Code. Enter the country code, which you can get from the
MSDN site Table of Country/Region and State/Province
Names and Codes [C++] (use the ISO Short Code or ISO Long
Code as long as you remain consistent).
Sort Order. Enter a number starting from 0 (the lower number is
listed at the top).
Visible. Select Yes to make the country name visible on the pub-
lic site; otherwise No.
Regions tab
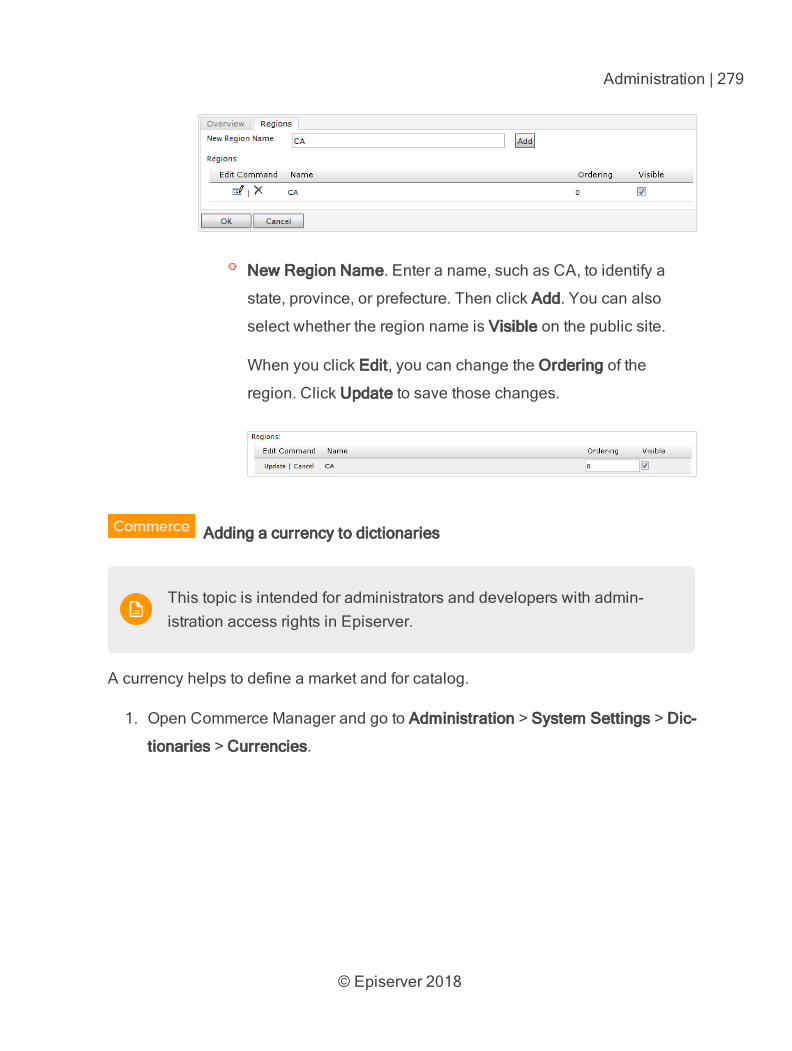
© Episerver 2018
Administration | 279
New Region Name. Enter a name, such as CA, to identify a
state, province, or prefecture. Then click Add. You can also
select whether the region name is Visible on the public site.
When you click Edit, you can change the Ordering of the
region. Click Update to save those changes.
Adding a currency to dictionaries
This topic is intended for administrators and developers with admin-istration access rights in Episerver.
A currency helps to define a market and for catalog.
1. Open Commerce Manager and go to Administration > System Settings > Dic-
tionaries > Currencies.
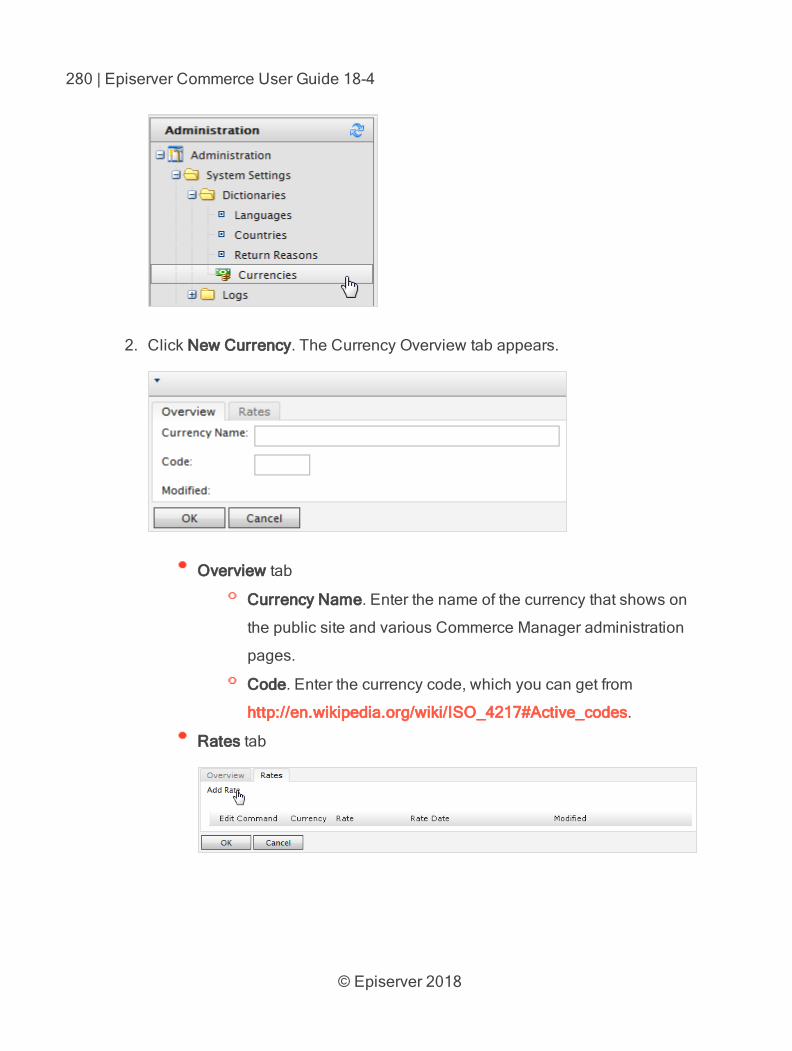
© Episerver 2018
280 | Episerver Commerce User Guide 18-4
2. Click New Currency. The Currency Overview tab appears.
Overview tab
Currency Name. Enter the name of the currency that shows on
the public site and various Commerce Manager administration
pages.
Code. Enter the currency code, which you can get from
http://en.wikipedia.org/wiki/ISO_4217#Active_codes.
Rates tab
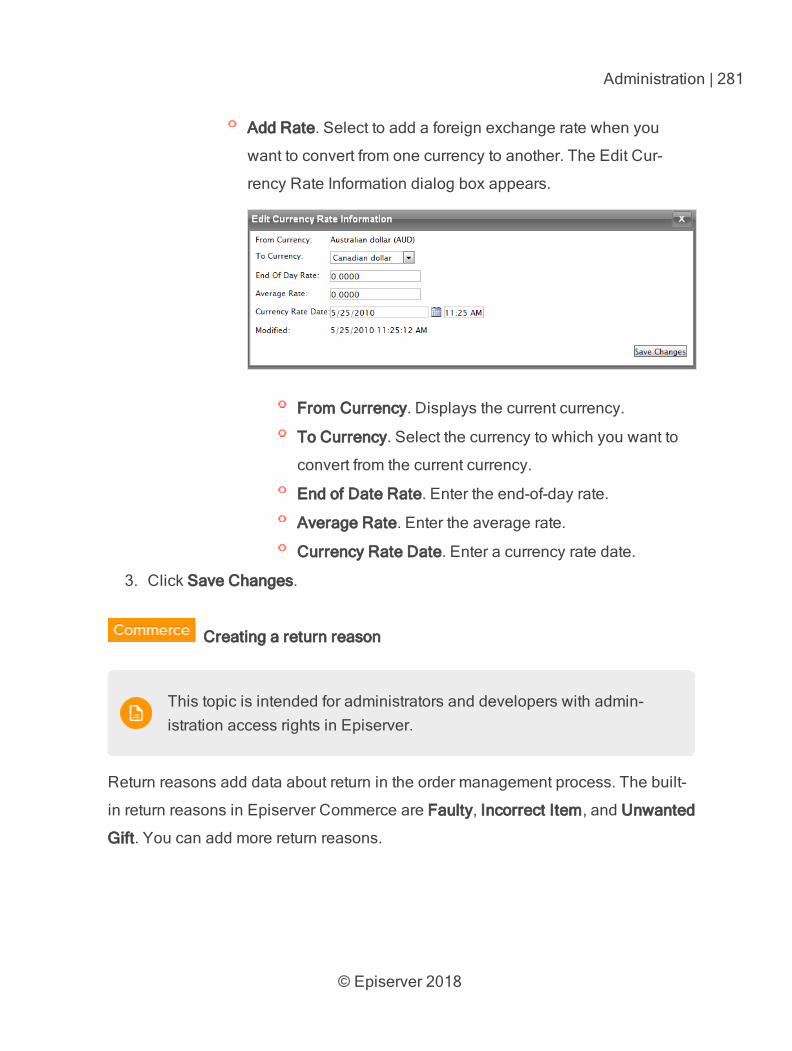
© Episerver 2018
Administration | 281
Add Rate. Select to add a foreign exchange rate when you
want to convert from one currency to another. The Edit Cur-
rency Rate Information dialog box appears.
From Currency. Displays the current currency.
To Currency. Select the currency to which you want to
convert from the current currency.
End of Date Rate. Enter the end-of-day rate.
Average Rate. Enter the average rate.
Currency Rate Date. Enter a currency rate date.
3. Click Save Changes.
Creating a return reason
This topic is intended for administrators and developers with admin-istration access rights in Episerver.
Return reasons add data about return in the order management process. The built-
in return reasons in Episerver Commerce are Faulty, Incorrect Item, and Unwanted
Gift. You can add more return reasons.
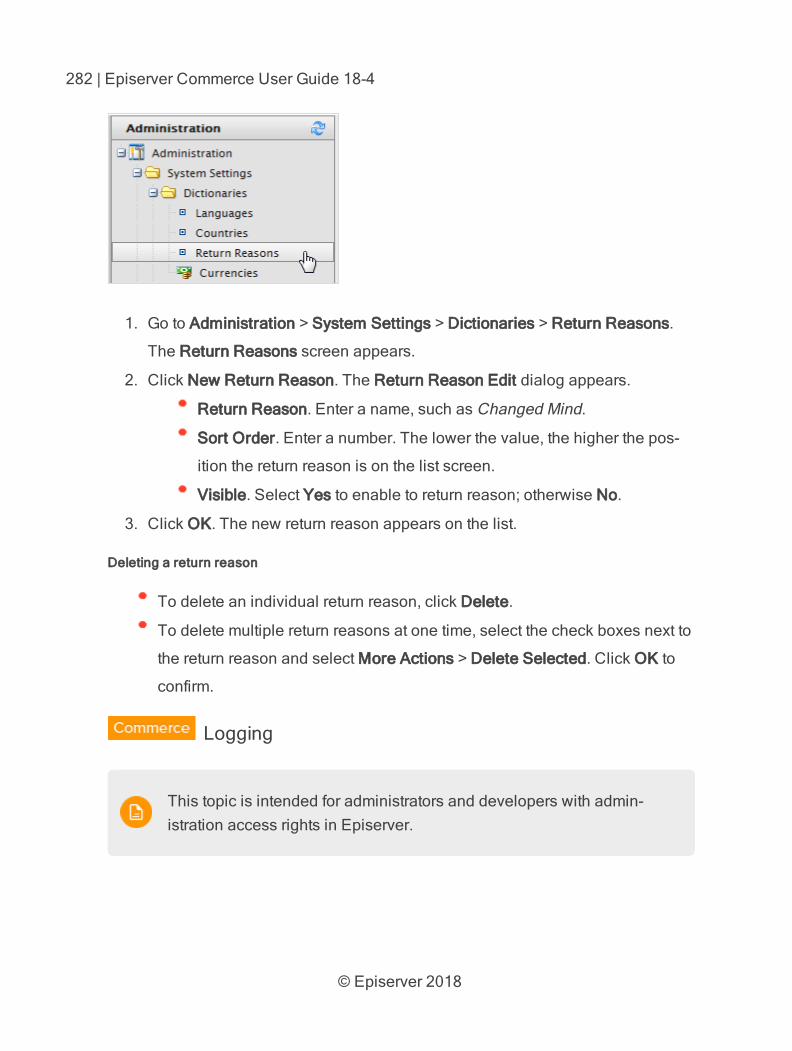
© Episerver 2018
282 | Episerver Commerce User Guide 18-4
1. Go to Administration > System Settings > Dictionaries > Return Reasons.
The Return Reasons screen appears.
2. Click New Return Reason. The Return Reason Edit dialog appears.
Return Reason. Enter a name, such as Changed Mind.
Sort Order. Enter a number. The lower the value, the higher the pos-
ition the return reason is on the list screen.
Visible. Select Yes to enable to return reason; otherwise No.
3. Click OK. The new return reason appears on the list.
Deleting a return reason
To delete an individual return reason, click Delete.
To delete multiple return reasons at one time, select the check boxes next to
the return reason and select More Actions > Delete Selected. Click OK to
confirm.
Logging
This topic is intended for administrators and developers with admin-istration access rights in Episerver.
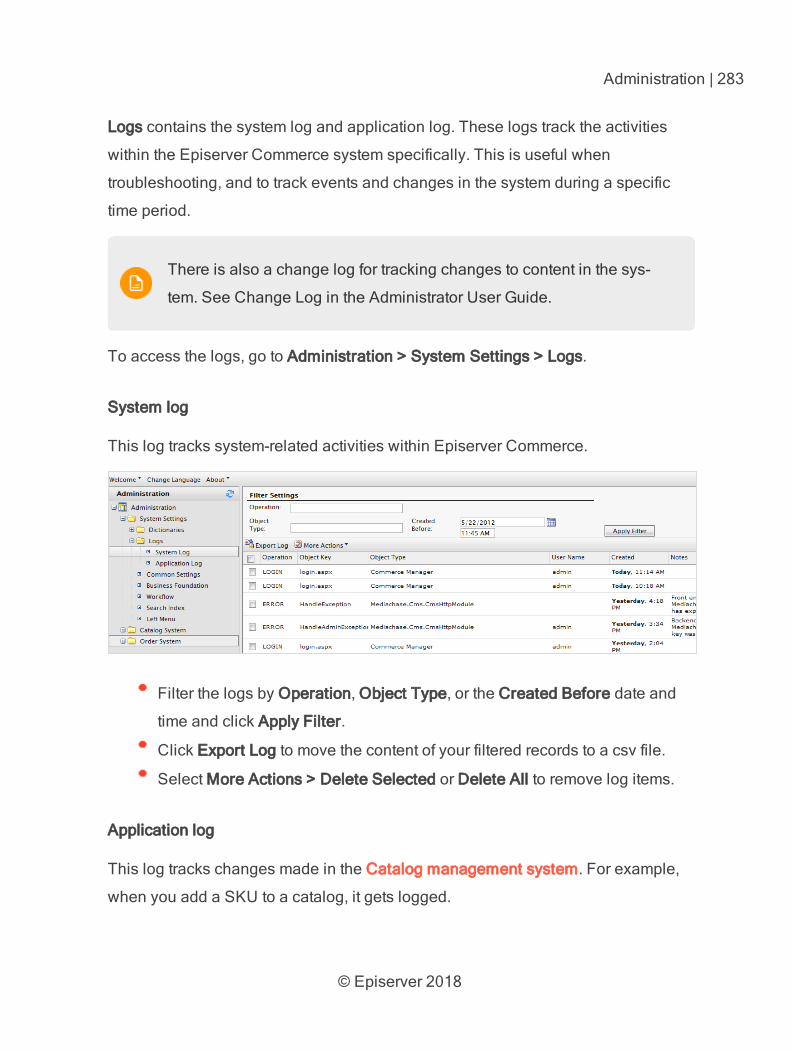
© Episerver 2018
Administration | 283
Logs contains the system log and application log. These logs track the activities
within the Episerver Commerce system specifically. This is useful when
troubleshooting, and to track events and changes in the system during a specific
time period.
There is also a change log for tracking changes to content in the sys-
tem. See Change Log in the Administrator User Guide.
To access the logs, go to Administration > System Settings > Logs.
System log
This log tracks system-related activities within Episerver Commerce.
Filter the logs by Operation, Object Type, or the Created Before date and
time and click Apply Filter.
Click Export Log to move the content of your filtered records to a csv file.
Select More Actions > Delete Selected or Delete All to remove log items.
Application log
This log tracks changes made in the Catalog management system. For example,
when you add a SKU to a catalog, it gets logged.
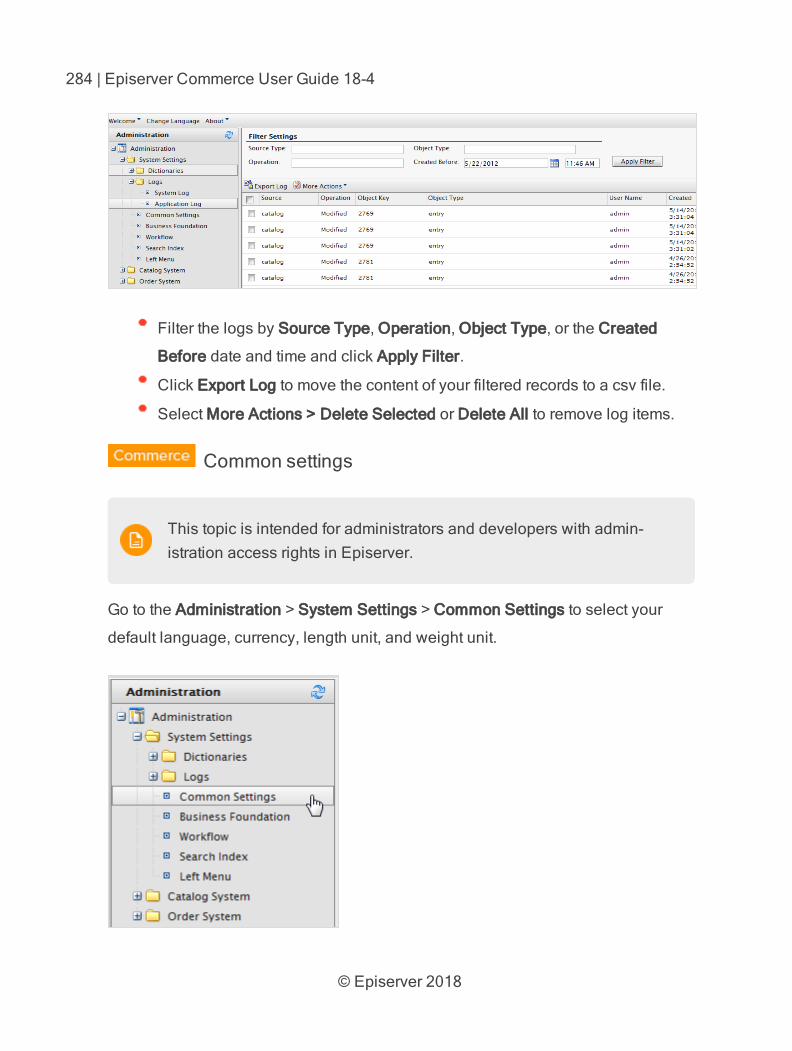
© Episerver 2018
284 | Episerver Commerce User Guide 18-4
Filter the logs by Source Type, Operation, Object Type, or the Created
Before date and time and click Apply Filter.
Click Export Log to move the content of your filtered records to a csv file.
Select More Actions > Delete Selected or Delete All to remove log items.
Common settings
This topic is intended for administrators and developers with admin-istration access rights in Episerver.
Go to the Administration > System Settings > Common Settings to select your
default language, currency, length unit, and weight unit.
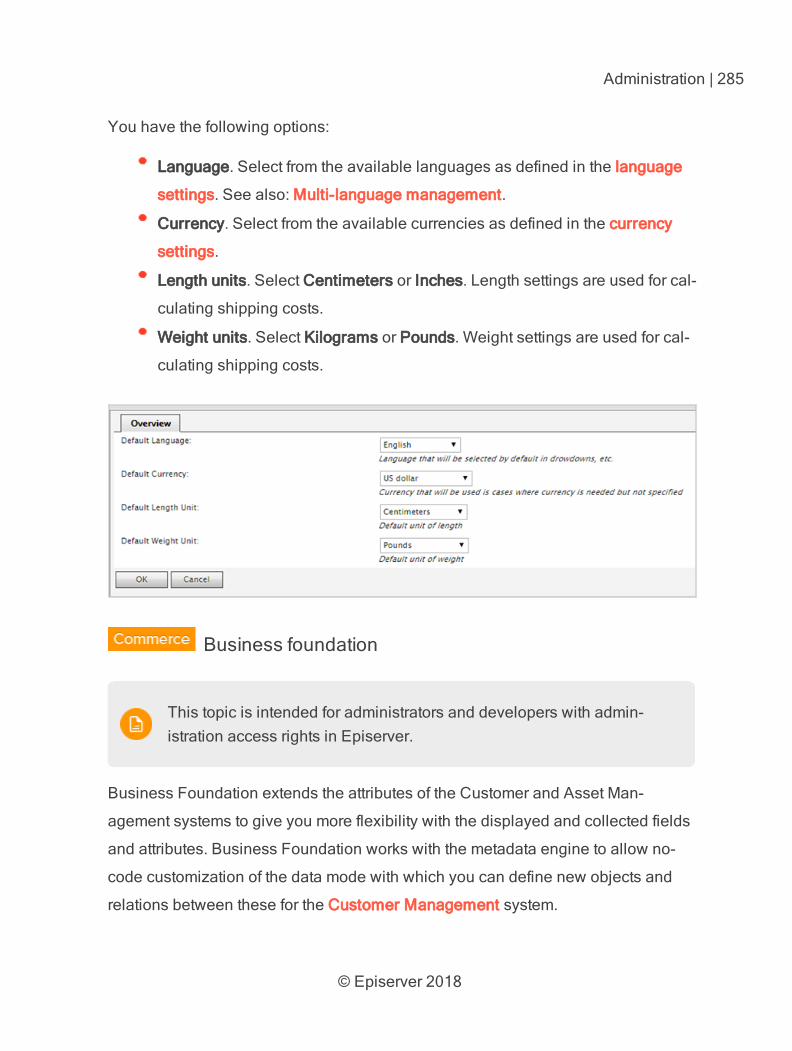
© Episerver 2018
Administration | 285
You have the following options:
Language. Select from the available languages as defined in the language
settings. See also: Multi-language management.
Currency. Select from the available currencies as defined in the currency
settings.
Length units. Select Centimeters or Inches. Length settings are used for cal-
culating shipping costs.
Weight units. Select Kilograms or Pounds. Weight settings are used for cal-
culating shipping costs.
Business foundation
This topic is intended for administrators and developers with admin-istration access rights in Episerver.
Business Foundation extends the attributes of the Customer and Asset Man-
agement systems to give you more flexibility with the displayed and collected fields
and attributes. Business Foundation works with the metadata engine to allow no-
code customization of the data mode with which you can define new objects and
relations between these for the Customer Management system.
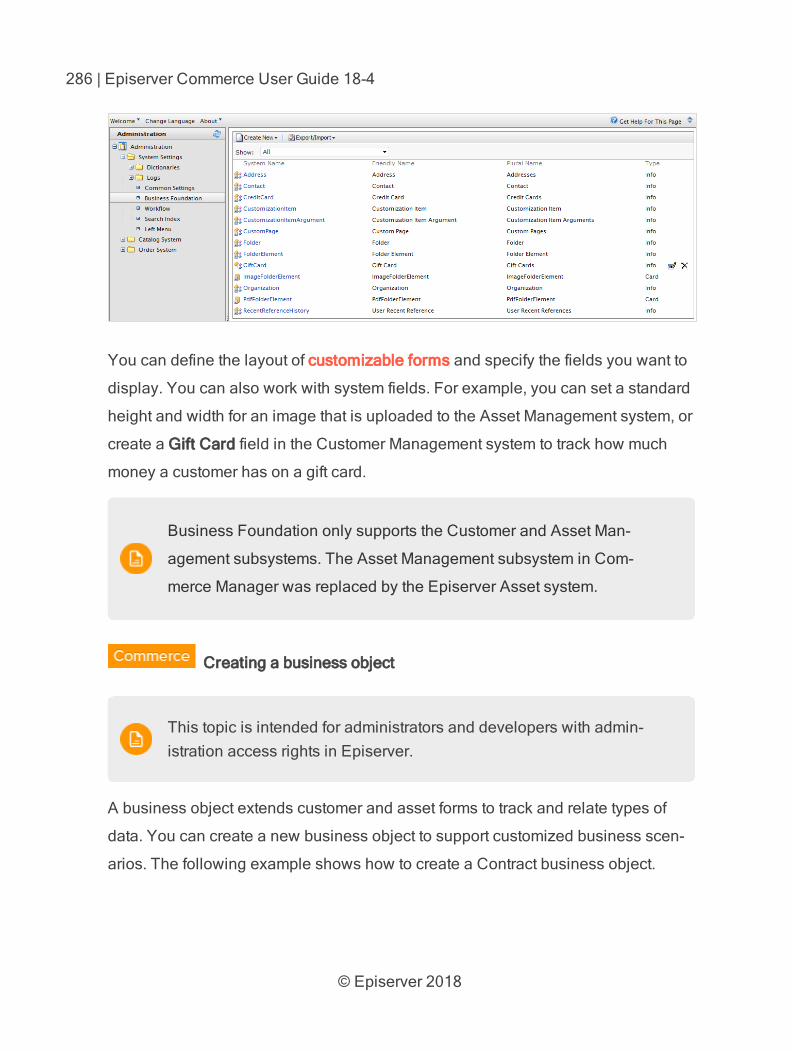
© Episerver 2018
286 | Episerver Commerce User Guide 18-4
You can define the layout of customizable forms and specify the fields you want to
display. You can also work with system fields. For example, you can set a standard
height and width for an image that is uploaded to the Asset Management system, or
create a Gift Card field in the Customer Management system to track how much
money a customer has on a gift card.
Business Foundation only supports the Customer and Asset Man-
agement subsystems. The Asset Management subsystem in Com-
merce Manager was replaced by the Episerver Asset system.
Creating a business object
This topic is intended for administrators and developers with admin-istration access rights in Episerver.
A business object extends customer and asset forms to track and relate types of
data. You can create a new business object to support customized business scen-
arios. The following example shows how to create a Contract business object.
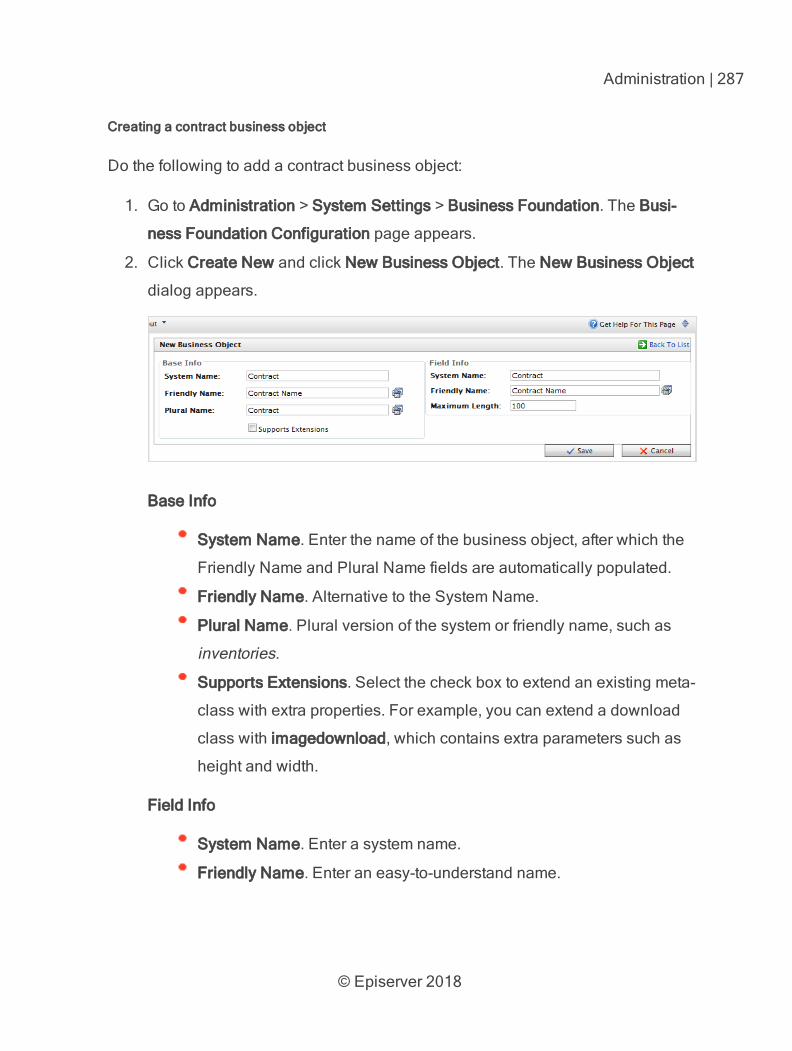
© Episerver 2018
Administration | 287
Creating a contract business object
Do the following to add a contract business object:
1. Go to Administration > System Settings > Business Foundation. The Busi-
ness Foundation Configuration page appears.
2. Click Create New and click New Business Object. The New Business Object
dialog appears.
Base Info
System Name. Enter the name of the business object, after which the
Friendly Name and Plural Name fields are automatically populated.
Friendly Name. Alternative to the System Name.
Plural Name. Plural version of the system or friendly name, such as
inventories.
Supports Extensions. Select the check box to extend an existing meta-
class with extra properties. For example, you can extend a download
class with imagedownload, which contains extra parameters such as
height and width.
Field Info
System Name. Enter a system name.
Friendly Name. Enter an easy-to-understand name.
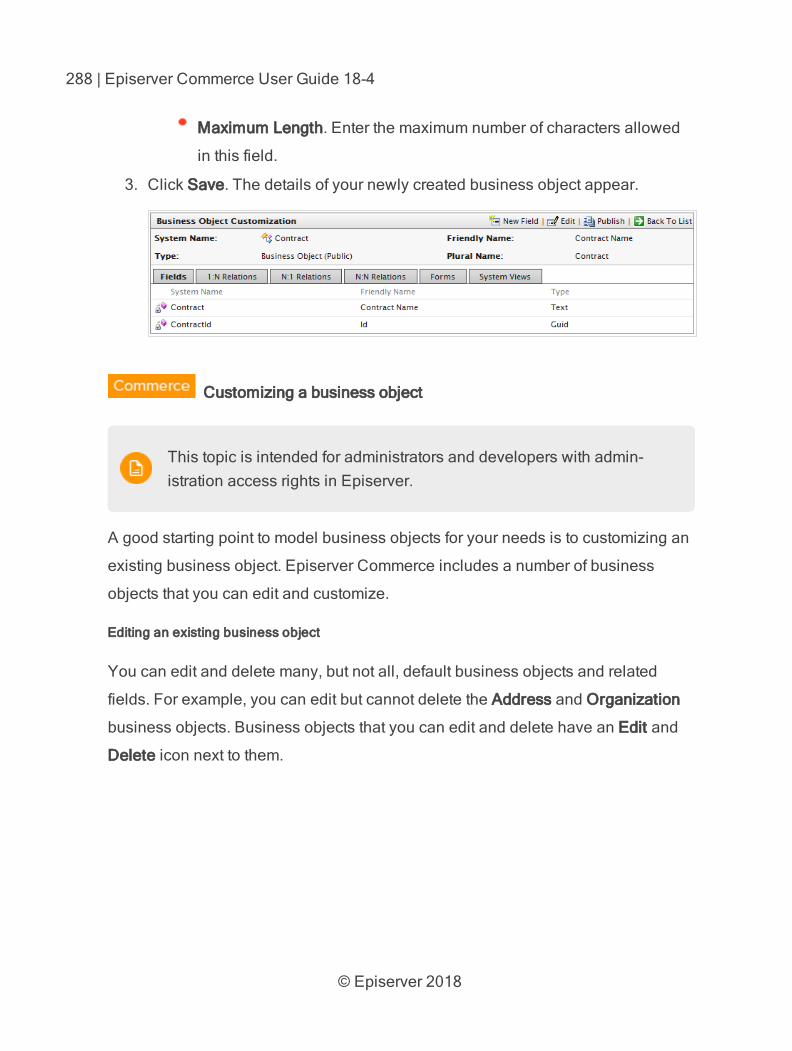
© Episerver 2018
288 | Episerver Commerce User Guide 18-4
Maximum Length. Enter the maximum number of characters allowed
in this field.
3. Click Save. The details of your newly created business object appear.
Customizing a business object
This topic is intended for administrators and developers with admin-istration access rights in Episerver.
A good starting point to model business objects for your needs is to customizing an
existing business object. Episerver Commerce includes a number of business
objects that you can edit and customize.
Editing an existing business object
You can edit and delete many, but not all, default business objects and related
fields. For example, you can edit but cannot delete the Address and Organization
business objects. Business objects that you can edit and delete have an Edit and
Delete icon next to them.
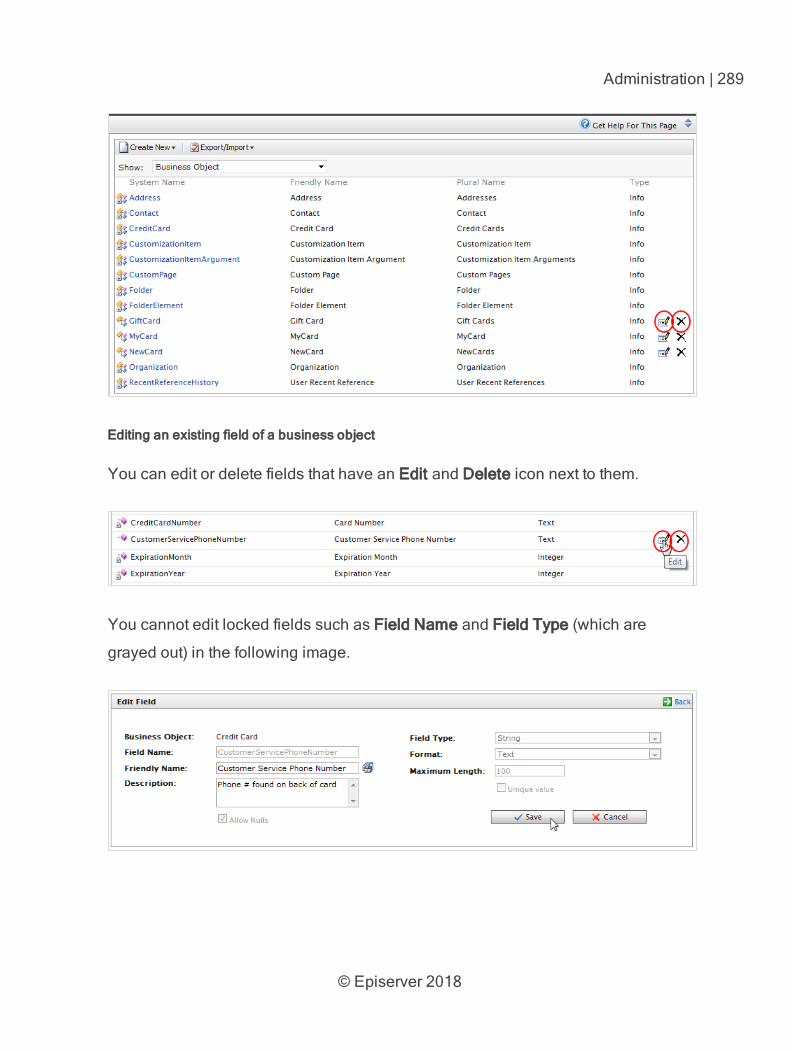
© Episerver 2018
Administration | 289
Editing an existing field of a business object
You can edit or delete fields that have an Edit and Delete icon next to them.
You cannot edit locked fields such as Field Name and Field Type (which are
grayed out) in the following image.
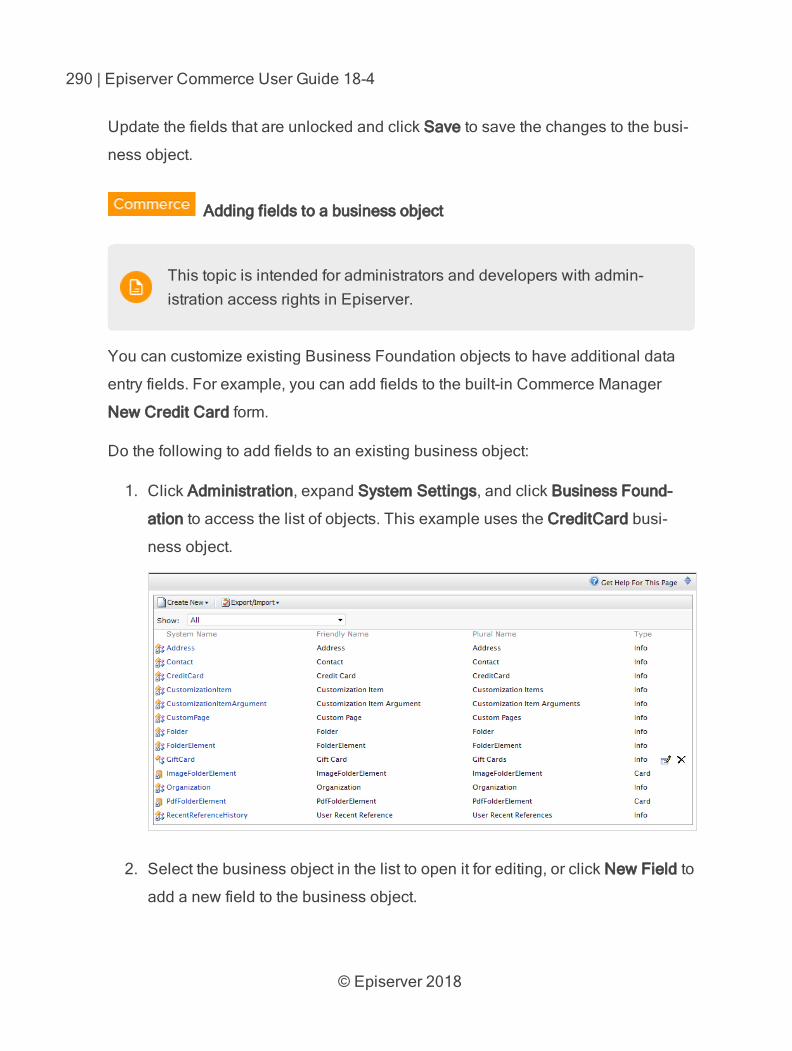
© Episerver 2018
290 | Episerver Commerce User Guide 18-4
Update the fields that are unlocked and click Save to save the changes to the busi-
ness object.
Adding fields to a business object
This topic is intended for administrators and developers with admin-istration access rights in Episerver.
You can customize existing Business Foundation objects to have additional data
entry fields. For example, you can add fields to the built-in Commerce Manager
New Credit Card form.
Do the following to add fields to an existing business object:
1. Click Administration, expand System Settings, and click Business Found-
ation to access the list of objects. This example uses the CreditCard busi-
ness object.
2. Select the business object in the list to open it for editing, or click New Field to
add a new field to the business object.
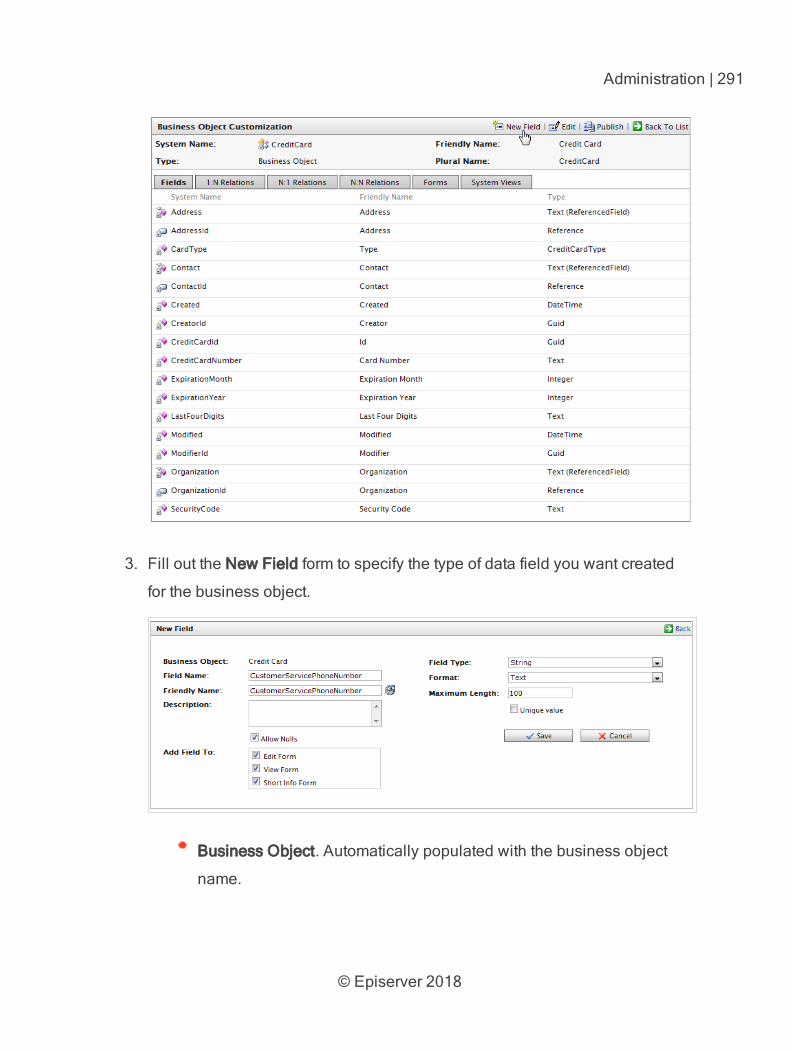
© Episerver 2018
Administration | 291
3. Fill out the New Field form to specify the type of data field you want created
for the business object.
Business Object. Automatically populated with the business object
name.
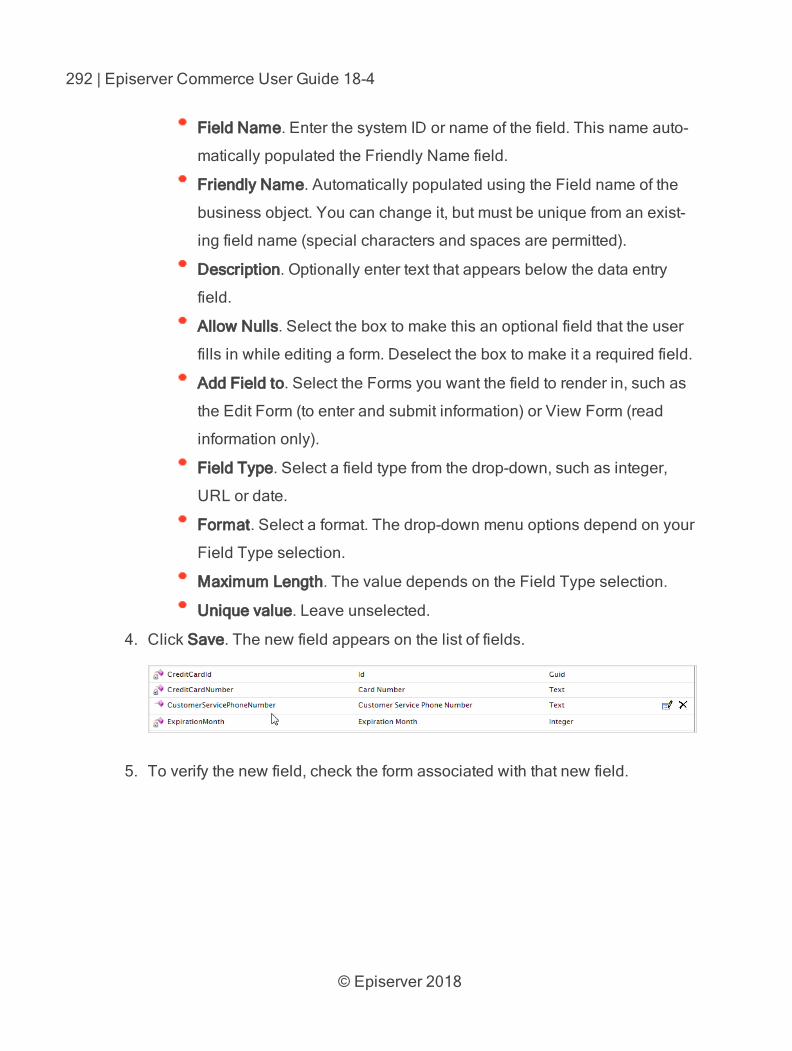
© Episerver 2018
292 | Episerver Commerce User Guide 18-4
Field Name. Enter the system ID or name of the field. This name auto-
matically populated the Friendly Name field.
Friendly Name. Automatically populated using the Field name of the
business object. You can change it, but must be unique from an exist-
ing field name (special characters and spaces are permitted).
Description. Optionally enter text that appears below the data entry
field.
Allow Nulls. Select the box to make this an optional field that the user
fills in while editing a form. Deselect the box to make it a required field.
Add Field to. Select the Forms you want the field to render in, such as
the Edit Form (to enter and submit information) or View Form (read
information only).
Field Type. Select a field type from the drop-down, such as integer,
URL or date.
Format. Select a format. The drop-down menu options depend on your
Field Type selection.
Maximum Length. The value depends on the Field Type selection.
Unique value. Leave unselected.
4. Click Save. The new field appears on the list of fields.
5. To verify the new field, check the form associated with that new field.
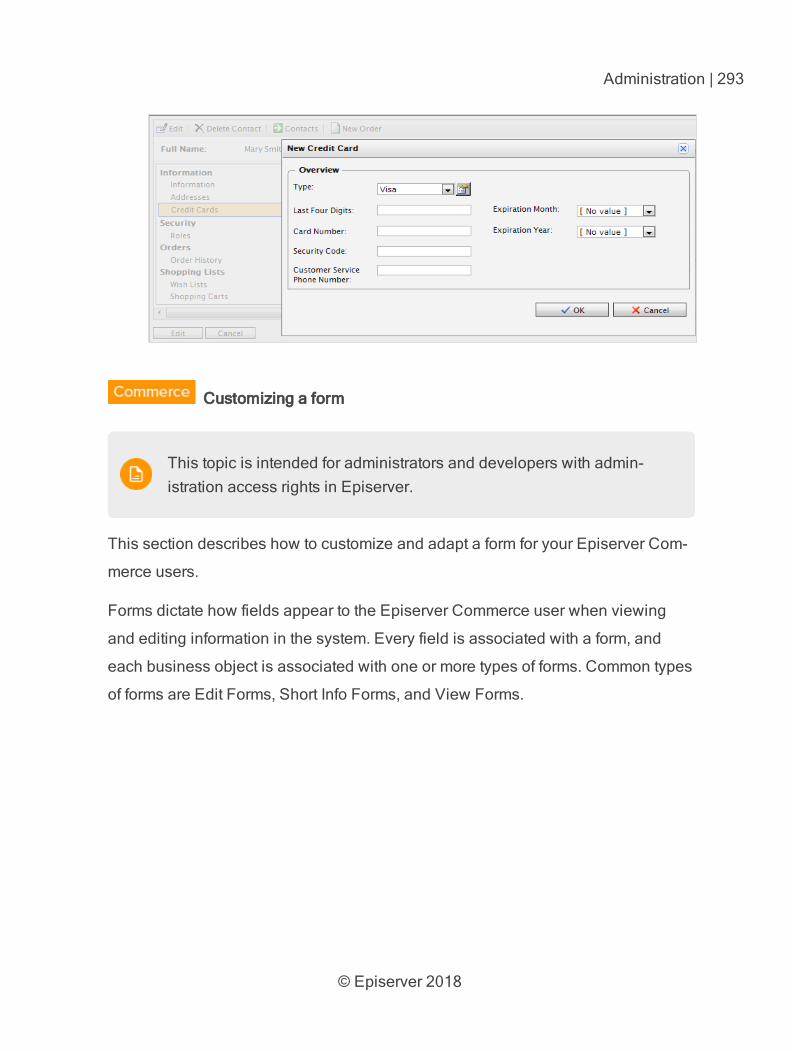
© Episerver 2018
Administration | 293
Customizing a form
This topic is intended for administrators and developers with admin-istration access rights in Episerver.
This section describes how to customize and adapt a form for your Episerver Com-
merce users.
Forms dictate how fields appear to the Episerver Commerce user when viewing
and editing information in the system. Every field is associated with a form, and
each business object is associated with one or more types of forms. Common types
of forms are Edit Forms, Short Info Forms, and View Forms.
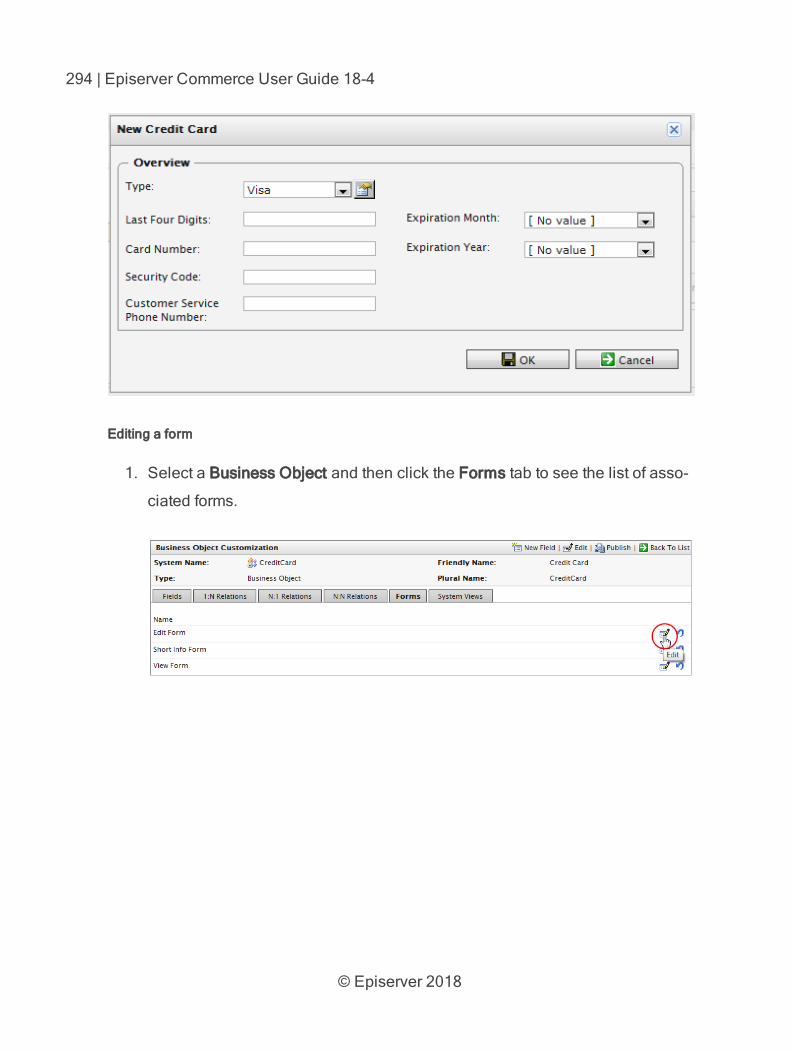
© Episerver 2018
294 | Episerver Commerce User Guide 18-4
Editing a form
1. Select a Business Object and then click the Forms tab to see the list of asso-
ciated forms.
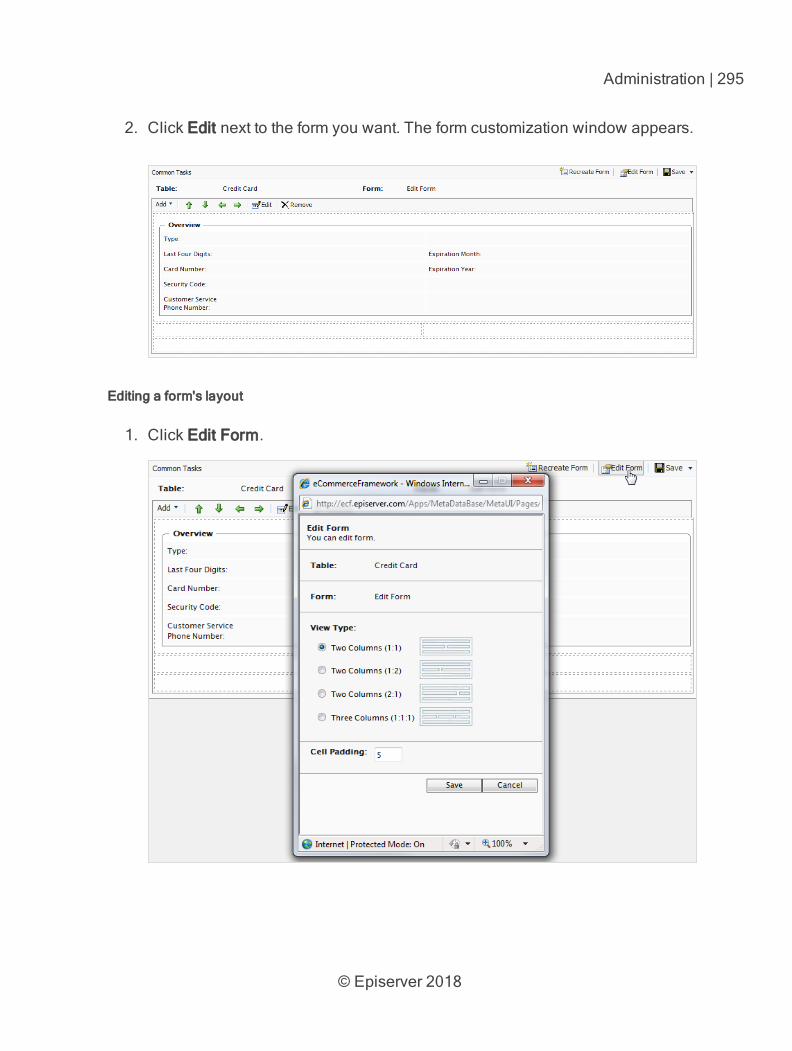
© Episerver 2018
Administration | 295
2. Click Edit next to the form you want. The form customization window appears.
Editing a form's layout
1. Click Edit Form.
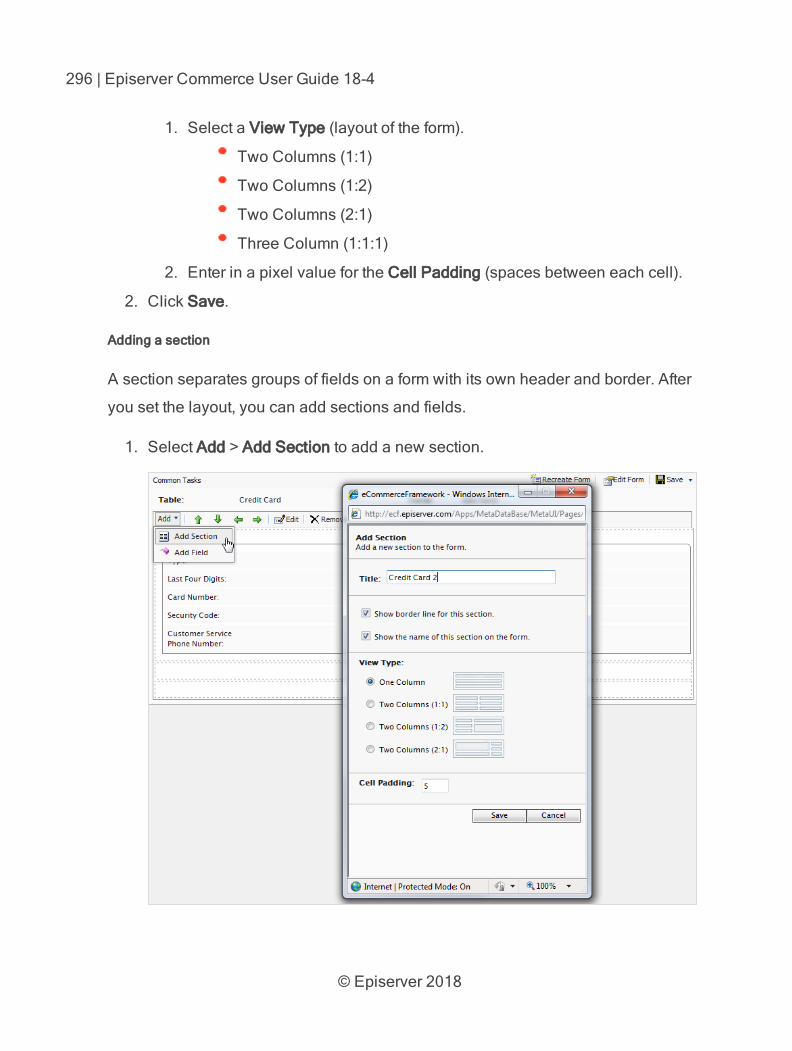
© Episerver 2018
296 | Episerver Commerce User Guide 18-4
1. Select a View Type (layout of the form).
Two Columns (1:1)
Two Columns (1:2)
Two Columns (2:1)
Three Column (1:1:1)
2. Enter in a pixel value for the Cell Padding (spaces between each cell).
2. Click Save.
Adding a section
A section separates groups of fields on a form with its own header and border. After
you set the layout, you can add sections and fields.
1. Select Add > Add Section to add a new section.
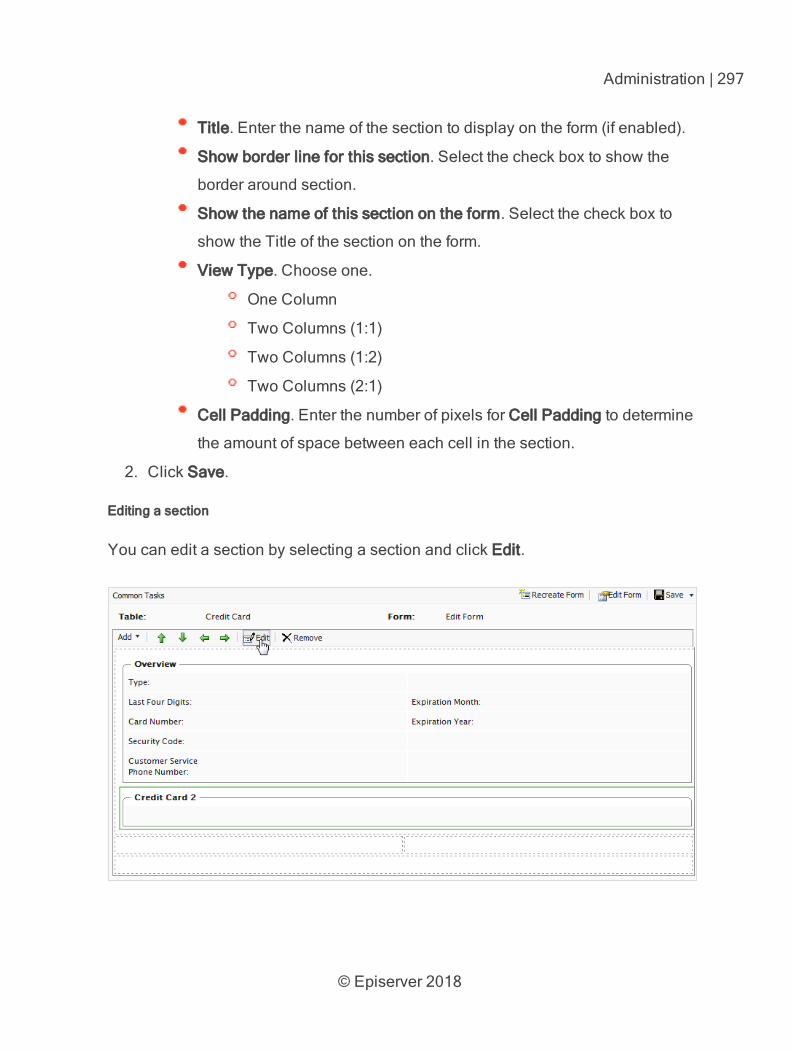
© Episerver 2018
Administration | 297
Title. Enter the name of the section to display on the form (if enabled).
Show border line for this section. Select the check box to show the
border around section.
Show the name of this section on the form. Select the check box to
show the Title of the section on the form.
View Type. Choose one.
One Column
Two Columns (1:1)
Two Columns (1:2)
Two Columns (2:1)
Cell Padding. Enter the number of pixels for Cell Padding to determine
the amount of space between each cell in the section.
2. Click Save.
Editing a section
You can edit a section by selecting a section and click Edit.
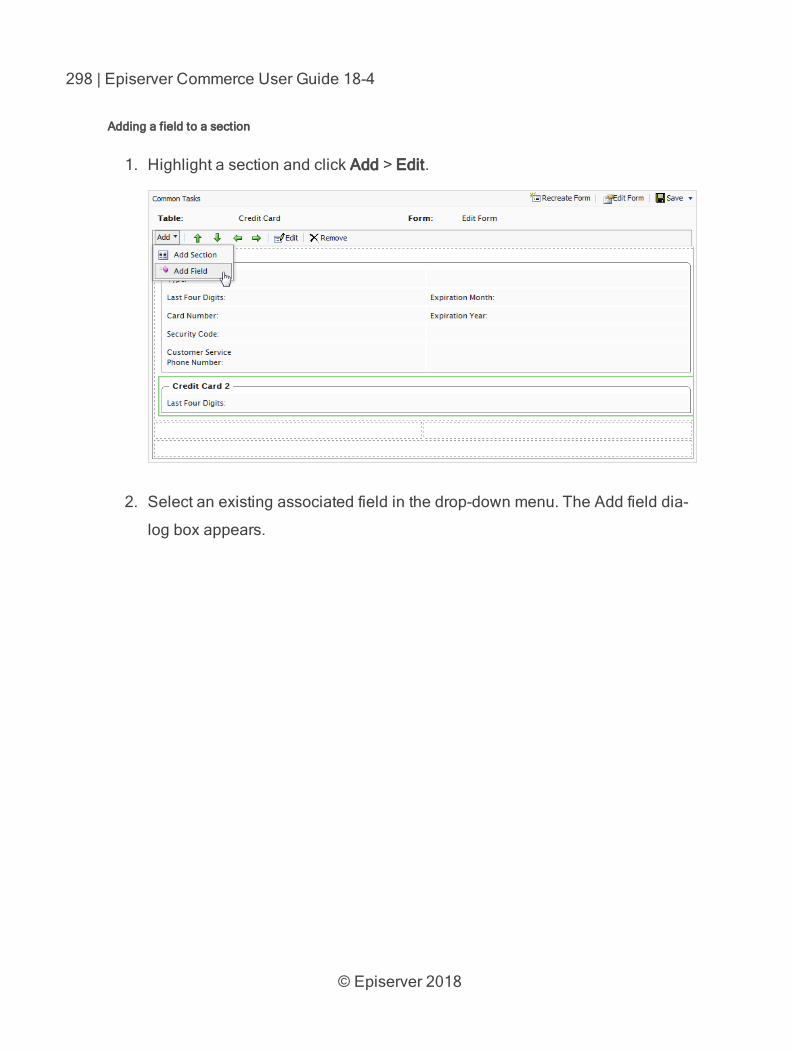
© Episerver 2018
298 | Episerver Commerce User Guide 18-4
Adding a field to a section
1. Highlight a section and click Add > Edit.
2. Select an existing associated field in the drop-down menu. The Add field dia-
log box appears.
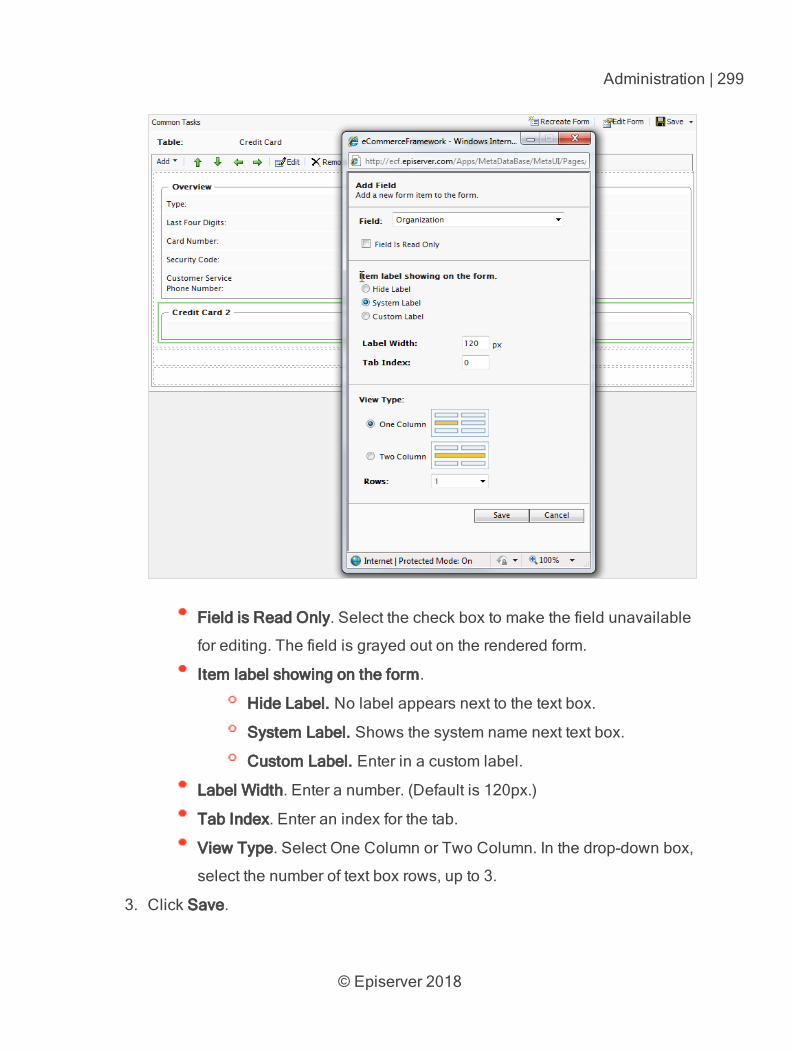
© Episerver 2018
Administration | 299
Field is Read Only. Select the check box to make the field unavailable
for editing. The field is grayed out on the rendered form.
Item label showing on the form.
Hide Label. No label appears next to the text box.
System Label. Shows the system name next text box.
Custom Label. Enter in a custom label.
Label Width. Enter a number. (Default is 120px.)
Tab Index. Enter an index for the tab.
View Type. Select One Column or Two Column. In the drop-down box,
select the number of text box rows, up to 3.
3. Click Save.
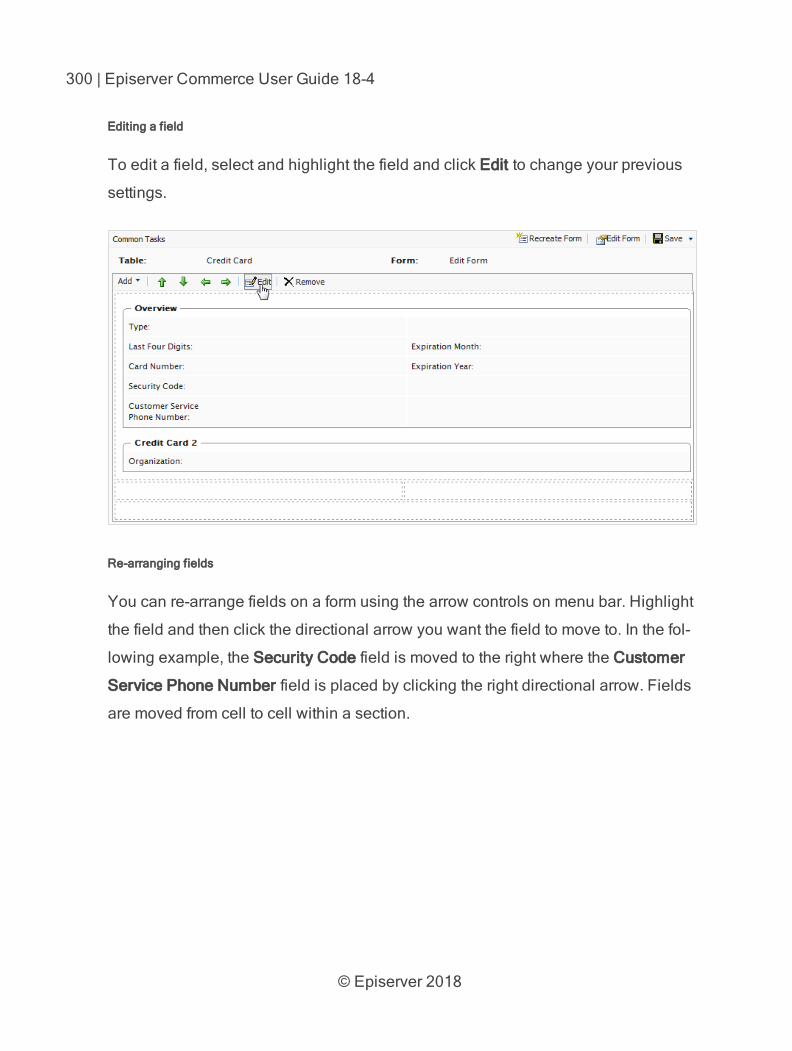
© Episerver 2018
300 | Episerver Commerce User Guide 18-4
Editing a field
To edit a field, select and highlight the field and click Edit to change your previous
settings.
Re-arranging fields
You can re-arrange fields on a form using the arrow controls on menu bar. Highlight
the field and then click the directional arrow you want the field to move to. In the fol-
lowing example, the Security Code field is moved to the right where the Customer
Service Phone Number field is placed by clicking the right directional arrow. Fields
are moved from cell to cell within a section.

© Episerver 2018
Administration | 301
Deleting a section or field
1. Highlight a section or field.
2. Click Remove. Click OK to confirm.
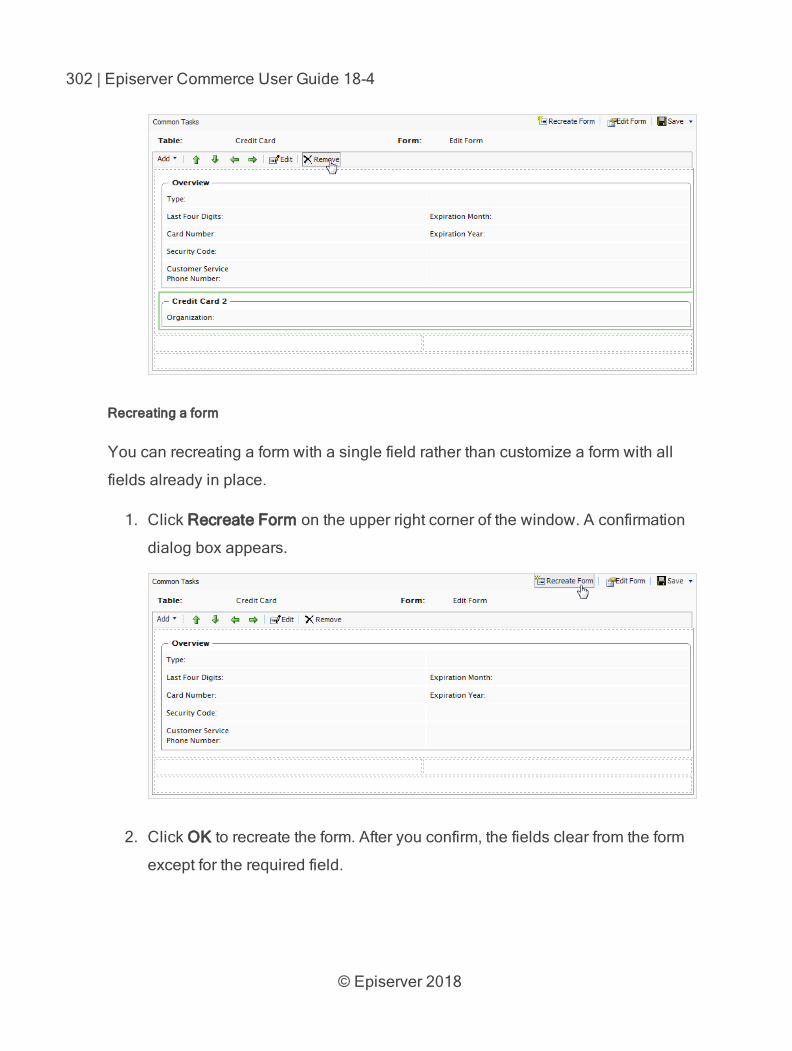
© Episerver 2018
302 | Episerver Commerce User Guide 18-4
Recreating a form
You can recreating a form with a single field rather than customize a form with all
fields already in place.
1. Click Recreate Form on the upper right corner of the window. A confirmation
dialog box appears.
2. Click OK to recreate the form. After you confirm, the fields clear from the form
except for the required field.
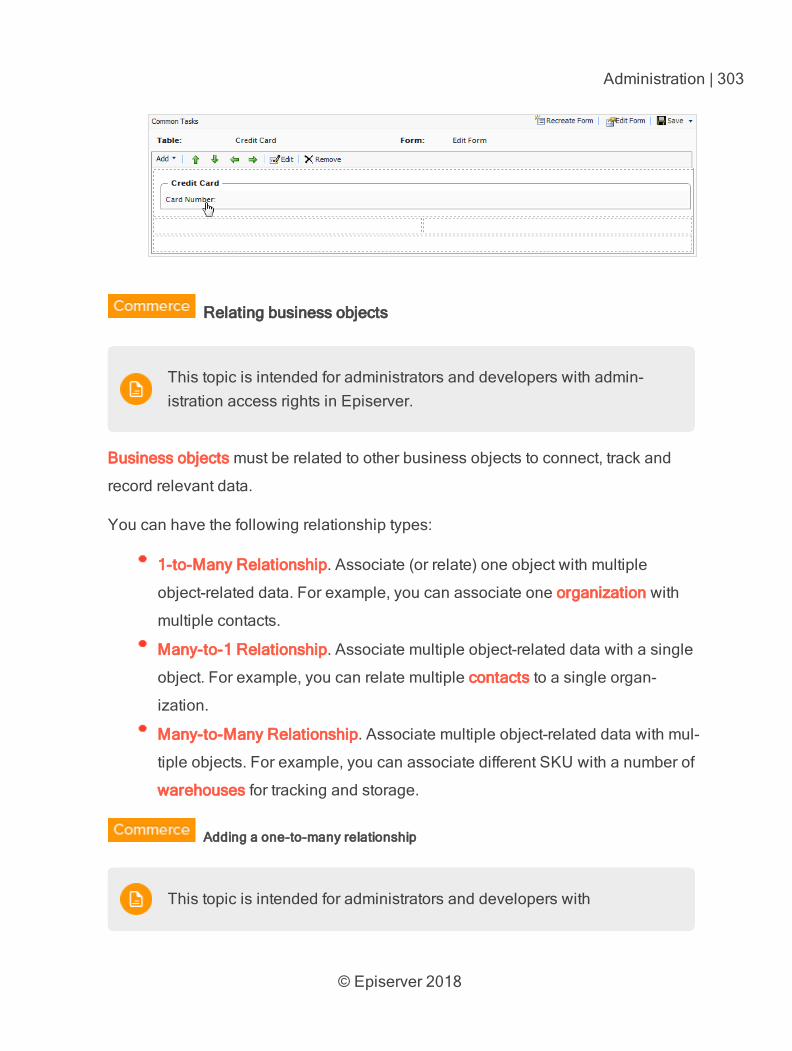
© Episerver 2018
Administration | 303
Relating business objects
This topic is intended for administrators and developers with admin-istration access rights in Episerver.
Business objects must be related to other business objects to connect, track and
record relevant data.
You can have the following relationship types:
1-to-Many Relationship. Associate (or relate) one object with multiple
object-related data. For example, you can associate one organization with
multiple contacts.
Many-to-1 Relationship. Associate multiple object-related data with a single
object. For example, you can relate multiple contacts to a single organ-
ization.
Many-to-Many Relationship. Associate multiple object-related data with mul-
tiple objects. For example, you can associate different SKU with a number of
warehouses for tracking and storage.
Adding a one-to-many relationship
This topic is intended for administrators and developers with
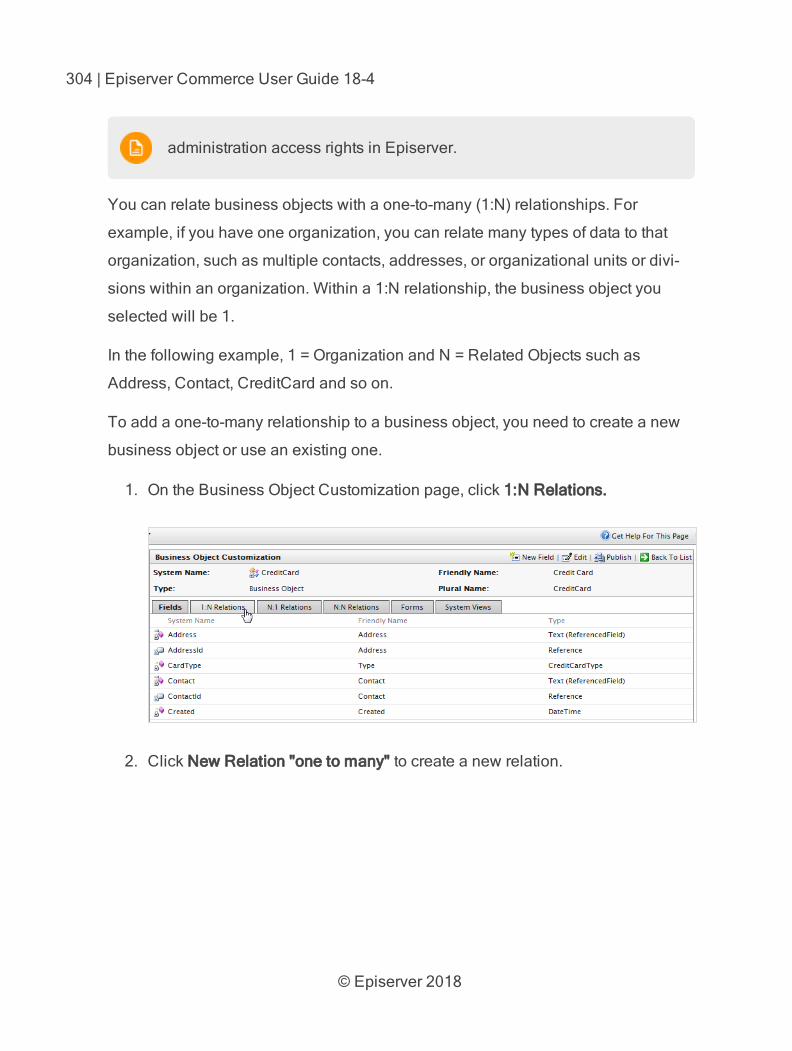
© Episerver 2018
304 | Episerver Commerce User Guide 18-4
administration access rights in Episerver.
You can relate business objects with a one-to-many (1:N) relationships. For
example, if you have one organization, you can relate many types of data to that
organization, such as multiple contacts, addresses, or organizational units or divi-
sions within an organization. Within a 1:N relationship, the business object you
selected will be 1.
In the following example, 1 = Organization and N = Related Objects such as
Address, Contact, CreditCard and so on.
To add a one-to-many relationship to a business object, you need to create a new
business object or use an existing one.
1. On the Business Object Customization page, click 1:N Relations.
2. Click New Relation "one to many" to create a new relation.
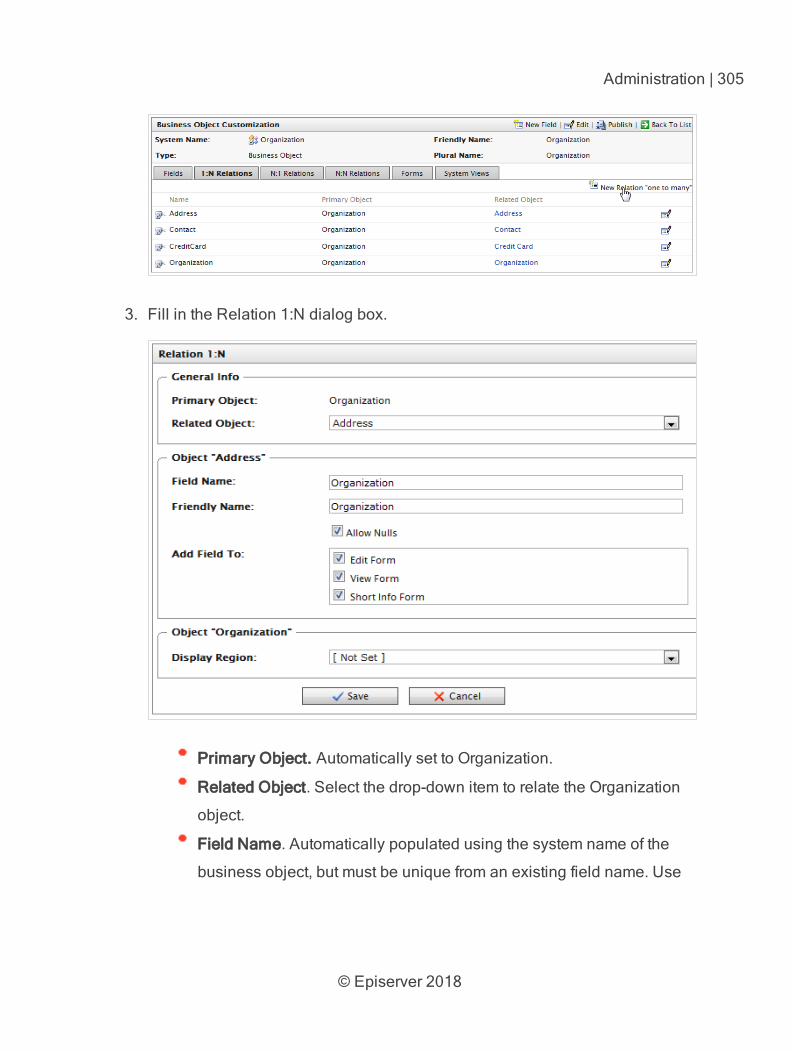
© Episerver 2018
Administration | 305
3. Fill in the Relation 1:N dialog box.
Primary Object. Automatically set to Organization.
Related Object. Select the drop-down item to relate the Organization
object.
Field Name. Automatically populated using the system name of the
business object, but must be unique from an existing field name. Use
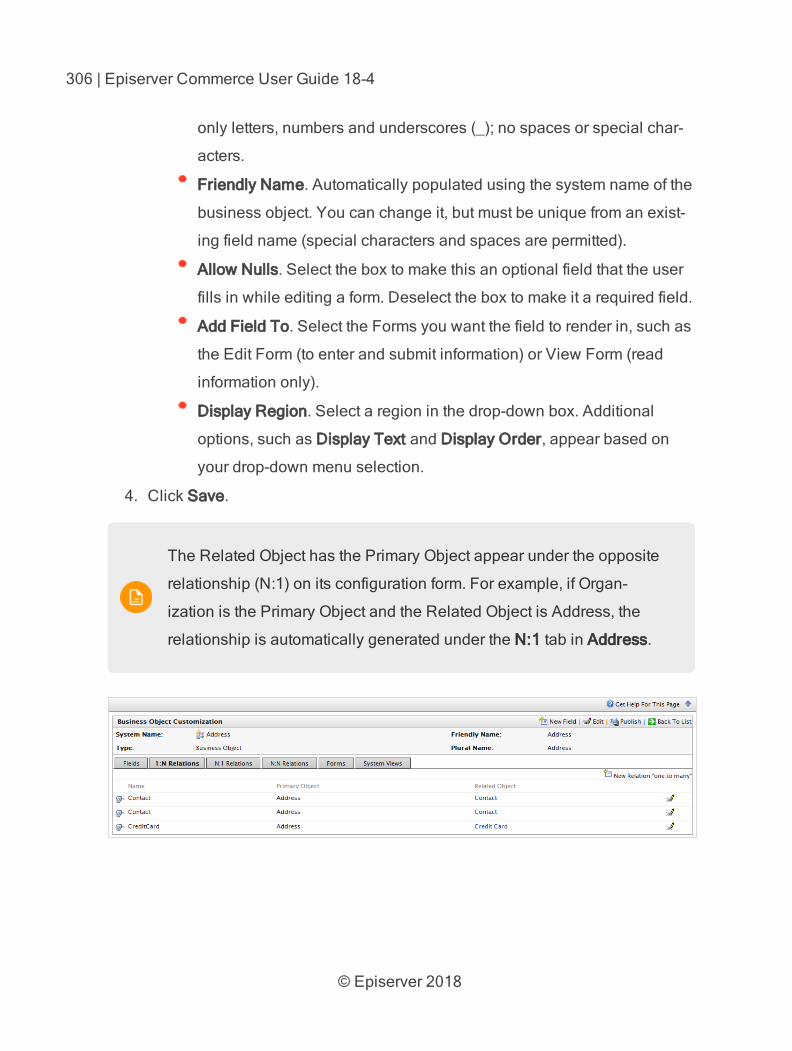
© Episerver 2018
306 | Episerver Commerce User Guide 18-4
only letters, numbers and underscores (_); no spaces or special char-
acters.
Friendly Name. Automatically populated using the system name of the
business object. You can change it, but must be unique from an exist-
ing field name (special characters and spaces are permitted).
Allow Nulls. Select the box to make this an optional field that the user
fills in while editing a form. Deselect the box to make it a required field.
Add Field To. Select the Forms you want the field to render in, such as
the Edit Form (to enter and submit information) or View Form (read
information only).
Display Region. Select a region in the drop-down box. Additional
options, such as Display Text and Display Order, appear based on
your drop-down menu selection.
4. Click Save.
The Related Object has the Primary Object appear under the opposite
relationship (N:1) on its configuration form. For example, if Organ-
ization is the Primary Object and the Related Object is Address, the
relationship is automatically generated under the N:1 tab in Address.
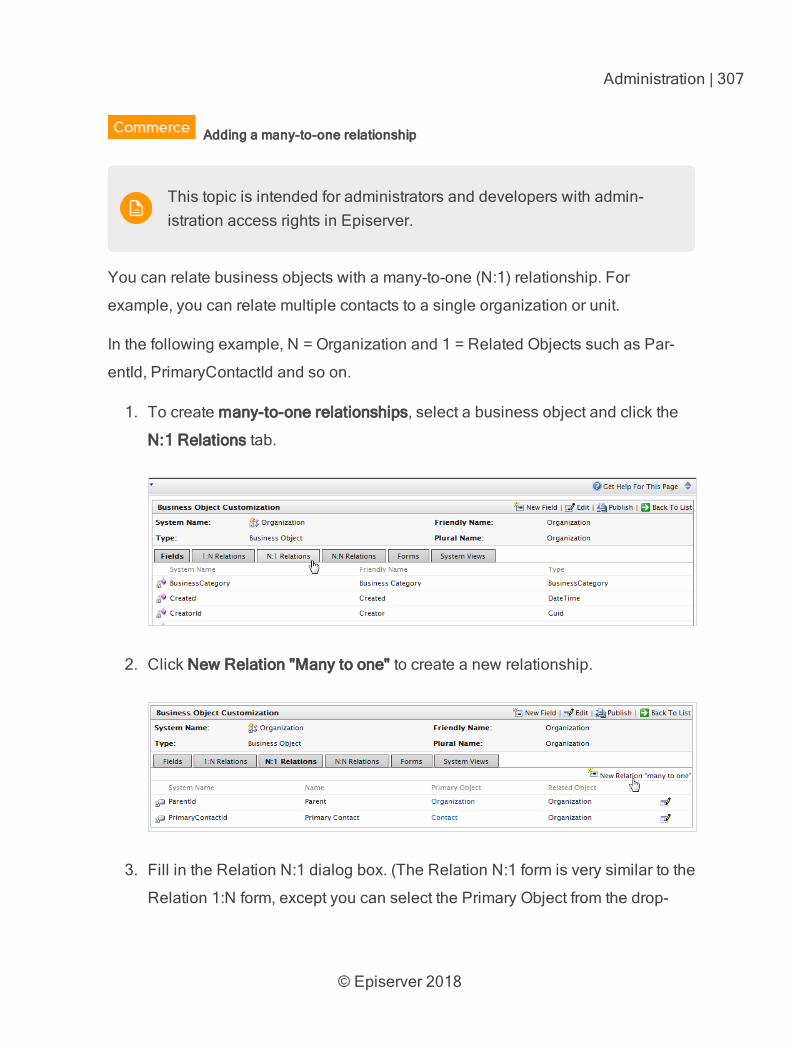
© Episerver 2018
Administration | 307
Adding a many-to-one relationship
This topic is intended for administrators and developers with admin-istration access rights in Episerver.
You can relate business objects with a many-to-one (N:1) relationship. For
example, you can relate multiple contacts to a single organization or unit.
In the following example, N = Organization and 1 = Related Objects such as Par-
entId, PrimaryContactId and so on.
1. To create many-to-one relationships, select a business object and click the
N:1 Relations tab.
2. Click New Relation "Many to one" to create a new relationship.
3. Fill in the Relation N:1 dialog box. (The Relation N:1 form is very similar to the
Relation 1:N form, except you can select the Primary Object from the drop-
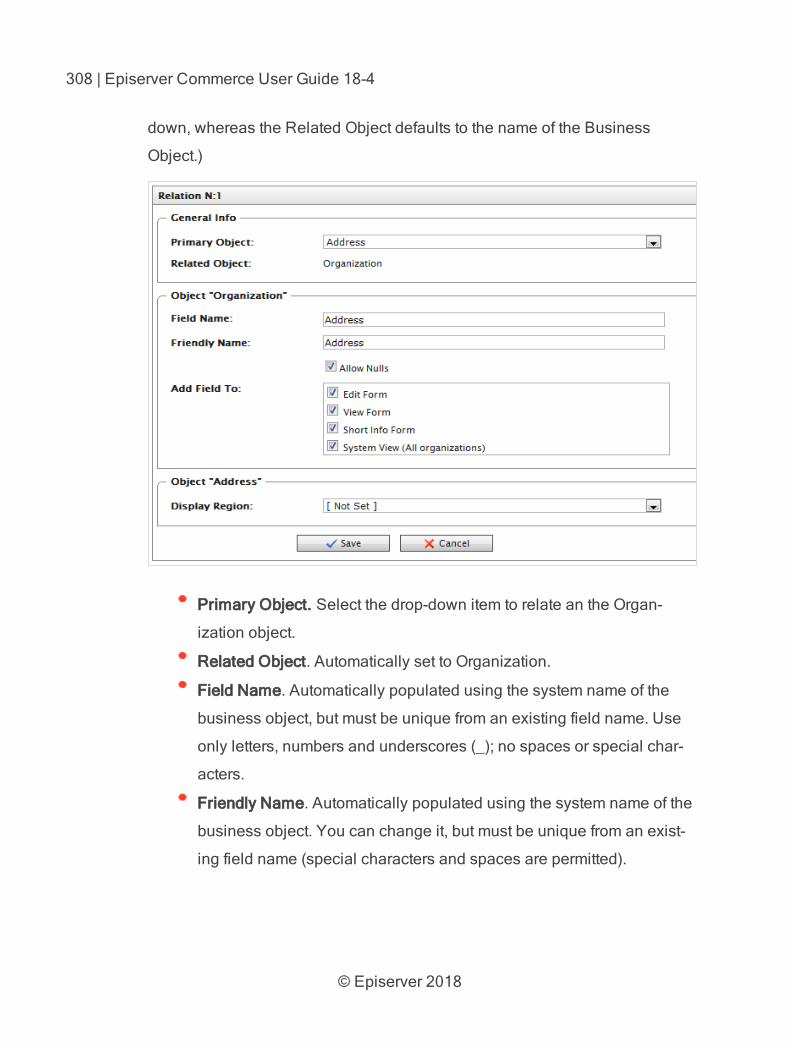
© Episerver 2018
308 | Episerver Commerce User Guide 18-4
down, whereas the Related Object defaults to the name of the Business
Object.)
Primary Object. Select the drop-down item to relate an the Organ-
ization object.
Related Object. Automatically set to Organization.
Field Name. Automatically populated using the system name of the
business object, but must be unique from an existing field name. Use
only letters, numbers and underscores (_); no spaces or special char-
acters.
Friendly Name. Automatically populated using the system name of the
business object. You can change it, but must be unique from an exist-
ing field name (special characters and spaces are permitted).
© Episerver 2018
Administration | 309
Allow Nulls. Select the box to make this an optional field that the user
fills in while editing a form. Deselect the box to make it a required field.
Add Field To. Select the Forms you want the field to render in, such as
the Edit Form (to enter and submit information) or View Form (read
information only).
Display Region. Select a region in the drop-down box. Additional
options, such as Display Text and Display Order, appear based on
your drop-down menu selection.
4. Click Save.
Like an 1:N relationship, if you create a N:1 relationship with a Primary
and Related Object, a 1:N relationship is automatically generated for
the Primary Object on the 1:N tab.
Adding a many-to-many relationship
This topic is intended for administrators and developers with admin-istration access rights in Episerver.
You can create a many-to-many (N:N) relationship with business objects. For
example, a many-to-many relationship helps to track many SKUs and their invent-
ory levels with many warehouse locations, or multiple contacts a part of multiple
organizations. A many-to-many relationship between two objects is also called a
bridge.
In the example both Organization and Organization_Contact = N.
1. To create a many-to-many relationship, select a business object and then
click the N:N Relations tab.
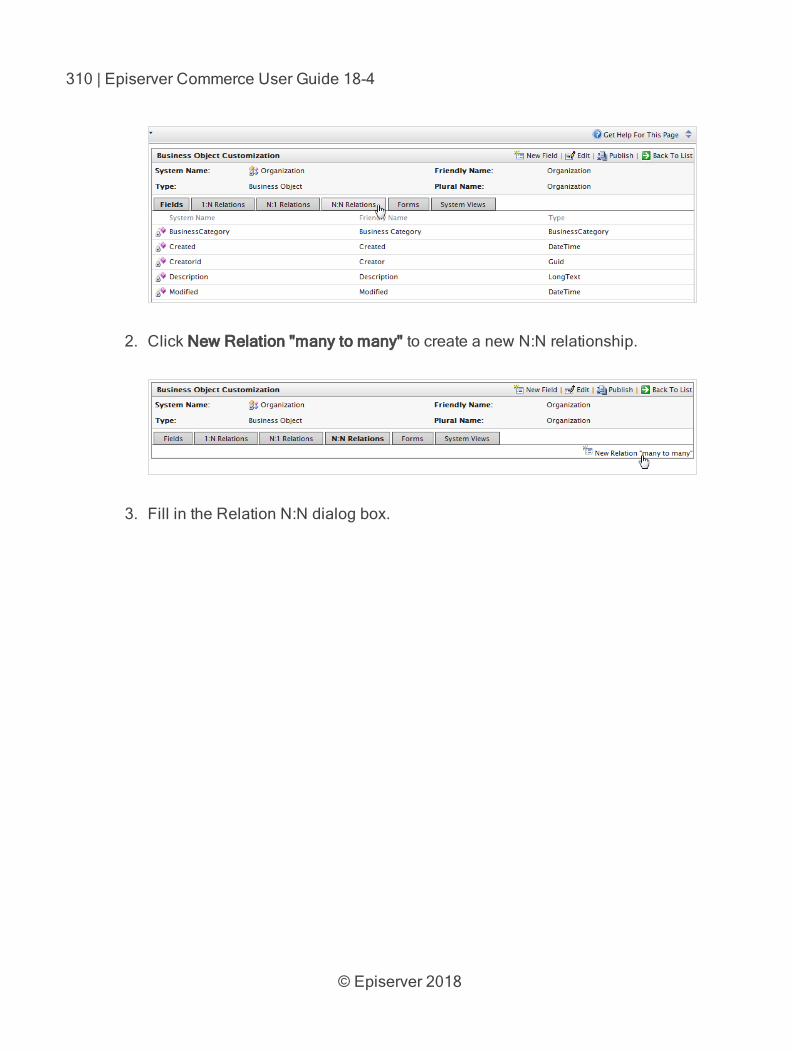
© Episerver 2018
310 | Episerver Commerce User Guide 18-4
2. Click New Relation "many to many" to create a new N:N relationship.
3. Fill in the Relation N:N dialog box.
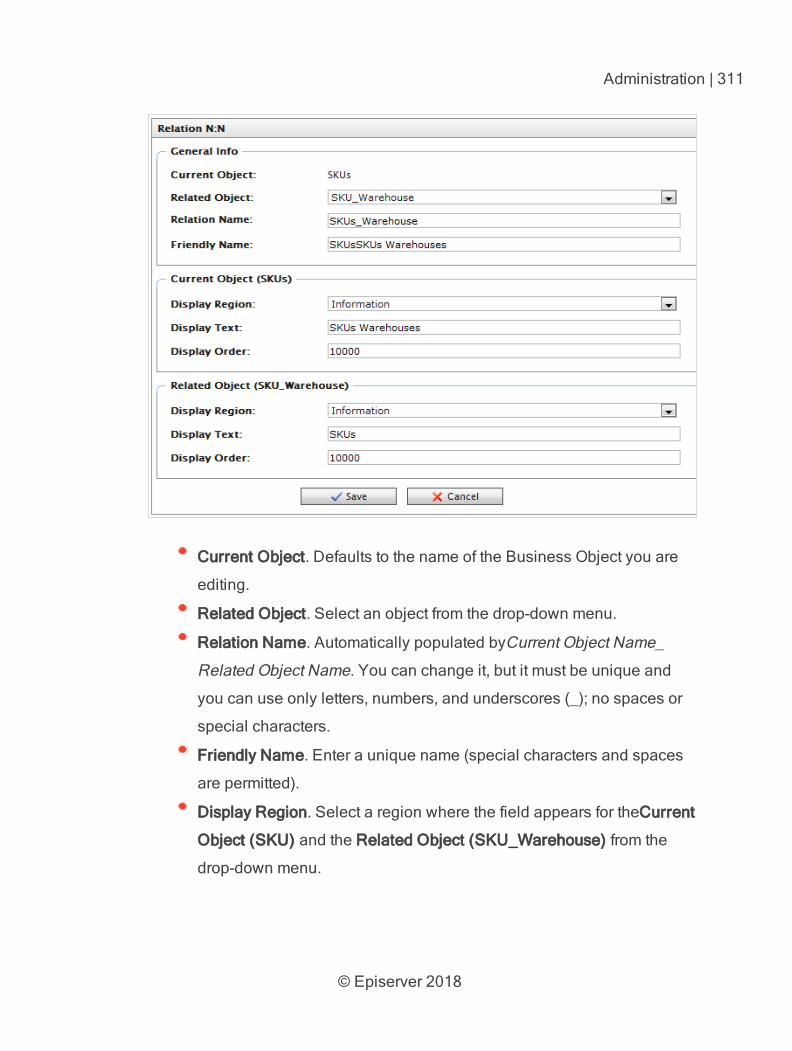
© Episerver 2018
Administration | 311
Current Object. Defaults to the name of the Business Object you are
editing.
Related Object. Select an object from the drop-down menu.
Relation Name. Automatically populated byCurrent Object Name_
Related Object Name. You can change it, but it must be unique and
you can use only letters, numbers, and underscores (_); no spaces or
special characters.
Friendly Name. Enter a unique name (special characters and spaces
are permitted).
Display Region. Select a region where the field appears for theCurrent
Object (SKU) and the Related Object (SKU_Warehouse) from the
drop-down menu.
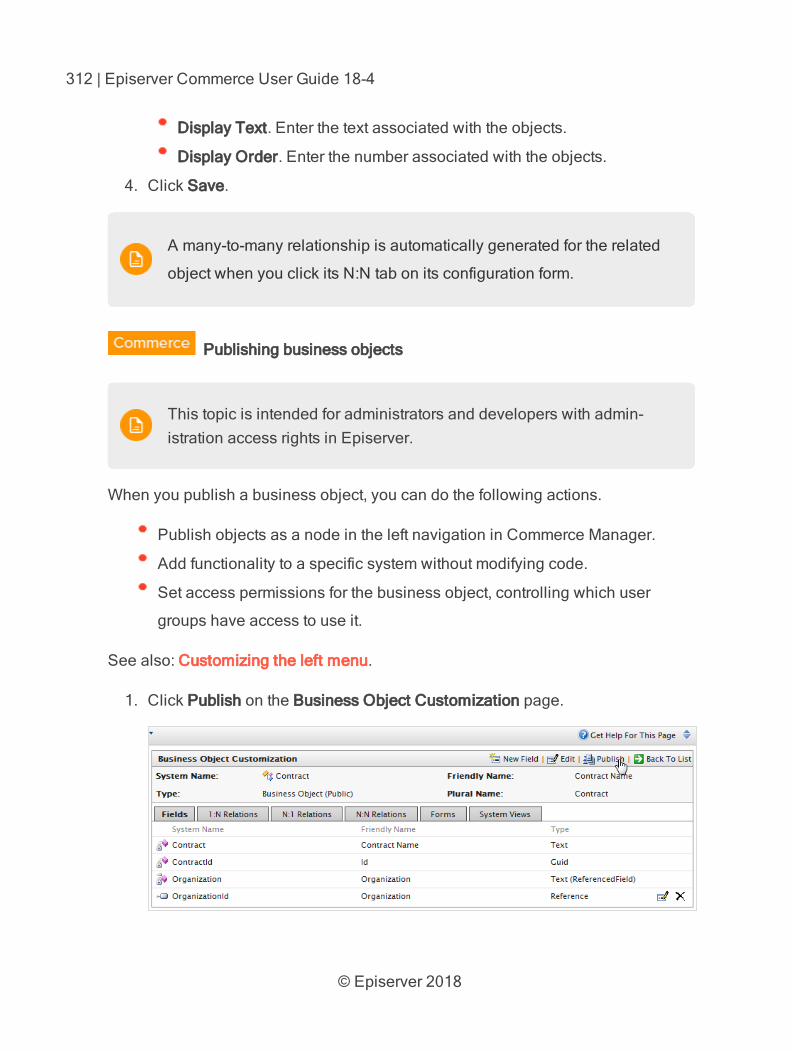
© Episerver 2018
312 | Episerver Commerce User Guide 18-4
Display Text. Enter the text associated with the objects.
Display Order. Enter the number associated with the objects.
4. Click Save.
A many-to-many relationship is automatically generated for the related
object when you click its N:N tab on its configuration form.
Publishing business objects
This topic is intended for administrators and developers with admin-istration access rights in Episerver.
When you publish a business object, you can do the following actions.
Publish objects as a node in the left navigation in Commerce Manager.
Add functionality to a specific system without modifying code.
Set access permissions for the business object, controlling which user
groups have access to use it.
See also: Customizing the left menu.
1. Click Publish on the Business Object Customization page.
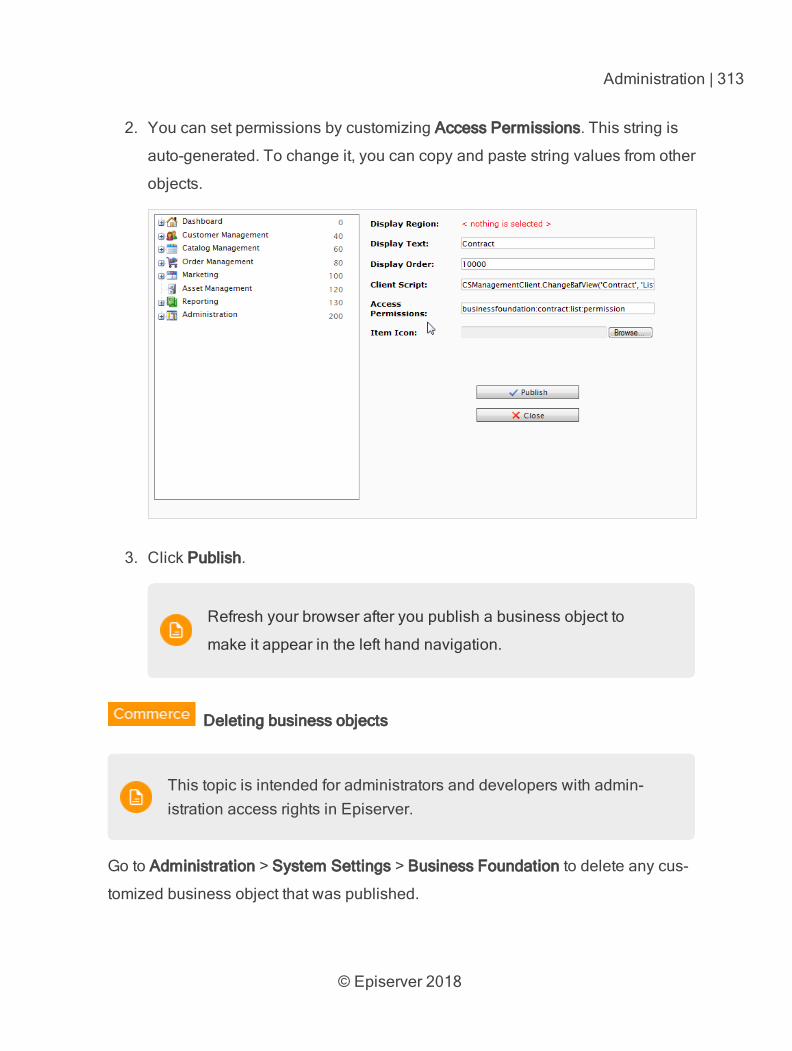
© Episerver 2018
Administration | 313
2. You can set permissions by customizing Access Permissions. This string is
auto-generated. To change it, you can copy and paste string values from other
objects.
3. Click Publish.
Refresh your browser after you publish a business object to
make it appear in the left hand navigation.
Deleting business objects
This topic is intended for administrators and developers with admin-istration access rights in Episerver.
Go to Administration > System Settings > Business Foundation to delete any cus-
tomized business object that was published.
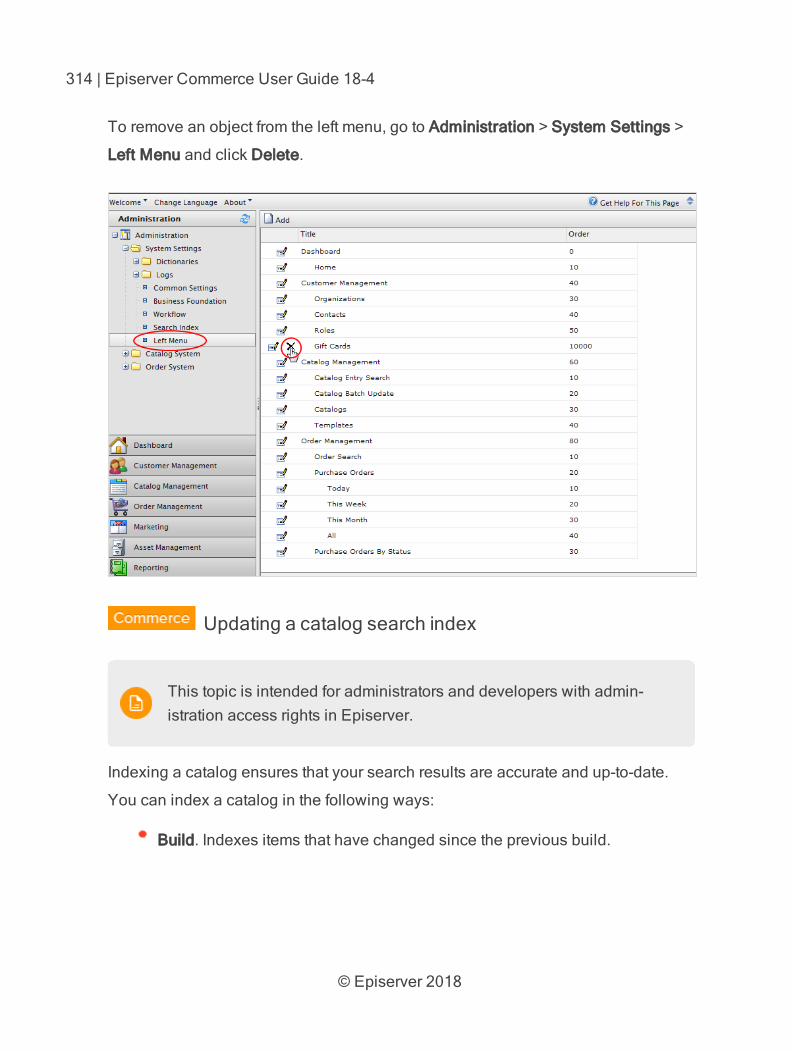
© Episerver 2018
314 | Episerver Commerce User Guide 18-4
To remove an object from the left menu, go to Administration > System Settings >
Left Menu and click Delete.
Updating a catalog search index
This topic is intended for administrators and developers with admin-istration access rights in Episerver.
Indexing a catalog ensures that your search results are accurate and up-to-date.
You can index a catalog in the following ways:
Build. Indexes items that have changed since the previous build.
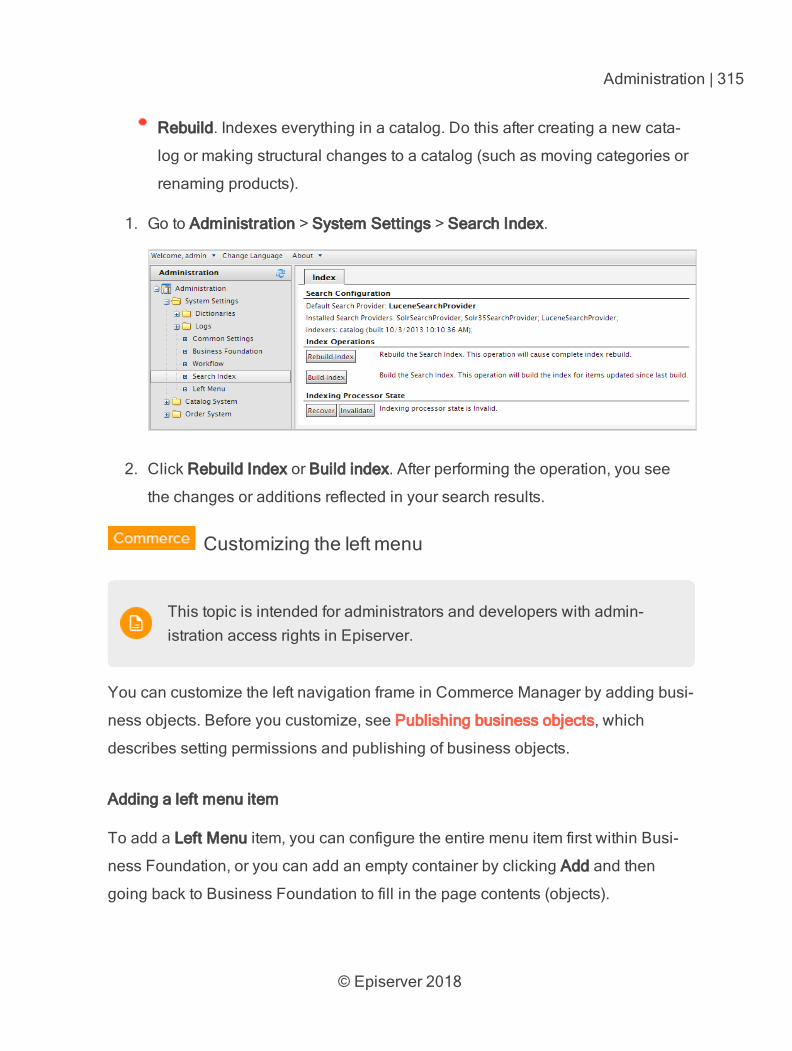
© Episerver 2018
Administration | 315
Rebuild. Indexes everything in a catalog. Do this after creating a new cata-
log or making structural changes to a catalog (such as moving categories or
renaming products).
1. Go to Administration > System Settings > Search Index.
2. Click Rebuild Index or Build index. After performing the operation, you see
the changes or additions reflected in your search results.
Customizing the left menu
This topic is intended for administrators and developers with admin-istration access rights in Episerver.
You can customize the left navigation frame in Commerce Manager by adding busi-
ness objects. Before you customize, see Publishing business objects, which
describes setting permissions and publishing of business objects.
Adding a left menu item
To add a Left Menu item, you can configure the entire menu item first within Busi-
ness Foundation, or you can add an empty container by clicking Add and then
going back to Business Foundation to fill in the page contents (objects).
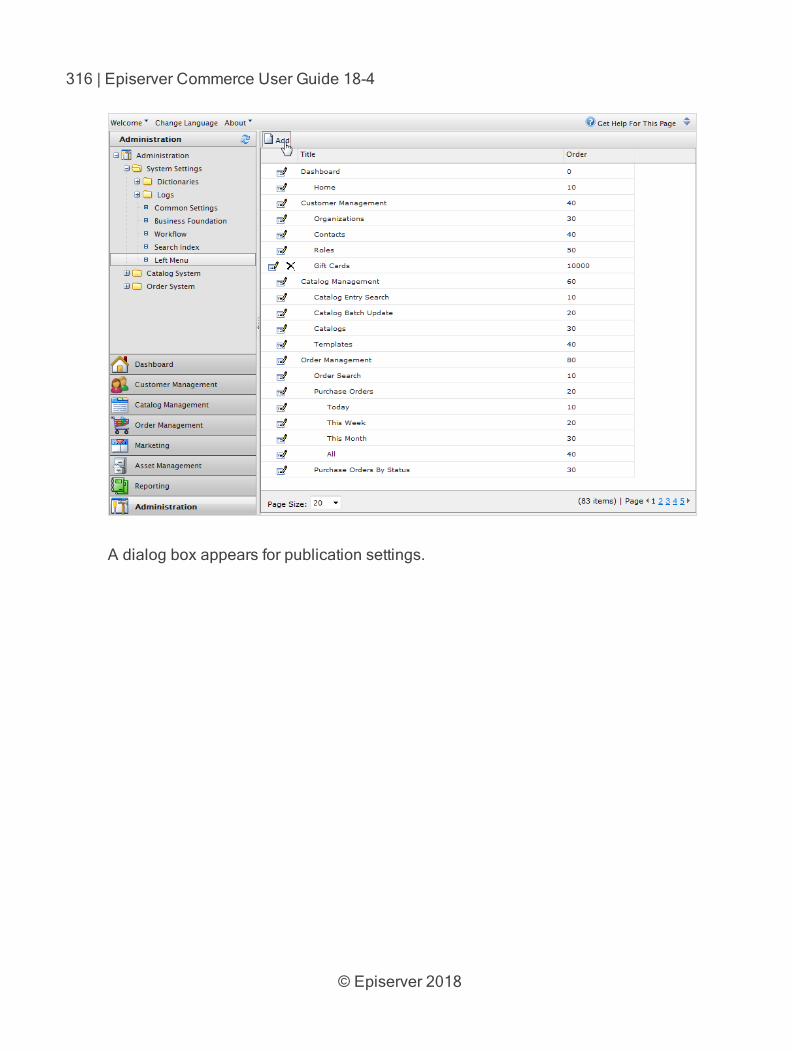
© Episerver 2018
316 | Episerver Commerce User Guide 18-4
A dialog box appears for publication settings.
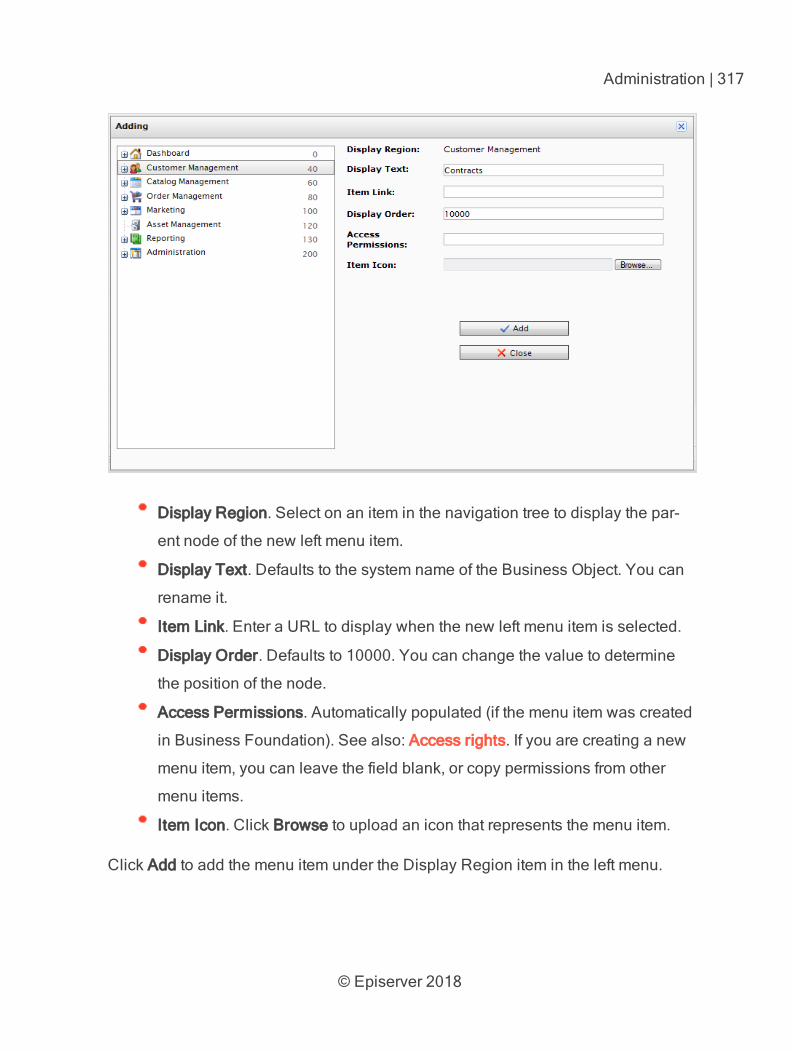
© Episerver 2018
Administration | 317
Display Region. Select on an item in the navigation tree to display the par-
ent node of the new left menu item.
Display Text. Defaults to the system name of the Business Object. You can
rename it.
Item Link. Enter a URL to display when the new left menu item is selected.
Display Order. Defaults to 10000. You can change the value to determine
the position of the node.
Access Permissions. Automatically populated (if the menu item was created
in Business Foundation). See also: Access rights. If you are creating a new
menu item, you can leave the field blank, or copy permissions from other
menu items.
Item Icon. Click Browse to upload an icon that represents the menu item.
Click Add to add the menu item under the Display Region item in the left menu.
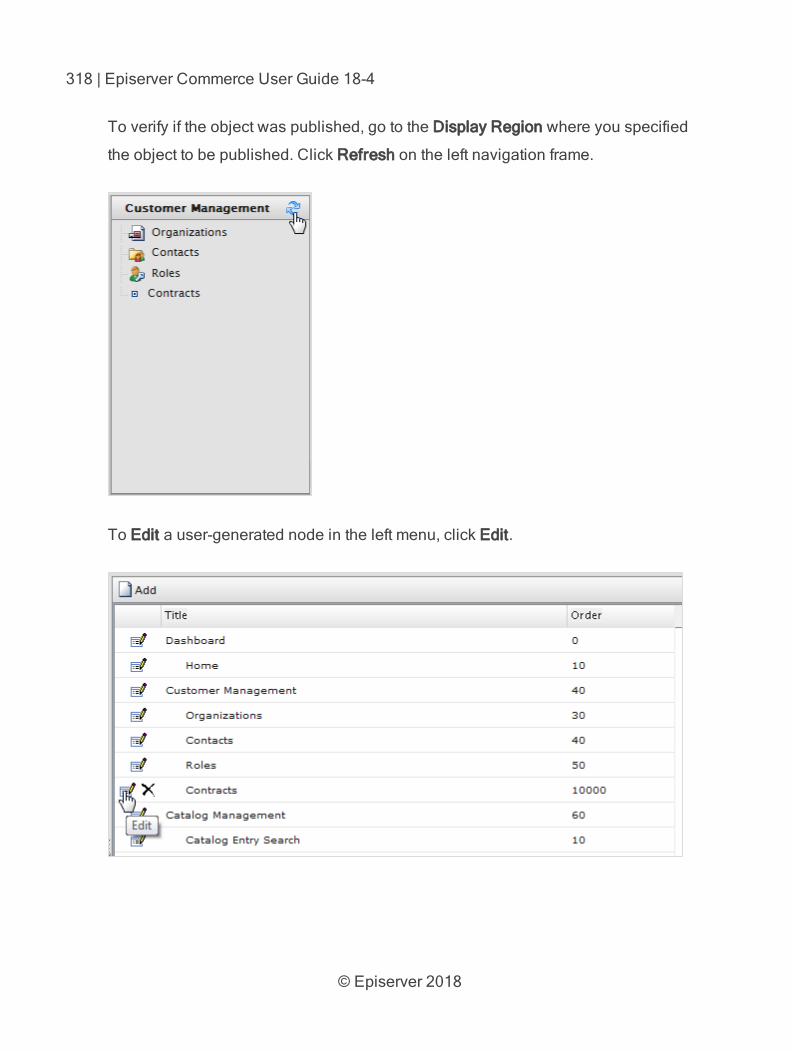
© Episerver 2018
318 | Episerver Commerce User Guide 18-4
To verify if the object was published, go to the Display Region where you specified
the object to be published. Click Refresh on the left navigation frame.
To Edit a user-generated node in the left menu, click Edit.
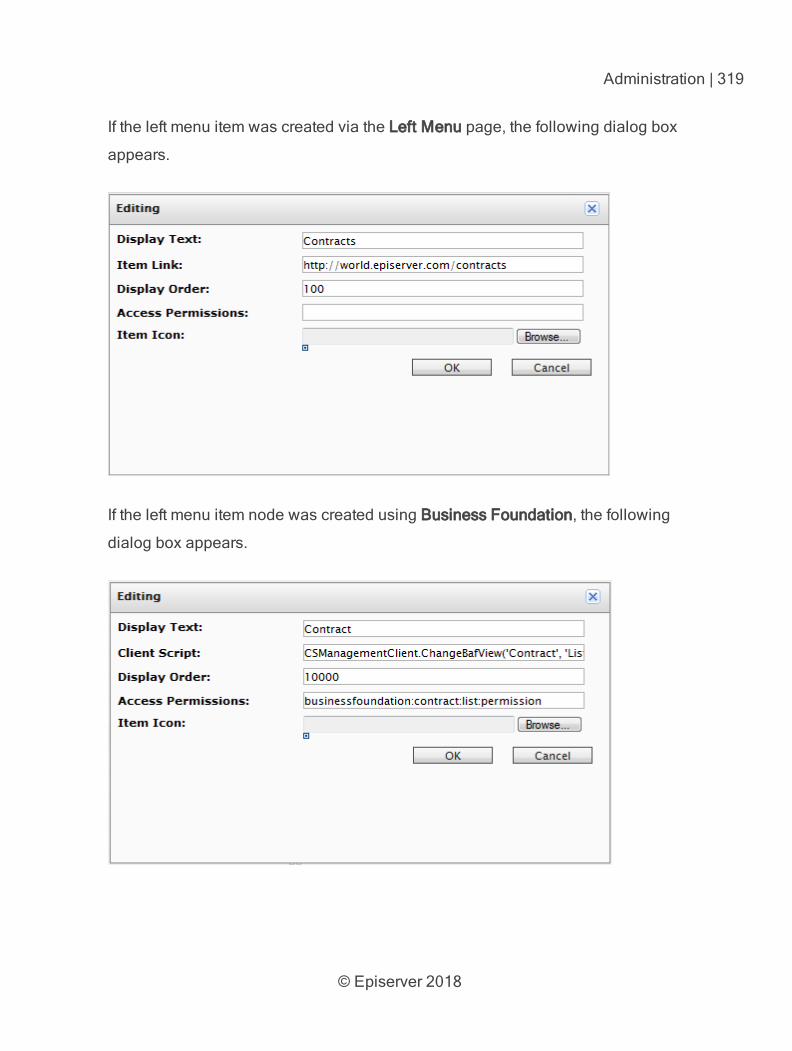
© Episerver 2018
Administration | 319
If the left menu item was created via the Left Menu page, the following dialog box
appears.
If the left menu item node was created using Business Foundation, the following
dialog box appears.
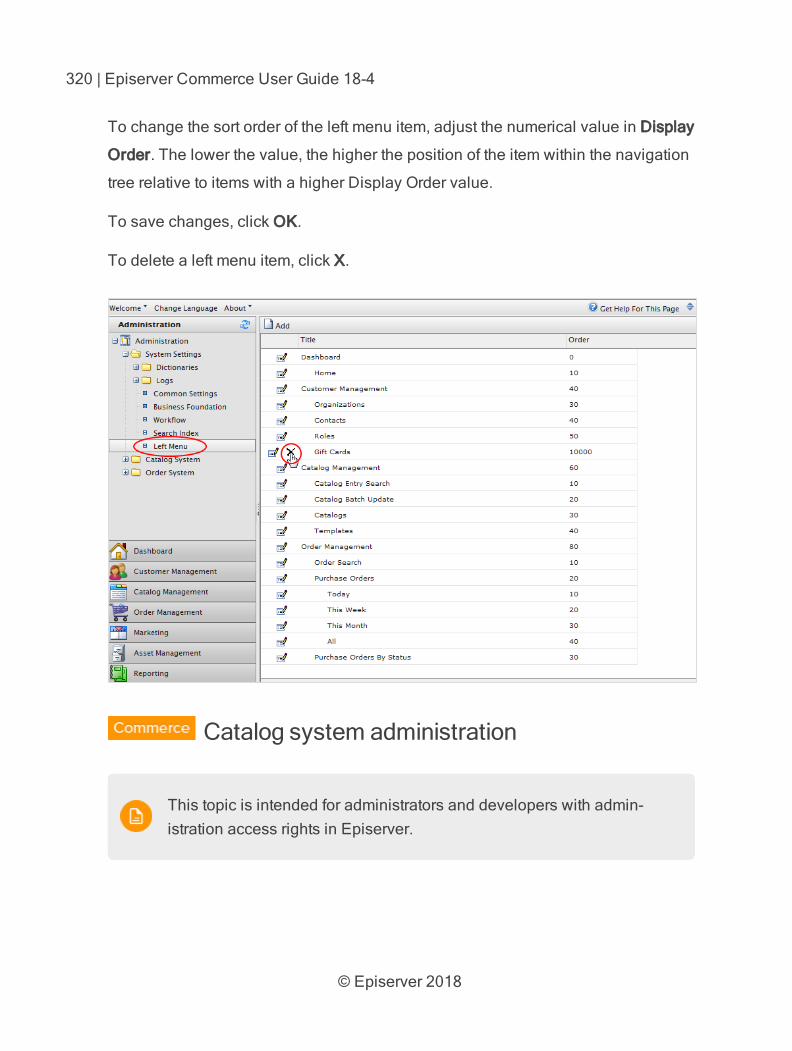
© Episerver 2018
320 | Episerver Commerce User Guide 18-4
To change the sort order of the left menu item, adjust the numerical value in Display
Order. The lower the value, the higher the position of the item within the navigation
tree relative to items with a higher Display Order value.
To save changes, click OK.
To delete a left menu item, click X.
Catalog system administration
This topic is intended for administrators and developers with admin-istration access rights in Episerver.
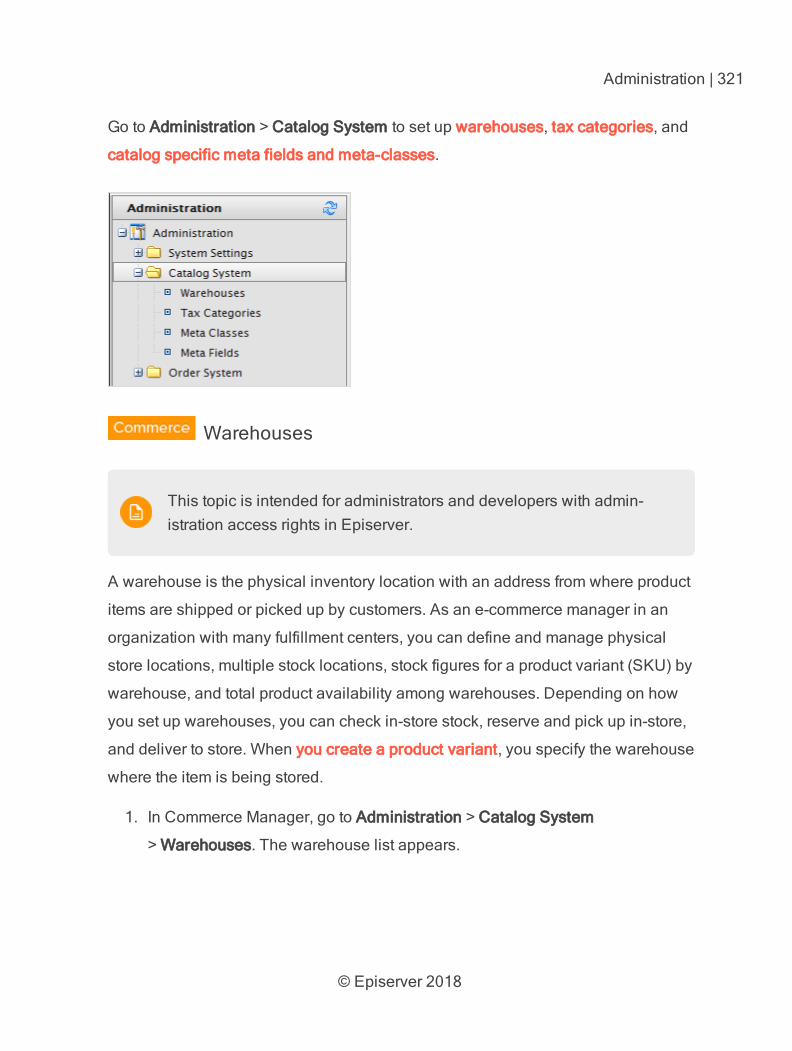
© Episerver 2018
Administration | 321
Go to Administration > Catalog System to set up warehouses, tax categories, and
catalog specific meta fields and meta-classes.
Warehouses
This topic is intended for administrators and developers with admin-istration access rights in Episerver.
A warehouse is the physical inventory location with an address from where product
items are shipped or picked up by customers. As an e-commerce manager in an
organization with many fulfillment centers, you can define and manage physical
store locations, multiple stock locations, stock figures for a product variant (SKU) by
warehouse, and total product availability among warehouses. Depending on how
you set up warehouses, you can check in-store stock, reserve and pick up in-store,
and deliver to store. When you create a product variant, you specify the warehouse
where the item is being stored.
1. In Commerce Manager, go to Administration > Catalog System
> Warehouses. The warehouse list appears.
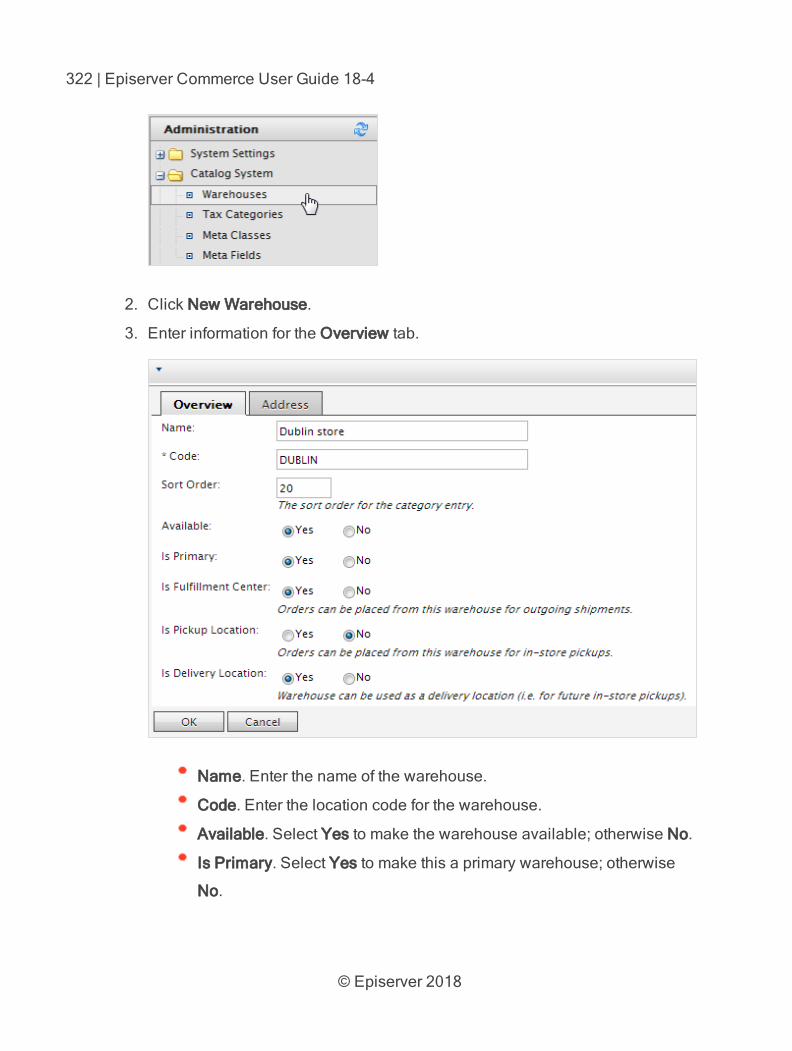
© Episerver 2018
322 | Episerver Commerce User Guide 18-4
2. Click New Warehouse.
3. Enter information for the Overview tab.
Name. Enter the name of the warehouse.
Code. Enter the location code for the warehouse.
Available. Select Yes to make the warehouse available; otherwise No.
Is Primary. Select Yes to make this a primary warehouse; otherwise
No.
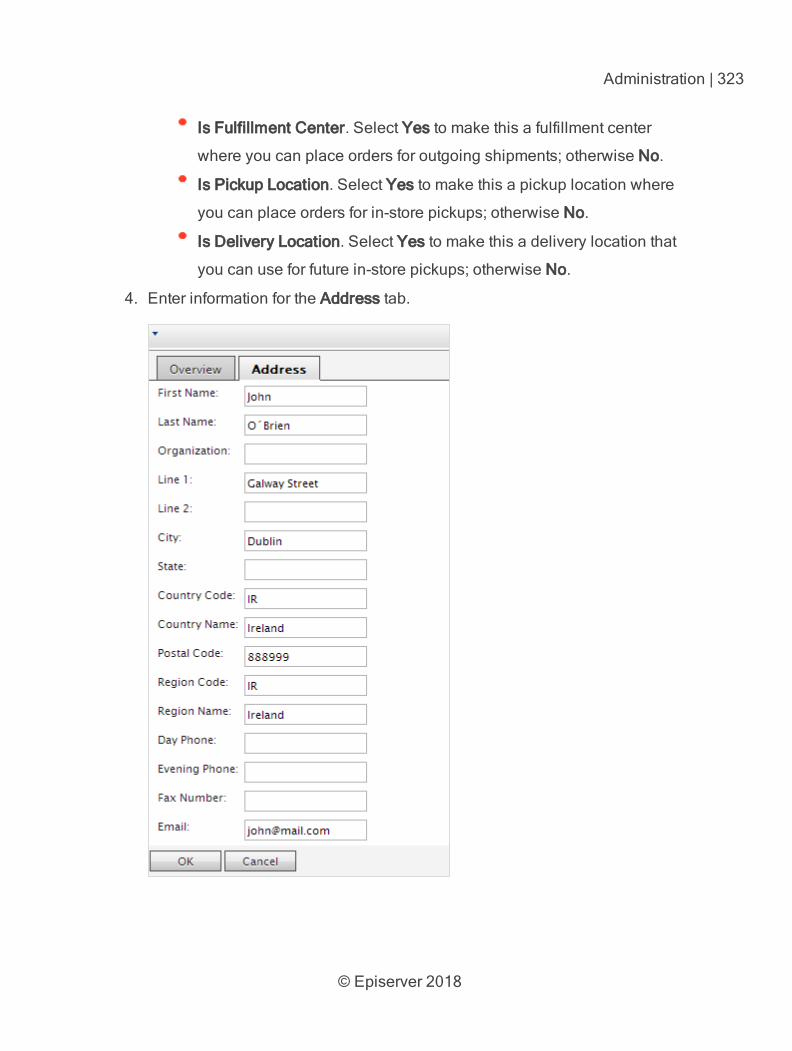
© Episerver 2018
Administration | 323
Is Fulfillment Center. Select Yes to make this a fulfillment center
where you can place orders for outgoing shipments; otherwise No.
Is Pickup Location. Select Yes to make this a pickup location where
you can place orders for in-store pickups; otherwise No.
Is Delivery Location. Select Yes to make this a delivery location that
you can use for future in-store pickups; otherwise No.
4. Enter information for the Address tab.
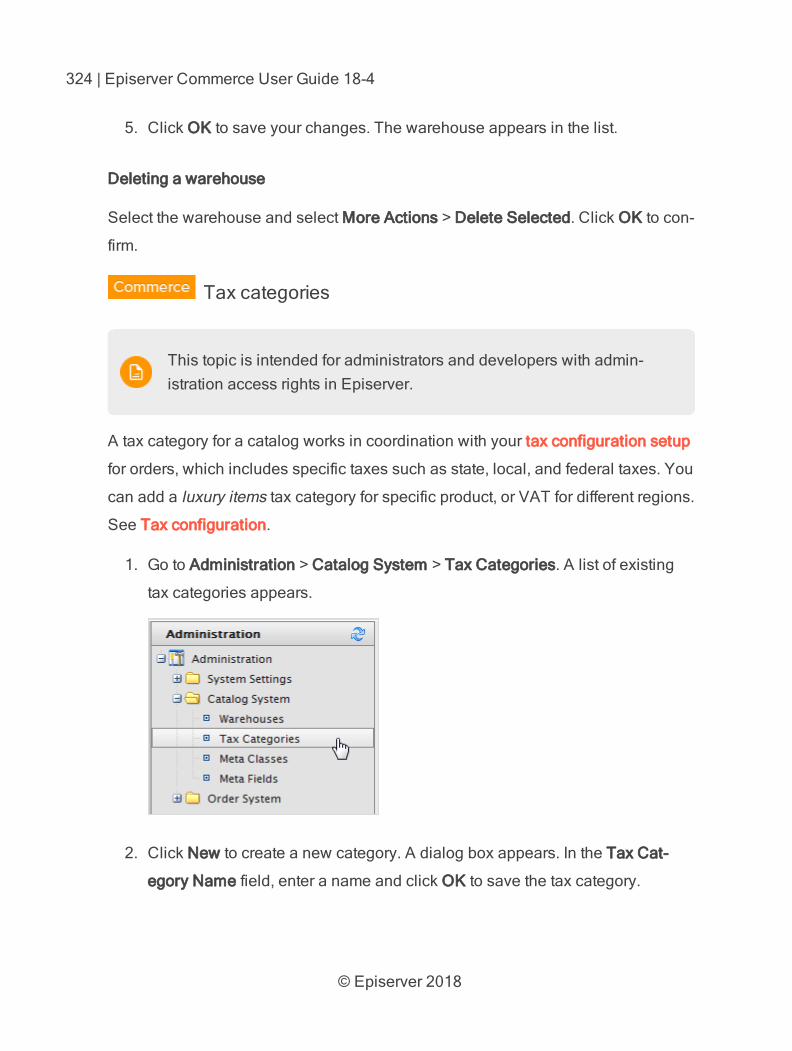
© Episerver 2018
324 | Episerver Commerce User Guide 18-4
5. Click OK to save your changes. The warehouse appears in the list.
Deleting a warehouse
Select the warehouse and select More Actions > Delete Selected. Click OK to con-
firm.
Tax categories
This topic is intended for administrators and developers with admin-istration access rights in Episerver.
A tax category for a catalog works in coordination with your tax configuration setup
for orders, which includes specific taxes such as state, local, and federal taxes. You
can add a luxury items tax category for specific product, or VAT for different regions.
See Tax configuration.
1. Go to Administration > Catalog System > Tax Categories. A list of existing
tax categories appears.
2. Click New to create a new category. A dialog box appears. In the Tax Cat-
egory Name field, enter a name and click OK to save the tax category.
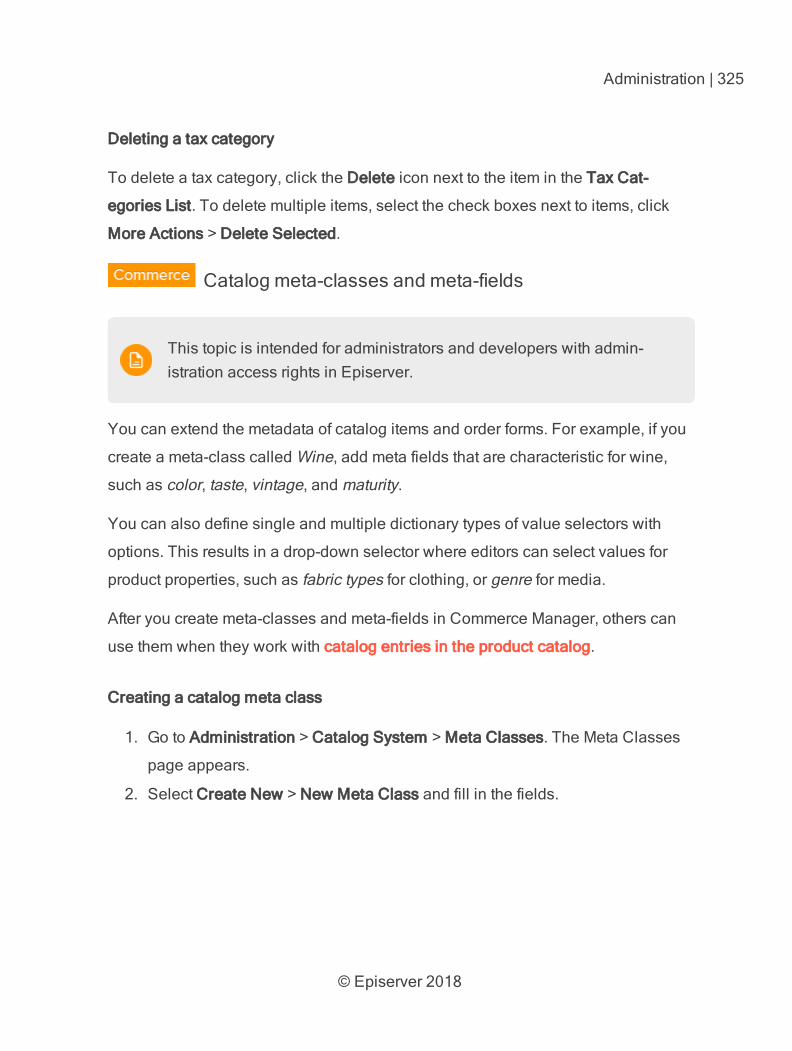
© Episerver 2018
Administration | 325
Deleting a tax category
To delete a tax category, click the Delete icon next to the item in the Tax Cat-
egories List. To delete multiple items, select the check boxes next to items, click
More Actions > Delete Selected.
Catalog meta-classes and meta-fields
This topic is intended for administrators and developers with admin-istration access rights in Episerver.
You can extend the metadata of catalog items and order forms. For example, if you
create a meta-class called Wine, add meta fields that are characteristic for wine,
such as color, taste, vintage, and maturity.
You can also define single and multiple dictionary types of value selectors with
options. This results in a drop-down selector where editors can select values for
product properties, such as fabric types for clothing, or genre for media.
After you create meta-classes and meta-fields in Commerce Manager, others can
use them when they work with catalog entries in the product catalog.
Creating a catalog meta class
1. Go to Administration > Catalog System > Meta Classes. The Meta Classes
page appears.
2. Select Create New > New Meta Class and fill in the fields.
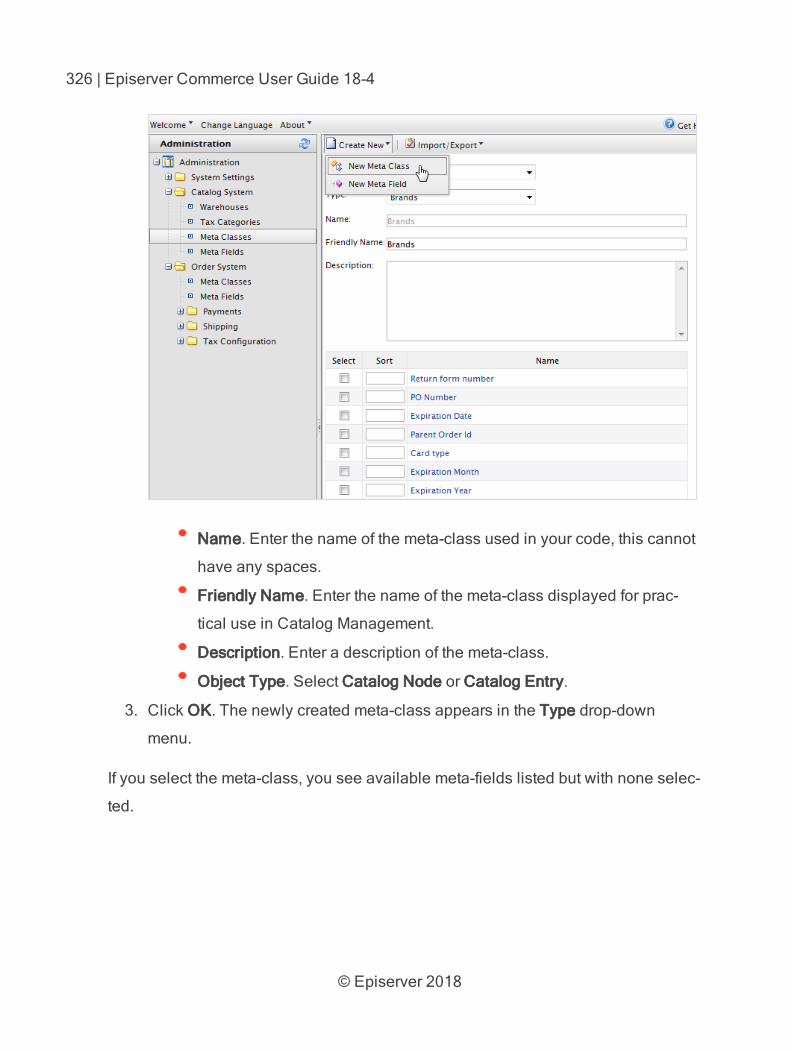
© Episerver 2018
326 | Episerver Commerce User Guide 18-4
Name. Enter the name of the meta-class used in your code, this cannot
have any spaces.
Friendly Name. Enter the name of the meta-class displayed for prac-
tical use in Catalog Management.
Description. Enter a description of the meta-class.
Object Type. Select Catalog Node or Catalog Entry.
3. Click OK. The newly created meta-class appears in the Type drop-down
menu.
If you select the meta-class, you see available meta-fields listed but with none selec-
ted.
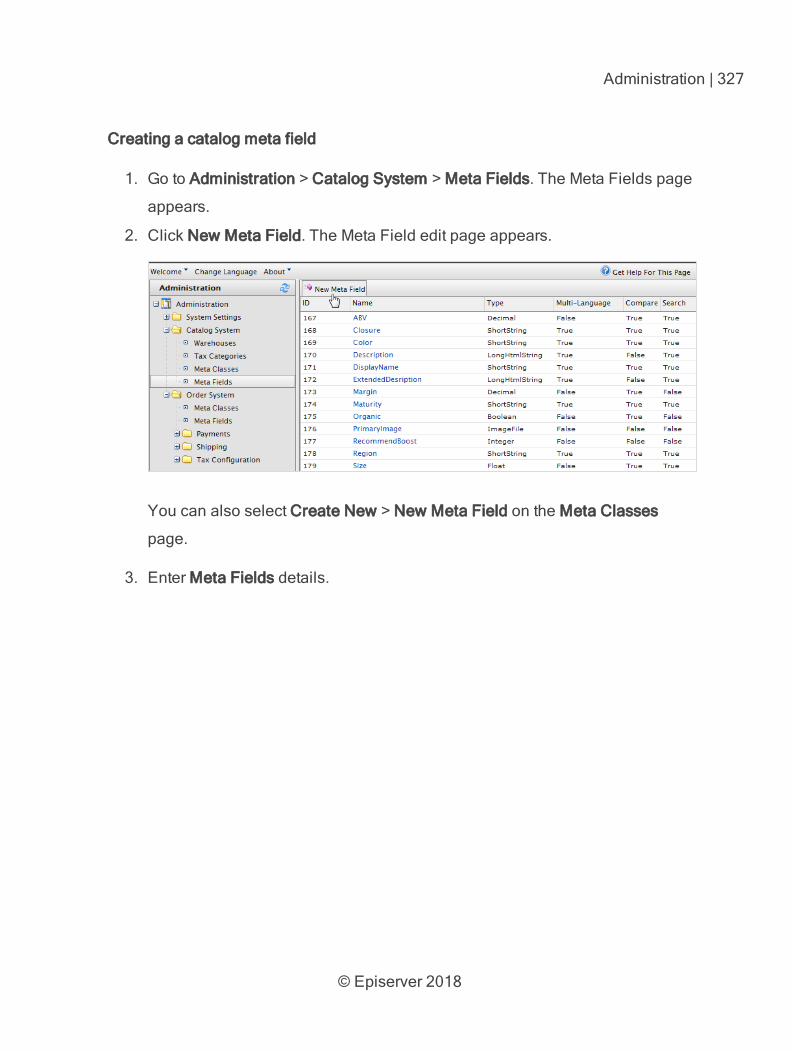
© Episerver 2018
Administration | 327
Creating a catalog meta field
1. Go to Administration > Catalog System > Meta Fields. The Meta Fields page
appears.
2. Click New Meta Field. The Meta Field edit page appears.
You can also select Create New > New Meta Field on the Meta Classes
page.
3. Enter Meta Fields details.
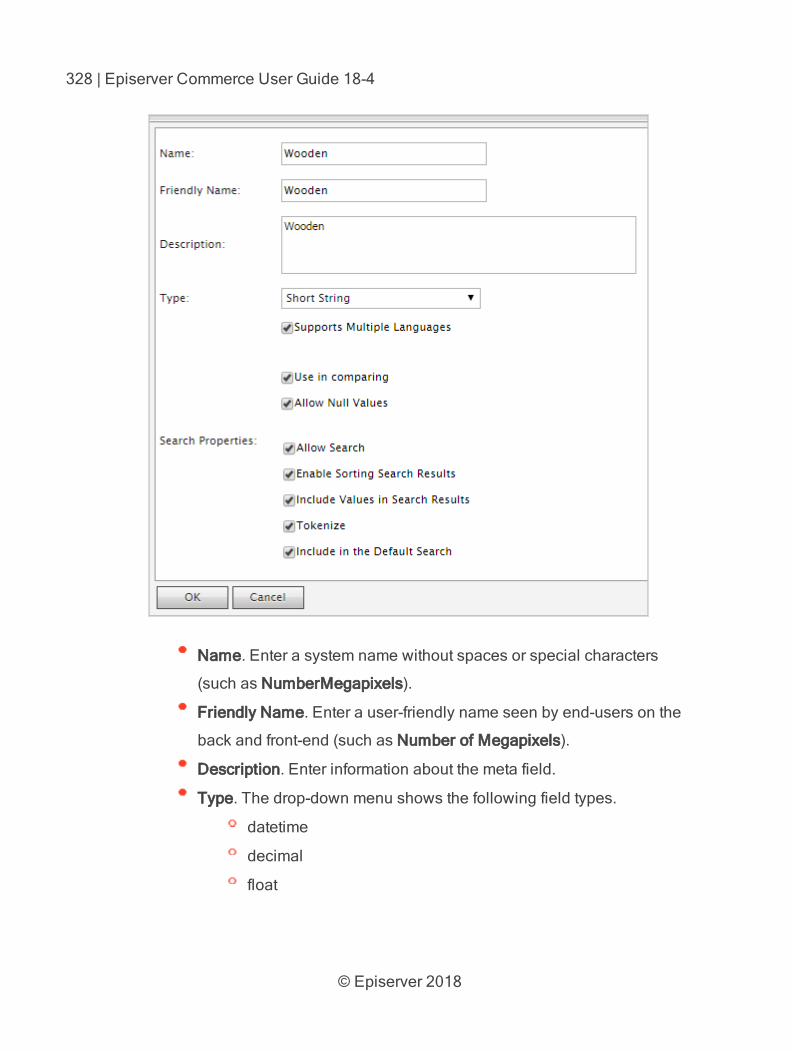
© Episerver 2018
328 | Episerver Commerce User Guide 18-4
Name. Enter a system name without spaces or special characters
(such as NumberMegapixels).
Friendly Name. Enter a user-friendly name seen by end-users on the
back and front-end (such as Number of Megapixels).
Description. Enter information about the meta field.
Type. The drop-down menu shows the following field types.
datetime
decimal
float
© Episerver 2018
Administration | 329
money
Integer
Boolean
Date
URL
Short String
Long String
Long Html String
String Dictionary
File
Image File
Dictionary (single and multiple line dictionary type option
selector)
Supports Multiple Languages. Select if the meta-field can
appear in two or more languages.
Use in comparing. Selectto compare items (only works if you
have compare functionality on the front-end site).
Allow Null Values. Allows a null value for this field.
Search Properties. Depending on the data field type selected, you
may have the option to set the search properties of the data field. The
options are:
Allow search. Permit searching on this meta field.
Enable Sorting Search Results. Enable sorting of search res-
ults on this meta field.
Include Values in Search Results. Include the original value of
this meta field in the search results.
© Episerver 2018
330 | Episerver Commerce User Guide 18-4
Tokenize. Prepare individual words (word breaking) in a
long product description property.
Include in the Default Search. Tokenize and combine meta
field values for search from the front-end site.
4. Click OK to save your changes. The newly added meta fields appear in the
meta fields list.
If newly created meta fields are not immediately visible, go to the next
page or set the Page Size to display more entries.
Applying meta fields to a meta class
1. Go to Administration > Catalog System > Meta Classes. The Meta Classes
page appears.
2. Select Element > Catalog Entry.
3. Select the desired meta class from the Type drop-down. The Name, Friendly
Name, and Description fields are populated with default values.
4. Apply a meta field to a meta class by selecting the check box next to the meta
field. If you want to sort the order of the meta fields in the catalog entry, enter a
number into the Sort field.
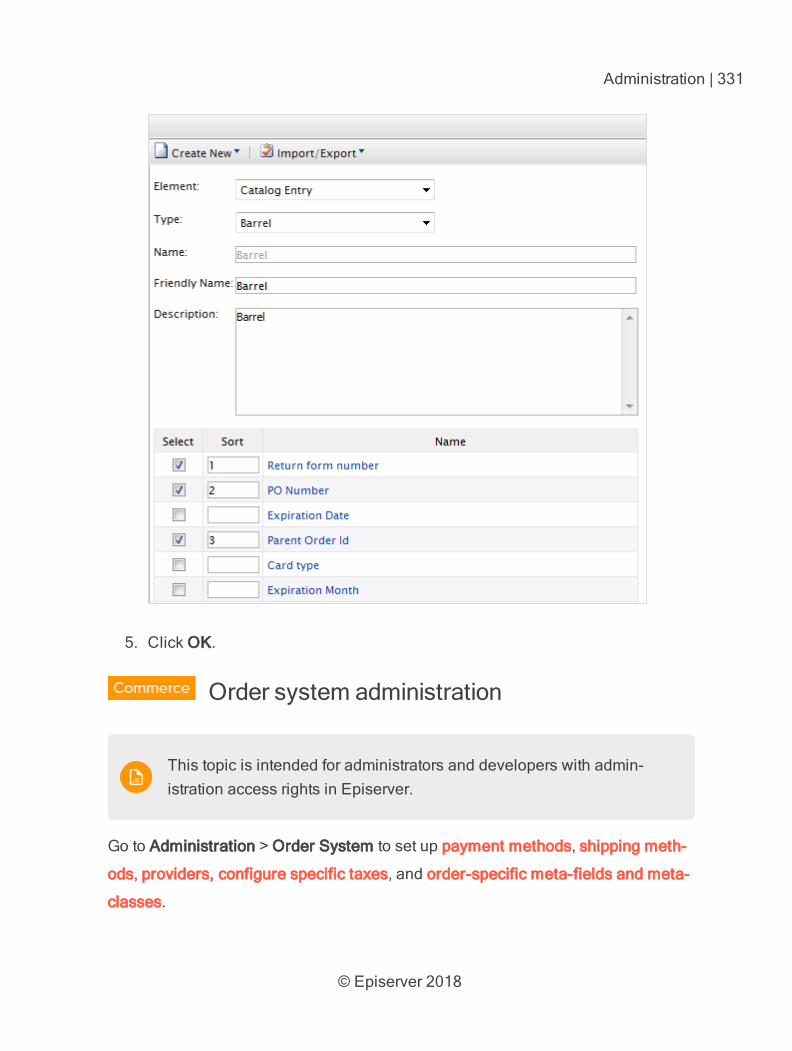
© Episerver 2018
Administration | 331
5. Click OK.
Order system administration
This topic is intended for administrators and developers with admin-istration access rights in Episerver.
Go to Administration > Order System to set up payment methods, shipping meth-
ods, providers, configure specific taxes, and order-specific meta-fields and meta-
classes.
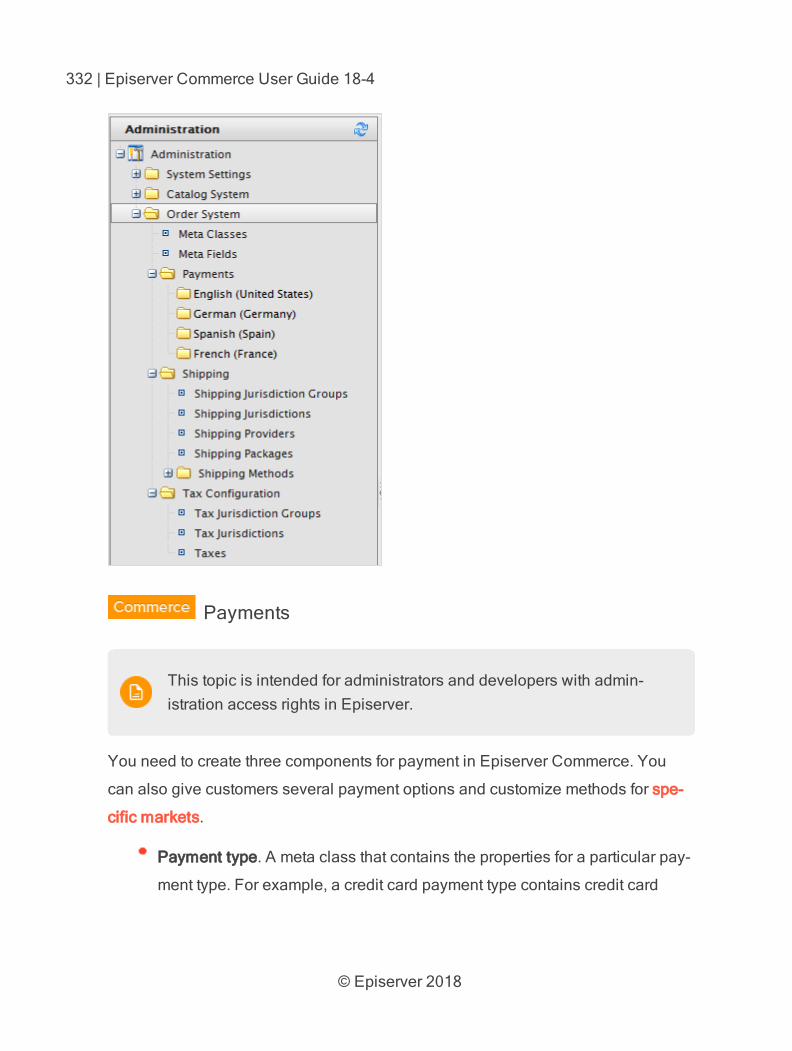
© Episerver 2018
332 | Episerver Commerce User Guide 18-4
Payments
This topic is intended for administrators and developers with admin-istration access rights in Episerver.
You need to create three components for payment in Episerver Commerce. You
can also give customers several payment options and customize methods for spe-
cific markets.
Payment type. A meta class that contains the properties for a particular pay-
ment type. For example, a credit card payment type contains credit card
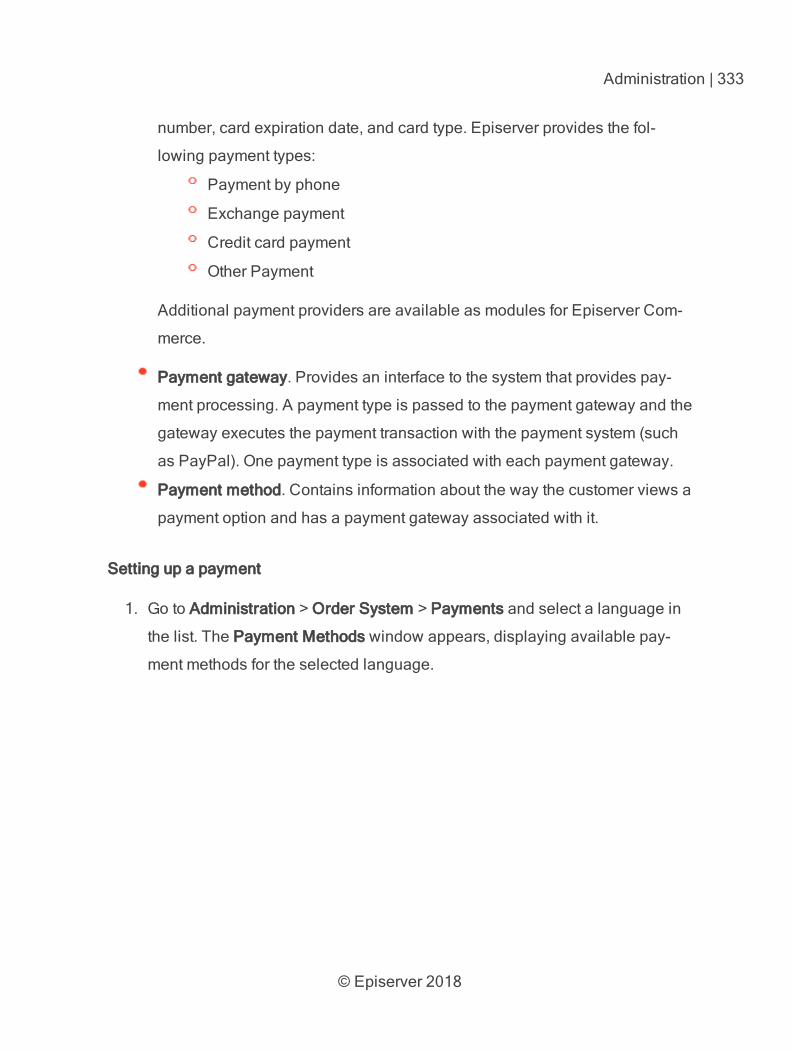
© Episerver 2018
Administration | 333
number, card expiration date, and card type. Episerver provides the fol-
lowing payment types:
Payment by phone
Exchange payment
Credit card payment
Other Payment
Additional payment providers are available as modules for Episerver Com-
merce.
Payment gateway. Provides an interface to the system that provides pay-
ment processing. A payment type is passed to the payment gateway and the
gateway executes the payment transaction with the payment system (such
as PayPal). One payment type is associated with each payment gateway.
Payment method. Contains information about the way the customer views a
payment option and has a payment gateway associated with it.
Setting up a payment
1. Go to Administration > Order System > Payments and select a language in
the list. The Payment Methods window appears, displaying available pay-
ment methods for the selected language.
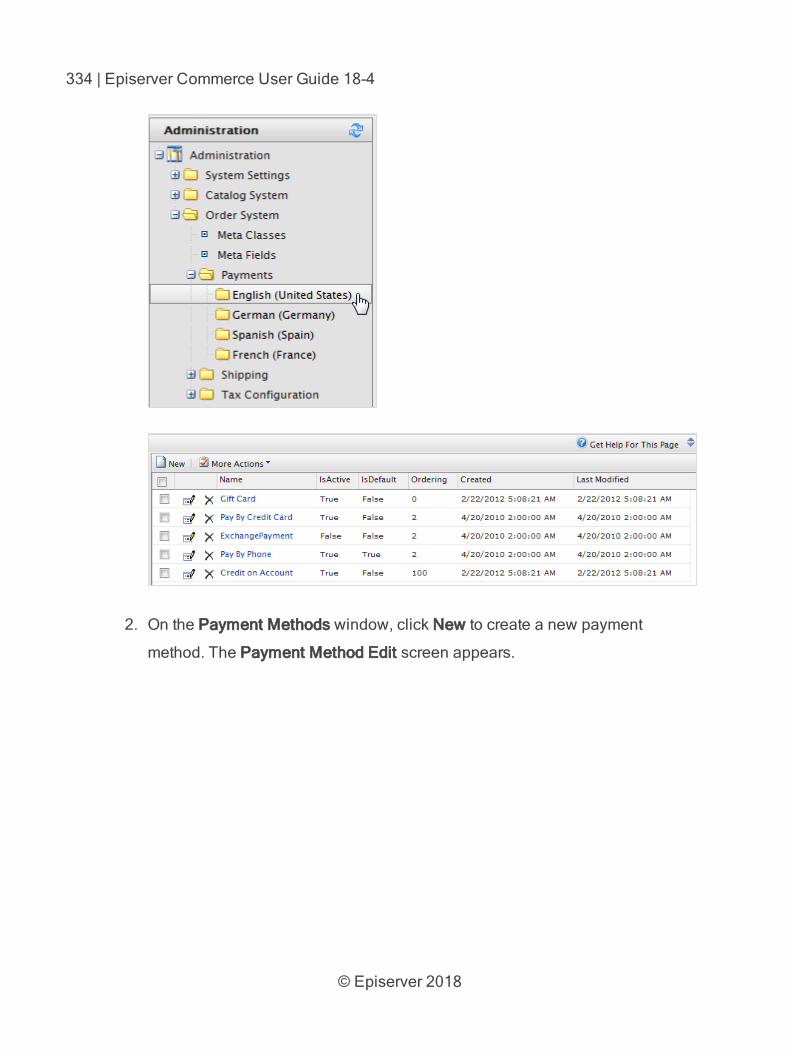
© Episerver 2018
334 | Episerver Commerce User Guide 18-4
2. On the Payment Methods window, click New to create a new payment
method. The Payment Method Edit screen appears.
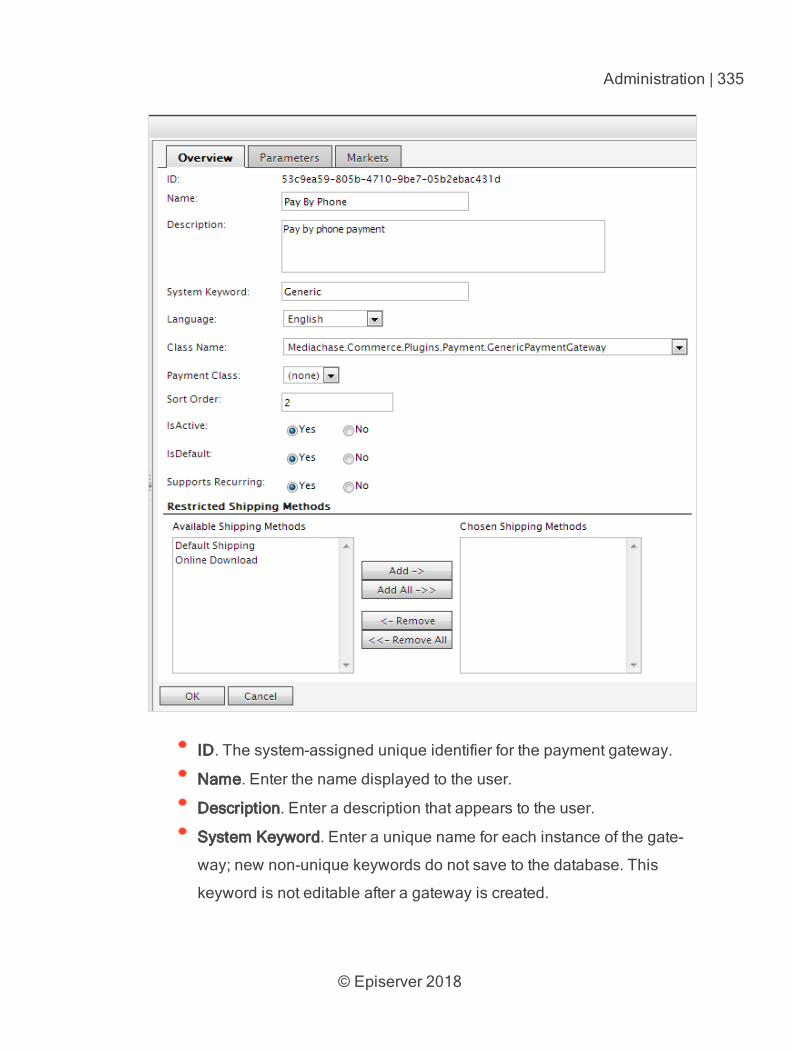
© Episerver 2018
Administration | 335
ID. The system-assigned unique identifier for the payment gateway.
Name. Enter the name displayed to the user.
Description. Enter a description that appears to the user.
System Keyword. Enter a unique name for each instance of the gate-
way; new non-unique keywords do not save to the database. This
keyword is not editable after a gateway is created.
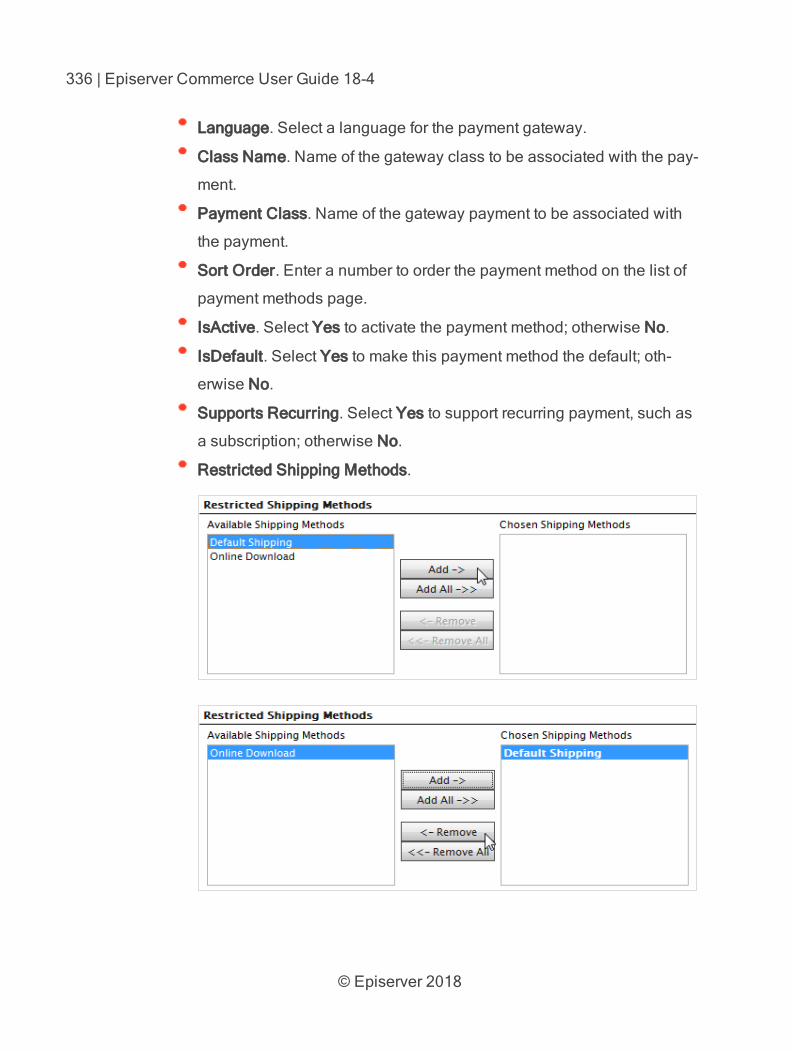
© Episerver 2018
336 | Episerver Commerce User Guide 18-4
Language. Select a language for the payment gateway.
Class Name. Name of the gateway class to be associated with the pay-
ment.
Payment Class. Name of the gateway payment to be associated with
the payment.
Sort Order. Enter a number to order the payment method on the list of
payment methods page.
IsActive. Select Yes to activate the payment method; otherwise No.
IsDefault. Select Yes to make this payment method the default; oth-
erwise No.
Supports Recurring. Select Yes to support recurring payment, such as
a subscription; otherwise No.
Restricted Shipping Methods.
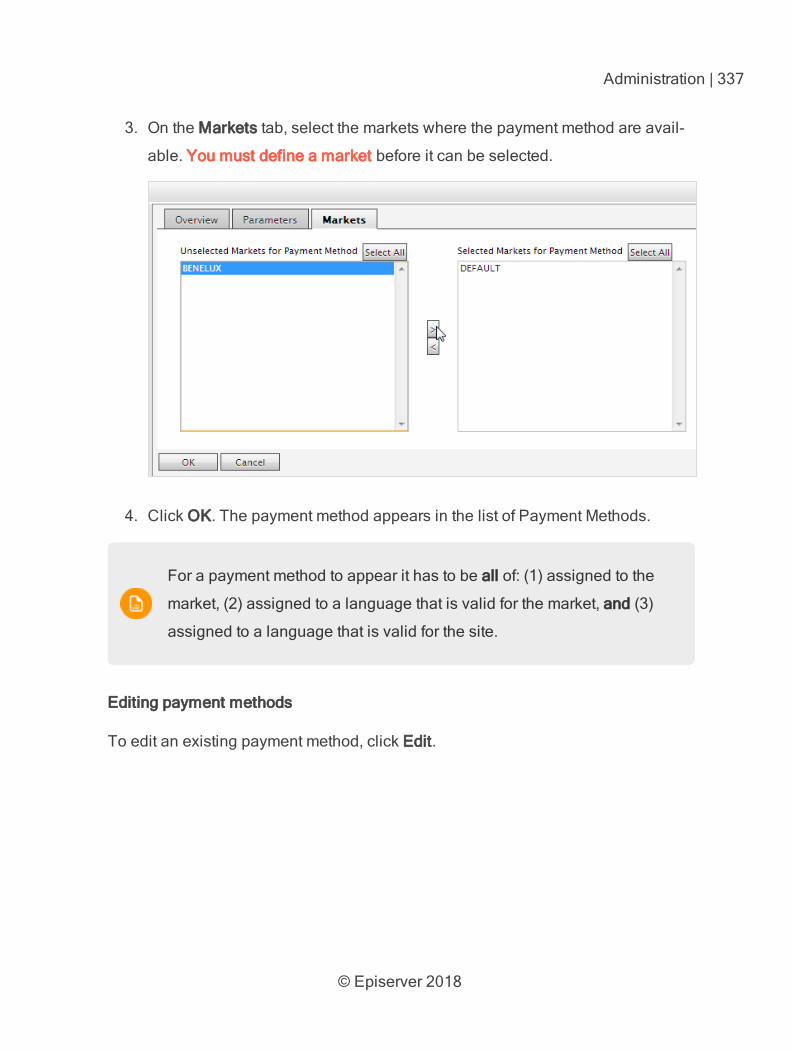
© Episerver 2018
Administration | 337
3. On the Markets tab, select the markets where the payment method are avail-
able. You must define a market before it can be selected.
4. Click OK. The payment method appears in the list of Payment Methods.
For a payment method to appear it has to be all of: (1) assigned to the
market, (2) assigned to a language that is valid for the market, and (3)
assigned to a language that is valid for the site.
Editing payment methods
To edit an existing payment method, click Edit.
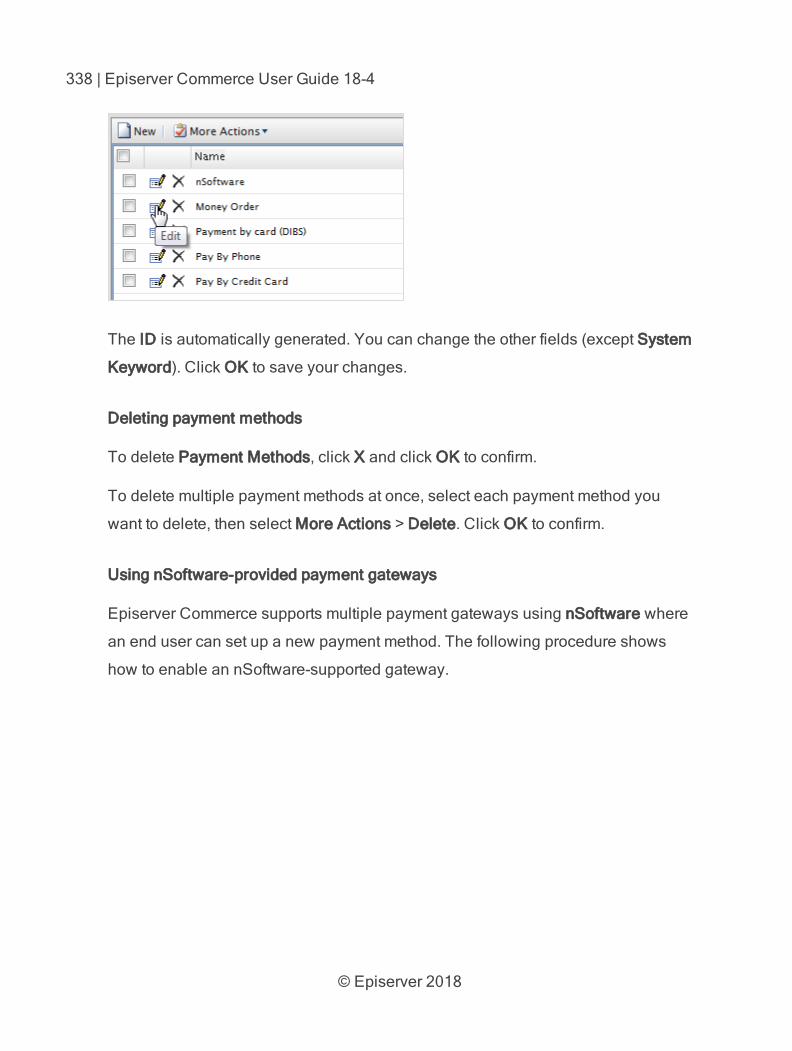
© Episerver 2018
338 | Episerver Commerce User Guide 18-4
The ID is automatically generated. You can change the other fields (except System
Keyword). Click OK to save your changes.
Deleting payment methods
To delete Payment Methods, click X and click OK to confirm.
To delete multiple payment methods at once, select each payment method you
want to delete, then select More Actions > Delete. Click OK to confirm.
Using nSoftware-provided payment gateways
Episerver Commerce supports multiple payment gateways using nSoftware where
an end user can set up a new payment method. The following procedure shows
how to enable an nSoftware-supported gateway.
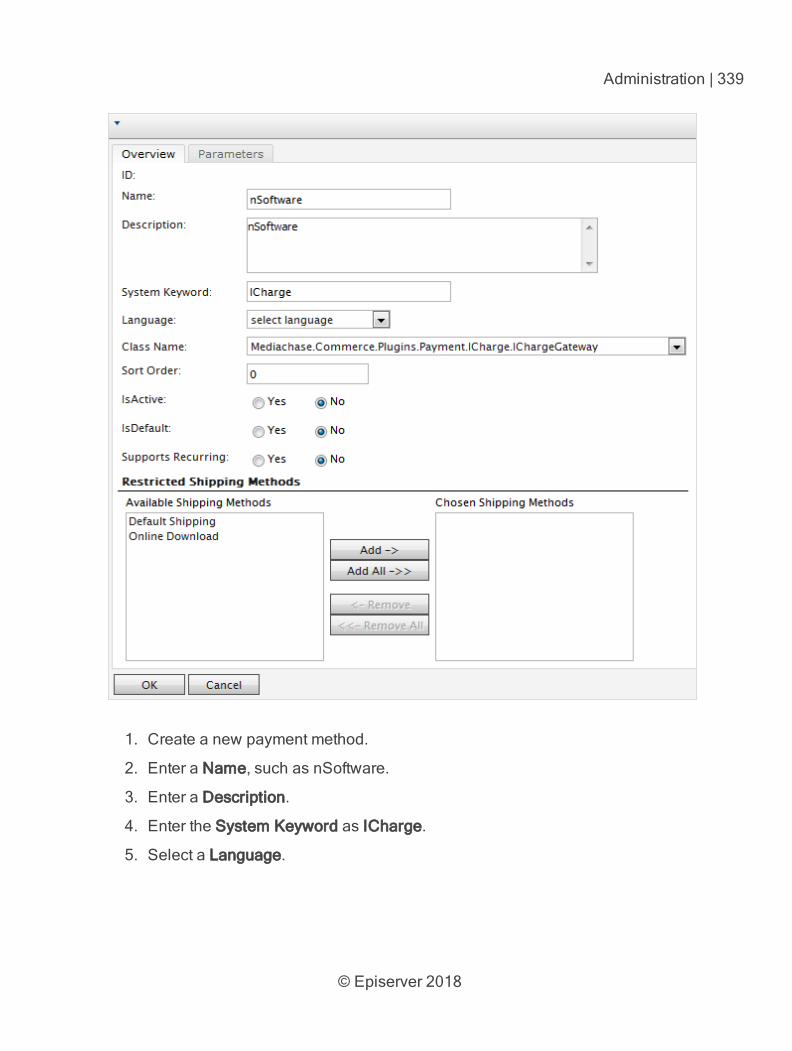
© Episerver 2018
Administration | 339
1. Create a new payment method.
2. Enter a Name, such as nSoftware.
3. Enter a Description.
4. Enter the System Keyword as ICharge.
5. Select a Language.
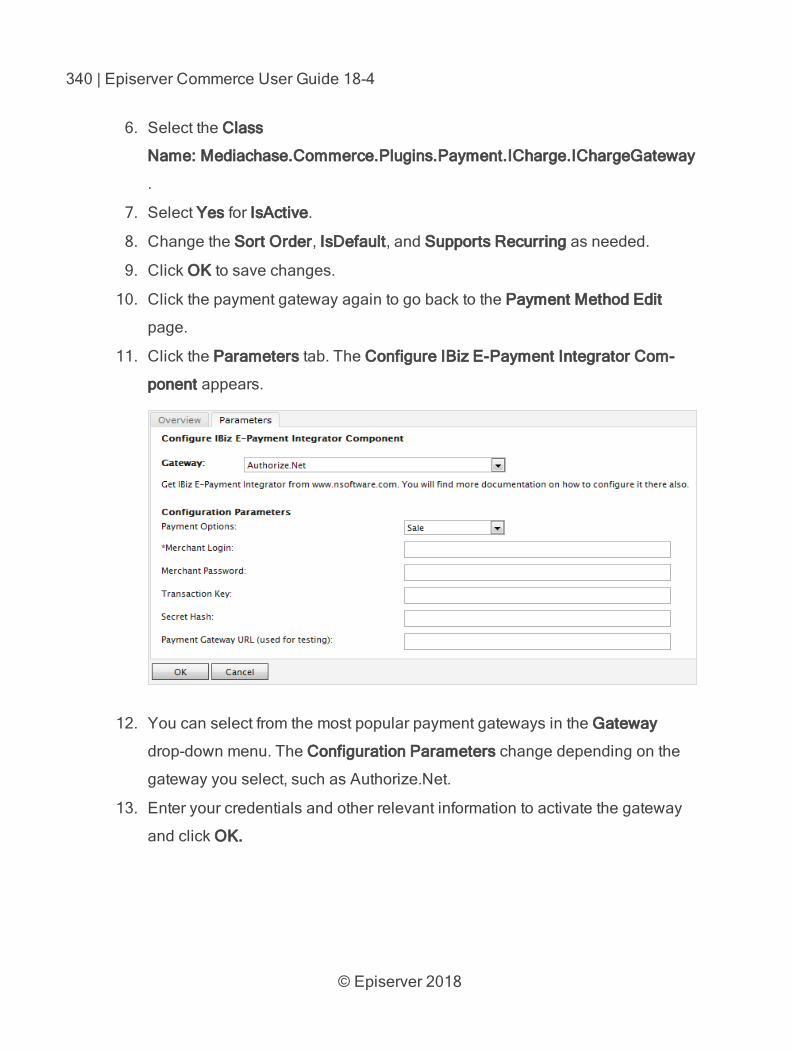
© Episerver 2018
340 | Episerver Commerce User Guide 18-4
6. Select the Class
Name: Mediachase.Commerce.Plugins.Payment.ICharge.IChargeGateway
.
7. Select Yes for IsActive.
8. Change the Sort Order, IsDefault, and Supports Recurring as needed.
9. Click OK to save changes.
10. Click the payment gateway again to go back to the Payment Method Edit
page.
11. Click the Parameters tab. The Configure IBiz E-Payment Integrator Com-
ponent appears.
12. You can select from the most popular payment gateways in the Gateway
drop-down menu. The Configuration Parameters change depending on the
gateway you select, such as Authorize.Net.
13. Enter your credentials and other relevant information to activate the gateway
and click OK.

© Episerver 2018
Administration | 341
Shipping
This topic is intended for administrators and developers with admin-istration access rights in Episerver.
Shipping is the physical delivery of product to e-commerce customers. Just as for
payments, you can set up shipping methods and providers. Episerver provides the
following shipping gateways:
Generic Gateway (fixed shipping rate)
Weight/Jurisdiction Gateway (base price + additional fee that is calculated
based on the weight and shipping location)
To create a customized shipping gateway, see the Developer Guide for Episerver
Commerce.
To create a shipping method, go to Administration > Order System > Shipping.
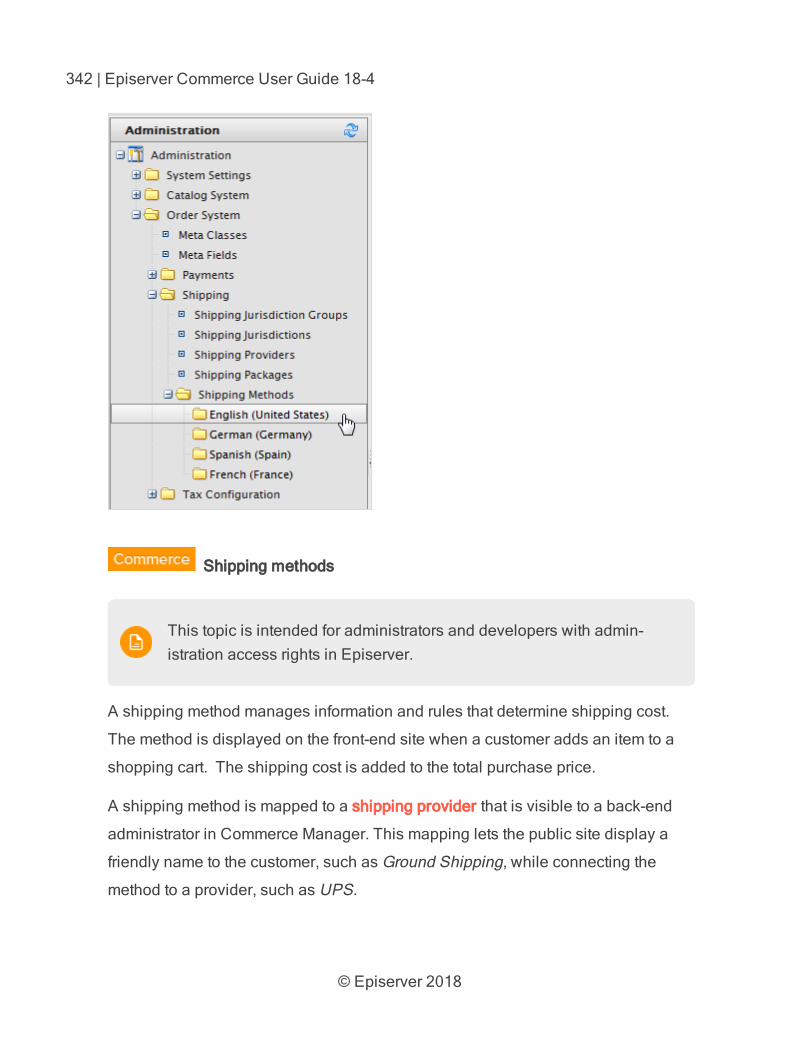
© Episerver 2018
342 | Episerver Commerce User Guide 18-4
Shipping methods
This topic is intended for administrators and developers with admin-istration access rights in Episerver.
A shipping method manages information and rules that determine shipping cost.
The method is displayed on the front-end site when a customer adds an item to a
shopping cart. The shipping cost is added to the total purchase price.
A shipping method is mapped to a shipping provider that is visible to a back-end
administrator in Commerce Manager. This mapping lets the public site display a
friendly name to the customer, such as Ground Shipping, while connecting the
method to a provider, such as UPS.
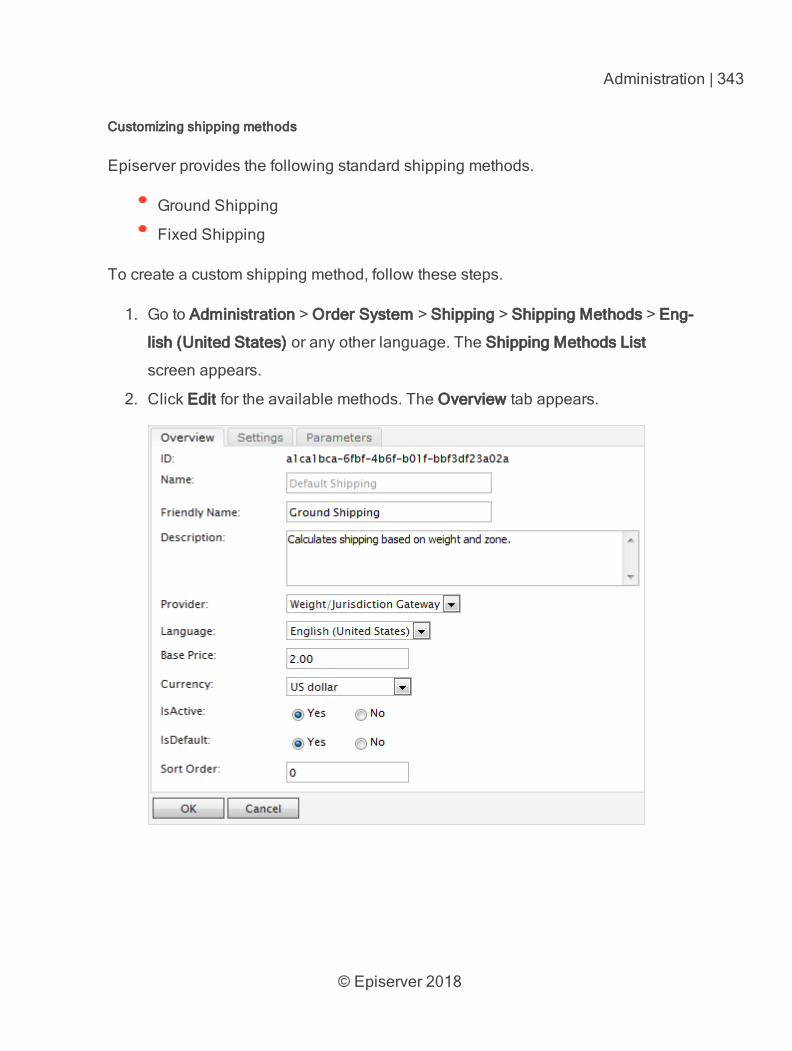
© Episerver 2018
Administration | 343
Customizing shipping methods
Episerver provides the following standard shipping methods.
Ground Shipping
Fixed Shipping
To create a custom shipping method, follow these steps.
1. Go to Administration > Order System > Shipping > Shipping Methods > Eng-
lish (United States) or any other language. The Shipping Methods List
screen appears.
2. Click Edit for the available methods. The Overview tab appears.
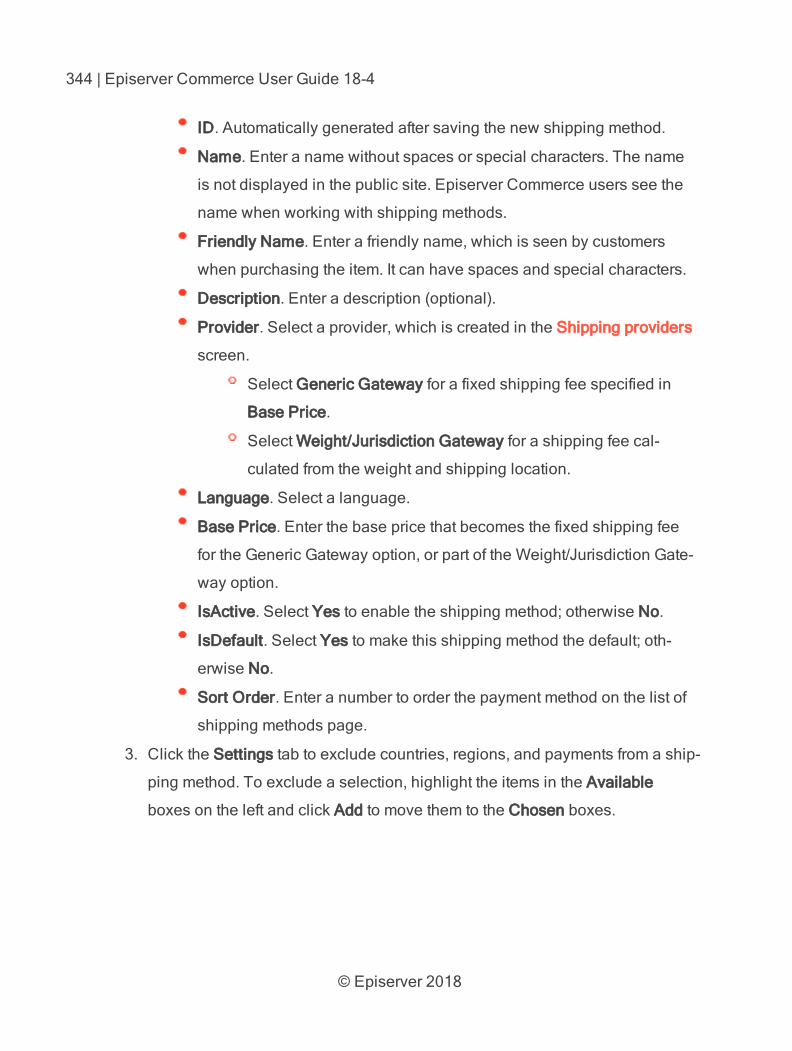
© Episerver 2018
344 | Episerver Commerce User Guide 18-4
ID. Automatically generated after saving the new shipping method.
Name. Enter a name without spaces or special characters. The name
is not displayed in the public site. Episerver Commerce users see the
name when working with shipping methods.
Friendly Name. Enter a friendly name, which is seen by customers
when purchasing the item. It can have spaces and special characters.
Description. Enter a description (optional).
Provider. Select a provider, which is created in the Shipping providers
screen.
Select Generic Gateway for a fixed shipping fee specified in
Base Price.
Select Weight/Jurisdiction Gateway for a shipping fee cal-
culated from the weight and shipping location.
Language. Select a language.
Base Price. Enter the base price that becomes the fixed shipping fee
for the Generic Gateway option, or part of the Weight/Jurisdiction Gate-
way option.
IsActive. Select Yes to enable the shipping method; otherwise No.
IsDefault. Select Yes to make this shipping method the default; oth-
erwise No.
Sort Order. Enter a number to order the payment method on the list of
shipping methods page.
3. Click the Settings tab to exclude countries, regions, and payments from a ship-
ping method. To exclude a selection, highlight the items in the Available
boxes on the left and click Add to move them to the Chosen boxes.
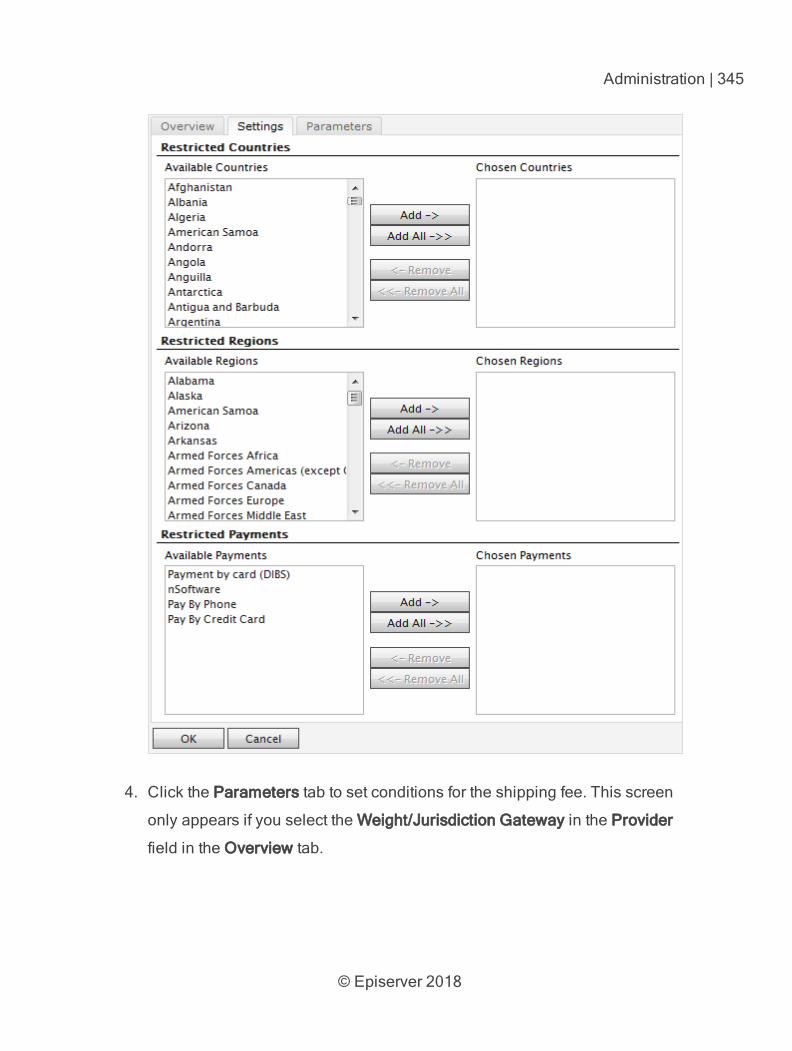
© Episerver 2018
Administration | 345
4. Click the Parameters tab to set conditions for the shipping fee. This screen
only appears if you select the Weight/Jurisdiction Gateway in the Provider
field in the Overview tab.
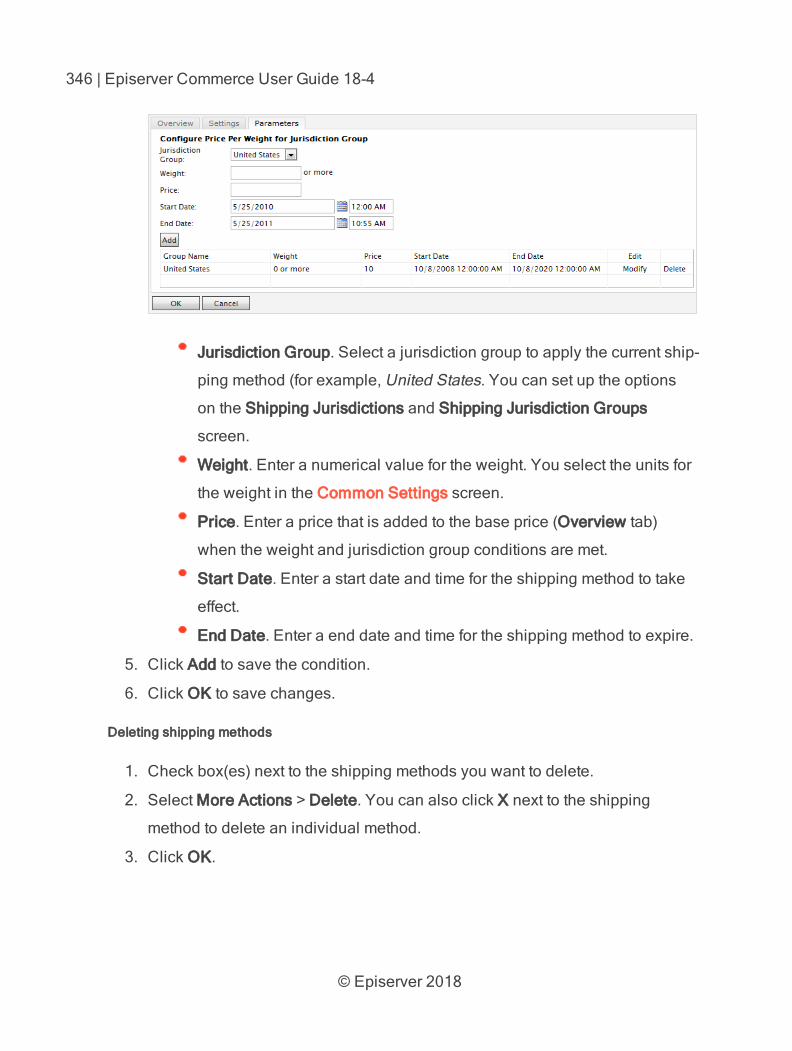
© Episerver 2018
346 | Episerver Commerce User Guide 18-4
Jurisdiction Group. Select a jurisdiction group to apply the current ship-
ping method (for example, United States. You can set up the options
on the Shipping Jurisdictions and Shipping Jurisdiction Groups
screen.
Weight. Enter a numerical value for the weight. You select the units for
the weight in the Common Settings screen.
Price. Enter a price that is added to the base price (Overview tab)
when the weight and jurisdiction group conditions are met.
Start Date. Enter a start date and time for the shipping method to take
effect.
End Date. Enter a end date and time for the shipping method to expire.
5. Click Add to save the condition.
6. Click OK to save changes.
Deleting shipping methods
1. Check box(es) next to the shipping methods you want to delete.
2. Select More Actions > Delete. You can also click X next to the shipping
method to delete an individual method.
3. Click OK.
© Episerver 2018
Administration | 347
Shipping providers
This topic is intended for administrators and developers with admin-istration access rights in Episerver.
A shipping provider class interacts with a shipping service, such as USPS, UPS, or
FedEX by retrieving shipping price information. A provider can present specific
scenarios with one or more services, such as price by weight or ground shipping.
The Shipping Providers page manages the list of providers and types.
Customizing a shipping provider
1. Go to Administration > Order System > Shipping > Shipping Providers. Edit
one of the two providers listed.
2. Edit Name and Description.
3. System Keyword (no spaces) and Classes are something that your
developers need to code and provide.
4. Click OK to save changes. The revised shipping provider appears in the Ship-
ping Providers page.
The Parameters and Packages tabs are partially implemented to let
developers fully customize those features.
Deleting shipping providers
1. Go to the Shipping Providers page.
2. Select the check box that corresponds to the shipping providers you want to
delete. (You can also click X to delete an individual shipping provider.)
© Episerver 2018
348 | Episerver Commerce User Guide 18-4
3. Select More Actions > Delete.
4. Click OK.
Configuring taxes
This topic is intended for administrators and developers with admin-istration access rights in Episerver.
Configure taxes so that rates are calculated and added to the total price during
the checkout process. You can combine and apply multiple taxes (such as federal,
state and local tax) to a purchase. Set up and maintain taxes with the following
methods:
Creating or editing tax controls manually
Importing data with a CSV file
Configuring taxes manually
To set up your taxes manually, work in the following areas in the Administration tab
of the Admin Site—Tax Categories, Tax Jurisdiction Groups, Tax Jurisdictions, and
Taxes—and the configuration pages for each catalog item.
1. Create and configure Countries and Regions (Go to Administration > Sys-
tem Settings > Dictionaries > Countries): In the Countries section, create the
countries you plan to sell your products in and set appropriate country codes.
For country codes, it is important to use the ISO Short code provided at
MSDN site Table of Language Culture Name, Codes, and ISO Values
Method [C++]. Using the ISO Long code or anything else does not correctly
calculate taxes during checkout.
© Episerver 2018
Administration | 349
2. Create new Tax Categories (Go to Administration > Catalog System):
Create tax categories that are used later to associate your catalog items with
the tax rates you define. For example, you may create categories such as Gen-
eral Sales, Food, and Luxury Items depending on the tax regulations for your
item types. The categories you create are selectable on the Page Details of
your items (Variations/SKU Edit page) and on the Tax Edit page.
3. Create and configure Tax Jurisdictions (Go to Administration > Order sys-
tem > Tax Configuration): Specify particular tax jurisdictions for a particular
region by specifying zip codes, country codes, and so on. Tax rates are
applied to whatever level of information you specify for each jurisdiction. For
example, if you specify only the country code as US, customers with a US
address (regardless of state, county and so on) are included in this jur-
isdiction.
Country Code and Region Code that you enter in the Jur-
isdictions Edit page must match the codes you used in step 1.
4. Create and configure new Tax Jurisdiction Groups (Go to Administration >
Order system > Tax Configuration): You can include multiple tax jurisdictions
in the new Tax Jurisdiction Groups.
5. Create and configure Taxes (Go to Administration > Order System > Tax
Configuration): Specify tax rates and also associate the Tax Categories and
Jurisdiction groups created in Steps 2 and 4.
6. Associate Catalogs to the Tax Categories created in Step 2 (Go to Order
Management > Catalogs): Go to the Catalog Management subsystem and
link specific catalog items to the appropriate tax categories from the Pri-
cing/Inventory page within each Variation/SKU Edit page.
© Episerver 2018
350 | Episerver Commerce User Guide 18-4
Configuring taxes using CSV import
CSV Tax Import can update tax data in bulk. Creating a CSV tax file with a spe-
cified format (see Example Scenarios) lets you complete steps 2 through 5 (In Con-
figuring taxes manually) in one shot. While you can complete step 6 of that
procedure manually, you can also use CSV import in the Catalog Management sub-
system to associate catalogs with tax categories.
Import your CSV tax file into your Commerce Manager by following these steps:
Prerequisite: A CSV tax file.
1. In Commerce Manager, click the Administration tab .
2. In the navigation tree, go to Order System > Taxes Configuration > Taxes.
3. Click Import Taxes.
4. Click Add New File and then Browse to select and upload your CSV tax file.
The path of your chosen file appears in the field.
5. Click Upload File and then Save The File. The CSV tax file appears in the
Files Available for Import section.
6. Select and highlight the CSV file and click Start Import. The import process
begins and completes in a dialog box. You can now view your tax setup in the
Commerce Manager.
To edit the existing setup, repeat the steps with a modified CSV file.
Caution: Re-importing a CSV file only edits existing information or
adds new data - nothing is deleted. If you delete an entire row of data
in the CSV file, you must manually delete those entries in the Com-
merce Manager. You can delete all the tax data and perform the CSV
tax import from scratch.
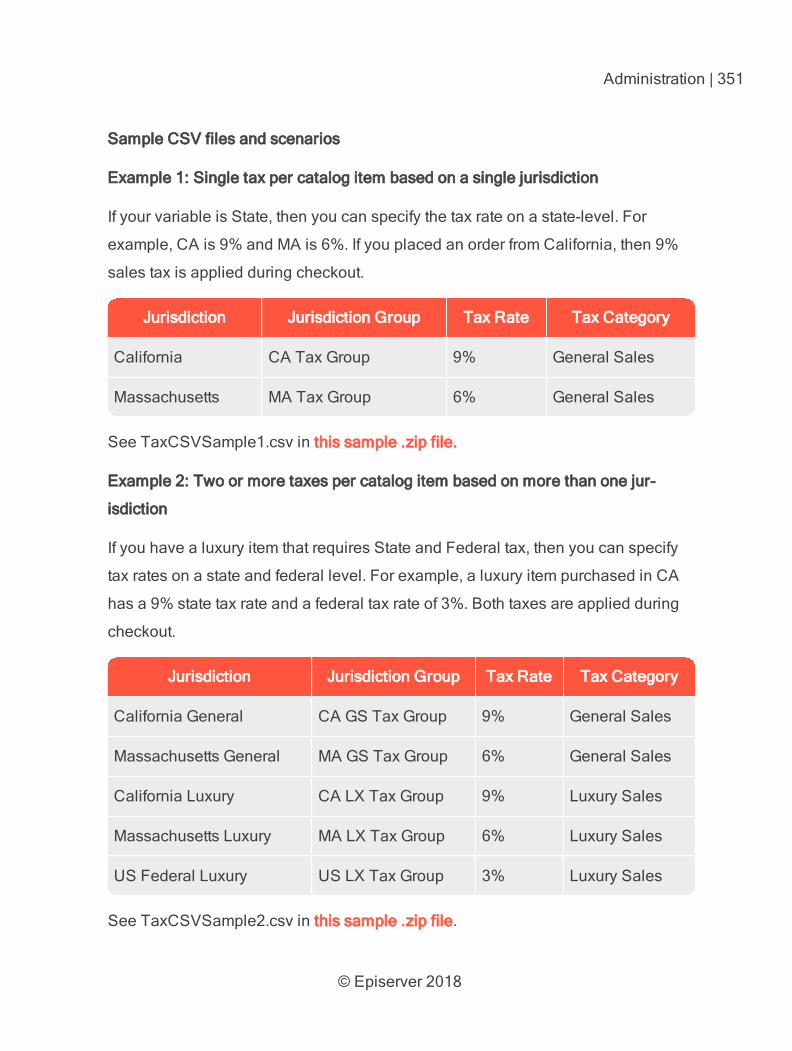
© Episerver 2018
Administration | 351
Sample CSV files and scenarios
Example 1: Single tax per catalog item based on a single jurisdiction
If your variable is State, then you can specify the tax rate on a state-level. For
example, CA is 9% and MA is 6%. If you placed an order from California, then 9%
sales tax is applied during checkout.
Jurisdiction Jurisdiction Group Tax Rate Tax Category
California CA Tax Group 9% General Sales
Massachusetts MA Tax Group 6% General Sales
See TaxCSVSample1.csv in this sample .zip file.
Example 2: Two or more taxes per catalog item based on more than one jur-
isdiction
If you have a luxury item that requires State and Federal tax, then you can specify
tax rates on a state and federal level. For example, a luxury item purchased in CA
has a 9% state tax rate and a federal tax rate of 3%. Both taxes are applied during
checkout.
Jurisdiction Jurisdiction Group Tax Rate Tax Category
California General CA GS Tax Group 9% General Sales
Massachusetts General MA GS Tax Group 6% General Sales
California Luxury CA LX Tax Group 9% Luxury Sales
Massachusetts Luxury MA LX Tax Group 6% Luxury Sales
US Federal Luxury US LX Tax Group 3% Luxury Sales
See TaxCSVSample2.csv in this sample .zip file.

© Episerver 2018
352 | Episerver Commerce User Guide 18-4
Example 3: Tax CSV file with tax type specified
You can specify the tax type. Episerver provides Sales Tax and Shipping Tax.
Jurisdiction Jurisdiction Group Tax Rate Tax Category
California CA Tax Group 9% Sales tax
Massachusetts MA Tax Group 6% Shipping Tax
See TaxCSVSample3.csv in this sample .zip file.
Order meta-classes and meta-fields
This topic is intended for administrators and developers with admin-istration access rights in Episerver.
You can extend the metadata of catalog items and order forms. For example, if you
create a meta-class called Wine, add meta-fields that are characteristic for wine,
such as color, taste, vintage, and maturity.
Default order meta-fields that are used by the ordering process are
built into the system and are not available from the administration inter-
face. However, you can add your own meta-fields to extend the attrib-
utes of your orders.
Creating an order meta-class
1. Navigate to Administration > Order System > Meta Classes. The Meta
Classes page appears.
2. Select Create New > New Meta Class and fill in the fields.
© Episerver 2018
Administration | 353
Name. Enter the name of the meta-class used in your code, this cannot
have any spaces.
Friendly Name. Enter the name of the meta-class displayed for prac-
tical use in Order Management.
Description. Enter a description of the meta-class.
Object Type. Select Order Group, Order Form, Shipment, LineItem,
Order Group Address, or Order Form Payment.
3. Select OK. The newly created meta-class appears in the Type drop-down
menu.
If you select the meta-class, you see available meta-fields listed but with none selec-
ted.
Creating an order meta field
1. Go to Administration > Order System > Meta Fields. The Meta Fields page
appears.

© Episerver 2018
354 | Episerver Commerce User Guide 18-4
2. Select New Meta Field. The Meta Field edit page appears.
You can also select Create New > New Meta Field on the Meta Classes
page.
3. Enter Meta Fields details.
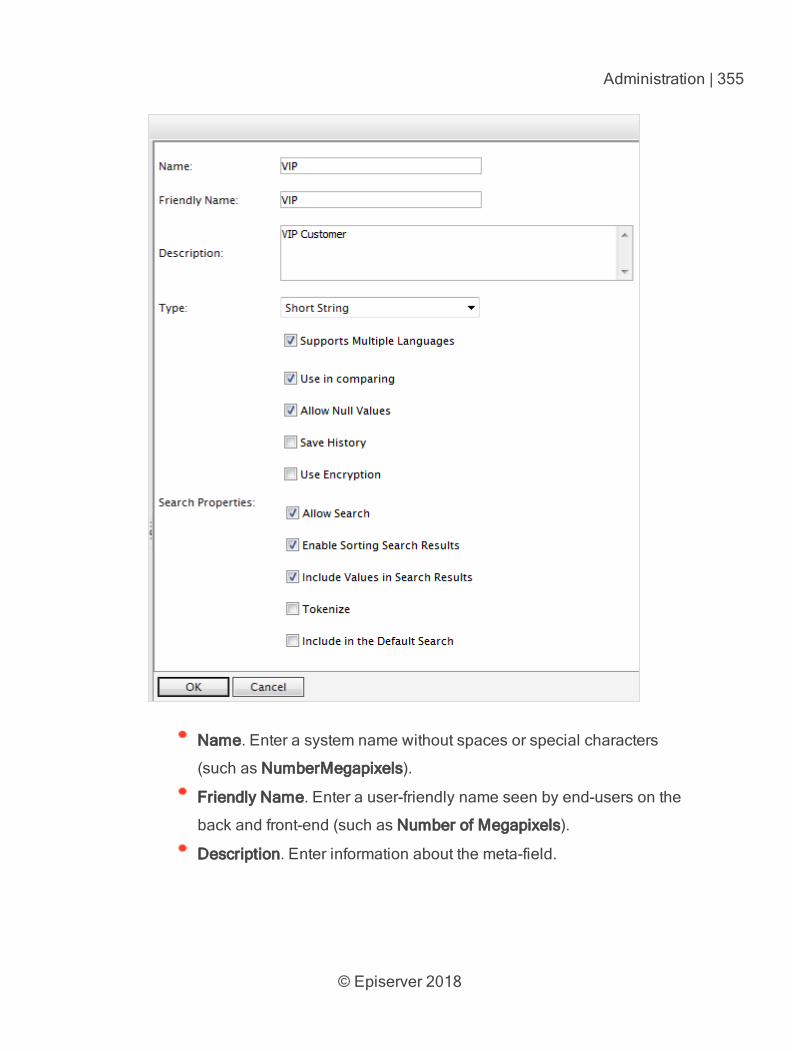
© Episerver 2018
Administration | 355
Name. Enter a system name without spaces or special characters
(such as NumberMegapixels).
Friendly Name. Enter a user-friendly name seen by end-users on the
back and front-end (such as Number of Megapixels).
Description. Enter information about the meta-field.
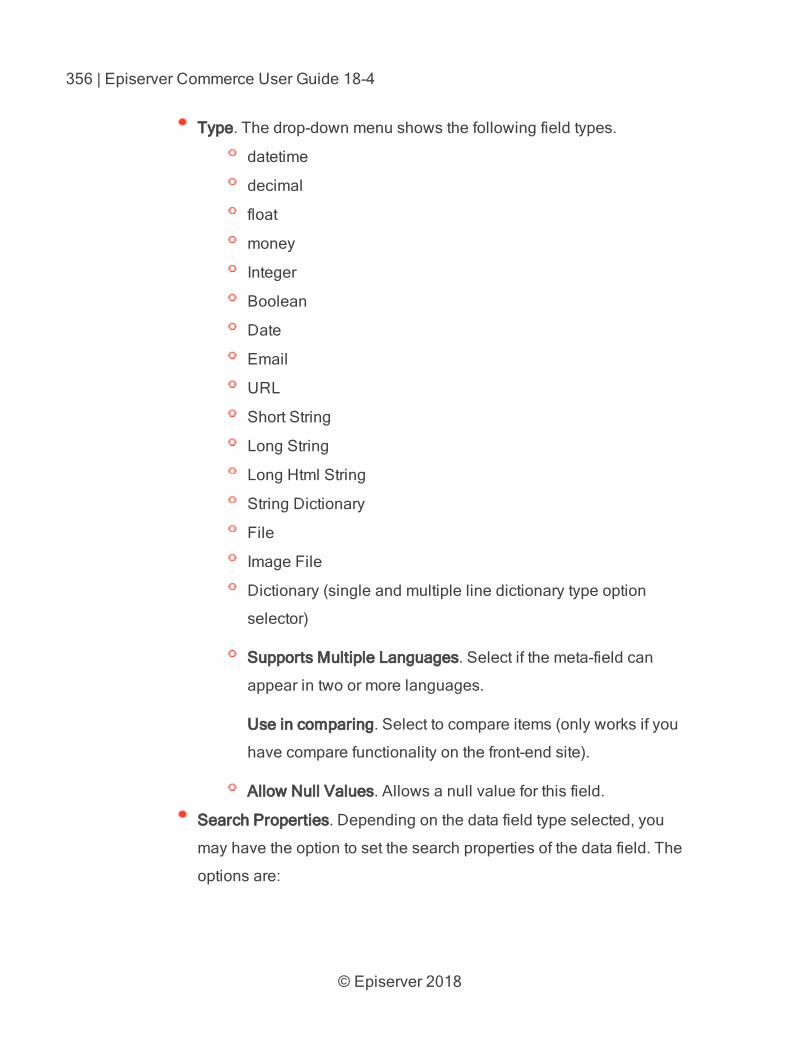
© Episerver 2018
356 | Episerver Commerce User Guide 18-4
Type. The drop-down menu shows the following field types.
datetime
decimal
float
money
Integer
Boolean
Date
URL
Short String
Long String
Long Html String
String Dictionary
File
Image File
Dictionary (single and multiple line dictionary type option
selector)
Supports Multiple Languages. Select if the meta-field can
appear in two or more languages.
Use in comparing. Select to compare items (only works if you
have compare functionality on the front-end site).
Allow Null Values. Allows a null value for this field.
Search Properties. Depending on the data field type selected, you
may have the option to set the search properties of the data field. The
options are:
© Episerver 2018
Administration | 357
Allow search. Select the box to permit searching on this meta-
field.
Enable Sorting Search Results. Select the box to enable sort-
ing of search results on this meta-field.
Include Values in Search Results. Select the box to include the
original value of this meta-field in the search results.
Tokenize. Select the box to prepare individual words (word
breaking) in a long product description property.
Include in the Default Search. Select the box to tokenize and
combine meta-field values for search from the front-end site.
4. Select OK. The newly added meta fields are listed in the meta-fields list.
If newly created meta-fields are not immediately visible, go to the next
page or set the Page Size to display more entries.
Applying meta fields to a meta-class
1. Go to Administration > Order System > Meta Classes. The Meta Classes
page appears.
2. Select Element > Catalog Entry.
3. Select the desired meta class from the Type drop-down. The Name, Friendly
Name, and Description fields are populated with default values.
4. Apply a meta-field to a meta-class by selecting the check box next to the
meta-field. If you want to sort the order of the meta-fields in the catalog entry,
enter a number into the Sort field.
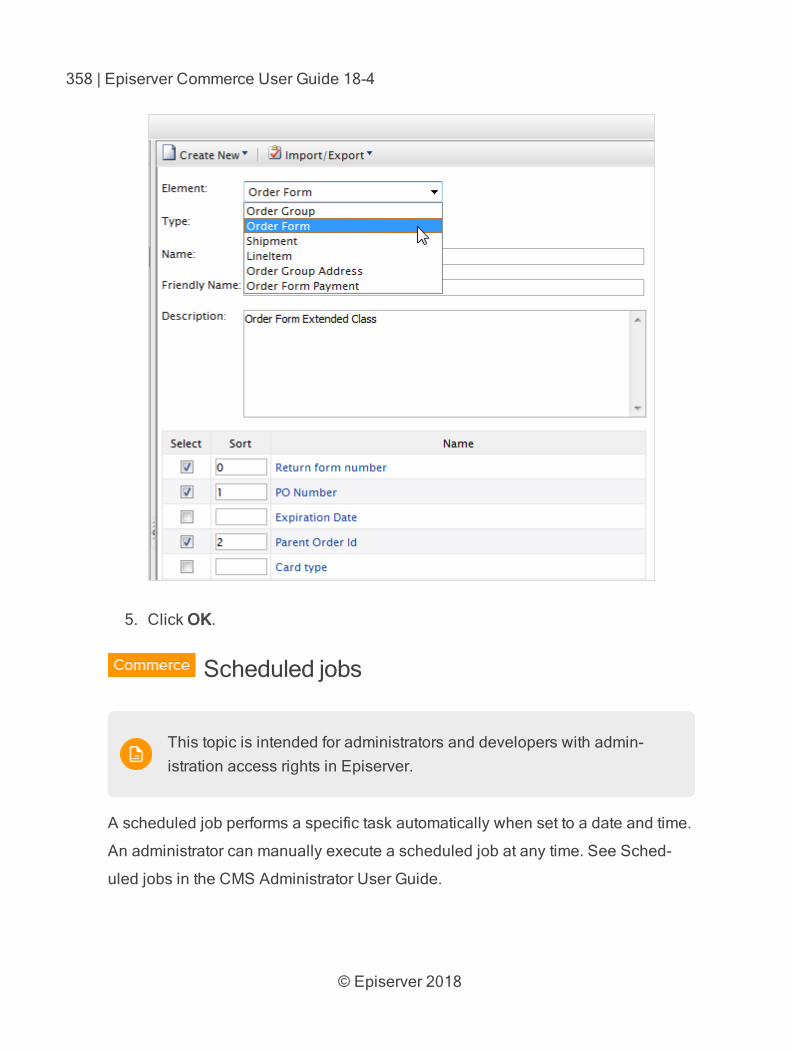
© Episerver 2018
358 | Episerver Commerce User Guide 18-4
5. Click OK.
Scheduled jobs
This topic is intended for administrators and developers with admin-istration access rights in Episerver.
A scheduled job performs a specific task automatically when set to a date and time.
An administrator can manually execute a scheduled job at any time. See Sched-
uled jobs in the CMS Administrator User Guide.
© Episerver 2018
Administration | 359
The following Commerce scheduled jobs are available via the administration inter-
face.
Subscription payment plans
Ensures that recurring payments are regularly generated as a background process.
Used for payment plans, such as magazine or grocery subscriptions, generating
recurring payments.
Remove expired carts
Removes carts that are expired, that is, not accessed for a specified number of
days. The default is 30. You can configure this value in the appSettings file's
ExpiredCartJobDays property.
Full search index
Performs a full indexing of content in product catalogs.
Incremental search index
Performs an incremental indexing of content in product catalogs.
Draft store migration
Used for migration of previously published content versions, when upgrading to the
version management introduced with Commerce 9. See Episerver World for tech-
nical details.
Find catalog URI conflicts
Analyzes the database to find entries and categories that have the same Name in
URL under the same parent category. If conflicts are found, they are logged as warn-
ings, output to the Scheduled Job Log, and sent to email addresses specified in the
© Episerver 2018
360 | Episerver Commerce User Guide 18-4
episerver:commerce.UriSegmentConflictsEmailRecipients AppSetting. For tech-
nical details, see URL segment and SEO URL.
Shipment releasing
Searches for releasable shipment in active orders. If the difference between current
time and shipment creation time is greater than the configured time span, the order
's shipment status is changed to Released.
By default, this job is not active. If the job is active, order shipments are released
one day after an order is placed by default. A developer can change the default
value in the <RootSite>/Configs/ecf.order.config file by editing the ship-
mentAutoReleaseTimeout element.
Rotate encryption keys
Sensitive customer data is secured with encryption keys that are set in meta fields.
This job rotates the encryption keys used by the system. See Episerver World for
technical details.
Export product feed
Exports your catalog to Episerver Perform. This job enables Episerver Perform to
provide accurate and valuable recommendations.
Maintain database indexes
To reduce fragmentation in the CMS and Commerce database indexes, this job
rebuilds or reorganizes them. You can run the job manually any time that you notice
a degradation in performance. Or, you can schedule it to run at regular intervals.
It is recommended to run this job at times of low usage if possible.
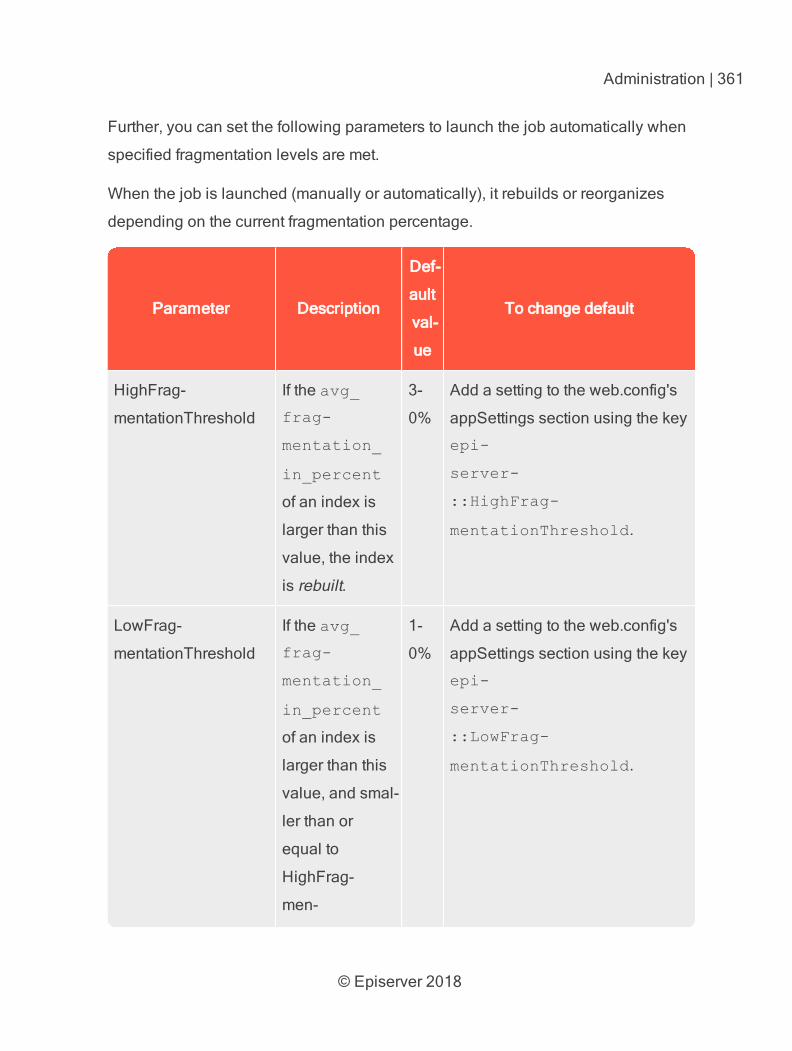
© Episerver 2018
Administration | 361
Further, you can set the following parameters to launch the job automatically when
specified fragmentation levels are met.
When the job is launched (manually or automatically), it rebuilds or reorganizes
depending on the current fragmentation percentage.
Parameter Description
Def-
ault
val-
ue
To change default
HighFrag-
mentationThreshold
If the avg_
frag-
mentation_
in_percent
of an index is
larger than this
value, the index
is rebuilt.
3-
0%
Add a setting to the web.config's
appSettings section using the key
epi-
server-
::HighFrag-
mentationThreshold.
LowFrag-
mentationThreshold
If the avg_
frag-
mentation_
in_percent
of an index is
larger than this
value, and smal-
ler than or
equal to
HighFrag-
men-
1-
0%
Add a setting to the web.config's
appSettings section using the key
epi-
server-
::LowFrag-
mentationThreshold.
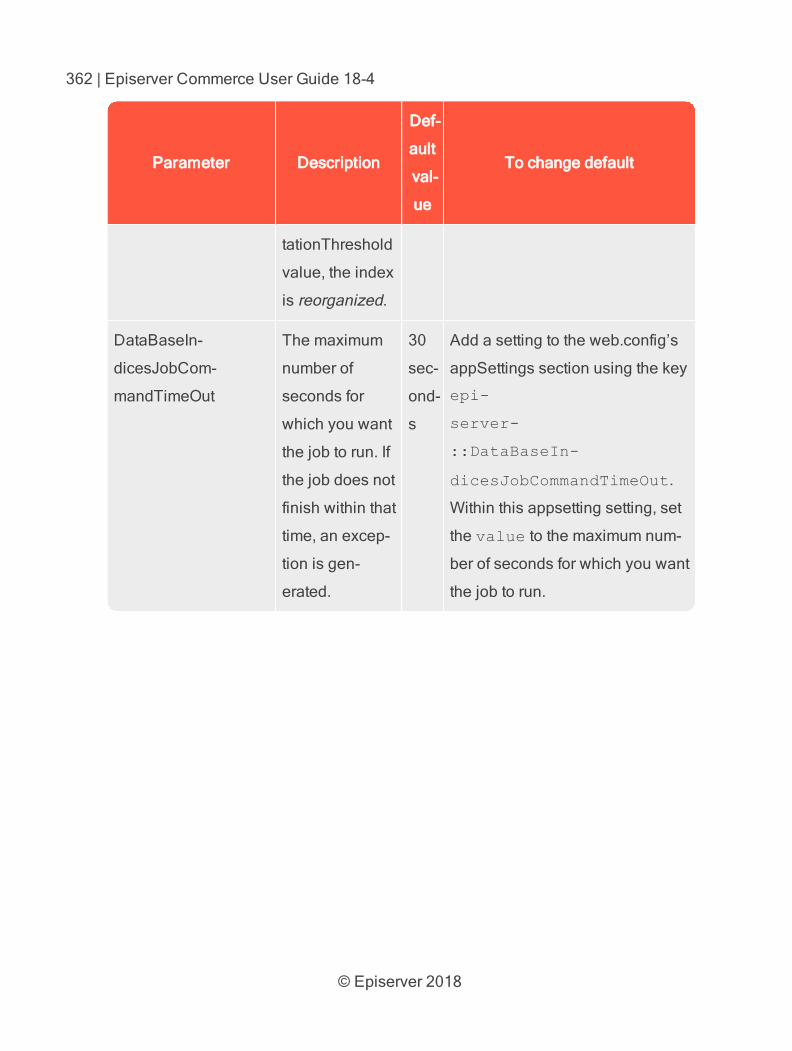
© Episerver 2018
362 | Episerver Commerce User Guide 18-4
Parameter Description
Def-
ault
val-
ue
To change default
tationThreshold
value, the index
is reorganized.
DataBaseIn-
dicesJobCom-
mandTimeOut
The maximum
number of
seconds for
which you want
the job to run. If
the job does not
finish within that
time, an excep-
tion is gen-
erated.
30
sec-
ond-
s
Add a setting to the web.config’s
appSettings section using the key
epi-
server-
::DataBaseIn-
dicesJobCommandTimeOut.
Within this appsetting setting, set
the value to the maximum num-
ber of seconds for which you want
the job to run.
Episerver Digital Experience Cloud
The Episerver Digital Experience Cloud™ unifies digital content, commerce and marketing in oneplatform, including omnichannel solutions for intelligent campaigns. The platform uses artificialintelligence and behavioral analytics to deliver personalized experiences everywhere. With oursecure, reliable platform you can quickly increase engagement, revenue and productivity, whilegetting the fastest time to value.
About Episerver
At Episerver, we believe digital transformation is a journey. We have been guiding customers for more than20 years in providing standout digital experiences. Today our network of 880 partners, in 30 countries, sup-ports 8,000 customers and over 30,000 websites. Founded in 1994, Episerver has offices in the US, UK,Sweden, Australia, Germany, Denmark, Finland, Norway, Poland, the Netherlands, Spain, South Africa, Singa-pore, Vietnam and the UAE.
For more information, visit episerver.com.
www.episerver.com
A
administrators
role 44, 177
all properties,
editing 37
assets
as catalog
entries 89
B
built-in discounts 208
bundles
commerce 101
defined 69
deleting 103
business categories
creating 160
deleting 160
editing 160
business
foundation 285
business objects
adding fields 290
creating 286
customizing 288
deleting 313
forms
customizing 293
editing 294
recreating 302
publishing 312
relationship
many to
many 309
many to one 307
one to many 303
C
campaigns
creating 190
deleting 194
editing 244
introduction 186
campaigns(legacy)
overview 239
carts
expired, remove,
job 359
catalog entries
assets 89
moving 77
related entries 90
viewing 93
catalogs
batch update 72
browsing 62
categories
editing 94
creating 65
deleting 67
Index
© Episerver 2018
365 | Episerver Commerce User Guide 18-4
entries
creating 67
duplicating 76
entry properties 79
entry, creating 67
exporting existing
data 53
importing
CSV files 55
importing existing
data 53
meta class
creating 325
meta classes 52
overview 325
meta field
creating 327
overview 51
properties 79
searching 64
structure 51
updating search
index 314
categories
editing 94
categorizing
products 91
commerce
administration 275
best sellers
report 273
bundles 101
defined 69
deleting 103
contacts 160
browsing 160
dictionaries 277
exchanges 137
inventories 85
log 282
low stock
report 273
markets 179
order
processing
114
packages 101
deleting 103
payment plans 120,
124
payments
methods
deleting 338
editing 337
overview 332
picklists 128
pricing
adding 84
by customer
group 85
editing 84
receiving 126
reporting 273
returns 129, 137
sales report 273
scheduled jobs 358
© Episerver 2018
Index | 366
shipments
completing 129
splitting 117
shipping 126, 341
report 273
shipping methods
customizing 343
deleting 346
overview 342
shipping providers
customizing 347
deleting 347
overview 347
shopping carts 134
taxes
configuring 348
configuring manu-
ally 348
configuring via
CSV
import 350
community member
role 43, 176
contacts
browsing 160
creating 167
customizing
views 163
dictionary
values 173
editing 172
overview 160
printing list 166
searching 162
content
editor role 43, 176
countries
adding 277
CRM
overview 145
currencies 279
adding 279
customer groups
pricing by 85
customer segments
browsing 268
creating 269
creating with con-
ditions 271
overview 267
D
developer role 45, 178
dictionaries 277
dictionary values
organizations 158
discounts
built-in 208
creating 197
exclusions 237
introduction 194
prevent combination
with other dis-
counts 237
prioritizing 235
promotion
codes 204
© Episerver 2018
367 | Episerver Commerce User Guide 18-4
redemption
limits 205
E
editing
all properties 37
content 37
on-page 37
encryption keys
rotate, job 360
entries
catalog, creating 67
exchanges
commerce 137
G
global menu 31
I
inventories
commerce 85
L
left menu
customizing 315
length
units,
determining
285
log 282
login 30
M
marketer role 43, 177
marketing
overview 185
markets
browsing 180
creating 181
overview 179
menu, global 31
merchandiser role 44,
177
meta classes
catalogs 52, 105
creating 352
creating for catalog
items 325
ordering 352
meta fields
applying to meta
class 357
creating 353
creating for catalog
items 327
O
on-page editing 37
order system 331
orders
browsing 105
canceling 125
commerce, over-
view 105
creating 108
from order
list 109
deleting 126
editing 125
processing 114
searching 108
© Episerver 2018
Index | 368
organizations
browsing 147
creating 153
customizing
views 148
dictionary
values 158
editing 156
overview 146
printing list 153
searching 148
P
packages
commerce 101
deleting 103
packing slips
printing 132
panes 35
settings 35
payment plans
canceling 124
creating 120
editing 124
recurring 124
payments
methods
deleting 338
editing 337
overview 332
picklists 128
deleting 134
printing 132
removing items 134
pricing
commerce 84
by customer
group 85
viewing 83
prioritizing
discounts 235
product order 108
products
categorization 91
deleting 78
promotion codes 204
promotions
activating 261
deactivating 261
deleting 262
promotions(legacy)
overview 244
R
receiving
overview 126
redemption limits, for
discounts 205
related entries
catalog entries 90
remove expired carts
job 359
returns
commerce 137
reasons 281
roles 42, 176
administrator 44,
177
© Episerver 2018
369 | Episerver Commerce User Guide 18-4
community
member 43,
176
content editor 43,
176
developer 45, 178
marketer 43, 177
merchandiser 44,
177
visitor 43, 176
website owner 44,
177
rotate encryption keys
job 360
S
scheduled jobs
commerce 358
shipments
completing 129
splitting 117
shipping 341
shipping methods
customizing 343
deleting 346
overview 342
shipping providers
customizing 347
deleting 347
overview 347
shopping carts
converting to pur-
chase
order 135
creating 135
overview 134
shopping flow 46
T
tax categories
deleting 325
overview 324
taxes
configuring 348
CSV import 350
manually 348
touch screen, pri-
oritizing mouse
input from 41
V
variants
deleting 78
video
Demo of creating a
campaign and
discount 190,
197
visitor role 43, 176
W
warehouses
deleting 324
overview 321
websites
owner role 44, 177
width
units,
determining
285