Embed Size (px)
Citation preview
8/9/2019 Epicor ERP Purchase Management Course 10.0.700.2
http://slidepdf.com/reader/full/epicor-erp-purchase-management-course-1007002 1/105
Epicor ERP
Purchase Management Course10.0.700.2
8/9/2019 Epicor ERP Purchase Management Course 10.0.700.2
http://slidepdf.com/reader/full/epicor-erp-purchase-management-course-1007002 2/105
Disclaimer
This document is for informational purposes only and is subject to change without notice. This document and itscontents, including the viewpoints, dates and functional content expressed herein are believed to be accurate as of itsdate of publication. However, Epicor Software Corporation makes no guarantee, representations or warranties with
regard to the enclosed information and specifically disclaims any applicable implied warranties, such as fitness for aparticular purpose, merchantability, satisfactory quality or reasonable skill and care. As each user of Epicor software islikely to be unique in their requirements in the use of such software and their business processes, users of this documentare always advised to discuss the content of this document with their Epicor account manager. All information containedherein is subject to change without notice and changes to this document since printing and other important informationabout the software product are made or published in release notes, and you are urged to obtain the current releasenotes for the software product. We welcome user comments and reserve the right to revise this publication and/ormake improvements or changes to the products or programs described in this publication at any time, without notice.The usage of any Epicor software shall be pursuant to an Epicor end user license agreement and the performance ofany consulting services by Epicor personnel shall be pursuant to Epicor's standard services terms and conditions. Usageof the solution(s) described in this document with other Epicor software or third party products may require the purchaseof licenses for such other products. Where any software is expressed to be compliant with local laws or requirementsin this document, such compliance is not a warranty and is based solely on Epicor's current understanding of such laws
and requirements. All laws and requirements are subject to varying interpretations as well as to change and accordinglyEpicor cannot guarantee that the software will be compliant and up to date with such changes. All statements ofplatform and product compatibility in this document shall be considered individually in relation to the products referredto in the relevant statement, i.e., where any Epicor software is stated to be compatible with one product and alsostated to be compatible with another product, it should not be interpreted that such Epicor software is compatiblewith both of the products running at the same time on the same platform or environment. Additionally platform orproduct compatibility may require the application of Epicor or third-party updates, patches and/or service packs andEpicor has no responsibility for compatibility issues which may be caused by updates, patches and/or service packsreleased by third parties after the date of publication of this document. Epicor® is a registered trademark and/ortrademark of Epicor Software Corporation in the United States, certain other countries and/or the EU. All othertrademarks mentioned are the property of their respective owners. Copyright © Epicor Software Corporation 2014.All rights reserved. No part of this publication may be reproduced in any form without the prior written consent of
Epicor Software Corporation.
EDE8919905
90521-10-9278-58310702
10.0.700.2
Revision: July 25, 2014 2:41 a.m.
Total pages: 105
course.ditaval
8/9/2019 Epicor ERP Purchase Management Course 10.0.700.2
http://slidepdf.com/reader/full/epicor-erp-purchase-management-course-1007002 3/105
Contents
Purchase Management Course..............................................................................................8
Before You Begin....................................................................................................................9
Audience.........................................................................................................................................................9Prerequisites....................................................................................................................................................9
Environment Setup........................................................................................................................................10
Workshop Constraints............................................................................................................................11
Overview...............................................................................................................................12
Application Setup.................................................................................................................14
Company Configuration................................................................................................................................14
Maintenance Programs..................................................................................................................................14
User Account Security Maintenance........................................................................................................14
Workshop - Create New User..........................................................................................................15
Log On as Administrator...........................................................................................................15
Add User..................................................................................................................................15
User Company.........................................................................................................................16
User Security............................................................................................................................16
Review Existing User.................................................................................................................16
Log On.....................................................................................................................................17
Buyer Maintenance.................................................................................................................................18
Workshop - Create Buyer................................................................................................................19
Add Buyer................................................................................................................................19
Authorize Users........................................................................................................................19
Adjust Authorized User List......................................................................................................19Part Maintenance...................................................................................................................................20
Part Class Maintenance...........................................................................................................................21
Workshop - Assign Buyer to Part Class.............................................................................................22
Supplier Maintenance.............................................................................................................................22
Supplier Detail.................................................................................................................................23
Purchase Points...............................................................................................................................23
Detail.......................................................................................................................................23
Banks..............................................................................................................................................23
Attributes........................................................................................................................................23
Supplier Ratings...............................................................................................................................24Workshop - Add Supplier................................................................................................................24
Add a Supplier.........................................................................................................................24
Enter the Supplier's Address.....................................................................................................24
Enter a New Purchase Point......................................................................................................25
Enter the Purchase Point Contact..............................................................................................25
Approve the Supplier................................................................................................................25
Supplier Ratings and Attributes........................................................................................................27
3Epicor ERP | 10.0.700.2
ContentsPurchase Management Course
8/9/2019 Epicor ERP Purchase Management Course 10.0.700.2
http://slidepdf.com/reader/full/epicor-erp-purchase-management-course-1007002 4/105
Workshop - Assign Ratings to a Supplier..................................................................................27
Workshop - Assign Attributes to a Supplier...............................................................................27
Supplier Price List Maintenance...............................................................................................................28
Workshop - Add a Supplier Price List and Create Price Breaks..........................................................29
Select a Supplier and Part.........................................................................................................29
Add Price Breaks......................................................................................................................30
Workshop - Create a Purchase Order Using the Supplier Price List....................................................31Create a Purchase Order - Part 1...............................................................................................31
Create a Purchase Order - Part 2...............................................................................................31
Miscellaneous Charge/Credit Maintenance.............................................................................................32
Site Maintenance....................................................................................................................................32
Site Configuration Control...............................................................................................................33
Daily Purchase Processing....................................................................................................34
Purchase Orders.............................................................................................................................................34
Purchase Advisor....................................................................................................................................36
Buy For Job Material...............................................................................................................................36
Workshop - Buy For Job Material.....................................................................................................38Enter Header Detail..................................................................................................................38
Enter Line Details......................................................................................................................39
Enter Expediting Charge...........................................................................................................39
Identify the GL Account............................................................................................................39
Buy For Inventory....................................................................................................................................40
Workshop - Buy For Inventory..........................................................................................................41
Enter Line Details......................................................................................................................42
Identify the GL Account............................................................................................................42
Approve the Purchase Order.....................................................................................................43
Review the Purchase Order.......................................................................................................44Buy For Subcontract Operation...............................................................................................................44
Workshop - Buy For Subcontract Operation.....................................................................................46
Enter Header Detail..................................................................................................................46
Enter Line Details......................................................................................................................46
Identify the GL Account............................................................................................................47
Approve the Purchase Order.....................................................................................................47
Buy For Other.........................................................................................................................................47
Workshop - Buy For Other...............................................................................................................48
Enter Header Detail..................................................................................................................48
Enter Line Details......................................................................................................................49
Identify the GL Account............................................................................................................49
Approve the Purchase Order.....................................................................................................49
Inter-Company PO - Valid Sites...............................................................................................................50
PO Approval..................................................................................................................................................50
Workshop - Approve Purchase Order......................................................................................................50
Change User...................................................................................................................................50
Approve the Purchase Order............................................................................................................51
Review the Purchase Order..............................................................................................................51
Epicor ERP | 10.0.700.24
Purchase Management CourseContents
8/9/2019 Epicor ERP Purchase Management Course 10.0.700.2
http://slidepdf.com/reader/full/epicor-erp-purchase-management-course-1007002 5/105
Duplicate PO..................................................................................................................................................51
Workshop - Duplicate Purchase Orders...................................................................................................52
Change User...................................................................................................................................52
Duplicate a Purchase Order..............................................................................................................52
Update the Duplicate Purchase Order..............................................................................................52
Approve the Purchase Order............................................................................................................53
Receive Purchase Orders................................................................................................................................53Workshop - Receive By Line....................................................................................................................54
Enter a Receipt................................................................................................................................54
Receive Job Material........................................................................................................................54
Review the Purchase Order..............................................................................................................54
Workshop - Mass Receipt.......................................................................................................................55
Review Open Purchase Orders.........................................................................................................55
Enter the Receipt.............................................................................................................................55
Perform a Mass Receipt...................................................................................................................55
Review the Purchase Order..............................................................................................................56
Purchase Order Tracker..................................................................................................................................56Workshop - Purchase Order Tracker........................................................................................................57
Specialized Purchase Processing..........................................................................................58
Requisitions...................................................................................................................................................58
Workshop - Assign Actions to a Requisition............................................................................................60
Add a Requisition Action.................................................................................................................60
Remove the Requisition Action........................................................................................................60
Workshop - Create a Requisition.............................................................................................................61
Enter the Requisition Detail..............................................................................................................61
Enter the Requisition Line................................................................................................................61
Dispatch the Requisition..................................................................................................................62Workshop - Approve a Requisition..........................................................................................................62
Set the Requisition User...................................................................................................................62
Assign the Specification Approval....................................................................................................62
Set the Requisition User...................................................................................................................63
Complete the Requisition Approval Process......................................................................................63
Purchase Order Suggestions...........................................................................................................................63
Generate Purchasing Suggestions...........................................................................................................63
Workshop - Generate PO Suggestions.............................................................................................65
New PO Suggestions...............................................................................................................................65
Suggestion - Detail..........................................................................................................................66
Workshop - Review Suggestions......................................................................................................67
Change User............................................................................................................................67
Generate Purchase Orders........................................................................................................67
Review Purchase Orders...........................................................................................................68
Change PO Suggestions..........................................................................................................................69
Supplier Relationship Management................................................................................................................70
Buyer Workbench...................................................................................................................................71
Buyer Workbench Functionality.......................................................................................................72
5Epicor ERP | 10.0.700.2
ContentsPurchase Management Course
8/9/2019 Epicor ERP Purchase Management Course 10.0.700.2
http://slidepdf.com/reader/full/epicor-erp-purchase-management-course-1007002 6/105
Workshop - Create an RFQ for Job-Related Material........................................................................72
Update Job Material.................................................................................................................72
Update a Buyer........................................................................................................................73
Generate an RFQ......................................................................................................................73
Print the RFQ ...........................................................................................................................74
Create a Price Break.................................................................................................................74
Create Another Price Break......................................................................................................75Create a Purchase Order ..........................................................................................................75
Reports............................................................................................................................................75
Supplier Connect....................................................................................................................................76
Purchase Contracts........................................................................................................................................76
Workshop - Create a Contract Part.........................................................................................................77
Approve Supplier for a Part..............................................................................................................78
Supplier Periodicity Maintenance............................................................................................................78
Workshop - Define Periodicity Codes...............................................................................................79
Part Schedule Maintenance.....................................................................................................................79
Workshop - Create Part Schedule....................................................................................................80Create the Part Schedule..........................................................................................................80
Enter the Schedule Settings......................................................................................................80
Enter the Supplier Details.........................................................................................................81
Workshop - Create Demand...................................................................................................................81
Create the Sales Order.....................................................................................................................81
Enter the Second Release.................................................................................................................82
Workshop - Create a Contract Purchase Order........................................................................................82
Create the Contract Purchase Order................................................................................................82
Add the Purchase Order Line...........................................................................................................83
Approve the Purchase Order............................................................................................................83Generate Purchase Schedules.................................................................................................................83
Workshop - Generate Purchase Order Suggestions..........................................................................84
Workshop - Generate the Purchase Schedule...................................................................................84
Workshop - Approve the Purchase Schedule....................................................................................85
Purchase Contract Report and Tracker....................................................................................................85
Landed Cost..................................................................................................................................................86
Landed Cost Setup.................................................................................................................................88
Country Maintenance......................................................................................................................88
Port..........................................................................................................................................88
Workshop - Add Port...............................................................................................................88
Company Configuration..................................................................................................................89
Workshop - Set Up Shipping and Receiving..............................................................................89
HS Commodity Codes.....................................................................................................................89
Workshop - Harmonized System (HS) Commodity Codes..........................................................90
Import Preference Scheme Maintenance..........................................................................................90
Workshop - Create the Import Preference Scheme....................................................................91
Import Tariff Maintenance...............................................................................................................91
Workshop - Import Tariff..........................................................................................................92
Epicor ERP | 10.0.700.26
Purchase Management CourseContents
8/9/2019 Epicor ERP Purchase Management Course 10.0.700.2
http://slidepdf.com/reader/full/epicor-erp-purchase-management-course-1007002 7/105
Miscellaneous Charge/Credit Maintenance......................................................................................92
Workshop - Miscellaneous Charge/Credit.................................................................................93
Supplier Shipment Classes...............................................................................................................93
Workshop - Supplier Shipment Classes.....................................................................................93
Workshop - Landed Cost Entry...............................................................................................................94
Create Purchase Orders...................................................................................................................94
Create Purchase Order #1........................................................................................................94Create Purchase Order #2........................................................................................................95
Enter the Shipment..........................................................................................................................96
Edit the Indirect Costs......................................................................................................................97
Disburse the Indirect Costs..............................................................................................................97
Complete the Shipment...................................................................................................................98
Process an AP Invoice......................................................................................................................98
Conclusion...........................................................................................................................100
Appendix.............................................................................................................................101
Cost Types...................................................................................................................................................101
Transaction Types........................................................................................................................................101
7Epicor ERP | 10.0.700.2
ContentsPurchase Management Course
8/9/2019 Epicor ERP Purchase Management Course 10.0.700.2
http://slidepdf.com/reader/full/epicor-erp-purchase-management-course-1007002 8/105
Purchase Management Course
This course focuses on the Purchase Management process. This process includes the creation and approval ofpurchase orders (POs) and requisitions, managing suppliers and their price lists, working with purchase order
suggestions, and monitoring the purchase order process using related reports and trackers. The advancedfunctionality in the Supplier Relationship Management and Purchase Contract modules also aids in managingpurchase orders.
Upon successful completion of this course, you will be able to:
• Complete Purchase Management configuration and maintenance program setup, including adding suppliersand their price lists.
• Review ratings assigned to a supplier.
• Assign attributes to a supplier.
• Create purchase orders for job material, inventory, subcontract operation, and other material.
• Approve, duplicate, and receive purchase orders.
• Complete the purchase requisitions creation and approval.• Manage purchase order suggestions and purchase contracts.
• Use Supplier Relationship Management (SRM) functionality to complete the Request for Quote (RFQ) for job-related and quoted material.
• Utilize Landed Cost functionality.
• Analyze purchasing data through reports and trackers.
Epicor ERP | 10.0.700.28
Purchase Management CoursePurchase Management Course
8/9/2019 Epicor ERP Purchase Management Course 10.0.700.2
http://slidepdf.com/reader/full/epicor-erp-purchase-management-course-1007002 9/105
Before You Begin
Read this topic for information you should know in order to successfully complete this course.
Audience
Specific audiences will benefit from this course.
• Cost Accountant
• CFO/Controller
• Purchasing Staff/Buyer
• Account Manager
• System Administrator
• IT/Technical Staff
Prerequisites
To complete the workshops in this course, the necessary modules must be licensed and operating in your trainingenvironment. For more information on the modules available, contact your Epicor Customer Account Managerat [email protected]. It is also important you understand the prerequisite knowledge contained in othervaluable courses.
•
Navigation Course - This course introduces navigational aspects of the Epicor application's user interface.Designed for a hands-on environment, general navigation principles and techniques available in two userinterface modes - Classic Menu and Modern Shell Menu. Workshops focus on each of these modes andguide you through each navigational principle introduced.
• System Flow Course - This course introduces a basic quote to cash scenario that includes the process fromthe initial customer quote to final cash receipts and payment of supplier invoices. This course emphasizes theseries of processes that make up the quote to cash process by using a simple scenario to highlight varioustransactions. Your organization may have more complex processing routines than those described in thiscourse.
• Suppliers Course - This course covers the supplier record and the information located within SupplierMaintenance.
• Parts Course - This course introduces the building blocks that make up Part Maintenance. It focuses on the
importance of Part Maintenance, required maintenance program setup, key fields, manufactured and purchasedpart setup, and commonly used reports and trackers.
• Knowledge Camp Course - This course provides a high level overview of the quote to cash flow throughthe Epicor application. You begin with how to create a quote, process it as an order, and fill the order acrossproduction planning and purchasing. The course also covers the manufacturing plan and shipment of partsto a customer, as well as how to process invoices, enter cash receipts, and generate supplier payments.
9Epicor ERP | 10.0.700.2
Before You BeginPurchase Management Course
8/9/2019 Epicor ERP Purchase Management Course 10.0.700.2
http://slidepdf.com/reader/full/epicor-erp-purchase-management-course-1007002 10/105
Environment Setup
The environment setup steps and potential workshop constraints must be reviewed in order to successfullycomplete the workshops in this course.
Your Epicor training environment, in which the Epicor demonstration database is found, enables you to experienceEpicor functionality in action but does not affect data in your live, production environment.
The following steps must be taken to successfully complete the workshops in this course.
1. Verify the following or ask your system administrator to verify for you:
• Your Epicor training icon (or web address if you are using Epicor Web Access) points to yourEpicor training environment with the Epicor demonstration database installed. Do not completethe course workshops in your live, production environment.
Note It is recommended that multiple Epicor demonstration databases are installed. ContactSupport or Systems Consulting for billable assistance.
• The Epicor demonstration database is at the same service pack and patch as the Epicorapplication. Epicor's education team updates the Epicor demonstration database for each service packand patch. If your system administrator upgrades your Epicor application to a new service pack or patch,he or she must also download the corresponding Epicor demonstration database from EPICweb > Support> Epicor > Downloads and install it. If this is not performed, unexpected results can occur when completingthe course workshops.
• Your system administrator restored (refreshed) the Epicor demonstration database prior tostarting this course. The Epicor demonstration database comes standard with parts, customers, salesorders, and so on, already defined. If the Epicor demonstration database is shared with multiple users(that is, the database is located on a server and users access the same data, much like your live, productionenvironment) and is not periodically refreshed, unexpected results can occur. For example, if a courseworkshop requires you to ship a sales order that came standard in the Epicor demonstration database,
but a different user already completed this workshop and the Epicor demonstration database was notrestored (refreshed), then you will not be able to ship the sales order. Epicor's education team has writtenthe course workshops to minimize situations like this from occurring, but Epicor cannot prevent usersfrom manipulating the data in your installation of the Epicor demonstration database.
2. Log in to the training environment using the credentials manager/manager. If you are logged into yourtraining environment as a different user, from the Options menu, select Change User.
3. From the Main menu, select the company Epicor Education (EPIC06).
4. From the Main menu, select the Main site.
Epicor ERP | 10.0.700.210
Purchase Management CourseBefore You Begin

8/9/2019 Epicor ERP Purchase Management Course 10.0.700.2
http://slidepdf.com/reader/full/epicor-erp-purchase-management-course-1007002 11/105
Workshop Constraints
Below is a list of workshops in this course that can be performed only once in each instance of a restored (refreshed)database. Where applicable, a detailed explanation of the workshop constraints is documented in the workshopitself.
Purchase Orders
• Workshop - Buy For Job Material
• Workshop - Buy For Inventory
• Workshop - Receive By Line
• Workshop - Review Suggestions
• Workshop - Change Purchase Order Suggestions
• Workshop - Create an RFQ for Job-Related Material
11Epicor ERP | 10.0.700.2
Before You BeginPurchase Management Course
8/9/2019 Epicor ERP Purchase Management Course 10.0.700.2
http://slidepdf.com/reader/full/epicor-erp-purchase-management-course-1007002 12/105
Overview
Use the Purchase Management module to create and monitor purchase orders (POs). Purchases may be forinventory, job material, subcontract material, or for other material. The destination of these items can be changed
upon their receipt.Purchase order receipts update the purchase order and history files. This provides a reference to assist in futurepurchasing decisions. Purchase order suggestions use the Time Phased Material Requirements Report forstreamlined purchase order creation.
Purchase Management Features
The following lists key purchasing features:
• Automated purchasing tools - Allows purchase order suggestions to be turned into purchase orders withlittle manual effort.
• Purchase requisitions - Allows for the initiation, approval, and tracking of PO requisitions.
•Purchase history - Historical information detailing POs and receipts over an extended period of time.
• Individual line items and mass receipts for POs - Options available for receiving one line or all lines on aPO.
• Supplier part number/stocking part number - Allows cross-referencing.
• Price breaks - Price breaks can also include effectivity dates.
• Supplier approval - Approval is available for a specific part, group of parts, or a job for a specific customer.
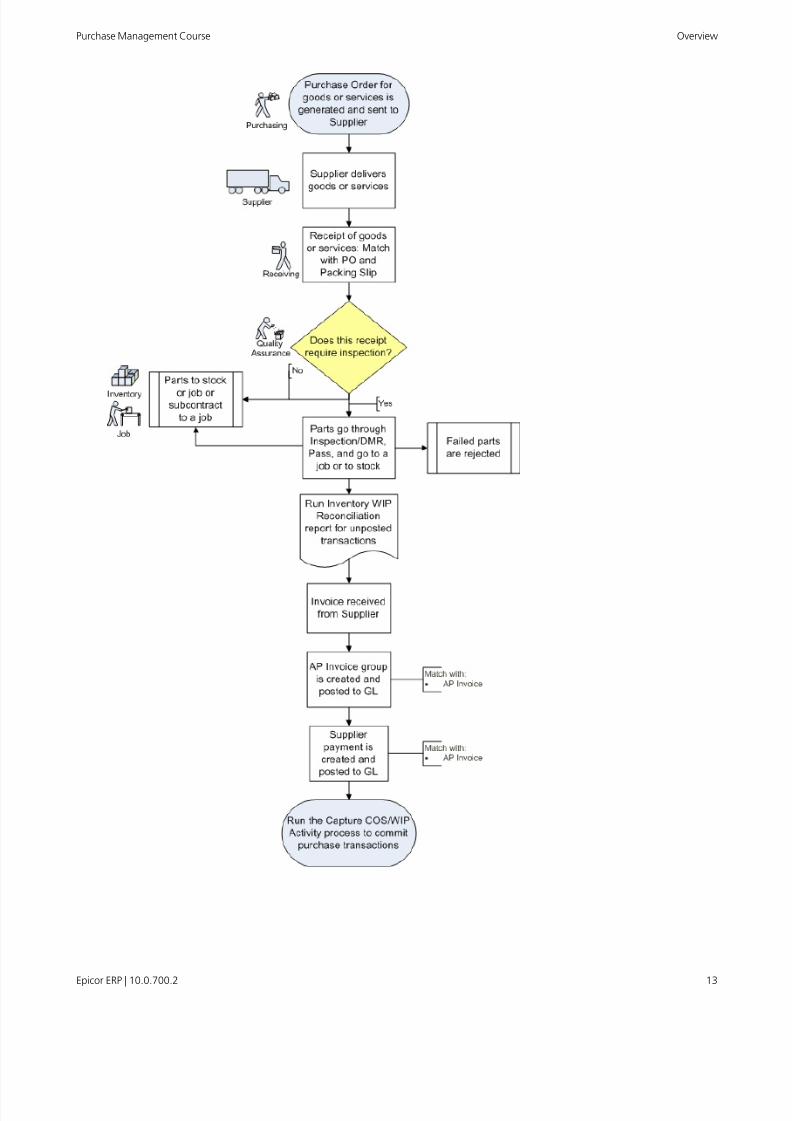
Purchase Management Process Flow
Purchase Management provides a dynamic interface for the communication of purchasing information bothinternally and to and from suppliers. The following diagram illustrates the Purchase Management process flow,beginning with the generation of a purchase order, and ending with the commitment of purchasing transactions.
Epicor ERP | 10.0.700.212
Purchase Management CourseOverview
8/9/2019 Epicor ERP Purchase Management Course 10.0.700.2
http://slidepdf.com/reader/full/epicor-erp-purchase-management-course-1007002 13/105
13Epicor ERP | 10.0.700.2
OverviewPurchase Management Course
8/9/2019 Epicor ERP Purchase Management Course 10.0.700.2
http://slidepdf.com/reader/full/epicor-erp-purchase-management-course-1007002 14/105
Application Setup
This section reviews Company Configuration and maintenance programs for Purchase Management.
Company Configuration
Company Configuration defines options for companies in the Epicor application. Use these options to customizethe application to best fit each company within your organization. This section reviews configurations and tablesspecific to the Purchase Management module.
Modules
Use the Modules sheets to define the default settings for the company.
Purchase
Use the Modules > Materials > Purchase sheet to define the default purchasing options for the PurchaseManagement module.
• System Setup > Company/Site Maintenance > Company Configuration
Maintenance Programs
This section of the course reviews the most significant maintenance programs applicable to the purchasing
process. In many cases, not all fields in a program are discussed. If you are interested in learning more about aspecific program, refer to the Application Help.
User Account Security Maintenance
Use User Account Security Maintenance to enter basic information, security access, and application privilegesfor users. Anyone who accesses the Epicor application must be set up in this program.
Users must have a defined user ID, name, and password. In this program, you can also define addresses, phonenumbers, and other company information.
Users are commonly created by the Epicor application implementation team. The System Administrator grantssecurity permissions based on the user's role in the company.
Menu Path
Navigate to this program from the Main Menu:
• ICE External > Security > User Security
• System Setup > Security Maintenance > User Account Security Maintenance
Important This program is not available in the Epicor Web Access.
Epicor ERP | 10.0.700.214
Purchase Management CourseApplication Setup
8/9/2019 Epicor ERP Purchase Management Course 10.0.700.2
http://slidepdf.com/reader/full/epicor-erp-purchase-management-course-1007002 15/105
Workshop - Create New User
During implementation, Dalton Manufacturing must create user records for use in their new Epicor application.The user created in this workshop will also be set up as a buyer and used throughout this course. You will alsoreview and change settings for an existing user that will be assigned as an approval person and authorized userto your new buyer record.
To complete this workshop, login to the Epicor application using the Classic Style menu structure.
1. Launch the Epicor Application.
2. Enter the User Name and Password.
3. Select the Classic Style check box and press Enter.
Log On as Administrator
In order to create a new user, you must be logged into the Epicor application with the appropriate administrativerights. In this workshop, perform the steps to log in as the System Administrator to create a new user.
1. On the Epicor application Main Menu, from the Options menu, select Change User.The Log on window displays.
2. In the User name field, enter epicor.
3. In the Password field, enter epicor.
4. Click OK.
Important Before moving to the next step in the workshop, ensure you are in the Epicor Educationcompany, and in the Main site.
Add User
Navigate to User Account Security Maintenance.
Menu Path: System Setup > Security Maintenance > User Account Security Maintenance
Important This program is not available in the Epicor Web Access.
1. From the New menu, select New User.
2. In the User ID field, enter XXX (where XXX are your initials).
3. In the Name field, enter your full name.
4. Accept the defaults for all remaining fields.
5. Click Save.
6. To the Security Settings message, click OK.
15Epicor ERP | 10.0.700.2
Application SetupPurchase Management Course
8/9/2019 Epicor ERP Purchase Management Course 10.0.700.2
http://slidepdf.com/reader/full/epicor-erp-purchase-management-course-1007002 16/105
User Company
1. From the New menu, select New Company.
The Company > Detail sheet displays.
2. In the Company field, select Epicor Education.
3. In the Available Sites pane, select Main.
4. Click the right arrow button to move the selected site to the Authorized Sites pane.
5. Navigate to the Detail sheet.
6. Clear the Account Disabled check box.
7. Select the Expire Password check box.
8. In the Password Expires Days field, enter 90.
9. Click Save.
User Security
1. Navigate to the Options sheet.
2. Select the Security Manager check box.
Selecting this field ensures access to all programs for course workshops.
3. Click Save and remain in User Account Maintenance.
Review Existing User
Howard Low will be added as an approval person and authorized user for your new buyer record. Verify that hisuser record contains the proper company and site settings.
1. Navigate to the Detail sheet.
2. In the User ID field, enter HLOW.
3. From the New menu, select New Company.
The Company > Detail sheet displays.
4. In the Company field, select Epicor Education.
5. In the Available Sites pane, select Main.
6. Click the right arrow button to move the selected site to the Authorized Sites pane.
7. Click Save.
Epicor ERP | 10.0.700.216
Purchase Management CourseApplication Setup
8/9/2019 Epicor ERP Purchase Management Course 10.0.700.2
http://slidepdf.com/reader/full/epicor-erp-purchase-management-course-1007002 17/105
Log On
Once the user has been established, the account needs to be activated. In this task set, log in as the new user toactivate the account.
1. On the Main Menu, from the Options menu, select Change User.The Log on window displays.
2. In the User name field, enter XXX (where XXX are your initials) and click OK.
3. In the Password Expired window, click Yes.
4. Leave the Current password field blank.
5. In the New password and Confirm new password fields, enter epicor.
6. Click OK.
You are logged in as the new user.
17Epicor ERP | 10.0.700.2
Application SetupPurchase Management Course
8/9/2019 Epicor ERP Purchase Management Course 10.0.700.2
http://slidepdf.com/reader/full/epicor-erp-purchase-management-course-1007002 18/105
Buyer Maintenance
Use Buyer Maintenance to create records for buyers responsible for your company's purchasing activities.
A buyer must first be defined as a system user and then added as an authorized user for the Buyer ID.
Buyers are specified in the purchase orders you create.
Buyer Maintenance is a key setup program, as you use it specify approved purchase amount limits for each buyer.If you use consolidated purchasing, you will also need to create identical buyer records within all of the companiesthat use the consolidated PO process.
The Buyer ID is used as a search or filter field for PO Suggestions and Part Class purchasing.
Menu Path
Navigate to this program from the Main Menu:
• Material Management > Purchase Contracts Management > Setup > Buyer
• Material Management > Purchase Management > Setup > Buyer
• Material Management > Supplier Relationship Management > Setup > Buyer
Epicor ERP | 10.0.700.218
Purchase Management CourseApplication Setup
8/9/2019 Epicor ERP Purchase Management Course 10.0.700.2
http://slidepdf.com/reader/full/epicor-erp-purchase-management-course-1007002 19/105
Workshop - Create Buyer
Dalton Manufacturing has a large buyer's group, and as such, must create user records and then assign them asauthorized users to buyer records. In this workshop, set up the user created in the previous workshop as a buyerwith a purchase order limit. Howard Low will approve purchase orders above the PO limit. Make the new buyeran authorized user for Brian Howard.
Navigate to Buyer Maintenance.
Menu Path: Material Management > Purchase Management > Setup > Buyer
Add Buyer
1. From the New menu, select New Buyer.
2. In the Buyer field, enter XXX (where XXX are your initials).
3. In the Name field, enter your full name.
4. In the PO Limit field, enter 125,000.
5. In the Approval Person field, select Howard Low.
6. Click Save.
Authorize Users
1. From the New menu, select New Authorized User.
2. On the Authorized Users sheet, in the User field, select your name.
3. Select the Default Buyer check box and press Enter.A new Authorized User line displays.
4. In the User field, select Howard Low and press Enter.
A new Authorized User line displays.
5. In the User field, select System Manager.
6. Click Save.
Adjust Authorized User List
In this task, add yourself as an authorized user to Brian Howard's account. This action provides the security rightsto make purchases on behalf of Brian, due to an absence or other such event where this would be necessary.
1. Click Clear.
2. If the Clear Confirmation window displays, click Yes.
3. In the Buyer field, search for and select Brian Howard.
4. From the New menu, select New Authorized User.
19Epicor ERP | 10.0.700.2
Application SetupPurchase Management Course

8/9/2019 Epicor ERP Purchase Management Course 10.0.700.2
http://slidepdf.com/reader/full/epicor-erp-purchase-management-course-1007002 20/105
5. In the User field, select your user name created in the previous workshop.
6. Click Save and exit Buyer Maintenance.
Part Maintenance
Use Part Maintenance to enter or update part information. Parts can be either purchased items used for rawmaterials or subassemblies or manufactured items used to fill sales orders.
Part Maintenance Sheets
• Detail Sheet
Use the Part > Detail sheet to set up new part master records and to modify the main details of existing partmaster records.
Non-Stock - The Non-Stock item determines how requirements for a part are satisfied:
• A manufactured part marked as Non-Stock is not normally stocked; therefore, all requirements are satisfiedby jobs. If the requirement is from a sales order, that order is linked to a job which satisfies demand. If therequirement is from another part, the demand is satisfied by creating a sub-assembly level on the same
job.
• A manufactured part marked as Stock indicates that all requirements will be satisfied from inventory andcreate allocations to pull the material on its need date. Requirements include any minimum, maximum,or safety stock levels, as well as requirements from sales orders or other jobs.
• A purchased part marked as Non-Stock is not normally stocked; therefore, all requirements are satisfiedby purchase orders linked to the job which created the requirement. This creates a purchasing suggestionfor the part.
• A purchased part marked as Stock indicates that all requirements are satisfied from inventory and createallocations to pull the material on its need date. Requirements include any minimum, maximum, and safetystock levels as well as requirements from sales orders or jobs.
• A sales kit marked as Non-Stock is not normally stocked; therefore, all requirements are satisfied by jobs.
If the requirement is from a sales order, that order is linked to a job which satisfies the demand.• A sales kit marked as Stock indicates that all requirements are satisfied from inventory and create allocations
to pull the sales kit on its need date. Requirements will include any minimum, maximum, and/or safetystock levels as well as requirements from sales orders or other jobs.
• Sites Sheet
Use the Part > Sites sheet to specify site information about the part. This information includes the name ofthe site and associated primary warehouse, ordering information, transfer information, manufacturinginformation, and purchasing information.
Reporting
• Comments Sheet
Use the Reporting > Comments sheets to enter manufacturing and purchasing comments that are associatedwith a part. If you have standard comments that never change (or change only slightly), you only need toenter them once in the part master file. They displays for specific jobs, quotes, sales orders, or purchase orders,and can be changed at that time.
• RoHS (Restriction of Hazardous Substances) Sheet
Each part is defined by a Substance Restriction Type and has indicators as to whether the part is compliant.For each substance, you can enter the percentage of the substance weight. The Compliance Status displaysas Not Applicable, Non Compliant, Compliant, or Exempt. You must enter an exempt date for substances
Epicor ERP | 10.0.700.220
Purchase Management CourseApplication Setup
8/9/2019 Epicor ERP Purchase Management Course 10.0.700.2
http://slidepdf.com/reader/full/epicor-erp-purchase-management-course-1007002 21/105
that are exempt for a part. After this date, the substance can be declared as exempt again for a certain periodor as restricted. You can also enter an exempt certificate identifier.
• Country of Origin Detail Sheet
Use the Reporting > Country of Origin > Detail sheet to designate the countries of origin for this part.This denotes the specific countries in which the item was manufactured, produced or grown, and the percentagemakeup based on quantity or value of the raw materials
Menu Path
Navigate to this program from the Main Menu:
• Material Management > Inventory Management > Setup > Part
• Material Management > Purchase Contracts Management > Setup > Part
• Material Management > Purchase Management > Setup > Part
• Material Management > Supplier Relationship Management > Setup > Part
• Production Management > Engineering > Setup > Part
• Production Management > Job Management > Setup > Part
• Production Management > Material Requirements Planning > Setup > Part
• Production Management > Quality Assurance > Setup > Part
• Sales Management > Configurator Management > Setup > Part
• Sales Management > Demand Management > Setup > Part
• Sales Management > Order Management > Setup > Part
• Service Management > Field Service > Setup > Part
For CRM users, the Main Menu appears as:
• Customer Relationship Management > Configurator Management > Setup > Part
• Customer Relationship Management > Order Management > Setup > Part
Part Class Maintenance
Use Part Class Maintenance to establish part classes for inventory parts. Part classes are not required in theEpicor application; but use them when it is important to classify inventory materials for reporting purposes. Partclasses are assigned to each part in Part Maintenance.
Example If you have three distinct types of raw materials, establish three part classes to review the stockstatus and other inventory reports for the different types.
Menu Path
Navigate to this program from the Main Menu:
• Material Management > Inventory Management > Setup > Part Class
• Material Management > Purchase Management > Setup > Part Class
• Production Management > Engineering > Setup > Part Class
• Production Management > Job Management > Setup > Part Class
• Production Management > Material Requirements Planning > Setup > Part Class
• Production Management > Quality Assurance > Setup > Part Class
• Sales Management > Configurator Management > Setup > Part Class
• Sales Management > Order Management > Setup > Part Class
21Epicor ERP | 10.0.700.2
Application SetupPurchase Management Course

8/9/2019 Epicor ERP Purchase Management Course 10.0.700.2
http://slidepdf.com/reader/full/epicor-erp-purchase-management-course-1007002 22/105
For CRM users, the Main Menu appears as:
• Customer Relationship Management > Configurator Management > Setup > Part Class
• Customer Relationship Management > Order Management > Setup > Part Class
Workshop - Assign Buyer to Part Class
This workshop demonstrates how to assign the buyer to a certain part class. This indicates the responsibility ofthis part class and the ability to view purchase order suggestions.
Navigate to Part Class Maintenance.
Menu Path: Material Management > Purchase Management > Setup > Part Class
1. In the Part Class field, search for and select the Steel part class.
2. In the Buyer field, select your name.
3. Accept all other defaults.
4. Click Save and exit Part Class Maintenance.
Supplier Maintenance
Use Supplier Maintenance to create supplier records. Suppliers are businesses from whom you purchase productsand services. Supplier records are used in several programs and are crucial for creating purchase orders andAccounts Payable (AP) invoices.
A supplier record must first be on file in the Epicor ERP application before that supplier is available on a purchaseorder, or as an approved supplier specific to a part, part class, or customer record.
Supplier records define several options which activate functionality you use throughout the Epicor application.Use this program to define how taxes are levied and payments are made against purchases through each supplier.
If you buy parts from multiple locations from a supplier, you can define each purchase point within supplierrecords. Users can then select these purchase points on purchase orders and other records. Supplier records alsocontain information on shipping manifests, so you can indicate how this organization ships part quantities toyour company.
Supplier records are needed for various multi-company processes. A supplier record can be defined as a globalrecord within a parent company, and then child companies within your organization can link to this record. Aschanges are made to a global supplier record, these changes automatically update within the linked child records.Supplier records can then be used for central payments, inter-company trading, and consolidated purchasing. Ifyour organization has the Multi-Site license, you can leverage this functionality.
Note Once a supplier record is created, use the Supplier Search window to search for and select a specificsupplier record. The search results can be sorted by Country, ID, Name, or Tax ID Num. The Tax ID Numis important in some countries as businesses identify vendors through their Tax ID number.
Menu Path
Navigate to this program from the Main Menu:
• Financial Management > Accounts Payable > Setup > Supplier
• Financial Management > Multi-Site > Setup > Supplier
• Material Management > Inventory Management > Setup > Supplier
• Material Management > Purchase Contracts Management > Setup > Supplier
Epicor ERP | 10.0.700.222
Purchase Management CourseApplication Setup
8/9/2019 Epicor ERP Purchase Management Course 10.0.700.2
http://slidepdf.com/reader/full/epicor-erp-purchase-management-course-1007002 23/105
• Material Management > Purchase Management > Setup > Supplier
• Material Management > Supplier Relationship Management > Setup > Supplier
• Production Management > Job Management > Setup > Supplier
• Production Management > Quality Assurance > Setup > Supplier
• Service Management > Expense Management > Setup > Supplier
• Service Management > Time Management > Setup > Supplier
Supplier DetailSupplier Maintenance > Supplier Detail
Use the Supplier > Detail sheet to establish the Supplier ID, name, and other high level information for thesupplier.
Purchase PointsSupplier Maintenance > Purchase Points
Purchase Points are locations from which the supplier ships material or provides services for your company. Usethe Purchase Points sheet to add, define, format, and maintain alternate addresses for the supplier as well asspecific contacts and manifest information for the other addresses. To review the main remit-to address for aSupplier, use the Supplier > Address sheet.
DetailSupplier Maintenance > Contacts > Detail
Use the Contacts > Detail sheet to add, edit, and delete supplier contacts for the supplier’s main location andthe supplier's purchase points. You can add as many contacts as you need for the supplier’s main location aswell as the supplier’s alternate locations.
When you enter contacts for a purchase point, these contacts are linked directly to the purchase point. Thislocation is displayed on the contact’s record within the purchase point field.
Banks
Use the Banks > Detail sheet to define the pay-to location for the supplier. Once set up, the bank account forthis supplier is available within AP Payment Entry. Payments for this supplier are sent to the defined location.
If the supplier uses multiple accounts at the same bank, enter a separate bank record for each account.
Each supplier can be paid electronically. To activate the electronic payment functionality, add a bank to thecurrent supplier record and then select the Electronic Payments check box on the Supplier > Detail sheet.
AttributesSupplier Maintenance > Attributes
Use the Attributes sheet to select attributes that apply to this supplier or this supplier contact.
The examples of attributes are:
• ISO9200 Certified
• UL Approved
Attributes are used by the Decision Wizard in the Buyer Workbench.
23Epicor ERP | 10.0.700.2
Application SetupPurchase Management Course
8/9/2019 Epicor ERP Purchase Management Course 10.0.700.2
http://slidepdf.com/reader/full/epicor-erp-purchase-management-course-1007002 24/105
Supplier Ratings
Use the Supplier Relationship Management (SRM) sheet in Supplier Maintenance to establish ratingsinformation for a supplier. This information assists in the decision to purchase goods or services from this supplier.
For more information, review the help topics for the Supplier Relationship Management module. This sheet linksfunctionality from the SRM module to your supplier records.
Workshop - Add Supplier
Dalton Manufacturing does business with suppliers worldwide. In this workshop, create a new supplier withpurchase points and supplier approval information.
Navigate to Supplier Maintenance.
Menu Path: Material Management > Purchase Management > Setup > Supplier
Add a Supplier
1.From the
New menu, select
New Supplier.
2. In the Supplier field, enter XXX (where XXX are your initials).
3. In the Name field, enter XXX Company (where XXX are your initials).
4. In the Group field, select Miscellaneous Supply.
Groups are used as a filter for various reports.
5. In the Terms field, select 2/10 Net 30.
6. In the FOB field, select Factory.
Free-on-Board (FOB) is the point at which the legal title for transported goods passes from one company toanother.
7. Click Save.
Enter the Supplier's Address
1. Navigate to the Supplier > Address sheet.
2. Enter the following information:
DataField
<your address>Address
MinneapolisCity
MNState/Prov
55555Postal Code
USACountry
888-555-1234Phone
Epicor ERP | 10.0.700.224
Purchase Management CourseApplication Setup
8/9/2019 Epicor ERP Purchase Management Course 10.0.700.2
http://slidepdf.com/reader/full/epicor-erp-purchase-management-course-1007002 25/105
3. Click Save.
Enter a New Purchase Point
1. From the New menu, select New Purchase Point.
The Purchase Points > Detail sheet displays.
2. In the Purchase Point field, enter 001.
3. Select the Primary Purchase Point check box.
4. Enter the following information:
DataField
<your address>Address
MinneapolisCity
MNState/Prov
55555Postal Code
USACountry
5. Accept all other defaults.
6. Click Save.
Enter the Purchase Point Contact
1. From the New menu, select New PP Contact.
The Purchase Points > Contacts > Detail sheet displays.
2. In the Name field, enter a friend's full name.
3. In the Role field, select Vice President.
4. Select the Primary Contact check box.
5. Click Save.
Approve the SupplierThe supplier needs to be approved for all parts, part classes, and subcontract operations. You have the ability tolimit what the supplier is approved to provide, so reviewing the different levels of supplier approvals is necessary.
1. From the Actions menu, select Approved Suppliers.
The Approved Supplier Maintenance window displays.
2. From the New menu, select New Approved Supplier.
25Epicor ERP | 10.0.700.2
Application SetupPurchase Management Course
8/9/2019 Epicor ERP Purchase Management Course 10.0.700.2
http://slidepdf.com/reader/full/epicor-erp-purchase-management-course-1007002 26/105
3. In the Type field, review the supplier approval attributes.
• Part - Supplier is approved for this part.
• Operation - Supplier is approved for this operation.
• Class - Supplier is approved for this part class.
• Customer - Supplier is approved for any part or operation linked to this customer.
4. In the Part Number field, enter SS-125 and press Tab.
5. Click Save.
6. Exit Approved Supplier Maintenance.
7. Navigate to the Supplier > Detail sheet and verify the Approved check box is selected.
8. Click Save and exit Supplier Maintenance.
Epicor ERP | 10.0.700.226
Purchase Management CourseApplication Setup
8/9/2019 Epicor ERP Purchase Management Course 10.0.700.2
http://slidepdf.com/reader/full/epicor-erp-purchase-management-course-1007002 27/105
Supplier Ratings and Attributes
This section covers how to assign ratings and attributes to a supplier using the Supplier Maintenance > SRMand Attributes sheets. The workshops guide you through these processes.
Workshop - Assign Ratings to a Supplier
This workshop demonstrates how to assign ratings to a supplier record.
Navigate to Supplier Maintenance.
Menu Path: Material Management > Purchase Management > Setup > Supplier
Important Assigned ratings for suppliers can be changed, however, only one set of assigned ratings canbe established for each supplier.
1. In the Supplier field, search for and select A-Z Metals.
2. Navigate to the SRM sheet.
3. Assign the following ratings:
DataField
A2On Time Rating
A2Price Rating
B1Quality Rating
B1Service Rating
These ratings indicate that the supplier does not have the best on time rating or price rating, which are themost important parameters to the buyer. Their quality and service carry the best ratings.
4. Click Save.
5. Remain in Supplier Maintenance.
Workshop - Assign Attributes to a Supplier
This workshop demonstrates how to assign attributes to a supplier record.
1. Navigate to the Attributes sheet.
2. In the Available Attributes pane, using the Ctrl key, select ISO Certified and UL Approved.
3. Click the right arrow button to move the selected attributes to the Selected Attributes pane.
4. Click Save.
5. Exit Supplier Maintenance.
27Epicor ERP | 10.0.700.2
Application SetupPurchase Management Course

8/9/2019 Epicor ERP Purchase Management Course 10.0.700.2
http://slidepdf.com/reader/full/epicor-erp-purchase-management-course-1007002 28/105
Supplier Price List Maintenance
Use Supplier Price List to set up different price lists for a specific part either from one supplier or from a groupof suppliers who all could potentially supply the part. This function is valuable if you want to buy the sameproducts from suppliers with different price lists. Such lists can account for different currencies, different situations(for example - promotional, retail, and so forth), or seasons.
Purchasing suggestions use this price list to suggest a price for a part. If a primary supplier has been specified inthe part file, purchasing suggestions will suggest the purchase be made from this supplier, and the price fromthe price list table will default into the purchase order (PO).
When a manual PO is entered into Purchase Order Entry, and the supplier, part, and quantity are identified, theprice from the price list defaults into the PO Price field.
Supplier Price List Maintenance Sheets
Below is a description of the Supplier Price List Maintenance sheets. For a description of all fields, review theApplication Help.
Parts > Detail
Use the Parts > Detail sheet to enter supplier pricing details for your internal part numbers.
Parts > Price Breaks
Use the Parts > Price Breaks sheet to establish price break information for the specified supplier and the internalpart number entered in the Parts > Detail sheet. These represent changes to the base price specified for thepart in the Parts > Detail sheet, based on the quantity or volume purchased.
Parts > Supplier Parts
Use the Parts > Supplier Parts sheet to identify the qualified manufacturer's part numbers associated with anapproved supplier part number. Single or multiple qualified manufacturers' part numbers can be associated witha specified supplier part number. This creates a link between your internal part number, the approved supplierpart source, and the qualified manufacturer's part numbers.
Parts > RoHS > Restrictions
Use the Parts > RoHS > Restrictions sheet to enter supplier pricing information that relates to RoHS restrictiontypes.
Parts > RoHS > Substances
Use the Parts > RoHS > Substances sheet to enter supplier pricing information related to RoHS substances.
Parts > Comments
Use the Parts > Comments sheet to enter purchasing comments for the internal part number and supplierspecified in the Parts > Detail sheet. Comments entered in this sheet display in programs that display pricebreaks.
Subcontract Operations > Detail
Use the Subcontract Operations > Detail sheet to enter supplier pricing details for subcontract operations.
Note The Subcontract Operations sheets contain most of the same fields as the Parts sheets.
Epicor ERP | 10.0.700.228
Purchase Management CourseApplication Setup
8/9/2019 Epicor ERP Purchase Management Course 10.0.700.2
http://slidepdf.com/reader/full/epicor-erp-purchase-management-course-1007002 29/105
Subcontract Operations > Price Breaks
Use the Subcontract Operations > Price Breaks sheet to establish price break information for the specifiedsupplier and the internal part and subcontract operation specified in the Subcontract Operations > Detailsheet. These represent changes to the base price specified for the part in the Subcontract Operations > Detailsheet, based on quantity or volume purchases.
Subcontract Operations > RoHS > Restrictions
Use the Subcontract Operations > RoHS > Restrictions sheet to enter supplier pricing information related toRoHS restrictions for the subcontract operation specified in the Subcontract Operations > Detail sheet.
Subcontract Operations > RoHS > Substances
Use the Subcontract Operations > RoHS > Substances sheet to enter supplier pricing information related toRoHS substances for the subcontract operation specified in the Subcontract Operations > Detail sheet.
Subcontract Operations > Comments
Use the Subcontract Operations > Comments sheet to enter purchasing comments for the internal partnumber, subcontract operation, and supplier specified in the Subcontract Operations > Detail sheet. Commentsyou enter in this sheet display in programs that display price breaks.
Menu Path
Navigate to this program from the Main Menu:
• Material Management > Purchase Management > Setup > Supplier Price List
Workshop - Add a Supplier Price List and Create Price Breaks
Dalton Manufacturing submitted a request for quote (RFQ) to one of their suppliers for a diamond tip insert (partnumber DIAMOND 8907). The supplier returned a price list that is active for 90 days and provides minimumquantities and discounts. In this workshop, create a supplier price list with price breaks using an existing part and
an existing supplier.Navigate to the Supplier Price List.
Menu Path: Material Management > Purchase Management > Setup > Supplier Price List
Select a Supplier and Part
1. In the Supplier field, search for and select a supplier.
2. From the New menu, select New Part.
3. In the Part field, search for and select DIAMOND 8907.
4. In the Supplier UOM field, accept the default of EA.
5. In the Effective field, accept the default of today's date.
6. In the Expires field, enter the date 90 days from today.
The Days field returns a value based on the dates you enter.
7. In the Base Unit Price field, enter 50.00.
29Epicor ERP | 10.0.700.2
Application SetupPurchase Management Course
8/9/2019 Epicor ERP Purchase Management Course 10.0.700.2
http://slidepdf.com/reader/full/epicor-erp-purchase-management-course-1007002 30/105
8. In the Price Per field, accept the default of /1.
This indicates the part is stocked and purchased in the same unit of measure.
9. In the Price Break Modifier field, select Percent of Base.
10. Select the Primary Supplier check box.
11. Click Save.
Add Price Breaks
1. From the New menu, select New Price Break.
2. Navigate to the Parts > Price Breaks > Detail sheet.
3. Enter the following information:
DataField
25Minimum Qty
2.5Price Modifier
4. Click Save.
5. From the New menu, select New Price Break.
6. Enter the following information:
DataField
40Minimum Qty3.0Price Modifier
7. Click Save.
8. From the New menu, select New Price Break.
9. Enter the following information:
DataField
60Minimum Qty
3.5Price Modifier
10. Click Save and exit Supplier Price List.
Epicor ERP | 10.0.700.230
Purchase Management CourseApplication Setup
8/9/2019 Epicor ERP Purchase Management Course 10.0.700.2
http://slidepdf.com/reader/full/epicor-erp-purchase-management-course-1007002 31/105
Workshop - Create a Purchase Order Using the Supplier Price List
One month later you need to purchase 40 units of the DIAMOND 8907 part. Now that you have created a supplierprice list, you can use it to order the item.
Note Purchase Order Entry and the Purchase Advisor are covered in the Daily Purchase Processingsection of this course. However, in this workshop, you will create a simple purchase order using the price
list you created in the previous workshop. This helps illustrate the relationship between supplier price listscreated for a given supplier, part and time period, and how the Epicor application processes item pricingwhen you add a purchase order for the same supplier and part in that period of time.
Navigate to Purchase Order Entry.
Menu Path: Material Management > Purchase Management > General Operations > Purchase Order Entry
Create a Purchase Order - Part 1
1. From the New menu, select New PO.
2. In the Buyer field, accept your name.
3. In the Supplier field, search for and select the supplier chosen in the previous workshop.
4. From the New menu, select New Line.
5. Navigate to the Lines > Detail sheet.
6. In the Part/Rev field, enter DIAMOND 8907 and press Tab.
7. In the Our Qty field, enter 40 and press Tab.
8. Click the Price Breaks button.
The Supplier Price List displays.
9. Navigate to the Parts > Price Breaks > List sheet, and notice the effective price for a quantity of 40 is48.50.
10. Exit Supplier Price List, and remain in Purchase Order Entry.
Create a Purchase Order - Part 2
1. Click the Purchase Advisor button.
2. In the tree view, select Do I have a supplier price list? Yes.
3. View the results, and close the Purchase Advisor.
4. Click Save.
5. Navigate to the Summary sheet.
6. Select the Unapproved check box.
The green Approved indicator displays.
31Epicor ERP | 10.0.700.2
Application SetupPurchase Management Course

8/9/2019 Epicor ERP Purchase Management Course 10.0.700.2
http://slidepdf.com/reader/full/epicor-erp-purchase-management-course-1007002 32/105
7. From the Actions menu, select Print.
8. Click Print Preview.
9. Review the purchase order, close all windows, and exit Purchase Order Entry.
Miscellaneous Charge/Credit Maintenance
Use Purchasing Miscellaneous Charge/Credit Maintenance to define charges or credits that apply to purchaseorders. Select the general ledger controls that define the accounts to which the credits or charges post. Examplesinclude freight charges and expediting fees.
Important These miscellaneous charges are not the same charges you set up in the Order Managementor Accounts Receivable modules. You pay these charges to suppliers. Your customers pay the miscellaneouscharges set up in the Order Management and Accounts Receivable modules.
Menu Path
Navigate to this program from the Main Menu:
• Financial Management > Accounts Payable > Setup > Miscellaneous Charge/Credit
• Material Management > Purchase Management > Setup > Miscellaneous Charge/Credit
• Service Management > Expense Management > Setup > Miscellaneous Charge/Credit
Site Maintenance
Use Site Maintenance to add and update sites available in the current company to define segment securitycodes.
You enter the primary information for each site through this program. Items you define include planning parameterssuch as Production Preparation Time, Rough Cut Horizon, and the Production Calendar. You can also
define the cost set, which determines the costing method used for the parts manufactured at the site. Lastly,define the transfer order parameters the site follows when fulfilling internal sales orders.
When a company is created in the Epicor application, one site record is created automatically by default. This siterecord is the default site selected for each part you create within Part Maintenance for the current company.
To add more than one site record through this program, you must license the Multi-Site module. You can thenset up as many sites as you need for each company within your organization.
You define the primary values for each site within Site Maintenance. Launch Site Configuration Control to setup how each site interacts with other modules. Use this system management program to pull in the site recordsyou create in Site Maintenance. You can then define the module parameters you need for each site record.
Menu Paths
Navigate to this program from the Main Menu:
• Financial Management > Multi-Site > Setup > Site Maintenance
• Material Management > Inventory Management > Setup > Site Maintenance
• Production Management > Job Management > Setup > Site Maintenance
Epicor ERP | 10.0.700.232
Purchase Management CourseApplication Setup
8/9/2019 Epicor ERP Purchase Management Course 10.0.700.2
http://slidepdf.com/reader/full/epicor-erp-purchase-management-course-1007002 33/105
Site Configuration Control
Use Site Configuration Control to define how each site interacts with various functions in the Epicor applicationsuch as the Inventory Management, Production Management, Shipping/Receiving, Time Management, andExpense Management modules.
You first create site records through Site Maintenance. You can then open each record within Site Configuration
Control to define parameters for several application functions.
Important Before you can open a site record in Site Configuration Control, you may need to have yourSystem Administrator give you security rights to that site in your user account.
• Within Inventory Management, you define the warehouses the site uses for shipping, receiving, DMRProcessing, and so on. You also indicate which warehouses are shared with other warehouses. You also definetransfer orders by setting up the definitions for transferring part quantities and the resources involved intransfer orders. Lastly, you define the serial tracking and cycling counting used for parts manufactured througheach site.
• The Production Management settings involve defining the prefixes used on unfirm, firm, and kanban jobsat the site. You can also define some production yield parameters.
•For the Shipping/Receiving functionality, you enter the various manifests this site uses for general,international, FedEx, and UPS shipping. You also define how shipment billing is handled by the current site.
• You use the Advanced Material Management (AMM) settings to specify default parameters for fulfillmentallocation processing, and to indicate how the site interacts with the Material Request Queue and otherAMM functionality.
• The Time and Expense settings determine whether labor hours and/or incurred expenses entered by employeesrequire approval by other authorized employees. If approval is required, you also define approver rights tochange or delete transactions, the methods used to approve time entries and expense entries, and the defaultworkflow groups to use for time entries and expense entries when they are unspecified for employees.
Menu Path
Navigate to this program from the Main Menu:
• System Setup > Company/Site Maintenance > Site Configuration
Important This program is not available in the Epicor Web Access.
33Epicor ERP | 10.0.700.2
Application SetupPurchase Management Course
8/9/2019 Epicor ERP Purchase Management Course 10.0.700.2
http://slidepdf.com/reader/full/epicor-erp-purchase-management-course-1007002 34/105
Daily Purchase Processing
The purchasing process begins with a request to buy from sources such as the job, a Time Phase Material POSuggestion, or an internal requisition. Purchase orders are then issued for job materials, inventory items, a
subcontract operation on a job, and for non-job related miscellaneous materials.This section reviews the day-to-day processes that occur in Purchase Management and demonstrates:
• The process flow for each of the Buy For options.
• The creation, approval, and duplication of purchase orders.
• The generation and processing of purchase order suggestions.
• The various ways to receive purchase orders.
Purchase Orders
Use Purchase Order Entry to create and print new purchase orders and make changes to existing orders.
You can create purchase orders (POs) for job material, inventory, subcontract operation, or materials classifiedas other. You can also create POs that are not linked to inventory. Leverage this functionality to create POs thattrack purchasing costs that are not tied to inventory quantities.
Although you can use purchasing suggestions in the application to create purchase orders, this section beginsby using the standard purchase order entry process to create POs. This is beneficial to understanding theapplication's logic and flow and providing insight into the additional fields and features. Purchasing suggestionsare investigated later in the course.
Purchase orders are defined as different types. When creating a new purchase order, indicate its type on eitherthe Summary or the Header > Detail sheet.
Available PO types include:
• Standard - Use this type to identify a regular purchase order you create to buy company materials.
• Customer Managed - Use this type to identify purchase orders you create for inventory quantities you storefor a customer.
• Supplier Managed - Use this type to identify a purchase order you create for inventory quantities you storefor a supplier.
Header > Detail
Use the Header > Detail sheet to enter general order information when creating or changing an order. Thissheet includes supplier, purchase order date, and payment term details.
Lines > Detail
Use the Lines > Detail sheet to enter purchase order line information when creating or changing an order.Purchase order lines describe the part, quantity, and price for each item ordered.
The Buy For section has four options:
• Select Inventory if the purchase is for inventory. Only parts that are in the Part Master can be purchased forInventory. Also, only parts marked as Qty Bearing can be purchased for Inventory.
Epicor ERP | 10.0.700.234
Purchase Management CourseDaily Purchase Processing
8/9/2019 Epicor ERP Purchase Management Course 10.0.700.2
http://slidepdf.com/reader/full/epicor-erp-purchase-management-course-1007002 35/105
• Select Other if the purchase is for miscellaneous use. If you selected a part that is set up as non-quantitybearing in the part master, this option is automatically selected. You cannot change the status to Job Materialor Inventory. Parts with Qty Bearing checked cannot be purchased for Other.
• Select Job Material if this purchase is to fulfill a specific job material requirement.
• Select Subcontract Operation if this purchase is to fulfill a specific job subcontract requirement.
Releases > Detail
Use the Releases > Detail sheet to enter purchase order line release information when creating or changing toan order. Purchase order line releases provide the detailed receipt information about each purchase order line.
Use Tax
A Use Tax calculation is included as a part of the Avalara sales tax integration. This additional tax is automaticallygenerated whenever sales taxes are calculated through the Avalara® third-party application.
A Use Tax is a type of excise taxation that exists in the United States. It is assessed due to a purchase of a productby a resident of the state issuing the tax. In most cases, this occurs when a product is purchased by a companyfrom a supplier that is located in a different state and that state charges Use Tax. This tax is strictly to accountfor usage, storage or consumption of the goods in that state (not for resale), regardless of where the purchase
took place.
This typically occurs when the consumer (buyer) of the products and services did not have a sales tax included inthe purchase transaction by the seller (supplier) on what should have been a taxable purchase. Once this isassessed, the buyer accrues the liability of the amount of consumer use tax assessed and in turn has to reportand remit the tax to the state and/or local taxing jurisdictions.
Existing functionality within the Epicor application is enhanced to handle Use Tax. On supplier records, the TaxLiability value determines whether the supplier needs to be included within the Use Tax calculation. On purchaseorders, the Tax Category value can indicate whether a purchased part is eligible for a Use Tax.
The tax engine can then leverage these values to automatically generate the use tax value required for thepurchase order. For more information on the Use Tax functionality, review Application Help.
Menu Path
Navigate to this program from the Main Menu:
• Material Management > Purchase Contracts Management > General Operations > Purchase Order Entry
• Material Management > Purchase Management > General Operations > Purchase Order Entry
35Epicor ERP | 10.0.700.2
Daily Purchase ProcessingPurchase Management Course
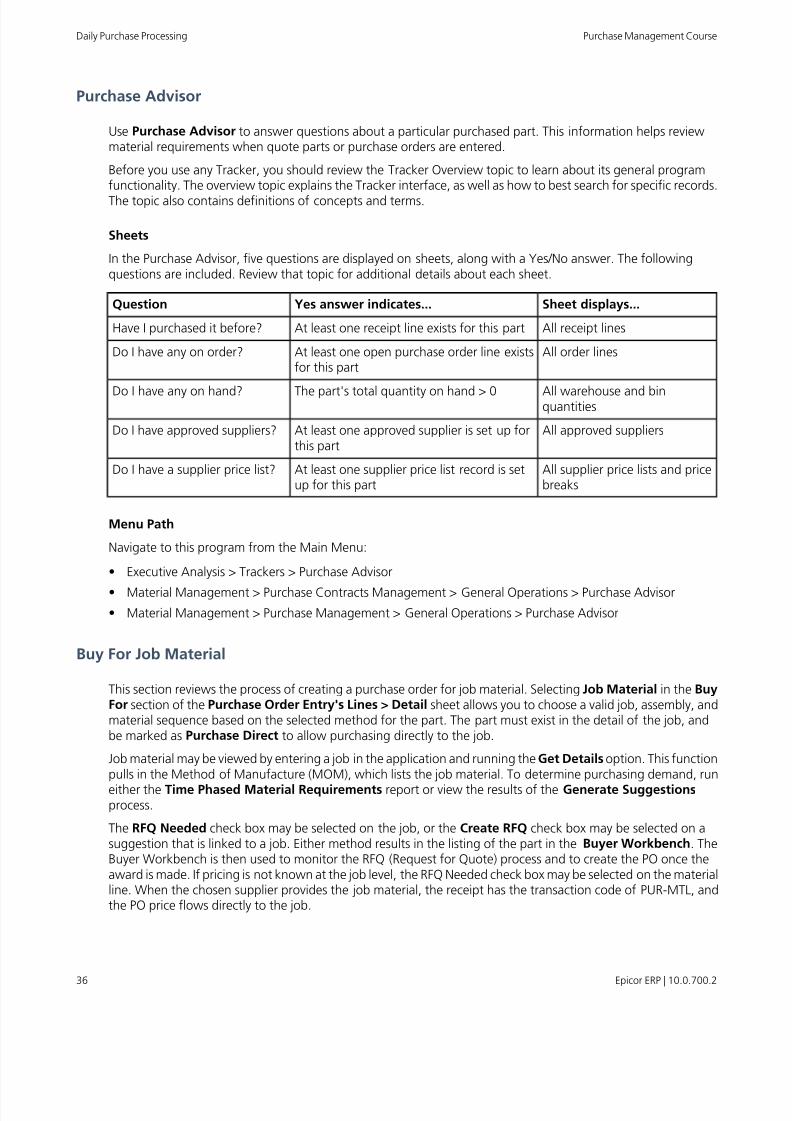
8/9/2019 Epicor ERP Purchase Management Course 10.0.700.2
http://slidepdf.com/reader/full/epicor-erp-purchase-management-course-1007002 36/105
Purchase Advisor
Use Purchase Advisor to answer questions about a particular purchased part. This information helps reviewmaterial requirements when quote parts or purchase orders are entered.
Before you use any Tracker, you should review the Tracker Overview topic to learn about its general programfunctionality. The overview topic explains the Tracker interface, as well as how to best search for specific records.
The topic also contains definitions of concepts and terms.
Sheets
In the Purchase Advisor, five questions are displayed on sheets, along with a Yes/No answer. The followingquestions are included. Review that topic for additional details about each sheet.
Sheet displays...Yes answer indicates...Question
All receipt linesAt least one receipt line exists for this partHave I purchased it before?
All order linesAt least one open purchase order line existsfor this part
Do I have any on order?
All warehouse and binquantities
The part's total quantity on hand > 0Do I have any on hand?
All approved suppliersAt least one approved supplier is set up forthis part
Do I have approved suppliers?
All supplier price lists and pricebreaks
At least one supplier price list record is setup for this part
Do I have a supplier price list?
Menu Path
Navigate to this program from the Main Menu:
• Executive Analysis > Trackers > Purchase Advisor
• Material Management > Purchase Contracts Management > General Operations > Purchase Advisor
• Material Management > Purchase Management > General Operations > Purchase Advisor
Buy For Job Material
This section reviews the process of creating a purchase order for job material. Selecting Job Material in the BuyFor section of the Purchase Order Entry's Lines > Detail sheet allows you to choose a valid job, assembly, andmaterial sequence based on the selected method for the part. The part must exist in the detail of the job, andbe marked as Purchase Direct to allow purchasing directly to the job.
Job material may be viewed by entering a job in the application and running the Get Details option. This functionpulls in the Method of Manufacture (MOM), which lists the job material. To determine purchasing demand, run
either the Time Phased Material Requirements report or view the results of the Generate Suggestionsprocess.
The RFQ Needed check box may be selected on the job, or the Create RFQ check box may be selected on asuggestion that is linked to a job. Either method results in the listing of the part in the Buyer Workbench. TheBuyer Workbench is then used to monitor the RFQ (Request for Quote) process and to create the PO once theaward is made. If pricing is not known at the job level, the RFQ Needed check box may be selected on the materialline. When the chosen supplier provides the job material, the receipt has the transaction code of PUR-MTL, andthe PO price flows directly to the job.
Epicor ERP | 10.0.700.236
Purchase Management CourseDaily Purchase Processing
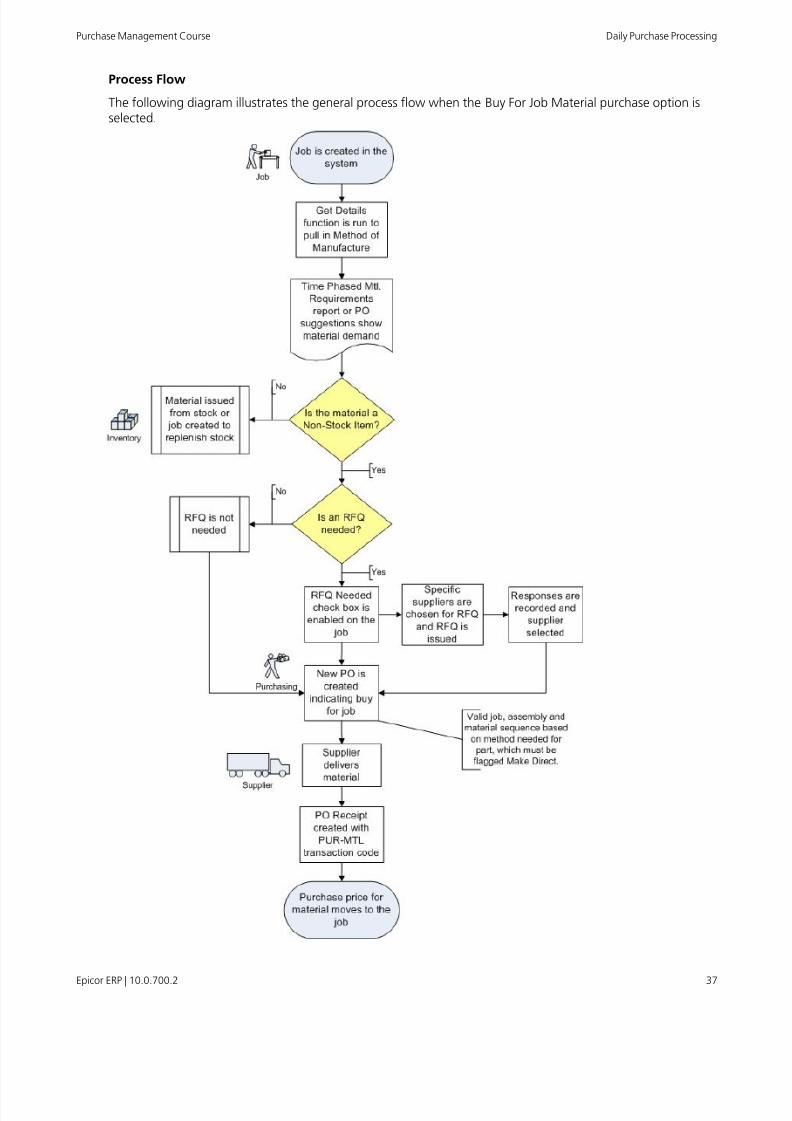
8/9/2019 Epicor ERP Purchase Management Course 10.0.700.2
http://slidepdf.com/reader/full/epicor-erp-purchase-management-course-1007002 37/105
Process Flow
The following diagram illustrates the general process flow when the Buy For Job Material purchase option isselected.
37Epicor ERP | 10.0.700.2
Daily Purchase ProcessingPurchase Management Course
8/9/2019 Epicor ERP Purchase Management Course 10.0.700.2
http://slidepdf.com/reader/full/epicor-erp-purchase-management-course-1007002 38/105
Workshop - Buy For Job Material
Job 2279 requires part number 8400S-8400116, which is a non-stock purchased part. This part has a preferredsupplier, Gecco Steel. The supplier has been asked to expedite this job. In this workshop, generate a purchaseorder for the material and add the expedite charge as a PO Miscellaneous Charge.
Navigate to Purchase Order Entry.
Menu Path: Material Management > Purchase Management > General Operations > Purchase Order Entry
Important
Due to necessary database setup and specific data used to complete the buying for material and RFQfunctionality, this workshop can only be performed by one person on a shared database. If job number2279 already has Purchasing selection of RFQ Needed, contact your system administrator to refresh yourdemonstration database.
Without completing this workshop, this does prohibit you from completing Workshop - Buy For Inventoryand Workshop - Receive By Line.
Enter Header Detail1. From the New menu, select New PO.
2. Navigate to the Header > Detail sheet.
3. Enter the following information:
DataField
Gecco SteelSupplier
Local TruckShip Via
FactoryFOB
4. In the Buyer field, verify your name displays.
5. Click Save.
6. Record the PO number _______________.
Epicor ERP | 10.0.700.238
Purchase Management CourseDaily Purchase Processing
8/9/2019 Epicor ERP Purchase Management Course 10.0.700.2
http://slidepdf.com/reader/full/epicor-erp-purchase-management-course-1007002 39/105
Enter Line Details
1. From the New menu, select New Line.
The Lines > Detail sheet displays.
2. In the Buy For section, select Job Material.
3. Enter the following information:
DataField
2279Job
0Asm
130Mtl
In the Part/Rev field, part 8400S-116 displays.
4. Click Save.
Enter Expediting Charge
1. From the New menu, select New PO Misc Charge.
The Header > Miscellaneous Charge sheet displays.
2. In the Charge ID field, select Rush/Expedite Charge.
3. In the Amount field, enter 100.00.
4. Click Save.
Identify the GL Account
Identify the general ledger account that is used by the Buy For - Job Material transaction for this purchase orderline.
1. Navigate to the Releases > Detail sheet.
2. Enter or verify the following information:
DataField
2279Job
130Mtl
1Our Qty
3. Click the Get Default button to pull in the default general ledger information for this purchase order linetransaction.
The G/L Account is the WIP Fabricated - Material account.
39Epicor ERP | 10.0.700.2
Daily Purchase ProcessingPurchase Management Course
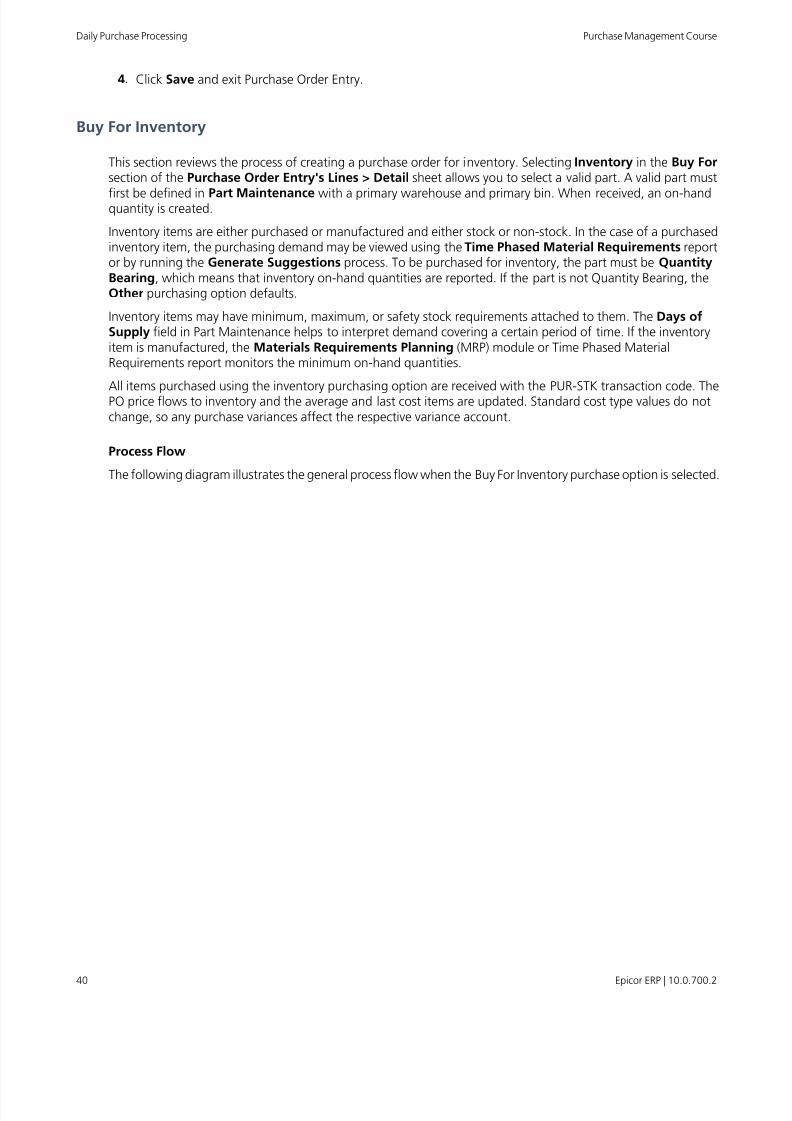
8/9/2019 Epicor ERP Purchase Management Course 10.0.700.2
http://slidepdf.com/reader/full/epicor-erp-purchase-management-course-1007002 40/105
4. Click Save and exit Purchase Order Entry.
Buy For Inventory
This section reviews the process of creating a purchase order for inventory. Selecting Inventory in the Buy Forsection of the Purchase Order Entry's Lines > Detail sheet allows you to select a valid part. A valid part must
first be defined in Part Maintenance with a primary warehouse and primary bin. When received, an on-handquantity is created.
Inventory items are either purchased or manufactured and either stock or non-stock. In the case of a purchasedinventory item, the purchasing demand may be viewed using the Time Phased Material Requirements reportor by running the Generate Suggestions process. To be purchased for inventory, the part must be QuantityBearing, which means that inventory on-hand quantities are reported. If the part is not Quantity Bearing, theOther purchasing option defaults.
Inventory items may have minimum, maximum, or safety stock requirements attached to them. The Days ofSupply field in Part Maintenance helps to interpret demand covering a certain period of time. If the inventoryitem is manufactured, the Materials Requirements Planning (MRP) module or Time Phased MaterialRequirements report monitors the minimum on-hand quantities.
All items purchased using the inventory purchasing option are received with the PUR-STK transaction code. ThePO price flows to inventory and the average and last cost items are updated. Standard cost type values do notchange, so any purchase variances affect the respective variance account.
Process Flow
The following diagram illustrates the general process flow when the Buy For Inventory purchase option is selected.
Epicor ERP | 10.0.700.240
Purchase Management CourseDaily Purchase Processing
8/9/2019 Epicor ERP Purchase Management Course 10.0.700.2
http://slidepdf.com/reader/full/epicor-erp-purchase-management-course-1007002 41/105
8/9/2019 Epicor ERP Purchase Management Course 10.0.700.2
http://slidepdf.com/reader/full/epicor-erp-purchase-management-course-1007002 42/105
Enter Line Details
1. In the PO Number field, enter the PO you created in the Workshop - Buy For Job Material and press Tab.
2. Navigate to the Lines > Detail sheet.
3. From the New menu, select New Line.
4. In the Buy For section, select Inventory.
5. In the Part/Rev field, enter 8400S-620 and press Tab.
6. Click the Purchase Advisor button.
The Purchase Advisor window displays.
7. In the tree view, select the question Do I have a supplier price list?
Use the Purchase Advisor to answer basic questions about a particular purchased part. This informationhelps review material requirements when part quotes or purchase orders are entered.
8. Review the price list information that displays.
9. Close the Purchase Advisor window.
10. In the Our Qty field, enter 50.
11. In the Unit Price field, enter 10.00.
12. In the Due Date field, enter the date one week from today.
13. Click Save.
Identify the GL Account
Identify the general ledger account that is used by the Buy For - Inventory transaction for this purchase orderline.
1. Navigate to the Releases > Detail sheet.
2. Enter or verify the following information:
DataField
One week from todayDue Date
50Our Qty
3. Click the Get Default button to pull in the default general ledger information for this purchase order linetransaction.
The G/L Account is the Inventory - Raw Material account.
Epicor ERP | 10.0.700.242
Purchase Management CourseDaily Purchase Processing
8/9/2019 Epicor ERP Purchase Management Course 10.0.700.2
http://slidepdf.com/reader/full/epicor-erp-purchase-management-course-1007002 43/105
Approve the Purchase Order
1. Navigate to the Summary sheet.
2. Select the Unapproved check box.
The Approved status displays.
3. Click Save and exit Purchase Order Entry.
43Epicor ERP | 10.0.700.2
Daily Purchase ProcessingPurchase Management Course
8/9/2019 Epicor ERP Purchase Management Course 10.0.700.2
http://slidepdf.com/reader/full/epicor-erp-purchase-management-course-1007002 44/105
Review the Purchase Order
Navigate to Purchase Order Tracker.
Menu Path: Material Management > Purchase Management > General Operations > Purchase Order Tracker
1. In the PO Number field, enter the PO number you created previously and press Tab.
2. Review the PO to make sure it contains the correct information.
3. Navigate to the Lines > Detail sheet.
4. Right-click in the Part/Rev field and select Open with > Time Phase.
The Time Phase Inquiry window displays.
5. Review the part to verify the PO is listed and the required quantity is correct.
6. Exit Time Phase Inquiry and Purchase Order Tracker.
Buy For Subcontract Operation
This section reviews the process of creating a purchase order for a subcontract operation. Selecting SubcontractOperation in the Buy For section of the Purchase Order Entry's Lines > Detail sheet allows you to identifya valid job with a valid subcontract operation to order against.
The job's method may indicate a specific supplier for a subcontract operation. Additionally, RFQ Needed maybe selected in the operation, meaning multiple quotes are required for pricing. As part of the supplier approvalprocess, the supplier record may be defined as approved for specific subcontract operations. The supplier mayalso have specific pricing for the subcontracted work, as indicated on a Supplier Price List.
A typical subcontract operation includes a period of time and labeled Days Out, indicating the time required bythe supplier to perform the operation. The Subcontract Status report is used to monitor both the outbound
and inbound flow of materials for subcontract operations. When a material is sent to the subcontractor, thetransaction code of MFG-VEN displays on reports and trackers. When the item is received back from the supplier,the transaction code of PUR-SUB is displayed.
Process Flow
The following diagram illustrates the general process flow when the Buy For Subcontract Operation purchaseoption is selected.
Epicor ERP | 10.0.700.244
Purchase Management CourseDaily Purchase Processing
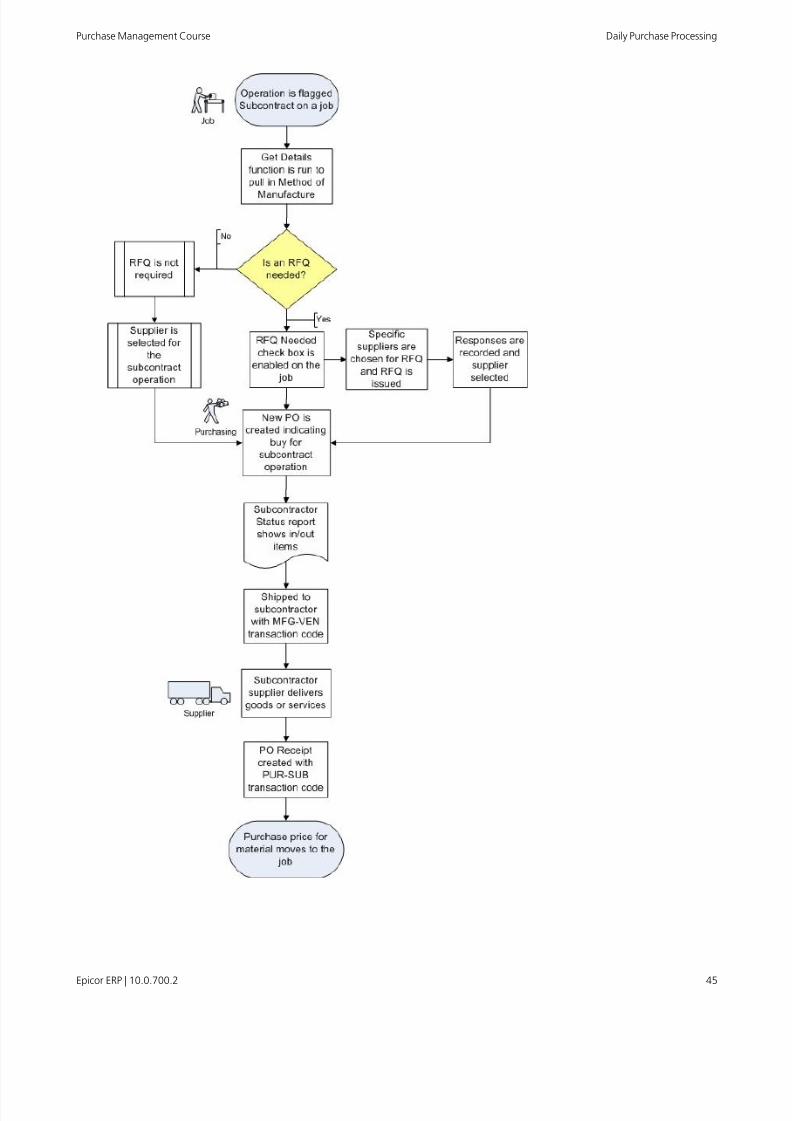
8/9/2019 Epicor ERP Purchase Management Course 10.0.700.2
http://slidepdf.com/reader/full/epicor-erp-purchase-management-course-1007002 45/105
45Epicor ERP | 10.0.700.2
Daily Purchase ProcessingPurchase Management Course
8/9/2019 Epicor ERP Purchase Management Course 10.0.700.2
http://slidepdf.com/reader/full/epicor-erp-purchase-management-course-1007002 46/105
Workshop - Buy For Subcontract Operation
Job 2340 includes a part with a subcontract operation for an outside vendor, Hades Heat Treating. In thisworkshop, create a purchase order for material on a subcontract operation.
Navigate to Purchase Order Entry.
Menu Path: Material Management > Purchase Management > General Operations > Purchase Order Entry
Enter Header Detail
1. From the New menu, select New PO.
2. Navigate to the Header > Detail sheet.
3. Enter the following information:
DataField
Hades Heat TreatingSupplier
Local TruckShip Via
FactoryFOB
4. In the Buyer field, verify your name displays.
5. Click Save.
6. Record the PO number _______________.
Enter Line Details1. From the New menu, select New Line.
The Lines > Detail sheet displays.
2. In the Buy For section, select Subcontract Operation.
3. Enter the following information:
DataField
2340Job
0Asm50Opr
In the Part/Rev field, part DCD-100-SP displays.
4. Click Save.
Epicor ERP | 10.0.700.246
Purchase Management CourseDaily Purchase Processing
8/9/2019 Epicor ERP Purchase Management Course 10.0.700.2
http://slidepdf.com/reader/full/epicor-erp-purchase-management-course-1007002 47/105
Identify the GL Account
Identify the general ledger account that is used by the Buy For - Subcontract transaction for this purchase orderline.
1. Navigate to the Releases > Detail sheet.
2. Enter or verify the following information:
DataField
2340Job
50Opr
50Our Qty
3. Click the Get Default button to pull in the default general ledger information for this purchase order linetransaction.
The G/L Account is the WIP Fabricated - Subcontract account.
Approve the Purchase Order
1. Navigate to the Summary sheet.
2. Select the Unapproved check box.
The Approved status displays.
3. Click Save and exit Purchase Order Entry.
Buy For Other
This section reviews the process of creating a purchase order for other material. Selecting Other allows you tocreate a part on-the-fly. The Other category has very few rules and is reserved for non job-related items or othersupplies. The only required fields are Part Number and Part Description.
While not required, the use of a Part Class is highly recommended. The Part Class carries the GL expense codesfor raw materials and inventory. If no Part Class is selected on the PO line item, the receipt dollars may affect thesuspense accounts.
An exception to the scenario above is an existing Quantity Bearing part. Quantity Bearing indicates that on-handquantities for this part are maintained in inventory. In this case, the Other purchase option defaults for this l ine
item. The transaction code for receipts entered using the Other purchase option is PUR-UKN.
Process Flow
The following diagram illustrates the general process flow when the Buy For Other purchase option is selected.
47Epicor ERP | 10.0.700.2
Daily Purchase ProcessingPurchase Management Course
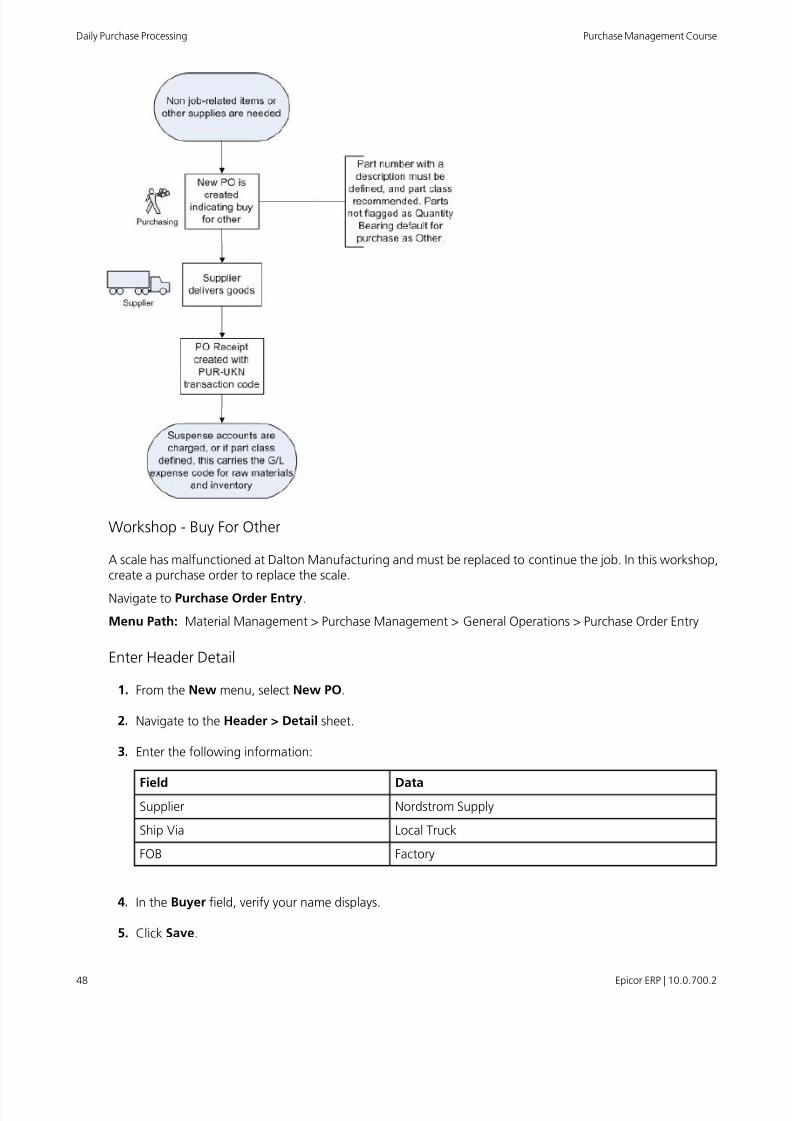
8/9/2019 Epicor ERP Purchase Management Course 10.0.700.2
http://slidepdf.com/reader/full/epicor-erp-purchase-management-course-1007002 48/105
Workshop - Buy For Other
A scale has malfunctioned at Dalton Manufacturing and must be replaced to continue the job. In this workshop,create a purchase order to replace the scale.
Navigate to Purchase Order Entry.
Menu Path: Material Management > Purchase Management > General Operations > Purchase Order Entry
Enter Header Detail
1. From the New menu, select New PO.
2. Navigate to the Header > Detail sheet.
3. Enter the following information:
DataFieldNordstrom SupplySupplier
Local TruckShip Via
FactoryFOB
4. In the Buyer field, verify your name displays.
5. Click Save.
Epicor ERP | 10.0.700.248
Purchase Management CourseDaily Purchase Processing

8/9/2019 Epicor ERP Purchase Management Course 10.0.700.2
http://slidepdf.com/reader/full/epicor-erp-purchase-management-course-1007002 49/105
6. Record the PO number _______________.
Enter Line Details
1. From the New menu, select New Line.
The Lines > Detail sheet displays.
2. In the Buy For section, select Other.
3. Enter the following information:
DataField
XXX-46309 (where XXX are your initials)Part/Rev
XXX Scale (where XXX are your initials)Description
Shop SuppliesClass
1Our Qty
126,000Unit Price
one week from todayDue Date
4. Click Save.
Identify the GL Account
Identify the general ledger account that is used by the Buy For - other transaction for this purchase order line.
1. Navigate to the Releases > Detail sheet.
2. Enter or verify the following information:
DataField
One week from todayDue Date
1Our Qty
3. Click the Get Default button to pull in the default general ledger information for this purchase order linetransaction.
The G/L Account is the Shop Supplies account.
Approve the Purchase Order
1. Navigate to the Summary sheet.
2. Select the Unapproved check box.
A message displays indicating you have exceeded you purchasing limit.
49Epicor ERP | 10.0.700.2
Daily Purchase ProcessingPurchase Management Course
8/9/2019 Epicor ERP Purchase Management Course 10.0.700.2
http://slidepdf.com/reader/full/epicor-erp-purchase-management-course-1007002 50/105
3. To the message, click OK.
The Unapproved status changes to Pending.
4. Click Save and exit Purchase Order Entry.
Inter-Company PO - Valid Sites
Inter-company purchase orders (PO) must have valid sites on PO releases.
If a purchase order is an inter-company PO, the site value on the PO release validates the inter-company receipt.The quantity received through the inter-company PO can only be received by the site selected in this field. Usethis functionality when you have multiple sites in a buying company, and you need to indicate which site receivedthe quantity on the inter-company PO release.
You select the site you need within Purchase Order Entry on the Releases > Detail sheet.
Menu Path
Navigate to this program from the Main Menu:
• Material Management > Purchase Contracts Management > General Operations > Purchase Order Entry
• Material Management > Purchase Management > General Operations > Purchase Order Entry
PO Approval
Use PO Approval to work with purchase orders that must be reviewed by a buyer due to another buyer exceedinghis/her purchasing limit. This program is valuable if you want to reject or accept a request as well as enter specificdetails about the overall decision.
Tip Once a consolidation purchase order is approved, the information regarding the specifics of thepurchase order releases are sent out to the various companies. This disbursement is important for eachcompany for receipt entry purposes.
Menu Path
Navigate to this program from the Main Menu:
• Material Management > Purchase Management > General Operations > PO Approval
Workshop - Approve Purchase Order
Howard Low's approval is required on the purchase order submitted for purchase of a $126,000 scale for DaltonManufacturing. In this workshop, perform the approval process by Howard Low for your purchase order.
Change User
Log on as Howard Low.
1. On the Main Menu, from the Options menu, select Change User.The Log on window displays.
2. In the Log On window, enter the following information:
Epicor ERP | 10.0.700.250
Purchase Management CourseDaily Purchase Processing
8/9/2019 Epicor ERP Purchase Management Course 10.0.700.2
http://slidepdf.com/reader/full/epicor-erp-purchase-management-course-1007002 51/105
DataField
hlowUser name
hlowPassword
3. Click OK.
Approve the Purchase Order
Navigate to PO Approval.
Menu Path: Material Management > Purchase Management > General Operations > PO Approval
Note In the tree view, verify that you in Epicor Education when launching PO Approval!
1. In the tree view, select the PO number you created in the Workshop - Buy For Other.
2. On the Detail sheet, in the Action field, select Accept.
The PO clears from the program once it is approved.
3. Click Save and exit PO Approval.
Review the Purchase Order
Navigate to Purchase Order Entry.
Menu Path: Material Management > Purchase Management > General Operations > Purchase Order Entry
1. In the PO Number field, enter the PO number created in the Workshop - Buy For Other and press Tab.
2. On the Summary sheet, verify the order is Approved.
3. Exit Purchase Order Entry.
Duplicate PO
Use the Duplicate option to create a new purchase order by copying information from an existing purchaseorder. This function saves you time if you have a new purchase order that is similar to an existing one.
Tip The new purchase order is automatically numbered using the next available PO number.
51Epicor ERP | 10.0.700.2
Daily Purchase ProcessingPurchase Management Course
8/9/2019 Epicor ERP Purchase Management Course 10.0.700.2
http://slidepdf.com/reader/full/epicor-erp-purchase-management-course-1007002 52/105
Workshop - Duplicate Purchase Orders
Dalton Manufacturing is ordering office materials that have been ordered before. To save time, you will duplicatea previous purchase order and update the quantities.
Change User
1. On the Main menu, from the Options menu, select Change User.
2. In the Log On window, enter the following information:
DataField
<your user name>User name
epicorPassword
3. Click OK.
Duplicate a Purchase Order
Navigate to Purchase Order Entry.
Menu Path: Material Management > Purchase Management > General Operations > Purchase Order Entry
1. In the PO Number field, enter the purchase order from Workshop - Buy For Inventory and press Tab.
2. From the Actions menu, select Duplicate PO.
The Duplicate PO window displays.
3. Verify the Get Latest Supplier Price check box is selected.
4. Verify the Copy Job Information check box is clear.
5. In the Due Date field, enter the date one week from today and click OK.
6. Select the Unapproved check box.
The Approved status displays.
7. Click Save.
8. Record PO number ______________.
Update the Duplicate Purchase Order
1. Clear the Ready for Mass Print check box.
2. Clear the Approved check box.
This allows data entry for the new PO.
3. Click Save.
Epicor ERP | 10.0.700.252
Purchase Management CourseDaily Purchase Processing
8/9/2019 Epicor ERP Purchase Management Course 10.0.700.2
http://slidepdf.com/reader/full/epicor-erp-purchase-management-course-1007002 53/105
4. Navigate to the Summary > Other sheet.
5. In the Line Items grid, delete lines 6, 7, and 8.
Each line must be deleted individually.
6. In the Delete Confirmation window, click Yes.
7. Click Save.
Approve the Purchase Order
1. Click Refresh.
2. Verify the Summary sheet displays.
3. Select the Unapproved check box.
The Approved status displays.
4. Click Save and exit Purchase Order Entry.
Receive Purchase Orders
Use Receipt Entry to enter the receipt of all inventory and non-inventory materials and subcontract parts.
Receipt line items are either purchase order receipts (recorded against a purchase order) or miscellaneous receipts(material received that is not associated with a purchase order). Receipt information updates the purchase order,if necessary, and creates transactions to update inventory or job quantities and costs.
The purchase order receipt consists of a header and line(s). The receipt header includes a packing slip number,date, and other basic information.
Invoice receipts cannot be updated. Optionally, receipts can be received to inspection. Receiving may elect toroute items through inspection if items appear damaged. To complete the inspection, use Inspection Processing.This functionality requires the Quality Assurance module.
The purchase order is created to receive parts to:
• Job - Creates a WIP (Work In Process) transaction of PUR-MTL.
• Inventory - Creates an inventory transaction of PUR-STK.
• Subcontract - Creates a WIP transaction of PUR-SUB.
• Other - Receipt to an expense creates a transaction of PUR-UKN.
Receiving is sometimes handled in the office, but it is typically handled on the dock. Because the process is creatingfinancial transactions, it is important to have procedures in place to ensure accuracy and timeliness.
Menu Path
Navigate to this program from the Main Menu:
• Material Management > Shipping / Receiving > General Operations > Receipt Entry
53Epicor ERP | 10.0.700.2
Daily Purchase ProcessingPurchase Management Course
8/9/2019 Epicor ERP Purchase Management Course 10.0.700.2
http://slidepdf.com/reader/full/epicor-erp-purchase-management-course-1007002 54/105
Workshop - Receive By Line
Dalton Manufacturing is receiving the purchase order containing a job material line. In this workshop, you willbe receiving the corresponding inventory line on the purchase order.
Important If you were unable to complete Workshop - Buy For Job Material, you will not be able tocomplete this workshop. Contact your system administrator to refresh your demonstration database.
Enter a Receipt
Navigate to Receipt Entry.
Menu Path: Material Management > Shipping / Receiving > General Operations > Receipt Entry
1. From the New menu, select New Receipt.
2. In the PO field, enter the PO number you created in the Workshop - Buy for Job Material and press Tab.
3. In the Packing Slip field, enter the PO number.
4. Click Save.
A new receipt is created using the supplier’s packing slip number and is matched to the purchase prder andthe supplier name. When all three of these values are known, the lines pull into the receipt with theircorresponding transaction codes.
Receive Job Material
1. From the New menu, select New Job Material Line.
The Job Material > Detail sheet displays.
2. In the PO/Line field, search for and select the first PO line (1) and press Tab.
3. Select the Line Received check box.
4. Click Save and exit Receipt Entry.
Review the Purchase Order
Navigate to Purchase Order Tracker.
Menu Path: Material Management > Purchase Management > General Operations > Purchase Order Tracker
1. In the PO Number field, enter the PO you created in the Workshop - Buy For Job Material and press Tab.
2. Navigate to the Receipts sheet and click the Retrieve button.
3. Right-click in the Part field and select Open With > Part Transaction History Tracker.
4. Click the Retrieve button.
5. Review the part to verify the transaction history.
Epicor ERP | 10.0.700.254
Purchase Management CourseDaily Purchase Processing
8/9/2019 Epicor ERP Purchase Management Course 10.0.700.2
http://slidepdf.com/reader/full/epicor-erp-purchase-management-course-1007002 55/105
6. Exit Part Transaction History Tracker and Purchase Order Tracker.
Workshop - Mass Receipt
The mass receipt functionality allows you to receive multiple lines on a purchase order at one time. The purchaseorder created for shop supplies has many lines. The Mass Receipt option allows the receipt of all the lines at one
time and assumes the lines are received complete. If some of the lines are not received complete, the listingallows changes to the quantity.
Review Open Purchase Orders
The Open Purchase Orders report ensures efficient processing of purchase orders. Use this report to view a listof open purchase order lines for the suppliers, parts, and jobs selected.
Navigate to Open Purchase Orders Report.
Menu Path: Material Management > Purchase Management > Reports > Open Purchase Orders
1. In the From field, enter the date two months ago.
2. In the To field, enter the date three days from today's date.
3. In the Report Type section, select Both.
4. In the Sort By field, verify PO/Line displays.
5. Click Print Preview and review the report.
6. Close the report and exit Open Purchase Orders Report.
Enter the Receipt
Navigate to Receipt Entry.Menu Path: Material Management > Shipping / Receiving > General Operations > Receipt Entry
1. From the New menu, select New Receipt.
2. Click the PO button.
3. In the Buyer field, select your name and click Search.
4. Select the PO created for the supplier, Nordstrom Supplies, and click OK.
5. In the Packing Slip field, enter the PO number.
6. In the Ship Via field, select UPS Ground.
7. Click Save.
Perform a Mass Receipt
You can receive a mixture of receipt types on one purchase order. In this task, select the lines to be received.
1. From the Actions menu, select Mass Receipt.
55Epicor ERP | 10.0.700.2
Daily Purchase ProcessingPurchase Management Course
8/9/2019 Epicor ERP Purchase Management Course 10.0.700.2
http://slidepdf.com/reader/full/epicor-erp-purchase-management-course-1007002 56/105
The Mass Receipts window displays.
There are two options when receiving lines by Mass Receipt:
• Receive all lines and change quantities that may not have been received or received short.
• Manually complete the quantity fields for each item received.
2. Click the Select All button to select all lines.
3. Click the Get All button to receive all the required quantity.
4. Click Process to receive the lines by mass receipt.
5. Exit Mass Receipts.
6. On the Summary sheet, select the Received All check box.
The All Received status displays.
7. Click Save.
8. In the Receipt is Compliant message, click OK.
9. Exit Receipt Entry.
Review the Purchase Order
Navigate to Purchase Order Tracker.
Menu Path: Material Management > Purchase Management > General Operations > Purchase Order Tracker
1. In the PO Number field, enter the PO received in the previous workshop and press Tab.
2. Navigate to the Receipts sheet and click the Retrieve button.
3. Review the Purchase Order.
4. Exit Purchase Order Tracker.
Purchase Order Tracker
Use Purchase Order Tracker to review information about purchase orders.
This tracker is used to investigate open or closed purchase orders by part number or purchase order number,and can be filtered by buyer or supplier.
Menu Path
Navigate to this program from the Main Menu:
• Executive Analysis > Trackers > Purchase Order Tracker
• Financial Management > Accounts Payable > General Operations > Purchase Order Tracker
• Material Management > Inventory Management > General Operations > Purchase Order Tracker
• Material Management > Purchase Contracts Management > General Operations > Purchase Order Tracker
Epicor ERP | 10.0.700.256
Purchase Management CourseDaily Purchase Processing
8/9/2019 Epicor ERP Purchase Management Course 10.0.700.2
http://slidepdf.com/reader/full/epicor-erp-purchase-management-course-1007002 57/105
• Material Management > Purchase Management > General Operations > Purchase Order Tracker
• Material Management > Shipping / Receiving > General Operations > Purchase Order Tracker
• Material Management > Supplier Relationship Management > General Operations > Purchase Order Tracker
• Production Management > Job Management > General Operations > Purchase Order Tracker
• Production Management > Quality Assurance > General Operations > Purchase Order Tracker
• Production Management > Scheduling > General Operations > Purchase Order Tracker
• Sales Management > Quote Management > General Operations > Purchase Order Tracker
For CRM users, the Main Menu appears as:
• Customer Relationship Management > Quote Management > General Operations > Purchase Order Tracker
Workshop - Purchase Order Tracker
Navigate to Purchase Order Tracker.
Menu Path: Material Management > Purchase Management > General Operations > Purchase Order Tracker
1. Click the PO Number button.
2. In the PO Status field, select Closed.
3. Click Search.
4. Select your purchase order and click OK.
5. Review the purchase order information.
6. Navigate to the Lines > Line Activity sheet.
7. Click the Retrieve button.
8. Navigate to the Receipts sheet.
9. Click the Retrieve button.
10. Exit Purchase Order Tracker.
57Epicor ERP | 10.0.700.2
Daily Purchase ProcessingPurchase Management Course

8/9/2019 Epicor ERP Purchase Management Course 10.0.700.2
http://slidepdf.com/reader/full/epicor-erp-purchase-management-course-1007002 58/105
Specialized Purchase Processing
This section reviews additional processes that occur in Purchase Management.
• Create and approve requisitions.
• Work with PO suggestions, changes, and creating a Request for Quote (RFQ).
• Use Supplier Relationship Management functionality to manage the RFQ process.
• Create purchase delivery schedules from contract purchase orders.
• Use reports and trackers to monitor PO activity.
Supplier Relationship Management (SRM) provides a tool for purchasing managers and other employees whoare obtaining quotes for raw material or subcontract operations from one or more suppliers. Supplier responsesautomatically build or add to price-break tables.
The ability to create purchase delivery schedules from contract purchase orders is found in the Purchase ContractsManagement (PCM) module.
Purchase Contracts Management provides a tool for purchasing managers to create contract purchase ordersand define specific delivery schedules for items purchased on a regular basis.
Requisitions
Use Requisition Entry to add, update, or delete a requisition. A requisition is a request for material from asupplier, and it can be used to acquire parts for a job or miscellaneous items.
Header Sheet
Use the Header sheet to enter requisition heading information when creating or making changes to a requisition.The heading includes general information about the requisition such as the requestor, requisition date, andship-to information.
Requisition Process Flow
The requisition process is determined by each customer company. In the example company in this course, theapproval process consists of two mandatory steps: specification approval and price approval. The followingdiagram illustrates the process of creating a requisition and how to process it through requisition actions in termsof the two example scenario.
Epicor ERP | 10.0.700.258
Purchase Management CourseSpecialized Purchase Processing
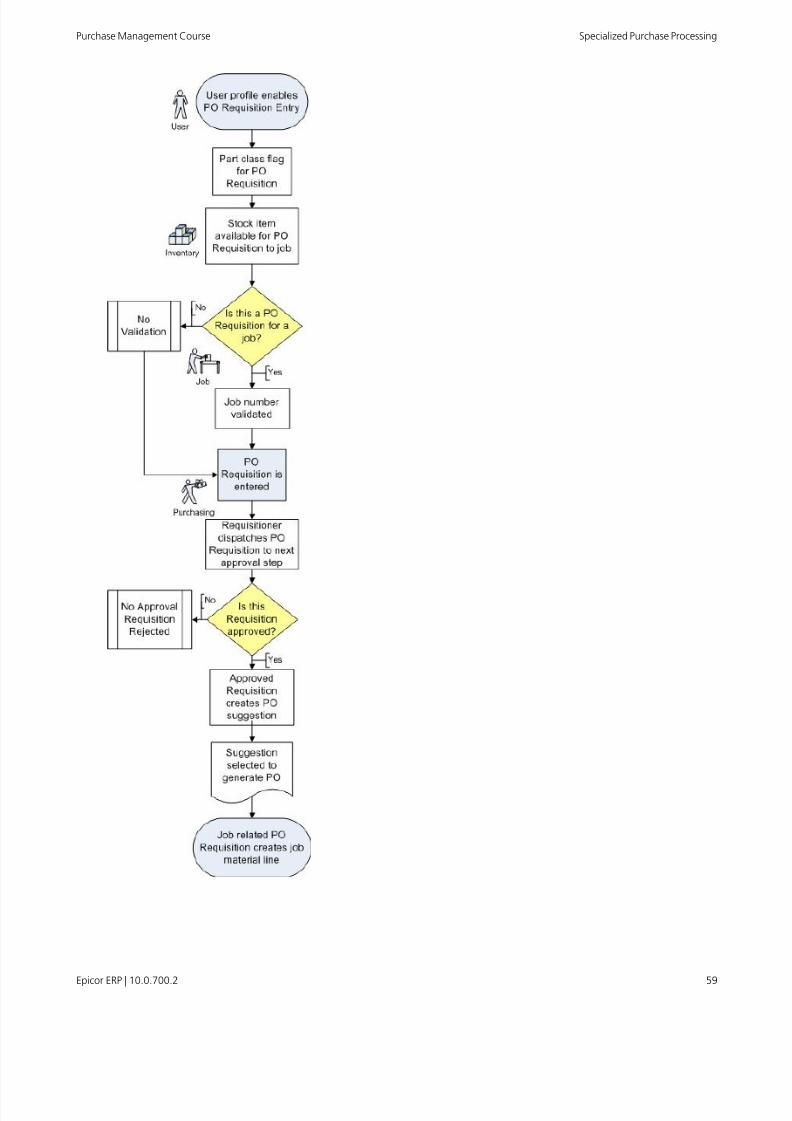
8/9/2019 Epicor ERP Purchase Management Course 10.0.700.2
http://slidepdf.com/reader/full/epicor-erp-purchase-management-course-1007002 59/105
59Epicor ERP | 10.0.700.2
Specialized Purchase ProcessingPurchase Management Course
8/9/2019 Epicor ERP Purchase Management Course 10.0.700.2
http://slidepdf.com/reader/full/epicor-erp-purchase-management-course-1007002 60/105
Menu Path
Navigate to this program from the Main Menu:
• Material Management > Purchase Management > General Operations > Requisition Entry
Workshop - Assign Actions to a Requisition
Use Requisition Actions Maintenance to assign actions to a requisition in the course of its dispatch (approval).
The actions defined are used to guide the purchase requisition dispatch (approval) process and include:
• Price approval
• Specification approval
• Budget or supervisor approval
• Send to purchasing
Navigate to Requisition Actions Maintenance.
Note This course only does not cover all of the purchase requisition functionality for Epicor ERP. For moreinformation refer to the Purchase Requisition course and application help.
Menu Path: Material Management > Purchase Management > Setup > Requisition Actions
Add a Requisition Action
1. Click New.
2. In the Action ID field, enter XXXPrice (where XXX are your initials).
3. In the Action Description field, enter XXX Price Approval (where XXX are your initials).
4. Select the Mandatory Action and Notify Requestor check boxes.
5. Click Save.
6. Navigate to the Authorized Users sheet.
7. In the Available Users pane, select Brian Howard.
8. Click the right arrow to move Brian Howard to the Selected Users pane.
9. Click Save.
Remove the Requisition Action
For the purpose of this course, the added requisition action needs to be removed. If the actions are not removedthen more steps are required for the approval process for each requisition entered.
Note It is extremely important to define the approval process for requisitions and have only the numberof requisition actions required for that process.
1. From the tree view, select XXX Price Approval (where XXX are your initials).
2. From the Standard toolbar, click Delete.
Epicor ERP | 10.0.700.260
Purchase Management CourseSpecialized Purchase Processing
8/9/2019 Epicor ERP Purchase Management Course 10.0.700.2
http://slidepdf.com/reader/full/epicor-erp-purchase-management-course-1007002 61/105
3. To the Delete Confirmation message, click Yes.
The requisition action entered is now removed from the database.
4. Exit Requisition Actions Maintenance.
Workshop - Create a Requisition
A department at Dalton Manufacturing needs to enter a requisition for a new voltage meter. A GE model XXX-772appears in the Glengarry Plating catalog for $397.50. In this workshop, create and define the requisitioninformation for the voltage meter.
Navigate to Requisition Entry.
Menu Path: Material Management > Purchase Management > General Operations > Requisition Entry
Enter the Requisition Detail
1. From the New menu, select New Requisition.
2. In the Request Date field, accept the default of today's date.
3. Navigate to the Header sheet.
4. In the Name field, select Brian Howard.
5. Click Save.
Enter the Requisition Line
1. From the New menu, select New Line.
2. Navigate to the Lines > Detail sheet.
3. In the Requisition For section, verify Other is selected.
If Job Material is selected, a job number, assembly number, and material sequence number are required.Additionally, if the part required inspection, the Insp Required field is selected.
4. Enter the following information:
DataField
XXX-772 (where XXX are your initials)Part/Rev
XXX GE High Voltage Meter (where XXX are your initials)Description
Shop SuppliesClass
1Our Qty
GLEN (Glengarry Plating)Supplier ID
397.50Unit Price
5. Click Save.
61Epicor ERP | 10.0.700.2
Specialized Purchase ProcessingPurchase Management Course
8/9/2019 Epicor ERP Purchase Management Course 10.0.700.2
http://slidepdf.com/reader/full/epicor-erp-purchase-management-course-1007002 62/105
Dispatch the Requisition
1. From the Actions menu, select Dispatch Requisition.
The Requisition Dispatching window displays.
2. In the Reply pane, in the Action field, select Specification Approval.
3. In the Dispatcher field, select Nancy Johnson and click OK.
4. Record the requisition number ___________.
5. Click Save.
Workshop - Approve a Requisition
Nancy Johnson is one of the specification approvers at Dalton Manufacturing. She is typically logged into theEpicor application on her computer when approving a requisition. The Set Requisition User functionality allows
a computer at a different location to temporarily set the requisition user. Nancy can then quickly approve arequisition at that location.
Navigate to Requisition Entry.
Menu Path: Material Management > Purchase Management > General Operations > Requisition Entry
Set the Requisition User
1. From the Actions menu, select Set Requisition User.
The Set Requisition User window displays.
2. In the User ID and Password fields, enter nancy.
3. Click OK to log in as Nancy Johnson.
Assign the Specification Approval
1. In the Req ID field, enter the requisition number you created in the previous workshop and press Tab.
2. From the Actions menu, select Dispatch Requisition.
The Requisition Dispatching window displays.
3. In the Reply pane, verify the Approve/Submit option is selected.This indicates that Nancy approves the specification and wants to forward this to Frank Lloyd Wright forprice approval.
4. In the Action field, select Approve Price.
5. In the Dispatcher field, select Frank Lloyd Wright.
6. Click OK.
Epicor ERP | 10.0.700.262
Purchase Management CourseSpecialized Purchase Processing
8/9/2019 Epicor ERP Purchase Management Course 10.0.700.2
http://slidepdf.com/reader/full/epicor-erp-purchase-management-course-1007002 63/105
7. Click Save.
Set the Requisition User
1. From the Actions menu, select Set Requisition User.
The Set Requisition User window displays.
2. In the User ID and Password fields, enter fwright.
3. Click OK to log in as Frank Wright.
Complete the Requisition Approval Process
1. From the Actions menu, select To Do List.
The To Do List window displays.
2. Select the line with Approve Price in the ReqActionDesc field.
3. Click the Dispatch button.
The Requisition Dispatching window displays.
4. In the Action field, select Create Purchase Order.
5. Click OK.
The requisition no longer displays in the To Do List window.
6. In the To Do List window, click OK.
7. Click Save.
8. Exit Requisition Entry.
Purchase Order Suggestions
Purchase orders can be created based on purchase order suggestions. This section reviews the generation, editing,and processing of purchase order suggestions.
Generate Purchasing Suggestions
Use Generate Purchasing Suggestions to automatically create a list of suggested purchases based ontime-phased information. You create actual purchase orders from these suggestions in Purchase Order Entry.
If the application is set up for consolidated purchasing and you are logged into the central purchasing company,you can run a full regeneration by selecting the Run Consolidated Purch check box. You can then review andprocess the purchase order suggestions from other companies.
63Epicor ERP | 10.0.700.2
Specialized Purchase ProcessingPurchase Management Course
8/9/2019 Epicor ERP Purchase Management Course 10.0.700.2
http://slidepdf.com/reader/full/epicor-erp-purchase-management-course-1007002 64/105
You must be run this process before using New PO Suggestions and Change PO Suggestions. Only one usercan run this function at a time. When you run Generate Purchase Suggestions:
• Use the Selection sheet to select the parameters for the process.
• Use the Filter sheet to select the sites to include in the generation process.
Purchase order suggestions are based on time-phased information such as:
• Direct job material• Inventory requirements
• Job subcontract operations
When generate suggestions, Generate Purchasing Suggestions first references the part or site record for thepart's purchase lead time. If there is no purchase lead time on the part or site record, then the Epicor applicationreferences the purchase lead time set at the supplier price break level for the part and its primary supplier.
Generate Purchasing Suggestions builds suggestions from:
• Time-phased information - For time-phased purchase orders, the program deletes and rebuilds some or alltime-phased purchase orders as appropriate based on the date the suggestions are generated and the selectedprocessing option.
• Requisitions marked as Send To Purchasing - For requisitions, the program does not delete or change theinformation. Requisitions can be removed from the application only by ordering the requisition item or manuallydeleting the requisition.
• Unlinked Buy To Order (BTO) sales order releases - This program uses the ship, order quantity and supplier,sales order, sales order line, and order release identification information stored in order release records togenerate purchase order suggestions. If you use the Regenerative mode, this program includes unlinkedsales order releases and releases with associated PO suggestions. This program also deletes the old POsuggestions. It always excludes previously linked Buy to Order (BTO) sales order releases.
• Purchase contract schedules - If you clear the Include Contract PO Parts check box, Generate Suggestionsbypasses active parts on purchase contracts, and only includes parts on standard purchase orders. If you selectthis check box, selecting the Run Generate Purchase Schedules check box designates that purchase contractschedules should be generated during the current Generate Suggestions session. it also includes active parts
on purchase contracts when generating purchase suggestions.
Note Selecting the Run Generate Purchase Schedules check box causes the Generate Suggestionsprogram to perform the same processing that takes place when you run the Generate Purchase Schedulesprogram.
For more information on how to review the status of the Generate Purchasing Suggestions process, review theSystem Monitor topics in the Application Help.
Menu Path
Navigate to this program from the Main Menu:
•Material Management > Purchase Contracts Management > General Operations > Generate Suggestions
• Material Management > Purchase Management > General Operations > Generate Suggestions
Menu Path
You can launch this program from the Main Menu in these locations:
Menu Path: Material Management > Purchase Contracts Management > General Operations > GenerateSuggestions
Epicor ERP | 10.0.700.264
Purchase Management CourseSpecialized Purchase Processing
8/9/2019 Epicor ERP Purchase Management Course 10.0.700.2
http://slidepdf.com/reader/full/epicor-erp-purchase-management-course-1007002 65/105
Workshop - Generate PO Suggestions
In this workshop, create a list of suggested purchases based on time-phased information.
Navigate to Generate Purchasing Suggestions.
Menu Path: Material Management > Purchase Management > General Operations > Generate Suggestions
Important The Generate Purchase Order Suggestions process should only be run by one person at atime on a shared database.
1. For the Processing Option, select Regenerative.
2. Leave the Cutoff Date field blank.
3. In the Schedule field, accept the default of Now.
4. Accept all other defaults.
5. Click Process.
6. Exit Generate Purchasing Suggestions.
New PO Suggestions
Use New PO Suggestions to process purchase order (PO) suggestions created by the Generate Suggestionsprocess.
Launch the Search function to pull in PO suggestions for a specific buyer or the buyers. You can also specify asite and cut-off date for the suggestions. Use the various sheets and Actions menu options in the program toadd and modify information before generating new purchase orders.
IfGenerate Suggestions
runs again while this program is open, clear the data and re-populate it with anothersearch.
If you have the Epicor application set up to handle consolidated purchasing, are logged into the central purchasingcompany, and ran Generate Suggestions with full regeneration with the Run Consolidated Purch check boxselected, you can use this program to review and process PO suggestions from other companies.
The Generate Purchase Order and Generate RFQ, and Send Forecast programs use the unit of measuresspecified in the Our Quantity and Supplier Qty fields to create forecasts,and purchase orders, or Requests ForQuotes (RFQ).
Menu Path
Navigate to this program from the Main Menu:
• > New PO Suggestions
• Material Management > Purchase Management > General Operations > New PO Suggestions
65Epicor ERP | 10.0.700.2
Specialized Purchase ProcessingPurchase Management Course
8/9/2019 Epicor ERP Purchase Management Course 10.0.700.2
http://slidepdf.com/reader/full/epicor-erp-purchase-management-course-1007002 66/105
Suggestion - DetailNew PO Suggestions > Suggestion > Detail
Use the Suggestion > Detail sheet to review and modify the details of suggestion from the program's tree view,Material List, or Subcontract List.
Tip If you use the Advanced Production module, the suggestions you generate pull material requirements
from your current batch jobs. Any source jobs used to create these batch jobs are ignored. For moreinformation, read the Advanced Production Module topic the Application Help.
Epicor ERP | 10.0.700.266
Purchase Management CourseSpecialized Purchase Processing
8/9/2019 Epicor ERP Purchase Management Course 10.0.700.2
http://slidepdf.com/reader/full/epicor-erp-purchase-management-course-1007002 67/105
Workshop - Review Suggestions
Time Phase Material Requirements creates PO Suggestions based on demand requirements by the part.
Once purchase order suggestions are generated, the Buyer may create purchase orders, or make an entry forRFQ's directly from the suggestion display grid. Any material marked for RFQ's, either on the suggestion grid oron the job, display in the Buyer Workbench for processing if the Supplier Relationship Management (SRM) module
is licensed. When multiple suggestions are issued for the same part, it may make sense to combine severalsuggestions into one purchase order.
Once the Buy field has been selected, the application creates one purchase order for each supplier and adds thesuggestion(s) as individual lines to that PO. Multiple suggestions only roll up to one purchase order line whenthe supplier, price, terms, and ship via are identical. If there are multiple due dates for the same part for a supplier,multiple releases are created for the purchase order line.
Important Due to necessary database setup and specific data used to complete the RFQ and purchaseorders suggestion functionality, this workshop can only be performed by one person on a shared database.
Change User
This allows you to see all suggestions.
1. On the Main menu, from the Options menu, select Change User.
2. In the Log On window, enter the following information:
DataField
managerUser name
managerPassword
3. Click OK.
Generate Purchase Orders
Navigate to Purchase Order Suggestion Entry.
Menu Path: Material Management > Purchase Management > General Operations > New PO Suggestions
1. Click Search (binoculars).
2. Click the Options button.
3. Select the Return All Rows check box and click OK.
4. Click Search.
5. Click Select All and click OK.
6. Navigate to the Material List sheet.
7. Click the Part column header to sort the records by part number.
8. Scroll down to SS-125.
67Epicor ERP | 10.0.700.2
Specialized Purchase ProcessingPurchase Management Course
8/9/2019 Epicor ERP Purchase Management Course 10.0.700.2
http://slidepdf.com/reader/full/epicor-erp-purchase-management-course-1007002 68/105
8/9/2019 Epicor ERP Purchase Management Course 10.0.700.2
http://slidepdf.com/reader/full/epicor-erp-purchase-management-course-1007002 69/105
Change PO Suggestions
Use the Change PO Suggestions program to change existing purchase orders based on purchasing suggestionscreated by the Generate Purchasing Suggestions process.
When purchase order suggestions are processed, the application evaluates all time phase information andrecommends changes to existing purchase orders such as:
• Expedite - Used when parts are not scheduled to arrive to meet the need by date.
• Postpone - Used when parts are scheduled to arrive before their need by date.
• Cancel - Used when the demand created no longer exists.
• Reduce - Used when a lower quantity is needed at the need by date of the purchase order.
• Increase - Used when the quantity required is not high enough to meet the demand on the need by date onthe purchase order.
You use this program to make changes on both consolidated purchase orders and intercompany purchase orders(ICPOs).
If you make a change to a purchase order release that is tied to a consolidated purchase order initiated by the
central purchasing company, your change is sent back to the central purchasing company as a purchase orderchange suggestion.
Besides making changes to an ICPO, you can cancel a specific detail line on these records. If the related orderrelease is not linked to a job record, the order release is void. However, if the related order release is linked to a
job, the order release quantity is set to zero and a manufacturing suggestion is created for the related job record.For more information, review the Incoming ICPO Suggestions help topics.
If the Generate Purchasing Suggestions process is run again while this program is open, you need to clearthe data in this program and re-populate with another search.
Menu Path
Navigate to this program from the Main Menu:
• Material Management > Purchase Management > General Operations > Change PO Suggestions
You can launch this program from these additional locations:
• Purchase Order Entry - This program is located on the Actions menu.
• Buyer Workbench - You can launch this program if the Supplier Relationship Management modulelicense code is installed.
69Epicor ERP | 10.0.700.2
Specialized Purchase ProcessingPurchase Management Course
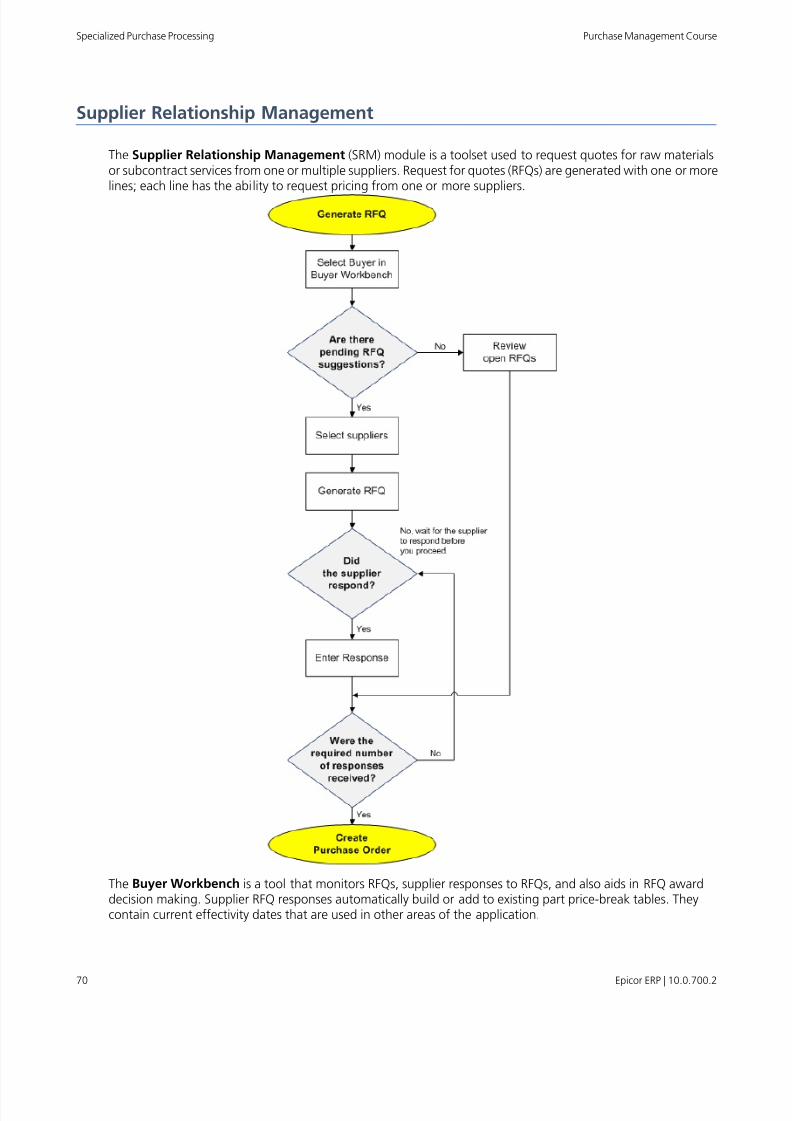
8/9/2019 Epicor ERP Purchase Management Course 10.0.700.2
http://slidepdf.com/reader/full/epicor-erp-purchase-management-course-1007002 70/105
8/9/2019 Epicor ERP Purchase Management Course 10.0.700.2
http://slidepdf.com/reader/full/epicor-erp-purchase-management-course-1007002 71/105
Requests for quotes can be entered in one of the following ways:
• Manually - in RFQ Entry
• Pushed - into the Buyer Workbench from:
• A material requirement on a quote
• A material requirement on a job
•
A line on the browse window of Purchasing Suggestions• A material sequence line on a method
• Pulled - into the Buyer Workbench from:
• Job-related material
• Quoted material
Buyer Workbench
Use Buyer Workbench to generate and manage requests for quotes (RFQs) and purchase orders from a central
location within the Epicor application.Buyers use the Buyer Workbench to review a summarization of the requests for quotes (RFQs) and purchaseorders assigned to them. The information includes the number of RFQ and purchase order records that are open,overdue, scheduled for today, scheduled for this week, and scheduled for beyond this week (future). Additionally,the sheet displays the number of RFQs which have received responses from suppliers and are ready for processing,as well as the number of purchase orders that require the buyer's approval. The workbench's tree view andActions menu provide access to additional programs such as:
• New PO Suggestions
• Change PO Suggestions
• Supplier Maintenance
The workbench provides the following:
• Ability to review of all open and overdue RFQs - This allows you to view RFQs and provides access to RFQEntry and Supplier Responses.
• Ability to review of all open and overdue purchase orders - This allows you to view purchase orders andprovides access to Purchase Order Entry.
• A listing of all new RFQ suggestions that can be generated from jobs, new quotes, or methods of manufacturing(MOM).
• Ability to review new and changed purchase suggestions - The Approval sheet enables you to approve purchaseorders that exceed a buyer's authority (POs > Approvals sheet). This allows you to view purchase suggestionsand provides access to Change PO Suggestions and New PO Suggestions.
• The Decision Wizard filters and sorts RFQs to find the best supplier match. The sorting criteria include leadtime, quality rating, price, and user-defined attributes such as ISO certification.
Menu Path
Navigate to this program from the Main Menu:
• Material Management > Supplier Relationship Management > General Operations > Buyer Workbench
71Epicor ERP | 10.0.700.2
Specialized Purchase ProcessingPurchase Management Course
8/9/2019 Epicor ERP Purchase Management Course 10.0.700.2
http://slidepdf.com/reader/full/epicor-erp-purchase-management-course-1007002 72/105
8/9/2019 Epicor ERP Purchase Management Course 10.0.700.2
http://slidepdf.com/reader/full/epicor-erp-purchase-management-course-1007002 73/105
3. In the Purchasing pane, select the RFQ Needed check box.
4. In the Quotes Required field, enter 1.
5. Click Save and exit Job Entry.
Update a BuyerNavigate to Buyer Maintenance.
Menu Path: Material Management > Purchase Management > Setup > Buyer
Important If the System Manager is already selected as the default buyer, use this workshop as a verificationof the authorization process for a buyer.
1. In the Buyer field, search for and select House Account.
2. Navigate to the Authorized Users sheet.
3. Highlight System Manager and select Default Buyer.
4. Click Save and exit Buyer Maintenance.
Generate an RFQ
Navigate to the Buyer Workbench.
Menu Path: Material Management > Supplier Relationship Management > General Operations > Buyer Workbench
1. In the Buyer field, verify House Account displays.
2. In the tree view, expand the RFQ's > House Account > Suggestions node and select CVB-TEF.
The RFQ's > Suggestions > List sheet displays.
3. Navigate to the RFQ's > Suggestions > Suppliers sheet.
4. Click the Supplier Wizard button to select suppliers.
The Supplier Wizard window displays.
Use the Supplier Wizard tool to pull in suppliers who previously received an RFQ on the selected part, soldthe company this part in the past, or provided price break information.
5. Accept the defaults and click OK.
The following message may be displayed: Suppliers are not approved for at least one of the selected
RFQs. The application looks for approved suppliers requesting quotes on this part, but it is not a requirement.Click OK to this message.
6. Navigate to the RFQ's > Suggestions > Detail sheet.
7. Select the RFQ check box.
8. In the Due Date field, enter today's date.
9. In the Decision and Respond fields, enter tomorrow's date.
73Epicor ERP | 10.0.700.2
Specialized Purchase ProcessingPurchase Management Course
8/9/2019 Epicor ERP Purchase Management Course 10.0.700.2
http://slidepdf.com/reader/full/epicor-erp-purchase-management-course-1007002 74/105
10. Click the Generate button.
The new RFQ displays in the tree view in the RFQ's > House Account > Today node.
Print the RFQ
1. Navigate to the RFQ's > Open RFQ's > Today sheet.
2. Select the RFQ created.
3. Click the RFQ Entry button.
RFQ Entry opens and automatically displays the RFQ you generated.
4. From the Actions menu, select RFQ > Print Form.
The RFQ Print Form window displays.
5. Click Print Preview.
6. Review the RFQ and close the RFQ Print Form window.
7. Exit RFQ Entry and return to the Buyer Workbench.
Create a Price Break
1. In the tree view, select the new RFQ.
2. Navigate to the RFQs > Open RFQ's sheet.
3. Click the Supplier Response button.
The Supplier Responses window displays.
In the Response field, the response status for your RFQ displays as Waiting.
4. Click the Add Supplier Responses button.
The Supplier Price List window displays.
5. In the Supplier field, enter GLOBE and press Tab.
6. From the New menu, select New Price Break.
Navigate to the Parts > Price Breaks > Detail sheet.
7. In the Minimum Quantity field, enter 1.
8. Navigate to the Parts > Detail sheet.
9. In the Days field, enter 90.
10. In the Base Unit Price field, enter 40.00.
11. Click Save.
Epicor ERP | 10.0.700.274
Purchase Management CourseSpecialized Purchase Processing
8/9/2019 Epicor ERP Purchase Management Course 10.0.700.2
http://slidepdf.com/reader/full/epicor-erp-purchase-management-course-1007002 75/105
Create Another Price Break
1. From the New menu, select New Price Break.
Navigate to the Parts > Price Breaks > Detail sheet.
2. In the Minimum Quantity field, enter 10.
3. In the Price Modifier field, enter -3.00.
4. Click Save.
5. Navigate to the Parts > Price Breaks > List sheet and compare the two price breaks.
6. Exit Supplier Price List.
In the Supplier Responses window, the response status for your RFQ displays as Received.
7. Exit Supplier Responses and return to the Buyer Workbench.
Create a Purchase Order
1. Navigate to the RFQs > Ready sheet.
2. Click the Decision Wizard button.
The RFQ Decision Wizard window displays.
3. Click the Create PO button.
The Decision Wizard decides which supplier and price break to use and automatically places the order.
A message with the PO number displays. Record the PO number and click OK.
4. Close the RFQ Decision Wizard, return to the Buyer Workbench, and click Refresh.
The new PO displays in the PO's > Open PO's > Today sheet.
5. Select the PO you created and click the PO Entry button.
Purchase Order Entry displays.
6. Review the PO.
7. Exit Purchase Order Entry and the Buyer Workbench.
Reports
This section is an overview of reports that relate to the Buyer Workbench and its processes.
Part Price Report
Menu Path: Material Management > Supplier Relationship Management > Reports > Part Price Report
Use the Part Price Report to review pricing information for your parts. This report prints in order by part.
75Epicor ERP | 10.0.700.2
Specialized Purchase ProcessingPurchase Management Course
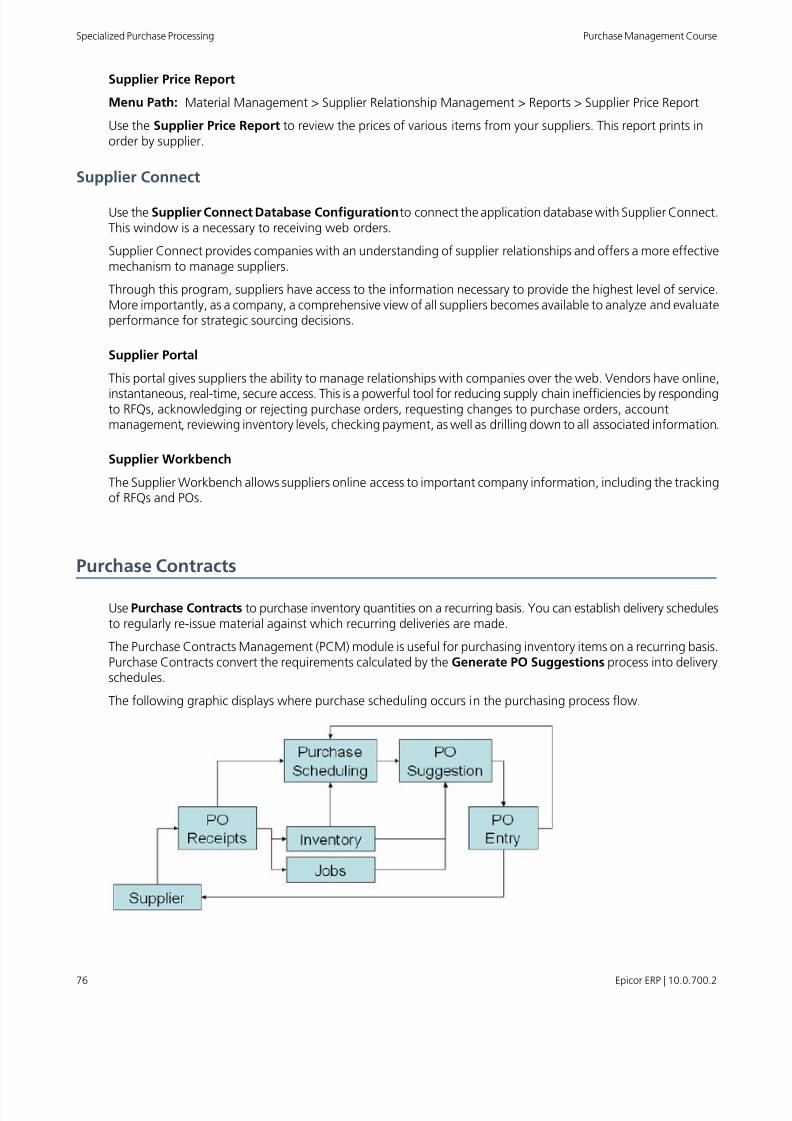
8/9/2019 Epicor ERP Purchase Management Course 10.0.700.2
http://slidepdf.com/reader/full/epicor-erp-purchase-management-course-1007002 76/105
Supplier Price Report
Menu Path: Material Management > Supplier Relationship Management > Reports > Supplier Price Report
Use the Supplier Price Report to review the prices of various items from your suppliers. This report prints inorder by supplier.
Supplier Connect
Use the Supplier Connect Database Configuration to connect the application database with Supplier Connect.This window is a necessary to receiving web orders.
Supplier Connect provides companies with an understanding of supplier relationships and offers a more effectivemechanism to manage suppliers.
Through this program, suppliers have access to the information necessary to provide the highest level of service.More importantly, as a company, a comprehensive view of all suppliers becomes available to analyze and evaluateperformance for strategic sourcing decisions.
Supplier Portal
This portal gives suppliers the ability to manage relationships with companies over the web. Vendors have online,
instantaneous, real-time, secure access. This is a powerful tool for reducing supply chain inefficiencies by respondingto RFQs, acknowledging or rejecting purchase orders, requesting changes to purchase orders, accountmanagement, reviewing inventory levels, checking payment, as well as drilling down to all associated information.
Supplier Workbench
The Supplier Workbench allows suppliers online access to important company information, including the trackingof RFQs and POs.
Purchase Contracts
Use Purchase Contracts to purchase inventory quantities on a recurring basis. You can establish delivery schedulesto regularly re-issue material against which recurring deliveries are made.
The Purchase Contracts Management (PCM) module is useful for purchasing inventory items on a recurring basis.Purchase Contracts convert the requirements calculated by the Generate PO Suggestions process into deliveryschedules.
The following graphic displays where purchase scheduling occurs in the purchasing process flow.
Epicor ERP | 10.0.700.276
Purchase Management CourseSpecialized Purchase Processing
8/9/2019 Epicor ERP Purchase Management Course 10.0.700.2
http://slidepdf.com/reader/full/epicor-erp-purchase-management-course-1007002 77/105
Periodicity Codes
Periodicity Codes dictate the required intervals for deliveries to be made for a scheduled item. These codes areattached to a part schedule to create the delivery frequency.
Part Schedule
This is where the delivery schedule for a part is set up. Use this area to select a production calendar for the
schedule and suppliers that should be attached to this part's delivery schedule.
Generate Contract PO
In order for a part's delivery schedule to be automated, a contract PO needs to be established and attached toa specific part schedule. The part selected on the part schedule must be a line on the contract PO. These lineitems automate purchase schedules with delivery dates, prices, and corresponding quantities.
Generate Purchase Schedules
This function produces the delivery schedule results based on the part schedule. Once the schedules are created,use the Purchase Schedule Approval option to analyze the results of the generation and allow approval.
Workshop - Create a Contract Part
Create a part for use in later workshops.
Navigate to Part Maintenance.
Menu Path: Material Management > Purchase Management > Setup > Part
1. From the New menu, select New Part.
2. In the Part field, enter 001-XXX (where XXX are your initials).
3. In the Description field, enter XXX Stainless Steel (where XXX are your initials).
4. Verify the Type field is Purchased.
5. In the Primary UOMs fields, accept the defaults of EA.
6. In the Class field, select Steel.
7. Click Save.
8. Navigate to the Part > Sites > Warehouses > Detail sheet.
The Warehouse field defaults to Main.
9. Navigate to the Part > Sites > Warehouses > Primary Bin sheet.
10. In the Primary Bin field, select 01-01-01.
11. Navigate to the Part > Sites > Detail sheet.
12. Enter the following information:
DataField
1000Min On-Hand
77Epicor ERP | 10.0.700.2
Specialized Purchase ProcessingPurchase Management Course
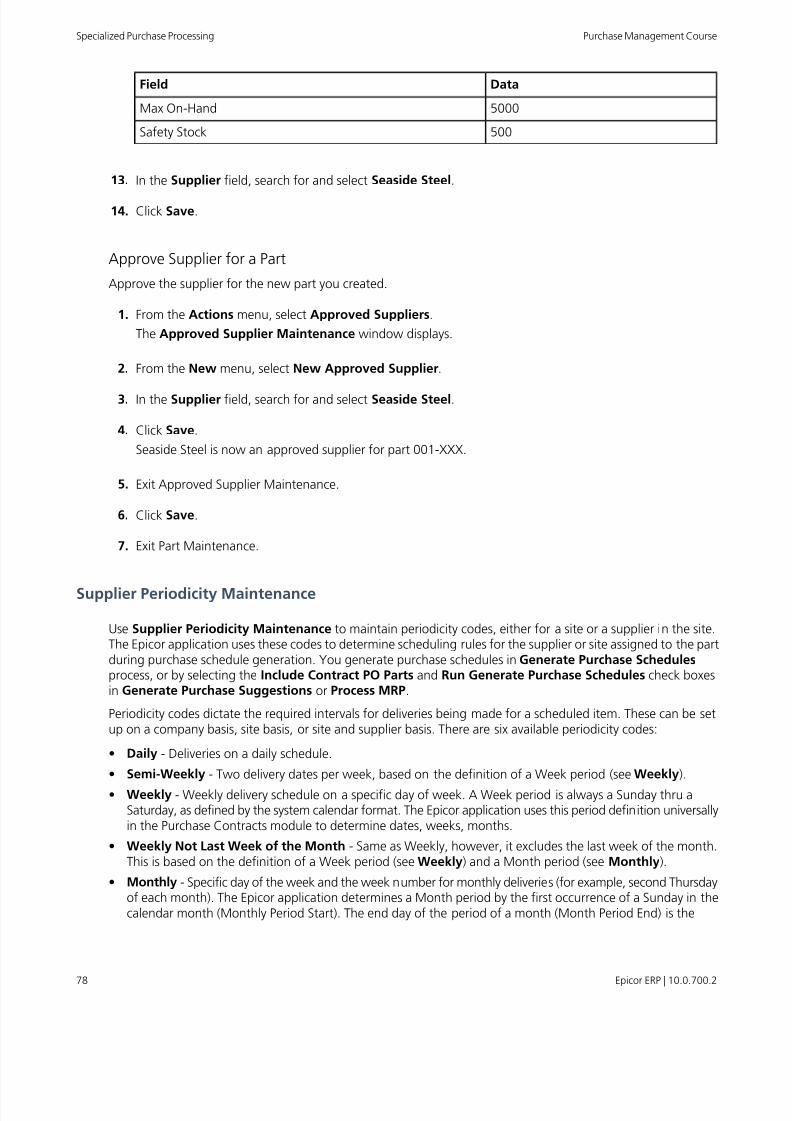
8/9/2019 Epicor ERP Purchase Management Course 10.0.700.2
http://slidepdf.com/reader/full/epicor-erp-purchase-management-course-1007002 78/105
DataField
5000Max On-Hand
500Safety Stock
13. In the Supplier field, search for and select Seaside Steel.
14. Click Save.
Approve Supplier for a Part
Approve the supplier for the new part you created.
1. From the Actions menu, select Approved Suppliers.
The Approved Supplier Maintenance window displays.
2. From the New menu, select New Approved Supplier.
3. In the Supplier field, search for and select Seaside Steel.
4. Click Save.
Seaside Steel is now an approved supplier for part 001-XXX.
5. Exit Approved Supplier Maintenance.
6. Click Save.
7. Exit Part Maintenance.
Supplier Periodicity Maintenance
Use Supplier Periodicity Maintenance to maintain periodicity codes, either for a site or a supplier in the site.The Epicor application uses these codes to determine scheduling rules for the supplier or site assigned to the partduring purchase schedule generation. You generate purchase schedules in Generate Purchase Schedulesprocess, or by selecting the Include Contract PO Parts and Run Generate Purchase Schedules check boxesin Generate Purchase Suggestions or Process MRP.
Periodicity codes dictate the required intervals for deliveries being made for a scheduled item. These can be setup on a company basis, site basis, or site and supplier basis. There are six available periodicity codes:
• Daily - Deliveries on a daily schedule.
• Semi-Weekly - Two delivery dates per week, based on the definition of a Week period (see Weekly).
• Weekly - Weekly delivery schedule on a specific day of week. A Week period is always a Sunday thru aSaturday, as defined by the system calendar format. The Epicor application uses this period definition universallyin the Purchase Contracts module to determine dates, weeks, months.
• Weekly Not Last Week of the Month - Same as Weekly, however, it excludes the last week of the month.This is based on the definition of a Week period (see Weekly) and a Month period (see Monthly).
• Monthly - Specific day of the week and the week number for monthly deliveries (for example, second Thursdayof each month). The Epicor application determines a Month period by the first occurrence of a Sunday in thecalendar month (Monthly Period Start). The end day of the period of a month (Month Period End) is the
Epicor ERP | 10.0.700.278
Purchase Management CourseSpecialized Purchase Processing
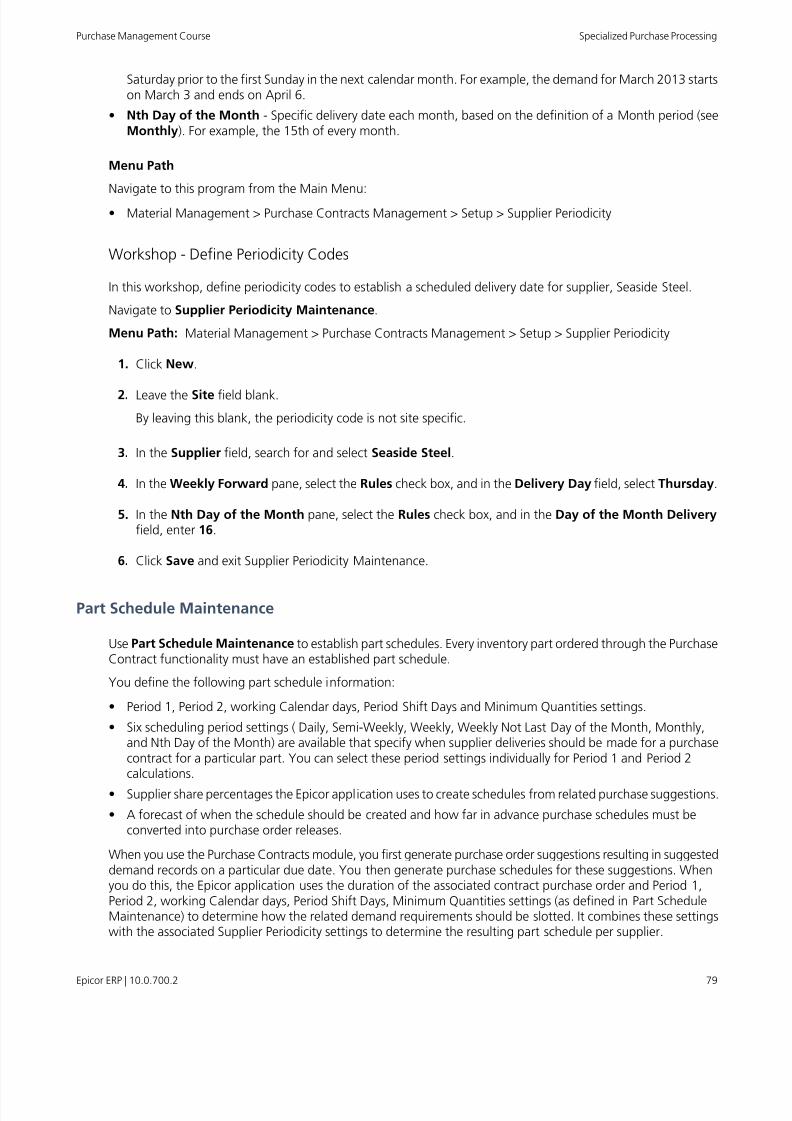
8/9/2019 Epicor ERP Purchase Management Course 10.0.700.2
http://slidepdf.com/reader/full/epicor-erp-purchase-management-course-1007002 79/105
Saturday prior to the first Sunday in the next calendar month. For example, the demand for March 2013 startson March 3 and ends on April 6.
• Nth Day of the Month - Specific delivery date each month, based on the definition of a Month period (seeMonthly). For example, the 15th of every month.
Menu Path
Navigate to this program from the Main Menu:
• Material Management > Purchase Contracts Management > Setup > Supplier Periodicity
Workshop - Define Periodicity Codes
In this workshop, define periodicity codes to establish a scheduled delivery date for supplier, Seaside Steel.
Navigate to Supplier Periodicity Maintenance.
Menu Path: Material Management > Purchase Contracts Management > Setup > Supplier Periodicity
1. Click New.
2. Leave the Site field blank.
By leaving this blank, the periodicity code is not site specific.
3. In the Supplier field, search for and select Seaside Steel.
4. In the Weekly Forward pane, select the Rules check box, and in the Delivery Day field, select Thursday.
5. In the Nth Day of the Month pane, select the Rules check box, and in the Day of the Month Deliveryfield, enter 16.
6. Click Save and exit Supplier Periodicity Maintenance.
Part Schedule Maintenance
Use Part Schedule Maintenance to establish part schedules. Every inventory part ordered through the PurchaseContract functionality must have an established part schedule.
You define the following part schedule information:
• Period 1, Period 2, working Calendar days, Period Shift Days and Minimum Quantities settings.
• Six scheduling period settings ( Daily, Semi-Weekly, Weekly, Weekly Not Last Day of the Month, Monthly,and Nth Day of the Month) are available that specify when supplier deliveries should be made for a purchasecontract for a particular part. You can select these period settings individually for Period 1 and Period 2calculations.
• Supplier share percentages the Epicor application uses to create schedules from related purchase suggestions.
• A forecast of when the schedule should be created and how far in advance purchase schedules must beconverted into purchase order releases.
When you use the Purchase Contracts module, you first generate purchase order suggestions resulting in suggesteddemand records on a particular due date. You then generate purchase schedules for these suggestions. Whenyou do this, the Epicor application uses the duration of the associated contract purchase order and Period 1,Period 2, working Calendar days, Period Shift Days, Minimum Quantities settings (as defined in Part ScheduleMaintenance) to determine how the related demand requirements should be slotted. It combines these settingswith the associated Supplier Periodicity settings to determine the resulting part schedule per supplier.
79Epicor ERP | 10.0.700.2
Specialized Purchase ProcessingPurchase Management Course
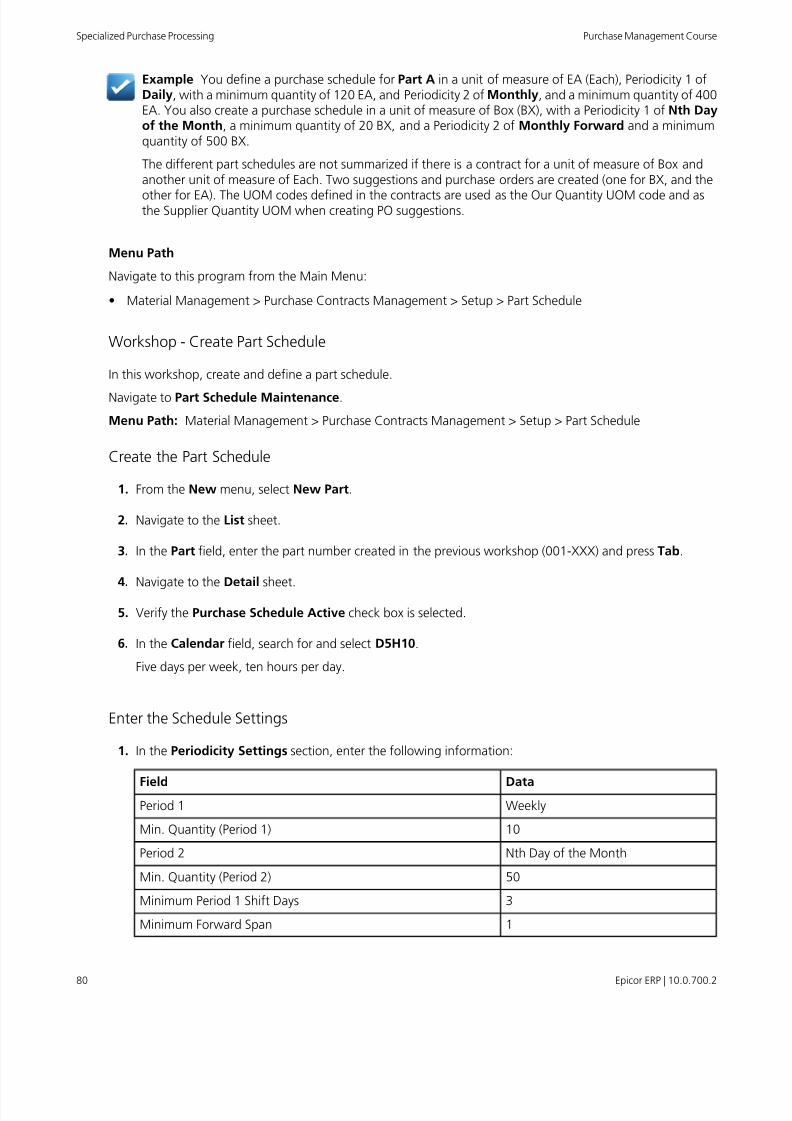
8/9/2019 Epicor ERP Purchase Management Course 10.0.700.2
http://slidepdf.com/reader/full/epicor-erp-purchase-management-course-1007002 80/105
Example You define a purchase schedule for Part A in a unit of measure of EA (Each), Periodicity 1 ofDaily, with a minimum quantity of 120 EA, and Periodicity 2 of Monthly, and a minimum quantity of 400EA. You also create a purchase schedule in a unit of measure of Box (BX), with a Periodicity 1 of Nth Dayof the Month, a minimum quantity of 20 BX, and a Periodicity 2 of Monthly Forward and a minimumquantity of 500 BX.
The different part schedules are not summarized if there is a contract for a unit of measure of Box andanother unit of measure of Each. Two suggestions and purchase orders are created (one for BX, and the
other for EA). The UOM codes defined in the contracts are used as the Our Quantity UOM code and asthe Supplier Quantity UOM when creating PO suggestions.
Menu Path
Navigate to this program from the Main Menu:
• Material Management > Purchase Contracts Management > Setup > Part Schedule
Workshop - Create Part Schedule
In this workshop, create and define a part schedule.
Navigate to Part Schedule Maintenance.
Menu Path: Material Management > Purchase Contracts Management > Setup > Part Schedule
Create the Part Schedule
1. From the New menu, select New Part.
2. Navigate to the List sheet.
3. In the Part field, enter the part number created in the previous workshop (001-XXX) and press Tab.
4.Navigate to the
Detail sheet.
5. Verify the Purchase Schedule Active check box is selected.
6. In the Calendar field, search for and select D5H10.
Five days per week, ten hours per day.
Enter the Schedule Settings
1. In the Periodicity Settings section, enter the following information:
DataFieldWeeklyPeriod 1
10Min. Quantity (Period 1)
Nth Day of the MonthPeriod 2
50Min. Quantity (Period 2)
3Minimum Period 1 Shift Days
1Minimum Forward Span
Epicor ERP | 10.0.700.280
Purchase Management CourseSpecialized Purchase Processing
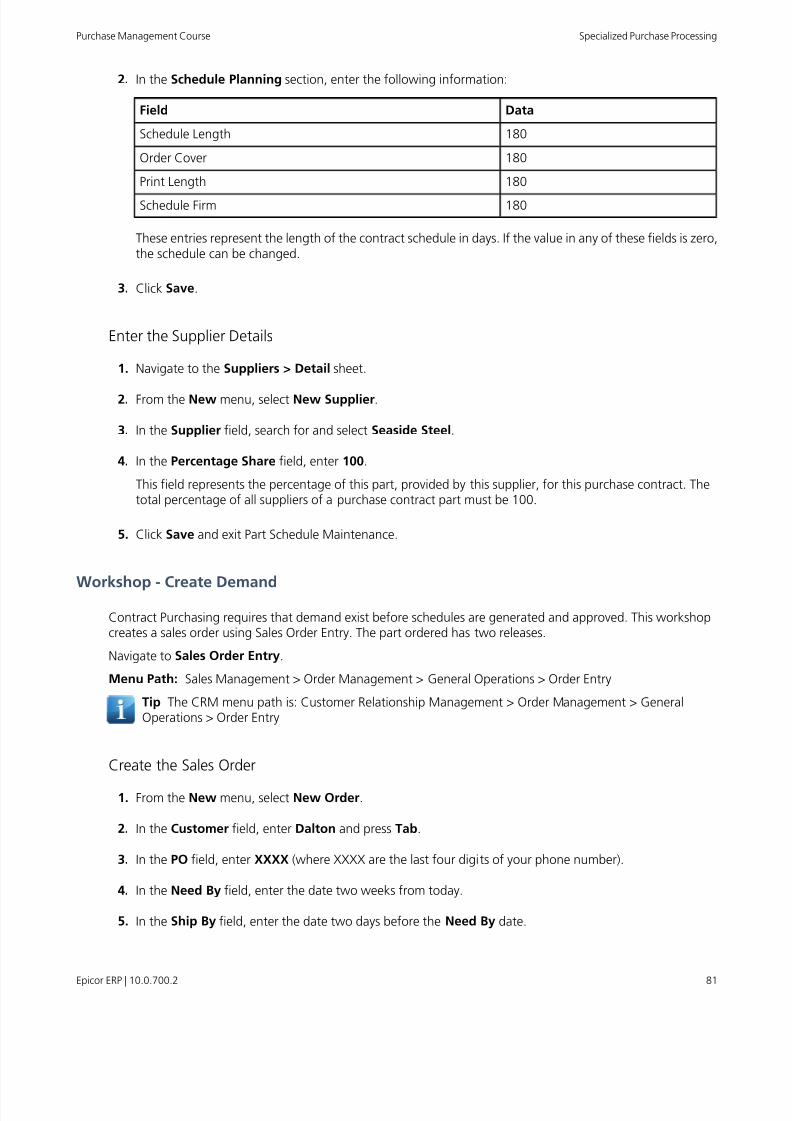
8/9/2019 Epicor ERP Purchase Management Course 10.0.700.2
http://slidepdf.com/reader/full/epicor-erp-purchase-management-course-1007002 81/105
2. In the Schedule Planning section, enter the following information:
DataField
180Schedule Length
180Order Cover
180Print Length
180Schedule Firm
These entries represent the length of the contract schedule in days. If the value in any of these fields is zero,the schedule can be changed.
3. Click Save.
Enter the Supplier Details
1. Navigate to the Suppliers > Detail sheet.
2. From the New menu, select New Supplier.
3. In the Supplier field, search for and select Seaside Steel.
4. In the Percentage Share field, enter 100.
This field represents the percentage of this part, provided by this supplier, for this purchase contract. Thetotal percentage of all suppliers of a purchase contract part must be 100.
5. Click Save and exit Part Schedule Maintenance.
Workshop - Create Demand
Contract Purchasing requires that demand exist before schedules are generated and approved. This workshopcreates a sales order using Sales Order Entry. The part ordered has two releases.
Navigate to Sales Order Entry.
Menu Path: Sales Management > Order Management > General Operations > Order Entry
Tip The CRM menu path is: Customer Relationship Management > Order Management > GeneralOperations > Order Entry
Create the Sales Order
1. From the New menu, select New Order.
2. In the Customer field, enter Dalton and press Tab.
3. In the PO field, enter XXXX (where XXXX are the last four digits of your phone number).
4. In the Need By field, enter the date two weeks from today.
5. In the Ship By field, enter the date two days before the Need By date.
81Epicor ERP | 10.0.700.2
Specialized Purchase ProcessingPurchase Management Course

8/9/2019 Epicor ERP Purchase Management Course 10.0.700.2
http://slidepdf.com/reader/full/epicor-erp-purchase-management-course-1007002 82/105
6. Click Save.
7. Note the Sales Order number: _______________.
8. From the New menu, select New Line.
9. Select the Lines > Detail sheet.
10. In the Part/Rev field, enter 001-XXX (where XXX are your initials) and press Tab.
11. In the Order Quantity field, enter 10.
12. In the Unit Price field, enter 8.
13. Select the Lock Line Quantity check box.
14. Click Save.
Enter the Second Release
1. From the New menu, select New Release.
2. In the Order Quantity field, enter 4.
3. In the Need By field, enter the date one month from today.
4. In the Ship By field, enter the date two days before the Need By date.
5. Click Save and exit Sales Order Entry.
Workshop - Create a Contract Purchase Order
In this workshop, create a contract purchase order.
Navigate to Purchase Order Entry.
Menu Path: Material Management > Purchase Management > General Operations > Purchase Order Entry
Create the Contract Purchase Order
1. From the New menu, select New Contract PO.
2. Navigate to the Header > Detail sheet.
3. In the Supplier field, search for and select Seaside Steel.
4. In the Ship Via field, select Local Truck.
5. In the FOB field, select Factory.
6. In the Buyer field, select your name.
7. In the Start Date field, select today's date.
Epicor ERP | 10.0.700.282
Purchase Management CourseSpecialized Purchase Processing
8/9/2019 Epicor ERP Purchase Management Course 10.0.700.2
http://slidepdf.com/reader/full/epicor-erp-purchase-management-course-1007002 83/105
8. In the End Date field, select the last day of the year.
9. Click Save.
10. Record the PO number _______________.
Add the Purchase Order Line1. From the New menu, select New Line.
The Lines > Detail sheet displays.
2. In the Part/Rev field, enter 001-XXX (where XXX are your initials) and press Tab.
3. In the Contract Qty field, enter 1000.
4. In the UOM field, verify EA displays.
5. In the Contract Price field, enter 90.
6. Select the Contract Active check box.
7. Click Save.
Approve the Purchase Order
1. Navigate to the Summary sheet.
2. Select the Unapproved check box.
The Approved status displays.
3. Click Save and exit Purchase Order Entry.
Generate Purchase Schedules
Use Generate Purchase Schedules to produce purchase schedules. You can then review and manually adjustthe resulting purchase schedules in Purchase Schedule Approval before formal approval.
Before you run Generate Purchase Schedules, use Generate Purchasing Suggestions process to producesuggestions for scheduled parts. The Generate Purchase Schedules process uses this data to generate the applicablepurchase schedules. When running Generate Purchase Schedules, use the Selection sheet to select the parametersfor the process, and the Filter sheet(s) to select the specific records to include for the process.
You can also generate purchase schedules in:
• Generate Purchase Suggestions, through selection of the Include Contract PO Parts and Run GeneratePurchase Schedules check boxes. If you select these check boxes, generated suggestions include purchaseschedules.
• Process MRP, through selection of the Include Contract PO Parts and Run Generate Purchase Schedulescheck boxes.
83Epicor ERP | 10.0.700.2
Specialized Purchase ProcessingPurchase Management Course
8/9/2019 Epicor ERP Purchase Management Course 10.0.700.2
http://slidepdf.com/reader/full/epicor-erp-purchase-management-course-1007002 84/105
Regardless of the program you use to generate purchase schedules, the Epicor application uses the followingparameters to determine how the related demand requirements should be slotted:
• Duration of the associated contract purchase order.
• Period 1, Period 2, working Calendar days, Period Shift Days and Minimum Quantities settings as defined inPart Schedule Maintenance for the associated part schedule record.
• It then combines the settings above with the associated Supplier Periodicity settings to determine the resulting
part schedules per supplier.Tip For more information about the logic used in purchase schedule generation, view the Generate PurchaseSchedules - Flowchart and Purchase Schedule Generation - Parameters and Calculations topics in theApplication Help.
Menu Path
Navigate to this program from the Main Menu:
• Material Management > Purchase Contracts Management > General Operations > Generate Purchase Schedules
Workshop - Generate Purchase Order Suggestions
In this workshop, generate PO suggestions. Running the PO Suggestions process produces suggestions forscheduled parts. This process then uses this data to determine the schedules in Schedule Maintenance.
Navigate to Generate Purchasing Suggestions.
Menu Path: Material Management > Purchase Contracts Management > General Operations > GeneratePurchase Schedules
Important The Generate Purchase Order Suggestions process should only be run by one person at atime in a shared database.
1. Leave the Cutoff Date field blank.
2. In the Schedule field, accept the default of Now.
3. Leave the User Description field blank.
4. Click Process.
5. Exit Generate Purchasing Suggestions.
Workshop - Generate the Purchase Schedule
In this workshop, generate the purchase schedule. The data produced using the Purchase Schedule process
becomes the basis of the Schedule Maintenance data that can be manually adjusted before approval.Navigate to Generate Purchase Schedules.
Menu Path: Material Management > Purchase Contracts Management > General Operations > GeneratePurchase Schedules
1. Leave the Cutoff Date field blank.
2. Click Process.
Epicor ERP | 10.0.700.284
Purchase Management CourseSpecialized Purchase Processing
8/9/2019 Epicor ERP Purchase Management Course 10.0.700.2
http://slidepdf.com/reader/full/epicor-erp-purchase-management-course-1007002 85/105
3. Exit Generate Purchase Schedules.
Workshop - Approve the Purchase Schedule
In this workshop, approve the purchase schedule. Suggestions can be modified before generating purchaseschedules.
Navigate to Purchase Schedule Approval.
Menu Path: Material Management > Purchase Contracts Management > General Operations > Purchase ScheduleApproval
1. Click Search (binoculars).
The Purchase Schedule Search displays.
2. Click the Search button.
3. Select the purchase order created in the Workshop - Create Contract Purchase Order.
4. Navigate to the Schedule > Detail sheet to review the details of the proposed schedule.
5. Click the Approve Schedule button.
6. Click Save and exit Purchase Schedule Approval.
Purchase Contract Report and Tracker
The following lists the reports and trackers important to Purchase Contracts.
Report
The Purchase Contract Schedule Report provides a breakdown of existing Contract POs. This is useful inviewing schedule requirements for contract POs.
Menu Path
Navigate to this program from the Main Menu:
• Material Management > Purchase Contracts Management > Reports > Purchase Contract Schedule
Tracker
The Purchase Contract Schedule Tracker provides contract quantities, contract dates, and current scheduleinformation regarding purchase contracts.
Menu Path
Navigate to this program from the Main Menu:
• Material Management > Purchase Contracts Management > General Operations > Purchase Contract ScheduleTracker
85Epicor ERP | 10.0.700.2
Specialized Purchase ProcessingPurchase Management Course
8/9/2019 Epicor ERP Purchase Management Course 10.0.700.2
http://slidepdf.com/reader/full/epicor-erp-purchase-management-course-1007002 86/105
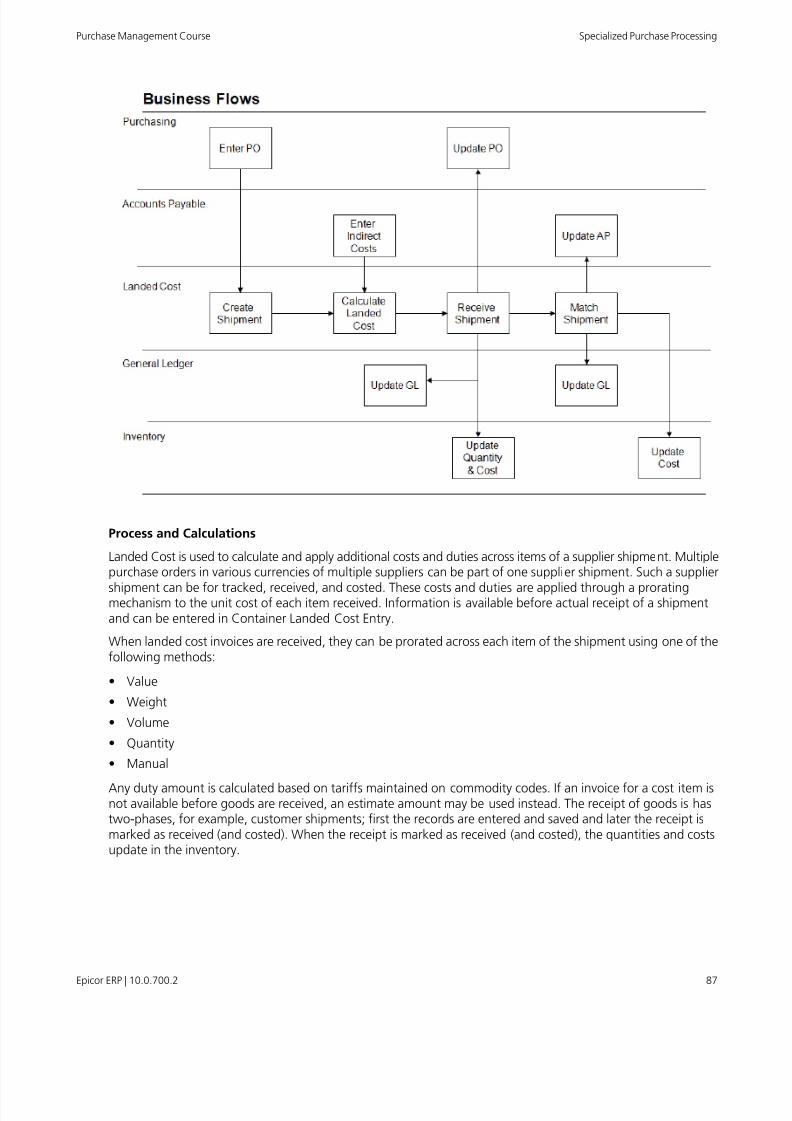
8/9/2019 Epicor ERP Purchase Management Course 10.0.700.2
http://slidepdf.com/reader/full/epicor-erp-purchase-management-course-1007002 87/105
Process and Calculations
Landed Cost is used to calculate and apply additional costs and duties across items of a supplier shipment. Multiplepurchase orders in various currencies of multiple suppliers can be part of one supplier shipment. Such a supplier
shipment can be for tracked, received, and costed. These costs and duties are applied through a proratingmechanism to the unit cost of each item received. Information is available before actual receipt of a shipmentand can be entered in Container Landed Cost Entry.
When landed cost invoices are received, they can be prorated across each item of the shipment using one of thefollowing methods:
• Value
• Weight
• Volume
• Quantity
• Manual
Any duty amount is calculated based on tariffs maintained on commodity codes. If an invoice for a cost item isnot available before goods are received, an estimate amount may be used instead. The receipt of goods is hastwo-phases, for example, customer shipments; first the records are entered and saved and later the receipt ismarked as received (and costed). When the receipt is marked as received (and costed), the quantities and costsupdate in the inventory.
87Epicor ERP | 10.0.700.2
Specialized Purchase ProcessingPurchase Management Course
8/9/2019 Epicor ERP Purchase Management Course 10.0.700.2
http://slidepdf.com/reader/full/epicor-erp-purchase-management-course-1007002 88/105
Landed Cost Setup
Several setup programs must be completed in order to use Landed Cost functionality.
Country Maintenance
Use Country Maintenance to enter country records. A country record includes the ISO code, currency, language,tax region, default sales taxes, and other country-specific settings.
If your company does business with customers and suppliers in other countries, define country-specific informationin Country Maintenance. This information defaults to all customers and suppliers in the country. It also defaultsto customer ship-to addresses and supplier purchase points.
The country record determines default options for currency, language, and printed address formats. For Europeancountries, it also configures international border crossing requirements.
The country record is optional if you primarily conduct business within one country.
When a country is not selected, the customer Sold To and Ship To records use the default country setup forthe company.
Menu Path
Navigate to this program from the Main Menu:
• Financial Management > Accounts Payable > Setup > Country
• Financial Management > Accounts Receivable > Setup > Country
• Material Management > Purchase Management > Setup > Country
• Sales Management > Customer Relationship Management > Setup > Country
• Sales Management > Order Management > Setup > Country
• Sales Management > Quote Management > Setup > Country
For CRM users, the Main Menu appears as:
• Customer Relationship Management > Sales and Marketing Management > Setup > Country
• Customer Relationship Management > Order Management > Setup > Country
• Customer Relationship Management > Quote Management > Setup > Country
Port
Use the Port sheet to add a port to a country. You can also designate one port per country as a default. Portsare available in Container Landed Cost Entry.
Workshop - Add Port
In this workshop, add a country port.
Navigate to Country Maintenance.
Menu Path: Material Management > Purchase Management > Setup > Country
1. In the Country field, search for and select Australia.
2. From the New menu, select New Port.
3. Enter the following information:
Epicor ERP | 10.0.700.288
Purchase Management CourseSpecialized Purchase Processing
8/9/2019 Epicor ERP Purchase Management Course 10.0.700.2
http://slidepdf.com/reader/full/epicor-erp-purchase-management-course-1007002 89/105
DataField
XXX SY (where XXX are your initials)Port
XXX Sydney (where XXX are your initials)Description
4. Select the Default check box.
This indicates the default port to be used for Landed Costs.
5. Click Save and exit Country Maintenance.
Company Configuration
Company Configuration contains features to enable Landed Cost processing for shipping and receiving goods.
Workshop - Set Up Shipping and Receiving
In this workshop, configure Company Configuration for landed cost.
Navigate to Company Configuration.
Menu Path: System Setup > Company/Site Maintenance > Company Configuration
1. Navigate to the Modules > Materials > Shipping Receiving sheet.
2. In the Landed Cost Defaults pane, verify all check boxes are selected:
• Allow Landed Cost In Receipt Entry
• Apply Landed Cost After Receipt
• Allow Split Container Shipment
• Allow Transfer of Indirect Costs
• Allow Update of PO Transaction Value
• Disable Uplift Percent
3. In the Default Disburse Method field, verify Value is selected.
4. Click Save and exit Company Configuration.
HS Commodity Codes
Use HS Commodity Maintenance to define the commodity codes tracked for Intrastat reporting and landed
costs. The World Customs Organization (WCO) has developed a Harmonized System (HS) of commodity codes.Most countries have adopted, or are in the process of adopting, a system of commodity codes based on thisHarmonized System.
Tariffs are linked to HS commodity codes rather than individual parts. This eliminates the maintenance of tariffson a part-by-part basis.
Note If intrastat is enabled, then the first eight characters of the HS commodity code will become theintrastat commodity number (ICN).
89Epicor ERP | 10.0.700.2
Specialized Purchase ProcessingPurchase Management Course
8/9/2019 Epicor ERP Purchase Management Course 10.0.700.2
http://slidepdf.com/reader/full/epicor-erp-purchase-management-course-1007002 90/105
Menu Path
Navigate to this program from the Main Menu:
• Material Management > Inventory Management > Setup > HS Commodity
• Material Management > Purchase Management > Setup > HS Commodity
• Material Management > Supplier Relationship Management > Setup > HS Commodity
• Production Management > Engineering > Setup > HS Commodity
• Production Management > Job Management > Setup > HS Commodity
• Sales Management > Order Management > Setup > HS Commodity
For CRM users, the Main Menu appears as:
• Customer Relationship Management > Order Management > Setup > HS Commodity
Workshop - Harmonized System (HS) Commodity Codes
Dalton Manufacturing must use commodity codes to track Intrastat reporting and landed costs, particularly fromsuppliers in the European Union. In this workshop, add a Harmonized System (HS) commodity code that classifiesa group of goods.
Navigate to HS Commodity Maintenance.
Menu Path: Material Management > Inventory Management > Setup > HS Commodity
1. Click New.
2. In the Code field, enter XXX SY1 (where XXX are your initials).
3. In the Description field, enter XXX Sydney (where XXX are your initials).
4. Enter the following information:
DataFieldXXX SYIMSTStatistical Import Code
XXX SYEXSTStatistical Export Code
XXX SYIMImport Code
XXX SYEXExport Code
For each instance, XXX are your initials.
5. Click Save and exit HS Commodity Maintenance.
Import Preference Scheme Maintenance
Use Import Preference Scheme Maintenance as the first step to set up tariffs to calculate landed cost duties.With this program, you can identify a group of countries with the same tariff rules and regulations to becomepart of a preference scheme.
Important Import Preference Scheme Maintenance is available only if your landed cost license is active.
Epicor ERP | 10.0.700.290
Purchase Management CourseSpecialized Purchase Processing
8/9/2019 Epicor ERP Purchase Management Course 10.0.700.2
http://slidepdf.com/reader/full/epicor-erp-purchase-management-course-1007002 91/105
A preference scheme can apply to one country or a group of countries. Most countries have trade agreements(preference schemes) that lift duties or have lower tariffs.
Example For example, Australia and New Zealand are typically referred to as ANZ in regards to importtariff regulations because they share the same import and export regulations and tariffs.
This program functions in conjunction with Import Tariff Maintenance and HS Commodity Maintenance.
Menu Path
Navigate to this program from the Main Menu:
• Material Management > Purchase Management > Setup > Import Preference Scheme
Workshop - Create the Import Preference Scheme
Dalton Manufacturing wishes to define an import preference scheme for Australia and New Zealand.
Navigate to Import Preference Scheme Maintenance.
Menu Path: Material Management > Purchase Management > Setup > Import Preference Scheme
1. From the New menu, select New Preference Scheme.
2. In the Code field, enter XXX-ANZ and XXX Australia and New Zealand (where XXX are your initials).
3. From the New menu, select New Preference Scheme Country.
4. In the Country field, select Australia and press Enter.
5. In the Country field, select New Zealand.
6. Click Save and exit Import Preferences Scheme Maintenance.
Import Tariff Maintenance
Use Import Tariff Maintenance to set up import tariff rates and link them to codes created in Import PreferenceScheme Maintenance and HS Commodity Maintenance.
Important Import Tariff Maintenance is available only if your landed cost license is active.
Import Tariff Maintenance calculates landed cost tariffs and duties. You can apply rates based on a standard rateamount or percentage, and define maximum and minimum duty amounts to apply to a shipment. You can alsolink a commodity code list to a tariff code and apply these codes to a tariff. One or more tariffs can be used tocalculate the duty on one shipment item. Duties depend on the country of origin of the item. Most countrieshave trade agreements (preference schemes) that lift duties or have lower tariffs. A preference scheme applies
to one country or to a group of countries.
Menu Path
Navigate to this program from the Main Menu:
• Material Management > Purchase Management > Setup > Import Tariff
91Epicor ERP | 10.0.700.2
Specialized Purchase ProcessingPurchase Management Course
8/9/2019 Epicor ERP Purchase Management Course 10.0.700.2
http://slidepdf.com/reader/full/epicor-erp-purchase-management-course-1007002 92/105
Workshop - Import Tariff
In this workshop, create a new import tariff for Australia and New Zealand.
Navigate to Import Tariff Maintenance.
Menu Path: Material Management > Purchase Management > Setup > Import Tariff
1. From the New menu, select New Tariff.
2. Enter the following information:
DataField
XXX-ANZI (where XXX are your initials)Code
XXX ANZ Import (where XXX are your initials)Description
XXX Australia and New Zealand (where XXX are your initials)Scheme
20Tariff Rate
15Percent50Amount
100Minimum Duty
10,000Maximum Duty
Duty calculation:
(Total shipment quantity X Tariff Rate) + (Total shipment value X Percent) + Amount = Duty
If total calculated duty amount is less than the minimum duty amount, the minimum duty amount is used.
If total calculated duty amount is more than the maximum duty amount, the maximum duty amount is used.
3. From the New menu, select New Commodity Code.
4. In the HS Commodity Code field, select XXX-SY1 (where XXX are your initials).
5. Click Save and exit Import Tariff Maintenance.
Miscellaneous Charge/Credit Maintenance
Use Purchasing Miscellaneous Charge/Credit Maintenance to define charges or credits that apply to purchaseorders. Select the general ledger controls that define the accounts to which the credits or charges post. Examplesinclude freight charges and expediting fees.
Important These miscellaneous charges are not the same charges you set up in the Order Managementor Accounts Receivable modules. You pay these charges to suppliers. Your customers pay the miscellaneouscharges set up in the Order Management and Accounts Receivable modules.
Menu Path
Navigate to this program from the Main Menu:
• Financial Management > Accounts Payable > Setup > Miscellaneous Charge/Credit
• Material Management > Purchase Management > Setup > Miscellaneous Charge/Credit
Epicor ERP | 10.0.700.292
Purchase Management CourseSpecialized Purchase Processing
8/9/2019 Epicor ERP Purchase Management Course 10.0.700.2
http://slidepdf.com/reader/full/epicor-erp-purchase-management-course-1007002 93/105
• Service Management > Expense Management > Setup > Miscellaneous Charge/Credit
Workshop - Miscellaneous Charge/Credit
In this workshop, create a new miscellaneous charge.
Navigate to Purchasing Miscellaneous Charge/Credit Maintenance.
Menu Path: Material Management > Purchase Management > Setup > Miscellaneous Charge/Credit
1. From the New menu, select New Charge.
2. In the Charge ID field, enter XXX (where XXX are your initials) and XXX Charge 1 (where XXX are yourinitials) as the description.
3. Select the Landed Cost check box.
Indicates that this code applies landed costs.
4. In the Landed Cost Method field, select or verify Value displays.
5. In the Cost Amount field, enter 30.
This cost amount applies to the Miscellaneous Charge code.
6. Accept the default currency.
7. Click Save and exit Purchasing Miscellaneous Charge/Credit Maintenance.
Supplier Shipment Classes
Use Supplier Shipment Class Maintenance to set up the characteristics of common containers to be shipped.
This includes volume and default cost information. The shipment class is referenced when creating containershipments.
Menu Path: Material Management > Shipping / Receiving > Setup > Supplier Shipment Class
Workshop - Supplier Shipment Classes
Dalton Manufacturing wishes to set up the characteristics of common containers used for shipments from Australiaand New Zealand, and link it to their defined indirect codes. In this workshop, add a supplier shipment class andlink the created indirect cost code to it.
Navigate to Supplier Shipment Class Maintenance.
Menu Path: Material Management > Shipping / Receiving > Setup > Supplier Shipment Class
1. From the New menu, select New Shipment Class.
2. Enter the following information:
DataField
XXX-1ANZ (where XXX are your initials)Shipment Class
XXX Containers from ANZ (where XXX are your initials)Description
93Epicor ERP | 10.0.700.2
Specialized Purchase ProcessingPurchase Management Course
8/9/2019 Epicor ERP Purchase Management Course 10.0.700.2
http://slidepdf.com/reader/full/epicor-erp-purchase-management-course-1007002 94/105
DataField
XXX Sydney (where XXX are your initials)Loading Port
XXX Sydney (where XXX are your initials)Discharging Port
100 LVolume
50 KGWeight
3. From the New menu, select New Indirect Cost.
4. In the Charge ID field, select XXX Charge 1 (where XXX are your initials).
5. In the Charge ID field, select XXX (where XXX are your initials).
XXX Charge 1 (where XXX are your initials) displays as the description.
6. Click Save and exit Supplier Shipment Class Maintenance.
Workshop - Landed Cost Entry
This workshop demonstrates the process of entering landed costs.
Create Purchase Orders
In this workshop, add two purchase orders for different suppliers. Each purchase order has two lines, and mustbe for parts that contain a valid HS Commodity Code. In a later workshop, the landed costs are disbursed amongthe four line items created in this workshop. Create two purchase orders.
Navigate to Purchase Order Entry.
Menu Path: Material Management > Purchase Management > General Operations > Purchase Order Entry
Create Purchase Order #1
1. From the New menu, select New PO.
2. Navigate to the Header > Detail sheet.
3. In the Buyer field, select your name.
4. In the Supplier field, search for and select A-Z Metals.
5. From the New menu, select New Line.
The Lines > Detail sheet displays.
6. Enter the following information:
DataField
84005-053Part/Rev
4Our Qty
24Unit Price
Epicor ERP | 10.0.700.294
Purchase Management CourseSpecialized Purchase Processing
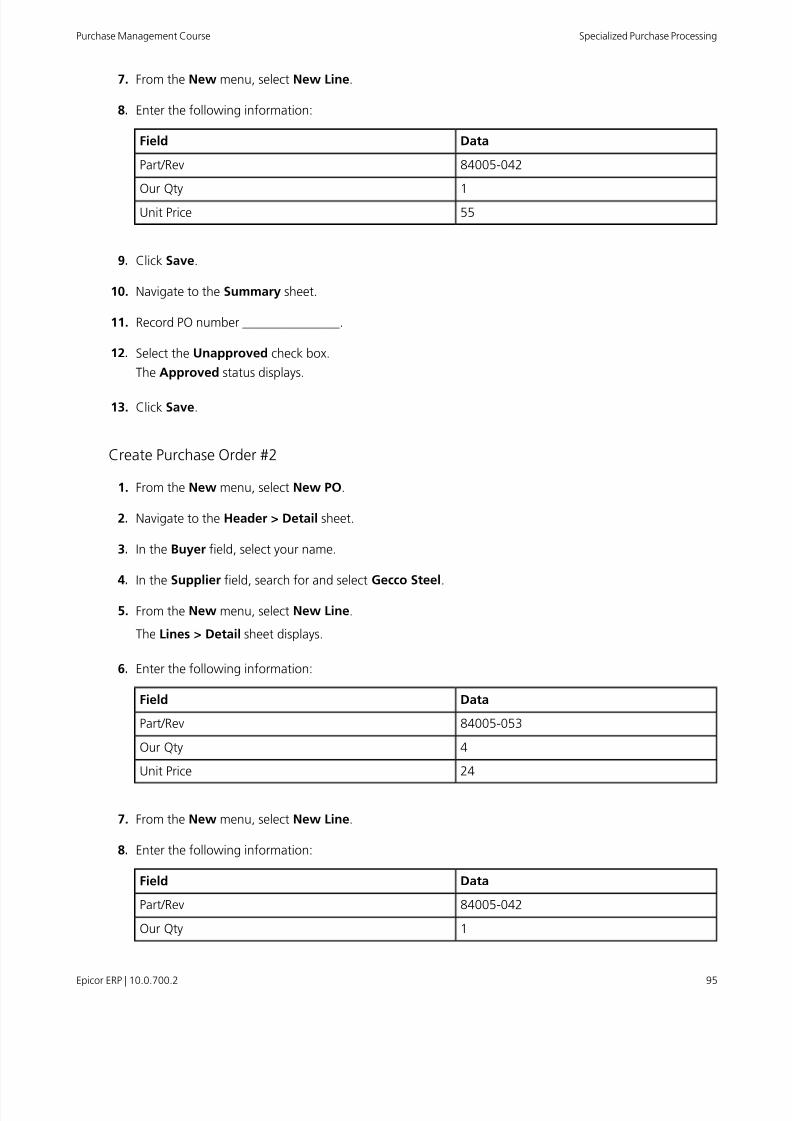
8/9/2019 Epicor ERP Purchase Management Course 10.0.700.2
http://slidepdf.com/reader/full/epicor-erp-purchase-management-course-1007002 95/105
7. From the New menu, select New Line.
8. Enter the following information:
DataField
84005-042Part/Rev
1Our Qty
55Unit Price
9. Click Save.
10. Navigate to the Summary sheet.
11. Record PO number _______________.
12. Select the Unapproved check box.
The Approved status displays.
13. Click Save.
Create Purchase Order #2
1. From the New menu, select New PO.
2. Navigate to the Header > Detail sheet.
3. In the Buyer field, select your name.
4. In the Supplier field, search for and select Gecco Steel.
5. From the New menu, select New Line.
The Lines > Detail sheet displays.
6. Enter the following information:
DataField
84005-053Part/Rev
4Our Qty
24Unit Price
7. From the New menu, select New Line.
8. Enter the following information:
DataField
84005-042Part/Rev
1Our Qty
95Epicor ERP | 10.0.700.2
Specialized Purchase ProcessingPurchase Management Course

8/9/2019 Epicor ERP Purchase Management Course 10.0.700.2
http://slidepdf.com/reader/full/epicor-erp-purchase-management-course-1007002 96/105
DataField
55Unit Price
9. Click Save.
10. Navigate to the Summary sheet.
11. Record PO number _______________.
12. Select the Unapproved check box.
The Approved status displays.
13. Click Save and exit Purchase Order Entry.
Enter the Shipment
Create the shipment for the two POs using one container. Parts must have a commodity code.
Navigate to Container Landed Cost Entry.
Menu Path: Material Management > Shipping / Receiving > General Operations > Container Landed Cost Entry
1. From the New menu, select New Shipment.
Record the Shipment ID _______________.
2. In the Description field, enter XXX Container LC (where XXX are your initials).
3. In the Status field, verify Ordered.
The status of the shipment determines the availability of other functions, such as Transfer of Indirect Costs.For example, if the status selected is Arrived, the container is not eligible for Transfer of Indirect Costs.
4. In the Shipping Option field, select Create New.
Select the option that determines how to handle discrepant quantities between the original PO release andthe shipped quantity:
• Create New - The PO release quantity is reduced to the shipping quantity, and a new PO release iscreated for the difference between the shipped quantity and the original quantity.
• Ship Short - The PO release quantity is reduced.
• None - No action taken.
5. In the Receipt Options field, select Create New.
Select the option that determines how to handle discrepant quantities between the original PO release andthe received quantity:
• Create New - The PO release quantity is reduced to the shipping quantity, and a new PO release iscreated for the difference between the shipped quantity and the original quantity.
• Arrive Short- The PO release quantity is reduced.
• None- No action taken.
6. In the Shipment Class field, select XXX Containers from ANZ (where XXX are your initials).
Epicor ERP | 10.0.700.296
Purchase Management CourseSpecialized Purchase Processing
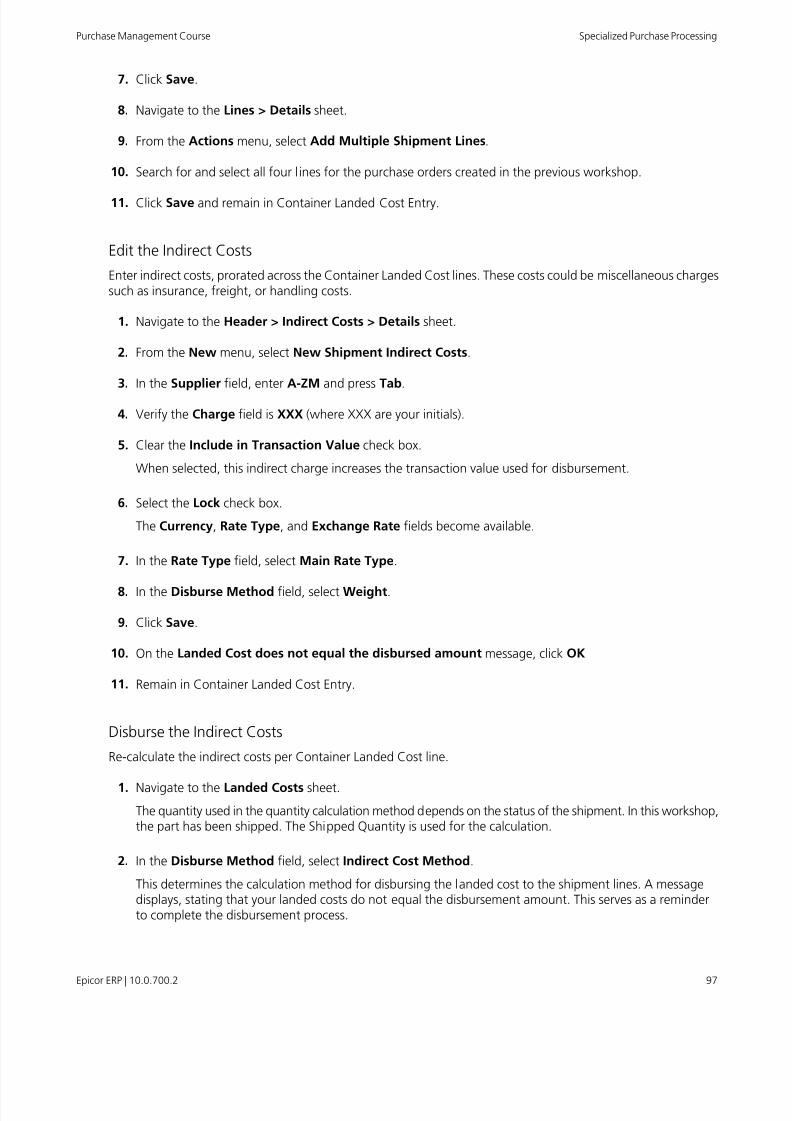
8/9/2019 Epicor ERP Purchase Management Course 10.0.700.2
http://slidepdf.com/reader/full/epicor-erp-purchase-management-course-1007002 97/105
7. Click Save.
8. Navigate to the Lines > Details sheet.
9. From the Actions menu, select Add Multiple Shipment Lines.
10. Search for and select all four lines for the purchase orders created in the previous workshop.
11. Click Save and remain in Container Landed Cost Entry.
Edit the Indirect Costs
Enter indirect costs, prorated across the Container Landed Cost lines. These costs could be miscellaneous chargessuch as insurance, freight, or handling costs.
1. Navigate to the Header > Indirect Costs > Details sheet.
2. From the New menu, select New Shipment Indirect Costs.
3. In the Supplier field, enter A-ZM and press Tab.
4. Verify the Charge field is XXX (where XXX are your initials).
5. Clear the Include in Transaction Value check box.
When selected, this indirect charge increases the transaction value used for disbursement.
6. Select the Lock check box.
The Currency, Rate Type, and Exchange Rate fields become available.
7. In the Rate Type field, select Main Rate Type.
8. In the Disburse Method field, select Weight.
9. Click Save.
10. On the Landed Cost does not equal the disbursed amount message, click OK
11. Remain in Container Landed Cost Entry.
Disburse the Indirect Costs
Re-calculate the indirect costs per Container Landed Cost line.
1. Navigate to the Landed Costs sheet.
The quantity used in the quantity calculation method depends on the status of the shipment. In this workshop,the part has been shipped. The Shipped Quantity is used for the calculation.
2. In the Disburse Method field, select Indirect Cost Method.
This determines the calculation method for disbursing the landed cost to the shipment lines. A messagedisplays, stating that your landed costs do not equal the disbursement amount. This serves as a reminderto complete the disbursement process.
97Epicor ERP | 10.0.700.2
Specialized Purchase ProcessingPurchase Management Course
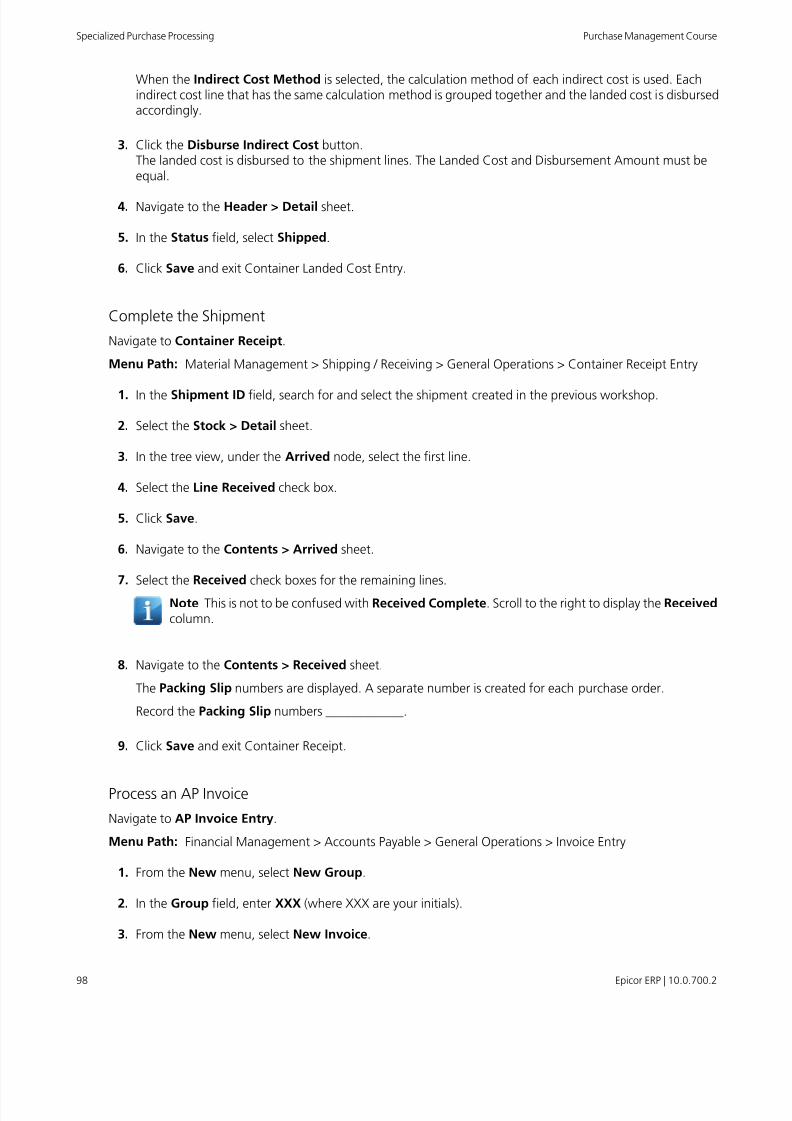
8/9/2019 Epicor ERP Purchase Management Course 10.0.700.2
http://slidepdf.com/reader/full/epicor-erp-purchase-management-course-1007002 98/105
When the Indirect Cost Method is selected, the calculation method of each indirect cost is used. Eachindirect cost line that has the same calculation method is grouped together and the landed cost is disbursedaccordingly.
3. Click the Disburse Indirect Cost button.The landed cost is disbursed to the shipment lines. The Landed Cost and Disbursement Amount must beequal.
4. Navigate to the Header > Detail sheet.
5. In the Status field, select Shipped.
6. Click Save and exit Container Landed Cost Entry.
Complete the Shipment
Navigate to Container Receipt.
Menu Path: Material Management > Shipping / Receiving > General Operations > Container Receipt Entry
1. In the Shipment ID field, search for and select the shipment created in the previous workshop.
2. Select the Stock > Detail sheet.
3. In the tree view, under the Arrived node, select the first line.
4. Select the Line Received check box.
5. Click Save.
6. Navigate to the Contents > Arrived sheet.
7. Select the Received check boxes for the remaining lines.
Note This is not to be confused with Received Complete. Scroll to the right to display the Receivedcolumn.
8. Navigate to the Contents > Received sheet.
The Packing Slip numbers are displayed. A separate number is created for each purchase order.
Record the Packing Slip numbers ____________.
9. Click Save and exit Container Receipt.
Process an AP Invoice
Navigate to AP Invoice Entry.
Menu Path: Financial Management > Accounts Payable > General Operations > Invoice Entry
1. From the New menu, select New Group.
2. In the Group field, enter XXX (where XXX are your initials).
3. From the New menu, select New Invoice.
Epicor ERP | 10.0.700.298
Purchase Management CourseSpecialized Purchase Processing
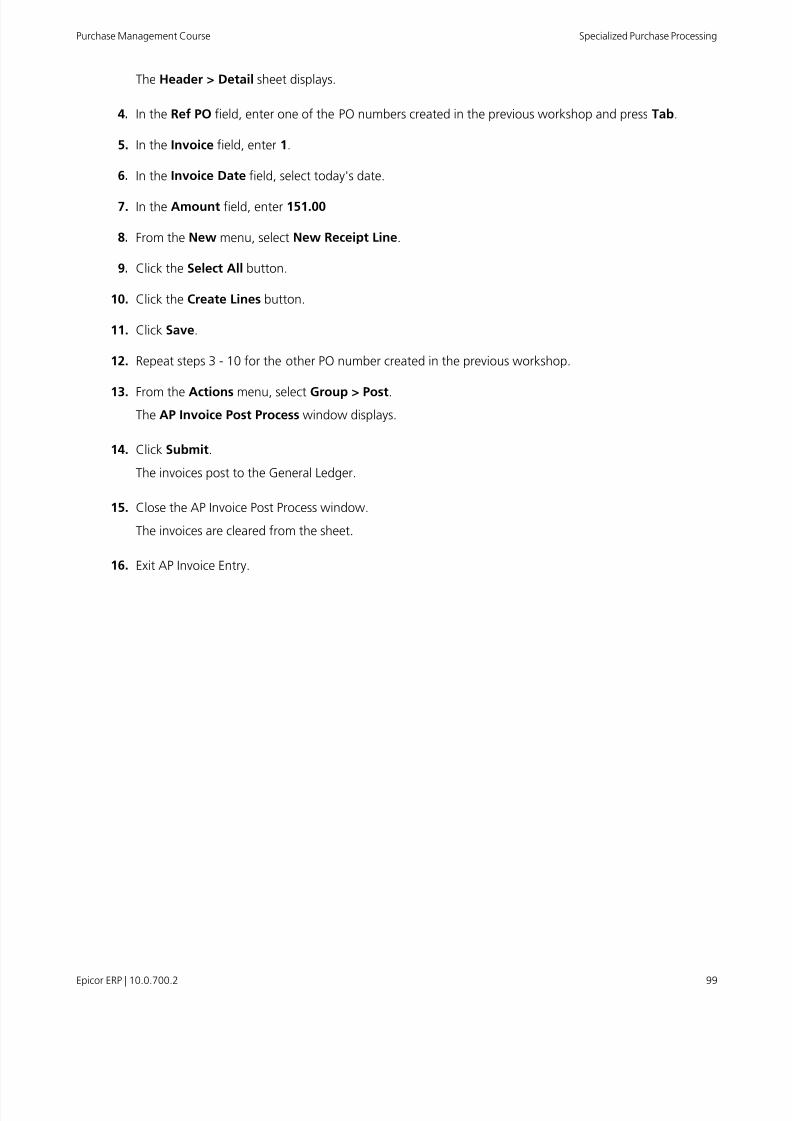
8/9/2019 Epicor ERP Purchase Management Course 10.0.700.2
http://slidepdf.com/reader/full/epicor-erp-purchase-management-course-1007002 99/105
The Header > Detail sheet displays.
4. In the Ref PO field, enter one of the PO numbers created in the previous workshop and press Tab.
5. In the Invoice field, enter 1.
6. In the Invoice Date field, select today's date.
7. In the Amount field, enter 151.00
8. From the New menu, select New Receipt Line.
9. Click the Select All button.
10. Click the Create Lines button.
11. Click Save.
12. Repeat steps 3 - 10 for the other PO number created in the previous workshop.
13. From the Actions menu, select Group > Post.The AP Invoice Post Process window displays.
14. Click Submit.
The invoices post to the General Ledger.
15. Close the AP Invoice Post Process window.
The invoices are cleared from the sheet.
16. Exit AP Invoice Entry.
99Epicor ERP | 10.0.700.2
Specialized Purchase ProcessingPurchase Management Course
8/9/2019 Epicor ERP Purchase Management Course 10.0.700.2
http://slidepdf.com/reader/full/epicor-erp-purchase-management-course-1007002 100/105
Conclusion
Congratulations! You have completed the Purchase Management course.
Epicor ERP | 10.0.700.2100
Purchase Management CourseConclusion
8/9/2019 Epicor ERP Purchase Management Course 10.0.700.2
http://slidepdf.com/reader/full/epicor-erp-purchase-management-course-1007002 101/105
Appendix
Additional Purchase Management Information.
• Cost Types
• Transaction Types
Cost Types
Cost type is initially setup in the company configuration. The cost type for each item may be different. For example,finished goods may be at a standard cost, while raw material may be an average cost.
A part's cost type may be changed only when the on-hand quantity of the part is zero. The actual cost of theitem may be changed at any time using Cost Adjustment.
Available costing methods:
• Average Cost - This method calculates a weighted average of all receipt costs for this part.
• FIFO - This is an abbreviation for First In First Out. This method assumes that the next quantity to be issuedor shipped from stock is the oldest quantity stored in the warehouse. As long as quantity remains from theoriginal received quantity, the Epicor application uses this cost value until the entire quantity from the originalreceipt is consumed.
• Last Cost - This method calculates the most recent receipt cost for this part.
• Lot Average Cost - This method calculates an average cost of all parts in a lot. This is the total cost, dividedby the total quantity, for all parts in a lot.
• Lot FIFO - This method determines the cost of all parts in a lot by using the FIFO costing method describedabove.
• Standard Cost - This method calculates a set cost that you establish and enter for this part. You define andupdate the standard cost for each part in the Costing Workbench.
If a part shipped using Customer Shipment Entry is standard costed, the shipment from Work In Process(WIP) MFG-CUS transaction captures the standard unit cost for the part rather than actual costs from the job.If there are variances between the standard cost for the part and the actual costs of the job, the Epicorapplication creates a MFG-VAR transaction for the remaining WIP balances.
Transaction Types
Transaction types classify part transactions. This is helpful when researching a part in the Part Tracker or whenrunning the Material Transaction Detail report.
Adjustments
• ADJ-MTL - Adjustment to job cost material.
• ADJ-SUB - Adjustment to job cost subcontract.
• ADJ-PUR - Adjustment to purchase cost variance.
101Epicor ERP | 10.0.700.2
AppendixPurchase Management Course
8/9/2019 Epicor ERP Purchase Management Course 10.0.700.2
http://slidepdf.com/reader/full/epicor-erp-purchase-management-course-1007002 102/105
• ADJ-CST - Adjustment to stock cost.
• ADJ-QTY - Adjustment to stock quantity.
Discrepant Material Reporting (DMR)
• DMR-MTL - DMR to job material.
• DMR-REJ - DMR to reject.
• DMR-SUB - DMR to subcontract.
• STK-DMR - Stock to DMR.
• SUB-DMR - Subcontract to DMR.
• DMR-STK - DMR to stock.
Inspection Processing
• ASM-INS - Assembly to inspection.
• INS-ASM - Inspection to assembly.
• INS-DMR - Inspection to DMR.
• INS-MTL - Inspection to job material.
• INS-STK - Inspection to stock.
• INS-REJ - Inspection to reject.
• INS-SUB - Inspection to subcontract.
• STK-INS - Stock to inspection.
• SUB-INS - Subcontract to inspection.
Manufacturing
• MFG-WIP - Manufacturing receipt to job.
• MFG-PLT - Manufacturing receipt to site.
•MFG-STK - Manufacturing receipt to stock.
• MFG-VAR - Manufacturing variance.
• MTL-DMR - Job material to DMR.
• MTL-INS - Job material to inspection.
site
• PLT-ASM - site to assembly.
• PLT-MTL - site to job material.
• PLT-STK - site to stock.
Purchasing
• PUR-INS - Purchase receipt to inspection.
• PUR-MTL - Purchase receipt to job material.
• PUR-STK - Purchase receipt to stock.
• PUR-SUB - Purchase receipt to subcontract.
• PUR-UKN - Purchase receipt to unknown.
Epicor ERP | 10.0.700.2102
Purchase Management CourseAppendix
8/9/2019 Epicor ERP Purchase Management Course 10.0.700.2
http://slidepdf.com/reader/full/epicor-erp-purchase-management-course-1007002 103/105
Return Material Processing
• RMA-INS - RMA receipt to inspection.
Salvage Material Processing
• SVG-STK - Salvage material receipt to stock.
Shipments
• MFG-CUS - Shipment of manufacturing job to customer.
• MFG-VEN - Shipment of manufacturing job to supplier.
• STK-CUS - Shipment of stock to customer.
Stock Transactions
• STK-ASM - Stock to job assembly.
• STK-MTL - Stock to job material.
• STK-PLT - Stock to site.
• STK-SRV - Stock to service.
• STK-STK - Stock to stock transfer.
• STK-UNK - Stock to unknown.
103Epicor ERP | 10.0.700.2
AppendixPurchase Management Course
8/9/2019 Epicor ERP Purchase Management Course 10.0.700.2
http://slidepdf.com/reader/full/epicor-erp-purchase-management-course-1007002 104/105
Index
C
change po suggestions 69
N
new po suggestions 65
S
site maintenance 32
Epicor ERP | 10.0.700.2104
Purchase Management CourseIndex
8/9/2019 Epicor ERP Purchase Management Course 10.0.700.2
http://slidepdf.com/reader/full/epicor-erp-purchase-management-course-1007002 105/105
Additional information is available at the Education andDocumentation areas of the EPICweb Customer Portal. To access
this site, you need a Site ID and an EPICweb account. To create anaccount, go to http://support.epicor.com.