Embed Size (px)
Citation preview

EP4000/EP5000Thank you for choosing Minolta.
This operator’s manual explains how to operate the copier and replenish its supplies. It also givessome troubleshooting tips as well as general precautions to be observed when operating the copier.
To ensure the best performance and effective use of your copier, read this manual carefully until yo ufamiliarize yourself thoroughly with its operation and features. After you have read through themanual, keep it for ready reference.Please use this manual as a quick and handy reference tool for immediately clarifying any questionswhich may arise.
CE Marking (Declaration of Conformity)
We declare under our sole responsibility that the copier and options to which this declarationrelates is in conformity with the specifications below.This declaration is valid for the area of the European Union (EU) only.
Product Type Copying MachineProduct Name EP4000/EP5000Options AF-5, AFR-13, S-106, ST-104, S-208, ST-211, C-301, PF-5D, PF-205,
PF-105, AD-9, D-102, DT-103, E2000KitStandards Safety*2 : EN 60 950 / 1992 (A1 : 1993, A2 : 1993, A3 : 1995)
(Safety of information technology equipment, including electricalbusiness equipment)
EMC*1 : EN 55 022 (Class B) / 1995(Limits and method for measurement of radio disturbancecharacteristics of information technology equipment (ITE))EN 50 082-1 / 1992(Electromagnetic compatibility - Generic immunity standardPart1: Residential, commercial and light industry)
IEC 801-2 / 1991 (Electrostatic discharge requirement)IEC 801-3 / 1984 (Radiated electromagnetic field requirement)IEC 801-4 / 1988 (Electrical fast transient / burst requirement)
Notes : *1) EMC performance : This product was designed for operation in a typical office environment.*2) First year of labeling according to EC-directive 73/23/EEC and 93/68/EEC :97
EC Directives SafetyEMC
::
73 / 23 / EEC and 93 / 68 / EEC89 / 336 / EEC and 93 / 68 / EEC
i

Contents
Terms and Symbols for the Type of Originals and Copy Paper vi
Chapter 1 Safety Notes p. 1
1. Installing the Copier p. 2 Installation SitePower SourceSpace Requirements
2. Precautions for Use p. 3Operating Environment Using the Copier Properly Moving the Copier Care of Copier Supplies
Chapter 2 Getting to Know Your Copier p. 5
1. Typical Types of Copies You Can Make with Your Copier p. 62. System Overview p. 83. Copier Parts and Accessories p. 104. Control Panel Keys and Indicators p. 165. Using the Touch Panel p. 18
What is the Touch Panel?How the Screen is OrganizedOperating the Touch Panel
6. Turning ON and OFF and Initial Mode p. 20Turning ON and OFFInitial Mode
7. Auxiliary Functions p. 21• Panel Resetting• Auto Panel Reset• Auto Copy Start• Auto Power-OFF• Energy Saver• Interrupt• Mode Check• Access Number
ii

Chapter 1
Safety Notes
Chapter 3
Making Copies
Chapter 6
Troubleshooting
Chapter 7
Miscellaneous
Chapter 3 Making Copies p. 231. Basic Copying Overview p. 242. Placing Originals p. 263. Manual Bypass Copying p. 324. Basic Functions
Copy Paper Size p. 34Zoom Ratio p. 36Image Density p. 40
5. Selecting the Original Copy Type p. 42• 1 1• 1 2• 2 1• 2 2• 1 [2in1]• 1 2[2in1]• 1[2in1] 1• 2[2in1] 1• Book 1• Book 2
6. Finishing Mode p. 48• Non-Sort• Sort• Sort Staple• Group• Hole Punch• Manual Staple• Auto Dual Function
7. Auxiliary Functions p. 58• Cover p. 58• Auto Original Count p. 61• Page Insertion p. 62• OHP Interleaving p. 68• File Margin p. 72• Edge/Frame Erase p. 74
▲
▲▲
▲
▲▲
▲
▲
▲
▲
▲
Contents
Chapter 2
Getting to KnowYour Copier
Chapter 4
Using the UserMode
Chapter 5
When a MessageAppears
iii

Contents
Chapter 4 Using the User Mode p. 77
1. Job Memory Input and Job RecallJob Memory Input p. 78Recalling a Job from Memory p. 81
2. Zoom Memory Input p. 823. Meter Count, Toner Replenisher, and Drum Dehumidifier p. 834. User’s Choice p. 84
• User’s Choice Functions p. 84• Making the User’s Choice Settings p. 90• Copy Track Function p. 92
5. Data Send p. 100
Chapter 5 When a Message Appears p. 101
1. When the Message "The current Paper Drawer is empty."Appears p. 102
2. When the Message "Replenish Toner." Appears p. 1083. When the Message "The Staple Cartridge is empty." Appears
p. 1104. When the Message "A paper misfeed has been detected."
Appears p. 114• Misfeed Location Displays p. 114• Misfeed Clearing Procedures
Copier p. 115Copier (Multi Bypass Tray) p. 117Paper Feed Cabinet (2-Drawer Type) p. 118Paper Feed Cabinet (1-Drawer Type) p. 119Duplex Unit p. 120Large Capacity Cassette p. 121Duplexing Document Feeder p. 122Automatic Document Feeder p. 123Sorter/Staple Sorter p. 124
5. When “ ” Appears p. 1256. What Does Each Message Mean? p. 126
iv

Chapter 1
Safety Notes
Chapter 3
Making Copies
Chapter 6
Troubleshooting
Contents
Chapter 6 Troubleshooting p. 1291. When This Type of Copy is Produced p. 1302. The Copier is not Functioning as Designed p. 132
Chapter 7 Miscellaneous p. 1331. Specifications p. 134
• Copier• Duplexing Document Feeder• Automatic Document Feeder• Sorter (10-Bin)• Sorter (20-Bin)• Staple Sorter (10-Bin)• Staple Sorter (20-Bin)• Paper Feed Cabinet (2-Drawer Type)• Paper Feed Cabinet (1-Drawer Type)• Duplex Cabinet• Duplex Unit• Large Capacity Cassette• Data Controller
2. Care of the Copier p. 140• Cleaning
3. Function Combination Matrix p. 1424. Description of Copy Paper Size and
Zoom Ratio Table p. 1455. Index p. 146
Chapter 7
Miscellaneous
Chapter 2
Getting to KnowYour Copier
Chapter 4
Using the UserMode
Chapter 5
When a MessageAppears
v

A few special terms and symbols are used in this manual to designate types of originals and copypaper. This page explains about these terms and symbols.
Feeding Direction (copy paper path)
In this copier system, copy paper is taken up from the right-hand side of the copier and fed throughthe copier toward the left-hand side, face up onto the Copy Tray. In the figure below, the directionin which the copy paper is fed, as indicated by the arrow, is called the "feeding direction."
1151O107AA
"Width" and "Length"
139O1610A
When we talk about the size of the original or copy, we call sideA "width" and side B "length."
A: Width B: Length
1139O1620A
<Crosswise >
When the original or copy has a "length" shorter than its"width," we call it "crosswise" and use symbol "C" or " ."
1139O1610A
<Lengthwise >
When the original or copy has a "length" longer than its"width," we call it "lengthwise" and use symbol "L" or " ."
Terms and Symbols Used
Terms and Symbols for the Type of Originals and Copy Papervi

Chapter 1
Safety Notes
Ch
apte
r 1
Saf
ety
Not
es
This chapter explains about the operating environment, conditions, and precautions for use.
1. Installing the Copier p. 2Installation Site Power SourceSpace Requirements
2. Precautions for Use p. 3Operating EnvironmentUsing the Copier ProperlyMoving the CopierCare of Copier Supplies
1

1. Installing the Copier
Installation SiteTo ensure utmost safety and prevent possible malfunctions of the copier, install it in a location whichmeets the following requirements.
u A place away from a curtain or the like thatmay catch fire and burn easily.
u An area where there is no possibility ofbeing splashed with water or other types ofliquid.
u An area free from direct sunlight.u A place out of the direct air stream of an air
conditioner, heater, or ventilator.u A well-ventilated place.u A dry place.
u A dust-free location.u An area not subject to undue vibration.u A stable and level location.u A place where ammonia or other organic
gas is not generated.u A place which does not put the operator in
the direct stream of exhaust from the copier.u A place which is not near any kind of
heating device.
Power Source The power source voltage requirements are as follows.
Space Requirements To ensure easy copier operation, supply replacement, and service maintenance, adhere to therecommended space requirements detailed below. Allow a clearance of 150mm or more at the backof the copier as there is a ventilation duct.
Unit: mm
u Use a power source with little voltage fluctuation.
Voltage Fluctuation : Within ±10%Frequency Fluctuation : Within ±0.3%
1156O008AA
1,870300
2,370
200
1156O009AA
150
1,310
C
hap
ter
1S
afet
y N
otes
2

2. Precautions for Use
= Locate the Copier in a Well Ventilated Room = A negligible amount of ozone is generated during normal operation of this copier. Anunpleasant odor may, however, be created in poorly ventilated rooms during extensive copieroperations. For a comfortable, healthy, and safe operating environment, it is recommended thatthe room be well ventilated.
NOTE
Operating EnvironmentThe operating environmental requirements of the copier are as follows.
Temperature : 10 °C to 30°C(50°F to 86°F) with a fluctuation of 10 °C(50°F) per hour
Humidity : 15% to 85% with a fluctuation of 20% per hour.
Using the Copier Properly To ensure the optimum performance of the copier, follow the precautions listed below.
= Placer le copieur dans une pièce largement ventilée =Une quantité d’ozone négligable est dégagée pendant le fonctionnement du copieur quandcelui-ci est utilisé normalement. Cependant, une odeur désagréable peut être ressentie dans lespièces dont l’aération est insuffisante et lorsque une utilisation prolongée du copieur esteffectuée. Pour avoir la certitude de travailler dans un environnement réunissant des conditionsde confort, santé et de sécurité, il est préférable de bien aérer la pièce ou se trouve le copieur.
REMARQUE
u NEVER place a heavy object on the copier or subject the copier to shocks.u NEVER open any doors, or turn OFF the copier while the copier is making copies.u NEVER bring any magnetized object or use flammable sprays near the copier.u ALWAYS insert the power plug all the way into the outlet.u ALWAYS make sure that the outlet is visible, clear of the copier or copier cabinet.u ALWAYS provide good ventilation when making a large number of continuous copies.
Care of Copier Supplies Use the following precautions when handling the copier supplies (toner, paper, etc.).
Moving the Copier If you need to transport the copier over a long distance, consult your Technical Representative.
u Store the paper, toner, and other supplies in a place free from direct sunlight and away from anyheating apparatus. Keep them in a dry, cool, clean environment.
u Store paper, which has been removed from its wrapper but not loaded into the drawer, in asealed plastic bag in a cool, dark place.
u Keep supplies out of the reach of children.u If your hands become soiled with toner, wash them with soap and water immediately.
Ch
apte
r 1
Saf
ety
Not
es
3

2. Precautions for Use
C
hap
ter
1S
afet
y N
otes
4

1. Typical Types of Copies You Can Make with Your Copier p. 62. System Overview p. 83. Copier Parts and Accessories
Outside the Copier p. 10Inside the Copier p.11Options p. 12
4. Control Panel Keys and Indicators p. 165. Using the Touch Panel p. 18
What is the Touch Panel?How the Screen is OrganizedOperating the Touch Panel
6. Turning ON and OFF and Initial Mode p. 20Turning ON and OFFInitial Mode
7. Auxiliary Functions p. 21Panel ResettingAuto Panel ResetAuto Copy StartAuto Power-OFFEnergy SaverInterruptMode CheckAccess Number
Ch
apte
r 2
Get
tin
g to
Kn
ow Y
our
Cop
ier
This chapter gives you a brief description of the system and preliminary information about thedifferent parts of the system.
Chapter 2
Getting to Know Your Copier
5

Here’s a rundown of the features the copier is equipped with to turn out different types of copies.For the operations, see the relevant pages indicated by ➭ p.
1.Typical Types of Copies You Can Make with Your Copier
▲Original Copy ➭ p. 42
Sort ➭ p. 48
1149O025AA
A A1149O025AA
1-sided 1-sided
▲
1149O026AA
B
BA A1149O026AA
1-sided 2-sided
▲
1149O027AA
BAA B1149O027AA
Book 1-sided
▲
1149O028AA
BA A B1149O028AA
2-in-1
1149O029AA
32
1
32
1
32
1
32
1
1149O029AA
Sort
1149O030AA
32
1
11
1
22
2
33
3
1149O030AA
Group
32
1
1
1149O031AA1149O031AA
Sort-and-Staple
32
1
32
1
1149O032AA1149O032AA
Hole Punch
Ch
apte
r 2
Get
tng
to K
now
You
r C
opie
r6

1. Typical Types of Copies You Can Make with Your Copier
Zoom Ratio ➭ p. 36
Auxiliary Functions ➭ p. 58
1149O004AA1149O004AA
Reduced, Full Size, Enlarged
1149O013AA1149O013AA
Cover ➭ p. 58
1149O014AA
Page Insertion ➭ p. 62
1149O017AA
OHP Interleaving ➭ p. 68
1149O015AB1149O015AC
File Margin ➭ p. 72
1149O016AA1149O016AA
Erase ➭ p. 74
Ch
apte
r 2
Get
tin
g to
Kn
ow Y
our
Cop
ier
7

2. System Overview
10-Bin Sorter S-106 <Option>Permits sorting or grouping copiesinto up to 10 copy sets or stacks.
Staple Sorter ST-104 <Option>Automatically staples copy sets orstacks that are sorted or grouped bythe same function as that of S-106.
20-Bin Sorter S-208 <Option>Permits sorting or grouping copiesinto up to 20 copy sets or stacks.
Staple Sorter ST-211 <Option>Automatically staples, and/orpunches holes in, copy sets orstacks that are sorted or grouped bythe same function as that of S-208.
1139O0030A
Duplex Unit AD-9 <Option>Mounted in the Paper Feed Cabinet,AD-9 automatically turns over1-sided copies to make 2-sidedcopies.
1136O020A
1136O059AA
1139O1222A
Duplex Cabinet PF-5D<Option>Turns over 1-sided copies to make 2-sidedcopies. It is also equipped with a storagedrawer for keeping copy paper and toner.
Ch
apte
r 2
Get
tin
g to
Kn
ow Y
our
Cop
ier
8

2. System Overview
Paper Feed Cabinet PF-205 <Option>Equipped with two paper drawers, eachcapable of holding up to 500 sheets of copypaper (80 g/m2).
Paper Feed Cabinet PF-105 <Option>Equipped with a large-capacity drawer to holdup to 2,500 sheets of copy paper (80 g/m2).
1139O0180A 1139O0012A
1156O013AA
Duplexing Document Feeder AFR-13<Option>In addition to the function of the AF-5, it canturn over 2-sided originals for making copies.
1156O012AA
Data Controller D-102 <Option>Capable of controlling varioustypes of data including the numberof copies made, copy cost, and userdepartments by means of specificmagnetic cards.
1138O525A
Large CapacityCassette C-301<Option>Holds up to3,000 sheets ofcopy paper (80 g/m2).
1134O005AA
Automatic Document Feeder AF-5<Option>Capable of feeding in sheet originals one at atime for making a copy or copies of each.
1151O007AA
Ch
apte
r 2
Get
tin
g to
Kn
ow Y
our
Cop
ier
9

3. Copier Parts and Accessories
1 2
3
4 5 6 7
8
9 10
11
1134O103CA12
1 Exit Tray Extender : Slide this Extender out when making copies on large-size paper.
2 Exit Tray : Holds copies fed out of the copier.
3 Front Door : Open to:• Replace the Toner Bottle. ➭ p. 108• Clear a paper misfeed. ➭ p. 115• Clean the Corona Unit. ➭ p. 141
Closing the Front Door after a misfeed has been cleared will turnthe misfeed warning message on the control panel OFF.
4 Control Panel : Use to start a copy cycle or to make copying job settings. See Control Panel Keys and Touch Panel. ➭ p. 16
5 Original Cover<Option>
: Holds the original placed on the Original Glass in position. ➭ p. 29
6 Power Switch : Use to turn the copier ON and OFF. ➭ p. 20
7 Multi Bypass Tray : Use for manual feeding of copy paper into the copier. ➭ p. 32
8 Multi Bypass Extender : Slide this Extender out to make copies on large-size copy paper.
9 Total Counter : Shows the total number of copies made so far.
10 1st Drawer : Holds up to 500 sheets of copy paper. ➭ p. 102
11 2nd Drawer : Holds up to 500 sheets of copy paper. ➭ p. 103It can accommodate paper of different sizes.
12 Paper Descent Key : Press before sliding the Drawer out of the copier.
Outside the Copier
C
hap
ter
2G
etti
ng
to K
now
You
r C
opie
r10

Inside the Copier
1134O009AA
1
2
3
4 5
6
7
8 9 10
10
1 Toner Bottle Holder : Swing open to replace the Toner Bottle.
2 Toner Bottle : Contains toner. Replace it with a new one when the warningmessage tells you to. ➭ p. 108
3 Original Width Scale : Place the original along this Scale for correct positioning.
4 Original Length Scale : Place the original along this Scale for correct positioning.
5 Original Pad : Holds the original in position on the Original Glass.
6 Original Glass : Place the original face down on this Glass.
7 Corona Unit CleaningLever
: Operate the Lever to clean the Corona Unit if unwanted lines areproduced on the copy. ➭ p. 141
8 Dehumidifier Switch : Do not touch this switch, it’s for the exclusive use by theTechnical Representative.
9 Transport SectionRelease Lever M2
: Swing down to release the Transport Section for clearing a misfedsheet of paper.
10 Misfeed RemovalKnobs M1 , M3
: Use to clear a misfed sheet of paper. ➭ p. 115
Ch
apte
r 2
Get
tin
g to
Kn
ow Y
our
Cop
ier
3. Copier Parts and Accessories
11

Options
1134O046AA
2
1
1 Paper Descent Key : Press before sliding the Drawer out of the cabinet.
2 3rd Drawer : Holds up to 2,500 sheets of copy paper. ➭ p. 104
3 3rd Drawer : Holds up to 500 sheets of copy paper. ➭ p. 105
4 4th Drawer : Holds up to 500 sheets of copy paper. ➭ p. 105
5 Paper Descent Key : Press before sliding the Drawer out of the cabinet.
6 Duplex Unit : Turns over 1-sided copies for making 2-sided copies.
Paper Feed Cabinet (1-Drawer Type)
5 3
1134O047AB
4
6
Paper Feed Cabinet (2-Drawer Type)
Duplex Unit
C
hap
ter
2G
etti
ng
to K
now
You
r C
opie
r
3. Copier Parts and Accessories
12

Options
1 Duplex Unit : Turns over 1-sided copies for making 2-sided copies.
2 Storage Drawer : Holds copy paper, toner and other supplies.
Duplex Cabinet
1134O090CA
1
2
Ch
apte
r 2
Get
tin
g to
Kn
ow Y
our
Cop
ier
3. Copier Parts and Accessories
13

Options
1156O010AA
3
1
2
9
4
5
9
6 7
8
1 Sort Bins (1st to 20thBin)
: Hold sorted or grouped copies, each capable of holding up to 50.
2 Non-Sort Bin : Holds up to 100 copies fed out in the Non-Sort mode.
3 Lock Release Lever : Press to unlock the Sorter from the copier for clearing a misfedsheet of paper or other service job.
4 Staple Cover : Open to replace the Staple Cartridge.*Staple Sorter only
20-Bin Sorter/20-Bin Staple Sorter
5 Document Exit Tray : Receives originals that are auomatically ejected from DocumentFeeder.
6 Document Feed TrayExtender
: Pull out when loading large-size originals.
7 Document Feed Tray : Load the originals face up on this tray.
8 Document Guide Plate Slide the plate as necessary to the size of the originals.
9 Single Feed Tray Place a single sheet of original on the tray to make a copy orcopies of it. ➭ p. 28
Automatic Document Feeder/Duplexing Document Feeder
C
hap
ter
2G
etti
ng
to K
now
You
r C
opie
r
3. Copier Parts and Accessories
14

Options
1 Lock Replase Lever : Press to unlock the sorter. ➭ pp. 110, 124
2 Sort Bins : Hold sorted or grouped copies.
3 Stapler Door : Open to replace the Staple Cartridge. ➭ p. 110*Staple Sorter only
10-Bin Sorter /10-Bin Staple Sorter
4 Data Controller : See the operator’s manual for the Data Controller for details.
Data Controller
5 Lock Release Lever : Use to unlock the Cassette from the copier for clearing a misfedsheet of paper or other service job.
6 Paper Plate Descent Key : Press to lower the Paper Plate.
7 Cassette Door : Open to add paper or clear a misfed sheet of paper.
Large Capacity Cassette
1156O011AA
3
1
2
5
4
6
7
Ch
apte
r 2
Get
tin
g to
Kn
ow Y
our
Cop
ier
3. Copier Parts and Accessories
15

11
4. Control Panel Keys and Indicators
1 Touch Panel• Shows various screens and messages.
See Touch Panel ➭ p. 18
2 Start Key• Press to start a copy cycle. ➭ p. 25• If pressed while the copier is warming
up, it enables the Auto Copy StartFunction. ➭ p. 21
3 Clear KeyPress to:• Reset the multi-copy entry to 1. ➭ p. 25• Clear a zoom ratio entered when setting
one from the 10-Key Pad. ➭ p. 38
4 Stop Key• Press to stop a multi-copy cycle. ➭ p. 25
5 Panel Reset Key• Press to set the copier into the initial
mode, clearing all settings madepreviously on the control panel. ➭ p. 21
6 Interrupt Key ➭ p. 22• Press to interrupt a current job with a
different one.• Press it again to return to the previous job.
7 Energy Saver Key• Press to set the copier into the Energy
Saver mode. ➭ p. 21
8 Access Mode Key• Press to enter the access number. ➭ p. 22
9 10-Key PadUse to enter:• The number of copies to be made. ➭ p. 25• The zoom ratio to be used. ➭ p. 38• The number of originals.
Note: It does not, however, clear thecontents of the zoom and jobprogram memory and the settingsmade immediately before theInterrupt mode.
Note: This key becomes valid only whenCopy Track of the Administratormode available from User’s Choiceis set.
13 12 10
p
R s [ ¯ « • 1
Z x I [ g
Z x
p I [ g
p
x1.000
{ ƒ
d ª · e R s [ {User Mode
Job Recall
Mode Check
Ch
apte
r 2
Get
tin
g to
Kn
ow Y
our
Cop
ier
16

10 User Mode Key• Press to show the User Mode menu.
See Using the User Mode ➭ p. 77
11 Job Recall Key• Press to show the Job Recall screen, on
which you can recall or check a copy-jobprogram previously stored in memory. See Recalling a Job from Memory See ➭ p. 81
12 Mode Check Key• Press to show the Mode Check screen.
From this screen, you can access thesetting screen of a particular function andchange or cancel the setting as necessary. See Mode Check ➭ p. 22
13 Display Contrast Knob• Turn to vary the brightness of the Touch
Panel.
• Job Memory Input • Toner Replenisher• Zoom Memory Input • Drum Dehumidifier• Meter Count • User’s Choice
User Mode
1 2 3
4 5 6
7 8 9
0 CStart
Stop
Access
Energy Saver
Interrupt
Panel Reset
1149O002EA
p
R s [ ¯ « • 1
Z x I [ g
Z x
p I [ g
p
x1.000
{ ƒ
d ª · e R s [ {
5
1 2 3 4
9
8
7
6
1156O088DA
1149O260CA
1149O259CA
Ch
apte
r 2
Get
tin
g to
Kn
ow Y
our
Cop
ier
4. Control Panel Keys and Indicators
17

5. Using the Touch Panel
What is the Touch Panel?When you turn ON the Power Switch, the Basic screen as shown below appears on the TouchPanel. It shows in messages and graphics the currently set functions, available functions tochoose from, and the copier status.
How the Screen is Organized
(1) Supplementary Function Keys The Auxiliary, Finishing, Orig. Copy, andBasics keys are displayed. When any of thesekeys is touched, the correspondingsupplementary function screen appears.
* Touching Basics returns you to the Basicscreen.
Example: Auxiliary Function
(1) Supplementary Function Keys
(2) Message Display
(3) Basic Function/Key
(4) Set Function1149O263CA
1149O265CA
▲
Ch
apte
r 2
Get
tin
g to
Kn
ow Y
our
Cop
ier
18

5. Using the Touch Panel
(2) Message Display
1156O062DA
Example: Add paper
Shows the current copier status, operatinginstructions, precautions, and other dataincluding the number of copies selected.
(3) Basic Function/Key Display
Example: Exposure
Shows the basic function keys and thecorresponding functions currently selected foruse. Touching a basic function key shows thecorresponding basic function screen.*What is shown inside the key is the current setting.
(4) Set Function Display
Example: Orig. Copy : 1 2 Finishing : Sort-and-Staple
Shows graphic representations of the settingscurrently made for Orig. Copy and Finishing.
*When you want to check for more details of the set functions, press the Mode Check key. ➭ p. 22
Operating the Touch PanelYou need only to lightly touch the key shown on the Touch Panel to select or activate the functionrepresented by the key.
NEVER press the Touch Panel hard or use a hard or pointed object to press it, as a damagedpanel could result.
NOTE
▲
▲
1149O268BA
1149O263CA
▲
Ch
apte
r 2
Get
tin
g to
Kn
ow Y
our
Cop
ier
19

▼▼
▼
▼
6. Turning ON and OFF and Initial Mode
Turning ON and OFF
Initial ModeWhen the Power Switch is turned ON, the Basic screen appears on the Touch Panel. The settings onthis screen are called the initial mode, serving as the reference for all panel settings to be later made.
User’s Choice can be used to change the settings of initial mode. ➭ p. 84
Useful Tip
1134O016AA
● Turning the Copier ONPress the Power Switch to the I (ON)position.
● Turning the Copier OFFPress the Power Switch to the (OFF)position.
The Auto Power-OFF function willautomatically shut down the copier a givenperiod of time after the last activity. ➭ p. 88
NOTE
No. of copies selected : 1Exposure : AutoZoom : ×1.000Paper : Auto PaperFinishing : Non-SortOrig. Copy : 1 1
The settings of the initial mode vary dependingon which option or options are mounted onyour copier.
Example: When the Automatic DocumentFeeder and Duplex Unit are mounted
No. of copies selected : 1Exposure : AutoZoom : X1.000Paper : Auto PaperFinishing : Non-SortOrig. Copy : 1 2▼
1149O270CA
When the copier is equipped with theDocument Feeder and Duplex Unit, 1 2copy mode is automatically selected,Touch this Key if you want to make 1 1copies.
▼1149O413CA
Ch
apte
r 2
Get
tin
g to
Kn
ow Y
our
Cop
ier
20

The Panel Reset key resets all control panelsettings to default settings including thenumber of copies and zoom ratio.
* If a document feeder is used, anyoriginal left on the Glass will be ejectedout of the unit.
Panel Resetting
The time for the copier to enter the AutoPanel Reset Function can be changed to 30sec. ➭ p. 86
Useful Tip
If no key on the control panel is pressed within60 sec. after a copy cycle has been completedor copying settings made, the Auto Panel Resetfunction is activated to return the copier to thedefault settings.
Auto Panel Reset
• The Panel Reset key enables you tocancel all previous settings at the touch ofthe key.
• To avoid miscopy, try to press this keybefore making any setting for your owncopy job.
Useful Tips
If you load originals in the document feederand press the Start key while the copier iswarming up after it has been turned ON, theAuto Copy Start function allows that copyprocess to be started as soon as the copiercompletes warming up.
Auto Copy Start
7. Auxiliary Functions
The time for the copier to enter the AutoPower-OFF mode can be selected from 1 to120 min. The Auto Power-OFF function caneven be disabled.For details, see User’s Choice. ➭ p. 88
Useful Tip
The Auto Power-OFF function shuts down thecopier a given period time after the copier hasbeen used last.
Auto Power-OFF
The copier is automatically shut down ifthe Auto Power-OFF function is activatedwhile it is in the Energy Saver mode.
NOTE
If the copier is shut down when it is not in use,it takes the copier some time to complete thewarm-up cycle. Instead of turning the copierOFF, it’s a good idea to use the Energy Savermode which will minimize the time for thecopier to complete the warm-up cycle to about30 sec.
To set the copier into the Energy Saver mode,you need only to press the Energy Saver key.Or, a given period of time after the copier hasbeen touched last, it automatically enters theEnergy Saver mode. The initial setting is 15min.
To cancel the Energy Saver mode, press anykey on the control panel.
Energy Saver
The time for the copier to enter the EnergySaver mode can be selected from 1 to 120min.For details, see User’s Choice. ➭ p. 86
Useful TipC
hap
ter
2G
etti
ng
to K
now
You
r C
opie
r
21

7. Auxiliary Functions
The Interrupt function allows you to interrupt acurrent job and run a different one. Pressingthe Interrupt key once sets the copier into theInterrupt mode. Pressing the key again lets thecopier leave the Interrupt mode, returning tothe previous settings.
Interrupt
• If the current job involves 2-sidedcopying, Cover function, Page Insertionor OHP Interleaving, the copier rejectsan Interrupt cycle.
• If the current job involves a finishingfunction other than Non-Sort, Non-Sort isautomatically selected at the same timewhen an Interrupt function is invoked.
Useful Tips
When the initial screen reappears, youcan now start a copy cycle.2
From the 10-Key Pad, enter the 4-digitaccess number and press the AccessMode key.
1
• If an access number has beenprogrammed, a copy cycle can beinitiated only after the access numberhas been input to the copier.
<"Access #" Prompt Screen>
NOTES
By pressing the Mode Check key on thecontrol panel, you can either check for orchange the current settings.
Mode Check
• When you touch Exit after having checkedthe currently set functions, the Basic screenreappears.
• To change a certain function, touch thecorresponding key and then make thenecessary change.
When the copy cycle is completed,press the Access Mode key again.3
If an access number has been programmed, itallows only particular persons to use the copieror a supervisor to keep track of the number ofcopies made by a particular department.
Access Number
• Before you can use this function, youmust first turn "ON" the "Copy Track"function of the Administrator Modeavailable from User’s Choice. ➭ p. 88
Entering the Access Number
1 2 3
4 5 6
7 8 9
0 C
1134P438DA
To correct the 4-digit access numberentered, first press the Clear key, thenenter the new number.
NOTE
1134P438DA
1149O259CA
1149O271CA
Ch
apte
r 2
Get
tin
g to
Kn
ow Y
our
Cop
ier
22

Ch
apte
r 3
Mak
ing
Cop
ies
1. Basic Copying Overview p. 24 2. Placing Originals
• Using the Automatic/Duplexing Document Feeder p. 26• Placing Originals on the Original Glass p. 29
3. Manual Bypass Copying p. 32 4. Basic Functions
• Copy Paper Size p. 34• Zoom Ratio p. 36• Image Density p. 40
5. Selecting the Original Copy Type p. 42
6. Finishing Mode p. 48
7. Auxiliary Functions
▲
This chapter shows you how to make copies.The "Basic Copying Overview" offers quick, at-a-glance instructions for making copies. Each stepis keyed to a page number with a more detailed description.
Chapter 3
Making Copies
• 1 1 • 1[2in1] 1• 1 2 • 2[2in1] 1• 2 1 • Book 1• 2 2 • Book 2• 1 [2in1]• 1 2[2in1]••
▲▲
▲▲
▲
▲▲ ▲
▲
▲
Some Precautions for Making Copies p. 46 Selecting Original Copy Type p. 44
▲
• Non-Sort • Hole Punch• Sort • Manual Staple• Sort Staple• Group• Select the Finishing Function p. 50•
• Auto Dual Function p. 56
Instructions for Loading Originals for the Finishing Functions p. 54
• Cover p. 58• Auto Original Count p. 61• Page Insertion p. 62• OHP Interleaving p. 68• File Margin p. 72• Edge/Frame Erase p. 74
23

One of the most basic copying jobs is to make full-size (×1.000) copies of the original.• Place the original in position (step 1), set the number of copies to be made (step 8), and press the
Start key (step 9). This will allow you to make full-size copies on paper of the same size as theoriginal.(*Automatically selected in the initial mode are Auto Paper, full size, and Auto Exposure.)
The selections you make on the Touch Panel will change the exposure level, zoom ratio, thetype of copy and so on.
1. Placing the Original
• Load the originals face up on thedocument feeder. ➭ p. 27
1151O16AA 1151O013AA
• Raise the Original Cover and place theoriginal face down on the Original Glass.➭ p. 29
2. Touch Paper. ➭ p. 34
3. Touch Zoom. ➭ p. 36
4. Touch Exposure. ➭ p. 40
Selecting the basic functionsTo change the copy papersize
To change the zoom ratio
To change the exposurelevel
5. Touch Orig. Copy. ➭ p. 42
Selecting the original copy type
▲
▲
• To make copies from abook
• To save copy paper
1. Basic Copying Overview
1149O272CA
1149O413CA
C
hap
ter
3M
akin
g C
opie
s24

6. Touch Finishing ➭ p. 48
Selecting the finishing type• To sort copies• To staple copies• To punch holes in copies
7. Touch Auxiliary. ➭ p. 58
Selecting the auxiliary functions• To make a file margin
on the copy
8. Setting the number of copies.
• From the 10-Key Pad, set the desirednumber of copies to be made.
* If you have entered an incorrect number,press the Clear key C , then enter thecorrect number.
1 2 3
4 5 6
7 8 9
0 C
1139O2640A1139P2640A
Start
Stop
1134P337CA
9. Pressing the Start key
When you press the Start key, the copier starts the copy cycle.
* To stop the copy cycle, press the Stop key.
1149O274CA
1149O265CA
Ch
apte
r 3
Mak
ing
Cop
ies
1. Basic Copying Overview
25

2. Placing Originals
The Automatic/Duplexing Document Feeder automatically feeds in sheet originals placed on theDocument Feed Tray one by one. After the copy cycle has been completed, it automaticallyejects the original onto the Document Exit Tray.
Some originals may not be suitable for reliable operation of the Document Feeder. Here is aguideline.
Using the Automatic/Duplexing Document Feeder
Originals Suitable for the Automatic/Duplexing Document Feeder
Originals Not Suitable
Type of Originals: Sheets (Plain paper)Normal mode
• 1-Sided Original (50 g/m2 to 110 g/m2)• 2-Sided Original (60 g/m2 to 90 g/m2)• Mixed Original Detection Mode (60 g/m2 to 90 g/m2)
Lightweight Original Detection Mode (40 g/m2 to 110 g/m2)Original Size: 1-Sided Original, 2-Sided Original, Mixed Original Detection Mode
A3L, B4L, A4L, A4C, 210mm × 330mmA5L (Except for Mixed Original Detection Mode)
2-in-1 (Dual Original Scanning) mode : A4C∗ Lightweight OriginalBe sure to use the User’s Choice to turn ON the Lightweight Original Mode when making copiesfrom the lightweight originals. ➭ p. 86For a lightweight original (40g/m2 to 50g/m2 ), it is recommended to place it directly onto theOriginal Glass or to make copies using the SADF Mode. (Single Automatic Document FeedingMode). ➭ p. 28
• Typing paper, paraffin paper, and other thin paper • Thick paper • Originals greater than A3L or smaller than A5L• Transparencies, translucent paper• Wrinkled, dog-eared, curled, or torn originals• Clipped or stapled originals • Carbon-backed originals
∗ For any of these types of originals, place the original manually on the Original Glass to make a copy. ➭ p. 29
1134O073AA
Typing paper,paraffin paper,and other thinpaper
Thick paper
Continuousforms
Wrinkled ordog-earedoriginal
Stapledoriginals
C
hap
ter
3M
akin
g C
opie
s26
Using the Mixed Original Detection Mode
NOTE
2 Touch Mixed Orig.
1151O015AA
Loading the Originals
Slide the Document Guide Plate to thesize of the originals.∗ When using large size originals, flip up the Document Feed Tray Extender. (AF-5)
1
• The maximum number of originals thatcan be loaded
A4 or smaller : Up to 50A3 or B4 : Up to 30
• Make sure that the top level of theoriginal stack does not exceed themarking.
• Make sure that the Document GuidePlate is in touch with the edges of theoriginal stack. If it’s not pressed snuglyagainst the original stack, skewedfeeding could result.
NOTES
▼
Load a neat stack of originals face upon the Document Feed Tray.2
The copier cannot staple together copies ofdifferent sizes made in the Mixed OriginalDetection mode.
Load the stack of originals so that therear edge of each original is pressedagainst the rear Document Guide Plate.Then, slide the front Document GuidePlate against the front edges of theoriginals with the greatest width.
1
1151O017AA
1149O275CB
1138O537AAAuto Size ModeCopy Paper: Letter1138O537AA
Originals Copies
Mixed Original Mode
Use the Mixed Original Detection mode tomake copies automatically from originals ofassorted sizes loaded in theAutomatic/Duplexing Document Feeder.If Auto Size is selected, you can make copiesof the same size from originals of differentsizes.
1151O016AA
Ch
apte
r 3
Mak
ing
Cop
ies
2. Placing Originals
27

Using the Single Automatic Document Feeding Mode (SADF Mode)
This is the mode in which you load your originals one by one onto the Automatic/DuplexingDocument Feeder to make a copy or copies from it. When you load the original, the copierautomatically starts the copy cycle.
1151O018AA
1151O019AA
Make sure that the Start Key is litgreen and place the original face downon the Document Feed Table.
2
The original is automatically taken upand the copy cycle is started.3
Making sure that the Start Key lightsup green again, load the next original.4
Open the Single Feed Tray and slidethe Guide Plate to the size of theoriginal.
1
• Originals available for the SADF Mode. Type : Plain paper Thickness : 35 g/m 2 to 200 m/g2
Size : A3L to A5L• The following features cannot be selected in the SADF Mode. 2-sided original 1-sided copy 2-sided original 2-sided copy Dual Original Scanning Mode (2 in 1 Mode) Cover Mode, Separation Mode, Manual Staple
▼▼
NOTES
• Be sure to place one original at a time.• Be sure to correct any fold or curl in
the original.
NOTES
C
hap
ter
3M
akin
g C
opie
s
2. Placing Originals
28

Different methods are used to place the original depending on its type. Use the appropriateprocedure.
Placing Originals on the Original Glass
Sheet Originals
Raise the Original Cover and place theoriginal face down on the OriginalGlass.
1
Align the rear left corner of theoriginal with the marker on theOriginal Width Scale. Then, press therear edge of the original up against theOriginal Positioning Plate at the rearside of the Original Glass.
2
Gently lower the Original Cover.3
Place a blank sheet of paper of thesame size as the original over theoriginal.
2
Highly Transparent Originals(Using transparencies and translucent paper forthe original)
Place the original in the same way asthe sheet originals.1
Gently lower the Original Cover.3
1134O112AA
1134O113AA
Original PositioningPlate
1134O060AA
1134O114AA
Blank Sheetof Paper
The original size that can be detectedin the Auto Paper Select Mode areA3L, B4L, A4L, A4C, A5L.When making copies from originalsother that the above, select the copypaper size.
When using wrinkled or curledoriginals, the original size might not bedetected correctly. So, select the copypaper size and do not use the AutoPaper Select Mode.Copy Paper Size ➭ p. 34
NOTESC
hap
ter
3M
akin
g C
opie
s
2. Placing Originals
29

Making Copies from A Book Using Book Copy Mode
("Book" refers to an open bound original.)
Place the open book so that its topedge is at the rear of the copier.1
1134O037AA
Gently lower the Original Cover.2
• If the book is thick, make a copy withthe Original Cover raised.
• Not positioning the open book properlywill result in copies with pages inincorrect order.
• Do not look directly at the OriginalGlass surface as a strong beam of lightis emitted.
NOTES
• Be sure to raise the Original Cover 15°or more before placing the original. Ifthe Original Cover is raised to anangle less than 15°, the copier may failto select the correct copy paper size orzoom ratio.
• Do not place an original weighingmore than 3 kg on the Original Glass.
• When placing an open book, do notpress the book hard on the OriginalGlass, as trouble could result.
Instructions for Original Placement
1139O080AA
15°
C
hap
ter
3M
akin
g C
opie
s30
2. Placing Originals

Ch
apte
r 3
Mak
ing
Cop
ies
312. Placing Originals

3. Manual Bypass Copying
Use the Manual Bypass to make copies on paper not loaded in any drawer, or to copy ontotransparencies, translucent paper, or any other special paper. When using the Multi Bypass Tray,you can load multiple sheets of copy paper.
Copy Paper That Can be Used for Manual Bypass
Non-Sort and 1-Sided Copy 2-Sided Copy Sort/Group/Staple/Punch
Type ofPaper
Plain paper (weighing 60g/m2 to 90g/m2)Heavyweight paper (weighing 91g/m2 to 157g/m2)Transparencies, translucent paper
Plain paper (weighing 60g/m2 to 90g/m2)Heavyweight paper (weighing 91g/m2 to 157g/m2)
Plain paper (weighing 60g/m2 to 90g/m2)
PaperSize
A3L to A6LWidth : 100 mm × 297 mmLength : 140 mm × 432 mm
A3L to A5L Sort/Group : A3L to A6LStaple : A3L to A5LPunch : A3L, A4C
CapacityPlain Paper … Up to 50 sheetsPlain Paper (once-copied paper) … Up to 20 sheetsThick paper, transparencies, translucent paper … Up to 20 sheets
Using the Manual Bypass
Place the original on the OriginalGlass and make the control panelsettings.
1
The following functions cannot beselected for Manual Bypass if "ManualFeed Expansion" of User’s Choice hasbeen turned "OFF" : Auto Size, Autopaper, Finishing, and 2-sided copying,Margin-by-Reduction, 1[2in1] 1 and2[2in1] 1.
NOTE
▲
▲
Swing down the Multi Bypass Trayand slide the Paper Guide Plate to thesize of the copy paper.
2
Place a neat stack of copy paper on theTable and insert it into the copier untilit stops.
3
• Before inserting, fan the paper stackwell if you are using transparencies ortranslucent paper.
• Correct any curl if you are usingheavyweight paper.
• When using once-copied paper, loadthe paper stack so that the blank sidefaces up.
• The paper will be copied on the sidefacing up.
NOTES
1136O079AA
1136O080AA
C
hap
ter
3M
akin
g C
opie
s32

3. Manual Bypass Copying
Touch Paper .4
1149O269CC
Touch Input Size .5
1156O083DA
Select the desired paper size andtouch Enter .6
1156O008CA
When you want to use inch size paper,touch Inch on the screen given in step 6 ,and you have screen that allows you toselect a inch paper size
When you use nonstandard size paper,touch Input # on the screen given in step 6 , and you have the following screen.
Touch X and enter the size from the10-Key Pad
Touch Y and enter the size from the10-Key Pad.Then touch OK .
Useful Tip
1156O009CA
1156O084DA
1156O085DA
Ch
apte
r 3
Mak
ing
Cop
ies
33

4. Basic Functions
In the following pages, we explain how to make the basic settings (copy paper, zoom ratio, andexposure level) to make copies.
1149O263CA
Basic Screen
Exposure key:Touch this key to showa screen which allowsyou to select the imagedensity of the copy.
Zoom key:Touch this key toshow a screen whichallows you to selectthe zoom ratio.
Paper Key:Touch this key toshow a screen whichallows you to selectthe paper size.
Copy Paper Size
In the Auto Paper mode, the copierautomatically selects the paper of theoptimum size according to the size of theoriginal being used and zoom ratio selectedfor use.
AutoPaper
1156O064DA
This mode is efficient when you want tomake copies on paper of the same size asyour originals automatically.
Useful Tip
Touch Paper on the Basic screen andthen touch Auto Paper .1
The copy paper size can be set manuallyaccording to your need.
Manual Selection
1156O063DA
Touch Paper on the Basic screen, andthe Touch Panel shows which drawerholds which copy paper size.
1
Touch the desired paper size key.2
1156O065DA
1 1st Drawer 2 2nd Drawer 3 3rd Drawer
123
4 4th Drawer Manual Large Capacity Cassette
4
L
C
hap
ter
3M
akin
g C
opie
s34

If the drawer currently selected for useruns out of paper and there is anotherdrawer loaded with paper of the same sizeand in the same direction, the copierautomatically selects that second drawer tocontinue copying.
Auto Drawer Switching
When you, for example, load the 1st Drawerand 2nd Drawer with paper of the same size,you can make up to 1,000 copies (80 g/m2)without interruption.
Useful Tip
Special Paper Setting
If a symbol , , or appears on thepaper select key shown on the Touch Panel, itmeans that particular drawer has beendesignated for special paper.
1156O066DA
The copier provides three different types ofspecial paper setting, each having specificpurposes as detailed below. The setting can bemade by using User’s Choice. ➭ p. 87
: Recycled paper
When this setting is made, the Display asksyou whether or not to use that particulardrawer as a possible candidate in the AutoPaper mode. You may be using both recycledas well as plain paper loaded in your copier.If, for example, you make this setting for thedrawer loaded with recycled paper, the copierdoes not select that particular drawer in theAuto Paper mode. This allows you to makecopies on plain paper first.
: Special paper (inserts)
This setting precludes both Auto Paper modeand Automatic Drawer Switching. Make thissetting for the paper for inserts (e.g., coloredpaper), preventing that paper from being usedfor other purposes.
: Disabling 2-sided copying
This setting precludes 2-sided copying.
S 2
S
2
Ch
apte
r 3
Mak
ing
Cop
ies
4. Basic Functions
35

When you touch Zoom on the Touch Panel, a screen appears that allows you to set the zoomratio. You have six different ways to choose from to set the zoom ratio. Select one according toyour need.
1156O067DB
Zoom Ratio Range: ×0.500 to ×2.00
Zoom Ratio
In the Auto Size mode, the copierautomatically selects the zoom ratioaccording to the size of the original beingused and the copy paper size selected for use.
Auto Size
Touch Auto Size to set the copier intothe Auto Size mode.1
The copier provides most frequently usedzoom ratios ready for immediate use.
Selecting a Ratio from among Fixed Ones
Touch the appropriate original-to-copy-size representation key. Youhave four reduction and fourenlargement ratios.
1
Select the paper size. (Copy Paper Size ➭ p. 34)2
This mode is very helpful for neat filingwhen you need to make copies fromoriginals of assorted sizes.
Useful Tip
1156O068DB
1156O069DA
1156O070DB
1156O071DB
When you touch Full Size , full size(×1.000) is selected.
C
hap
ter
3M
akin
g C
opie
s
4. Basic Functions
36

Pressing the ▼ or ▲ key changes thezoom ratio shown in 0.001 increments.You can keep touching the key to changethe ratio quickly.
Using Zoom Up/Down Keys
1156O073DB
Hold down the ▼ or ▲ key until thedesired zoom ratio is reached.1
To save time, first select the fixed zoomratio nearest to the target ratio beforeusing the ▼ or ▲ key.
Useful Tip
This function lets you make a copy slightlyreduced in image size from that of theoriginal.
For a Slightly Smaller Image
1156O072DB
Touch Minimal .1
• A ratio of ×0.930 has beenfactory-programmed in Minimal, butthat ratio can be changed asnecessary. ➭ p. 82
• It comes in handy for making a copy,without losing any portion of theoriginal image, from an originalwhich has an image area covering itsentire surface.
Useful Tips
Ch
apte
r 3
Mak
ing
Cop
ies
4. Basic Functions
37

1156O074DB
Touch User Set .1
Example: ×1.300Press 1, 3, 0, and 0, in that order.
To correct a ratio, press the Clear keyand then enter the correct one again.
You can store some of the most frequentlyused zoom ratios in memory and recallthem later as necessary.
Calling up a Ratio from Memory
1156O074DB
Touch User Set .1
From among the two ratios previouslystored in memory, select the desiredone.
2
1149O301CA
It’s a good idea for you to storefrequently used zoom ratios in memory.➭ p. 39
Useful Tip
Using the 10-Key Pad
You may use the 10-Key Pad to directlyenter the zoom ratio.
Enter the desired zoom ratio from the10-Key Pad.2
1 2 3
4 5 6
7 8 9
0 C1139O4870A1139O4870A
1149O160BA
C
hap
ter
3M
akin
g C
opie
s
4. Basic Functions
38

* When the key is touched, the ratio isshown on the key, indicating that ithas been stored in memory.
Storing a Ratio in Memory
Touch User Set .1
Example: ×1.300Press 1, 3, 0, and 0, in that order.
To correct a ratio, press the Clear key andthen enter the correct one again.
Touch memory location key 1 or 2 in which to store the set zoom ratio.4
• When a new ratio is stored, the old oneis erased.
• The custom zoom ratios may be storedin memory by using the User Mode.➭ p. 82
NOTES
Enter the desired zoom ratio from the10-Key Pad.3
1 2 3
4 5 6
7 8 9
0 C1139O4870A1139O4870A
Touch Store .2
1149O160BA
1156O074DA
1149O303CA
1149O302CA
Ch
apte
r 3
Mak
ing
Cop
ies
4. Basic Functions
39

When you touch Exposure on the Touch Panel, a screen appears that allows you to set theexposure level or image density. You have a choice of three different ways to adjust theexposure level: Auto Exposure, Manual Exposure, or Photo mode. Select the appropriate modeaccording to your particular needs.
Image Density
When in the Auto Exposure mode, thecopier automatically adjusts the exposurelevel for the optimum copy image density.
Auto Exposure
Touch Auto .The Auto key is highlighted,indicating that the copier is set into theAuto Exposure mode.
1
• The exposure level in the AutoExposure mode can be made eitherdarker or lighter by using User’sChoice. ➭ p. 85
• The copier has been factory-set toautomatically select the AutoExposure mode. User’s Choice can beused to change this default setting tothe Manual Exposure mode. ➭ p. 85
Useful Tips
In the Manual Exposure mode, you canvary the exposure level in nine steps.
Manual Exposure
Touch Lighter or Darker asnecessary.1
<To make the image darker> Touch Darker .
<To make the image lighter> Touch Lighter .
1149O304CA
1156O057CA
1149O268BA
C
hap
ter
3M
akin
g C
opie
s
4. Basic Functions
40

The copier can make a faithful reproductionof an original having a halftone image suchas photos. The image density of the photomay be varied in nine steps.
Touch Lighter or Darker asnecessary.2
<To make the image darker> Touch Darker .
<To make the image lighter> Touch Lighter .
Photo
Touch Photo .The Photo key is highlighted,indicating that the copier is set into thePhoto mode.
1
1149O306CA
1156O058CA
When making copies in the PhotoMode, Auto Exposure does not operate.Select the desired exposure level in theManual Exposure Mode.
NOTE
Ch
apte
r 3
Mak
ing
Cop
ies
4. Basic Functions
41

▲
5. Selecting the Original Copy Type
In the following pages, let’s look at how we should make the settings for the type of copy wewant to make from the type of original we have.When you touch Orig. Copy on the Touch Panel, a screen appears that allows you to set theorig. copy type.
▲
▲
Original Copy Types
▲
1149O405AA
Original Copy1 1
▲
Select 1 1 to make 1-sided copies from1-sided originals.
▲
1149O408AA
Originals Copy1 2
▲
<Only when a Duplex Unit is mounted> Select 1 2 to make 2-sided copies from 1-sided originals.
* Two originals can be copied onto one copy.
▲
1149O407AA
Original Copies2 1
▲
<Only when a Duplexing Document Feeder is mounted> Select 2 1 to make 1-sided copies from 2-sided originals.
▲
1149O410AA
Original Copy
2 2▲
<Only when a Duplexing Document Feeder and Duplex Unit are mounted> Select 2 2 to make 2-sided copies from 2-sided originals.
▲
1149O406AA
Originals Copy1 [2in1] <accessed via 2in1>
▲
<Only when an Automatic/Duplexing Document Feeder is mounted> Select 1 [2in1] to make a 1-sided copy, through reduction, from two 1-sided originals side-by-side.* You need half as many sheets of copy paper
as required otherwise.
▲
The size of the original should be A4crosswise for 2-in-1.
NOTE
Ch
apte
r 3
Mak
ing
Cop
ies
42

▲
The size of the original should be A4crosswise for 2-in-1.
NOTE
1149O412AA
Originals Copy
1 2[2in1] <accessed via 2in1>
▲
▲
<Only when an Automatic Document Feeder and Duplex Unit are mounted>Select 1 2-[2in1] to make a 2-sided copy,through reduction, from four 1-sided originals.Each pair of originals will be placedside-by-side on either side of the copy.* You need 1/4 as many sheets of copy paper
as required otherwise.
1149O409AA
Original Copies
1[2in1] 1 <accessed via Separation>
▲ <Only when an Automatic/Duplexing Document Feeder is mounted> Select 1-[2in1] 1 to make 1-sided page-by-page copies of a 1-sided original which is the result of 2-in-1 copying.* You need twice as many sheets of copy paper
as the original.
▲
1149O411AA
Original Copies
2[2in1] 1 <accessed via Separation>
▲
▲
<Only when a Duplexing Document Feeder is mounted> Select 2-[2in1] 1 to make 1-sided page-by-page copies of a 2-sided original which is the result of 2-in-1 copying.* You need four times as many sheets of copy
paper as the original.
1149O403AA
Originals Copies
Book 1 <accessed via Book Copy via Separation>
▲
Select Book 1 to make 1-sided page-by-pagecopies of an open book.
▲
1149O404AA
Originals Copy
Book 2 <accessed via Book Copy via Separation>
▲
<Only when a Duplex Unit is mounted>Select Book 2 to make a 2-sided copy of anopen book. Each page of the open book will becopied onto one side of the copy.
▲
Ch
apte
r 3
Mak
ing
Cop
ies
5. Selecting the Original Copy Type
43

▲
▲ ▲
Selecting Original Copy Type
▲
Touch the key corresponding to thedesired original-to-copy type.2
Touch Orig. Copy .1
▲
When you make copies from a book,select the correct key according towhether the book is bound on the left oron the right (R-Book).
NOTE
1149O312CA
1149O272CA
1149O269CA
Margin key for the original:
• When you’re going to make copies using1 2 or 2 1, first check to see if youroriginal has a file margin in it. The copiermakes a necessary correction of marginposition to make good copies out of it aslong as you instruct it properly.
Original with aFile Margin
Original with noFile Margin
1152O044AA
If your original has a file margin
➀ Check your original for a margin.➁ Touch Margin .➂ Select the margin width from among 5mm, 10mm, 15mm and 20mm. displayed under Original’s Margin.➃ Touch Enter .
1149O314DA
If your original has no file margin
There is no need of your making any setting.
Ch
apte
r 3
Mak
ing
Cop
ies
5. Selecting the Original Copy Type
44

▲
5. Selecting the Original Copy Type
# of Origs key
• If you’re going to make copies using 1 2, 1 [2in1], or 1 2-[2in1], you need to enter thenumber of your originals. Then the copier can arrange the pages in correct order.
▲ ▲ ▲
Setting Even/Odd
➀ Touch # of Origs .
➁ Touch Even or Odd as appropriate.
➂ Touch Enter .
Using the 10-Key Pad
➀ Touch Input # .
➁ Enter the number of originals from the 10-Key Pad.
➂ Touch Enter .
1149O308CA
1149O309CA
When you know the number of originals
If you want the document feeder to count the number of originals for you
Select Auto Count to let the document feeder count the number of originals.
➀ Touch Auto Count .
➁ Load your originals into the document feeder.
➂ Press the Start key. *The document feeder starts feeding the originals loaded in it to count the number of originals. (At this time, no copy cycle is run.)
➃ Unload the originals ejected onto the Document Exit Tray and reload them onto the Document Feed Tray. Then, press the Start key to make copies.
1149O310CA
1151O016AA
• The maximum number of originals youcan set is 61.
• To correct a wrong number, press theClear key, then enter the correct number.
NOTES
Ch
apte
r 3
Mak
ing
Cop
ies
45

▲
Load the originals crosswise.If the originals are loaded lengthwise, the directions of the copy images will be mixed up.
Some Precautions for Making Copies
Use the following procedure when loading originals to make 1-sided copies from 2-sided originals (2 1).
▲
Loading the Originals
Correct:
2-Sided OriginalsLoaded Crosswise 1-Sided Copies
1151O023AA
Incorrect:
2-Sided OriginalsLoaded Lengthwise 1-Sided Copies
1151O022AA
Precautions for Book Copying
• Ensure that the top edge of the book is at the rearside.
• Make copies in descending order of page. • When Book Copy is selected, the zoom ratio is
automatically set to ×1.000. Select the desiredzoom ratio and copy paper size.
• User’s Choice allows you to program a defaultzoom ratio, paper size, margin setting, and erasesetting. ➭ p. 87
Placing the Book on the Glass Correctly
• When the 2-in-1 function is selected, the copier automatically selects a reduction ratio. Youcan nonetheless make a full-size copy.
• If the Frame + Center Erase function is selected, you can eliminate shadows which wouldotherwise be produced along the edges and down the center of the copy.
• User’s Choice allows you to program a default zoom ratio, paper size, margin setting, and erasesetting. ➭ p. 87
Precautions for 2-in-1 Copying
Ch
apte
r 3
Mak
ing
Cop
ies
5. Selecting the Original Copy Type
46

▲• When the 2-in-1 separation function is selected, the copier automatically selects an enlargement
ratio. You can nonetheless make a full-size copy.• User’s Choice allows you to program a default zoom ratio, paper size, margin setting, and erase
setting. ➭ p. 87
Precautions for 2-in-1 Separation Copying
Ch
apte
r 3
Mak
ing
Cop
ies
5. Selecting the Original Copy Type
47

6. Finishing Mode
In the following, we explain about different finishing functions and setting procedures.When Finishing is touched on the Touch Panel, a screen appears that allows you to set aparticular finishing function.
Copies
Non-Sort
Originals
1076O145
• All copies are fed out without being sorted,grouped, stapled, or punched.
Sort
1st Bin
2nd Bin
3rd Bin
Originals
Copies
1076O146
<Only when a Sorter or Staple Sorter is mounted>
• This function is effective when makingmultiple copies from multiple originals.Copies are sorted into complete sets of theoriginals.
Finishing Functions
Sort Staple
1st Bin
2nd Bin
3rd Bin
Originals
Copies
1151O108AA
<Only when a Staple Sorter is mounted>
• This function is effective when makingmultiple copies from multiple originals.Copies are sorted into complete sets of theoriginals and then stapled.
Ch
apte
r 3
Mak
ing
Cop
ies
48

Group
1st Bin
2nd Bin
3rd Bin
Copies
Originals
1076O147
<Only when a Sorter or Staple Sorter is mounted>
• The copies made from each single originalare separated into groups. Each groupcontains the same number of copies.
321
1
1
1
Hole Punch
1149O399DA
Originals
Copies
1st Bin
2nd Bin
3rd Bin
<Only when a 20-Bin Staple Sorter is mounted>
• Holes are punched in the copy sets orstacks for filing. It can be combined withNon-Sort, Sort, Sort Staple, or Group.
Originals
Manual Staple
Sorting or GroupingManual Staple
1151O109AA
Copies<Only when a Staple Sorter is mounted>
• This function allows you to staple copysets already made in the Sort mode or copystacks made in the Group mode.
* The feature is efficient for staplingoriginals after making copies.➭ pp. 52, 53
The copier has been factory-set to automatically select Non-Sort in the initial mode. Also, thecopier automatically switches between Sort and Non-Sort depending on the number oforiginals loaded in the document feeder and the number of copies to be made. User’s Choicecan, however, be used to change these default settings. ➭ pp. 85, 86
Useful Tip
Ch
apte
r 3
Mak
ing
Cop
ies
6. Finishing Mode
49

Touch the desired finishing functionkey.1
Selecting the Finishing Function
Sort / Group / Sort-and-Staple
• The capacity of each Sorter Bin is asfollows
Non-Sort
Sort, Group, Sort Staple
• When making copies in the Sort StapleMode, make sure to load the originalsinto the Document Feeder in thecorrect direction.
• Thick paper, translucent paper, andOHP transparencies cannot be used formaking copies in Sort, Group, or SortStaple.
NOTES
Type of Paper Capacity
Plain and recycledpaper
20 BinUp to 100 sheets
10 BinUp to 50 sheets
Special paper (thickpaper, translucentpaper, OHPtransparencies)
Up to 10 sheets
Bin Capacity
10-Bin Sorter, StapleSorter (1st to 10th Bin)
Up to 25 sheets
20-Bin Sorter, StapleSorter (1st to 20th Bin)
Up to 50 sheets (Letter or smaller)
◆ Removing Copies from the Sorter
After the Sort, Group, or Sort Staplemode is finished, the bins will shiftupward in position. When all movemethas ceased, then remove your copy setsor stacks from the bins. Once yourcopies are removed, the bins will shiftdownward in preparation for the nextstoring job.
1149O274DA
Ch
apte
r 3
Mak
ing
Cop
ies
6. Finishing Mode
50

Hole Punch
Touch the desired finishing functionkey.1
1149O316DA
Touch Hole Punch .2
1149O319DA
• When making copies in the Hole PunchMode, make sure to load the originalsinto the Document Feeder in thecorrect direction.
• The size of the copy paper for HolePunch is A3L and A4 crosswise only.
NOTES
Manual Staple
<To staple copy sets made in Sort or copy stacks made in Group>
Check that each copy set or stack hasbeen fed into the Sorter Bin.1
Copies made in Non-Sort cannot bestapled manually
NOTE
Touch Staple .Then, the copy set or stack in theSorter Bin will be stapled together.
2
1149O320CB
Ch
apte
r 3
Mak
ing
Cop
ies
6. Finishing Mode
51

Align the sheets of paper neatly.1
1134O039AA
Insert the paper stack onto the 1st Binfacing up.2
1139O1320A
• Make sure of the stapling position andpress the paper stack against thebracket.
• Up to 25 sheets of plain paper can bestapled.
• Never attempt to reach for the staplingposition. This can be dangerous.
NOTES
This feature is useful for staplingoriginals after making copies.
Useful Tip
Using the Manual Staple Function
<To use as a stapler>*When a 10-Bin Staple Sorter is mounted.
1149O086AA
StaplingPosition
Touch Staple . Then, the paper stackin the Sorter Bin will be stapledtogether.
3
1149O320CB
Ch
apte
r 3
Mak
ing
Cop
ies
6. Finishing Mode
52

6. Finishing Mode
Align the sheets of paper neatly.1
1134O039AA
Insert the paper stack into the 1st Bin.2
1149O400AA
Non-Sort Bin
Sort Bins
1st Bin
Non-SortBin
1149O401AA
Up to 50 sheets of plain paper can bestapled.
NOTE
*When a 20-Bin Staple Sorter is mounted
1149O085AA
StaplingPosition
• Make sure of the stapling position andpress the paper stack against thebracket.
• Never attempt to reach for the staplingposition. This can be dangerous.
NOTES
Touch Staple .Then, the paper stack in the Sorter willbe stapled together.
3
1149O320CB
This feature is useful for staplingoriginals after making copies.
Useful TipC
hap
ter
3M
akin
g C
opie
s
53

Place the original with its stapling position at the upper right corner as shown below.
Note the correct direction of the originals if the copies are to be stapled either in Sort Staple orManual Staple Mode.
Instructions for Loading Originals for the Finishing Functions
Using the Automatic/Duplexing Document Feeder
Load the originals crosswise in the document feeder. Ensure also that the stapling position is locatedas shown below.
Correct:
1151O024AB
CopiesOriginals loaded crosswise
Stapling Position
Placing the Original on the Glass
Correct:
1039O2230A
Stapling Position
* Use Manual Staple to staple copies after they have been made.
Ch
apte
r 3
Mak
ing
Cop
ies
6. Finishing Mode
54

Load the originals so that the punched holes in them are located as shown below.
Note the correct direction of the originals if the copies are to be punched using Hole Punch.
Using the Automatic/Duplexing Document Feeder
Load the originals so that the punched holes in them are located as shown below.
Correct:
Placing the Original on the Glass
Correct:
Hole Punch is possible only when your copier is equipped with a 20-Bin Staple Sorter.
NOTE
1149O089DA
Punched Hole Position
Originals Copies
Punched Hole Position
Original Copy
1149O092EA
Ch
apte
r 3
Mak
ing
Cop
ies
6. Finishing Mode
55

Auto Dual Function
Each of the Sort Bins holds up to 50 (*25) sheets of paper. The Auto Dual function, however,allows sorting of copies of up to 100 (*50) originals under certain conditions.
All figures in the following text are given based on the 20-Bin Staple Sorter and 20-BinSorter. Figures marked with * are for the 10-Bin Staple Sorter.
NOTE
Auto Dual Function in Sort Mode
When 10 (*5) or less copies are made from an original set consisting of more than 50 (*25) pagesin Sort Mode, the Auto Dual function is automatically activated to allow the Sorter or StapleSorter to continue sorting copies using the 11th (*6th) to 20th (*10th) Bins.
Copies Bins Used
1st to 50th (25th) sorted copies 1st to 10th (*5th) Bins
51st to 100th (*26th to 50th) sorted copies 11th to 20th (*6th to 10th) Bins
• If the number of copies selected exceeds 10 (*5), the copy cycle stops at the 50th (*25th) original.
Example: Making 3 copy sets of a 30-page original set using a 10-Bin Staple Sorter
Each of the top three binscontains 25 sorted copies.
Each of the 6th to 8th Binscontains 5 sorted copies.
30-Page Original Set
Auto Dual Function in Sort Staple Mode
To have a complete set from the originals, place the copies from the 6th Bin on top of those from th e1st Bin. In the same way, place the copies from the 7th Bin on top of those from the 2nd Bin, and soon.
When 10 (*5) or fewer copies are made from an original set consisting of more than 51 (*26)originals in Sort Staple Mode and Auto Dual is activated, Sort Staple is automatically switchedto Sort (no stapling takes place).
Ch
apte
r 3
Mak
ing
Cop
ies
6. Finishing Mode
56

Auto Dual Function in Group Mode
When more than 51 (*26) copies are to be grouped together into one group, the Sorter or StapleSorter uses the subsequent bin to continue grouping the copies.
Original Copies Bins Used
1st1st to 50th (*25th) copies 1st Bin51st (*26th) to subsequent copies 2nd Bin
3rd to Nth: Same way up to the 20th (*10th)
Example: Using a 10-Bin Staple Sorter to separate copies made from 2 different originals into two groups when each group contains 35 copies or more.
Copies of 1st original1st Bin: 252nd Bin: 10
Copies of 2nd original3rd Bin: 254th Bin: 10
Auto Dual Function in Non-Sort Mode
The capacity of the Non-Sort Bin (*1st Bin) is 100 (*50) in Non-Sort. If more than 100 (*50)copies are made in Non-Sort, the Sorter uses the 1st (*2nd), 2nd (*3rd), and subsequent bins tohold those excess copies.
To Make More Than 20 (*10) Copy Sets in Sort Mode
The maximum number of copy sets that can be sorted in a single copy run in Sort Mode is 20(*10). If you need more copy sets than that, do this: first, enter the number of copy sets you needfrom the 10-Key Pad and press the Start key. When the copier finishes making and sorting 20(*10) copy sets, it temporarily stops. You now remove the copy sets from the bins, then load youroriginals again and press the Start key. The copier resumes the copy job where it left off.
Ch
apte
r 3
Mak
ing
Cop
ies
6. Finishing Mode
57

7. Auxiliary Functions
Cover
These pages explain about convenient functions offered as the Auxiliary functions and how toset these features. When the Auxiliary key on the Touch Panel is touched, the Auxiliaryfunction menu screen appears.
The Cover mode lets you make a front cover or a front and back cover for a copy set by copyingthe first page or the first and last page of an original set on different paper from the normal copypaper, such as colored paper. There are six different Cover functions available. Select theappropriate one according to your need. The Cover key is shown only when the copier isequipped with a document feeder.
Functions
Front Cover: CopiedBack Cover: None
321
321
1149O039AA1149O039AA
Front Cover: CopiedBack Cover: Blank
321
321
1149O040AA1149O040AA
Front Cover: CopiedBack Cover: Copied
321
321
1149O041AA1149O041AA
1149O390AA
1149O394AA
1149O393AA
321
321
1149O043AA1149O043AA
321
321
1149O044AA1149O044AA
Front Cover: BlankBack Cover: None
Front Cover: BlankBack Cover: Blank
Front Cover: BlankBack Cover: Copied
1149O392AA
1149O389AA
1149O391AA
321
321
1149O042AA1149O042AA
Ch
apte
r 3
Mak
ing
Cop
ies
58

Touch Cover .1
1149O321CA
Using the Cover Mode
Select the appropriate function(W/Image, Blank, or None) for Frontand Back.
3
1149O323CA
Touch the key for Cover Sheet.6
Touch Enter .8
Touch the key for # of Origs.9
Touch the key for Front or Back.2
1156O075AA
Select the drawer in which paper forthe cover has been loaded in step 5.7
Touch Enter .4
Load the paper for the cover (e.g.,colored paper) in the drawer.5
Touch Input # .10
1149O331CA
1149O093AA
You can use the Multi Bypass Tray asthe source of the paper for the cover.
Useful Tip
1156O076DA
1156O077DA
1156O078DAC
hap
ter
3M
akin
g C
opie
s
7. Auxiliary Functions
59

Load your originals into the documentfeeder and press the Start key.13
• The maximum number of originals thatcan be entered is 61.
• Press the Clear key to correct anumber entry.
NOTES
Count the number of your originalsand enter that number from the 10-KeyPad.
11
Touch Enter .12
The copier offers a function thatautomatically counts the number oforiginals (Auto Count).To use this feature, see p. 61.
Useful Tip
1149O094AA
1 2 3
4 5 6
7 8 9
12
1149O045AA
Ch
apte
r 3
Mak
ing
Cop
ies
7. Auxiliary Functions
60

The copier offers a feature that automatically counts the number of originals. It can be used bytouching Auto Count .
1149O332CA
Auto Original Count
Using the Auto Count Function
1149O333CA
Touch Auto Count .1
Load your originals into the documentfeeder.3
Press the Start key to start the originalcount sequence.4
• The document feeder starts feedingthe originals loaded on it to count thenumber of originals. (At this time, nocopy cycle is run.)
Unload the originals ejected onto theDocument Exit Tray and reload themonto the Document Feed Tray. Then,press the Start key.
5
Start
Stop
1134P337CA
1149O095AA
Touch Enter .2
1151O016AA
Ch
apte
r 3
Mak
ing
Cop
ies
7. Auxiliary Functions
61

Page Insertion allows you to insert a blank sheet of paper (e.g., colored paper) into the copy set.Two different functions are available. Select the appropriate one according to your need.*The Page Insertion key is shown only when the copier is equipped with a document feeder.
Page Insertion
\
1149O046AA
Specify Page2 for Insert.
Page Insertion <Copied Inserts>
1149O046AA
Original Set Copy Set
Insert
The copier copies the page, which isspecified for an insert, on paper for inserts(e.g., colored paper).
\
Page Insertion <Non-Copied Inserts>
Original Set
Copy Set
Insert
1149O047AA
Specify Page2 for Insert.
The copier inserts a blank sheet of paper forinserts (e.g., colored paper) at any specifiedplace between pages.
Functions
Ch
apte
r 3
Mak
ing
Cop
ies
7. Auxiliary Functions
62

Specifying the Place for an Insert
In the Page Insertion mode, you must specify where to place an insert. Two ways are available tospecify the insert places, either ADF Detection or 10-Key Input.
1149O048AA
Original Set
Copy Set
Insert MarkerExample: 2nd from top
CopiedInsert Non-Copied
Insert
1149O048AA
Copy Set
1149O049AA
1 2 3
4 5 6
7 8 9
1 2 3
6 7
11
2
10-Key Input
Using the 10-Key Pad, define the places for inserts. ➭ p. 66<Up to 20 places can be defined.>
1149O049AA
Original Set Copy Set
Non-CopiedInsert
CopiedInsert
Copy Set
ADF Detection cannot be operated when the Mixed Original Detection mode is set.
NOTE
ADF Detection (automatic detection)
Put a sheet of paper of a different size from the originals at your desired places in theoriginal set (for convenience, let us call this paper the insert marker), load the original setonto the document feeder, and let the copier start the original count sequence. ➭ p. 64<The copier automatically detects and sets the places for inserts.>
Ch
apte
r 3
Mak
ing
Cop
ies
7. Auxiliary Functions
63
Touch the appropriate key for CopyOnto Inserts to select whether to copyonto inserts (YES) or not (NO).
2
Load the paper for inserts into thedrawer.3
Touch Enter .6
Select the paper source in which paperfor inserts has been loaded in step 3.5
1149O334CA
1149O093AA
<ADF Detection>
Touch Page Insertion .1
Using Page Insertion
Touch the paper size key for InsertPaper.4
You can use the Multi Bypass Tray asthe source of the paper for the inserts.
Useful Tip
Touch ADF Detection .7
1149O336DA
1149O338DA
1149O338DA
1156O079DA
Ch
apte
r 3
Mak
ing
Cop
ies
7. Auxiliary Functions
64

Put an insert marker into the desiredplace in the original set. (Insertmarkers can be used in up to 20 places.)
8
1134O070AA
Original Set
Insert Marker
\
1149O050AA1149O050AA
Example 1: To place a copied insert atthe 2nd position from top.
CopiedInsert
Copy SetOriginal Set
\
1149O051AA
Example 2: To place a non-copied insertbetween pages 1 and 2.
Original SetCopy Set
Non-Copied Insert
For the insert marker, use paper that isa size, or loaded in a direction,different from the originals.
NOTE
Load the original set containing insertmarkers into the document feeder.9
Press the Start Key to let the copierstart the original count sequence.10* The document feeder starts feeding
the originals loaded in it to detect theplace for inserts. (At this time, nocopy cycle is run.)
Remove the insert markers from theoriginals ejected onto the DocumentExit Tray.
11
1134O071AA
Insert Marker
Unload the original set and reload itonto the Document Feed Tray.12
1149O097AA
Press the Start Key.
The copy cycle is run for pageinsertion.
13
1149O096AA
Insert Marker
Ch
apte
r 3
Mak
ing
Cop
ies
7. Auxiliary Functions
65

Using Page Insertion
Touch the paper size key for InsertPaper.4
<10-Key Input>
1156O079DB
Touch Page Insertion .1
1149O338DA
1149O342DA
Touch or to move the cursor toposition no. 1 of the Insert Sheets.9
▲▼
1 2 3
4 5 6
7 8 9
12
1149O045AA
1149O343CB
• The maximum number of originals thatcan be entered is 60.
• Press the Clear key to correct anumber entry.
NOTES
Touch the appropriate key for CopyOnto Inserts to select whether to copyonto inserts (YES) or not (NO).
2
1149O336DA
Load the paper for inserts into thedrawer.3
You can use the Multi Bypass Tray asthe source of the paper for the inserts.
Useful Tip
Touch Enter .6
Select the paper source in which paperfor inserts has been loaded in step 3.5
Touch 10-Key Input .7
Enter the number of originals from the10-Key Pad.8
1149O344CB
1149O093AA
Ch
apte
r 3
Mak
ing
Cop
ies
7. Auxiliary Functions
66

11
\
1149O047AA
Example 2: To place a non-copied insertbetween pages 1 and 2, enter 2 for position no.1.
Original Set
Copy Set
Non-CopiedInsert
• To correct a number entry, press theClear Key and then enter the newnumber.
• The maximum number that can beentered is 60.
NOTES
If you want to place more inserts,repeat steps 9 and 10 to enter numbersfor placement positions no. 2 and up.
There are from 1 to 20 positions forinserts.
NOTE
From the 10-Key Pad, enter a numberfor placement position no. 1.10
Load the original set into the documentfeeder.13
\
Example 1: To place a copied insert atthe 2nd position from top,enter 2 for position no.1.
CopiedInsert
Copy SetOriginal Set
1149O046AA
Press the Start Key.
The copy cycle is run for page insertion.
14
Touch Enter .12
1149O344CB
1145O339DA
Ch
apte
r 3
Mak
ing
Cop
ies
7. Auxiliary Functions
67

Single Copy
<Copied Interleaves>
The copier copies onto OHP transparencies and,after each transparency, inserts a non-copiedsheet of paper.
<Non-Copied Interleaves>
Originals Copies
When you make copies on transparencies, the OHP Interleaving function inserts copied ornon-copied interleaves after each transparency. Four different functions are available. Selectthe appropriate one according to your need.
OHP Interleaving
Functions
• OHP Interleaving can be available only when A4 lengthwise or A4 crosswise paper is loaded inany paper source.
• For Multiple Copy, the copier should be equipped with a 20-Bin Sorter or 20-Bin Staple Sorter.• OHP Interleaving precludes 2-sided copying.
NOTES
The copier copies onto OHP transparenciesand, after each transparency, inserts a copiedsheet of paper.
21
2211
1149O063AA
Originals Copies
Copied Interleaves
21
2
1
1149O064AA
Non-Copied Interleaves
Ch
apte
r 3
Mak
ing
Cop
ies
7. Auxiliary Functions
68

The copier copies onto OHP transparenciesand, for the 1st set, inserts a copied sheet ofpaper after each transparency. Also, thecopier sorts extra copies into a specifiednumber of sets.
The copier copies onto OHP transparenciesand, for the 1st set, inserts a non-copied sheetof paper after each transparency. Also, thecopier sorts extra copies into a specifiednumber of sets.
<Non-Copied Interleaves> Originals Copies
<Copied Interleaves> Originals Copies
Extra Copies(2 sets)
Multiple Copy
21
2211
21
21
1149O065AA1149O065AA
Copied Interleaves
21
2
1
21
21
1149O066AA1149O066AA
Non-Copied Interleaves
Extra Copies(2 sets)
Ch
apte
r 3
Mak
ing
Cop
ies
7. Auxiliary Functions
69

1145O367CB
Using OHP Interleaving
Touch OHP Interleaving .2
1149O345CA
Load OHP transparencies onto theMulti Bypass Tray. (Up to 20 sheets ofOHP transparencies can be placed onthe tray.)
1
Select whether to copy onto theinterleaves (YES) or not (NO).3
Touch Enter .6
4 5
7 8
7
1149O052AA
Select the size of Insert Paper.5
1156O080DA
Touch the key for the size of InsertPaper.4
Enter the number of copy sets to makefrom the 10-Key Pad.7
Touch Enter .8
1149O420DA
1149O349DA
Ch
apte
r 3
Mak
ing
Cop
ies
7. Auxiliary Functions
70

Load the originals into the documentfeeder.9
1149O097AA
If you make each copy through theOriginal Glass, start with the last pageof the set."Placing Originals" ➭ p. 29
NOTE
Press the Start key and the copier startsthe copy cycle for OHP Interleaving.10
Ch
apte
r 3
Mak
ing
Cop
ies
7. Auxiliary Functions
71
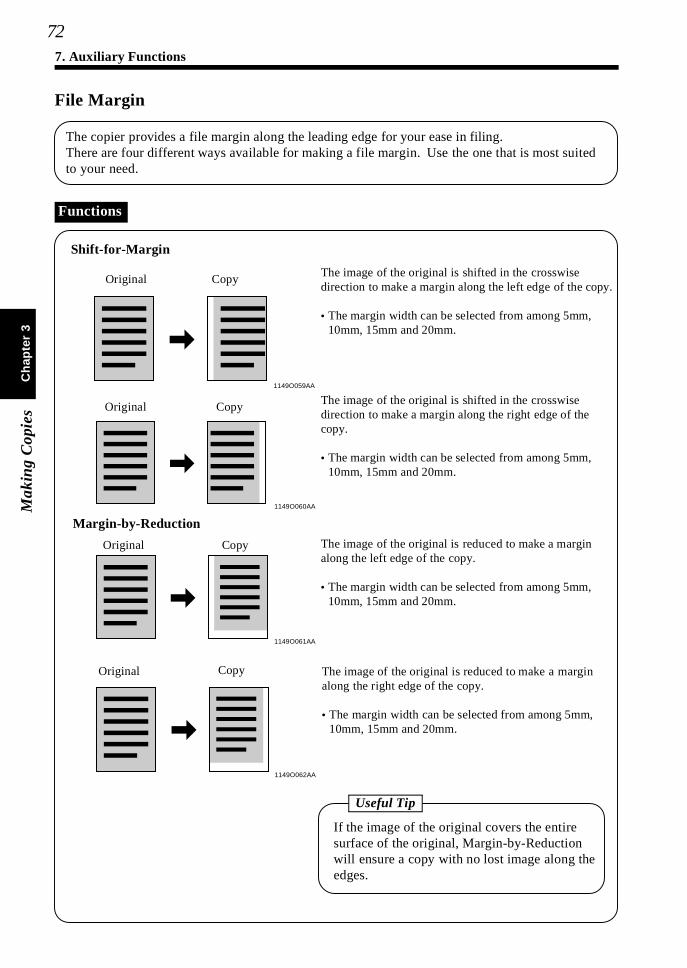
The copier provides a file margin along the leading edge for your ease in filing.There are four different ways available for making a file margin. Use the one that is most suitedto your need.
File Margin
Functions
Copy
Shift-for-Margin
Original
1149O059AA
The image of the original is shifted in the crosswisedirection to make a margin along the left edge of the copy.
• The margin width can be selected from among 5mm,10mm, 15mm and 20mm.
Original Copy
1149O060AA
The image of the original is shifted in the crosswisedirection to make a margin along the right edge of thecopy.
• The margin width can be selected from among 5mm,10mm, 15mm and 20mm.
Margin-by-Reduction
Original Copy
1149O061AA
The image of the original is reduced to make a marginalong the left edge of the copy.
• The margin width can be selected from among 5mm,10mm, 15mm and 20mm.
Original Copy
1149O062AA
The image of the original is reduced to make a marginalong the right edge of the copy.
• The margin width can be selected from among 5mm,10mm, 15mm and 20mm.
If the image of the original covers the entiresurface of the original, Margin-by-Reductionwill ensure a copy with no lost image along theedges.
Useful Tip
Ch
apte
r 3
Mak
ing
Cop
ies
7. Auxiliary Functions
72

Touch File Margin .1
Place the original.• If you use a document feeder, loading
your originals in the document feederwill change the contents of the display.
21149O352CA
Using File Margin
Select the "Mode" of margin making.4
Select the "Width" of the margin.5
Having a margin width larger thannecessary could result in part of theimage missing on the copy. Try to keepa logical margin width.
NOTE
Touch Enter .6
Press the Start Key.7The copy cycle is run for File Margin.
Loading the Originals in Margin Mode
<Using the Document Feeder> <Using the Glass>
Margin Position Original Placement
Left
Right
Margin Position Original Placement
Left
Right
Margin side on the left.
1149O099AA
Margin side on the right.
1149O100AA
Margin side on the right.
1149O107AA
Margin side on the left.
1149O108AA
1149O203AA
1149O204AA
1149O201AA
1149O202AA
Referring to the table given below,select the "Position" of the margin.3
1149O353DA
1149O353DA
1149O353DA
Ch
apte
r 3
Mak
ing
Cop
ies
7. Auxiliary Functions
73

The copier erases a margin of a set width along the four edges, one edge, or at the center to eraseshadows or other unwanted images. This feature is effective in erasing the communicationsrecord on a document received by fax.One of six different functions can be selected. Use the one that is most suited to your need. The erase width can be selected from among 5mm, 10mm, 15mm and 20mm.The erase width for the Top Edge is 10mm only.For Frame Erase, the width of only the left and right edges can be varied and the erase width forthe top edge is fixed to 10mm.
Edge/Frame Erase
Functions
Erases an area of the original equivalent to agiven margin from the left edge of the copy.
Left Edge Erase
Erases an area of the original equivalent to agiven margin from the right edge of the copy.
Right Edge Erase
Frame Erase
Erases a given width along the four edges.
Top Edge Erase
Erases an area of the original equivalent to5mm from the top edge of the copy.
Center Erase
Erases a given width down the center.
Frame + Center Erase
Erases a given width along the four edges anddown the center.
1149O053AA 1149O054AA
1149O055AA 1149O056AA
1149O057AA 1148O058AA
Ch
apte
r 3
Mak
ing
Cop
ies
7. Auxiliary Functions
74

Touch Edge/Frame Erase .1
You must follow certain rules whenplacing the original. "Loading the Originals for Edge/FrameErase" ➭ p. 76
NOTE
Place the original.2
1149O355CA
Using a Particular Edge/Frame Erase Function
Select the particular erase function("Position").3
Select the erase "Width."4
Touch Enter .5
Press the Start Key.The copy cycle is run for Edge/FrameErase.
6
1149O357DA
1149O357DA
The erase width represents that on thecopy, not on the original. So, use carewhen making a reduction or enlargementcopy.
Example: Erasing the center of an A3 size book original on a copy reduced by ×0.707.
NOTE
1145O414AA
15mm
20mm
~0.707
Copy (A4 lengthwise)
Book Original (A3)
1145O414AA
✕ 0.707
15mm20mm
If you want to erase the 20mm-wide centermargin on the original, that is reduced to14mm on the copy, select 15mm for the erasewidth.
Ch
apte
r 3
Mak
ing
Cop
ies
7. Auxiliary Functions
75

<Using the Glass>
1149O101AA
1149O102AA
1149O109AA
1149O110AA
1149O207AB
1149O208AA
1149O213AA
1149O214AA
1149O103AA
1149O104AA
1149O209AA
1149O210AA
1149O105AA1149O211AA
1149O111AA
1149O112AA
1149O216AA
1149O215AB
1149O113AB1149O217AA
Loading the Originals for Edge/Frame Erase
<Using the Document Feeder>
Erase Function Original Placement
Left Edge Erase
Right Edge Erase
Frame Erase
Top Edge Erase
Center Erase
Frame + Center Erase
Erase Function Original Placement
Left Edge Erase
Right Edge Erase
Frame Erase
Top Edge Erase
Center Erase
Frame + Center Erase
1149O212AA 1149O106AA 1149O114AB1149O218AB
Ch
apte
r 3
Mak
ing
Cop
ies
7. Auxiliary Functions
76

Ch
apte
r 4
Usi
ng
the
Use
r M
ode
This chapter explains about the functions that are made available by using the User Mode key, i.e.,Job Memory Input, Zoom Memory Input, Meter Count, Toner Replenisher, Drum Dehumidifier,User’s Choice and Data Send.
Chapter 4
Using the User Mode
1. Job Memory Input and Job Recall• Job Memory Input p. 78• Recalling a Job from Memory p. 81
2. Zoom Memory Input p. 823. Meter Count, Toner Replenisher, and Drum Dehumidifier p. 834. User’s Choice
• User’s Choice Functions p. 84• Making the User’s Choice Settings p. 90• Copy Track Function p. 92
5. Data Send p.100
77

1. Job Memory Input and Job Recall
Up to 10 different, frequently used copying job programs can be stored in memory and recalledlater as necessary.If "100 Accounts" or "1000 Accounts" is selected for "Copy Track" of Administrator Modeunder User’s Choice, five more jobs can be stored in memory for each account (only for account#1 to #10), in addition to the ordinary jobs.
Press the User Mode key.2
Set up the job you want to store inmemory.1
Job Memory Input
Storing a Job
Touch Job Memory Input .3
1156O088DA
1149O358CA
Select any one of the 10 job numberkeys from 1 to 10 . (For AccountJob, select any number from 1 to 5 .)Touch a job number key marked with .
4
Touch Account Job if you want tostore a job in Account Job memory. To check for the details of the job
stored, touch Check and then touchthe job number key.
5
1149O359CA
A job number key not marked withindicates that a job has already beenstored under that number, rejecting theinput of a new job. If you want to usethat number to store a new job, firstdelete the job which is now stored inthat number.Deleting a Program ➭ p. 80
NOTE
User Mode
1134P356CA
C
hap
ter
4U
sin
g th
e U
ser
Mod
e78

After you have checked the settings,touch Exit .6
The job settings appear on the TouchPanel.
Touch Exit on the Job Memory Inputscreen. Then, the Basic screenreappears.
7
1149O360CA
1149O359CAC
hap
ter
4U
sin
g th
e U
ser
Mod
e
1. Job Memory Input and Job Recall
79

Touch Delete , then touch the jobnumber key from which you want todelete a job program.The number key you touch should notbe marked with .
3
1149O361CA
When appears in that key, itindicates that the job program has beendeleted.
Deleting a Program
Press the User Mode key.1
Touch Job Memory Input .2
Touch Account Job if you want todelete a job in Account Job memory.
User Mode
1134P356CA
1149O362CA
Touch Exit .Then, the Basic screen reappears.4
1156O088DA
C
hap
ter
4U
sin
g th
e U
ser
Mod
e
1. Job Memory Input and Job Recall
80
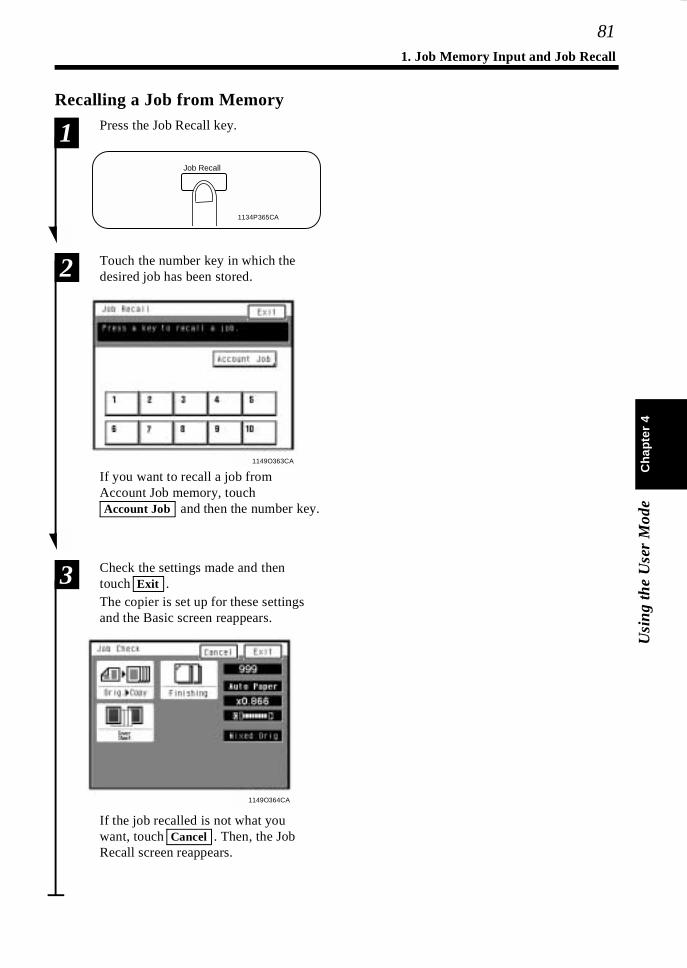
Recalling a Job from MemoryPress the Job Recall key.1
1149O363CA
Touch the number key in which thedesired job has been stored.2
If you want to recall a job fromAccount Job memory, touch Account Job and then the number key.
Check the settings made and thentouch Exit .The copier is set up for these settingsand the Basic screen reappears.
3
1149O364CA
If the job recalled is not what youwant, touch Cancel . Then, the JobRecall screen reappears.
Job Recall
1134P365CA
Ch
apte
r 4
Usi
ng
the
Use
r M
ode
1. Job Memory Input and Job Recall
81

2. Zoom Memory Input
Up to two different, frequently used zoom ratios can be stored in memory so you can use themlater whenever necessary. For the Minimal ratio, X0.930 has been factory-set, but that can bechanged as necessary.
Press the User Mode Key.1
Touch Zoom Memory Input .2
1156O088DA
Storing a Zoom Ratio
Using the 10-Key Pad, enter thedesired zoom ratio.3
Touch the desired number key inwhich you want to store the zoomratio, either 1 or 2 .
4
1149O365CA
1149O227AB
Touch Exit . The Basic screen reappears.5
• The zoom ratio can range from ×0.500to ×2.000.
• The Minimal ratio can range between×0.900 and ×0.999.
NOTES
User Mode
1134P356CA
For example, enter X1.234, as 1 , 2 , 3 , and 4 , in that order. To correctan entry, press the Clear key, thenenter the new ratio.
• When a new zoom ratio is stored in akey number, the old one stored in thatkey number is lost.
• The custom zoom ratios may also bestored using the screen accessed by the User Set key which is shown whenZoom is touched on the Basic screen.Storing a Ratio in Memory ➭ p. 39
NOTES
1149O365CA
C
hap
ter
4U
sin
g th
e U
ser
Mod
e82

Touching Meter Count allows you to check the total count of each of the following five counters.
Total Counter
3. Meter Count, Toner Replenisher, and Drum Dehumidifier
Shows the total number of copies madesince the installation of the copier.
Size Counter
Shows the number of copies made oncopy paper of a preset size. (The sizewill be set by your TechnicalRepresentative.)
2-Sided Total
Shows the number of 2-sided copies.
2-Sided Size
Shows the number of copies made oncopy paper of a preset size (the samesize as set for Size Counter).
Meter Count
Toner Replenisher
Touching Toner Replenisher sets the copier into the auxiliary toner replenishing mode.The copier tends to exhaust the supply of toner rapidly when making a number of copies from anoriginal with dark solid areas such as a photo. As a result, the image density of the copy willbecome lighter. In such a case, you can use Toner Replenisher to regain the normal imagedensity quickly.
• Do not turn OFF the Power Switch or open the Front Door while the copier isreplenishing toner.
• Toner is not replenished if the image density is sufficiently high.• The toner replenishing sequence ends automatically.
NOTES
Drum Dehumidifier
Touch Drum Dehumidifier to activate the Drum Dehumidifier function.During times of high humidity or when there are sudden rapid changes in humidity (especiallywhen you are using a heater in winter), condensation*1 can form on the surface of the PCDrum*2, resulting in blotchy copies. In such instances, use Drum Dehumidifier to dry thesurface of the PC Drum.
*1 Condensation:A phenomenon in which small drops of water are formed on cold surfaces, such as thesurface of the PC Drum.
*2 PC Drum:Functions in the copier as film in a camera.
A copy cycle can be initiated even while the copier is in the Drum Dehumidifier cycle.
Useful Tip
# of Active Accounts
Shows the total number of copies madeby the active accounts.
Ch
apte
r 4
Usi
ng
the
Use
r M
ode
83

4. User’s Choice
The copier has been set so that the most frequently used settings are automatically selected in theinitial mode. User’s Choice allows you to select the default settings which are automaticallyselected in the initial mode according to your own needs. By setting defaults that are mostfrequently used, time and effort to make extra settings will be eliminated when the copier isturned ON or when Auto Panel Reset is activated.
User’s Choice Functions
1156O081DA
A listing of User’s Choice functions is givenin six pages of menu, from 1/6 to 6/6 . Toshow the listing of each page, touch thedesired page number key at the bottom ofthe Touch Panel.
Mixed Orig. Detection
Language Selection
Paper Priority
Copy Mode Priority
Expo. Mode Priority
Expo. Level Priority
Manual Expo. Adjust
Energy Saver Mode
Auto Panel Reset
Drum Dehumidifier
Counter Removal
Intelligent Sort
Confirmation Beep
Original Thickness
Smaller Originals
Custom 2in1
Custom 2in1 Separation
Custom Book Copy
Special Paper
Orig. Copy Default
Auto Power-OFF Mode
Original on Glass
1/6
2/6
3/6
4/6
5/6
6/6
p. 88
p. 87
p. 86
p. 85
Finishing Priority
Administrator Mode
▼
Manual Feed Expansion
C
hap
ter
4U
sin
g th
e U
ser
Mod
e84

Mixed Orig. Detection
1/6 2/6
Select whether to enable ("ON") the MixedOriginal Detection mode or not ("OFF")when power is turned ON or panel reset.
The initial setting is "OFF."
Language Selection
Select the language of the Touch Panelmessages, either "Japanese" or "English."
The initial setting is "English"
Paper Priority
Specify the paper source selectedautomatically.
The initial setting is "1" (1st Drawer).
Copy Mode Priority
Specify the default mode selectedautomatically when power is turned ON orpanel reset, either "Auto Paper," "AutoSize," or "Manual."
The initial setting is "Auto Paper."
Expo. Mode Priority
Specify the default exposure mode selectedautomatically when power is turned ON orpanel reset, either "Auto" or "Manual."
The initial setting is "Auto."
Expo. Level Priority
AutoSelect the default exposure level in the AutoExposure mode, either "Lighter," "Normal,"or "Darker."
The initial setting is "Normal."
ManualSet the default exposure level in the ManualExposure mode.
The initial setting is "Normal."
Manual Expo. Adjust
Determine the defaultexposure-level-adjusting-increments in theManual Exposure mode, as optimized by thetype of original.
"Mode 1": For users who frequently useoriginals with halftone images,such as photos.
"Mode 2": For users who use a wide rangeof types of originals.
"Mode 3": For users who frequently useoriginals with a coloredbackground or faint texts.
The initial setting is "Mode 1."
Finishing Priority
Select the default finishing type when thecopier is equipped with a Sorter or StapleSorter, either "NonSort," "Sort," "Group,""Sort Staple," "NonSort + Hole Punch,""Sort + Hole Punch," "Group + HolePunch," or "Sort Staple + Hole Punch."
The initial setting is "NonSort."
Manual Feed Expansion
Select whether to enable (ON) the size inputfor manual bypass paper or not (OFF).When the function is turned "ON," AutoPaper, Auto size, Finishing, 2-sidedCopying, Margin-by-Reduction, Erase,1[2in1] 1, and 2[2in1] 1 can be used.
The initial setting is "ON."
▲ ▲
Ch
apte
r 4
Usi
ng
the
Use
r M
ode
4. User’s Choice
85

3/6 4/6
Auto Panel Reset
Select the time it takes the auto panel resetfunction to be activated from among "30sec.," "1 min.," "2 min.," "3 min.," or "5min.," or not activate the function at all ("NoReset").
The initial setting is "1 min."
Energy Saver Mode
Set the time it takes the copier to enter theEnergy Saver mode, from 1 to 120 min. (in1-min. increments).
The initial setting is "15 min."
Drum Dehumidifier
Select whether to allow ["ON (Auto)"] thecopier to enter into the Drum Dehumidifiermode automatically after it has been turnedON, or not ("OFF").
The initial setting is "OFF."
Counter Removal
Select whether to reset the panel ("ON") ornot ("OFF") when the Plug-In Counter ispulled out of the copier or a magnetic card ispulled out of the Data Controller.
The initial setting is "ON."
Intelligent Sort
Select whether to turn "ON" or "OFF" thefunction that automatically switchesbetween Sort and Non-Sort, selectingNon-Sort if only a single original is loadedand Sort if two or more originals are loadedin the document feeder.
The initial setting is "ON."
Confirmation Beep
Select whether to turn "ON" or "OFF" thebeep that sounds each time a key on theTouch Panel is touched.
The initial setting is "ON."
Original Thickness
Select whether to allow ("Thin") the user tomake copies from thin originals in additionto the standard ones or not ("Standard")using the document feeder.
The initial setting is "Standard."
Smaller Originals
Select whether to enable ("ON") a copycycle or not ("OFF") when it is initiated bypressing the Start key with no originalsplaced on the Original Glass or with anoriginal smaller than the detectable sizeplaced on the Original Glass in the AutoPaper mode.If "ON" is selected, the copy cycle is runusing the paper loaded in the default papersource. If "OFF" is selected, a warningmessage appears to instruct the user to selectpaper.
The initial setting is "OFF."
C
hap
ter
4U
sin
g th
e U
ser
Mod
e
4. User’s Choice
86

Custom 2in1
5/6
It is possible to store in memory varioussettings that are automatically recalled whenthe 2-in-1 copy is selected. Functions thatcan be set are "Paper," "Zoom," "Margin,"and "Erase."
• When a "Paper" size is selected, that size isautomatically selected when the 2-in-1copy is set. "Auto Paper" is among thechoices of paper size.
The initial setting is "AutoPaper."
• When a "Zoom" ratio is selected, that ratiois automatically selected when the 2-in-1copy is set. "Auto Size" is among thechoices of zoom ratio.
The initial setting is " ×0.707."
• When a "Margin" setting is made, thatsetting is automatically selected when the2-in-1 copy is set.
The initial setting is no margin.
• When an "Erase" setting is made, thatsetting is automatically selected when the2-in-1 copy is set.
The initial setting is no erase.
Custom 2in1 Separation
It is possible to store in memory varioussettings that are automatically recalled whenthe 2-in-1 separation copy is selected.Functions that can be set are "Paper,""Zoom," "Margin," and "Erase."
• When a "Paper" size is selected, that size isautomatically selected when the 2-in-1separation copy is set. "Auto Paper" isamong the choices of paper size.
The initial setting is "AutoPaper."
• When a "Zoom" ratio is selected, that ratiois automatically selected when the 2-in-1separation copy is set. "Auto Size" isamong the choices of zoom ratio.
The initial setting is " ×1.414."
• When a "Margin" setting is made, thatsetting is automatically selected when the2-in-1 separation copy is set.
The initial setting is no margin.
• When an "Erase" setting is made, thatsetting is automatically selected when the2-in-1 separation copy is set.
The initial setting is no erase.
Custom Book Copy
It is possible to store in memory varioussettings that are automatically recalled whenBook copy is selected. Functions that canbe set are "Paper," "Zoom," "Margin," and"Erase."
• When a "Paper" size is selected, that size isautomatically selected when Book copy isset. "Auto Paper" is among the choices ofpaper size.
The initial setting is the paper in the 1stDrawer.
• When a "Zoom" ratio is selected, that ratiois automatically selected when Book copyis set.
The initial setting is " ×1.000."
• When a "Margin" setting is made, thatsetting is automatically selected whenBook copy is set.
The initial setting is no margin.
• When an "Erase" setting is made, thatsetting is automatically selected whenBook copy is set.
The initial setting is no erase.
Special Paper
Set up a drawer for special paper loading.The initial setting is "Normal" for alldrawers.See p. 35 for Special Paper Setting.
Ch
apte
r 4
Usi
ng
the
Use
r M
ode
4. User’s Choice
87

6/6
Initial SettingEP4000 60minEP5000 90min
CopyTrack
This mode is used only by the administratorof your copier. When Administrator Modeis selected, the copier prompts you to enteryour "Admin. #" (administrator number).The following functions can be set onlywhen the correct administrator number isentered. The administrator number is set bythe Technical Representative. For moredetails, consult your TechnicalRepresentative.See p. 92 for setting the Copy Trackfunction.
This function allows the administrator tokeep track of the number of copies made byeach account.Select either "OFF," "100 Accounts," or"1000 Accounts."
The initial setting is "OFF."
Administrator Mode
Select the type of Orig. Copy settingselected automatically when the copier isturned ON or panel reset.
The initial setting is 1 1.
When the copier is equipped with a DuplexUnit, the initial setting is 1 2. Consultyour Technical Representative if you wantto set 1 1 for Orig. Copy Default.
▼▼
▼ ▼
▼
Orig. Copy Default▼
Select the time it takes the Auto Power-OFFfunction to be activated, from 1 min. to 120min. in 1-min. increments. Auto Power-OFF shuts down the copier a given period oftime after the last operation.
∗ Consult your Technical Representative ifyou want to disable this function.
Auto Power-OFF Mode
Original on Glass
Select whether to turn "ON" or "OFF" thebeep that sounds when you attempt to loadan original in the document feeder withanother one left on the glass.
The initial setting is "Beep ON."
When "100 Accounts" is selected:
ID #:You can program or change youraccess number (for a max. of 100accounts).
Limit:You can limit the maximum number ofcopies that can be made.
Total:Displays the count of the TotalCounter. You can also clear thecounter.
Size:Displays the count of the Size Counter.
When "1000 Accounts" is selected:
Total:Displays the count of the TotalCounter. You can also clear thecounter.
C
hap
ter
4U
sin
g th
e U
ser
Mod
e
4. User’s Choice
88
Max. Copy Sets
Determine the number of copies or copy setsthat can be set using the 10-Key Pad.
The initial setting is "OFF."
User Help
Set the help code to be transmitted by theuser when a Data Terminal is mounted.For details, consult your TechninalRepresentative.
Ch
apte
r 4
Usi
ng
the
Use
r M
ode
4. User’s Choice
89

Press the User Mode Key.1Making the User’s Choice Settings
1156O088DA
Touch User’s Choice .2
Page 1/6 of the User’s Choice menuappears.
Select the key of the page number onwhich the desired User’s Choicefunction is listed.For example, to change FinishingPriority from Non-Sort to Sort, touch 2/6 .
3
1149O368CA
Touch the key of the desired User’sChoice function.For example, touch Finishing Priority .
4
The following screen appears, onwhich NonSort is highlighted,indicating that it is selected.
User Mode
1134P356CA
1156O081DA
1149O368CA
1149O369CA
C
hap
ter
4U
sin
g th
e U
ser
Mod
e
4. User’s Choice
90

Touch Sort .5
Touch Enter .* Repeat steps 3 to 6 to make new
settings for other User’s Choicefunctions.
6
Touch Exit .7
1149O370CA
1149O371CA
Ch
apte
r 4
Usi
ng
the
Use
r M
ode
4. User’s Choice
91

The administrator of the copier should make the setting, either "100 Accounts" or "1000Accounts."
Press the User Mode key.1
Copy Track Function
Setting the Copy Track Function
User Mode
1134P356CA
1156O088DA
Touch User’s Choice .2
1156O081DA
Touch Administrator Mode .4
1149O372CA
Enter the administrator number usingthe 10-Key Pad.5
• Your Technical Representative is toprogram and change the administratornumber. For details, consult yourTechnical Representative.
• The administrator should remember theadministrator number.
NOTES
Touch 6/6 .31149O235AB
C
hap
ter
4U
sin
g th
e U
ser
Mod
e
4. User’s Choice
92

Touch Copy Track .6
Select the appropriate function.For example, to keep track of 100accounts, touch 100 Accounts and then Enter .
7
1149O373CA
1149O374CA
Initialize the Copy Track function data.For example, you may touch Yes and Enter .
8
1149O375CA
If you change the function, be sure toinitialize the Copy Track data.
NOTE
Touch Enter .9
Touch Exit .10
1149O376CA
Ch
apte
r 4
Usi
ng
the
Use
r M
ode
4. User’s Choice
93

An ID # can be programmed when "100 Accounts" is selected.
Programming the ID #
Press the User Mode key.1
Touch User’s Choice .2
Touch 6/6 .3
Touch Administrator Mode .4
Enter the administrator number usingthe 10-Key Pad.5
• Your Technical Representative is toprogram and change the administratornumber. For details, consult yourTechnical Representative.
• The administrator should remember theadministrator number.
NOTES
User Mode
1134P356CA
1156O088DA
1156O081DA
1149O372CA
1149O235AB
C
hap
ter
4U
sin
g th
e U
ser
Mod
e
4. User’s Choice
94

Touch Copy Track Data .6 Enter the ID # from the 10-Key Pad.Then, touch Enter .9
Select the page number on which thetarget account is shown.7
Touch the ID # key of the targetaccount.8
1149O378CA
• The ID number should be a 4-digitnumber.
• To correct a number entry, press theClear key and then enter the newnumber.
• If you want to program an ID numberfor other accounts, repeat steps 7through 9.
• If a new ID number is programmed, theold one is erased.
• If a new ID number entered alreadyexists for another account, the entry isrejected. Enter a different ID number.
NOTES
Touch Enter .10
Touch Exit .11
1149O376CA
1149O377CA
1149O376CA
1149O243AA
Ch
apte
r 4
Usi
ng
the
Use
r M
ode
4. User’s Choice
95

A Limit can be set when "100 Accounts" is selected.
Setting a Limit for Each Account
Press the User Mode key.1
Touch User’s Choice .2
Touch 6/6 .3
Touch Administrator Mode .4
Enter the administrator number usingthe 10-Key Pad.5
• Your Technical Representative is toprogram and change the administratornumber. For details, consult yourTechnical Representative.
• The administrator should remember theadministrator number.
NOTES
User Mode
1134P356CA
1156O088DA
1156O081DA
1149O372CA
1149O235AB
C
hap
ter
4U
sin
g th
e U
ser
Mod
e
4. User’s Choice
96
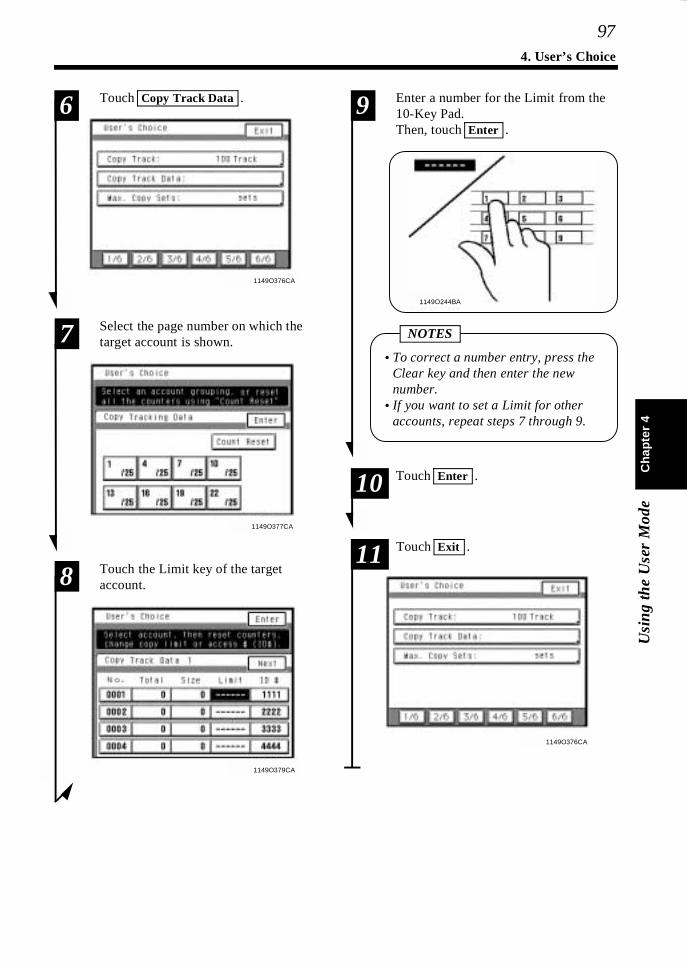
Touch Copy Track Data .6 Enter a number for the Limit from the10-Key Pad.Then, touch Enter .
9
Select the page number on which thetarget account is shown.7
Touch the Limit key of the targetaccount.8
1149O379CA
• To correct a number entry, press theClear key and then enter the newnumber.
• If you want to set a Limit for otheraccounts, repeat steps 7 through 9.
NOTES
Touch Enter .10
Touch Exit .11
1149O376CA
1149O377CA
1149O376CA
1149O244BA
Ch
apte
r 4
Usi
ng
the
Use
r M
ode
4. User’s Choice
97

A counter can be cleared for each account when "100 Accounts" or "1000 Accounts" is selected.
Clearing Counters for Each Account
Press the User Mode key.1User Mode
1134P356CA
Touch User’s Choice .2
Touch 6/6 .3
Touch Administrator Mode .4
Enter the administrator number usingthe 10-Key Pad.5
• Your Technical Representative is toprogram and change the administratornumber. For details, consult yourTechnical Representative.
• The administrator should remember theadministrator number.
NOTES
1156O088DA
1156O081DA
1149O372CA
1149O235AB
C
hap
ter
4U
sin
g th
e U
ser
Mod
e
4. User’s Choice
98

Touch Copy Track Data .6
Select the page number on which thetarget account is shown.7
You can touch Count Reset to clearthe counters of all accounts at once.
Useful Tip
Touch the counter key of the targetaccount.8
1149O380CA
Press the Clear key and then touch Enter .9
1149O381CA
If you want to clear the counters forother accounts, repeat steps 7 through9.
NOTE
Touch Enter .10
Touch Exit .11
1149O376CA
1149O377CA
1149O376CA
Ch
apte
r 4
Usi
ng
the
Use
r M
ode
4. User’s Choice
99

5. Data Send
The copier provides a function that allows the user to tell his/her service shop the operatingstatus of the copier by means of preset codes when a Data Terminal is mounted. For moredetails, consult your Technical Representative.
1156O088DA
C
hap
ter
4U
sin
g th
e U
ser
Mod
e100

Ch
apte
r 5
Wh
en a
Mes
sage
App
ears
1. When the Message "The current Paper Drawer is empty." Appears p. 1022. When the Message "Replenish Toner." Appears p. 1083. When the Message "The Staple Cartridge is empty." Appears p. 1104. When the Message "A paper misfeed has been detected." Appears p. 114
• Misfeed Location Displays p. 114• Misfeed Clearing Procedures Copier p. 115 Copier (Multi Bypass Tray) p. 117 Paper Feed Cabinet (2-Drawer Type) p. 118 Paper Feed Cabinet (1-Drawer Type) p.119 Duplex Unit p. 120 Large Capacity Cassette p. 121 Duplexing Document Feeder p. 122 Automatic Document Feeder p. 123 Sorter/Staple Sorter p. 124
5. When " " Appears p. 1256. What Does Each Message Mean? p. 126
Chapter 5
When a Message Appears
This chapter explains about the various warning messages given on the Touch Panel and steps totake to correct these faulty conditions. It also covers the procedures to be used for replenishingsupplies.
101

1. When the Message "The current Paper Drawer is empty." Appears
1156O082DA
1st Drawer
Slide out the 1st Drawer.1
When the drawer currently selected for use runs out ofpaper, the message shown on the left appears. The currentcopy cycle is interrupted and you cannot then start a newcopy cycle. The blinking drawer has run out of paper.
Example: The 1st Drawer has run out of paper.
Fan the paper stack thoroughly.
Front Side
Add paper by using the following procedure.
Load the paper stack into the Drawerso that its front side faces down.2
Adding Paper
1149O115AA
1149O116AA
The paper should beloaded no higher than ▼ (Max. LevelIndicator).
NOTE
Max.
1145O555KA
Slide the Drawer back in.3
C
hap
ter
5W
hen
a M
essa
ge A
ppea
rs102

2nd Drawer
Slide the 2nd Drawer.1
1149O117AA
Slide the Edge Guides in the directionof the arrows.2
1149O118AA
Load the paper stack into the Drawerso that its front side faces down.3
1149O118AA
The paper should beloaded no higher than ▼ (Max. LevelIndicator).
NOTE
Slide the Edge Guides snugly upagainst the paper stack.4
1149O120AA
Slide the Drawer back in.5
Max.
1145O555KA
Ch
apte
r 5
Wh
en a
Mes
sage
App
ears
1. When the Message "The current Paper Drawer is empty." Appears
103
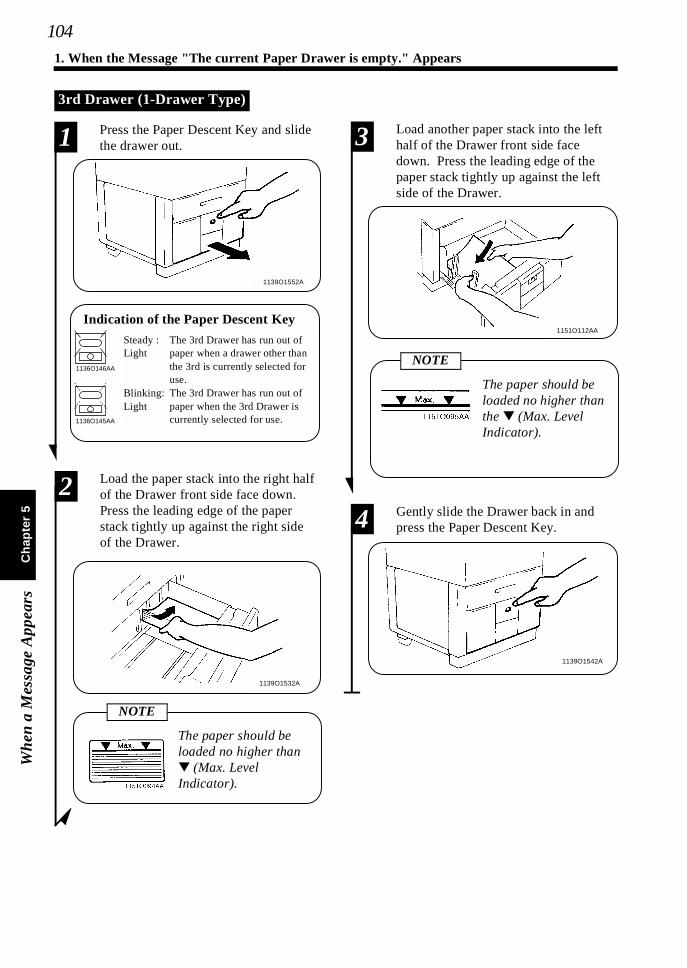
3rd Drawer (1-Drawer Type)
Press the Paper Descent Key and slidethe drawer out.1
Load the paper stack into the right halfof the Drawer front side face down.Press the leading edge of the paperstack tightly up against the right sideof the Drawer.
2
Load another paper stack into the lefthalf of the Drawer front side facedown. Press the leading edge of thepaper stack tightly up against the leftside of the Drawer.
3
Gently slide the Drawer back in andpress the Paper Descent Key.4
1139O1552A
The 3rd Drawer has run out ofpaper when a drawer other thanthe 3rd is currently selected foruse.The 3rd Drawer has run out ofpaper when the 3rd Drawer iscurrently selected for use.
Steady :Light
Blinking:Light
Indication of the Paper Descent Key1151O112AA
The paper should beloaded no higher thanthe ▼ (Max. LevelIndicator).
NOTE1136O146AA
1136O145AA
1139O1532A
The paper should beloaded no higher than ▼ (Max. LevelIndicator).
NOTE
1139O1542A
C
hap
ter
5W
hen
a M
essa
ge A
ppea
rs
1. When the Message "The current Paper Drawer is empty." Appears
104

3rd/4th Drawer (2-Drawer Type)
Slide out the Drawer.1
1149O125AA
Load the paper stack into the Drawerso that its front side faces down.2
1149O116AA
The paper should beloaded no higher than ▼ (Max. LevelIndicator).
NOTE
Max.
1145O555KA
Slide the Drawer back in.3C
hap
ter
5W
hen
a M
essa
ge A
ppea
rs
1. When the Message "The current Paper Drawer is empty." Appears
105

Large Capacity Cassette
Holding the Door Lock Release Lever,open the Cassette Door. 1
1134O055AA
◆ When adding paper to a partiallyloaded Large Capacity Cassette,press the Paper Plate Descent Key tolower the Paper Plate before openingthe Cassette Door.
1134O031AA
Unwrap the package of copy paper andfan the paper stack thoroughly.2
1139O1370A
Front Side
1134O054AA
Place the paper stack onto the PaperPlate so that its front side faces up.3
• Make sure that the leading edge of thepaper stack is pressed tightly upagainst the Guide Plate on the left ofthe Large Capacity Cassette.
• The paper should be loaded no higherthan the ▼ (Max. Level Indicator).
NOTES
1134O033AA
Close the Cassette Door.4
◆ This causes the Paper Plate to riseautomatically.
The Paper Plate may not ascend if theCassette Door is not closed completely.Be sure to close the Door completely.
NOTE
1139O0470A
C
hap
ter
5W
hen
a M
essa
ge A
ppea
rs
1. When the Message "The current Paper Drawer is empty." Appears
106

Ch
apte
r 5
Wh
en a
Mes
sage
App
ears
107

2. When the Message "Replenish Toner." Appears
Replacing the Toner Bottle
Swing down the Front Door.1
1136O001AA
Swing open the Toner Bottle Holderand pull out the used Toner Bottle.2
1136O002AA
1149O385CA
The message shown on the left appears whentoner is soon running out. You can still makecopies, but the image density will becomelighter and lighter. It is recommended thereforethat you replace the Toner Bottle with a new oneas soon as possible.
1149O384CA
When toner has run out, the message shown onthe left appears and you can no longer start anew copy cycle. Replace the Toner Bottle byfollowing the procedure given below.
C
hap
ter
5W
hen
a M
essa
ge A
ppea
rs108

Tap a new Toner Bottle against a deskor other hard surface four to five times.Then, turn the Toner Bottle upsidedown and tap it in the same way again.
3
1134O075AA
Shake the new Toner Bottle well.4
1138O048AA
With the Seal facing upward, insert theBottle into position.5
1136O005AA
Check that the marking on theBottle is aligned with the markingon the Toner Bottle Holder.Then pull the seal off the Toner Bottle.
6
1136O006AA
1136O007AA
Swing the Toner Bottle Holder closedand close the Front Door.7
• Use ONLY the specified toner for thiscopier. Using any other toner couldresult in image trouble.
• Do not turn OFF the Power Switch oropen the Door while the copier isreplenishing toner.
NOTES
Use the Toner Replenisher functionavailable from the User Mode if theimage is light immediately after theToner Bottle has been replaced with anew one. ➭ p. 83
Toner Replenisher
Ch
apte
r 5
Wh
en a
Mes
sage
App
ears
2. When the Message "Replenish Toner." Appears
109

3. When the Message "The Staple Cartridge is empty." Appears
1149O386CA
The message shown on the left appears when thestaples are running out in a copier systemequipped with a Staple Sorter.
Replace the Staple Cartridge with a new one byfollowing the procedure given below.
10-Bin Staple Sorter
Open the Stapler Door.2
Lock Release Lever
Stapler Door1139O0490A
Taking hold of the Lock Release Leverof the Staple Sorter, slide the StapleSorter away from the copier.
1
While lifting the Staple CartridgeRelease Lever, pull the StapleCartridge out of its port.
3
Pull the staple belt about 3 cm out ofthe new Staple Cartridge and break offthat portion.
4
Replacing the Staple Cartridge
1139O2190A
1139O0970A
1139O1350A
Check that no portion of the staple belthangs out of the cartridge. Break offany portion of the belt that hangs out ofthe cartridge.
NOTE
C
hap
ter
5W
hen
a M
essa
ge A
ppea
rs110

Insert the new Staple Cartridge in thedirection of the arrow until it clicksinto position.
5
1149O1440A
Place a sheet of paper into the 1st Binof the Staple Sorter.7
1139O1320A
Close the Stapler Door and slide theStaple Sorter back against the copier.6
Touch Staple .* The Staple Sorter automatically
test-staples the paper 2 to 3 times.
8
1149O320CB
* If no staples are evident, placeanother sheet of paper into the 1stBin and repeat steps 7, 8, and 9.
Remove the sheet of paper from the 1stBin and check that staples have beendriven into it.
9
1151O111AA
• Replace the Staple Cartridge only afteryou are prompted to do that by themessage. Removing the StapleCartridge before then will result instapling trouble.
• Immediately after the new StapleCartridge has been loaded, be sure tofollow steps 7 to 9.
• DO NOT turn the green gear near thecartridge inside the Stapler Unit.
NOTES
Ch
apte
r 5
Wh
en a
Mes
sage
App
ears
3. When the Message "The Staple Cartridge is empty." Appears
111

20-Bin Staple Sorter
Taking hold of the Lock Release Leverof the Staple Sorter, slide the StapleSorter away from the copier.
1
1136O166AA 1136O166AA
Open the Stapler Door.2
1136O011AA
While pressing the Staple CartridgeRelease Lever down in the direction ofthe arrow, pull the Staple Cartridge outof its port.
3
Pull the staple belt about 3 cm (1 inch)out of the new Staple Cartridge andbreak off that portion.
4
1139O0970A
1134O076AA
Check that no portion of the staple belthangs out of the cartridge. Break offany portion of the belt that hangs out ofthe cartridge.
NOTE
Insert the new Staple Cartridge in thedirection of the arrow until it clicksinto position.
5
1136O013AA
Close the Stapler Door and slide theStaple Sorter back against the copier.6
Place a sheet of paper into the 1st Binof the Staple Sorter.7
1149O400AA
Non-Sort Bin
1st Bin
1149O401AA
C
hap
ter
5W
hen
a M
essa
ge A
ppea
rs
3. When the Message "The Staple Cartridge is empty." Appears
112

* If no staples are evident, placeanother sheet of paper into the 1stBin and repeat steps 7, 8, and 9.
Touch Staple .* The Staple Sorter automatically
test-staples the paper 2 to 3 times.
8
Remove the sheet of paper and checkthat staples have been driven into it.9
1149O320CB
1136O017AA
• Replace the Staple Cartridge only afteryou are prompted to do that by themessage. Removing the StapleCartridge before then will result instapling trouble.
• Immediately after the new StapleCartridge has been loaded, be sure tofollow steps 7 to 9.
• DO NOT turn the green gear near thecartridge inside the Stapler Unit.
NOTES
Ch
apte
r 5
Wh
en a
Mes
sage
App
ears
3. When the Message "The Staple Cartridge is empty." Appears
113

4. When the Message "A paper misfeed has been detected." Appears
1149O387CA
If a paper misfeed occurs during acopy cycle, the message shown on theleft appears and that particular copycycle is stopped in the middle ofoperation.
Clear the misfed sheet of paperaccording to the procedure givenbelow.
Misfeed Location DisplaysDifferent procedures are used to clear a misfed sheet of paper depending on the location. First,isolate the location, then clear the misfeed according to the procedure applicable to the misfeedoccurring at that particular location.A blinking dot "O" indicates that there is a misfeed at that location. A lit dot "O" indicates thatthere might be a sheet of paper stopped at that location.
Copier ➭ p. 115
1149O252AA
Multi Bypass Tray ➭ p. 117
1149O251AA
Paper Feed Cabinet ➭ p. 118
1156O061AA
Duplex Unit ➭ p. 120
1149O254AA
Automatic/Duplexing DocumentFeeder ➭ p. 122
1149O255AA
Sorter/Staple Sorter ➭ p. 124
1149O256AA
Large Capacity Cassette ➭ p.121
1156O006AA
Ch
apte
r 5
Wh
en a
Mes
sage
App
ears
114

Misfeed Clearing Procedures
Copier
Swing down the Front Door andremove the Exit Tray.1
Open the Left Door. Pushing and, atthe same time, turning MisfeedRemoval Knob M1 , pull out the sheetof paper.
2
Swing Transport Section ReleaseLever M2 down.4
Close the Left Door and fit the ExitTray back into position.3
Turning Misfeed Removal Knob M3 ,pull out the sheet of paper.5
Swing Transport Section ReleaseLever M2 back to its originalposition. Close the Front Door.
6
1136O035AA
1136O037AA
1136O038AA
1136O039AA
1136O036AA
Be careful not to touch the areasmarked with High Voltage and Caution with bare hands.
NOTE
CAUTION
The Fusing Unit and its surrounding areasmay be extremely hot. DO NOT touch anypart except the paper.
Ch
apte
r 5
Wh
en a
Mes
sage
App
ears
4. When the Message "A paper misfeed has been detected." Appears
115

Open the Right Door and pull out thesheet of paper from the Paper Take-UpSection.
7
Close the Right Door.8
Slide out the 1st Drawer and unloadthe paper from the Drawer.9
Fan the paper thoroughly and reload itin the Drawer.10
Slide the Drawer back in.11
Open and close the Front Door to resetthe misfeed indication/message on theTouch Panel.
13
In the same way, unload and reload thepaper stack in the 2nd Drawer.12
1134O052AA
1134O023AA
1134O019AA
1136O040AA
After removing the misfed sheets ofpaper, start the copy cycle followingthe message on the Display.
NOTE
Ch
apte
r 5
Wh
en a
Mes
sage
App
ears
4. When the Message "A paper misfeed has been detected." Appears
116

Multi Bypass Tray
Unload the paper stack from the MultiBypass Tray.Then open the Right Door.
1
Pull out the sheet of paper from thePaper Take-Up Section. Then, closethe Right Door.
2
Fan the paper stack thoroughly andplace it back on the Tray.3
Open and close the Front Door to resetthe misfeed indication/message on theTouch Panel.
4
1134O023AA1134O110AA
1136O042AA
1136O043AA
Ch
apte
r 5
Wh
en a
Mes
sage
App
ears
4. When the Message "A paper misfeed has been detected." Appears
117

Paper Feed Cabinet (2-Drawer Type)
Open the Lower Right Door and pullout the sheet of paper.1
Slide out the drawer and unload thepaper stack from it.3
To reset the paper misfeed indicationon the Touch Panel, open and close theFront Door.
6
Slide the Drawer back in.5
Fan the paper thoroughly and reload it.4
Close the Lower Right Door.2
1139O1480A
1134O023AA
1139O1560A
1139O0710A
Ch
apte
r 5
Wh
en a
Mes
sage
App
ears
4. When the Message "A paper misfeed has been detected." Appears
118

Paper Feed Cabinet (1-Drawer Type)
Open the Lower Right Door and pullout the sheet of paper.1
Press the Paper Descent Key and thenslide out the drawer.3
Close the Lower Right Door.2
1139O1552A
Unload the paper from the drawer.Fan the paper thoroughly and reload it.4
1139O1532A
Slide the drawer back in and press thePaper Desent Key.5
To reset the paper misfeed indicationon the Touch Panel, open and close theFront Door.
6
1134O023AA
1139O0710A
Ch
apte
r 5
Wh
en a
Mes
sage
App
ears
4. When the Message "A paper misfeed has been detected." Appears
119

Duplex Unit
Open the Middle Left Door and LowerLeft Door. Pull out the sheet of paperfrom the Transport Section.
1
Close the Middle Left and Lower LeftDoors.2
Open the Lower Right Door and pullout the sheet of paper from theTransport Section.
3
Close the Lower Right Door.4
Slide out the Duplex Unit and open theMisfeed Removal Guide Plate.5
Pull out the sheet of paper from theDuplex Unit.6
Close the Misfeed Removal GuidePlate and slide the Duplex Unit backinto the copier.
7
Open and close the Front Door to resetthe misfeed indication/message on theTouch Panel.
8
1136O047AA
1139O0780A
1136O048AA
1139O0800A
1136O046AA
1134O023AA
Ch
apte
r 5
Wh
en a
Mes
sage
App
ears
4. When the Message "A paper misfeed has been detected." Appears
120

Large Capacity Cassette
Press the Paper Descent Key.1
Holding the Door Lock Release Lever,open the Cassette Door and thenremove the sheet of paper.
2
Close the Cassette Door.3
Press the Lock Release Lever and slidethe cassette away from the copier.4
Remove the sheet of paper.5
Slide the cassette back against thecopier.6
1134O031AA
1134O027AA
1134O033AA
1134O028AA
1134O029AA
1134O030AA
Ch
apte
r 5
Wh
en a
Mes
sage
App
ears
4. When the Message "A paper misfeed has been detected." Appears
121

Duplexing Document Feeder
Remove the original stack from theDocument Feed Tray.1
1156O014AA
1156O015AA
Swing open Document Feed Unit DoorF1 and gently pull out the original.2
Swing open Document Turnover/ExitUnit Door F2 and carefully pull outthe original from the Exit Unit.
3
1156O016AA
Raise the Duplexing Document Feeder.Gently pull out the original from theDocument Turnover/Feed Unit.
5
1156O017AA
Close F1 .6
Remove the original from the OriginalGlass and lower the DuplexingDocument Feeder.
7
1156O018AA
Add the number of originals indicatedon the Touch Panel to the bottom ofthe original stack removed in step 1,and reload the stack onto theDocument Feed Tray.
8
1156O019AA
Close F2 .4
Ch
apte
r 5
Wh
en a
Mes
sage
App
ears
4. When the Message "A paper misfeed has been detected." Appears
122

Automatic Document Feeder
Remove the original stack from theDocument Feed Tray and the originalsfed onto the Document Exit Tray.
1
1151O097AA
1151O031AA
Swing open Document Feed Unit DoorF1 and gently pull out the original.2
Carefully pull out the original from theDocument Exit Unit.3
1151O034AA
Raise the Automatic Document Feeder.Gently pull out the original from theDocument Feed Unit.
4
1149O402AA
Close F1 .5
Remove the original from the OriginalGlass and lower the AutomaticDocument Feeder.
6
Reload all the originals removed instep 1 onto the Document Feed Tray.7
1139O0840A
1151O098AA
Ch
apte
r 5
Wh
en a
Mes
sage
App
ears
4. When the Message "A paper misfeed has been detected." Appears
123

Sorter/Staple Sorter
Holding the Lock Release Lever, slidethe Sorter/Staple Sorter away from thecopier.
1
1139O0880A
10-Bin 20-Bin
Holding the Lock Release Lever, slidethe Sorter/Staple Sorter away from thecopier.
1
1136O166AA1136O166AA
Pull out the copy from the transportsection.2
1139O0870A
Slide the Sorter/Staple Sorter back tothe copier.3
1139O0650A
Open Misfeed Clearing Guide Plate S .2
1136O174CA
Turn the misfeed clearing knob oneturn in the direction shown (StapleSorter only).
3
Pull out the copy from the transportsection.4
1136O175CA
Close Misfeed Clearing Guide Plate Sand slide the Sorter/Staple Sorter backto the copier.
5
Ch
apte
r 5
Wh
en a
Mes
sage
App
ears
4. When the Message "A paper misfeed has been detected." Appears
124

5. When Appears
1149O264CA
When appears in the lower leftcorner of the Touch Panel, it means thatpart of the copier mechanism ismalfunctioning. Call your TechnicalRepresentative immediately.If a copy function involving themalfunctioning component is selected,the message "The XXX ismalfunctioning. Use another mode &call your tech. rep!" appears.You can nonetheless make copies as longas you don’t use that particular function.
Touching on the Touch Panel showsthe following screen.
When you call your TechnicalRepresentative, please give him/her thecode given on this screen.
Example: Code: C0920
Touching Exit in the upper rightcorner of the screen returns the Basiccopying screen to the Touch Panel.
IMPORTANT
1149O388CA
5. When Appears
Ch
apte
r 5
Wh
en a
Mes
sage
App
ears
125

6. What Does Each Message Mean?
Message Cause Action
A malfunction has been detected.Please call your technical rep. andprovide the following code:
The copier malfunctioned and isunable to make copies.
Call and inform your TechnicalRepresentative of the code beingshown on the Touch Panel.
Please input your Access Code #,then press the ACCESS Key.
An access number has been set andthe number assigned for your owndepartment must be entered beforeyou can make a copy.
Enter your access number. ➭ p. 22
To begin copying, please insert theKey Counter into the copier asillustrated below:
The Key Counter is not plugged inand the copier is unable to makecopies.
Plug in the Key Counter.
To begin copying, please insert theMagnetic Card into Data Controlleras illustrated below:
A magnetic card is not insertedinto the Data Controller (option)and the copier is unable to makecopies.
Insert a magnetic card into theData Controller.
The current Paper Drawer isempty. Please reload.
The currently selected drawer hasrun out of paper.
Load the drawer with paper.➭ p.102
Please add toner (Instructions foradding toner are on the inside ofthe front cover).
Toner has run out and the copier isunable to make copies.
Replace the Toner Bottle with anew one. ➭ p.108
Please replenish toner soon: Toner is soon running out. Replace the Toner Bottle with anew one. ➭ p.108
The Staple Cartridge is empty.Please replace.
The staples have run out. Replace the Staple Cartridge with anew one. ➭ p.110
A paper misfeed has been detected.Please remove the misfeed at ● .
A misfeed has occurred and nocopy cycle can be initiated.
Clear the misfed sheet of paper.➭ p.114
The section indicated by ➡ is open.Please close it properly.
A copier door is left open or anoption is not attached properly andthe copier is unable to make copies.
Close the door or cover and attachthe option properly.
Preventative Maintenance Time!Please call your technical rep. andprovide the following code:
The time has come when the copierneeds service and the copier isunable to make copies.
Call and inform your TechnicalRepresentative of the code beingshown on the Touch Panel.
Call for Maintenance soon: The time has come when the copierneeds service.
Call your Technical Representative.
Copies have been left in theDuplex Unit. Please remove thembefore proceeding any further.
A copy or copies are left in theDuplex Unit and the copier isunable to make copies.
Remove all copies from the DuplexUnit.
Sorter has reached its capacity.Please remove all the copies beforeproceeding any further.
The Sorter Bin capacity has beenreached and the copier is unable tomake copies.
Remove all copies from the SorterBins.
Original(s) have been left on theGlass. Please lift the cover andremove them.
You try to use the document feederwhen there is an original left on theOriginal Glass.
First remove the original from theGlass, then load the originals in thedocument feeder.
Ch
apte
r 5
Wh
en a
Mes
sage
App
ears
126

Message Cause Action
Original(s) left on the Glass. You have left an original on theOriginal Glass.
Remove the original from theGlass.
2-sided copying is not possible onpaper sizes less than A5 size.
You have selected a paper size thatis not good for 2-sided copying.
Select a standard copy paper sizeof A5 or larger, or cancel 2-sidedcopying.
Sorting or Grouping is not possiblewith A5 , B6 or 5-1/2 ×8-1/2 paper sizes.
You have selected a copy papersize not good for Sort or Group.
Select a standard copy paper sizeof A5 (5-1/2" × 8-1/2" ) orlarger, or cancel Sort or Group.
Stapling is not possible on papersizes less than B5 size.
You have selected a copy papersize not good for Sort Staple.
Select a standard copy paper sizeof B5 or larger, or cancel SortStaple.
Hole-Punching is only possiblewith A3 and A4 sizes.
You have selected a copy papersize not good for Hole Punch.
Select the specified paper size orcancel Hole Punch.
Matching paper size isn’t available.Reselect paper size or changezoom.
No drawers contain paper of theright size to run a copy cycle in theAuto Paper mode.
Cancel Auto Paper and select theappropriate copy paper size orchange the zoom ratio.
Matching paper size isn’t available.Please change direction of original.
The copy paper of the calculatedsize is loaded in a directiondifferent from that of the originalto run a copy cycle in the AutoPaper mode.
Change the direction of theoriginal.
Auto Sizing is not possible. Selectanother zoom method or paper size.
The zoom ratio calculated based onthe original size and copy papersize is outside the range from × 0.5to × 2.0 to run a copy cycle in theAuto Size mode.
Cancel Auto Size and select theappropriate zoom ratio or changethe copy paper size.
Please load Cover paper into thesource indicated below.
Paper for covers has run out. Load paper for covers.
Paper for covers is not loaded.
Please load Insert sheets into theindicated paper source.
The paper source specified forinserts has run out of paper.
Load the specified paper sourcewith the paper for inserts. ➭ p.102
The paper source specified forinserts is not loaded with paper.
To staple, please remove all theremaining copies from the Sorter.
A stapled copy set/stack is left inthe Sorter Bin.
Remove all copies from the SorterBins or cancel Sort Staple.
Remove copies from the Sorter. A copy or copies are left in theSorter Bins.
Remove all copies from the SorterBins.
Please load the originals into theDocument Feeder.
The originals are not loaded in thedocument feeder, though a modethat requires the document feeder(Cover, Page Insertion, etc.) hasbeen set.
Load the originals in the documentfeeder.
Copies remain in the Duplex Unit,please press START to feed themout.
A copy or copies are left in theDuplex Unit.
Press the Start key to feed thecopies out of the Duplex Unit andout onto the Exit Tray.
Manual Feeding cannot becombined with duplexing. Canceleither one.
Two-sided copying is not possiblewith paper loaded in the MultiBypass Tray.
Select another paper source or1-sided copying.
XXX and OOO cannot becombined.
You have set two functions thatconflict with each other.
Cancel either one of the twofunctions.
Ch
apte
r 5
Wh
en a
Mes
sage
App
ears
6. What Does Each Message Mean?
127

Message Cause Action
The maximum # for 2-sided copiesis 50. Please reenter.
You have entered 51 or more forthe number of copies to be made ina 2-sided copying cycle.
If you press the Start key, thecopier starts the copy cycle tomake only 50 copies.
To recover job, reinsert thefollowing # of originals:
After a misfed sheet of paper hasbeen cleared, you need to reloadthe originals fed out onto theDocument Exit Tray onto theDocument Feed Tray.
Add the number of originalsindicated to the bottom of theremaining stack and reload.
For Margin-by-Reduction, selectAuto Paper or Auto Size instead ofManual.
Margin-by-Reduction is possibleonly in Auto Paper or Auto Size.
Select Auto Paper or Auto Size.
Matching paper size is only inSpecial tray. If OK, press START.
The drawer selected for use hasbeen set up for special paperloading by using User’s Choice.
If you don’t want the special paper,place the desired type of paper ofthe corresponding size on the MultiBypass Tray. ➭ p.35
Auto-Sizing and Manual Feedingcannot be combined.
The two functions are incompatiblewith each other.
Select a zoom ratio.
Your account has reached itsmaximum copy allowance. Pleasecall your administrator.
The max. number of copies thatcan be made for your account isdetermined in the AdministratorMode.
Consult the administrator of yourcopier. ➭ p.88
Ch
apte
r 5
Wh
en a
Mes
sage
App
ears
6. What Does Each Message Mean?
128

Ch
apte
r 6
Tro
ubl
esho
otin
g
This chapter gives you instructions on how to troubleshoot copier malfunctions by showing actualexamples.
Chapter 6
Troubleshooting
1. When This Type of Copy is produced p. 130• The image is too light.• The image is too dark.• The copy is blurry.• The copy has dark specks or spots.• The edge of the copy is dirty.• The image on the copy is not aligned properly.• The copy has lines.
2. The Copier is not functioning as designed p. 132• The Touch Panel shows nothing.• The Start key does not light up green.• No copies are fed out when the Start key is pressed.• Control panel keys do not respond.• The copier is not activated when the Power Switch is turned ON.
129

1. When This Type of Copy is produced
Symptom Possible Cause Action
The image is too light. The exposure level for the AutoExposure mode is set at "Lighter."
Change the setting of "AutoExposure Level" of User’s Choice. ➭ p. 85Or, cancel the Auto Exposuremode and select Manual Exposureto adjust the exposure level toobtain a darker image. ➭ p . 40
The exposure level for the ManualExposure mode is set at "Lighter."
Touch [Darker] as necessary toobtain a darker image. ➭ p. 40
You have been making copies froma photo or an original with a largedark area.
The copier needs more toner.Replenish toner by using TonerReplenisher of User Mode. ➭ p. 83
The Toner Bottle has just beenreplaced.
The copier needs more toner.Replenish toner by using TonerReplenisher of User Mode. ➭ p. 83
The message "Replenish Toner." isshown on the Touch Panel.
Replace the Toner Bottle. ➭ p. 108
The paper is damp. Change the paper.
The image is too dark. The exposure level for the AutoExposure mode is set at "Darker."
Change the setting of "AutoExposure Level" of User’s Choice. ➭ p. 85Or, cancel the Auto Exposuremode and select Manual Exposureto adjust the exposure level toobtain a lighter image.➭ p. 40
The exposure level for the ManualExposure mode is set at "Darker."
Touch [Lighter] as necessary toobtain a lighter image. ➭ p. 40
The Original Glass surface is dirty. Wipe the Original Glass clean witha soft dry cloth. ➭ p. 140
The original is not held tightlyagainst the Original Glass.
Place the original in position sothat it is held tightly against theOriginal Glass.
The copy is blurry. The paper is damp. Change the paper.
1074O110
1074O109
1074O108
C
hap
ter
6T
rou
bles
hoot
ing
130

Symptom Possible Cause Action
The copy has dark specks or spots. The Original Glass is dirty. Wipe the Original Glass clean witha soft dry cloth. ➭ p. 140
The Original Pad or DocumentFeed Belt is dirty.
Wipe the Original Pad orDocument Feed Belt clean with asoft cloth dampened with milddetergent. ➭ pp. 140, 141
The original is very thin or highlytransparent.
Place a blank sheet of paper overthe original. ➭ p. 29
The original is 2-sided. The information on the back sideof a 2-sided, thin original may beslightly reproduced on the copy.Set the copier into the ManualExposure mode and, using the[Lighter] key, make the exposurelevel lighter. ➭ p. 40
The edge of the copy is dirty. The Original Pad or DocumentFeed Belt is dirty.
Wipe the Original Pad orDocument Feed Belt clean with asoft cloth dampened with milddetergent. ➭ pp. 140, 141
You have selected a paper sizelarger than the original.(When Zoom Ratio is set at fullsize ×1.000)
Select the same copy paper size asthe original.Or, use the Auto Size Mode toenlarge the copy to the appropriatesize. ➭ p. 36
The original is not placed in thecorrect position (when the zoomratio is set at full size ×1.000).
Select the same copy paper size asthe original. ➭ p. 34Or, reload the paper in the samedirection as the original.
The reduction ratio selected is notin accord with the copy paper size. (When doing manual reductioncopying.)
Select the zoom ratio according tothe copy paper size. ➭ p. 36Or, use the Auto Size Mode toreduce the copy to the appropriatesize. ➭ p. 36
The image on the copy is notaligned properly.
The original is not placed in thecorrect position.
Place the original correctly on theOriginal Glass against the OriginalWidth Scale. ➭ p. 29Or, load it onto the documentfeeder correctly along theDocument Guide Plates. ➭ p. 27
The originals may not be suitablefor use in the document feeder.
Raise the document feeder andplace the originals on the OriginalGlass one at a time, instead ofusing the document feeder. ➭ p. 29
The copy has lines. The Corona Units are dirty. Using the Corona Unit CleaningLevers, clean the Corona Units.➭ p. 141
1074O111
1074O112
1. When This Type of Copy is produced
1074O113
Ch
apte
r 6
Tro
ubl
esho
otin
g
131

Symptom Check for: Action
The Touch Panel shows nothing. Is only the Start key lit up green? The copier is in the Energy Savermode.Press any key on the control panelto cancel Energy Saver.
Auto Power Off is activated. ➭ p. 21
Turn the Power Switch ON.➭ p. 20
The Display Contrast Knob isplaced in the excessively light ordark position. ➭ p. 16
Viewing the Touch Panel, turn theDisplay Contrast Knob asnecessary. ➭ p. 17
The Start key does not light upgreen.
Is your Access Number entered? Enter your Access Number byfollowing the procedure given in"Entering the Access Number." ➭ p. 22
No copies are fed out when theStart key is pressed.
The copier has developed amalfunction.
Check the Touch Panel and takeaction according to the message onthe panel.
The copier was just turned ON andis warming up.
It takes the copier 60 sec. to beready for making copies after it hasbeen turned ON.Please wait.
Control panel keys do not respond. The Interrupt key LED is lit up. The copier is in the interrupt mode.Press the Interrupt key to cancelthe interrupt mode.
The copier is not activated whenthe Power Switch is turned ON.
The power cord is left unpluggedfrom the power outlet.
Plug the power cord into the poweroutlet.
The room circuit breaker is open. Close the room circuit breaker.
* If these procedures do not correct the problem, turn OFF the Power Switch, unplug the power cordfrom the power outlet and contact your Technical Representative.
2. The Copier is not functioning as designed
1149O271CA
C
hap
ter
6T
rou
bles
hoot
ing
132

Ch
apte
r 7
Mis
cell
aneo
us
1. Specifications p. 134• Copier• Duplexing Document Feeder • Automatic Document Feeder • Sorter (10-Bin)• Sorter (20-Bin)• Staple Sorter (10-Bin)• Staple Sorter (20-Bin)• Paper Feed Cabinet (2-Drawer Type)• Paper Feed Cabinet (1-Drawer Type)• Duplex Cabinet• Duplex Unit • Large Capacity Cassette• Data Controller
2. Care of the Copier p. 140• Cleaning
3. Function Combination Matrix p. 1424. Description of Copy Paper Size and Zoom Ratio Table p. 1455. Index p. 146
This chapter gives complete specifications of the copier system and options,plus care and reference information to facilitate your use of the copier.
Chapter 7
Miscellaneous
133

EP4000 EP5000Type Console CopierPlaten Type StationaryPhotoconductor OPCCopying System Electrostatic Dry Powdered Image Transfer to Plain PaperDeveloping System Micro-Toning SystemFusing System Lamp-Heated RollerTypes of Original Sheets, Books, and other three-dimensional objects
Maximum Original Size : A3 LengthwiseMaximum Original Weight : 3kg
Kinds of Paper Plain paper (60g/m2 to 157g/m2 )Recycled paperSpecial paper (Multi Bypass Tray only) Thick paper (91g/m2 to 157g/m2), Transparencies, Translucent paper
Copy Paper Size First Drawer A3L, B4L, A4L, A4C, A5L, 10"×8"C, LetterC, LetterL, 11"×14"L, 11"×17"L, 8"×13"L 210mm×280mmL, 216mm×297mmL, 297mm×216mmC, 216mm×320mmL, 220mm×280mmL, 297mm×430mmL, 210mm×330mmL2nd Drawer A3L, B4L, A4L, A4C, B5L, B5C, A5L, LetterL, LetterC, 11"×14"L, 11"×17"LMulti Bypass Tray Crosswise : 100mm to 297mm Lengthwise : 140mm to 432mm
Paper Feeding System First Drawer : 500 sheets 2nd Drawer : 500 sheetsMulti Bypass Tray : 50 sheets (80g/m2)
: 20 sheets (Recycled paper or Special Paper)Warm-up Time 130 seconds or less 240 seconds or lessFirst Copy A4C = 4.1 seconds or less
(in Full Size Mode using First CopierDrawer)
A4C = 3.7 seconds or less(in Full Size Mode using First CopierDrawer)
Copy Speed(Approx. copies/minute)
Full size (×1.000) A3 : 26 B4L : 29 A4L : 34 A4C : 40
Full size (×1.000) A3 : 28 B4L : 31 A4L : 37 A4C : 50
Magnification Ratios Fixed ratiosFull size: 1:1 ±0.005Reduction ratios: ×0.500, ×0.707, ×0.816Enlargement ratios: ×1.154, ×1.414, ×2.000Zoom ratios: From ×0.500 to ×2.000 in ×0.001 increments
Multiple Copies Up to 999 copies (count-down system)Exposure Control Auto Exposure Mode, Manual Exposure Mode and Photo ModeLost Image 1-sided copy in the full size mode
Leading edge : 3mm (approx. 1/8") Trailing edge : 3mm (approx. 1/8") Front edge : 1mm (approx. 1/25")
Power Requirements AC 110V, 115V, 120V, 127V, 220-240V; 50/60HzPower Consumption 1.5 kW (Max.)Dimensions Width
DepthHeight
:::
620mm (Excluding Copy Tray)740mm960mm
Weight 122kg 123.5kg
1. Specifications
Copier EP4000/EP5000
C
hap
ter
7M
isce
llan
eou
s134

Document FeedingSystem
Standard Mode : 1-sided original, 2-sided original, 2-in-1, Single FeedingMixed Original Detection Mode: 1-sided Mixed Original Detection 2-sided Mixed Original Detection
Kinds of Original Plain paper
Original Weight 1-sided original Mode, 2-in-1 Mode : 50g/m2 to 110g/m2
2-sided original Mode : 60g/m2 to 90g/m2
Single Feeding Mode : 35g/m2 to 200g/m2
Lightweight Original Mode : 40g/m2 to 110g/m2
Original Size 1-sided/2-sided original Mode: A3L, B4L, A4L, A4C, A5L, 210mm ✕ 330mm
2-in-1 Mode: A4C
Capacity of DocumentFeed Tray
A4 or Smaller : 60 sheets (80g/m2)A3L, B4L : 30 sheets (80g/m2)
Copy Productivity 100%
First Copy with ADF A4C = 11 seconds or less
Power Source DC24V supplied from copier
Power Consumption 60W or less
Dimensions Width: 644mm Depth: 505mm Height: 166mm
Weight 17kg
Duplexing Document Feeder AFR-13
Automatic Document Feeder AF-5
Document FeedingSystem
Standard Mode : 1-sided original, 2-in-1, Single FeedingMixed Original Detection Mode: 1-sided Mixed Original Detection
Kinds of Original Plain paper
Original Weight 1-sided original Mode, 2-in-1 Mode : 50g/m2 to 110g/m2
Mixed original Detection Mode : 60g/m2 to 90g/m2
Single Feeding Mode : 35g/m2 to 200g/m2
Lightweight Original Mode : 40g/m2 to 110g/m2
Original Size 1-sided original Mode: A3L, B4L, A4L, A4C, A5L, 210mm ✕ 330mm
2-in-1 Mode: A4C
Capacity of DocumentFeed Tray
A4 or Smaller : 30 sheets (80g/m2)A3L, B4L : 15 sheets (80g/m2)
Copy Productivity 100%
First Copy with ADF A4C = 11 seconds or less
Power Source DC24V supplied from copier
Power Consumption 48W or less
Dimensions Width: 587mm Depth: 505mm Height: 125mm
Weight 13kg
Ch
apte
r 7
Mis
cell
aneo
us
1. Specifications
135

No. of Bins Sort Bins : 10Modes Non-Sort Mode, Sort Mode, Group ModeKinds of Paper Non-Sort Mode
• Plain paper, Recycled paper• Special Paper
T Thick paper, Transparencies, Translucent paperSort Mode, Group Mode
• Plain paper, Recycled paperPaper Size Non-Sort Mode : A3L to A6L
Sort Mode, Group Mode : A3L to A5LCapacity of Bins Non-Sort Mode
• Plain paper, Recycled paper1st bin : 50 sheets2nd to 10th bin : 25 sheets/bin
• Special Paper1st bin only : 10 sheets/bin
Sort Mode, Group Mode• Plain paper, Recycled paper
1st to 10th bin : 25 sheets/binPower Source DC24V supplied from copierPower Consumption 72W or lessDimensions Width : 400mm Depth : 562mm Height : 404mmWeight 15.8kg
Sorter S-106
Sorter S-208
No. of Bins Sort Bins : 20Modes Non-Sort Mode, Sort Mode, Group ModeKinds of Paper Non-Sort Mode
• Plain paper, Recycled paper• Special PaperT Thick paper, Transparencies, Translucent paper
Sort Mode, Group Mode• Plain paper, Recycled paper
Paper Size Non-Sort Mode : A3L to A6LSort Mode, Group Mode : A3L to A5L
Capacity of Bins Non-Sort Mode• Plain paper, Recycled paper:
Non-Sort bin: 100 sheets1st bin to 20th bin: 50 sheets/binTotal: 1,100 sheets (A4 or smaller, weighing 80g/m2)Total: 600 sheets (A3 or B4, weighing 80g/m 2)
• Special PaperTransparencies: 10 sheets (Max. paper size A4)Thick paper, Translucent paper: 10 sheets
Sort Mode, Group Mode:• Plain paper, Recycled paper:
1st bin to 20th bin: 50 sheets/binTotal: 1,000 sheets (A4 or smaller, weighing 80g/m2)Total: 600 sheets (A3 or B4, weighing 80g/m 2)
Power Source DC24V supplied from copierPower Consumption 72W or lessDimensions Width : 425mm Depth : 605mm Height : 960mmWeight 39.5kg
C
hap
ter
7M
isce
llan
eou
s
1. Specifications
136

1. Specifications
No. of Bins Sort Bins : 10Modes Non-Sort Mode, Sort Mode, Group Mode, Sort-Staple ModeKinds of Paper Non-Sort Mode
• Plain paper, Recycled paper• Special Paper
T Thick paper, Transparencies, Translucent paperSort Mode, Group Mode, Sort-Staple Mode
• Plain paper, Recycled paperPaper Size Non-Sort Mode : A3L to A6L
Sort Mode, Group Mode : A3L to A5LSort-Staple Mode : A3L to B5L
Capacity of Bins Non-Sort Mode• Plain paper, Recycled paper
1st bin : 50 sheets2nd to 10th bin : 25 sheets/bin
• Special Paper1st bin only : 10 sheets/bin
Sort Mode, Group Mode, Sort-Staple Mode• Plain paper, Recycled paper
1st to 10th bin : 25 sheets/binPower Source DC24V supplied from copierPower Consumption 72W or lessDimensions Width : 400mm Depth : 562mm Height : 404mmWeight 18.1kgAccessories Staple Cartridge, 5,000 staples / cartridge ✕ 1 piece
Staple Sorter ST-104
Staple Sorter ST-211
No. of Bins Non-Sort Bin + 20 Sort BinsModes Non-Sort Mode, Sort Mode, Group Mode, Sort-Staple Mode, Hole Punch ModeKinds of Paper Non-Sort Mode, Hole Punch Mode
• Plain paper, Recycled paper• Special PaperT Thick paper, Transparencies, Translucent paper
Sort Mode, Group Mode, Sort-Staple Mode• Plain paper, Recycled paper
Paper Size Non-Sort Mode : A3L to A6LSort Mode, Group Mode : A3L to A5LSort-Staple Mode : A3L to B5LHole Punch Mode : A3L, A4C
Capacity of Bins Non-Sort Mode, Hole Punch Mode• Plain paper, Recycled paper
Non-Sort bin: 100 sheets1st bin to 20th bin: 50 sheets/binTotal: 1,100 sheets (A4 or smaller, weighing 80g/m2)Total: 600 sheets (A3 or B4, weighing 80g/m2)
• Special PaperTransparencies: 10 sheets (Max. paper size Letter)Thick paper, Translucent paper: 10 sheets
Sort Mode, Group Mode, Sort-Staple Mode• Plain paper, Recycled paper
1st bin to 20th bin: 50 sheets/binTotal: 1,000 sheets (A4 or smaller, weighing 80g/m2)Total: 600 sheets (A3 or B4, weighing 80g/m2)
Punching Punch Hole: 4 HolePower Source DC24V supplied from copierPower Consumption 72W or lessDimensions Width : 425mm Depth : 605mm Height : 960mmWeight 44.5kgAccessories Staple Cartridge, 5,000 staples / cartridge ✕ 1 piece
Ch
apte
r 7
Mis
cell
aneo
us
1. Specifications
137

Kinds of Paper Plain paper, Recycled paper : Weighing 60g/m2 to 90g/m2
Copy Paper Size 3rd Drawer : A5L to A3L4th Drawer : A4L to A3L
Paper Feeding System Automatic feeding from drawerTotal Drawer Capacity : 1,000 sheets (500 sheets ✕ 2)
Power Source DC24V supplied from copier
Dimensions Width : 620mm Depth : 695mm Height : 390mm
Weight 35kg
Paper Feed Cabinet PF-205
Paper Feed Cabinet PF-105
Kinds of Paper Plain paper, Recycled paper : Weighing 60g/m2 to 90g/m2
Copy Paper Size 3rd Drawer : A4C
Paper Feeding System Automatic feeding from drawerDrawer Capacity : 2,500 sheets (80g/m2)
Power Source DC24V supplied from copier
Dimensions Width : 620mm Depth : 695mm Height : 390mm
Weight 36.4kg
Paper Feed Cabinet PF-5D
Kinds of Paper Plain paper, Recycled paper : Weighing 60g/m2 to 90g/m2
Copy Paper Size A5L to A3L
Multiple Copies 2-Sided Copies : 50 sheets
Power Source DC24V supplied from copier
Dimensions Width : 620mm Depth : 695mm Height : 390mm
Weight 42kg
Duplex Unit AD-9
Kinds of paper Plain paper, Recycled paper : Weighing 60g/m2 to 90g/m2
Size : A3L to A5L
Capacity Up to 50 sheets (60g/m2 to 90g/m2)Up to 20 sheets (91g/m2 to 157g/m2)
Power Source DC24V supplied from copier
Weight 14.2kg
Dimensions Stored in the Paper Feed Cabinet
C
hap
ter
7M
isce
llan
eou
s
1. Specifications
138

Name Data Controller D-102
Type Magnetically encoded card accessed Copy Counter
Type of Cards Departmental, Register, Administration, Erasing, Time/Date, and Cleaning Card
Departmental CardsAccommodated
Up to 999 groups
Display 7-segment, 16-digit liquid-crystal display
Copy Count to be • Max. no. of copies made, total: 9,999,999
Stored in Memory • Max. no. of copies made, by paper size: 9,999,999
• Max. no. of copies made, by department: 999,999
• Max. no. of copies made, by copy mode: 999,999
• Max. no. of copies made, by department/copy mode: 99,999
Distinguishable Copy Modes
Up to 16 types
Power Source DC24V (supplied from copier)
Power Consumption 5 W or less
Dimensions Width : 180mmDepth : 64mmHeight : 111mm
Weight Approx. 55g
Others A printer (option) recommended by us can be hooked up, sourced from anotherpower supply.
Data Controller D-102
Large Capacity Cassette C-301
Type Automatic paper supply and take-up from a 3,000-sheet capacity Cassette
Installation Fixed to copier by means of dedicated Stand with Slide Rails
Types of Paper Plain paper, Recycled paper: Weighing 60g/m2 to 90g/m2
Paper Size A4C
Capacity 3,000 sheets (80g/m2)
Power Source DC24 V, 1.2 A (supplied from copier)
Power Consumption 30 W or less
Dimensions Width : 290mmDepth : 446mmHeight : 480mm
Weight 10kg (Excluding Mounting Brackets)
Ch
apte
r 7
Mis
cell
aneo
us
1. Specifications
139

Housing
Cleaning
◆ Turn OFF the Power Switch of the copier when cleaning.
Wipe the surface of the Housing cleanwith a soft cloth dampened with mildhome detergent.
Wipe the surface of the Control Panelclean with a soft, dry cloth.
NEVER use a glass cleaner or anyother detergent to avoid damage to thecontrol panel keys and Display.
NOTE
Control Panel
2. Care of the Copier
1134O024AA
Original Glass
Original Pad
Wipe the surface of the Original Padclean with a soft cloth dampened withmild home detergent
1134O026AA
Front Door
Wipe the surface of the Original Glassclean with a soft, dry cloth.
Wipe the inside of the Front Doorclean with a soft cloth.
1139O1830A
1134O025AA
1136O072AA
C
hap
ter
7M
isce
llan
eou
s140

2. Care of the Copier
1
2
1
3
Corona Units
2
Document Transport Belt
3
4
Gently slide out the Upper CoronaUnit Cleaning Lever as far as it goes.
Gently slide the Cleaning Lever backinto the original position.
Gently slide out the Lower CoronaUnit Cleaning Lever as far as it goes.
Gently slide the Cleaning Lever backinto the original position.Repeat steps 1 to 4 two to three times.
Wipe the surface of the DocumentTransport Belt clean with a soft clothdampened with mild home detergent.
Hold the Document Transport Belt atboth edges and pull it to the left toexpose a fresh surface.
Wipe the fresh surface clean with asoft cloth dampened with mild homedetergent.
Repeat these steps until the entiresurface of the Belt is wiped clean.
1136O073AA
1136O074AA
1136O075AA
1136O076AA
1139O1910A
1151O1920A
Ch
apte
r 7
Mis
cell
aneo
us
141

B
ook
1
B
ook
2
M
ixed
Ori
g.
Ori
g.
Cop
y
▲
3. Function Combination Matrix
O : The functions can be combined. ● : The functions can be combined (though a miscopy could result).
: The functions cannot be combined. (The function set first takes precedence.) ▲ : The functions cannot be combined. (The function set last takes precedence.)
Basic Orig. Copy
Paper Zoom
PaperAuto Paper ▲ ▲ O O O O O O O O O O ▲ ▲ O
Manual Paper ▲ O O O O O O O O O O O O O O
ZoomAuto Size ▲ O ▲ ▲ O O O O O O O O ▲ ▲ O
Fixed Ratio O O ▲ O O O O O O O O O O O O
Zoom Memory O O ▲ O O O O O O O O O O O O
1 1 O O O O O ▲ ▲ ▲ ▲ ▲ ▲ ▲ ▲ ▲ O
1 2 O O O O O ▲ ▲ ▲ ▲ ▲ ▲ ▲ ▲ ▲ O
2 1 O O O O O ▲ ▲ ▲ ▲ ▲ ▲ ▲ ▲ ▲ O
2 2 O O O O O ▲ ▲ ▲ ▲ ▲ ▲ ▲ ▲ ▲ O
1[2in1] 1 O O O O O ▲ ▲ ▲ ▲ ▲ ▲ ▲ ▲ ▲ O
2[2in1] 1 O O O O O ▲ ▲ ▲ ▲ ▲ ▲ ▲ ▲ ▲ O
1 [2in1] O O O O O ▲ ▲ ▲ ▲ ▲ ▲ ▲ ▲ ▲ O
1 2[2in1] O O O O O ▲ ▲ ▲ ▲ ▲ ▲ ▲ ▲ ▲ O
Book 1 O O O ▲ ▲ ▲ ▲ ▲ ▲ ▲ ▲ ▲
Book 2 O O O ▲ ▲ ▲ ▲ ▲ ▲ ▲ ▲ ▲
Mixed Orig. O O O O O O O O O O O O O ▲ ▲
Non-Sort O O O O O O O O O O O O O O O O
Sort O O O O O O O O O O O O O O O O
Group O O O O O O O O O O O O O O O O
Sort-&-Staple O O O O O O O O O O O O O ▲ ▲ ●
Manual Staple O
Hole Punch O O O O O O O O O O O O O O O O
Cover O O O O O O O O O O O
Page Insertion O O O O O O O O O O O
Single Copy O O O O O O
Multi Copy O O O O O O
File MarginRight O O O O O O O O O O O O O O O O
Left O O O O O O O O O O O O O O O O
Reduce O B O B B O O O O O O O O O
Edge/Frame Erase O O O O O O O O O O O O O O O O
Interrupt O O O O O O O O O O O O
Multi Bypass ▲ ▲ A O O O A O A O A A A
Job Memory O O O O O O O O O O O O O O O O
ADF / SADF Mode
Functions Set First
Functions Set Last
▼
A
uto
Pap
er
M
anua
l Pap
er
A
uto
Size
F
ixed
Rat
io
Z
oom
Mem
ory
1
1
1
2
2
1
2
2
1[
2in
1]
1
2[
2in
1]
1
1
2[2i
n1]
1
[2in
1]
▲ ▲ ▲ ▲
▲ ▲
▲ ▲
Bas
ic
▼▼
▼▼
▼▼
▼▼
Fin
ishi
ng
Au
xili
ary
OHPInter-
leaving
▲ ▲
▼▼
C
hap
ter
7M
isce
llan
eou
s142

: The functions cannot be combined. (The function set last takes precedence. The function set first is automatically canceled.Cover, Page Insertion, or OHP Interleaving, if combined, is not canceled.)
: The functions cannot be combined.(Either one of the functions must be canceled before a copy cycle can be initiated.)
Finishing AuxiliaryOHPInter-
leavingFile Margin
PaperAuto Paper O O O O O O O O ▲ ▲ O O O O O A O O
Manual Paper O O O O O O O O C C O O B O O ▲ O O
ZoomAuto Size O O O O O O O O O O O O O O O A O O
Fixed Ratio O O O O O O O O O O O O B O O O O O
Zoom Memory O O O O O O O O O O O O O O O O O O
1 1 O O O O O O O O O O O O O O O O O O
1 2 O O O O O O O O O O O O A O O
2 1 O O O O O O O O O O O O O O ▲ O O ▲
2 2 O O O O O O O O O O O O A O ▲
1[2in1] 1 O O O O O O O O O O ▲ A O ▲
2[2in1] 1 O O O O O O O O O O ▲ A O ▲
1 [2in1] O O O O O O O O O O O O O O O ▲
1 2[2in1] O O O O O O O O O O O O A O ▲
Book 1 O O O O O O O O ▲ A O ▲
Book 2 O O O O O O O O A O ▲
Mixed Orig. O O O ● O O ▲ ▲ O O O O O O O ▲ O O
Non-Sort ▲ ▲ ▲ D O O O F ▲ O O O O O O O O
Sort ▲ ▲ ▲ O O O O O O O O O O ▲ A O O
Group ▲ ▲ ▲ O O O O ▲ ▲ O O O O ▲ A O O
Sort-&-Staple ▲ ▲ ▲ O O O ▲ ▲ O O O O ▲ A O ▲
Manual Staple O A O
Hole Punch O O O O O O O ▲ ▲ O O O O ▲ A O O
Cover O O O O O O O O O O O A O ▲
Page Insertion O O O O O O O O O O O O O ▲
Single Copy E O ▲ O O O O O ▲
Multi Copy O O O ▲ O O O O O ▲
File MarginRight O O O ● O ● O O O O ▲ O O O O O O
Left O O O O O O O O O O ▲ O O O O O O
Reduce O O O O O O O O O O O O O O A O O
Edge/Frame Erase O O O O O O O O O O O O O O A O O
Interrupt O O O O O O O O
Multi Bypass O A A A A A O O C C O O A A O O O
Job Memory O O O O O O O O O O O O O O O O O
ADF / SADF Mode O
Functions Set First
Functions Set Last
N
on-S
ort
Bas
ic
So
rt
G
rou
p
So
rt-&
-Sta
ple
M
anua
l Sta
ple
H
ole
Pun
ch
C
over
P
age
Inse
rtio
n
E
dge
/Fra
me
Era
se
In
terr
upt
M
ulti
Byp
ass
Jo
b M
emor
y
S
ingl
e C
opy
M
ult
i Cop
y
R
ight
L
eft
R
educ
e
Ori
g.
Cop
y
▲
▼▼
▼▼
▼▼
▼▼
Aux
ilia
ry
OHPInter-
leaving
Fin
ishi
ng
A
DF
/ S
AD
F M
ode
▼▼
Ch
apte
r 7
Mis
cell
aneo
us
3. Function Combination Matrix
143

Conditions for Combined Functions
A : The functions can be combined when the manual bypass paper size is input. B : The combination is possible if Auto Paper or Auto Size has been set, but not if Manual is set.
(One of the functions must be canceled before a copy cycle can be initiated.) C : When OHP Interleaving is selected, the copier automatically selects A4 crosswise paper and
therefore you cannot select paper of any other size. If none of the paper sources of the copieris loaded with A4 crosswise paper, A4 lengthwise is next selected. B5 size paper is nextselected, if neither A4 crosswise nor A4 lengthwise paper is loaded in the copier.
D : The combination is possible if the copier is equipped with a Staple Sorter, but not if the copieris equipped with a Sorter. (If a Sorter or Staple Sorter is attached, the function set first, Non-Sort, takes precedence.)
E : The combination is possible if the copier is not equipped with a Sorter. (If a Sorter is attached, the function set first, OHP Interleaving, takes precedence.)
F : The combination is possible if the copier is not equipped with a Sorter. (If a Sorter is attached, the function set first, Non-Sort, is automatically switched to Sort torun a copy cycle for OHP Interleaving.)
C
hap
ter
7M
isce
llan
eou
s
3. Function Combination Matrix
144

4. Description of Copy Paper Size and Zoom Ratio Table
Name Size (Metric) Size (Inch)
A3 297 mm × 420 mm 11-3/4" × 16-1/2"
B4 257 mm × 364 mm 10" × 14-1/4"
A4 210 mm × 297 mm 8-1/4" × 11-3/4"
B5 182 mm × 257 mm 7-1/4" × 10"
A5 148 mm × 210 mm 5-3/4" × 8-1/4"
B6 128 mm × 182 mm 5" × 7-1/4"
A6 105 mm × 148 mm 4-1/4" × 5-3/4"
POST CARD 100 mm × 148 mm 4" × 5-3/4"
Name Size (Inch) Size (Metric)
LEDGER 11" × 17" 279 mm × 432 mm
11" × 14" 11" × 14" 279 mm × 356 mm
COMPUTER 10-1/8" × 14" 257 mm × 356 mm
10" × 14" 10" × 14" 254 mm × 356 mm
9-1/4" × 14" 9-1/4" × 14" 236 mm × 356 mm
LEGAL 8-1/2" × 14" 216 mm × 356 mm
FOOLSCAP GOVERNMENT LEGAL 8-1/2" × 13" 216 mm × 330 mm
FOOLSCAP 8" × 13" 203 mm × 330 mm
FOOLSCAP 8-2/3" × 13" 220 mm × 330 mm
FOOLSCAP FOLIO 8-1/4" × 13" 210 mm × 330 mm
8-1/4" × 11-3/4" 8-1/4" × 11-3/4" 210 mm × 301 mm
LETTER 8-1/2" × 11" 216 mm × 279 mm
GOVERNMENT LETTER 8" × 10-1/2" 203 mm × 267 mm
QUARTO 8" × 10" 203 mm × 254 mm
STATEMENT INVOICE 5-1/2" × 8-1/2" 140 mm × 216 mm
Paper Size
Metric Areas
Original Size Copy Paper Size Zoom Ratio
A3297 × 420 mm11-3/4" ×16-1/2"
A4 ×0.707
A5 ×0.500
B4 ×0.866
B5 ×0.610
A4210 × 297 mm8-1/4" × 11-3/4"
A5 ×0.707
A6 ×0.500
B5 ×0.866
B6 ×0.610
A3 ×1.414
B4 ×1.224
A5148 × 210 mm5-3/4" × 8-1/4"
A6 ×0.707
B6 ×0.866
A4 ×1.414
A3 ×2.000
B4 ×1.733
B5 ×1.224
A6105 × 148 mm4-1/4" × 5-3/4"
A4 ×2.000
A5 ×1.414
B5 ×1.733
B6 ×1.224
B4257 × 364 mm10" × 14-1/4"
A4 ×0.816
A5 ×0.577
B5 ×0.707
B6 ×0.500
A3 ×1.154
B5182 × 257 mm7-1/4" × 10"
A5 ×0.816
A6 ×0.577
B6 ×0.707
A3 ×1.640
A4 ×1.154
B4 ×1.414
B6128 × 182 mm5" × 7-1/4"
A6 ×0.816
A4 ×1.640
A5 ×1.154
B4 ×2.000
B5 ×1.414
Inch Areas
Original Size Copy Paper Size Zoom Ratio
11" × 17"279.4 × 431.8 mm
11" × 14" ×0.823
Legal ×0.772
Foolscap ×0.764
Letter ×0.647
Invoice ×0.500
11" × 15"279.4 × 381 mm
11" × 14" ×0.933
Legal ×0.772
Foolscap ×0.772
Letter ×0.733
Invoice ×0.500
11" × 14"279.4 × 355.6 mm
Legal ×0.772
Foolscap ×0.772
Letter ×0.772
Invoice ×0.500
Legal8-1/2" × 14"215.9 × 355.6 mm
Foolscap ×0.928
Letter ×0.785
Invoice ×0.607
11" × 17" ×1.214
Foolscap8-1/2" × 13"215.9 × 330.2 mm
Letter ×0.846
Invoice ×0.647
11" × 17" ×1.294
11" × 14" ×1.076
Letter8-1/2" × 11"215.9 × 279.4 mm
Invoice ×0.647
11" × 17" ×1.294
11" × 14" ×1.272
Invoice5-1/2" × 8-1/2"139.7 × 215.9 mm
11" × 17" ×2.000
11" × 14" ×1.647
Legal ×1.545
Foolscap ×1.529
Letter ×1.294
Zoom Ratio = Copy Paper Size ÷ Original Size
1" (inch) = 25.4 mm 1 mm = 0.0394" (inch)
Zoom Ratio Table (Original Size to Copy Paper Size)
Ch
apte
r 7
Mis
cell
aneo
us
145

5. Index
1 (2in1) p. 421 1 p. 421 2 p. 421 2(2in1) p. 431(2in1) 1 p .432 1 p. 422 2 p. 422(2in1) 1 p. 432-Sided Size p. 832-Sided Total p. 83
A Access Number p. 22Adding Paper p. 102Administrator Mode (User’s Choice) p. 88Administrator Number p. 88Auto Copy Start p. 21Auto Drawer Switching p .35Auto Dual Function p. 56Auto Exposure p. 40Auto Original Count p. 61Auto Panel Reset p. 21Auto Panel Reset (User’s Choice) p. 86Auto Paper p. 34Auto Power-OFF Mode pp. 21, 88Auto Size p. 36
B Basic Copying Overview p. 24Book 1 p. 43Book 2 p. 43
C Calling up a Ratio from Memory p. 38Care of the Copier p. 140Cleaning p. 140Clear Key p. 16Confirmation Beep (User’s Choice) p. 86 Control Panel p. 16Copy Mode Priority (User’s Choice) p. 85Copy Paper Size p. 34Copy Track (User’s Choice) p. 88Copy Track Function p. 92Counter Removal (User’s Choice) p. 86Cover p. 58Custom 2in1 (User’s Choice) p. 87Custom 2in1 Separation (User’s Choice) p. 87Custom Book Copy (User’s Choice) p. 87
▼
▼▼
▼▼
▼
▼
▼
▼▼
D Data Send p. 100Description of Copy Paper Size p. 145Drum Dehumidifier p. 83Drum Dehumidifier (User’s Choice) p. 86
E Edge/Frame Erase p. 74Energy Saver Mode pp. 16, 21Energy Saver Mode (User’s Choice) p. 86Expo. Level Priority (User’s Choice) p. 85Expo. Mode Priority (User’s Choice) p. 85
F File Margin p. 72Finishing Mode p. 48Finishing Priority (User’s Choice) p. 85Fixed Zoom Ratio p. 36Function Combination Matrix p. 142
G Group p. 49
H Hole Punch p. 49
I Image Density p. 40Initial Mode p. 20Intelligent Sort (User’s Choice) p. 86Interrupt Mode p. 22
J Job Memory Input p. 78
L Language Selection (User’s Choice) p. 85
M Making the User’s Choice Settings p. 90Manual Bypass Copying p. 32Manual Expo. Adjust (User’s Choice) p. 85Manual Exposure p. 40Manual Staple p. 49Max Copy Sets (User’s Choice) p. 89Misfeed Clearing Procedure p. 115Misfeed Location Displays p. 114Mixed Original Detection Mode p. 27Mixed Orig. Detection (User’s Choice) p.85Mode Check p. 22
NNon-Sort P.48
C
hap
ter
7M
isce
llan
eous
146

▼
5. Index
O OHP Interleaving p. 68Original Copy Default (User’s Choice) p. 88Original Thickness (User’s Choice) p. 86
P Page Insertion p. 62Panel Reset Key p. 16Panel Resetting p. 21Paper Priority (User’s Choice) p. 85Photo Mode p. 41Placing Originals p. 26
R Recalling a Job from Memory p. 81Replacing the Staple Cartridge p. 110Replacing the Toner Bottle p. 108
S Selecting a Ratio p. 36Selecting the Original Copy Type p. 42Single Automatic Document Feeding Mode (SADF Mode) p. 28Size Counter p. 83Smaller Originals (User’s Choice) p. 86Sort p. 48Sort Staple p. 48Special Paper (User’s Choice) p. 87Special Paper Setting p. 35Start Key p. 16Stop Key p. 16Storing a Ratio in Memory p. 39Storing a Zoom Ratio p. 82System Overview p. 8
T Toner Replenisher p. 83Total Counter p. 83Troubleshooting p. 129Turning ON and OFF p. 20
U User’s Choice p. 84User’s Help (User’s Choice) p. 89Using the Touch Panel p. 18
W What Does Each Message Mean? p. 126
Z Zoom Ratio p. 36Zoom Ratio Table p. 145
▼
Ch
apte
r 7
Mis
cell
aneo
us
147