Embed Size (px)
Citation preview
EOP ASSIST 4.0: A Software Application for
K-12 Schools, School Districts, Regional Education Agencies, and State Agencies
Installation Manual
Updated August 2017
1 | P a g e
EOP ASSIST 4.0 Installation Manual
Table of Contents Table of Contents ...............................................................................................................................1
Chapter 1: Overview ..........................................................................................................................4
Chapter 2: Technical Requirements ....................................................................................................5
Expertise Requirements of IT Personnel ................................................................................................... 5
Server Requirements ................................................................................................................................ 5 Operating System .................................................................................................................................. 5 Web Server Software ............................................................................................................................ 6 Relational Database Management System .......................................................................................... 7 Scripting Language ............................................................................................................................... 7
Configuration Requirements ..................................................................................................................... 8 PHP ........................................................................................................................................................ 8 MySQL ................................................................................................................................................... 9 Microsoft SQL Server ............................................................................................................................. 9 Apache HTTP Server .............................................................................................................................. 9 Microsoft Windows Server With IIS .................................................................................................... 10
Connectivity ............................................................................................................................................ 11
Chapter 3: Installation Instructions ................................................................................................... 12
Set Up Server Environment ..................................................................................................................... 12
Set Up a Database and Privileged User ................................................................................................... 12 MySQL ................................................................................................................................................. 12 Microsoft SQL Server ........................................................................................................................... 12
Download EOP ASSIST 4.0 Files ............................................................................................................... 12
Configure EOP ASSIST 4.0 ........................................................................................................................ 13
Initialize EOP ASSIST 4.0 .......................................................................................................................... 13 Choose the Hosting Level .................................................................................................................... 14 Verify Requirements ............................................................................................................................ 15 Enter the Database Settings ............................................................................................................... 16 Set Up the Super Admin Account ........................................................................................................ 17 Finish ................................................................................................................................................... 17
Chapter 4: Setting Up Schools, Districts, and/or Users ....................................................................... 18
State-Level Hosting ................................................................................................................................. 18 Create a State Administrator Account ................................................................................................ 19 Share Log-In Credentials With the State Administrator ...................................................................... 21
2 | P a g e
EOP ASSIST 4.0 Installation Manual
District-Level Hosting .............................................................................................................................. 22 Create the District Profile .................................................................................................................... 22 Create a District Administrator Account ............................................................................................. 24 Share Log-In Credentials With the District Administrator ................................................................... 25
School-Level Hosting ............................................................................................................................... 26 Create the School Profile ..................................................................................................................... 26 Create a School Administrator Account .............................................................................................. 28 Share Log-In Credentials With the School Administrator.................................................................... 30
Chapter 5: Time-Out Feature ............................................................................................................ 31
Chapter 6: Client Access ................................................................................................................... 32
Chapter 7: Resources and Technical Assistance ................................................................................. 33
Recommended Resources for Distribution ............................................................................................. 33
Additional Resources .............................................................................................................................. 34
Technical Assistance ............................................................................................................................... 34
Appendix A: Configuring PHP and MySQL on Apache HTTP Server ..................................................... 36
Linux/Unix ............................................................................................................................................... 36 Install Apache ...................................................................................................................................... 36 Install MySQL ...................................................................................................................................... 36 Install PHP ........................................................................................................................................... 36
Microsoft Windows ................................................................................................................................. 37
Mac OS X Yosemite ................................................................................................................................. 37 Enable Apache..................................................................................................................................... 38 Enable PHP for Apache ....................................................................................................................... 38 Install MySQL ...................................................................................................................................... 38
Appendix B: Configuring PHP and MySQL on Microsoft Windows Server with IIS ............................... 39
Install IIS 7 on Windows Server 2008 R2 ................................................................................................. 39
Install and Configure PHP ........................................................................................................................ 39
Configure IIS 7 to Run FastCGI ................................................................................................................ 40
Configure IIS 7 to Run PHP via FastCGI ................................................................................................... 40
Testing PHP ............................................................................................................................................. 42
Install MySQL Server on Windows Server 2008 or Windows Server 2008 R2 ........................................ 42
Appendix C: Configuring PHP and Microsoft SQL Server on Microsoft Windows Server with IIS .......... 43
Install IIS 7 on Windows Server 2008 R2 ................................................................................................. 43
3 | P a g e
EOP ASSIST 4.0 Installation Manual
Install and Configure PHP ........................................................................................................................ 43
Configure IIS 7 to Run FastCGI ................................................................................................................ 44
Configure IIS 7 to Run PHP via FastCGI ................................................................................................... 45
Testing PHP ............................................................................................................................................. 47
Install SQL Server Driver for PHP ............................................................................................................ 47
Appendix D: Configuring PHP on Microsoft Windows Server with IIS ................................................. 48
Install IIS .................................................................................................................................................. 48
Install PHP ............................................................................................................................................... 49
Install MySQL Server ............................................................................................................................... 50
Finalize Configuration ............................................................................................................................. 51
4 | P a g e
EOP ASSIST 4.0 Installation Manual
Chapter 1: Overview EOP ASSIST 4.0 is a Web-accessible software application that allows school emergency management planning teams to develop and revise their school emergency operations plans (EOPs). The application includes various user roles and permissions, based on the type of institution hosting the application. EOP ASSIST 4.0 was designed to be installed on any of the three hosting levels described below. It is important to select the correct hosting level for your institution, so that the application is installed correctly and its accounts are set up correctly for your institution’s needs.
• State-level hosting allows state agencies (or regional education agencies—REAs), multiple districts and their schools, and independent schools to have access to and different roles within the application. Typically, a state agency or REA will host the application at this level so that all schools and districts within its jurisdiction may log into the application to develop and revise their school EOPs, which are stored on the state’s or REA’s server.
• District-level hosting allows one district and its schools to have access to and different roles within the application. Only individuals from the district office and schools throughout the district may log into the application to develop and revise their school EOPs, which are stored on the district’s server.
• School-level hosting allows an individual school, regardless of whether it is public or nonpublic, to host the application on its own server for the school itself. Only individuals from that school’s planning team may log into the application to develop and revise their school EOP, which is stored on the school’s server.
This Web-accessible software application requires installation by Information Technology (IT) personnel onto a local server at a state agency, an REA, a school district, or an individual school, as applicable. It is important for IT personnel responsible for installing EOP ASSIST 4.0 to ensure that the connection between the server and clients is secure. EOP ASSIST 4.0 is compatible with Secure Sockets Layer (SSL) security protocols. It requires the services of an HTTP Web server that supports PHP, a server-side scripting language, and a back-end database server. More information on technical requirements is provided in Chapter 2 and is important to review before installing the application.
This EOP ASSIST 4.0 Installation Manual covers preparing for installation, running the installation script, and identifying the steps that should be done after the installation script has completed. This manual focuses on getting the software application up and running on a Web server environment of your choice, but it is not an exhaustive or definitive guide for setting up and configuring Web server environments. It does provide basic information on installing and configuring select supported environments.
Once EOP ASSIST 4.0 is installed on a server, IT personnel will need to create a URL that points to the application. Then individual users will be able to access EOP ASSIST 4.0 through a Web browser using the URL. The application will run on most personal computers; more information on client access is provided in Chapter 6. Before you begin the installation process, please review the entire EOP ASSIST 4.0 Installation Manual to ensure that you have met the requirements and are familiar with the instructions.

5 | P a g e
EOP ASSIST 4.0 Installation Manual
Chapter 2: Technical Requirements Expertise Requirements of IT Personnel IT personnel assigned to install the software are required to have an intermediate level of expertise or knowledge related to networking, Web server, and database system configuration. Specifically, the application should be installed by a skilled network administrator or system administrator who has experience in server configuration. To ensure connectivity between education institutions using EOP ASSIST 4.0, the network or system administrator of the server network needs to configure the firewall to make the server available to only applicable education institutions.
Server Requirements The REMS TA Center designed EOP ASSIST 4.0 to be compatible with multiple server environments, in order to meet the needs of schools, school districts, REAs, state agencies, and their partner organizations in the field of school emergency management. That being said, the software application is not compatible with all server environments, and so education institutions that choose to install EOP ASSIST 4.0 must ensure that their server meets the following requirements. IT personnel may choose to install the server software independently or download a preconfigured Accessibility Management Platform (AMP) environment.
Operating System EOP ASSIST 4.0 was designed to be installed on a server using one of the following three types of operating systems: Linux, which is free and open sourced and is offered in a plethora of distributions; Microsoft Windows, which the REMS TA Center found is commonly used by education institutions across the United States; and Mac OS X/macOS, which the REMS TA Center found is also commonly used by education institutions across the United States. This software application is currently supported on the following operating system versions:
Operating System Oldest Compatible Release Latest Compatible Release
Linux N/A N/A
Microsoft Windows Server 2008 Server 2016
Mac OS X/ macOS Mac OS X 10.10 Yosemite macOS 10.12 Sierra
6 | P a g e
EOP ASSIST 4.0 Installation Manual
EOP ASSIST 4.0 is compatible with all Linux distributions that can run the compatible Web server software, relational database management system (RDBMS), and scripting language listed in this document. To download the latest versions of the above operating systems, which includes reviewing their respective system requirements and installation instructions, please access:
• https://www.microsoft.com/en-us/cloud-platform/windows-server • http://www.apple.com/macos/sierra/
Please Note: At the time that this software application was released, macOS 10.13 was not yet available, and the REMS TA Center was unable to test EOP ASSIST 3.0 on it. While the REMS TA Center cannot guarantee that the operating system is compatible, the REMS TA Center anticipates that the required Web server software, RDBMS, and scripting language listed in this document will not fail on future minor operating system upgrades.
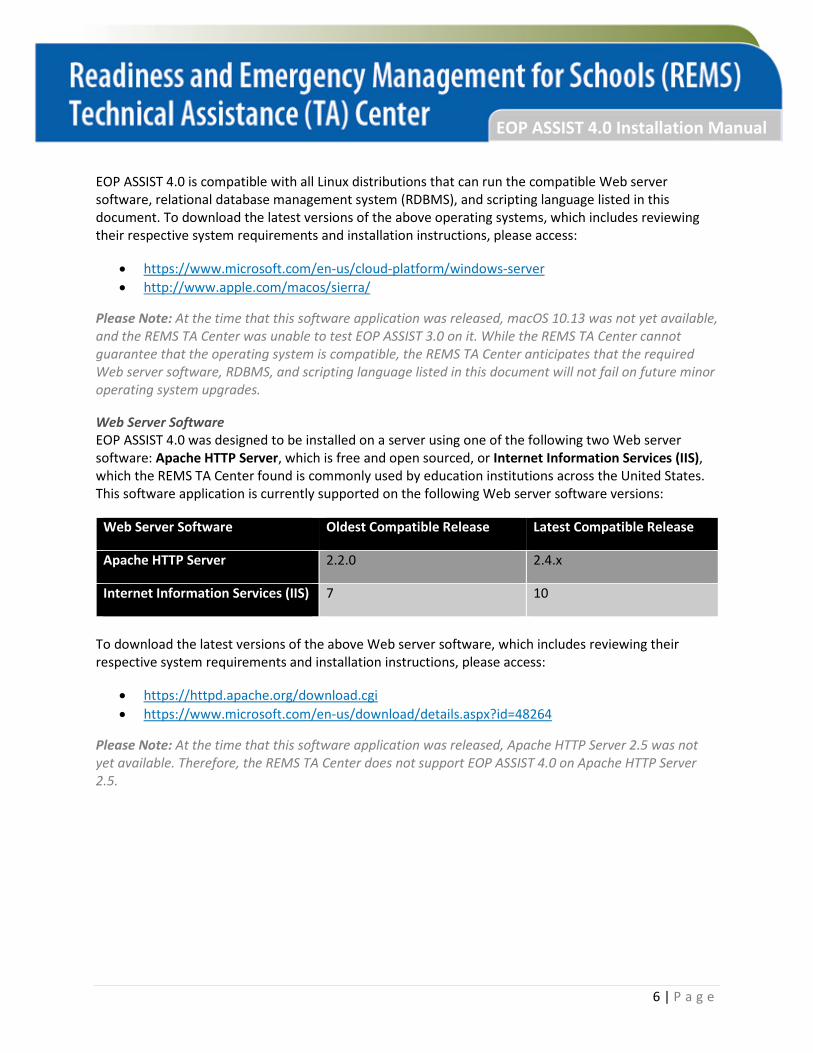
Web Server Software EOP ASSIST 4.0 was designed to be installed on a server using one of the following two Web server software: Apache HTTP Server, which is free and open sourced, or Internet Information Services (IIS), which the REMS TA Center found is commonly used by education institutions across the United States. This software application is currently supported on the following Web server software versions:
Web Server Software Oldest Compatible Release Latest Compatible Release
Apache HTTP Server 2.2.0 2.4.x
Internet Information Services (IIS) 7 10
To download the latest versions of the above Web server software, which includes reviewing their respective system requirements and installation instructions, please access:
• https://httpd.apache.org/download.cgi • https://www.microsoft.com/en-us/download/details.aspx?id=48264
Please Note: At the time that this software application was released, Apache HTTP Server 2.5 was not yet available. Therefore, the REMS TA Center does not support EOP ASSIST 4.0 on Apache HTTP Server 2.5.
7 | P a g e
EOP ASSIST 4.0 Installation Manual
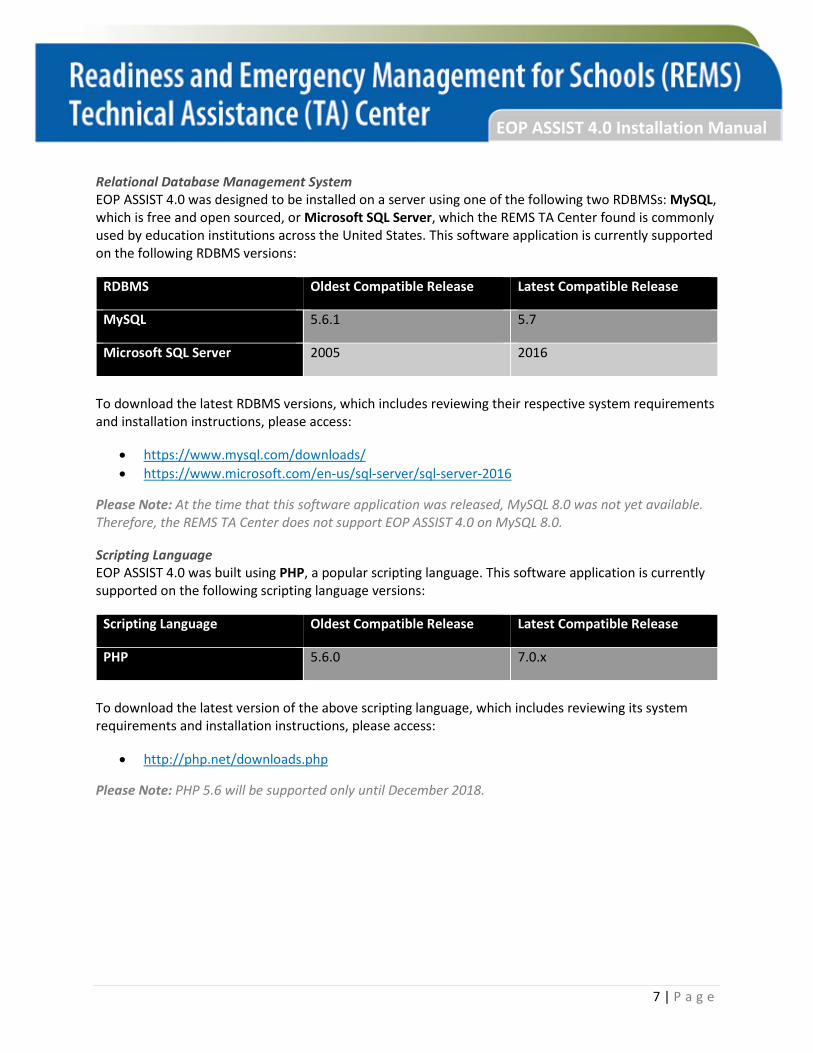
Relational Database Management System EOP ASSIST 4.0 was designed to be installed on a server using one of the following two RDBMSs: MySQL, which is free and open sourced, or Microsoft SQL Server, which the REMS TA Center found is commonly used by education institutions across the United States. This software application is currently supported on the following RDBMS versions:
RDBMS Oldest Compatible Release Latest Compatible Release
MySQL 5.6.1 5.7
Microsoft SQL Server 2005 2016
To download the latest RDBMS versions, which includes reviewing their respective system requirements and installation instructions, please access:
• https://www.mysql.com/downloads/ • https://www.microsoft.com/en-us/sql-server/sql-server-2016
Please Note: At the time that this software application was released, MySQL 8.0 was not yet available. Therefore, the REMS TA Center does not support EOP ASSIST 4.0 on MySQL 8.0.
Scripting Language EOP ASSIST 4.0 was built using PHP, a popular scripting language. This software application is currently supported on the following scripting language versions:
Scripting Language Oldest Compatible Release Latest Compatible Release
PHP 5.6.0 7.0.x
To download the latest version of the above scripting language, which includes reviewing its system requirements and installation instructions, please access:
• http://php.net/downloads.php
Please Note: PHP 5.6 will be supported only until December 2018.
8 | P a g e
EOP ASSIST 4.0 Installation Manual
Configuration Requirements
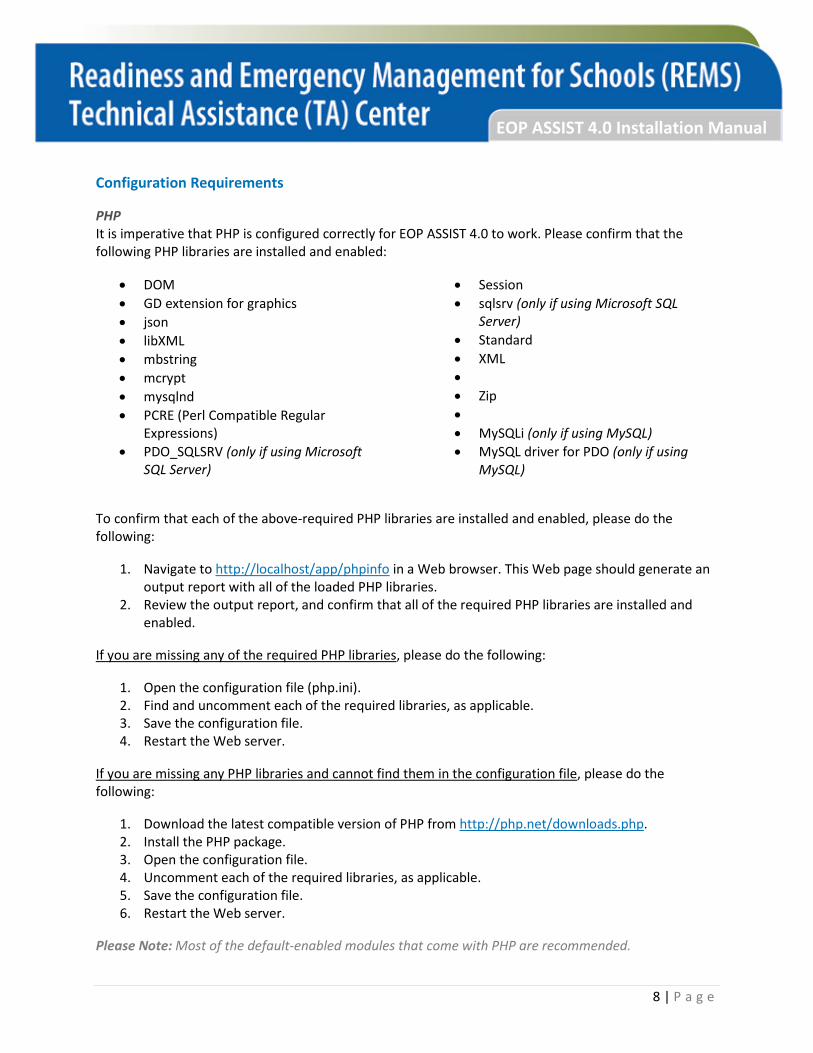
PHP It is imperative that PHP is configured correctly for EOP ASSIST 4.0 to work. Please confirm that the following PHP libraries are installed and enabled:
• DOM • GD extension for graphics • json • libXML • mbstring • mcrypt • mysqlnd • PCRE (Perl Compatible Regular
Expressions) • PDO_SQLSRV (only if using Microsoft
SQL Server)
• Session • sqlsrv (only if using Microsoft SQL
Server) • Standard • XML • • Zip • • MySQLi (only if using MySQL) • MySQL driver for PDO (only if using
MySQL)
To confirm that each of the above-required PHP libraries are installed and enabled, please do the following:
1. Navigate to http://localhost/app/phpinfo in a Web browser. This Web page should generate an output report with all of the loaded PHP libraries.
2. Review the output report, and confirm that all of the required PHP libraries are installed and enabled.
If you are missing any of the required PHP libraries, please do the following:
1. Open the configuration file (php.ini). 2. Find and uncomment each of the required libraries, as applicable. 3. Save the configuration file. 4. Restart the Web server.
If you are missing any PHP libraries and cannot find them in the configuration file, please do the following:
1. Download the latest compatible version of PHP from http://php.net/downloads.php. 2. Install the PHP package. 3. Open the configuration file. 4. Uncomment each of the required libraries, as applicable. 5. Save the configuration file. 6. Restart the Web server.
Please Note: Most of the default-enabled modules that come with PHP are recommended.
EOP ASSIST 4.0 Installation Manual
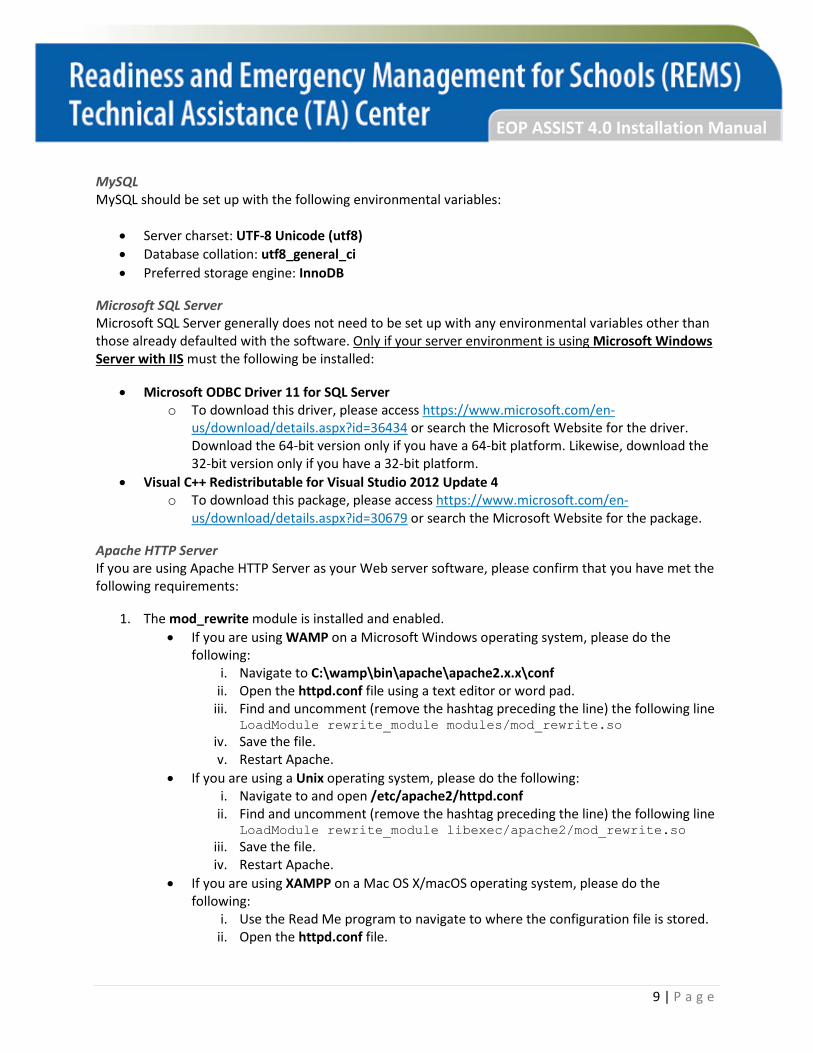
MySQL MySQL should be set up with the following environmental variables:
• Server charset: UTF-8 Unicode (utf8) • Database collation: utf8_general_ci • Preferred storage engine: InnoDB
Microsoft SQL Server Microsoft SQL Server generally does not need to be set up with any environmental variables other than those already defaulted with the software. Only if your server environment is using Microsoft Windows Server with IIS must the following be installed:
• Microsoft ODBC Driver 11 for SQL Server o To download this driver, please access https://www.microsoft.com/en-
us/download/details.aspx?id=36434 or search the Microsoft Website for the driver. Download the 64-bit version only if you have a 64-bit platform. Likewise, download the 32-bit version only if you have a 32-bit platform.
• Visual C++ Redistributable for Visual Studio 2012 Update 4 o To download this package, please access https://www.microsoft.com/en-
us/download/details.aspx?id=30679 or search the Microsoft Website for the package.
Apache HTTP Server If you are using Apache HTTP Server as your Web server software, please confirm that you have met the following requirements:
1. The mod_rewrite module is installed and enabled. • If you are using WAMP on a Microsoft Windows operating system, please do the
following: i. Navigate to C:\wamp\bin\apache\apache2.x.x\conf
ii. Open the httpd.conf file using a text editor or word pad. iii. Find and uncomment (remove the hashtag preceding the line) the following line
LoadModule rewrite_module modules/mod_rewrite.so iv. Save the file. v. Restart Apache.
• If you are using a Unix operating system, please do the following: i. Navigate to and open /etc/apache2/httpd.conf
ii. Find and uncomment (remove the hashtag preceding the line) the following line LoadModule rewrite_module libexec/apache2/mod_rewrite.so
iii. Save the file. iv. Restart Apache.
• If you are using XAMPP on a Mac OS X/macOS operating system, please do the following:
i. Use the Read Me program to navigate to where the configuration file is stored. ii. Open the httpd.conf file.
9 | P a g e
EOP ASSIST 4.0 Installation Manual
iii. Find and uncomment (remove the hashtag preceding the line) the following line LoadModule rewrite_module modules/mod_rewrite.so
iv. Save the file. v. Restart Apache.
2. The AllowOverride directive is set to All. • Open your httpd.conf Apache configuration file. • Find and uncomment the following line, and confirm that it is set correctly:
AllowOverride = All • Do this for the document root directory. • If you are installing EOP ASSIST 4.0 as a virtual host, do the same for the virtual host
directory settings.
DocumentRoot “path/to/your/root/directory” <Directory “path/to/your/root/directory”> … # commented directives Options FollowSymLinks Multiviews AllowOverride All … </Directory>
To configure and enable Apache modules, please refer to the following documentation:
• https://httpd.apache.org/docs/2.2/configuring.html
Microsoft Windows Server With IIS If you are using Microsoft Windows Server with IIS as your Web server software, please confirm that you have met the following requirements:
1. The URL_rewrite module is installed and enabled and contains two directives. • To download this module, please access http://www.iis.net/downloads/microsoft/url-
rewrite. • Confirm that the web.config file is in your document root and that it has directives. • Delete all of the EOP files from the document root. • Paste all of the EOP files that you just deleted back into the document root. • Restart your server. • Navigate to the IIS Manager, and confirm that you have directives for URL_rewrite. • Click on Sites > Default Website > URL Rewrite. • Confirm that you have two rules (e.g., Imported Rule 1 and Imported Rule 2). • Navigate to the server root (wwwroot). • Confirm that the web.config file is located in the server root. • Open the web.config file, and confirm that it has the correct directives inside:
<?xml version="1.0" encoding="UTF-8"?> <configuration> <system.webServer> <rewrite>
10 | P a g e
EOP ASSIST 4.0 Installation Manual
<rules> <rule name="Imported Rule 1" stopProcessing="true"> <match url="^(.*)$" ignoreCase="false" /> <conditions logicalGrouping="MatchAll"> <add input="{URL}" pattern="^system.*" ignoreCase="false" /> </conditions> <action type="Rewrite" url="/index.php?{R:1}" /> </rule> <rule name="Imported Rule 2" stopProcessing="true"> <match url="^(.*)$" ignoreCase="false" /> <conditions logicalGrouping="MatchAll"> <add input="{REQUEST_FILENAME}" matchType="IsFile" ignoreCase="false" negate="true" /> <add input="{REQUEST_FILENAME}" matchType="IsDirectory" ignoreCase="false" negate="true" /> <add input="{R:1}" pattern="^(index\.php|images|robots\.txt|css|uploads|assets)" ignoreCase="false" negate="true" /> </conditions> <action type="Rewrite" url="index.php?{R:1}" /> </rule> </rules> </rewrite>
2. PHP is configured to run as FastCGI. 3. The Non Thread Safe PHP package is installed from php.net. 4. CGI is enabled, and the CGI directives are set correctly.
• Open your php.ini, and confirm that you have the following CGI directives set correctly: cgi.force_redirect = 0 cgi.fix_pathinfo = 1 fastcgi.impersonate = 1 fastcgi.logging = 0
Connectivity Network connectivity between servers and schools is required for the application to be used by individual users. To ensure privacy and cybersecurity, a secure connection between servers and individual users is also required. The application uses standard Transmission Control Protocol/Internet Protocol (TCP/IP) port (443) to connect between browser and server. Port 443, therefore, needs to be enabled on the institution’s firewall, as applicable, in order for this application to operate.
11 | P a g e

EOP ASSIST 4.0 Installation Manual
Chapter 3: Installation Instructions Set Up Server Environment EOP ASSIST 4.0 supports three Web server environments. Please choose to set up the server environment of your choice.
• Apache HTTP Server with MySQL and PHP. This server environment is recommended by the REMS TA Center. For basic configuration information, see Appendix A.
• Microsoft Windows Server with IIS, MySQL, and PHP. For basic configuration information, see Appendix B and Appendix D.
• Microsoft Windows Server with IIS, Microsoft SQL Server, and PHP. For basic configuration information, see Appendix C and Appendix D.
Set Up a Database and Privileged User After configuring your Web server and PHP to work with an RDBMS, you will need to create a database.
1. Create a new database named eopassist. 2. Create a user account for the application, and grant it all privileges to the eopassist database
that you just created.
MySQL If you are using MySQL as your RDBMS, there are several free database management tools that you may use for database administration. These tools include:
• phpMyAdmin—a free Web application tool for MySQL database administration. This tool may be downloaded from https://www.phpmyadmin.net/.
• MySQL Workbench—a powerful and unified visual tool that provides an interface for easily administering MySQL environments. This tool may be downloaded from https://www.mysql.com/products/workbench/.
• MySQL Command Shell—the built-in MySQL command-line tool that comes with MySQL and can be used to perform administrative tasks. This tool may be downloaded from https://dev.mysql.com/downloads/shell/.
• Webmin MySQL Module—a Web application like phpMyAdmin, but less powerful. This tool may be downloaded from http://www.webmin.com.
Microsoft SQL Server If you are using Microsoft SQL Server as your RDBMS, then you may use the following tool for database administration:
• SQL Server Management Studio—an integrated tool that may be used to perform administrative tasks. This tool may be downloaded from https://msdn.microsoft.com/en-us/library/mt238290.aspx.
Download EOP ASSIST 4.0 Files
12 | P a g e

EOP ASSIST 4.0 Installation Manual
After registering for EOP ASSIST 4.0 at https://rems.ed.gov/EOPASSIST.aspx, you will receive an email with a link to a hidden Web page and instructions for downloading the application files in a compressed (zipped) folder. Download and unzip the installation package. The installation package is in a directory called EOP_ASSIST_PKG and will include the following files and folders:
• application/ (directory) • assets/ (directory) • system/ (directory) • uploads/ (directory) • .htaccess (file), which will be hidden on Unix systems (if this is the case, use the command line) • index.php (file) • web.config (file)
Configure EOP ASSIST 4.0 On the Linux and Mac OS X/macOS operating systems, please confirm that the Apache user has read/write access to the main application directory. Then please do the following:
1. Copy all the files in the EOP_ASSIST_PKG folder to the root Web directory. This could be htdocs for Apache, wwwroot for IIS, or any virtual directory, depending on your Web server setup.
2. Grant read/write access to the Apache or IIS service user on the following file and folder: application/config/settings.php uploads/
Initialize EOP ASSIST 4.0 Next, you will need to run an install script that will set up the database tables and initialize the application. Make sure you have created a database and a database user before you continue.
1. Open your Web browser, and navigate to the following URL: http://localhost/install. 2. You will see the Installation Wizard, as shown below.
a. If you do not see this screen, then please review the Configuration Requirements section and confirm that your server environment is configured correctly.
13 | P a g e
EOP ASSIST 4.0 Installation Manual
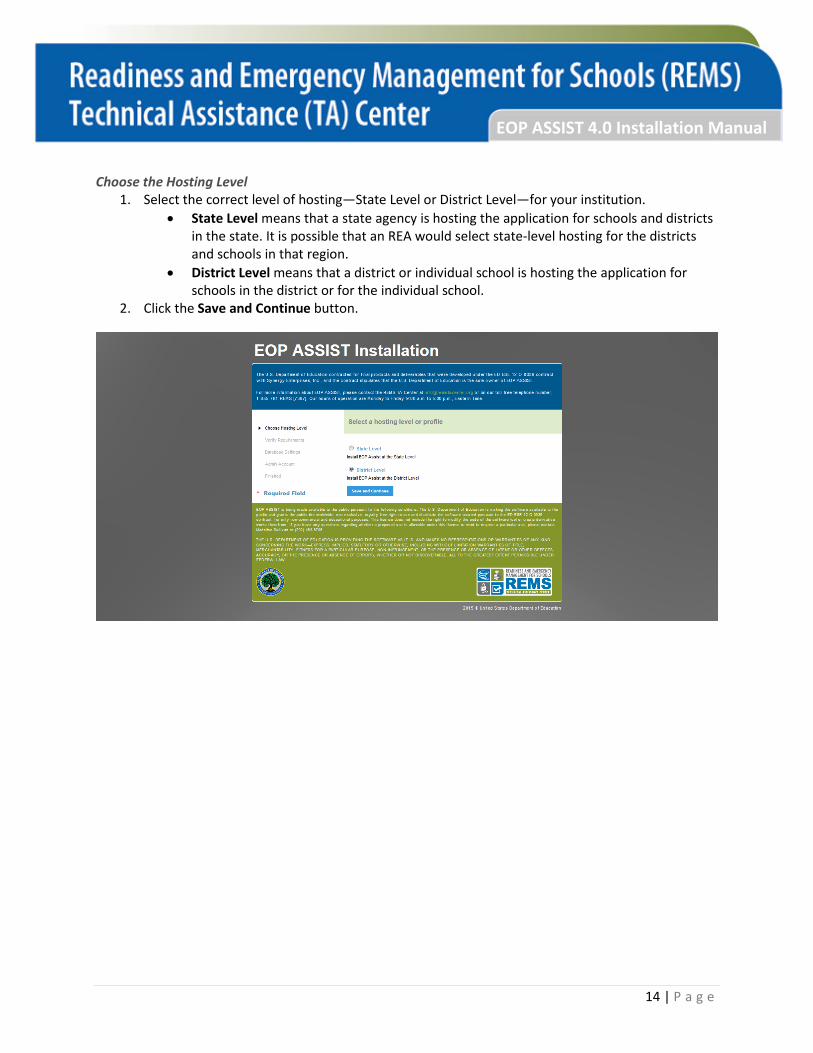
Choose the Hosting Level 1. Select the correct level of hosting—State Level or District Level—for your institution.
• State Level means that a state agency is hosting the application for schools and districts in the state. It is possible that an REA would select state-level hosting for the districts and schools in that region.
• District Level means that a district or individual school is hosting the application for schools in the district or for the individual school.
2. Click the Save and Continue button.
14 | P a g e
EOP ASSIST 4.0 Installation Manual
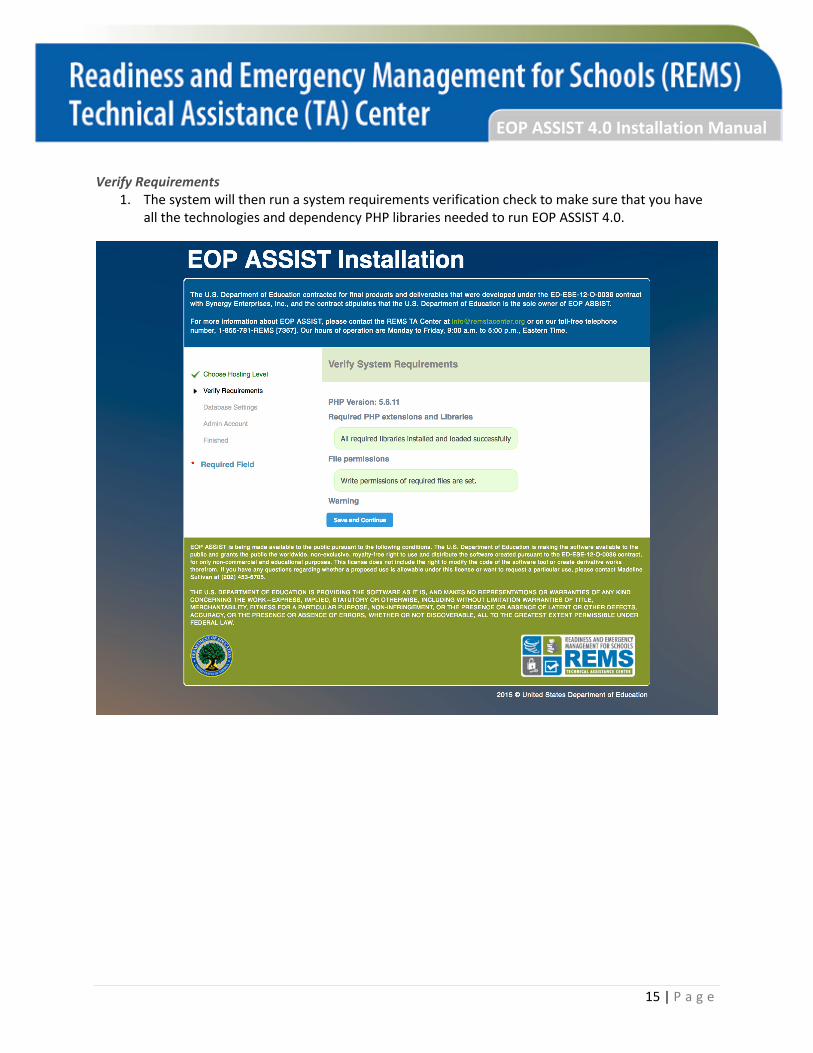
Verify Requirements 1. The system will then run a system requirements verification check to make sure that you have
all the technologies and dependency PHP libraries needed to run EOP ASSIST 4.0.
15 | P a g e
EOP ASSIST 4.0 Installation Manual
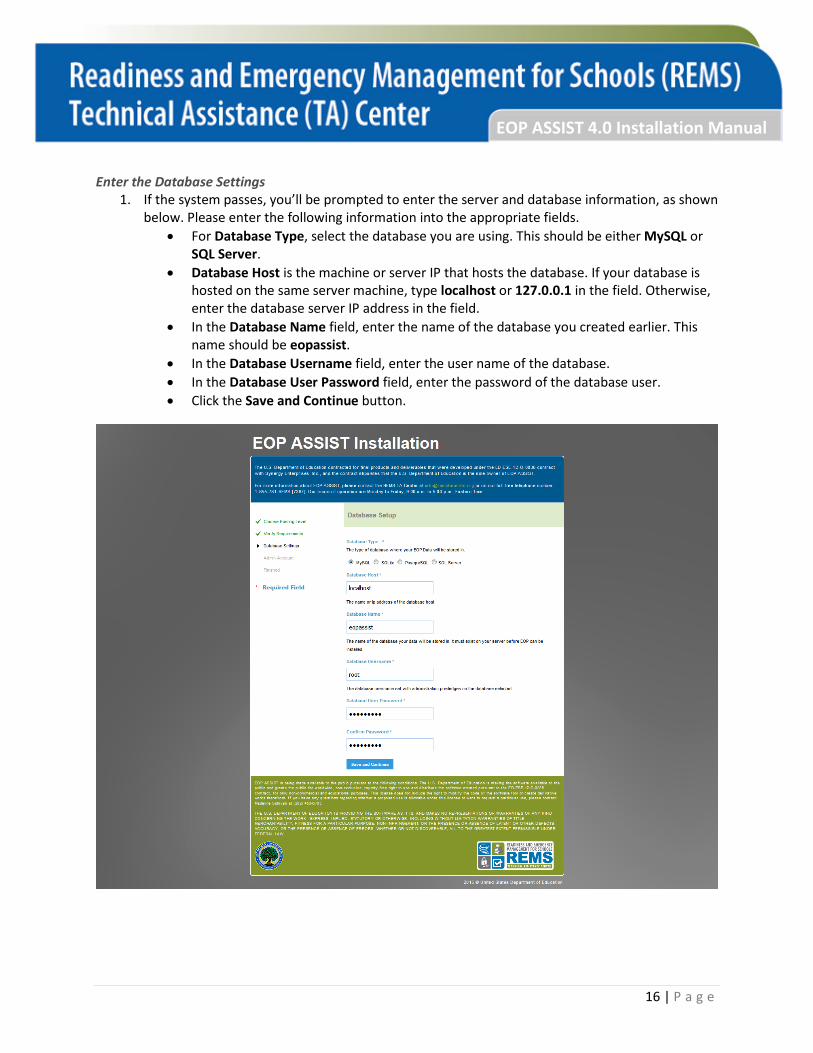
Enter the Database Settings 1. If the system passes, you’ll be prompted to enter the server and database information, as shown
below. Please enter the following information into the appropriate fields. • For Database Type, select the database you are using. This should be either MySQL or
SQL Server. • Database Host is the machine or server IP that hosts the database. If your database is
hosted on the same server machine, type localhost or 127.0.0.1 in the field. Otherwise, enter the database server IP address in the field.
• In the Database Name field, enter the name of the database you created earlier. This name should be eopassist.
• In the Database Username field, enter the user name of the database. • In the Database User Password field, enter the password of the database user. • Click the Save and Continue button.
16 | P a g e
EOP ASSIST 4.0 Installation Manual
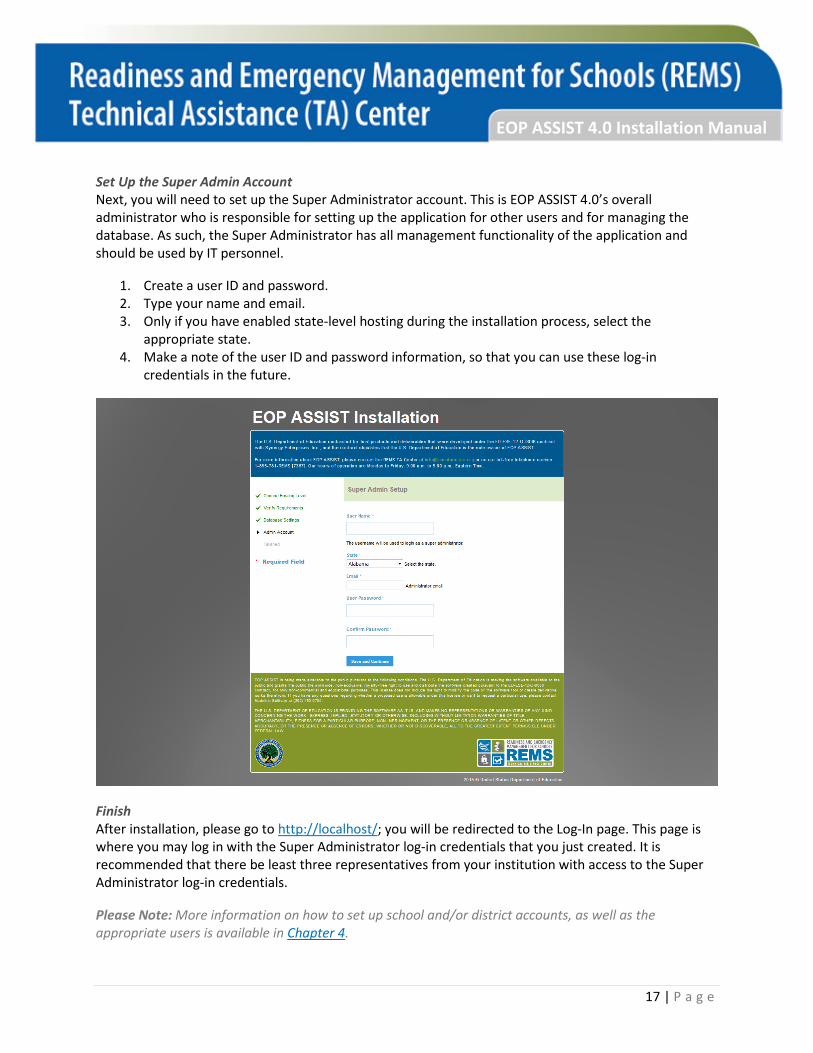
Set Up the Super Admin Account Next, you will need to set up the Super Administrator account. This is EOP ASSIST 4.0’s overall administrator who is responsible for setting up the application for other users and for managing the database. As such, the Super Administrator has all management functionality of the application and should be used by IT personnel.
1. Create a user ID and password. 2. Type your name and email. 3. Only if you have enabled state-level hosting during the installation process, select the
appropriate state. 4. Make a note of the user ID and password information, so that you can use these log-in
credentials in the future.
Finish After installation, please go to http://localhost/; you will be redirected to the Log-In page. This page is where you may log in with the Super Administrator log-in credentials that you just created. It is recommended that there be least three representatives from your institution with access to the Super Administrator log-in credentials.
Please Note: More information on how to set up school and/or district accounts, as well as the appropriate users is available in Chapter 4.
17 | P a g e
EOP ASSIST 4.0 Installation Manual
Chapter 4: Setting Up Schools, Districts, and/or Users At this point, you have downloaded EOP ASSIST 4.0 and installed it on your institution’s server. Again, it is important to recognize whether your institution is hosting the application at the state, district, or school level. To begin setting up the appropriate entities within EOP ASSIST 4.0 for your level of hosting, please review the following subsection that is applicable to your institution. It is not possible to host the application at more than one type of level.
State-Level Hosting The state level allows state agencies (or REAs), multiple districts and their schools, and independent schools to have access to and different roles within the application. Typically, a state agency or REA will host the application at this level so that all schools and districts within its jurisdiction may log into the application to develop and revise their school EOPs, which are stored on the state’s or REA’s server.
The Super Administrator’s first task will be to create at least one State Administrator account that is associated with the state agency or REA. Once the State Administrator’s log-in credentials are shared with him or her, the State Administrator will be responsible for creating additional State Administrator accounts for the state agency or REA, district profiles, and District Administrator accounts for all districts within your institution’s jurisdiction, as well as school profiles and School Administrator accounts for all independent schools within your institution’s jurisdiction.
18 | P a g e
EOP ASSIST 4.0 Installation Manual
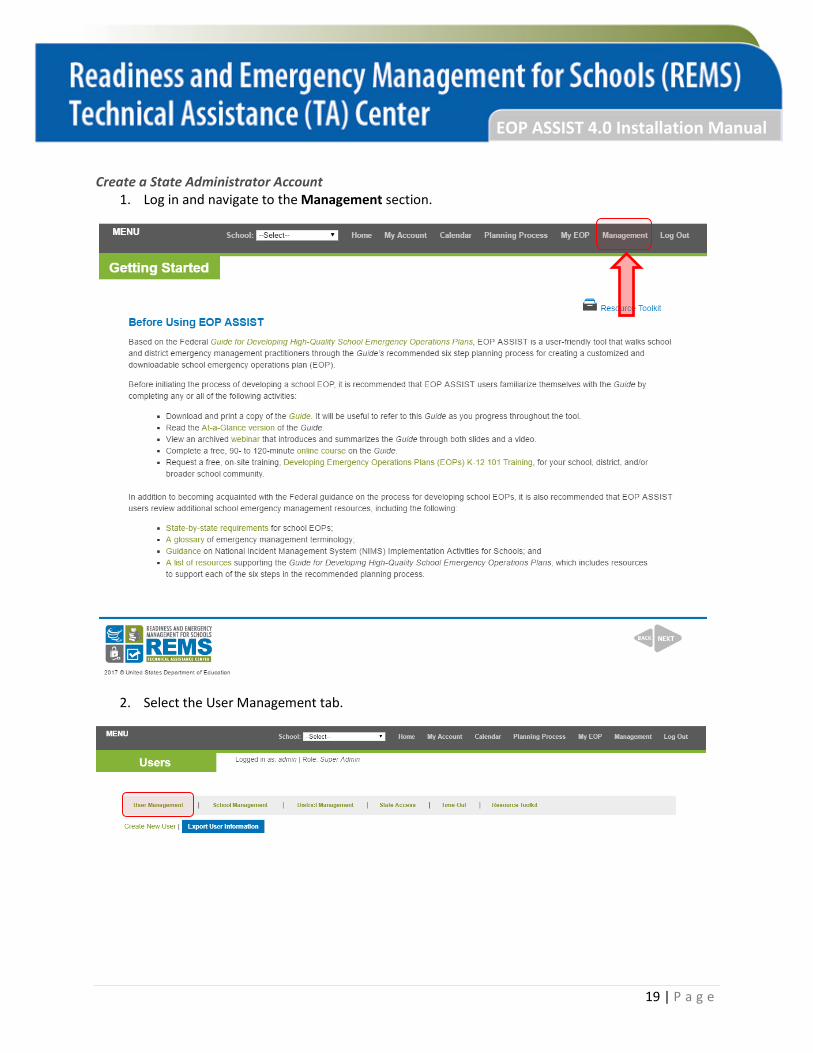
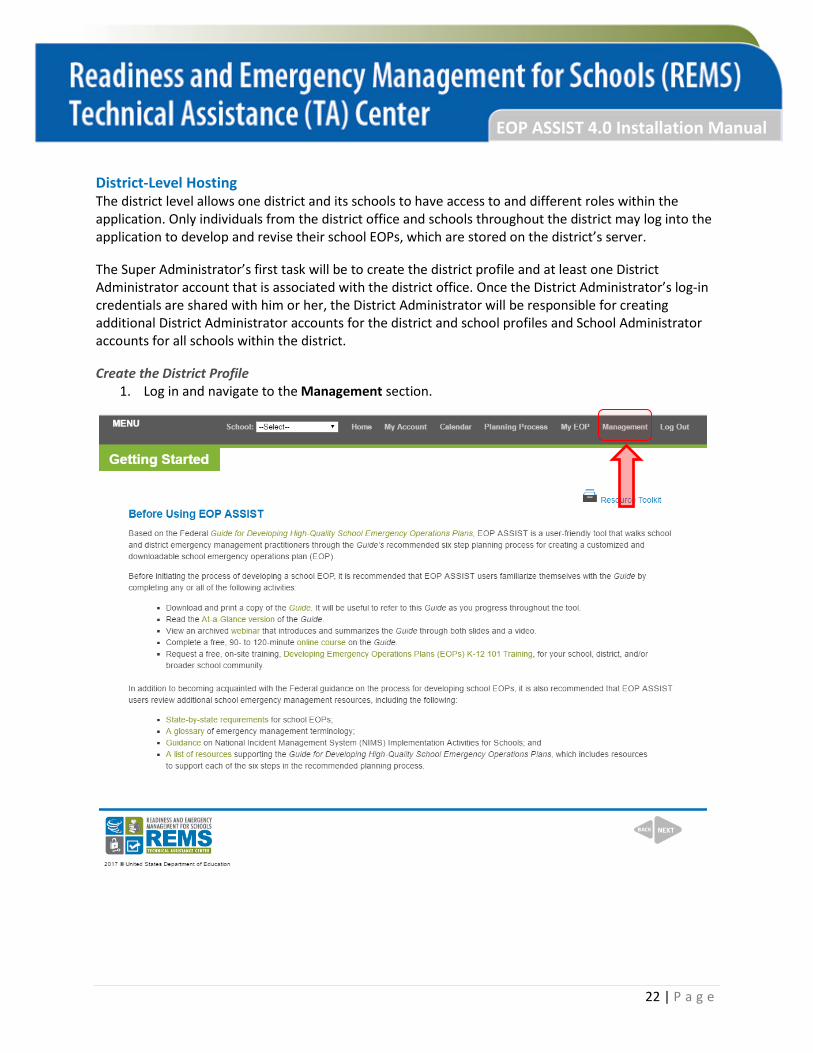
Create a State Administrator Account 1. Log in and navigate to the Management section.
2. Select the User Management tab.
19 | P a g e
EOP ASSIST 4.0 Installation Manual
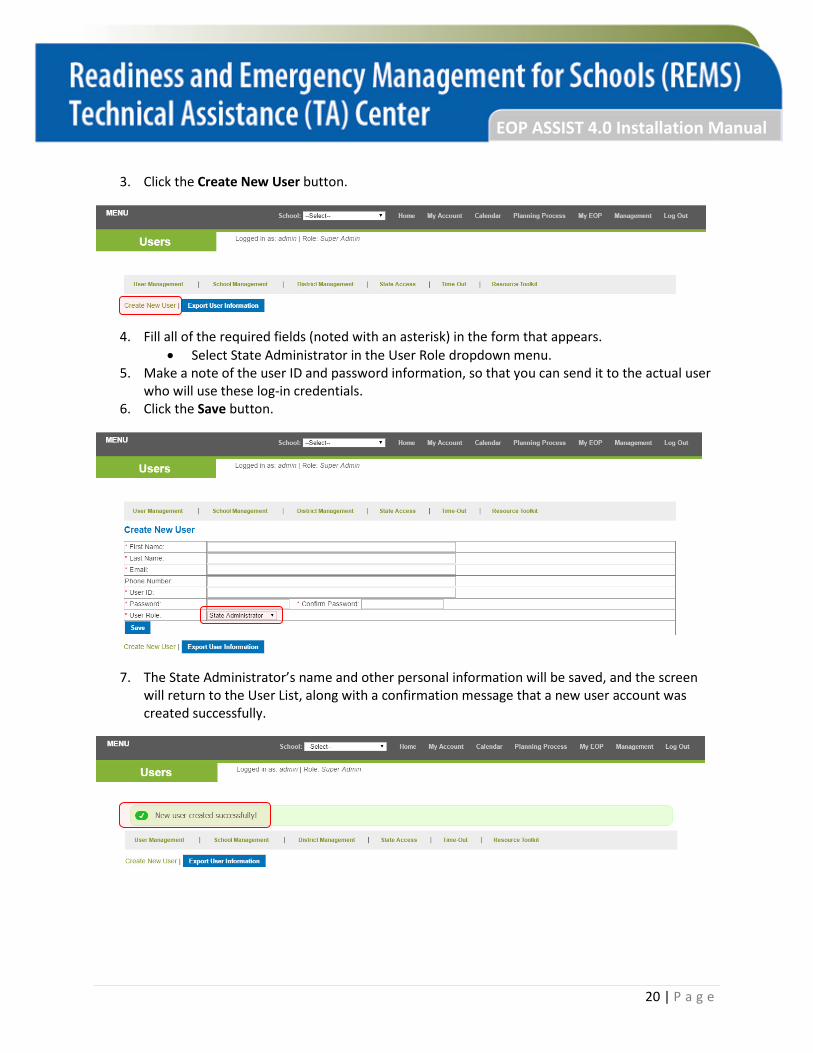
3. Click the Create New User button.
4. Fill all of the required fields (noted with an asterisk) in the form that appears. • Select State Administrator in the User Role dropdown menu.
5. Make a note of the user ID and password information, so that you can send it to the actual user who will use these log-in credentials.
6. Click the Save button.
7. The State Administrator’s name and other personal information will be saved, and the screen will return to the User List, along with a confirmation message that a new user account was created successfully.
20 | P a g e
EOP ASSIST 4.0 Installation Manual
Share Log-In Credentials With the State Administrator Now that you have created a State Administrator account to manage the entire state’s or region’s access to the application, you will need to share the State Administrator’s log-in credentials with him or her. The REMS TA Center recommends that you share all of the following information with each State Administrator:
• User ID of the State Administrator • Password of the State Administrator • Reminder that the State Administrator may want to change his or her password • Responsibility of the State Administrator to create at least two additional State Administrator
accounts • Responsibility of the State Administrator to create a district profile and a District Administrator
account for each district within your institution’s jurisdiction • Responsibility of the State Administrator to create a school profile and a School Administrator
account for each independent school in your institution’s jurisdiction • Reminder that the State Administrator may want to fill out and distribute the Customizable EOP
ASSIST Info Sheet for States and Regional Education Agencies to Share With School Districts and Schools to schools and districts in their jurisdiction, so they understand what EOP ASSIST 4.0 is and how they can get started using the application on the state’s or REA’s server
• EOP ASSIST 4.0 User Manual as a reference guide • EOP ASSIST Video Tutorials as resources
The REMS TA Center recommends that there be least three State Administrator accounts designated for each state agency or REA hosting EOP ASSIST 4.0.
Please Note: For more information on how to create district profiles, district-level user accounts, independent school profiles, and school-level user accounts, as well as more information on the responsibilities of the State Administrator, please refer to the EOP ASSIST 4.0 User Manual.
21 | P a g e
EOP ASSIST 4.0 Installation Manual
District-Level Hosting The district level allows one district and its schools to have access to and different roles within the application. Only individuals from the district office and schools throughout the district may log into the application to develop and revise their school EOPs, which are stored on the district’s server.
The Super Administrator’s first task will be to create the district profile and at least one District Administrator account that is associated with the district office. Once the District Administrator’s log-in credentials are shared with him or her, the District Administrator will be responsible for creating additional District Administrator accounts for the district and school profiles and School Administrator accounts for all schools within the district.
Create the District Profile 1. Log in and navigate to the Management section.
22 | P a g e
EOP ASSIST 4.0 Installation Manual
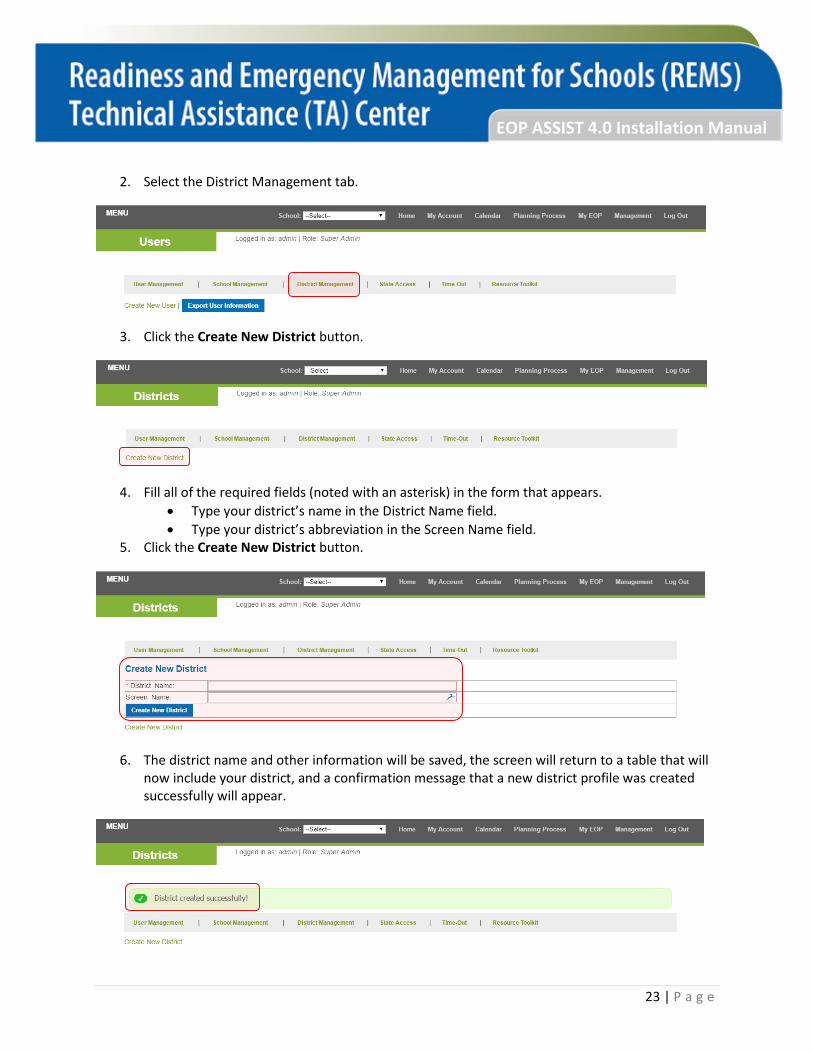
2. Select the District Management tab.
3. Click the Create New District button.
4. Fill all of the required fields (noted with an asterisk) in the form that appears. • Type your district’s name in the District Name field. • Type your district’s abbreviation in the Screen Name field.
5. Click the Create New District button.
6. The district name and other information will be saved, the screen will return to a table that will now include your district, and a confirmation message that a new district profile was created successfully will appear.
23 | P a g e
EOP ASSIST 4.0 Installation Manual
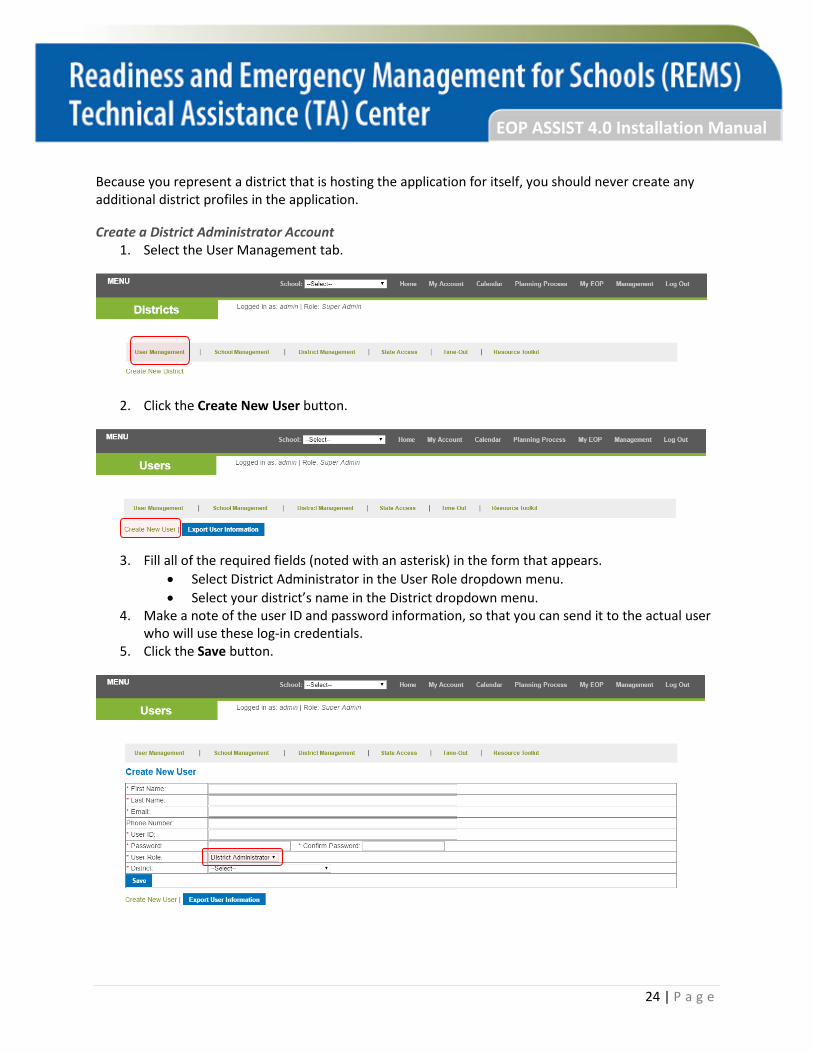
Because you represent a district that is hosting the application for itself, you should never create any additional district profiles in the application.
Create a District Administrator Account 1. Select the User Management tab.
2. Click the Create New User button.
3. Fill all of the required fields (noted with an asterisk) in the form that appears. • Select District Administrator in the User Role dropdown menu. • Select your district’s name in the District dropdown menu.
4. Make a note of the user ID and password information, so that you can send it to the actual user who will use these log-in credentials.
5. Click the Save button.
24 | P a g e
EOP ASSIST 4.0 Installation Manual
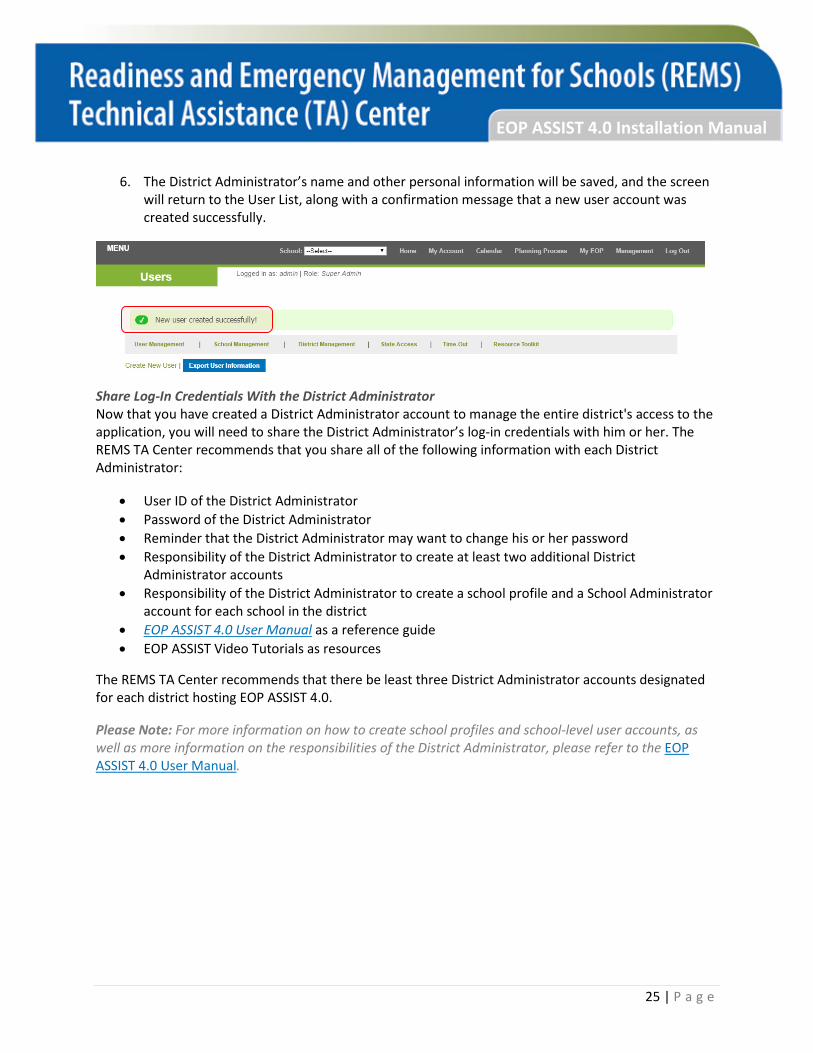
6. The District Administrator’s name and other personal information will be saved, and the screen will return to the User List, along with a confirmation message that a new user account was created successfully.
Share Log-In Credentials With the District Administrator Now that you have created a District Administrator account to manage the entire district's access to the application, you will need to share the District Administrator’s log-in credentials with him or her. The REMS TA Center recommends that you share all of the following information with each District Administrator:
• User ID of the District Administrator • Password of the District Administrator • Reminder that the District Administrator may want to change his or her password • Responsibility of the District Administrator to create at least two additional District
Administrator accounts • Responsibility of the District Administrator to create a school profile and a School Administrator
account for each school in the district • EOP ASSIST 4.0 User Manual as a reference guide • EOP ASSIST Video Tutorials as resources
The REMS TA Center recommends that there be least three District Administrator accounts designated for each district hosting EOP ASSIST 4.0.
Please Note: For more information on how to create school profiles and school-level user accounts, as well as more information on the responsibilities of the District Administrator, please refer to the EOP ASSIST 4.0 User Manual.
25 | P a g e
EOP ASSIST 4.0 Installation Manual
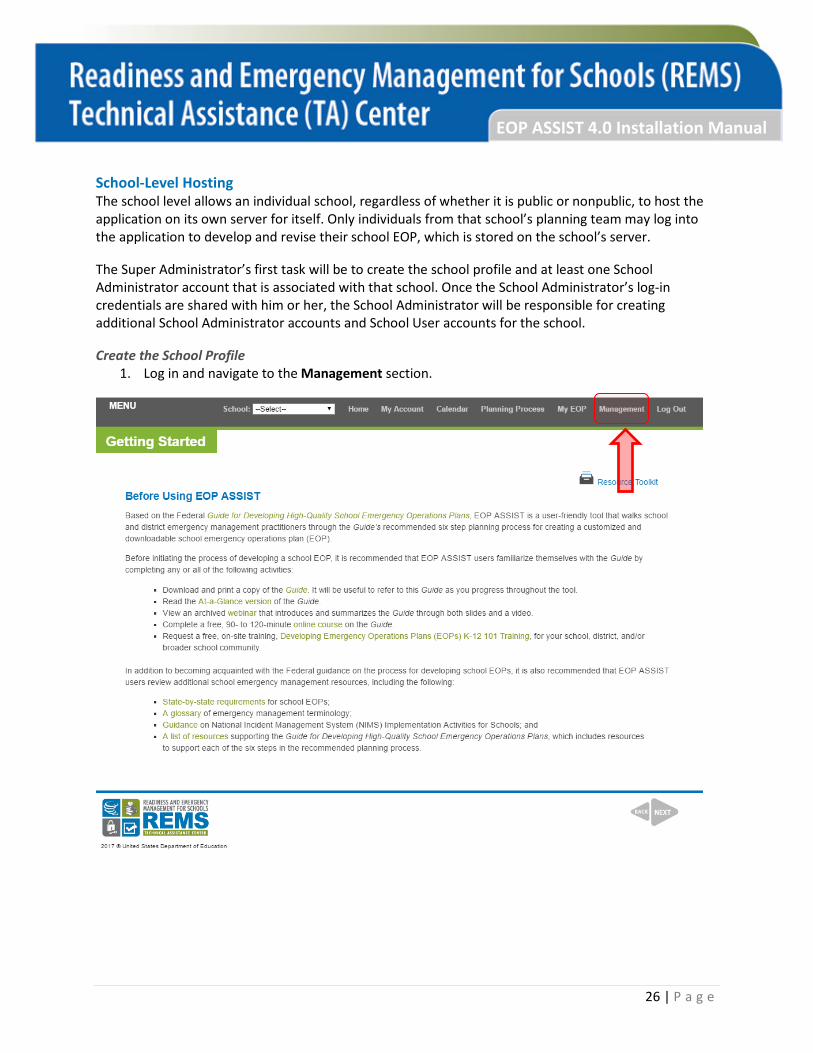
School-Level Hosting The school level allows an individual school, regardless of whether it is public or nonpublic, to host the application on its own server for itself. Only individuals from that school’s planning team may log into the application to develop and revise their school EOP, which is stored on the school’s server.
The Super Administrator’s first task will be to create the school profile and at least one School Administrator account that is associated with that school. Once the School Administrator’s log-in credentials are shared with him or her, the School Administrator will be responsible for creating additional School Administrator accounts and School User accounts for the school.
Create the School Profile 1. Log in and navigate to the Management section.
26 | P a g e
EOP ASSIST 4.0 Installation Manual
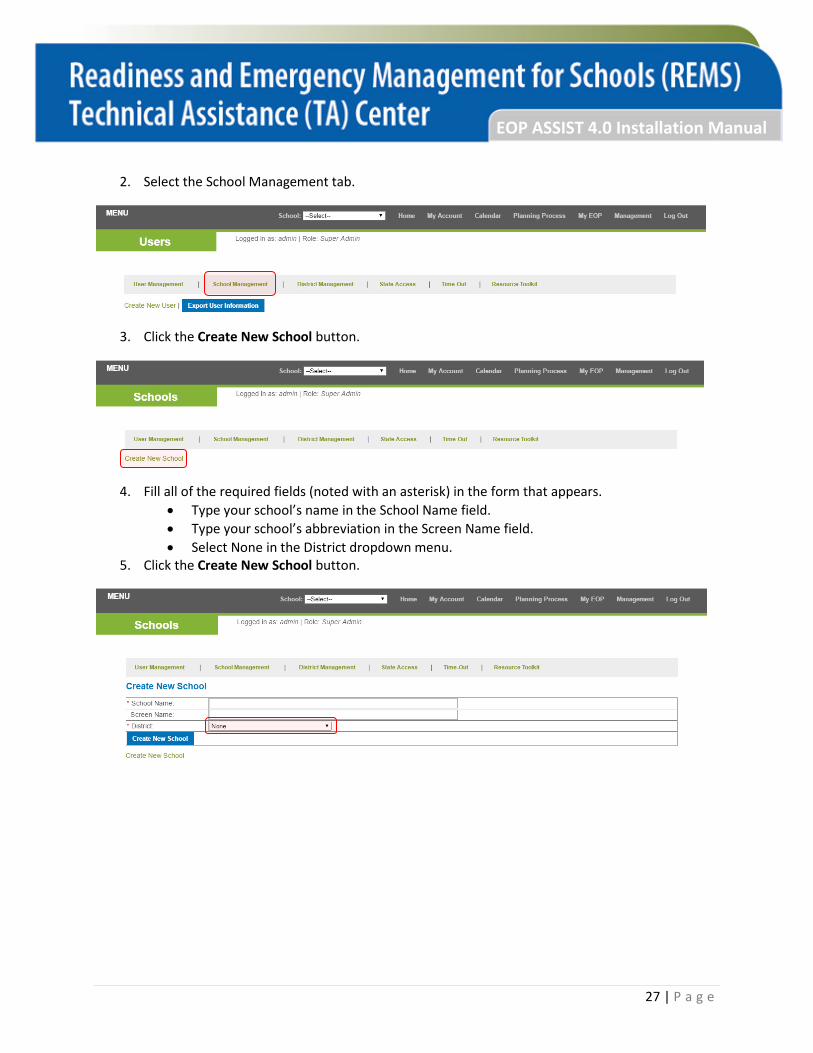
2. Select the School Management tab.
3. Click the Create New School button.
4. Fill all of the required fields (noted with an asterisk) in the form that appears. • Type your school’s name in the School Name field. • Type your school’s abbreviation in the Screen Name field. • Select None in the District dropdown menu.
5. Click the Create New School button.
27 | P a g e
EOP ASSIST 4.0 Installation Manual
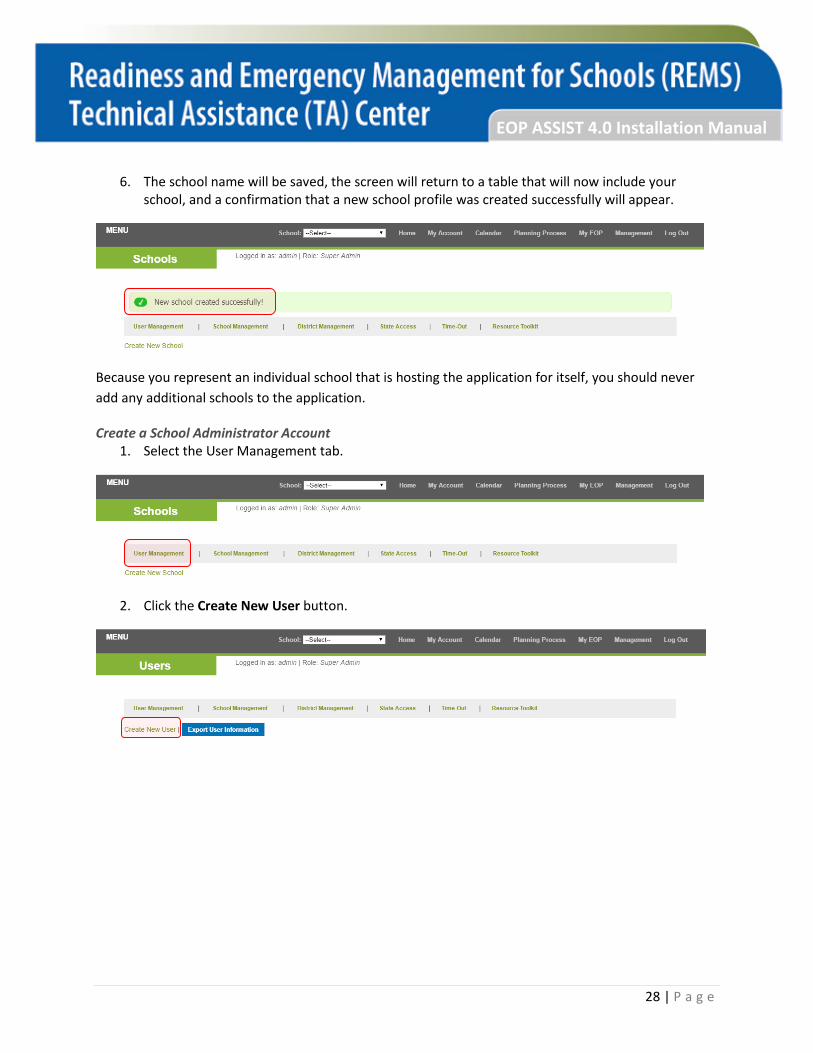
6. The school name will be saved, the screen will return to a table that will now include your school, and a confirmation that a new school profile was created successfully will appear.
Because you represent an individual school that is hosting the application for itself, you should never add any additional schools to the application.
Create a School Administrator Account 1. Select the User Management tab.
2. Click the Create New User button.
28 | P a g e
EOP ASSIST 4.0 Installation Manual
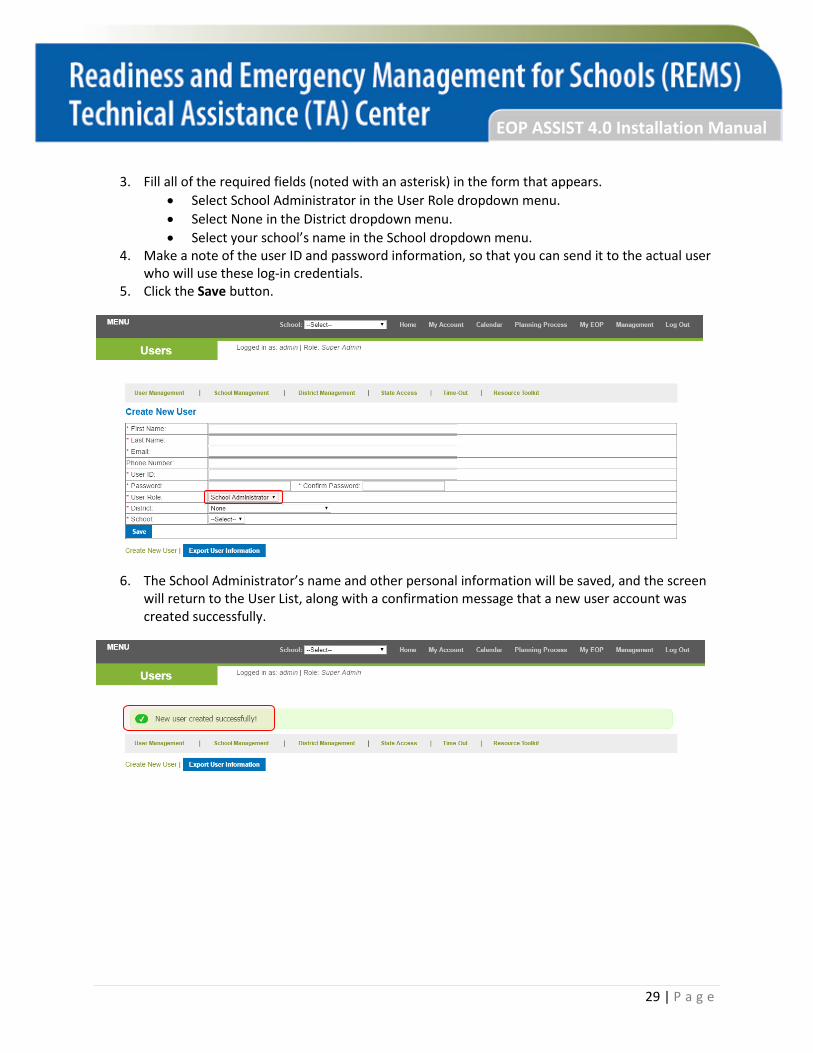
3. Fill all of the required fields (noted with an asterisk) in the form that appears. • Select School Administrator in the User Role dropdown menu. • Select None in the District dropdown menu. • Select your school’s name in the School dropdown menu.
4. Make a note of the user ID and password information, so that you can send it to the actual user who will use these log-in credentials.
5. Click the Save button.
6. The School Administrator’s name and other personal information will be saved, and the screen will return to the User List, along with a confirmation message that a new user account was created successfully.
29 | P a g e
EOP ASSIST 4.0 Installation Manual
Share Log-In Credentials With the School Administrator Now that you have created a School Administrator account to manage the school planning team’s access to the application, you will need to share the School Administrator’s log-in credentials with him or her. The REMS TA Center recommends that you share all of the following information with the School Administrator:
• User ID of the School Administrator account • Password of the School Administrator account • Reminder that the School Administrator may want to change his or her password • Responsibility of the School Administrator to create at least two additional School Administrator
accounts • Responsibility of the School Administrator to create a School User account for each member of
the school’s planning team • EOP ASSIST 4.0 User Manual as a reference guide • EOP ASSIST Video Tutorials as resources
The REMS TA Center recommends that there be least three School Administrator accounts designated for each school hosting EOP ASSIST 4.0.
Please Note: For more information on how to create school-level user accounts, as well as more information on the responsibilities of the School Administrator, please refer to the EOP ASSIST 4.0 User Manual.
30 | P a g e
EOP ASSIST 4.0 Installation Manual
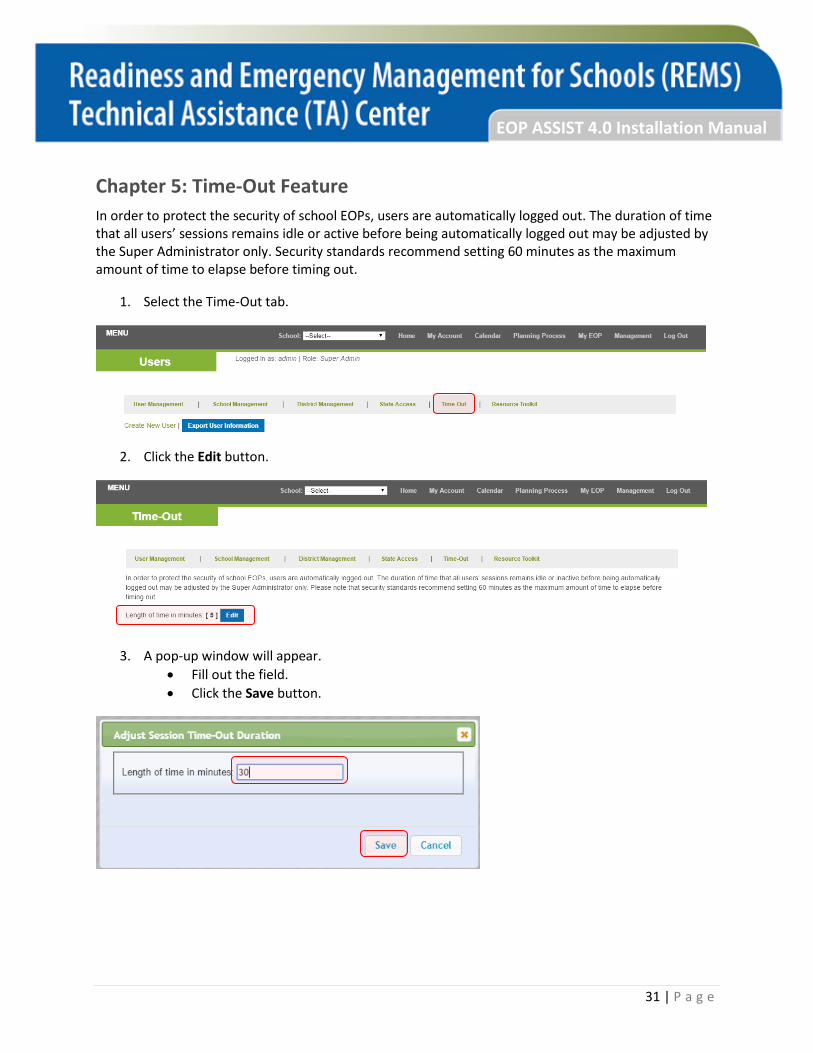
Chapter 5: Time-Out Feature In order to protect the security of school EOPs, users are automatically logged out. The duration of time that all users’ sessions remains idle or active before being automatically logged out may be adjusted by the Super Administrator only. Security standards recommend setting 60 minutes as the maximum amount of time to elapse before timing out.
1. Select the Time-Out tab.
2. Click the Edit button.
3. A pop-up window will appear. • Fill out the field. • Click the Save button.
31 | P a g e

EOP ASSIST 4.0 Installation Manual
Chapter 6: Client Access No client installation is required. After EOP ASSIST 4.0 has been installed on an institution’s server, users access it as a Web application via a Web browser using the Web server IP address (e.g., http://192.168.16.7). Alternatively, if you have a Domain Name System (DNS) server, then you may set up a domain name and point it to the IP address (e.g., eopassist.domain.org). Any of the modern browsers in the table below can be used to access EOP ASSIST 4.0, and a secure connection with the latest encryption technologies is always recommended.
Web Browser Compatible Releases
Internet Explorer 8.0 and above
Microsoft Edge 13 and above
Mozilla Firefox 46 and above
Apple Safari 8.0 and above
Google Chrome 49 and above
You will need to share the appropriate Web server IP address or domain name with all users of EOP ASSIST at your institution, so that they can access the application.
32 | P a g e
EOP ASSIST 4.0 Installation Manual
Chapter 7: Resources and Technical Assistance Recommended Resources for Distribution The REMS TA Center has developed a number of resources for EOP ASSIST users. It is important that you distribute the following recommended resources to emergency management practitioners when they first gain access to the application, so that they understand its features and how they may use to it to develop a school EOP.
Customizable EOP ASSIST Info Sheet for States and Regional Education Agencies to Share With School Districts and Schools This downloadable and interactive flyer allows state agencies and REAs who are hosting the software application for their schools and districts to distribute and share information on EOP ASSIST and promote its use across the state or region. State agencies and REAs may fill in the interactive forms with their agency name, as well as contact information for the representative overseeing EOP ASSIST at their agency, and use this tool to help communicate the basics on how EOP ASSIST works and what schools and school districts need to do to get started using the application. http://rems.ed.gov/docs/resources/EOP_Assist_FactSheetStatesShareWithLEAs.pdf
EOP ASSIST 4.0 User Manual This publication provides in-depth information on using EOP ASSIST from all user levels, including directions on how to complete tasks. All users should review this document before they begin to use the application, as well as refer to it throughout their use. https://rems.ed.gov/docs/EOP_ASSIST_4.0_User_Manual.pdf
An Overview of the Features and Functions of EOP ASSIST Video Tutorial This video provides an overview of the general layout of the application and shows users how to log in, log out, and change their password. https://www.youtube.com/watch?v=GGAUYcC9Krw
Using EOP ASSIST as an Administrator Video Tutorial This video provides information on some of the management features of the application and focuses on School Administrators and District Administrators, and how they can manage user accounts, school profiles, and school EOPs. https://www.youtube.com/watch?v=-_uAYLFQU9o
Creating a School EOP With EOP ASSIST: A Focus on the Planning Process Video Tutorial This video provides information on generating a school EOP using the application, and it reviews the Planning Process and My EOP sections. https://www.youtube.com/watch?v=ODHH2k47Yj0
EOP ASSIST Discussion Forum This forum on the REMS TA Center’s Community of Practice allows current and potential users to share feedback, exchange ideas, and pose questions. https://rems.ed.gov/COP/REMSCOPforum/topics.aspx?ForumID=85
33 | P a g e
EOP ASSIST 4.0 Installation Manual
Additional Resources In addition to the recommended resources above, the REMS TA Center has created the following additional resources. You may choose to also distribute these resources to emergency management practitioners or share them by request. These resources provide an overview of the application’s purpose, features, and functions and are intended to be used to secure buy-in from colleagues and school administrators for the application’s use.
EOP ASSIST 4.0 Product Description This downloadable and distributable flyer provides an overview of the application and its technical requirements, and it is intended for practitioners who are interested in potentially using EOP ASSIST. https://rems.ed.gov/Docs/EOP_ASSIST_4.0_Flyer.pdf
EOP ASSIST 3.0: Next Generation of Updates and Enhancements Webinar This Webinar provides an overview of the updated management features of the most recent version of the software application available to state agencies, regional education agencies, school districts, and schools. This includes how to use the tool to meet state and local requirements. http://rems.ed.gov/EOPAssist30NextGenUpdatesEnhancements.aspx
An Overview of the Features & Functions of EOP ASSIST 2.0 for School & School District Hosts and Their Stakeholders This presentation provides an overview of the application and its setup when it is hosted by schools, districts, or other local agencies. https://rems.ed.gov/Docs/EOP_ASSIST_2_0_OverviewSchoolDistrictHostsStakeholders.pptx
An Overview of the Features & Functions of EOP ASSIST 2.0 for State Agency Hosts and Their Stakeholders This presentation provides an overview of the application and its setup when it is hosted by state agencies and regional agencies on behalf of multiple schools and districts. https://rems.ed.gov/Docs/EOP_ASSIST_2_0_OverviewStateAgencyHostsStakeholders.pptx
EOP ASSIST: Features, Functions, and Recent Enhancements Webinar This Webinar provides an overview of the application’s features and functions and demonstrates how practitioners may use it to develop school EOPs. The Webinar includes information on management features for states, districts, and schools. https://rems.ed.gov/EOPASSISTFeaturesandRecentEnhancements.aspx
An Overview of the EOP ASSIST Software Application This presentation provides a brief overview of the application when it is hosted by schools or districts. https://rems.ed.gov/Docs/EOP_ASSIST_Overview.ppt
Technical Assistance The REMS TA Center is pleased to offer technical support by phone or email to individuals and planning teams at schools, school districts, REAs, and state agencies regarding the installation or use of EOP ASSIST. If you have any questions, please contact the REMS TA Center Help Desk by email at
34 | P a g e
EOP ASSIST 4.0 Installation Manual
[email protected] or by phone, toll-free, at 1-855-781-REMS (7367). Our hours of operation are Monday through Friday, 9:00 a.m. to 5:00 p.m., Eastern Time.
35 | P a g e
EOP ASSIST 4.0 Installation Manual
Appendix A: Configuring PHP and MySQL on Apache HTTP Server As stated in Chapter 3, EOP ASSIST 4.0 is compatible with three Web server environments. This appendix provides information on how to set up Apache, PHP, and MySQL on a Microsoft Windows, Linus, or Mac OS X/ macOS operating system.
Linux/Unix Linux, Apache, MySQL, and PHP (also known by the acronym LAMP stack) is a bundle of open source software that is used to run Websites and servers. To install the required software on a Linux/Unix operating system, run the following commands.
Install Apache 1. Open the terminal. 2. Type the following command:
sudo apt-get update sudo apt-get install apache2
3. Confirm that Apache is installed. 4. Direct your browser to your server’s IP address (e.g., http://12.34.56.789). 5. The page should display the following message: “It works!".
Install MySQL 1. Type the following command in the terminal:
sudo apt-get install mysql-server libapache2-mod-auth-mysql php5-mysql
2. During the installation, MySQL will ask you to set a root password. If you miss the chance to set the password while the program is installing, it is very easy to set the password later from within the MySQL shell.
3. Once you have installed MySQL, you will need to activate it. Type the following command:
sudo mysql_install_db
Install PHP 1. Open the terminal. 2. Type the following command:
sudo apt-get install php5 libapache2-mod-php5 php5-mcrypt
36 | P a g e
EOP ASSIST 4.0 Installation Manual
Microsoft Windows To install the required software on a Linux/Unix operating system, review the following information.
The primary Microsoft Windows platform for running Apache 2.4 is Windows 2000 or later. Always obtain and install the current service pack to avoid operating system bugs. Apache HTTP Server versions later than 2.2 will not run on any operating system earlier than Windows 2000.
The Apache HTTP Server Project itself does not provide binary releases of software, only source code. Individual committers may provide binary packages as a convenience, but it is not a release deliverable.
The popular and recommended options for deploying the Apache HTTP Server and, optionally, PHP and MySQL on Microsoft Windows include:
• ApacheHaus • Apache Lounge • BitNami WAMP Stack • WampServer • XAMPP
BitNami WAMP Stack, WampServer and XAMPP are bundled with PHP and MySQL, both of which are necessary for EOP ASSIST 4.0 to work. They additionally provide installers with built-in wizards and guides that will help you configure a Web server environment suitable for EOP ASSIST without having to configure each manually. If you decide to use any of these, stop here and head to their respective installation documentation.
To manually install and configure Apache on a Microsoft Windows operating system, refer to the documentation that Apache has provided: http://httpd.apache.org/docs/current/platform/windows.html#down
Mac OS X Yosemite Apache and PHP are already packaged with OS X. To create a local Web server, enable both Apache and PHP, and then install MySQL. You may also choose to use third-party Web software bundles such as XAMPP and MAMP that simplify and automate the whole process. Read more about installing each Web software bundle in third-party documentation.
• XAMPP: https://www.apachefriends.org/index.html • MAMP: https://www.mamp.info/en/
37 | P a g e
EOP ASSIST 4.0 Installation Manual
Enable Apache 1. Open the terminal application. 2. Run the following command:
sudo apachectl start
3. Access http://localhost 4. Verify “It works!”
Enable PHP for Apache You’ll then need to change your working directory to the apache2 directory and enable the php5 module. To do so, run the following commands.
1. Change the working directory to the apache2 directory by typing the following command:
cd /etc/apache2/
2. Edit the Apache configuration by typing the following command:
vi httpd.conf
3. Uncomment the following lines (remove #):
LoadModule php5_module libexec/apache2/libphp5.so LoadModule deflate_module libexec/apache2/mod_deflate.so LoadModule expires_module libexec/apache2/mod_expires.so LoadModule rewrite_module libexec/apache2/mod_rewrite.so
4. You will the need to restart Apache. Type the following command:
sudo apachectl restart
5. The default DocumentRoot for Mac OS X Yosemite is /Library/WebServer/Documents. You can verify this from your Apache configuration by typing the following command:
grep DocumentRoot httpd.conf
Install MySQL 1. You will need to download the MySQL DMG for Mac OS X. To do so, you may follow the
directions provided by a third party: http://dev.mysql.com/downloads/mysql/
38 | P a g e
EOP ASSIST 4.0 Installation Manual
Appendix B: Configuring PHP and MySQL on Microsoft Windows Server with IIS As stated in Chapter 3, EOP ASSIST 4.0 is compatible with three Web server environments. This appendix provides information on how to set up IIS, MySQL, and PHP on a Microsoft Windows operating system.
Install IIS 7 on Windows Server 2008 R2 By default, IIS 7 is not installed on Windows Server 2008 R2. You can install IIS 7.5 IIS by using the Add Roles wizard in Server Manager or by using the command line.
1. Click the Start button. 2. Point to Administrative Tools. 3. Click the Server Manager button. 4. In Roles Summary, click the Add Roles button. 5. Use the Add Roles Wizard to add the Web server role.
Read more about configuration and using the command line here: https://technet.microsoft.com/en-us/library/Cc771209.aspx
Install and Configure PHP In order for Microsoft Windows to run PHP code, the PHP binary files need to be copied to your system. No installation is required but some configuration is needed to have it run properly.
1. Download PHP 5.6.x from http://windows.php.net/download#php-5.6 or PHP 7.0.x from http://windows.php.net/download#php-7.0
• For IIS 7, the non-thread safe binaries should be used. • PHP for Windows is built using Visual Studio 2012, 2015 or 2017 and, therefore, requires
the VC11, VC14 or VC15 Redistributables. You may download them here: i. VC11 for Visual Studio 2012: https://www.microsoft.com/en-
us/download/details.aspx?id=30679 ii. VC14 for Visual Studio 2015: https://www.microsoft.com/en-
us/download/details.aspx?id=48145 iii. VC15 for Visual Studio 2017: https://www.microsoft.com/en-
us/download/details.aspx?id=30679 2. Extract the files here: C:/php 3. Copy the php.ini-production file from C:/php/ to the Microsoft Windows directory and rename
it to php.ini so that you have C:/Windows/php.ini open the php.ini file. 4. Uncomment set the key for the following lines:
cgi.force_redirect = 0 fastcgi.impersonate = 1 extension_dir to the ‘ext’ folder in the path PHP was extracted to (e.g.. ‘C:PHPext’) date.timezone to the time zone of your server (the URL on the line above this key lists the accepted values).
39 | P a g e
EOP ASSIST 4.0 Installation Manual
Please Note: For more detailed information on configuring PHP, reference Appendix D.
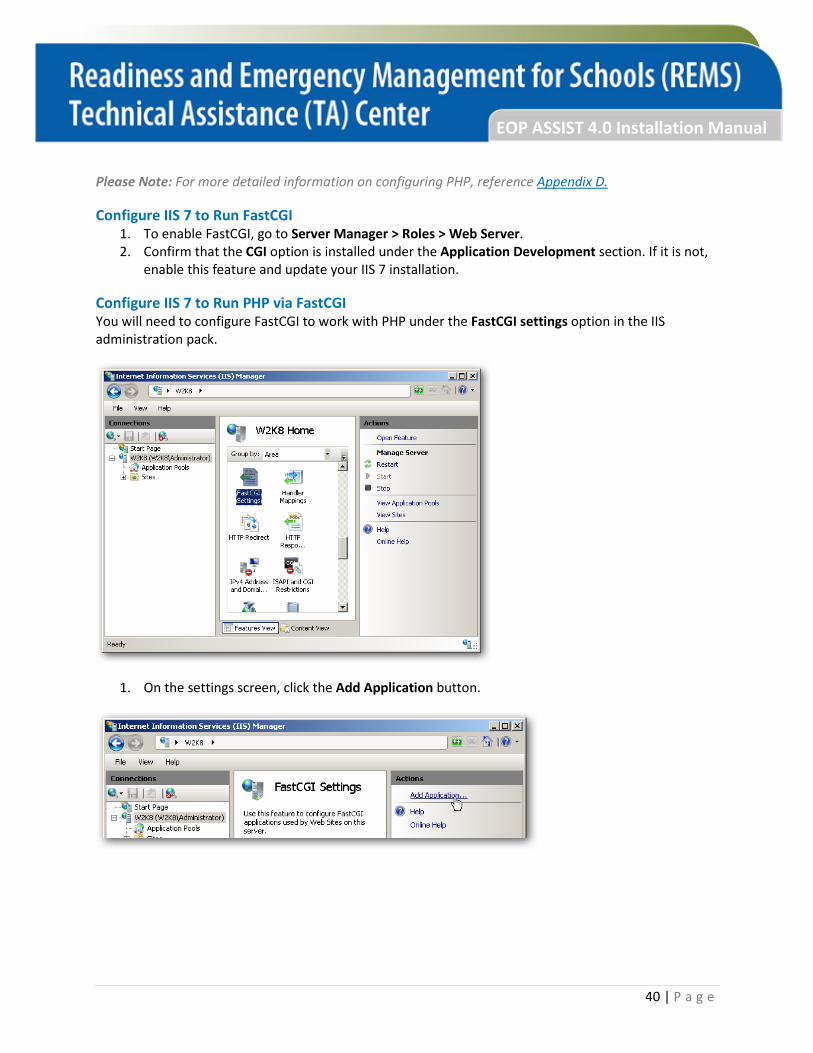
Configure IIS 7 to Run FastCGI 1. To enable FastCGI, go to Server Manager > Roles > Web Server. 2. Confirm that the CGI option is installed under the Application Development section. If it is not,
enable this feature and update your IIS 7 installation.
Configure IIS 7 to Run PHP via FastCGI You will need to configure FastCGI to work with PHP under the FastCGI settings option in the IIS administration pack.
1. On the settings screen, click the Add Application button.
40 | P a g e
EOP ASSIST 4.0 Installation Manual
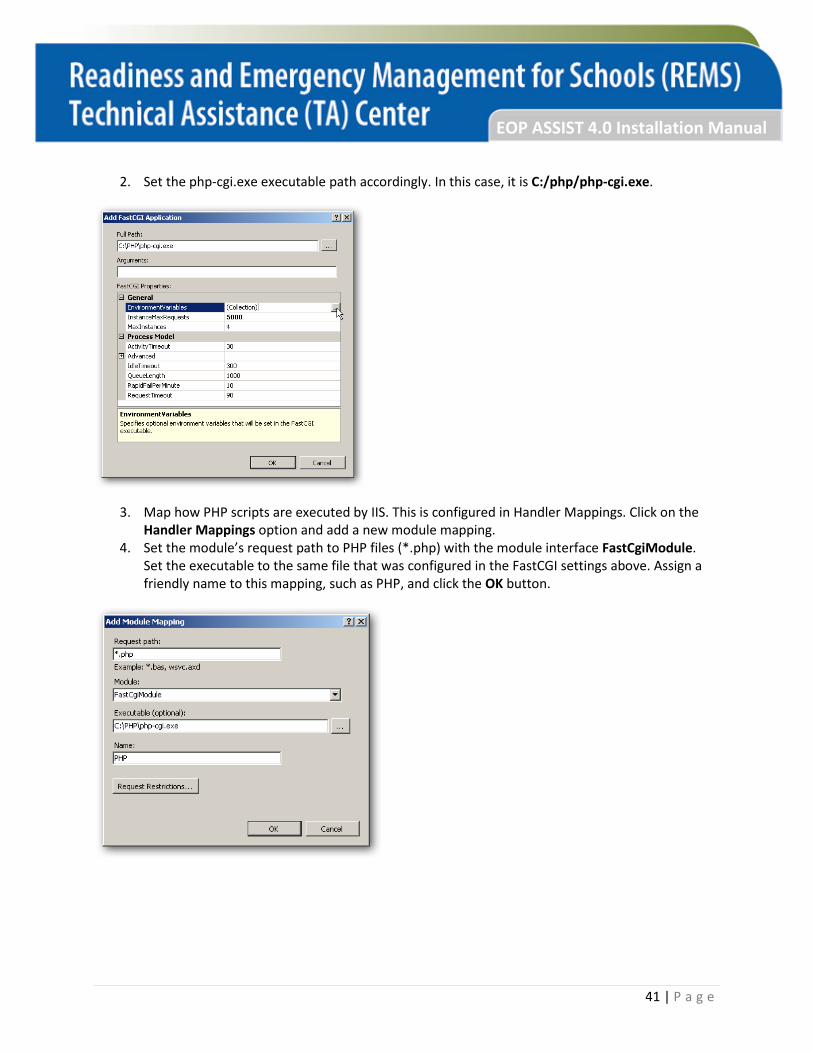
2. Set the php-cgi.exe executable path accordingly. In this case, it is C:/php/php-cgi.exe.
3. Map how PHP scripts are executed by IIS. This is configured in Handler Mappings. Click on the Handler Mappings option and add a new module mapping.
4. Set the module’s request path to PHP files (*.php) with the module interface FastCgiModule. Set the executable to the same file that was configured in the FastCGI settings above. Assign a friendly name to this mapping, such as PHP, and click the OK button.
41 | P a g e
EOP ASSIST 4.0 Installation Manual
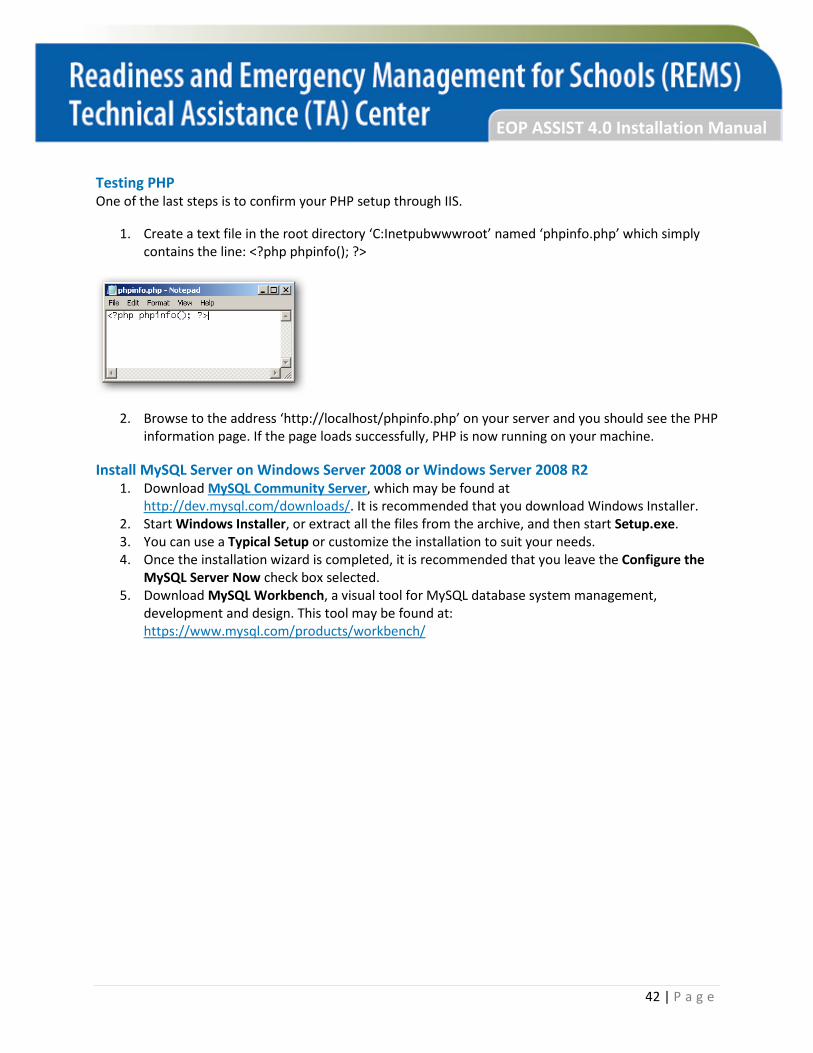
Testing PHP One of the last steps is to confirm your PHP setup through IIS.
1. Create a text file in the root directory ‘C:Inetpubwwwroot’ named ‘phpinfo.php’ which simply contains the line: <?php phpinfo(); ?>
2. Browse to the address ‘http://localhost/phpinfo.php’ on your server and you should see the PHP information page. If the page loads successfully, PHP is now running on your machine.
Install MySQL Server on Windows Server 2008 or Windows Server 2008 R2 1. Download MySQL Community Server, which may be found at
http://dev.mysql.com/downloads/. It is recommended that you download Windows Installer. 2. Start Windows Installer, or extract all the files from the archive, and then start Setup.exe. 3. You can use a Typical Setup or customize the installation to suit your needs. 4. Once the installation wizard is completed, it is recommended that you leave the Configure the
MySQL Server Now check box selected. 5. Download MySQL Workbench, a visual tool for MySQL database system management,
development and design. This tool may be found at: https://www.mysql.com/products/workbench/
42 | P a g e
EOP ASSIST 4.0 Installation Manual
Appendix C: Configuring PHP and Microsoft SQL Server on Microsoft Windows Server with IIS As stated in Chapter 3, EOP ASSIST 4.0 is compatible with three Web server environments. This appendix provides information on how to set up IIS, Microsoft SQL Server, and PHP on a Microsoft Windows operating system.
To set up Microsoft SQL Server so that it works with PHP, you will need to install and configure the SQL Server driver for PHP, which is a PHP extension that allows the reading and writing of SQL Server data from within PHP scripts. The following operating systems are supported:
• Windows Server 2008 R2 or Windows Server 2008; • Windows 7, Windows Vista Service Pack 1, or Windows XP SP3; and • Windows Server 2003 SP2, or Windows 2000 SP4.
Additionally, you will need to have the following installed before you can continue:
• PHP 5.x.x Microsoft SQL Server 2008 Native Client. You can download this from a Microsoft SQL Server 2008 Feature Pack or at: http://www.microsoft.com/en-us/download/details.aspx?id=16978;
• Any edition of SQL Server 2005 or SQL Server 2008; • A Web server configured to run PHP.
Install IIS 7 on Windows Server 2008 R2 By default, IIS 7 is not installed on Windows Server 2008 R2. You can install IIS 7.5 IIS by using the Add Roles wizard in Server Manager or by using the command line.
1. Click Start, point to Administrative Tools and then click Server Manager. 2. In Roles Summary, click Add Roles. 3. Use the Add Roles Wizard to add the Web server role.
Read more about configuration and using the command line here: https://technet.microsoft.com/en-us/library/Cc771209.aspx
Install and Configure PHP In order for Microsoft Windows to run PHP code, the PHP binary files need to be copied to your system. No installation is required but some configuration is needed to have it run properly.
1. Download PHP 5.6.x from http://windows.php.net/download#php-5.6 or PHP 7.0.x from http://windows.php.net/download#php-7.0.
• For IIS 7, the non-thread safe binaries should be used. • PHP for Windows is built using Visual Studio 2012, 2015 or 2017 and, therefore, requires
the VC11, VC14 or VC15 Redistributables. You may download them here:
43 | P a g e
EOP ASSIST 4.0 Installation Manual
i. VC11 for Visual Studio 2012: https://www.microsoft.com/en-us/download/details.aspx?id=30679
ii. VC14 for Visual Studio 2015: https://www.microsoft.com/en-us/download/details.aspx?id=48145
iii. VC15 for Visual Studio 2017: https://www.microsoft.com/en-us/download/details.aspx?id=30679
2. Extract the files here: C:/php 3. Copy the php.ini-production file from C:/php/ to the Microsoft Windows directory and rename
it to php.ini so that you have C:/Windows/php.ini open the php.ini file. 4. Uncomment and set the key for the following lines:
cgi.force_redirect = 0 fastcgi.impersonate = 1 extension_dir to the ‘ext’ folder in the path PHP was extracted to (i.e. ‘C:PHPext’) date.timezone to the time zone of your server (the URL on the line above this key lists the accepted values)
Please Note: For more detailed information on configuring PHP, reference Appendix D.
Configure IIS 7 to Run FastCGI 1. To enable FastCGI, go to Server Manager > Roles > Web Server 2. Confirm that the CGI option is installed under the Application Development section. If it is not,
enable this feature and update your IIS 7 installation.
44 | P a g e
EOP ASSIST 4.0 Installation Manual
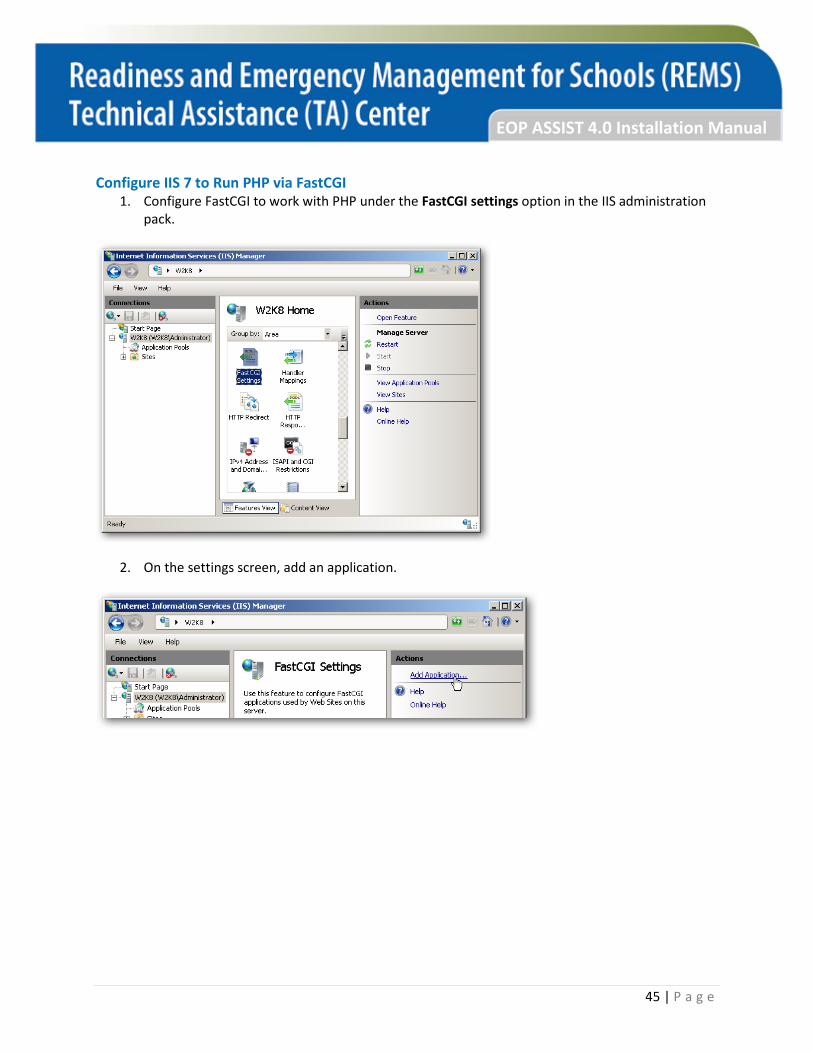
Configure IIS 7 to Run PHP via FastCGI 1. Configure FastCGI to work with PHP under the FastCGI settings option in the IIS administration
pack.
2. On the settings screen, add an application.
45 | P a g e
EOP ASSIST 4.0 Installation Manual
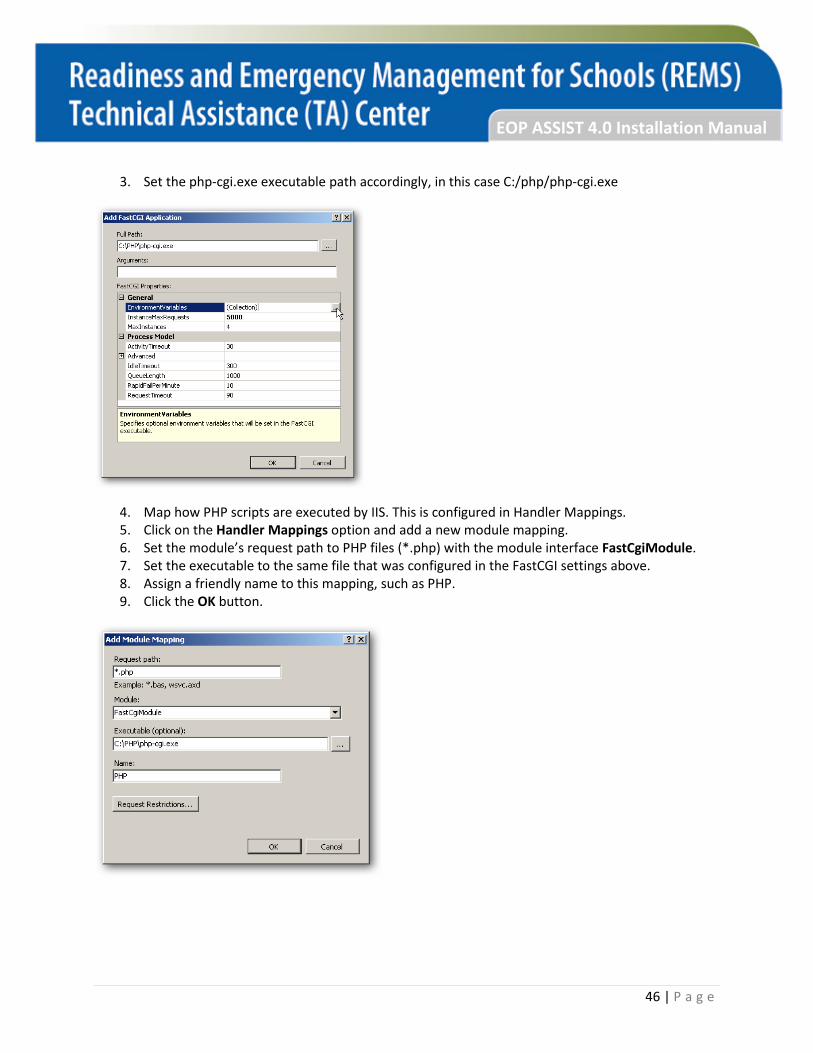
3. Set the php-cgi.exe executable path accordingly, in this case C:/php/php-cgi.exe
4. Map how PHP scripts are executed by IIS. This is configured in Handler Mappings. 5. Click on the Handler Mappings option and add a new module mapping. 6. Set the module’s request path to PHP files (*.php) with the module interface FastCgiModule. 7. Set the executable to the same file that was configured in the FastCGI settings above. 8. Assign a friendly name to this mapping, such as PHP. 9. Click the OK button.
46 | P a g e
EOP ASSIST 4.0 Installation Manual
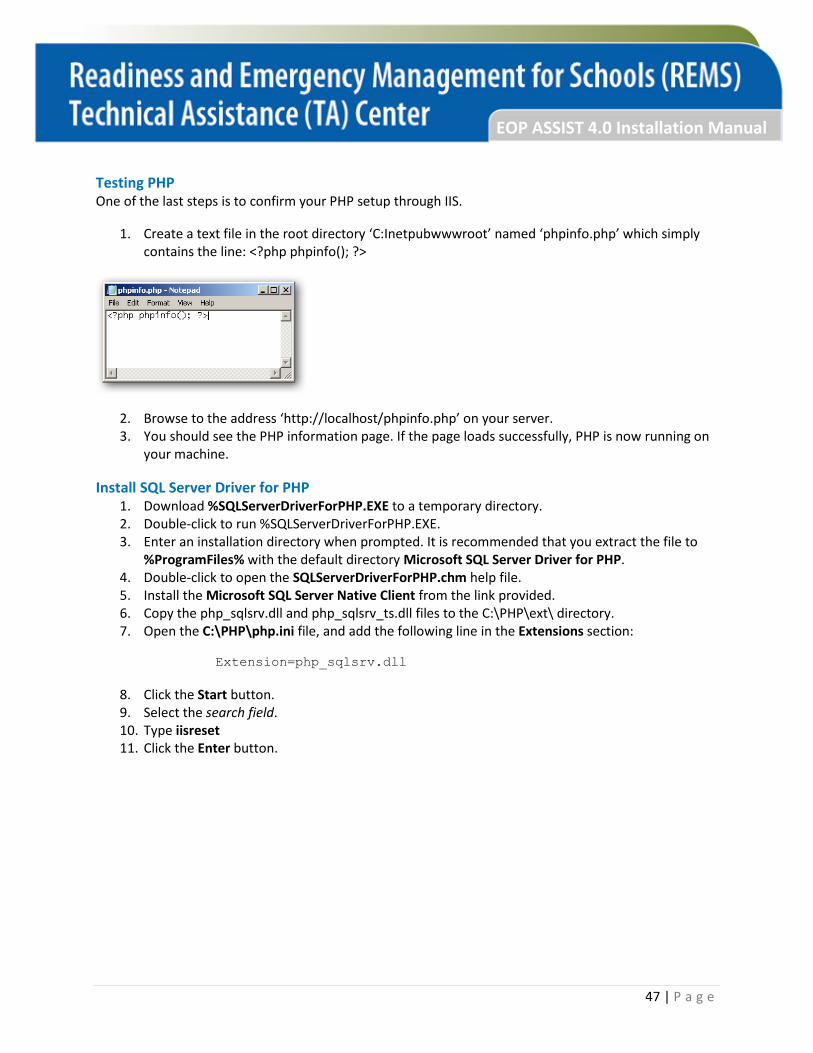
Testing PHP One of the last steps is to confirm your PHP setup through IIS.
1. Create a text file in the root directory ‘C:Inetpubwwwroot’ named ‘phpinfo.php’ which simply contains the line: <?php phpinfo(); ?>
2. Browse to the address ‘http://localhost/phpinfo.php’ on your server. 3. You should see the PHP information page. If the page loads successfully, PHP is now running on
your machine.
Install SQL Server Driver for PHP 1. Download %SQLServerDriverForPHP.EXE to a temporary directory. 2. Double-click to run %SQLServerDriverForPHP.EXE. 3. Enter an installation directory when prompted. It is recommended that you extract the file to
%ProgramFiles% with the default directory Microsoft SQL Server Driver for PHP. 4. Double-click to open the SQLServerDriverForPHP.chm help file. 5. Install the Microsoft SQL Server Native Client from the link provided. 6. Copy the php_sqlsrv.dll and php_sqlsrv_ts.dll files to the C:\PHP\ext\ directory. 7. Open the C:\PHP\php.ini file, and add the following line in the Extensions section:
Extension=php_sqlsrv.dll
8. Click the Start button. 9. Select the search field. 10. Type iisreset 11. Click the Enter button.
47 | P a g e
EOP ASSIST 4.0 Installation Manual
Appendix D: Configuring PHP on Microsoft Windows Server with IIS Confirm that you have IIS installed and running. If not, you will need to Install IIS.
Install IIS To install IIS on Windows Server 2012, complete the following directions.
1. Begin on the Start page. 2. Click the Server Manager tile. 3. Click the OK button. 4. Navigate to the Server Manager. 5. Select Dashboard. 6. Click the Add Roles and Features button. 7. The Add Roles and Features Wizard will open. 8. Navigate to the Before You Begin page. 9. Click the Next button. 10. Navigate to the Select Installation Type page. 11. Select Role-based or Feature-based Installation. 12. Click the Next button. 13. Navigate to the Select Destination Server page. 14. Click the Select a Server From the Server Pool button. 15. Select your server. 16. Click the Next button. 17. On the Select Server Roles page, select Web Server (IIS). 18. Click the Next button. 19. On the Select Features page, note the preselected features that are installed by default, and
then select CGI. This selection also installs FastCGI, which is recommended for PHP applications. 20. Click the Next button. 21. On the Web Server Role (IIS) page, click the Next button. 22. On the Select Role Services page, note the preselected role services that are installed by
default, and then click Next. (Note: You only have to install the IIS 8 default role services for a static-content Web server.)
23. On the Confirm Installation Selections page, confirm your selections. 24. Click the Install button. 25. On the Installation Progress page, confirm that your installation of the Web Server (IIS) role and
required role services completed successfully. 26. Click the Close button. 27. To verify that IIS installed successfully, type the following into a Web browser:
http://localhost
28. You should see the default IIS Welcome page.
48 | P a g e
EOP ASSIST 4.0 Installation Manual
Install PHP To download and install PHP, complete the following directions. Download PHP and the WinCache extension.
1. Open your browser to Windows for PHP Download Page and download the PHP non-thread-safe .zip package.
2. Download the WinCache extension from the List of Windows Extensions for PHP.
Install PHP and WinCache.
3. Extract all files in the PHP .zip package to a folder of your choice, for example C:\PHP\ 4. Extract the WinCache .zip package to the PHP extensions folder (\ext), for example C:\PHP\ext.
The WinCache .zip package contains one file (Php_wincache.dll).
Add the PHP installation folder to the Path environment variable.
5. Open Control Panel, click System and Security, click System, and then click Advanced System Settings.
6. In the System Properties window, select the Advanced tab, and then click Environment Variables
7. Under System Variables, select Path, and then click Edit. 8. Add the path to your PHP installation folder to the end of the Variable Value, for example
;C:\PHP. Click OK.
Set up a handler mapping for PHP.
9. Open IIS Manager, select the hostname of your computer in the Connections panel, and then double-click Handler Mappings.
10. In the Action panel, click Add Module Mapping. 11. In Request path, type *.php. 12. From the Module menu, select FastCgiModule. 13. In the Executable box, type the full path to Php-cgi.exe, for example C:\PHP\Php-cgi.exe. 14. In Name, type a name for the module mapping, for example FastCGI. 15. Click OK.
Add default document entries for PHP.
16. Select the hostname of your computer in the Connections panel, and double-click Default Document.
17. In the Action panel, click Add. Type Index.php in the Name box, and then click OK. 18. Click Add again. Type Default.php in the Name box, and then click OK.
49 | P a g e
EOP ASSIST 4.0 Installation Manual
Test your PHP installation.
19. Open a text editor, for example Notepad, as Administrator. 20. In a new file, type the following text: <?php phpinfo(); ?> 21. Save the file as C:\inetpub\wwwroot\Phpinfo.php. 22. Open a browser and enter the following URL: http://localhost/phpinfo.php. A nicely formatted
Web page is displayed showing the current PHP settings.
Add Your PHP Application (in this case, EOP ASSIST 4.0).
23. Extract the EOP application files and paste them in the Web document root, e.g., C:\inetpub\wwwroot\
Install MySQL Server To install MySQL Server on Windows Server 2008 or Windows Server 2008 R2, complete the following directions:
Download MySQL Community Server, which may be found at http://dev.mysql.com/downloads/. It is recommended that you download Windows Installer.
Start Windows Installer, or extract all the files from the archive, and then start Setup.exe. You can use a Typical Setup or customize the installation to suit your needs.
Once the installation wizard is completed, it is recommended that you leave the Configure the MySQL Server Now check box selected.
Run the MySQL Server Instance Configuration Wizard, and then choose the configurations options that most closely match your environment. For more information, see http://dev.mysql.com/doc/refman/5.0/en/mysql-config-wizard.html.
Best practice recommendations are as follows:
1. Click Next in the Instance Configuration Wizard. 2. Select Detailed Configuration, and then click Next. 3. Select a server type that best suits your environment. If installing MySQL on the same server
running IIS be sure not to select Dedicated MySQL Server Machine. 4. Select a database option (Multifunctional Database or Transactional Database), and then click
Next. 5. Choose the option that sets the number of concurrent connections you need. 6. You may adjust networking settings to suit your environment or accept defaults, and then click
Next. 7. Select the default character set that best suits you (UTF-8 is recommended), and then click Next. 8. We recommend enabling both Microsoft Windows options here. Select both check boxes, and
then click Next. 9. Type the password you want to use for the root account, and then click Next.
50 | P a g e

EOP ASSIST 4.0 Installation Manual
10. Click Execute to apply your settings. 11. Click Finish to close the wizard.
Finalize Configuration For PHP to work with MySQL, it is necessary to perform the following modifications to the Php.ini file:
1. Open the c:\php\php.ini file with your favorite text editor. 2. Confirm that the extension_dir points to the folder where all PHP loadable extensions are
located, frequently in the Ext folder (for example, extension_dir=”.\ext”). 3. Uncomment the following lines by removing the semicolon:
extension=php_mysqli.dll extension=php_mbstring.dll extension=php_mcrypt.dll
4. Enable dynamic extension for MySQL by uncommenting the corresponding line for the MySQL extension: extension=php_mysql.dll.
5. Save and close the Php.ini file. 6. Restart the IIS service by clicking the Start button, selecting the Search Field, typing iisreset, and
then clicking the Enter button.
You should then see the mysqli section on the PHP information page created earlier (http://localhost/phpinfo.php). If so, PHP is now configured on IIS. Return to the instructions for installing EOP ASSIST in Chapter 3.
51 | P a g e