Embed Size (px)
Citation preview
EOP ASSIST:
A Software Application For K-12 Schools and School Districts
Installation Manual
Updated September 2015
Table of Contents
Chapter 1: Overview ..........................................................................................................................3
Chapter 2: General Installation Considerations ...................................................................................4
Expertise Requirements of IT Personnel ................................................................................................... 4
Server Requirements ................................................................................................................................ 4
PHP ........................................................................................................................................................ 4Database Systems ................................................................................................................................. 5Web Servers .......................................................................................................................................... 5
Connectivity .............................................................................................................................................. 5
Chapter 3: Installation Instructions .....................................................................................................6
Set Up a Web Server Environment of Choice ........................................................................................... 6
Set Up a Database and Privileged User ..................................................................................................... 6
MySQL – Database ................................................................................................................................ 6MS SQL Server 2005 – 2014 .................................................................................................................. 6
Download EOP ASSIST Files ....................................................................................................................... 6
Configure EOP ASSIST................................................................................................................................ 7
Initialize EOP ASSIST .................................................................................................................................. 7
Chapter 4: Setting Up Schools, Districts, and/or Users ....................................................................... 10
State-Level Hosting ................................................................................................................................. 10
District-Level Hosting .............................................................................................................................. 15
School-Level Hosting ............................................................................................................................... 24
Chapter 5: Client Installation and Access ........................................................................................... 33
Chapter 6: Additional Assistance ...................................................................................................... 33
Appendix A. Configuring PHP and MySQL on Apache ........................................................................ 34
Linux/Unix ............................................................................................................................................... 34
Install Apache ...................................................................................................................................... 34Install MySQL ...................................................................................................................................... 34Install PHP ........................................................................................................................................... 34
Windows ................................................................................................................................................. 34
Mac OS X Yosemite ................................................................................................................................. 35
1 | P a g e
EOP ASSIST Installation Manual
2 | P a g e
EOP ASSIST Installation Manual
Enable Apache..................................................................................................................................... 35Enable PHP for Apache ....................................................................................................................... 35Install MySQL ...................................................................................................................................... 36
Appendix B. Configuring PHP and MySQL on IIS ................................................................................ 37
Install IIS 7 on Windows Server 2008 R2 ................................................................................................. 37
Install and Configure PHP ........................................................................................................................ 37
Configure IIS 7 to Run FastCGI ................................................................................................................ 37
Configure IIS 7 to Run PHP via FastCGI ................................................................................................... 38
Testing PHP ............................................................................................................................................. 40
Install MySQL Server on Windows Server 2008 or Windows Server 2008 R2 ........................................ 40
Appendix C. Configuring PHP and MS SQL Server 2005 – 2014 on IIS .................................................. 41
Install IIS 7 on Windows Server 2008 R2 ................................................................................................. 41
Install and Configure PHP ........................................................................................................................ 41
Configure IIS 7 to Run FastCGI ................................................................................................................ 42
Configure IIS 7 to Run PHP via FastCGI ................................................................................................... 42
Testing PHP ............................................................................................................................................. 44
Install SQL Server Driver for PHP ............................................................................................................ 44
Appendix D. Configuring a PHP Web Application on IIS ..................................................................... 45
Install IIS .................................................................................................................................................. 45
Install PHP ............................................................................................................................................... 46
Install MySQL Server ............................................................................................................................... 47
Finalize Configuration ............................................................................................................................. 48
3 | P a g e
EOP ASSIST Installation Manual
Chapter 1: Overview
EOP ASSIST is a web-accessible software application that requires installation by Information Technology (IT) personnel onto a local server at a state agency, school district, or an individual school, as applicable. It is important for IT personnel responsible for installing EOP ASSIST to ensure that the connection between the server and clients is secure. EOP ASSIST is compatible with Secure Sockets Layer (SSL) security protocols.
Individual users will not need to install EOP ASSIST onto their computers separately, as they will be able to access it through a Web browser, which is described in more detail later in this Installation Manual.
This guide covers preparing for installation, running the installation script, and the steps that should be
done after the installation script has completed.
EOP ASSIST is a Web application and therefore requires the services of an http Web server that supports PHP, a server side scripting language, and a back-end database server, MySQL or MS SQL Server 2005-2014.
This documentation focuses on getting EOP ASSIST up and running on a Web server environment of your choice; it is not an exhaustive or definitive guide to setting up and configuring Web server environments. It does, however, include basic information on installing and configuring some supported environments.
Before proceeding with your installation, you should review the minimum requirements section and
supported Web server environments. EOP ASSIST will run on most personal computers but standard
server hardware is recommended for production.
Please review the entire Installation Manual before beginning the installation of EOP ASSIST.
4 | P a g e
EOP ASSIST Installation Manual
Chapter 2: General Installation Considerations
Expertise Requirements of IT Personnel IT personnel assigned to install the software are required to have an intermediate level of expertise or knowledge related to networking, Web server and database system configuration. Specifically, the application should be installed at a state agency, school district, or individual school, as applicable, by a skilled network administrator or system administrator who has experience in server configuration. To ensure connectivity between schools and districts, the network or system administrator of the server network needs to configure the firewall to make the server only available to applicable schools.
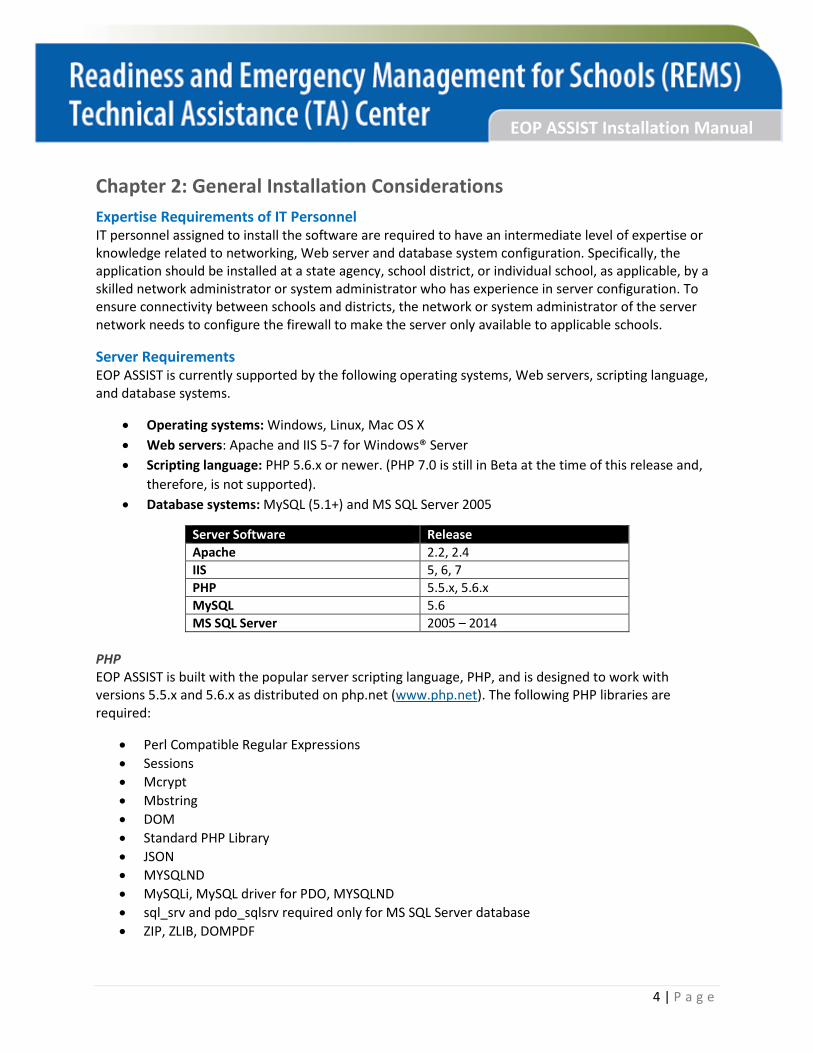
Server Requirements EOP ASSIST is currently supported by the following operating systems, Web servers, scripting language, and database systems.
Operating systems: Windows, Linux, Mac OS X
Web servers: Apache and IIS 5-7 for Windows® Server
Scripting language: PHP 5.6.x or newer. (PHP 7.0 is still in Beta at the time of this release and,
therefore, is not supported).
Database systems: MySQL (5.1+) and MS SQL Server 2005
Server Software Release
Apache 2.2, 2.4
IIS 5, 6, 7
PHP 5.5.x, 5.6.x
MySQL 5.6
MS SQL Server 2005 – 2014
PHP EOP ASSIST is built with the popular server scripting language, PHP, and is designed to work with versions 5.5.x and 5.6.x as distributed on php.net (www.php.net). The following PHP libraries are required:
Perl Compatible Regular Expressions
Sessions
Mcrypt
Mbstring
DOM
Standard PHP Library
JSON
MYSQLND
MySQLi, MySQL driver for PDO, MYSQLND
sql_srv and pdo_sqlsrv required only for MS SQL Server database
ZIP, ZLIB, DOMPDF
5 | P a g e
EOP ASSIST Installation Manual
LIBXML, XMLRPC, XML
GD extension for graphics
Note: Most of the default-enabled modules that come with PHP are recommended.
Database Systems MySQL is the database software required for EOP ASSIST. It should be set up with the following
environmental variables:
Server charset: UTF-8 Unicode (utf8)
Database collation: utf8_general_ci
Preferred storage engine: InnoDB
Microsoft SQL Server 2005 – 2014 is another type of database software that may be used for the installation of EOP ASSIST. It does not need to be set up with any environmental variables other than those already defaulted with the software.
Web Servers EOP ASSIST is compatible for installation on any Linux, OS X, or Windows Server that can host PHP Websites. IT personnel can install the server software (Apache/MySQL/PHP) independently or download a preconfigured Accessibility Management Platform (AMP) environment.
Apache (Recommended)
EOP ASSIST will work on Apache 2.x hosted on UNIX/Linux, OS X, or Windows.
Microsoft IIS
EOP ASSIST will work with IIS 5, IIS 6, or IIS 7 if PHP is configured correctly.
On IIS 7 EOP ASSIST requires Windows 2008 Server SP2 or later for FastCGI support.
Connectivity Network connectivity between district servers and schools is required for the application to be used by individual schools. To ensure privacy and cybersecurity, a secure connection between district servers and schools is also required. The application uses standard Transmission Control Protocol/Internet Protocol (TCP/IP) port (443) to connect between browser and server. Port 443, therefore, need to be enabled on the district firewall and school firewall for this application to operate.
6 | P a g e
EOP ASSIST Installation Manual
Chapter 3: Installation Instructions
Set Up a Web Server Environment of Choice EOP ASSIST supports three Web server environments:
1. Apache 2.x with PHP and MySQL database (recommended). For basic configuration
information, see Appendix A.
2. Microsoft IIS 5, IIS 6 or IIS 7 with PHP and MySQL database. For basic set up information,
see Appendix B.
3. Microsoft IIS 5, IIS 6 or IIS 7 with PHP and MS SQL Server 2005 – 2014 database. For basic
set up information, see Appendix B.
Set Up a Database and Privileged User After configuring your Web server and PHP to work with a database system using MySQL or MS SQL Server, you will need to create a database.
1. Create a new database named eopassist. 2. Create a user account for the application and grant it all privileges to the eopassist database
that you just created.
MySQL – Database For a MySQL back-end database, there are several free database management tools that you may use for database administration, such as
phpMyAdmin (https://www.phpmyadmin.net/), a free web application tool to assist with
MySQL database administration.
MySQL Workbench (https://www.mysql.com/products/workbench/), a powerful unified visual
tool that provides an interface for easily administering MySQL environments.
MySQL command shell, the built-in MySQL command line tool that comes with MySQL and can
be used to do anything administrative.
Webmin MySQL module, a Web application like phpMyAdmin but less powerful.
MS SQL Server 2005 – 2014 For a MS SQL Server back-end database, you may utilize the SQL Server Management Studio.
Download EOP ASSIST Files After registering for EOP ASSIST at http://rems.ed.gov/EOPASSIST.aspx, you will receive an email with a link and instructions for downloading the application files in a compressed (zipped) folder. Download and unzip the installation package. The installation package will include the following files and folders:
EOP ASSIST User Manual;
EOP ASSIST Installation Manual; and
Application files in a directory called EOP_ASSIST_PKG.
7 | P a g e
EOP ASSIST Installation Manual
Configure EOP ASSIST Copy all the files in the EOP_ASSIST_PKG folder to the root Web directory. This could be htdocs for Apache, wwwroot for IIS, or any virtual directory, depending on your Web server setup.
On Linux and OS X operating systems, make sure the Apache user has read/write access to the main application directory.
Grant read/write access to the apache or IIS service user on the following file and folder:
application/config/settings.php
uploads/
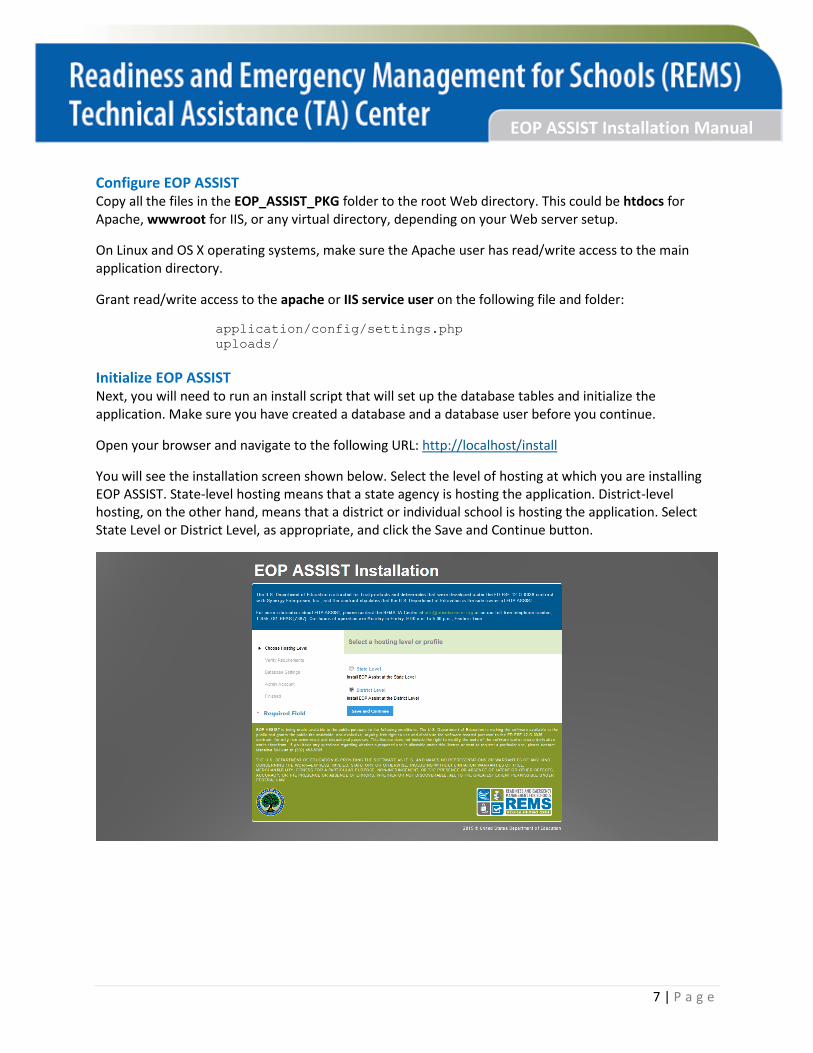
Initialize EOP ASSIST Next, you will need to run an install script that will set up the database tables and initialize the application. Make sure you have created a database and a database user before you continue.
Open your browser and navigate to the following URL: http://localhost/install
You will see the installation screen shown below. Select the level of hosting at which you are installing EOP ASSIST. State-level hosting means that a state agency is hosting the application. District-level hosting, on the other hand, means that a district or individual school is hosting the application. Select State Level or District Level, as appropriate, and click the Save and Continue button.
8 | P a g e
EOP ASSIST Installation Manual
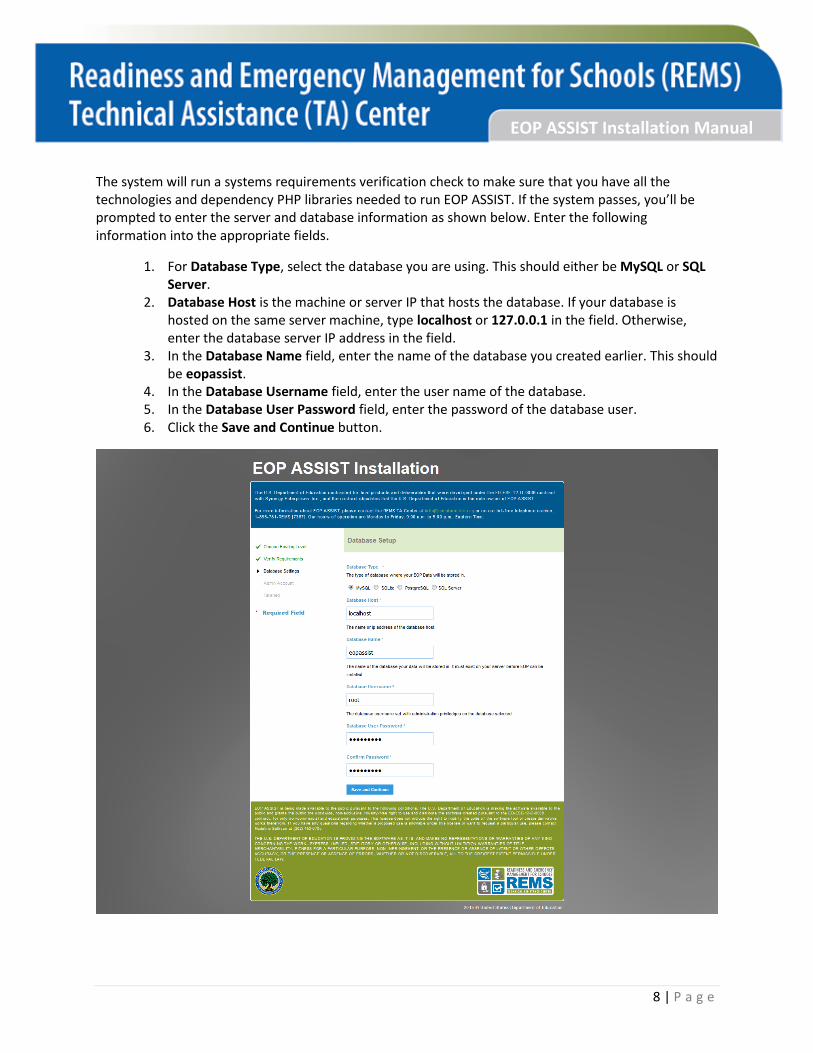
The system will run a systems requirements verification check to make sure that you have all the technologies and dependency PHP libraries needed to run EOP ASSIST. If the system passes, you’ll be prompted to enter the server and database information as shown below. Enter the following information into the appropriate fields.
1. For Database Type, select the database you are using. This should either be MySQL or SQL Server.
2. Database Host is the machine or server IP that hosts the database. If your database is hosted on the same server machine, type localhost or 127.0.0.1 in the field. Otherwise, enter the database server IP address in the field.
3. In the Database Name field, enter the name of the database you created earlier. This should be eopassist.
4. In the Database Username field, enter the user name of the database. 5. In the Database User Password field, enter the password of the database user. 6. Click the Save and Continue button.
9 | P a g e
EOP ASSIST Installation Manual
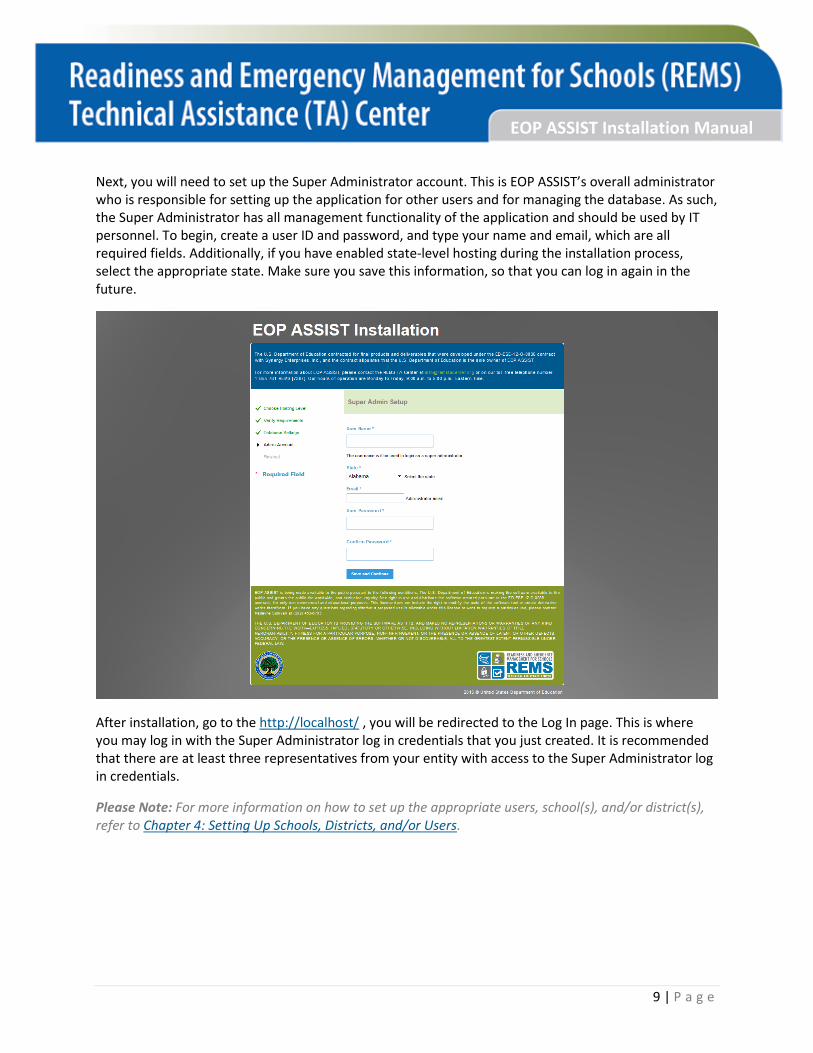
Next, you will need to set up the Super Administrator account. This is EOP ASSIST’s overall administrator who is responsible for setting up the application for other users and for managing the database. As such, the Super Administrator has all management functionality of the application and should be used by IT personnel. To begin, create a user ID and password, and type your name and email, which are all required fields. Additionally, if you have enabled state-level hosting during the installation process, select the appropriate state. Make sure you save this information, so that you can log in again in the future.
After installation, go to the http://localhost/ , you will be redirected to the Log In page. This is where you may log in with the Super Administrator log in credentials that you just created. It is recommended that there are at least three representatives from your entity with access to the Super Administrator log in credentials.
Please Note: For more information on how to set up the appropriate users, school(s), and/or district(s), refer to Chapter 4: Setting Up Schools, Districts, and/or Users.
10 | P a g e
EOP ASSIST Installation Manual
Chapter 4: Setting Up Schools, Districts, and/or Users
At this point, you have downloaded EOP ASSIST and installed the app on your state, district, or school server. It is important to recognize whether your organization is hosting EOP ASSIST at the state or local level. State-level hosting means that a state agency is hosting the application, and districts and schools throughout your state may log in to develop and revise their school EOPs, which are stored on the state agency’s server. District-level hosting, on the other hand, means that a district is hosting the application, and only users from the district (in a district office or in schools throughout the district) may log in to develop, revise, and view their school EOPs, which are stored on the district’s server. Likewise, school-level hosting implies that an individual school is hosting the application, and only users from the school may log in to develop, revise, and view their school EOP, which is stored on the school’s server. To begin setting up the appropriate entities within EOP ASSIST for your level of hosting so that users may develop a high-quality school EOP, please review the following subsections.
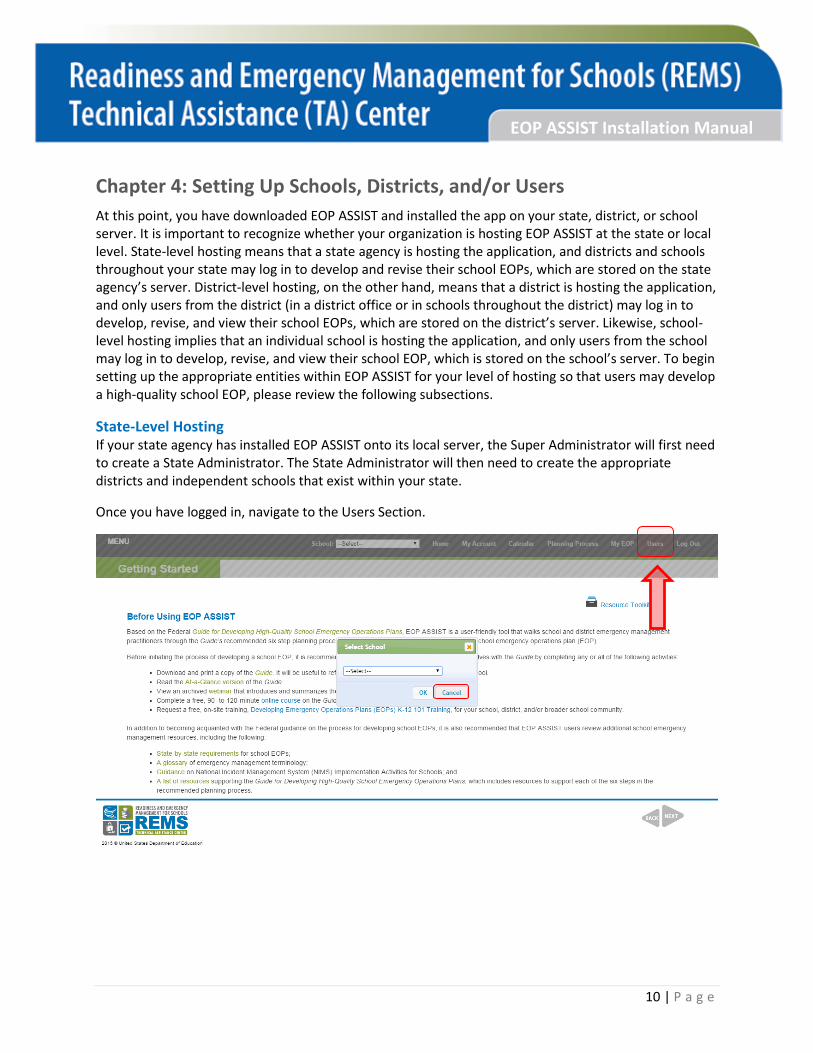
State-Level Hosting If your state agency has installed EOP ASSIST onto its local server, the Super Administrator will first need to create a State Administrator. The State Administrator will then need to create the appropriate districts and independent schools that exist within your state.
Once you have logged in, navigate to the Users Section.

11 | P a g e
EOP ASSIST Installation Manual
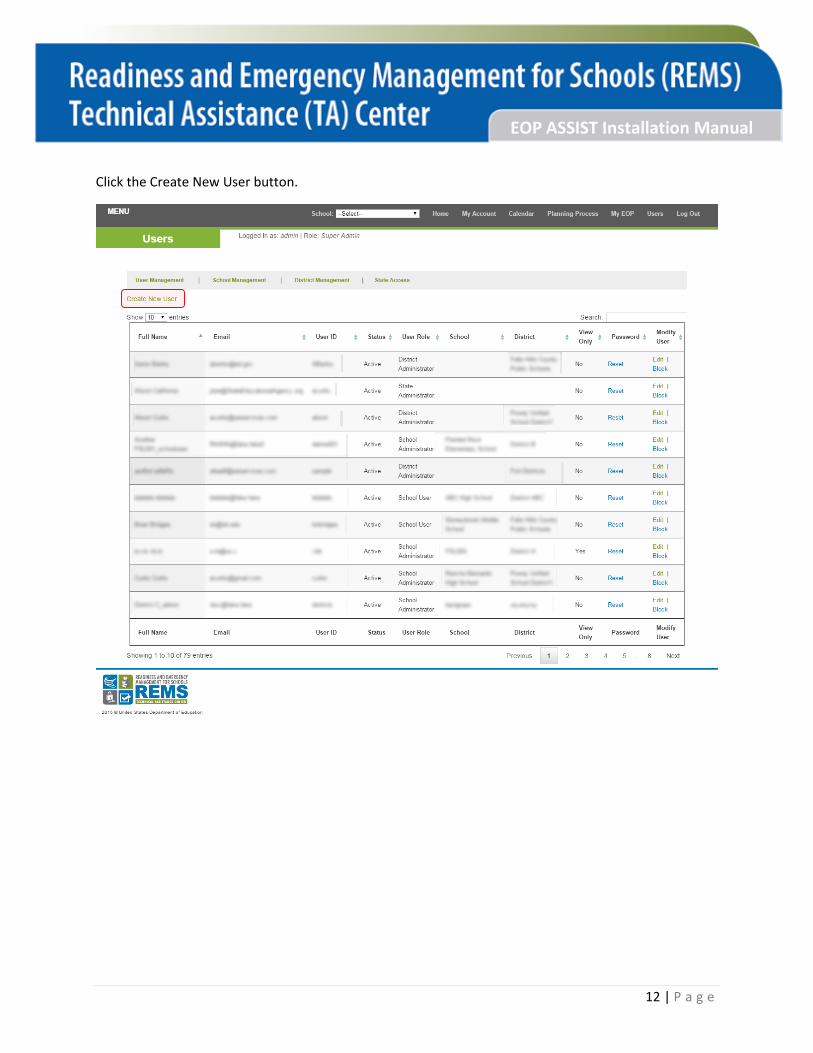
Select the User Management tab.
12 | P a g e
EOP ASSIST Installation Manual
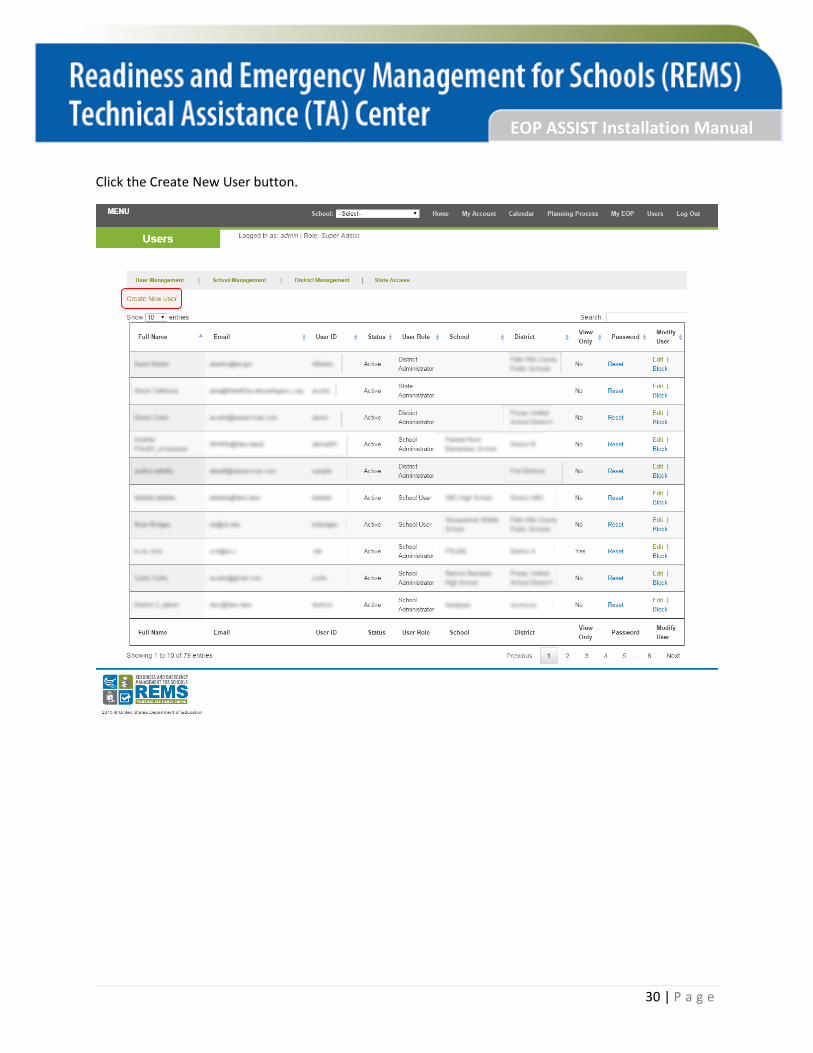
Click the Create New User button.
13 | P a g e
EOP ASSIST Installation Manual
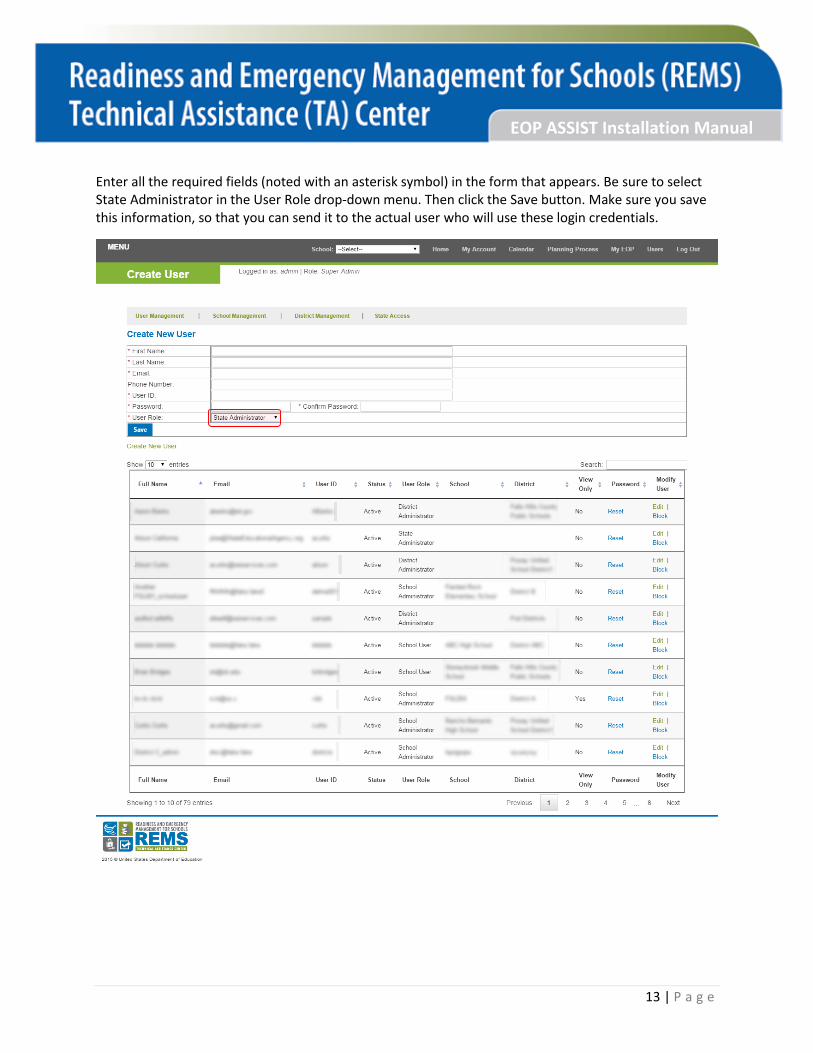
Enter all the required fields (noted with an asterisk symbol) in the form that appears. Be sure to select State Administrator in the User Role drop-down menu. Then click the Save button. Make sure you save this information, so that you can send it to the actual user who will use these login credentials.
14 | P a g e
EOP ASSIST Installation Manual
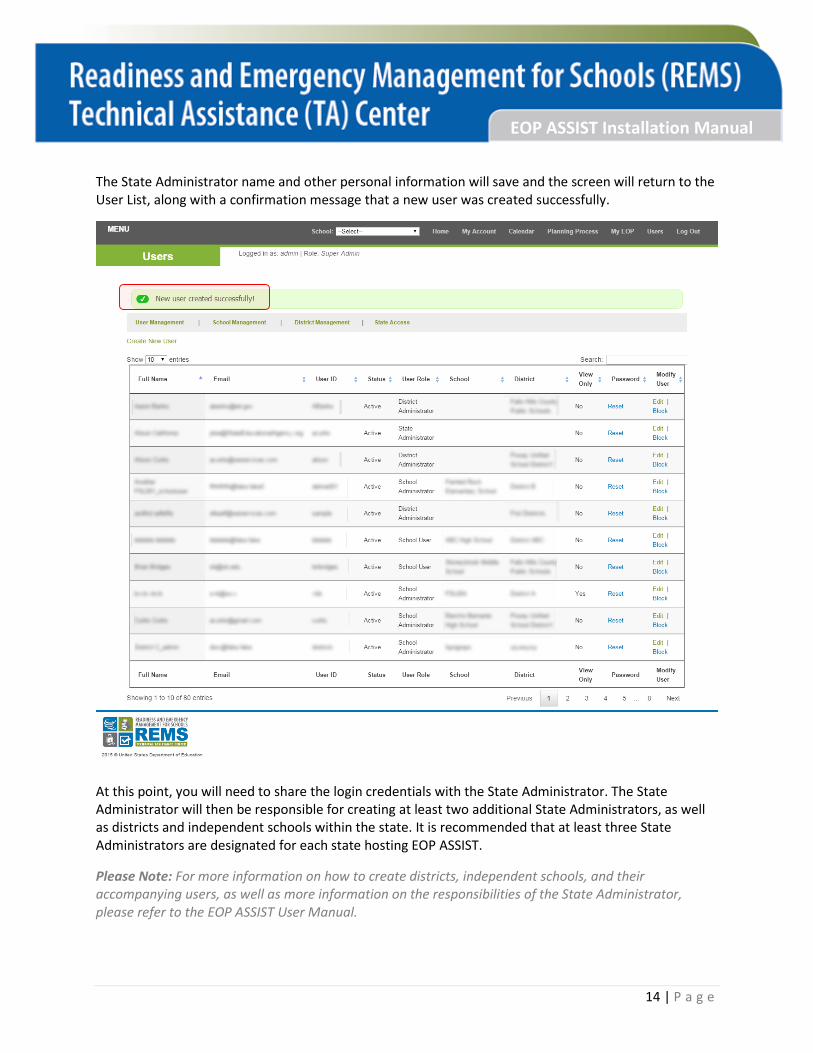
The State Administrator name and other personal information will save and the screen will return to the User List, along with a confirmation message that a new user was created successfully.
At this point, you will need to share the login credentials with the State Administrator. The State Administrator will then be responsible for creating at least two additional State Administrators, as well as districts and independent schools within the state. It is recommended that at least three State Administrators are designated for each state hosting EOP ASSIST.
Please Note: For more information on how to create districts, independent schools, and their accompanying users, as well as more information on the responsibilities of the State Administrator, please refer to the EOP ASSIST User Manual.

15 | P a g e
EOP ASSIST Installation Manual
District-Level Hosting If your district has installed EOP ASSIST onto your local server, the Super Administrator will need to first create the district, and then create at least one District Administrator associated with that district. The District Administrator will then need to add schools and School Administrators for the district.
Once you have logged in, navigate to the Users Section.
16 | P a g e
EOP ASSIST Installation Manual
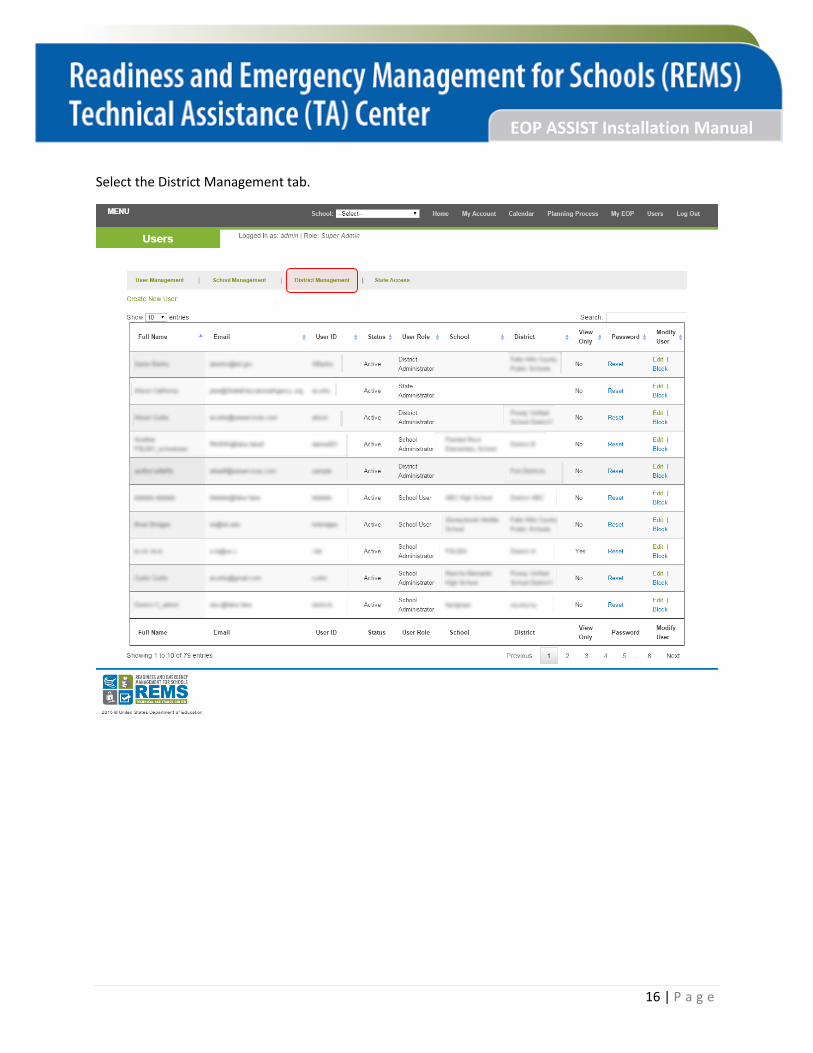
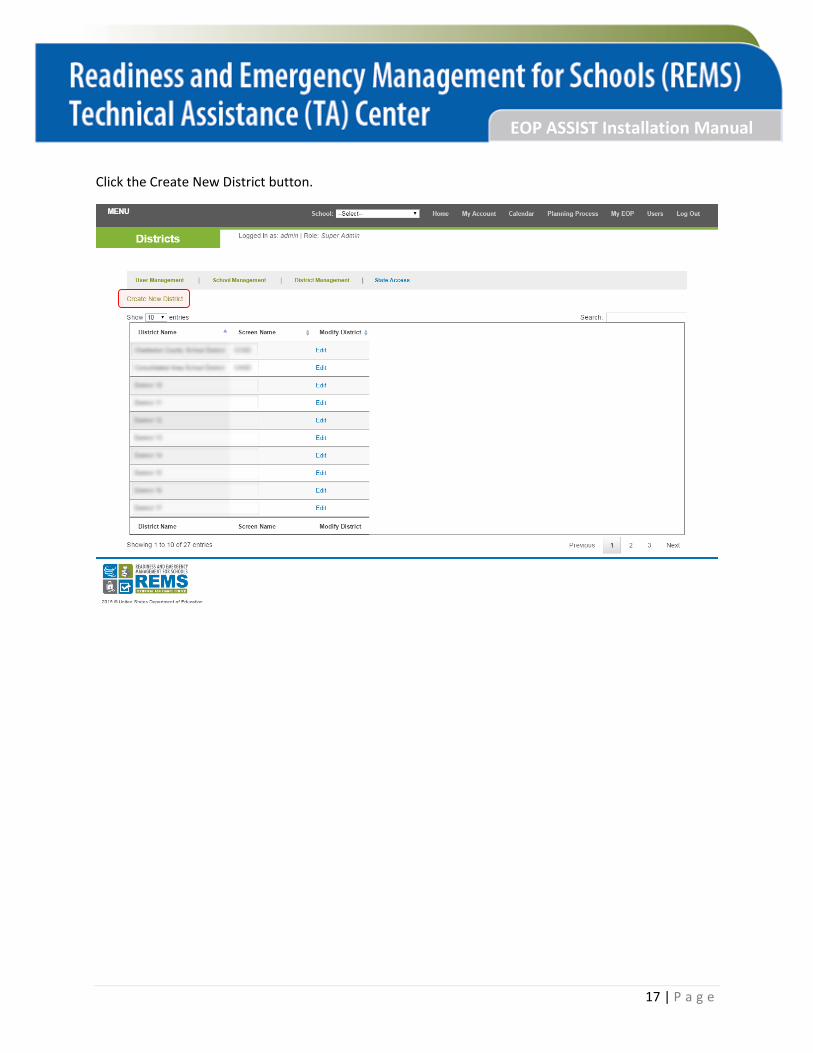
Select the District Management tab.
17 | P a g e
EOP ASSIST Installation Manual
Click the Create New District button.
18 | P a g e
EOP ASSIST Installation Manual
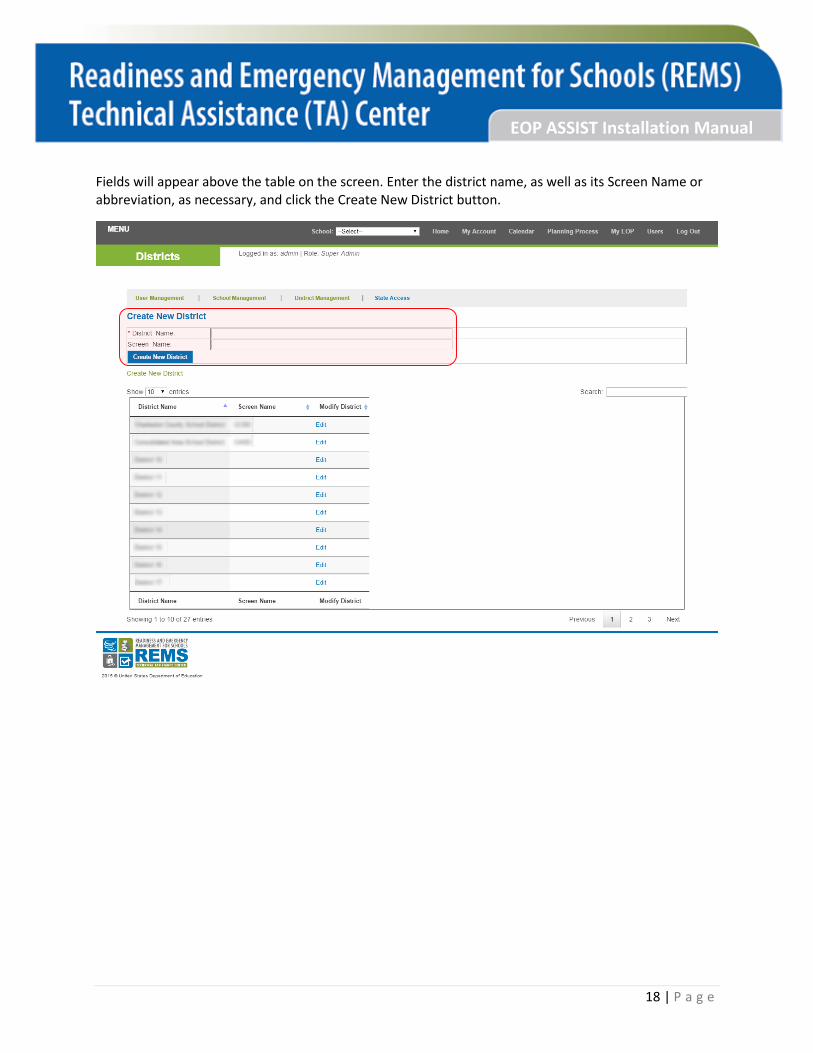
Fields will appear above the table on the screen. Enter the district name, as well as its Screen Name or abbreviation, as necessary, and click the Create New District button.
19 | P a g e
EOP ASSIST Installation Manual
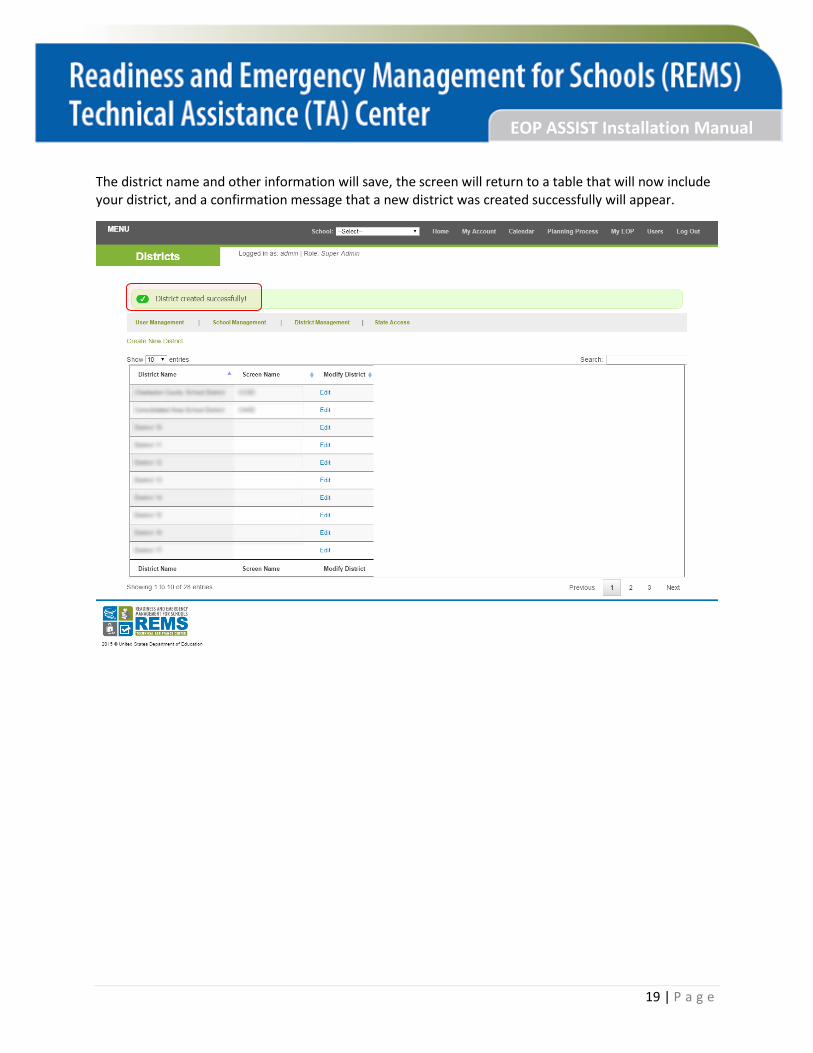
The district name and other information will save, the screen will return to a table that will now include your district, and a confirmation message that a new district was created successfully will appear.
20 | P a g e
EOP ASSIST Installation Manual
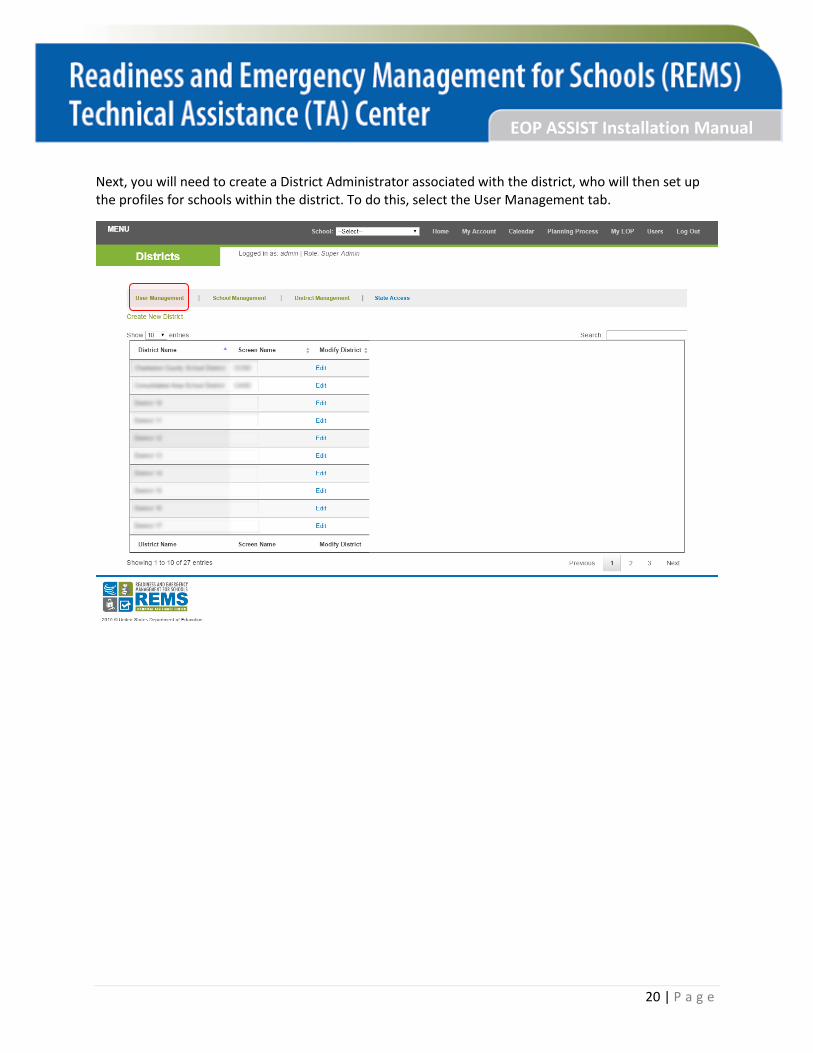
Next, you will need to create a District Administrator associated with the district, who will then set up the profiles for schools within the district. To do this, select the User Management tab.

21 | P a g e
EOP ASSIST Installation Manual
Click the Create New User button.
22 | P a g e
EOP ASSIST Installation Manual
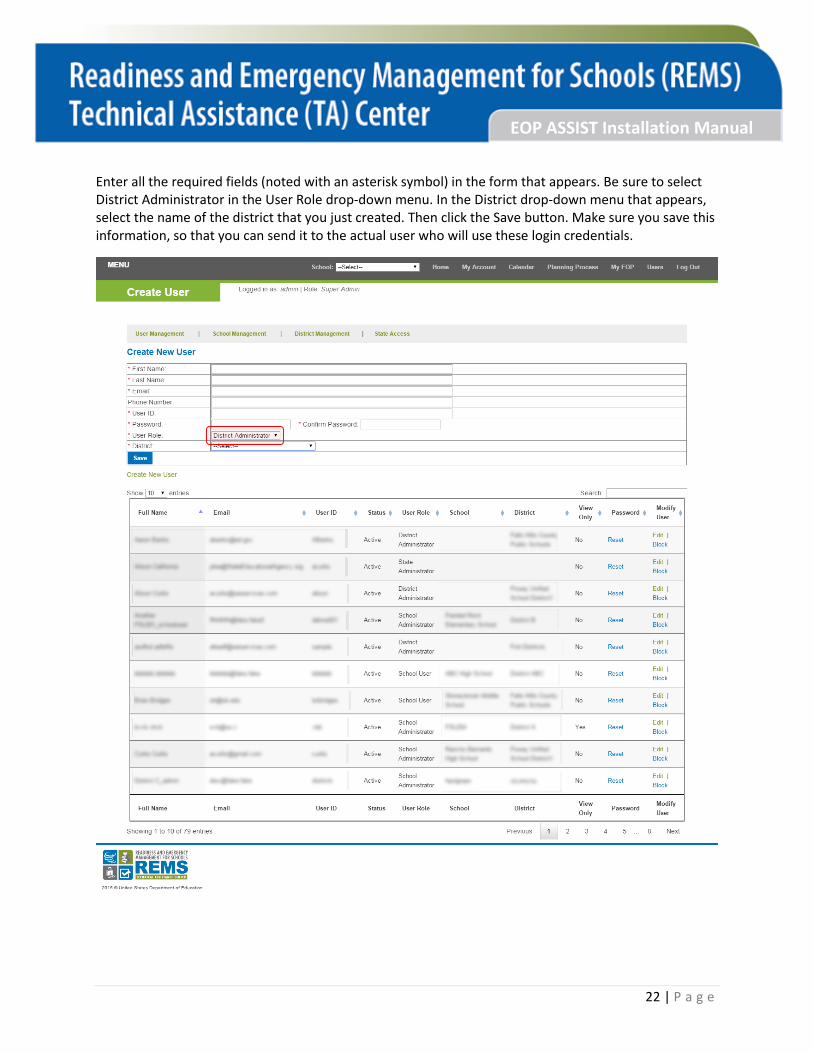
Enter all the required fields (noted with an asterisk symbol) in the form that appears. Be sure to select District Administrator in the User Role drop-down menu. In the District drop-down menu that appears, select the name of the district that you just created. Then click the Save button. Make sure you save this information, so that you can send it to the actual user who will use these login credentials.
23 | P a g e
EOP ASSIST Installation Manual
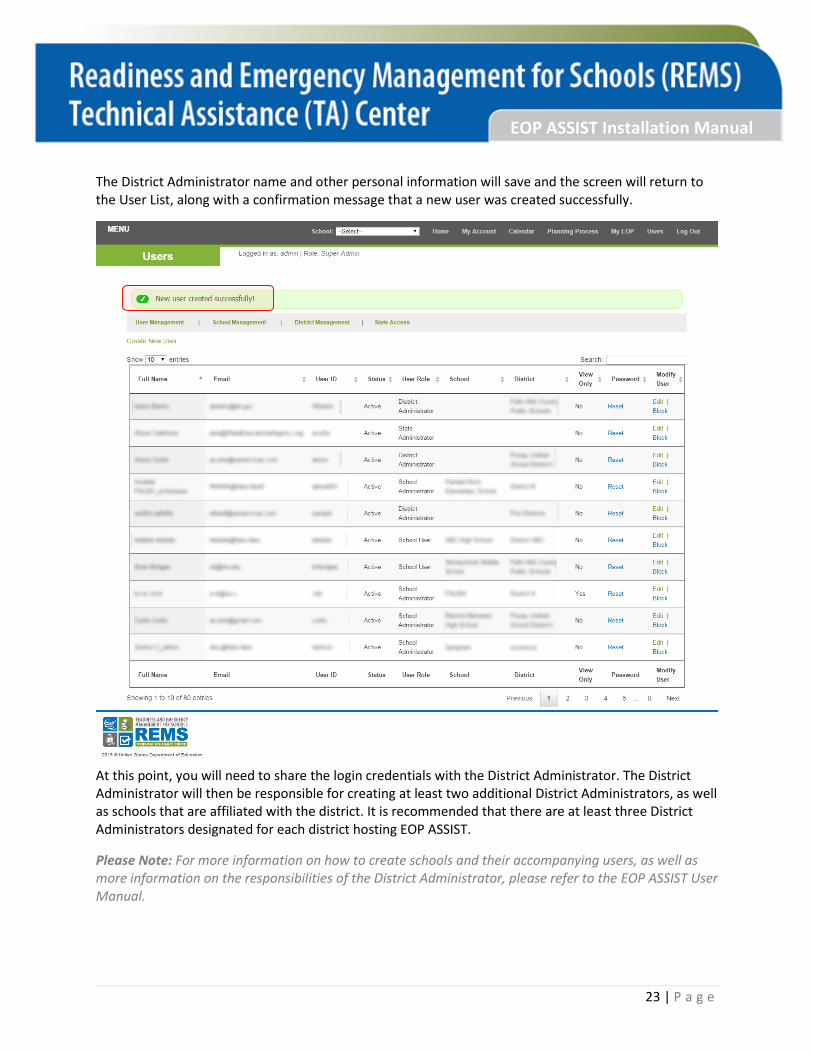
The District Administrator name and other personal information will save and the screen will return to the User List, along with a confirmation message that a new user was created successfully.
At this point, you will need to share the login credentials with the District Administrator. The District Administrator will then be responsible for creating at least two additional District Administrators, as well as schools that are affiliated with the district. It is recommended that there are at least three District Administrators designated for each district hosting EOP ASSIST.
Please Note: For more information on how to create schools and their accompanying users, as well as more information on the responsibilities of the District Administrator, please refer to the EOP ASSIST User Manual.
24 | P a g e
EOP ASSIST Installation Manual
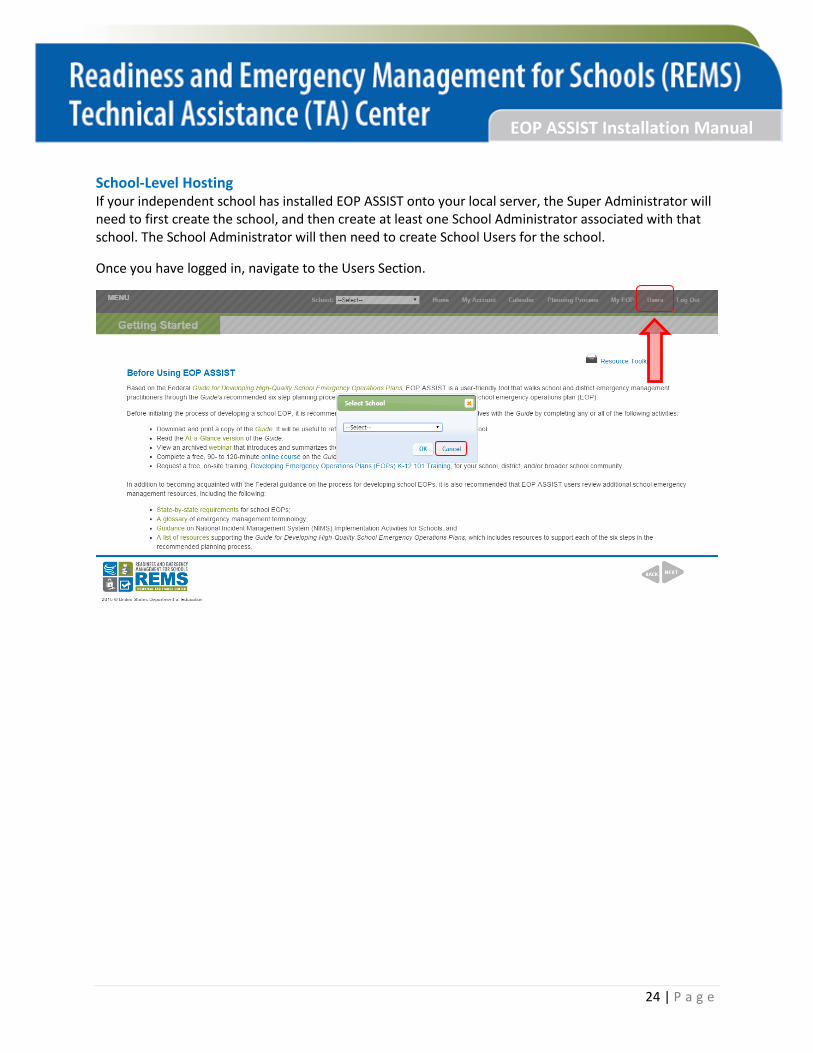
School-Level Hosting If your independent school has installed EOP ASSIST onto your local server, the Super Administrator will need to first create the school, and then create at least one School Administrator associated with that school. The School Administrator will then need to create School Users for the school.
Once you have logged in, navigate to the Users Section.
25 | P a g e
EOP ASSIST Installation Manual
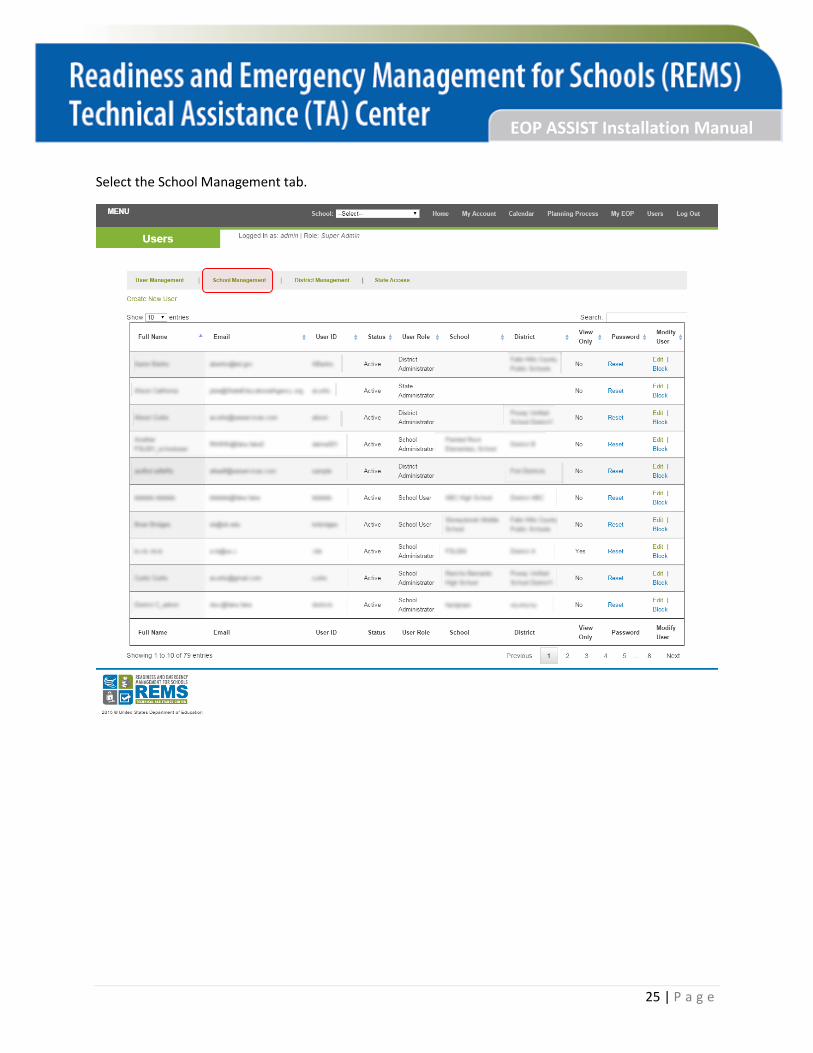
Select the School Management tab.
26 | P a g e
EOP ASSIST Installation Manual
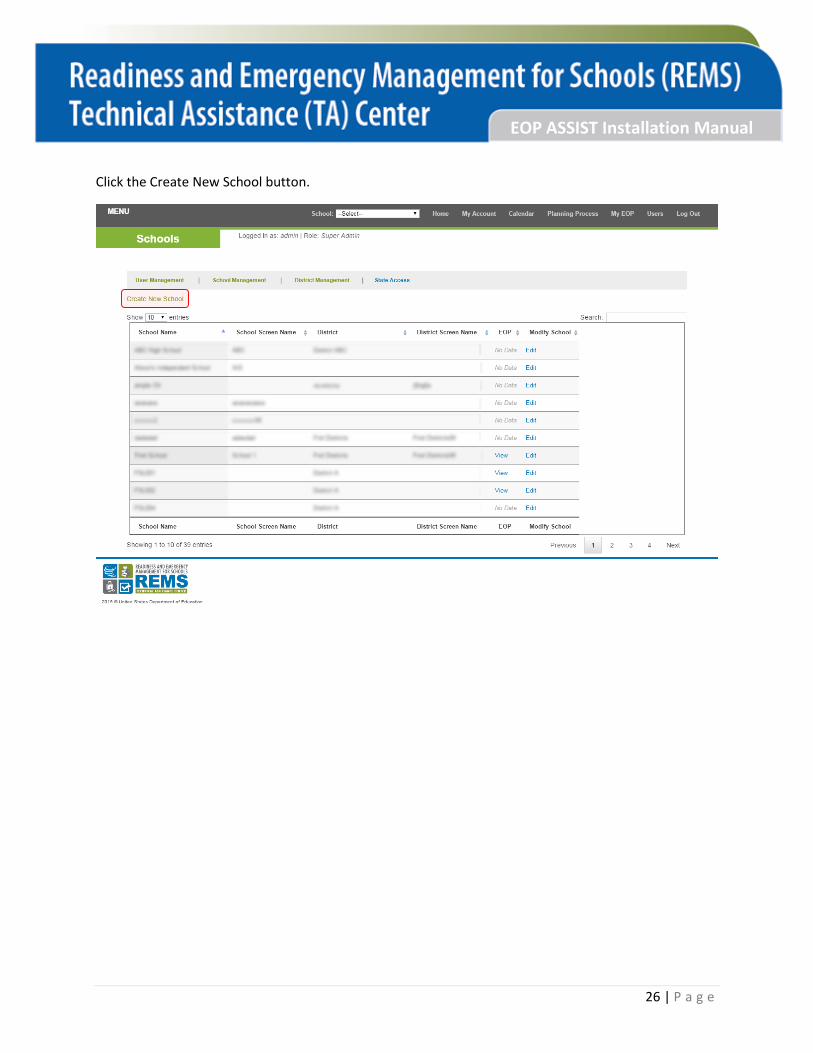
Click the Create New School button.
27 | P a g e
EOP ASSIST Installation Manual
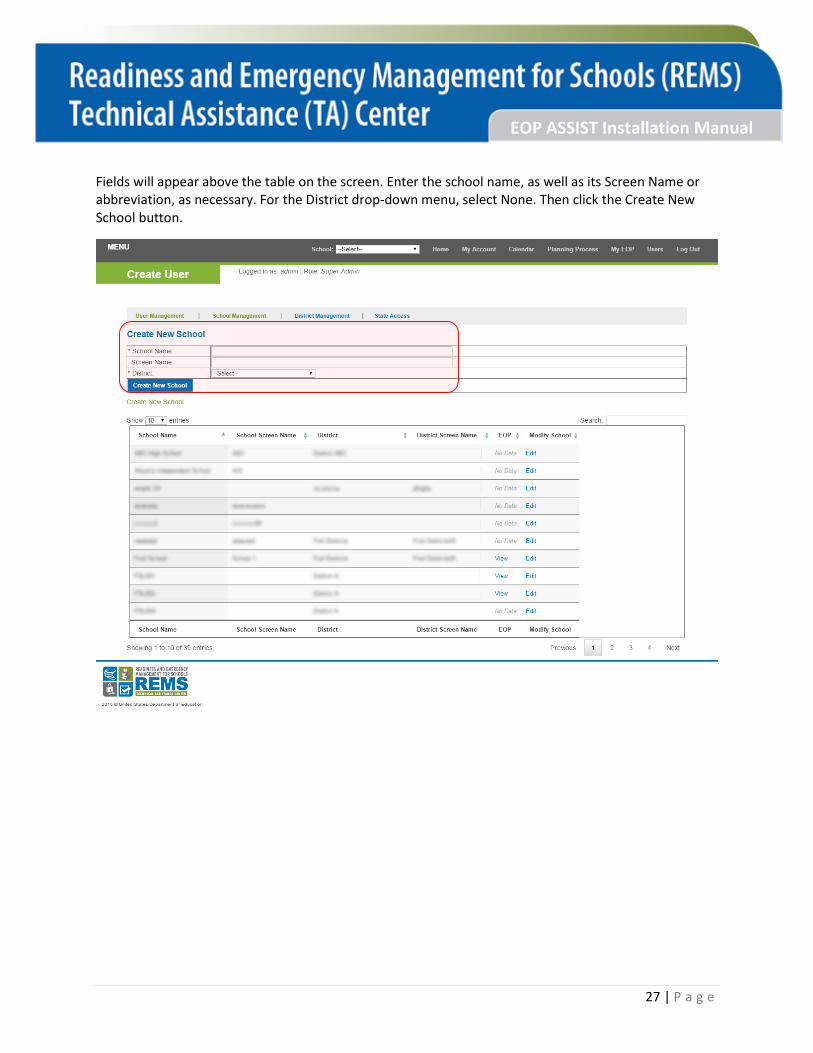
Fields will appear above the table on the screen. Enter the school name, as well as its Screen Name or abbreviation, as necessary. For the District drop-down menu, select None. Then click the Create New School button.
28 | P a g e
EOP ASSIST Installation Manual
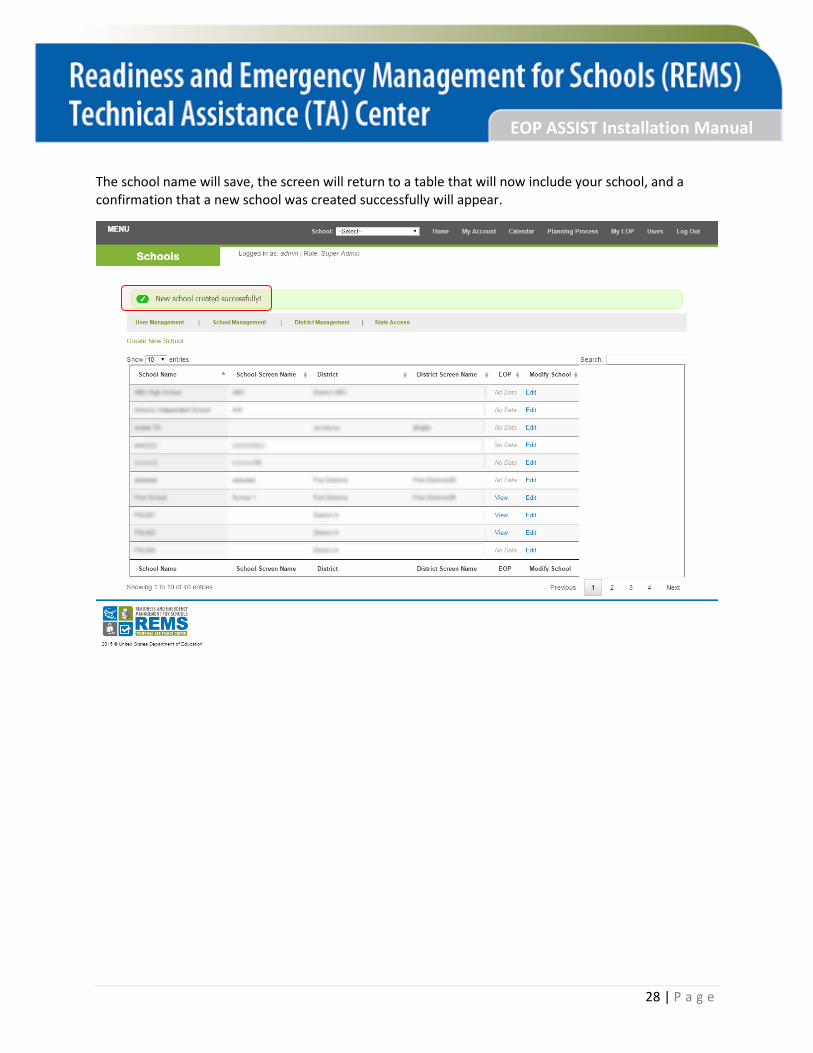
The school name will save, the screen will return to a table that will now include your school, and a confirmation that a new school was created successfully will appear.
29 | P a g e
EOP ASSIST Installation Manual
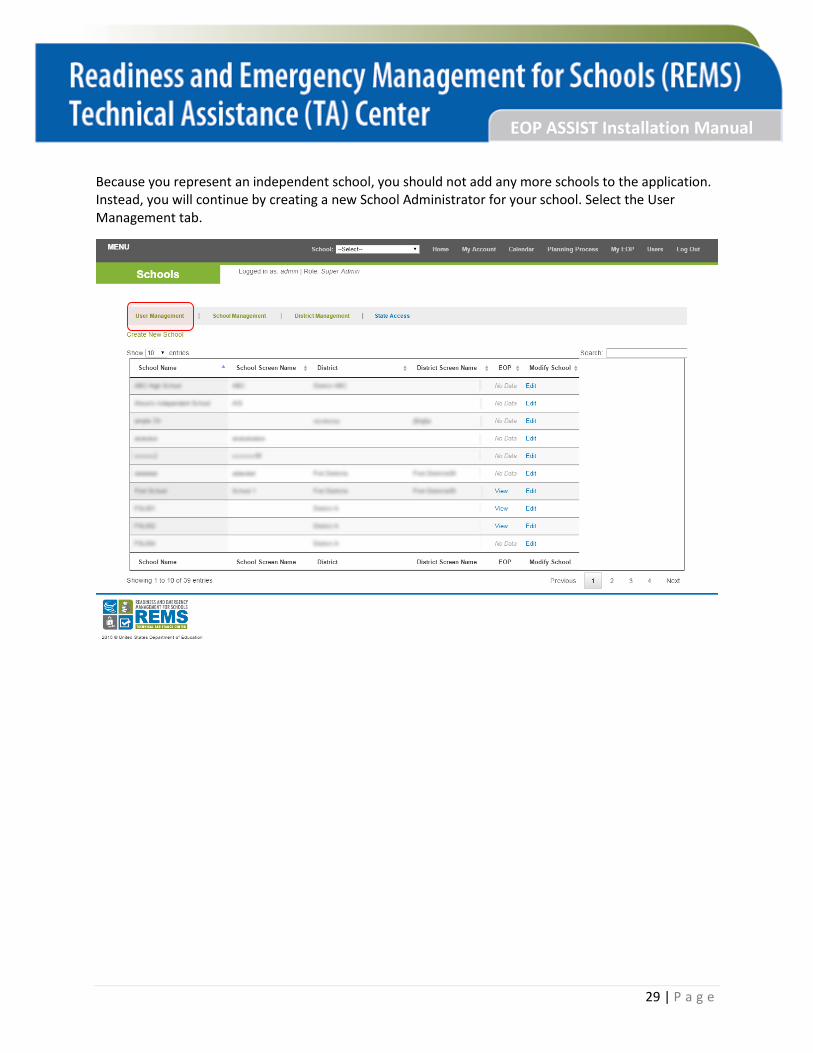
Because you represent an independent school, you should not add any more schools to the application. Instead, you will continue by creating a new School Administrator for your school. Select the User Management tab.
30 | P a g e
EOP ASSIST Installation Manual
Click the Create New User button.
31 | P a g e
EOP ASSIST Installation Manual
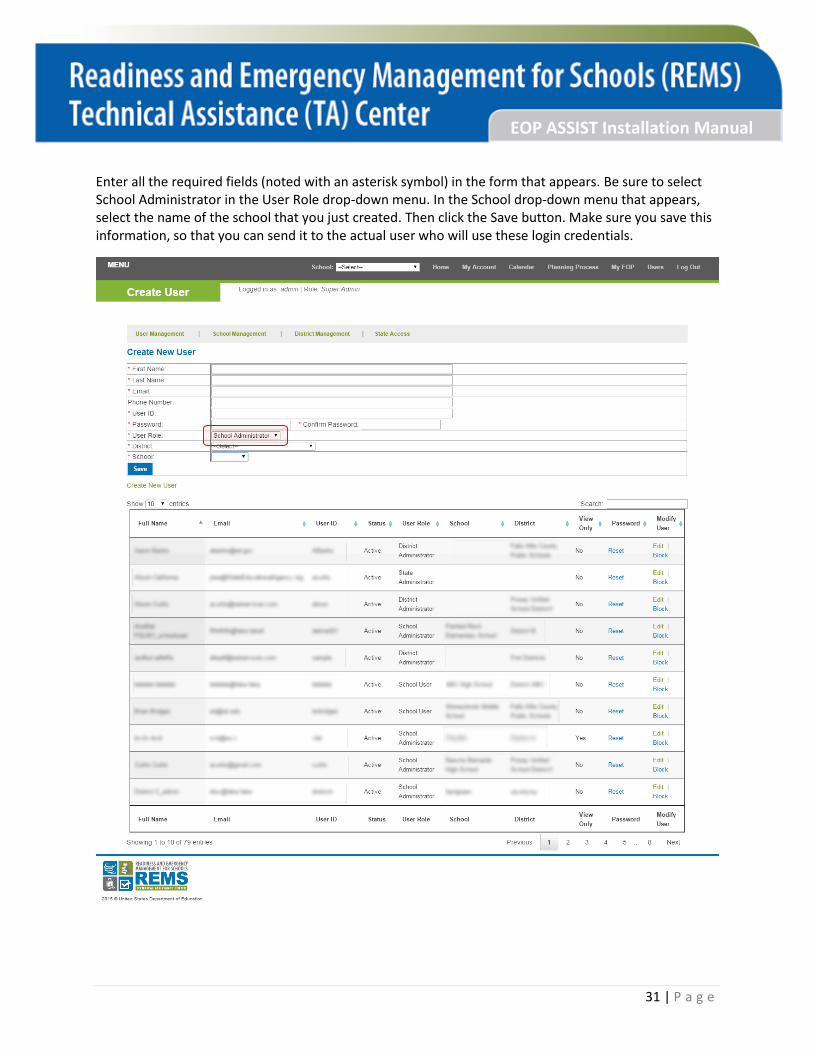
Enter all the required fields (noted with an asterisk symbol) in the form that appears. Be sure to select School Administrator in the User Role drop-down menu. In the School drop-down menu that appears, select the name of the school that you just created. Then click the Save button. Make sure you save this information, so that you can send it to the actual user who will use these login credentials.

32 | P a g e
EOP ASSIST Installation Manual
The School Administrator name and other personal information will save and the screen will return to the User List, along with a confirmation message that a new user was created successfully.
At this point, you will need to share the login credentials with the School Administrator. The School Administrator will then be responsible for creating at least two additional School Administrators, as well as School Users affiliated with the school. It is recommended that there are at least three School Administrators designated for each school hosting EOP ASSIST.
Please Note: For more information on how to create a school and its accompanying users, as well as more information on the responsibilities of the School Administrator, please refer to the EOP ASSIST User Manual.
33 | P a g e
EOP ASSIST Installation Manual
Chapter 5: Client Installation and Access
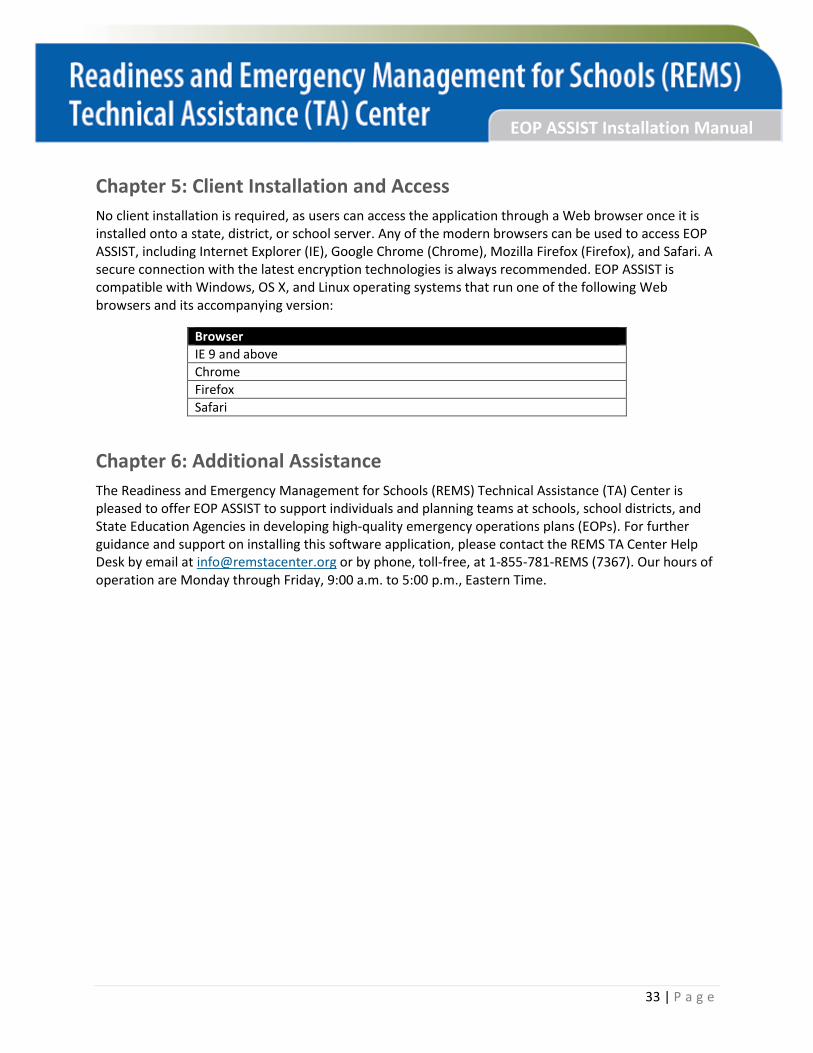
No client installation is required, as users can access the application through a Web browser once it is installed onto a state, district, or school server. Any of the modern browsers can be used to access EOP ASSIST, including Internet Explorer (IE), Google Chrome (Chrome), Mozilla Firefox (Firefox), and Safari. A secure connection with the latest encryption technologies is always recommended. EOP ASSIST is compatible with Windows, OS X, and Linux operating systems that run one of the following Web browsers and its accompanying version:
Browser
IE 9 and above
Chrome
Firefox
Safari
Chapter 6: Additional Assistance
The Readiness and Emergency Management for Schools (REMS) Technical Assistance (TA) Center is pleased to offer EOP ASSIST to support individuals and planning teams at schools, school districts, and State Education Agencies in developing high-quality emergency operations plans (EOPs). For further guidance and support on installing this software application, please contact the REMS TA Center Help Desk by email at [email protected] or by phone, toll-free, at 1-855-781-REMS (7367). Our hours of operation are Monday through Friday, 9:00 a.m. to 5:00 p.m., Eastern Time.
34 | P a g e
EOP ASSIST Installation Manual
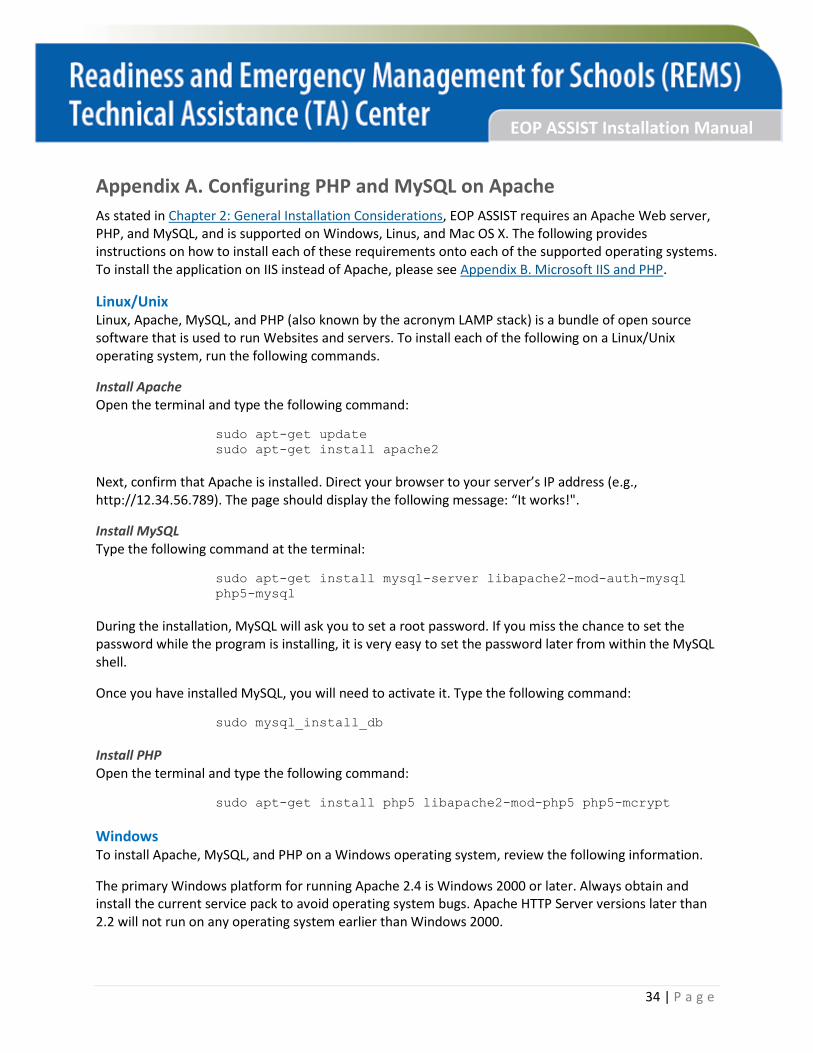
Appendix A. Configuring PHP and MySQL on Apache
As stated in Chapter 2: General Installation Considerations, EOP ASSIST requires an Apache Web server, PHP, and MySQL, and is supported on Windows, Linus, and Mac OS X. The following provides instructions on how to install each of these requirements onto each of the supported operating systems. To install the application on IIS instead of Apache, please see Appendix B. Microsoft IIS and PHP.
Linux/Unix Linux, Apache, MySQL, and PHP (also known by the acronym LAMP stack) is a bundle of open source software that is used to run Websites and servers. To install each of the following on a Linux/Unix operating system, run the following commands.
Install Apache Open the terminal and type the following command:
sudo apt-get update
sudo apt-get install apache2
Next, confirm that Apache is installed. Direct your browser to your server’s IP address (e.g., http://12.34.56.789). The page should display the following message: “It works!".
Install MySQL Type the following command at the terminal:
sudo apt-get install mysql-server libapache2-mod-auth-mysql
php5-mysql
During the installation, MySQL will ask you to set a root password. If you miss the chance to set the password while the program is installing, it is very easy to set the password later from within the MySQL shell.
Once you have installed MySQL, you will need to activate it. Type the following command:
sudo mysql_install_db
Install PHP Open the terminal and type the following command:
sudo apt-get install php5 libapache2-mod-php5 php5-mcrypt
Windows To install Apache, MySQL, and PHP on a Windows operating system, review the following information.
The primary Windows platform for running Apache 2.4 is Windows 2000 or later. Always obtain and install the current service pack to avoid operating system bugs. Apache HTTP Server versions later than 2.2 will not run on any operating system earlier than Windows 2000.
35 | P a g e
EOP ASSIST Installation Manual
The Apache HTTP Server Project itself does not provide binary releases of software, only source code. Individual committers may provide binary packages as a convenience, but it is not a release deliverable.
The popular and recommended options for deploying the Apache server and, optionally, PHP and MySQL on Microsoft Windows include:
ApacheHaus Apache Lounge BitNami WAMP Stack WampServer XAMPP
BitNami WAMP Stack, WampServer and XAMPP are bundled with PHP and MySQL, both of which are necessary for EOP ASSIST to work. They additionally provide installers with built-in wizards and guides that will help you configure a Web server environment suitable for EOP ASSIST without having to configure each manually. If you decide to use any of these, stop here and head to their respective installation documentation.
To manually install and configure Apache on a Windows operating system, refer to the documentation that Apache has provided: http://httpd.apache.org/docs/current/platform/windows.html#down
Mac OS X Yosemite Apache and PHP are already packaged with OS X. To create a local Web server, enable both Apache and PHP, and then install MySQL. You may also choose to use third-party Web software bundles such as XAMPP and MAMP that simplify and automate the whole process. Read more about installing each Web software bundle in third-party documentation.
XAMPP: https://www.apachefriends.org/index.html
MAMP: https://www.mamp.info/en/
Enable Apache Open the terminal app and run:
sudo apachectl start
Verify “It works!” by accessing http://localhost
Enable PHP for Apache You’ll then need to change your working directory to the apache2 directory and enable the php5 module. To do so, run the following commands.
Change the working directory to the apache2 directory by typing the following command:
cd /etc/apache2/
36 | P a g e
EOP ASSIST Installation Manual
Edit the Apache configuration by typing the following command:
vi httpd.conf
Uncomment the following lines (remove #):
LoadModule php5_module libexec/apache2/libphp5.so
LoadModule deflate_module libexec/apache2/mod_deflate.so
LoadModule expires_module libexec/apache2/mod_expires.so
LoadModule rewrite_module libexec/apache2/mod_rewrite.so
You will the need to restart Apache. Type the following command:
sudo apachectl restart
The default DocumentRoot for Mac OS X Yosemite is /Library/WebServer/Documents. You can verify this from your Apache configuration by typing the following command:
grep DocumentRoot httpd.conf
Install MySQL You will need to download the MySQL DMG for Mac OS X. To do so, you may follow the directions provided by a third party: http://dev.mysql.com/downloads/mysql/
Install MySQL.
37 | P a g e
EOP ASSIST Installation Manual
Appendix B. Configuring PHP and MySQL on IIS
Install IIS 7 on Windows Server 2008 R2 By default, IIS 7 is not installed on Windows Server® 2008 R2. You can install IIS 7.5 IIS by using the Add Roles wizard in Server Manager or by using the command line.
1. Click Start, point to Administrative Tools and then click Server Manager.
2. In Roles Summary, click Add Roles.
3. Use the Add Roles Wizard to add the Web server role.
Read more about configuration and using the command line here: https://technet.microsoft.com/en-us/library/Cc771209.aspx
Install and Configure PHP In order for windows to run PHP code, the PHP binary files need to be copied to your system. No installation is required but some configuration is needed to have it run properly.
1. Download PHP 5.6.x from http://windows.php.net/download#php-5.6. For IIS7, the non thread
safe binaries should be used.
2. Extract the files here: C:/php
3. Copy the php.ini-production file from C:/php/ to the windows directory and rename it to
php.ini so that you have C:/Windows/php.ini open the php.ini file. Uncomment the following
lines:
a. Uncomment and set the key, cgi.force_redirect = 0
b. Uncomment the key, fastcgi.impersonate = 1
c. Uncomment and set the key, extension_dir to the ‘ext’ folder in the path PHP was
extracted to (i.e. ‘C:PHPext’).
d. Set the key, date.timezone to the time zone of your server (the URL on the line above
this key lists the accepted values).
Please Note: For more detailed information on installing and configuring PHP, reference Appendix D. Configuring a PHP Web Application on IIS.
Configure IIS 7 to Run FastCGI To enable FastCGI, go to Server Manager > Roles > Web Server and make sure that the CGI option is installed under the Application Development section. If it is not, enable this feature and update your IIS 7 installation.
38 | P a g e
EOP ASSIST Installation Manual
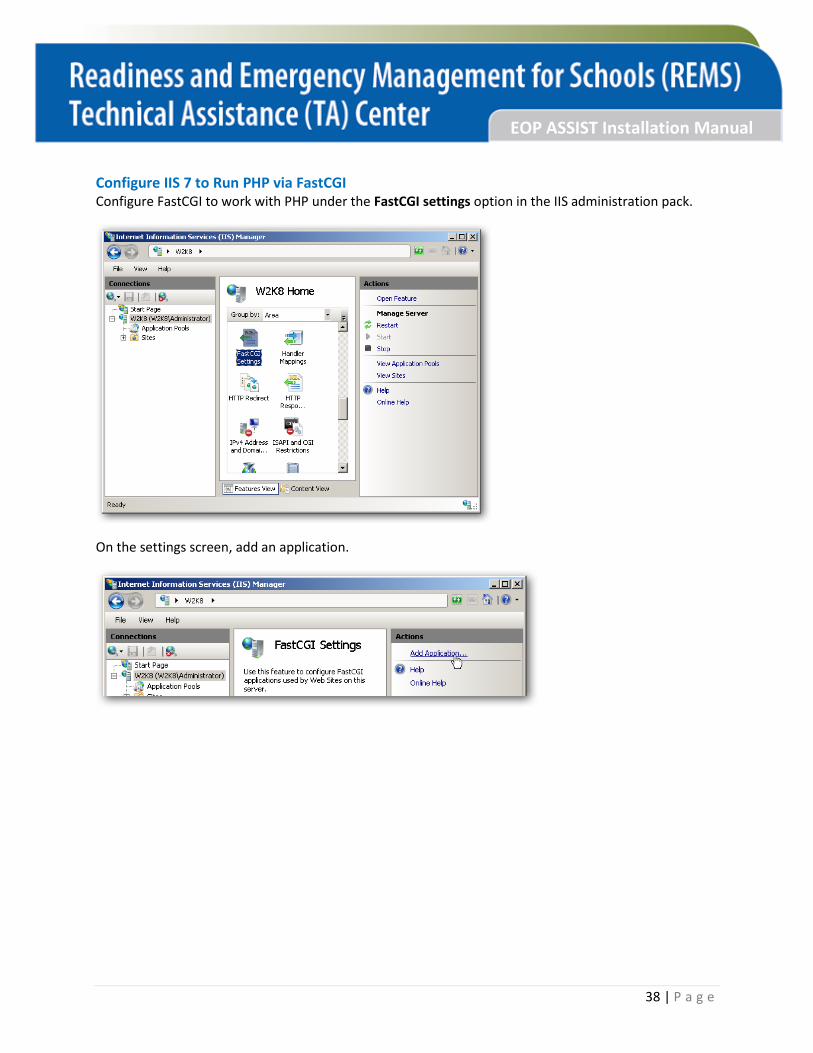
Configure IIS 7 to Run PHP via FastCGI Configure FastCGI to work with PHP under the FastCGI settings option in the IIS administration pack.
On the settings screen, add an application.
39 | P a g e
EOP ASSIST Installation Manual
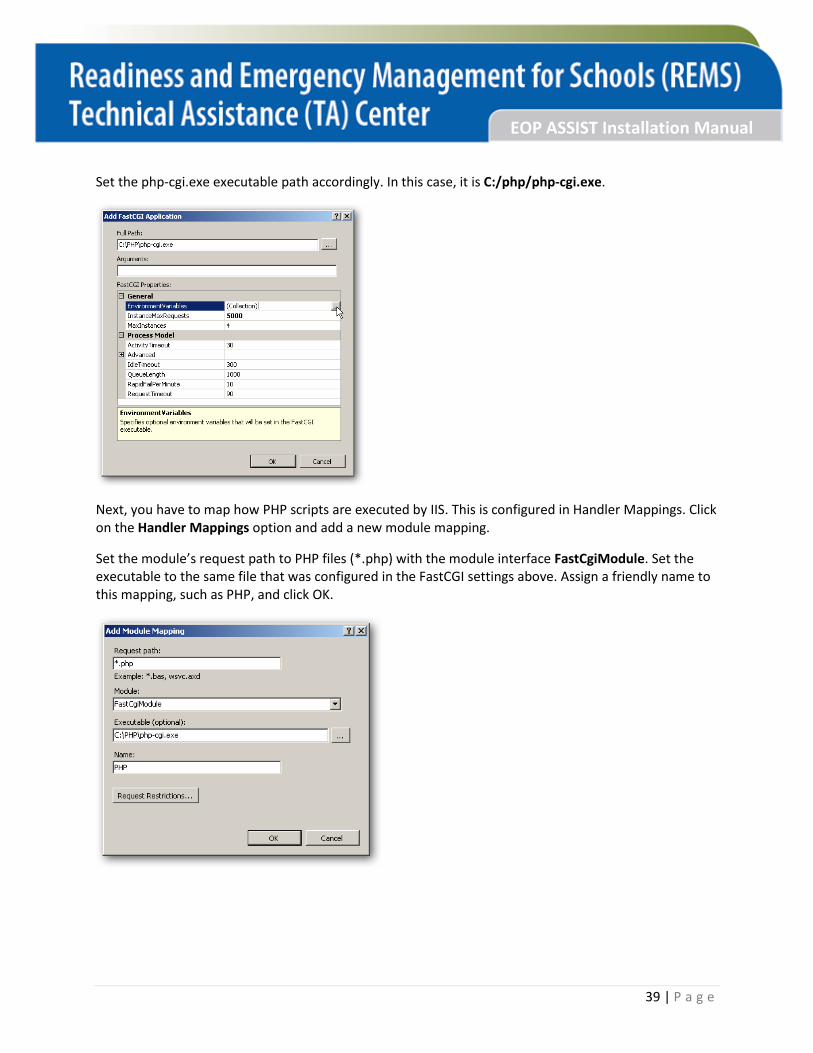
Set the php-cgi.exe executable path accordingly. In this case, it is C:/php/php-cgi.exe.
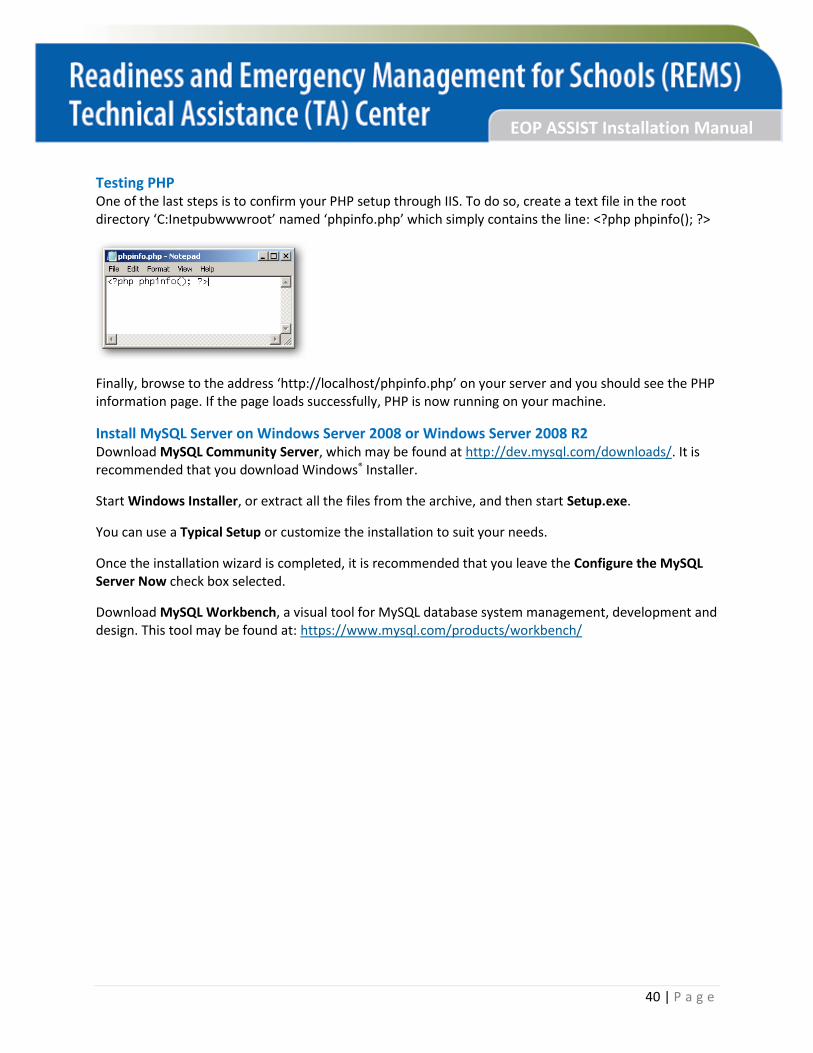
Next, you have to map how PHP scripts are executed by IIS. This is configured in Handler Mappings. Click on the Handler Mappings option and add a new module mapping.
Set the module’s request path to PHP files (*.php) with the module interface FastCgiModule. Set the executable to the same file that was configured in the FastCGI settings above. Assign a friendly name to this mapping, such as PHP, and click OK.
40 | P a g e
EOP ASSIST Installation Manual
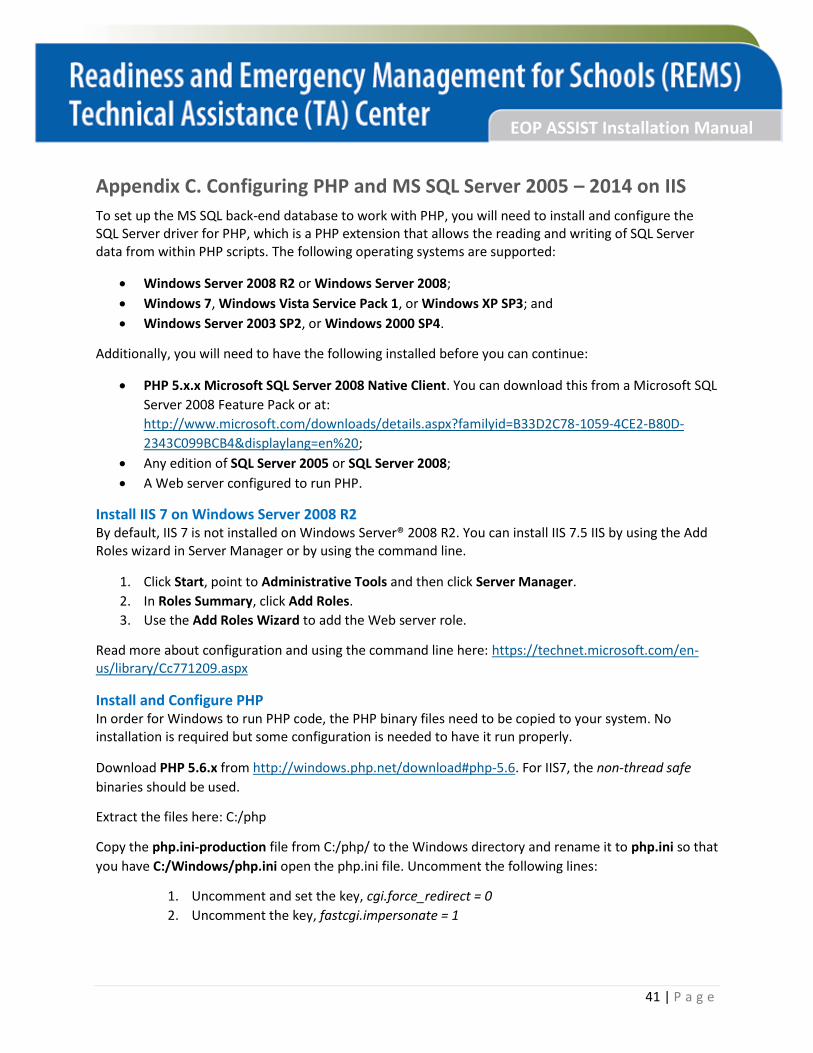
Testing PHP One of the last steps is to confirm your PHP setup through IIS. To do so, create a text file in the root directory ‘C:Inetpubwwwroot’ named ‘phpinfo.php’ which simply contains the line: <?php phpinfo(); ?>
Finally, browse to the address ‘http://localhost/phpinfo.php’ on your server and you should see the PHP information page. If the page loads successfully, PHP is now running on your machine.
Install MySQL Server on Windows Server 2008 or Windows Server 2008 R2 Download MySQL Community Server, which may be found at http://dev.mysql.com/downloads/. It is recommended that you download Windows® Installer.
Start Windows Installer, or extract all the files from the archive, and then start Setup.exe.
You can use a Typical Setup or customize the installation to suit your needs.
Once the installation wizard is completed, it is recommended that you leave the Configure the MySQL Server Now check box selected.
Download MySQL Workbench, a visual tool for MySQL database system management, development and design. This tool may be found at: https://www.mysql.com/products/workbench/
41 | P a g e
EOP ASSIST Installation Manual
Appendix C. Configuring PHP and MS SQL Server 2005 – 2014 on IIS
To set up the MS SQL back-end database to work with PHP, you will need to install and configure the SQL Server driver for PHP, which is a PHP extension that allows the reading and writing of SQL Server data from within PHP scripts. The following operating systems are supported:
Windows Server 2008 R2 or Windows Server 2008;
Windows 7, Windows Vista Service Pack 1, or Windows XP SP3; and
Windows Server 2003 SP2, or Windows 2000 SP4.
Additionally, you will need to have the following installed before you can continue:
PHP 5.x.x Microsoft SQL Server 2008 Native Client. You can download this from a Microsoft SQL
Server 2008 Feature Pack or at:
http://www.microsoft.com/downloads/details.aspx?familyid=B33D2C78-1059-4CE2-B80D-
2343C099BCB4&displaylang=en%20;
Any edition of SQL Server 2005 or SQL Server 2008;
A Web server configured to run PHP.
Install IIS 7 on Windows Server 2008 R2 By default, IIS 7 is not installed on Windows Server® 2008 R2. You can install IIS 7.5 IIS by using the Add Roles wizard in Server Manager or by using the command line.
1. Click Start, point to Administrative Tools and then click Server Manager.
2. In Roles Summary, click Add Roles.
3. Use the Add Roles Wizard to add the Web server role.
Read more about configuration and using the command line here: https://technet.microsoft.com/en-us/library/Cc771209.aspx
Install and Configure PHP In order for Windows to run PHP code, the PHP binary files need to be copied to your system. No installation is required but some configuration is needed to have it run properly.
Download PHP 5.6.x from http://windows.php.net/download#php-5.6. For IIS7, the non-thread safe
binaries should be used.
Extract the files here: C:/php
Copy the php.ini-production file from C:/php/ to the Windows directory and rename it to php.ini so that
you have C:/Windows/php.ini open the php.ini file. Uncomment the following lines:
1. Uncomment and set the key, cgi.force_redirect = 0
2. Uncomment the key, fastcgi.impersonate = 1
42 | P a g e
EOP ASSIST Installation Manual
3. Uncomment and set the key, extension_dir to the ‘ext’ folder in the path PHP was
extracted to (i.e. ‘C:PHPext’)
4. Set the key, date.timezone to the time zone of your server (the URL on the line above
this key lists the accepted values)
Please Note: For more detailed information on installing and configuring PHP, reference Appendix D. Configuring a PHP Web Application on IIS.
Configure IIS 7 to Run FastCGI To enable FastCGI, go to Server Manager > Roles > Web Server and make sure that the CGI option is installed under the Application Development section. If it is not, enable this feature and update your IIS 7 installation.
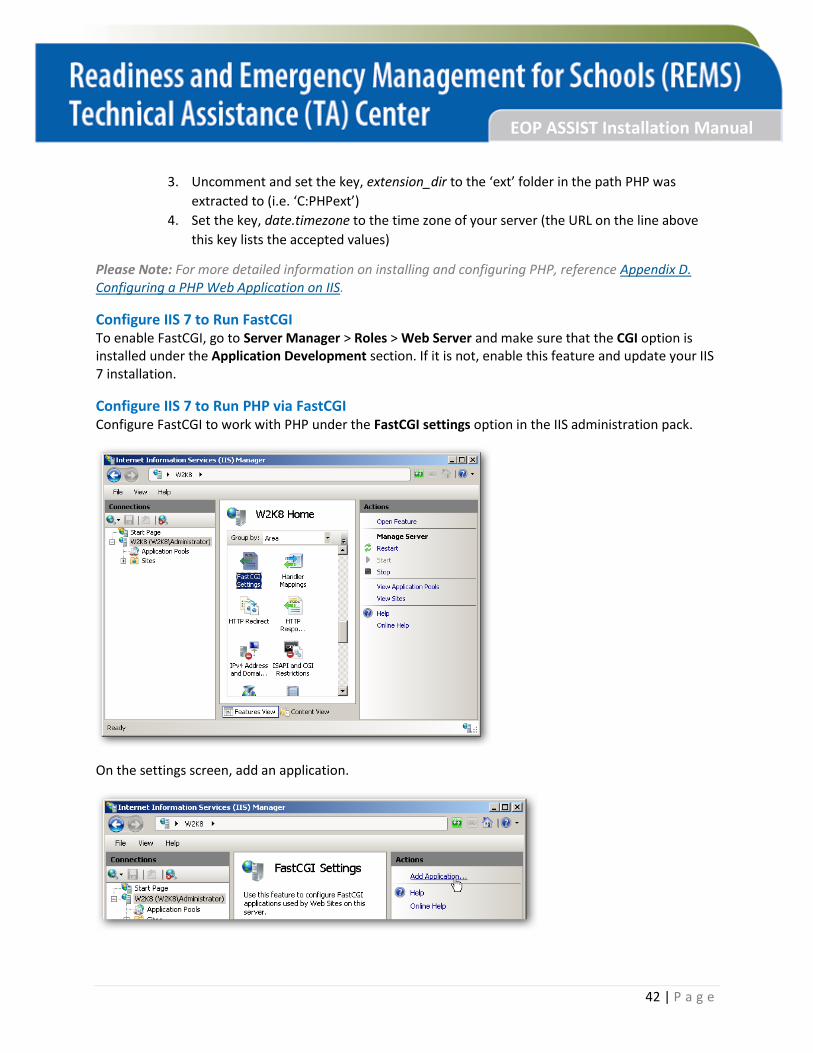
Configure IIS 7 to Run PHP via FastCGI Configure FastCGI to work with PHP under the FastCGI settings option in the IIS administration pack.
On the settings screen, add an application.
43 | P a g e
EOP ASSIST Installation Manual
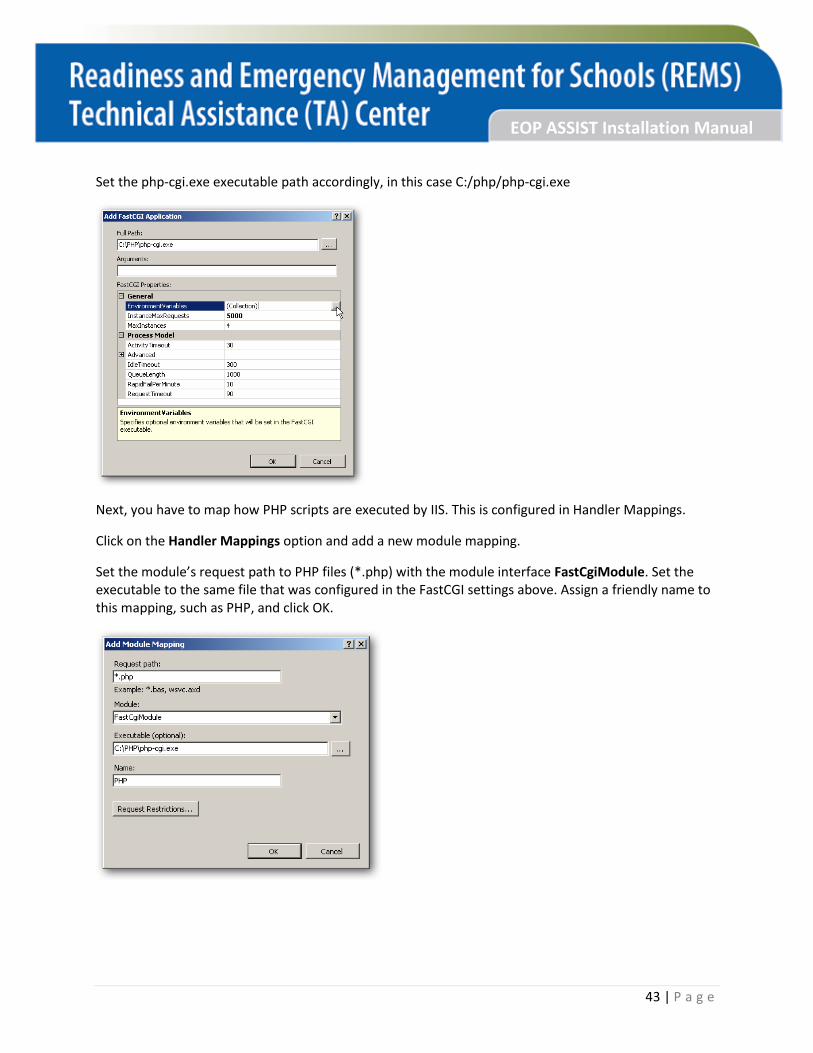
Set the php-cgi.exe executable path accordingly, in this case C:/php/php-cgi.exe
Next, you have to map how PHP scripts are executed by IIS. This is configured in Handler Mappings.
Click on the Handler Mappings option and add a new module mapping.
Set the module’s request path to PHP files (*.php) with the module interface FastCgiModule. Set the executable to the same file that was configured in the FastCGI settings above. Assign a friendly name to this mapping, such as PHP, and click OK.
44 | P a g e
EOP ASSIST Installation Manual
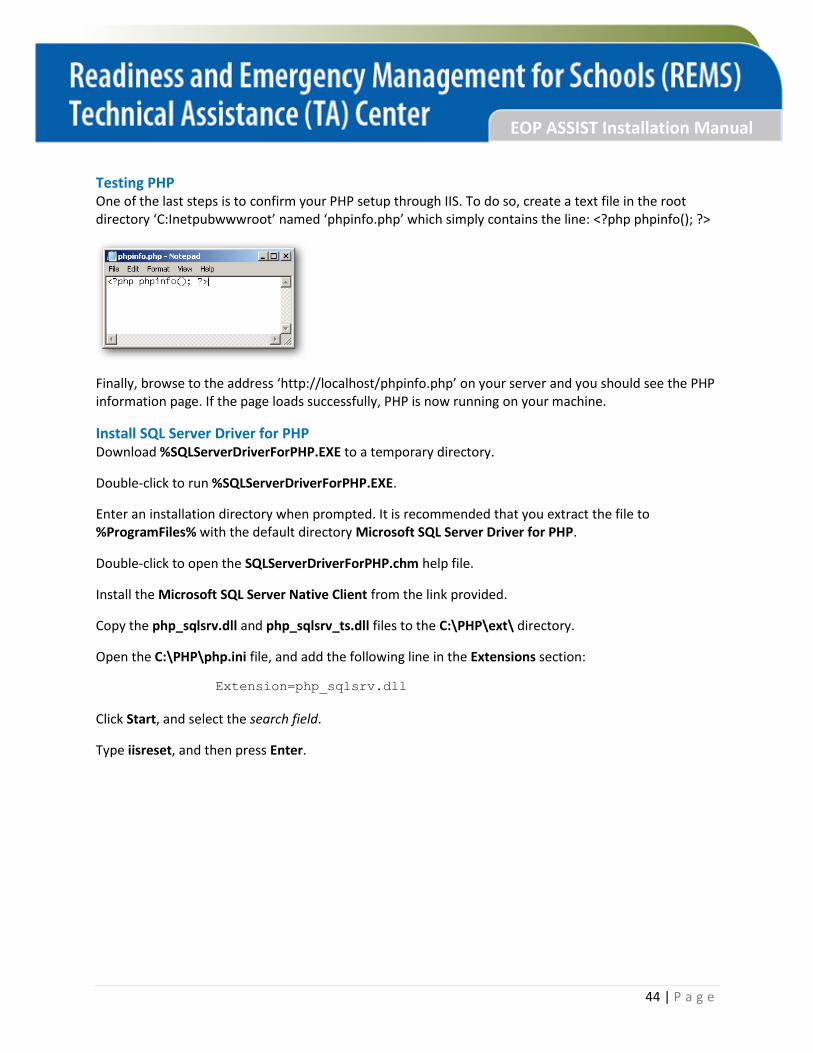
Testing PHP One of the last steps is to confirm your PHP setup through IIS. To do so, create a text file in the root directory ‘C:Inetpubwwwroot’ named ‘phpinfo.php’ which simply contains the line: <?php phpinfo(); ?>
Finally, browse to the address ‘http://localhost/phpinfo.php’ on your server and you should see the PHP information page. If the page loads successfully, PHP is now running on your machine.
Install SQL Server Driver for PHP Download %SQLServerDriverForPHP.EXE to a temporary directory.
Double-click to run %SQLServerDriverForPHP.EXE.
Enter an installation directory when prompted. It is recommended that you extract the file to %ProgramFiles% with the default directory Microsoft SQL Server Driver for PHP.
Double-click to open the SQLServerDriverForPHP.chm help file.
Install the Microsoft SQL Server Native Client from the link provided.
Copy the php_sqlsrv.dll and php_sqlsrv_ts.dll files to the C:\PHP\ext\ directory.
Open the C:\PHP\php.ini file, and add the following line in the Extensions section:
Extension=php_sqlsrv.dll
Click Start, and select the search field.
Type iisreset, and then press Enter.
45 | P a g e
EOP ASSIST Installation Manual
Appendix D. Configuring a PHP Web Application on IIS
Confirm that you have IIS installed and running. If not, you will need to Install IIS.
Install IIS To install IIS on Windows Server 2012, complete the following directions.
On the Start page, click the Server Manager tile, and then click OK.
In Server Manager, select Dashboard, and click Add Roles and Features.
In the Add Roles and Features Wizard, on the Before You Begin page, click Next.
On the Select Installation Type page, select Role-based or Feature-based Installation and click Next
On the Select Destination Server page, select Select a server from the server pool and then select your server. Click Next.
On the Select Server Roles page, select Web Server (IIS). Click Next.
On the Select Features page, note the preselected features that are installed by default, and then select CGI. This selection also installs FastCGI, which is recommended for PHP applications. Click Next.
On the Web Server Role (IIS) page, click Next.
On the Select Role Services page, note the preselected role services that are installed by default, and then click Next. (Note: You only have to install the IIS 8 default role services for a static-content web server.)
On the Confirm Installation Selections page, confirm your selections, and then click Install.
On the Installation Progress page, confirm that your installation of the Web Server (IIS) role and required role services completed successfully, and then click Close.
To verify that IIS installed successfully, type the following into a web browser:
http://localhost
You should see the default IIS Welcome page.
46 | P a g e
EOP ASSIST Installation Manual
Install PHP To download and install PHP, complete the following directions. Download PHP and the WinCache extension.
1. Open your browser to Windows for PHP Download Page and download the PHP non-thread-safe .zip package.
2. Download the WinCache extension from the List of Windows Extensions for PHP.
Install PHP and WinCache.
1. Extract all files in the PHP .zip package to a folder of your choice, for example C:\PHP\ 2. Extract the WinCache .zip package to the PHP extensions folder (\ext), for example
C:\PHP\ext. The WinCache .zip package contains one file (Php_wincache.dll).
Add the PHP installation folder to the Path environment variable.
1. Open Control Panel, click System and Security, click System, and then click Advanced System Settings.
2. In the System Properties window, select the Advanced tab, and then click Environment Variables
3. Under System Variables, select Path, and then click Edit. 4. Add the path to your PHP installation folder to the end of the Variable Value, for
example ;C:\PHP. Click OK.
Set up a handler mapping for PHP.
1. Open IIS Manager, select the hostname of your computer in the Connections panel, and then double-click Handler Mappings.
2. In the Action panel, click Add Module Mapping. 3. In Request path, type *.php. 4. From the Module menu, select FastCgiModule. 5. In the Executable box, type the full path to Php-cgi.exe, for example C:\PHP\Php-
cgi.exe. 6. In Name, type a name for the module mapping, for example FastCGI. 7. Click OK.
Add default document entries for PHP.
1. Select the hostname of your computer in the Connections panel, and double-click Default Document.
2. In the Action panel, click Add. Type Index.php in the Name box, and then click OK. 3. Click Add again. Type Default.php in the Name box, and then click OK.
47 | P a g e
EOP ASSIST Installation Manual
Test your PHP installation.
1. Open a text editor, for example Notepad, as Administrator. 2. In a new file, type the following text: <?php phpinfo(); ?> 3. Save the file as C:\inetpub\wwwroot\Phpinfo.php. 4. Open a browser and enter the following URL: http://localhost/phpinfo.php. A nicely
formatted Web page is displayed showing the current PHP settings.
Add Your PHP Application (in this case EOP Assist)
1. Extract the EOP application files and paste them in the Web document root, e.g., C:\inetpub\wwwroot\
Install MySQL Server To install MySQL Server on Windows Server 2008 or Windows Server 2008 R2, complete the following directions:
Download MySQL Community Server, which may be found at http://dev.mysql.com/downloads/. It is recommended that you download Windows® Installer.
Start Windows Installer, or extract all the files from the archive, and then start Setup.exe. You can use a Typical Setup or customize the installation to suit your needs.
Once the installation wizard is completed, it is recommended that you leave the Configure the MySQL Server Now check box selected.
Run the MySQL Server Instance Configuration Wizard, and then choose the configurations options that most closely match your environment. For more information, see http://dev.mysql.com/doc/refman/5.0/en/mysql-config-wizard.html.
Best practice recommendations are as follows:
1. Click Next in the Instance Configuration Wizard. 2. Select Detailed Configuration, and then click Next. 3. Select a server type that best suits your environment. If installing MySQL on the same server
running IIS be sure not to select Dedicated MySQL Server Machine. 4. Select a database option (Multifunctional Database or Transactional Database), and then click
Next. 5. Choose the option that sets the number of concurrent connections you need. 6. You may adjust networking settings to suit your environment or accept defaults, and then click
Next. 7. Select the default character set that best suits you (UTF-8 is recommended), and then click Next. 8. We recommend enabling both Windows options here. Select both check boxes, and then click
Next. 9. Type the password you want to use for the root account, and then click Next. 10. Click Execute to apply your settings.
48 | P a g e
EOP ASSIST Installation Manual
11. Click Finish to close the wizard.
Finalize Configuration For PHP to work with MySQL, it is necessary to perform the following modifications to the Php.ini file:
1. Open the c:\php\php.ini file with your favorite text editor. 2. Confirm that the extension_dir points to the folder where all PHP loadable extensions
are located, frequently in the Ext folder (for example, extension_dir=”.\ext”). 3. Uncomment the following lines by removing the semicolon:
extension=php_mysqli.dll
extension=php_mbstring.dll
extension=php_mcrypt.dll
4. Enable dynamic extension for MySQL by uncommenting the corresponding line for the MySQL extension: extension=php_mysql.dll.
5. Save and close the Php.ini file.
Restart the IIS service by clicking on Start, selecting the Search Field, typing iisreset, and then pressing Enter.
You should then see the mysqli section on the PHP information page created earlier (http://localhost/phpinfo.php). If so, PHP is now configured on IIS. Return to the instructions for installing EOP ASSIST in Chapter 3. Installation Instructions.