Embed Size (px)
Citation preview

Oracle® Enterprise Single Sign-On Suite PlusInstallation GuideRelease 11.1.2E27157-02
August 2012

Oracle Enterprise Single Sign-On Suite Plus, Installation and Setup Guide, Release 11.1.2
E27157-02
Copyright ©2012, Oracle and/or its affiliates. All rights reserved.
This software and related documentation are provided under a license agreement containing restrictions on useand disclosure and are protected by intellectual property laws. Except as expressly permitted in your licenseagreement or allowed by law, you may not use, copy, reproduce, translate, broadcast, modify, license,transmit, distribute, exhibit, perform, publish, or display any part, in any form, or by any means. Reverseengineering, disassembly, or decompilation of this software, unless required by law for interoperability, isprohibited.
The information contained herein is subject to change without notice and is not warranted to be error-free. Ifyou find any errors, please report them to us in writing.
If this software or related documentation is delivered to the U.S. Government or anyone licensing it on behalfof the U.S. Government, the following notice is applicable:
U.S. GOVERNMENT RIGHTS Programs, software, databases, and related documentation and technical datadelivered to U.S. Government customers are "commercial computer software" or "commercial technical data"pursuant to the applicable Federal Acquisition Regulation and agency-specific supplemental regulations. Assuch, the use, duplication, disclosure, modification, and adaptation shall be subject to the restrictions andlicense terms set forth in the applicable Government contract, and, to the extent applicable by the terms of theGovernment contract, the additional rights set forth in FAR 52.227-19, Commercial Computer SoftwareLicense (December 2007). Oracle USA, Inc., 500 Oracle Parkway, Redwood City, CA 94065.
This software is developed for general use in a variety of information management applications. It is notdeveloped or intended for use in any inherently dangerous applications, including applications which maycreate a risk of personal injury. If you use this software in dangerous applications, then you shall beresponsible to take all appropriate fail-safe, backup, redundancy, and other measures to ensure the safe use ofthis software. Oracle Corporation and its affiliates disclaim any liability for any damages caused by use of thissoftware in dangerous applications.
Oracle is a registered trademark of Oracle Corporation and/or its affiliates. Other names may be trademarksof their respective owners.
This software and documentation may provide access to or information on content, products, and services fromthird parties. Oracle Corporation and its affiliates are not responsible for and expressly disclaim all warrantiesof any kind with respect to third-party content, products, and services. Oracle Corporation and its affiliateswill not be responsible for any loss, costs, or damages incurred due to your access to or use of third-partycontent, products, or services.

Oracle Enterprise Single Sign-On Suite Plus Installation and Setup Guide
Table of Contents
Preface 6Audience 6Access to Oracle Support 6
Related Documents 6
Conventions 7
Before You Install Oracle Enterprise Single Sign-On Suite Plus 8Overview of the Oracle Enterprise Single Sign-On Suite Plus Installation Process 9Required Supporting Software 10Contents of the Oracle Enterprise Single Sign-On Suite Plus Master Archive 11Contents of the Logon Manager Folder 11
Contents of the Password Reset Folder 11
Contents of the Provisioning Gateway Folder 12
Contents of the Universal Authentication Manager Folder 12
Contents of the Anywhere Folder 12
Contents of the Reporting Folder 12
Installing Oracle Enterprise Single Sign-On Suite Plus 13Installing the Oracle Enterprise Single Sign-On Administrative Console 14Installing Logon Manager 18Prerequisites for Installing Logon Manager 19Prerequisites for Installing Logon Manager 19
Prerequisites for Unattended (“Silent”) Installations 19
Upgrading an Existing Logon Manager Installation 21Installing Logon Manager Client-Side Software 23Completing the Installation of Logon Manager 35Installing Password Reset 36Prerequisites for Installing Password Reset 37Prerequisites for Installing the Password Reset Client 37
Prerequisites for Installing the Password Reset Server 38
Prerequisites for Unattended (“Silent”) Installations 39
Upgrading an Existing Password Reset Installation 40Installing the Password Reset Server Component 41Configuring IIS 7.0 on Windows Server 2008 for Password Reset 44Completing the Installation of the Password Reset Server-Side Component 45Configuring the Password Reset Authentication and Password Reset Services 46Creating the Required Service Accounts 46
Assigning the Service Accounts to the Respective Password Reset Services 46
Configuring Access for the Password Reset Web Service's IIS Web Site Contents 48
Verifying the Password Reset Services Permissions 49
Configuring the Password Reset Web Service's Access to the Password Reset RegistrySettings 51
Configuring Password Reset Server to Store Data in Active Directory 53
— Page 3 of 174 —
Limiting the Inherited Permissions for the SSPRRESET Account to the RequiredMinimum 55
Delegating Control at the OU Level 56
Configuring the Password Reset Web Service's IIS Site as a Trusted Site in ActiveDirectory
61
Restricting Access to the Password Reset Web Console 64Configuring Password Reset for SSL Connectivity with Windows Server 2003/2003 R2 65Step 1: Installing the X.509 Certificate in Microsoft IIS 65
Step 2: Modifying the Password Reset Server Configuration Files 68
Step 3: Granting Password Reset Server Access to the WebServices Directory 70
Step 4: Restricting Password Reset Connectivity to SSL Only 73
Step 5: Testing the New Connectivity Configuration 75
Configuring Password Reset for SSL Connectivity with Windows Server 2008/2008 R2 76Step 1: Installing the X.509 Certificate in Microsoft IIS 76
Step 2: Modifying the Password Reset Server Configuration Files 79
Step 3: Granting Password Reset Server Access to the WebServices Directory 82
Step 4: Restricting Password Reset Connectivity to SSL Only 83
Step 5: Testing the New Connectivity Configuration 83
Installing Password Reset Client-Side Software 85Installing Password Reset Language Packs 86
Reverting to the Original Language Pack After Installing Another 86
Installing Language Packs at the Command Line 86
Installing the Password Reset Client-Side Software from the Command Line 89Completing the Installation of the Password Reset Client 91(Optional) Running the Reset Client Under a Specified User Account 91
Disabling the “Redirection” Popup 91
Specifying a Custom Window Title 91
Using Password Reset Client With a Custom Reset Web Application 92
Installing Provisioning Gateway 93Prerequisites for Installing Provisioning Gateway 94Prerequisites for Installing the Provisioning Gateway Client-Side Component 94
Prerequisites for Installing the Provisioning Gateway Server-Side Component 94
Installing Provisioning Gateway Server on Windows Server 2008 95
(Windows 2008 Server Only) Creating a Classic .NET Application Pool for ProvisioningGateway Server 97
Prerequisites for Unattended (“Silent”) Installations 98
Upgrading an Existing Provisioning Gateway Installation 99Installing the Provisioning Gateway Server-Side Component 100(Optional) Installing the Client-Side Provisioning Gateway Command-Line Interface(CLI) 101Completing the Installation of Provisioning Gateway 102(Windows Server 2008 Only) Creating an Application Pool for Provisioning Gateway 102
Oracle Enterprise Single Sign-On Suite Plus Installation and Setup Guide
Configuring a 64-bit OS to Run Provisioning Gateway Server 103
Granting the Required Permissions to the PMSERVICE Account 104
Setting the CycleInterval Registry Key 107
Granting Provisioning Rights to Domain Users 108
Configuring Syslog 108
Creating or Identifying a User Account for Anonymous Logon 109
Granting the IIS Anonymous Account Access to ADAM/AD-LDS 110
Configuring Provisioning Gateway for SSL Connectivity 110
Installing Universal Authentication Manager 115Prerequisites for Installing Universal Authentication Manager 116Prerequisites for Unattended (“Silent”) Installations 119
Configuring Universal Authentication Manager for Synchronization with a Repository119
Upgrading an Existing Universal Authentication Manager Installation 131Installing the Universal Authentication Manager Client-Side Software 132Performing an Unattended (Silent) Installation 139
Completing the Installation of Universal Authentication Manager 142
Selecting the Desired GINA Library (Windows XP Only) 144
Installing Anywhere 146Prerequisites for Installing Anywhere 147Prerequisites for Installing the Anywhere Console 147
Prerequisites for Unattended (“Silent”) Installations 148
Installing the Anywhere Console 149Troubleshooting Oracle Enterprise Single Sign-On Suite Plus Installations 151Windows Installer Error 1720 151
Troubleshooting Provisioning Gateway Installations 151
Troubleshooting Password Reset Installations 153Uninstalling Oracle Enterprise Single Sign-On Suite Plus Components 154Appendices 155Deploying Oracle Enterprise Single Sign-On Suite Plus Products for Offline Use viaAnywhere 156Packaging Oracle Enterprise Single Sign-On Suite Plus for Mass Deployment 158Creating a Customized Agent Installation Package 159Testing the Customized Package in a Pilot Deployment 162Oracle Enterprise Single Sign-On Suite Plus Configuration Reference 163Password Reset Client-Side Registry Settings 163
Password Reset Server-Side Registry Settings 165
Modifying the DCOM Permissions of the Password Reset Reporting Service 166
Installing and Configuring an ADAM/AD-LDS Instance for Password Reset 169
— Page 5 of 174 —

Audience
Preface
The Oracle Fusion Middleware Oracle Enterprise Single Sign-On Suite Plus Installation Guideexplains how to prepare your environment for installation of each suite application, install each ofthe suite applications, and complete the necessary post-installation tasks.
Audience
This guide is intended for experienced administrators responsible for the planning, implementationand deployment of applications. Administrators are expected to have solid knowledge of directoryenvironments, permission structures, domain administration, and databases.
Access to Oracle Support
Oracle customers have access to electronic support through My Oracle Support.
For information, visit http://www.oracle.com/support/contact.html or visithttp://www.oracle.com/accessibility/support.html if you are hearing impaired.
Related Documents
For more information, see the other documents in the Oracle Enterprise Single Sign-On Suite Plusdocumentation set for this release.
Oracle Enterprise Single Sign-On Suite Plus
Release Notes
Installation Guide
Administrator's Guide
Secure Deployment Guide
User's Guide
Oracle Enterprise Single Sign-On Logon Manager
Deploying Logon Manager with Microsoft Active Directory
Deploying Logon Manager with Microsoft Active Directory Application Mode and Active DirectoryLightweight Directory Services
Deploying Logon Manager with a Lightweight Directory Access Protocol Directory
Template Configuration and Diagnostics for Windows Applications
Template Configuration and Diagnostics for Web Applications
Template Configuration and Diagnostics for Mainframe Applications
Oracle Enterprise Single Sign-On Provisioning Gateway
Administrator's Guide
Command Line Interface Guide
Oracle Identity Manager Connector Guide
Sun Java System Identity Manager Connector Guide
IBM Tivoli Identity Manager Connector Guide
— Page 6 of 174 —

Oracle Enterprise Single Sign-On Suite Plus Installation and Setup Guide
Oracle Enterprise Single Sign-On Universal Authentication Manager
Administrator's Guide
User's Guide
Conventions
The following text conventions are used in this document:
Convention Meaning
boldface Boldface type indicates graphical user interface elements associated with an action,or terms defined in text or the glossary.
italic Italic type indicates book titles, emphasis, or placeholder variables for which yousupply particular values.
monospace Monospace type indicates commands within a paragraph, URLs, code in examples,text that appears on the screen, or text that you enter.
— Page 7 of 174 —

Before You Install Oracle Enterprise Single Sign-On Suite Plus
Before You Install Oracle Enterprise Single Sign-OnSuite Plus
Before you install Oracle Enterprise Single Sign-On Suite Plus, read the information contained inthis section carefully and follow it closely. This section contains the following topics:
l Overview of the Oracle Enterprise Single Sign-On Suite Plus Installation Processl Contents of the Oracle Enterprise Single Sign-On Suite Plus Master Archive
— Page 8 of 174 —

Oracle Enterprise Single Sign-On Suite Plus Installation and Setup Guide
Overview of the Oracle Enterprise Single Sign-On SuitePlus Installation Process
Oracle Enterprise Single Sign-On Suite Plus handles all tasks related to granting users access toapplications, including automatic sign-on, application password change,Windows password reset,kiosk session management, application credential provisioning, as well as strong authenticationinside and outside of the session.
Oracle Enterprise Single Sign-On Suite Plus consists of the following components:
l Oracle Enterprise Single Sign-On Logon Manager – provides single sign-on functionality.l Provisioning Gateway – provides remote credential provisioning capability.l Password Reset – provides the self-service password reset ability. Consists of the following com-ponents:
o Password Reset Client - installed as a selectable component during the Logon Managerinstallation.
o Password Reset Server components.
l Kiosk Manager – provides session and application management for kiosk environments.l Universal Authentication Manager – provides strong authentication inside and outside the Win-dows session.
l Anywhere – provides the ability to deploy custom-configured installation packages to end-userworkstations not connected to the enterprise network.
The following is a high-level overview of the suite installation process:
If this installation is an upgrade, please refer to the "Upgrading anExisting Installation..." section for the selected component(s).
1. Determine which components of the Oracle Enterprise Single Sign-On Suite Plus and their fea-tures you will be installing, based on the business requirements of your organization.
2. Ensure that supporting software listed in Required Supporting Software has been installed onthe target machine(s). Refer to the Oracle Enterprise Single Sign-On Suite Plus 11.1.2.0.0Release Notes for a per-application list of requirements.
3. Obtain and decompress the appropriate installer archive. See Contents of the Oracle EnterpriseSingle Sign-On Suite Plus Master Archive for the description of its contents.
4. Complete the installation steps in this guide for each component you've chosen to install.5. If any problems arise during the installation or post-installation tasks, see Troubleshooting
Oracle Enterprise Single Sign-On Suite Plus Installation Issues.
— Page 9 of 174 —

Required Supporting Software
Required Supporting Software
In order to install and function properly, the Oracle Enterprise Single Sign-On Suite Plusapplications require the following third-party supporting software to be installed on the targetmachines if it has not already been installed:
l The Windows Installer InstallScript redistributable (isscript1150.msi). You mustinstall this package for the Agent and Console installers to run unless your machine already hasthis package installed. It can be obtained from http://-consumerdocs.installshield.com/selfservice/viewContent.do?externalId=Q108322.
l The Microsoft .NET 2.0 framework (dotnetfx20.exe). It can be obtained from http://ww-w.microsoft.com/en-us/download/details.aspx?id=19.
l The Microsoft .NET 4.0 "Full Profile" framework (dotNetFx40_Full_x86_x64.exe).You must install this package for the Console to run if your machine does not already have the.NET Framework version 4.0 installed. It can be otained from http://www.microsoft.com/en-us/download/details.aspx?id=17718.
l The Microsoft Visual C++ 2010 runtime library (vcredist_x86.exe). You must installthis package for the Agent and Console to run if your machine does not already have this redis-tributable installed. It can be obtained from http://www.microsoft.com/en-us/down-load/details.aspx?id=5555.
— Page 10 of 174 —

Oracle Enterprise Single Sign-On Suite Plus Installation and Setup Guide
Contents of the Oracle Enterprise Single Sign-On SuitePlus Master Archive
The following section describes the purpose of the files contained in the Oracle Enterprise SingleSign-On Suite Plus master archive. The archive contains the following folders:
l ESSO Logon Manager 11.1.2.0.0l ESSO Password Reset 11.1.2.0.0l ESSO Provisioning Gateway 11.1.2.0.0l ESSO Universal Authentication Manager 11.1.2.0.0l ESSO Anywhere 11.1.2.0.0l Reporting
The archive root also contains a PDF file, "ESSRN.PDF," which contains the product release notes.
Contents of the Logon Manager Folder
The contents of this folder are as follows:
l ESSO Administrative Console.msi - the Oracle Enterprise Single Sign-On AdministrativeConsole installer.
l ESSO-LM.msi - the 32-bit Logon Manager installer.l ESSO-LMx64.msi - the 64-bit Logon Manager installer.l BIP Reports - report files for generating usage reports for Oracle Enterprise Single Sign-OnSuite Plus applications with Oracle Business Intelligence Publisher.
l Language Transforms - MSI installer language transform files that allow you to launch theLogon Manager installer in a specific supported language.
l Utility - folder thatcontains supplementary software and unsupported Logon Manager trou-bleshooting tools. These are:
o SSOHiddenWindowResponse.exe - the Hidden Window Response utility. Use this utilityto allow Logon Manager to detect hidden application windows by window title and class. Formore information, see the guide, Using the Hidden Window Response Utility, available inthe online documentation center.
o ssoSCDetect.exe - SmartCard detection tool. When troubleshooting logon issues with theSmartCard authenticator, run this tool to determine whether Logon Manager can see aninserted SmartCard.
o TraceController.exe - the Trace Controller utility. Use this utility to enable andmanagetrace logging in Logon Manager and other Oracle Enterprise Single Sign-On AcceleratorSuite applications.
For more information, see the Oracle Enterprise Single Sign-On Suite Plus Administrator'sGuide.
o Logon Manager Event Viewer.msi - the Logon Manager Event Viewer installer. Installsand registers the messaging libraries required to view Logon Manager events in the Win-dows Event Viewer.
Contents of the Password Reset Folder
The contents of this folder are as follows:
l ESSO-PR_Server.msi - 32/64-bit installer for the Password Reset server-side software.
— Page 11 of 174 —

Contents of the Oracle Enterprise Single Sign-On Suite Plus Master Archive
Contents of the Provisioning Gateway Folder
The contents of this folder are as follows:
l ESSO-PG_ClientCLI.msi - 32-bit installer for the Provisioning Gateway command-line inter-face client-side software. Note that installation on 64-bit environments is not supported.
l ESSO-PG_Server.msi - 32/64-bit installer for the Provisioning Gateway server-side software.
Contents of the Universal Authentication Manager Folder
The contents of this folder are as follows:
l ESSO-UAM.msi - the Universal Authentication Manager 32-bit installer. Note that installationon 64-bit systems is not supported.
l Language Transforms - MSI installer language transform files that allow you to launch theUniversal Authentication Manager installer in a specific supported language.
l SmartCard - contains .reg files that enable supported smart cards.l Utility - contains the command-line and graphical configuration tools, DeployTool.exe and Con-figEditor.exe and a document describing their use.
Contents of the Anywhere Folder
The contents of this folder are as follows:
l Console - contains the Anywhere Console installer MSI file.l Utility - contains the VBS script file that adds the requiredMIME types to Microsoft IIS.
Contents of the Reporting Folder
The contents of this folder are as follows:
l MSSQL -Table setup scripts, stored procedure SQL scripts, and .NET stored procedures for theMicrosoft SQL Server database.
l ORACLE -Table setup scripts, stored procedure SQL scripts, and Java stored procedures for theOracle database.
— Page 12 of 174 —

Oracle Enterprise Single Sign-On Suite Plus Installation and Setup Guide
Installing Oracle Enterprise Single Sign-On Suite Plus
This section describes how to install each of the Oracle Enterprise Single Sign-On Suite Pluscomponents.
This section covers the following topics:
l Installing the Oracle Enterprise Single Sign-On Administrative Consolel Installing Oracle Enterprise Single Sign-On Logon Managerl Installing Oracle Enterprise Single Sign-On Password Resetl Installing Oracle Enterprise Single Sign-On Provisioning Gatewayl Installing Oracle Enterprise Single Sign-On Universal Authentication Managerl Installing Oracle Enterprise Single Sign-On Anywhere
— Page 13 of 174 —
Installing the Oracle Enterprise Single Sign-On Administrative Console
Installing the Oracle Enterprise Single Sign-OnAdministrative Console
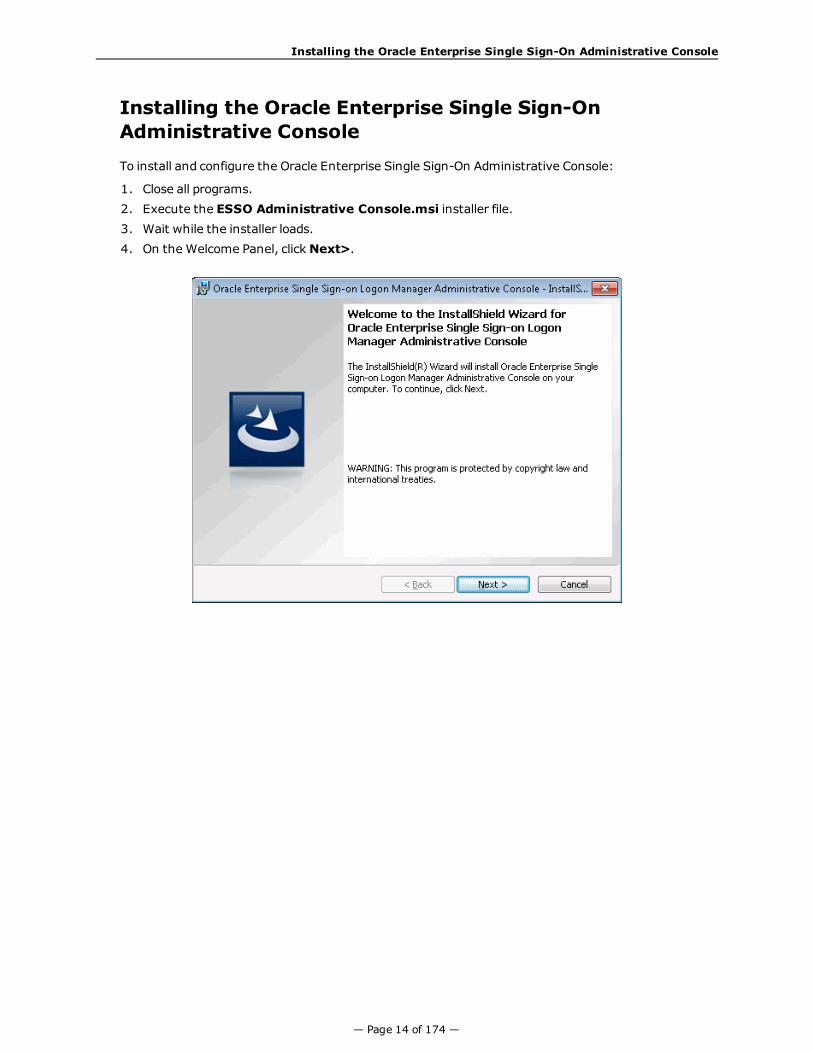
To install and configure the Oracle Enterprise Single Sign-On Administrative Console:
1. Close all programs.2. Execute the ESSO Administrative Console.msi installer file.3. Wait while the installer loads.4. On the Welcome Panel, clickNext>.
— Page 14 of 174 —

Oracle Enterprise Single Sign-On Suite Plus Installation and Setup Guide
6. Select a setup type. The Complete option installs all program features. The Custom optionallows you to choose which program features to install andwhere they will be installed. If youwill be performing a custom installation, go to Step 7. If not, go to Step 8.
7. If you are performing a custom setup, choose from the following installation options. ClickNext when you are done.
— Page 15 of 174 —

Installing the Oracle Enterprise Single Sign-On Administrative Console
Logon Manager Administrative Console
(requires 14MB of space):This option installs all necessary files and settingsthat serve as the core foundation of the application.
Templates (requires 76KB of space):Add-on templates that include additional supportedapplication templates, configurations, and settingsthat can be included in the console.
ChangeClick this button to change the current installationdestination folder for the Console. Select a differentlocation, if desired, and clickOK.
Help Icon Means the Feature:
Click theHelp button todisplay the Custom Setup tips.Each icon indicates the state ofthe available feature.
Will be completely installed to the local harddrive.
Will have selected subfeatures installed tothe local hard drive.
Will not be installed.
SpaceClick Space to display the Disk Space Requirementsfor installing the selected features on the localservers. ClickOK.
— Page 16 of 174 —

Oracle Enterprise Single Sign-On Suite Plus Installation and Setup Guide
8. The InstallShieldWizard is ready to begin the installation. Click Install.
9. Wait for the installation to complete. When the Completed screen displays, click Finish.
— Page 17 of 174 —

Installing Logon Manager
Installing Logon Manager
This section describes the steps necessary for installing Logon Manager.It covers the following topics:
l Prerequisites for Installing Logon Managerl Upgrading an Existing Logon Manager Installationl Installing the Logon Manager Client-Side Softwarel Completing the Installation of Logon Manager
— Page 18 of 174 —

Oracle Enterprise Single Sign-On Suite Plus Installation and Setup Guide
Prerequisites for Installing Logon Manager
Before you install Logon Manager, ensure the prerequisites listed in this section have beensatisfied.
Please refer to the latest release notes to find out about last-minute requirements orchanges that might affect your installation.
Prerequisites for Installing Logon Manager
If you are installing Logon Manager on a 64-bit (x64) system, you must use the 64-bit installerfiles markedwith the _x64 suffix. While the installers have been compiled for the 64-bit platform,Logon Manager itself is a 32-bit application that runs via the Windows-on-Windows 64-bit(WoW64) emulation engine and is installed into the "Program Files (x86)" parent directory. The32-bit version of Logon Manager is fully compatible with the supported 64-bit operating systemslisted below.
Oracle supports the installation of Logon Manager on the following 64-bit platforms:
l Windows Server 2003l Windows Server 2003 R2l Windows Server 2008l Windows Server 2008 R2l Windows 7
If you plan to synchronize with a database, or have the Reporting Service store application eventsin a database, you must install the appropriate database client in order to allow Logon Manager toconnect to the database instance. Additionally, if you are installing Logon Manager on a 64-bitsystem and plan to connect to an Oracle database, you must install the 32-bit version of the Oracledatabase client on the target end-user machine; otherwise, the Reporting Service will not be ableto connect to the Oracle database.
Prerequisites for Unattended (“Silent”) Installations
In order to successfully install Logon Manager in unattended ("silent")mode, the WindowsManagement Instrumentation (WMI) service must be running before the installer is executed.
To check whether the WMI service is running, and start it if necessary, do the following on eachtarget machine:
1. Open the System Management Console.2. Open the Services snap-in.3. Navigate to theWindows Management Instrumentation service and check its status and
startupmode.4. Depending on the status, do one of the following:
l If the status is Started, the WMI service is running; proceed to the nextsection.
— Page 19 of 174 —

Prerequisites for Installing Logon Manager
l If the status is blank, check the service's startup type and start it as follows:
o If the startup type isDisabled, do the following:
1. Double-click the service.
2. In the dialog box that appears, change the startup type toManual or Automatic,as required by your environment.
3. Click Apply.
4. Click Start to start the service. The status changes to Started.
o If the startup type is not Disabled, do the following:
1. Double-click the service.
2. In the dialog box that appears, Click Start to start the service.
3. The status changes to Started.
4. ClickOK.
5. ClickOK to close the service properties dialog box.
— Page 20 of 174 —

Oracle Enterprise Single Sign-On Suite Plus Installation and Setup Guide
Upgrading an Existing Logon Manager Installation
This section provides information on upgrading an existing Logon Manager installation to the latestversion.
Upgrading to Logon Manager 11.1.2 is supported for the following versions of Logon Manager:
l 11.1.1.2.xl 11.1.1.5.x
See the following Oracle Support document to determine your software version:
https://support.us.oracle.com/oip/faces/secure/km/DocumentDisplay.jspx?id=762647.1
Oracle fully supports installing version 11.1.2 of Logon Manager on top of existing installations ofLogon Manager as listed above. The installer will uninstall the previous version automatically, andthen proceedwith installation of the new version. Refer to the sections in this guide for moreinformation on installing both the Logon Manager Administrative Console and the Logon ManagerAgent.
If the original installer was customized using the Logon Manager AdministrativeConsole, you must customize the new installer in the samemanner before performingthe upgrade, otherwise your current Logon Manager settings will be overwritten by thedefaults in the unmodified installer.
Oracle recommends that you do not change the primary logon method during anupgrade, as such a change introduces unneeded complexity to the process. Changes tothe primary logon method should be undertaken as a separate project.
The following are the basic recommended steps to upgrade to Logon Manager 11.1.2.
1. Perform a backup of your existing credentials.2. Run your installation as outlined in the sections, Installing the Oracle Enterprise Single Sign-
On Administrative Console and Installing Logon Manager.3. If deploying on Microsoft Active Directory, set theUse secure location for storing user set-
tings option underGlobal Agent Settings > [TargetSettingsSet] > ADEXT to Yes andpublish this setting to the repository as an administrative override.
Only deploy this override once all instances of Logon Manager have been upgraded toversion 11.1.2.0.0; otherwise, once Logon Manager 11.1.2.0.0 synchronizes with therepository, all previous versions will no longer be able to synchronize with therepository for that user. For more information on this setting, see the Oracle EnterpriseSingle Sign-On Suite Plus Secure Deployment Guide.
4. Update all of your repository objects (policies, templates, and so on) to the latest data schemaused by the latest version of Logon Manager as follows:
a. Connect to your repository with the latest version of the Oracle Enterprise Single Sign-OnAdministrative Console.
b. Retrieve all of your templates, policies, and any other data from the repository and into theConsole.
c. (Optional) Make any configuration changes in your templates and policies as desired.
d. Publish all of the retrieved objects back to your repository.
— Page 21 of 174 —

Upgrading an Existing Logon Manager Installation
This procedure is mandatory and must be performed in a test environment beforedeploying Logon Manager to end-users. This is because the latest version of LogonManager introduces a new data schema to its configuration objects, such as templatesand policies, which is incompatible with objects created with previous versions of LogonManager. Attempting to synchronize Logon Manager with a repository that has not beenupdated will result in data corruption. Oracle highly recommends that you create aseparate OU in your repository to test your new configuration objects before deployingthem enterprise-wide.
5. Restore your backed up credentials to the new installation.
The Passphrase Suppression setting is, as of the 11.1.5.1 release, configurable underGlobal Agent Settings > [TargetSettingsSet] > Authentication > Windows v2> Recovery Method. The default is to display the passphrase. If you want to suppressthe passphrase, you must change this setting.
Note that if you have a custom passphrase suppression (a DLL that implements theSecondary Authentication API), this DLL must return a unique GUID from its GetIDfunction. Also, you must set the:
HKLM\Software\Passlogix\MsAuth\ResetMethods:ResetMethodGUID
registry value to that GUID.
See the Oracle Enterprise Single Sign-On Suite Plus Administrator's Guidemore details.
6. After the installer has finished and your credentials are restored, the upgrade is complete.Refer to the Oracle Enterprise Single Sign-On Suite Plus Release Notes to learn about the newproduct features.
— Page 22 of 174 —

Oracle Enterprise Single Sign-On Suite Plus Installation and Setup Guide
Installing Logon Manager Client-Side Software
If you have a previous version of Kiosk Manager installed and are updating it during thisinstallation, you must first uninstall the previous Kiosk Manager using the ControlPanel Add/Remove Programs or the Uninstall option of the earlier softwareinstaller.
For additional considerations with regard to Kiosk Manager, see the Oracle EnterpriseSingle Sign-On Suite Plus Administrator's Guide.
To install and configure Logon Manager:
1. Close all programs.2. Execute one of the following files to begin the installation:
l ESSO-LM.msi for 32-bit installations.
l ESSO-LMx64.msi for 64-bit installations.
If you are installing in a language other than English and would like to launch theinstaller in the desired language, execute the following command:
msiexec /I <packagename>.msi TRANSFORMS=<language>.mst
where <packagename> is the name of the Logon Manager installer MSI package, and<language>.mst is the name of the corresponding language transform file (included inthe installer archive).
3. On the Welcome Panel, clickNext>.
— Page 23 of 174 —

Installing Logon Manager Client-Side Software
4. Select a setup type. Typical provides a path to select commonly used program features easily.Advanced provides a detailed tree view of all the program features available for installation. Ifyou select a typical setup, follow Steps 5 and 6. For an advanced setup, go to Step 7. ClickNext>.
— Page 24 of 174 —
Oracle Enterprise Single Sign-On Suite Plus Installation and Setup Guide
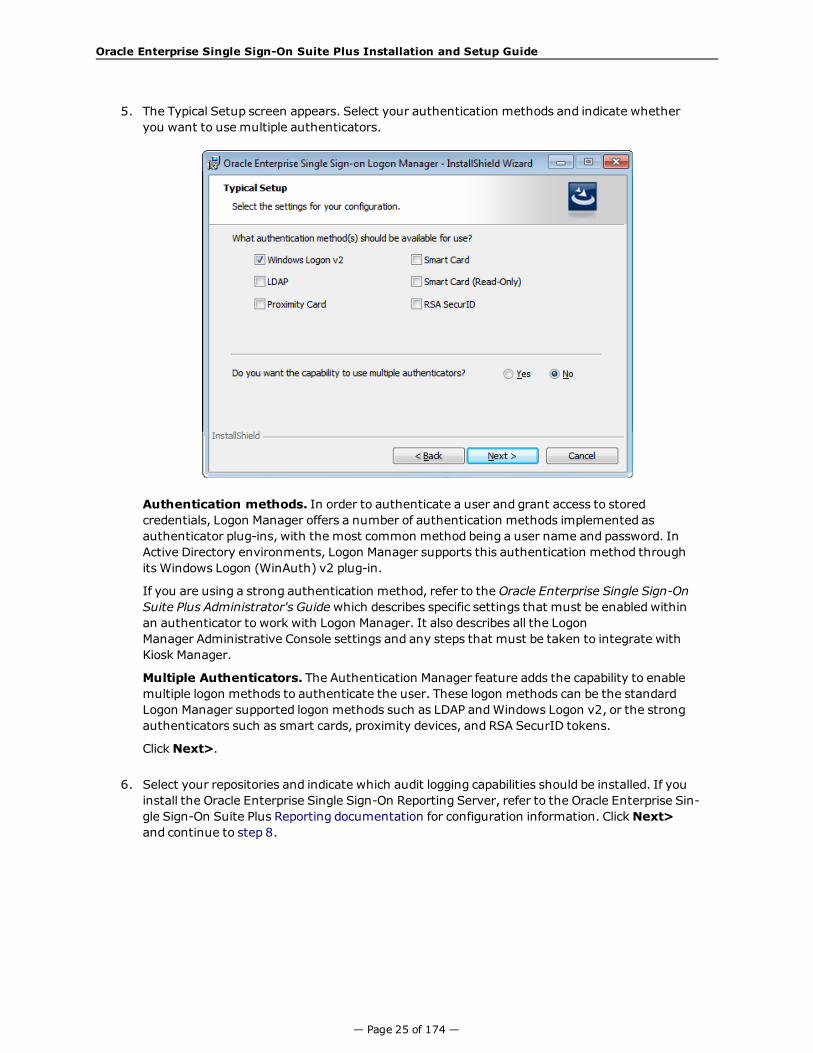
5. The Typical Setup screen appears. Select your authentication methods and indicate whetheryou want to use multiple authenticators.
Authentication methods. In order to authenticate a user and grant access to storedcredentials, Logon Manager offers a number of authentication methods implemented asauthenticator plug-ins, with the most common method being a user name and password. InActive Directory environments, Logon Manager supports this authentication method throughits Windows Logon (WinAuth) v2 plug-in.
If you are using a strong authentication method, refer to the Oracle Enterprise Single Sign-OnSuite Plus Administrator's Guidewhich describes specific settings that must be enabled withinan authenticator to work with Logon Manager. It also describes all the LogonManager Administrative Console settings and any steps that must be taken to integrate withKiosk Manager.
Multiple Authenticators. The Authentication Manager feature adds the capability to enablemultiple logon methods to authenticate the user. These logon methods can be the standardLogon Manager supported logon methods such as LDAP andWindows Logon v2, or the strongauthenticators such as smart cards, proximity devices, and RSA SecurID tokens.
ClickNext>.
6. Select your repositories and indicate which audit logging capabilities should be installed. If youinstall the Oracle Enterprise Single Sign-On Reporting Server, refer to the Oracle Enterprise Sin-gle Sign-On Suite Plus Reporting documentation for configuration information. ClickNext>and continue to step 8.
— Page 25 of 174 —

Installing Logon Manager Client-Side Software
— Page 26 of 174 —
Oracle Enterprise Single Sign-On Suite Plus Installation and Setup Guide
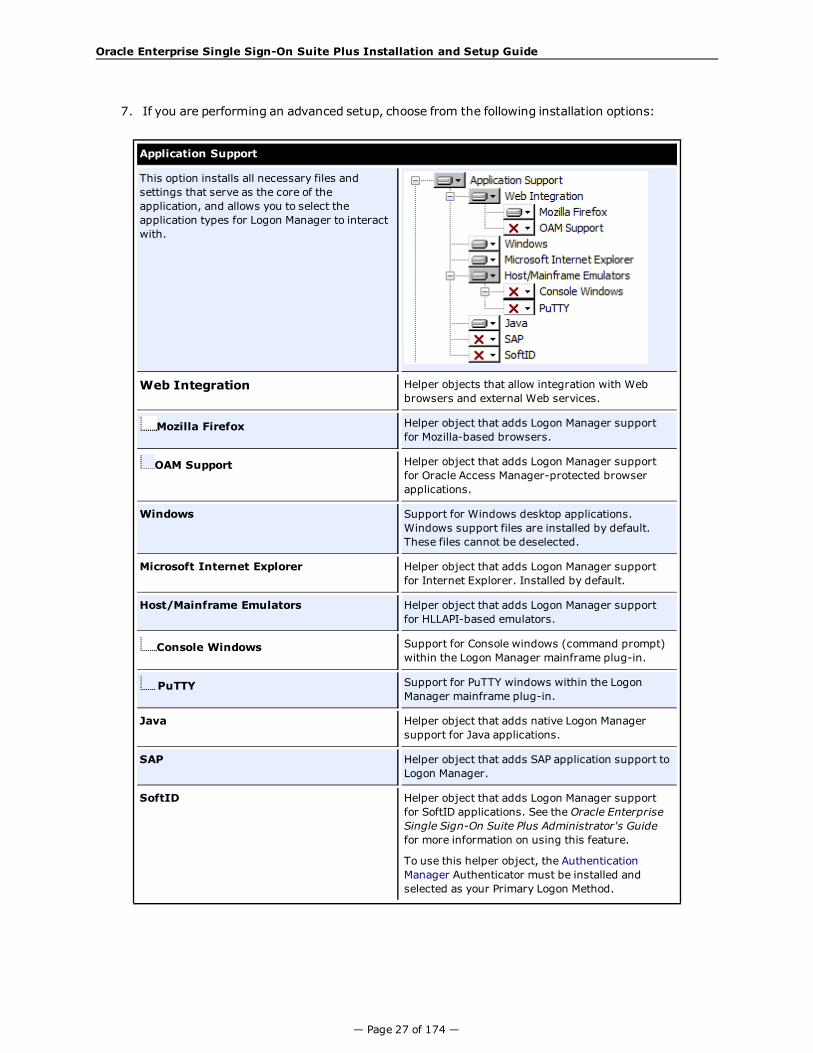
7. If you are performing an advanced setup, choose from the following installation options:
Application Support
This option installs all necessary files andsettings that serve as the core of theapplication, and allows you to select theapplication types for Logon Manager to interactwith.
Web Integration Helper objects that allow integration with Webbrowsers and external Web services.
Mozilla Firefox Helper object that adds Logon Manager supportfor Mozilla-based browsers.
OAM Support Helper object that adds Logon Manager supportfor Oracle Access Manager-protected browserapplications.
Windows Support for Windows desktop applications.Windows support files are installed by default.These files cannot be deselected.
Microsoft Internet Explorer Helper object that adds Logon Manager supportfor Internet Explorer. Installed by default.
Host/Mainframe Emulators Helper object that adds Logon Manager supportfor HLLAPI-based emulators.
Console Windows Support for Console windows (command prompt)within the Logon Manager mainframe plug-in.
PuTTY Support for PuTTY windows within the LogonManager mainframe plug-in.
Java Helper object that adds native Logon Managersupport for Java applications.
SAP Helper object that adds SAP application support toLogon Manager.
SoftID Helper object that adds Logon Manager supportfor SoftID applications. See the Oracle EnterpriseSingle Sign-On Suite Plus Administrator's Guidefor more information on using this feature.
To use this helper object, the AuthenticationManager Authenticator must be installed andselected as your Primary Logon Method.
— Page 27 of 174 —
Installing Logon Manager Client-Side Software
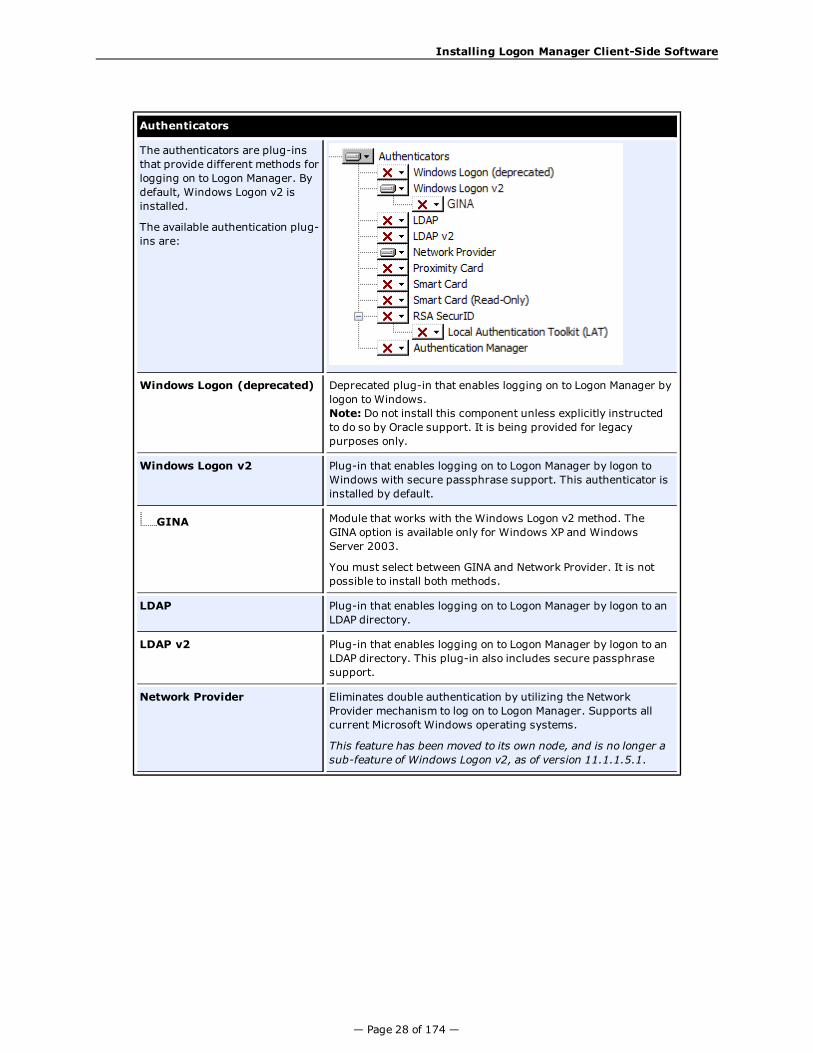
Authenticators
The authenticators are plug-insthat provide different methods forlogging on to Logon Manager. Bydefault, Windows Logon v2 isinstalled.
The available authentication plug-ins are:
Windows Logon (deprecated) Deprecated plug-in that enables logging on to Logon Manager bylogon to Windows.Note: Do not install this component unless explicitly instructedto do so by Oracle support. It is being provided for legacypurposes only.
Windows Logon v2 Plug-in that enables logging on to Logon Manager by logon toWindows with secure passphrase support. This authenticator isinstalled by default.
GINA Module that works with the Windows Logon v2 method. TheGINA option is available only for Windows XP and WindowsServer 2003.
You must select between GINA and Network Provider. It is notpossible to install both methods.
LDAP Plug-in that enables logging on to Logon Manager by logon to anLDAP directory.
LDAP v2 Plug-in that enables logging on to Logon Manager by logon to anLDAP directory. This plug-in also includes secure passphrasesupport.
Network Provider Eliminates double authentication by utilizing the NetworkProvider mechanism to log on to Logon Manager. Supports allcurrent Microsoft Windows operating systems.
This feature has been moved to its own node, and is no longer asub-feature of Windows Logon v2, as of version 11.1.1.5.1.
— Page 28 of 174 —
Oracle Enterprise Single Sign-On Suite Plus Installation and Setup Guide
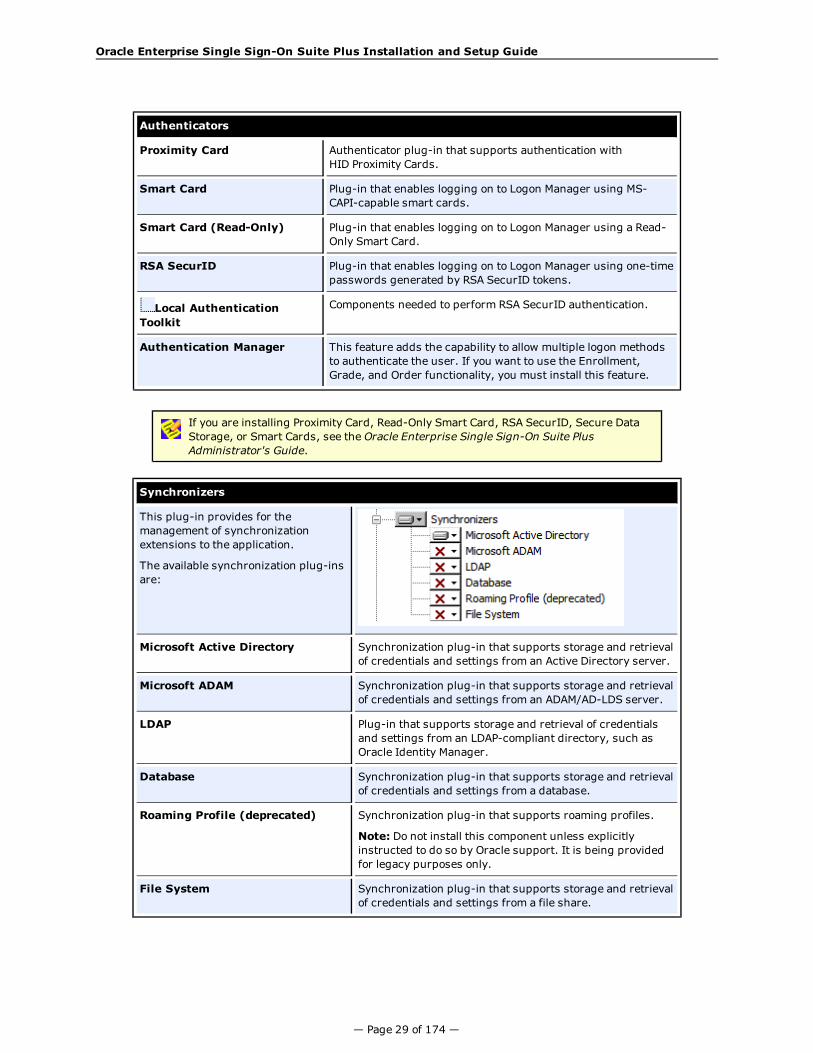
Authenticators
Proximity Card Authenticator plug-in that supports authentication withHID Proximity Cards.
Smart Card Plug-in that enables logging on to Logon Manager using MS-CAPI-capable smart cards.
Smart Card (Read-Only) Plug-in that enables logging on to Logon Manager using a Read-Only Smart Card.
RSA SecurID Plug-in that enables logging on to Logon Manager using one-timepasswords generated by RSA SecurID tokens.
Local AuthenticationToolkit
Components needed to perform RSA SecurID authentication.
Authentication Manager This feature adds the capability to allow multiple logon methodsto authenticate the user. If you want to use the Enrollment,Grade, and Order functionality, you must install this feature.
If you are installing Proximity Card, Read-Only Smart Card, RSA SecurID, Secure DataStorage, or Smart Cards, see the Oracle Enterprise Single Sign-On Suite PlusAdministrator's Guide.
Synchronizers
This plug-in provides for themanagement of synchronizationextensions to the application.
The available synchronization plug-insare:
Microsoft Active Directory Synchronization plug-in that supports storage and retrievalof credentials and settings from an Active Directory server.
Microsoft ADAM Synchronization plug-in that supports storage and retrievalof credentials and settings from an ADAM/AD-LDS server.
LDAP Plug-in that supports storage and retrieval of credentialsand settings from an LDAP-compliant directory, such asOracle Identity Manager.
Database Synchronization plug-in that supports storage and retrievalof credentials and settings from a database.
Roaming Profile (deprecated) Synchronization plug-in that supports roaming profiles.
Note: Do not install this component unless explicitlyinstructed to do so by Oracle support. It is being providedfor legacy purposes only.
File System Synchronization plug-in that supports storage and retrievalof credentials and settings from a file share.
— Page 29 of 174 —

Installing Logon Manager Client-Side Software
Kiosk Manager
Kiosk Manager
Plug-in that is available to supportkiosk scenarios.
To use Kiosk Manager, you must install the LDAP Authenticatorand a synchronizer. You must also ensure that WindowsAuthenticator v2 is not installed.
Kiosk Manager and its subcomponents are onlyavailable when installing on the 32-bit versionsof Windows XP and Windows Server 2003.
Refer to the Oracle Enterprise Single Sign-On Suite PlusAdministrator's Guide for more information.
Session Locking Support Installs the Kiosk Manager session locking component tosupport kiosk scenarios. This component is not installed bydefault.
If you install this component, the Kiosk Manager Agent(SMAgent) starts automatically.
If you do not install the Kiosk Manager GINA, the KioskManager Agent (SMAgent) does not start automatically, butevents can be triggered through the command line from otherapplications. Using this scenario, you can install KioskManager on a workstation and have it run only when executed.
See the Oracle Enterprise Single Sign-On Suite PlusAdministrator's Guide for more information on using thecommand-line options.
Password Reset
Password Reset Client Installs the client-side component of Password Reset whichprovides knowledge-based authentication and password resetfunctionality.
You must install the Password Reset server-side componentbefore you install the client-side component. Password reset isnot installed as part of the Typical installation option. For moreinformation on installing Password Reset, see InstallingPassword Reset.
— Page 30 of 174 —

Oracle Enterprise Single Sign-On Suite Plus Installation and Setup Guide
Provisioning Options
Provisioning Gateway Client Installs the Provisioning Gateway client-side software thatprovides remote credential provisioning functionality as well ascredential delegation.
You must install the Provisioning Gateway server component(as described in Installing the Provisioning Gateway Server-Side Component) before you install the client-side software.
Credential Delegation Installs the Provisioning Gateway credential delegationcomponent, allowing a user to temporarily delegate one or morecredentials to another user.
Requires Provisioning Gateway to be installed and functional onthe target machine.
Audit Logging Methods
This plug-in provides for the management ofevent logging extensions to the application.
The available plug-ins are:
ESSO Reporting Server Event Management plug-in that supports logging ofevents to the reporting service.
Windows Event Manager Event Management plug-in that supports logging ofevents to the Windows Event Manager.
Syslog Server Event Management plug-in that supports logging ofevents to a Syslog server.
XML File Event Management plug-in that supports logging ofevents to a local XML file.
Database Event Management plug-in that supports logging ofevents to a Database.
Backup/Restore
This plug-in provides a simple file-based backupand restore mechanism via a wizard interface.
— Page 31 of 174 —
Installing Logon Manager Client-Side Software
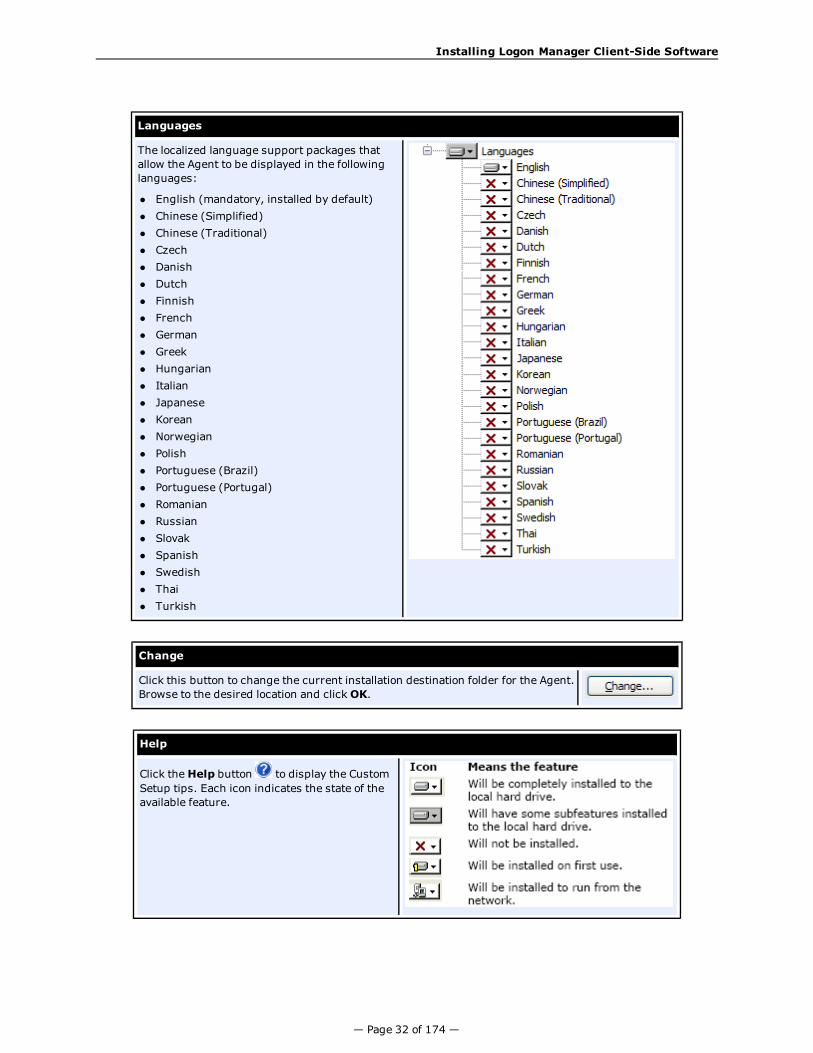
Languages
The localized language support packages thatallow the Agent to be displayed in the followinglanguages:
l English (mandatory, installed by default)l Chinese (Simplified)l Chinese (Traditional)l Czechl Danishl Dutchl Finnishl Frenchl Germanl Greekl Hungarianl Italianl Japanesel Koreanl Norwegianl Polishl Portuguese (Brazil)l Portuguese (Portugal)l Romanianl Russianl Slovakl Spanishl Swedishl Thail Turkish
Change
Click this button to change the current installation destination folder for the Agent.Browse to the desired location and clickOK.
Help
Click theHelp button to display the CustomSetup tips. Each icon indicates the state of theavailable feature.
— Page 32 of 174 —
Oracle Enterprise Single Sign-On Suite Plus Installation and Setup Guide
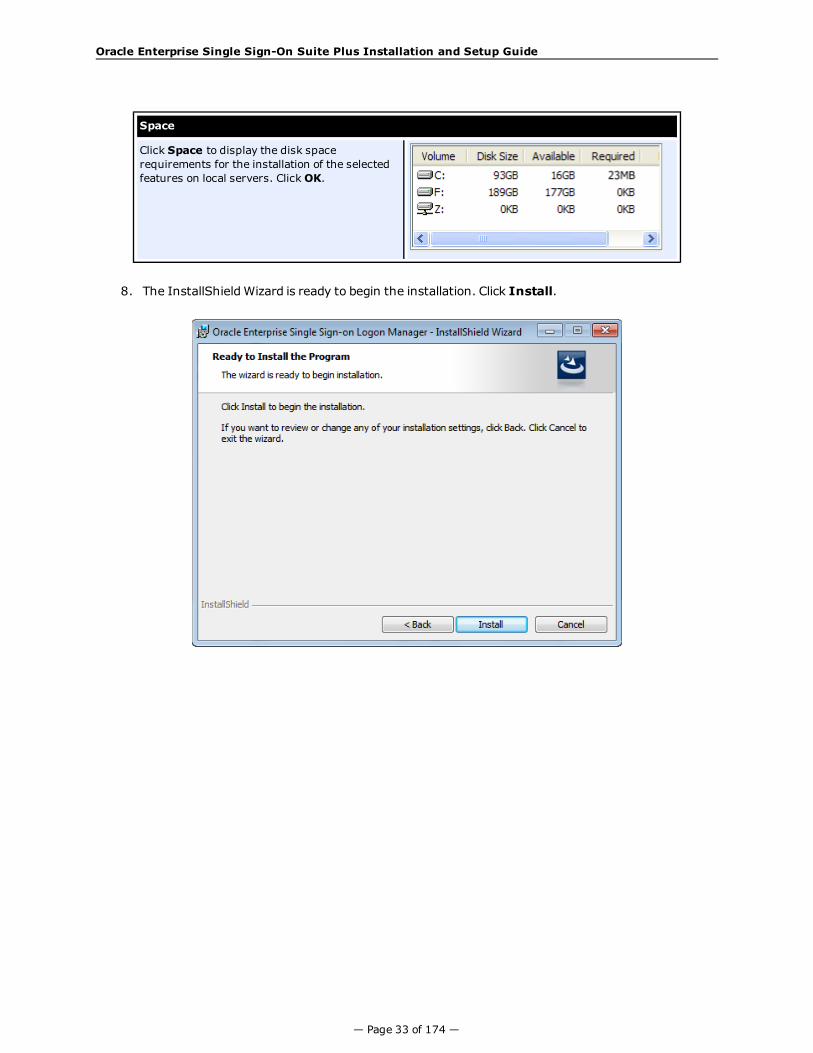
Space
Click Space to display the disk spacerequirements for the installation of the selectedfeatures on local servers. ClickOK.
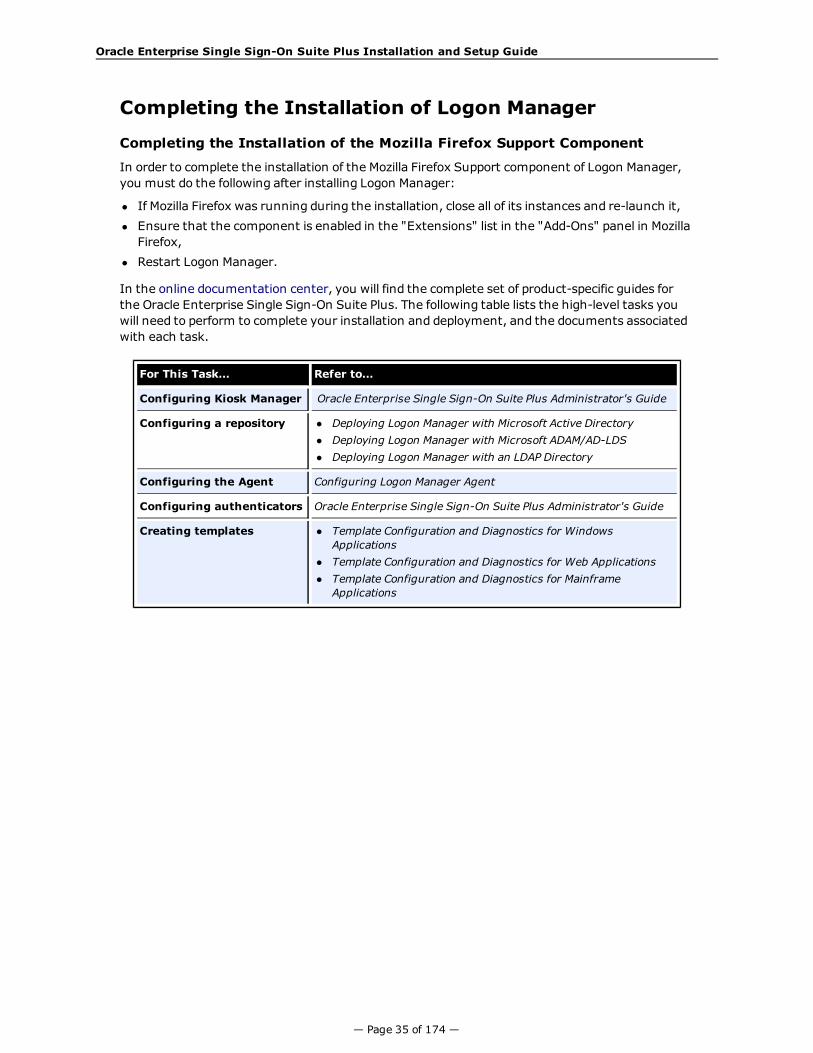
8. The InstallShieldWizard is ready to begin the installation. Click Install.
— Page 33 of 174 —

Installing Logon Manager Client-Side Software
9. Wait for the installation to complete. When the Completed screen appears, click Finish.
10. The Logon Manager installation does not require restarting, except in the following scenarios:
l If you installed the Windows Authentication v2 authenticator with the GINA or NetworkProvider components (Windows XP andWindows Server 2003 only), you will be promptedto restart your workstation after you click Finish. Continue with step 11 after restart.
l If you installed Kiosk Manager (32-bit Windows XP andWindows Server 2003 only), youmust configure Logon Manager to synchronize with one of the synchronizers that youselected during installation. Refer to the Oracle Enterprise Single Sign-On Suite Plus Admin-istrator's Guide for instructions. Do not install any other GINAs if you install the SM GINA.Restart your workstation after setting up synchronization, then continue with step 11.
11. After your workstation or server restarts, log on toWindows. The Logon Manager WelcomeScreen/First Time Use (FTU)Wizard launches. Follow the instructions on the screen tocomplete the FTU Wizard. After the FTU is complete, an icon appears in the tool tray.
Refer to the Oracle Enterprise Single Sign-On Suite Plus User's Guide and online helpfor information on completing the FTU Wizard and using Logon Manager.
— Page 34 of 174 —
Oracle Enterprise Single Sign-On Suite Plus Installation and Setup Guide
Completing the Installation of Logon Manager
Completing the Installation of the Mozilla Firefox Support Component
In order to complete the installation of the Mozilla Firefox Support component of Logon Manager,you must do the following after installing Logon Manager:
l If Mozilla Firefox was running during the installation, close all of its instances and re-launch it,l Ensure that the component is enabled in the "Extensions" list in the "Add-Ons" panel in MozillaFirefox,
l Restart Logon Manager.
In the online documentation center, you will find the complete set of product-specific guides forthe Oracle Enterprise Single Sign-On Suite Plus. The following table lists the high-level tasks youwill need to perform to complete your installation and deployment, and the documents associatedwith each task.
For This Task… Refer to…
Configuring Kiosk Manager Oracle Enterprise Single Sign-On Suite Plus Administrator's Guide
Configuring a repository l Deploying Logon Manager with Microsoft Active Directoryl Deploying Logon Manager with Microsoft ADAM/AD-LDSl Deploying Logon Manager with an LDAP Directory
Configuring the Agent Configuring Logon Manager Agent
Configuring authenticators Oracle Enterprise Single Sign-On Suite Plus Administrator's Guide
Creating templates l Template Configuration and Diagnostics for WindowsApplications
l Template Configuration and Diagnostics for Web Applicationsl Template Configuration and Diagnostics for MainframeApplications
— Page 35 of 174 —
Installing Password Reset
Installing Password Reset
This section describes the steps necessary for installing Password Reset.It covers the following topics:
l Prerequisites for Installing Password Resetl Upgrading an Existing Password Reset Installationl Installing the Password Reset Server-Side Componentl Installing the Password Reset Client-Side Component
— Page 36 of 174 —

Oracle Enterprise Single Sign-On Suite Plus Installation and Setup Guide
Prerequisites for Installing Password Reset
Before you install Password Reset, ensure the prerequisites listed in this section have beensatisfied.
Please refer to the latest release notes to find out about last-minute requirements orchanges that might affect your installation.
Prerequisites for Installing the Password Reset Client
l Because the Password Reset Client relies on the Password Reset Server to function, you mustinstall the Password Reset Server first before you will be able to install and successfully con-figure the Password Reset Client component.
l If you are installing Password Reset Client and Logon Manager on the sameWindows XP work-station, you cannot use the Logon Manager Network Provider logon method.
l Installing the Password Reset Client on Windows XP disables the Fast User Switching feature,which allowsmultiple users to be logged on to a computer at the same time and to switchamong logons by pressingWin+L. This feature is unavailable because Password Reset utilizes acustom GINA (Graphical Identification and Authentication) component that replaces the Micro-soft default GINA dynamic link library (Msgina.dll). To change logons on aWindows XP com-puter, a user must log off to allow the next user to log on. To do this, open Task Manager(CTRL+ALT+DELETE), and click Log off.
l If you want to use Password Reset on a workstation where Kiosk Manager is installed, refer tothe Oracle Enterprise Single Sign-On Suite Plus Administrator's Guide for configuration infor-mation.
l The optional registry settings, AutomaticEnroll and ForceEnrollment, control whether a work-station user is asked or required to enroll in the password reset service on next logon. Thesevalues can be set by modifying the installer package; they are not added by the install wizard onthe client. See Oracle Enterprise Single Sign-On Suite Plus Configuration Reference for the loca-tion and values of those settings.
l When you install the Password Reset Server, take note of the URLs for the Password Reset Webresources listed in the table below; you will enter those URLs during the installation of thePassword Reset Client. Those resources, served by the Password Reset Server, provide theclient with the enrollment and reset capability.
Enroll URL Enter the URL of the Enrollment service default page:http://host/vgoselfservicereset/enrollmentclient/EnrollUser.aspx
Reset URL Enter the URL of the reset service default page:http://host /vgoselfservicereset/resetclient/default.aspx
Check EnrollURL
Enter the URL of the Enrollment check service (checks if user is enrolled):http://host/vgoselfservicereset/resetclient/checkenrollment.aspx
Check ForceEnroll URL
Enter the URL of the force enrollment check service (checks if user is forcedto enroll):http://host /vgoselfservicereset/resetclient/checkforceenrollment.aspx
Check StatusURL
Enter the URL of the status check service (checks for Password Resetservice availability):http://host /vgoselfservicereset/resetclient/checkstatus.aspx
— Page 37 of 174 —

Prerequisites for Installing Password Reset
Prerequisites for Installing the Password Reset Server
l Review the hardware and software requirements in the Oracle Enterprise Single Sign-On SuitePlus Release Notes thoroughly and verify that your environment meets all requirements.
l You must use matching versions of the Oracle Enterprise Single Sign-On Administrative Con-sole and the Password Reset server component; otherwise, unpredictable behavior may result.
l You must not install the Password Reset server-side components on a domain controller. Use amember server instead.
l Due to a Microsoft error, Digest Authentication fails if you are usingWindows Server 2003 asyour Web server, andWindows Server 2008 R2 as your domain controller. Microsoft has issueda hot fix to address this problem. See http://support.microsoft.com/kb/977073 on the Micro-soft Web site to read a discussion of this issue and download the hot fix.
l Ensure that DNS is configured andworking properly, including correct enumeration of forwardand reverse lookup zones.
l Verify that your servers andworkstations have the latest service packs andWindows updatesinstalled on them.
l If you are installing on Windows Server 2008, install the IIS 7.0 Web Server first as described inConfiguring IIS 7.0 for Password Reset on Windows Server 2008.
l By default, members of the "Domain Administrators" group in Active Directory are auto-matically added to the local "Administrators" group on the member server. If you are not amember of the "Domain Administrators" group, add yourself to the local "Administrators"group on the member server. For simplicity, the instructions in this guide assume that an“Administrator” account, which is a member of the "Schema Administrators" group is used toinstall and set up Password Reset Server.
l For the creation of service accounts, consider using long, complex passwords and set theaccounts to lock out after a specific number of bad password attempts. These actions will pre-vent a hacker from successfully launching a dictionary attack on service accounts.
Generally speaking, Microsoft recommends that IIS servers be installed on memberservers. For a full discussion of this matter, visit Microsoft.com.
— Page 38 of 174 —

Oracle Enterprise Single Sign-On Suite Plus Installation and Setup Guide
Prerequisites for Unattended (“Silent”) Installations
In order to successfully install Password Reset in unattended ("silent")mode, the WindowsManagement Instrumentation (WMI) service must be running before the installer is executed.
To check whether the WMI service is running, and start it if necessary, do the following on eachtarget machine:
1. Open the System Management Console.2. Open the Services snap-in.3. Navigate to theWindows Management Instrumentation service and check its status and
startupmode.4. Depending on the status, do one of the following:
l If the status is Started, the WMI service is running; proceed to the nextsection.
l If the status is blank, check the service's startup type and start it as follows:
o If the startup type isDisabled, do the following:
1. Double-click the service.
2. In the dialog box that appears, change the startup type toManual or Automatic,as required by your environment.
3. Click Apply.
4. Click Start to start the service. The status changes to Started.
o If the startup type is not Disabled, do the following:
1. Double-click the service.
2. In the dialog box that appears, Click Start to start the service.
3. The status changes to Started.
4. ClickOK.
5. ClickOK to close the service properties dialog box.
— Page 39 of 174 —

Upgrading an Existing Password Reset Installation
Upgrading an Existing Password Reset Installation
This section provides information on upgrading an existing Password Reset installation to the latestversion.
Upgrading to Password Reset 11.1.2 is supported from the following versions of Password Reset:
l 11.1.1.2.xl 11.1.1.5.x
When upgrading a Password Reset Server installation, do the following:
1. Backup the server settings with an export of the HKEY_LOCAL_MACHINE\Sof-tware\Passlogix\SSPR registry key.
2. Follow the instructions in Installing the Password Reset Server-Side Component. After com-pleting the installation, you must restart Microsoft IIS and verify that the required serviceaccounts are active within the system and that Password Reset is still configured to use them.
3. (Optional) If you are upgrading an instance of Password Reset that uses an Oracle database asits repository, you must add new indexes required by Password Reset 11.1.2 by running thefollowing queries:
l CREATE INDEX SSPR.UQ_USERID ON SSPR.USERQUESTIONS (USERSID);
l CREATE INDEX SSPR.EI_USERID ON SSPR.ENROLLMENTINFORMATION(USERSID);
l CREATE INDEX SSPR.RI_USERID ON SSPR.RESETINFORMATION (USERSID);
— Page 40 of 174 —

Oracle Enterprise Single Sign-On Suite Plus Installation and Setup Guide
Installing the Password Reset Server Component
If you are installing Password Reset on Windows Server 2008, you must install MicrosoftInternet Information Services 7.0 first. See the section on configuring IIS 7.0 beforebeginning this installation.
Installation of Password Reset on Windows Server 2003 in a64-bit environment can take up to 50 seconds to complete.
1. Close all programs.2. Launch the ESSO-PR_Server.msi installer file.3. In the "Welcome" panel, click Next.
4. Select Complete or Custom setup type and clickNext >.(Custom setup allows you to specifyan alternate installation directory.) Then clickNext >.
— Page 41 of 174 —

Installing the Password Reset Server Component
5. Click Install.
The bar indicates the progress of the installation.
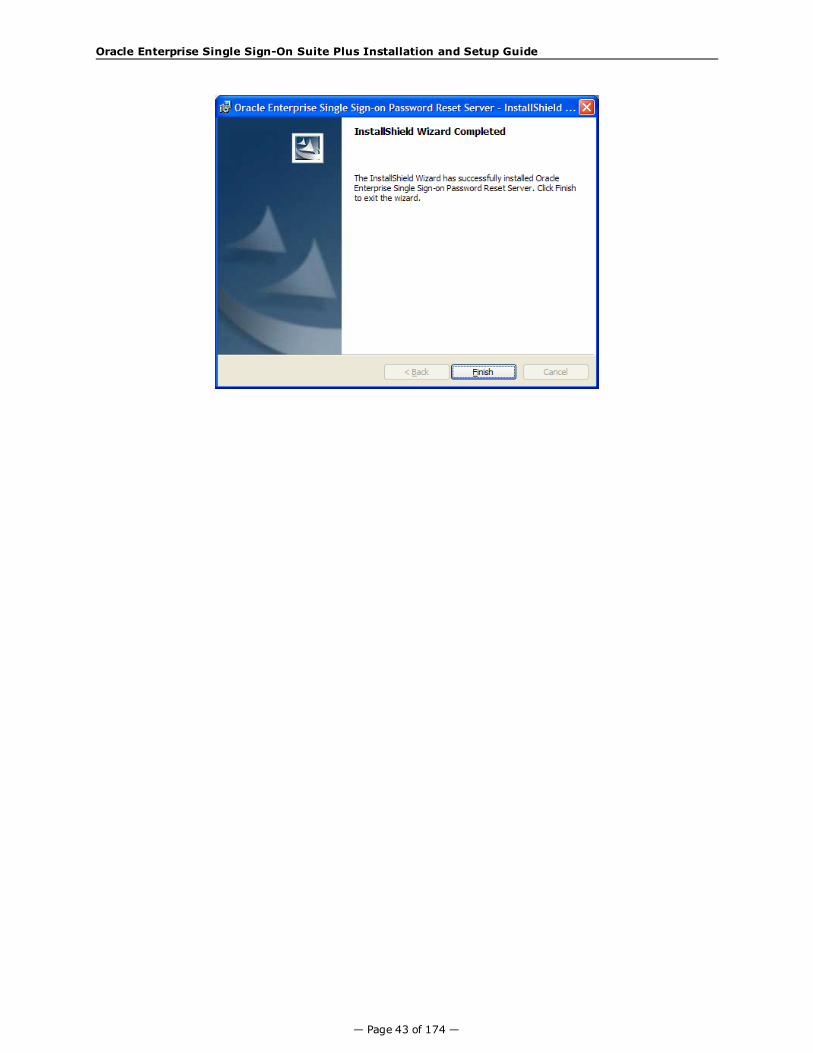
6. When the installation is complete, click Finish.
— Page 42 of 174 —
Oracle Enterprise Single Sign-On Suite Plus Installation and Setup Guide
— Page 43 of 174 —
Configuring IIS 7.0 on Windows Server 2008 for Password Reset
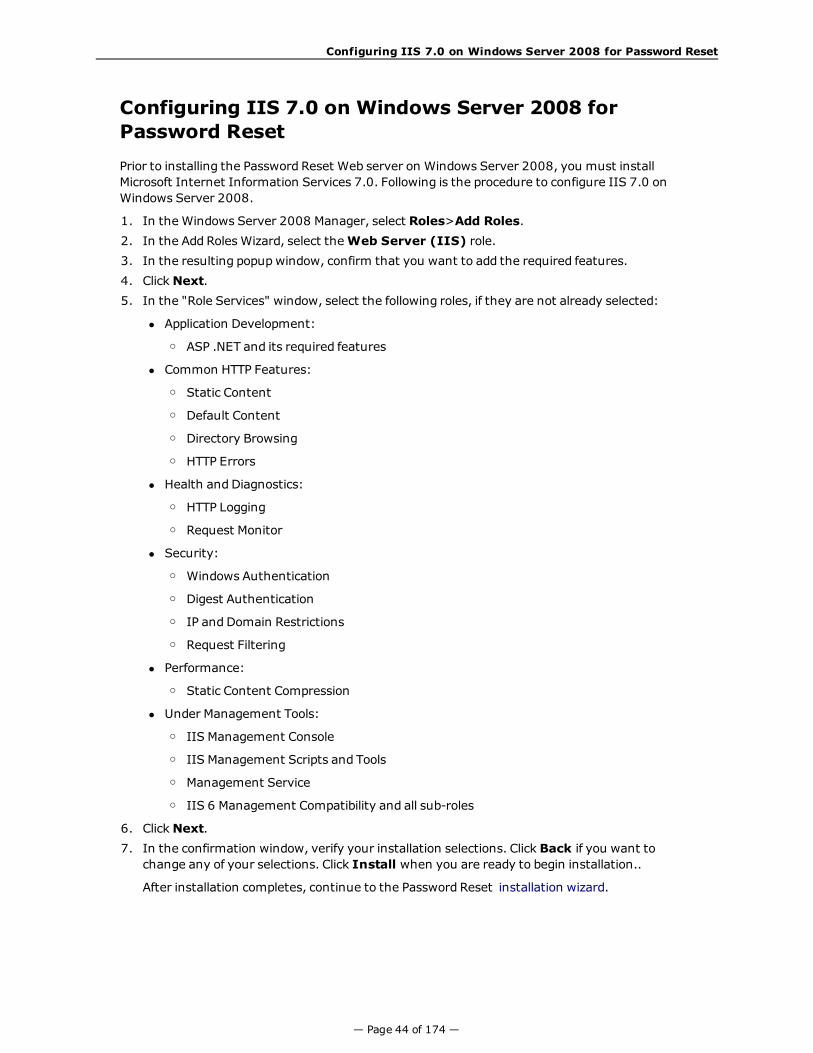
Configuring IIS 7.0 on Windows Server 2008 forPassword Reset
Prior to installing the Password Reset Web server on Windows Server 2008, you must installMicrosoft Internet Information Services 7.0. Following is the procedure to configure IIS 7.0 onWindows Server 2008.
1. In the Windows Server 2008 Manager, select Roles>Add Roles.2. In the Add Roles Wizard, select theWeb Server (IIS) role.3. In the resulting popupwindow, confirm that you want to add the required features.4. ClickNext.5. In the "Role Services" window, select the following roles, if they are not already selected:
l Application Development:
o ASP .NET and its required features
l Common HTTP Features:
o Static Content
o Default Content
o Directory Browsing
o HTTP Errors
l Health and Diagnostics:
o HTTP Logging
o Request Monitor
l Security:
o Windows Authentication
o Digest Authentication
o IP and Domain Restrictions
o Request Filtering
l Performance:
o Static Content Compression
l Under Management Tools:
o IIS Management Console
o IIS Management Scripts and Tools
o Management Service
o IIS 6 Management Compatibility and all sub-roles
6. ClickNext.7. In the confirmation window, verify your installation selections. Click Back if you want to
change any of your selections. Click Install when you are ready to begin installation..
After installation completes, continue to the Password Reset installation wizard.
— Page 44 of 174 —

Oracle Enterprise Single Sign-On Suite Plus Installation and Setup Guide
Completing the Installation of the Password ResetServer-Side Component
Perform the steps in this section to configure your host environment for Password Reset Serverand configure your Password Reset Server installation for operation. You must do the following inorder to start using Password Reset Server:
l Configuring the Password Reset Authentication and PasswordReset Services
l Configuring Password Reset Server to Store Data in Active Directoryl Limiting the Inherited Permissions for the SSPRRESET Account to the RequiredMinimuml Configuring the Password Reset Web Service's IIS Site as a Trusted Site in Active Directoryl Restricting Access to the Password Reset Web Consolel Configuring Password Reset for SSL Connectivity with Windows Server 2003/2003 R2l Configuring Password Reset for SSL Connectivity with Windows Server 2008/2008 R2
— Page 45 of 174 —

Configuring the Password Reset Authentication and Password Reset Services
Configuring the Password Reset Authentication andPassword Reset Services
Creating the Required Service Accounts
Create the following two accounts on your domain controller. These accounts should be ordinaryusers in the "Domain Users" group (default):
l SSPRWEB. This account will be responsible for Password Reset IIS functions andwill makechanges, additions, and so forth, to the organizational unit (OU) that you will create later. If theIIS instance hosting the Password Reset Web service and the Active Directory or ADAM/AD-LDSrepository are running on separate machines, this account must be in the same domain as (orin a trusted domain of) the Active Directory or ADAM/AD-LDS repository andmust have readandwrite permissions to the Password Reset Web service's IIS site directories and sub-directories.
l SSPRRESET. This account will run the actual reset service on the Password Reset memberserver with IIS. It will be responsible for resetting user passwords on the domain level.
Make these accounts members of the local "Administrators" group on the IIS host toavoid problems.
These accounts will be the service accounts that Password Reset uses to manage thecontainer where user questions and enrollment information will be housed and tohandle the actual password reset process. Because these are service accounts, youshould use highly complex passwords and prudent practices in terms of user lockoutafter a certain number of bad attempts. Although this might result in some help deskcalls from users who cannot reset their passwords, it will also alert you that someonehas been trying to attack these service accounts. For information as to best practices forservice accounts and security log monitoring, visit Microsoft’s knowledge base.
Assigning the Service Accounts to the Respective PasswordReset Services
Assigning the Required Service Account to the Password ResetSystem Service
1. Run:Control Panel> Administrative Tools> Services.2. From the list in the right-hand pane, right-click Self Service Password Reset, and select
Properties.3. In the Self Service Password Reset Properties dialog box, select the Log On tab.4. Select This account and enter the account name: Domain\SSPRRESET. Then enter and
confirm (re-enter) the password for the account.
A dialog box displays to advise you that changes will apply after the service is restarted.
5. Restart the service as indicated. The SSPRRESET account setup is complete.
— Page 46 of 174 —

Oracle Enterprise Single Sign-On Suite Plus Installation and Setup Guide
The SSPRRESET account runs the password reset service on the IIS server where theserver-side components reside.
The SSPRWEB account runs the virtual Web site on the IIS server where the server-sidecomponents reside.
— Page 47 of 174 —

Configuring the Password Reset Authentication and Password Reset Services
Configuring Access for the Password Reset Web Service'sIIS Web Site Contents
You must configure access to the Password Reset Web service's IIS Web site contents (under thevgoSelfServiceReset virtual directory) as follows:
Configuration of Virtual Sub-Directories
Virtual Directory EnrollmentClient
Enable Anonymous Access NO
Integrated Windows Authentication NO
Digest Authentication YES
Authentication and Access Control SSPRWEB
Virtual Directory ManagementClient
Enable Anonymous Access NO
Integrated Windows Authentication YES
Digest Authentication NO
Authentication and Access Control SSPRWEB
Virtual Directory ResetClient
Enable Anonymous Access YES
Integrated Windows Authentication YES
Digest Authentication NO
Authentication and Access Control SSPRWEB
Virtual Directory WebServices
Enable Anonymous Access NO
Integrated Windows Authentication YES
Digest Authentication NO
Authentication and Access Control SSPRWEB
The only virtual directory that permits anonymous access is the ResetClient directory.
— Page 48 of 174 —
Oracle Enterprise Single Sign-On Suite Plus Installation and Setup Guide
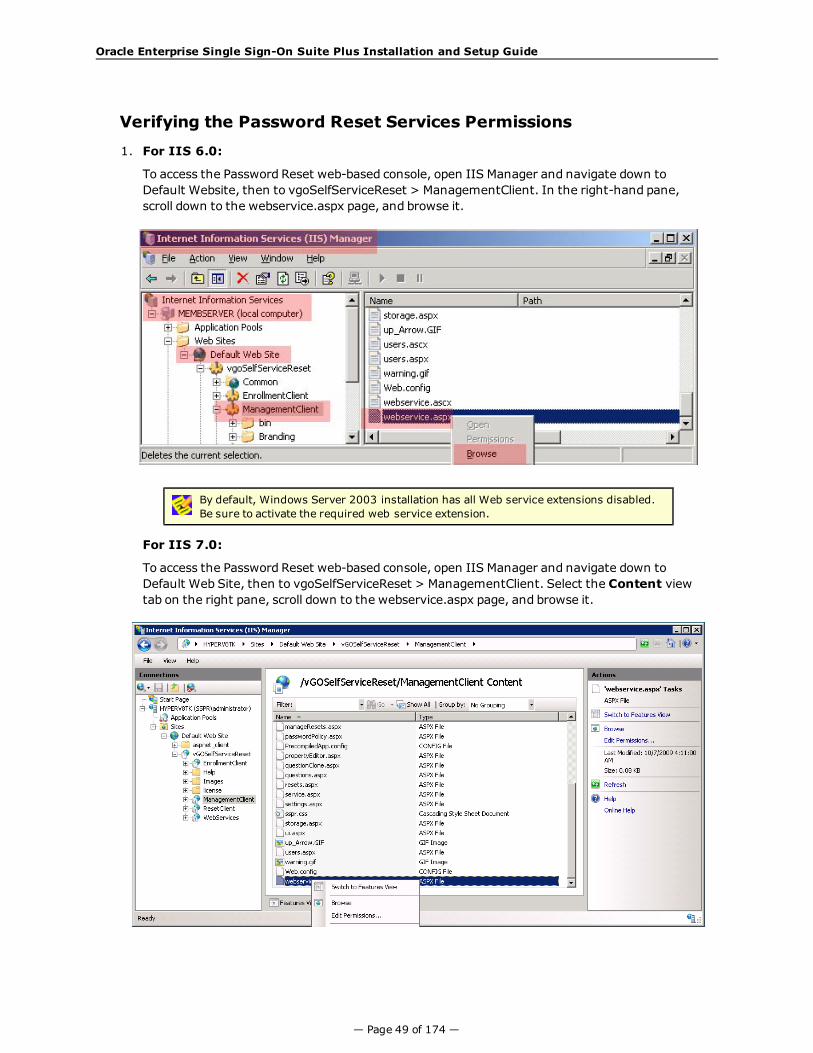
Verifying the Password Reset Services Permissions
1. For IIS 6.0:
To access the Password Reset web-based console, open IIS Manager and navigate down toDefault Website, then to vgoSelfServiceReset > ManagementClient. In the right-hand pane,scroll down to the webservice.aspx page, and browse it.
By default, Windows Server 2003 installation has all Web service extensions disabled.Be sure to activate the required web service extension.
For IIS 7.0:
To access the Password Reset web-based console, open IIS Manager and navigate down toDefault Web Site, then to vgoSelfServiceReset > ManagementClient. Select the Content viewtab on the right pane, scroll down to the webservice.aspx page, and browse it.
— Page 49 of 174 —

Configuring the Password Reset Authentication and Password Reset Services
On IIS 7.0, SSPR Server will be installed into the custom “SSPR AppPool” application poolinstead of DefaultAppPool (as is the case of IIS 6.0). The reason for this is thatDefaultAppPool in IIS 7.0 uses the Integrated managed pipeline mode, which is notcompatible with vGOSelfServiceReset application.
When you open your browser, add this page to your Favorites list for easy access.
2. In the Password Reset Management Console web page, locate the System >Web ServiceAccount section. Verify that the SSPRWEB account has been designated as the CurrentAccount.
3. In the Password Reset Management Console Web page, locate the System > Reset Service sec-tion. Verify that the SSPRRESET account is listed as the service account for the Reset Service.
If the SSPRRESET account is not listed as the Reset Service account under the ResetService section of the Password Reset Management Console Web page, verify that youare logged in as a local administrator. If it still does not appear, you can manually assignit by specifying the account with the following naming convention:Domainname\SSPRRESET.
If you receive an error message indicating that the account does not have logon rights to aservice:
1. Navigate to the IIS member server where you installed the Password Reset server-side com-ponents.
2. Check the local administrator’s group.3. Verify that the SSPRRESET and the SSPRWEB accounts are both members of the local admin-
istrator’s group.4. Click on Reset Service in the left pane and verify that the SSPRRESET account is listed as the
Reset Service account.
— Page 50 of 174 —
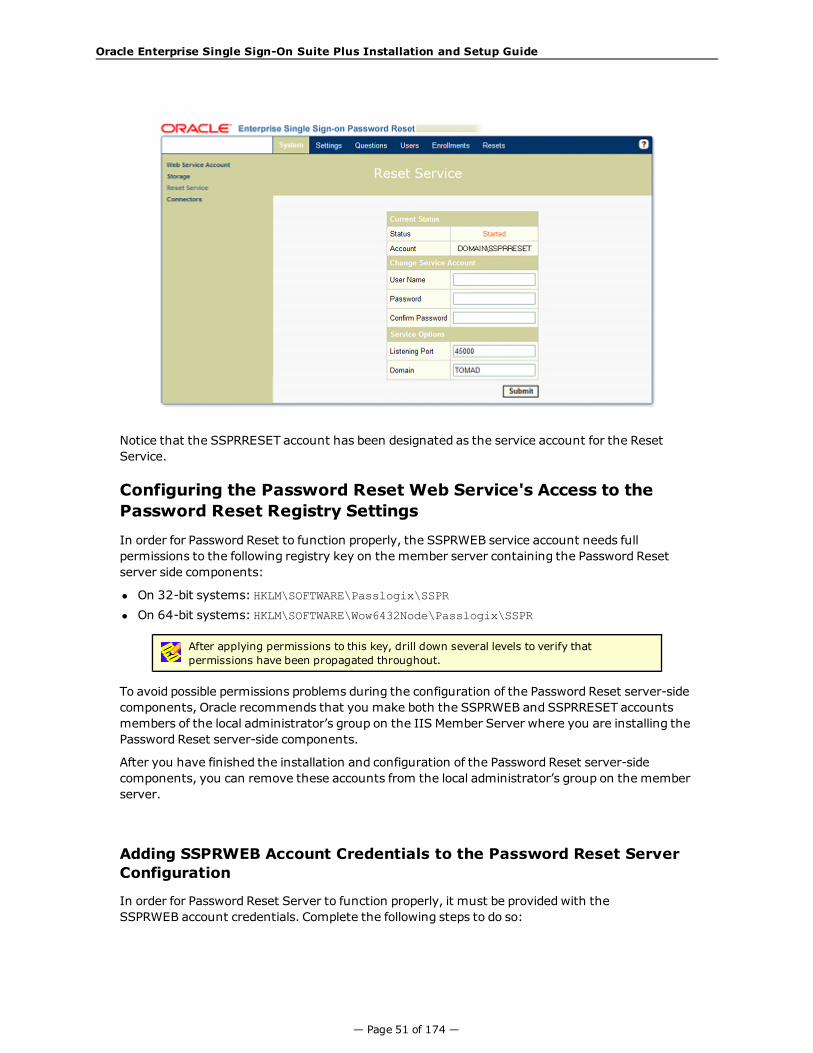
Oracle Enterprise Single Sign-On Suite Plus Installation and Setup Guide
Notice that the SSPRRESET account has been designated as the service account for the ResetService.
Configuring the Password Reset Web Service's Access to thePassword Reset Registry Settings
In order for Password Reset to function properly, the SSPRWEB service account needs fullpermissions to the following registry key on the member server containing the Password Resetserver side components:
l On 32-bit systems: HKLM\SOFTWARE\Passlogix\SSPRl On 64-bit systems: HKLM\SOFTWARE\Wow6432Node\Passlogix\SSPR
After applying permissions to this key, drill down several levels to verify thatpermissions have been propagated throughout.
To avoid possible permissions problems during the configuration of the Password Reset server-sidecomponents, Oracle recommends that you make both the SSPRWEB and SSPRRESET accountsmembers of the local administrator’s group on the IIS Member Server where you are installing thePassword Reset server-side components.
After you have finished the installation and configuration of the Password Reset server-sidecomponents, you can remove these accounts from the local administrator’s group on the memberserver.
Adding SSPRWEB Account Credentials to the Password Reset ServerConfiguration
In order for Password Reset Server to function properly, it must be providedwith theSSPRWEB account credentials. Complete the following steps to do so:
— Page 51 of 174 —

Configuring the Password Reset Authentication and Password Reset Services
1. Add the credentials to the Web.config file:
a. Locate the following file on the Password Reset machine and open it in a text editor:
<PR_Install_Directory>\WebServices\Web.config
b. Locate the following line:
<identity impersonate="true">
c. Modify the line to look as follows and replace the example values of the userName and pass-word parameters with the SSPRWEB account credentials. (Retain the quotation marksenclosing the values. The parameter names are case-sensitive.)
<identity impersonate="true" userName="domain\ssprweb"password="ssprweb_password" />
d. Save and close the file.
2. Encrypt the credentials:
a. On the Password Reset server machine, launch the command prompt with administratorprivileges.
b. Change into the following directory:
%windir%\Microsoft.NET\Framework\v4.0.30319
c. Run the following command:
aspnet_regiis.exe -pe "system.web/identity" -app"/vgoselfservicereset/webservices"
d. Do one of the following:
l If you are runningWindows Server 2003, run the following command:
aspnet_regiis.exe -pa "NetFrameworkConfigurationKey" "NTAuthority\Network Service"
l If your are runningWindows Server 2008 or later, run the following command:
aspnet_regiis.exe -pa "NetFrameworkConfigurationKey" "IISAPPPOOL\SSPR AppPool"
The SSPRWEB account credentials will be encrypted and the Password Reset Web service will beable to decrypt and use them to run under the SSPRWEB account.
Tomanually decrypt the credentials, run the following command:
aspnet_regiis.exe -pd "system.web/identity" -app"/vgoselfservicereset/webservices"
— Page 52 of 174 —

Oracle Enterprise Single Sign-On Suite Plus Installation and Setup Guide
Configuring Password Reset Server to Store Data inActive Directory
Password Reset stores user questions, answers, configuration, and enrollment information withinan organizational unit in Active Directory. Select any name for the OU that will identify the uniteasily.
Before you proceed, create this organizational unit at the root of your domain. If the OUdoes not exist when you try to enable storage, you might receive an error messageindicating that no such object exists on the server.
The Connect As account performs the schema extension. As such, this account must be amemberof the Schema Administrator’s group and have permissions to create objects within the PasswordReset OU.
To enable storage in Active Directory:
1. In the System > Storage screen, select the storage type as AD in the Storage Type drop-downmenu.
2. Enter the fully qualified domain name or the IP address of the domain controller that you wantto use.
3. Enter 389 for the port number. This is the LDAP port used by Active Directory.4. Click the Add button.
— Page 53 of 174 —

Configuring Password Reset Server to Store Data in Active Directory
5. Populate the fields according to the information in the table below.6. Click Submit.
After a slight delay, the confirmation message, Successfully Saved Changes, is displayed.
Storage ConfigurationScreen Label Explanation
Storage Type The type of directory in which Password Reset is installed. Thisexample uses Microsoft Active Directory (AD).
Server Name/IP Address,Port Number
The fully-qualified domain name or the IP address of the domaincontroller. The port number for AD is 389. The port number for SSL is636.
Servers The list of domain controllers to use. This example uses one server:SSPRDC.DOMAIN.COM. It is possible to have multiple servers.
Server Timeout The number of seconds in an attempt to establish a connection to therepository before a timeout.
Storage Location (DN) The distinguished name (DN) of the Password Reset OU that youcreate within Active Directory, for example:
OU=ESSOPR,DC=DOMAINNAME,DC=COM
Where:
ESSOPR is the name of the OU that you create.DOMAINNAME is the NetBIOS or short name of the domain.COM is the extension of the domain.
Use SSL Select to enable secure socket layer.
Initialize Storage forPassword Reset
Make sure that this box is checked. If you do not select this option,you will not be able to enter information into either the Connect As orPassword fields. This tells Password Reset whether or not it shouldextend the schema and create the initial objects. If this box is notchecked, Password Reset will only update the storage settings.
Connect As The name of the account that will actually extend the AD schema andadd the necessary objects to the Password Reset OU. This accountshould be a member of the Schema Admins group and havepermissions to create objects in the Password Reset OU.
Enter the username in this syntax: Domain\Username
Password The password for the account specified above.
To verify that the Password Reset OU is configured correctly, open a fresh instance ofActive Directory Users and Computers on your targeted domain controller, using theAdvanced view. You should see an OU named ESSOPR (or the name that you chose) andtwo subordinate OUs named SystemQuestions and Users. The existence of these twosubordinate OUs indicates success.
You can now remove both the SSPRWEB and SSPRRESET accounts from the local administrator’sgroup on the IIS member server where you installed the Password Reset server-side components.
— Page 54 of 174 —

Oracle Enterprise Single Sign-On Suite Plus Installation and Setup Guide
Limiting the Inherited Permissions for the SSPRRESET Accountto the Required Minimum
The goal of this procedure is to grant a limited set of rights to the password reset account(SSPRRESET). You will be able to reset user passwords and unlock accounts with this account, butnothingmore.
Note that the SSPRRESET account is simply a member of your domain users group. As a fail-safebuilt into AD, this account cannot be used to change the password of a user that has greater rights(such as, an administrator account).
You can assign this right at the organizational unit level or group level. Assigning this right at theuser level should not be a general practice and is not recommended.
Planning Your Privilege Hierarchy
The assignment of password reset permissions mandates careful consideration and planning toensure that the desired accounts, and only the desired accounts, are granted this permission.Some practices and caveats that might help you fine-tune your strategy as you set up theseaccounts include:
l Consider granting the password reset account granular permissions based on organizationalunits or specific groups. After applying permissions to either, test to make sure that you havethe desired results.
l Do not run the Delegation of Control Wizard at the root of your domain: if you do, you will givethe password reset account rights that extend beyond users to objects such as computers andprinters.
l Because the password reset account is a member of the domain users group, its password resetpermissions are applied to all the members of the domain users group, who are at the samelevel.
So, if you store all of your users in the default users container in AD and run the Delegation ofControl Wizard at that level, it will not permit a domain user account to reset administratoraccount passwords. Active Directory does not permit users to have admin rights overadministrators.
In this scenario, the password reset service account will not be granted permission to reset thepassword of your administrators. Your administrators will be able to enroll in Password Reset andgo through the entire password reset dialog. However, when they attempt to reset theirpasswords, they will receive an error message because the password reset service account is notdesigned to have permissions to reset the password for users in a higher security group.
Carefully consider whether you want members of your domain administrators group to be able tohave their passwords reset by an ordinary user account. While you can grant this level of control tothe password reset account, you might decide it is wiser not to do so.
— Page 55 of 174 —

Configuring Password Reset Server to Store Data in Active Directory
Delegating Control at the OU Level
Consider an OU structure in Active Directory where users are divided in the followingmanner:
l OU = Users1l OU = Users2l OU = Users (the default user container created in AD)
Assigning users to organizational units makes it possible to manage the SSPRRESET serviceaccount permissions of many users in a simple and uniform manner.
In the following example, we will give the SSPRRESET account the authority over the Users2 OU toreset its members’ passwords.
1. Go to Start>Administrative Tools> Active Directory Users and Computers.2. Make sure Advanced Features is checked under the View menu.
3. Navigate toActive Directory Users and Computers> [YourDomain] > [YourOU]. Thisexample uses YOURCOMPANY.COM> Users2.
4. Right-click on the OU that you want to control (this example uses the Users2 OU) and selectProperties.
— Page 56 of 174 —

Oracle Enterprise Single Sign-On Suite Plus Installation and Setup Guide
5. In the Users2 Properties window, select the Security tab.
6. Click the Advanced button to access Advanced Security Settings.
— Page 57 of 174 —

Configuring Password Reset Server to Store Data in Active Directory
7. Click the Add button.8. In the Enter the object name to select field, enter the name of your ssprreset account (or
browse to the account using the Advanced > Find buttons. (You can use the Check namesbutton to verify that you have entered the account name correctly.
9. ClickOK.
10. From the Object tab of the Permission Entry screen, select User objects from the "Applyonto:" dropdown menu.
11. In the Permissions window, check the Reset Password box in the Allow column.
— Page 58 of 174 —
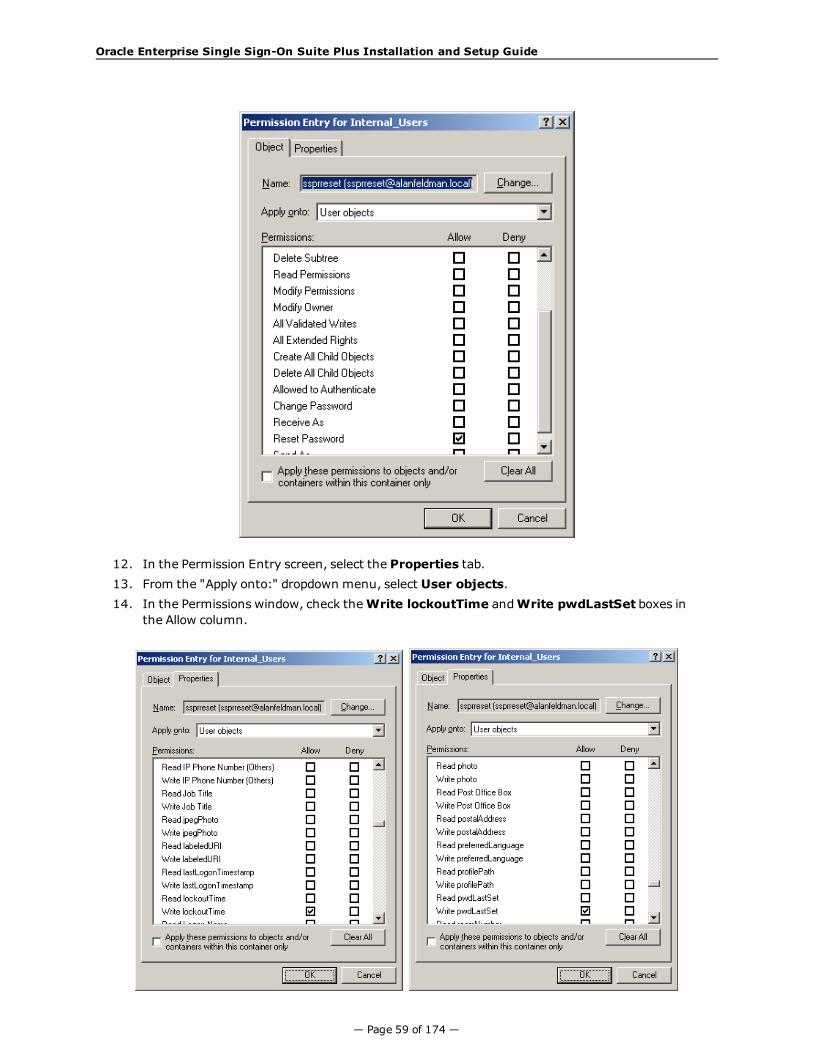
Oracle Enterprise Single Sign-On Suite Plus Installation and Setup Guide
12. In the Permission Entry screen, select the Properties tab.13. From the "Apply onto:" dropdown menu, select User objects.14. In the Permissions window, check theWrite lockoutTime andWrite pwdLastSet boxes in
the Allow column.
— Page 59 of 174 —

Configuring Password Reset Server to Store Data in Active Directory
15. ClickOK.16. ClickOK twomore times to close the windows. Your changes take effect immediately.
To verify that permissions were correctly assigned:
1. Right-click on the OU to which you just assigned the new permissions.2. Select Properties.3. Select the Security tab.
The SSPRRESET account should be listed as having Special Permissions. The Advanced tabwillindicate that this account has password reset permissions on the OU.
— Page 60 of 174 —

Oracle Enterprise Single Sign-On Suite Plus Installation and Setup Guide
Configuring the Password Reset Web Service's IIS Siteas a Trusted Site in Active Directory
There are two virtual directories within Password Reset that do not permit anonymous access, butthat are configured to use integratedWindows authentication (that is, if you are logged onto thedomain with your Windows password, you should be able to get to that page).
Due to security policies for IIS running on Windows Server 2003/2008, the first time a userattempts to enroll, he might encounter a popup screen requesting username and password, as iscustomary with any Web site with such settings. You can avoid this behavior (which can lead toundesired help desk calls) by putting the fully qualified domain name of your Password Reset IISserver in your list of trusted sites for any user in your domain.
To designate your Password Reset server as a trusted intranet site:
l For an individual computer, add the Password Reset IIS server’s default Web site to your list oftrusted intranet sites.
l Within AD, add this site to your list of trusted intranet sites through a group policy.
To accomplish this, you need:
l Domain administrator rightsl The ability to create or modify group policies at the OU or domain level.
In the following example, the Password Reset server site is designated as a trusted intranet site forthe entire domain. As such, it is a trusted site to all domain users.
You might choose to create this policy for each OU that contains potential PasswordReset users for more granular access control. Regardless of your approach, the endresult is the inclusion of the Password Reset IIS server default Web site as a trustedsite.
To add the Password Reset IIS server to the list of trusted sites in your organization, you must firstcreate a policy for Windows clients that do not have the Internet Explorer Enhanced SecurityConfiguration installed (by default, Windows XP does not have this feature installed):
1. Remove the Internet Explorer Enhanced Security Configuration settings (Control Panel >Add/Remove Programs > Add/Remove Windows Components).
2. De-select (remove) the Internet Explorer Enhanced Security Configuration.
You can install this enhanced security feature on your domain controller after havingcreated this policy. Read the dialog box that pops up when you attempt to import thecurrent zone within Group Policy Object Editor.
To create this policy, open Active Directory Users and Computers, right-click on theorganizational units that contain users who will be enrolling in Password Reset (in thisexample, at the root level of the domain) and click the Group Policy tab.
3. Create a policy named SSPR TRUSTED INTRANET SERVER.
— Page 61 of 174 —

Configuring the Password Reset Web Service's IIS Site as a Trusted Site in Active Directory
4. Click Edit.
5. Expand the user configuration portion of the policy in the Group Policy Object Editor.6. Navigate toWindows Settings > Internet Explorer Maintenance > Security > Security Zones
and Content Ratings.7. ClickModify Settings.8. Read the displayedmessage and proceed.
This is the same Internet Properties dialog box that is found in Internet Explorer 6.0.
— Page 62 of 174 —

Oracle Enterprise Single Sign-On Suite Plus Installation and Setup Guide
9. In the Internet Properties dialog box, click the Local intranet zone icon, then click the Sitesbutton.
10. In the Local Intranet dialog box, click Advanced.11. Enter the fully qualified domain name of your Password Reset IIS default website where indi-
cated.12. Click Close.13. ClickOK andApply as needed to close out of the Group Policy Object Editor.
Depending on the replication speedwithin your network, it could take some time to replicate thispolicy throughout your Active Directory structure.
To confirm that this policy was applied at your desired level in AD:
1. Log on as a user who would be affected by this policy (having given AD group policy replicationsufficient time).
2. In Internet Explorer, open Tools> Internet Options> Security > Local Intranet>Sites > Advanced.
Internet Explorer should list the site you added in its Trusted Sites window.
— Page 63 of 174 —

Restricting Access to the Password Reset Web Console
Restricting Access to the Password Reset Web Console
In order to avoid unauthorized users from accessing the Web-based Password Reset managementconsole, perform the following steps:
1. Open Windows Explorer and navigate to:
l On 32-bit systems: C:\Program Files\Passlogix\v-GO SSPR
l On 64-bit systems: C:\Program Files (x86)\Passlogix\v-GO SSPR
2. Right-click theManagement Client and select Properties from the shortcut menu.3. In the Properties dialog box, click the Security tab.4. Click Advanced.5. Click Inheritable rights for Users to clear the selection.6. In the dialog box that opens, click Copy.7. ClickOK.8. In the Security tab, remove unauthorized users.9. Click Add.10. Choose an Advanced search and select IIS_WPG (for Windows 2003).11. ClickOK.
All permissions except Full should be checked under the Allow column.
— Page 64 of 174 —

Oracle Enterprise Single Sign-On Suite Plus Installation and Setup Guide
Configuring Password Reset for SSL Connectivity withWindows Server 2003/2003 R2
Before configuring Password Reset for SSL connectivity on Windows Server 2003/2003 R2, youmust obtain an X.509 Certificate from a trusted certificate authority (CA). This trusted CAmust beinstalled in the list of trusted Root CAs. The certificate must be valid for the current date and itssubject must exactly match the network name (either its host name or fully qualifiedURL containing a host name and domain suffix) that Password Reset client instances will use whenconnecting to the Password Reset server instance. The instructions in this section assume that avalid certificate has been obtained and is ready to be installed.
The following articles from the Microsoft Web site can be referred to for information oninstalling certificates and setting up SSL:
l "How to: Obtain an X.509 Certificate” http://msdn2.microsoft.com/en-us/library/ms819929.aspx
l “How to: Set Up SSL on a Web Server” http://msdn2.microsoft.com/en-us/library/aa302411.aspx
If you use Microsoft Certificate Services to obtain the X.509 certificate, choose a ServerAuthentication Certificate. Also, enable theMark keys as exportable and Use localmachine store options under the Key Options section.
The steps required to enforce SSL-only connections to Password Reset server are as follows:
1. Installing the X.509 Certificate in Microsoft IIS2. Modifying the Password Reset Server Configuration Files3. Granting Password Reset Server Access to the WebServices Directory4. Restricting Password Reset Connectivity to SSL Only5. Testing the New Connectivity Configuration
Step 1: Installing the X.509 Certificate in Microsoft IIS
1. Launch Microsoft IIS Manager.2. In the left-hand pane, expand the root node, then expandWeb Sites.3. Right-clickDefault Web Site and select Properties from the context menu.4. In the dialog that appears, select theDirectory Security tab.5. In the Secure Communications field, click Server Certificate.6. In the wizard that appears, clickNext.
— Page 65 of 174 —

Configuring Password Reset for SSL Connectivity with Windows Server 2003/2003 R2
7. In the "Pending Certificate Request" dialog, select Process the pending request andinstall the certificate, then clickNext.
8. Enter the absolute path or navigate to the certificate file, then clickNext.
9. Specify the desired SSL port and clickNext. The default value is 443.
— Page 66 of 174 —

Oracle Enterprise Single Sign-On Suite Plus Installation and Setup Guide
10. Review the information displayed in the summary dialog. If there are any errors, go back andcorrect them; otherwise, clickNext.
11. In the dialog that appears, take note of the Issued To value ("ssolabmem" in our example).You will use this value to modify the Password Reset server configuration files in the nextsection.
12. Click Finish to exit the wizard. The certificate is now installed.
— Page 67 of 174 —

Configuring Password Reset for SSL Connectivity with Windows Server 2003/2003 R2
Step 2: Modifying the Password Reset Server Configuration FilesYou must update the following configuration files to use the HTTP-over-SSL (HTTPS) protocol whencalling the Password Reset Web pages:l %PROGRAMFILES%\Passlogix\v-GO SSPR\EnrollmentClient\web.config
l %PROGRAMFILES%\Passlogix\v-GO SSPR\ManagementClient\web.config
l %PROGRAMFILES%\Passlogix\v-GO SSPR\ResetClient\web.config
Do the following:
1. Modify the \EnrollmentClient\web.config file as follows:
a. Locate the <appSettings> section.
b. Modify the EnrollSvc.enrollment key value as follows:
i. Change http to https.
ii. Replace localhost with the Issued To value from your X.509 certificate.(You recorded this value in the previous part of this procedure.)
iii. (Optional) If you are using a custom port to connect to this service, append the portnumber at the end of the host name, separated by a semicolon. For example:https://sssolabmem.ssolab.com:1880.
c. Save and close the file.
2. Modify the \ManagementClient\web.config file as follows:
— Page 68 of 174 —

Oracle Enterprise Single Sign-On Suite Plus Installation and Setup Guide
a. Locate the <appSettings> section.
b. Modify the AdminSvc.administration key value as follows:
i. Change http to https.
ii. Replace localhost with the Issued To value from your X.509 certificate.(You recorded this value in the previous part of this procedure.)
iii. (Optional) If you are using a custom port to connect to this service, append the portnumber at the end of the host name, separated by a semicolon. For example:https://sssolabmem.ssolab.com:1880.
c. Save and close the file.
3. Modify the \ResetClient\web.config file as follows:
a. Locate the <appSettings> section.
b. Modify the ResetSvc.PasswordReset key value as follows:
i. Change http to https.
ii. Replace localhost with the Issued To value from your X.509 certificate.(You recorded this value in the previous part of this procedure.)
iii. (Optional) If you are using a custom port to connect to this service, append the portnumber at the end of the host name, separated by a semicolon. For example:https://sssolabmem.ssolab.com:1880.
c. Save and close the file.
— Page 69 of 174 —

Configuring Password Reset for SSL Connectivity with Windows Server 2003/2003 R2
Step 3: Granting Password Reset Server Access to theWebServices Directory
1. Launch Microsoft IIS Manager.2. In the tree in the left-hand pane, navigate to and expand the vGOSelfServiceReset node.
— Page 70 of 174 —

Oracle Enterprise Single Sign-On Suite Plus Installation and Setup Guide
3. Right-click theWeb Services node located under the vGOSelfServiceReset node, andselect Properties from the context menu.
4. In the dialog that appears, select theDirectory Security tab.
— Page 71 of 174 —
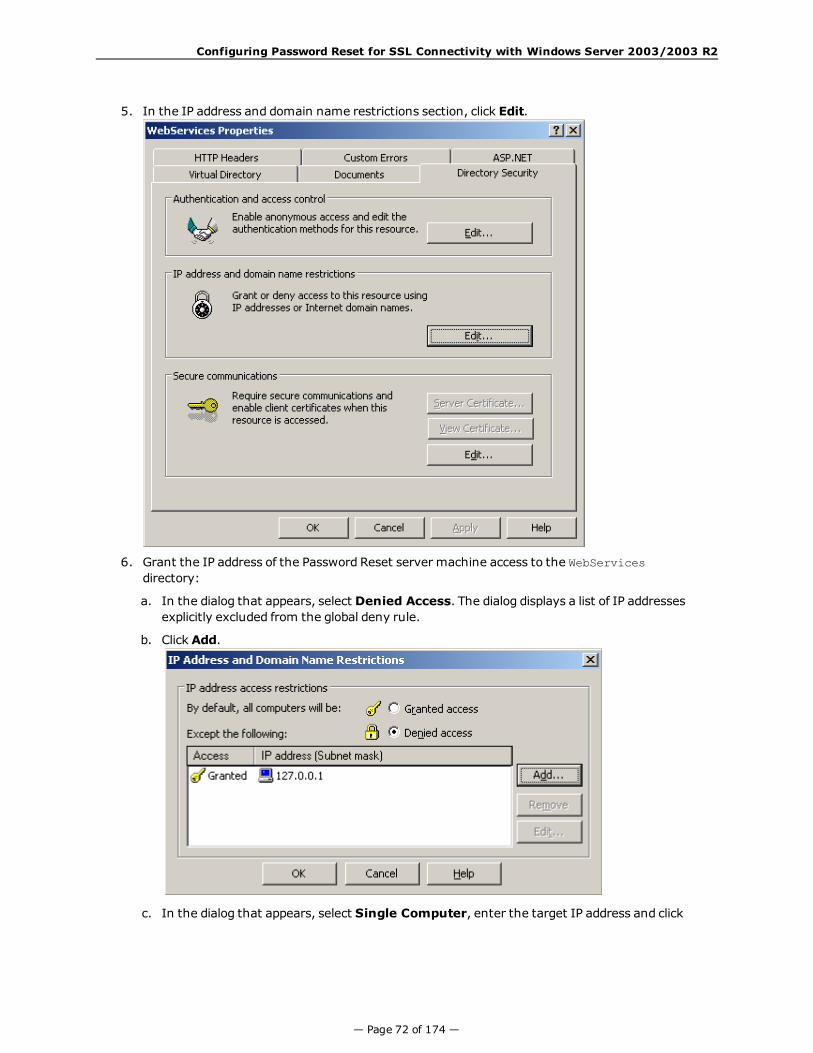
Configuring Password Reset for SSL Connectivity with Windows Server 2003/2003 R2
5. In the IP address and domain name restrictions section, click Edit.
6. Grant the IP address of the Password Reset server machine access to the WebServicesdirectory:
a. In the dialog that appears, select Denied Access. The dialog displays a list of IP addressesexplicitly excluded from the global deny rule.
b. Click Add.
c. In the dialog that appears, select Single Computer, enter the target IP address and click
— Page 72 of 174 —
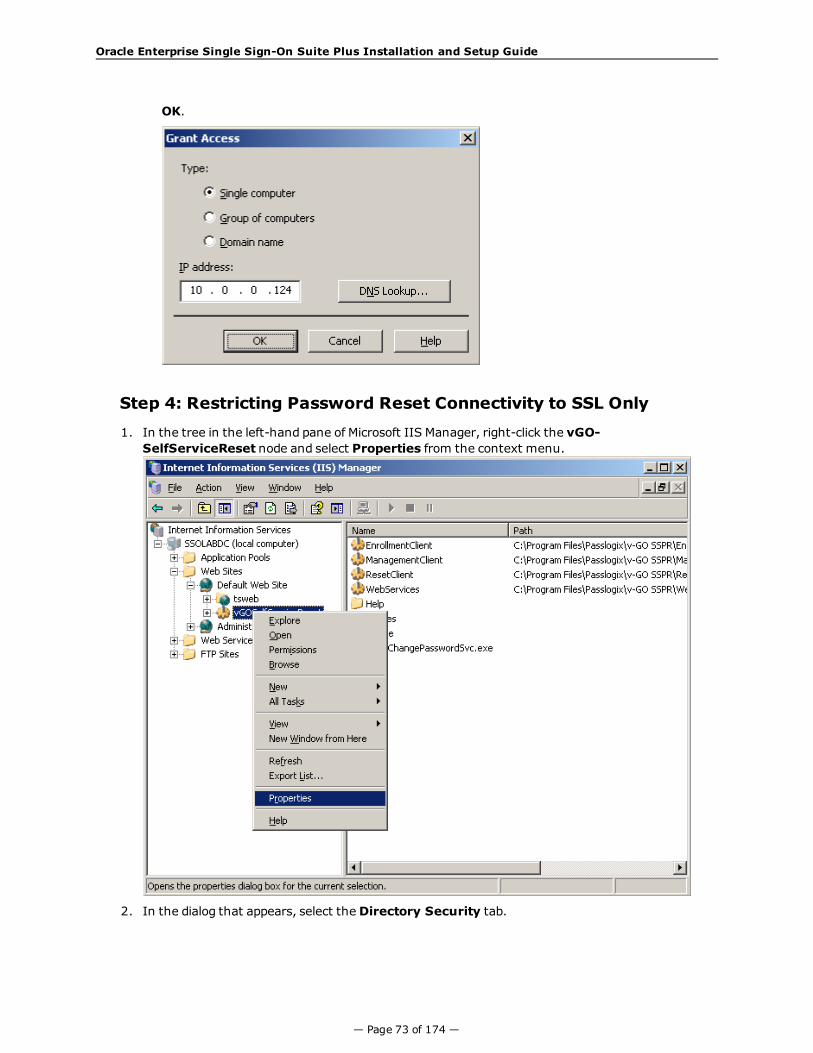
Oracle Enterprise Single Sign-On Suite Plus Installation and Setup Guide
OK.
Step 4: Restricting Password Reset Connectivity to SSL Only
1. In the tree in the left-hand pane of Microsoft IIS Manager, right-click the vGO-SelfServiceReset node and select Properties from the context menu.
2. In the dialog that appears, select theDirectory Security tab.
— Page 73 of 174 —
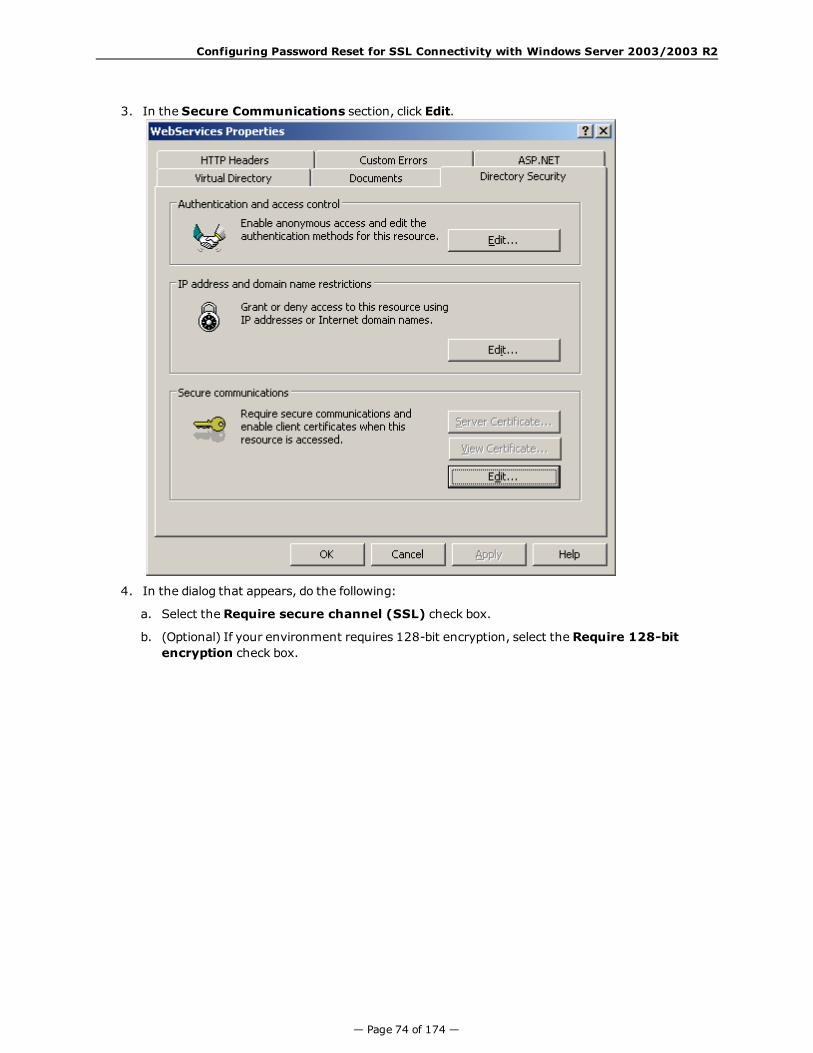
Configuring Password Reset for SSL Connectivity with Windows Server 2003/2003 R2
3. In the Secure Communications section, click Edit.
4. In the dialog that appears, do the following:
a. Select the Require secure channel (SSL) check box.
b. (Optional) If your environment requires 128-bit encryption, select the Require 128-bitencryption check box.
— Page 74 of 174 —
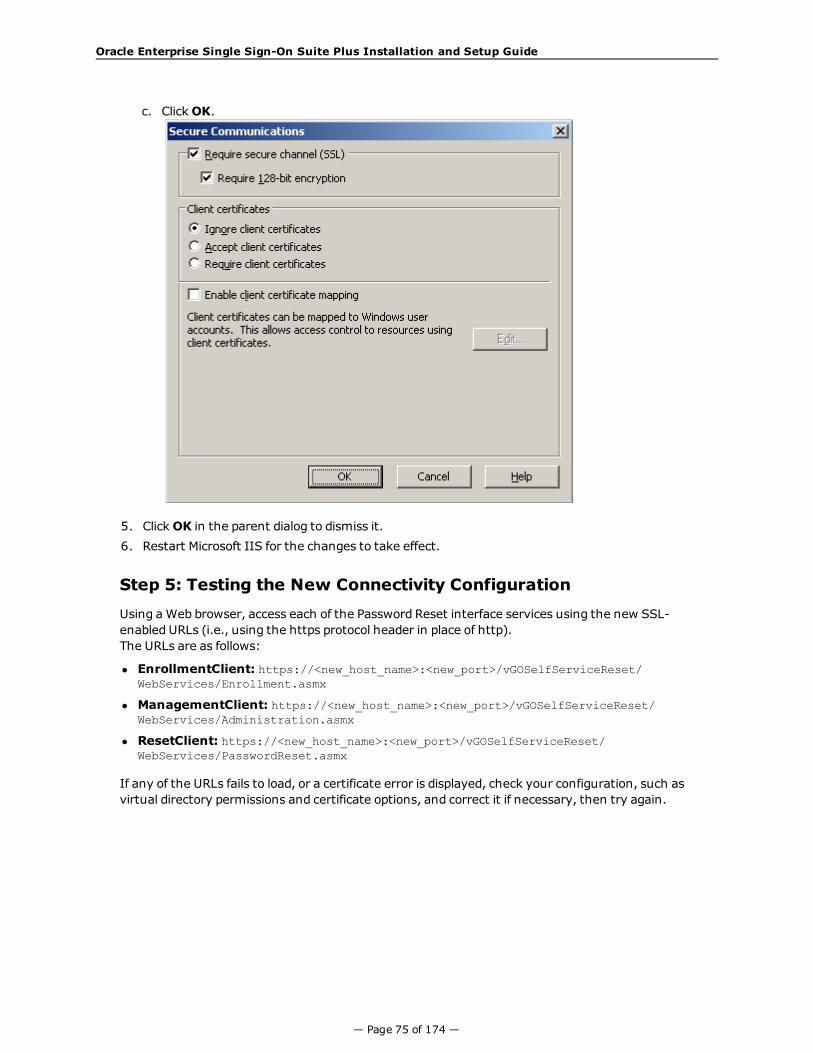
Oracle Enterprise Single Sign-On Suite Plus Installation and Setup Guide
c. ClickOK.
5. ClickOK in the parent dialog to dismiss it.6. Restart Microsoft IIS for the changes to take effect.
Step 5: Testing the New Connectivity Configuration
Using aWeb browser, access each of the Password Reset interface services using the new SSL-enabled URLs (i.e., using the https protocol header in place of http).The URLs are as follows:
l EnrollmentClient: https://<new_host_name>:<new_port>/vGOSelfServiceReset/WebServices/Enrollment.asmx
l ManagementClient: https://<new_host_name>:<new_port>/vGOSelfServiceReset/WebServices/Administration.asmx
l ResetClient: https://<new_host_name>:<new_port>/vGOSelfServiceReset/WebServices/PasswordReset.asmx
If any of the URLs fails to load, or a certificate error is displayed, check your configuration, such asvirtual directory permissions and certificate options, and correct it if necessary, then try again.
— Page 75 of 174 —

Configuring Password Reset for SSL Connectivity with Windows Server 2008/2008 R2
Configuring Password Reset for SSL Connectivity withWindows Server 2008/2008 R2
Before configuring Password Reset for SSL connectivity on Windows Server 2008/2008 R2, youmust obtain an X.509 Certificate from a trusted certificate authority (CA). This trusted CAmust beinstalled in the list of trusted Root CAs. The certificate must be valid for the current date and itssubject must exactly match the network name (either its host name or fully qualifiedURL containing a host name and domain suffix) that Password Reset client instances will use whenconnecting to the Password Reset server instance. The instructions in this section assume that avalid certificate has been obtained and is ready to be installed.
The following articles from the Microsoft Web site can be referred to for information oninstalling certificates and setting up SSL:
l "How to: Obtain an X.509 Certificate” http://msdn2.microsoft.com/en-us/library/ms819929.aspx
l “How to: Set Up SSL on a Web Server” http://msdn2.microsoft.com/en-us/library/aa302411.aspx
If you use Microsoft Certificate Services to obtain the X.509 certificate, choose a ServerAuthentication Certificate. Also, enable theMark keys as exportable and Use localmachine store options under the Key Options section.
The steps required to enforce SSL-only connections to Password Reset server are as follows:
1. Installing the X.509 Certificate in Microsoft IIS2. Modifying the Password Reset Server Configuration Files3. Granting Password Reset Server Access to the WebServices Directory4. Restricting Password Reset Connectivity to SSL Only5. Testing the New Connectivity Configuration
Step 1: Installing the X.509 Certificate in Microsoft IIS
1. Launch Microsoft IIS Manager.2. In the Connections pane on the left, select the target server instance.3. In theHome pane in the center, double-click the Server Certificates icon.4. In the Actions pane on the right, click Complete Certificate Request....5. In the Complete Certificate Request dialog that appears, do the following:
a. In the File name containing the certificate authority's response field, browse to orprovide the full path and file name of the target X.509 certificate.
b. In the Friendly name field, enter a descriptive name for the certificate.
— Page 76 of 174 —

Oracle Enterprise Single Sign-On Suite Plus Installation and Setup Guide
c. ClickOK.
The certificate appears in the target machine's Server Certificates list.
— Page 77 of 174 —

Configuring Password Reset for SSL Connectivity with Windows Server 2008/2008 R2
6. Bind the installed certificate to the https protocol for the selected site. In the Connectionspane on the left, expand the target machine node and drill down to and select theDefaultWeb Site node.
7. In the Edit Site section in the Actions pane on the right, click Bindings.8. In the Site Bindings dialog that appears, click Add.
9. In the Add Site Binding dialog that appears, do the following:
a. From the Type drop-down list, select https.
b. From the Certificate drop-down list, select the certificate you installed earlier in this pro-cedure.
c. Leave the remaining settings at their defaults.
— Page 78 of 174 —

Oracle Enterprise Single Sign-On Suite Plus Installation and Setup Guide
d. ClickOK to save your changes and dismiss the Add Site Binding dialog.
10. Click Close to dismiss the Site Bindings dialog.
Step 2: Modifying the Password Reset Server Configuration FilesYou must update the following configuration files to use the HTTP-over-SSL (HTTPS) protocol whencalling the Password Reset Web pages:l %PROGRAMFILES%\Passlogix\v-GO SSPR\EnrollmentClient\web.config
l %PROGRAMFILES%\Passlogix\v-GO SSPR\ManagementClient\web.config
l %PROGRAMFILES%\Passlogix\v-GO SSPR\ResetClient\web.config
Do the following:
1. Modify the \EnrollmentClient\web.config file as follows:
a. Locate the <appSettings> section.
b. Modify the EnrollSvc.enrollment key value as follows:
i. Change http to https.
ii. Replace localhost with the Issued To value from your X.509 certificate.(You recorded this value in the previous part of this procedure.)
iii. (Optional) If you are using a custom port to connect to this service, append the portnumber at the end of the host name, separated by a semicolon. For example:https://sssolabmem.ssolab.com:1880.
c. Save and close the file.
— Page 79 of 174 —
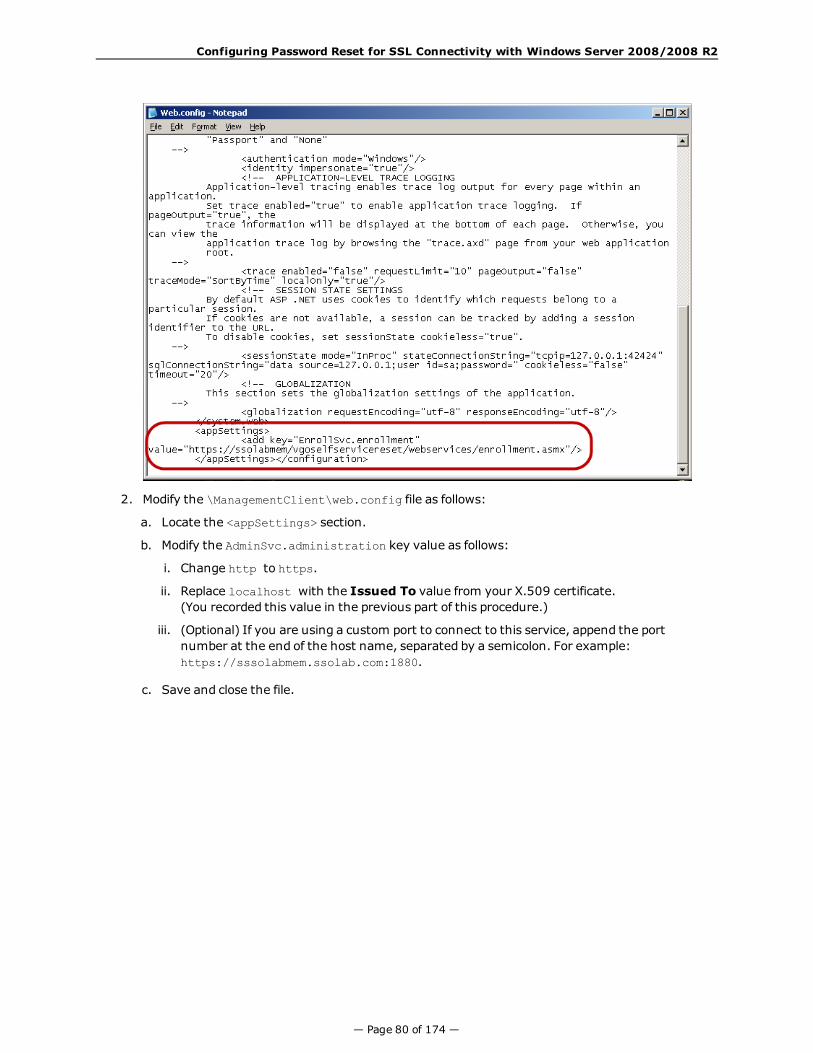
Configuring Password Reset for SSL Connectivity with Windows Server 2008/2008 R2
2. Modify the \ManagementClient\web.config file as follows:
a. Locate the <appSettings> section.
b. Modify the AdminSvc.administration key value as follows:
i. Change http to https.
ii. Replace localhost with the Issued To value from your X.509 certificate.(You recorded this value in the previous part of this procedure.)
iii. (Optional) If you are using a custom port to connect to this service, append the portnumber at the end of the host name, separated by a semicolon. For example:https://sssolabmem.ssolab.com:1880.
c. Save and close the file.
— Page 80 of 174 —

Oracle Enterprise Single Sign-On Suite Plus Installation and Setup Guide
3. Modify the \ResetClient\web.config file as follows:
a. Locate the <appSettings> section.
b. Modify the ResetSvc.PasswordReset key value as follows:
i. Change http to https.
ii. Replace localhost with the Issued To value from your X.509 certificate.(You recorded this value in the previous part of this procedure.)
iii. (Optional) If you are using a custom port to connect to this service, append the portnumber at the end of the host name, separated by a semicolon. For example:https://sssolabmem.ssolab.com:1880.
c. Save and close the file.
— Page 81 of 174 —

Configuring Password Reset for SSL Connectivity with Windows Server 2008/2008 R2
Step 3: Granting Password Reset Server Access to theWebServices Directory
1. Launch Microsoft IIS Manager if it is not already open.2. In the Connections pane on the left, expand the target machine node and drill down to and
select the Sites > Default Web Site > WebServices node.3. In theDefault Web Site Home pane in the center, double-click the IP Address and
Domain Restrictions icon.4. In the Actions pane on the right, click Add Allow Entry... .5. In the Add Allow Restriction Rule dialog that appears, do the following:
a. Select the Specific IP Address radio button.
b. Enter the IPv4 or IPv6 address of the target machine.
— Page 82 of 174 —

Oracle Enterprise Single Sign-On Suite Plus Installation and Setup Guide
c. ClickOK to save your changes and dismiss the dialog.
Step 4: Restricting Password Reset Connectivity to SSL Only
1. Launch Microsoft IIS Manager if it's not already open.2. In the Connections pane on the left, select the target machine node.3. Under the target machine node, drill down to and select the Sites > Default Web Site node.4. In theDefault Web Site Home pane in the center, double-click the SSL Settings icon.5. In the SSL Settings screen in the center pane, select the Require SSL check box and leave
the Client certificates option at its default value.
6. In the Actions pane on the right, click Apply to save your changes.
Step 5: Testing the New Connectivity Configuration
Using aWeb browser, access each of the Password Reset interface services using the new SSL-enabled URLs (i.e., using the https protocol header in place of http).
— Page 83 of 174 —

Configuring Password Reset for SSL Connectivity with Windows Server 2008/2008 R2
The URLs are as follows:
l EnrollmentClient: https://<new_host_name>:<new_port>/vGOSelfServiceReset/WebServices/Enrollment.asmx
l ManagementClient: https://<new_host_name>:<new_port>/vGOSelfServiceReset/WebServices/Administration.asmx
l ResetClient: https://<new_host_name>:<new_port>/vGOSelfServiceReset/WebServices/PasswordReset.asmx
If any of the URLs fails to load, or a certificate error is displayed, check your configuration, such asvirtual directory permissions and certificate options, and correct it if necessary, then try again.
— Page 84 of 174 —

Oracle Enterprise Single Sign-On Suite Plus Installation and Setup Guide
Installing Password Reset Client-Side Software
The Password Reset Client Installer provides the following functions:
l Supplies the components needed to run Password Reset through theWindows interface
l Sets the registry values that point the Password Reset client to theenrollment and reset service
l Offers or obliges workstation users to enroll in the password reset service if soconfigured
To install and configure the Password Reset client-side software, make sure you have created afunctioning installation of Password Reset server as described in Installing the Password ResetServer-Side Component.
To perform an unattended ("silent") installation of the Password Reset client, seeInstalling the Password Reset Client-Side Software from the Command Line.
Then, follow the instructions in Installing the Logon Manager Client-Side Software and do thefollowingwhen prompted by the installer:
1. When prompted to select between a Typical and Advanced installation, select Advanced.2. In the Advanced Setup screen, click Password Reset Client and select This feature, and
all subfeatures, will be installed on local hard drive. Make any other installationchoices as desired, then clickNext.
3. In the Setup Configuration Information screen, enter the Password Reset Server URLs:
When you have finished, clickNext.
— Page 85 of 174 —

Installing Password Reset Client-Side Software
4. Continue the installation process as prompted by the installer and described in Installing theLogon Manager Client-Side Software.
Installing Password Reset Language Packs
In order to install additional language packs after initial installation:
1. In the Windows control panel, launch Add/Remove Programs.2. Highlight Logon Manager and click the Change button.3. Navigate through the install wizard and click theModify button.4. Select the additional language packs that you want to install.5. Reboot as instructed and re-launch Add/Remove Programs to complete the additional lan-
guage installation.
Reverting to the Original Language Pack After Installing Another
To revert to the original language pack after you've installed another one:
1. Launch Add/Remove Programs andmodify the Logon Managerinstallation to set the appropriate language pack.
2. Reboot as instructed after the installation finishes.3. Repair the installation.
You must repair the installation after modifying it. Failure to do so will cause improperfunctionality of the GINA button.
Installing Language Packs at the Command Line
In order to install the various language packs, you must install Password Reset using commandline switches as illustrated below; otherwise the GINA stubwill not appear on localized operatingsystems. You install the desired language pack by adding the language name to the string thatfollows the ADDLOCAL switch.
Following is the minimum command line for the ADDLOCAL switch:
msiexec /i "Location of .msi" ADDLOCAL=Gina,VersionTracker,English,CheckEnrollment.x86_only,Release_Only
And following is an example of a command line to install silently (/q) with the German languagepack added:
msiexec /i "Location of .msi" /q ADDLOCAL=Gina,vgo_sspr_client,English,German,CheckEnrollment.x86_only,Release_Only
/i = Install
/q = Quiet installation
ADDLOCAL = Follow with options to install (listed below)
— Page 86 of 174 —

Oracle Enterprise Single Sign-On Suite Plus Installation and Setup Guide
ADDLOCAL Options
Gina
l Required for all operating systems prior to Windows 7 (Windows Vista is not supported)l Do not include for Windows 7
Required Items
l VersionTrackerl One of the following:
o CheckEnrollment.x86_only (32-bit operating systems)
o CheckEnrollment.x64_only (64-bit operating systems)
l One of the following:
o Release_Only (32-bit operating systems)
o Release_Only.x64 (64-bit operating systems)
For Installation with Windows Windows 7
l Vista_Only (32-bit)l Vista_Only.x64 (64-bit)
Installable Language Packs (always install English)l Brazilian Portuguesel Czechl Danishl Dutchl Englishl Finnishl Frenchl Germanl Greekl Hungarianl Italianl Japanesel Koreanl Norwegianl Polishl Portuguesel Romanianl Russianl Simplified Chinesel Slovakl Spanishl Swedishl Thai
— Page 87 of 174 —

Installing Password Reset Client-Side Software
l Traditional Chinesel Turkish
— Page 88 of 174 —
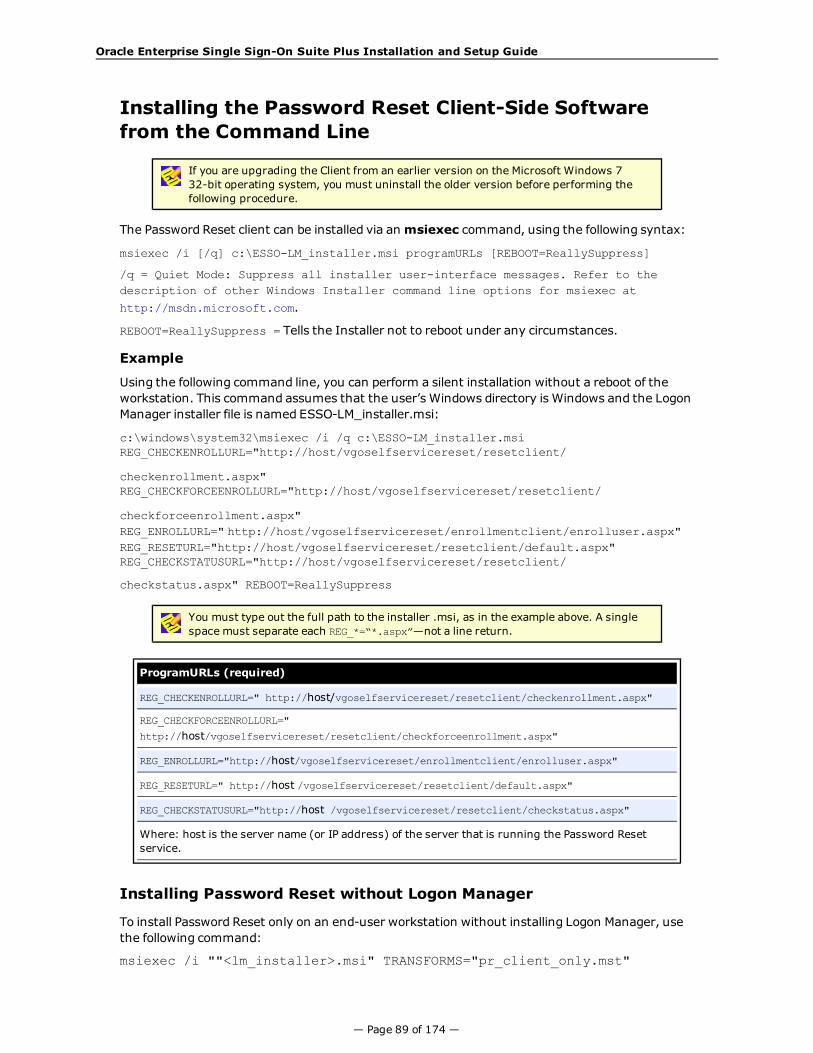
Oracle Enterprise Single Sign-On Suite Plus Installation and Setup Guide
Installing the Password Reset Client-Side Softwarefrom the Command Line
If you are upgrading the Client from an earlier version on the Microsoft Windows 732-bit operating system, you must uninstall the older version before performing thefollowing procedure.
The Password Reset client can be installed via anmsiexec command, using the following syntax:
msiexec /i [/q] c:\ESSO-LM_installer.msi programURLs [REBOOT=ReallySuppress]
/q = Quiet Mode: Suppress all installer user-interface messages. Refer to thedescription of other Windows Installer command line options for msiexec at
http://msdn.microsoft.com.
REBOOT=ReallySuppress = Tells the Installer not to reboot under any circumstances.
Example
Using the following command line, you can perform a silent installation without a reboot of theworkstation. This command assumes that the user’s Windows directory is Windows and the LogonManager installer file is named ESSO-LM_installer.msi:
c:\windows\system32\msiexec /i /q c:\ESSO-LM_installer.msiREG_CHECKENROLLURL="http://host/vgoselfservicereset/resetclient/
checkenrollment.aspx"REG_CHECKFORCEENROLLURL="http://host/vgoselfservicereset/resetclient/
checkforceenrollment.aspx"REG_ENROLLURL=" http://host/vgoselfservicereset/enrollmentclient/enrolluser.aspx"REG_RESETURL="http://host/vgoselfservicereset/resetclient/default.aspx"REG_CHECKSTATUSURL="http://host/vgoselfservicereset/resetclient/
checkstatus.aspx" REBOOT=ReallySuppress
You must type out the full path to the installer .msi, as in the example above. A singlespace must separate each REG_*=“*.aspx”—not a line return.
ProgramURLs (required)
REG_CHECKENROLLURL=" http://host/vgoselfservicereset/resetclient/checkenrollment.aspx"
REG_CHECKFORCEENROLLURL="
http://host/vgoselfservicereset/resetclient/checkforceenrollment.aspx"
REG_ENROLLURL="http://host/vgoselfservicereset/enrollmentclient/enrolluser.aspx"
REG_RESETURL=" http://host /vgoselfservicereset/resetclient/default.aspx"
REG_CHECKSTATUSURL="http://host /vgoselfservicereset/resetclient/checkstatus.aspx"
Where: host is the server name (or IP address) of the server that is running the Password Resetservice.
Installing Password Reset without Logon Manager
To install Password Reset only on an end-user workstation without installing Logon Manager, usethe following command:
msiexec /i ""<lm_installer>.msi" TRANSFORMS="pr_client_only.mst"
— Page 89 of 174 —

Installing the Password Reset Client-Side Software from the Command Line
Be sure to specify the full path and name to the installer file and the full path to the transform file.
— Page 90 of 174 —
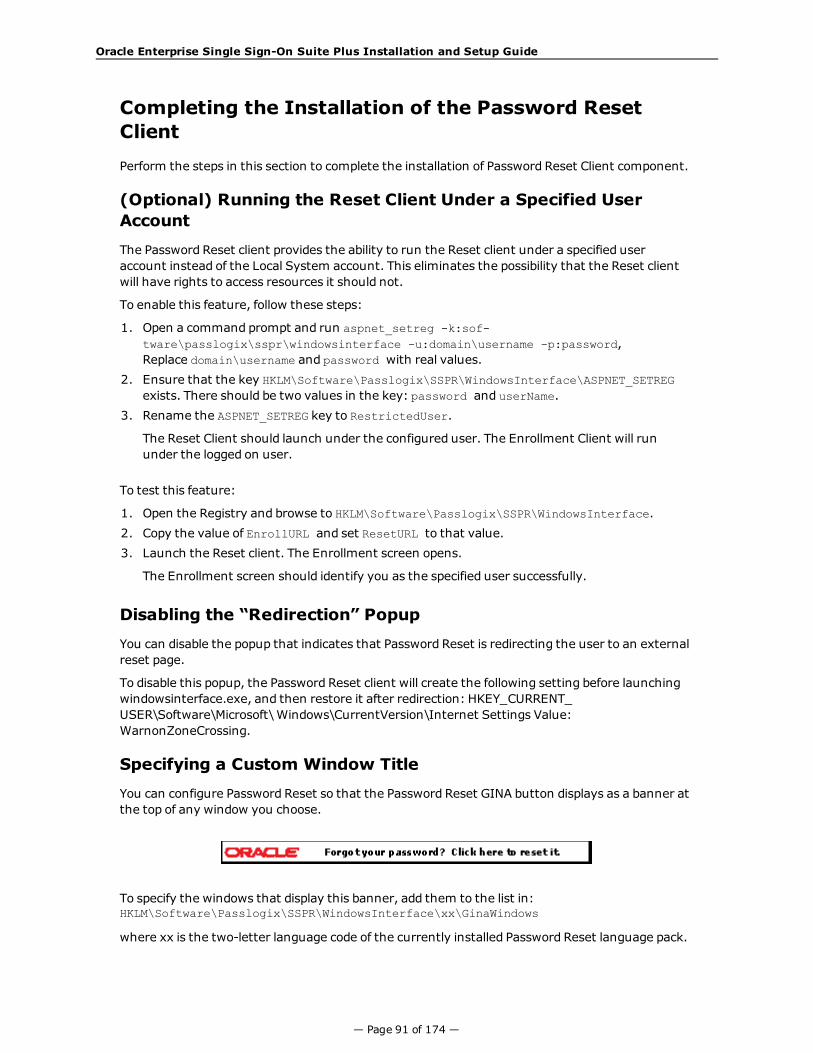
Oracle Enterprise Single Sign-On Suite Plus Installation and Setup Guide
Completing the Installation of the Password ResetClient
Perform the steps in this section to complete the installation of Password Reset Client component.
(Optional) Running the Reset Client Under a Specified UserAccount
The Password Reset client provides the ability to run the Reset client under a specified useraccount instead of the Local System account. This eliminates the possibility that the Reset clientwill have rights to access resources it should not.
To enable this feature, follow these steps:
1. Open a command prompt and run aspnet_setreg -k:sof-tware\passlogix\sspr\windowsinterface -u:domain\username -p:password,Replace domain\username and password with real values.
2. Ensure that the key HKLM\Software\Passlogix\SSPR\WindowsInterface\ASPNET_SETREGexists. There should be two values in the key: password and userName.
3. Rename the ASPNET_SETREG key to RestrictedUser.
The Reset Client should launch under the configured user. The Enrollment Client will rununder the logged on user.
To test this feature:
1. Open the Registry and browse to HKLM\Software\Passlogix\SSPR\WindowsInterface.2. Copy the value of EnrollURL and set ResetURL to that value.3. Launch the Reset client. The Enrollment screen opens.
The Enrollment screen should identify you as the specified user successfully.
Disabling the “Redirection” Popup
You can disable the popup that indicates that Password Reset is redirecting the user to an externalreset page.
To disable this popup, the Password Reset client will create the following setting before launchingwindowsinterface.exe, and then restore it after redirection: HKEY_CURRENT_USER\Software\Microsoft\Windows\CurrentVersion\Internet Settings Value:WarnonZoneCrossing.
Specifying a Custom Window Title
You can configure Password Reset so that the Password Reset GINA button displays as a banner atthe top of any window you choose.
To specify the windows that display this banner, add them to the list in:HKLM\Software\Passlogix\SSPR\WindowsInterface\xx\GinaWindows
where xx is the two-letter language code of the currently installed Password Reset language pack.
— Page 91 of 174 —
Completing the Installation of the Password Reset Client
Within this key, add a REG_SZ value for each window title that you want to have display thebanner. The value name will be WindowTitleX, where X is a sequence number starting from 1, andthe value data is the window title. For example:
l WindowTitle1=LogOn toWindowsl WindowTitle2=Unlock Computer
The window title must match exactly, including any leading or trailing white space.
Using Password Reset Client With a Custom Reset WebApplication
You can configure the Password Reset client in the absence of a Password Reset server installation.
Follow the instructions to install Password Reset on the client machine.
1. Set the ResetURL value to point to the custom reset Web application.2. Set the StatusURL to a resource that will return the success response. This forces Password
Reset to bypass the status check and display the ResetURL contents. See below for details.
The StatusURL setting should point to a resource (such as an HTML file) that contains thefollowing content:
<HTML>
<HEAD>
<TITLE>CHECKSTATUS</TITLE>
</HEAD>
<BODY>
GOOD SSPR STATUS
</BODY>
</HTML>
— Page 92 of 174 —

Oracle Enterprise Single Sign-On Suite Plus Installation and Setup Guide
Installing Provisioning Gateway
This section describes the steps necessary for installing Provisioning Gateway.It covers the following topics:
l Prerequisites for Installing Provisioning Gatewayl Upgrading an Existing Provisioning Gateway Installationl Installing the Provisioning Gateway Server-Side Componentl Completing the Installation of Provisioning Gateway
— Page 93 of 174 —

Prerequisites for Installing Provisioning Gateway
Prerequisites for Installing Provisioning Gateway
Before you install Provisioning Gateway, ensure the prerequisites listed in this section have beensatisfied.
Please refer to the latest release notes to find out about last-minute requirements orchanges that might affect your installation.
Prerequisites for Installing the Provisioning Gateway Client-SideComponent
l The Provisioning Gateway client-side component at the very minimum requires the followingsoftware to function:
o Internet Explorer 8.0 and above with 128-bit encryption or Mozilla Firefox 5.0 and above
o Microsoft® .NET Framework 2.0 (installed as part of the Provisioning Gateway setup)
o Microsoft Web Services Enhancements 3.0 (WSE 3.0) (installed as part of the ProvisioningGateway setup)
o In order for the Provisioning Gateway support for the Logon Manager Agent to function prop-erly, Logon Manager must be installed.
o If you are installing the optional command-line interface, you must install a Java runtimeenvironment version 1.6 or later on the target machine.
Prerequisites for Installing the Provisioning Gateway Server-Side Component
l In order to install the Provisioning Gateway server-side component, you must run the installeras a user with administrative privileges; otherwise, the installer will fail.
l Provisioning Gateway Server at the very minimum requires the following software to function:
o Microsoft Windows Server 2003/2003 R2, or Windows Server 2008/2008 R2.o Microsoft Internet Information Server version 5.0 or later (6.x is recommendedand is necessary if you are usingWindows Server 2008) Provisioning Gatewayuses the IISWeb server to provide a browser-based interface for user enrollment,general setup, and administrative tasks.
If you are installing Provisioning Gateway Server with IIS 7.0 running on WindowsServer 2008, you must configure IIS 7.0 to run the Provisioning Gateway Webapplication as described in Installing Provisioning Gateway Server on Windows Server2008 as well as complete the post-installation steps described in Completing theInstallation of Provisioning Gateway.
o Microsoft Active Directory®, Microsoft ADAM/AD-LDS, Oracle Directory ServerEnterprise Edition, Oracle Unified Directory, Oracle Virtual Directory, IBM LDAPDirectory, Oracle Internet Directory, Novell eDirectory Server.
If Active Directory or ADAM/AD-LDS is used, the anonymous account used in IIS musthave administrative privileges and the server must be joined to the domain.
o Microsoft SQL Server 2000, Microsoft SQL Server 2000 Desktop Engine (MSDE2000), Microsoft SQL Server 2005 Express Edition, or Microsoft SQL Server 2005
— Page 94 of 174 —
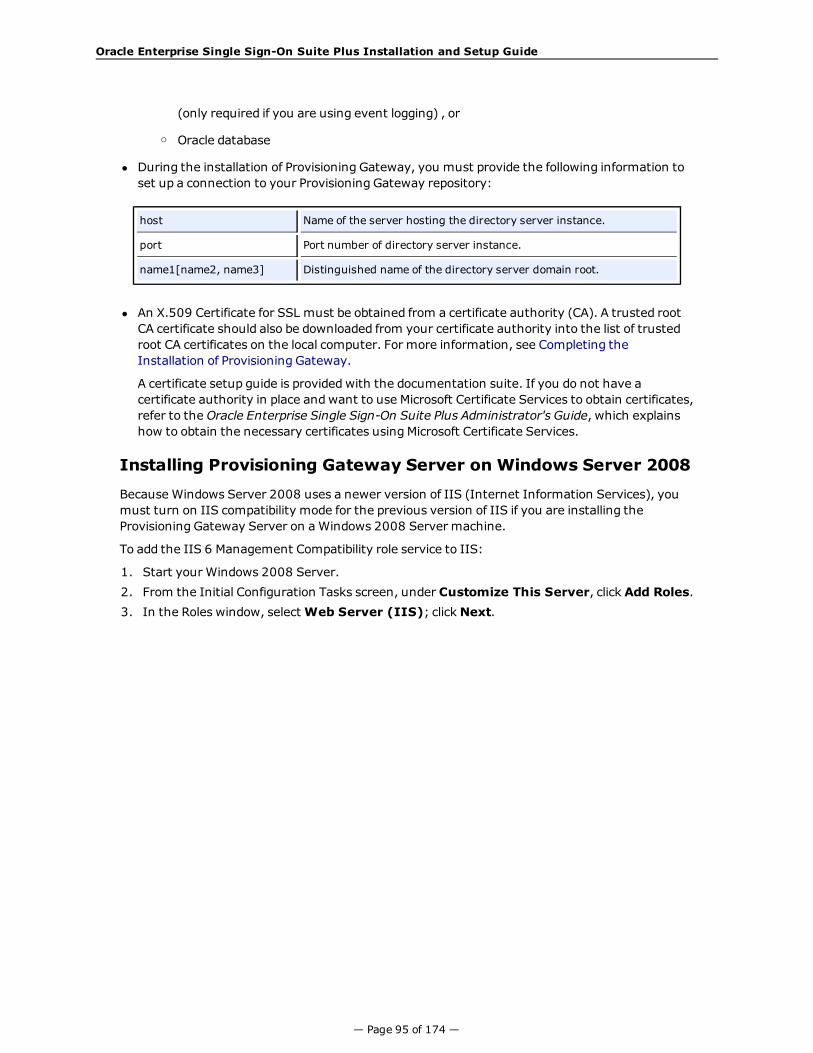
Oracle Enterprise Single Sign-On Suite Plus Installation and Setup Guide
(only required if you are using event logging) , or
o Oracle database
l During the installation of Provisioning Gateway, you must provide the following information toset up a connection to your Provisioning Gateway repository:
host Name of the server hosting the directory server instance.
port Port number of directory server instance.
name1[name2, name3] Distinguished name of the directory server domain root.
l An X.509 Certificate for SSL must be obtained from a certificate authority (CA). A trusted rootCA certificate should also be downloaded from your certificate authority into the list of trustedroot CA certificates on the local computer. For more information, see Completing theInstallation of Provisioning Gateway.
A certificate setup guide is providedwith the documentation suite. If you do not have acertificate authority in place andwant to use Microsoft Certificate Services to obtain certificates,refer to the Oracle Enterprise Single Sign-On Suite Plus Administrator's Guide, which explainshow to obtain the necessary certificates usingMicrosoft Certificate Services.
Installing Provisioning Gateway Server on Windows Server 2008
Because Windows Server 2008 uses a newer version of IIS (Internet Information Services), youmust turn on IIS compatibility mode for the previous version of IIS if you are installing theProvisioning Gateway Server on aWindows 2008 Server machine.
To add the IIS 6 Management Compatibility role service to IIS:
1. Start your Windows 2008 Server.2. From the Initial Configuration Tasks screen, under Customize This Server, click Add Roles.3. In the Roles window, selectWeb Server (IIS); clickNext.
— Page 95 of 174 —

Prerequisites for Installing Provisioning Gateway
4. In the Role services window, select theWindows Authentication service under Web Server> Security.
5. In the Role services window, scroll down and select IIS 6 Management Compatibility.
— Page 96 of 174 —

Oracle Enterprise Single Sign-On Suite Plus Installation and Setup Guide
6. ClickNext.7. From the Confirmation screen of the Add Roles wizard, click Install.8. After configuring IIS 6 Management Compatibility, install the Provisioning Gateway Server as
described in Installing the Provisioning Gateway Server-Side Component.
(Windows 2008 Server Only) Creating a Classic .NET ApplicationPool for Provisioning Gateway Server
Before installing, Provisioning Gateway, you must create a classic .NET application pool. You willmove the Provisioning Gateway Web application into this pool after installation.
1. Launch Microsoft IIS Manager.2. From the tree, select server_name > Application Pools.3. Right-click Application Pools and select Add Application Pool... from the drop-down menu.4. For the name of the new app pool, enter Classic .Net App Pool. From the Managed Pipeline
Mode field drop-down menu, select Classic.
For all Web Services using .NET and IIS, where .NET is installed before IIS isconfigured, you must run the following command after creating the classicapplication pool:
aspnet_regiis –i
The location of the aspnet_regiis tool is as follows:
l 32-bit systems: %WINDIR%\Microsoft.NET\Framework\v2.0.50727l 64-bit systems: %WINDIR%\Microsoft.NET\Framework64\v2.0.50727
— Page 97 of 174 —
Prerequisites for Installing Provisioning Gateway
Prerequisites for Unattended (“Silent”) Installations
In order to successfully install Provisioning Gateway in unattended ("silent")mode, the WindowsManagement Instrumentation (WMI) service must be running before the installer is executed.
To check whether the WMI service is running, and start it if necessary, do the following on eachtarget machine:
1. Open the System Management Console.2. Open the Services snap-in.3. Navigate to theWindows Management Instrumentation service and check its status and
startupmode.4. Depending on the status, do one of the following:
l If the status is Started, the WMI service is running; proceed to the nextsection.
l If the status is blank, check the service's startup type and start it as follows:
o If the startup type isDisabled, do the following:
1. Double-click the service.
2. In the dialog box that appears, change the startup type toManual or Automatic,as required by your environment.
3. Click Apply.
4. Click Start to start the service. The status changes to Started.
o If the startup type is not Disabled, do the following:
1. Double-click the service.
2. In the dialog box that appears, Click Start to start the service.
3. The status changes to Started.
4. ClickOK.
5. ClickOK to close the service properties dialog box.
— Page 98 of 174 —

Oracle Enterprise Single Sign-On Suite Plus Installation and Setup Guide
Upgrading an Existing Provisioning GatewayInstallation
If you are upgrading from an earlier version of Provisioning Gateway, perform the followingprocedures:
l Provisioning Gateway Server. Follow the instructions in Installing Provisioning Gatewaytoinstall Provisioning Gateway Server. After running the installer, reset Microsoft IIS and verifythat the anonymous service accounts are still assigned.
l Provisioning Gateway Agent. The Agent has been integrated into Logon Manager and isinstalled with it automatically. To upgrade, uninstall all previous versions of Provisioning Gate-way Agent, shut down the Logon Manager, then follow the instructions in Installing the LogonManager Client-Side Software. After running the installer. Restart Logon Manager when done.
— Page 99 of 174 —

Installing the Provisioning Gateway Server-Side Component
Installing the Provisioning Gateway Server-SideComponent
To install and configure the Provisioning Gateway Server:
1. Close all programs.2. Launch the ESSO-PG_Server.msi installer file.3. On the Welcome Panel, clickNext.4. On the Customer Agreement screen, enter your user name, organization name, and select
who to Install this application for:All Users orOnly for you. ClickNext.5. On the Setup Type screen, select Complete or Custom. Complete installs all program files.
Custom allows you to choose which program files are installed andwhere they are installed.Custom installations are only recommended for advanced users. ClickNext.
6. Provisioning Gateway is ready to be installed. Click Install. Wait for the installation to com-plete. When it is done, click Finish.
— Page 100 of 174 —

Oracle Enterprise Single Sign-On Suite Plus Installation and Setup Guide
(Optional) Installing the Client-Side ProvisioningGateway Command-Line Interface (CLI)
This installation procedure is optional. The Provisioning Gateway Client CLI SDK issupplied as an integration component for Provisioning Solutions.
This software requires that a Java runtime environment version 1.6 or later is installedon the target machine.
The Provisioning Gateway Server provides aWeb service that allows integration with other third-party provisioning systems. The Provisioning Gateway CLI is used to communicate with this Webservice. You can use it as a traditional scripting tool or, if you prefer, you can use the SDK library todevelopmore complex integration solutions and connectors for the Provisioning Gateway Server.
Complete the following procedure to install and configure the Provisioning Gateway CLI. For moreinformation on the CLI syntax and usage, refer to the Provisioning Gateway CLI Guide.
1. Close all programs.2. Launch the ESSO-PG_ClientCLI.msi installer file.3. On the Welcome Panel, clickNext.4. On the Customer Agreement panel, enter your user name, organization name, and select who
to Install this application for: All Users orOnly for you. ClickNext.5. The Setup Type panel appears. Select Complete or Custom. Complete installs all program
files;Custom allows you to choose what program files are installed and the location. Custominstallations are only recommended for advanced users. To install the Java CLI, you mustchoose the custom panel. Installation choices for the Java CLI are JDK 1.4 or 1.5.
6. Select the proper setup options and clickNext.7. Provisioning Gateway is ready to be installed. Click Install.8. When the installation is complete, click Finish.
— Page 101 of 174 —

Completing the Installation of Provisioning Gateway
Completing the Installation of Provisioning Gateway
This section describes the tasks necessary to create a fully functional Provisioning Gatewaydeployment. It covers the following topics:
l (Windows Server 2008 Only) Creating an Application Pool for Provisioning Gatewayl Setting the CycleInterval Registry Keyl Granting Provisioning Rights to Domain Usersl Configuring Syslogl Creating or Identifying a User Account for Anonymous Logonl Granting the IIS Anonymous Account Access to ADAM/AD-LDSl Configuring Provisioning Gateway for SSL Connectivity
(Windows Server 2008 Only) Creating an Application Pool forProvisioning Gateway
After installing Provisioning Gateway on Windows Server 2008 and above, you must move theProvisioning Gateway Console and Provisioning Gateway Service Web applications into the classic.NET application pool you created before the installation.
1. Launch Microsoft IIS Manager.2. In the tree, navigate to server_name >Sites>Default Web Site and right-click v-GO PM
Console.3. SelectManage Application >Advanced Settings. In the Advanced Settings window, select
Application Pool. In the Select Application Pool window, select Classic .NET AppPool.
— Page 102 of 174 —
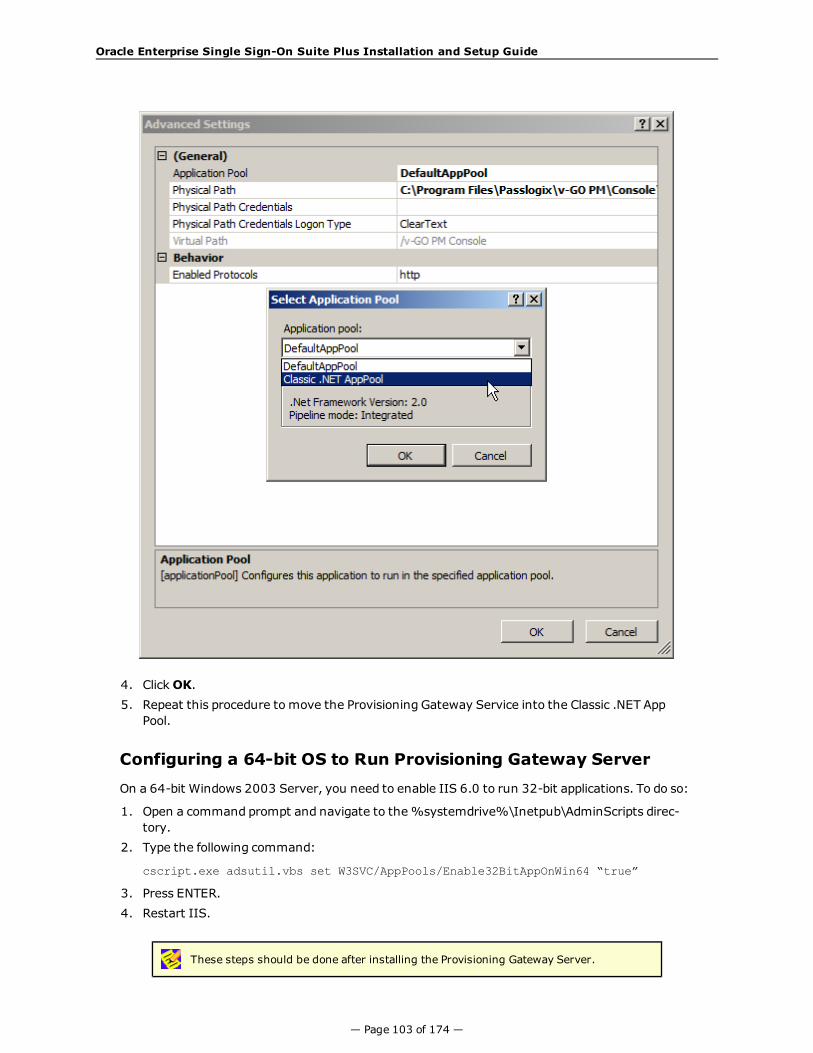
Oracle Enterprise Single Sign-On Suite Plus Installation and Setup Guide
4. ClickOK.5. Repeat this procedure to move the Provisioning Gateway Service into the Classic .NET App
Pool.
Configuring a 64-bit OS to Run Provisioning Gateway Server
On a 64-bit Windows 2003 Server, you need to enable IIS 6.0 to run 32-bit applications. To do so:
1. Open a command prompt and navigate to the%systemdrive%\Inetpub\AdminScripts direc-tory.
2. Type the following command:
cscript.exe adsutil.vbs set W3SVC/AppPools/Enable32BitAppOnWin64 “true”
3. Press ENTER.4. Restart IIS.
These steps should be done after installing the Provisioning Gateway Server.
— Page 103 of 174 —

Completing the Installation of Provisioning Gateway
On a 64-bit Windows 2008 Server, you must enable running 32-bit applications for the Classic.NET Application Pool:
1. Open Internet Information Services (IIS) Manager.2. Click Application Pools.3. Right-click Classic .NET AppPool and select Advanced Settings...4. Change "Enable 32-bit Applications" settings to True and clickOK.
5. Restart IIS.
Granting the Required Permissions to the PMSERVICE Account
You must grant the permissions required by Provisioning Gateway to each repository containerholding user data to the PMSERVICE account as follows:
1. In the repository, navigate to the Logon Manager configuration data container (usually namedSSOConfig) and open its permission dialog, then do the following:
— Page 104 of 174 —

Oracle Enterprise Single Sign-On Suite Plus Installation and Setup Guide
a. Select This object and all child objects from the Apply onto: drop-down list.
b. Grant the PMSERVICE account read-only access to the SSOConfig container.
2. Navigate to theUsers container and open its permissions dialog and do the following:
a. Select User Objects from the Apply Onto: drop-down list.
b. Grant the PMSERVICE account the followingALLOW privileges:
l Create vGOConfig Objects
l Delete vGOConfig Objects
l Create vGOUserData Objects
l Delete vGOUserData Objects
l List Contents
l Read All Properties
l Read Permissions
3. Grant the PMSERVICE account the Full Control privilege over vGOConfig objects:
4. Grant the PMSERVICE account the Full Control privilege over vGOLocatorClass objects:
— Page 105 of 174 —
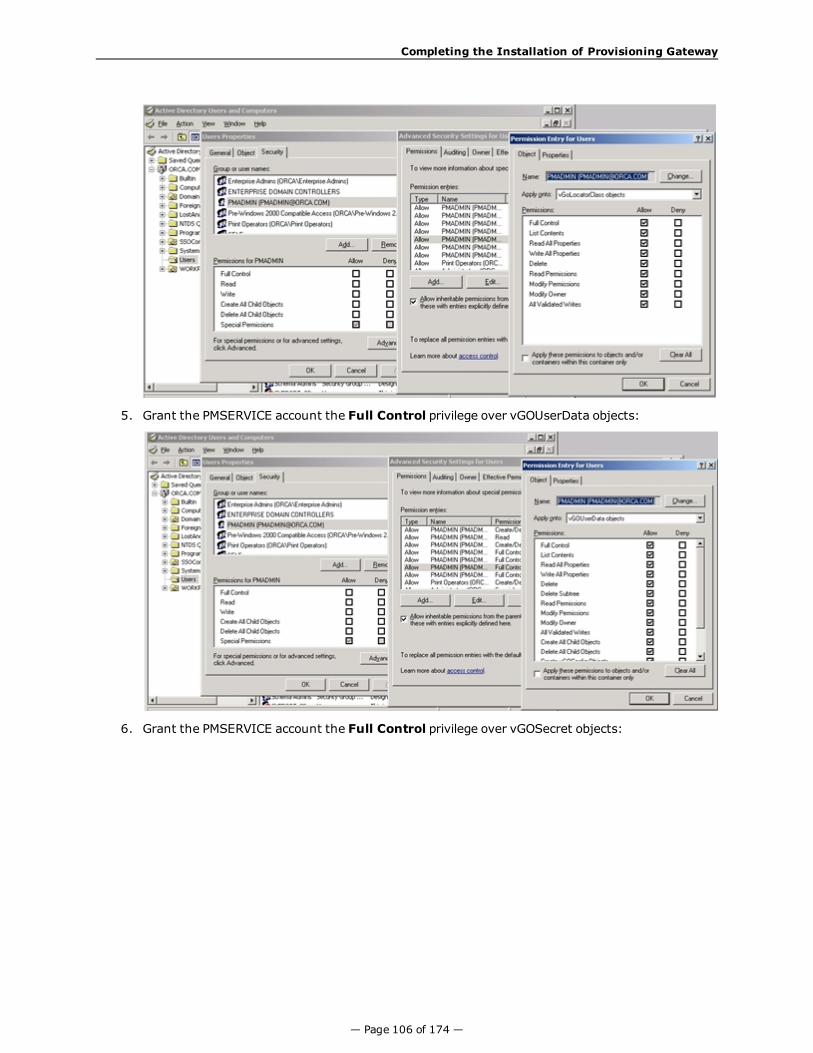
Completing the Installation of Provisioning Gateway
5. Grant the PMSERVICE account the Full Control privilege over vGOUserData objects:
6. Grant the PMSERVICE account the Full Control privilege over vGOSecret objects:
— Page 106 of 174 —

Oracle Enterprise Single Sign-On Suite Plus Installation and Setup Guide
Setting the CycleInterval Registry Key
In order for Provisioning Gateway to function properly, the Provisioning Gateway Agent mustsynchronize to retrieve the provisioning instructions from the directory.
When you deploy Provisioning Gateway, you must decide on the synchronization interval. TheCycleInterval registry key is used to force synchronization to occur on a regular interval. If this isnot set to a non-zero value, synchronization only occurs upon some user action. This is not thedesired behavior with Provisioning Gateway. Oracle recommends that this key be set to a value, forexample, 15 minutes. This setting would guarantee that the provisioning instructions are pulleddown from the directory within 15 minutes (or whatever interval is set) of when they are putthere by the Provisioning Gateway Server.
The CycleInterval registry key can be set through the Oracle Enterprise Single Sign-OnAdministrative Console:
1. Open the Oracle Enterprise Single Sign-On Administrative Console by clickingStart>Pro-grams > Oracle > Oracle Enterprise Single Sign-On Administrative Console.
2. Expand Logon Manager > Global Agent Settings, expand Live, and click Syn-chronization.
3. Set the Interval for automatic re-sync setting to the desired value.4. Click Tools >Write Global Agent Settings to HKLM.5. The Apply Settings dialog opens. Click Yes.
— Page 107 of 174 —
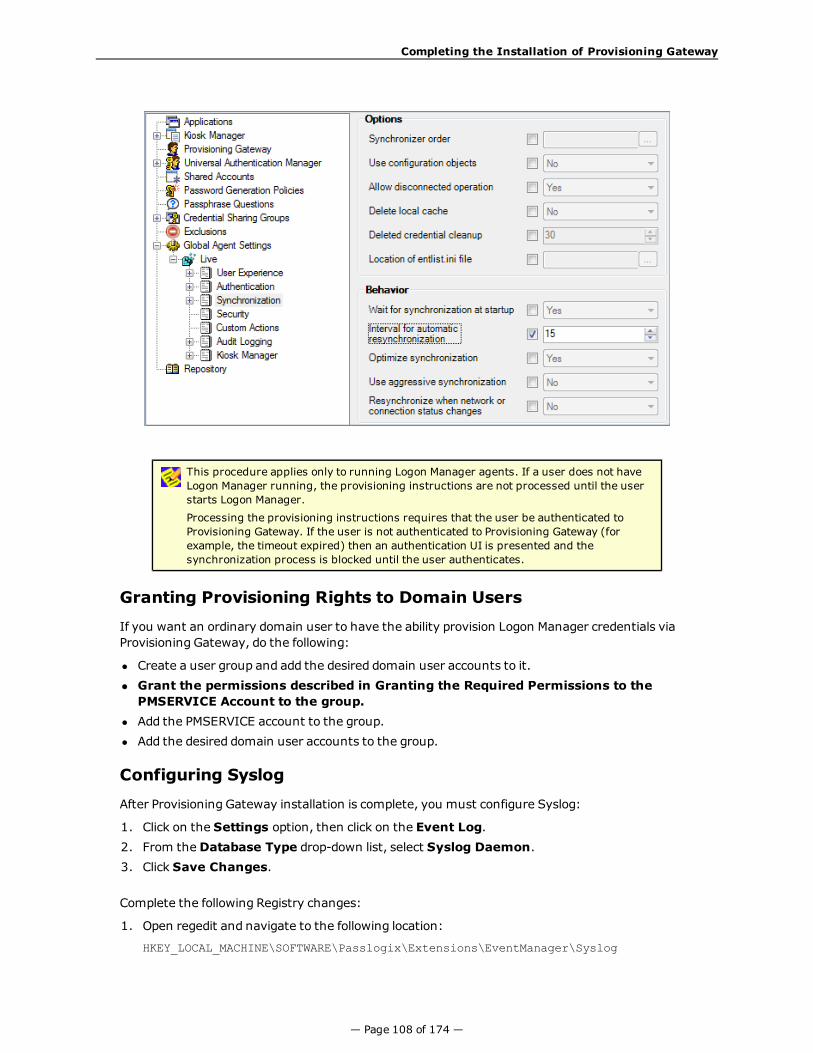
Completing the Installation of Provisioning Gateway
This procedure applies only to running Logon Manager agents. If a user does not haveLogon Manager running, the provisioning instructions are not processed until the userstarts Logon Manager.Processing the provisioning instructions requires that the user be authenticated toProvisioning Gateway. If the user is not authenticated to Provisioning Gateway (forexample, the timeout expired) then an authentication UI is presented and thesynchronization process is blocked until the user authenticates.
Granting Provisioning Rights to Domain Users
If you want an ordinary domain user to have the ability provision Logon Manager credentials viaProvisioning Gateway, do the following:
l Create a user group and add the desired domain user accounts to it.l Grant the permissions described in Granting the Required Permissions to thePMSERVICE Account to the group.
l Add the PMSERVICE account to the group.l Add the desired domain user accounts to the group.
Configuring Syslog
After Provisioning Gateway installation is complete, you must configure Syslog:
1. Click on the Settings option, then click on the Event Log.2. From theDatabase Type drop-down list, select Syslog Daemon.3. Click Save Changes.
Complete the following Registry changes:
1. Open regedit and navigate to the following location:
HKEY_LOCAL_MACHINE\SOFTWARE\Passlogix\Extensions\EventManager\Syslog
— Page 108 of 174 —

Oracle Enterprise Single Sign-On Suite Plus Installation and Setup Guide
2. Enter the IP address of your Syslog server in the RemoteAddress key.
If you are using a non-standard Syslog port, enter the correct port number of yourSyslog server in the RemotePort key.
Creating or Identifying a User Account for Anonymous Logon
You must create or identify a dedicated Anonymous User account through which ProvisioningGateway users and administrators access Provisioning Gateway Web Services. This AnonymousUser account should be amember of the Administrators group.
Because the default Anonymous User account in IIS, IUSR_MACHINE_NAME, is not amember of the Administrator group, you must create or choose a domain user accountthat is an Administrator; this will allow the account to perform the following tasks:l Change which Web service account to use from the management consolel Read from and write to the directory service (if Active Directory or ADAM/AD-LDS)l Write to the local-machine registry IHKLM).
To create a new user account or assign Administrator rights to an existing account, usethe Active Directory Users and Computers console (for an Active Directory domain) orthe Computer Management console (for non-Active Directory domains)
The user account you create or choose is specified as the Anonymous User dialog of the Servicestool during this step.
If you are using Windows Server 2008
1. Launch the Microsoft IIS Manager.2. In the left-hand tree, drill down to<Server>> Sites > Default Web Site and select the Pro-
visioning Gateway Console site node.3. In the IIS section of the center pane, double-click Authentication.4. In the Authentication pane, right-click Anonymous Authentication and select Edit.5. In the dialog box that appears, select Specific User and click Set.6. In the dialog box that appears, enter the name of the anonymous access user account in the
<DOMAIN>\<user> form, and the appropriate password, then clickOK.7. ClickOK in the Edit Anonymous Access… dialog to dismiss it.8. Repeat steps 2-7 for the Provisioning Gateway Service site.9. When you have finished, restart Microsoft IIS to apply your changes.
If you are using Windows Server 2003
1. Launch the Microsoft IIS Manager.2. Locate the Provisioning Gateway Console node in the tree, right-click on it, and click Prop-
erties.3. Click theDirectory Security tab and click the Edit button next toAnonymous Access4. Mark the Anonymous Access checkbox and enter the username and password of the anony-
mous user. The anonymous user must have local administrative access.
By default, the Provisioning Gateway Management Console is not restricted. Any userwith a credential in the backend storage can log in. If you want to restrict access to aparticular group, please see the Additional Security Settings in the Provisioning GatewayAdministrator Guide.
— Page 109 of 174 —

Completing the Installation of Provisioning Gateway
Granting the IIS Anonymous Account Access to ADAM/AD-LDS
This step only applies to ADAM/AD-LDS users. Use the account chosen in Step 4 above.
1. Launch the ADAM/AD-LDS command line interface.2. Enter:
dsacls [\\SERVER:PORT\DISTINGUISHED_NAME] /g [USER]:ga /i:t"
For example:
dsacls \\localhost:50000\ou=pm,dc=passlogix,dc=com /g PLX\PMWeb:ga /i:t
3. To verify that the account was given access, type:
dsacls \\SERVER:PORT\DISTINGUISHED_NAME
The output shows the security information for the directory object. The Anonymous Accountshould appear in the list with full access.
Configuring Provisioning Gateway for SSL Connectivity
Before configuring Provisioning Gateway for SSL connectivity, you must obtain an X.509Certificate from a trusted certificate authority. This trusted CAmust be installed in the list oftrusted Root CAs.
The certificate must be valid for the current date andmust contain the name of the Web site(machine name).
The following instructions assume that these certificates are available at known locations.
The following articles from the Microsoft Web site can be referred to for information oninstalling certificates and setting up SSL:
"How to: Obtain an X.509 Certificate” http://msdn2.microsoft.com/en-us/library/ms819929.aspx
“How to: Set Up SSL on a Web Server” http://msdn2.microsoft.com/en-us/library/aa302411.aspx
If you use Microsoft Certificate Services to obtain the X.509 certificate, choose a ServerAuthentication Certificate. Also, enable theMark keys as exportable and Use localmachine store options under the Key Options section.
1. Go to Control Panel > Internet Information Services. Right-clickDefault Web Site.Select Properties.
— Page 110 of 174 —

Oracle Enterprise Single Sign-On Suite Plus Installation and Setup Guide
2. Click theDirectory Security tab and under Secure Communications, click Server Cer-tificate.
— Page 111 of 174 —
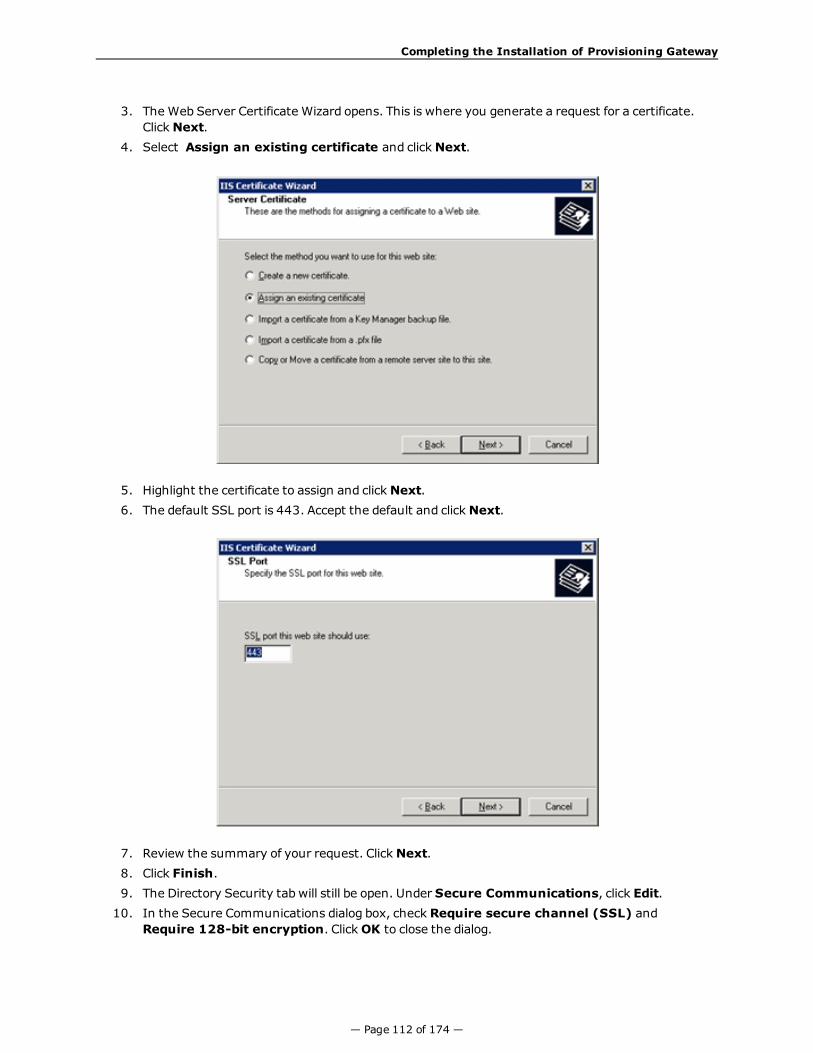
Completing the Installation of Provisioning Gateway
3. The Web Server Certificate Wizard opens. This is where you generate a request for a certificate.ClickNext.
4. Select Assign an existing certificate and clickNext.
5. Highlight the certificate to assign and clickNext.6. The default SSL port is 443. Accept the default and clickNext.
7. Review the summary of your request. ClickNext.8. Click Finish.9. The Directory Security tab will still be open. Under Secure Communications, click Edit.10. In the Secure Communications dialog box, check Require secure channel (SSL) and
Require 128-bit encryption. ClickOK to close the dialog.
— Page 112 of 174 —

Oracle Enterprise Single Sign-On Suite Plus Installation and Setup Guide
11. On the Internet Information Services Tree (see screen following step 1), select ProvisioningGateway Console. Right-click and select Properties. To enable SSL for the Console, repeatsteps 2 through 10. The next two steps ensure that the Console can communicate with theWeb service.
12. Select the ASP.NET tab (on the Provisioning Gateway Console Properties dialog box). Verifythat the ASP.NET version is set to 2.0.x. (If it is not set to 2.0, change the setting, then clickApply). Click Edit Configuration.
— Page 113 of 174 —

Completing the Installation of Provisioning Gateway
13. Under Application Settings, select localhost.UP and click Edit.
14. In the Value field, change the prefix of the URL to https. The console will now communicateover SSL with the Web service.
— Page 114 of 174 —

Oracle Enterprise Single Sign-On Suite Plus Installation and Setup Guide
Installing Universal Authentication Manager
This section describes the steps necessary for installing Universal Authentication Manager.
It covers the following topics:
l Prerequisites for Installing Universal Authentication Managerl Upgrading an Existing Universal Authentication Manager Installationl Installing the Universal Authentication Manager Client-Side Softwarel Completing the Installation of Universal Authentication Manager
— Page 115 of 174 —

Prerequisites for Installing Universal Authentication Manager
Prerequisites for Installing Universal AuthenticationManager
Before you install Universal Authentication Manager, ensure the prerequisites listed in this sectionhave been satisfied.
Prepare the Universal Authentication Manager Repository
Before installing Universal Authentication Manager in enterprise mode, you must prepare yourMicrosoft Active Directory repository for use with Universal Authentication Manager as described inPreparing the Universal Authentication Manager Repository. Microsoft ADAM/AD-LDS is notsupported.
Prerequisites for Universal Authentication Manager Logon Methods
Universal Authentication Manager requires and supports various third-party software, hardware,andmiddleware for the logon methods. The general prerequisites are listed below. For a detailedlist of supported products and versions for this release, refer to the Oracle Enterprise Single Sign-On Suite Plus Release Notes.
Prerequisites for Using Smart Cards
The following third-party software and hardware components are required to use smart cards withUniversal Authentication Manager:
l Supported smart cardmiddleware software (PKCS#11, MiniDriver/Base CSP, .NET)l Supported smart card readers and driversl Supported smart cardsl Each cardmust have an embedded serial number.l If using Smart Card PIN mode, each cardmust have a valid digital certificate and a key pair,which can be generated either by third-party tools or Universal Authentication Manager. Oraclerecommends using the method that conformsmore closely to your organization's security pol-icies. Cards without a valid certificate and key pair can only be usedwith a Universal Authen-tication Manager-generated PIN.
To have Universal Authentication Manager generate a key pair, you must configure it todo so via Universal Authentication Manager registry settings, as described in the OracleEnterprise Single Sign-On Universal Authentication Manager Administrator's Guide.Universal Authentication Manager does not generate digital certificates and one is notrequired in such scenario.
l Your card's middleware must conform to the Microsoft Base CSP standard or be both fullyPKCS#11-compliant and provide a CSPmodule.
l If usingWindows XP andMicrosoft Base CSP-compliant middleware, the Microsoft Base CSPframework must be installed.
l Sagem smart cards are not supported in this release of Universal Authentication Manager.
— Page 116 of 174 —

Oracle Enterprise Single Sign-On Suite Plus Installation and Setup Guide
After the smart cardmiddleware is installed, you must merge the appropriate registry file with it.The registry files are available in the Universal Authentication Manager installation folder in the/SmartCard subfolder. Double-click the registry file to merge it. The following table displays theregistry file for each supported smart card:
Card Family/Type Middleware Registry File
RSA smart card 5200 PKCS11 RSA Authentication Client2.0
smart_providers_pkcs11_ rsa.reg
NetMaker Net iD - CardOS 1 PKCS11 NetMaker Net iD 4.6 smart_providers_pkcs11_ netid.reg
ORGA JCOP21 v2.2 PKCS11 SafeSign/RaakSignStandard 3.0.23
smart_providers_pkcs11_safesign.reg
Oberthur ID-ONE Cosmo PKCS11 SafeSign/RaakSignStandard 3.0.23
smart_providers_pkcs11_safesign.reg
Athena IDProtect PKCS11 SafeSign/RaakSignStandard 3.0.23
smart_providers_pkcs11_safesign.reg
Athena ASECard Crypto PKCS11 Athena ASECard Crypto4.33
smart_providers_pkcs11_athena.reg
HID Crescendo 700 PKCS11 HID RaakSign Standard 2.3 smart_providers_pkcs11_raaksign.reg
Gemalto Cyberflex 64K (v2c)SPE Required / SPE Optional
PKCS11 Gemalto Access Client 5.5
Xiring CCID Driver version1.00.0002 or later / XISIGNreader
Gemalto PC-PinPad version4.0.7.5 or later / PC PinPadreader
smart_providers_pkcs11_gemalto.reg
IBM JCOP21id PKCS11 SafeSign Identity Client2.2.0
smart_providers_pkcs11_safesign.reg
DigiSign JCOP with MyEIDApplet
PKCS11 Fujitsu mPollux DigiSignClient 1.3.2-34 (1671)
smart_providers_pkcs11_fujitsu.reg
— Page 117 of 174 —

Prerequisites for Installing Universal Authentication Manager
Card Family/Type Middleware Registry File
Oberthur ID-One Cosmo 64v5.2D Fast ATR with PIVapplication SDK
PKCS11 ActivIdentity ActivClient 6.1 smart_providers_pkcs11_actividentity.reg
Cyberflex 64K PKCS11 Gemalto Access Client 5.5 smart_providers_pkcs11_gemalto.reg
HID Crescendo 200 MS BaseCSP/MiniDriver
HID Global MiniDriver forMS Base smart card CSP
smart_providers_basecsp.reg
Gemalto .NET v2+ MS BaseCSP/MiniDriver
Gemalto MiniDriver forMicrosoft Windows XP
smart_providers_basecsp.reg
Oberthur ID-ONE Cosmo MS BaseCSP/MiniDriver
Oberthur ID-ONE MiniDriverfor MS Base smart card CSP
smart_providers_basecsp.reg
Athena ASECard Crypto ILM MS BaseCSP/MiniDriver
Athena ASECard Crypto ILMMiniDriver for MS Basesmart card
smart_providers_basecsp.reg
Prerequisites for Using Proximity Cards
The following third-party hardware components are required to use Proximity Cards with UniversalAuthentication Manager.
l Supported Proximity Card readers and driversl Supported Proximity or Contactless Cards and tokens
Prerequisites for Using Fingerprint Readers
The following third-party hardware components are required to use a fingerprint reader withUniversal Authentication Manager.
l Supported fingerprint readers and driversl For the Fingerprint logon method, BIO-key BSP version 1.10 must be installed.
— Page 118 of 174 —
Oracle Enterprise Single Sign-On Suite Plus Installation and Setup Guide
Prerequisites for Unattended (“Silent”) Installations
In order to successfully install Universal Authentication Manager in unattended ("silent")mode,the Windows Management Instrumentation (WMI) service must be running before the installer isexecuted.
To check whether the WMI service is running, and start it if necessary, do the following on eachtarget machine:
1. Open the System Management Console.2. Open the Services snap-in.3. Navigate to theWindows Management Instrumentation service and check its status and
startupmode.4. Depending on the status, do one of the following:
l If the status is Started, the WMI service is running; proceed to the nextsection.
l If the status is blank, check the service's startup type and start it as follows:
o If the startup type isDisabled, do the following:
1. Double-click the service.
2. In the dialog box that appears, change the startup type toManual or Automatic,as required by your environment.
3. Click Apply.
4. Click Start to start the service. The status changes to Started.
o If the startup type is not Disabled, do the following:
1. Double-click the service.
2. In the dialog box that appears, Click Start to start the service.
3. The status changes to Started.
4. ClickOK.
5. ClickOK to close the service properties dialog box.
Configuring Universal Authentication Manager forSynchronization with a Repository
Before completing the procedures in this section, note that:
l Oracle recommends that you install Universal Authentication Manager in local mode and switchit to enterprise (synchronization) mode (as described in the Oracle Enterprise Single Sign-OnUniversal Authentication Manager Administrator's Guide) only after you have prepared therepository and configured synchronization settings. Otherwise, Universal AuthenticationManager data structures may not be correctly created or permissions correctly set within therepository.
l When deploying Universal Authentication Manager in enterprise mode, users must not enroll inany logon methods until synchronization with the repository has been properly configured andtested. Otherwise, enrollment data will be lost.
l Only Microsoft Active Directory is supported as a repository.
— Page 119 of 174 —

Prerequisites for Installing Universal Authentication Manager
In order to allow Universal Authentication Manager to centrally store andmanage policies andenrollment data, you must prepare an Active Directory-based repository and configure UniversalAuthentication Manager for synchronization with that repository by performing the followingtasks:
l Create a Universal Authentication Manager Service Accountl Extend the Schemal Enable Data Storage Under User Objectsl Initialize Universal Authentication Manager Storagel Configure the Universal Authentication Manager Synchronizer
When assigning user groups, keep the following in mind:
l User groups used should be in the same domain,l Use security groups, not distribution groups,l Universal Authentication Manager will only support a single Active Directory domain.
Preparing the Repository when Logon Manager is Already Deployed
If Logon Manager is already installed and synchronizing with your Active Directory-basedrepository, Universal Authentication Manager will be sharing Logon Manager's repository containerto store its own policies and settings. In such cases, you do not need to extend the schema orenable data storage under user objects. Instead, complete the following steps:
l Complete the steps in Initializing Universal Authentication Manager Storage.l Complete the steps in Configuring the Universal Authentication Manager Synchronizer.
— Page 120 of 174 —

Oracle Enterprise Single Sign-On Suite Plus Installation and Setup Guide
Creating a Universal Authentication Manager Service Account
In order for Universal Authentication Manager to read andwrite data in the repository, you mustgive it the privileges to do so. This is accomplished by creating a service account that UniversalAuthentication Manager uses to interact with its repository. This account should be a standarddomain account (member of Domain Users); no other permissions are necessary.
1. On the workstation that will serve as your domain controller, launch Active Directory Usersand Computers.
2. Right-click in the Users container and select New > User. The User account is a regularmember of the Domain Users group.
3. Enter a name for the user or group account (for this example, the name is uamservice) andclickNext>.
— Page 121 of 174 —
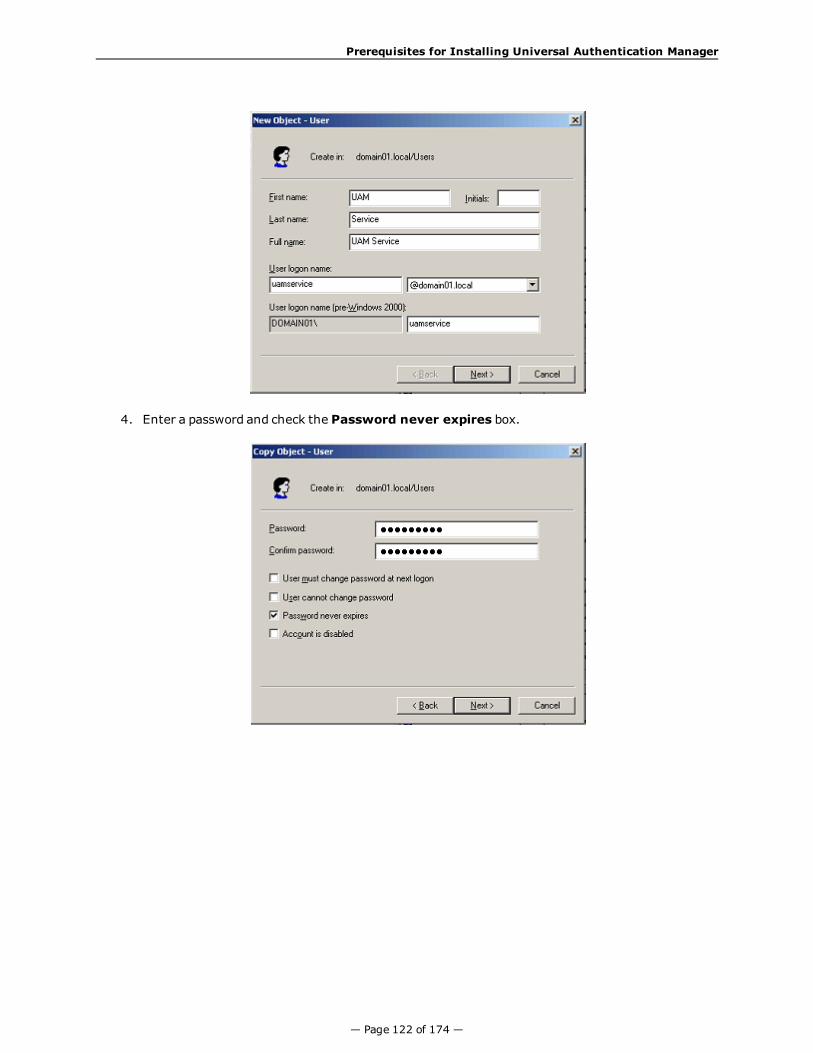
Prerequisites for Installing Universal Authentication Manager
4. Enter a password and check the Password never expires box.
— Page 122 of 174 —
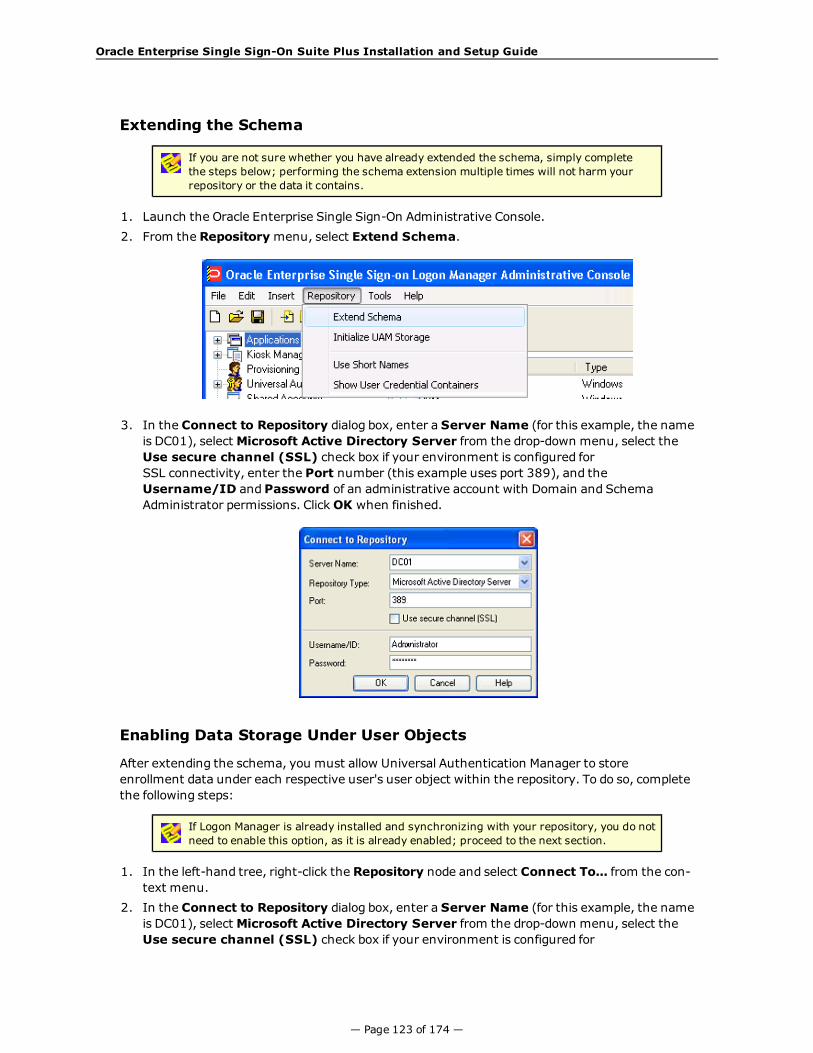
Oracle Enterprise Single Sign-On Suite Plus Installation and Setup Guide
Extending the Schema
If you are not sure whether you have already extended the schema, simply completethe steps below; performing the schema extension multiple times will not harm yourrepository or the data it contains.
1. Launch the Oracle Enterprise Single Sign-On Administrative Console.2. From the Repositorymenu, select Extend Schema.
3. In the Connect to Repository dialog box, enter a Server Name (for this example, the nameis DC01), selectMicrosoft Active Directory Server from the drop-down menu, select theUse secure channel (SSL) check box if your environment is configured forSSL connectivity, enter the Port number (this example uses port 389), and theUsername/ID and Password of an administrative account with Domain and SchemaAdministrator permissions. ClickOK when finished.
Enabling Data Storage Under User Objects
After extending the schema, you must allow Universal Authentication Manager to storeenrollment data under each respective user's user object within the repository. To do so, completethe following steps:
If Logon Manager is already installed and synchronizing with your repository, you do notneed to enable this option, as it is already enabled; proceed to the next section.
1. In the left-hand tree, right-click the Repository node and select Connect To... from the con-text menu.
2. In the Connect to Repository dialog box, enter a Server Name (for this example, the nameis DC01), selectMicrosoft Active Directory Server from the drop-down menu, select theUse secure channel (SSL) check box if your environment is configured for
— Page 123 of 174 —

Prerequisites for Installing Universal Authentication Manager
SSL connectivity, enter the Port number (this example uses port 389), and theUsername/ID and Password of an administrative account with Domain and SchemaAdministrator permissions. ClickOK when finished.
3.
4. From the Repositorymenu, select Enable Storing Credentials Under User Object.5. In the prompt that appears, clickOK.6. In the confirmation dialog that appears, clickOK to dismiss it.
Initializing Universal Authentication Manager Storage
1. After successfully extending the schema, return to the Repository menu and select InitializeUAM Storage.
2. From the drop-down menu, select the server that you just created. The other fields are filled inautomatically.
3. ClickOK.
— Page 124 of 174 —

Oracle Enterprise Single Sign-On Suite Plus Installation and Setup Guide
4. In the Select User or Groupwindow, start typing the name of your service account, then clickCheck Names. The service account name is filled in automatically.
5. ClickOK andwait for the success message.
The data structures have now been created and the required permissions set. For moreinformation on what's done in the repository during this step, see the next section.
Once the Universal Authentication Manager service account has been created, it can also beconfigured manually or automatically on multiple end-user machines using the command-line tool DeployTool.exe. For more information, see the Oracle Enterprise Single Sign-OnUniversal Authentication Manager Administrator's Guide.
About The Universal Authentication Manager Repository Data Structuresand Permissions
When you invoke the Initialize UAM Storage command described earlier, UniversalAuthentication Manager does the followingwithin your repository:
1. Modifies the schema to ensure that vgoUser and vgoConfig classes may be placed inside Con-tainer objects.
2. Builds the default container structure "Program Data/Passlogix/UAM" with subcontainers "Pol-icies" and "Index" as shown below:
— Page 125 of 174 —

Prerequisites for Installing Universal Authentication Manager
Never manually modify the contents of the index and policies containers.
The containers can be named differently if your environment requires so; however, you willneed tomanually configure all Universal Authentication Manager client instances to point tothe custom-named containers. Oracle highly recommends you leave the container names attheir defaults.
3. Grants the Universal Authentication Manager service account generic read, write, modify, anddelete permissions to the index container (as well as all other permissions inherited from itsparent) so that the Universal Authentication Manager service can read, create, modify, anddelete objects in the index container.
4. Grants the Universal Authentication Manager service account generic read permissions (aswell as any permissions inherited from its parent) so that the Universal Authentication Man-ager service can read objects within the policies container.
5. Updates the domain root DSE object to grant the Universal Authentication Manager serviceaccount permissions to create and delete vgoConfig and vGoUser objects under User objectsacross the entire domain. (If the user objects have been relocated to a custom location, thepermissions can be set directly at the target container instead of at the root.)
6. Updates the domain root DSE object to grant the Universal Authentication Manager serviceaccount generic read permissions to all vgoConfig objects across the domain so that the Uni-versal Authentication Manager service can read all vgoConfig objects regardless of their loca-tion in the repository.
Configuring the Universal Authentication Manager Synchronizer
You are now ready to configure the Universal Authentication Manager to allow UniversalAuthentication Manager to synchronize with the repository. Complete the following steps:
1. Launch the Oracle Enterprise Single Sign-On Administrative Console.2. In the left-hand tree navigate toGlobal Agent Settings
> [TargetSettingsSet>] > Synchronization.3. If Logon Manager is not installed and synchronizing with the repository, add a configuration
node for the Active Directory synchronizer to your settings set as follows (otherwise skip to thenext step):
— Page 126 of 174 —

Oracle Enterprise Single Sign-On Suite Plus Installation and Setup Guide
a. Right-click the Synchronization node and selectManage synchronizers from the contextmenu.
b. In the window that appears, click Add.
c. In the list of available synchronizers, select Active Directory, enter ADEXT as the name,and clickOK.
d. ClickOK to dismiss the dialog. The ADEXT node appears under the Synchronizationnode.
4. Do one of the following:
l If Logon Manager is installed and synchronizing with the repository, do not modify thevalue of the Base location(s) for configuration objects field; instead, skip to the nextstep.
l If Logon Manager is not installed and synchronizing with the repository, do the following inthe Base location(s) for configuration objects field:
i. Select the check box.
ii. Click the ... button.
iii. In the window that appears, enter the fully qualified DN of the Universal AuthenticationManagerpolicies container.
iv. ClickOK.
5. In the Base location(s) for UAM storage index field, select the check box, click the ... but-ton, and enter the fully qualified DN of the Universal Authentication Manager index container,then clickOK.
6. If it is not already set, select the check box next to the Location to store user credentialsoption and select Under respective directory user objects from the drop-down list.
7. Configure other synchronization settings as desired; for more information on each setting, seethe Console help.
8. Export your settings to a .REG file for distribution to end-user workstations:
a. From the Filemenu, select Export.
b. In the dialog that appears, clickHKLM Registry Format.
c. In the "Save" dialog that appears, navigate to the desired location and pro-vide a name for the .REG file, then click Save.
9. Distribute the .REG file to your Universal Authentication Manager workstations andmerge itinto their Windows registries.
Configuring Universal Authentication Manager Synchronization forAdministrative Users
The rights necessary to store credentials under user objects are granted at the tree root andinherited down to user objects. If you are deploying Universal Authentication Manager inenterprise mode in an environment where members of protected user groups, such asAdministrators, will be using it, you must grant the Universal Authentication Manager serviceaccount through the AdminSDHolder object the permissions necesary to create and deletevGOUserData and vGOSecret objects.
— Page 127 of 174 —
Prerequisites for Installing Universal Authentication Manager
If Logon Manager is already installed and synchronizing with the same repository thatUniversal Authentication Manager is utilizing, you will also need to grant thesepermissions to the AdminSDHolder object itself, which was most likely done duringLogon Manager deployment. This granting will appear as "SELF" in the affectedadministrative user's permissions list, as well as in the AdminSDHolder object'spermissions list.
Without this explicit permission application, administrative users will be blocked from storing theirUniversal Authentication Manager data in the repository due to automatic inheritance ofrestrictive rights from the AdminSDHolder object. This is because the object’s ACL, which governsthe ACLs of all protected groups, prohibits rights inheritance by default. More information aboutthis issue is available in the followingMS Knowledge Base article:http://support.microsoft.com/kb/817433.
The following protected user groups are known to be affected by this problem:
l Enterprise Adminsl Schema Adminsl Domain Adminsl Administratorsl Account Operatorsl Server Operatorsl Print Operatorsl BackupOperatorsl Cert Publishers
To verify that you are experiencing this particular issue, do the following:
1. Log in to the primary domain controller as a domain administrator.2. Open the "Active Directory Users and Computers" MMC snap-in.3. From the Viewmenu, select Advanced Features.4. Navigate to the affected user object, right-click it, and select Properties.5. In the dialog that appears, select the Security tab.
— Page 128 of 174 —
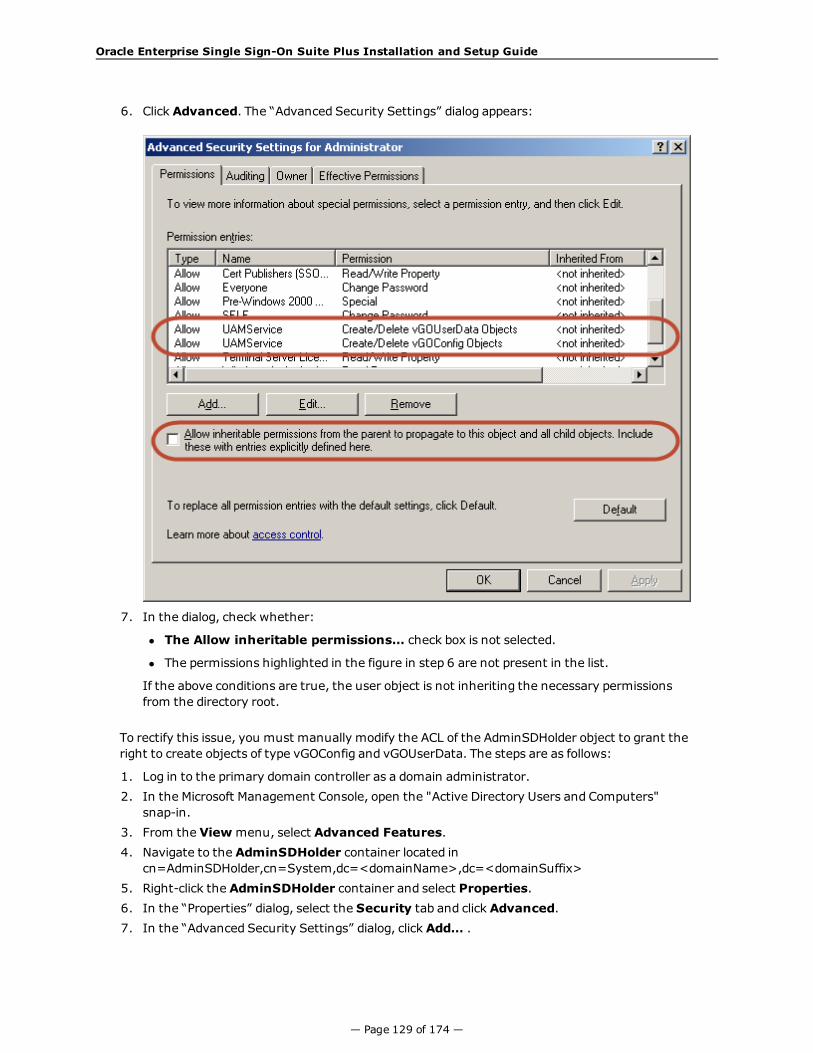
Oracle Enterprise Single Sign-On Suite Plus Installation and Setup Guide
6. Click Advanced. The “Advanced Security Settings” dialog appears:
7. In the dialog, check whether:
l The Allow inheritable permissions… check box is not selected.
l The permissions highlighted in the figure in step 6 are not present in the list.
If the above conditions are true, the user object is not inheriting the necessary permissionsfrom the directory root.
To rectify this issue, you must manually modify the ACL of the AdminSDHolder object to grant theright to create objects of type vGOConfig and vGOUserData. The steps are as follows:
1. Log in to the primary domain controller as a domain administrator.2. In the Microsoft Management Console, open the "Active Directory Users and Computers"
snap-in.3. From the Viewmenu, select Advanced Features.4. Navigate to the AdminSDHolder container located in
cn=AdminSDHolder,cn=System,dc=<domainName>,dc=<domainSuffix>5. Right-click the AdminSDHolder container and select Properties.6. In the “Properties” dialog, select the Security tab and click Advanced.7. In the “Advanced Security Settings” dialog, click Add… .
— Page 129 of 174 —

Prerequisites for Installing Universal Authentication Manager
8. In the “Select User, Computer, or Group” dialog, enter the name of the Universal Authen-tication Managerservice account and clickOK.
9. In the “Permission Entry” dialog, do the following:
a. From the Apply onto: drop-down list, select This object and all child objects.
If the create and delete permissions for vGOUserData objects do not appear in thepermissions list, select User objects from the Apply onto: drop-down list instead.This variation occurs between different versions and patches of Active Directory and theunderlying operating system.
b. In the list of permissions, select the Allow check box for the permissions shown below:
c. ClickOK.
10. Trigger the SD propagator (SDPROP) process to immediately propagate the changesthroughout the network. Instructions for launching the SD propagator process are provided inthe followingMicrosoft Knowledge Base article: http://support.microsoft.com/kb/251343.
If you encounter a version of this procedure that calls to apply the above permissionsonto “This object only,” disregard it. It is deprecated and has been superseded by thesteps above.
If you are running Windows Server 2008 R2, you can trigger the SD propagator processby kicking off the RunProtectAdminGroupsTask task.
— Page 130 of 174 —

Oracle Enterprise Single Sign-On Suite Plus Installation and Setup Guide
Upgrading an Existing Universal AuthenticationManager Installation
Upgrading from earlier versions of Universal Authentication Manager is not supported. You mustfully uninstall any old versions of Universal Authentication Manager before installing the currentversion. The new version will ignore all repository data stored by any earlier versions, thus deletionof the old data is not required.
Migrating from Logon Manager with Strong Authenticators toUniversal Authentication Manager
Each client workstation with Logon Manager may only be configured to use one primary logonmethod. Logon Manager supports several native primary logon methods, including strongauthenticators such as smart cards or proximity cards. If a strong authenticator is deployed andconfigured as the Logon Manager primary logon method, each end user must convert to usingUniversal Authentication Manager as the primary logon method.
End users must manually change the Logon Manager Primary Logon Method from the strongauthenticator to the Universal Authentication Manager Authenticator using the Logon ManagerAgent Settings tab to Change Primary Logon Method.
— Page 131 of 174 —

Installing the Universal Authentication Manager Client-Side Software
Installing the Universal Authentication Manager Client-Side Software
Oracle recommends that you install any hardware devices, middleware, and driversprior to installing Universal Authentication Manager.
Installing Universal Authentication Manager requires you to have local administratorpermissions.
Oracle recommends against installing Universal Authentication Manager on the sameworkstation as the Oracle Enterprise Single Sign-On Administrative Console to avoidlockout. You should have at least one workstation running the Oracle Enterprise SingleSign-On Administrative Console without Universal Authentication Manager.
If you want to perform an unattended ("silent") installation, see Performing anUnattended (Silent) Installation of Universal Authentication Manager.
During the installation, you will be prompted to select a client mode (local or enterprise).For more information on the Universal Authentication Manager client modes, see theUniversal Authentication Manager Administrator's Guide.)
If you are installing Universal Authentication Manager onWindows 7, the Microsoft Windows Password and PKI smart card credential providerswill be disabled and the Universal Authentication Manager credential provider will beenabled in their place.
To install and configure Universal Authentication Manager:
1. Close all programs.2. Launch the ESSO-UAM.msi installer file.
If you are installing in a language other than English and would like to launch theinstaller in the desired language, execute the following command:
msiexec /I <packagename>.msi TRANSFORMS=<language>.mst
where <packagename> is the name of the Universal Authentication Manager installerMSI package, and <language>.mst is the name of the corresponding languagetransform file (included in the installer archive).
3. On the Welcome Panel, clickNext>.
— Page 132 of 174 —
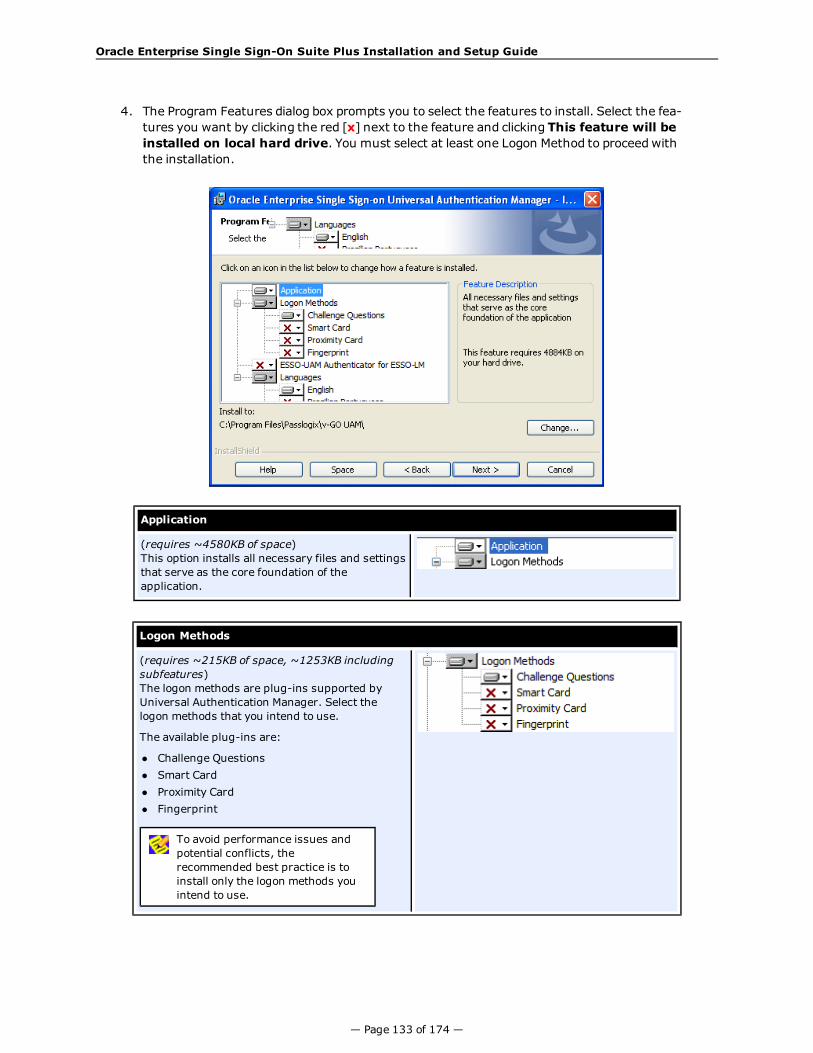
Oracle Enterprise Single Sign-On Suite Plus Installation and Setup Guide
4. The Program Features dialog box prompts you to select the features to install. Select the fea-tures you want by clicking the red [x] next to the feature and clicking This feature will beinstalled on local hard drive. You must select at least one Logon Method to proceedwiththe installation.
Application
(requires ~4580KB of space)This option installs all necessary files and settingsthat serve as the core foundation of theapplication.
Logon Methods
(requires ~215KB of space, ~1253KB includingsubfeatures)The logon methods are plug-ins supported byUniversal Authentication Manager. Select thelogon methods that you intend to use.
The available plug-ins are:
l Challenge Questionsl Smart Cardl Proximity Cardl Fingerprint
To avoid performance issues andpotential conflicts, therecommended best practice is toinstall only the logon methods youintend to use.
— Page 133 of 174 —

Installing the Universal Authentication Manager Client-Side Software
Universal Authentication Manager Authenticator for Logon Manager
(requires ~105KB of space)The Universal Authentication Manager Authenticatorplug-in integrates Universal Authentication Managerwith Logon Manager. If Logon Manager is installed afterUniversal Authentication Manager, you can Modify theUniversal Authentication Manager installation to installthe Universal Authentication Manager Authenticator.
The Universal Authentication ManagerAuthenticator option is only available ifyou already have the Logon ManagerAgent installed on the workstation.
Languages
The localized language support packages thatallow the Agent to be displayed in the followinglanguages:
l English (mandatory, installed by default)l Chinese (Simplified)l Chinese (Traditional)l Czechl Danishl Dutchl Finnishl Frenchl Germanl Greekl Hungarianl Italianl Japanesel Koreanl Norwegianl Polishl Portugese (Brazil)l Portugese (Portugal)l Romanianl Russianl Slovakl Spanishl Swedishl Thail Turkish
Change
Click this button to change the current installation destination folder for the Client.Browse to the location and clickOK.
— Page 134 of 174 —
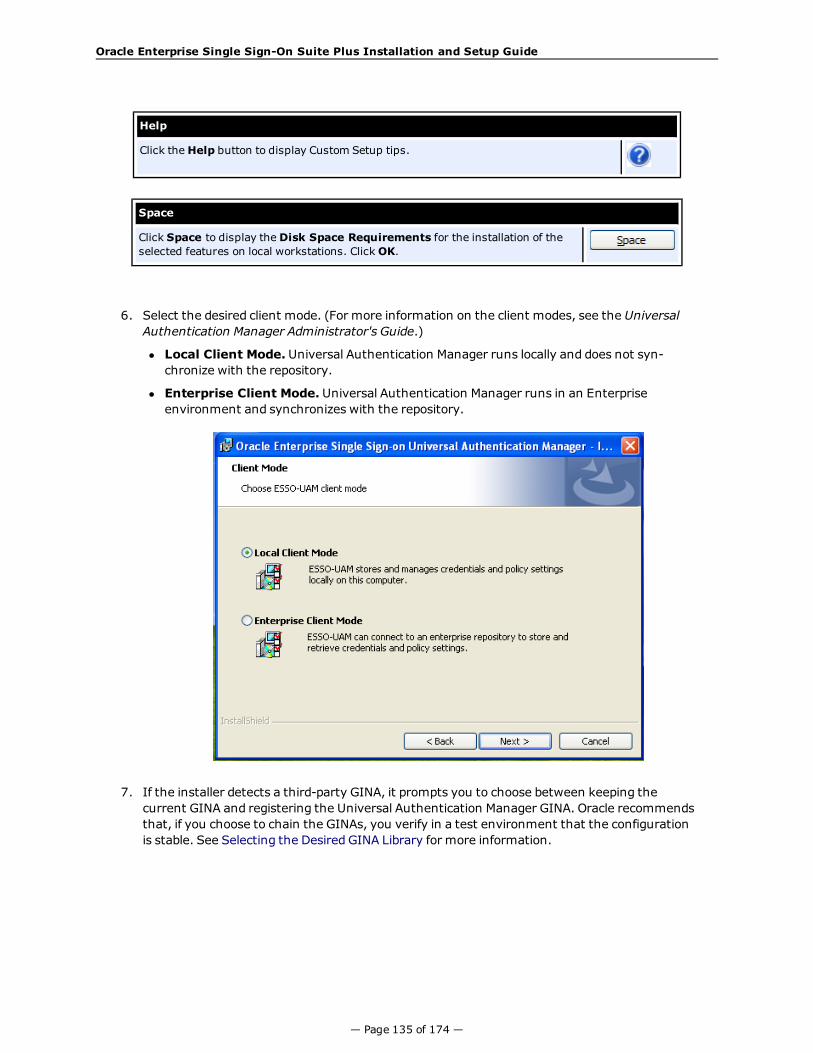
Oracle Enterprise Single Sign-On Suite Plus Installation and Setup Guide
Help
Click theHelp button to display Custom Setup tips.
Space
Click Space to display theDisk Space Requirements for the installation of theselected features on local workstations. ClickOK.
6. Select the desired client mode. (For more information on the client modes, see the UniversalAuthentication Manager Administrator's Guide.)
l Local Client Mode. Universal Authentication Manager runs locally and does not syn-chronize with the repository.
l Enterprise Client Mode. Universal Authentication Manager runs in an Enterpriseenvironment and synchronizes with the repository.
7. If the installer detects a third-party GINA, it prompts you to choose between keeping thecurrent GINA and registering the Universal Authentication Manager GINA. Oracle recommendsthat, if you choose to chain the GINAs, you verify in a test environment that the configurationis stable. See Selecting the Desired GINA Library for more information.
— Page 135 of 174 —

Installing the Universal Authentication Manager Client-Side Software
8. If you selected to install the Universal Authentication Manager Authenticator for LogonManager in step 4, the installer proceeds with the next step, depending on whether or notLogon Manager is detected with any strong authenticators installed. The UniversalAuthentication Manager Authenticator for Logon Manager allows for integration with LogonManager.
Logon Manager installed with Strong Authenticators
When the installer detects that Logon Manager is installed alongwith at least one strongauthenticator and the Universal Authentication Manager Authenticator custom setup optionhas been enabled for installation, the installer will not ask if you want to configure UniversalAuthentication Manager as the Logon Manager primary logon method.
Logon Manager installed without Strong Authenticators
When the installer detects that Logon Manager is installed without any strong authenticatorsand the Universal Authentication Manager Authenticator custom setup option has beenenabled for installation, the installer will ask if you want to configure Universal AuthenticationManager as the Logon Manager primary logon method. If you select to configure UniversalAuthentication Manager as the Logon Manager primary logon method,UniversalAuthentication Manager will be the only available option in the Primary Logon dropdown ofLogon Manager First-Time Use (FTU)Wizard. For more information on the FTU Wizard, see theOracle Enterprise Single Sign-On Suite Plus User Guide.
Make your selection and clickNext.
— Page 136 of 174 —

Oracle Enterprise Single Sign-On Suite Plus Installation and Setup Guide
9. The InstallShieldWizard is ready to begin the installation. Click Install.
10. Wait for the installation to complete. When the Completed screen appears, click Finish.
— Page 137 of 174 —

Installing the Universal Authentication Manager Client-Side Software
11. After installation is complete, you may be prompted to restart the machine.
l If you installed the Client in Local Mode, click Yes now.
l If you installed the Client in Enterprise Mode, clickNo and proceed to Completing the Instal-lation of Universal Authentication Manager to configure the required service accounts.
— Page 138 of 174 —

Oracle Enterprise Single Sign-On Suite Plus Installation and Setup Guide
Performing an Unattended (Silent) Installation
In order to install Oracle Enterprise Single Sign-On products successfully in unattended ("silent")mode, the Windows Management Instrumentation (WMI) service must be running before youexecute the installer. To check whether it is running and start if it is not, see Prerequisites forUnattended ("Silent") Installations.
Command Line Syntax
Universal Authentication Manager supports standardMSIEXEC.exe command line parameters.The command line to perform an unattended installation uses the following sequence:
MSIEXEC.exe [Install Flag] [MSI Installer Filename] [Custom Properties][User Interface Level Flag]
Where:
Install Flag. /i = install, /x = uninstall, /a = admin install
Filename.Name of the MSI package to install
Custom Universal Authentication Manager Installer Properties
The custom installer includes the ability to configure the following options:
l Option to select local (default) or enterprise model Option to configure Logon Manager to use Universal Authentication Manager as its PrimaryLogon Method
l Ability to select which GINA to usel Ability to configure custom features to installl Ability to install in the desired language
Use the following custom parameters to configure these installer options:
l CLIENTMODE
o 0 = Local Client Mode (default)
o 1 = Enterprise Client Mode
l SSO_LOGONMETHOD
o Yes = Configure Universal Authentication Manager as the Logon Manager Primary LogonMethod
o No = Do not configure Universal Authentication Manager as the only available Logon Man-ager Primary Logon Method (default)
l GINACHOICE (Windows XP only)
o 0 = Keep the current GINA (default)
o 1 = Register Universal Authentication Manager GINA
l ADDLOCAL
o "Application" (Required)
o "SmartCard"
o "ProximityCard"
o "Fingerprint"
o "ChallengeQuestions"
— Page 139 of 174 —

Installing the Universal Authentication Manager Client-Side Software
o "UAMAuth"
To configure which features are installed, use the standard "ADDLOCAL" command lineoption.
Do NOT use the ADDLOCAL property with ORCA, which is command-line only.
Installable Language Packs (English is always installed)l Englishl Brazilian Portuguesel Frenchl Germanl Italianl Japanesel Koreanl Simplified Chinesel Spanishl Czechl Finnishl Dutchl Polishl Portuguesel Tranditional Chinesel Danishl Greekl Hungarianl Norwegianl Romanianl Russianl Slovakl Swedishl Turkishl Thai
Examples
l msiexec /i "ESSO-UAM.msi” ADDLOCAL=”Application,SmartCard,ProximityCard,German,Norwegian,Turkish”CLIENTMODE=1 GINACHOICE=1
Installs Universal Authentication Manager with Smart Card and Proximity Card, in enterprisemode, using the Universal Authentication Manager GINA, with the German, Norwegian, andTurkish language packs.
— Page 140 of 174 —

Oracle Enterprise Single Sign-On Suite Plus Installation and Setup Guide
l msiexec /qn /i "ESSO-UAM.msi” ADDLOCAL =”Application,SmartCard”CLIENTMODE=0 GINACHOICE=0
Installs Universal Authentication Manager with Smart Card only, in Local Client mode, andusing the default GINA.
l msiexec /qn /i "ESSO-UAM.msi” ADDLOCAL =”Application,Fingerprint”CLIENTMODE=0
Installs Universal Authentication Manager with Fingerprint only, in Local Client mode.
l msiexec /i "ESSO-UAM.msi"ADDLOCAL="Application,ChallengeQuestions,ProximityCard,SmartCard,Fingerprint"CLIENTMODE=1 GINACHOICE=0
Installs Universal Authentication Manager with Challenge Questions, Proximity Card, SmartCard, and Fingerprint, in Enterprise Client mode, using the default GINA.
— Page 141 of 174 —
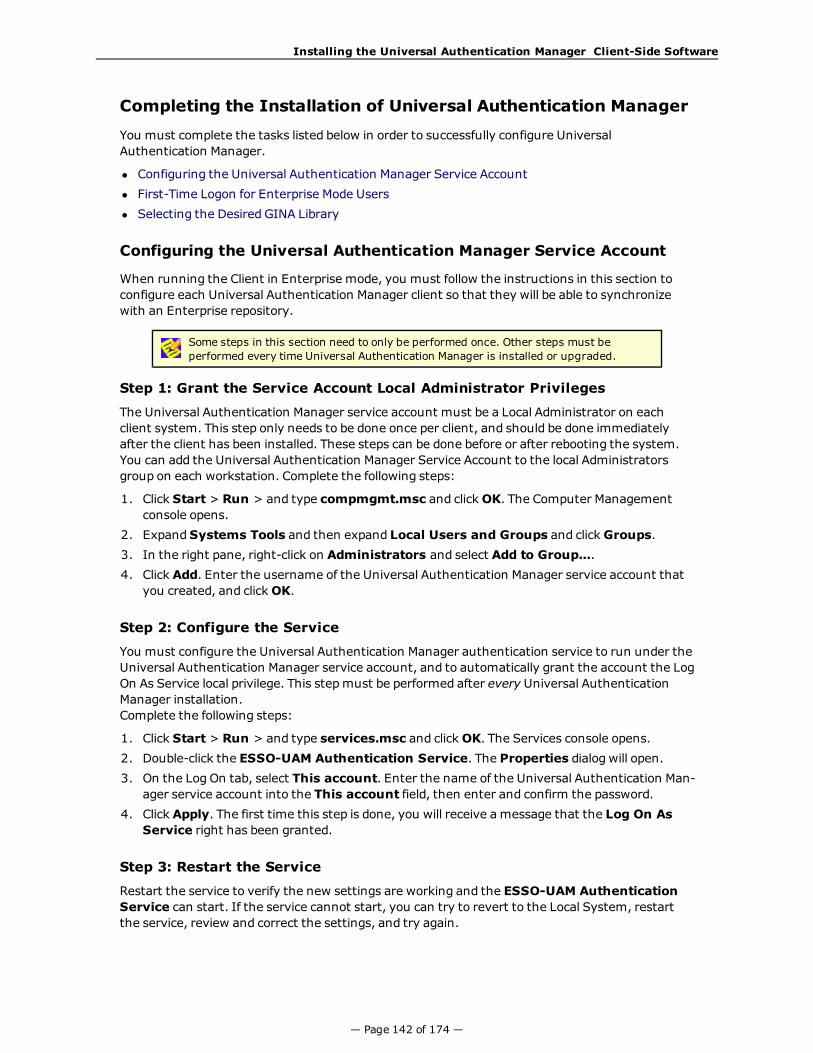
Installing the Universal Authentication Manager Client-Side Software
Completing the Installation of Universal Authentication Manager
You must complete the tasks listed below in order to successfully configure UniversalAuthentication Manager.
l Configuring the Universal Authentication Manager Service Accountl First-Time Logon for Enterprise Mode Usersl Selecting the Desired GINA Library
Configuring the Universal Authentication Manager Service Account
When running the Client in Enterprise mode, you must follow the instructions in this section toconfigure each Universal Authentication Manager client so that they will be able to synchronizewith an Enterprise repository.
Some steps in this section need to only be performed once. Other steps must beperformed every time Universal Authentication Manager is installed or upgraded.
Step 1: Grant the Service Account Local Administrator Privileges
The Universal Authentication Manager service account must be a Local Administrator on eachclient system. This step only needs to be done once per client, and should be done immediatelyafter the client has been installed. These steps can be done before or after rebooting the system.You can add the Universal Authentication Manager Service Account to the local Administratorsgroup on each workstation. Complete the following steps:
1. Click Start > Run > and type compmgmt.msc and clickOK. The Computer Managementconsole opens.
2. ExpandSystems Tools and then expand Local Users and Groups and clickGroups.3. In the right pane, right-click on Administrators and select Add to Group....4. Click Add. Enter the username of the Universal Authentication Manager service account that
you created, and clickOK.
Step 2: Configure the Service
You must configure the Universal Authentication Manager authentication service to run under theUniversal Authentication Manager service account, and to automatically grant the account the LogOn As Service local privilege. This stepmust be performed after every Universal AuthenticationManager installation.Complete the following steps:
1. Click Start > Run > and type services.msc and clickOK. The Services console opens.2. Double-click the ESSO-UAM Authentication Service. The Properties dialog will open.3. On the Log On tab, select This account. Enter the name of the Universal Authentication Man-
ager service account into the This account field, then enter and confirm the password.4. Click Apply. The first time this step is done, you will receive a message that the Log On As
Service right has been granted.
Step 3: Restart the Service
Restart the service to verify the new settings are working and the ESSO-UAM AuthenticationService can start. If the service cannot start, you can try to revert to the Local System, restartthe service, review and correct the settings, and try again.
— Page 142 of 174 —

Oracle Enterprise Single Sign-On Suite Plus Installation and Setup Guide
To restart the service, right-click the service and click Restart.
Do not leave the service in a stopped state. If the service is left in a stopped state, usersmay not be able to log on.
Reverting Your Changes After Uninstalling Universal AuthenticationManager
To undo these steps and return to a clean system:
1. Uninstall Universal Authentication Manager or set theESSO-UAM Authentication Service back to Local System and restart.
2. Click Start > Run > and type compmgmt.msc and clickOK. The Computer Managementconsole opens.
3. ExpandSystems Tools and then expand Local Users and Groups and clickGroups.4. In the right pane, right-click on Administrators and select Add to Group....5. Highlight the service user name and click Remove.6. Click Start > Run > and type secpol.msc and clickOK.
The Local Security Policy console appears.7. Double-click the Universal Authentication Manager service account.
The Properties dialog appears.8. Expand Local Policies and expandUser Rights Assignment.9. Double-click the Log on as a Service policy.10. Select the Universal Authentication Manager service account and click Remove.
First-Time Logon for Enterprise Mode Users
It is recommended that you require Enterprise Mode users to perform their first-time logon inconnectedmode. If the workstation is not connected to the Active Directory Domain Controller,users will be able to log on but not enroll, because Windows cannot resolve the username whiledisconnected.
If users perform a first-time logon in disconnectedmode, they might receive the followingmessage when attempting to access to the Client application: "You cannot enroll in UniversalAuthentication Manager until you log on toWindows with the computer connected to the Windowsnetwork.”
— Page 143 of 174 —
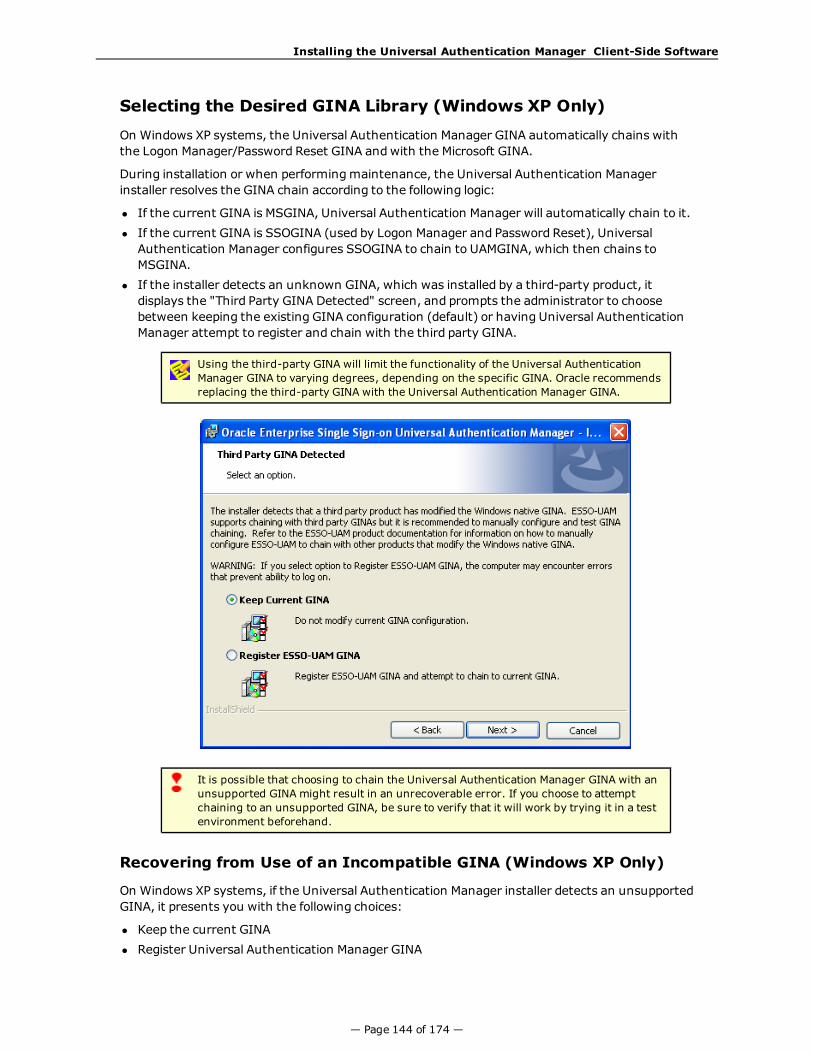
Installing the Universal Authentication Manager Client-Side Software
Selecting the Desired GINA Library (Windows XP Only)
On Windows XP systems, the Universal Authentication Manager GINA automatically chains withthe Logon Manager/Password Reset GINA andwith the Microsoft GINA.
During installation or when performingmaintenance, the Universal Authentication Managerinstaller resolves the GINA chain according to the following logic:
l If the current GINA is MSGINA, Universal Authentication Manager will automatically chain to it.l If the current GINA is SSOGINA (used by Logon Manager and Password Reset), UniversalAuthentication Manager configures SSOGINA to chain to UAMGINA, which then chains toMSGINA.
l If the installer detects an unknown GINA, which was installed by a third-party product, itdisplays the "Third Party GINA Detected" screen, and prompts the administrator to choosebetween keeping the existing GINA configuration (default) or having Universal AuthenticationManager attempt to register and chain with the third party GINA.
Using the third-party GINA will limit the functionality of the Universal AuthenticationManager GINA to varying degrees, depending on the specific GINA. Oracle recommendsreplacing the third-party GINA with the Universal Authentication Manager GINA.
It is possible that choosing to chain the Universal Authentication Manager GINA with anunsupported GINA might result in an unrecoverable error. If you choose to attemptchaining to an unsupported GINA, be sure to verify that it will work by trying it in a testenvironment beforehand.
Recovering from Use of an Incompatible GINA (Windows XP Only)
On Windows XP systems, if the Universal Authentication Manager installer detects an unsupportedGINA, it presents you with the following choices:
l Keep the current GINAl Register Universal Authentication Manager GINA
— Page 144 of 174 —
Oracle Enterprise Single Sign-On Suite Plus Installation and Setup Guide
If you opt to register the Universal Authentication Manager GINA, Universal AuthenticationManager attempts to register UAMGINA and chain it to the unsupported GINA. If the third-partyGINA is incompatible with UAMGINA, upon restart you might be unable to log on. In order to regaincontrol of your workstation, perform the following steps to modify the registry manually:
1. Restart workstation, boot in Safe Mode and log on as a local administrator.
Do not restart in Safe Mode with Networking or Safe Mode with Command Line. Refer toMicrosoft documentation for more information about restarting your workstation in thedifferent Safe Modes.
2. Click Start > Run > and type regedit.exe and clickOK to launch the Registry Editor.
3. Select the GINA configuration that you want to use from the following list. If you plan to unin-stall Universal Authentication Manager after recovery, deleting the OrigGinaName entry willprevent an unintendedmodification of the GinaDLL registry entry.
l To restore the standardWindows logon:
a. Navigate to HKEY_LOCAL_MACHINE\SOFTWARE\Microsoft\Windows NT\Cu-rrentVersion\Winlogon and delete the GinaDLL registry entry.
b. Restart.
l To configure for Universal Authentication Manager GINA only:
a. Navigate to HKEY_LOCAL_MACHINE\SOFTWARE\Microsoft\Windows NT\Cu-rrentVersion\Winlogon and ensure that the GinaDLL registry entry is set to “Uam-Gina.dll.”
b. Navigate to HKEY_LOCAL_MACHINE\SOFTWARE\Passlogix\UAM\Gina and delete anyChainToGinaName registry entry.
c. Restart.
l To restore any previously configured third-party GINA:
a. Navigate to HKEY_LOCAL_MACHINE\SOFTWARE\Passlogix\UAM\Gina and copy the valueof any OrigGinaName registry entry to HKEY_LOCAL_MACHINE\SOF-TWARE\Microsoft\Windows NT\CurrentVersion\Winlogon\GinaDLL, or set GinaDLLto the name of the third-party GINA dll.
b. Restart.
— Page 145 of 174 —

Installing Anywhere
Installing Anywhere
This section describes the steps necessary for installing Anywhere.It covers the following topics:
l Prerequisites for Installing Anywherel Installing the Anywhere Console
After installing Anywhere, please read Deploying Oracle Enterprise Single Sign-On Suite PlusComponents for Offline Use via Anywhere.
— Page 146 of 174 —

Oracle Enterprise Single Sign-On Suite Plus Installation and Setup Guide
Prerequisites for Installing Anywhere
Before you install Anywhere, ensure the prerequisites listed in this section have been satisfied.
Please refer to the latest release notes to find out about last-minute requirements orchanges that might affect your installation.
Prerequisites for Installing the Anywhere Console
l Anywhere reads the configuration of the other Oracle products from which you will create theAnywhere deployment package. Prior to installing Anywhere, install the products that youintend to deploy. Follow the installation and setup instructions for these products from theirrespective installation and setup guides. The deployment package must include Logon Managerandmight include Oracle Enterprise Single Sign-On Provisioning Gateway (ProvisioningGateway).
Install these products on a clean workstation. If you are deploying Provisioning Gateway, installits Administrative Console on a different workstation.
The Visual C++ Runtime Library and .NET 2.0 Framework are prerequisites for runningAnywhere. The installation package includes the Visual C++ Runtime Library, howeveryou must make the .NET 2.0 Framework available to users. See the Oracle EnterpriseSingle Sign-On Suite Plus Release Notes for a complete list of software and hardwarerequirements.
l Configure the Agents as you want the end users to work with them. End users do not have theoption to alter the installation. If you want different users to install different packages, create aseparate deployment package for each installation.
l There are two types of XML files associated with Anywhere:
o The Anywhere configuration XML. Configures the application itself. This file includesassemblies' dependencies and component files, required permissions, and the locationwhere Anywhere places updates as you create them.
o The deployment configuration XML. Configures the Anywhere deployments that youcreate. This file includes the target location of the application XML, the version of the appli-cation that the Agents will run, and the location (Web page or network file share) whereAnywhere checks for updates.
— Page 147 of 174 —

Prerequisites for Installing Anywhere
Prerequisites for Unattended (“Silent”) Installations
In order to successfully install Logon Manager, Provisioning Gateway Client, and Password ResetClient in unattended ("silent")mode, the Windows Management Instrumentation (WMI) servicemust be running before the installer is executed.
To check whether the WMI service is running, and start it if necessary, do the following on eachtarget machine:
1. Open the System Management Console.2. Open the Services snap-in.3. Navigate to theWindows Management Instrumentation service and check its status and
startupmode.4. Depending on the status, do one of the following:
l If the status is Started, the WMI service is running; proceed to the nextsection.
l If the status is blank, check the service's startup type and start it as follows:
o If the startup type isDisabled, do the following:
1. Double-click the service.
2. In the dialog box that appears, change the startup type toManual or Automatic,as required by your environment.
3. Click Apply.
4. Click Start to start the service. The status changes to Started.
o If the startup type is not Disabled, do the following:
1. Double-click the service.
2. In the dialog box that appears, Click Start to start the service.
3. The status changes to Started.
4. ClickOK.
5. ClickOK to close the service properties dialog box.
— Page 148 of 174 —

Oracle Enterprise Single Sign-On Suite Plus Installation and Setup Guide
Installing the Anywhere Console
Read the sections Prerequisites for Installing Anywhere Console and Creating the DeploymentPackage before proceeding with the Anywhere Console installation.
To install the Anywhere Console:
1. Launch the ESSO-Anywhere Console.msi installer file.
2. Select Complete setup. Anywhere does not require any setup customization. Select the Cus-tom option only to specify a directory other than the default. ClickNext >.
3. Click Install at the prompt.
— Page 149 of 174 —

Installing the Anywhere Console
4. Click Finish when the installation is completed.
See the Oracle Enterprise Single Sign-On Suite Plus Administrator's Guide for instructions oncreating your deployment package.
— Page 150 of 174 —
Oracle Enterprise Single Sign-On Suite Plus Installation and Setup Guide
Troubleshooting Oracle Enterprise Single Sign-On SuitePlus Installations
This section provides descriptions of most commonly encountered Oracle Enterprise Single Sign-On Suite Plus installation issues and their solutions.
Windows Installer Error 1720
If an error 1720 occurs during the installation of any of the Oracle Enterprise Single Sign-On SuitePlus components software installation, then the currently logged-on user does not have sufficientrights to install software on that machine. You must log on to the machine as a user withAdministrator rights or contact your organization's IT support personnel.
Troubleshooting Provisioning Gateway Installations
The following are the most common issues that can be encountered during the installation ofProvisioning Gateway, alongwith their solutions.
Provisioning Gateway Does Not Support File Synchronization
Provisioning Gateway will not function correctly if it is deployedwith the file synchronizer.
The Agent is configured to store its user data as a flat file on a network drive, FTP server, NFSshare, or local disk drive. Provisioning Gateway will not function in this scenario because it requiresa directory in order to distinguish and provision individual user accounts.
Multiple Locators Require an Entlist at Each Locator Site
If two users are stored in different containers, a matching application configuration list (entlist)must exist in each locator site in order for provisioning to work down to the client. The matchingentlists must exist under both containers that store the user credentials.
Using Active Directory or ADAM/AD-LDS and IIS Web Services onDifferent Servers
If IIS and Active Directory (or the ADAM/AD-LDS instance) are on different computers, then youmust provide the IISWeb services with a user account that is in the same domain as (or a trusteddomain of) Active Directory or ADAM/AD-LDS, and that is providedwith read/write access to thedirectory.
Internet Security Settings (Windows 2003 Users)
The default settings for Windows 2003 Internet Security are more stringent than those forWindows XP. If Internet Explorer Enhanced Security Configuration is enabled (on by default inWindows 2003), you must add the Provisioning Gateway Web Console URL to the workstation'sTrusted Sites Internet Zone or the Local Intranet Zone in order to use Provisioning Gatewaywithout issues.
Internet Security Settings (Windows Domain and Citrix MetaFrame®Users)
In order for Windows domain users and Citrix MetaFrame users to access Provisioning Gateway,you must add the Provisioning Gateway Web service to the workstation's Local Intranet zone.
— Page 151 of 174 —

Troubleshooting Oracle Enterprise Single Sign-On Suite Plus Installations
Deploying Provisioning Gateway With Multiple Oracle InternetDirectory (OID) Servers
When Provisioning Gateway is deployedwith multiple Oracle Internet Directory (OID) servers load-balanced in an active-active (all servers active) topology, Provisioning Gateway cannot resolve theclient-server session state due tomultiple servers being involved in the session. This will causeProvisioning Gateway to behave erratically. To avoid this issue, do one of the following:
l For simple failover support, load-balance your deployment using an active-standby topology. Inthis configuration, only one OID server is handling connections from Provisioning Gatewayclients at any given moment. Backup servers, synchronized with the active server via rep-lication, are ready to take over if the active server fails. You must configure your network toautomatically re-route the connections from the failed server to one of the backup serverswhen a failure occurs.
l (Recommended) Use the Oracle Real Application Cluster (RAC) technology to create an OIDserver cluster. A cluster will appear as a single server to Provisioning Gateway clients, while pro-viding the performance and high availability of a fully load-balanced deployment. In case ofserver failure, operation continues uninterrupted, and servers can be replaced on the fly.Servers can also be added at any time, providing quick and easy scalability.
— Page 152 of 174 —

Oracle Enterprise Single Sign-On Suite Plus Installation and Setup Guide
Troubleshooting Password Reset Installations
Server Error in “/vGOSelfServiceReset/ManagementClient”Application
When you install .NET 2.0 on a computer running a newly installed operating system, the NetworkService account must be granted read/write access or you will encounter a server error when youaccess the Password Reset 7.0 Management Console.
To avoid the server error, grant the Network Service account read/write access to the followingfolder:
C:\Windows\Microsoft.NET\Framework\v2.0.50727\Temporary ASP.NET Files
This is not a Password Reset-specific issue. All ASP.NET applications will receive this error if theconfiguration is not set correctly.
Group Security Policy: Password History Setting Should Be Increased
Password Reset uses the password history setting of the Windows XP Group Security Policy. Youshould allow for one additional prior password in addition to the Enforce password history setting.For example, if the setting is 3 (ensuring that a user’s last three prior passwords cannot bereused), Password Reset uses one of these, so the actual setting is 2. Oracle recommends a highersetting for Enforce password history for optimal security.
Internet Security Settings (Windows 2003 users)
The default settings for Windows 2003 Internet Security settings are more stringent than thosefor Windows XP. You must add the Password Reset Web service to the workstation's Trusted SitesInternet zone or the Local Intranet zone in order to use Password Reset as a Windows 2003 client.
— Page 153 of 174 —

Uninstalling Oracle Enterprise Single Sign-On Suite Plus Components
Uninstalling Oracle Enterprise Single Sign-On Suite PlusComponents
To uninstall one or more Oracle Enterprise Single Sign-On Suite Plus components, do thefollowing:
1. From the Start menu, open the Control Panel.2. Depending on your operating system:
l Open Add/Remove Programs.
l Open Programs and Features.
3. In the list of installed software, select the desired component and click Remove orUninstall.4. Confirm any messages that you might receive asking if you are sure you want to remove the
program.5. Follow any additional prompts to complete the uninstallation process.6. Repeat steps 3 through 5 for each additional component you want to uninstall.
— Page 154 of 174 —
Oracle Enterprise Single Sign-On Suite Plus Installation and Setup Guide
Appendices
This section contains additional information that you might find useful when installing orconfiguring Oracle Enterprise Single Sign-On Suite Pluscomponents. It contains the followingtopics:
l Appendix A: Deploying Oracle Enterprise Single Sign-On Suite Plus Components for Offline Usevia Oracle Enterprise Single Sign-On Anywhere
l Appendix B: Packaging Oracle Enterprise Single Sign-On Suite Plus for Mass Deploymentl Appendix C: Oracle Enterprise Single Sign-On Suite Plus Configuration Reference
— Page 155 of 174 —

Deploying Oracle Enterprise Single Sign-On Suite Plus Products for Offline Use via Anywhere
Deploying Oracle Enterprise Single Sign-On Suite PlusProducts for Offline Use via Anywhere
Anywhere reads the configuration of the other Oracle products from which you will create theAnywhere deployment package.
To create a product configuration file that Anywhere will read:
1. Carefully review the information in Prerequisites for Installing Anywhere.2. Install the Oracle Enterprise Single Sign-On Administrative Console. For more information on
configuring the Oracle Enterprise Single Sign-On Administrative Console, see the Oracle Enter-prise Single Sign-On Administrative Console help.
3. Install the Logon Manager Agent.4. Install the additional Oracle components as required. For more information, see the individual
Agent installation and setup sections.5. Configure the Logon Manager Agent and Provisioning Gateway Agent, if applicable, as you
want. See the Oracle Enterprise Single Sign-On Suite Plus Administrator's Guide and the Agentinstallation and setup sections for more information.
6. When you have completed your configuration, select Global Agent Settings > Live >Write to Live HKLM.
7. When you create the Anywhere deployment, you will have the option to use the Live HKLM set-tings, or an exported registry file. If you plan to use a registry file, select the set of Global AgentSettings you have configured, right-click, and Export to a .REG file. The following graphicdepicts a sample configuration.
— Page 156 of 174 —

Oracle Enterprise Single Sign-On Suite Plus Installation and Setup Guide
Oracle recommends that you thoroughly test the registry settings before you exportthem for inclusion in the package.If you want to sign your package using a digital certificate, follow the instructions forgenerating an X.509 certificate in the following MSDN article:http://msdn2.microsoft.com/en-us/library/ms819929.aspx
— Page 157 of 174 —

Packaging Oracle Enterprise Single Sign-On Suite Plus for Mass Deployment
Packaging Oracle Enterprise Single Sign-On Suite Plusfor Mass Deployment
**Verify whether this applies to other components or just LM**
The most convenient way tomass-deploy Oracle Enterprise Single Sign-On Suite Plus is to create acustomizedMSI package and distribute it to end-user machines using a deployment tool of yourchoice. An end-user machine that has been configured and tested for production acts as aconfiguration “master” from which the target Agent configuration will be derived for inclusion inthe package. Below is a high-level overview of the required steps. The steps are described in detaillater in this guide.
1. Obtain the following:
a. The latest installer for the Oracle Enterprise Single Sign-On Suite Plus component(s) youwant to deploy.
b. The latest versions of the following documents:
l Installing Oracle Enterprise Single Sign-On Suite Plus(this document)
l Logon Manager Best Practices: Deploying Logon Manager with [your targetrepository]
l Configuring the Logon Manager Agent (this is being folded into theadmin guide; update when confirmed)
2. If performing an unattended (“silent”) installation, complete the steps in Pre-Requisites forUnattended (“Silent”) Installations.
3. Install the Logon Manager Agent and the Oracle Enterprise Single Sign-On Administrative Con-sole on the “master” machine.
4. Configure Logon Manager settings using the Console. Make sure you have thoroughly read andunderstood the Logon Manager Best Practices guides listed above before you begin.
5. Generate the custom MSI package using the Oracle Enterprise Single Sign-On AdministrativeConsole:
a. Select the Logon Manager components that you want installed on the end-user machines.(For example, if your environment calls for a single primary logon method, you may want toexclude all but the desired authenticator.)
b. Select the customized set of global Logon Manager settings you have configured in step 4.
c. Generate the final MSI package. This package will contain the components selected in step6a and configuration settings from step 4.
d. Test the package by deploying it on a pilot group of machines. Identify and correct anyissues that may arise. Document the solutions as necessary.
e. Once the pilot deployment is successful, deploy the MSI package enterprise-wide usinga third-party tool of your choice.
— Page 158 of 174 —

Oracle Enterprise Single Sign-On Suite Plus Installation and Setup Guide
Creating a Customized Agent Installation Package
1. Place the base Logon Manager Agent MSI package in a working directory on the “master”machine.
2. Start the Oracle Enterprise Single Sign-On Administrative Console.3. Create and configure the desired set of Global Agent settings:
a. In the tree in the left-hand pane, right-click theGlobal Agent Settings node and selectImport --> From Live HKLM.
b. When the “Live” settings set appears in the tree, right-click it, select Rename from the con-text menu, give the set a descriptive name, and hit Enter.
c. Configure Logon Manager as desired. For detailed information on each setting, see theOracle Enterprise Single Sign-On Suite Plus Administrator's Guide.
4. Create the customizedMSI package for deployment to end-user machines:
a. From the Toolsmenu, select Generate Customized MSI.
b. In the “Logon Manager MSI Generator” wizard that appears, do the following:
i. In the “Base MSI Selection” screen, click Browse and navigate to the Logon ManagerAgent base MSI package, then clickNext.
ii. In the “Feature Selection” screen, select the Logon Manager components that you wantto include in the package. Expand each category node to find the desired component(s),then select the check box next to each desired component. When you have finished,clickNext.
— Page 159 of 174 —
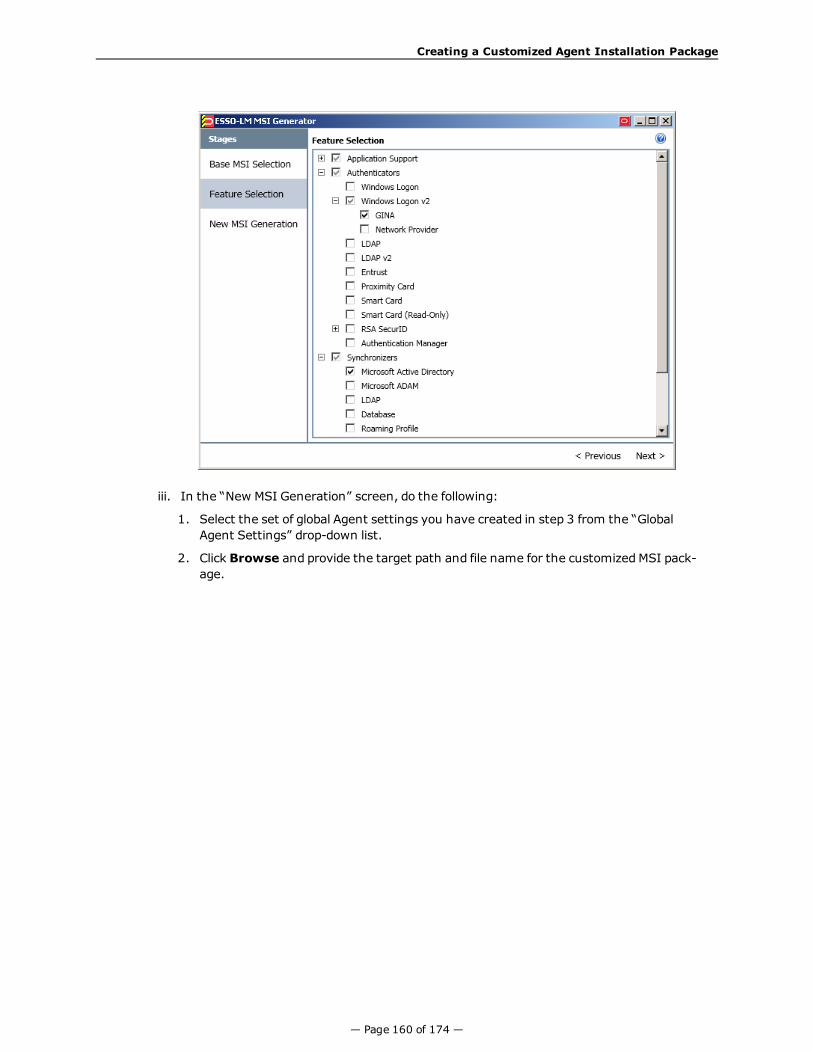
Creating a Customized Agent Installation Package
iii. In the “New MSI Generation” screen, do the following:
1. Select the set of global Agent settings you have created in step 3 from the “GlobalAgent Settings” drop-down list.
2. Click Browse and provide the target path and file name for the customizedMSI pack-age.
— Page 160 of 174 —

Oracle Enterprise Single Sign-On Suite Plus Installation and Setup Guide
3. ClickGenerate.
5. Close the “Logon Manager MSI Generator” wizard.6. Save the package settings to an XML file for future reference:
a. From the Filemenu, select Save.
b. When prompted, enter a descriptive file name and click Save.
— Page 161 of 174 —

Testing the Customized Package in a Pilot Deployment
Testing the Customized Package in a Pilot Deployment
Once you have generated your custom MSI package, test it by installing it on one or more pilotmachines. Always install the package on a clean machine – that is, one that does not contain any
Logon Manager-related files or registry entries. If you are using the samemachine to test multiplepackages, you must sanitize it before installing a new package so that old settings and files do notremain; if the installer detects existing data, it will perform an upgrade instead of a normalinstallation, resulting in false problems and false positives during testing.
To sanitize your pilot machine:
1. Delete the following directories and their contents:
l The Logon Manager application directory:
o On 32-bit systems: \Program Files\Passlogix
o On 64-bit systems: \Program Files (x86)\Passlogix
l The Logon Manager user data directory:
o On Windows XP: \Documents and Settings\<user>\Application Data\Passlogix
o On Windows 7: \Users\<user>\AppData\Roaming\Passlogix
2. Delete the following registry keys and their children:
l On 32-bit systems:
o HKEY_CURRENT_USER\Software\Passlogix
o HKEY_LOCAL_MACHINE\Software\Passlogix
l On 64-bit systems:
o HKEY_CURRENT_USER\Software\Passlogix
o HKEY_LOCAL_MACHINE\Software\Wow6432Node\Passlogix
When testing the package, look for any deployment and configuration problems; Oracle highlyrecommends that you set up a dedicated test environment so that you can perform a full range ofstaging tests, including the chosen global Agent settings, administrative overrides,synchronization with your central repository, and response to applications. The last item willrequire that you create a set of pilot templates and test them against a selected set of applications.This will let you spot and correct any application response issues that would have otherwise arisen(and been much more costly to resolve) in production.
When the package has been fully tested and verified, use a deployment tool (such as MicrosoftSystems Management Server) to deploy Logon Manager enterprise-wide.
— Page 162 of 174 —
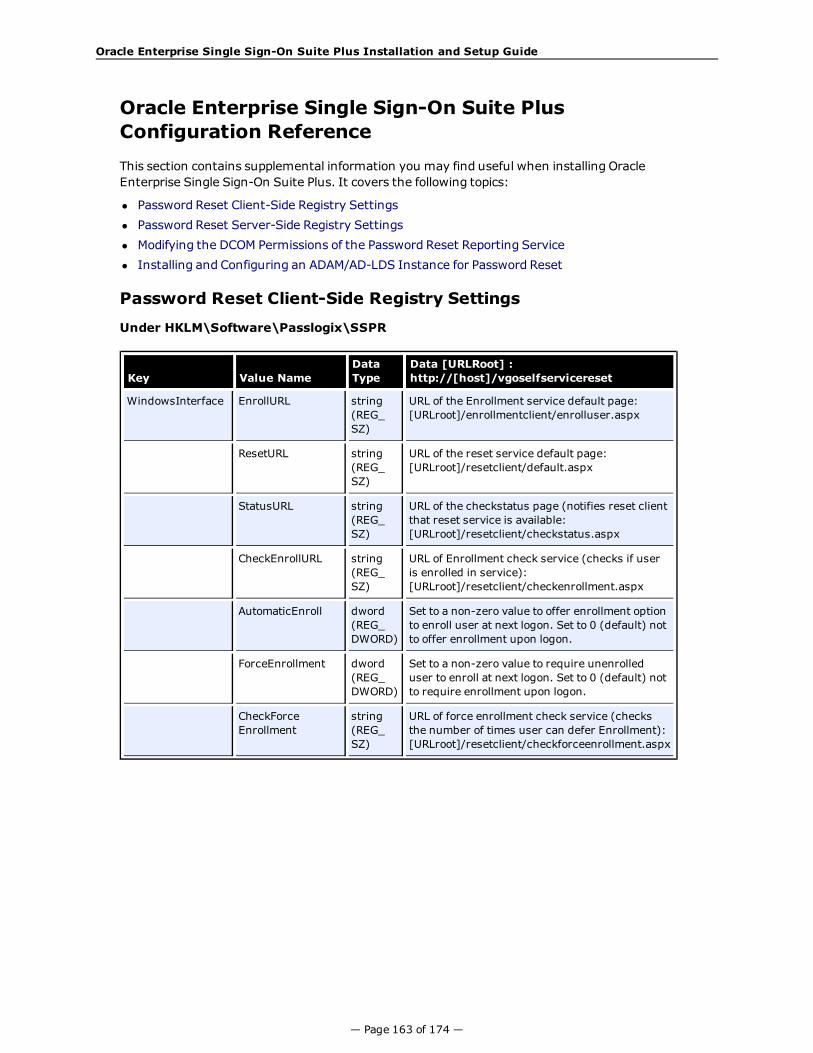
Oracle Enterprise Single Sign-On Suite Plus Installation and Setup Guide
Oracle Enterprise Single Sign-On Suite PlusConfiguration Reference
This section contains supplemental information you may find useful when installing OracleEnterprise Single Sign-On Suite Plus. It covers the following topics:
l Password Reset Client-Side Registry Settingsl Password Reset Server-Side Registry Settingsl Modifying the DCOM Permissions of the Password Reset Reporting Servicel Installing and Configuring an ADAM/AD-LDS Instance for Password Reset
Password Reset Client-Side Registry Settings
Under HKLM\Software\Passlogix\SSPR
Key Value NameDataType
Data [URLRoot] : http://[host]/vgoselfservicereset
WindowsInterface EnrollURL string(REG_SZ)
URL of the Enrollment service default page:[URLroot]/enrollmentclient/enrolluser.aspx
ResetURL string(REG_SZ)
URL of the reset service default page:[URLroot]/resetclient/default.aspx
StatusURL string(REG_SZ)
URL of the checkstatus page (notifies reset clientthat reset service is available:[URLroot]/resetclient/checkstatus.aspx
CheckEnrollURL string(REG_SZ)
URL of Enrollment check service (checks if useris enrolled in service):[URLroot]/resetclient/checkenrollment.aspx
AutomaticEnroll dword(REG_DWORD)
Set to a non-zero value to offer enrollment optionto enroll user at next logon. Set to 0 (default) notto offer enrollment upon logon.
ForceEnrollment dword(REG_DWORD)
Set to a non-zero value to require unenrolleduser to enroll at next logon. Set to 0 (default) notto require enrollment upon logon.
CheckForceEnrollment
string(REG_SZ)
URL of force enrollment check service (checksthe number of times user can defer Enrollment):[URLroot]/resetclient/checkforceenrollment.aspx
— Page 163 of 174 —
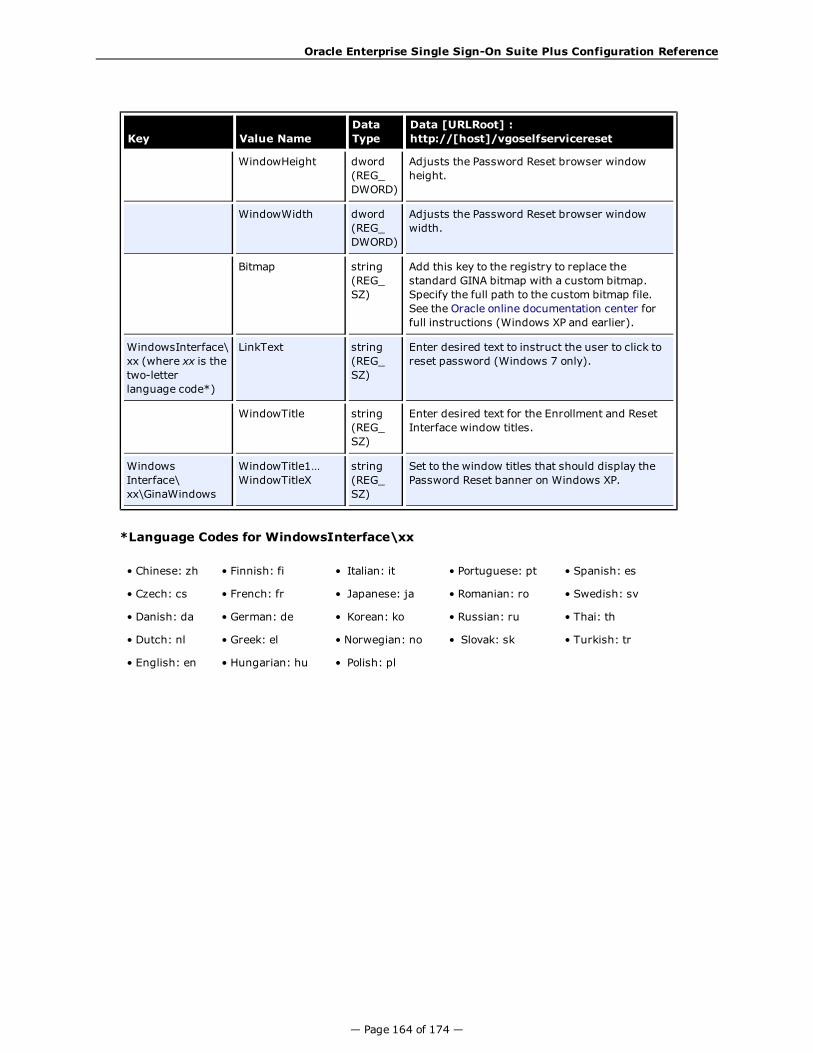
Oracle Enterprise Single Sign-On Suite Plus Configuration Reference
Key Value NameDataType
Data [URLRoot] : http://[host]/vgoselfservicereset
WindowHeight dword(REG_DWORD)
Adjusts the Password Reset browser windowheight.
WindowWidth dword(REG_DWORD)
Adjusts the Password Reset browser windowwidth.
Bitmap string(REG_SZ)
Add this key to the registry to replace thestandard GINA bitmap with a custom bitmap.Specify the full path to the custom bitmap file.See the Oracle online documentation center forfull instructions (Windows XP and earlier).
WindowsInterface\xx (where xx is thetwo-letterlanguage code*)
LinkText string(REG_SZ)
Enter desired text to instruct the user to click toreset password (Windows 7 only).
WindowTitle string(REG_SZ)
Enter desired text for the Enrollment and ResetInterface window titles.
WindowsInterface\xx\GinaWindows
WindowTitle1…WindowTitleX
string(REG_SZ)
Set to the window titles that should display thePassword Reset banner on Windows XP.
*Language Codes for WindowsInterface\xx
• Chinese: zh • Finnish: fi • Italian: it • Portuguese: pt • Spanish: es
• Czech: cs • French: fr • Japanese: ja • Romanian: ro • Swedish: sv
• Danish: da • German: de • Korean: ko • Russian: ru • Thai: th
• Dutch: nl • Greek: el • Norwegian: no • Slovak: sk • Turkish: tr
• English: en • Hungarian: hu • Polish: pl
— Page 164 of 174 —
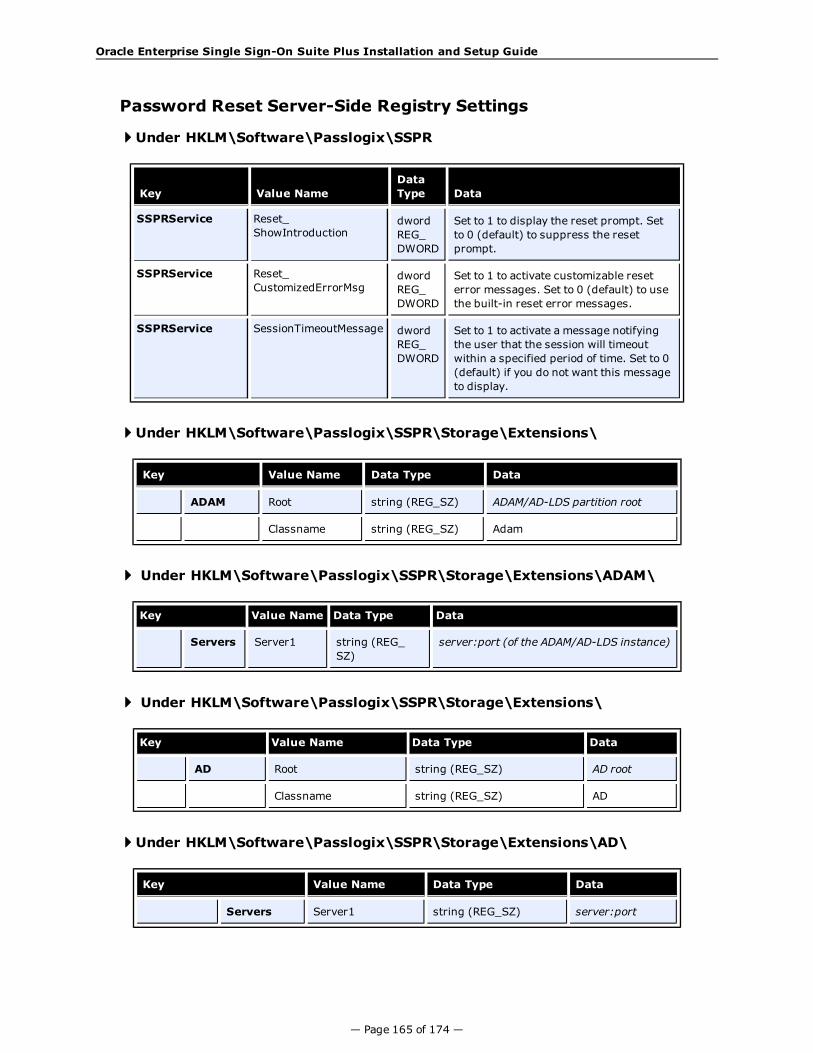
Oracle Enterprise Single Sign-On Suite Plus Installation and Setup Guide
Password Reset Server-Side Registry Settings
4Under HKLM\Software\Passlogix\SSPR
Key Value NameDataType Data
SSPRService Reset_ShowIntroduction
dwordREG_DWORD
Set to 1 to display the reset prompt. Setto 0 (default) to suppress the resetprompt.
SSPRService Reset_CustomizedErrorMsg
dwordREG_DWORD
Set to 1 to activate customizable reseterror messages. Set to 0 (default) to usethe built-in reset error messages.
SSPRService SessionTimeoutMessage dwordREG_DWORD
Set to 1 to activate a message notifyingthe user that the session will timeoutwithin a specified period of time. Set to 0(default) if you do not want this messageto display.
4Under HKLM\Software\Passlogix\SSPR\Storage\Extensions\
Key Value Name Data Type Data
ADAM Root string (REG_SZ) ADAM/AD-LDS partition root
Classname string (REG_SZ) Adam
4 Under HKLM\Software\Passlogix\SSPR\Storage\Extensions\ADAM\
Key Value Name Data Type Data
Servers Server1 string (REG_SZ)
server:port (of the ADAM/AD-LDS instance)
4 Under HKLM\Software\Passlogix\SSPR\Storage\Extensions\
Key Value Name Data Type Data
AD Root string (REG_SZ) AD root
Classname string (REG_SZ) AD
4Under HKLM\Software\Passlogix\SSPR\Storage\Extensions\AD\
Key Value Name Data Type Data
Servers Server1 string (REG_SZ) server:port
— Page 165 of 174 —

Oracle Enterprise Single Sign-On Suite Plus Configuration Reference
Modifying the DCOM Permissions of the Password ResetReporting Service
Password Reset sends reporting events to the SQL Reporting database through the SSO ReportingService, which runs locally on the Web server. The local SSO Reporting Service sends those eventsto the SQL Reporting database at regular intervals.
The default interval for transmitting events to the SQL Reporting database is 30minutes. You can change this setting from the Reporting page of the Password ResetManagement Console.
You can configure the Web server in one of two ways to enable reporting:
l Make the Password Reset Reset domain account a member of the local Administrators group.
or
l (Recommended) Modify the DCOM permissions of the SSO Reporting Service to allow the Pass-word Reset Reset account to launch and activate the SSO Reporting Service.
Tomodify the DCOM permissions:
1. Click Start > Run. At the command prompt, type dcomcnfg and press Enter.to launch theComponent Services management tool.
2. Navigate to the DCOM Config node:Console Root > Component Services > Computers> My Computer > DCOM Config.
— Page 166 of 174 —

Oracle Enterprise Single Sign-On Suite Plus Installation and Setup Guide
3. Locate the “SSOReportingService Class” node, right-click, and select Properties.
4. From the “SSOReportingService Class Properties" window, select the Security tab.
5. In the “Launch and Activation Permissions” section, click Customize, then click Edit.
6. In the "Group or user names:" section, click Add.
— Page 167 of 174 —
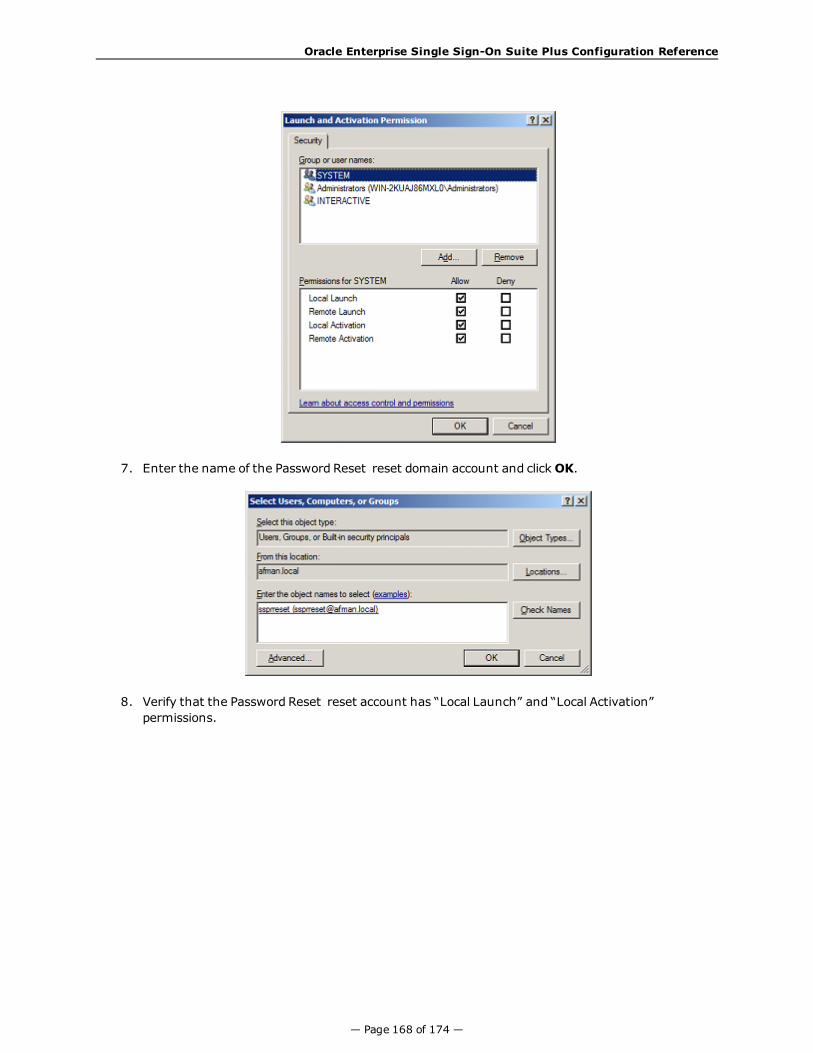
Oracle Enterprise Single Sign-On Suite Plus Configuration Reference
7. Enter the name of the Password Reset reset domain account and clickOK.
8. Verify that the Password Reset reset account has “Local Launch” and “Local Activation”permissions.
— Page 168 of 174 —

Oracle Enterprise Single Sign-On Suite Plus Installation and Setup Guide
9. ClickOK twice to finish.
Installing and Configuring an ADAM/AD-LDS Instance forPassword Reset
1. Run the ADAM/AD-LDS installer. Select A unique instance and clickNext.
— Page 169 of 174 —

Oracle Enterprise Single Sign-On Suite Plus Configuration Reference
2. Provide your Instance name and clickNext.
3. Specify port numbers of 10000 and 10001 (ten thousand range, for easy recall) and clickNext.
— Page 170 of 174 —
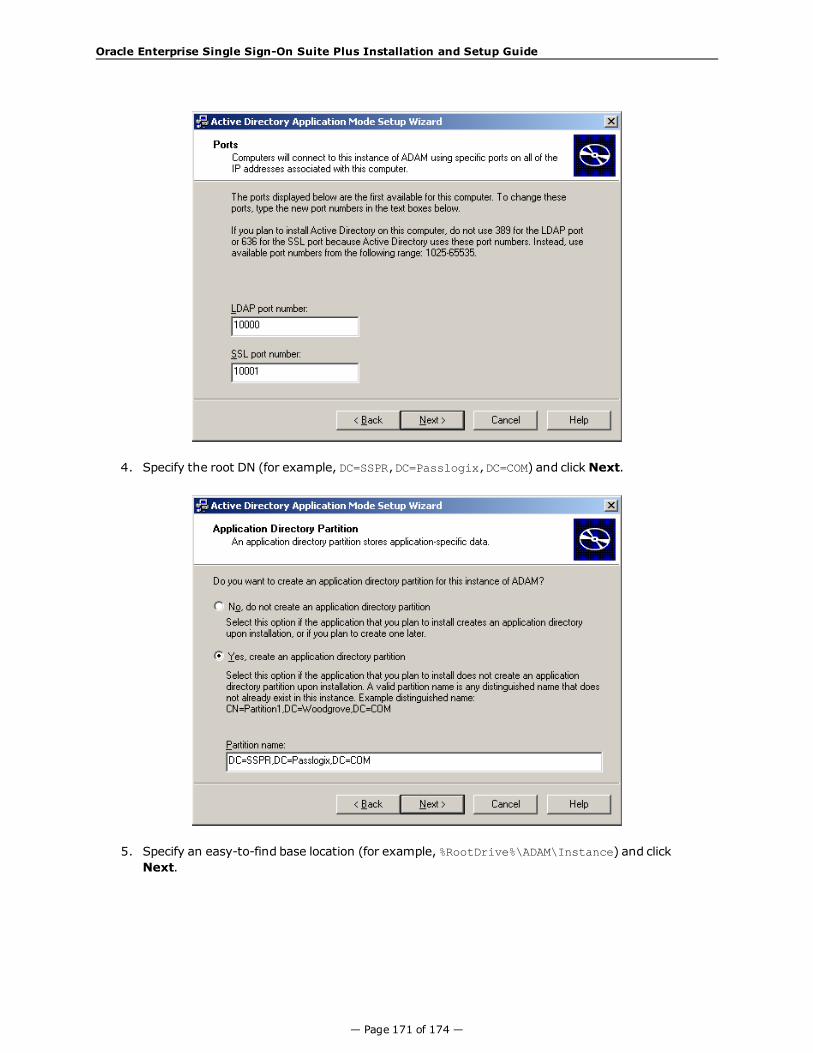
Oracle Enterprise Single Sign-On Suite Plus Installation and Setup Guide
4. Specify the root DN (for example, DC=SSPR,DC=Passlogix,DC=COM) and clickNext.
5. Specify an easy-to-find base location (for example, %RootDrive%\ADAM\Instance) and clickNext.
— Page 171 of 174 —

Oracle Enterprise Single Sign-On Suite Plus Configuration Reference
6. Specify the run privileges and clickNext.
7. Specify the Administrative Permissions and clickNext.
— Page 172 of 174 —

Oracle Enterprise Single Sign-On Suite Plus Installation and Setup Guide
8. Select Do not import LDIF files for this instance of ADAM and clickNext.
9. ClickNext as requested to proceed.
— Page 173 of 174 —

Oracle Enterprise Single Sign-On Suite Plus Configuration Reference
10. Click Finish.
— Page 174 of 174 —