Embed Size (px)
Citation preview
End User Guide to Starfish CONNECT™
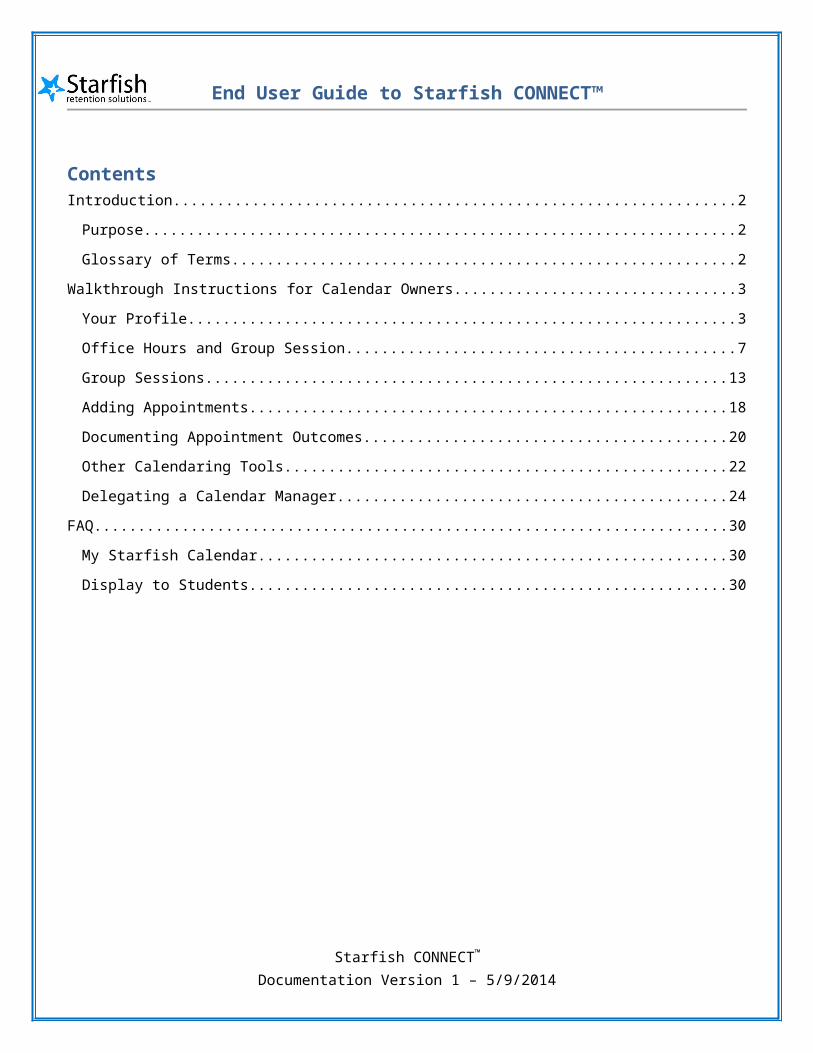
ContentsIntroduction................................................................................................................................................................2
Purpose...................................................................................................................................................................2
Glossary of Terms...................................................................................................................................................2
Walkthrough Instructions for Calendar Owners.........................................................................................................3
Your Profile.............................................................................................................................................................3
Office Hours and Group Session..............................................................................................................................7
Group Sessions......................................................................................................................................................13
Adding Appointments...........................................................................................................................................18
Documenting Appointment Outcomes.................................................................................................................20
Other Calendaring Tools.......................................................................................................................................22
Delegating a Calendar Manager............................................................................................................................24
FAQ...........................................................................................................................................................................30
My Starfish Calendar.............................................................................................................................................30
Display to Students...............................................................................................................................................30
Starfish CONNECT™
Documentation Version 1 – 5/9/2014
End User Guide to Starfish CONNECT™
Introduction
Purpose This document is designed to be a guide for end user calendar owners. It describes the features and functions of Starfish CONNECT™ as they relate to online appointment scheduling and integration with Microsoft® Exchange™ (when applicable).
Glossary of Terms Appointment: A documented meeting between a student and a calendar owner (i.e., advisor, instructor).
Students may only schedule appointments in the future at times the calendar owner designates as available. Calendar owners and calendar managers, however, can schedule future appointments, as well as document appointments that occurred in the past.
Appointment Type: Grouping of appointment reasons and activities (i.e., SpeedNotes) that a common set of roles can add and/or view.
Calendar Manager: A Starfish user who can see and edit another user’s Starfish calendar. A calendar owner can designate his/her own calendar managers by navigating to Profile > Appointment Preferences. Or, a Starfish Admin can batch upload these relationships.
Group Session: Similar to Office Hours, but more than one student can sign up for this particular block of time. The Calendar Owner decides how many students can sign up for each Group Session.
Office Hours: Calendar owners can add blocks of time called “Office Hours” to their calendars to indicate when they are available to meet with students. Appointments can be added outside the blocks by calendar owners or calendar managers, but students can only self-schedule within the block. Office Hours allow students to sign up for individual one-on-one slots within the time parameters entered by the calendar owner.
Outcomes: Results of a meeting documented in free form text on the Outcomes tab of an Appointment in Starfish.
SpeedNotes: Activity codes that provide an easy way for staff to document common outcomes of an appointment. Specific SpeedNotes are set up by the institution per Appointment Type.
Proprietary and Confidential | Copyright © 2013 Starfish Retention Solutions, Inc. Page | 2 of 30

End User Guide to Starfish CONNECT™
Walkthrough Instructions for Calendar Owners
Your Profile
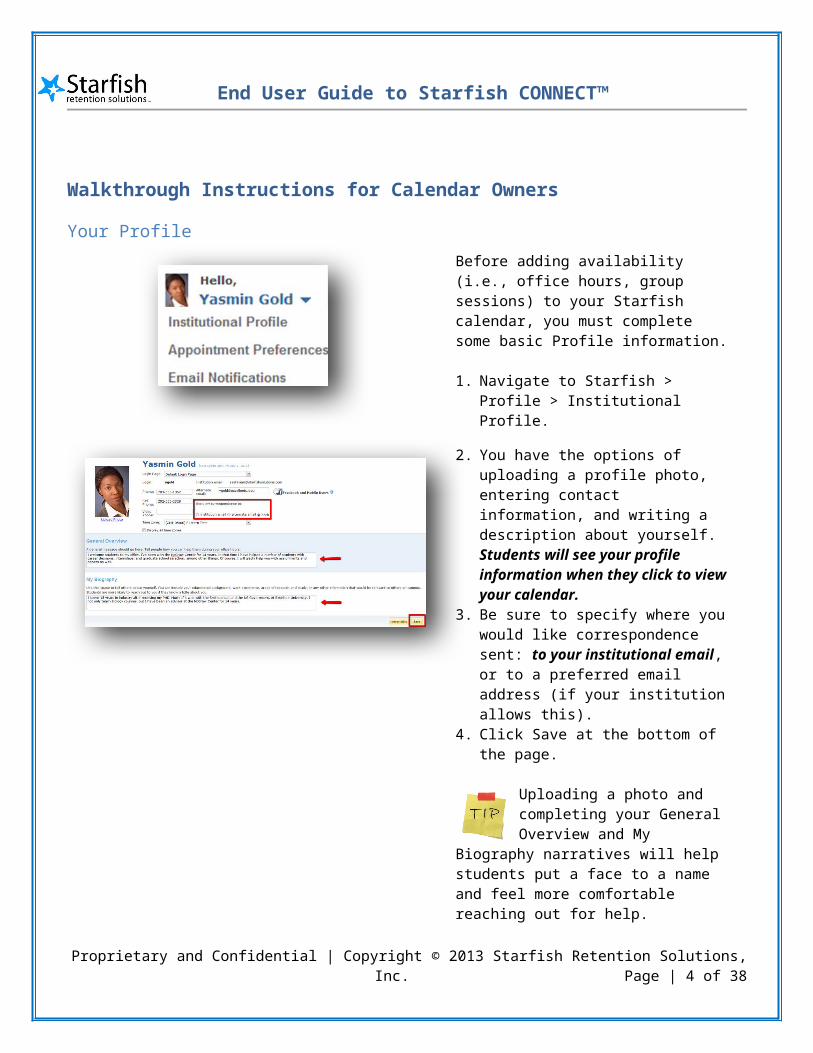
Before adding availability (i.e., office hours, group sessions) to your Starfish calendar, you must complete some basic Profile information.
1. Navigate to Starfish > Profile > Institutional Profile.
2. You have the options of uploading a profile photo, entering contact information, and writing a description about yourself. Students will see your profile information when they click to view your calendar.
3. Be sure to specify where you would like correspondence sent: to your institutional email, or to a preferred email address (if your institution allows this).
4. Click Save at the bottom of the page.
Uploading a photo and completing your General Overview and My Biography narratives will help students put a face to a name and
feel more comfortable reaching out for help.
Proprietary and Confidential | Copyright © 2013 Starfish Retention Solutions, Inc. Page | 3 of 30
End User Guide to Starfish CONNECT™
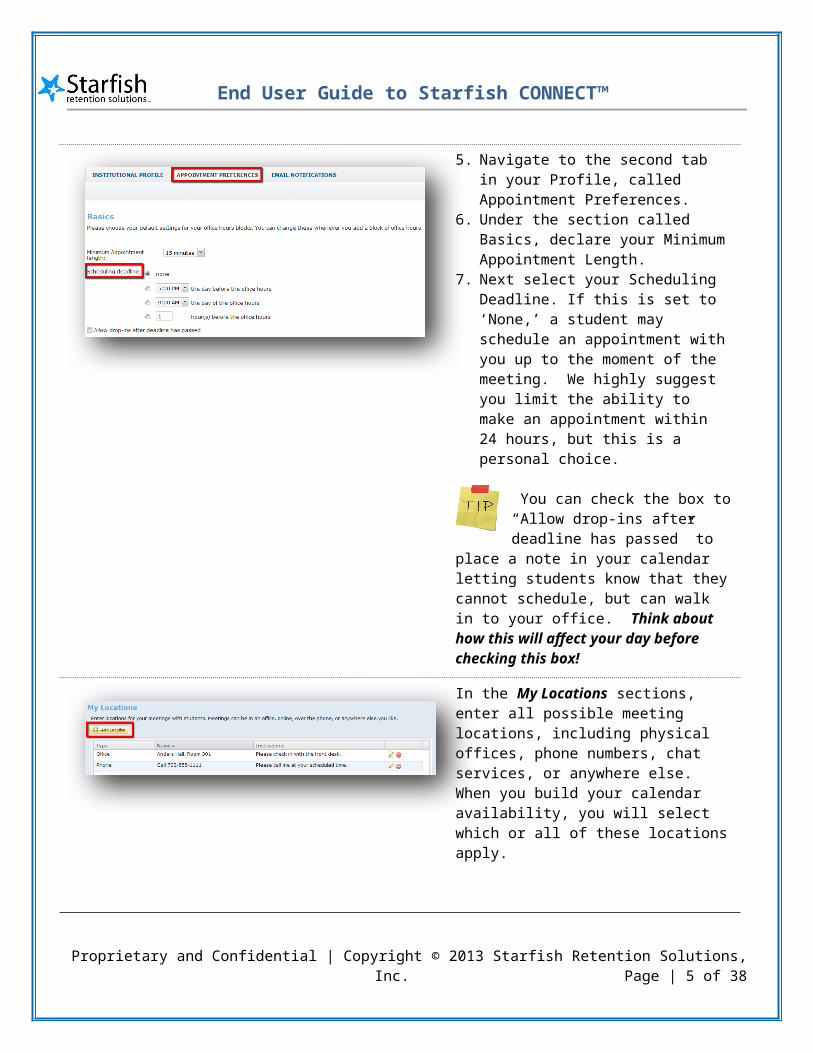
5. Navigate to the second tab in your Profile, called Appointment Preferences.
6. Under the section called Basics, declare your Minimum Appointment Length.
7. Next select your Scheduling Deadline. If this is set to ‘None,’ a student may schedule an appointment with you up to the moment of the meeting. We highly suggest you limit the ability to make an appointment within 24 hours, but this is a personal choice.
You can check the box to “Allow drop-ins after deadline has passed” to place a note in your calendar
letting students know that they cannot schedule, but can walk in to your office. Think about how this will affect your day before checking this box!
In the My Locations sections, enter all possible meeting locations, including physical offices, phone numbers, chat services, or anywhere else. When you build your calendar availability, you will select which or all of these locations apply.
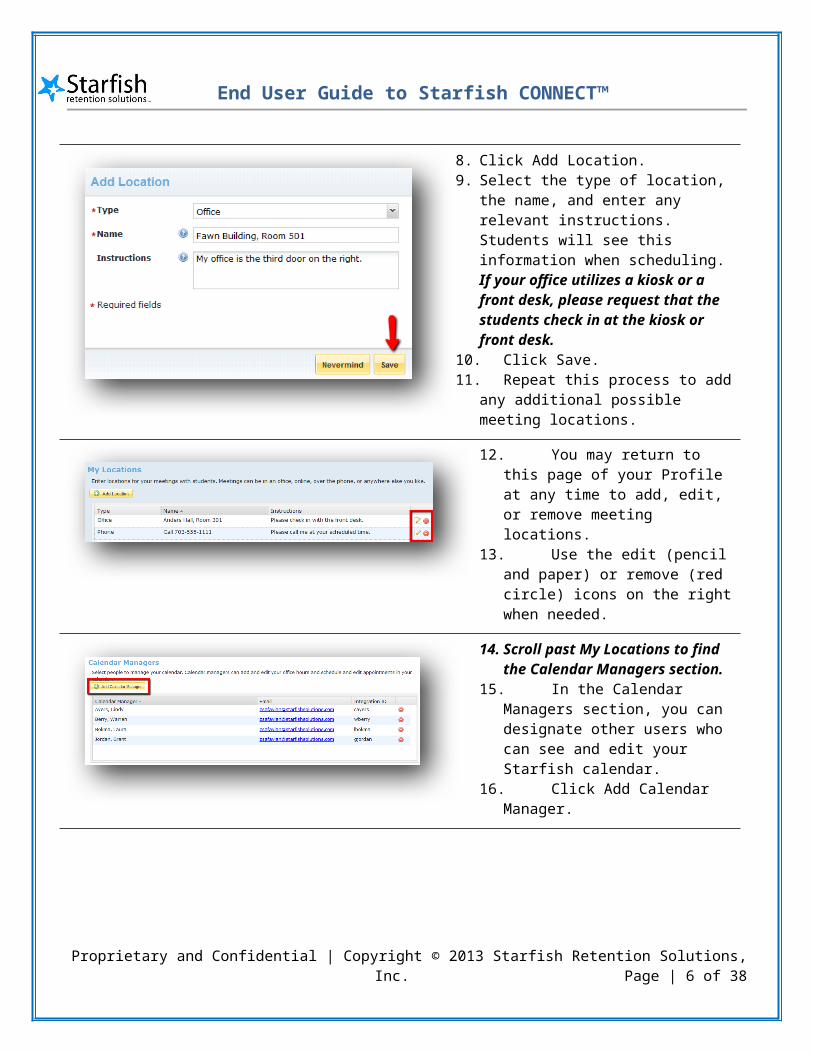
8. Click Add Location.9. Select the type of location, the name, and
enter any relevant instructions. Students will see this information when scheduling. If your office utilizes a kiosk or a front desk, please request that the students check in at the kiosk or front desk.
10. Click Save.11. Repeat this process to add any additional
possible meeting locations.
Proprietary and Confidential | Copyright © 2013 Starfish Retention Solutions, Inc. Page | 4 of 30
End User Guide to Starfish CONNECT™
12. You may return to this page of your Profile at any time to add, edit, or remove meeting locations.
13. Use the edit (pencil and paper) or remove (red circle) icons on the right when needed.
14. Scroll past My Locations to find the Calendar Managers section.
15. In the Calendar Managers section, you can designate other users who can see and edit your Starfish calendar.
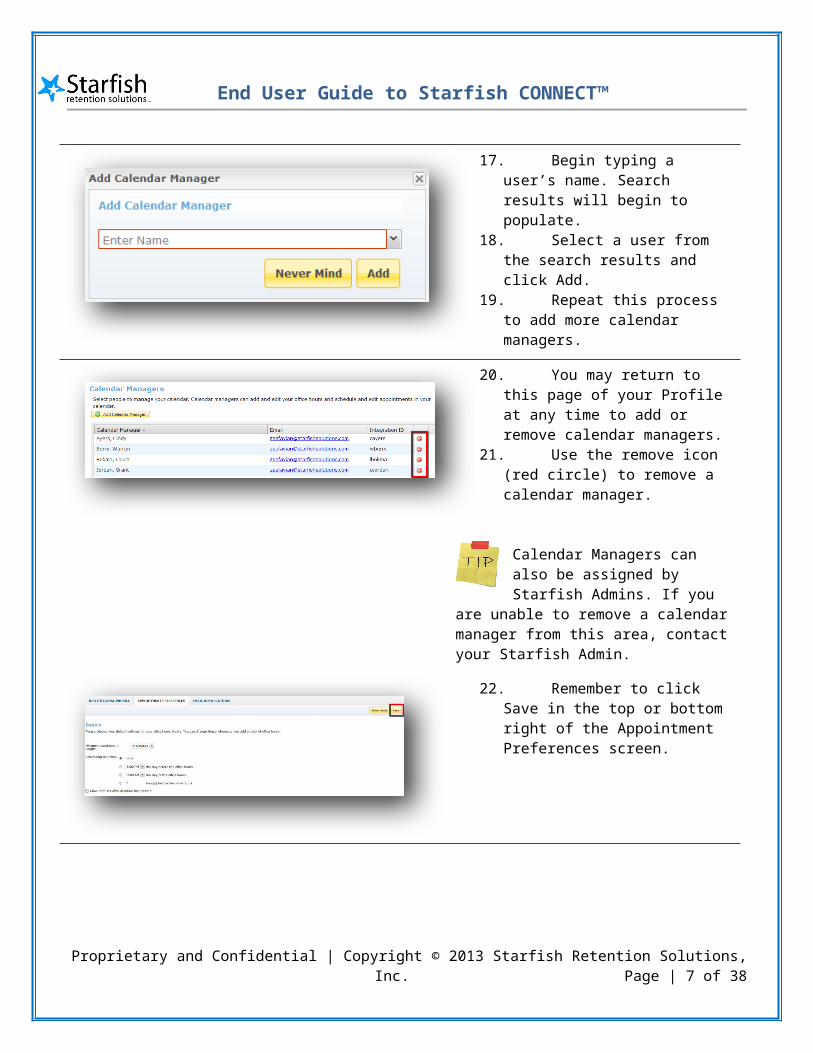
16. Click Add Calendar Manager.
17. Begin typing a user’s name. Search results will begin to populate.
18. Select a user from the search results and click Add.
19. Repeat this process to add more calendar managers.
20. You may return to this page of your Profile at any time to add or remove calendar managers.
21. Use the remove icon (red circle) to remove a calendar manager.
Calendar Managers can also be assigned by Starfish Admins. If you are unable to remove a calendar
manager from this area, contact your Starfish Admin.
Proprietary and Confidential | Copyright © 2013 Starfish Retention Solutions, Inc. Page | 5 of 30
End User Guide to Starfish CONNECT™
22. Remember to click Save in the top or bottom right of the Appointment Preferences screen.
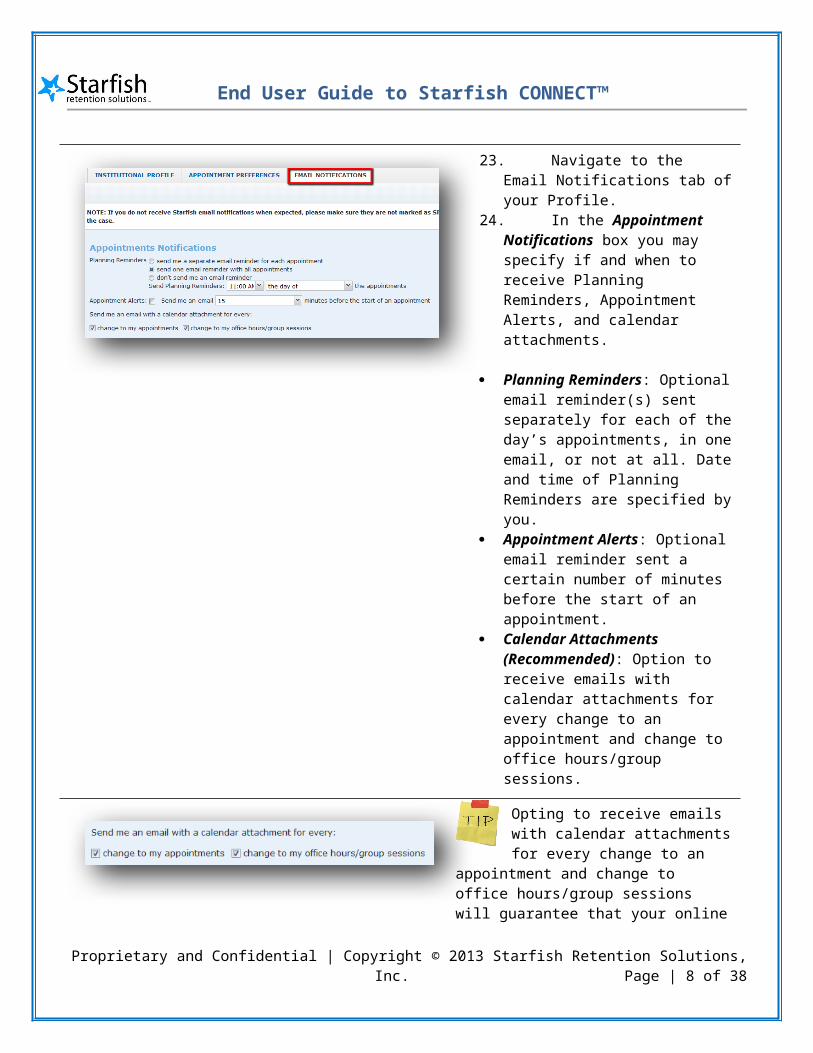
23. Navigate to the Email Notifications tab of your Profile.
24. In the Appointment Notifications box you may specify if and when to receive Planning Reminders, Appointment Alerts, and calendar attachments.
Planning Reminders: Optional email reminder(s) sent separately for each of the day’s appointments, in one email, or not at all. Date and time of Planning Reminders are specified by you.
Appointment Alerts: Optional email reminder sent a certain number of minutes before the start of an appointment.
Calendar Attachments (Recommended): Option to receive emails with calendar attachments for every change to an appointment and change to office hours/group sessions.
Opting to receive emails with calendar attachments for every change to an appointment and
change to office hours/group sessions will guarantee that your online calendar (e.g., Outlook, Google, Entourage) is in sync with your Starfish calendar. Remember, we do not use Exchange so we cannot update Outlook calendars via Starfish.
Proprietary and Confidential | Copyright © 2013 Starfish Retention Solutions, Inc. Page | 6 of 30
End User Guide to Starfish CONNECT™
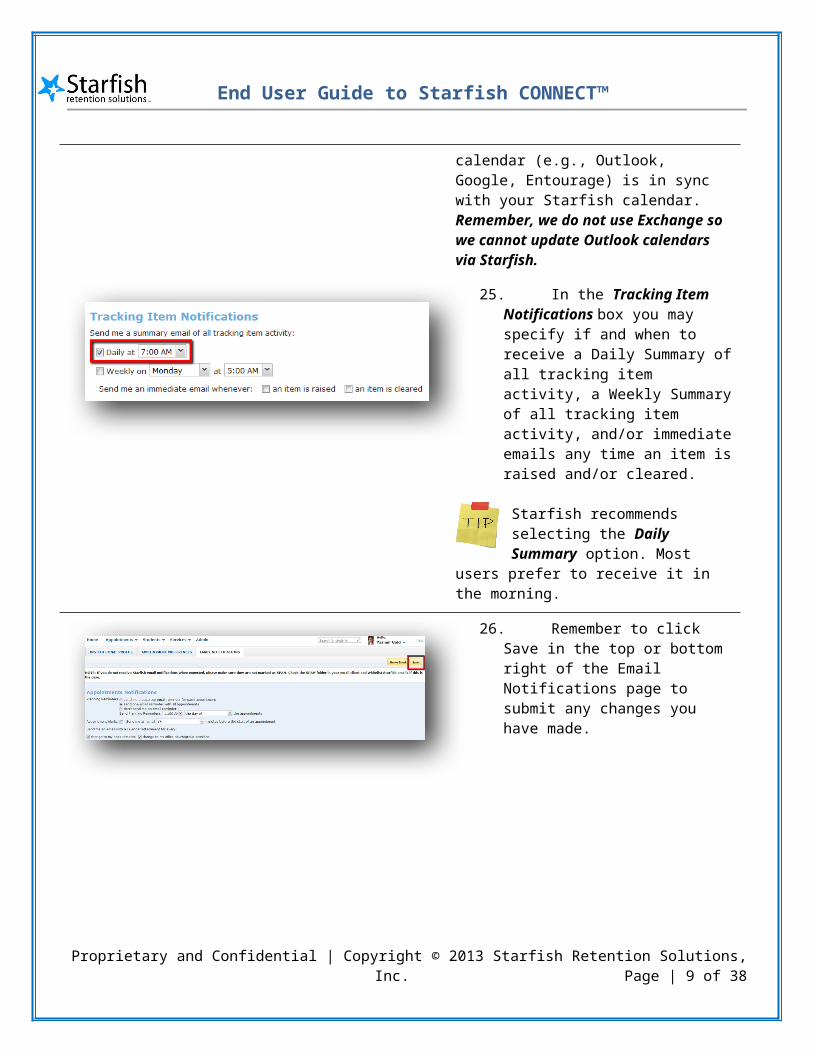
25. In the Tracking Item Notifications box you may specify if and when to receive a Daily Summary of all tracking item activity, a Weekly Summary of all tracking item activity, and/or immediate emails any time an item is raised and/or cleared.
Starfish recommends selecting the Daily Summary option. Most users prefer to receive it in the morning.
26. Remember to click Save in the top or bottom right of the Email Notifications page to submit any changes you have made.
Proprietary and Confidential | Copyright © 2013 Starfish Retention Solutions, Inc. Page | 7 of 30
End User Guide to Starfish CONNECT™
Office Hours and Group Session
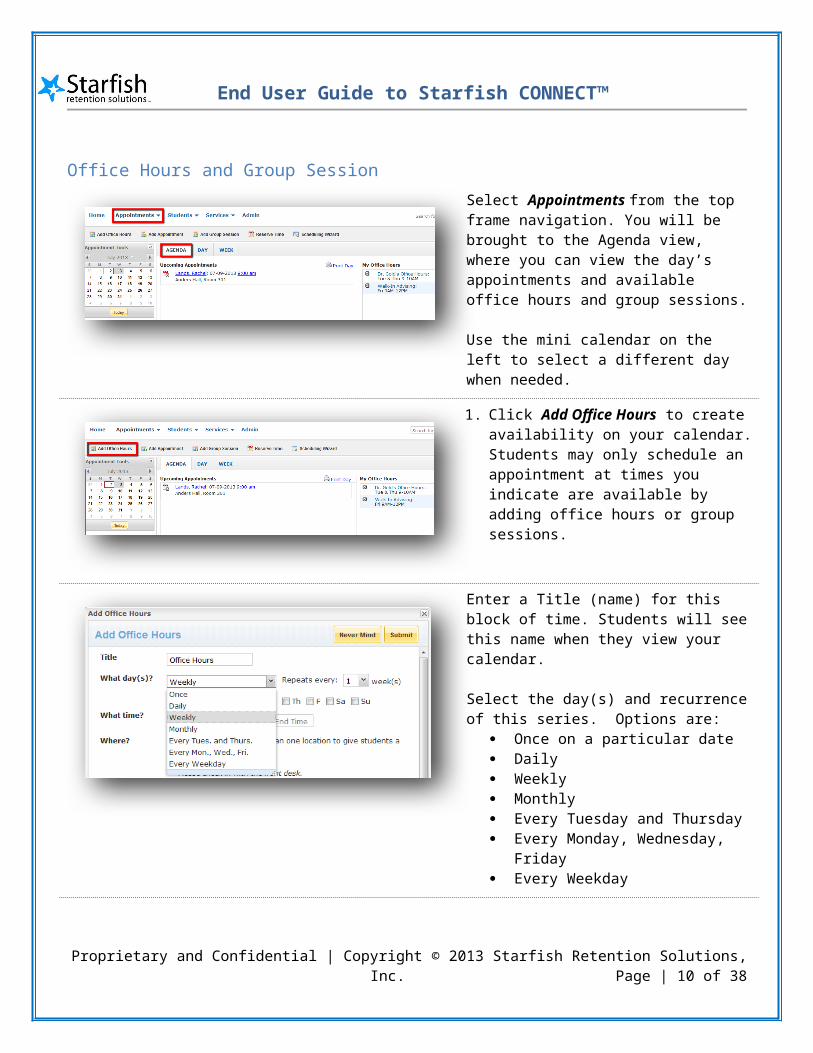
Select Appointments from the top frame navigation. You will be brought to the Agenda view, where you can view the day’s appointments and available office hours and group sessions.
Use the mini calendar on the left to select a different day when needed.
1. Click Add Office Hours to create availability on your calendar. Students may only schedule an appointment at times you indicate are available by adding office hours or group sessions.
Enter a Title (name) for this block of time. Students will see this name when they view your calendar.
Select the day(s) and recurrence of this series. Options are:
Once on a particular date Daily Weekly Monthly Every Tuesday and Thursday Every Monday, Wednesday, Friday Every Weekday
Proprietary and Confidential | Copyright © 2013 Starfish Retention Solutions, Inc. Page | 8 of 30
End User Guide to Starfish CONNECT™
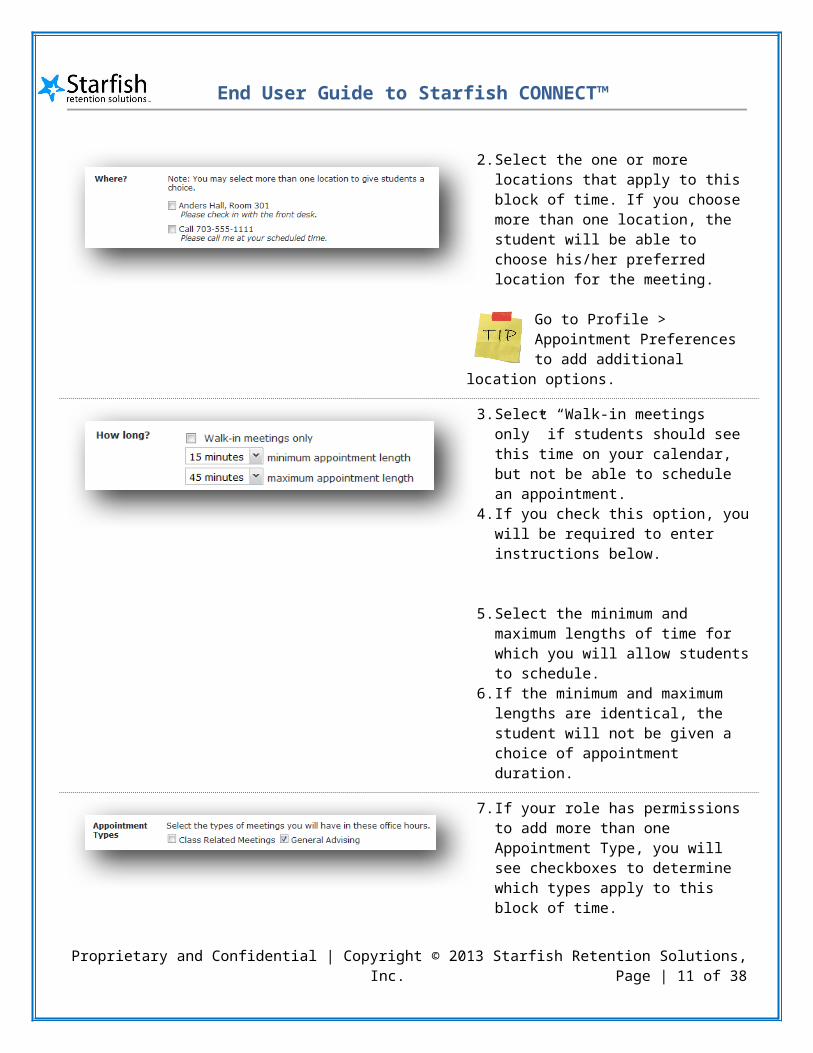
2. Select the one or more locations that apply to this block of time. If you choose more than one location, the student will be able to choose his/her preferred location for the meeting.
Go to Profile > Appointment Preferences to add additional location options.
3. Select “Walk-in meetings only” if students should see this time on your calendar, but not be able to schedule an appointment.
4. If you check this option, you will be required to enter instructions below.
5. Select the minimum and maximum lengths of time for which you will allow students to schedule.
6. If the minimum and maximum lengths are identical, the student will not be given a choice of appointment duration.
7. If your role has permissions to add more than one Appointment Type, you will see checkboxes to determine which types apply to this block of time.
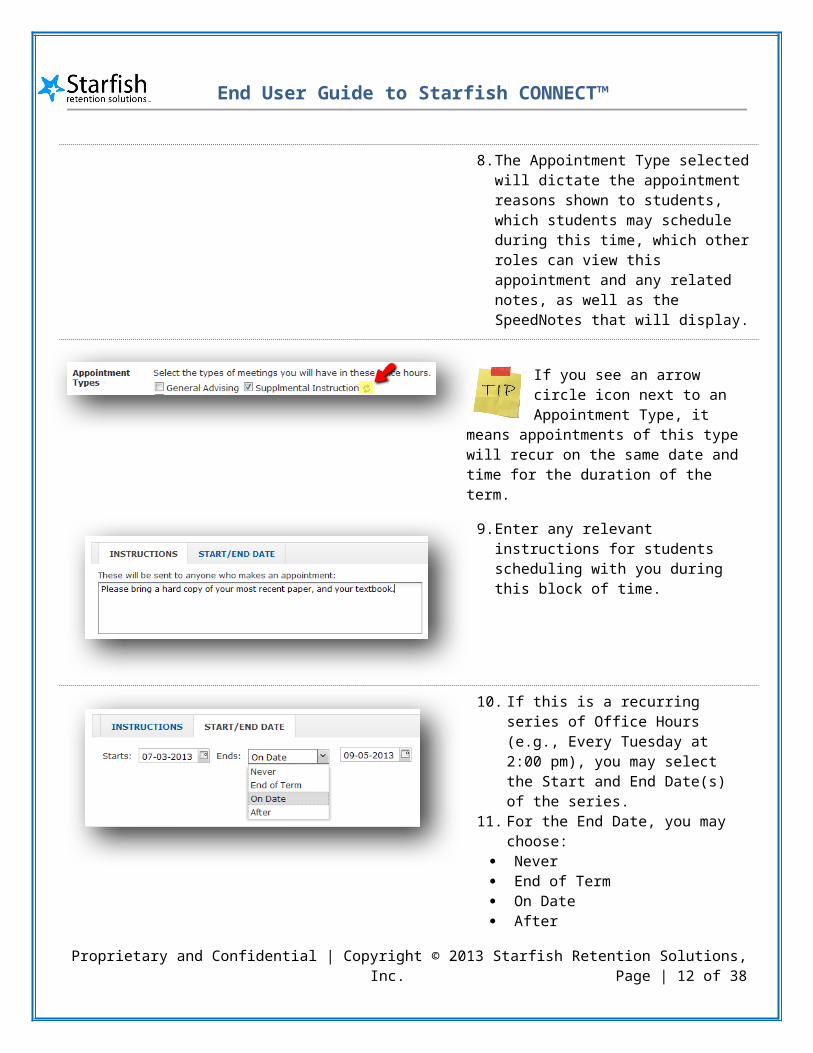
8. The Appointment Type selected will dictate the appointment reasons shown to students, which students may schedule during this time, which other roles can view this appointment and any related notes, as well as the SpeedNotes that will display.
If you see an arrow circle icon next to an Appointment Type, it means appointments of this type will recur
on the same date and time for the duration of the term.
Proprietary and Confidential | Copyright © 2013 Starfish Retention Solutions, Inc. Page | 9 of 30
End User Guide to Starfish CONNECT™
9. Enter any relevant instructions for students scheduling with you during this block of time.
10. If this is a recurring series of Office Hours (e.g., Every Tuesday at 2:00 pm), you may select the Start and End Date(s) of the series.
11. For the End Date, you may choose: Never End of Term On Date After
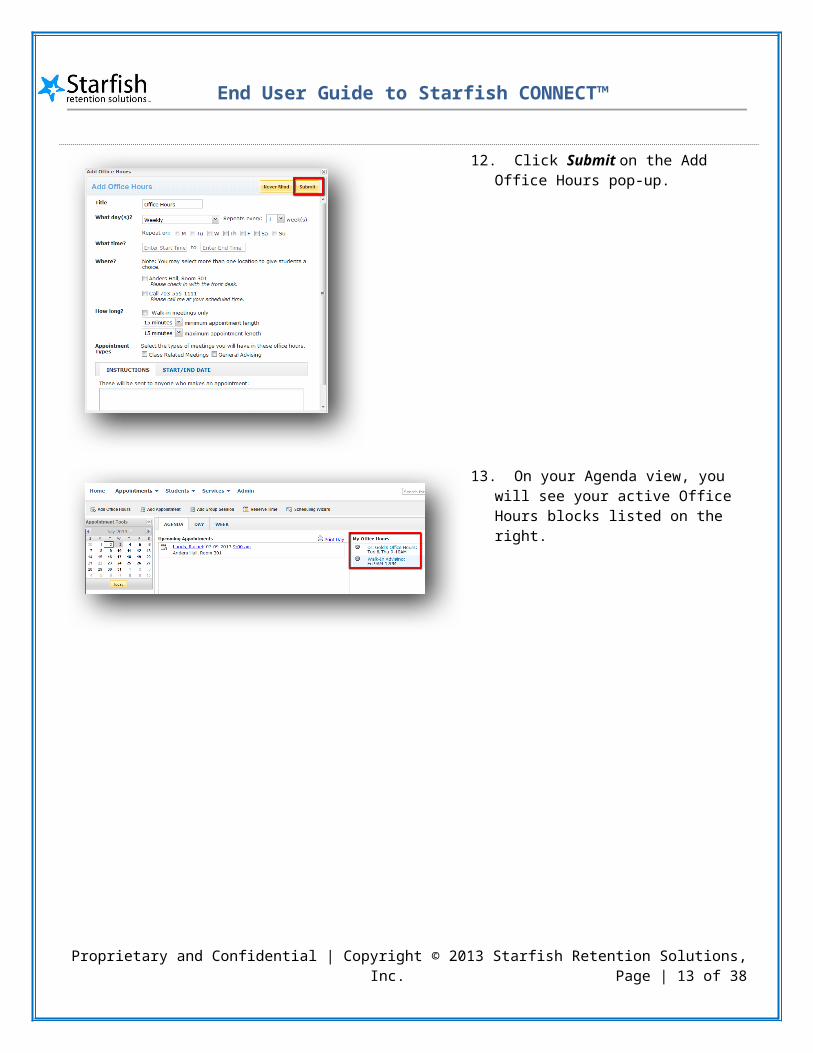
12. Click Submit on the Add Office Hours pop-up.
Proprietary and Confidential | Copyright © 2013 Starfish Retention Solutions, Inc. Page | 10 of 30
End User Guide to Starfish CONNECT™
13. On your Agenda view, you will see your active Office Hours blocks listed on the right.
Proprietary and Confidential | Copyright © 2013 Starfish Retention Solutions, Inc. Page | 11 of 30
End User Guide to Starfish CONNECT™
14. Click the gray and white double-down arrow to view the Office Hours Menu.
15. From this menu, you may choose to Edit Office Hours to modify the series, or Cancel Series to delete all occurrences of the series.
16. To edit one occurrence of a series, go to the Day View. Use the mini calendar on the left to select a day. Find your office hours block displayed in the calendar and click the gray and white double-down arrow in the header of the block to view the menu.
Proprietary and Confidential | Copyright © 2013 Starfish Retention Solutions, Inc. Page | 12 of 30
End User Guide to Starfish CONNECT™
17. You may also click the gray and white double-down arrow from the Week View.
18. Clicking this icon will display the Office Hours Menu where you may choose to Edit Office Hours, Cancel Series, or Cancel Occurrence.
Starfish recommends editing a series from the Agenda View, and editing an occurrence from either the Day or Week View.
19. If you click to cancel an occurrence, you will see a notification confirming the cancellation and how many appointments within this block will be canceled.
20. Enter a message to the students with appointments during this time.
21. Then click Submit.
Group Sessions
Proprietary and Confidential | Copyright © 2013 Starfish Retention Solutions, Inc. Page | 13 of 30

End User Guide to Starfish CONNECT™
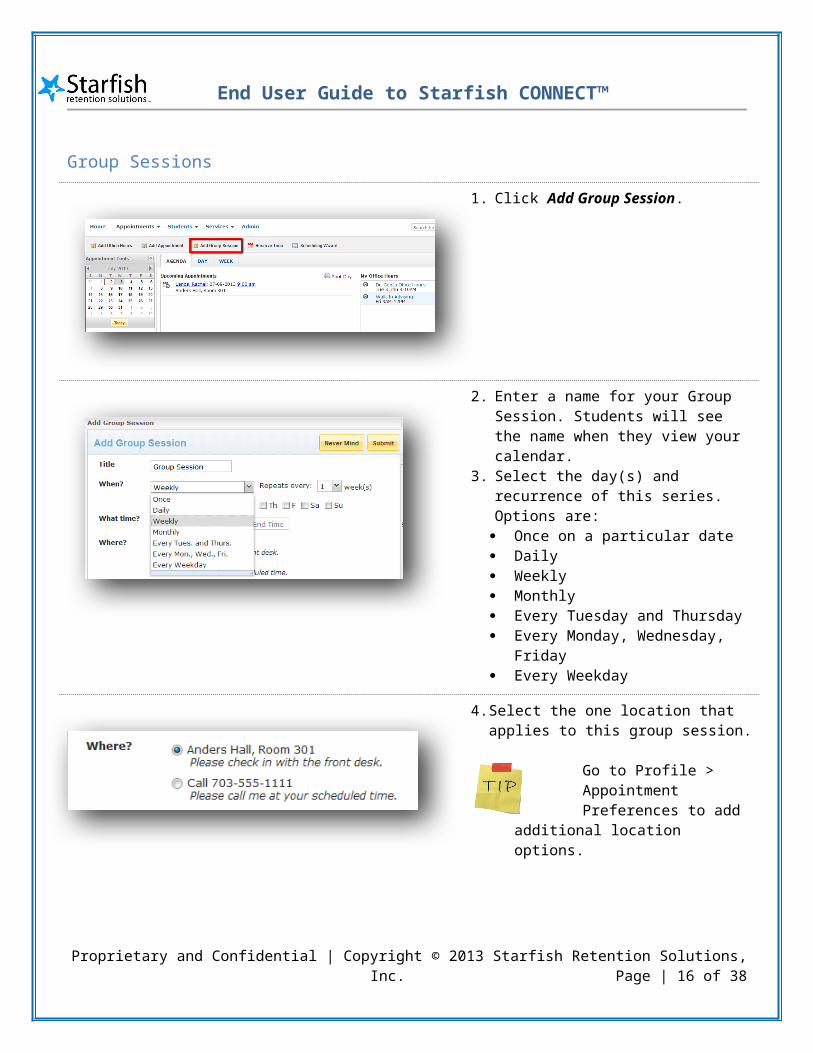
1. Click Add Group Session.
2. Enter a name for your Group Session. Students will see the name when they view your calendar.
3. Select the day(s) and recurrence of this series. Options are: Once on a particular date Daily Weekly Monthly Every Tuesday and Thursday Every Monday, Wednesday, Friday Every Weekday
4. Select the one location that applies to this group session.
Go to Profile > Appointment Preferences to add additional location options.
Proprietary and Confidential | Copyright © 2013 Starfish Retention Solutions, Inc. Page | 14 of 30

End User Guide to Starfish CONNECT™
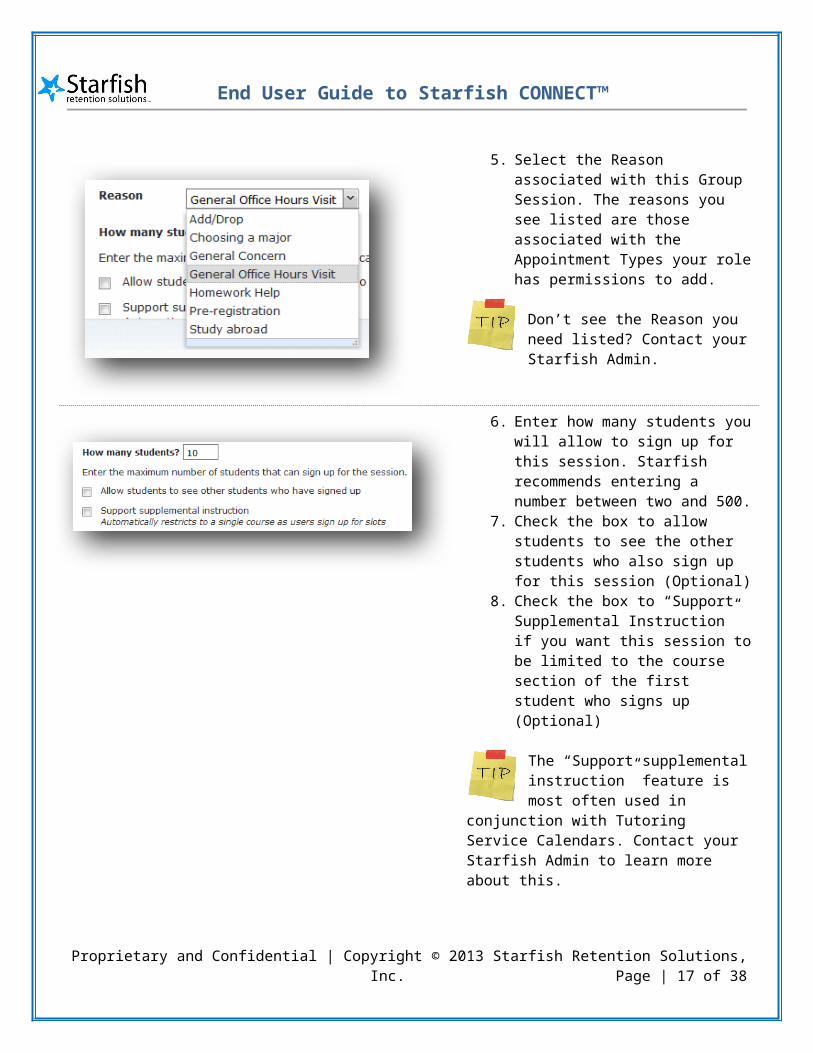
5. Select the Reason associated with this Group Session. The reasons you see listed are those associated with the Appointment Types your role has permissions to add.
Don’t see the Reason you need listed? Contact your Starfish Admin.
6. Enter how many students you will allow to sign up for this session. Starfish recommends entering a number between two and 500.
7. Check the box to allow students to see the other students who also sign up for this session (Optional)
8. Check the box to “Support Supplemental Instruction” if you want this session to be limited to the course section of the first student who signs up (Optional)
The “Support supplemental instruction” feature is most often used in conjunction with Tutoring
Service Calendars. Contact your Starfish Admin to learn more about this.
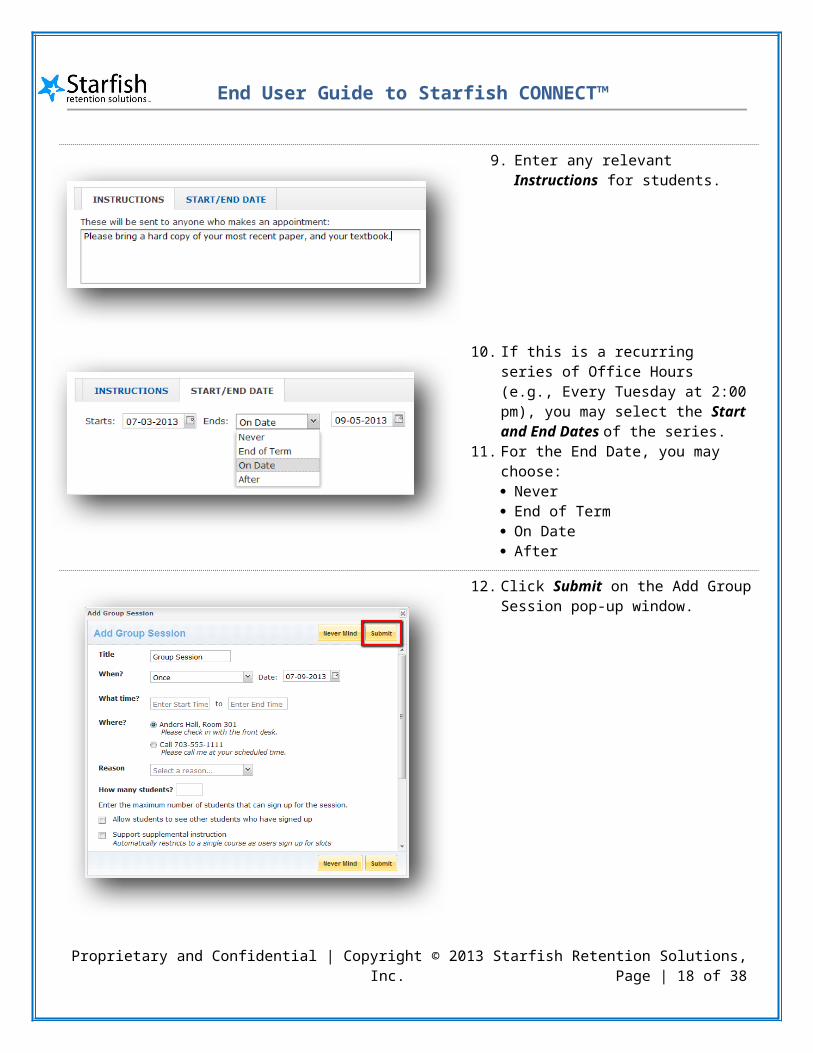
9. Enter any relevant Instructions for students.
Proprietary and Confidential | Copyright © 2013 Starfish Retention Solutions, Inc. Page | 15 of 30
End User Guide to Starfish CONNECT™
10. If this is a recurring series of Office Hours (e.g., Every Tuesday at 2:00 pm), you may select the Start and End Dates of the series.
11. For the End Date, you may choose: Never End of Term On Date After
12. Click Submit on the Add Group Session pop-up window.
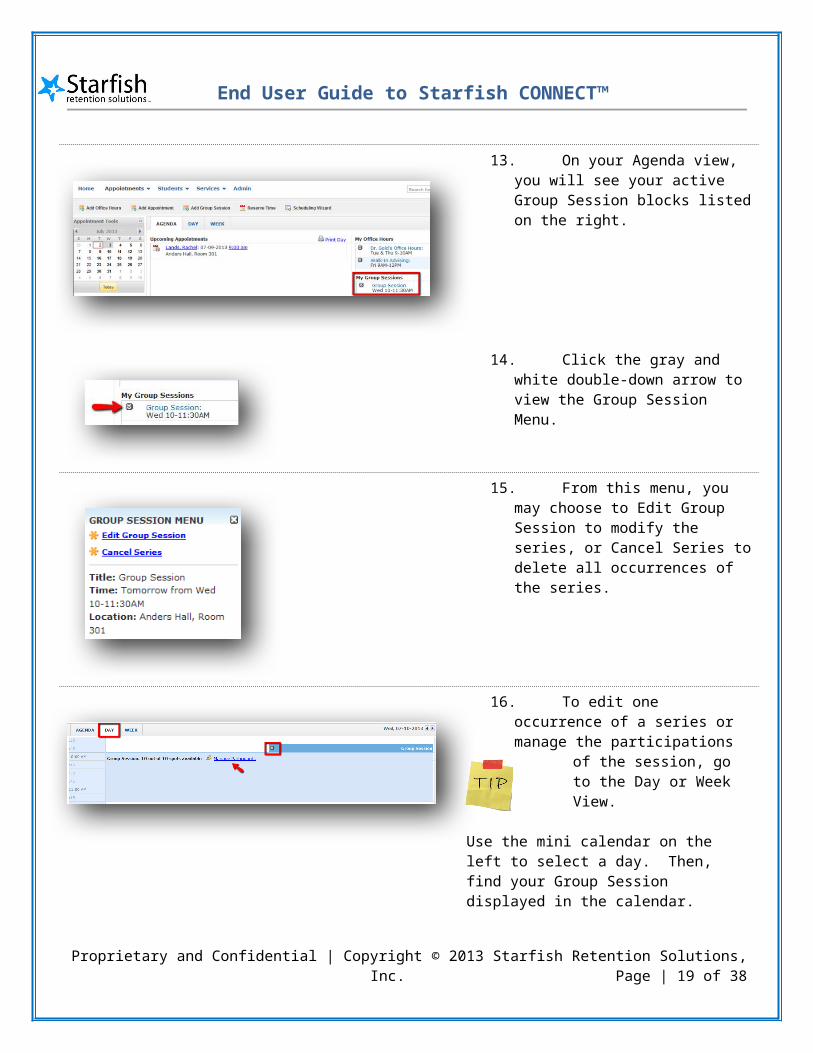
13. On your Agenda view, you will see your active Group Session blocks listed on the right.
Proprietary and Confidential | Copyright © 2013 Starfish Retention Solutions, Inc. Page | 16 of 30
End User Guide to Starfish CONNECT™
14. Click the gray and white double-down arrow to view the Group Session Menu.
15. From this menu, you may choose to Edit Group Session to modify the series, or Cancel Series to delete all occurrences of the series.
16. To edit one occurrence of a series or manage the participations of the session, go to the Day or Week View.
Use the mini calendar on the left to select a day. Then, find your Group Session displayed in the calendar.
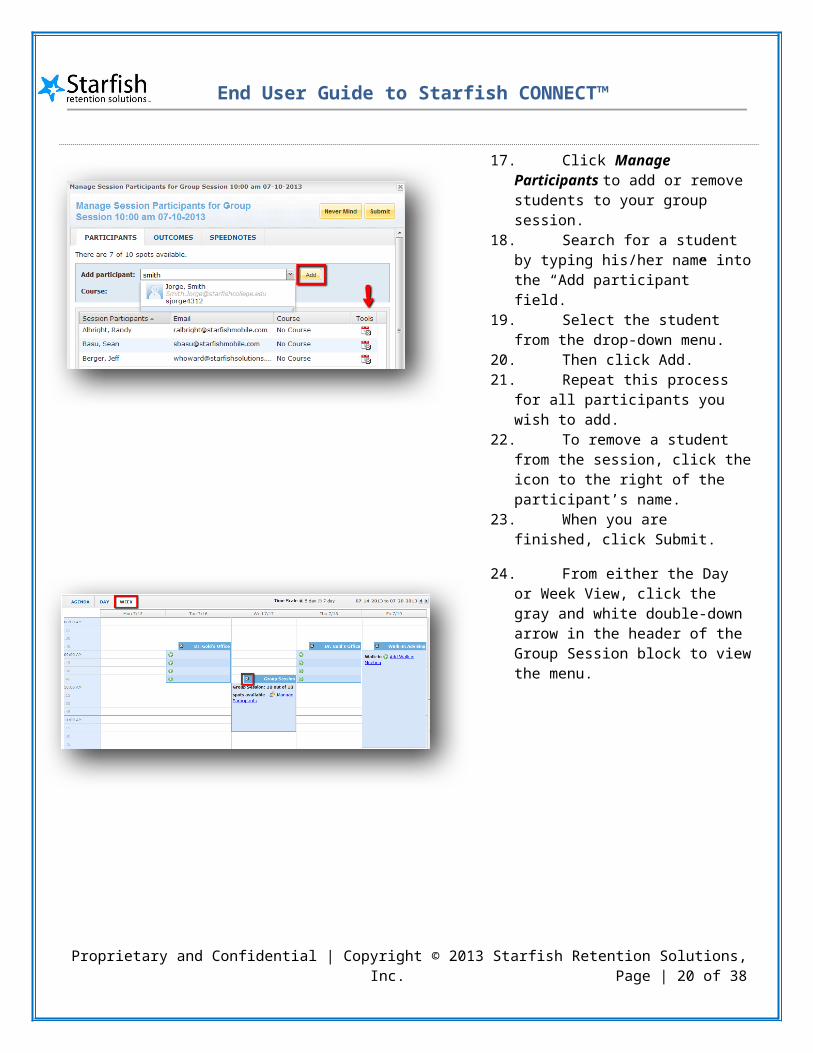
17. Click Manage Participants to add or remove students to your group session.
18. Search for a student by typing his/her name into the “Add participant” field.
19. Select the student from the drop-down menu.
20. Then click Add.21. Repeat this process for all participants
you wish to add.22. To remove a student from the session,
click the icon to the right of the participant’s name.
23. When you are finished, click Submit.
Proprietary and Confidential | Copyright © 2013 Starfish Retention Solutions, Inc. Page | 17 of 30
End User Guide to Starfish CONNECT™
24. From either the Day or Week View, click the gray and white double-down arrow in the header of the Group Session block to view the menu.
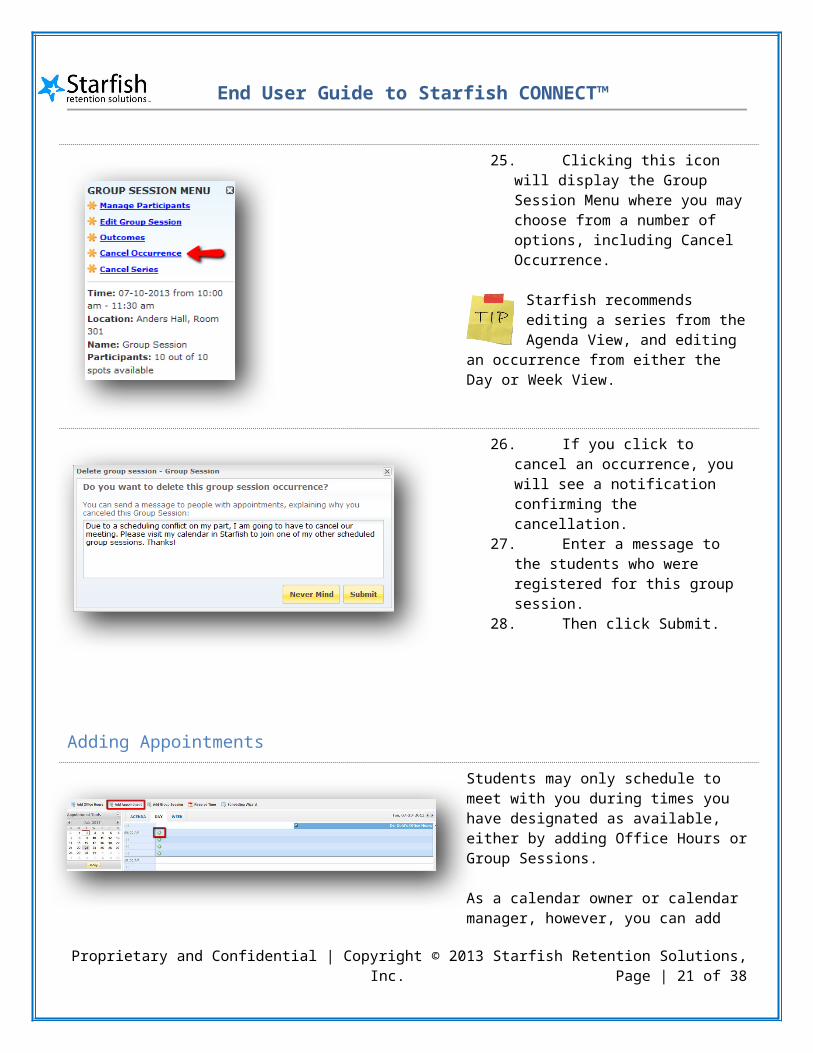
25. Clicking this icon will display the Group Session Menu where you may choose from a number of options, including Cancel Occurrence.
Starfish recommends editing a series from the Agenda View, and editing an occurrence from either the Day or Week View.
26. If you click to cancel an occurrence, you will see a notification confirming the cancellation.
27. Enter a message to the students who were registered for this group session.
28. Then click Submit.
Proprietary and Confidential | Copyright © 2013 Starfish Retention Solutions, Inc. Page | 18 of 30
End User Guide to Starfish CONNECT™
Adding Appointments
Students may only schedule to meet with you during times you have designated as available, either by adding Office Hours or Group Sessions.
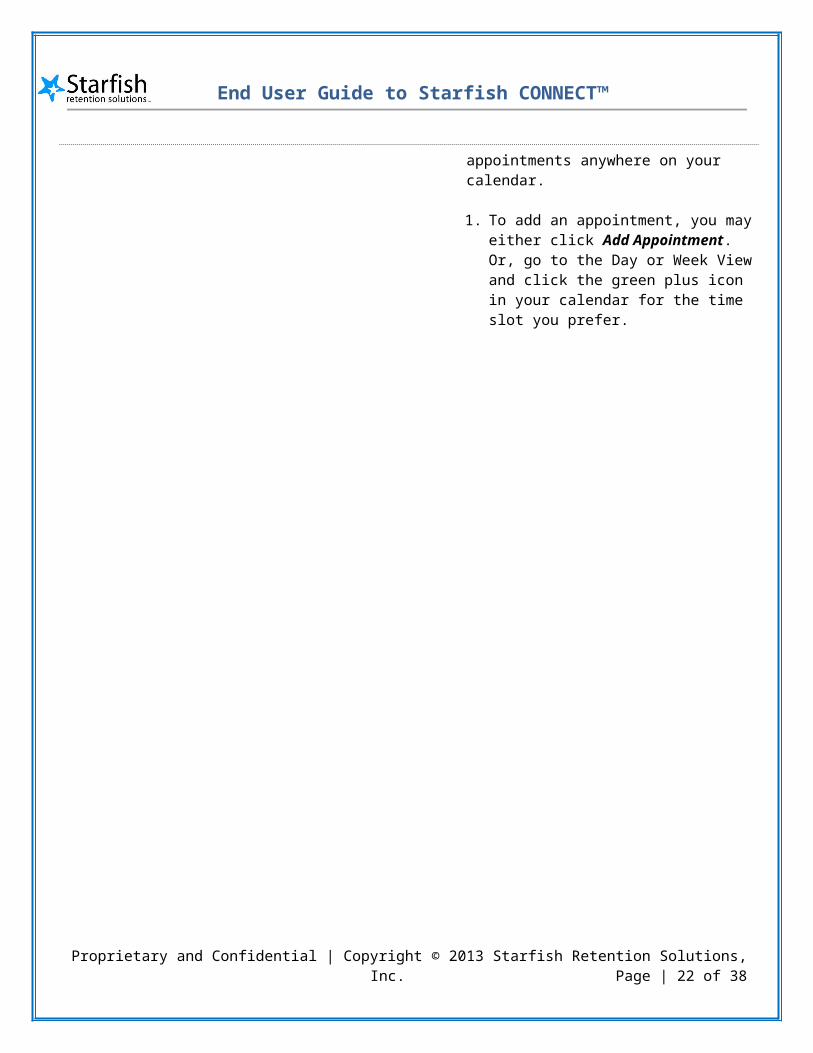
As a calendar owner or calendar manager, however, you can add appointments anywhere on your calendar.
1. To add an appointment, you may either click Add Appointment. Or, go to the Day or Week View and click the green plus icon in your calendar for the time slot you prefer.
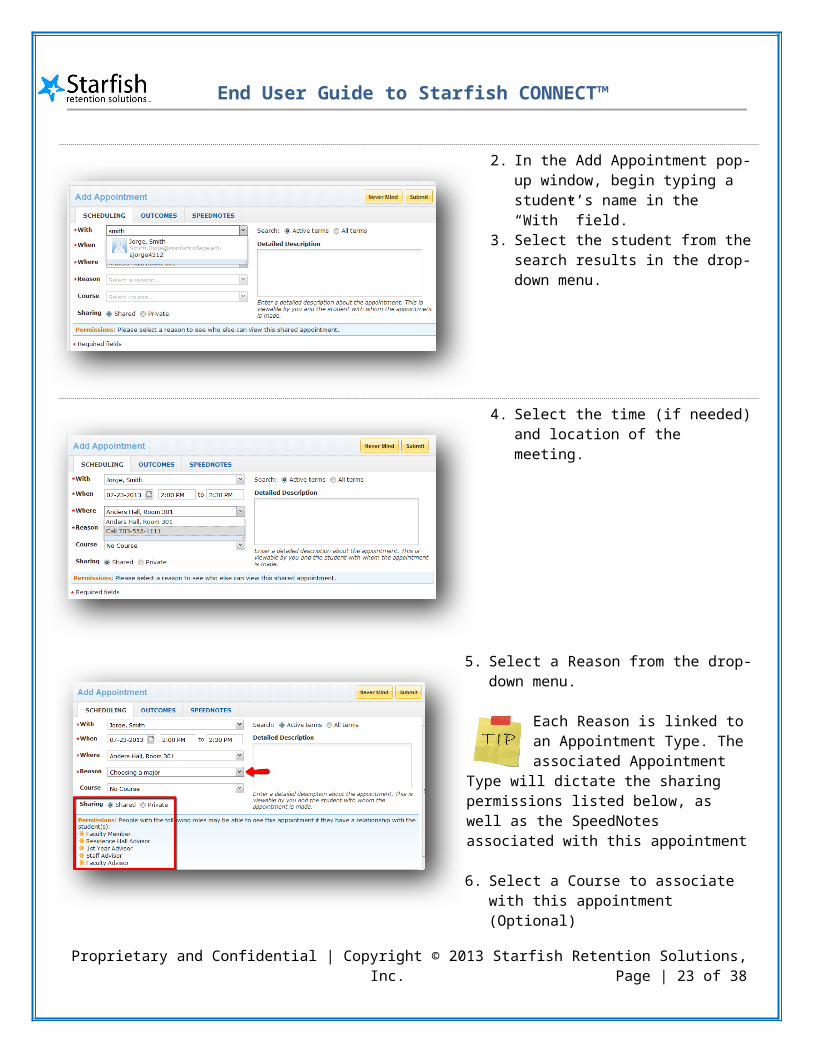
2. In the Add Appointment pop-up window, begin typing a student’s name in the “With” field.
3. Select the student from the search results in the drop-down menu.
4. Select the time (if needed) and location of the meeting.
Proprietary and Confidential | Copyright © 2013 Starfish Retention Solutions, Inc. Page | 19 of 30
End User Guide to Starfish CONNECT™
5. Select a Reason from the drop-down menu.
Each Reason is linked to an Appointment Type. The associated Appointment Type will dictate the sharing permissions listed below, as
well as the SpeedNotes associated with this appointment
6. Select a Course to associate with this appointment (Optional)
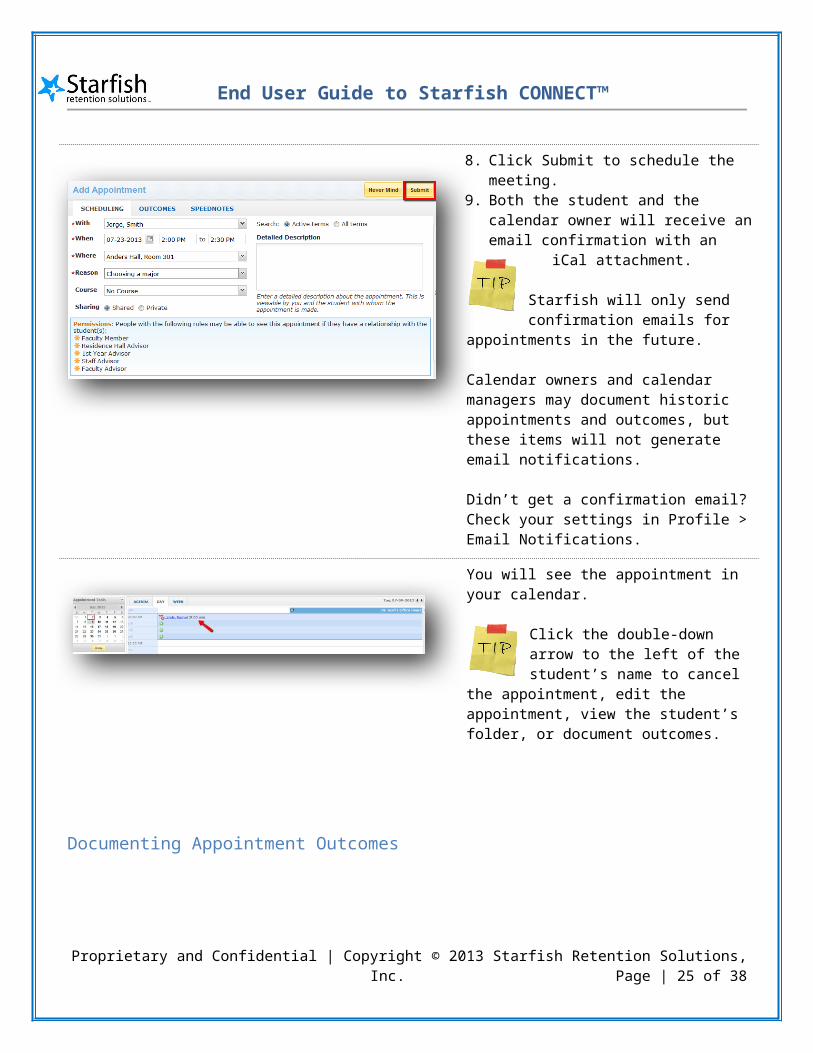
7. Enter a Detailed Description of the meeting context (Optional)
8. Click Submit to schedule the meeting.9. Both the student and the calendar owner
will receive an email confirmation with an iCal attachment.
Starfish will only send confirmation emails for appointments in the future.
Calendar owners and calendar managers may document historic appointments and outcomes, but these items will not generate email notifications.
Didn’t get a confirmation email? Check your settings in Profile > Email Notifications.
You will see the appointment in your calendar.
Click the double-down arrow to the left of the student’s name to cancel the appointment, edit the
appointment, view the student’s folder, or document outcomes.
Documenting Appointment Outcomes
Proprietary and Confidential | Copyright © 2013 Starfish Retention Solutions, Inc. Page | 20 of 30
End User Guide to Starfish CONNECT™
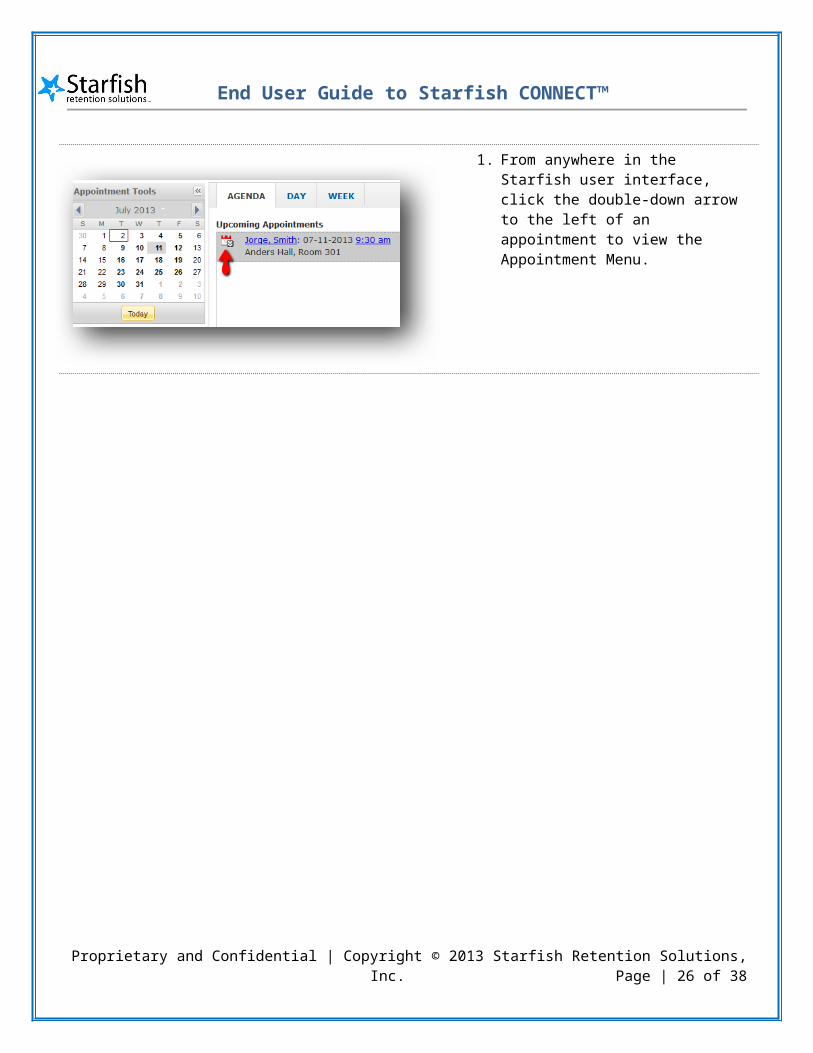
1. From anywhere in the Starfish user interface, click the double-down arrow to the left of an appointment to view the Appointment Menu.
2. Select Outcomes to document your notes on this meeting.
Proprietary and Confidential | Copyright © 2013 Starfish Retention Solutions, Inc. Page | 21 of 30
End User Guide to Starfish CONNECT™
3. Enter the Actual Start Date and Actual End Date of the appointment (Optional)
4. If the student did not show up to the appointment, check the box for “Student missed appointment.” Based on your institution’s settings, this might generate an email to the student.
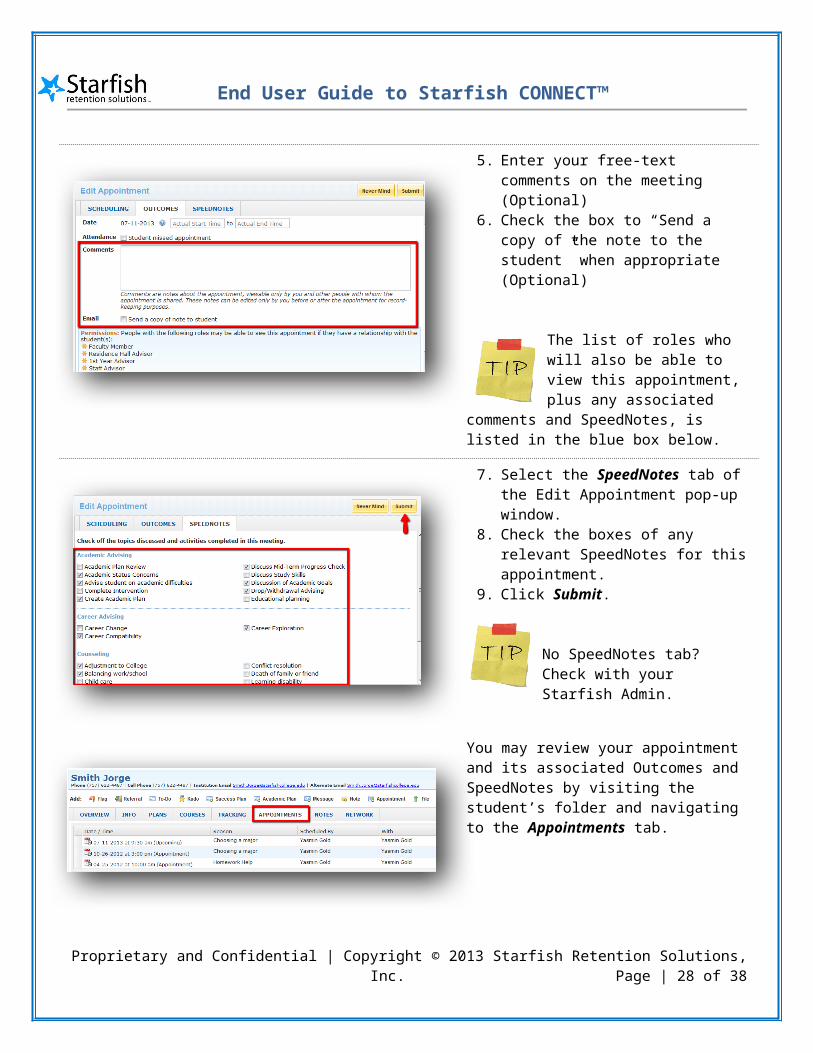
5. Enter your free-text comments on the meeting (Optional)
6. Check the box to “Send a copy of the note to the student” when appropriate (Optional)
The list of roles who will also be able to view this appointment, plus any associated comments and SpeedNotes, is listed in the blue box below.
7. Select the SpeedNotes tab of the Edit Appointment pop-up window.
8. Check the boxes of any relevant SpeedNotes for this appointment.
9. Click Submit.
No SpeedNotes tab? Check with your Starfish Admin.
Proprietary and Confidential | Copyright © 2013 Starfish Retention Solutions, Inc. Page | 22 of 30
End User Guide to Starfish CONNECT™
You may review your appointment and its associated Outcomes and SpeedNotes by visiting the student’s folder and navigating to the Appointments tab.
Other Calendaring Tools
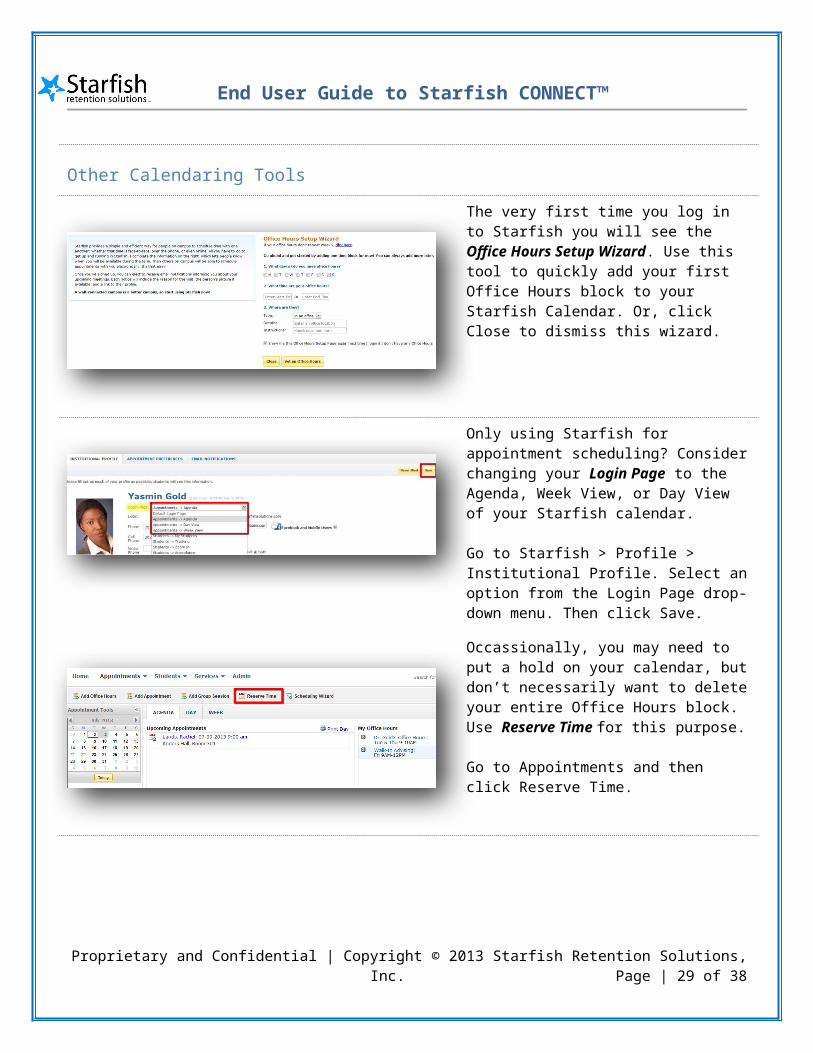
The very first time you log in to Starfish you will see the Office Hours Setup Wizard. Use this tool to quickly add your first Office Hours block to your Starfish Calendar. Or, click Close to dismiss this wizard.
Only using Starfish for appointment scheduling? Consider changing your Login Page to the Agenda, Week View, or Day View of your Starfish calendar.
Go to Starfish > Profile > Institutional Profile. Select an option from the Login Page drop-down menu. Then click Save.
Proprietary and Confidential | Copyright © 2013 Starfish Retention Solutions, Inc. Page | 23 of 30
End User Guide to Starfish CONNECT™
Occassionally, you may need to put a hold on your calendar, but don’t necessarily want to delete your entire Office Hours block. Use Reserve Time for this purpose.
Go to Appointments and then click Reserve Time.
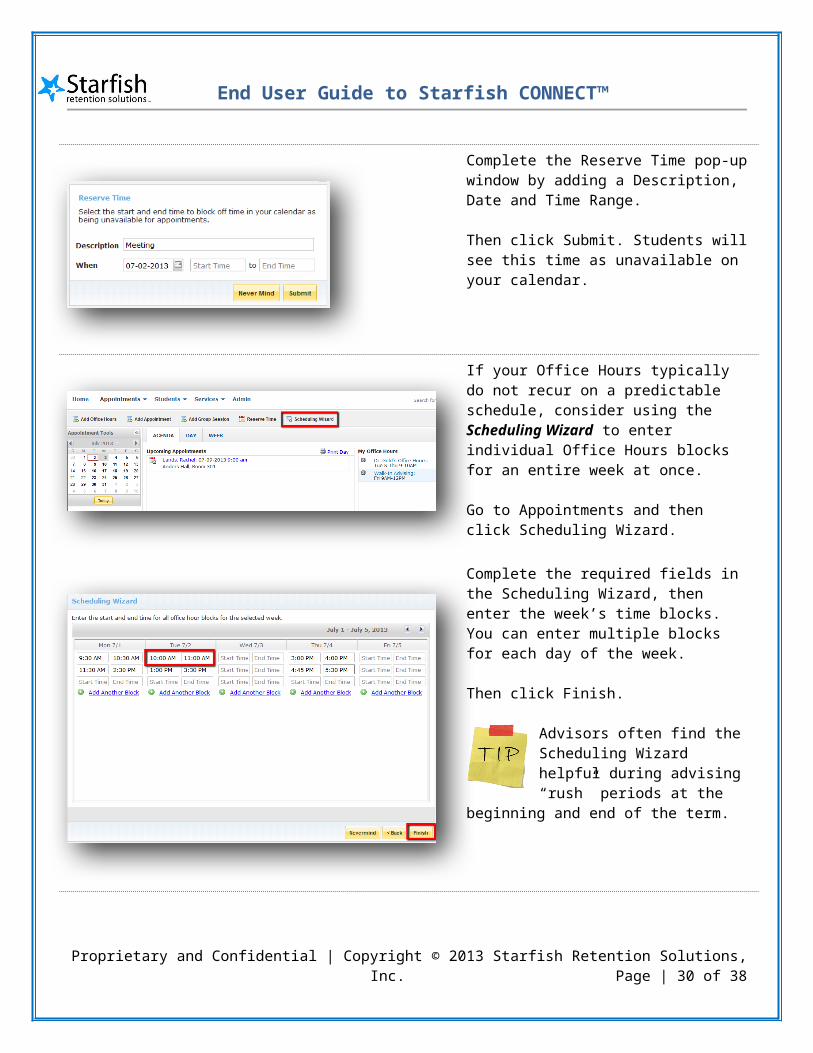
Complete the Reserve Time pop-up window by adding a Description, Date and Time Range.
Then click Submit. Students will see this time as unavailable on your calendar.
If your Office Hours typically do not recur on a predictable schedule, consider using the Scheduling Wizard to enter individual Office Hours blocks for an entire week at once.
Go to Appointments and then click Scheduling Wizard.
Proprietary and Confidential | Copyright © 2013 Starfish Retention Solutions, Inc. Page | 24 of 30
End User Guide to Starfish CONNECT™
Complete the required fields in the Scheduling Wizard, then enter the week’s time blocks. You can enter multiple blocks for each day of the week.
Then click Finish.
Advisors often find the Scheduling Wizard helpful during advising “rush” periods at the beginning and end of the term.
Calendar owners may Print their agenda for the day. Simply go to the Agenda view and click Print Day.
A new tab or window will open in your Internet browser and the day’s schedule of appointments will be shown in an easily printable format.
Proprietary and Confidential | Copyright © 2013 Starfish Retention Solutions, Inc. Page | 25 of 30
End User Guide to Starfish CONNECT™
Delegating a Calendar Manager
Calendar owners may delegate Calendar Managers in Profile > Appointment Preferences.
1. As a Calendar Manager you will have access to the Schedule View where you can view your calendar, as well as all calendars you manage.
2. The first time a Calendar Manager navigates to the Schedule View, a pop-up window will explain how it works.
3. Read this carefully, then click the “X” in the upper right to close this pop-up.
Proprietary and Confidential | Copyright © 2013 Starfish Retention Solutions, Inc. Page | 26 of 30

End User Guide to Starfish CONNECT™
4. On the far left panel, you will see a list of the calendars you manage.
5. Each person is given a different color and you have options to choose which calendars to view by checking off the boxes, or selecting an Appointment Type from the drop-down menu.
6. In the calendar itself, you will see each person’s calendar in a different color. You can change the time scale by changing the radio button selection above the calendar.
7. To add an appointment to someone’s calendar, click the green plus icon, just as you would from your own Day or Week view of the calendar.
8. To add Office Hours or Group Sessions to someone’s calendar, click the appropriate option just above the calendar.
Proprietary and Confidential | Copyright © 2013 Starfish Retention Solutions, Inc. Page | 27 of 30
End User Guide to Starfish CONNECT™
9. You will be asked to indicate the calendar for which this block will be scheduled.
10. Complete the remainder of the form, then click Submit.
Proprietary and Confidential | Copyright © 2013 Starfish Retention Solutions, Inc. Page | 28 of 30
End User Guide to Starfish CONNECT™
FAQ
My Starfish Calendar
I am trying to create Office Hours but it keeps telling me that there is a conflict: “The Office Hours block overlaps with other Office Hours blocks.” I don’t see any conflicts on my calendar.
If you are creating an Office Hour Block that spans multiple weeks, you may want to check to see if you already have appointments created during those times for any of the weeks covered by the Office Hour Block that you wish to create. For example, if you want to create an Office Hour Block for every Tuesday from 8am-noon, for the next three weeks, but you have an appointment on your Starfish calendar for 9am next Tuesday, that would conflict with the proposed block and produce this error.
not sure if you sent a response, you can check your sent messages folder for the email that would have been sent to Starfish as a response.
I am getting Appointment Notifications for another Starfish user. Why am I receiving a confirmation of an appointment between my colleague and a student?
Check your Profile settings and make sure that any institutional email or alternate email addresses are correct. If so, please verify that none of your colleagues have auto-forwarding setup that is forwarding these appointments to you.
Display to Students
I created Office Hours in Starfish, but students are saying that my Office Hours appear as “unavailable” to them.
Do you have more than one Appointment Type available to you? As in, when creating Office Hours, you see checkboxes to indicate which Appointment Types apply to this block of time (e.g., Class Related Meetings vs. Advising). If so, it may be that you have setup “Class Related” Office Hours, and therefore these appear as “unavailable” to your advisees. Remember that Appointment Types dictate which students can schedule with you during this block of time, which reasons they can choose from, and the SpeedNotes available.
You can also check the Appointment Preferences that you have setup in your Profile. If you have chosen to apply a scheduling deadline, such as “5:00pm the day before the office hours,” students who try to schedule an appointment at 6:00pm would not be able to execute this task.
Proprietary and Confidential | Copyright © 2013 Starfish Retention Solutions, Inc. Page | 29 of 30
End User Guide to Starfish CONNECT™
How do “Walk-in Hours” display to students?
Students will see the block of time in your calendar, the location, and the associated instructions, but will not be able to schedule an appointment.
What do students see when I add a Reserve Time to “hold” a portion of my Office Hours on my Starfish calendar?
Students will see the time marked as “unavailable” where your Reserve Time is listed. In this example, the Reserve Time is scheduled from 1:30-2:00 pm.
Can students see other students’ information in Starfish?
A student will never see another student’s information in Starfish. A student will simply see “time slot taken” on your calendar where another student has already signed up.
Proprietary and Confidential | Copyright © 2013 Starfish Retention Solutions, Inc. Page | 30 of 30