Embed Size (px)
Citation preview
EMS | User Guide
EMS
User Guide
Date: September 27, 2010
Copyright © 2005, 2016, Oracle and/or its affiliates. All rights reserved.
This software and related documentation are provided under a license agreement containing restrictions on use and disclosure and are protected by intellectual property laws. Except as expressly permitted in your license agreement or allowed by law, you may not use, copy, reproduce, translate, broadcast, modify, license, transmit, distribute, exhibit, perform, publish, or display any part, in any form, or by any means. Reverse engineering, disassembly, or decompilation of this software, unless required by law for interoperability, is prohibited.
The information contained herein is subject to change without notice and is not warranted to be error-free. If you find any errors, please report them to us in writing.
If this software or related documentation is delivered to the U.S. Government or anyone licensing it on behalf of the U.S. Government, then the following notice is applicable:
U.S. GOVERNMENT END USERS: Oracle programs, including any operating system, integrated software, any programs installed on the hardware, and/or documentation, delivered to U.S. Government end users are "commercial computer software" pursuant to the applicable Federal Acquisition Regulation and agency-specific supplemental regulations. As such, use, duplication, disclosure, modification, and adaptation of the programs, including any operating system, integrated software, any programs installed on the hardware, and/or documentation, shall be subject to license terms and license restrictions applicable to the programs. No other rights are granted to the U.S. Government.
This software or hardware is developed for general use in a variety of information management applications. It is not developed or intended for use in any inherently dangerous applications, including applications that may create a risk of personal injury. If you use this software or hardware in dangerous applications, then you shall be responsible to take all appropriate fail-safe, backup, redundancy, and other measures to ensure its safe use. Oracle Corporation and its affiliates disclaim any liability for any damages caused by use of this software or hardware in dangerous applications.
Oracle and Java are registered trademarks of Oracle and/or its affiliates. Other names may be trademarks of their respective owners.
Intel and Intel Xeon are trademarks or registered trademarks of Intel Corporation. All SPARC trademarks are used under license and are trademarks or registered trademarks of SPARC International, Inc. AMD, Opteron, the AMD logo, and the AMD Opteron logo are trademarks or registered trademarks of Advanced Micro Devices. UNIX is a registered trademark of The Open Group.
This software or hardware and documentation may provide access to or information about content, products, and services from third parties. Oracle Corporation and its affiliates are not responsible for and expressly disclaim all warranties of any kind with respect to third-party content, products, and services unless otherwise set forth in an applicable agreement between you and Oracle. Oracle Corporation and its affiliates will not be responsible for any loss, costs, or damages incurred due to your access to or use of third-party content, products, or services, except as set forth in an applicable agreement between you and Oracle.

About this Document
Oracle Corporation acquired MICROS and its Torex products. All further references to Torex should be considered as Oracle Corporation.

Page: ii © Torex Retail Holdings Limited 2010. All rights reserved.
Revision History
Document Revision
Date Comment
1.0 September 27, 2010 First published

© Torex Retail Holdings Limited 2010. All rights reserved. iii
Contents
1. Introduction ...........................................................................................1
1.1 Introduction to EMS – Benefits and Functionality.................................................. 1
1.2 Relationship between FoS, BoS and EMS............................................................... 2
2. Navigating EMS .....................................................................................2
2.1 Logging On ................................................................................................................. 2
2.2 EMS Front Screen and Main Menu ........................................................................... 3
2.3 Central Menu............................................................................................................... 4
2.4 Outlet Menu................................................................................................................. 5
2.5 Navigating Data Entry Screens................................................................................. 6
2.6 Query Mode................................................................................................................. 6
2.7 Related Windows........................................................................................................ 7
2.8 Saving Work................................................................................................................ 7
2.9 The EMS Toolbar ........................................................................................................ 7
2.10 Keyboard Shortcuts................................................................................................... 8
2.11 Help Facility ................................................................................................................ 9
3. General Central Maintenance...............................................................9
3.1 System – Tax Groups ................................................................................................ 9
3.2 System - System Codes .......................................................................................... 10
3.3 Admin - BOS Codes ................................................................................................. 16
3.4 Admin - Outlet Classification .................................................................................. 18
3.5 Admin - Hardware Classification ............................................................................ 21
3.6 Admin - ABS Configuration..................................................................................... 24
3.7 Admin – Organisation.............................................................................................. 28
3.8 Admin - MIS Analysis............................................................................................... 30
4. Central Stock Item Maintenance ........................................................31
4.2 System - System Codes .......................................................................................... 32
4.3 System - Pricing ....................................................................................................... 33
4.4 Central - BSI's, Stock and Products....................................................................... 33
5. Central Sales Item Maintenance.........................................................40
5.1 Glossary of Terms Used.......................................................................................... 40
iv © Torex Retail Holdings Limited 2010. All rights reserved.
5.2 Sales Hierarchy ........................................................................................................ 41
5.3 Sales Item Hierarchies............................................................................................. 41
5.4 Sales Item Descriptors (SIDs .................................................................................. 42
5.5 Sales Item Preparators (SIPs) ................................................................................. 43
5.6 Sales Item Terminators (SITs)................................................................................. 43
5.7 Base Sales Items and Sales Item Recipes............................................................. 44
5.8 SID Permutations ..................................................................................................... 46
5.9 New SITs and BSIs................................................................................................... 47
5.10 Check BSIs................................................................................................................ 48
5.11 List BSIs .................................................................................................................... 48
6. Terminal Layout Maintenance ............................................................49
6.1 Key Maps................................................................................................................... 50
6.2 Central PIL Maintenance ......................................................................................... 51
6.3 Outlet Maintained PILs ............................................................................................ 52
6.4 PIL Entities................................................................................................................ 53
6.5 PoS Item Lists........................................................................................................... 53
6.6 BSI Routes ................................................................................................................ 54
7. PIL Designer ........................................................................................55
7.1 Opening a PIL ........................................................................................................... 56
7.2 Creating a New PIL................................................................................................... 56
7.3 Creating a New Button............................................................................................. 56
7.4 Button Tasks............................................................................................................. 57
7.5 Prices......................................................................................................................... 58
8. Outlet Configuration ...........................................................................59
8.1 Organisations ........................................................................................................... 59
8.2 Outlet Creation ......................................................................................................... 60
8.3 Trading Area Creation for an Outlet ....................................................................... 62
8.4 Printer Creation for an Outlet.................................................................................. 63
8.5 Terminal Creation for an Outlet .............................................................................. 64
8.6 Cash Drawer Creation for the Terminals ............................................................... 65
8.7 Weekly Statement of Business Creation for an Outlet......................................... 66
8.8 Outlet Trading Areas................................................................................................ 67
8.9 Outlet Trading Modes .............................................................................................. 68
© Torex Retail Holdings Limited 2010. All rights reserved. v
8.10 Printers...................................................................................................................... 68
8.11 Outlet ICC Devices ................................................................................................... 69
8.12 Terminals .................................................................................................................. 70
8.13 Drawers ..................................................................................................................... 72
8.14 Remote Order Printing............................................................................................. 72
8.15 WSOB Takings Config ............................................................................................. 73
8.16 Outlet Tax Groups.................................................................................................... 74
8.17 Outlet Stock Rooms................................................................................................. 74
8.18 EFTPOS Acquirers ................................................................................................... 75
8.19 Stock Outlets ............................................................................................................ 75
8.20 Sales Room Configurations .................................................................................... 76
8.21 Valid Room Configurations..................................................................................... 76
8.22 Automatic Allowances............................................................................................. 77
9. Price Maintenance...............................................................................78
9.1 Examples of User-Defined Price Matrices ............................................................. 78
9.2 Price Bands............................................................................................................... 78
9.3 Price Matrix Dates .................................................................................................... 78
9.4 Pricing Rules ............................................................................................................ 80
9.5 Current Pricing Rules .............................................................................................. 80
9.6 Pricing Rule Live ...................................................................................................... 80
9.7 Copy Pricing Rules .................................................................................................. 80
9.8 Prices......................................................................................................................... 81
9.9 Price Deletion Rules................................................................................................. 81
9.10 Price Deletion Rule Insert........................................................................................ 81
10. Outlet Pricing.......................................................................................81
11. Central Pricing Module .......................................................................81
11.1 Toolbar Options and Keyboard Shortcuts ............................................................ 81
11.2 Price Matrix ............................................................................................................... 82
11.3 Price Matrix Selections............................................................................................ 83
11.4 Editing Pricing Grids................................................................................................ 84
11.5 Pricing Tools............................................................................................................. 85
11.6 Pricing Query Tools ................................................................................................. 89
11.7 User Preferences...................................................................................................... 90
vi © Torex Retail Holdings Limited 2010. All rights reserved.
12. ABS Features.......................................................................................91
12.1 Promotions ............................................................................................................... 91
12.2 Outlets ....................................................................................................................... 93
12.3 Meal Deal (Style 1).................................................................................................... 93
13. Allocations and Data Extraction ......................................................101
13.1 Allocations .............................................................................................................. 101
13.2 Supplier Allocations............................................................................................... 101
13.3 Supplier Allocations By Trading Style ................................................................. 102
13.4 PIL Allocations ....................................................................................................... 102
13.5 PIL Allocations By Trading Style.......................................................................... 102
13.6 Allocation Updates................................................................................................. 103
13.7 Allocation Updates By Trading Style ................................................................... 103
13.8 BSI Allocations ....................................................................................................... 104
13.9 BSI Allocations By Trading Style ......................................................................... 104
13.10 Stock Item Allocations........................................................................................... 104
13.11 Stock Item Allocations By Trading Style ............................................................. 104
13.12 Product Allocations ............................................................................................... 105
13.13 Product Allocations By Trading Style.................................................................. 105
13.14 Deallocate Supplier ................................................................................................ 105
13.15 Outlet Deallocations............................................................................................... 106
13.16 Extractions.............................................................................................................. 106
13.17 Do Outlet Data Extractions.................................................................................... 106
13.18 Extracted Outlets.................................................................................................... 107
13.19 Outlet Disk 5 Creation............................................................................................ 107
13.20 Outlet Data Extractions By Trading Style............................................................ 108
13.21 View Outlets for Extraction ................................................................................... 108
14. ABS Back Office Configuration........................................................109
14.1 Access Control Maintenance ................................................................................ 109
14.2 User Groups............................................................................................................ 110
14.3 User Group Controls.............................................................................................. 111
14.4 Attached User Groups ........................................................................................... 112
14.5 P&L Configuration.................................................................................................. 113
14.6 P&L Groups ............................................................................................................ 114
© Torex Retail Holdings Limited 2010. All rights reserved. vii
14.7 P&L Lines................................................................................................................ 115
14.8 P&L Configuration.................................................................................................. 117
14.9 P&L Forward Lines................................................................................................. 119
14.10 P&L Types............................................................................................................... 120
14.11 P&L Line Types ...................................................................................................... 121
14.12 P&L Payment Method Configuration.................................................................... 121
14.13 P&L Tax Groups ..................................................................................................... 122
14.14 P&L Deposit Configs.............................................................................................. 123
14.15 P&L Promotion Configs......................................................................................... 123
14.16 Report Configuration Maintenance ...................................................................... 124
14.17 Report Groups ........................................................................................................ 125
14.18 ABS Touch Panel Button Property Maintenance................................................ 134
14.19 Extracting Configuration Details .......................................................................... 137
14.20 Do Config Extractions............................................................................................ 138
15. Flash Report Configuration..............................................................138
15.1 Budget Configurations .......................................................................................... 139
15.2 Generating Spreadsheets...................................................................................... 139
15.3 Loading Spreadsheets........................................................................................... 140
15.4 Budget Values ........................................................................................................ 141
15.5 Prior Year Sales Configurations ........................................................................... 142
15.6 Generate Prior Year Sales Spreadsheet .............................................................. 142
15.7 Load Prior Year Sales Spreadsheet ..................................................................... 143
15.8 Prior Year Sales Values ......................................................................................... 143
15.9 Flash Report Files .................................................................................................. 143
15.10 Flash Report Config............................................................................................... 144
15.11 Outlet References................................................................................................... 145

© Torex Retail Holdings Limited 2010. All rights reserved. Page: 1
1. Introduction
1.1 Introduction to EMS – Benefits and Functionality The Enterprise Management System (EMS) is an enhanced central database application that allows the user to maintain and manage outlet EPoS systems in large estates effec-tively. The key functionality of the package is fourfold.
Using EMS it is possible to establish global settings across the whole estate or a partof the estate, for example across an operational brand; as well as customising individual outlets.
EMS will also process, summarise and store transactional data from both individualoutlets and groups of outlets. This data is then accessible using industry standard MIS in-terrogation tools.
The third key function of EMS is its value to an organisation as a method of controllingtheir business in terms of cost control, audit functions and financial planning.
Major price changes can be progressed in the background and brought into effect on a re-quired date across the whole estate or specified outlets.
Individual organisations’ financial calendars and organisational structures can be held to aid support reporting.
Utilities scan incoming transactional data against compliance / exception parameters and automatically reports and logs any breaches of these parameters, for example cash vari-ance tolerance.
Utilities scan incoming transactional data for integrity and hold back any suspect data until investigated.
Details are held to support MIS reporting on areas such as:
Outlet styles Trading area type and brand and so on Outlet / trading area facilities Outlet / organization trading impacts Compliance / exception parameters
Finally, central master files are held enabling selections to be made from these filesand copied to groups of outlets or individual outlets.
Transaction files are polled back to EMS as part of the overnight process. This bilateral polling takes place in such areas as:
Till screen layouts Sales
Promotions Prices
Staff activity Trading areas and modes
Payment methods EFTPOS transactions
Stocks Suppliers and product deliverables
Page: 2 © Torex Retail Holdings Limited 2010. All rights reserved.
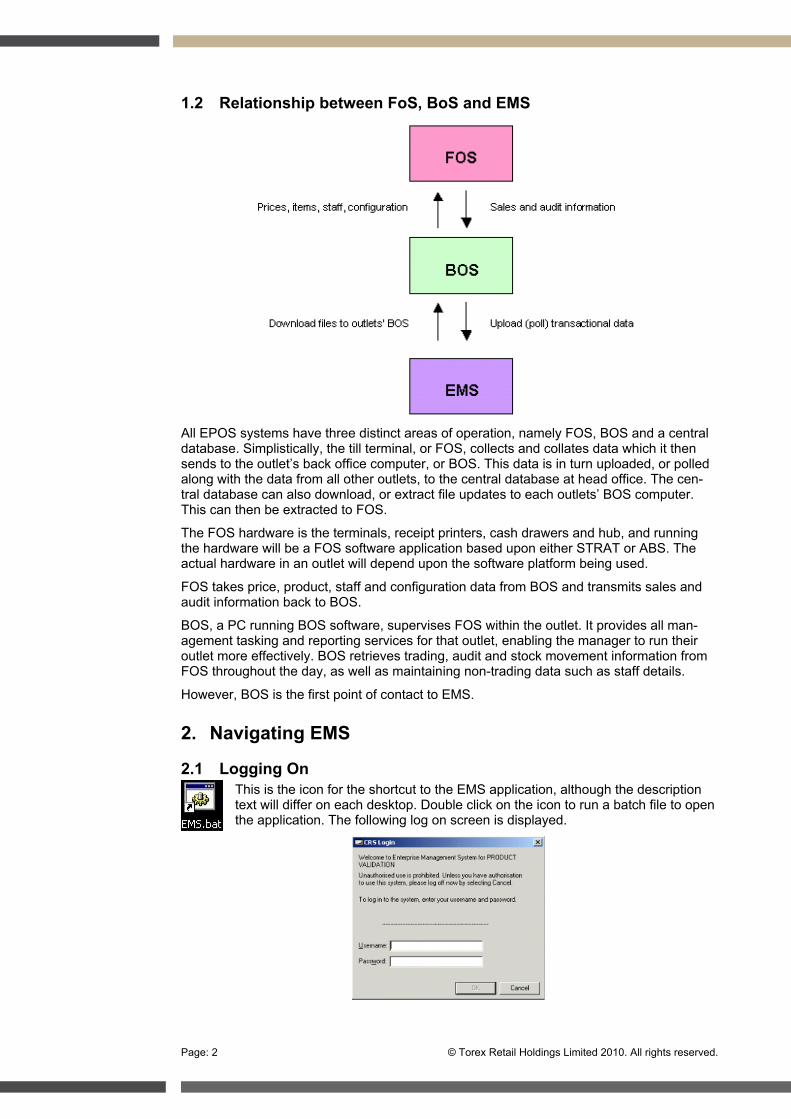
1.2 Relationship between FoS, BoS and EMS
All EPOS systems have three distinct areas of operation, namely FOS, BOS and a central database. Simplistically, the till terminal, or FOS, collects and collates data which it then sends to the outlet’s back office computer, or BOS. This data is in turn uploaded, or polled along with the data from all other outlets, to the central database at head office. The cen-tral database can also download, or extract file updates to each outlets’ BOS computer. This can then be extracted to FOS.
The FOS hardware is the terminals, receipt printers, cash drawers and hub, and running the hardware will be a FOS software application based upon either STRAT or ABS. The actual hardware in an outlet will depend upon the software platform being used.
FOS takes price, product, staff and configuration data from BOS and transmits sales and audit information back to BOS.
BOS, a PC running BOS software, supervises FOS within the outlet. It provides all man-agement tasking and reporting services for that outlet, enabling the manager to run their outlet more effectively. BOS retrieves trading, audit and stock movement information from FOS throughout the day, as well as maintaining non-trading data such as staff details.
However, BOS is the first point of contact to EMS.
2. Navigating EMS
2.1 Logging On This is the icon for the shortcut to the EMS application, although the description text will differ on each desktop. Double click on the icon to run a batch file to open the application. The following log on screen is displayed.

© Torex Retail Holdings Limited 2010. All rights reserved. Page: 3
Your user name and password will have been supplied to you at the time of installation. Enter these now and click “OK”.
2.2 EMS Front Screen and Main Menu
This screen is the first screen you encounter when entering the Enterprise Management System. From this screen you are able to navigate around all areas of the system.
The majority of the visible screen area is blank, as not only are many of the windows in EMS fairly large, but also in certain circumstances it is necessary to work with a number of windows open at once.
File contains the usual Save and Exit options, plus Rollback. Use this functionality to de-lete recently maintained, non-extracted data.
Within the Options menu the Objects List option provides a list of all the functionality avail-able in EMS. It is an alternative method to navigating through the menu options.

Page: 4 © Torex Retail Holdings Limited 2010. All rights reserved.
Central and Outlet are the most critical menus to the EMS user at this level, and where you will spend most of your time. Central is the main global file maintenance menu. Outlet is where data is configured on a local basis, at outlet level.
Reports is where reports are configured and generated.
Admin and System. Here, all of the pre configuration data is input.
Window and Help are the standard menu options seen in all MS Windows applications.
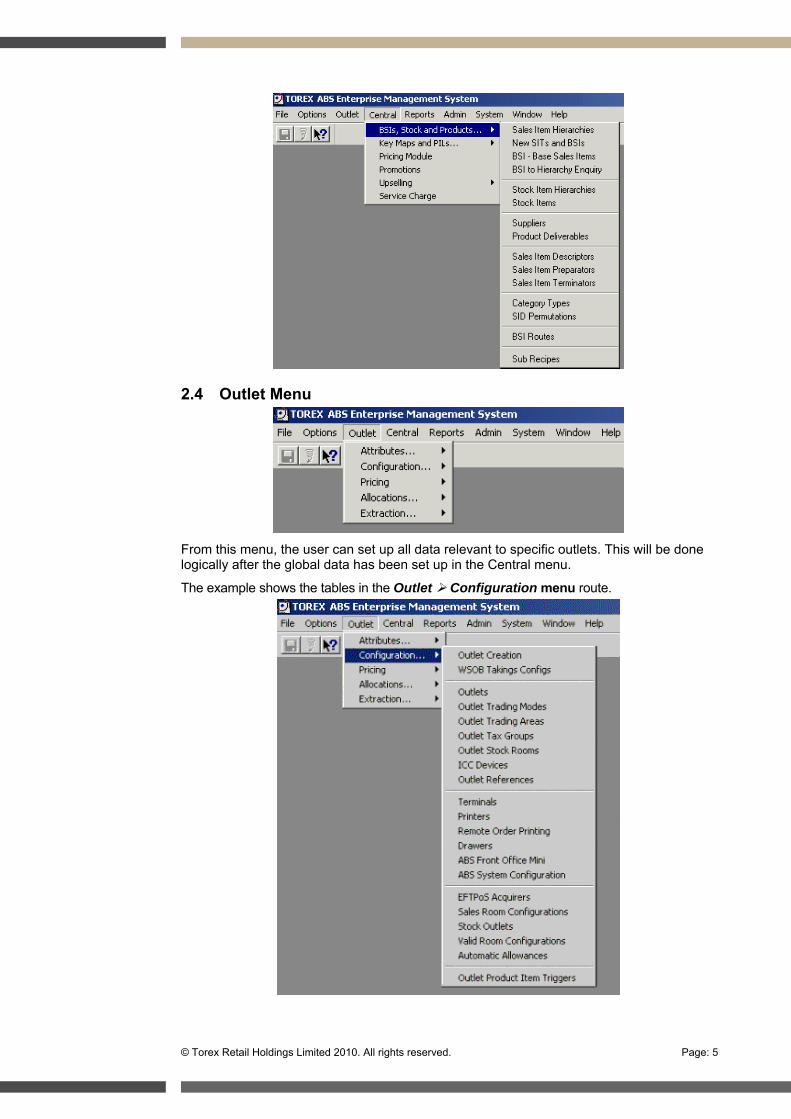
2.3 Central Menu This is the main file maintenance menu in EMS. Here, data is set up and maintained glob-ally, for an entire estate.
Each heading under the main menu bar options has its own drop down menu containing the tables in which the data is entered.
An example showing the drop down menu under the Central BSI’s, Stock and Prod-ucts menu route is shown below:
© Torex Retail Holdings Limited 2010. All rights reserved. Page: 5
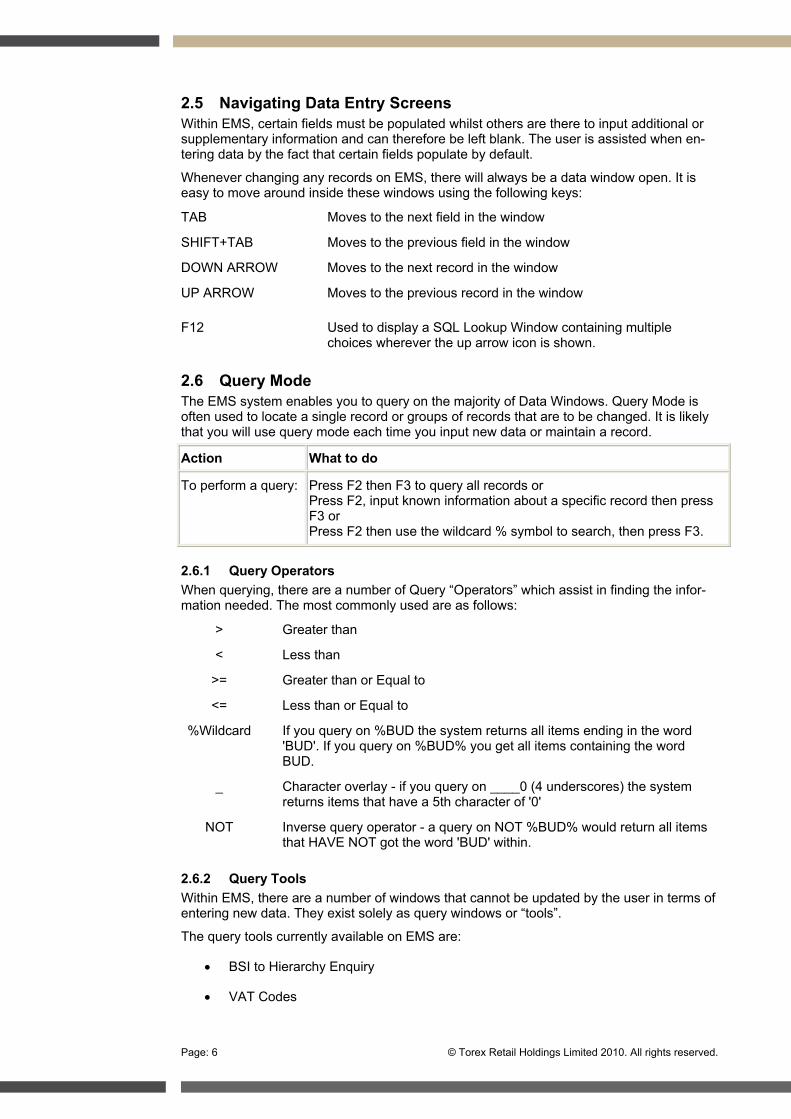
2.4 Outlet Menu
From this menu, the user can set up all data relevant to specific outlets. This will be done logically after the global data has been set up in the Central menu.
The example shows the tables in the Outlet Configuration menu route.
Page: 6 © Torex Retail Holdings Limited 2010. All rights reserved.
2.5 Navigating Data Entry Screens Within EMS, certain fields must be populated whilst others are there to input additional or supplementary information and can therefore be left blank. The user is assisted when en-tering data by the fact that certain fields populate by default.
Whenever changing any records on EMS, there will always be a data window open. It is easy to move around inside these windows using the following keys:
TAB Moves to the next field in the window
SHIFT+TAB Moves to the previous field in the window
DOWN ARROW Moves to the next record in the window
UP ARROW Moves to the previous record in the window
F12 Used to display a SQL Lookup Window containing multiple choices wherever the up arrow icon is shown.
2.6 Query Mode The EMS system enables you to query on the majority of Data Windows. Query Mode is often used to locate a single record or groups of records that are to be changed. It is likely that you will use query mode each time you input new data or maintain a record.
Action What to do
To perform a query: Press F2 then F3 to query all records or Press F2, input known information about a specific record then press F3 or Press F2 then use the wildcard % symbol to search, then press F3.
2.6.1 Query Operators When querying, there are a number of Query “Operators” which assist in finding the infor-mation needed. The most commonly used are as follows:
> Greater than
< Less than
>= Greater than or Equal to
<= Less than or Equal to
%Wildcard If you query on %BUD the system returns all items ending in the word 'BUD'. If you query on %BUD% you get all items containing the word BUD.
_ Character overlay - if you query on ____0 (4 underscores) the system returns items that have a 5th character of '0'
NOT Inverse query operator - a query on NOT %BUD% would return all items that HAVE NOT got the word 'BUD' within.
2.6.2 Query Tools Within EMS, there are a number of windows that cannot be updated by the user in terms of entering new data. They exist solely as query windows or “tools”.
The query tools currently available on EMS are:
BSI to Hierarchy Enquiry
VAT Codes
© Torex Retail Holdings Limited 2010. All rights reserved. Page: 7
POS Items
PIL’s
BSI Future Matrix
Current Pricing Rules
Prices
Outlet Price Check
Extracted Outlets
Remember that queries can be carried out on all windows by pressing F2.
2.7 Related Windows When inputting or maintaining data on EMS, it is possible to view related data by opening one or more related windows. A list of related windows can be viewed by pressing F9 or by selecting the icon on the toolbar.
The related window displays information that is connected with the open data window. For example, when the BSI window is open, it is possible to display a separate window that shows BSI Routes. This information will automatically update when the BSI records are changed.
2.8 Saving Work It is important that work is saved regularly on EMS. The ‘Save’ icon on the Toolbar at the top should be used to save/commit data entries. It is suggested that this function be used before closing any data windows where records have been added or changed.
Note: When the Save function is activated, it saves data for all open windows. Therefore, if multiple windows are open at the same time, all data must be complete before the ‘save’ operates successfully.
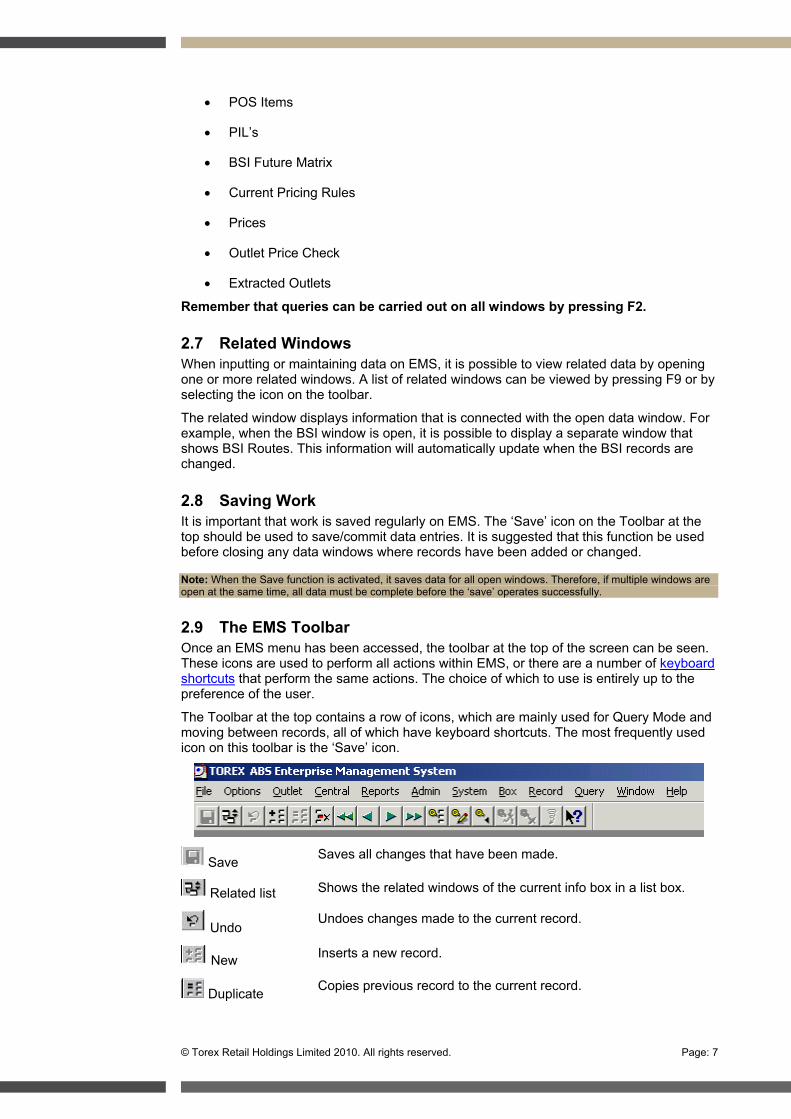
2.9 The EMS Toolbar Once an EMS menu has been accessed, the toolbar at the top of the screen can be seen. These icons are used to perform all actions within EMS, or there are a number of keyboard shortcuts that perform the same actions. The choice of which to use is entirely up to the preference of the user.
The Toolbar at the top contains a row of icons, which are mainly used for Query Mode and moving between records, all of which have keyboard shortcuts. The most frequently used icon on this toolbar is the ‘Save’ icon.
Save Saves all changes that have been made.
Related list Shows the related windows of the current info box in a list box.
Undo Undoes changes made to the current record.
New Inserts a new record.
Duplicate Copies previous record to the current record.

Page: 8 © Torex Retail Holdings Limited 2010. All rights reserved.
Delete Deletes the current record.
Previous/next
Scrolls to the next and previous record or page of records.
All records Retrieves all records from the current info box.
Define Defines the search specifications for a query.
Edit previous Edits the search specifications of the previous query.
Execute Retrieves all records that match the current search specifications.
End Ends the query mode.
Rollback Returns the data to its previous state.
Context Help Reserved for future functionality.
2.10 Keyboard Shortcuts F1 Help
F2 Define Query
F3 Execute Query
ALT+F3 Query All Records
F4 Count Query
F5 Refresh
F6 End Query
F7 Duplicate Record
F9 Related Windows
F12 Lookup Window (SQL)
ALT+DOWN Open dropdown Menu
ALT+F4 Exit EMS
ALT+F5 Clear Info Box
ALT+INSERT New Record
CTRL+X Cut
CTRL+C Copy
CTRL+V Paste
CTRL+Z Undo
CTRL+D Delete Record
CTRL+DEL Delete until end of line
CTRL+TAB Next Info Window
CTRL+PAGE DOWN Next Info Box

© Torex Retail Holdings Limited 2010. All rights reserved. Page: 9
CTRL+F4 Close Window
TAB Next field
SHIFT+TAB Previous Field
DOWN ARROW Next Record
UP ARROW Previous Record
2.11 Help Facility Although there is no help facility available, some assistance is provided in the status line.
Remember: F2 / F3 FOR QUERYING
ALT + INSERT TO MAKE A NEW ENTRY
3. General Central Maintenance
3.1 System – Tax Groups
3.1.1 Tax
Field Definitions
Field Meaning
Tax ID The ID of the tax rate.
Description Name identifying the tax rate.
Percent The tax rate used in the calculations for example 17.5 equals 17.5%.
3.1.2 Tax Groups This table is used to define a tax group. A tax group is a list of one or more tax rates. Each sales item has a tax group. When the sales item is sold a tax rates is applied.
Field Definitions
Field Meaning
Tax Group ID The ID of the tax group.
Description Name identifying tax group.
Default Tax ID Id of tax to use as default rate.
Page: 10 © Torex Retail Holdings Limited 2010. All rights reserved.
3.2 System - System Codes
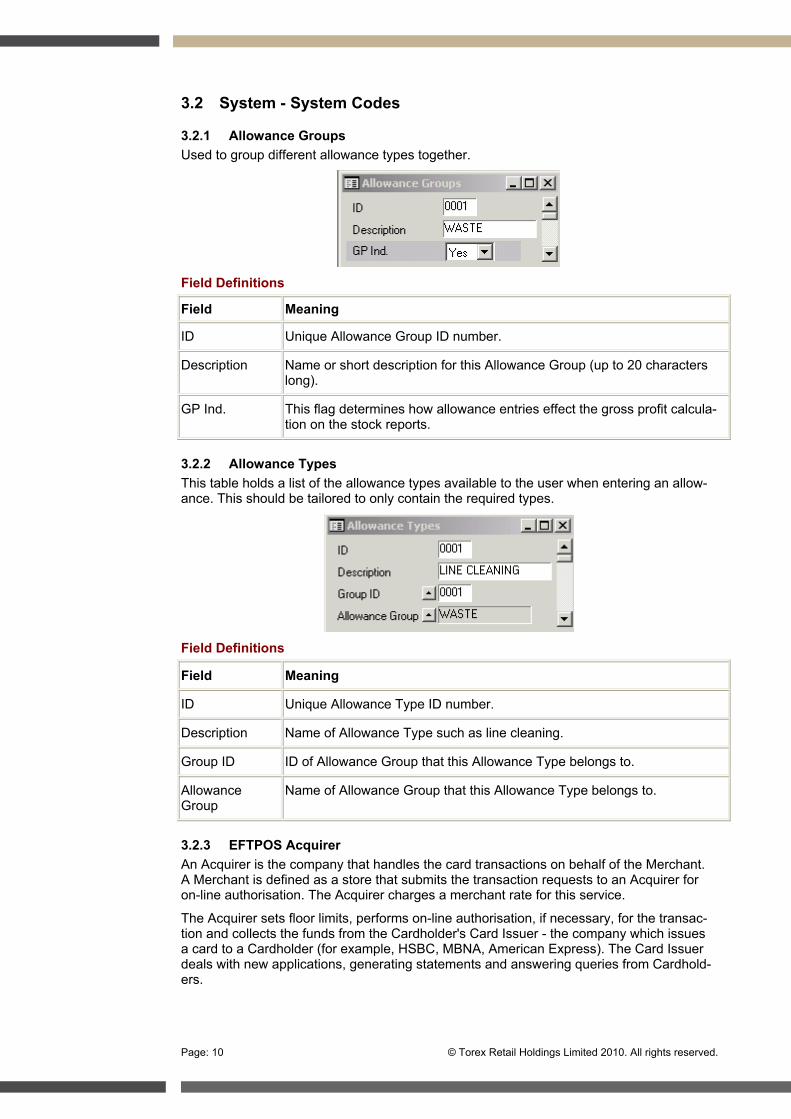
3.2.1 Allowance Groups Used to group different allowance types together.
Field Definitions
Field Meaning
ID Unique Allowance Group ID number.
Description Name or short description for this Allowance Group (up to 20 characters long).
GP Ind. This flag determines how allowance entries effect the gross profit calcula-tion on the stock reports.
3.2.2 Allowance Types This table holds a list of the allowance types available to the user when entering an allow-ance. This should be tailored to only contain the required types.
Field Definitions
Field Meaning
ID Unique Allowance Type ID number.
Description Name of Allowance Type such as line cleaning.
Group ID ID of Allowance Group that this Allowance Type belongs to.
Allowance Group
Name of Allowance Group that this Allowance Type belongs to.
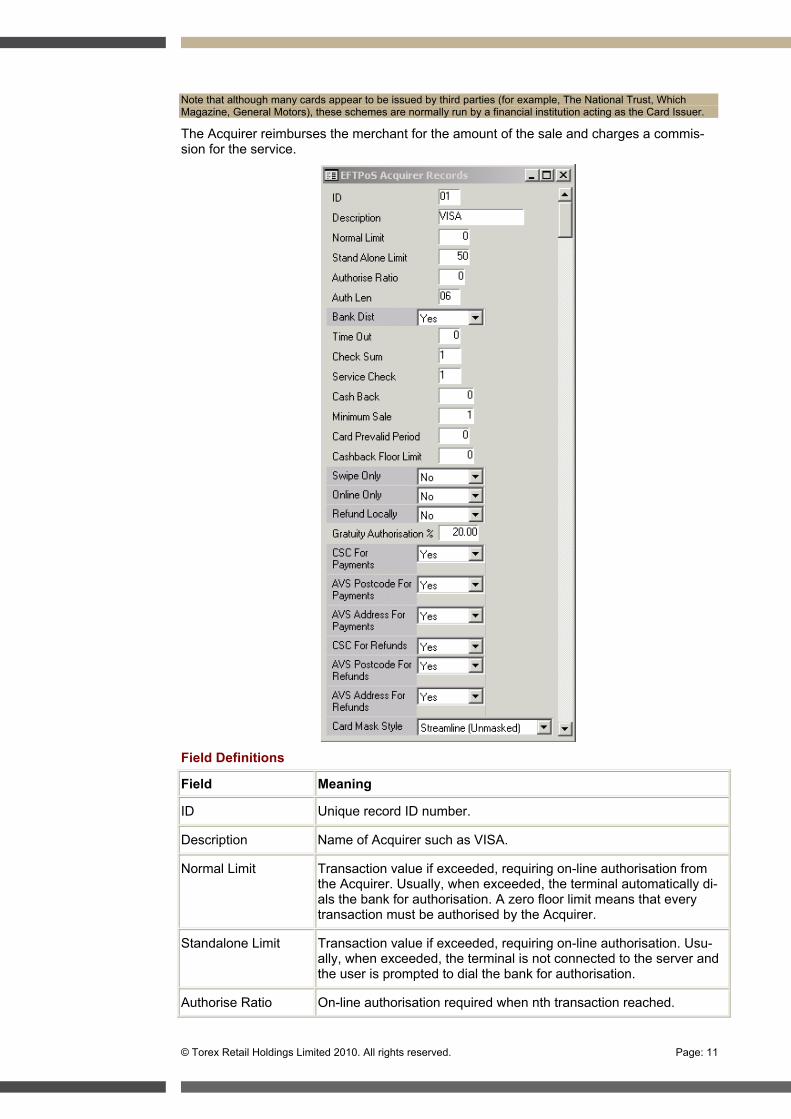
3.2.3 EFTPOS Acquirer An Acquirer is the company that handles the card transactions on behalf of the Merchant. A Merchant is defined as a store that submits the transaction requests to an Acquirer for on-line authorisation. The Acquirer charges a merchant rate for this service.
The Acquirer sets floor limits, performs on-line authorisation, if necessary, for the transac-tion and collects the funds from the Cardholder's Card Issuer - the company which issues a card to a Cardholder (for example, HSBC, MBNA, American Express). The Card Issuer deals with new applications, generating statements and answering queries from Cardhold-ers.
© Torex Retail Holdings Limited 2010. All rights reserved. Page: 11
Note that although many cards appear to be issued by third parties (for example, The National Trust, Which Magazine, General Motors), these schemes are normally run by a financial institution acting as the Card Issuer.
The Acquirer reimburses the merchant for the amount of the sale and charges a commis-sion for the service.
Field Definitions
Field Meaning
ID Unique record ID number.
Description Name of Acquirer such as VISA.
Normal Limit Transaction value if exceeded, requiring on-line authorisation from the Acquirer. Usually, when exceeded, the terminal automatically di-als the bank for authorisation. A zero floor limit means that every transaction must be authorised by the Acquirer.
Standalone Limit Transaction value if exceeded, requiring on-line authorisation. Usu-ally, when exceeded, the terminal is not connected to the server and the user is prompted to dial the bank for authorisation.
Authorise Ratio On-line authorisation required when nth transaction reached.

Page: 12 © Torex Retail Holdings Limited 2010. All rights reserved.
Auth Len For manual authorisation, code must be n characters.
Bank Dist Default to Yes.
Timeout Response required within this time.
Checksum Type of checksum used on cards.
Service Check Type of service code checks used.
Cash Back Maximum value of a transaction that is required before a user is prompted to ask the customer if they require any cash back.
Minimum Sale Minimum value of a transaction that is required before a user is prompted to ask the customer if they require any cash back.
Card Prevalid Period Number of days that card may be used prior to start date.
Cashback Floor Limit Maximum amount of cash back that a customer can receive on each transaction.
Swipe Only If selected, indicates that manual input is not allowed.
Online Only If selected, indicates on-line authorisation only allowed.
Refund Locally Indicates if refunds may be carried out locally.
Gratuity Authorisation %
Used to authorise and set the percentage of the transaction that can be taken from the customer in tips.
AVS and CSC The AVS and CSC fields indicate the card security data required when the customer is not present for payments and refunds. The ad-dress verification system (AVS) is used as an additional point of ref-erence to authenticate card use, for telemarketing purposes, by con-firming the cardholder's address.
Card Mask Style Two values, No masking, and Streamline (Only last four digits of the card displayed).
3.2.4 Payment Groups A Payment Group is a collection of similar or related Payment Methods such as Cash, Credit Card, Debit Card. Payment Groups are provided for reporting purposes and allow analysis of how payment method patterns vary by region or by day.
Field Definitions
Field Meaning
Payment Group ID
Unique Payment Group ID number.
Description Name or short description of Payment Group (up to 20 characters long).
ID Two-character code representing Payment Group.
© Torex Retail Holdings Limited 2010. All rights reserved. Page: 13
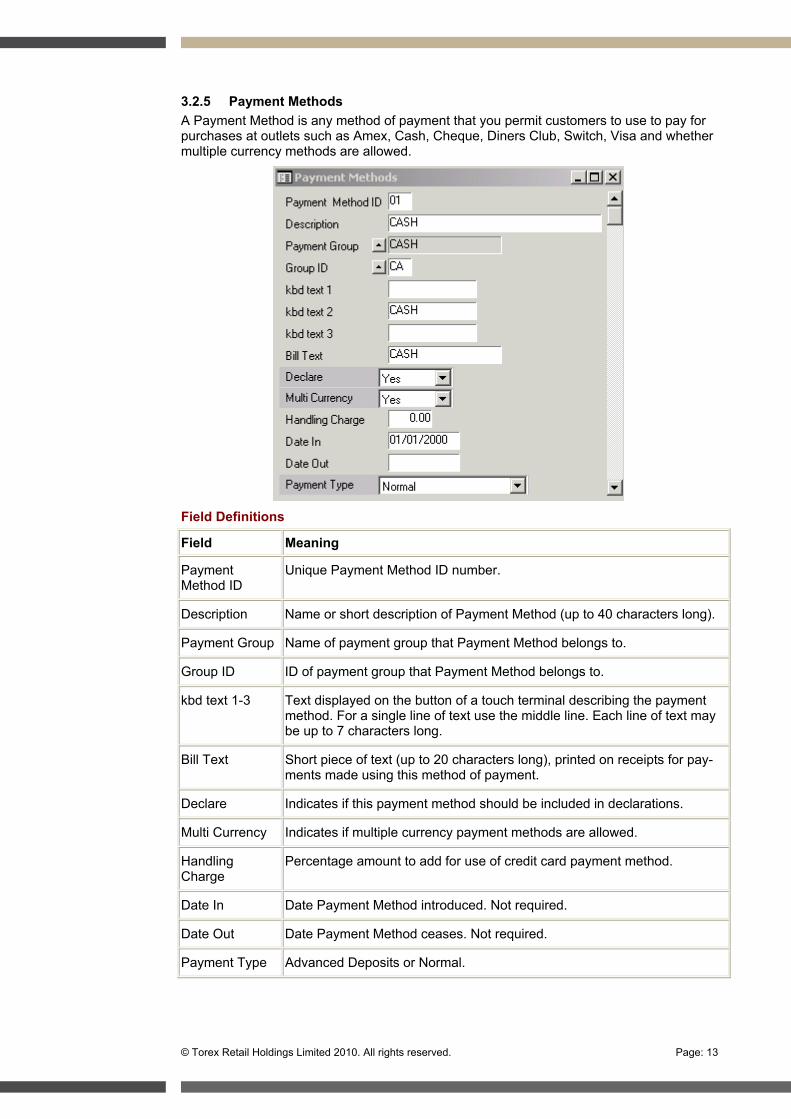
3.2.5 Payment Methods A Payment Method is any method of payment that you permit customers to use to pay for purchases at outlets such as Amex, Cash, Cheque, Diners Club, Switch, Visa and whether multiple currency methods are allowed.
Field Definitions
Field Meaning
Payment Method ID
Unique Payment Method ID number.
Description Name or short description of Payment Method (up to 40 characters long).
Payment Group Name of payment group that Payment Method belongs to.
Group ID ID of payment group that Payment Method belongs to.
kbd text 1-3 Text displayed on the button of a touch terminal describing the payment method. For a single line of text use the middle line. Each line of text may be up to 7 characters long.
Bill Text Short piece of text (up to 20 characters long), printed on receipts for pay-ments made using this method of payment.
Declare Indicates if this payment method should be included in declarations.
Multi Currency Indicates if multiple currency payment methods are allowed.
Handling Charge
Percentage amount to add for use of credit card payment method.
Date In Date Payment Method introduced. Not required.
Date Out Date Payment Method ceases. Not required.
Payment Type Advanced Deposits or Normal.

Page: 14 © Torex Retail Holdings Limited 2010. All rights reserved.
3.2.6 Room Charges Used for the hotel ledger functionality to link the room charges to the lines on the P&L statement.
Field Definitions
Field Meaning
Room Charge ID Unique identifier.
Description Name of the room charge type.
3.2.7 Promotion Styles Represents the different styles of promotion:
1 = Meal Deal 2 = Discount 3 = Price Override 4 = Conditional Discount 5 = Conditional Percentage 6 = Conditional Product Disc/Price Override 7 = Trading Mode Toggle 8 = Promotion Voucher 9 = Extra Staff Discount
Field Definitions
Field Meaning
Promotion Style ID Unique number identifying promotional style.
Description Name of promotional style.
Fos Type Type of FOS such as STRAT.
3.2.8 Promotion Analysis Codes
Field Definitions
Field Meaning
Promotion Analysis ID
Unique Promotion type ID number.
Description Name of promotion such as meal deal or discount.
© Torex Retail Holdings Limited 2010. All rights reserved. Page: 15
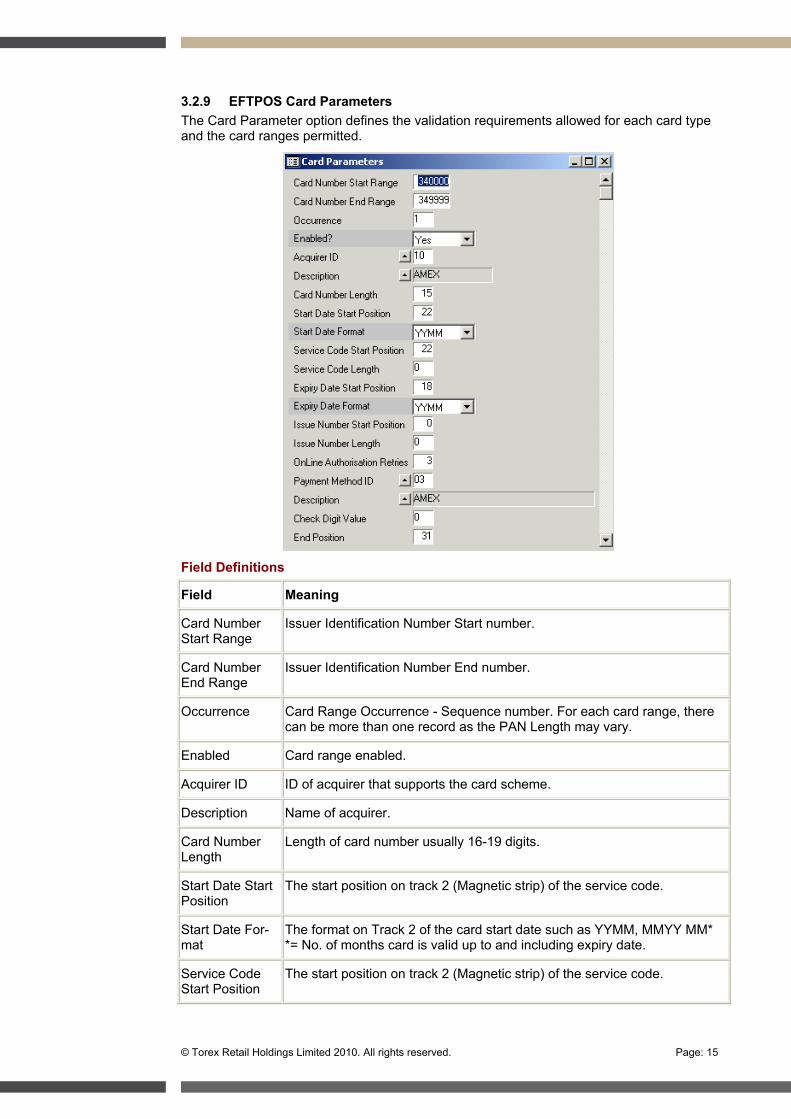
3.2.9 EFTPOS Card Parameters The Card Parameter option defines the validation requirements allowed for each card type and the card ranges permitted.
Field Definitions
Field Meaning
Card Number Start Range
Issuer Identification Number Start number.
Card Number End Range
Issuer Identification Number End number.
Occurrence Card Range Occurrence - Sequence number. For each card range, there can be more than one record as the PAN Length may vary.
Enabled Card range enabled.
Acquirer ID ID of acquirer that supports the card scheme.
Description Name of acquirer.
Card Number Length
Length of card number usually 16-19 digits.
Start Date Start Position
The start position on track 2 (Magnetic strip) of the service code.
Start Date For-mat
The format on Track 2 of the card start date such as YYMM, MMYY MM* *= No. of months card is valid up to and including expiry date.
Service Code Start Position
The start position on track 2 (Magnetic strip) of the service code.
Page: 16 © Torex Retail Holdings Limited 2010. All rights reserved.
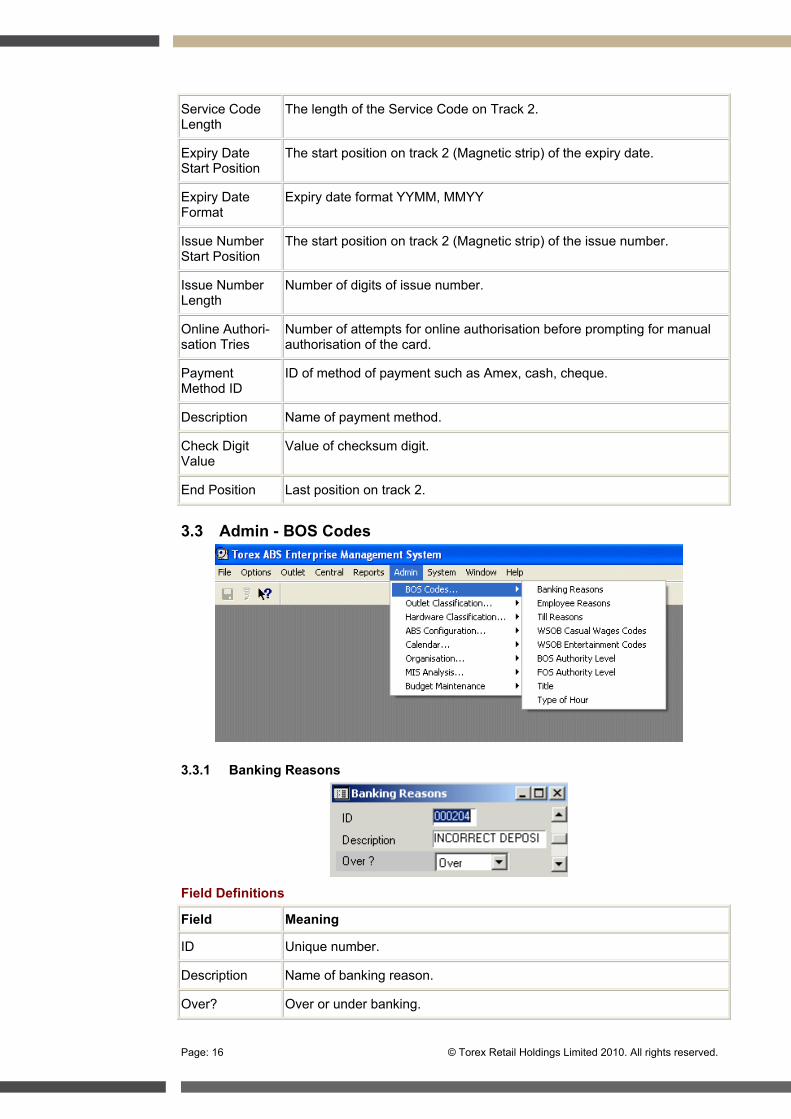
Service Code Length
The length of the Service Code on Track 2.
Expiry Date Start Position
The start position on track 2 (Magnetic strip) of the expiry date.
Expiry Date Format
Expiry date format YYMM, MMYY
Issue Number Start Position
The start position on track 2 (Magnetic strip) of the issue number.
Issue Number Length
Number of digits of issue number.
Online Authori-sation Tries
Number of attempts for online authorisation before prompting for manual authorisation of the card.
Payment Method ID
ID of method of payment such as Amex, cash, cheque.
Description Name of payment method.
Check Digit Value
Value of checksum digit.
End Position Last position on track 2.
3.3 Admin - BOS Codes
3.3.1 Banking Reasons
Field Definitions
Field Meaning
ID Unique number.
Description Name of banking reason.
Over? Over or under banking.

© Torex Retail Holdings Limited 2010. All rights reserved. Page: 17
3.3.2 Employee Reasons Reasons for employees leaving.
Field Definitions
Field Meaning
ID Unique number.
Description Name of reason.
3.3.3 Till Reasons Reasons for re-declaring tills.
Field Definitions
Field Meaning
ID Unique number.
Description Name of reason.
3.3.4 BOS Authority Level
Field Definitions
Field Meaning
Authority Level The authority ID used by BOS.
Description The name for the authority level.
3.3.5 FOS Authority Level
Field Definitions
Field Meaning
Authority Level The authority ID used by FOS.
Description The name for the authority level.
Page: 18 © Torex Retail Holdings Limited 2010. All rights reserved.
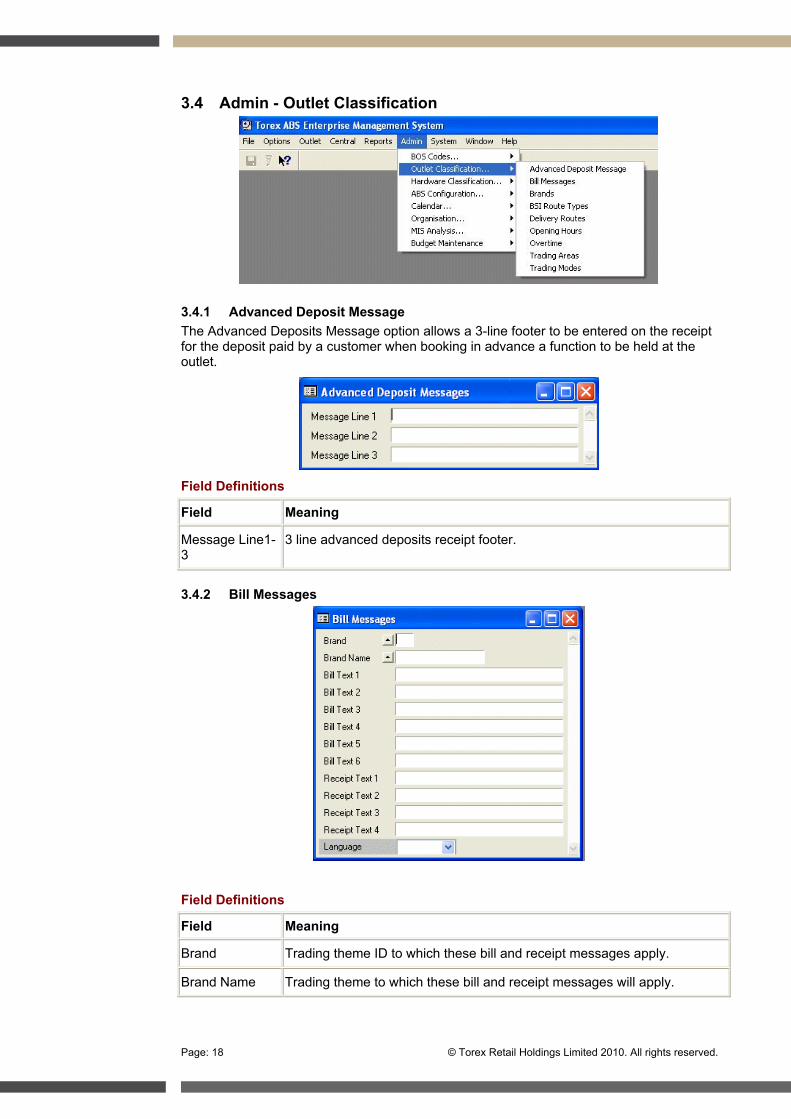
3.4 Admin - Outlet Classification
3.4.1 Advanced Deposit Message The Advanced Deposits Message option allows a 3-line footer to be entered on the receipt for the deposit paid by a customer when booking in advance a function to be held at the outlet.
Field Definitions
Field Meaning
Message Line1-3
3 line advanced deposits receipt footer.
3.4.2 Bill Messages
Field Definitions
Field Meaning
Brand Trading theme ID to which these bill and receipt messages apply.
Brand Name Trading theme to which these bill and receipt messages will apply.
© Torex Retail Holdings Limited 2010. All rights reserved. Page: 19
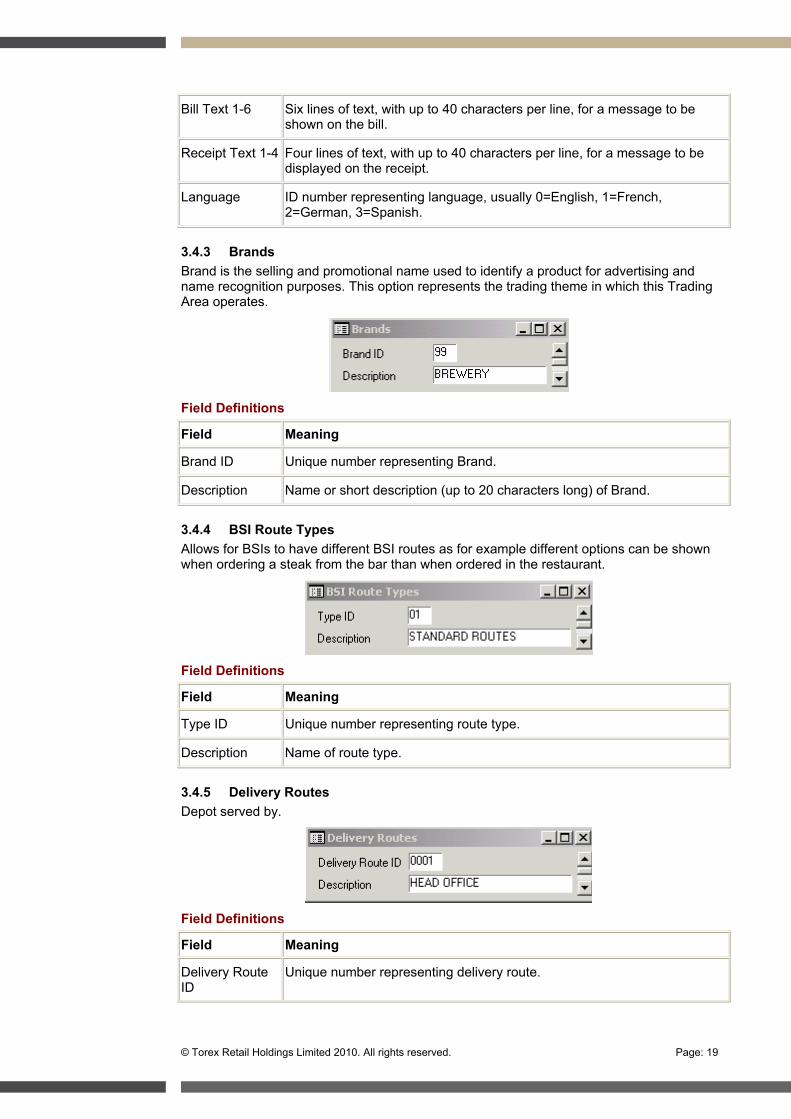
Bill Text 1-6 Six lines of text, with up to 40 characters per line, for a message to be shown on the bill.
Receipt Text 1-4 Four lines of text, with up to 40 characters per line, for a message to be displayed on the receipt.
Language ID number representing language, usually 0=English, 1=French, 2=German, 3=Spanish.
3.4.3 Brands Brand is the selling and promotional name used to identify a product for advertising and name recognition purposes. This option represents the trading theme in which this Trading Area operates.
Field Definitions
Field Meaning
Brand ID Unique number representing Brand.
Description Name or short description (up to 20 characters long) of Brand.
3.4.4 BSI Route Types Allows for BSIs to have different BSI routes as for example different options can be shown when ordering a steak from the bar than when ordered in the restaurant.
Field Definitions
Field Meaning
Type ID Unique number representing route type.
Description Name of route type.
3.4.5 Delivery Routes Depot served by.
Field Definitions
Field Meaning
Delivery Route ID
Unique number representing delivery route.

Page: 20 © Torex Retail Holdings Limited 2010. All rights reserved.
Description Name of delivery route.
3.4.6 Opening Hours
Field Definitions
Field Meaning
ID Unique ID.
Description Name of opening hours.
Weekly Hours Total number of hours.
Closing Time Daily closing time.
3.4.7 Trading Areas A Trading Area is an area or room in an outlet where trading takes place such as Bar, Lounge, Restaurant, Function Room.
Field Definitions
Field Meaning
Area Unique Trading Area ID number.
Description Name or brief description of the Trading Area (up to 20 characters long).
3.4.8 Trading Modes The Trading Mode option allows different prices to be charged for the same sales item within a trading area. Usually, incentives occur in a given time frame such as Happy Hour, Sunday Special, student night. Increases in prices may occur after midnight for some late night establishments.
Field Definitions
Field Meaning
Trading Mode Unique Trading Mode ID number.
Description Name or brief description of the Trading Mode (up to 20 characters long).
© Torex Retail Holdings Limited 2010. All rights reserved. Page: 21
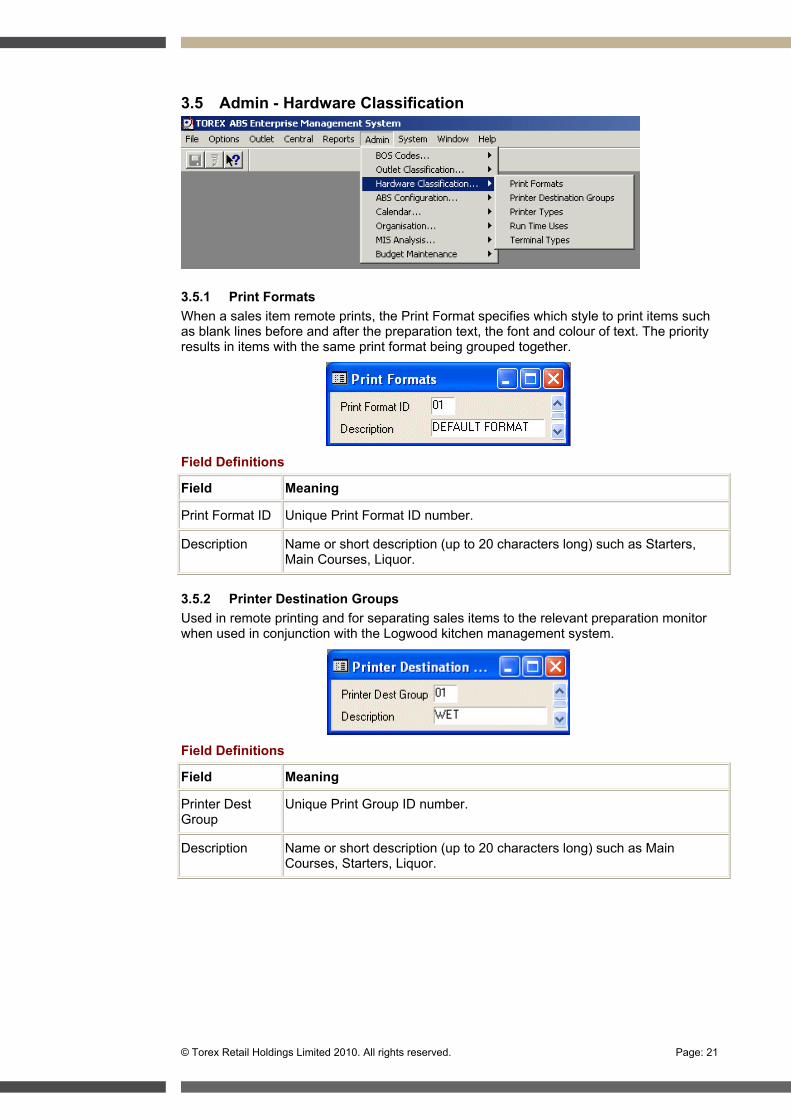
3.5 Admin - Hardware Classification
3.5.1 Print Formats When a sales item remote prints, the Print Format specifies which style to print items such as blank lines before and after the preparation text, the font and colour of text. The priority results in items with the same print format being grouped together.
Field Definitions
Field Meaning
Print Format ID Unique Print Format ID number.
Description Name or short description (up to 20 characters long) such as Starters, Main Courses, Liquor.
3.5.2 Printer Destination Groups Used in remote printing and for separating sales items to the relevant preparation monitor when used in conjunction with the Logwood kitchen management system.
Field Definitions
Field Meaning
Printer Dest Group
Unique Print Group ID number.
Description Name or short description (up to 20 characters long) such as Main Courses, Starters, Liquor.
Page: 22 © Torex Retail Holdings Limited 2010. All rights reserved.
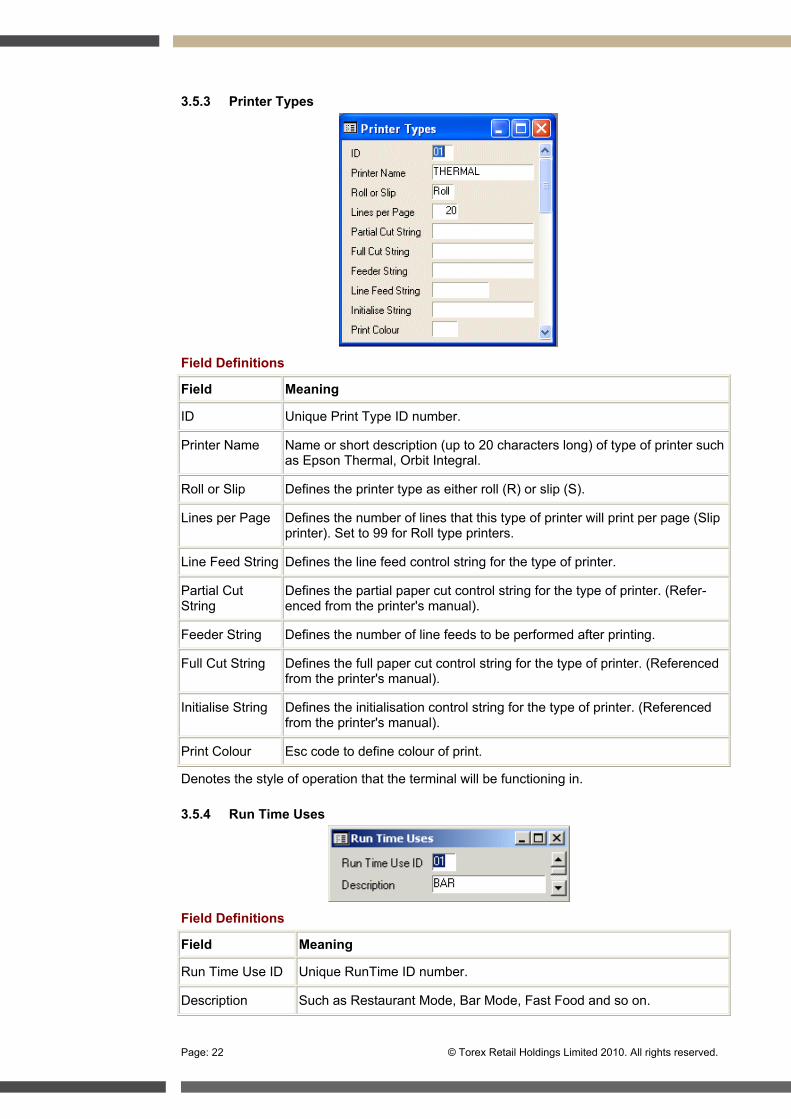
3.5.3 Printer Types
Field Definitions
Field Meaning
ID Unique Print Type ID number.
Printer Name Name or short description (up to 20 characters long) of type of printer such as Epson Thermal, Orbit Integral.
Roll or Slip Defines the printer type as either roll (R) or slip (S).
Lines per Page Defines the number of lines that this type of printer will print per page (Slip printer). Set to 99 for Roll type printers.
Line Feed String Defines the line feed control string for the type of printer.
Partial Cut String
Defines the partial paper cut control string for the type of printer. (Refer-enced from the printer's manual).
Feeder String Defines the number of line feeds to be performed after printing.
Full Cut String Defines the full paper cut control string for the type of printer. (Referenced from the printer's manual).
Initialise String Defines the initialisation control string for the type of printer. (Referenced from the printer's manual).
Print Colour Esc code to define colour of print.
Denotes the style of operation that the terminal will be functioning in.
3.5.4 Run Time Uses
Field Definitions
Field Meaning
Run Time Use ID Unique RunTime ID number.
Description Such as Restaurant Mode, Bar Mode, Fast Food and so on.

© Torex Retail Holdings Limited 2010. All rights reserved. Page: 23
3.5.5 Terminal Types
Field Definitions
Field Meaning
Type Unique Terminal Type ID number.
Name Name of Terminal used such as ABS, Handheld, Pad (up to 20 characters).
FOS Type Such as STRAT.
List Indicator Yes when used with Pads.
Max X Co-ordinate Number of buttons horizontally on touch panel.
Max Y Co-ordinate Number of buttons vertically on touch panel.
Key Pad Indicator Indicates whether the terminal type has a separate numeric keypad, external of the touch screen.
Command Window Mov-able?
Indicates if Command Window can be repositioned.
Command Window Left Position of top corner of Command Window - number of cells across grid.
Command Window Top Position of top corner of Command Window - number of cells down grid.
Command Window Width Width of Command Window, measured in number of cells.
Command Window Height Height of Command Window, measured in number of cells.
Maintainable Indicates if maintenance of touch panels can be maintained at the outlet. If set to yes, the PIL is fully editable, and if it is set to no, the user is only able to view the PIL.
Drawer Ind? Indicates if drawer is attached.
Page: 24 © Torex Retail Holdings Limited 2010. All rights reserved.
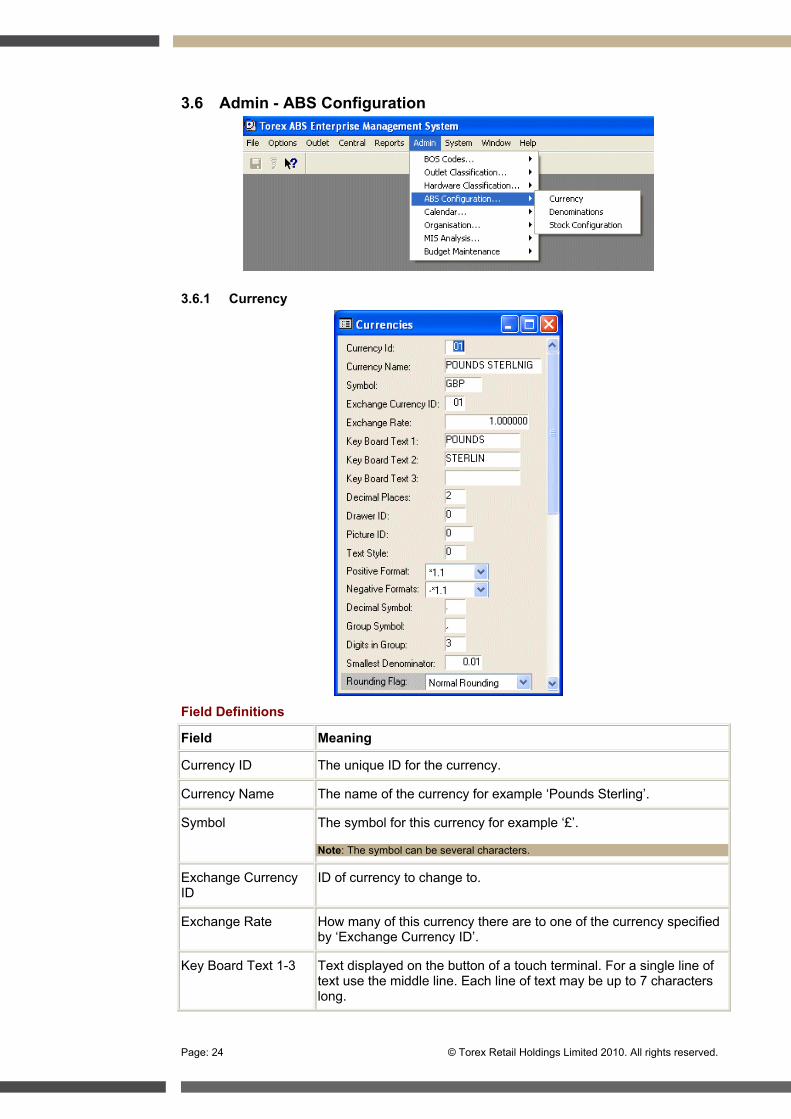
3.6 Admin - ABS Configuration
3.6.1 Currency
Field Definitions
Field Meaning
Currency ID The unique ID for the currency.
Currency Name The name of the currency for example ‘Pounds Sterling’.
Symbol The symbol for this currency for example ‘£’.
Note: The symbol can be several characters.
Exchange Currency ID
ID of currency to change to.
Exchange Rate How many of this currency there are to one of the currency specified by ‘Exchange Currency ID’.
Key Board Text 1-3 Text displayed on the button of a touch terminal. For a single line of text use the middle line. Each line of text may be up to 7 characters long.
© Torex Retail Holdings Limited 2010. All rights reserved. Page: 25
Decimal Places The number of digits after the decimal. Must be between 0 and 9 for example for UK pounds this would be 2.
Drawer ID ID of the drawer (may be a Money Belt Server or Cash Drawer).
Picture ID Associated image.
Text Style Text alignment.
Positive Format The format the currency is displayed in when it is a positive value for example, *1.1, 1.1*,* 1.1, 1.1 * where ‘*’ indicates the currency sym-bol and ‘1.1’ indicates the value.
Negative Format The format the currency is displayed in when it is a negative value. Possible values are as follows: (*1.1), *1.1, *-1.1, *1.1-, (1.1*), -1.1*, 1.1-*, 1.1*-, -1.1 *, -* 1.1, 1.1 *-, * 1.1-, *-1.1, 1.1- *, (* 1.1), (1.1 *) where ‘*’ indicates the currency symbol and ‘1.1’ indicates the value.
Decimal Symbol The character used to denote the decimal symbol for example for £0.00 it would equal ‘.’. This field can only contain a single character but must not contain a ‘-‘, ‘(‘, or ‘)’.
Group Symbol The character used to denote the groupings of figures for example for £1,000.00 it would equal ‘,’. This field can only contain a single char-acter but must not contain a ‘-‘, ‘(‘, or ‘)’.
Digits in Group The number of digits in a group for example for £1,000,000.00 this field would equal 3. Must be between 0 and 9. 0 indicates that the grouping symbol is not used.
Smallest Denominator This field contains the smallest denomination for the currency. De-fault Value = 0
Rounding Flag This field contains a flag that indicates how the amount is to be rounded such as Round down, Round up.
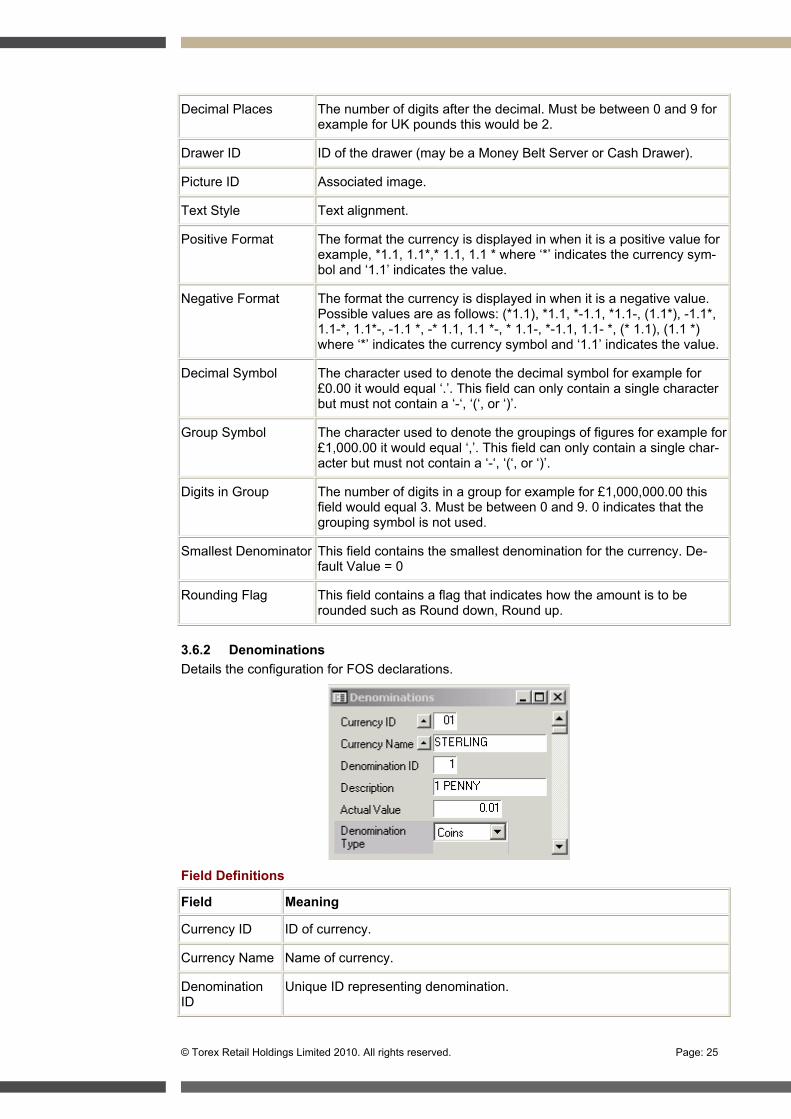
3.6.2 Denominations Details the configuration for FOS declarations.
Field Definitions
Field Meaning
Currency ID ID of currency.
Currency Name Name of currency.
Denomination ID
Unique ID representing denomination.
Page: 26 © Torex Retail Holdings Limited 2010. All rights reserved.
Description The description displayed on the screen for example ‘1 Pence’.
Actual Value Holds the value of this denomination for example ‘0.01’ for a penny.
Denomination Type
Coins or Note.
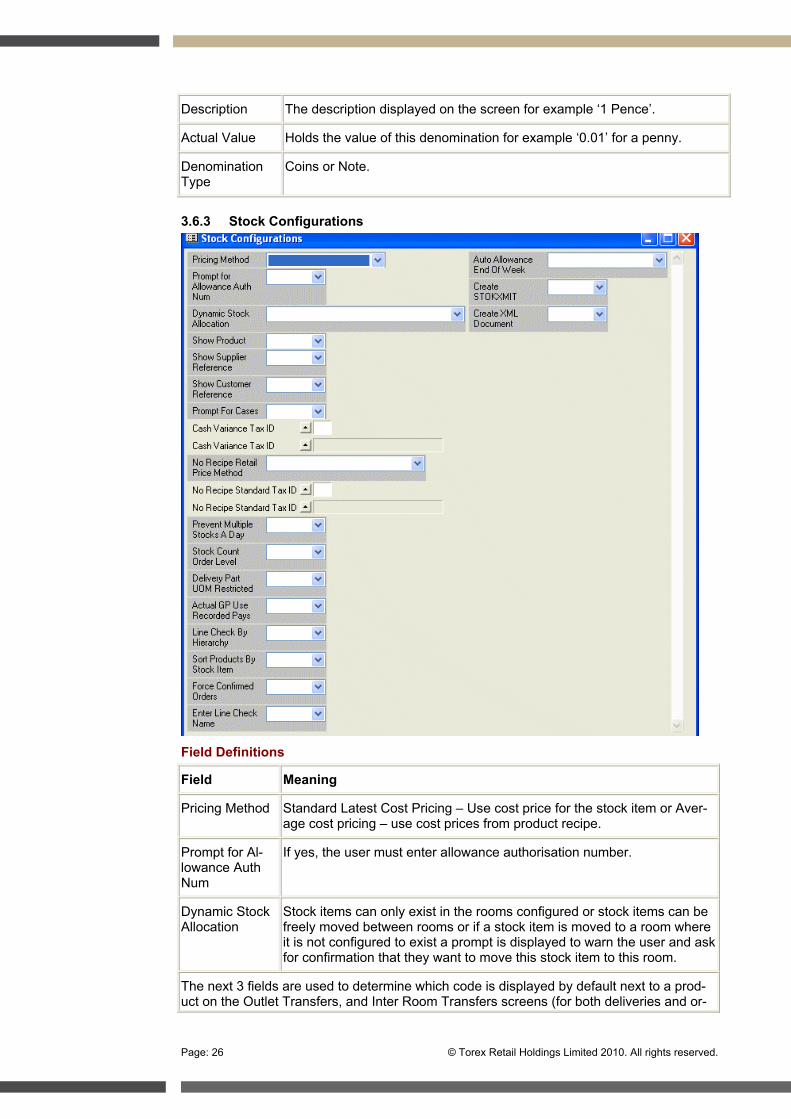
3.6.3 Stock Configurations
Field Definitions
Field Meaning
Pricing Method Standard Latest Cost Pricing – Use cost price for the stock item or Aver-age cost pricing – use cost prices from product recipe.
Prompt for Al-lowance Auth Num
If yes, the user must enter allowance authorisation number.
Dynamic Stock Allocation
Stock items can only exist in the rooms configured or stock items can be freely moved between rooms or if a stock item is moved to a room where it is not configured to exist a prompt is displayed to warn the user and ask for confirmation that they want to move this stock item to this room.
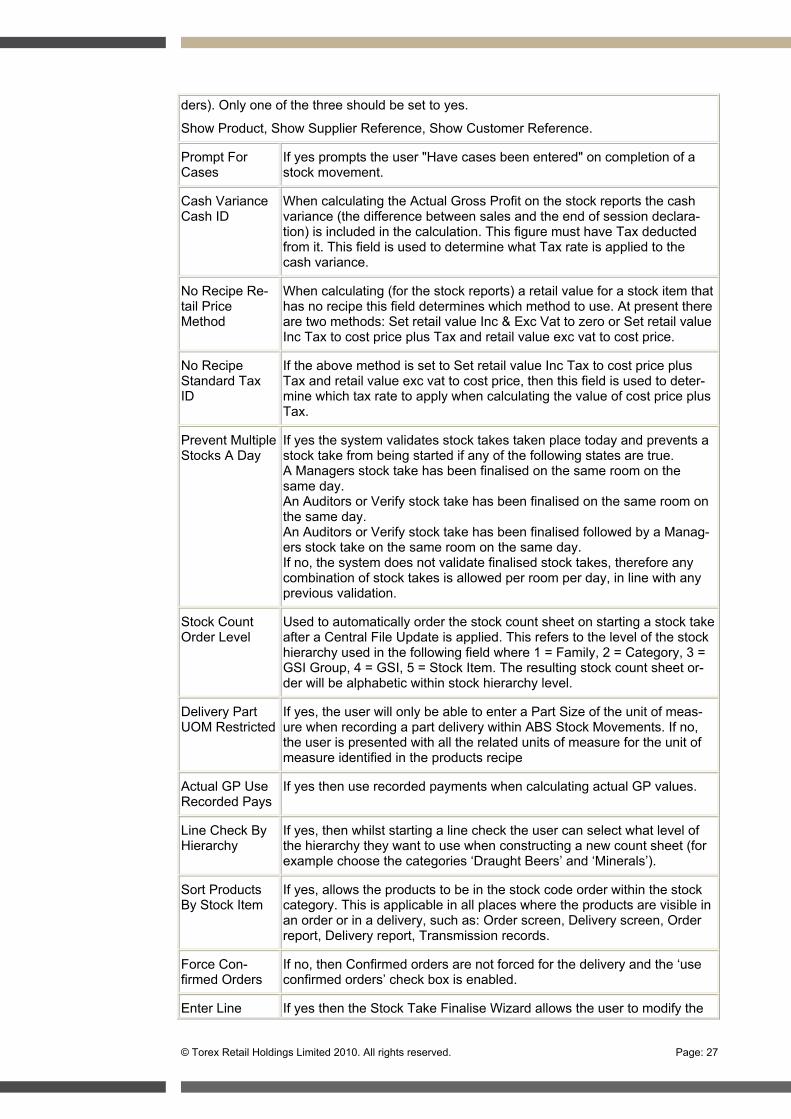
The next 3 fields are used to determine which code is displayed by default next to a prod-uct on the Outlet Transfers, and Inter Room Transfers screens (for both deliveries and or-
© Torex Retail Holdings Limited 2010. All rights reserved. Page: 27
ders). Only one of the three should be set to yes.
Show Product, Show Supplier Reference, Show Customer Reference.
Prompt For Cases
If yes prompts the user "Have cases been entered" on completion of a stock movement.
Cash Variance Cash ID
When calculating the Actual Gross Profit on the stock reports the cash variance (the difference between sales and the end of session declara-tion) is included in the calculation. This figure must have Tax deducted from it. This field is used to determine what Tax rate is applied to the cash variance.
No Recipe Re-tail Price Method
When calculating (for the stock reports) a retail value for a stock item that has no recipe this field determines which method to use. At present there are two methods: Set retail value Inc & Exc Vat to zero or Set retail value Inc Tax to cost price plus Tax and retail value exc vat to cost price.
No Recipe Standard Tax ID
If the above method is set to Set retail value Inc Tax to cost price plus Tax and retail value exc vat to cost price, then this field is used to deter-mine which tax rate to apply when calculating the value of cost price plus Tax.
Prevent Multiple Stocks A Day
If yes the system validates stock takes taken place today and prevents a stock take from being started if any of the following states are true. A Managers stock take has been finalised on the same room on the same day. An Auditors or Verify stock take has been finalised on the same room on the same day. An Auditors or Verify stock take has been finalised followed by a Manag-ers stock take on the same room on the same day. If no, the system does not validate finalised stock takes, therefore any combination of stock takes is allowed per room per day, in line with any previous validation.
Stock Count Order Level
Used to automatically order the stock count sheet on starting a stock take after a Central File Update is applied. This refers to the level of the stock hierarchy used in the following field where 1 = Family, 2 = Category, 3 = GSI Group, 4 = GSI, 5 = Stock Item. The resulting stock count sheet or-der will be alphabetic within stock hierarchy level.
Delivery Part UOM Restricted
If yes, the user will only be able to enter a Part Size of the unit of meas-ure when recording a part delivery within ABS Stock Movements. If no, the user is presented with all the related units of measure for the unit of measure identified in the products recipe
Actual GP Use Recorded Pays
If yes then use recorded payments when calculating actual GP values.
Line Check By Hierarchy
If yes, then whilst starting a line check the user can select what level of the hierarchy they want to use when constructing a new count sheet (for example choose the categories ‘Draught Beers’ and ‘Minerals’).
Sort Products By Stock Item
If yes, allows the products to be in the stock code order within the stock category. This is applicable in all places where the products are visible in an order or in a delivery, such as: Order screen, Delivery screen, Order report, Delivery report, Transmission records.
Force Con-firmed Orders
If no, then Confirmed orders are not forced for the delivery and the ‘use confirmed orders’ check box is enabled.
Enter Line If yes then the Stock Take Finalise Wizard allows the user to modify the
Page: 28 © Torex Retail Holdings Limited 2010. All rights reserved.
Check Name names of line checks.
Auto Allowance End Of Week
The day of the week when automatic allowances should be generated.
Create STOKXMIT
If yes, new transmission files for polling are created when a stocktake is done.
Create XML Document
If yes an XML document is created in c:\ABS\XML directory whenever an order is confirmed (which contains the details of the order) or a delivery is created (which contains the details of the delivery).
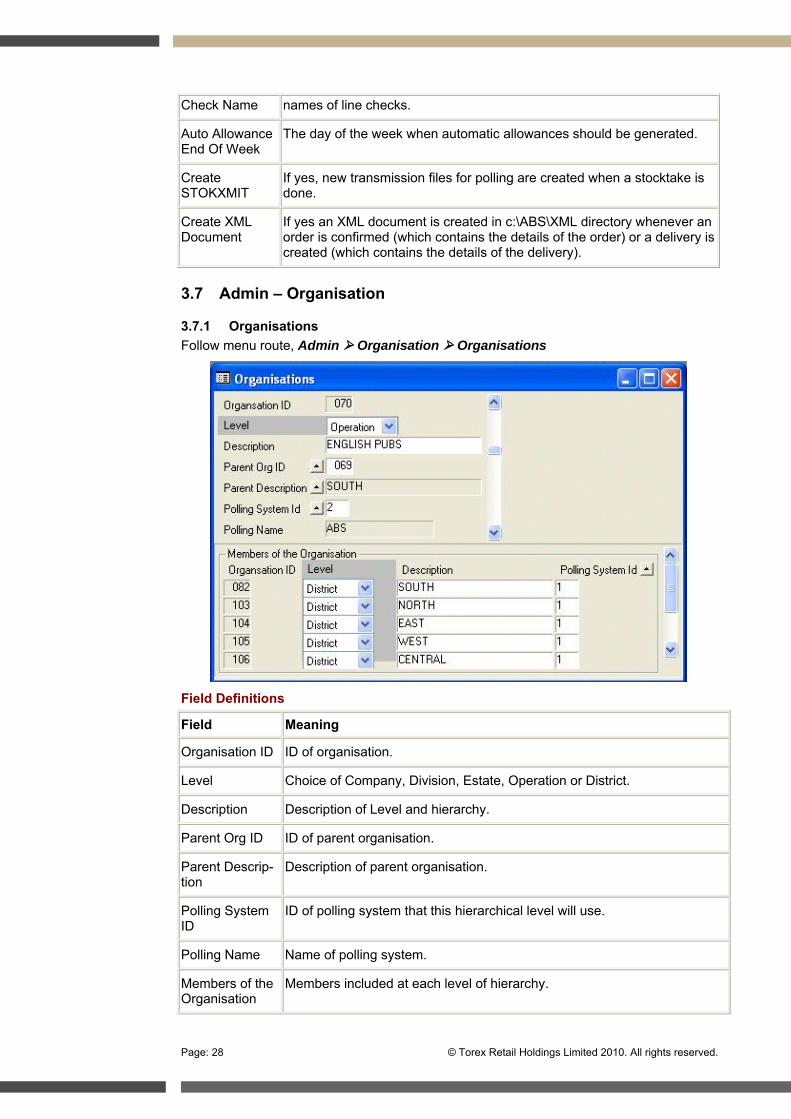
3.7 Admin – Organisation
3.7.1 Organisations Follow menu route, Admin Organisation Organisations
Field Definitions
Field Meaning
Organisation ID ID of organisation.
Level Choice of Company, Division, Estate, Operation or District.
Description Description of Level and hierarchy.
Parent Org ID ID of parent organisation.
Parent Descrip-tion
Description of parent organisation.
Polling System ID
ID of polling system that this hierarchical level will use.
Polling Name Name of polling system.
Members of the Organisation
Members included at each level of hierarchy.
© Torex Retail Holdings Limited 2010. All rights reserved. Page: 29
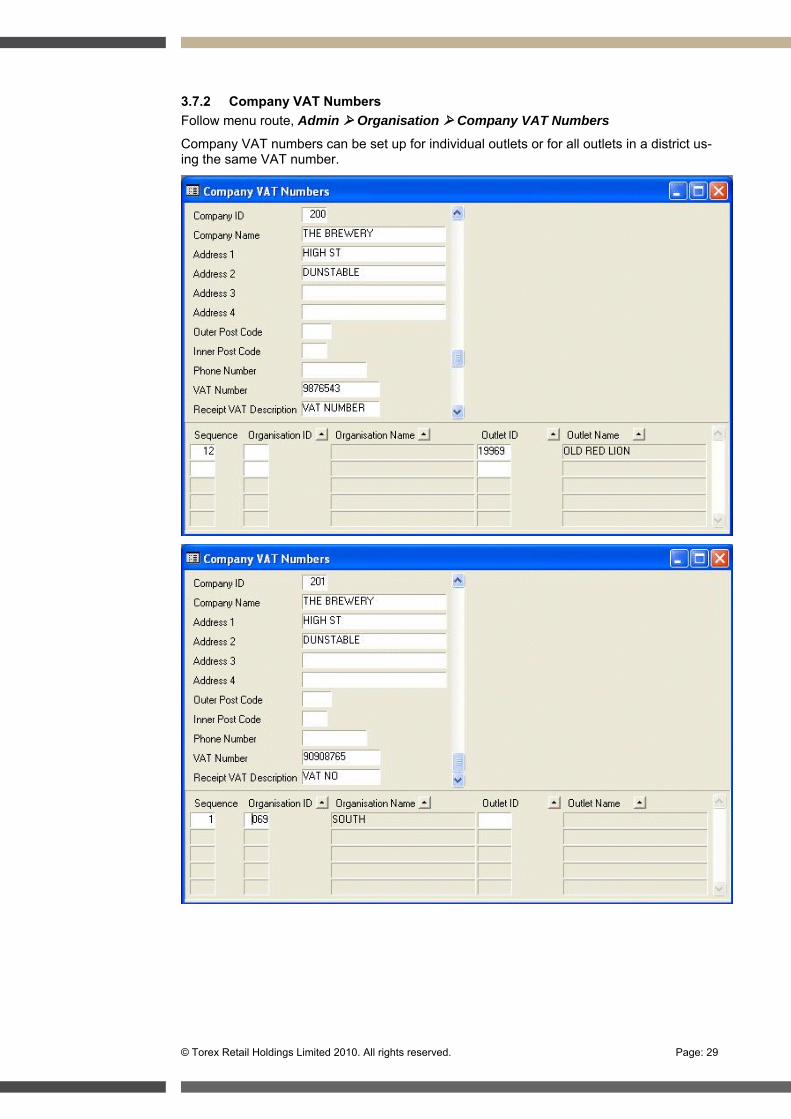
3.7.2 Company VAT Numbers Follow menu route, Admin Organisation Company VAT Numbers
Company VAT numbers can be set up for individual outlets or for all outlets in a district us-ing the same VAT number.

Page: 30 © Torex Retail Holdings Limited 2010. All rights reserved.
3.8 Admin - MIS Analysis
3.8.1 Budget Weightings
Field Definitions
Field Meaning
Weighting ID Unique number representing budget weightings.
Description Name of weighting.
Days of Week Sunday- Saturday.
3.8.2 Trading Styles
Field Definitions
Field Meaning
ID Unique number.
Description Name of trading style.

© Torex Retail Holdings Limited 2010. All rights reserved. Page: 31
4. Central Stock Item Maintenance 4.1.1 Glossary of Terms Used Stock Family: Top levels of respective hierarchies. In a pub, an example of a Family would be the Wet family.
Stock Category: Second level of hierarchies. A member of the stock family, for example Draught Beers
Generic Stock Item Group (GSI Group): Third level of hierarchies. Member of stock cate-gories. Represents groups of items stocked in outlets, for example Standard Lagers
Generic Stock Items (GSIs): Fourth level of hierarchies. Member of GSI Groups. Repre-sents actual products stocked in outlets, for example Heineken
Stock Items: Actual items stocked in outlets.
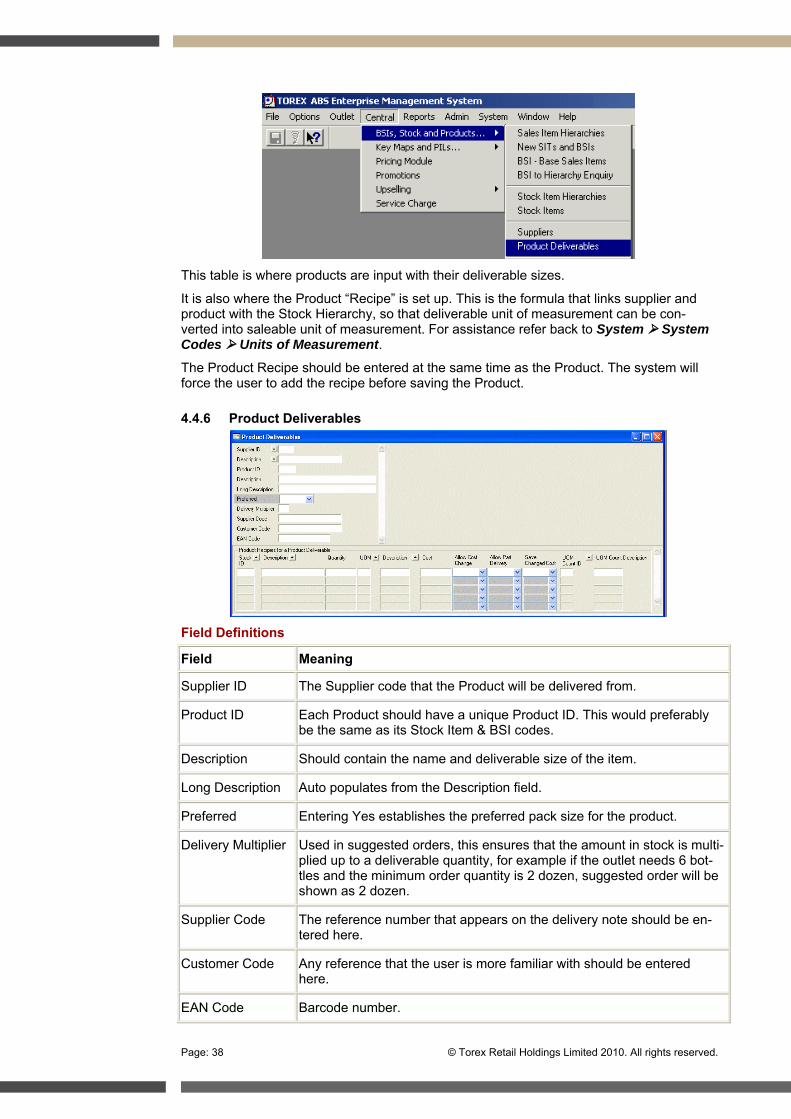
Product Deliverables: This table is where products are input with their deliverable sizes.
Product Recipe: A formula that states how delivered items are to be converted into the appropriate stock items.
Units of Measure (UOMs).
4.1.2 Stock Hierarchy EMS contains a model of your business. This model can provide you with detailed informa-tion on all the items you stock. Goods that are sold and move out of your business are re-moved from stock, and goods that move into your business are added to stock. All move-ments are tracked and accounted for at the outlet.
Because this model is highly detailed and updated frequently, it is capable of providing de-tailed information on all aspects of the way the business is running, and in particular on the quantities of items stocked and sold across the entire business estate. As a result you can always find out exactly what is going on, and has gone on, anywhere in your business.
To reach this state you first have to enter into EMS details of your business and in particu-lar details of everything you stock and sell. EMS deals with this data in a hierarchical man-ner. The data is arranged in two hierarchies, Stock and Sales. We will look at the Stock hi-erarchy first.
The Stock hierarchy can be split into five main levels, which is structured to provide you with the maximum possible flexibility for business analysis and detailed reporting.
M A I N E L E M E N T S O F T H E S T O C K H I E R A R C H Y
Stock Family Top level of the Corporate Data Hierarchy. Maximum of 9 Families can be specified.
Level 2 - Stock Category Stock Family is Parent level of Stock Category. Maximum of 99 Cate-gories.
Level 3 - Generic Stock Item Group Stock Category is Parent level of GSI Group. Allows a maximum of 999 Item Groups.
Level 4 - Generic Stock Items A member of the Generic Stock Item Group. Allows a maximum of 9999 generic Items.
Level 5 - Stock Item Is actual item stocked at an outlet, in its deliverable size. Linked to Stock GSI on EMS. System allows maximum 99999 Stock items
Page: 32 © Torex Retail Holdings Limited 2010. All rights reserved.
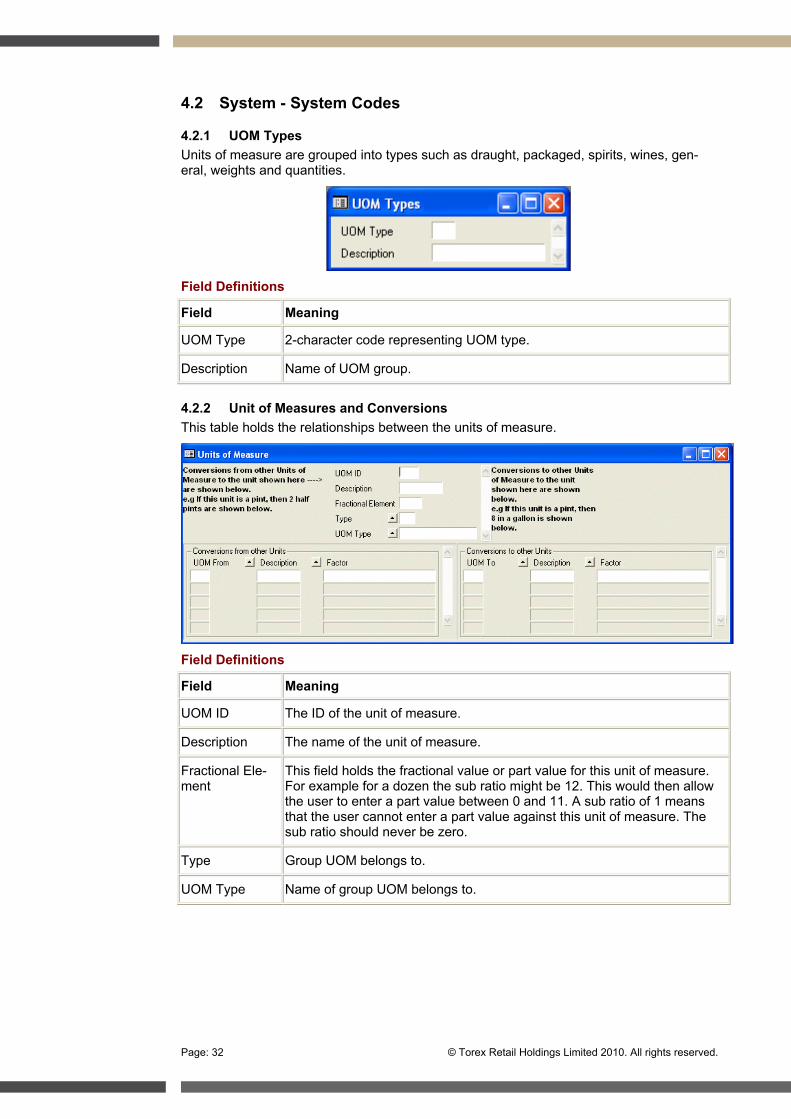
4.2 System - System Codes
4.2.1 UOM Types Units of measure are grouped into types such as draught, packaged, spirits, wines, gen-eral, weights and quantities.
Field Definitions
Field Meaning
UOM Type 2-character code representing UOM type.
Description Name of UOM group.
4.2.2 Unit of Measures and Conversions This table holds the relationships between the units of measure.
Field Definitions
Field Meaning
UOM ID The ID of the unit of measure.
Description The name of the unit of measure.
Fractional Ele-ment
This field holds the fractional value or part value for this unit of measure. For example for a dozen the sub ratio might be 12. This would then allow the user to enter a part value between 0 and 11. A sub ratio of 1 means that the user cannot enter a part value against this unit of measure. The sub ratio should never be zero.
Type Group UOM belongs to.
UOM Type Name of group UOM belongs to.

© Torex Retail Holdings Limited 2010. All rights reserved. Page: 33
4.3 System - Pricing
4.3.1 Cost Update Dates
Field Definitions
Field Meaning
Effective Date Date for cost update to become effective.
Description Name of cost update.
4.4 Central - BSI's, Stock and Products
Page: 34 © Torex Retail Holdings Limited 2010. All rights reserved.
The data must be input in a certain sequence as it has a cumulative effect, that is data in-put in one field will be built upon when the data is input in the next field. If the data is input in a different order, errors will occur. The recommended data entry sequence is as follows.
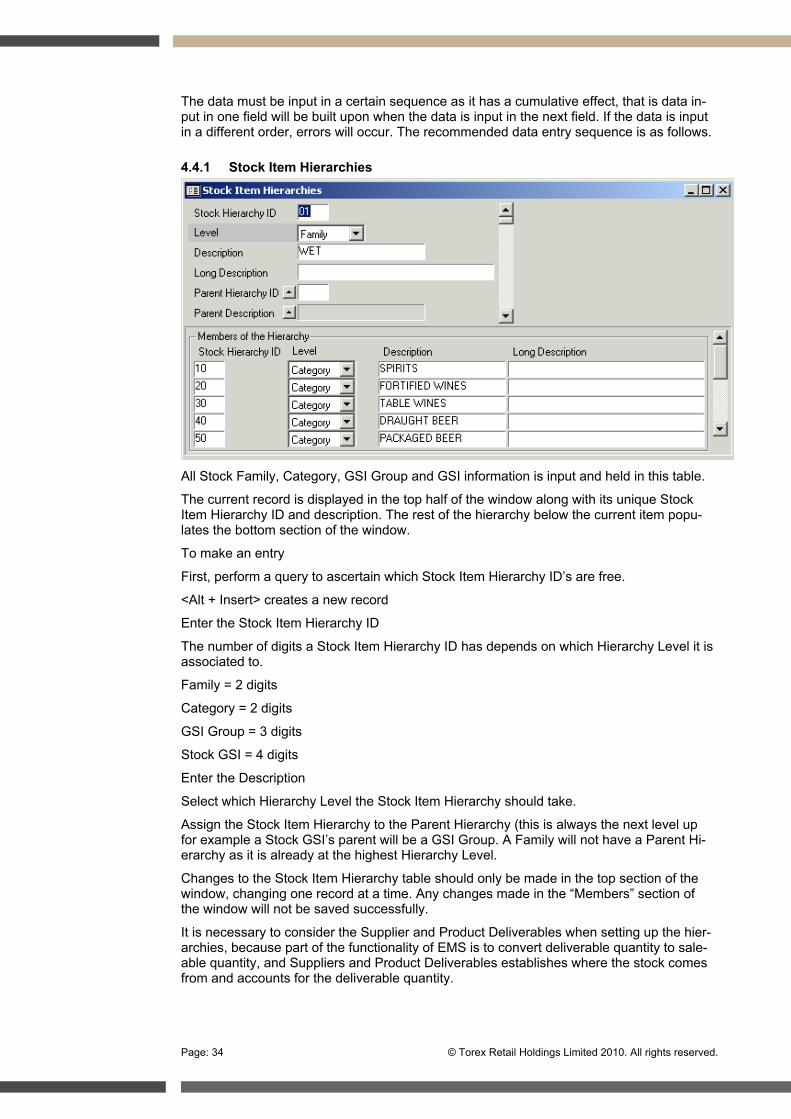
4.4.1 Stock Item Hierarchies
All Stock Family, Category, GSI Group and GSI information is input and held in this table.
The current record is displayed in the top half of the window along with its unique Stock Item Hierarchy ID and description. The rest of the hierarchy below the current item popu-lates the bottom section of the window.
To make an entry
First, perform a query to ascertain which Stock Item Hierarchy ID’s are free.
<Alt + Insert> creates a new record
Enter the Stock Item Hierarchy ID
The number of digits a Stock Item Hierarchy ID has depends on which Hierarchy Level it is associated to.
Family = 2 digits
Category = 2 digits
GSI Group = 3 digits
Stock GSI = 4 digits
Enter the Description
Select which Hierarchy Level the Stock Item Hierarchy should take.
Assign the Stock Item Hierarchy to the Parent Hierarchy (this is always the next level up for example a Stock GSI’s parent will be a GSI Group. A Family will not have a Parent Hi-erarchy as it is already at the highest Hierarchy Level.
Changes to the Stock Item Hierarchy table should only be made in the top section of the window, changing one record at a time. Any changes made in the “Members” section of the window will not be saved successfully.
It is necessary to consider the Supplier and Product Deliverables when setting up the hier-archies, because part of the functionality of EMS is to convert deliverable quantity to sale-able quantity, and Suppliers and Product Deliverables establishes where the stock comes from and accounts for the deliverable quantity.
© Torex Retail Holdings Limited 2010. All rights reserved. Page: 35
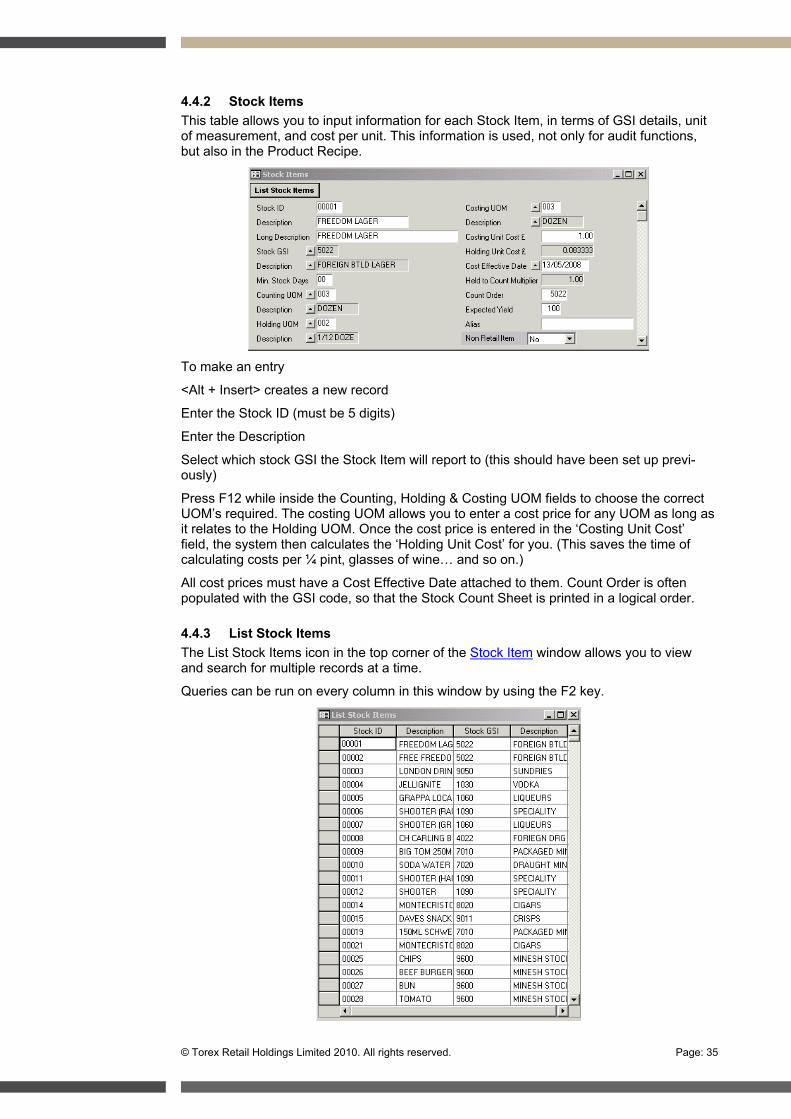
4.4.2 Stock Items This table allows you to input information for each Stock Item, in terms of GSI details, unit of measurement, and cost per unit. This information is used, not only for audit functions, but also in the Product Recipe.
To make an entry
<Alt + Insert> creates a new record
Enter the Stock ID (must be 5 digits)
Enter the Description
Select which stock GSI the Stock Item will report to (this should have been set up previ-ously)
Press F12 while inside the Counting, Holding & Costing UOM fields to choose the correct UOM’s required. The costing UOM allows you to enter a cost price for any UOM as long as it relates to the Holding UOM. Once the cost price is entered in the ‘Costing Unit Cost’ field, the system then calculates the ‘Holding Unit Cost’ for you. (This saves the time of calculating costs per ¼ pint, glasses of wine… and so on.)
All cost prices must have a Cost Effective Date attached to them. Count Order is often populated with the GSI code, so that the Stock Count Sheet is printed in a logical order.
4.4.3 List Stock Items The List Stock Items icon in the top corner of the Stock Item window allows you to view and search for multiple records at a time.
Queries can be run on every column in this window by using the F2 key.
Page: 36 © Torex Retail Holdings Limited 2010. All rights reserved.
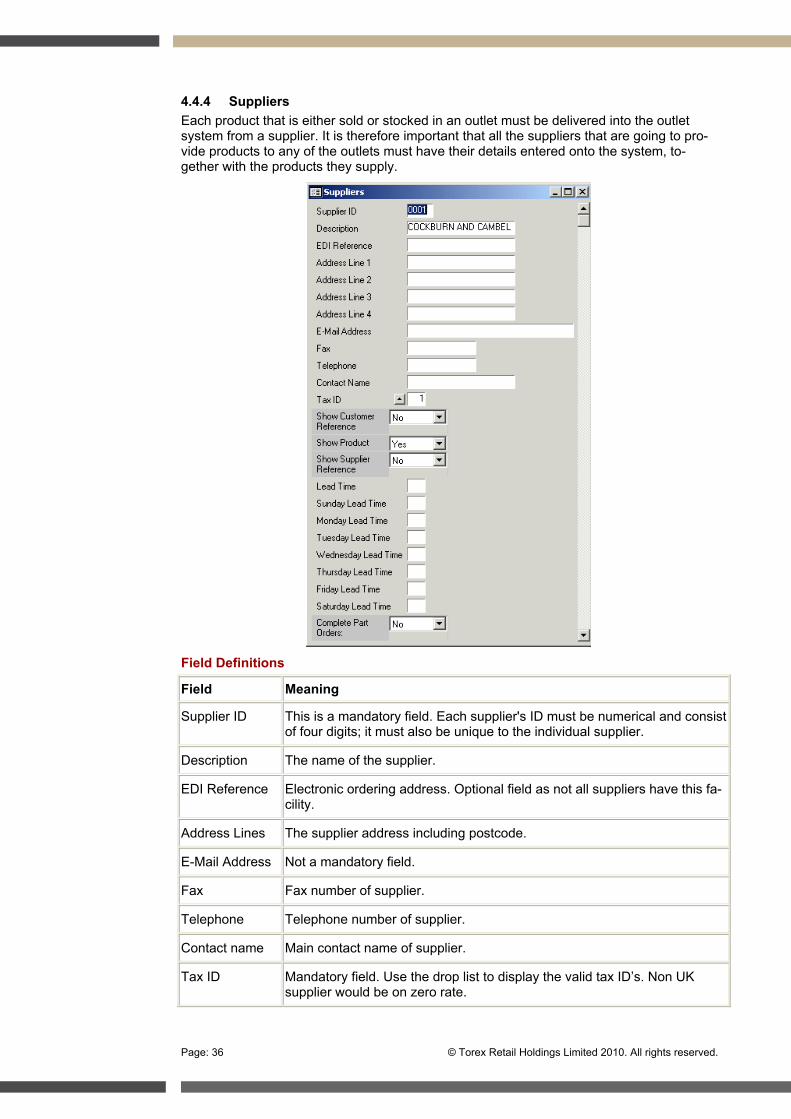
4.4.4 Suppliers Each product that is either sold or stocked in an outlet must be delivered into the outlet system from a supplier. It is therefore important that all the suppliers that are going to pro-vide products to any of the outlets must have their details entered onto the system, to-gether with the products they supply.
Field Definitions
Field Meaning
Supplier ID This is a mandatory field. Each supplier's ID must be numerical and consist of four digits; it must also be unique to the individual supplier.
Description The name of the supplier.
EDI Reference Electronic ordering address. Optional field as not all suppliers have this fa-cility.
Address Lines The supplier address including postcode.
E-Mail Address Not a mandatory field.
Fax Fax number of supplier.
Telephone Telephone number of supplier.
Contact name Main contact name of supplier.
Tax ID Mandatory field. Use the drop list to display the valid tax ID’s. Non UK supplier would be on zero rate.
© Torex Retail Holdings Limited 2010. All rights reserved. Page: 37
Show customer reference / Show product / Show supplier reference
When these items are flagged “Yes”, they can be seen on the Stock Movement screen on ABS BOS.
Lead time Minimum amount of time permitted between order and delivery.
Complete Part Orders
If no, shortfalls in the delivery remain On Order in Part Delivered Order(s). If yes, the order is set to Completed by updating the order against the de-livered quantities and then completing any shortfalls in the delivery. The shortfalls in the ordered quantity are identified as Not Delivered.
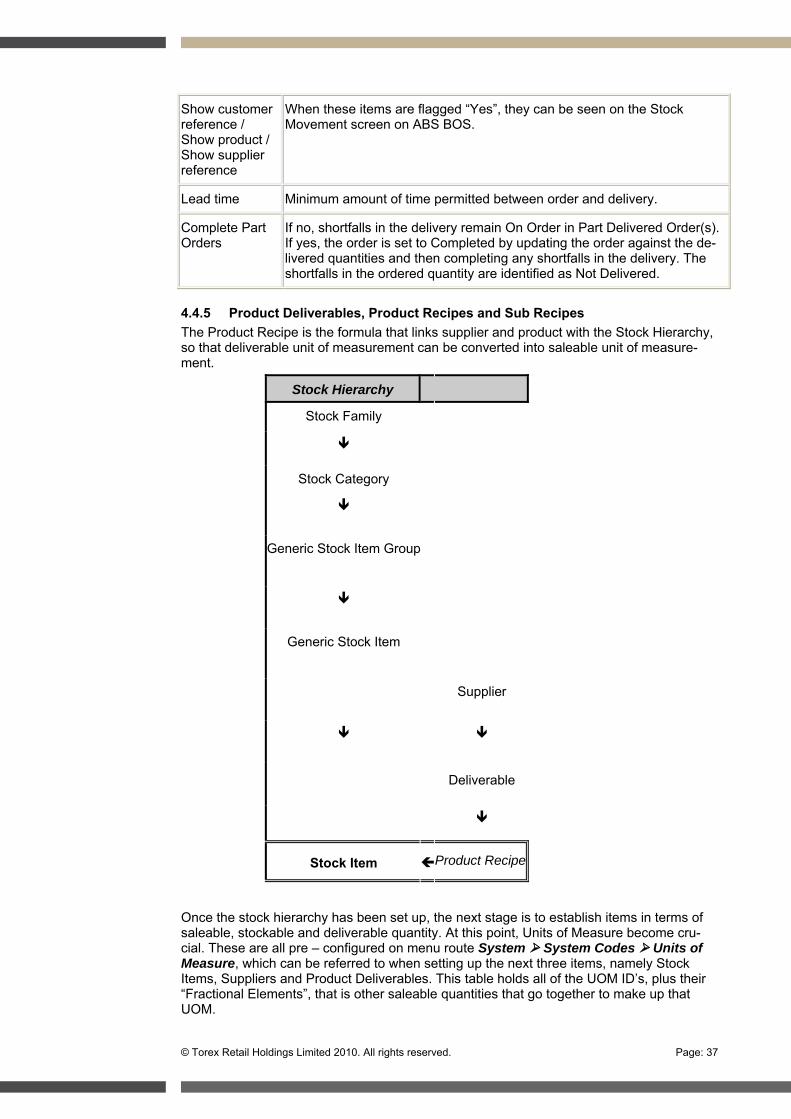
4.4.5 Product Deliverables, Product Recipes and Sub Recipes The Product Recipe is the formula that links supplier and product with the Stock Hierarchy, so that deliverable unit of measurement can be converted into saleable unit of measure-ment.
Stock Hierarchy
Stock Family
Stock Category
Generic Stock Item Group
Generic Stock Item
Supplier
Deliverable
Stock Item Product Recipe
Once the stock hierarchy has been set up, the next stage is to establish items in terms of saleable, stockable and deliverable quantity. At this point, Units of Measure become cru-cial. These are all pre – configured on menu route System System Codes Units of Measure, which can be referred to when setting up the next three items, namely Stock Items, Suppliers and Product Deliverables. This table holds all of the UOM ID’s, plus their “Fractional Elements”, that is other saleable quantities that go together to make up that UOM.
Page: 38 © Torex Retail Holdings Limited 2010. All rights reserved.
This table is where products are input with their deliverable sizes.
It is also where the Product “Recipe” is set up. This is the formula that links supplier and product with the Stock Hierarchy, so that deliverable unit of measurement can be con-verted into saleable unit of measurement. For assistance refer back to System System Codes Units of Measurement.
The Product Recipe should be entered at the same time as the Product. The system will force the user to add the recipe before saving the Product.
4.4.6 Product Deliverables
Field Definitions
Field Meaning
Supplier ID The Supplier code that the Product will be delivered from.
Product ID Each Product should have a unique Product ID. This would preferably be the same as its Stock Item & BSI codes.
Description Should contain the name and deliverable size of the item.
Long Description Auto populates from the Description field.
Preferred Entering Yes establishes the preferred pack size for the product.
Delivery Multiplier Used in suggested orders, this ensures that the amount in stock is multi-plied up to a deliverable quantity, for example if the outlet needs 6 bot-tles and the minimum order quantity is 2 dozen, suggested order will be shown as 2 dozen.
Supplier Code The reference number that appears on the delivery note should be en-tered here.
Customer Code Any reference that the user is more familiar with should be entered here.
EAN Code Barcode number.
© Torex Retail Holdings Limited 2010. All rights reserved. Page: 39
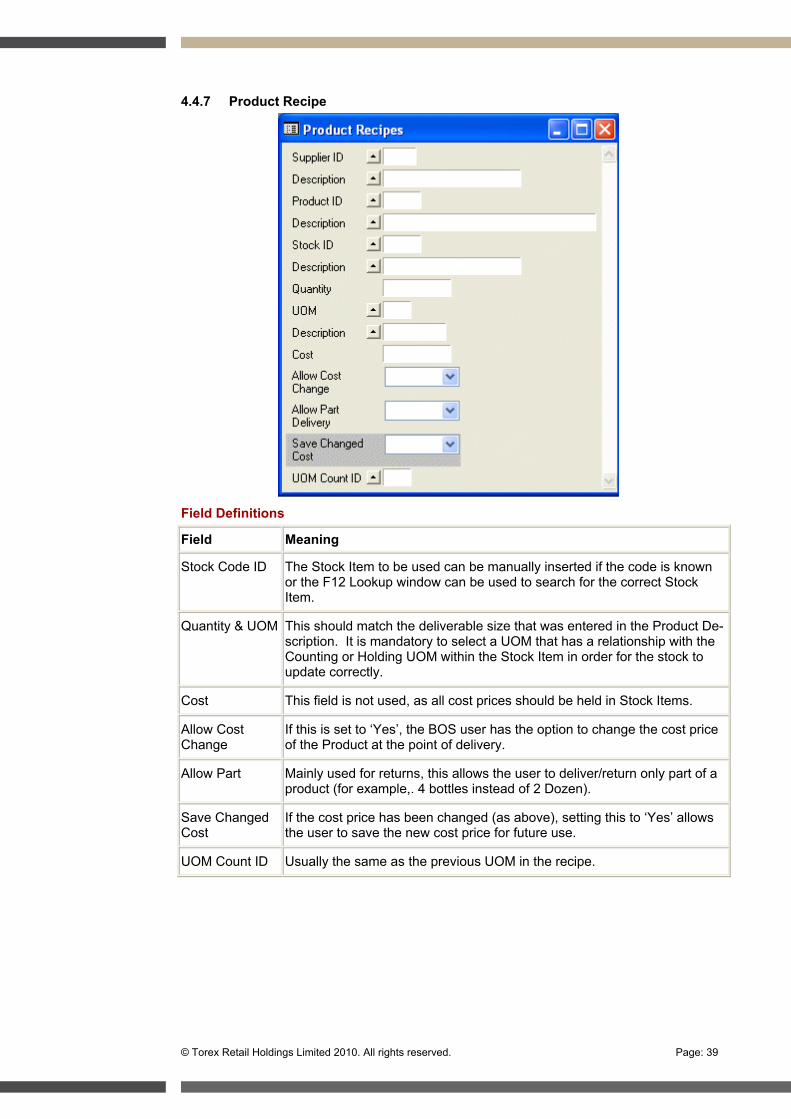
4.4.7 Product Recipe
Field Definitions
Field Meaning
Stock Code ID The Stock Item to be used can be manually inserted if the code is known or the F12 Lookup window can be used to search for the correct Stock Item.
Quantity & UOM This should match the deliverable size that was entered in the Product De-scription. It is mandatory to select a UOM that has a relationship with the Counting or Holding UOM within the Stock Item in order for the stock to update correctly.
Cost This field is not used, as all cost prices should be held in Stock Items.
Allow Cost Change
If this is set to ‘Yes’, the BOS user has the option to change the cost price of the Product at the point of delivery.
Allow Part Mainly used for returns, this allows the user to deliver/return only part of a product (for example,. 4 bottles instead of 2 Dozen).
Save Changed Cost
If the cost price has been changed (as above), setting this to ‘Yes’ allows the user to save the new cost price for future use.
UOM Count ID Usually the same as the previous UOM in the recipe.
Page: 40 © Torex Retail Holdings Limited 2010. All rights reserved.
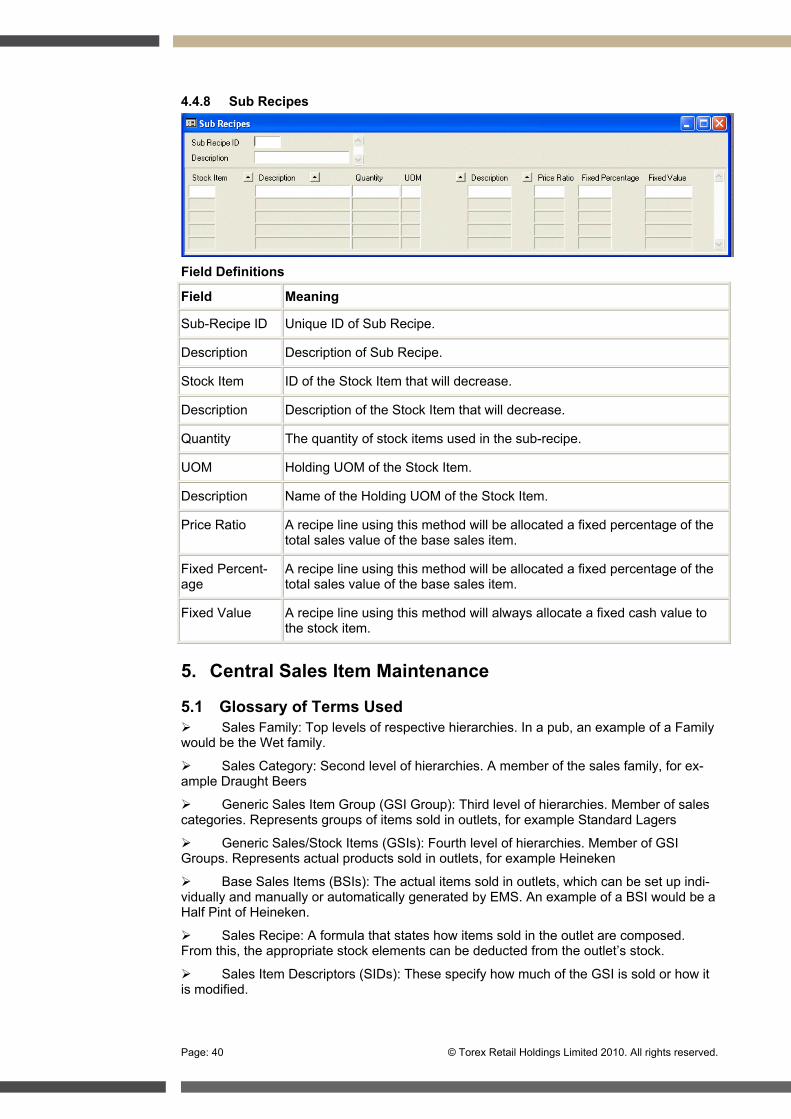
4.4.8 Sub Recipes
Field Definitions
Field Meaning
Sub-Recipe ID Unique ID of Sub Recipe.
Description Description of Sub Recipe.
Stock Item ID of the Stock Item that will decrease.
Description Description of the Stock Item that will decrease.
Quantity The quantity of stock items used in the sub-recipe.
UOM Holding UOM of the Stock Item.
Description Name of the Holding UOM of the Stock Item.
Price Ratio A recipe line using this method will be allocated a fixed percentage of the total sales value of the base sales item.
Fixed Percent-age
A recipe line using this method will be allocated a fixed percentage of the total sales value of the base sales item.
Fixed Value A recipe line using this method will always allocate a fixed cash value to the stock item.
5. Central Sales Item Maintenance
5.1 Glossary of Terms Used Sales Family: Top levels of respective hierarchies. In a pub, an example of a Family would be the Wet family.
Sales Category: Second level of hierarchies. A member of the sales family, for ex-ample Draught Beers
Generic Sales Item Group (GSI Group): Third level of hierarchies. Member of sales categories. Represents groups of items sold in outlets, for example Standard Lagers
Generic Sales/Stock Items (GSIs): Fourth level of hierarchies. Member of GSI Groups. Represents actual products sold in outlets, for example Heineken
Base Sales Items (BSIs): The actual items sold in outlets, which can be set up indi-vidually and manually or automatically generated by EMS. An example of a BSI would be a Half Pint of Heineken.
Sales Recipe: A formula that states how items sold in the outlet are composed. From this, the appropriate stock elements can be deducted from the outlet’s stock.
Sales Item Descriptors (SIDs): These specify how much of the GSI is sold or how it is modified.
© Torex Retail Holdings Limited 2010. All rights reserved. Page: 41
Quantifier: One of two types of SID. This relates to the GSI in terms of quantity, for example Pint or Half Pint are SID quantifiers for draught beers.
Modifier: The other type of SID. Modifies the GSI other than in terms of quantity, for example Shandy or Top are SID modifiers for draught beers.
Sales Item Terminator (SIT): The product selected after the SID has been selected, which designates the item required, for example Half Heineken. The system will then use the information to see if there is a valid BSI set up for the selected combination.
5.2 Sales Hierarchy Just like the stock hierarchy the Sales hierarchy can be split into five main levels.
M A I N E L E M E N T S O F T H E S A L E S H I E R A R C H Y
Sales Family Top level of the Corporate Data Hierarchy. Maximum of 9 Families can be specified.
Level 2 - Sales Category Sales Family is Parent level of Sales Category. Maximum of 99 Cate-gories.
Level 3 - Generic Stock Item Group Sales Category is Parent level of GSI Group. Allows a maximum of 999 Item Groups.
Level 4 - Generic Sales Items A member of the Generic Sales Item Group. Allows a maximum of 9999 generic Items.
Level 5 - Base Sales Item The actual items sold in the outlets.
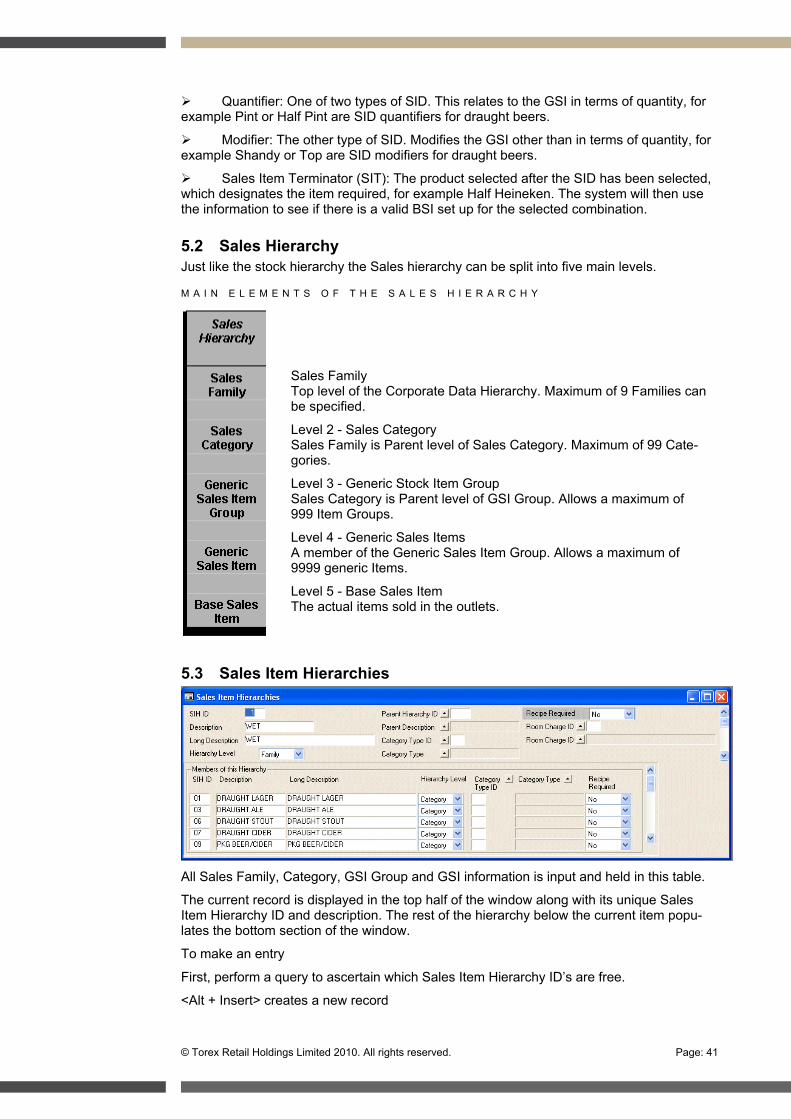
5.3 Sales Item Hierarchies
All Sales Family, Category, GSI Group and GSI information is input and held in this table.
The current record is displayed in the top half of the window along with its unique Sales Item Hierarchy ID and description. The rest of the hierarchy below the current item popu-lates the bottom section of the window.
To make an entry
First, perform a query to ascertain which Sales Item Hierarchy ID’s are free.
<Alt + Insert> creates a new record

Page: 42 © Torex Retail Holdings Limited 2010. All rights reserved.
Enter the Sales Item Hierarchy ID
The number of digits a Sales Item Hierarchy ID has depends on which Hierarchy Level it is associated to.
Family = 2 digits
Category = 2 digits
GSI Group = 3 digits
GSI = 4 digits
Enter the Description
Select which Hierarchy Level the Sales Item Hierarchy should take.
Assign the Sales Item Hierarchy to the Parent Hierarchy (this is always the next level up for example a Sales GSI’s parent will be a GSI Group. A Family will not have a Parent Hi-erarchy as it is already at the highest Hierarchy Level.
Changes to the Sales Item Hierarchy table should only be made in the top section of the window, changing one record at a time. Any changes made in the “Members” section of the window will not be saved successfully.
5.4 Sales Item Descriptors (SIDs The SID specifies the quantity or form in which the BSI can be sold and there are two types. The first, a quantifier, specifies the quantity such as half pint, pint or double. The second, a modifier, specifies the form and includes such things as shandy, top and spritzer. A BSI can be composed of a quantifier and a modifier, for example a half pint shandy but can never be two modifiers or two quantifiers.
SIDs are set up using menu route: Central BSIs Stock and Products Sales Item Descriptors
Field Definitions
Field Meaning
Item ID Unique Sales Item Descriptor ID number.
Description Name of Sales Item Descriptor (up to 16 characters long).
K/B Text 1-3 Text displayed on the button of a touch terminal. First of three lines pro-vided. For a single line of text use the middle line. Each line of text may be up to 7 characters long. Traditionally, outer lines are populated with aster-isks.
For BSI Name An abbreviated description, (up to a 4 characters long), that is displayed on a touch terminal when this SID is selected.
SID Type Modifier (indicates the form the main items will be dispensed in for exam-ple Cordial, Shandy, Top), Quantity (indicates the quantity of the main item for example Pint, Single, Large, 7").
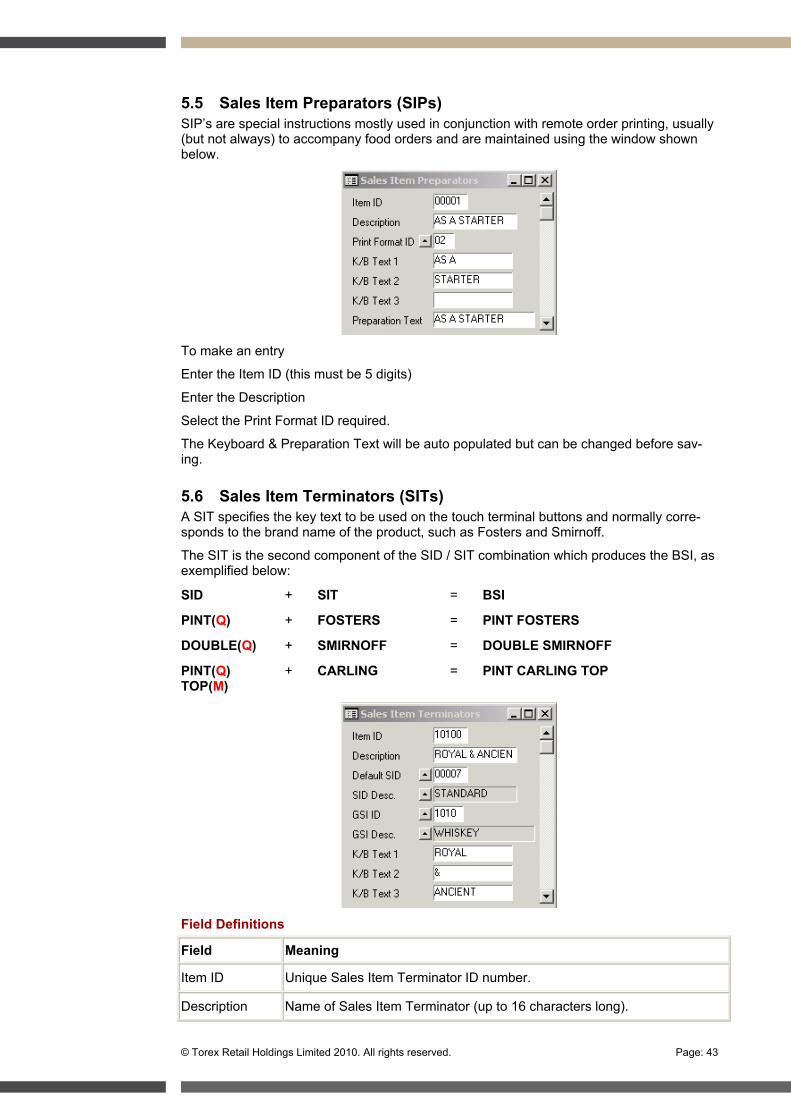
© Torex Retail Holdings Limited 2010. All rights reserved. Page: 43
5.5 Sales Item Preparators (SIPs) SIP’s are special instructions mostly used in conjunction with remote order printing, usually (but not always) to accompany food orders and are maintained using the window shown below.
To make an entry
Enter the Item ID (this must be 5 digits)
Enter the Description
Select the Print Format ID required.
The Keyboard & Preparation Text will be auto populated but can be changed before sav-ing.
5.6 Sales Item Terminators (SITs) A SIT specifies the key text to be used on the touch terminal buttons and normally corre-sponds to the brand name of the product, such as Fosters and Smirnoff.
The SIT is the second component of the SID / SIT combination which produces the BSI, as exemplified below:
SID + SIT = BSI
PINT(Q) + FOSTERS = PINT FOSTERS
DOUBLE(Q) + SMIRNOFF = DOUBLE SMIRNOFF
PINT(Q) TOP(M)
+ CARLING = PINT CARLING TOP
Field Definitions
Field Meaning
Item ID Unique Sales Item Terminator ID number.
Description Name of Sales Item Terminator (up to 16 characters long).
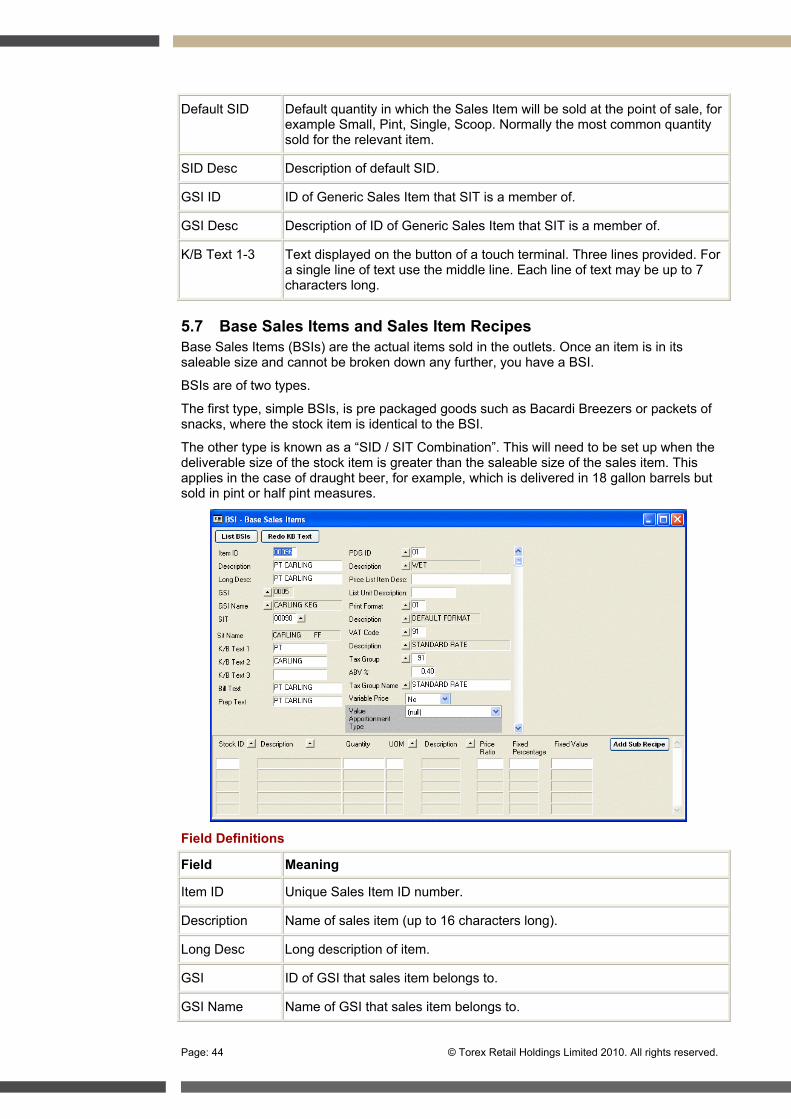
Page: 44 © Torex Retail Holdings Limited 2010. All rights reserved.
Default SID Default quantity in which the Sales Item will be sold at the point of sale, for example Small, Pint, Single, Scoop. Normally the most common quantity sold for the relevant item.
SID Desc Description of default SID.
GSI ID ID of Generic Sales Item that SIT is a member of.
GSI Desc Description of ID of Generic Sales Item that SIT is a member of.
K/B Text 1-3 Text displayed on the button of a touch terminal. Three lines provided. For a single line of text use the middle line. Each line of text may be up to 7 characters long.
5.7 Base Sales Items and Sales Item Recipes Base Sales Items (BSIs) are the actual items sold in the outlets. Once an item is in its saleable size and cannot be broken down any further, you have a BSI.
BSIs are of two types.
The first type, simple BSIs, is pre packaged goods such as Bacardi Breezers or packets of snacks, where the stock item is identical to the BSI.
The other type is known as a “SID / SIT Combination”. This will need to be set up when the deliverable size of the stock item is greater than the saleable size of the sales item. This applies in the case of draught beer, for example, which is delivered in 18 gallon barrels but sold in pint or half pint measures.
Field Definitions
Field Meaning
Item ID Unique Sales Item ID number.
Description Name of sales item (up to 16 characters long).
Long Desc Long description of item.
GSI ID of GSI that sales item belongs to.
GSI Name Name of GSI that sales item belongs to.

© Torex Retail Holdings Limited 2010. All rights reserved. Page: 45
SIT Sales Item Terminator ID may be displayed if linked to this sales item.
SIT Name Sales Item Terminator name may be displayed if linked to this sales item.
K/B Text 1-3 Three lines provided for the text displayed on the button of a touch termi-nal. For a single line of text use the middle line. Each line of text may be up to 7 characters long.
Bill Text A brief description of this item, (up to 16 characters long), that is printed on the bill. This is also displayed on a customer receipt.
Prep Text A short piece of text, (up to 20 characters long), that describes the way that this Sales Item is prepared. This text is printed on the remote printer such as kitchen printer or bar dispense printer.
PDG ID Printer group in which the item belongs.
Description Name of printer group in which the item belongs such as Starters, Main Courses, Desserts or Wines, Cocktails and so on.
Price List Item Description
Description of item as shown on price list.
List Unit De-scription
Description of the how this unit will be sold that will appear on the price list, that is Pint, Bottle. ½ bottle.
Print Format Print format (colour, text size, position and order on printout) to be used when printing this Sales Item to a remote printer.
Description Name of print format.
VAT Code VAT (tax) rate to apply against the Sales Item.
Description Name of VAT group such as standard or zero.
Tax Group Tax group that sales item belongs to.
ABV% Alcohol By Volume such as 0380 represents 3.8%.
Tax Group Name
Name of tax group that sales item belongs to.
Variable Price Used for BSI’s like service charge where variables in the sell price can be set against it. At POS the user can then enter a variable figure.
Value Appor-tionment Type
The field determines how the sales value from the base sales item is di-vided between the stock items in its recipe.
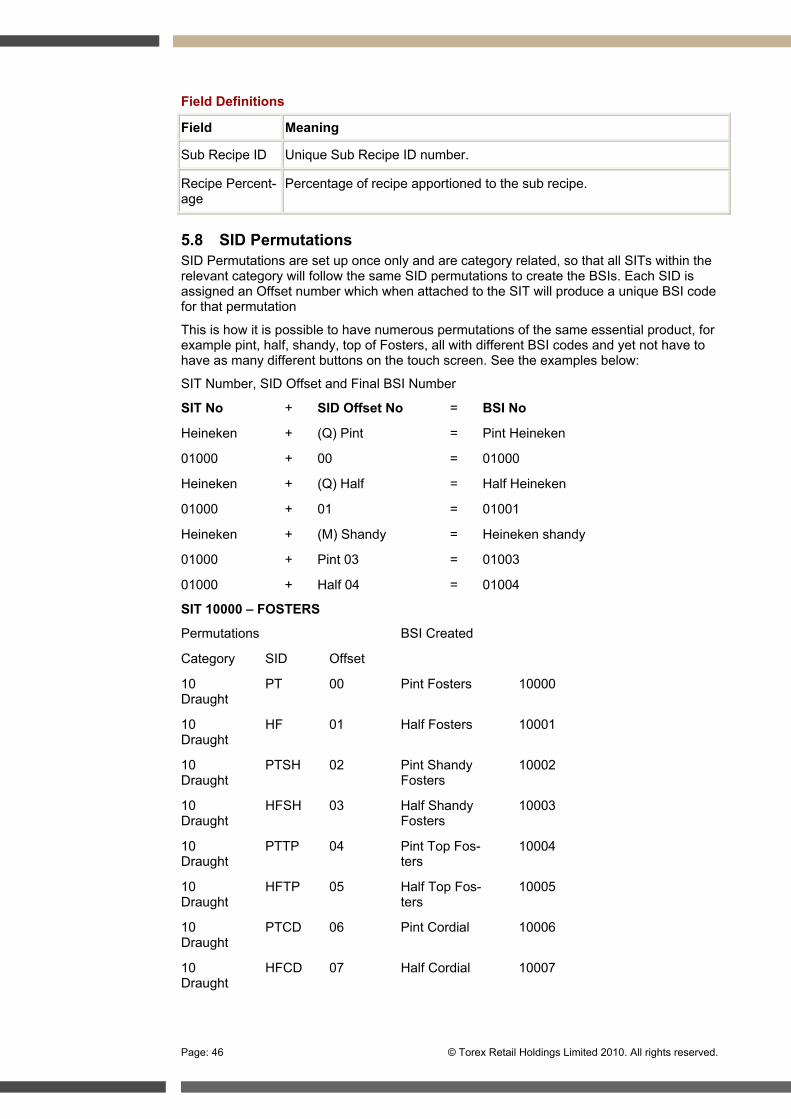
Page: 46 © Torex Retail Holdings Limited 2010. All rights reserved.
Field Definitions
Field Meaning
Sub Recipe ID Unique Sub Recipe ID number.
Recipe Percent-age
Percentage of recipe apportioned to the sub recipe.
5.8 SID Permutations SID Permutations are set up once only and are category related, so that all SITs within the relevant category will follow the same SID permutations to create the BSIs. Each SID is assigned an Offset number which when attached to the SIT will produce a unique BSI code for that permutation
This is how it is possible to have numerous permutations of the same essential product, for example pint, half, shandy, top of Fosters, all with different BSI codes and yet not have to have as many different buttons on the touch screen. See the examples below:
SIT Number, SID Offset and Final BSI Number
SIT No + SID Offset No = BSI No
Heineken + (Q) Pint = Pint Heineken
01000 + 00 = 01000
Heineken + (Q) Half = Half Heineken
01000 + 01 = 01001
Heineken + (M) Shandy = Heineken shandy
01000 + Pint 03 = 01003
01000 + Half 04 = 01004
SIT 10000 – FOSTERS
Permutations BSI Created
Category SID Offset
10 Draught
PT 00 Pint Fosters 10000
10 Draught
HF 01 Half Fosters 10001
10 Draught
PTSH 02 Pint Shandy Fosters
10002
10 Draught
HFSH 03 Half Shandy Fosters
10003
10 Draught
PTTP 04 Pint Top Fos-ters
10004
10 Draught
HFTP 05 Half Top Fos-ters
10005
10 Draught
PTCD 06 Pint Cordial 10006
10 Draught
HFCD 07 Half Cordial 10007
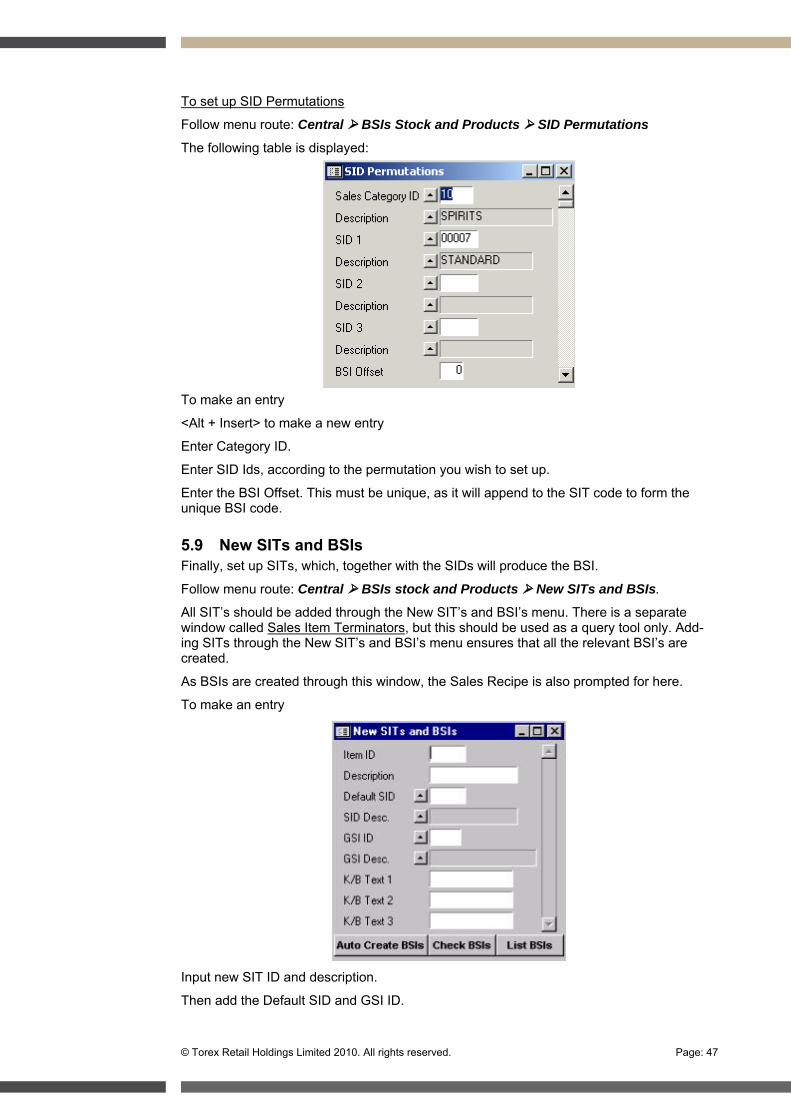
© Torex Retail Holdings Limited 2010. All rights reserved. Page: 47
To set up SID Permutations
Follow menu route: Central BSIs Stock and Products SID Permutations
The following table is displayed:
To make an entry
<Alt + Insert> to make a new entry
Enter Category ID.
Enter SID Ids, according to the permutation you wish to set up.
Enter the BSI Offset. This must be unique, as it will append to the SIT code to form the unique BSI code.
5.9 New SITs and BSIs Finally, set up SITs, which, together with the SIDs will produce the BSI.
Follow menu route: Central BSIs stock and Products New SITs and BSIs.
All SIT’s should be added through the New SIT’s and BSI’s menu. There is a separate window called Sales Item Terminators, but this should be used as a query tool only. Add-ing SITs through the New SIT’s and BSI’s menu ensures that all the relevant BSI’s are created.
As BSIs are created through this window, the Sales Recipe is also prompted for here.
To make an entry
Input new SIT ID and description.
Then add the Default SID and GSI ID.

Page: 48 © Torex Retail Holdings Limited 2010. All rights reserved.
Click on the Auto Create BSI’s icon. The system will carry out two checks.
The SID Permutations are set up correctly.
There is enough space to create the BSI’s. However, it only checks to see that 10 spaces are available. If more than 10 BSIs will be required, it is necessary to perform a manual check.
The Keyboard text will be auto populated and the related BSI’s will be created.
Input the sales recipe details, as before, in the lower part of the window.
5.10 Check BSIs The Check BSI’s icon is a query tool, which allows you to view the BSI’s that have been Auto Created from the SIT. In addition to displaying these BSI’s, it also displays any other BSI’s that are linked to the same GSI.
5.11 List BSIs The List BSI’s icon in the top corner of the Base Sales Item window allows you to view and search for multiple records at a time.
Queries can be run on every column in this window by using the F2 key.
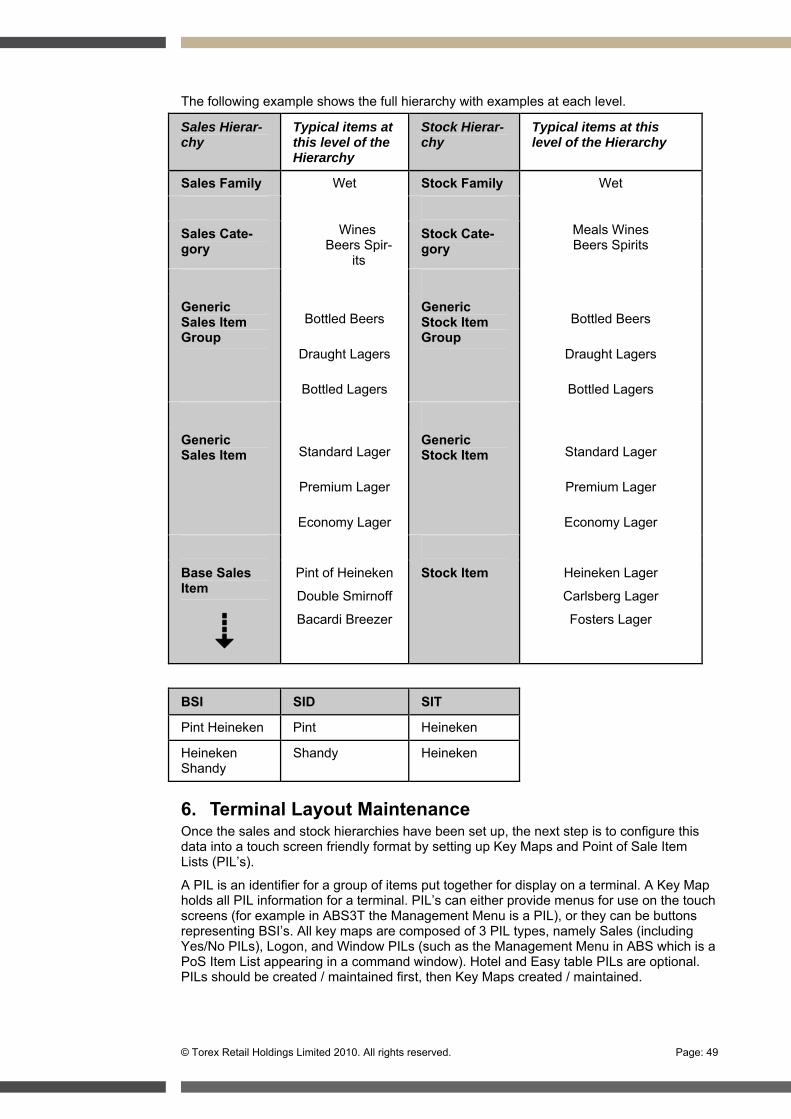
© Torex Retail Holdings Limited 2010. All rights reserved. Page: 49
The following example shows the full hierarchy with examples at each level.
Sales Hierar-chy
Typical items at this level of the Hierarchy
Stock Hierar-chy
Typical items at this level of the Hierarchy
Sales Family Wet Stock Family Wet
Sales Cate-gory
Wines Beers Spir-
its
Stock Cate-gory
Meals Wines Beers Spirits
Generic Sales Item Group
Bottled Beers
Draught Lagers
Bottled Lagers
Generic Stock Item Group
Bottled Beers
Draught Lagers
Bottled Lagers
Generic Sales Item Standard Lager
Premium Lager
Economy Lager
Generic Stock Item Standard Lager
Premium Lager
Economy Lager
Base Sales Item
Pint of Heineken
Double Smirnoff
Bacardi Breezer
Stock Item Heineken Lager
Carlsberg Lager
Fosters Lager
BSI SID SIT
Pint Heineken Pint Heineken
Heineken Shandy
Shandy Heineken
6. Terminal Layout Maintenance Once the sales and stock hierarchies have been set up, the next step is to configure this data into a touch screen friendly format by setting up Key Maps and Point of Sale Item Lists (PIL’s).
A PIL is an identifier for a group of items put together for display on a terminal. A Key Map holds all PIL information for a terminal. PIL’s can either provide menus for use on the touch screens (for example in ABS3T the Management Menu is a PIL), or they can be buttons representing BSI’s. All key maps are composed of 3 PIL types, namely Sales (including Yes/No PILs), Logon, and Window PILs (such as the Management Menu in ABS which is a PoS Item List appearing in a command window). Hotel and Easy table PILs are optional. PILs should be created / maintained first, then Key Maps created / maintained.
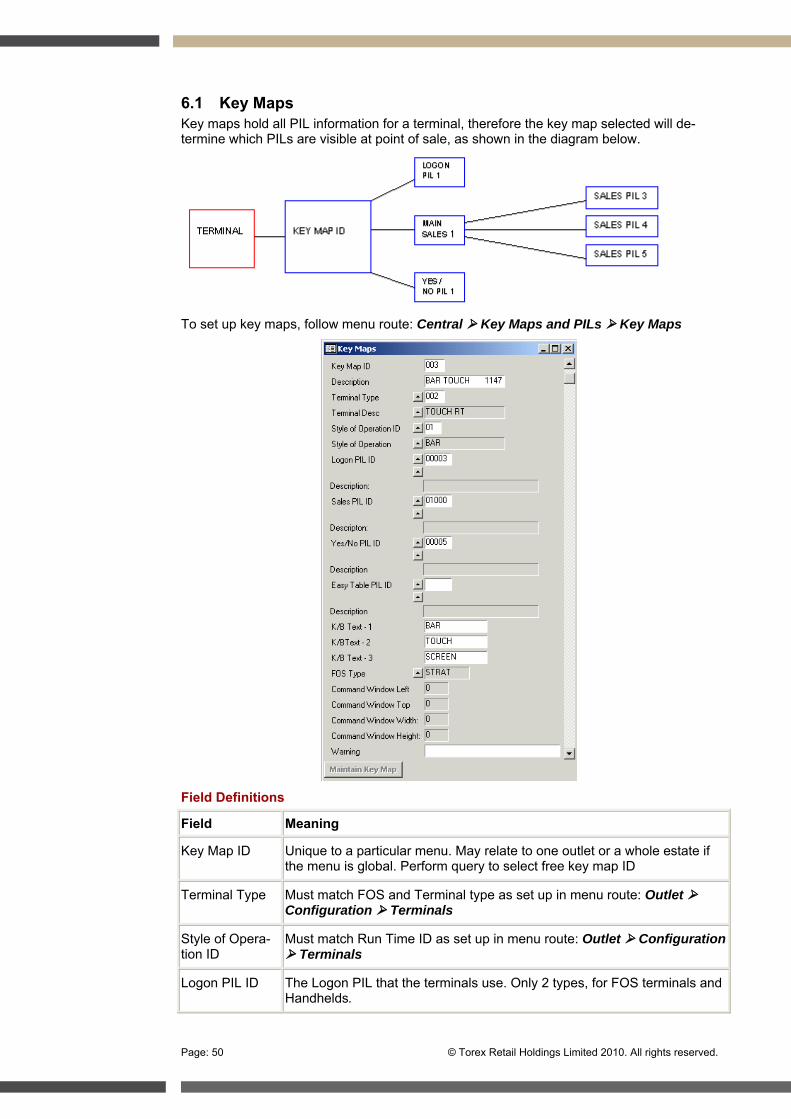
Page: 50 © Torex Retail Holdings Limited 2010. All rights reserved.
6.1 Key Maps Key maps hold all PIL information for a terminal, therefore the key map selected will de-termine which PILs are visible at point of sale, as shown in the diagram below.
To set up key maps, follow menu route: Central Key Maps and PILs Key Maps
Field Definitions
Field Meaning
Key Map ID Unique to a particular menu. May relate to one outlet or a whole estate if the menu is global. Perform query to select free key map ID
Terminal Type Must match FOS and Terminal type as set up in menu route: Outlet Configuration Terminals
Style of Opera-tion ID
Must match Run Time ID as set up in menu route: Outlet Configuration Terminals
Logon PIL ID The Logon PIL that the terminals use. Only 2 types, for FOS terminals and Handhelds.
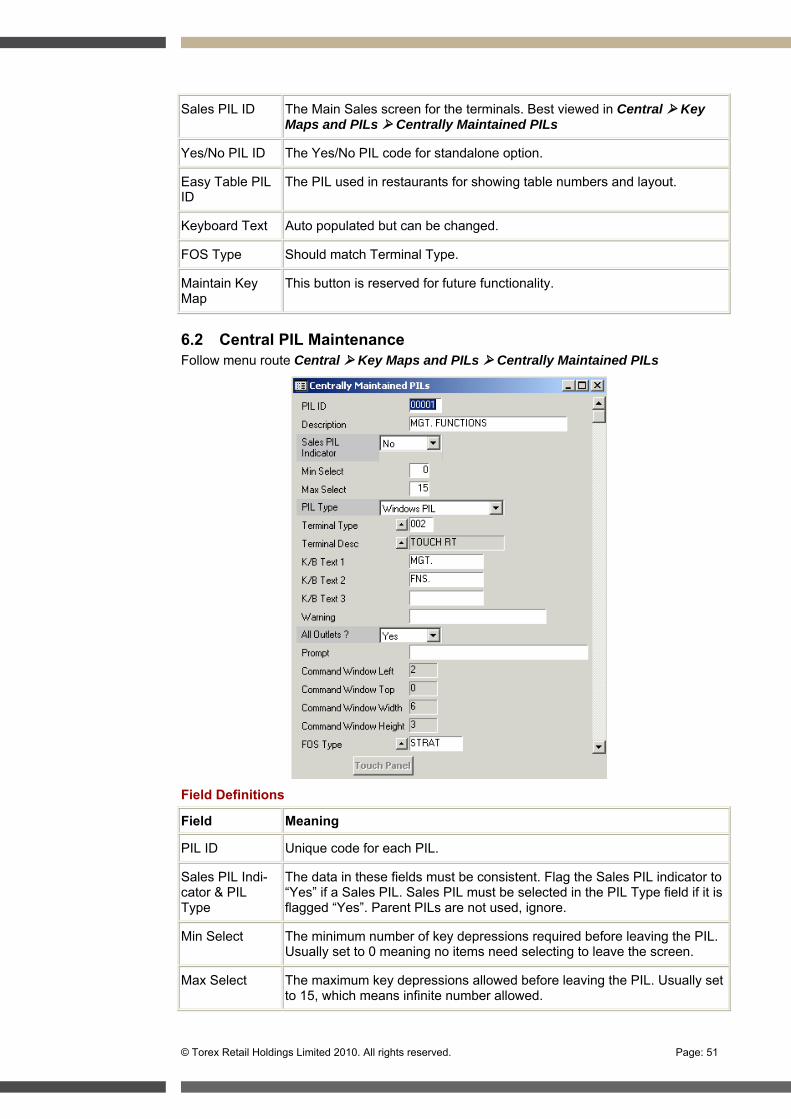
© Torex Retail Holdings Limited 2010. All rights reserved. Page: 51
Sales PIL ID The Main Sales screen for the terminals. Best viewed in Central Key Maps and PILs Centrally Maintained PILs
Yes/No PIL ID The Yes/No PIL code for standalone option.
Easy Table PIL ID
The PIL used in restaurants for showing table numbers and layout.
Keyboard Text Auto populated but can be changed.
FOS Type Should match Terminal Type.
Maintain Key Map
This button is reserved for future functionality.
6.2 Central PIL Maintenance Follow menu route Central Key Maps and PILs Centrally Maintained PILs
Field Definitions
Field Meaning
PIL ID Unique code for each PIL.
Sales PIL Indi-cator & PIL Type
The data in these fields must be consistent. Flag the Sales PIL indicator to “Yes” if a Sales PIL. Sales PIL must be selected in the PIL Type field if it is flagged “Yes”. Parent PILs are not used, ignore.
Min Select The minimum number of key depressions required before leaving the PIL. Usually set to 0 meaning no items need selecting to leave the screen.
Max Select The maximum key depressions allowed before leaving the PIL. Usually set to 15, which means infinite number allowed.
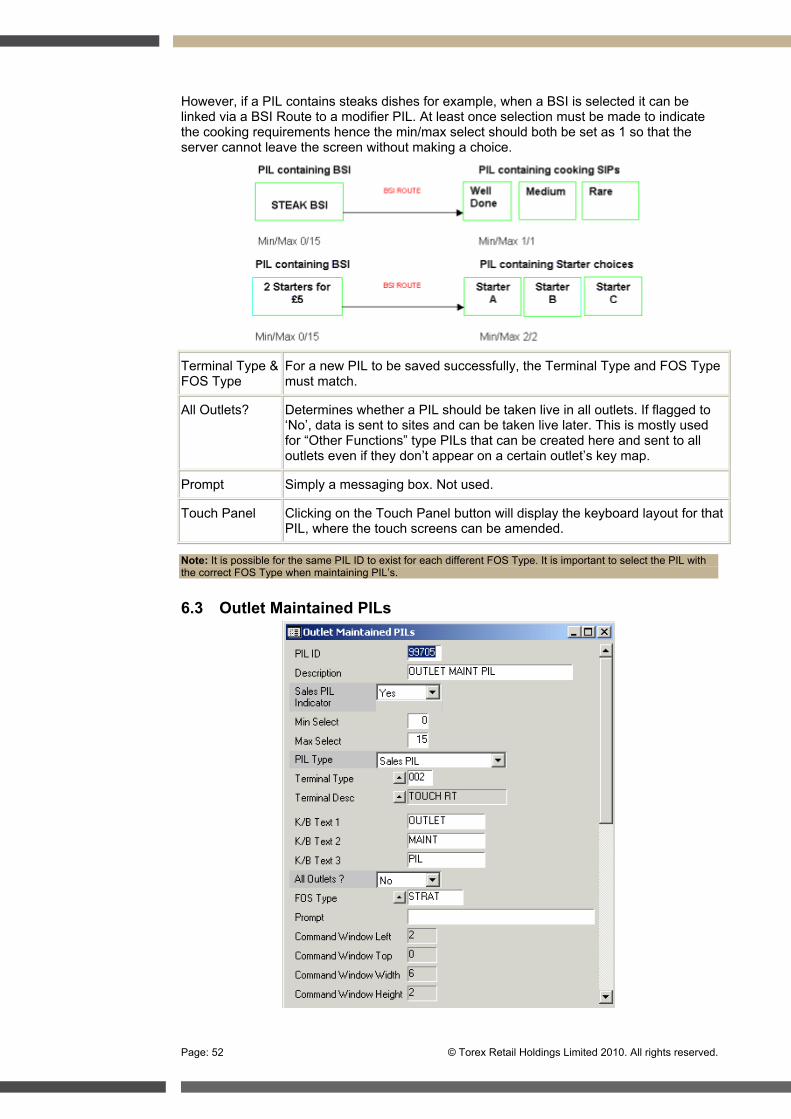
Page: 52 © Torex Retail Holdings Limited 2010. All rights reserved.
However, if a PIL contains steaks dishes for example, when a BSI is selected it can be linked via a BSI Route to a modifier PIL. At least once selection must be made to indicate the cooking requirements hence the min/max select should both be set as 1 so that the server cannot leave the screen without making a choice.
Terminal Type & FOS Type
For a new PIL to be saved successfully, the Terminal Type and FOS Type must match.
All Outlets? Determines whether a PIL should be taken live in all outlets. If flagged to ‘No’, data is sent to sites and can be taken live later. This is mostly used for “Other Functions” type PILs that can be created here and sent to all outlets even if they don’t appear on a certain outlet’s key map.
Prompt Simply a messaging box. Not used.
Touch Panel Clicking on the Touch Panel button will display the keyboard layout for that PIL, where the touch screens can be amended.
Note: It is possible for the same PIL ID to exist for each different FOS Type. It is important to select the PIL with the correct FOS Type when maintaining PIL’s.
6.3 Outlet Maintained PILs
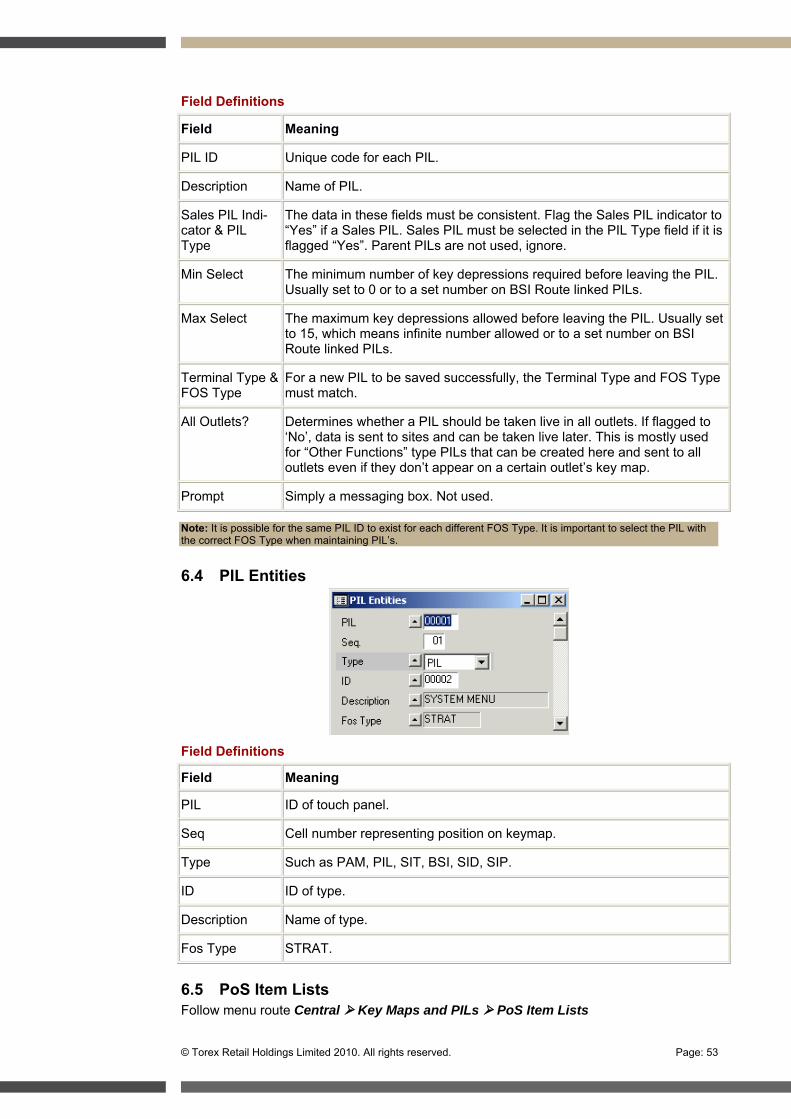
© Torex Retail Holdings Limited 2010. All rights reserved. Page: 53
Field Definitions
Field Meaning
PIL ID Unique code for each PIL.
Description Name of PIL.
Sales PIL Indi-cator & PIL Type
The data in these fields must be consistent. Flag the Sales PIL indicator to “Yes” if a Sales PIL. Sales PIL must be selected in the PIL Type field if it is flagged “Yes”. Parent PILs are not used, ignore.
Min Select The minimum number of key depressions required before leaving the PIL. Usually set to 0 or to a set number on BSI Route linked PILs.
Max Select The maximum key depressions allowed before leaving the PIL. Usually set to 15, which means infinite number allowed or to a set number on BSI Route linked PILs.
Terminal Type & FOS Type
For a new PIL to be saved successfully, the Terminal Type and FOS Type must match.
All Outlets? Determines whether a PIL should be taken live in all outlets. If flagged to ‘No’, data is sent to sites and can be taken live later. This is mostly used for “Other Functions” type PILs that can be created here and sent to all outlets even if they don’t appear on a certain outlet’s key map.
Prompt Simply a messaging box. Not used.
Note: It is possible for the same PIL ID to exist for each different FOS Type. It is important to select the PIL with the correct FOS Type when maintaining PIL’s.
6.4 PIL Entities
Field Definitions
Field Meaning
PIL ID of touch panel.
Seq Cell number representing position on keymap.
Type Such as PAM, PIL, SIT, BSI, SID, SIP.
ID ID of type.
Description Name of type.
Fos Type STRAT.
6.5 PoS Item Lists Follow menu route Central Key Maps and PILs PoS Item Lists

Page: 54 © Torex Retail Holdings Limited 2010. All rights reserved.
The Outlet Maintained field can be toggled Yes and No to establish whether or not the PIL can be amended at outlet level.
6.6 BSI Routes Once the BSI Route Type Ids have been set up, the next step is to overlay these IDs with the actual BSIs and the routes they are to follow. This is done in menu route: Central BSIs, Stock and Products BSI Routes.
Field Definitions
Field Meaning
Route Type ID The route type to be associated with the BSI.
BSI The BSI number affected.
Seq Usually set to 1 if only one route. For multiple routes, this is the order in which they appear.
PIL ID The PIL that the options are sitting on.
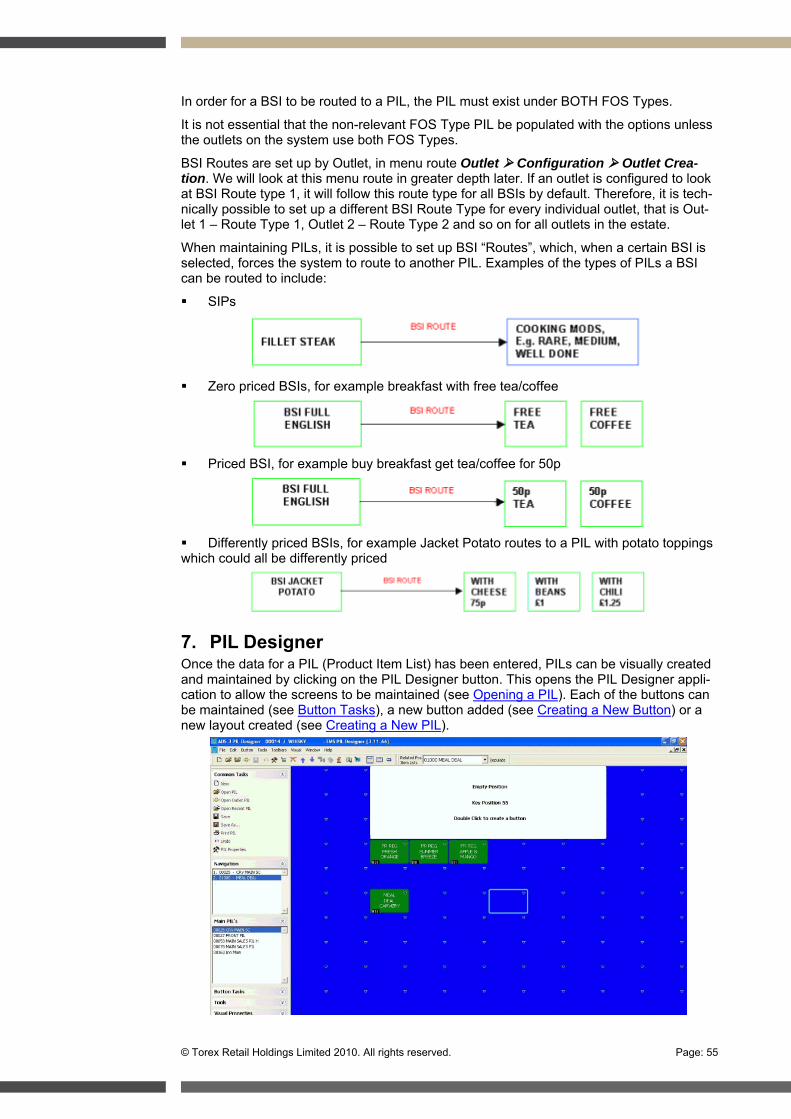
© Torex Retail Holdings Limited 2010. All rights reserved. Page: 55
In order for a BSI to be routed to a PIL, the PIL must exist under BOTH FOS Types.
It is not essential that the non-relevant FOS Type PIL be populated with the options unless the outlets on the system use both FOS Types.
BSI Routes are set up by Outlet, in menu route Outlet Configuration Outlet Crea-tion. We will look at this menu route in greater depth later. If an outlet is configured to look at BSI Route type 1, it will follow this route type for all BSIs by default. Therefore, it is tech-nically possible to set up a different BSI Route Type for every individual outlet, that is Out-let 1 – Route Type 1, Outlet 2 – Route Type 2 and so on for all outlets in the estate.
When maintaining PILs, it is possible to set up BSI “Routes”, which, when a certain BSI is selected, forces the system to route to another PIL. Examples of the types of PILs a BSI can be routed to include:
SIPs
Zero priced BSIs, for example breakfast with free tea/coffee
Priced BSI, for example buy breakfast get tea/coffee for 50p
Differently priced BSIs, for example Jacket Potato routes to a PIL with potato toppings which could all be differently priced
7. PIL Designer Once the data for a PIL (Product Item List) has been entered, PILs can be visually created and maintained by clicking on the PIL Designer button. This opens the PIL Designer appli-cation to allow the screens to be maintained (see Opening a PIL). Each of the buttons can be maintained (see Button Tasks), a new button added (see Creating a New Button) or a new layout created (see Creating a New PIL).
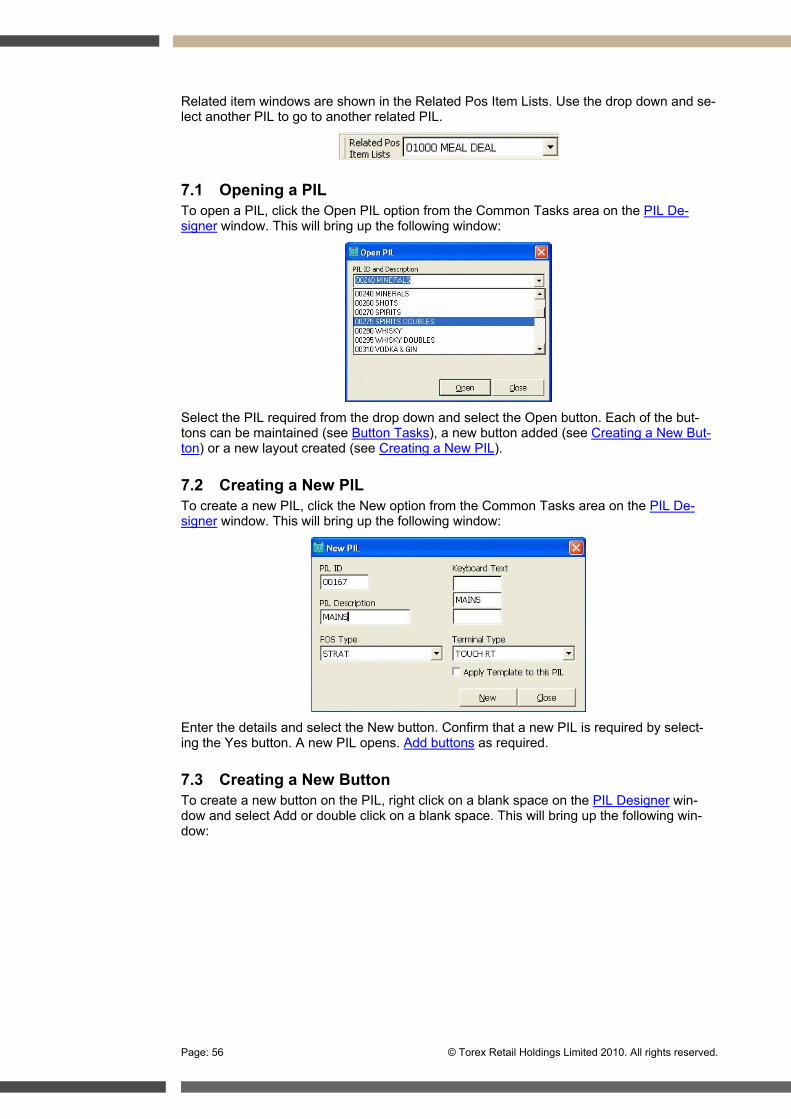
Page: 56 © Torex Retail Holdings Limited 2010. All rights reserved.
Related item windows are shown in the Related Pos Item Lists. Use the drop down and se-lect another PIL to go to another related PIL.
7.1 Opening a PIL To open a PIL, click the Open PIL option from the Common Tasks area on the PIL De-signer window. This will bring up the following window:
Select the PIL required from the drop down and select the Open button. Each of the but-tons can be maintained (see Button Tasks), a new button added (see Creating a New But-ton) or a new layout created (see Creating a New PIL).
7.2 Creating a New PIL To create a new PIL, click the New option from the Common Tasks area on the PIL De-signer window. This will bring up the following window:
Enter the details and select the New button. Confirm that a new PIL is required by select-ing the Yes button. A new PIL opens. Add buttons as required.
7.3 Creating a New Button To create a new button on the PIL, right click on a blank space on the PIL Designer win-dow and select Add or double click on a blank space. This will bring up the following win-dow:
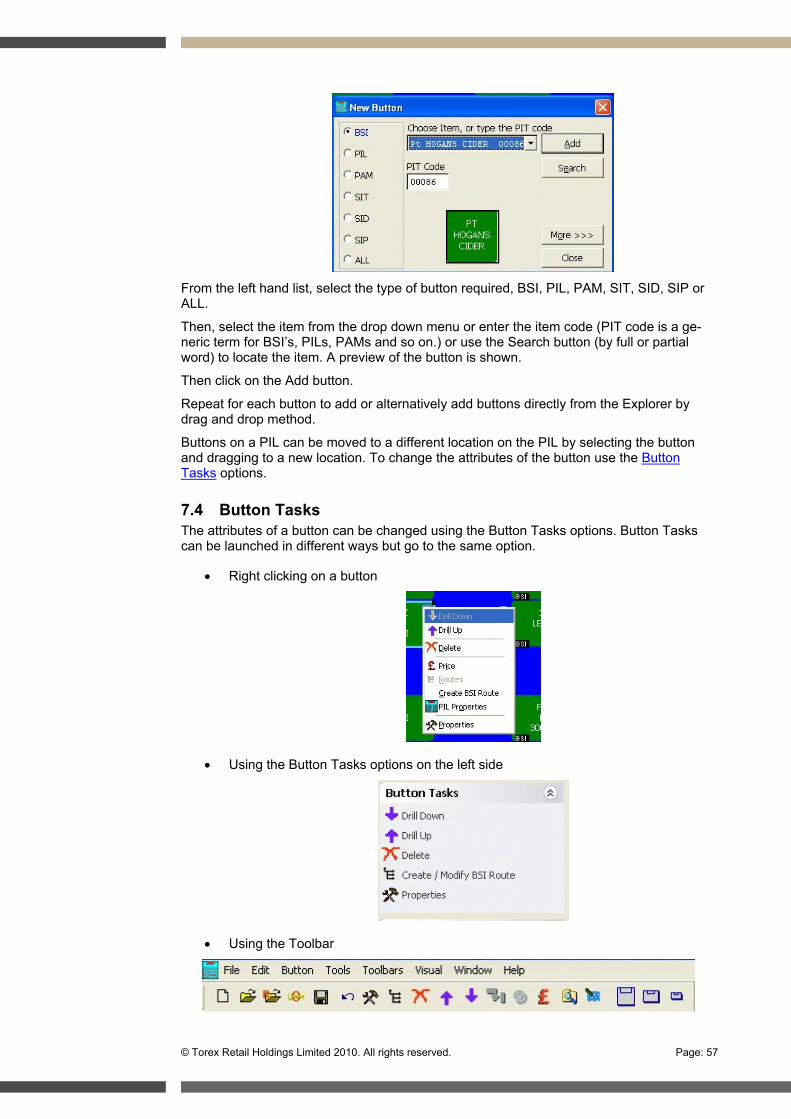
© Torex Retail Holdings Limited 2010. All rights reserved. Page: 57
From the left hand list, select the type of button required, BSI, PIL, PAM, SIT, SID, SIP or ALL.
Then, select the item from the drop down menu or enter the item code (PIT code is a ge-neric term for BSI’s, PILs, PAMs and so on.) or use the Search button (by full or partial word) to locate the item. A preview of the button is shown.
Then click on the Add button.
Repeat for each button to add or alternatively add buttons directly from the Explorer by drag and drop method.
Buttons on a PIL can be moved to a different location on the PIL by selecting the button and dragging to a new location. To change the attributes of the button use the Button Tasks options.
7.4 Button Tasks The attributes of a button can be changed using the Button Tasks options. Button Tasks can be launched in different ways but go to the same option.
Right clicking on a button
Using the Button Tasks options on the left side
Using the Toolbar

Page: 58 © Torex Retail Holdings Limited 2010. All rights reserved.
Button Task
Meaning
Drill Down Goes down one level.
Drill Up Goes up one level.
Delete Highlighted button is removed.
Price Leads to Price window.
Create BSI Route
Calls the BSI Route Maintenance window.
PIL Prop-erties
Calls PIL Properties window.
Amend as necessary.
Properties For editing type of button, name, colour, price and so on.
7.5 Prices Select a Price band and select the required Price Matrix launch button.
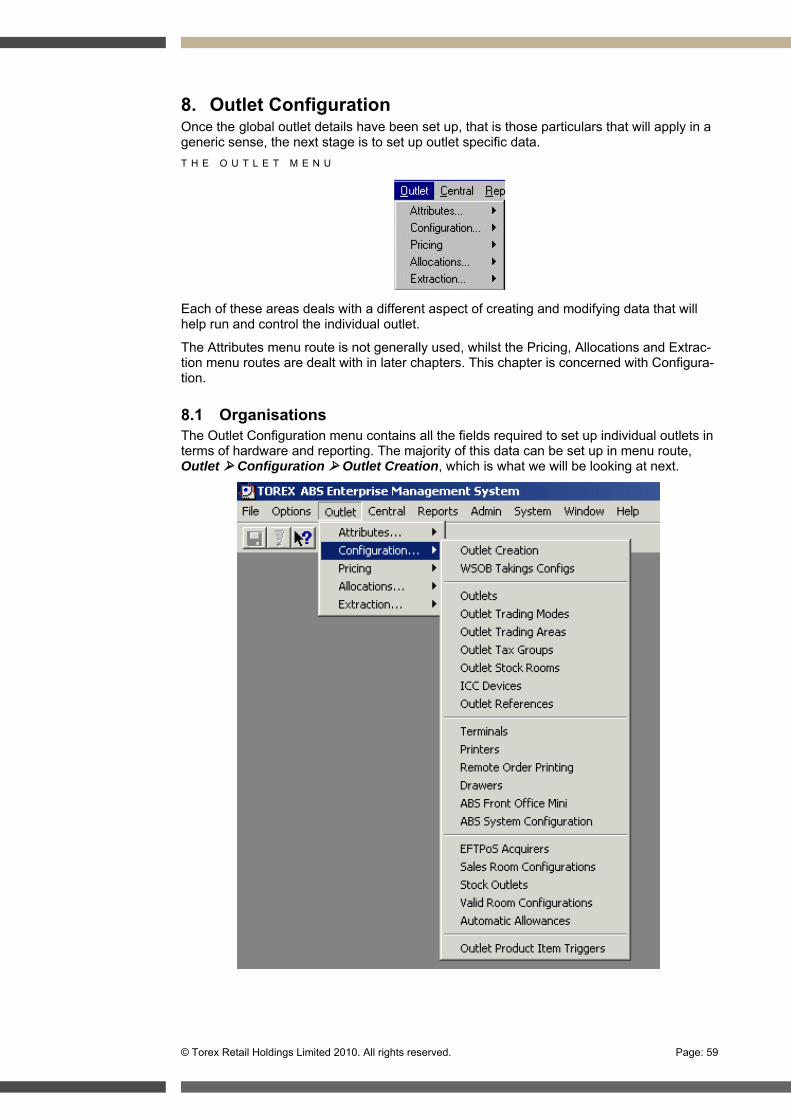
© Torex Retail Holdings Limited 2010. All rights reserved. Page: 59
8. Outlet Configuration Once the global outlet details have been set up, that is those particulars that will apply in a generic sense, the next stage is to set up outlet specific data. T H E O U T L E T M E N U
Each of these areas deals with a different aspect of creating and modifying data that will help run and control the individual outlet.
The Attributes menu route is not generally used, whilst the Pricing, Allocations and Extrac-tion menu routes are dealt with in later chapters. This chapter is concerned with Configura-tion.
8.1 Organisations The Outlet Configuration menu contains all the fields required to set up individual outlets in terms of hardware and reporting. The majority of this data can be set up in menu route, Outlet Configuration Outlet Creation, which is what we will be looking at next.
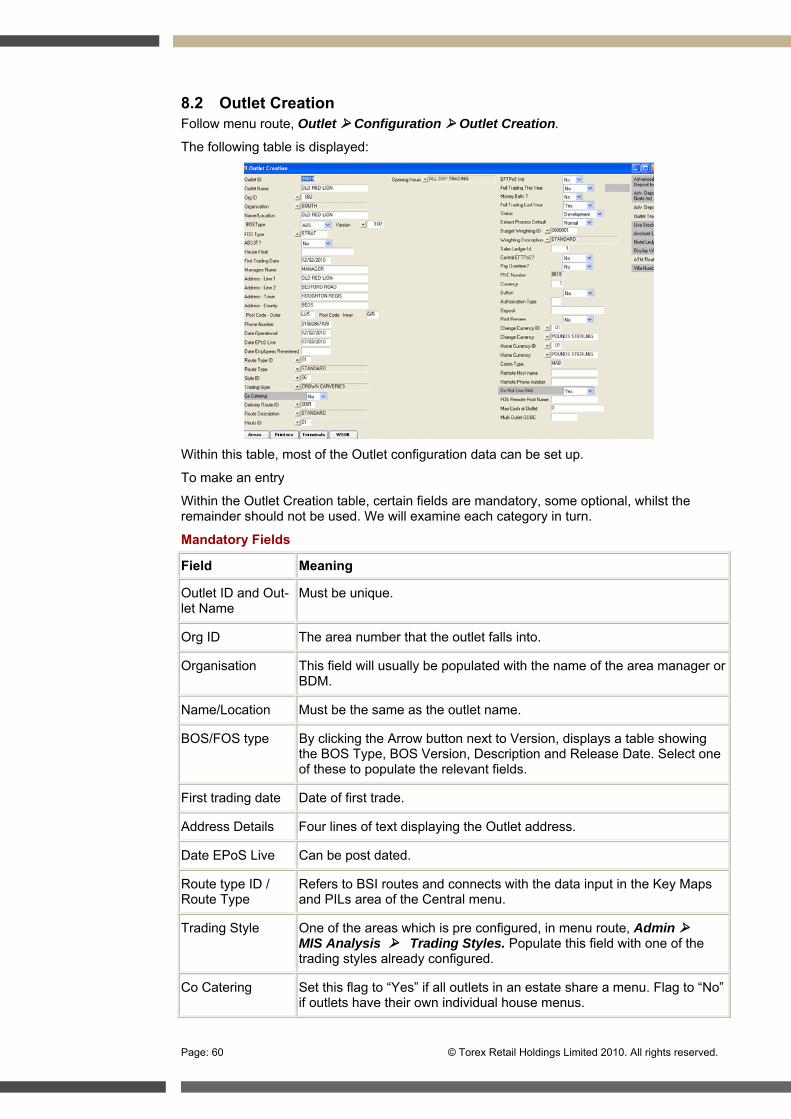
Page: 60 © Torex Retail Holdings Limited 2010. All rights reserved.
8.2 Outlet Creation Follow menu route, Outlet Configuration Outlet Creation.
The following table is displayed:
Within this table, most of the Outlet configuration data can be set up.
To make an entry
Within the Outlet Creation table, certain fields are mandatory, some optional, whilst the remainder should not be used. We will examine each category in turn.
Mandatory Fields
Field Meaning
Outlet ID and Out-let Name
Must be unique.
Org ID The area number that the outlet falls into.
Organisation This field will usually be populated with the name of the area manager or BDM.
Name/Location Must be the same as the outlet name.
BOS/FOS type By clicking the Arrow button next to Version, displays a table showing the BOS Type, BOS Version, Description and Release Date. Select one of these to populate the relevant fields.
First trading date Date of first trade.
Address Details Four lines of text displaying the Outlet address.
Date EPoS Live Can be post dated.
Route type ID / Route Type
Refers to BSI routes and connects with the data input in the Key Maps and PILs area of the Central menu.
Trading Style One of the areas which is pre configured, in menu route, Admin MIS Analysis Trading Styles. Populate this field with one of the trading styles already configured.
Co Catering Set this flag to “Yes” if all outlets in an estate share a menu. Flag to “No” if outlets have their own individual house menus.
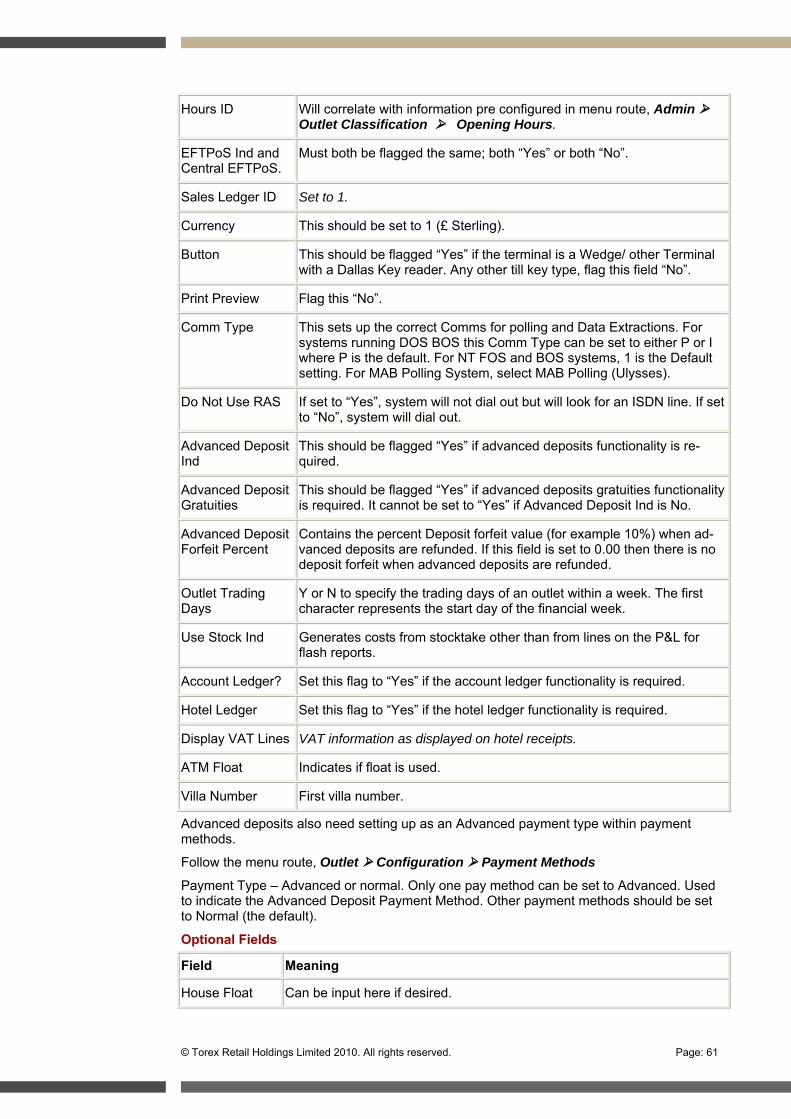
© Torex Retail Holdings Limited 2010. All rights reserved. Page: 61
Hours ID Will correlate with information pre configured in menu route, Admin Outlet Classification Opening Hours.
EFTPoS Ind and Central EFTPoS.
Must both be flagged the same; both “Yes” or both “No”.
Sales Ledger ID Set to 1.
Currency This should be set to 1 (£ Sterling).
Button This should be flagged “Yes” if the terminal is a Wedge/ other Terminal with a Dallas Key reader. Any other till key type, flag this field “No”.
Print Preview Flag this “No”.
Comm Type This sets up the correct Comms for polling and Data Extractions. For systems running DOS BOS this Comm Type can be set to either P or I where P is the default. For NT FOS and BOS systems, 1 is the Default setting. For MAB Polling System, select MAB Polling (Ulysses).
Do Not Use RAS If set to “Yes”, system will not dial out but will look for an ISDN line. If set to “No”, system will dial out.
Advanced Deposit Ind
This should be flagged “Yes” if advanced deposits functionality is re-quired.
Advanced Deposit Gratuities
This should be flagged “Yes” if advanced deposits gratuities functionality is required. It cannot be set to “Yes” if Advanced Deposit Ind is No.
Advanced Deposit Forfeit Percent
Contains the percent Deposit forfeit value (for example 10%) when ad-vanced deposits are refunded. If this field is set to 0.00 then there is no deposit forfeit when advanced deposits are refunded.
Outlet Trading Days
Y or N to specify the trading days of an outlet within a week. The first character represents the start day of the financial week.
Use Stock Ind Generates costs from stocktake other than from lines on the P&L for flash reports.
Account Ledger? Set this flag to “Yes” if the account ledger functionality is required.
Hotel Ledger Set this flag to “Yes” if the hotel ledger functionality is required.
Display VAT Lines VAT information as displayed on hotel receipts.
ATM Float Indicates if float is used.
Villa Number First villa number.
Advanced deposits also need setting up as an Advanced payment type within payment methods.
Follow the menu route, Outlet Configuration Payment Methods
Payment Type – Advanced or normal. Only one pay method can be set to Advanced. Used to indicate the Advanced Deposit Payment Method. Other payment methods should be set to Normal (the default).
Optional Fields
Field Meaning
House Float Can be input here if desired.
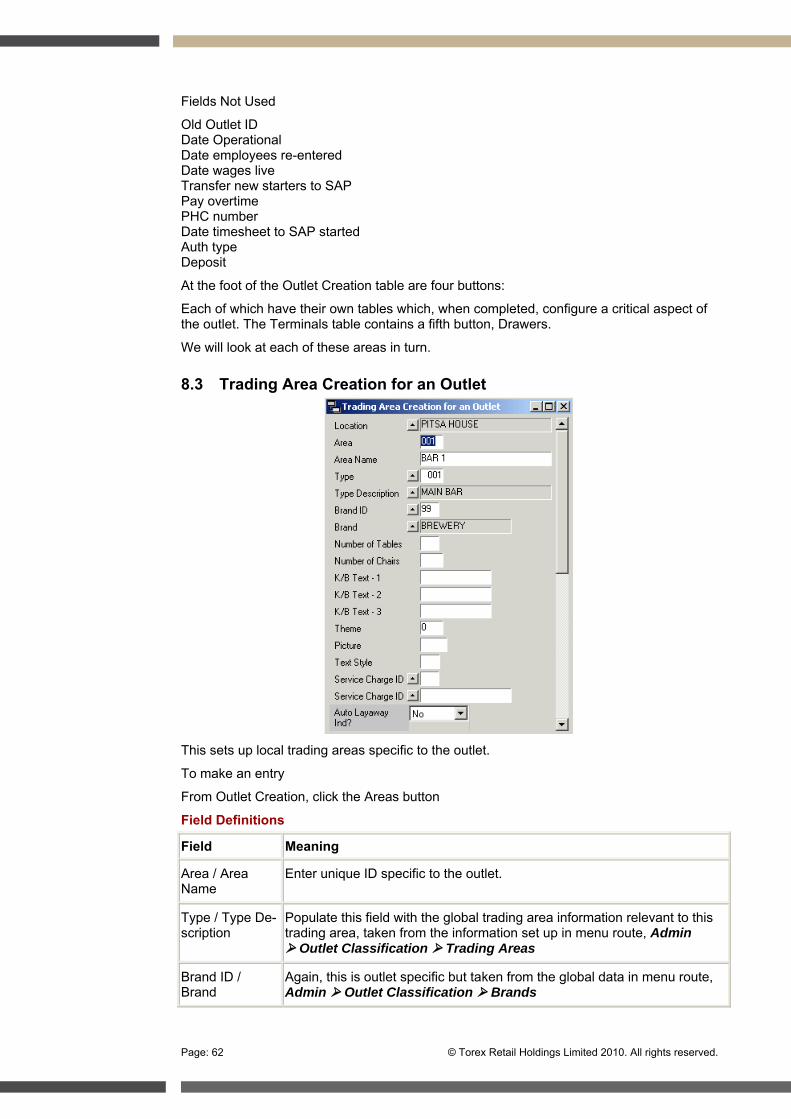
Page: 62 © Torex Retail Holdings Limited 2010. All rights reserved.
Fields Not Used
Old Outlet ID Date Operational Date employees re-entered Date wages live Transfer new starters to SAP Pay overtime PHC number Date timesheet to SAP started Auth type Deposit
At the foot of the Outlet Creation table are four buttons:
Each of which have their own tables which, when completed, configure a critical aspect of the outlet. The Terminals table contains a fifth button, Drawers.
We will look at each of these areas in turn.
8.3 Trading Area Creation for an Outlet
This sets up local trading areas specific to the outlet.
To make an entry
From Outlet Creation, click the Areas button
Field Definitions
Field Meaning
Area / Area Name
Enter unique ID specific to the outlet.
Type / Type De-scription
Populate this field with the global trading area information relevant to this trading area, taken from the information set up in menu route, Admin Outlet Classification Trading Areas
Brand ID / Brand
Again, this is outlet specific but taken from the global data in menu route, Admin Outlet Classification Brands
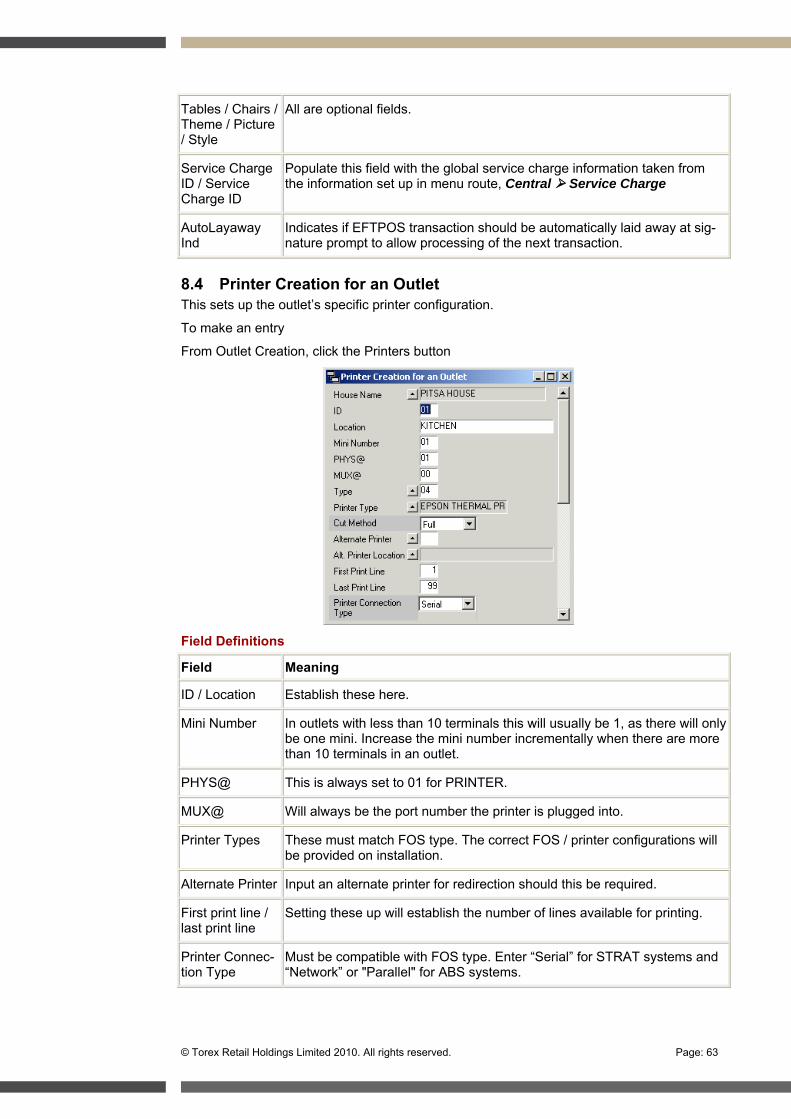
© Torex Retail Holdings Limited 2010. All rights reserved. Page: 63
Tables / Chairs / Theme / Picture / Style
All are optional fields.
Service Charge ID / Service Charge ID
Populate this field with the global service charge information taken from the information set up in menu route, Central Service Charge
AutoLayaway Ind
Indicates if EFTPOS transaction should be automatically laid away at sig-nature prompt to allow processing of the next transaction.
8.4 Printer Creation for an Outlet This sets up the outlet’s specific printer configuration.
To make an entry
From Outlet Creation, click the Printers button
Field Definitions
Field Meaning
ID / Location Establish these here.
Mini Number In outlets with less than 10 terminals this will usually be 1, as there will only be one mini. Increase the mini number incrementally when there are more than 10 terminals in an outlet.
PHYS@ This is always set to 01 for PRINTER.
MUX@ Will always be the port number the printer is plugged into.
Printer Types These must match FOS type. The correct FOS / printer configurations will be provided on installation.
Alternate Printer Input an alternate printer for redirection should this be required.
First print line / last print line
Setting these up will establish the number of lines available for printing.
Printer Connec-tion Type
Must be compatible with FOS type. Enter “Serial” for STRAT systems and “Network” or "Parallel" for ABS systems.
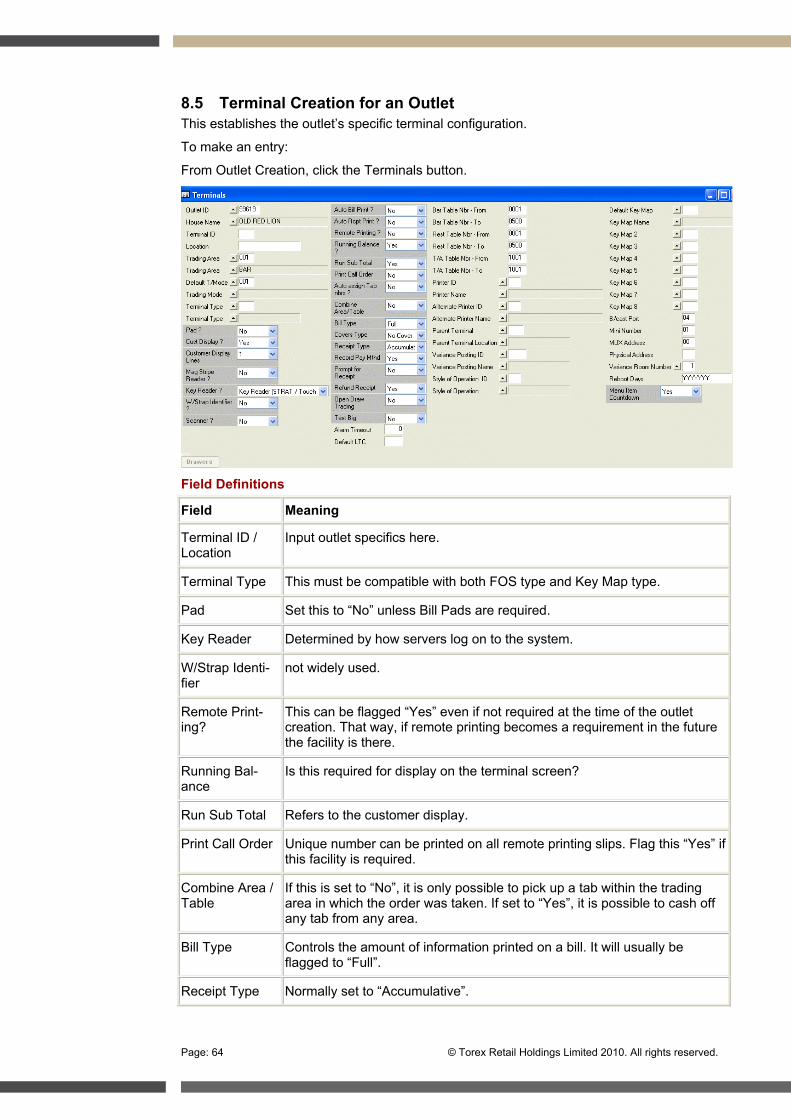
Page: 64 © Torex Retail Holdings Limited 2010. All rights reserved.
8.5 Terminal Creation for an Outlet This establishes the outlet’s specific terminal configuration.
To make an entry:
From Outlet Creation, click the Terminals button.
Field Definitions
Field Meaning
Terminal ID / Location
Input outlet specifics here.
Terminal Type This must be compatible with both FOS type and Key Map type.
Pad Set this to “No” unless Bill Pads are required.
Key Reader Determined by how servers log on to the system.
W/Strap Identi-fier
not widely used.
Remote Print-ing?
This can be flagged “Yes” even if not required at the time of the outlet creation. That way, if remote printing becomes a requirement in the future the facility is there.
Running Bal-ance
Is this required for display on the terminal screen?
Run Sub Total Refers to the customer display.
Print Call Order Unique number can be printed on all remote printing slips. Flag this “Yes” if this facility is required.
Combine Area / Table
If this is set to “No”, it is only possible to pick up a tab within the trading area in which the order was taken. If set to “Yes”, it is possible to cash off any tab from any area.
Bill Type Controls the amount of information printed on a bill. It will usually be flagged to “Full”.
Receipt Type Normally set to “Accumulative”.
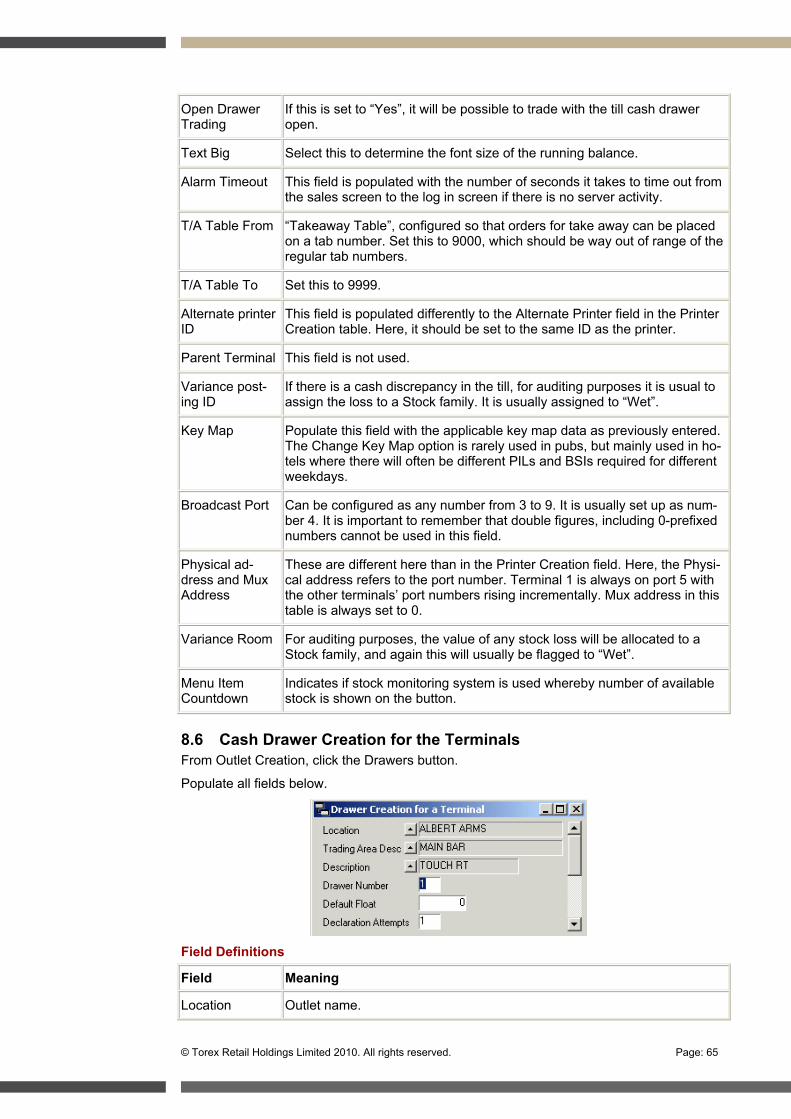
© Torex Retail Holdings Limited 2010. All rights reserved. Page: 65
Open Drawer Trading
If this is set to “Yes”, it will be possible to trade with the till cash drawer open.
Text Big Select this to determine the font size of the running balance.
Alarm Timeout This field is populated with the number of seconds it takes to time out from the sales screen to the log in screen if there is no server activity.
T/A Table From “Takeaway Table”, configured so that orders for take away can be placed on a tab number. Set this to 9000, which should be way out of range of the regular tab numbers.
T/A Table To Set this to 9999.
Alternate printer ID
This field is populated differently to the Alternate Printer field in the Printer Creation table. Here, it should be set to the same ID as the printer.
Parent Terminal This field is not used.
Variance post-ing ID
If there is a cash discrepancy in the till, for auditing purposes it is usual to assign the loss to a Stock family. It is usually assigned to “Wet”.
Key Map Populate this field with the applicable key map data as previously entered. The Change Key Map option is rarely used in pubs, but mainly used in ho-tels where there will often be different PILs and BSIs required for different weekdays.
Broadcast Port Can be configured as any number from 3 to 9. It is usually set up as num-ber 4. It is important to remember that double figures, including 0-prefixed numbers cannot be used in this field.
Physical ad-dress and Mux Address
These are different here than in the Printer Creation field. Here, the Physi-cal address refers to the port number. Terminal 1 is always on port 5 with the other terminals’ port numbers rising incrementally. Mux address in this table is always set to 0.
Variance Room For auditing purposes, the value of any stock loss will be allocated to a Stock family, and again this will usually be flagged to “Wet”.
Menu Item Countdown
Indicates if stock monitoring system is used whereby number of available stock is shown on the button.
8.6 Cash Drawer Creation for the Terminals From Outlet Creation, click the Drawers button.
Populate all fields below.
Field Definitions
Field Meaning
Location Outlet name.
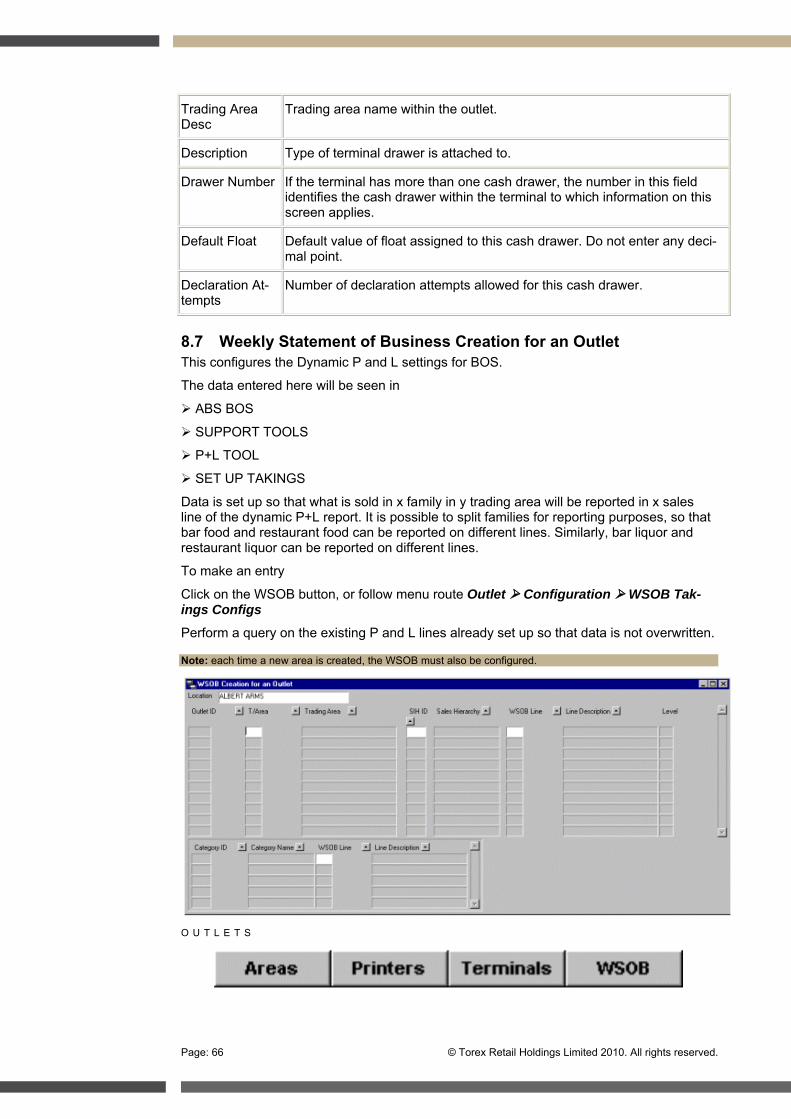
Page: 66 © Torex Retail Holdings Limited 2010. All rights reserved.
Trading Area Desc
Trading area name within the outlet.
Description Type of terminal drawer is attached to.
Drawer Number If the terminal has more than one cash drawer, the number in this field identifies the cash drawer within the terminal to which information on this screen applies.
Default Float Default value of float assigned to this cash drawer. Do not enter any deci-mal point.
Declaration At-tempts
Number of declaration attempts allowed for this cash drawer.
8.7 Weekly Statement of Business Creation for an Outlet This configures the Dynamic P and L settings for BOS.
The data entered here will be seen in
ABS BOS
SUPPORT TOOLS
P+L TOOL
SET UP TAKINGS
Data is set up so that what is sold in x family in y trading area will be reported in x sales line of the dynamic P+L report. It is possible to split families for reporting purposes, so that bar food and restaurant food can be reported on different lines. Similarly, bar liquor and restaurant liquor can be reported on different lines.
To make an entry
Click on the WSOB button, or follow menu route Outlet Configuration WSOB Tak-ings Configs
Perform a query on the existing P and L lines already set up so that data is not overwritten.
Note: each time a new area is created, the WSOB must also be configured.
O U T L E T S
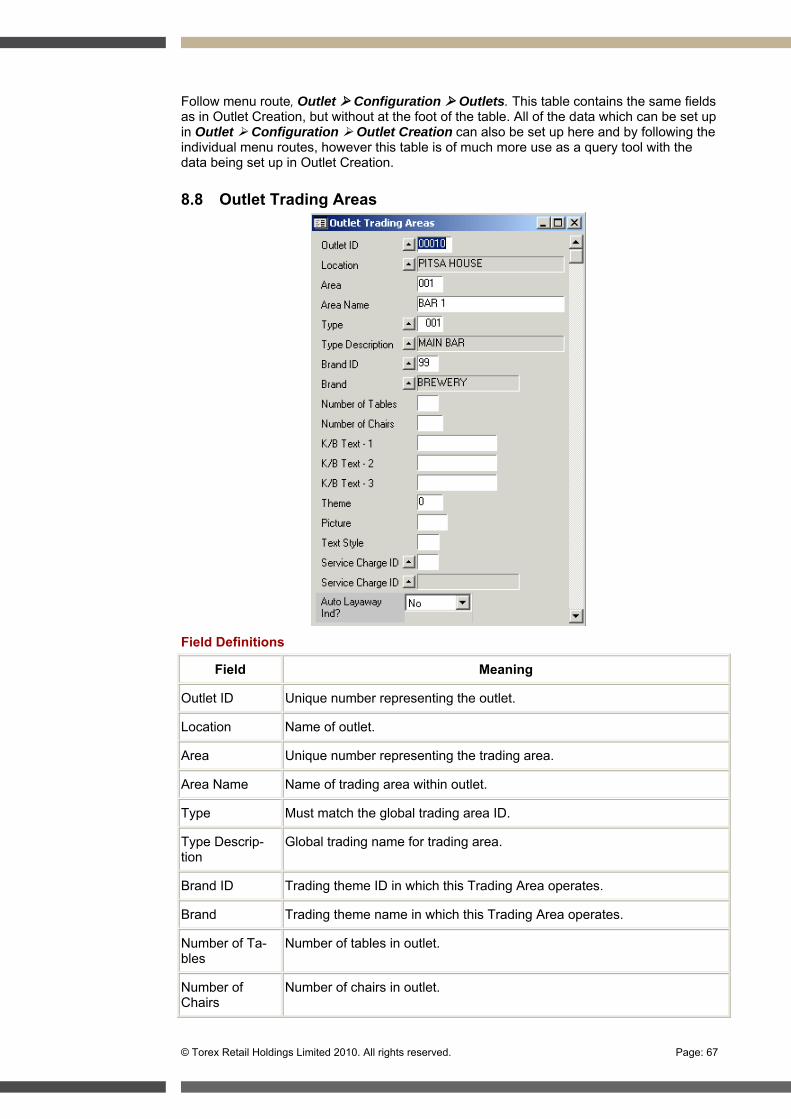
© Torex Retail Holdings Limited 2010. All rights reserved. Page: 67
Follow menu route, Outlet Configuration Outlets. This table contains the same fields as in Outlet Creation, but without at the foot of the table. All of the data which can be set up in Outlet Configuration Outlet Creation can also be set up here and by following the individual menu routes, however this table is of much more use as a query tool with the data being set up in Outlet Creation.
8.8 Outlet Trading Areas
Field Definitions
Field Meaning
Outlet ID Unique number representing the outlet.
Location Name of outlet.
Area Unique number representing the trading area.
Area Name Name of trading area within outlet.
Type Must match the global trading area ID.
Type Descrip-tion
Global trading name for trading area.
Brand ID Trading theme ID in which this Trading Area operates.
Brand Trading theme name in which this Trading Area operates.
Number of Ta-bles
Number of tables in outlet.
Number of Chairs
Number of chairs in outlet.
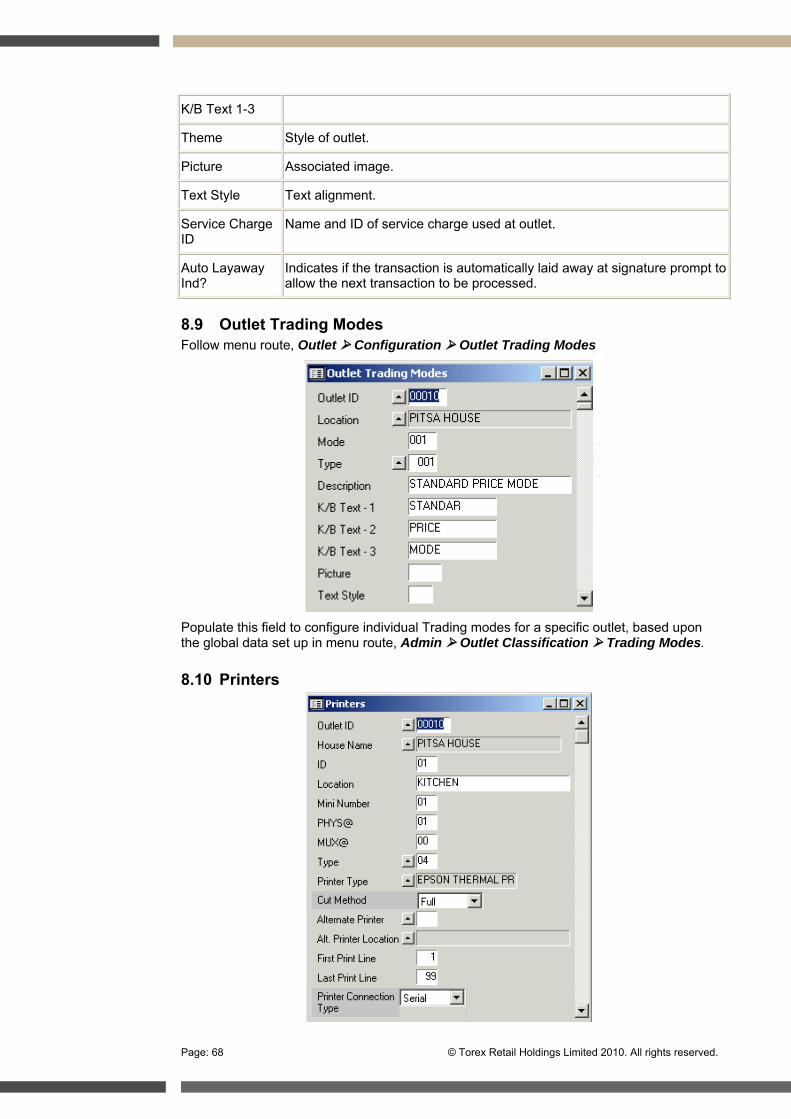
Page: 68 © Torex Retail Holdings Limited 2010. All rights reserved.
K/B Text 1-3
Theme Style of outlet.
Picture Associated image.
Text Style Text alignment.
Service Charge ID
Name and ID of service charge used at outlet.
Auto Layaway Ind?
Indicates if the transaction is automatically laid away at signature prompt to allow the next transaction to be processed.
8.9 Outlet Trading Modes Follow menu route, Outlet Configuration Outlet Trading Modes
Populate this field to configure individual Trading modes for a specific outlet, based upon the global data set up in menu route, Admin Outlet Classification Trading Modes.
8.10 Printers
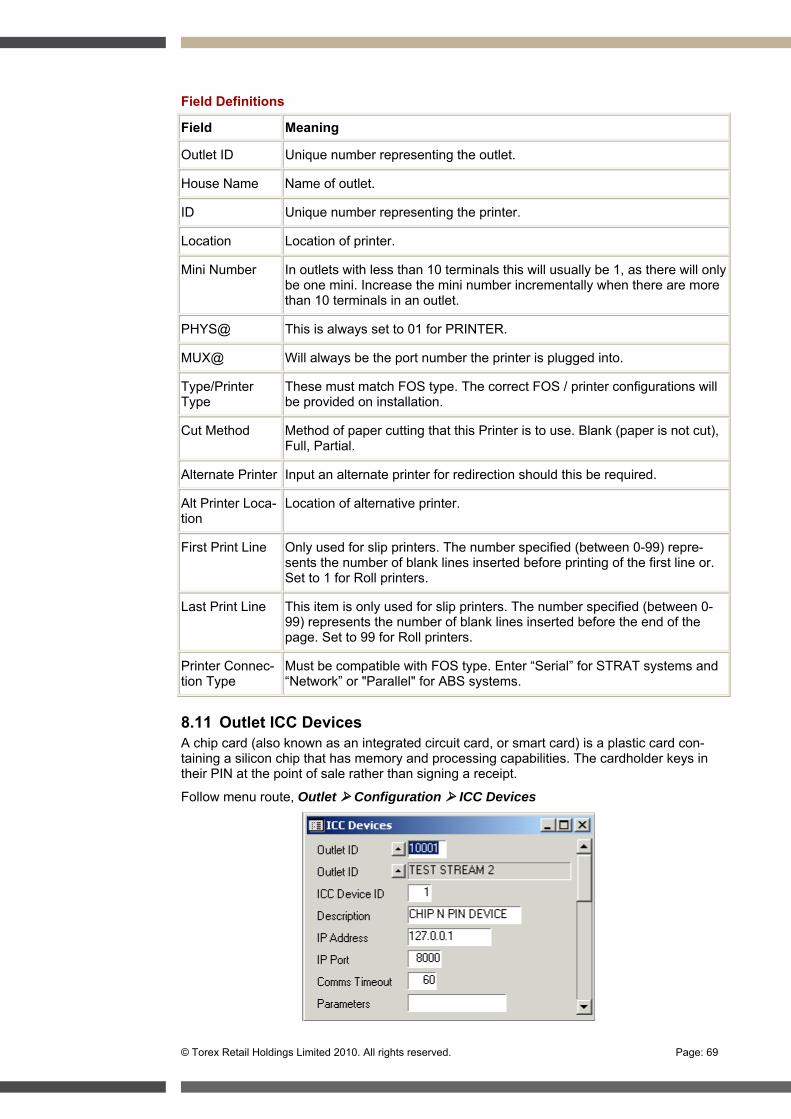
© Torex Retail Holdings Limited 2010. All rights reserved. Page: 69
Field Definitions
Field Meaning
Outlet ID Unique number representing the outlet.
House Name Name of outlet.
ID Unique number representing the printer.
Location Location of printer.
Mini Number In outlets with less than 10 terminals this will usually be 1, as there will only be one mini. Increase the mini number incrementally when there are more than 10 terminals in an outlet.
PHYS@ This is always set to 01 for PRINTER.
MUX@ Will always be the port number the printer is plugged into.
Type/Printer Type
These must match FOS type. The correct FOS / printer configurations will be provided on installation.
Cut Method Method of paper cutting that this Printer is to use. Blank (paper is not cut), Full, Partial.
Alternate Printer Input an alternate printer for redirection should this be required.
Alt Printer Loca-tion
Location of alternative printer.
First Print Line Only used for slip printers. The number specified (between 0-99) repre-sents the number of blank lines inserted before printing of the first line or. Set to 1 for Roll printers.
Last Print Line This item is only used for slip printers. The number specified (between 0-99) represents the number of blank lines inserted before the end of the page. Set to 99 for Roll printers.
Printer Connec-tion Type
Must be compatible with FOS type. Enter “Serial” for STRAT systems and “Network” or "Parallel" for ABS systems.
8.11 Outlet ICC Devices A chip card (also known as an integrated circuit card, or smart card) is a plastic card con-taining a silicon chip that has memory and processing capabilities. The cardholder keys in their PIN at the point of sale rather than signing a receipt.
Follow menu route, Outlet Configuration ICC Devices
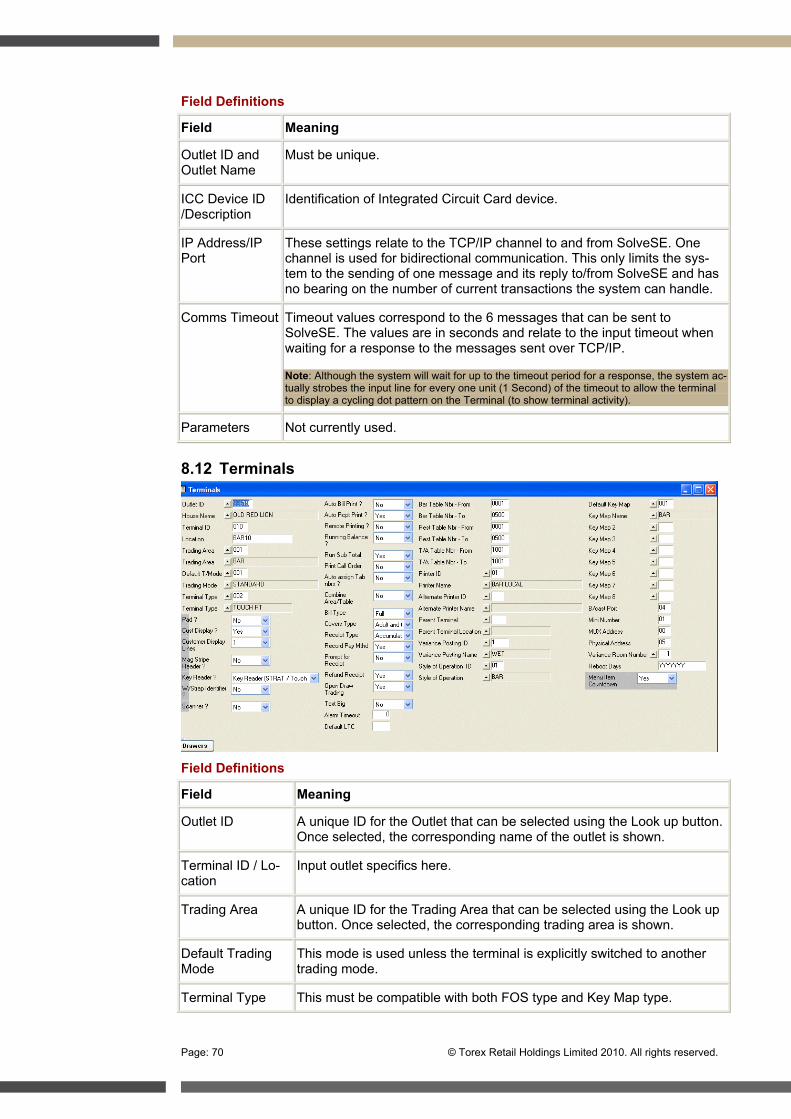
Page: 70 © Torex Retail Holdings Limited 2010. All rights reserved.
Field Definitions
Field Meaning
Outlet ID and Outlet Name
Must be unique.
ICC Device ID /Description
Identification of Integrated Circuit Card device.
IP Address/IP Port
These settings relate to the TCP/IP channel to and from SolveSE. One channel is used for bidirectional communication. This only limits the sys-tem to the sending of one message and its reply to/from SolveSE and has no bearing on the number of current transactions the system can handle.
Comms Timeout Timeout values correspond to the 6 messages that can be sent to SolveSE. The values are in seconds and relate to the input timeout when waiting for a response to the messages sent over TCP/IP.
Note: Although the system will wait for up to the timeout period for a response, the system ac-tually strobes the input line for every one unit (1 Second) of the timeout to allow the terminal to display a cycling dot pattern on the Terminal (to show terminal activity).
Parameters Not currently used.
8.12 Terminals
Field Definitions
Field Meaning
Outlet ID A unique ID for the Outlet that can be selected using the Look up button. Once selected, the corresponding name of the outlet is shown.
Terminal ID / Lo-cation
Input outlet specifics here.
Trading Area A unique ID for the Trading Area that can be selected using the Look up button. Once selected, the corresponding trading area is shown.
Default Trading Mode
This mode is used unless the terminal is explicitly switched to another trading mode.
Terminal Type This must be compatible with both FOS type and Key Map type.

© Torex Retail Holdings Limited 2010. All rights reserved. Page: 71
Pad Set this to “No” unless Bill Pads are required.
Key Reader Determined by how servers log on to the system.
W/Strap Identifier Not widely used.
Remote Printing? This can be flagged “Yes” even if not required at the time of the outlet creation. That way, if remote printing becomes a requirement in the fu-ture the facility is there.
Running Balance Is this required for display on the terminal screen?
Run Sub Total This refers to the customer display.
Print Call Order Unique number can be printed on all remote printing slips. Flag this “Yes” if this facility is required.
Combine Area / Table
If this is set to “No”, it is only possible to pick up a tab within the trading area in which the order was taken. If set to “Yes”, it is possible to cash off any tab from any area.
Bill Type Controls the amount of information printed on a bill. It will usually be flagged to “Full”.
Receipt Type Normally set to “Accumulative”.
Open Drawer Trading
If this is set to “Yes”, it will be possible to trade with the till cash drawer open.
Text Big Select this to determine the font size of the running balance.
Alarm Timeout This field is populated with the number of seconds it takes to time out from the sales screen to the log in screen if there is no server activity.
T/A Table From “Takeaway Table”, configured so that orders for take away can be placed on a tab number. Set this to 9000, which should be way out of range of the regular tab numbers.
T/A Table To Set this to 9999.
Alternate Printer ID
This field is populated differently to the Alternate Printer field in the Printer Creation table. Here, it should be set to the same ID as the printer.
Parent Terminal This field is not used.
Variance Posting ID
If there is a cash discrepancy in the till, for auditing purposes it is usual to assign the loss to a Stock family. It is usually assigned to “Wet”.
Key Map Populate this field with the applicable key map data as previously en-tered. The Change Key Map option is rarely used in pubs, but mainly used in hotels where there will often be different PILs and BSIs required for different weekdays.
Broadcast Port Can be configured as any number from 3 to 9. It is usually set up as number 4. It is important to remember that double figures, including 0-prefixed numbers cannot be used in this field.
Physical address and Mux Address
These are different here than in the Printer Creation field. Here, the Physical address refers to the port number. Terminal 1 is always on port 5 with the other terminals’ port numbers rising incrementally. Mux ad-dress in this table is always set to 0.
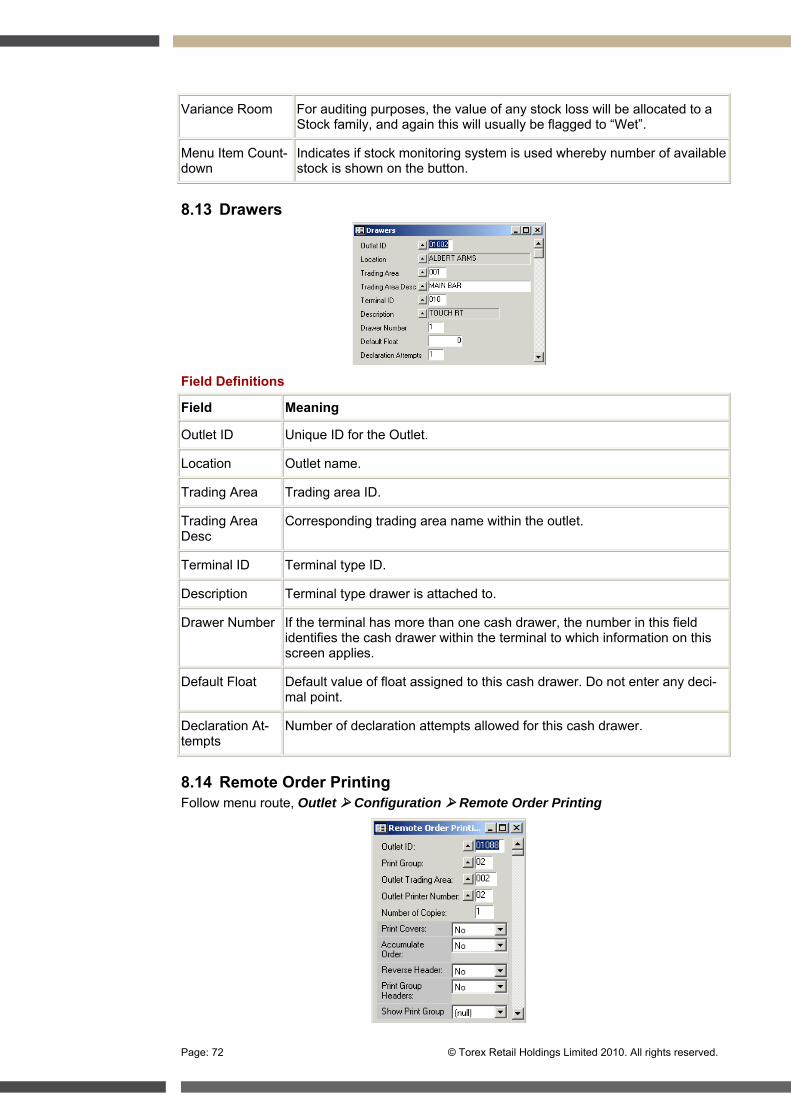
Page: 72 © Torex Retail Holdings Limited 2010. All rights reserved.
Variance Room For auditing purposes, the value of any stock loss will be allocated to a Stock family, and again this will usually be flagged to “Wet”.
Menu Item Count-down
Indicates if stock monitoring system is used whereby number of available stock is shown on the button.
8.13 Drawers
Field Definitions
Field Meaning
Outlet ID Unique ID for the Outlet.
Location Outlet name.
Trading Area Trading area ID.
Trading Area Desc
Corresponding trading area name within the outlet.
Terminal ID Terminal type ID.
Description Terminal type drawer is attached to.
Drawer Number If the terminal has more than one cash drawer, the number in this field identifies the cash drawer within the terminal to which information on this screen applies.
Default Float Default value of float assigned to this cash drawer. Do not enter any deci-mal point.
Declaration At-tempts
Number of declaration attempts allowed for this cash drawer.
8.14 Remote Order Printing Follow menu route, Outlet Configuration Remote Order Printing
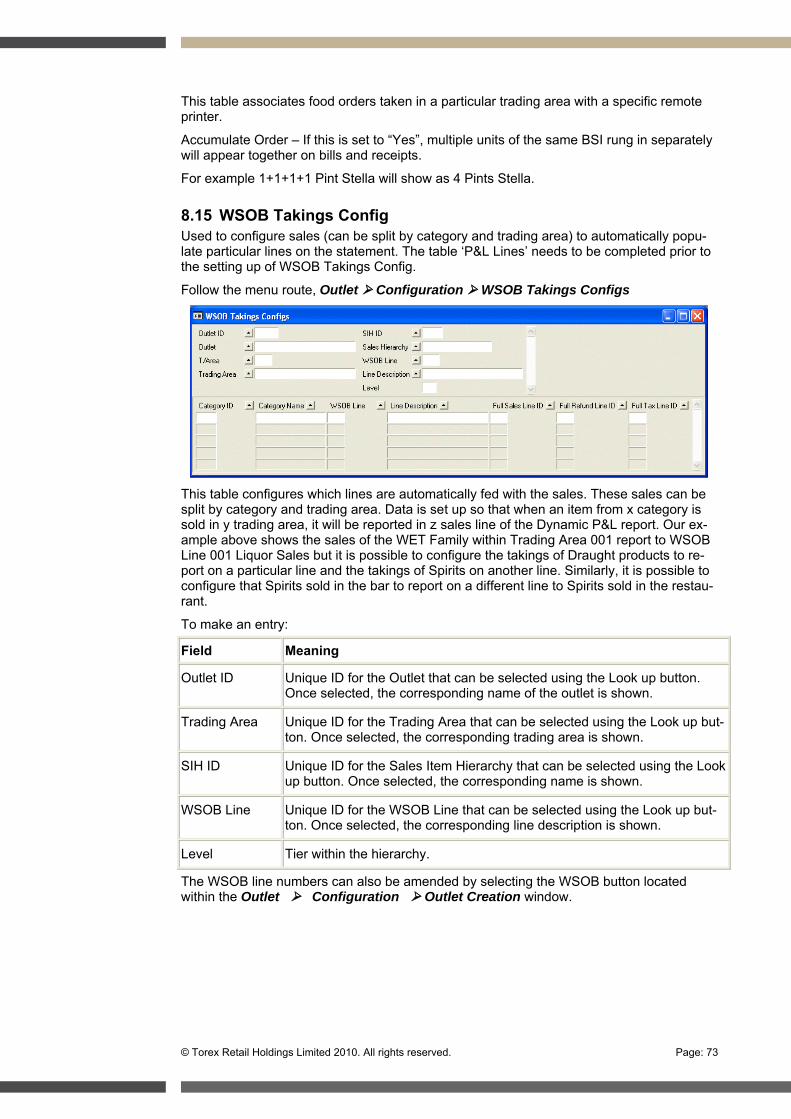
© Torex Retail Holdings Limited 2010. All rights reserved. Page: 73
This table associates food orders taken in a particular trading area with a specific remote printer.
Accumulate Order – If this is set to “Yes”, multiple units of the same BSI rung in separately will appear together on bills and receipts.
For example 1+1+1+1 Pint Stella will show as 4 Pints Stella.
8.15 WSOB Takings Config Used to configure sales (can be split by category and trading area) to automatically popu-late particular lines on the statement. The table ‘P&L Lines’ needs to be completed prior to the setting up of WSOB Takings Config.
Follow the menu route, Outlet Configuration WSOB Takings Configs
This table configures which lines are automatically fed with the sales. These sales can be split by category and trading area. Data is set up so that when an item from x category is sold in y trading area, it will be reported in z sales line of the Dynamic P&L report. Our ex-ample above shows the sales of the WET Family within Trading Area 001 report to WSOB Line 001 Liquor Sales but it is possible to configure the takings of Draught products to re-port on a particular line and the takings of Spirits on another line. Similarly, it is possible to configure that Spirits sold in the bar to report on a different line to Spirits sold in the restau-rant.
To make an entry:
Field Meaning
Outlet ID Unique ID for the Outlet that can be selected using the Look up button. Once selected, the corresponding name of the outlet is shown.
Trading Area Unique ID for the Trading Area that can be selected using the Look up but-ton. Once selected, the corresponding trading area is shown.
SIH ID Unique ID for the Sales Item Hierarchy that can be selected using the Look up button. Once selected, the corresponding name is shown.
WSOB Line Unique ID for the WSOB Line that can be selected using the Look up but-ton. Once selected, the corresponding line description is shown.
Level Tier within the hierarchy.
The WSOB line numbers can also be amended by selecting the WSOB button located within the Outlet Configuration Outlet Creation window.

Page: 74 © Torex Retail Holdings Limited 2010. All rights reserved.
It will not be possible to insert records into the related window, only to amend the Line ID field.
Lines also need allocating for the advanced deposits that are left outstanding and are to be carried forward into the following week’s P&L statement, and for those brought forward from the previous week’s P&L statement.
8.16 Outlet Tax Groups
Follow menu route, Outlet Configuration Outlet Tax Groups
This table associates the outlet with the tax rate of the country in which it is trading. Thus, UK outlets will be set up onto standard tax rate for VAT, and outlets in other countries, for example in a European country will be set up on zero rate, or whichever tax rate is appli-cable for that country.
It is possible to set different Trading Areas within an outlet up on different tax rates, de-pending upon what is sold within that area
Use the Populate button to auto-populate all fields for all trading areas.
8.17 Outlet Stock Rooms Follow menu route, Outlet Configuration Outlet Stock Rooms
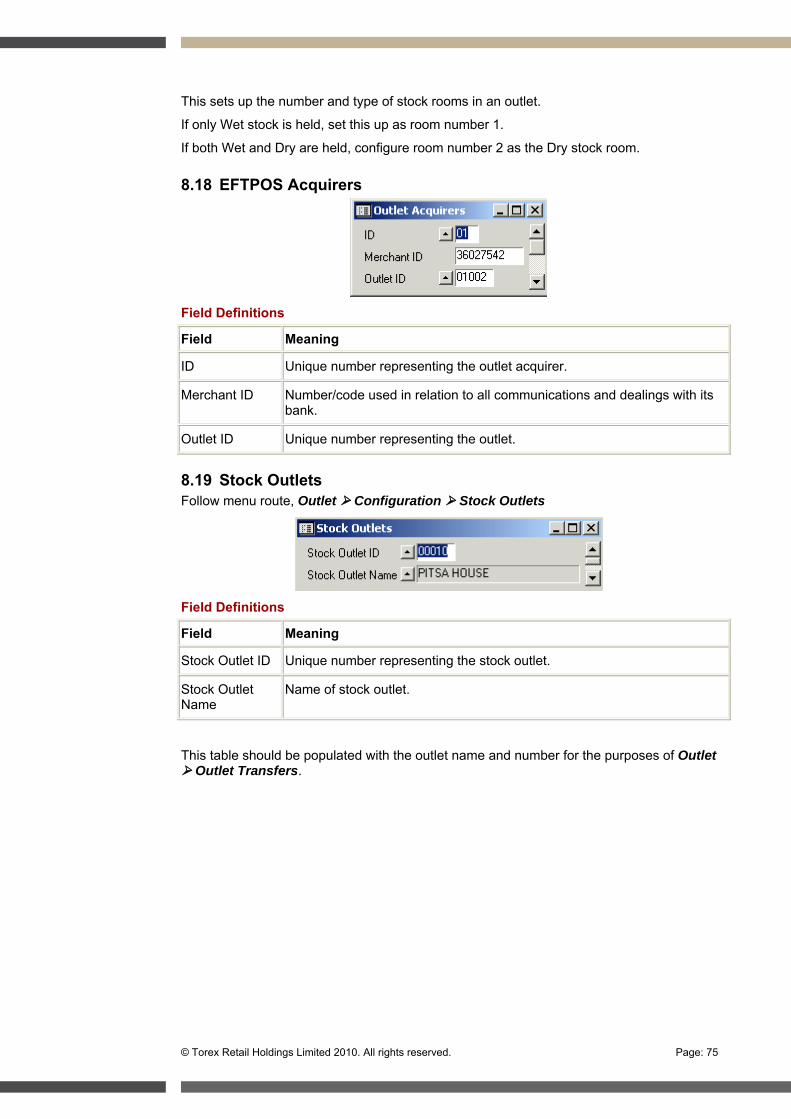
© Torex Retail Holdings Limited 2010. All rights reserved. Page: 75
This sets up the number and type of stock rooms in an outlet.
If only Wet stock is held, set this up as room number 1.
If both Wet and Dry are held, configure room number 2 as the Dry stock room.
8.18 EFTPOS Acquirers
Field Definitions
Field Meaning
ID Unique number representing the outlet acquirer.
Merchant ID Number/code used in relation to all communications and dealings with its bank.
Outlet ID Unique number representing the outlet.
8.19 Stock Outlets Follow menu route, Outlet Configuration Stock Outlets
Field Definitions
Field Meaning
Stock Outlet ID Unique number representing the stock outlet.
Stock Outlet Name
Name of stock outlet.
This table should be populated with the outlet name and number for the purposes of Outlet Outlet Transfers.
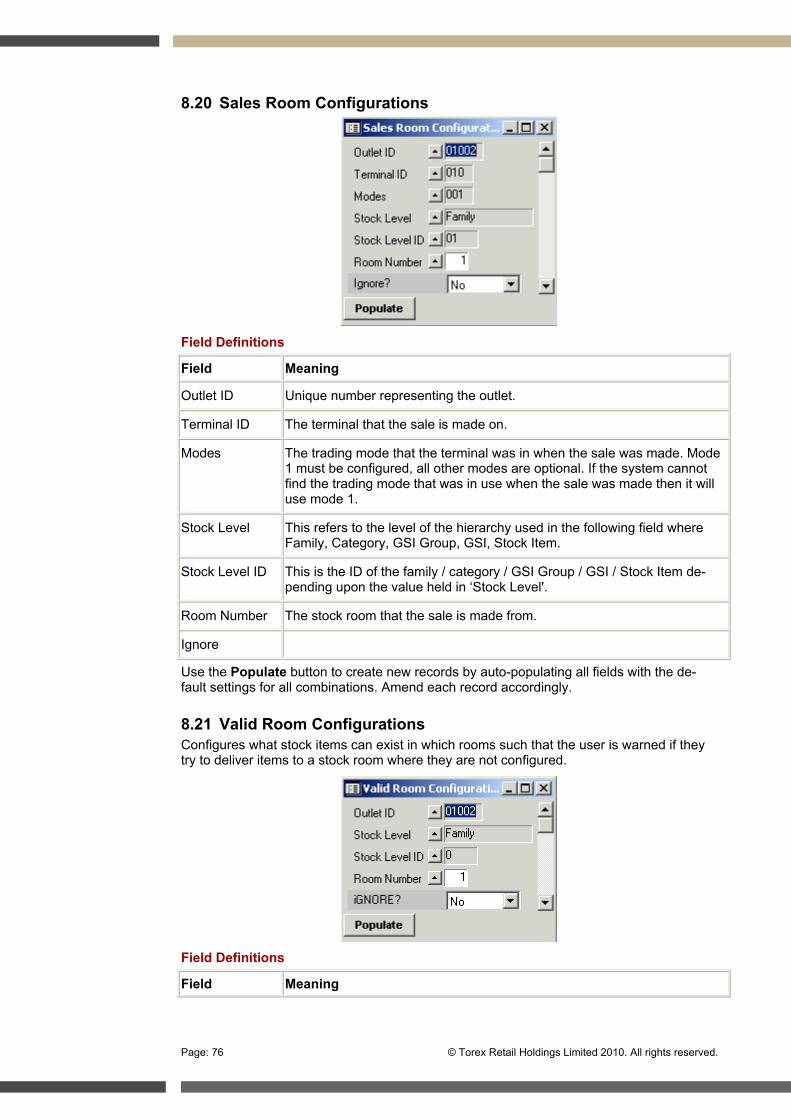
Page: 76 © Torex Retail Holdings Limited 2010. All rights reserved.
8.20 Sales Room Configurations
Field Definitions
Field Meaning
Outlet ID Unique number representing the outlet.
Terminal ID The terminal that the sale is made on.
Modes The trading mode that the terminal was in when the sale was made. Mode 1 must be configured, all other modes are optional. If the system cannot find the trading mode that was in use when the sale was made then it will use mode 1.
Stock Level This refers to the level of the hierarchy used in the following field where Family, Category, GSI Group, GSI, Stock Item.
Stock Level ID This is the ID of the family / category / GSI Group / GSI / Stock Item de-pending upon the value held in ‘Stock Level'.
Room Number The stock room that the sale is made from.
Ignore
Use the Populate button to create new records by auto-populating all fields with the de-fault settings for all combinations. Amend each record accordingly.
8.21 Valid Room Configurations Configures what stock items can exist in which rooms such that the user is warned if they try to deliver items to a stock room where they are not configured.
Field Definitions
Field Meaning
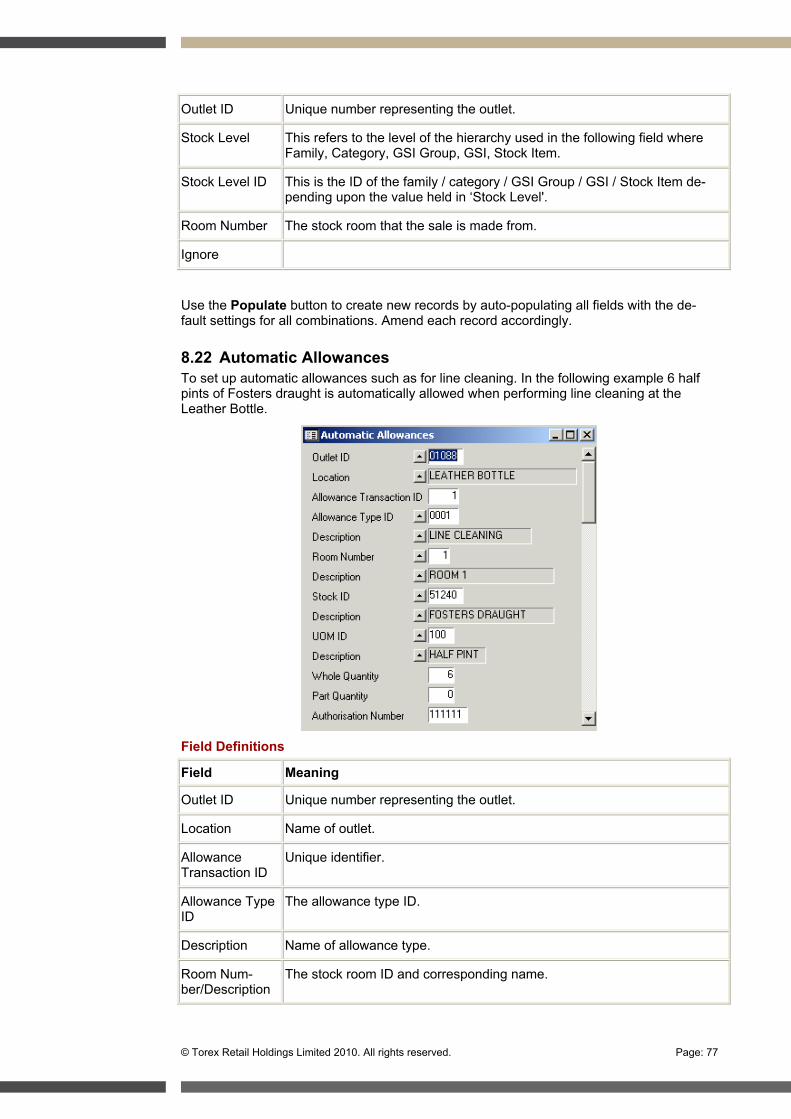
© Torex Retail Holdings Limited 2010. All rights reserved. Page: 77
Outlet ID Unique number representing the outlet.
Stock Level This refers to the level of the hierarchy used in the following field where Family, Category, GSI Group, GSI, Stock Item.
Stock Level ID This is the ID of the family / category / GSI Group / GSI / Stock Item de-pending upon the value held in ‘Stock Level'.
Room Number The stock room that the sale is made from.
Ignore
Use the Populate button to create new records by auto-populating all fields with the de-fault settings for all combinations. Amend each record accordingly.
8.22 Automatic Allowances To set up automatic allowances such as for line cleaning. In the following example 6 half pints of Fosters draught is automatically allowed when performing line cleaning at the Leather Bottle.
Field Definitions
Field Meaning
Outlet ID Unique number representing the outlet.
Location Name of outlet.
Allowance Transaction ID
Unique identifier.
Allowance Type ID
The allowance type ID.
Description Name of allowance type.
Room Num-ber/Description
The stock room ID and corresponding name.

Page: 78 © Torex Retail Holdings Limited 2010. All rights reserved.
Stock ID/Description
The stock item ID and corresponding name.
UOM ID The unit of measure selected by the user when entering the automatic al-lowance.
Description Name of UOM.
Whole Quantity The whole quantity for the allowance.
Part Quantity The part quantity for the allowance.
Authorisation Number
Security code.
9. Price Maintenance
9.1 Examples of User-Defined Price Matrices Pricing on EMS is maintained by way of a Price Matrix that allows prices within an outlet to be easily controlled and updated. Within the matrix, prices are set up on “bands” at levels defined by the user.
Customer A – A globally set up matrix, so that groups of prices can be applied to the outlet, possible to have different prices in each individual trading area within the outlet and for each separate hierarchy level
Customer B – Each outlet assigned to at least one band, but possibility to set up sev-eral bands per outlet based upon what they sell and the run times set up. Therefore an outlet may have one band (bar), 2 bands (bar, restaurant), 4 bands (bar, restau-rant, happy hour, function rooms) and so on with an infinite number of possibilities.
9.2 Price Bands
Field Definitions
Field Meaning
Price Band Unique ID representing a price band.
Description Corresponding name of price band.
9.3 Price Matrix Dates
Field Definitions
Field Meaning
Matrix Date Date price matrix applied.
Description Name of price matrix applied.
© Torex Retail Holdings Limited 2010. All rights reserved. Page: 79
Before any prices can be entered, price bands must be created and the matrix effective dates set up. This takes place as pre-configuration at Torex, according to the specifications of the customer. Thereafter, Price Matrices are maintained by the user.
Selling Prices can be entered or amended using 4 different methods all of which are found in the menu above, namely:
Price Matrix Inserts - Enter the price of one BSI into several bands at once.
Price Update Across All Bands - allows multiple BSI price changes on every Price Band.
Price Update by Band – Similar to 2., but allows for a range of bands to be updated, as opposed to all bands.
Price Matrices - allows the price of a single BSI in any one Price Band to be updated.
9.3.1.1 Price Matrix Inserts With Price Matrix Insert, it is possible to enter the price of a BSI into several Price Bands at once.
The Price Increment is used to determine the difference in retail price between the bands, that is if all bands were to have the same price, the increment will be set to 0.
In this example the following prices will be created.
Band 10 – 1.95 Band 11 – 2.00………….Band 25 – 2.70
Again, prices can be set to either Active ‘Yes’ or ‘No’, depending on whether they are to be used straight away or not.
9.3.1.2 Price Updates Across All Bands This option allows multiple BSI price changes on every Price Band. This is effective if a group of items are all to change price in every band, saving a great deal of time making manual entries in Price Matrices.
Matrix Effective Date – The Matrix Date for which the prices are to be changed.
Amount +/- (£) – The increase/decrease to be applied.
Category – Once the Category is entered, a list of BSI’s belonging to that Category show. BSI’s can be selected by clicking the grey box to the left of the Item ID. Holding down Ctrl or Shift allows multiple selections. Once all BSI’s are selected Apply & OK.
System returns to the Price Matrix Updates all Bands window. At this point, you can click Next or Update Matrix. Clicking the Next icon here will allow other entries to be made be-fore updating the Matrix, whereas Update Matrix will amend the selling prices as stated, and the Applied flag changes to “Yes” to denote that the process has been completed.
9.3.1.3 Price Update by Band This is very similar to the Update All Bands function and contains all of the same options. However, it is possible to select a range of Price Bands to be updated, rather than all bands being affected.
BSI’s are selected in the same way as above after entering the category to be used.
The Price Matrices window allows the price of a single BSI in any one Price Band to be en-tered.
Prices that are set to Active ‘Yes’ cannot be amended. Instead, a new record should be inserted with a higher sequence number. When this record becomes Active, it will be used by the system instead of the old record.
All historical price change information is stored and the previous price of the BSI is dis-played at the bottom.
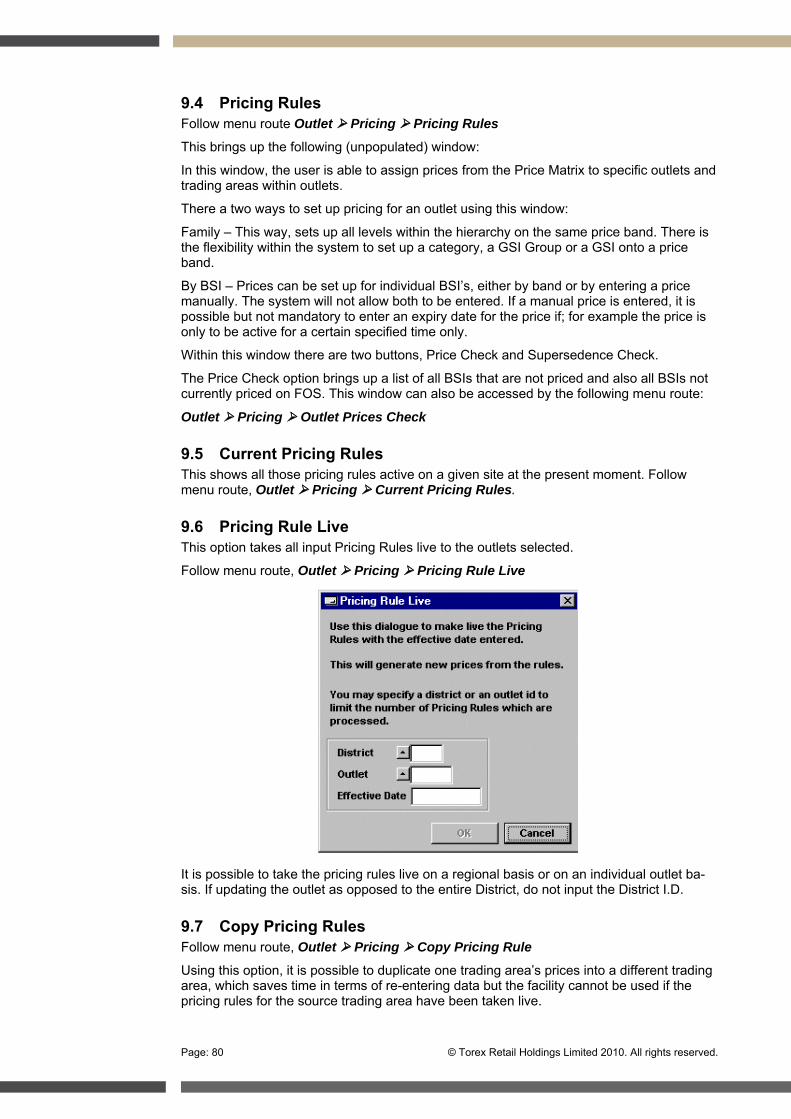
Page: 80 © Torex Retail Holdings Limited 2010. All rights reserved.
9.4 Pricing Rules Follow menu route Outlet Pricing Pricing Rules
This brings up the following (unpopulated) window:
In this window, the user is able to assign prices from the Price Matrix to specific outlets and trading areas within outlets.
There a two ways to set up pricing for an outlet using this window:
Family – This way, sets up all levels within the hierarchy on the same price band. There is the flexibility within the system to set up a category, a GSI Group or a GSI onto a price band.
By BSI – Prices can be set up for individual BSI’s, either by band or by entering a price manually. The system will not allow both to be entered. If a manual price is entered, it is possible but not mandatory to enter an expiry date for the price if; for example the price is only to be active for a certain specified time only.
Within this window there are two buttons, Price Check and Supersedence Check.
The Price Check option brings up a list of all BSIs that are not priced and also all BSIs not currently priced on FOS. This window can also be accessed by the following menu route:
Outlet Pricing Outlet Prices Check
9.5 Current Pricing Rules This shows all those pricing rules active on a given site at the present moment. Follow menu route, Outlet Pricing Current Pricing Rules.
9.6 Pricing Rule Live This option takes all input Pricing Rules live to the outlets selected.
Follow menu route, Outlet Pricing Pricing Rule Live
It is possible to take the pricing rules live on a regional basis or on an individual outlet ba-sis. If updating the outlet as opposed to the entire District, do not input the District I.D.
9.7 Copy Pricing Rules Follow menu route, Outlet Pricing Copy Pricing Rule
Using this option, it is possible to duplicate one trading area’s prices into a different trading area, which saves time in terms of re-entering data but the facility cannot be used if the pricing rules for the source trading area have been taken live.
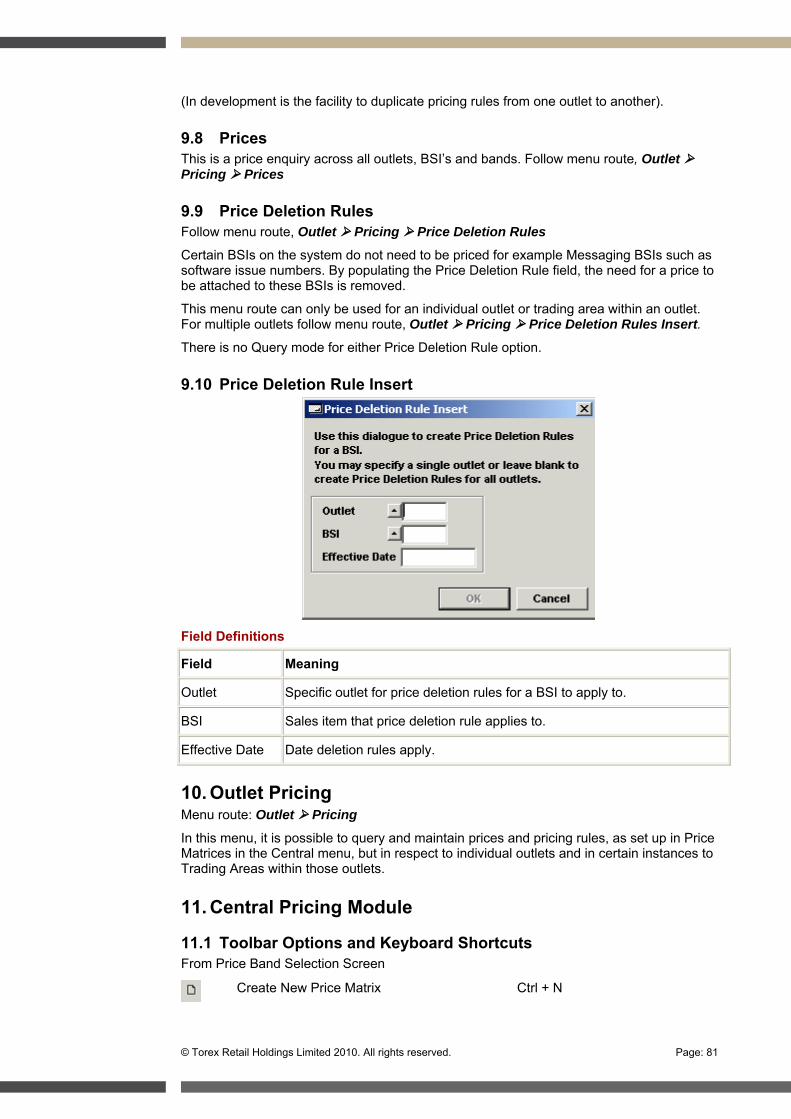
© Torex Retail Holdings Limited 2010. All rights reserved. Page: 81
(In development is the facility to duplicate pricing rules from one outlet to another).
9.8 Prices This is a price enquiry across all outlets, BSI’s and bands. Follow menu route, Outlet Pricing Prices
9.9 Price Deletion Rules Follow menu route, Outlet Pricing Price Deletion Rules
Certain BSIs on the system do not need to be priced for example Messaging BSIs such as software issue numbers. By populating the Price Deletion Rule field, the need for a price to be attached to these BSIs is removed.
This menu route can only be used for an individual outlet or trading area within an outlet. For multiple outlets follow menu route, Outlet Pricing Price Deletion Rules Insert.
There is no Query mode for either Price Deletion Rule option.
9.10 Price Deletion Rule Insert
Field Definitions
Field Meaning
Outlet Specific outlet for price deletion rules for a BSI to apply to.
BSI Sales item that price deletion rule applies to.
Effective Date Date deletion rules apply.
10. Outlet Pricing Menu route: Outlet Pricing
In this menu, it is possible to query and maintain prices and pricing rules, as set up in Price Matrices in the Central menu, but in respect to individual outlets and in certain instances to Trading Areas within those outlets.
11. Central Pricing Module
11.1 Toolbar Options and Keyboard Shortcuts From Price Band Selection Screen
Create New Price Matrix Ctrl + N

Page: 82 © Torex Retail Holdings Limited 2010. All rights reserved.
Open Band Selection Screen Ctrl + O
Open Template
Display Grid Active Ctrl + D
Display Grid Inactive
View
Copy Price Band Ctrl + X
Copy BSI Price
Fixed Band Width
Show Inactive Prices
Explorer for Templates
When a Pricing Grid is open
Save Active Ctrl + S
Save Inactive Ctrl + I
Search BSI Ctrl + F
Remove BSI from View
BSI Properties Ctrl + P
Export as Excel Spreadsheet
Add Band to Template
Remove Band from Template
11.2 Price Matrix The EMS Enhanced Price Matrix is launched via the CentralPricing Module option.
For the Price Matrix to load successfully, the two following windows must be populated through EMS.
11.2.1 Price Matrix Dates SystemPricingPrice Matrix Dates
A Price Matrix Date must be created before a pricing grid can be opened for the first time. The system creates a new price matrix for the price matrix date that is entered. All prices that are entered into a pricing grid are assigned to a price matrix date.
When a date and description has been entered, the following dialog box will appear. Click OK to create a new price matrix or CANCEL to delete the new date and description.
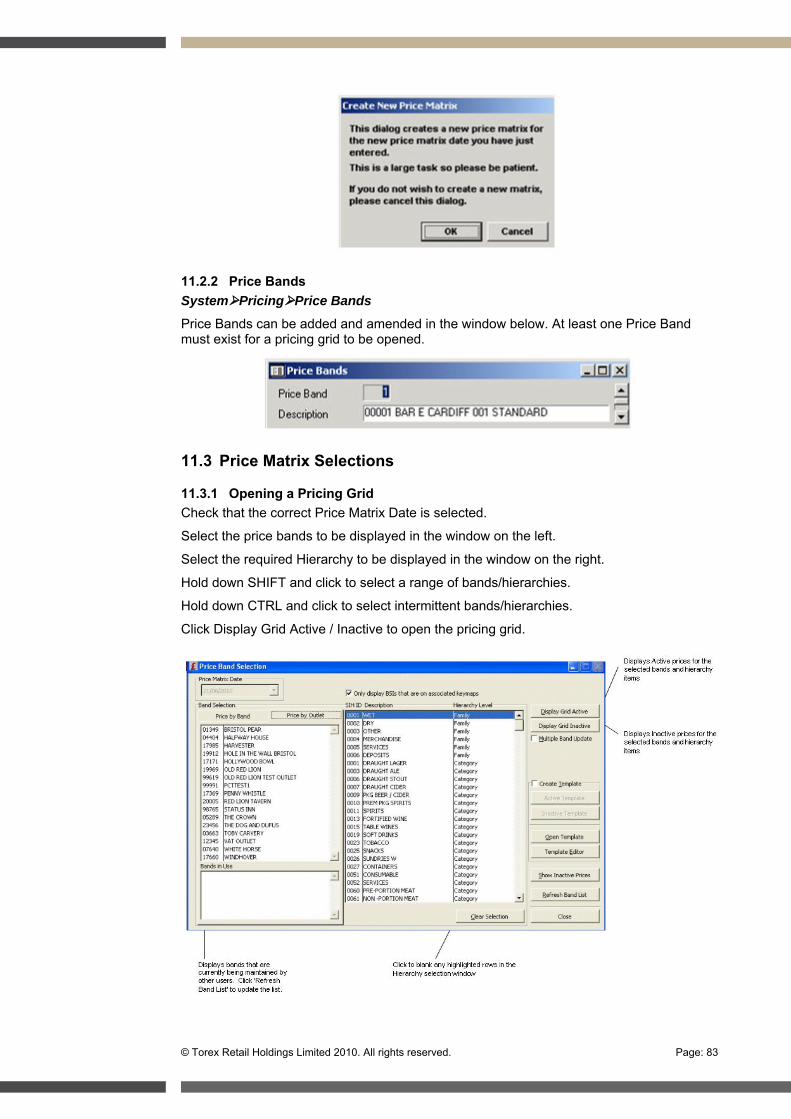
© Torex Retail Holdings Limited 2010. All rights reserved. Page: 83
11.2.2 Price Bands SystemPricingPrice Bands
Price Bands can be added and amended in the window below. At least one Price Band must exist for a pricing grid to be opened.
11.3 Price Matrix Selections
11.3.1 Opening a Pricing Grid Check that the correct Price Matrix Date is selected.
Select the price bands to be displayed in the window on the left.
Select the required Hierarchy to be displayed in the window on the right.
Hold down SHIFT and click to select a range of bands/hierarchies.
Hold down CTRL and click to select intermittent bands/hierarchies.
Click Display Grid Active / Inactive to open the pricing grid.
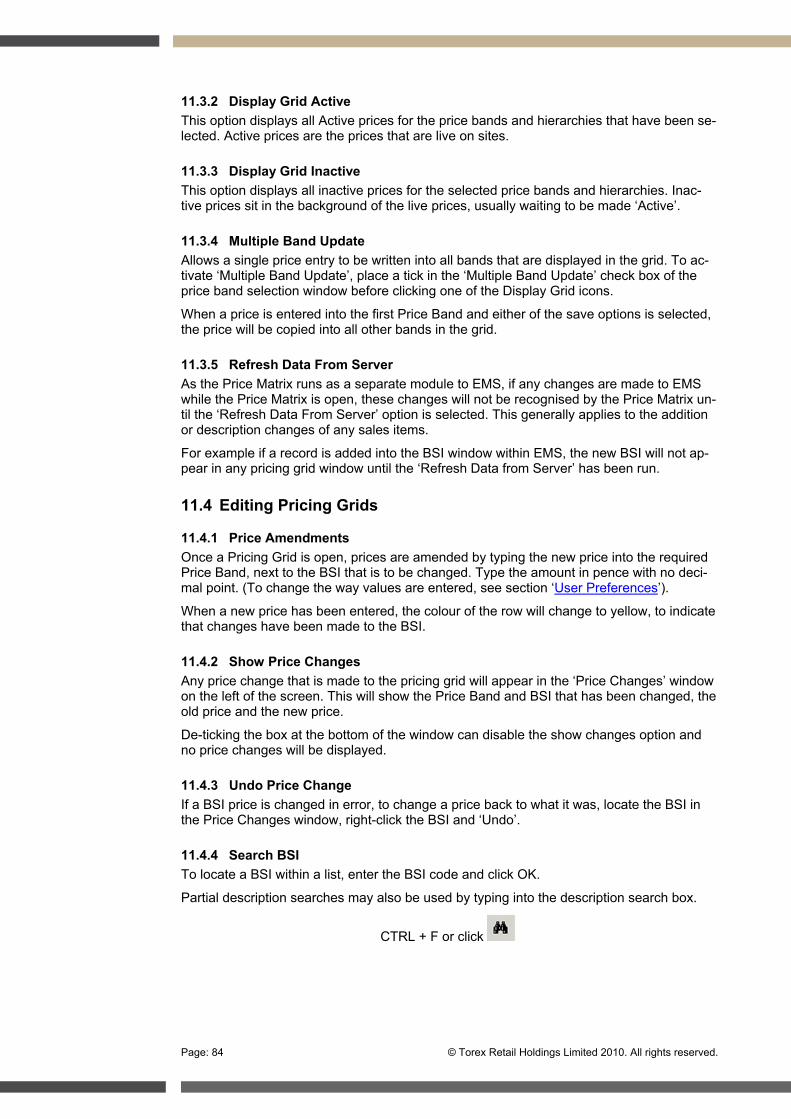
Page: 84 © Torex Retail Holdings Limited 2010. All rights reserved.
11.3.2 Display Grid Active This option displays all Active prices for the price bands and hierarchies that have been se-lected. Active prices are the prices that are live on sites.
11.3.3 Display Grid Inactive This option displays all inactive prices for the selected price bands and hierarchies. Inac-tive prices sit in the background of the live prices, usually waiting to be made ‘Active’.
11.3.4 Multiple Band Update Allows a single price entry to be written into all bands that are displayed in the grid. To ac-tivate ‘Multiple Band Update’, place a tick in the ‘Multiple Band Update’ check box of the price band selection window before clicking one of the Display Grid icons.
When a price is entered into the first Price Band and either of the save options is selected, the price will be copied into all other bands in the grid.
11.3.5 Refresh Data From Server As the Price Matrix runs as a separate module to EMS, if any changes are made to EMS while the Price Matrix is open, these changes will not be recognised by the Price Matrix un-til the ‘Refresh Data From Server’ option is selected. This generally applies to the addition or description changes of any sales items.
For example if a record is added into the BSI window within EMS, the new BSI will not ap-pear in any pricing grid window until the ‘Refresh Data from Server’ has been run.
11.4 Editing Pricing Grids
11.4.1 Price Amendments Once a Pricing Grid is open, prices are amended by typing the new price into the required Price Band, next to the BSI that is to be changed. Type the amount in pence with no deci-mal point. (To change the way values are entered, see section ‘User Preferences’).
When a new price has been entered, the colour of the row will change to yellow, to indicate that changes have been made to the BSI.
11.4.2 Show Price Changes Any price change that is made to the pricing grid will appear in the ‘Price Changes’ window on the left of the screen. This will show the Price Band and BSI that has been changed, the old price and the new price.
De-ticking the box at the bottom of the window can disable the show changes option and no price changes will be displayed.
11.4.3 Undo Price Change If a BSI price is changed in error, to change a price back to what it was, locate the BSI in the Price Changes window, right-click the BSI and ‘Undo’.
11.4.4 Search BSI To locate a BSI within a list, enter the BSI code and click OK.
Partial description searches may also be used by typing into the description search box.
CTRL + F or click
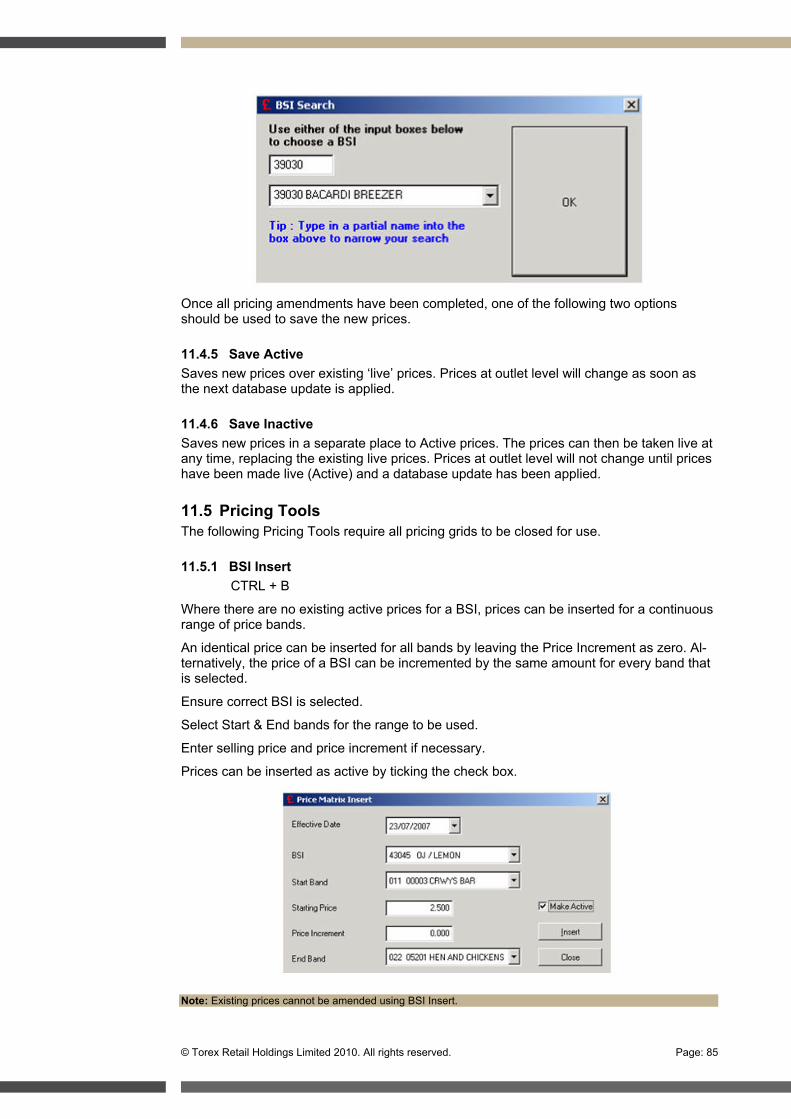
© Torex Retail Holdings Limited 2010. All rights reserved. Page: 85
Once all pricing amendments have been completed, one of the following two options should be used to save the new prices.
11.4.5 Save Active Saves new prices over existing ‘live’ prices. Prices at outlet level will change as soon as the next database update is applied.
11.4.6 Save Inactive Saves new prices in a separate place to Active prices. The prices can then be taken live at any time, replacing the existing live prices. Prices at outlet level will not change until prices have been made live (Active) and a database update has been applied.
11.5 Pricing Tools The following Pricing Tools require all pricing grids to be closed for use.
11.5.1 BSI Insert CTRL + B
Where there are no existing active prices for a BSI, prices can be inserted for a continuous range of price bands.
An identical price can be inserted for all bands by leaving the Price Increment as zero. Al-ternatively, the price of a BSI can be incremented by the same amount for every band that is selected.
Ensure correct BSI is selected.
Select Start & End bands for the range to be used.
Enter selling price and price increment if necessary.
Prices can be inserted as active by ticking the check box.
Note: Existing prices cannot be amended using BSI Insert.

Page: 86 © Torex Retail Holdings Limited 2010. All rights reserved.
11.5.2 Update Price Matrix By Band/All Bands Price ToolsUpdate Price Matrix
By using the Update Matrix utility, a single item or multiple items from the same category can be updated for a range of price bands or all price bands.
• Upon selecting a category, a list of all BSI within that category will appear.
• Select the required BSIs from the list and click CHOOSE.
• Use the Show BSIs icon to check that the selected items to be updated are correct.
• Choose the range of bands to be updated (for example All bands from 009 to 017)
• Set the amount that all selected BSIs will be updated by. Minus figures are also allowed in this field.
• Click Update Matrix
• New prices can be checked in a pricing grid.
• To update all bands at once, select the ‘Price Matrix Update All Bands’ option and follow above.
11.5.3 Price Matrix Live CTRL + L
Price Matrix Live looks for any Inactive prices that are attached to a matrix date and makes them Active.
The Inactive prices, when made live (active) will overwrite any existing Active prices when this option is used.
11.5.4 Create New Price Matrix CTRL + N
All prices within the price matrix are assigned to a matrix date. This is the date that the price matrix was created. Each price matrix date can carry a separate set of prices. It is possible to have several price matrix dates, and therefore several different price matrices for a BSI.
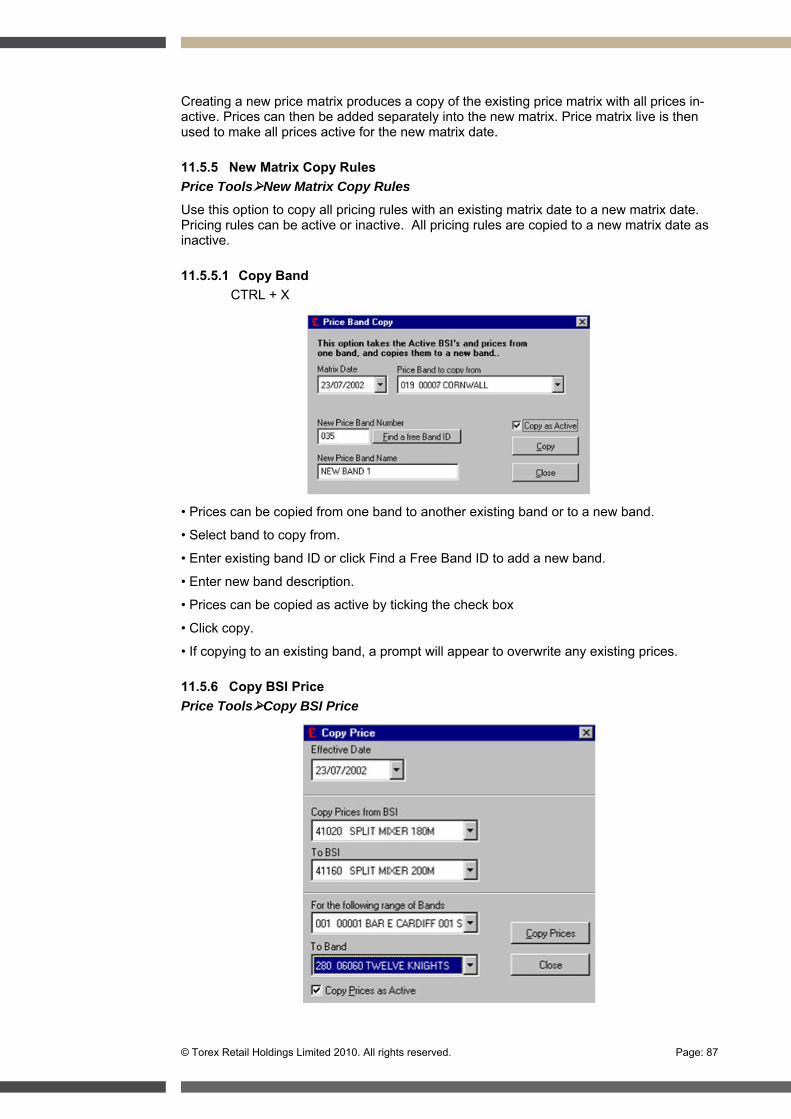
© Torex Retail Holdings Limited 2010. All rights reserved. Page: 87
Creating a new price matrix produces a copy of the existing price matrix with all prices in-active. Prices can then be added separately into the new matrix. Price matrix live is then used to make all prices active for the new matrix date.
11.5.5 New Matrix Copy Rules Price ToolsNew Matrix Copy Rules
Use this option to copy all pricing rules with an existing matrix date to a new matrix date. Pricing rules can be active or inactive. All pricing rules are copied to a new matrix date as inactive.
11.5.5.1 Copy Band CTRL + X
• Prices can be copied from one band to another existing band or to a new band.
• Select band to copy from.
• Enter existing band ID or click Find a Free Band ID to add a new band.
• Enter new band description.
• Prices can be copied as active by ticking the check box
• Click copy.
• If copying to an existing band, a prompt will appear to overwrite any existing prices.
11.5.6 Copy BSI Price Price ToolsCopy BSI Price
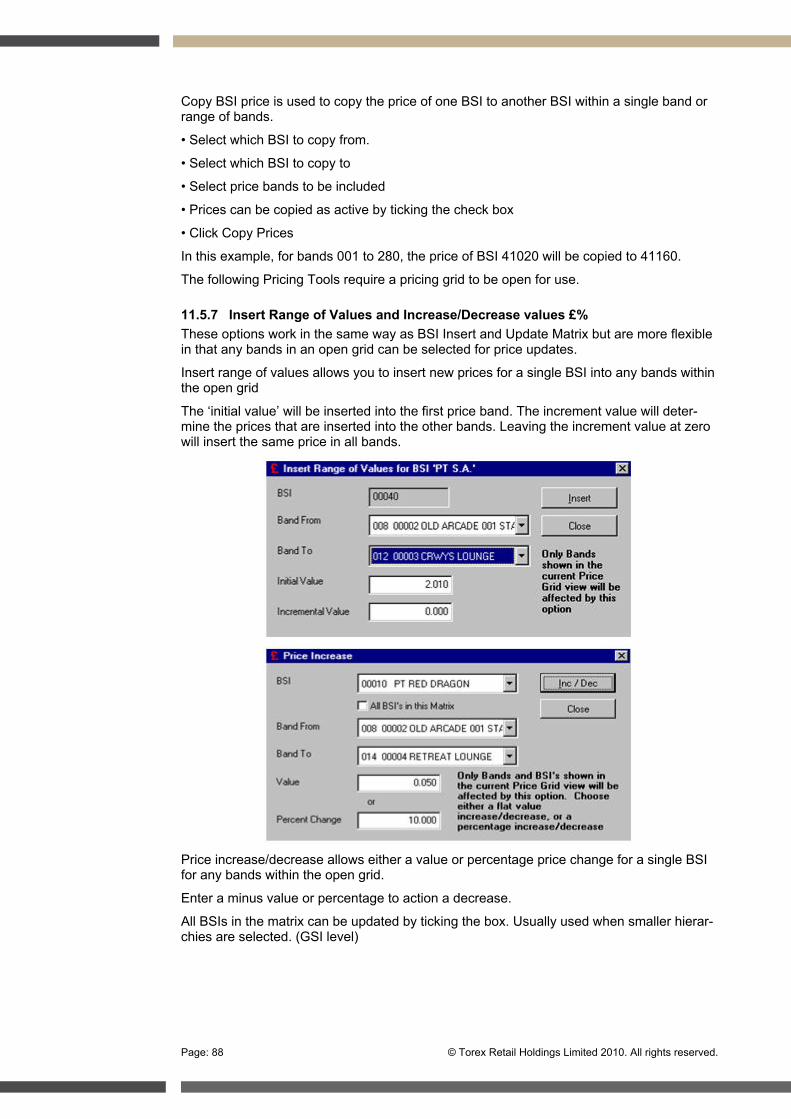
Page: 88 © Torex Retail Holdings Limited 2010. All rights reserved.
Copy BSI price is used to copy the price of one BSI to another BSI within a single band or range of bands.
• Select which BSI to copy from.
• Select which BSI to copy to
• Select price bands to be included
• Prices can be copied as active by ticking the check box
• Click Copy Prices
In this example, for bands 001 to 280, the price of BSI 41020 will be copied to 41160.
The following Pricing Tools require a pricing grid to be open for use.
11.5.7 Insert Range of Values and Increase/Decrease values £% These options work in the same way as BSI Insert and Update Matrix but are more flexible in that any bands in an open grid can be selected for price updates.
Insert range of values allows you to insert new prices for a single BSI into any bands within the open grid
The ‘initial value’ will be inserted into the first price band. The increment value will deter-mine the prices that are inserted into the other bands. Leaving the increment value at zero will insert the same price in all bands.
Price increase/decrease allows either a value or percentage price change for a single BSI for any bands within the open grid.
Enter a minus value or percentage to action a decrease.
All BSIs in the matrix can be updated by ticking the box. Usually used when smaller hierar-chies are selected. (GSI level)
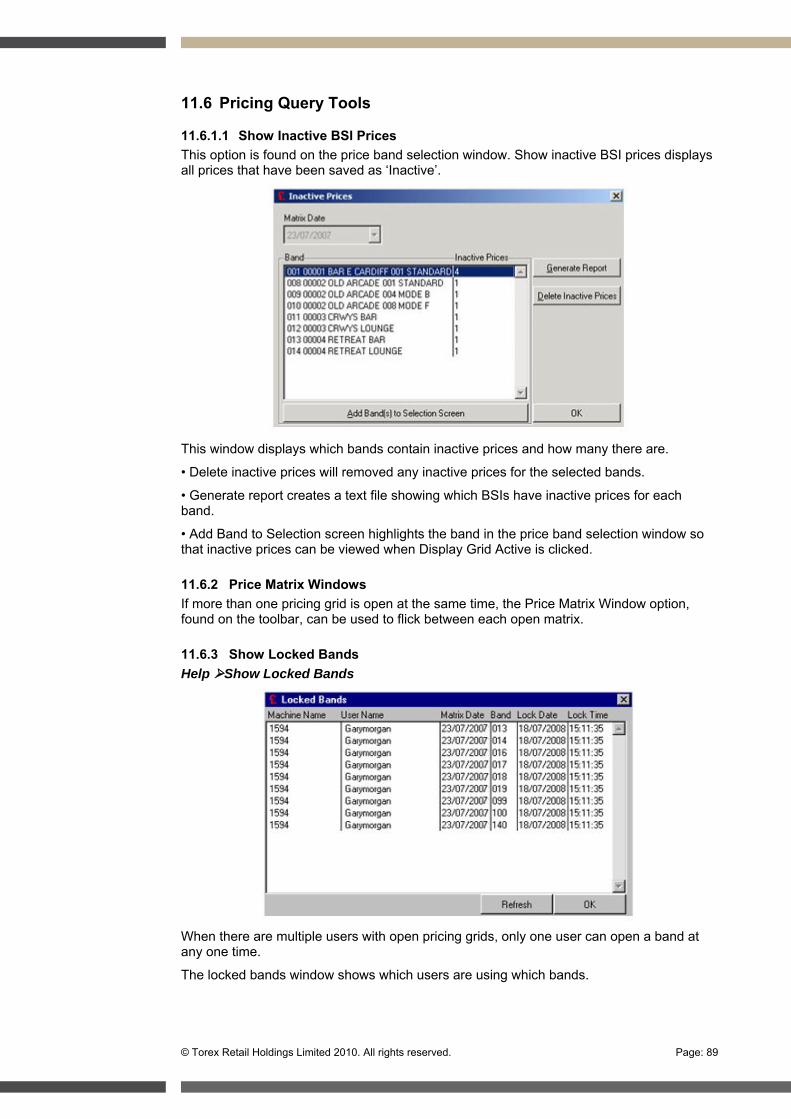
© Torex Retail Holdings Limited 2010. All rights reserved. Page: 89
11.6 Pricing Query Tools
11.6.1.1 Show Inactive BSI Prices This option is found on the price band selection window. Show inactive BSI prices displays all prices that have been saved as ‘Inactive’.
This window displays which bands contain inactive prices and how many there are.
• Delete inactive prices will removed any inactive prices for the selected bands.
• Generate report creates a text file showing which BSIs have inactive prices for each band.
• Add Band to Selection screen highlights the band in the price band selection window so that inactive prices can be viewed when Display Grid Active is clicked.
11.6.2 Price Matrix Windows If more than one pricing grid is open at the same time, the Price Matrix Window option, found on the toolbar, can be used to flick between each open matrix.
11.6.3 Show Locked Bands Help Show Locked Bands
When there are multiple users with open pricing grids, only one user can open a band at any one time.
The locked bands window shows which users are using which bands.
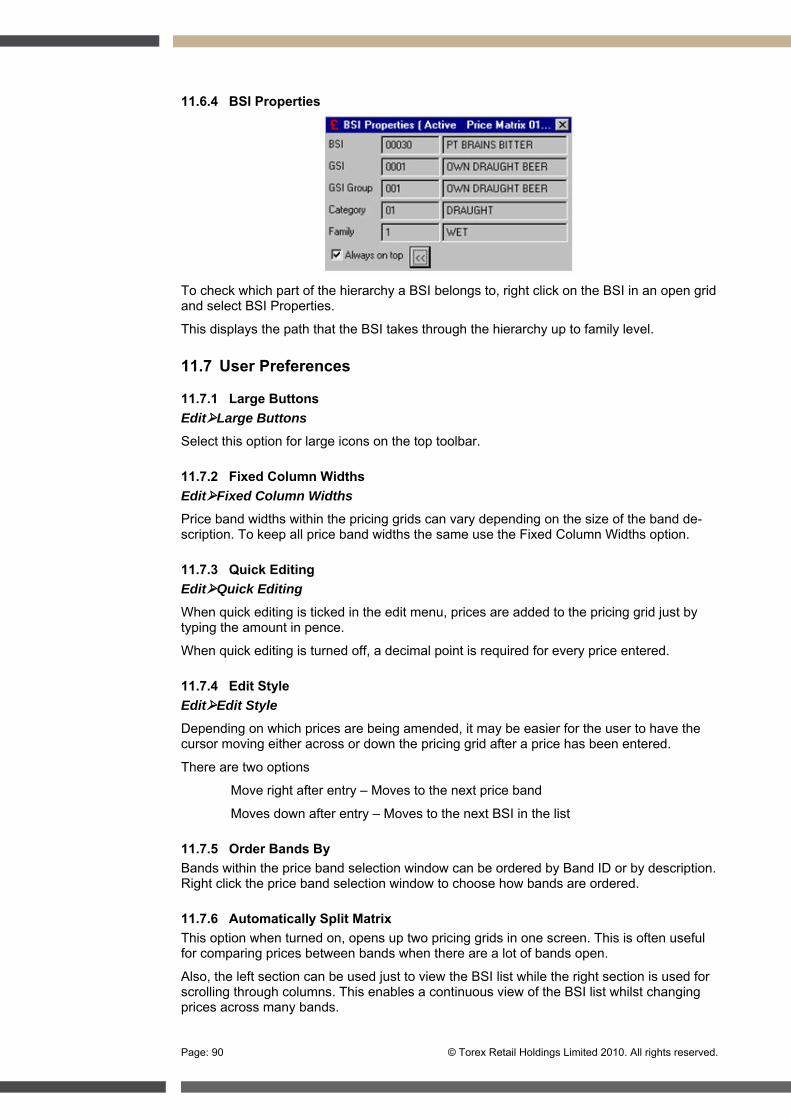
Page: 90 © Torex Retail Holdings Limited 2010. All rights reserved.
11.6.4 BSI Properties
To check which part of the hierarchy a BSI belongs to, right click on the BSI in an open grid and select BSI Properties.
This displays the path that the BSI takes through the hierarchy up to family level.
11.7 User Preferences
11.7.1 Large Buttons EditLarge Buttons
Select this option for large icons on the top toolbar.
11.7.2 Fixed Column Widths EditFixed Column Widths
Price band widths within the pricing grids can vary depending on the size of the band de-scription. To keep all price band widths the same use the Fixed Column Widths option.
11.7.3 Quick Editing EditQuick Editing
When quick editing is ticked in the edit menu, prices are added to the pricing grid just by typing the amount in pence.
When quick editing is turned off, a decimal point is required for every price entered.
11.7.4 Edit Style EditEdit Style
Depending on which prices are being amended, it may be easier for the user to have the cursor moving either across or down the pricing grid after a price has been entered.
There are two options
Move right after entry – Moves to the next price band
Moves down after entry – Moves to the next BSI in the list
11.7.5 Order Bands By Bands within the price band selection window can be ordered by Band ID or by description. Right click the price band selection window to choose how bands are ordered.
11.7.6 Automatically Split Matrix This option when turned on, opens up two pricing grids in one screen. This is often useful for comparing prices between bands when there are a lot of bands open.
Also, the left section can be used just to view the BSI list while the right section is used for scrolling through columns. This enables a continuous view of the BSI list whilst changing prices across many bands.

© Torex Retail Holdings Limited 2010. All rights reserved. Page: 91
11.7.7 Gridlines MatrixGrid
There are several gridline options for an open pricing grid.
Each of these changes the on-screen view and must be changed once a pricing grid is open.
11.7.8 Export as Excel Spreadsheet MatrixToolsExport as Excel spreadsheet
Prices can be exported from a pricing grid and saved as a .xls file. This can then be opened from Excel.
• Select bands and hierarchies from selection screen
• Display Grid Active
• Select Export as Excel spreadsheet option or click icon on toolbar
• You will be prompted to Save As.
• Save file then open in Excel.
12. ABS Features
12.1 Promotions This is where promotions are set up globally. The Promotion option allows the setting up of sales promotions for example, discounts such as 10% off starters, or meal deals such as 2 for 1. A promotion is activated by the touching of the appropriate button on the sales screen of the terminal and applies to the current transaction only. Each promotion has as-sociated parameters that set up the promotion criteria.
Follow the menu route Central Promotions
The current record is displayed in the top half of the window. The promotional parameters of the current record populate the bottom section of the window when the appropriate pro-motion style tab is selected.
To support the setting up of sales promotions, each promotion calls upon the associated Promotional Parameters to set up the promotion criteria. If the order meets the minimum trigger requirement for the promotion, then a benefit is initiated. The promotions that can be set up on the system fall into eight different styles. Examples of each are shown on the following pages.

Page: 92 © Torex Retail Holdings Limited 2010. All rights reserved.
Field Definitions
Field Meaning
CRS Promotion Id Unique promotion Id.
Promotion Style Id Number representing the promotional style.
Description Name of promotion style such as Conditional Discount.
PAM Function module that is called when the promotion button is pressed on the till and causes the promotion to be activated.
BOS Promotion Id Unique number representing the actual promotion. Up to 99 promotions can exist.
Promotion Name Name of promotion such as £5 off if £20 spent on drinks.
K/B Text1, 2, 3 Text displayed on the button of a touch terminal. Three lines are pro-vided. For a single line of text use the middle line. Each line of text may be up to 7 characters long.
Start Date The date at which the promotion commences (becomes available).
End Date The date at which the promotion ceases (no longer available).
Start Time The time at which the promotion commences (becomes available).
End Time The time at which the promotion ceases (no longer available).
Valid Days The days within a trading week (starting Sunday) that the promotion ap-plies.
FOS Authority Level
The lowest authority level allowed to activate the promotion.
Description The name of the lowest authority level allowed to activate the promotion.
Trading Mode The valid trading mode within which the promotion can be applied. 00 means it can be applied in all modes.
New Trading Mode
The alternative trading mode to switch to used only when the Trading Mode Toggles promotion style is selected.
FOS Type Terminal type.
Reason Required Indicates if prompting of promotion reason is selected.
Filename Not used.
Benefit Price Only applies to meal deal promotions – selling price of meal.
Min Digits Re-quired
Sets the minimum number of digits to enter as reference for the promo-tion, that is Voucher number. 0 (zero) means there is no prompt for a voucher number.
Read Mag. Stripe?
Indicates if a magnetic strip reader can be used with the promotion.
Max. Mult Sets the maximum number of times the promotion can be applied to a transaction.
Max Attempts Sets the maximum amount of attempts to automatically apply the promo-
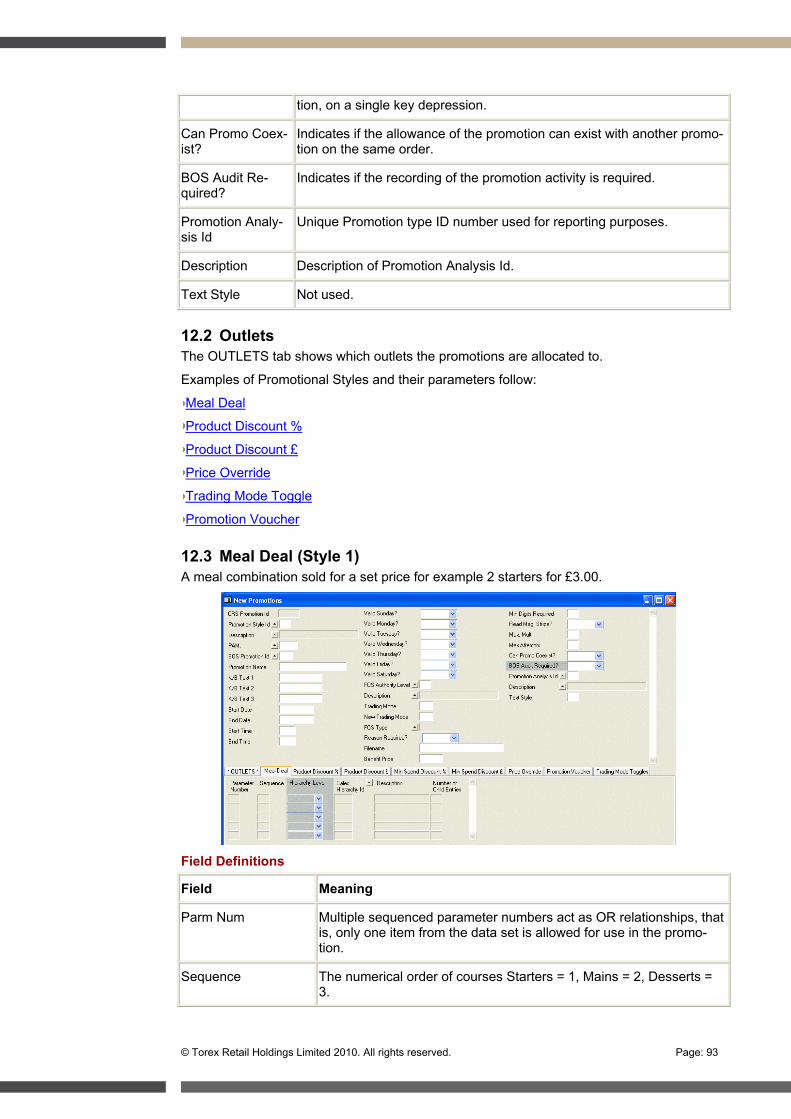
© Torex Retail Holdings Limited 2010. All rights reserved. Page: 93
tion, on a single key depression.
Can Promo Coex-ist?
Indicates if the allowance of the promotion can exist with another promo-tion on the same order.
BOS Audit Re-quired?
Indicates if the recording of the promotion activity is required.
Promotion Analy-sis Id
Unique Promotion type ID number used for reporting purposes.
Description Description of Promotion Analysis Id.
Text Style Not used.
12.2 Outlets The OUTLETS tab shows which outlets the promotions are allocated to.
Examples of Promotional Styles and their parameters follow:
Meal Deal
Product Discount %
Product Discount £
Price Override
Trading Mode Toggle
Promotion Voucher
12.3 Meal Deal (Style 1) A meal combination sold for a set price for example 2 starters for £3.00.
Field Definitions
Field Meaning
Parm Num Multiple sequenced parameter numbers act as OR relationships, that is, only one item from the data set is allowed for use in the promo-tion.
Sequence The numerical order of courses Starters = 1, Mains = 2, Desserts = 3.

Page: 94 © Torex Retail Holdings Limited 2010. All rights reserved.
Hierarchy Level The hierarchy level of the promotional item to be sold.
Sales Hierarchy Id/Description/Number of Child Entries
The details of the promotional item to be sold.
12.3.1 Product Discount % (Style 2 & 9) Allows a fixed % discount to be applied to the bill (entire or part) and will be applicable to those items defined in the trigger criteria for example 20% off food.
Field Definitions
Field Meaning
Parameter Number Multiple sequenced parameter numbers act as OR relationships, that is, only one item from the data set is allowed for use in the promotion.
Trigger Hierarchy Level The hierarchy level of the promotional item to be sold.
Trigger Sales Hierarchy Id /Description/Min Trigger Qty
The details including minimum quantity of the promotional item to be sold.
Benefit Hierarchy Level The hierarchy level of the benefit items.
Benefit Sales Hierarchy Id /Description /Percent Discount
The details including % discount of the benefit items.
12.3.2 Product Discount £ (Style 3) Allows a fixed benefit value to be applied to the bill (entire or part) and will be applicable to those items defined in the trigger criteria for example buy 2 get 1 free.

© Torex Retail Holdings Limited 2010. All rights reserved. Page: 95
Field Definitions
Field Meaning
Parm Num Parameter number to allow multiple triggers and benefits. The maximum combination of trigger and benefit parameters is 98.
Trigger Qty /Trigger Hierarchy Level /Trigger Sales Hierar-chy ID/Trigger Description /Trigger Child Quantity
Details of the trigger item including quantity to sell before benefit is initiated.
Benefit Quantity /Benefit Hi-erarchy Level /Benefit Sales Hierarchy ID /Benefit Descrip-tion /Benefit Child Quantity
Details of the benefit item including quantity to fulfill the pro-motion.
Benefit Type Price Override indicates that the item price is to be overrid-den by the price specified in the Benefit Value field. Money Off indicates that the amount specified is to be taken off the standard item price.
Benefit Value The amount by which to override the item price or to be de-ducted from the item price.
M I N S P E N D D I S C O U N T % ( S T Y L E 4 )
Will allow a percentage discount if a certain event occurs for example minimum spend of £30 and receive 10% off.
Field Meaning
Parameter Number
Multiple sequenced parameter numbers act as OR relationships, that is, only one item from the data set is allowed for use in the promotion. To al-low multiple triggers and benefits. The maximum combination of trigger and benefit parameters is 99.
Trigger Hierar-chy Level
The hierarchy level of the promotional item to be sold.

Page: 96 © Torex Retail Holdings Limited 2010. All rights reserved.
Trigger Sales Hierarchy Id /Description./Min Trigger Spend
The details including minimum spend of the promotional item to be sold.
Benefit Hierar-chy Level
The hierarchy level of the benefit items.
Benefit Sales Hierarchy Id /Description /Benefit Dis-count Percent-age
The details including the % discount of the benefit items.
M I N S P E N D D I S C O U N T £ ( S T Y L E 5 )
Will allow a discount if a certain event occurs for example minimum spend of £20 on drinks and receive £5 off.
Field Meaning
Parameter Number Multiple sequenced parameter numbers act as OR relationships, that is, only one item from the data set is allowed for use in the pro-motion.
Trigger Hierarchy Level
The hierarchy level of the promotional item to be sold.
Trigger Sales Hierar-chy Id /Description/Min Trigger Spend
The details including minimum spend of the promotional item to be sold.
Benefit Value Benefit given.
12.3.3 Price Override (Style 6) Allows a product price to be overridden automatically or manually for example £2.50 Pre-set to enforce a minimum charge.
Field Definitions
Field Meaning
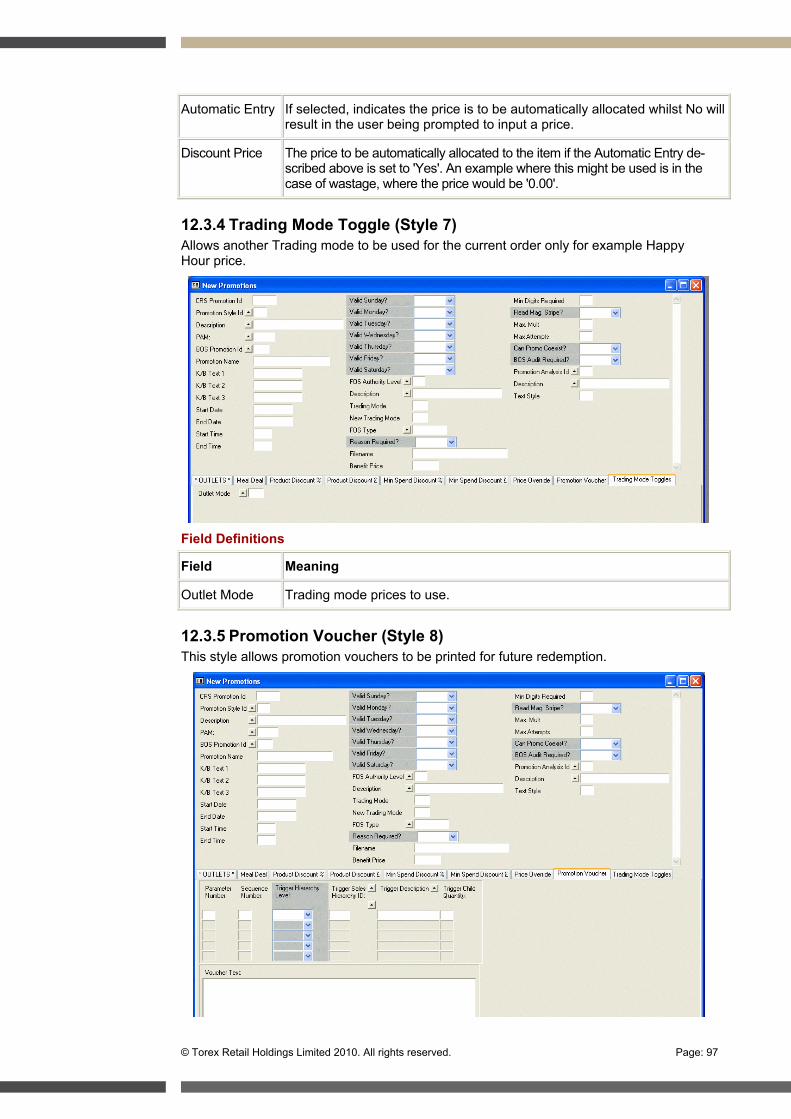
© Torex Retail Holdings Limited 2010. All rights reserved. Page: 97
Automatic Entry If selected, indicates the price is to be automatically allocated whilst No will result in the user being prompted to input a price.
Discount Price The price to be automatically allocated to the item if the Automatic Entry de-scribed above is set to 'Yes'. An example where this might be used is in the case of wastage, where the price would be '0.00'.
12.3.4 Trading Mode Toggle (Style 7) Allows another Trading mode to be used for the current order only for example Happy Hour price.
Field Definitions
Field Meaning
Outlet Mode Trading mode prices to use.
12.3.5 Promotion Voucher (Style 8) This style allows promotion vouchers to be printed for future redemption.
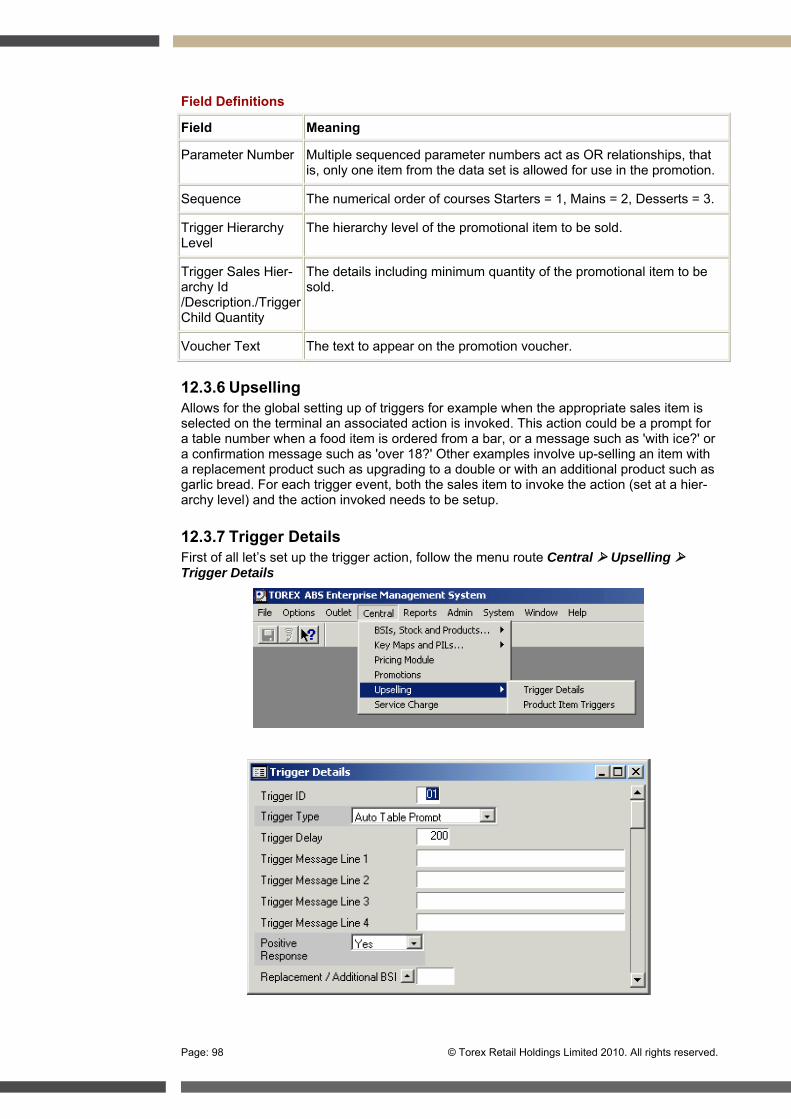
Page: 98 © Torex Retail Holdings Limited 2010. All rights reserved.
Field Definitions
Field Meaning
Parameter Number Multiple sequenced parameter numbers act as OR relationships, that is, only one item from the data set is allowed for use in the promotion.
Sequence The numerical order of courses Starters = 1, Mains = 2, Desserts = 3.
Trigger Hierarchy Level
The hierarchy level of the promotional item to be sold.
Trigger Sales Hier-archy Id /Description./Trigger Child Quantity
The details including minimum quantity of the promotional item to be sold.
Voucher Text The text to appear on the promotion voucher.
12.3.6 Upselling Allows for the global setting up of triggers for example when the appropriate sales item is selected on the terminal an associated action is invoked. This action could be a prompt for a table number when a food item is ordered from a bar, or a message such as 'with ice?' or a confirmation message such as 'over 18?' Other examples involve up-selling an item with a replacement product such as upgrading to a double or with an additional product such as garlic bread. For each trigger event, both the sales item to invoke the action (set at a hier-archy level) and the action invoked needs to be setup.
12.3.7 Trigger Details First of all let’s set up the trigger action, follow the menu route Central Upselling Trigger Details
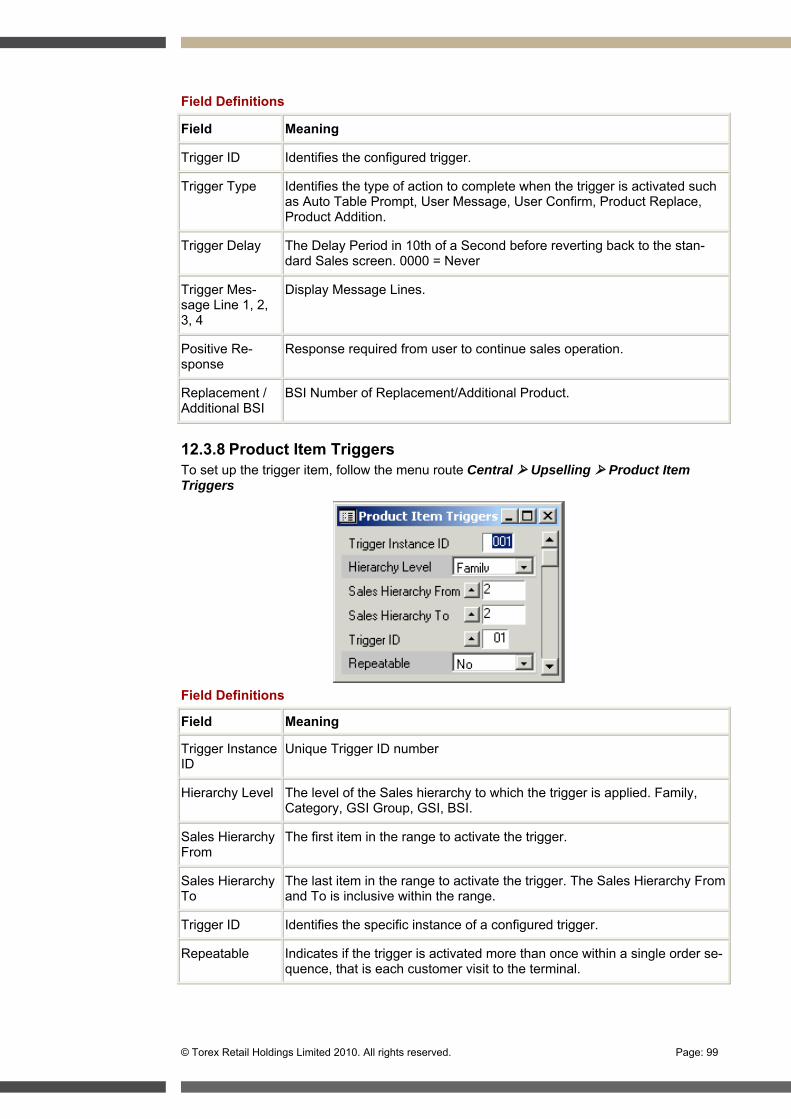
© Torex Retail Holdings Limited 2010. All rights reserved. Page: 99
Field Definitions
Field Meaning
Trigger ID Identifies the configured trigger.
Trigger Type Identifies the type of action to complete when the trigger is activated such as Auto Table Prompt, User Message, User Confirm, Product Replace, Product Addition.
Trigger Delay The Delay Period in 10th of a Second before reverting back to the stan-dard Sales screen. 0000 = Never
Trigger Mes-sage Line 1, 2, 3, 4
Display Message Lines.
Positive Re-sponse
Response required from user to continue sales operation.
Replacement / Additional BSI
BSI Number of Replacement/Additional Product.
12.3.8 Product Item Triggers To set up the trigger item, follow the menu route Central Upselling Product Item Triggers
Field Definitions
Field Meaning
Trigger Instance ID
Unique Trigger ID number
Hierarchy Level The level of the Sales hierarchy to which the trigger is applied. Family, Category, GSI Group, GSI, BSI.
Sales Hierarchy From
The first item in the range to activate the trigger.
Sales Hierarchy To
The last item in the range to activate the trigger. The Sales Hierarchy From and To is inclusive within the range.
Trigger ID Identifies the specific instance of a configured trigger.
Repeatable Indicates if the trigger is activated more than once within a single order se-quence, that is each customer visit to the terminal.

Page: 100 © Torex Retail Holdings Limited 2010. All rights reserved.
12.3.9 Outlet Product Item Triggers Follow menu route, Outlet Configuration Outlet Product Item Triggers
This table associates triggers to outlets.
Populate this table to configure triggers to outlets, based upon the global data set up in menu route, Central Upselling Product Item Triggers
12.3.10 Service Charge A service charge is automatically applied to a transaction when configured items are sold within a specified trading area. This will be a percentage of the sales value for the config-ured item. A covers trigger quantity is setup to override the percentage service charge with a covers service charge percentage such as when large parties are being catered for.
Follow the menu route Central Service Charge
Field Definitions
Field Meaning
Service Charge ID
Unique ID.
Description Description of service charge.
Service Charge %
Percentage of service charge to be used. This will be overridden by the covers trigger percentage if the covers exceed the trigger quantity.
Covers Trigger When the number of covers exceeds this value the covers service charge is used and not the usual service charge. If set to zero then covers trigger is not used.
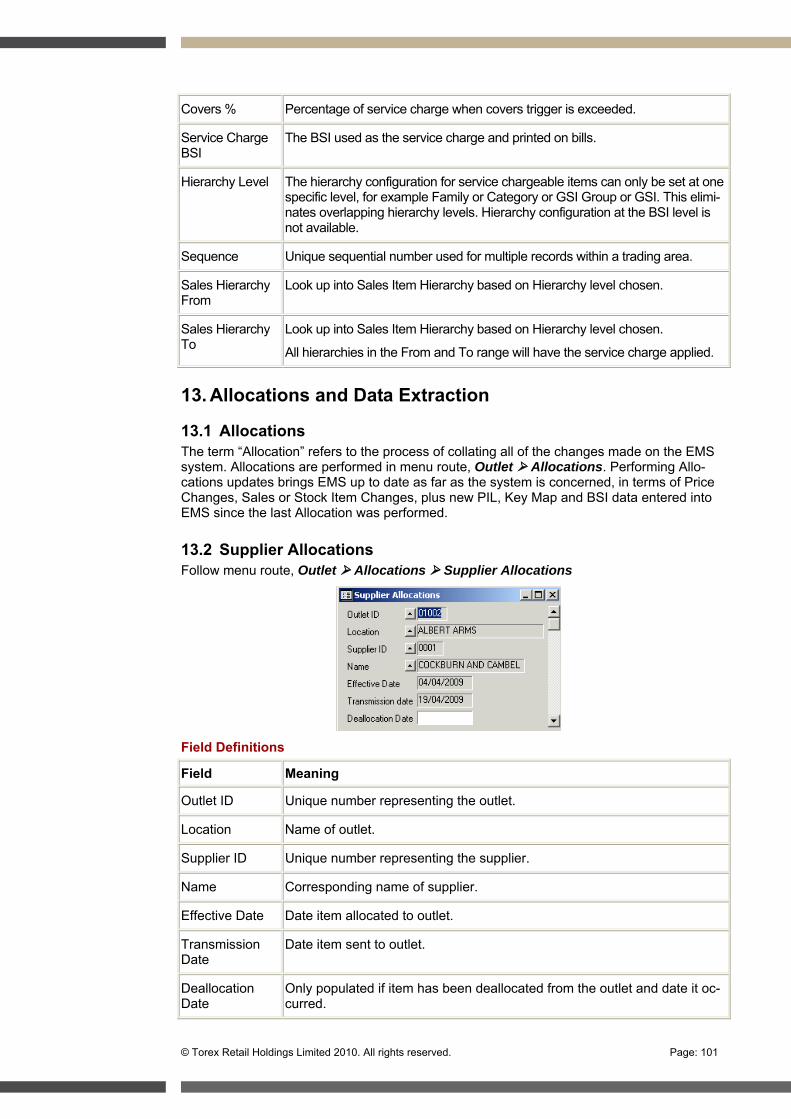
© Torex Retail Holdings Limited 2010. All rights reserved. Page: 101
Covers % Percentage of service charge when covers trigger is exceeded.
Service Charge BSI
The BSI used as the service charge and printed on bills.
Hierarchy Level The hierarchy configuration for service chargeable items can only be set at one specific level, for example Family or Category or GSI Group or GSI. This elimi-nates overlapping hierarchy levels. Hierarchy configuration at the BSI level is not available.
Sequence Unique sequential number used for multiple records within a trading area.
Sales Hierarchy From
Look up into Sales Item Hierarchy based on Hierarchy level chosen.
Sales Hierarchy To
Look up into Sales Item Hierarchy based on Hierarchy level chosen.
All hierarchies in the From and To range will have the service charge applied.
13. Allocations and Data Extraction
13.1 Allocations The term “Allocation” refers to the process of collating all of the changes made on the EMS system. Allocations are performed in menu route, Outlet Allocations. Performing Allo-cations updates brings EMS up to date as far as the system is concerned, in terms of Price Changes, Sales or Stock Item Changes, plus new PIL, Key Map and BSI data entered into EMS since the last Allocation was performed.
13.2 Supplier Allocations Follow menu route, Outlet Allocations Supplier Allocations
Field Definitions
Field Meaning
Outlet ID Unique number representing the outlet.
Location Name of outlet.
Supplier ID Unique number representing the supplier.
Name Corresponding name of supplier.
Effective Date Date item allocated to outlet.
Transmission Date
Date item sent to outlet.
Deallocation Date
Only populated if item has been deallocated from the outlet and date it oc-curred.
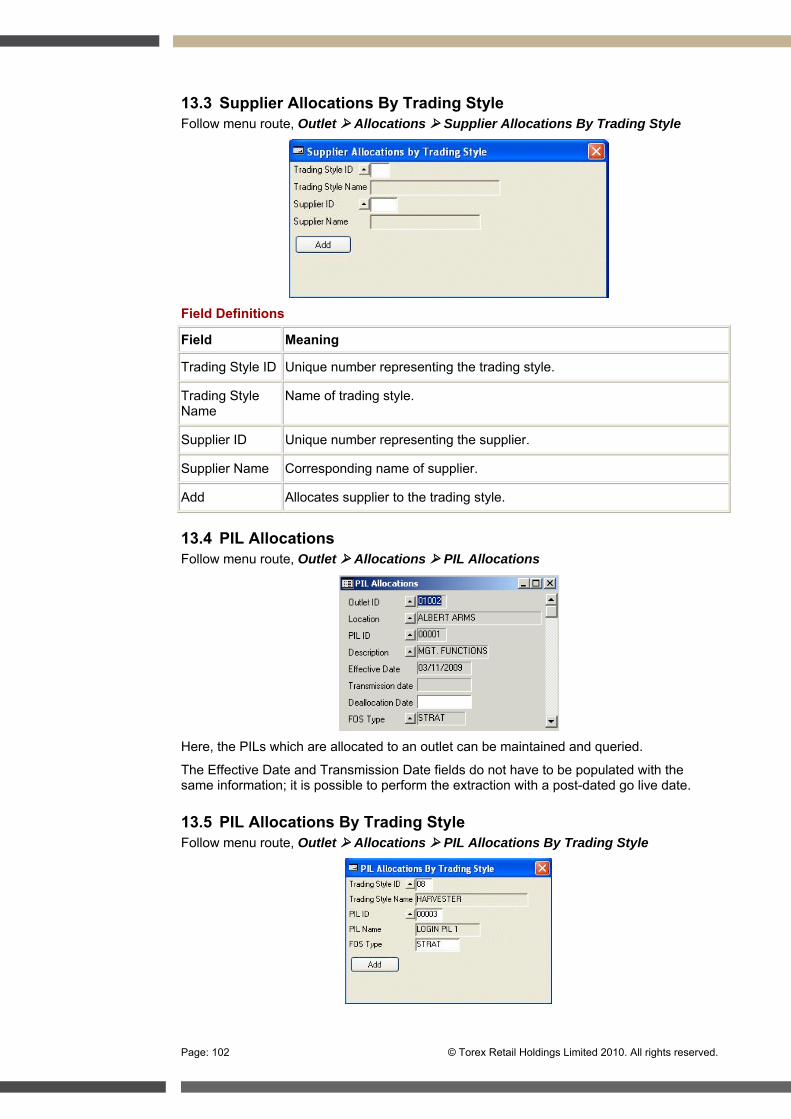
Page: 102 © Torex Retail Holdings Limited 2010. All rights reserved.
13.3 Supplier Allocations By Trading Style Follow menu route, Outlet Allocations Supplier Allocations By Trading Style
Field Definitions
Field Meaning
Trading Style ID Unique number representing the trading style.
Trading Style Name
Name of trading style.
Supplier ID Unique number representing the supplier.
Supplier Name Corresponding name of supplier.
Add Allocates supplier to the trading style.
13.4 PIL Allocations Follow menu route, Outlet Allocations PIL Allocations
Here, the PILs which are allocated to an outlet can be maintained and queried.
The Effective Date and Transmission Date fields do not have to be populated with the same information; it is possible to perform the extraction with a post-dated go live date.
13.5 PIL Allocations By Trading Style Follow menu route, Outlet Allocations PIL Allocations By Trading Style
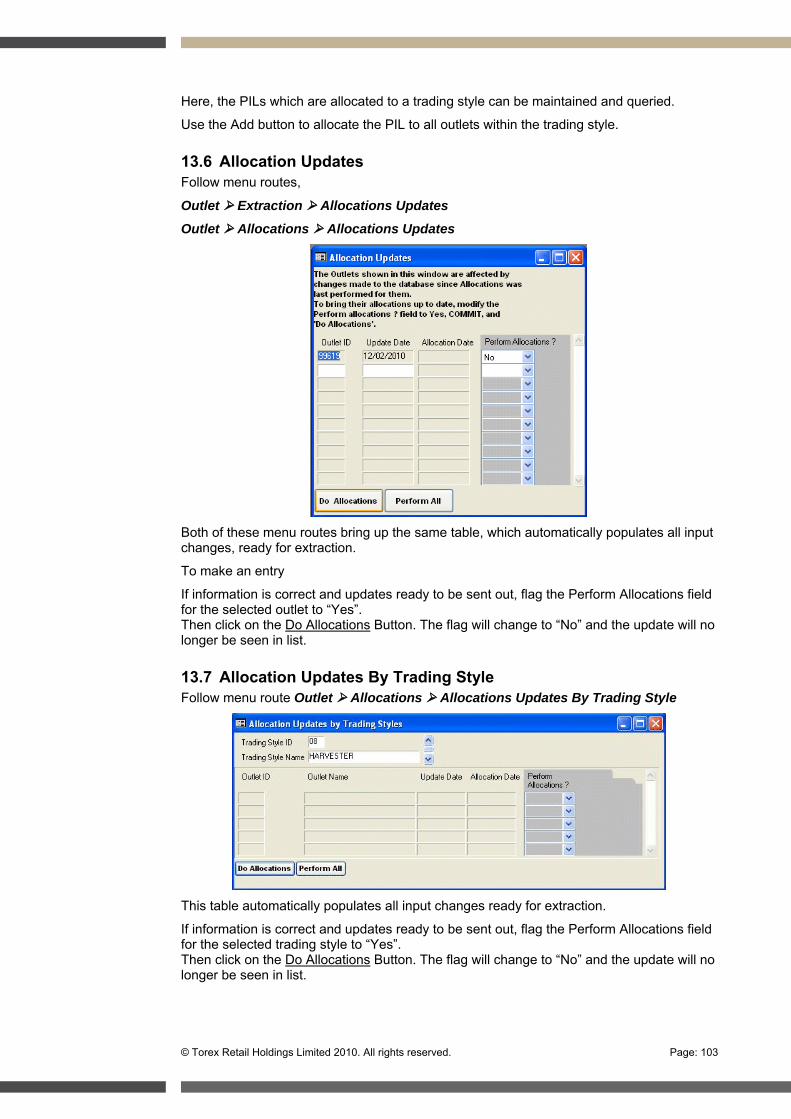
© Torex Retail Holdings Limited 2010. All rights reserved. Page: 103
Here, the PILs which are allocated to a trading style can be maintained and queried.
Use the Add button to allocate the PIL to all outlets within the trading style.
13.6 Allocation Updates Follow menu routes,
Outlet Extraction Allocations Updates
Outlet Allocations Allocations Updates
Both of these menu routes bring up the same table, which automatically populates all input changes, ready for extraction.
To make an entry
If information is correct and updates ready to be sent out, flag the Perform Allocations field for the selected outlet to “Yes”. Then click on the Do Allocations Button. The flag will change to “No” and the update will no longer be seen in list.
13.7 Allocation Updates By Trading Style Follow menu route Outlet Allocations Allocations Updates By Trading Style
This table automatically populates all input changes ready for extraction.
If information is correct and updates ready to be sent out, flag the Perform Allocations field for the selected trading style to “Yes”. Then click on the Do Allocations Button. The flag will change to “No” and the update will no longer be seen in list.
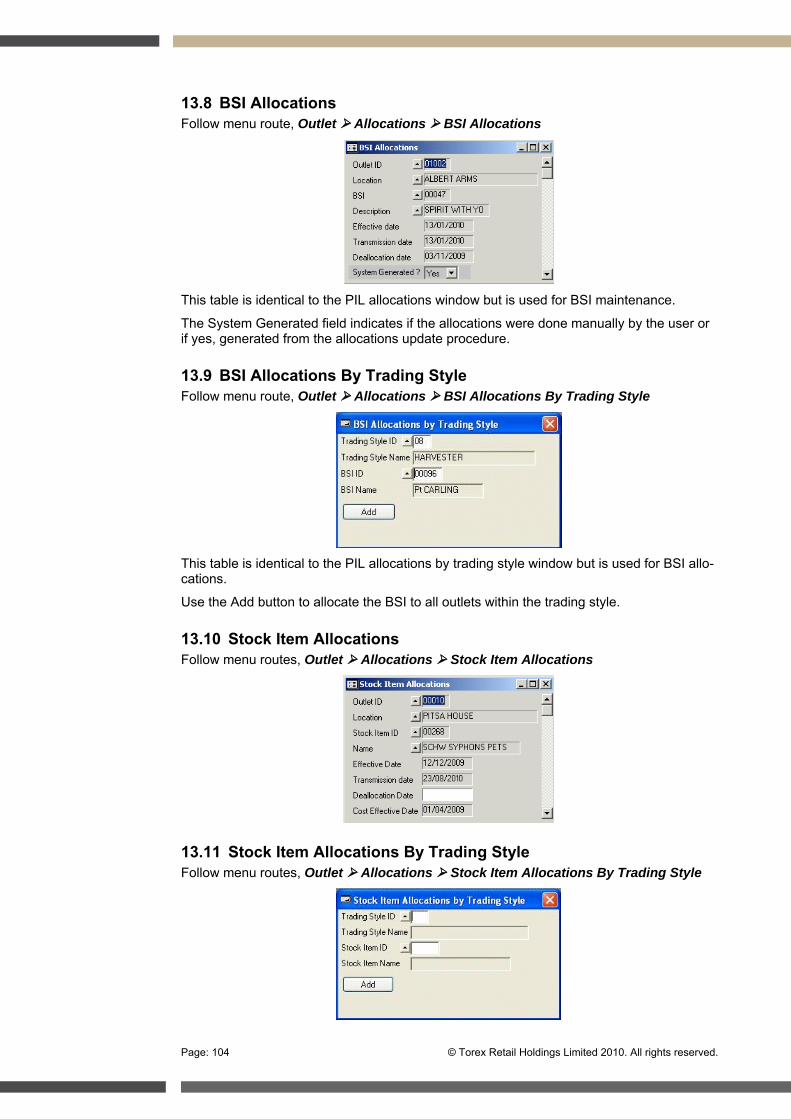
Page: 104 © Torex Retail Holdings Limited 2010. All rights reserved.
13.8 BSI Allocations Follow menu route, Outlet Allocations BSI Allocations
This table is identical to the PIL allocations window but is used for BSI maintenance.
The System Generated field indicates if the allocations were done manually by the user or if yes, generated from the allocations update procedure.
13.9 BSI Allocations By Trading Style Follow menu route, Outlet Allocations BSI Allocations By Trading Style
This table is identical to the PIL allocations by trading style window but is used for BSI allo-cations.
Use the Add button to allocate the BSI to all outlets within the trading style.
13.10 Stock Item Allocations Follow menu routes, Outlet Allocations Stock Item Allocations
13.11 Stock Item Allocations By Trading Style Follow menu routes, Outlet Allocations Stock Item Allocations By Trading Style
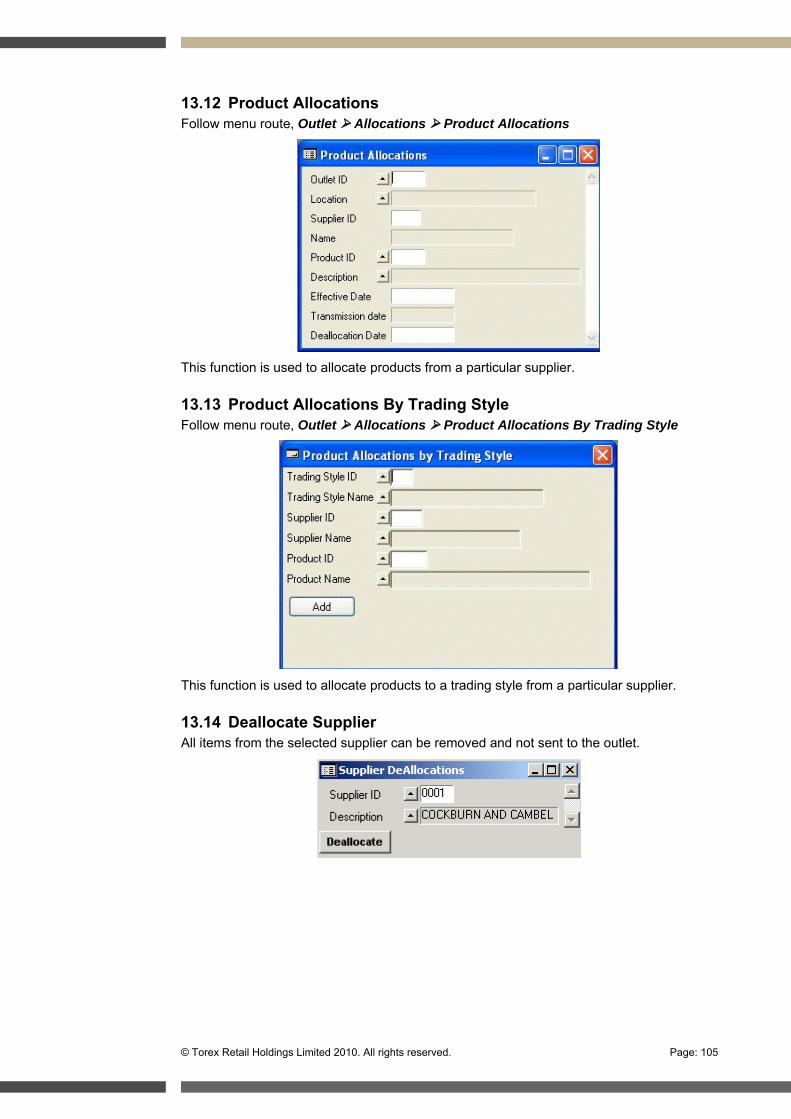
© Torex Retail Holdings Limited 2010. All rights reserved. Page: 105
13.12 Product Allocations Follow menu route, Outlet Allocations Product Allocations
This function is used to allocate products from a particular supplier.
13.13 Product Allocations By Trading Style Follow menu route, Outlet Allocations Product Allocations By Trading Style
This function is used to allocate products to a trading style from a particular supplier.
13.14 Deallocate Supplier All items from the selected supplier can be removed and not sent to the outlet.
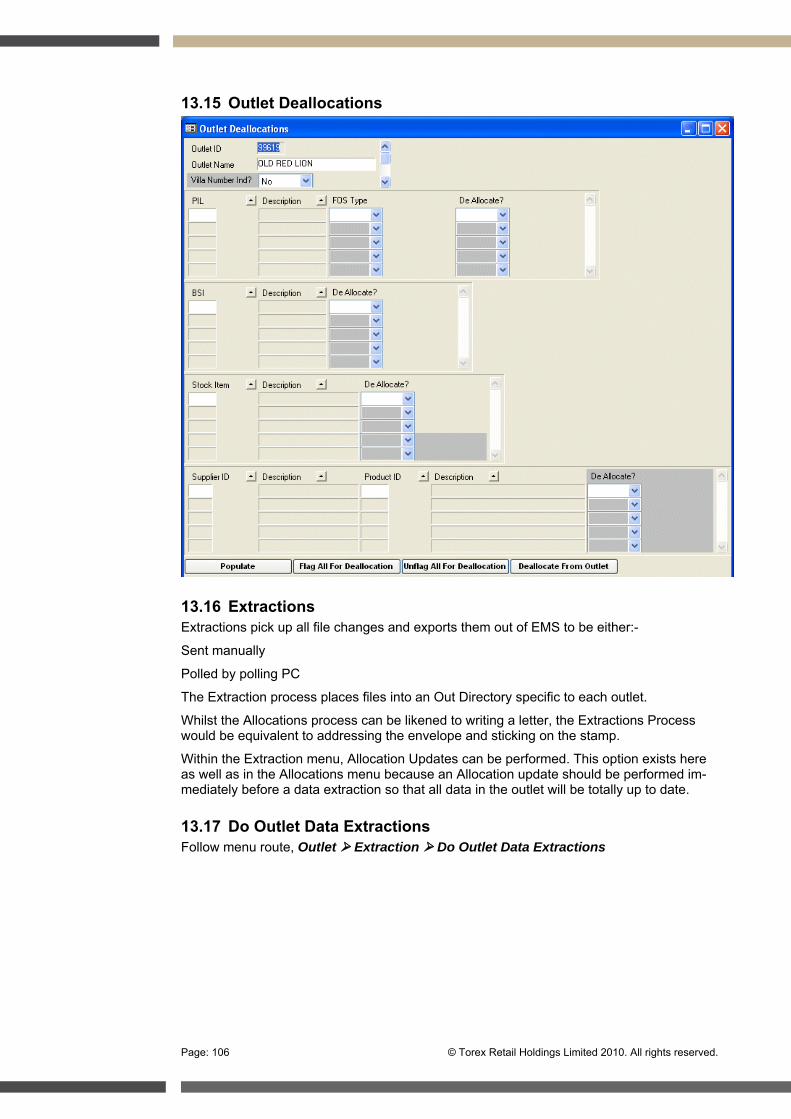
Page: 106 © Torex Retail Holdings Limited 2010. All rights reserved.
13.15 Outlet Deallocations
13.16 Extractions Extractions pick up all file changes and exports them out of EMS to be either:-
Sent manually
Polled by polling PC
The Extraction process places files into an Out Directory specific to each outlet.
Whilst the Allocations process can be likened to writing a letter, the Extractions Process would be equivalent to addressing the envelope and sticking on the stamp.
Within the Extraction menu, Allocation Updates can be performed. This option exists here as well as in the Allocations menu because an Allocation update should be performed im-mediately before a data extraction so that all data in the outlet will be totally up to date.
13.17 Do Outlet Data Extractions Follow menu route, Outlet Extraction Do Outlet Data Extractions

© Torex Retail Holdings Limited 2010. All rights reserved. Page: 107
In this table all outlets and outlet IDs are displayed, along with their BOS and FOS types. If the Emergency Flag is set to Yes, the previous files will be overwritten. If set to No, the new files will be appended when using with the Ulysses polling system.
13.18 Extracted Outlets Follow menu route, Outlet Extraction Extracted Outlets
This shows when extractions have been run for an outlet and the types of extractions per-formed. See Related Window “Extracted Tables of an Extracted Outlet”.
13.19 Outlet Disk 5 Creation

Page: 108 © Torex Retail Holdings Limited 2010. All rights reserved.
13.20 Outlet Data Extractions By Trading Style Follow menu route, Outlet Extraction Outlet Data Extractions By Trading Style
In this table all outlets within a trading style and outlet IDs are displayed, along with their BOS and FOS types. If the Emergency Flag is set to Yes, the previous files will be over-written. If set to No, the new files will be appended when using with the Ulysses polling system.
13.21 View Outlets for Extraction Follow menu route, Outlet Extraction View Outlets for Extraction
All tables and the pending changes are displayed for a specific outlet. The contents are not amendable and just for viewing purposes only.
Field Definitions
Field Meaning
Process? Set this flag to “Yes” in order to process the extraction.
Refresh prices? If flagged to “Yes”, the entire price file will be extracted. If “No”, only selling price changes will be sent.
Run Type Refers to the type of extraction required, and there are four methods of ex-
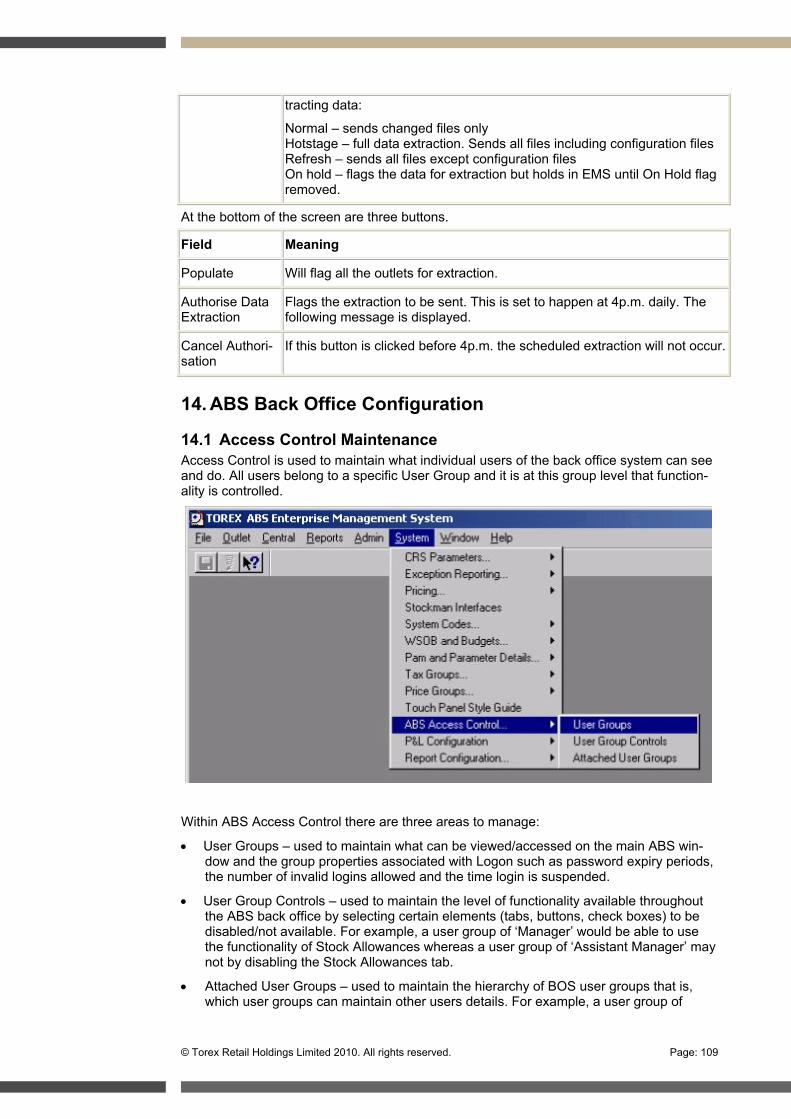
© Torex Retail Holdings Limited 2010. All rights reserved. Page: 109
tracting data:
Normal – sends changed files only Hotstage – full data extraction. Sends all files including configuration files Refresh – sends all files except configuration files On hold – flags the data for extraction but holds in EMS until On Hold flag removed.
At the bottom of the screen are three buttons.
Field Meaning
Populate Will flag all the outlets for extraction.
Authorise Data Extraction
Flags the extraction to be sent. This is set to happen at 4p.m. daily. The following message is displayed.
Cancel Authori-sation
If this button is clicked before 4p.m. the scheduled extraction will not occur.
14. ABS Back Office Configuration
14.1 Access Control Maintenance Access Control is used to maintain what individual users of the back office system can see and do. All users belong to a specific User Group and it is at this group level that function-ality is controlled.
Within ABS Access Control there are three areas to manage:
User Groups – used to maintain what can be viewed/accessed on the main ABS win-dow and the group properties associated with Logon such as password expiry periods, the number of invalid logins allowed and the time login is suspended.
User Group Controls – used to maintain the level of functionality available throughout the ABS back office by selecting certain elements (tabs, buttons, check boxes) to be disabled/not available. For example, a user group of ‘Manager’ would be able to use the functionality of Stock Allowances whereas a user group of ‘Assistant Manager’ may not by disabling the Stock Allowances tab.
Attached User Groups – used to maintain the hierarchy of BOS user groups that is, which user groups can maintain other users details. For example, a user group of

Page: 110 © Torex Retail Holdings Limited 2010. All rights reserved.
‘Manager’ would be able to maintain the details of user groups such as ‘Assistant Manager’ and ‘Supervisor’ but not vice versa.
14.2 User Groups Follow the menu route, System ABS Access Control User Groups
The following table is displayed:
Using this table, elements on the main ABS window and the group Login properties can be managed (at a group level).
To make an entry
Within the User Groups table, all fields are mandatory. We will examine each field in turn.
Mandatory Fields
Field Meaning
Group ID The unique ID of the user group.
Name The name of the user group.
Grace Logins The number of logins a user is allowed after the password expiry period has ended. A user may be on holiday when the password expires. This is used to give the user a chance to change the password upon their return.
Expiry Period Each back office user has an expiry period (the number of days that a password is valid). Values can be between 1 and 99 with a default value of 90 days.
Maintain Local Indicates if the user can maintain the details of other users that belong to the same back office user group. A user might forget their password and instead of getting someone outside to give them a new password, some-one who is in the same group with this permission can change it for them.
Employees Select Yes to indicate a user can maintain the details of others who do not belong to a back office user group (non-back office users). Select No for just BOS users.
URL Specifies the URL of the html page displayed on the main ABS window. This allows the html page to vary depending upon the access level of the current user. If the URL points at a local file then the file should be stored
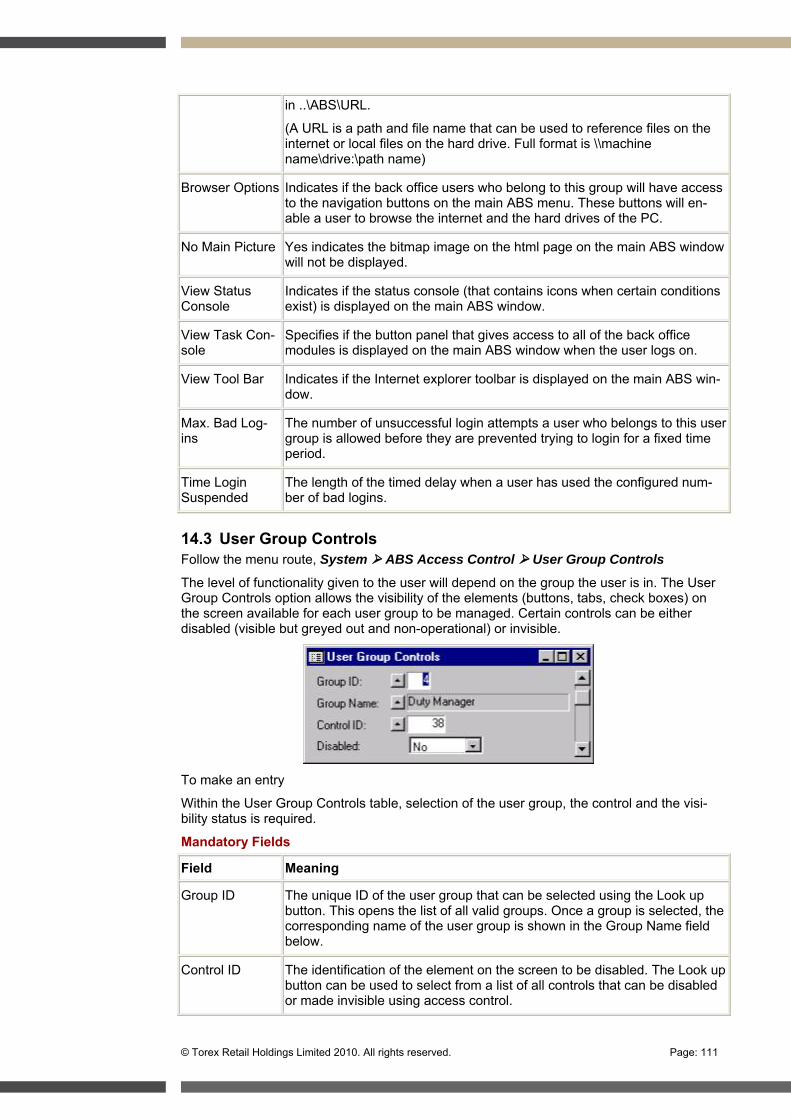
© Torex Retail Holdings Limited 2010. All rights reserved. Page: 111
in ..\ABS\URL.
(A URL is a path and file name that can be used to reference files on the internet or local files on the hard drive. Full format is \\machine name\drive:\path name)
Browser Options Indicates if the back office users who belong to this group will have access to the navigation buttons on the main ABS menu. These buttons will en-able a user to browse the internet and the hard drives of the PC.
No Main Picture Yes indicates the bitmap image on the html page on the main ABS window will not be displayed.
View Status Console
Indicates if the status console (that contains icons when certain conditions exist) is displayed on the main ABS window.
View Task Con-sole
Specifies if the button panel that gives access to all of the back office modules is displayed on the main ABS window when the user logs on.
View Tool Bar Indicates if the Internet explorer toolbar is displayed on the main ABS win-dow.
Max. Bad Log-ins
The number of unsuccessful login attempts a user who belongs to this user group is allowed before they are prevented trying to login for a fixed time period.
Time Login Suspended
The length of the timed delay when a user has used the configured num-ber of bad logins.
14.3 User Group Controls Follow the menu route, System ABS Access Control User Group Controls
The level of functionality given to the user will depend on the group the user is in. The User Group Controls option allows the visibility of the elements (buttons, tabs, check boxes) on the screen available for each user group to be managed. Certain controls can be either disabled (visible but greyed out and non-operational) or invisible.
To make an entry
Within the User Group Controls table, selection of the user group, the control and the visi-bility status is required.
Mandatory Fields
Field Meaning
Group ID The unique ID of the user group that can be selected using the Look up button. This opens the list of all valid groups. Once a group is selected, the corresponding name of the user group is shown in the Group Name field below.
Control ID The identification of the element on the screen to be disabled. The Look up button can be used to select from a list of all controls that can be disabled or made invisible using access control.
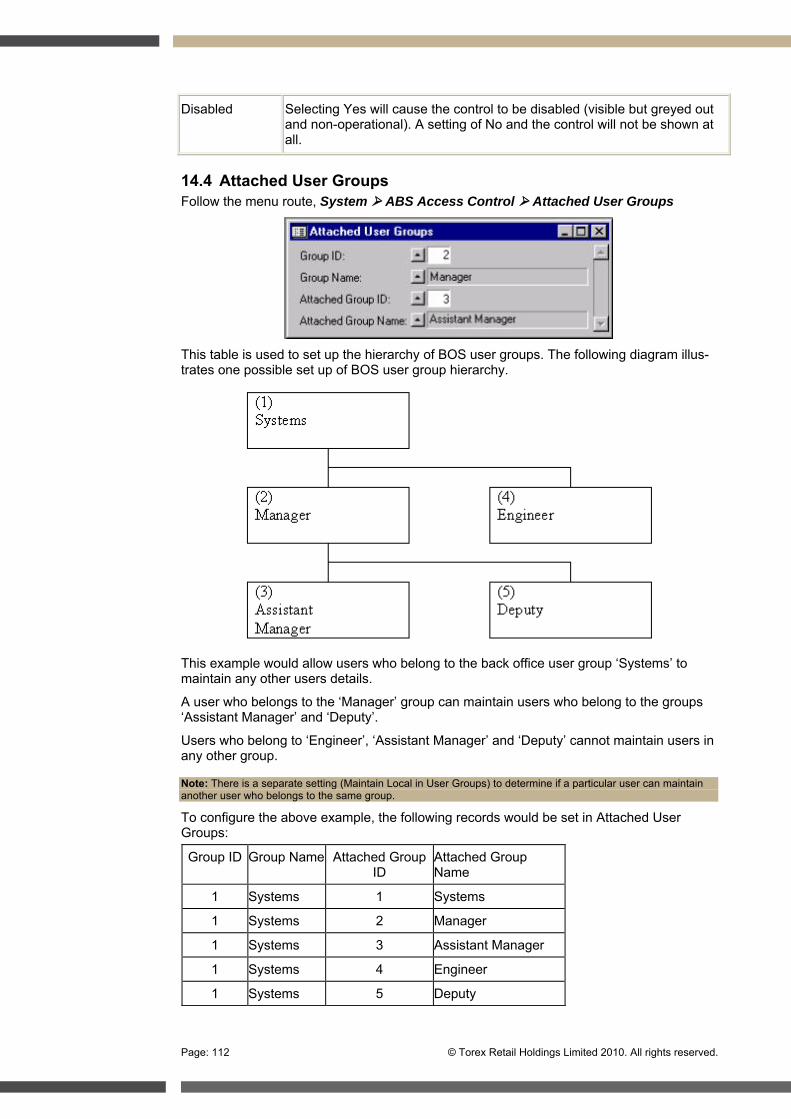
Page: 112 © Torex Retail Holdings Limited 2010. All rights reserved.
Disabled Selecting Yes will cause the control to be disabled (visible but greyed out and non-operational). A setting of No and the control will not be shown at all.
14.4 Attached User Groups Follow the menu route, System ABS Access Control Attached User Groups
This table is used to set up the hierarchy of BOS user groups. The following diagram illus-trates one possible set up of BOS user group hierarchy.
This example would allow users who belong to the back office user group ‘Systems’ to maintain any other users details.
A user who belongs to the ‘Manager’ group can maintain users who belong to the groups ‘Assistant Manager’ and ‘Deputy’.
Users who belong to ‘Engineer’, ‘Assistant Manager’ and ‘Deputy’ cannot maintain users in any other group.
Note: There is a separate setting (Maintain Local in User Groups) to determine if a particular user can maintain another user who belongs to the same group.
To configure the above example, the following records would be set in Attached User Groups:
Group ID Group Name Attached Group ID
Attached Group Name
1 Systems 1 Systems
1 Systems 2 Manager
1 Systems 3 Assistant Manager
1 Systems 4 Engineer
1 Systems 5 Deputy

© Torex Retail Holdings Limited 2010. All rights reserved. Page: 113
2 Manager 2 Manager
2 Manager 3 Assistant Manager
2 Manager 5 Deputy
3 Assistant Manager
3 Assistant Manager
4 Engineer 4 Engineer
5 Deputy 5 Deputy
Note: A group must always have a link to itself.
To make an entry
Within the Attached User Groups table, two fields require selecting, first the user group and then the user group that they can maintain.
Mandatory Fields
Field Meaning
Group ID The unique ID of the user group that can be selected using the Look up button. Once selected, the corresponding name of the user group is shown.
Attached Group ID
The user group ID that Group ID has access rights over that can be se-lected using the Look up button. Once selected, the corresponding name of the selected attached user group is shown.
14.5 P&L Configuration P&L Configuration is used to control the setup and layout of a Statement of Business.
The Statement of Business can go under many names: Declaration of Business Done, Banking Sheet, Weekly Return, Dynamic Profit and Loss and so on. As the variety of names suggest, P&L Configuration is used in different ways, but essentially it is a spread-sheet recording all income, expenses and banking for the outlet. At some point (normally weekly but occasionally daily) the statement is balanced and finalised. A statement bal-ances if all of the incoming equals all of the outgoings. The system records this by showing a 'Cash on Hand' of zero.

Page: 114 © Torex Retail Holdings Limited 2010. All rights reserved.
To configure a statement, several tables require completing in a certain order (as some ta-ble use entries made in another). The tables to be completed are shown below:
P&L Groups – used to split the statement into individual worksheets (tabs) that repre-sent different financial sections of the business.
P&L Lines – used to configure the lines (rows) on a worksheet. The tables ‘P&L Groups’ and ‘P&L Tax Groups both need to be completed prior to the setting up of P&L Lines.
P&L Configuration – is used for general configuration settings including the Print Dia-log box settings. The table ‘P&L Lines’ needs to be completed prior to the setting up of P&L Configuration.
P&L Forward Lines – used for bringing figures into the current statement from the last statement and for carrying figures forward to the next statement. The table ‘P&L Lines’ needs to be completed prior to the setting up of P&L Forward Lines.
P&L Types – for configuring the characteristics – format and prompts of an entry on the P&L Details window.
P&L Line Types –used to add extra columns in the P&L Details window to supplement the default Transaction Date, Value and Tax Rate columns. These additional columns prompt for more information such as descriptions, comments, meter readings etc. The tables ‘P&L Lines’ and ‘P&L Types’ both need to be completed prior to the setting up of P&L Line Types.
P&L Payment Method Configuration – used to configure sales paid by specific pay-ment methods to automatically populate particular lines on the statement. The table ‘P&L Lines’ needs to be completed prior to the setting up of P&L Payment Method Configuration.
P&L Tax Groups – used to link the tax rates used in the outlets with those used in cal-culations within the statement.
P&L Deposit Configs –
P&L Promotion Configs -
14.6 P&L Groups Follow the menu route, System P&L Configuration P&L Groups Records within the P&L Groups table represent the tabs (individual worksheets) within the statement and are usually titled to cover the different financial areas of the business such as: Income, Expenses, Bankings, Summary, and so on.
For each tab or group, the style (daily or weekly) to be displayed and calculated on needs to be set along with the ranges of cells to view and print (both for current and finalised re-ports).
To make an entry
Each record within this table represents a group (or tab) on the statement. All fields are Mandatory.
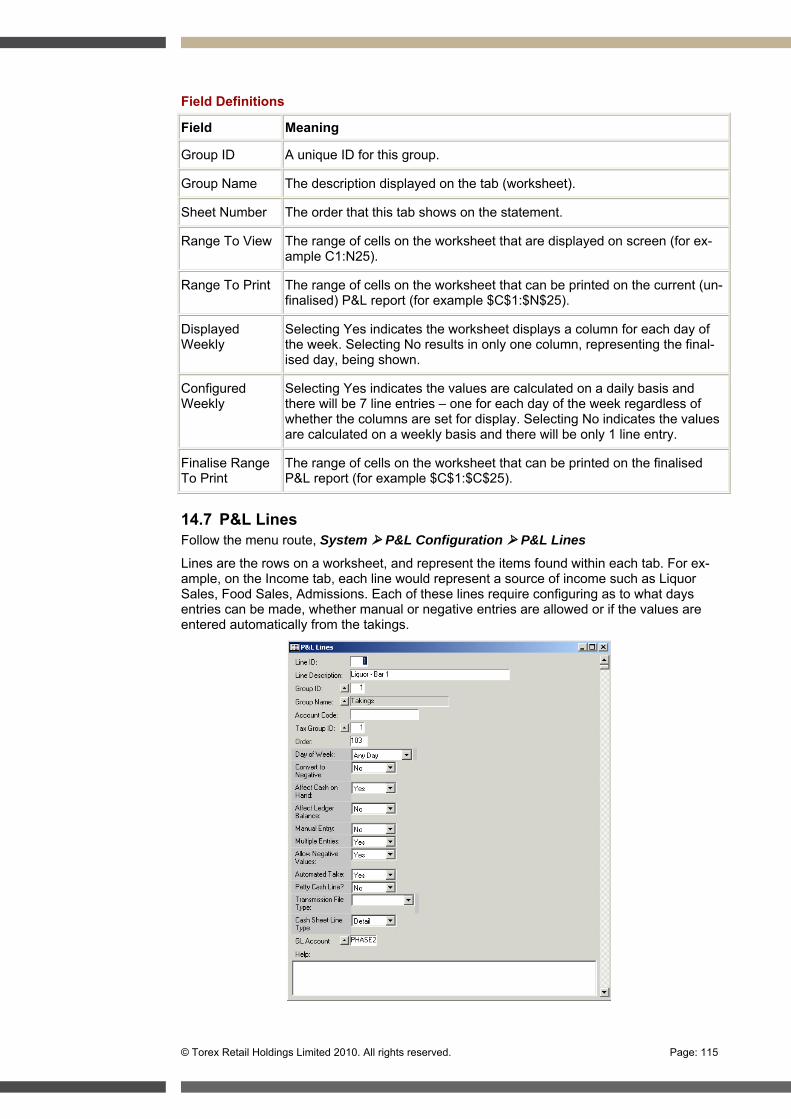
© Torex Retail Holdings Limited 2010. All rights reserved. Page: 115
Field Definitions
Field Meaning
Group ID A unique ID for this group.
Group Name The description displayed on the tab (worksheet).
Sheet Number The order that this tab shows on the statement.
Range To View The range of cells on the worksheet that are displayed on screen (for ex-ample C1:N25).
Range To Print The range of cells on the worksheet that can be printed on the current (un-finalised) P&L report (for example $C$1:$N$25).
Displayed Weekly
Selecting Yes indicates the worksheet displays a column for each day of the week. Selecting No results in only one column, representing the final-ised day, being shown.
Configured Weekly
Selecting Yes indicates the values are calculated on a daily basis and there will be 7 line entries – one for each day of the week regardless of whether the columns are set for display. Selecting No indicates the values are calculated on a weekly basis and there will be only 1 line entry.
Finalise Range To Print
The range of cells on the worksheet that can be printed on the finalised P&L report (for example $C$1:$C$25).
14.7 P&L Lines Follow the menu route, System P&L Configuration P&L Lines
Lines are the rows on a worksheet, and represent the items found within each tab. For ex-ample, on the Income tab, each line would represent a source of income such as Liquor Sales, Food Sales, Admissions. Each of these lines require configuring as to what days entries can be made, whether manual or negative entries are allowed or if the values are entered automatically from the takings.
Page: 116 © Torex Retail Holdings Limited 2010. All rights reserved.
Mandatory Fields
Field Meaning
Line ID A unique ID for the line on the worksheet.
Line Description The name of the line displayed on the worksheet.
Group ID The group (or tab) that this line belongs to. Once selected, the name of the selected Group ID is shown.
Account Code The account code for this line. This is used to associate these lines with account codes on the customers central accounting system.
Tax Group ID The tax group to assign to this line that can be selected using the Look up button.
Order The line number where the calculation is done (outside of the area that is visible on the sheet). The value specified should not be less than 100 and should go up in increments of 3.
Day Of Week The day of the week that an entry for this line is valid. A value of 0 represents any day. With values of 1 (Sunday) through to 7 (Satur-day), when entering details to this line the date will default to the ap-propriate day of the week.
Convert To Negative Select Yes to allow transactions against this line to be subtracted from the cash on hand Selecting No results in the value being added.
Affect Cash On Hand Select Yes to indicate the values entered against this line affect the cash on hand. The cash on hand is effectively the balance of the cur-rent statement (all positive values less all negative values). Select No for memo only type lines.
Affect Ledger Balance Select Yes to indicate the values entered against this line affect the ledger balance.
Manual Entry If manual entries can be added, select Yes. Selecting No will allow the transactions for the line to be viewed, but details cannot be added or amended.
Multiple Entries Select Yes to indicate multiple entries can be entered. Only applica-ble if Manual Entry is allowed.
Allow Negative Value Negative cash values can be entered if Yes is selected.
Automated Take Select Yes if this line is automatically populated by sales from the tills and ensure the Manual Entry field is configured to No to prevent any values from being overwritten.
Transmission File Type
Specifies the transmission file type that the line appears on. Select from a drop-down list with a choice of Income, Expense, Income and Expense and Not Reported.
Cash Sheet Line Type
Specifies whether H (Header), D (Detail), or T (Total) when loaded into cash sheet from TF36.
GL Account Associated account.
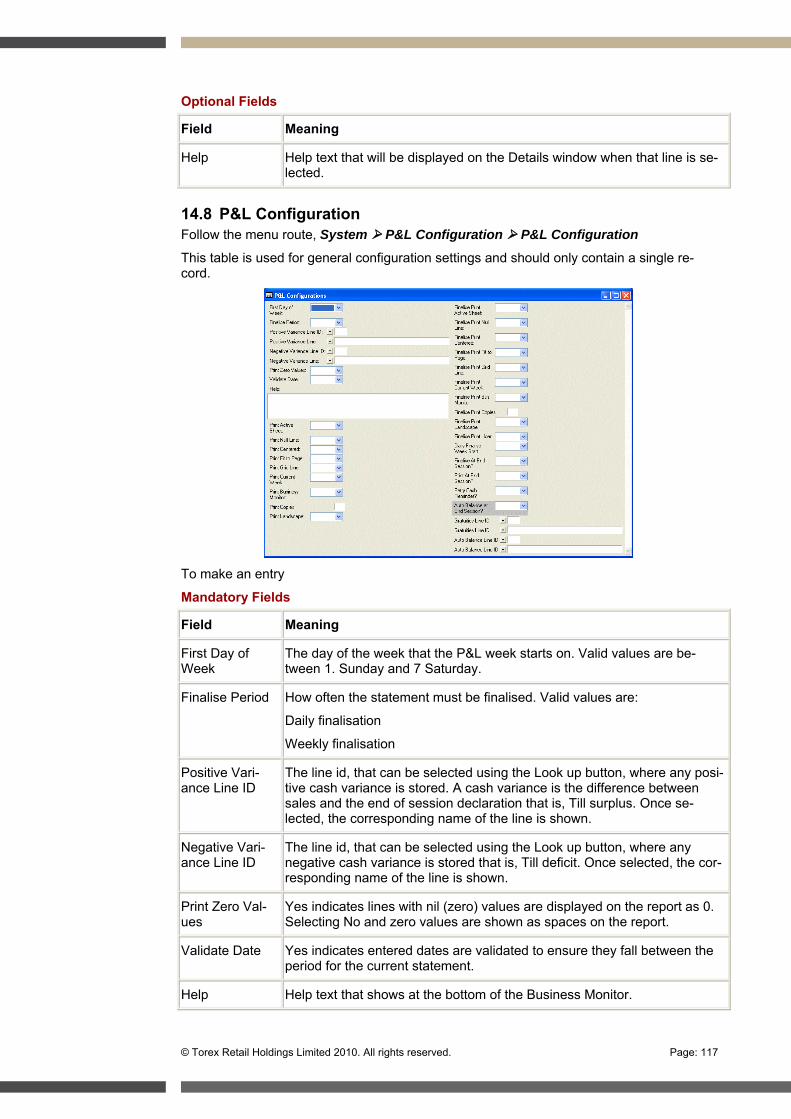
© Torex Retail Holdings Limited 2010. All rights reserved. Page: 117
Optional Fields
Field Meaning
Help Help text that will be displayed on the Details window when that line is se-lected.
14.8 P&L Configuration Follow the menu route, System P&L Configuration P&L Configuration
This table is used for general configuration settings and should only contain a single re-cord.
To make an entry
Mandatory Fields
Field Meaning
First Day of Week
The day of the week that the P&L week starts on. Valid values are be-tween 1. Sunday and 7 Saturday.
Finalise Period How often the statement must be finalised. Valid values are:
Daily finalisation
Weekly finalisation
Positive Vari-ance Line ID
The line id, that can be selected using the Look up button, where any posi-tive cash variance is stored. A cash variance is the difference between sales and the end of session declaration that is, Till surplus. Once se-lected, the corresponding name of the line is shown.
Negative Vari-ance Line ID
The line id, that can be selected using the Look up button, where any negative cash variance is stored that is, Till deficit. Once selected, the cor-responding name of the line is shown.
Print Zero Val-ues
Yes indicates lines with nil (zero) values are displayed on the report as 0. Selecting No and zero values are shown as spaces on the report.
Validate Date Yes indicates entered dates are validated to ensure they fall between the period for the current statement.
Help Help text that shows at the bottom of the Business Monitor.
Page: 118 © Torex Retail Holdings Limited 2010. All rights reserved.
The following fields relate to the Print Dialog box within P&L Configuration and changes made at site will be stored locally.
Field Meaning
Print Active Sheet
Select Yes and only the worksheet that was being viewed in the main statement of business screen will be printed. Selecting No and the entire P&L statement will be printed.
Print Null Line Selecting Yes indicates lines with nil (zero) values are printed.
Print Centered Selecting Yes prints the statement/worksheet such that it is horizontally and vertically centred on the page.
Print Fit to Page Selecting Yes shrinks the statement/selected worksheet to fit exactly on 1 page.
Print Grid Line Selecting Yes prints the statement/selected worksheet with grid lines around the cells.
Print Current Week
Selecting Yes and the Current Week report is printed.
Print Business Monitor
Selecting Yes and the business monitor (shows any comments made for the current week's business activities) will print to accompany the state-ment/worksheet.
Print Copies Number of copies of reports required.
Print Landscape Selecting Yes will print with the orientation of the paper being Landscape (longer length horizontal).
The following fields are applicable when finalising the statement:
Field Meaning
Finalise Print Active Sheet
Yes indicates that on finalisation only the worksheet that was being viewed in the main statement of business screen will be printed. Selecting No and the entire P&L statement will be printed.
Finalise Print Null Line
Selecting Yes indicates lines with nil (zero) values are printed.
Finalise Print Centered
Selecting Yes prints the statement/worksheet such that it is horizontally and vertically centred on the page.
Finalise Print Fit to Page
Selecting Yes shrinks the statement/selected worksheet to fit exactly on 1 page on finalisation.
Finalise Print Grid Line
Selecting Yes prints the statement/selected worksheet with grid lines around the cells on finalisation.
Finalise Print Current Week
Selecting Yes and the Current Week report is printed on finalisation.
Finalise Print Bus Monitor
Selecting Yes and the business monitor (shows any comments made for the current week's business activities) will print to accompany the state-ment/worksheet on finalisation.
Finalise Print Copies
Number of copies of reports required on finalisation.

© Torex Retail Holdings Limited 2010. All rights reserved. Page: 119
Finalise Print Landscape
Selecting Yes will print with the orientation of the paper being Landscape (longer length horizontal) on finalisation.
Finalise Print User
Selecting Yes indicates the user who finalised the statement is displayed on the Finalisation reports.
Daily Finalise Week Start
Start day of week when configured for daily finalisation.
Finalise at End Session?
Automatically finalise at end of session.
Print at End Session?
Automatically print reports at end of session.
Petty Cash Re-minder?
Prompts at finalisation of P&L for petty cash to be entered as part of the house float.
Auto Balance at End Session
Balances the P&L at the end of session to the figures that are declared in the tills.
Gratuities Line ID
Line number and corresponding description for gratuities.
Auto Balance Line ID
Line number and corresponding description for auto balance.
14.9 P&L Forward Lines Follow the menu route, System P&L Configuration P&L Forward Lines
Used for bringing figures from the last finalised statement and for carrying figures forward to the next statement. Used for historical tracking of a line.
To make an entry
Within the P&L Forward Lines table, the Carry Forward Line ID and the Brought Forward Line ID need selecting.
Mandatory Fields
Field Meaning
Carry Forward Line ID
A unique ID for the Carry Forward Line that can be selected using the Look up button that shows valid lines. Once selected, the corresponding name of the line is shown.
Brought For-ward Line ID
A unique ID for the Brought Forward Line that can be selected using the Look up button that shows valid lines. Once selected, the corresponding name of the line is shown.
The ID of the line that the carry forward value from the last statement is added to.
Once the records on the P&L Forward Lines table have been entered continue to configure the statement by setting up the P&L Payment Method Configuration table.
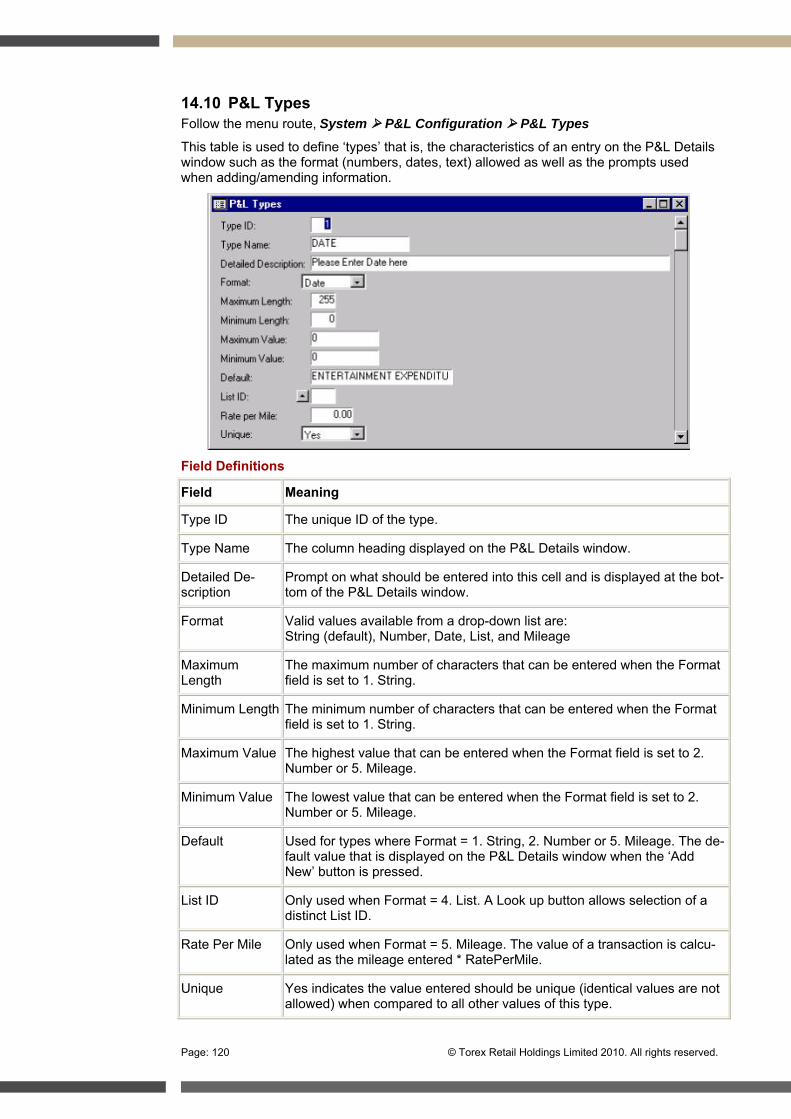
Page: 120 © Torex Retail Holdings Limited 2010. All rights reserved.
14.10 P&L Types Follow the menu route, System P&L Configuration P&L Types
This table is used to define ‘types’ that is, the characteristics of an entry on the P&L Details window such as the format (numbers, dates, text) allowed as well as the prompts used when adding/amending information.
Field Definitions
Field Meaning
Type ID The unique ID of the type.
Type Name The column heading displayed on the P&L Details window.
Detailed De-scription
Prompt on what should be entered into this cell and is displayed at the bot-tom of the P&L Details window.
Format Valid values available from a drop-down list are: String (default), Number, Date, List, and Mileage
Maximum Length
The maximum number of characters that can be entered when the Format field is set to 1. String.
Minimum Length The minimum number of characters that can be entered when the Format field is set to 1. String.
Maximum Value The highest value that can be entered when the Format field is set to 2. Number or 5. Mileage.
Minimum Value The lowest value that can be entered when the Format field is set to 2. Number or 5. Mileage.
Default Used for types where Format = 1. String, 2. Number or 5. Mileage. The de-fault value that is displayed on the P&L Details window when the ‘Add New’ button is pressed.
List ID Only used when Format = 4. List. A Look up button allows selection of a distinct List ID.
Rate Per Mile Only used when Format = 5. Mileage. The value of a transaction is calcu-lated as the mileage entered * RatePerMile.
Unique Yes indicates the value entered should be unique (identical values are not allowed) when compared to all other values of this type.
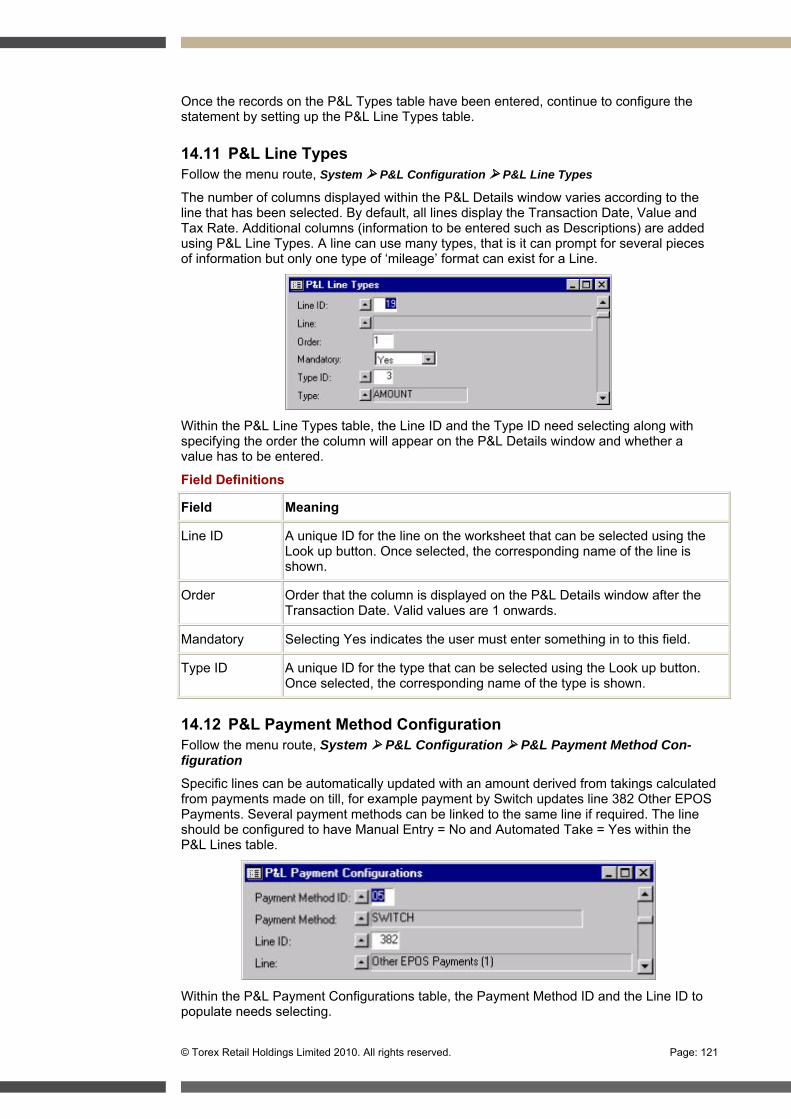
© Torex Retail Holdings Limited 2010. All rights reserved. Page: 121
Once the records on the P&L Types table have been entered, continue to configure the statement by setting up the P&L Line Types table.
14.11 P&L Line Types Follow the menu route, System P&L Configuration P&L Line Types
The number of columns displayed within the P&L Details window varies according to the line that has been selected. By default, all lines display the Transaction Date, Value and Tax Rate. Additional columns (information to be entered such as Descriptions) are added using P&L Line Types. A line can use many types, that is it can prompt for several pieces of information but only one type of ‘mileage’ format can exist for a Line.
Within the P&L Line Types table, the Line ID and the Type ID need selecting along with specifying the order the column will appear on the P&L Details window and whether a value has to be entered.
Field Definitions
Field Meaning
Line ID A unique ID for the line on the worksheet that can be selected using the Look up button. Once selected, the corresponding name of the line is shown.
Order Order that the column is displayed on the P&L Details window after the Transaction Date. Valid values are 1 onwards.
Mandatory Selecting Yes indicates the user must enter something in to this field.
Type ID A unique ID for the type that can be selected using the Look up button. Once selected, the corresponding name of the type is shown.
14.12 P&L Payment Method Configuration Follow the menu route, System P&L Configuration P&L Payment Method Con-figuration
Specific lines can be automatically updated with an amount derived from takings calculated from payments made on till, for example payment by Switch updates line 382 Other EPOS Payments. Several payment methods can be linked to the same line if required. The line should be configured to have Manual Entry = No and Automated Take = Yes within the P&L Lines table.
Within the P&L Payment Configurations table, the Payment Method ID and the Line ID to populate needs selecting.
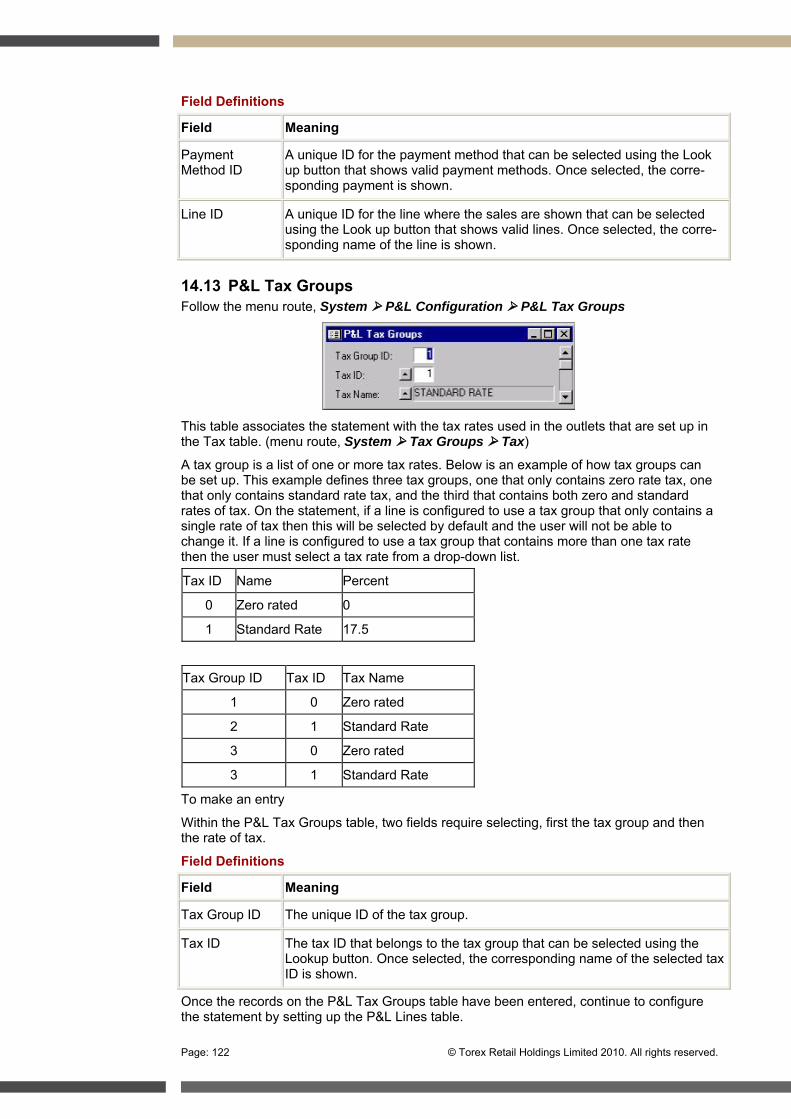
Page: 122 © Torex Retail Holdings Limited 2010. All rights reserved.
Field Definitions
Field Meaning
Payment Method ID
A unique ID for the payment method that can be selected using the Look up button that shows valid payment methods. Once selected, the corre-sponding payment is shown.
Line ID A unique ID for the line where the sales are shown that can be selected using the Look up button that shows valid lines. Once selected, the corre-sponding name of the line is shown.
14.13 P&L Tax Groups Follow the menu route, System P&L Configuration P&L Tax Groups
This table associates the statement with the tax rates used in the outlets that are set up in the Tax table. (menu route, System Tax Groups Tax)
A tax group is a list of one or more tax rates. Below is an example of how tax groups can be set up. This example defines three tax groups, one that only contains zero rate tax, one that only contains standard rate tax, and the third that contains both zero and standard rates of tax. On the statement, if a line is configured to use a tax group that only contains a single rate of tax then this will be selected by default and the user will not be able to change it. If a line is configured to use a tax group that contains more than one tax rate then the user must select a tax rate from a drop-down list.
Tax ID Name Percent
0 Zero rated 0
1 Standard Rate 17.5
Tax Group ID Tax ID Tax Name
1 0 Zero rated
2 1 Standard Rate
3 0 Zero rated
3 1 Standard Rate
To make an entry
Within the P&L Tax Groups table, two fields require selecting, first the tax group and then the rate of tax.
Field Definitions
Field Meaning
Tax Group ID The unique ID of the tax group.
Tax ID The tax ID that belongs to the tax group that can be selected using the Lookup button. Once selected, the corresponding name of the selected tax ID is shown.
Once the records on the P&L Tax Groups table have been entered, continue to configure the statement by setting up the P&L Lines table.
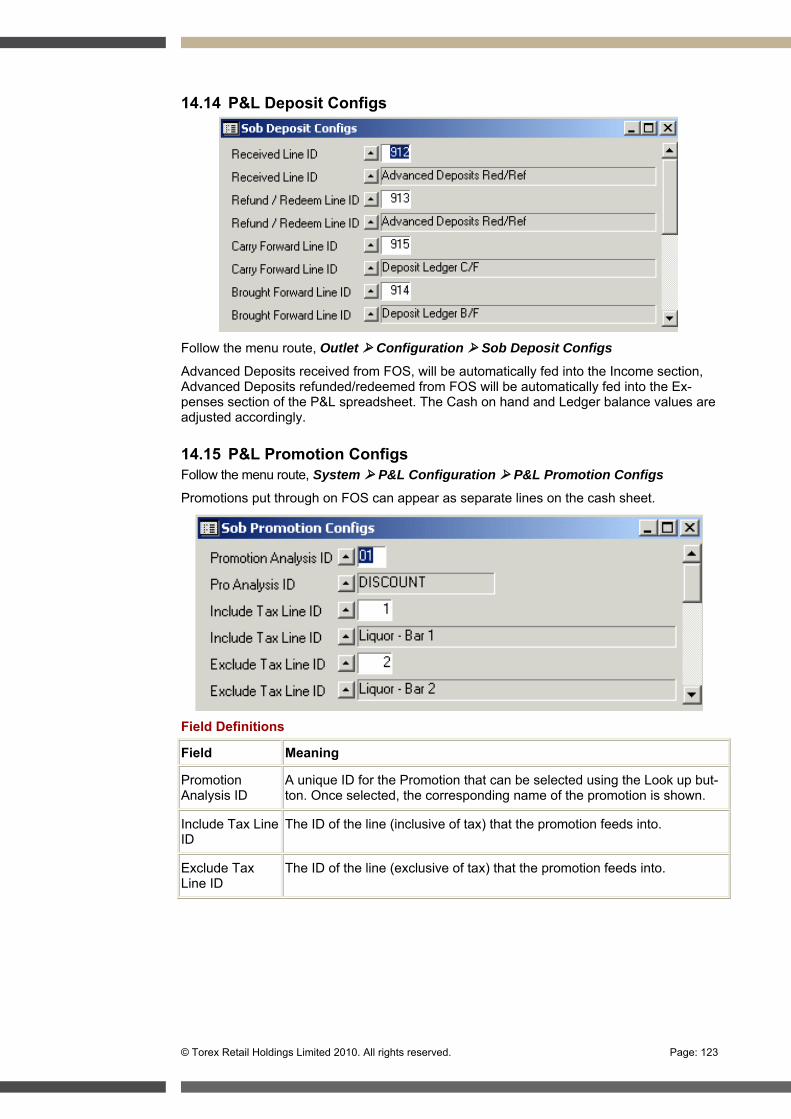
© Torex Retail Holdings Limited 2010. All rights reserved. Page: 123
14.14 P&L Deposit Configs
Follow the menu route, Outlet Configuration Sob Deposit Configs
Advanced Deposits received from FOS, will be automatically fed into the Income section, Advanced Deposits refunded/redeemed from FOS will be automatically fed into the Ex-penses section of the P&L spreadsheet. The Cash on hand and Ledger balance values are adjusted accordingly.
14.15 P&L Promotion Configs Follow the menu route, System P&L Configuration P&L Promotion Configs
Promotions put through on FOS can appear as separate lines on the cash sheet.
Field Definitions
Field Meaning
Promotion Analysis ID
A unique ID for the Promotion that can be selected using the Look up but-ton. Once selected, the corresponding name of the promotion is shown.
Include Tax Line ID
The ID of the line (inclusive of tax) that the promotion feeds into.
Exclude Tax Line ID
The ID of the line (exclusive of tax) that the promotion feeds into.
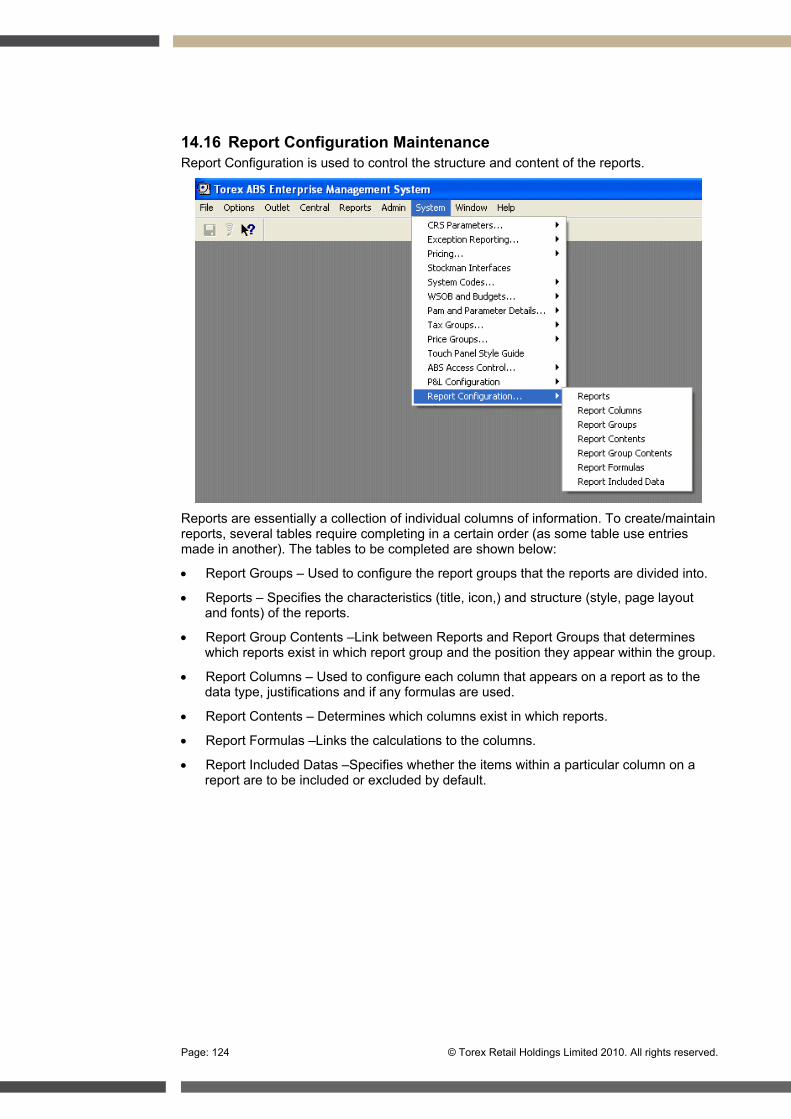
Page: 124 © Torex Retail Holdings Limited 2010. All rights reserved.
14.16 Report Configuration Maintenance Report Configuration is used to control the structure and content of the reports.
Reports are essentially a collection of individual columns of information. To create/maintain reports, several tables require completing in a certain order (as some table use entries made in another). The tables to be completed are shown below:
Report Groups – Used to configure the report groups that the reports are divided into.
Reports – Specifies the characteristics (title, icon,) and structure (style, page layout and fonts) of the reports.
Report Group Contents –Link between Reports and Report Groups that determines which reports exist in which report group and the position they appear within the group.
Report Columns – Used to configure each column that appears on a report as to the data type, justifications and if any formulas are used.
Report Contents – Determines which columns exist in which reports.
Report Formulas –Links the calculations to the columns.
Report Included Datas –Specifies whether the items within a particular column on a report are to be included or excluded by default.
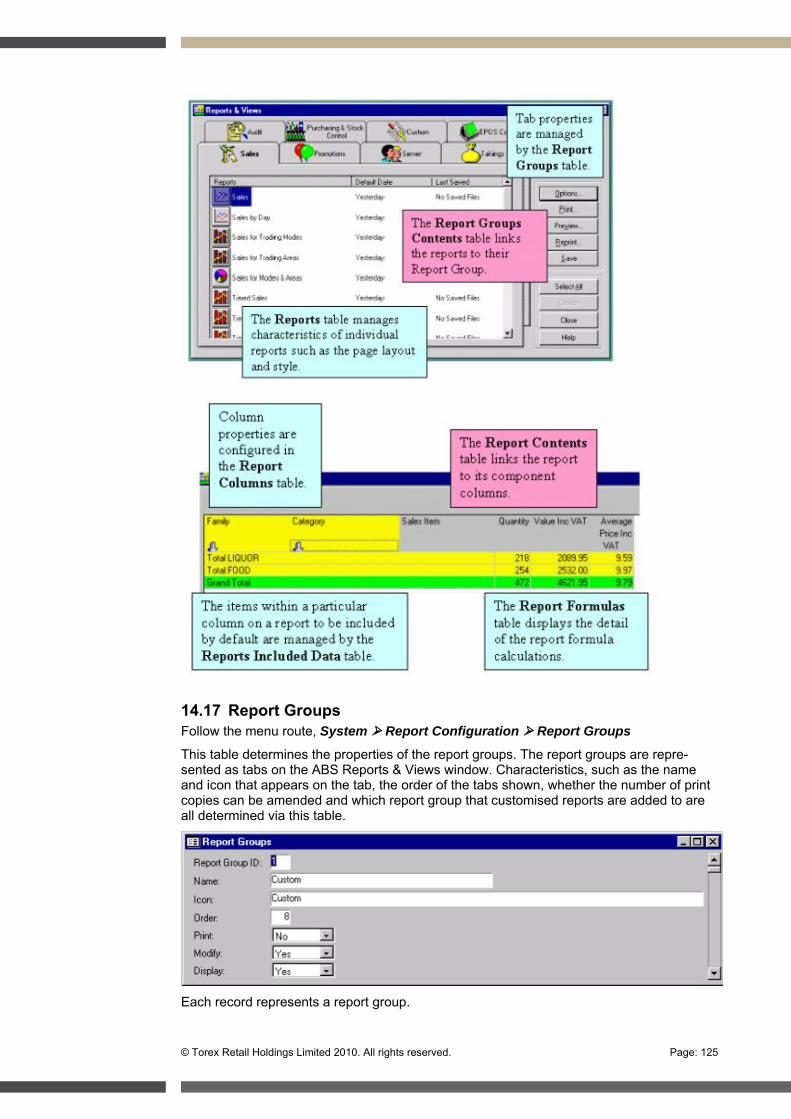
© Torex Retail Holdings Limited 2010. All rights reserved. Page: 125
14.17 Report Groups Follow the menu route, System Report Configuration Report Groups
This table determines the properties of the report groups. The report groups are repre-sented as tabs on the ABS Reports & Views window. Characteristics, such as the name and icon that appears on the tab, the order of the tabs shown, whether the number of print copies can be amended and which report group that customised reports are added to are all determined via this table.
Each record represents a report group.
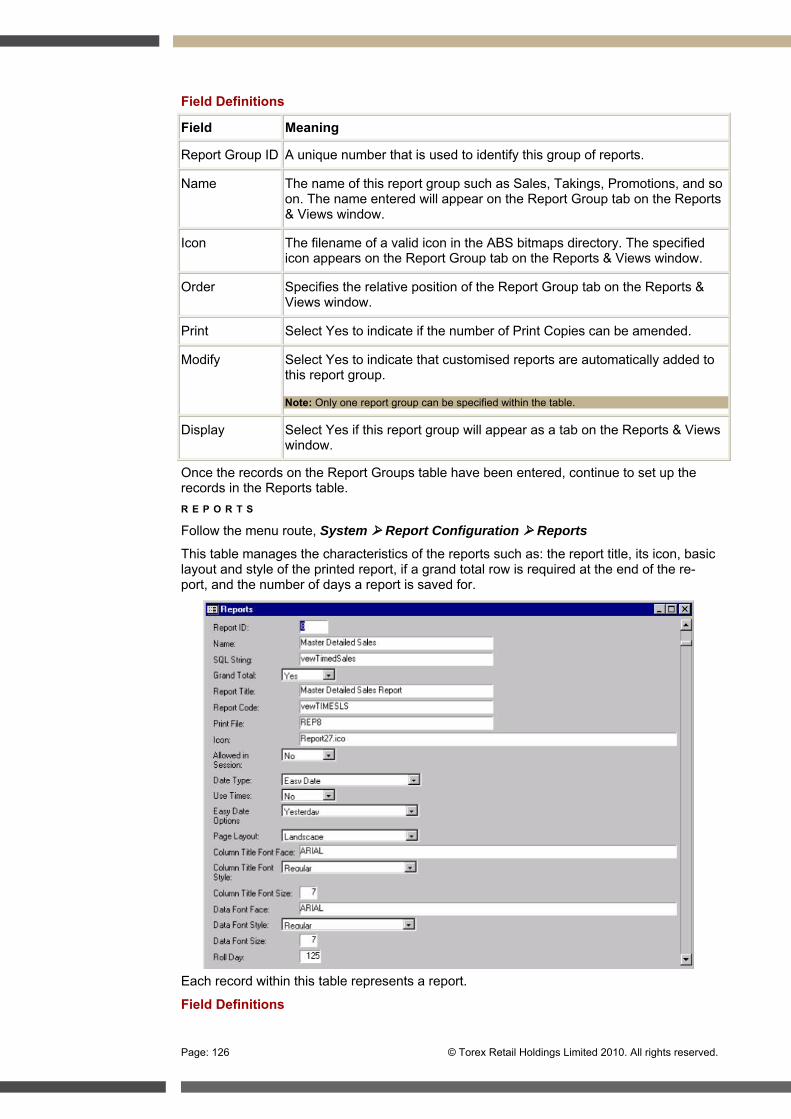
Page: 126 © Torex Retail Holdings Limited 2010. All rights reserved.
Field Definitions
Field Meaning
Report Group ID A unique number that is used to identify this group of reports.
Name The name of this report group such as Sales, Takings, Promotions, and so on. The name entered will appear on the Report Group tab on the Reports & Views window.
Icon The filename of a valid icon in the ABS bitmaps directory. The specified icon appears on the Report Group tab on the Reports & Views window.
Order Specifies the relative position of the Report Group tab on the Reports & Views window.
Print Select Yes to indicate if the number of Print Copies can be amended.
Modify Select Yes to indicate that customised reports are automatically added to this report group.
Note: Only one report group can be specified within the table.
Display Select Yes if this report group will appear as a tab on the Reports & Views window.
Once the records on the Report Groups table have been entered, continue to set up the records in the Reports table. R E P O R T S
Follow the menu route, System Report Configuration Reports
This table manages the characteristics of the reports such as: the report title, its icon, basic layout and style of the printed report, if a grand total row is required at the end of the re-port, and the number of days a report is saved for.
Each record within this table represents a report.
Field Definitions
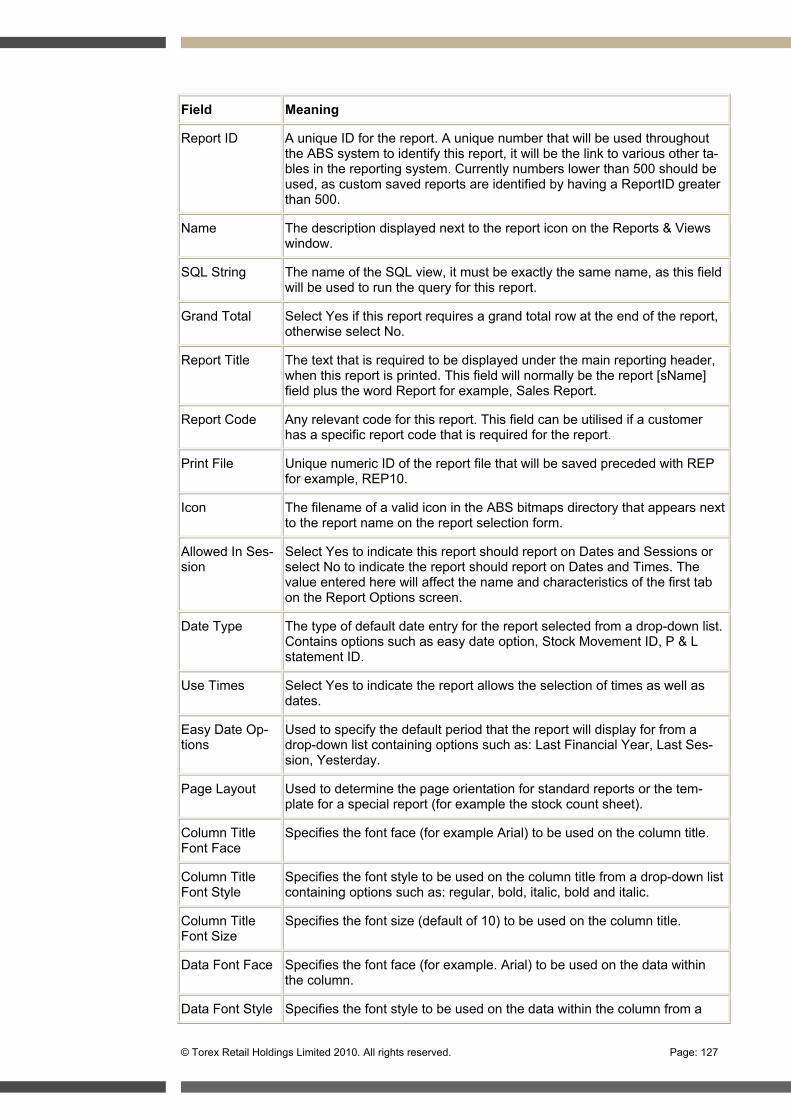
© Torex Retail Holdings Limited 2010. All rights reserved. Page: 127
Field Meaning
Report ID A unique ID for the report. A unique number that will be used throughout the ABS system to identify this report, it will be the link to various other ta-bles in the reporting system. Currently numbers lower than 500 should be used, as custom saved reports are identified by having a ReportID greater than 500.
Name The description displayed next to the report icon on the Reports & Views window.
SQL String The name of the SQL view, it must be exactly the same name, as this field will be used to run the query for this report.
Grand Total Select Yes if this report requires a grand total row at the end of the report, otherwise select No.
Report Title The text that is required to be displayed under the main reporting header, when this report is printed. This field will normally be the report [sName] field plus the word Report for example, Sales Report.
Report Code Any relevant code for this report. This field can be utilised if a customer has a specific report code that is required for the report.
Print File Unique numeric ID of the report file that will be saved preceded with REP for example, REP10.
Icon The filename of a valid icon in the ABS bitmaps directory that appears next to the report name on the report selection form.
Allowed In Ses-sion
Select Yes to indicate this report should report on Dates and Sessions or select No to indicate the report should report on Dates and Times. The value entered here will affect the name and characteristics of the first tab on the Report Options screen.
Date Type The type of default date entry for the report selected from a drop-down list. Contains options such as easy date option, Stock Movement ID, P & L statement ID.
Use Times Select Yes to indicate the report allows the selection of times as well as dates.
Easy Date Op-tions
Used to specify the default period that the report will display for from a drop-down list containing options such as: Last Financial Year, Last Ses-sion, Yesterday.
Page Layout Used to determine the page orientation for standard reports or the tem-plate for a special report (for example the stock count sheet).
Column Title Font Face
Specifies the font face (for example Arial) to be used on the column title.
Column Title Font Style
Specifies the font style to be used on the column title from a drop-down list containing options such as: regular, bold, italic, bold and italic.
Column Title Font Size
Specifies the font size (default of 10) to be used on the column title.
Data Font Face Specifies the font face (for example. Arial) to be used on the data within the column.
Data Font Style Specifies the font style to be used on the data within the column from a
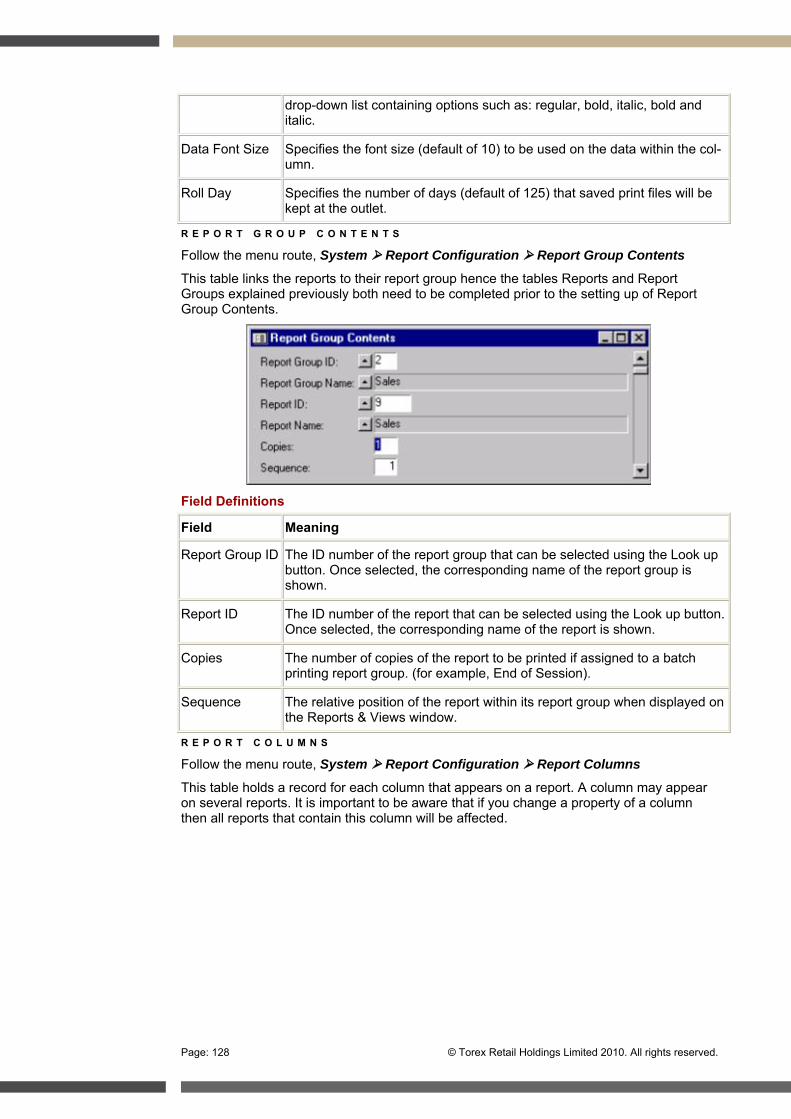
Page: 128 © Torex Retail Holdings Limited 2010. All rights reserved.
drop-down list containing options such as: regular, bold, italic, bold and italic.
Data Font Size Specifies the font size (default of 10) to be used on the data within the col-umn.
Roll Day Specifies the number of days (default of 125) that saved print files will be kept at the outlet.
R E P O R T G R O U P C O N T E N T S
Follow the menu route, System Report Configuration Report Group Contents
This table links the reports to their report group hence the tables Reports and Report Groups explained previously both need to be completed prior to the setting up of Report Group Contents.
Field Definitions
Field Meaning
Report Group ID The ID number of the report group that can be selected using the Look up button. Once selected, the corresponding name of the report group is shown.
Report ID The ID number of the report that can be selected using the Look up button. Once selected, the corresponding name of the report is shown.
Copies The number of copies of the report to be printed if assigned to a batch printing report group. (for example, End of Session).
Sequence The relative position of the report within its report group when displayed on the Reports & Views window.
R E P O R T C O L U M N S
Follow the menu route, System Report Configuration Report Columns
This table holds a record for each column that appears on a report. A column may appear on several reports. It is important to be aware that if you change a property of a column then all reports that contain this column will be affected.
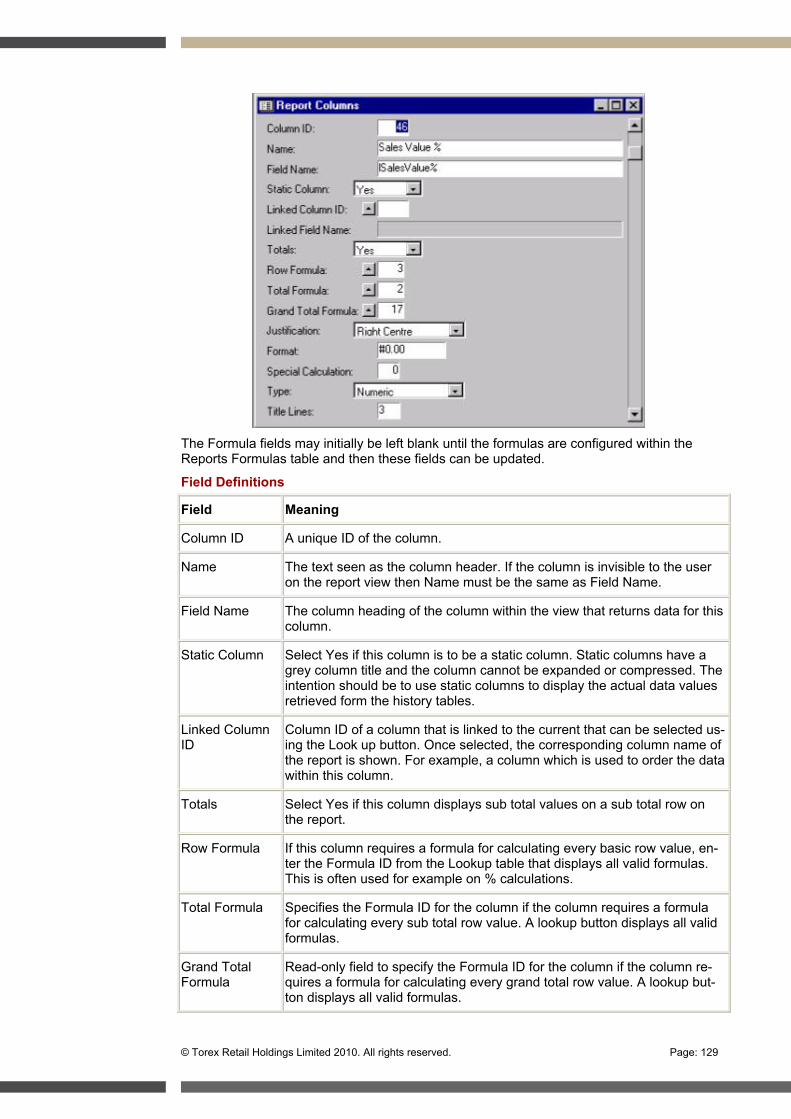
© Torex Retail Holdings Limited 2010. All rights reserved. Page: 129
The Formula fields may initially be left blank until the formulas are configured within the Reports Formulas table and then these fields can be updated.
Field Definitions
Field Meaning
Column ID A unique ID of the column.
Name The text seen as the column header. If the column is invisible to the user on the report view then Name must be the same as Field Name.
Field Name The column heading of the column within the view that returns data for this column.
Static Column Select Yes if this column is to be a static column. Static columns have a grey column title and the column cannot be expanded or compressed. The intention should be to use static columns to display the actual data values retrieved form the history tables.
Linked Column ID
Column ID of a column that is linked to the current that can be selected us-ing the Look up button. Once selected, the corresponding column name of the report is shown. For example, a column which is used to order the data within this column.
Totals Select Yes if this column displays sub total values on a sub total row on the report.
Row Formula If this column requires a formula for calculating every basic row value, en-ter the Formula ID from the Lookup table that displays all valid formulas. This is often used for example on % calculations.
Total Formula Specifies the Formula ID for the column if the column requires a formula for calculating every sub total row value. A lookup button displays all valid formulas.
Grand Total Formula
Read-only field to specify the Formula ID for the column if the column re-quires a formula for calculating every grand total row value. A lookup but-ton displays all valid formulas.
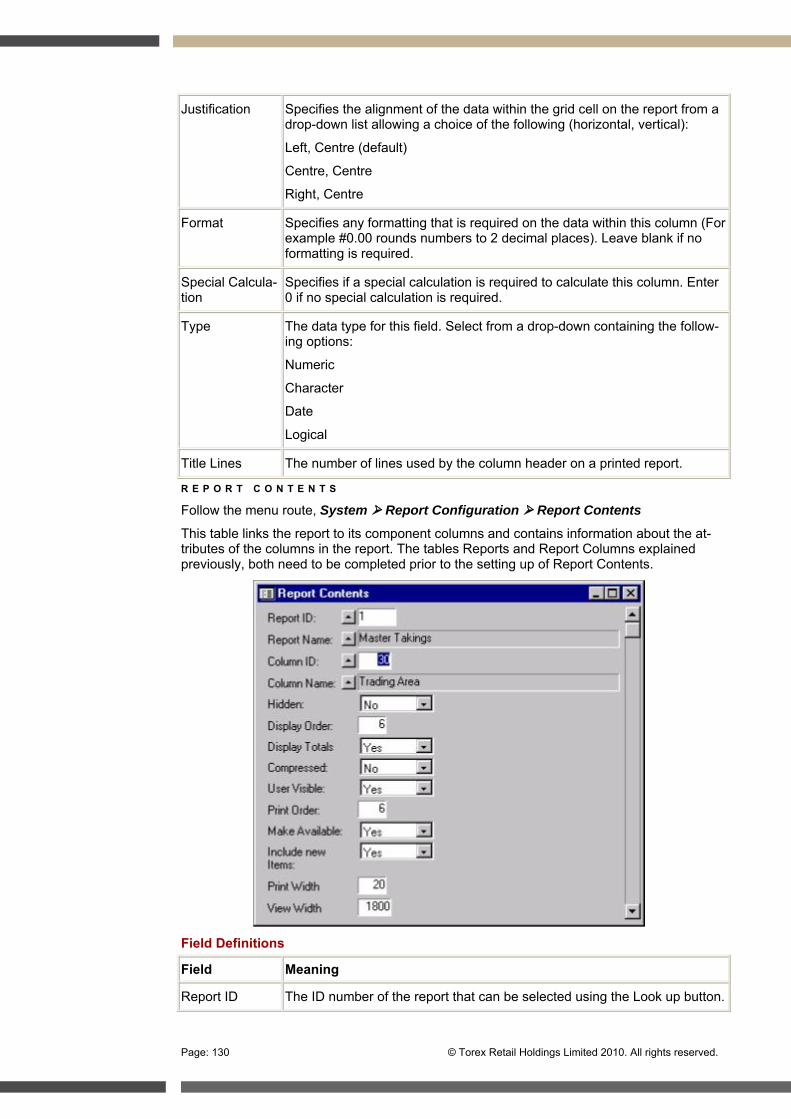
Page: 130 © Torex Retail Holdings Limited 2010. All rights reserved.
Justification Specifies the alignment of the data within the grid cell on the report from a drop-down list allowing a choice of the following (horizontal, vertical):
Left, Centre (default)
Centre, Centre
Right, Centre
Format Specifies any formatting that is required on the data within this column (For example #0.00 rounds numbers to 2 decimal places). Leave blank if no formatting is required.
Special Calcula-tion
Specifies if a special calculation is required to calculate this column. Enter 0 if no special calculation is required.
Type The data type for this field. Select from a drop-down containing the follow-ing options:
Numeric
Character
Date
Logical
Title Lines The number of lines used by the column header on a printed report.
R E P O R T C O N T E N T S
Follow the menu route, System Report Configuration Report Contents
This table links the report to its component columns and contains information about the at-tributes of the columns in the report. The tables Reports and Report Columns explained previously, both need to be completed prior to the setting up of Report Contents.
Field Definitions
Field Meaning
Report ID The ID number of the report that can be selected using the Look up button.
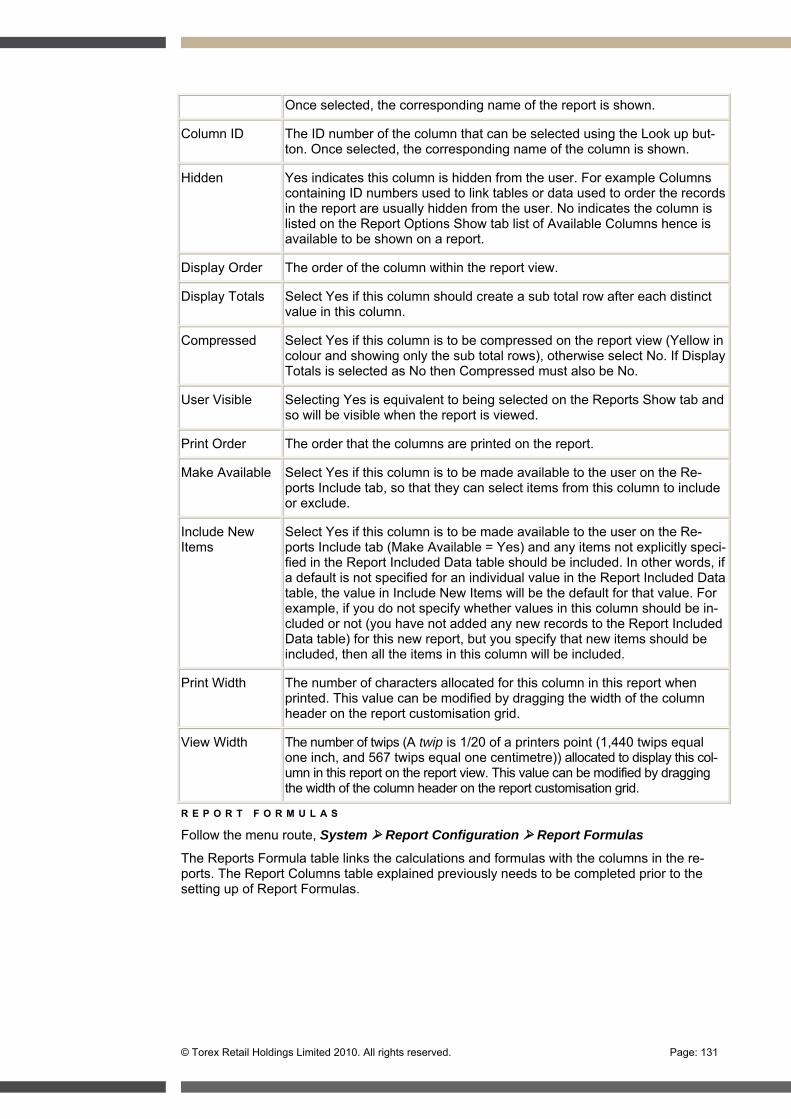
© Torex Retail Holdings Limited 2010. All rights reserved. Page: 131
Once selected, the corresponding name of the report is shown.
Column ID The ID number of the column that can be selected using the Look up but-ton. Once selected, the corresponding name of the column is shown.
Hidden Yes indicates this column is hidden from the user. For example Columns containing ID numbers used to link tables or data used to order the records in the report are usually hidden from the user. No indicates the column is listed on the Report Options Show tab list of Available Columns hence is available to be shown on a report.
Display Order The order of the column within the report view.
Display Totals Select Yes if this column should create a sub total row after each distinct value in this column.
Compressed Select Yes if this column is to be compressed on the report view (Yellow in colour and showing only the sub total rows), otherwise select No. If Display Totals is selected as No then Compressed must also be No.
User Visible Selecting Yes is equivalent to being selected on the Reports Show tab and so will be visible when the report is viewed.
Print Order The order that the columns are printed on the report.
Make Available Select Yes if this column is to be made available to the user on the Re-ports Include tab, so that they can select items from this column to include or exclude.
Include New Items
Select Yes if this column is to be made available to the user on the Re-ports Include tab (Make Available = Yes) and any items not explicitly speci-fied in the Report Included Data table should be included. In other words, if a default is not specified for an individual value in the Report Included Data table, the value in Include New Items will be the default for that value. For example, if you do not specify whether values in this column should be in-cluded or not (you have not added any new records to the Report Included Data table) for this new report, but you specify that new items should be included, then all the items in this column will be included.
Print Width The number of characters allocated for this column in this report when printed. This value can be modified by dragging the width of the column header on the report customisation grid.
View Width The number of twips (A twip is 1/20 of a printers point (1,440 twips equal one inch, and 567 twips equal one centimetre)) allocated to display this col-umn in this report on the report view. This value can be modified by dragging the width of the column header on the report customisation grid.
R E P O R T F O R M U L A S
Follow the menu route, System Report Configuration Report Formulas
The Reports Formula table links the calculations and formulas with the columns in the re-ports. The Report Columns table explained previously needs to be completed prior to the setting up of Report Formulas.
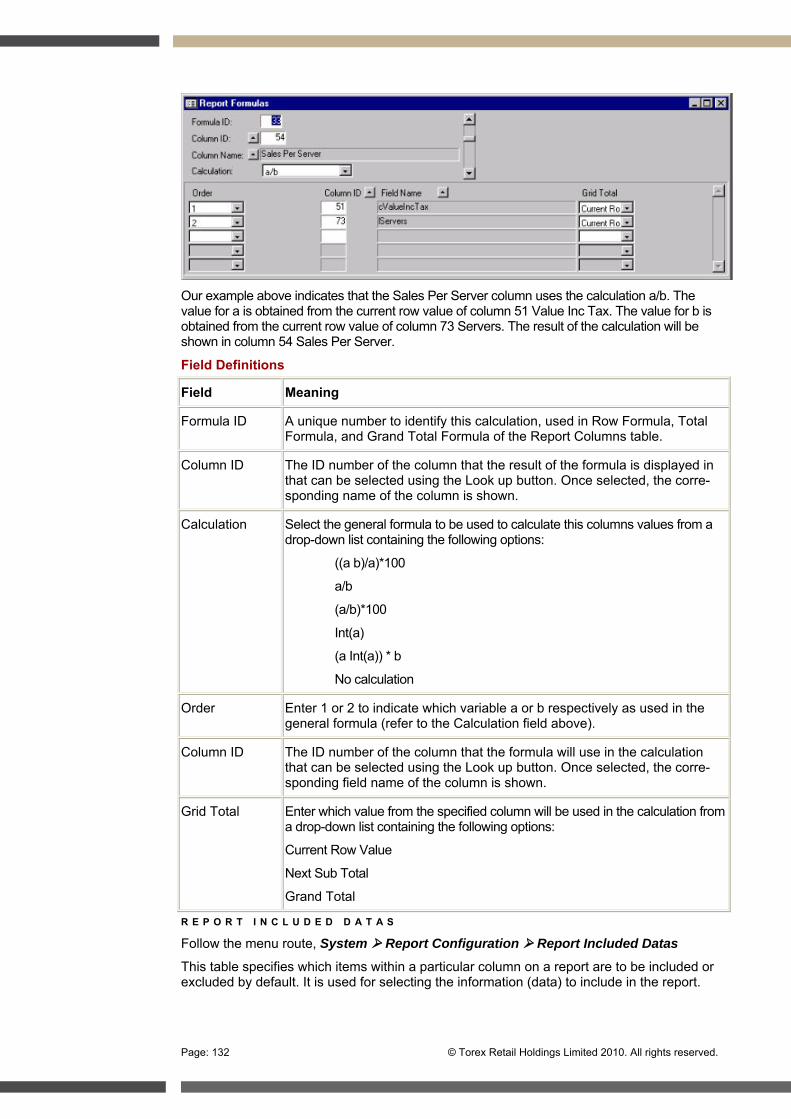
Page: 132 © Torex Retail Holdings Limited 2010. All rights reserved.
Our example above indicates that the Sales Per Server column uses the calculation a/b. The value for a is obtained from the current row value of column 51 Value Inc Tax. The value for b is obtained from the current row value of column 73 Servers. The result of the calculation will be shown in column 54 Sales Per Server.
Field Definitions
Field Meaning
Formula ID A unique number to identify this calculation, used in Row Formula, Total Formula, and Grand Total Formula of the Report Columns table.
Column ID The ID number of the column that the result of the formula is displayed in that can be selected using the Look up button. Once selected, the corre-sponding name of the column is shown.
Calculation Select the general formula to be used to calculate this columns values from a drop-down list containing the following options:
((a b)/a)*100
a/b
(a/b)*100
Int(a)
(a Int(a)) * b
No calculation
Order Enter 1 or 2 to indicate which variable a or b respectively as used in the general formula (refer to the Calculation field above).
Column ID The ID number of the column that the formula will use in the calculation that can be selected using the Look up button. Once selected, the corre-sponding field name of the column is shown.
Grid Total Enter which value from the specified column will be used in the calculation from a drop-down list containing the following options:
Current Row Value
Next Sub Total
Grand Total
R E P O R T I N C L U D E D D A T A S
Follow the menu route, System Report Configuration Report Included Datas
This table specifies which items within a particular column on a report are to be included or excluded by default. It is used for selecting the information (data) to include in the report.
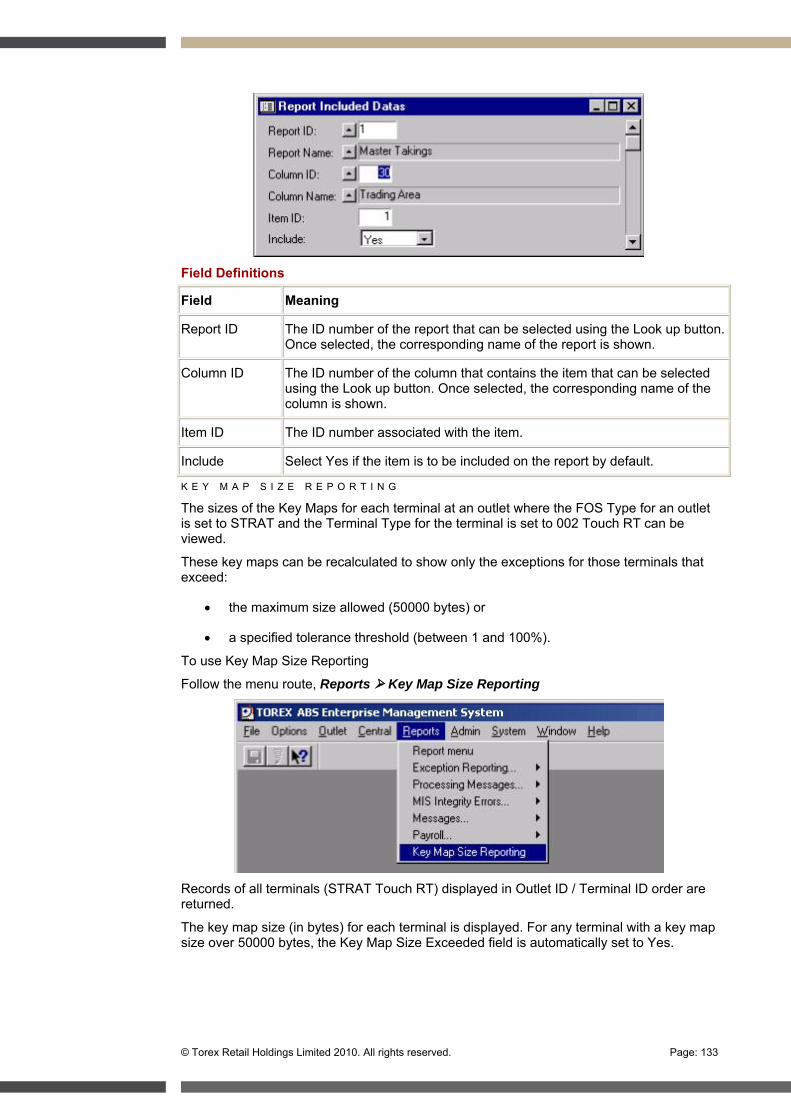
© Torex Retail Holdings Limited 2010. All rights reserved. Page: 133
Field Definitions
Field Meaning
Report ID The ID number of the report that can be selected using the Look up button. Once selected, the corresponding name of the report is shown.
Column ID The ID number of the column that contains the item that can be selected using the Look up button. Once selected, the corresponding name of the column is shown.
Item ID The ID number associated with the item.
Include Select Yes if the item is to be included on the report by default.
K E Y M A P S I Z E R E P O R T I N G
The sizes of the Key Maps for each terminal at an outlet where the FOS Type for an outlet is set to STRAT and the Terminal Type for the terminal is set to 002 Touch RT can be viewed.
These key maps can be recalculated to show only the exceptions for those terminals that exceed:
the maximum size allowed (50000 bytes) or
a specified tolerance threshold (between 1 and 100%).
To use Key Map Size Reporting
Follow the menu route, Reports Key Map Size Reporting
Records of all terminals (STRAT Touch RT) displayed in Outlet ID / Terminal ID order are returned.
The key map size (in bytes) for each terminal is displayed. For any terminal with a key map size over 50000 bytes, the Key Map Size Exceeded field is automatically set to Yes.
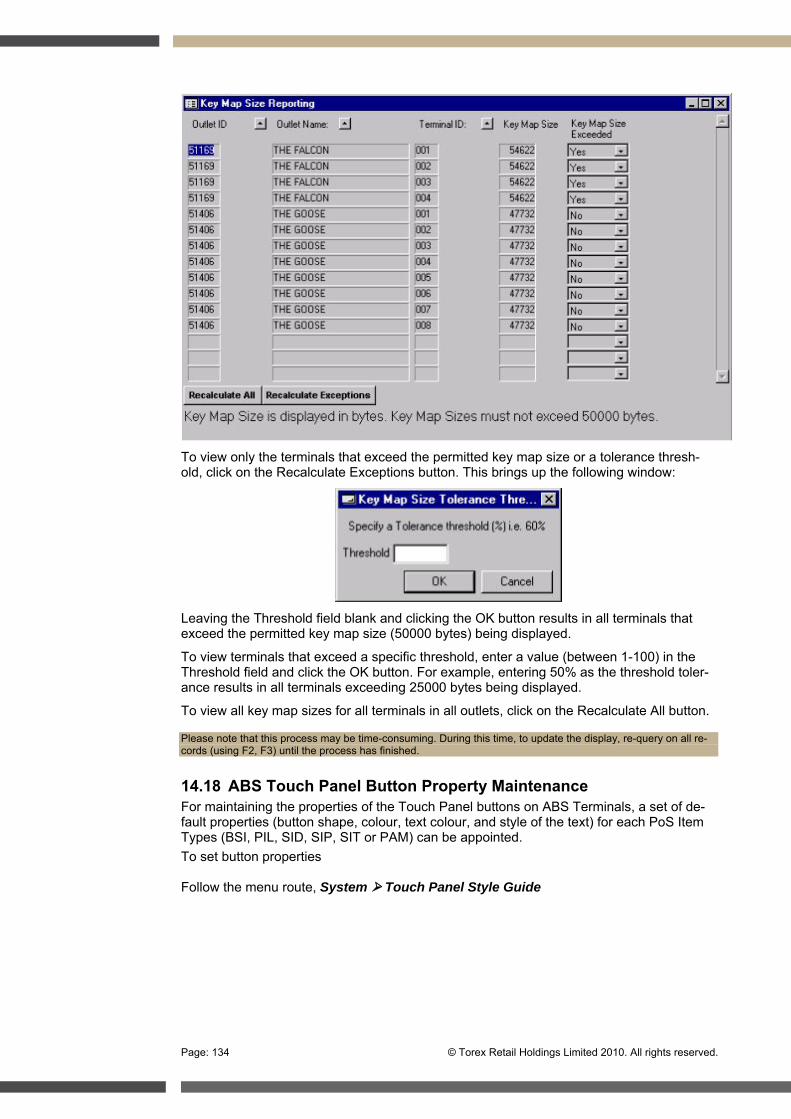
Page: 134 © Torex Retail Holdings Limited 2010. All rights reserved.
To view only the terminals that exceed the permitted key map size or a tolerance thresh-old, click on the Recalculate Exceptions button. This brings up the following window:
Leaving the Threshold field blank and clicking the OK button results in all terminals that exceed the permitted key map size (50000 bytes) being displayed.
To view terminals that exceed a specific threshold, enter a value (between 1-100) in the Threshold field and click the OK button. For example, entering 50% as the threshold toler-ance results in all terminals exceeding 25000 bytes being displayed.
To view all key map sizes for all terminals in all outlets, click on the Recalculate All button.
Please note that this process may be time-consuming. During this time, to update the display, re-query on all re-cords (using F2, F3) until the process has finished.
14.18 ABS Touch Panel Button Property Maintenance For maintaining the properties of the Touch Panel buttons on ABS Terminals, a set of de-fault properties (button shape, colour, text colour, and style of the text) for each PoS Item Types (BSI, PIL, SID, SIP, SIT or PAM) can be appointed. To set button properties Follow the menu route, System Touch Panel Style Guide
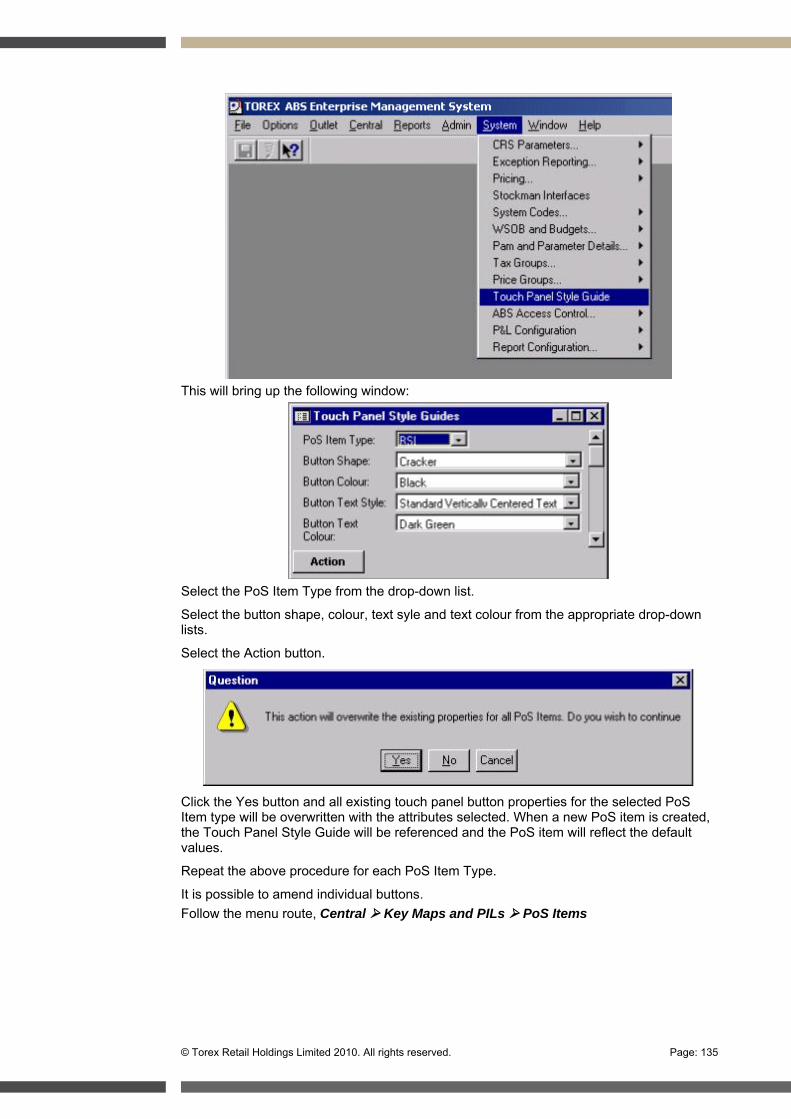
© Torex Retail Holdings Limited 2010. All rights reserved. Page: 135
This will bring up the following window:
Select the PoS Item Type from the drop-down list.
Select the button shape, colour, text syle and text colour from the appropriate drop-down lists.
Select the Action button.
Click the Yes button and all existing touch panel button properties for the selected PoS Item type will be overwritten with the attributes selected. When a new PoS item is created, the Touch Panel Style Guide will be referenced and the PoS item will reflect the default values.
Repeat the above procedure for each PoS Item Type.
It is possible to amend individual buttons. Follow the menu route, Central Key Maps and PILs PoS Items
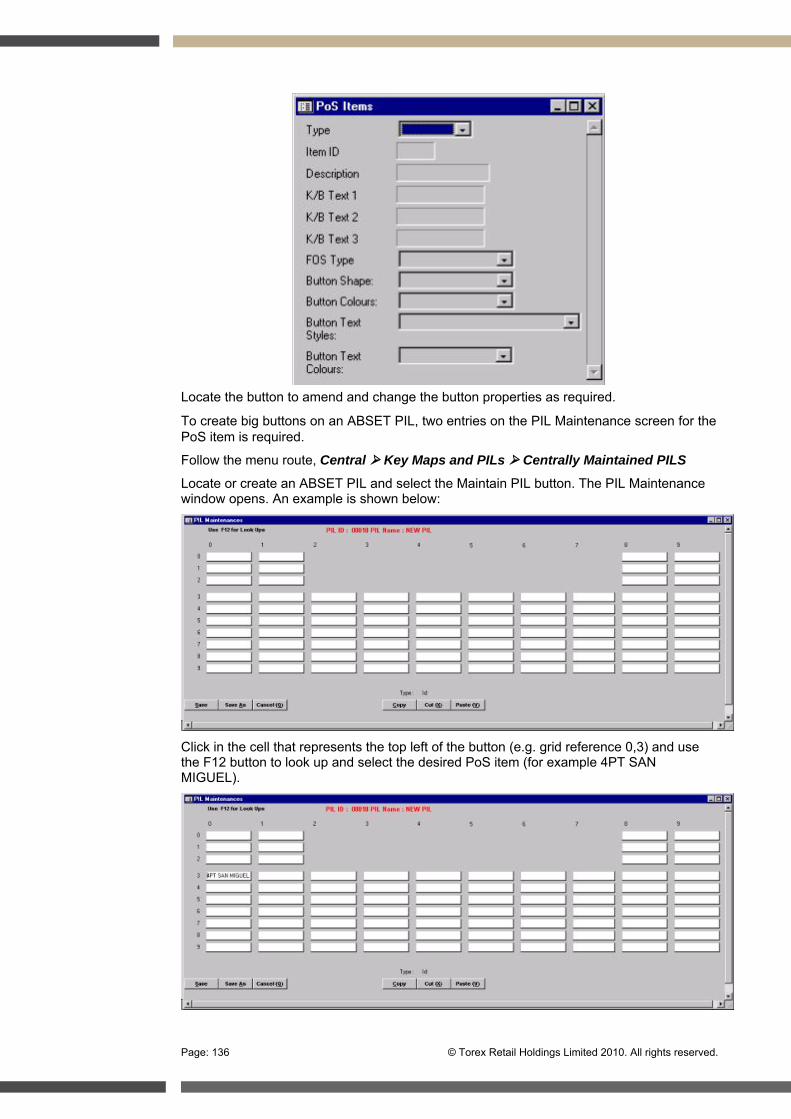
Page: 136 © Torex Retail Holdings Limited 2010. All rights reserved.
Locate the button to amend and change the button properties as required.
To create big buttons on an ABSET PIL, two entries on the PIL Maintenance screen for the PoS item is required.
Follow the menu route, Central Key Maps and PILs Centrally Maintained PILS
Locate or create an ABSET PIL and select the Maintain PIL button. The PIL Maintenance window opens. An example is shown below:
Click in the cell that represents the top left of the button (e.g. grid reference 0,3) and use the F12 button to look up and select the desired PoS item (for example 4PT SAN MIGUEL).
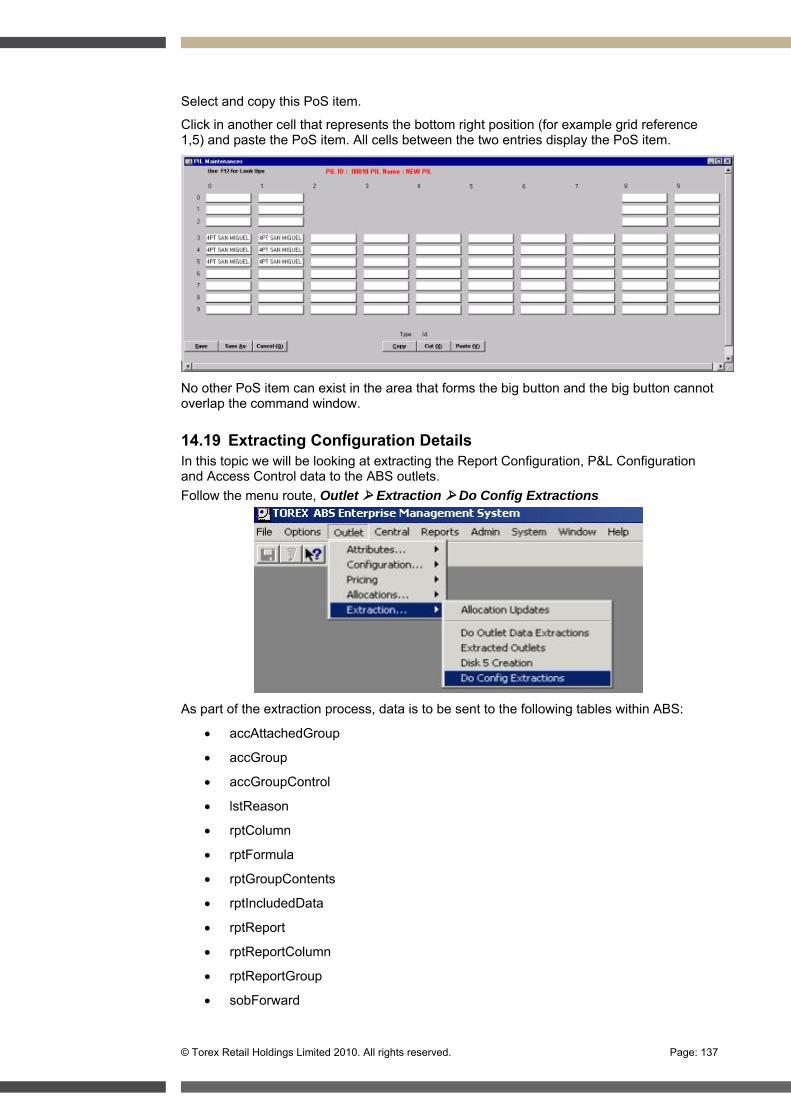
© Torex Retail Holdings Limited 2010. All rights reserved. Page: 137
Select and copy this PoS item.
Click in another cell that represents the bottom right position (for example grid reference 1,5) and paste the PoS item. All cells between the two entries display the PoS item.
No other PoS item can exist in the area that forms the big button and the big button cannot overlap the command window.
14.19 Extracting Configuration Details In this topic we will be looking at extracting the Report Configuration, P&L Configuration and Access Control data to the ABS outlets. Follow the menu route, Outlet Extraction Do Config Extractions
As part of the extraction process, data is to be sent to the following tables within ABS:
accAttachedGroup
accGroup
accGroupControl
lstReason
rptColumn
rptFormula
rptGroupContents
rptIncludedData
rptReport
rptReportColumn
rptReportGroup
sobForward

Page: 138 © Torex Retail Holdings Limited 2010. All rights reserved.
sobGroups
sobLines
sobLineType
sobPaymentMethodConfig
sobTaxGroup
sobType
The tables: sobConfig, sobBudget and sobFixedValueUpdate, are extracted using the ex-isting Outlet Data Extractions functionality.
14.20 Do Config Extractions
Click the Extract button and confirm the extraction process is required by clicking on the Yes button.
The data will be created in the directory: mar-ston\home\marston\source\foxpro_extract\prod\houses\global on the server, in FoxPro 2.x DBF format. The previous contents of this directory will be removed prior to the configura-tion data being created in the directory.
On completion of the extract, click the OK button.
15. Flash Report Configuration In this chapter we will be looking at the budget maintenance. The budget information for a financial week of an outlet is maintained on a spreadsheet. When the budget information for an outlet requires amending the spreadsheet is updated. When all budget information has been entered into the spreadsheet, the Budget tables within EMS can be updated by loading the spreadsheet into EMS.
The format of the spreadsheet, and the generation, and the loading processes are all de-tailed below.
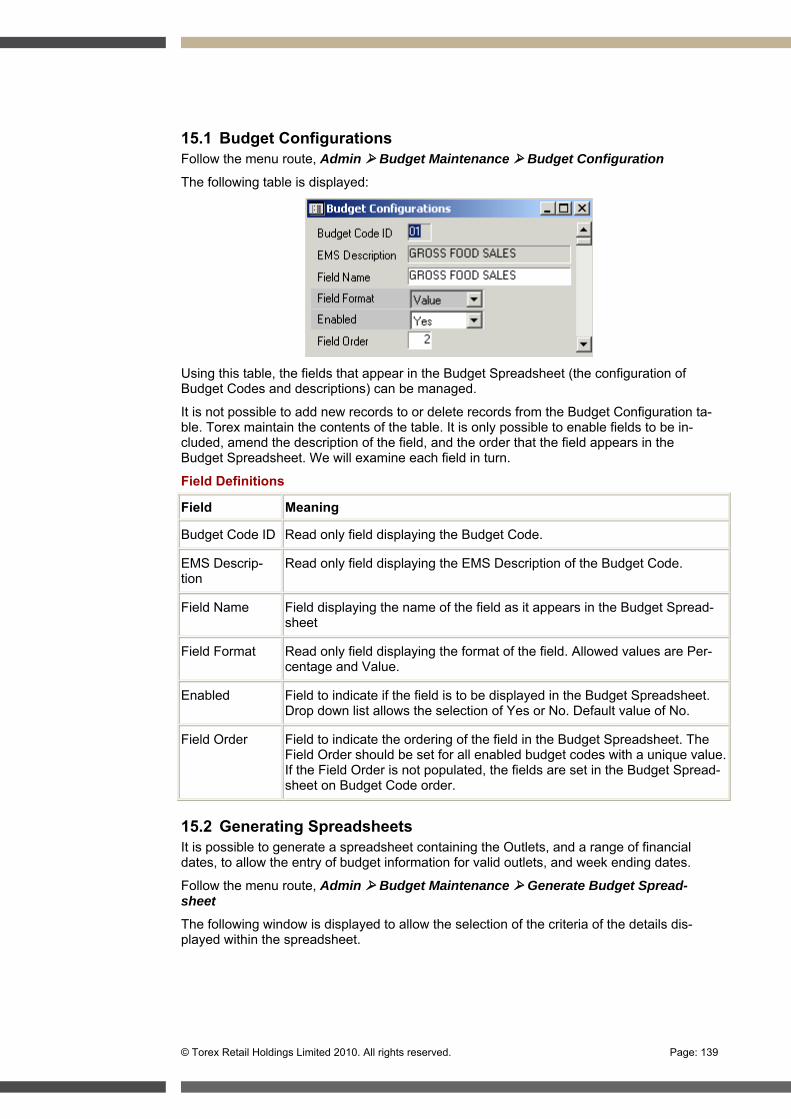
© Torex Retail Holdings Limited 2010. All rights reserved. Page: 139
15.1 Budget Configurations Follow the menu route, Admin Budget Maintenance Budget Configuration
The following table is displayed:
Using this table, the fields that appear in the Budget Spreadsheet (the configuration of Budget Codes and descriptions) can be managed.
It is not possible to add new records to or delete records from the Budget Configuration ta-ble. Torex maintain the contents of the table. It is only possible to enable fields to be in-cluded, amend the description of the field, and the order that the field appears in the Budget Spreadsheet. We will examine each field in turn.
Field Definitions
Field Meaning
Budget Code ID Read only field displaying the Budget Code.
EMS Descrip-tion
Read only field displaying the EMS Description of the Budget Code.
Field Name Field displaying the name of the field as it appears in the Budget Spread-sheet
Field Format Read only field displaying the format of the field. Allowed values are Per-centage and Value.
Enabled Field to indicate if the field is to be displayed in the Budget Spreadsheet. Drop down list allows the selection of Yes or No. Default value of No.
Field Order Field to indicate the ordering of the field in the Budget Spreadsheet. The Field Order should be set for all enabled budget codes with a unique value. If the Field Order is not populated, the fields are set in the Budget Spread-sheet on Budget Code order.
15.2 Generating Spreadsheets It is possible to generate a spreadsheet containing the Outlets, and a range of financial dates, to allow the entry of budget information for valid outlets, and week ending dates.
Follow the menu route, Admin Budget Maintenance Generate Budget Spread-sheet
The following window is displayed to allow the selection of the criteria of the details dis-played within the spreadsheet.

Page: 140 © Torex Retail Holdings Limited 2010. All rights reserved.
We will examine each field in turn.
Field Definitions
Field Meaning
Spreadsheet Di-rectory
Used to specify the directory on the local machine where the spreadsheet is created. A Browse button is provided to aid location of the directory.
Financial Period Start
A lookup window for the selection of a valid Week Ending Date.
Financial Period End
A lookup window for the selection of a valid Week Ending Date.
Clicking the OK button starts the generation of the spreadsheet.
When the spreadsheet has been generated, a confirmation message indicates the success or failure of the spreadsheet generation. Click the OK button when done.
15.3 Loading Spreadsheets It is possible to automate the input of the budget information for outlets from a spreadsheet into EMS.
Follow the menu route, Admin Budget Maintenance Load Budget Spreadsheet
The following window is displayed to allow the selection of the criteria of the details used when loading the spreadsheet.
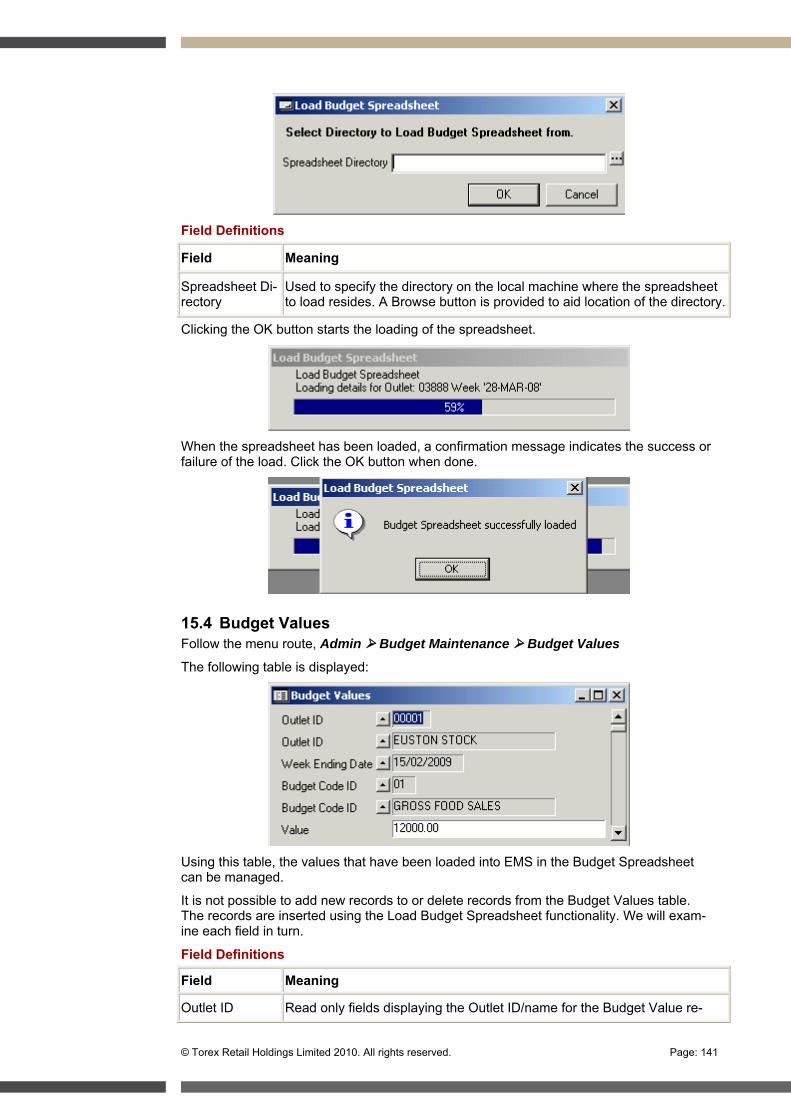
© Torex Retail Holdings Limited 2010. All rights reserved. Page: 141
Field Definitions
Field Meaning
Spreadsheet Di-rectory
Used to specify the directory on the local machine where the spreadsheet to load resides. A Browse button is provided to aid location of the directory.
Clicking the OK button starts the loading of the spreadsheet.
When the spreadsheet has been loaded, a confirmation message indicates the success or failure of the load. Click the OK button when done.
15.4 Budget Values Follow the menu route, Admin Budget Maintenance Budget Values
The following table is displayed:
Using this table, the values that have been loaded into EMS in the Budget Spreadsheet can be managed.
It is not possible to add new records to or delete records from the Budget Values table. The records are inserted using the Load Budget Spreadsheet functionality. We will exam-ine each field in turn.
Field Definitions
Field Meaning
Outlet ID Read only fields displaying the Outlet ID/name for the Budget Value re-
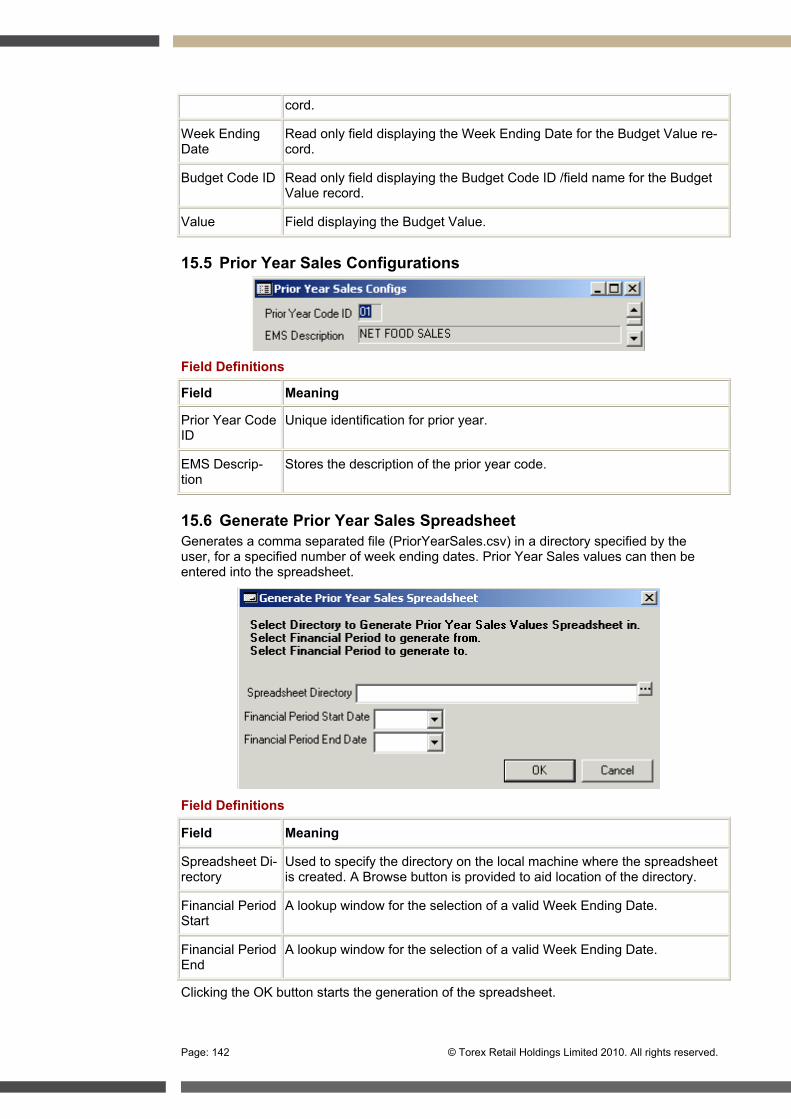
Page: 142 © Torex Retail Holdings Limited 2010. All rights reserved.
cord.
Week Ending Date
Read only field displaying the Week Ending Date for the Budget Value re-cord.
Budget Code ID Read only field displaying the Budget Code ID /field name for the Budget Value record.
Value Field displaying the Budget Value.
15.5 Prior Year Sales Configurations
Field Definitions
Field Meaning
Prior Year Code ID
Unique identification for prior year.
EMS Descrip-tion
Stores the description of the prior year code.
15.6 Generate Prior Year Sales Spreadsheet Generates a comma separated file (PriorYearSales.csv) in a directory specified by the user, for a specified number of week ending dates. Prior Year Sales values can then be entered into the spreadsheet.
Field Definitions
Field Meaning
Spreadsheet Di-rectory
Used to specify the directory on the local machine where the spreadsheet is created. A Browse button is provided to aid location of the directory.
Financial Period Start
A lookup window for the selection of a valid Week Ending Date.
Financial Period End
A lookup window for the selection of a valid Week Ending Date.
Clicking the OK button starts the generation of the spreadsheet.
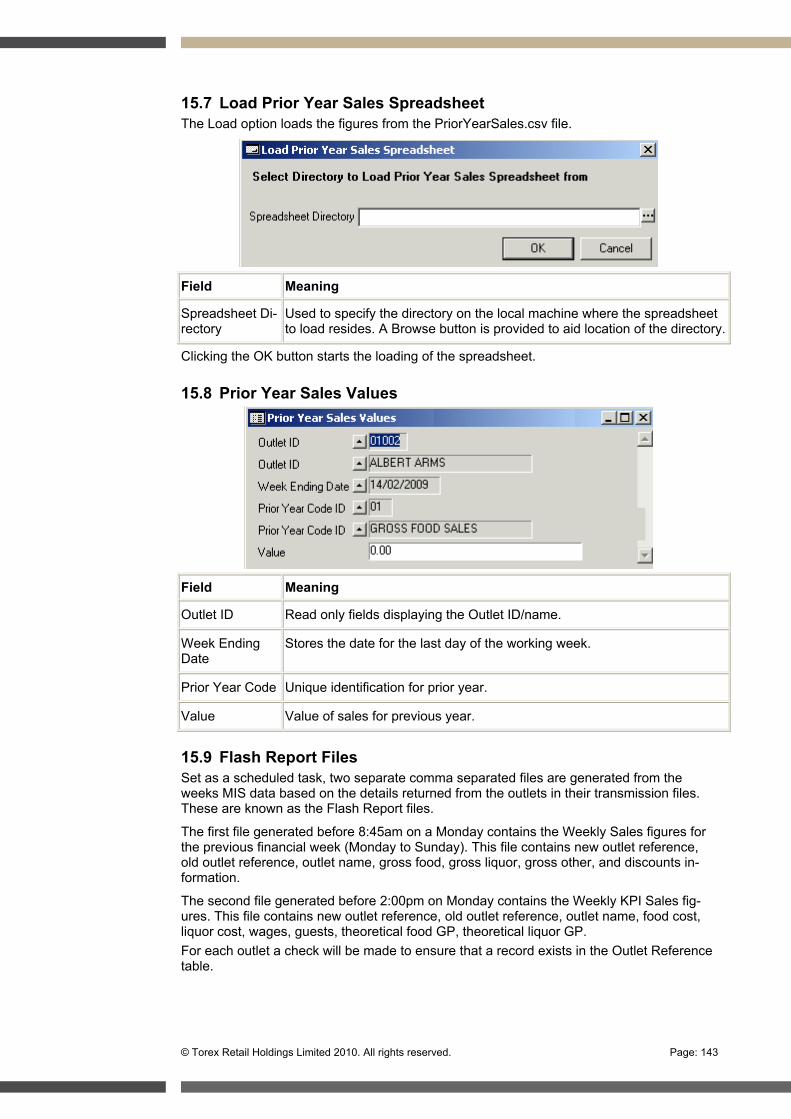
© Torex Retail Holdings Limited 2010. All rights reserved. Page: 143
15.7 Load Prior Year Sales Spreadsheet The Load option loads the figures from the PriorYearSales.csv file.
Field Meaning
Spreadsheet Di-rectory
Used to specify the directory on the local machine where the spreadsheet to load resides. A Browse button is provided to aid location of the directory.
Clicking the OK button starts the loading of the spreadsheet.
15.8 Prior Year Sales Values
Field Meaning
Outlet ID Read only fields displaying the Outlet ID/name.
Week Ending Date
Stores the date for the last day of the working week.
Prior Year Code Unique identification for prior year.
Value Value of sales for previous year.
15.9 Flash Report Files Set as a scheduled task, two separate comma separated files are generated from the weeks MIS data based on the details returned from the outlets in their transmission files. These are known as the Flash Report files.
The first file generated before 8:45am on a Monday contains the Weekly Sales figures for the previous financial week (Monday to Sunday). This file contains new outlet reference, old outlet reference, outlet name, gross food, gross liquor, gross other, and discounts in-formation.
The second file generated before 2:00pm on Monday contains the Weekly KPI Sales fig-ures. This file contains new outlet reference, old outlet reference, outlet name, food cost, liquor cost, wages, guests, theoretical food GP, theoretical liquor GP. For each outlet a check will be made to ensure that a record exists in the Outlet Reference table.
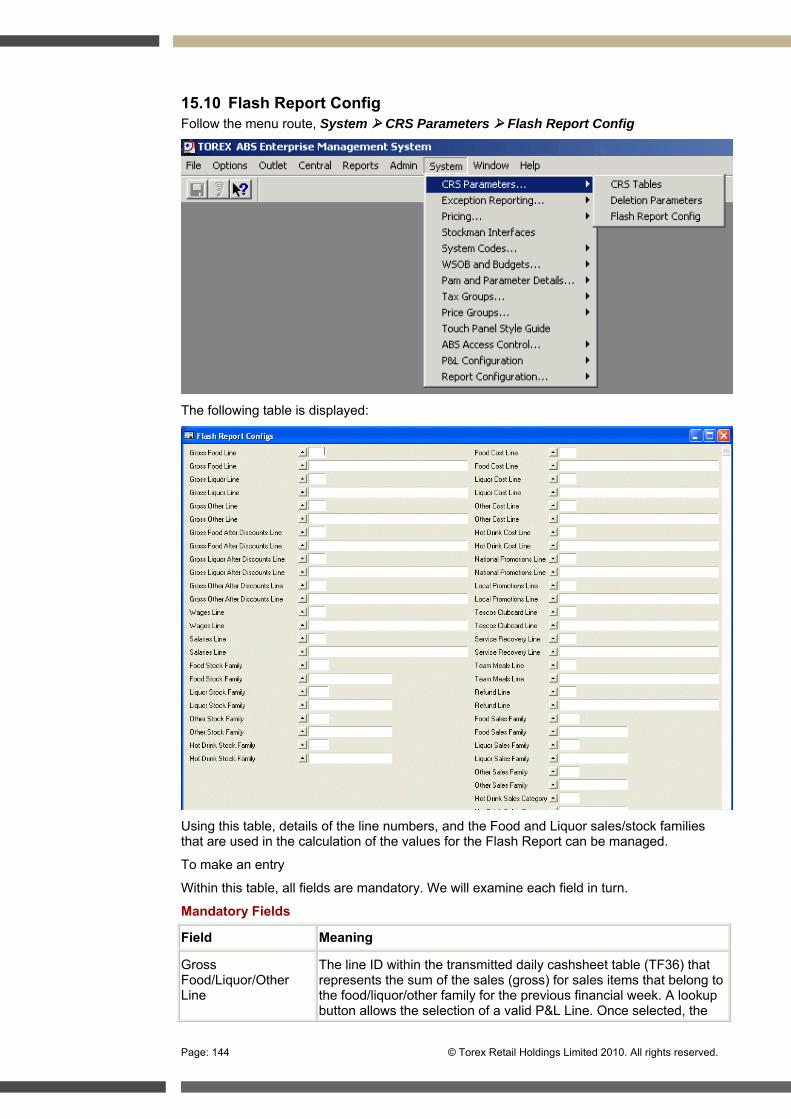
Page: 144 © Torex Retail Holdings Limited 2010. All rights reserved.
15.10 Flash Report Config Follow the menu route, System CRS Parameters Flash Report Config
The following table is displayed:
Using this table, details of the line numbers, and the Food and Liquor sales/stock families that are used in the calculation of the values for the Flash Report can be managed.
To make an entry
Within this table, all fields are mandatory. We will examine each field in turn.
Mandatory Fields
Field Meaning
Gross Food/Liquor/Other Line
The line ID within the transmitted daily cashsheet table (TF36) that represents the sum of the sales (gross) for sales items that belong to the food/liquor/other family for the previous financial week. A lookup button allows the selection of a valid P&L Line. Once selected, the
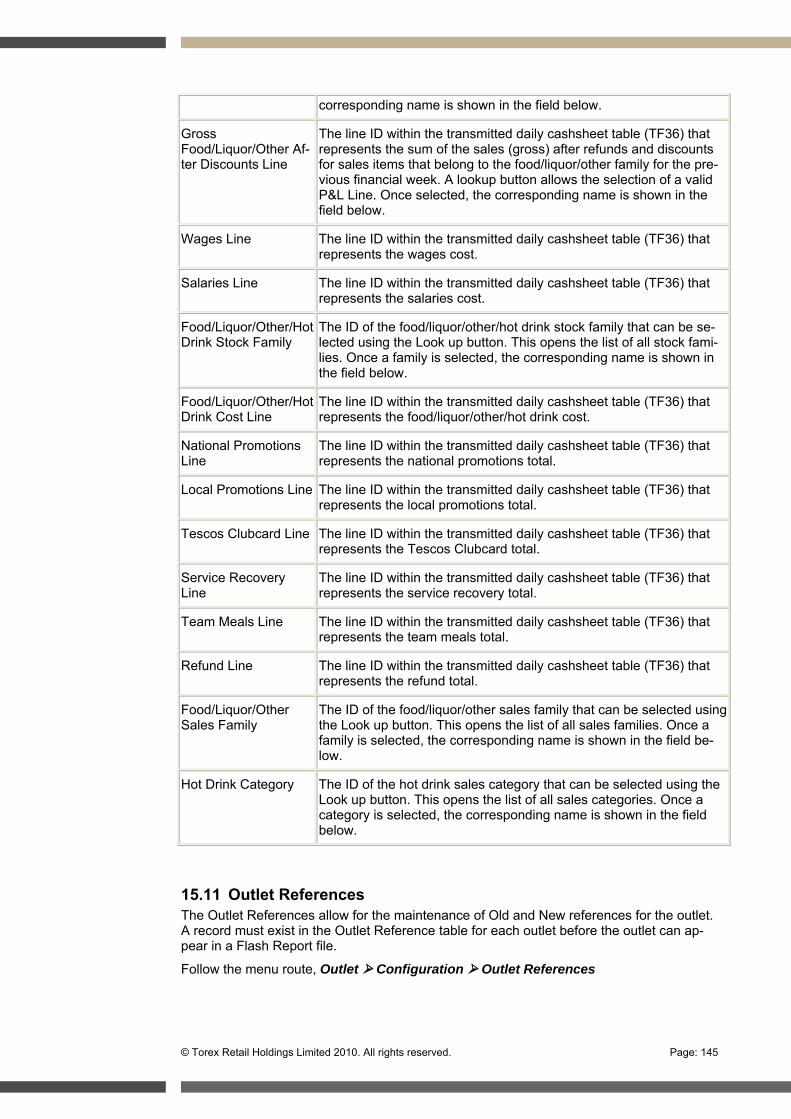
© Torex Retail Holdings Limited 2010. All rights reserved. Page: 145
corresponding name is shown in the field below.
Gross Food/Liquor/Other Af-ter Discounts Line
The line ID within the transmitted daily cashsheet table (TF36) that represents the sum of the sales (gross) after refunds and discounts for sales items that belong to the food/liquor/other family for the pre-vious financial week. A lookup button allows the selection of a valid P&L Line. Once selected, the corresponding name is shown in the field below.
Wages Line The line ID within the transmitted daily cashsheet table (TF36) that represents the wages cost.
Salaries Line The line ID within the transmitted daily cashsheet table (TF36) that represents the salaries cost.
Food/Liquor/Other/Hot Drink Stock Family
The ID of the food/liquor/other/hot drink stock family that can be se-lected using the Look up button. This opens the list of all stock fami-lies. Once a family is selected, the corresponding name is shown in the field below.
Food/Liquor/Other/Hot Drink Cost Line
The line ID within the transmitted daily cashsheet table (TF36) that represents the food/liquor/other/hot drink cost.
National Promotions Line
The line ID within the transmitted daily cashsheet table (TF36) that represents the national promotions total.
Local Promotions Line The line ID within the transmitted daily cashsheet table (TF36) that represents the local promotions total.
Tescos Clubcard Line The line ID within the transmitted daily cashsheet table (TF36) that represents the Tescos Clubcard total.
Service Recovery Line
The line ID within the transmitted daily cashsheet table (TF36) that represents the service recovery total.
Team Meals Line The line ID within the transmitted daily cashsheet table (TF36) that represents the team meals total.
Refund Line The line ID within the transmitted daily cashsheet table (TF36) that represents the refund total.
Food/Liquor/Other Sales Family
The ID of the food/liquor/other sales family that can be selected using the Look up button. This opens the list of all sales families. Once a family is selected, the corresponding name is shown in the field be-low.
Hot Drink Category The ID of the hot drink sales category that can be selected using the Look up button. This opens the list of all sales categories. Once a category is selected, the corresponding name is shown in the field below.
15.11 Outlet References The Outlet References allow for the maintenance of Old and New references for the outlet. A record must exist in the Outlet Reference table for each outlet before the outlet can ap-pear in a Flash Report file.
Follow the menu route, Outlet Configuration Outlet References
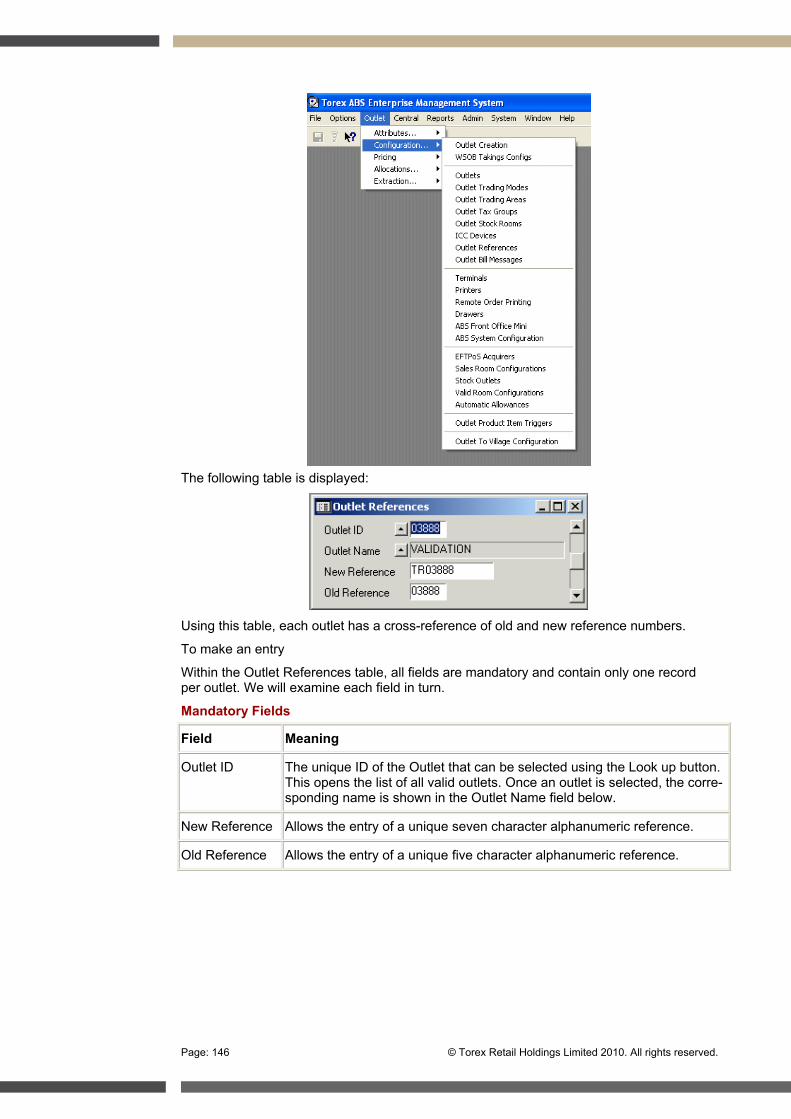
Page: 146 © Torex Retail Holdings Limited 2010. All rights reserved.
The following table is displayed:
Using this table, each outlet has a cross-reference of old and new reference numbers.
To make an entry
Within the Outlet References table, all fields are mandatory and contain only one record per outlet. We will examine each field in turn.
Mandatory Fields
Field Meaning
Outlet ID The unique ID of the Outlet that can be selected using the Look up button. This opens the list of all valid outlets. Once an outlet is selected, the corre-sponding name is shown in the Outlet Name field below.
New Reference Allows the entry of a unique seven character alphanumeric reference.
Old Reference Allows the entry of a unique five character alphanumeric reference.


![[Name] [Title] Oracle Corporation](https://img.pdfslide.us/doc/110x75/56813582550346895d9ce01d/name-title-oracle-corporation.jpg)