Embed Size (px)
Citation preview

EMC® Documentum® Research andDevelopment
Version 4.0
User Guide
EMC CorporationCorporate Headquarters
Hopkinton, MA 01748-91031-508-435-1000www.EMC.com
Legal Notice
Copyright © 2014-2016 EMC Corporation. All Rights Reserved.
EMC believes the information in this publication is accurate as of its publication date. The information is subject to changewithout notice.
THE INFORMATION IN THIS PUBLICATION IS PROVIDED “AS IS.” EMC CORPORATIONMAKES NO REPRESENTATIONSOR WARRANTIES OF ANY KINDWITH RESPECT TO THE INFORMATION IN THIS PUBLICATION, AND SPECIFICALLYDISCLAIMS IMPLIED WARRANTIES OF MERCHANTABILITY OR FITNESS FOR A PARTICULAR PURPOSE.
Use, copying, and distribution of any EMC software described in this publication requires an applicable software license.
For the most up-to-date listing of EMC product names, see EMC Corporation Trademarks on EMC.com. Adobe and Adobe PDFLibrary are trademarks or registered trademarks of Adobe Systems Inc. in the U.S. and other countries. All other trademarksused herein are the property of their respective owners.
Documentation Feedback
Your opinion matters. We want to hear from you regarding our product documentation. If you have feedbackabout how we can make our documentation better or easier to use, please send us your feedback directly [email protected]
Table of Contents
Preface ................................................................................................................................. 7
Chapter 1 Overview ...................................................................................................... 9Research and Development ............................................................................... 10Registration Forms ........................................................................................... 11Regulatory Labeling Documents........................................................................ 11Regulatory Safety Documents............................................................................ 13Clinical Crossover Documents........................................................................... 13Virtual Documents ........................................................................................... 14
Chapter 2 Roles ........................................................................................................... 15Administrators ................................................................................................. 15Managers ......................................................................................................... 16Product Manager.......................................................................................... 16Regulatory Manager ..................................................................................... 16Clinical Trial Manager................................................................................... 17Non-clinical Study Manager .......................................................................... 17Quality Project Manager ............................................................................... 17Labeling Manager......................................................................................... 18Safety Manager ............................................................................................ 18
Authors ........................................................................................................... 19All Authors .................................................................................................. 19Regulatory Authors ...................................................................................... 19Regulatory Publisher .................................................................................... 20
Reviewers ........................................................................................................ 20Approvers........................................................................................................ 21Coordinators .................................................................................................... 21Readers............................................................................................................ 22Auditors .......................................................................................................... 22
Chapter 3 Create Registration Forms .......................................................................... 23Creating a Product Registration Form ................................................................ 23Creating a Quality Project Registration Form...................................................... 25Creating a Regulatory Application Registration Form ......................................... 26Creating a Clinical Trial Registration Form ......................................................... 27Creating a Clinical Trial Registration Form for Crossover Documents .................. 28Creating a Non-clinical Study Registration Form ................................................ 29Registration Form Lifecycle Models ................................................................... 30Product Registration Form Lifecycle .............................................................. 30Clinical Trial Registration Form Lifecycle ....................................................... 31Non-Clinical Study Registration Form Lifecycle ............................................. 31
3
Table of Contents
Quality Project Registration Form Lifecycle .................................................... 33Regulatory Application Registration Form Lifecycle ....................................... 33
Restrict Access to Registration Forms ................................................................. 34Assign Users to Roles........................................................................................ 35Registration Form Changes that apply to Existing Documents ............................. 35Changing a Product Code for a Product ......................................................... 36Changing Product-related Information for a Product ...................................... 37Changing Project Information ....................................................................... 38Changing Clinical Trial Information............................................................... 38Updating the Regulatory Application Number ............................................... 38
Chapter 4 Create Documents ....................................................................................... 39Controlled Documents ...................................................................................... 39Creating a Controlled Document ................................................................... 40Creating a Regulatory Administrative, Labeling, or Safety Document .............. 43Creating a Relation between Labeling Documents .......................................... 44Updating the Labeling Status ........................................................................ 44Creating a Non-clinical, Clinical, or Quality Document ................................... 45Associating a Document with a Regulatory Application .................................. 45Creating a Clinical Crossover Document ........................................................ 46Creating a Clinical Study Report Assembly Virtual Document......................... 48Creating a Copy of a Controlled Document (Technology Transfer) ................... 48Assigning Users to Roles for a Controlled Document ...................................... 50Creating a Non-controlled Document ............................................................ 51File Naming and Versioning .......................................................................... 51Importing a File from your Computer ............................................................ 51
Document Updates ........................................................................................... 52Editing a Document ...................................................................................... 52Checking in a Document ............................................................................... 52
Configuring Content Templates ......................................................................... 53Creating a Content Template ......................................................................... 53Modifying a Content Template ...................................................................... 55
Chapter 5 Working with Documents ............................................................................ 57Locating Documents ......................................................................................... 57Finding Documents using a Public Search .......................................................... 57Finding Documents using Facets ....................................................................... 58Viewing Documents and their Properties ........................................................... 59Viewing the Document History ......................................................................... 59Deleting and Restoring a Document................................................................... 59Exporting the Doc List to Microsoft Excel ........................................................... 60Finding Documents .......................................................................................... 61
Chapter 6 Review and Approve Documents ................................................................ 63Workflow Process ............................................................................................. 63Document Review and Approval....................................................................... 67Adding a Document to a Workflow ............................................................... 67Self-Approving a Document.......................................................................... 68Sending Virtual Documents to a Workflow..................................................... 68
Performing Tasks in a Workflow ........................................................................ 70Viewing the Audit Trail................................................................................. 71Categorizing Inbox Tasks .............................................................................. 72
4
Table of Contents
Processing Documents in a Workflow ................................................................ 73Collaborative Editing .................................................................................... 73Editing a Document in a Workflow ................................................................ 74Consolidating Document Changes................................................................. 74Reviewing Documents in a Review Task ........................................................ 75Reviewing Document Feedback from Reviewers ............................................ 76Approving Documents ................................................................................. 76Reviewing Document Feedback from Approvers ............................................ 77
Working with Approved Documents ................................................................. 77Suspending a Document ............................................................................... 78Withdrawing a Document ............................................................................. 78Superseded Documents ................................................................................ 78Expiry Review of Documents ........................................................................ 79Updating the Expiry Review Date for a Document.......................................... 79
Viewing Document Status ................................................................................. 81Viewing Workflow Progress .............................................................................. 81Workflow Task Performer Changes .................................................................... 81Updating Workflow Task Performers ............................................................. 82Stopping a Workflow .................................................................................... 84Delegating a Task as a Workflow Supervisor .................................................. 84Delegating a Task as a User ........................................................................... 85Reassigning Roles......................................................................................... 85
5
Table of Contents
6

Preface
This guide describes the default behavior of EMC Documentum Research and Development(Research and Development), part of the EMC Documentum for Life Sciences solution suite. Thesolution is built on the Documentum D2 web application and Documentum platform.
Documentum D2 is a web-based application that enables users to store, retrieve, and managedocuments in a Documentum repository. It is highly customizable through a configurationapplication that does not require programming knowledge. Documentum D2 consists of thefollowing components:
• Documentum D2 Configuration (D2-Config): The configuration application that enables you toconfigure settings for security, workflows, document classification, and the client user interface.
• Documentum D2 Client (D2 Client): The main application that is used to interact withdocuments in the repository.
Additional Documentum D2 components that are used in Research and Development are:• Documentum D2 Office Integration (O2): Microsoft Office and Outlook propertiessynchronization for documents and email.
• Documentum D2 PDF Integration (C2): PDF file control for watermarking and controlledprinting.
Intended AudienceThis guide is intended for those who use the EMC Documentum Research and Development solution,part of the EMC Documentum for Life Sciences solution suite.
Revision History
Revision Date Description
October 2016 Updated the note in Creating a Copy of aControlled Document (Technology Transfer),page 48.
7
Preface
Revision Date Description
June 2016 Added a note about annotations not supportedin Microsoft Excel or Microsoft PowerPointnative formats in Editing a Document in aWorkflow, page 74.
Added a note in the section, Updating WorkflowTask Performers, page 82.
Added a note about the Track Changes featurein Microsoft Word 2013 in Editing a Documentin a Workflow, page 74.
June 2015 Initial publication.
8
Chapter 1Overview
The EMC Documentum Research and Development (Documentum R&D) solution, part of theEMC Documentum for Life Sciences solution suite, enables Life Sciences organizations to manageresearch and development documents in preparation for regulatory submissions. This solution helpsensure compliance with regulatory agency standards and provides visibility to track progress onthe documents. It provides governance, tools, document control functionality, and embedded lifesciences industry models. This solution includes:
• Drug Information Association’s (DIA) Electronic Document Management (EDM) Reference ModelInformation Architecture, including industry defined data model, dictionaries, and taxonomies
• Enables Title 21 CFR PART 11 compliance including electronic signature capabilities
• Automated policy enforcement and audit trails
• Automated document routing
• Flexible lifecycles and workflows with four levels of control mapped to DIA EDM referencemodel artifacts
• Simplified document handling based on metadata and policy inheritance
• Product and regulatory application management for business owners to reduce IT dependencies
• Enforced signatures in review and approval tasks ensures compliant policies and simplifies thedocument approval process
• Enforced business rules, such as rules for review and approval
This section contains the following topics:
• Research and Development, page 10
• Registration Forms, page 11
• Regulatory Labeling Documents, page 11
• Regulatory Safety Documents, page 13
• Clinical Crossover Documents, page 13
• Virtual Documents, page 14
9
Overview
Research and DevelopmentThe pharmaceutical industry focuses on bringing new and innovative drugs to market with theintent to improve human health and quality of life. The industry is highly regulated and regulatorycompliance is critical throughout the drug development process.
The Documentum R&D documents cover the following domains:
• Non-clinical: Safety testing at the cellular and body system levels
• Clinical: Human testing
• Quality: Quality, Chemistry, Manufacturing, and Controls (CMC), and Technical documents
• Regulatory Administrative: Documents for filing to government agencies, such as documents inModule 1 of submissions
• Safety: Documents related to the safety information of a drug for a product.
• Labeling: Documents related to the labeling information of a drug for a product.
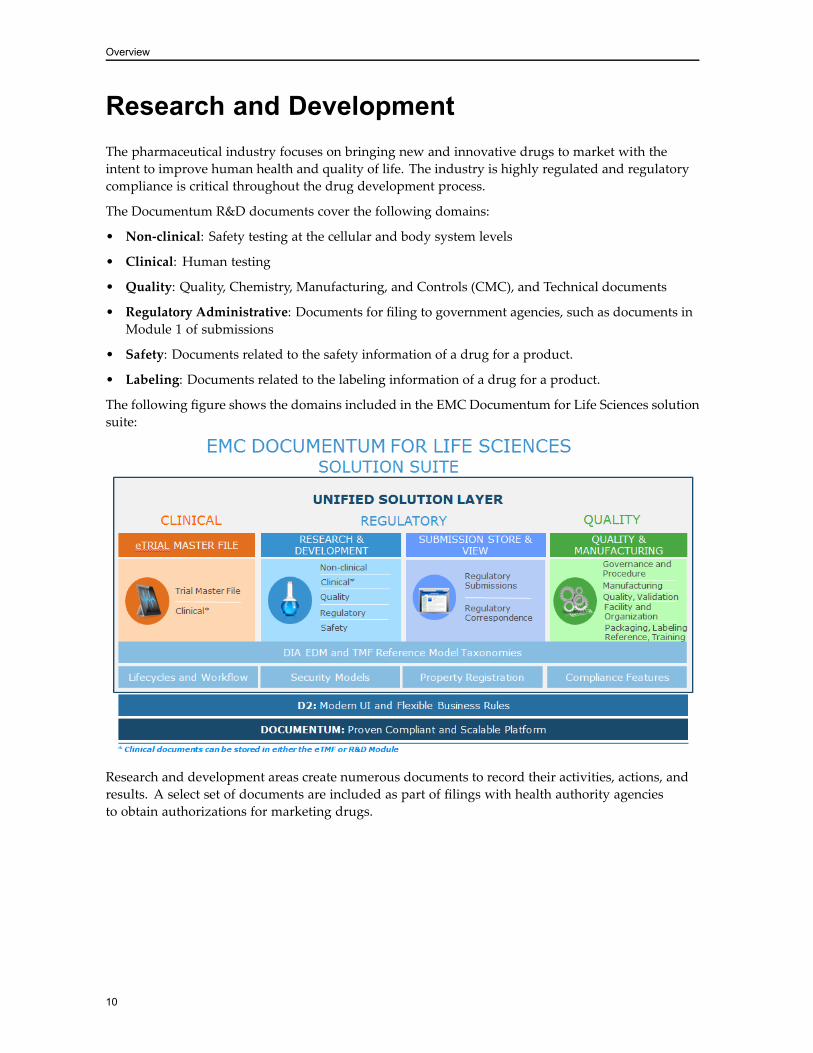
The following figure shows the domains included in the EMC Documentum for Life Sciences solutionsuite:
Research and development areas create numerous documents to record their activities, actions, andresults. A select set of documents are included as part of filings with health authority agenciesto obtain authorizations for marketing drugs.
10
Overview
Registration FormsDocumentum R&D uses registration forms to pre-register product codes, study IDs, and associatedmetadata, which the relevant documents can inherit automatically.
The following registration forms relate to research and development:
• Product Registration Form: Registers product codes and product-specific information, such aschemical names, trade names, and generic names.
• Regulatory Application Registration Form: Registers information for regulatory administrativedocuments and the regulatory submissions themselves.
• Clinical Trial Registration Form: Registers individual trials. Each trial is associated with aproduct code and receives a unique trial ID, which documents related to a particular clinical trialcan inherit. Clinical Crossover Documents, page 13 provides more information about clinicaltrial registration form for crossover documents between Documentum R&D and DocumentumElectronic Trial Master File (Documentum eTMF).
• Non-clinical Study Registration Form: Registers pre-clinical study information.
• Project Registration Form: Registers quality projects. Projects are also associated with a productcode.
Authors use registration forms as templates for creating and importing documents. When theregistration form is selected during the create or import process, documents inherit its informationautomatically. This automatic population reduces data entry and ensures accuracy. Documents areautomatically filed in the appropriate location in the repository based on the type and metadatavalues.
Regulatory Labeling DocumentsA regulatory labeling document is a file or document that describes the labeling information of adrug for a specific product. Pharmaceutical companies are often required to manage product labelingdocuments. The same information is often duplicated in multiple documents for various productstrengths, dosage forms, and presentations, resulting in a large set of labeling documents that aredifficult to manage and keep synchronized.
Documentum R&D includes the Regulatory Labeling domain under which Authors can createlabeling documents. Since these documents are important artifacts required by health agencies whensubmitting an application, you can associate them with an existing regulatory application within thesystem. Two types of labeling documents are supported in Documentum R&D:
• Core labeling documents or artifacts—These are product-related documents and are not linkedto specific applications, such as:
— Company Core Data Sheet (CCDS)—A collection of medical information related to aparticular product, including indications, contra-indications, dosage forms, pharmacologicaldata, drug safety information, and so on. It is used as a master document to produce various
11
Overview
labeling documents related to the product such as patient information leaflets, packagelabeling, and so on.
— Company Core Safety Information (CCSI)—A standard labeling document that containsgeneric product-level safety information.
• Application labeling documents or artifacts—These are specific to a particular application:
— Summary of Product Characteristics (SPC)—A standard labeling document used in Europeansubmissions. Its primary use is for pharmacovigilance (PV, that is, drug safety), providingguidance to medical practitioners.
— Structured Product Labeling (SPL)—A machine-readable version of the SPC (written in astandardized XML format and part of the HL7 standard) used in US submissions.
— Mock-ups—Mock-ups of outer packaging, blister packs, ampoule labeling, and so on.
— Package Inserts (PIs)—Patient information leaflets to be included in the package.
Supporting labeling artifacts such as artwork are also included as part of the application labelingartifacts. Application labeling artifacts must be approved for use by the relevant Health Authority,and are therefore included in submissions (for example, in the regional M1 module of an eCTDsubmission). They must conform to national regulations on the use of language, terminology, fontsize, legibility and accessibility (for example, the use of braille) in addition to providing sufficientand accurate information on product suitability, indications or contra-indications, dosage, knownpotential side-effects, and so on. This information is usually derived from the CCDS and SPC/SPLand translated into a consumer-understandable form.
In Documentum R&D, Labeling documents can use either Control Category 2 or Category 3 lifecyclemodels. To enable the regulatory approval status of an application labeling artifact, the followinglabeling status values are assigned to the artifacts that are independent of the lifecycle status values:
• Draft or Revision—Assigned to a labeling document that is in preparation and has not yet beeninternally approved for submission to the Regulatory Authority.
• Internally-Approved—Indicates that the document has been reviewed and approved forsubmission by the Sponsor, but has not yet been approved by the Health Authority. It may besubmitted as a draft labeling document to that Health Authority.
• Agency-Approved—Indicates that the document has been submitted to, and approved by,the Health Authority. It may be resubmitted as an approved labeling document as part of asubsequent labeling amendment submission, if necessary.
• Submitted in Review—Indicates that the document has been submitted to the agency forapproval.
• Effective—Indicates that the document has been approved by the agency and currently used asa product label.
• Historical—Indicates that the document had been used as a current label and had beensuperseded by a newer Agency-Approved version.
12
Overview
Amendments to labeling documents can impact existing labeling documents for the same product.The dependencies include:
• Changes to core labeling documents affect all other labeling documents (both core and applicationlabeling) for the same product.
• Changes to application labeling documents may affect other application labeling documents forthe same product and application, but not core labeling documents for that product.
The system sends a notification to the Authors and Document Coordinators of the affected documentsso that they can assess the impact on those documents and amend them as required.
Regulatory Safety DocumentsA regulatory safety document describes the safety information of a drug under a specific product.Documentum R&D includes the Safety domain under which Authors can create these types ofdocuments. Safety documents are categorized as Control Category 2 documents and the Category 2lifecycle and workflows apply to these documents.
Clinical Crossover DocumentsAccording to the DIA reference models, certain Trial Master File (TMF) artifacts may be sharedbetween the TMF and Clinical R&D domains. These documents are known as clinical crossoverdocuments in the Life Sciences solution.
To support crossover documents, the system enables you to create clinical TMF documents inDocumentum eTMF and if Documentum R&D is installed, the system auto-links these documents tothe Clinical domain in Documentum R&D. The Documentum R&D lifecycle-related functionalitysuch as Associate Regulatory Application is enabled for these TMF documents.
If only Documentum eTMF is installed, the system does not auto-link the TMF documents toDocumentum R&D. When Documentum R&D is installed, a migration utility is provided to enableexisting TMF documents to be auto-linked to Documentum R&D.
Conversely, if only Documentum R&D is installed, the existing R&D clinical documents that arecrossovers are created as R&D documents, but not linked to Documentum eTMF. When DocumentumeTMF is installed, you can use the migration utility to convert the crossover documents to TMFdocuments and auto-link to Documentum eTMF.
Only Clinical TMF artifacts are supported as crossover documents. Artifacts such as Regulatorydocuments cannot be considered as crossover documents. Crossover documents have the samecontrol category in both Documentum R&D and Documentum eTMF. Crossover documents created inDocumentum R&D are assumed to be trial-level or product-level documents in Documentum eTMF.
TMF placeholders for crossover documents are not included in Documentum R&D. Crossover onlyapplies to TMF documents. However, if a placeholder for a trial-level TMF document is versionedto create a draft 0.1 version, it becomes a TMF document and is cross-linked to Documentum R&Daccordingly.
13
Overview
Clinical trial registration forms can be created either in Documentum R&D or eTMF:
• If created in Documentum eTMF, the initial state of the clinical trial registration form is Planning.If TMF file planning is enabled, a file plan is provided to activate the trial. Otherwise, theregistration form can be activated without a file plan.
• If created in Documentum R&D, the initial state of the clinical trial registration form is Activewith TMF file planning disabled. To enable TMF file planning, Documentum eTMF must alsobe installed, and the state of the registration must be reverted to Planning. Existing R&Ddocuments are not automatically linked into TMF when this happens. After it is TMF-enabled,the registration form cannot be TMF-disabled and reverted back to a Documentum R&D onlytrial registration form.
Virtual DocumentsA virtual document is a document composed of other documents. Virtual documents are used toorganize component documents that are located in various folders across functional areas, such asClinical Study Report components, CTD Module 2 or 3 components, and so on.
The highest level of the virtual document is called a parent or a root and the component documentsare called children. You can construct a virtual document using different file types, and you can usefiles in more than one virtual document at the same time. Virtual documents can contain other virtualdocuments and can be used to represent complex hierarchical structures, such as an eCTD module.The EMC Documentum D2 User Guide provides more information about virtual documents.
In Documentum R&D, you can assemble an arbitrary hierarchy of documents through the VirtualDocument widget or use a predefined Virtual Document template , and route virtual documentsfor review and approval as a group.
14
Chapter 2Roles
A role is a type of group that contains users or other groups that are assigned a specific role. Rolesprovide a means of defining groups that have a particular function within a system. For example,pharmaceutical companies manage their huge set of documentation the assignment of roles suchas Authors, Reviewers, Approvers, Managers, and so on. Each role can have one or more peopledesignated to perform the activity.
This section describes the following roles and their related tasks:• Administrators, page 15
• Managers, page 16
• Authors, page 19
• Reviewers, page 20
• Approvers, page 21
• Coordinators, page 21
• Readers, page 22
• Auditors, page 22
AdministratorsAdministrators can access administrative functions, but they do not have access to documents.
The following Administrator tasks are available in the Administration view (known as theAdministration widget):
• Administer group membership
• Administer dictionaries
• Administer taxonomies
The EMC Documentum D2 User Guide provides more information.
15
Roles
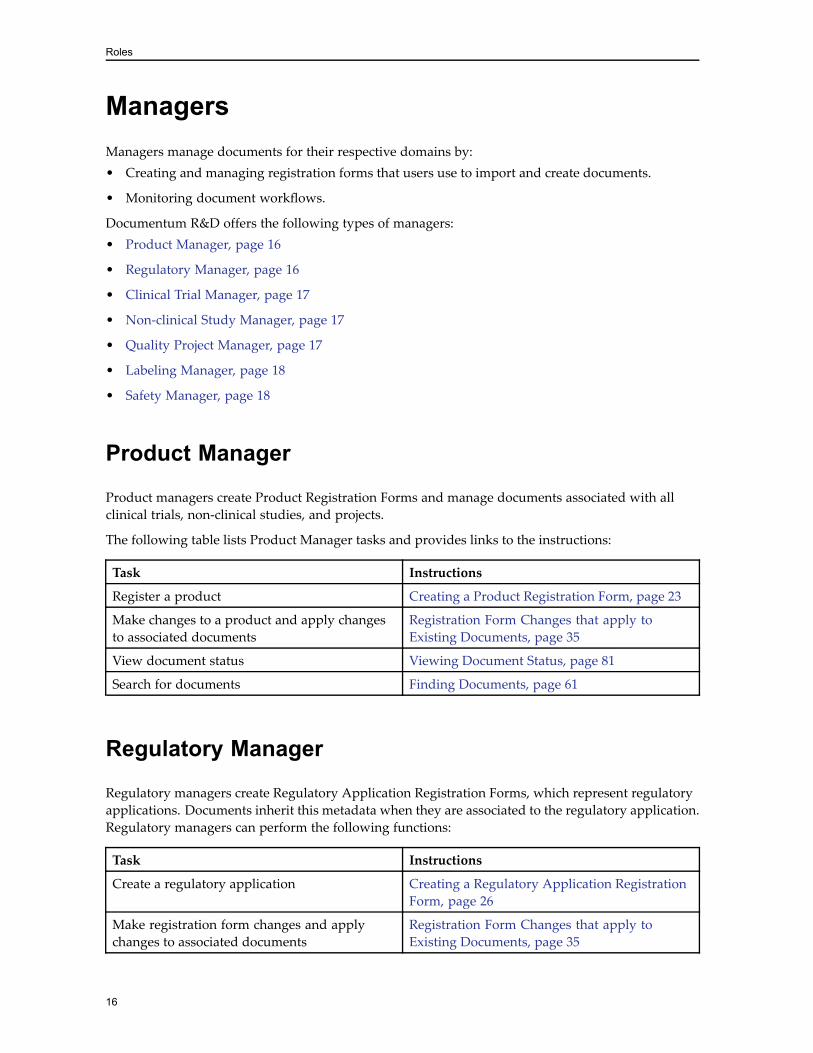
ManagersManagers manage documents for their respective domains by:• Creating and managing registration forms that users use to import and create documents.
• Monitoring document workflows.
Documentum R&D offers the following types of managers:• Product Manager, page 16
• Regulatory Manager, page 16
• Clinical Trial Manager, page 17
• Non-clinical Study Manager, page 17
• Quality Project Manager, page 17
• Labeling Manager, page 18
• Safety Manager, page 18
Product Manager
Product managers create Product Registration Forms and manage documents associated with allclinical trials, non-clinical studies, and projects.
The following table lists Product Manager tasks and provides links to the instructions:
Task Instructions
Register a product Creating a Product Registration Form, page 23
Make changes to a product and apply changesto associated documents
Registration Form Changes that apply toExisting Documents, page 35
View document status Viewing Document Status, page 81
Search for documents Finding Documents, page 61
Regulatory Manager
Regulatory managers create Regulatory Application Registration Forms, which represent regulatoryapplications. Documents inherit this metadata when they are associated to the regulatory application.Regulatory managers can perform the following functions:
Task Instructions
Create a regulatory application Creating a Regulatory Application RegistrationForm, page 26
Make registration form changes and applychanges to associated documents
Registration Form Changes that apply toExisting Documents, page 35
16
Roles
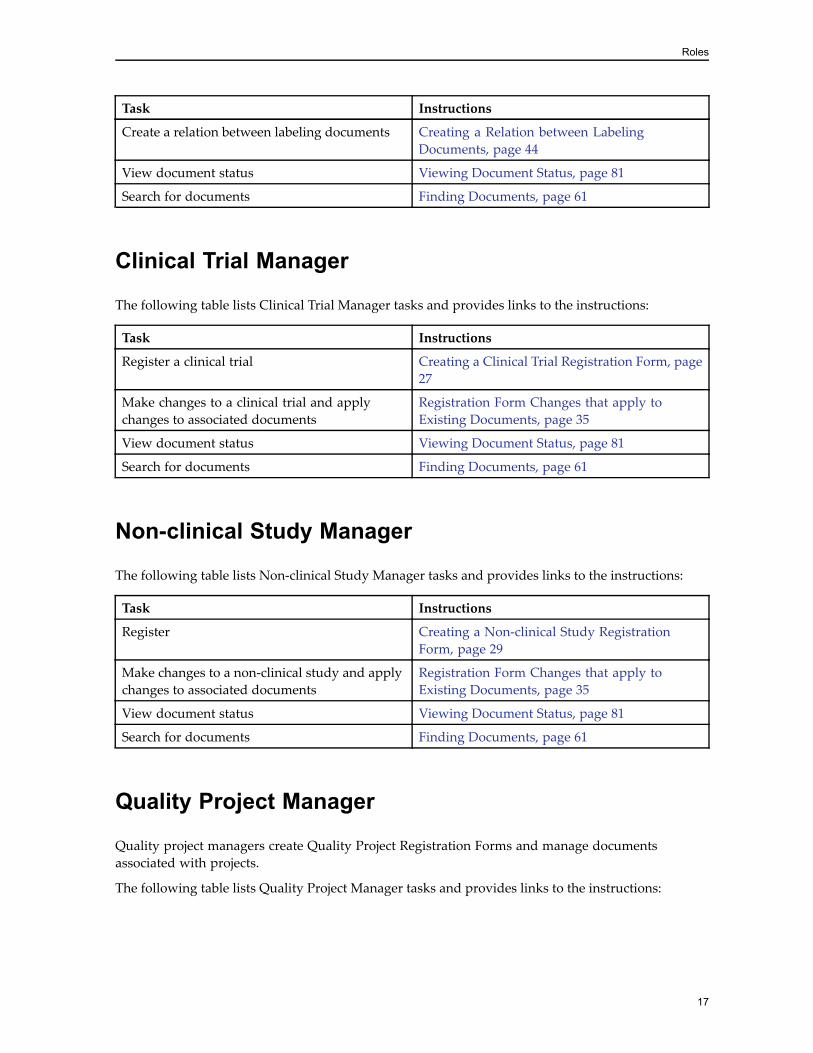
Task Instructions
Create a relation between labeling documents Creating a Relation between LabelingDocuments, page 44
View document status Viewing Document Status, page 81
Search for documents Finding Documents, page 61
Clinical Trial Manager
The following table lists Clinical Trial Manager tasks and provides links to the instructions:
Task Instructions
Register a clinical trial Creating a Clinical Trial Registration Form, page27
Make changes to a clinical trial and applychanges to associated documents
Registration Form Changes that apply toExisting Documents, page 35
View document status Viewing Document Status, page 81
Search for documents Finding Documents, page 61
Non-clinical Study Manager
The following table lists Non-clinical Study Manager tasks and provides links to the instructions:
Task Instructions
Register Creating a Non-clinical Study RegistrationForm, page 29
Make changes to a non-clinical study and applychanges to associated documents
Registration Form Changes that apply toExisting Documents, page 35
View document status Viewing Document Status, page 81
Search for documents Finding Documents, page 61
Quality Project Manager
Quality project managers create Quality Project Registration Forms and manage documentsassociated with projects.
The following table lists Quality Project Manager tasks and provides links to the instructions:
17
Roles
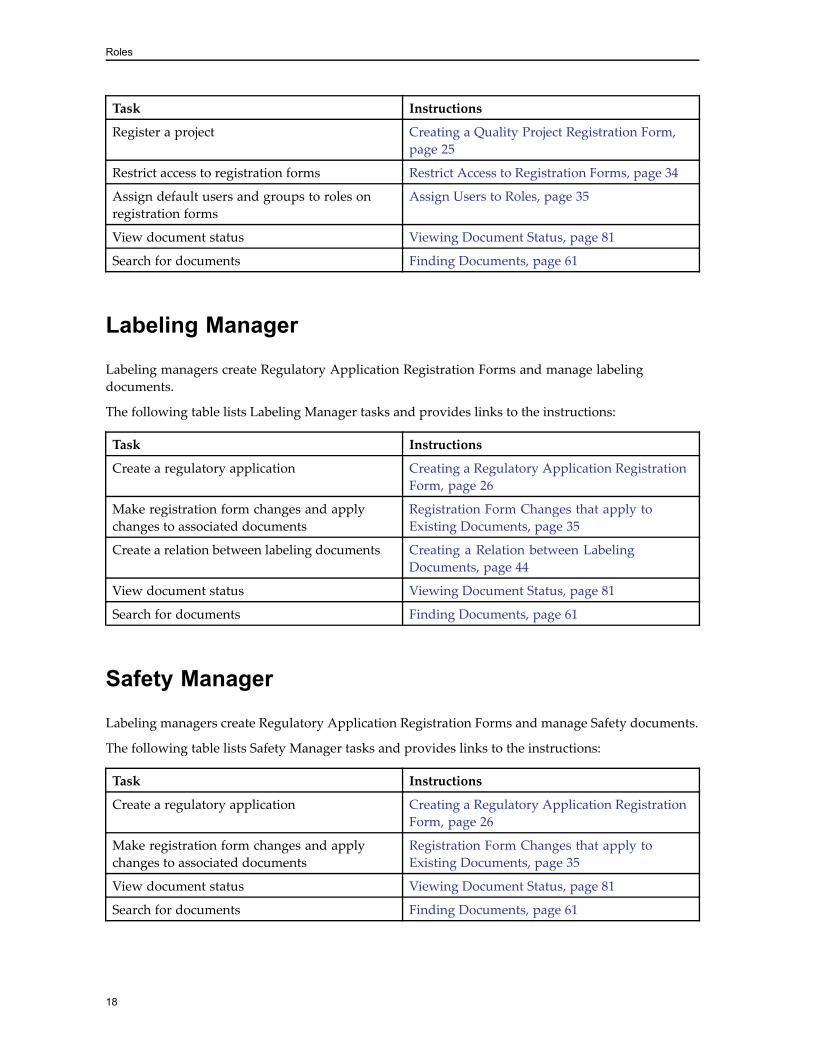
Task Instructions
Register a project Creating a Quality Project Registration Form,page 25
Restrict access to registration forms Restrict Access to Registration Forms, page 34
Assign default users and groups to roles onregistration forms
Assign Users to Roles, page 35
View document status Viewing Document Status, page 81
Search for documents Finding Documents, page 61
Labeling Manager
Labeling managers create Regulatory Application Registration Forms and manage labelingdocuments.
The following table lists Labeling Manager tasks and provides links to the instructions:
Task Instructions
Create a regulatory application Creating a Regulatory Application RegistrationForm, page 26
Make registration form changes and applychanges to associated documents
Registration Form Changes that apply toExisting Documents, page 35
Create a relation between labeling documents Creating a Relation between LabelingDocuments, page 44
View document status Viewing Document Status, page 81
Search for documents Finding Documents, page 61
Safety Manager
Labeling managers create Regulatory Application Registration Forms and manage Safety documents.
The following table lists Safety Manager tasks and provides links to the instructions:
Task Instructions
Create a regulatory application Creating a Regulatory Application RegistrationForm, page 26
Make registration form changes and applychanges to associated documents
Registration Form Changes that apply toExisting Documents, page 35
View document status Viewing Document Status, page 81
Search for documents Finding Documents, page 61
18
Roles
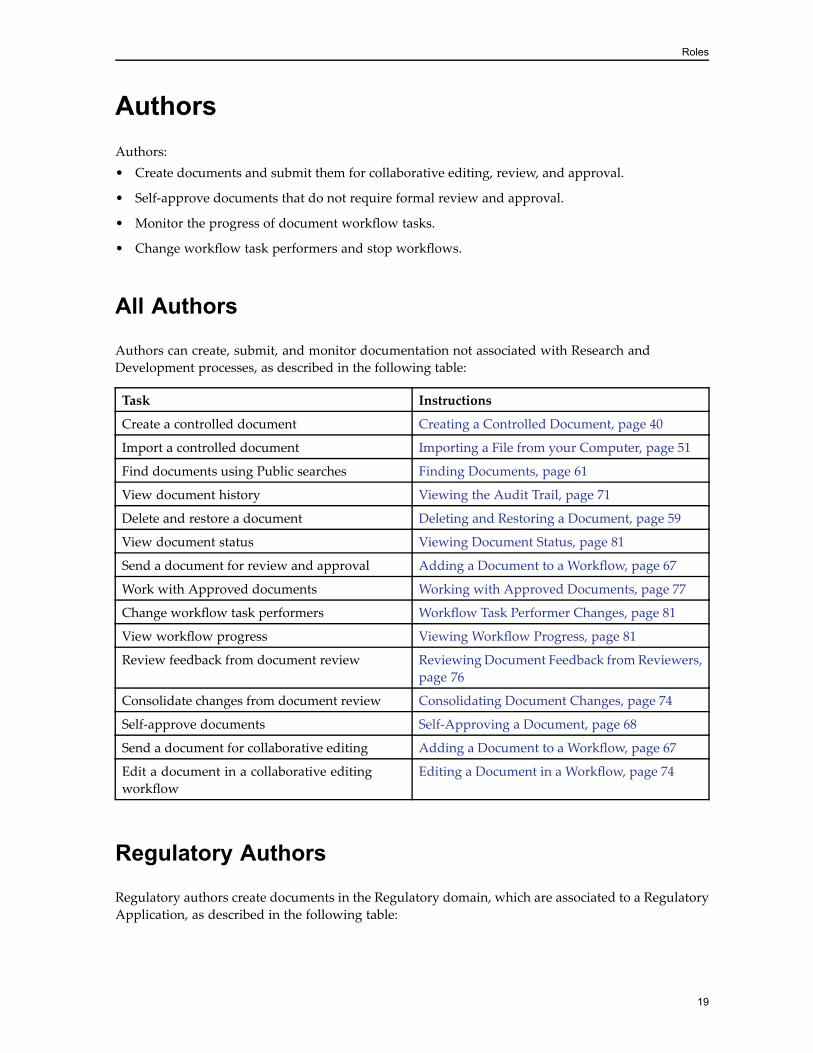
AuthorsAuthors:• Create documents and submit them for collaborative editing, review, and approval.
• Self-approve documents that do not require formal review and approval.
• Monitor the progress of document workflow tasks.
• Change workflow task performers and stop workflows.
All Authors
Authors can create, submit, and monitor documentation not associated with Research andDevelopment processes, as described in the following table:
Task Instructions
Create a controlled document Creating a Controlled Document, page 40
Import a controlled document Importing a File from your Computer, page 51
Find documents using Public searches Finding Documents, page 61
View document history Viewing the Audit Trail, page 71
Delete and restore a document Deleting and Restoring a Document, page 59
View document status Viewing Document Status, page 81
Send a document for review and approval Adding a Document to a Workflow, page 67
Work with Approved documents Working with Approved Documents, page 77
Change workflow task performers Workflow Task Performer Changes, page 81
View workflow progress Viewing Workflow Progress, page 81
Review feedback from document review Reviewing Document Feedback from Reviewers,page 76
Consolidate changes from document review Consolidating Document Changes, page 74
Self-approve documents Self-Approving a Document, page 68
Send a document for collaborative editing Adding a Document to a Workflow, page 67
Edit a document in a collaborative editingworkflow
Editing a Document in a Workflow, page 74
Regulatory Authors
Regulatory authors create documents in the Regulatory domain, which are associated to a RegulatoryApplication, as described in the following table:
19

Roles
Task Instructions
Create a Regulatory Administrative document Creating a Regulatory Administrative, Labeling,or Safety Document, page 43
Create a relation between labeling documents Creating a Relation between LabelingDocuments, page 44
Regulatory Publisher
Regulatory publishers are responsible for assembling and publishing submissions to a regulatoryHealth Authority. They are given read/write access to all documents that can be included in asubmission, and they can make last-minute changes when required.
The following table lists Regulatory Publisher tasks and provides links to the instructions:
Task Instructions
Create a controlled document Creating a Controlled Document, page 40
Import a controlled document Importing a File from your Computer, page 51
Find documents using Public searches Finding Documents, page 61
View document history Viewing the Audit Trail, page 71
View document status Viewing Document Status, page 81
Send a document for review and approval Adding a Document to a Workflow, page 67
Work with Approved documents Working with Approved Documents, page 77
Change workflow task performers Workflow Task Performer Changes, page 81
View workflow progress Viewing Workflow Progress, page 81
Review feedback from document review Reviewing Document Feedback from Reviewers,page 76
Consolidate changes from document review Consolidating Document Changes, page 74
Self-approve documents Self-Approving a Document, page 68
Send a document for collaborative editing Adding a Document to a Workflow, page 67
Edit a document in a collaborative editingworkflow
Editing a Document in a Workflow, page 74
ReviewersReviewers review documents using annotations and edit documents. They are responsible fortechnical review during the authoring and review cycle. Reviewers complete workflow tasks and canbrowse and search for documents.
The following table lists Reviewer tasks and provides links to the instructions:
20
Roles
Task Instructions
Perform workflow tasks Performing Tasks in a Workflow, page 70
View document status Viewing Document Status, page 81
Delegate a task to another user Delegating a Task as a User, page 85
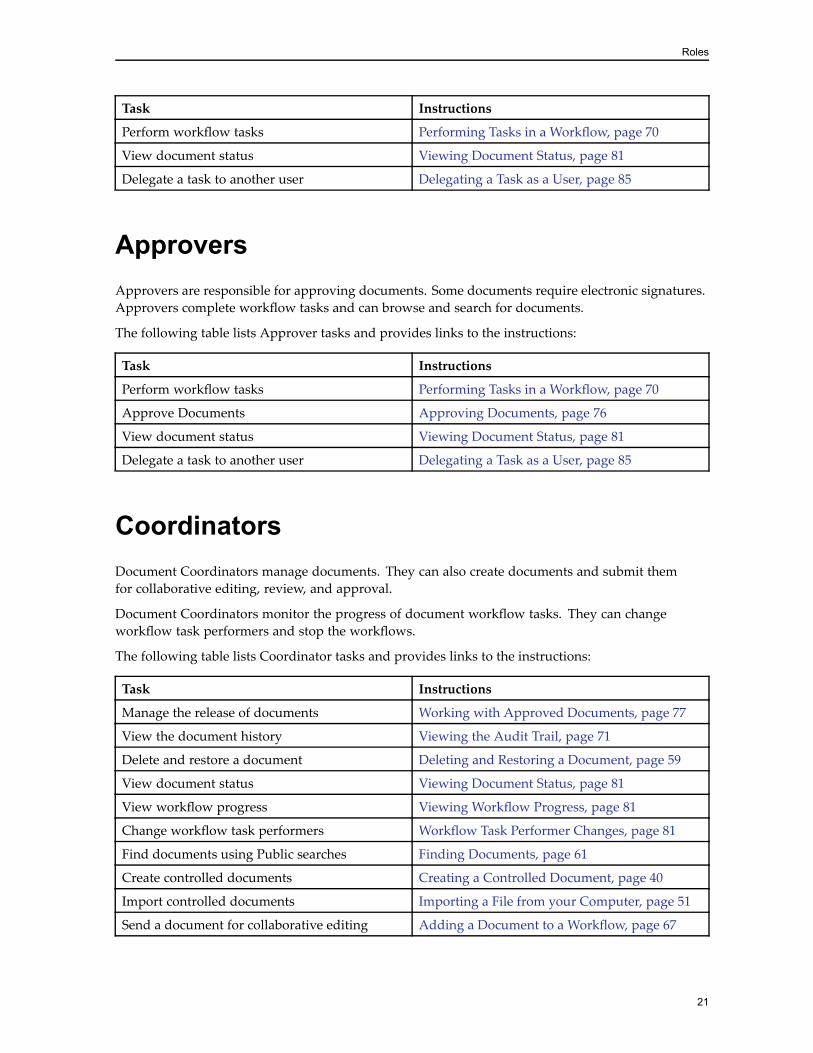
ApproversApprovers are responsible for approving documents. Some documents require electronic signatures.Approvers complete workflow tasks and can browse and search for documents.
The following table lists Approver tasks and provides links to the instructions:
Task Instructions
Perform workflow tasks Performing Tasks in a Workflow, page 70
Approve Documents Approving Documents, page 76
View document status Viewing Document Status, page 81
Delegate a task to another user Delegating a Task as a User, page 85
CoordinatorsDocument Coordinators manage documents. They can also create documents and submit themfor collaborative editing, review, and approval.
Document Coordinators monitor the progress of document workflow tasks. They can changeworkflow task performers and stop the workflows.
The following table lists Coordinator tasks and provides links to the instructions:
Task Instructions
Manage the release of documents Working with Approved Documents, page 77
View the document history Viewing the Audit Trail, page 71
Delete and restore a document Deleting and Restoring a Document, page 59
View document status Viewing Document Status, page 81
View workflow progress Viewing Workflow Progress, page 81
Change workflow task performers Workflow Task Performer Changes, page 81
Find documents using Public searches Finding Documents, page 61
Create controlled documents Creating a Controlled Document, page 40
Import controlled documents Importing a File from your Computer, page 51
Send a document for collaborative editing Adding a Document to a Workflow, page 67
21
Roles
Task Instructions
Send a document for review and approval Adding a Document to a Workflow, page 67
Self-approve documents Self-Approving a Document, page 68
Edit a document in a collaborative editingworkflow
Editing a Document in a Workflow, page 74
Consolidate document changes from eachreviewer
Consolidating Document Changes, page 74
Review document feedback from reviewers Reviewing Document Feedback from Reviewers,page 76
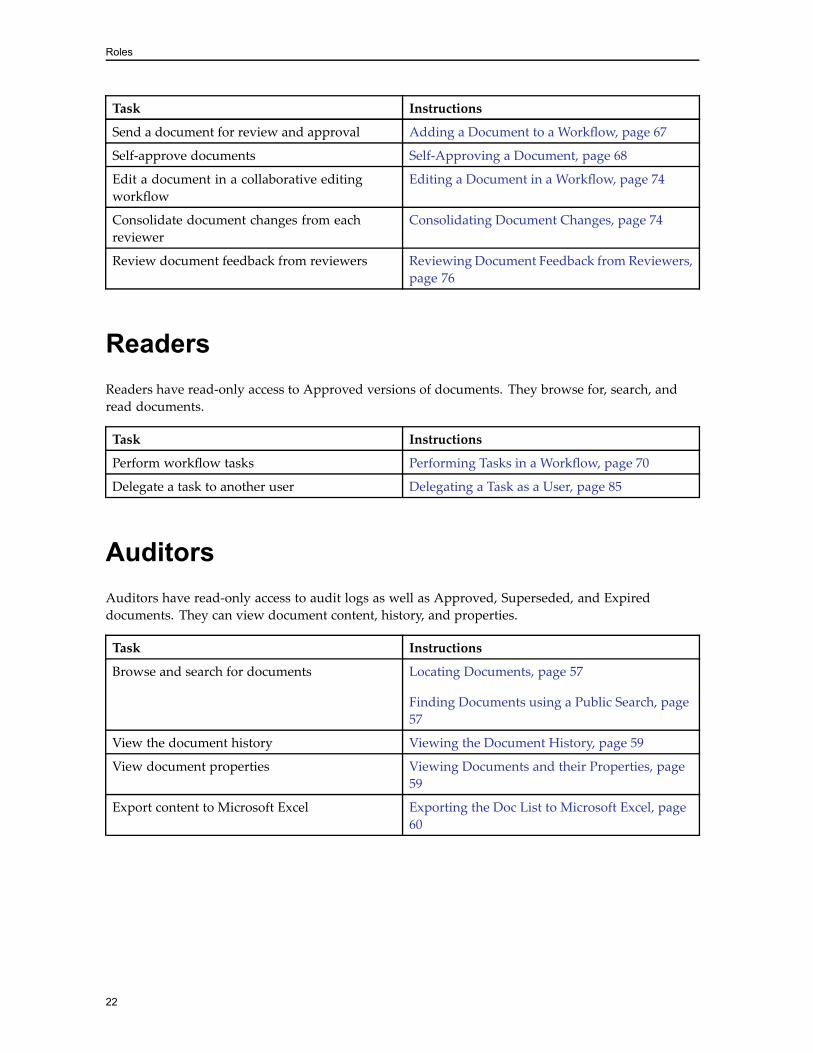
ReadersReaders have read-only access to Approved versions of documents. They browse for, search, andread documents.
Task Instructions
Perform workflow tasks Performing Tasks in a Workflow, page 70
Delegate a task to another user Delegating a Task as a User, page 85
AuditorsAuditors have read-only access to audit logs as well as Approved, Superseded, and Expireddocuments. They can view document content, history, and properties.
Task Instructions
Browse and search for documents Locating Documents, page 57
Finding Documents using a Public Search, page57
View the document history Viewing the Document History, page 59
View document properties Viewing Documents and their Properties, page59
Export content to Microsoft Excel Exporting the Doc List to Microsoft Excel, page60
22
Chapter 3Create Registration Forms
This section contains the following topics:• Creating a Product Registration Form, page 23
• Creating a Quality Project Registration Form, page 25
• Creating a Regulatory Application Registration Form, page 26
• Creating a Clinical Trial Registration Form, page 27
• Creating a Clinical Trial Registration Form for Crossover Documents, page 28
• Creating a Non-clinical Study Registration Form, page 29
• Registration Form Lifecycle Models, page 30
You can perform the following configurations on registration forms:• Restrict Access to Registration Forms, page 34
• Assign Users to Roles, page 35
• Registration Form Changes that apply to Existing Documents, page 35
Creating a Product Registration FormProduct Registration Forms define products and product-related metadata. These forms relateproducts to the appropriate product identification codes and are required to create the anyregistration form.
1. Log in as a Product Manager.
2. Select New > Content from the menu bar.
3. On the Fill creation profile page:
a. For Creation profile, select Product Management.
b. For Document Type, select Product Registration Form.
c. Click Next.
4. On the Edit properties page, select or type information in the fields associated with following tabs:
a. Product Info: Type the product code and DIA Reference Model specific information for theproduct.
23
Create Registration Forms
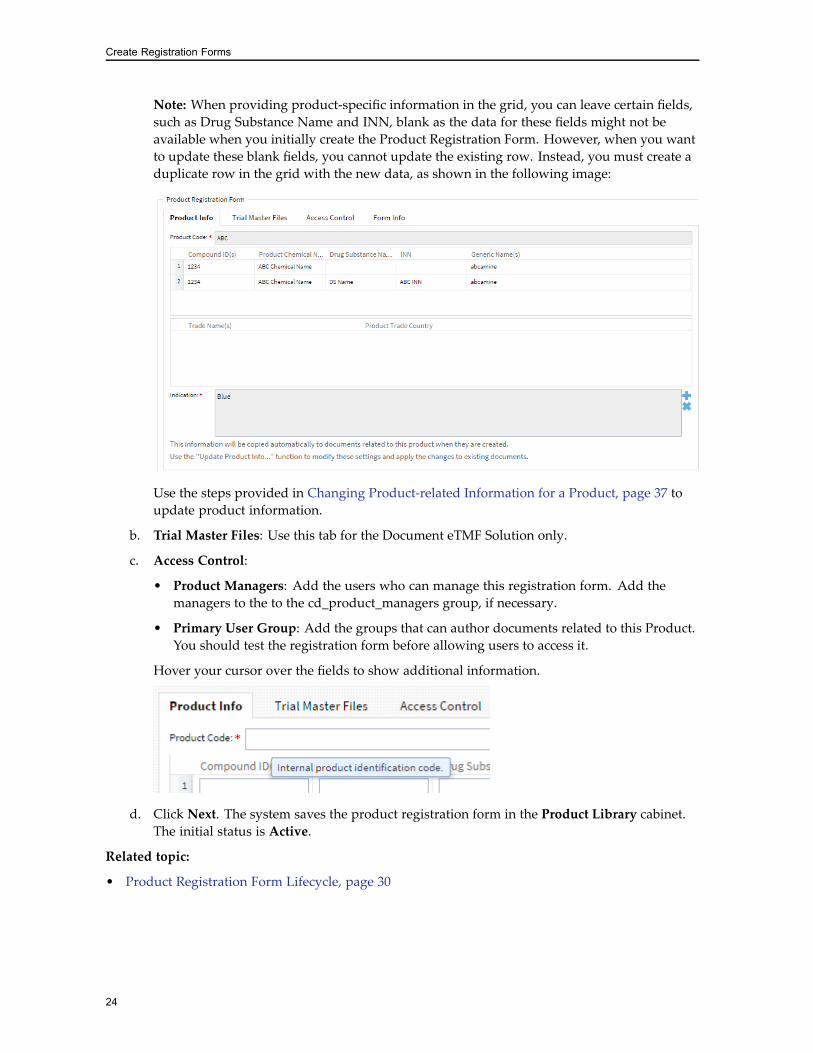
Note: When providing product-specific information in the grid, you can leave certain fields,such as Drug Substance Name and INN, blank as the data for these fields might not beavailable when you initially create the Product Registration Form. However, when you wantto update these blank fields, you cannot update the existing row. Instead, you must create aduplicate row in the grid with the new data, as shown in the following image:
Use the steps provided in Changing Product-related Information for a Product, page 37 toupdate product information.
b. Trial Master Files: Use this tab for the Document eTMF Solution only.
c. Access Control:
• Product Managers: Add the users who can manage this registration form. Add themanagers to the to the cd_product_managers group, if necessary.
• Primary User Group: Add the groups that can author documents related to this Product.You should test the registration form before allowing users to access it.
Hover your cursor over the fields to show additional information.
d. Click Next. The system saves the product registration form in the Product Library cabinet.The initial status is Active.
Related topic:
• Product Registration Form Lifecycle, page 30
24
Create Registration Forms
Creating a Quality Project Registration Form1. Log in as a Quality Project Manager.
2. Select New > Content from the menu bar.
3. On the Fill creation profile page:
a. For Creation profile, select Project Management.
b. For Document Type, select Project Registration Form.
c. Click Next.
4. On the Edit properties page, select or type information in the fields associated with following tabs:
a. Project Info: Provide information about the project.
b. Drug Substance: Provide information about the test substance.
c. Drug Product: Provide dosage information about the test substance.
d. Access Control:
• Project Managers: Add the users who can manage this registration form. Add themanagers to the to the cd_quality_project_managers group, if necessary.
• Primary User Group: Add the groups that can author documents related to this Product.You should test the registration form before allowing users to access it.
e. Default Users / Groups: Define the default roles that appear when users create documentswith this registration from. You can define all of the document-level roles except Authors.You do not define authors because the user who creates the document becomes the initialAuthor. These default users and groups appear on the Process Info tab of the document.Authors can adjust these settings when they create documents.
f. Click Next. The system saves the form in the Project Library cabinet.
Related topic:
• Quality Project Registration Form Lifecycle, page 33
25
Create Registration Forms
Creating a Regulatory Application RegistrationFormA Regulatory Application Registration Form represents a planned or submitted regulatoryapplication.
1. Log in as a Regulatory Manager.
2. Navigate to New > Content from the menu bar.
3. On the Fill creation profile page:
a. For Creation profile, select Regulatory Application Management.
b. For Document type, select Regulatory Application Registration Form.
c. Click Next.
4. On the Edit properties page, select or type information in the fields associated with following tabs:
a. Regulatory Application Info: Provide information about the regulatory application.
b. Product/Project Info: Type the DIA Reference Model specific information for the product.
c. Access Control:
• Regulatory Managers: Add the users who can manage this registration form. Add themanagers to the to the cd_regulatory_managers group, if necessary.
• Primary User Group: Add the groups that can relate documents to this registration form.You should test the registration form before allowing users to access it.
d. Default Users/Groups:
• Document Coordinators: Add user who release the documents as Approved versions.
• Authors: Add users who create documents associated to this registration form.
• Reviewers: Add users who review documents associated to this registration form.
• Approvers: Add users who approve documents associated to this registration form.
• Readers: Add users who read documents associated to this registration form.
e. Click Next. The Regulatory Application Registration Form appears in the RegulatoryApplication Library/<product>/<region> folder using the ApplicationDescription as the display name.
26
Create Registration Forms
Creating a Clinical Trial Registration Form1. Log in as a Clinical Trial Manager.
2. Select New > Content from the menu bar.
3. On the Fill creation profile page:
a. For Creation profile, select Clinical Trial Management.
b. For Document Type, select Trial Registration Form.
c. Click Next.
4. On the Edit properties page, select or type information in the fields associated with following tabs:
a. Project Info: Provide information to identify the trial. If you have selected a ProjectRegistration Form, both the Product Code and Project Name are inherited from theregistration form.
Note: If you do not select a Product Registration Form before creating the document, you canselect a product from the Product Code list. This contains a list of all products whose statusis Active in the repository. Based on the selected product, a list of projects is displayed inthe Project Name that you can choose from. A project has many to one relationship with aproduct.
b. Trial Info: Provide information about the clinical trial.
c. Access Control:
• Clinical Trial Managers: Add the users who can manage this registration form. Add themanagers to the to the cd_clinical_trial_managers group, if necessary.
• Primary User Group: Add the groups that can author documents related to this trial. Youshould test the registration form before allowing users to access it.
d. Default Users / Groups:• Document Coordinators: Add user who release the documents as Approved versions.
• Reviewers: Add users who review documents created with this registration form.
• Approvers: Add users who approve documents created with this registration form.
• Readers: Add users who read documents created with this registration form.
• Auditors: Add users who audit documents created with this registration form.
e. Click Next. The system saves the form in the Clinical Trial Library cabinet. If the directorystructure does not exist, the system creates it. The initial status is Active.
Related topic:
• Clinical Crossover Documents, page 13
• Clinical Trial Registration Form Lifecycle, page 31
27
Create Registration Forms
Creating a Clinical Trial Registration Form forCrossover DocumentsTo support the creation of crossover documents, the system enables you to create a Clinical TrialRegistration Form that is common to both Documentum eTMF and Documentum R&D. Creating thisregistration form is only enabled when you have both Documentum eTMF and Documentum R&Dinstalled. You need to make additional configuration changes in D2-Config to enable crossover acrossboth solutions. The EMC Documentum for Life Sciences Installation Guide provides the configurationsteps. Ensure that you have created a TMF File Plan Template. The EMC Documentum Electronic TrialMaster File User Guide provides the steps for creating a TMF File Plan Template, associating the fileplan with the registration form, and activating the file plan.
1. Log in as a Clinical Trial Manager.
2. Select New > Content from the menu bar.
3. In the Creation profile field, select Clinical Trial Management.
4. In the Document Type field, select Trial Registration Form and click Next.
5. On the Project Info tab, type or select information to identify the trial. You can select a productfrom the Product Code list. This contains a list of all products whose status is Active in therepository. Based on the selected product, a list of projects is displayed in the Project Name listthat you can choose.
6. On the Trial Info tab, type or select information to identify the trial. The Clinical Trial Identifier(Clinical Trial ID) is case sensitive. For example, if there is already a Clinical Trial ID named Abc,the system allows you to create a Clinical Trial ID named abcEnsure that the Generate TMF template option is selected. In the TMF template field, select thefile plan template that you created for the crossover document.
7. Verify the information on the Access Control, and Default Users / Groups tabs. These tabsinherit information from the Product Registration Form.
8. Click Next.The system saves the form in the Clinical Trial Library cabinet. If the directory structure does notexist, the system creates it. The initial status is Active.
9. To convert the Clinical Trial Registration Form to an eTMF registration form, in the Doc List,right-click the registration form, and then click Revert to “Planning”.
Related topics:
• Clinical Crossover Documents, page 13
• Clinical Trial Registration Form Lifecycle, page 31
28
Create Registration Forms
Creating a Non-clinical Study RegistrationForm1. Log in as a Non-clinical Study Manager.
2. Select New > Content from the menu bar.
3. On the Fill creation profile page:
a. For Creation profile, select Non-Clinical Study Management.
b. For Document Type, select Non-Clinical Study Registration Form.
c. Click Next.
4. On the Edit properties page, select or type information in the fields associated with following tabs:
a. Nonclinical Study Info: Provide information about the non-clinical study.
b. Access Control:
• Non-Clinical Trial Managers: Add the users who can manage this registration form. Addthe managers to the to the cd_non-clinical_study_managers group, if necessary.
• Primary User Group: Add the groups that can author documents related to this Product.You should test the registration form before allowing users to access it.
c. Default Users / Groups:• Document Coordinators: Add user who release the documents as Approved versionscreated with this registration form.
• Reviewers: Add users who review documents created with this registration form.
• Approvers: Add users who approve documents created with this registration form.
• Readers: Add users who read documents created with this registration form.
d. Click Next. The system saves the form in the Non-Clinical Study Library cabinet. Theinitial status is Active.
Related topic:
• Non-Clinical Study Registration Form Lifecycle, page 31
29
Create Registration Forms
Registration Form Lifecycle ModelsThe lifecycles of the registration forms indicate the status of a particular product, procedure, orquality project document.
This section contains the following topics:
• Product Registration Form Lifecycle, page 30
• Clinical Trial Registration Form Lifecycle, page 31
• Non-Clinical Study Registration Form Lifecycle, page 31
• Quality Project Registration Form Lifecycle, page 33
• Regulatory Application Registration Form Lifecycle, page 33
Product Registration Form Lifecycle
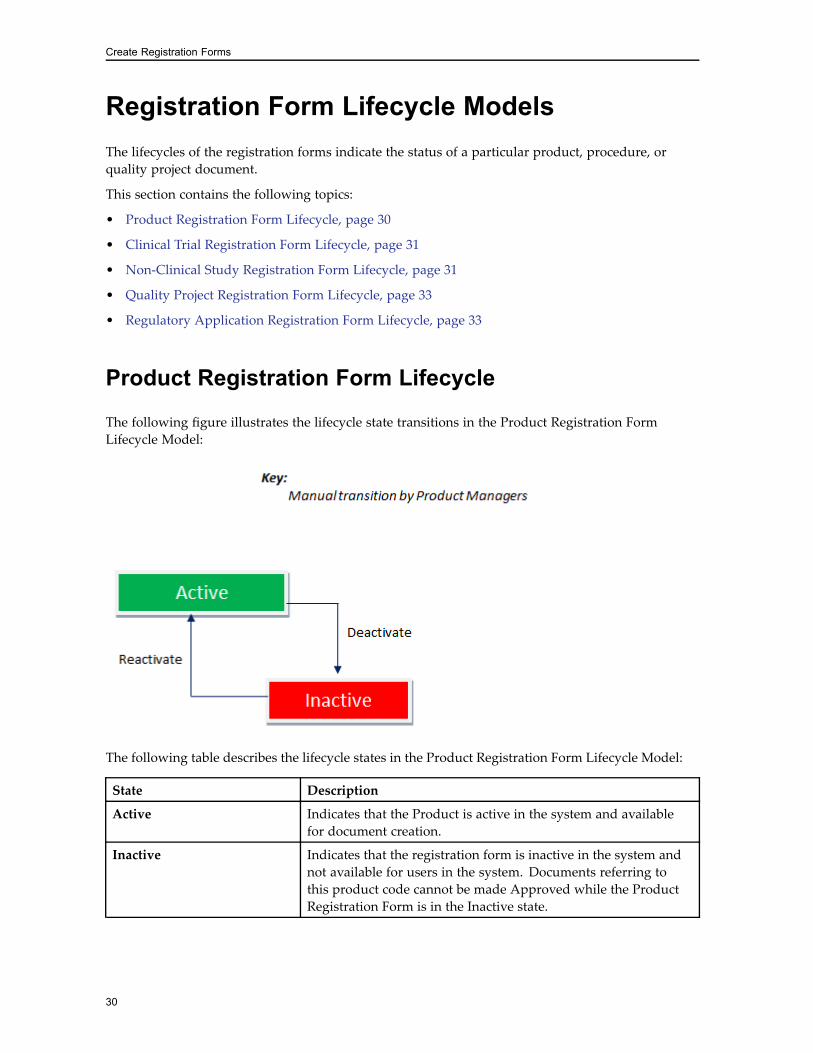
The following figure illustrates the lifecycle state transitions in the Product Registration FormLifecycle Model:
The following table describes the lifecycle states in the Product Registration Form Lifecycle Model:
State Description
Active Indicates that the Product is active in the system and availablefor document creation.
Inactive Indicates that the registration form is inactive in the system andnot available for users in the system. Documents referring tothis product code cannot be made Approved while the ProductRegistration Form is in the Inactive state.
30
Create Registration Forms
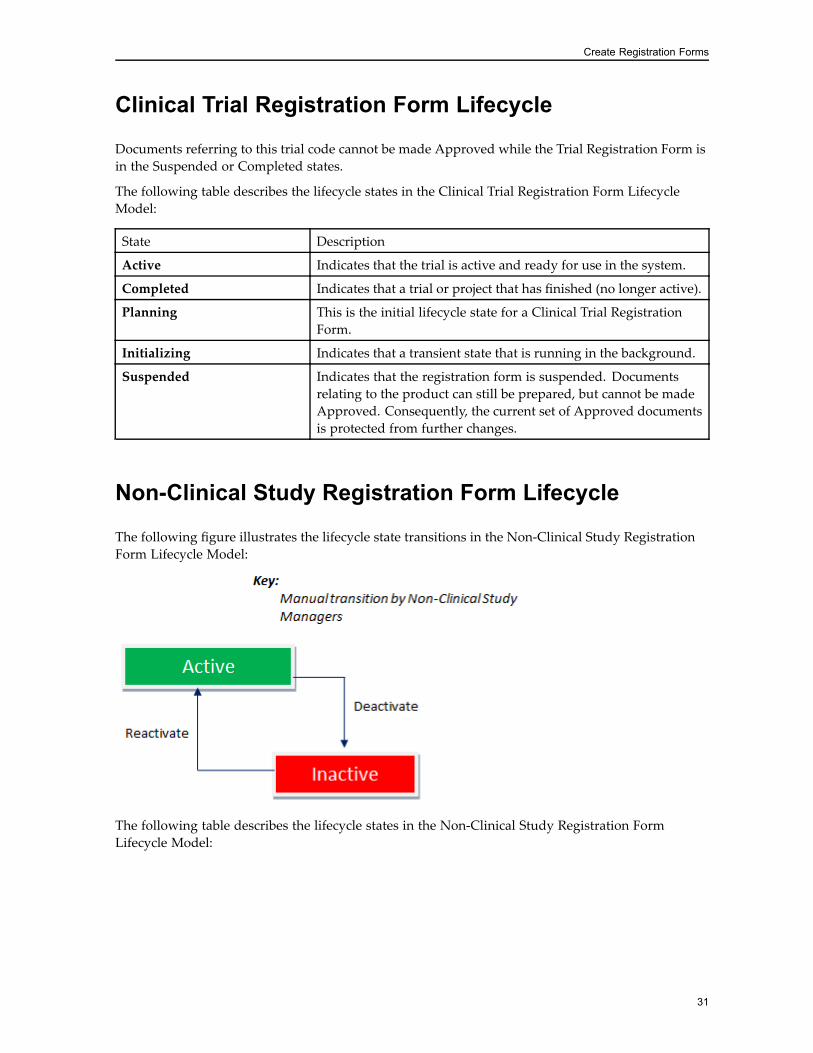
Clinical Trial Registration Form Lifecycle
Documents referring to this trial code cannot be made Approved while the Trial Registration Form isin the Suspended or Completed states.
The following table describes the lifecycle states in the Clinical Trial Registration Form LifecycleModel:
State Description
Active Indicates that the trial is active and ready for use in the system.
Completed Indicates that a trial or project that has finished (no longer active).
Planning This is the initial lifecycle state for a Clinical Trial RegistrationForm.
Initializing Indicates that a transient state that is running in the background.
Suspended Indicates that the registration form is suspended. Documentsrelating to the product can still be prepared, but cannot be madeApproved. Consequently, the current set of Approved documentsis protected from further changes.
Non-Clinical Study Registration Form Lifecycle
The following figure illustrates the lifecycle state transitions in the Non-Clinical Study RegistrationForm Lifecycle Model:
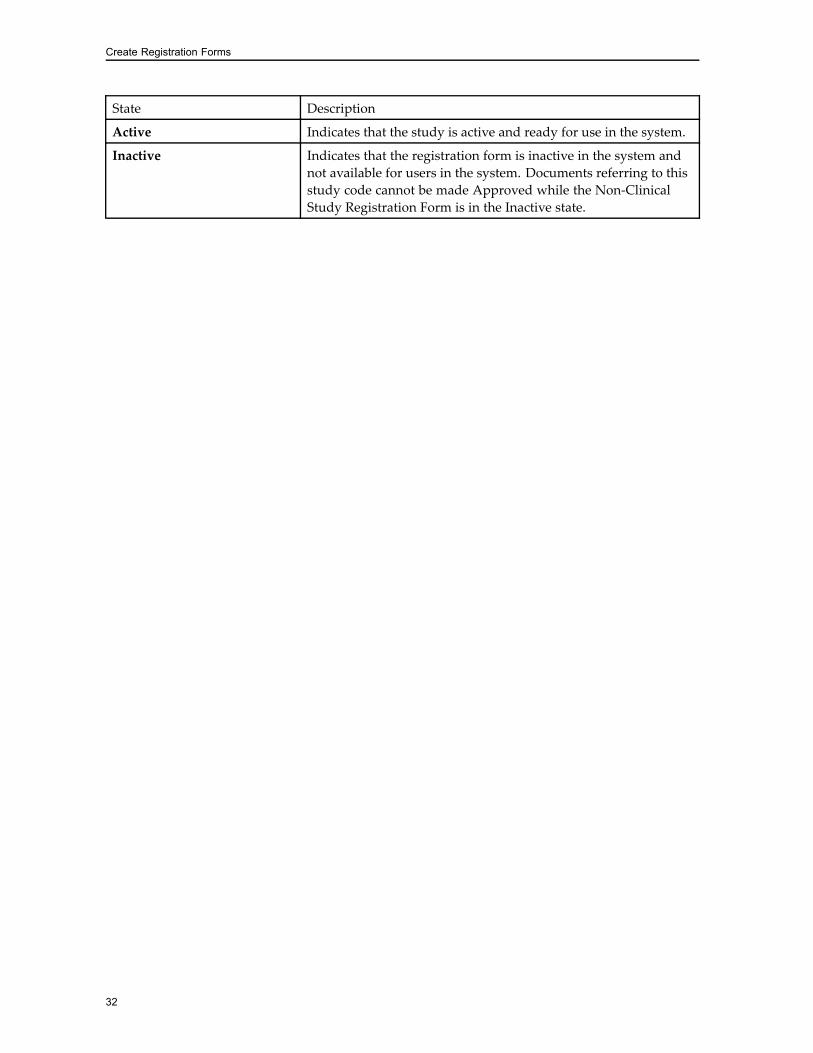
The following table describes the lifecycle states in the Non-Clinical Study Registration FormLifecycle Model:
31
Create Registration Forms
State Description
Active Indicates that the study is active and ready for use in the system.
Inactive Indicates that the registration form is inactive in the system andnot available for users in the system. Documents referring to thisstudy code cannot be made Approved while the Non-ClinicalStudy Registration Form is in the Inactive state.
32
Create Registration Forms
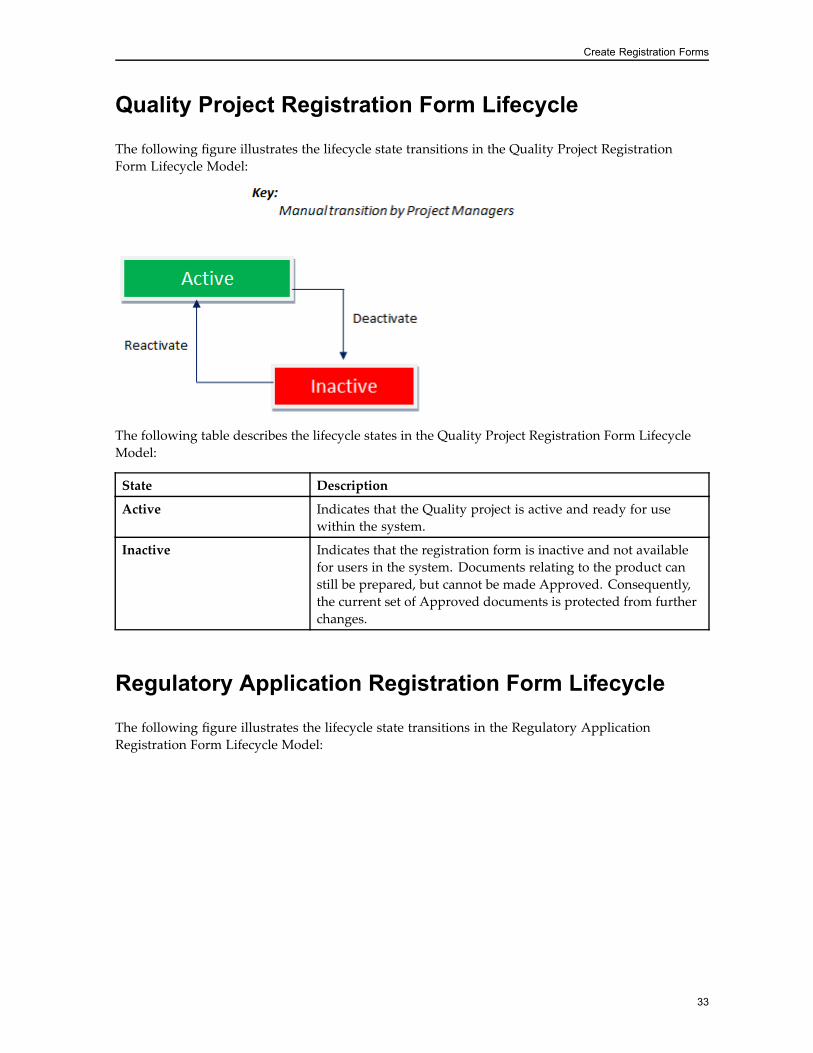
Quality Project Registration Form Lifecycle
The following figure illustrates the lifecycle state transitions in the Quality Project RegistrationForm Lifecycle Model:
The following table describes the lifecycle states in the Quality Project Registration Form LifecycleModel:
State Description
Active Indicates that the Quality project is active and ready for usewithin the system.
Inactive Indicates that the registration form is inactive and not availablefor users in the system. Documents relating to the product canstill be prepared, but cannot be made Approved. Consequently,the current set of Approved documents is protected from furtherchanges.
Regulatory Application Registration Form Lifecycle
The following figure illustrates the lifecycle state transitions in the Regulatory ApplicationRegistration Form Lifecycle Model:
33

Create Registration Forms
The following table describes the lifecycle states in the Regulatory Application Registration FormLifecycle Model:
State Description
Active Indicates the registration is active and ready for use in the system.
Inactive Indicates the registration is inactive in the system and notavailable for users in the system.
Restrict Access to Registration FormsAdministrators can restrict access using the following methods:• Control user access: Restrict access to registration forms by creating specific group forms for theappropriate functional area group (cd_non_clinical). For example, set up a confidential study thatconsists of documents visible to a new group with specified users. Then define this group as theNon-clinical Trial Managers on the Access Control tab of the Non-Clinical Study RegistrationForm. Only these users can view the registration form and create documents that refer to thisstudy. Additional restrictions can also be imposed by changing the lifecycle state of the form.
• Control lifecycle states: By changing the lifecycle status of a registration form, administratorscan preserve the current set of Effective (Approved) documents relating to a particular product,study, or project. The study or entire product line is frozen when the associated registration formsare in one of these states.— Clinical Trial, Non-clinical Study, Regulatory Application, or Project Registration Form:Restrict access to a Clinical Trial, Non-clinical Study, or Project Registration Form by changingthe status of the form to Completed (for Clinical Trial) or Inactive (for the other forms).Documents referring to a particular study or project cannot be made Approved while the
34
Create Registration Forms
Clinical Trial, Non-clinical Study, or Project Registration Form is in a Completed (for ClinicalTrial) or Inactive (for the other forms).
— Product Restriction Form: Restrict access to a Product Registration Form by changing thestatus of the form to Inactive. Documents referring to a Product Registration Form cannot bemade Approved while the Product Registration Form is in an Inactive state.
While the registration form remains frozen, users can create, review, and approve documents.However, users cannot release the documents to an Approved state until the appropriateregistration forms are reverted to an active state.
Assign Users to RolesUse this procedure to change the default users and groups assigned to the roles on the Project,Clinical Trial, or Non-Clinical Study Registration Forms.
1. Right-click a Project, Clinical Trial, or Non-Clinical Study Registration Form and select Properties.
2. On the Default Users / Groups tab, select the users and groups for the default roles that appearwhen users create documents that refer to this registration form. For example, On the Reviewerstab, select the default users and groups responsible for reviewing the documents created withthis registration form. Authors can adjust these settings when they create documents.
3. Click OK.If you want to change the default user groups and restrict security to the Regulatory ApplicationRegistration Forms, follow these steps:
1. Log in as a Regulatory Manager.
2. In the Browser, navigate to the Regulatory Application Library cabinet.
3. In the Doc List, right-click the registration form, and then click Update Security.
4. In the Properties dialog box, on the Default Users / Groups tab, add or remove the users orgroups for the default roles.
5. Click OK.
Registration Form Changes that apply toExisting DocumentsWhen users create documents from registration forms, the documents inherit the attribute propertiesof the registration form. When you change registration form properties, the changes apply tothe documents that users create after the change. In some situations, it is also necessary to applyregistration form updates to existing documents. For example, if you change the product code for aproduct, the change affects new documents and existing documents for that product.
35
Create Registration Forms
Documentum R&D enables Product Managers to make the following changes that apply to existingdocuments:
• Changing a Product Code for a Product, page 36
• Changing Product-related Information for a Product, page 37
• Changing Project Information, page 38
• Changing Clinical Trial Information, page 38
• Updating the Regulatory Application Number, page 38
These functions are restricted to the registration form managers.
Note: There are no predefined rules governing the conventions for product codes and trial IDs due tovarying customer requirements. Administrators can constrain these fields through regular expressionpattern matching in D2-Config as necessary. For example, Administrators can customize these fieldsto alphanumeric only plus certain characters such as underscores, hyphens, and spaces based on theirrequirements. The EMC Documentum D2 Administration Guide provides more information.
Changing a Product Code for a Product
Use this procedure to reassign an existing product to a new product code. The change affects not onlythe Product Registration Form, but also all of the documents associated with the existing productcode, including historical versions.
Note: You cannot perform the Change Product Code operation if the product registration formhas a regulatory application associated with it.
1. Log in as a Product Manager.
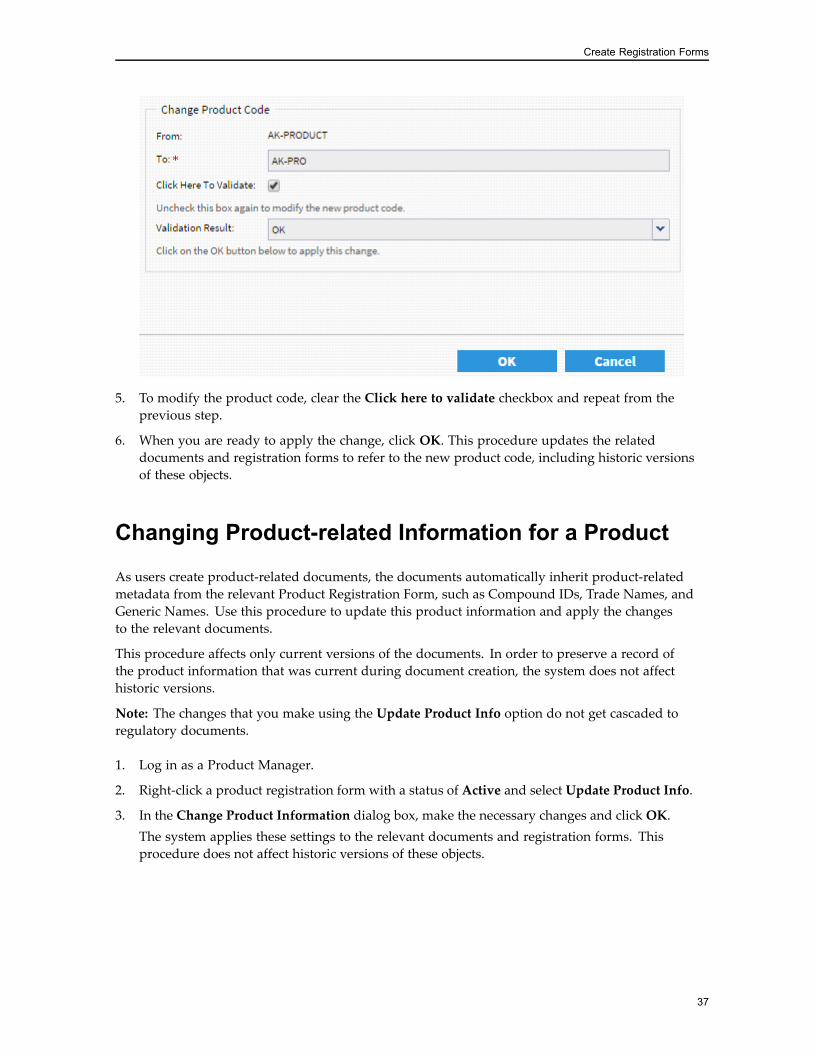
2. Right-click a product registration form with a status of Active and select Change Product Code.
3. In the Change Product Code dialog box, type the new product code. Product codes are casesensitive. For example, if there is already a product code named Emc, the system allows you tocreate a product code named emc.
4. Select Click Here To Validate. Review the validation result.
36
Create Registration Forms
5. To modify the product code, clear the Click here to validate checkbox and repeat from theprevious step.
6. When you are ready to apply the change, click OK. This procedure updates the relateddocuments and registration forms to refer to the new product code, including historic versionsof these objects.
Changing Product-related Information for a Product
As users create product-related documents, the documents automatically inherit product-relatedmetadata from the relevant Product Registration Form, such as Compound IDs, Trade Names, andGeneric Names. Use this procedure to update this product information and apply the changesto the relevant documents.
This procedure affects only current versions of the documents. In order to preserve a record ofthe product information that was current during document creation, the system does not affecthistoric versions.
Note: The changes that you make using the Update Product Info option do not get cascaded toregulatory documents.
1. Log in as a Product Manager.
2. Right-click a product registration form with a status of Active and select Update Product Info.
3. In the Change Product Information dialog box, make the necessary changes and click OK.The system applies these settings to the relevant documents and registration forms. Thisprocedure does not affect historic versions of these objects.
37
Create Registration Forms
Changing Project Information
Similar to changing product information, use this procedure to change project-related information inthe Quality Project registration form. The system applies these settings to the relevant documents.This procedure does not affect historic document versions.
1. Log in as a Quality Project Manager.
2. Right-click a project registration form with a status of Active and select Change Project Info.
3. In the dialog box, make the necessary changes and click OK.The system applies these settings to the relevant documents and registration forms. Thisprocedure does not affect historic versions of these objects.
Changing Clinical Trial Information
Similar to changing product information, use this procedure to change trial-related information inthe clinical trial registration form. The system applies these settings to the relevant documents. Thisprocedure does not affect historic document versions.
1. Log in as a Trial Manager.
2. Right-click a clinical trial registration form with a status of Planning, Active, or Completed,and select Update Trial Info.
3. In the Change Clinical Trial Information dialog box, make the necessary changes and click OK.
Updating the Regulatory Application Number
Use this procedure to update the application number for Regulatory Application Registration Form.
1. Log in as a Regulatory Manager.
2. Right-click a Regulatory Application Registration Form with a status of Active and select ChangeApplication Number.
3. In the dialog box, make the necessary changes and click OK.The system applies these settings to the relevant documents and registration forms. Thisprocedure does not affect historic versions of these objects.
38
Chapter 4Create Documents
This section contains the following topics:• Controlled Documents, page 39
• Document Updates, page 52
• Configuring Content Templates, page 53
Controlled DocumentsDocumentum R&D uses registration forms to store clinical, non-clinical, quality, regulatoryadministration, and product metadata that new documents inherit. There are several methods ofinheriting data:• Inherit data from an existing document: Create a document using a similar document.
• Inherit data from a registration form: Import or create a document using a registrationform. Search for or navigate to a related registration form in the Product, Project, RegulatoryApplication, or Non-Clinical Library cabinet and then import or create a document.
Each document type requires a specific login and type of registration form:
Document type Member of Group Registration form location
Regulatory Administrative cd_regulatory_doc_authors Cabinets > RegulatoryApplication Library
Clinical cd_clinical_doc_authors Cabinets > Clinical Trial Library
Non-clinical cd_non_clinical_authors Cabinets > Non-Clinical StudyLibrary
Quality cd_quality_authors Cabinets > Project Library
Safety cd_safety_doc_authors Cabinets > Product
Labeling cd_labeling_doc_authors Cabinets > RegulatoryApplication Library
This section includes:• Creating a Controlled Document, page 40
• Creating a Regulatory Administrative, Labeling, or Safety Document, page 43
39
Create Documents
• Creating a Relation between Labeling Documents, page 44
• Updating the Labeling Status, page 44
• Creating a Non-clinical, Clinical, or Quality Document, page 45
• Associating a Document with a Regulatory Application, page 45
• Creating a Clinical Crossover Document, page 46
• Creating a Clinical Study Report Assembly Virtual Document, page 48
• Creating a Copy of a Controlled Document (Technology Transfer), page 48
• Assigning Users to Roles for a Controlled Document, page 50
• Creating a Non-controlled Document, page 51
• File Naming and Versioning, page 51
• Importing a File from your Computer, page 51
Creating a Controlled Document
You can use this generic procedure for creating all types of controlled documents.
1. Log in as a member of the Author group based on the domain of the document you wish to create.
2. From the repository, select a similar document or registration form.
3. Select New > Content from the menu bar.
4. In the Creation profile field, select a document area, for example, Regulatory/Administrativeor Non-Clinical.The role of the user determines the creation profile options that appear. For example, if the user isa member of the cd_non_clinical_authors group, then the Non-clinical document area appears.
5. In the Document type field, select the document to create and click Next.
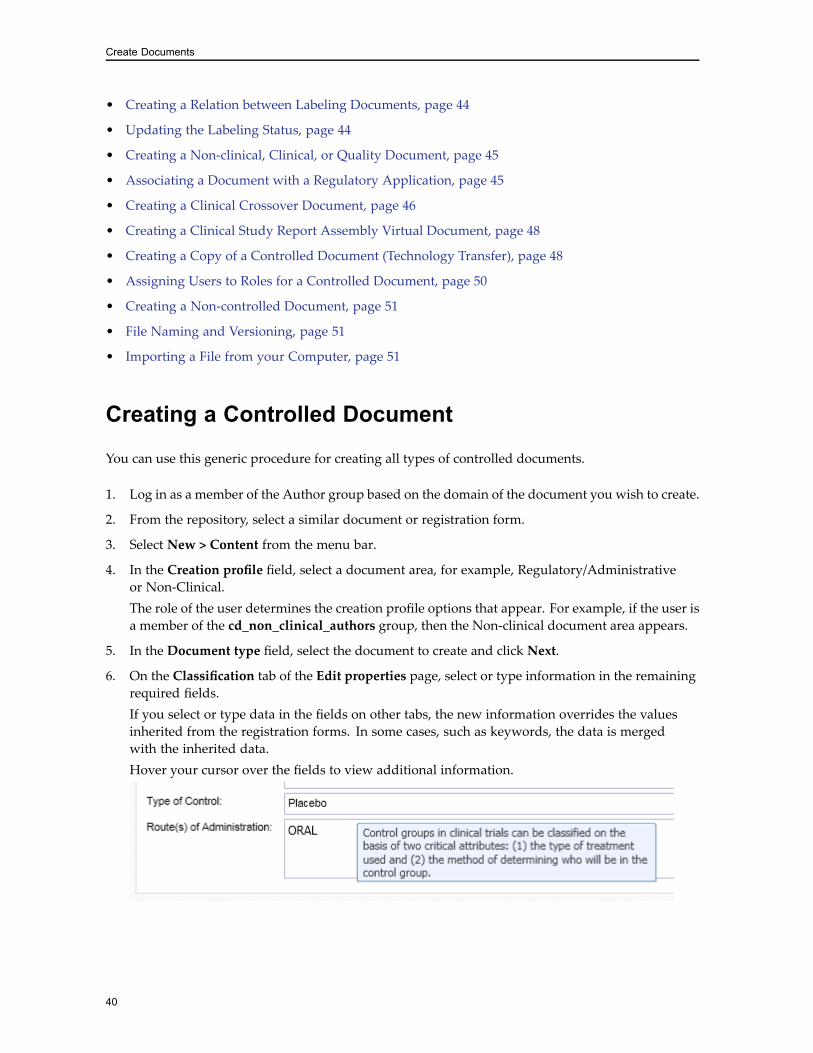
6. On the Classification tab of the Edit properties page, select or type information in the remainingrequired fields.If you select or type data in the fields on other tabs, the new information overrides the valuesinherited from the registration forms. In some cases, such as keywords, the data is mergedwith the inherited data.Hover your cursor over the fields to view additional information.
40
Create Documents
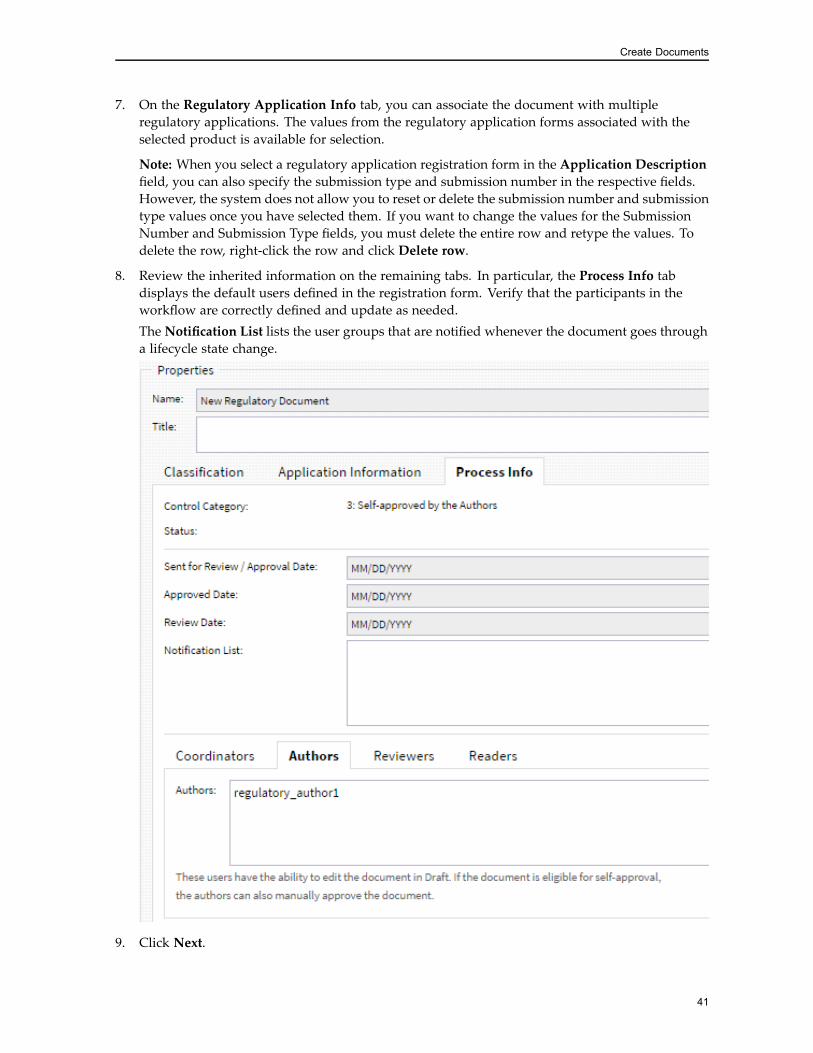
7. On the Regulatory Application Info tab, you can associate the document with multipleregulatory applications. The values from the regulatory application forms associated with theselected product is available for selection.
Note: When you select a regulatory application registration form in the Application Descriptionfield, you can also specify the submission type and submission number in the respective fields.However, the system does not allow you to reset or delete the submission number and submissiontype values once you have selected them. If you want to change the values for the SubmissionNumber and Submission Type fields, you must delete the entire row and retype the values. Todelete the row, right-click the row and click Delete row.
8. Review the inherited information on the remaining tabs. In particular, the Process Info tabdisplays the default users defined in the registration form. Verify that the participants in theworkflow are correctly defined and update as needed.The Notification List lists the user groups that are notified whenever the document goes througha lifecycle state change.
9. Click Next.
41

Create Documents
The document appears in its native format. The content for the document is based on a contenttemplate. The Configuring Content Templates, page 53 section provide more information. Fromthe application, edit the content of the document as needed.To update the content in the document, refresh the screen. For example, if the native format isMicrosoft Word, press Ctrl-A and then F9 to update the content. The EMC Documentum D2Administration Guide provides information on configuring Microsoft Office products to showD2 properties.When you finish, save and close the document.
10. Click Check In and Finish.The system creates the document with a minor version number. The document is checked in.Based on the document type and Control Category, the document is assigned a lifecycle. Thesystem also stores the document in a dynamically created folder structure based on the metadataof the document. When the new document is checked in, the information from the product andthe domain registration forms is auto-populated in the corresponding document’s properties.
Related topic:
• File Naming and Versioning, page 51
42
Create Documents
Creating a Regulatory Administrative, Labeling, orSafety Document
1. Log in as the member of the Author or Manager group based on the domain of the document. Forcreating Regulatory/Administrative documents, you must be a Regulatory Author or RegulatoryManager. For creating Labeling documents, you must be a Labeling Author or Labeling Manager.For creating Safety documents, you must be a Safety Author or Safety Manager.
2. Select New > Content from the menu bar.
3. In the New Content dialog box, on the Fill creation profile page:
a. For Creation profile, select a document domain or domain and group. For example, forRegulatory Administrative documents, select Regulatory/Administrative.
b. For Document type, select the document to create.
c. Click Next.
4. On the Edit Properties page, select or type information in the fields associated with following tabs:
a. Classification: Provide information about the product.
b. Regulatory Application Info: Provide information about each application. The values fromthe regulatory application forms associated with the selected product is available for selection.
c. Process Info:• Coordinators: Add the users can who release this document as Approved.
• Authors: Add the users who can edit this document in Draft status and self-approve,if eligible.
• Reviewers: Add the users can who review this document.
• Approvers: If applicable, add the users who can approve this document.
• Readers: Add the users with read-only access to this document.
The Notification List lists the user groups or users who are notified whenever the documentgoes through a lifecycle state change.
d. Click Next. The document appears in its native format. The content of the document isbased on the template located in the Templates cabinet. The Configuring Content Templates,page 53 section provide more information about creating and editing template documents.From the application, edit the content of the document as needed. When you finish, saveand close the document.
e. Click Check In and Finish.
The Regulatory document appears in the Regulatory cabinet in the configured folderstructure.
The Labeling document appears in the Regulatory cabinet. Core labeling documents arelocated in the Core Labeling folder. Application labeling documents are placed in theLabeling > Draft of Revision folder. For application labeling documents, the Relationswidget displays the related core labeling document and the Regulatory ApplicationRegistration Form. For core labeling documents, the Relations widget displays the list ofrelated application labeling documents.
43
Create Documents
The Safety document appears in the Safety cabinet.
Creating a Relation between Labeling Documents
You can create a relation between two regulatory labeling documents using the following procedure:
1. In the Doc List, select a regulatory labeling document.
2. Click Content > Create relation.
3. In the New relation creation dialog box, in the Relation target field, select the labeling documentyou want to create the relation with.
4. In the Relation type list, select a relation type.
5. Select Reverse relation if you want to create a child-parent relationship. If you started with theparent document highlighted and browsed for the child document to relate, leave this optionblank.
6. Click OK.You can view the relations for the labeling document in the Relations widget.
Updating the Labeling Status
When a label document is first created, the Labeling Status is set to Draft or Revision. When thedocument is Approved, the Labeling Status changes to Internally Approved. You can change theLabeling Status on Approved documents without creating a new version of the document.
1. In the Doc List, right-click a regulatory labeling document and click Update Labeling Status.
2. In the Labeling Status field, select a value and then click OK.
44

Create Documents
Creating a Non-clinical, Clinical, or Quality Document
1. Log in as a member of the Author group based on the domain of the document.
2. From the repository, select a similar document or registration form.
3. Select New > Content from the menu bar.
4. On the Fill creation profile page:
a. For Creation profile, select a document domain or domain and group, for example, Quality -Quality Information, Clinical - Study Documents, or Non-Clinical - Summaries.
Note: If you are creating a document in the Clinical - Study Reports domain, you must firstselect a Clinical Trial Registration Form before creating the document. This ensures that therelevant values are inherited from the registration form to the clinical document.
b. For Document type, select the document to create.
c. Click Next.
5. On the Edit Properties page, select or type information in the fields associated with following tabs:
a. Classification: Specify the product code and the clinical trial identifier.
b. Regulatory Application Info: If you know the regulatory application to associate with thisdocument, you can select it now or associate it later once you create the document.
Note: The Application Forms list in the Regulatory Application Info tab in the Creationprofile page of Clinical, Non-clinical, and Quality documents is filtered based on the selectedProduct Code and not the combination of Product Code and Project Name.
c. Process Info: Shows the default users defined in the registration form. Verify the participantsin the workflow and update as needed.
The Notification List lists the user groups that are notified whenever the document goesthrough a lifecycle state change.
d. Complete or verify the information in any other tabs that are specific to document you create.
e. Click Next.
6. The document appears in its native format. The content of the document is based on thecorresponding templates located in the Templates cabinet. The Configuring Content Templates,page 53 section provide more information about creating and editing template documents.From the application, edit the content of the document as needed. When you finish, save andclose the document.
7. Click Check In and Finish. The system saves quality documents in the Quality cabinet, clinicaldocuments in the Clinical cabinet, and non-clinical documents in the Non-Clinical cabinet.
Associating a Document with a Regulatory Application
The relationship between a document and a regulatory application form are created when thedocument is first created. Using the following procedure, we can add more associations withregulatory application forms or remove the existing associations:
45
Create Documents
1. In the Doc List, right-click a document and select Associate Submission/Application.
2. In the Application Description field, select the registration application form, which representsthe Regulatory Application.
3. To associate the document with a regulatory application, in the Application Forms list, select aform.
4. To associate the document with a regulatory submission for that application, in the SubmissionNumber list, select the submission number.
Note: When you select a regulatory application registration form in the Application Descriptionfield, you can also specify the submission type and submission number in the respective fields.However, the system does not allow you to reset or delete the submission number and submissiontype values once you have selected them. If you want to change the values for the SubmissionNumber and Submission Type fields, you must delete the entire row and retype the values. Todelete the row, right-click the row and click Delete row.
5. Click OK.The Relations widget lists the related regulatory application and submissions.
Creating a Clinical Crossover Document
1. Log in as a member of the Author group based on the domain of the document.
2. From the repository, select a similar document or Clinical Trial Registration Form for crossoverdocuments.
3. Select New > Content from the menu bar.
4. On the Fill creation profile page:
a. For Creation profile, select Clinical - Study Reports. This creation profile contains the listof clinical crossover documents.
b. For Document type, select the crossover document to create.
c. Click Next.
5. On the Edit Properties page, select or type information in the fields associated with following tabs:
a. Classification: Provide information about the product. If you selected a Clinical TrialRegistration Form, the information is inherited from the registration form. In the Scope field,you can set the scope to either Product, Trial, Country, or Site.
b. Product Info: Provide the product-related information.
c. Clinical Study Information: Provide information about the clinical study.
d. Regulatory Application Info: If you know the regulatory application to associate with thisdocument, you can select it now or associate it later once you create the document.
e. Process Info: Shows the default users defined in the registration form. Verify the participantsin the workflow and update as needed.
46
Create Documents
The Notification List lists the user groups that are notified whenever the document goesthrough a lifecycle state change.
f. Click Next.
6. The document appears in its native format. From the application, edit the content of thedocument as needed. When you finish, save and close the document.
7. Click Check In and Finish. The system saves clinical documents in the Clinical cabinet. On theLocations tab, note that the crossover document is linked to the Documentum eTMF folder pathin addition to the Documentum R&D folder location.
47
Create Documents
Creating a Clinical Study Report Assembly VirtualDocument1. Log in as a Clinical Author.
2. Select New > Content from the menu bar.
3. On the Fill creation profile page:
a. For Creation profile, select Clinical - Virtual Document Artifact (Compound Artifacts). Thisprofile contains a list of approved virtual document templates.
b. For Document type, select Study Report Assembly.
c. Click Next.
4. On the Edit Properties page, select or type information in the fields associated with various tabsand then click Next.The system saves the virtual document in the Study Report Assembly folder within theClinical cabinet.
5. In the Doc List, right-click the virtual document and click Display Virtual Document. The StudyReport Assembly virtual document is displayed in the Virtual Doc widget.
The Study Report Assembly virtual document lists the template documents and placeholders ascontentless objects for documents. Use the following steps to add the required documents into theStudy Report Assembly using the following steps:
1. In the Virtual Doc widget, select a document template or placeholder that you want to fill.
2. To import a document, follow the steps provided in Importing a File from your Computer,page 51.
Creating a Copy of a Controlled Document (TechnologyTransfer)
Documentum R&D enables you to create a copy of the document that is in the Approved state andrelate the copy to the original document. This is also known as Technology Transfer. Currently, thisfeature is only applicable to Quality documents in Documentum R&D.
Out-of-the-box, Authors can create a copy of a Quality document into a Manufacturing document,that is, perform a technology transfer of Quality-related information into Manufacturing documents,which are a part of Documentum Q&M.
Note: For this feature, you must have both Documentum R&D and Documentum Q&M installedin your environment. To perform the technology transfer, the user must be a member of both thecd_regulatory_managers and cd_quality_doc_authors or cd_quality_doc_coordinators groups. Theuser must be part of the GMP roles, cd_<applicable site>_coordinators or cd_<applicable site>_authorsto create GMP documents.
The system does not allow you to create a copy of a selected Quality document through the New> Content menu option, which is disabled. Instead, you must use the Technology Transfer menu
48
Create Documents
option. This option calls up a creation profile that creates a special subset of documents calledManufacturing (Copy from Quality).
1. Log in as a member of the Regulatory Managers or Quality Authors group.
2. In the Doc List, right-click a Quality document that is in the Draft or Effective state, and clickTechnology Transfer.
3. On the Fill creation profile page:
a. In the Group field, select a Good Manufacturing Practices (GMP) group.
b. In the Subgroup field, select a GMP subgroup and then click Next.The Creation profile field is set toManufacturing (Copy from Quality) and cannot be edited.
4. On the Edit Properties page, select or type information in the fields associated with the followingtabs:
a. On the Classification tab, select or type information in the required fields.The Responsibility field lists all the groups and users applicable to the site. You can select aparticular user or a group of users who will be responsible for the document.The Artifact Name field is automatically filled with the Subgroup information if there is noartifact name under the subgroup in the document inventory.For Category 1 documents, the Training Required radio button is set to Yes by default. ForCategory 2 and 3 documents, it is set to No.If you select another language in the Language field, you can provide the English Titlein the optional field that appears.
b. On the Traceability tab, select or type information in the fields.The Previous Document Number field is used to link documents that are transferred fromthe Document R&D solution to the Q&M solution.The Notification List lists the user groups that are notified whenever the document goesthrough a lifecycle state change.
5. On the Document Info tab, view the document properties labels. When creating a newdocument, this tab appears blank.
6. On the Process Info tab, select or type the required information.This tab displays the control category of the document, the review interval, review notificationdays, and review notification recipients. The fields that appear vary according to control category.Only Document Coordinators can edit these fields for Category 1 and 2 documents. Authors canedit these fields for Category 3 documents.
7. Click Next.
8. The document appears in its native format. From the content’s native application, edit the contentof the document as needed.To view the content, refresh the screen. For example, if the native format is Microsoft Word,press Ctrl-A and then F9 to update the content. The EMC Documentum D2 Administration Guideprovides information on configuring Microsoft Office products to show D2 properties.When you finish, save and close the document.
9. Click Check In and Finish.
49
Create Documents
The system creates the document with a minor version number and file name. The documentis checked in. Based on the document type and Control Category, the document is assigned alifecycle. The system also stores the document, which is in the Draft state, in theManufacturingcabinet in Documentum Q&M. The Relations widget lists the source document from which thecopy was created with the relation type “Transferred From.”
Whenever a copy of a document is created or when the status of the copy changes, the system sendsan email notification to the Authors of the original document about the changes.
Assigning Users to Roles for a Controlled Document
Use this procedure to change the default users and groups assigned to the roles for a controlleddocument, follow these steps:
1. Log in as the Coordinator for the controlled document.
2. In the Browser, navigate to the folder where the document is located.
3. In the Doc List, right-click the document, and then click Update Security.
4. In the Properties dialog box, on the Default Users / Groups tab, add or remove the users orgroups for the default roles.
5. Click OK.
50
Create Documents
Creating a Non-controlled Document
Non-controlled documents are memos, letters, and notes.
1. Log in as a member of the Author group based on the type of document.
2. Select New > Content from the menu bar.
3. In the Creation profile field, select General.
4. In the Document type field, select the document to create and click Next.
5. In the Title field, type a title for the document.
6. In the File Under field, type the name of a folder or folder path to store the document.
7. In the Keywords field, type keywords to assist with searching for the document.
8. On the Process Info tab, you can add readers who can access the document.
9. Click Next.
10. The document appears in its native format. From the application, edit the content of thedocument as needed. When you finish, save and close the document.
11. Click Check In and Finish. The system creates the folder structure and stores the document inthe General cabinet under Letters,Memos, or Notes.
12. Right-click the document to change the lifecycle state from Not Issued to Issue document orRetain as a historic copy.You cannot submit non-controlled documents for review and approval.
File Naming and Versioning
The document name is automatically assigned based on the naming schema: <artifact name>- <document ID>
Where the artifact name is 230 characters and the document ID is a 9 digit incremental number.
The naming rules ensure that documents are named consistently.
For example, when the artifact name is Cover Letter and the document ID is 000000001, the namedisplayed in the D2 Client workspace is: Cover Letter - 000000001
Importing a File from your Computer1. In the Doc List, select a similar document or a registration form.
2. Select Import > File from the menu bar.
3. In the Import File dialog box, select the document to import from your local file system.
4. Select the file format and click Next.
5. In the Creation profile field, select a document area.
51
Create Documents
6. In the Document type field, select the type and click Next.
7. On the Edit properties page, fill in the required fields for each of the tabs.
8. Click Next.
9. If requested, select a location for the document on your local file system.
10. Edit the content in the imported file, if required and then click Check In and Finish to import thedocument. The file automatically inherits the relevant properties of the document or registrationform. The uploaded document has a status of Draft and a version of 0.1.
Document UpdatesThis section contains the following topics:
• Editing a Document, page 52
• Checking in a Document, page 52
Editing a Document1. Log in as a member of the Author group based on the type of document.
2. In the Doc List, locate the document.
3. Right-click the document and select Edit. The document is checked out to the user.
4. Update, save, and close the document.
Checking in a Document1. In the Doc List, locate the document.
2. Right-click the document and select Check in.
3. The document is checked in and can be added to a workflow.Related topic:
• Adding a Document to a Workflow, page 67
52
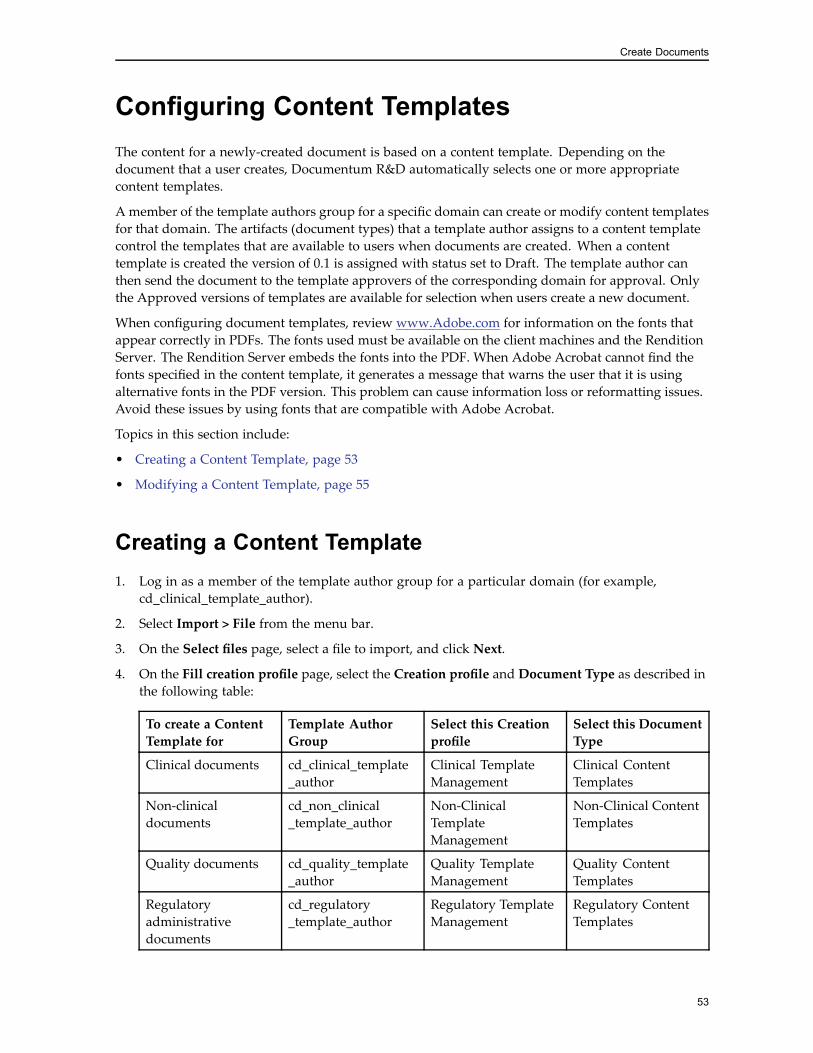
Create Documents
Configuring Content TemplatesThe content for a newly-created document is based on a content template. Depending on thedocument that a user creates, Documentum R&D automatically selects one or more appropriatecontent templates.
A member of the template authors group for a specific domain can create or modify content templatesfor that domain. The artifacts (document types) that a template author assigns to a content templatecontrol the templates that are available to users when documents are created. When a contenttemplate is created the version of 0.1 is assigned with status set to Draft. The template author canthen send the document to the template approvers of the corresponding domain for approval. Onlythe Approved versions of templates are available for selection when users create a new document.
When configuring document templates, review www.Adobe.com for information on the fonts thatappear correctly in PDFs. The fonts used must be available on the client machines and the RenditionServer. The Rendition Server embeds the fonts into the PDF. When Adobe Acrobat cannot find thefonts specified in the content template, it generates a message that warns the user that it is usingalternative fonts in the PDF version. This problem can cause information loss or reformatting issues.Avoid these issues by using fonts that are compatible with Adobe Acrobat.
Topics in this section include:
• Creating a Content Template, page 53
• Modifying a Content Template, page 55
Creating a Content Template1. Log in as a member of the template author group for a particular domain (for example,
cd_clinical_template_author).
2. Select Import > File from the menu bar.
3. On the Select files page, select a file to import, and click Next.
4. On the Fill creation profile page, select the Creation profile and Document Type as described inthe following table:
To create a ContentTemplate for
Template AuthorGroup
Select this Creationprofile
Select this DocumentType
Clinical documents cd_clinical_template_author
Clinical TemplateManagement
Clinical ContentTemplates
Non-clinicaldocuments
cd_non_clinical_template_author
Non-ClinicalTemplateManagement
Non-Clinical ContentTemplates
Quality documents cd_quality_template_author
Quality TemplateManagement
Quality ContentTemplates
Regulatoryadministrativedocuments
cd_regulatory_template_author
Regulatory TemplateManagement
Regulatory ContentTemplates
53
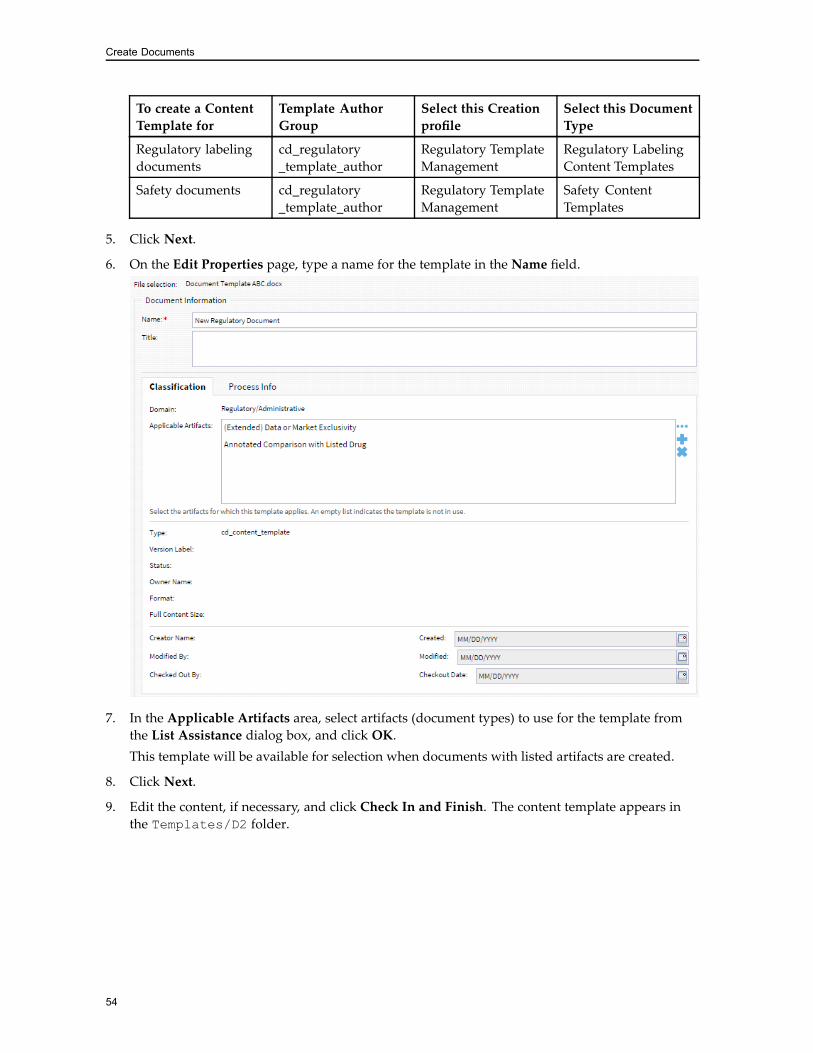
Create Documents
To create a ContentTemplate for
Template AuthorGroup
Select this Creationprofile
Select this DocumentType
Regulatory labelingdocuments
cd_regulatory_template_author
Regulatory TemplateManagement
Regulatory LabelingContent Templates
Safety documents cd_regulatory_template_author
Regulatory TemplateManagement
Safety ContentTemplates
5. Click Next.
6. On the Edit Properties page, type a name for the template in the Name field.
7. In the Applicable Artifacts area, select artifacts (document types) to use for the template fromthe List Assistance dialog box, and click OK.This template will be available for selection when documents with listed artifacts are created.
8. Click Next.
9. Edit the content, if necessary, and click Check In and Finish. The content template appears inthe Templates/D2 folder.
54
Create Documents
Modifying a Content Template
You can modify a content template and the artifacts associated with the template. The artifacts thatyou assign to the content template control the templates that appear to users when they create adocument.
1. Log in as a member of template author group for a particular domain.
2. In the Browser, navigate to the Templates/D2 folder.
3. Right-click the content template and select Edit to adjust the template in its native format.
4. Exit, save, and check in the template.
5. To adjust the applicable artifacts, right-click the content template and select Properties.
6. In the Properties dialog box, adjust the selected applicable artifacts.Include an artifact (document type) if you want this content template available for users creatingthat document type. Remove an artifact if you do not want this content template available to userscreating that document type. For example, if you remove the Drug Product Stability - Summaryartifact, this content template no longer appears to authors who create this type of document.
7. Click OK to update the content template properties.
55
Create Documents
56
Chapter 5Working with Documents
This section contains the following topics:
• Locating Documents, page 57
• Finding Documents using a Public Search, page 57
• Finding Documents using Facets, page 58
• Viewing Documents and their Properties, page 59
• Viewing the Document History, page 59
• Deleting and Restoring a Document, page 59
• Exporting the Doc List to Microsoft Excel, page 60
• Finding Documents, page 61
Locating DocumentsThe Browse view shows the folders and documents to which you have access. The folder structureis based on the DIA reference model. When you select a folder in the Repository browser, thedocuments within that folder appear in the Doc List.
You can perform quick searches by typing text to locate documents. For example, if you typeProcedure, the search returns all documents containing Principal. You can export your search resultslists to Microsoft Excel.
Finding Documents using a Public Search1. Click the Browse button.
2. Click theMy Searches tab.
3. In the Searches > Public Searches folder, double-click a search query, such as the Find Effective /Approved Documents search query.
4. Complete the required search fields and click Run.
57
Working with Documents
Finding Documents using FacetsThe faceted navigation includes two components, a Facet widget and a breadbox in the Doc Listwidget. The Facet widget allows search refinement in a dynamic facet list. Facets are grouped bycategory and ordered based on the configuration or advanced search settings.
The Doc List widget contains the breadbox to display the facet selections in the same order it is usedfor refinement. The breadbox is hidden if no facet value is selected or if all the values are cleared.The facets are categorized as standard and structured facets. The standard facets are single selectionfacets. The structured facets are hierarchical. When a user selects a facet value in the Facet widget, allthe facets are refreshed, the selected category reflects the selected facet value and removes the otherfacet values. A new set of facets available for the new results is displayed.
The EMC Documentum D2 User Guide provides more information about using faceted search, thesearch ratings, and results.
To perform a faceted search:
1. Click Browse.
2. Click the Doc List widget.
3. In the Quick Search box, type the name of the document you want to search and click Search.
4. Click the Facet widget to view the faceted search results.
58
Working with Documents
Viewing Documents and their Properties1. To view the document without downloading it to your computer, select a document in the Doc
List and click Preview.
2. To view the document properties, click the Properties tab next to the Preview.
3. To download a copy of the document to your computer, double-click it or click Content > Exportfrom the menu.
Viewing the Document HistoryThe document history, also known as the audit trail, shows information on what has happened tothe document. It includes lifecycle state changes, such as changing from Draft to Approved and anydocument property value changes.
1. Click the Browse button and select a document.
2. Click the Audit tab. The audit trail shows relevant information for the selected document.
Deleting and Restoring a DocumentTo delete a document in D2 Client, you must install the D2-Bin plugin, which adds recycling bincapabilities to D2 Client. The EMC Documentum D2 Installation Guide provides the steps for installingthe plugin.
Follow these steps to delete and restore a document:
1. Log in as a member of the Author or Document Coordinator group.
2. Click Browse.
3. In the Browser, navigate to the folder containing the document you want to delete.
4. In the Doc List, right-click the document that is in the Draft state and click Delete.
5. In the Delete dialog box, select one of the following options:• Delete selected version only: Deletes the current version of the document.
• Delete all versions: Deletes all major and minor versions of the document.
6. Click OK. The document is deleted and placed in the Recycle Bin.
7. To restore a deleted document, in the Recycle Bin, right-click the document and click Restore.
Note: Documents that are purged from the Recycle Bin cannot be restored. Only users incd_admingroup can purge the Recycle Bin.
59

Working with Documents
Exporting the Doc List to Microsoft ExcelYou can export the list of files in the Doc List to a Microsoft Excel spreadsheet.
1. Right-click the Doc List tab and select Export to Excel.
2. Select a location for the file on your local file system.
60
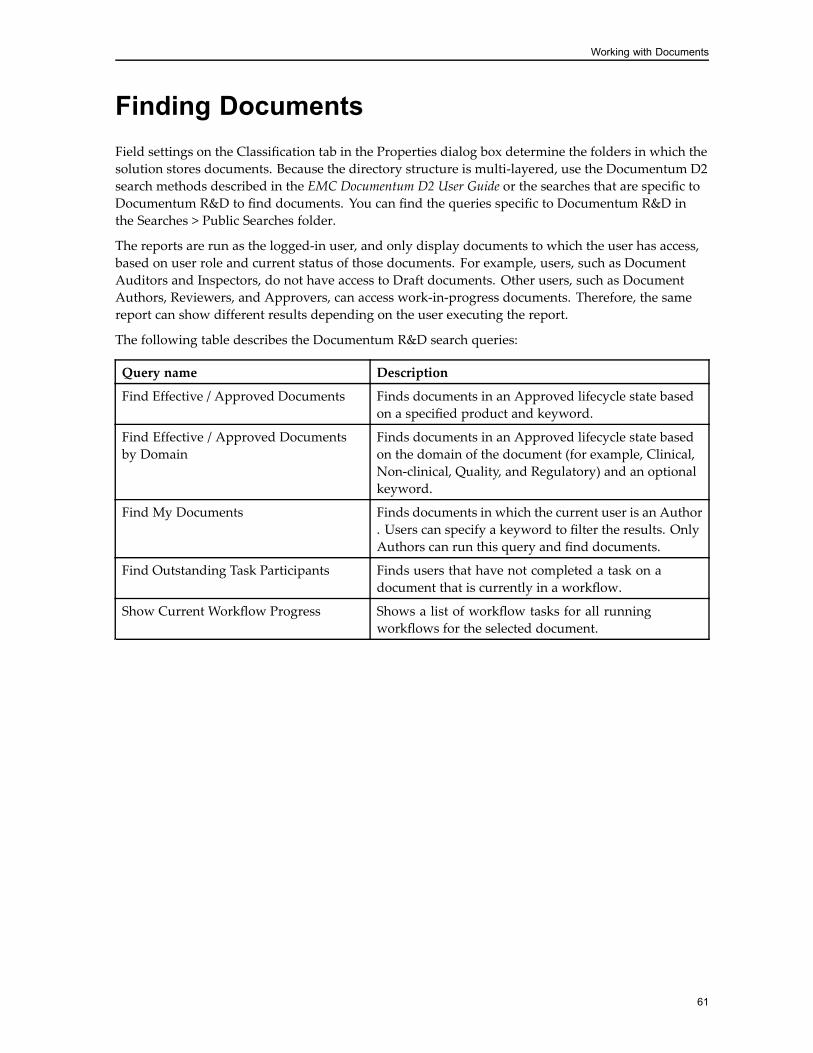
Working with Documents
Finding DocumentsField settings on the Classification tab in the Properties dialog box determine the folders in which thesolution stores documents. Because the directory structure is multi-layered, use the Documentum D2search methods described in the EMC Documentum D2 User Guide or the searches that are specific toDocumentum R&D to find documents. You can find the queries specific to Documentum R&D inthe Searches > Public Searches folder.
The reports are run as the logged-in user, and only display documents to which the user has access,based on user role and current status of those documents. For example, users, such as DocumentAuditors and Inspectors, do not have access to Draft documents. Other users, such as DocumentAuthors, Reviewers, and Approvers, can access work-in-progress documents. Therefore, the samereport can show different results depending on the user executing the report.
The following table describes the Documentum R&D search queries:
Query name Description
Find Effective / Approved Documents Finds documents in an Approved lifecycle state basedon a specified product and keyword.
Find Effective / Approved Documentsby Domain
Finds documents in an Approved lifecycle state basedon the domain of the document (for example, Clinical,Non-clinical, Quality, and Regulatory) and an optionalkeyword.
Find My Documents Finds documents in which the current user is an Author. Users can specify a keyword to filter the results. OnlyAuthors can run this query and find documents.
Find Outstanding Task Participants Finds users that have not completed a task on adocument that is currently in a workflow.
Show Current Workflow Progress Shows a list of workflow tasks for all runningworkflows for the selected document.
61
Working with Documents
62
Chapter 6Review and Approve Documents
This section is for Authors, Reviewers, Approvers, and Managers who participate in the reviewand approval of documents.
This section contains the following topics:
• Workflow Process, page 63
• Document Review and Approval, page 67
• Performing Tasks in a Workflow, page 70
• Processing Documents in a Workflow, page 73
• Working with Approved Documents, page 77
• Viewing Document Status, page 81
• Viewing Workflow Progress, page 81
• Workflow Task Performer Changes, page 81
Workflow ProcessA workflow is a series of tasks that users perform on documents. Tasks appear in their inboxes withdocuments and instructions on how to complete the tasks. For example, an author starts a workflowby sending a document to one or more reviewers using a review workflow. When the workflowstarts, the system automatically sends the document to all the specified reviewers to perform a reviewtask. Each reviewer receives a review task. When all the reviewers finish their tasks, the workflowends. The workflow creates separate tasks for each user participating in the workflow.
There are two main types of workflow users:
• Workflow task performers: These users complete tasks in a workflow.
• Workflow supervisors: These users initiate the workflow. Workflow supervisors are usuallyAuthors or Document Coordinators.
The Life Sciences solution assigns the internal flag (category) to all documents to control applicablelifecycle and workflows. The document type determines the workflows that can be initiated fora document based on the category.
The following table describes the document control categories:
63
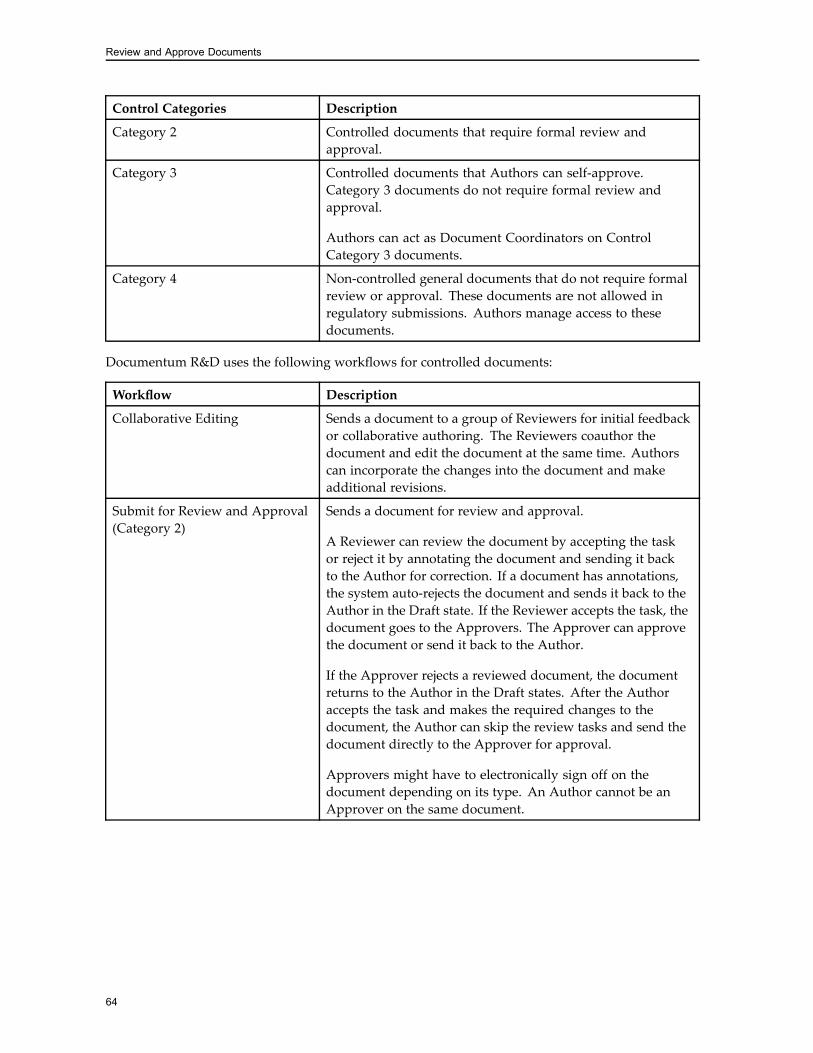
Review and Approve Documents
Control Categories Description
Category 2 Controlled documents that require formal review andapproval.
Category 3 Controlled documents that Authors can self-approve.Category 3 documents do not require formal review andapproval.
Authors can act as Document Coordinators on ControlCategory 3 documents.
Category 4 Non-controlled general documents that do not require formalreview or approval. These documents are not allowed inregulatory submissions. Authors manage access to thesedocuments.
Documentum R&D uses the following workflows for controlled documents:
Workflow Description
Collaborative Editing Sends a document to a group of Reviewers for initial feedbackor collaborative authoring. The Reviewers coauthor thedocument and edit the document at the same time. Authorscan incorporate the changes into the document and makeadditional revisions.
Submit for Review and Approval(Category 2)
Sends a document for review and approval.
A Reviewer can review the document by accepting the taskor reject it by annotating the document and sending it backto the Author for correction. If a document has annotations,the system auto-rejects the document and sends it back to theAuthor in the Draft state. If the Reviewer accepts the task, thedocument goes to the Approvers. The Approver can approvethe document or send it back to the Author.
If the Approver rejects a reviewed document, the documentreturns to the Author in the Draft states. After the Authoraccepts the task and makes the required changes to thedocument, the Author can skip the review tasks and send thedocument directly to the Approver for approval.
Approvers might have to electronically sign off on thedocument depending on its type. An Author cannot be anApprover on the same document.
64
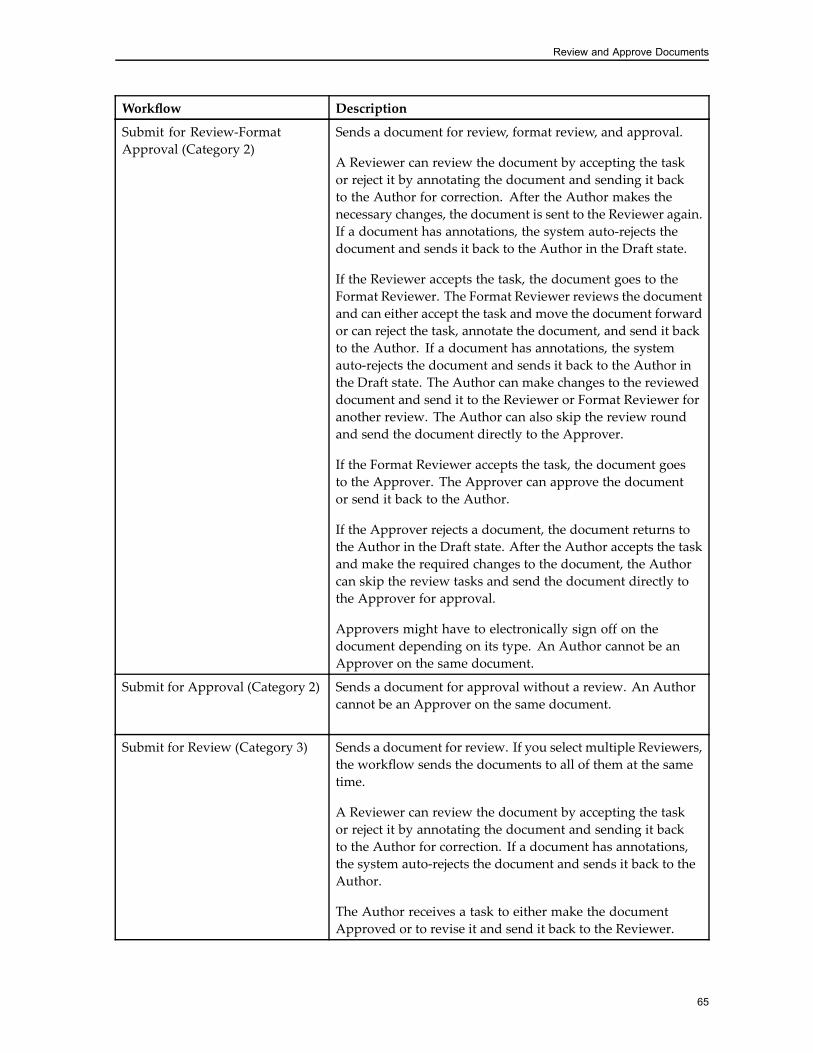
Review and Approve Documents
Workflow Description
Submit for Review-FormatApproval (Category 2)
Sends a document for review, format review, and approval.
A Reviewer can review the document by accepting the taskor reject it by annotating the document and sending it backto the Author for correction. After the Author makes thenecessary changes, the document is sent to the Reviewer again.If a document has annotations, the system auto-rejects thedocument and sends it back to the Author in the Draft state.
If the Reviewer accepts the task, the document goes to theFormat Reviewer. The Format Reviewer reviews the documentand can either accept the task and move the document forwardor can reject the task, annotate the document, and send it backto the Author. If a document has annotations, the systemauto-rejects the document and sends it back to the Author inthe Draft state. The Author can make changes to the revieweddocument and send it to the Reviewer or Format Reviewer foranother review. The Author can also skip the review roundand send the document directly to the Approver.
If the Format Reviewer accepts the task, the document goesto the Approver. The Approver can approve the documentor send it back to the Author.
If the Approver rejects a document, the document returns tothe Author in the Draft state. After the Author accepts the taskand make the required changes to the document, the Authorcan skip the review tasks and send the document directly tothe Approver for approval.
Approvers might have to electronically sign off on thedocument depending on its type. An Author cannot be anApprover on the same document.
Submit for Approval (Category 2) Sends a document for approval without a review. An Authorcannot be an Approver on the same document.
Submit for Review (Category 3) Sends a document for review. If you select multiple Reviewers,the workflow sends the documents to all of them at the sametime.
A Reviewer can review the document by accepting the taskor reject it by annotating the document and sending it backto the Author for correction. If a document has annotations,the system auto-rejects the document and sends it back to theAuthor.
The Author receives a task to either make the documentApproved or to revise it and send it back to the Reviewer.
65
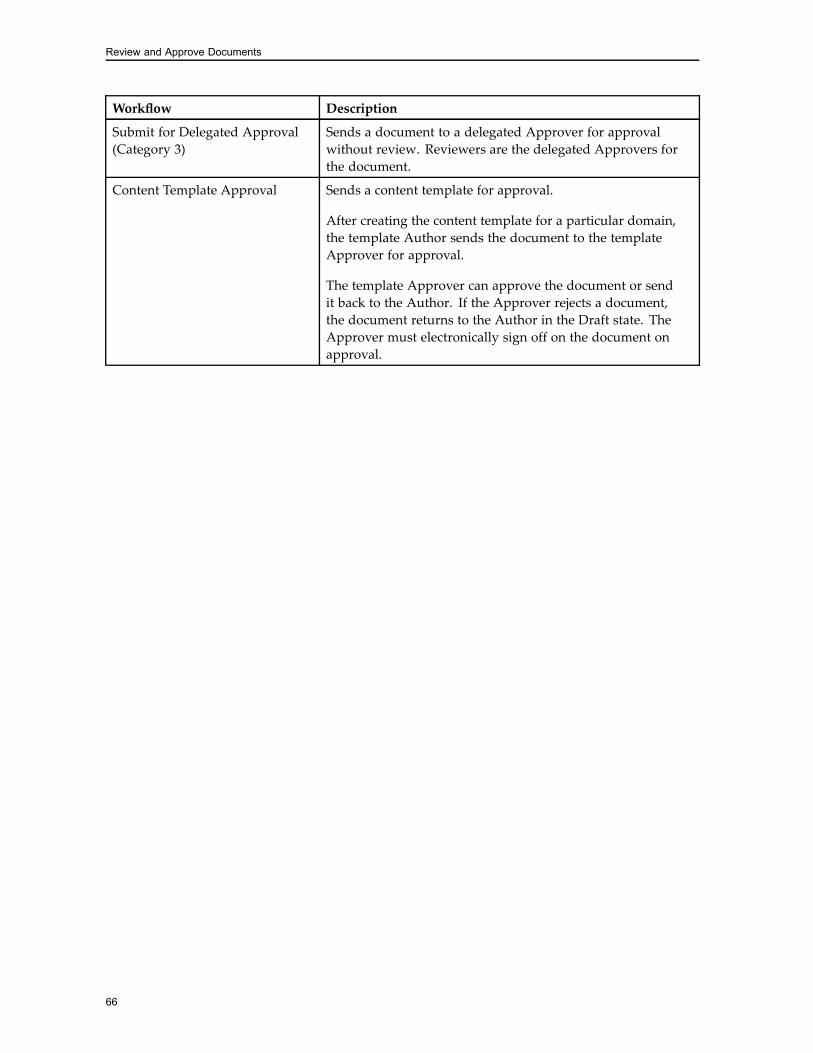
Review and Approve Documents
Workflow Description
Submit for Delegated Approval(Category 3)
Sends a document to a delegated Approver for approvalwithout review. Reviewers are the delegated Approvers forthe document.
Content Template Approval Sends a content template for approval.
After creating the content template for a particular domain,the template Author sends the document to the templateApprover for approval.
The template Approver can approve the document or sendit back to the Author. If the Approver rejects a document,the document returns to the Author in the Draft state. TheApprover must electronically sign off on the document onapproval.
66
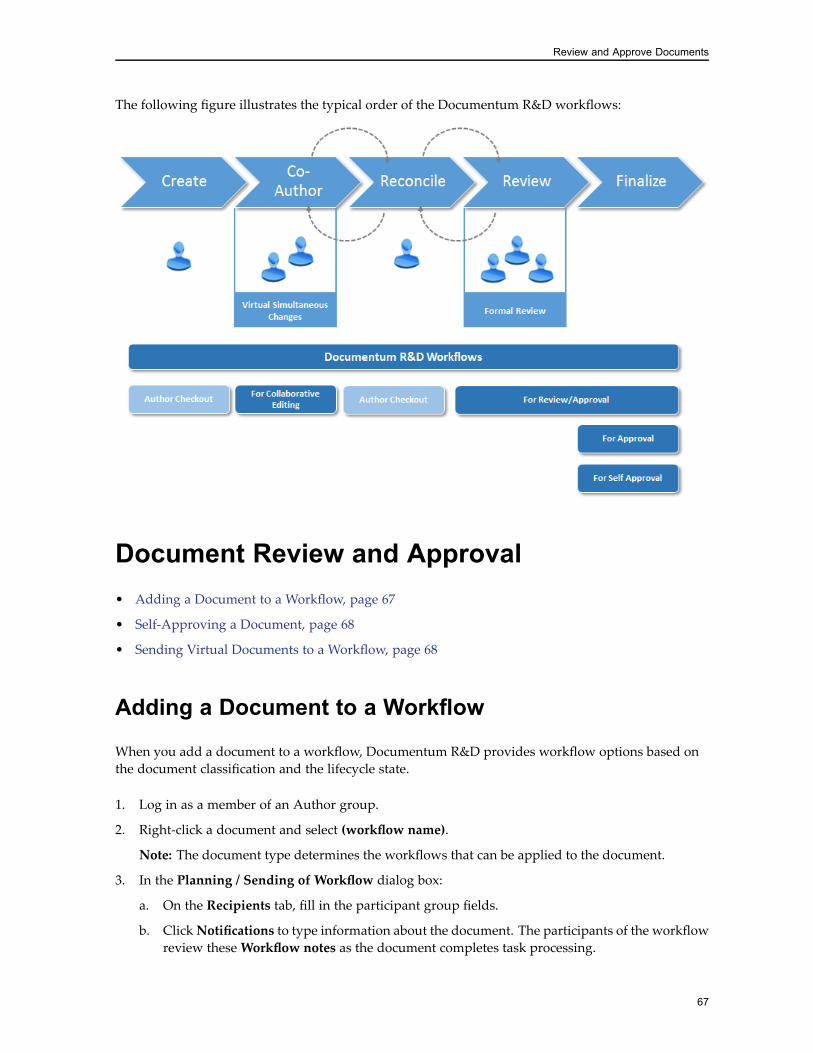
Review and Approve Documents
The following figure illustrates the typical order of the Documentum R&D workflows:
Document Review and Approval• Adding a Document to a Workflow, page 67
• Self-Approving a Document, page 68
• Sending Virtual Documents to a Workflow, page 68
Adding a Document to a Workflow
When you add a document to a workflow, Documentum R&D provides workflow options based onthe document classification and the lifecycle state.
1. Log in as a member of an Author group.
2. Right-click a document and select (workflow name).
Note: The document type determines the workflows that can be applied to the document.
3. In the Planning / Sending of Workflow dialog box:
a. On the Recipients tab, fill in the participant group fields.
b. ClickNotifications to type information about the document. The participants of the workflowreview theseWorkflow notes as the document completes task processing.
67

Review and Approve Documents
c. Click Attachments to add additional content required for processing workflow tasks. Youcan add multiple documents to the same workflow in theWorkflow documents field.
d. Click Planning and Follow-up to select a date for planning and following up on the task inthe workflow.
4. Click Send to send the document to the specified user in the workflow.
Self-Approving a Document
Authors can self-approve Category 3 documents.
1. In the Doc List, right-click a document and select Self-approve and make“Effective/Approved/Final”.
2. Fill in the fields, if required, and click OK.
Sending Virtual Documents to a Workflow
In Documentum R&D, a virtual document can be sent on a workflow. Before sending a virtualdocument to a workflow, ensure that:
• The child documents in the virtual document structure should be in the Draft or Approved statesonly.
• No child document should be involved in any other workflow.
• No child document should be checked out.
• The virtual document should be in the Draft state and not involved in a workflow.
The system validates the virtual document against these conditions and if the validation fails, itgenerates an error message and you cannot proceed with the workflow.
To send a virtual document to a workflow, follow these steps:
1. In the Browser, navigate to the folder that contains the virtual document.
2. In the Doc List, right-click a virtual document and select a workflow.
3. In the Planning / Sending of Workflow dialog box:
a. On the Recipients tab, fill in the participant group fields.
b. ClickNotifications to type information about the document. The participants of the workflowreview theseWorkflow notes as the document completes task processing.
c. Click Attachments to add additional content required for processing workflow tasks.
d. Click Planning and Follow-up to select a date for planning and following up on the task inthe workflow.
4. Click Send to send the document to the specified user in the workflow.You can also send multiple child documents to a workflow, if required, using the following steps:
68
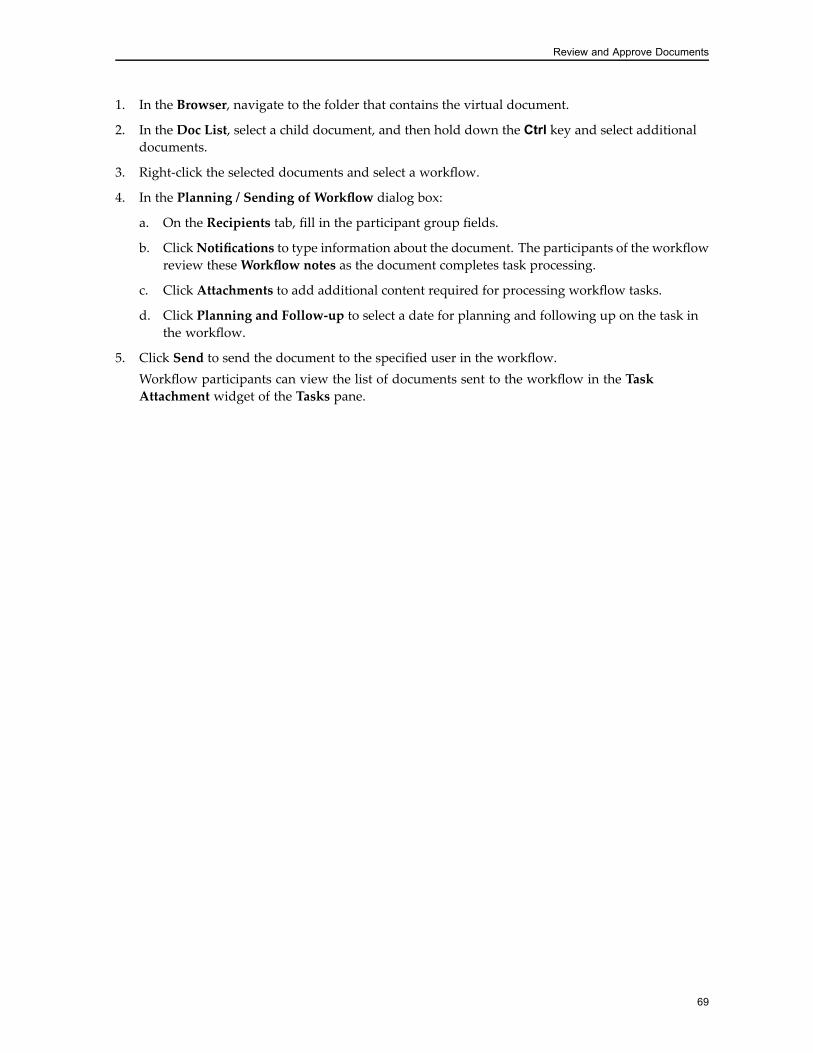
Review and Approve Documents
1. In the Browser, navigate to the folder that contains the virtual document.
2. In the Doc List, select a child document, and then hold down the Ctrl key and select additionaldocuments.
3. Right-click the selected documents and select a workflow.
4. In the Planning / Sending of Workflow dialog box:
a. On the Recipients tab, fill in the participant group fields.
b. ClickNotifications to type information about the document. The participants of the workflowreview theseWorkflow notes as the document completes task processing.
c. Click Attachments to add additional content required for processing workflow tasks.
d. Click Planning and Follow-up to select a date for planning and following up on the task inthe workflow.
5. Click Send to send the document to the specified user in the workflow.Workflow participants can view the list of documents sent to the workflow in the TaskAttachment widget of the Tasks pane.
69
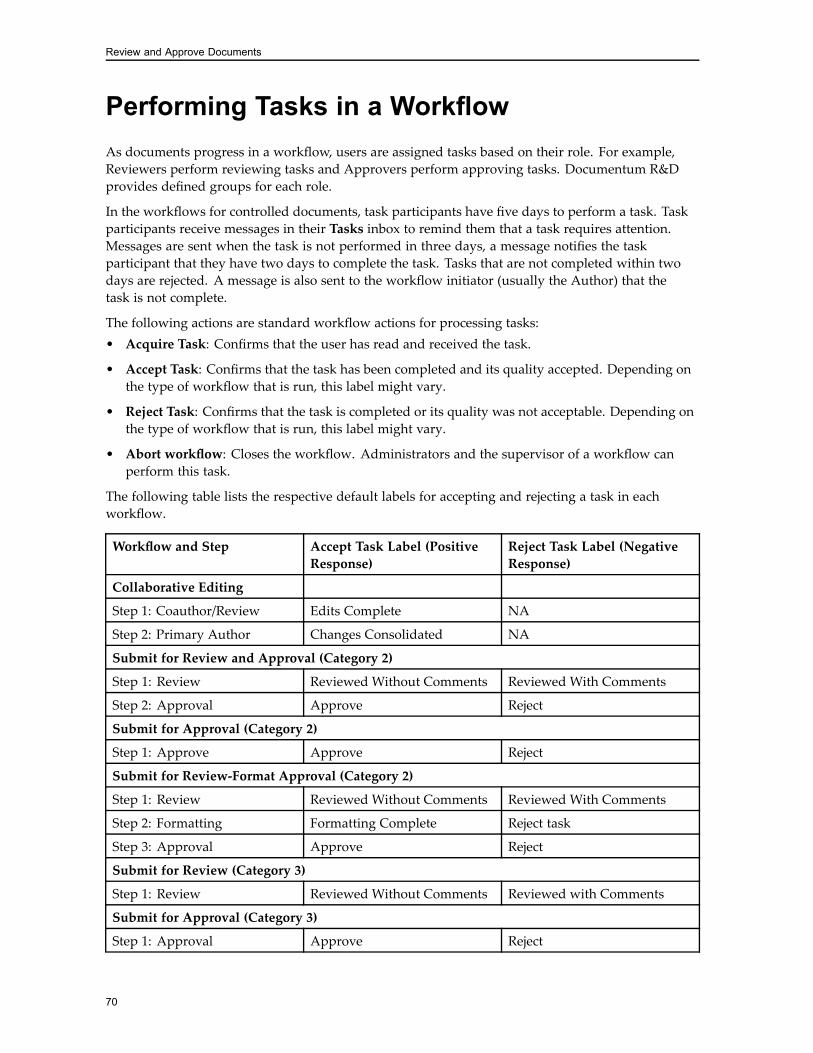
Review and Approve Documents
Performing Tasks in a WorkflowAs documents progress in a workflow, users are assigned tasks based on their role. For example,Reviewers perform reviewing tasks and Approvers perform approving tasks. Documentum R&Dprovides defined groups for each role.
In the workflows for controlled documents, task participants have five days to perform a task. Taskparticipants receive messages in their Tasks inbox to remind them that a task requires attention.Messages are sent when the task is not performed in three days, a message notifies the taskparticipant that they have two days to complete the task. Tasks that are not completed within twodays are rejected. A message is also sent to the workflow initiator (usually the Author) that thetask is not complete.
The following actions are standard workflow actions for processing tasks:• Acquire Task: Confirms that the user has read and received the task.
• Accept Task: Confirms that the task has been completed and its quality accepted. Depending onthe type of workflow that is run, this label might vary.
• Reject Task: Confirms that the task is completed or its quality was not acceptable. Depending onthe type of workflow that is run, this label might vary.
• Abort workflow: Closes the workflow. Administrators and the supervisor of a workflow canperform this task.
The following table lists the respective default labels for accepting and rejecting a task in eachworkflow.
Workflow and Step Accept Task Label (PositiveResponse)
Reject Task Label (NegativeResponse)
Collaborative Editing
Step 1: Coauthor/Review Edits Complete NA
Step 2: Primary Author Changes Consolidated NA
Submit for Review and Approval (Category 2)
Step 1: Review Reviewed Without Comments Reviewed With Comments
Step 2: Approval Approve Reject
Submit for Approval (Category 2)
Step 1: Approve Approve Reject
Submit for Review-Format Approval (Category 2)
Step 1: Review Reviewed Without Comments Reviewed With Comments
Step 2: Formatting Formatting Complete Reject task
Step 3: Approval Approve Reject
Submit for Review (Category 3)
Step 1: Review Reviewed Without Comments Reviewed with Comments
Submit for Approval (Category 3)
Step 1: Approval Approve Reject
70
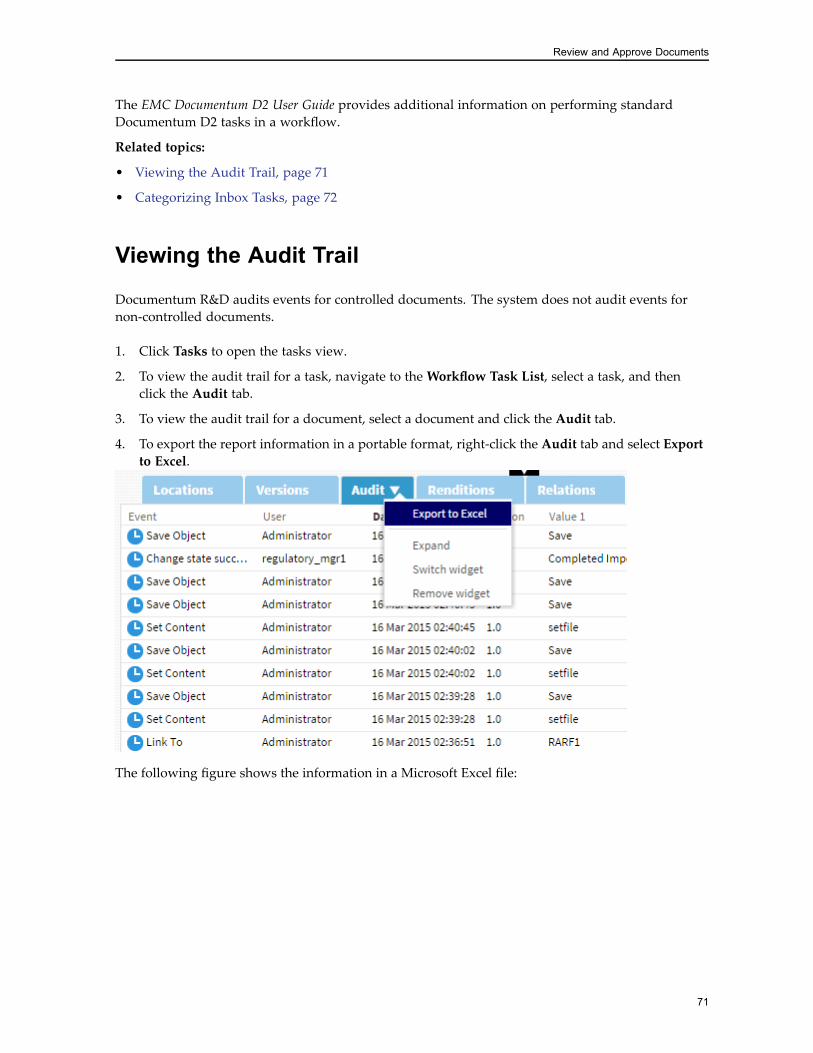
Review and Approve Documents
The EMC Documentum D2 User Guide provides additional information on performing standardDocumentum D2 tasks in a workflow.
Related topics:
• Viewing the Audit Trail, page 71
• Categorizing Inbox Tasks, page 72
Viewing the Audit Trail
Documentum R&D audits events for controlled documents. The system does not audit events fornon-controlled documents.
1. Click Tasks to open the tasks view.
2. To view the audit trail for a task, navigate to theWorkflow Task List, select a task, and thenclick the Audit tab.
3. To view the audit trail for a document, select a document and click the Audit tab.
4. To export the report information in a portable format, right-click the Audit tab and select Exportto Excel.
The following figure shows the information in a Microsoft Excel file:
71
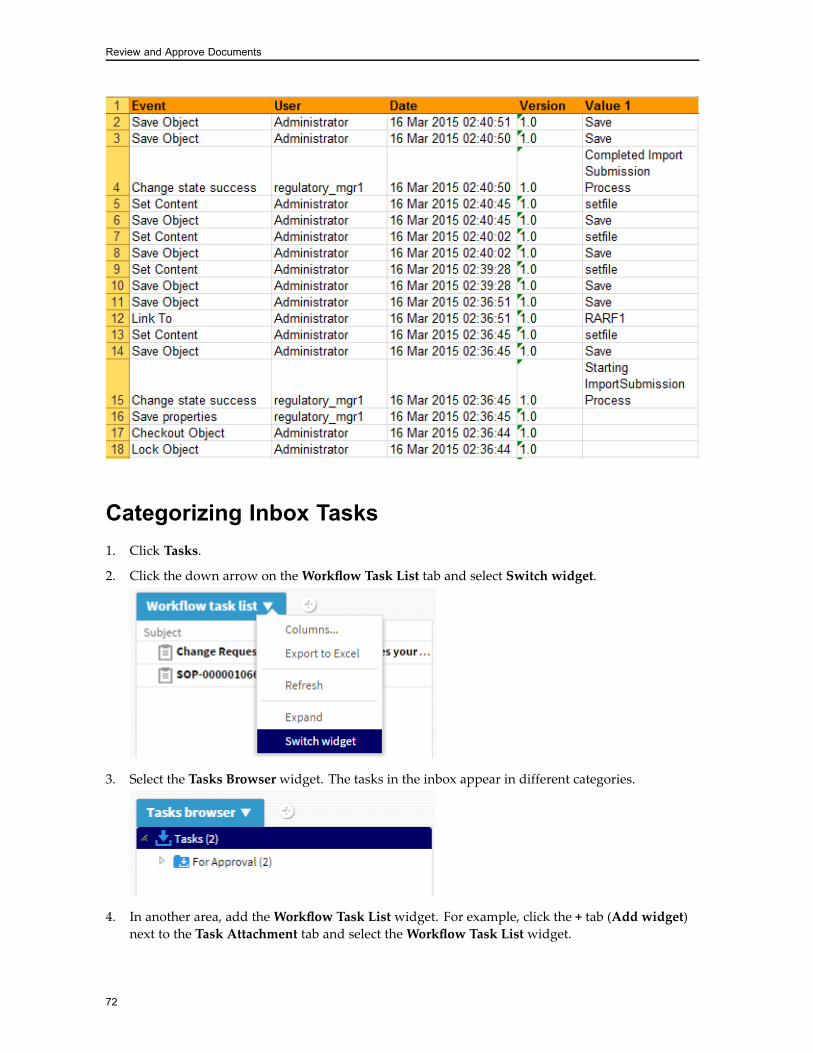
Review and Approve Documents
Categorizing Inbox Tasks1. Click Tasks.
2. Click the down arrow on theWorkflow Task List tab and select Switch widget.
3. Select the Tasks Browser widget. The tasks in the inbox appear in different categories.
4. In another area, add theWorkflow Task List widget. For example, click the + tab (Add widget)next to the Task Attachment tab and select theWorkflow Task List widget.
72
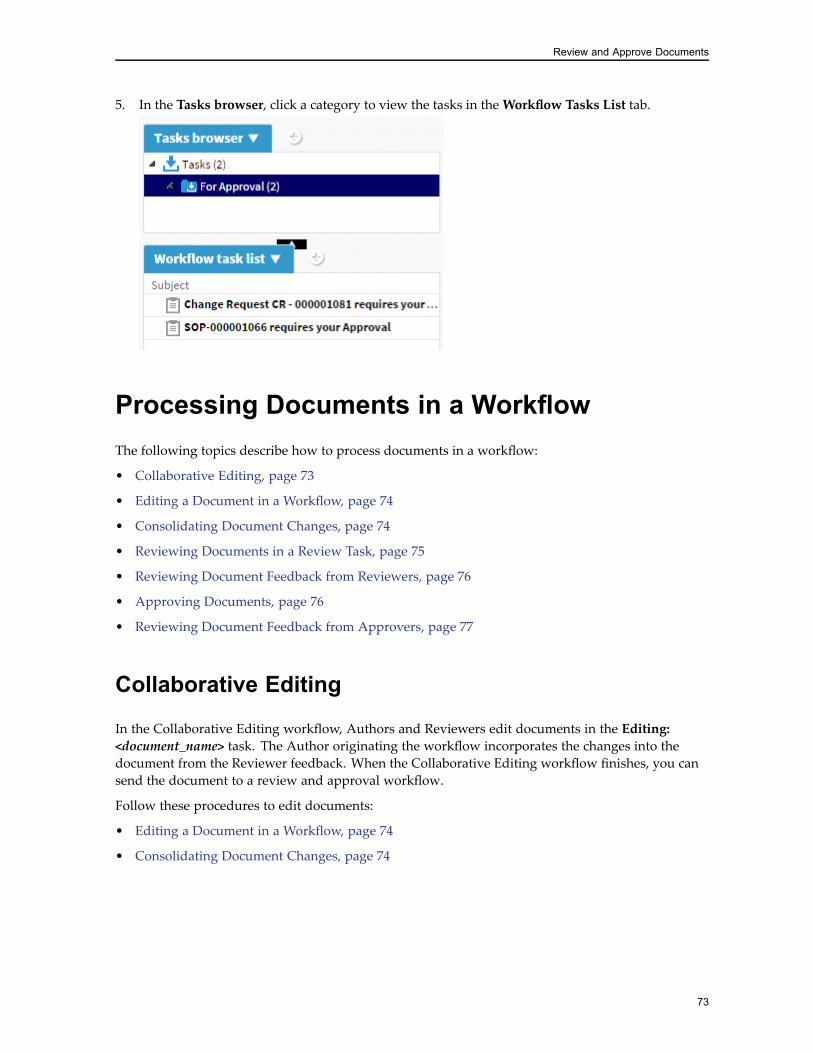
Review and Approve Documents
5. In the Tasks browser, click a category to view the tasks in theWorkflow Tasks List tab.
Processing Documents in a WorkflowThe following topics describe how to process documents in a workflow:
• Collaborative Editing, page 73
• Editing a Document in a Workflow, page 74
• Consolidating Document Changes, page 74
• Reviewing Documents in a Review Task, page 75
• Reviewing Document Feedback from Reviewers, page 76
• Approving Documents, page 76
• Reviewing Document Feedback from Approvers, page 77
Collaborative Editing
In the Collaborative Editing workflow, Authors and Reviewers edit documents in the Editing:<document_name> task. The Author originating the workflow incorporates the changes into thedocument from the Reviewer feedback. When the Collaborative Editing workflow finishes, you cansend the document to a review and approval workflow.
Follow these procedures to edit documents:
• Editing a Document in a Workflow, page 74
• Consolidating Document Changes, page 74
73
Review and Approve Documents
Editing a Document in a Workflow1. Depending on the workflow, log in as a member of an Author or Reviewer group.
2. In theWorkflow Task List, select the task.
3. In Task Attachment, select the document and then select Content > Review and Edit PersonalCopy from the menu bar. If the document contains annotations from others Reviewers, selectContent > Review and Edit Consolidated Copy. You can verify if the document has annotationsin the Relations tab.
Note: D2 supports adding and editing annotations only in the Microsoft Word native format. Theannotations functionality does not work for other formats such as Excel, PowerPoint, and so on.See the EMC Documentum D2 User Guide for more information about annotations.
In Collaborative Editing workflow, when a document is opened in the Word 2013 native formatduring the Review phase, a Reviewer can disable the Track Changes feature in Word and modifythe original content in the document. However, this negates the purpose of the collaborativeediting as the other Reviewers in the workflow will not know if any changes were made to thedocument. As there is no option to lock the disabling of Track Changes in Word 2013, you mustnot disable Track Changes for documents opened in Word 2013 in the Collaborative Editingworkflow.
4. Edit the document in its native format and save the changes.
5. Click Relations, right-click the document with annotations, and select Check in.
6. In theWorkflow Task List, right-click the task, select Edits Complete, add a comment, andclick OK.When the task is rejected, the document is routed to the Author (workflow initiator) in theEditing task.
Consolidating Document Changes1. Log in as a member of an Author group.
2. Click the Tasks button to open the tasks view.
3. In theWorkflow Task List, select the task.
4. In Task Attachment, select the document and then select Content > Checkout and MergeChanges from the menu bar.
5. Edit the document in its native format, accept or reject the changes, and save the document.
6. Right-click the document, and select Check in.
7. Right-click the task and select Changes Consolidated.
8. In the Task dialog box, add comments and select one of the options:• Select End Workflow to stop the workflow.
• Select Return the document to the Reviewers to continue editing the document.
9. Click OK.
74
Review and Approve Documents
10. If the document can be self-approved, right-click the document, select Self-approve and make“Effective/Approved/Final”, and click OK. If this option is not available, the document must beformally-reviewed and approved before it becomes Approved.
Reviewing Documents in a Review Task
In the Review tasks of the controlled document workflows, Reviewers review documents.
The Author, who originates the workflow, reviews the feedback received from the Reviewers in aseparate workflow task.
1. Log in as a member of a Reviewer group.
2. Click the Tasks button to open the tasks view.
3. In theWorkflow Task List, select the task.
4. Select the document from the Task Attachment area.
5. To review and annotate the PDF document format:
a. In the Task Attachment area, double-click the document and annotate the PDF.
b. When you finish reviewing the document, save and close it.
c. To check in the annotations, click Relations, right-click the document with annotations,and select Check in.
6. To annotate the document in its native format, for example, in Microsoft Word:
a. In the Task Attachment area, select the document and then select Content > Review andEdit Personal Copy from the menu bar. If the document contains annotations from othersReviewers, select Content > Review and Edit Consolidated Copy. You can verify if thedocument has annotations in the Relations tab.
b. Edit the document in its native format and save the changes.
c. To check in the annotations, click Relations, right-click the document with annotations,and select Check in.
7. For Control Category 2 documents, after reviewing the document, in theWorkflow Task List,right-click the task and select Reviewed Without Comments or Reviewed With Comments todemote the document to Draft and send a task to the Author for additional changes.
8. For Control Category 3 documents, after reviewing the document, in theWorkflow Task List,right-click the task and select one of the following options:• Reviewed Without Comments: This option assigns Reviewed status to the document andmakes it ready to be promoted to Approved.
• Reviewed With Comments: This option rejects the document and returns it to the Author inthe Draft state.
75

Review and Approve Documents
Reviewing Document Feedback from Reviewers
When the Reviewers return a document to the Author (workflow originator) for further changes, theAuthor receives a task to review the document. The document reverts to the Draft state. The Authorreviews and merges the comments and annotations from the Reviewers.
1. Log in as a member of an Author group.
2. Click the Tasks button to open the tasks view.
3. In theWorkflow Task List, select the task.
4. In the Task Attachment area, double-click the document to view any PDF annotations.
5. To merge native annotations from the Reviewers (for example, tracked changes in MicrosoftWord):
a. In the Task Attachment area, select the document and then select Content > Checkout andMerge Changes from the menu bar.
b. Merge comments by accepting or refusing the modifications.
c. Save and close the document.
d. Right-click the document and select Check in.
6. For Control Category 2, right-click the task and select one of the following options to completethe task:• Select Resend to route the document back to the Reviewer, to the Formatter Reviewer, or skipthe review phase and send the document directly for approval.
• Select End Workflow to end the workflow.
7. For Control Category 3, right-click the task and select one of the following options to completethe task:• Select Resend to route the document back to the Reviewer.
• Select End Workflow to end the workflow.
Approving Documents1. Log in as a member of an Approver group for the document review workflow.
2. Click the Tasks button to open the tasks view.
3. In theWorkflow Task List, select the task.
4. To review the document, in the Task Attachment area, double-click the document to view itin PDF format.
5. When you finish reviewing the document, right-click the task and select one of the followingoptions:• Select Approve to approve the document and prepare to make the document approved. Theworkflow completes and the document state changes to Approved.
76
Review and Approve Documents
If you accept the task, in the Sign off dialog box, type your login credentials and select areason to electronically sign the document and click OK. The system records your intentionin the audit trail of the document.
Note: The document type determines whether an electronic signature is required for approval.
• Select Reject to demote the document and return it to the Author in the Draft state.
Reviewing Document Feedback from Approvers1. Log in as a member of an Author group.
2. Click the Tasks button to open the tasks view.
3. In theWorkflow Task List, select the task.
4. In the Task Attachment area, double-click the document to view any PDF annotations.
5. In the Task notes, double-click the note from the Approver.
6. In theWorkflow Note dialog box, review the comments from the Approver and then click Close.
7. To make changes to the document, in the Task Attachment area, select the document and thenselect Content > Checkout and Merge Changes from the menu bar.
8. Edit the document in its native format and save the document.
9. Right-click the document, and select Check in.
10. Right-click the task and select one of the following options to complete the task:• Select Resend to route the document back to the Approver or Reviewer.
— Select Promote to For Review to send the document to Reviewers.
— Select Promote to For Approval to skip the review task and send the document directlyfor approval.
— Select Promote to For Formatter Review to skip the review task and send the documentfor format review. This option appears only in the Submit for Review Format Approvalworkflow.
• Select End Workflow to complete the workflow and retain the document in the Draft state.
Working with Approved DocumentsThis section contains the following topics:
• Suspending a Document, page 78
• Withdrawing a Document, page 78
• Superseded Documents, page 78
• Expiry Review of Documents, page 79
• Updating the Expiry Review Date for a Document, page 79s
77
Review and Approve Documents
Suspending a Document
Suspending an Approved document prevents it from being used while a modified version is beingprepared, reviewed, and approved. You must be a Coordinator to perform this task.
1. In the Doc List, right-click a document in the Approved state and select Suspend document.
2. Click OK.
3. To reinstate the document, select Reinstate as “Effective/Approved/Final” version.
4. In the dialog box, click OK.
Withdrawing a Document
You can retire documents in the Draft or Approved states by withdrawing them. All versions arewithdrawn together. You can retain Withdrawn documents as historical records. You must bea Coordinator to perform this task.
1. In the Doc List, right-click a document and selectWithdraw document.
2. In theWithdrawal Reason field, type the reason.
3. Click OK.
4. To reinstate a withdrawn document, select Revert to Draft.
Superseded Documents
Superseded documents are documents that were previously Approved. There is only one Approvedversion of a document at a time. The system automatically updates the document state when newApproved versions are created. For example:1. Version 0.1: Process a document in a Submit for Review and Approval workflow.
2. Version 1.0: Approvers change the document state to Approved. The version is 1.0.
3. Version 1.1: The document is edited by the Author and in a Draft state.
4. Version 1.1: Process a document in a Submit for Review and Approval workflow.
5. Version 2.0: Approvers change the document state to Approved. The updated Approveddocument is version 2.0. The original document, which was version 1.0, is now automaticallychanged to Superseded.
Users cannot suspend, withdraw, or change the version of a superseded document. They onlyhave READ permission on the superseded document. They cannot check out or edit a supersededdocument (all non-current versions of a document).
78
Review and Approve Documents
Expiry Review of Documents
Control Category 2 documents in the Approved state must go through the Expiry Review workflowbefore they can be expired. The workflow is triggered automatically on the predefined expiry reviewdate for the document. When the workflow is triggered on the specified date, the assigned DocumentCoordinator receives a workflow task and an email notification to initiate the workflow. TheDocument Coordinator can only accept the expiry review task. There is not Reject task option. Afteraccepting the task and reviewing the document, the Document Coordinator can either withdraw thedocument, expire the document, or send it back to the Author for revision. The document revertsto the Draft state if sent back to the Author. The Author must acknowledge that a revision on thedocument is required before making the necessary changes.
Follow these steps to perform the expiry review task:
1. Log in as a member of the Document Coordinator, Clinical Trial Manager, or Product Managergroup participating in the expiry review workflow.
2. Click the Tasks button to open the tasks view.
3. In theWorkflow Task List, right-click the task and click Accept task.
4. On the Task tab, select one of the following options:• Withdraw document: Changes the state of the document to Withdrawn.
• Allow to Expire: Changes the state of the document to Expired.
• Revision is required (author(s) must be assigned): Returns the document to the author(s) inthe Draft state for revision.
5. On theWorkflow participant(s) tab, in the Review Acknowledge (authors) list, provide the listof authors who must acknowledge that a revision on the document is required.
6. Click OK.
Updating the Expiry Review Date for a Document
Control Category 2 documents that are about to be expired must go through a review process.This expiry review process is automatically triggered on a predefined review date. DocumentCoordinators can modify the expiry review date using the following steps:
1. Log in as the member of the Document Coordinator group.
2. In the Doc List, right-click a Category 2 document that has a status of Approved and then clickAdjust Expiration Dates.
3. In the Set Expiry Review Dates dialog box, in the Next Expiry Review Date field, specify a datefor when the expiry review workflow is to be triggered.
4. In the Expiry Review Recipients field, add or remove the user or group that receives the reviewtask. Typically, the recipients include Document Coordinators or Managers.
5. Click OK.
79
Review and Approve Documents
When the expiry review date triggers, the assigned Document Coordinators or Managers receive asystem notification to initiate the expiry review process for the document.
80
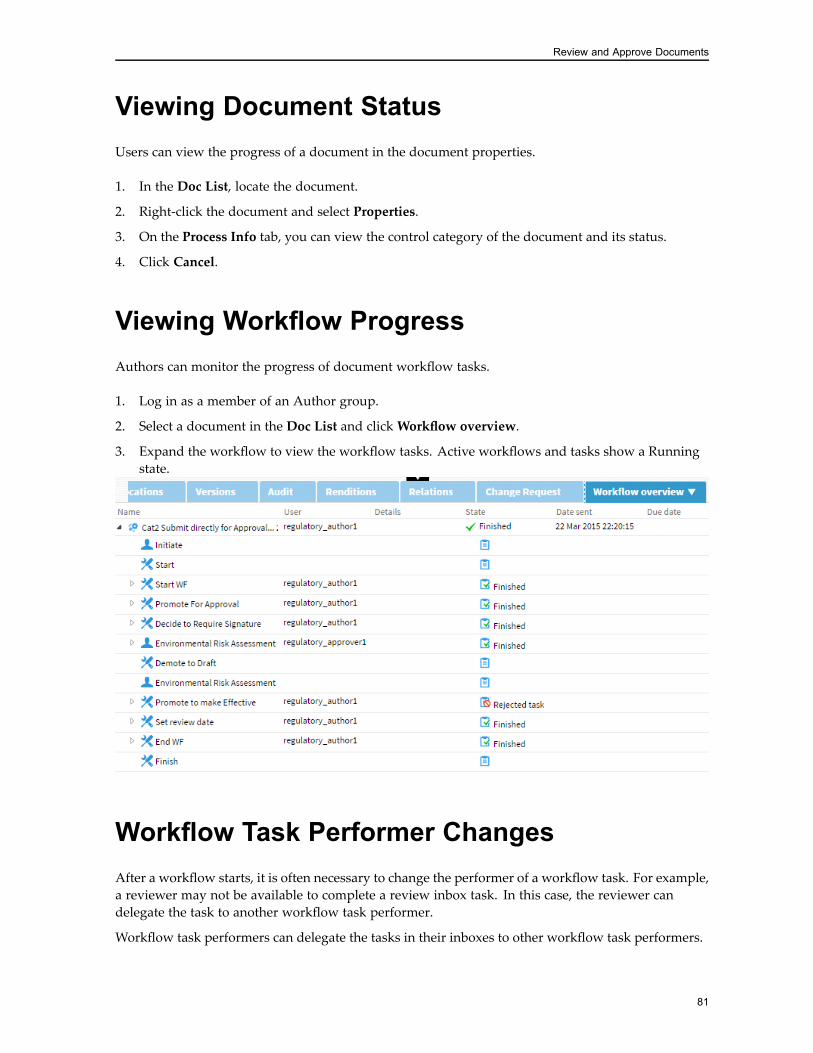
Review and Approve Documents
Viewing Document StatusUsers can view the progress of a document in the document properties.
1. In the Doc List, locate the document.
2. Right-click the document and select Properties.
3. On the Process Info tab, you can view the control category of the document and its status.
4. Click Cancel.
Viewing Workflow ProgressAuthors can monitor the progress of document workflow tasks.
1. Log in as a member of an Author group.
2. Select a document in the Doc List and clickWorkflow overview.
3. Expand the workflow to view the workflow tasks. Active workflows and tasks show a Runningstate.
Workflow Task Performer ChangesAfter a workflow starts, it is often necessary to change the performer of a workflow task. For example,a reviewer may not be available to complete a review inbox task. In this case, the reviewer candelegate the task to another workflow task performer.
Workflow task performers can delegate the tasks in their inboxes to other workflow task performers.
81
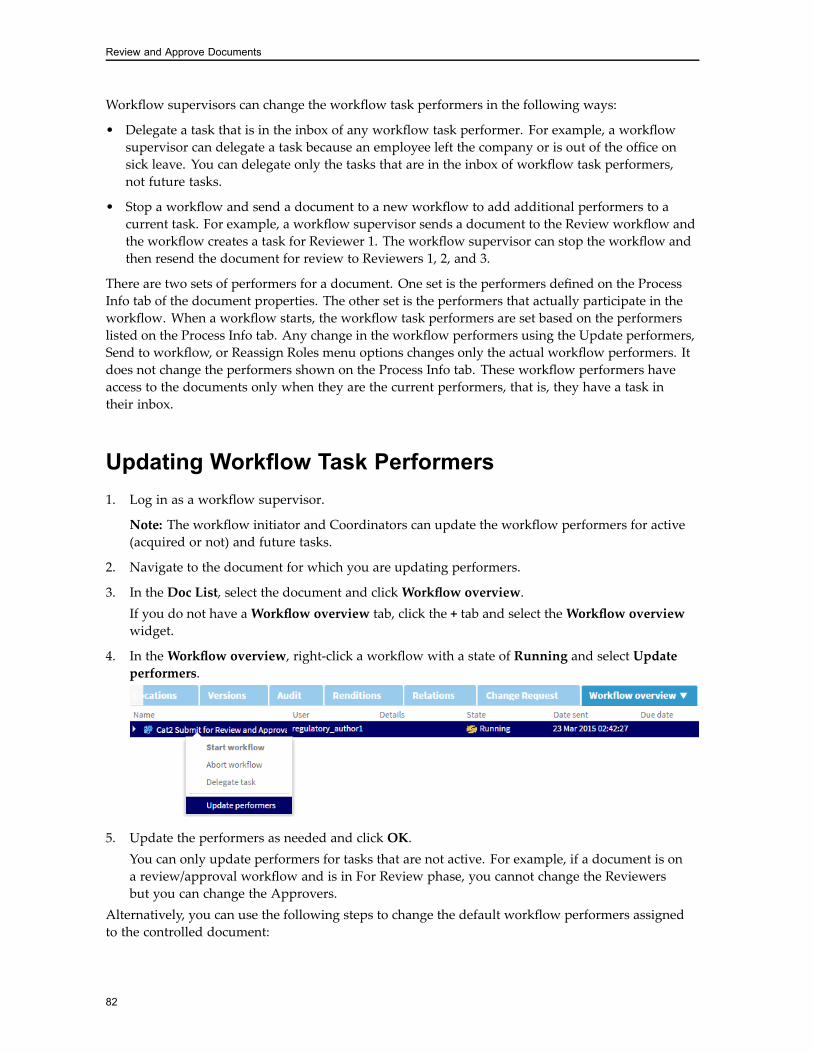
Review and Approve Documents
Workflow supervisors can change the workflow task performers in the following ways:
• Delegate a task that is in the inbox of any workflow task performer. For example, a workflowsupervisor can delegate a task because an employee left the company or is out of the office onsick leave. You can delegate only the tasks that are in the inbox of workflow task performers,not future tasks.
• Stop a workflow and send a document to a new workflow to add additional performers to acurrent task. For example, a workflow supervisor sends a document to the Review workflow andthe workflow creates a task for Reviewer 1. The workflow supervisor can stop the workflow andthen resend the document for review to Reviewers 1, 2, and 3.
There are two sets of performers for a document. One set is the performers defined on the ProcessInfo tab of the document properties. The other set is the performers that actually participate in theworkflow. When a workflow starts, the workflow task performers are set based on the performerslisted on the Process Info tab. Any change in the workflow performers using the Update performers,Send to workflow, or Reassign Roles menu options changes only the actual workflow performers. Itdoes not change the performers shown on the Process Info tab. These workflow performers haveaccess to the documents only when they are the current performers, that is, they have a task intheir inbox.
Updating Workflow Task Performers1. Log in as a workflow supervisor.
Note: The workflow initiator and Coordinators can update the workflow performers for active(acquired or not) and future tasks.
2. Navigate to the document for which you are updating performers.
3. In the Doc List, select the document and clickWorkflow overview.If you do not have aWorkflow overview tab, click the + tab and select theWorkflow overviewwidget.
4. In theWorkflow overview, right-click a workflow with a state of Running and select Updateperformers.
5. Update the performers as needed and click OK.You can only update performers for tasks that are not active. For example, if a document is ona review/approval workflow and is in For Review phase, you cannot change the Reviewersbut you can change the Approvers.
Alternatively, you can use the following steps to change the default workflow performers assignedto the controlled document:
82
Review and Approve Documents
1. Log in as the Coordinator for the controlled document.
2. In the Browser, navigate to the folder where the document is located.
3. In the Doc List, right-click the document, and then click Reassign Roles.
4. In the Properties dialog box, on the Default Users / Groups tab, add or remove the users orgroups for the default roles.
5. Click OK.
83
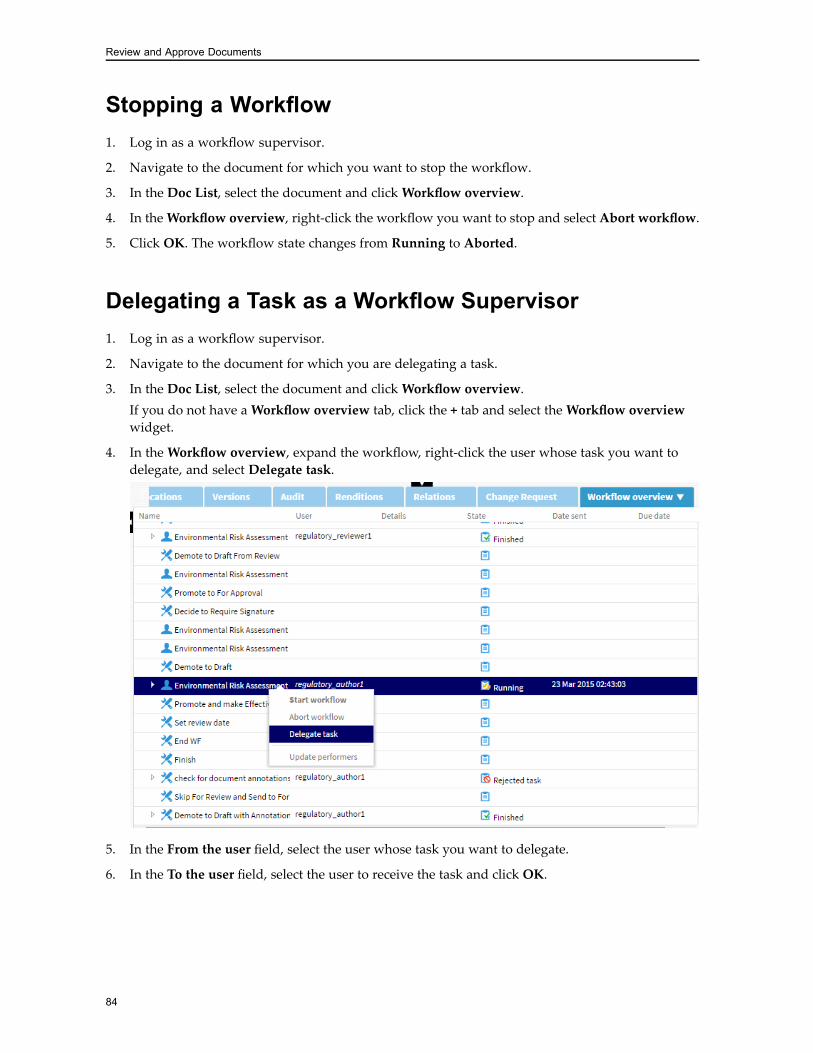
Review and Approve Documents
Stopping a Workflow1. Log in as a workflow supervisor.
2. Navigate to the document for which you want to stop the workflow.
3. In the Doc List, select the document and clickWorkflow overview.
4. In theWorkflow overview, right-click the workflow you want to stop and select Abort workflow.
5. Click OK. The workflow state changes from Running to Aborted.
Delegating a Task as a Workflow Supervisor1. Log in as a workflow supervisor.
2. Navigate to the document for which you are delegating a task.
3. In the Doc List, select the document and clickWorkflow overview.If you do not have aWorkflow overview tab, click the + tab and select theWorkflow overviewwidget.
4. In theWorkflow overview, expand the workflow, right-click the user whose task you want todelegate, and select Delegate task.
5. In the From the user field, select the user whose task you want to delegate.
6. In the To the user field, select the user to receive the task and click OK.
84
Review and Approve Documents
Delegating a Task as a User
All workflow users can delegate their tasks to another workflow performer.
1. In theWorkflow Task List, locate a task to delegate.
2. Right-click the task and select Delegate task.
3. In the User field, select the user to receive the task and click OK.
Reassigning Roles1. Log in as a member of a Document Coordinator or Author group. Only document coordinators
can reassign roles for Category 1 and 2 documents. Authors and document coordinators canreassign roles for Category 3 documents.
2. Right-click a document and select Reassign Roles. Change the user groups assigned to the rolesas needed. Each tab represents a different user role. For example, on the Approvers tab, youcan replace the Approvers listed for that role.
3. Click OK.
85
Review and Approve Documents
86
Index
Aadding a document to a workflow, 67approving documents, 76audit trail, 71
Ccategorizing inbox tasks, 72checking in, 52clinical crossover documents, 13clinical trial registration form
create, 27crossover documents, 28
configuringcontent template, 53
content template, 53control category
viewing, 81control category 2 documents
expiry review, 79creating
clinical documents, 45clinical study report assembly, 48controlled document, 40controlled documents, 45crossover documents, 46non-clinical documents, 45non-controlled documents, 51quality documents, 45regulatory administrative
document, 43regulatory labeling document, 43safety document, 43virtual document, 48
Ddelegating a task, 81
users, 85workflow supervisor, 84
Doc List
export, 60document
checking in, 52deleting, 59editing, 73reviewing, 75reviewing feedback fromapprovers, 77reviewing feedback from reviewers, 76
document changesconsolidating, 74
document history, 59document status
viewing, 81document_id, 51documents
audit, 57withdraw, 78
Eediting a document in a workfllow, 74existing documents
registration form changes, 35export
Doc List, 60
Ffacets, 58file names, 51finding
documents, 57finding documents, 61
Iimport file
new version, 51inbox tasks
categorizing, 72
87
Index
Llifecycle states
registration forms, 30
Nnew version
import file, 51non-clinical study registration form
create, 29non-controlled documents
creating, 51
Ooverview
Research and Development, 9
Pperformers
update, 81 to 82product registration form
create, 23properties
view, 59public search, 57
Qquality project registration form
create, 25
Rreassigning, 85reassigning roles, 81, 85registration form
assign users, 35restrict access, 34
registration form changesexisting documents, 35
registration forms, 23lifecycle states, 30
regulatory applicationassociate, 45
regulatory application registration formcreate, 26
regulatory labeling document, 11regulatory labeling documents
relate, 44
status, 44reinstate a document, 78role
administrators, 15approvers, 21auditors, 22authors, 19coordinators, 21managers, 16readers, 22reviewers, 20
roles, 85assign users, 50
Ssafety documents, 13search
documents, 61stop a workflow, 81, 84superseded, 78suspending a document, 78
Ttask performers
update, 81 to 82
Uupdate task performers, 82users
delegating a task, 85
Vview document properties, 59viewing control category, 81viewing document status, 81viewing the audit trail, 71viewing workflow progress, 81virtual documents, 14
Wwithdraw documents, 78workflow
stopping, 81, 84workflow progress
viewing, 81workflow supervisor
88
Index
delegating a task, 84workflow tasks
approving documents, 76editing documents, 73reinstate a document, 78reviewing documents in a review
task, 75reviewing feedback fromapprovers, 77reviewing feedback from reviewers, 76
superseded documents, 78suspending a document, 78update performers, 81 to 82
workflowsadding documents, 67performing tasks, 70self-approving, 68sending virtual documents, 68
working with documents, 57
89