Embed Size (px)
Citation preview

ELASTOSIL® M MOLDMAKING COMPOUNDSMADE EASY
CREATING TOMORROW’S SOLUTIONS

Where to Find What
Moldmaking Techniques 4
Choosing the Best Moldmaking Technique 6
Preparing the Model 8
Preparing the Material 10
One-Part Block Mold (Casting, Impression) 12
Two-Part Block Mold (Casting, Impression) 16
One-Part Skin Mold (Casting, Spreading) 22
Two-Part Skin Mold (Casting, Spreading) 28
Making the Reproductions 42
Materials 44
Reproduction 46
ELASTOSIL® M 50
Characteristics 52
Special Tips 54
Glossary 56
Wacker Chemie AG 62

33
THERE’S NO HARM IN ASKING
ELASTOSIL® M moldmaking compoundsare room-temperature-curing, two-com-ponent (>RTV-2) silicone rubbers dis-tinguished by excellent fidelity of repro-duction. There are suitable grades formaking all kinds of molds, no matterhow intricate, and for use with all typesof reproduction material, whether wax,plaster, concrete, casting resin or low-melting metal alloy.
Thanks to their great flexibility and out-standing release properties, ELASTOSIL® Mrubbers separate very easily from themodel. Their high resistance to thereproduction material means they can be used over and over again.
All these excellent processing propertiesmake ELASTOSIL® M compounds indis-pensable for mold making: whether forindustrial manufacturers or for artists andcraftsmen.
This manual is intended to give bothbeginners and professionals quickanswers to specific practical questions.What types of mold are available? What is the best moldmaking technique?What material is most suitable ?
If there are any questions not covered bythis booklet, our technical service teamare here to assist you.
Call us. We’ll be glad to help.
ELASTOSIL® M is a registered trademark of Wacker Chemie AG.Wacker Chemie AG is certified to EN ISO 9001 and EN ISO 14001. The Elastomers Business Unit within WACKER SILICONES is certified to ISO/TS 16949:2002.

The first silicone rubber layer is critical forfaithful reproduction of fine detail. So workwith extreme care.
Where to Find What
Moldmaking Techniques
Choosing the Best Moldmaking Technique 6
Preparing the Model 8
Preparing the Material 10
One-Part Block Mold (Casting, Impression) 12
Two-Part Block Mold (Casting, Impression) 16
One-Part Skin Mold (Casting, Spreading) 22
Two-Part Skin Mold (Casting, Spreading) 28
Making the Reproductions 42
Materials 44
Reproduction 46
ELASTOSIL® M 50
Characteristics 52
Special Tips 54
Glossary 56
Wacker Chemie AG 62

5
6
WHICH MOLDMAKING TECHNIQUESHOULD I USE?
ELASTOSIL® M moldmaking compoundsare suitable for all types of molds what-ever the degree of difficulty. Which tech-nique to choose depends entirely on thesize and composition of the model to becopied.
The table shown here illustrates themost important types of model and willhelp you to choose the most suitablemoldmaking technique.
Where to Find What
Moldmaking Techniques 4
Choosing the Best Moldmaking Technique
Preparing the Model 8
Preparing the Material 10
One-Part Block Mold (Casting, Impression) 12
Two-Part Block Mold (Casting, Impression) 16
One-Part Skin Mold (Casting, Spreading) 22
Two-Part Skin Mold (Casting, Spreading) 28
Making the Reproductions 42
ELASTOSIL® M 50
Glossary 56
Wacker Chemie AG 62

7
Model type Example Moldmaking technique Advantages Disadvantages
Medallion
Relief
Industrial
prototyping
Trophies,
small statues
Fossils,
coins
Large statues
– Flat reverse side
– Only shallow, if any,
>undercuts or recesses
– For models of limited size
– Flat reverse side
– Deep >undercuts
or recesses
– For models of any size
– Structured on all sides
– Complex shape
– Deep >undercuts
– For models of limited size
– Pedestal or even base
– Complex shape
– Deep >undercuts or
recesses
– For models of limited size
– Structured on all sides
– Only shallow, if any,
>undercuts or recesses
– For models of limited size
– Structured on all sides
– Complex shape
– Deep >undercuts or
recesses
– For models of any size
– One-part >block mold
– Casting or impression technique
– One-part >skin mold
– Casting or spreading technique
– One-part >block mold
– Demolding by cutting along
a parting line
– Use as two or more-part >block mold
– Casting technique (with >vacuum if
necessary)
– One-part >skin mold
– Demolding by cutting open at the
side
– Use as one-part >skin mold, which
can be folded open
– Casting or spreading technique
– Two or multi-part >block mold
– Casting or impression technique
– Two or more-part >skin mold
– Casting or spreading technique
– Less labor intensive
– High mold stability
– Low demolding forces
– Relatively low silicone
rubber requirement
– Less labor intensive
than with two-part
>block mold
– High mold stability
– Less labor intensive
than for two-part
>skin mold
– Low demolding forces
– Relatively low silicone
rubber requirement
– High mold stability
– Low demolding forces
– Relatively low silicone
rubber requirement
– Relatively high silicone
rubber requirement
– More labor intensive
than for >block mold
(>support required)
– Relatively high silicone
rubber requirement
– More labor intensive
than for >block mold
(>support required)
– Relatively labor
intensive
– Relatively high silicone
rubber requirement
– More labor intensive
than for >block mold
(>support required)

8
WHAT DO I NEED TO BEAR IN MIND WHEN PREPARING THE MODEL?
ELASTOSIL® M moldmaking grades sep-arate easily from the majority of materialsfrom which models are made. Neverthe-less, it is generally advisable to spendsome time on preparing the model.
Specifics– Carefully clean all surfaces to remove
dust, dirt, oil, etc., not forgetting thosethat are difficult to access.
– Where possible, secure loose sectionsof the model; otherwise remove themfor safe keeping.
Where to Find What
Moldmaking Techniques 4
Choosing the Best Moldmaking Technique 6
Preparing the Model
Preparing the Material 10
One-Part Block Mold (Casting, Impression) 12
Two-Part Block Mold (Casting, Impression) 16
One-Part Skin Mold (Casting, Spreading) 22
Two-Part Skin Mold (Casting, Spreading) 28
Making the Reproductions 42
ELASTOSIL® M 50
Glossary 56
Wacker Chemie AG 62
Water-soluble synthetic resins such as methyl
cellulose (wallpaper paste) or polyvinyl alcohol
in a solution consisting of 4–10 parts by
weight of solid to 100 parts by weight of water
Concentrated solutions of soap or wetting
agents (e.g. dishwashing liquid)
Wax or paraffin; liquid or as 5–10 %
solution in xylene or sulfur-free
white spirit
Petrolatum (e.g. Vaseline) pharmaceutical grade
WACKER Protective Film SF 18
yes yes
if required yes if required
yes yes
yes yes
if required if required
Model made of Plasticine Clay, unfired Plaster Wax Wood Metal

9
– Fill damaged areas or surfaces, cracksor fissures with a modeling compound(e.g. Plasticine) or filler to prevent themoldmaking compound from adheringto the model.
– Seal porous or absorbent surfaces, orcover them with film.
– Cover sensitive surfaces with film orother suitable materials to prevent soil-ing, discoloration or other undesirablechanges.
– Apply a coating of a release agent (e.g.Vaseline) to any material such as glass,porcelain, ceramics or silicone rubberthat might form chemical bonds withthe silicone rubber.
– Smooth, non-absorbent surfaces donot generally require a release agent.However, if the model is to be used forseveral molds, a release agent shouldbe applied to prevent the mold surfacefrom becoming coated with silicone.
– Molds of >addition curing grades mightnot cure completely (i.e. may be inhibit-ed) if >condensation-curing gradeshave been used previously on themodel. The remedy in such cases is tocoat the affected area with WACKERProtective Film SF 18.
Caution:Remember that preparatory work mightaffect the model’s appearance. Forexample, wood may be darkened andnatural and synthetic stone discolored.For this reason we strongly advise you tocarry out preliminary tests on an incon-spicuous section to discover exactlywhat changes are likely. This trial mold-ing will show you how cleanly and easilythe cured silicone can be removed.
1 Fired clay, concrete, cast and natural stone, unglazedporcelain, bones etc.
2 Glass, porcelain, glazed ceramic
3 Many modeling compound grades, organic rubbers, cold-curing epoxy resins, polyester resins, polyurethanes, >con-densation-curing >RTV-2 silicone rubbers among others
yes if possible
yes yes if required
yes yes if possible yes
yes yes yes if required yes
yes
Porous materials1 Smooth materials2 Leather Plastics Silicone rubber Inhibiting materials3

10
– Always thoroughly mix all pourablecompounds and components beforeremoving them from or processingthem in containers, preferably with amechanical stirrer. Mixing disperses the fillers uniformly and improves theflow properties of those grades withhigh tear resistances.
– Grades with high tear strength maythicken somewhat on storage. They canbe made to flow again by stirring well.
HOW DO I PREPARE THE MOLDMAKING COMPOUND?
1 Stirring the componentsEverything you need– Balance, accurate to 0.1 g or a meas-
uring vessel, pipette or disposablesyringe
– Clean metal or plastic containers,preferably of polyethylene
– Metal, wood or plastic spatula– Stiff short-bristled brush– Mechanical stirrer: power drill with
stirrer attachment (for kneadable compounds: roll mill or kneader)
– >Vacuum pump (oil or water-jet pump)and >vacuum vessel: e.g. glass orplastic desiccator
– Grease-dissolving solvent: e.g. whitespirit or acetone
Where to Find What
Moldmaking Techniques 4
Choosing the Best Moldmaking Technique 6
Preparing the Model 8
Preparing the Material
One-Part Block Mold (Casting, Impression) 12
Two-Part Block Mold (Casting, Impression) 16
One-Part Skin Mold (Casting, Spreading) 22
Two-Part Skin Mold (Casting, Spreading) 28
Making the Reproductions 42
ELASTOSIL® M 50
Glossary 56
Wacker Chemie AG 62

11
– Weigh out the >components exactly,since only strict observance of the mix-ing ratio will yield >reproducible potlives and curing time, and cured rub-bers with the specified properties
Note:If you are also using the weighing vesselfor >deaeration, its volume must be atleast four times that of the >catalyzedrubber compound.
– With >condensation-curing ELASTOSIL® Mgrades, the rubber and >T-series cata-lyst must be mixed, and in the case of>addition-curing grades, >componentsA and B.
– Mix the >components homogeneouslyusing a spatula for pourable andspreadable products, or a mechanicalstirrer for large quantities.
– Mix kneadable products by hand, on a roll mill or in a kneader.
– While mixing, regularly scrape theproduct off the vessel wall with a spatula.
3 Mixing of components 4 Removing entrapped air2 Metering of components
– To achieve bubble-free cured rubberproducts, free-flowing mixtures shouldbe >deaerated (>evacuated) underreduced pressure (10 to 20 mbar) in a>desiccator or >vacuum cabinet.
– Note: >evacuation causes the >cat-alyzed mix to expand strongly. Only fillthe evacuation vessel to at most aquarter of its total capacity.
– During >evacuation, the rubberexpands strongly at first and then usu-ally collapses before it reaches the rim.If it looks likely to overflow, admit airbriefly. Repeat the process until the mixcollapses completely under full >vacu-um. Break the >vacuum immediatelyafterwards.
– Deaeration should not take longer than 5 minutes. It should never be per-formed until no more bubbles form.Otherwise certain components essen-tial for proper >curing might escape.
12
HOW DO I CAST A ONE-PART BLOCK MOLD?
Everything you need– A suitable smooth, flat, non-absorbent
base– Strips of wood, plastic or metal for
making a molding box– Sealing wax or a modeling compound
(e.g. Plasticine) for immobilizing themodel and sealing the joints in themolding box
– Short-haired brush– Release agent and lubricant (Vaseline,
liquid soap, dishwashing liquid) toassist with demolding
Where to Find What
Moldmaking Techniques 4
Choosing the Best Moldmaking Technique 6
Preparing the Model 8
Preparing the Material 10
One-Part Block Mold (Casting, Impression)
Two-Part Block Mold (Casting, Impression) 16
One-Part Skin Mold (Casting, Spreading) 22
Two-Part Skin Mold (Casting, Spreading) 28
Making the Reproductions 42
ELASTOSIL® M 50
Glossary 56
Wacker Chemie AG 62
13
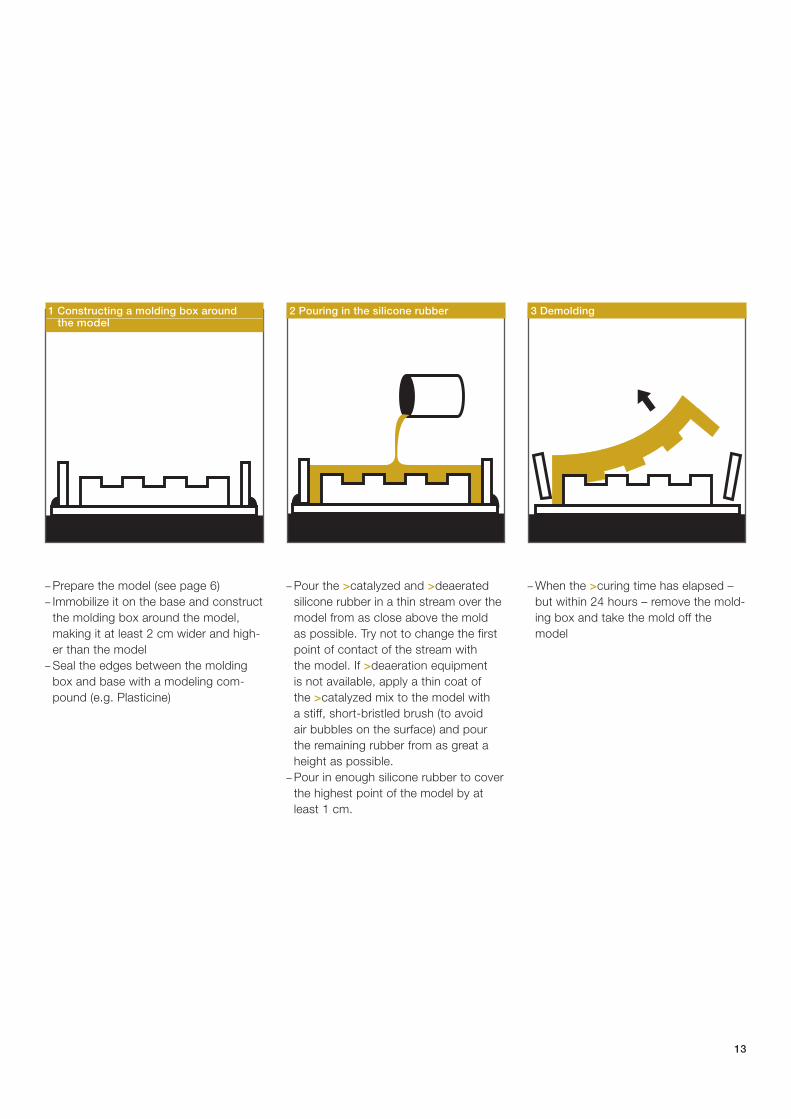
– Prepare the model (see page 6)– Immobilize it on the base and construct
the molding box around the model,making it at least 2 cm wider and high-er than the model
– Seal the edges between the moldingbox and base with a modeling com-pound (e.g. Plasticine)
– Pour the >catalyzed and >deaeratedsilicone rubber in a thin stream over themodel from as close above the mold as possible. Try not to change the firstpoint of contact of the stream with the model. If >deaeration equipment is not available, apply a thin coat of the >catalyzed mix to the model with a stiff, short-bristled brush (to avoid air bubbles on the surface) and pourthe remaining rubber from as great aheight as possible.
– Pour in enough silicone rubber to coverthe highest point of the model by atleast 1 cm.
– When the >curing time has elapsed –but within 24 hours – remove the mold-ing box and take the mold off themodel
1 Constructing a molding box around the model
2 Pouring in the silicone rubber 3 Demolding
14
Everything you need:– Smooth, flat base– Roller or press
HOW DO I MAKE A ONE-PART BLOCKMOLD BY THE IMPRESSION TECHNIQUE?
Where to Find What
Moldmaking Techniques 4
Choosing the Best Moldmaking Technique 6
Preparing the Model 8
Preparing the Material 10
One-Part Block Mold (Casting, Impression)
Two-Part Block Mold (Casting, Impression) 16
One-Part Skin Mold (Casting, Spreading) 22
Two-Part Skin Mold (Casting, Spreading) 28
Making the Reproductions 42
ELASTOSIL® M 50
Glossary 56
Wacker Chemie AG 62
15
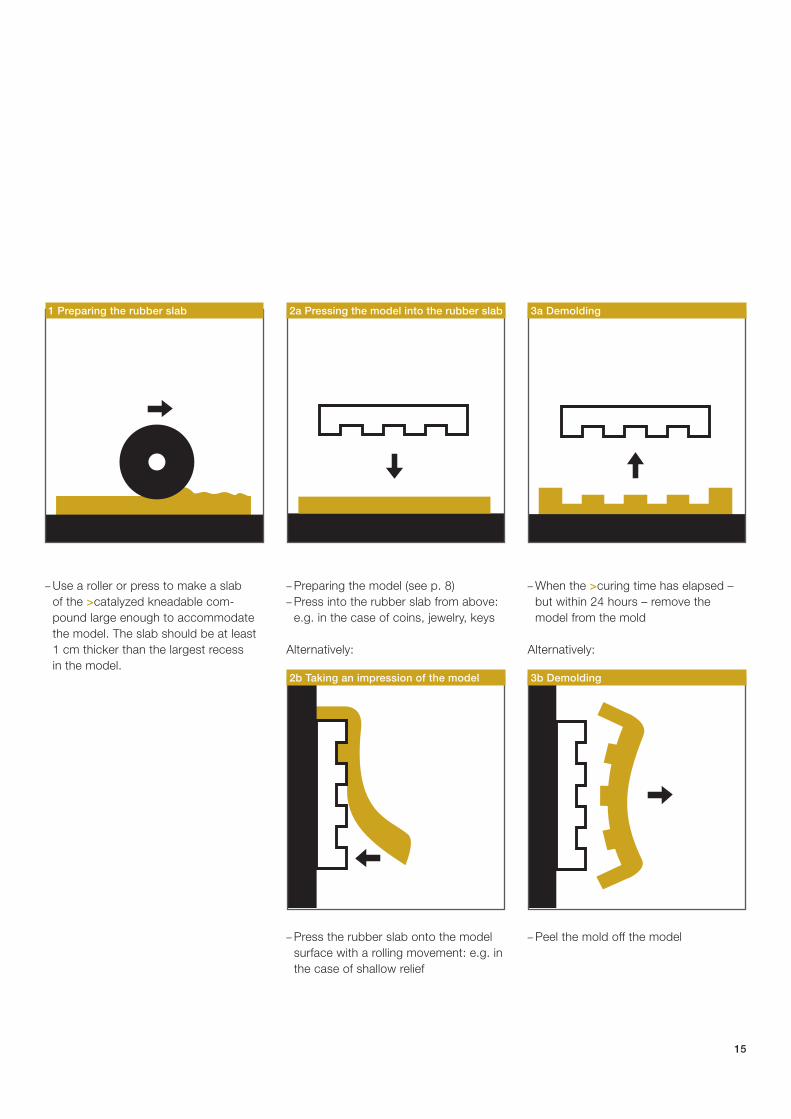
– Preparing the model (see p. 8)– Press into the rubber slab from above:
e.g. in the case of coins, jewelry, keys
Alternatively:
– Press the rubber slab onto the modelsurface with a rolling movement: e.g. inthe case of shallow relief
– When the >curing time has elapsed –but within 24 hours – remove themodel from the mold
Alternatively:
– Peel the mold off the model
– Use a roller or press to make a slab of the >catalyzed kneadable com-pound large enough to accommodatethe model. The slab should be at least1 cm thicker than the largest recess in the model.
1 Preparing the rubber slab 2a Pressing the model into the rubber slab 3a Demolding
3b Demolding2b Taking an impression of the model
Everything you need:– A suitable smooth, flat and non-absor-
bent base– Strips of wood, plastic or metal for
making a molding box– Sealing wax or a modeling compound
(e.g. Plasticine) for immobilizing themodel and sealing the joints in themolding box
– Plastic film or aluminum foil for protect-ing the model against soiling (optional)
– Embedding material: clay or a modelingcompound (e.g. Plasticine)
– Marker for drawing the parting line(optional)
– Tubes or locating pegs to act as >locksor >spacers for vent holes and feedingchannels (optional)
– Stiff short-bristled brush – Release agent: Vaseline, wax solution,
WACKER Protective Film SF 18– Drill (optional)
16
HOW DO I CAST A TWO-PART BLOCK MOLD?
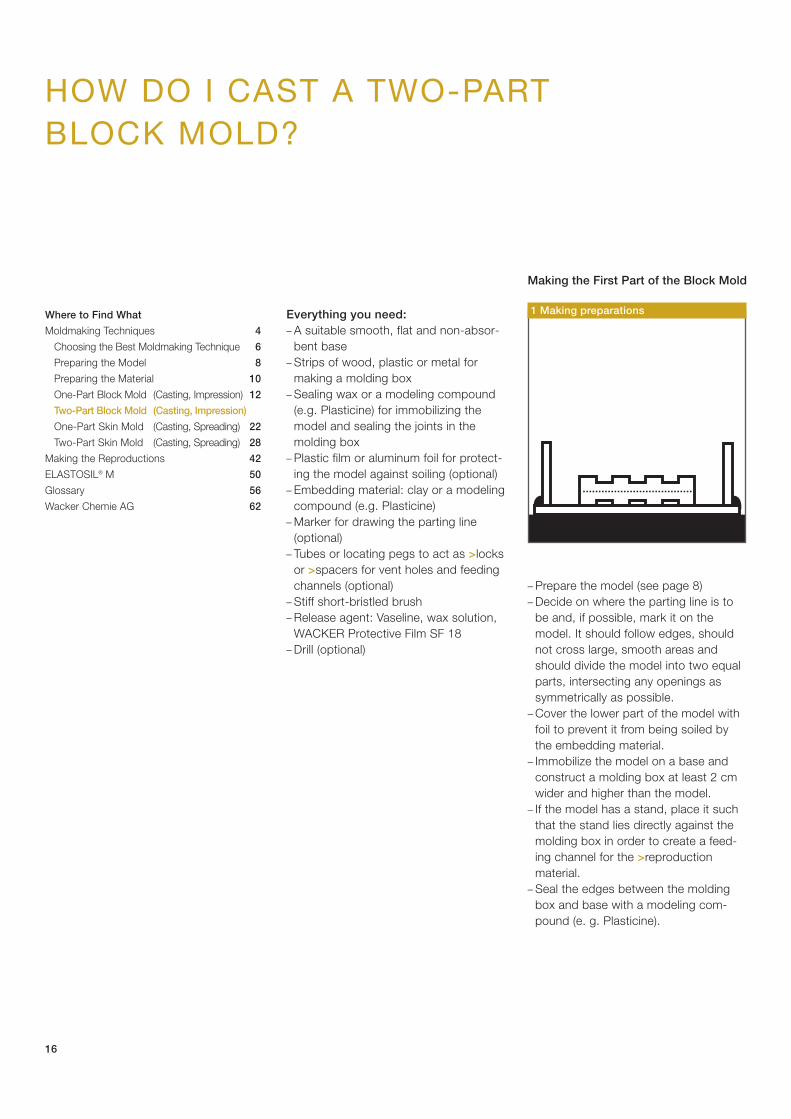
1 Making preparations
– Prepare the model (see page 8)– Decide on where the parting line is to
be and, if possible, mark it on themodel. It should follow edges, shouldnot cross large, smooth areas andshould divide the model into two equalparts, intersecting any openings assymmetrically as possible.
– Cover the lower part of the model withfoil to prevent it from being soiled bythe embedding material.
– Immobilize the model on a base andconstruct a molding box at least 2 cmwider and higher than the model.
– If the model has a stand, place it suchthat the stand lies directly against themolding box in order to create a feed-ing channel for the >reproductionmaterial.
– Seal the edges between the moldingbox and base with a modeling com-pound (e. g. Plasticine).
Making the First Part of the Block Mold
Where to Find What
Moldmaking Techniques 4
Choosing the Best Moldmaking Technique 6
Preparing the Model 8
Preparing the Material 10
One-Part Block Mold (Casting, Impression) 12
Two-Part Block Mold (Casting, Impression)
One-Part Skin Mold (Casting, Spreading) 22
Two-Part Skin Mold (Casting, Spreading) 28
Making the Reproductions 42
ELASTOSIL® M 50
Glossary 56
Wacker Chemie AG 62
17
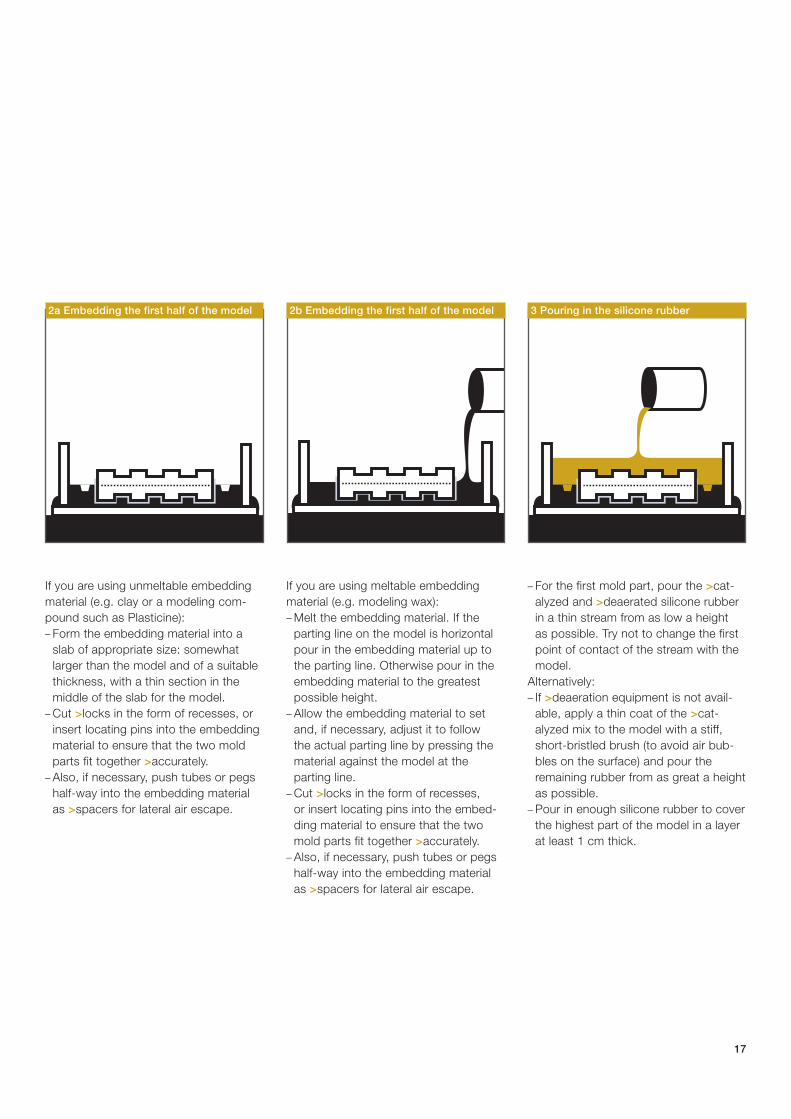
If you are using unmeltable embeddingmaterial (e.g. clay or a modeling com-pound such as Plasticine):– Form the embedding material into a
slab of appropriate size: somewhatlarger than the model and of a suitablethickness, with a thin section in themiddle of the slab for the model.
– Cut >locks in the form of recesses, orinsert locating pins into the embeddingmaterial to ensure that the two moldparts fit together >accurately.
– Also, if necessary, push tubes or pegshalf-way into the embedding materialas >spacers for lateral air escape.
2a Embedding the first half of the model 2b Embedding the first half of the model
If you are using meltable embeddingmaterial (e.g. modeling wax):– Melt the embedding material. If the
parting line on the model is horizontalpour in the embedding material up tothe parting line. Otherwise pour in theembedding material to the greatestpossible height.
– Allow the embedding material to setand, if necessary, adjust it to follow the actual parting line by pressing thematerial against the model at the parting line.
– Cut >locks in the form of recesses, or insert locating pins into the embed-ding material to ensure that the twomold parts fit together >accurately.
– Also, if necessary, push tubes or pegshalf-way into the embedding materialas >spacers for lateral air escape.
3 Pouring in the silicone rubber
– For the first mold part, pour the >cat-alyzed and >deaerated silicone rubberin a thin stream from as low a height as possible. Try not to change the firstpoint of contact of the stream with themodel.
Alternatively: – If >deaeration equipment is not avail-
able, apply a thin coat of the >cat-alyzed mix to the model with a stiff,short-bristled brush (to avoid air bub-bles on the surface) and pour theremaining rubber from as great a heightas possible.
– Pour in enough silicone rubber to coverthe highest part of the model in a layerat least 1 cm thick.

18
– When the >curing time has elapsed –but within 24 hours – remove the molding box and take the mold off the model
– Remove the base, disassemble themolding box and remove the embed-ding material and frame. Leave thecompleted mold part on the model.
4 Removing the embedding material 5 Applying release agent
– Reassemble the molding box– Apply release agent to all exposed
areas of the first mold part in order to prevent it from sticking to the second part.
Where to Find What
Moldmaking Techniques 4
Choosing the Best Moldmaking Technique 6
Preparing the Model 8
Preparing the Material 10
One-Part Block Mold (Casting, Impression) 12
Two-Part Block Mold (Casting, Impression)
One-Part Skin Mold (Casting, Spreading) 22
Two-Part Skin Mold (Casting, Spreading) 28
Making the Reproductions 42
ELASTOSIL® M 50
Glossary 56
Wacker Chemie AG 62
19
– After the second part of the mold hascured, disassemble the mold box andpeel the mold parts off the model.
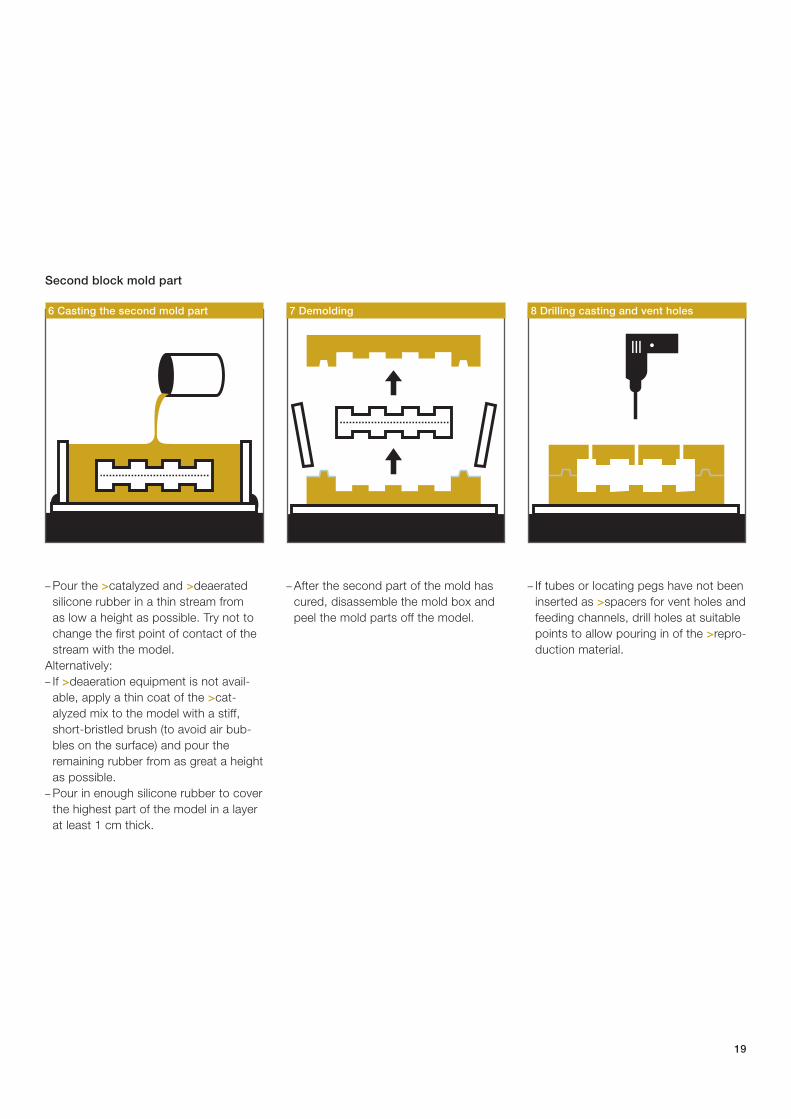
– If tubes or locating pegs have not beeninserted as >spacers for vent holes andfeeding channels, drill holes at suitablepoints to allow pouring in of the >repro-duction material.
– Pour the >catalyzed and >deaeratedsilicone rubber in a thin stream from as low a height as possible. Try not tochange the first point of contact of thestream with the model.
Alternatively: – If >deaeration equipment is not avail-
able, apply a thin coat of the >cat-alyzed mix to the model with a stiff,short-bristled brush (to avoid air bub-bles on the surface) and pour theremaining rubber from as great a heightas possible.
– Pour in enough silicone rubber to coverthe highest part of the model in a layerat least 1 cm thick.
6 Casting the second mold part 7 Demolding 8 Drilling casting and vent holes
Second block mold part
20
Everything you need:– A suitable smooth, flat, non-absorbent
base– Marker for drawing the parting line
(optional) – Roller or press– Release agent: Vaseline, wax solution,
WACKER Protective Film SF 18– Tubes or locating pegs to act as >locks
or >spacers for vent holes and feedingchannels (optional)
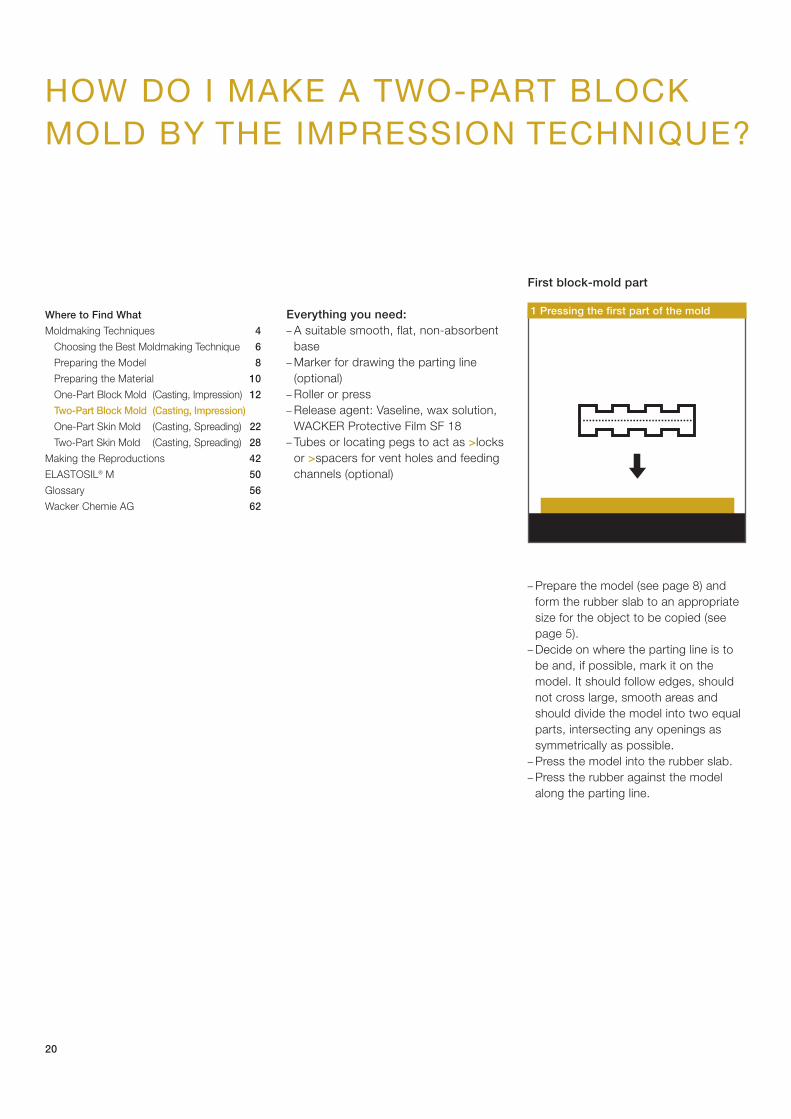
– Prepare the model (see page 8) andform the rubber slab to an appropriatesize for the object to be copied (seepage 5).
– Decide on where the parting line is tobe and, if possible, mark it on themodel. It should follow edges, shouldnot cross large, smooth areas andshould divide the model into two equalparts, intersecting any openings assymmetrically as possible.
– Press the model into the rubber slab.– Press the rubber against the model
along the parting line.
HOW DO I MAKE A TWO-PART BLOCKMOLD BY THE IMPRESSION TECHNIQUE?
1 Pressing the first part of the mold
First block-mold part
Where to Find What
Moldmaking Techniques 4
Choosing the Best Moldmaking Technique 6
Preparing the Model 8
Preparing the Material 10
One-Part Block Mold (Casting, Impression) 12
Two-Part Block Mold (Casting, Impression)
One-Part Skin Mold (Casting, Spreading) 22
Two-Part Skin Mold (Casting, Spreading) 28
Making the Reproductions 42
ELASTOSIL® M 50
Glossary 56
Wacker Chemie AG 62
21
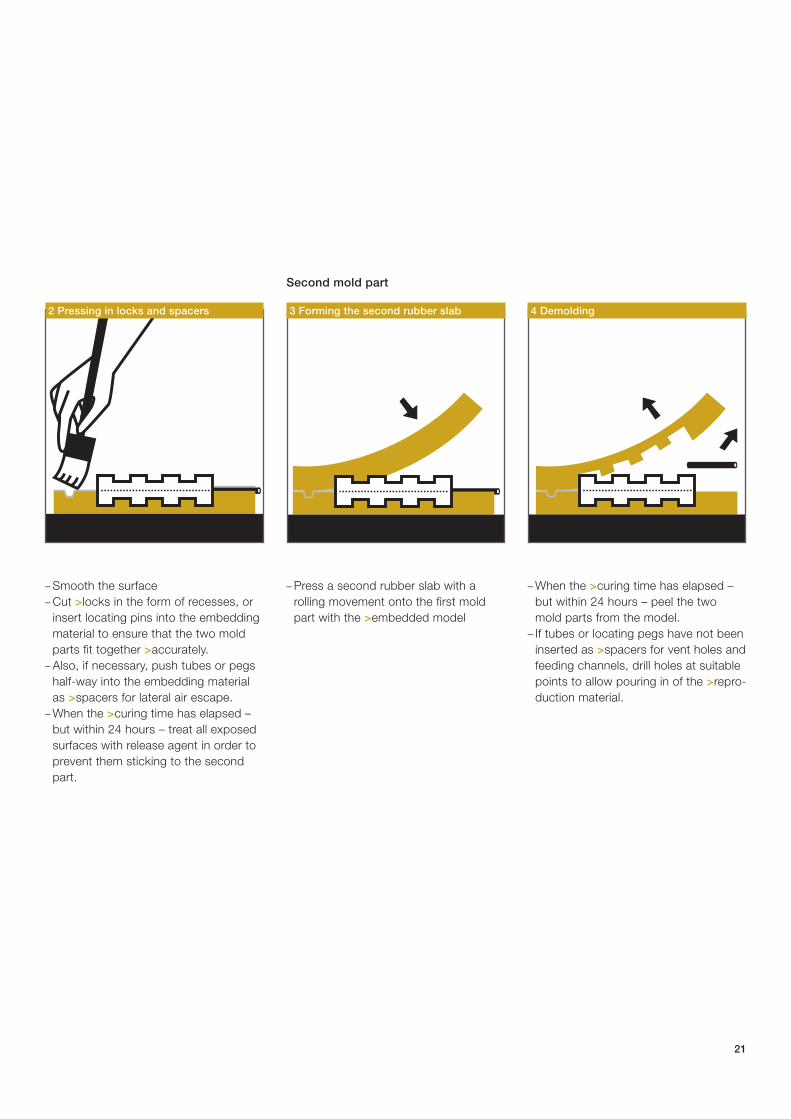
– Smooth the surface – Cut >locks in the form of recesses, or
insert locating pins into the embeddingmaterial to ensure that the two moldparts fit together >accurately.
– Also, if necessary, push tubes or pegshalf-way into the embedding materialas >spacers for lateral air escape.
– When the >curing time has elapsed –but within 24 hours – treat all exposedsurfaces with release agent in order toprevent them sticking to the secondpart.
– Press a second rubber slab with arolling movement onto the first moldpart with the >embedded model
– When the >curing time has elapsed –but within 24 hours – peel the twomold parts from the model.
– If tubes or locating pegs have not beeninserted as >spacers for vent holes andfeeding channels, drill holes at suitablepoints to allow pouring in of the >repro-duction material.
2 Pressing in locks and spacers 3 Forming the second rubber slab 4 Demolding
Second mold part

22
Everything you need:– A suitable smooth, flat, non-absorbent
base– If the >support is to be made in plaster
by pouring: strips of metal to make amolding box
– Sealing wax or a modeling compound(e.g. Plasticine) for immobilizing themodel and sealing the edges of themolding box
– Plastic film or aluminum foil for protect-ing the model against soiling (optional)
– Tubes or locating pegs to act as >locksor >spacers for vent holes and feedingchannels (optional)
– Clay or a modeling compound (e.g.Plasticine) as >spacing layer for therubber
– Plaster or glass-fiber-reinforced poly-ester or epoxy resin for making the>support by either pouring or spread-ing
– Spatula– Short-haired brush (optional) – Drill (optional)
HOW DO I CAST A ONE-PART SKIN MOLD?
Where to Find What
Moldmaking Techniques 4
Choosing the Best Moldmaking Technique 6
Preparing the Model 8
Preparing the Material 10
One-Part Block Mold (Casting, Impression) 12
Two-Part Block Mold (Casting, Impression) 16
One-Part Skin Mold (Casting, Spreading)
Two-Part Skin Mold (Casting, Spreading) 28
Making the Reproductions 42
ELASTOSIL® M 50
Glossary 56
Wacker Chemie AG 62
23
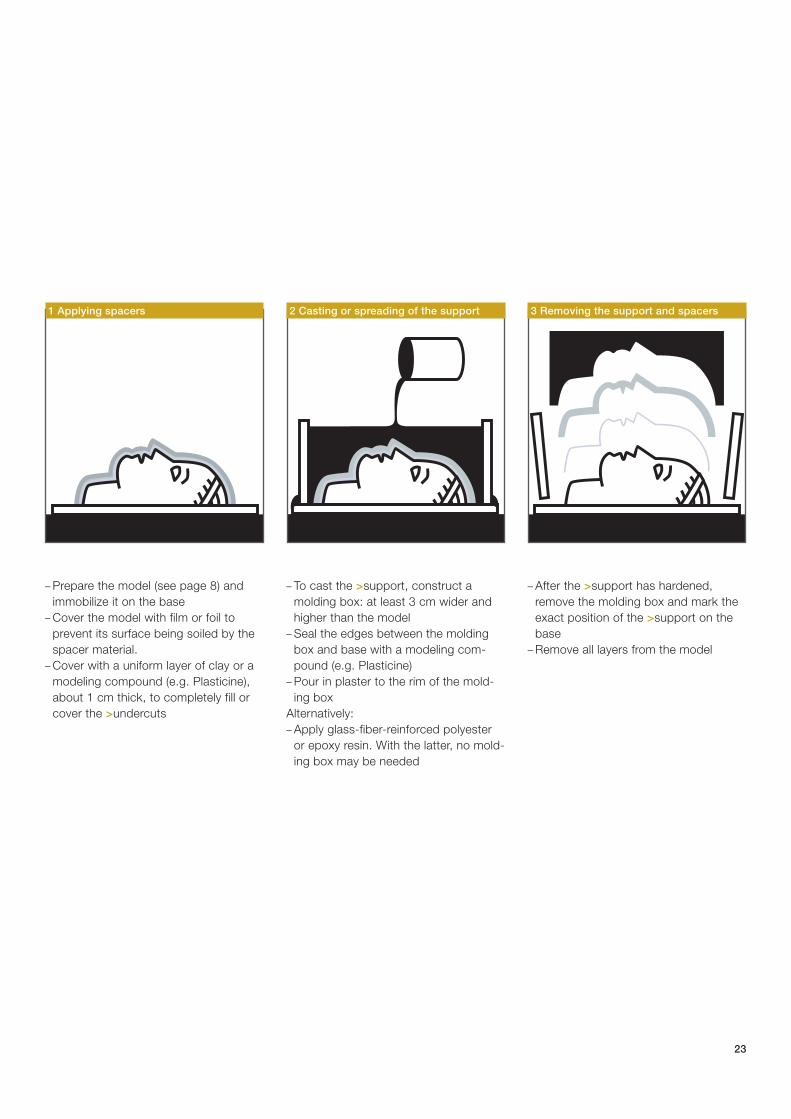
– Prepare the model (see page 8) andimmobilize it on the base
– Cover the model with film or foil to prevent its surface being soiled by thespacer material.
– Cover with a uniform layer of clay or amodeling compound (e.g. Plasticine),about 1 cm thick, to completely fill orcover the >undercuts
– To cast the >support, construct amolding box: at least 3 cm wider andhigher than the model
– Seal the edges between the moldingbox and base with a modeling com-pound (e.g. Plasticine)
– Pour in plaster to the rim of the mold-ing box
Alternatively:– Apply glass-fiber-reinforced polyester
or epoxy resin. With the latter, no mold-ing box may be needed
– After the >support has hardened,remove the molding box and mark theexact position of the >support on thebase
– Remove all layers from the model
1 Applying spacers 2 Casting or spreading of the support 3 Removing the support and spacers

24
– If tubes or locating pins have not beeninserted as >spacers for vent holes andfeeding channels during casting orspreading the >support, drill feedingchannels at the lowest points and ventholes at the highest points. This willprevent air pockets being trapped dur-ing filling of the cavity.
4 Drilling casting and vent holesWhere to Find What
Moldmaking Techniques 4
Choosing the Best Moldmaking Technique 6
Preparing the Model 8
Preparing the Material 10
One-Part Block Mold (Casting, Impression) 12
Two-Part Block Mold (Casting, Impression) 16
One-Part Skin Mold (Casting, Spreading)
Two-Part Skin Mold (Casting, Spreading) 28
Making the Reproductions 42
ELASTOSIL® M 50
Glossary 56
Wacker Chemie AG 62
25
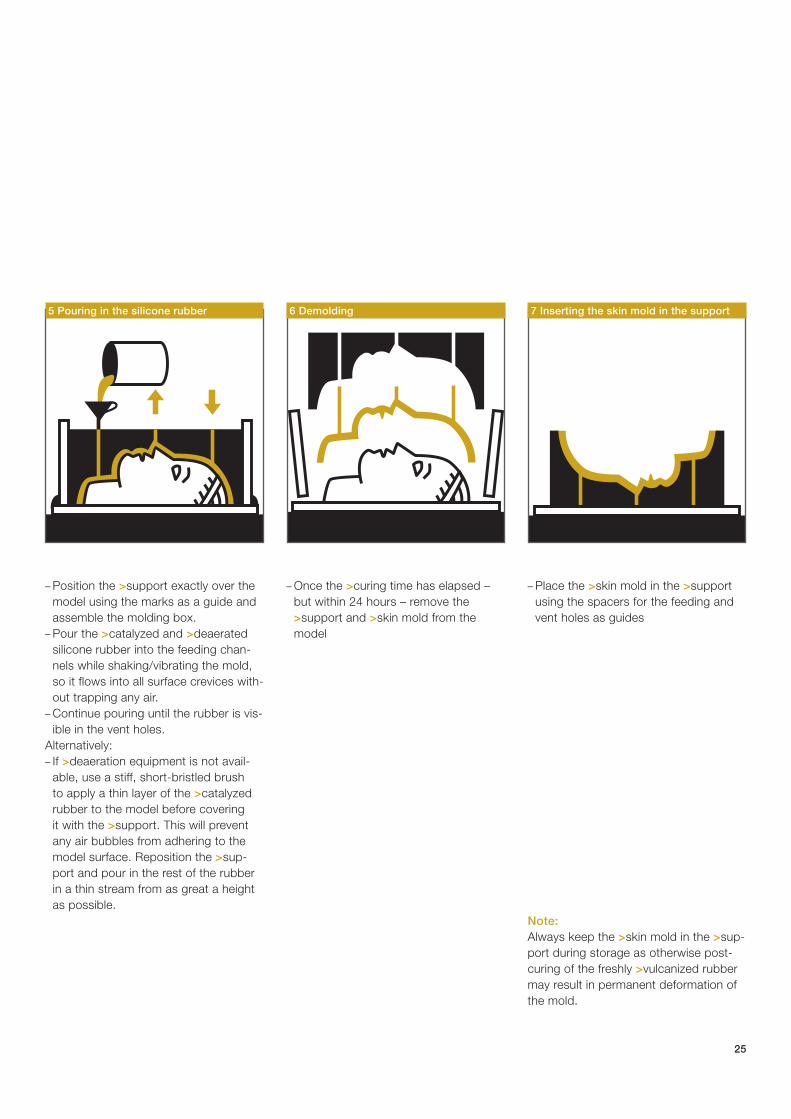
– Position the >support exactly over themodel using the marks as a guide andassemble the molding box.
– Pour the >catalyzed and >deaeratedsilicone rubber into the feeding chan-nels while shaking/vibrating the mold,so it flows into all surface crevices with-out trapping any air.
– Continue pouring until the rubber is vis-ible in the vent holes.
Alternatively:– If >deaeration equipment is not avail-
able, use a stiff, short-bristled brush to apply a thin layer of the >catalyzedrubber to the model before covering it with the >support. This will preventany air bubbles from adhering to themodel surface. Reposition the >sup-port and pour in the rest of the rubberin a thin stream from as great a heightas possible.
– Once the >curing time has elapsed –but within 24 hours – remove the >support and >skin mold from themodel
– Place the >skin mold in the >supportusing the spacers for the feeding andvent holes as guides
Note:Always keep the >skin mold in the >sup-port during storage as otherwise post-curing of the freshly >vulcanized rubbermay result in permanent deformation ofthe mold.
5 Pouring in the silicone rubber 6 Demolding 7 Inserting the skin mold in the support
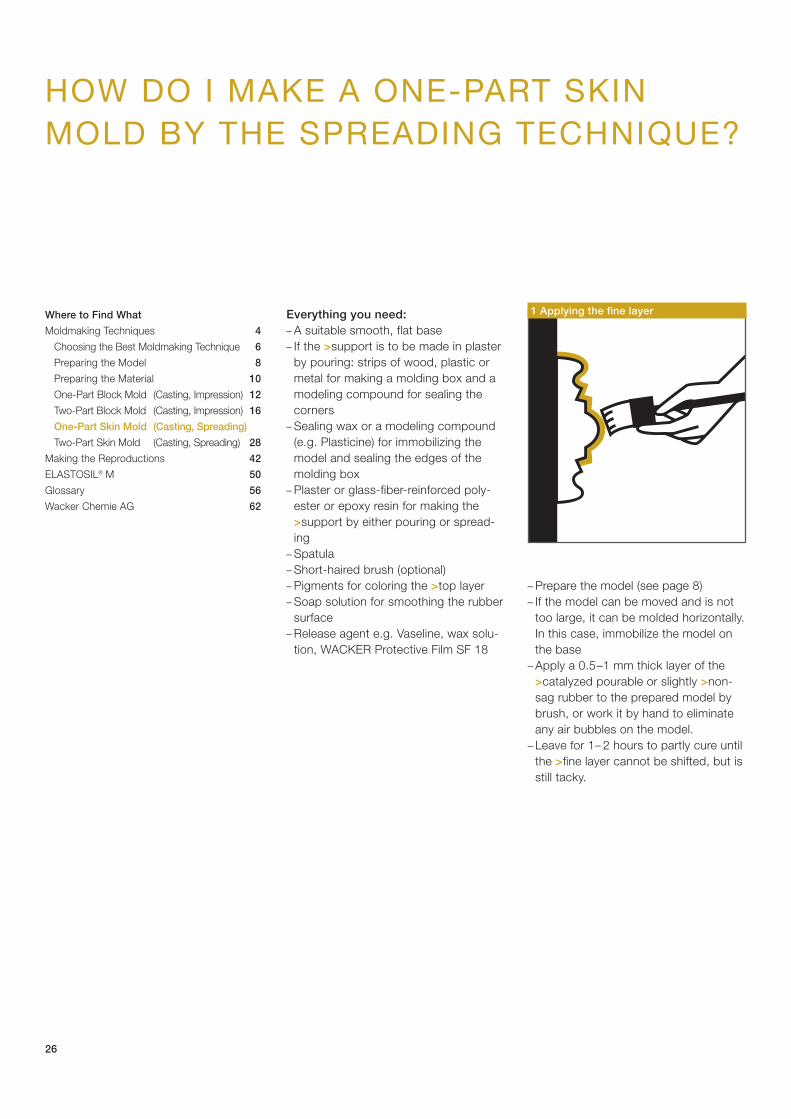
– Prepare the model (see page 8) – If the model can be moved and is not
too large, it can be molded horizontally.In this case, immobilize the model onthe base
– Apply a 0.5–1 mm thick layer of the>catalyzed pourable or slightly >non-sag rubber to the prepared model bybrush, or work it by hand to eliminateany air bubbles on the model.
– Leave for 1– 2 hours to partly cure untilthe >fine layer cannot be shifted, but isstill tacky.
26
Everything you need:– A suitable smooth, flat base– If the >support is to be made in plaster
by pouring: strips of wood, plastic ormetal for making a molding box and amodeling compound for sealing thecorners
– Sealing wax or a modeling compound(e.g. Plasticine) for immobilizing themodel and sealing the edges of themolding box
– Plaster or glass-fiber-reinforced poly-ester or epoxy resin for making the>support by either pouring or spread-ing
– Spatula– Short-haired brush (optional) – Pigments for coloring the >top layer – Soap solution for smoothing the rubber
surface– Release agent e.g. Vaseline, wax solu-
tion, WACKER Protective Film SF 18
HOW DO I MAKE A ONE-PART SKINMOLD BY THE SPREADING TECHNIQUE?
1 Applying the fine layerWhere to Find What
Moldmaking Techniques 4
Choosing the Best Moldmaking Technique 6
Preparing the Model 8
Preparing the Material 10
One-Part Block Mold (Casting, Impression) 12
Two-Part Block Mold (Casting, Impression) 16
One-Part Skin Mold (Casting, Spreading)
Two-Part Skin Mold (Casting, Spreading) 28
Making the Reproductions 42
ELASTOSIL® M 50
Glossary 56
Wacker Chemie AG 62
27
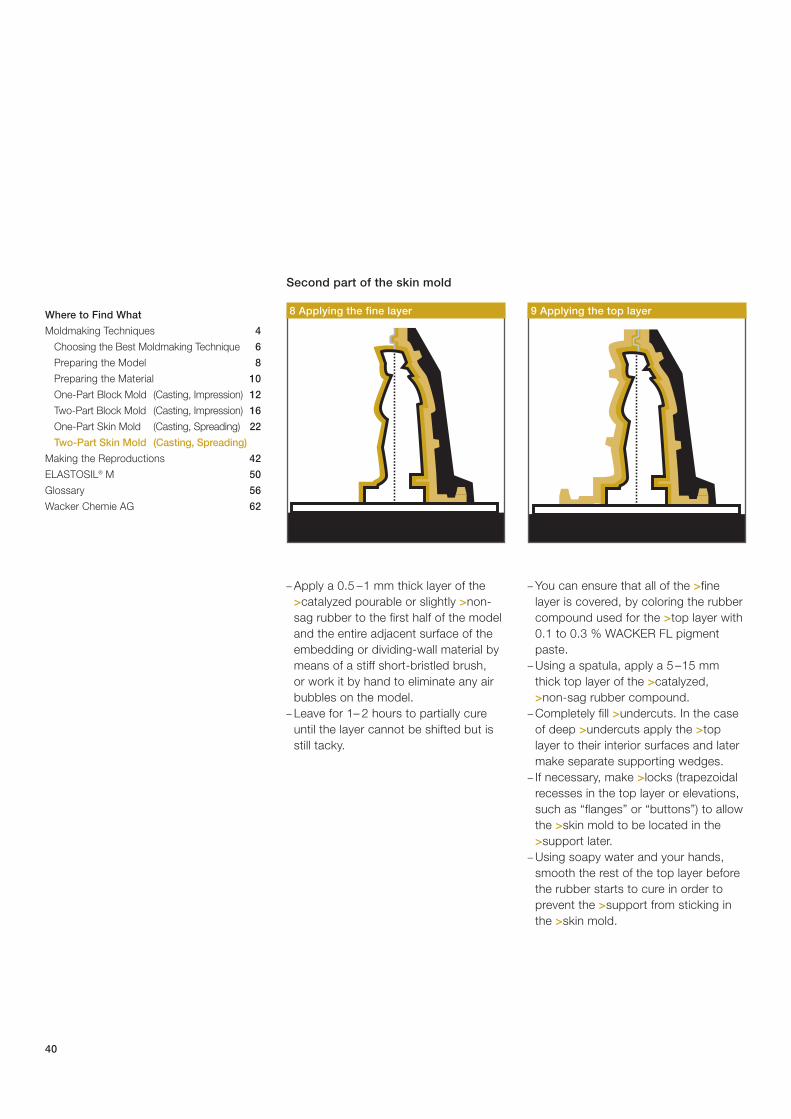
– You can ensure that all of the >finelayer is covered, by coloring the rubbercompound used for the >top layer with0.1 to 0.3 % WACKER FL pigmentpaste.
– Using a spatula, apply a 5 –15 mmthick top layer of the >catalyzed, >non-sag rubber compound.
– Completely fill >undercuts. In the caseof deep >undercuts apply the >toplayer to their interior surfaces and latermake separate supporting wedges
– If necessary, make >locks (trapezoidalrecesses in the top layer or elevations,such as seams or “buttons”) to allowthe >skin mold to be located in the>support later.
– Using soapy water and your hand,smooth the rest of the top layer beforethe rubber starts to cure in order toprevent the >support from sticking inthe >skin mold.
– When the >curing time has elapsed –but within 24 hours – make the >sup-port by spreading plaster over the mold or making a frame and pouringthe plaster around the mold
Alternatively:– Spread Vaseline on the rubber surface
and apply a glass-fiber-reinforced poly-ester or epoxy resin.
2 Applying the top layer 3 Casting/spreading of the support
– Once the >support has set, remove itand the skin mold from the model.
Turn the >support upside down and insertthe >skin mold with the aid of the >locks.
Note:Always keep the >skin mold in the >sup-port during storage as otherwise post-curing of the freshly >vulcanized rubbermay result in permanent deformation ofthe mold.
4 Demolding
5 Inserting the skin mold
28
Everything you need:– A suitable smooth, flat, non-absorbent
base– Strips of wood, plastic or metal for
making a molding box– Sealing wax or a modeling compound
(e.g. Plasticine) for immobilizing themodel and sealing the joints in themolding box.
– Plastic film or aluminum foil for protect-ing the model against soiling (optional)
– Embedding material: clay or a modelingcompound (e.g. Plasticine)
– Blocks as spacers for liquid embeddingmaterial (optional).
– Marker for drawing the parting line(optional)
– Tubes or locating pegs to act as >locksor >spacers for vent holes and feedingchannels (optional)
– Clay or a modeling compound (e.g.Plasticine) as >spacing layer for therubber
– Plaster or glass-fiber-reinforced poly-ester or epoxy resin for making the>support by either pouring or spread-ing
– Spatula– Short-haired brush (optional) – Drill (optional)– Release agent: Vaseline, wax solution,
WACKER Protective Film SF 18– Clamps or screws to hold together the
finished >support
HOW DO I CAST A TWO-PART SKIN MOLD?
Where to Find What
Moldmaking Techniques 4
Choosing the Best Moldmaking Technique 6
Preparing the Model 8
Preparing the Material 10
One-Part Block Mold (Casting, Impression) 12
Two-Part Block Mold (Casting, Impression) 16
One-Part Skin Mold (Casting, Spreading) 22
Two-Part Skin Mold (Casting, Spreading)
Making the Reproductions 42
ELASTOSIL® M 50
Glossary 56
Wacker Chemie AG 62

29
– Prepare the model (see page 8)– Decide on where the parting line is
to be and, if possible, mark it on themodel. It should follow edges, shouldnot cross large, smooth areas andshould divide the model into two equalparts, intersecting any openings assymmetrically as possible.
– Cover the lower half of the model with film or foil to prevent soiling of itssurface by the embedding material.
– Immobilize it on the base and construct the molding box around the model, making it at least 3 cmwider and 3 cm higher than the model.
– If the model has a standing base, placeit such that the base lies directlyagainst the molding box in order to create a feeding hole for the >repro-duction material.
– Seal the edges between the moldingbox and the base with a modelingcompound (e.g. Plasticine).
If you are using non-meltable embeddingmaterial (e.g. clay or a modeling com-pound such as Plasticine):– Shape the embedding material into a
slab of appropriate thickness, leaving agap in the middle that is slightly largerthan the model.
– Place the slab in the molding box andpress the embedding material to fit thebox.
If you are using meltable embeddingmaterial (e.g. modeling wax):– Melt the embedding material. If the
parting line on the model is horizontalpour in the embedding material up tothe parting line. Otherwise pour in theembedding material to the greatestpossible height.
– Allow the embedding material to setand, if necessary, adjust it to follow theactual parting line by pressing thematerial against the model at the part-ing line.
– Cut >locks in the form of recesses, orinsert locating pins into the embeddingmaterial to ensure that the two moldparts fit together >accurately.
– Also, if necessary, push tubes or pegshalf-way into the embedding materialas >spacers for vent holes and feedingchannels.
2a Embedding the model 2b Embedding the model1 Preparations

30
3 Applying the spacing layer
– Cover the model surface with film or foilto prevent soiling by the spacer layer.
– Coat with an even 1 cm layer of clay ora modeling compound (Plasticine) to :completely fill or cover over >under-cuts.
First Part of Skin Mold
Where to Find What
Moldmaking Techniques 4
Choosing the Best Moldmaking Technique 6
Preparing the Model 8
Preparing the Material 10
One-Part Block Mold (Casting, Impression) 12
Two-Part Block Mold (Casting, Impression) 16
One-Part Skin Mold (Casting, Spreading) 22
Two-Part Skin Mold (Casting, Spreading)
Making the Reproductions 42
ELASTOSIL® M 50
Glossary 56
Wacker Chemie AG 62
31
– Pour plaster into the molding box.Alternatively:– Apply glass-fiber-reinforced polyester
or epoxy resin. With the latter, no mold-ing box may be needed.
– When the >support has set, disassem-ble the molding box.
– Remove all the layers from the model.– If tubes or locating pins have not been
inserted as >spacers for vent holes andfeeding channels during casting orspreading the >support, drill feedingchannels at lowest points and ventholes at the highest points. This willprevent air pockets being trapped dur-ing filling of the cavity.
– Assemble the molding box again andposition the >support, without the>spacer layer, over the model.
– While gently shaking/vibrating themold, pour >catalyzed and >deaeratedsilicone rubber into the feeding chan-nels, so that it flows into all surfacecrevices without trapping any air.
– Continue pouring until the rubber is vis-ible in the air escape holes.
Alternatively:– If >deaeration equipment is not avail-
able, use a stiff, short-bristled brush toapply a thin layer of the >catalyzed rub-ber to the model before covering it withthe >support. This will prevent any airbubbles from adhering to the modelsurface. Reposition the >support andpour in the rest of the rubber in a thinstream from as great a height as possi-ble.
4 Making the first part of the support 5 Removing the support, drilling holes 6 Casting the first part of the skin mold
32
– When the >curing time has elapsed – but within 24 hours – remove themolding box and lay the mold on itsback.
– Remove the base, and embeddingmaterial.
– Leave the support and completed moldpart on the model.
7 Removing embedding materialWhere to Find What
Moldmaking Techniques 4
Choosing the Best Moldmaking Technique 6
Preparing the Model 8
Preparing the Material 10
One-Part Block Mold (Casting, Impression) 12
Two-Part Block Mold (Casting, Impression) 16
One-Part Skin Mold (Casting, Spreading) 22
Two-Part Skin Mold (Casting, Spreading)
Making the Reproductions 42
ELASTOSIL® M 50
Glossary 56
Wacker Chemie AG 62

33
– Pour plaster into the molding boxAlternatively:– Spread glass fiber-reinforced polyester
or epoxy resin over the spacing layer (inthis case there is no need to constructa molding box).
8 Applying the spacing layer 9 Pouring the second part of the support
– When the >support has set, disassem-ble the molding box
– Remove the second part of the >sup-port, >spacer layer and foil from themodel.
Second part of skin mold
– Reassemble the molding box for thesecond part of the >support
– Apply a uniform layer of clay or a mod-eling compound (Plasticine) approx. 1 cm thick onto the film or foil still covering the model surface to com-pletely fill or cover >undercuts.
10 Removing spacers
34
11 Applying the release agent, drilling holes
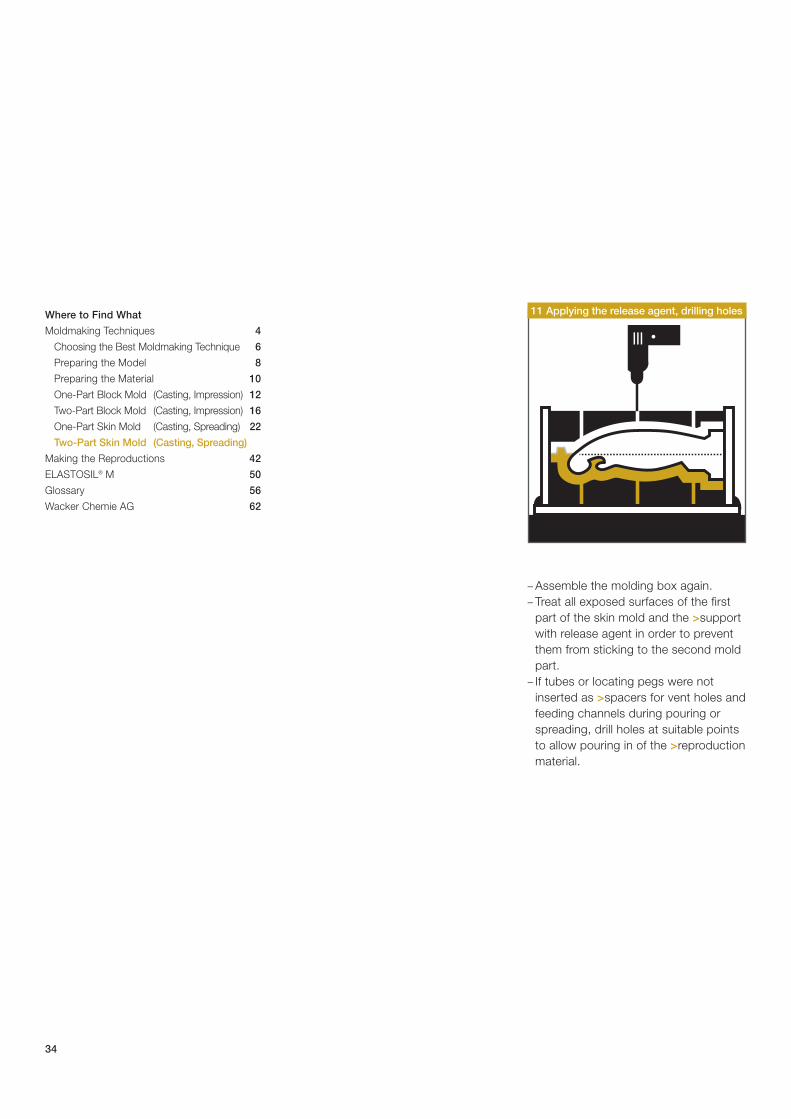
– Assemble the molding box again.– Treat all exposed surfaces of the first
part of the skin mold and the >supportwith release agent in order to preventthem from sticking to the second moldpart.
– If tubes or locating pegs were notinserted as >spacers for vent holes andfeeding channels during pouring orspreading, drill holes at suitable pointsto allow pouring in of the >reproductionmaterial.
Where to Find What
Moldmaking Techniques 4
Choosing the Best Moldmaking Technique 6
Preparing the Model 8
Preparing the Material 10
One-Part Block Mold (Casting, Impression) 12
Two-Part Block Mold (Casting, Impression) 16
One-Part Skin Mold (Casting, Spreading) 22
Two-Part Skin Mold (Casting, Spreading)
Making the Reproductions 42
ELASTOSIL® M 50
Glossary 56
Wacker Chemie AG 62
35
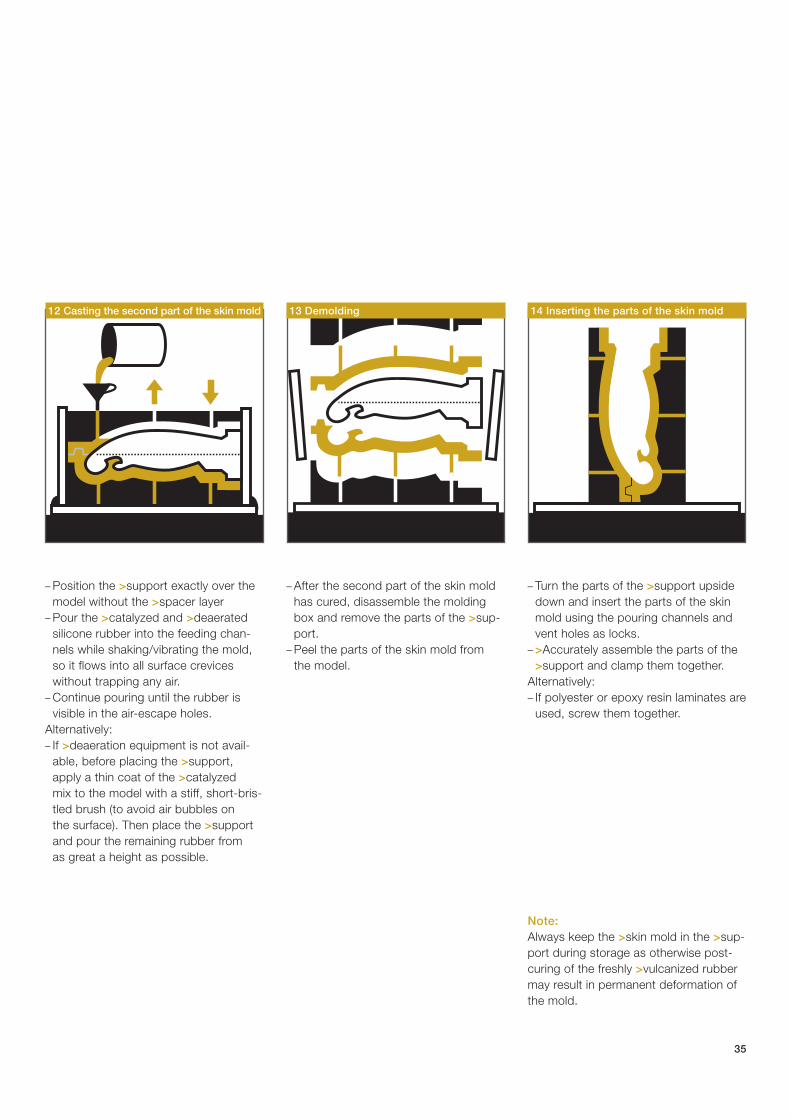
– Position the >support exactly over themodel without the >spacer layer
– Pour the >catalyzed and >deaeratedsilicone rubber into the feeding chan-nels while shaking/vibrating the mold,so it flows into all surface crevices without trapping any air.
– Continue pouring until the rubber is visible in the air-escape holes.
Alternatively:– If >deaeration equipment is not avail-
able, before placing the >support,apply a thin coat of the >catalyzed mix to the model with a stiff, short-bris-tled brush (to avoid air bubbles on the surface). Then place the >supportand pour the remaining rubber fromas great a height as possible.
– After the second part of the skin moldhas cured, disassemble the moldingbox and remove the parts of the >sup-port.
– Peel the parts of the skin mold from the model.
– Turn the parts of the >support upsidedown and insert the parts of the skinmold using the pouring channels andvent holes as locks.
– >Accurately assemble the parts of the>support and clamp them together.
Alternatively:– If polyester or epoxy resin laminates are
used, screw them together.
Note:Always keep the >skin mold in the >sup-port during storage as otherwise post-curing of the freshly >vulcanized rubbermay result in permanent deformation ofthe mold.
12 Casting the second part of the skin mold 13 Demolding 14 Inserting the parts of the skin mold
36
Everything you need:– A suitable smooth, flat, non-absorbent
base– Strips of wood, plastic or metal for
making a molding box– Sealing wax or a modeling compound
(e.g. Plasticine) for immobilizing themodel and sealing the edges of themolding box
– Embedding or dividing-wall material:clay or a modeling compound (e.g..Plasticine)
– Marker for drawing the parting line(optional)
– Tubes or locating pegs to act as >locksor >spacers for vent holes and feedingchannels (optional)
– Plaster or glass-fiber-reinforced polyester or epoxy resin for making the >support by either pouring orspreading
– Spatula– Short-haired brush (optional) – Drill (optional)– Pigments for coloring the >top layer– Soap solution for smoothing the rubber
surface– Release agent: Vaseline, wax solution,
WACKER Protective Film SF 18– Clamps or screws to hold the >support
together
HOW DO I MAKE A TWO-PART SKINMOLD BY THE SPREADING TECHNIQUE?
Where to Find What
Moldmaking Techniques 4
Choosing the Best Moldmaking Technique 6
Preparing the Model 8
Preparing the Material 10
One-Part Block Mold (Casting, Impression) 12
Two-Part Block Mold (Casting, Impression) 16
One-Part Skin Mold (Casting, Spreading) 22
Two-Part Skin Mold (Casting, Spreading)
Making the Reproductions 42
ELASTOSIL® M 50
Glossary 56
Wacker Chemie AG 62

37
– Prepare the model (see page 8)– Decide on where the parting line is to
be and, if possible, mark it on themodel. It should follow edges, shouldnot cross large, smooth areas andshould divide the model into two equalparts, intersecting any openings assymmetrically as possible.
– If the model is to be >embedded, coverits lower part with film or foil to preventits surface being soiled by the embed-ding material.
– Immobilize the model on the base.
Relatively large models are reproducedin an upright position. Create a dividingwall as follows:– Place a flange of a modeling com-
pound, approx. 1–2 cm wide and 5 cmhigh, along the parting line.
– Adjust the dividing wall so that it fol-lows the parting line exactly, and pressit onto the model.
– Into the embedding or dividing wallmaterial, cut >locks in the form ofrecesses, or insert locating pins toensure that the two mold parts fittogether >accurately.
– Also, if necessary, push tubes or pegshalf-way into the embedding materialas >spacers for lateral air escape andas feed channels.
1 Preparations
First part of skin mold
2 Applying a dividing model 3 Applying locks
38
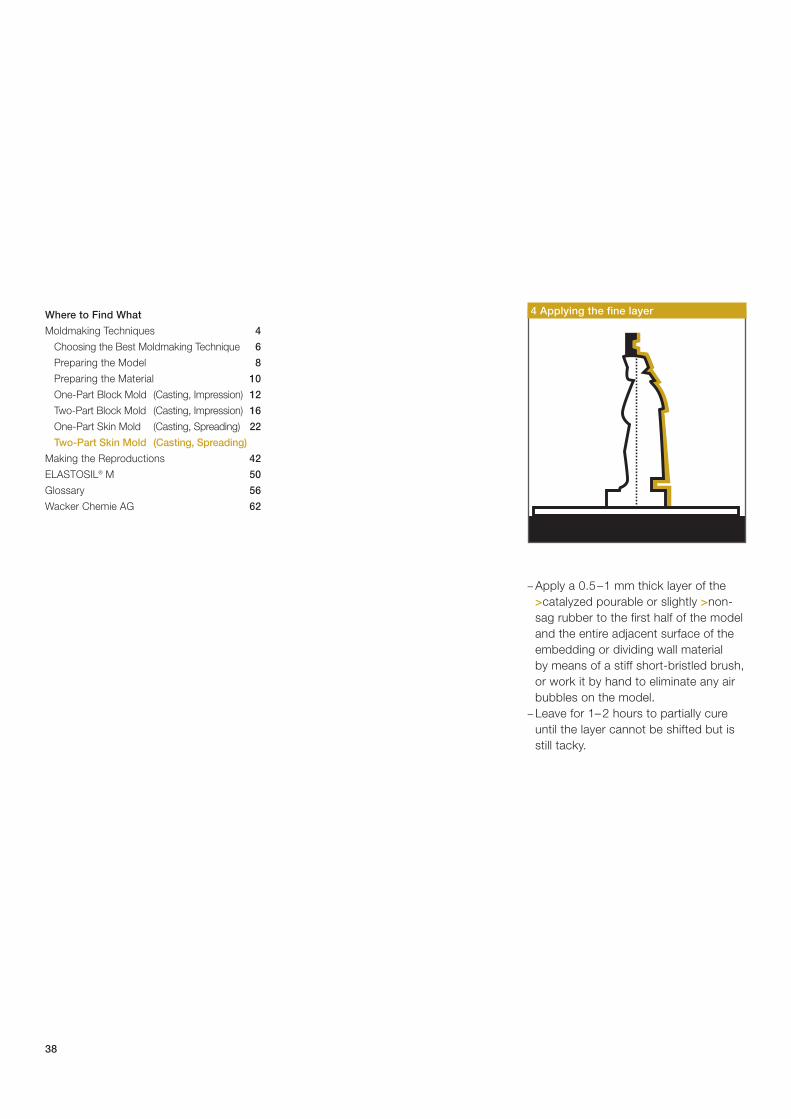
4 Applying the fine layer
– Apply a 0.5–1 mm thick layer of the>catalyzed pourable or slightly >non-sag rubber to the first half of the modeland the entire adjacent surface of theembedding or dividing wall material by means of a stiff short-bristled brush,or work it by hand to eliminate any airbubbles on the model.
– Leave for 1– 2 hours to partially cureuntil the layer cannot be shifted but isstill tacky.
Where to Find What
Moldmaking Techniques 4
Choosing the Best Moldmaking Technique 6
Preparing the Model 8
Preparing the Material 10
One-Part Block Mold (Casting, Impression) 12
Two-Part Block Mold (Casting, Impression) 16
One-Part Skin Mold (Casting, Spreading) 22
Two-Part Skin Mold (Casting, Spreading)
Making the Reproductions 42
ELASTOSIL® M 50
Glossary 56
Wacker Chemie AG 62

39
– When the >curing time has elapsed –but within 24 hours – make the >sup-port by spreading plaster over the moldor
– If the model is horizontal, construct aside molding box and pour in the plas-ter.
Alternatively:– Coat the rubber surface with Vaseline
and then apply glass fiber-reinforcedpolyester or epoxy resin.
– Leave the material for the >supportmold to harden.
– If the model has a >dividing wall,remove the dividing-wall material
– If the model has been >embedded,turn the mold upside down and remove the base, molding box, em-bedding material and foil. Leave the finished >skin mold and >support on the model.
– Treat all exposed surfaces of the first parts of the >skin mold and the >support with release agent in order to prevent them from sticking to thesecond parts.
5 Applying the top layer
– You can ensure that all of the >finelayer is covered, by coloring the rubbercompound used for the >top layer with0.1 to 0.3 % WACKER FL pigmentpaste.
– Using a spatula, apply a top layer ofthe >catalyzed, >non-sag rubber com-pound 5 –15 mm thick
– Completely fill >undercuts. In the caseof deep >undercuts apply the >toplayer to their interior surfaces and latermake separate supporting wedges
– If necessary, make >locks (trapezoidalrecesses in the top layer or elevations,such as “flanges” or “buttons”) to allowthe >skin mold to be located in the>support later.
– Using soapy water and your hand,smooth the rest of the top layer beforethe rubber starts to cure in order toprevent the >support from sticking inthe >skin mold.
6 Making the first part of the support 7 Removing the embedding or dividing-wall material
40
– You can ensure that all of the >finelayer is covered, by coloring the rubbercompound used for the >top layer with0.1 to 0.3 % WACKER FL pigmentpaste.
– Using a spatula, apply a 5 –15 mmthick top layer of the >catalyzed, >non-sag rubber compound.
– Completely fill >undercuts. In the caseof deep >undercuts apply the >toplayer to their interior surfaces and latermake separate supporting wedges.
– If necessary, make >locks (trapezoidalrecesses in the top layer or elevations,such as “flanges” or “buttons”) to allowthe >skin mold to be located in the>support later.
– Using soapy water and your hands,smooth the rest of the top layer beforethe rubber starts to cure in order toprevent the >support from sticking inthe >skin mold.
8 Applying the fine layer 9 Applying the top layer
Second part of the skin mold
– Apply a 0.5 –1 mm thick layer of the>catalyzed pourable or slightly >non-sag rubber to the first half of the modeland the entire adjacent surface of theembedding or dividing-wall material bymeans of a stiff short-bristled brush, or work it by hand to eliminate any airbubbles on the model.
– Leave for 1– 2 hours to partially cureuntil the layer cannot be shifted but isstill tacky.
Where to Find What
Moldmaking Techniques 4
Choosing the Best Moldmaking Technique 6
Preparing the Model 8
Preparing the Material 10
One-Part Block Mold (Casting, Impression) 12
Two-Part Block Mold (Casting, Impression) 16
One-Part Skin Mold (Casting, Spreading) 22
Two-Part Skin Mold (Casting, Spreading)
Making the Reproductions 42
ELASTOSIL® M 50
Glossary 56
Wacker Chemie AG 62
41
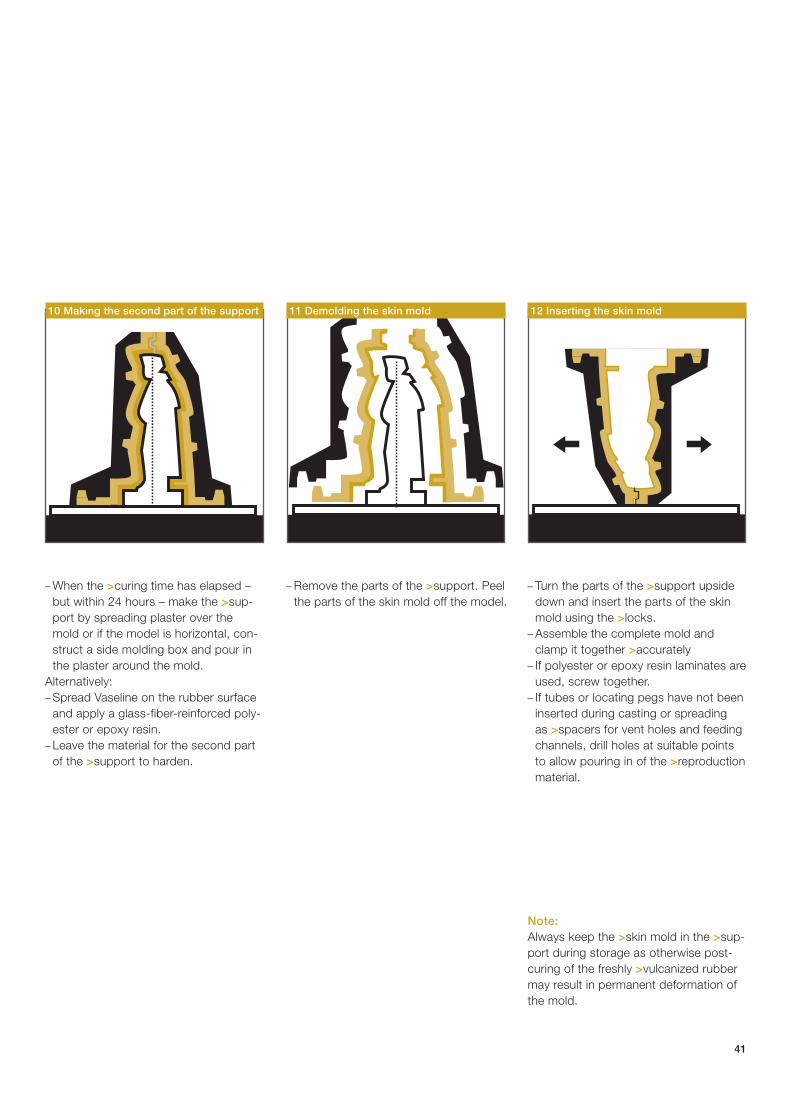
– When the >curing time has elapsed –but within 24 hours – make the >sup-port by spreading plaster over the mold or if the model is horizontal, con-struct a side molding box and pour inthe plaster around the mold.
Alternatively:– Spread Vaseline on the rubber surface
and apply a glass-fiber-reinforced poly-ester or epoxy resin.
– Leave the material for the second partof the >support to harden.
– Turn the parts of the >support upsidedown and insert the parts of the skinmold using the >locks.
– Assemble the complete mold andclamp it together >accurately
– If polyester or epoxy resin laminates areused, screw together.
– If tubes or locating pegs have not beeninserted during casting or spreading as >spacers for vent holes and feedingchannels, drill holes at suitable pointsto allow pouring in of the >reproductionmaterial.
Note:Always keep the >skin mold in the >sup-port during storage as otherwise post-curing of the freshly >vulcanized rubbermay result in permanent deformation ofthe mold.
10 Making the second part of the support 11 Demolding the skin mold
– Remove the parts of the >support. Peelthe parts of the skin mold off the model.
12 Inserting the skin mold

It may be just a copy, but the moment it is peeled out of the mold it becomes anoriginal object in its own right, that bearsthe hallmark of its creator.
Where to Find What
Moldmaking Techniques 4
Choosing the Best Moldmaking Technique 6
Preparing the Model 8
Preparing the Material 10
One-Part Block Mold (Casting, Impression) 12
Two-Part Block Mold (Casting, Impression) 16
One-Part Skin Mold (Casting, Spreading) 22
Two-Part Skin Mold (Casting, Spreading) 28
Making the Reproductions
Materials 44
Reproduction 46
ELASTOSIL® M 50
Characteristics 52
Special Tips 54
Glossary 56
Wacker Chemie AG 62


44
White cement, cast concrete, artificialstone mixturesBasically, the same considerations applyhere as to plaster. However, if the sys-tems are highly alkaline (as is frequentlythe case with synthetic stone), the cast-ings may be covered with white depositswhen conventional RTV-2 silicone rubbercompounds are used. These depositsare caused by alkaline decompositionproducts of the silicone. In such cases,we advise the use of addition-curingELASTOSIL® M grades for the molds.They are more resistant to alkalis andmore suited to highly alkaline reproduc-tion materials than >condensation curinggrades.
Casting resinsThese generally will attack silicone rub-ber molds the most. The number ofcastings that can be obtained decreaseswith– decreasing filler content of the resin – decreasing curing rate of the resin– increasing curing temperature of the
resin– increasing complexity and bulk of the
reproduction– increased frequency of casting
To obtain the maximum number of castings, be sure to choose the mostsuitable rubber grades, and take greatcare when preparing and handling themolds (see p. 46). We advise you tocondition the molds by heating them to 100 –150 °C when not in use (e.g.overnight) in order to remove resin com-ponents which have swelled the rubber.
WaxWaxes do not extensively attack moldsmade from ELASTOSIL® M. However,the molds tend to absorb a certainamount of wax. That is why frequentlyused molds have waxy deposits on theirsurfaces that may give rise to unfaithfulreproductions. Careful washing withwhite spirit will remove the deposits, butthe mold will not be fully restored unlessthe wax is melted out in an oven at150° C. Place the molds upside downon a base to catch the melting wax.
Before casting, heat the mold above the melting point of the wax in order toensure that the wax flows even into the finest details of the mold surface.
PlasterELASTOSIL® M molds are hardly affect-ed at all by plaster. The first castingsmade from fresh molds may have airbubbles on their surfaces due to poorwetting of the mold surface by the plas-ter solution. This can be prevented bytreating the fresh molds with a concen-trated solution of soft soap or dishwash-ing liquid, or with a slurry of plaster. Thistreatment can be discontinued after sev-eral casts have been made.
WHAT DO I HAVE TO REMEMBER WITH THE DIFFERENT REPRODUCTION MATERIALS?
Where to Find What
Moldmaking Techniques 4
Making the Reproductions 42
Materials
Reproduction 46
ELASTOSIL® M 50
Glossary 56
Wacker Chemie AG 62
45
Unsaturated polyester resinsThe higher the styrene content and thecuring temperature, the more extensivelydo the resins attack the molds. In orderto obtain the maximum number of cast-ings, it is particularly important to heatthe molds routinely to remove styrenewhich has swelled the rubber.
Polyurethane resins and foamsThe corrosiveness of these compoundstowards silicone rubber increases in theorder: casting resins, flexible foams, hardfoams. In addition, corrosiveness of thefoams increases with increase in contentof blowing agent.Casting polyurethane foams requirespressure-resistant molds, and, depend-ing on the depth of the >undercuts, special ELASTOSIL® M grades. Ask ourtechnical service staff.
Epoxy resinsHeat-curing and unfilled grades aremuch more aggressive than cold-curing,highly-filled systems.After they have been stored at roomtemperature, freshly made molds of>condensation-curing ELASTOSIL® Mgrades must be post-cured for severalhours at around 150 °C before first use.
Methacrylate resinsSilicone rubber molds are not suitablefor unfilled methacrylates. Generally, noteven the first casting can be demolded.Even highly filled methacrylate resins willonly allow 10 castings at most to bemade.
Metal alloys, electroforming Silicone rubber molds are suitable forcasting metal alloys with melting pointsof up to 300 °C. Use the “>lost wax” (or investment casting) technique for casting metals with higher meltingpoints. The highly thermally conductive ELASTOSIL® M grades are best suitedof all for casting metals. Use thin-walledmolds and place them on a thermallyconductive surface (metal sheet) duringcasting. When making the mold, bear inmind that it will expand greatly due tothe high coefficient of thermal expansionof the silicone rubber. Consequently,allow it time to cool down between cast-ing operations.In order to allow the liquid metal to flowinto even the finest details, coat thestored, >post-cured mold with anextremely thin layer of talc, silicon car-bide, graphite or conductive carbonblack. Despite these measures, the firstfew castings must be discarded, sincethe mold will still emit gas, which causespock marks on the surface.
Another technique for making metalreproductions is by electroforming. Inthis case, silver is sprayed onto the sur-face of the ELASTOSIL® M mold (silversprays are obtainable from dental suppli-ers) to render the surface conductive.Graphite may also be used, but theresults are inferior. The electroformingbaths are filled with weakly acidic oralkaline electrolytes and operated at thelowest temperature possible. The elec-trodes should make contact with asgreat a surface area of the mold as pos-sible.
FoodsMolds made of ELASTOSIL® M are oftenused for producing shapes from foods,such as chocolate, marzipan or icecream. Remember to observe the foodsafety laws applicable in your country. Inall cases, however, the moulds shouldbe heated to 200 °C for at least 4 hoursbefore use to remove volatile compo-nents. For further information, call ourtechnical service staff.
How to make a >reproduction with aone-part >block mold– Place the prepared mold on a suitable
base – level or slightly inclined.– Having prepared and, where necessary,
>deaerated the >reproduction material,pour it slowly into the mold. At thesame time shake or vibrate the mold sothat the reproduction material flowsinto every surface detail without trap-ping any air.
– Once the material has set, demold thecasting by pressing on the reverse sideand bending back the mold.
First bring the mold into shapeThe molds will only perform to speci-fication if all reaction products (mainly low alcohols) have been allowed toevaporate from the cured rubber.
With molds made from >addition-curingELASTOSIL® M grades, this is the caseas soon as they are removed from themodel. The molds can be used immedi-ately
Before molds made from >condensa-tion-curing ELASTOSIL® M grades are used to make reproductions, theymust be stored at room temperature for between 48 and 72 hours, the exactstorage period depends on the timerequired for curing and on the thickness.The same results can be obtained bystoring the molds for 24 hours at roomtemperature and >post-curing them at70 °C in a well-ventilated oven. As a rule of thumb, 6 hours are then requiredper centimeter of layer thickness.
46
HOW DO I MAKE A REPRODUCTION?
Where to Find What
Moldmaking Techniques 4
Making the Reproductions 42
Materials 44
Reproduction
ELASTOSIL® M 50
Glossary 56
Wacker Chemie AG 62

47
How to make a >reproduction with atwo-part >block mold– Using the >locks, assemble the parts
of the mold exactly and either clampthem or bind them together with textiletape.
– Having prepared and, where necessary,>deaerated the >reproduction material,pour it slowly through a funnel into thefeeding channel(s). At the same time,shake or vibrate the mold so that the>reproduction material flows into everysurface detail without trapping any air.
– Stop pouring when the >reproductionmaterial appears in the air holes.
– Once the material has set, demold thecasting by removing the mold parts.
2a Demolding the casting
1a Pouring into the one-part block mold
2b Demolding the casting
1b Pouring into the two-part block mold

48
How to make a >reproduction with aone-part >skin mold– Place the prepared mold in the >sup-
port on a suitable base, level or slightlyinclined.
– >Deaerate the >reproduction material if necessary and pour it slowly into themold. At the same time, shake orvibrate the mold so that the reproduc-tion material flows into every surfacedetail without trapping air.
– Once the >reproduction material hasset, remove the >support and the >skinmold from the casting.
Where to Find What
Moldmaking Techniques 4
Making the Reproductions 42
Materials 44
Reproduction
ELASTOSIL® M 50
Glossary 56
Wacker Chemie AG 62
49
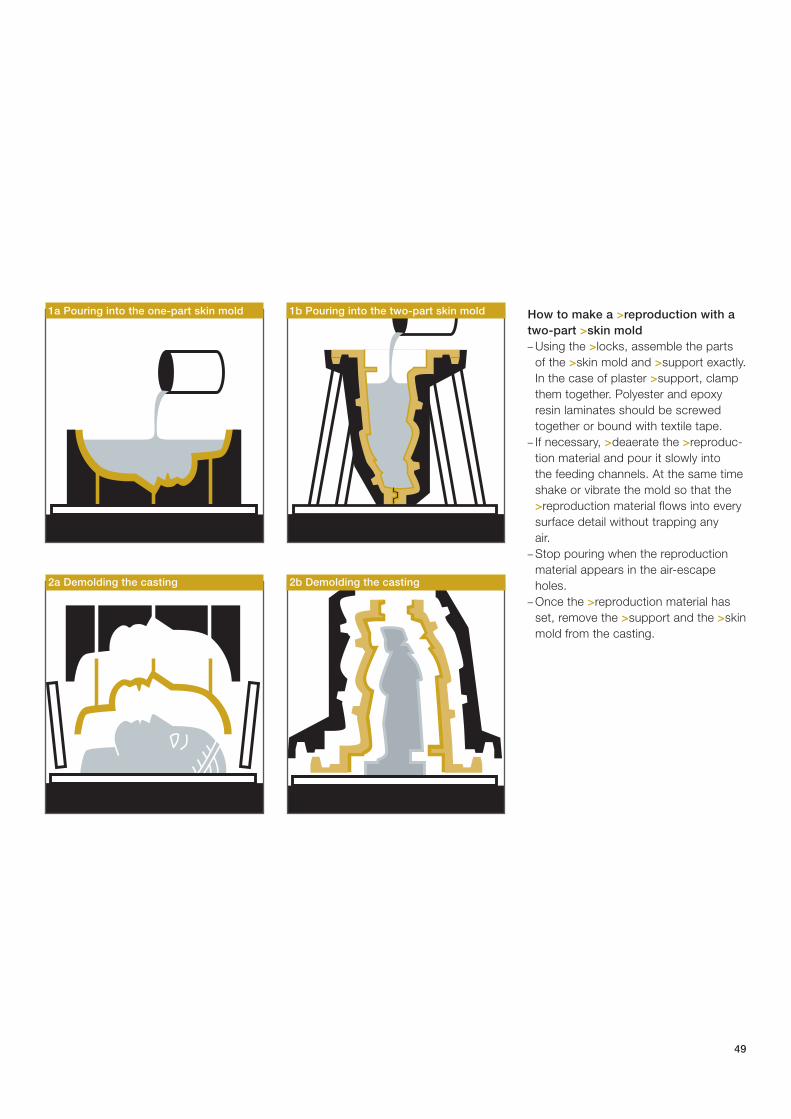
How to make a >reproduction with atwo-part >skin mold– Using the >locks, assemble the parts
of the >skin mold and >support exactly.In the case of plaster >support, clampthem together. Polyester and epoxyresin laminates should be screwedtogether or bound with textile tape.
– If necessary, >deaerate the >reproduc-tion material and pour it slowly into the feeding channels. At the same timeshake or vibrate the mold so that the>reproduction material flows into everysurface detail without trapping any air.
– Stop pouring when the reproductionmaterial appears in the air-escapeholes.
– Once the >reproduction material hasset, remove the >support and the >skinmold from the casting.
2a Demolding the casting
1a Pouring into the one-part skin mold
2b Demolding the casting
1b Pouring into the two-part skin mold

To ensure reproducible results, it is advis-able to calculate the added amounts precisely when preparing the moldmakingcompound.
Where to Find What
Moldmaking Techniques 4
Choosing the Best Moldmaking Technique 6
Preparing the Model 8
Preparing the Material 10
One-Part Block Mold (Casting, Impression) 12
Two-Part Block Mold (Casting, Impression) 16
One-Part Skin Mold (Casting, Spreading) 22
Two-Part Skin Mold (Casting, Spreading) 28
Making the Reproductions 42
Materials 44
Reproduction 46
ELASTOSIL® M
Characteristics 52
Special Tips 54
Glossary 56
Wacker Chemie AG 62
52
WHAT DO I NEED TO KNOW ABOUTELASTOSIL® M MOLDMAKING COMPOUNDS?
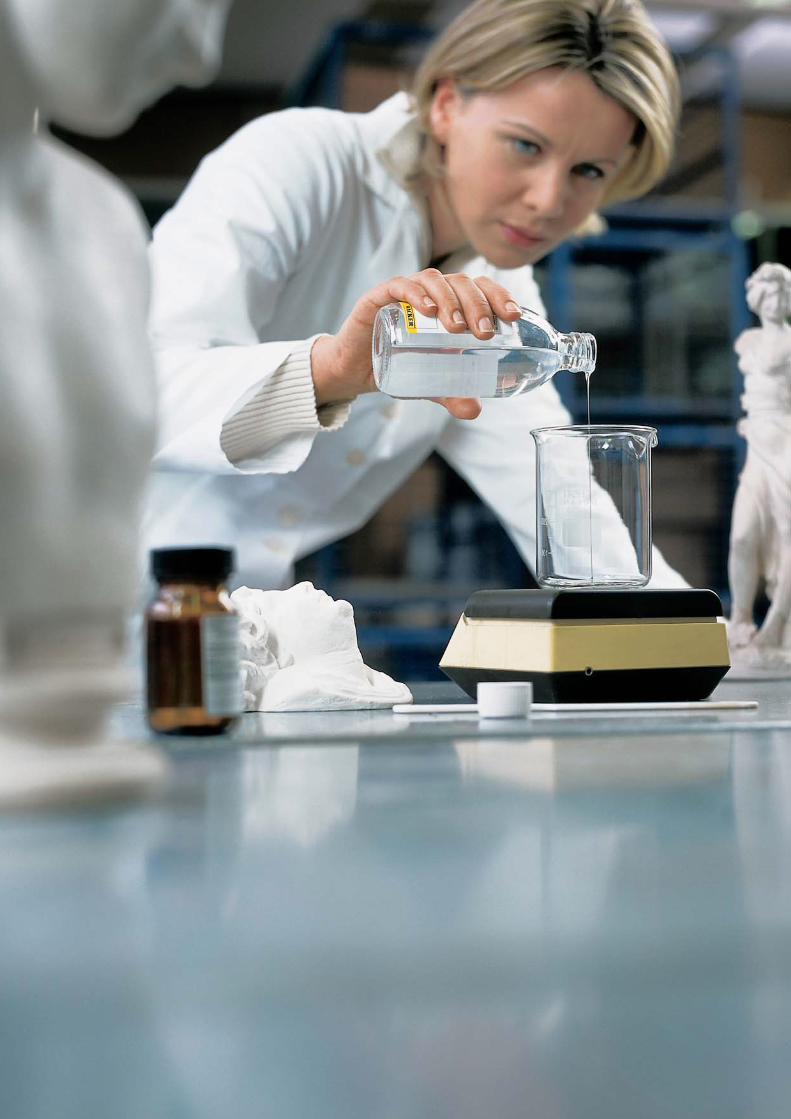
SafetyDetailed safety information is given in therelevant safety datasheet. This accom-panies your consignment of ELASTOSIL® Mmold-making compound. Please keep it in a safe place. Should it ever get mislaid, do not hesitate to ask yourWACKER sales office for another copy.
Storage>Components A and B of >addition-curing ELASTOSIL® M grades and therubber base of >condensation-curinggrades should be stored at between 5 °C and 30 °C in tightly sealed drums.When opened, the drum must be imme-diately sealed airtight again. Never leavedrums open or with a loosely fitted lid for long periods.>Condensation-curing >RTV-2 siliconerubbers require small amounts of mois-ture in the rubber base to optimize thesubsequent curing process. If the drumsare left open or incorrectly sealed, themoisture will evaporate. This results in longer pot lives and faulty >curing.To restore a rubber base, stir in 1 to 2grams of water per kilogram of rubberbase and leave the tightly sealed drumto stand for 24 hours.>T-series catalysts react with moisture to form a flocculent precipitate. Alwaystightly seal the containers and storethem under as cool conditions as pos-sible, preferably between 5 °C and25 °C. Small amounts of precipitate will not affect the properties of the curedrubber.
ConsistencyAs far as >consistency is concerned,ELASTOSIL® M molding compounds are divided into pourable, spreadable,>non-sag and kneadable systems. Theflow property is described by means of the >viscosity: the higher the numberquoted, the thicker is the compound, or the more pasty is the spreadablecomposition. >Non-sag spreadablegrades differ from spreadable gradesaccording to their flowability. That is to say, up to a particular maximum layerthickness (usually up to 10 mm), they will neither run off under the effects ofgravity on vertical or inclined surfaces;nor do they sag (hence >non-sag).
ReactivityThe reactivity of ELASTOSIL® M mold-making compounds is described by theirpot life and by the curing time. The pot life is the time for which the>catalyzed rubber base can still bereadily processed. For example, heatingthe compound by 7° C halves the potlife, while cooling it by 7°C doubles thepot life. The curing time also shows asimilar relationship to temperature. The curing time covers the time until thecured rubber is tack free as well as thetime until curing is complete. Specifica-tions usually only give the former. The ultimate properties of the cured rub-ber are usually only achieved after sever-al days. Cured rubbers prepared at rela-tively high temperatures usually continueto cure to different extents during subse-quent storage at room temperature.Both the pot life and the curing time can be modified by the addition of cureaccelerators and retarders.
Where to Find What
Moldmaking Techniques 4
Making the Reproductions 42
ELASTOSIL® M 50
Characteristics
Special Tips 54
Glossary 56
Wacker Chemie AG 62

53
Properties of the cured rubber The most important properties of thecured rubber are the mechanical values.Along with the indentation hardness,which is expressed in Shore A, the tearresistance is one of the most importantproperties. The higher the >Shore Avalue, the harder is the cured rubber; so-called >high-strength grades are charac-terized by a high tear strength of wellover 10 N/mm. The processing proper-ties and properties of the cured rubbersare determined by the type of curingsystem used.
>Condensation-curing>Condensation-curing >RTV-2 siliconerubbers are cured by the addition of aliquid or pasty >T-series catalyst. Therubber base and >T-series catalyst havedifferent lot numbers. The pot life andcuring time will vary according to thetype of >T-series catalyst, and theamount added. The >T-series catalystand maximum and minimum amounts toadd are specified for each rubber grade:if too much or too little >T-series catalystis used, the cured rubber will have inferi-or properties. Curing may even fail com-pletely.>Condensation-curing >RTV-2 siliconerubbers cure at temperatures between 0 and 70 °C. At above 80 °C, reversionof the curing reaction occurs: the systemremains – or reverts to – a tacky to liquidstate.For rapid, complete curing >condensa-tion-curing >RTV-2 systems requiresmall amounts of moisture. At less than40 % relative humidity, the cured rubbersurfaces in contact with the air canremain tacky to liquid. In such cases, theroom humidity should be increased
by appropriate measures (evaporators,aerosol sprays, damp cloths). Addingwater to the rubber does not help here!The curing reaction generally eliminatesa lower alcohol, usually ethanol orpropanol. The cured rubber can only be used after all the alcohol has eva-porated. This evaporation of the alcoholcauses a loss in weight that leads tothree dimensional >shrinkage of thecured rubber of the order of < 5 % of the volume.
>Addition curing>Addition curing >RTV-2 silicone rubbersare cured by mixing the two >compo-nents A and B. The two >componentsmust always have the same lot number,otherwise there may be severe changesin the product properties. The two >com-ponents must also be mixed strictly inthe specified weight ratio. A deviation inthe ratio of A : B usually leads to >im-paired curing.>Addition-curing >RTV-2 silicone rub-bers cure at between 10 and 200 °C.Since the curing reaction does not formany volatile >reaction products, there is neither reversion of the curing reaction at higher temperatures nor chemical>shrinkage of the cured rubber as aresult of weight loss. Cured rubbers from>addition-curing >RTV-2 silicone rubberscan therefore be used immediately afterdemolding.
>Impaired curingCertain substances or materials impairthe action of the platinum-complex cata-lyst and can >inhibit vulcanization of>addition-curing ELASTOSIL® M gradesif they come into contact with theuncured rubber. It suffices even if suchsubstances are present on the surface of a substrate (model, mixing equipment)or in the ambient air. Even the ovens or heating cabinets in which the castingresins are hardened can release the>inhibitors. The most important onesare:– Sulfur, numerous sulfur compounds
and other sulfur-containing substancessuch as natural and synthetic rubbers(e.g. EPDM)
– Amines, urethanes and amine-contain-ing derivatives, such as polyurethanesor amine-cured epoxy resins
– Organo-metallic (especially organo-tin)compounds and substances containingthem, e.g. cured rubbers and >T-seriescatalysts of >condensation-curing>RTV-2 silicone rubbers.
We strongly recommend carrying outpreliminary tests to prevent >inhibition.

Adhesion to cured rubbersConventional primers cannot be used for bonding to cured silicone rubbers.However, >condensation-curing ELASTOSIL® M grades generally develop adequately strong bonds when cured incontact with relatively freshly producedcured rubbers that have been cleanedwith acetone or white spirit. “Laminarbonding” takes place.Special measures are required for pro-moting adhesion of >addition-curingELASTOSIL® M grades. We will be gladto provide you with the information onrequest.
Bonding to non-siliconesELASTOSIL® M cured rubbers can beeasily bonded to other materials by theuse of a one-component (RTV-1) siliconerubber adhesive.– Treat and prime the material surface.
Clean the silicone rubber surface withacetone or white spirit.
– Apply silicone rubber adhesive to bothparts and press together immediately.
– Slide the parts over one another ifadjustment is necessary.
– Wipe off any excess adhesive thatexudes from the sides.
– A strong bond is usually obtained after1– 2 days, depending on the layerthickness, atmospheric humidity andtemperature.
– The odor of acetic acid occurring dur-ing curing of the adhesive disappearscompletely once curing is complete.
54
Adhesion to non-silicones>RTV-2 silicones are characterized bytheir pronounced release effect and, of themselves, do not adhere well, if atall, to other materials. To overcome this,the material surface must be treated with a special adhesion promoter orprimer. Primers are low-viscosity solu-tions of reactive silanes or siliconeresins. After the solvent has evaporated,exposure to the atmospheric moistureforms a resin film, which bonds the sub-strate to the rubber mold. The primershould be chosen according to whetherthe material surface is absorbent or not,and which ELASTOSIL® M grade is used.How to form a bond:– Roughen the mating surface of the
substrate, e.g. with sandpaper or bysandblasting
– Remove dust from the surface anddegrease with acetone or white spirit
– Apply primer brush, spray or dipping– Leave to dry for about 1 hour at room
temperature and a relative humidity of at least 40 %
Best results are achieved if the rubber isallowed to harden as slowly as possible.The maximum adhesion is achieved noearlier than 72 hours after >curing is complete. For more information aboutbonding to cured rubbers, please ask forour leaflet “Primers for WACKER >RTV-2Silicone Rubbers”
ANYTHING ELSE?
Where to Find What
Moldmaking Techniques 4
Making the Reproductions 42
ELASTOSIL® M 50
Characteristics 52
Special Tips
Glossary 56
Wacker Chemie AG 62

55
Bonding to cured silicone rubberClean the surfaces to be bonded withacetone or white spirit. Apply a thin coatof a RTV-1 silicone rubber adhesive andpress them together immediately. Other-wise proceed as described under “bond-ing to non-silicones”.
Repairing damaged moldsMolds made from >addition-curingELASTOSIL® M grades are also mostsuitably cured with RTV-1 silicone rubbers. The spreadable material is converted to silicone rubber by atmos-pheric moisture. The odor of acetic acid occurring during curing of the adhesive disappears completely once>curing is complete.Damaged molds made of >condensa-tion-curing ELASTOSIL® M grades can be repaired with freshly preparedmaterial of the same grade:– Clean the damaged areas carefully
using acetone or white spirit.– Carefully pull apart cracks.– Coat the two sides of the crack with
a thin coat of >catalyzed rubber baseand close up again.
– Remove any excess material exudingfrom the sides.
ColoringELASTOSIL® M silicone rubbers, provid-ed they have a suitable base color, canbe colored in any shade by the additionof up to 4 wt. % ELASTOSIL® ColorPaste FL.
Curing retarders and acceleratorsThe pot life and >curing times can bemodified by the addition of acceleratorsand retarders. For further information,contact our technical support staff.
Removing rubber residuesResidues of uncured ELASTOSIL® Mmoldmaking compounds can be easilyremoved from containers and clothingwith grease-dissolving solvents such aswhite spirit or acetone. Residues in containers should be allowed to cure tomake them easy to remove. Curedmaterial can only be removed mechani-cally. This is easier if it is first swelledwith a solvent. It cannot be dissolved.Please remember that when choosingsuitable work clothes.
Expansion and shrinkageThe ability of silicone rubber to swell,and the shrinkage of solvent-containingsilicone rubber molds can be exploitedfor producing enlarged reproductionsfrom swollen molds, or producing smaller-size reproductions by evaporating thesolvent. If an interpositive is used, it ispossible to produce enlargement orreduction to a desired scale without distortion. For information about theexact procedure, and points to note, seeour leaflet “Expansion and Shrinkage”, or ask our technical service staff.
Thickeners These additives modify the flow proper-ties or produce a non-sag consistency ofthe pourable ELASTOSIL® M grades withhigh tear strength. For example, they areused in the production of >skin molds to
allow the silicone rubber compound tobe spread with a brush or spatula onnon-flat or vertical mold surfaces withoutrun off or sagging. Depending on howmuch of the particular additive is added,the consistency of the rubber compoundcan be adjusted precisely in the rangefrom reduced flow to complete non-sagbehavior. Please ask our technical serv-ice staff for more information.
Increased lifetimeThe lifetime of ELASTOSIL® M molds canoften be extended by the use of suitablerelease agents. These differ dependingon the application and reproductionmaterial. In the simplest case, it is suffi-cient to coat the mold with a dishwash-ing detergent solution or a low-viscositysilicone fluid. Dissolved waxes or high-viscosity silicone fluids are also suitable.In some applications, it is advisable touse barrier coats, which are subsequent-ly transferred to the casting. Your advisercan give you more information.

Practical questions are easiest to deal withon the spot.
Where to Find What
Moldmaking Techniques 4
Choosing the Best Moldmaking Technique 6
Preparing the Model 8
Preparing the Material 10
One-Part Block Mold (Casting, Impression) 12
Two-Part Block Mold (Casting, Impression) 16
One-Part Skin Mold (Casting, Spreading) 22
Two-Part Skin Mold (Casting, Spreading) 28
Making the Reproductions 42
Materials 44
Reproduction 46
ELASTOSIL® M 50
Characteristics 52
Special Tips 54
Glossary
Wacker Chemie AG 62

58
>Accuracy of fit, accurately fittingThe exactness with which the mold partsfit together without giving rise to anunwanted seam, also: distortion-free fit-ting of the skin mold into the >support
>Addition curingCuring mechanism for RTV-2 siliconerubber. No volatile by-products areformed and hence there is no shrinkage.The cured rubber can be used imme-diately after demolding.
>Block moldA mold that is more than 3 cm thick and is formed either by the pouring orthe impression technique. Thanks to its inherent stability it is self-supporting.
>Catalysis /catalyzedMixing either the rubber base and the T-series >catalyst or components A andB to obtain a workable rubber.
>CatalystA compound that accelerates curing. In the case of >condensation-curingELASTOSIL® M grades, organo-tin com-pounds are employed. Platinum com-pounds are used with >addition-curinggrades.
>ComponentPart of a two or multi-part system. The>condensation-curing ELASTOSIL® Mgrades are composed of a rubber baseand a >T-series catalyst. >Addition-cur-ing ELASTOSIL® M grades comprise anA and a B component.
WHO CAN EXPLAIN THE TECHNICALTERMS USED IN THE TEXT?
Where to Find What
Moldmaking Techniques 4
Making the Reproductions 42
ELASTOSIL® M 50
Glossary
Wacker Chemie AG 62
59
>Condensation-curingCuring mechanism for RTV-2 siliconerubber. A volatile, low molecular weightalcohol is formed as a by-product.
>ConsistencyThe flow and deformation properties of amaterial.
>Crosslinking, crosslinkerSubstance containing at least threereactive groups, which reacts with the >silicone polymer to produce three-dimensional crosslinking.
>CuringChemical reaction between the curingagent and the ends of at least three silicone polymer chains. This reactiontransforms the silicone rubber base into an elastomeric form.
>Curing timeTime during which the rubber mold canbe removed from the model without riskof damage.
>Deaeration/dearatedRemoval of the air trapped when therubber base and >T-series catalyst orcomponents A and B are mixed.
>DesiccatorPressure resistant glass or plastic vesselused for >deaerating >catalyzed rubbersby means of a >vacuum pump.
>Dividing wallUsed for molds of two or more partsApplying a roll of clay or a modelingcompound (e.g. Plasticine) to the modelalong the parting lines to separate theindividual mold parts.
>EmbeddedUsed for molds of two or more partsCovering the second part or other partsof the model by applying or pouring in a material as far as the parting line(s).
>Evacuation/evacuatedDeaeration of the >catalyzed rubberunder >vacuum.
>Fine layerThe first layer of silicone rubber appliedto the model in the production of a skinmold: usually by brushing on a pourableto slightly >thixotropic rubber to obtain a completely bubble-free mold surface incontact with the model.
>FlexibilityThe ability of a material to return to itsinitial state after a deformation.
>High-strengthCured rubbers with high tear resistance.
>Impaired curingIncomplete or failed >cross-linking thatmanifests itself in reduced hardness or,in extreme cases, in tacky-to-liquidphases in the rubber or on its surface.
>Inhibition/inhibitors /inhibitImpaired curing of >addition-curing RTV-2 silicone rubbers due to partial or com-plete poisoning of the platinum catalystthrough contact with certain materials,including:–Sulfur, numerous sulfur compounds
and other sulfur-containing substancessuch as natural and synthetic rubbers(e.g. EPDM)
–Amines, urethanes and amine-contain-ing derivatives, such as polyurethanesor amine-cured epoxy resins
–Organo-metallic (especially organo-tin)compounds and substances containingthem, e.g. cured rubbers and catalystsof >condensation-curing RTV-2 siliconerubbers.
>LocksInterlocking raised or recessed surfacesfor ensuring >accuracy of fit duringassembly of parts.
>Lost wax methodAlso “investment casting”; method forproducing reproductions from high-melt-ing metals with a melting point over 400 °C, which cannot be made directlyin a mold of RTV-2 silicone rubber.
>Non-sagCatalyzed rubbers which do not flowunder gravity when applied to vertical orinclined surfaces, but retain their shapeor thickness.
60
>Post-curing/post-curedHeating the rubber mold after demoldingto achieve the ultimate properties of thecured rubber.
>Reaction productA substance formed in a reaction; thevolatile alcohol eliminated during con-densation curing, for example, is also a reaction product.
>ReproducibleTo produce an exact copy of a model.
>ReproductionAn exact copy of a model.
>Reproduction materialMaterial used to make a reproduction.
>RTV-1 silicone rubber One-component rubber that cures atroom temperature. It can also be usedfor bonding RTV-2 cured rubbers.
>RTV-2 silicone rubber Two-component rubber that cures orvulcanizes at room temperature (RTV).
>Shore hardnessMeasure of the hardness of a cured rubber (indentation hardness). Two hard-ness scales are used:Shore A for the usual rubber hardnessrange; Shore 00 for the extremely lowhardness range.
Where to Find What
Moldmaking Techniques 4
Making the Reproductions 42
ELASTOSIL® M 50
Glossary
Wacker Chemie AG 62
61
>ShrinkageReduction in size and weight of the rubber due to evaporation of the volatile alcohol formed during curing;only occurs in >condensation-curing ELASTOSIL® M grades.
>Silicone polymerLong-chained compound of alternatingoxygen and silicon atoms, the latterbearing two organic groups; the chain is terminated at each end by a reactivegroup.
>Skin moldA mold less than 2 cm thick that isformed by either pouring or spreading. It requires a >support for stability duringuse.
>Spacer /spacingA modeling compound placed betweenthe model and >support when a mold is made, and removed for pouring in the>catalyzed rubber compound.
>Support A shell made out a rigid material (suchas plaster or casting resin) that preventsa skin mold from being distorted when it is filled with reproduction material orwhile it is in storage.
>ThixotropicDescriptive of rubber compositions withrestricted flow: from slightly thickened to completely non-sag.
>Top layerThe second layer of silicone rubberapplied on top of the >fine layer, usuallyby spreading a >thixotropic or >non-sagELASTOSIL® M grade.
>T-series catalystIn >condensation-curing ELASTOSIL® Mgrades: the second component of themoldmaking compound containing thecuring agent and catalyst
>UndercutA recess or elevation at the surface ofthe model that tapers towards the sur-face.
>VacuumSpace largely devoid of air that is gener-ated by extracting the air by means of a>vacuum pump: >deaerating a pourableELASTOSIL® M grade requires a >vacu-um with a maximum residual pressure of20 mbar
>Vacuum pumpDevice for extracting air to generate a>vacuum.
>ViscosityA characterization of the consistency of a compound: pourable, spreadable orkneadable. Viscosity is quoted in milli-pascal seconds (mPa s). The higher thevalue, the less able the compound is to flow.
>Vulcanization, vulcanizingSee >curing
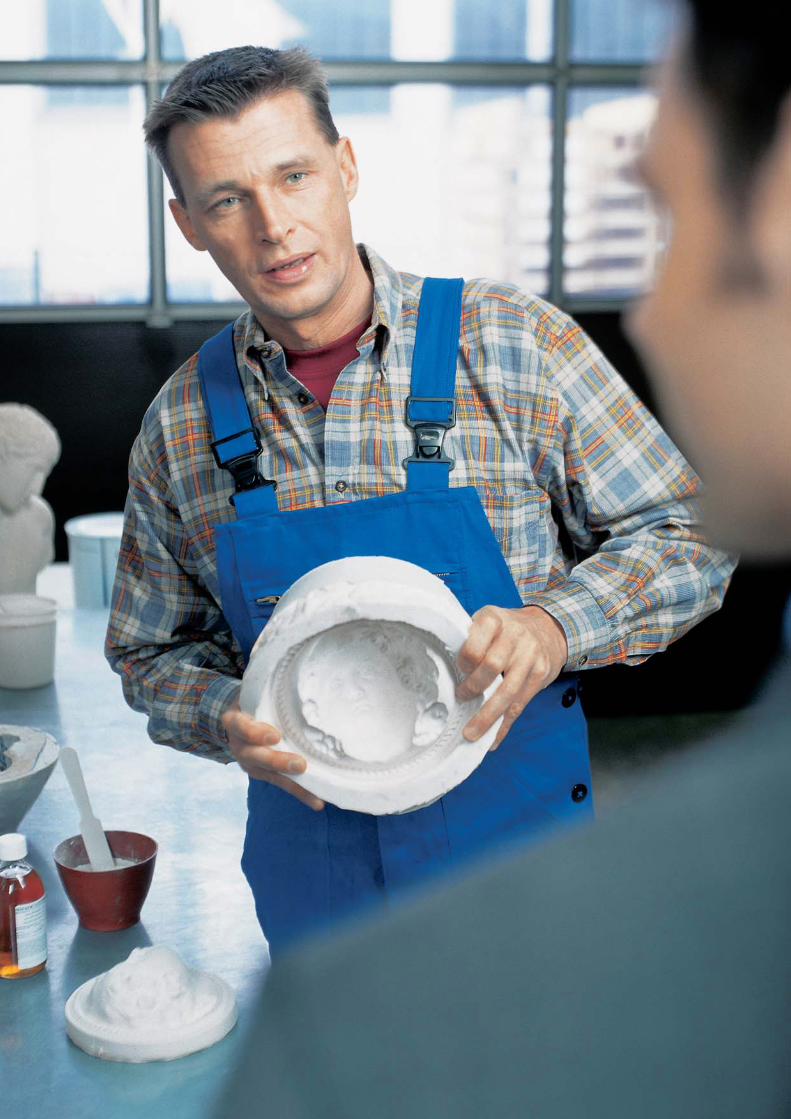
6007
e/03
.08
repr
int
6007
e/10
.06
Wacker Chemie AGHanns-Seidel-Platz 481737 München, [email protected]
www.wacker.com