Embed Size (px)
Citation preview
The sensor will automatically start recharging whilst connected to a PC. The battery life of your sensor depends on the regularity of transmissions. Battery life is indicated on the ‘Existing Sensors’ software screen accessed via the ‘View Sensors’ button or on the unit itself. When the low symbol appears on the sensor LCD you should recharge the unit with the USB cable provided. Whilst recharging the unit accuracy tolerance will be exceeded.
This is done via EL-WiFi. Open the software package, click on the ‘View Sensors’ icon, select the sensor you wish to change and click on the ‘Adjust Sensor Settings’ icon. The software will lead you through the options that can be amended.
LOW
Changing Sensor Settings
EL-WiFi-THQuick Start Guide
Sensor Placement
Recharging
Wall Bracket
Your sensor is a free standing product but it also comes with a click-in bracket so that the product can be clearly displayed and attached onto a flat surface or wall. (wall screws not included)
When placing your sensor consider local heat sources and radio obstructions. For optimum WiFi performance you may need to try positioning your sensor in various different locations/positions. Any physical obstructions between your router and sensor will affect the range of the sensor. WiFi extenders can also be used to gain improvements.
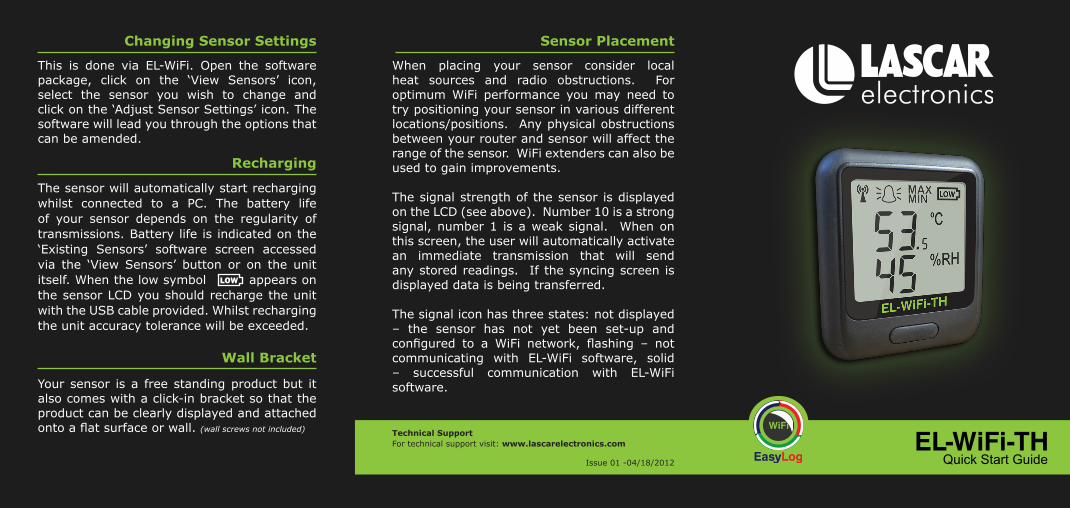
The signal strength of the sensor is displayed on the LCD (see above). Number 10 is a strong signal, number 1 is a weak signal. When on this screen, the user will automatically activate an immediate transmission that will send any stored readings. If the syncing screen is displayed data is being transferred.
The signal icon has three states: not displayed – the sensor has not yet been set-up and configured to a WiFi network, flashing – not communicating with EL-WiFi software, solid – successful communication with EL-WiFi software.
Technical SupportFor technical support visit: www.lascarelectronics.com
Issue 01 -04/18/2012
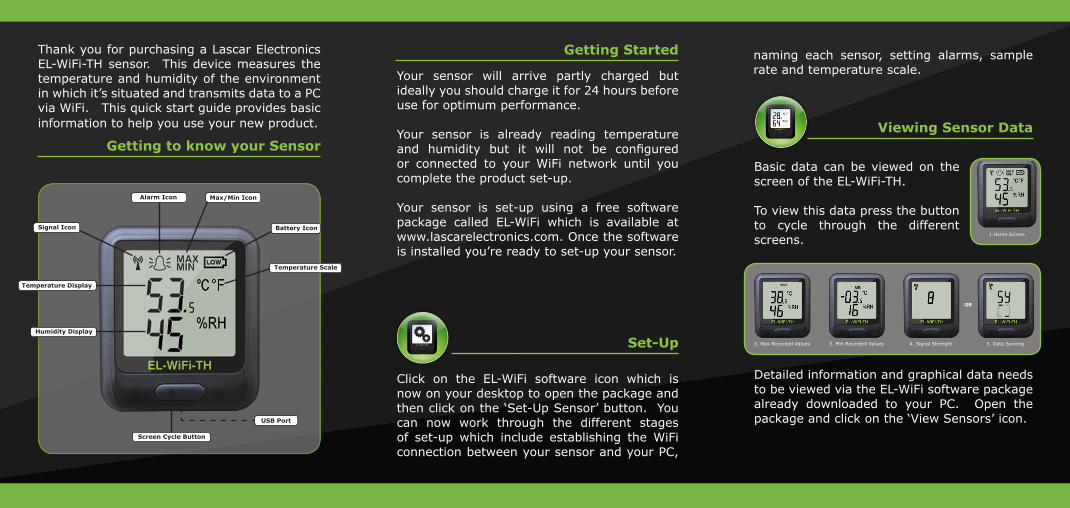
Basic data can be viewed on the screen of the EL-WiFi-TH.
To view this data press the button to cycle through the different screens.
Thank you for purchasing a Lascar Electronics EL-WiFi-TH sensor. This device measures the temperature and humidity of the environment in which it’s situated and transmits data to a PC via WiFi. This quick start guide provides basic information to help you use your new product.
Click on the EL-WiFi software icon which is now on your desktop to open the package and then click on the ‘Set-Up Sensor’ button. You can now work through the different stages of set-up which include establishing the WiFi connection between your sensor and your PC,
Your sensor will arrive partly charged but ideally you should charge it for 24 hours before use for optimum performance.
Your sensor is already reading temperature and humidity but it will not be configured or connected to your WiFi network until you complete the product set-up. Your sensor is set-up using a free software package called EL-WiFi which is available at www.lascarelectronics.com. Once the software is installed you’re ready to set-up your sensor.
Screen Cycle Button
USB Port
Signal Icon
Temperature Display
Humidity Display
Alarm Icon Max/Min Icon
Battery Icon
Temperature Scale
Getting Started
Viewing Sensor DataGetting to know your Sensor
Set-Up
Detailed information and graphical data needs to be viewed via the EL-WiFi software package already downloaded to your PC. Open the package and click on the ‘View Sensors’ icon.
2. Max Recorded Values 3. Min Recorded Values 4. Signal Strength
OR
5. Data Syncing
1.Home Screen
naming each sensor, setting alarms, sample rate and temperature scale.
EL-WiFi
° °F
EL-WiFi-TH
EL-WiFi
° °F
EL-WiFi-TH
EL-WiFi
° °F
EL-WiFi-TH
EL-WiFi
° °F
EL-WiFi-TH
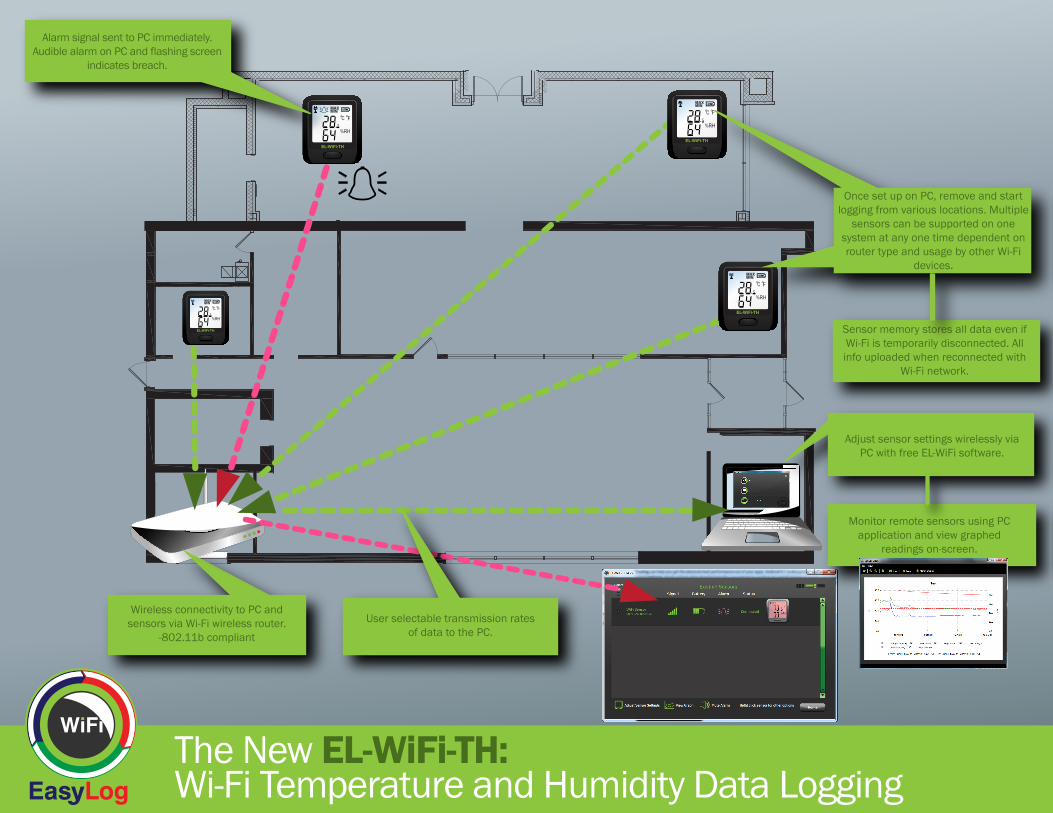
Monitor remote sensors using PC application and view graphed
readings on-screen.
Sensor memory stores all data even if Wi-Fi is temporarily disconnected. All info uploaded when reconnected with
Wi-Fi network.
Wireless connectivity to PC and sensors via Wi-Fi wireless router.
-802.11b compliant
User selectable transmission rates of data to the PC.
Adjust sensor settings wirelessly via PC with free EL-WiFi software.
Once set up on PC, remove and start logging from various locations. Multiple
sensors can be supported on one system at any one time dependent on router type and usage by other Wi-Fi
devices.
Alarm signal sent to PC immediately. Audible alarm on PC and flashing screen
indicates breach.
The New EL-WiFi-TH: Wi-Fi Temperature and Humidity Data Logging