Embed Size (px)
Citation preview

2
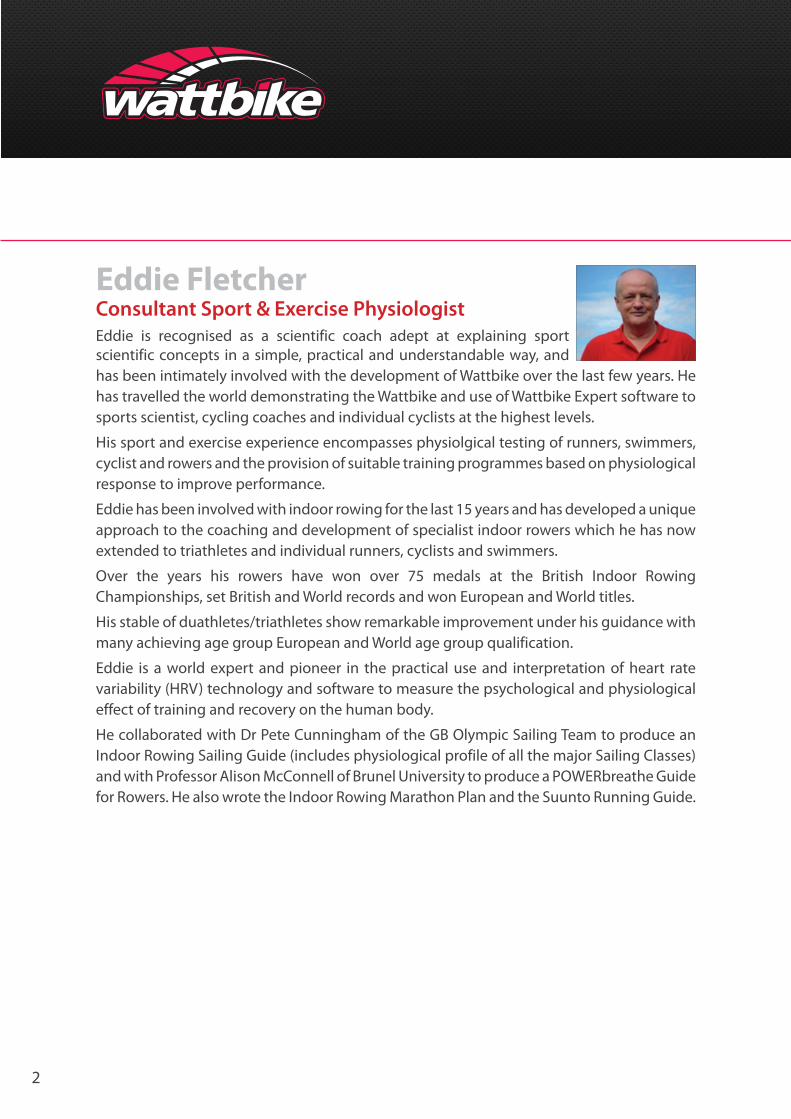
Eddie FletcherConsultant Sport & Exercise PhysiologistEddie is recognised as a scientific coach adept at explaining sport scientific concepts in a simple, practical and understandable way, and has been intimately involved with the development of Wattbike over the last few years. He has travelled the world demonstrating the Wattbike and use of Wattbike Expert software to sports scientist, cycling coaches and individual cyclists at the highest levels.
His sport and exercise experience encompasses physiolgical testing of runners, swimmers, cyclist and rowers and the provision of suitable training programmes based on physiological response to improve performance.
Eddie has been involved with indoor rowing for the last 15 years and has developed a unique approach to the coaching and development of specialist indoor rowers which he has now extended to triathletes and individual runners, cyclists and swimmers.
Over the years his rowers have won over 75 medals at the British Indoor Rowing Championships, set British and World records and won European and World titles.
His stable of duathletes/triathletes show remarkable improvement under his guidance with many achieving age group European and World age group qualification.
Eddie is a world expert and pioneer in the practical use and interpretation of heart rate variability (HRV) technology and software to measure the psychological and physiological effect of training and recovery on the human body.
He collaborated with Dr Pete Cunningham of the GB Olympic Sailing Team to produce an Indoor Rowing Sailing Guide (includes physiological profile of all the major Sailing Classes) and with Professor Alison McConnell of Brunel University to produce a POWERbreathe Guide for Rowers. He also wrote the Indoor Rowing Marathon Plan and the Suunto Running Guide.
3
Contents
Introduction .................................................................................................................................................................. 7Bike Fit ............................................................................................................................................................................ 9Which Wattbike ........................................................................................................................................................... 21 What’s the difference? .........................................................................................................................................21 How to choose the right Wattbike for you ...........................................................................................................21Using the Wattbike ..................................................................................................................................................... 23 Using Watts ..................................................................................................................................................................................................23 Polar View .....................................................................................................................................................................................................24Power, Resistance and Cadence Tables .................................................................................................................. 25 Wattbike Pro ................................................................................................................................................................................................25 Wattbike Trainer .........................................................................................................................................................................................26Gearing and Cadence ................................................................................................................................................ 26 What is a gear? ............................................................................................................................................................................................26 Standard gear metre table .....................................................................................................................................................................28 Standard metric gear table ....................................................................................................................................................................29 What are gear inches? ..............................................................................................................................................................................30 Imperial gear table ....................................................................................................................................................................................31 Imperial gear table - Pro and Trainer ..................................................................................................................................................32Getting Started ........................................................................................................................................................... 33 What you need to know to train on the Wattbike..........................................................................................................................33 To use a Wattbike effectively you need to know or estimate your: .........................................................................................33Heart Rate and Power Training Zones .................................................................................................................... 34Estimating Maximum Heart Rate (MHR) and Maximum Minute Power (MMP) .............................................. 37Power to Weight Ratio ............................................................................................................................................... 38 What is power to weight ratio [P/Kg]?................................................................................................................................................38 Why measure power to weight ratio [P/Kg]? ...................................................................................................................................38 The basic science of power to weight ratio [P/Kg]?.......................................................................................................................39 What is a typical power to weight ratio? ...........................................................................................................................................39 How to improve power to weight ratio [P/Kg] ................................................................................................................................40 Wattbike ranking........................................................................................................................................................................................40Test Yourself ................................................................................................................................................................. 41 5 Fitness Levels ...........................................................................................................................................................................................41Using High and Low Resistance Settings ............................................................................................................... 43Warm Up and Cool Down .......................................................................................................................................... 44 Warm up ........................................................................................................................................................................................................44 Recommended warm ups ......................................................................................................................................................................44 The 20 minute warm up for technique ..............................................................................................................................................45 Warm up on the Wattbike Pro ...............................................................................................................................................................45 Warm up on the Wattbike Trainer ........................................................................................................................................................46 Recommended cool downs ...................................................................................................................................................................47Rest and Recovery ...................................................................................................................................................... 48 Illness ..............................................................................................................................................................................................................48 The Recovery, Zone 1 and Zone 2 rule ...............................................................................................................................................48 Under recovery ...........................................................................................................................................................................................48 Heat/cold/humidity ..................................................................................................................................................................................49
4
Neuromuscular and DOMS (Delayed Onset Muscle Soreness) .................................................................................................49 The benefits of measuring recovery ...................................................................................................................................................49 The link between Training Zones and Recovery .............................................................................................................................50 General guidelines ....................................................................................................................................................................................51 Effective training ........................................................................................................................................................................................52 Physiological Limits...................................................................................................................................................................................53 Age decline ..................................................................................................................................................................................................53 Summary .......................................................................................................................................................................................................54Fluid And Carbohydrate Intake Before, During And After Training .................................................................. 55 Fluid intake during training ...................................................................................................................................................................55 Carbohydrate intake required during and after training ............................................................................................................55Cycling Tests ................................................................................................................................................................ 57 3 Minute aerobic test................................................................................................................................................................................58 10 Minute progress check ......................................................................................................................................................................58 Ramp tests ....................................................................................................................................................................................................58 20 Minute high percentage of maximum minute power test ...................................................................................................593 Minute Aerobic Test ................................................................................................................................................ 60 Conducting the 3 Minute Aerobic Test ..............................................................................................................................................60Air Resistance Setting and Cadence Recommendations - 3 Minute Aerobic Test .......................................... 6210 Minute Progress Test ............................................................................................................................................ 65 Conducting the Wattbike 10 Minute Progress Check ...................................................................................................................65Ramp Tests ................................................................................................................................................................... 67 The Storer Test .............................................................................................................................................................................................67Air Resistance Setting and Cadence Recommendations - Storer Test on a Wattbike Pro ............................. 69Air Resistance Setting and Cadence Recommendations - Storer Test on a Wattbike Trainer ...................... 70British Cycling Ramp Test .......................................................................................................................................... 71 Conducting A British Cycling Ramp Test ...........................................................................................................................................72Air Resistance Setting And Cadence Recommendations - British Cycling Test on a Wattbike Pro ............. 74 Male Ramp test on a Wattbike Pro .......................................................................................................................................................74 Female Ramp test on a Wattbike Pro ..................................................................................................................................................7620 Minute High Percentage of Maximum Minute Power Test............................................................................ 78 Conducting the 20 minute test ............................................................................................................................................................78Pedalling Technique Test ........................................................................................................................................... 81 Conducting the Pedalling Technique Test ........................................................................................................................................81Pedalling Technique Training Sessions .................................................................................................................. 83Pedalling Technique - What the Polar View Shapes Mean .................................................................................. 87 How to read the graph .............................................................................................................................................................................87 Example shapes ..........................................................................................................................................................................................88 Angle of peak force ...................................................................................................................................................................................89 Ten ways to improve your force curve ...............................................................................................................................................89Training Session Terminology .................................................................................................................................. 93Training Plans .............................................................................................................................................................. 96Sportive Worked Example - Based on a Wattbike Pro .......................................................................................100Sportive Training Plans ............................................................................................................................................103Triathlon 16 Week Training Plan ............................................................................................................................125
5
Triathlon Plan ............................................................................................................................................................128 Week 3 Example .......................................................................................................................................................................................12816 Week Training Plan Technique Sessions .........................................................................................................130 Technique Session Weeks 2-5 - Resistance level 1 .......................................................................................................................131 Technique Session Weeks 7-10 - Resistance level 2.....................................................................................................................132 Technique Session Weeks 12-15 - Resistance level 3 ..................................................................................................................134Triathlete 16 Week Training Plans .........................................................................................................................135Weight Management Training Guide ...................................................................................................................138Weight Management Training Plan ......................................................................................................................146 Warm up/leg speed before all Zone 2 workouts ..........................................................................................................................147Notes page .................................................................................................................................................................148
6
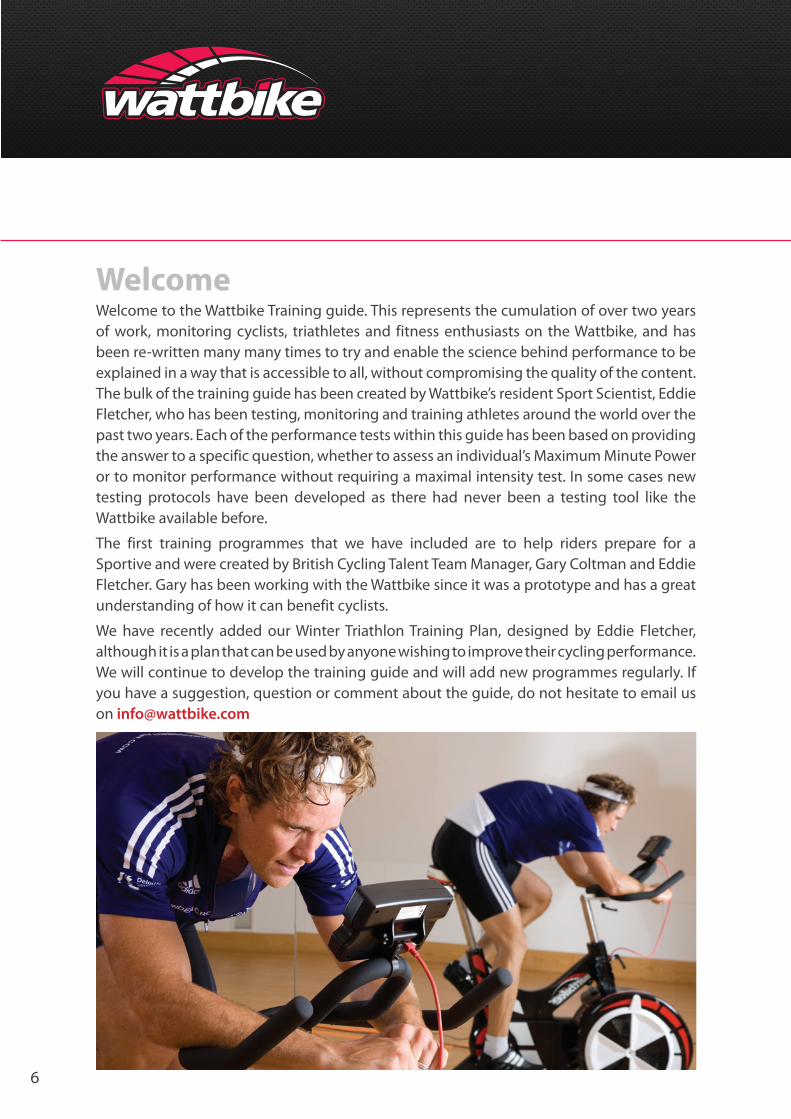
WelcomeWelcome to the Wattbike Training guide. This represents the cumulation of over two years of work, monitoring cyclists, triathletes and fitness enthusiasts on the Wattbike, and has been re-written many many times to try and enable the science behind performance to be explained in a way that is accessible to all, without compromising the quality of the content. The bulk of the training guide has been created by Wattbike’s resident Sport Scientist, Eddie Fletcher, who has been testing, monitoring and training athletes around the world over the past two years. Each of the performance tests within this guide has been based on providing the answer to a specific question, whether to assess an individual’s Maximum Minute Power or to monitor performance without requiring a maximal intensity test. In some cases new testing protocols have been developed as there had never been a testing tool like the Wattbike available before.
The first training programmes that we have included are to help riders prepare for a Sportive and were created by British Cycling Talent Team Manager, Gary Coltman and Eddie Fletcher. Gary has been working with the Wattbike since it was a prototype and has a great understanding of how it can benefit cyclists.
We have recently added our Winter Triathlon Training Plan, designed by Eddie Fletcher, although it is a plan that can be used by anyone wishing to improve their cycling performance.We will continue to develop the training guide and will add new programmes regularly. If you have a suggestion, question or comment about the guide, do not hesitate to email us on [email protected]
7
IntroductionThis Guide is a general guide aimed at a range of Wattbike users who wish to use the Wattbike to improve cycling performance or general fitness and can be used with our online training plans or your own training plan.
Many of the workouts in the training plans can be used by anyone with a desire to improve their general fitness and cycling ability although they are initially aimed at riders training for a Sportive event (or equivalent) and (with the Winter Training Plan) triathletes.
You are recommended to read the whole of this Guide before embarking on your Wattbike training plan.
Familiarise yourself with how the Wattbike works, how to establish your personal heart rate and power training Zones and how to match the resistance levels and cadence for your personal needs.
Make sure you understand all the functions of the Wattbike Performance Computer and how to use Wattbike Expert software to monitor and analyse your Wattbike sessions. You should thoroughly read the Wattbike User Guide that came with your Wattbike and the Beginners Guide to Wattbike Expert Software. You should also download the latest version of the Wattbike Expert and Performance Computer firmware.
In particular make sure you understand what the Polar View shows and how it can be used to monitor and improve you pedalling technique - more information can be found in the Wattbike Polar View section.
The Wattbike measures your absolute mechanical power in Watts (a measure of how quickly work is done). The amount of power produced is measured from the force you apply to the chain through the cranks.
Your Wattbike is factory calibrated and does not need recalibrating. It is very accurate.The mean accuracy of the Wattbike is typically within 2% (-0.42% +/- 1.21%) with retest variance typically better than 1% (0.42% +/- 0.46%) - South Australian Institute of Sport 31/03/2010.
Split down into intermediate ranges the Wattbike accuracy is typically:
And over the full range within 2%
Watts
Accuracy
< 100
Up to 6%
100-200
Within 2%
200-500
Within 1.5%
>500
Within 1%

8
Within the calibration limits of each individual Wattbike the actual result you achieve may vary slightly from the figures in the tables used in this Guide. The Guide tables are based on our factory tests and assume constant cadence and application of force.
The Wattbike samples data 100 times a second and is recording data for each pedal revolution. It also measures and, in the software, records 39 different cycling parameters. Not all the parameters are visible on the Wattbike Performance Computer (although they are recorded). To view all the parameters use the Wattbike Expert software.
There are a number technical resources available throughout this website which you should use as reference to aid understanding of how the Wattbike works and how to use Wattbike Expert software.
9
Bike Fit
SECTION 1 – General Wattbike Cycling Position and Set Up ...............................................................................10 Saddle Height ........................................................................................................................................................................10 Saddle fore/aft Position......................................................................................................................................................10 Handlebar Height (Saddle to Handlebar Difference) ..............................................................................................11 Handlebar fore/aft Position ..............................................................................................................................................11Notes on Bike Set Up .........................................................................................................................................................................11 Saddle height formula .......................................................................................................................................................12 Measuring inseam (without shoes) .......................................................................................................................12 Saddle fore/aft ......................................................................................................................................................................12 Handlebar height (saddle to handlebar differences) ..............................................................................................12 Handlebars fore/aft .............................................................................................................................................................12 General ....................................................................................................................................................................................13 Crank length ..........................................................................................................................................................................13SECTION 2 Wattbike specific bike set up measurements.....................................................................................14 Wattbike saddle positions ................................................................................................................................................14 Saddle height (Race Saddle) ....................................................................................................................................14 Wattbike saddle height settings ............................................................................................................................14 Wattbike saddle height settings with extra-long seat post (extra 10 cm) ..............................................16 Handlebar positions (Standard Wattbike handlebars and Drops) .....................................................................17 Wattbike handlebar height ......................................................................................................................................17 Wattbike handlebar settings ...................................................................................................................................17 Wattbike handlebar settings with extra long stem (extra 10 cms) ............................................................18 Handlebar height (saddle to handlebar differences) based on height ............................................................19 The overall riding position ................................................................................................................................................19 Overall Tribar riding position ...........................................................................................................................................20 Overall Drops riding position ..........................................................................................................................................20
10
SECTION 1 – General Wattbike Cycling Position and Set UpIt is important that to set up a safe and comfortable cycling position. The correct set-up is crucial to maximise performance, prevent injury and ensure the most comfortable riding position on the Wattbike. Set up takes account of various body shapes, bone length discrepancy, flexibility/core strength and injury history.
The correct sequence for set up is, saddle height, saddle fore/aft position, handlebar height and handlebar fore/aft position.
Before starting, ensure that the saddle is parallel to the floor; use a spirit level if necessary.
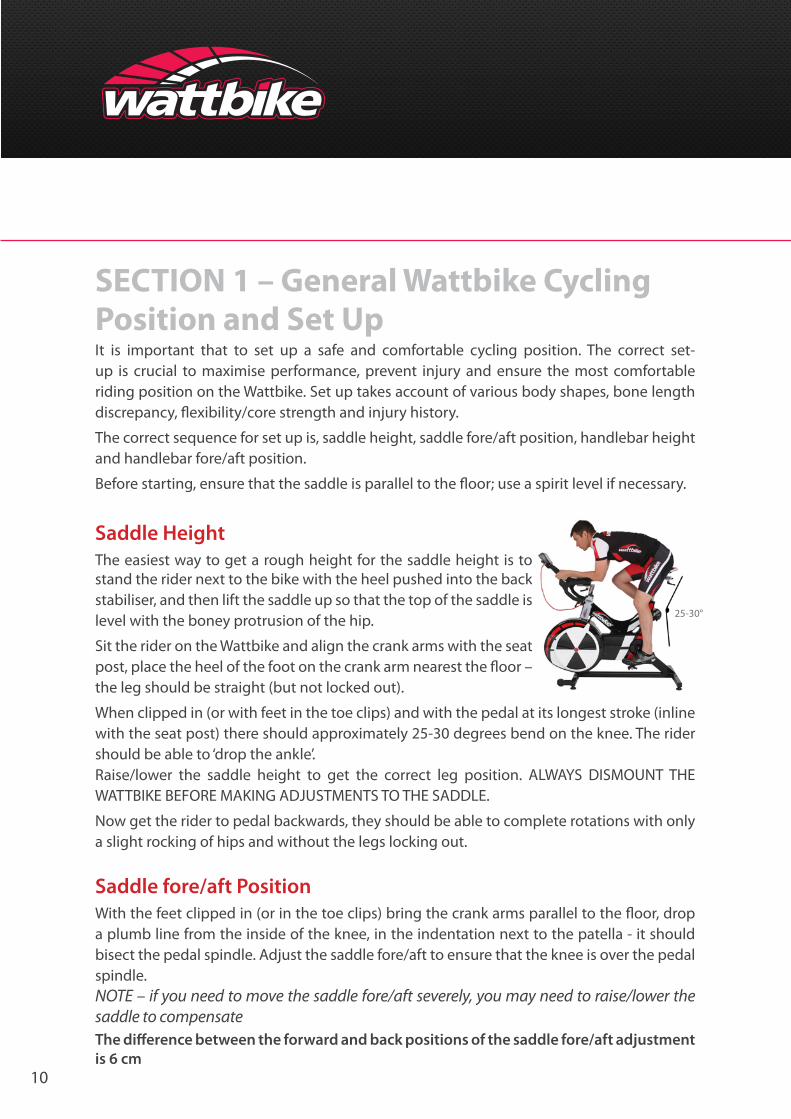
Saddle HeightThe easiest way to get a rough height for the saddle height is to stand the rider next to the bike with the heel pushed into the back stabiliser, and then lift the saddle up so that the top of the saddle is level with the boney protrusion of the hip.
Sit the rider on the Wattbike and align the crank arms with the seat post, place the heel of the foot on the crank arm nearest the floor – the leg should be straight (but not locked out).
When clipped in (or with feet in the toe clips) and with the pedal at its longest stroke (inline with the seat post) there should approximately 25-30 degrees bend on the knee. The rider should be able to ‘drop the ankle’.Raise/lower the saddle height to get the correct leg position. ALWAYS DISMOUNT THE WATTBIKE BEFORE MAKING ADJUSTMENTS TO THE SADDLE.
Now get the rider to pedal backwards, they should be able to complete rotations with only a slight rocking of hips and without the legs locking out.
Saddle fore/aft PositionWith the feet clipped in (or in the toe clips) bring the crank arms parallel to the floor, drop a plumb line from the inside of the knee, in the indentation next to the patella - it should bisect the pedal spindle. Adjust the saddle fore/aft to ensure that the knee is over the pedal spindle.NOTE – if you need to move the saddle fore/aft severely, you may need to raise/lower the saddle to compensateThe difference between the forward and back positions of the saddle fore/aft adjustment is 6 cm
25-30°
11
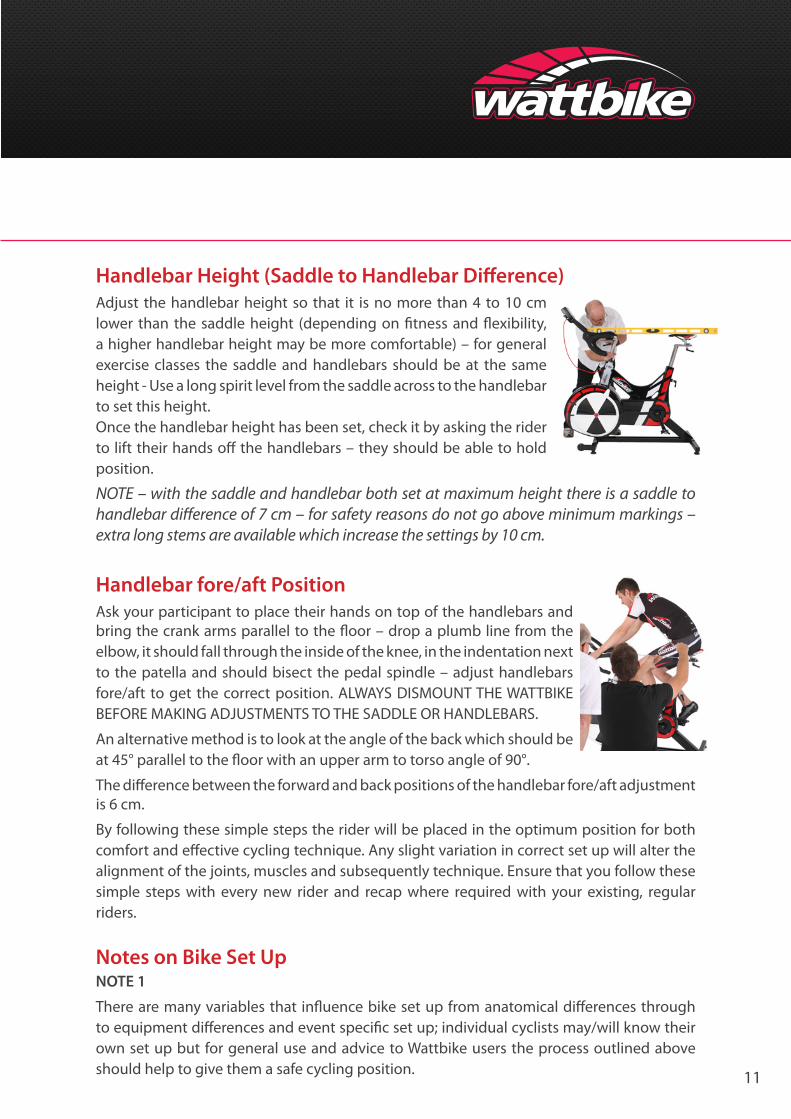
Handlebar Height (Saddle to Handlebar Difference)Adjust the handlebar height so that it is no more than 4 to 10 cm lower than the saddle height (depending on fitness and flexibility, a higher handlebar height may be more comfortable) – for general exercise classes the saddle and handlebars should be at the same height - Use a long spirit level from the saddle across to the handlebar to set this height. Once the handlebar height has been set, check it by asking the rider to lift their hands off the handlebars – they should be able to hold position.
NOTE – with the saddle and handlebar both set at maximum height there is a saddle to handlebar difference of 7 cm – for safety reasons do not go above minimum markings – extra long stems are available which increase the settings by 10 cm.
Handlebar fore/aft PositionAsk your participant to place their hands on top of the handlebars and bring the crank arms parallel to the floor – drop a plumb line from the elbow, it should fall through the inside of the knee, in the indentation next to the patella and should bisect the pedal spindle – adjust handlebars fore/aft to get the correct position. ALWAYS DISMOUNT THE WATTBIKE BEFORE MAKING ADJUSTMENTS TO THE SADDLE OR HANDLEBARS.
An alternative method is to look at the angle of the back which should be at 45° parallel to the floor with an upper arm to torso angle of 90°.
The difference between the forward and back positions of the handlebar fore/aft adjustment is 6 cm.
By following these simple steps the rider will be placed in the optimum position for both comfort and effective cycling technique. Any slight variation in correct set up will alter the alignment of the joints, muscles and subsequently technique. Ensure that you follow these simple steps with every new rider and recap where required with your existing, regular riders.
Notes on Bike Set UpNOTE 1
There are many variables that influence bike set up from anatomical differences through to equipment differences and event specific set up; individual cyclists may/will know their own set up but for general use and advice to Wattbike users the process outlined above should help to give them a safe cycling position.
12
NOTE 2
Saddle height formulaMeasuring inseam (without shoes)
Stand with back flat against a wall with heels as close to wall as possible. Place a hardback book vertically as far as possible into the inseam with the edge flush against the wall. Make sure the book protrudes out enough to allow measurement from the top edge of the book down to the floor.
Take inseam measurement multiply by 0.885 e.g. Inseam 82 cm X 0.885 = 72.6 cm so saddle height = 72.6 cm above the bottom bracket axle – this ensures that leg is not at full stretch.
Another common formula is to multiply the inseam measurement by 1.09 (this gives a measurement which includes the crank length).
Other multipliers suggested are 1.06 and 1.08, 1.06 for women who flex forward at the hip and 1.08 for men who flex forward through the mid and upper spine.
NOTE 3
Saddle fore/aft Depending on a cyclist’s preference and type of racing back/forward position may vary 10-20 mm
NOTE 4
Handlebar height (saddle to handlebar differences)British Cycling Guidelines are relative to a cyclists’ height:
Rider height (cm) Saddle-to-handlebar difference (cm)155 4165 6175 8185 10
NOTE 5
Handlebars fore/aftSet up varies greatly by event type and aerodynamic position required.

13
NOTE 6
GeneralSet up varies depending on the demands of the type of cycling – track sprinters and track endurance riders will differ, MTB, BMX, Cyclo-cross have their own set up differences as do road and time trial cyclists which they may wish to replicate on a Wattbike
14
SECTION 2 Wattbike specific bike set up measurementsWattbike saddle positionsSaddle height (Race Saddle)The Wattbike seat post height = 45 cm with the seat post set at 0. There are 12 cm between the seat post marking 0 and top of the saddle [race saddle]. Maximum seat height = 82 cm (measured from the center of the bottom bracket/crank arm to the top of the saddle [race saddle] along the direction of the seat post)There are 22 cm between the seat post marking 0 and top of the saddle [race saddle] with the long seat post. Maximum seat height = 92 cm (measured from the center of the bottom bracket/crank arm to the top of the saddle [race saddle] along the direction of the seat post)The Wattbike seat post angle is 75°
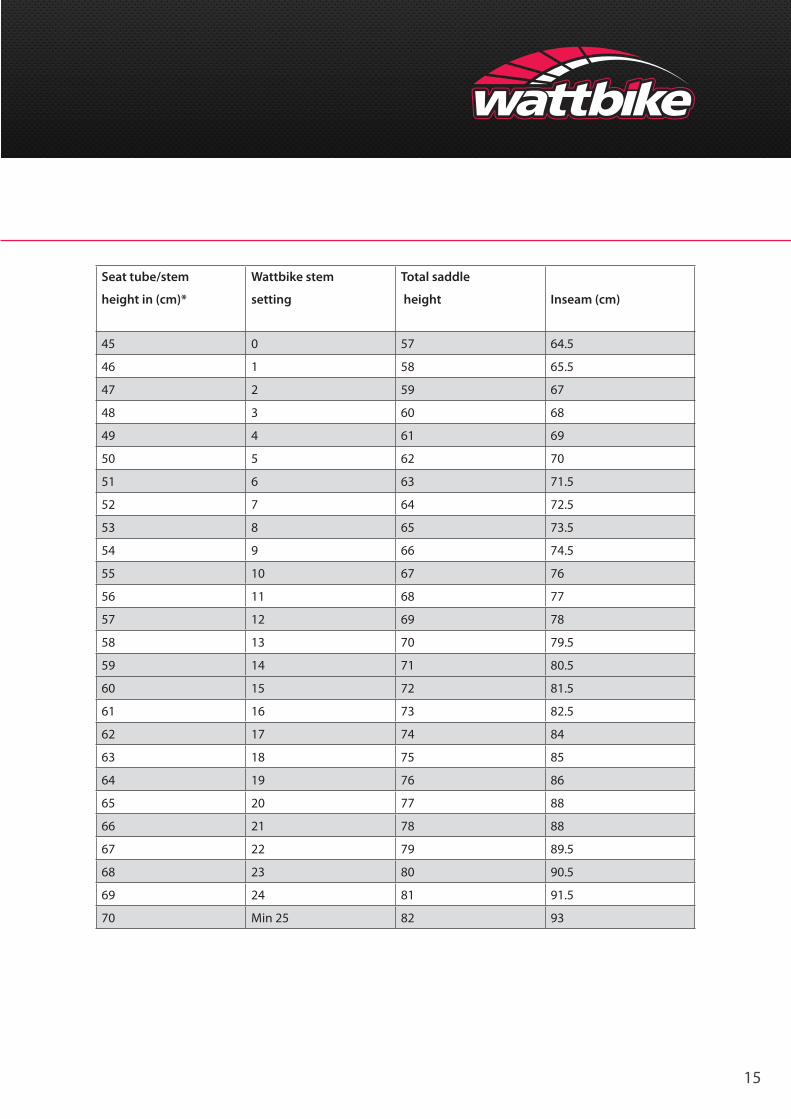
Wattbike saddle height settings*Total saddle height in cm measured from the center of the bottom bracket/crank arm to the top of the saddle [race saddle] along the direction of the seat post (using saddle height formula - inseam x 0.885 – rounded to nearest 0.5 cm)
15
Seat tube/stem
height in (cm)*
Wattbike stem
setting
Total saddle
height Inseam (cm)
45 0 57 64.5
46 1 58 65.5
47 2 59 67
48 3 60 68
49 4 61 69
50 5 62 70
51 6 63 71.5
52 7 64 72.5
53 8 65 73.5
54 9 66 74.5
55 10 67 76
56 11 68 77
57 12 69 78
58 13 70 79.5
59 14 71 80.5
60 15 72 81.5
61 16 73 82.5
62 17 74 84
63 18 75 85
64 19 76 86
65 20 77 88
66 21 78 88
67 22 79 89.5
68 23 80 90.5
69 24 81 91.5
70 Min 25 82 93
16
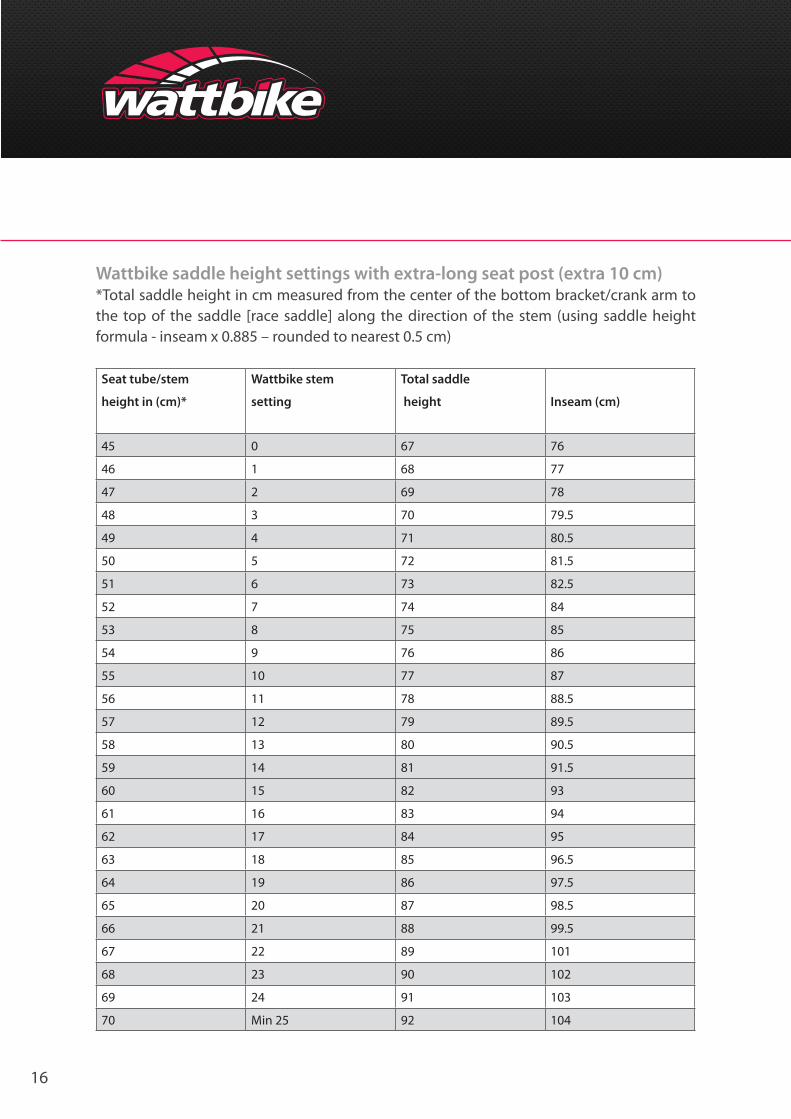
Wattbike saddle height settings with extra-long seat post (extra 10 cm)*Total saddle height in cm measured from the center of the bottom bracket/crank arm to the top of the saddle [race saddle] along the direction of the stem (using saddle height formula - inseam x 0.885 – rounded to nearest 0.5 cm)
Seat tube/stem
height in (cm)*
Wattbike stem
setting
Total saddle
height Inseam (cm)
45 0 67 76
46 1 68 77
47 2 69 78
48 3 70 79.5
49 4 71 80.5
50 5 72 81.5
51 6 73 82.5
52 7 74 84
53 8 75 85
54 9 76 86
55 10 77 87
56 11 78 88.5
57 12 79 89.5
58 13 80 90.5
59 14 81 91.5
60 15 82 93
61 16 83 94
62 17 84 95
63 18 85 96.5
64 19 86 97.5
65 20 87 98.5
66 21 88 99.5
67 22 89 101
68 23 90 102
69 24 91 103
70 Min 25 92 104
17
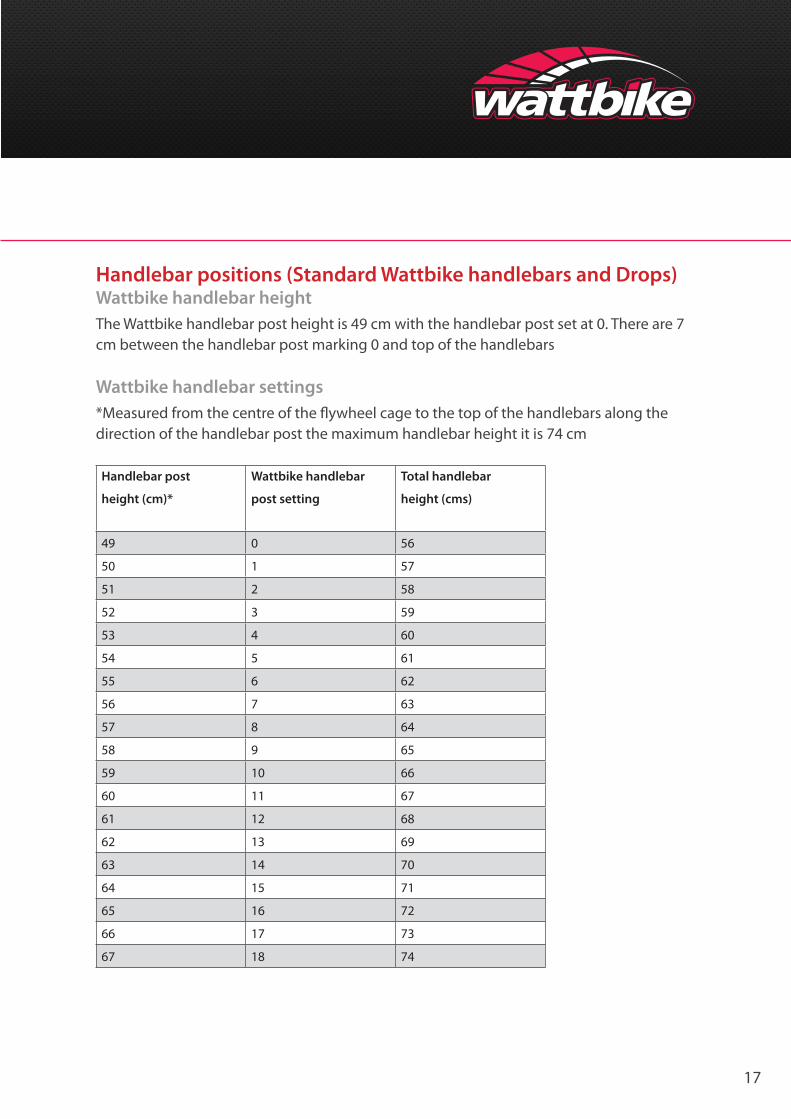
Handlebar positions (Standard Wattbike handlebars and Drops)Wattbike handlebar height The Wattbike handlebar post height is 49 cm with the handlebar post set at 0. There are 7 cm between the handlebar post marking 0 and top of the handlebars
Wattbike handlebar settings*Measured from the centre of the flywheel cage to the top of the handlebars along the direction of the handlebar post the maximum handlebar height it is 74 cm
Handlebar post
height (cm)*
Wattbike handlebar
post setting
Total handlebar
height (cms)
49 0 56
50 1 57
51 2 58
52 3 59
53 4 60
54 5 61
55 6 62
56 7 63
57 8 64
58 9 65
59 10 66
60 11 67
61 12 68
62 13 69
63 14 70
64 15 71
65 16 72
66 17 73
67 18 74
18
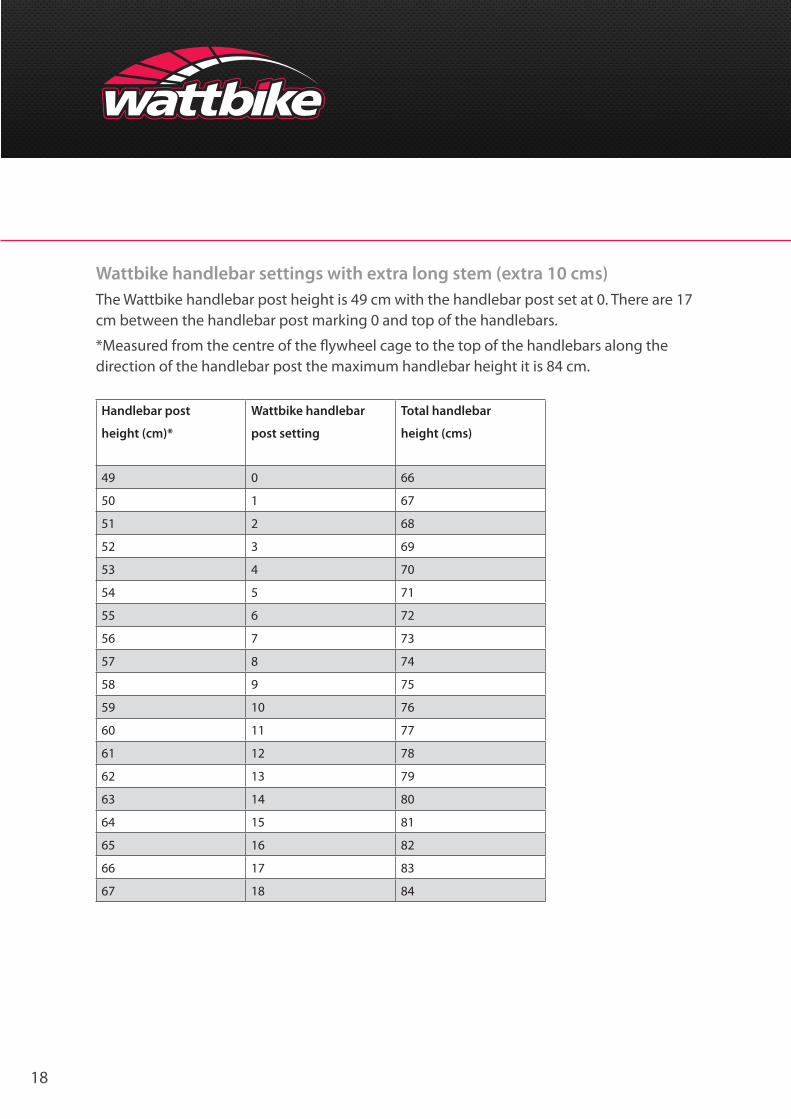
Wattbike handlebar settings with extra long stem (extra 10 cms)The Wattbike handlebar post height is 49 cm with the handlebar post set at 0. There are 17 cm between the handlebar post marking 0 and top of the handlebars.
*Measured from the centre of the flywheel cage to the top of the handlebars along the direction of the handlebar post the maximum handlebar height it is 84 cm.
Handlebar post
height (cm)*
Wattbike handlebar
post setting
Total handlebar
height (cms)
49 0 66
50 1 67
51 2 68
52 3 69
53 4 70
54 5 71
55 6 72
56 7 73
57 8 74
58 9 75
59 10 76
60 11 77
61 12 78
62 13 79
63 14 80
64 15 81
65 16 82
66 17 83
67 18 84
19
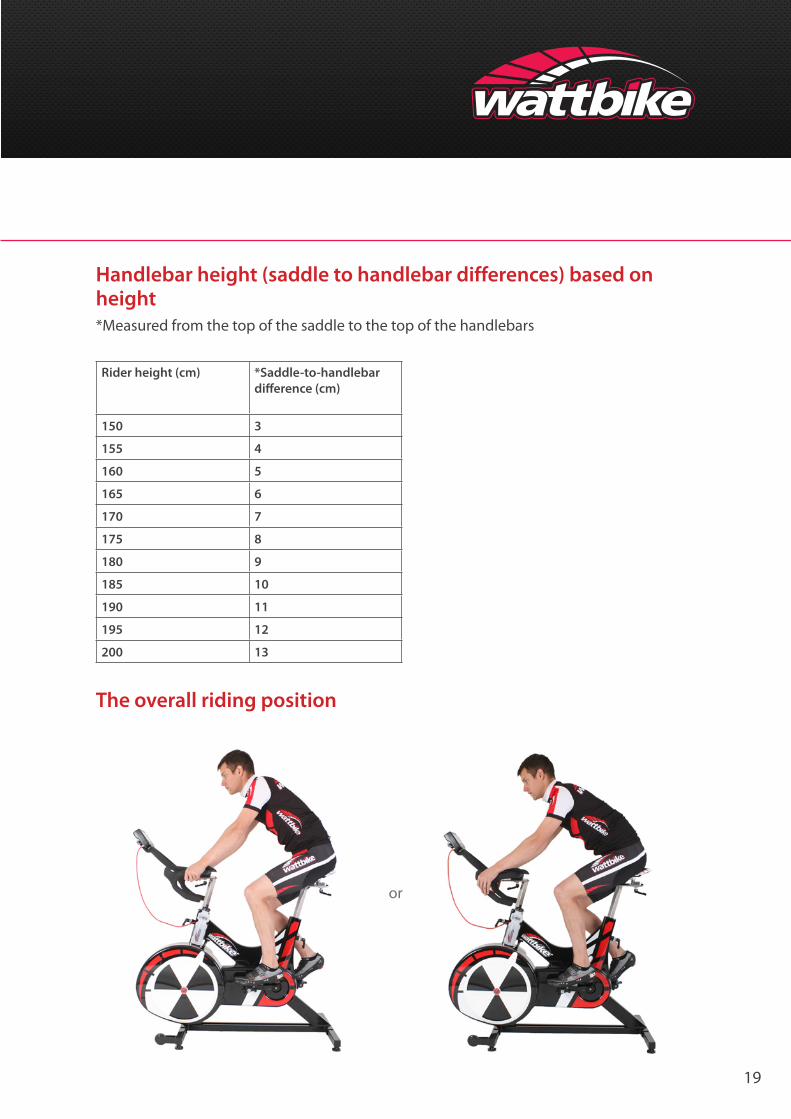
Handlebar height (saddle to handlebar differences) based on height *Measured from the top of the saddle to the top of the handlebars
Rider height (cm) *Saddle-to-handlebar difference (cm)
150 3
155 4
160 5
165 6
170 7
175 8
180 9
185 10
190 11
195 12
200 13
The overall riding position
or
20
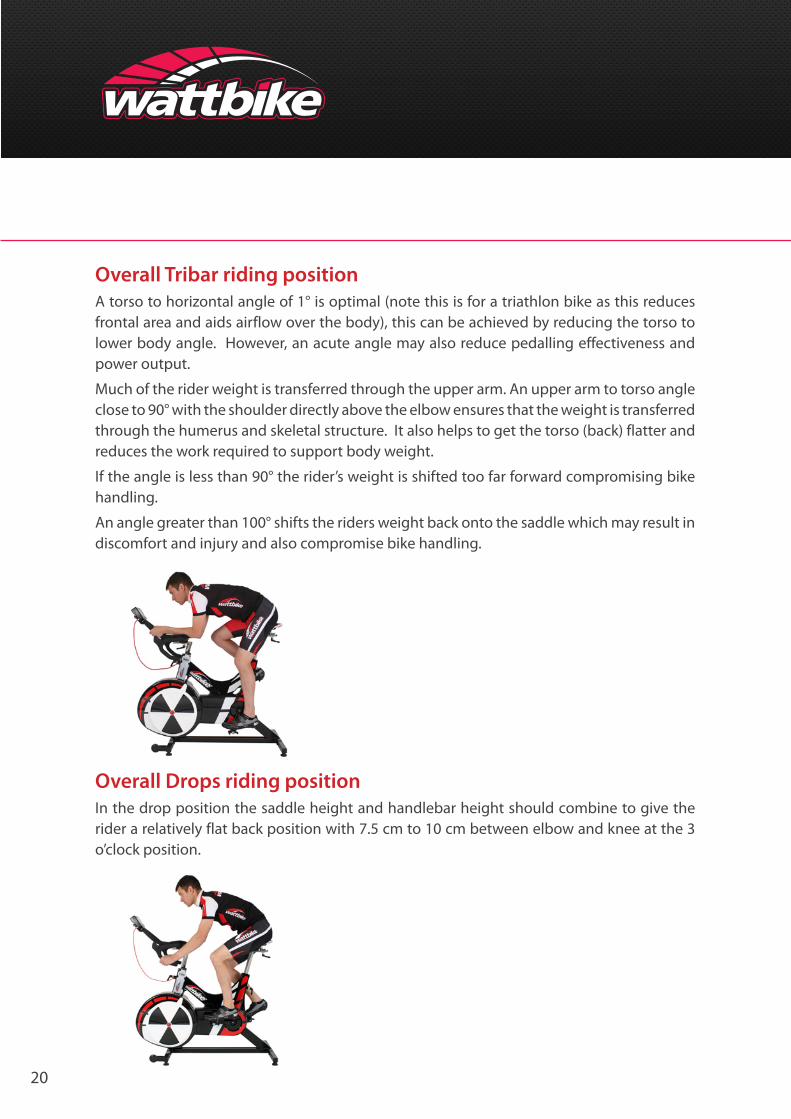
Overall Tribar riding positionA torso to horizontal angle of 1° is optimal (note this is for a triathlon bike as this reduces frontal area and aids airflow over the body), this can be achieved by reducing the torso to lower body angle. However, an acute angle may also reduce pedalling effectiveness and power output.
Much of the rider weight is transferred through the upper arm. An upper arm to torso angle close to 90° with the shoulder directly above the elbow ensures that the weight is transferred through the humerus and skeletal structure. It also helps to get the torso (back) flatter and reduces the work required to support body weight.
If the angle is less than 90° the rider’s weight is shifted too far forward compromising bike handling.
An angle greater than 100° shifts the riders weight back onto the saddle which may result in discomfort and injury and also compromise bike handling.
Overall Drops riding positionIn the drop position the saddle height and handlebar height should combine to give the rider a relatively flat back position with 7.5 cm to 10 cm between elbow and knee at the 3 o’clock position.

21
Which Wattbike?There are two Wattbike models to choose from; the Pro and the Trainer
What’s the difference?Both Wattbikes have the same measurement system, accuracy, monitor and Wattbike Expert software functions and deliver a professional range of cadence/power outputs. The only difference is the resistance range:
The Trainer is low to medium resistance whilst the Pro is medium to high resistance. There is an overlap from the Trainer to the Pro at the medium level. At each equivalent resistance level and cadence the Trainer power output (W) is approximately 57% of the equivalent output on the Pro.
Simply put, if you cycled at 90 cadence on the Wattbike Trainer at resistance level 1 you would produce 85 W and at resistance level 10 225 W. On the Wattbike Pro resistance level 1 at 90 cadence delivers 150 W and at resistance level 10 390 W.
How to choose the right Wattbike for youThe choice is easier to make if your Wattbike is for individual use. If it will be used by others (family members, young adults/children) then the choice invariably will be the Wattbike Trainer as this gives the lower resistance ranges that will be needed for effective exercise by non cyclists.
The Wattbike trainer is the preferred model for most people, as they can use the combination of the air brake and the magnetic brake to replicate any desired power to meet practical exercise and training needs.
If you do not fall into any of the categories below, we would recommend a Wattbike Trainer.If the Wattbike is for individual use then the following guidelines may be of use:
A Wattbike Pro is suitable for you if you: • Are a male category three cyclist or better • Are a female category two cyclist or better • Have a maximum minute power of more than 280 Watts • Are a male track sprinter (it is also best for most female track sprinters) • Have a 10 mile time trial time of less than 26 minutes • Are a triathlete and have a 40k time of less than 1:10 (note if you have a time
between 1:10 and 1:15 but are improving then the Wattbike Pro should still be your choice)
• Will be using the Wattbike for cross training for a specific sport (i.e. Rugby, Football, Rowing)

22
• Will be using the Wattbike to test cyclists or triathletes • Will be using the Wattbike to test professional sports people (i.e. Rugby,
Football, Rowing) • Will be using the Wattbike for Group Cycle training for Cyclists and Triathletes
You really should consider having at least one Wattbike Trainer and one Wattbike Pro if you:
• Will be using the Wattbike in a rehabilitation facility • Are a sport scientist and will be testing both sedentary and trained populations • Are a gym or health club and want to be able to cater for all your members• Throughout this guide we will indicate when it is appropriate to use the
Wattbike Pro or Wattbike Trainer.

23
Using the WattbikeThis section of the guide details the main features and concepts of the Wattbike. To best understand the tests and training plans which follow you will need to be familiar with each of these sections.
• Using Watts
• The Polar View
Using WattsThe key difference between the Wattbike and every other indoor bike is that the Wattbike accurately measures power output in Watts.
The amount of power produced is measured 100 times per second by a load cell, located on the chain, and is a measurement of the sum of all forces applied to the chain through the cranks. The Wattbike’s Performance Computer then displays the power output every 3 seconds, if you are connected to the Wattbike Expert Software every pedal revolution can be seen in real time with data sampling 100 times per second.
This high rate of data sampling means that the force exerted on the cranks can be recorded every 10microseconds (1/100th of a second), allowing the Wattbike’s unique Polar View to display how force is being applied at all points in every pedal revolution. This allows the Wattbike to show your pedalling technique as well as your power output.
Accurately measuring power output is the basis for all of the other parameters recorded on the Wattbike, and means that for the first time it is possible to race between indoor bikes and produce accurate and repeatable results. This is true of every session completed on the Wattbike, no matter when or where the session is done; the results will be comparable with all other Wattbike results. This is made possible because the Wattbike is factory calibrated, and is accurate throughout its life.
The accuracy of the data from the Wattbike means that you can monitor your training progress with a higher level of efficacy than ever before. Every session can be monitored for Power, Average Power, Heart Rate, Average Heart Rate (using either a Suunto ANT+ or Garmin ANT+ chest belt), you can also compare your speed, pace or even the force exerted.Whether you’re a competitive cyclist, triathlete, cross trainer or just keen to be fit, you can monitor the effectiveness of your training and your power per kilo output (how much power you can produce for every kilo of body weight) using the Wattbike. So, you will now know when you get out to compete that you are fitter and more powerful than ever before, and that will produce better performances.
The other benefit of all that data about your power output is in building confidence. Seeing your improvement over time can be very motivational, as you strive to achieve new personal bests.
24
The Polar ViewOne of the unique features of the Wattbike is the ability to monitor your cycling technique as you ride. This is shown as a force curve on the Wattbike Performance Computer known as the Polar View. The Polar View shows the force applied to the pedals and the position of the pedals when applying this force
When cycling, you can play around with the graph – pushing on the left leg will create a large force shape on the left, pushing hard on the right leg will enlarge the graph on the right. You see a percentage beneath each side, telling you how much power each leg is generating. Standing up and altering your cycling technique will produce a change in the graph.
Wattbike Expert Software (version 2.50.42 upwards) automatically calculates the Power to Weight ratio [P/kg] providing the correct weight, in kilograms has been entered in the cyclist’s personal file.
25
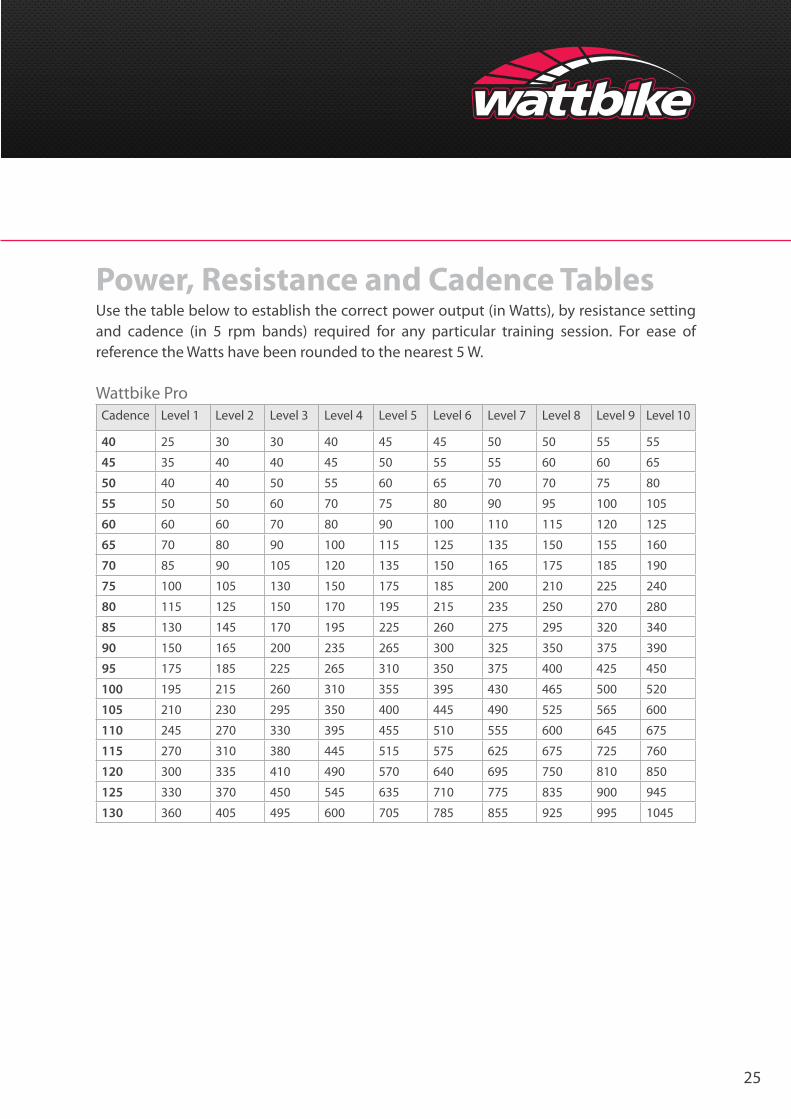
Power, Resistance and Cadence TablesUse the table below to establish the correct power output (in Watts), by resistance setting and cadence (in 5 rpm bands) required for any particular training session. For ease of reference the Watts have been rounded to the nearest 5 W.
Wattbike ProCadence Level 1 Level 2 Level 3 Level 4 Level 5 Level 6 Level 7 Level 8 Level 9 Level 10
40 25 30 30 40 45 45 50 50 55 55
45 35 40 40 45 50 55 55 60 60 65
50 40 40 50 55 60 65 70 70 75 80
55 50 50 60 70 75 80 90 95 100 105
60 60 60 70 80 90 100 110 115 120 125
65 70 80 90 100 115 125 135 150 155 160
70 85 90 105 120 135 150 165 175 185 190
75 100 105 130 150 175 185 200 210 225 240
80 115 125 150 170 195 215 235 250 270 280
85 130 145 170 195 225 260 275 295 320 340
90 150 165 200 235 265 300 325 350 375 390
95 175 185 225 265 310 350 375 400 425 450
100 195 215 260 310 355 395 430 465 500 520
105 210 230 295 350 400 445 490 525 565 600
110 245 270 330 395 455 510 555 600 645 675
115 270 310 380 445 515 575 625 675 725 760
120 300 335 410 490 570 640 695 750 810 850
125 330 370 450 545 635 710 775 835 900 945
130 360 405 495 600 705 785 855 925 995 1045

26
Wattbike TrainerCadence Level 1 Level 2 Level 3 Level 4 Level 5 Level 6 Level 7 Level 8 Level 9 Level 10
40 15 15 15 20 25 25 25 30 30 30
45 20 20 20 25 30 30 30 35 35 35
50 25 25 25 30 35 35 40 40 45 45
55 30 30 35 40 40 45 50 50 55 55
60 35 35 40 45 50 55 60 65 70 70
65 40 45 50 55 65 70 75 80 85 90
70 50 50 60 70 75 85 95 100 105 110
75 55 60 70 80 95 105 115 120 130 135
80 65 70 85 95 110 125 135 145 155 160
85 75 80 100 115 130 145 160 170 180 190
90 85 95 115 135 150 170 185 200 215 225
95 100 110 130 155 175 200 215 230 245 260
100 110 125 150 175 200 225 245 265 285 300
105 125 140 170 200 230 260 280 300 325 340
110 140 155 190 225 260 290 320 340 365 385
115 155 175 210 250 290 325 355 385 415 435
120 170 190 235 280 325 365 395 430 460 485
125 190 210 260 310 360 405 440 480 513 540
130 210 230 280 340 400 450 490 530 570 595
Gearing and CadenceThe Wattbike measures absolute mechanical power in Watts. The amount of power produced is measured from the sum of all the forces applied to the chain through the cranks. It is important to recognize that the underlying calculations for Speed (kph), pace (1/km) and distance per revolution are standard equations derived from Watts (W).
What is a Gear?In addition to the measuring technology the basic construction of the Wattbike includes a chain, a 48 chainring and 13 sprocket combination. Fundamental to understanding how the Wattbike relates to cycling is the understanding of what chainrings and sprockets are and do, bike gearing and how the air brake gear lever, in particular can be used to simulate gearing on a bike. We have all heard about and probably used a gear on a bike – but what is a gear and what does it do? Simply a gear determines the distance a bike will travel in one complete pedal revolution. It is dependent on the circumference of the wheels and the size
27
of the front ‘chainring’ and the back ‘sprocket’The number of teeth on a chainring or sprocket determines its size. For instance a 52 chainring has 52 teeth; a 14 sprocket has 14 teeth. So you may hear a gear referred to as a 52/14. Chainrings commonly range from 39 teeth to 56 teeth in size (smaller and larger are available) and sprockets 11 teeth to 26 teeth – the combinations depend on the needs of the cyclist. Measuring the distance a bike travels over one complete pedal revolution is known as ‘rolling out’ and is measured in metres (known as ‘gear metres’). Put the bike into gear i.e. 52/14 roll the bike backwards for one complete pedal revolution. The distance between the start and finish position is measured.
Gear Metres can also be calculated from the equation:
Using a standard sprint rim with normal road tubular tyres a 52/14 gear is 7.93 m so in this gear combination the bike moves 7.93 m along the ground for every pedal revolution. Wheel diameter, tyre width and tyre pressure will alter the distance travelled per revolution. The higher the gear the further the bike will travel for one complete pedal revolution. In low gear the bike will not travel as far. A high gear is one which has a high teeth number on the chainring with a low teeth number on the sprocket. Conversely a low gear is one with a low teeth number on the chainring and high teeth number on the sprocket.
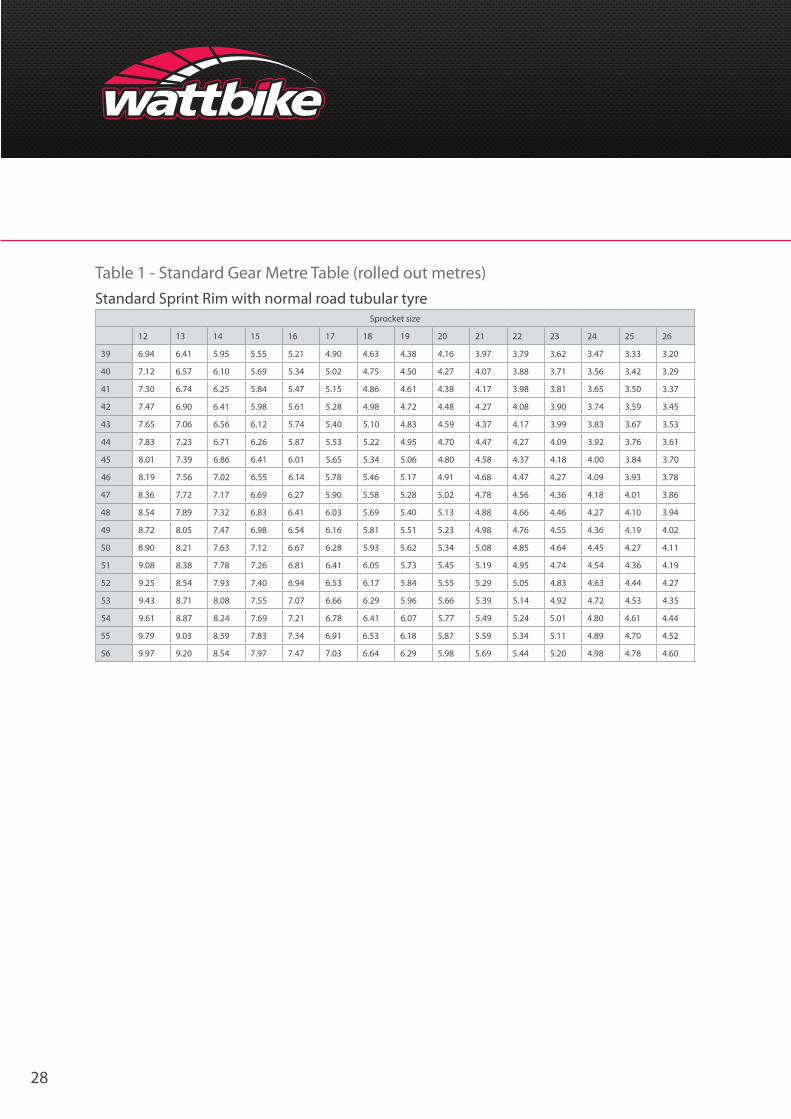
However there are many chainring and sprocket combinations available to achieve a particular gear metre. Tables showing gear metres and conversion to equivalent Wattbike settings are shown in Tables 1 and 2.
28
Table 1 - Standard Gear Metre Table (rolled out metres) Standard Sprint Rim with normal road tubular tyre
Sprocket size
12 13 14 15 16 17 18 19 20 21 22 23 24 25 26
39 6.94 6.41 5.95 5.55 5.21 4.90 4.63 4.38 4.16 3.97 3.79 3.62 3.47 3.33 3.20
40 7.12 6.57 6.10 5.69 5.34 5.02 4.75 4.50 4.27 4.07 3.88 3.71 3.56 3.42 3.29
41 7.30 6.74 6.25 5.84 5.47 5.15 4.86 4.61 4.38 4.17 3.98 3.81 3.65 3.50 3.37
42 7.47 6.90 6.41 5.98 5.61 5.28 4.98 4.72 4.48 4.27 4.08 3.90 3.74 3.59 3.45
43 7.65 7.06 6.56 6.12 5.74 5.40 5.10 4.83 4.59 4.37 4.17 3.99 3.83 3.67 3.53
44 7.83 7.23 6.71 6.26 5.87 5.53 5.22 4.95 4.70 4.47 4.27 4.09 3.92 3.76 3.61
45 8.01 7.39 6.86 6.41 6.01 5.65 5.34 5.06 4.80 4.58 4.37 4.18 4.00 3.84 3.70
46 8.19 7.56 7.02 6.55 6.14 5.78 5.46 5.17 4.91 4.68 4.47 4.27 4.09 3.93 3.78
47 8.36 7.72 7.17 6.69 6.27 5.90 5.58 5.28 5.02 4.78 4.56 4.36 4.18 4.01 3.86
48 8.54 7.89 7.32 6.83 6.41 6.03 5.69 5.40 5.13 4.88 4.66 4.46 4.27 4.10 3.94
49 8.72 8.05 7.47 6.98 6.54 6.16 5.81 5.51 5.23 4.98 4.76 4.55 4.36 4.19 4.02
50 8.90 8.21 7.63 7.12 6.67 6.28 5.93 5.62 5.34 5.08 4.85 4.64 4.45 4.27 4.11
51 9.08 8.38 7.78 7.26 6.81 6.41 6.05 5.73 5.45 5.19 4.95 4.74 4.54 4.36 4.19
52 9.25 8.54 7.93 7.40 6.94 6.53 6.17 5.84 5.55 5.29 5.05 4.83 4.63 4.44 4.27
53 9.43 8.71 8.08 7.55 7.07 6.66 6.29 5.96 5.66 5.39 5.14 4.92 4.72 4.53 4.35
54 9.61 8.87 8.24 7.69 7.21 6.78 6.41 6.07 5.77 5.49 5.24 5.01 4.80 4.61 4.44
55 9.79 9.03 8.39 7.83 7.34 6.91 6.53 6.18 5.87 5.59 5.34 5.11 4.89 4.70 4.52
56 9.97 9.20 8.54 7.97 7.47 7.03 6.64 6.29 5.98 5.69 5.44 5.20 4.98 4.78 4.60
29
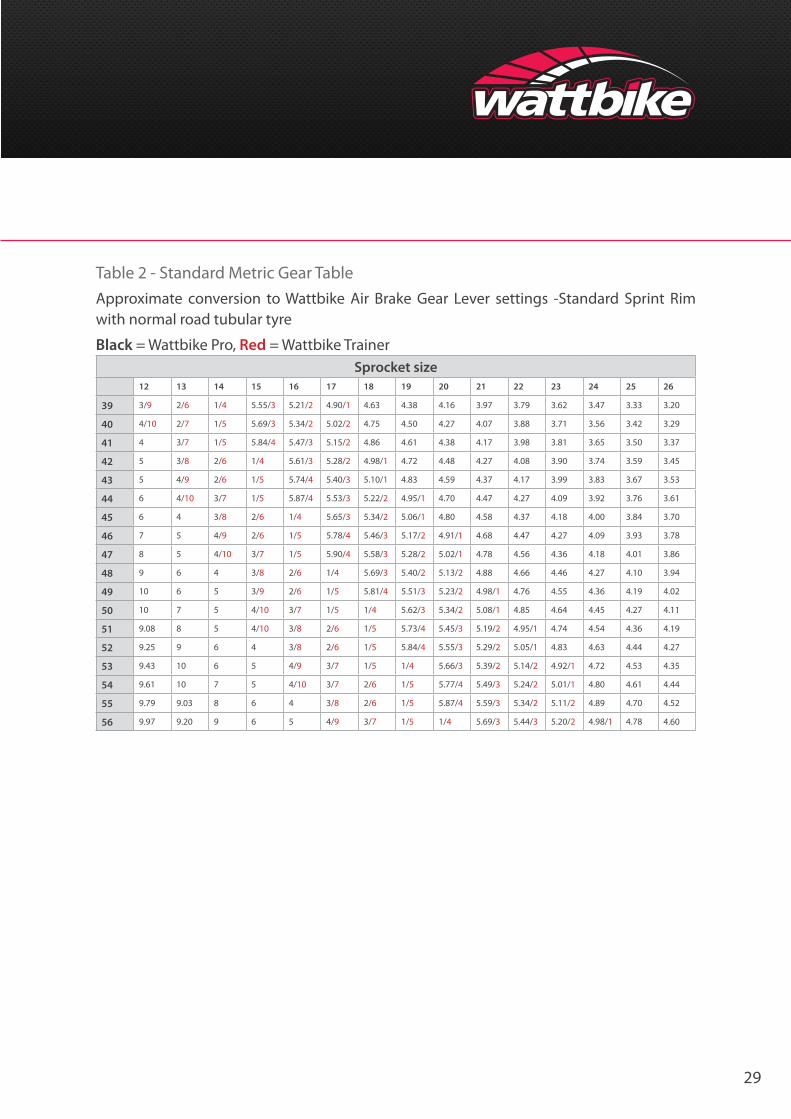
Table 2 - Standard Metric Gear TableApproximate conversion to Wattbike Air Brake Gear Lever settings -Standard Sprint Rim with normal road tubular tyre
Black = Wattbike Pro, Red = Wattbike TrainerSprocket size
12 13 14 15 16 17 18 19 20 21 22 23 24 25 26
39 3/9 2/6 1/4 5.55/3 5.21/2 4.90/1 4.63 4.38 4.16 3.97 3.79 3.62 3.47 3.33 3.20
40 4/10 2/7 1/5 5.69/3 5.34/2 5.02/2 4.75 4.50 4.27 4.07 3.88 3.71 3.56 3.42 3.29
41 4 3/7 1/5 5.84/4 5.47/3 5.15/2 4.86 4.61 4.38 4.17 3.98 3.81 3.65 3.50 3.37
42 5 3/8 2/6 1/4 5.61/3 5.28/2 4.98/1 4.72 4.48 4.27 4.08 3.90 3.74 3.59 3.45
43 5 4/9 2/6 1/5 5.74/4 5.40/3 5.10/1 4.83 4.59 4.37 4.17 3.99 3.83 3.67 3.53
44 6 4/10 3/7 1/5 5.87/4 5.53/3 5.22/2 4.95/1 4.70 4.47 4.27 4.09 3.92 3.76 3.61
45 6 4 3/8 2/6 1/4 5.65/3 5.34/2 5.06/1 4.80 4.58 4.37 4.18 4.00 3.84 3.70
46 7 5 4/9 2/6 1/5 5.78/4 5.46/3 5.17/2 4.91/1 4.68 4.47 4.27 4.09 3.93 3.78
47 8 5 4/10 3/7 1/5 5.90/4 5.58/3 5.28/2 5.02/1 4.78 4.56 4.36 4.18 4.01 3.86
48 9 6 4 3/8 2/6 1/4 5.69/3 5.40/2 5.13/2 4.88 4.66 4.46 4.27 4.10 3.94
49 10 6 5 3/9 2/6 1/5 5.81/4 5.51/3 5.23/2 4.98/1 4.76 4.55 4.36 4.19 4.02
50 10 7 5 4/10 3/7 1/5 1/4 5.62/3 5.34/2 5.08/1 4.85 4.64 4.45 4.27 4.11
51 9.08 8 5 4/10 3/8 2/6 1/5 5.73/4 5.45/3 5.19/2 4.95/1 4.74 4.54 4.36 4.19
52 9.25 9 6 4 3/8 2/6 1/5 5.84/4 5.55/3 5.29/2 5.05/1 4.83 4.63 4.44 4.27
53 9.43 10 6 5 4/9 3/7 1/5 1/4 5.66/3 5.39/2 5.14/2 4.92/1 4.72 4.53 4.35
54 9.61 10 7 5 4/10 3/7 2/6 1/5 5.77/4 5.49/3 5.24/2 5.01/1 4.80 4.61 4.44
55 9.79 9.03 8 6 4 3/8 2/6 1/5 5.87/4 5.59/3 5.34/2 5.11/2 4.89 4.70 4.52
56 9.97 9.20 9 6 5 4/9 3/7 1/5 1/4 5.69/3 5.44/3 5.20/2 4.98/1 4.78 4.60
30
What are gear inches?Gear inches is a system that assigns numerical measurements to gear ratios to indicate how low or high a gear is. It has no physical significance. Gear inches relate to the diameter in inches of the main wheel of an old-fashioned penny-farthing with equivalent gearing.
To convert from gear inches to gear metres divide by 0.08 (more exactly: 0.0798, or precisely: 0.0254π). So for example level 1 on the Wattbike is 6.2 metres (at 90 cadence see table 3) or 6.2/0.08 =77.5 inches. The difference between gear inches and gear metres is the factor ∏ i.e multiply by 3.142 to get the distance travelled in one pedal revolution.
Gear inches originate from the old-fashioned penny-farthing when crankarms were attached directly to the large drive wheel. One turn of the pedals moved the bicycle a distance equal to the circumference of the wheel.
The larger the wheel the farther the bicycle went for each turn of the pedals. The gear-inch system is a holdover from these early days when wheel diameter determined the bike’s gearing. Riding in a high gear on a modern bike is mechanically equivalent to riding a penny-farthing with a large wheel whereas a low gear on a modern bike is the equivalent of a smaller wheel on a penny-farthing.
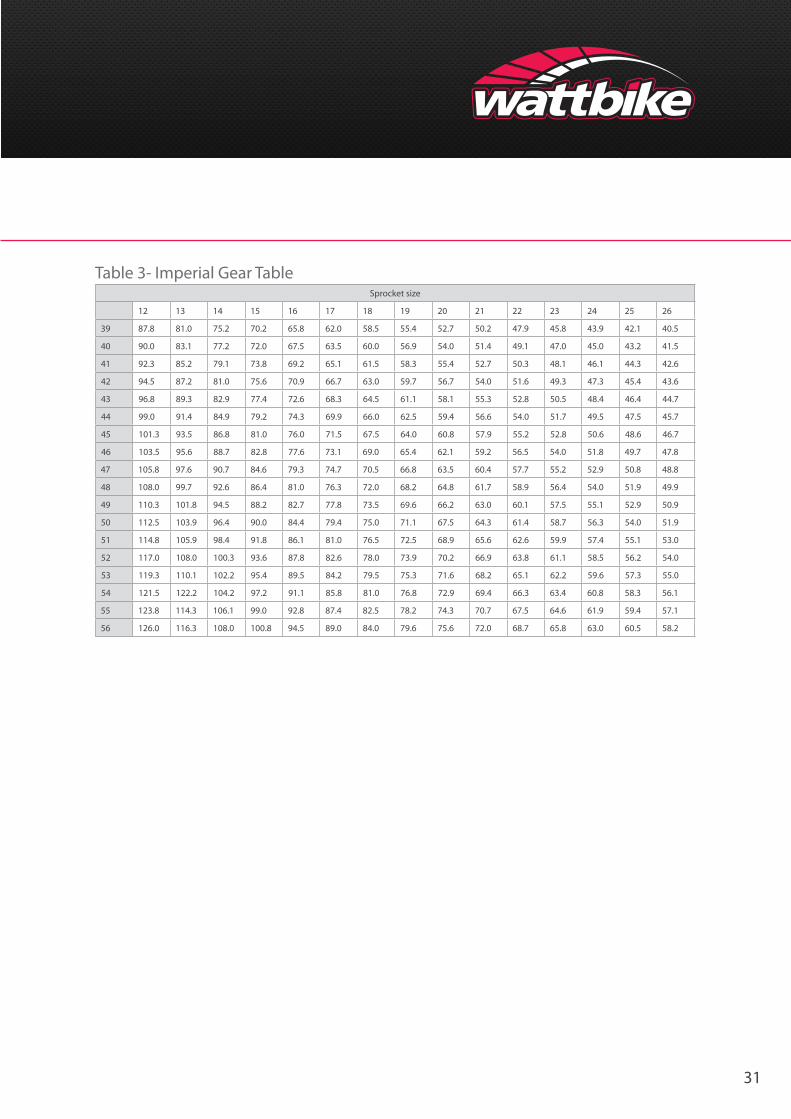
Gear inches express gear ratios as the diameter of a directly-driven wheel and is calculated as follows: Diameter of drive wheel in inches × number of teeth on the chainring / number of teeth on the sprocket. The gear inches table is based on a wheel diameter of 27 inches. This means that a 48 teeth chainring/18 teeth sprocket setup is usually considered to be 72 inches. The full gear inches and conversion to equivalent Wattbike settings are shown in Tables 3 and 4.
Level 1 = 6.2 metres
6.2
0.08 = 77.5 inches
31
Table 3- Imperial Gear TableSprocket size
12 13 14 15 16 17 18 19 20 21 22 23 24 25 26
39 87.8 81.0 75.2 70.2 65.8 62.0 58.5 55.4 52.7 50.2 47.9 45.8 43.9 42.1 40.5
40 90.0 83.1 77.2 72.0 67.5 63.5 60.0 56.9 54.0 51.4 49.1 47.0 45.0 43.2 41.5
41 92.3 85.2 79.1 73.8 69.2 65.1 61.5 58.3 55.4 52.7 50.3 48.1 46.1 44.3 42.6
42 94.5 87.2 81.0 75.6 70.9 66.7 63.0 59.7 56.7 54.0 51.6 49.3 47.3 45.4 43.6
43 96.8 89.3 82.9 77.4 72.6 68.3 64.5 61.1 58.1 55.3 52.8 50.5 48.4 46.4 44.7
44 99.0 91.4 84.9 79.2 74.3 69.9 66.0 62.5 59.4 56.6 54.0 51.7 49.5 47.5 45.7
45 101.3 93.5 86.8 81.0 76.0 71.5 67.5 64.0 60.8 57.9 55.2 52.8 50.6 48.6 46.7
46 103.5 95.6 88.7 82.8 77.6 73.1 69.0 65.4 62.1 59.2 56.5 54.0 51.8 49.7 47.8
47 105.8 97.6 90.7 84.6 79.3 74.7 70.5 66.8 63.5 60.4 57.7 55.2 52.9 50.8 48.8
48 108.0 99.7 92.6 86.4 81.0 76.3 72.0 68.2 64.8 61.7 58.9 56.4 54.0 51.9 49.9
49 110.3 101.8 94.5 88.2 82.7 77.8 73.5 69.6 66.2 63.0 60.1 57.5 55.1 52.9 50.9
50 112.5 103.9 96.4 90.0 84.4 79.4 75.0 71.1 67.5 64.3 61.4 58.7 56.3 54.0 51.9
51 114.8 105.9 98.4 91.8 86.1 81.0 76.5 72.5 68.9 65.6 62.6 59.9 57.4 55.1 53.0
52 117.0 108.0 100.3 93.6 87.8 82.6 78.0 73.9 70.2 66.9 63.8 61.1 58.5 56.2 54.0
53 119.3 110.1 102.2 95.4 89.5 84.2 79.5 75.3 71.6 68.2 65.1 62.2 59.6 57.3 55.0
54 121.5 122.2 104.2 97.2 91.1 85.8 81.0 76.8 72.9 69.4 66.3 63.4 60.8 58.3 56.1
55 123.8 114.3 106.1 99.0 92.8 87.4 82.5 78.2 74.3 70.7 67.5 64.6 61.9 59.4 57.1
56 126.0 116.3 108.0 100.8 94.5 89.0 84.0 79.6 75.6 72.0 68.7 65.8 63.0 60.5 58.2
32
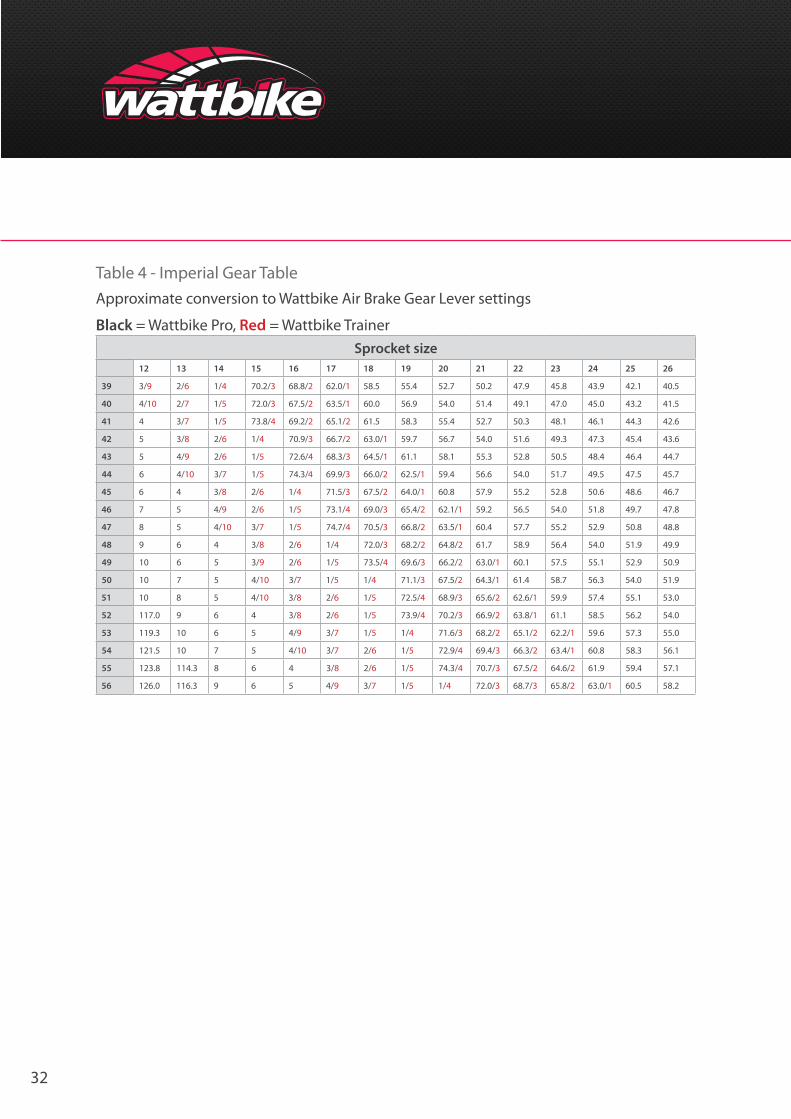
Table 4 - Imperial Gear Table Approximate conversion to Wattbike Air Brake Gear Lever settings
Black = Wattbike Pro, Red = Wattbike TrainerSprocket size
12 13 14 15 16 17 18 19 20 21 22 23 24 25 26
39 3/9 2/6 1/4 70.2/3 68.8/2 62.0/1 58.5 55.4 52.7 50.2 47.9 45.8 43.9 42.1 40.5
40 4/10 2/7 1/5 72.0/3 67.5/2 63.5/1 60.0 56.9 54.0 51.4 49.1 47.0 45.0 43.2 41.5
41 4 3/7 1/5 73.8/4 69.2/2 65.1/2 61.5 58.3 55.4 52.7 50.3 48.1 46.1 44.3 42.6
42 5 3/8 2/6 1/4 70.9/3 66.7/2 63.0/1 59.7 56.7 54.0 51.6 49.3 47.3 45.4 43.6
43 5 4/9 2/6 1/5 72.6/4 68.3/3 64.5/1 61.1 58.1 55.3 52.8 50.5 48.4 46.4 44.7
44 6 4/10 3/7 1/5 74.3/4 69.9/3 66.0/2 62.5/1 59.4 56.6 54.0 51.7 49.5 47.5 45.7
45 6 4 3/8 2/6 1/4 71.5/3 67.5/2 64.0/1 60.8 57.9 55.2 52.8 50.6 48.6 46.7
46 7 5 4/9 2/6 1/5 73.1/4 69.0/3 65.4/2 62.1/1 59.2 56.5 54.0 51.8 49.7 47.8
47 8 5 4/10 3/7 1/5 74.7/4 70.5/3 66.8/2 63.5/1 60.4 57.7 55.2 52.9 50.8 48.8
48 9 6 4 3/8 2/6 1/4 72.0/3 68.2/2 64.8/2 61.7 58.9 56.4 54.0 51.9 49.9
49 10 6 5 3/9 2/6 1/5 73.5/4 69.6/3 66.2/2 63.0/1 60.1 57.5 55.1 52.9 50.9
50 10 7 5 4/10 3/7 1/5 1/4 71.1/3 67.5/2 64.3/1 61.4 58.7 56.3 54.0 51.9
51 10 8 5 4/10 3/8 2/6 1/5 72.5/4 68.9/3 65.6/2 62.6/1 59.9 57.4 55.1 53.0
52 117.0 9 6 4 3/8 2/6 1/5 73.9/4 70.2/3 66.9/2 63.8/1 61.1 58.5 56.2 54.0
53 119.3 10 6 5 4/9 3/7 1/5 1/4 71.6/3 68.2/2 65.1/2 62.2/1 59.6 57.3 55.0
54 121.5 10 7 5 4/10 3/7 2/6 1/5 72.9/4 69.4/3 66.3/2 63.4/1 60.8 58.3 56.1
55 123.8 114.3 8 6 4 3/8 2/6 1/5 74.3/4 70.7/3 67.5/2 64.6/2 61.9 59.4 57.1
56 126.0 116.3 9 6 5 4/9 3/7 1/5 1/4 72.0/3 68.7/3 65.8/2 63.0/1 60.5 58.2
33
Getting StartedThis section of the training guide is very important to make sure that you understand how to get the most out of the training plans, and the Wattbike. You should read each page carefully before moving on to find out about the tests in the next section.
What you need to know to train on the Wattbike• Heart Rate and Power Training Zones• Estimating Maximum Heart Rate (MHR) and Maximum Minute Power (MMP)• The Importance of Power to Weight Ratio [P/Kg] in Cycling• Test yourself• Fitness Levels• Using High And Low Resistance Settings• Warm Up And Cool Down• Fluid And Carbohydrate Intake Before, During And After Training
To use a Wattbike effectively you need to know or estimate your:• *Maximum minute power – [MMP] in Watts [W]• *Maximum heart rate- [MHR] in beats per minute [bpm]• Heart rate and power training Zones• Range of Wattbike cadence (revolutions per minute [r/m]) and air resistance
settings for each training Zone *The highest average minute power output (in Watts) and highest heart rate achieved during a Wattbike cycling ramp test (usually the final minute)
You can estimate or find these values by using one of the Wattbike Cycling Tests in this Guide.
WarningDo not guess any of these requirements, use the tests in this guide to estimate your personal values.The tests in this Guide assume a high level of basic fitness and should not be attempted if you are a beginner or have been recently ill or injured. If in doubt consult your Doctor before you commence a Wattbike test or training plan. The tests are not suitable for anyone under the age of 18 unless under supervision.
34
Heart Rate and Power Training ZonesHeart rates are measured by connecting a heart rate monitor to the Wattbike (coded Suunto and Garmin and uncoded Polar [HR receiver required for Polar]).
We have adopted the British Cycling methodology for calculating heart rate and power training Zones. This methodology has been expanded to include a table of recommended Wattbike cadence and air resistance settings to achieve the heart rate and power Zones required.
The training Zones are based on the results of a Wattbike test to find or estimate your maximum minute power and maximum heart rate.
In general a workout where heart rate is 50 beats below maximum heart rate is recovery or base endurance. 30 to 50 beats below maximum is endurance training, 15 to 30 beats below maximum is intensive training and 0-15 beats below is very short high intensity interval training.
Once you have carried out a Wattbike test or used an estimated method to calculate your maximum heart rate you will be able to work out your personal Wattbike air resistance and cadence settings that apply to each of your heart rate and power training Zones using the table provided in this guide.
The key measures you should use to establish (or estimate) your heart rate and power training Zones are:
• Heart rate [bpm]• Watts [W]• Cadence [r/m]
This means that it is possible to train with the correct heart rate, power, cadence and air resistance for a training session of known duration/distance and intensity (training Zone). You can choose to train by any combination of heart rate, power, cadence and air resistance setting.
35
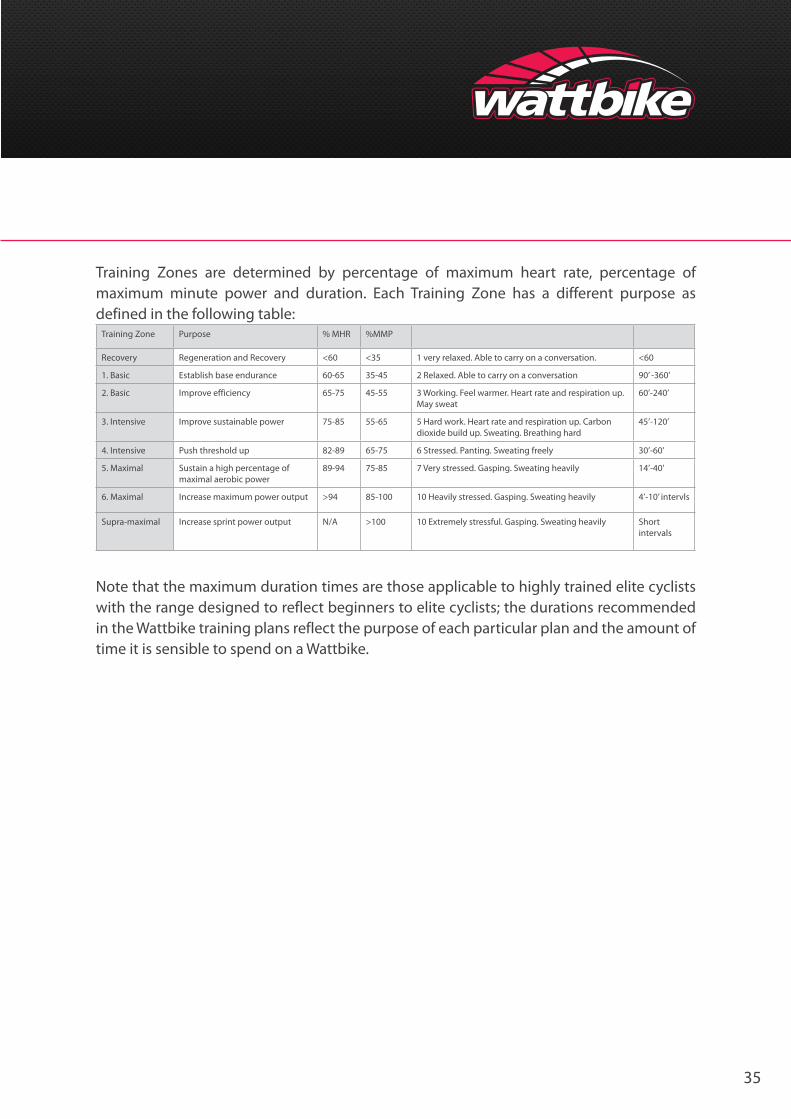
Training Zones are determined by percentage of maximum heart rate, percentage of maximum minute power and duration. Each Training Zone has a different purpose as defined in the following table:
Training Zone Purpose % MHR %MMP
Recovery Regeneration and Recovery <60 <35 1 very relaxed. Able to carry on a conversation. <60
1. Basic Establish base endurance 60-65 35-45 2 Relaxed. Able to carry on a conversation 90’ -360’
2. Basic Improve efficiency 65-75 45-55 3 Working. Feel warmer. Heart rate and respiration up. May sweat
60’-240’
3. Intensive Improve sustainable power 75-85 55-65 5 Hard work. Heart rate and respiration up. Carbon dioxide build up. Sweating. Breathing hard
45’-120’
4. Intensive Push threshold up 82-89 65-75 6 Stressed. Panting. Sweating freely 30’-60’
5. Maximal Sustain a high percentage of maximal aerobic power
89-94 75-85 7 Very stressed. Gasping. Sweating heavily 14’-40’
6. Maximal Increase maximum power output >94 85-100 10 Heavily stressed. Gasping. Sweating heavily 4’-10’ intervls
Supra-maximal Increase sprint power output N/A >100 10 Extremely stressful. Gasping. Sweating heavily Short intervals
Note that the maximum duration times are those applicable to highly trained elite cyclists with the range designed to reflect beginners to elite cyclists; the durations recommended in the Wattbike training plans reflect the purpose of each particular plan and the amount of time it is sensible to spend on a Wattbike.
36
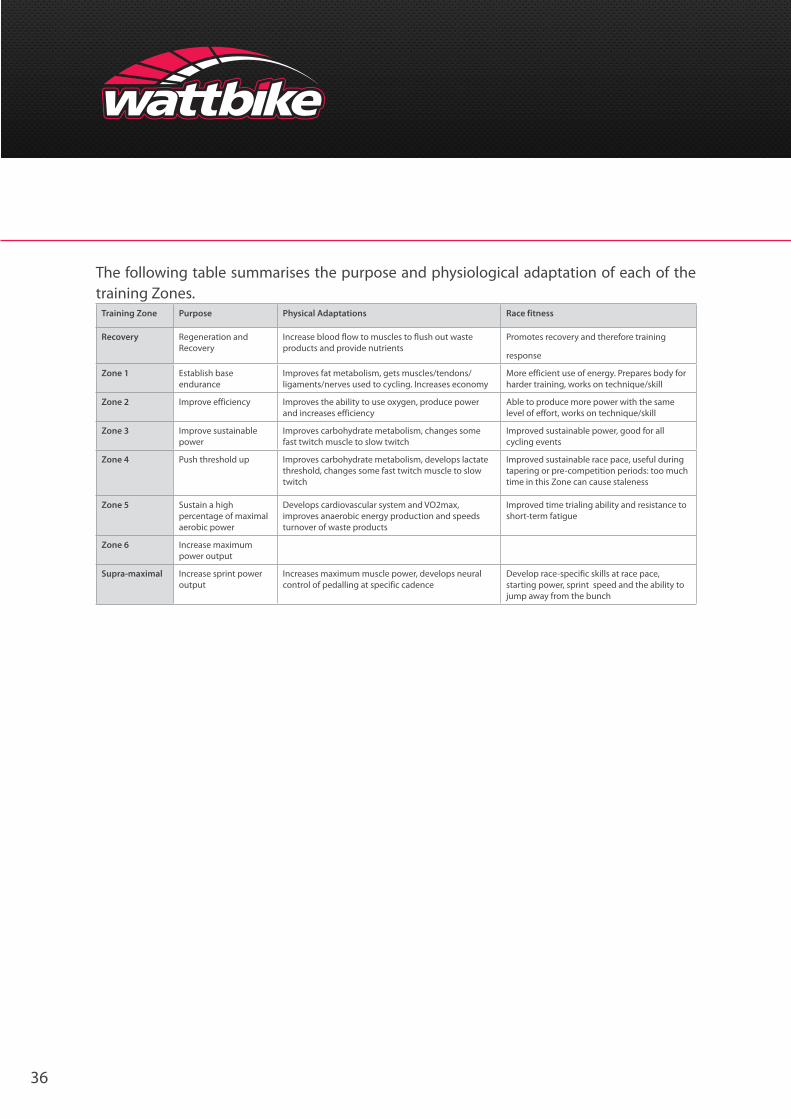
The following table summarises the purpose and physiological adaptation of each of the training Zones.
Training Zone Purpose Physical Adaptations Race fitness
Recovery Regeneration and Recovery
Increase blood flow to muscles to flush out waste products and provide nutrients
Promotes recovery and therefore training
response
Zone 1 Establish base endurance
Improves fat metabolism, gets muscles/tendons/ligaments/nerves used to cycling. Increases economy
More efficient use of energy. Prepares body for harder training, works on technique/skill
Zone 2 Improve efficiency Improves the ability to use oxygen, produce power and increases efficiency
Able to produce more power with the same level of effort, works on technique/skill
Zone 3 Improve sustainable power
Improves carbohydrate metabolism, changes some fast twitch muscle to slow twitch
Improved sustainable power, good for all cycling events
Zone 4 Push threshold up Improves carbohydrate metabolism, develops lactate threshold, changes some fast twitch muscle to slow twitch
Improved sustainable race pace, useful during tapering or pre-competition periods: too much time in this Zone can cause staleness
Zone 5 Sustain a high percentage of maximal aerobic power
Develops cardiovascular system and VO2max, improves anaerobic energy production and speeds turnover of waste products
Improved time trialing ability and resistance to short-term fatigue
Zone 6 Increase maximum power output
Supra-maximal Increase sprint power output
Increases maximum muscle power, develops neural control of pedalling at specific cadence
Develop race-specific skills at race pace, starting power, sprint speed and the ability to jump away from the bunch
37
Estimating Maximum Heart Rate (MHR) and Maximum Minute Power (MMP)The only way to determine your cycling maximum heart rate and maximum minute power is by using a properly constructed cycling test.
However such a test requires considerable motivation, physical stress and discomfort and it is inadvisable without medical clearance and supervision, particularly for individuals predisposed to coronary heart disease. We therefore suggest that people consider themselves “average” and use age predicted maximum heart rates despite the inaccuracy of such methods (as much as +/- 20 bpm).
Remember that if you know your running maximum heart rate your cycling max could be 5-10 beats lower.
A number of methods are available (subtract at least 5 beats for cycling):• MHR = 220 minus your age• 210 minus (0.65 X age)• 217 minus (0.85 X age)
See www.brianmac.co.uk/maxhr.htm for further suggestions.
As you progress in your training adjust your training Zones if you achieve a higher maximum heart rate and, when fit enough arrange to undertake a structured Wattbike cycling test.
To estimate maximum minute power use the average power achieved in a Wattbike 3 minute aerobic test. Exercise caution when undertaking the test for the first time. You can also use the maximum heart rate achieved in this test as your starting point for heart rate calculations (even though this may be inaccurate).
Always err on the side of caution, as you improve you can adjust the heart rate and power training Zones.
38
Power to Weight RatioThe Wattbike measures absolute mechanical power in Watts. The amount of power produced is measured from the sum of all the forces applied to the chain through the cranks. One way to utilise the Wattbike’s power data is to determine power to weight ratio [P/Kg] and use this information to optimise performance.
What is power to weight ratio [P/Kg]?Power to weight [P/Kg] ratio is the relationship between:
• Power (measured is watts [W])
• Weight (measured in kilograms [kg])
For example if a cyclist produces a maximum minute power of 350 W during a cycling ramp test and weighs 70 Kgs the power to weight ratio [P/Kg] is expressed as: P/Kg = 350/70 = 5 Watts per kilogram of body weight. A cyclist weighing 90 Kgs achieving the same maximum minute power would have a power to weight ratio [P/Kg] of P/Kg = 350/90 = 3.89 Watts per kilogram of body weight.
Wattbike Expert Software (version 2.50.42 upwards) automatically calculates the Power to Weight ratio [P/kg] providing the correct weight, in kilograms has been entered in the cyclist’s personal file.
Why measure power to weight ratio [P/Kg]The purpose of measurement is to optimise power to weight ratio relative to a specific task, for example cycling up a hill or during a sprint of short duration (note also the consideration of drag and rolling road resistance where frontal surface area and weight are equally relevant even on a flat road course).
Optimisation can be done in two ways which can be combined:• Increasing absolute power• Decreasing weight
Losing weight as a means of improving the ratio is not recommended unless clearly overweight. Dieting to attain an “ideal” cycling weight can be very counter productive. It’s not as simple as losing weight, if lean muscle mass is lost absolute power output will be reduced as the means for producing the power has gone.
The best option is to focus on optimising power whilst balancing diet and weight. It is far simpler to maximise power than control body weight. Weight loss can usually be achieved naturally by a structured training and racing program. By focusing on training to maximise power (increasing lean muscle mass) power and weight ratio can be optimised.
39
The basic science of power to weight ratio[P/Kg]The best explanation is to consider hill cycling ability. Assume two cyclists of equal ability and identical equipment riding uphill side-by-side. The first cyclist weighs 85 Kgs and has an average power on the climb of 450 watts. The second cyclist weighs 65 Kgs and has an average power on the climb of 380 watts.
Looking at pure absolute power the natural assumption is that the first cyclist would easily beat the second cyclist on this climb because of the 70 watt power difference.
However, power is not the only variable that cyclists have to contend with whilst climbing. Part of a cyclist’s climbing power is used to move horizontally in a forward direction and part to overcome the influence of gravity in moving in an uphill direction (i.e. climbing the hill).When weight is taken into account in addition to absolute climbing power the result for each cyclist is:
• Cyclist 1 P/Kg= 5.29 W/Kg (450/85)
• Cyclist 2 P/Kg = 5.85 (380/65)
Cyclist 2 in most circumstances would get to the top of the hill first even though cyclist 1 is producing 18% more absolute power than cyclist 2.
What is a typical power to weight ratioIt really depends on the type of cyclist. Sprinters typically have high short duration power output and lower endurance scores whilst endurance cyclists may have low short duration power and high endurance scores. Weight (lean muscle mass) is an advantage for short duration sprint cyclists.
As an example, world class male sprint cyclists typically weigh over 80 Kgs and in some cases over 90 Kgs and are capable of peak power scores in the range 1750-2250 W and max minute power of 360-400W. Conversely world class male endurance cyclists typically weigh closer to 70-75 Kgs and whilst producing lower peak power scores of 1000-1250W have a much higher max minute power score of 420-500W.
World class female sprint cyclists typically weigh 60-65 Kgs with peak power scores of 1000-1500W, world class female endurance cyclist typically weigh well below 60 Kgs with max minute power score of 320-350W.
On a Wattbike we have seen scores within these ranges - the highest peak power score, so far is 2300W (male) and 1600W (female). Testing peak power and maximum minute power on a Wattbike is an easy process. A 6 second Peak Power Test is built into the Wattbike Performance Computer and Maximum Minute Power Ramp Test protocols are easy to construct on a Wattbike and analyse using Wattbike Expert Software.
40
How to improve power to weight ratio [P/Kg]In the example above cyclist 1 would need to lose 9 Kgs to increase power to weight ratio to equal that of cyclist 2. A rapid reduction in body weight of this magnitude would result in the loss of lean muscle mass responsible for producing the power in the first place. The better choice would be to focus on increasing absolute power using a structured training program.
The advantage of the Wattbike is the control and immediate, accurate feedback on relevant parameters such as gearing (resistance), cadence (see section on Gearing and Cadence), power output, technique (using the unique Polar Graph facility of the Wattbike Performance Computer and Expert Software) and many other cycling parameters to optimize performance.
The Wattbike RankingThe Wattbike ranking is a good place to log scores and look at comparisons with other Wattbike users.
• The current peak power ranking has a number of male entries over 1750W with a few over 2000W, for females there are a few entries in the range 1000-1250 W
• For 60 minutes there are a limited number of entries so far but for males a few in the range 300-350 W
• We expect the 60 minute score to improve dramatically as more people attempt 60 minutes on a Wattbike.
41
Test YourselfStep 1Conduct a 3 minute aerobic test, or if you are undertaking Sportive Training Plans 4 and 5 or the Triathlon Winter Training Plan you could use the Fletcher Test (20 minute high percentage of maximum minute power test) and/or one of the ramp tests. Full details of all the test can be found in the Wattbike Cycling Tests section.
Step 2Record the average power in Watts and the maximum heart rate achieved for the 3 minutes or, the highest average minute power output in Watts and highest heart rate achieved during a ramp test (usually the final minute).
Step 3Use the experience description or your maximum minute power to decide your fitness level and training plan. The fitness levels equate to the Sportive training plans. For example if you are a beginner with no cycling experience then your fitness level is 1 and you should follow Sportive training plan 1. If you are an experienced cyclist cycling 5 + times a week then you are fitness level 5 and should follow Sportive training plan 5.
Step 4Apply the power and heart rate training Zones to the specific training plan you are following.Fitter individuals (non cyclists) and experienced cyclists can use just a ramp test in step 1 to establish maximum minute power and maximum heart rate.
There are 5 fitness levels
Level 1 (Beginner) - No previous cycling experience, not currently exercisingMMP Power to weight
M - 240W F - 160W M - 2.58W/kg F - 2.16W/kg
Level 2 (Moderate Fitness) - Informal exercise over the last 12 monthsMMP Power to weight
M - 240-290W F - 160-200W M - 2.58-3.11W/kg F - 2.16-2.72W/kg
42
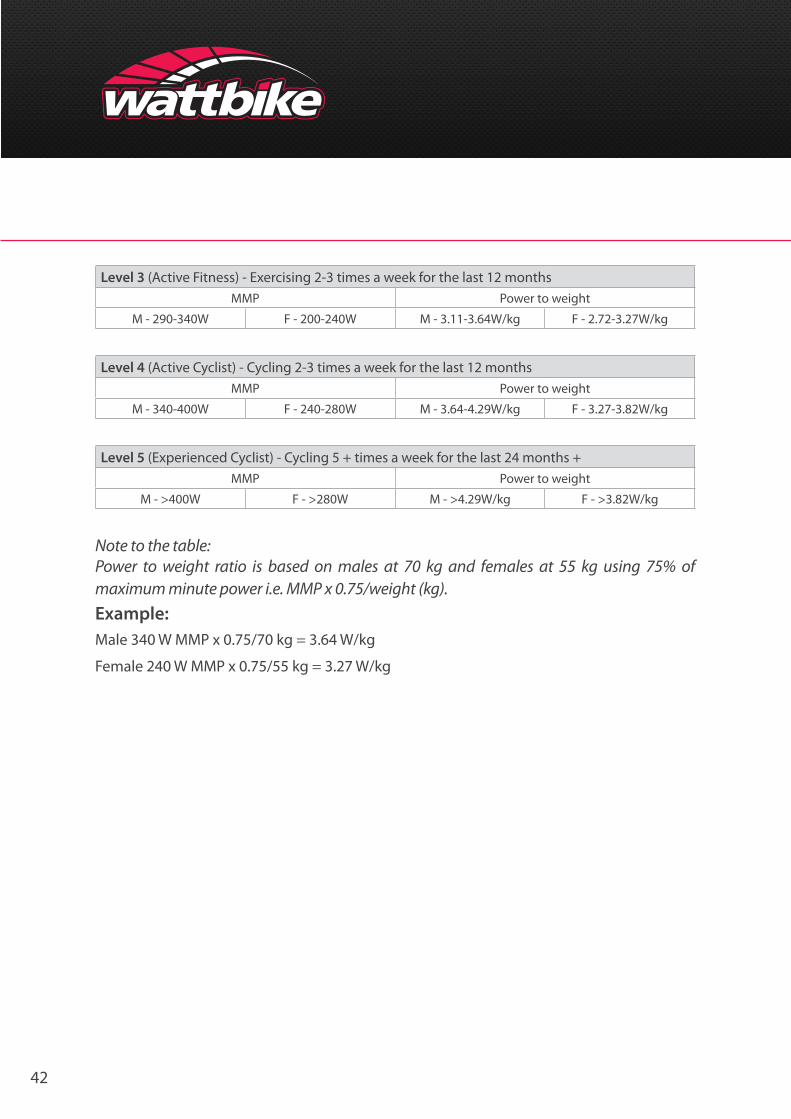
Level 3 (Active Fitness) - Exercising 2-3 times a week for the last 12 monthsMMP Power to weight
M - 290-340W F - 200-240W M - 3.11-3.64W/kg F - 2.72-3.27W/kg
Level 4 (Active Cyclist) - Cycling 2-3 times a week for the last 12 monthsMMP Power to weight
M - 340-400W F - 240-280W M - 3.64-4.29W/kg F - 3.27-3.82W/kg
Level 5 (Experienced Cyclist) - Cycling 5 + times a week for the last 24 months +MMP Power to weight
M - >400W F - >280W M - >4.29W/kg F - >3.82W/kg
Note to the table:Power to weight ratio is based on males at 70 kg and females at 55 kg using 75% of maximum minute power i.e. MMP x 0.75/weight (kg).Example:Male 340 W MMP x 0.75/70 kg = 3.64 W/kg
Female 240 W MMP x 0.75/55 kg = 3.27 W/kg
43
Using High And Low Resistance SettingsQuestion: If a high resistance produces greater power does this mean that it is better always to use a high resistance setting?
Answer: In a word ‘NO’ - The air resistance setting is not an indication of how fast you can go – level 10 is not fast and level 1 is not slow. It is not a measure of how difficult it is to complete a workout. A setting of level 10 is not more difficult than an equivalent setting of 1 The same amount of power (Watts) applied to each pedal revolution will produce the same result whether it is applied when using a high air resistance setting or when a lower setting is employed.
In the case of a high resistance setting the power will be applied through a slower movement working against a higher load. Conversely in the case of a lower resistance setting the power is applied more quickly working against a lighter load. For the same power output a lower resistance setting will require a higher cadence but less force. Conversely, a higher resistance setting allows a higher power output for a given cadence but requires more force.
Question: The optimum cadence (pedal revolutions per minute r/m) is a balance between leg speed and power applied to the pedals.
Answer: For general exercise the ideal setting is one that allows comfortable pedal spinning at a cadence of between 70-90 pedal revolutions per minute (r/m) – more experienced cyclists may be able to maintain a cadence of 90-110 revolutions per minute (r/m) and trained cyclists in excess of 110 revolutions per minute (r/m) – sprinters can reach 140 +. Depending on the circumstances cadence can vary from 50 to 200 rpm.
44
Warm Up And Cool DownWarm up and cool down are very important – although some the tests and some sessions in the Training Plans have warm and cool down recommendations this section is a general guide to the purpose and duration of warm up and cool down for each of the training Zones.
Warm upThe purpose of a warm up is to increase muscle and core temperature, blood flow and improve the uptake, transport and utilisation of oxygen, as well as providing a comfortable way to lead into more vigorous exercise. A warm up should progress gradually and provide sufficient intensity to increase muscle and core temperature without causing fatigue or reduced energy stores (it should make you sweat and you should be slightly breathless).
A warm up also prepares the body physically and mentally for your training session. At the start of exercise, the body begins to release adrenalin, which increases the heart rate and causes dilation of the capillaries in the muscles.
This has the dual function of increasing the temperature and elasticity of the muscles to help prevent injury and improve the speed at which oxygen can be transported around the body. The increased temperature allows the enzymes required for the muscular contraction to function more efficiently.
Warm up also make you more alert as the increased body temperature allows nerve impulses to travel more quickly, improving reaction time. There are also psychological benefits of a warm up, especially if you are superstitious and perform the same routine every time you exercise or compete.
The warm up you do may need to vary depending on the environmental conditions (hot or cold/dry or humid) and should be completed 5-10 minutes before undertaking your Wattbike session.
Recommended Warm UpsThe recommended warm up for the different type of session is:
• Recovery - Warm up 5’ slow pedalling – repeat for cool down
• Zone 1 & Zone 2 - Warm up 5’-10’ at Recovery Zone, repeat for cool down
• Zone 3 - Warm up 10’ progressive Recovery-Zone 1-Zone 2, cool down 10’ at Recovery Zone
• 10’ Progress Check - Warm up 5’ at 50% of MMP, cool down 5-10 minutes at Recovery Zone
• Technique, Zone 4, Zone 5 and 3’ & 20’ Tests - These sessions have a specific warm
up which is based on Maximum Minute Power (MMP), see below
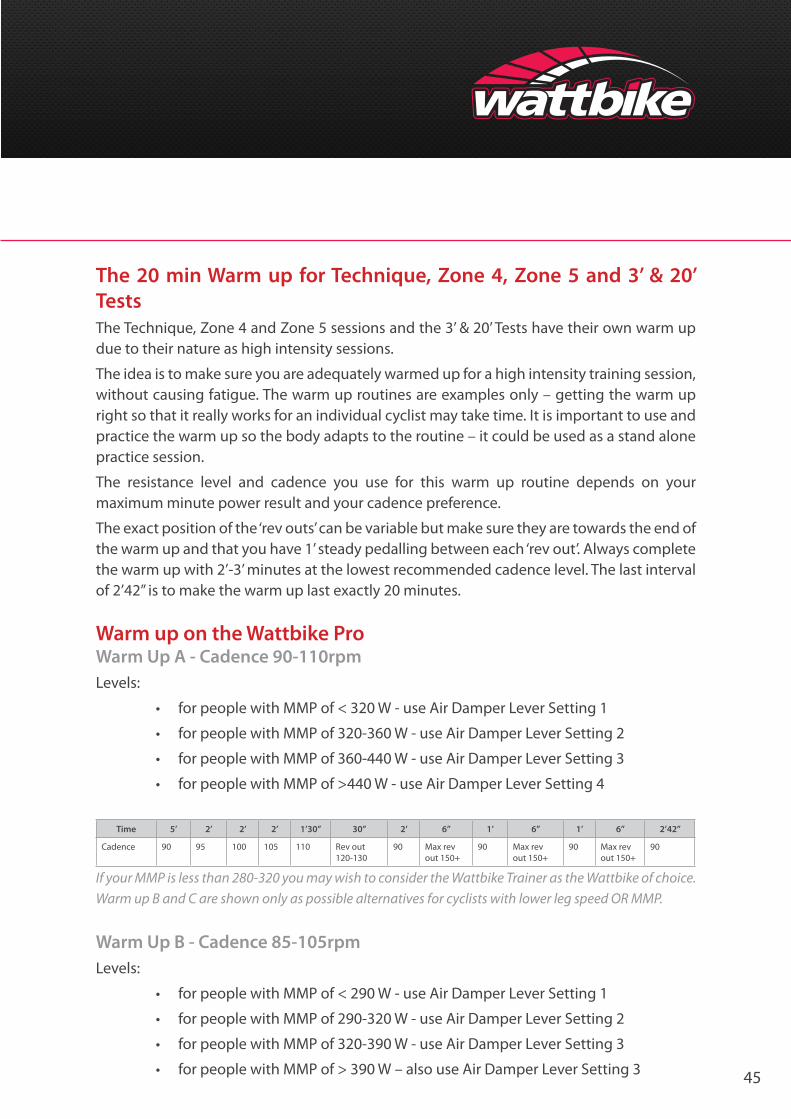
45
The 20 min Warm up for Technique, Zone 4, Zone 5 and 3’ & 20’ TestsThe Technique, Zone 4 and Zone 5 sessions and the 3’ & 20’ Tests have their own warm up due to their nature as high intensity sessions.
The idea is to make sure you are adequately warmed up for a high intensity training session, without causing fatigue. The warm up routines are examples only – getting the warm up right so that it really works for an individual cyclist may take time. It is important to use and practice the warm up so the body adapts to the routine – it could be used as a stand alone practice session.
The resistance level and cadence you use for this warm up routine depends on your maximum minute power result and your cadence preference.
The exact position of the ‘rev outs’ can be variable but make sure they are towards the end of the warm up and that you have 1’ steady pedalling between each ‘rev out’. Always complete the warm up with 2’-3’ minutes at the lowest recommended cadence level. The last interval of 2’42” is to make the warm up last exactly 20 minutes.
Warm up on the Wattbike ProWarm Up A - Cadence 90-110rpmLevels:
• for people with MMP of < 320 W - use Air Damper Lever Setting 1
• for people with MMP of 320-360 W - use Air Damper Lever Setting 2
• for people with MMP of 360-440 W - use Air Damper Lever Setting 3
• for people with MMP of >440 W - use Air Damper Lever Setting 4
Time 5’ 2’ 2’ 2’ 1’30” 30” 2’ 6” 1’ 6” 1’ 6” 2’42”
Cadence 90 95 100 105 110 Rev out 120-130
90 Max rev out 150+
90 Max rev out 150+
90 Max rev out 150+
90
If your MMP is less than 280-320 you may wish to consider the Wattbike Trainer as the Wattbike of choice.Warm up B and C are shown only as possible alternatives for cyclists with lower leg speed OR MMP.
Warm Up B - Cadence 85-105rpmLevels:
• for people with MMP of < 290 W - use Air Damper Lever Setting 1
• for people with MMP of 290-320 W - use Air Damper Lever Setting 2
• for people with MMP of 320-390 W - use Air Damper Lever Setting 3
• for people with MMP of > 390 W – also use Air Damper Lever Setting 3
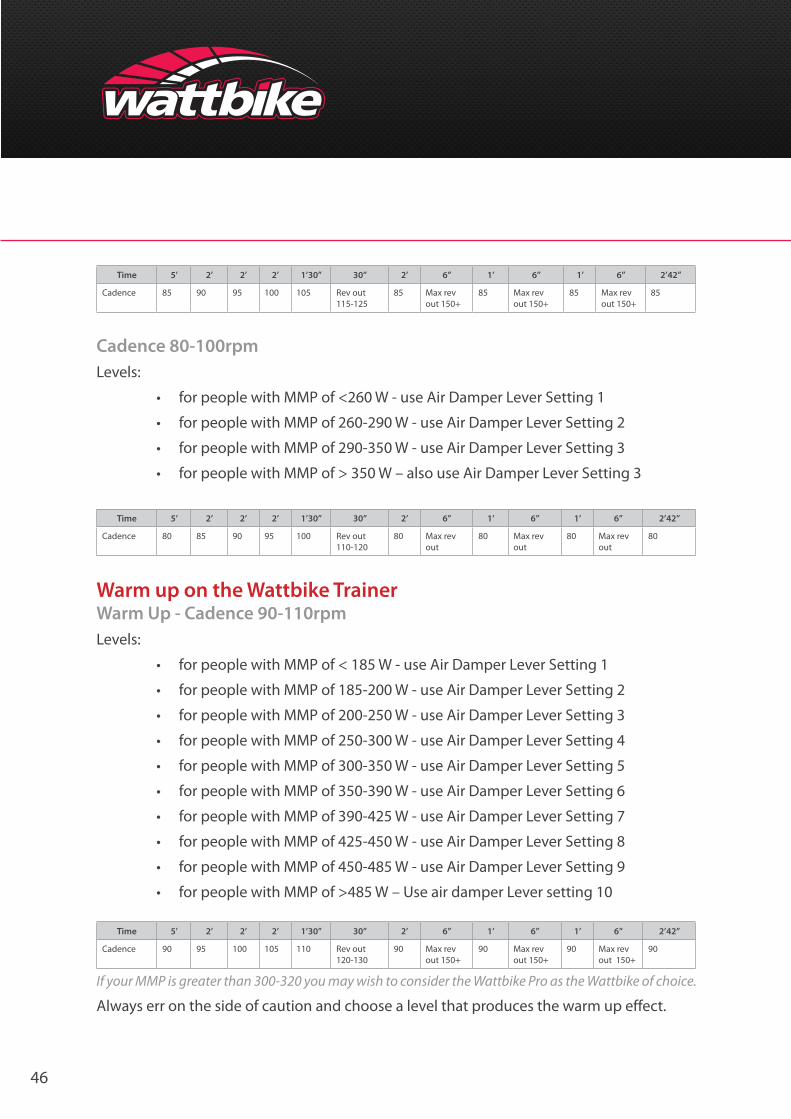
46
Time 5’ 2’ 2’ 2’ 1’30” 30” 2’ 6” 1’ 6” 1’ 6” 2’42”
Cadence 85 90 95 100 105 Rev out 115-125
85 Max rev out 150+
85 Max rev out 150+
85 Max rev out 150+
85
Cadence 80-100rpmLevels:
• for people with MMP of <260 W - use Air Damper Lever Setting 1
• for people with MMP of 260-290 W - use Air Damper Lever Setting 2
• for people with MMP of 290-350 W - use Air Damper Lever Setting 3
• for people with MMP of > 350 W – also use Air Damper Lever Setting 3
Time 5’ 2’ 2’ 2’ 1’30” 30” 2’ 6” 1’ 6” 1’ 6” 2’42”
Cadence 80 85 90 95 100 Rev out 110-120
80 Max rev out
80 Max rev out
80 Max rev out
80
Warm up on the Wattbike TrainerWarm Up - Cadence 90-110rpmLevels:
• for people with MMP of < 185 W - use Air Damper Lever Setting 1
• for people with MMP of 185-200 W - use Air Damper Lever Setting 2
• for people with MMP of 200-250 W - use Air Damper Lever Setting 3
• for people with MMP of 250-300 W - use Air Damper Lever Setting 4
• for people with MMP of 300-350 W - use Air Damper Lever Setting 5
• for people with MMP of 350-390 W - use Air Damper Lever Setting 6
• for people with MMP of 390-425 W - use Air Damper Lever Setting 7
• for people with MMP of 425-450 W - use Air Damper Lever Setting 8
• for people with MMP of 450-485 W - use Air Damper Lever Setting 9
• for people with MMP of >485 W – Use air damper Lever setting 10
Time 5’ 2’ 2’ 2’ 1’30” 30” 2’ 6” 1’ 6” 1’ 6” 2’42”
Cadence 90 95 100 105 110 Rev out 120-130
90 Max rev out 150+
90 Max rev out 150+
90 Max rev out 150+
90
If your MMP is greater than 300-320 you may wish to consider the Wattbike Pro as the Wattbike of choice. Always err on the side of caution and choose a level that produces the warm up effect.
47
Recommended Cool DownsThe recommended cool downs for the different type of session:
• Recovery - 5’ slow pedalling
• Zone 1 & Zone 2 - 5’-10’ at Recovery Zone
• Zone 3 - 10’ at Recovery Zone
• 10’ Progress Check - 5-10 minutes at Recovery Zone
• Technique, Zone 4, Zone 5 and 3’ & 20’ Tests - 15-20 minutes at
Recovery Zone
Do not miss your warm up and cool down, they are important components of any training session.
48
Rest and Recovery You can only train as hard as you can rest.
Rest is good. If you feel tired you probably are tired.
Recovery between sessions is not all about the duration, intensity and physiological effort of your cycling sessions.
Recovery is influenced by many other factors. Simple influences may be diet, hydration and sleep. More complex issues concern work and family stress. You need to be aware of the influence of your individual lifestyle on your recovery. If it is clear that you not over training then look at lifestyle issues for the cause of any deterioration. If you are in a period of heavy work or family stress reduce the number of training sessions and, both the duration and intensity of the sessions.
A maximum of 3 sessions per week with a full 24 hours between each one is recommended.Sessions in your Recovery and Zone 1/Zone 2 should be sufficient to maintain fitness in the short term and help manage recovery and reduce stress.
IllnessTraining whilst ill is not recommended. Sometimes deterioration in performance is a precursor to illness - STOP TRAINING – You will recover quicker with rest.
When you restart ease back into training with some training sessions in your Recovery to Zone 1 and Zone 2 heart rate and power training Zones.
The Recovery, Zone 1 and Zone 2 RuleIn periods of illness, injury or stress never exceed training Zones Recovery/Zone 1/Zone 2 for any session. Limit the session to less than 45’. This is a short term rule only. 3 sessions per week at low intensity/short duration is insufficient to maintain a high trained status so if recovery is prolonged a reassessment of your training Zones may be needed.
Under recoveryUnder recovery is the main reason why cyclists under perform or deteriorate. The traditional view has been ‘if it’s not ‘hard’ it hasn’t done any good’. Continual ‘hard’ training leads to under recovery, illness, injury, over training and under performance. A good training program balances duration, intensity and recovery to maximize physiological adaptation and race performance.
49
Heat/Cold/HumidityDon’t misinterpret sessions in extreme environmental conditions. Heat and/or high humidity in particular will have a marked influence on your performance and recovery. Heart rate will be elevated significantly and power or distance will be reduced. Do not take this as an indication of deterioration – adapt your cycling session to the conditions.
Neuromuscular and DOMS (Delayed Onset Muscle Soreness)It should be noted that heart rate is measuring the cardiovascular effects of training – it does not measure neuromuscular fatigue or muscle soreness and stiffness.
Whilst training sessions in Training Zones 4-6 will promote race specific neuromuscular adaptations heart rate is not a direct measure of the neuromuscular fatigue. When considering your recovery needs and planning the balance of your training program these additional recovery issues need to be included.
Neuromuscular fatigue can be defined as ‘fatigue representing the decline in muscle tension capacity with repeated stimulation’. Commonly this manifests itself in an inability to achieve a sub maximal or maximal exercise or training response. The exact causes of neuromuscular fatigue are unclear.
Muscle and stiffness can persist for several hours whereas muscle soreness (DOMS – delayed-onset muscle soreness) can appear later and last for a number of days. There are a number of direct causes of DOMS such as minute tears in muscle tissue and overstretching.
Neuromuscular fatigue and muscle soreness and stiffness extend the recovery period required before the body is ready for the next training session.
The benefits of measuring recoveryHow to measure recovery is beyond the scope of this Training Guide – however there are many benefits to measuring recovery:
• Detect early signs of overtraining or illness• Optimize training load by finding the balance between training load and
recovery• Evidence based support for critical coaching decisions• Record individual reference values e.g. during off-season when the body is
recovered• Check the recovery status during hard training periods• Check recovery status when subjective feelings and fitness level indicates poor
recovery• Make sure that the body is recovered sufficiently before a new hard training
period
50
The link between Training Zones and RecoveryIt is important to recognize that a Training Zone is also an indication of the Rest and Recovery period needed before the next training session (and therefore fatigue is linked to the duration and intensity of a training session)
• Well timed rest is one of the most important factors of your training• The effectiveness of a training session can be negligible or even detrimental
if you do not include sufficient rest and recovery and periodization into your training program
• Your body needs time for recovery after a single high intensity session or a hard training period of several days or even after a low intensity but long cycling session
• Without rest your body’s adaptation to the training stimulus will not occur. In the worst case training will lead to exhaustion and a state of overstress otherwise known as overtraining or under recovery.
A Training Zone identifies the general exertion level of your training.
During training, fatigue is temporarily increasing with recovery starting immediately after the session is completed. With recovery performance rises above the pre-training level because the body is preparing to handle the next training stimulus better than before.
If your body does not receive the next training stimulus within a reasonable period of time the achieved physiological adaptation begins to slowly decrease (detraining). However, if the next high intensity session is held BEFORE your body has recovered from the previous one the physiological adaptation will remain lower than it would have been after full recovery.
Continuous hard training with insufficient recovery will slowly lead to lower performance and a long term state of overtraining. When over trained even a long period of recovery may not be enough to return performance to the original level.
Longer more sustainable cycling may leave you less exhausted but will cause more total fatigue resulting in a longer recovery period.
Some of your cycling sessions will be interval training rather than continuous cycling where periods of high heart rates are followed by recovery periods. If the intervals are long and the recovery periods are short fatigue may reach a sufficiently high level to give you a significant recovery period.
However, for short intervals even with short recovery periods your fatigue may not accumulate sufficiently to calculate a realistic recovery period. Heart rate may rise to high levels but differs from cyclist to cyclist. Care is needed in assessing the recovery period needed.
The Training Zones correlate strongly with the lactate level of your body although for long-endurance training the correlation is not as strong (and recovery may take longer than anticipated). As a general rule a high Training Zone (5-6) can only be reached in training that
51
also causes high lactate. Base endurance training with low lactate also has low Training Zone (Recovery through to Zone 1-Zone 4).
Training Zones Blood lactate levelsRecovery less than 1.0 mmol
Zone 1 1.0-1.5 mmolZone 2 1.5-2.0 mmolZone 3 2.0-2.5 mmolZone 4 2.5-3.5 mmolZone 5 3.5-6.0 mmolZone 6 more than 6 mmol
Supra-maximal more than 6 mmol
NOTE Recovery is not just a question of the lactate level. Of more importance are the cardiovascular fatigue (linked to duration and heart rate), muscular fatigue and fatigue caused by lifestyle issues. It cannot always be assumed that a training session that causes low lactate is also one with a short recovery period.Training Zones also be considered in the context of Recovery Time
Scale of Recovery Time (Depends on the time spent at each level):Training Zone Recovery time in hours/days
Recovery and Zone 1 a few hours2 3 hours to 1 day3 1 to 2 days4 1 to 4 days5 2 to 7 days6 7 days +
General GuidelinesThe best way to train is on a Wattbike is by cycling at even heart rate over a set time or distance tracking progress for improvement or deterioration in watts, speed or time to complete a set distance. It is important not to misinterpret the data – you must expect day to day variation in power output, distance covered and heart rate. What you are looking for is a trend – a period of improvement or deterioration.
Small fluctuations are normal. For some sessions – AND THIS IS IMPORTANT power or distance

52
covered is unimportant. If cycling for recovery it is the recovery element that is paramount, stay in your recovery heart rate Zone.
Effective TrainingA common mistake is to always train at high intensity and long duration. This tends to develop ‘one pace cycling’ usually characterized by a gradual decline in performance over time. Such cyclists tend to have a high propensity to illness and over training (usually undiagnosed).By reducing the duration and intensity of training and allowing sufficient recovery there may be significant short term improvement even for older athletes simply because training is more effective. In general ‘more is less’ and ‘less is more’.
If you find that you are training mostly in Zones 4 and 5 you are most certainly over training and under recovering. The majority of your training should be in Zones 1-3 with fewer sessions in Zones 4 and above.
If I don’t see improvement why use Training Zones to monitor my training?It depends on your definition of improvement. When you first start using Training Zones you may see significant improvement in the power or distance completed for the same physiological effort.
After a while the power, distance and heart rate will plateau into consistency i.e. minimal variation in any of the parameters. This is because there are invisible improvements (physiological adaptation) happening. These improvements may take months or even years to develop. Building base endurance is the key to cycling faster at the higher intensities.
By using Training Zones to monitor your training you can manage your expectations, track each session for the correct level of duration-intensity-recovery, prevent illness and over training and make your cycling all the more enjoyable.
How do I know if I am improving or declining?You may recover from a cycling session rapidly (short term fatigue) but carry accumulated (long term) fatigue from cycling session to cycling session. This long term fatigue builds up over time and is one reason why you need a periodized training program that has built in recovery sessions. There are a number of key signs that indicate improvement or deterioration:
Improvement
• Increasing power or distance covered for the same physiological effort• Reducing physiological effort for the same power or distance
53
Deterioration
• Reducing power or distance for the same physiological effort• Increasing physiological effort for the same power or distance
Should I improve all the time?The simple answer is NO. There are limits and it is important to know your limits to get the most out of your training and to prevent over training. There are three questions to consider:
• Have you reached your physiological limits?• Are you fighting age decline?• Is your training ineffective?
Physiological LimitsNot everyone can be a top athlete, so much depends on genetics. It is true that you can improve aspects of body composition, strength, endurance and maximal oxygen uptake but only so far.
However it may still be possible to get a significant improvement with the correct level of duration-intensity-recovery training. For instance untrained individuals may be able to improve their VO2max by as much as 25% with training whereas in experienced cyclists improvement may only be 2-3%.
Manage your expectations to get the best out of your training and the use of training Zones to monitor training sessions.
Age declineThe science of aging predicts a gradual decline in the body’s ability to function as we get older. The precise mechanisms underlying the aging process are not fully understood, but the rate of decline in the general population of biological and physiological functions is known to be progressive and age related.
The reduction in exercise capacity in older individuals stems from a decrease in muscle mass, cardiovascular function and respiratory function. One age-related alteration to respiratory function is decreased respiratory muscle strength and endurance and decline in respiratory muscle strength may lead to breathlessness during activities of daily living and exercise.
The following panel summarizes the general and specific age related evidence for biological and physiological decline.
General evidence• Biological and physical peak is reached between ages 20-35

54
• During middle age 35-45 physical activity usually declines with a 5-10kg accumulation of body fat
• In later middle age (45-65) women reach menopause and men reduce substantially their output of sex hormones. The decline in physical condition continues and may accelerate
• In early old age (65-75) there may be a modest increase in physical activity following retirement but by middle old age (75-85) many people have developed some physical disability and in very old age, (over 85) totally dependency may set in
• Typical expectation is 8-10 years of partial disability and a year of total dependency
Physiological evidence• Maximum heart rate declines with age• Maximal oxygen uptake (VO2max) decreases by 10% per decade in men and
women regardless of age and exercise activity although some studies have shown no decline in aerobic capacity during a 10 year period in people maintaining constant training
• Factors other than physical activity are also crucial to the decline of maximal oxygen uptake heredity issues, increase in fat, decrease in skeletal muscle mass
However, it’s not all bad news; several studies have shown that, for athletes the decrease in maximum heart rate from age 50-70 is smaller than non-athletes.
Additionally exercise training for older people may increase aerobic capacity to the same relative extent (15-30%) as in younger adults.
Indeed, the endurance performance of older athletes provides good evidence of the benefits of maintaining regular exercise to preserve cardiovascular function.
The overall conclusion is that exercise training improves physiologic response at any age and improvements often occur at a rate and magnitude independent of a person’s age.
A key point for older cyclists is to remember that the older body needs more recovery time than the younger body.
Summary• Set realistic goals within the framework of your own physiology and performance• Be aware of aging and adjust expectations and the volume of training accordingly
- remember an older body needs more recovery time than a younger one• Develop an effective training program, one that balances duration-intensity-
recovery
55
Fluid And Carbohydrate Intake Before, During And After TrainingWhen training on an indoor cycle careful attention to fluid and carbohydrate intake is required. Try to train in an air conditioned area or an area with good natural air circulation. A fan may help – keeping cool is important.
Fluid intake during trainingAlmost any dehydration impairs performance - For each litre of sweat lost to dehydration, your heart rate will increase by approximately 8 beats and this will significantly reduce performance if the body is not continually re-hydrated.
The loss of water represents the most serious consequence of profuse sweating. Intensity and duration of exercise, external temperature and humidity determine the amount of water lost through sweating. Water loss (dehydration) can seriously impair your training, and subsequent recovery so careful attention to drinking strategy is important.
Fluid loss from the vascular compartment places a significant strain on circulatory function which ultimately impairs training performance and thermoregulation of the body.
Therefore taking on fluid before and during training will reduce the detrimental effects of dehydration on performance. Adding carbohydrates to your fluids will provide additional glucose energy. Determining the optimal fluid/carbohydrate mixture and volume becomes important to minimise fatigue and dehydration.
The body needs liquid intake on sedentary days of approximately 2.5 litres of water which it draws from food (0.8 L), stores (0.5 L) and direct liquid intake (1.2 L). On active days you may need much more 2-4 litres so remember to remain well hydrated.
Keeping a check on your body weight is a useful indicator of fluid loss every 0.45 kg of body weight lost is equivalent to 0.45 L of dehydration.
It is important to continual replace liquid throughout the normal day and during training – when training try to get into a regular habit of drinking every 10-15 minutes.
Consuming 0.4-0.6 L of fluid immediately before training and drinking .0.15-0.25 L every 15 minutes during training will optimise the beneficial effects of fluid intake. Fluid delivery of about 1L per hour should meet the needs of your training.
Carbohydrate intake required during and after trainingOne hour of cycling will reduce liver glycogen by over 50% - 2 hours of cycling will deplete all of the glycogen content of the liver and active muscles.
Before each training session a small amount of low (apples/butter-navy-kidney beans/
56
lentils) to moderate (white pasta/oatmeal/All-bran/peas) glycemic food should be eaten to provide energy at the right time.
Consuming 60g of liquid or solid carbohydrates each hour during your training sessions will help to postpone fatigue.
If you are doing an ultra long session on the Wattbike a single concentrated carbohydrate feed about 30 minutes before anticipated fatigue (generally about 2 hours into a session) is as effective as periodic carbohydrate feeding.
Immediately after training replenish your body with a small amount of high (oranges/white rice/corn flakes/new potatoes) glycemic food and within 2 hours a moderate glycemic food meal should be eaten.
57
Cycling TestsThe primary purpose of a Wattbike test is to set your heart rate and power training Zones, monitor changes in fitness and provide information about the effectiveness of your training workouts using scientific, comparable and reliable measures.
In addition the consistent and reliable data output from a Wattbike test is available to track direct changes in your performance over specific distances and durations.
Ideally, tests should only be carried out by qualified personal trainers, coaches, sports scientists (physiologists) and trained medical personnel. However it is recognized that as a Wattbike user you may wish to carry out a basic test to help you understand your current fitness level and to use in conjunction with your own training plan or the Wattbike training plans.
This section is not an exhaustive manual of cycling tests but the tests selected cover the requirements of this Guide. You may wish to use other cycling tests not in this Guide or design your own appropriate test (s). Contact Wattbike if any guidance is required.
Initial testing provides the data and information required to start a Wattbike training plan. Ongoing regular testing will give you a picture of short, medium and long term changes in all aspects of your cycling performance or general fitness.
Tests should be carried out at the beginning of each phase of your training plan and at specific points during a training phase to monitor changes in your performance.
For more information about SiS products please visit www.scienceinsport.com
58
Whilst the tests can be carried out using just the Wattbike and a heart rate monitor, gas analysis and lactate testing can be integrated into the test protocols.
Before any test is undertaken you should warm up correctly. Following completion of a test you should cool down correctly.
Each test has a recommended warm up and cool down and each test protocol clearly states the applicability of the test to individual Wattbike users.
The testsWhilst there are many different cycling tests we have selected 4 different tests that cover the requirements of this Guide.
• 3 minute aerobic test• 10 minute progress check (based on 3 minutes)• Ramp test• 20 minute high percentage of maximum minute power test
3 minute aerobic testThis test estimates aerobic capacity. The absolute average power and maximum heart rate achieved during the test can be used as an estimate of maximum minute power and maximum heart rate to calculate heart rate and power training ZonesAerobic capacity is related to the ability to perform moderate to high intensity exercise for prolonged periods and is an important component for endurance cyclists and for general fitness.
10 minute progress check (based on 3 minutes)Using a maximal test to measure aerobic capacity is extremely fatiguing and should be used sparingly. This test is a progress check test of aerobic capacity using the result of the 3 minute aerobic test to set the sub maximal level. It has the advantage of being less fatiguing than a maximal test and has a short recovery period.A regular check is useful to track training progress.
Ramp testsA ramp test also measures aerobic capacity. The average power achieved in the final minute is known as maximum minute power and together with the maximum heart rate achieved during the test can be used to calculate heart rate and power training Zones. A ramp test is designed to last for 8-12 minutes so selection of the correct starting power is important.
Aerobic capacity and maximum minute power are important components for serious endurance cyclists and for general fitness.
59
20 minute high percentage of maximum minute power testThis is a test for experienced cyclists only (used only for Training Plans 4 & 5 and the Triathlon Plan of this Guide). It is usually conducted at 75-80% of maximum minute power (Z5 heart rate and power training Zone) and measures improvement in sustaining a high percentage of maximal aerobic power.
This is a progress check test so cyclists should have first conducted the 3 minute aerobic test to establish maximum minute power and maximum heart rate to establish heart rate and power training Zones.
For a more detailed analysis consider live recording your tests in Wattbike Expert Software or transferring the data to the software for later analysis.
All your test results can be stored in the Wattbike Expert database for future comparison www.wattbike.com/uk/wattbike/expert_software
WarningThe tests in this Guide assume a high level of basic fitness and should not be attempted if you are a beginner or have been recently ill or injured (use the estimated methods). If in doubt consult your Doctor before you commence a Wattbike test or training plan.The tests are not suitable for children or young adults under the age of 18 unless under supervision.
60
3 Minute Aerobic TestThis test estimates aerobic capacity. The absolute average power and maximum heart rate achieved during the test can be used as an estimate of maximum minute power and maximum heart rate to calculate heart rate and power training Zones.
Aerobic capacity is related to the ability to perform moderate to high intensity exercise for prolonged periods and is an important component for endurance cyclists and for general fitness.
Conducting the 3 Minute Aerobic TestWarm up for 10-20 minutes at low intensity to moderate intensity with a cadence of 70 to 90 rpm. Include 3 x 6 second high cadence sprints in your warm up.
1. From the Main menu select Workout (down button), press ENTER. Select New workout (down button) and set up a New workout for a time of 3 minutes. 2. A heart rate monitor (Polar [uncoded] with heart rate receiver, or a coded ANT or ANT+SPORT heart rate chest belt – Suunto or Garmin) is required.3. From the Main menu go to Setup select HR and press ENTER this goes to the HR setup screen, select ANT chest belt or Polar un-coded chest belt (not forgetting to connect the HR Interface cable for Polar) and follow the instructions on the display.4. When connected press ESC until the display returns to the Main menu. The HR belt is now connected.5. Press ESC until the display returns to the Main menu.6. From Custom workout (Main menu - Workout - Custom) select the 3 minute workout. Select the Watts display screen (consider using these Watts with the Polar Graph display to look at left/right leg symmetry and pedalling technique during the test).7. Set the air resistance lever to the required level.8. From a static starting position pedal, in a seated position at a cadence (r/m) that can be maintained for 3 minutes (recommended 90-110 r/m).9. Record
• Power average (W) - this is the estimate of your maximum minute power (use Recall to get this information - also note the average cadence)
• The maximum heart rate that you achieved (you will need to watch for this visually during the test or record separately) - this is the estimate of your maximum heart rate

61
• Use your maximum heart rate and maximum minute power with the table on the Heart Rate and Power Training Zones page.
62
Air Resistance Setting and Cadence Recommendations - 3 Minute Aerobic TestThe Wattbike is an air resistance bike so factors such as training background, age, gender, height and weight all influence the optimal air resistance setting. For this test the Magnetic Climb Lever should ALWAYS be set at 1.
A little experimentation will quickly establish the correct setting and cadence combination. Cadence should normally be in the range 90-110 revolutions per minute (rpm) for this test.Lower than 90 rpm may be relevant for inexperienced cyclists and higher than 110 rpm for experienced cyclists although very low cadences may indicate too high an air resistance setting and very high cadences too low an air resistance setting.
We suggest you settle on 100 rpm as a benchmark.
Within the calibration range of each Wattbike and, for every air resistance setting of the Wattbike and cadence combination the Watts output is known. This makes it relatively simple to set the resistance and cadence to achieve a required output. Training and testing on a Wattbike is therefore reliable, accurate and comparable.
The tables below approximate the power output in Watts for selected combinations of cadence and air resistance settings for both the Wattbike Pro and the Wattbike Trainer, clearly demonstrating the importance of leg speed.
Whilst the tables show all the air resistance settings from 1 to 10 it is anticipated that for most people the most effective setting will be in resistance range 1-5 on the Wattbike Pro (in exceptional circumstances powerful cyclists may need a higher resistance setting) with the full range of air resistance settings available on the Wattbike Trainer.
At 100 cadence the minimum power output on the Wattbike Pro is 195 W at resistance level 1 up to 520 W at resistance level 10 . On the Wattbike Trainer the range at 100 cadence is 110 W at resistance level 1 through to 300 W at resistance level 10.
As a general rule if your 3’ test score is more than 280-320 W you can train on either the Wattbike Pro or Wattbike Trainer although for higher scores the Wattbike Pro is more appropriate.. If your score is under 300 W then it is recommended that you train on the Wattbike Trainer although note there is some overlap between the Wattbike models.
Resistance levels 5-10 on the Wattbike Trainer overlap resistance levels 1-3/4 on the Wattbike Pro.
Power output in Watts at different cadence and air resistance setting. For ease of reference the Watts rounded to the nearest 5 W.

63
Wattbike PRO Air resistance Cadence/Power [W] Tablerpm/resistance 1 2 3 4 5 6 7 8 9 10
80 115 125 150 170 195 215 235 250 270 280
85 130 145 170 195 225 260 275 295 320 340
90 150 165 200 235 265 300 325 350 375 390
95 175 185 225 265 310 350 375 400 425 450
100 195 215 260 310 355 395 430 465 500 520
105 210 230 295 350 400 445 490 525 565 600
110 245 270 330 395 455 510 555 600 645 675
115 270 310 380 445 515 575 625 675 725 760
120 300 335 410 490 570 640 695 750 810 850
Wattbike TRAINER Air resistance Cadence/Power [W] Tablerpm/resistance 1 2 3 4 5 6 7 8 9 10
80 65 70 85 95 110 125 135 145 155 160
85 75 80 100 115 130 145 160 170 180 190
90 85 95 115 135 150 170 185 200 215 225
95 100 110 130 155 175 200 215 230 245 260
100 110 125 150 175 200 225 245 265 285 300
105 125 140 170 200 230 260 280 300 325 340
110 140 155 190 225 260 290 320 340 365 385
115 155 175 210 250 290 325 355 385 415 435
120 170 190 235 280 325 365 395 430 460 485
Careful selection of the air resistance setting and cadence range is important as the best result is achieved by maintaining constant cadence and power (Watts) output throughout the whole 3 minutes of the test.
Example:You set the air resistance lever at setting 3 on the Wattbike Pro and ride at 100 cadence for 3 minutes.
This means you will produce an average power in Watts of 260 W equivalent to a speed of 40.8 kmh and a distance of 2,040m in 3 minutes.
For purposes of the example assume your maximum heart rate during the 3 minutes is 188. Your maximum minute power is 260 Watts and maximum heart rate is 188 bpm for the purpose of calculating heart rate and power training Zones.
If you weigh 75 Kg then your power to weight ratio is 3.47 W/Kg i.e. 260/75.
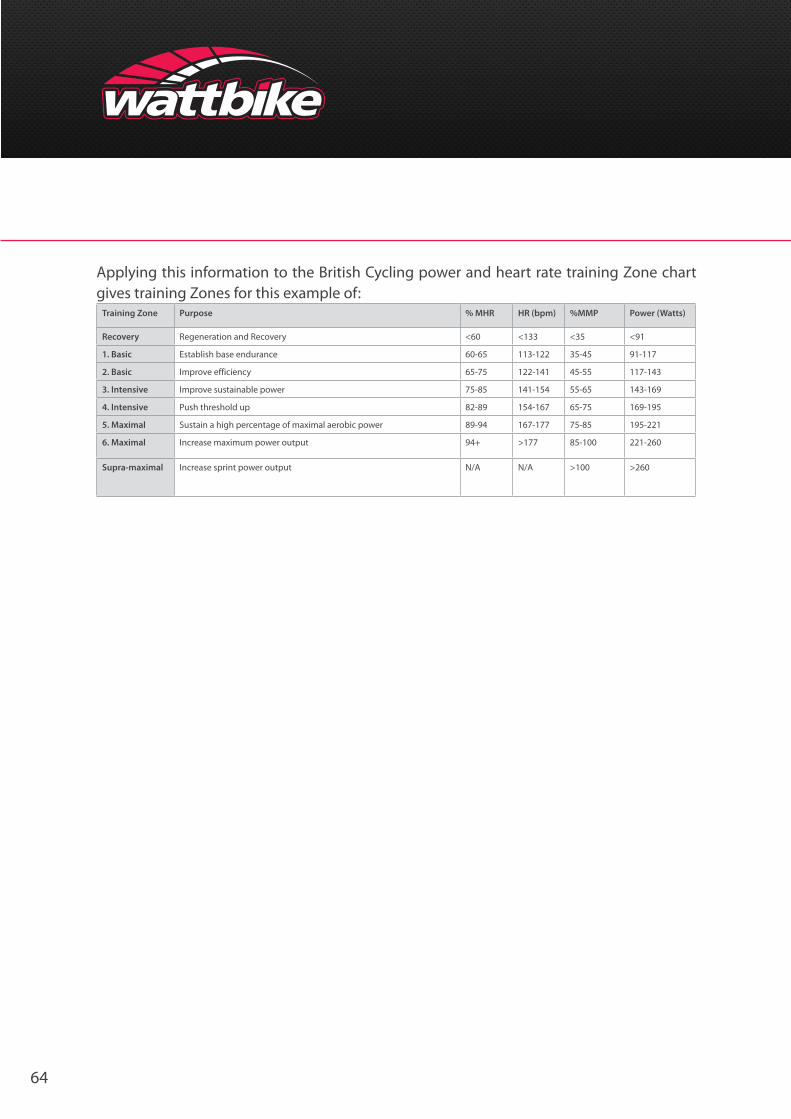
64
Applying this information to the British Cycling power and heart rate training Zone chart gives training Zones for this example of:
Training Zone Purpose % MHR HR (bpm) %MMP Power (Watts)
Recovery Regeneration and Recovery <60 <133 <35 <91
1. Basic Establish base endurance 60-65 113-122 35-45 91-117
2. Basic Improve efficiency 65-75 122-141 45-55 117-143
3. Intensive Improve sustainable power 75-85 141-154 55-65 143-169
4. Intensive Push threshold up 82-89 154-167 65-75 169-195
5. Maximal Sustain a high percentage of maximal aerobic power 89-94 167-177 75-85 195-221
6. Maximal Increase maximum power output 94+ >177 85-100 221-260
Supra-maximal Increase sprint power output N/A N/A >100 >260
65
10 Minute Progress CheckThis test is a progress check of aerobic capacity using the result of your 3 minute aerobic test to set the sub maximal level. It has the advantage of being less fatiguing than a maximal test and has a short recovery period.
Regular progress checks are useful in tracking the effectiveness of your training plan. The training plans recommend “progress checkpoints”. Improvement is indicated by a progressively reducing heart rate for the same cadence/power output.
Conducting the Wattbike 10 Minute Progress Check1. This is a sub maximal progress check based on the average power achieved during your 3 minute aerobic test.2. A heart rate monitor (Polar [uncoded] with heart rate receiver, or a coded ANT or ANT+SPORT heart rate chest belt, Suunto or Garmin) is required.3. In Setup select HR and press ENTER this goes to the HR setup screen, select ANT chest belt or Polar un-coded chest belt (not forgetting to connect the HR Interface cable for Polar) and follow the instructions on the display.4. When connected press ESC until the display returns to the Main menu - The HR belt is now connected.5. In the Main menu select Recall and the Set split. Set the split intervals for 1 minute.6. Press ESC until the display returns to the Main menu.7. Warm up for 5 minutes at 50% of the average power achieved in your 3 minute aerobic test.8. From the Main menu select Workout (down button), press ENTER. Select New workout (down button) and set up a New workout for a time of 10 minutes.9. From Custom workout (Main menu - Workout - Custom) select the 10 minute workout. Select the Watts display screen (consider using these Watts with the Polar Graph display to look at left/right leg symmetry and pedalling technique during the test).10. Set the air resistance lever to the setting used during your 3 minute aerobic test.11. From a static starting position pedal at an even cadence keeping the power at 70% of the power achieved in your 3 minute test.12. Record the average HR at the end of each 1 minute (use the Recall Summary split information to get this information, once the test has been completed) for comparison against future progress checks.
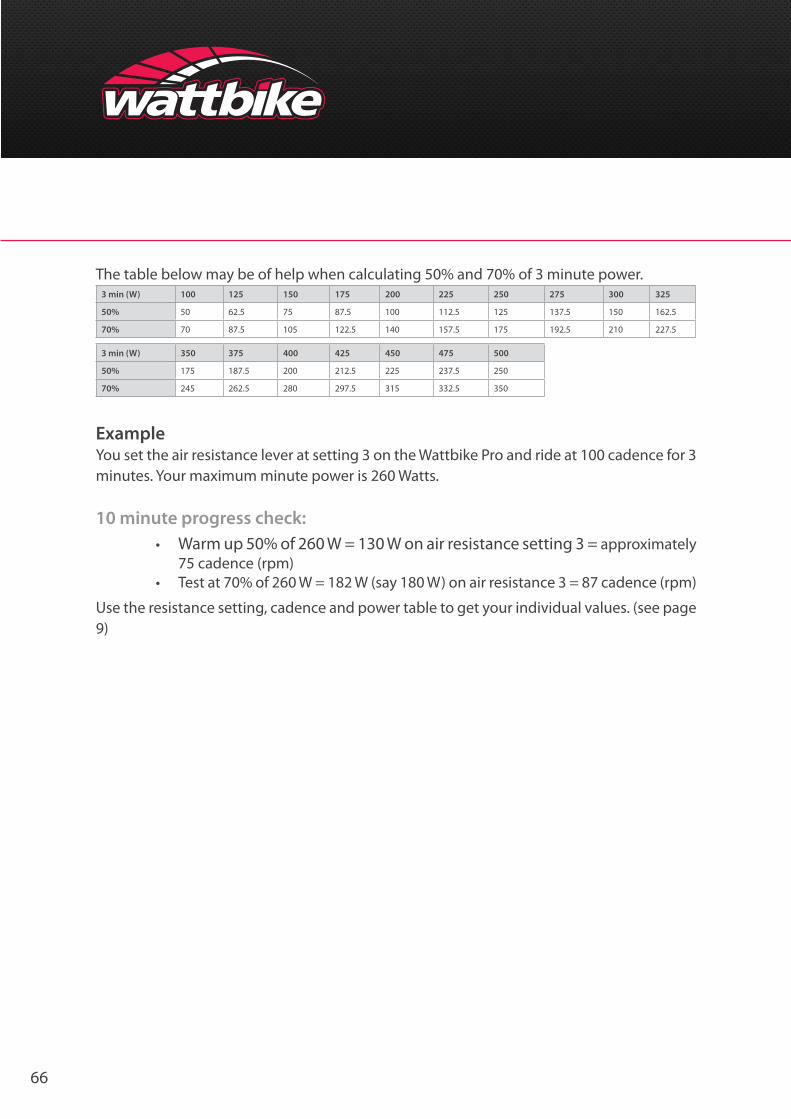
66
The table below may be of help when calculating 50% and 70% of 3 minute power.3 min (W) 100 125 150 175 200 225 250 275 300 325
50% 50 62.5 75 87.5 100 112.5 125 137.5 150 162.5
70% 70 87.5 105 122.5 140 157.5 175 192.5 210 227.5
3 min (W) 350 375 400 425 450 475 500
50% 175 187.5 200 212.5 225 237.5 250
70% 245 262.5 280 297.5 315 332.5 350
ExampleYou set the air resistance lever at setting 3 on the Wattbike Pro and ride at 100 cadence for 3 minutes. Your maximum minute power is 260 Watts.
10 minute progress check:• Warm up 50% of 260 W = 130 W on air resistance setting 3 = approximately
75 cadence (rpm)• Test at 70% of 260 W = 182 W (say 180 W) on air resistance 3 = 87 cadence (rpm)
Use the resistance setting, cadence and power table to get your individual values. (see page 9)
67
Ramp TestsThere are a number of ramp tests used in the cycling world. We have adopted two different protocols:
Storer test for non cyclistsBritish Cycling ramp test for experienced cyclists
The Storer TestThis test is adapted from Storer et al. (1990 Storer TW, Davis JA, & Caiozzo VJ. Accurate prediction of VO2max in cycle ergometry. Med Sci Sports Exerc 1990; 22:704-712.) and is a progressively increasing cycling test (power increases every minute).
The formula associated with this test has the added advantage of estimating maximum oxygen uptake (VO2max) using body weight (Kgs), age and maximum minute power to determine the result. Compared to direct measures it gives a good estimate [±6%].
This test measures aerobic capacity. The average power achieved in the final minute (maximum minute power) and the maximum heart rate achieved during the test can be used to estimate heart rate and power training Zones.
WarningTo estimate whether you should do the Storer ramp test do the 3 minute test first - for male cyclists if you achieve a 3 minute average power of 280 W or less then the Storer test is suitable for you. Females have the option of using the Storer test or the British Cycling ramp test (providing the 3 minute test result is more than 215 W).The Storer ramp test starts at 100 W and ramps by 15 W every minute. The test should last 8-12 minutes - an 8 stage test would take the power to 205 W in the 8th minute and a 12 stage test would take the power to 265 W in the twelfth minute.
12 stage Storer ramp testStage 1 2 3 4 5 6 7 8 9 10 11 12
Watts 100 115 130 145 160 175 190 205 220 235 250 265
1. Warm up for 5 minutes at low intensity to moderate intensity with a cadence of 70 to 90 rpm.2. A heart rate monitor (Polar [uncoded] with heart rate receiver, or a coded ANT or ANT+SPORT heart rate chest belt - Suunto or Garmin) is required.3. From the Main menu go to Setup select HR and press ENTER this goes to the
68
HR setup screen, select ANT chest belt or Polar un-coded chest belt (not forgetting to connect the HR Interface cable for Polar) and follow the instructions on the display.4. When connected press ESC until the display returns to the Main menu. The HR belt is now connected.5. Press ESC until the display returns to the Main menu.6. In the Main menu select Recall and the Set split. Set the split intervals for 1 minute.7. Press ESC until the display returns to the Main menu.8. From the Main menu select Just ride. Select the Watts display screen.9. Use the table below to work out the air resistance settings and cadence to use for this test.10. You may need someone to assist you and keep you on track.11. Pedal in a seated position for 1 minute at the starting power.12. Increase the air resistance setting and cadence as necessary every minute to ensure an approximate 15W increase in power (W) output very minute.13. Keep increasing the power (W) output by 15W every minute until you cannot complete a full minute at the ramp level (only complete minutes count).14. Record:
• Highest Power average (W) achieved in the final complete minute - this is the estimate of your maximum minute power (use Recall to get this information)
• Note the maximum heart rate that you achieved (you will need to watch for this visually during the test) - this is the estimate of your maximum heart rate
Record the data for each complete minute for comparison against future retests - use the Recall Summary to get this information:
• Power average• Average cadence• Average HR
Apply your maximum minute power and maximum heart rate to the table on the Heart Rate and Power Training Zones (p19).
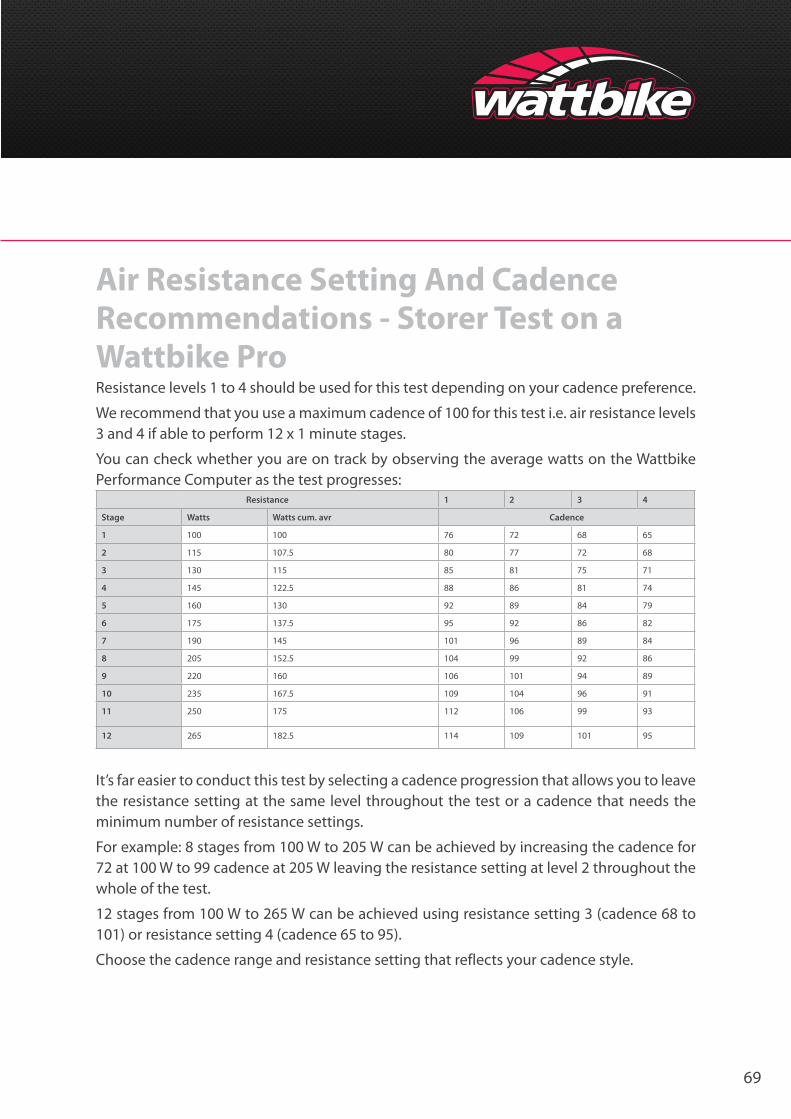
69
Air Resistance Setting And Cadence Recommendations - Storer Test on a Wattbike ProResistance levels 1 to 4 should be used for this test depending on your cadence preference.
We recommend that you use a maximum cadence of 100 for this test i.e. air resistance levels 3 and 4 if able to perform 12 x 1 minute stages.
You can check whether you are on track by observing the average watts on the Wattbike Performance Computer as the test progresses:
Resistance 1 2 3 4
Stage Watts Watts cum. avr Cadence
1 100 100 76 72 68 65
2 115 107.5 80 77 72 68
3 130 115 85 81 75 71
4 145 122.5 88 86 81 74
5 160 130 92 89 84 79
6 175 137.5 95 92 86 82
7 190 145 101 96 89 84
8 205 152.5 104 99 92 86
9 220 160 106 101 94 89
10 235 167.5 109 104 96 91
11 250 175 112 106 99 93
12 265 182.5 114 109 101 95
It’s far easier to conduct this test by selecting a cadence progression that allows you to leave the resistance setting at the same level throughout the test or a cadence that needs the minimum number of resistance settings.
For example: 8 stages from 100 W to 205 W can be achieved by increasing the cadence for 72 at 100 W to 99 cadence at 205 W leaving the resistance setting at level 2 throughout the whole of the test.
12 stages from 100 W to 265 W can be achieved using resistance setting 3 (cadence 68 to 101) or resistance setting 4 (cadence 65 to 95).
Choose the cadence range and resistance setting that reflects your cadence style.
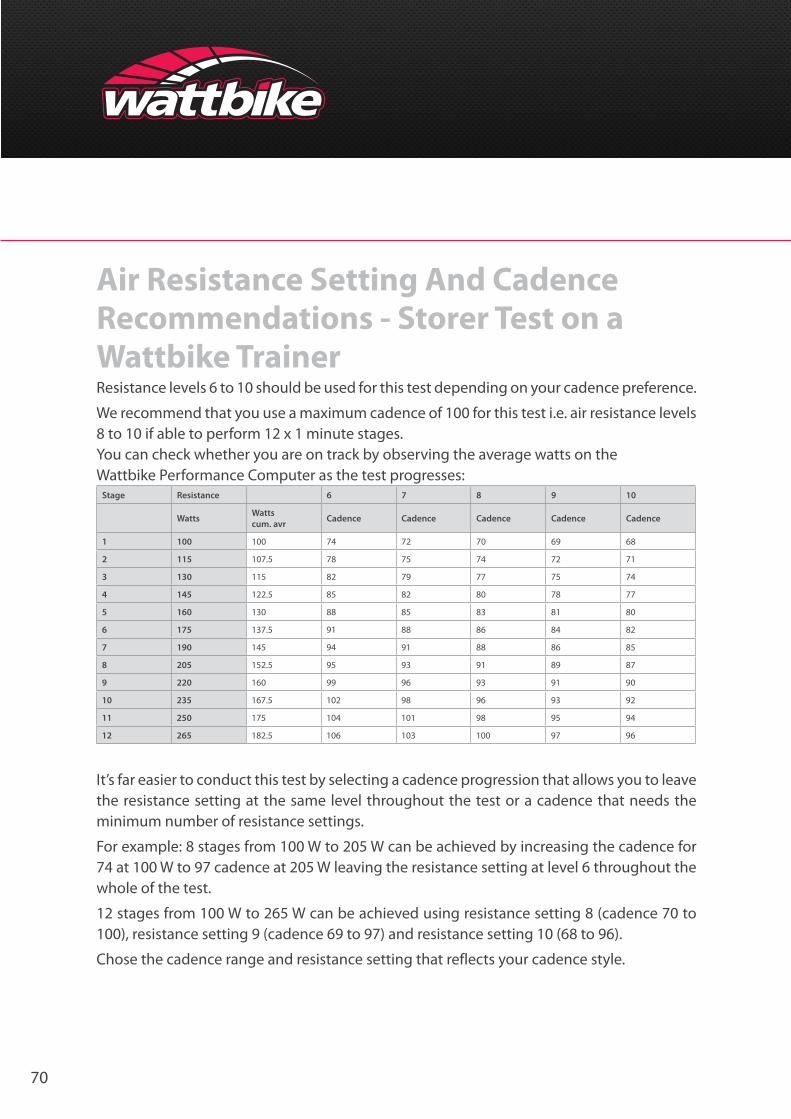
70
Air Resistance Setting And Cadence Recommendations - Storer Test on a Wattbike TrainerResistance levels 6 to 10 should be used for this test depending on your cadence preference.
We recommend that you use a maximum cadence of 100 for this test i.e. air resistance levels 8 to 10 if able to perform 12 x 1 minute stages.You can check whether you are on track by observing the average watts on theWattbike Performance Computer as the test progresses:
Stage Resistance 6 7 8 9 10
Watts Watts cum. avr Cadence Cadence Cadence Cadence Cadence
1 100 100 74 72 70 69 68
2 115 107.5 78 75 74 72 71
3 130 115 82 79 77 75 74
4 145 122.5 85 82 80 78 77
5 160 130 88 85 83 81 80
6 175 137.5 91 88 86 84 82
7 190 145 94 91 88 86 85
8 205 152.5 95 93 91 89 87
9 220 160 99 96 93 91 90
10 235 167.5 102 98 96 93 92
11 250 175 104 101 98 95 94
12 265 182.5 106 103 100 97 96
It’s far easier to conduct this test by selecting a cadence progression that allows you to leave the resistance setting at the same level throughout the test or a cadence that needs the minimum number of resistance settings.
For example: 8 stages from 100 W to 205 W can be achieved by increasing the cadence for 74 at 100 W to 97 cadence at 205 W leaving the resistance setting at level 6 throughout the whole of the test.
12 stages from 100 W to 265 W can be achieved using resistance setting 8 (cadence 70 to 100), resistance setting 9 (cadence 69 to 97) and resistance setting 10 (68 to 96).
Chose the cadence range and resistance setting that reflects your cadence style.
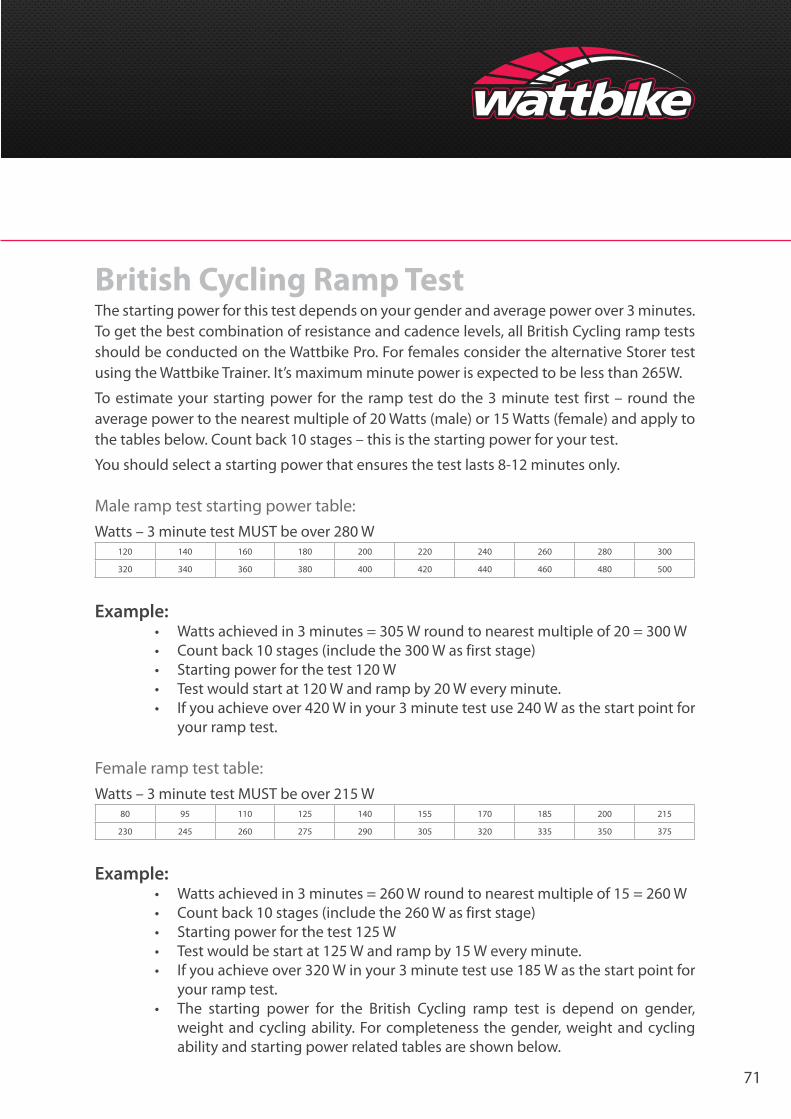
71
British Cycling Ramp TestThe starting power for this test depends on your gender and average power over 3 minutes.To get the best combination of resistance and cadence levels, all British Cycling ramp tests should be conducted on the Wattbike Pro. For females consider the alternative Storer test using the Wattbike Trainer. It’s maximum minute power is expected to be less than 265W.
To estimate your starting power for the ramp test do the 3 minute test first – round the average power to the nearest multiple of 20 Watts (male) or 15 Watts (female) and apply to the tables below. Count back 10 stages – this is the starting power for your test.
You should select a starting power that ensures the test lasts 8-12 minutes only.
Male ramp test starting power table:Watts – 3 minute test MUST be over 280 W
120 140 160 180 200 220 240 260 280 300
320 340 360 380 400 420 440 460 480 500
Example:• Watts achieved in 3 minutes = 305 W round to nearest multiple of 20 = 300 W• Count back 10 stages (include the 300 W as first stage)• Starting power for the test 120 W• Test would start at 120 W and ramp by 20 W every minute.• If you achieve over 420 W in your 3 minute test use 240 W as the start point for
your ramp test.
Female ramp test table:Watts – 3 minute test MUST be over 215 W
80 95 110 125 140 155 170 185 200 215
230 245 260 275 290 305 320 335 350 375
Example:• Watts achieved in 3 minutes = 260 W round to nearest multiple of 15 = 260 W• Count back 10 stages (include the 260 W as first stage)• Starting power for the test 125 W• Test would be start at 125 W and ramp by 15 W every minute.• If you achieve over 320 W in your 3 minute test use 185 W as the start point for
your ramp test.• The starting power for the British Cycling ramp test is depend on gender,
weight and cycling ability. For completeness the gender, weight and cycling ability and starting power related tables are shown below.
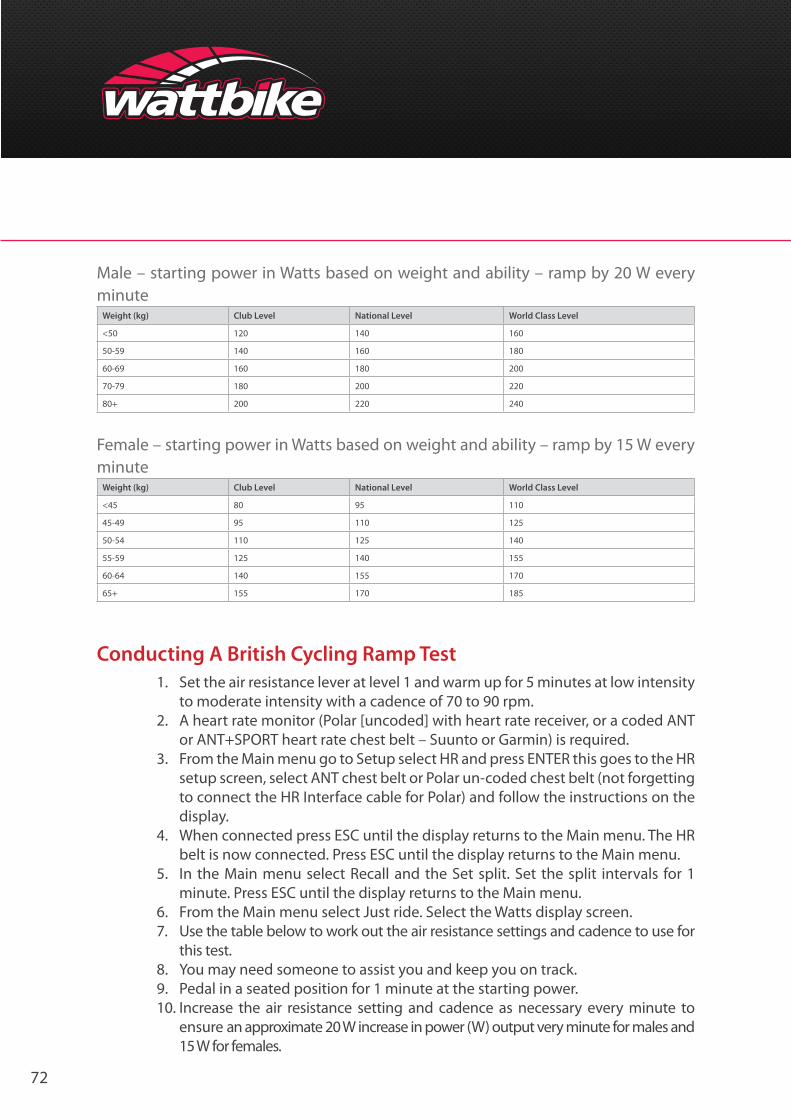
72
Male – starting power in Watts based on weight and ability – ramp by 20 W every minute
Weight (kg) Club Level National Level World Class Level
<50 120 140 160
50-59 140 160 180
60-69 160 180 200
70-79 180 200 220
80+ 200 220 240
Female – starting power in Watts based on weight and ability – ramp by 15 W every minute
Weight (kg) Club Level National Level World Class Level
<45 80 95 110
45-49 95 110 125
50-54 110 125 140
55-59 125 140 155
60-64 140 155 170
65+ 155 170 185
Conducting A British Cycling Ramp Test1. Set the air resistance lever at level 1 and warm up for 5 minutes at low intensity
to moderate intensity with a cadence of 70 to 90 rpm.2. A heart rate monitor (Polar [uncoded] with heart rate receiver, or a coded ANT
or ANT+SPORT heart rate chest belt – Suunto or Garmin) is required.3. From the Main menu go to Setup select HR and press ENTER this goes to the HR
setup screen, select ANT chest belt or Polar un-coded chest belt (not forgetting to connect the HR Interface cable for Polar) and follow the instructions on the display.
4. When connected press ESC until the display returns to the Main menu. The HR belt is now connected. Press ESC until the display returns to the Main menu.
5. In the Main menu select Recall and the Set split. Set the split intervals for 1 minute. Press ESC until the display returns to the Main menu.
6. From the Main menu select Just ride. Select the Watts display screen.7. Use the table below to work out the air resistance settings and cadence to use for
this test.8. You may need someone to assist you and keep you on track.9. Pedal in a seated position for 1 minute at the starting power.10. Increase the air resistance setting and cadence as necessary every minute to
ensure an approximate 20 W increase in power (W) output very minute for males and 15 W for females.
73
11. Keep increasing the power (W) output by 20W (male) or 15W (female) every minute until you cannot complete a full minute at the ramp level (only complete minutes count).
12. Record: ** Highest Power average (W) achieved in the final complete minute – this is the estimate of your maximum minute power (use Recall to get this information) ** Note the maximum heart rate that you achieved (you will need to watch for this visually during the test) – this is the estimate of your maximum heart rate
Record the data for each complete minute for comparison against future retests - use the Recall Summary to get this information:
• Power average• Average cadence• Average HR
Apply your maximum minute power and maximum heart rate to the table on the Heart Rate and Power Training Zones page (p18).
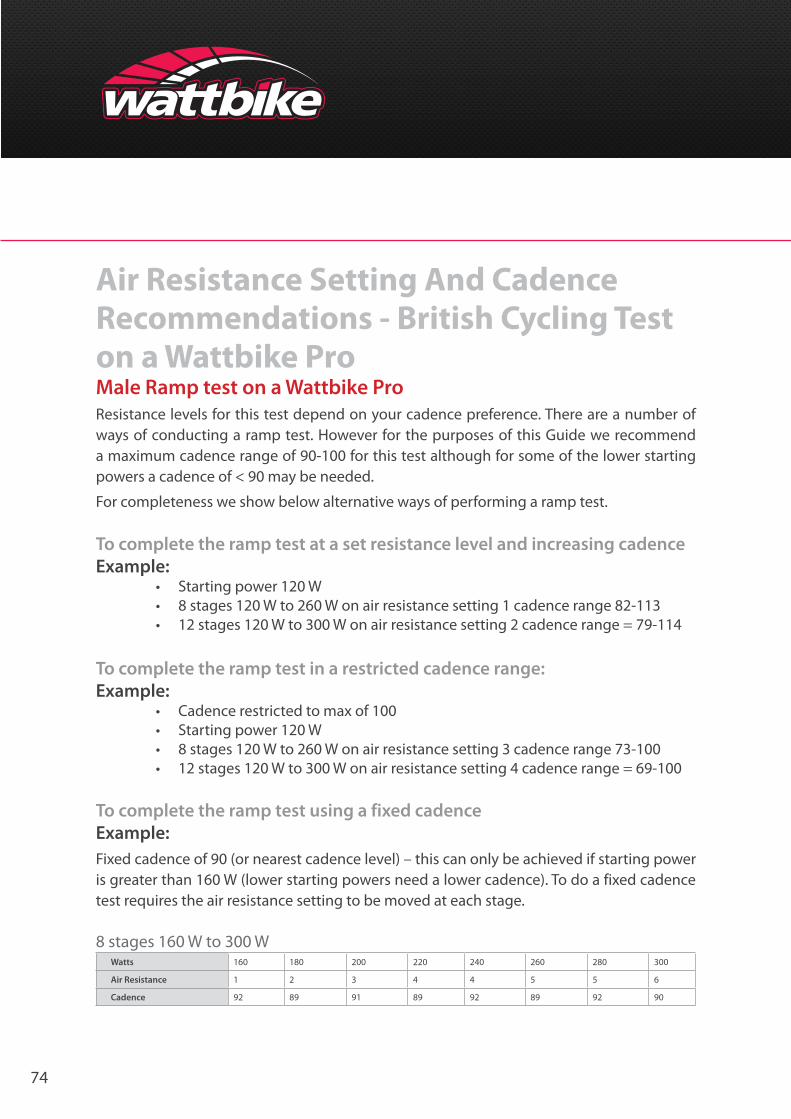
74
Air Resistance Setting And Cadence Recommendations - British Cycling Test on a Wattbike ProMale Ramp test on a Wattbike ProResistance levels for this test depend on your cadence preference. There are a number of ways of conducting a ramp test. However for the purposes of this Guide we recommend a maximum cadence range of 90-100 for this test although for some of the lower starting powers a cadence of < 90 may be needed.
For completeness we show below alternative ways of performing a ramp test.
To complete the ramp test at a set resistance level and increasing cadenceExample:
• Starting power 120 W• 8 stages 120 W to 260 W on air resistance setting 1 cadence range 82-113• 12 stages 120 W to 300 W on air resistance setting 2 cadence range = 79-114
To complete the ramp test in a restricted cadence range:Example:
• Cadence restricted to max of 100• Starting power 120 W• 8 stages 120 W to 260 W on air resistance setting 3 cadence range 73-100• 12 stages 120 W to 300 W on air resistance setting 4 cadence range = 69-100
To complete the ramp test using a fixed cadenceExample:Fixed cadence of 90 (or nearest cadence level) – this can only be achieved if starting power is greater than 160 W (lower starting powers need a lower cadence). To do a fixed cadence test requires the air resistance setting to be moved at each stage.
8 stages 160 W to 300 WWatts 160 180 200 220 240 260 280 300
Air Resistance 1 2 3 4 4 5 5 6
Cadence 92 89 91 89 92 89 92 90
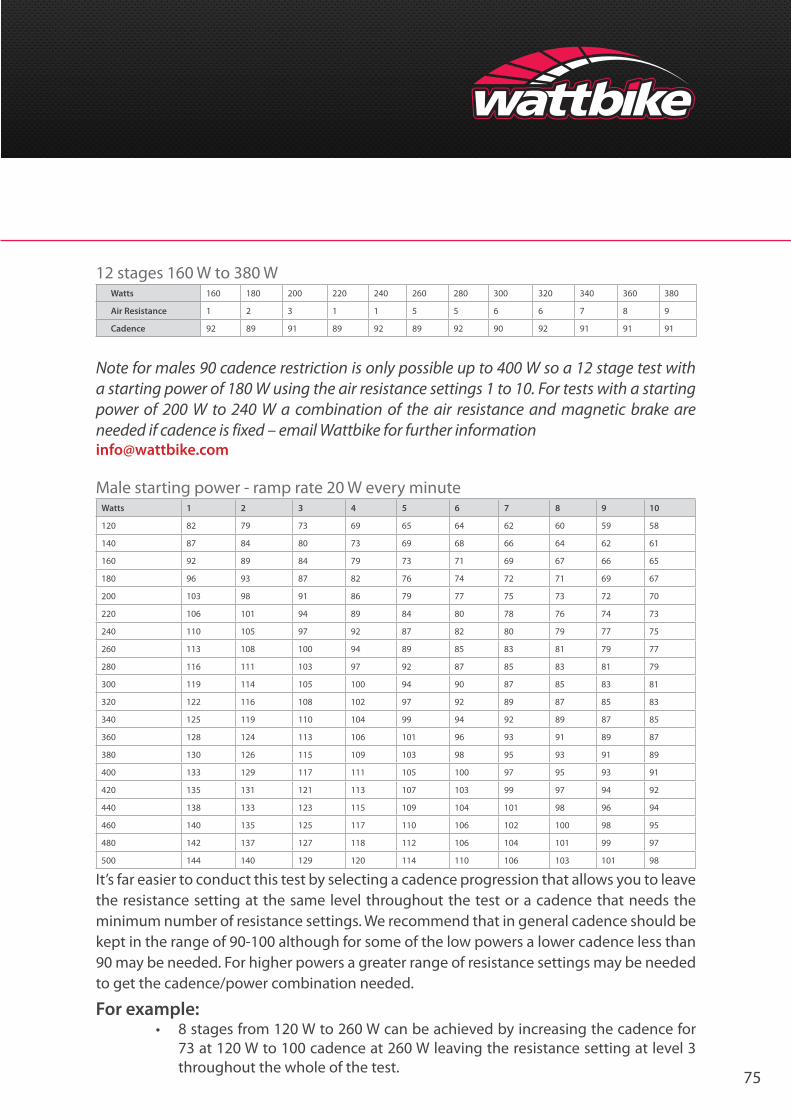
75
12 stages 160 W to 380 WWatts 160 180 200 220 240 260 280 300 320 340 360 380
Air Resistance 1 2 3 1 1 5 5 6 6 7 8 9
Cadence 92 89 91 89 92 89 92 90 92 91 91 91
Note for males 90 cadence restriction is only possible up to 400 W so a 12 stage test with a starting power of 180 W using the air resistance settings 1 to 10. For tests with a starting power of 200 W to 240 W a combination of the air resistance and magnetic brake are needed if cadence is fixed – email Wattbike for further information [email protected]
Male starting power - ramp rate 20 W every minuteWatts 1 2 3 4 5 6 7 8 9 10
120 82 79 73 69 65 64 62 60 59 58
140 87 84 80 73 69 68 66 64 62 61
160 92 89 84 79 73 71 69 67 66 65
180 96 93 87 82 76 74 72 71 69 67
200 103 98 91 86 79 77 75 73 72 70
220 106 101 94 89 84 80 78 76 74 73
240 110 105 97 92 87 82 80 79 77 75
260 113 108 100 94 89 85 83 81 79 77
280 116 111 103 97 92 87 85 83 81 79
300 119 114 105 100 94 90 87 85 83 81
320 122 116 108 102 97 92 89 87 85 83
340 125 119 110 104 99 94 92 89 87 85
360 128 124 113 106 101 96 93 91 89 87
380 130 126 115 109 103 98 95 93 91 89
400 133 129 117 111 105 100 97 95 93 91
420 135 131 121 113 107 103 99 97 94 92
440 138 133 123 115 109 104 101 98 96 94
460 140 135 125 117 110 106 102 100 98 95
480 142 137 127 118 112 106 104 101 99 97
500 144 140 129 120 114 110 106 103 101 98
It’s far easier to conduct this test by selecting a cadence progression that allows you to leave the resistance setting at the same level throughout the test or a cadence that needs the minimum number of resistance settings. We recommend that in general cadence should be kept in the range of 90-100 although for some of the low powers a lower cadence less than 90 may be needed. For higher powers a greater range of resistance settings may be needed to get the cadence/power combination needed.
For example:• 8 stages from 120 W to 260 W can be achieved by increasing the cadence for
73 at 120 W to 100 cadence at 260 W leaving the resistance setting at level 3 throughout the whole of the test.
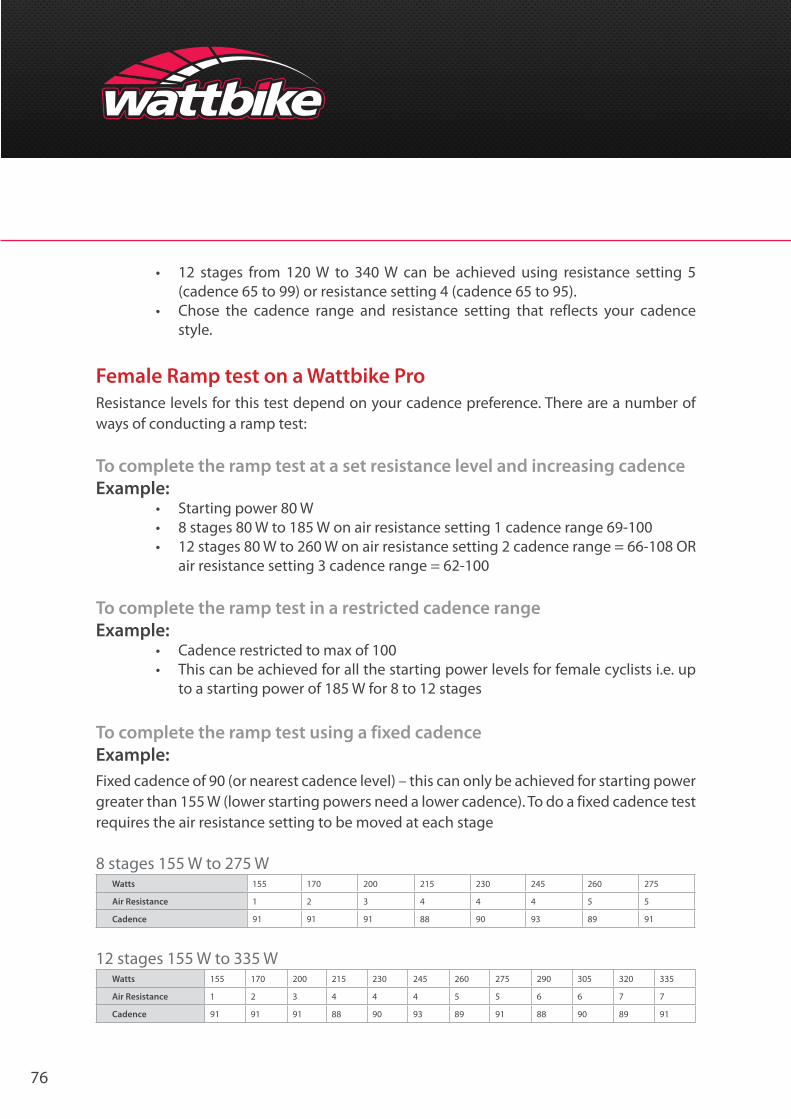
76
• 12 stages from 120 W to 340 W can be achieved using resistance setting 5 (cadence 65 to 99) or resistance setting 4 (cadence 65 to 95).
• Chose the cadence range and resistance setting that reflects your cadence style.
Female Ramp test on a Wattbike ProResistance levels for this test depend on your cadence preference. There are a number of ways of conducting a ramp test:
To complete the ramp test at a set resistance level and increasing cadenceExample:
• Starting power 80 W• 8 stages 80 W to 185 W on air resistance setting 1 cadence range 69-100• 12 stages 80 W to 260 W on air resistance setting 2 cadence range = 66-108 OR
air resistance setting 3 cadence range = 62-100
To complete the ramp test in a restricted cadence rangeExample:
• Cadence restricted to max of 100• This can be achieved for all the starting power levels for female cyclists i.e. up
to a starting power of 185 W for 8 to 12 stages
To complete the ramp test using a fixed cadenceExample:Fixed cadence of 90 (or nearest cadence level) – this can only be achieved for starting power greater than 155 W (lower starting powers need a lower cadence). To do a fixed cadence test requires the air resistance setting to be moved at each stage
8 stages 155 W to 275 WWatts 155 170 200 215 230 245 260 275
Air Resistance 1 2 3 4 4 4 5 5
Cadence 91 91 91 88 90 93 89 91
12 stages 155 W to 335 WWatts 155 170 200 215 230 245 260 275 290 305 320 335
Air Resistance 1 2 3 4 4 4 5 5 6 6 7 7
Cadence 91 91 91 88 90 93 89 91 88 90 89 91
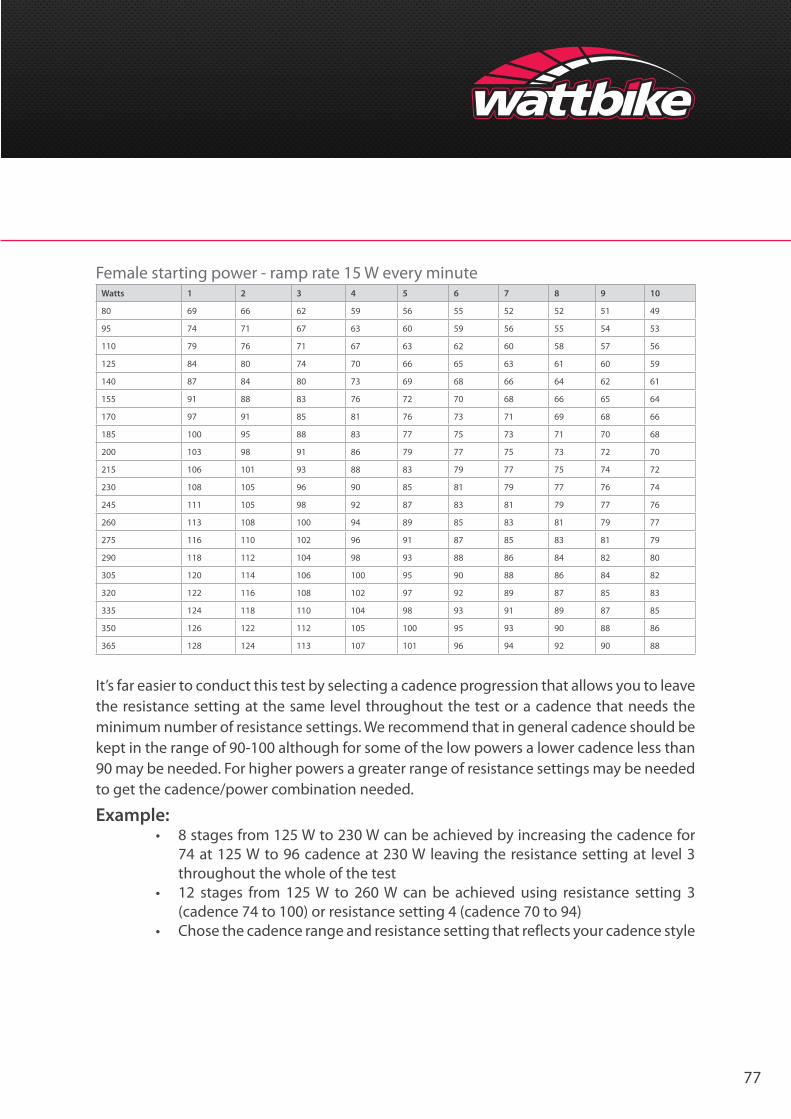
77
Female starting power - ramp rate 15 W every minuteWatts 1 2 3 4 5 6 7 8 9 10
80 69 66 62 59 56 55 52 52 51 49
95 74 71 67 63 60 59 56 55 54 53
110 79 76 71 67 63 62 60 58 57 56
125 84 80 74 70 66 65 63 61 60 59
140 87 84 80 73 69 68 66 64 62 61
155 91 88 83 76 72 70 68 66 65 64
170 97 91 85 81 76 73 71 69 68 66
185 100 95 88 83 77 75 73 71 70 68
200 103 98 91 86 79 77 75 73 72 70
215 106 101 93 88 83 79 77 75 74 72
230 108 105 96 90 85 81 79 77 76 74
245 111 105 98 92 87 83 81 79 77 76
260 113 108 100 94 89 85 83 81 79 77
275 116 110 102 96 91 87 85 83 81 79
290 118 112 104 98 93 88 86 84 82 80
305 120 114 106 100 95 90 88 86 84 82
320 122 116 108 102 97 92 89 87 85 83
335 124 118 110 104 98 93 91 89 87 85
350 126 122 112 105 100 95 93 90 88 86
365 128 124 113 107 101 96 94 92 90 88
It’s far easier to conduct this test by selecting a cadence progression that allows you to leave the resistance setting at the same level throughout the test or a cadence that needs the minimum number of resistance settings. We recommend that in general cadence should be kept in the range of 90-100 although for some of the low powers a lower cadence less than 90 may be needed. For higher powers a greater range of resistance settings may be needed to get the cadence/power combination needed.
Example:• 8 stages from 125 W to 230 W can be achieved by increasing the cadence for
74 at 125 W to 96 cadence at 230 W leaving the resistance setting at level 3 throughout the whole of the test
• 12 stages from 125 W to 260 W can be achieved using resistance setting 3 (cadence 74 to 100) or resistance setting 4 (cadence 70 to 94)
• Chose the cadence range and resistance setting that reflects your cadence style
78
20 Minute High Percentage of Maximum Minute Power TestThis is a test for experienced cyclists only (used only for Training Plans 4 & 5 and the Winter Triathlon Training plan of this Guide). It is usually conducted at 75-80% of maximum minute power (Zone 5 heart rate and power training Zone) and measures improvement in sustaining a high percentage of maximal aerobic power.
This is a progress check test so cyclists should have first conducted the 3 minute aerobic test to establish maximum minute power and maximum heart rate to establish heart rate and power training Zones. For a more detailed analysis consider live recording your tests in Wattbike Expert Software or transferring the data to the software for later analysis.
All your test results can be stored in the Wattbike Expert database for future comparison.
Conducting the 20 minute test1. Warm up for 10-20 minutes at low intensity to moderate intensity with a cadence of 70 to 90 rpm. Include 3 x 6 second high cadence sprints in your warm up.
2. From the Main menu select Workout (down button), press ENTER. Select New workout (down button) and set up a New workout for a time of 20 minutes.
3. A heart rate monitor (Polar [uncoded] with heart rate receiver, or a coded ANT or ANT+SPORT heart rate chest belt – Suunto or Garmin) is required. 4. From the Main menu go to Setup select HR and press ENTER this goes to the HR setup screen, select ANT chest belt or Polar un-coded chest belt (not forgetting to connect the HR Interface cable for Polar) and follow the instructions on the display.5. When connected press ESC until the display returns to the Main menu. The HR belt is now connected.6. Press ESC until the display returns to the Main menu.7. From Custom workout (Main menu – Workout – Custom) select the 20 minute workout. Select the Watts display screen (consider using these Watts with the Polar Graph display to look at left/right leg symmetry and pedalling technique during the test).8. Set the air resistance lever to the required level.9. From a static starting position pedal, in a seated position at a cadence (rpm) that can be maintained for 20 minutes (recommended 90-100 rpm).
10. Record:• Power average (W) - (use Recall to get this information - also note the average
cadence) • Use the Split function in Recall to record the average heart rate for each minute
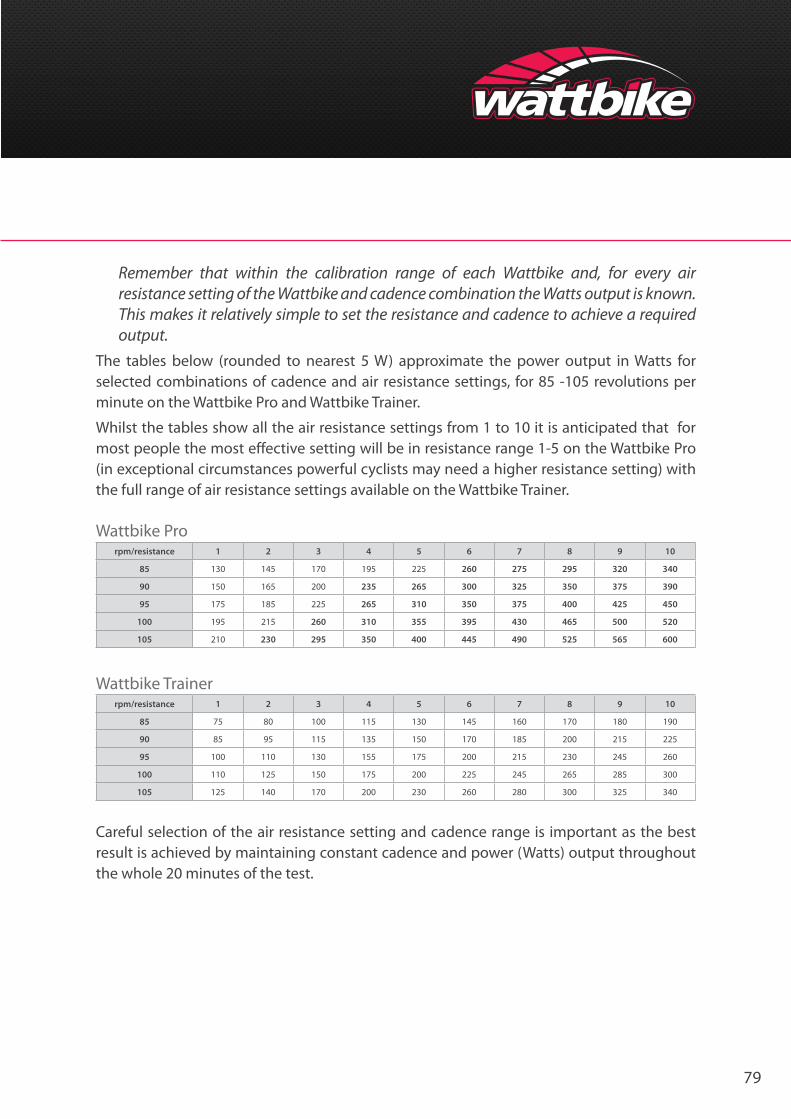
79
Remember that within the calibration range of each Wattbike and, for every air resistance setting of the Wattbike and cadence combination the Watts output is known. This makes it relatively simple to set the resistance and cadence to achieve a required output.
The tables below (rounded to nearest 5 W) approximate the power output in Watts for selected combinations of cadence and air resistance settings, for 85 -105 revolutions per minute on the Wattbike Pro and Wattbike Trainer.
Whilst the tables show all the air resistance settings from 1 to 10 it is anticipated that for most people the most effective setting will be in resistance range 1-5 on the Wattbike Pro (in exceptional circumstances powerful cyclists may need a higher resistance setting) with the full range of air resistance settings available on the Wattbike Trainer.
Wattbike Prorpm/resistance 1 2 3 4 5 6 7 8 9 10
85 130 145 170 195 225 260 275 295 320 340
90 150 165 200 235 265 300 325 350 375 390
95 175 185 225 265 310 350 375 400 425 450
100 195 215 260 310 355 395 430 465 500 520
105 210 230 295 350 400 445 490 525 565 600
Wattbike Trainerrpm/resistance 1 2 3 4 5 6 7 8 9 10
85 75 80 100 115 130 145 160 170 180 190
90 85 95 115 135 150 170 185 200 215 225
95 100 110 130 155 175 200 215 230 245 260
100 110 125 150 175 200 225 245 265 285 300
105 125 140 170 200 230 260 280 300 325 340
Careful selection of the air resistance setting and cadence range is important as the best result is achieved by maintaining constant cadence and power (Watts) output throughout the whole 20 minutes of the test.
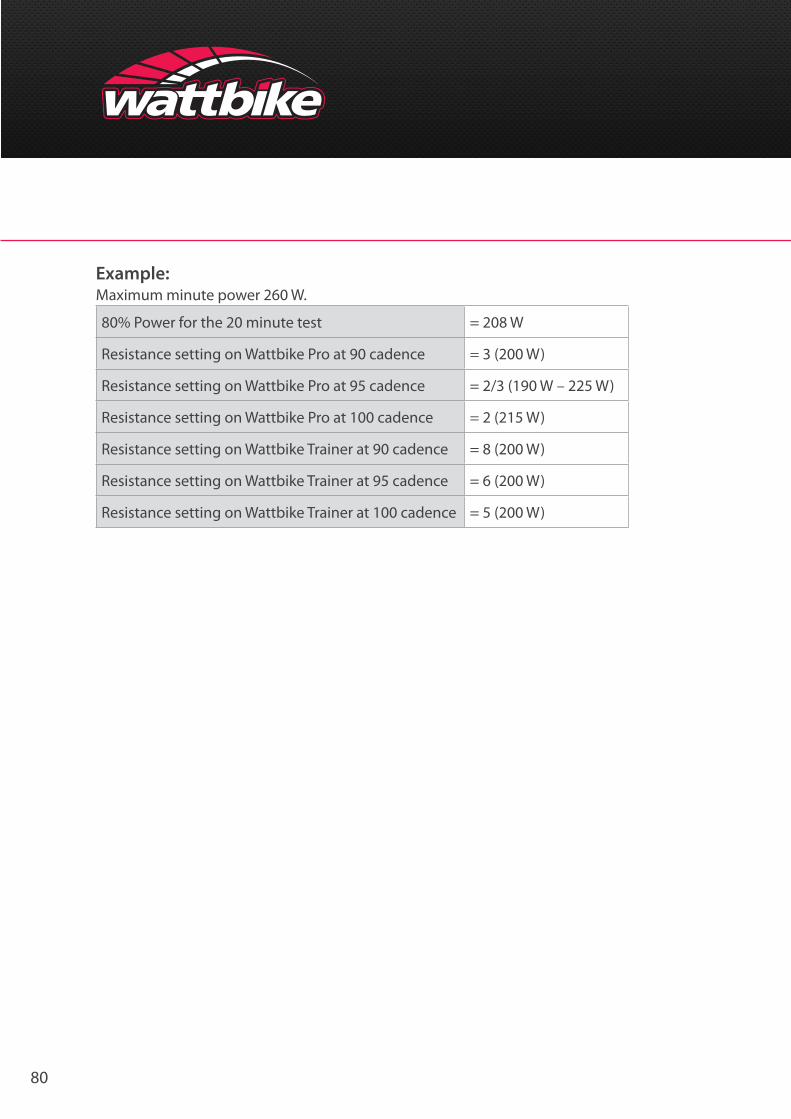
80
Example:Maximum minute power 260 W.
80% Power for the 20 minute test = 208 W
Resistance setting on Wattbike Pro at 90 cadence = 3 (200 W)
Resistance setting on Wattbike Pro at 95 cadence = 2/3 (190 W – 225 W)
Resistance setting on Wattbike Pro at 100 cadence = 2 (215 W)
Resistance setting on Wattbike Trainer at 90 cadence = 8 (200 W)
Resistance setting on Wattbike Trainer at 95 cadence = 6 (200 W)
Resistance setting on Wattbike Trainer at 100 cadence = 5 (200 W)
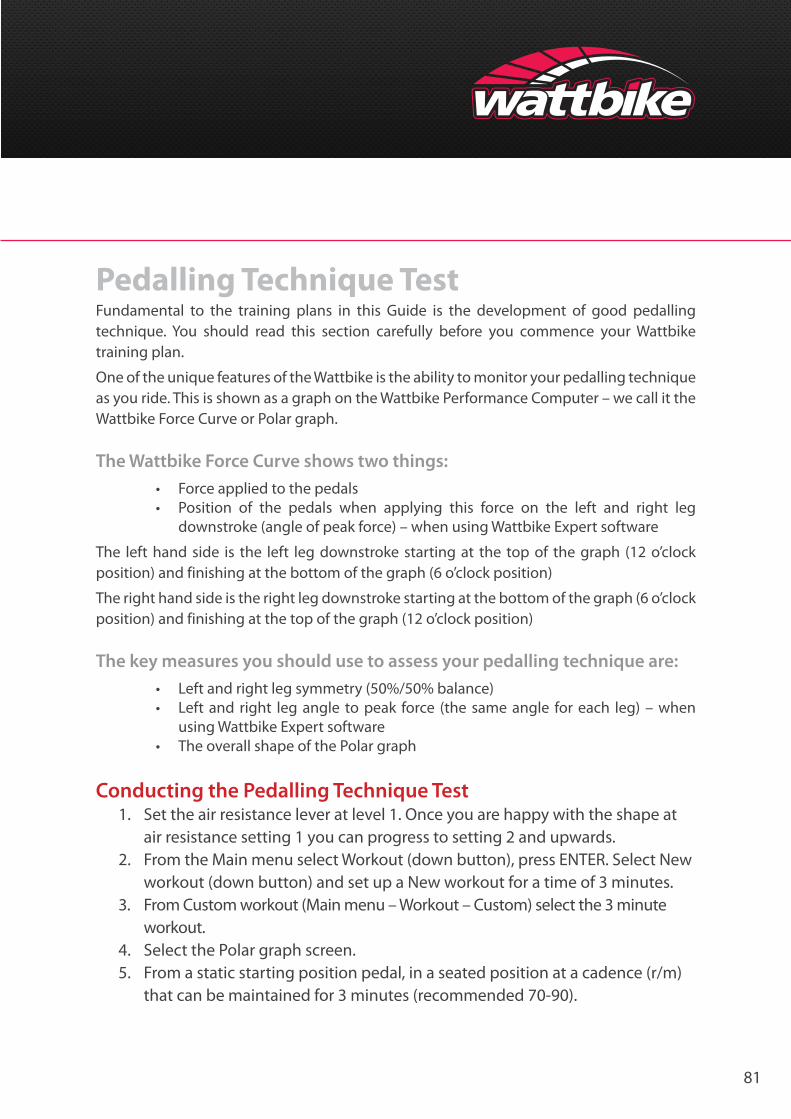
81
Pedalling Technique TestFundamental to the training plans in this Guide is the development of good pedalling technique. You should read this section carefully before you commence your Wattbike training plan.
One of the unique features of the Wattbike is the ability to monitor your pedalling technique as you ride. This is shown as a graph on the Wattbike Performance Computer – we call it the Wattbike Force Curve or Polar graph.
The Wattbike Force Curve shows two things:• Force applied to the pedals• Position of the pedals when applying this force on the left and right leg
downstroke (angle of peak force) – when using Wattbike Expert software
The left hand side is the left leg downstroke starting at the top of the graph (12 o’clock position) and finishing at the bottom of the graph (6 o’clock position)
The right hand side is the right leg downstroke starting at the bottom of the graph (6 o’clock position) and finishing at the top of the graph (12 o’clock position)
The key measures you should use to assess your pedalling technique are:• Left and right leg symmetry (50%/50% balance)• Left and right leg angle to peak force (the same angle for each leg) – when
using Wattbike Expert software• The overall shape of the Polar graph
Conducting the Pedalling Technique Test1. Set the air resistance lever at level 1. Once you are happy with the shape at air resistance setting 1 you can progress to setting 2 and upwards.2. From the Main menu select Workout (down button), press ENTER. Select New workout (down button) and set up a New workout for a time of 3 minutes.3. From Custom workout (Main menu – Workout – Custom) select the 3 minute workout. 4. Select the Polar graph screen.5. From a static starting position pedal, in a seated position at a cadence (r/m) that can be maintained for 3 minutes (recommended 70-90).
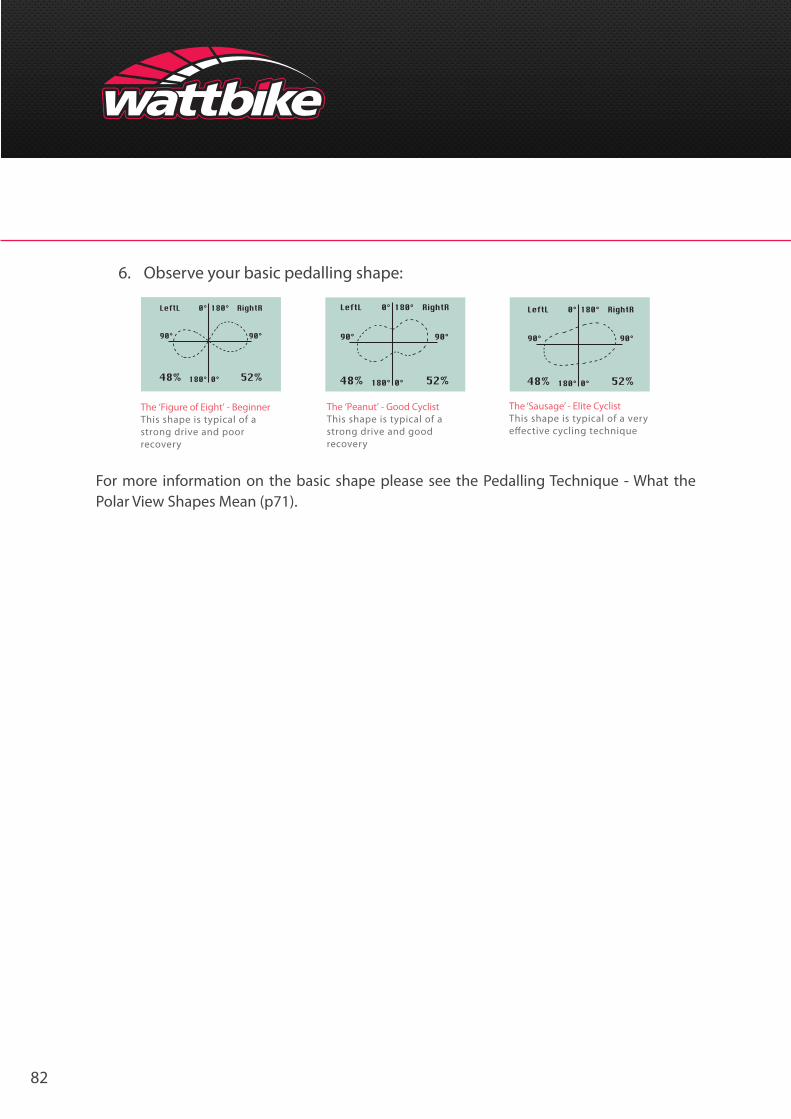
82
6. Observe your basic pedalling shape:
For more information on the basic shape please see the Pedalling Technique - What the Polar View Shapes Mean (p71).
The ‘Figure of Eight’ - BeginnerThis shape is typical of a strong drive and poor recovery
The ‘Peanut’ - Good CyclistThis shape is typical of a strong drive and good recovery
The ‘Sausage’ - Elite CyclistThis shape is typical of a very e�ective cycling technique
83
Pedalling Technique Training SessionsThere are many opportunities within the training plans to practice effective pedalling technique. Whilst you should always think and practice pedalling technique the low intensity (Z1 and Z2 and even into Z3) Wattbike sessions can be changed to pedalling technique sessions.
Example:From training plan 1 – 20’ Z1 FoP (focus on pedalling) can be split into 5 x 4’, 2’ rest between intervals, cadence increasing for each interval.Interval 1 at 70 cadence raising the cadence by 5 pedal revolutions for each subsequent interval – 70, 75, 80, 85, 90 .Depending on your maximum minute power higher cadence pedalling technique sessions are possible.
Example:From training plan 5 – 30’ Z1 for a cyclist, with a maximum minute power of 400W the session could be split 6 x 5’, 2’rest between intervals, cadence increasing for each interval – there is more flexibility in the resistance setting although all pedalling technique sessions should start at resistance level 1 on a Wattbike Pro.Once the technique has been mastered at resistance level 1, the session can be repeated at higher settings.In this example interval 1 could be at 85 cadence with subsequent intervals at 90, 95, 100, 105, 110 – at 110 cadence on resistance setting 1, on a Wattbike Pro, this cyclist would be producing 240 W i.e. 60% of maximum minute power of 400 so just into their Z3 heart rate and power training Zone.The overriding consideration is to be able to produce a consistent shape with good balance (close to 50/50 and with an equal angle of peak force in each leg) at all appropriate cadence levels and resistance settings in each training Zone.Intervals can be shorter, if just beginning or longer if you are more experienced.The key to getting an effective pedalling technique is usually in the ‘scrape back’ i.e. imagine ‘scrapping mud off the sole of the foot’ at the bottom of the pedal stroke to ensure a smooth continuous pedalling action.The Polar graphs below show a real pedalling technique session by a triathlete at resistance setting 4, 3 x 7’, 2 rest between intervals at 85, 90 and 95 cadence (power 195 W, 230 W and 265 W). Note the similarity of shape and angle of peak force at each cadence level.
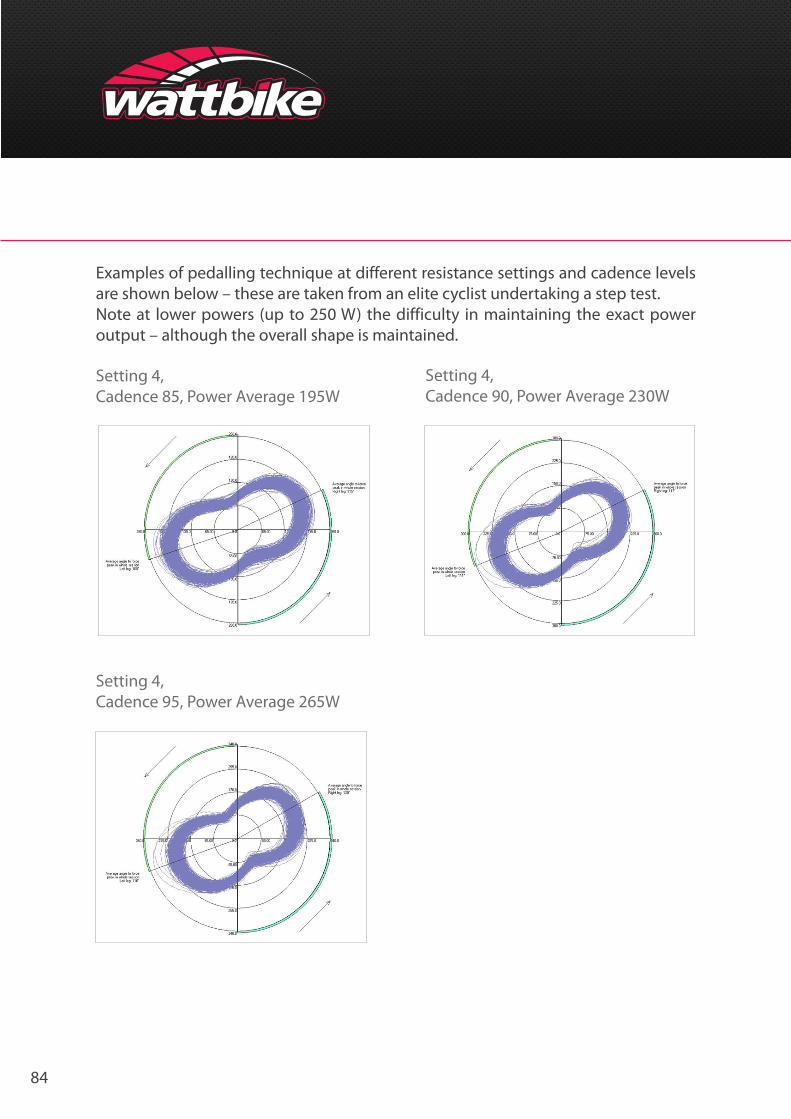
84
Examples of pedalling technique at different resistance settings and cadence levels are shown below – these are taken from an elite cyclist undertaking a step test. Note at lower powers (up to 250 W) the difficulty in maintaining the exact power output – although the overall shape is maintained.
Setting 4, Cadence 95, Power Average 265W
Setting 4, Cadence 90, Power Average 230W
Setting 4, Cadence 85, Power Average 195W

85
At the higher power levels 350 upwards the rider was more comfortable with the resistance level and cadence and even when standing up on the pedals was able to maintain a consistent shape, angle of peak force and cadence.
Setting 2, 74 cadence, power 100 W
Setting 3, 79 cadence, power 150 W
Setting 4, 84 cadence, power 200 W
Setting 6, 84 cadence, power 250 W

86
Setting 7, 87 cadence, power 300 W (seated and standing)
Setting 9, 88 cadence, power 350 W (seated and standing)
Setting 10, 90 cadence, power 400 W
Setting 10, 144 cadence, power 1500 W Performed by a World Class Sprinter
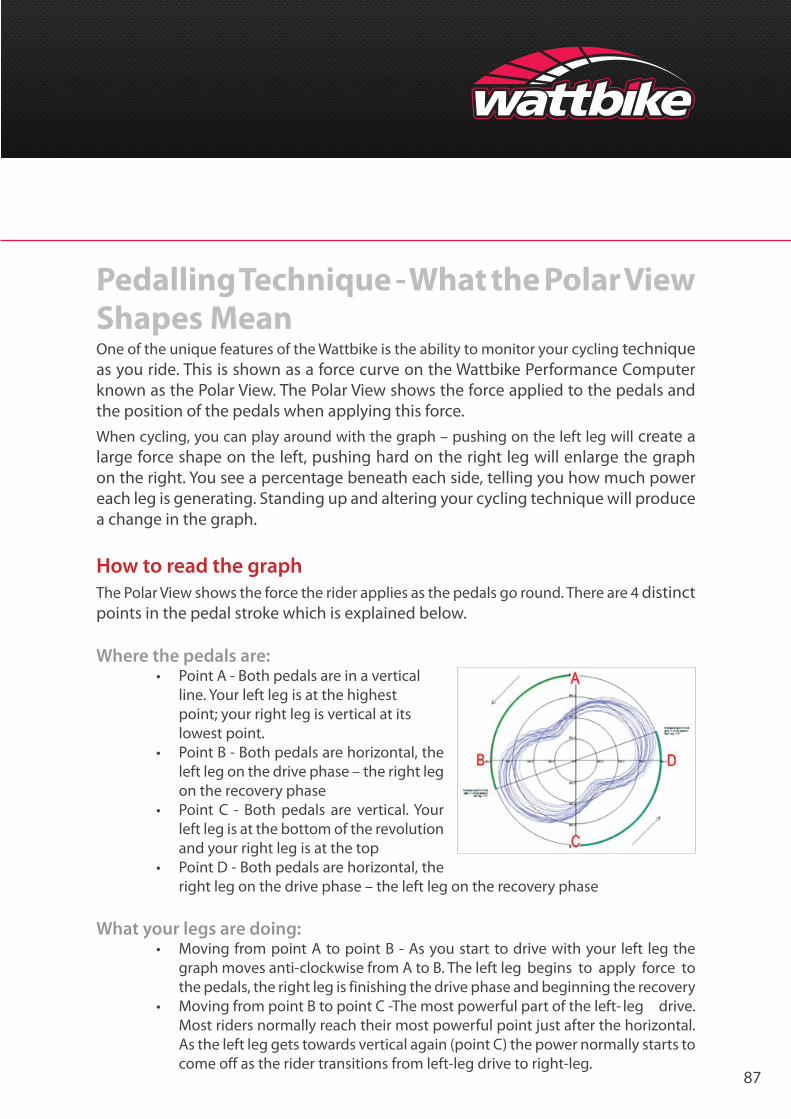
87
Pedalling Technique - What the Polar View Shapes MeanOne of the unique features of the Wattbike is the ability to monitor your cycling technique as you ride. This is shown as a force curve on the Wattbike Performance Computer known as the Polar View. The Polar View shows the force applied to the pedals and the position of the pedals when applying this force.When cycling, you can play around with the graph – pushing on the left leg will create a large force shape on the left, pushing hard on the right leg will enlarge the graph on the right. You see a percentage beneath each side, telling you how much power each leg is generating. Standing up and altering your cycling technique will produce a change in the graph.
How to read the graphThe Polar View shows the force the rider applies as the pedals go round. There are 4 distinct points in the pedal stroke which is explained below.
Where the pedals are:• Point A - Both pedals are in a vertical
line. Your left leg is at the highest point; your right leg is vertical at its lowest point.
• Point B - Both pedals are horizontal, the left leg on the drive phase – the right leg on the recovery phase
• Point C - Both pedals are vertical. Your left leg is at the bottom of the revolution and your right leg is at the top
• Point D - Both pedals are horizontal, the right leg on the drive phase – the left leg on the recovery phase
What your legs are doing:• Moving from point A to point B - As you start to drive with your left leg the
graph moves anti-clockwise from A to B. The left leg begins to apply force to the pedals, the right leg is finishing the drive phase and beginning the recovery
• Moving from point B to point C -The most powerful part of the left- leg drive. Most riders normally reach their most powerful point just after the horizontal. As the left leg gets towards vertical again (point C) the power normally starts to come off as the rider transitions from left-leg drive to right-leg.
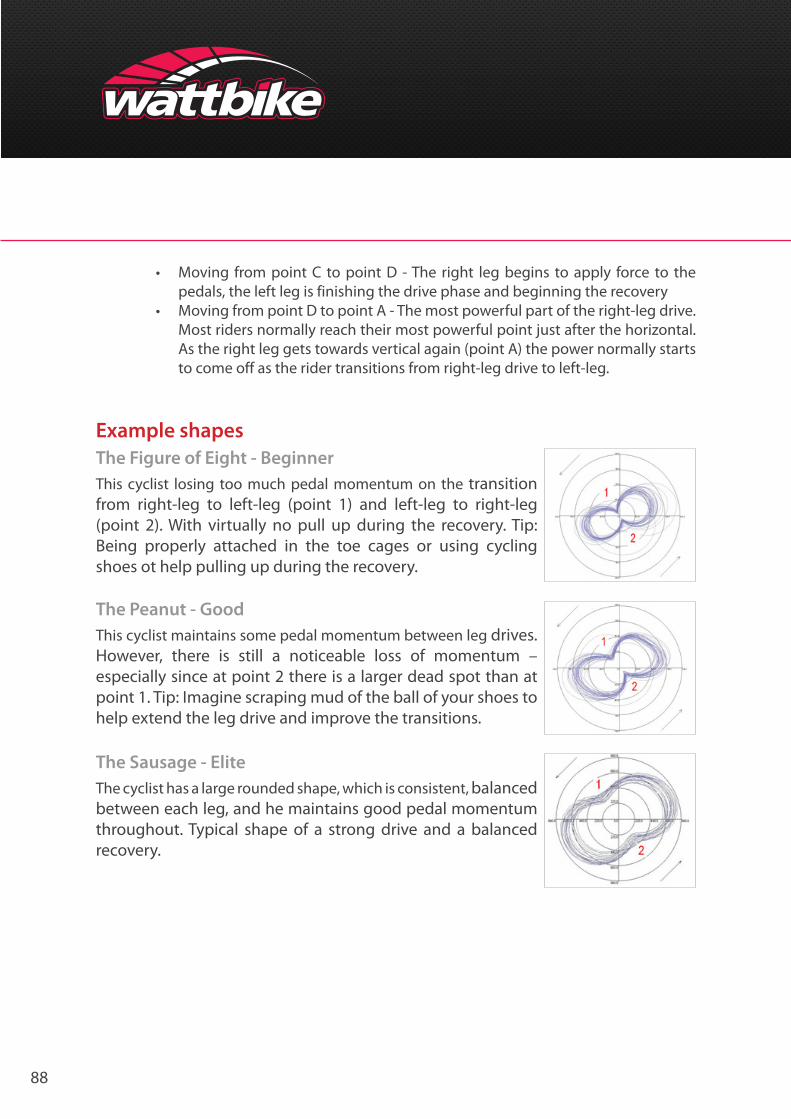
88
• Moving from point C to point D - The right leg begins to apply force to the pedals, the left leg is finishing the drive phase and beginning the recovery
• Moving from point D to point A - The most powerful part of the right-leg drive. Most riders normally reach their most powerful point just after the horizontal. As the right leg gets towards vertical again (point A) the power normally starts to come off as the rider transitions from right-leg drive to left-leg.
Example shapesThe Figure of Eight - BeginnerThis cyclist losing too much pedal momentum on the transition from right-leg to left-leg (point 1) and left-leg to right-leg (point 2). With virtually no pull up during the recovery. Tip: Being properly attached in the toe cages or using cycling shoes ot help pulling up during the recovery.
The Peanut - GoodThis cyclist maintains some pedal momentum between leg drives. However, there is still a noticeable loss of momentum – especially since at point 2 there is a larger dead spot than at point 1. Tip: Imagine scraping mud of the ball of your shoes to help extend the leg drive and improve the transitions.
The Sausage - EliteThe cyclist has a large rounded shape, which is consistent, balanced between each leg, and he maintains good pedal momentum throughout. Typical shape of a strong drive and a balanced recovery.
89
Angle of peak forceThe angle of peak force should be the same in each leg. However the actual angle of peak force is dependent upon a number of things - your cycling position, whether in a seated or standing position and whether using high/low resistance settings and/or high or low cadence. Different combinations will have different physiological effects, matching your heart rate and power training Zones to the resistance and cadence levels (use the tables in this guide to help) is a key component of getting the best out of your Wattbike training.
Ten ways to improve your force curve1. As a first step check your cycling position – incorrect cycling position can affect
both the downstroke and upstroke phases.
2. Irrespective of your force curve make sure you are applying force to the pedals evenly with each leg. The left/right leg % should be as close to 50/50 as possible (it will fluctuate but try to keep in the range 48%-52%).
3. Consider investing in a good pair of cycling shoes. The use of training shoes will, generally always compromise your force curve as they make it difficult to fully implement the full power and recovery phases.
4. To practice pedalling don’t stand up on the pedals unless it is a specific session you need to do.
5. A ‘figure of eight’ shape may indicate too high a resistance setting forcing you to concentrate solely on the downstroke – power phase preventing upstroke momentum. Lower the resistance to a level which allows you to improve you force curve to optimum. Concentrate on ‘scrapping the mud off the sole of the foot’ at the bottom of the pedal revolution.
6. Note that the Wattbike can be used for high cadence low wattage at one extreme and low cadence (r/m) high wattage at the other. Optimum leg speed is important. Experiment with different cadences and resistance settings. Cadence range can vary from 50-200 depending on the type of cycling you do.
7. Set the Wattbike Performance Computer to display the Polar Graph when you do a workout. You can set the text view you want on the right hand side of the display by pressing the ENTER button. This will constantly remind you to focus on effective pedalling.
8. If you have a laptop set up the Polar view in the Wattbike Expert Software. In addition to showing your force curve you can also see your angle of peak force and set the display bar at the bottom of the screen to show all the left and right leg parameters.
90
9. Set yourself a specific cycling effectiveness workout where you concentrate solely on improving your pedalling action and force curve rather than on distance, speed, watts, HR etc. Split the workout into short intervals and gradually expand the time of each interval as you improve. For example:
• 5 x 4 minutes - 1 minute rest between each interval• 4 x 5 minutes - 1 minute rest between each interval• 2 x 10 minutes – 1 minute rest between each interval
10. Then try a 20 minute session holding the force curve for 20 minutes
91
The Training Plans
92
Contents
Training Session Terminology .................................................................................................................................. 93 Road Rides ...........................................................................................................................................................93 Flat Terrain ....................................................................................................................................................................................................93 Varied Terrain ...............................................................................................................................................................................................93 Hilly .................................................................................................................................................................................................................93 Include some hills ......................................................................................................................................................................................94The Plans ...................................................................................................................................................................... 96
93
Training Session TerminologyUse the following glossary to understand the requirements of the different type of session.
Road RidesAll long road rides above 2.5 hours are aimed at general conditioning to build endurance which is an important requirement for completing a sportive type event. Simply put, you need to spend enough hours in the saddle to prepare you to complete the course.During all road rides, it is important to eat and drink throughout – so always have food with you and aim to drink a 500ml bottle every 1 – 1.5 hrs. You should finish this ride feeling tired but not exhausted and the next day should be a rest day, which means either a day off or an easy recovery session at Z1.Where possible complete your longest road ride of each week in a group. This will help develop you group riding skills and also enable a longer distance to be covered for the same amount of effort of a shorter ride. It is important for riders on training plans 1 – 3 to ensure a few long group rides are included before taking on the event. These rides will also provide you with the confidence to successfully complete the event.Road rides are notated to be carried out on either flat or varied terrain or may be detailed as ‘hilly’. The ability for you to include the rides as detailed will be somewhat determined by the area that you live / ride. However, where if possible, use the below to guide you to build the routes:
Flat Terrain:80% flat. You would be able to ride 80% of the route sitting in the saddle and using just 3 or 4 different gears. You will need to increase the pace to push up through your training Zones.
Varied Terrain:Rolling terrain, not too structured, avoid really big hills. Let the terrain dictate the Zones whilst riding ‘steady’ and not attacking the hills. Ride easy on the flat sections.
Hilly:60% - 80% hilly. This type of ride will require a lot of climbing, and lots of time out of the saddle, along with a lot of time descending. You will need to use many gears, and the ride will see you spend more time in the higher training Zones than the varied terrain
94
due to the nature of the course. These rides will build strength as well as endurance and ‘top end’ fitness.
Include some hills:This is a road ride that is mainly on flat or rolling terrain, but will have some hills within it that will take you high up the training Zones. As a guide, look to include two hills for every one hour ridden (note the ride is not a structured training session however so you do not have to be too strict about when the hills come in the ride).
AT Interval session 1 – e.g. AT session with 4 efforts.10’ progressive warm up to Z3, 2’ easy before first interval then 4 x 4’ intervals at AT (Z4/Z5 Training Zone) with 4’ recovery between intervals, 10’ cool down.
AT Interval session 2 – e.g. AT session 2 with 3 efforts.As AT Interval session 1 but with 2’ recovery between intervals. Warm up for AT (Z4/Z5 Training Zone) Interval sessions 1 & 2. 3’ easy pedalling, 5’ progressive to Z4/Z5, 2’ easy.
Cadence session (seated) – e.g. 30’ cadence session.30’ Z1 with 4 rev outs (acceleration to maximum cadence on resistance level 1) at 10’, 15, 20, 25’ – rev outs 15-30 seconds in duration.
FoP - Focus on Pedalling technique – e.g. 20’ Z1 FoP.
Power session 1 – e.g. Power session 1 with 4 efforts.10’ warm up then 4 x 300m efforts accelerating flywheel from 30 rpm to as fast as possible. If max cadence reached within 200m then increase resistance. Fully recover between efforts – 3’-5’ recovery between each effort, 10’ cool down. Set the Wattbike resistance level at your Z4/Z5 level.Fully recover between efforts – 3’-5’ recovery between each effort, 10’ cool down.
Power session 2: - e.g. Power session with 4 efforts.10 minute warm up then 4 x 2’ intervals with 4’ recovery between intervals.
Over geared – 80 rpm at Z4/Z5 – accelerating the last 30 seconds to 100+ rpm at Z5, 10’ cool down. See the tables of power, resistance and cadence. Set the resistance lever to the level that delivers your Z4/Z5 power Zone at 80 rpm.
95
Progressive session: - e.g. 45’ PS Z1-Z3.Increasing resistance level and/or cadence that increases HR and power from your Z1 to Z3 training Zones. Includes warm up and cool down.
Example 5’ warm up then 10’ at Z1, 10’ at Z2, 10’ at Z3, 10’ cool down.
Rev outs: - e.g. 60’ inc 4 rev outs downhill (downhill sprints).Rev out is acceleration to maximum cadence at 15’, 25’ 35’ and 45’, rev outs of 10 -20 seconds (build up to 20 seconds; important that cadence is as high as possible & remains high for duration of rev out.
Strength session (seated): - e.g. Strength efforts with 3 efforts.10’ progressive warm up to Z3 followed by 5’ recovery, then 3 x 3’ at Z3 60-70 cadence, 5’ recovery between efforts, 10’ cool down. See the tables of power, resistance and cadence. Set the resistance lever to the level that delivers your Z3 power Zone at 60-70 rpm.
Where sets of efforts are required (2 sets of 2 OR 2 sets of 3) recovery is 5’ between sets.
96
Training PlansThe Sportive Training plans have been put together by British Cycling Talent Team Manager, Gary Coltman, and Wattbike’s resident Sport Scientist Eddie Fletcher.
The PlansThe plans in this Guide are designed to prepare a cyclist for a Sportive event (or equivalent) and for Triathletes there is a specially designed Winter Training Plan.
There are 5 different plans - which plan you adopt depends not only on your ability and fitness level but also on the amount of cycling you have previously done. However for Plans 4 and 5 you do need to be a capable cyclist - within each Fitness level there is a recommended ability level in terms of maximum minute power (MMP) and power to weight ratio (PKg - the power to weight ratios are based on, male 70Kg and Female 55Kg). The simplest way to start is to match up your fitness level with the training plans so that if you assess your fitness level as 1 you should start on training plan 1 and so on up to fitness level 5 and training plan 5 (subject to the maximum minute power restrictions). Each plan starts 16 weeks from your race day and is intended to be a menu of sessions that could be followed. The plans are general and not individual plans but they do have a structure that would be useful to follow at each level. As you progress it is possible to switch to a higher or lower level plan as appropriate. Be flexible in your approach to ensure you select the plan and sessions which match your fitness level and time availability.
• Plan 1 starts with 2 sessions in week 1 progressing to 3 sessions in week 2 and then to 4 sessions per week from week 7 onwards.
• Plan 2 starts with 3 sessions per week in weeks 1 to 3 progressing to 4 sessions per week from week 4 onwards.
• Plan 3 starts with 3 sessions per week in weeks 1 and 2 progressing to 4 sessions per week in weeks 3 to 5 and has an optional session 5 from week 6 onwards.
• Plan 4 starts with 4 sessions per week in weeks 1 to 3 progressing to an optional session 5 from week 6 onwards.
• Plan 5 is based on 5 sessions per week in weeks 1 to 7 progressing to 6 sessions a week from week 8 onwards.
Within each plan there are recommended minimum road and Wattbike sessions (shown in bold) with an alternative Wattbike session to substitute for the road sessions if you are unable to get out on the road (weather or time constraints) - however try not to miss the recommended road sessions if at all possible.
97
Plans 4 and 5 are more flexible - there is no suggested route through the mix of road and Wattbike sessions - experienced riders can mix and match - we suggest that a good mix would be a ratio of 3:1 / 4:1 road rides to Wattbike rides. For all plans do not miss the weekly long ride sessions (session 1). Each Plan has recovery weeks built into the Plan - recovery weeks should be treated as compulsory. Do not hesitate to take extra recovery days throughout the duration of any of the Plans if necessary.Do not overreach, take a sensible approach to which plan you start on to avoid over training, fatigue, illness and injury. It is far better to start slowly and build your fitness at a lower level and then switch to a higher level plan as your fitness improves. It is acceptable to mix and match the Training Plans to suit your requirements although we do recommend that you try to adopt one of the plans in its entirety matching the plan to the fitness description level that best reflects your current training status.
WarningThe training plans in this Guide assume a basic to high level of fitness and should not be attempted if you are a beginner or have been recently ill or injured (use the estimated methods). If in doubt consult your Doctor before you commence a Wattbike test or training plan. The tests are not suitable for children or young adults under the age of 18 unless under supervision.
98
The Sportive Plan
99
Contents
Sportive Worked Example - Based on a Wattbike Pro .......................................................................................100 Example Training Sessions .................................................................................................................................101The Training Plans ....................................................................................................................................................103 Level 1 - Weeks 1-4 ............................................................................................................................................103 Level 1 - Weeks 5-8 ............................................................................................................................................104 Level 1 - Weeks 9-12...........................................................................................................................................105 Level 1 - Weeks 13-16 .........................................................................................................................................106 Level 2 - Weeks 1-4 ............................................................................................................................................107 Level 2 - Weeks 5-8 ............................................................................................................................................108 Level 2 - Weeks 9-12 ..........................................................................................................................................109 Level 2 - Weeks 13-16 .........................................................................................................................................110 Level 3 - Weeks 1-4 ............................................................................................................................................111 Level 3 - Weeks 5-8 ............................................................................................................................................112 Level 3 - Weeks 9-12 ..........................................................................................................................................113 Level 3 - Weeks 13-16 .........................................................................................................................................114 Level 4 - Weeks 1-4 ............................................................................................................................................115 Level 4 - Weeks 5-8 ............................................................................................................................................116 Level 4 - Weeks 9-12 ..........................................................................................................................................117 Level 4 - Weeks 13-16 .........................................................................................................................................118 Level 5 - Weeks 1-4 ............................................................................................................................................119 Level 5 - Weeks 5-8 ............................................................................................................................................120 Level 5 - Weeks 9-12 ..........................................................................................................................................121 Level 5 - Weeks 13-16 .........................................................................................................................................122
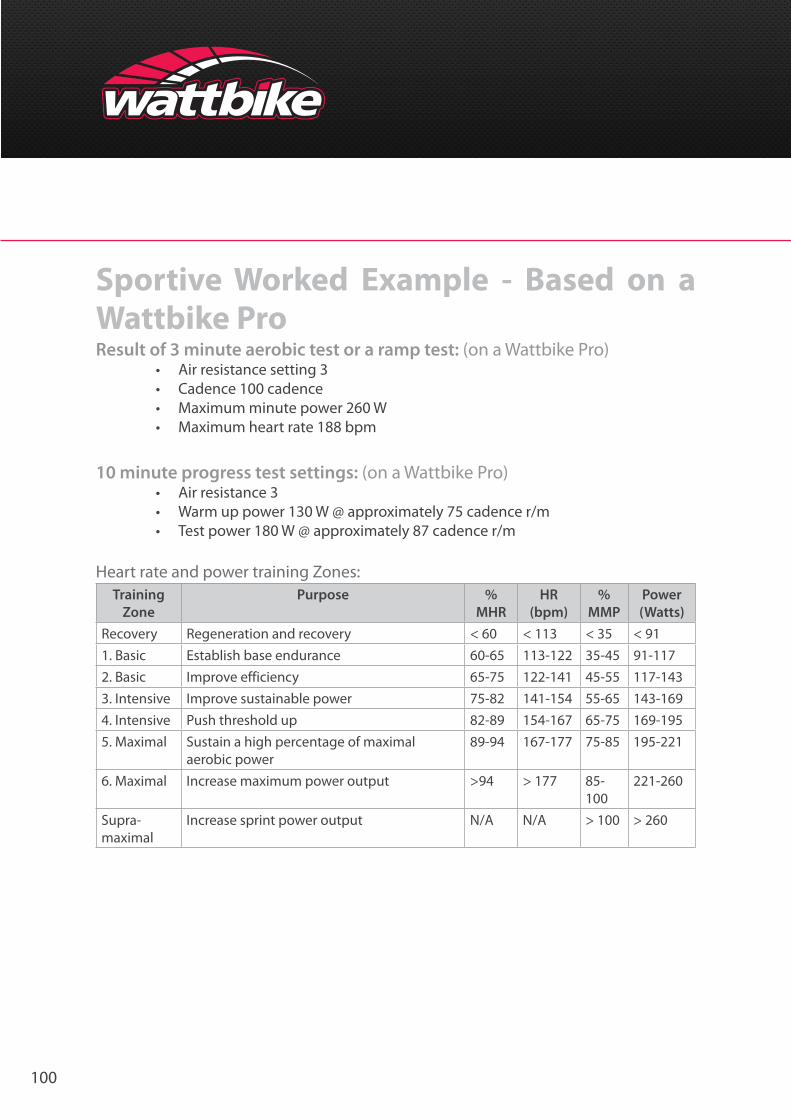
100
Sportive Worked Example - Based on a Wattbike Pro Result of 3 minute aerobic test or a ramp test: (on a Wattbike Pro)
• Air resistance setting 3• Cadence 100 cadence• Maximum minute power 260 W• Maximum heart rate 188 bpm
10 minute progress test settings: (on a Wattbike Pro)• Air resistance 3• Warm up power 130 W @ approximately 75 cadence r/m• Test power 180 W @ approximately 87 cadence r/m
Heart rate and power training Zones:Training
ZonePurpose %
MHRHR
(bpm)%
MMPPower (Watts)
Recovery Regeneration and recovery < 60 < 113 < 35 < 911. Basic Establish base endurance 60-65 113-122 35-45 91-1172. Basic Improve efficiency 65-75 122-141 45-55 117-1433. Intensive Improve sustainable power 75-82 141-154 55-65 143-1694. Intensive Push threshold up 82-89 154-167 65-75 169-1955. Maximal Sustain a high percentage of maximal
aerobic power89-94 167-177 75-85 195-221
6. Maximal Increase maximum power output >94 > 177 85-100
221-260
Supra-maximal
Increase sprint power output N/A N/A > 100 > 260
101
Example training sessions taken from various Plans based on MHR 188 and 260 W MMP on a Wattbike ProA Recovery session - 30’ Recovery:
• 30 minutes HR to 113 at 91 W at 70 cadence, this is air resistance setting 1 on a Wattbike Pro
• 70 cadence at air resistance setting 1 = 90 W approximatelyA Zone 1 session - 45’ Z1:
• 45’ minutes HR 113-122 at 91-117 W at 70-80 cadence, this is air resistance setting 1 on a Wattbike Pro
• 70 cadence at air resistance setting 1 = 90 W approximately• 75 cadence at air resistance setting 1 =100 W approximately• 80 cadence at air resistance setting 1 =115 W approximately
A Zone 2 session - 45’ Z2:• 45 minutes HR 122-141 at 117-143 W at 80-90 cadence, this is air resistance
setting 1 on a Wattbike Pro• 80 cadence at air resistance setting 1 =115 W approximately• 85 cadence at air resistance setting 1 =130 W approximately• 90 cadence at air resistance setting 1 =150 W approximately
A Zone 3 session - 60’ Z2-Z3 majority of ride should be at Z2. Z2 section as above: Zone 3 section HR 141-154 at 143-169 W at 90-95 cadence, this is air resistance setting 1 on a Wattbike Pro.• 90cadenceatairresistancesetting1=150Wapproximately• 95cadenceatairresistancesetting1=175Wapproximately
A shorter higher intensity Zone 4 continuous or interval set – 30’ Z4 :• 30 mins HR to 154-167 at 169-195 W and 95-100 cadence, this is air resistance setting 2 on a Wattbike Pro• 95cadenceatairresistance1=175Wapproximately• 100cadenceatairresistance1=190Wapproximately
OR Power session with 4 efforts, 4 x 2’ intervals with 4’ recovery between intervals. Over geared – 80 rpm at Z4 – accelerating the last 30 seconds to 100+ rpm at Z5• 80 cadence at air resistance setting 4 on a Wattbike Pro = 170 W approximately adjusting the air resistance setting to 3 for the last 30 seconds will deliver approximately 220 W at 100 cadence
102
A Zone 5 session - AT session with 4 efforts 4 x 4’ intervals at AT with 4’ recovery between intervals:• HR 167-177 at 195-221 W at 100 + cadence, this is air resistance setting 1 on a Wattbike Pro• 100cadenceatairresistancesetting1=190Wapproximately• 105cadenceatairresistancesetting1=210Wapproximately
A Zone 6 session - there are no Z6 in these particular plans but for completion:• 4-10 minutes intervals 177 + at 221-260 W at 100 + cadence, this is air resistance setting 2 on a Wattbike Pro• 100cadenceatairresistancesetting2=210Wapproximately• 105cadenceatairresistancesetting2=230Wapproximately• 110cadenceatairresistancesetting2=260Wapproximately
Depending on the type of training session required any combination of air resistance and cadence can be used to create the power output required. See the table of resistance setting, cadence and power on page 9.
The Wattbike can be used for high cadence low wattage at one extreme and low cadence high wattage at the other. A good general cadence rate is 70-110 rpm although depending on the circumstances cadence can vary from 50 to 200 rpm. On a Wattbike Pro for example 200 W can be delivered at air resistance setting 1 and a cadence just over 100 r/m. The cadence required to produce 200 W at air resistance settings 2 to 10 reduces progressively. At setting 5 the cadence requirement is about 80 r/m and at setting 10 only 70 r/m.
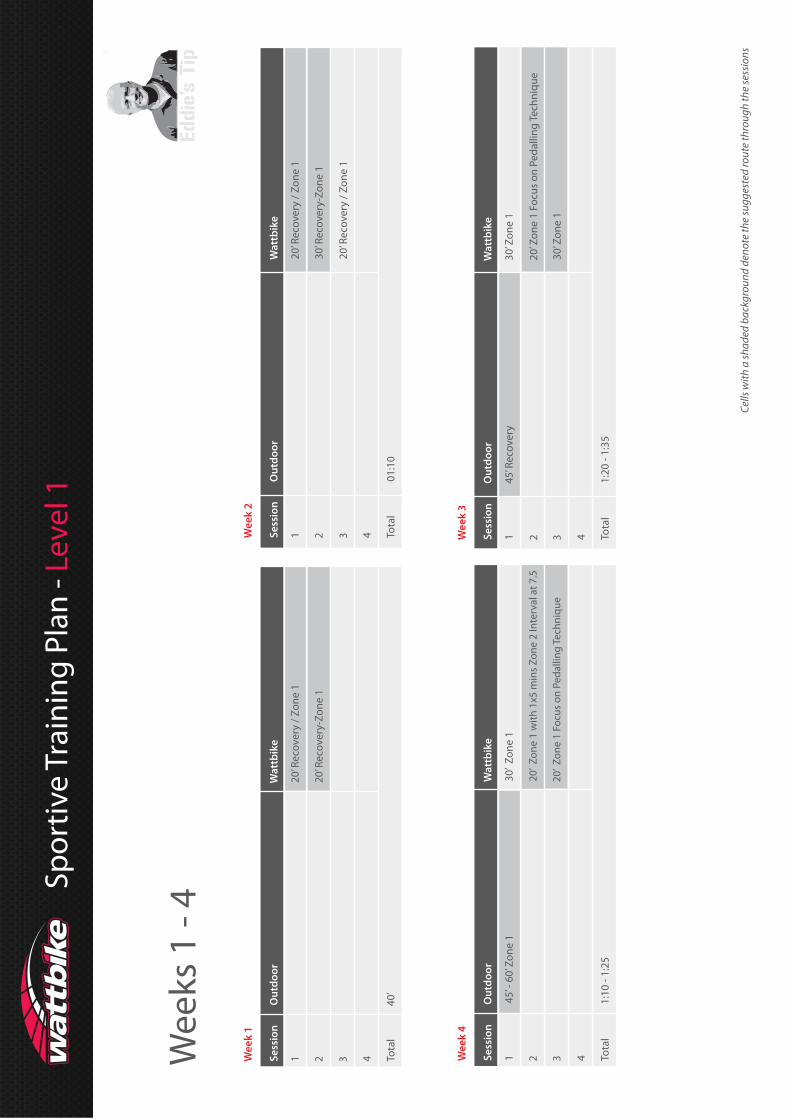
Spor
tive
Trai
ning
Pla
n - L
evel
1
Wee
ks 1
- 4
Sess
ion
Wee
k 1
Out
door
Wat
tbik
e
120
’ Rec
over
y / Z
one
1
20’ R
ecov
ery-
Zone
12 3 4 To
tal
40’
Sess
ion
Wee
k 2
Out
door
Wat
tbik
e
120
’ Rec
over
y / Z
one
1
30’ R
ecov
ery-
Zone
1
20’ R
ecov
ery
/ Zon
e 1
2 3 4 Tota
l01
:10
Sess
ion
Wee
k 3
Out
door
Wat
tbik
e
130
’ Zon
e 1
30’ Z
one
1
45’ R
ecov
ery
20’ Z
one
1 Fo
cus
on P
edal
ling
Tech
niqu
e2 3 4 To
tal
1:20
- 1:
35
Sess
ion
Wee
k 4
Out
door
Wat
tbik
e
130
’ Zon
e 1
45’ -
60’
Zon
e 1
20’ Z
one
1 w
ith 1
x5 m
ins
Zone
2 In
terv
al a
t 7.5
20’ Z
one
1 Fo
cus
on P
edal
ling
Tech
niqu
e
2 3 4 Tota
l1:
10 -
1:25
Cells
with
a sh
aded
bac
kgro
und
deno
te th
e su
gges
ted
rout
e th
roug
h th
e se
ssio
ns
Eddie
's T
ip
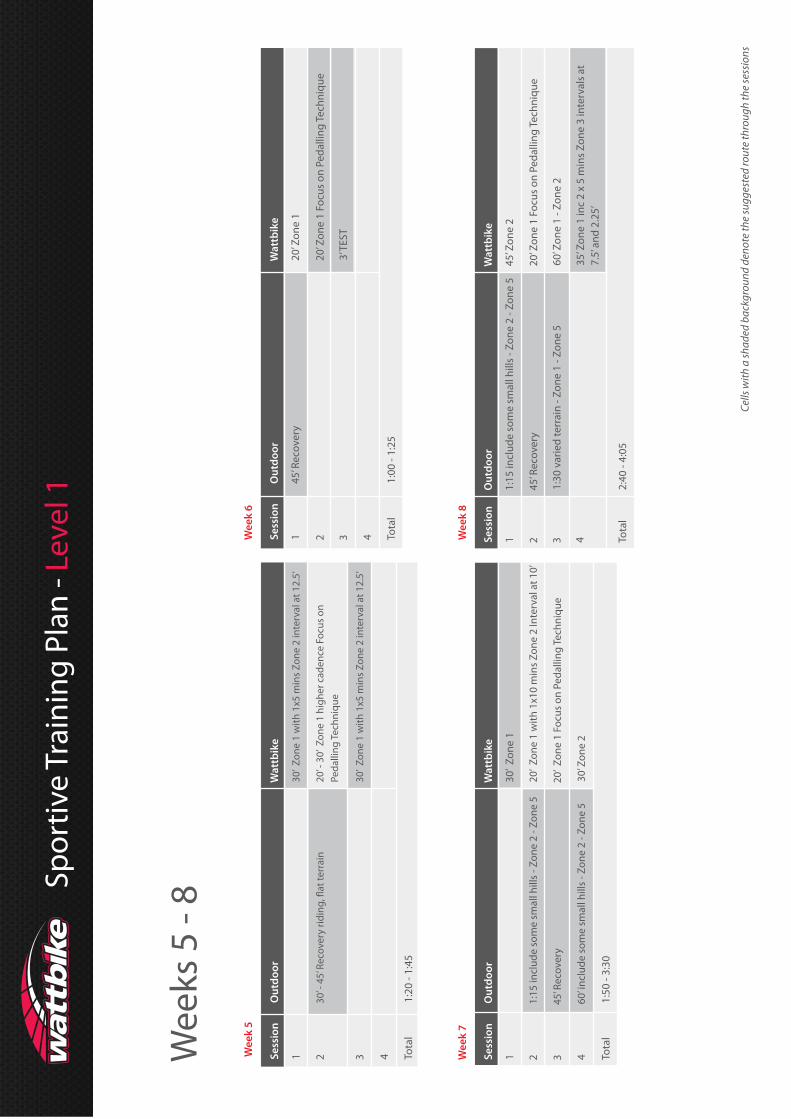
Spor
tive
Trai
ning
Pla
n - L
evel
1
Wee
ks 5
- 8
Sess
ion
Wee
k 5
Out
door
Wat
tbik
e
130
’ Zon
e 1
with
1x5
min
s Zo
ne 2
inte
rval
at 1
2.5’
30’ Z
one
1 w
ith 1
x5 m
ins
Zone
2 in
terv
al a
t 12.
5’
20’ -
30’
Zon
e 1
high
er c
aden
ce F
ocus
on
Peda
lling
Tech
niqu
e 2 3 4 To
tal
1:20
- 1:
45
Sess
ion
Wee
k 6
Out
door
Wat
tbik
e
120
’ Zon
e 1
3’ T
EST
45’ R
ecov
ery
20’ Z
one
1 Fo
cus
on P
edal
ling
Tech
niqu
e2 3 4 To
tal
1:00
- 1:
25
Sess
ion
Wee
k 7
Out
door
Wat
tbik
e
130
’ Zon
e 1
20’ Z
one
1 w
ith 1
x10
min
s Zo
ne 2
Inte
rval
at 1
0’1:
15 in
clud
e so
me
smal
l hill
s - Z
one
2 - Z
one
5
60’ in
clud
e so
me
smal
l hill
s - Z
one
2 - Z
one
530
’ Zon
e 2
45’ R
ecov
ery
20’ Z
one
1 Fo
cus
on P
edal
ling
Tech
niqu
e
2 3 4 Tota
l1:
50 -
3:30
Sess
ion
Wee
k 8
Out
door
Wat
tbik
e
145
’ Zon
e 2
60’ Z
one
1 - Z
one
2
35’ Z
one
1 in
c 2
x 5
min
s Zo
ne 3
inte
rval
s at
7.5’
and
2.2
5’
1:15
incl
ude
som
e sm
all h
ills
- Zon
e 2
- Zon
e 5
45’ R
ecov
ery
1:30
var
ied
terr
ain
- Zon
e 1
- Zon
e 5
20’ Z
one
1 Fo
cus
on P
edal
ling
Tech
niqu
e2 3 4 To
tal
2:40
- 4:
05
Cells
with
a sh
aded
bac
kgro
und
deno
te th
e su
gges
ted
rout
e th
roug
h th
e se
ssio
ns

Spor
tive
Trai
ning
Pla
n - L
evel
1
Wee
ks 9
- 12
Sess
ion
Wee
k 9
Out
door
Wat
tbik
e
160
’ Zon
e 2
60’ Z
one
2
1:30
var
ied
terr
ain
- Zon
e 1
- Zon
e 5
1:30
var
ied
terr
ain
- Zon
e 1
- Zon
e 5
35’ Z
one
1 in
c 2
x 5
min
s Zo
ne 3
inte
rval
s at
7.5’
and
22.
5’
35’ Z
one
1 in
c 2
x 5
min
s Zo
ne 3
inte
rval
s at
7.5’
and
22.
5’
2 3 4 Tota
l3:
10 -
4:10
Sess
ion
Wee
k 10
Out
door
Wat
tbik
e
160
’ Zon
e 2
1:30
var
ied
terr
ain
- Zon
e 1
- Zon
e 5
1:30
var
ied
terr
ain
- Zon
e 1
- Zon
e 5
20’ -
30’
Zon
e 1
high
er c
aden
ce F
ocus
on
Peda
lling
Tech
niqu
e
60’ Z
one
2 in
clud
e 10
min
ute
prog
ress
ch
eck
at th
e st
art
60’ Z
one
2
2 3 4 Tota
l3:
20 -
5:15
Sess
ion
Wee
k 11
Out
door
Wat
tbik
e
11:
30 Z
one
2
1:30
var
ied
terr
ain
- Zon
e 1
- Zon
e 5
20’ -
30’
Zon
e 1
high
er c
aden
ce F
ocus
on
Peda
lling
Tech
niqu
e
60’ Z
one
2 - Z
one
3
1:30
Zon
e 2
2 3 4 Tota
l3:
20 -
5:30
Sess
ion
Wee
k 12
Out
door
Wat
tbik
e
1
1:30
Zon
e 2
- Zon
e 3
2:30
incl
ude
som
e hi
lls -
Zone
2 -
Zone
6
and
27’
20’ -
30’
Zon
e 1
high
er c
aden
ce F
ocus
on
Peda
lling
Tech
niqu
e
at 6
’ and
30’
2 3 4 Tota
l4:
20 -
4:30
Cells
with
a sh
aded
bac
kgro
und
deno
te th
e su
gges
ted
rout
e th
roug
h th
e se
ssio
ns
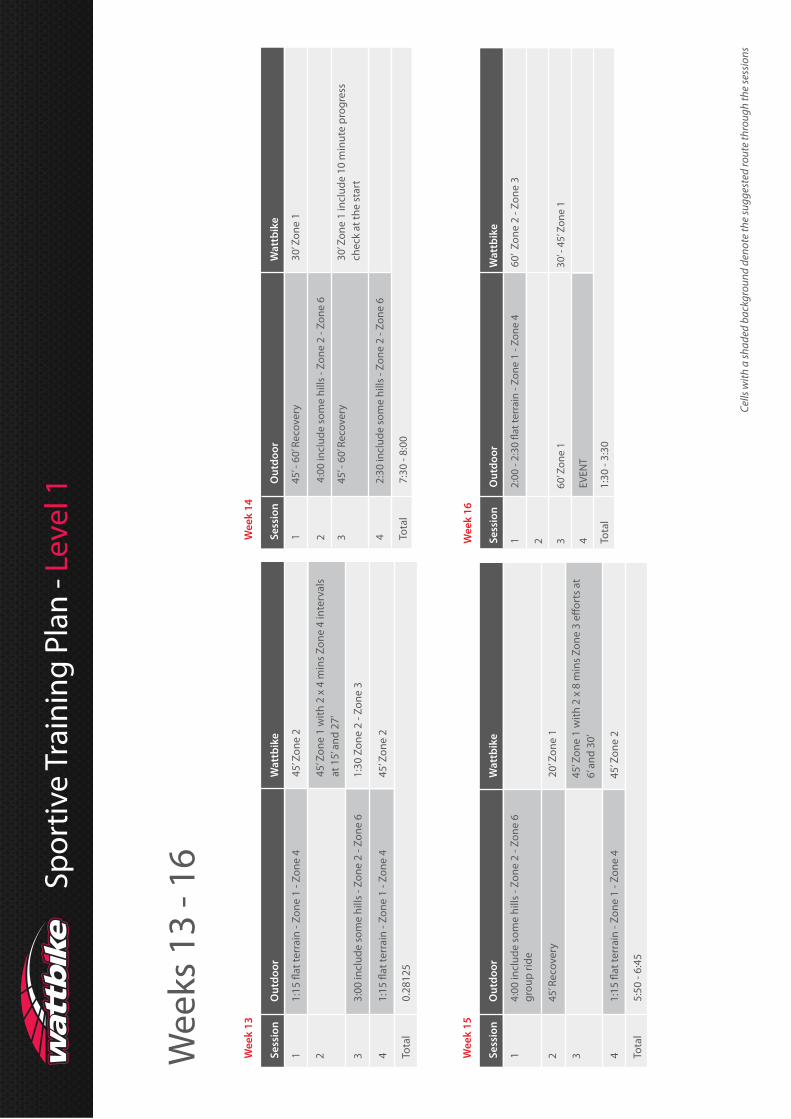
Spor
tive
Trai
ning
Pla
n - L
evel
1
Wee
ks 1
3 - 1
6
Sess
ion
Wee
k 13
Out
door
Wat
tbik
e
145
’ Zon
e 2
3:00
incl
ude
som
e hi
lls -
Zone
2 -
Zone
6
45’ Z
one
1 w
ith 2
x 4
min
s Zo
ne 4
inte
rval
sat
15’
and
27’
1:30
Zon
e 2
- Zon
e 3
45’ Z
one
2
2 3 4 Tota
l0.
2812
5
Sess
ion
Wee
k 14
Out
door
Wat
tbik
e
130
’ Zon
e 1
45’ -
60’
Rec
over
y
45’ -
60’
Rec
over
y
4:00
incl
ude
som
e hi
lls -
Zone
2 -
Zone
6
2:30
incl
ude
som
e hi
lls -
Zone
2 -
Zone
6
30’ Z
one
1 in
clud
e 10
min
ute
prog
ress
ch
eck
at th
e st
art
2 3 4 Tota
l7:
30 -
8:00
Sess
ion
Wee
k 15
Out
door
Wat
tbik
e
14:
00 in
clud
e so
me
hills
- Zo
ne 2
- Zo
ne 6
grou
p rid
e
45’ R
ecov
ery
20’ Z
one
1
45’ Z
one
2
2 3 4 Tota
l5:
50 -
6:45
6’ a
nd 3
0’
Sess
ion
Wee
k 16
Out
door
Wat
tbik
e
160
’ Zon
e 2
- Zon
e 3
EVEN
T
60’ Z
one
130
’ - 4
5’ Z
one
1
2 3 4 Tota
l1:
30 -
3:30
Cells
with
a sh
aded
bac
kgro
und
deno
te th
e su
gges
ted
rout
e th
roug
h th
e se
ssio
ns
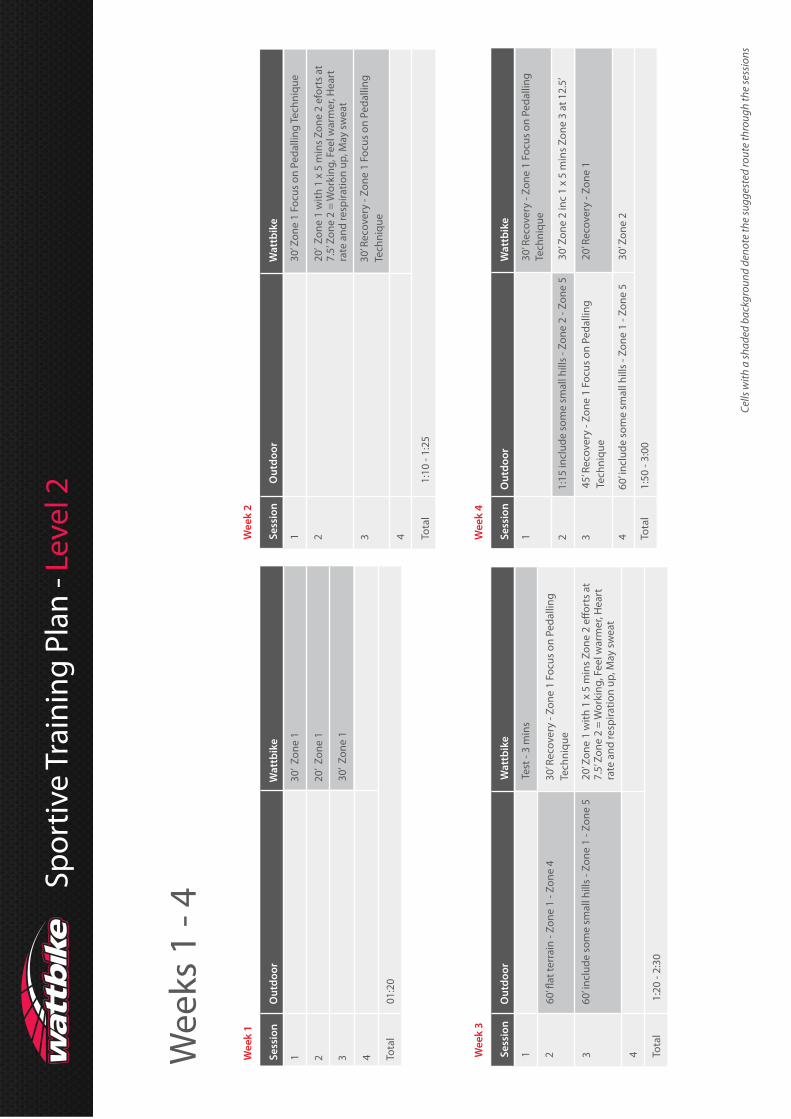
Spor
tive
Trai
ning
Pla
n - L
evel
2
Wee
ks 1
- 4
Sess
ion
Wee
k 1
Out
door
Wat
tbik
e
130
’ Zon
e 1
30’ Z
one
1
20’ Z
one
12 3 4 To
tal
01:2
0
Sess
ion
Wee
k 2
Out
door
Wat
tbik
e
130
’ Zon
e 1
Focu
s on
Ped
allin
g Te
chni
que
20’ Z
one
1 w
ith 1
x 5
min
s Zo
ne 2
efo
rts
at7.
5’ Z
one
2 =
Wor
king
, Fee
l war
mer
, Hea
rtra
te a
nd re
spira
tion
up, M
ay s
wea
t
30’ R
ecov
ery
- Zon
e 1
Focu
s on
Ped
allin
gTe
chni
que
2 3 4 Tota
l1:
10 -
1:25
Sess
ion
Wee
k 3
Out
door
Wat
tbik
e
1Te
st -
3 m
ins
30’ R
ecov
ery
- Zon
e 1
Focu
s on
Ped
allin
gTe
chni
que
60’ in
clud
e so
me
smal
l hill
s - Z
one
1 - Z
one
5 7.
5’ Z
one
2 =
Wor
king
, Fee
l war
mer
, Hea
rt
rate
and
resp
iratio
n up
, May
sw
eat
2 3 4 Tota
l1:
20 -
2:30
Sess
ion
Wee
k 4
Out
door
Wat
tbik
e
130
’ Rec
over
y - Z
one
1 Fo
cus
on P
edal
ling
Tech
niqu
e
30’ Z
one
2 in
c 1
x 5
min
s Zo
ne 3
at 1
2.5’
1:15
incl
ude
som
e sm
all h
ills
- Zon
e 2
- Zon
e 5
60’ in
clud
e so
me
smal
l hill
s - Z
one
1 - Z
one
5
20’ R
ecov
ery
- Zon
e 1
45’ R
ecov
ery
- Zon
e 1
Focu
s on
Ped
allin
gTe
chni
que
30’ Z
one
2
2 3 4 Tota
l1:
50 -
3:00
Cells
with
a sh
aded
bac
kgro
und
deno
te th
e su
gges
ted
rout
e th
roug
h th
e se
ssio
ns
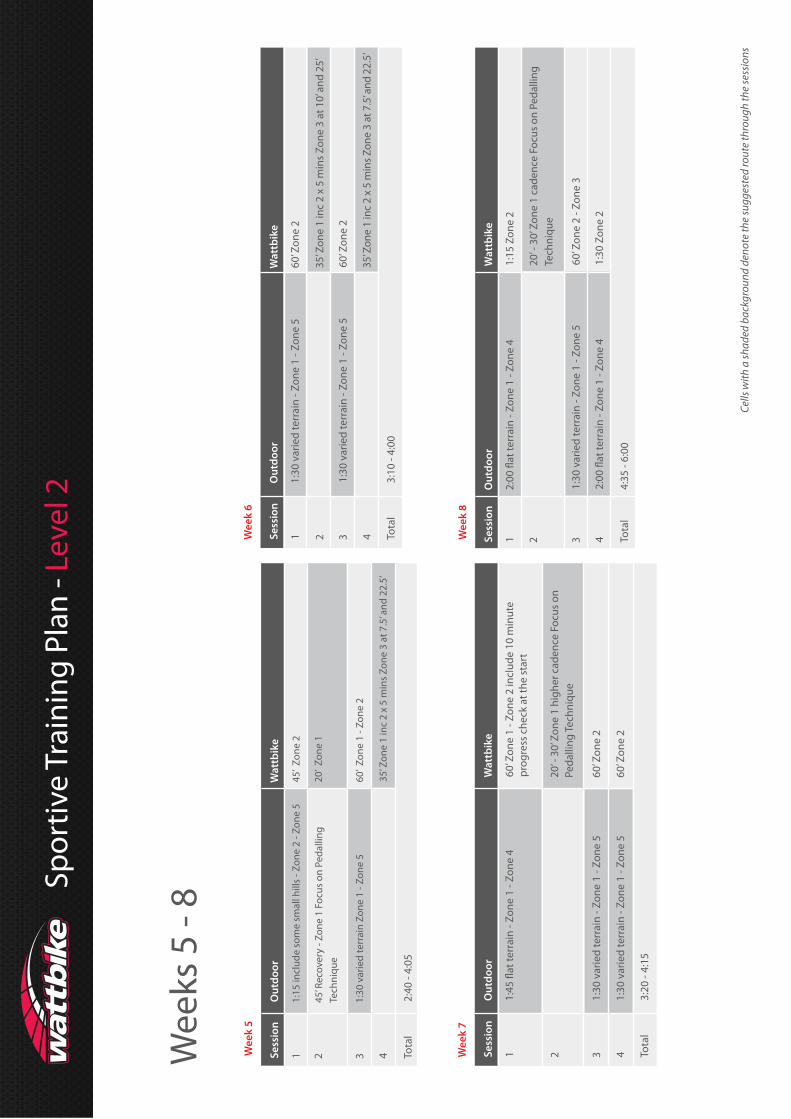
Spor
tive
Trai
ning
Pla
n - L
evel
2
Wee
ks 5
- 8
Sess
ion
Wee
k 5
Out
door
Wat
tbik
e
145
’ Zon
e 2
60’ Z
one
1 - Z
one
2
35’ Z
one
1 in
c 2
x 5
min
s Zo
ne 3
at 7
.5’ a
nd 2
2.5’
1:30
var
ied
terr
ain
Zone
1 -
Zone
5
20’ Z
one
1 45
’ Rec
over
y - Z
one
1 Fo
cus
on P
edal
ling
Tech
niqu
e
1:15
incl
ude
som
e sm
all h
ills
- Zon
e 2
- Zon
e 5
2 3 4 Tota
l2:
40 -
4:05
Sess
ion
Wee
k 6
Out
door
Wat
tbik
e
160
’ Zon
e 2
60’ Z
one
2
35’ Z
one
1 in
c 2
x 5
min
s Zon
e 3
at 7
.5’ a
nd 2
2.5’
1:30
var
ied
terr
ain
- Zon
e 1
- Zon
e 5
1:30
var
ied
terr
ain
- Zon
e 1
- Zon
e 5
35’ Z
one
1 in
c 2
x 5
min
s Zo
ne 3
at 1
0’ a
nd 2
5’2 3 4 To
tal
3:10
- 4:
00
Sess
ion
Wee
k 7
Out
door
Wat
tbik
e
160
’ Zon
e 1
- Zon
e 2
incl
ude
10 m
inut
e pr
ogre
ss c
heck
at t
he s
tart
1:30
var
ied
terr
ain
- Zon
e 1
- Zon
e 5
1:30
var
ied
terr
ain
- Zon
e 1
- Zon
e 5
20’ -
30’
Zon
e 1
high
er c
aden
ce F
ocus
on
Peda
lling
Tech
niqu
e
60’ Z
one
2
60’ Z
one
2
2 3 4 Tota
l3:
20 -
4:15
Sess
ion
Wee
k 8
Out
door
Wat
tbik
e
11:
15 Z
one
2
60’ Z
one
2 - Z
one
3
1:30
Zon
e 2
1:30
var
ied
terr
ain
- Zon
e 1
- Zon
e 5
20’ -
30’
Zon
e 1
cade
nce
Focu
s on
Ped
allin
g Te
chni
que
2 3 4 Tota
l4:
35 -
6:00
Cells
with
a sh
aded
bac
kgro
und
deno
te th
e su
gges
ted
rout
e th
roug
h th
e se
ssio
ns
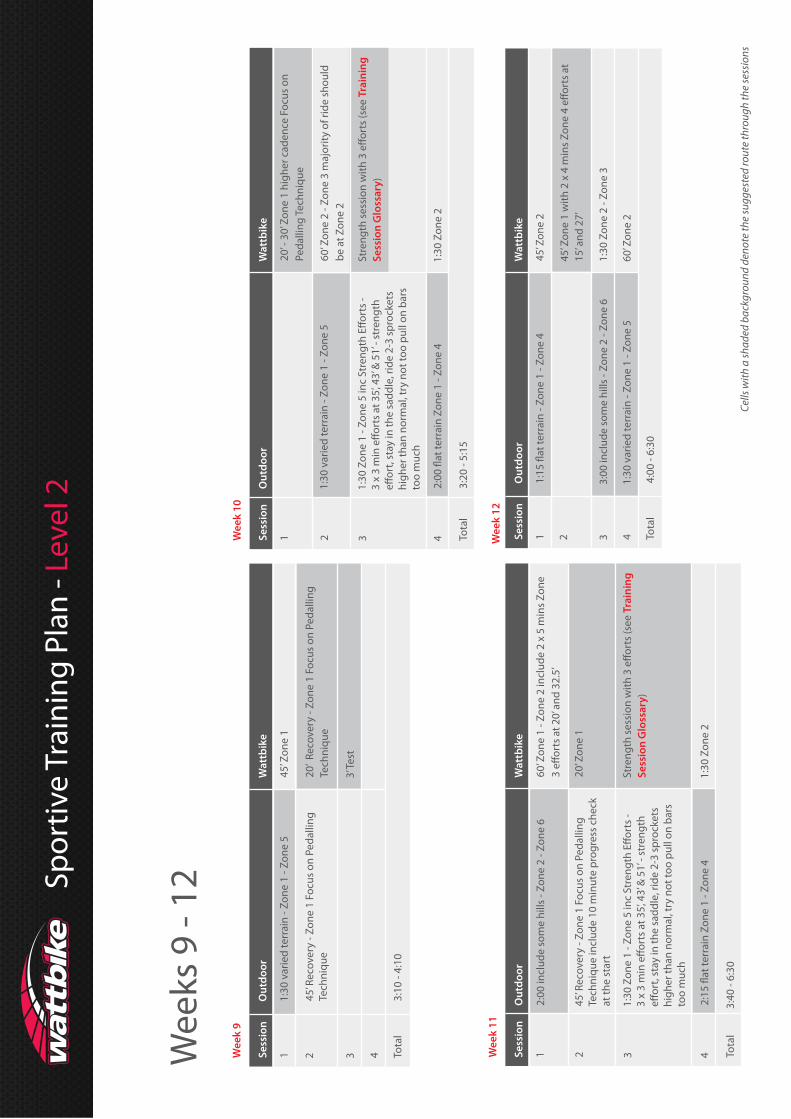
Spor
tive
Trai
ning
Pla
n - L
evel
2
Wee
ks 9
- 12
Sess
ion
Wee
k 9
Out
door
Wat
tbik
e
145
’ Zon
e 1
3’ Te
st
1:30
var
ied
terr
ain
- Zon
e 1
- Zon
e 5
45’ R
ecov
ery
- Zon
e 1
Focu
s on
Ped
allin
gTe
chni
que
20’ R
ecov
ery
- Zon
e 1
Focu
s on
Ped
allin
gTe
chni
que
2 3 4 Tota
l3:
10 -
4:10
Sess
ion
Wee
k 10
Out
door
Wat
tbik
e
120
’ - 3
0’ Z
one
1 hi
gher
cad
ence
Foc
us o
nPe
dalli
ng Te
chni
que
60’ Z
one
2 - Z
one
3 m
ajor
ity o
f rid
e sh
ould
be a
t Zon
e 2
1:30
var
ied
terr
ain
- Zon
e 1
- Zon
e 5
high
er th
an n
orm
al, t
ry n
ot to
o pu
ll on
bar
sto
o m
uch
Trai
ning
Sess
ion
Glo
ssar
y)
2 3 4 Tota
l3:
20 -
5:15
1:30
Zon
e 2
Wee
k 11
Sess
ion
Out
door
Wat
tbik
e
160
’ Zon
e 1
- Zon
e 2
incl
ude
2 x
5 m
ins
Zone
20’ Z
one
145
’ Rec
over
y - Z
one
1 Fo
cus
on P
edal
ling
Tech
niqu
e in
clud
e 10
min
ute
prog
ress
che
ck
at th
e st
art
2:00
incl
ude
som
e hi
lls -
Zone
2 -
Zone
6
high
er th
an n
orm
al, t
ry n
ot to
o pu
ll on
bar
sto
o m
uch
Trai
ning
Sess
ion
Glo
ssar
y)
2 3 4 Tota
l3:
40 -
6:30
1:30
Zon
e 2
Wee
k 12
Sess
ion
Out
door
Wat
tbik
e
145
’ Zon
e 2
1:30
var
ied
terr
ain
- Zon
e 1
- Zon
e 5
1:30
Zon
e 2
- Zon
e 3
60’ Z
one
2
3:00
incl
ude
som
e hi
lls -
Zone
2 -
Zone
6
15’ a
nd 2
7’2 3 4 To
tal
4:00
- 6:
30
Cells
with
a sh
aded
bac
kgro
und
deno
te th
e su
gges
ted
rout
e th
roug
h th
e se
ssio
ns
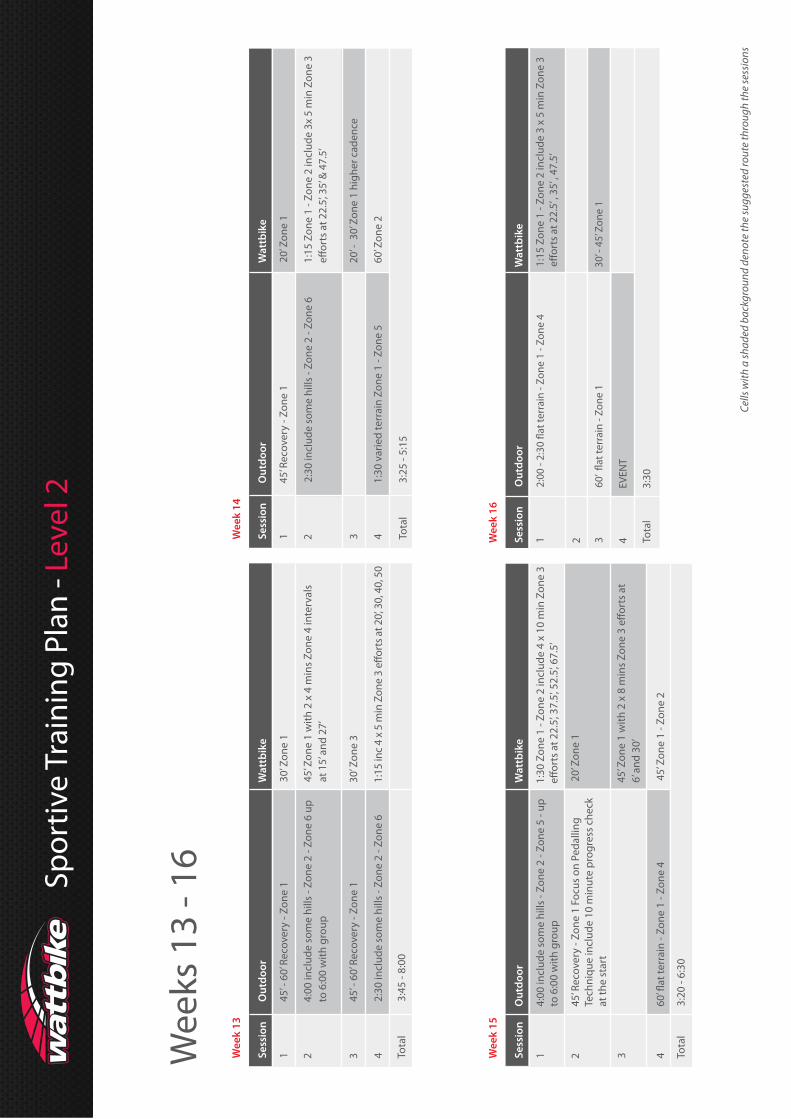
Spor
tive
Trai
ning
Pla
n - L
evel
2
Wee
ks 1
3 - 1
6
Sess
ion
Wee
k 13
Out
door
Wat
tbik
e
130
’ Zon
e 1
45’ -
60’
Rec
over
y - Z
one
1
45’ -
60’
Rec
over
y - Z
one
1
2:30
incl
ude
som
e hi
lls -
Zone
2 -
Zone
6
45’ Z
one
1 w
ith 2
x 4
min
s Zo
ne 4
inte
rval
sat
15’
and
27’
4:00
incl
ude
som
e hi
lls -
Zone
2 -
Zone
6 u
pto
6:0
0 w
ith g
roup
30’ Z
one
3
2 3 4 Tota
l3:
45 -
8:00
Sess
ion
Wee
k 14
Out
door
Wat
tbik
e
120
’ Zon
e 1
45’ R
ecov
ery
- Zon
e 1
2:30
incl
ude
som
e hi
lls -
Zone
2 -
Zone
6
1:30
var
ied
terr
ain
Zone
1 -
Zone
5
20’ -
30’
Zon
e 1
high
er c
aden
ce
60’ Z
one
2
1:15
Zon
e 1
- Zon
e 2
incl
ude
3x 5
min
Zon
e 3
2 3 4 Tota
l3:
25 -
5:15
Sess
ion
Wee
k 15
Out
door
Wat
tbik
e
14:
00 in
clud
e so
me
hills
- Zo
ne 2
- Zo
ne 5
- up
to 6
:00
with
gro
up
1:30
Zon
e 1
- Zon
e 2
incl
ude
4 x
10 m
in Z
one
3
45’ R
ecov
ery
- Zon
e 1
Focu
s on
Ped
allin
g Te
chni
que
incl
ude
10 m
inut
e pr
ogre
ss c
heck
at th
e st
art
45’ Z
one
1 - Z
one
2
2 3 4 Tota
l3:
20 -
6:30
6’ a
nd 3
0’
20’ Z
one
1
Sess
ion
Wee
k 16
Out
door
Wat
tbik
e
11:
15 Z
one
1 - Z
one
2 in
clud
e 3
x 5
min
Zon
e 3
EVEN
T
30’ -
45’
Zon
e 1
2 3 4 Tota
l3:
30
Cells
with
a sh
aded
bac
kgro
und
deno
te th
e su
gges
ted
rout
e th
roug
h th
e se
ssio
ns
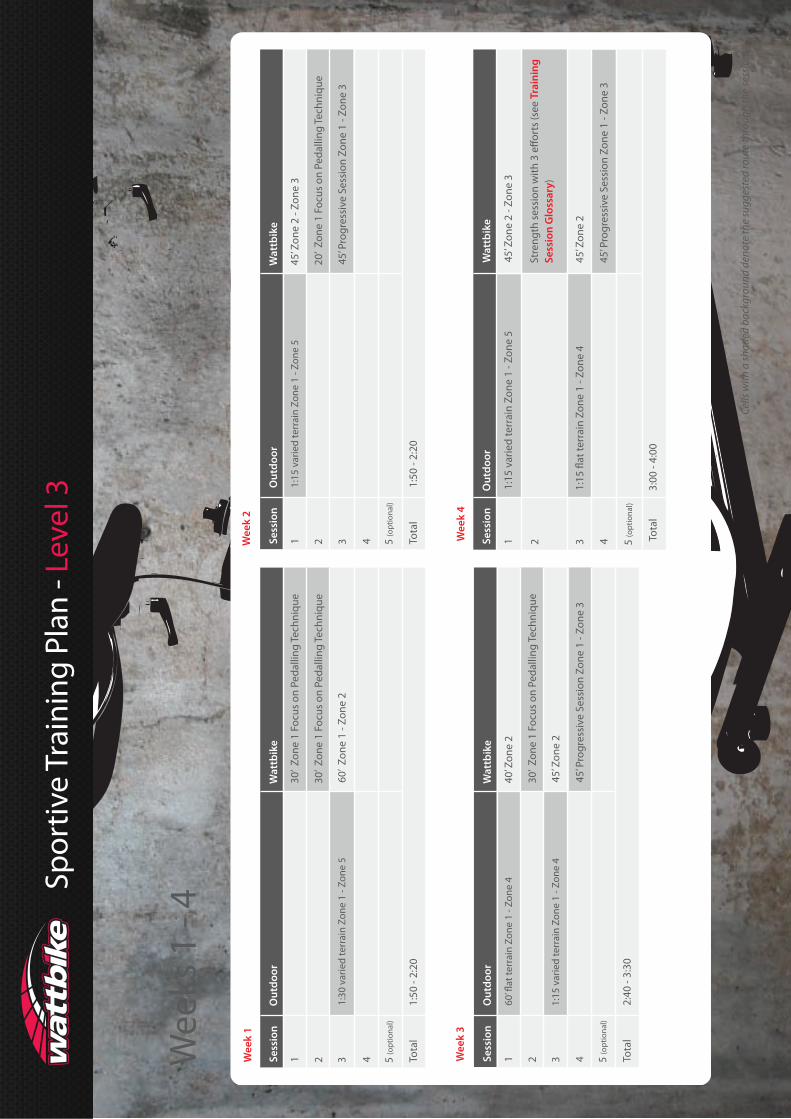
Spor
tive
Trai
ning
Pla
n - L
evel
3
Wee
ks 1
- 4
Sess
ion
Wee
k 1
Out
door
Wat
tbik
e
130
’ Zon
e 1
Focu
s on
Ped
allin
g Te
chni
que
60’ Z
one
1 - Z
one
2
30’ Z
one
1 Fo
cus
on P
edal
ling
Tech
niqu
e2 3 4 5
(opt
iona
l)
Tota
l1:
50 -
2:20
1:30
var
ied
terr
ain
Zone
1 -
Zone
5
Wee
k 2
Sess
ion
Out
door
Wat
tbik
e
145
’ Zon
e 2
- Zon
e 3
45’ P
rogr
essi
ve S
essi
on Z
one
1 - Z
one
3
20’ Z
one
1 Fo
cus
on P
edal
ling
Tech
niqu
e2 3 4 5
(opt
iona
l)
Tota
l1:
50 -
2:20
1:15
var
ied
terr
ain
Zone
1 -
Zone
5
Wee
k 3
Sess
ion
Out
door
Wat
tbik
e
140
’ Zon
e 2
45’ Z
one
2
45’ P
rogr
essi
ve S
essi
on Z
one
1 - Z
one
3
30’ Z
one
1 Fo
cus
on P
edal
ling
Tech
niqu
e2 3 4 5
(opt
iona
l)
Tota
l2:
40 -
3:30
60’ �
at te
rrai
n Zo
ne 1
- Zo
ne 4
1:15
var
ied
terr
ain
Zone
1 -
Zone
4
Sess
ion
Wee
k 4
Out
door
Wat
tbik
e
145
’ Zon
e 2
- Zon
e 3
1:15
�at
terr
ain
Zone
1 -
Zone
445
’ Zon
e 2
1:15
var
ied
terr
ain
Zone
1 -
Zone
5
45’ P
rogr
essi
ve S
essi
on Z
one
1 - Z
one
3
2 3 4 Tota
l3:
00 -
4:00
Stre
ngth
ses
sion
with
3 e
�ort
s (s
ee T
rain
ing
Sess
ion
Glo
ssar
y)
5 (o
ptio
nal)
Cells
with
a sh
aded
bac
kgro
und
deno
te th
e su
gges
ted
rout
e th
roug
h th
e se
ssio
ns
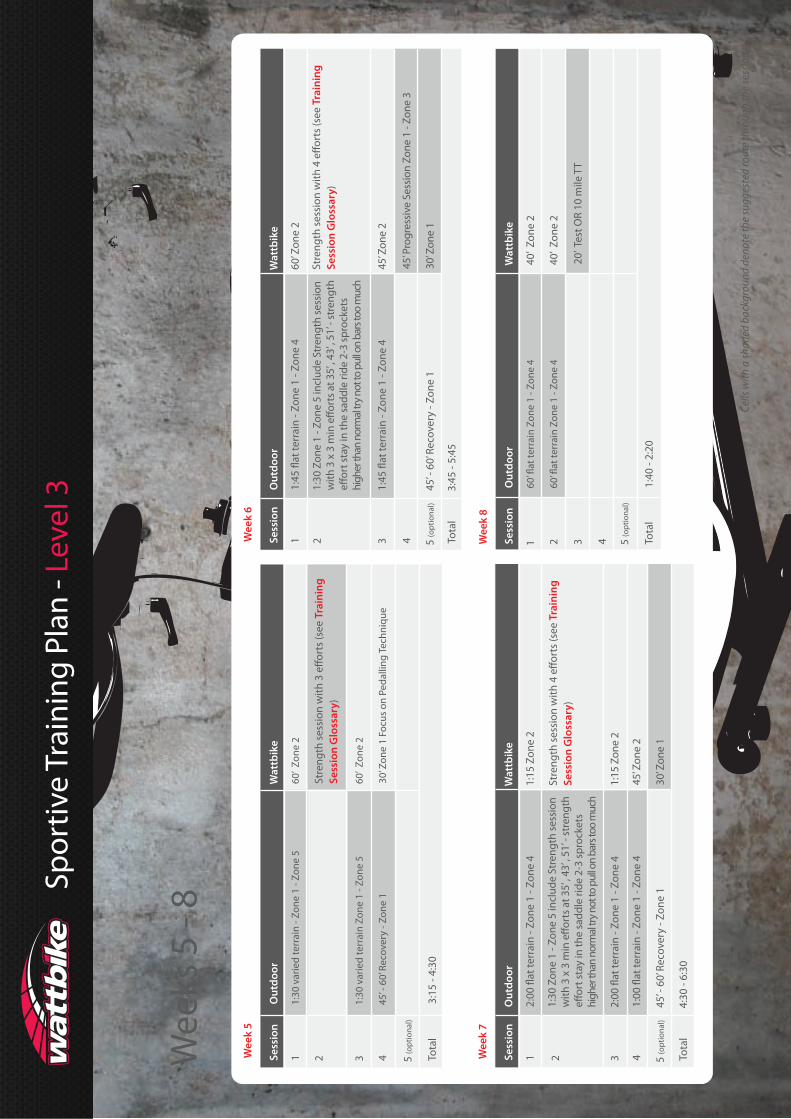
Spor
tive
Trai
ning
Pla
n - L
evel
3
Wee
ks 5
- 8
Cells
with
a sh
aded
bac
kgro
und
deno
te th
e su
gges
ted
rout
e th
roug
h th
e se
ssio
ns
Sess
ion
Wee
k 5
Out
door
Wat
tbik
e
1
60’ Z
one
2
60’ Z
one
2
30’ Z
one
1 Fo
cus
on P
edal
ling
Tech
niqu
e
1:30
var
ied
terr
ain
Zone
1 -
Zone
5
45’ -
60’
Rec
over
y - Z
one
1
1:30
var
ied
terr
ain
- Zon
e 1
- Zon
e 5
2 3 4 Tota
l3:
15 -
4:30
Stre
ngth
ses
sion
with
3 e
�ort
s (s
ee T
rain
ing
Sess
ion
Glo
ssar
y)
5 (o
ptio
nal)
Sess
ion
Wee
k 6
Out
door
Wat
tbik
e
160
’ Zon
e 2
45’ Z
one
2
45’ P
rogr
essi
ve S
essi
on Z
one
1 - Z
one
3
30’ Z
one
1
1:30
Zon
e 1
- Zon
e 5
incl
ude
Stre
ngth
sess
ion
with
3 x
3 m
in e
�ort
s at 3
5’ ,
43’ ,
51’ -
stre
ngth
e�or
t sta
y in
the
sadd
le ri
de 2
-3 sp
rock
ets
high
er th
an n
orm
al tr
y not
to p
ull o
n ba
rs to
o m
uch
1:45
�at
terr
ain
- Zon
e 1
- Zon
e 4
1:45
�at
terr
ain
- Zon
e 1
- Zon
e 4
2 3 4 Tota
l3:
45 -
5:45
45’ -
60’
Rec
over
y - Z
one
1
Stre
ngth
ses
sion
with
4 e
�ort
s (s
ee T
rain
ing
Sess
ion
Glo
ssar
y)
5 (o
ptio
nal)
Sess
ion
Wee
k 7
Out
door
Wat
tbik
e
11:
15 Z
one
2
1:15
Zon
e 2
45’ Z
one
2
30’ Z
one
1
1:30
Zon
e 1
- Zon
e 5
incl
ude
Stre
ngth
sess
ion
with
3 x
3 m
in e
�ort
s at 3
5’ ,
43’ ,
51’ -
stre
ngth
e�or
t sta
y in
the
sadd
le ri
de 2
-3 sp
rock
ets
high
er th
an n
orm
al tr
y not
to p
ull o
n ba
rs to
o m
uch
2:00
�at
terr
ain
- Zon
e 1
- Zon
e 4
2:00
�at
terr
ain
- Zon
e 1
- Zon
e 4
1:00
�at
terr
ain
- Zon
e 1
- Zon
e 4
2 3 4 Tota
l4:
30 -
6:30
45’ -
60’
Rec
over
y - Z
one
1
Stre
ngth
ses
sion
with
4 e
�ort
s (s
ee T
rain
ing
Sess
ion
Glo
ssar
y)
5 (o
ptio
nal)
Sess
ion
Wee
k 8
Out
door
Wat
tbik
e
140
’ Zon
e 2
20’ T
est O
R 10
mile
TT
40’ Z
one
22 3 4 5
(opt
iona
l)
Tota
l1:
40 -
2:20
60’ �
at te
rrai
n Zo
ne 1
- Zo
ne 4
60’ �
at te
rrai
n Zo
ne 1
- Zo
ne 4
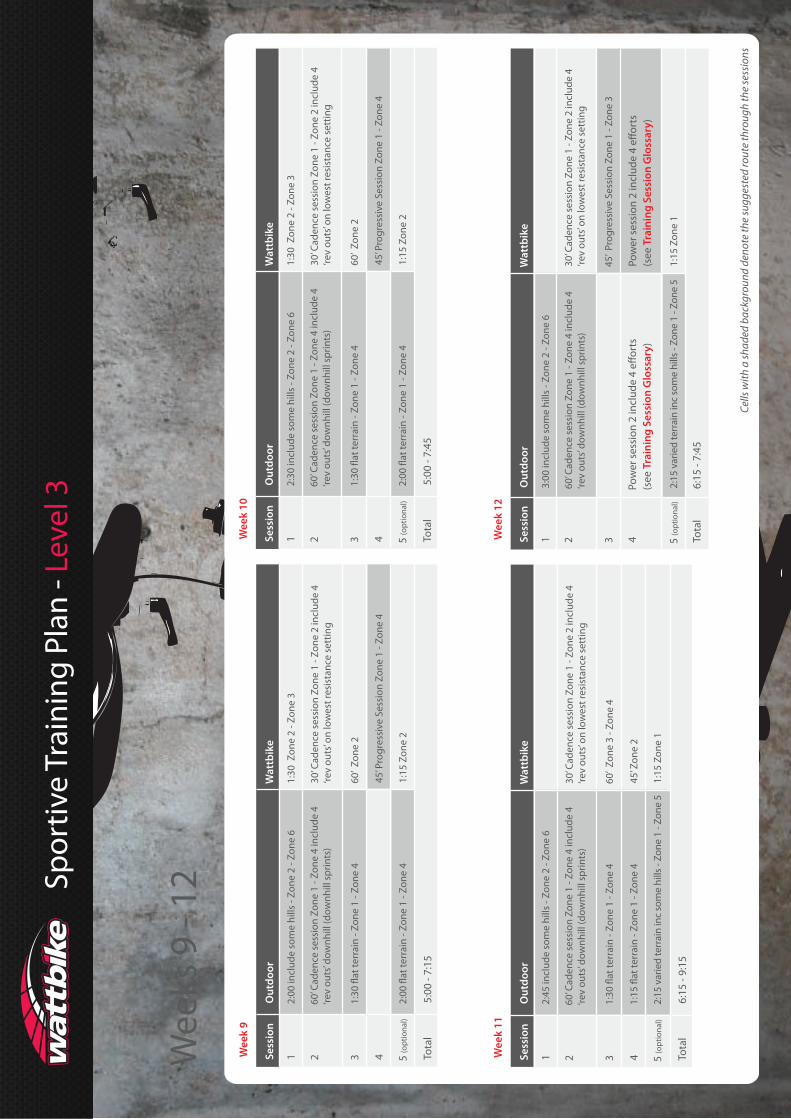
Spor
tive
Trai
ning
Pla
n - L
evel
3
Wee
ks 9
- 12
Cells
with
a sh
aded
bac
kgro
und
deno
te th
e su
gges
ted
rout
e th
roug
h th
e se
ssio
ns
Sess
ion
Wee
k 9
Out
door
Wat
tbik
e
1
60’ Z
one
2
1:30
Zon
e 2
- Zon
e 3
45’ P
rogr
essi
ve S
essi
on Z
one
1 - Z
one
4
1:15
Zon
e 2
1:30
�at
terr
ain
- Zon
e 1
- Zon
e 4
2:00
�at
terr
ain
- Zon
e 1
- Zon
e 4
60’ C
aden
ce s
essi
on Z
one
1 - Z
one
4 in
clud
e 4
‘rev
outs
’ dow
nhill
(dow
nhill
spr
ints
)
2:00
incl
ude
som
e hi
lls -
Zone
2 -
Zone
6
2 3 4 Tota
l5:
00 -
7:15
30’ C
aden
ce s
essi
on Z
one
1 - Z
one
2 in
clud
e 4
‘rev
outs
’ on
low
est r
esis
tanc
e se
ttin
g
5 (o
ptio
nal)
Sess
ion
Wee
k 10
Out
door
Wat
tbik
e
1
60’ Z
one
2
1:30
Zon
e 2
- Zon
e 3
45’ P
rogr
essi
ve S
essi
on Z
one
1 - Z
one
4
1:15
Zon
e 2
1:30
�at
terr
ain
- Zon
e 1
- Zon
e 4
2:00
�at
terr
ain
- Zon
e 1
- Zon
e 4
60’ C
aden
ce s
essi
on Z
one
1 - Z
one
4 in
clud
e 4
‘rev
outs
’ dow
nhill
(dow
nhill
spr
ints
)
2:30
incl
ude
som
e hi
lls -
Zone
2 -
Zone
6
2 3 4 Tota
l5:
00 -
7:45
30’ C
aden
ce s
essi
on Z
one
1 - Z
one
2 in
clud
e 4
‘rev
outs
’ on
low
est r
esis
tanc
e se
ttin
g
5 (o
ptio
nal)
Sess
ion
Wee
k 11
Out
door
Wat
tbik
e
1
60’ Z
one
3 - Z
one
4
45’ Z
one
2
1:15
Zon
e 1
1:30
�at
terr
ain
- Zon
e 1
- Zon
e 4
1:15
�at
terr
ain
- Zon
e 1
- Zon
e 4
2:15
var
ied
terr
ain
inc
som
e hi
lls -
Zone
1 -
Zone
5
60’ C
aden
ce s
essi
on Z
one
1 - Z
one
4 in
clud
e 4
‘rev
outs
’ dow
nhill
(dow
nhill
spr
ints
)
2:45
incl
ude
som
e hi
lls -
Zone
2 -
Zone
6
2 3 4 Tota
l6:
15 -
9:15
30’ C
aden
ce s
essi
on Z
one
1 - Z
one
2 in
clud
e 4
‘rev
outs
’ on
low
est r
esis
tanc
e se
ttin
g
5 (o
ptio
nal)
Sess
ion
Wee
k 12
Out
door
Wat
tbik
e
1
45’ P
rogr
essi
ve S
essi
on Z
one
1 - Z
one
3
Pow
er s
essi
on 2
incl
ude
4 e�
orts
(s
ee T
rain
ing
Sess
ion
Glo
ssar
y)
1:15
Zon
e 1
2:15
var
ied
terr
ain
inc
som
e hi
lls -
Zone
1 -
Zone
5
60’ C
aden
ce s
essi
on Z
one
1 - Z
one
4 in
clud
e 4
‘rev
outs
’ dow
nhill
(dow
nhill
spr
ints
)
3:00
incl
ude
som
e hi
lls -
Zone
2 -
Zone
6
2 3 4 Tota
l6:
15 -
7:45
30’ C
aden
ce s
essi
on Z
one
1 - Z
one
2 in
clud
e 4
‘rev
outs
’ on
low
est r
esis
tanc
e se
ttin
g
5 (o
ptio
nal)
Pow
er s
essi
on 2
incl
ude
4 e�
orts
(s
ee T
rain
ing
Sess
ion
Glo
ssar
y)
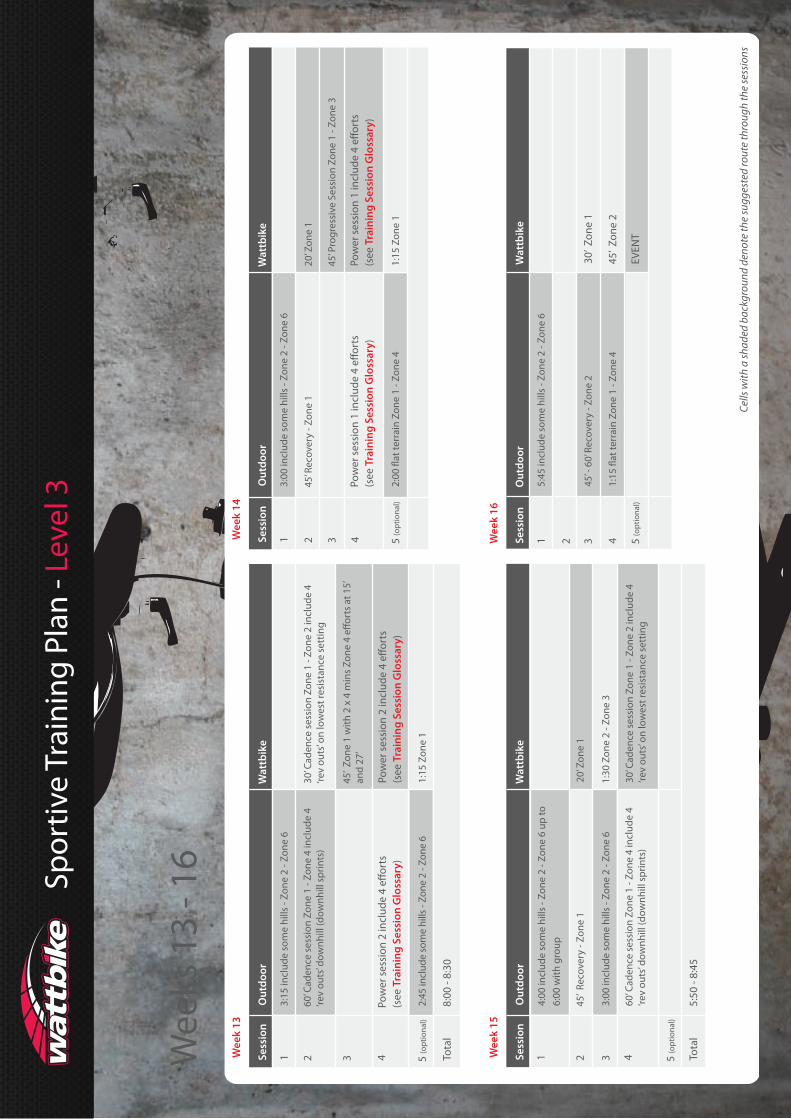
Spor
tive
Trai
ning
Pla
n - L
evel
3
Wee
ks 1
3 - 1
6
Cells
with
a sh
aded
bac
kgro
und
deno
te th
e su
gges
ted
rout
e th
roug
h th
e se
ssio
ns
Sess
ion
Wee
k 13
Out
door
Wat
tbik
e
1
45’ Z
one
1 w
ith 2
x 4
min
s Zo
ne 4
e�o
rts
at 1
5’an
d 27
’
Pow
er s
essi
on 2
incl
ude
4 e�
orts
(s
ee T
rain
ing
Sess
ion
Glo
ssar
y)
1:15
Zon
e 1
2:45
incl
ude
som
e hi
lls -
Zone
2 -
Zone
6
60’ C
aden
ce s
essi
on Z
one
1 - Z
one
4 in
clud
e 4
‘rev
outs
’ dow
nhill
(dow
nhill
spr
ints
)
3:15
incl
ude
som
e hi
lls -
Zone
2 -
Zone
6
2 3 4 Tota
l8:
00 -
8:30
30’ C
aden
ce s
essi
on Z
one
1 - Z
one
2 in
clud
e 4
‘rev
outs
’ on
low
est r
esis
tanc
e se
ttin
g
5 (o
ptio
nal)
Pow
er s
essi
on 2
incl
ude
4 e�
orts
(s
ee T
rain
ing
Sess
ion
Glo
ssar
y)
Sess
ion
Wee
k 14
Out
door
Wat
tbik
e
1
45’ P
rogr
essi
ve S
essi
on Z
one
1 - Z
one
3
1:15
Zon
e 1
2:00
�at
terr
ain
Zone
1 -
Zone
4
45’ R
ecov
ery
- Zon
e 1
3:00
incl
ude
som
e hi
lls -
Zone
2 -
Zone
6
2 3 4
20’ Z
one
1
5 (o
ptio
nal)
Pow
er s
essi
on 1
incl
ude
4 e�
orts
(s
ee T
rain
ing
Sess
ion
Glo
ssar
y)Po
wer
ses
sion
1 in
clud
e 4
e�or
ts
(see
Tra
inin
g Se
ssio
n G
loss
ary)
Sess
ion
Wee
k 15
Out
door
Wat
tbik
e
1
1:30
Zon
e 2
- Zon
e 3
45’ R
ecov
ery
- Zon
e 1
3:00
incl
ude
som
e hi
lls -
Zone
2 -
Zone
6
20’ Z
one
1
60’ C
aden
ce s
essi
on Z
one
1 - Z
one
4 in
clud
e 4
‘rev
outs
’ dow
nhill
(dow
nhill
spr
ints
)
4:00
incl
ude
som
e hi
lls -
Zone
2 -
Zone
6 u
p to
6:00
with
gro
up
2 3 4 Tota
l5:
50 -
8:45
30’ C
aden
ce s
essi
on Z
one
1 - Z
one
2 in
clud
e 4
‘rev
outs
’ on
low
est r
esis
tanc
e se
ttin
g
5 (o
ptio
nal)
Sess
ion
Wee
k 16
Out
door
Wat
tbik
e
1
30’ Z
one
1
45’ Z
one
2
EVEN
T
2 3 4 5 (o
ptio
nal)
45’ -
60’
Rec
over
y - Z
one
2
1:15
�at
terr
ain
Zone
1 -
Zone
4
5:45
incl
ude
som
e hi
lls -
Zone
2 -
Zone
6
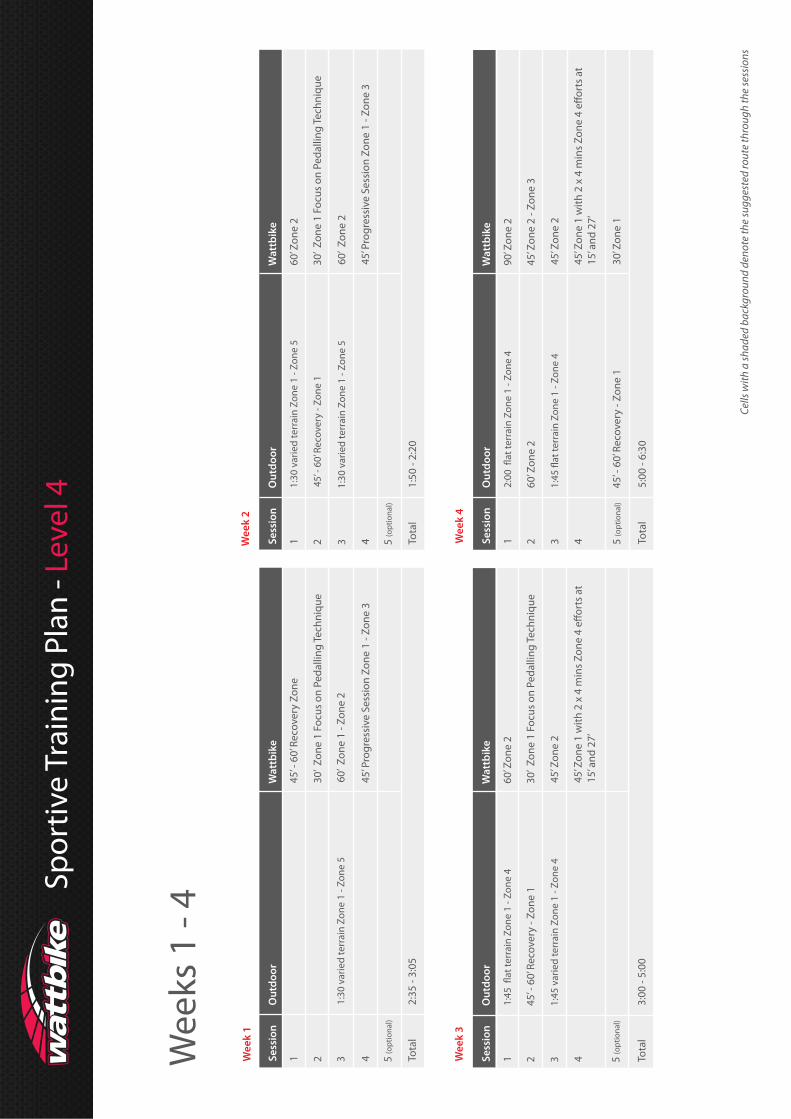
Spor
tive
Trai
ning
Pla
n - L
evel
4
Wee
ks 1
- 4
Cells
with
a sh
aded
bac
kgro
und
deno
te th
e su
gges
ted
rout
e th
roug
h th
e se
ssio
ns
Sess
ion
Wee
k 1
Out
door
Wat
tbik
e
145
’ - 6
0’ R
ecov
ery
Zone
60’ Z
one
1 - Z
one
2
45’ P
rogr
essi
ve S
essi
on Z
one
1 - Z
one
3
30’ Z
one
1 Fo
cus
on P
edal
ling
Tech
niqu
e2 3 4 5
(opt
iona
l)
Tota
l2:
35 -
3:05
1:30
var
ied
terr
ain
Zone
1 -
Zone
5
Wee
k 2
Sess
ion
Out
door
Wat
tbik
e
160
’ Zon
e 2
60’ Z
one
2
45’ P
rogr
essi
ve S
essi
on Z
one
1 - Z
one
3
30’ Z
one
1 Fo
cus
on P
edal
ling
Tech
niqu
e2 3 4 5
(opt
iona
l)
Tota
l1:
50 -
2:20
1:30
var
ied
terr
ain
Zone
1 -
Zone
5
1:30
var
ied
terr
ain
Zone
1 -
Zone
5
45’ -
60’
Rec
over
y - Z
one
1
Wee
k 3
Sess
ion
Out
door
Wat
tbik
e
160
’ Zon
e 2
45’ Z
one
2
15’ a
nd 2
7’
30’ Z
one
1 Fo
cus
on P
edal
ling
Tech
niqu
e45
’ - 6
0’ R
ecov
ery
- Zon
e 1
2 3 4 5 (o
ptio
nal)
Tota
l3:
00 -
5:00
1:45
var
ied
terr
ain
Zone
1 -
Zone
4
Wee
k 4
Sess
ion
Out
door
Wat
tbik
e
190
’ Zon
e 2
45’ Z
one
2
30’ Z
one
145
’ - 6
0’ R
ecov
ery
- Zon
e 1
15’ a
nd 2
7’
45’ Z
one
2 - Z
one
360
’ Zon
e 2
2 3 4 5 (o
ptio
nal)
Tota
l5:
00 -
6:30
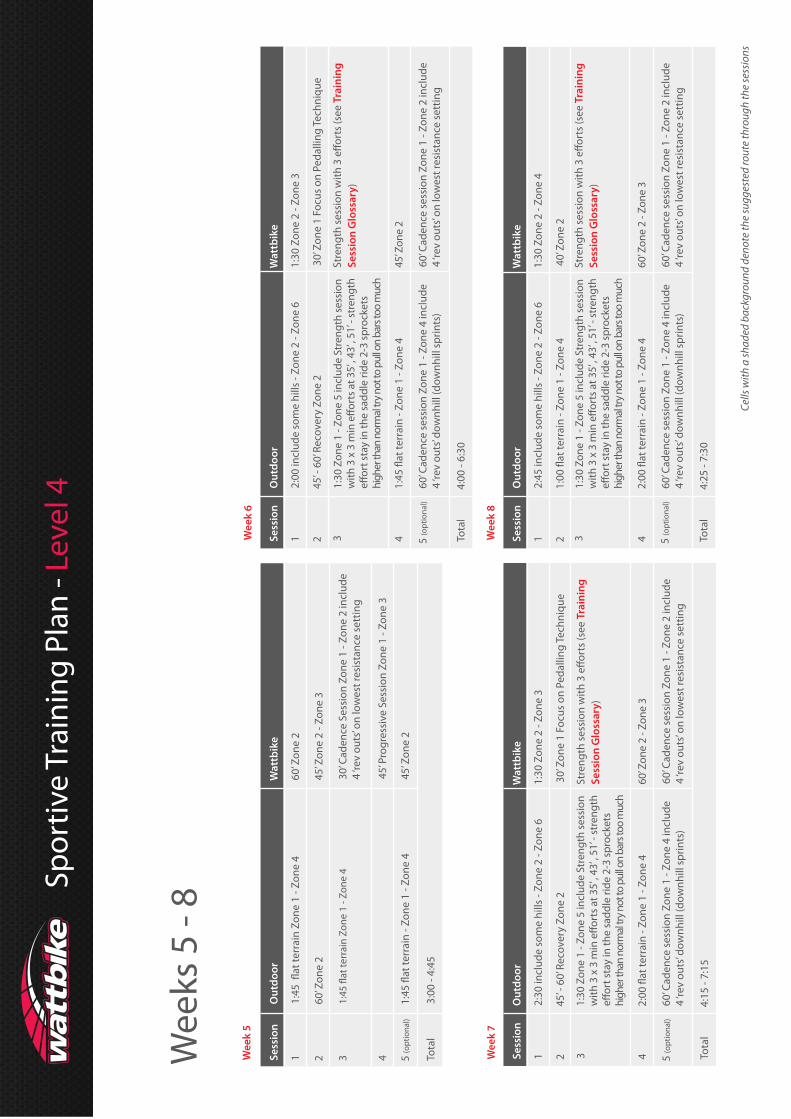
Spor
tive
Trai
ning
Pla
n - L
evel
4
Wee
ks 5
- 8
Cells
with
a sh
aded
bac
kgro
und
deno
te th
e su
gges
ted
rout
e th
roug
h th
e se
ssio
ns
Wee
k 5
Sess
ion
Out
door
Wat
tbik
e
160
’ Zon
e 2
30’ C
aden
ce S
essi
on Z
one
1 - Z
one
2 in
clud
e4
‘rev
outs
’ on
low
est r
esis
tanc
e se
ttin
g
45’ Z
one
2
45’ P
rogr
essi
ve S
essi
on Z
one
1 - Z
one
3
45’ Z
one
2 - Z
one
360
’ Zon
e 2
2 3 4 5 (o
ptio
nal)
Tota
l3:
00 -
4:45
Sess
ion
Wee
k 6
Out
door
Wat
tbik
e
11:
30 Z
one
2 - Z
one
3
45’ Z
one
2
1:30
Zon
e 1
- Zon
e 5
incl
ude
Stre
ngth
ses
sion
high
er th
an n
orm
al tr
y not
to p
ull o
n ba
rs to
o m
uch
2:00
incl
ude
som
e hi
lls -
Zone
2 -
Zone
6
45’ -
60’
Rec
over
y Zo
ne 2
30’ Z
one
1 Fo
cus
on P
edal
ling
Tech
niqu
e2 3 4 To
tal
4:00
- 6:
30
60’ C
aden
ce s
essi
on Z
one
1 - Z
one
4 in
clud
e4
‘rev
outs
’ dow
nhill
(dow
nhill
spr
ints
)60
’ Cad
ence
ses
sion
Zon
e 1
- Zon
e 2
incl
ude
4 ‘re
v ou
ts’ o
n lo
wes
t res
ista
nce
sett
ing
Trai
ning
Sess
ion
Glo
ssar
y)
5 (o
ptio
nal)
Sess
ion
Out
door
Wat
tbik
e
11:
30 Z
one
2 - Z
one
3
60’ Z
one
2 - Z
one
3
1:30
Zon
e 1
- Zon
e 5
incl
ude
Stre
ngth
ses
sion
high
er th
an n
orm
al tr
y not
to p
ull o
n ba
rs to
o m
uch
2:30
incl
ude
som
e hi
lls -
Zone
2 -
Zone
6
45’ -
60’
Rec
over
y Zo
ne 2
30’ Z
one
1 Fo
cus
on P
edal
ling
Tech
niqu
e2 3 4 To
tal
4:15
- 7:
15
60’ C
aden
ce s
essi
on Z
one
1 - Z
one
4 in
clud
e4
‘rev
outs
’ dow
nhill
(dow
nhill
spr
ints
)60
’ Cad
ence
ses
sion
Zon
e 1
- Zon
e 2
incl
ude
4 ‘re
v ou
ts’ o
n lo
wes
t res
ista
nce
sett
ing
Trai
ning
Sess
ion
Glo
ssar
y)
5 (o
ptio
nal)
Wee
k 7
Sess
ion
Wee
k 8
Out
door
Wat
tbik
e
11:
30 Z
one
2 - Z
one
4
60’ Z
one
2 - Z
one
3
1:30
Zon
e 1
- Zon
e 5
incl
ude
Stre
ngth
sess
ion
high
er th
an n
orm
al tr
y not
to p
ull o
n ba
rs to
o m
uch
2:45
incl
ude
som
e hi
lls -
Zone
2 -
Zone
6
40’ Z
one
22 3 4 To
tal
4:25
- 7:
30
60’ C
aden
ce s
essi
on Z
one
1 - Z
one
4 in
clud
e4
‘rev
outs
’ dow
nhill
(dow
nhill
spr
ints
)60
’ Cad
ence
ses
sion
Zon
e 1
- Zon
e 2
incl
ude
4 ‘re
v ou
ts’ o
n lo
wes
t res
ista
nce
sett
ing
Trai
ning
Sess
ion
Glo
ssar
y)
5 (o
ptio
nal)
Spor
tive
Trai
ning
Pla
n - L
evel
4
Wee
ks 9
- 12
Cells
with
a sh
aded
bac
kgro
und
deno
te th
e su
gges
ted
rout
e th
roug
h th
e se
ssio
ns
Sess
ion
Wee
k 9
Out
door
Wat
tbik
e
11:
30 Z
one
2 - Z
one
4
60’ Z
one
2 - Z
one
3
1:30
Zon
e 1
- Zon
e 5
incl
ude
Stre
ngth
sess
ion
high
er th
an n
orm
al tr
y not
to p
ull o
n ba
rs to
o m
uch
3:00
incl
ude
som
e hi
lls -
Zone
2 -
Zone
6
40’ Z
one
22 3 4 To
tal
4:25
- 7:
45
60’ C
aden
ce s
essi
on Z
one
1 - Z
one
4 in
clud
e4
‘rev
outs
’ dow
nhill
(dow
nhill
spr
ints
)60
’ Cad
ence
ses
sion
Zon
e 1
- Zon
e 2
incl
ude
4 ‘re
v ou
ts’ o
n lo
wes
t res
ista
nce
sett
ing
Trai
ning
Sess
ion
Glo
ssar
y)
5 (o
ptio
nal)
Wee
k 10
Sess
ion
Out
door
Wat
tbik
e
11:
30 Z
one
2 - Z
one
4
30’ C
aden
ce S
essi
on Z
one
1 - Z
one
2 in
clud
e4
‘rev
outs
’ on
low
est r
esis
tanc
e se
ttin
g
45’ Z
one
2
45’ Z
one
2 2 3 4 5
(opt
iona
l)
3:15
inc
lude
som
e hi
lls -
Zone
2 -
Zone
6
60’ C
aden
ce s
essi
on Z
one
1 - Z
one
4 in
clud
e4
‘rev
outs
’ dow
nhill
(dow
nhill
spr
ints
)
Wee
k 11
Sess
ion
Out
door
Wat
tbik
e
120
’ Tes
t OR
10 m
ile T
T
30’ C
aden
ce S
essi
on Z
one
1 - Z
one
2 in
clud
e4
‘rev
outs
’ on
low
est r
esis
tanc
e se
ttin
g
2:30
incl
ude
som
e hi
lls -
Zone
2 -
Zone
6
Pow
er s
essi
on -
as W
B se
ssio
n. O
n dr
ops
on
1:30
Zon
e 2
- Zon
e 3
1:30
Zon
e 2
/ Zon
e 3
2 3 4 5 (o
ptio
nal)
Tota
l4:
45 -
6:45
2:00
incl
ude
som
e hi
lls -
Zone
2 -
Zone
6
60’ C
aden
ce s
essi
on Z
one
1 - Z
one
4 in
clud
e4
‘rev
outs
’ dow
nhill
(dow
nhill
spr
ints
)
Trai
ning
Ses
sion
Glo
ssar
y)
Wee
k 12
Sess
ion
Out
door
Wat
tbik
e
11:
30 Z
one
2 - Z
one
43:
15 in
clud
e so
me
hills
- Zo
ne 2
- Zo
ne 6
30’ C
aden
ce S
essi
on Z
one
1 - Z
one
2 in
clud
e4
‘rev
outs
’ on
low
est r
esis
tanc
e se
ttin
g
2:30
incl
ude
som
e hi
lls -
Zone
2 -
Zone
6
Pow
er s
essi
on -
as W
B se
ssio
n. O
n dr
ops
on
1:30
Zon
e 2
- Zon
e 3
40’ Z
one
2
2 3 4 5 (o
ptio
nal)
Tota
l4:
55 -
8:30
60’ C
aden
ce s
essi
on Z
one
1 - Z
one
4 in
clud
e4
‘rev
outs
’ dow
nhill
(dow
nhill
spr
ints
)
Trai
ning
Ses
sion
Glo
ssar
y)
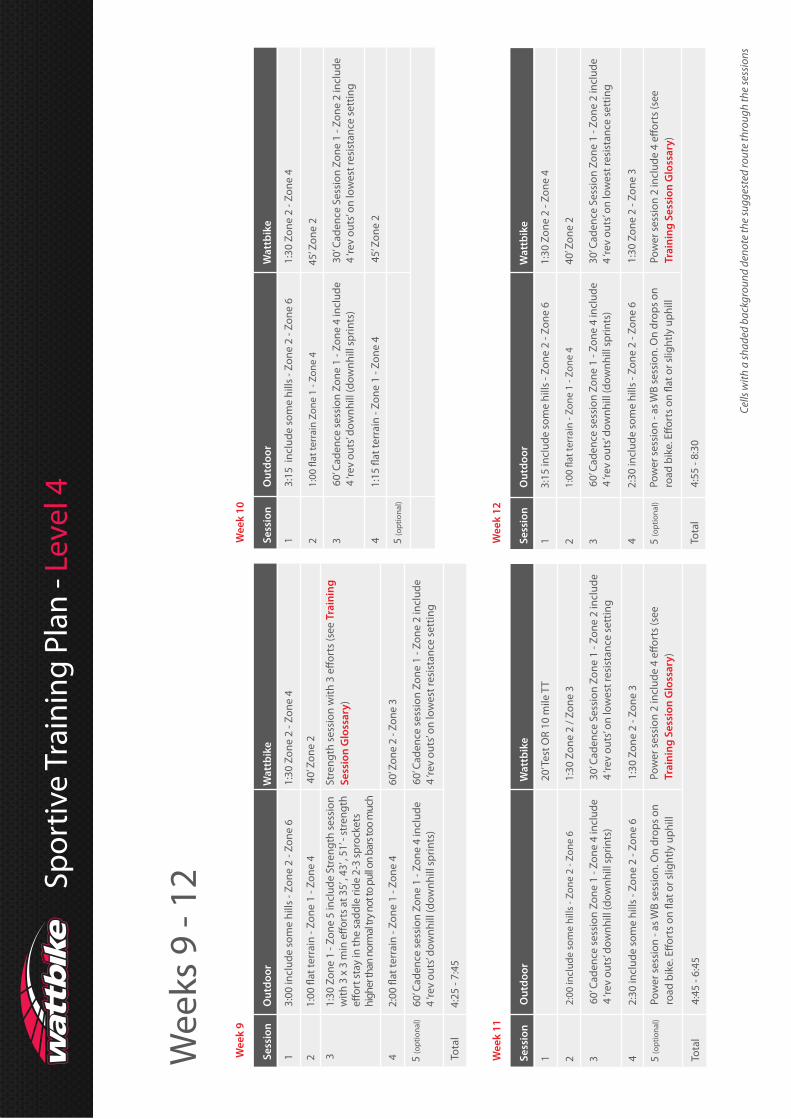
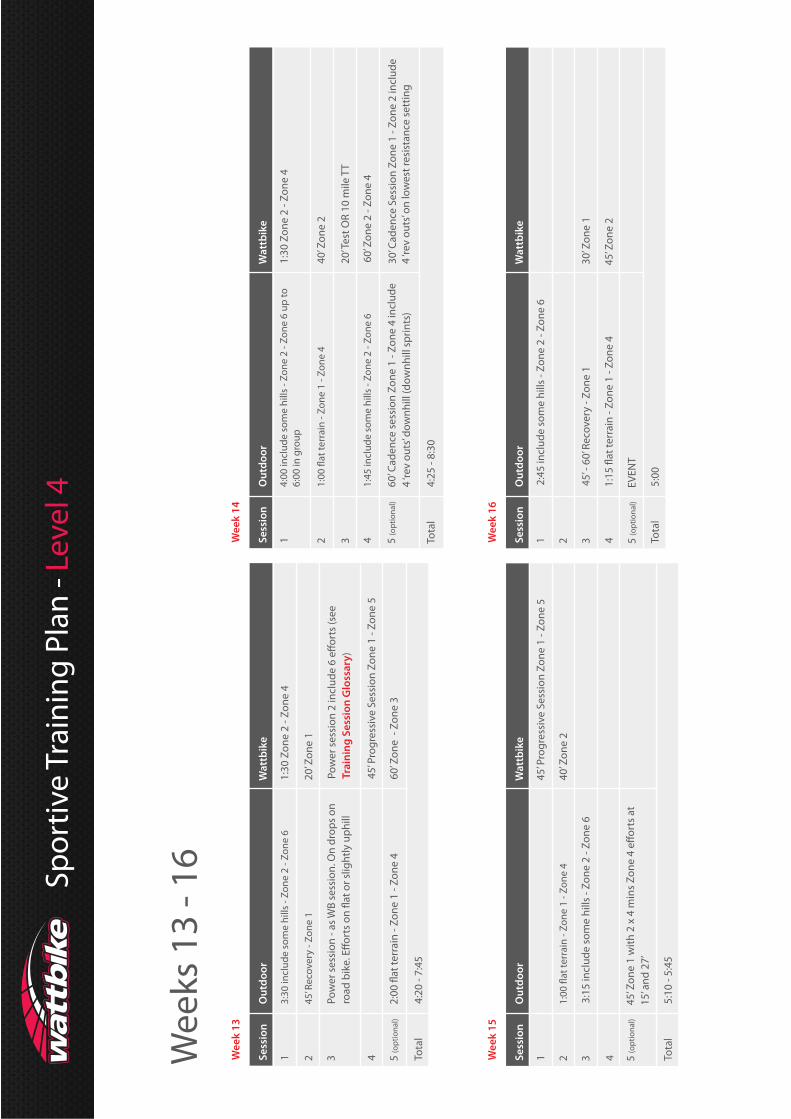
Spor
tive
Trai
ning
Pla
n - L
evel
4
Wee
ks 1
3 - 1
6W
eek
13
Sess
ion
Out
door
Wat
tbik
e
11:
30 Z
one
2 - Z
one
4
60’ Z
one
- Zo
ne 3
Pow
er s
essi
on -
as W
B se
ssio
n. O
n dr
ops
on
45’ P
rogr
essi
ve S
essi
on Z
one
1 - Z
one
5
20’ Z
one
12 3 4 5
(opt
iona
l)
Tota
l4:
20 -
7:45
45’ R
ecov
ery
- Zon
e 1
3:30
incl
ude
som
e hi
lls -
Zone
2 -
Zone
6
Trai
ning
Ses
sion
Glo
ssar
y)
Wee
k 14
Sess
ion
Out
door
Wat
tbik
e
11:
30 Z
one
2 - Z
one
4
60’ C
aden
ce s
essi
on Z
one
1 - Z
one
4 in
clud
e4
‘rev
outs
’ dow
nhill
(dow
nhill
spr
ints
)
60’ Z
one
2 - Z
one
4
40’ Z
one
2
20’ T
est O
R 10
mile
TT
2 3 4 5 (o
ptio
nal)
1:45
incl
ude
som
e hi
lls -
Zone
2 -
Zone
6
4:00
incl
ude
som
e hi
lls -
Zone
2 -
Zone
6 u
p to
6:00
in g
roup
Tota
l4:
25 -
8:30
30’ C
aden
ce S
essi
on Z
one
1 - Z
one
2 in
clud
e4
‘rev
outs
’ on
low
est r
esis
tanc
e se
ttin
g
Wee
k 15
Sess
ion
Out
door
Wat
tbik
e
145
’ Pro
gres
sive
Ses
sion
Zon
e 1
- Zon
e 5
15’ a
nd 2
7’
40’ Z
one
2
2 3 4 5 (o
ptio
nal)
Tota
l5:
10 -
5:45
3:15
incl
ude
som
e hi
lls -
Zone
2 -
Zone
6
Wee
k 16
Sess
ion
Out
door
Wat
tbik
e
12:
45 in
clud
e so
me
hills
- Zo
ne 2
- Zo
ne 6
EVEN
T
2 3 4 5 (o
ptio
nal)
Tota
l5:
00
45’ -
60’
Rec
over
y - Z
one
1
45’ Z
one
2
30’ Z
one
1
Spor
tive
Trai
ning
Pla
n - L
evel
5
Wee
ks 1
- 4
Sess
ion
Wee
k 1
Out
door
Wat
tbik
e
1 2 3 4 5 Tota
l
6
3’ O
R 20
’ Tes
t
60’ Z
one
3 - Z
one
4
30’ C
aden
ce s
essi
on Z
one
1 - Z
one
2 in
clud
e 4
‘rev
outs
’ on
low
est r
esis
tanc
e se
ttin
g60
’ Cad
ence
ses
sion
Zon
e 1
- Zon
e 4
incl
ude
4 ‘re
v ou
ts’ d
ownh
ill (d
ownh
ill s
prin
ts)
30’ Z
one
1 Fo
cus
on P
edal
ling
Tech
niqu
e
4:30
- 7:
30
60’ Z
one
3
1:30
Zon
e 3
Sess
ion
Wee
k 2
Out
door
Wat
tbik
e
1 2 3 4 5 Tota
l
6
1:30
Zon
e 2
- Zon
e 4
60’ Z
one
3 - Z
one
4
30’ C
aden
ce s
essi
on Z
one
1 - Z
one
2 in
clud
e 4
‘rev
outs
’ on
low
est r
esis
tanc
e se
ttin
g60
’ Cad
ence
ses
sion
Zon
e 1
- Zon
e 4
incl
ude
4 ‘re
v ou
ts’ d
ownh
ill (d
ownh
ill s
prin
ts)
3:00
var
ied
terr
ain
Zone
1 -
Zone
5
5:30
- 11
:50
60’ Z
one
3
1:30
Zon
e 2
- Zon
e 4
1:30
Zon
e 3
Sess
ion
Wee
k 3
Out
door
Wat
tbik
e
1 2 3 4 5 Tota
l
6
1:30
Zon
e 2
- Zon
e 5
60’ Z
one
3 - Z
one
4
30’ C
aden
ce s
essi
on Z
one
1 - Z
one
2 in
clud
e 4
‘rev
outs
’ on
low
est r
esis
tanc
e se
ttin
g60
’ Cad
ence
ses
sion
Zon
e 1
- Zon
e 4
incl
ude
4 ‘re
v ou
ts’ d
ownh
ill (d
ownh
ill s
prin
ts)
3:00
Hill
y Zo
ne 1
- Zo
ne 6
6:00
- 12
:15
4:00
var
ied
terr
ain
Zone
1 -
Zone
5
1:30
Zon
e 2
- Zon
e 4
1:30
Zon
e 2
- Zon
e 4
1:45
Zon
e 2
- Zon
e 3
Sess
ion
Wee
k 3
Out
door
Wat
tbik
e
1 2 3 4 5 Tota
l
6
1:30
Zon
e 2
- Zon
e 5
60’ Z
one
3 - Z
one
4
30’ C
aden
ce s
essi
on Z
one
1 - Z
one
2 in
clud
e 4
‘rev
outs
’ on
low
est r
esis
tanc
e se
ttin
g60
’ Cad
ence
ses
sion
Zon
e 1
- Zon
e 4
incl
ude
4 ‘re
v ou
ts’ d
ownh
ill (d
ownh
ill s
prin
ts)
3:00
Hill
y Zo
ne 1
- Zo
ne 6
6:00
- 13
:15
with
gro
up
1:30
Zon
e 2
- Zon
e 4
1:30
Zon
e 2
- Zon
e 3
2:00
Var
ied
terr
ain
Zone
1 -
Zone
5
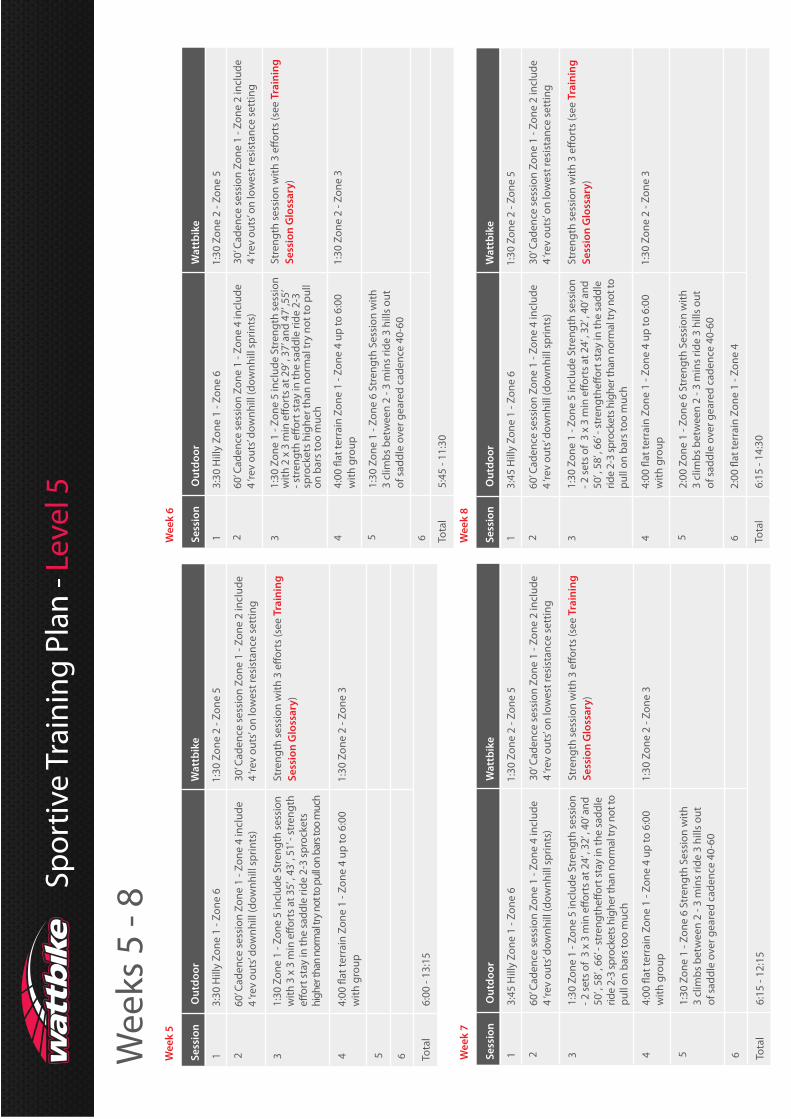
Spor
tive
Trai
ning
Pla
n - L
evel
5
Wee
ks 5
- 8
Sess
ion
Wee
k 5
Out
door
Wat
tbik
e
1 2 3 4 5 Tota
l
6
1:30
Zon
e 2
- Zon
e 5
Trai
ning
Sess
ion
Glo
ssar
y)
30’ C
aden
ce s
essi
on Z
one
1 - Z
one
2 in
clud
e 4
‘rev
outs
’ on
low
est r
esis
tanc
e se
ttin
g60
’ Cad
ence
ses
sion
Zon
e 1
- Zon
e 4
incl
ude
4 ‘re
v ou
ts’ d
ownh
ill (d
ownh
ill s
prin
ts)
3:30
Hill
y Zo
ne 1
- Zo
ne 6
6:00
- 13
:15
with
gro
up1:
30 Z
one
2 - Z
one
3
1:30
Zon
e 1
- Zon
e 5
incl
ude
Stre
ngth
sess
ion
high
er th
an n
orm
al tr
y not
to p
ull o
n ba
rs to
o m
uch
Sess
ion
Wee
k 6
Out
door
Wat
tbik
e
1 2 3 4 5 Tota
l
6
1:30
Zon
e 2
- Zon
e 5
Trai
ning
Sess
ion
Glo
ssar
y)
30’ C
aden
ce s
essi
on Z
one
1 - Z
one
2 in
clud
e 4
‘rev
outs
’ on
low
est r
esis
tanc
e se
ttin
g60
’ Cad
ence
ses
sion
Zon
e 1
- Zon
e 4
incl
ude
4 ‘re
v ou
ts’ d
ownh
ill (d
ownh
ill s
prin
ts)
3:30
Hill
y Zo
ne 1
- Zo
ne 6
5:45
- 11
:30
with
gro
up1:
30 Z
one
2 - Z
one
3
1:30
Zon
e 1
- Zon
e 5
incl
ude
Stre
ngth
ses
sion
spro
cket
s hi
gher
than
nor
mal
try
not t
o pu
ll on
bar
s to
o m
uch
1:30
Zon
e 1
- Zon
e 6
Stre
ngth
Ses
sion
with
3 cl
imbs
bet
wee
n 2
- 3 m
ins
ride
3 hi
lls o
utof
sad
dle
over
gea
red
cade
nce
40-6
0
Sess
ion
Wee
k 7
Out
door
Wat
tbik
e
1 2 3 4 5 Tota
l
6
1:30
Zon
e 2
- Zon
e 5
Trai
ning
Sess
ion
Glo
ssar
y)
30’ C
aden
ce s
essi
on Z
one
1 - Z
one
2 in
clud
e 4
‘rev
outs
’ on
low
est r
esis
tanc
e se
ttin
g60
’ Cad
ence
ses
sion
Zon
e 1
- Zon
e 4
incl
ude
4 ‘re
v ou
ts’ d
ownh
ill (d
ownh
ill s
prin
ts)
3:45
Hill
y Zo
ne 1
- Zo
ne 6
6:15
- 12
:15
with
gro
up1:
30 Z
one
2 - Z
one
3
1:30
Zon
e 1
- Zon
e 5
incl
ude
Stre
ngth
sess
ion
ride
2-3
spro
cket
s hig
her t
han
norm
al tr
y no
t to
pull
on b
ars
too
muc
h
1:30
Zon
e 1
- Zon
e 6
Stre
ngth
Ses
sion
with
3 cl
imbs
bet
wee
n 2
- 3 m
ins
ride
3 hi
lls o
utof
sad
dle
over
gea
red
cade
nce
40-6
0
Sess
ion
Wee
k 8
Out
door
Wat
tbik
e
1 2 3 4 5 Tota
l
6
1:30
Zon
e 2
- Zon
e 5
Trai
ning
Sess
ion
Glo
ssar
y)
30’ C
aden
ce s
essi
on Z
one
1 - Z
one
2 in
clud
e 4
‘rev
outs
’ on
low
est r
esis
tanc
e se
ttin
g60
’ Cad
ence
ses
sion
Zon
e 1
- Zon
e 4
incl
ude
4 ‘re
v ou
ts’ d
ownh
ill (d
ownh
ill s
prin
ts)
3:45
Hill
y Zo
ne 1
- Zo
ne 6
6:15
- 14
:30
with
gro
up1:
30 Z
one
2 - Z
one
3
1:30
Zon
e 1
- Zon
e 5
incl
ude
Stre
ngth
ses
sion
ride
2-3
spro
cket
s hig
her t
han
norm
al tr
y no
t to
pull
on b
ars
too
muc
h
2:00
Zon
e 1
- Zon
e 6
Stre
ngth
Ses
sion
with
3 cl
imbs
bet
wee
n 2
- 3 m
ins
ride
3 hi
lls o
utof
sad
dle
over
gea
red
cade
nce
40-6
0
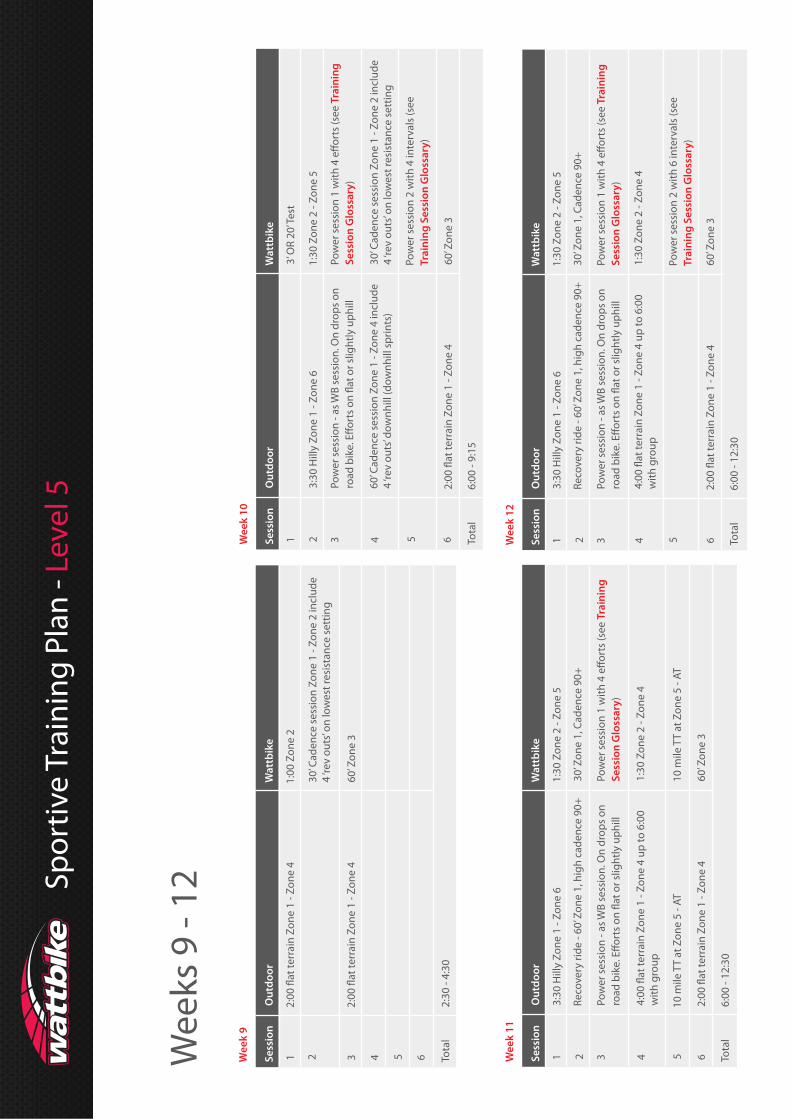
Spor
tive
Trai
ning
Pla
n - L
evel
5
Wee
ks 9
- 12
Sess
ion
Wee
k 9
Out
door
Wat
tbik
e
1 2 3 4 5 Tota
l
6
1:00
Zon
e 2
60’ Z
one
3
30’ C
aden
ce s
essi
on Z
one
1 - Z
one
2 in
clud
e 4
‘rev
outs
’ on
low
est r
esis
tanc
e se
ttin
g
2:30
- 4:
30
Sess
ion
Wee
k 10
Out
door
Wat
tbik
e
1 2 3 4 5 Tota
l
6
1:30
Zon
e 2
- Zon
e 5
3’ O
R 20
’ Tes
t
Trai
ning
Sess
ion
Glo
ssar
y)
Pow
er s
essi
on 2
with
4 in
terv
als
(see
Tr
aini
ng S
essi
on G
loss
ary)
Pow
er s
essi
on -
as W
B se
ssio
n. O
n dr
ops
on
60’ C
aden
ce s
essi
on Z
one
1 - Z
one
4 in
clud
e4
‘rev
outs
’ dow
nhill
(dow
nhill
spr
ints
)
3:30
Hill
y Zo
ne 1
- Zo
ne 6
60’ Z
one
3
30’ C
aden
ce s
essi
on Z
one
1 - Z
one
2 in
clud
e 4
‘rev
outs
’ on
low
est r
esis
tanc
e se
ttin
g
6:00
- 9:
15
Sess
ion
Wee
k 11
Out
door
Wat
tbik
e
1 2 3 4 5 Tota
l
6
1:30
Zon
e 2
- Zon
e 5
Trai
ning
Sess
ion
Glo
ssar
y)Po
wer
ses
sion
- as
WB
sess
ion.
On
drop
s on
3:30
Hill
y Zo
ne 1
- Zo
ne 6
30’ Z
one
1, C
aden
ce 9
0+Re
cove
ry ri
de -
60’ Z
one
1, h
igh
cade
nce
90+
10 m
ile T
T at
Zon
e 5
- AT
10 m
ile T
T at
Zon
e 5
- AT
1:30
Zon
e 2
- Zon
e 4
with
gro
up
60’ Z
one
3
6:00
- 12
:30
Sess
ion
Wee
k 12
Out
door
Wat
tbik
e
1 2 3 4 5 Tota
l
6
1:30
Zon
e 2
- Zon
e 5
Trai
ning
Sess
ion
Glo
ssar
y)Po
wer
ses
sion
- as
WB
sess
ion.
On
drop
s on
3:30
Hill
y Zo
ne 1
- Zo
ne 6
30’ Z
one
1, C
aden
ce 9
0+Re
cove
ry ri
de -
60’ Z
one
1, h
igh
cade
nce
90+
Pow
er s
essi
on 2
with
6 in
terv
als
(see
Tr
aini
ng S
essi
on G
loss
ary)
1:30
Zon
e 2
- Zon
e 4
with
gro
up
60’ Z
one
3
6:00
- 12
:30

Spor
tive
Trai
ning
Pla
n - L
evel
5
Wee
ks 1
3 - 1
6
Sess
ion
Wee
k 13
Out
door
Wat
tbik
e
1 2 3 4 5 Tota
l
6
1:30
Zon
e 2
- Zon
e 3
30’ C
aden
ce s
essi
on Z
one
1 - Z
one
2 in
clud
e 4
‘rev
outs
’ on
low
est r
esis
tanc
e se
ttin
g60
’ Cad
ence
ses
sion
Zon
e 1
- Zon
e 4
incl
ude
4 ‘re
v ou
ts’ d
ownh
ill (d
ownh
ill s
prin
ts)
5:30
- 10
:00
60’ Z
one
3
4:00
Var
ied
terr
ain
Zone
1 -
Zone
4
10 m
ile T
T at
Zon
e 5
- AT
10 m
ile T
T at
Zon
e 5
- AT
60’Z
one
1 - Z
one
240
min
s L2
Sess
ion
Wee
k 14
Out
door
Wat
tbik
e
1 2 3 4 5 Tota
l
6
60’ Z
one
3
5:00
- 9:
30
1:30
Zon
e 2
- Zon
e 4
Reco
very
ride
- 60
’ Zon
e 1,
hig
h ca
denc
e 90
+30
’ Zon
e 1,
Cad
ence
90+
4:00
Var
ied
terr
ain
Zone
1 -
Zone
5
30’ Z
one
1, C
aden
ce 9
0+Re
cove
ry ri
de -
60’ Z
one
1, h
igh
cade
nce
90+
(see
Tra
inin
g Se
ssio
n G
loss
ary)
(see
Tra
inin
g Se
ssio
n G
loss
ary)
Sess
ion
Wee
k 15
Out
door
Wat
tbik
e
1 2 3 4 5 Tota
l
6
4:30
- 7:
45
10 m
ile T
T at
Zon
e 5
- AT
10 m
ile T
T at
Zon
e 5
- AT
1:30
Zon
e 2
- Zon
e 4
4:00
Var
ied
terr
ain
Zone
1 -
Zone
5
30’ Z
one
1, C
aden
ce 9
0+
30’ Z
one
1, C
aden
ce 9
0+
Reco
very
ride
- 60
’ Zon
e 1,
hig
h ca
denc
e 90
+
Reco
very
ride
- 60
’ Zon
e 1,
hig
h ca
denc
e 90
+
(see
Tra
inin
g Se
ssio
n G
loss
ary)
Sess
ion
Wee
k 16
Out
door
Wat
tbik
e
1 2 3 4 5 Tota
l
6
1:30
Zon
e 2
- Zon
e 4
60’ Z
one
2
30’ Z
one
1, C
aden
ce 9
0+Re
cove
ry ri
de -
60’ Z
one
1, h
igh
cade
nce
90+
06:3
0
3:00
Var
ied
terr
ain
Zone
1 -
Zone
5
EVEN
T
The Triathlon Winter Plan
124
Contents
The Triathlon Winter Plan ...........................................................................................................................................................125 Flat Terrain .........................................................................................................................................................126 Varied Terrain .............................................................................................................................................................................................126Triathlon Plan ............................................................................................................................................................128 Using a Wattbike Pro ..........................................................................................................................................128 Week 3 Example .......................................................................................................................................................................................128Winter Training Plan Technique Sessions ............................................................................................................130 Technique Session Weeks 2-5 - Resistance Level 1 ......................................................................................................................131 Technique Session Weeks 7-10 - Resistance Level 2 ...................................................................................................................132 Technique Session Weeks 12-15 - Resistance Level 3 .................................................................................................................134Triathlete Winter Training Plans .............................................................................................................................135
125
The Triathlon 16 Week Training PlanThis Plan is designed for experienced triathletes and cyclists using a Wattbike Pro, although by using the table on page 9 it can be adapted for the Wattbike Trainer. It can be followed as a complete 16 week training plan if time is limited or if it is difficult to get out on the road due to darkness or inclement weather.
Training on the Wattbike is time efficient and has the advantage of monitoring everything that you do from pedalling technique to physiological response (heart rate) and power output (Watts).
A general cadence Guide for each of the Training Zones is:
• Recovery - 60-80 rpm
• Zone 1 – 80-85 rpm
• Zone 2 – 85-90 rpm
• Zone 3 – 90-95 rpm
• Zone 4 – 95-100 rpm
• Zone 5 – 95-105 rpm
• Zone 6 – 95-110 rpm
• Maximal 100 + rpm
The simplest way to start is to undertake either a 3’ aerobic test or a ramp test to determine your maximum minute power and maximum heart rate and to calculate your heart rate and power training Zones.
The Triathlon 16 Week Training Plan is designed to take you through the winter training months from October through to January or November through to February. The Plan is general and not an individual plan but has a structure that is useful to follow in the absence of any other plan.
The Plan consists of 4 sessions a week – 2 X ‘long’ slow Zone 1 to Zone 2 rides, 1 technique session and a medium length interval session (2 x 20’ 5’ rest between intervals Zone 2 and Zone 3).
After the initial Set up and familiarization week there are 3 X 5 week periodised phases with periodisation within each phase.
Week 1 is a Test, Set up and Wattbike familiarization week.
Weeks 6, 11 are recovery weeks and Week 16 is recovery and re-test week ready for the next Plan in the series.
The recovery weeks include a 10’ submaximal progress check.
In weeks 4, 9 and 14 there is a high intensity (Zone 5) 20’ progress Test.
126
Wherever possible (weather permitting) one of either session 1 or 4 should be a road ride. Try not to miss this session.
The ‘long’ road and Wattbike rides are aimed at general conditioning and to build endurance which is an important requirement for completing a triathlon or long cycling event. Long road rides can be a longer duration than indicated but on a Wattbike the maximum duration should be 90’.
During all road and Wattbike rides, it is important to eat and drink throughout – so always have food with you and aim to drink a 500ml bottle every 1 – 1.5 hrs. You should finish this ride feeling relaxed and not too tired. Whilst these sessions are specified as Zone 1 to Zone 2 it is accepted, on road rides that due to terrain your heart rate may stray into higher Zones but the bulk of the ride should be at Zone 1to Zone 2.
Where possible complete your long road ride of each week in a group. This will help develop you group riding skills and also enable a longer distance to be covered for the same amount of effort of a shorter ride
Road rides are notated to be carried out on either flat or varied terrain. The ability for you to include the rides as detailed will be somewhat determined by the area that you live / ride.
However, where if possible, use the below to guide you to build the routes:
Flat Terrain:80% flat. You would be able to ride 80% of the route sitting in the saddle and using just 3 or 4 different gears.
Varied Terrain:Rolling terrain, not too structured, avoid really big hills. Let the terrain dictate the Zones whilst riding ‘steady’ and not attacking the hills. Ride easy on the flat sections.
The ‘long’ Wattbike rides can be split into intervals if needed (for comfort) so for instance a 90’ session can become 2 x 45’ or 3 x 30’ or 4 x 22.4’ (2’ rest between intervals).
The Plan recovery weeks should be treated as compulsory. Do not hesitate to take extra recovery days throughout the duration of the Plan.
Do not overreach, take a sensible approach to the Plan to avoid over training, fatigue, illness and injury.
The winter months are well known for viral infections from mild colds through to flu and other viruses. NEVER train when ill, wait until you are fully recovered before recommencing training – always start training again at low intensity and progressively build back into the Winter Training Plan.

127
WarningThe training plans in this Guide assume a basic to high level of fitness and should not be attempted if you are a beginner or have been recently ill or injured (use the estimated methods). If in doubt consult your Doctor before you commence a Wattbike test or training plan. The tests are not suitable for children or young adults under the age of 18 unless under supervision.
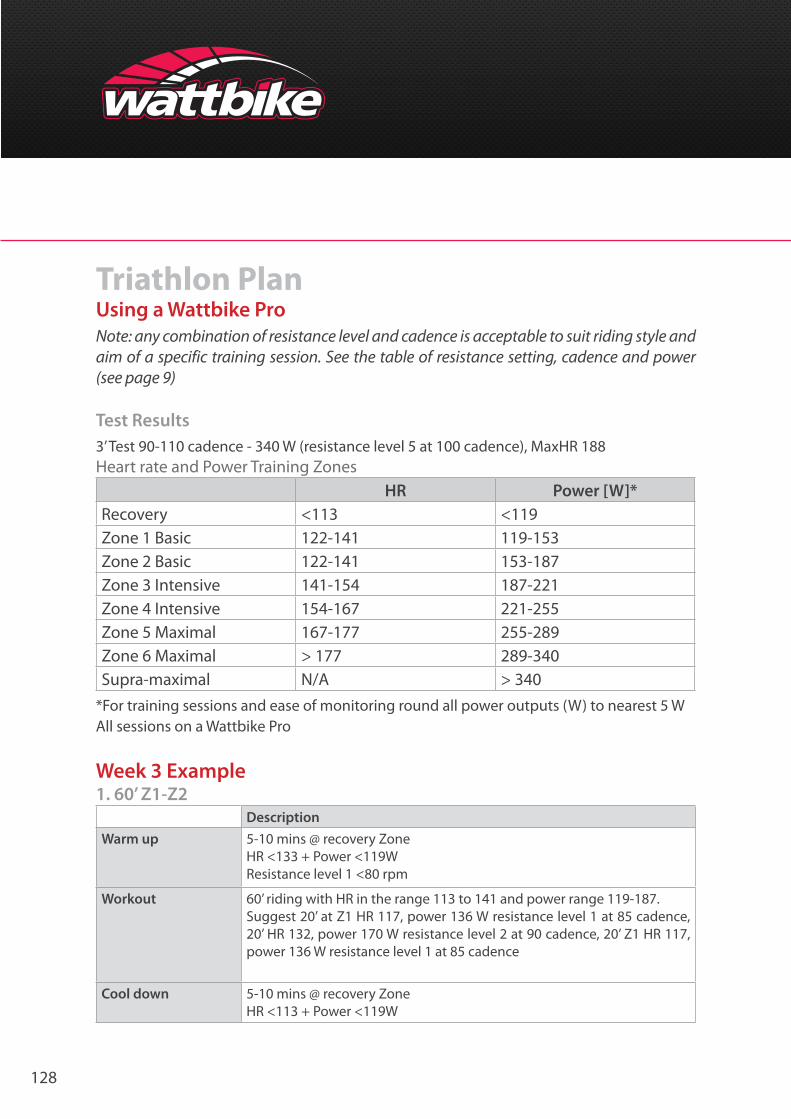
128
Triathlon PlanUsing a Wattbike ProNote: any combination of resistance level and cadence is acceptable to suit riding style and aim of a specific training session. See the table of resistance setting, cadence and power (see page 9)
Test Results3’ Test 90-110 cadence - 340 W (resistance level 5 at 100 cadence), MaxHR 188Heart rate and Power Training Zones
HR Power [W]*Recovery <113 <119Zone 1 Basic 122-141 119-153Zone 2 Basic 122-141 153-187Zone 3 Intensive 141-154 187-221Zone 4 Intensive 154-167 221-255Zone 5 Maximal 167-177 255-289Zone 6 Maximal > 177 289-340Supra-maximal N/A > 340
*For training sessions and ease of monitoring round all power outputs (W) to nearest 5 WAll sessions on a Wattbike Pro
Week 3 Example1. 60’ Z1-Z2
DescriptionWarm up 5-10 mins @ recovery Zone
HR <133 + Power <119WResistance level 1 <80 rpm
Workout 60’ riding with HR in the range 113 to 141 and power range 119-187. Suggest 20’ at Z1 HR 117, power 136 W resistance level 1 at 85 cadence, 20’ HR 132, power 170 W resistance level 2 at 90 cadence, 20’ Z1 HR 117, power 136 W resistance level 1 at 85 cadence
Cool down 5-10 mins @ recovery Zone HR <113 + Power <119W
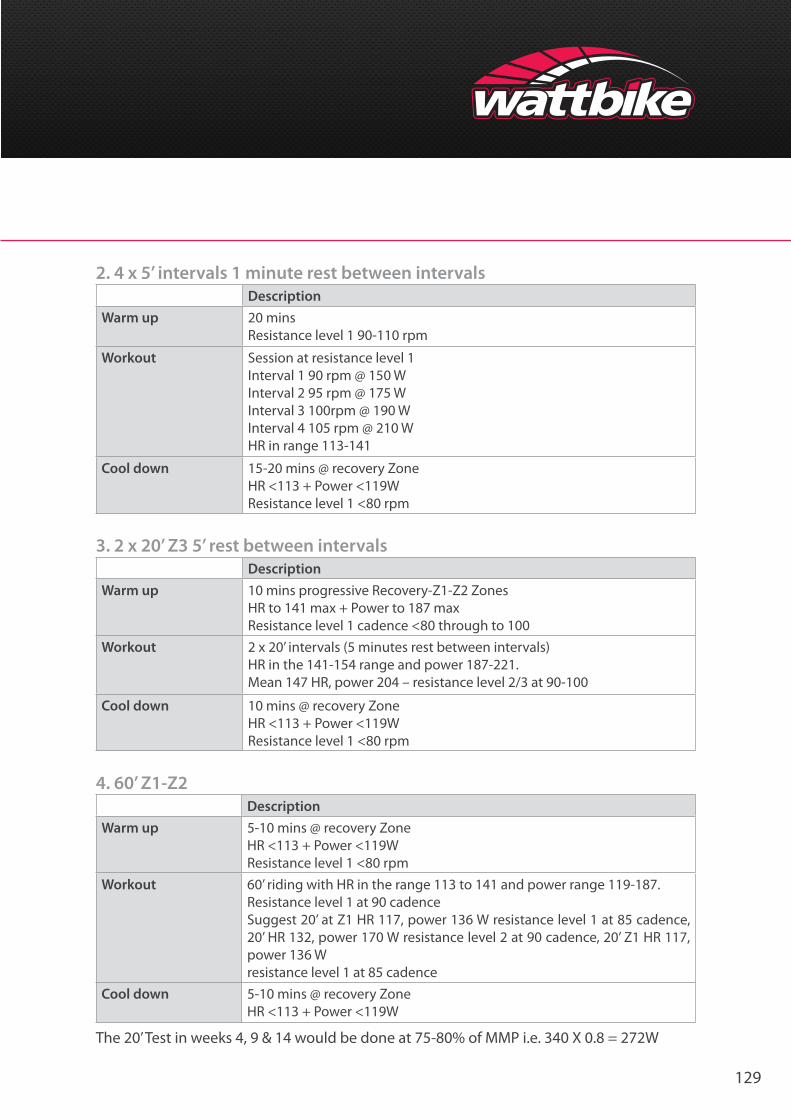
129
2. 4 x 5’ intervals 1 minute rest between intervalsDescription
Warm up 20 minsResistance level 1 90-110 rpm
Workout Session at resistance level 1Interval 1 90 rpm @ 150 W Interval 2 95 rpm @ 175 W Interval 3 100rpm @ 190 W Interval 4 105 rpm @ 210 WHR in range 113-141
Cool down 15-20 mins @ recovery Zone HR <113 + Power <119WResistance level 1 <80 rpm
3. 2 x 20’ Z3 5’ rest between intervalsDescription
Warm up 10 mins progressive Recovery-Z1-Z2 ZonesHR to 141 max + Power to 187 maxResistance level 1 cadence <80 through to 100
Workout 2 x 20’ intervals (5 minutes rest between intervals) HR in the 141-154 range and power 187-221. Mean 147 HR, power 204 – resistance level 2/3 at 90-100
Cool down 10 mins @ recovery Zone HR <113 + Power <119WResistance level 1 <80 rpm
4. 60’ Z1-Z2Description
Warm up 5-10 mins @ recovery Zone HR <113 + Power <119WResistance level 1 <80 rpm
Workout 60’ riding with HR in the range 113 to 141 and power range 119-187. Resistance level 1 at 90 cadenceSuggest 20’ at Z1 HR 117, power 136 W resistance level 1 at 85 cadence, 20’ HR 132, power 170 W resistance level 2 at 90 cadence, 20’ Z1 HR 117, power 136 W resistance level 1 at 85 cadence
Cool down 5-10 mins @ recovery Zone HR <113 + Power <119W
The 20’ Test in weeks 4, 9 & 14 would be done at 75-80% of MMP i.e. 340 X 0.8 = 272W
130
16 Week Training Plan Technique SessionsMake sure you fully understand the pedalling technique section of the main Training Guide.Selection of the correct resistance and cadence level for the technique sessions is important. Use your maximum minute power (MMP) assigned to the 20’ warm up routine to identify a suitable cadence range.
If MMP is below 280 W restrict the technique sessions to resistance levels 1 and 2 on a Wattbike Pro
• MMP below 280 W use 80 as starting cadence• MMP below 300 W use 85 as starting cadence• MMP above 320 W use 90 as starting cadence
As a general guide technique sessions should be completed in heart rate and power training Zones 1 and 2 and occasionally into Zone 3 during the last interval of weeks 12 to 15 – adjust cadence to keep within these Zones.
Although the sessions are specified in 5 rpm increases per interval the progression can be a lower rpm increase if needed e.g. 3 or 4 rpm. Be flexible, the essence of the technique sessions is to maintain pedalling technique whilst increasing leg speed for each interval within training Zones Z1-Z2 and occasionally into Z3.
Cyclists with MMP above 320 may be more flexible on the choice of resistance level and cadence subject to the heart rate and power training Zone limit and the ability to maintain a good pedalling action. Practicing good technique at the lower resistance levels is a good discipline to adopt.
On a Wattbike Pro the technique session will be undertaken at resistance level 1 in Phase 1, resistance level 2 in phase 2 and resistance level 3 in Phase 3.
The following table shows the relationship between cadence and watts at resistance levels 1 – 3 in the cadence range 80-110. For other cadences and resistance levels see the Power, Resistance and Cadence Table (page 9).
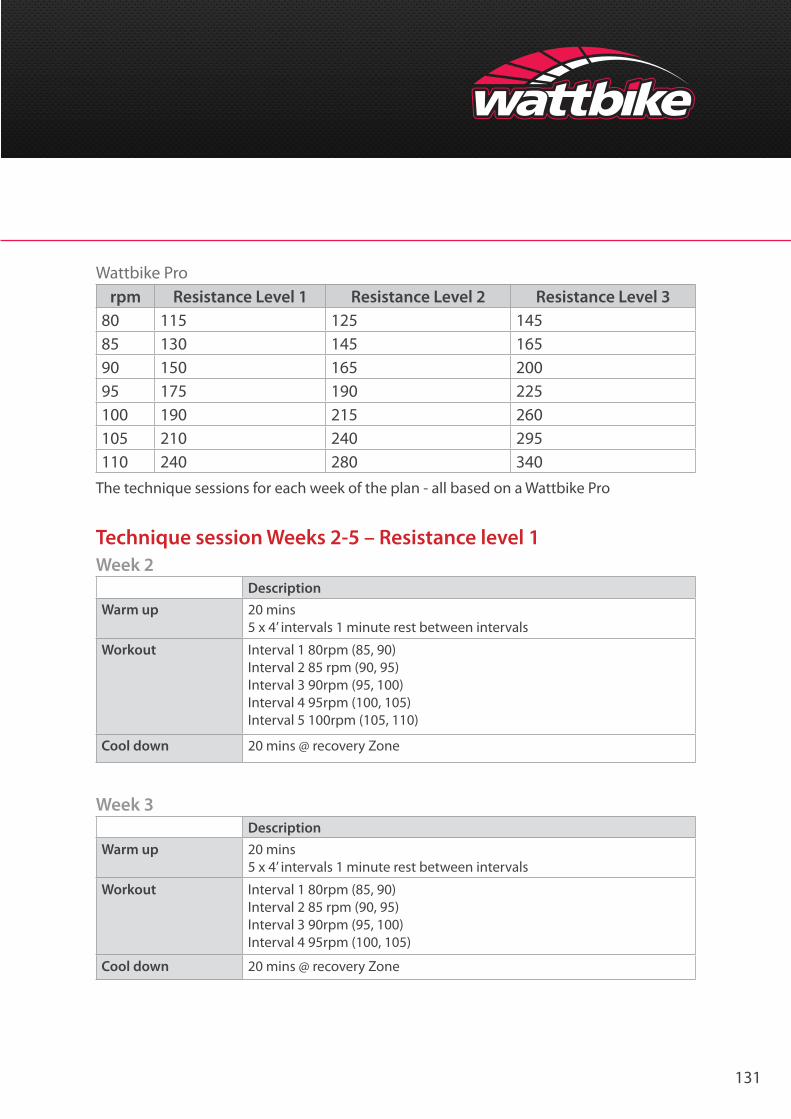
131
Wattbike Prorpm Resistance Level 1 Resistance Level 2 Resistance Level 3
80 115 125 14585 130 145 16590 150 165 20095 175 190 225100 190 215 260105 210 240 295110 240 280 340
The technique sessions for each week of the plan - all based on a Wattbike Pro
Technique session Weeks 2-5 – Resistance level 1Week 2
DescriptionWarm up 20 mins
5 x 4’ intervals 1 minute rest between intervals
Workout Interval 1 80rpm (85, 90) Interval 2 85 rpm (90, 95)Interval 3 90rpm (95, 100) Interval 4 95rpm (100, 105)Interval 5 100rpm (105, 110)
Cool down 20 mins @ recovery Zone
Week 3Description
Warm up 20 mins5 x 4’ intervals 1 minute rest between intervals
Workout Interval 1 80rpm (85, 90) Interval 2 85 rpm (90, 95)Interval 3 90rpm (95, 100) Interval 4 95rpm (100, 105)
Cool down 20 mins @ recovery Zone
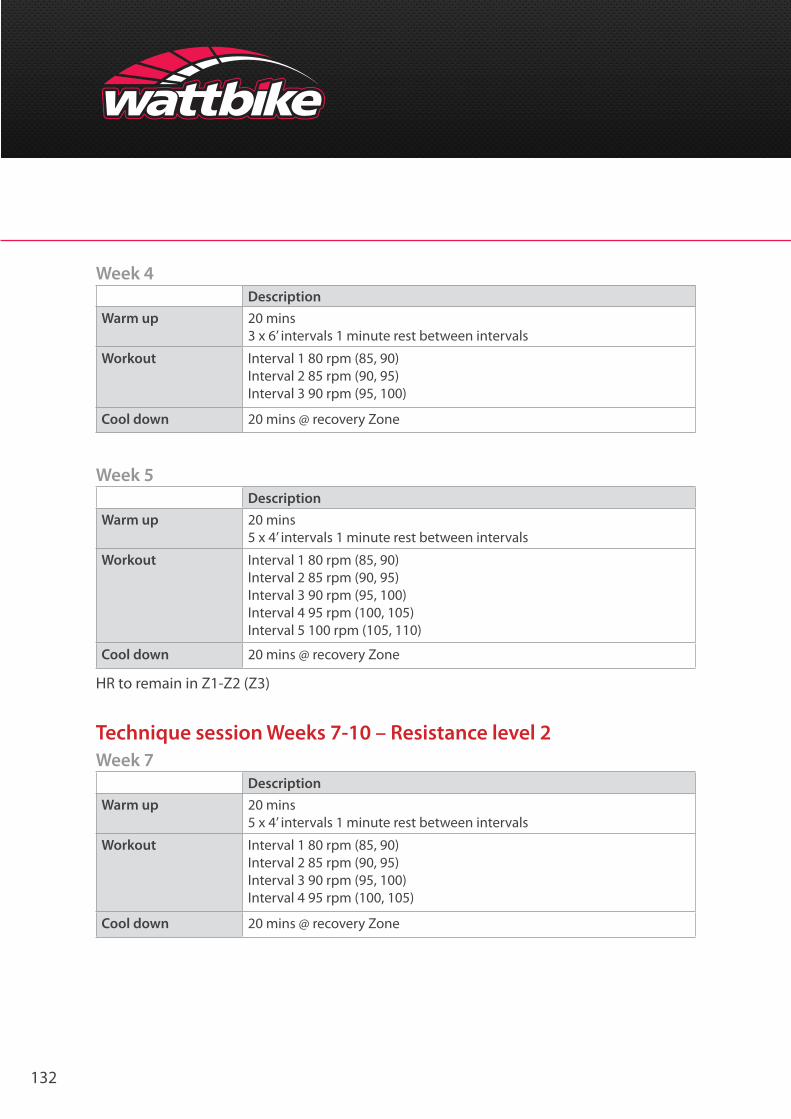
132
Week 4Description
Warm up 20 mins3 x 6’ intervals 1 minute rest between intervals
Workout Interval 1 80 rpm (85, 90) Interval 2 85 rpm (90, 95)Interval 3 90 rpm (95, 100)
Cool down 20 mins @ recovery Zone
Week 5Description
Warm up 20 mins5 x 4’ intervals 1 minute rest between intervals
Workout Interval 1 80 rpm (85, 90) Interval 2 85 rpm (90, 95)Interval 3 90 rpm (95, 100) Interval 4 95 rpm (100, 105)Interval 5 100 rpm (105, 110)
Cool down 20 mins @ recovery Zone
HR to remain in Z1-Z2 (Z3)
Technique session Weeks 7-10 – Resistance level 2Week 7
DescriptionWarm up 20 mins
5 x 4’ intervals 1 minute rest between intervals
Workout Interval 1 80 rpm (85, 90) Interval 2 85 rpm (90, 95)Interval 3 90 rpm (95, 100) Interval 4 95 rpm (100, 105)
Cool down 20 mins @ recovery Zone
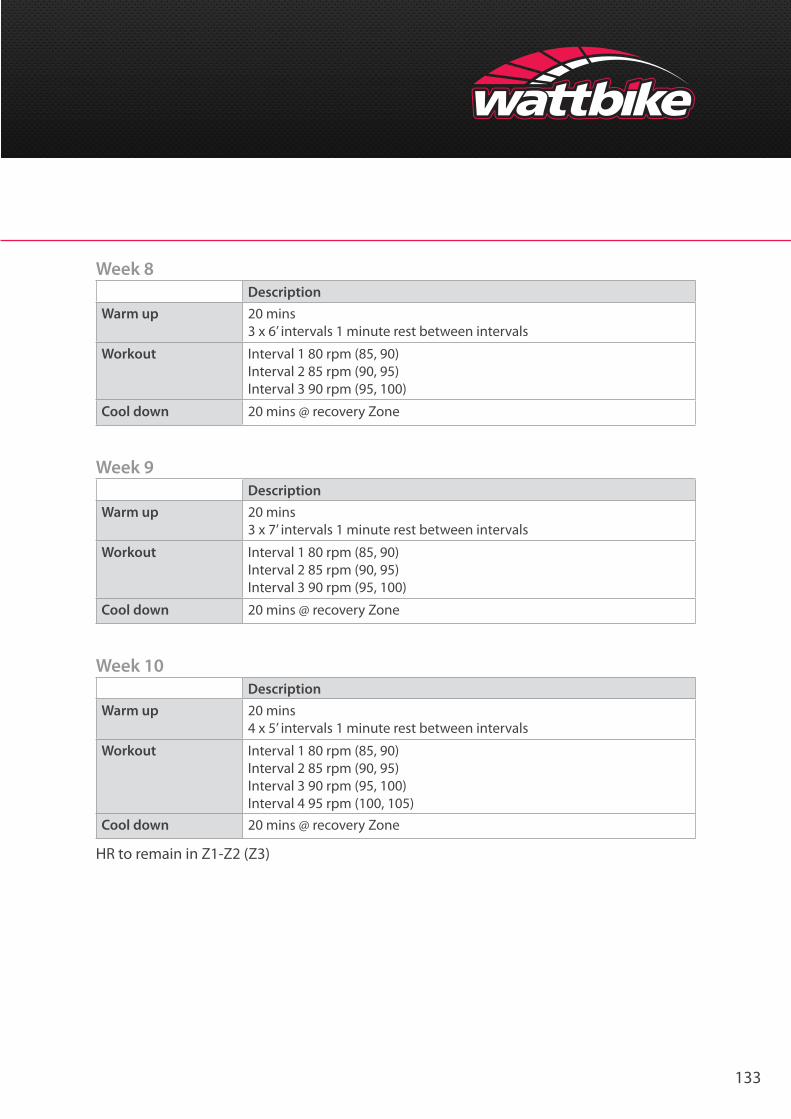
133
Week 8Description
Warm up 20 mins3 x 6’ intervals 1 minute rest between intervals
Workout Interval 1 80 rpm (85, 90) Interval 2 85 rpm (90, 95)Interval 3 90 rpm (95, 100)
Cool down 20 mins @ recovery Zone
Week 9Description
Warm up 20 mins3 x 7’ intervals 1 minute rest between intervals
Workout Interval 1 80 rpm (85, 90) Interval 2 85 rpm (90, 95)Interval 3 90 rpm (95, 100)
Cool down 20 mins @ recovery Zone
Week 10Description
Warm up 20 mins4 x 5’ intervals 1 minute rest between intervals
Workout Interval 1 80 rpm (85, 90) Interval 2 85 rpm (90, 95)Interval 3 90 rpm (95, 100) Interval 4 95 rpm (100, 105)
Cool down 20 mins @ recovery Zone
HR to remain in Z1-Z2 (Z3)
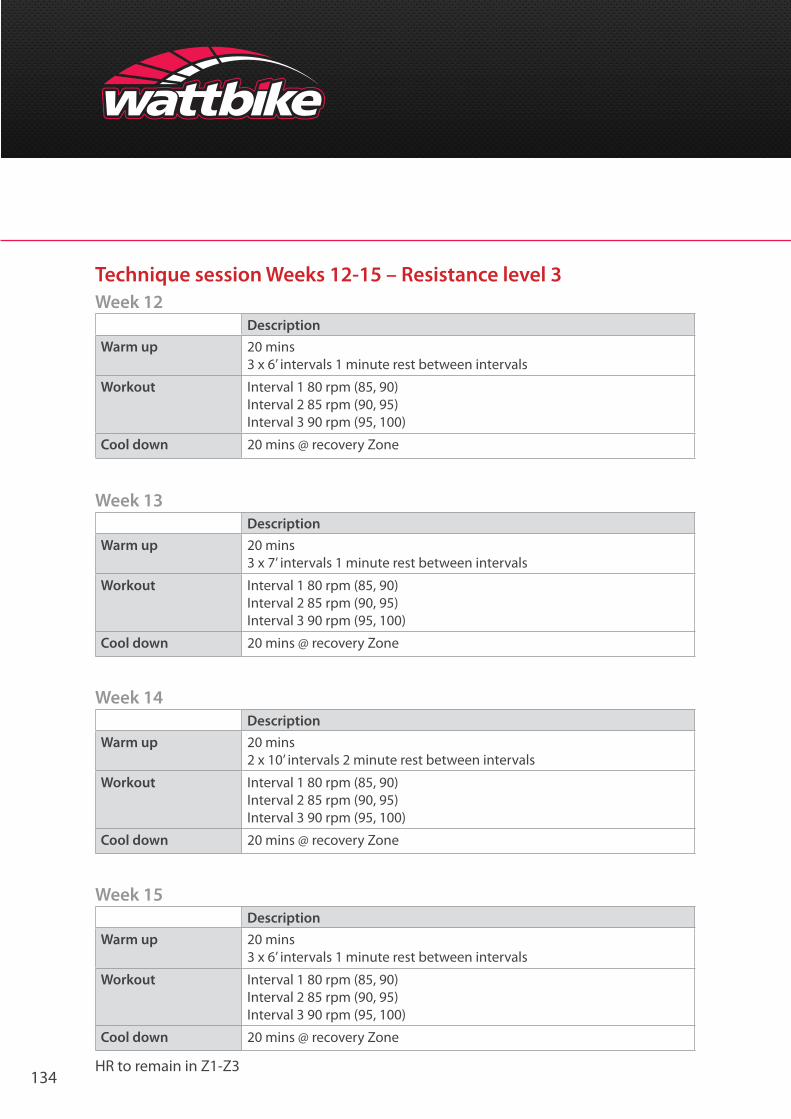
134
Technique session Weeks 12-15 – Resistance level 3Week 12
DescriptionWarm up 20 mins
3 x 6’ intervals 1 minute rest between intervals
Workout Interval 1 80 rpm (85, 90) Interval 2 85 rpm (90, 95)Interval 3 90 rpm (95, 100)
Cool down 20 mins @ recovery Zone
Week 13Description
Warm up 20 mins3 x 7’ intervals 1 minute rest between intervals
Workout Interval 1 80 rpm (85, 90) Interval 2 85 rpm (90, 95)Interval 3 90 rpm (95, 100)
Cool down 20 mins @ recovery Zone
Week 14Description
Warm up 20 mins2 x 10’ intervals 2 minute rest between intervals
Workout Interval 1 80 rpm (85, 90) Interval 2 85 rpm (90, 95)Interval 3 90 rpm (95, 100)
Cool down 20 mins @ recovery Zone
Week 15Description
Warm up 20 mins3 x 6’ intervals 1 minute rest between intervals
Workout Interval 1 80 rpm (85, 90) Interval 2 85 rpm (90, 95)Interval 3 90 rpm (95, 100)
Cool down 20 mins @ recovery Zone
HR to remain in Z1-Z3
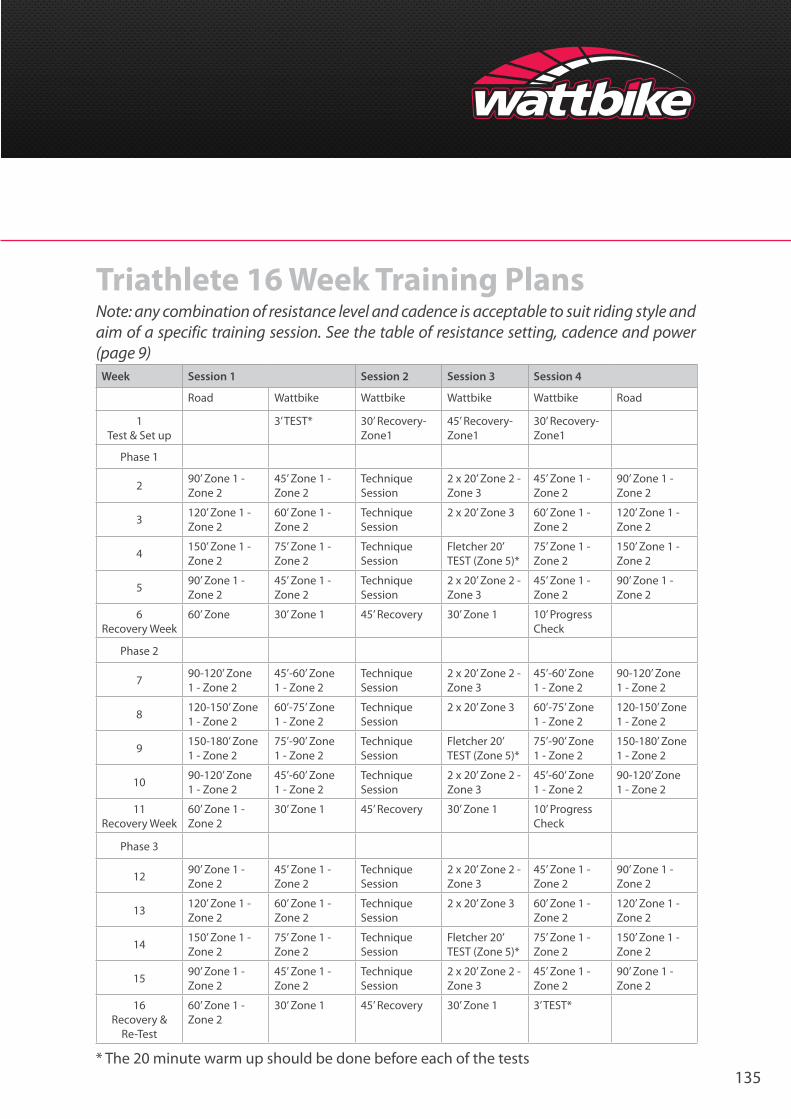
135
Triathlete 16 Week Training PlansNote: any combination of resistance level and cadence is acceptable to suit riding style and aim of a specific training session. See the table of resistance setting, cadence and power (page 9)
Week Session 1 Session 2 Session 3 Session 4
Road Wattbike Wattbike Wattbike Wattbike Road
1Test & Set up
3’ TEST* 30’ Recovery-Zone1
45’ Recovery- Zone1
30’ Recovery-Zone1
Phase 1
2 90’ Zone 1 - Zone 2
45’ Zone 1 - Zone 2
TechniqueSession
2 x 20’ Zone 2 - Zone 3
45’ Zone 1 - Zone 2
90’ Zone 1 - Zone 2
3 120’ Zone 1 - Zone 2
60’ Zone 1 - Zone 2
Technique Session
2 x 20’ Zone 3 60’ Zone 1 - Zone 2
120’ Zone 1 - Zone 2
4 150’ Zone 1 - Zone 2
75’ Zone 1 - Zone 2
Technique Session
Fletcher 20’ TEST (Zone 5)*
75’ Zone 1 - Zone 2
150’ Zone 1 - Zone 2
5 90’ Zone 1 - Zone 2
45’ Zone 1 - Zone 2
Technique Session
2 x 20’ Zone 2 - Zone 3
45’ Zone 1 - Zone 2
90’ Zone 1 - Zone 2
6 Recovery Week
60’ Zone 30’ Zone 1 45’ Recovery 30’ Zone 1 10’ Progress Check
Phase 2
7 90-120’ Zone 1 - Zone 2
45’-60’ Zone 1 - Zone 2
Technique Session
2 x 20’ Zone 2 - Zone 3
45’-60’ Zone 1 - Zone 2
90-120’ Zone 1 - Zone 2
8 120-150’ Zone 1 - Zone 2
60’-75’ Zone 1 - Zone 2
Technique Session
2 x 20’ Zone 3 60’-75’ Zone 1 - Zone 2
120-150’ Zone 1 - Zone 2
9 150-180’ Zone 1 - Zone 2
75’-90’ Zone 1 - Zone 2
Technique Session
Fletcher 20’ TEST (Zone 5)*
75’-90’ Zone 1 - Zone 2
150-180’ Zone 1 - Zone 2
10 90-120’ Zone 1 - Zone 2
45’-60’ Zone 1 - Zone 2
Technique Session
2 x 20’ Zone 2 - Zone 3
45’-60’ Zone 1 - Zone 2
90-120’ Zone 1 - Zone 2
11 Recovery Week
60’ Zone 1 - Zone 2
30’ Zone 1 45’ Recovery 30’ Zone 1 10’ Progress Check
Phase 3
12 90’ Zone 1 - Zone 2
45’ Zone 1 - Zone 2
Technique Session
2 x 20’ Zone 2 - Zone 3
45’ Zone 1 - Zone 2
90’ Zone 1 - Zone 2
13 120’ Zone 1 - Zone 2
60’ Zone 1 - Zone 2
Technique Session
2 x 20’ Zone 3 60’ Zone 1 - Zone 2
120’ Zone 1 - Zone 2
14 150’ Zone 1 - Zone 2
75’ Zone 1 - Zone 2
Technique Session
Fletcher 20’ TEST (Zone 5)*
75’ Zone 1 - Zone 2
150’ Zone 1 - Zone 2
15 90’ Zone 1 - Zone 2
45’ Zone 1 - Zone 2
Technique Session
2 x 20’ Zone 2 - Zone 3
45’ Zone 1 - Zone 2
90’ Zone 1 - Zone 2
16 Recovery &
Re-Test
60’ Zone 1 - Zone 2
30’ Zone 1 45’ Recovery 30’ Zone 1 3’ TEST*
* The 20 minute warm up should be done before each of the tests
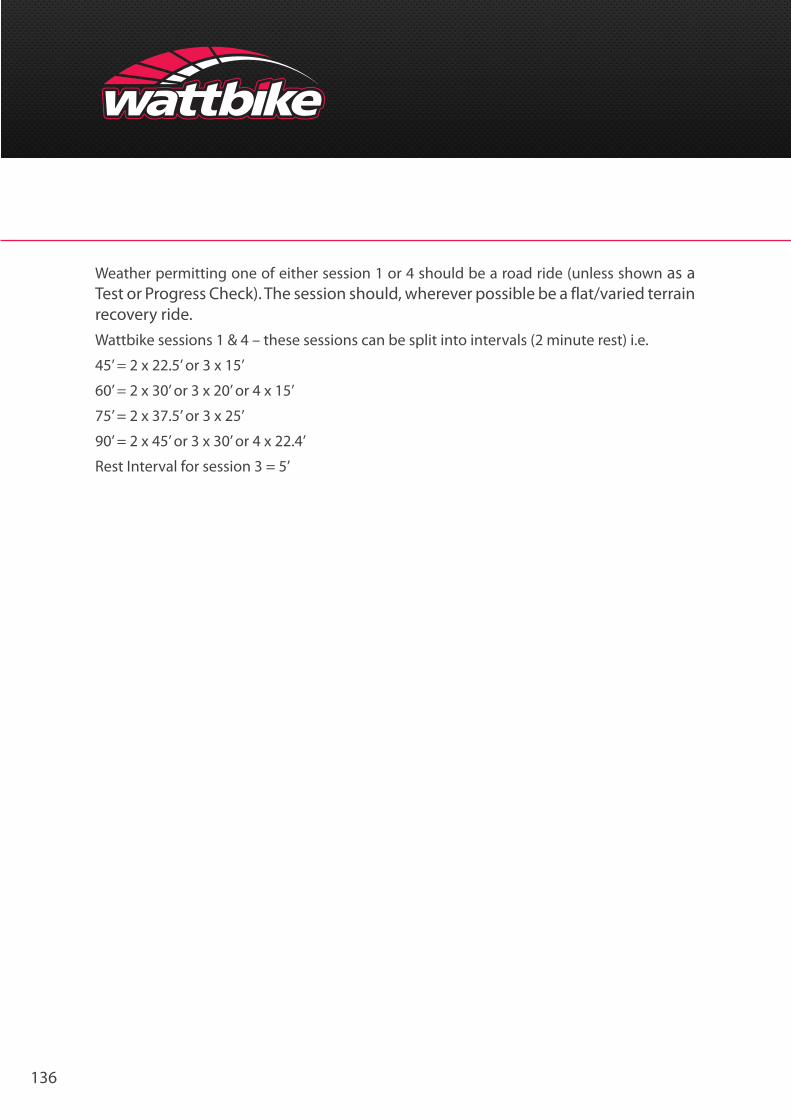
136
Weather permitting one of either session 1 or 4 should be a road ride (unless shown as a Test or Progress Check). The session should, wherever possible be a flat/varied terrain recovery ride.Wattbike sessions 1 & 4 – these sessions can be split into intervals (2 minute rest) i.e.
45’ = 2 x 22.5’ or 3 x 15’
60’ = 2 x 30’ or 3 x 20’ or 4 x 15’
75’ = 2 x 37.5’ or 3 x 25’
90’ = 2 x 45’ or 3 x 30’ or 4 x 22.4’
Rest Interval for session 3 = 5’

137
Weight Management Training Plan
Contents
Introduction ...............................................................................................................................................................138Outline of the Wattbike Weight Management Training plan ............................................................................139 Returning to training after a break ..............................................................................................................................139How to establish your heart rate and power training zones .............................................................................140Warm up and cool down ..........................................................................................................................................143Power, resistance and cadence tables ...................................................................................................................144Fluid and carbohydrate intake before, during and after training ....................................................................145
138
IntroductionThe Wattbike Weight Management Training Plan is designed for sedentary individuals although it is a plan that can be used by anyone wanting to lose weight or reduce body fat and improve overall fitness. This Training Plan is designed to be used in conjunction with a controlled diet as exercise on its own is less effective.
In addition to eating a balanced diet we also recommend supplementing your Wattbike training with other exercise activities such as a weights programme and other cardiovascular activity.
Before commencing the Wattbike Weight Management Training Plan you should consult your Doctor, and should not start the plan if you have recently been ill or injured. This Training Plan is not suitable for anyone under the age of 18 unless under supervision.
Before commencing your training plan you should ensure that you read the following sections of the Wattbike Training Guide to ensure that you are setup correctly on the Wattbike and that you are able to get the most out of your training:
• Introduction• Wattbike specific set up • Getting started (full section)• 3 minute Aerobic Test
We also recommend that you make sure you understand all the functions of the Wattbike Performance Computer and how to use Wattbike Expert software to monitor and analyse your Wattbike sessions. You should thoroughly read the Wattbike User Guide that came with your Wattbike and the Beginners Guide to Wattbike Expert Software http://wattbike.com/uk/wattbike/expert_software
139
Outline of the Wattbike Weight Management Training planThe Wattbike Weight Management Training Plan runs over a period of 24 weeks (6 x 4 week phases). Each four week phase consists of a light week, medium week, hard week and another light week. The intensity of the weeks are defined by the number of weekly workouts, the duration of each workout (in minutes) and by intensity (by heart rate and power training zone and cadence [revolutions per minute]) of the workouts.
Each four week phase has gradual increase in the number of workouts and the duration and intensity of each workout.
Week 1 has only 80 minutes of training at low intensity but by Week 23 there is 245 minutes of training over 5 workouts plus increases in overall intensity (Note the times given exclude warm up and cool down time, which is very important and should not be skipped).Every workout has a pedaling technique element and a defined resistance level/cadence/heart rate and power output relative to individual ability as determined by an initial Wattbike test.
Recovery is important – if you feel you need more time to recover, extra rest days during any week are acceptable and after every four week phase you may want to rest for two to three days before starting the next phase.
Stop training at once if ill or injured and do not recommence until fully recovered.
Returning to training after a breakIf you have missed between less than 5 workouts pick up the plan from where you left off.
If you have missed 5-10 workouts go back to the first week of the four week phase you had started.If you have missed 10-20 workouts go back one, four week phase
If you miss more than 20 workouts you may want to start the plan from the beginning
If you have been ill or injured for a prolonged period you should go back to the start of the training plan.
After a holiday two to three days at Recovery level should be sufficient to get back into the Training Plan at the pre holiday level.
140
How to establish your heart rate and power training zonesThe Wattbike Weight Management Training Plan sets a training intensity range of < 60% up to 75% of maximum heart rate (MHR) for this training plan which is equivalent to heart rate and power training zones Recovery through to Zone 2 (see the Wattbike Training Guide wattbike.com/uk/guide).
You should feel relaxed and able to carry on a conversation in training zones Recovery/Zone 1 and in Zone 2 you should feel as though you are working harder, feeling warmer with heart rate and respiration increased and you may start to sweat. The purposes of these three training zones are:
Recovery
Regeneration and recovery – increases blood flow to muscles to flush out waste products and provide nutrients, allows you to work on technique
Zone 1Establish base endurance – Improves fat metabolism, gets muscles, tendons, ligaments and nerves used to cycling, more efficient use of energy, allows you to work on techniqueZone 2 Improve efficiency – Improves the ability to use oxygen and produce power (efficiency = able to produce more power with the same level of effort), allows you to work on technique
Together with the heart rate percentage the training plan also uses maximum minute power (MMP)* to determine both the power element of the zones and warm up level.
*The highest average minute power output (in Watts) achieved during a Wattbike cycling ramp test (usually the final minute)
The only way to determine your cycling maximum heart rate and maximum minute power is by using a properly constructed cycling test.
Warning:Cycling tests require considerable motivation, physical stress and discomfort and it is inadvisable without medical clearance and supervision, particularly for individuals predisposed to coronary heart disease. As this is a weight management training plan the maximum heart rate ramp tests outlined in the Wattbike Training Guide are not recommended in the initial stages of the Wattbike Weight Management Training Plan.
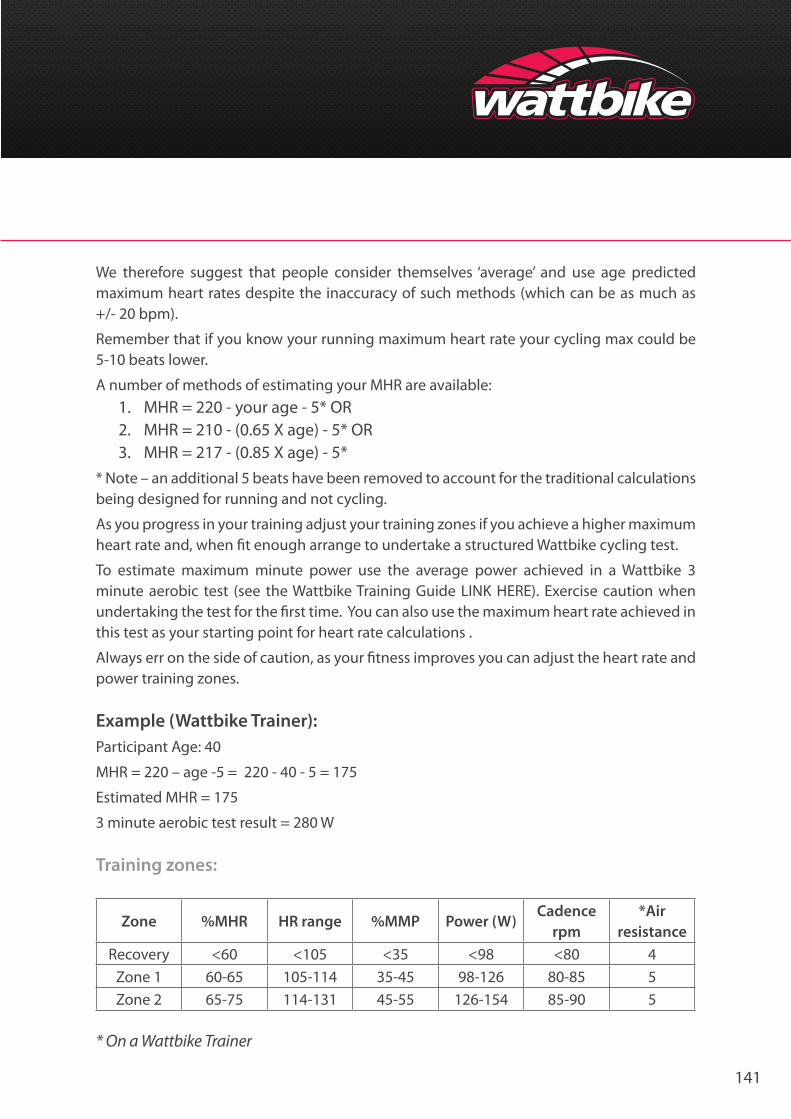
141
We therefore suggest that people consider themselves ‘average’ and use age predicted maximum heart rates despite the inaccuracy of such methods (which can be as much as +/- 20 bpm).
Remember that if you know your running maximum heart rate your cycling max could be 5-10 beats lower.
A number of methods of estimating your MHR are available:1. MHR = 220 - your age - 5* OR2. MHR = 210 - (0.65 X age) - 5* OR3. MHR = 217 - (0.85 X age) - 5*
* Note – an additional 5 beats have been removed to account for the traditional calculations being designed for running and not cycling.
As you progress in your training adjust your training zones if you achieve a higher maximum heart rate and, when fit enough arrange to undertake a structured Wattbike cycling test.
To estimate maximum minute power use the average power achieved in a Wattbike 3 minute aerobic test (see the Wattbike Training Guide LINK HERE). Exercise caution when undertaking the test for the first time. You can also use the maximum heart rate achieved in this test as your starting point for heart rate calculations .
Always err on the side of caution, as your fitness improves you can adjust the heart rate and power training zones.
Example (Wattbike Trainer):Participant Age: 40
MHR = 220 – age -5 = 220 - 40 - 5 = 175
Estimated MHR = 175
3 minute aerobic test result = 280 W
Training zones:
Zone %MHR HR range %MMP Power (W)Cadence
rpm*Air
resistanceRecovery <60 <105 <35 <98 <80 4
Zone 1 60-65 105-114 35-45 98-126 80-85 5Zone 2 65-75 114-131 45-55 126-154 85-90 5
* On a Wattbike Trainer
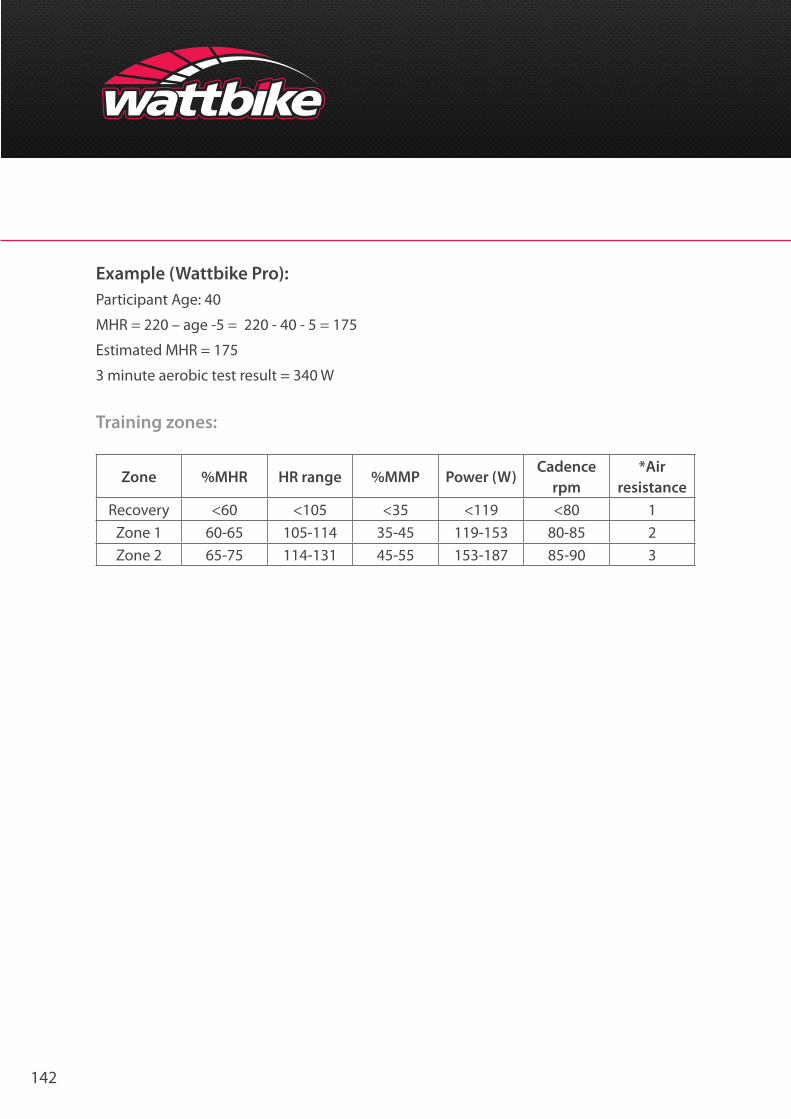
142
Example (Wattbike Pro):Participant Age: 40
MHR = 220 – age -5 = 220 - 40 - 5 = 175
Estimated MHR = 175
3 minute aerobic test result = 340 W
Training zones:
Zone %MHR HR range %MMP Power (W)Cadence
rpm*Air
resistanceRecovery <60 <105 <35 <119 <80 1
Zone 1 60-65 105-114 35-45 119-153 80-85 2Zone 2 65-75 114-131 45-55 153-187 85-90 3
143
Warm up and cool downWarm up and cool down are an integral part of a workout and should not be missed. For a full explanation of warm up and cool down see the Wattbike Training Guide wattbike.com/uk/guide
Recommended warm up and cool down for the workouts are:
Recovery
Warm up and cool down 5’ easy pedalling (below 80 rpm) at level 1 on the Wattbike Pro and lower than level 5 on the Wattbike Trainer
Zone 1 Warm up and cool down 5’-10’ easy pedalling (below 80 rpm) at level 1 on the Wattbike Pro and lower than level 5 on the Wattbike Trainer
Zone 2 Warm up
10’ duration1’ @ 801’ @ 851’ @ 901’ @ 951’ @ 1001’ @ 806” rev out54” @ 85-906” rev out54” @ 85-902’ @ 80
The Zone 2 warm up resistance level setting is based on your maximum minute power es-tablished in your 3 minute aerobic test – see the Wattbike Training Guide for full warm up details.
Cool down 5’-10’ easy pedalling (below 80 rpm) at level 1 on the Wattbike Pro and lower than level 5 on the Wattbike Trainer.
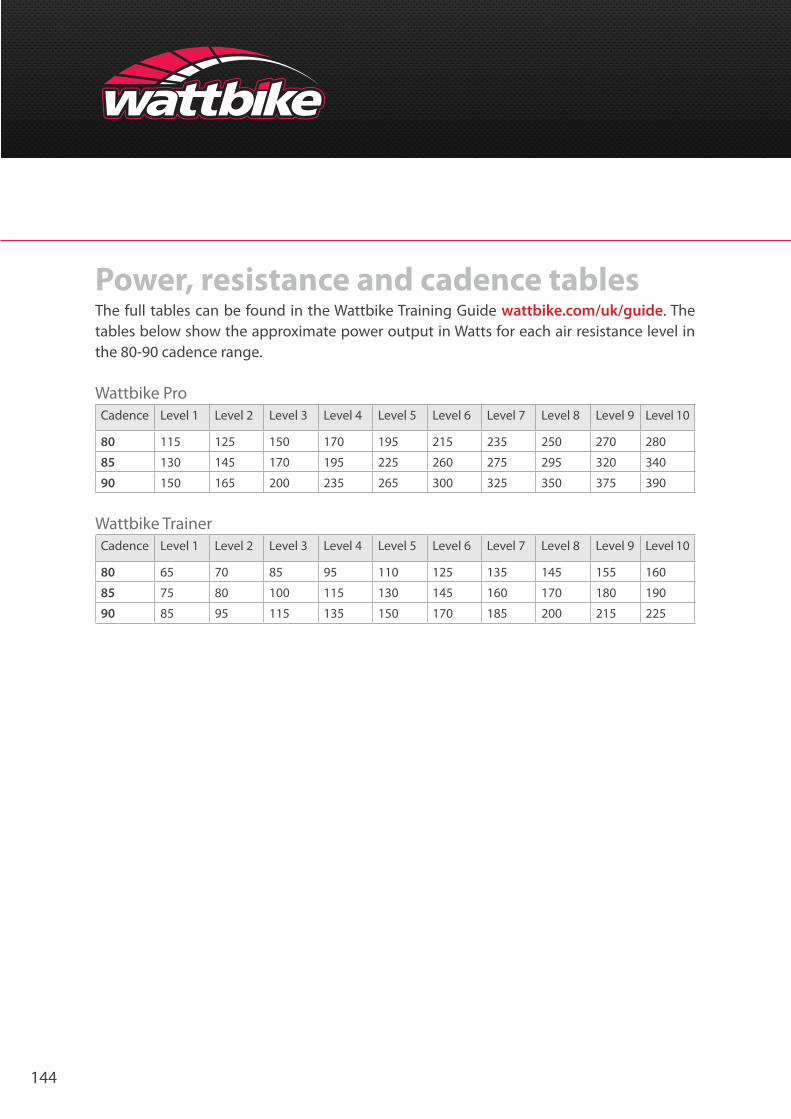
144
Power, resistance and cadence tablesThe full tables can be found in the Wattbike Training Guide wattbike.com/uk/guide. The tables below show the approximate power output in Watts for each air resistance level in the 80-90 cadence range.
Wattbike ProCadence Level 1 Level 2 Level 3 Level 4 Level 5 Level 6 Level 7 Level 8 Level 9 Level 10
80 115 125 150 170 195 215 235 250 270 280
85 130 145 170 195 225 260 275 295 320 340
90 150 165 200 235 265 300 325 350 375 390
Wattbike TrainerCadence Level 1 Level 2 Level 3 Level 4 Level 5 Level 6 Level 7 Level 8 Level 9 Level 10
80 65 70 85 95 110 125 135 145 155 160
85 75 80 100 115 130 145 160 170 180 190
90 85 95 115 135 150 170 185 200 215 225
145
Fluid and carbohydrate intake before, during and after trainingWhen training on an indoor cycle careful attention to fluid and carbohydrate intake is required. Try to train in an air conditioned area or an area with good natural air circulation. A fan may help – keeping cool is important – see the section in the Wattbike Training Guide. Be careful about consuming many of the energy drinks that are available, many are calorie rich and contain sugar which will add weight rather than reducing it. The idea behind this plan is to assist with burning calories. Whilst correct hydration is vital this can be achieved during the workouts simply by drinking water before during and after your workout. Sensible eating before and after your workout will help to ensure you have sufficient energy for the workout whilst helping weigh/fat loss.
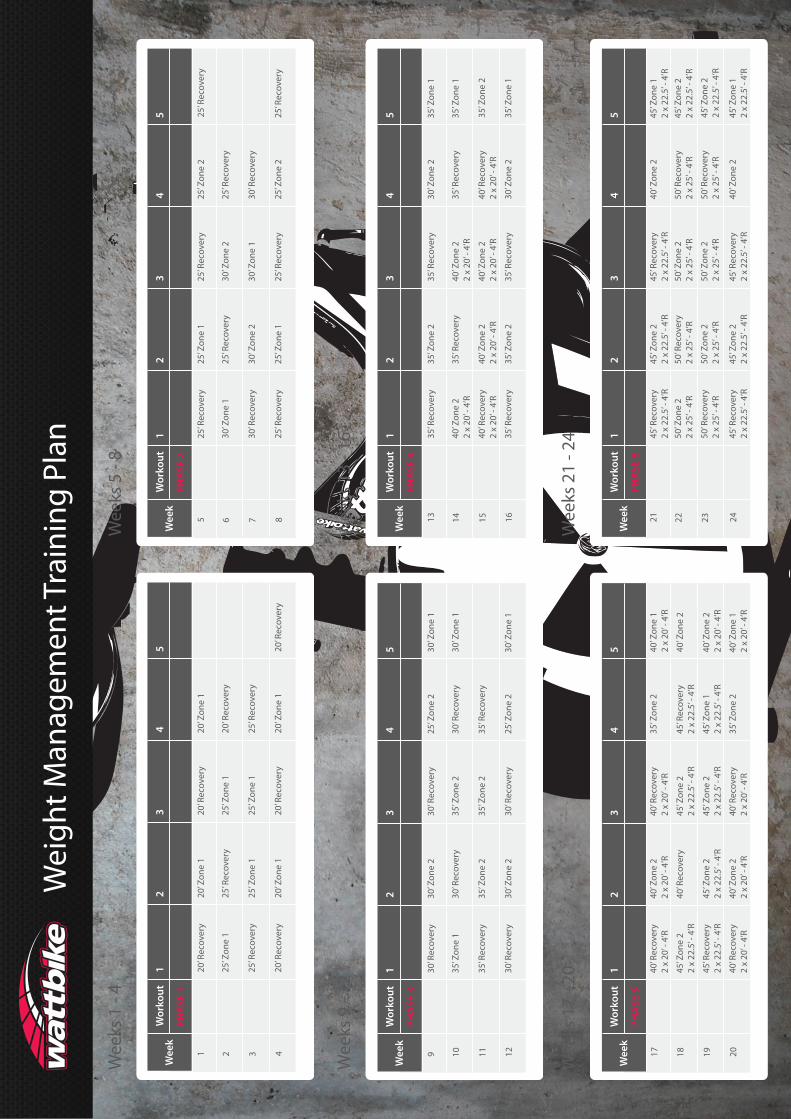
Wei
ght M
anag
emen
t Tra
inin
g Pl
an
Wee
ks 1
- 4
Wee
ks 5
- 8
Wee
ks 9
- 12
Wee
ks 1
3 - 1
6
Wee
kW
orko
ut1
23
45
PHA
SE 1
120
’ Rec
over
y20
’ Rec
over
y20
’ Zon
e 1
20’ Z
one
1
25’ Z
one
125
’ Zon
e 1
25’ R
ecov
ery
20’ R
ecov
ery
25’ R
ecov
ery
25’ Z
one
125
’ Zon
e 1
25’ R
ecov
ery
20’ R
ecov
ery
20’ R
ecov
ery
20’ R
ecov
ery
20’ Z
one
120
’ Zon
e 1
2 3 4
Wee
kW
orko
ut1
23
45
PHA
SE 2
525
’ Rec
over
y25
’ Rec
over
y25
’ Rec
over
y25
’ Zon
e 1
25’ Z
one
2
30’ Z
one
130
’ Zon
e 2
25’ R
ecov
ery
25’ R
ecov
ery
30’ R
ecov
ery
30’ Z
one
130
’ Zon
e 2
30’ R
ecov
ery
25’ R
ecov
ery
25’ R
ecov
ery
25’ R
ecov
ery
25’ Z
one
125
’ Zon
e 2
6 7 8
Wee
kW
orko
ut1
23
45
PHA
SE 4
1335
’ Rec
over
y35
’ Rec
over
y35
’ Zon
e 2
30’ Z
one
235
’ Zon
e 1
40’ Z
one
22
x 20
’ - 4
’R40
’ Zon
e 2
2 x
20’ -
4’R
35’ R
ecov
ery
35’ R
ecov
ery
35’ Z
one
1
40’ R
ecov
ery
2 x
20’ -
4’R
40’ Z
one
22
x 20
’ - 4
’R40
’ Zon
e 2
2 x
20’ -
4’R
40’ R
ecov
ery
2 x
20’ -
4’R
35’ Z
one
2
35’ R
ecov
ery
35’ R
ecov
ery
35’ Z
one
135
’ Zon
e 2
30’ Z
one
2
14 15 16
Wee
kW
orko
ut1
23
45
PHA
SE 3
930
’ Rec
over
y30
’ Rec
over
y30
’ Zon
e 2
25’ Z
one
230
’ Zon
e 1
35’ Z
one
135
’ Zon
e 2
30’ R
ecov
ery
30’ R
ecov
ery
30’ Z
one
1
35’ R
ecov
ery
35’ Z
one
235
’ Zon
e 2
35’ R
ecov
ery
30’ R
ecov
ery
30’ R
ecov
ery
30’ Z
one
130
’ Zon
e 2
25’ Z
one
2
10 11 12
Wee
ks 1
7 - 2
0W
eeks
21
- 24
Wee
kW
orko
ut1
23
45
PHA
SE 6
2145
’ Rec
over
y2
x 22
.5’ -
4’R
45’ R
ecov
ery
2 x
22.5
’ - 4
’R45
’ Zon
e 2
2 x
22.5
’ - 4
’R40
’ Zon
e 2
45’ Z
one
12
x 22
.5’ -
4’R
50’ Z
one
22
x 25
’ - 4
’R50
’ Zon
e 2
2 x
25’ -
4’R
50’ R
ecov
ery
2 x
25’ -
4’R
50
’ Rec
over
y2
x 25
’ - 4
’R45
’ Zon
e 2
2 x
22.5
’ - 4
’R
50’ R
ecov
ery
2 x
25’ -
4’R
50’ Z
one
22
x 25
’ - 4
’R50
’ Zon
e 2
2 x
25’ -
4’R
50’ R
ecov
ery
2 x
25’ -
4’R
45’ Z
one
22
x 22
.5’ -
4’R
45’ R
ecov
ery
2 x
22.5
’ - 4
’R45
’ Rec
over
y2
x 22
.5’ -
4’R
45’ Z
one
12
x 22
.5’ -
4’R
45’ Z
one
22
x 22
.5’ -
4’R
40’ Z
one
2
22 23 24
Wee
kW
orko
ut1
23
45
PHA
SE 5
1740
’ Rec
over
y2
x 20
’ - 4
’R40
’ Rec
over
y2
x 20
’ - 4
’R40
’ Zon
e 2
2 x
20’ -
4’R
35’ Z
one
240
’ Zon
e 1
2 x
20’ -
4’R
45’ Z
one
22
x 22
.5’ -
4’R
45’ Z
one
22
x 22
.5’ -
4’R
40’ R
ecov
ery
45’ R
ecov
ery
2 x
22.5
’ - 4
’R40
’ Zon
e 2
45’ R
ecov
ery
2 x
22.5
’ - 4
’R45
’ Zon
e 2
2 x
22.5
’ - 4
’R45
’ Zon
e 2
2 x
22.5
’ - 4
’R45
’ Zon
e 1
2 x
22.5
’ - 4
’R40
’ Zon
e 2
2 x
20’ -
4’R
40’ R
ecov
ery
2 x
20’ -
4’R
40’ R
ecov
ery
2 x
20’ -
4’R
40’ Z
one
12
x 20
’ - 4
’R40
’ Zon
e 2
2 x
20’ -
4’R
35’ Z
one
2
18 19 20
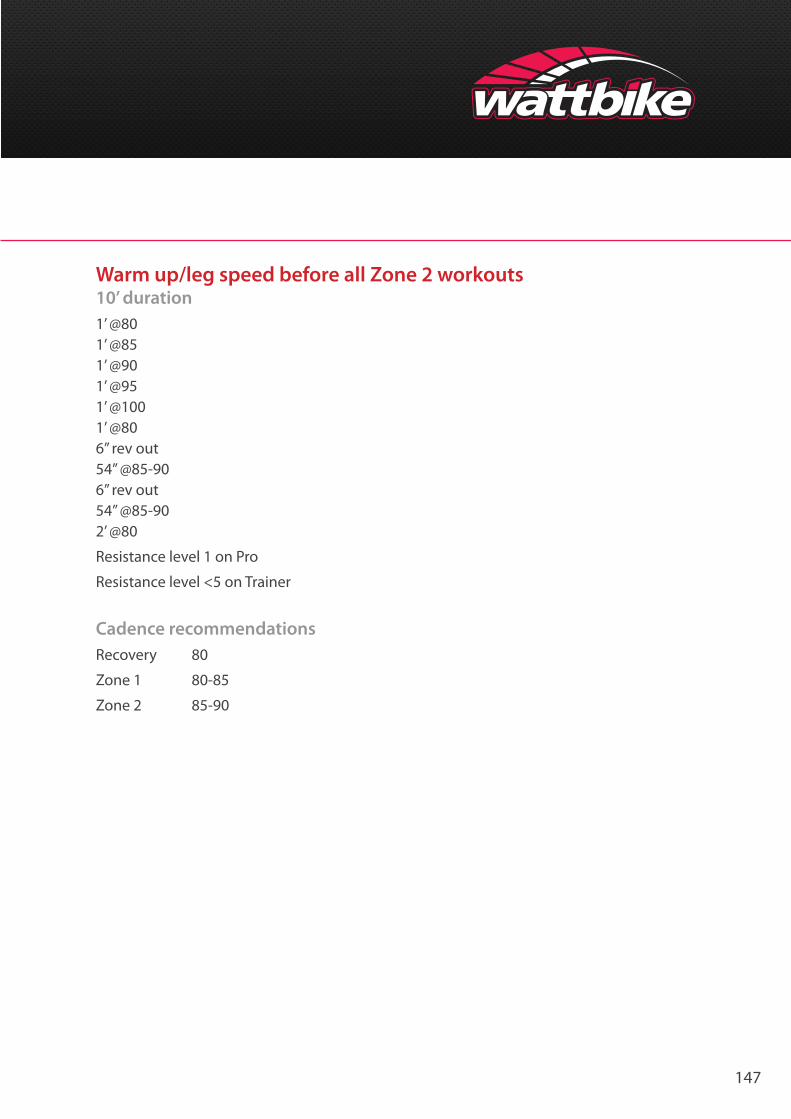
147
Warm up/leg speed before all Zone 2 workouts 10’ duration1’ @801’ @851’ @901’ @951’ @1001’ @806” rev out54” @85-906” rev out54” @85-902’ @80
Resistance level 1 on Pro
Resistance level <5 on Trainer
Cadence recommendationsRecovery 80
Zone 1 80-85
Zone 2 85-90

148
Notes

149