Embed Size (px)
Citation preview
Eclipse™ SystemPatient Guide
1
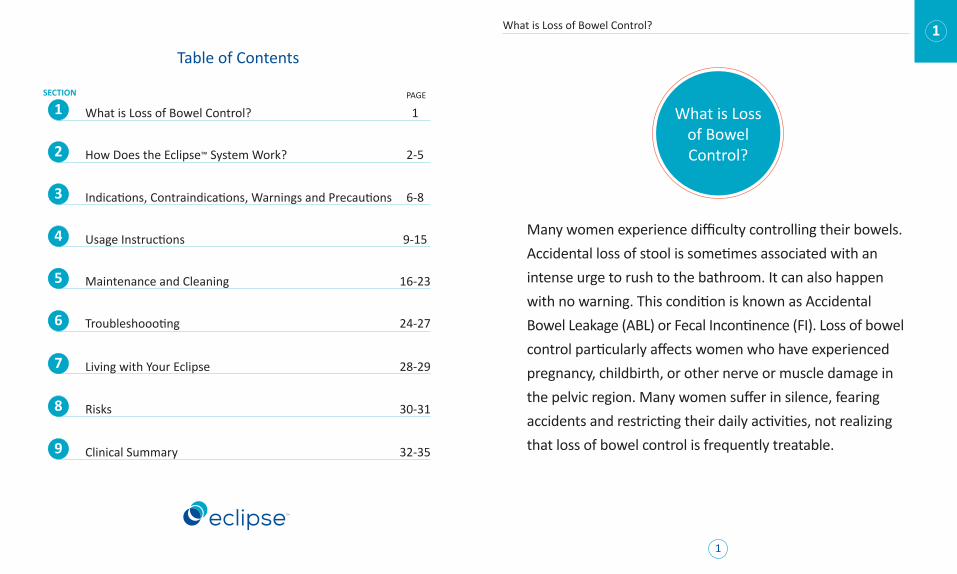
Many women experience difficulty controlling their bowels. Accidental loss of stool is sometimes associated with an intense urge to rush to the bathroom. It can also happen with no warning. This condition is known as Accidental Bowel Leakage (ABL) or Fecal Incontinence (FI). Loss of bowel control particularly affects women who have experienced pregnancy, childbirth, or other nerve or muscle damage in the pelvic region. Many women suffer in silence, fearing accidents and restricting their daily activities, not realizing that loss of bowel control is frequently treatable.
What is Loss of Bowel Control?
What is Loss of Bowel Control? 1
Table of Contents
1 What is Loss of Bowel Control? 1
SECTION PAGE
2 How Does the Eclipse™ System Work? 2-5
3 Indications, Contraindications, Warnings and Precautions 6-8
4 Usage Instructions 9-15
5 Maintenance and Cleaning 16-23
6 Troubleshoooting 24-27
7 Living with Your Eclipse 28-29
8 Risks 30-31
9 Clinical Summary 32-35

32
The Eclipse System is intended to help you regain control of your bowel movements. The Eclipse Insert is placed into your vagina, resting in the same place as a tampon, as shown in Picture 1. When you inflate the Balloon, as in Picture 2, it will help to control your rectum, preventing stool from passing when you’re not ready for it. When you’re ready to have a bowel movement, simply deflate the Balloon. Once you have finished your bowel movement, inflate the Balloon again and go on your way. The Eclipse System includes the Trial Insert, the Eclipse Insert and a Pump, as shown in Pictures 3, 4 & 5. In addition, the Eclipse System includes a Sizing Kit, which is only used by your healthcare provider during your fitting visit.
How Does the Eclipse
System Work?
2
How Does the Eclipse™ System Work?
Picture 2: Inflated Balloon to prevent unintended loss of stool
Picture 1: Uninflated Balloon to allow bowel movements
Rectum
Rectum Uterus
Uterus
Bladder
Bladder
Eclipse Insert
Vagina
Vagina
Tube
Tube
Eclipse Insert
54
2
How Does the Eclipse™ System Work?
Picture 4: Eclipse Insert, Inflated (indigo)
4Connector
Valve
Cap
BaseTube
Picture 3: Trial Insert, Inflated (white)
3Connector
Valve
Cap
BaseTube
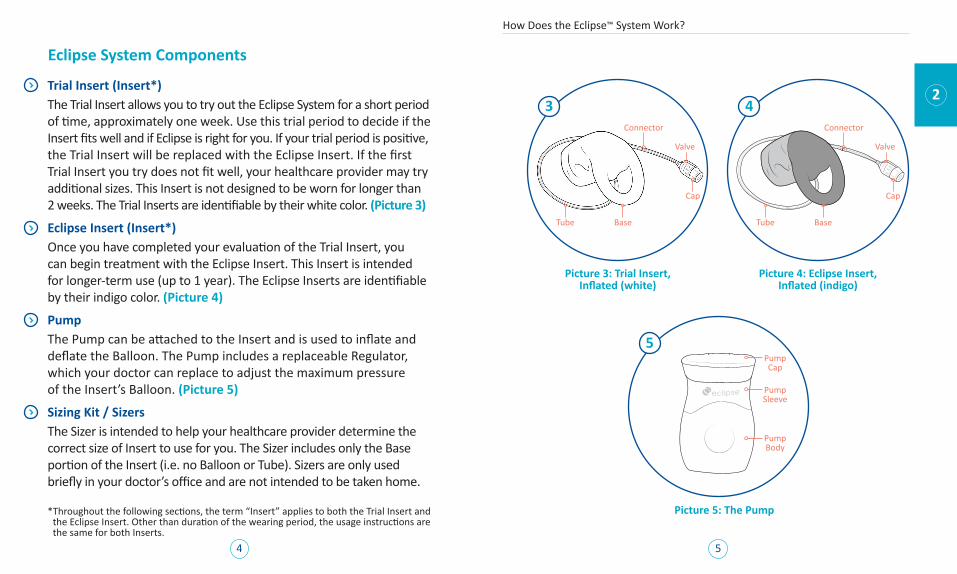
Trial Insert (Insert*)The Trial Insert allows you to try out the Eclipse System for a short period of time, approximately one week. Use this trial period to decide if the Insert fits well and if Eclipse is right for you. If your trial period is positive, the Trial Insert will be replaced with the Eclipse Insert. If the first Trial Insert you try does not fit well, your healthcare provider may try additional sizes. This Insert is not designed to be worn for longer than 2 weeks. The Trial Inserts are identifiable by their white color. (Picture 3)
Eclipse Insert (Insert*)Once you have completed your evaluation of the Trial Insert, you can begin treatment with the Eclipse Insert. This Insert is intended for longer-term use (up to 1 year). The Eclipse Inserts are identifiable by their indigo color. (Picture 4)
PumpThe Pump can be attached to the Insert and is used to inflate and deflate the Balloon. The Pump includes a replaceable Regulator, which your doctor can replace to adjust the maximum pressure of the Insert’s Balloon. (Picture 5)
Sizing Kit / SizersThe Sizer is intended to help your healthcare provider determine the correct size of Insert to use for you. The Sizer includes only the Base portion of the Insert (i.e. no Balloon or Tube). Sizers are only used briefly in your doctor’s office and are not intended to be taken home.
* Throughout the following sections, the term “Insert” applies to both the Trial Insert and the Eclipse Insert. Other than duration of the wearing period, the usage instructions are the same for both Inserts.
Eclipse System Components
Picture 5: The Pump
5
Pump Sleeve
Pump Cap
Pump Body
76
Indications for UseThe EclipseTM System is indicated for the treatment of fecal incontinence in adult women. It is intended for prescription use.
ContraindicationsIf you have any of the following conditions, you should not use the Insert until the condition is resolved:
• Presence of vaginal infection• Presence of open vaginal wound
WarningsPlease heed the following warnings to prevent the noted potential consequences:
• The Insert contains metal, so you must remove it before obtaining an MRI. An MRI may cause heating or movement of the Insert, which could lead to adverse events.
• Before obtaining a pelvic X-ray, you should consult with your doctor about whether or not to remove the Insert as the Insert may obscure images.
Indications, Contraindications,
Warnings and Precautions
Indications, Contraindications, Warnings and Precautions
3
• The Insert and the Pump are for single-patient use only, so they should not be shared with anyone. Sharing the Insert and/or Pump could result in transmission of disease and/or infection.
• You should remove the Insert immediately and notify your doctor if you experience any of the following: a foul odor or excessive vaginal discharge, difficulty urinating or defecating, significant bleeding not associated with menstruation or any new onset or worsening pelvic pain or discomfort.
Precautions The following precautions will help to ensure safe use of the Eclipse System:
• Prior to initial use, read and understand all product instructions for use.
• The Trial Insert should not be used for longer than 2 weeks, as it is not designed for long-term use. The Eclipse Insert should be used for long-term use.
• Prior to each use, inspect the Insert and the Pump for possible damage. If damaged, do not use.
• To remove the Insert from the vagina, do not pull the Tube. Pulling on the Tube may damage the Insert, Connector, or Tube.
• To disconnect the Insert Valve from the Pump, grasp the Valve, do not pull on the Tube. Pulling on the Tube may damage the Insert, the Connector, and/or the Tube.
98
• If you are using any treatment for vaginal atrophy, such as topical estrogen cream, maintain use of that treatment while using the Insert.
• Avoid use of the Insert if you have severe vaginal atrophy that would prevent safe, effective, or comfortable use of the Insert.
• If you have mild to moderate atrophy that prevents comfortable or effective use of the Eclipse System, a treatment for vaginal atrophy, such as topical estrogen cream, can be prescribed. Vaginal estrogen therapy may be associated with increased risks such as certain cancers and cardiovascular events. Please refer to the Prescribing Information and discuss all risks with your doctor prior to beginning use.
• The Eclipse System has not been tested in patients with severe pelvic organ prolapse (beyond the plane of the hymen) or in patients who are pregnant.
• The safety and effectiveness of the Eclipse System have not been evaluated in women who use an IUD.
• If you have had a recent hysterectomy, use of the Eclipse System could irritate or damage the tissue in the top of your vagina. You should discuss with your doctor when is the best time to begin use of the Insert.
• The safety and effectiveness of the Eclipse System for use in women with less than 4 episodes of fecal incontinence over a 2-week period have not been demonstrated.
4
Usage Intructions
Insertion and RemovalTo Place the Insert:Precaution: Remove any tampon or other device you may already be wearing in your vagina.
1. Completely deflate the Insert (see Deflation Instructions on page 15).
2. Apply lubricant to your vagina, if desired. Adding lubricant directly to the Insert may make it slippery and difficult to grasp, so apply the lubricant to your vaginal opening instead, to ease insertion of the Insert.
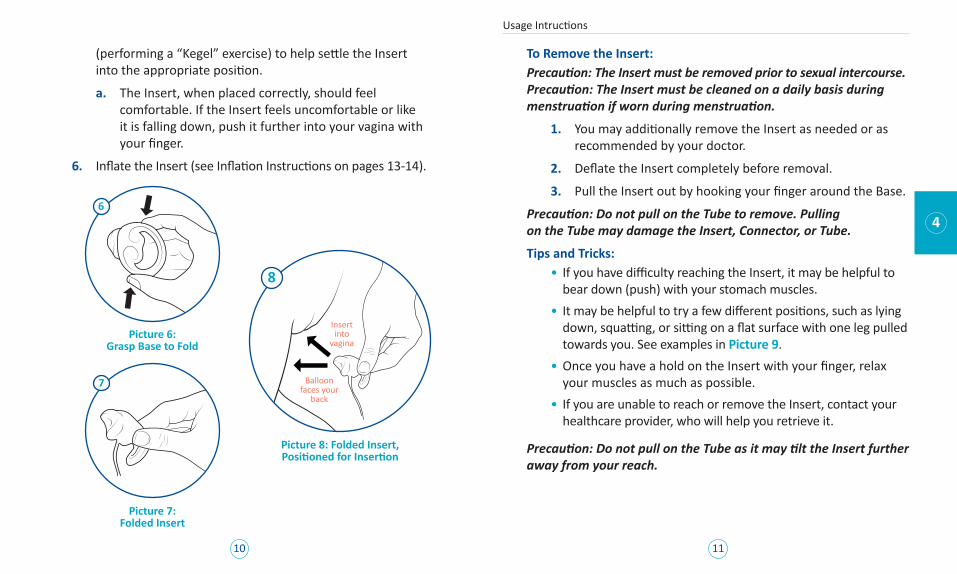
3. Fold the Insert as shown in Pictures 6 & 7.
4. Hold the Insert with the Balloon pointed down and towards your back as shown in Picture 8.
5. Push the folded Insert as far back in your vagina as is comfortable. Once it is placed, squeeze your pelvic muscles
Usage Instructions
1110
(performing a “Kegel” exercise) to help settle the Insert into the appropriate position.
a. The Insert, when placed correctly, should feel comfortable. If the Insert feels uncomfortable or like it is falling down, push it further into your vagina with your finger.
6. Inflate the Insert (see Inflation Instructions on pages 13-14).
To Remove the Insert: Precaution: The Insert must be removed prior to sexual intercourse.Precaution: The Insert must be cleaned on a daily basis during menstruation if worn during menstruation.
1. You may additionally remove the Insert as needed or as recommended by your doctor.
2. Deflate the Insert completely before removal.
3. Pull the Insert out by hooking your finger around the Base.
Precaution: Do not pull on the Tube to remove. Pulling on the Tube may damage the Insert, Connector, or Tube.
Tips and Tricks:• If you have difficulty reaching the Insert, it may be helpful to
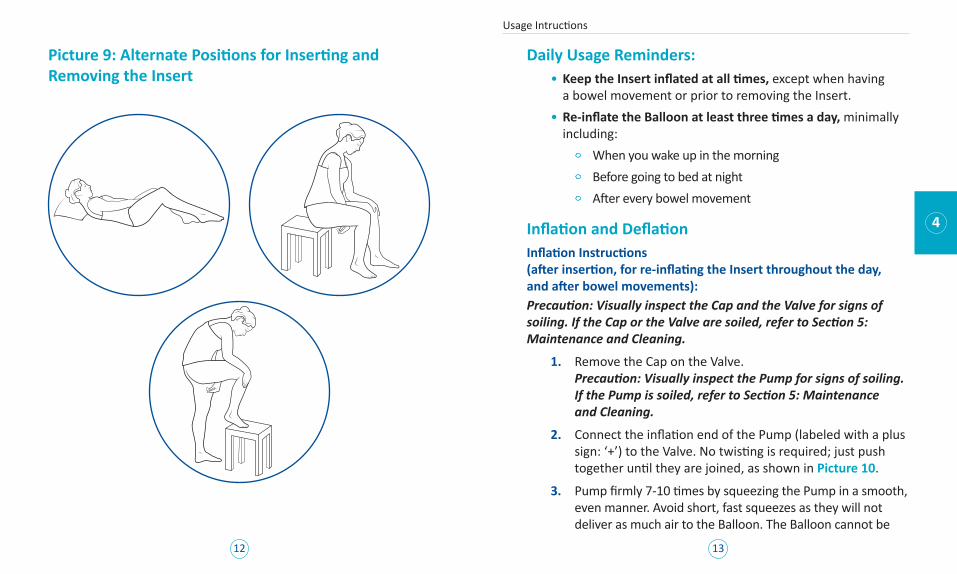
bear down (push) with your stomach muscles.• It may be helpful to try a few different positions, such as lying
down, squatting, or sitting on a flat surface with one leg pulled towards you. See examples in Picture 9.
• Once you have a hold on the Insert with your finger, relax your muscles as much as possible.
• If you are unable to reach or remove the Insert, contact your healthcare provider, who will help you retrieve it.
Precaution: Do not pull on the Tube as it may tilt the Insert further away from your reach.
4
Usage Intructions
Picture 6: Grasp Base to Fold
Picture 7: Folded Insert
6
7
Picture 8: Folded Insert, Positioned for Insertion
8
Insert into
vagina
Balloon faces your
back
1312
Picture 9: Alternate Positions for Inserting and Removing the Insert
4
Usage Intructions
Daily Usage Reminders:• Keep the Insert inflated at all times, except when having
a bowel movement or prior to removing the Insert.• Re-inflate the Balloon at least three times a day, minimally
including:When you wake up in the morningBefore going to bed at nightAfter every bowel movement
Inflation and DeflationInflation Instructions (after insertion, for re-inflating the Insert throughout the day, and after bowel movements):Precaution: Visually inspect the Cap and the Valve for signs of soiling. If the Cap or the Valve are soiled, refer to Section 5: Maintenance and Cleaning.
1. Remove the Cap on the Valve. Precaution: Visually inspect the Pump for signs of soiling. If the Pump is soiled, refer to Section 5: Maintenance and Cleaning.
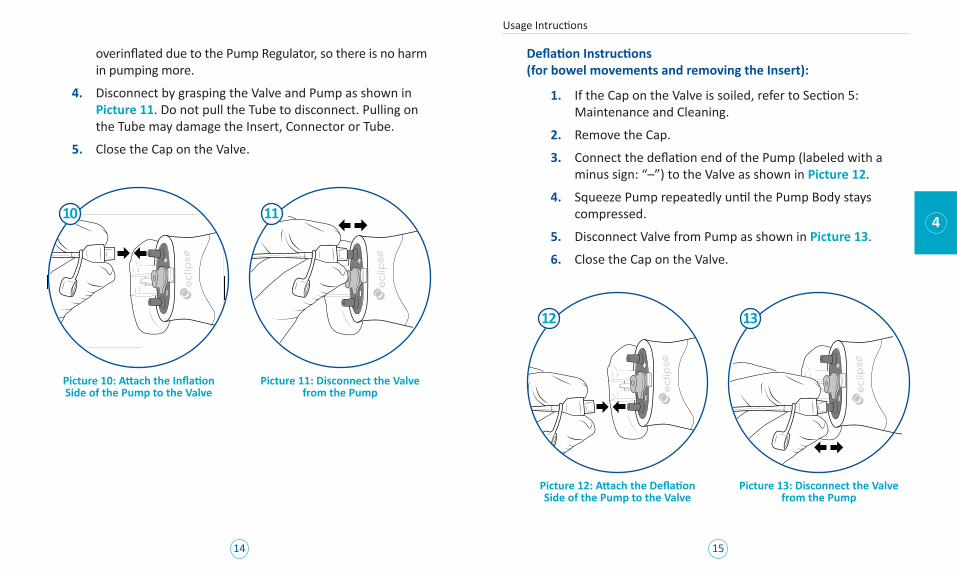
2. Connect the inflation end of the Pump (labeled with a plus sign: ‘+’) to the Valve. No twisting is required; just push together until they are joined, as shown in Picture 10.
3. Pump firmly 7-10 times by squeezing the Pump in a smooth, even manner. Avoid short, fast squeezes as they will not deliver as much air to the Balloon. The Balloon cannot be
1514
overinflated due to the Pump Regulator, so there is no harm in pumping more.
4. Disconnect by grasping the Valve and Pump as shown in Picture 11. Do not pull the Tube to disconnect. Pulling on the Tube may damage the Insert, Connector or Tube.
5. Close the Cap on the Valve.
4
Usage Intructions
Deflation Instructions (for bowel movements and removing the Insert):
1. If the Cap on the Valve is soiled, refer to Section 5: Maintenance and Cleaning.
2. Remove the Cap.
3. Connect the deflation end of the Pump (labeled with a minus sign: “–”) to the Valve as shown in Picture 12.
4. Squeeze Pump repeatedly until the Pump Body stays compressed.
5. Disconnect Valve from Pump as shown in Picture 13.
6. Close the Cap on the Valve.
Picture 12: Attach the Deflation Side of the Pump to the Valve
12
Picture 10: Attach the Inflation Side of the Pump to the Valve
10
Picture 11: Disconnect the Valve from the Pump
11
Picture 13: Disconnect the Valve from the Pump
13
1716
Maintenance and Cleaning
5
Maintenance and Cleaning
How to Clean Your Insert On a weekly basis, or daily during your monthly menstrual period, or if the Cap or Valve are visually soiled, remove your Insert and follow these instructions to clean it:
Get Ready:
1. Get a bowl ready for cleaning. Fill it with a gallon of lukewarm water, enough to submerge the Insert, and add 1 teaspoon of mild dishwashing liquid detergent for every gallon of water.
2. Have several lint-free wipes, such as gauze pads, ready.
3. Inflate the Balloon on your Insert, and leave the Cap open.
Get Clean:
1. If the Cap is soiled before you remove the Insert from your vagina, use a clean cloth to pat the Cap dry before opening it in order to prevent liquid or solid contaminant from entering the Valve or the Tube.
2. Rinse the Insert under running lukewarm tap water for at least 1 minute.
3. Submerge the Insert in your bowl of soapy water for at least 2 minutes. You will need to place a clean object on the Insert to keep it from floating.
4. Use your wipe to scrub the Valve for at least 30 seconds, keeping it under water. Pay attention to clean the corners and the connectors. (See Pictures 3 & 4) Use extra wipes as needed.
5. Scrub the rest of the Insert for at least 1 minute. Again, give some extra scrubs to the corners inside the Base ring and around the Tube. (See Pictures 3 & 4) Use extra wipes as needed.
6. Rinse the Insert under running lukewarm tap water for at least 1 minute.
Get Going:
1. Dry the Insert thoroughly with a fresh wipe.
2. Check the Insert for damage or any remaining unclean areas before use. If visible soil remains on any of the Insert components, the cleaning procedure should be repeated until all visible soil is removed.
Precaution: If, after cleaning, there is still evidence of soiling on your Valve or Cap, repeat the cleaning instructions and pay particular attention to the Valve and Cap. If you are unable to remove all evidence of soiling, the Valve should be replaced. You may order a replacement Valve from Customer Service at 1-844-NO-TO-ABL (1-844-668-6225). In the meantime, do not use the Insert. Please store the Insert in the inflated position, and leave the Pump disconnected.
1918
How to Disinfect Your InsertIf your Insert gets soiled, first clean your Insert as described on pages 16-17, then follow these instructions to disinfect it:
Get Ready:
1. Always clean your Insert before disinfecting it.
2. Get a bowl ready for disinfection. Fill it with 70% Isopropyl Alcohol (IPA), sometimes labeled as ‘rubbing alcohol’, check ingredients to ensure it contains 70% IPA, enough to completely cover the Insert (a minimum of 3 cups is suggested).
3. Inflate the Balloon on your Insert, and leave the Valve Cap open.
Get Disinfected:
1. Submerge the Insert in the IPA and let it soak for at least 10 minutes. You will need to place a clean object on the Insert to keep it from floating.
2. After the 10 minutes have passed, rinse the Insert under running tap water for at least 1 minute.
Get Going:
1. Dry all surfaces using clean, lint-free wipes.
How to Clean Your PumpWhenever your Pump becomes soiled, follow these instructions to clean it, as well as the following instructions to disinfect it:
Get Ready:
1. Get a bowl ready for cleaning. Fill it with a gallon of lukewarm water and add at least 1 teaspoon of mild
dishwashing liquid detergent for every gallon of water.
2. Have several lint-free wipes, such as gauze pads ready.
Get Clean:
Clean Pump Cap and Pump Sleeve
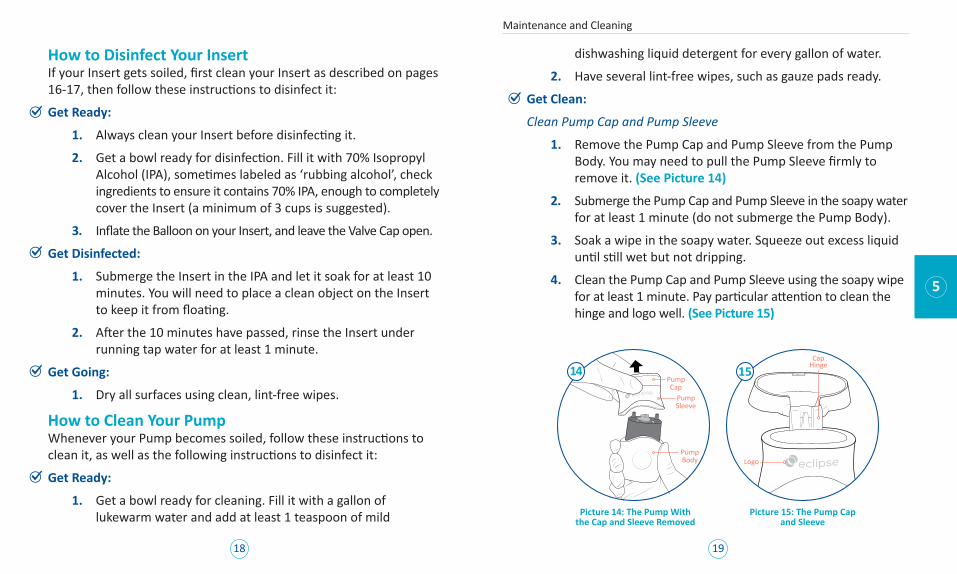
1. Remove the Pump Cap and Pump Sleeve from the Pump Body. You may need to pull the Pump Sleeve firmly to remove it. (See Picture 14)
2. Submerge the Pump Cap and Pump Sleeve in the soapy water for at least 1 minute (do not submerge the Pump Body).
3. Soak a wipe in the soapy water. Squeeze out excess liquid until still wet but not dripping.
4. Clean the Pump Cap and Pump Sleeve using the soapy wipe for at least 1 minute. Pay particular attention to clean the hinge and logo well. (See Picture 15)
Maintenance and Cleaning
5
Picture 14: The Pump With the Cap and Sleeve Removed
14
Pump Sleeve
Pump Cap
Pump Body
Picture 15: The Pump Cap and Sleeve
15Cap
Hinge
Logo
2120
3. Get a fresh wipe and run it under lukewarm water. Squeeze out excess liquid.
4. Wipe the Pump Body using the wetted wipe for at least 1 minute.
a. Pay extra attention to clean the seams and/or crevices.
b. Be sure to remove all detergent from the Pump Body. Replace soiled wipes, as needed.
Get Going:
1. Dry the Pump Cap, Pump Sleeve and the Pump Body thoroughly with a fresh, dry wipe.
2. Securely attach the Pump Cap and Pump Sleeve back onto the Pump Body. (See Picture 17) Check the Pump for damage or any remaining unclean areas before use.
Maintenance and Cleaning
5
5. Rinse the Pump Cap and Pump Sleeve under the faucet, using lukewarm water for at least 1 minute, again paying particular attention to the hinge and logo.
6. Set aside the Pump Cap and Pump Sleeve.
Clean Pump Body
1. Soak a new wipe in the soapy water. Squeeze out excess liquid until still wet but not dripping.
2. Clean the Pump Body using the soapy wipe for at least 1 minute.
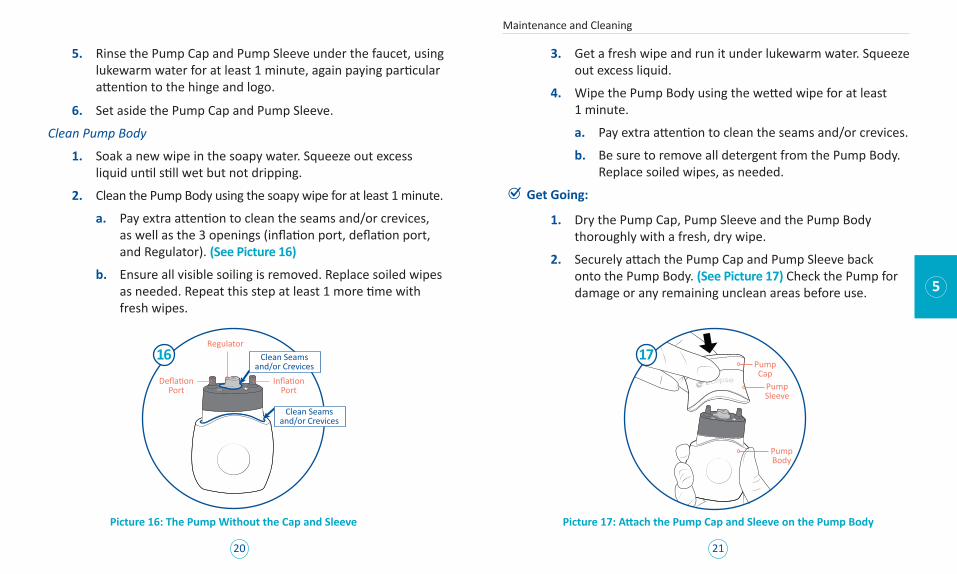
a. Pay extra attention to clean the seams and/or crevices, as well as the 3 openings (inflation port, deflation port, and Regulator). (See Picture 16)
b. Ensure all visible soiling is removed. Replace soiled wipes as needed. Repeat this step at least 1 more time with fresh wipes.
Inflation Port
Regulator
Deflation Port
Clean Seams and/or Crevices
Clean Seams and/or Crevices
Picture 16: The Pump Without the Cap and Sleeve
16
Pump Sleeve
Pump Cap
Pump Body
Picture 17: Attach the Pump Cap and Sleeve on the Pump Body
17
2322
Maintenance and Cleaning
5
How to Disinfect Your Pump If your Pump gets soiled, first clean your Pump as described on pages 18-21, then follow these instructions to disinfect:
Get Ready:
1. Remove the Pump Cap and Pump Sleeve from the Pump Body. You may need to pull the Pump Sleeve firmly to remove it. (See Picture 14)
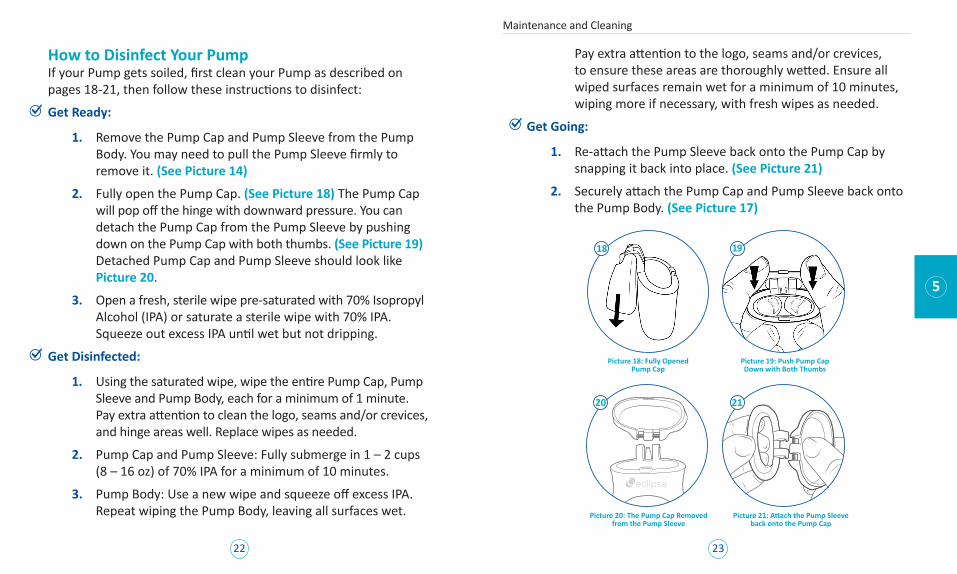
2. Fully open the Pump Cap. (See Picture 18) The Pump Cap will pop off the hinge with downward pressure. You can detach the Pump Cap from the Pump Sleeve by pushing down on the Pump Cap with both thumbs. (See Picture 19) Detached Pump Cap and Pump Sleeve should look like Picture 20.
3. Open a fresh, sterile wipe pre-saturated with 70% Isopropyl Alcohol (IPA) or saturate a sterile wipe with 70% IPA. Squeeze out excess IPA until wet but not dripping.
Get Disinfected:
1. Using the saturated wipe, wipe the entire Pump Cap, Pump Sleeve and Pump Body, each for a minimum of 1 minute. Pay extra attention to clean the logo, seams and/or crevices, and hinge areas well. Replace wipes as needed.
2. Pump Cap and Pump Sleeve: Fully submerge in 1 – 2 cups (8 – 16 oz) of 70% IPA for a minimum of 10 minutes.
3. Pump Body: Use a new wipe and squeeze off excess IPA. Repeat wiping the Pump Body, leaving all surfaces wet.
Pay extra attention to the logo, seams and/or crevices, to ensure these areas are thoroughly wetted. Ensure all wiped surfaces remain wet for a minimum of 10 minutes, wiping more if necessary, with fresh wipes as needed.
Get Going:
1. Re-attach the Pump Sleeve back onto the Pump Cap by snapping it back into place. (See Picture 21)
2. Securely attach the Pump Cap and Pump Sleeve back onto the Pump Body. (See Picture 17)
Picture 21: Attach the Pump Sleeve back onto the Pump Cap
21
Picture 19: Push Pump Cap Down with Both Thumbs
19
Picture 20: The Pump Cap Removed from the Pump Sleeve
20
Picture 18: Fully Opened Pump Cap
18
2524
6
Troubleshooting
Troubleshooting
If you are experiencing this: Try this:
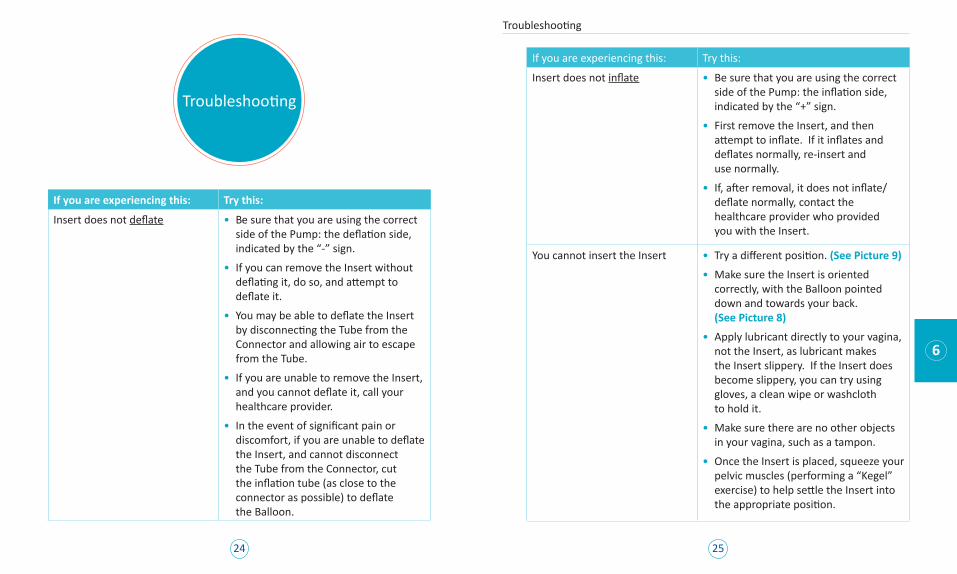
Insert does not deflate • Be sure that you are using the correct side of the Pump: the deflation side, indicated by the “-” sign.
• If you can remove the Insert without deflating it, do so, and attempt to deflate it.
• You may be able to deflate the Insert by disconnecting the Tube from the Connector and allowing air to escape from the Tube.
• If you are unable to remove the Insert, and you cannot deflate it, call your healthcare provider.
• In the event of significant pain or discomfort, if you are unable to deflate the Insert, and cannot disconnect the Tube from the Connector, cut the inflation tube (as close to the connector as possible) to deflate the Balloon.
If you are experiencing this: Try this:
Insert does not inflate • Be sure that you are using the correct side of the Pump: the inflation side, indicated by the “+” sign.
• First remove the Insert, and then attempt to inflate. If it inflates and deflates normally, re-insert and use normally.
• If, after removal, it does not inflate/deflate normally, contact the healthcare provider who provided you with the Insert.
You cannot insert the Insert • Try a different position. (See Picture 9)
• Make sure the Insert is oriented correctly, with the Balloon pointed down and towards your back. (See Picture 8)
• Apply lubricant directly to your vagina, not the Insert, as lubricant makes the Insert slippery. If the Insert does become slippery, you can try using gloves, a clean wipe or washcloth to hold it.
• Make sure there are no other objects in your vagina, such as a tampon.
• Once the Insert is placed, squeeze your pelvic muscles (performing a “Kegel” exercise) to help settle the Insert into the appropriate position.
2726
6
Troubleshooting
If you are experiencing this: Try this:
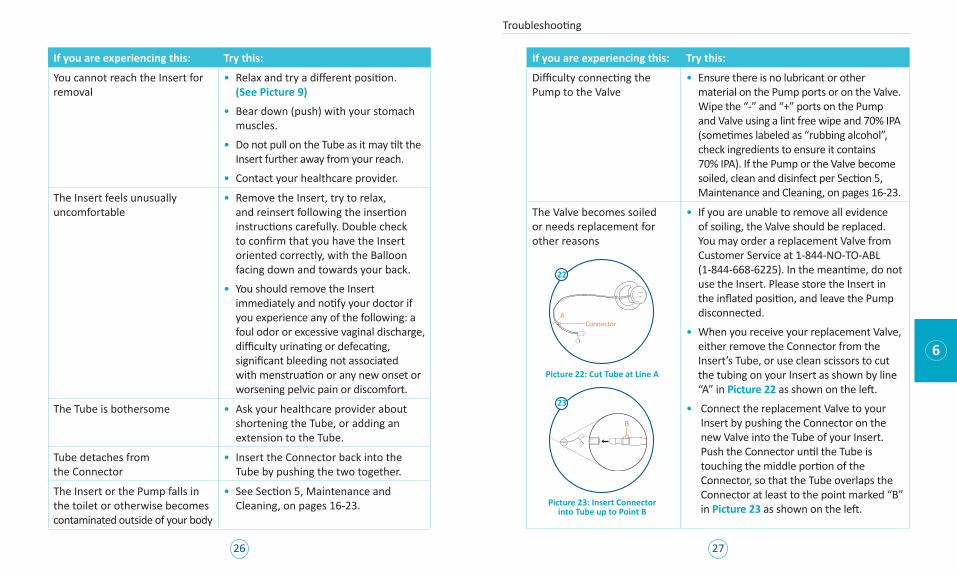
You cannot reach the Insert for removal
• Relax and try a different position. (See Picture 9)
• Bear down (push) with your stomach muscles.
• Do not pull on the Tube as it may tilt the Insert further away from your reach.
• Contact your healthcare provider.
The Insert feels unusually uncomfortable
• Remove the Insert, try to relax, and reinsert following the insertion instructions carefully. Double check to confirm that you have the Insert oriented correctly, with the Balloon facing down and towards your back.
• You should remove the Insert immediately and notify your doctor if you experience any of the following: a foul odor or excessive vaginal discharge, difficulty urinating or defecating, significant bleeding not associated with menstruation or any new onset or worsening pelvic pain or discomfort.
The Tube is bothersome • Ask your healthcare provider about shortening the Tube, or adding an extension to the Tube.
Tube detaches from the Connector
• Insert the Connector back into the Tube by pushing the two together.
The Insert or the Pump falls in the toilet or otherwise becomes contaminated outside of your body
• See Section 5, Maintenance and Cleaning, on pages 16-23.
If you are experiencing this: Try this:
Difficulty connecting the Pump to the Valve
• Ensure there is no lubricant or other material on the Pump ports or on the Valve. Wipe the “-” and “+” ports on the Pump and Valve using a lint free wipe and 70% IPA (sometimes labeled as “rubbing alcohol”, check ingredients to ensure it contains 70% IPA). If the Pump or the Valve become soiled, clean and disinfect per Section 5, Maintenance and Cleaning, on pages 16-23.
The Valve becomes soiled or needs replacement for other reasons
• If you are unable to remove all evidence of soiling, the Valve should be replaced. You may order a replacement Valve from Customer Service at 1-844-NO-TO-ABL (1-844-668-6225). In the meantime, do not use the Insert. Please store the Insert in the inflated position, and leave the Pump disconnected.
• When you receive your replacement Valve, either remove the Connector from the Insert’s Tube, or use clean scissors to cut the tubing on your Insert as shown by line “A” in Picture 22 as shown on the left.
• Connect the replacement Valve to your Insert by pushing the Connector on the new Valve into the Tube of your Insert. Push the Connector until the Tube is touching the middle portion of the Connector, so that the Tube overlaps the Connector at least to the point marked “B” in Picture 23 as shown on the left.Picture 23: Insert Connector
into Tube up to Point B
23
Picture 22: Cut Tube at Line A
22
ConnectorA
B
2928
7
Living with your Eclipse™
Living with Your Eclipse
The Trial Period• After your healthcare provider performs your first fitting, if
you find an Insert size that fits you, you will go home with a Trial Insert. Wear this Insert for approximately 1 week, and no longer than 2 weeks. Assess if it fits well, is comfortable, and works for you. Some women find that it takes a little time to get used to wearing it. However, if you feel that it does not fit well (for example, if it falls out or if it hurts), you can remove it immediately and see your healthcare provider to try another size.
• If the selected Trial Insert size works for you, your healthcare provider will exchange it for an Eclipse Insert.
Replacement • The Trial Insert is intended to be worn for approximately
one week. Caution: Do not use Trial Insert for longer than 2 weeks.
• The Eclipse Insert and the Pump should be replaced yearly by your healthcare provider.
• If the internal portion of the Valve of either Insert becomes visibly soiled and you are unable to remove the soil by following the cleaning instructions on pages 16-23, the Valve should be replaced. Please contact Customer Service directly at 1-844-NO-TO-ABL (1-844-668-6225) to order a new Valve.
Storage• When you are not wearing the Insert, inflate it prior to storage.
Keeping it inflated at all times preserves the Balloon shape.• Store the Insert in a dry, room temperature environment.
Follow-up with Your Healthcare Provider• After your initial fitting visit, you will be asked to return in
approximately one week to confirm that the Insert fits well and remains comfortable. At this time, if you are satisfied with the Insert, you should discard the Trial Insert and begin use of the Eclipse Insert. If the original Trial Insert did not fit appropriately, your healthcare provider may try additional sizes.
• Once you begin treatment with the Eclipse Insert, you should return for routine follow-up visits as needed, at a time interval specified by your healthcare provider.
Air Travel• Please check the Transportation Security Administration
(TSA) Website prior to travel for information about procedures when traveling with medical equipment.
• Carry your completed Patient Identification Card (included at the end of this booklet) and present it as needed during security screening.
3130
8
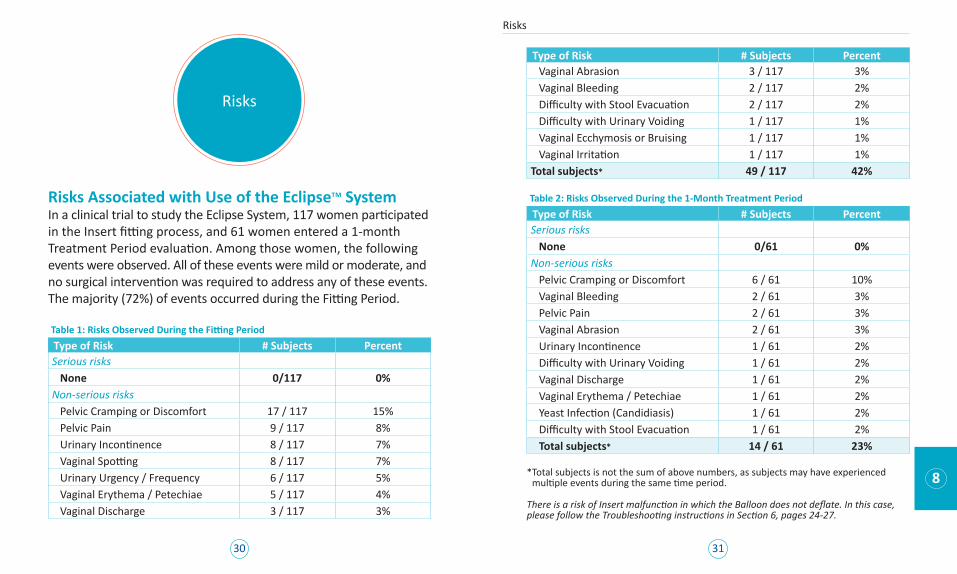
Table 1: Risks Observed During the Fitting Period Type of Risk # Subjects PercentSerious risks
None 0/117 0%Non-serious risks
Pelvic Cramping or Discomfort 17 / 117 15%Pelvic Pain 9 / 117 8%Urinary Incontinence 8 / 117 7%Vaginal Spotting 8 / 117 7%Urinary Urgency / Frequency 6 / 117 5%Vaginal Erythema / Petechiae 5 / 117 4%Vaginal Discharge 3 / 117 3%
Table 2: Risks Observed During the 1-Month Treatment Period Type of Risk # Subjects PercentSerious risks
None 0/61 0%Non-serious risks
Pelvic Cramping or Discomfort 6 / 61 10%Vaginal Bleeding 2 / 61 3%Pelvic Pain 2 / 61 3%Vaginal Abrasion 2 / 61 3%Urinary Incontinence 1 / 61 2%Difficulty with Urinary Voiding 1 / 61 2%Vaginal Discharge 1 / 61 2%Vaginal Erythema / Petechiae 1 / 61 2%Yeast Infection (Candidiasis) 1 / 61 2%Difficulty with Stool Evacuation 1 / 61 2%Total subjects* 14 / 61 23%
Risks
Risks
There is a risk of Insert malfunction in which the Balloon does not deflate. In this case, please follow the Troubleshooting instructions in Section 6, pages 24-27.
* Total subjects is not the sum of above numbers, as subjects may have experienced multiple events during the same time period.
Risks Associated with Use of the EclipseTM SystemIn a clinical trial to study the Eclipse System, 117 women participated in the Insert fitting process, and 61 women entered a 1-month Treatment Period evaluation. Among those women, the following events were observed. All of these events were mild or moderate, and no surgical intervention was required to address any of these events. The majority (72%) of events occurred during the Fitting Period.
Type of Risk # Subjects PercentVaginal Abrasion 3 / 117 3%Vaginal Bleeding 2 / 117 2%Difficulty with Stool Evacuation 2 / 117 2%Difficulty with Urinary Voiding 1 / 117 1%Vaginal Ecchymosis or Bruising 1 / 117 1%Vaginal Irritation 1 / 117 1%
Total subjects* 49 / 117 42%
3332 9
Clinical Summary
Clinical Summary
The EclipseTM System was evaluated in a clinical study that was designed to determine the safety and effectiveness of the device. Six (6) clinical study sites across the United States enrolled patients, with 10 doctors and 4 nurse practitioners participating as investigators and device fitters.
In order to participate, patients had to meet several criteria, including a 6-month history of fecal incontinence (FI), ≥4 FI episodes (defined as major or minor soiling) during a 2-week baseline diary, and successful fitting of the Eclipse Insert.
Two hundred (200) women agreed to participate in the study, and of those, 110 were eligible to be fitted with an Insert. The majority of those who were not eligible had fewer than 4 episodes during their 2-week baseline diary. 61 women were successfully fitted with an Insert, chose to continue with the Treatment Period evaluation, and received an Eclipse System.
The goal of the study was to understand how many women experienced a 50% of greater reduction in FI episodes during a 2-week period.
3534 9
Clinical Summary
Study ResultsSafetyThere were no serious device-related adverse events reported. All device-related adverse events were rated as mild (78%) or moderate (22%) and none required medical intervention beyond a topical vaginal steroid cream for vaginal irritation and an antifungal cream/suppository for yeast infection. The majority of adverse events were experienced during the Fitting Period. There were substantially fewer occurrences once subjects were successfully fit with the device and entered treatment. For a complete list of adverse events, see Tables 1 and 2 in Section 8 (Risks Associated with Use of the Eclipse System).
Effectiveness79% of the 61 subjects reported at least a 50% reduction in FI episodes. Some of those 61 patients did not complete the study; 86% of subjects who completed the study reported at least a 50% reduction in FI. Twenty-three (23) subjects (41%) reported a complete elimination of FI episodes, and seventy percent (70%) of subjects reported 75% or greater reduction in FI episodes.
Of the 56 patients who completed the Treatment Period, results also showed that patients experienced a reduction in the mean number of FI Episodes per 2-week period from 11.6±9.5 at baseline to 2.1±2.9 during the Treatment Period.
Quality of LifePatients also completed questionnaires designed to determine if they were experiencing any change in their quality of life while wearing the Eclipse Insert. The results showed that participants did on average have a significant improvement in quality of life. Further, 86% of patients said their bowel control was “very much better” or “much better”. 98% of patients responded that they would recommend the Eclipse System to a friend with FI. Finally, after completing the Treatment Period, 54/56 subjects (96%) said the Insert was comfortable or they could not feel it (48% and 48% respectively).
Optional Treatment PeriodAt the end of the one-month Treatment Period, women also had the opportunity to continue in the study for another two months; 48 did continue. All results were consistent between 1 and 3 months.
3736
We hope that using the EclipseTM System will reduce your accidents and help
you regain control of your bowels, and your life. If you have any feedback or
questions for the makers of the Eclipse, please feel free to reach out to us.
Notes

Pelvalon | 923 Thompson Place, Sunnyvale, CA [email protected] | Toll Free: 1-844-NO-TO-ABL (1-844-668-6225)
INS616 Rev A | 1215 | ©2015 Pelvalon, Inc. All rights reserved.
For additional information on the Eclipse System,
please visitwww.EclipseSystem.com

Medical Device Identification CardI am currently wearing a medical insert prescribed by my doctor.
Patient Name:
Doctor Name:
Doctor Phone:
Pelvalon | 923 Thompson Place, Sunnyvale, CA 94085www.EclipseSystem.com | Toll Free: 1-844-NO-TO-ABL (1-844-668-6225)
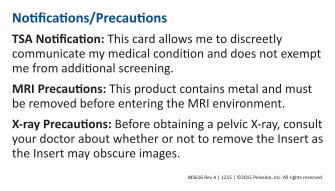
Notifications/PrecautionsTSA Notification: This card allows me to discreetly communicate my medical condition and does not exempt me from additional screening.MRI Precautions: This product contains metal and must be removed before entering the MRI environment.X-ray Precautions: Before obtaining a pelvic X-ray, consult your doctor about whether or not to remove the Insert as the Insert may obscure images.
INS616 Rev A | 1215 | ©2015 Pelvalon, Inc. All rights reserved.


![Eclipse Fujitsu Ten Audio Visual Navigation System Product Brochure for Eclipse Fujitsu Ten Cd5030 Gps Receiver[1]](https://img.pdfslide.us/doc/110x75/55cf9d8a550346d033ae14b2/eclipse-fujitsu-ten-audio-visual-navigation-system-product-brochure-for-eclipse.jpg)