Embed Size (px)
Citation preview

1
eCast for IOS
Revision 1.3
2
Contents Overview .................................................................................................... 5
What’s New ................................................................................................. 5
Connecting to the 4 Cast DMX Bridge ............................................................. 6
App Navigation ............................................................................................ 7
Fixtures Tab ................................................................................................ 8
Patching Fixtures ................................................................................... 9
Fixture Not In Library ........................................................................... 11
Fixture Identification ............................................................................ 11
Custom Fixture Profiles ......................................................................... 12
Edit the Fixture Button Order ................................................................. 16
DMX Universe Editor ............................................................................. 17
Settings .................................................................................................... 21
MIDI ................................................................................................... 21
Archive ............................................................................................... 22
Program Lock ...................................................................................... 22
Erase Memory ...................................................................................... 23
App Status .......................................................................................... 23
Channels Tab ............................................................................................ 24
Color Picker ......................................................................................... 25
Pan/Tilt Control .................................................................................... 26
Channel Faders .................................................................................... 26
Clear Button ........................................................................................ 27
Save Button ........................................................................................ 27
Scenes Tab ............................................................................................... 28
Saving Scenes ..................................................................................... 29
Scene Files .......................................................................................... 32
Edit a Saved Scene............................................................................... 32
Solo Button and Scene Playback ............................................................ 33
Clear Button ........................................................................................ 33
Effects ................................................................................................ 33
Shows Tab ................................................................................................ 34
3
Edit a Show ......................................................................................... 34
Save Show .......................................................................................... 37
Edit a Saved Show ............................................................................... 37
Shows List ........................................................................................... 38
Show Playback ..................................................................................... 38
Effects Tab ................................................................................................ 39
Pan/Tilt Effect Editor ............................................................................. 41
Editing a Shape .................................................................................... 42
Save the Effect .................................................................................... 44
Load ................................................................................................... 45
Color Effect Editor ................................................................................ 46
Setting the Hue Range .......................................................................... 47
Phase Control ...................................................................................... 47
Color Effect Presets .............................................................................. 48
Recording Color Chases ........................................................................ 49
Function Buttons .................................................................................. 49
Save ................................................................................................... 50
Load ................................................................................................... 51
Flash Effect Editor ................................................................................ 52
Flash Effect Presets .............................................................................. 53
Recording Flash Chases ........................................................................ 53
Empty Steps ........................................................................................ 54
Function Buttons .................................................................................. 54
Save ................................................................................................... 55
Load ................................................................................................... 55
Master Pop-up ........................................................................................... 56
Master Fader ....................................................................................... 56
Black Button ........................................................................................ 57
Mic Gain .............................................................................................. 57
Audio Button ....................................................................................... 57
Tap Button .......................................................................................... 57
MIDI ........................................................................................................ 58
File System and ITunes .............................................................................. 59
4
Idle Timer and Background State ................................................................. 61
App Authentication .................................................................................... 62
Contacts ................................................................................................... 63
Revision History ........................................................................................ 64
5
Overview
eCast is a lighting control app designed for small to medium sized venues such as
nightclubs, churches, trade shows or anywhere intelligent lighting fixtures might be used. It is only available for Apple IPad. This app lets you to control individual
channels of many intelligent lights so that you can create scenes, special effects and shows. There is also support for audio triggers and MIDI.
Before you can connect to lights, you will need the 4 Cast DMX Bridge, available
from your Elation products supplier. The bridge allows you to connect to any DMX512 lighting fixture from any manufacturer. The bridge provides a private Wi-
Fi network to connect to your IPad. It also provides an Elation e-fly transmitter than can wirelessly control Elation e-fly equipped lights.
This app can support up to 12 DMX universes on a single network. Lighting
control messages from this app are sent over the network using either Art-Net or streaming ACN protocols. The app will work with any Art-Net or sACN node from
any manufacturer but you must first connect to at least one 4 Cast DMX Bridge to
unlock the outputs.
This manual describes all of the features of the eCast app. There is a separate user manual for the 4 Cast DMX Bridge. You may want to consider downloading
this manual into your IPad for future reference.
What’s New Version 1.3
Fix minor bugs. Add ability to select or unselect groups of fixture buttons.
Add “Clear” function for all button pages. Improve the way scenes fade out when toggled off.
Add ability to start a new universe when auto patching.
6
Connecting to the 4 Cast DMX Bridge
To control intelligent lighting fixtures using DMX512 or Elation’s e-fly wireless
network, your IPad needs to be connected to the 4 Cast DMX Bridge’s internal Wi-Fi network or to an external network that both devices are connected to such as a
home or business Wi-Fi network. When the bridge is turned on, it will either create a local Wi-Fi network that you can join using the Wi-Fi settings on your
IPad or it will join an existing network depending on how you have it set up. If the bridge is making a local network it will show up on the list of available networks in
the Wi-Fi section in your IPad’s settings. The default network name is “Elation 4castDMX” and the default password is “4castdmx”. Select and join this network
as you would join any other Wi-Fi network from you IPad. It is highly recommended that you change the password for your bridge network before using
it in public. The network can appear on any Wi-Fi device in the vicinity of your lighting system.
The default network lighting protocol for the 4 Cast DMX Bridge is sACN. The app
also defaults its first four universes to sACN the first time you use it. If you have
a connection between the app and the bridge the green activity LED on the bridge will flash briefly every second or so to show that it is receiving a message. The
app sends a regular refresh packet every second or so even if there is no lighting activity taking place.
The Wi-Fi range between your IPad and the bridge will vary depending on the
environment but you should expect no more than 75 feet for a reliable connection when the bridge is making its own network. If you are using an external network
generated from a router, the range will depend on the range or coverage of that network. The range of the e-fly network is far greater than the range of the
bridge’s Wi-Fi network so it is recommended that the bridge be kept close to your IPad rather than close to the lights.
Important Note: If you lose your Wi-Fi connection to the bridge, your IPad may
try to reconnect to another known network. If for example, you turn off the
bridge power or if you step out of the Wi-Fi range of the bridge, your device might automatically connect to your home network. In that case you would have to set
the Wi-Fi on your device back to the bridge network when it is available. If the bridge network is the primary network on your device, it will automatically re-
connect to it whenever the network is available.
7
App Navigation
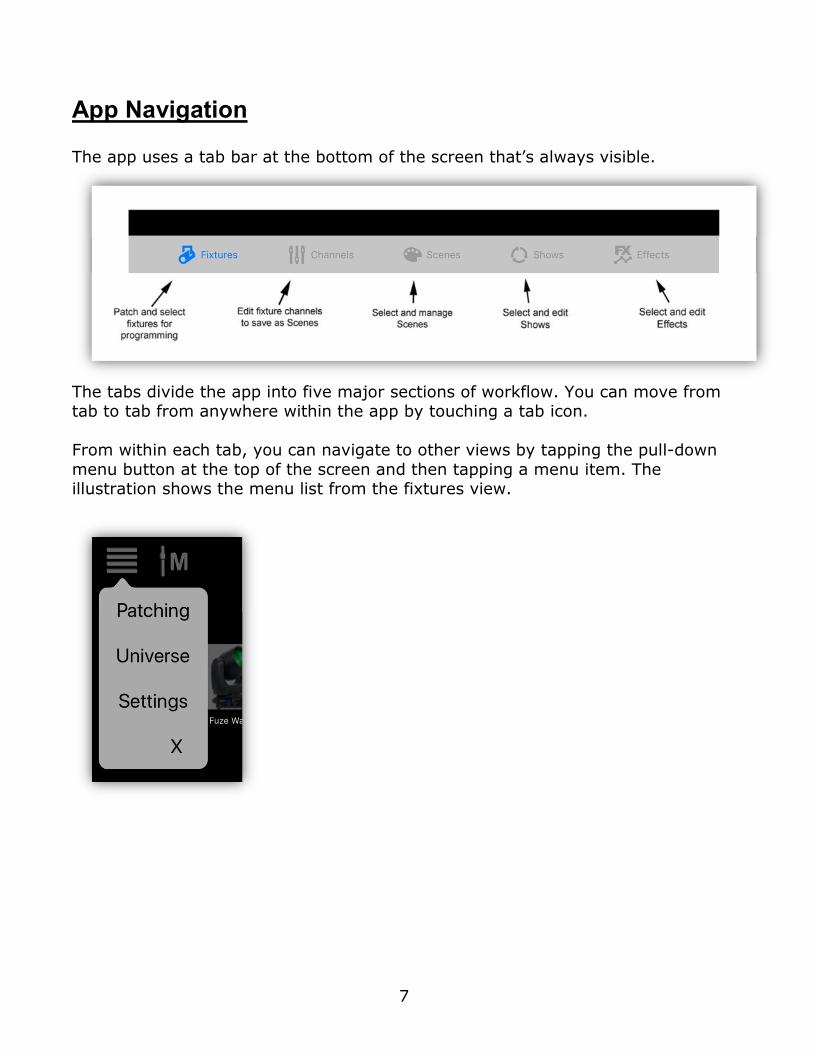
The app uses a tab bar at the bottom of the screen that’s always visible.
The tabs divide the app into five major sections of workflow. You can move from tab to tab from anywhere within the app by touching a tab icon.
From within each tab, you can navigate to other views by tapping the pull-down
menu button at the top of the screen and then tapping a menu item. The illustration shows the menu list from the fixtures view.
8
Fixtures Tab
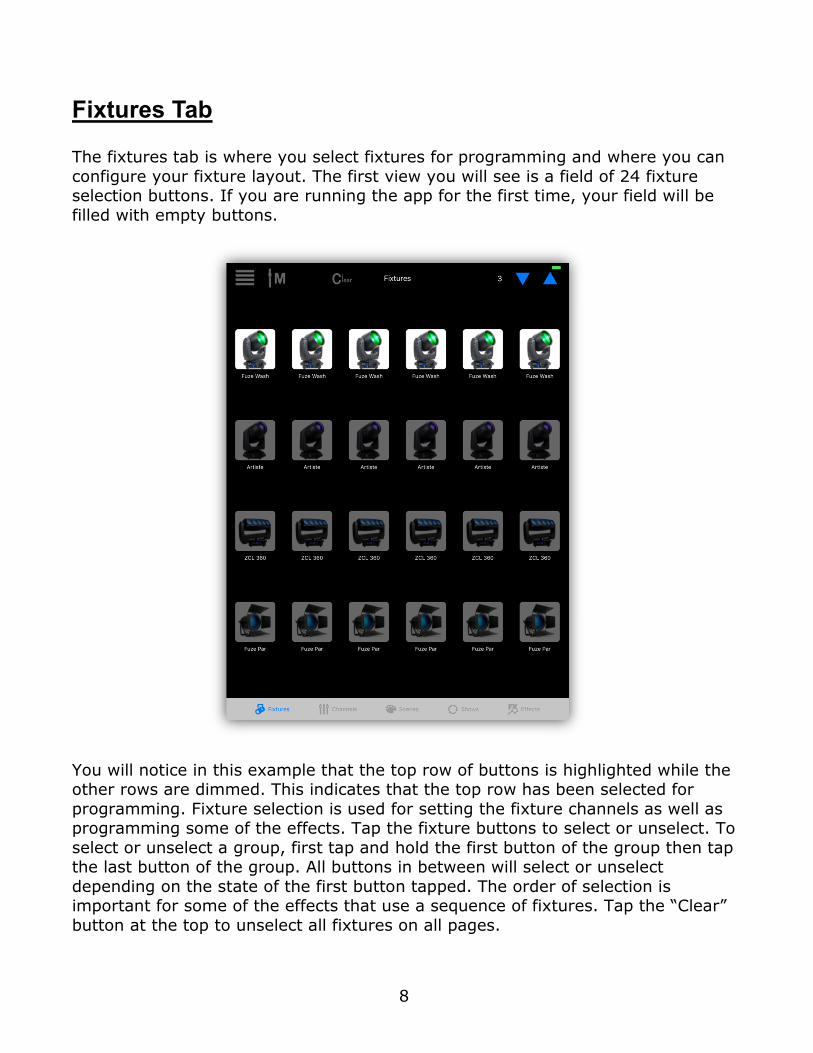
The fixtures tab is where you select fixtures for programming and where you can
configure your fixture layout. The first view you will see is a field of 24 fixture selection buttons. If you are running the app for the first time, your field will be
filled with empty buttons.
You will notice in this example that the top row of buttons is highlighted while the other rows are dimmed. This indicates that the top row has been selected for
programming. Fixture selection is used for setting the fixture channels as well as programming some of the effects. Tap the fixture buttons to select or unselect. To
select or unselect a group, first tap and hold the first button of the group then tap the last button of the group. All buttons in between will select or unselect
depending on the state of the first button tapped. The order of selection is important for some of the effects that use a sequence of fixtures. Tap the “Clear”
button at the top to unselect all fixtures on all pages.
9
In the upper right there are blue up and down arrow buttons for changing pages.
You can use up to 24 pages of 24 fixture buttons per page. Tap the up or down arrow or touch and hold to auto repeat.
Patching Fixtures
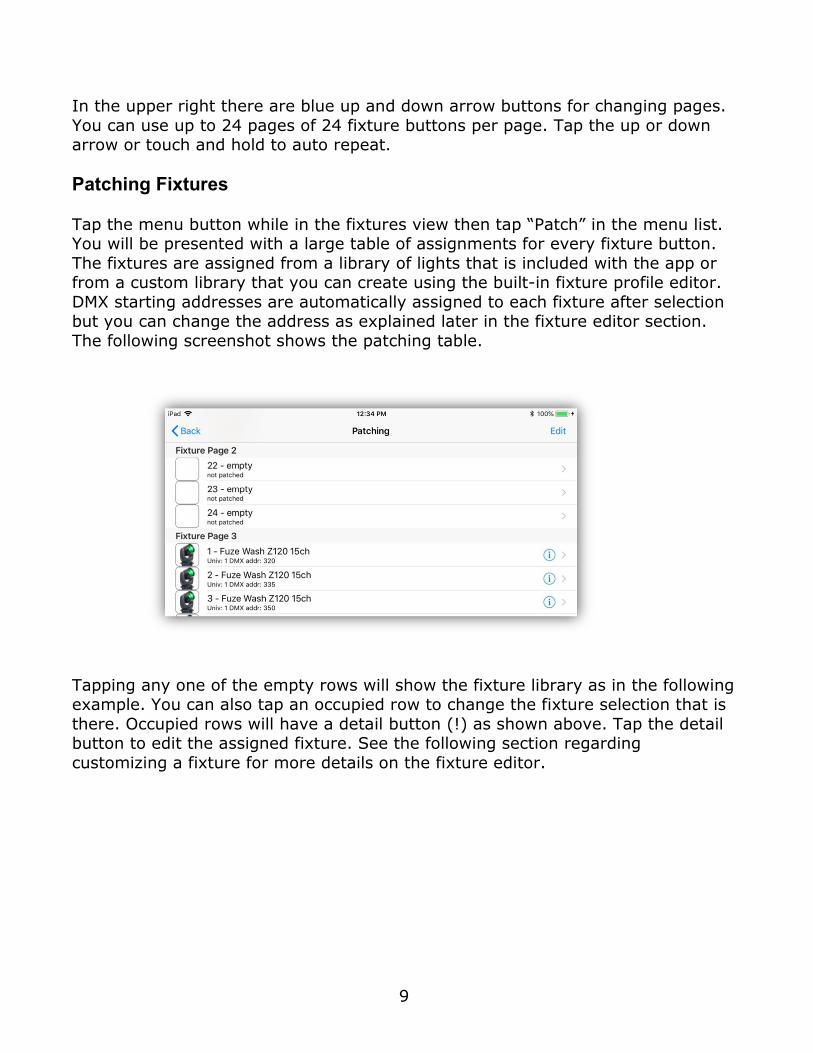
Tap the menu button while in the fixtures view then tap “Patch” in the menu list. You will be presented with a large table of assignments for every fixture button.
The fixtures are assigned from a library of lights that is included with the app or from a custom library that you can create using the built-in fixture profile editor.
DMX starting addresses are automatically assigned to each fixture after selection but you can change the address as explained later in the fixture editor section.
The following screenshot shows the patching table.
Tapping any one of the empty rows will show the fixture library as in the following example. You can also tap an occupied row to change the fixture selection that is
there. Occupied rows will have a detail button (!) as shown above. Tap the detail button to edit the assigned fixture. See the following section regarding
customizing a fixture for more details on the fixture editor.
10
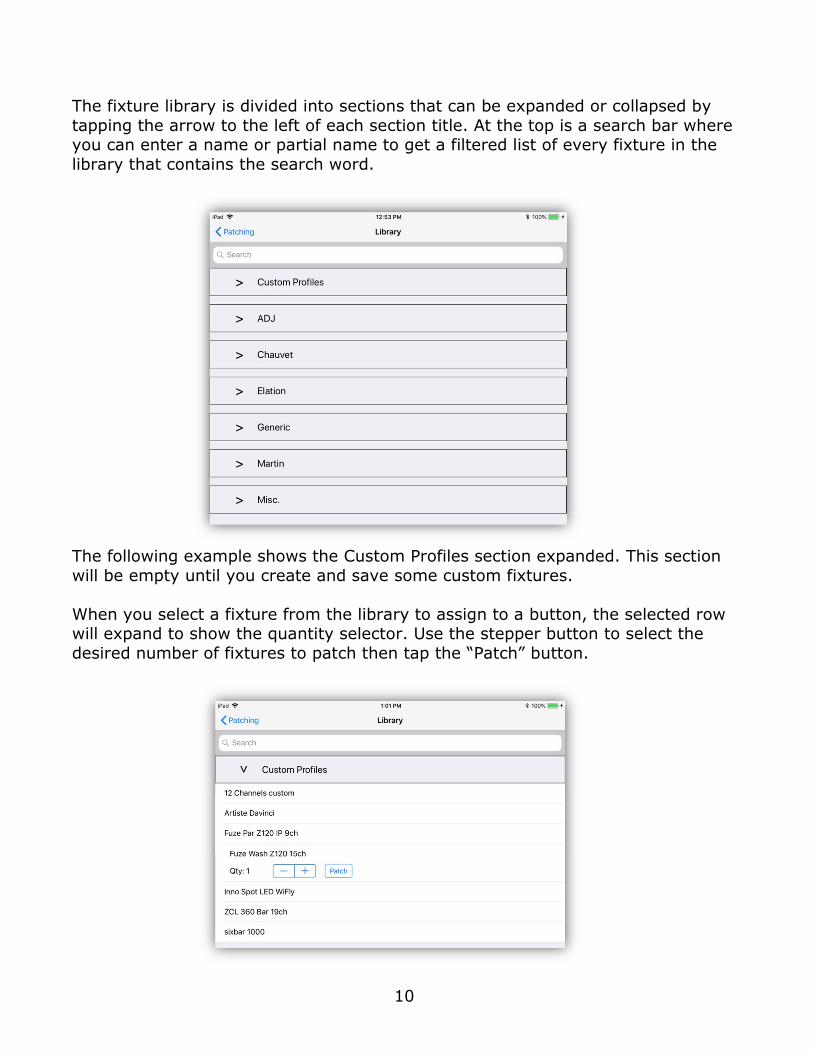
The fixture library is divided into sections that can be expanded or collapsed by
tapping the arrow to the left of each section title. At the top is a search bar where you can enter a name or partial name to get a filtered list of every fixture in the
library that contains the search word.
The following example shows the Custom Profiles section expanded. This section
will be empty until you create and save some custom fixtures.
When you select a fixture from the library to assign to a button, the selected row will expand to show the quantity selector. Use the stepper button to select the
desired number of fixtures to patch then tap the “Patch” button.
11
Fixture Not In Library
If your fixture is not in the library you will have to make the fixture profile using the editor. Start by selecting any fixture from the library that is similar to the one
you plan to use. The “Generic” section contains some basic fixture types. Anything will work as you will be changing the number of channels used and the
types of channels used. See the section on how to make a custom profile.
Helpful hint: If you are going to customize a group of fixtures that will all be identical, first save a single custom profile as explained in the next section.
Return to the patching view and then patch the whole group of fixtures by selecting the custom profile and then the quantity. Customization can include
things as simple as adding a photo to be used for the button. Doing it this way as
a group saves time by not having to assign the same photo to each fixture one at a time.
Fixture Identification
When a new fixture is first patched it is assigned a unique ID number that it will keep until you remove or replace the fixture. A fixture ID is used by scenes to
identify fixtures that are part of a scene. This ID also allows you to move fixtures around on the button field and change a fixture’s DMX address without affecting
the scenes that control that fixture.
12
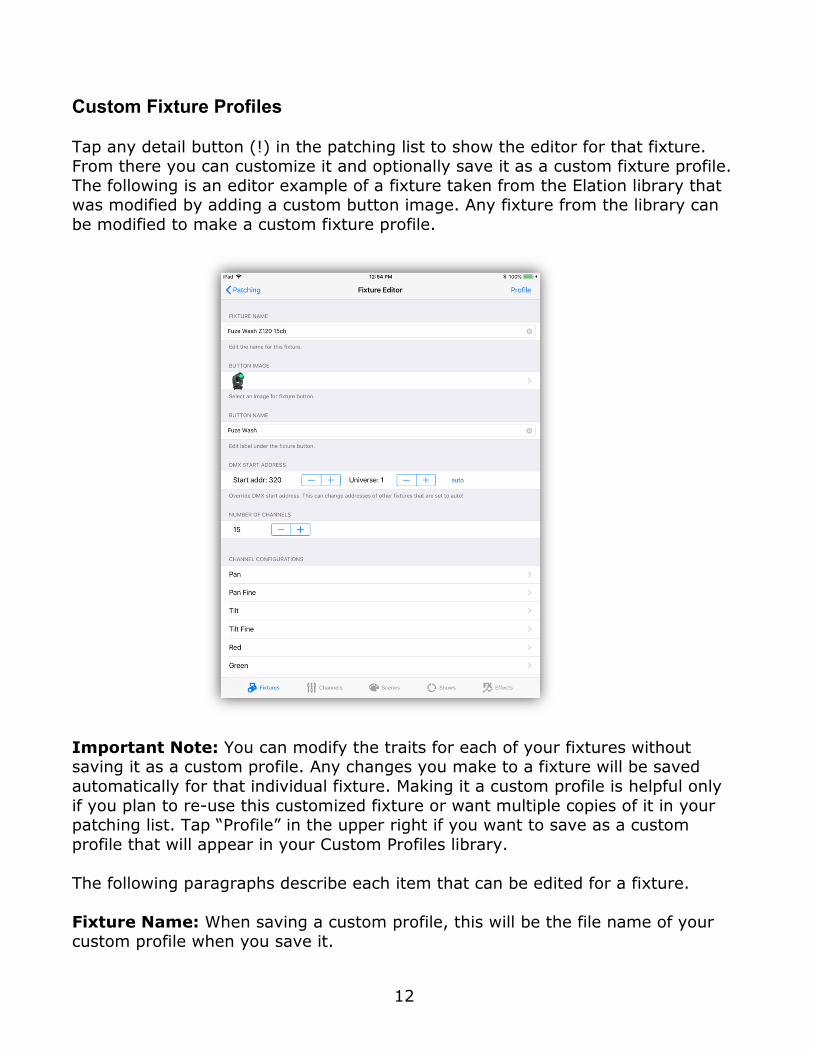
Custom Fixture Profiles
Tap any detail button (!) in the patching list to show the editor for that fixture. From there you can customize it and optionally save it as a custom fixture profile.
The following is an editor example of a fixture taken from the Elation library that was modified by adding a custom button image. Any fixture from the library can
be modified to make a custom fixture profile.
Important Note: You can modify the traits for each of your fixtures without saving it as a custom profile. Any changes you make to a fixture will be saved
automatically for that individual fixture. Making it a custom profile is helpful only
if you plan to re-use this customized fixture or want multiple copies of it in your patching list. Tap “Profile” in the upper right if you want to save as a custom
profile that will appear in your Custom Profiles library.
The following paragraphs describe each item that can be edited for a fixture.
Fixture Name: When saving a custom profile, this will be the file name of your custom profile when you save it.

13
Button Image: Tapping this row will show the photo picker where you can choose a picture from your photo library to use as the fixture’s button. Screen
shots from the web page of your light usually look the best. As an alternative you can also use the camera on your IPad to take a picture of the fixture itself or its
function.
Button Name: This will be the label that appears under the fixture’s button. This lets you identify each button with its own name which can be helpful when there
are many fixtures of the same type. Keep the length short enough so that it fits neatly under the button.
DMX Start Address: This is the DMX starting address and universe number for
the fixture. Addresses are assigned automatically in ascending order but you also have the option to override the assigned address. Touch “auto” and “override” will
appear in red letters. Press and hold either stepper to change the DMX address or
the universe number. Be aware that when you manually change the start address of a fixture, surrounding fixtures that are set to “auto” will adjust their addresses
to fill in around the overridden fixture(s). Also be aware that it is possible to accidently overlap overridden fixture channels by setting overridden start
addresses too close to each other.
To return a fixture to auto patching, touch “override” and the address will return to “auto” mode.
To force auto patching to start using a new universe, manually set the patch for
the first fixture in the new universe. This will force auto patch to begin a new universe starting at that fixture. Any subsequent fixtures will automatically follow.
It’s helpful sometimes to lock the DMX address assignment for a fixture by using
“override”, especially if you want to be able to move the location of the fixture’s
button in the order without changing its address. Simply press “override” so that the address is displayed in red. This will prevent the address from automatically
changing when the fixture is moved.
Note: If you are using more than four DMX512 universes, you will also have to configure each additional universe as explained in the next chapter. The first four
universes are defaulted to match the default settings of the 4Cast DMX Bridge.
Number of Channels: Edit the number of DMX512 channels used by the fixture.
14
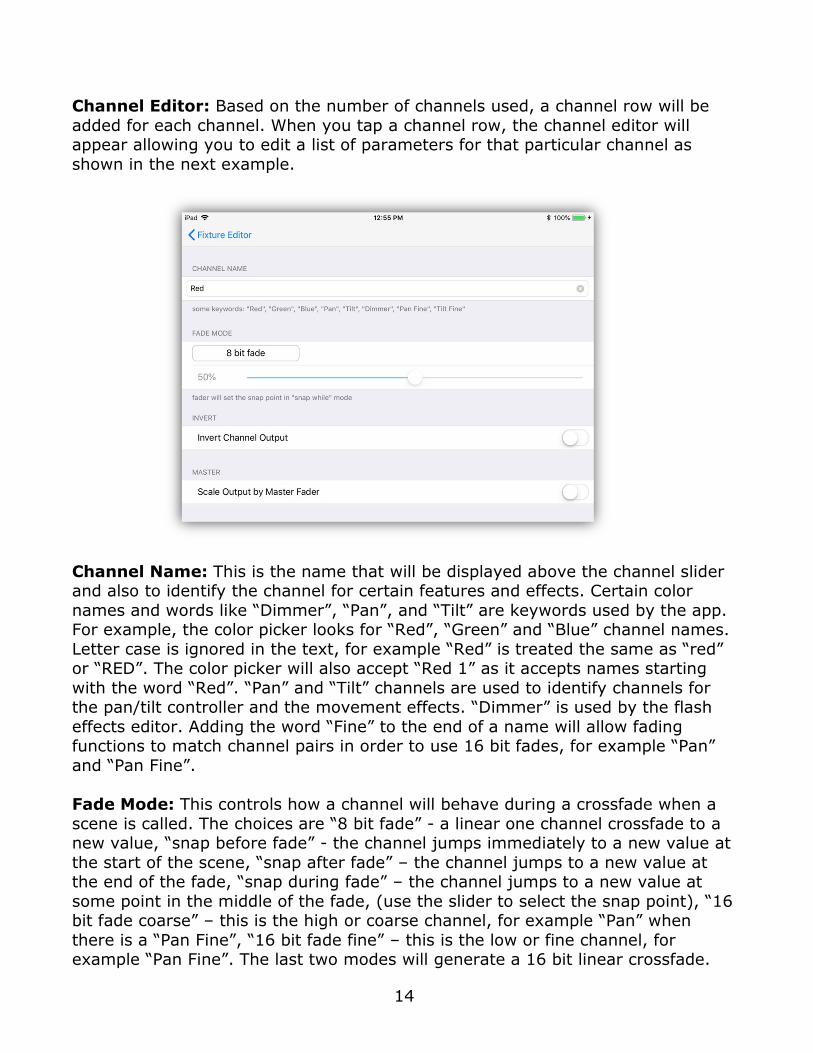
Channel Editor: Based on the number of channels used, a channel row will be
added for each channel. When you tap a channel row, the channel editor will appear allowing you to edit a list of parameters for that particular channel as
shown in the next example.
Channel Name: This is the name that will be displayed above the channel slider and also to identify the channel for certain features and effects. Certain color
names and words like “Dimmer”, “Pan”, and “Tilt” are keywords used by the app. For example, the color picker looks for “Red”, “Green” and “Blue” channel names.
Letter case is ignored in the text, for example “Red” is treated the same as “red” or “RED”. The color picker will also accept “Red 1” as it accepts names starting
with the word “Red”. “Pan” and “Tilt” channels are used to identify channels for the pan/tilt controller and the movement effects. “Dimmer” is used by the flash
effects editor. Adding the word “Fine” to the end of a name will allow fading functions to match channel pairs in order to use 16 bit fades, for example “Pan”
and “Pan Fine”.
Fade Mode: This controls how a channel will behave during a crossfade when a
scene is called. The choices are “8 bit fade” - a linear one channel crossfade to a new value, “snap before fade” - the channel jumps immediately to a new value at
the start of the scene, “snap after fade” – the channel jumps to a new value at the end of the fade, “snap during fade” – the channel jumps to a new value at
some point in the middle of the fade, (use the slider to select the snap point), “16 bit fade coarse” – this is the high or coarse channel, for example “Pan” when
there is a “Pan Fine”, “16 bit fade fine” – this is the low or fine channel, for example “Pan Fine”. The last two modes will generate a 16 bit linear crossfade.
15
The fine channel must use the same name as the coarse channel with “Fine”
added.
Invert Channel Output: This will invert the channel’s output. Use this to adjust things like pan and tilt to match your stage setup.
Scale Output by Master Fader: This will cause the channel to be scaled by the
master fader. This will normally only be used on the dimmer channel. In some cases where the fixture has no dimmer, e.g. RGB fixture, more than one channel
can be set. Note: When a scene uses a fade out time, these “Master Fader” channels will be used to fade out the scene.
16
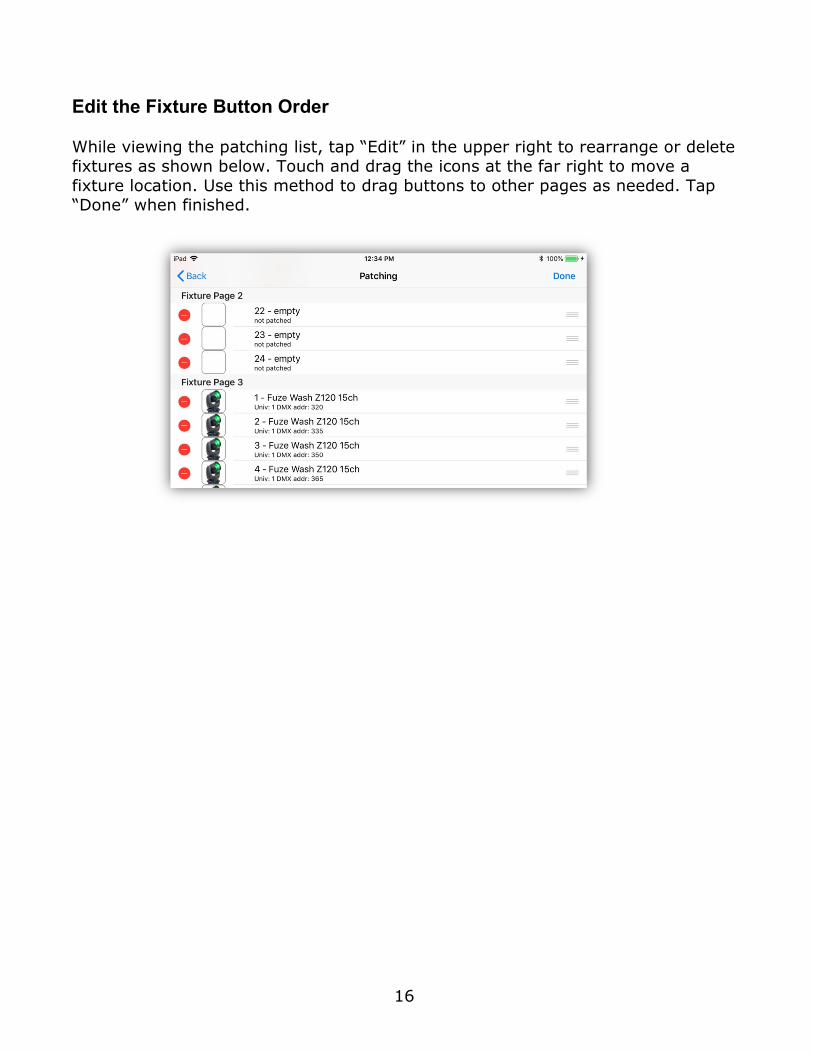
Edit the Fixture Button Order
While viewing the patching list, tap “Edit” in the upper right to rearrange or delete fixtures as shown below. Touch and drag the icons at the far right to move a
fixture location. Use this method to drag buttons to other pages as needed. Tap “Done” when finished.
17
DMX Universe Editor
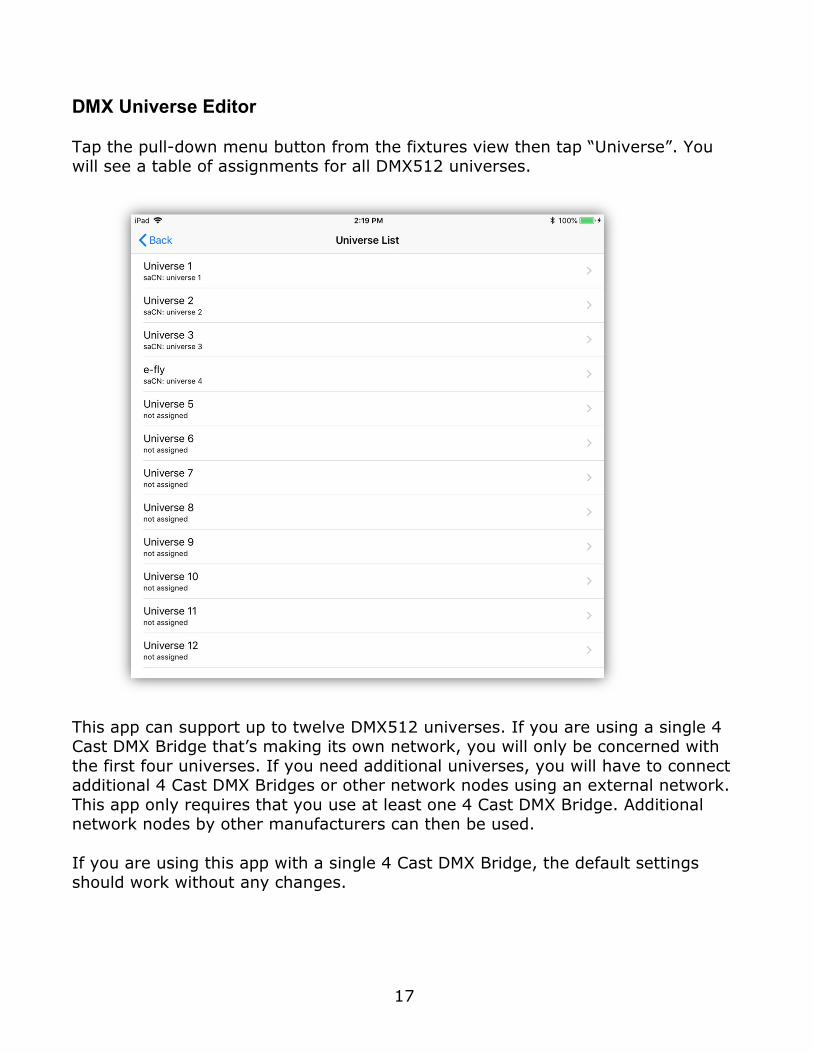
Tap the pull-down menu button from the fixtures view then tap “Universe”. You will see a table of assignments for all DMX512 universes.
This app can support up to twelve DMX512 universes. If you are using a single 4 Cast DMX Bridge that’s making its own network, you will only be concerned with
the first four universes. If you need additional universes, you will have to connect additional 4 Cast DMX Bridges or other network nodes using an external network.
This app only requires that you use at least one 4 Cast DMX Bridge. Additional network nodes by other manufacturers can then be used.
If you are using this app with a single 4 Cast DMX Bridge, the default settings should work without any changes.
18
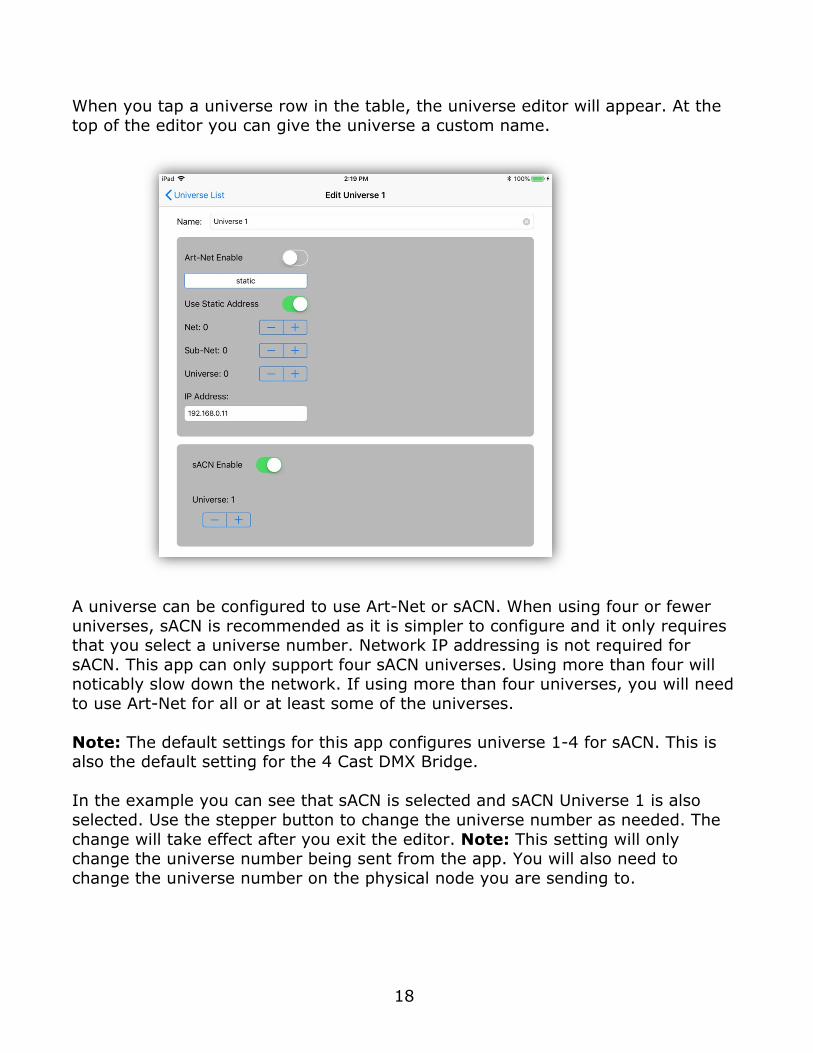
When you tap a universe row in the table, the universe editor will appear. At the
top of the editor you can give the universe a custom name.
A universe can be configured to use Art-Net or sACN. When using four or fewer
universes, sACN is recommended as it is simpler to configure and it only requires that you select a universe number. Network IP addressing is not required for
sACN. This app can only support four sACN universes. Using more than four will noticably slow down the network. If using more than four universes, you will need
to use Art-Net for all or at least some of the universes.
Note: The default settings for this app configures universe 1-4 for sACN. This is also the default setting for the 4 Cast DMX Bridge.
In the example you can see that sACN is selected and sACN Universe 1 is also
selected. Use the stepper button to change the universe number as needed. The
change will take effect after you exit the editor. Note: This setting will only change the universe number being sent from the app. You will also need to
change the universe number on the physical node you are sending to.
19
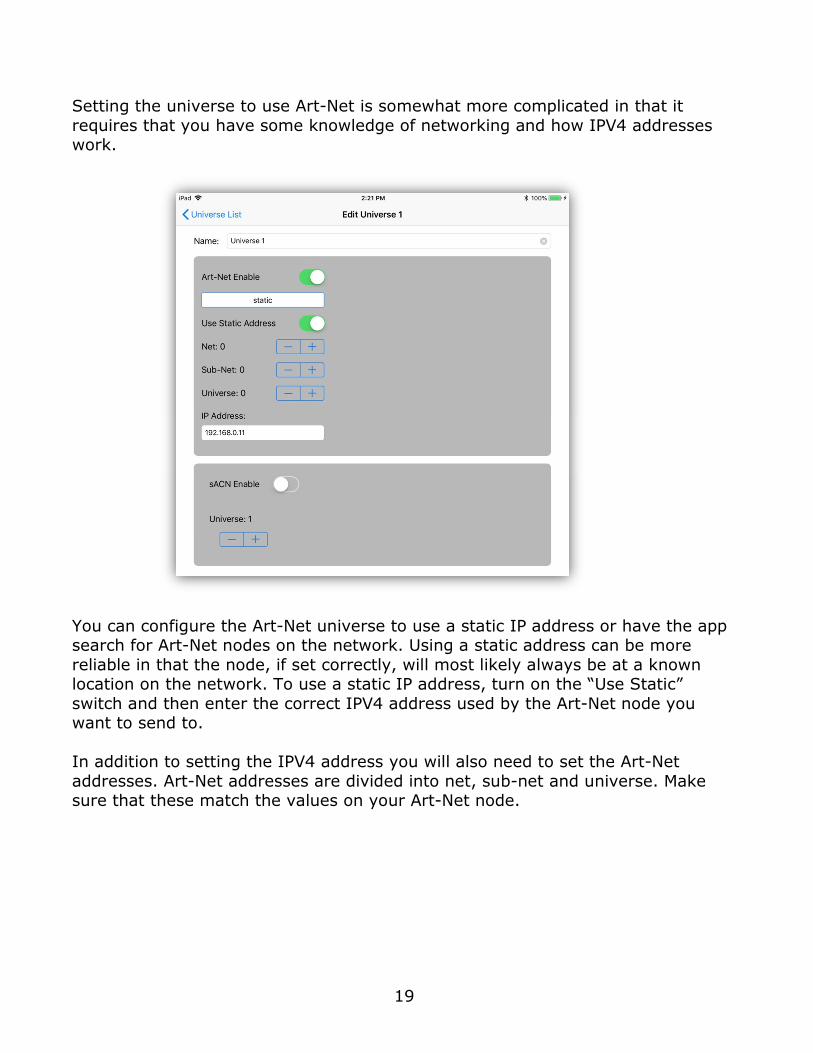
Setting the universe to use Art-Net is somewhat more complicated in that it
requires that you have some knowledge of networking and how IPV4 addresses work.
You can configure the Art-Net universe to use a static IP address or have the app search for Art-Net nodes on the network. Using a static address can be more
reliable in that the node, if set correctly, will most likely always be at a known location on the network. To use a static IP address, turn on the “Use Static”
switch and then enter the correct IPV4 address used by the Art-Net node you want to send to.
In addition to setting the IPV4 address you will also need to set the Art-Net
addresses. Art-Net addresses are divided into net, sub-net and universe. Make sure that these match the values on your Art-Net node.
20
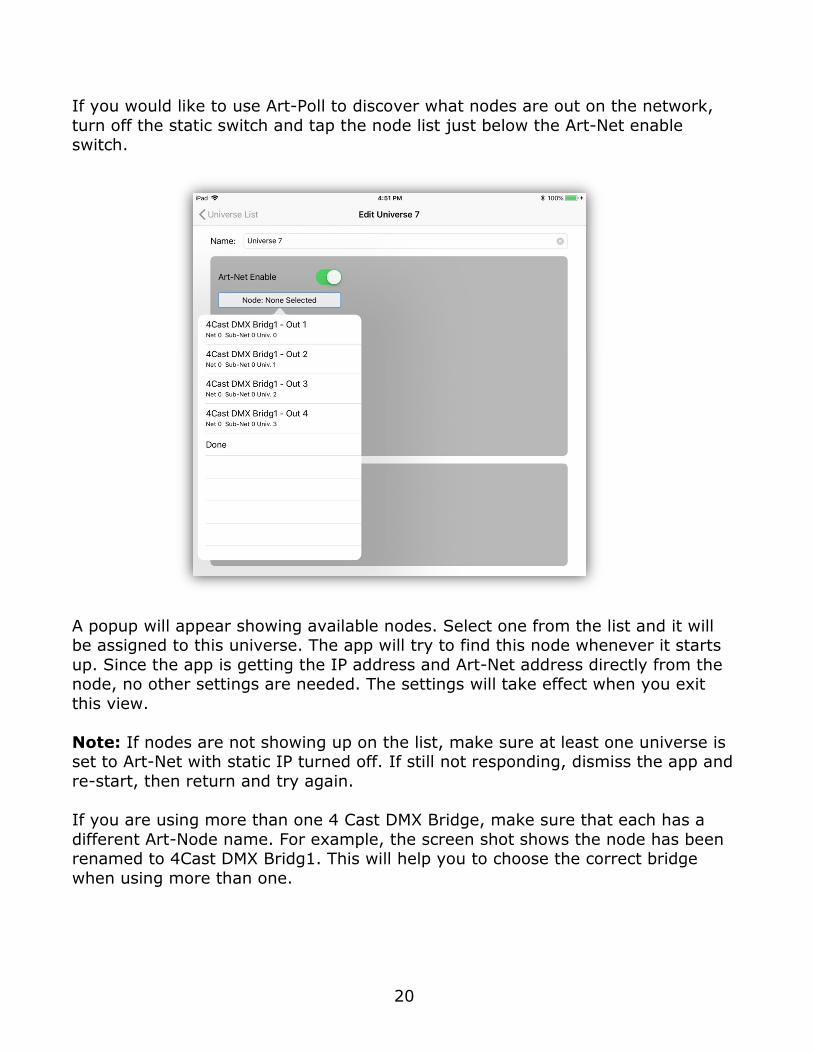
If you would like to use Art-Poll to discover what nodes are out on the network,
turn off the static switch and tap the node list just below the Art-Net enable switch.
A popup will appear showing available nodes. Select one from the list and it will be assigned to this universe. The app will try to find this node whenever it starts
up. Since the app is getting the IP address and Art-Net address directly from the node, no other settings are needed. The settings will take effect when you exit
this view.
Note: If nodes are not showing up on the list, make sure at least one universe is set to Art-Net with static IP turned off. If still not responding, dismiss the app and
re-start, then return and try again.
If you are using more than one 4 Cast DMX Bridge, make sure that each has a
different Art-Node name. For example, the screen shot shows the node has been renamed to 4Cast DMX Bridg1. This will help you to choose the correct bridge
when using more than one.
21
Settings
Tap the pull-down menu button from the fixtures view then tap “Settings”. You
will see a table of various settings used to customize the app. Each setting is described in the following paragraphs.
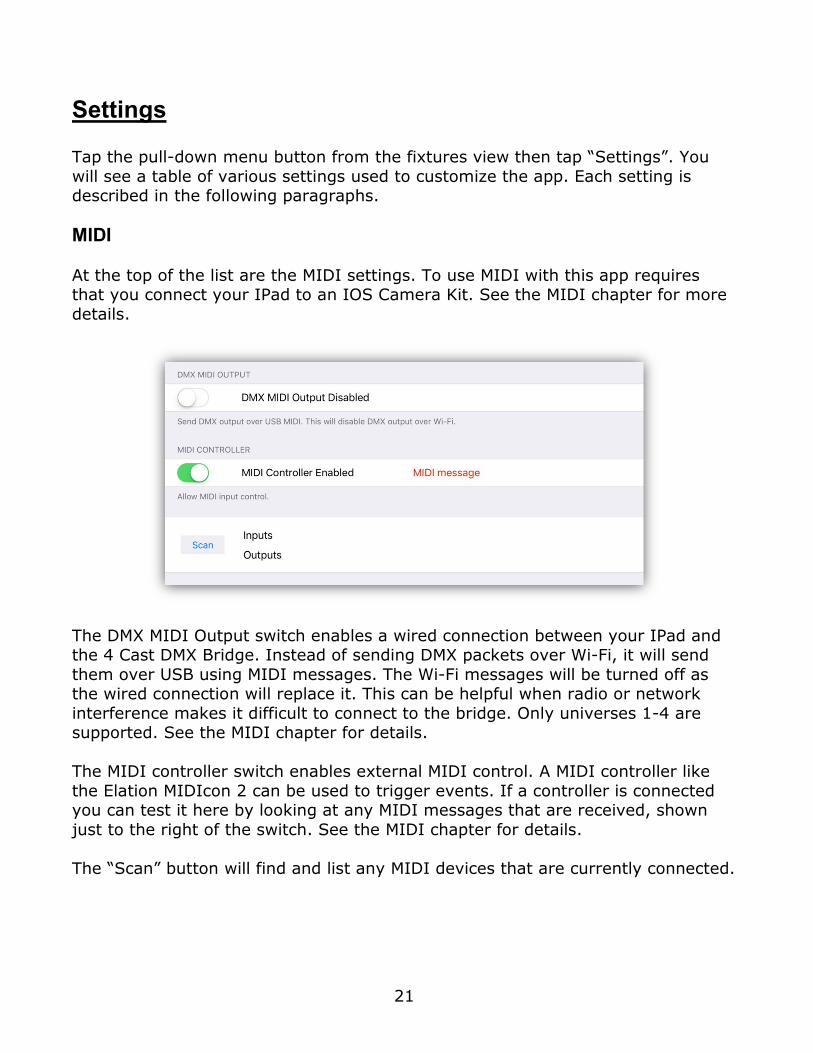
MIDI
At the top of the list are the MIDI settings. To use MIDI with this app requires that you connect your IPad to an IOS Camera Kit. See the MIDI chapter for more
details.
The DMX MIDI Output switch enables a wired connection between your IPad and the 4 Cast DMX Bridge. Instead of sending DMX packets over Wi-Fi, it will send
them over USB using MIDI messages. The Wi-Fi messages will be turned off as the wired connection will replace it. This can be helpful when radio or network
interference makes it difficult to connect to the bridge. Only universes 1-4 are supported. See the MIDI chapter for details.
The MIDI controller switch enables external MIDI control. A MIDI controller like
the Elation MIDIcon 2 can be used to trigger events. If a controller is connected you can test it here by looking at any MIDI messages that are received, shown
just to the right of the switch. See the MIDI chapter for details.
The “Scan” button will find and list any MIDI devices that are currently connected.
22
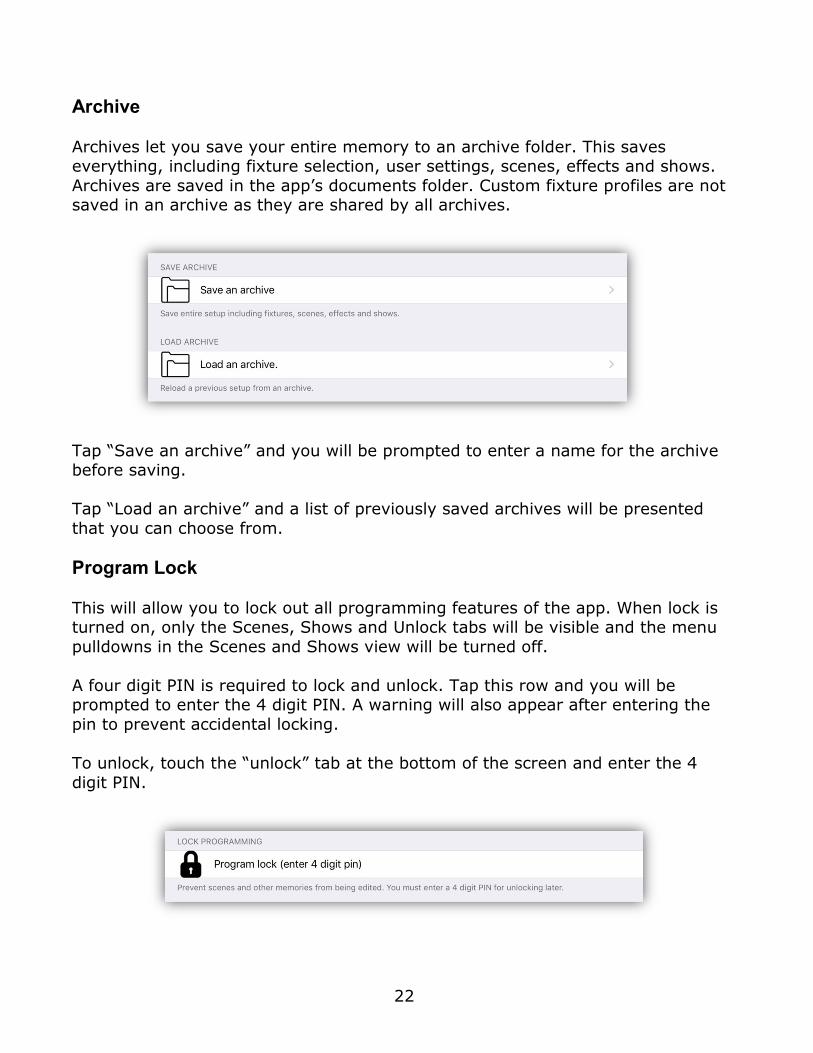
Archive
Archives let you save your entire memory to an archive folder. This saves everything, including fixture selection, user settings, scenes, effects and shows.
Archives are saved in the app’s documents folder. Custom fixture profiles are not saved in an archive as they are shared by all archives.
Tap “Save an archive” and you will be prompted to enter a name for the archive before saving.
Tap “Load an archive” and a list of previously saved archives will be presented
that you can choose from.
Program Lock
This will allow you to lock out all programming features of the app. When lock is turned on, only the Scenes, Shows and Unlock tabs will be visible and the menu
pulldowns in the Scenes and Shows view will be turned off.
A four digit PIN is required to lock and unlock. Tap this row and you will be prompted to enter the 4 digit PIN. A warning will also appear after entering the
pin to prevent accidental locking.
To unlock, touch the “unlock” tab at the bottom of the screen and enter the 4
digit PIN.
23
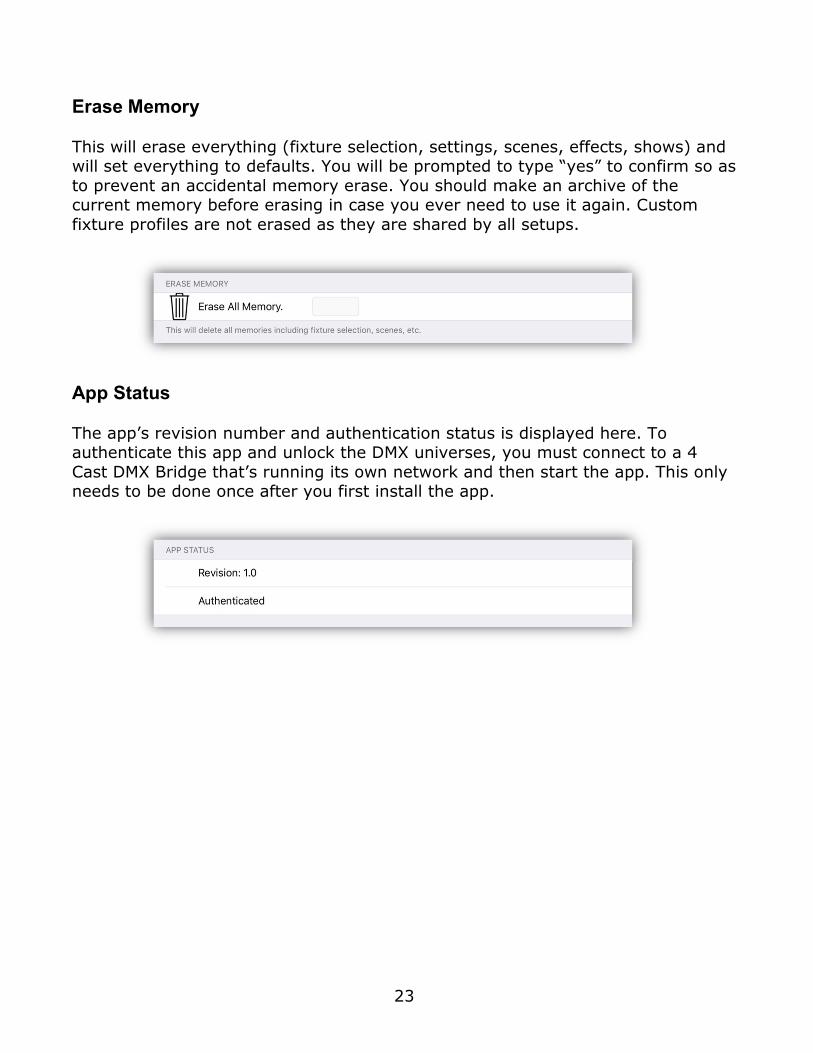
Erase Memory
This will erase everything (fixture selection, settings, scenes, effects, shows) and will set everything to defaults. You will be prompted to type “yes” to confirm so as
to prevent an accidental memory erase. You should make an archive of the current memory before erasing in case you ever need to use it again. Custom
fixture profiles are not erased as they are shared by all setups.
App Status
The app’s revision number and authentication status is displayed here. To authenticate this app and unlock the DMX universes, you must connect to a 4
Cast DMX Bridge that’s running its own network and then start the app. This only needs to be done once after you first install the app.
24
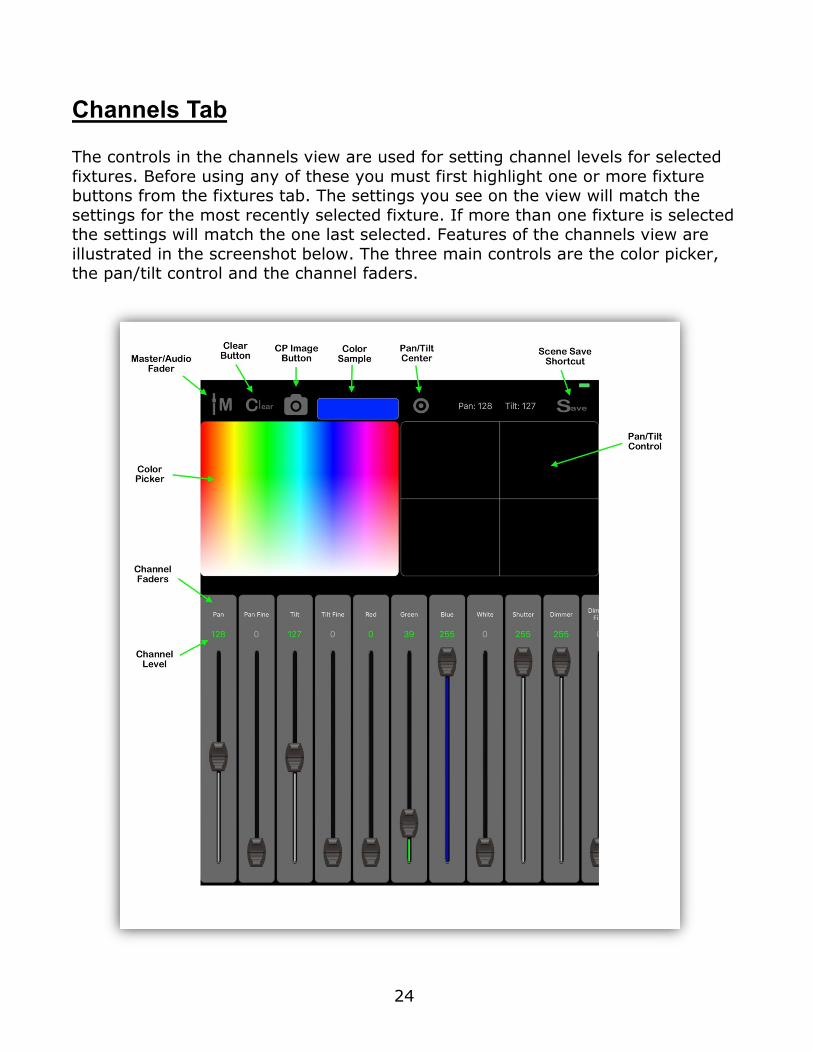
Channels Tab
The controls in the channels view are used for setting channel levels for selected
fixtures. Before using any of these you must first highlight one or more fixture buttons from the fixtures tab. The settings you see on the view will match the
settings for the most recently selected fixture. If more than one fixture is selected the settings will match the one last selected. Features of the channels view are
illustrated in the screenshot below. The three main controls are the color picker, the pan/tilt control and the channel faders.
25
All three control sections will act on every selected fixture when possible. If all
selected fixtures are of the same type, they will all follow the changes as you adjust any control. If mixed types of fixtures are selected, the control will look for
matching channel names where possible. The color picker and pan/tilt controls are more generic so will be able to affect any fixture selected that has those types
of channels. The faders are more specific to the displayed fixture so may not always match every selected fixture’s channel names.
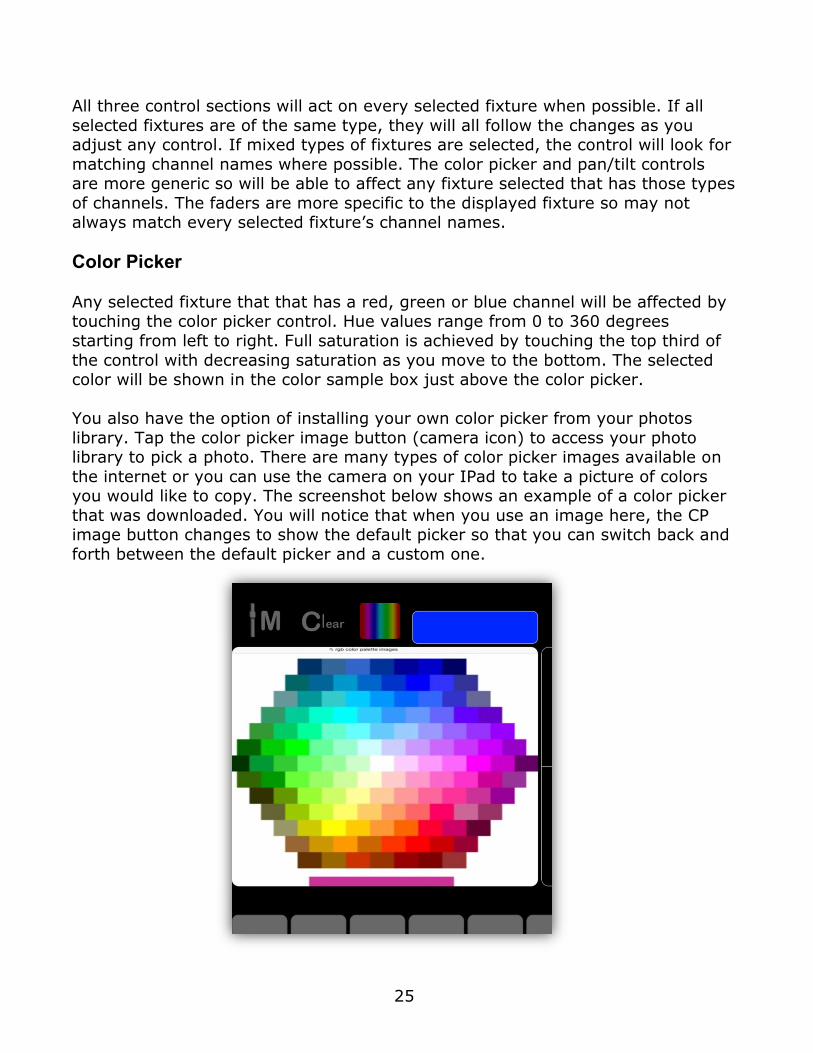
Color Picker
Any selected fixture that that has a red, green or blue channel will be affected by touching the color picker control. Hue values range from 0 to 360 degrees
starting from left to right. Full saturation is achieved by touching the top third of
the control with decreasing saturation as you move to the bottom. The selected color will be shown in the color sample box just above the color picker.
You also have the option of installing your own color picker from your photos
library. Tap the color picker image button (camera icon) to access your photo library to pick a photo. There are many types of color picker images available on
the internet or you can use the camera on your IPad to take a picture of colors you would like to copy. The screenshot below shows an example of a color picker
that was downloaded. You will notice that when you use an image here, the CP image button changes to show the default picker so that you can switch back and
forth between the default picker and a custom one.
26
Pan/Tilt Control
Any selected fixture with a pan or tilt channel can be controlled by touching the pan/tilt control and moving the crosshairs. The DMX512 pan and tilt values will be
displayed just above the control. There is also a Center button above the control that will set the pan and tilt to the center position.
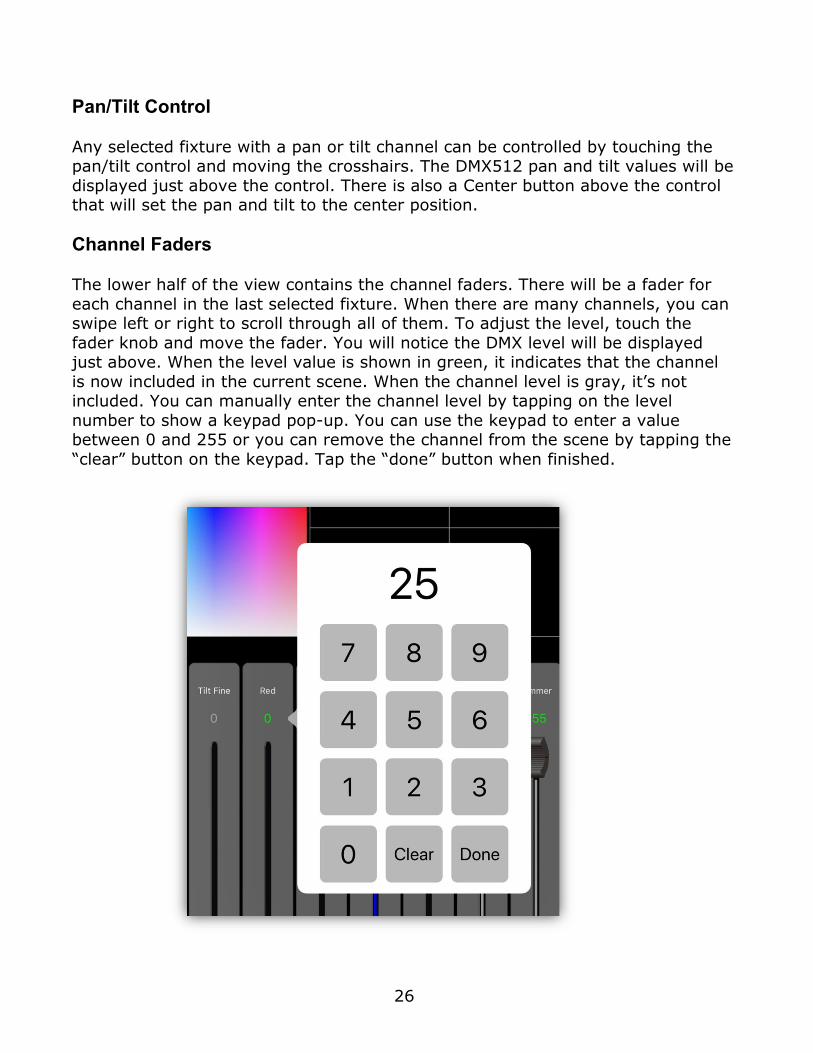
Channel Faders The lower half of the view contains the channel faders. There will be a fader for
each channel in the last selected fixture. When there are many channels, you can swipe left or right to scroll through all of them. To adjust the level, touch the
fader knob and move the fader. You will notice the DMX level will be displayed just above. When the level value is shown in green, it indicates that the channel
is now included in the current scene. When the channel level is gray, it’s not included. You can manually enter the channel level by tapping on the level
number to show a keypad pop-up. You can use the keypad to enter a value between 0 and 255 or you can remove the channel from the scene by tapping the
“clear” button on the keypad. Tap the “done” button when finished.
27
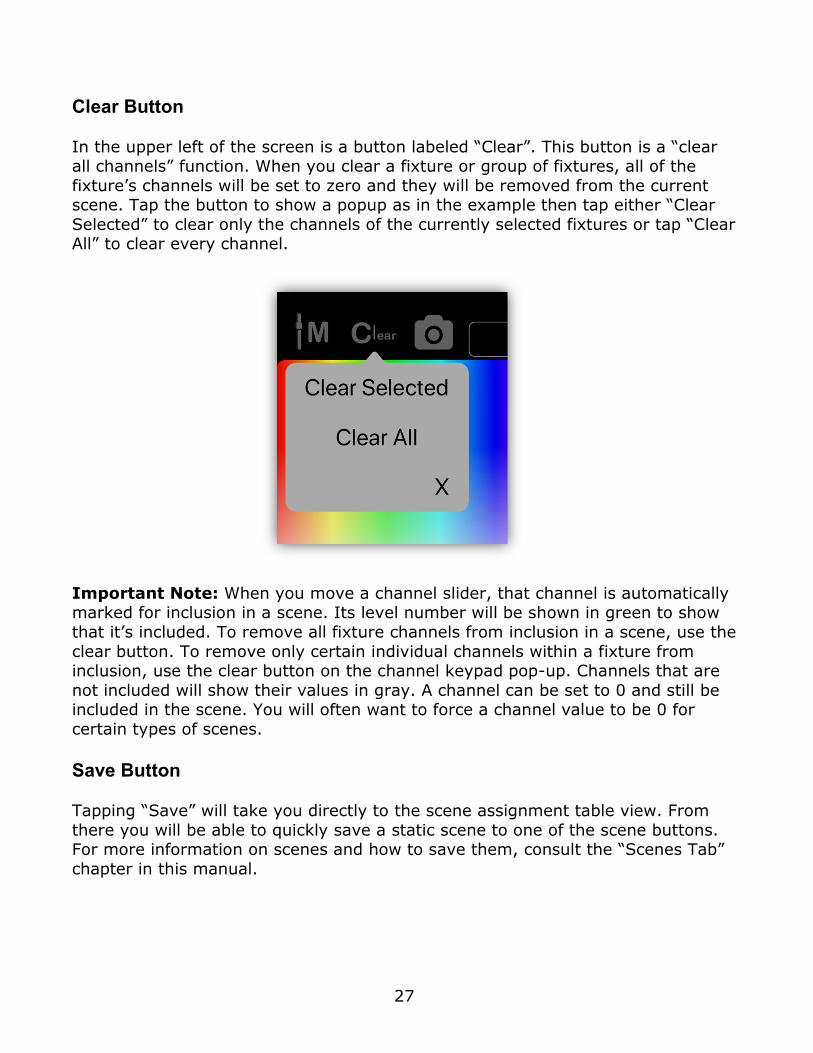
Clear Button
In the upper left of the screen is a button labeled “Clear”. This button is a “clear all channels” function. When you clear a fixture or group of fixtures, all of the
fixture’s channels will be set to zero and they will be removed from the current scene. Tap the button to show a popup as in the example then tap either “Clear
Selected” to clear only the channels of the currently selected fixtures or tap “Clear All” to clear every channel.
Important Note: When you move a channel slider, that channel is automatically marked for inclusion in a scene. Its level number will be shown in green to show
that it’s included. To remove all fixture channels from inclusion in a scene, use the
clear button. To remove only certain individual channels within a fixture from inclusion, use the clear button on the channel keypad pop-up. Channels that are
not included will show their values in gray. A channel can be set to 0 and still be included in the scene. You will often want to force a channel value to be 0 for
certain types of scenes.
Save Button Tapping “Save” will take you directly to the scene assignment table view. From
there you will be able to quickly save a static scene to one of the scene buttons. For more information on scenes and how to save them, consult the “Scenes Tab”
chapter in this manual.
28
Scenes Tab
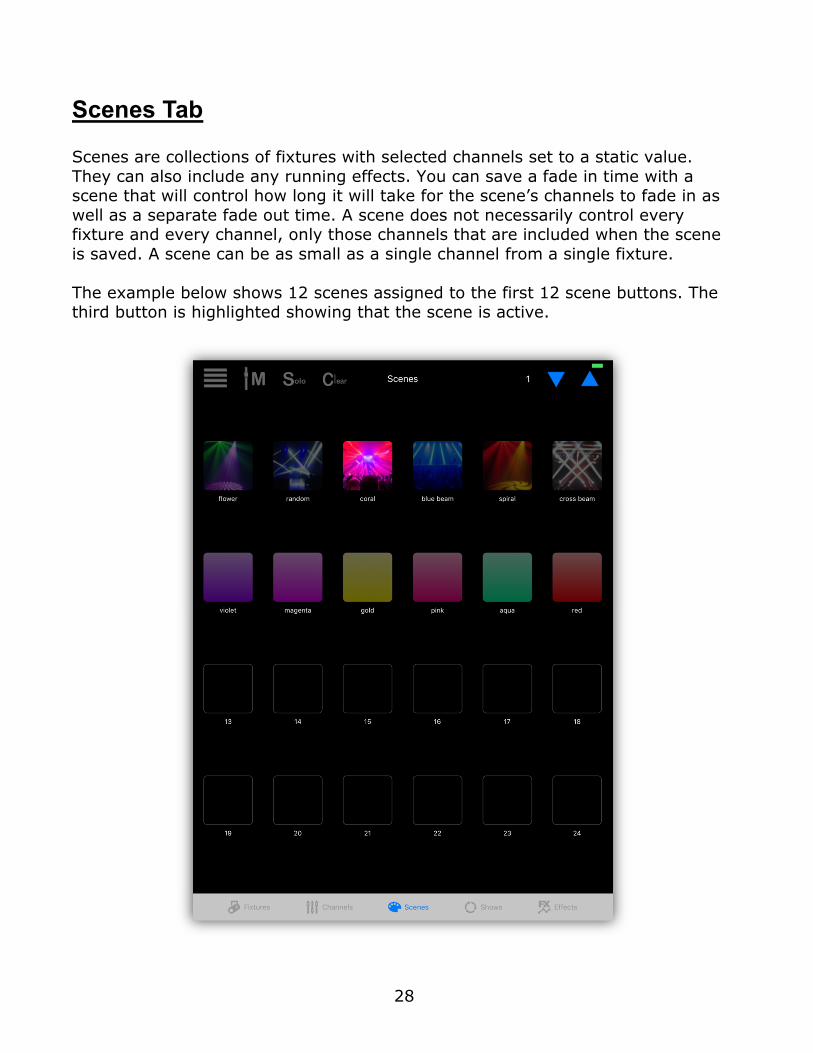
Scenes are collections of fixtures with selected channels set to a static value.
They can also include any running effects. You can save a fade in time with a scene that will control how long it will take for the scene’s channels to fade in as
well as a separate fade out time. A scene does not necessarily control every fixture and every channel, only those channels that are included when the scene
is saved. A scene can be as small as a single channel from a single fixture.
The example below shows 12 scenes assigned to the first 12 scene buttons. The third button is highlighted showing that the scene is active.
29
There are 99 pages available with 24 scene buttons per page. Tapping any button
that has a scene assigned to it will toggle the scene on or off. When turning on, the scene’s channels will fade in using the fade in time that was saved with the
scene. Tapping again will fade the scene out using the fade out time that was saved with the scene. Change pages with the page up and down buttons in the
upper right. As you can see in the example some buttons have images while some show a solid color. You can configure the button appearance and label
however you prefer when you save the scene.
When making a new scene it’s usually a good idea to first clear all channels. Select fixtures from the fixtures tab, then change any channel value from the
channels tab by moving one of the channel sliders or by using the color picker or pan/tilt controls. Only channels that have been changed since the last “Clear” will
be included in the scene. Included channel values are displayed in green while those not included are gray as displayed above each channel fader.
Another way to include channels into a new scene is to first turn on some other scenes. When you save the new scene, the other scenes will automatically be
merged in.
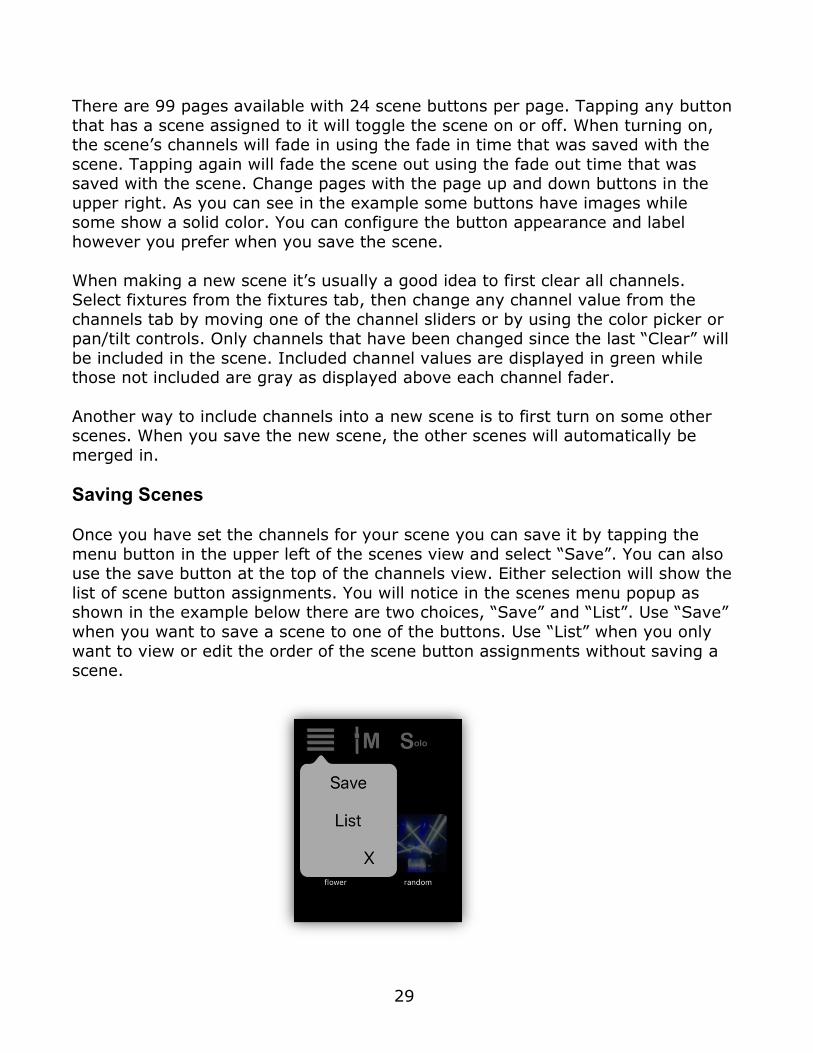
Saving Scenes Once you have set the channels for your scene you can save it by tapping the
menu button in the upper left of the scenes view and select “Save”. You can also use the save button at the top of the channels view. Either selection will show the
list of scene button assignments. You will notice in the scenes menu popup as shown in the example below there are two choices, “Save” and “List”. Use “Save”
when you want to save a scene to one of the buttons. Use “List” when you only
want to view or edit the order of the scene button assignments without saving a scene.

30
The scene button list will appear similar to the example below. Each row
represents a scene button assignment or an empty unused button. At the left is the image or color assigned to the scene button followed by the button number
followed by the button label. In small print under the button label is the file name for that scene.
As you can see in the example, some buttons have scenes assigned to them and some are empty. You can scroll down and view up to 99 pages of scene buttons
on the list. If you are only editing the order of the buttons or deleting a scene, tap the “Edit” button in the upper right. This will allow you to drag or delete a scene’s
row using the standard IOS list editor. If you are saving a scene you can tap any row to save at that location. If there is a scene at that location you will be
prompted to overwrite the old scene. This will replace the original scene at that button. The previous scene at that location will be erased and replaced. Tapping
an empty row will place a new scene at that unused button location.
31
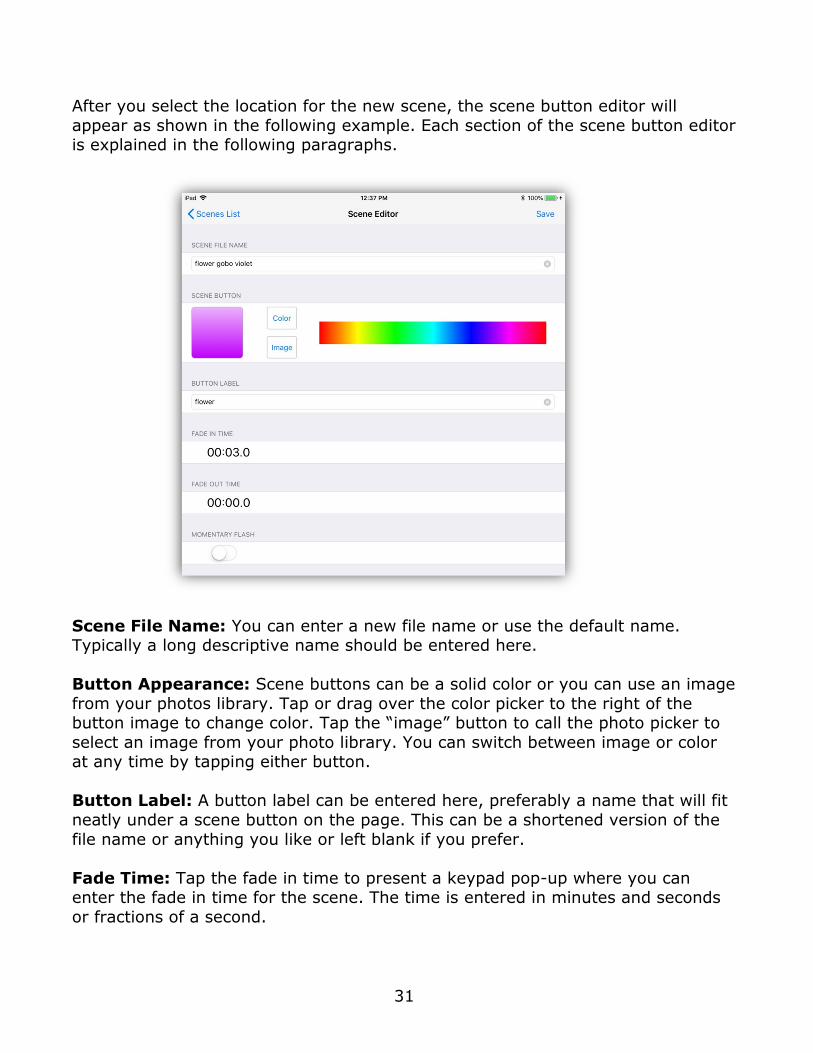
After you select the location for the new scene, the scene button editor will
appear as shown in the following example. Each section of the scene button editor is explained in the following paragraphs.
Scene File Name: You can enter a new file name or use the default name. Typically a long descriptive name should be entered here.
Button Appearance: Scene buttons can be a solid color or you can use an image
from your photos library. Tap or drag over the color picker to the right of the button image to change color. Tap the “image” button to call the photo picker to
select an image from your photo library. You can switch between image or color at any time by tapping either button.
Button Label: A button label can be entered here, preferably a name that will fit
neatly under a scene button on the page. This can be a shortened version of the
file name or anything you like or left blank if you prefer.
Fade Time: Tap the fade in time to present a keypad pop-up where you can enter the fade in time for the scene. The time is entered in minutes and seconds
or fractions of a second.
32
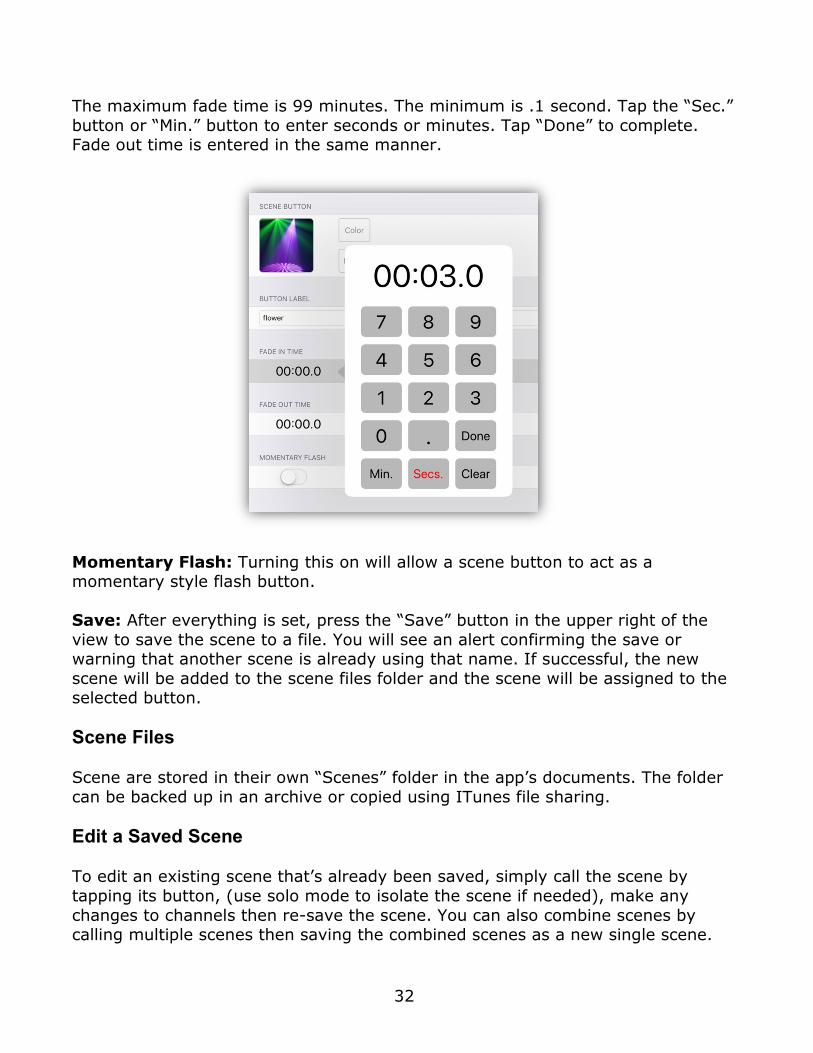
The maximum fade time is 99 minutes. The minimum is .1 second. Tap the “Sec.”
button or “Min.” button to enter seconds or minutes. Tap “Done” to complete. Fade out time is entered in the same manner.
Momentary Flash: Turning this on will allow a scene button to act as a momentary style flash button.
Save: After everything is set, press the “Save” button in the upper right of the
view to save the scene to a file. You will see an alert confirming the save or warning that another scene is already using that name. If successful, the new
scene will be added to the scene files folder and the scene will be assigned to the selected button.
Scene Files Scene are stored in their own “Scenes” folder in the app’s documents. The folder
can be backed up in an archive or copied using ITunes file sharing.
Edit a Saved Scene To edit an existing scene that’s already been saved, simply call the scene by
tapping its button, (use solo mode to isolate the scene if needed), make any
changes to channels then re-save the scene. You can also combine scenes by calling multiple scenes then saving the combined scenes as a new single scene.
33
Solo Button and Scene Playback
In the upper left of each scene page is a button labeled “Solo”. “Solo” will be displayed in red when on and gray when off.
When solo is turned on only one scene at a time can be turned on. Any other
scenes that are running will be replaced by any new single scene. Only the channels that are included with the new scene will be activated and all other
channels will be set to 0.
When solo is turned off more than one scene can be turned on at a time. In that case, whenever a new scene is called that completely replaces all channels of
another scene, the replaced scene button will turn dim showing that it is no
longer active. A new scene can partially replace an old scene. This happens when the new scene only uses some of the channels in the old one. In that case both
scene buttons will stay lit indicating that there are still active channels in both scenes.
Toggling a scene button from lit state to dim turns the scene off by fading it out.
It will fade out using the fade out time that was saved with the scene. A fade out requires that a scene contain at least one fixture with a dimmable channel that
can fade to black. If there are no included dimmable channels in a scene’s fixtures, the included channels will be released and set to 0 without fading. Any
effects attached to the scene will also stop.
Clear Button
Tap the “Clear” button to turn off all scenes.
Effects Any effects that are running when you save a scene will be included in that scene.
Turn effects on or off by tapping effects buttons from the effects tab. A scene can contain only effects if you like. This allows you to combine any number of effects
into a single action.
Important Note: A scene only keeps a list of effects names. When a scene
starts, it will try to start all effects in its list. If you change an effect or delete it, any scene that uses the effect will reflect those changes.
Important Note: Each fixture has a unique ID. A scene looks for that ID when it
plays back. If you have removed or replaced a fixture it may no longer be there. In other words, if you change your fixtures, old scenes that used those fixtures
may no longer work as expected.
34
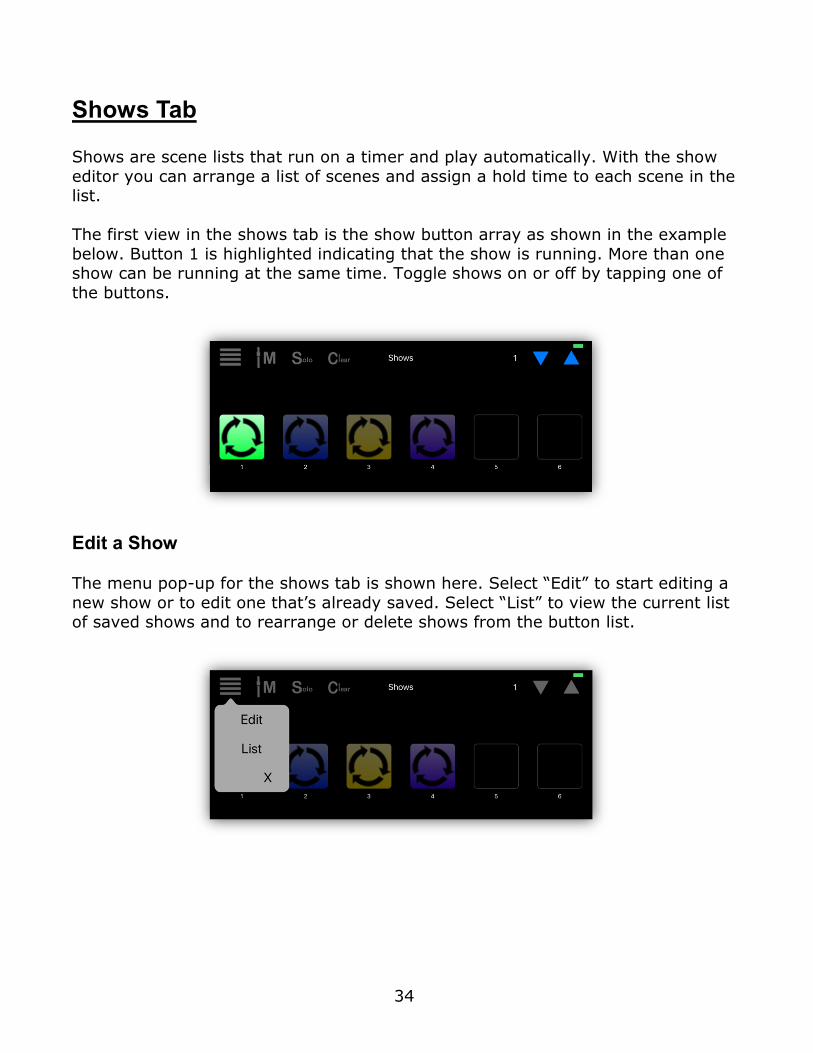
Shows Tab
Shows are scene lists that run on a timer and play automatically. With the show
editor you can arrange a list of scenes and assign a hold time to each scene in the list.
The first view in the shows tab is the show button array as shown in the example
below. Button 1 is highlighted indicating that the show is running. More than one show can be running at the same time. Toggle shows on or off by tapping one of
the buttons.
Edit a Show The menu pop-up for the shows tab is shown here. Select “Edit” to start editing a
new show or to edit one that’s already saved. Select “List” to view the current list of saved shows and to rearrange or delete shows from the button list.
35
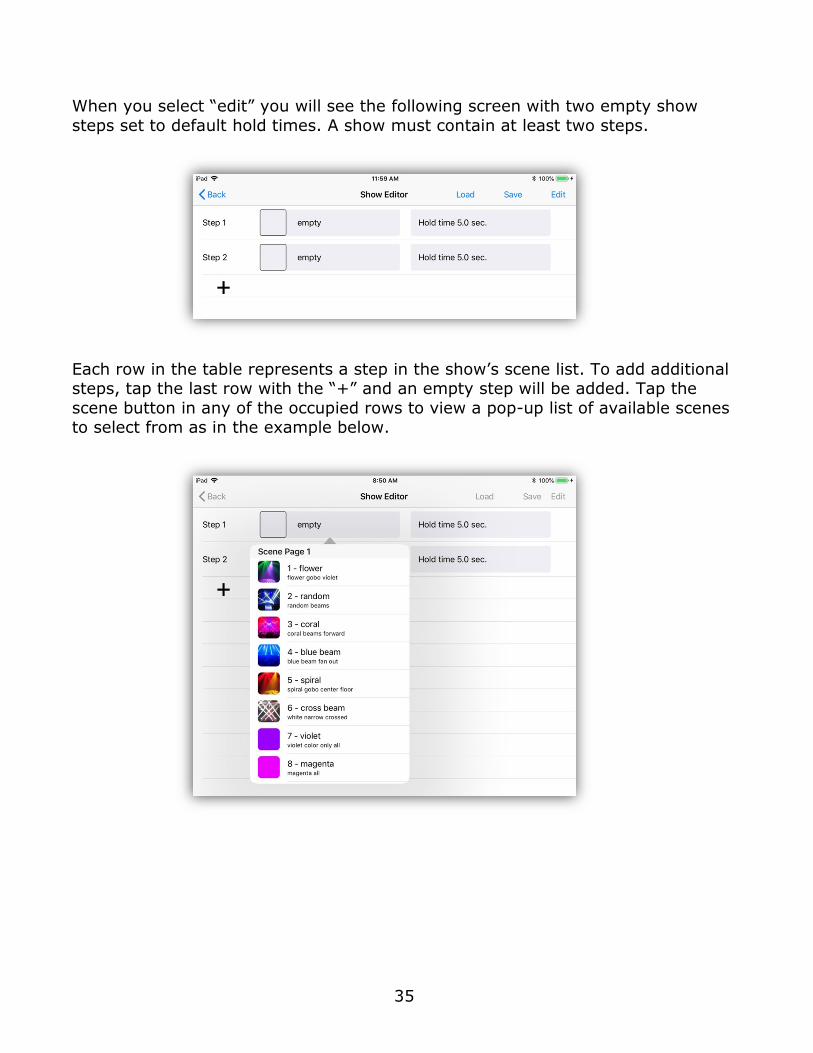
When you select “edit” you will see the following screen with two empty show
steps set to default hold times. A show must contain at least two steps.
Each row in the table represents a step in the show’s scene list. To add additional steps, tap the last row with the “+” and an empty step will be added. Tap the
scene button in any of the occupied rows to view a pop-up list of available scenes to select from as in the example below.
36
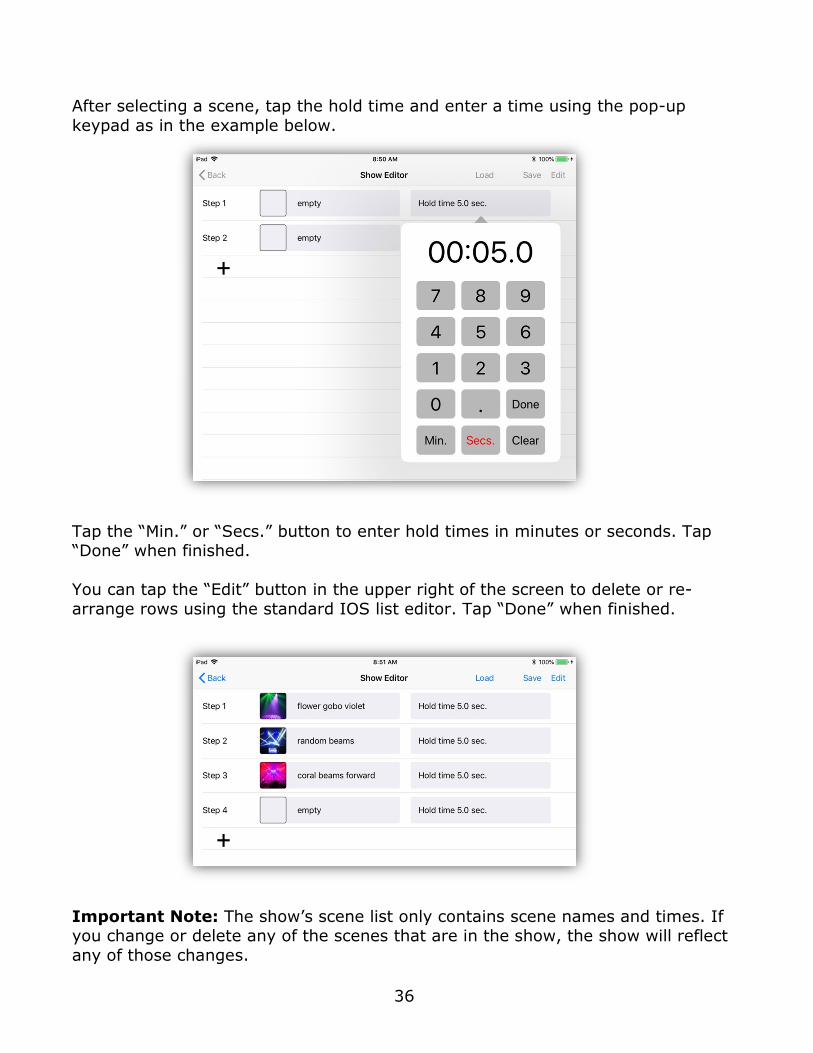
After selecting a scene, tap the hold time and enter a time using the pop-up
keypad as in the example below.
Tap the “Min.” or “Secs.” button to enter hold times in minutes or seconds. Tap “Done” when finished.
You can tap the “Edit” button in the upper right of the screen to delete or re-
arrange rows using the standard IOS list editor. Tap “Done” when finished.
Important Note: The show’s scene list only contains scene names and times. If you change or delete any of the scenes that are in the show, the show will reflect
any of those changes.

37
Save Show
Tap the “Save” button at the top of the show editor when you are finished editing and a view similar to the example below will appear.
A default name that uses the page and button number can be used or you can
enter a longer more descriptive file name for the show. You can also enter a short label that will appear under the show button. Touch and drag in the color strip to
change the button color. You can also tap the image button to call the image picker where you can choose and crop any image from your photo library.
If you would like to be able to override the times of the show steps using the tap sync or audio sync feature, turn on the enable switch for tap/audio sync.
Tap the “Save” button in the upper right to save the file. An alert will appear to
confirm the save or to warn if another show is already using that name.
Edit a Saved Show From the show editor, tap the “Load” button at the top of the screen. This will
present a list of show files. You can select a show to edit from this list.
38
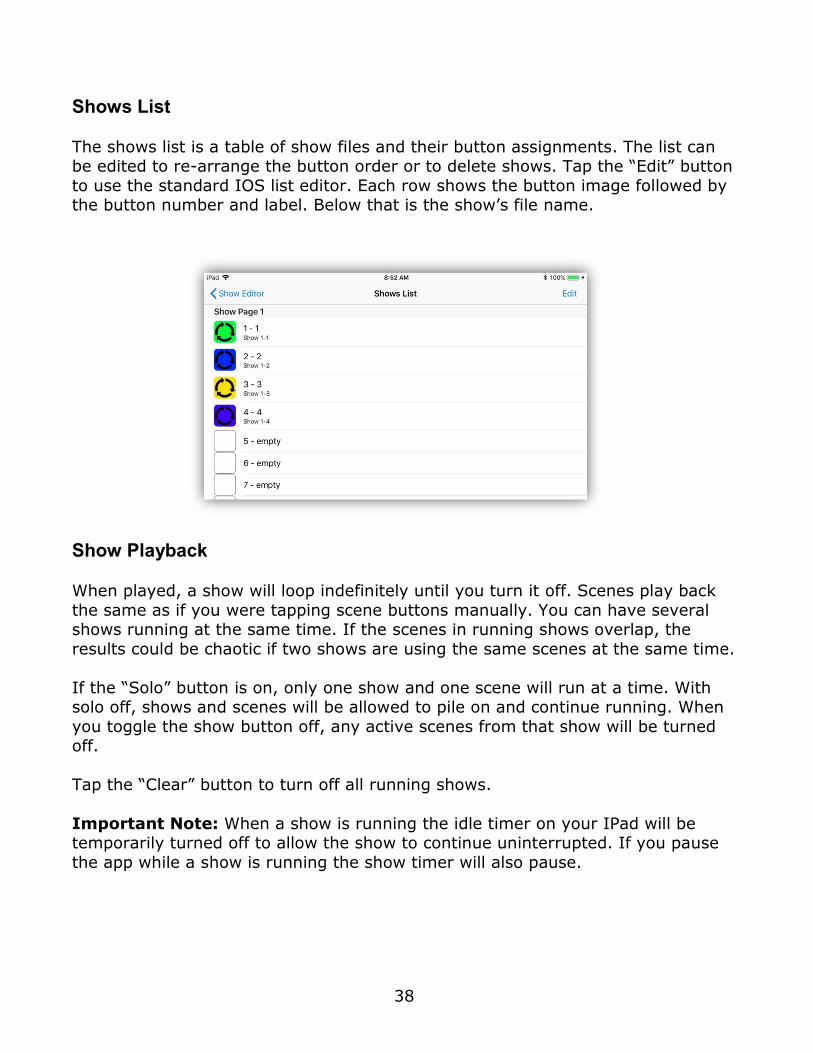
Shows List
The shows list is a table of show files and their button assignments. The list can be edited to re-arrange the button order or to delete shows. Tap the “Edit” button
to use the standard IOS list editor. Each row shows the button image followed by the button number and label. Below that is the show’s file name.
Show Playback When played, a show will loop indefinitely until you turn it off. Scenes play back
the same as if you were tapping scene buttons manually. You can have several shows running at the same time. If the scenes in running shows overlap, the
results could be chaotic if two shows are using the same scenes at the same time.
If the “Solo” button is on, only one show and one scene will run at a time. With solo off, shows and scenes will be allowed to pile on and continue running. When
you toggle the show button off, any active scenes from that show will be turned off.
Tap the “Clear” button to turn off all running shows.
Important Note: When a show is running the idle timer on your IPad will be temporarily turned off to allow the show to continue uninterrupted. If you pause
the app while a show is running the show timer will also pause.
39
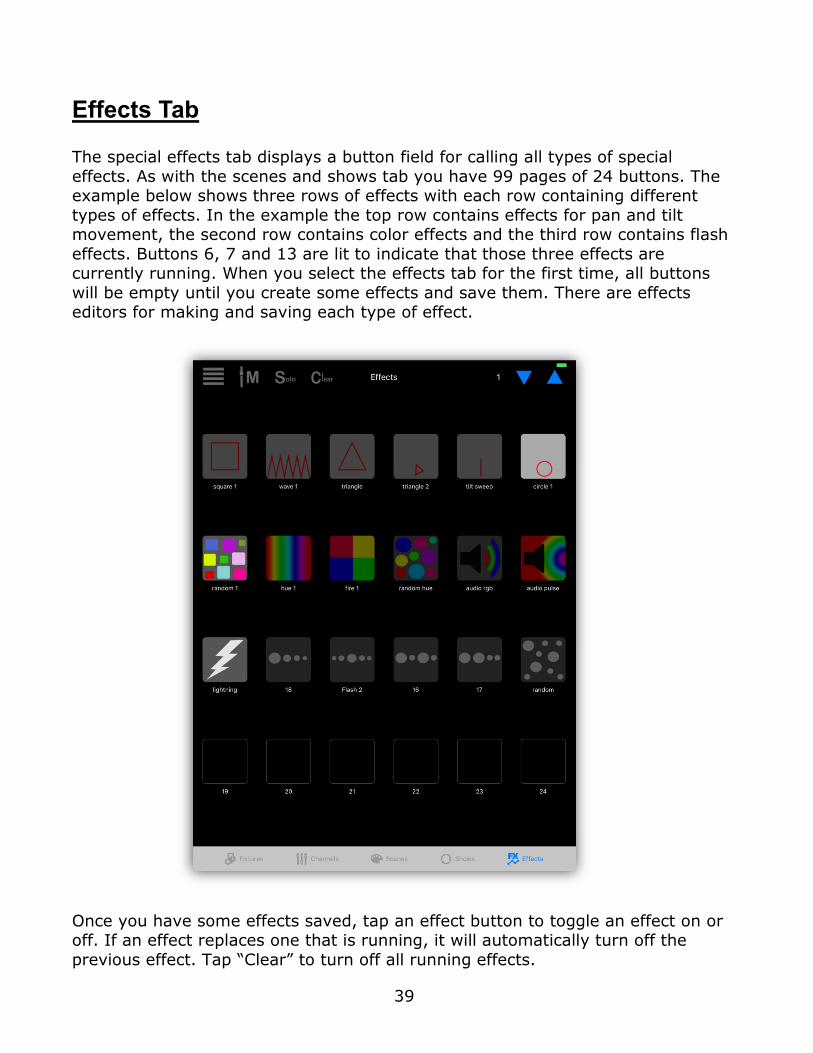
Effects Tab
The special effects tab displays a button field for calling all types of special
effects. As with the scenes and shows tab you have 99 pages of 24 buttons. The example below shows three rows of effects with each row containing different
types of effects. In the example the top row contains effects for pan and tilt movement, the second row contains color effects and the third row contains flash
effects. Buttons 6, 7 and 13 are lit to indicate that those three effects are currently running. When you select the effects tab for the first time, all buttons
will be empty until you create some effects and save them. There are effects editors for making and saving each type of effect.
Once you have some effects saved, tap an effect button to toggle an effect on or off. If an effect replaces one that is running, it will automatically turn off the
previous effect. Tap “Clear” to turn off all running effects.
40
Important Note: When an effect is running the idle timer on your IPad will be temporarily turned off to allow effects to run without interruption. Effects will
pause when you pause this app and restart when you reopen the app.
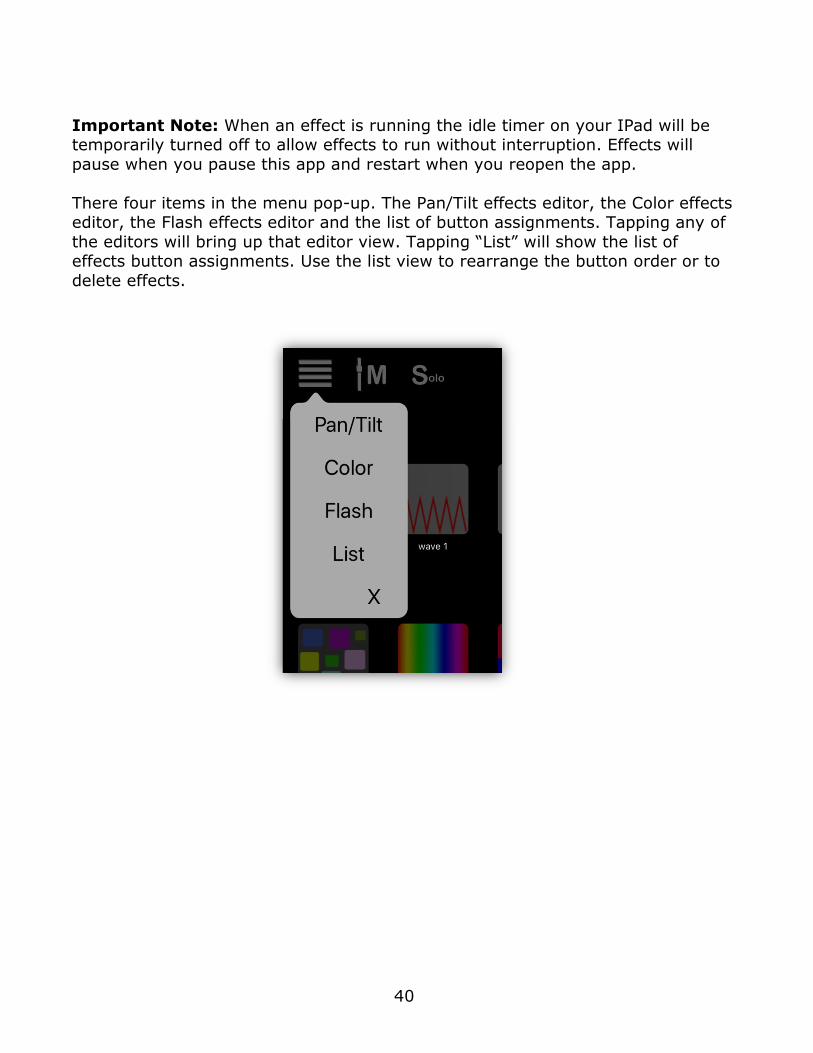
There four items in the menu pop-up. The Pan/Tilt effects editor, the Color effects editor, the Flash effects editor and the list of button assignments. Tapping any of
the editors will bring up that editor view. Tapping “List” will show the list of effects button assignments. Use the list view to rearrange the button order or to
delete effects.
41
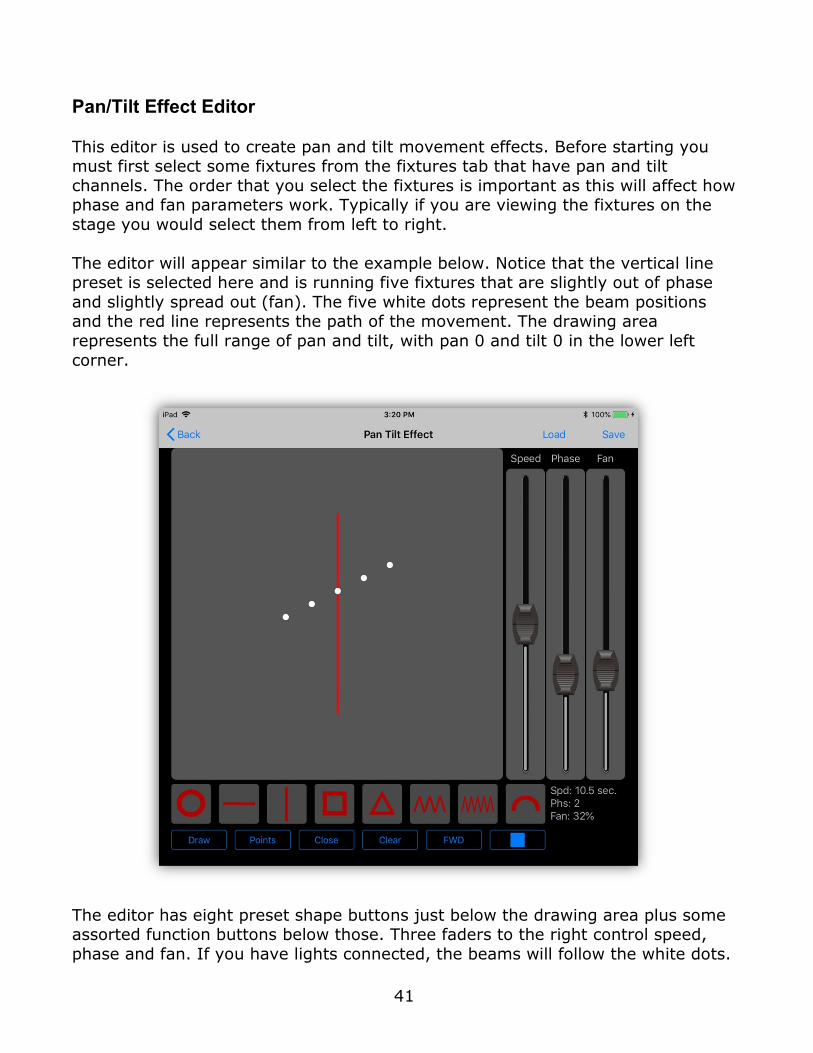
Pan/Tilt Effect Editor
This editor is used to create pan and tilt movement effects. Before starting you must first select some fixtures from the fixtures tab that have pan and tilt
channels. The order that you select the fixtures is important as this will affect how phase and fan parameters work. Typically if you are viewing the fixtures on the
stage you would select them from left to right.
The editor will appear similar to the example below. Notice that the vertical line preset is selected here and is running five fixtures that are slightly out of phase
and slightly spread out (fan). The five white dots represent the beam positions and the red line represents the path of the movement. The drawing area
represents the full range of pan and tilt, with pan 0 and tilt 0 in the lower left
corner.
The editor has eight preset shape buttons just below the drawing area plus some assorted function buttons below those. Three faders to the right control speed,
phase and fan. If you have lights connected, the beams will follow the white dots.

42
You can select from one of the eight preset shapes or you can draw your own
shape. Once you have a shape in the editor you can move it around, resize it or rotate it even while the effect is running. It is helpful to see actual lights moving
while editing as typically the shape needs to be sized and located to match the mounting positions of the lights.
Use the play/stop button in the lower right to run the effect. The effect must be
paused to select a new shape or to draw.
Editing a Shape You can go back and forth between the FX tab and the Fixtures tab to change the
fixture selection for the effect you are editing.
To move the shape use a one finger touch to drag the shape around on the
editor. To resize the shape, pinch with two fingers. You can pinch horizontally or vertically. To rotate the shape use a three finger touch and rotate your touch in a
circle. You can edit any of the preset shapes or one that you draw yourself.
The row of buttons across the very bottom function as follows:
Draw: This button will let you draw a shape path with your finger. The initial path will appear as a dotted line until you tell the editor to finish the path by tapping
the play button or by tapping the “Close” button. When finished, the path will become a solid red line. “Close” will connect the end to the start.
Points: This is similar to drawing. You enter single points by tapping the screen.
The editor will automatically connect the points as you tap. Finish the path by
tapping the play button or the “Close” button.
Close Button: Tap the “Close” button to connect the end of your path to its start. Use this to create a path that you want to loop continuously. If you don’t want the
path to loop, don’t close the path, the beam will travel from end to end of your path (bounce).
Clear Button: Tap the “Clear” button to erase what’s on the drawing area.
Fwd/Rev Button: This button controls the direction that the beams will follow
along the path. This will only affect a closed path that is looping. An open path that is bouncing will automatically change direction at the endpoints.
Play/Stop Button: This is used to end drawing mode and to run the effect. For
shapes that are finished, you can start and stop the animation. A white dot will
simulate each fixture’s beam on the drawing.
43
Speed Fader: Speed can vary depending on the size of the shape and distance
between points. Speed can also depend on the responsiveness of the light fixture. Some moving heads cannot move at high speeds. Adjust the speed fader until it
looks right on the lights rather than the screen animation.
Phase Fader: This allows you to spread fixtures across the shape. For this to work, you need to select more than one fixture. The selection order will determine
the order of the beam positions across the shape. With the phase at 0, all beams will be on the same point. With the phase at full, the beams will be spread out
evenly along the shape path. Move the phase slider to see the relative beam positions along the path in the editor.
Fan Fader: This control will fan the beams apart on the horizontal plane. You will
need to have more than one fixture selected for it to work. Adjust the control to your liking while observing the lights rather than relying on the screen animation.
Fan order will follow the order that the lights were selected from the Fixtures tab.
Helpful Hints: When drawing, the speed that you move your finger will affect the
speed of the effect. The slower you draw, the more points will be included in the path making it run slower. Experiment until you get the feel for what works best.
Don’t worry about the initial size or location of the path as you can resize or move it later. The fade time between points is always equal so keep point to point
distances close to equal if you want an even looking effect. The phase control uses points to set the distance between beams so more points means finer control
over the phase.

44
Save the Effect
Tapping the “Save” button at the top of the editor screen will show the button assignment list similar to the next example. To save the effect to one of the
buttons, select an empty button row on any page. Scroll down to reach the higher page numbers. Note: You can also select a row that’s occupied; the effect that’s
there will be replaced with your new effect. You will be prompted to overwrite the old effect.
You can reorder the buttons at any time by using the “Edit” button at the top of the screen using the standard IOS style list editor.

45
After selecting a button location, the button editor will appear similar to the
example below. In this example a circle shape effect was selected. The default button image will show the shape on a gray background. You also have the option
of choosing an image from your photo library. Tap the “image” button to call the photo picker.
Enter a long descriptive file name for the effect and also a short button label that
will appear on the effects button page under the button. A default name and label is provided. After you have entered the names, tap the “Save” button in the
upper right to save the file and button assignment. Effects files are stored in their own folder in the app’s documents directory.
There is a tap/audio sync enable switch that allows the effect to be controlled by
the tap sync button or audio beat. Don’t enable this if you want the effect to always run at the same speed.
Load
You can load a saved pan/tilt effect into the editor. Tap the “Load” button at the top of the screen then select from the list of saved effects. Only pan/tilt effects
can be loaded into the pan/tilt effects editor.
46
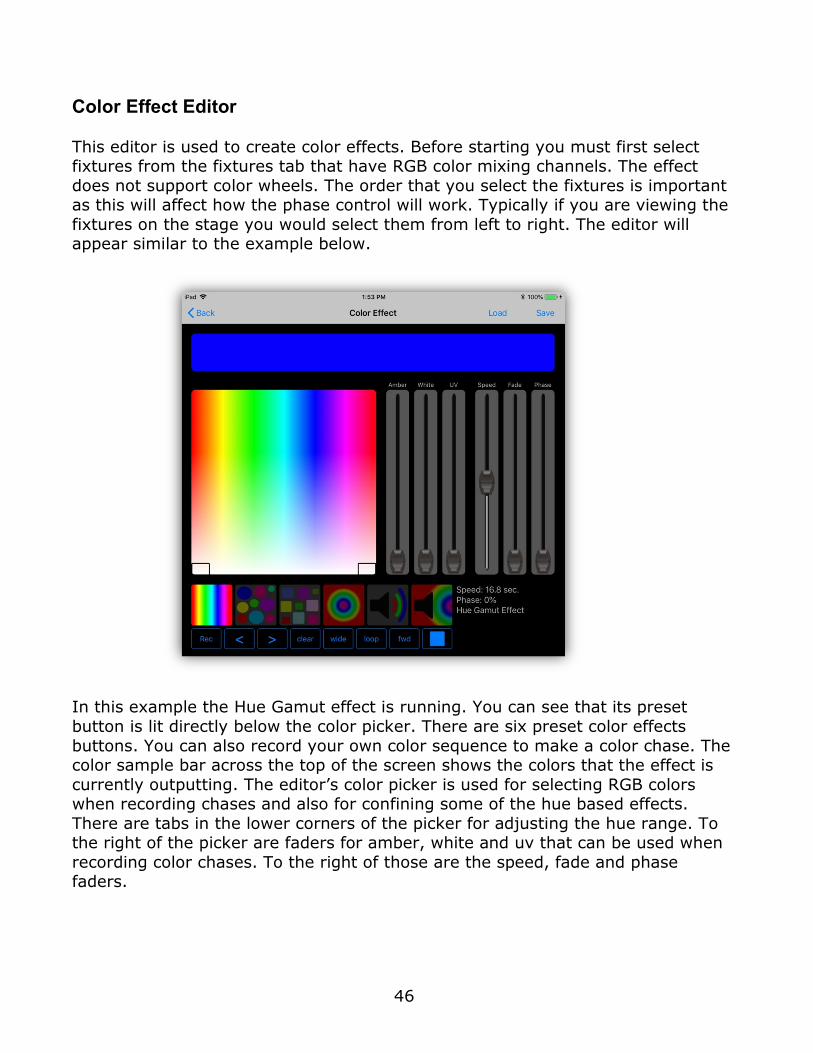
Color Effect Editor
This editor is used to create color effects. Before starting you must first select fixtures from the fixtures tab that have RGB color mixing channels. The effect
does not support color wheels. The order that you select the fixtures is important as this will affect how the phase control will work. Typically if you are viewing the
fixtures on the stage you would select them from left to right. The editor will appear similar to the example below.
In this example the Hue Gamut effect is running. You can see that its preset
button is lit directly below the color picker. There are six preset color effects
buttons. You can also record your own color sequence to make a color chase. The color sample bar across the top of the screen shows the colors that the effect is
currently outputting. The editor’s color picker is used for selecting RGB colors when recording chases and also for confining some of the hue based effects.
There are tabs in the lower corners of the picker for adjusting the hue range. To the right of the picker are faders for amber, white and uv that can be used when
recording color chases. To the right of those are the speed, fade and phase faders.
47
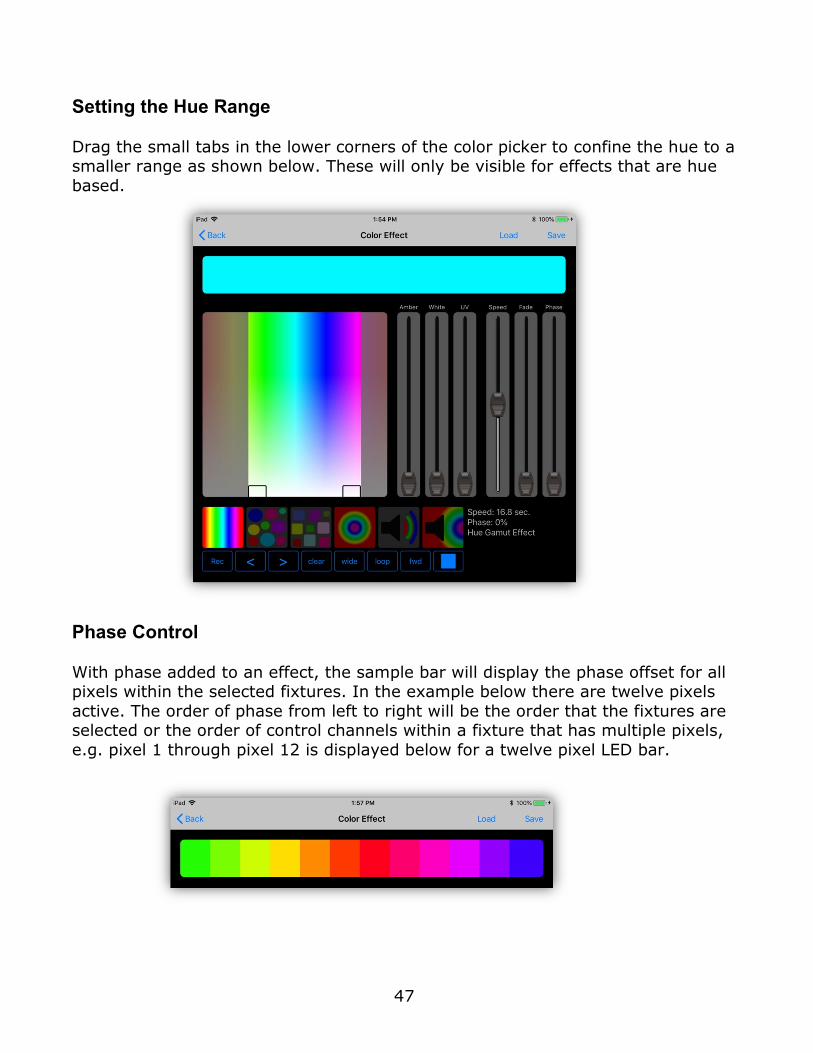
Setting the Hue Range
Drag the small tabs in the lower corners of the color picker to confine the hue to a smaller range as shown below. These will only be visible for effects that are hue
based.
Phase Control
With phase added to an effect, the sample bar will display the phase offset for all pixels within the selected fixtures. In the example below there are twelve pixels
active. The order of phase from left to right will be the order that the fixtures are selected or the order of control channels within a fixture that has multiple pixels,
e.g. pixel 1 through pixel 12 is displayed below for a twelve pixel LED bar.
48
Color Effect Presets
Hue Gamut Effect: The color will gradually change hue across the entire gamut unless you confine the hues by using the control tabs in the color
picker. Speed is displayed as the time it takes to run the entire gamut. The fade control has no effect. Adding phase will offset the color between fixtures
and also between pixels in a bar or matrix style fixture. When using a narrow hue range the effect will look smoother if you set it to “bounce” instead of “loop”.
Random Hue Effect: The color changes randomly but is confined to the
hues in the picker. The hues will be at full saturation. The speed is set in beats per minute and can be synced to the tap or audio beats. Fade is a
percentage based on the time between beats. Phase will depend on the number of
pixels selected with more phase causing more pixels to change randomly.
Random RGB Effect: The color changes randomly but unlike the random hue effect, red, green and blue channels are picked at random.
This will give a much wider range of colors. The speed is set in beats per minute and can be synced to the tap or audio beats. Fade is a percentage based
on the time between beats. Phase will depend on the number of pixels selected with more phase causing more pixels to change randomly.
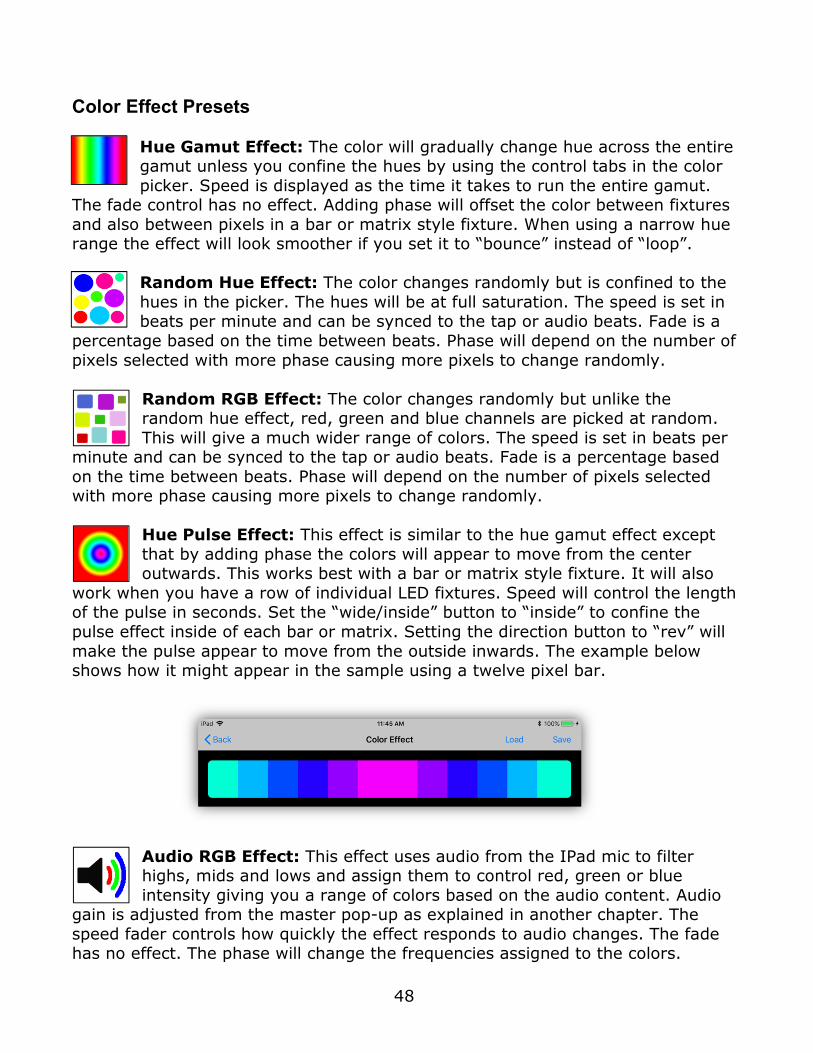
Hue Pulse Effect: This effect is similar to the hue gamut effect except
that by adding phase the colors will appear to move from the center outwards. This works best with a bar or matrix style fixture. It will also
work when you have a row of individual LED fixtures. Speed will control the length of the pulse in seconds. Set the “wide/inside” button to “inside” to confine the
pulse effect inside of each bar or matrix. Setting the direction button to “rev” will
make the pulse appear to move from the outside inwards. The example below shows how it might appear in the sample using a twelve pixel bar.
Audio RGB Effect: This effect uses audio from the IPad mic to filter highs, mids and lows and assign them to control red, green or blue
intensity giving you a range of colors based on the audio content. Audio gain is adjusted from the master pop-up as explained in another chapter. The
speed fader controls how quickly the effect responds to audio changes. The fade has no effect. The phase will change the frequencies assigned to the colors.
49
Audio Pulse Effect: This effect is similar to the hue pulse effect except
that it uses low frequency audio pulses as triggers. When a low pulse is detected from the mic as from a pulsing music beat, the effect will run
through its hue gamut. You can adjust the size of the hue gamut from the color picker. Speed will control the length of the pulse. Fade has no effect. Phase will
work similar to the hue pulse effect where the pulse will appear to move from the center outwards as you add more phase. The mic gain is adjusted from the
master pop-up as explained in another chapter.
Recording Color Chases You can record your own multi-step color chases. To start recording, first select
the fixtures to include in the chase from the fixtures tab. Tap the “record” button
in the lower left of the editor. It will turn red to indicate record mode. Use the color picker along with the amber, white or uv faders to assign a color to the first
step. Advance to the next step by tapping the “>” button and repeat. After entering all of the steps, tap the record button to toggle record mode off or tap
the play button. While recording, you can use the “<” or “>” buttons to edit steps in the chase. The current step number is displayed in the lower right of the editor.
Speed is shown in beats per minute. You can also enable the tap/audio sync when
you save the chase. Fade is a percentage based on the time between beats. Phase will offset the steps across fixtures depending on the number of fixtures
and number of steps.
Function Buttons
There are eight functional buttons across the bottom of the editor. Here is a brief summary of each from left to right:
Record: For recording custom color chases.
<>: Two buttons for selecting chase steps while recording.
Clear: Used to clear the entire chase while in record mode.
Wide/Inside: Wide mode spreads phasing across all selected fixtures and pixels.
It essentially treats all selected fixtures as one large matrix. Inside mode confines
phasing within each fixture. This is only useful on fixtures that have multiple RGB sections or pixels like LED bars.
Loop/Bounce: Loop mode will make patterns play in a continuous loop by
returning to the start of each sequence when the end is reached. Bounce mode
50
will make patterns reverse direction at each end point essentially bouncing from
end to end.
Fwd/Rev: This controls the direction of playback. This will only apply to looping patterns since bouncing patterns reverse direction automatically at each end.
Play/Stop: Use this button to run the effect or stop it.
Note: Some fixtures may require dimmer and shutter channels to be turned on to
see the effect.
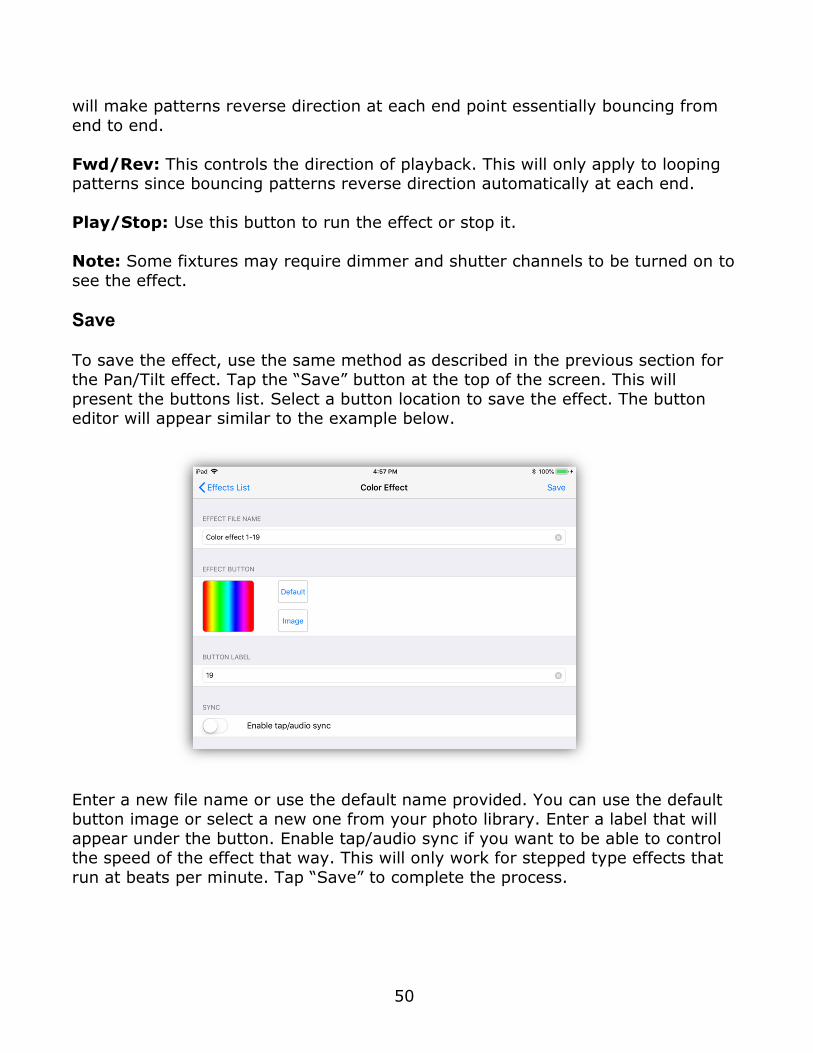
Save
To save the effect, use the same method as described in the previous section for the Pan/Tilt effect. Tap the “Save” button at the top of the screen. This will
present the buttons list. Select a button location to save the effect. The button editor will appear similar to the example below.
Enter a new file name or use the default name provided. You can use the default button image or select a new one from your photo library. Enter a label that will
appear under the button. Enable tap/audio sync if you want to be able to control the speed of the effect that way. This will only work for stepped type effects that
run at beats per minute. Tap “Save” to complete the process.
51
Load
You can load a saved color effect into the editor. Tap the “Load” button at the top of the screen then select from the list of saved effects. Only color effects can be
loaded into the color effects editor.
52
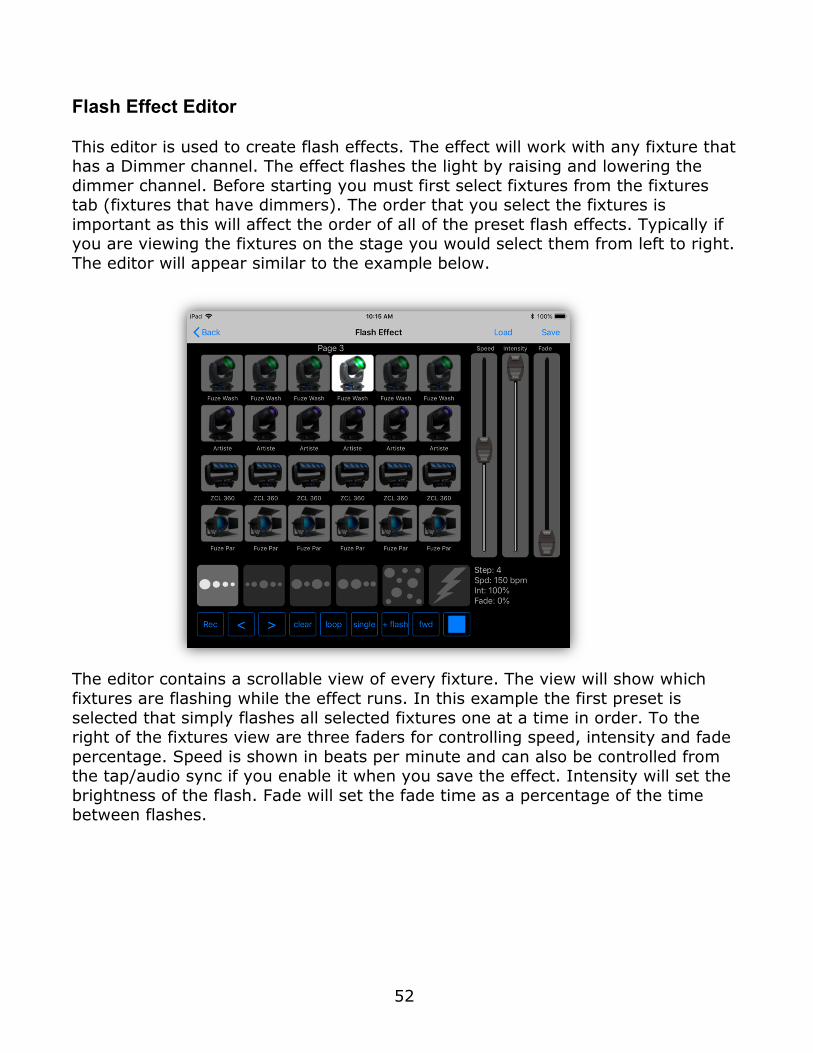
Flash Effect Editor
This editor is used to create flash effects. The effect will work with any fixture that has a Dimmer channel. The effect flashes the light by raising and lowering the
dimmer channel. Before starting you must first select fixtures from the fixtures tab (fixtures that have dimmers). The order that you select the fixtures is
important as this will affect the order of all of the preset flash effects. Typically if you are viewing the fixtures on the stage you would select them from left to right.
The editor will appear similar to the example below.
The editor contains a scrollable view of every fixture. The view will show which
fixtures are flashing while the effect runs. In this example the first preset is
selected that simply flashes all selected fixtures one at a time in order. To the right of the fixtures view are three faders for controlling speed, intensity and fade
percentage. Speed is shown in beats per minute and can also be controlled from the tap/audio sync if you enable it when you save the effect. Intensity will set the
brightness of the flash. Fade will set the fade time as a percentage of the time between flashes.
53
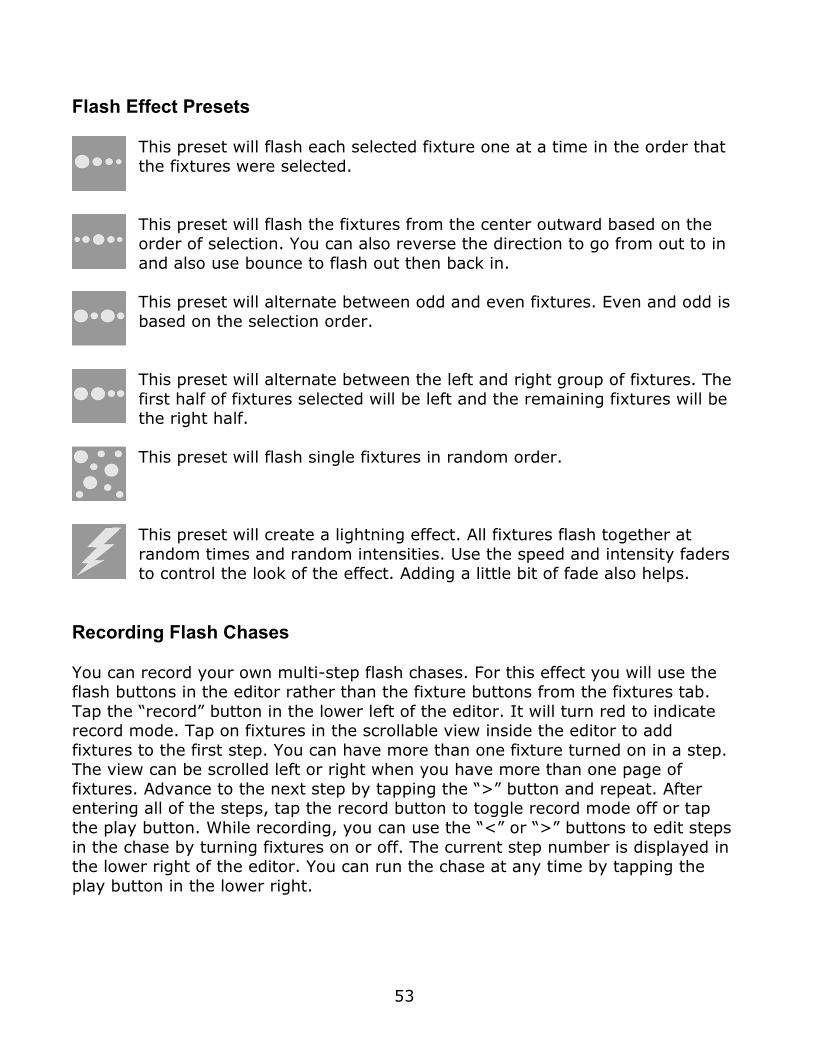
Flash Effect Presets
This preset will flash each selected fixture one at a time in the order that the fixtures were selected.
This preset will flash the fixtures from the center outward based on the order of selection. You can also reverse the direction to go from out to in
and also use bounce to flash out then back in.
This preset will alternate between odd and even fixtures. Even and odd is based on the selection order.
This preset will alternate between the left and right group of fixtures. The
first half of fixtures selected will be left and the remaining fixtures will be the right half.
This preset will flash single fixtures in random order.
This preset will create a lightning effect. All fixtures flash together at
random times and random intensities. Use the speed and intensity faders to control the look of the effect. Adding a little bit of fade also helps.
Recording Flash Chases
You can record your own multi-step flash chases. For this effect you will use the flash buttons in the editor rather than the fixture buttons from the fixtures tab.
Tap the “record” button in the lower left of the editor. It will turn red to indicate record mode. Tap on fixtures in the scrollable view inside the editor to add
fixtures to the first step. You can have more than one fixture turned on in a step. The view can be scrolled left or right when you have more than one page of
fixtures. Advance to the next step by tapping the “>” button and repeat. After entering all of the steps, tap the record button to toggle record mode off or tap
the play button. While recording, you can use the “<” or “>” buttons to edit steps
in the chase by turning fixtures on or off. The current step number is displayed in the lower right of the editor. You can run the chase at any time by tapping the
play button in the lower right.
54
Empty Steps
In some cases you may want to have empty steps in your recorded chase to achieve the look of an old style flash chase. This will give you the type of chase
that has a brief pause in between flashes. When recording, skip a step by tapping “>” without selecting fixtures. Also add one empty step at the end of the chase.
Function Buttons There are nine functional buttons across the bottom of the editor. Here is a brief
summary of each from left to right:
Record: For recording flash chases.
<>: Two buttons for selecting chase steps while recording.
Clear: Used to clear the entire chase while in record mode.
Loop/Bounce: Loop mode will make patterns play in a continuous loop by returning to the start of each sequence when the end is reached. Bounce mode
will make patterns reverse direction at each end point essentially bouncing from end to end.
Single/Add: Single mode will solo each flash step while turning the previous flashed step off. This is typical for a flash effect. Add mode will keep previous
steps turned on until the end of the sequence where they will all turn off together.
+Flash/-Flash: This is used to create a negative flash effect where lights flash off instead of on.
Fwd/Rev: This controls the direction of playback. This will only apply to looping
patterns since bouncing patterns reverse direction automatically at each end.
Play/Stop: Use this button to run the effect or stop it.

55
Save
To save the effect, use the same method as described in the previous sections for the Pan/Tilt and Color effects. Tap the “Save” button at the top of the screen. This
will present the buttons list. Select a button location to save the effect. The button editor will appear similar to the example below.
Enter a new file name or use the default name provided. You can use the default
button image or select a new one from your photo library. Enter a short label that will appear under the button. Enable tap/audio sync if you want to be able to
control the speed of the effect that way. Note: The “lightning” effect will ignore
tap/audio. Tap “Save” to complete the process.
Load You can load a saved flash effect into the editor. Tap the “Load” button at the top
of the screen then select from the list of saved effects. Only flash effects can be loaded into the flash effects editor.
56
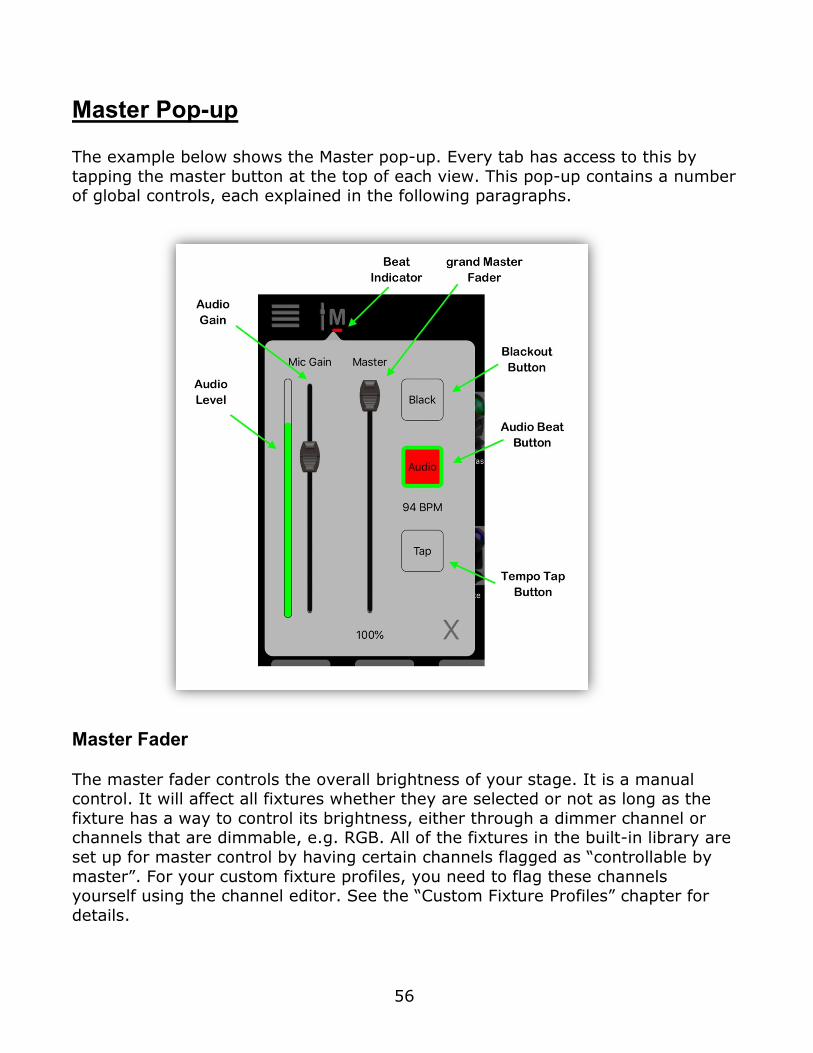
Master Pop-up
The example below shows the Master pop-up. Every tab has access to this by
tapping the master button at the top of each view. This pop-up contains a number of global controls, each explained in the following paragraphs.
Master Fader
The master fader controls the overall brightness of your stage. It is a manual control. It will affect all fixtures whether they are selected or not as long as the
fixture has a way to control its brightness, either through a dimmer channel or channels that are dimmable, e.g. RGB. All of the fixtures in the built-in library are
set up for master control by having certain channels flagged as “controllable by
master”. For your custom fixture profiles, you need to flag these channels yourself using the channel editor. See the “Custom Fixture Profiles” chapter for
details.
57
Black Button
This button works along with the master to fader to achieve a blackout by pulling the master fader to 0. Tap and hold the button briefly to get a 3 second fade from
the master. Tap and release quickly to get an instant fadeout. Tap the button again to return the master to its previous position.
Mic Gain This fader controls the sensitivity of the microphone input for audio effects and
audio beat. Adjust the gain with music playing and observe the level indicator. The indicator responds to low frequencies as this is what’s used for the beat
detector. Set the level so that low frequency beats raise the level indicator just into the orange and cause the pulse indicator on the audio button to flash. The
pulse indicator is the green frame around the audio button. Note: The audio level indicator will not respond to high frequencies such as those coming from a smart
phone speaker. For best results, try to use the gain fader in the 50-75% range.
Audio Button
This button will enable the audio beat function. When there is a low frequency pulsing beat that is picked up by the mic, this function will try to extract a tempo
from it and trigger any effects or shows that have the sync function enabled. When the tempo is detected, the button will flash red on each beat as shown in
the example and the beats per minute will be displayed below the button. The beat will stop if the audio stops and any effects or shows will revert to their saved
tempos.
Tap Button The tap sync button lets you tap in a beat. The beats per minute will be displayed
above the button and the button will flash red on each beat. You only need to tap
twice to activate it. Tap once to turn it off. If any currently running show or effect has the tap sync enabled, it will respond to the current BPM. You must enable this
for each individual show or effect. See instructions on saving shows and effects for more info.
58
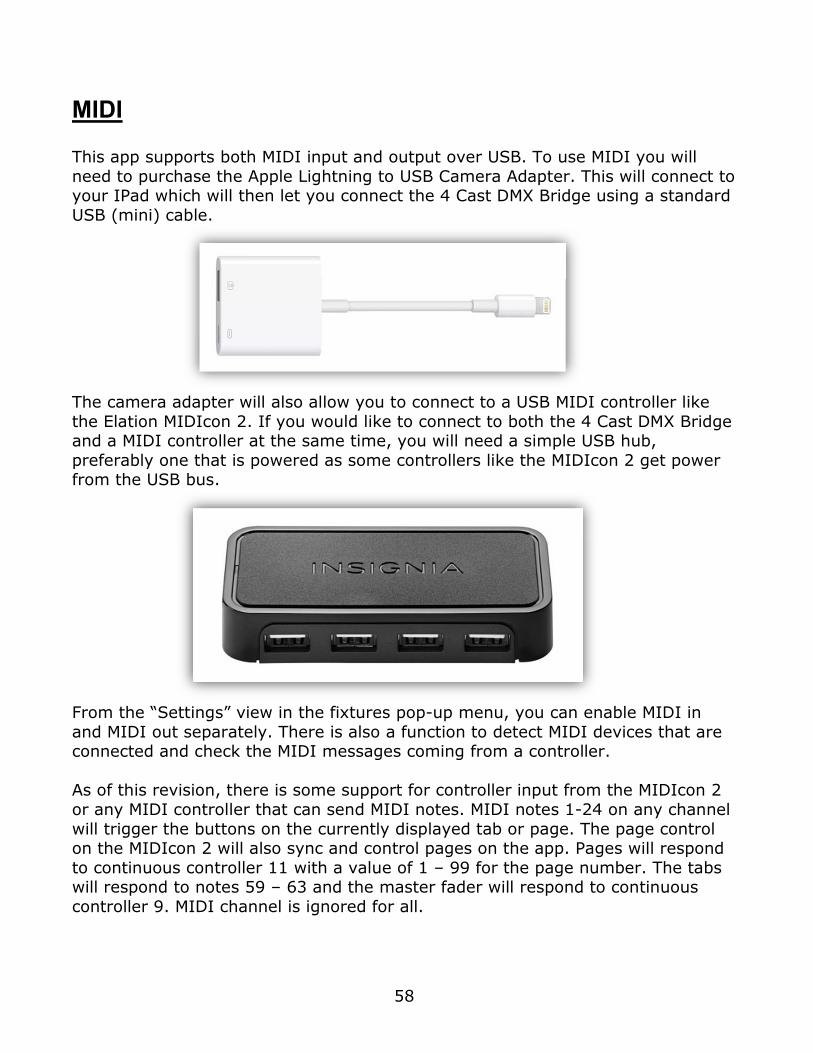
MIDI
This app supports both MIDI input and output over USB. To use MIDI you will
need to purchase the Apple Lightning to USB Camera Adapter. This will connect to your IPad which will then let you connect the 4 Cast DMX Bridge using a standard
USB (mini) cable.
The camera adapter will also allow you to connect to a USB MIDI controller like
the Elation MIDIcon 2. If you would like to connect to both the 4 Cast DMX Bridge and a MIDI controller at the same time, you will need a simple USB hub,
preferably one that is powered as some controllers like the MIDIcon 2 get power from the USB bus.
From the “Settings” view in the fixtures pop-up menu, you can enable MIDI in
and MIDI out separately. There is also a function to detect MIDI devices that are connected and check the MIDI messages coming from a controller.
As of this revision, there is some support for controller input from the MIDIcon 2
or any MIDI controller that can send MIDI notes. MIDI notes 1-24 on any channel
will trigger the buttons on the currently displayed tab or page. The page control on the MIDIcon 2 will also sync and control pages on the app. Pages will respond
to continuous controller 11 with a value of 1 – 99 for the page number. The tabs will respond to notes 59 – 63 and the master fader will respond to continuous
controller 9. MIDI channel is ignored for all.

59
File System and ITunes
Scenes, effects, shows, custom profiles and various settings are stored in the
app’s documents folder in your IPad. Subfolders are created for each type of memory. There are also files that contain all of the button assignments. You can
access these files using ITunes running on your Mac when your IPad is connected to it. The screenshot below is an example of the file sharing display in ITunes
connected to an IPad running the eCast app.
In the app’s documents window on the right you can see the five folders plus the
button assignment files. The folders can’t be opened in ITunes but they can be dragged to your desktop where you can open and edit them. You can then drag
them back to ITunes where they will be copied back into your IPad automatically.

60
The example below shows a Finder window with the contents of the Profiles folder
containing 6 custom profiles.
You can use ITunes to back up your folders on your computer or to load new files into your IOS device. To Share custom profiles with another user, copy any new
profiles in or out of the profiles folder while it’s on your desktop.
Important Note: There is a potential compatibility issue between IOS filenames and OSX filenames. IOS will allow you to create two files with the same name
using different case, for example “scene 1” and “Scene 1”. OSX will see these as the same file name. This can cause error warnings if you try to transfer files like
this between your IPad and your OSX device using ITunes. Try to avoid duplicate file naming to avoid this problem.
61
Idle Timer and Background State
The Idle timer on your IPad determines when your device will automatically turn
off its screen and call Auto-Lock. This is something that you would normally want to happen as it helps preserve battery life and prevent unwanted access. This app
will temporarily disable the idle timer under certain conditions as when it’s running a timed effect or a timed show. This insures that there will be no
interruption in the playback. When there are no longer any effects or shows running, the timer is re-enabled.
As with most IOS apps, certain events can cause the eCast app to enter the
background state. For example, when the idle timer expires or when you press the home button the app will enter the background state. When the app goes to
the background, all timers will stop and the connection to the 4 Cast DMX Bridge is temporarily closed. The bridge will continue to output the most recent static
DMX512 and e-fly signals but any effect or show that was running will pause. When the app is recalled from the background state any paused effect or show
will continue.
IOS devices were designed to work this way as things like LCD screens and Wi-Fi
connections consume battery life. If battery life is not an issue and you would like to keep the app and screen active all the time, go to Settings, General, Auto-Lock
and select “Never”. This will keep your screen on all the time unless you manually shut it down using the sleep/wake button.
62
App Authentication
To unlock the DMX outputs of the eCast app requires a one-time authentication
process. To do this you must connect your IPad to the Wi-Fi network of an Elation 4 Cast DMX Bridge then start the eCast app. The eCast app will automatically
connect and detect the 4 Cast DMX Bridge and then unlock the DMX outputs of the app. This only needs to be done one time. In the eCast settings there is a row
that shows whether or not the app has been authenticated. Look at the “Settings” chapter at the beginning of this manual for details.

63
Contacts
Information and specifications in this document are subject to change without
notice. Elation Professional and KMX Inc. assume no responsibility or liability for any errors or inaccuracies that may appear in this manual.
Elation Professional World Headquarters 6122 S Eastern Ave.
Los Angeles, CA. 90040 323-582-3322
866-245-6726 Web site: www.elationlighting.com
Email: [email protected]
Elation Professional - Europe Junostraat 2
6468 EW Kerkrade
Netherlands Tel: +31 45 546 85 66
Web site: http//www.elationlighting.eu/
© Elation Professional ® 2018 All rights reserved. © KMX Inc. 2018 All rights reserved.
64
Revision History 1.0 First release.
1.1 Fix minor bugs. 1.2 Fix minor bugs.
Allow empty steps at end of recorded flash chase.
1.3 Fix minor bugs.
Add ability to select or unselect groups of fixture buttons. Add “Clear” function for all button pages.
Improve the way scenes fade out when toggled off.
Add ability to start a new universe when auto patching.