Embed Size (px)
DESCRIPTION
Membahas Google Apps
Citation preview
teq.com
All Things Google
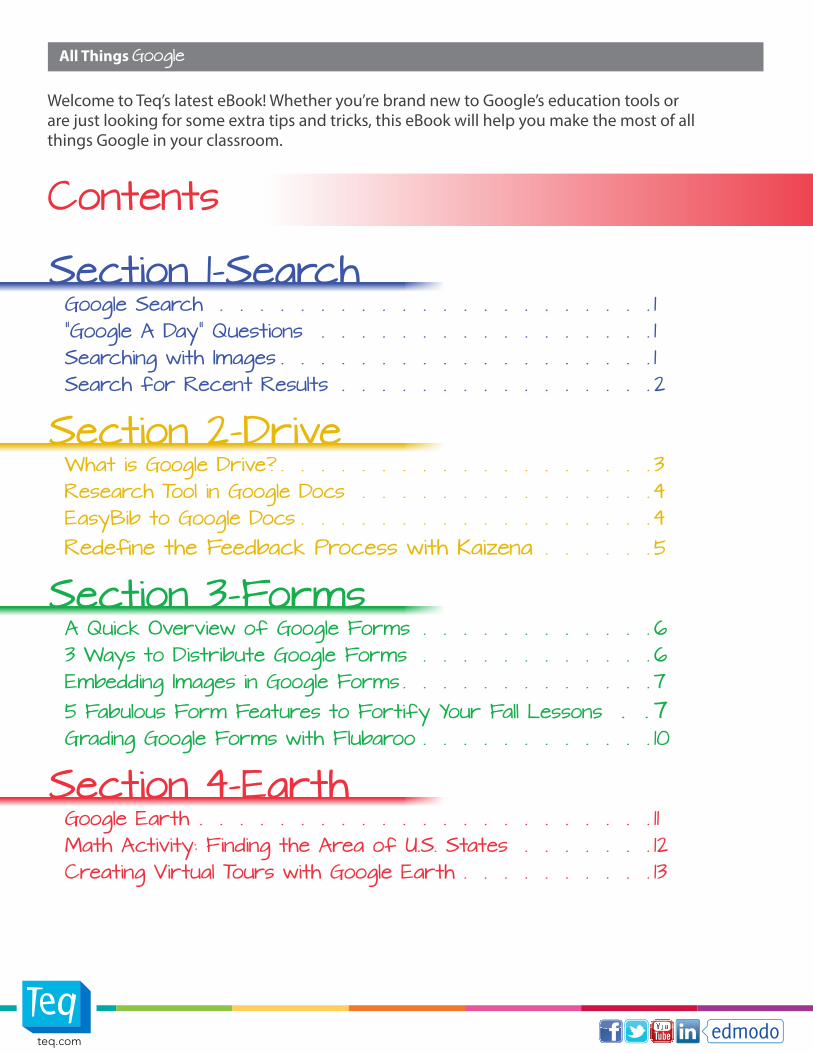
Contents
Section 1-Search Google Search 1 "Google A Day" Questions 1 Searching with Images 1 Search for Recent Results 2
Section 2-Drive What is Google Drive? 3 Research Tool in Google Docs 4 EasyBib to Google Docs 4 Redefine the Feedback Process with Kaizena 5
Section 3-Forms A Quick Overview of Google Forms 6 3 Ways to Distribute Google Forms 6 Embedding Images in Google Forms 7 5 Fabulous Form Features to Fortify Your Fall Lessons 7 Grading Google Forms with Flubaroo 10
Section 4-Earth Google Earth 11 Math Activity: Finding the Area of U.S. States 12 Creating Virtual Tours with Google Earth 13
Welcome to Teq’s latest eBook! Whether you’re brand new to Google’s education tools or are just looking for some extra tips and tricks, this eBook will help you make the most of all things Google in your classroom.
1
teq.com
All Things Google
SearchSection 1
"A Google A Day" Questions
Trying to enhance your students’ research and creative thinking skills? A Google a Day (www.agoogleaday.com) may be able to help. A Google a Day is a daily search puzzle that can be solved using some creativity and clever search skills on Google. Using Google to find the answer is not only allowed—it’s encouraged! A new question is posted everyday, and printed weekdays above The New York Times crossword puzzle. Each day’s puzzle offers search tips and features used to solve the question. These questions are challenging and require the right questions be asked to find the solution.
To prevent spoilers from appearing as you search the web, A Google A Day uses a special version of Google, called Deja Google, “[A] wormhole inspired time machine that enables you to solve today's puzzle spoiler free by searching the Internet as it existed before A Google a Day launched.” This way, someone’s recent blog post about finding the answer won’t spoil the fun.
Introduce A Google a Day to your students, and watch as they accept the challenge to become more savvy searchers!
Searching with Images
You’ve probably searched Google Images by typing in some term and scrolling through images to find what you're looking for. But did you know you can search Google Images with a picture you already have? Simply navigate to Google Images (images.google.com), and drag and drop an image file into the search bar. Google will do its best to find a match.
Wondering how this can enhance your class? What about a local biology exploration? Have your students investigate plants around the school or at home, and snap a picture of the plants in the area. Back in the classroom, they can use Google to identify the plants and begin their research.
12 * 2
50 ft to m
filetype:pdf
weather New York
define cat
site:teq.com
Google SearchDid you know you can be more specific when searching with Google? Using search operators (support.google.com/websearch/answer/136861) can help you specify your search terms to get exactly what you need. Check out a few of these examples:
Calculate: returns product and the web calculator
Convert: returns conversion and web convert tool
Filetype: add after search terms to return PDF files
Weather: will return the weather forecast, in this case "New York"
Define/Dictionary: will return the definition of the word, in this case "cat"
Site-specific search: will return results from a specific site, in this case "teq.com"
2
teq.com
All Things Google
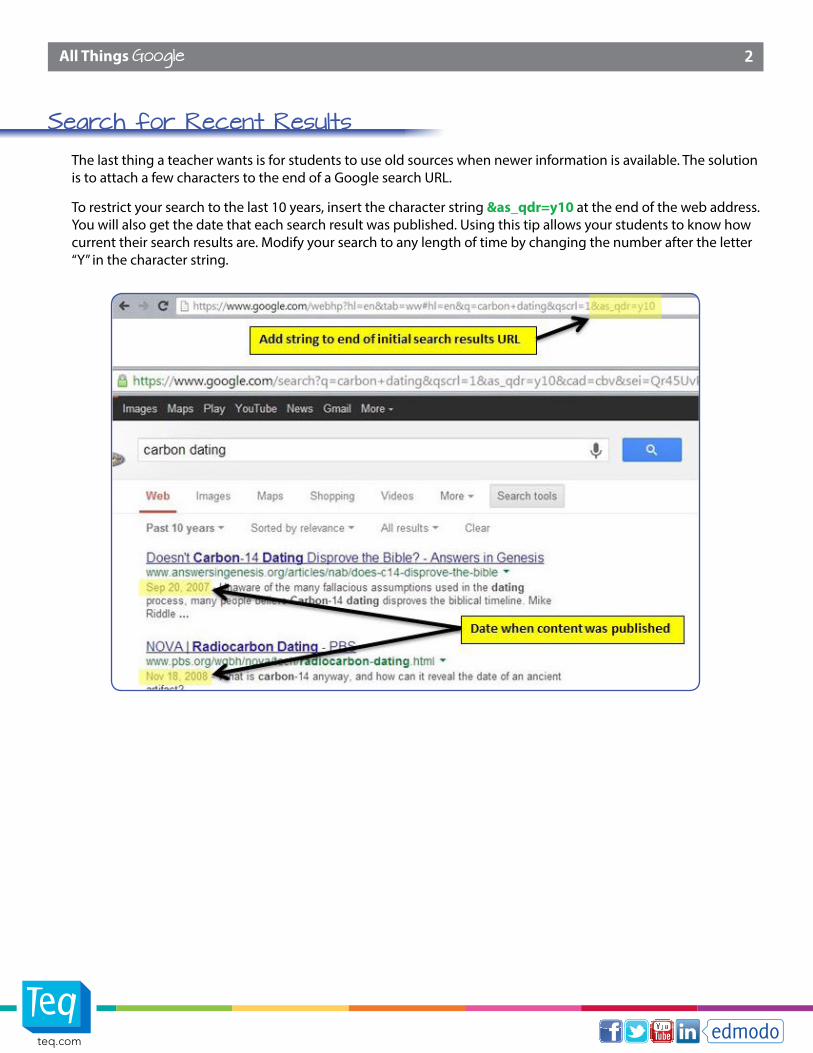
Search for Recent ResultsThe last thing a teacher wants is for students to use old sources when newer information is available. The solution is to attach a few characters to the end of a Google search URL.
To restrict your search to the last 10 years, insert the character string &as_qdr=y10 at the end of the web address. You will also get the date that each search result was published. Using this tip allows your students to know how current their search results are. Modify your search to any length of time by changing the number after the letter “Y” in the character string.
3
teq.com
All Things Google
Section 2 Google Drive
What is Google Drive?
Google Drive is a cloud-based storage, sharing, and collaboration solution that allows you to access word processing files, spreadsheets, presentations, drawings, and more through a browser on any web-enabled device.
Google Drive eliminates the need for email attachments. With Drive, you can instantly share files or folders from any device. Once you’ve shared that file, you and your students will be able to collaborate on the file in real time.
To fully-utilize Google Drive, you’ll need to create a free account. Already using Gmail? Great! You’re good-to-go. If you’re using a different email provider, you can use your existing email address to create your Google account. Either way, it’s free, and with it you’ll get 15GB of storage for all your files, mail, photos, and videos.
Google Drive provides students and teachers with an easy way to collaborate -- a key 21st century skill. It allows for continuous feedback throughout the creation process. It’s no longer write, turn in, wait, review, and revise. With Drive, the entire process is transparent and collaborative—from brainstorming to the final draft.
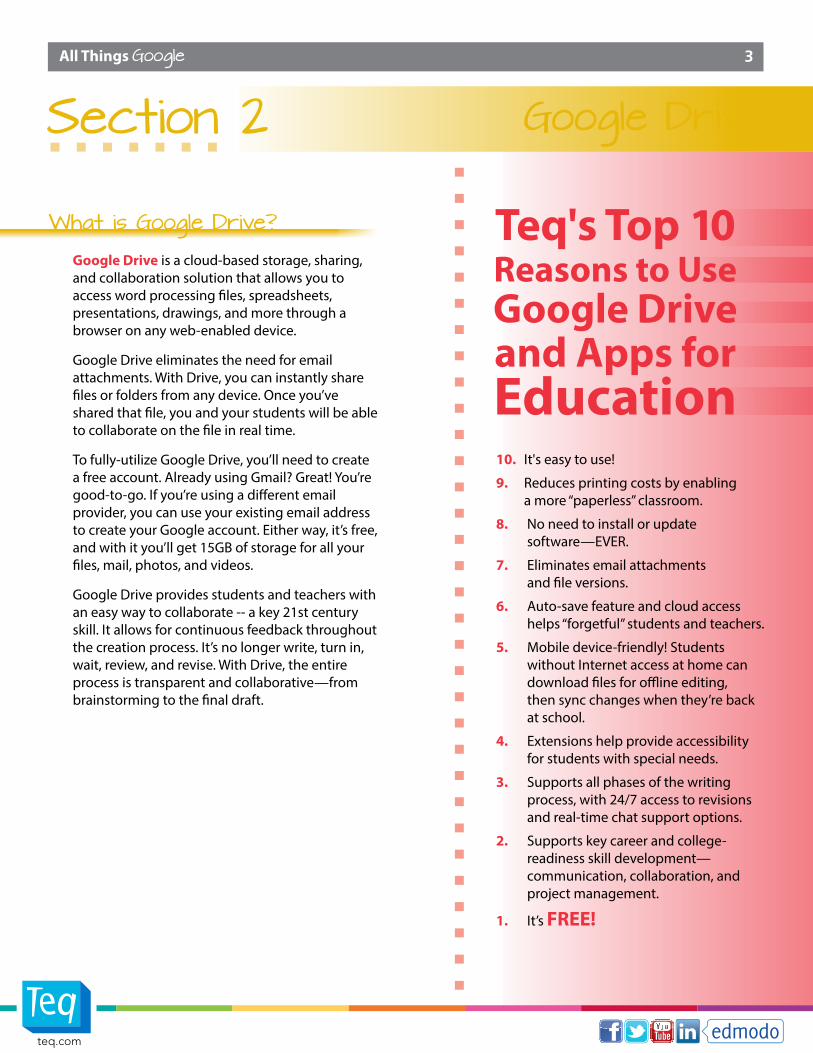
10. It's easy to use!
9. Reduces printing costs by enabling a more “paperless” classroom.
8. No need to install or update software—EVER.
7. Eliminates email attachments and file versions.
6. Auto-save feature and cloud access helps “forgetful” students and teachers.
5. Mobile device-friendly! Students without Internet access at home can download files for offline editing, then sync changes when they’re back at school.
4. Extensions help provide accessibility for students with special needs.
3. Supports all phases of the writing process, with 24/7 access to revisions and real-time chat support options.
2. Supports key career and college-readiness skill development—communication, collaboration, and project management.
1. It’s FREE!
Teq's Top 10 Reasons to Use Google Drive and Apps for Education

4
teq.com
All Things Google
Research Tool in Google Docs Looking for information about the Common Core Standards? Students writing their final research papers for your class? Google Doc’s Research panel can help you and your students search for anything on the web, including images (which can be filtered by specific usage rights), and quotes. Simply highlight the word or phrase you’d like to research, right-click, and select the research option. The research panel will open to the right of your document.
Users can choose to preview (or open) the link, insert a hyperlink into a document, or create a citation to the source, straight from your results list within the research tool. This tool will create a footnote citation for a source in just one click.
EasyBib to Google Docs
One of the anchor standards of the Writing strand of the Common Core Standards (www.corestandards.org/ELA-Literacy/CCRA/W) is Research to Build and Present Knowledge, which means that research papers will most likely find their way into your curriculum. However, many students tend to struggle with the process of collecting and citing their research properly.
Enter EasyBib (www.easybib.com) — a website that quickly creates citations using different styles for a variety of media. EasyBib is an excellent classroom tool because
• It’s easy to use. Type in a search term and the results are listed on the page. A menu on the left side of the page will list
source categories such as web sites, journal articles, and online databases, and show the number of results for each.
• It understands a variety of sources. In addition to the source menu, you’ll be able to click on tabs that will sort the results by academic, online,
or all sources.
• Its ability to create citations. Once you’ve explored a source, you can return to the search results and click on the Cite It button. This will
create your citation and place it in a bibliography.
• It easily integrates with Google Docs. Click on the Save to Google Docs button at the top of your bibliography list. When you do this, you’ll
be prompted to grant access to EasyBib from Google Docs. Alternatively, there is a dropdown at the top of your bibliography list that will allow you to check only certain citations that will be exported to your Google Docs account. Using either method, you’ll be able to create your research report, and if you’re working collaboratively, you can invite others to add to your Google Doc. We recommend waiting until all your sources are gathered before exporting your citations.
5
teq.com
All Things Google
Redefine the Feedback Process with KaizenaBack in May, we posted about improving feedback with an app for Google Drive called Voice Comments. Since its release, this useful tool has helped educators provide more personalized and meaningful feedback to students in their Google Documents. Rather than having to navigate through a sea of red ink, or click through and read comment after comment, the Voice Comments app took the entire feedback process and turned it into a conversational review. Thus, the process of providing feedback was made more efficient, and the experience of receiving feedback was more engaging.
To say that the creators of Voice Comments (formerly 121writing.com, now Kaizena) take feedback very seriously is an understatement, for sure. Over the past several months, they have been ambitiously analyzing feedback from teachers and, on September 10, during a live broadcast on Teachercast.tv, they officially released a completely redesigned user experience.
The new name, Kaizena, comes from the Japanese philosophy of “continuous improvement,” which truly demonstrates their commitment to redefining how teachers provide feedback to students using 21st century tools.
At first look, the Kaizena interface is sleek and simple. There are several enhancements to the original Voice Comments app. You now have the ability to choose a Document from your Google Drive directly from the Kaizena site, a much clearer process for sharing feedback with collaborators. They’ve also added two new comment types — text comments and [web] resources — to help provide more “actionable” feedback, giving students specific items to follow through with. Other additions to the service include a resource library, for items that can be reused to save time, and a nifty new threaded comments view to facilitate two-way, continuous discussions.
Perhaps the biggest change (and the most important) is the general usability of the feedback tools. Users can now highlight sections of a document before leaving the feedback, which makes the process unbelievably easier for both sender and receiver. Here is a video at how to use Kaizena to provide personalized, targeted and actionable feedback to students.
A major goal for the staff at Kaizena is for teachers to be able to “provide a clear path for students to improve.” As educators today, we are gifted with access to incredible technology tools, and, as such, our goal must be to utilize whatever we can to improve the work we do to engage our students. Kaizena is one of those tools that is certainly worth a look, especially if your students struggle with their response to current feedback methods. Give it a try and let us know what you think!
6
teq.com
All Things Google
Google FormsSection 3
A Quick Overview of Google Forms Google Forms is a tool within your Google Drive that allows you to create forms, surveys, and quizzes. You can easily share what you create with others, and have them complete your forms online. Google Forms also allows you to easily collect all the responses in a spreadsheet, making it perfect for collecting data in your classroom.
Here are some classroom uses:
• Peer reviews of classmate presentations or projects
• Student evaluations for both formal and informal assessments
• Exit tickets–as students leave class, they can fill out a Google Form to show what they learned that day
• Data collection for analysis–have students create their own Google Form to collect data and have them track the results of an experiment
3 Ways to Distribute Google FormsOnce your Google Form is created, you’ll have to decide how you’d like to share it with your students. Here are a few ways to make it easy for your students to access the form from a computer or any web-enabled device:
1. Email - All Google Forms and other Google Documents have the Share feature in the upper right-hand corner. When sharing the “Live Form,” you are prompted to put in email addresses, which may populate from your contacts. This will email the Google Form to any recipient you choose.
2. QR Code - Turn the “Live Form” URL into a QR code that anyone can scan with a mobile device. Using websites like QR Stuff (www.qrstuff.com) or Google’s own URL shortener (www.goo.gl, click on the details link after creating the shortened URL), you can create a QR code that can be printed out and displayed in the classroom or handed out to students to scan. Place QR codes around the classroom at different activity or research centers to assess student learning as they are traveling around the room. After the students complete a task at a center, they can scan a QR code to bring them to an assessment form.
3. Web Address (URL) - Give students access to the link you’ve created by posting it where they can view it from a computer or web-enabled device. Creating a classroom website, Edmodo (www.edmodo.com) group, Schoology (www.schoology.com) Classroom, wiki space, or even posting the link to popular social media like Twitter or Facebook can give your students quick and easy access to the “Live Form.” There are plenty of URL shorteners (www.goo.gl) on the Internet to simplify the link to the form.
Google Forms are part of Google Drive, but have so many uses and features that they deserve their own section in this eBook.
7
teq.com
All Things Google
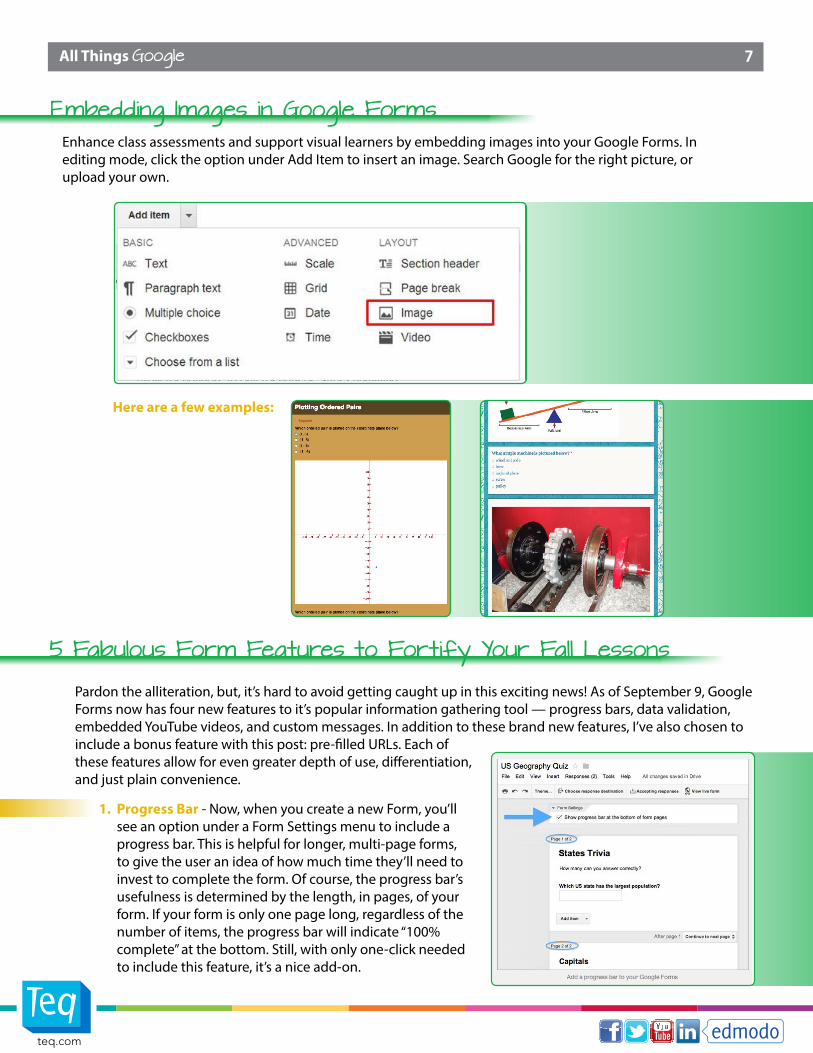
Embedding Images in Google Forms Enhance class assessments and support visual learners by embedding images into your Google Forms. In editing mode, click the option under Add Item to insert an image. Search Google for the right picture, or upload your own.
Here are a few examples:
5 Fabulous Form Features to Fortify Your Fall LessonsPardon the alliteration, but, it’s hard to avoid getting caught up in this exciting news! As of September 9, Google Forms now has four new features to it’s popular information gathering tool — progress bars, data validation, embedded YouTube videos, and custom messages. In addition to these brand new features, I’ve also chosen to include a bonus feature with this post: pre-filled URLs. Each of these features allow for even greater depth of use, differentiation, and just plain convenience.
1. Progress Bar - Now, when you create a new Form, you’ll see an option under a Form Settings menu to include a progress bar. This is helpful for longer, multi-page forms, to give the user an idea of how much time they’ll need to invest to complete the form. Of course, the progress bar’s usefulness is determined by the length, in pages, of your form. If your form is only one page long, regardless of the number of items, the progress bar will indicate “100% complete” at the bottom. Still, with only one-click needed to include this feature, it’s a nice add-on.

8
teq.com
All Things Google
2. Data Validation - I’m going to admit, this is my favorite of the new updates! You may have experienced this when filling out an online form before: you enter your phone number, email address, etc., and you get an error message that tells you to format it a specific way. That’s data validation at work — the form field is programmed to accept specific items in specific formats.
So how will this help you and/or your students? Think immediate feedback. In this video, you’ll see an example of how to use data validation to provide immediate feedback.
There are several other ways to use data validation, such as character count limits in paragraph responses, accepting custom ranges of numeric values, and more. You can find more specific information about each of the options here.
3. Embed YouTube Video - Several months ago, Google gave us the ability to include images in Forms, which, at the time, was one of the most highly requested features from users. As with most things, users asked for even more, and Google listened. As of last week, if you’re sending a Form and you want feedback on a video, or perhaps you’re creating an assessment and would like students to respond to questions about a video, you can easily embed from YouTube (Only videos hosted on YouTube are currently supported.) in just a few steps.
Under the Add Item dropdown, select Video. Next, you can perform a search directlyfrom the popup window, or you can choose to copy-and-paste from another window or tab. Either way, after you click Done, the video will embed itself into your Form, and you’ll have the option to add a title and caption. Like images, this features adds to the differentiation choices and assessment options, or it could provide a great peer review platform for student projects.
9
teq.com
All Things Google
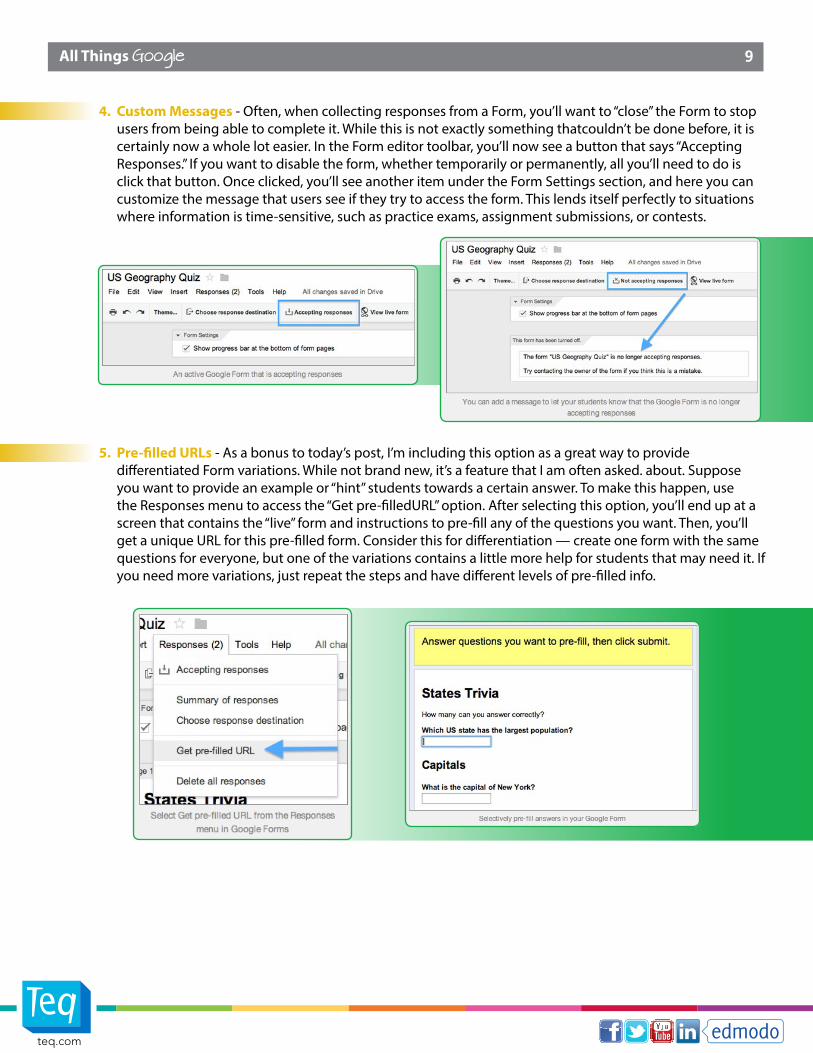
4. Custom Messages - Often, when collecting responses from a Form, you’ll want to “close” the Form to stop users from being able to complete it. While this is not exactly something thatcouldn’t be done before, it is certainly now a whole lot easier. In the Form editor toolbar, you’ll now see a button that says “Accepting Responses.” If you want to disable the form, whether temporarily or permanently, all you’ll need to do is click that button. Once clicked, you’ll see another item under the Form Settings section, and here you can customize the message that users see if they try to access the form. This lends itself perfectly to situations where information is time-sensitive, such as practice exams, assignment submissions, or contests.
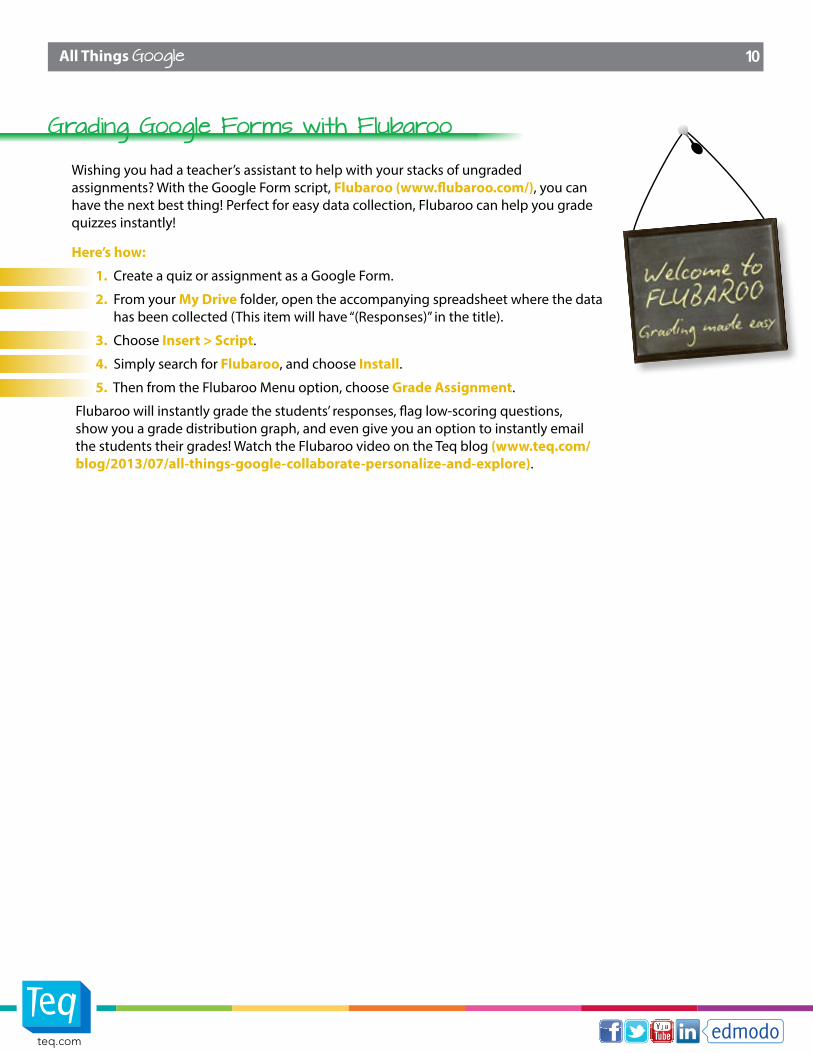
5. Pre-filled URLs - As a bonus to today’s post, I’m including this option as a great way to provide differentiated Form variations. While not brand new, it’s a feature that I am often asked. about. Suppose you want to provide an example or “hint” students towards a certain answer. To make this happen, use the Responses menu to access the “Get pre-filledURL” option. After selecting this option, you’ll end up at a screen that contains the “live” form and instructions to pre-fill any of the questions you want. Then, you’ll get a unique URL for this pre-filled form. Consider this for differentiation — create one form with the same questions for everyone, but one of the variations contains a little more help for students that may need it. If you need more variations, just repeat the steps and have different levels of pre-filled info.
10
teq.com
All Things Google
Grading Google Forms with Flubaroo
Wishing you had a teacher’s assistant to help with your stacks of ungraded assignments? With the Google Form script, Flubaroo (www.flubaroo.com/), you can have the next best thing! Perfect for easy data collection, Flubaroo can help you grade quizzes instantly!
Here’s how:
1. Create a quiz or assignment as a Google Form.
2. From your My Drive folder, open the accompanying spreadsheet where the data has been collected (This item will have “(Responses)” in the title).
3. Choose Insert > Script.
4. Simply search for Flubaroo, and choose Install.
5. Then from the Flubaroo Menu option, choose Grade Assignment.
Flubaroo will instantly grade the students’ responses, flag low-scoring questions, show you a grade distribution graph, and even give you an option to instantly email the students their grades! Watch the Flubaroo video on the Teq blog (www.teq.com/blog/2013/07/all-things-google-collaborate-personalize-and-explore).
11
teq.com
All Things Google
Google EarthSection 4 Google EarthGoogle Earth is the amazing free application that puts the world at your fingertips. It's a great application for your computer, and even better on an interactive whiteboard. Start using Google Earth by downloading the software (googleearth.com) and running the quick installation.
Once installed, simply launch Google Earth, and you are ready to explore!
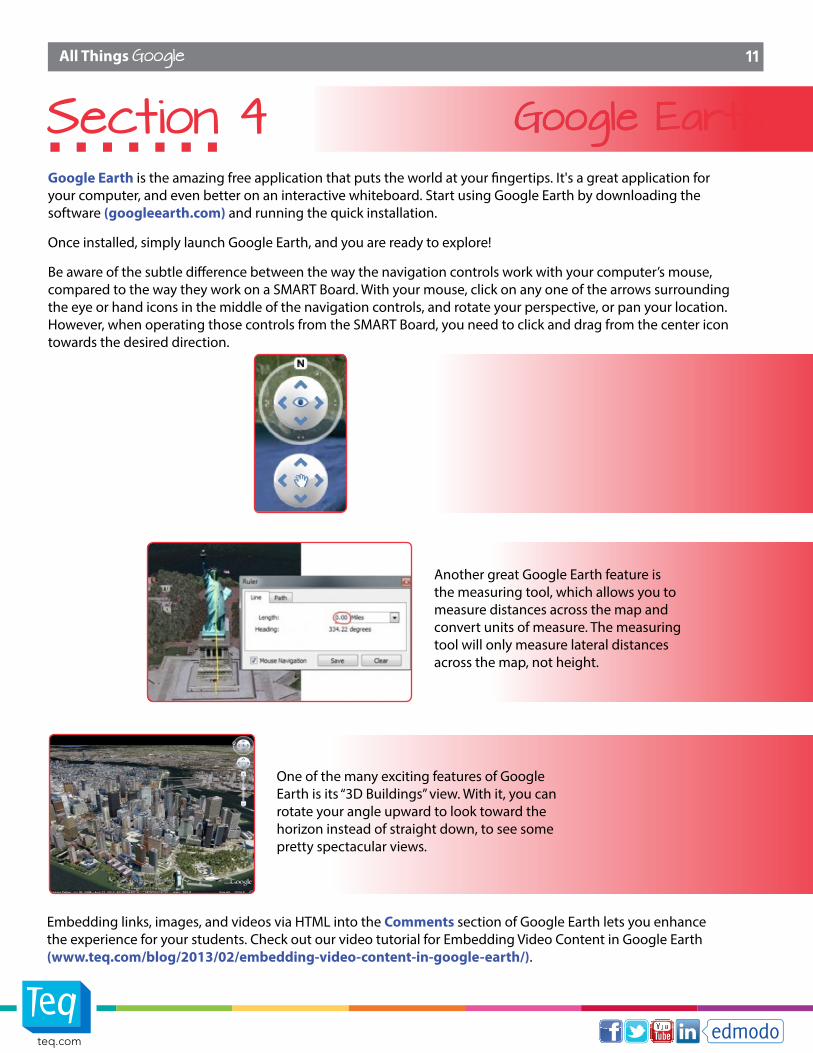
Be aware of the subtle difference between the way the navigation controls work with your computer’s mouse, compared to the way they work on a SMART Board. With your mouse, click on any one of the arrows surrounding the eye or hand icons in the middle of the navigation controls, and rotate your perspective, or pan your location. However, when operating those controls from the SMART Board, you need to click and drag from the center icon towards the desired direction.
Another great Google Earth feature is the measuring tool, which allows you to measure distances across the map and convert units of measure. The measuring tool will only measure lateral distances across the map, not height.
One of the many exciting features of Google Earth is its “3D Buildings” view. With it, you can rotate your angle upward to look toward the horizon instead of straight down, to see some pretty spectacular views.
Embedding links, images, and videos via HTML into the Comments section of Google Earth lets you enhance the experience for your students. Check out our video tutorial for Embedding Video Content in Google Earth (www.teq.com/blog/2013/02/embedding-video-content-in-google-earth/).
12
teq.com
All Things Google
Math Activity: Finding the Area of U.S. StatesGoogle Earth is a great tool for teaching geography and social studies content, but it becomes apparent very quickly that the almost-endless features can also lend themselves to other subject areas and interdisciplinary activities.
In the webinar, Google Earth Revisited (www.teq.com/video/teq-webinar-google-earth-revisited), we covered a Common Core-based (6.G.1) activity on finding the area of geometric shapes and irregular polygons using different states in the United States. Students can easily complete this activity on an interactive whiteboard or computer.
Follow the steps outlined in our online video, Finding the Area of Geometric Shapes Using Google Earth (www.teq.com/blog/2013/03/finding-the-area-of-geometric-shapes-using-google-earth/), to see how, using the polygon and line tools, students can estimate the area of different states like Colorado, Nevada, and Tennessee, and then look up the actual area to see how close their measurements are.
Google Lit Trips (www.googlelittrips.org) allows students to virtually enter the settings of the books they are reading in class! Google Lit Trips has over 40 trips organized by grade level that students and teachers can download and run through Google Earth. The website provides step-by-step instructions on how teachers can create their own lit trips.
Google Earth Lit Trips
13
teq.com
All Things Google
Creating Virtual Tours with Google Earth
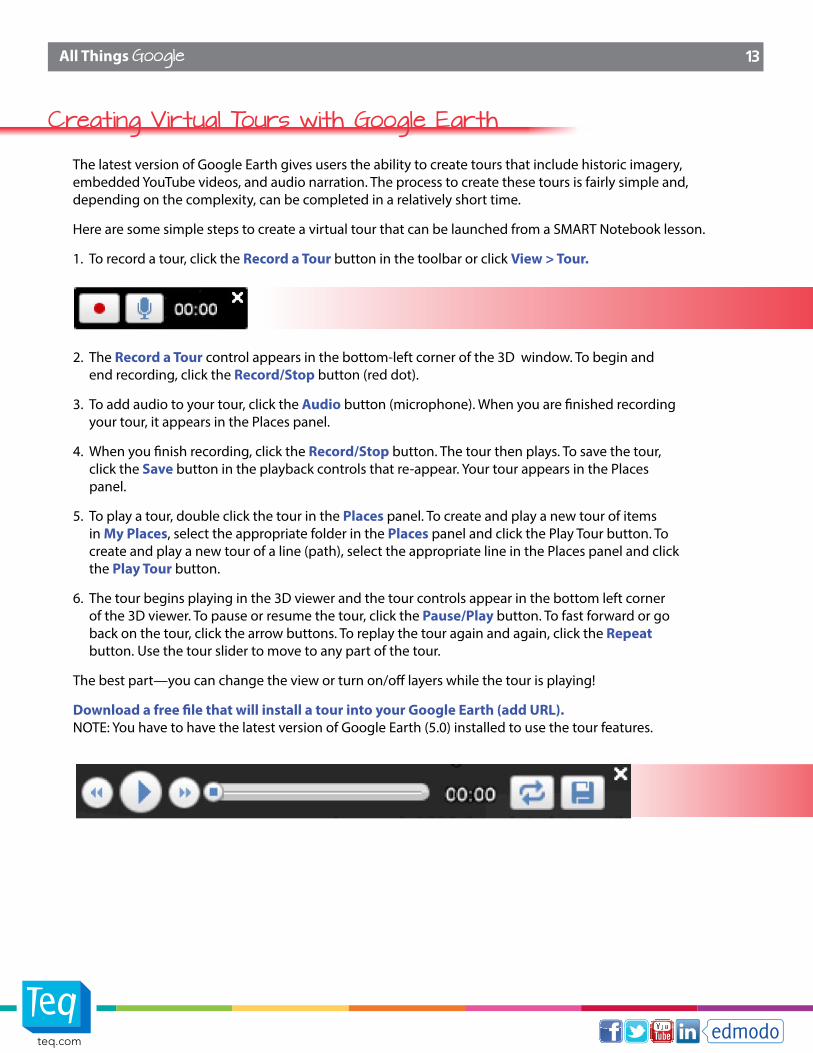
2. The Record a Tour control appears in the bottom-left corner of the 3D window. To begin and end recording, click the Record/Stop button (red dot).
3. To add audio to your tour, click the Audio button (microphone). When you are finished recording your tour, it appears in the Places panel.
4. When you finish recording, click the Record/Stop button. The tour then plays. To save the tour, click the Save button in the playback controls that re-appear. Your tour appears in the Places panel.
5. To play a tour, double click the tour in the Places panel. To create and play a new tour of items in My Places, select the appropriate folder in the Places panel and click the Play Tour button. To create and play a new tour of a line (path), select the appropriate line in the Places panel and click the Play Tour button.
6. The tour begins playing in the 3D viewer and the tour controls appear in the bottom left corner of the 3D viewer. To pause or resume the tour, click the Pause/Play button. To fast forward or go back on the tour, click the arrow buttons. To replay the tour again and again, click the Repeat button. Use the tour slider to move to any part of the tour.
The best part—you can change the view or turn on/off layers while the tour is playing!
Download a free file that will install a tour into your Google Earth (add URL). NOTE: You have to have the latest version of Google Earth (5.0) installed to use the tour features.
The latest version of Google Earth gives users the ability to create tours that include historic imagery, embedded YouTube videos, and audio narration. The process to create these tours is fairly simple and, depending on the complexity, can be completed in a relatively short time.
Here are some simple steps to create a virtual tour that can be launched from a SMART Notebook lesson.
1. To record a tour, click the Record a Tour button in the toolbar or click View > Tour.
14
teq.com
All Things Google
About Teq Professional Development
© 2
013
TeqRequest a PD Consultation
Meet The Teachers:
Matt Thaxter
Joseph Sanfilippo
Tim Hodkinson
Matt Ringh
877.455.9369 │ teq.com
Teq provides personalized PD to increase achievement in our schools. We work with educators to support a Common Core curriculum, while fostering creativity in the twenty-first century learning environment. We leverage instructional technology to increase digital literacy, differentiate instruction, and promote college- and career-readiness.
![M.leichtova(2014)[149][178] Misunderstanding Russia - Russian Foreign Policy and the West (Google eBook)](https://img.pdfslide.us/doc/110x75/55cf8eae550346703b9484fc/mleichtova2014149178-misunderstanding-russia-russian-foreign-policy.jpg)


![M.li, K.M.kemburi (2014)[272][326] New Dynamics in US-China Relations Contending for the Asia Pacific (Google eBook)](https://img.pdfslide.us/doc/110x75/55cf8eae550346703b948639/mli-kmkemburi-2014272326-new-dynamics-in-us-china-relations-contending.jpg)


![J.v.esch Et Al. (the Haague C. for Strategic S.) (2014)[228][241] Strategic Monitor 2014 Four Strategic Challenges (Google eBook)](https://img.pdfslide.us/doc/110x75/55cf8eae550346703b948629/jvesch-et-al-the-haague-c-for-strategic-s-2014228241-strategic.jpg)


![[Ebook gratis] 10 técnicas de Marketing para Captar Leads - Google Drive](https://img.pdfslide.us/doc/110x75/553c408e550346b94f8b48c2/ebook-gratis-10-tecnicas-de-marketing-para-captar-leads-google-drive.jpg)