Embed Size (px)
DESCRIPTION
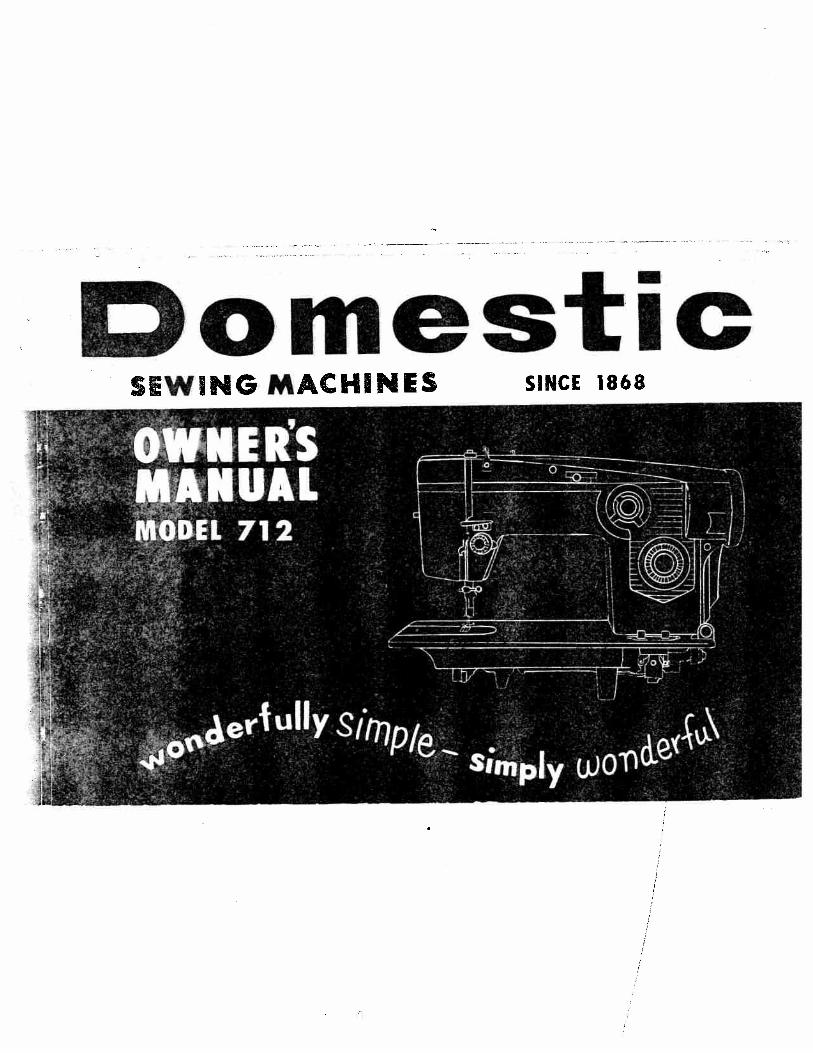
Manual for Eaton Viking or Domestic sewing machine manual model 712. Date approx. 1969.
Citation preview
89813NIS
oi’s
S3NIHVWONIMS
Iwo

DOMESTIC SEWiNG MACHINE CO., INC.Cleveland, Ohio 44111
DOMESlC SEWING MACHINES1470 Birchmount Road
Scarborough, Ontario, Canada
You are now the owner of a new Domestic zigzag sewing machine, the mcstversatile machine of its type you can possess. Buttonholes, monogramming, darning,overcasting and creative embroidery ar done with ease and speed.
) aid you in obtaining the greatest performance from your machine thisbook on its care and use has been written for you. Read the instructions carefully.s a thorough understanding of your machine will reward you with many hours of;oubte-i:ee creative sewing.
Time-saving attachments such as rufflers, binders, edgestitchers and cordbg feet, to complement the accessories furnished are available from your dealer.
I
I
/
1
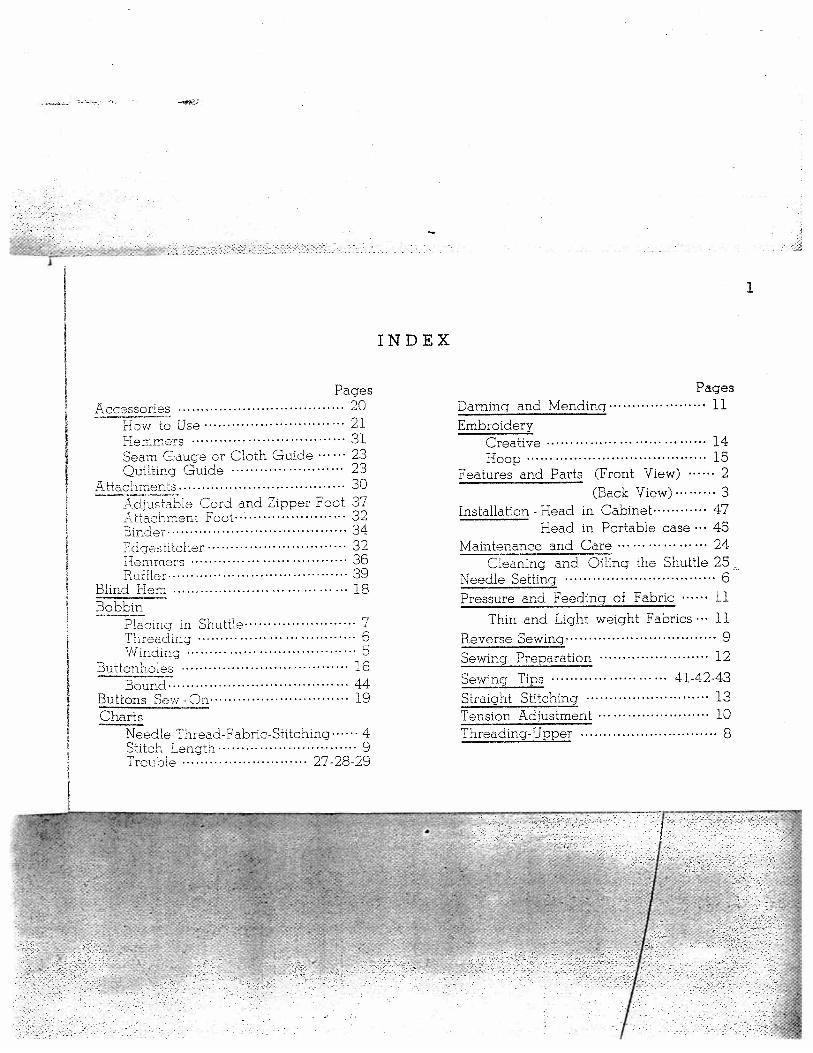
PagesAccessories 20
- Howtoilse 21Hemmers 31Seani Gauge or Cloth Guide 23Quilting Guide 23
Attachments 30djustanie Cord and Zipper Foot 37
Ataohment Foot 32Binde 34Ednestitcher 32Hemmers 36Rudter 39
Blind Horn 18Bobbin
Piacng m Shuttle 7Threadng 6Winding 5
Buttonholes 16Bound 44
Buttons Sew-On 19Charts
Needle-Thread-Fabric-Stitching 4Stitch Length 9Trouble 27-28-29
INDEX
PagesDarning and Mending 11
EmbroideryCreative 14Hoop 15
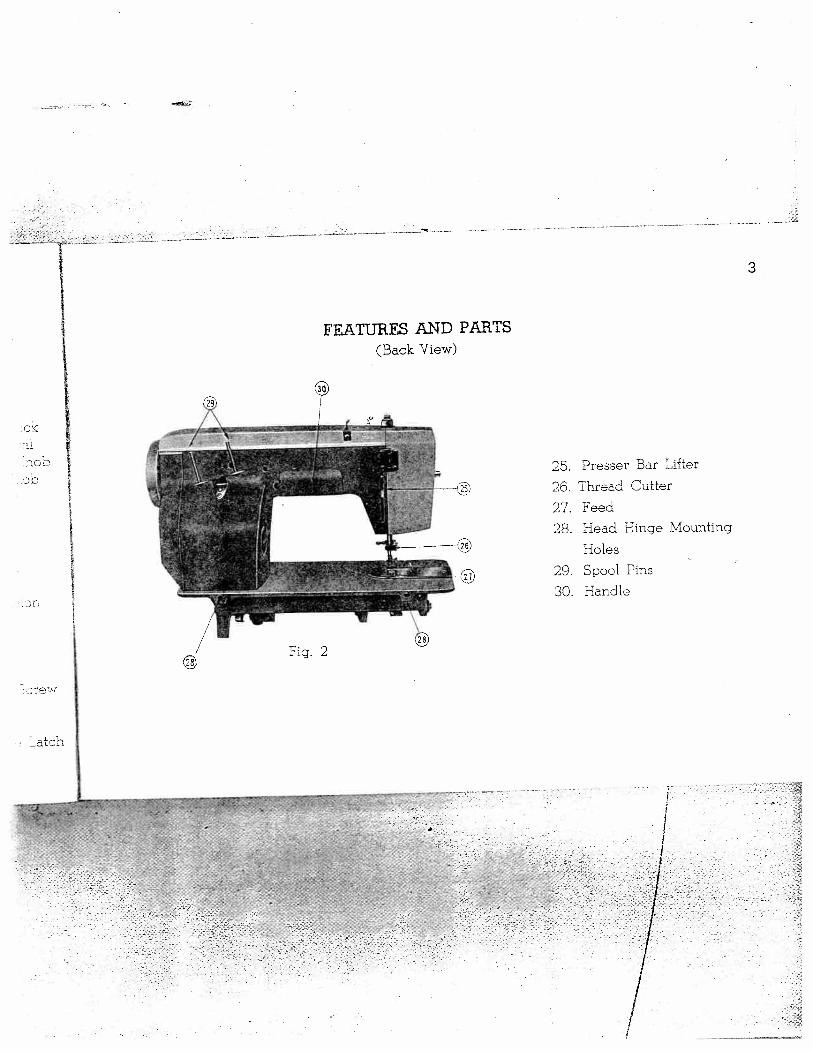
Features and Parts (Front View) 2
(Back View) 3Installation - Head in Cabinet 47
Head in Portable case .•• 45Maintenance and Care 24
Cleaning and Oiling the Shuttle 25 -
Needle Setting 6
Pressure and Feeding of Fabric 11
Thin and Light weight Fabrics ... 11
Reverse Sewing 9
Sewing Preparation 12
Sewing Tips 41-42-43
Straight Stitching 13Tension Adjustment 10Threading-’Jpper 8
0
- -
-- -
U
4

2
FEATURES AND PARTS(Front View) 1. Thread Take-up Lev
2. Pressure Release(Darning)
3. Arm Thread Guides4. Blind Stitch Lever5. Zigzag Stitch Width6. Zigzag Stitch Width7. Stitch Width Cpntroi8. Buttonhole Control9. Bobbin Winder Cov€
1C. Hand Wheel11. Clutch12. Cover Release Buttoi13. Stitch Length Contrc14. Push Buttod Reverse15. Bobbin Winding Ten16. Drop Feed Buttons17. Needle Plate18. Cover Plate19. Presser Foot20. Presser Foot Thumb21. Needle Clamp22. Tension Regulator23. Thread Bar and Face24. Sew Lite Switch
— . F
4.
/
7
®, ,,
Fig. 1
(jt\j
)Jj
D
o0 0 0
P1
CJ2
CD
Z
U—
0
b
Cf2
00
(D0
0)
(4)
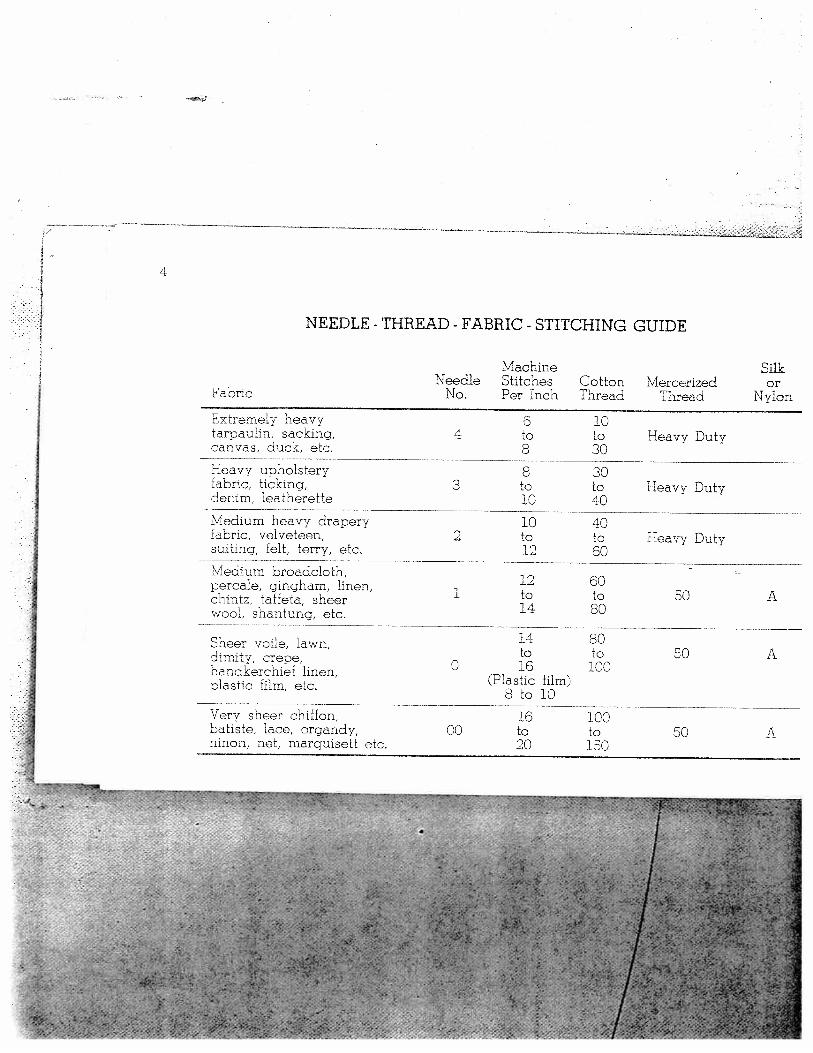
NEEDLE - THREAD - FABRIC - STITCHING GUIDE
Machine SilkNeedle Stitches Cotton Mercerized or
Fabric No. Per Inch Thread Thread Nylon
Extremely heavy 6 10tarpaulin, sacking, 4 to to Heavy Dutycanvas, ducK, etc. 3 30Heavy upholstery 8 30fabric, ticking, 3 to to Heavy Dutydenim, leatherette 10 40Medium heavy drapery 10 40fabric, velveteen, to to Heavy Dutysuiting, felt, terry, etc. 12 60Medium broadcloth,
12 60percale, gingham, linen, 1 + Achintz, taffeta, sheer j° oo 0
wool, shantung, etc.
Sheer voile, lawn, 14 80to to 50 Aaimity, crepe,
0 16 100nanakercn:ef linen,-.- (Plastic 1dm,olasuc film, etc.
8 to 10
Very sheer chiffon, 16 100batiste, lace, organdy, 00 to to 50 Aninon, net, marquisett etc. 20 150
0
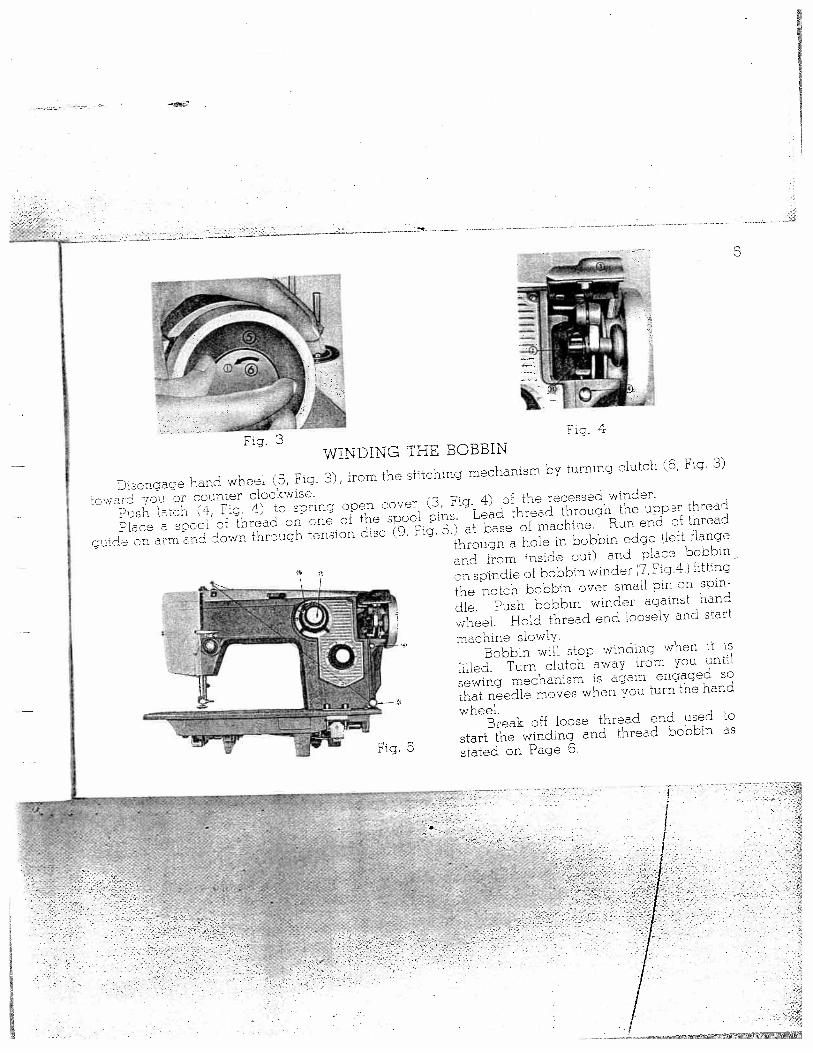
Fig. 3WINDING THE BOBBIN
0,,- it5.
fhsengage hand wheel 5, Fig. 3 from the s:itching mechanism by turning clutch 6, Fig. 3
towaro rou or counter clockwise.
Push stch 4, Ftg. 4) to spring oPen cover 3, Fig. 4 of the recessed winder.
Pioce a snoc of thread on one of the spool pins. Lead thread through the uppor thread
guide on crot and down through tension oisc 9, Fig. 5; at base of machine. Run end of thread
through a hole in bobbin edge left flange
dod from inside out) and claco bobbin -
n spindle of bobbin winder 7, Fig.4, fitting
he notch bobbin over small pin on spin
dle. Push bobbin winder against hand
wheel. Hold thread end loosely and start
machine slowly.Bobbin will stop winding wrien it ts
filled. Turn clutch away from you until
sewing mechanism is again engaged so
that needle moves when you turn the hand
wheel.Break off loose thread end used to
start the winding and thread bobbin as
stated on Page 6
I
.-.
I- ---.
:
-
-:- -
- t:- P -
-
I
4
6
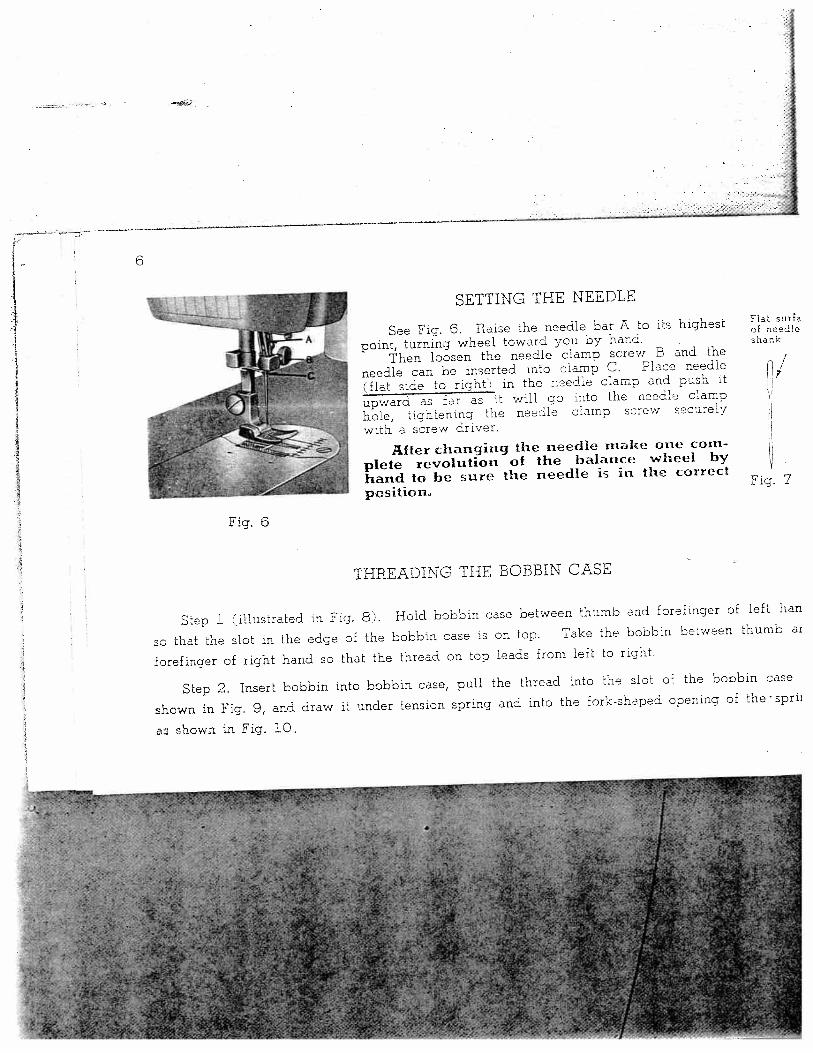
SETTING THE NEEDLE
See Fig. 6. Raise the needle bar A to its highest
point, turning wheel toward you by hand, shank
Then loosen the needle clamp screw S and the
needle can be inserted into clamp C. Place needle /(flat side to right, in the needle clomp and push it
upward as far as it will go intO the needle clamp
hole, tightening the needle damp screw securely
wtth a screw driver.
After changing the needle make one com
plete revolution of the balance wheel by
hand to be sure the needle is in the correct,., .7
posztiong.
Fig. 6
THREADING THE BOBBIN CASE
Step ]. ‘illustrated in Fig. 8’. Hold bobbin case between thumb and forefinger of left han
so that the slot in the edge of the bobbin case is on top. Take the bobbin between thumb am
forefinger of right hand so that the thread on top leads from left to right.
Step 2. Insert bobbin into bobbin case, pull the thread into the slot of the bobbin case
shown in Fig. 9, and draw it under tension spring and into the fork-shaped opening of the sprim
as shown in Fig. 10.
I.
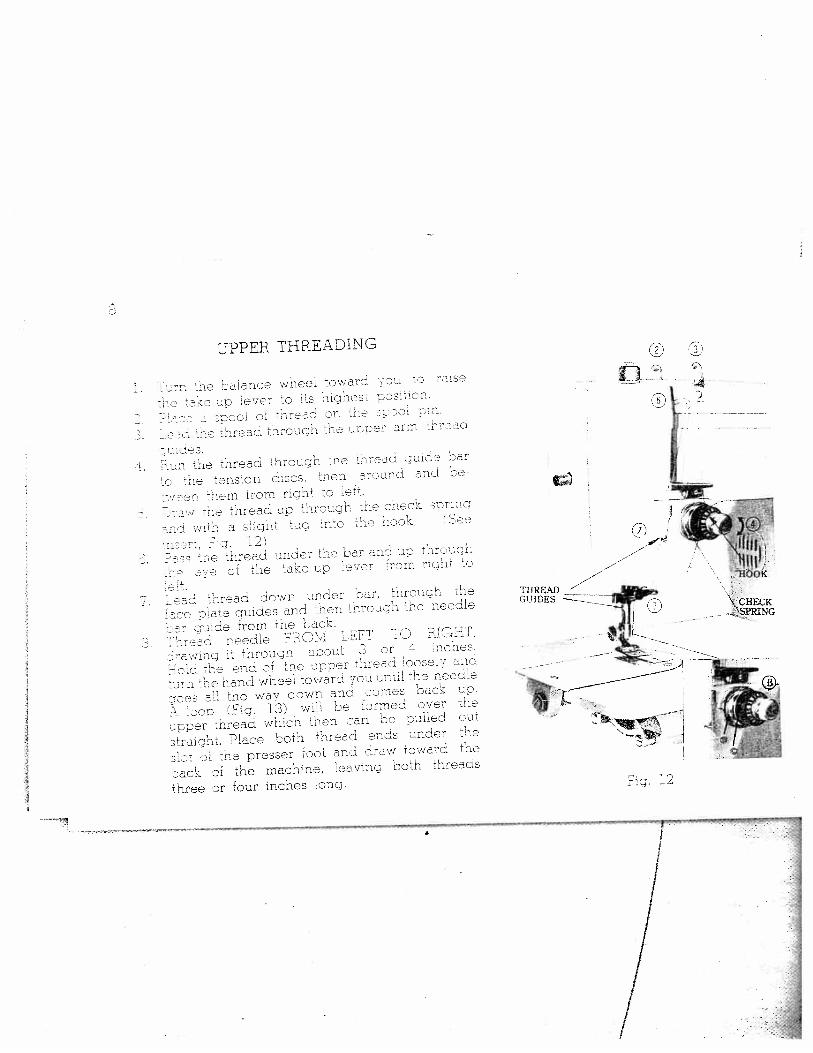
UPPER THREADiNG
000 toe vatance wneO owar0 2500
ow sa c ever to 02 clones’ oOC
520501
tOe :nread :orovnn dse snor w:v r
-n Ii’ ri :he :hreaci hrough he :hreact :uiclo oar
tensIon scs. thn aroortO ans
o oem trom rrqcv ::
- nraa0 to nrvuor toe 00cc rlr1
‘52 tROt a F:gzt 0q rtO Ot .2DK
:c.-so :e :nreao onner toe oar lOt 00
oeOt i0e :ace-:0 oscar 0.20 o.;n:ts
Osree0 sown coder car. tvr:art toe
ece lao vuides and ihen rough the need1
zr’eO veenie thOM ZEF
rsw:ncr 0 :hrouqo aood ro000:.
ow coo -o :00 0002 -: rae: oc’sev: coo
000 Se vend whee owern 100 mtd ‘e needle
cli the woo dawn an: c:es hack on.
ov Fig. 13 cob he Ecrrrosd :ver
ortper toread which ben cars he cuiled out
sreight. hiace both thread ods :nder -he
;1o 01 fle presser loot son drew roward Ose
:000 aS the oacdl00, leaving both threads
three ar four inches long.
U
L‘Tffrr’,
,,0bOK
THREAD
\ccKGUIDESSPpjç,
-
_
$1
Fig. 12
/

I-
9
SETTING THE STITCH LENGTH
The lenath of the stitch is regulated by the dial, shown in Fig. 14. Near 0 is the shorteststitch and 5 is the longest, but the dial may be set at any spot between the markings for avariety of lengths. Turn the dial to the right to lengthen arid to the left to shorten the stitch,The number stitch length you choose is indicated by the pointer.
STITCH LENGTH CHART (APPROXIMATE)
Figures on indicator 0 1 2 3 4 5
Number of stitches per inch No Feeding 30 25 15 8 6
/
1
Fig. 13 Fig. 14
SEWING IN REVERSEWhen you wish to sew backward to tie the threads at the beginning or end of a seam, press
in the button H, Fig. 14, as far as it will go. The machine will sew backward as long as thebutton is held in.
S
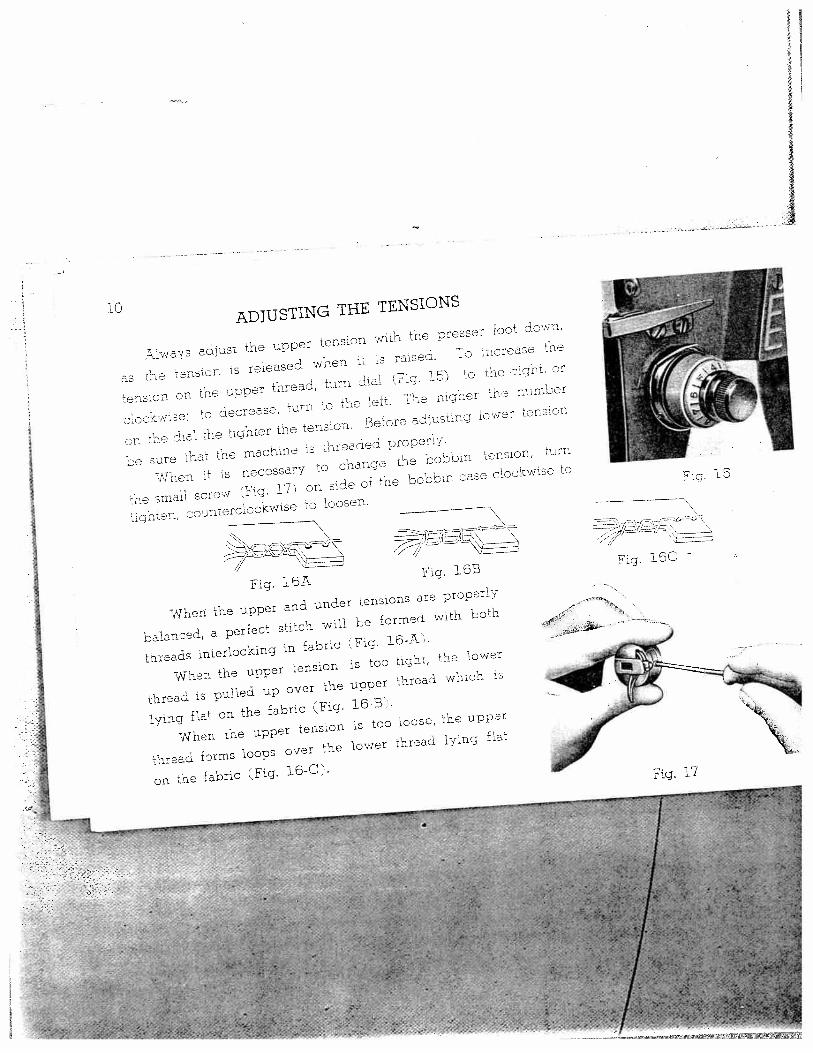
ADJUSTING THE TENSIONS
Aiwa-js adjust the upper tension with the presser foot down,
as the tension is released when it :s raised. To :ncrease the
tension on the upper thread, turn dial (Fig. 151 to tIre right, or
ciocwise; to decrease, turn to the left. The hader the number
on the dial the tighter the tension. Before adjusting lower tenston
Ire sure that the machine is threaded property.
7/hen it is necessary to change the bobbin tension, turn
the small screw ,Fig. 17) on side of the bobbin case ciocbwise to
tighten, counterclocKwise tO loosen.
When the upper and under tensions are properly
balanced, a perfect stitch will be formed with both
threads interlocking in fabric (Fig. 16-k
When the upper tension is too tight, the lower
thread is pulled up over the upper thread which
lying flat on the fabric Fig. 16-B.
When the upper tension is too loose, the upper
thread forms loops over the lower thread lytng flat
on the fabric (Fig. 16-C).
10
1
Fig. 16A
Fig. 15
711o\__N
Fig. 165Fig. 16C
Fig. 17

ADJUSTING PRESSURE AND FEEDING OF FABRIC
GENERAL SEWING. Usually for straight sewing and various embroidery work, the pressure
bar cap or darning release (Fig. 19 is at its lowest position and the feed at its highest level - with
the drop feed button marked UP pressed all the way down. (Fig. 18)
SEWING THIN OR LIGHT WEIGHT FABRICS
When lighter pressure is required to sew satisfactorily on thin
silk or flimsy material, the pressure cap should be about halfway
down. Release all the way by pressing the snap lock A, Fig.
20) and then press cap B down again to half-way spot. Lower
the feed slightly by pressing the DOWN button \Fig. 18 to the
xed line.
DARNING AND MENDING 8
A
Fig. 20
/
11
Fig. 18
I Fig. 19
In order to move the fabric freely in any
direction for darning and mending, release
the pressure cap B completely by pressing
down on the snap lock (A, Fig. 20. Press
DOWN button [Fig. 18) all the way down,
which drops the feed well below the needle
plate. To return feed to normal, press the
UP button all the way down.
- y
12
PREPARING TO SEW
l-iave take-up lever at highest point before starting to sew. Do not try to help the feedingby culling the material as this may deflect the needle and cause it to break.
NEVER run machine without material under presser foot.FLce material and threads in position under the presser ioct and lower the nresser foot. You
re no-,, ready to begin sewing. Ey having the needle a: its hiahest porn:, it is not necessaryo :ouch the hand wheel to start the machine. You merely press the control. The speed of the:aachtne :s regulated by increasing or decreasing the amount of pressure exerted on the control.
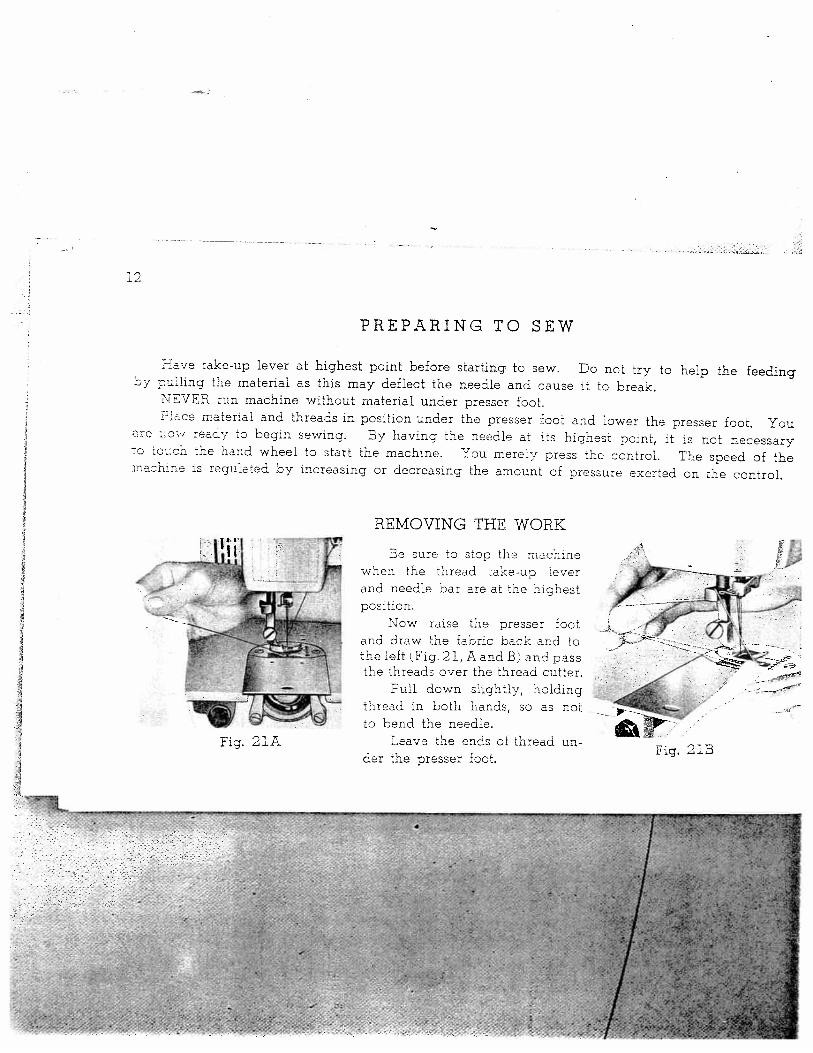
REMOVING THE WORK
13.
r/
Fig. 21A
Be sure to ston the mach:newhen the thread take-up leverand needle bar are at :he h:ghestposition.
Now raise the presser footand draw the fabric back and tothe left Fig. 21, A and B and passthe threads over the thread cutter.
Pull down slightly, holdingthread in both hands, so as notto bend the needle.
Zeave the ends oi thread under the presser foot.
Fig. 21b
1
: -*K
- - -
40 . /
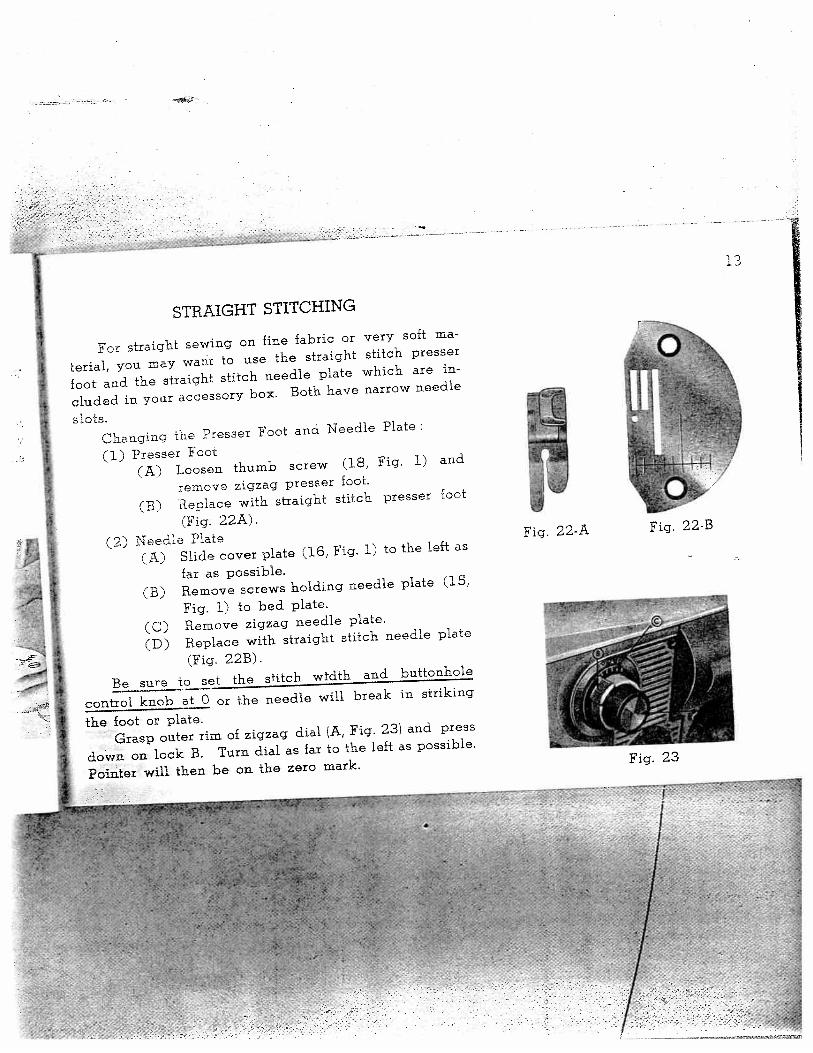
STRAIGHT STITCHING
For straight sewing on fine fabric or very soft ma
terial, you may want to use the straight stitch presser
foot and the straight stitch needle plate which are in
cluded in your accessory box. Both have narrow needle
slots.
Changing the Presser Foot and Needle Plate:
(1) Presser Foot
(A) Loosen thumb screw (18, Fig. 1) and
remove zigzag presser foot.
(3) Replace with straight stitch presser foot
(Fig. 22A).
(2) Needle Plate
(A) Slide cover plate (16, Fig. 1) to the left as
far as possible.
(B) Remove screws holding needle plate (15,
Fig. 1) to bed plate.
(C) Remove zigzag needle plate.
(ID) Replace with straight stitch needle plate
(Fig. 22B).
Be sure to set the sfitch wtdth and buttonhole
control knob at 0 or the needle will break in striking
the foot or plate.
Grasp outer rim of zigzag dial (A, Fig. 23) and press
down on. lock B Turn dial as far to the left as possible
Pointer will then be on. the zero mark
13
Fig. 22-A Fig. 22-B
Fig. 23
/
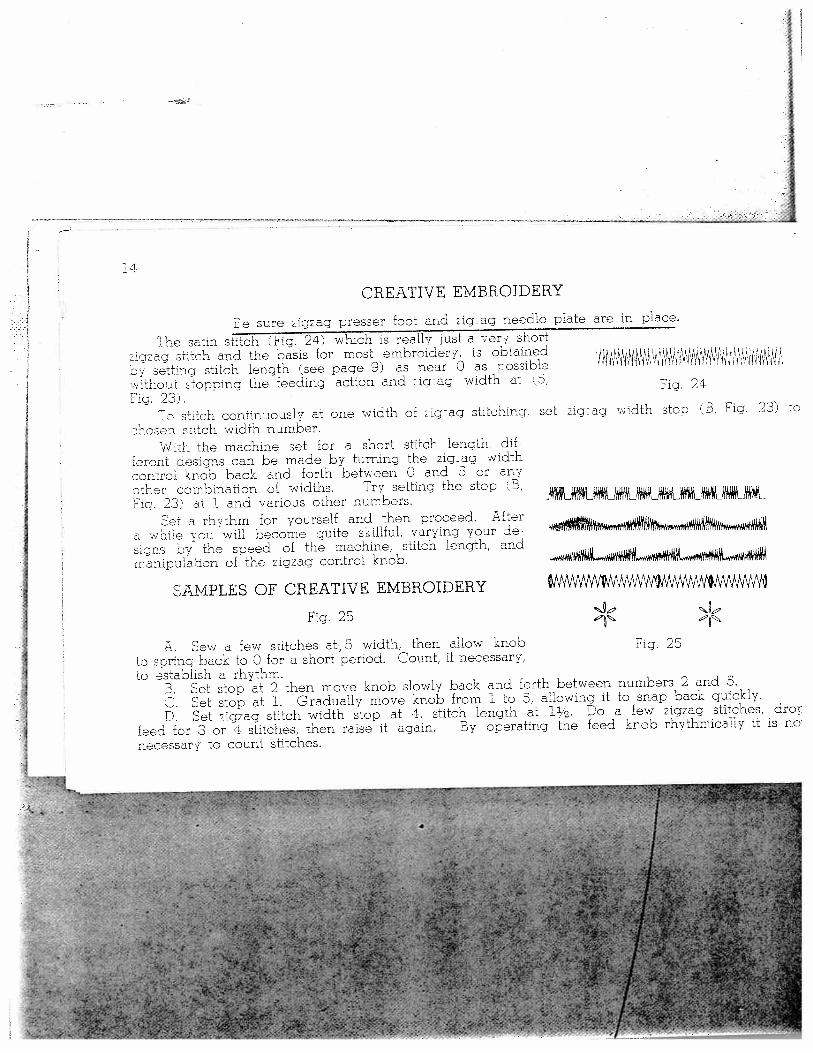
CREATIVE EMBROIDERY
The satin stitch Fig. 24) hich is really just a verf shortigzag szilch and the basis for most embroidery, is obtained
by setting stitch lenqth see page 9) as near C as possiblewithout tiovping the feeding action and igag width at 5,
Fig. 23To s)2ch continuously at one width of :iqag stitching set zigag idth stop B, Fig. 23) to
Aosen ztdch width number.::n the macnine set zor a short m::cn length ci:
brent designs can be made by Lrning the zig:ag widthcontrol knob back and forth beteen C and 5 or any
cobinaticn of widths. Try setting the stop B,Ag, 3 at 1 and various other numbers.
Set a rh7thm for yourself and then proceed. Mterwhile z cu will become quite skillful varying your de
signs by the speed of the machine, stitch length, andmanipulation of the zigzag control knob.
SAMPLES OF CREATIVE EMBROIDERY
A. Sew a few stitches at, 5 width, then allow knob Fig. 25to spring back to C for a short period. Cotcit, if necessary,to eslablish a rhythm.
3. Set stop at 2 then move knob slowly back and forth between numbers 2 and 5.
C. Set stop at 1. Gradually move knob from 1 to 5, allowing it to snap back quickly.
ID. Set zigzag stitch width stop at 4, stitch length at 11’. Do a few zigzag stitches, drop
feed for 3 or 4 stitches, then raise it again. By operating the feed knob rhythmically it is no
necessary to count stitches.
Fe sure zigzag presser foot and zigag needle plate are in place.
Fig. 24
Fig. 25
- —
-T -:____
a
15
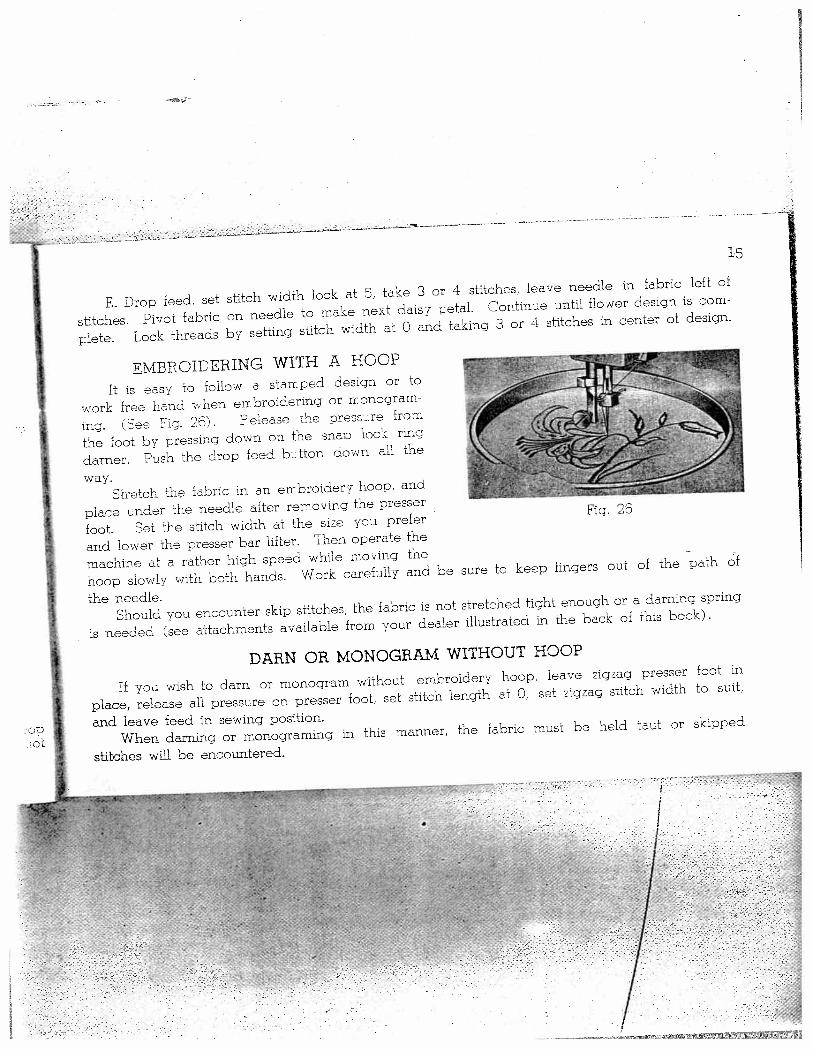
EMBROIDERING WITH A HOOP
it is easy to follow a stamped design or to
work free hand hen en broidering or monogram
mg. (See Fig. 26). Pelease the pressre from
the foot bz pressing down on the snap iocF ring
darner. Push the drop feed button down all the
:Lt,z ‘‘••
2 I
. ;z4I *2-1
ii,,
- -
2
E. Drop feed, set stitch width lock at 5, take 3 or 4 stitches, leave needle in fabric left of
stitches. Pivot fabric on needle to make next daisy vetal. Continue until flo,ver design is corn
plete. Lock threads by setting stitch width at 0 and taking 3 or 4 stitches in center of design.
way,Stretch the fabric in an embroidery hoop, and
place under the needle aiter removing the presser
foot. Set the stitch width at the size you preferFig. 2o
and lower the presser bar lifter. Then operate the
machine at a rather high speed while moving the
hoop slowly with both hands. Work carefully and be sure to keep fingers out of the path of
the needle.Should you encounter skip stitches, the fabric is not stretched tight enough or a darning spring
is needed see attachments available from your dealer illustrated in the back of this book).
DARN OR MONOGRAM WITHOUT HOOP
If you wish to darn or monogram without embroidery hoop, leave zigzag presser foot in
place, release all pressure on presser foot, set stitch length at 0, set zigzag stitch width to suit,
and leave feed in sewing position.
When darning or monograming in this manner, the fabric must be held taut or skipped
stitches will be encountered.
4:- -n
4
21
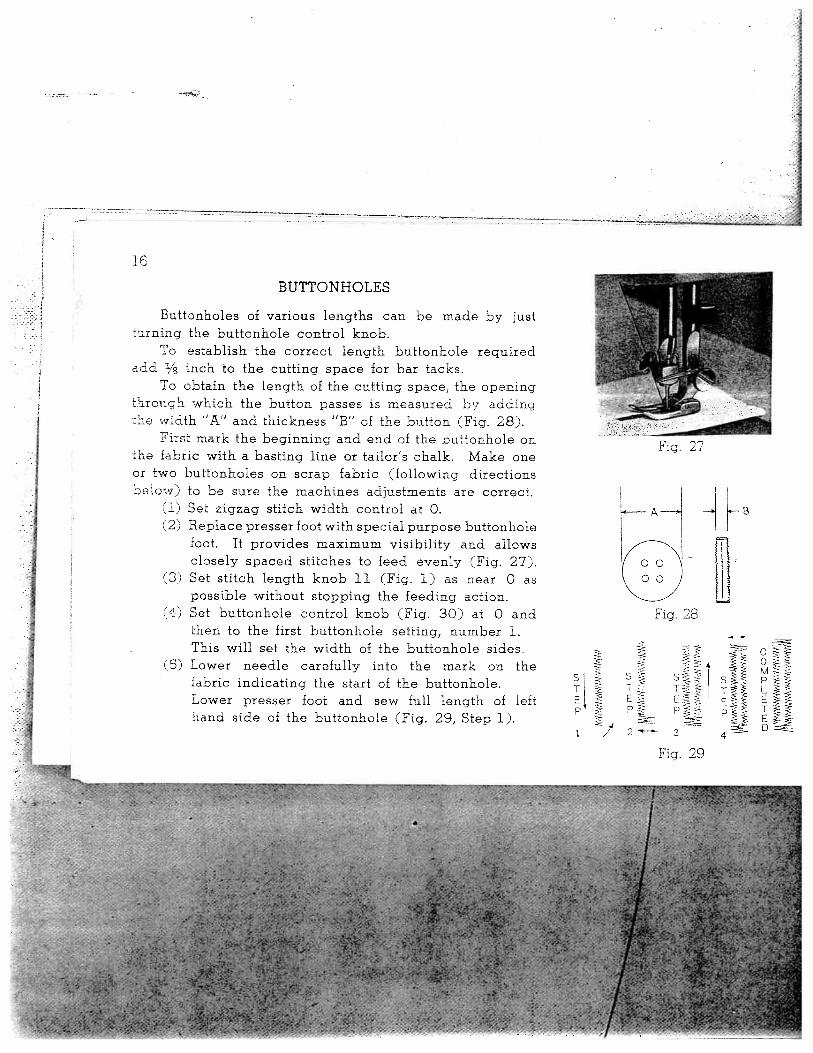
BUTTONHOLES
Buttonholes of various lengths can be made by justturning the buttonhole control knob.
To establish the correct length buttonhole requiredadd 1/8 inch to the cutting space for bar tacks.
To obtain the length of the cutting space, the openingthrough which the button passes is measured by addingthe width “A” and thickness “B” of the button (Fig. 28).
First mark the beginning and end of the buttonhole onthe fabric with a basting line or tailor’s chalk. Make oneor two buttonholes on scrap fabric (following directionsbelow) to be sure the machines adjustments are correct.
(1) Set zigzag stitch width control at 0.(2) Replace presser foot with special purpose buttonhole
foot. It provides maximum visibility and allowsclosely spaced stitches to feed evenly (Fig. 27).
(3) Set stitch length knob 11 (Fig. 1) as near 0 aspossible without stopping the feeding action.
4) Set buttonhole control knob (Fig. 30) at 0 andthen to the first buttonhole setting, number 1.This will set the width of the buttonhole sides.
(5) Lower needle carefully into the mark on thefabric indicating the start of the buttonhole.Lower presser foot and sew full length of lefthand side of the buttonhole (Fig. 29, Step 1).
16
i
48
w.S S
p P
I / 2—- 3
Fig. 29
Si’T
4
o e:PLE IETt:.D
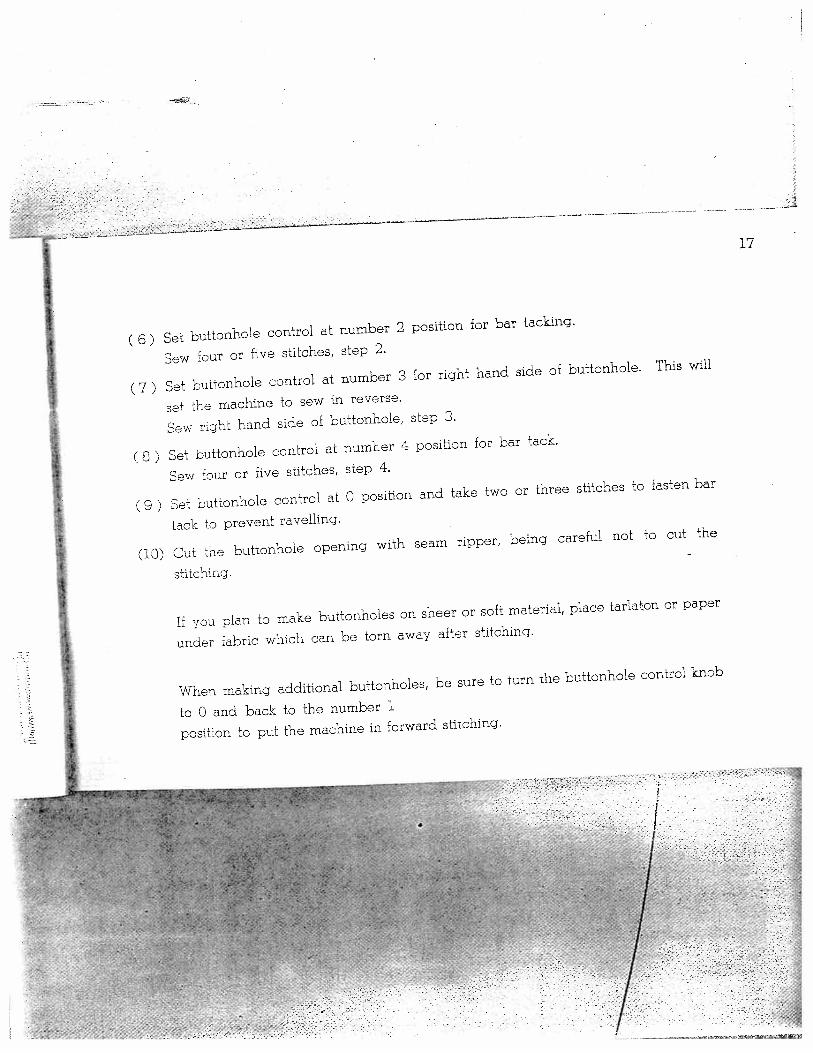
(6) Set buttonhole control at number 2 position for bar tacking.
Sew four or five stitches, step 2.
(7) Set buttonhole control at number 3 for right hand side of buttonhole. This will
set the machine to sew in reverse.
Sew right hand side of buttonhole, step 3.
(8) Set buttonhole control at number 4 position for bar tack.
Sew four or five stitches, step 4.
(9) Set buttonhole control at 0 position and take two or three stitches to fasten bar
tack to prevent ravelling.
(10) Cut the buttonhole opening with seam ripper, being careful not to cut the
stitching.-
If you plan to make buttonholes on sheer or soft material, place tarlaton or paper
under fabric which can be torn away after stitching.
When making additional buttonholes, be sure to turn the buttonhole control knob
to 0 and back to the number 1
position to put the machine in forward stitching.
/
/*
17
I.
I
I
—
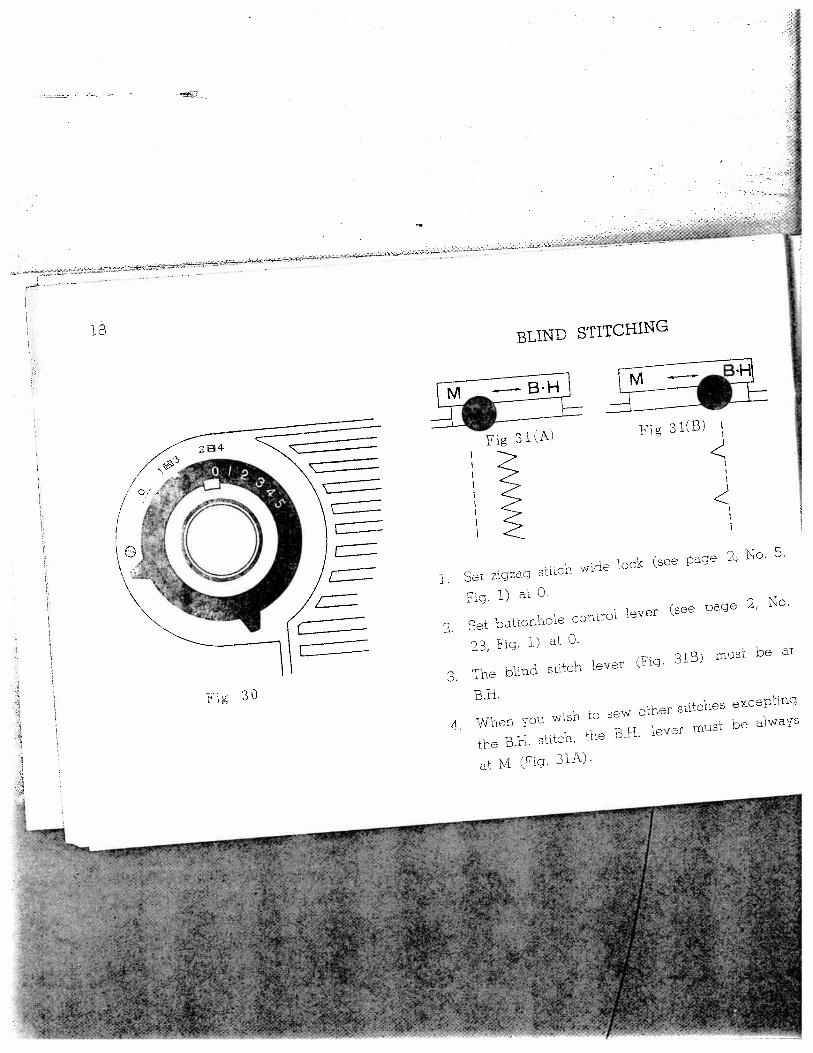
‘S BLIND STITCHING
_— 24 zEE
/
I
_____
7/
(jQ)Fig 3LA)
‘IFig 3ltB)
Fig 30
1. Set zigzag stitch wide lock (see page 2, No. 5,
Fig. 1) at 0.
2. Set buttonhole contro lever see page 2, No.
23, Fig. 1) al 0.
3. The blind stitch lever çFig. 313) must be at
B.H.
4. When you wish to sew other stitches excepting
the B.H. stitch, the 3.31. lever must be always
at M (Fig. 31A).
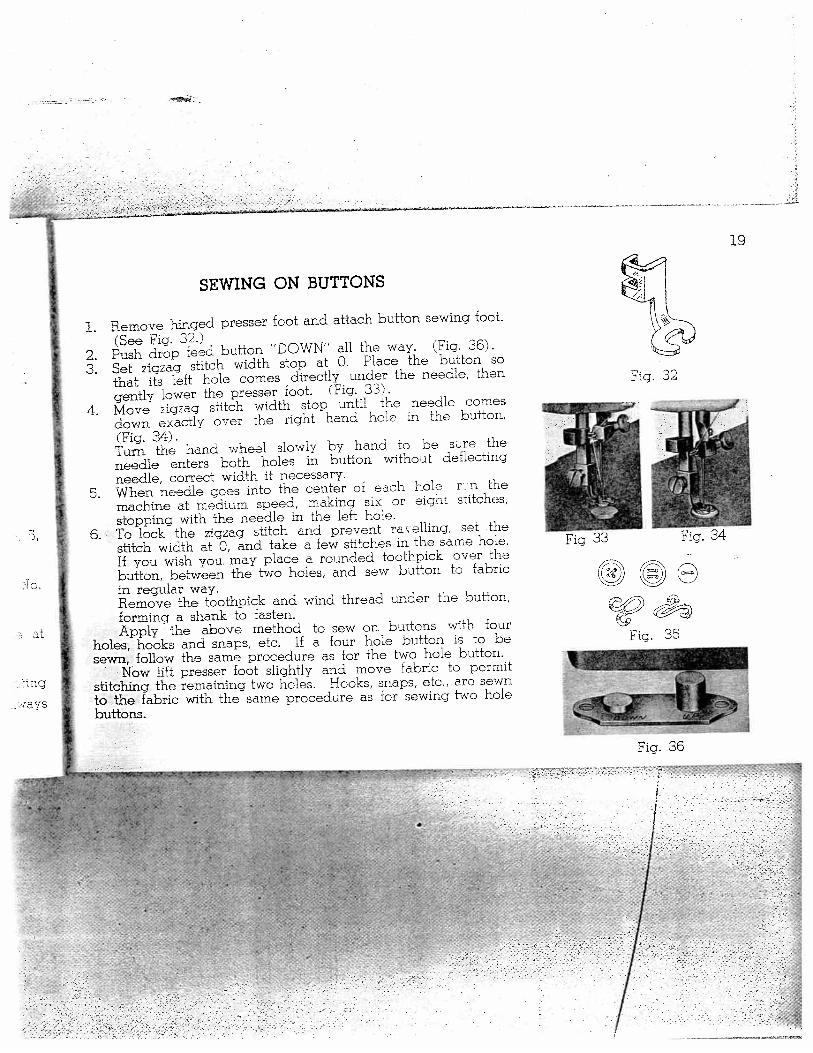
SEWING ON BUTTONS
1. Remove hinged presser foot and attach button sewing foot.
(See Fig. 32.)2. Push drop feed button “DOWN” all the way. (Fig. 36).
3. Set zigzag stitch width stop at 0. Place the button so
that its left hole comes directly under the needle, then
gently lower the presser foot. (Fig. 33).
4. Move zigzag stitch width stop until the needle comes
down exactly over the right hand hole in the button.
(Fig. 34).Turn the hand wheel slowly by hand to be svre the
needle enters both holes in button without deflecting
needle, correct width if necessary.
5. When needle goes into the center of each hole r n the
machine at medium speed, making six or eight stitches,
stopping with the needle in the left hole.
6. To lock the zigzag stitch and prevent ravelling, set the
stitch width at 0, and take a few stiches in the same hole.
If you wish you may place a rounded toothpick over the
button, between the two holes, and sew button to fabric
in regular way.Remove the toothpick and wind thread under the button,
forming a shank to fasten.Apply the above method to sew on buttons with four
holes, hooks and snaps, etc. If a four hole button is to be
sewn, follow the same procedure as for the two hole button.
Now lift presser foot slightly and move fabric to permit
stitching the remaining two holes. Hooks, snaps, etc., are sewn
to the fabric with the same procedure as for sewing two hole
buttons.
F
Fig. 32
Fig. 35
19
Fig. 36
c
F
-‘
h
F
I
/
20
‘-5
3.
4.D.
b.
7.
8.
9.
10.
11.
12.
13.
14.
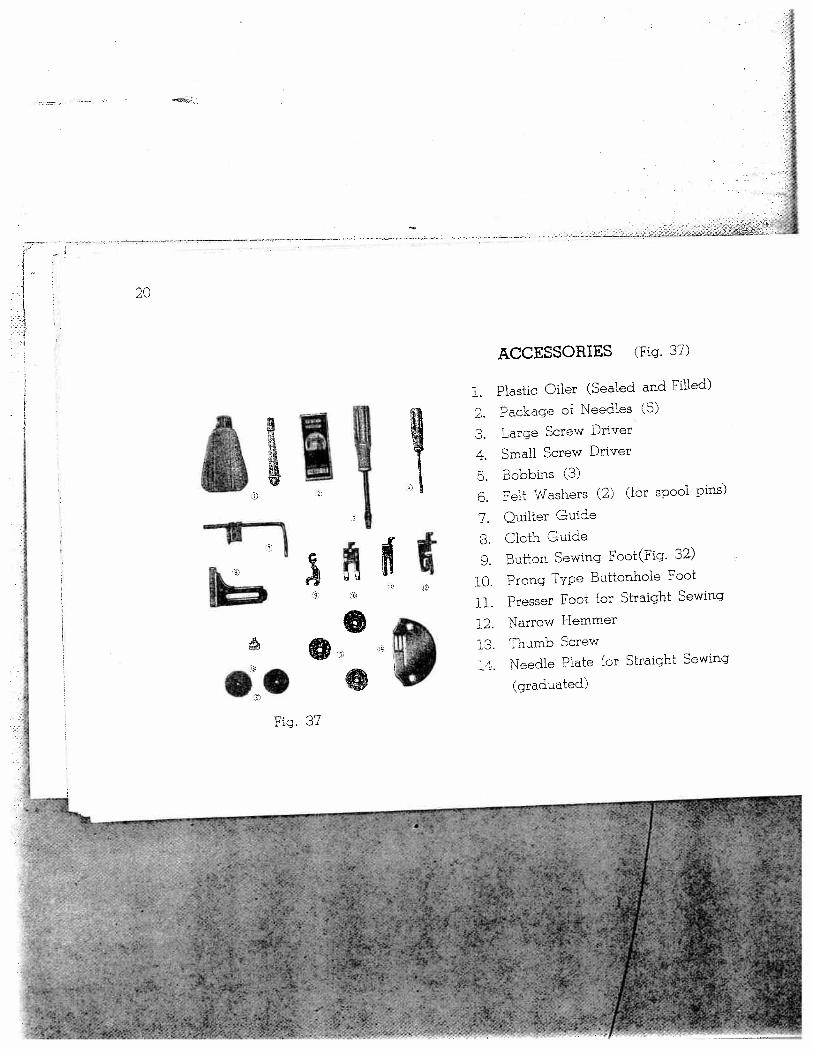
ACCESSORIES (Fig. 37)
05
1. Plastic Oiler (Sealed and Filled)
Package of Needles (5)
Large Screw Driver
Small Screw Driver
Bobbins (3)
Felt Washers (2) (for spool pins)
Quilter Guide
Cloth Guide
Button Sewing Fcot(Fig. 32)
Prong Type Buttonhole Foot
Presser Foot for Straight Sewing
Narrow Hemmer
Thumb Screw
Needle Plate for Straight Sewing
(graduated)
II
1I
•6•
Fig. 37
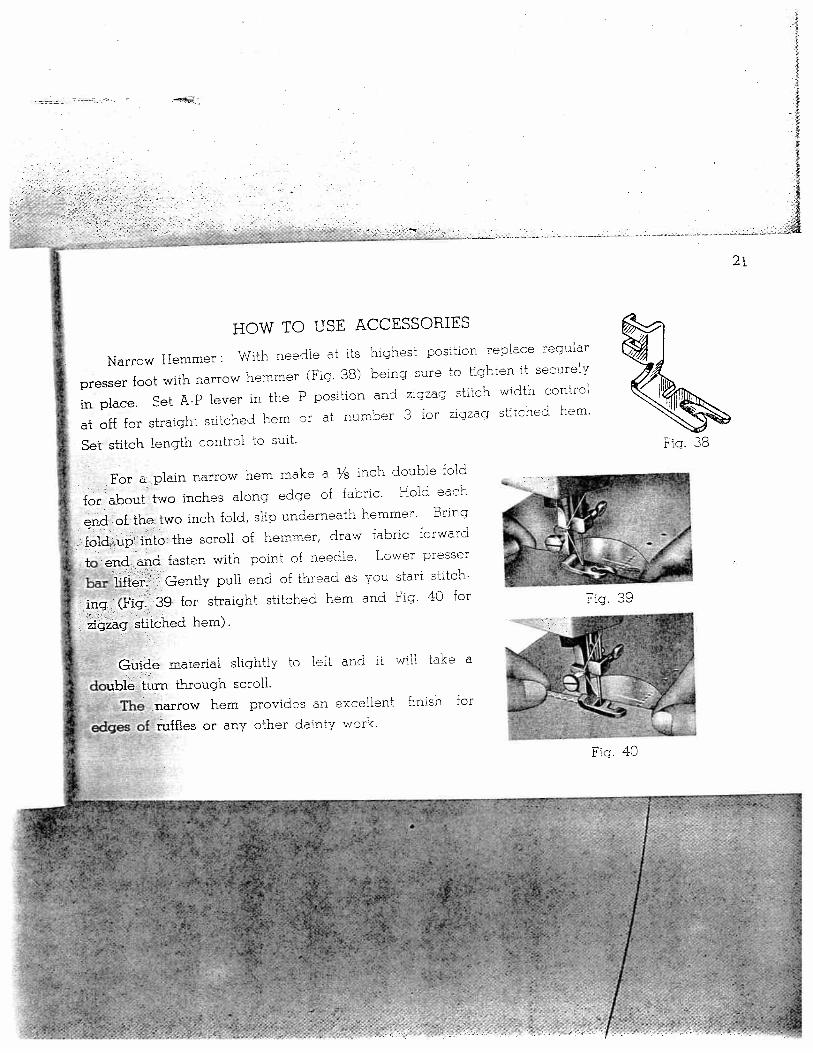
HOW TO USE ACCESSORIES
Narrow Hemmer: With needle at its highest position replace regular
presser foot with narrow hemmer (Fig. 38) being sure to tighten it securely
in place. Set A-P lever in the P position and zigzag stitch width control
at off for straight stitched hem or at number 3 for :igzag stitched hem.
Set stitch length control to suit.
For a plain narrow hem make a inch double fold
for about two inches along edge of fabric. Hold eact
end of the two inch fold, slip underneath hemmer. Brtng
fold up into the scroll of hemmer, draw fabric forward
to end and fasten with point of needle. Lower presser
bar lifter. Gently pull end of thread as you start stitch
ing (Fig. 39 for straight stitched hem and Fig. 40 for
zigzag stitched hem).
Guide material slightly to left and t will take a
double turn through scroll.
The narrow hem provides an excellent finish for
edges of ruffles or any other dainty work.
: : e77
Fr
.
• - I -
- ,..
..- 4•.
2i
I
Fig. 38
Fig. 39
-d
Fig. 40
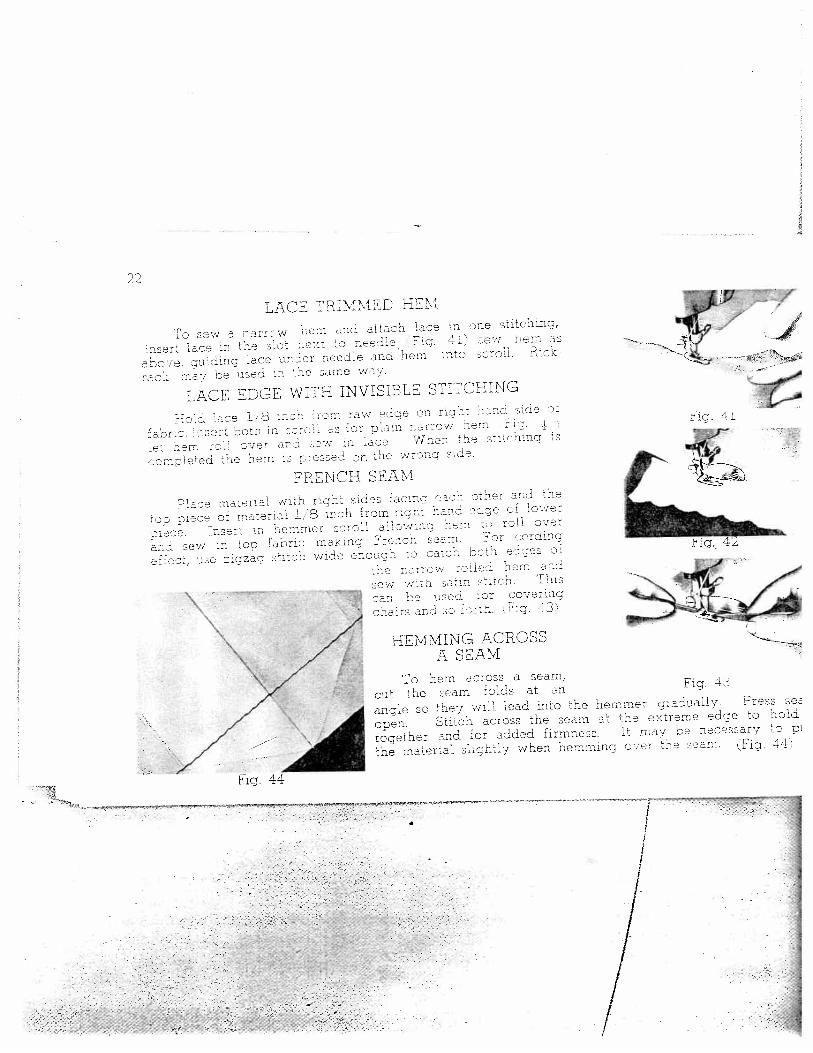
0 StJ C rarrw .rn no attach lace to one stitchmg,
lace In toe s0t us::: ID ::eed F:. 41
coo e yciding lace :n:er cecOle ano hem uto croi. dde
SuZ may Ce IC oe D0ne way
LACE ErGE WITH INVIESLE STTCHING
la:e 8 :0 :r to raw euce so stool sIde o:
:cr ts.airI :yr: ::.
Ia: em ru. :er n::w :0 a. Jnta Ir :chov is
comole:ed :nero: oremed c the :vrcroj s:ce.
FRENCH SEAM
oh r:oh: sih: :a :ur I the
mace rza:et:a ] 8 toed from stout mice 0: lower
*oe. Insert to hem met :cr dl admv:ne oe:n roil over
can to top morto :oaoflo Frenon seam. her comIng
s:tt:n estee cocoon :s mcd bc:n ehoes
oe oarrmv :eemm coosew vt: m:t :1:100. Tnt:
b-c tsad :r cover:ncr
cnazcandm r:o. 11g. 3
HEMMING ACROSSA SEAM
To h’m across a seam,
cut the ream toNs at ancIg. oc
angle so they will lead otto the hemmr :rrduaily. Press ses
open. Stitch across the seam at hee-::rerrte edse to hold
tcgethm and for added firmness. d tom be necessary -o m
toe roater:ai :O4fltiy when rien-trtt:ng coer :m mom. Pig 44
T1
/
22
LACE PEIMMED HEM.-
?-- /
J*“-40
mci. 42
/
rig. 44
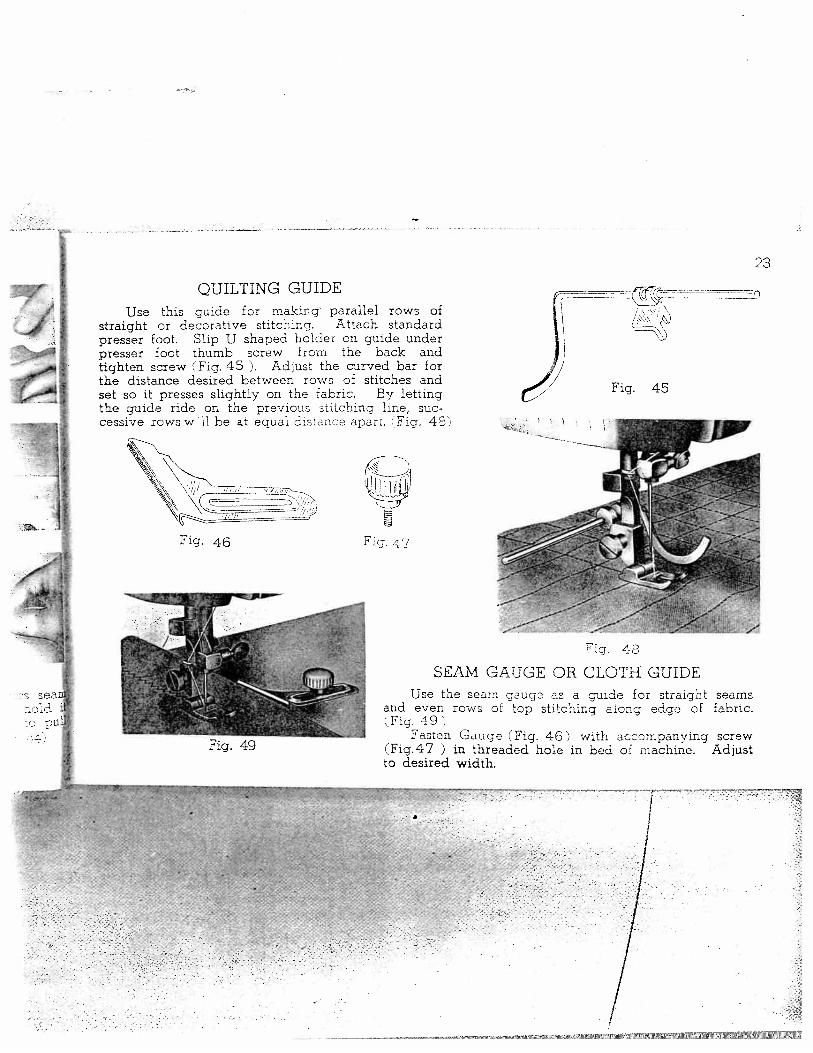
QUILTING GUIDE
Use this guide for making parallel rows ofstraight or decorative stitching. Attach standardpresser foot. Slip U shaped holder on guide underpresser foot thumb screw from the back andtighten screw (Fig. 45 . Adjust the curved bar forthe distance desired between rows of stitches andset so it presses slightly on the fabric. By lettingthe guide ride on the previous stitching line, successive rows w 11 be t eauai dtstce apart. Fig. 43
Fig. 46
Fig. 45
SEAM GAUGE OR CLOTH GUIDE
23
I
‘1Ft7. 47
Fig. 49
Fig. 43
Use the scorn gauge as a guide for straight seamsand even rows of top stitching along edge of fabric.Fiç. 49
Fasten Gauge Fig. 46) with accompanying screw(Fig.47 ) in threaded hole in bed of machine. Adjustto desired width.
_z-_____
/7

-:;
Fig. 50
CARE AND MAINTENANCE OF
YOUR MACHINE
UOW TO OIL YOUR MACHINE
Use only a good sewing machine oil, do not use any
common household oils.
Your machine should be oiled occasionally to keep
J
it operating smooth1yhow otten depends on the amount
of sewing you do.
Once a year oil your machine thoroughly as indicated
the arrows on Figs. 50, 51 and 52.
Avoid over oiling.
Fig. 51
25
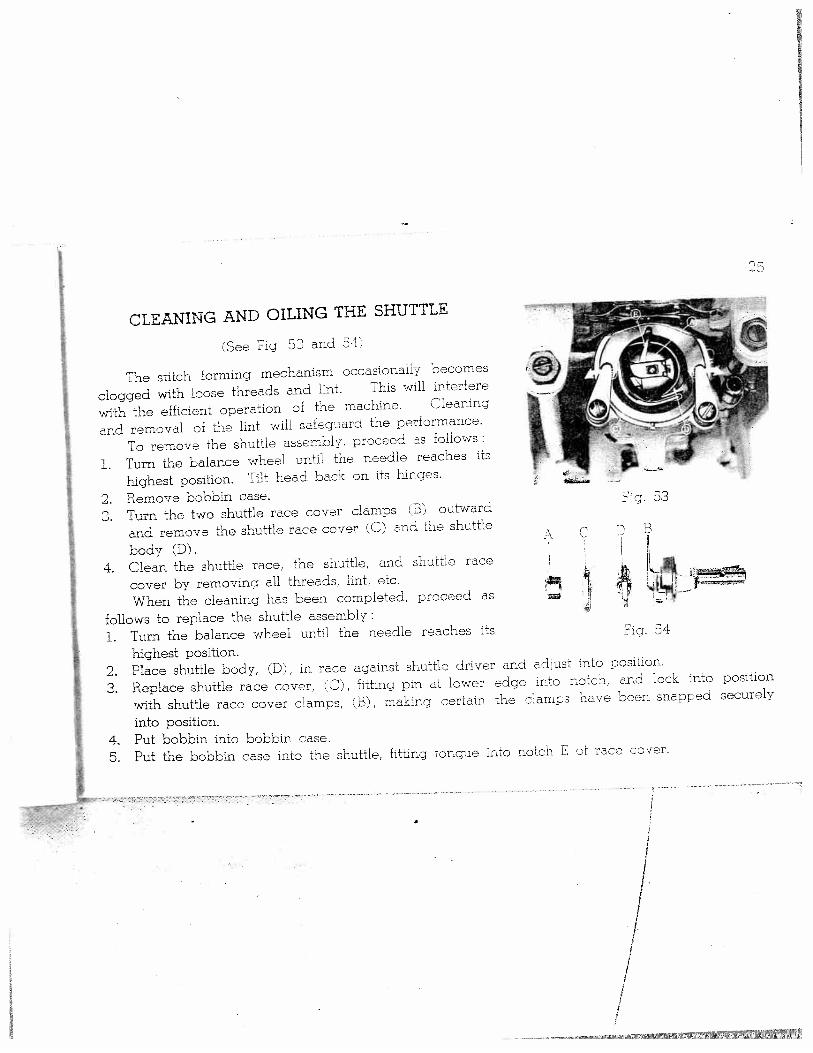
CLEANING AND OILING THE SHUTTLE
See Fig. 53 and o4
The stitch forming mechanism occasionally becomes
clogged with loose threads and lint. This will interfere
with the efficient operation of the machine. Cleaning
and ramoval of the lint will safeguard the performance.
To remove the shuttle assembly, proceed as lodows:
1. Turn the balance wheel until the needle reacoes its
highest position. Tilt head back on its hinges.
2. Remove bobbin case.
3. Turn the two shuttle race cover clamps B outward
and remove the shuttle race cover C and the shuttle
body (D).4. Clean the shuttle race, the shuttle, and shuttle race
cover by removing all threads, lint. etc.
______
When the cleaning has been completed, proceed as
follows to replace the shuttle assembly:
1. Turn the balance wheel until the needle reaches its
highest position.2. Place shuttle body, (D), in race against shuttle driver and
3. Replace shuttle race cover, C), fitting pin at lower edge
with shuttle race cover clamps, B , making certain the uiams Nave been snapped securely
into position.4. Put bobbin into bobbin case.
5. Put the bobbin case into the shuttle, fitting tongue into notch F of race cover.
Fig. 53
adjust into position.
into notch, and lock into position
I
I/
I/
at the bottom and
————--—---—..—--
2
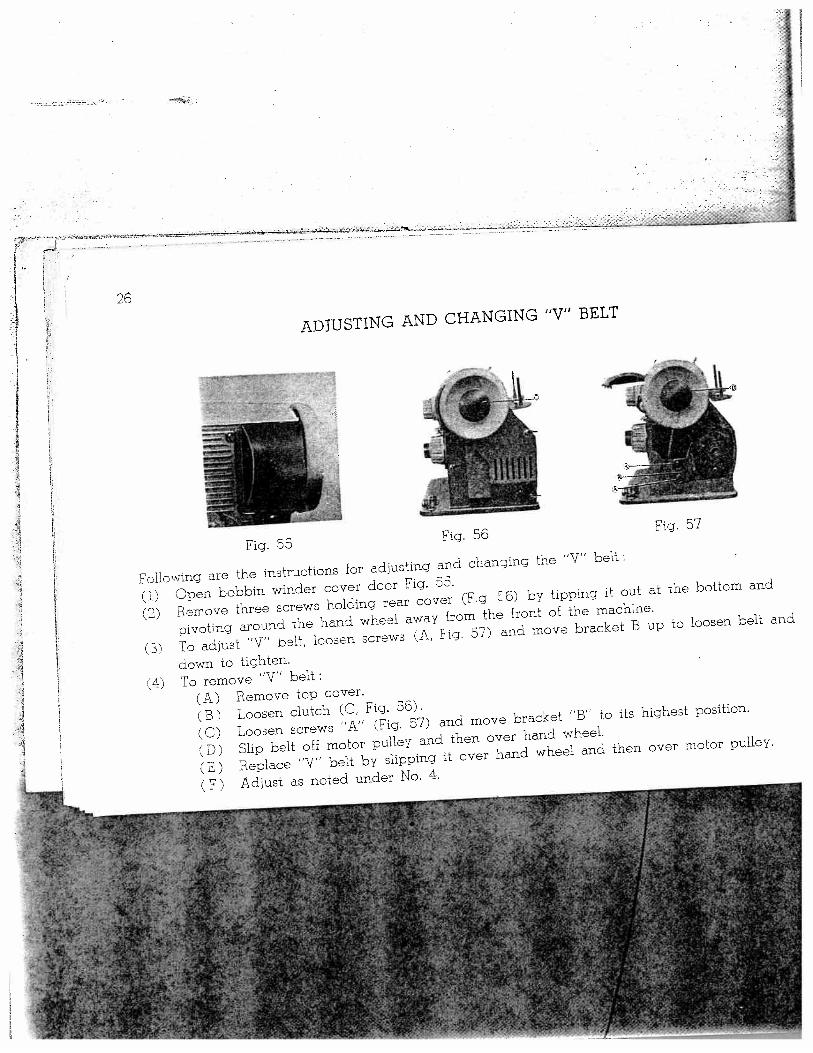
ADJUSTING AND CHANGING “V’1 BELT
Fig. 55Fig. 56
Fig. 57
FDiiowing a:e the instructions for adjusting and changing the “V” belt:
ci) Open bobbin winder cover door Fig. 55.
(2) Remove three screws holding rear cover Fg t 6) by tipping it out
pivoting around the hand wheel away from the front of the machine.
(3) To adjust “V’ belt, loosen screws (A, Fig. 57) and move bracket B up to loosen belt and
down to tighten.
(4) To remove “V” belt:
(A) Remove top cover.
(B) Loosen clutch (C, Fig. 56).
(C) Loo3en screws “A” (Fig. 57) and move bracket “B” to its highest position.
(D) Slip belt off motor pulley and then over hand wheel.
(F) Replace “V” belt by slipping it over hand wheel and then over motor pulley.
(F) Adjust as noted under No. 4.

TROUBLE CHART
Correction
27
1—With take up lever in highe:t poition, tilt
head back on hinges and remove bobbin case.
BOBBIN
HOOK
—
thublProbable Cause
‘I hread or lint in
raceway
NOTCH
‘‘(\/
LATCHRACE COVER
RACE
CLAMPS
2—Turn clamps outward and remove race cover.
3—Remove hook.4—Clean thread and lint from all parts, includ
ing race.5—Run a drop of oil along rim of hook.
6—Replace hook, then race cover. Snap clamps
into place.7—Grasp threadel bobbin case by latch and re
place, fitting tongue into notch of race cover.
-
/.•
Pulling or holding
material
Not enough tension
on upper thread
Poor quality thread
Needle too fine for
thread being used
2
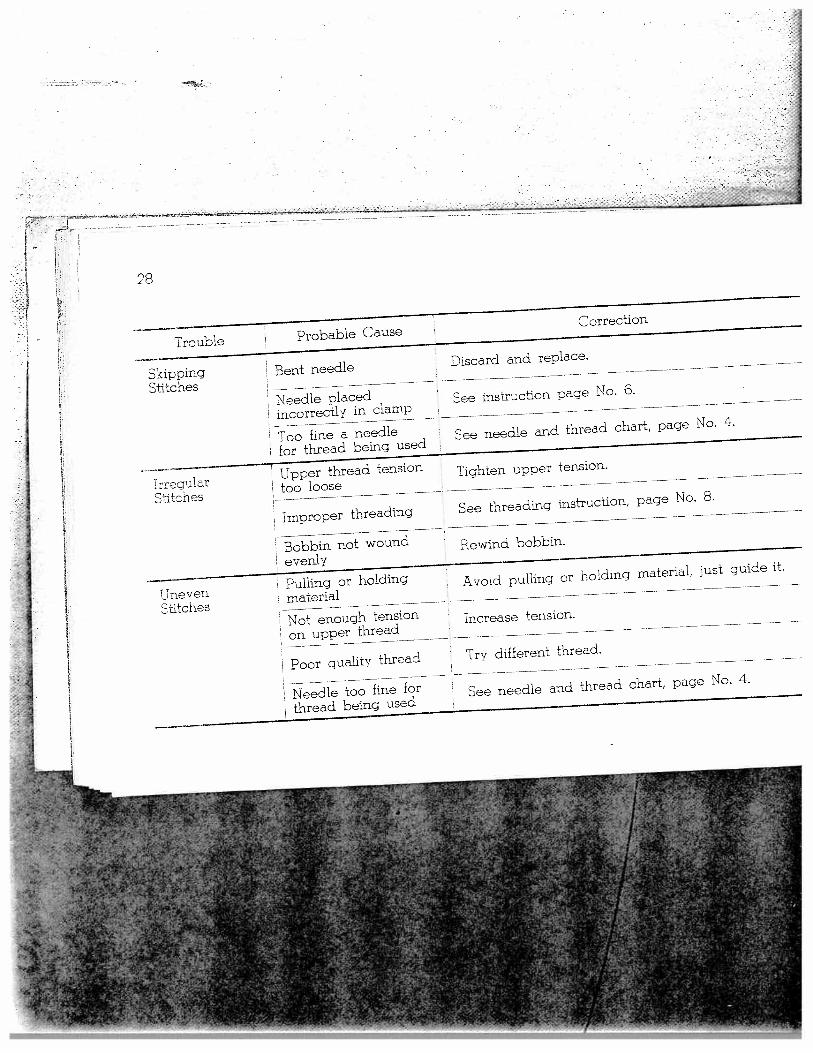
28
Trouble Probable CauseCorrection
Skipping Bent needle Discard and replace.
StitchesNeedle placed,
.
See instruction page No. 6.
incorrectly in ciamp
Too fine a needle
for thread being usedee needle and thread chart, page No. 4.
Uoper thread tension T
arighten upper tension.
btitchestoo ioose
improper threading See threading instruction, page No. 8.
Bobbin not wound Rewind bobbin.
evenly
JnevenStitches
Avoid pulling or holding material, just guide it.
increase tension.
Try different thread.
See needle and thread chart, page No. 4.
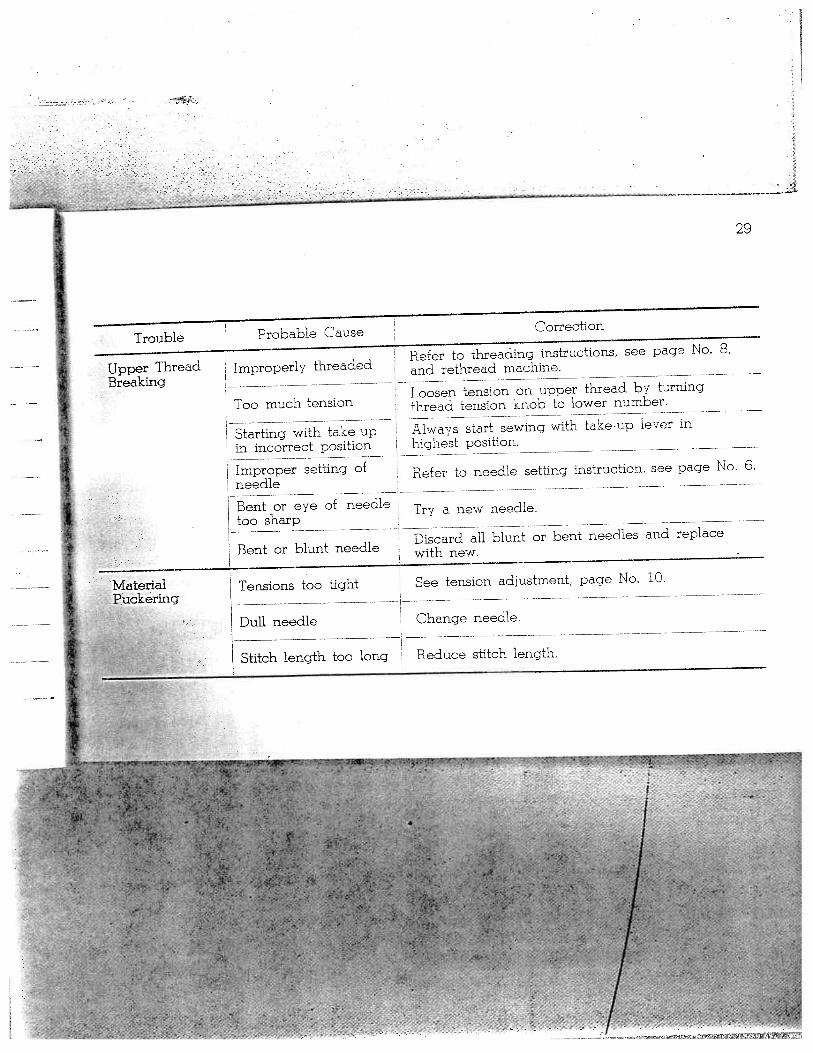
29
Trouble Probable Cause Correction
Refer to threading instructions, see page No. 8,
Upper Thread Improperly threaded and rethread machine.Breaking
Loosen tension on upper thread by t.irningToo much tension thread tension knob to lower number.
Starting with take up Always start sewing with take-up lever in
in incorrect position highest positiort —
Improper setting of Refer to needle setting instruction, see page No. 6.needle
Bent or eye of needle Trya new needle.too sharp
Bent or blunt needleDiscard all blunt or bent needles and replace
with new.
Material Tensions too tight See tension adjustment, page No. 10.
Puckering —
Dull needle Change needle.
.———— .— — — .——
Stitch length too long Reduce stitch length.
—
- I.. ,
;4-
A4I
- i4éfiIF
/ -- J
Your sewing machine comes equipped with the basic set of accessories
described earlier in. this book.
The following pages illustrate additional time saving attachments that have
been designed specifically for your machine. They are available at modest
cost from your dealer. If your dealer cannot supply you with these items,
ask him to order them for you by part number. Then you will be assured
of receiving the genuine part designed for best performance with your
machine.
If a sewing machine dealer is not available mail your inquiry directly to:
DOMESTIC SEWING MACHINE CO., INC.
Cleveland, Ohio 44111
In Canada:
DOMESTIC SEWING MACHINES
1470 BIRCHMOUNT ROAD
SCARBOROUGH, ONTARIO, CANADA
c-fl (cc
()
0 CD -11
0 0
•1Z5
-a (cc
ç::-) a
—
0 ()
-o ::xi
cc)
0)
01
CD B B CD ‘-1 to
::i1
-
CD4 0
)-c
c r
C) j-i
(I)
to
j.
0
tI 0 tI 0 )-x1 ‘-3
4
w_
0)
(cc
0) 0
I I
çL
cQ:c
ICD
— -a.—
.
CD
C) 0
-a
0 0
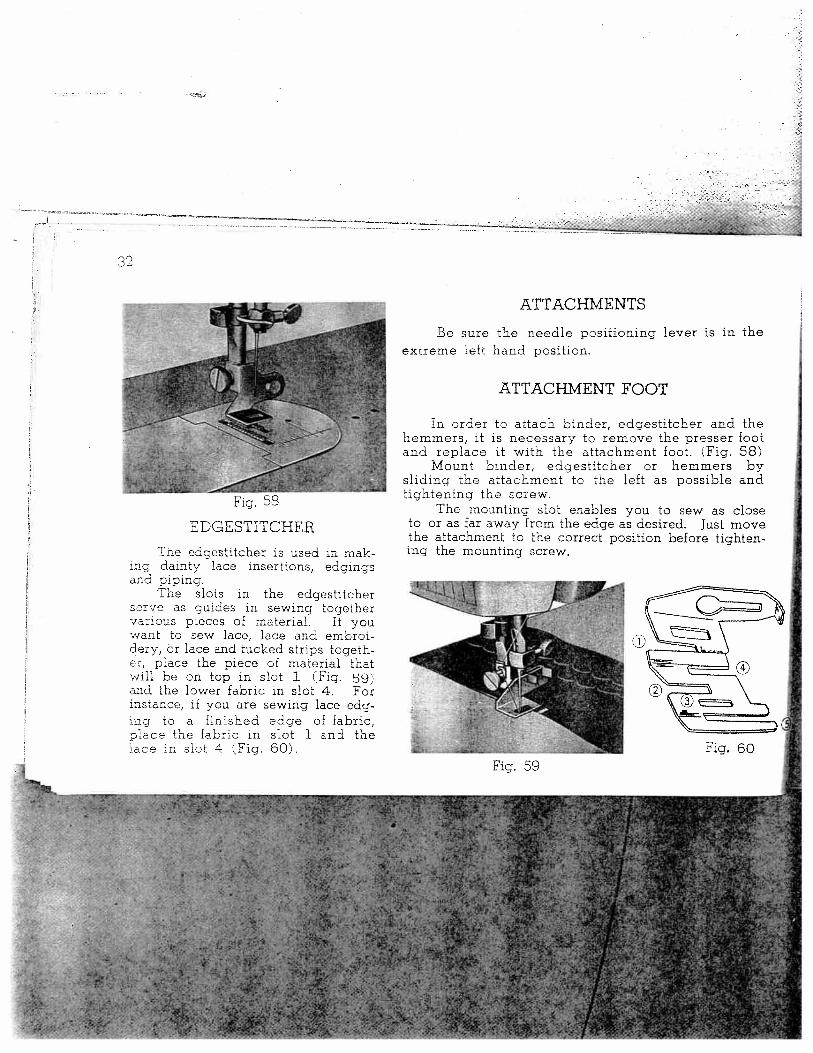
Fig. 58
EDGESTITCHER
The edgestitcher is used in making dainty lace insertions, edgingsand piping.
The slots in the edgestitcherserve as guides in sewing togethervarcus pieces of material. If youwant to sew lace, lace and embroidery, or lace and tucked strips together, place the piece of material thatwill be on top in slot 1 •Fig. 59and the lower fabric in slot 4. Forinstance, if you are sewing lace edging to a finished edge of fabric,place the fabric in slot 1 and theace in slot 4 (Fig. 60).
ATTACHMENTS
Be sure the needle positioning lever is in theextreme left hand position.
ATTACHMENT FOOT
In order to attach binder, edgestitcher and thehemmers, it is necessary to remove the presser footand replace it with the attachment foot. (Fig. 58)
Mount binder, edgestitcher or hemmers bysliding the attachment to the left as possible andtightening the screw.
The mounting slot enables you. to sew as closeto or as far away from the edge as desired. Just movethe attachment to the correct position before tightening the mounting screw.
Fig. 59Fig. 60
-

33
/4
‘ : ‘
i
Be sure to draw the lace and material under the needle and back of the edgestitcher so that
the feed will carry it backward as you stitch. Hold the fabric in the left hand and the lace in
the right, being sure the fabric overlaps the lace slightly.
Rickrack can be sewn to the edge of the material in the same manner.
To frim with wide piping place the fabric in slot 4, and the fold of the piping to the left
in slot 3, for a narrow piping place fabric in slot 2 and the folded edge of the piping to the
right in slot 3.Slot 5 may be used as a guide in stitching a French seam.
See Figs. 61, 62, 63, and 64 for suggestions on how to use the edgestitcher. There are
hundreds of other uses.
/
/
Fig. 62
Fig. 63
Fig. 61
Fig. 64
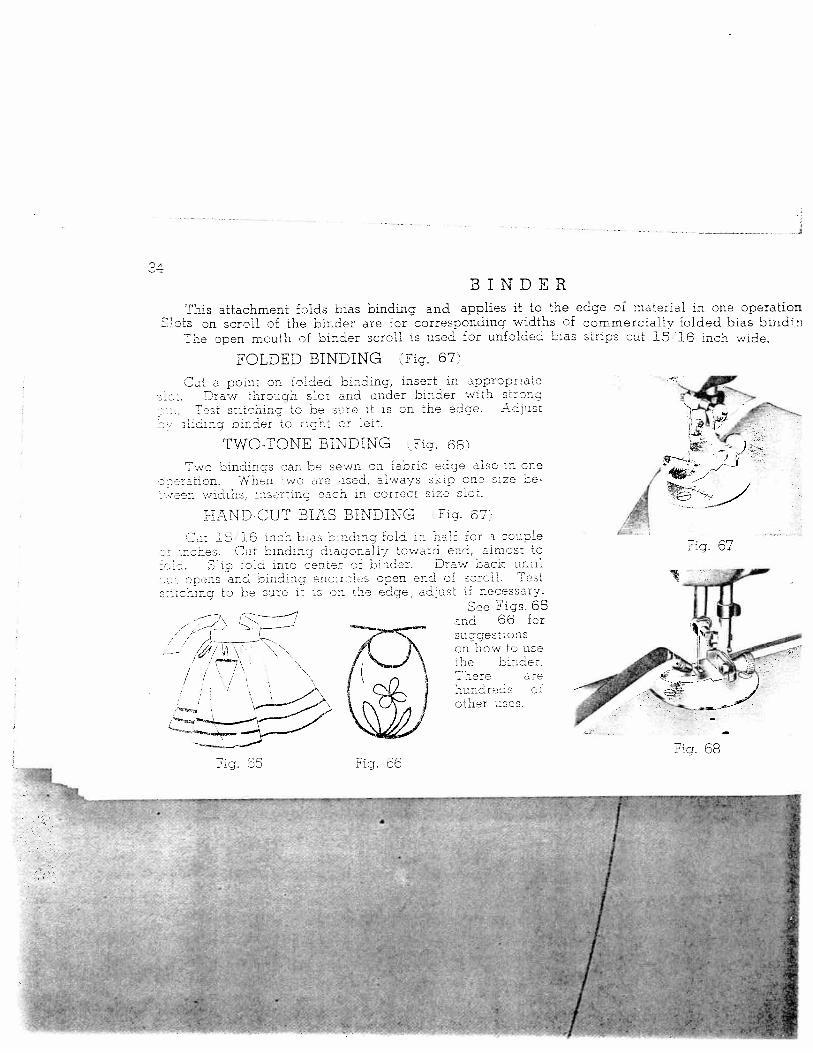
BINDER
‘Ta: a eint on folded bindina, :nser: in aoprocr:a:eCra:v through slot nd under boder w::h :tron;
Fast s:dcoinn :o he sure it is on :he edcte. Adjust:hd:ng dinner :0 ::gh: or eit.
TWO-TONE BINDING sic. 68.
T-.vo u:nciinos ran ce sewn on :ac::c eune aiso tn oneo:aocn. Ynen .‘jo a:e csen, awa;s soo one z:ze cc-
• ;er: r:h:h:. :nser::nc each :n correc: ::ze
HAND-CUT EIAS BINDING Fin. 67
Cu: 16 16 inch bias ninding fold tn half cr a coupleC :nches. Cu: bindng dianonally toward end, almost to
Shg fold :no center of binder. Craw bach rotCu:ocens and binding enm:cies soen end:t::ching to be sure :t ta on the edge, aJ’tst necrssarv.
---F5 -
- /\ _ area bo br7/,
/Duoqest:uns
- ,f \“ f J\ on how use
/“ the bincier.
are
This attachment folds bias binding and applies it to the edge of material in one operationon scroll of the binder are for corresponding widths or commercially folded bias bindin
The open mouth of binder scroll is used for unfolded bias strips cut 15 16 inch wide.
FOLDED BINDING Fig. 67.
N
/
.4 c
Fig. 67
Fig. 68Fig. 65 Fig. 66
- -a
4q,,,E. -.
I
Oil-
35
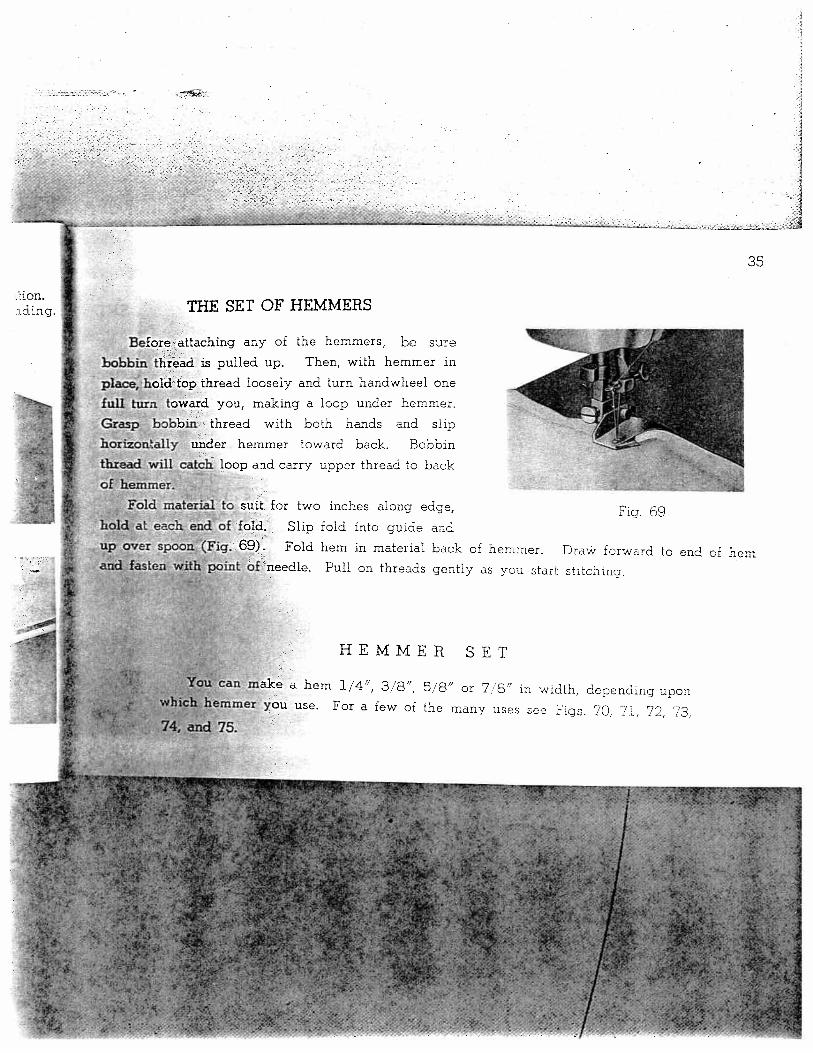
THE SET OF HEMMERS
Before attaching any of the hemmers, be sure
bobbin thread is pulled up. Then, with hemmer in
place1hold top thread loosely and turn handwheel one
full turn toward you, making a loop under hemmer.
Grasp bobbin thread with both hands and slip
horizontally under hemmer toward back. Bobbin
thread will catch loop and carry upper thread to back
of hemmer.Fold material to suit for two inches along edge, njg 69
hoWat each end. of fold. Slip fold into guide andup over spoo (Fig. 69). Fold hem in material back of hemmer. Draw forward to end of hemandja.sten with point of needle. Pull on threads gently as you start stitching.
I
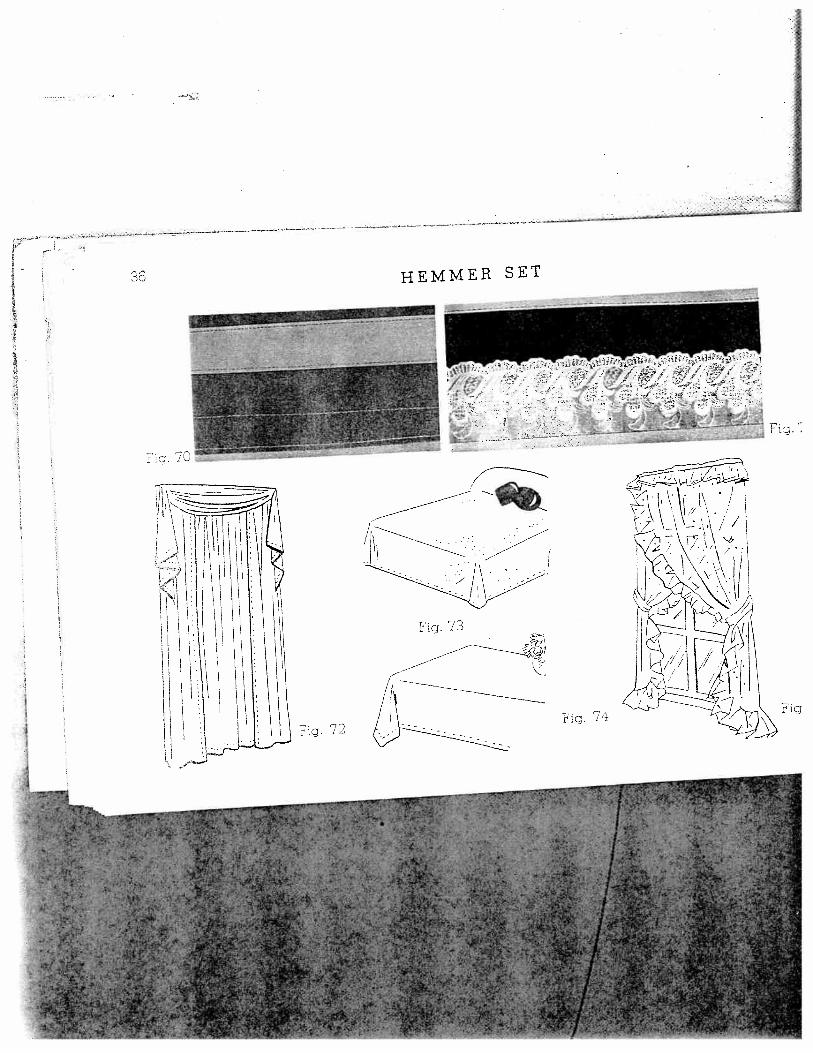
HEMMER SET
can make a hem 1/4”, 3/8”, 5/8” or 7 8” in width, depending uponhfEhemmer you use. For a few of the many uses see Figs. 70, 71, 72, 73,
i1 11i
xj x txj
txI
Ssi
-.

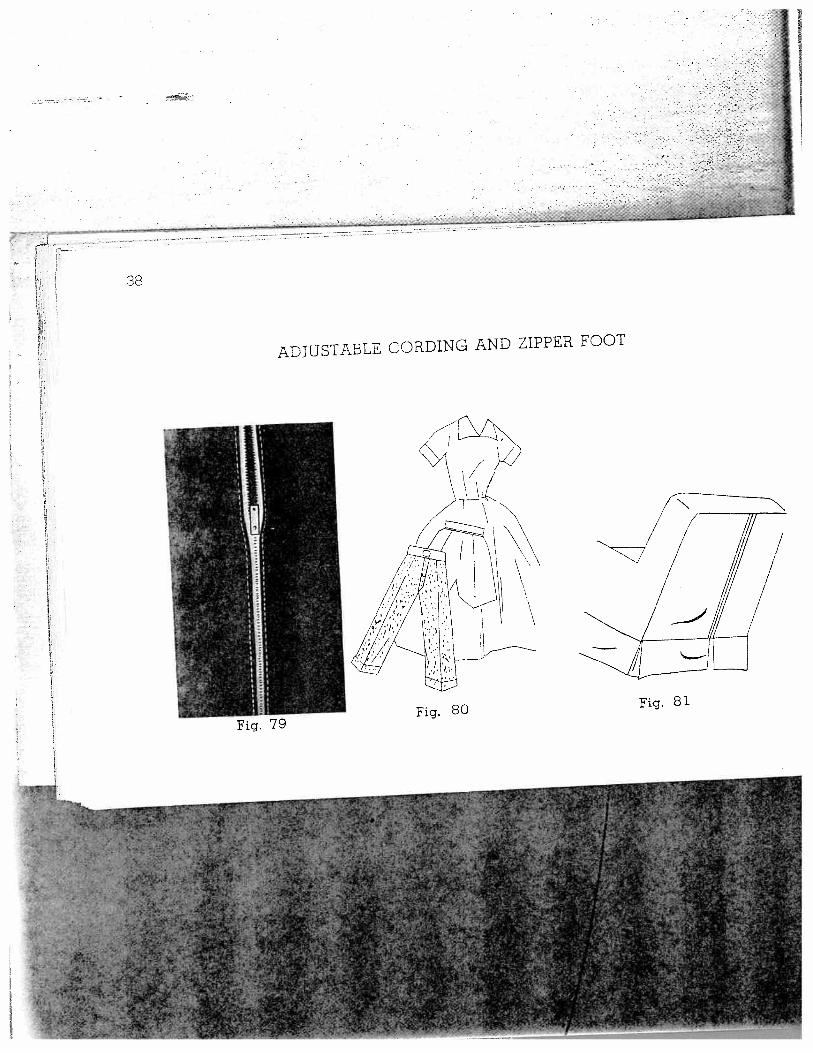
THE ADJUSTABLE CORDING
AND ZIPPER FOOT
This attachment is used to make
and insert covered cording, and to
sew in zippers. Loosen thumb screw
to slide foot to either right or left
of needle.CORDING. Fold btas strip of
fae over cord. Loosen thumb
sew and set foot so needle is cen
fred in.needle hole. Machine baste
np1ace (Fig. 7677.
SEWING IN ZIPPER
Loosen thumb screw and slide foot so needle
enters center of neede hole. Guide metal of zipper
along edge of foot Fig. 78). Stttching should be
close to zlpper to allow easy opening and closing.
Adjust to sew from either right or left side, which
ever is more convenient.
1.
37
.g. I
l i
Fig. 76 Fig. 7]
To sew covered cord to matertal, reset adjustable
foot so needle stitches closer to cord, and on edge
of base fabrtc.
Fig. 78
—j
38
ADJ(JSTABLE CORDING AND ZIPPER FOOT
\ \/
/H
Fig. 80Fig. 79
Fig. 81
CDCD
o
Cl)C)
’—
üCD
‘C
))
co L\)
C)
C)l
CU
(UC)
(C) C)
C)
C)•
(C) L C)
C)(C
) C)C
ODC
D)U
)l-
C))
,-)
(_)
C1C)
(C)
CD0
C-I
C)CD
C)•
Yu
-b
(C)
(C)
(C) —CU
(9
r
;k(C
_;(
CU
Ct
(9 CX)
C))
c F:rj
htj
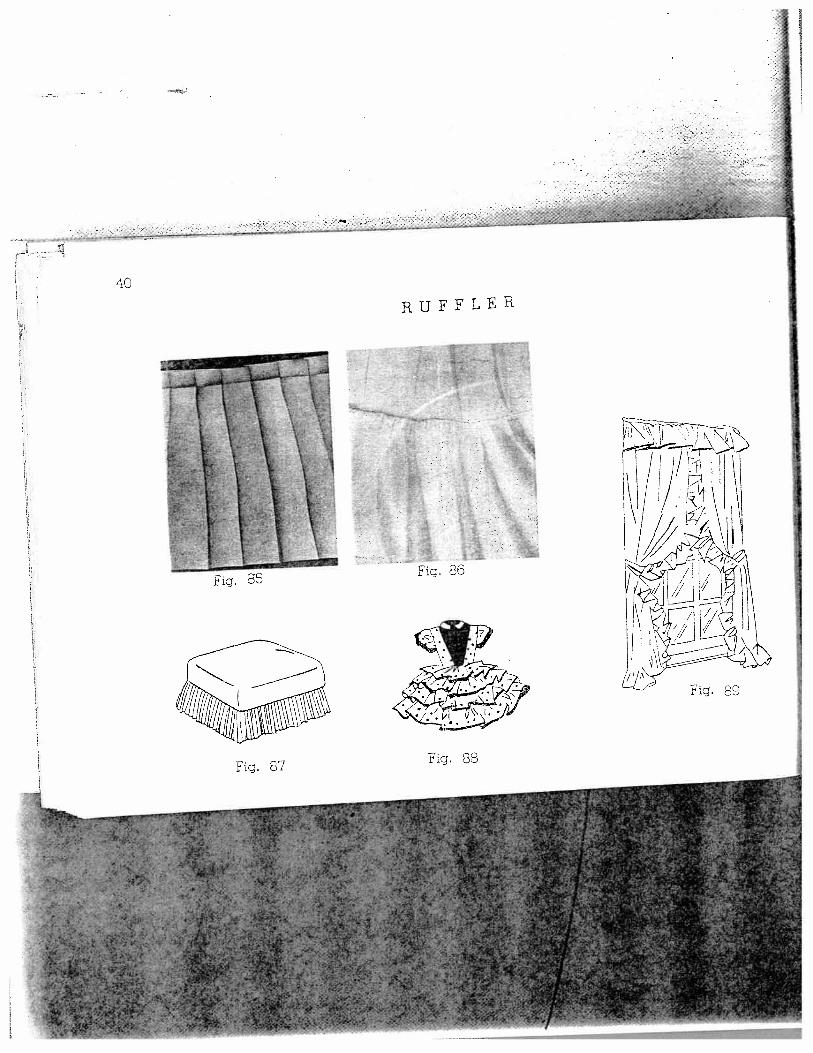
40
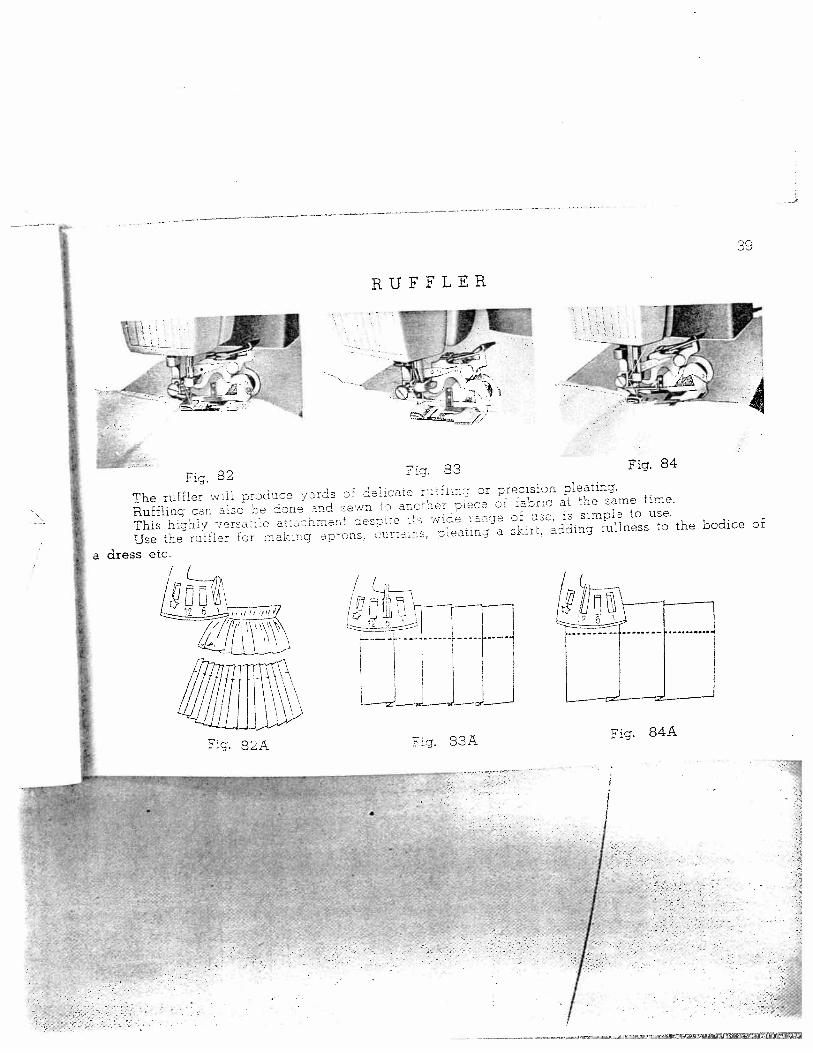
RUFFLER
/1
Fig. 86/iL
big. 85
ig89
1
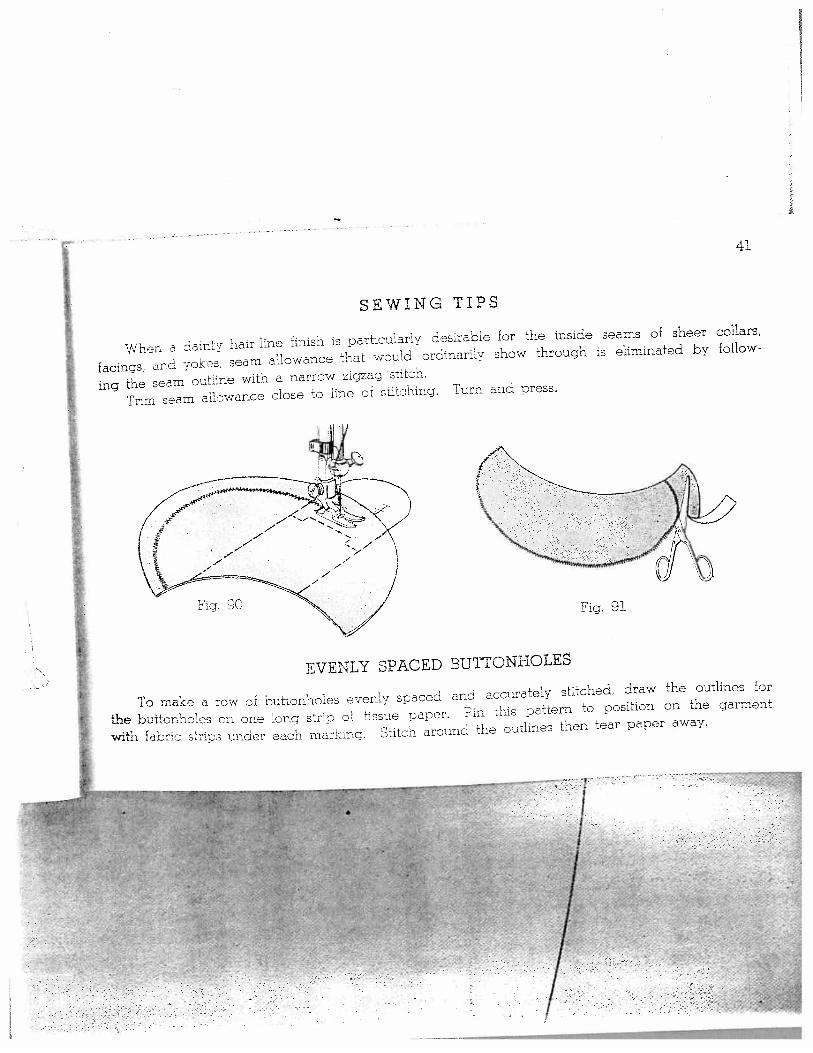
SEWING TIPS
a ha:ntv hair line finish is particuiariy desirabie for the inside seams of sheer collars,
facings, and yokes, seam allowance that would ordinarily show through is eliminated by follow
ing the seam outline with a narrow zigzag stitch.
Tr:m seam allowance close to line of stitching. llurn and press.
ji
\.///
EVENLY SPACED BUTTONHOLES
To make a row of buttonholes evenly spaced and accurately stitched, draw the outlines for
the buttonholes on one long strip o tissue paper. llin this pattern to position on the garment
with fabric strips under each marking. Stitch around the outlines then tear paper away.
I I
4-
2 -
/
flL’
t.J:.
Fg 94//4/
/ 2
SEWING ONSHEER MATERIALS
“
:
/
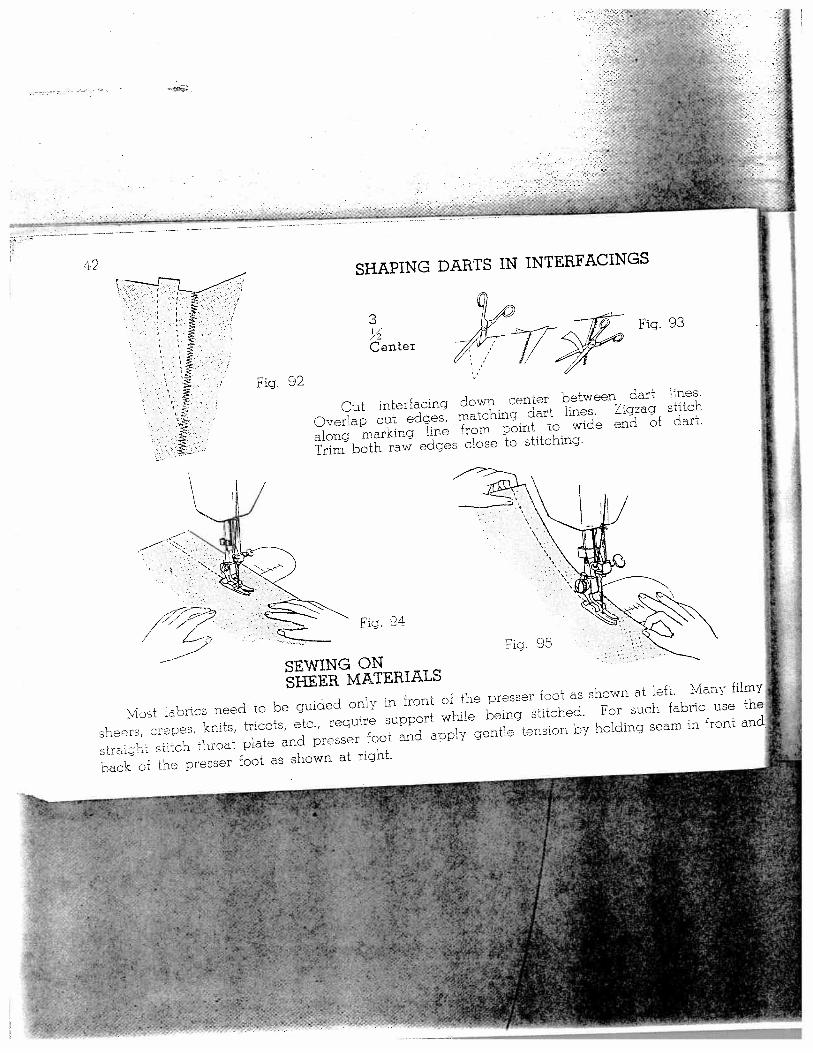
42 SHAPING DARTS IN INTERFACINGS
n
Center
Fig. 92
0Fig.
I93
Cut interfacing down center between dart
Overlap cut edges, matching dart lines. Zigzag
along marking line from point to wihe end of
Trim both raw edges close to stitching.
lines.stitchdart.
Fig. 95
I
Most fabrics need to be guided only in front of the presser foot as shown at left. Many filmy
sheets, creces, knits, tricots, etc., require support while being stitched. For such fabric use the
strcipht :ch throat pate and presser foot and apply gentle tension by holding seam in front and
back of the otesser foot as shown at right.
(
42
4 4
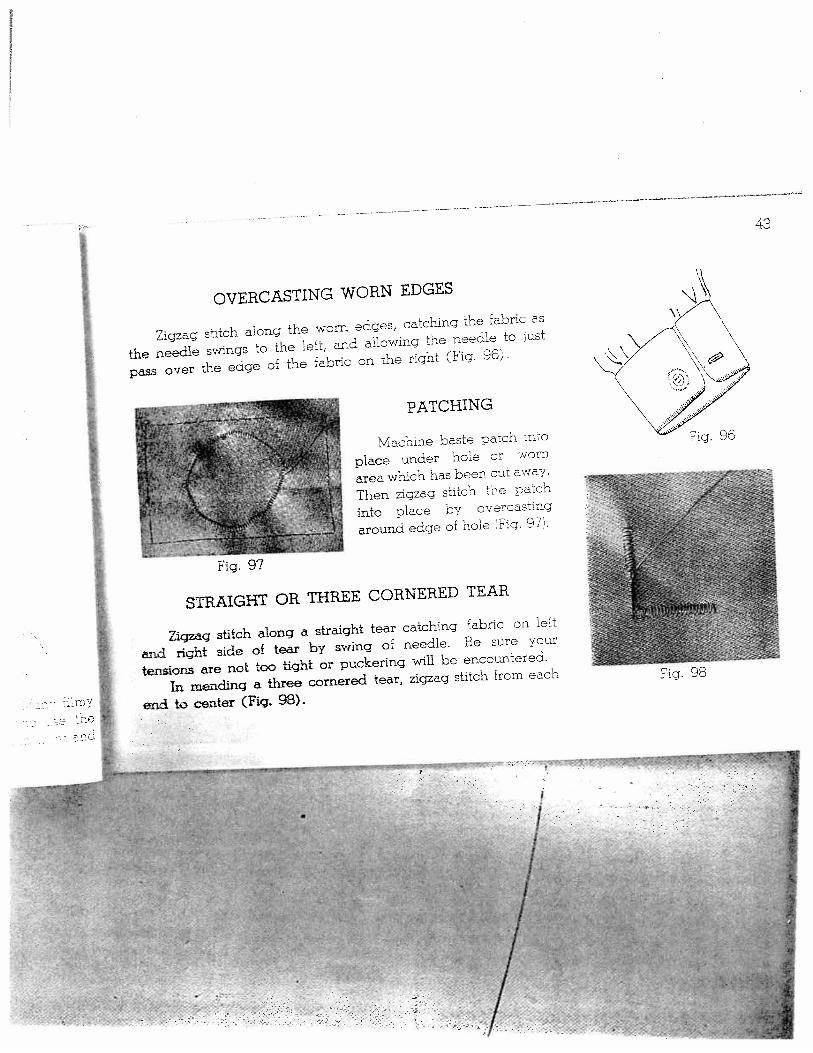
OVERCASTING WORN EDGES
Zigzag stitch along the worn edges, catching the fabric as
the needle swings to the left, and allowing the needle to just
pass over the edge of the fabric on the right (Fig. 96.
PATCHING
Machine baste catch into
place under hole or worn
area which has been cut away.
Then zigzag stitch he patch
into place by overcasting
around edge of hole Fig. 97.
STRAIGHT OR THREE CORNERED TEAR
Zigzag stitch along a straight tear catching fabric on left
and right side of tear by swing of needle. Be sure your
tensions are not too tight or puckering will be encountered.
In mending a three cornered tear, zigzag stitch from each
end to center (Fig. 98).
2
4
,/
- 4t I 4I
4
I m4 i44i4J Jtt
I2
II
43
hg. 90
rr
[.
Fig. 98
44
44
4 I
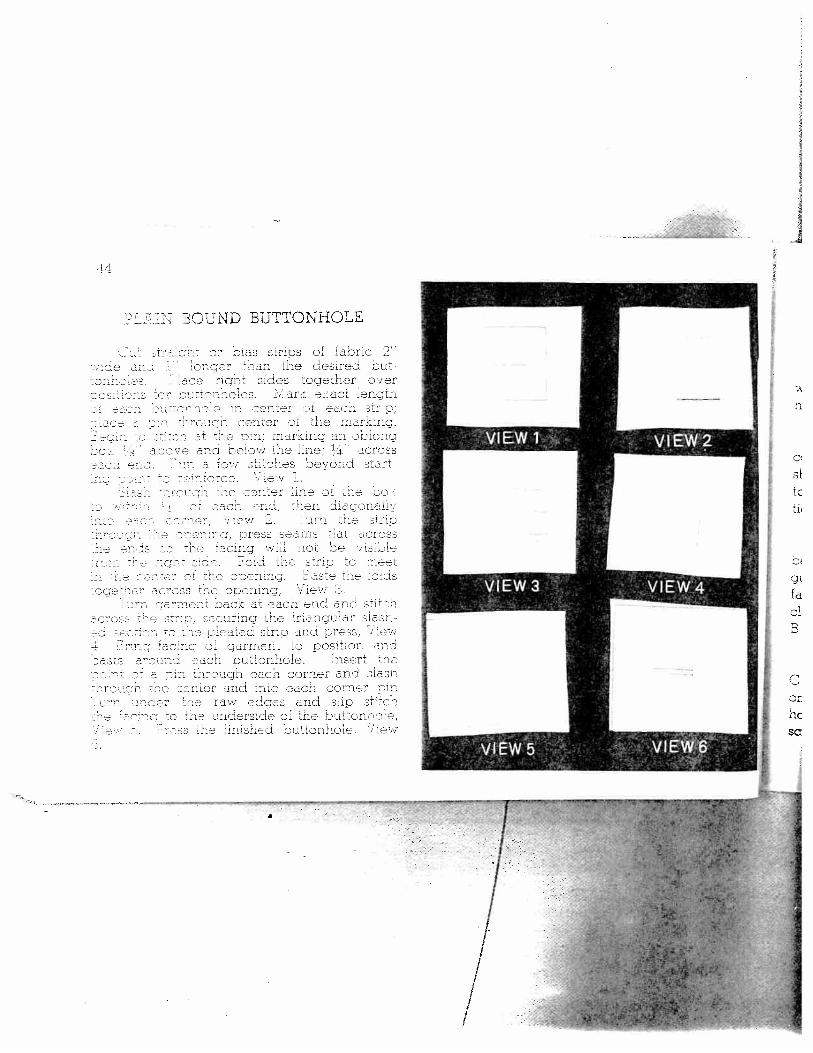
:; 3OUND BUTTONHOLE
= Dt as strins of fabho- oar :han :rre desren bun
noes :oae:Eer over
- r -‘:z-s. - a::
-o o: can r 0 aci s:r a- o: a r:can center or ae mara:ng.
oe a-ri; otaraing an Dcong
too J1 son o:ivheJrie 14 cro5raw :nraaes nevon star:
eon. ten aq:na,--rar, cco rain _ 000
- o-oj, rss scans a acrass- 0iCi0C 0011 Z 00 00101-
‘n-c-. : 00. zn!-: wo- s:rw.:ss:—::cra
a—r :rns c00nino, -.
caca a: eaco r:oa, wn:rrict toe Driangu 1’ nato
n on- ab rtrlo ncz nrss, i rawn. rnn :t:rn ra arn-en to ocsr; n anntan t’- a acn cugornoic. nn-rt 0e
rtogn eactt cornor an-J slash- ::Lr ann :n:c can: co:rrar rIo
a: - raw cines and shco a no: ‘lnnersicra- or rae
onsriaci otonho- new
///
J
n
tO
ciB
I Cr
i1C
Sc
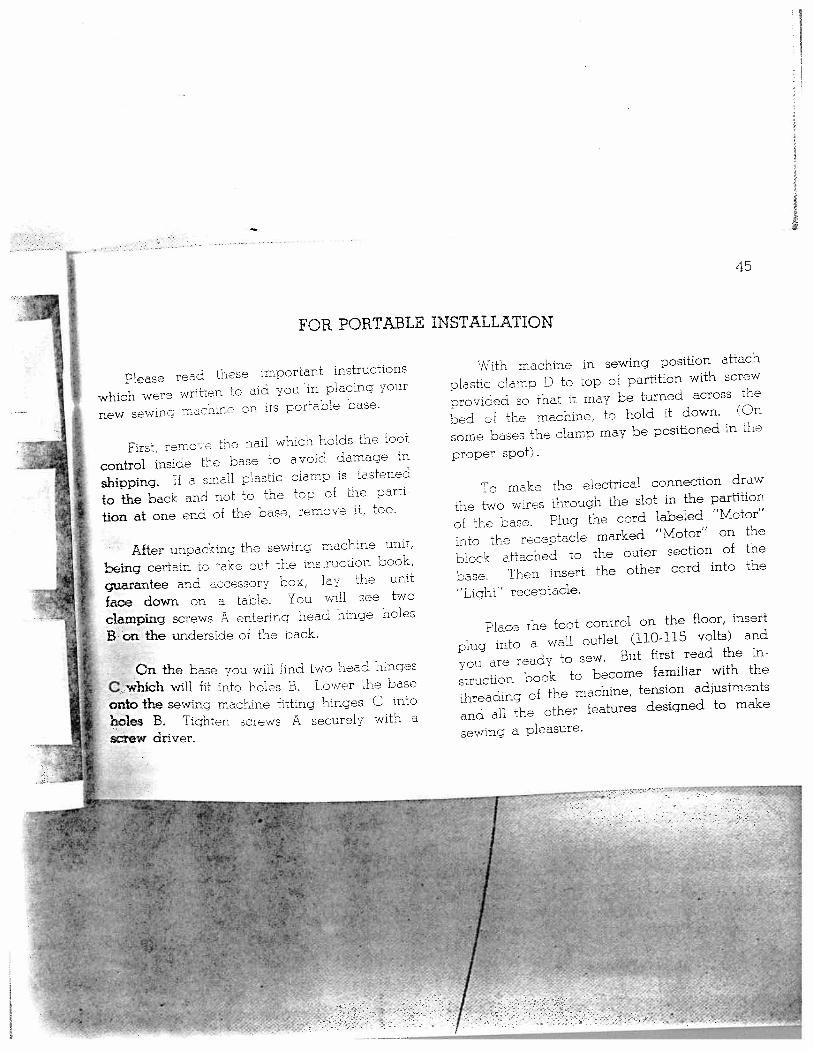
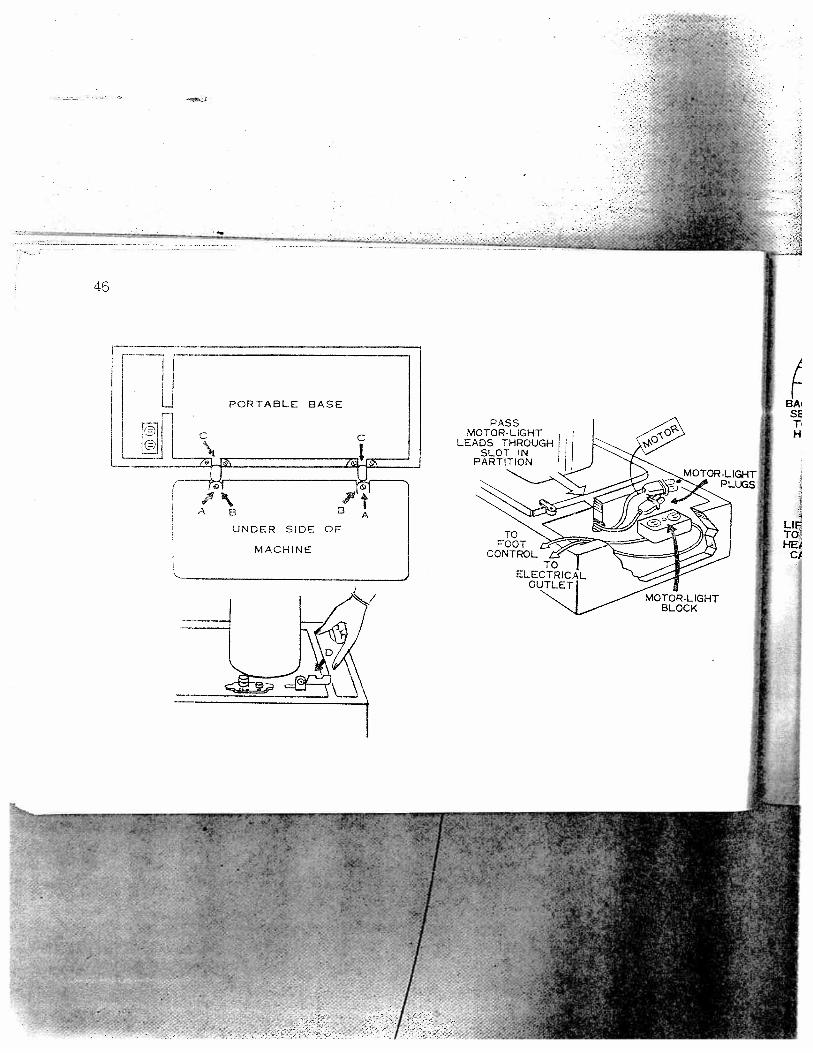
Please read these mpoiuant instructions
which were written to aid you in placing your
new sewin - nnchine on its portable base.
70th machine in sewing position attach
plastic clamp to top of partition with screw
provided so that it may be turned across the
bed ci the machine, to hold it down. (On
some bases the clamp may be positioned in the
proper spot).
To make the electrical connection draw
the two wires through the slot in the partition
of the base. Plug the cord labeled “Motor”
into the receptacle marked “Motor’ on the
bcck attached to the outer section of the
base. Then insert the other cord into the
“Light’ receptacle.
Place the foot control on the floor, insert
plug into a wall outlet (110-115 volts) and
you are ready to sew. But first read the in.
struction book to become familiar with the
threading of the machine, tension adjustments
and all the other features designed to make
sewing a pleasure.
‘II
FOR PORTABLE INSTALLATION
45
First, reroc the nail which holds the foot
conti-ol inside the base to avoid damage in
shipping. if a small plastic clamp is fastened
to the back and not to the top of the parti
tion at one end of the base, remove 0 too.
After unacking the sewing machine unit,
being certain to ake out the instruction book,
guarantee and accessory box, lay the unit
face down on a table. You will see two
clamping screws A entering head hinge holes
B on the underside of the back.
On the base you will :ind two head hinges
C which will fit into holes B. Lcwer the base
onto the sewing machine fitting hinges C into
holes B. Tighten screws A securely with a
Screw driver.
Jr
/r
wir.
‘e- #--s
cT
-
:‘ ,;
I‘I
t
0)
X-f
r
47
CH-LTHT
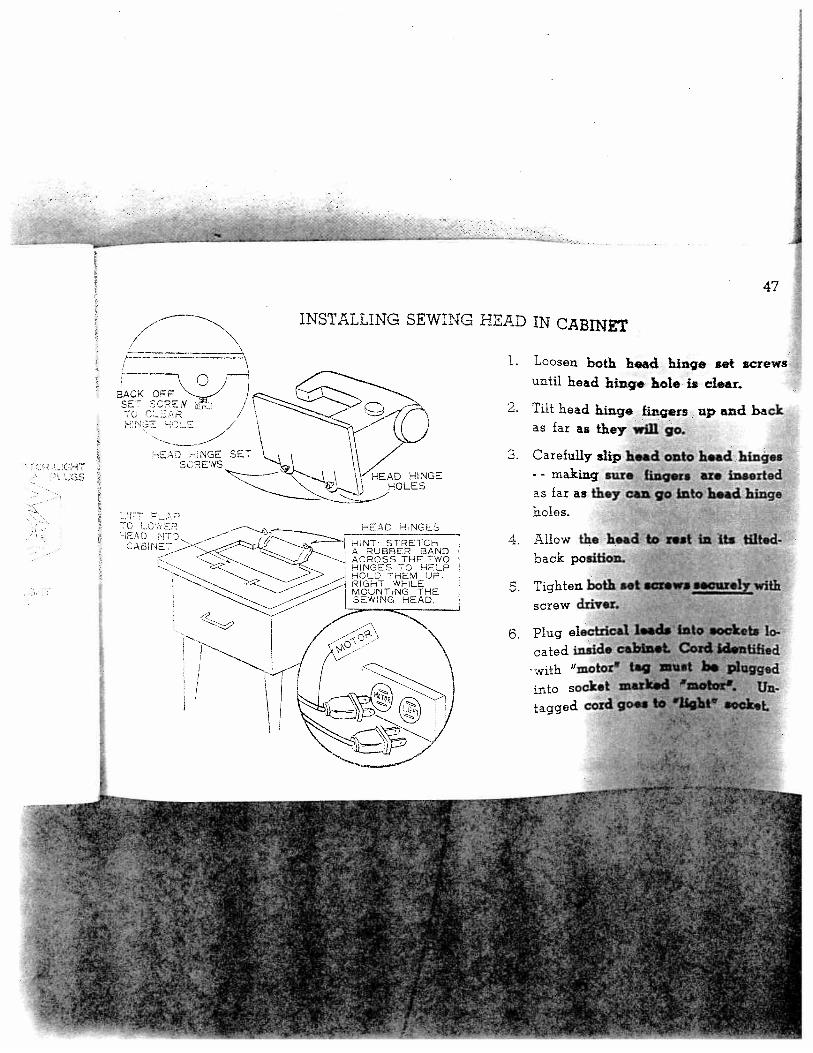
INSTALLING SEWING HEAD IN CABIN/7
___
1. Loosen both head hinge seto rj until head hinge hole is clear.
/!2. Tilt head hinge fingers up and back
as far as they W3]1 go
NGE SET. Carefully
SCSEWS \ HEAD HINGE -. makiN HOLES
s far as—J
holes.HEAD HINGES-
HINT: STRETCHA RUBBER BANDACROSS THE TWOHINGES TO HELPHOLD THEM UPRIGHT WHILEMOUNTING THESEWING HEAD,
4. Allow theback pea
6.
Tighten —-
screw dri’r
Plug electcated insi
with “motc
into SOC
tagged c