Embed Size (px)
Citation preview
EasyWare PC Software for use with EasyOne Spirometer
Operator’s Manual English
ndd Medical Technologies ndd Medizintechnik AG
Two Dundee Park Technoparkstrasse 1 Andover, MA 01810 CH-8005 Zürich www.nddmed.com www.ndd.ch
EasyWare-Manual-ENG-V10.docx May 25, 2011
EasyWare Page 2
Table of Contents
1 Introduction 3
2 Installing the PC software 3
2.1 PC/Laptop Requirements 3
2.2 Installation of the EasyWare PC software 4
2.3 Installing EasyWare in a network 7
3 Performing a spirometry test using EasyWare 8
3.1 Performing an off-line spirometry test 8
3.2 Performing an on-line spirometry test (for ScreenConnector) 8
4 Details of EasyWare 9
4.1 The EasyWare main window 9
4.2 The PC database and synchronization with EasyOne 9
4.3 Viewing patient data 10
4.4 Entering a new patient data 10
4.5 Deleting records 10
4.6 Viewing test results in 'Normal View' 11
4.7 Viewing test results in 'Advanced View' 11
4.7.1 Displaying of up to 8 trials 12
4.7.2 Reviewing tests 12
4.7.3 Changing Trial Ranking and Trial Acceptability 12
4.8 Children Incentive 13
4.9 Trending 13
4.10 Finding Records 13
4.11 Printing a test and creating PDF reports 13
4.12 Direct printing via PC 14
4.13 Exporting data 14
4.14 Importing data 14
4.15 Select device in DB 14
4.16 Device status 14
4.17 Device configuration 14
4.18 Preferences 15
4.19 Language Selection 15
5 Attachment A: Database Structure 16
6 Attachment B: Text File Export Data Format 17
7 Attachment C: Electronic Medical Record Interface 19
EasyWare Page 3
1 Introduction With the EasyWare PC software, the EasyOne spirometer can be used in conjunction with a PC. The main features of EasyWare are:
direct printing via PC, searching for patients or IDs, quickly previewing test results, entering patient data on the PC, saving measurement data (including curves) in a Microsoft Access compatible database, print and print preview protocols directly from the PC database, export of data from the database into text files, configuration of the EasyOne device, displaying real-time curves using the EasyOne ScreenConnector.
2 Installing the PC software
2.1 PC/Laptop Requirements
The minimum requirements for installing the PC software are as follows:
Operating system: 32 + 64 Bit
Microsoft Windows XP Home and Professional (min. SP2),
Microsoft Windows Vista (all versions), Microsoft Windows 7 (all versions)
Processor: Pentium ≥ 1.0 GHz
Screen resolution: SVGA 1024 x 768
Hard disk memory: 100 MByte free
RAM: 256 MByte
Internet Explorer: Microsoft Internet Explorer 6.0 or higher
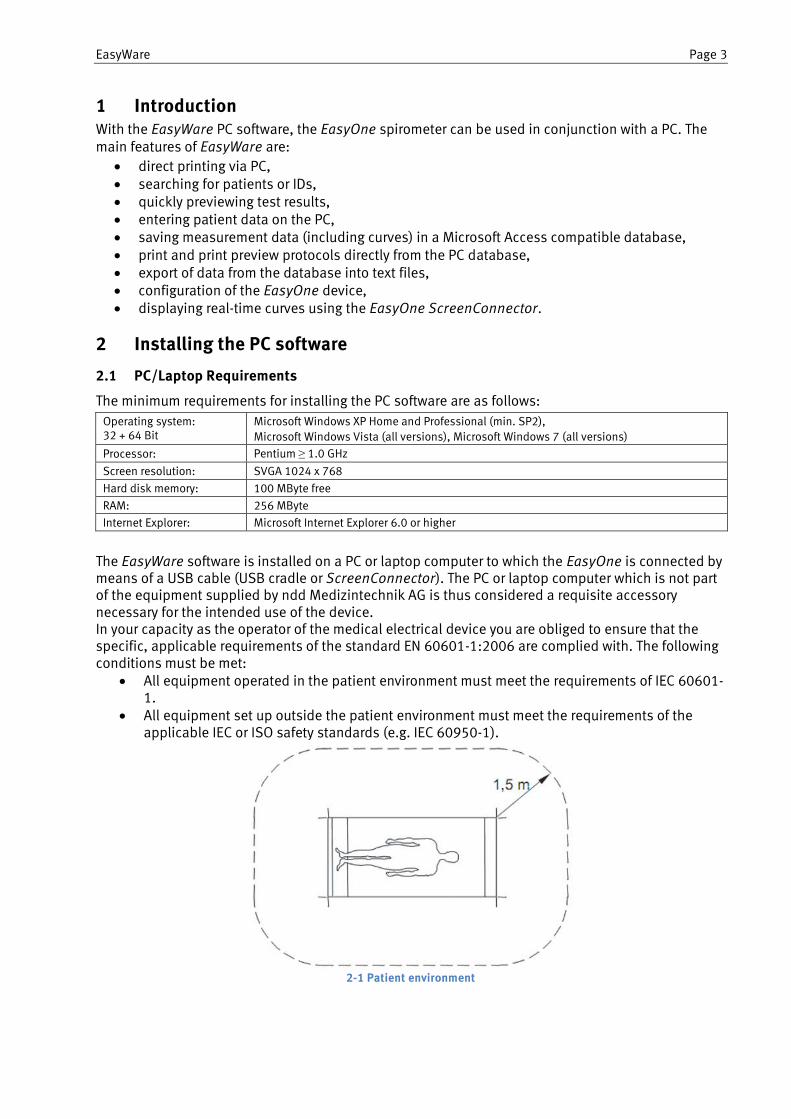
The EasyWare software is installed on a PC or laptop computer to which the EasyOne is connected by means of a USB cable (USB cradle or ScreenConnector). The PC or laptop computer which is not part of the equipment supplied by ndd Medizintechnik AG is thus considered a requisite accessory necessary for the intended use of the device. In your capacity as the operator of the medical electrical device you are obliged to ensure that the specific, applicable requirements of the standard EN 60601-1:2006 are complied with. The following conditions must be met:
All equipment operated in the patient environment must meet the requirements of IEC 60601-1.
All equipment set up outside the patient environment must meet the requirements of the applicable IEC or ISO safety standards (e.g. IEC 60950-1).
2-1 Patient environment
EasyWare Page 4
If IEC XXXXX devices (devices that do not fulfill the requirements of IEC standard 60601-1) are operated in the patient environment, it must be ensured that the maximum allowed touch currents will not be exceeded. These are the applicable limits:
normal condition: 100 μA with interruption of the (not permanently connected) protective earth conductor: 500 μA.
Appropriate measures must be taken, if these limits are exceeded. Suggestions:
additional protective earth connection of the PC or isolating transformer for the PC or isolating transformer with built-in power outlet strip for the PC and the devices connected to
it. Note: EN 6060-1:2006 specifies the requirements for power outlet strips. Bear in mind that the touch currents may vary with the system configuration. In altitudes above 2000 meters above sea level the air clearance of the applicable IEC safety standards (e.g. IEC 60950-1) for the requisite accessories is no longer sufficient, because IEC 60601-1 adds an additional factor which is increases with altitude. Suggestions:
Use of isolating transformer which is in conformance to IEC 60601-1for the PC or Use of isolating transformer which is in conformance to IEC 60601-1 with built-in multiple
socket-outlets for the PC and the devices connected to it.
2.2 Installation of the EasyWare PC software
You will require Administrator privileges to install the software. Proceed as follows:
Do not yet connect the ScreenConnector nor the USB-Cradle to the PC. You will require Administrator privileges on the PC in order to install the software. Quit all programs and insert the EasyWare CD into your CD ROM drive. The installation routine
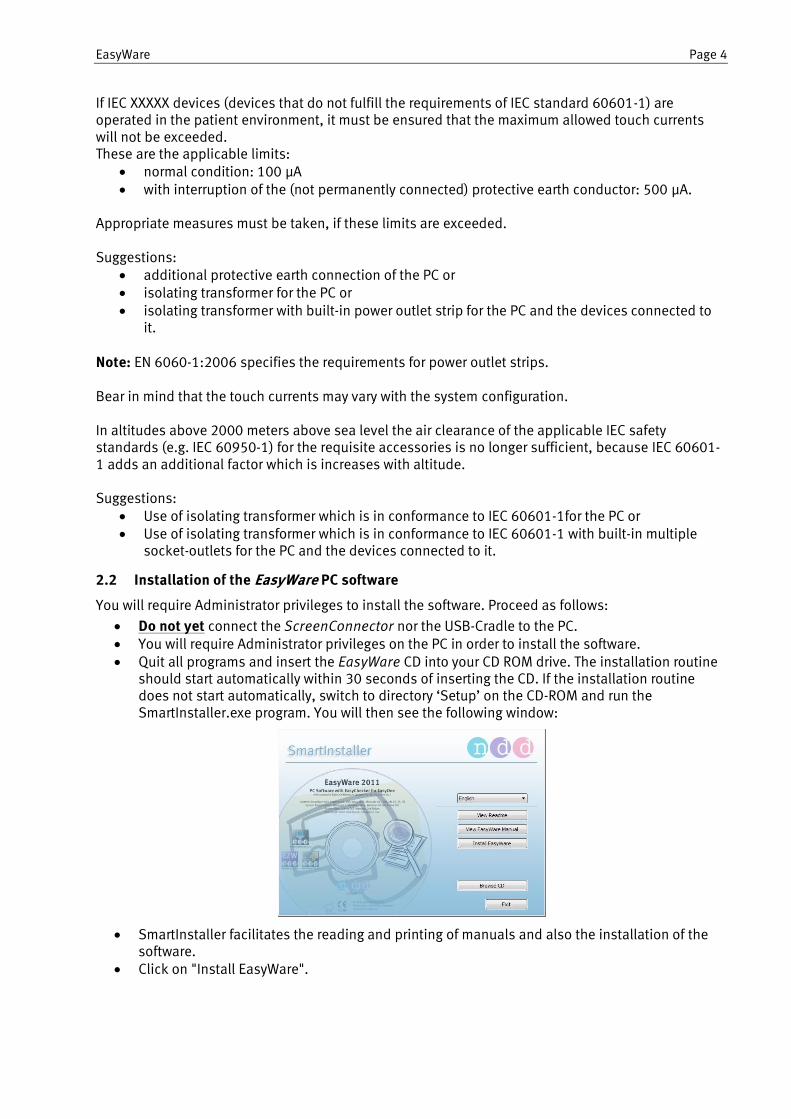
should start automatically within 30 seconds of inserting the CD. If the installation routine does not start automatically, switch to directory ‘Setup’ on the CD-ROM and run the SmartInstaller.exe program. You will then see the following window:
SmartInstaller facilitates the reading and printing of manuals and also the installation of the software.
Click on "Install EasyWare".
EasyWare Page 5
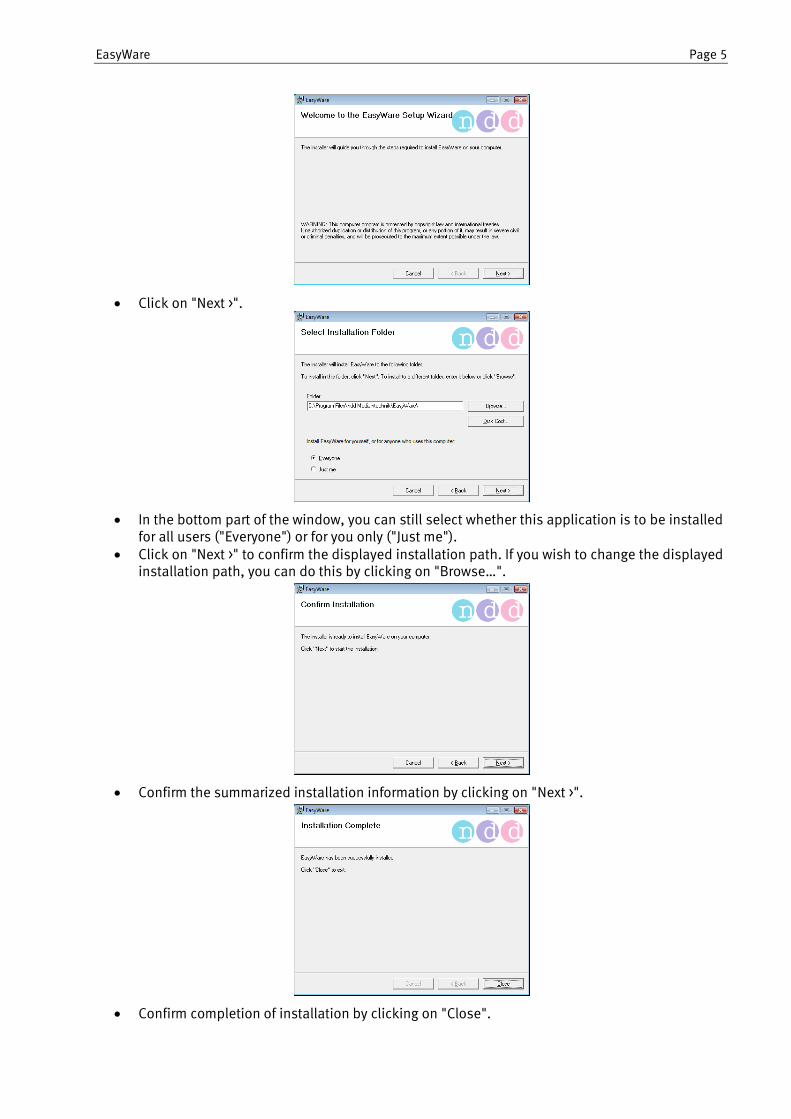
Click on "Next >".
In the bottom part of the window, you can still select whether this application is to be installed for all users ("Everyone") or for you only ("Just me").
Click on "Next >" to confirm the displayed installation path. If you wish to change the displayed installation path, you can do this by clicking on "Browse…".
Confirm the summarized installation information by clicking on "Next >".
Confirm completion of installation by clicking on "Close".
EasyWare Page 6
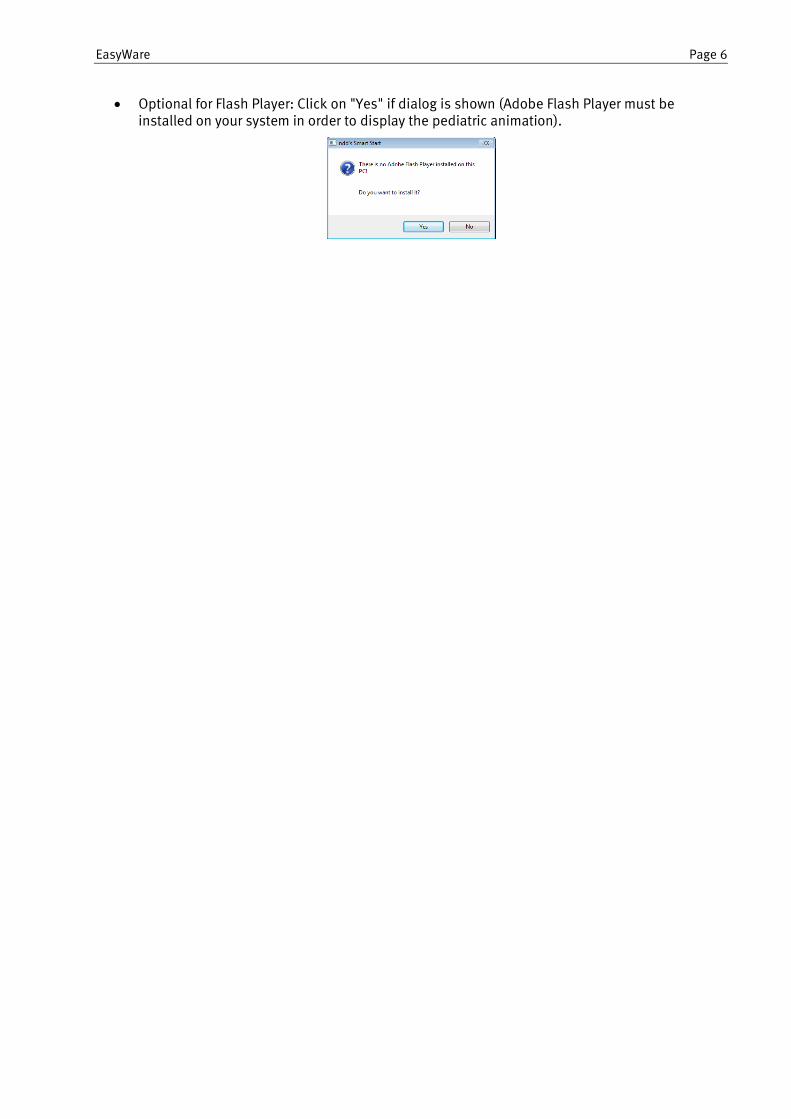
Optional for Flash Player: Click on "Yes" if dialog is shown (Adobe Flash Player must be installed on your system in order to display the pediatric animation).
EasyWare Page 7
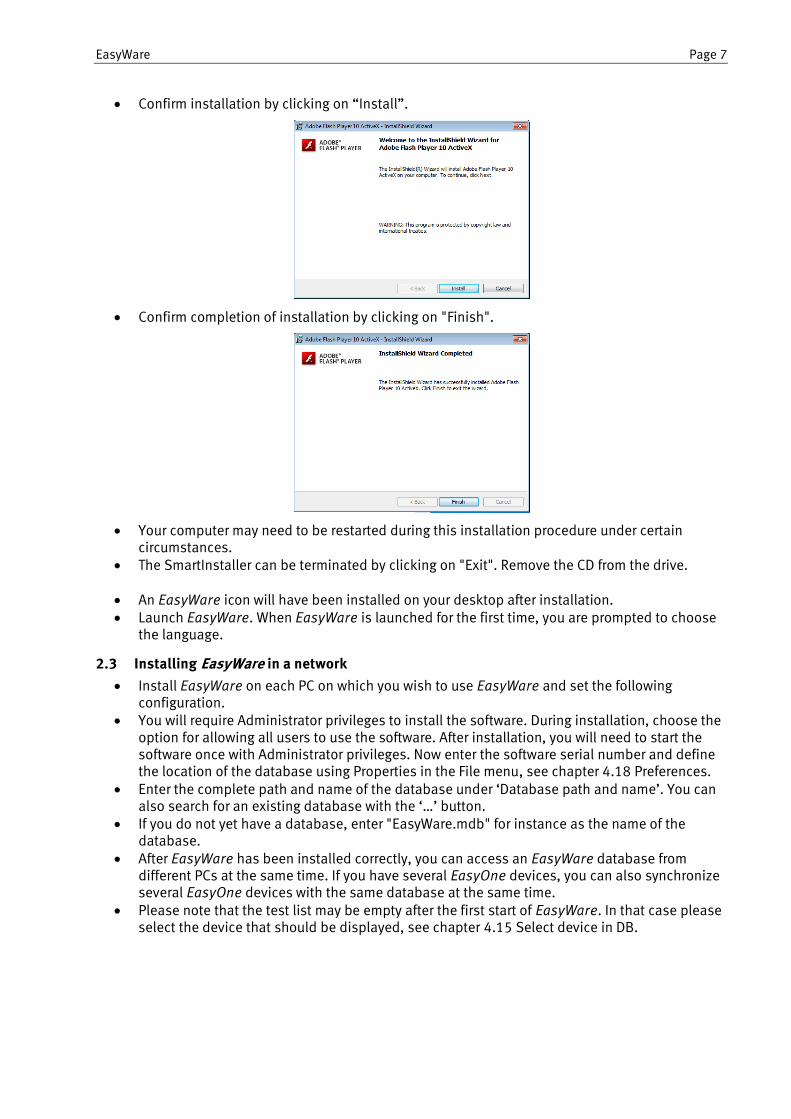
Confirm installation by clicking on “Install”.
Confirm completion of installation by clicking on "Finish".
Your computer may need to be restarted during this installation procedure under certain circumstances.
The SmartInstaller can be terminated by clicking on "Exit". Remove the CD from the drive.
An EasyWare icon will have been installed on your desktop after installation. Launch EasyWare. When EasyWare is launched for the first time, you are prompted to choose
the language.
2.3 Installing EasyWare in a network
Install EasyWare on each PC on which you wish to use EasyWare and set the following configuration.
You will require Administrator privileges to install the software. During installation, choose the option for allowing all users to use the software. After installation, you will need to start the software once with Administrator privileges. Now enter the software serial number and define the location of the database using Properties in the File menu, see chapter 4.18 Preferences.
Enter the complete path and name of the database under ‘Database path and name’. You can also search for an existing database with the ‘…’ button.
If you do not yet have a database, enter "EasyWare.mdb" for instance as the name of the database.
After EasyWare has been installed correctly, you can access an EasyWare database from different PCs at the same time. If you have several EasyOne devices, you can also synchronize several EasyOne devices with the same database at the same time.
Please note that the test list may be empty after the first start of EasyWare. In that case please select the device that should be displayed, see chapter 4.15 Select device in DB.
EasyWare Page 8
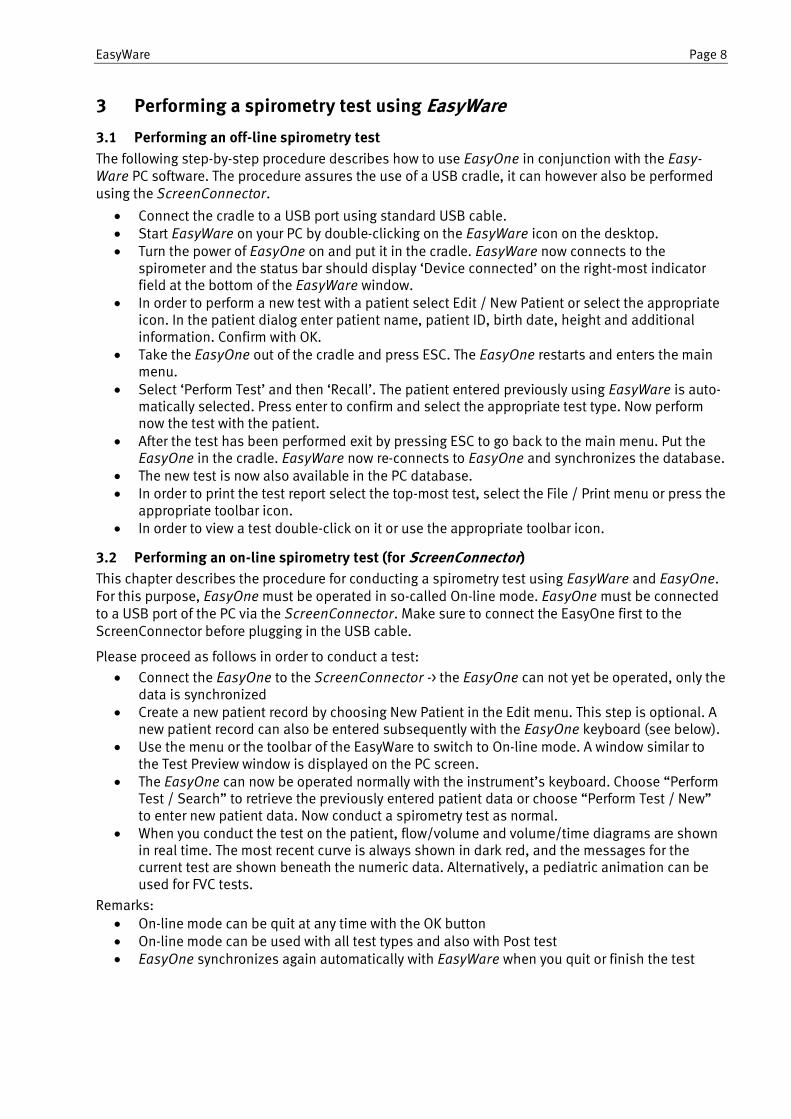
3 Performing a spirometry test using EasyWare
3.1 Performing an off-line spirometry test
The following step-by-step procedure describes how to use EasyOne in conjunction with the Easy-Ware PC software. The procedure assures the use of a USB cradle, it can however also be performed using the ScreenConnector.
Connect the cradle to a USB port using standard USB cable. Start EasyWare on your PC by double-clicking on the EasyWare icon on the desktop. Turn the power of EasyOne on and put it in the cradle. EasyWare now connects to the
spirometer and the status bar should display ‘Device connected’ on the right-most indicator field at the bottom of the EasyWare window.
In order to perform a new test with a patient select Edit / New Patient or select the appropriate icon. In the patient dialog enter patient name, patient ID, birth date, height and additional information. Confirm with OK.
Take the EasyOne out of the cradle and press ESC. The EasyOne restarts and enters the main menu.
Select ‘Perform Test’ and then ‘Recall’. The patient entered previously using EasyWare is auto-matically selected. Press enter to confirm and select the appropriate test type. Now perform now the test with the patient.
After the test has been performed exit by pressing ESC to go back to the main menu. Put the EasyOne in the cradle. EasyWare now re-connects to EasyOne and synchronizes the database.
The new test is now also available in the PC database. In order to print the test report select the top-most test, select the File / Print menu or press the
appropriate toolbar icon. In order to view a test double-click on it or use the appropriate toolbar icon.
3.2 Performing an on-line spirometry test (for ScreenConnector)
This chapter describes the procedure for conducting a spirometry test using EasyWare and EasyOne. For this purpose, EasyOne must be operated in so-called On-line mode. EasyOne must be connected to a USB port of the PC via the ScreenConnector. Make sure to connect the EasyOne first to the ScreenConnector before plugging in the USB cable.
Please proceed as follows in order to conduct a test:
Connect the EasyOne to the ScreenConnector -> the EasyOne can not yet be operated, only the data is synchronized
Create a new patient record by choosing New Patient in the Edit menu. This step is optional. A new patient record can also be entered subsequently with the EasyOne keyboard (see below).
Use the menu or the toolbar of the EasyWare to switch to On-line mode. A window similar to the Test Preview window is displayed on the PC screen.
The EasyOne can now be operated normally with the instrument’s keyboard. Choose “Perform Test / Search” to retrieve the previously entered patient data or choose “Perform Test / New” to enter new patient data. Now conduct a spirometry test as normal.
When you conduct the test on the patient, flow/volume and volume/time diagrams are shown in real time. The most recent curve is always shown in dark red, and the messages for the current test are shown beneath the numeric data. Alternatively, a pediatric animation can be used for FVC tests.
Remarks: On-line mode can be quit at any time with the OK button On-line mode can be used with all test types and also with Post test EasyOne synchronizes again automatically with EasyWare when you quit or finish the test
EasyWare Page 9
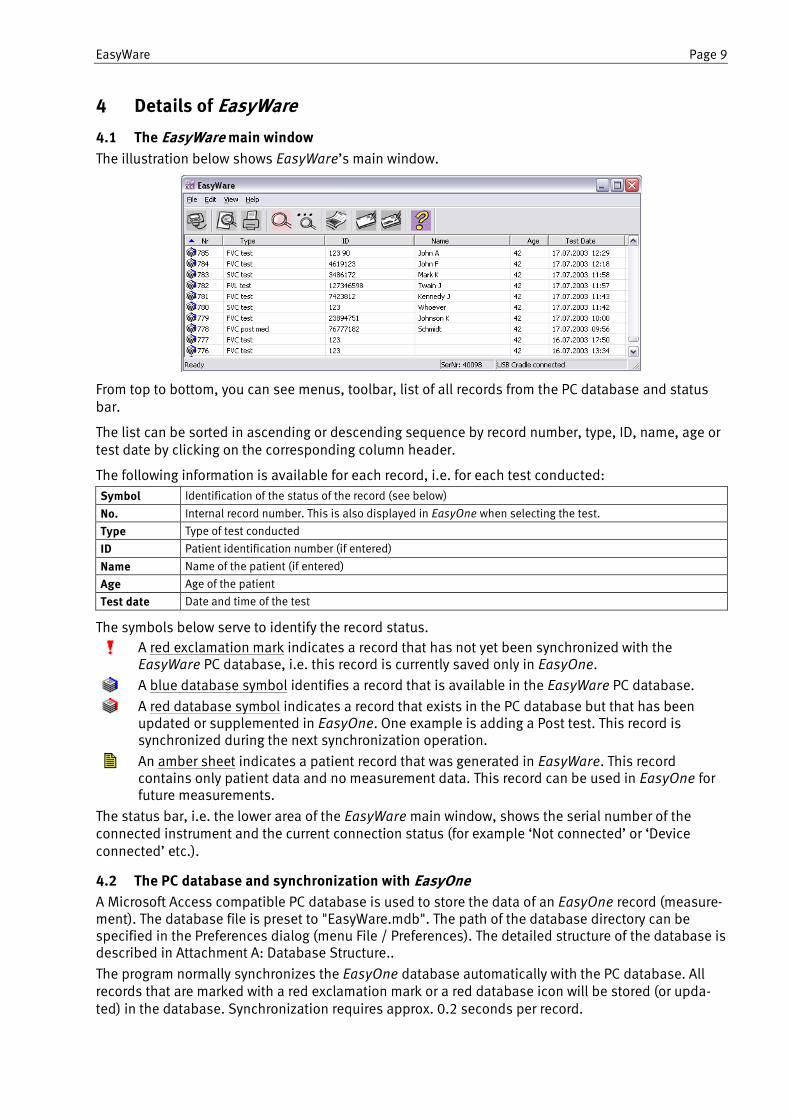
4 Details of EasyWare
4.1 The EasyWare main window
The illustration below shows EasyWare’s main window.
From top to bottom, you can see menus, toolbar, list of all records from the PC database and status bar.
The list can be sorted in ascending or descending sequence by record number, type, ID, name, age or test date by clicking on the corresponding column header.
The following information is available for each record, i.e. for each test conducted:
Symbol Identification of the status of the record (see below)
No. Internal record number. This is also displayed in EasyOne when selecting the test.
Type Type of test conducted
ID Patient identification number (if entered)
Name Name of the patient (if entered)
Age Age of the patient
Test date Date and time of the test
The symbols below serve to identify the record status.
A red exclamation mark indicates a record that has not yet been synchronized with the EasyWare PC database, i.e. this record is currently saved only in EasyOne.
A blue database symbol identifies a record that is available in the EasyWare PC database.
A red database symbol indicates a record that exists in the PC database but that has been updated or supplemented in EasyOne. One example is adding a Post test. This record is synchronized during the next synchronization operation.
An amber sheet indicates a patient record that was generated in EasyWare. This record contains only patient data and no measurement data. This record can be used in EasyOne for future measurements.
The status bar, i.e. the lower area of the EasyWare main window, shows the serial number of the connected instrument and the current connection status (for example ‘Not connected’ or ‘Device connected’ etc.).
4.2 The PC database and synchronization with EasyOne
A Microsoft Access compatible PC database is used to store the data of an EasyOne record (measure-ment). The database file is preset to "EasyWare.mdb". The path of the database directory can be specified in the Preferences dialog (menu File / Preferences). The detailed structure of the database is described in Attachment A: Database Structure..
The program normally synchronizes the EasyOne database automatically with the PC database. All records that are marked with a red exclamation mark or a red database icon will be stored (or upda-ted) in the database. Synchronization requires approx. 0.2 seconds per record.
EasyWare Page 10
When synchronization is complete the list in the EasyWare window is redrawn and all records are now shown as ‘blue database icons’ and ‘yellow patient data sheets’.
Synchronization range
Records are within the synchronization range if their date is more recent or the same as the date of the most recent record in the database. Due to this the time & date of EasyOne and EasyWare should not differ much. Therefore a warning is displayed if the difference is more than 15 minutes.
New Patient Records
New patient records can only be created if EasyOne is connected to the PC.
Modified Records
In the synchronization process, EasyOne has always priority. If EasyOne is connected with EasyWare and the patient data is edited, it is done on both sides. If they are not connected, two cases have to be considered: a) within or b) outside of synchronization range. Within the synchronization range only records modified in EasyOne will be synchronized. Outside of the synchronization range modified records will generally not be synchronized. This means that if you edit a record in EasyWare and the EasyOne is connected again, the data from the EasyOne overwrites the edited EasyWare data.
Deleted Records
Records cannot be deleted in EasyWare as long as they are in the synchronization range. The delete command can be executed. The next synchronization however, will undo this effort because the records will be re-synchronized from EasyOne.
Note
Note that the first synchronization operation for an EasyOne may take a relatively long time since, under certain circumstances; many records may have already been saved in EasyOne.
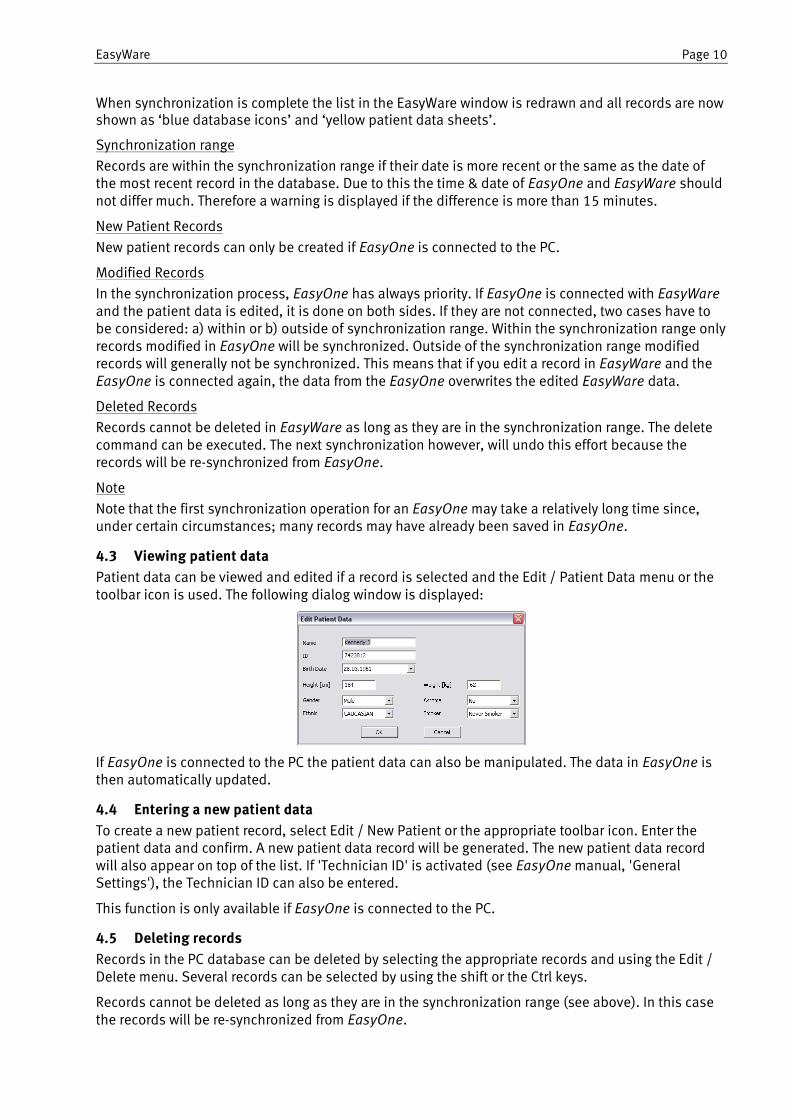
4.3 Viewing patient data
Patient data can be viewed and edited if a record is selected and the Edit / Patient Data menu or the toolbar icon is used. The following dialog window is displayed:
If EasyOne is connected to the PC the patient data can also be manipulated. The data in EasyOne is then automatically updated.
4.4 Entering a new patient data
To create a new patient record, select Edit / New Patient or the appropriate toolbar icon. Enter the patient data and confirm. A new patient data record will be generated. The new patient data record will also appear on top of the list. If 'Technician ID' is activated (see EasyOne manual, 'General Settings'), the Technician ID can also be entered.
This function is only available if EasyOne is connected to the PC.
4.5 Deleting records
Records in the PC database can be deleted by selecting the appropriate records and using the Edit / Delete menu. Several records can be selected by using the shift or the Ctrl keys.
Records cannot be deleted as long as they are in the synchronization range (see above). In this case the records will be re-synchronized from EasyOne.

EasyWare Page 11
4.6 Viewing test results in 'Normal View'
By selecting and double clicking a record the test results can be displayed. Alternatively the menu View / Test Result or the appropriate icon can be used. The following window is displayed:
The example above uses 'Best Value' display (see chapter 4.17 Device configuration). If 'Best Trial' is selected the trial rank will additionally be displayed in the header of the table. Please note that in 'Normal View' only the three best trials (rank #1 to #3) are displayed. If additional trials have been performed, and if the curve data of all data is stored, then data and curves of these additional trials are displayed in 'Advanced View' (see chapter below).
The test result window contains the following information:
Curves depending on the measurement type. Pre and/or post curve with predicted values. Patient and test information. Numerical test results of pre and/or post test. Warnings and interpretation.
By clicking on the trial number or on the trial rank individual curves can be highlighted
By using the arrow buttons the next or the previous record can be displayed. Instead of the buttons the PgUp or PgDown keys can also be used.
EasyWare Test Previews can easily be copied into other applications (e.g. Microsoft Word). Please execute the following operations:
1. Start the application where you want to copy the EasyWare report (e.g. Microsoft Word). 2. Start EasyWare.
3. Select the test you would like to copy and double click in the test list or select View / Test Result in the menu. This opens the View Test Result window.
4. Select what detail is shown (Baseline, Post or Baseline combined with Post) 5. Press and hold the Alt–key on the keyboard. Press the PrtScr-key. This copies the content of
the current active window into the clipboard. 6. Change to the other application (Microsoft Word) 7. Press Ctrl-V or select Edit / Paste in the menu. This copies the content of the clipboard into the
application.
4.7 Viewing test results in 'Advanced View'
The selection field ‘Advanced View’ enables additional features.
EasyWare Page 12
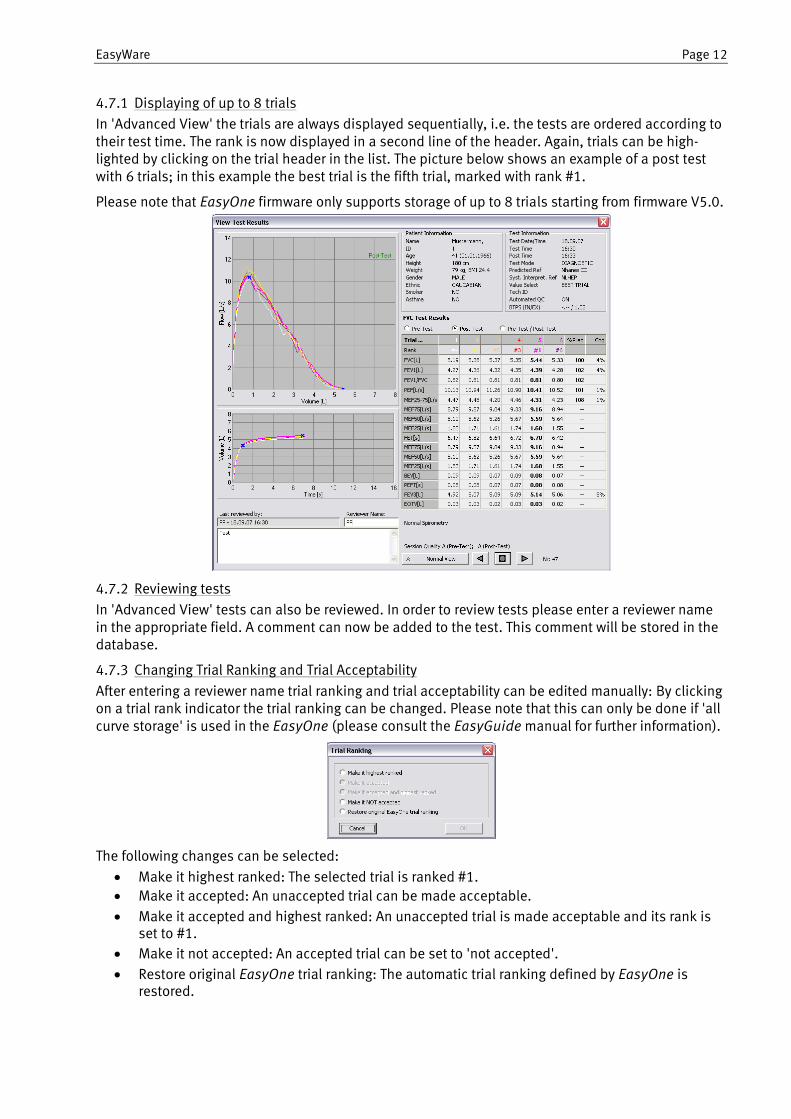
4.7.1 Displaying of up to 8 trials
In 'Advanced View' the trials are always displayed sequentially, i.e. the tests are ordered according to their test time. The rank is now displayed in a second line of the header. Again, trials can be high-lighted by clicking on the trial header in the list. The picture below shows an example of a post test with 6 trials; in this example the best trial is the fifth trial, marked with rank #1.
Please note that EasyOne firmware only supports storage of up to 8 trials starting from firmware V5.0.
4.7.2 Reviewing tests
In 'Advanced View' tests can also be reviewed. In order to review tests please enter a reviewer name in the appropriate field. A comment can now be added to the test. This comment will be stored in the database.
4.7.3 Changing Trial Ranking and Trial Acceptability
After entering a reviewer name trial ranking and trial acceptability can be edited manually: By clicking on a trial rank indicator the trial ranking can be changed. Please note that this can only be done if 'all curve storage' is used in the EasyOne (please consult the EasyGuide manual for further information).
The following changes can be selected:
Make it highest ranked: The selected trial is ranked #1.
Make it accepted: An unaccepted trial can be made acceptable.
Make it accepted and highest ranked: An unaccepted trial is made acceptable and its rank is set to #1.
Make it not accepted: An accepted trial can be set to 'not accepted'.
Restore original EasyOne trial ranking: The automatic trial ranking defined by EasyOne is restored.
EasyWare Page 13
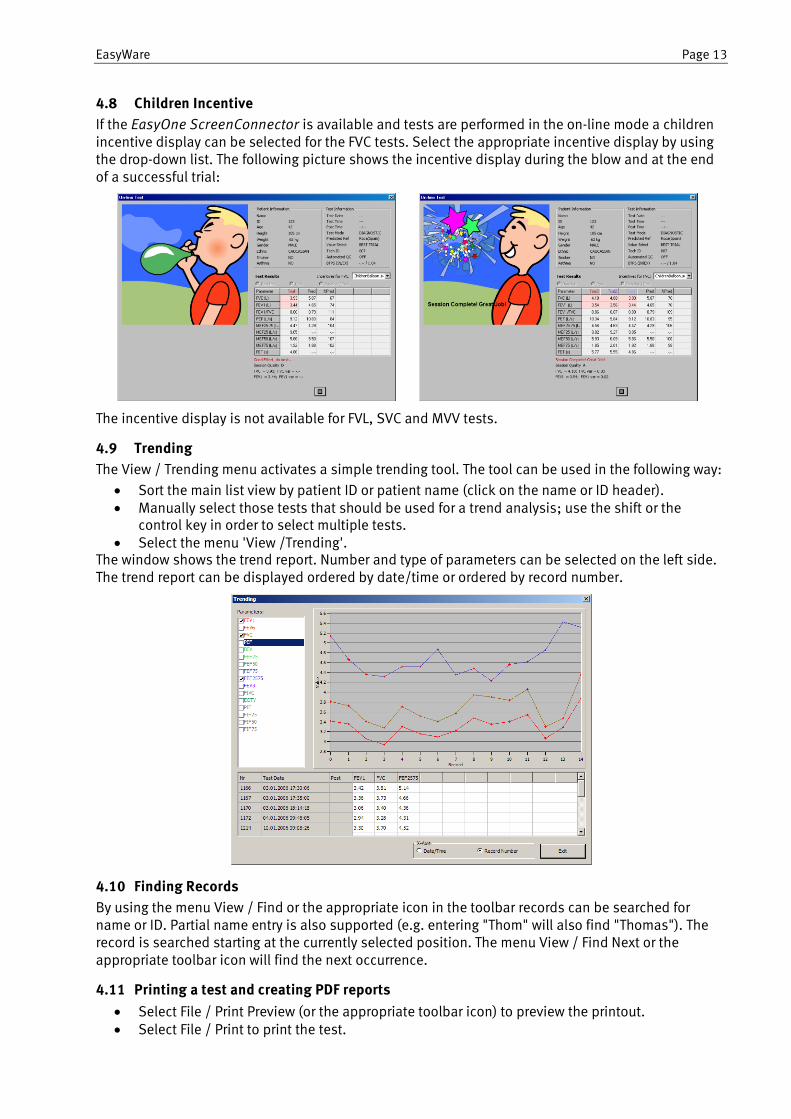
4.8 Children Incentive
If the EasyOne ScreenConnector is available and tests are performed in the on-line mode a children incentive display can be selected for the FVC tests. Select the appropriate incentive display by using the drop-down list. The following picture shows the incentive display during the blow and at the end of a successful trial:
The incentive display is not available for FVL, SVC and MVV tests.
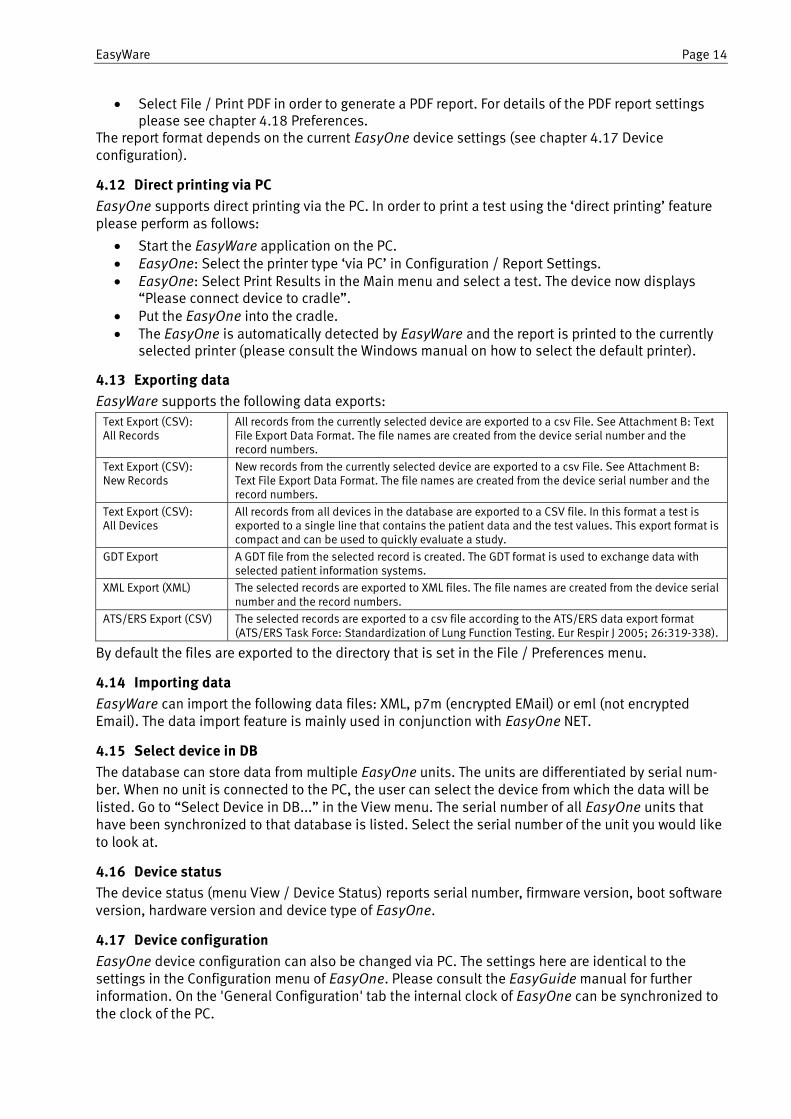
4.9 Trending
The View / Trending menu activates a simple trending tool. The tool can be used in the following way:
Sort the main list view by patient ID or patient name (click on the name or ID header). Manually select those tests that should be used for a trend analysis; use the shift or the
control key in order to select multiple tests. Select the menu 'View /Trending'.
The window shows the trend report. Number and type of parameters can be selected on the left side. The trend report can be displayed ordered by date/time or ordered by record number.
4.10 Finding Records
By using the menu View / Find or the appropriate icon in the toolbar records can be searched for name or ID. Partial name entry is also supported (e.g. entering "Thom" will also find "Thomas"). The record is searched starting at the currently selected position. The menu View / Find Next or the appropriate toolbar icon will find the next occurrence.
4.11 Printing a test and creating PDF reports
Select File / Print Preview (or the appropriate toolbar icon) to preview the printout. Select File / Print to print the test.
EasyWare Page 14
Select File / Print PDF in order to generate a PDF report. For details of the PDF report settings please see chapter 4.18 Preferences.
The report format depends on the current EasyOne device settings (see chapter 4.17 Device configuration).
4.12 Direct printing via PC
EasyOne supports direct printing via the PC. In order to print a test using the ‘direct printing’ feature please perform as follows:
Start the EasyWare application on the PC. EasyOne: Select the printer type ‘via PC’ in Configuration / Report Settings. EasyOne: Select Print Results in the Main menu and select a test. The device now displays
“Please connect device to cradle”. Put the EasyOne into the cradle. The EasyOne is automatically detected by EasyWare and the report is printed to the currently
selected printer (please consult the Windows manual on how to select the default printer).
4.13 Exporting data
EasyWare supports the following data exports:
Text Export (CSV): All Records
All records from the currently selected device are exported to a csv File. See Attachment B: Text File Export Data Format. The file names are created from the device serial number and the record numbers.
Text Export (CSV): New Records
New records from the currently selected device are exported to a csv File. See Attachment B: Text File Export Data Format. The file names are created from the device serial number and the record numbers.
Text Export (CSV): All Devices
All records from all devices in the database are exported to a CSV file. In this format a test is exported to a single line that contains the patient data and the test values. This export format is compact and can be used to quickly evaluate a study.
GDT Export A GDT file from the selected record is created. The GDT format is used to exchange data with selected patient information systems.
XML Export (XML) The selected records are exported to XML files. The file names are created from the device serial number and the record numbers.
ATS/ERS Export (CSV) The selected records are exported to a csv file according to the ATS/ERS data export format (ATS/ERS Task Force: Standardization of Lung Function Testing. Eur Respir J 2005; 26:319-338).
By default the files are exported to the directory that is set in the File / Preferences menu.
4.14 Importing data
EasyWare can import the following data files: XML, p7m (encrypted EMail) or eml (not encrypted Email). The data import feature is mainly used in conjunction with EasyOne NET.
4.15 Select device in DB
The database can store data from multiple EasyOne units. The units are differentiated by serial num-ber. When no unit is connected to the PC, the user can select the device from which the data will be listed. Go to “Select Device in DB...” in the View menu. The serial number of all EasyOne units that have been synchronized to that database is listed. Select the serial number of the unit you would like to look at.
4.16 Device status
The device status (menu View / Device Status) reports serial number, firmware version, boot software version, hardware version and device type of EasyOne.
4.17 Device configuration
EasyOne device configuration can also be changed via PC. The settings here are identical to the settings in the Configuration menu of EasyOne. Please consult the EasyGuide manual for further information. On the 'General Configuration' tab the internal clock of EasyOne can be synchronized to the clock of the PC.
EasyWare Page 15
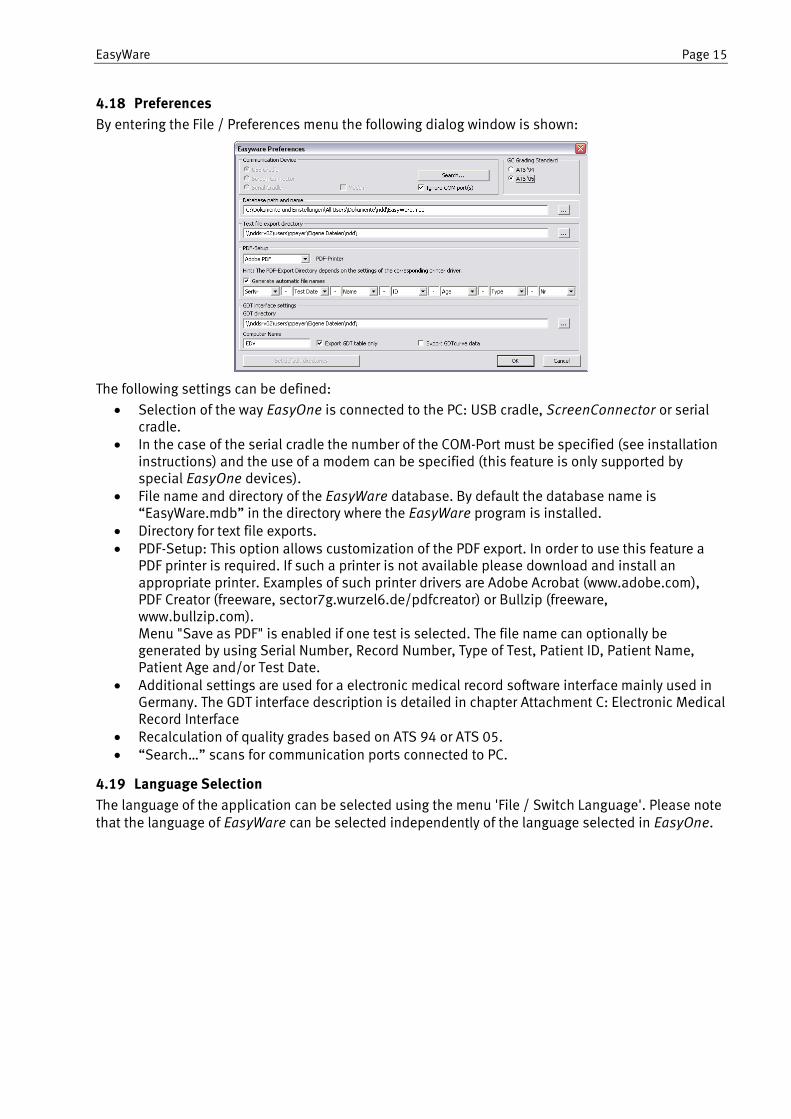
4.18 Preferences
By entering the File / Preferences menu the following dialog window is shown:
The following settings can be defined:
Selection of the way EasyOne is connected to the PC: USB cradle, ScreenConnector or serial cradle.
In the case of the serial cradle the number of the COM-Port must be specified (see installation instructions) and the use of a modem can be specified (this feature is only supported by special EasyOne devices).
File name and directory of the EasyWare database. By default the database name is “EasyWare.mdb” in the directory where the EasyWare program is installed.
Directory for text file exports. PDF-Setup: This option allows customization of the PDF export. In order to use this feature a
PDF printer is required. If such a printer is not available please download and install an appropriate printer. Examples of such printer drivers are Adobe Acrobat (www.adobe.com), PDF Creator (freeware, sector7g.wurzel6.de/pdfcreator) or Bullzip (freeware, www.bullzip.com). Menu "Save as PDF" is enabled if one test is selected. The file name can optionally be generated by using Serial Number, Record Number, Type of Test, Patient ID, Patient Name, Patient Age and/or Test Date.
Additional settings are used for a electronic medical record software interface mainly used in Germany. The GDT interface description is detailed in chapter Attachment C: Electronic Medical Record Interface
Recalculation of quality grades based on ATS 94 or ATS 05. “Search…” scans for communication ports connected to PC.
4.19 Language Selection
The language of the application can be selected using the menu 'File / Switch Language'. Please note that the language of EasyWare can be selected independently of the language selected in EasyOne.

EasyWare Page 16
5 Attachment A: Database Structure The following diagram shows the organization of the database.
Devices Index 0
TestDescr Index 1
PrePost Index2
Trial Index3
Info
SerNr long SerNr long SerNr long SerNr long Key text
RecNum long RecNum long RecNum long RecNum long Description text
SyncDate date/time Date date/time PrePost bool PrePost bool
Status ByteArray Export(10) byte Date date/time TrialNum(11) byte
DecrKey text PatientID text NoOfTrials byte Date date/time
DecrKeydesc text BirthDate date/time Boolean1 bool Accept bool LogoName text Height float Boolean2 bool TrialTyp byte Weight float Boolean3 bool TrialNo(11) byte Gender bool Boolean4 bool FEV1 *§ float Smoker bool Boolean5 bool FEV6 *§ float Asthma byte QCGrade byte FVC *§ float Ethnic byte Word0 integer PEF float Name text Word1 integer BEV float Spare byte Word2 integer FET *# float TechnID text BtpsExp float PEFT *# float TypeOfTest byte BtpsIn float FEF25 float FEV6Selected bool FEF50 float AutoQCOn bool FEF75 float StorageOption bool FEF2575 § float CRC long FEV3 *# float Memo memo FIVC * float Status OLE IVC float ReviewerName text VC (EOTV) float ReviewDate date/time PIF *§ float ExtendedData memo FIF25 $ float TVersion byte FIF50 float FIF75 $ float Tzero float CuFVLen integer CuVTLen integer CurveFV(3) ByteArray CurveVT(4) ByteArray OrigTrialNum text
Notes:
1. Key fields are marked with a thicker frame.
2. The data type is indicated on the right hand side.
3. Format of CurveFV ByteArray: The ByteArray contains 2 byte integer values with low byte followed by high byte. The listed values are flow values with a resolution of 10 ml/s per bit. The volume spacing between samples is 30 ml. The first point of the curve at (0,0) has been omitted.
4. Format of CurveVT ByteArray: Organization identical to CurveFV. The listed values are volume values with a resolution of 10 ml per bit. The time spacing between samples is 60 ms. The first point of the curve at (0,0) has been omitted.
5. Trial fields marked with * have a different meaning if the test type is ‘slow vital capacity’.
6. Trial fields marked with # have a different meaning if the test type is ‘MVV’.
7. Trial fields marked with § have a different meaning if the test type is ‘Calibration Check’.
8. Trial fields marked with $ have a different meaning if the test type is 'FVC'.
9. Most of the field names are identical to the names used in the text file export. For an explanation please refer to the following Attachment.
10. The field labeled ‘Export’ in the TestDescr table is used to identify the export status of the test.
11. TrialNum is the rank of the trial, TrialNo is the sequence number of the trial.
EasyWare Page 17
6 Attachment B: Text File Export Data Format The EasyWare program exports data files with the following file names: SNsssss-rrrrr.csv, where sssss stands for the EasyOne serial number (unique), and rrrrr stand for the internal test record number (also unique up to 32768 records on a single unit). The file name is therefore unique.
The following describes the format used for data export from EasyOne.
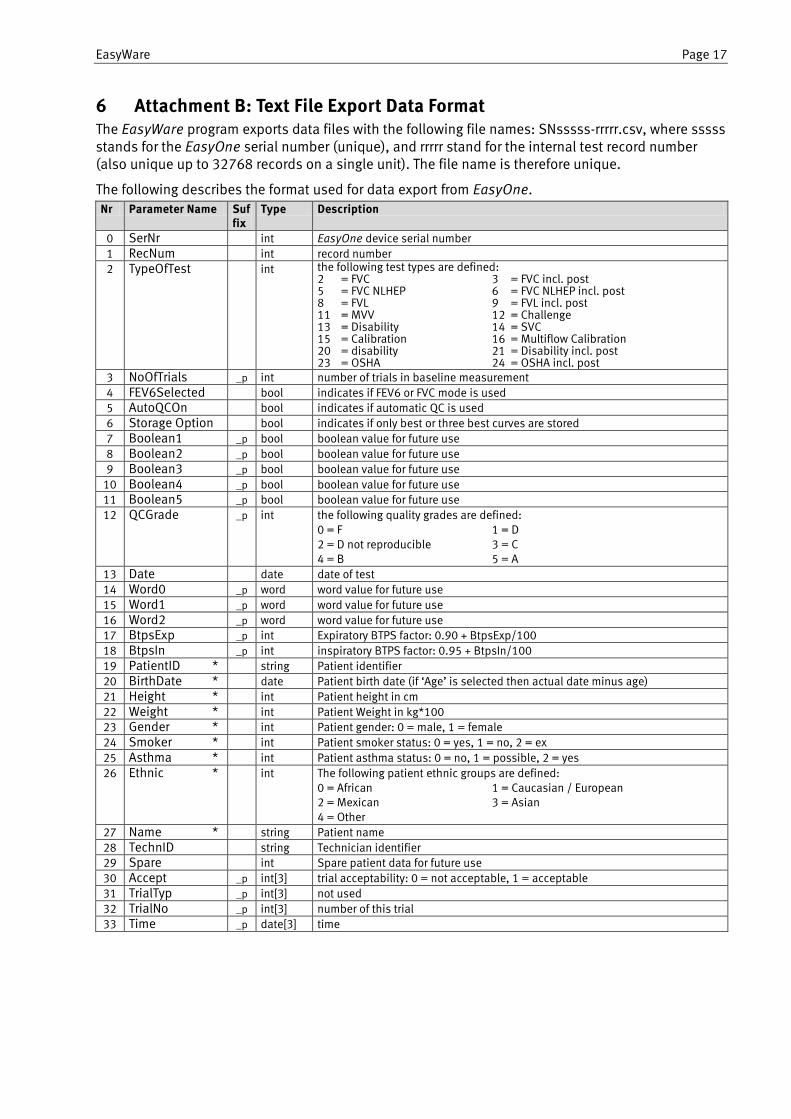
Nr Parameter Name Suffix
Type Description
0 SerNr int EasyOne device serial number
1 RecNum int record number
2 TypeOfTest int the following test types are defined: 2 = FVC 3 = FVC incl. post 5 = FVC NLHEP 6 = FVC NLHEP incl. post 8 = FVL 9 = FVL incl. post 11 = MVV 12 = Challenge 13 = Disability 14 = SVC 15 = Calibration 16 = Multiflow Calibration 20 = disability 21 = Disability incl. post 23 = OSHA 24 = OSHA incl. post
3 NoOfTrials _p int number of trials in baseline measurement
4 FEV6Selected bool indicates if FEV6 or FVC mode is used
5 AutoQCOn bool indicates if automatic QC is used
6 Storage Option bool indicates if only best or three best curves are stored
7 Boolean1 _p bool boolean value for future use
8 Boolean2 _p bool boolean value for future use
9 Boolean3 _p bool boolean value for future use
10 Boolean4 _p bool boolean value for future use
11 Boolean5 _p bool boolean value for future use
12 QCGrade _p int the following quality grades are defined: 0 = F 1 = D 2 = D not reproducible 3 = C 4 = B 5 = A
13 Date date date of test
14 Word0 _p word word value for future use
15 Word1 _p word word value for future use
16 Word2 _p word word value for future use
17 BtpsExp _p int Expiratory BTPS factor: 0.90 + BtpsExp/100
18 BtpsIn _p int inspiratory BTPS factor: 0.95 + BtpsIn/100
19 PatientID * string Patient identifier
20 BirthDate * date Patient birth date (if ‘Age’ is selected then actual date minus age)
21 Height * int Patient height in cm
22 Weight * int Patient Weight in kg*100
23 Gender * int Patient gender: 0 = male, 1 = female
24 Smoker * int Patient smoker status: 0 = yes, 1 = no, 2 = ex
25 Asthma * int Patient asthma status: 0 = no, 1 = possible, 2 = yes
26 Ethnic * int The following patient ethnic groups are defined: 0 = African 1 = Caucasian / European 2 = Mexican 3 = Asian 4 = Other
27 Name * string Patient name
28 TechnID string Technician identifier
29 Spare int Spare patient data for future use
30 Accept _p int[3] trial acceptability: 0 = not acceptable, 1 = acceptable
31 TrialTyp _p int[3] not used
32 TrialNo _p int[3] number of this trial
33 Time _p date[3] time
EasyWare Page 18
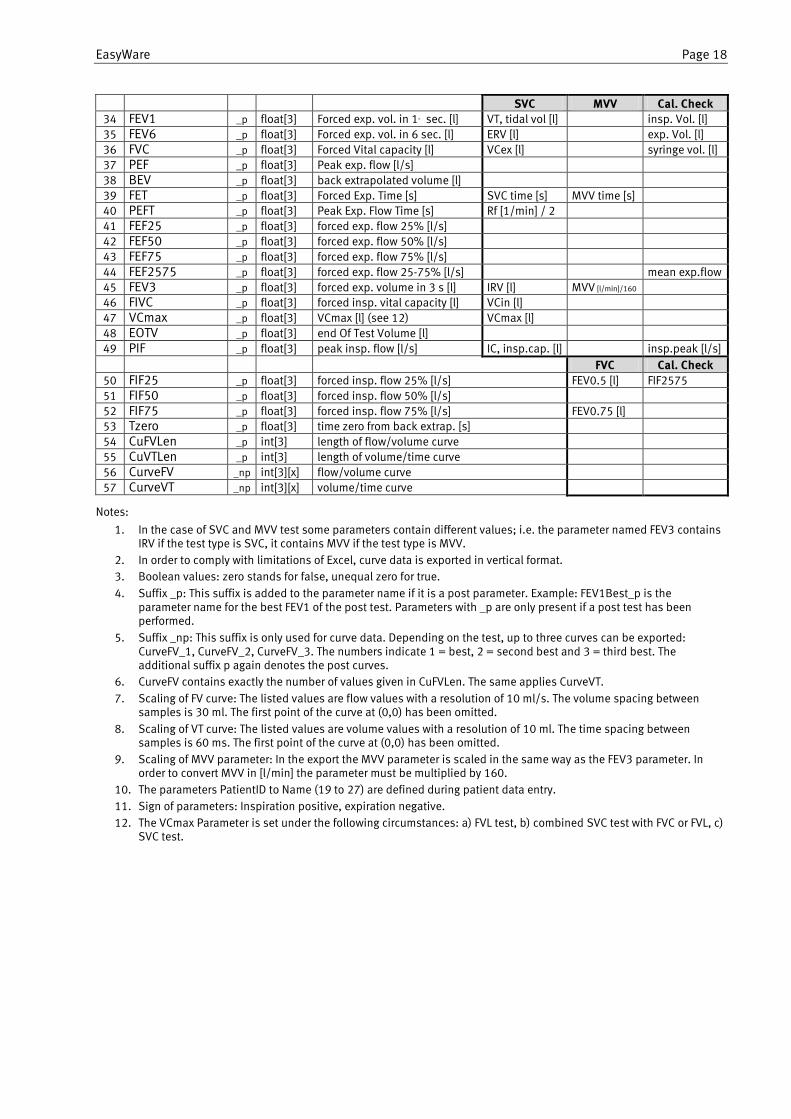
SVC MVV Cal. Check
34 FEV1 _p float[3] Forced exp. vol. in 1st sec. [l] VT, tidal vol [l] insp. Vol. [l]
35 FEV6 _p float[3] Forced exp. vol. in 6 sec. [l] ERV [l] exp. Vol. [l]
36 FVC _p float[3] Forced Vital capacity [l] VCex [l] syringe vol. [l]
37 PEF _p float[3] Peak exp. flow [l/s]
38 BEV _p float[3] back extrapolated volume [l]
39 FET _p float[3] Forced Exp. Time [s] SVC time [s] MVV time [s]
40 PEFT _p float[3] Peak Exp. Flow Time [s] Rf [1/min] / 2
41 FEF25 _p float[3] forced exp. flow 25% [l/s]
42 FEF50 _p float[3] forced exp. flow 50% [l/s]
43 FEF75 _p float[3] forced exp. flow 75% [l/s]
44 FEF2575 _p float[3] forced exp. flow 25-75% [l/s] mean exp.flow
45 FEV3 _p float[3] forced exp. volume in 3 s [l] IRV [l] MVV [l/min]/160
46 FIVC _p float[3] forced insp. vital capacity [l] VCin [l]
47 VCmax _p float[3] VCmax [l] (see 12) VCmax [l]
48 EOTV _p float[3] end Of Test Volume [l]
49 PIF _p float[3] peak insp. flow [l/s] IC, insp.cap. [l] insp.peak [l/s]
FVC Cal. Check
50 FIF25 _p float[3] forced insp. flow 25% [l/s] FEV0.5 [l] FIF2575
51 FIF50 _p float[3] forced insp. flow 50% [l/s]
52 FIF75 _p float[3] forced insp. flow 75% [l/s] FEV0.75 [l]
53 Tzero _p float[3] time zero from back extrap. [s]
54 CuFVLen _p int[3] length of flow/volume curve
55 CuVTLen _p int[3] length of volume/time curve
56 CurveFV _np int[3][x] flow/volume curve
57 CurveVT _np int[3][x] volume/time curve
Notes:
1. In the case of SVC and MVV test some parameters contain different values; i.e. the parameter named FEV3 contains IRV if the test type is SVC, it contains MVV if the test type is MVV.
2. In order to comply with limitations of Excel, curve data is exported in vertical format.
3. Boolean values: zero stands for false, unequal zero for true.
4. Suffix _p: This suffix is added to the parameter name if it is a post parameter. Example: FEV1Best_p is the parameter name for the best FEV1 of the post test. Parameters with _p are only present if a post test has been performed.
5. Suffix _np: This suffix is only used for curve data. Depending on the test, up to three curves can be exported: CurveFV_1, CurveFV_2, CurveFV_3. The numbers indicate 1 = best, 2 = second best and 3 = third best. The additional suffix p again denotes the post curves.
6. CurveFV contains exactly the number of values given in CuFVLen. The same applies CurveVT.
7. Scaling of FV curve: The listed values are flow values with a resolution of 10 ml/s. The volume spacing between samples is 30 ml. The first point of the curve at (0,0) has been omitted.
8. Scaling of VT curve: The listed values are volume values with a resolution of 10 ml. The time spacing between samples is 60 ms. The first point of the curve at (0,0) has been omitted.
9. Scaling of MVV parameter: In the export the MVV parameter is scaled in the same way as the FEV3 parameter. In order to convert MVV in [l/min] the parameter must be multiplied by 160.
10. The parameters PatientID to Name (19 to 27) are defined during patient data entry.
11. Sign of parameters: Inspiration positive, expiration negative.
12. The VCmax Parameter is set under the following circumstances: a) FVL test, b) combined SVC test with FVC or FVL, c) SVC test.
EasyWare Page 19
7 Attachment C: Electronic Medical Record Interface
Introduction
The following describes the interface set up to facilitate the data communication between EasyWare and an Electronic Medical Record System (EMR). As an example the integration of the German GDT standard is described.
Version history
EasyWare Version
Description Date Document Version
1.3.1 First implementation of the GDT interface 3.4.2002 1.1
2.4 Correction of the GDT file name, now without "_" N/A N/A
2.7 Curve data export, export of EasyOne serial number and record number. Implementation of Test Recall.
17.9.2004 1.2
2.8 Recall via record type 6311. Support of first name and last name with 3101, 3102. Export of interpretation and predicted values.
14.4.2005 1.3
Software Settings
The following settings need to be made in File/Preferences menu of EasyWare:
Parameter Description
GDT Folder The GDT folder of the EMR system. This may also be a folder in a network drive. For convenient path entry the button Browse may be used. The GDT file will be written to this folder and read in from this folder.
Computer Name Name of the EMR computer.
Export only GDT table If this is activated: Only formatted text of the result table (GDT field 6228) will be exported (see also example forced spirometry below).
Data accepted by EasyWare from EMR / GDT
The following data is read in by EasyWare from the GDT interface. The data that is actually transmitted depends on the EMR (GDT) system used. Excessive data is ignored by EasyWare.
GDT Field ID
Description Comment
8000 Record ID
8316 GDT-ID of EMR When this information is sent, the GDT-ID is automatically accept used by EasyWare (see chapter “Software Settings”).
3000 Patient ID The ID may include letters and numbers. Maximum length: 15 characters
3101 Name First name, maximum number of characters: 47
3102 First Name Last Name, maximum number of characters: 47
3103 Date of Birth
3110 Gender (1 = male)
3622 Height (in cm)
3623 Weight (in kg)
Here an example of a GDT file (nddPCS.gdt), received from an EMR with the name PCS: 014810000202 01380006302 0158315Extern 0128316PCS 014921802.00 01030001 0093100 0143101Meier 0163102Manfred 017310301011966 0093104 019310624106 Kiel 0203107Schulstr. 1 01031101 0123622185 011362363
EasyWare Page 20
In addition to some GDT specific information the file contains the following patient information: Name, date of birth, gender, height in cm, weight in kg. For correct interpretation of these data the EMR computer name must be entered as "PCS" in File / Preferences.
View of tests with EasyWare
EasyWare supports 3 ways to recall a test stored in the EMR system:
ViewTest using command line parameters
As of EasyWare V2.7 record number and EasyOne serial number are exported in the EasyWare export file. A record number in combination with a serial number do clearly identify a test. The data is transmitted in the following way:
0298410SN:RecNum 40098:1030
Serial number and record number are transmitted using GDT record type 8410 (comment) and are separated by colon ‚:’. When EasyWare is started with the following parameters
EasyWare /r:40098:1030
The test view window of the selected record will automatically be shown.
View test via GDT record type 6311 using EasyOne serial number and record number
As of EasyWare V2.8 the GDT record type 6311 is supported. As described above EasyOne serial number and record number will be transmitted using GDT record type 8410 when the test results are transmitted using GDT record type 6310. That information allows clear identification of the test. If the same GDT record type 8410 is used again when a test is recalled via GDT record type 6311, the appropriate test is automatically displayed in EasyWare.
View test via GDT record type 6311 with patient name, ID and date and time of test
As of EasyWare V2.8 GDT record type 6311 is supported. In the transmission of test results using GDT record type 6310, record type 8432 (date) and 8439 (time) are always included:
8432ddmmyyyy (Day, Month, Year)
8439hhmmss (Hour, Minutes, Seconds)
In case of a recall via GDT record type 6311 the test can be identified by name, ID, date and time and will be shown.
Example EMR Application "TurboMed"
TurboMed software settings
The following settings have to be applied only when the EMR interface is used:
1. Start TurboMed software and select the record of a patient.
In the patient record select „Konsultationen / Geräteanbindung“.
Select „Gerät anbinden“.
Enter the following:
Field Entry Description
Name EasyOne Name of equipment Programm c:\nddmed\EasyWare.exe Complete path of EasyWare software. Export-File c:\nddmed\nddturbomed.gdt Name and path of the export file. Import-File c:\nddmed\turbomedndd.gdt Name and path of the import file. The path (in
the example c:\nddmed\) must be identical to the export file path.
Type 2 Version of the GDT / EMR interface
Confirm the entry with: „Speichern“.
Confirm the dialog „Geräte anbinden“ with „Ende“.
These adjustments are sufficient for the set up of the EMR software. Now proceed with the set up of EasyWare.
EasyWare Page 21
Set up EasyWare Software
When the EMR interface is used for the first time, the following settings have to be done:
1. Start EasyWare.
Open menu „File / Preferences“.
Enter the path of the EMR folder according to the export path set in EMR TurboMed (in the above example c:\nddmed\).
Enter the EMR computer name to „TurboMed“.
At „Only export GDT table“ the box must be checked.
Confirm the dialogue with OK.
Close EasyWare.
Performing a measurement
The following describes the test procedure.
1. Start TurboMed, select a patient and open that file.
2. Select „Konsultationen / Geräteanbindung“.
3. Select "EasyOne" and then „Start“.
4. EasyWare is automatically started. In case where a) EasyOne is not inserted in the cradle, or b) not connected to the PC via the ScreenConnector, or c) not switched on the software will prompt you to do so.
5. A message box shows the synchronization between EasyOne and software.
6. The patient data entry window appears automatically. Enter the required data.
7. Confirm with OK. The data will be sent to EasyOne automatically.
8. Take EasyOne.
9. Select „Perform Test“.
10. Select „ALT“ and confirm with „Enter“.
11. The data of the patient appears. Confirm with „Enter“.
12. Select the appropriate test type (FVC, FVL, SVC, MVV) and confirm with „Enter“.
13. Perform a complete test with the patient, but do not print the test.
14. Put EasyOne back into the cradle.
15. The data will be automatically synchronized and written into the EasyWare data base.
16. Print a report if required.
17. Close EasyWare.
18. TurboMed now receives the data. Confirm with OK
19. Close the program now with ‚Ende‘.
Remarks
Pre / post tests are supported: In case you want to show pre / post tests directly in the EMR TurboMed proceed as follows: Perform the pre test as described above. Without putting EasyOne into cradle perform the post test. After completion of pre and post test you may put EasyOne into cradle and proceed as described above. TurboMed now shows the pre / post test.
EasyWare Page 22
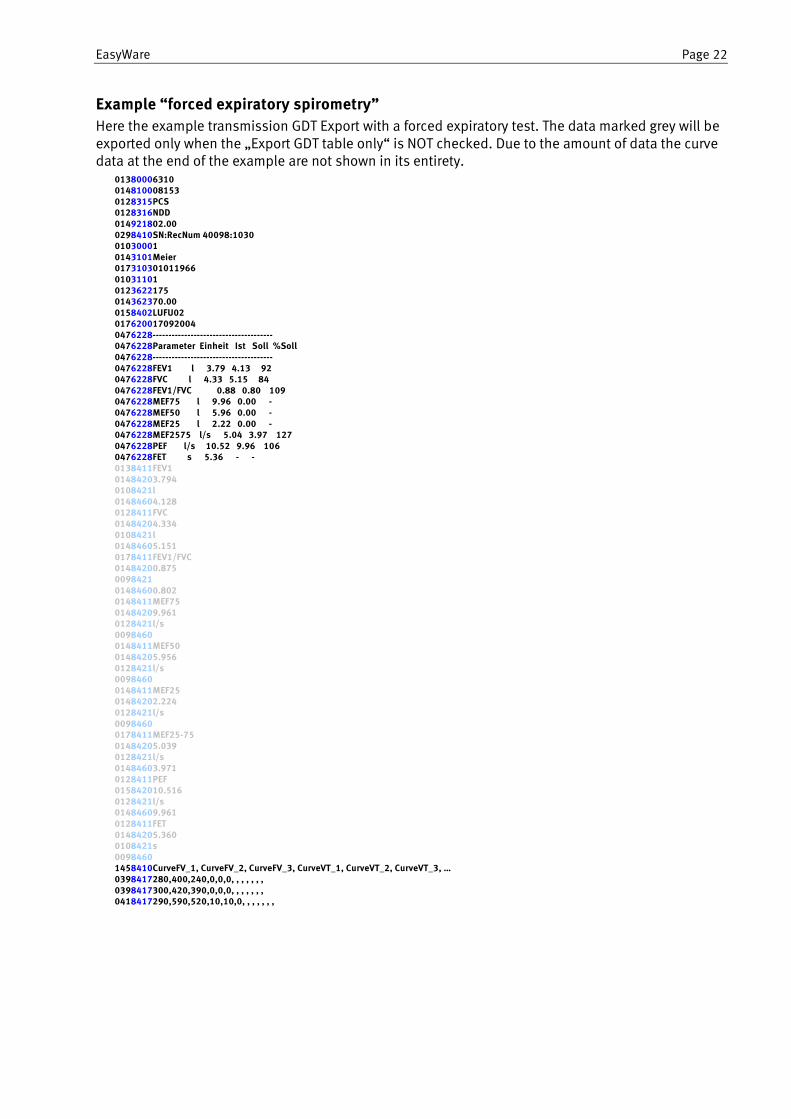
Example “forced expiratory spirometry”
Here the example transmission GDT Export with a forced expiratory test. The data marked grey will be exported only when the „Export GDT table only“ is NOT checked. Due to the amount of data the curve data at the end of the example are not shown in its entirety.
01380006310 014810008153 0128315PCS 0128316NDD 014921802.00 0298410SN:RecNum 40098:1030 01030001 0143101Meier 017310301011966 01031101 0123622175 014362370.00 0158402LUFU02 017620017092004 0476228-------------------------------------- 0476228Parameter Einheit Ist Soll %Soll 0476228-------------------------------------- 0476228FEV1 l 3.79 4.13 92 0476228FVC l 4.33 5.15 84 0476228FEV1/FVC 0.88 0.80 109 0476228MEF75 l 9.96 0.00 - 0476228MEF50 l 5.96 0.00 - 0476228MEF25 l 2.22 0.00 - 0476228MEF2575 l/s 5.04 3.97 127 0476228PEF l/s 10.52 9.96 106 0476228FET s 5.36 - - 0138411FEV1 01484203.794 0108421l 01484604.128 0128411FVC 01484204.334 0108421l 01484605.151 0178411FEV1/FVC 01484200.875 0098421 01484600.802 0148411MEF75 01484209.961 0128421l/s 0098460 0148411MEF50 01484205.956 0128421l/s 0098460 0148411MEF25 01484202.224 0128421l/s 0098460 0178411MEF25-75 01484205.039 0128421l/s 01484603.971 0128411PEF 015842010.516 0128421l/s 01484609.961 0128411FET 01484205.360 0108421s 0098460 1458410CurveFV_1, CurveFV_2, CurveFV_3, CurveVT_1, CurveVT_2, CurveVT_3, … 0398417280,400,240,0,0,0, , , , , , , 0398417300,420,390,0,0,0, , , , , , , 0418417290,590,520,10,10,0, , , , , , ,


![IEC 60950 and IEC 62368 safety standard terminology€¦ · as for operator access areas, except as given in 1.7.14, 2.1.3, 4.5.4, 4.6.2 and 5.1.7. service access area [IEC 60950-1]:](https://img.pdfslide.us/doc/110x75/5fd918379509c8683f1fe745/iec-60950-and-iec-62368-safety-standard-as-for-operator-access-areas-except-as.jpg)