Embed Size (px)
Citation preview
E-PSR User Manual – Training Module 2 (Supplier):
Supplier Account Management
and Adding Users
(www.suppliers.gov.bs)
2
Table of Contents
GLOSSARY OF TERMS .................................................................................................................................... 3
PURPOSE OF TRAINING MODULE ................................................................................................................. 4
LEARNING OBJECTIVES .................................................................................................................................. 4
LOGGING IN................................................................................................................................................... 4
MANAGING USER ACCOUNT DETAILS ........................................................................................................... 5
View & Modify Profile ............................................................................................................................... 6
View & Transfer Assets ............................................................................................................................. 7
Monitor Activities ..................................................................................................................................... 7
Subscribe/Unsubscribe to Email Alerts ..................................................................................................... 8
MANAGING ORGANISATION ACCOUNT DETAILS .......................................................................................... 8
Dashboard ................................................................................................................................................. 9
Organisation Profile .................................................................................................................................. 9
CREATE AND MANAGE ORGANISATION GROUPS ....................................................................................... 10
ADD NEW ACCOUNT USERS ........................................................................................................................ 12
User Details ............................................................................................................................................. 13
Sending Invitations .................................................................................................................................. 14
Confirmation Email ................................................................................................................................. 15
3
GLOSSARY OF TERMS
Activity: an action performed on the Supplier Account by any users allowed access to the account.
Activities are recorded and listed in the Activity Log and can be downloaded in Excel format for
monitoring purposes.
Activity Centre: the central workspace in a Supplier Account that provides access to all functions
within the electronic procurement system, such as supplier profile, account management and tender
related activities (response to invitations and tenders).
Activity Log: full audit trail of actions created within the website, from inviting users to creating
calendar entries.
Asset: anything that is created in the Supplier Account, such as Supplier Profile, Organisation Profile,
or Response, etc. The Supplier Administrator can move assets to another user within the account.
Dashboard: workspace within the Organisation work section that allows the Supplier Administrator
to access and manage the Organisation profile and added users.
E-PSR Portal: The electronic Procurement and Supplier Registry web-based system is the
Government of The Bahamas’ procurement system for online procurement activities.
Group: groups form the organisation/company structure in a Supplier Account. When a Supplier
Administrator registers its company, a group with the company business name is created by default.
Sub-groups can be created and added by the Supplier Administrator any time.
My Account: one component of the “Account” field accessible to the Supplier Administrator, along
with My Organisation, for management purposes.
My Organisation Profile: key business and activities details of the supplier organisation or
company.
Organisation: generic term used in a Supplier Account to design the registered supplier entity,
whether a business, company, association or individual.
Subscription: category of functions open to the Supplier user within an account and including at the
highest role level: Portal, Collaboration Creation, Allow Hierarchy, and Receive Alert. Access to a
category of function or subscription is dependent on the role attributed to the supplier user
(administrator or simple registered user).
Supplier Administrator: highest role in a Supplier Account that has access to all assets created
within the Organisation and has the ability to manage all users. This level of access should be reserved
for only one or two users within the Organisation.
Supplier Registered User: lowest role in a Supplier Account that has limited powers under the
supervision of the Supplier Administrator. The registered user can edit assets, but cannot publish
Profiles, or invite other users or send a tender response.
User Account Profile: key personal information details of the Supplier Administrator of an account.
4
PURPOSE OF TRAINING MODULE
The purpose of this module is to serve as a reference guide for registered suppliers on how to use the
function “Manage your Account and Add Users” found on the Activity Centre page of a Supplier
Account. This function allows the Supplier Administrator(s) to view and manage the
organisation/company account details, create and manage any groups created within the
organisation, and also invite new users to join the account in a selected role, whether administrator
or simple registered user. The role of a user, administrator or simple user, will define the range of
powers and functions accessibility in the account of the user.
Learning Objectives
This training module was created to walk you through the different features available in the context
of the management of a Supplier Account on the e-PSR portal. By the end of this hands-on training,
you, as Supplier Administrator, will be able to:
i) View, review and update the different Profiles described in the account;
ii) Monitor the activities and actions performed by any user on the account;
iii) Create sub-groups within the account structure;
iv) Add and invite other users (of the registered entity) to join the account.
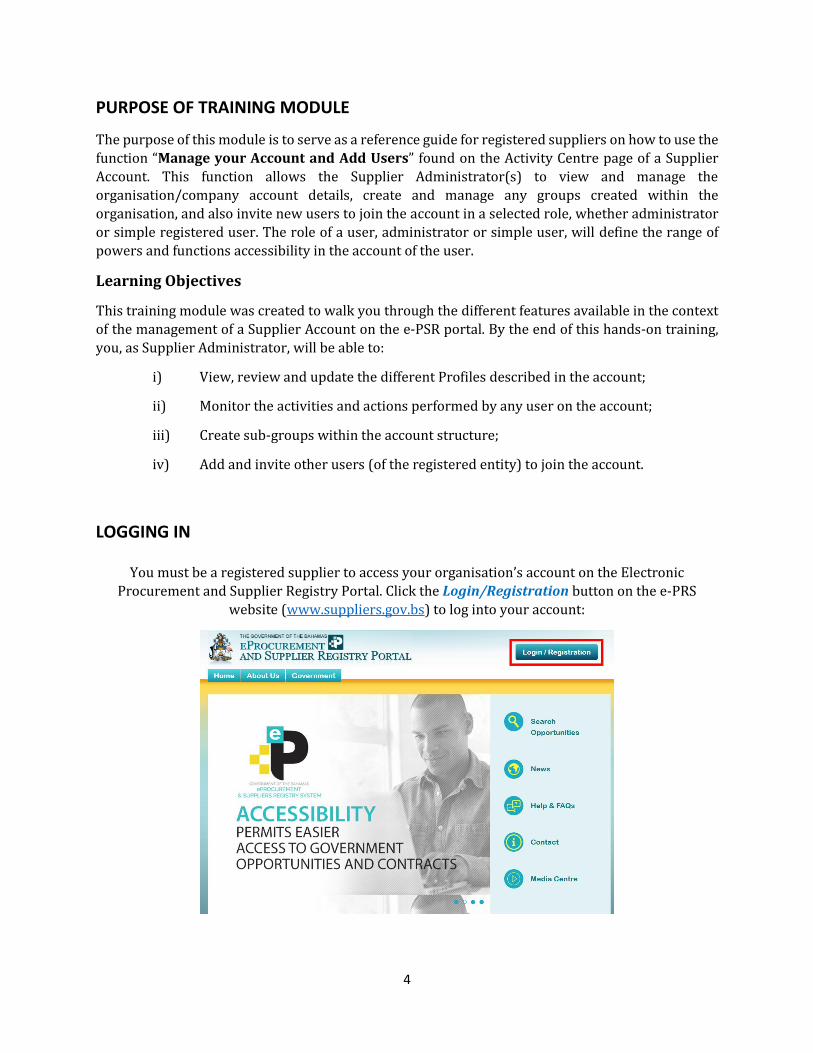
LOGGING IN
You must be a registered supplier to access your organisation’s account on the Electronic
Procurement and Supplier Registry Portal. Click the Login/Registration button on the e-PRS
website (www.suppliers.gov.bs) to log into your account:
5
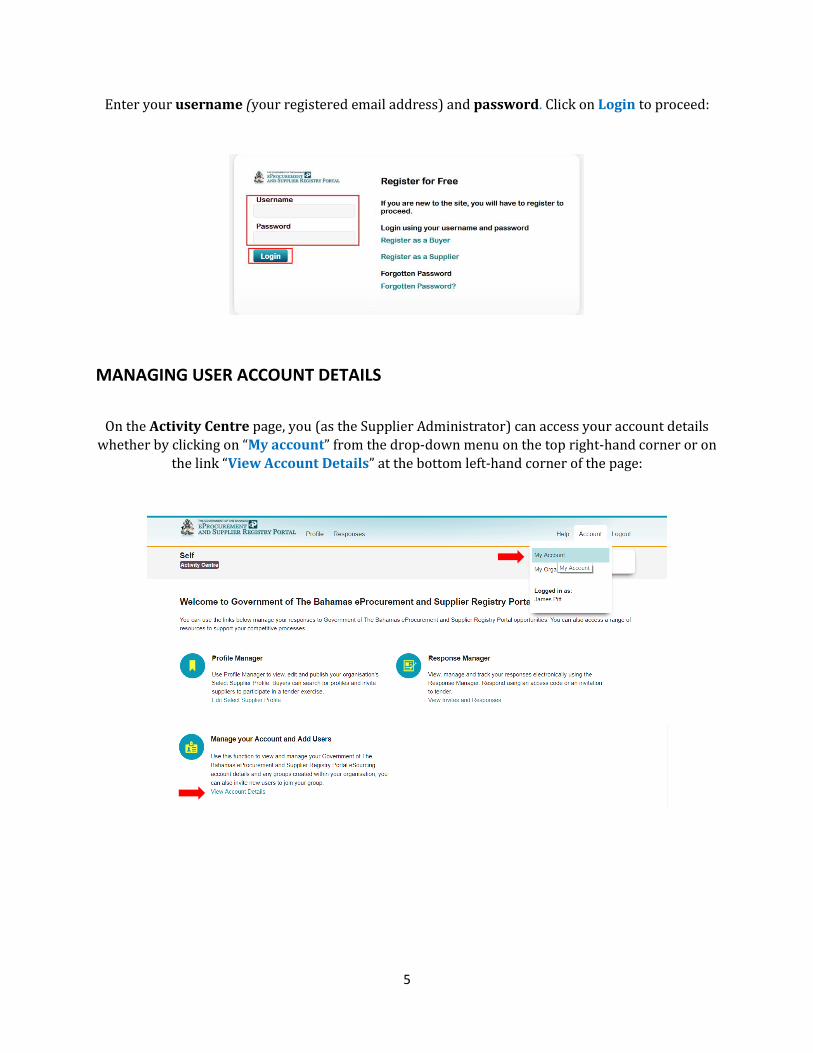
Enter your username (your registered email address) and password. Click on Login to proceed:
MANAGING USER ACCOUNT DETAILS
On the Activity Centre page, you (as the Supplier Administrator) can access your account details
whether by clicking on “My account” from the drop-down menu on the top right-hand corner or on
the link “View Account Details” at the bottom left-hand corner of the page:
6
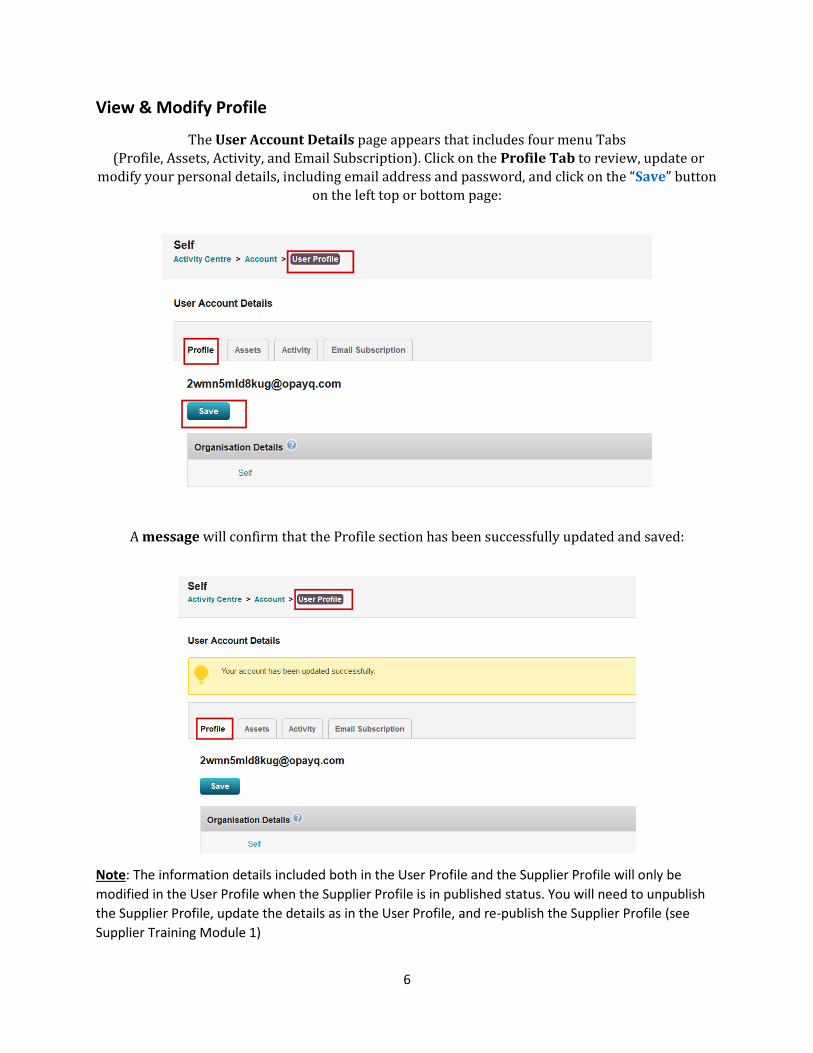
View & Modify Profile
The User Account Details page appears that includes four menu Tabs (Profile, Assets, Activity, and Email Subscription). Click on the Profile Tab to review, update or
modify your personal details, including email address and password, and click on the “Save” button
on the left top or bottom page:
A message will confirm that the Profile section has been successfully updated and saved:
Note: The information details included both in the User Profile and the Supplier Profile will only be
modified in the User Profile when the Supplier Profile is in published status. You will need to unpublish
the Supplier Profile, update the details as in the User Profile, and re-publish the Supplier Profile (see
Supplier Training Module 1)
7
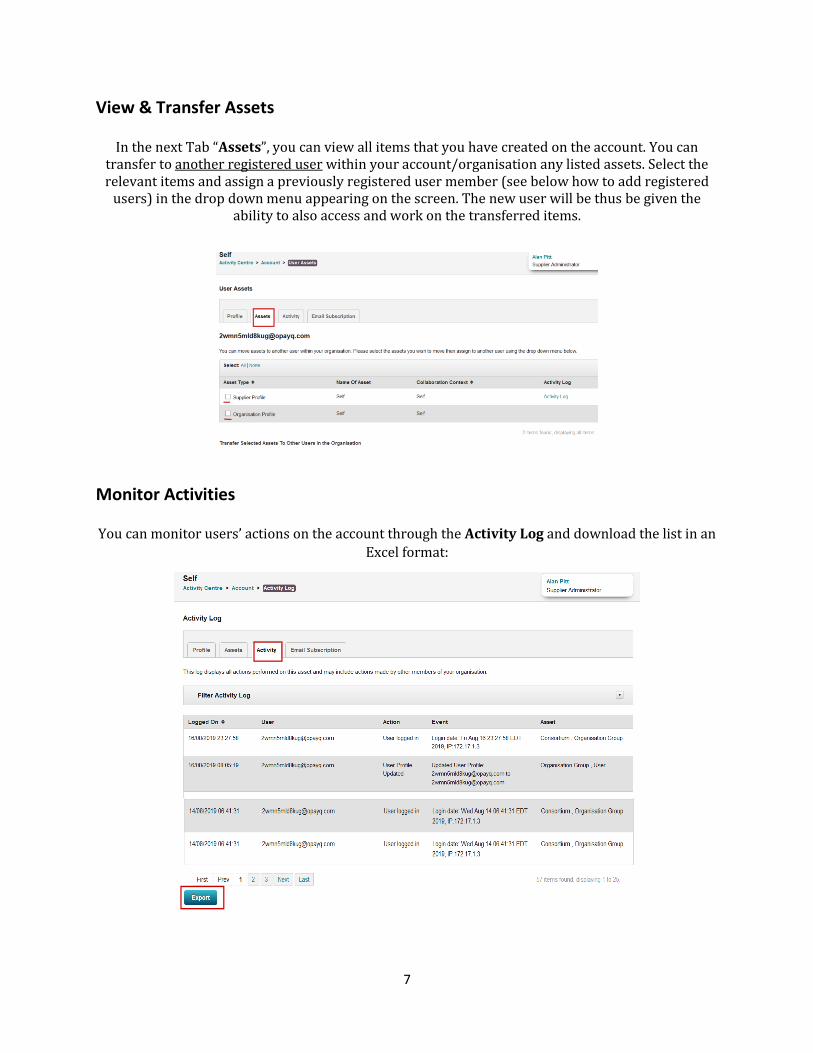
View & Transfer Assets
In the next Tab “Assets”, you can view all items that you have created on the account. You can transfer to another registered user within your account/organisation any listed assets. Select the relevant items and assign a previously registered user member (see below how to add registered
users) in the drop down menu appearing on the screen. The new user will be thus be given the ability to also access and work on the transferred items.
Monitor Activities You can monitor users’ actions on the account through the Activity Log and download the list in an
Excel format:
8
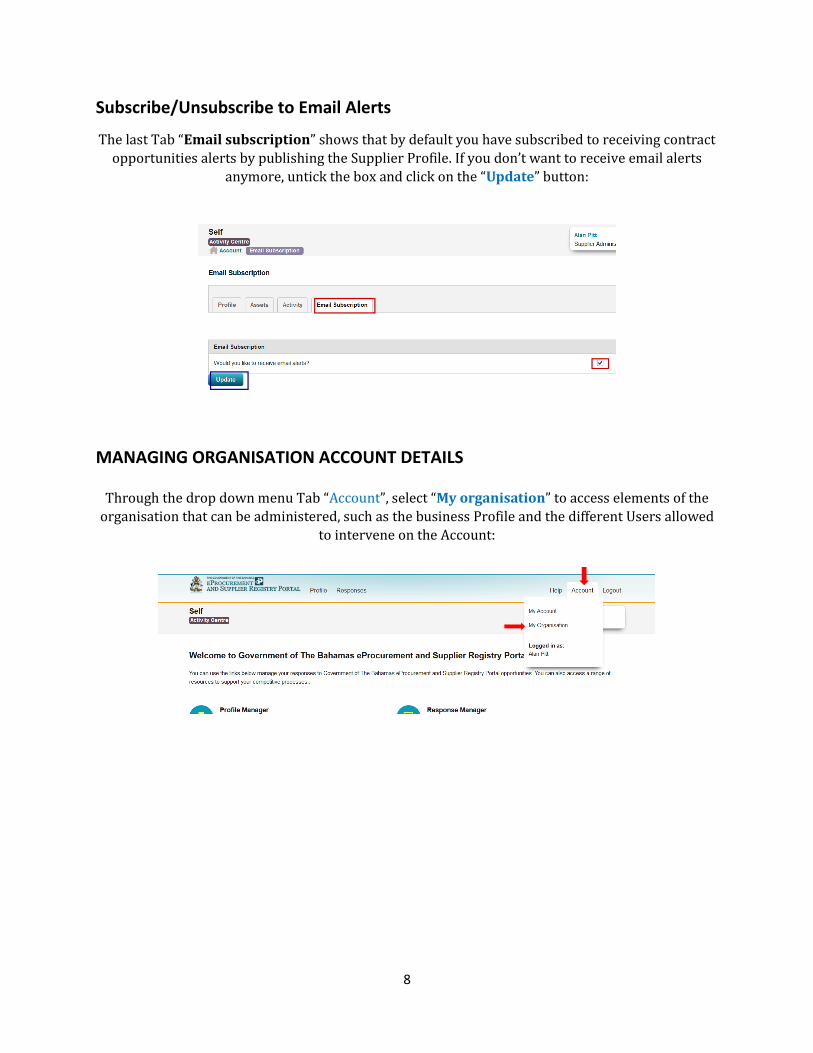
Subscribe/Unsubscribe to Email Alerts
The last Tab “Email subscription” shows that by default you have subscribed to receiving contract
opportunities alerts by publishing the Supplier Profile. If you don’t want to receive email alerts
anymore, untick the box and click on the “Update” button:
MANAGING ORGANISATION ACCOUNT DETAILS
Through the drop down menu Tab “Account”, select “My organisation” to access elements of the
organisation that can be administered, such as the business Profile and the different Users allowed
to intervene on the Account:
9
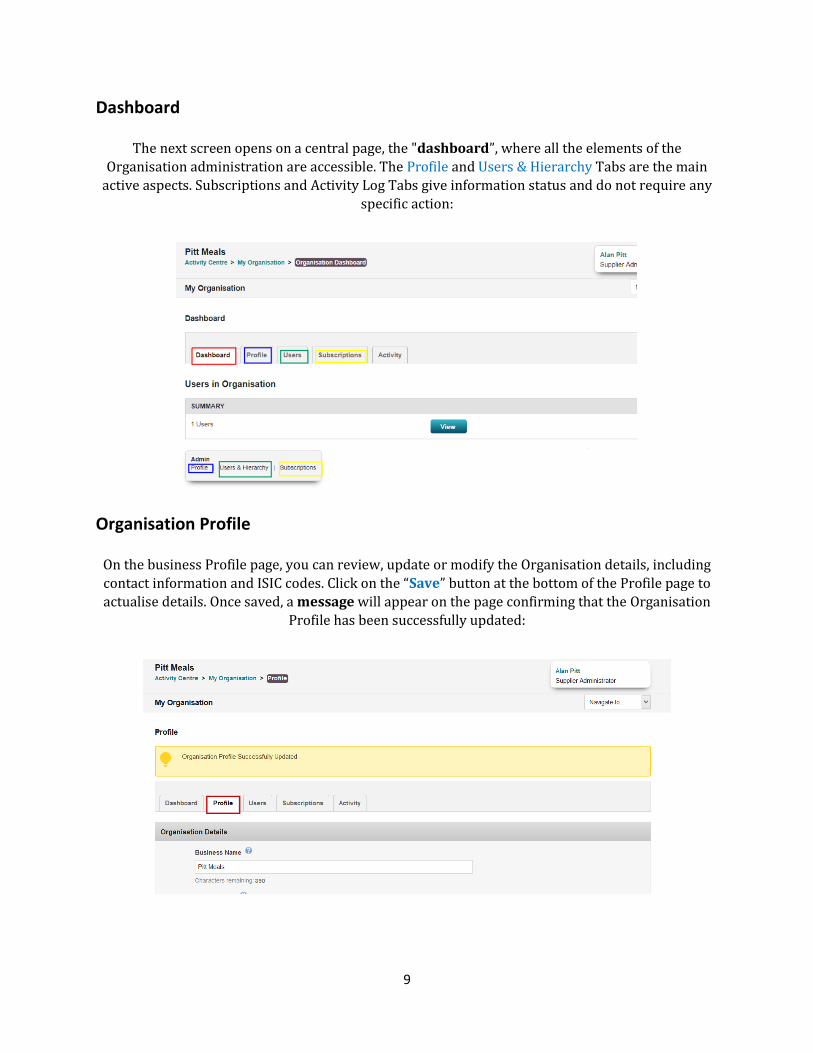
Dashboard
The next screen opens on a central page, the "dashboard”, where all the elements of the
Organisation administration are accessible. The Profile and Users & Hierarchy Tabs are the main
active aspects. Subscriptions and Activity Log Tabs give information status and do not require any
specific action:
Organisation Profile
On the business Profile page, you can review, update or modify the Organisation details, including
contact information and ISIC codes. Click on the “Save” button at the bottom of the Profile page to
actualise details. Once saved, a message will appear on the page confirming that the Organisation
Profile has been successfully updated:
10
Note/Reminder: The information details included both in the Organisation Profile and the Supplier
Profile will only be modified in the Organisation Profile when the Supplier Profile is in “published”
status. You will need to unpublish the Supplier Profile, update the details as in the Organisation Profile,
and re-publish the Supplier Profile (see Supplier Training Module 1) in order for the updated information
to be available to government Buyers.
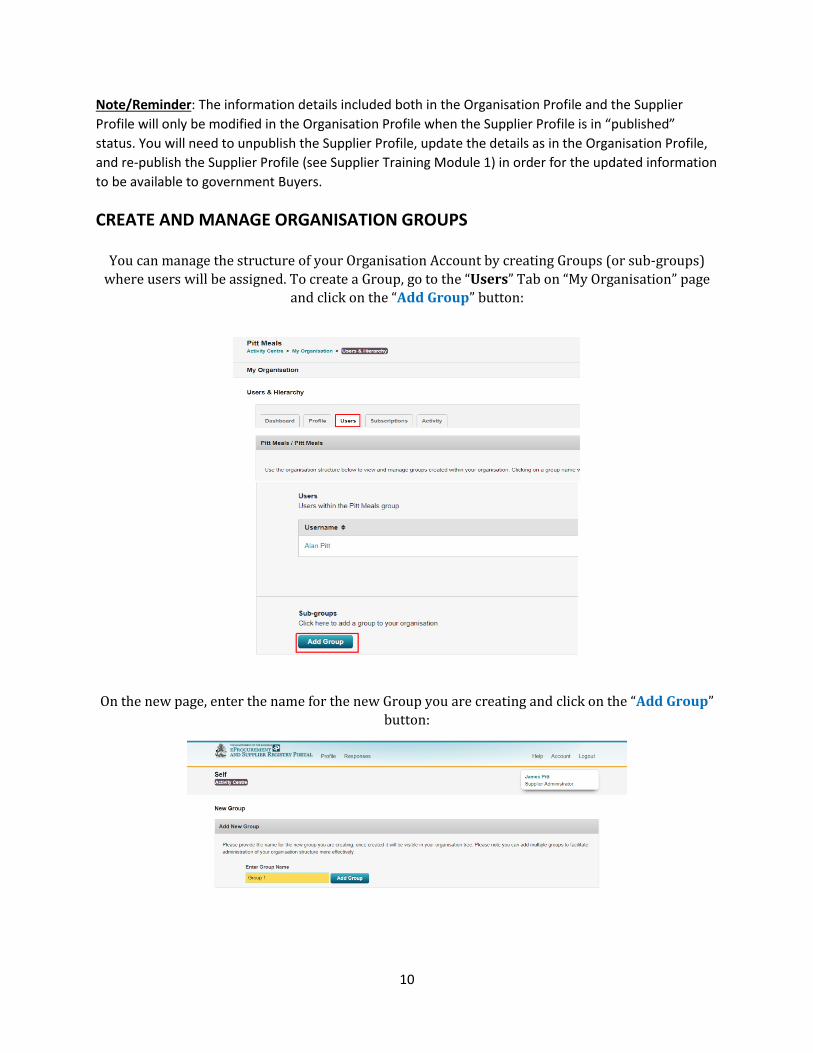
CREATE AND MANAGE ORGANISATION GROUPS
You can manage the structure of your Organisation Account by creating Groups (or sub-groups)
where users will be assigned. To create a Group, go to the “Users” Tab on “My Organisation” page
and click on the “Add Group” button:
On the new page, enter the name for the new Group you are creating and click on the “Add Group”
button:
11
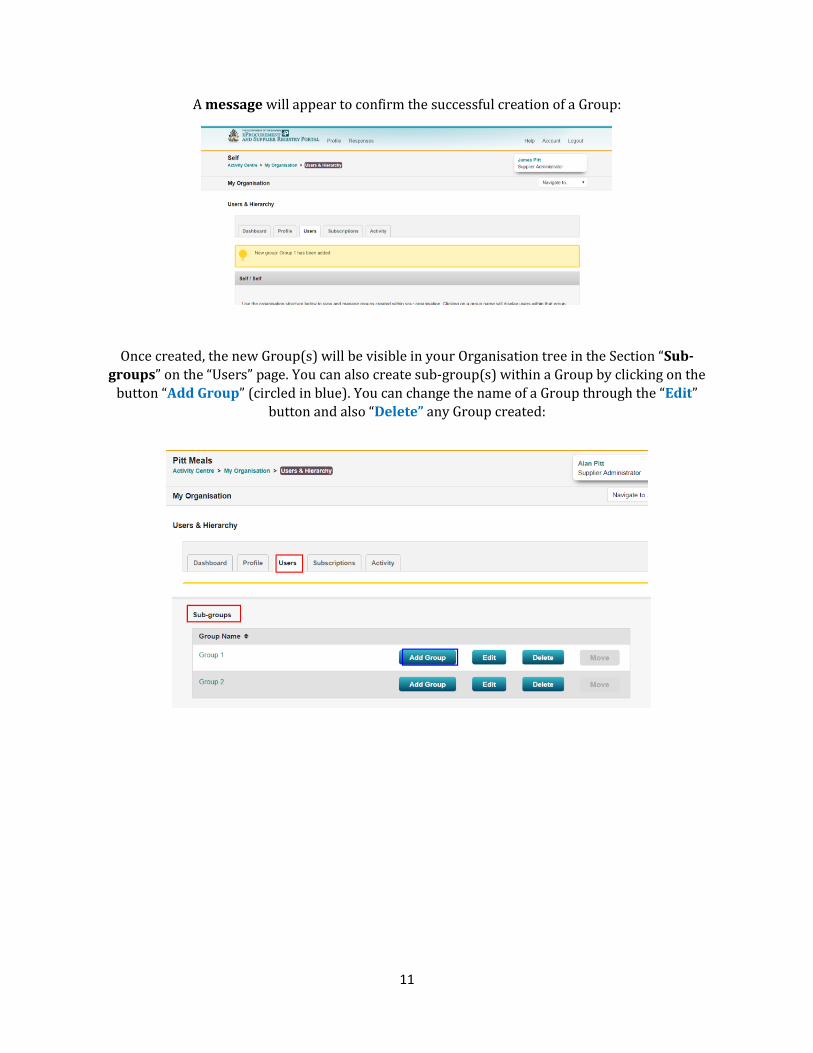
A message will appear to confirm the successful creation of a Group:
Once created, the new Group(s) will be visible in your Organisation tree in the Section “Sub-
groups” on the “Users” page. You can also create sub-group(s) within a Group by clicking on the
button “Add Group” (circled in blue). You can change the name of a Group through the “Edit”
button and also “Delete” any Group created:
12
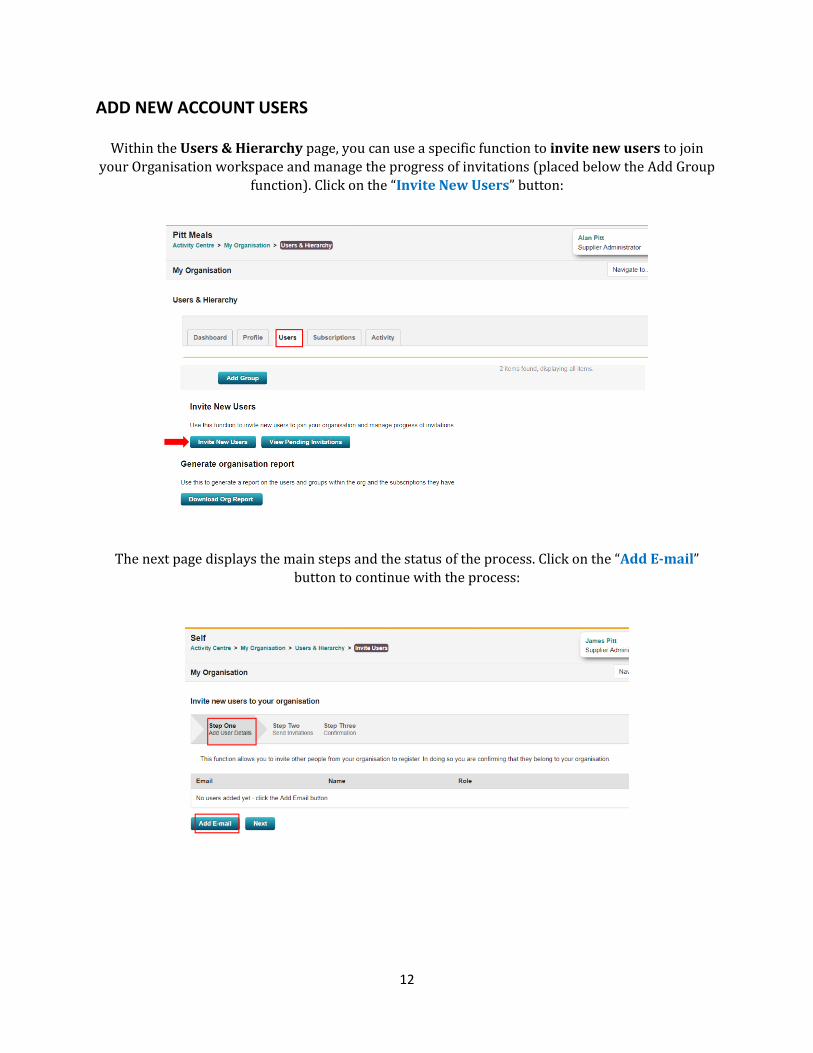
ADD NEW ACCOUNT USERS
Within the Users & Hierarchy page, you can use a specific function to invite new users to join
your Organisation workspace and manage the progress of invitations (placed below the Add Group
function). Click on the “Invite New Users” button:
The next page displays the main steps and the status of the process. Click on the “Add E-mail”
button to continue with the process:
13
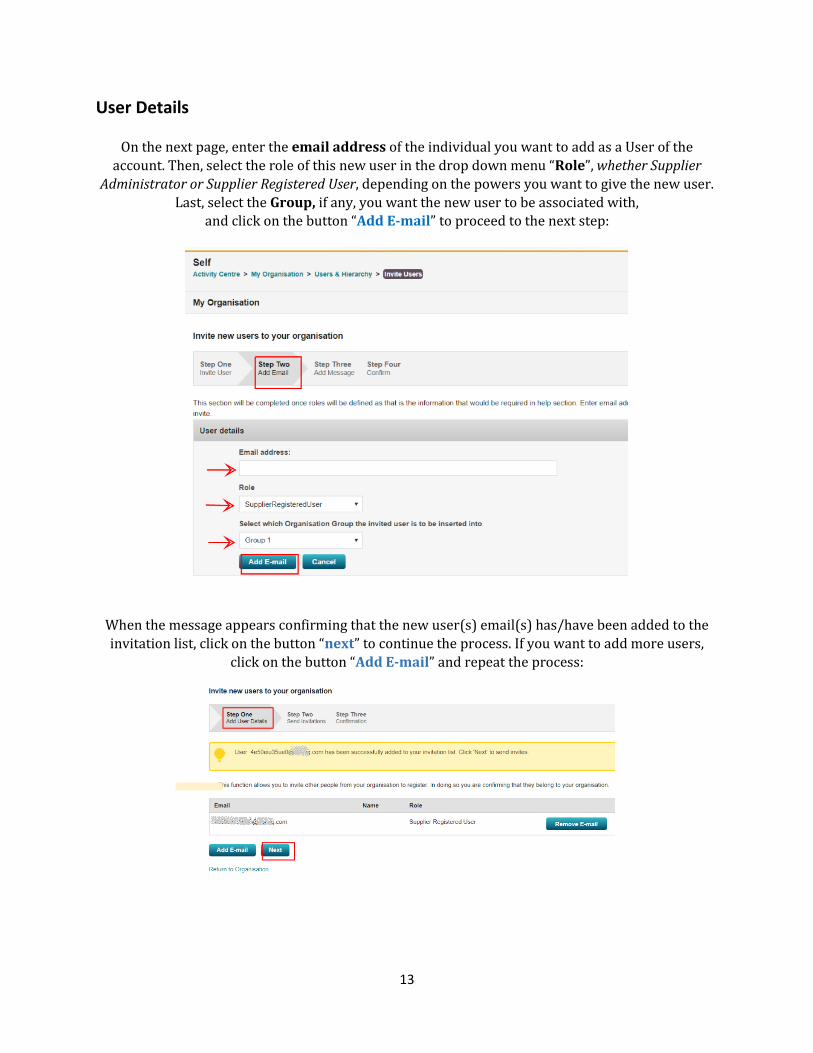
User Details
On the next page, enter the email address of the individual you want to add as a User of the
account. Then, select the role of this new user in the drop down menu “Role”, whether Supplier
Administrator or Supplier Registered User, depending on the powers you want to give the new user.
Last, select the Group, if any, you want the new user to be associated with, and click on the button “Add E-mail” to proceed to the next step:
When the message appears confirming that the new user(s) email(s) has/have been added to the
invitation list, click on the button “next” to continue the process. If you want to add more users,
click on the button “Add E-mail” and repeat the process:
14
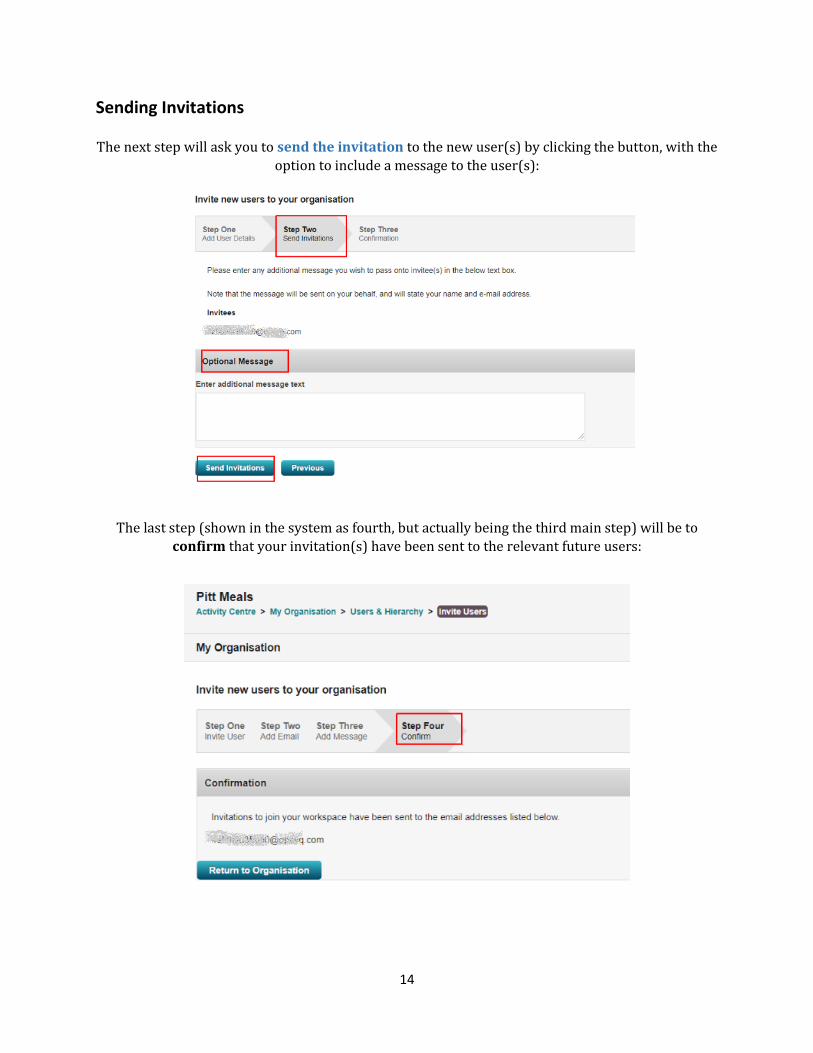
Sending Invitations The next step will ask you to send the invitation to the new user(s) by clicking the button, with the
option to include a message to the user(s):
The last step (shown in the system as fourth, but actually being the third main step) will be to
confirm that your invitation(s) have been sent to the relevant future users:
15
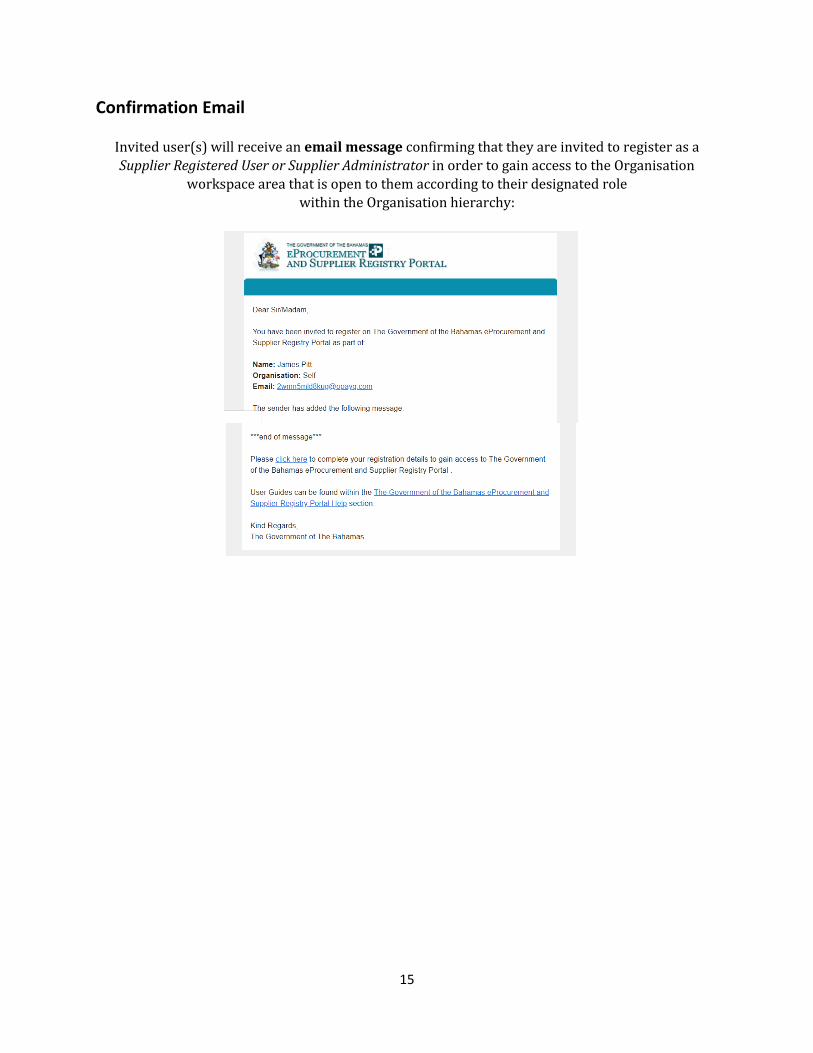
Confirmation Email
Invited user(s) will receive an email message confirming that they are invited to register as a
Supplier Registered User or Supplier Administrator in order to gain access to the Organisation
workspace area that is open to them according to their designated role
within the Organisation hierarchy: