Embed Size (px)
Citation preview

e-automate 8.1 Installation Guide
Revised: 05/17/2013 © 2013 Digital Gateway, Inc. - All Rights Reserved Page 1

Table of Contents New Installation Introduction ...................................................................................................... 3
Installing Full Microsoft SQL Server ............................................................................................. 5
Installing Microsoft SQL Express .................................................................................................. 6
Downloading e-admin and e-automate ...................................................................................... 15
Downloading a Sample Database .............................................................................................. 15
Installing e-admin .................................................................................................................... 18
Initializing e-admin ............................................................................................................... 22
Updating e-automate Databases ............................................................................................... 34
Installing e-automate ............................................................................................................... 37
Logging into e-automate Sample ............................................................................................... 41
Revised: 05/17/2013 © 2013 Digital Gateway, Inc. - All Rights Reserved Page 2

New Installation Introduction Congratulations in selecting Digital Gateway as your business management solutions provider. You have chosen a company devoted to helping you and your business succeed. The purpose of this document is to assist you in getting your e-automate system installed. Getting Started walks you through the installation of Microsoft® Server Desktop Engine or SQL Express, e-admin, and e-automate, the main components to your e-automate system. You will also install a license key and create and restore a sample database. You use the sample database to get acquainted with the software by looking at sample customers, vendors, inventory items, equipment, et cetera. You can also use the sample database to begin testing e-automate transactions in a safe environment. Before beginning this process, ensure that the minimum system requirements for hardware and software have been met. To view the system requirements see e-automate System Requirements 8.1 on the website. Successful implementation of your system depends upon meeting the minimum system requirements. e-automate is a client-server application. This means that your company data is stored on a server and accessed via a computer network using client computers. The data is stored in a Microsoft® SQL database on the server. The server is connected via a network to other computers called workstations or clients. Your users work on these workstations to accomplish their day-to-day tasks.
Revised: 05/17/2013 © 2013 Digital Gateway, Inc. - All Rights Reserved Page 3
In order for this configuration to work, certain software programs must be installed on the server and other programs on the workstations. The main software programs that are installed on the server are Microsoft® SQL Server and e-admin often called e-automate Server. Not all companies who purchase e-automate purchase and install the full version of Microsoft® SQL Server. Smaller dealers with five or fewer employees often go with Microsoft® SQL Express. SQL Express is a version of SQL that comfortably supports up to five users. SQL Express offers the SQL Server Management Studio which offers valuable tools for running scripts and troubleshooting problems. Only Microsoft® SQL Server and Microsoft® SQL Express 2005 and above are supported in the 8.1 version of e-automate. Because SQL offers additional tools for database support, Digital Gateway no longer recommends MSDE. Installing SQL Server and e-automate on a domain controller is not supported or recommended. There are specific security restrictions when running SQL Server in this configuration and given the resource demands of a domain controller, SQL Server performance may be degraded. Furthermore, SQL Server is not supported on a read-only domain controller. Setup will normally fail. Even if you find methods to work around the problem with setup, SQL Server is not supported on a read-only domain controller. In addition, SQL Server failover clustering is not supported to install on a domain controller. e-admin is the server program that manages your company’s database, security, licensing, connections and database maintenance. Once the server is installed and configured, you install the e-automate client software on your workstations. Based on your selection of products, follow the instructions appropriate for your configuration to get your e-automate system up and running.
Revised: 05/17/2013 © 2013 Digital Gateway, Inc. - All Rights Reserved Page 4

Installing Full Microsoft SQL Server If you intend to use the full version of Microsoft® SQL Server you should have it installed by a qualified computer professional. Only Microsoft® SQL Server 2005 and above is supported in the 8.1 version of e-automate. Once SQL Server is installed you should follow the instructions labeled, Downloading e-admin and e-automate. Installing SQL Server and e-automate on a domain controller is not supported or recommended. There are specific security restrictions when running SQL Server in this configuration and given the resource demands of a domain controller, SQL Server performance may be degraded. Furthermore, SQL Server is not supported on a read-only domain controller. Setup will normally fail. Even if you find methods to work around the problem with setup, SQL Server is not supported on a read-only domain controller. In addition, SQL Server failover clustering is not supported to install on a domain controller.
Revised: 05/17/2013 © 2013 Digital Gateway, Inc. - All Rights Reserved Page 5

Installing Microsoft SQL Express Follow these instructions if you intend to use the SQL Express and the associated SQL Server Management Studio Express SQL Express. Before you can install SQL Express you must download the installation files from the Microsoft website. Only Microsoft® SQL Express 2005 and above are supported in the 8.1 version of e-automate. Installing SQL Server and e-automate on a domain controller is not supported or recommended. There are specific security restrictions when running SQL Server in this configuration and given the resource demands of a domain controller, SQL Server performance may be degraded. Furthermore, SQL Server is not supported on a read-only domain controller. Setup will normally fail. Even if you find methods to work around the problem with setup, SQL Server is not supported on a read-only domain controller. In addition, SQL Server failover clustering is not supported to install on a domain controller. The following instructions outline the installation of the standard 32-bit version of SQL Express, but the 64-bit version is also available for download, if appropriate. If you need assistance, contact a qualified computer professional for assistance. 1 Go to http://www.microsoft.com and click on Downloads>Download Center. 2 Perform a search for “SQL Server 2008 R2 RTM - Express with Management Tools.”
Click on the Application arrow to go to the Registration Suggested page. 3 Click Continue to go to the Registration Suggested for This Download page. 4 Choose either Yes, I want to register and receive the download, or No, I do not want to register.
Take me to the download, and click Continue. 5 Click the Download button for either the 64-bit install (SQLEXPRWT_x64_ENU.exe) or the 32-bit install
(SQLEXPRWT_x86_ENU). Note: Be sure to download the appropriate version for your business needs.
6 Click Run when asked ‘Do you want to run or save the .exe file from download.microsoft.com?’ The SQL Server Installation Center window displays.
Revised: 05/17/2013 © 2013 Digital Gateway, Inc. - All Rights Reserved Page 6

7
Click New installation or add features to an existing installation. The License Terms window displays.
8
Review the license terms and click the I accept the license terms checkbox. Optionally, you can click the Send feature usage data to Microsoft checkbox, if desired.
Click [Next >]. The Feature Selection window displays.
Revised: 05/17/2013 © 2013 Digital Gateway, Inc. - All Rights Reserved Page 7

9
Confirm each feature is selected and click [Next >]. The Instance Configuration window displays. Note: Throughout the installation, unless explicitly directed to do so, do not change the default settings specified by the installer. If you want a customized installation, contact a qualified computer profession to install your SQL software.
10 An instance of SQL Server named SQLEXPRESS will install by default. If you are not running any other instances of SQL, Digital Gateway recommends you change this to be the Default instance. If you are running other instances of SQL, consult with your network administrator on how you want to proceed. When you run SQL as the default instance, typically you use the server name to identify it.
Select Default instance and click [Next >]. The Server Configuration window displays.
Revised: 05/17/2013 © 2013 Digital Gateway, Inc. - All Rights Reserved Page 8

11
Confirm that the SQL Server Database Engine Startup Type and the SQL Server Browser Startup Type are both set to Automatic. Click [Next >]. The Database Engine Configuration window displays. Note: Do not change the default settings on the Collation tab. If you want a customized installation, contact a qualified computer profession to install your SQL software.
Revised: 05/17/2013 © 2013 Digital Gateway, Inc. - All Rights Reserved Page 9
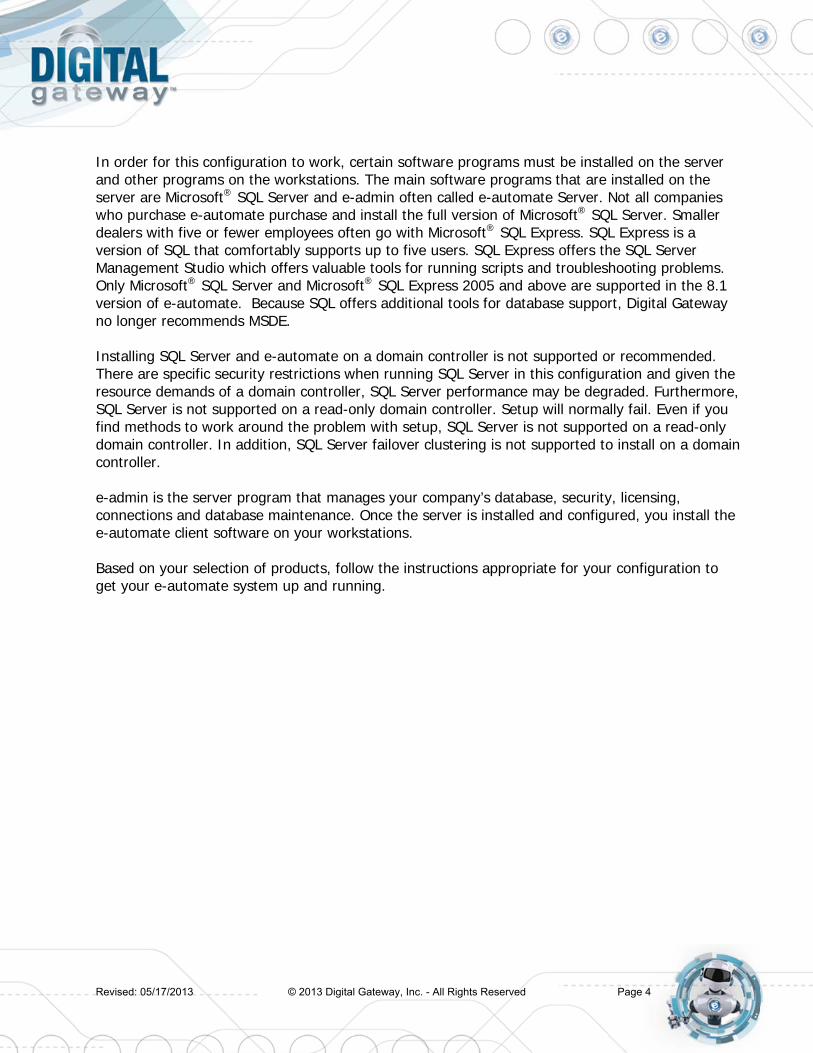
12 To guarantee access to e-admin, you will need to add the local administrators group. This ensures that any Windows user that is included in the local administrators group, whether they are a domain or local user, will have access to SQL.
Select Mixed Mode (Windows Authentication and SQL Server Authentication). Enter a password of your choosing in the Enter password field. Enter the password again in the Confirm password field. Click [Add] in the Specify SQL Server administrators field. Click [Object Types] and confirm that Users, Groups, and Built-in Security Principals are checked. Click [Locations] and select the local machine name. Type Administrators in the Enter the object names to select field and click [Check Names]. The
ServerName\Administrators group will automatically populate. Click [OK] to return to the Database Engine Configuration window. Click [Next >]. The Error Reporting window displays.
Note: Do not change the default settings on the Data Directories tab. If you want a customized installation, contact a qualified computer profession to install your SQL software.
Revised: 05/17/2013 © 2013 Digital Gateway, Inc. - All Rights Reserved Page 10
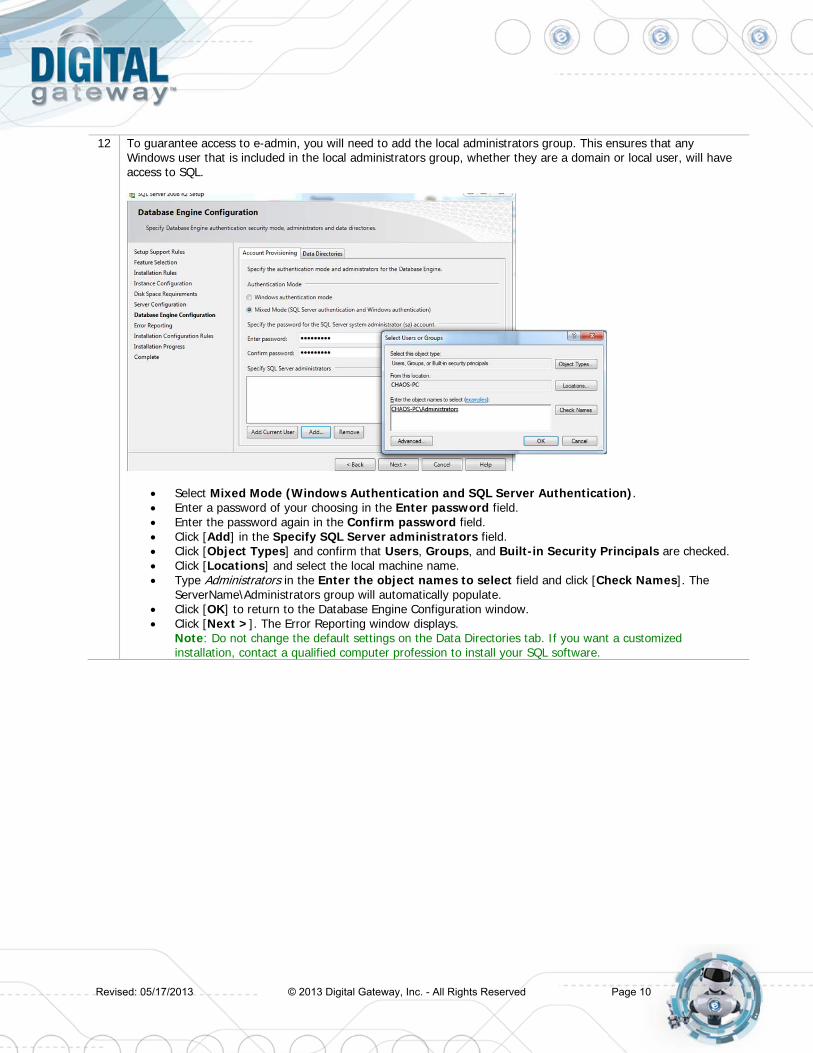
13
Click the Send Windows and SQL Server Error Reports to Microsoft checkbox if desired. This setting is optional.
Click [Next >]. The Installation Progress window displays. 14 This window shows the progress of the install. When the entire installation has taken place, the Complete window
displays.
Revised: 05/17/2013 © 2013 Digital Gateway, Inc. - All Rights Reserved Page 11
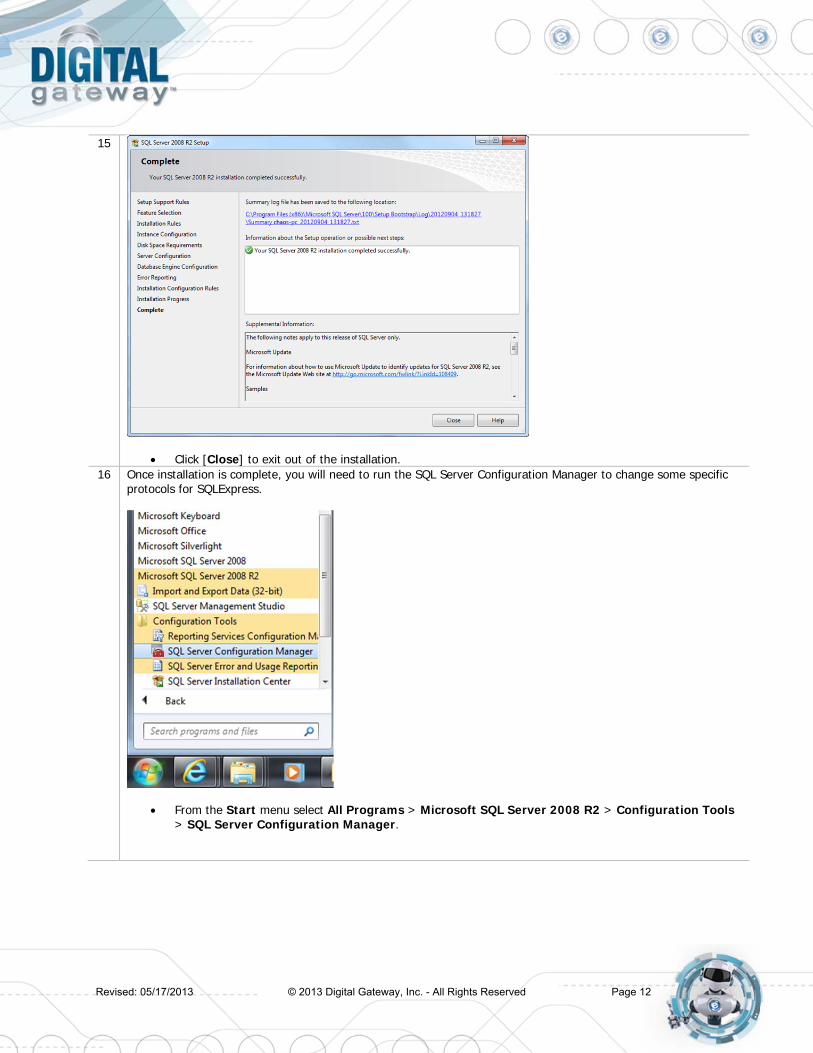
15
Click [Close] to exit out of the installation. 16 Once installation is complete, you will need to run the SQL Server Configuration Manager to change some specific
protocols for SQLExpress.
From the Start menu select All Programs > Microsoft SQL Server 2008 R2 > Configuration Tools > SQL Server Configuration Manager.
Revised: 05/17/2013 © 2013 Digital Gateway, Inc. - All Rights Reserved Page 12

17
Locate and expand the SQL Server Network Configuration by clicking on the arrow. Click on Protocols for SQLEXPRESS. The SQL Server Configuration window displays the protocols in the
right window. 18
Right-click on Named Pipes and select Enable. Click [OK] to acknowledge the restart server warning.
Revised: 05/17/2013 © 2013 Digital Gateway, Inc. - All Rights Reserved Page 13
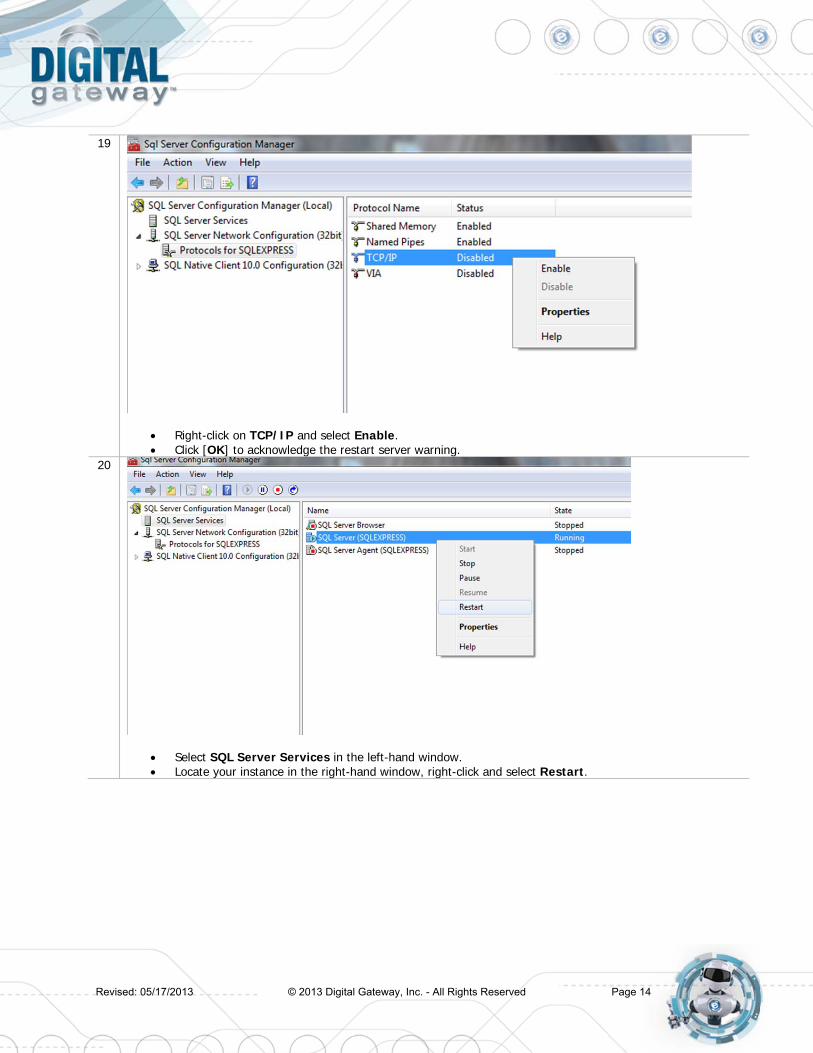
19
Right-click on TCP/IP and select Enable. Click [OK] to acknowledge the restart server warning.
20
Select SQL Server Services in the left-hand window. Locate your instance in the right-hand window, right-click and select Restart.
Revised: 05/17/2013 © 2013 Digital Gateway, Inc. - All Rights Reserved Page 14

Downloading e-admin and e-automate Before you can begin the installation of e-admin or e-automate, you must first download the software. You can access the software by going to http://www.digitalgateway.com and logging in with the appropriate credentials. If you need assistance with this process, please contact Digital Gateway’s Customer Care who can route you to your account manager or provide you with the instructions to obtain the software.
Downloading a Sample Database When initializing e-admin, you will be offered the option to create and restore a sample database which provides you with the ability to get acquainted with the software by looking at sample customers, vendors, inventory items, equipment, et cetera. You can choose to download a sample database which allows you to test e-automate transactions in a safe environment using the training exercises provided, or you can download just the sample database with no exercises supplied. You will need to download this database prior to installing and initializing e-admin. Follow these steps to obtain a sample database. 1 Navigate to http://www.digitalgateway.com and log in with the appropriate credentials. The Customer
Resource Center page displays. Note: If you need assistance to obtain your login credentials, please contact your account manager.
2
Click on Training Downloads in the menu bar. The Training Downloads page displays.
Revised: 05/17/2013 © 2013 Digital Gateway, Inc. - All Rights Reserved Page 15

3
Click on the appropriate sample database link for your needs under the Training Downloads section. The Windows Internet Explorer window displays.
Revised: 05/17/2013 © 2013 Digital Gateway, Inc. - All Rights Reserved Page 16
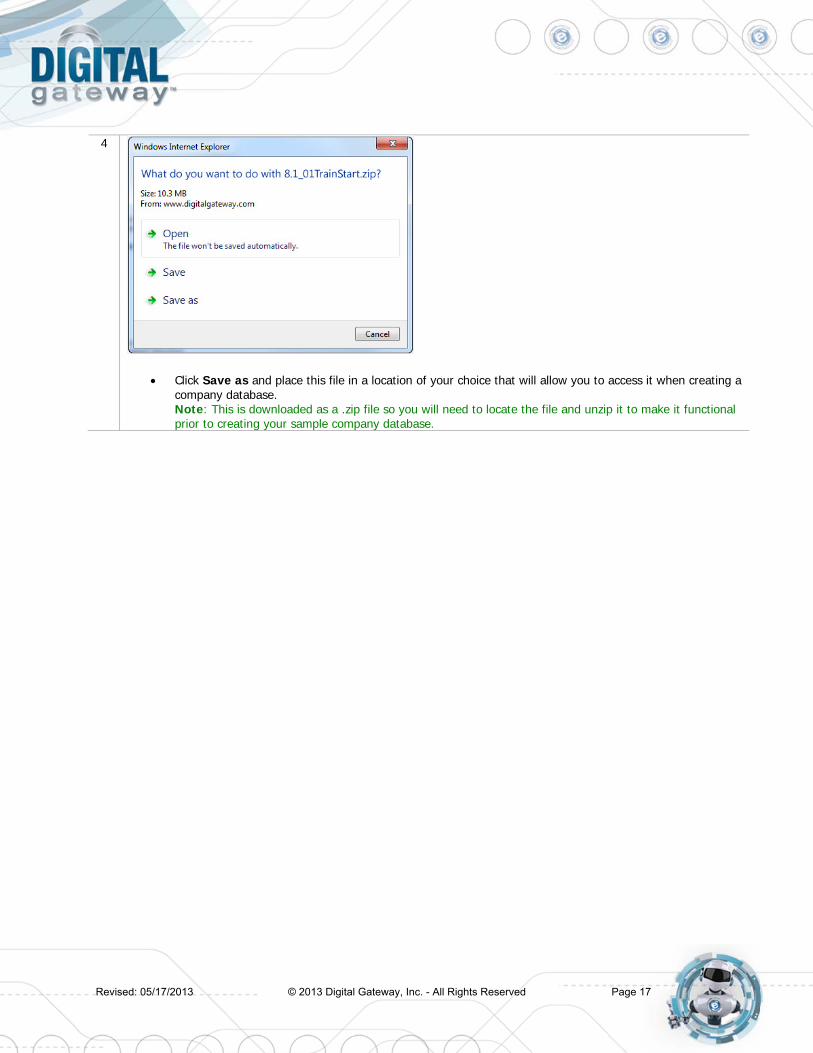
4
Click Save as and place this file in a location of your choice that will allow you to access it when creating a company database. Note: This is downloaded as a .zip file so you will need to locate the file and unzip it to make it functional prior to creating your sample company database.
Revised: 05/17/2013 © 2013 Digital Gateway, Inc. - All Rights Reserved Page 17

Installing e-admin Before installing e-admin, be sure you have completed the installation of Microsoft® SQL server or SQL Express version 2005 or newer. Digital Gateway does not distribute the e-automate software on a CD/DVD. All versions of e-automate are downloaded from the Digital Gateway website. 1 Secure the download files from Digital Gateway’s Customer Care. Customer Care can route you to your
account manager or provide you with the instructions to obtain the software. 2 Double-click the e-automateServerSetup.exe file to begin installation. 3
Ensure that Server components and e-agent server components are both checked. Ensure that All users (requires admin rights) is selected.
Note: Because you are installing e-admin to your server (host) machine, it is not recommended to select This user only.
Click [Next].
Revised: 05/17/2013 © 2013 Digital Gateway, Inc. - All Rights Reserved Page 18

4
Specify your Install Path and click [Next]. Note: It is recommended that you install e-admin to the default directory; to choose a different location click […] and select your desired location.
5
Choose the shortcuts you wish to add by clicking the corresponding checkbox and click [Next].
Revised: 05/17/2013 © 2013 Digital Gateway, Inc. - All Rights Reserved Page 19

6
Click [Finish] to perform the listed actions. The End User License Agreement window displays. Note: At any time during the installation you can click [Back] to return to a previous screen and modify the parameters.
7
Read the License Agreement and click [Accept]. If you click [Cancel] in the License Agreement window, the Install Wizard stops the installation.
Revised: 05/17/2013 © 2013 Digital Gateway, Inc. - All Rights Reserved Page 20

8 The installer completes the installation and launches the e-admin login window.
Click [Close] to exit out of the installation wizard.
Revised: 05/17/2013 © 2013 Digital Gateway, Inc. - All Rights Reserved Page 21

Initializing e-admin With Microsoft® SQL Server, or SQL Express installed, a sample database downloaded, and e-admin installed you are ready to initialize your server. Initialization prepares e-admin to work with either SQL Server or SQL Express. The first time you run e-admin, you will automatically begin the initialization procedure. 1 Before you log in to e-admin for the first time, you must know the name of your server. You can determine the
name of your server by locating the My Computer icon located on your server’s desktop.
Right-click on the My Computer icon and select Properties. The View basic information about your computer window displays.
2
Locate the full computer name. In the above example, the full computer name is carrie-pc.ecisolutions.com. You only need to use the portion of the name before the first period, in this example, “carrie-pc”. Be sure you remember the exact name of the server.
Revised: 05/17/2013 © 2013 Digital Gateway, Inc. - All Rights Reserved Page 22

3 If you have just installed e-admin, the e-admin login window was launched at the completion of the installation. If you are launching e-admin for the first time, go to Start>All Programs> Digital Gateway>e-admin to open the e-admin login window.
Click the [Edit] button (pencil) to open the Manage Logon Profiles window. 4
Click [Add] to add an e-admin profile. The Edit Logon Profile window displays. 5
Enter the name of your SQL Server in the SQL server field. Typically this is the name of your server determined in steps 1 and 2. The DGServer name automatically populates. Note: If you need to specify an alternate SQL server port, you must use the cliconfig utility from Microsoft to specify the port. Note: You can specify an alternate port to your DGServer using the server:port syntax.
Click [Next ] to continue.
Revised: 05/17/2013 © 2013 Digital Gateway, Inc. - All Rights Reserved Page 23
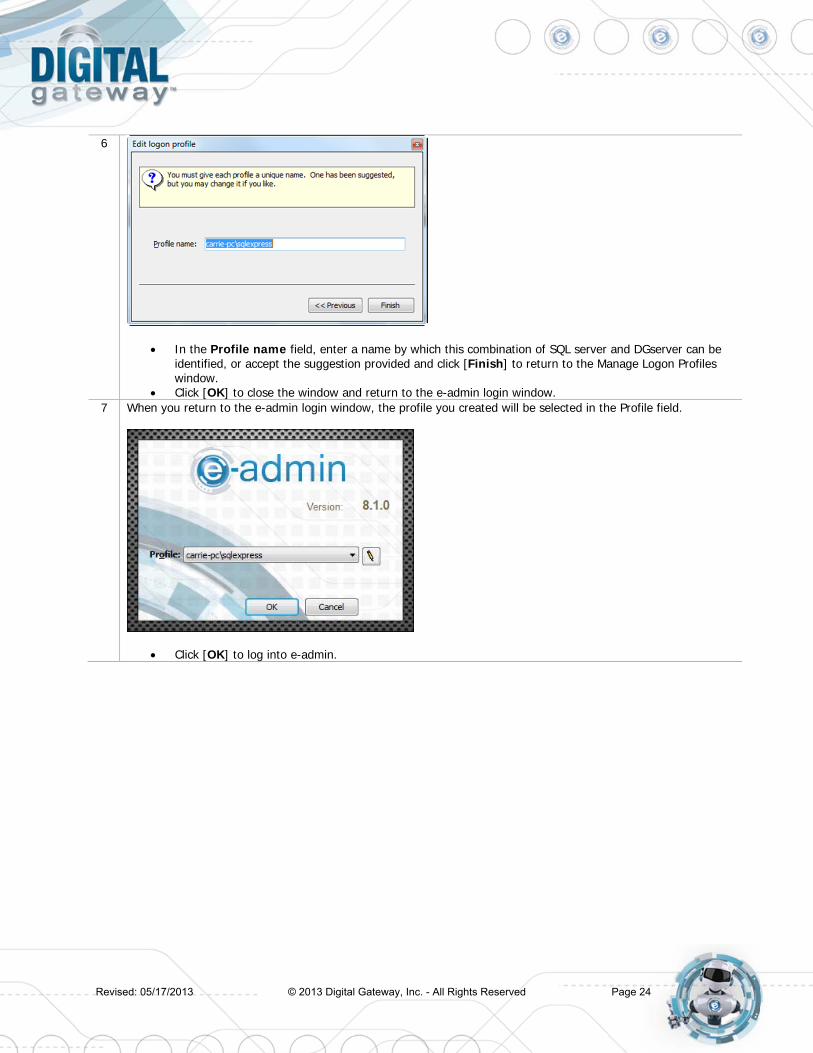
6
In the Profile name field, enter a name by which this combination of SQL server and DGserver can be identified, or accept the suggestion provided and click [Finish] to return to the Manage Logon Profiles window.
Click [OK] to close the window and return to the e-admin login window. 7 When you return to the e-admin login window, the profile you created will be selected in the Profile field.
Click [OK] to log into e-admin.
Revised: 05/17/2013 © 2013 Digital Gateway, Inc. - All Rights Reserved Page 24

8 During login, e-admin examines the database to determine if the database is initialized. The first time you run e-admin, if the database is not initialized, the system will automatically begin the initialization process.
Click [OK] to begin the initialization process. The e-admin window displays. Note: Click [Cancel] to exit the wizard and perform a manual setup at a later time.
9
Click [OK] to acknowledge that e-automate was successfully initialized. The e-automate Website Setup window displays.
Revised: 05/17/2013 © 2013 Digital Gateway, Inc. - All Rights Reserved Page 25

10 You should have received the Web Login, Web Admin Password, and Web User Password in an email shortly after your software purchase. If you do not have this information, contact Digital Gateway at 1-866-DGATEWAY. e-automate uses this information when you log into the online e-automate Customer Resource Center website. If you have entered the login and passwords here, the system will automatically log you in and you will not have to enter your login and password when accessing the Digital Gateway online Customer Care website.
Enter your web login in the Web Login field. Enter your admin password in the Web Admin Password field. Enter the user password in the Web User Password field. Click [Next]. The Configure DG Server window displays.
Note: The web login information is not critical to the installation of e-admin. If you choose to not set up your website with e-automate, simply click [Cancel] and you will move to the next step of initializing e-admin without any negative impact on the installation. You will have to manually secure your License Key if you choose to skip this step.
11
Enter a password of your choosing in the Full access password field. Note: If your password isn’t strong enough to meet the requirements, a warning dialog will appear with the required parameters.
Enter a password of your choosing in the Read-only password field. Note: If your password isn’t strong enough to meet the requirements, a warning dialog will appear with the required parameters.
Click [OK]. The Create Company window displays.
Revised: 05/17/2013 © 2013 Digital Gateway, Inc. - All Rights Reserved Page 26

12 You use this window to create a company in e-admin. The company is where you store all of your company information. Digital Gateway recommends that all customers create a sample company that you can use for experimenting and testing prior to creating your usable company database.
Enter a name in the Company ID field. The Database field will automatically populate. Click on the dropdown in the Database Type field and select Test. Select the Restore to New Company radio button to create a sample company.
Note: To create a new company, please refer to e-admin Online Help for the New company option details.
Revised: 05/17/2013 © 2013 Digital Gateway, Inc. - All Rights Reserved Page 27
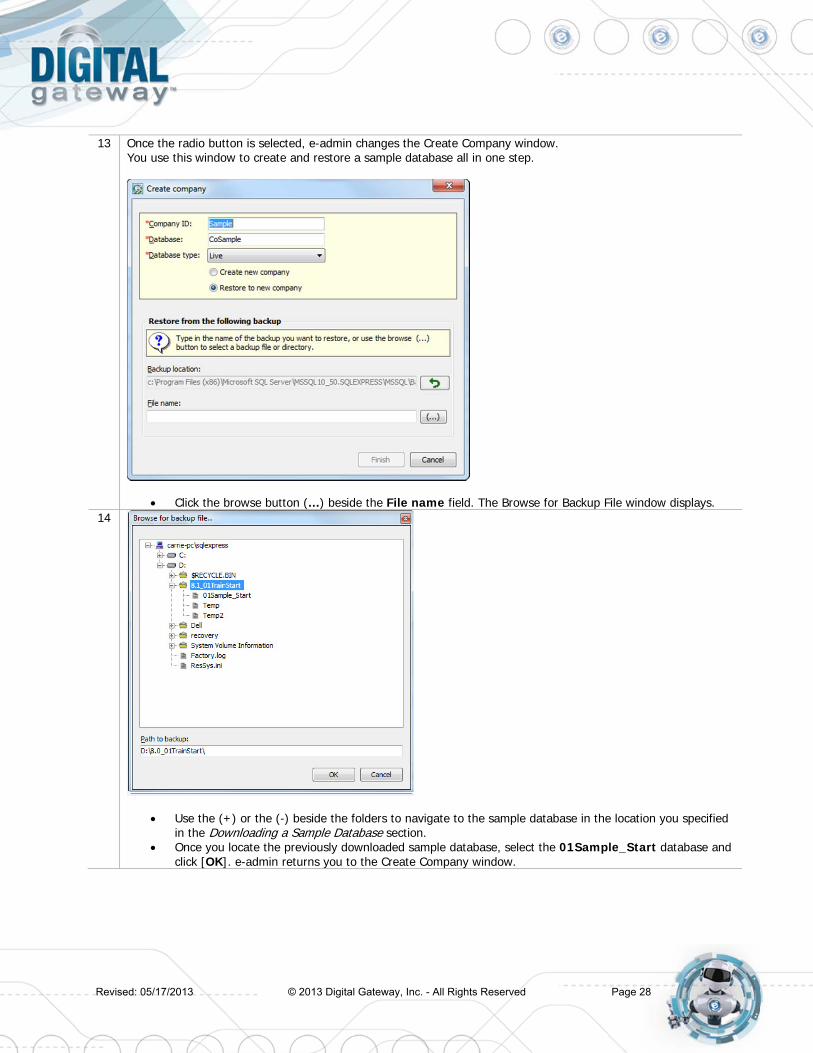
13 Once the radio button is selected, e-admin changes the Create Company window. You use this window to create and restore a sample database all in one step.
Click the browse button (…) beside the File name field. The Browse for Backup File window displays. 14
Use the (+) or the (-) beside the folders to navigate to the sample database in the location you specified in the Downloading a Sample Database section.
Once you locate the previously downloaded sample database, select the 01Sample_Start database and click [OK]. e-admin returns you to the Create Company window.
Revised: 05/17/2013 © 2013 Digital Gateway, Inc. - All Rights Reserved Page 28

15
To create the company and restore the 01Sample_Start database click [OK]. 16 e-admin begins the company create and restore process. Once the company has been created and the database
has been restored, the e-admin window is displayed.
Click [OK] and the Enter Email Settings window displays. 17
Click [OK] to acknowledge the warning. The DGServer Email Settings window displays.
Revised: 05/17/2013 © 2013 Digital Gateway, Inc. - All Rights Reserved Page 29
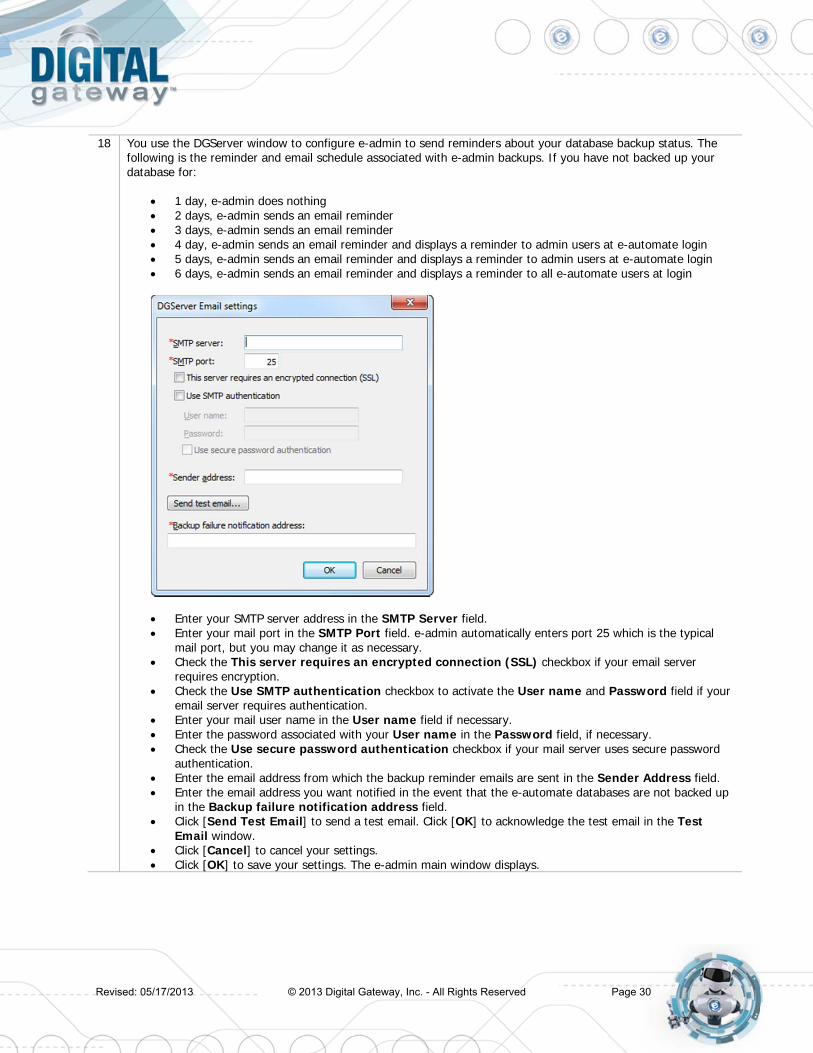
18 You use the DGServer window to configure e-admin to send reminders about your database backup status. The following is the reminder and email schedule associated with e-admin backups. If you have not backed up your database for:
1 day, e-admin does nothing 2 days, e-admin sends an email reminder 3 days, e-admin sends an email reminder 4 day, e-admin sends an email reminder and displays a reminder to admin users at e-automate login 5 days, e-admin sends an email reminder and displays a reminder to admin users at e-automate login 6 days, e-admin sends an email reminder and displays a reminder to all e-automate users at login
Enter your SMTP server address in the SMTP Server field. Enter your mail port in the SMTP Port field. e-admin automatically enters port 25 which is the typical
mail port, but you may change it as necessary. Check the This server requires an encrypted connection (SSL) checkbox if your email server
requires encryption. Check the Use SMTP authentication checkbox to activate the User name and Password field if your
email server requires authentication. Enter your mail user name in the User name field if necessary. Enter the password associated with your User name in the Password field, if necessary. Check the Use secure password authentication checkbox if your mail server uses secure password
authentication. Enter the email address from which the backup reminder emails are sent in the Sender Address field. Enter the email address you want notified in the event that the e-automate databases are not backed up
in the Backup failure notification address field. Click [Send Test Email] to send a test email. Click [OK] to acknowledge the test email in the Test
Email window. Click [Cancel] to cancel your settings. Click [OK] to save your settings. The e-admin main window displays.
Revised: 05/17/2013 © 2013 Digital Gateway, Inc. - All Rights Reserved Page 30

19 You will need to obtain your License Keys.
Click File>Licenses from the e-admin main window. The Manage Users and Licenses window displays. 20 If you have set up your e-automate website login, you can download your license key from the internet in this
window. If you have not set up your website login, the Download key from internet button will be grayed out and you will need to contact Customer Care to request a license key.
Click Download key from internet. The Retrieving License Key window displays.
Revised: 05/17/2013 © 2013 Digital Gateway, Inc. - All Rights Reserved Page 31
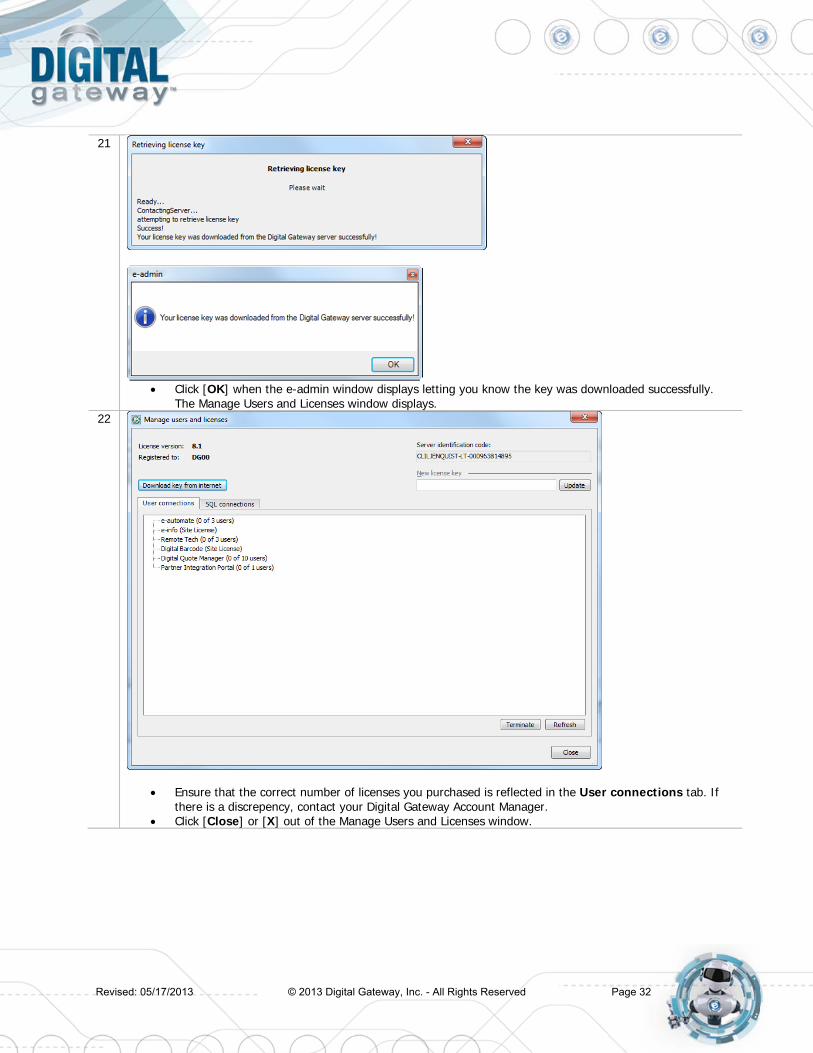
21
Click [OK] when the e-admin window displays letting you know the key was downloaded successfully.
The Manage Users and Licenses window displays. 22
Ensure that the correct number of licenses you purchased is reflected in the User connections tab. If there is a discrepency, contact your Digital Gateway Account Manager.
Click [Close] or [X] out of the Manage Users and Licenses window.
Revised: 05/17/2013 © 2013 Digital Gateway, Inc. - All Rights Reserved Page 32

23 If your database needs to be upgraded, you will see YES in the Needs upgrade column. Please refer to the steps in the following section, Updating e-automate Databases for this process.
Revised: 05/17/2013 © 2013 Digital Gateway, Inc. - All Rights Reserved Page 33

Updating e-automate Databases There is no sample database shipped with e-automate. When you download the sample database from the website, you will be required to update it after initializing e-admin. You use the Update Database activity to update e-automate databases. The database must be updated to the current version before you can log into the e-automate client. The version of the e-automate database is listed in the e-admin window in the Version column. If your database needs to be upgraded, you will see YES in the Needs upgrade column in the e-admin window. 1
Select the company database you want to update in the e-admin main window. Select Company>Maintenance > Update Database. The e-admin window displays reminding of the
time it could take to update the database. 2
Click [Yes]. The Backup Database Location window displays.
Revised: 05/17/2013 © 2013 Digital Gateway, Inc. - All Rights Reserved Page 34
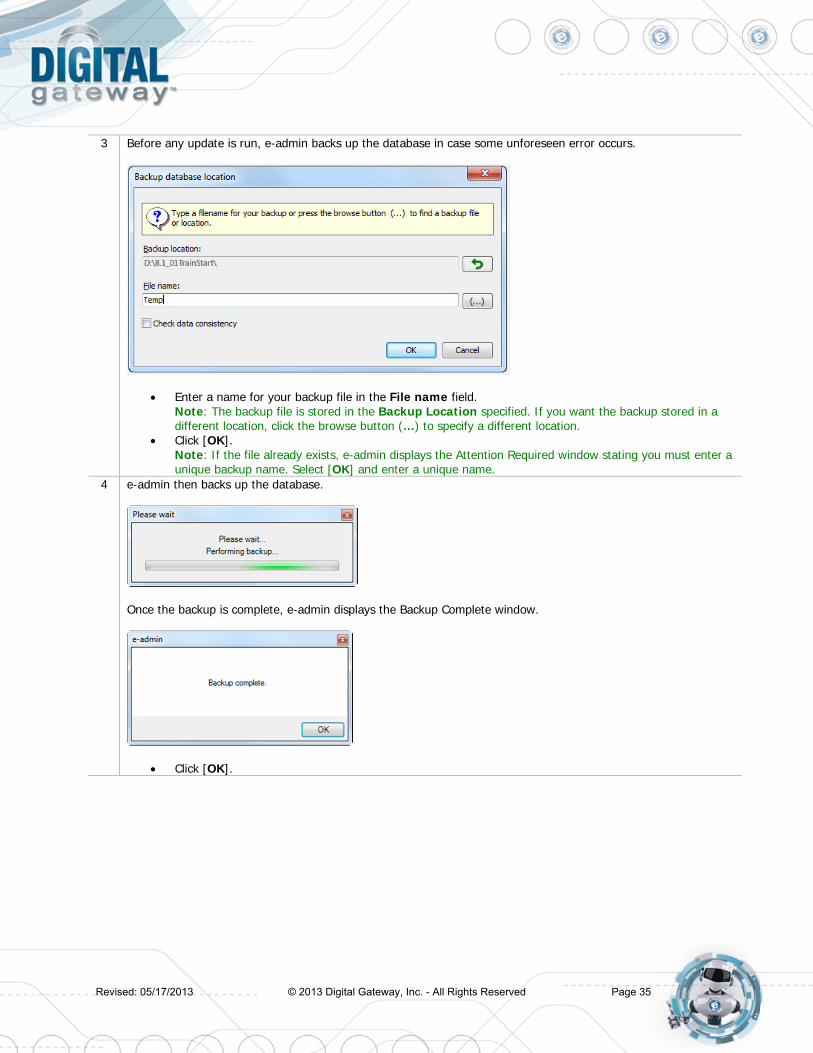
3 Before any update is run, e-admin backs up the database in case some unforeseen error occurs.
Enter a name for your backup file in the File name field. Note: The backup file is stored in the Backup Location specified. If you want the backup stored in a different location, click the browse button (…) to specify a different location.
Click [OK]. Note: If the file already exists, e-admin displays the Attention Required window stating you must enter a unique backup name. Select [OK] and enter a unique name.
4 e-admin then backs up the database.
Once the backup is complete, e-admin displays the Backup Complete window.
Click [OK].
Revised: 05/17/2013 © 2013 Digital Gateway, Inc. - All Rights Reserved Page 35
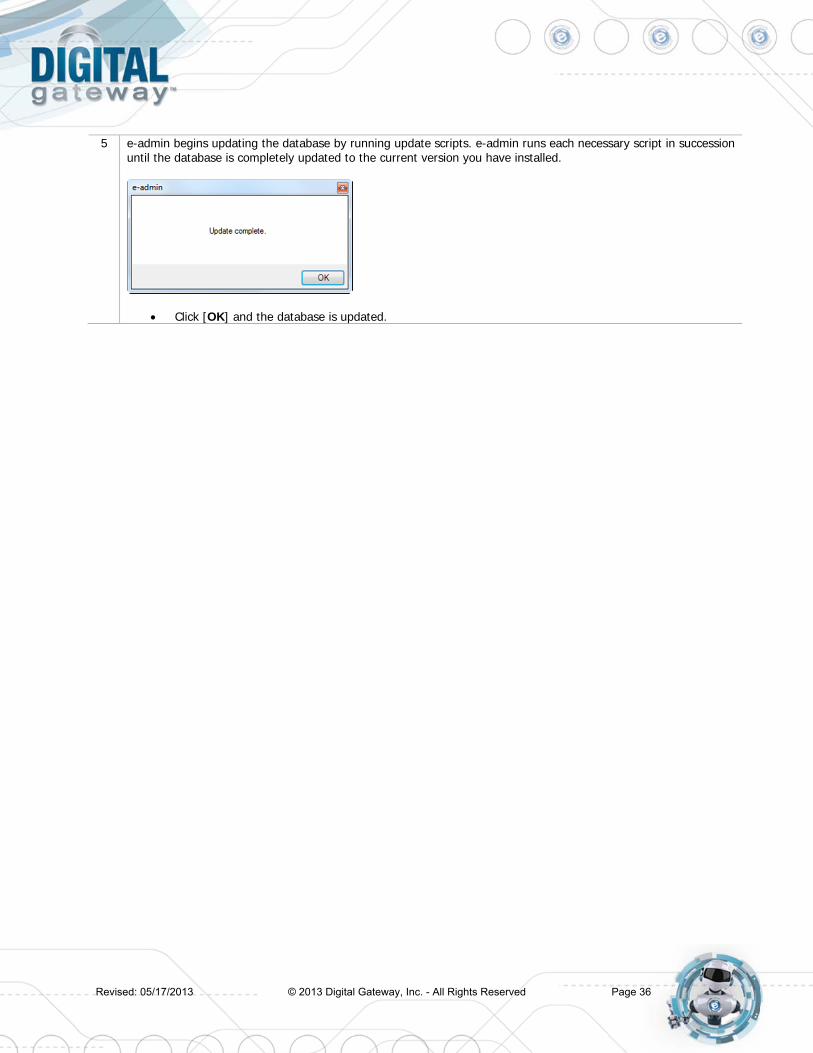
5 e-admin begins updating the database by running update scripts. e-admin runs each necessary script in succession until the database is completely updated to the current version you have installed.
Click [OK] and the database is updated.
Revised: 05/17/2013 © 2013 Digital Gateway, Inc. - All Rights Reserved Page 36

Installing e-automate Once you have configured the server and e-admin, you can then install the e-automate client on your various workstations. You can install e-automate on as many workstations as you like; e-admin and the DG Server will manage how many users can be connected to the database at one time. Be sure you install the e-automate client on your workstations and not the server. 1 Secure the download file from Digital Gateway’s Customer Care. Customer Care can route you to your account
manager or provide you with the instructions to obtain the software. 2 Locate the e-automateClientSetup.exe file to begin installation. To make this file available on other computers,
you can: Share this directory and make it accessible from other computers on your network. Copy the client installation file, e-automateClientSetup.exe to a CD of flash drive that you take from
client to client. Copy the client install file, e-automateClientSetup.exe to a shared company network drive accessible
from all intended client computers. 3 From the client machines, use one of the above methods to access e-automateClientSetup.exe.
Double-click on the file to begin the installation. The Welcome window displays. 4
Ensure that Client components is checked. Ensure that All users (requires admin rights) is selected.
Note: This is the default setting. You can change it to This user only according to your company policies.
Click [Next].
Revised: 05/17/2013 © 2013 Digital Gateway, Inc. - All Rights Reserved Page 37

5
Specify your Install Path and click [Next]. Note: It is recommended that you install e-admin to the default directory; to choose a different location click […] and select your desired location.
6
Choose the shortcuts you wish to add by clicking the corresponding checkbox and click [Next].
Revised: 05/17/2013 © 2013 Digital Gateway, Inc. - All Rights Reserved Page 38

7
Click [Finish] to perform the listed actions. The End User License Agreement window displays. Note: At any time during the installation you can click [Back] to return to a previous screen and modify the parameters.
8
Read the License Agreement and click [Accept]. If you click [Cancel] in the License Agreement window, the Install Wizard stops the installation.
Revised: 05/17/2013 © 2013 Digital Gateway, Inc. - All Rights Reserved Page 39

9
Click [Close] to exit out of the installation wizard.
Revised: 05/17/2013 © 2013 Digital Gateway, Inc. - All Rights Reserved Page 40

Logging into e-automate Sample Once you have installed SQL Server or SQL Express, e-admin, a sample database, license key, and e-automate client, you can log into the sample database and take a look around. 1 Select Start > All Programs > e-automate from the client workstation start menu. The e-automate
logon window displays. 2 e-automate uses logon profiles to manage login information. The first time you log into e-automate you need to
create a logon profile. You should consider creating two, one for the sample database or testing database and one when you get your live company database running. You can create as many as necessary. Before you can create a logon profile you must enter the user name.
Enter Admin in the User ID field. Leave the Password field blank. Click the Edit icon (Pencil). The Manage Logon Profiles window displays.
3
Click [Add]. The Edit Logon Profile window displays.
Revised: 05/17/2013 © 2013 Digital Gateway, Inc. - All Rights Reserved Page 41

4
Enter the name of the SQL Server on which you installed e-admin in the SQL server field. The DGServer name automatically populates.
Click [Next ] to continue. 5
In the Company field, use the down arrow to select Sample if not the default. Click [Next] to continue.
6
In the Profile name field, accept the name suggested or enter a new name to describe this profile. Click [Finish] to complete the profile. Click [OK] to close the Manage Logon Profiles window and add your new profile to the e-automate login
window.
Revised: 05/17/2013 © 2013 Digital Gateway, Inc. - All Rights Reserved Page 42

7
In the User ID field, enter Admin. Leave the Password field blank. In the Profile field, verify your created profile is displayed, use down arrow to change as necessary. Click [OK] to login to e-automate.
8 e-automate displays the e-automate window.
Revised: 05/17/2013 © 2013 Digital Gateway, Inc. - All Rights Reserved Page 43
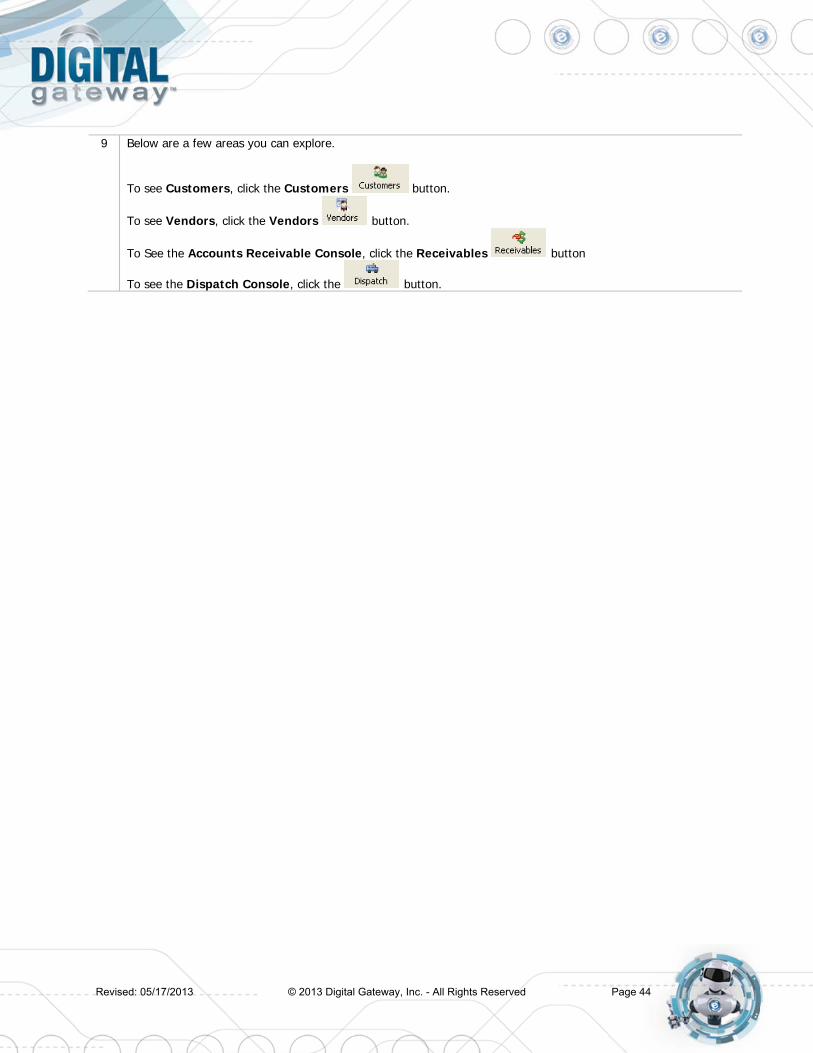
9 Below are a few areas you can explore.
To see Customers, click the Customers button.
To see Vendors, click the Vendors button.
To See the Accounts Receivable Console, click the Receivables button
To see the Dispatch Console, click the button.
Revised: 05/17/2013 © 2013 Digital Gateway, Inc. - All Rights Reserved Page 44