Embed Size (px)
Citation preview


2
Dynamic Simulations in a 3D-Enviornment a comparison between Maya and Blender
By
Dario Senkic
Academy for technology and environment
University of Gävle
S-801 76 Gävle, Sweden
Email:
Abstract
Today there are several 3D software’s that are capable of producing realistic
simulations, such as fire, water, smoke, cloth etc. This thesis will focus on two
software’s, Autodesk Maya and Blender. The first one, Maya, is an industry-leading
commercial product, while the second, Blender, is based on open-source. Thus
raising interesting questions regarding the overall performance in both software's.
Three different sets of simulations will be created in both applications, then a
comparison will be made focusing on the work-flow, rendering time and the final
render. In order to draw a conclusion of the final result, each simulation will be
rendered as a short video sequence and later showed to a number of participants.
The participants will then decide which simulation looks more appealing in the
terms of both photorealism and behaviour of the simulations. Through that process,
it is showed that both applications outweigh each other in different areas.
Keywords: Maya, Blender, computer graphics, dynamics, simulation
3
Contents 1 Introduction .......................................................................................................................................... 4
1.1 Aim of research ............................................................................................................................. 4
1.2 Limitations ..................................................................................................................................... 4
1.3 Method .......................................................................................................................................... 5
1.4 Questions at issue ......................................................................................................................... 5
2 Related Work ........................................................................................................................................ 6
3.1 Software & Hardware ........................................................................................................................ 6
3.1.1 Maya ........................................................................................................................................... 6
3.1.2 Blender ....................................................................................................................................... 7
3.2 Hardware ....................................................................................................................................... 8
4 Production process and results ............................................................................................................ 9
4.1 Work-flow ...................................................................................................................................... 9
4.1.1. Smoke .................................................................................................................................... 9
4.1.1.1 Smoke in Maya .................................................................................................................. 10
4.1.1.2 Smoke in Blender............................................................................................................... 10
4.1.2 Fire ........................................................................................................................................ 11
4.1.2.1 Fire in Maya ....................................................................................................................... 11
4.1.2.2 Fire in Blender ................................................................................................................... 12
4.1.3 Water .................................................................................................................................... 13
4.1.3.1 Water in Maya ................................................................................................................... 13
4.1.3.2 Water in Blender ............................................................................................................... 14
....................................................................................................................................................... 14
4.2 Rendering Time ........................................................................................................................... 14
4.3 Survey .......................................................................................................................................... 15
4.3.1 Live participants ................................................................................................................... 16
4.3.2 Online participants ............................................................................................................... 17
4.3.3 Result .................................................................................................................................... 18
5 Discussion ........................................................................................................................................... 19
5.1 Work-flow .................................................................................................................................... 19
5.2 Rendering time ............................................................................................................................ 19
5.3 Results of the survey ................................................................................................................... 20
6 Conclusion .......................................................................................................................................... 21
6.1 Further research .......................................................................................................................... 21
7 References .......................................................................................................................................... 22

4
1 Introduction
Dynamic simulations were for the first time used by Pixar Animation Studios in 1989, for
their short film Knick Knack.[1] Since then, the technology has advanced quite far, and today all
major computer graphic (CG) software’s (e.g. Maya, 3DsMAX, Lightwave) have incorporated a
dynamic system in one way or another, and are capable of producing very realistic simulations.
In addition, there are a few specialized software’s and plug-ins that are designed solely to simulate
specific entities. Most notable are RealFlow, which is specialized in simulating liquid, and FumeFX, a
plug-in for 3DsMax, designed to simulate smoke and fire.
Even though the mentioned software’s produce very good results, they are relatively expensive for the
average user. However, there is an alternative called Blender. Blender (like Maya) is a software
containing a complete set of tools for modelling, animation, simulation and rendering. The main
difference is that Blender is distributed completely free as Open-Source.[2]
While Maya and other high-end software’s have been recognized for their use in big-budget movies,
commercials, etc. Blender does not enjoy an equally large merit list.[3] Despite this, it is worth putting
it to the test against a high-end software to see where and how they differ.
1.1 Aim of research The aim of this research is to compare Maya’s dynamic system with Blender’s. That includes the
work-flow, render time and of course the final render. Because both applications differ in the terms of
graphical interface (GUI), tool usability and rendering software, the results are expected to vary.
Since Blender is a free software, it will be interesting to see if it can compete with Maya, which has
been (and still is) one of the leading tools in the industry of CGI (Computer Generated Imagery)[4].
1.2 Limitations Both software’s contain numerous tools for the creation of CGI, that however does not mean they can
perform every task flawlessly. Therefore, the results of this research will hopefully help CG artists (on
any level) decide what software to use for a specific task.
Also, it is important to point out that no third-party scripts or plug-ins will be used in this research. As
its aim is to test the software’s native tools, and not external ones.

5
1.3 Method The method used for this research is comparing each step of the process (Chapter 4). The steps that
will be covered are the worklflow, rendering time and the result from a survey.
1.4 Questions at issue There are a few important questions that will hopefully be answered through this research:
• Which simulations will the participant find most visually appealing?
Considering the differences in both applications, how will the end result be like and how will the
participants respond?
• Which software has the best work-flow?
The work-flow tend to vary more or less in each software, Maya and Blender are by no means an
exception. How much does it vary, and what software is the most effective?
• Which software has the fastest rendering times?
Since both Maya and Blender use different rendering software's, the rendering time is expected to
vary. Which one will prove to be the fastest?
• Can the results later be used in a constructive manner?
Is it possible to use the results for future research into dynamic simulation, or can it perhaps be used
by end-users, including people in the CGI industry?

6
2 Related Work Research regarding this subject is scarce at best. The closest work that I was able to locate was a thesis
by Andrej Blom.[5]
Blom’s thesis focused on the creation of smoke and fire, comparing Maya’s fluid system with
FumeFX – a plug-in for 3DsMAX. His results showed that FumeFX was more efficient in calculating
the simulation, and also produced better looking results than Maya’s fluid system. However, he
concluded that while FumeFX is easier to set up, the user is limited since it is a plug-in created solely
for fire and smoke. Blom also noted that, since Maya is open for creation of custom scripts, a plug-in
like FumeFX is not necessary in the CG industry, due to their knowledge and experience.
Other works that are somewhat related, have been done by Magnus Wrenninge[6], and another by
Theodore Kim, Nils Thürey, Doug James and Markus Gross[7]. While both papers focuses on
mathematical algorithms, rather than CG software, they are both interesting in the sense that they
compare different methods to achieve realistic results.
Another, also somewhat related paper was written by David Minor. His thesis was about implementing
and to a certain extent, improving the Eularian algorithm (used in fluid simulations) in combination
with a standalone simulation software.[8] He concluded that his work was mostly successful, although
more work was needed on the rendererin order to achive better results.
Yet another paper, written by Alan Wai Lun Woo, focused on smoke simulation using a frustum
aligned grid. In simple terms, it is a fluid simulation in which the angle of the camera is used to help
computate the simulation. This means that it’s possible to use higher resolutions but with less
resources, because anything that is outside the camera frustum is not taken into account. The
drawback, according to Woo, is that the camera can not be animated using this method But that it is
possible if modified, using particles.[9]
In a more related work by Tomas Andersson, he compares two different methods in simulating liquid
using RealFlow. One method is manual in nature and requires the artist to fakesome of the fluids
behaviour. The other method is solely dynamic and relies only on the software to produce a
satisfactory result. He concluded that (in his case) the manual approach produced the best result.[10]
3.1 Software & Hardware Since the rendering time will be taken into account, I found it relevant to include both software and
hardware specifications. Below follows a short description of both.
3.1.1 Maya
Version used: Maya 2009 Unlimited
Render software: Mental Ray
―Maya is currently used in the film and television industry. Maya has a high learning curve but has
developed over the years into an application platform in and of itself through extendibility via its MEL
programming language. A common alternative to using the default built in rendering system named
mental ray is Pixar's Renderman.‖[11]

7
3.1.2 Blender
Version used: Blender 2.48a
Render software: Blender internal
―Blender is a free, open-source, 3D studio for animation, modelling, rendering, and texturing offering
a feature set comparable to commercial 3D animation suites such as Maya, 3ds Max, or Cinema 4D. It
includes features such as multi-resolution sculpting; retopology painting. Additionally it supports 3D
view texture painting; stack based modifier system; flexible particle system with particle based hair;
cloth/soft body dynamics, rigid body dynamics and fluid simulation; node based texturing and node
based compositing; an integrated non linear video editor; and integrated game engine.‖[11]

8
3.2 Hardware
The computer used for the simulations and renderings was a standard Desktop computer with a dual-
core processor. The hardware itself was somewhat outdated at the time of research, which might have
caused the rendering times to increase to a certain degree. It should however not be considered a major
obstacle, since the purpose is to compare the rendering times for each simulation with each other.
The following hardware was used:
• CPU: AMD64 4200+ X2 (Dual Core)
• RAM: Corsair 2048 MB
• Motherboard: Asus A8R-MVP
9
4 Production process and results
The production process will consist of three steps
Work-flow: Depending on the simulation, but also the software, the work-flow will vary. A certain
simulation requires certain entities in order to function, which varies depending on the software.
Some may be easy to set up, while others may be more advanced.
Render time: Each simulation will take a certain amount of time to render, again, depending on the
simulation and software.
Survey: The final renders will be presented to a number of participants as a short video sequence,
containing three different simulations – Smoke, Fire and Water – from both Maya and Blender,
thus a total of six separate clips. Each clip will contain 150 frames with a speed of 25 fps (Frames
Per Second), which translates to 6 seconds per clip. In order to prevent bias towards a software,
the participants will not know which software was used to produce a certain simulation. To
identify a simulation, they will receive neutral names such as Example 1 and Example 2. After the
participants have watched the simulations, they will choose one example from each simulation
which they believe looks most appealing, in the terms of behaviour and photorealism.
4.1 Work-flow In order to achieve the most from each software, I will need to research into what methods are optimal
for creating each simulation. While there may be several ways of creating a simulation, I will focus on
the method that gives the most realistic results.
The easiest solution for creating the simulations, would be by applying the same technique in both
programs. It is however uncertain if it is even possible, since the two programs does not necessarily
utilizes its dynamic system the same way.
Nevertheless, the focus will lie on displaying the two software’s full potential, rather than creating the
simulations by applying the same work-flow techniques.
4.1.1. Smoke
The smoke simulation is quite different (at least the approach) in both software's. While Maya uses its
fluid system to simulate smoke, Blender uses particles in combination with textures. Neither method is
not necessarily better or worse than the other, but the end-result is expected to be quite different.

10
4.1.1.1 Smoke in Maya
Figure 1: Work-flow in Maya - Smoke
Figure 1 shows how the simulation looks like after it has been set up. In order to create thick smoke in
Maya, a fluid container was created with a resolution of 30 and a particle emitter was linked to the
same container. Next, a few values had to be set, those that proved to be most important were Friction,
Density, Turbulence, the Shading and the Drop-off rate.
4.1.1.2 Smoke in Blender
Figure 2: Work-flow in Blender - Smoke
Figure 2 shows the smoke simulation done in Blender. In order to achieve the thick smoke in Blender,
a Plane was used as a particle emitter. Instead of emitting points, it was set to emit Billboards (more
commonly known as Sprites). A small texture was then created in Blender, representing a puff of
smoke (Figure 3).
11
Figure 3: Puff of Smoke
The texture was then applied to the plane’s colour and alpha channel, making the white parts visible,
while the black parts turned transparent. Next, the billboard’s rotation and size was animated, making
the texture less repetitive. Finally, the animation was baked and polished with Blender’s Node Editor.
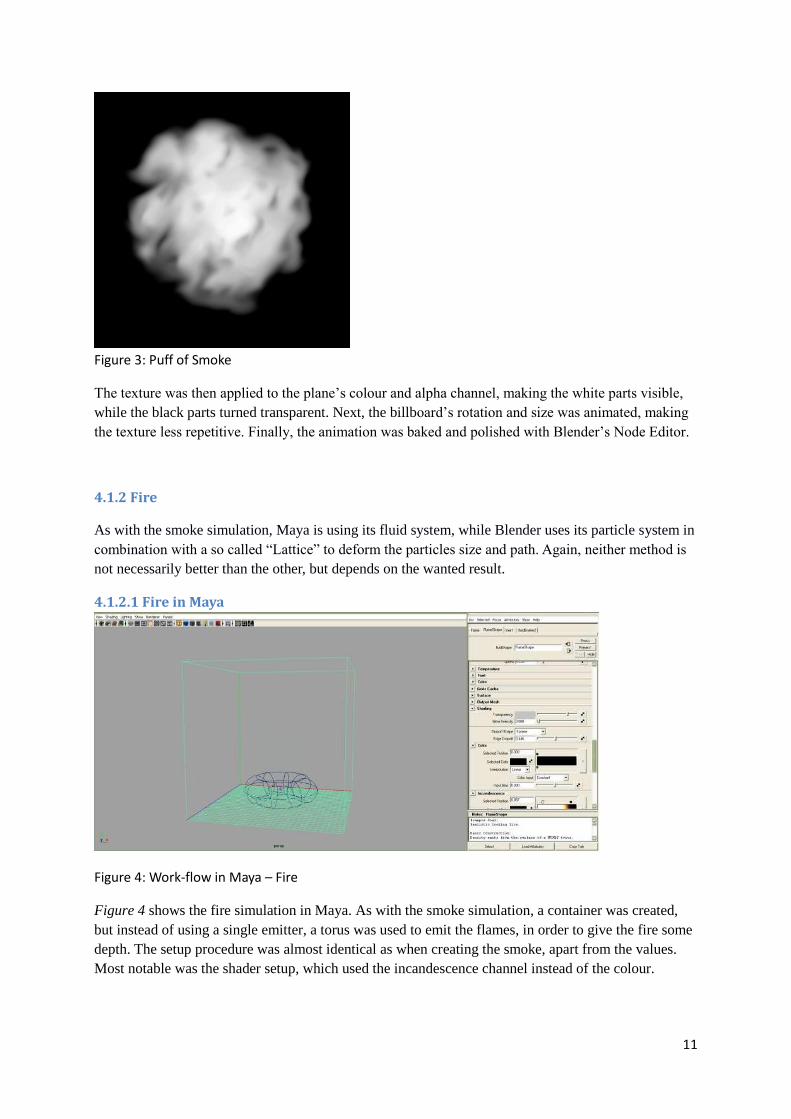
4.1.2 Fire
As with the smoke simulation, Maya is using its fluid system, while Blender uses its particle system in
combination with a so called ―Lattice‖ to deform the particles size and path. Again, neither method is
not necessarily better than the other, but depends on the wanted result.
4.1.2.1 Fire in Maya
Figure 4: Work-flow in Maya – Fire
Figure 4 shows the fire simulation in Maya. As with the smoke simulation, a container was created,
but instead of using a single emitter, a torus was used to emit the flames, in order to give the fire some
depth. The setup procedure was almost identical as when creating the smoke, apart from the values.
Most notable was the shader setup, which used the incandescence channel instead of the colour.
12
4.1.2.2 Fire in Blender
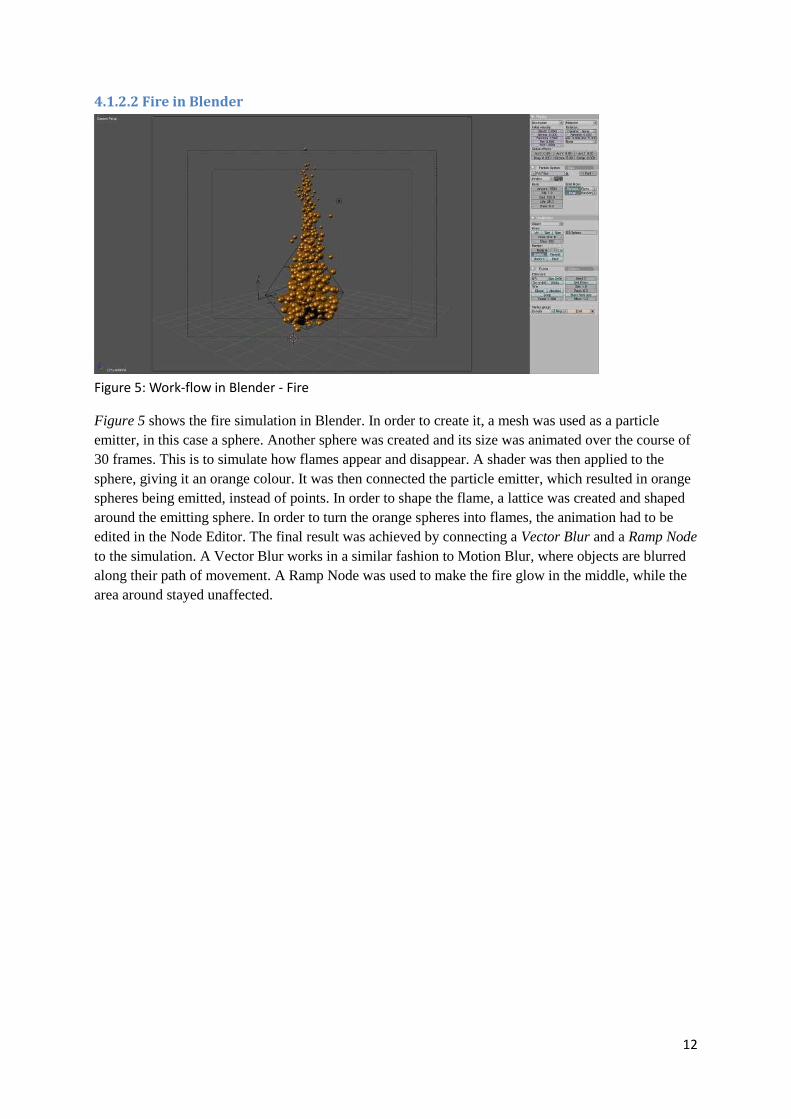
Figure 5: Work-flow in Blender - Fire
Figure 5 shows the fire simulation in Blender. In order to create it, a mesh was used as a particle
emitter, in this case a sphere. Another sphere was created and its size was animated over the course of
30 frames. This is to simulate how flames appear and disappear. A shader was then applied to the
sphere, giving it an orange colour. It was then connected the particle emitter, which resulted in orange
spheres being emitted, instead of points. In order to shape the flame, a lattice was created and shaped
around the emitting sphere. In order to turn the orange spheres into flames, the animation had to be
edited in the Node Editor. The final result was achieved by connecting a Vector Blur and a Ramp Node
to the simulation. A Vector Blur works in a similar fashion to Motion Blur, where objects are blurred
along their path of movement. A Ramp Node was used to make the fire glow in the middle, while the
area around stayed unaffected.
13
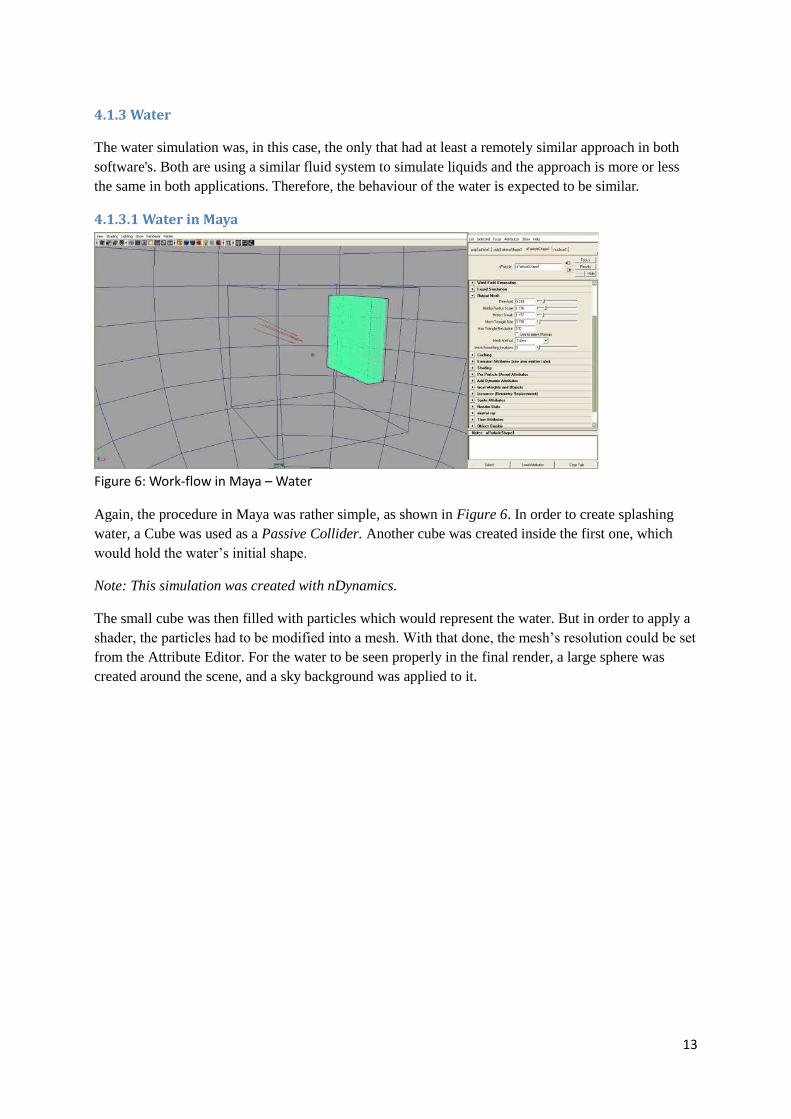
4.1.3 Water
The water simulation was, in this case, the only that had at least a remotely similar approach in both
software's. Both are using a similar fluid system to simulate liquids and the approach is more or less
the same in both applications. Therefore, the behaviour of the water is expected to be similar.
4.1.3.1 Water in Maya
Figure 6: Work-flow in Maya – Water
Again, the procedure in Maya was rather simple, as shown in Figure 6. In order to create splashing
water, a Cube was used as a Passive Collider. Another cube was created inside the first one, which
would hold the water’s initial shape.
Note: This simulation was created with nDynamics.
The small cube was then filled with particles which would represent the water. But in order to apply a
shader, the particles had to be modified into a mesh. With that done, the mesh’s resolution could be set
from the Attribute Editor. For the water to be seen properly in the final render, a large sphere was
created around the scene, and a sky background was applied to it.
14
4.1.3.2 Water in Blender
Figure 7: Work-flow in Blender – Water
To create water in Blender, its fluid system was used (Figure 7). The initial procedure is similar as in
Maya. A large cube was created which would represent the boundaries of the simulation, then a
another cube was created within the first one. which was the water’s initial shape. When the desired
parameters was set, the simulation was baked.
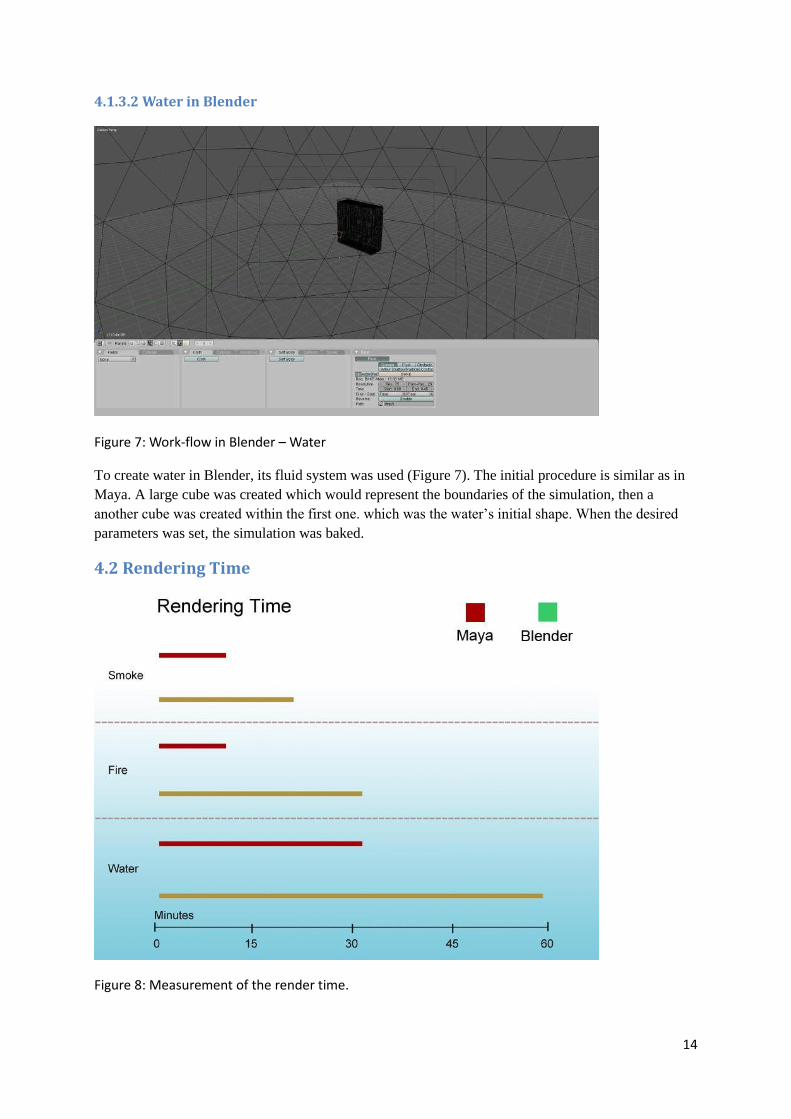
4.2 Rendering Time
Figure 8: Measurement of the render time.

15
Looking at Figure 8, it’s clear that Maya was faster in rendering all simulations. The smoke and water
simulation was rendered twice as fast as in Blender, while the fire simulation was rendered more that
twice as fast. However, it is important to take into consideration that Blender had to go through an
extra step when rendering the first two simulations, namely the Node Editor. The Node Editor is an
integrated composositor in Blender. It can handle layers, textures, shaders and in this case, passes.
4.3 Survey In order to try and reach a objective conclusion about which simulation was visually better, I set up
two blind surveys, one with live participants, and the other with online participants.
In both cases the participants had to watch a video sequence which showed all six simulations in a
row. Of course, they didn’t know what software was used to produce a certain simulation, instead the
simulations had neutral names such as Example 1 & 2.

16
4.3.1 Live participants
For this survey, I used a laptop from which the video sequence was shown to the 6 people that
participated. In order to avoid possible bias to each other, the participants were shown the video one at
a time. Before the survey started, a participant would be equipped with a small piece of paper (Figure
9) and a pencil. They were instructed to write down the example for each simulation they thought
looked most realistic. They were also allowed to watch the sequence as many times they desired.
Figure 9: Paper which was used in the live survey
There were a total of six participants. As shown by Figure 10, 100% preferred Blender’s smoke
simulation, 66% preferred Maya’s fire simulation, and the last simulation scored equally.
Figure 10: Live survey

17
4.3.2 Online participants
For the online survey, the same video sequence shown to the live participants, was uploaded to
YouTube.[12] The link was then posted on an online community[13], where 16 people participated in
the survey.
As with the live participants, they were told to watch the sequence and then post their results.
Figure 11: Online survey
Again, as shown in Figure 11 , 100% preferred Blender’s smoke simulation. The fire simulation
scored equally this time, and Blender’s water simulation was preferred by 81.25% of the participants.
18
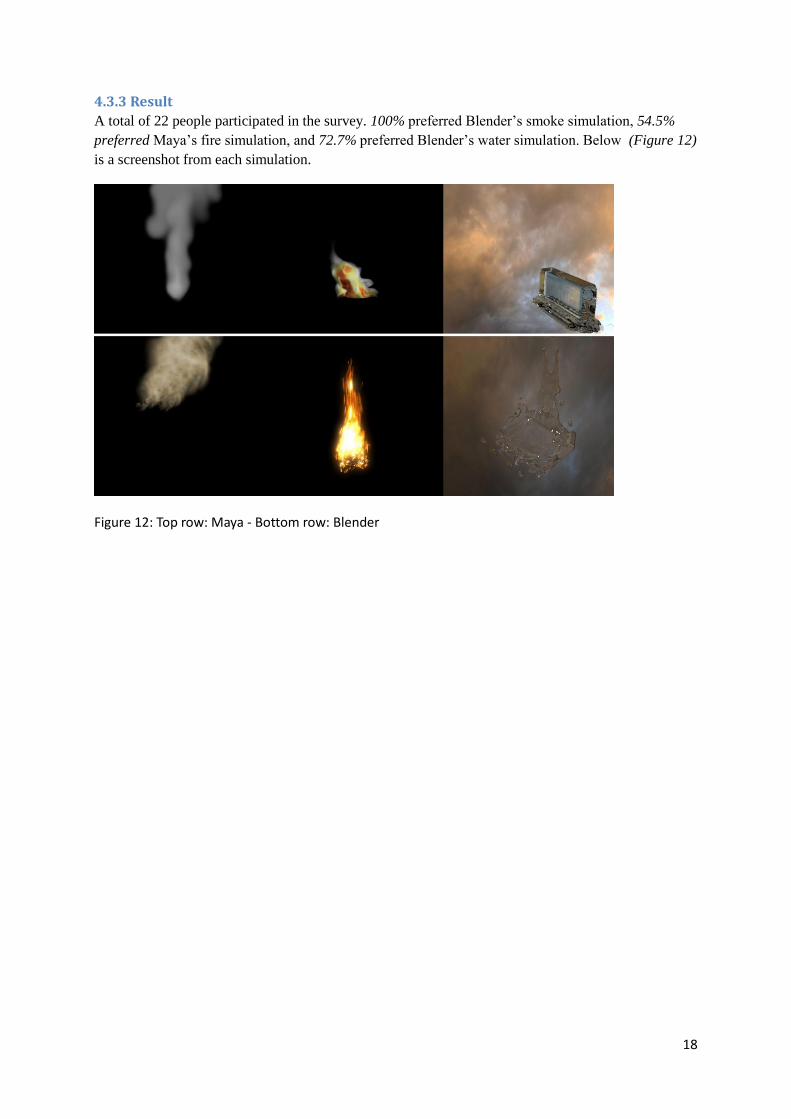
4.3.3 Result
A total of 22 people participated in the survey. 100% preferred Blender’s smoke simulation, 54.5%
preferred Maya’s fire simulation, and 72.7% preferred Blender’s water simulation. Below (Figure 12)
is a screenshot from each simulation.
Figure 12: Top row: Maya - Bottom row: Blender
19
5 Discussion
5.1 Work-flow Generally, Maya had a superior work-flow compared to Blender. Almost every key function in
creating the simulations were available through the Attribute Editor. Also, some functions were
already pre-set, which made the whole process even easier. However, when tweaking the water mesh,
Maya automatically updates the mesh according to the new values, thus locking the entire application
until the calculation is done. This can become extremely time consuming, especially if the mesh
contains a lot of faces. In other words, more time is spent on waiting than working.
Blender had a generally slow work-flow. This is because, in contrast to Maya, Blender doesn’t have
that many built-in modules. Therefore, much of the work have to be done from scratch. When
creating the water simulation, Blender proved to be better. It was easy to set up, because everything
was available from a single menu, and Blender didn’t update the mesh until it was baked, which is
preferable since any change to a high-poly surface (especially in this case) uses considerable system
resources.
5.2 Rendering time
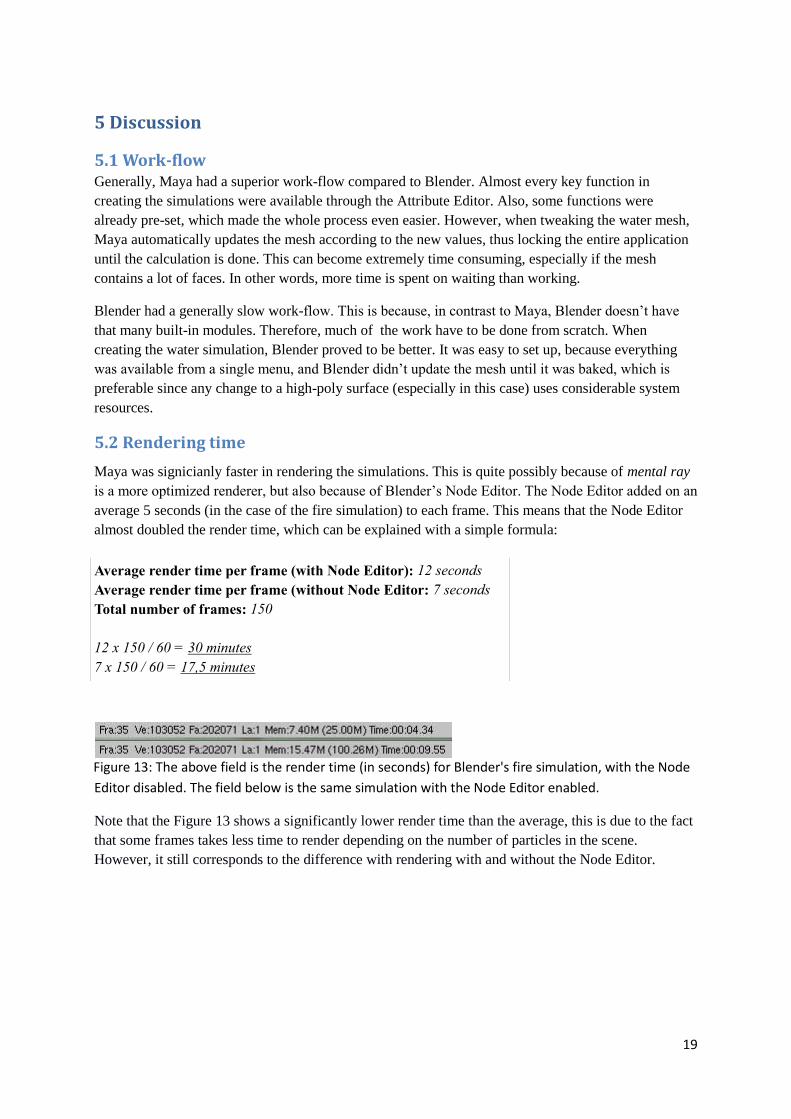
Maya was signicianly faster in rendering the simulations. This is quite possibly because of mental ray
is a more optimized renderer, but also because of Blender’s Node Editor. The Node Editor added on an
average 5 seconds (in the case of the fire simulation) to each frame. This means that the Node Editor
almost doubled the render time, which can be explained with a simple formula:
Figure 13: The above field is the render time (in seconds) for Blender's fire simulation, with the Node
Editor disabled. The field below is the same simulation with the Node Editor enabled.
Note that the Figure 13 shows a significantly lower render time than the average, this is due to the fact
that some frames takes less time to render depending on the number of particles in the scene.
However, it still corresponds to the difference with rendering with and without the Node Editor.
Average render time per frame (with Node Editor): 12 seconds
Average render time per frame (without Node Editor: 7 seconds
Total number of frames: 150
12 x 150 / 60 = 30 minutes
7 x 150 / 60 = 17,5 minutes
20
5.3 Results of the survey
The results of the survey, or rather the survey, were quite surprising. While working on the
simulations, I was expecting that Maya's simulations would be considered superior by most of the
participants, because all the simulations were fluid-based and therefore produced a very natural
motion. Also, the rendering software, Mental Ray, is much more advanced than Blender's internal
renderer, which was also expected to further add to the realism.
In contrast to Maya, I wasn't expecting Blender's simulations to match those of Maya's. As described
earlier, Blender is not capable of mimicking the natural motion of smoke and fire due to its limited
fluid system. This requires the artist to use different methods that are, compared to Maya, technically
inferior. A clear example of that is the fire simulation, where a lattice had to be used in order to to
―shape‖ the fire.
Since no further questions were asked regarding why a certain simulation looked better than the other,
one could only speculate about the results. In the case of the smoke simulation, it is possible that the
smoke created with Blender was found more aesthetically pleasing because of its thickness and
―massive‖ look compared to Maya's. The result of the fire simulation were quite balanced with Maya
scoring a few percentages more. This can perhaps be explained by the fact that the participants had
their own perception of what fire tends to look like. The opinions are however not necessarily wrong
since fire does not always look the same, but depends on the temperature and the material that is
burning.[14] The last and only simulation that scored according to expectation was the water
simulation. While both applications use their fluid systems to simulate liquids, Maya is using particles
as a reference. In it's current state this is quite a drawback, because the size and number of particles
affect the end result. In order to achieve a smooth liquid-like surface it is required to use a large
amount of particles, which unfortunately slows down the software to a point where it sometimes even
crashes. This means that the resolution of the liquid is practially limited. Despite this, Maya's water
simulation scored reasonably well, perhaps because its relatively loq resolution was not noticed by all
participants.
The survey received some criticism, especially from the internet community used for the online
survey. There were accusations of bias towards either of the software's used in this research. It was
claimed that some simulations were purposely limited in order to manipulate the results. However, it is
clearly stated in beginning of this paper that its purpose is to compare the software's full capabilities,
also the process explained here clearly did not include any limitations, other than the ones inherited.
A more reasonable criticism was expressed claiming that the authors knowledge limited some of the
simulations (claiming they could have looked better). This of course might very well be true, but the
limited information about dynamics and limited timespan simply didn't allow for further research and
testing.
21
6 Conclusion
• Which simulations will the participant find most visually appealing?
The majority of the particapants found Blender’s smoke and water simulation to be better, while
Maya’s fire simulation was better than Blender’s
• Which software has the best work-flow?
Maya’s workflow was much better in constructing the fire and smoke simulation, whereas Blender’s
worflow was slightly better with teh water simulation.
• Which software has the fastest rendering times?
Clearly, Maya was at least twice as fast rendering the simulations.
• Can the results later be used in a constructive manner?
In my opinion, a more throughout research and comparison is required in order to answer this
question.
6.1 Further research Since this research was started, quite a few improvements have been made to Blender's fluid system.
The latest version, 2.54 (currently in Beta stage) allows for simulation of smoke and fire, very similar
to the one in Maya. Also, an external, physically correct. render software called LuxRender is expected
to be closely integrated with the new version of Blender. All these changes would probably even out
(to a certain degree) current differences and allow for a more fair comparison.
Furthermore, it would be interesting to test how the simulations in both programs can interact with
each other (e.g. how fire interacts with water etc.) and how they interact with static and moving
objects. I believe that would be a more comprehensive research, since it would reflect what is actually
used by artists. Last but not least. in order for these kind of comparisons to be useful for people using
these software’s, the tests need to be more extensive.

22
7 References
[1] Wikipedia, Dynamic simulation,
http://en.wikipedia.org/wiki/Dynamic_simulation (2009-04-25)
[2] Blender.org, Manual/Introduction,
http://wiki.blender.org/index.php/Doc:Manual/Introduction (2009-04-25)
[3] Autodesk Maya, Customer showcase, Blender, Blender on the history channel, Vendredi
http://usa.autodesk.com/adsk/servlet/pc/index?siteID=123112&id=13588387&linkID=13552446 (2009-
04-25)
http://www.blendernation.com/2006/09/27/blender-on-the-history-channel/ (2009-04-25)
http://users.skynet.be/mume//vendredi/blender.html (2009-04-25)
[4] Dexigner, Maya to serve as chief animation software for Lucasfilm animation Singapore
http://www.dexigner.com/design_news/maya_for_lucasfilm_animation_singapore.html (2009-04-
25)
[5] Blom, A., Comparing FumeFx with Autodesk Maya Dynamic System, [urn:nbn:se:hig:diva-610],
University of Gävle, June 2008
[6] Wrenninge, M., Fluid Simulation for Visual Effects,
[LITH-ITN-MT-EX--03/018—SE], Linköping University, April 2003
[7] Theodore, K., Thürey, N., James, D., Gross, M., Wavelet Turbulence for Fluid Simulation,
Cornell Univerrsity, ETH Zürich, 2008
http://www.cs.cornell.edu/~tedkim/WTURB/ (2009-04-25)
[8] Minor, D., Physical Simulation of Fire and Smoke,
N.C.C.A Bournemouth University, September 2007
http://nccastaff.bournemouth.ac.uk/jmacey/MastersProjects/MSc07/DavidMinor/MSc%20Thesis.pdf (2009-
04-25)
[9] Wai Lun Woo, A., Realistic Smoke Simulation Using A Frustum Aligned Grid,
The University of British Columbia, April 2006
www.cs.ubc.ca/~rbridson/docs/awoo_msc.pdf (2009-04-25)
[10] Andersson, T., Controlling the fluid dynamics: an analysis of the workflow of fluids,
[urn:nbn:se:hig:diva-155], University of Gävle, June 2007
[11] Wikipedia, 3D computer graphics software,
http://en.wikipedia.org/wiki/3D_computer_graphics_software (2009-04-25)
[12] Youtube, Dynamic Simulation Research: Maya VS. Blender,
http://www.youtube.com/watch?v=_nPDsluQVuY (2009-05-20)
[13] Torrent-Damage, Dynamic Simulation
http://www.torrent-damage.net/ (2009-05-20)
[14] T.C. Forensic, Sources of ignition -General temperatures
http://www.tcforensic.com.au/docs/article10.html#1.1 (2009-05-20)