Embed Size (px)
Citation preview

DVR Network & Remote Viewing - Complete Setup Guide -

1
Step 1 Connect your DVR into a Modem or Router using basic Ethernet / Cat-5 cable
Step 2 Identify your Network IP Address In order to identify your network IP addresses go to a computer that is connected to the same network as the DVR. On Windows, click the start button, select Run and type “CMD” as shown below, and click OK. See example below:

2
The command prompt below will appear. Type “ipconfig” and click Enter. It will display a total of three different IP addresses (example 192.168.XXX.XXX).
The top address is your Computer’s IP address. The Default Gateway address is your Router. Please make sure you write down all 3 addresses as they appear. You will need them in order to complete the next step.

3
Step 3 Assign a unique IP Address to the DVR You now must assign a unique IP address to your DVR on the Network. For example, if your computer’s IP address is 192.168.1.3, you can make the DVR’s address 192.168.1.4 by simply changing the last digit. Go to your DVR and click MENU, select SYSTEM, and then NETWORK. Input the new IP address you have selected into the DVR’s “Network Settings,” along with the Subnet Mask and Default Gateway address. Exit and Save your changes in the DVR menu.
Now that you have assigned an IP address to your DVR you can use the “ping” command to see if it is recognized on your network. Go back to your computer and click start , select Run, and Type CMD. Type “PING 192.168.XXX.XXX” (DVR’s IP address) into the command prompt and click Enter.

4
If you get a “Reply” it was successful. If it shows “Request timed out” it means your network connection has failed. You now have access to the DVR from any computer on the assigned network. Simply open the Internet Explorer browser and type 192.168.XXX.XXX (DVR's IP address). Then download the ActiveX control. You will need to make some temporary changes to the security settings in your browser in order to enable the ActiveX control. Changing your Security Settings: 1. When you first access the DVR using Internet Explorer, you may encounter this error when IE is trying to install the ActiveX control required to drive the Remote View.

5
2. For Internet Explorer to work with Remote View, settings in Internet explorer must be changed. Click on Tools, and then Internet Options.
3. Select the Security tab and click Customer level in order to change the Active X control.

6
4. Scroll down the list until you find “Download unsigned ActiveX Controls (not secure)”. Change the setting to Enable (not secure). Also, change the Initialize and script ActiveX Controls not marked….. to Enable (not secure).
5. Click OK to exit out the Security Setting window and click OK to exit out the Internet option window. Close all Internet Explorer windows. 6. Launch Internet Explorer again. You should see a yellow bar stating that “Your current security settings put your computer at risk. Click here to change your security settings…”. DO NOT CHANGE ANY SETTINGS AT THIS POINT. You may do so AFTER the ActiveX Control installation is completed and you have successfully logged on to your DVR from another computer on the network.

7
7. Right click on the yellow bar and select Install ActiveX Control. Please be patient - the installation may take longer than expected depending on your system’s performance.

8
8. Once the ActiveX Control is installed, the Login Screen is displayed. This is an indication that you have successfully installed the ActiveX Control and you have connected to your DVR. Simply log on to your DVR using the correct username and password. Please refer to your DVR manual to obtain this information.

9
Step 4 Open Ports on Router for Remote View Log into your network Router by typing the Default Gateway IP into the Address Bar on your Internet browser (For Example: 192.168.1.1). You will be prompted to enter your Router’s user name and password. Please refer to your Router’s manual to obtain this information. This will usually be set to something simple, such as user name: “admin” and password: “admin”. Once you get onto your router’s main page the next step is to configure your network for remote access. In order to do this, you will need to configure your router's port forwarding settings. The port forwarding process varies dependent upon router model. You can visit www.portforward.com for a list of guides by router model. You can also contact your router provider with additional questions regarding the port forwarding process. Configure Port Forwarding: Go to “Port Forwarding” settings and select “Add Service”. In most cases, you will need to forward HTTP (port 80) to your DVR’s IP (example 192.168.XXX.XXX). You can input port 5000 as the ending port. Make sure you Forward the Ports on “TCP & UDP” Protocols. Please refer to the “Port Forwarding” instructions in your DVR manual in order to confirm which specific ports need to be forwarded.

10
When you have finished configuring the port forwarding in your router, you will need to test your network. Go to a computer on the same network as your DVR and type www.canyouseeme.org. Your “Public IP” address will appear and it will ask which port you want to test. Please enter the port that you opened for your DVR (port 80) and select Check. You will get a response indicating whether it was a “Success” or an “Error.”
If the test was successful, your ports are open and you can now access your DVR remotely over the internet by typing your “Public IP” in the address bar on your Internet browser. If you get a response indicating there was an error, can either contact your router manufacture so they can assist you in the Port Forwarding process, or just double check to see if you made any potential errors in the port forwarding process.

11
Step 5. View your DVR Remotely over the Internet There are two types of IP addresses - static and dynamic. Static IP addresses never change. If you have a static IP address you can always use the same “Public IP” address in order to access your DVR. Dynamic IP addresses may change each time you connect to the network (e.g. Internet). Most people have dynamic IP addresses which are assigned by their internet service provider. If you have a dynamic IP address, you will need to register with a DNS service and create a “Hostname” which will automatically be notified of any address changes. Once you have received a “Hostname” you will be able to access your DVR remotely by entering the Hostname in your internet browser. Dynamic DNS is a free service that provides you with a Hostname in order to access your DVR remotely. Please follow the instructions below to register.

12
1. Open up Internet Explorer and access this website: http://www.dyndns.com 2. On the upper right hand corner of the page, click on Create Account.
3. Fill in the necessary information to create the account. Make sure you write down your Username and Password since you will need to enter them into the DVR later.
13
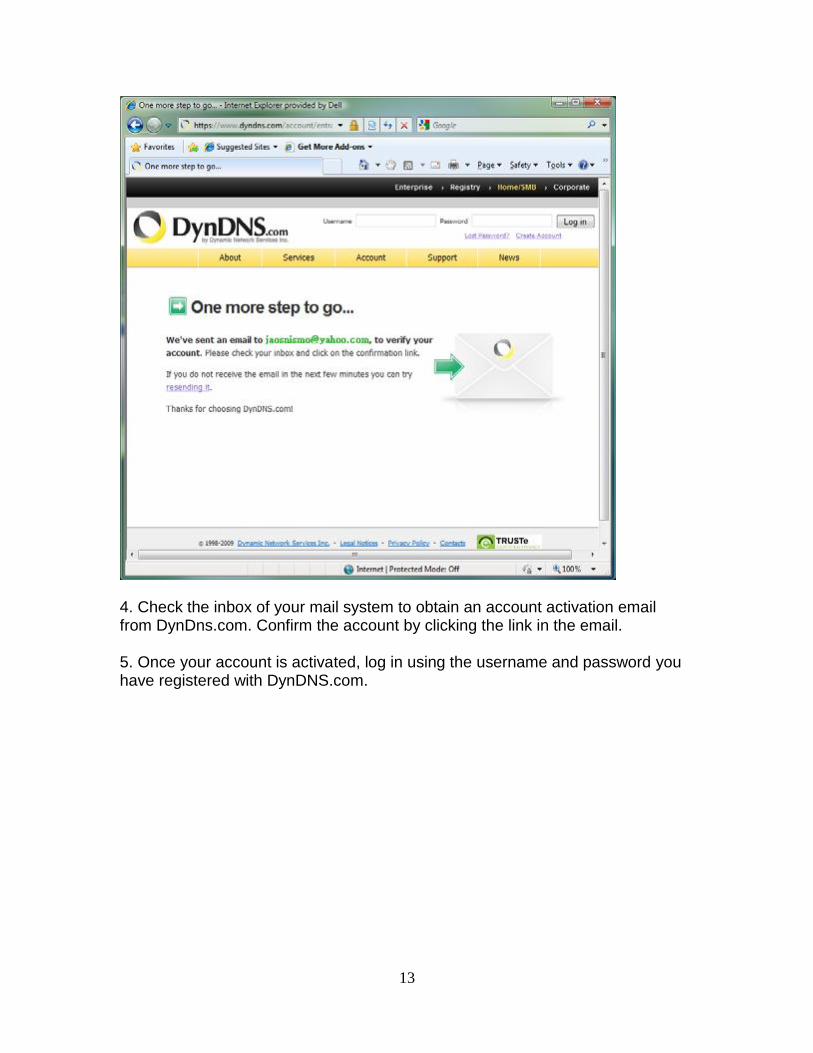
4. Check the inbox of your mail system to obtain an account activation email from DynDns.com. Confirm the account by clicking the link in the email. 5. Once your account is activated, log in using the username and password you have registered with DynDNS.com.

14
6. Navigate to “Add Host Services (Highlighted in Yellow)” under My Services. 7. Put in any name you desire under Hostname. Choose the domain name under the list from the drop down menu.

15
8. Enter the IP address or click “Use auto detected IP address XXX.XXX.XXX.XXX”, then click Add to Cart.

16
9. Once you Add to Cart, the request will be shown in a shopping cart with $0.00. Click next to continue. Make sure you write down the Hostname and IP Address since you will need them later.

17
10.The next screen is the Free Services Checkout which will should you the host name you have registered. Click Activate Services to continue.

18
11. The host service is now completed. The receipt will indicate the host name you have registered and the IP address that is associated with the Host name. Enjoy the free service. Go to your DVR and click MENU, then SYSTEM, and then NETWORK. Select the option for DDNS setup and enter your assigned Hostname along with your “Public IP” address and Password that you have selected. Exit and Save your changes in the DVR Menu. You should now be able to access the DVR remotely by simply entering the Hostname in your Internet Explorer browser.