Embed Size (px)
Citation preview

dungeon master LITE USER GUIDE
This documentation is provided through the Unity asset store EULA: https://unity3d.com/legal/as_terms i
Dungeon Master LITE
September 2017
Version 1.1.0
Chivalrous Games
https://chivalrousgames.com
dungeon master LITE USER GUIDE
This documentation is provided through the Unity asset store EULA: https://unity3d.com/legal/as_terms ii
Disclaimer
Chivalrous Games Reg. provides this publication as is without warranty of any kind, either expressed or implied. This publication could include technical inaccuracies or typographical errors. Changes are periodically made to the information herein. These changes will be incorporated in new editions of the publication. Chivalrous Games Reg. may make improvement and/or changes in the product(s) and/or programs(s) described in this publication at any time.
Trademarks
Chivalrous Games is a registered trademark of Chivalrous Games Reg. All other brand and product names are trademarks or registered trademarks of their respective companies:
Unity Technologies
3DForge
Invector
Copyright
This documentation is provided through the Unity Asset Store EULA. https://unity3d.com/legal/as_terms

dungeon master LITE USER GUIDE
This documentation is provided through the Unity asset store EULA: https://unity3d.com/legal/as_terms iii
Preface Foreword
First of all, I want to thank you for buying the Dungeon Master Lite Unity asset. I put hundreds of
hours into this product and I plan to add many more. By buying this Unity asset, you support my
work and allow me to invest more time to improve the Dungeon Master.
If you didn’t buy the Dungeon Master, I invite you to do so by going to the Unity asset store
https://www.assetstore.unity3d.com/
If you have any comments, questions, if you need help, want to request a new feature or want to
submit bug reports, I invite you to do so at [email protected]
I will read every email and answer them as soon as possible. But please keep in mind that I am a
one man team and the realities of life will sometime prevent me from answering immediately.
If you like the Dungeon Master Lite, check out the features exclusive to the full version of the
Dungeon Master and take your game to the next level!
For readability, in this guide “Dungeon Master” really means “Dungeon Master Lite”. If features
exclusive to the full version of the Dungeon Master are discussed, it will be clearly explained that
they are not available in the Lite version of the Dungeon Master.
Documentation Mindset
This document describes step by step procedures on how to use the Dungeon Master asset for
Unity. It has a functional approach. Rather that describing each possibility, it focuses on getting
things done and will suggest approaches to common goals. It means that this guide will not attempt
to cover every configuration possible and will not explain every possible property value and effect.
NOTE: If you want more detailed information, please see the Dungeon Master documentation on the Chivalrous Games website at: https://chivalrousgames.com/products/dungeonmaster/documentation/
Typographical Conventions
Throughout this guide, you will see words and phrases that appear in different fonts and formats.
The following list describes the most important typographical conventions used in this guide.
Bold text indicates a menu option, a window title, buttons, and so on that you can use to identify a
part of the user interface.
Examples: Print or Save As dialog box
Menu selection sequences indicate a series of menu options that you need to select in a particular
sequence and listed in one step. Each menu option is separated by a pipe ( | ).

dungeon master LITE USER GUIDE
This documentation is provided through the Unity asset store EULA: https://unity3d.com/legal/as_terms iv
Example: Choose File | Save As | File Name and enter the name of the document.
Italic text indicates emphasis on something so you don’t miss an important part of an operation.
Example: To make element A work with element B, do not forget to set element C.

dungeon master LITE USER GUIDE
This documentation is provided through the Unity asset store EULA: https://unity3d.com/legal/as_terms v
Document Revisions
Date Version Number
Document Changes
05/27/2017 1.0.2 First release version
09/08/2017 1.1.0 Dynamic NavMesh, PrefabHelper, Mass Transform Edit, other minor improvements

dungeon master LITE USER GUIDE
This documentation is provided through the Unity asset store EULA: https://unity3d.com/legal/as_terms vi
Table of Contents
Preface ........................................................................................................................................................................................ iii
1 Introduction ................................................................................................................................................................ 9
1.1 .... Scope and Purpose ............................................................................................................................................................. 9
1.2 .... Process Overview ............................................................................................................................................................. 10
2 Configure the Unity project ............................................................................................................................... 11
2.1 .... Configure a layer for the dungeon character ..................................................................................................... 11
2.2 .... Configure input to open/close the full map ........................................................................................................ 12
3 Configure the Dungeon Master wizards ....................................................................................................... 13
3.1 .... Deactivate the DungeonMasterData directory ................................................................................................. 13
3.2 .... Move the DungeonMasterData directory ............................................................................................................ 14
4 Dungeon character ................................................................................................................................................ 15
4.1 .... Create the dungeon character .................................................................................................................................. 15
5 Dungeon ..................................................................................................................................................................... 16
5.1 .... Create, configure and test the dungeon ................................................................................................................ 16
5.2 .... Setup the dungeon renderer ...................................................................................................................................... 19
5.3 .... Journey renderer (not available in Lite version) .............................................................................................. 19
5.4 .... Setup the map controller ............................................................................................................................................. 19
6 Level ............................................................................................................................................................................ 21
6.1 .... Create and configure the level .................................................................................................................................. 21
6.2 .... Testing a level ................................................................................................................................................................... 25
7 Room ........................................................................................................................................................................... 26
7.1 .... Create a room ................................................................................................................................................................... 26
7.2 .... Configure and test a room .......................................................................................................................................... 27
7.3 .... Configure child elements of a room ........................................................................................................................ 31
7.4 .... Add or remove child elements of a room .............................................................................................................. 34
8 Connector type ........................................................................................................................................................ 36
8.1 .... Create a connector type ............................................................................................................................................... 36
8.2 .... Configure a connector type ........................................................................................................................................ 36
9 Dungeon connector ............................................................................................................................................... 38
dungeon master LITE USER GUIDE
This documentation is provided through the Unity asset store EULA: https://unity3d.com/legal/as_terms vii
9.1 .... Create a dungeon connector ...................................................................................................................................... 38
9.2 .... Configure a dungeon connector ............................................................................................................................... 38
10 Room connector ..................................................................................................................................................... 40
10.1 .. Create a room connector ............................................................................................................................................. 40
10.2 .. Configure a room connector ...................................................................................................................................... 40
11 Spawnable type ...................................................................................................................................................... 42
11.1 .. Create a spawnable type .............................................................................................................................................. 42
11.2 .. Configure a spawnable type ....................................................................................................................................... 42
12 Spawnable ................................................................................................................................................................. 44
12.1 .. Create a spawnable ........................................................................................................................................................ 44
12.2 .. Configure a spawnable ................................................................................................................................................. 44
13 Region ......................................................................................................................................................................... 46
13.1 .. Create a region ................................................................................................................................................................. 47
14 Preset rooms (not available in Lite version) .............................................................................................. 48
15 Map controller ......................................................................................................................................................... 49
15.1 .. Implement your own Map Controller .................................................................................................................... 49
16 Dungeon generation report ............................................................................................................................... 51
16.1 .. Create a dungeon generation report ..................................................................................................................... 51
16.2 .. Use a dungeon generation report ............................................................................................................................ 51
17 Dungeon generation tester ................................................................................................................................ 53
17.1 .. Test with the dungeon generation tester ............................................................................................................. 53
17.2 .. Proceed with the results of the test ......................................................................................................................... 54
18 Common tools ......................................................................................................................................................... 55
18.1 .. Find missing scripts ........................................................................................................................................................ 55
18.2 .. Performance report........................................................................................................................................................ 56
18.3 .. Destroying game objects .............................................................................................................................................. 59
18.4 .. Generic Dynamic NavMesh ......................................................................................................................................... 59
18.5 .. Prefab Helper .................................................................................................................................................................... 62
18.6 .. Mass Transform Adjustment ...................................................................................................................................... 65
19 Update guide ............................................................................................................................................................ 67
19.1 .. Version 1.0.2 ...................................................................................................................................................................... 67
19.2 .. Update from 1.0.2 to 1.1.0 ........................................................................................................................................... 67
dungeon master LITE USER GUIDE
This documentation is provided through the Unity asset store EULA: https://unity3d.com/legal/as_terms viii
20 Upgrade guide ......................................................................................................................................................... 68
20.1 .. Upgrading from Dungeon Master Lite 1.0.2 to Dungeon Master 1.0.2 .................................................. 68
20.2 .. Upgrading from Dungeon Master Lite 1.1.0 to Dungeon Master 1.1.0 .................................................. 68
21 Appendices ............................................................................................................................................................... 69
21.1 .. Dungeon generation explained ................................................................................................................................. 69
21.2 .. Render weight explained ............................................................................................................................................. 70
21.3 .. Room coordinates explained ...................................................................................................................................... 70
21.4 .. Room size explained ....................................................................................................................................................... 70
21.5 .. Connectors explained .................................................................................................................................................... 73
21.6 .. Spawnables explained ................................................................................................................................................... 75
21.7 .. Lock and Key system explained ................................................................................................................................ 76
21.8 .. Dynamic NavMesh in a Level explained ................................................................................................................ 77
21.9 .. External ressources ........................................................................................................................................................ 81

Introduction
This documentation is provided through the Unity asset store EULA: https://unity3d.com/legal/as_terms 9
1 Introduction
1.1 Scope and Purpose
The Dungeon Master is a Unity asset that creates levels procedurally both at runtime and
design time. It works for both 2D and 3D games. With the Dungeon Master Lite, each
dungeon can create a single level. With the full version of the Dungeon Master, each
dungeon can create many levels and attach them together. These levels can be of any
theme, it doesn’t have to be a literal dungeon. Moreover, since the levels can be very big, the
Dungeon Master will handle the rendering of these levels automatically to avoid huge
resource consumption, meaning that the project will keep a good performance. In addition,
the Dungeon Master contains a system to create maps and mini-maps automatically, so
players can navigate through the game using these maps. In the full version of the Dungeon
Master, the map also contains a system to create GPS-like journeys so the players have
guidance to reach their goal. This pathing system is not available in the Dungeon Master
Lite.
The purpose of the current user guide is to explain how to setup a dungeon and the main steps to achieve this. It will not cover all the possibilities offered by the Dungeon Master, but it will cover the most common scenarios and give the game developer enough insight so he can work with the other features.
NOTE: For more detailed information and code reference, please see the Dungeon Master documentation on the Chivalrous Games website at: https://chivalrousgames.com/products/dungeonmaster/documentation/
Introduction
This documentation is provided through the Unity asset store EULA: https://unity3d.com/legal/as_terms 10
1.2 Process Overview
These are the main steps to setup a dungeon that exploits most of the functionality and
features offered by the Dungeon Master Lite. Not all of these steps are mandatory to get a
fully functional dungeon.
Configure the Unity project
Configure the Dungeon Master wizards
Configure the Dungeon character
Create a dungeon
Create a level
Create a room
Create a connector type
Create a dungeon connector
Create a room connector
Create a spawnable type
Create a spawnable
Create a region

Configure Unity Project
This documentation is provided through the Unity asset store EULA: https://unity3d.com/legal/as_terms 11
2 Configure the Unity project
Whenever you want to use the Dungeon Master in a project, you should follow these steps for the Dungeon Master to work properly. Instead of providing these configurations of the project along with the asset, I prefer to let you do it yourself to make sure it doesn’t mess up any other custom configurations you already have in your project.
2.1 Configure a layer for the dungeon character
The Dungeon Master needs a physics layer to track the character movement inside the dungeon. This layer should not interact with any other layer in the game. If you want to use the map features, the Dungeon Master will also use this layer to display map game objects and the map camera will be set to see only see this layer.
2.1.1 Create a new DungeonCharacter layer
1. Go to Edit | Project Settings | Tags and Layers to open the Tags and Layers inspector panel.
2. Select an empty User Layer and enter a name for the dungeon character layer. I suggest the name DungeonCharacter which should make the use of this layer obvious. For readability sake, I will assume this is the name you used for your layer and will now refer to this layer by using the name DungeonCharacter throughout this document.
2.1.2 Configure physics for the DungeonCharacter layer
Each Dungeon Master room will be surrounded by a trigger that will use the dungeon character layer. The map game objects and the dungeon character will also use this layer. If the dungeon character layer generates collisions with other layers, it will probably mess up your game. The dungeon character layer should only create collisions with itself. To make sure it won’t create collisions with other layers, follow these steps:
1. Go to Edit | Project Settings | Physics to open the PhysicsManager inspector panel.
2. Find the DungeonCharacter row and column.
3. Uncheck all checkboxes for this row and column with the exception of the checkbox that is included in both the row and the column. The DungeonCharacter layer should only create collisions with itself.
4. Go to Edit | Project Settings | Physics 2D to open the Physics2DSettings inspector panel.
5. Find the DungeonCharacter row and column.
6. Uncheck all checkboxes for this row and column with the exception with the exception of the checkbox that is included in both the row and the column.
Configure Unity Project
This documentation is provided through the Unity asset store EULA: https://unity3d.com/legal/as_terms 12
2.1.3 Configure your cameras to ignore the DungeonCharacter layer
With the exception of the map camera, your other game cameras should ignore the new layer. Otherwise, some map elements could show up on your main game camera, which is most certainly not something you want. If your game cameras are already in the scene, follow these steps to ignore the dungeon character layer.
1. Select your camera in the Scene panel.
2. In the Camera script of the inspector panel, open the Culling Mask drop down and make sure the DungeonCharacter layer is unchecked.
If you are creating game cameras dynamically through scripting, make sure they ignore this layer when you create them.
2.2 Configure input to open/close the full map
If you want, the Dungeon Master will create maps and mini-maps for you. By default, a mini-map is displayed on the upper right side of the screen. The player can open up a full map to get a better view of the current floor of the level. The Dungeon Master expects an input for the player to be able to open and close the full map. If you don’t want the player to be able to use the full map, this input setup is not mandatory.
It would be a good idea to reserve this input for the map of the Dungeon Master only. If you want to make the input open the map contextually (only in certain situations), then you probably have to extend the MapController script to handle this situation. An example of an extended MapController script is provided in the example project. Look for the ExampleMapController script.
I will not cover all the input possibilities, but for the example I will assume the game is destined to be played on a computer with a keyboard. But you can modify the input for whatever you want.
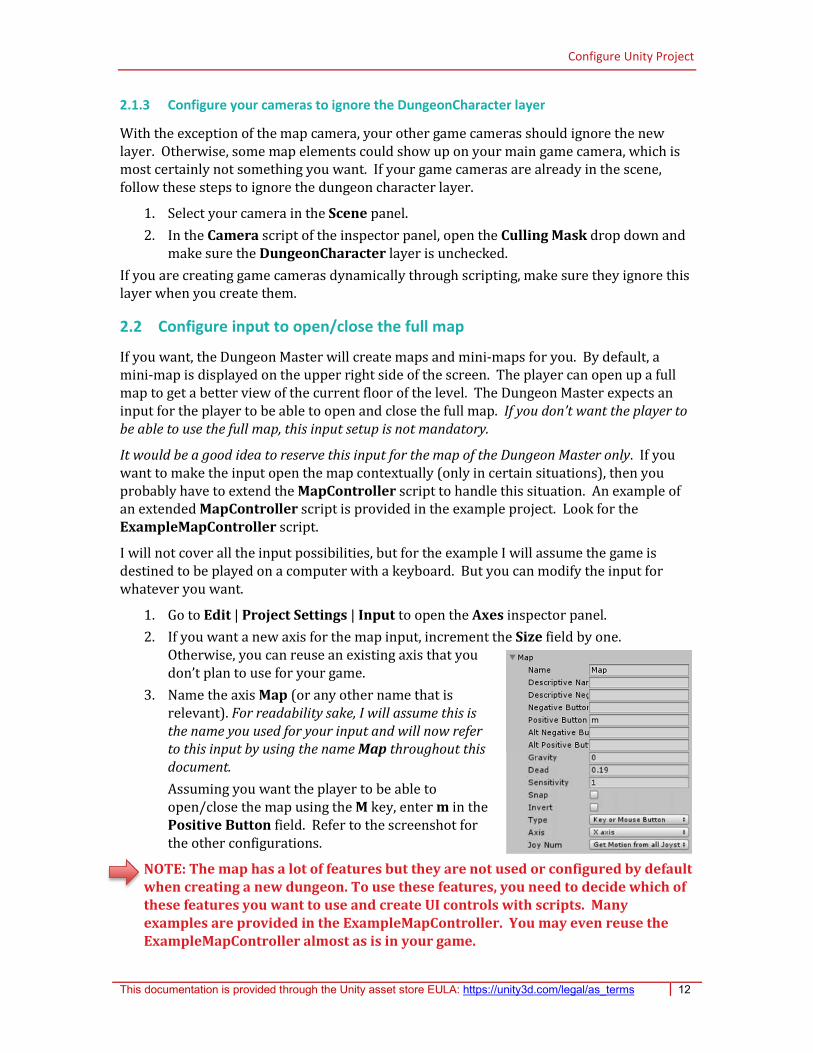
1. Go to Edit | Project Settings | Input to open the Axes inspector panel.
2. If you want a new axis for the map input, increment the Size field by one. Otherwise, you can reuse an existing axis that you don’t plan to use for your game.
3. Name the axis Map (or any other name that is relevant). For readability sake, I will assume this is the name you used for your input and will now refer to this input by using the name Map throughout this document.
Assuming you want the player to be able to open/close the map using the M key, enter m in the Positive Button field. Refer to the screenshot for the other configurations.
NOTE: The map has a lot of features but they are not used or configured by default when creating a new dungeon. To use these features, you need to decide which of these features you want to use and create UI controls with scripts. Many examples are provided in the ExampleMapController. You may even reuse the ExampleMapController almost as is in your game.

Configure the Dungeon Master wizards
This documentation is provided through the Unity asset store EULA: https://unity3d.com/legal/as_terms 13
3 Configure the Dungeon Master wizards How to keep a tidy project structure
Working with the Dungeon Master will create a lot of prefabs, assets and scriptable objects in your project. To help you tidy up your project, the Dungeon Master includes a feature to sort all of these elements in a DungeonMasterData folder. By default, if you use the wizards provided with the Dungeon Master (found under Tools | Chivalrous Games | Dungeon Master), all the elements will be created in a DungeonMasterData folder under the Assets folder. Since the Assets folder is not displayed in the Unity editor, the DungeonMasterData folder will appear at the root of your project folders.
This feature can be modified to move the DungeonMasterData folder elsewhere in your project structure or it can be deactivated completely, leaving you to sort all files manually (which I don’t encourage you to do, since it will probably be a lot of work).
3.1 Deactivate the DungeonMasterData directory
NOTE: If you deactivate the DungeonMasterData directory, you have to keep your project in order manually. Keep in mind that if you deactivate this feature, create Dungeon Master items and reactivate this feature later on, your items will not be reorganized automatically.
1. Tools | Chivalrous Games | Dungeon Master | Dungeon Master Wizard Configuration
2. Uncheck the box Enforce Structure
3. Click on Create configuration file
This will create a scriptable object under Resources/ChivalrousGames/DungeonMaster/ called WizardConfiguration. Whenever you modify the default behavior of the DungeonMasterData folder, this file is required. If this file is deleted, the Dungeon Master will revert to default behavior.
Configure the Dungeon Master wizards
This documentation is provided through the Unity asset store EULA: https://unity3d.com/legal/as_terms 14
3.2 Move the DungeonMasterData directory
You can, of course, move the DungeonMasterData directory manually. But if you do and do not configure the wizards to target your DungeonMasterData directory, a new directory will be created at the root of the Assets folder, meaning you would end up with two of these folders.
To target your moved DungeonMasterData directory, follow these steps:
1. Tools | Chivalrous Games | Dungeon Master | Dungeon Master Wizard Configuration
2. Make sure the box Enforce Structure is checked
3. Enter the path toward your DungeonMasterData folder is located into the field Path Toward Dungeon Master Data. Exclude the root Assets folder from this path and the target DungeonMasterData folder as well.
Example: if you want your files to appear under Assets/MyDataFiles/My Sub Folder/DungeonMasterData
You would enter:
MyDataFiles/My Sub Folder
Into the field Path Toward Dungeon Master Data

Dungeon character
This documentation is provided through the Unity asset store EULA: https://unity3d.com/legal/as_terms 15
4 Dungeon character
The dungeon character is not a character controller. It is a game object added to your character controller. The Dungeon Master will use it to track the movement of the character controller inside the dungeon. It allows the Dungeon Master to update the map display and update the rendering of the dungeon.
In the full version of the Dungeon Master, a character can collect keys used by the lock and key system. This feature is not available in the Dungeon Master Lite version.
4.1 Create the dungeon character
The dungeon character needs only to be created once and added to the character controller of the game.
1. Locate your character controller in the scene. If you use a prefab that you instantiate at the beginning of the game, you need to add the dungeon character to this prefab.
2. Right-click on your character controller in the scene and click on Create Empty
3. Rename the empty to something relevant like “Dungeon Character”
4. Position the empty to a logical place on your character controller. The upper body or torso would be appropriate for a humanoid character.
5. On the Inspector panel of the empty, click on Add Component and add the Dungeon Character component.
6. If you use 2d Physics in your game, check the box Use 2d Physics.
7. Change the layer of the empty to DungeonCharacter. See section 2.1 of this guide for more information concerning this layer.
8. Make sure the empty and the script remain enabled.
The robot character controller in this screenshot is provided by Invector: https://www.assetstore.unity3d.com/en/#!/search/page=1/sortby=popularity/query=publisher:13943

Dungeon
This documentation is provided through the Unity asset store EULA: https://unity3d.com/legal/as_terms 16
5 Dungeon
The dungeon is the central element of the Dungeon Master, it will attach everything together. Although its role is crucial, it is easy to configure. It will rely on other scripts to handle the rendering of the dungeon and map. Default versions of these scripts are provided when the dungeon is created via the wizard.
5.1 Create, configure and test the dungeon
Creating a new dungeon should be done via the Create Dungeon wizard. Once the dungeon is created, it should be configured with the inspector panel.
5.1.1 Create the dungeon:
1. Go to Tools | Chivalrous Games | Dungeon Master and click on Create Dungeon.
2. Enter a name for your dungeon into the Dungeon Name text field.
3. Click on Create Dungeon.
4. Your new dungeon will be created in your DungeonMasterData folder and will be instantiated in the scene.
5.1.2 Configure the dungeon
5. Locate your dungeon in the scene and click on it to reveal the inspector panel.
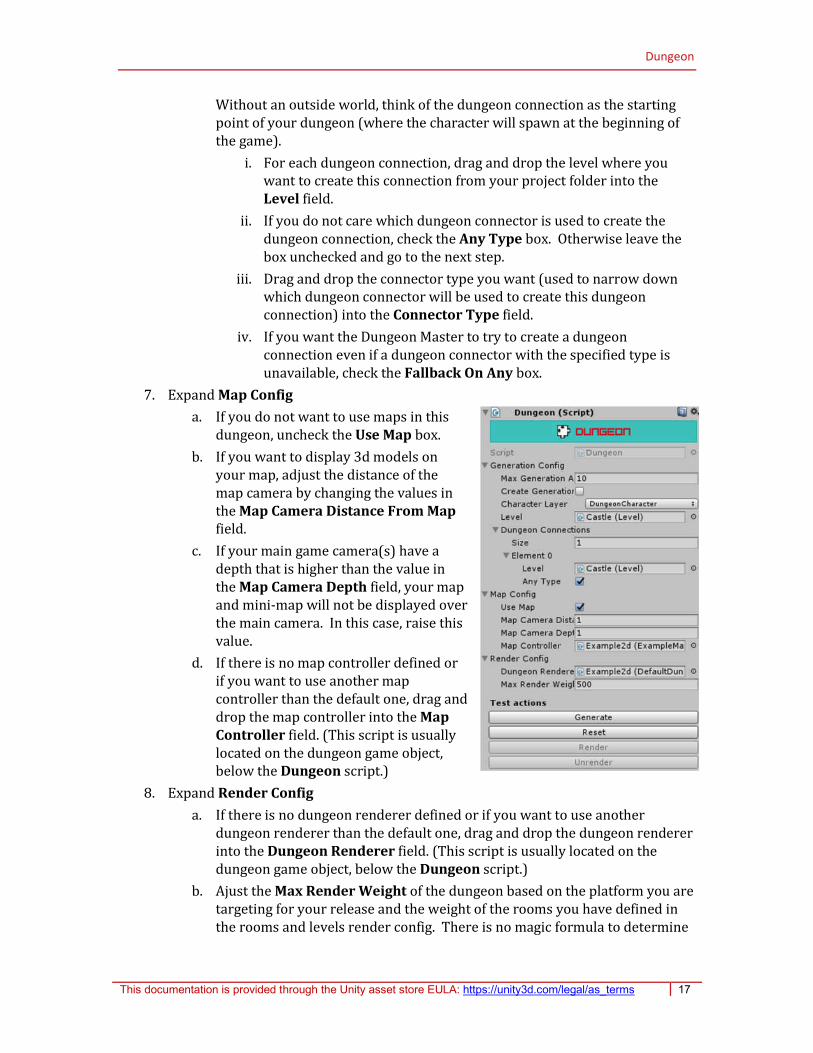
6. Expand Generation Config
a. Open the Character Layer drop down and click on DungeonCharacter
b. The property Level is a reference to the level that your dungeon will generate. There is no need to fill this value manually; the level creation wizard will do it automatically. With the full version of the Dungeon Master, a dungeon can create more than one level.
c. Expand Dungeon Connections and enter the number of dungeon connections you want to create in your dungeon into the Size field. Each dungeon connection is a path between your dungeon and the outside world.
NOTE: Even if there is no outside world, the dungeon needs at least one unlocked dungeon connection to be able to work properly.
Dungeon
This documentation is provided through the Unity asset store EULA: https://unity3d.com/legal/as_terms 17
Without an outside world, think of the dungeon connection as the starting point of your dungeon (where the character will spawn at the beginning of the game).
i. For each dungeon connection, drag and drop the level where you want to create this connection from your project folder into the Level field.
ii. If you do not care which dungeon connector is used to create the dungeon connection, check the Any Type box. Otherwise leave the box unchecked and go to the next step.
iii. Drag and drop the connector type you want (used to narrow down which dungeon connector will be used to create this dungeon connection) into the Connector Type field.
iv. If you want the Dungeon Master to try to create a dungeon connection even if a dungeon connector with the specified type is unavailable, check the Fallback On Any box.
7. Expand Map Config
a. If you do not want to use maps in this dungeon, uncheck the Use Map box.
b. If you want to display 3d models on your map, adjust the distance of the map camera by changing the values in the Map Camera Distance From Map field.
c. If your main game camera(s) have a depth that is higher than the value in the Map Camera Depth field, your map and mini-map will not be displayed over the main camera. In this case, raise this value.
d. If there is no map controller defined or if you want to use another map controller than the default one, drag and drop the map controller into the Map Controller field. (This script is usually located on the dungeon game object, below the Dungeon script.)
8. Expand Render Config
a. If there is no dungeon renderer defined or if you want to use another dungeon renderer than the default one, drag and drop the dungeon renderer into the Dungeon Renderer field. (This script is usually located on the dungeon game object, below the Dungeon script.)
b. Ajust the Max Render Weight of the dungeon based on the platform you are targeting for your release and the weight of the rooms you have defined in the rooms and levels render config. There is no magic formula to determine

Dungeon
This documentation is provided through the Unity asset store EULA: https://unity3d.com/legal/as_terms 18
the best Max Render Weight of the dungeon; it depends on the assets you are using. Test it out and see what works for you.
See the appendix Render weight explained for more information on the render weight.
5.1.3 Test the dungeon
When working with a dungeon in the scene, 4 buttons are added up at the bottom of the dungeon script in the inspector panel. These buttons can be used to test the dungeon generation or even to generate it at runtime and use it as-is in your game.
The Generate button will generate your dungeon in the scene. This will create a big hierarchy of game objects under the dungeon game object.
If you don’t want to generate the dungeon at runtime and, by doing so, do not want to leverage the possibility of having different results with the same dungeon configuration, you can keep this generated dungeon and build your game with this single dungeon.
At this point, nothing is rendered. There are a lot of placeholders in the scene, one for each room, spawn point and connector point. In addition, game objects that contain the map game objecst are generated. Depending on the room setting Show Gizmos a lot of gizmos may also show up in the scene.
Clicking the Generate button again will generate a new dungeon, replacing the one already in the scene.
The Reset button will unrender and ungenerate the dungeon, removing all the hierarchy under the dungeon game object from the scene.
The Render button will render everything in the dungeon at once. This should only be used as a test feature in the editor. Look around the dungeon, see if it fits with your needs. But don’t forget to unrender it. The dungeon renderer should handle the runtime rendering of your dungeon. If you leave the dungeon in its rendered state, then you lose the features offered by the dungeon renderer and it will tax the platform resources.
The Unrender button simply unrenders the dungeon, returning it to its generated but unrendered state.
A good way to work with these buttons is to setup your dungeon, generate it and see if warning or error messages show up in the console. Read the messages to see if anything is missing in your dungeon, solve the issues and try again. Once generation is successful, see if you want to adjust the settings of the various dungeon elements such as rooms, connectors and spawnables. To generate different version of this dungeon, go in the level perfabs of this dungeon in the project files (not the ones in the scene) modify the generation seed or spawn seed and then generate/render the dungeon again to see the results.
NOTE: To make working with the Dungeon Master a very enjoyable experience, start with a small dungeon and a small level. Generate it and solve the issues. When it works well, add on what you already have to make it bigger and more complex. Generate often to verify you still have a good success rate and solve the issues along the way.
See the chapter Dungeon Generation Report if you need help solving the various issues in your dungeon.

Dungeon
This documentation is provided through the Unity asset store EULA: https://unity3d.com/legal/as_terms 19
See the appendix Dungeon generation explained for more information on dungeon generation.
5.2 Setup the dungeon renderer
There are many ways to render a level. The Dungeon Master does not have the pretension to have the best way to render. But the dungeon renderer supplied with the Dungeon Master can cover a lot of cases and is easy to configure. The dungeon renderer provided by default will read the render configurations specified in the dungeon, levels and rooms.
Although it may look like rendering with the dungeon renderer is laggy at design time, the end results in a final build are usually excellent. To avoid hiccups and lag, you should test out your dungeon at runtime (use a build for more exact results) and modify the configurations of the dungeon renderer until you are satisfied with the results.
When creating the dungeon through the Create Dungeon wizard, a Default Dungeon Renderer will be added automatically on your dungeon game object. The dungeon renderer uses coroutines to load game objects and render them in the scene. The coroutines run on the main thread of the application (it means that it stops the game while the coroutine does its work). To avoid creating lag, you can give a maximum working time per second to the dungeon renderer and you can also setup the number of render passes it will do in a second.
The Max Render Millis field is the maximum amount of milliseconds per second during which the dungeon renderer will work. If there is nothing or few things to render, it will take less than that time.
The Render Passes Per Second is the number of times per second the dungeon renderer will launch and work. The Max Render Millis value is divided by the number of Render Passes to determine the maximum time given to each render pass.
The dungeon renderer will not stop rendering when in the middle of rendering a single room, even if rendering that single room exceeds to time allocated to the render pass. Try to avoid creating levels with huge or very heavy rooms. If you can split your huge rooms into smaller rooms, then you will experience better rendering.
For programmers who wish to implement their own dungeon renderer, you can get a quick start by extending the DungeonRenderer abstract class.
5.3 Journey renderer (not available in Lite version)
The full version of the Dungeon Master can generate GPS-like journeys on the map. A default journey renderer is added on the dungeon game object to achieve this. This feature is not available for the Dungeon Master Lite.
5.4 Setup the map controller
The map in the dungeon master has a lot of features but they are not forced on you when you create a new dungeon. When creating the dungeon through the Create Dungeon wizard, a Default Map Controller will be added to your dungeon game object. This map
Dungeon
This documentation is provided through the Unity asset store EULA: https://unity3d.com/legal/as_terms 20
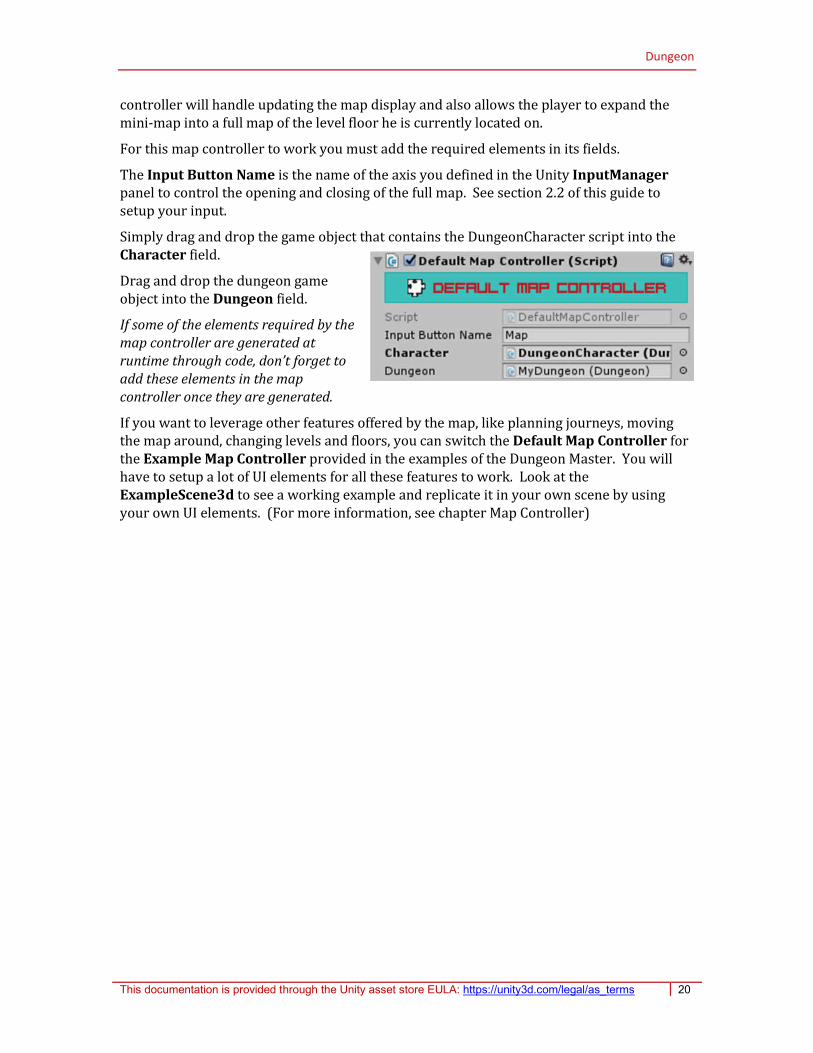
controller will handle updating the map display and also allows the player to expand the mini-map into a full map of the level floor he is currently located on.
For this map controller to work you must add the required elements in its fields.
The Input Button Name is the name of the axis you defined in the Unity InputManager panel to control the opening and closing of the full map. See section 2.2 of this guide to setup your input.
Simply drag and drop the game object that contains the DungeonCharacter script into the Character field.
Drag and drop the dungeon game object into the Dungeon field.
If some of the elements required by the map controller are generated at runtime through code, don’t forget to add these elements in the map controller once they are generated.
If you want to leverage other features offered by the map, like planning journeys, moving the map around, changing levels and floors, you can switch the Default Map Controller for the Example Map Controller provided in the examples of the Dungeon Master. You will have to setup a lot of UI elements for all these features to work. Look at the ExampleScene3d to see a working example and replicate it in your own scene by using your own UI elements. (For more information, see chapter Map Controller)

Level
This documentation is provided through the Unity asset store EULA: https://unity3d.com/legal/as_terms 21
6 Level
A level is a collection of rooms that usually share the same theme. For example, a level could be a village, a sewer or a cave. A level contains configuration that is common to all its rooms.
Because levels can very different from one another, a lot of the configurations in the Dungeon Master are level-based (located on the level and affect only this level). For example, in a desert level, you would probably need to render a lot of rooms at once because the player can see very far toward the horizon, whereas in a cave you would render less rooms since the player cannot see very far because of the twists and turns of the corridors.
6.1 Create and configure the level
Creating a new level should be done via the Create Level wizard. Once the level is created, it should be configured with the inspector panel.
6.1.1 Create the level:
1. Go to Tools | Chivalrous Games | Dungeon Master and click on Create Level.
2. Drag and drop your dungeon game object into the Dungeon field. The dungeon game object can be the one from the scene or the one in your project files, it doesn’t matter.
3. Enter a name for your level into the Level Name text field.
4. If you dungeon character works with 2d physics, check the box Use 2d Physics.
5. Drag and drop the wall connector type you want to use for this level in the Wall Connector Type field. (for more information on Connector Types, see the chapter Create a connector type or see the appendix Connectors explained)
6. Click on Create Level.
7. Your new level will be created in your DungeonMasterData folder.

Level
This documentation is provided through the Unity asset store EULA: https://unity3d.com/legal/as_terms 22
6.1.2 Configure the level
1. Locate your level in your DungeonMasterData folder and click on it to reveal the inspector panel.
2. Expand Generation Config
a. Select the Generation Start Type you need for this level.
Specified Coordinate will have the level put its first room at the coordinate you specify in the Starting Room Coordinate fields. (For more information see the appendix Level coordinates explained)
Specified Starting Rooms will begin generating the level based on the preset rooms you will supply later on. This setting is mandatory if you plan to preset rooms in the level. (For more information on preset rooms, see the chapter Preset rooms)
b. Select the Generation Fill Type you need for this level.
Ordered Rooms And Ordered Directions usually creates long and linear levels.
Ordered Rooms And Random Directions usually creates long and twisting levels.
Of course, these are only general tendencies. The shape of the level is much more affected by the rooms and connectors you will supply and by the level max width, max height and max depth. But playing around with this setting can give interesting results.
c. Enter the desired Level Coordinate. This coordinate is the position of this level in the scene in relation to the other levels. (For more information on the level coordinate, see the appendix Level coordinates explained)
d. You do not need to adjust the Rooms list at first, it will auto-expand as you add rooms inside the level through the Create Room wizard.
NOTE: If you ever delete one of the rooms in a level or want to temporarily remove some rooms in a level to make tests, you have to modify the Rooms list. Do not leave empty entries in this list. You can also add rooms manually to the list with a simple drag and drop of the
room game objects located in your DungeonMasterData folder.
Level
This documentation is provided through the Unity asset store EULA: https://unity3d.com/legal/as_terms 23
e. Enter the Room Size for this level. (For more information on room size, see the appendix Room size explained)
f. Choose if your level should use 2d Physics or not. If you enable this option, movement of the character in the dungeon will be detected based on 2d Physics. So depending on the orientation of your game, your level should only have rooms generated on 2 axes.
g. Check the option Dynamic Nav Mesh if you want this level to generate and manage a NavMesh at runtime. (For more information see the appendix Dynamic NavMesh in a Level explained)
h. The Max Width, Max Height and Max Depth values should be adjusted to give a general shape to your level. These values also determine which coordinates are available to place rooms in the level (related to Specified Coordinate and Starting Room Coordinate). (For more information on the level and room coordinates, see the appendix Level coordinates explained)
i. Set Min Room Amount for this level. When generating itself, this level will keep adding rooms until this value is reached. When this value is reached, the level will move on to closing itself with walls.
j. If you check the Random Generation Seed option, each time this level is generated, a random seed will be used, resulting in a different level each time (room position and orientation will be randomized). Enabling this option disables the Generation Seed manual setup in the editor.
k. Set a Generation Seed for this level. This seed is used to generate everything randomly in the level with the exception of spawnables. Two levels with the exact same configurations (including configurations of all child elements like rooms and connectors) will reach the same random result with a particular seed. This means that in a finished game, players could share the seed from their games between themselves to play the same version of the game.
l. If you check the Random Spawn Seed option, each time this level is generated, a random seed will be used, resulting in a different level each time (only spawn points are randomized, not rooms position and orientation). Enabling this option disables the Spawn Seed manual setup in the editor.
m. Set a Spawn Seed for this level. This seed is used to generate spawnables randomly in the level. If you generate a level and like the shape and rooms but do not like how elements are spawned, you can keep the level as is and randomize spawnables differently by simply changing this seed.
n. The Max Generation Attempts is the maximum number of times this level will try to generate itself before giving up. The level can do this amount of attempts each time the dungeon tries to generate itself. (For more information see the appendix Dungeon generation explained)
3. Expand Map Config
a. Set the appropriate Plane for the map if you plan to use one for your game. XZ means top-down map, XY means side-scroller map, ZY is probably not very relevant but is provided to cover all bases.
Level
This documentation is provided through the Unity asset store EULA: https://unity3d.com/legal/as_terms 24
b. Set the Map Object Size, it is the area reserved on the map for each room map game object.
c. If you want to Rotate Room Map Object to match with the room rotation, check this option.
d. Determine a game object to represent a Discovered room (but not yet visited) in this level, a game object to represent a Visited room and a game object to display the Character’s position on the map. These values are defaults that can be overridden for each room in the level.
e. If you want to allow the player to scroll around when the full map is opened, set an appropriate Full Map Scroll Speed. This speed should be comfortable (not too fast or too slow). Try it and see what works best for you.
f. The Fullmap Rect determines the screen area that will be used by the map camera when the full map is opened. Values range from 0 to 1. By default, the whole screen area is used to display the full map.
g. The Fullmap Orthographic Size can be thought of as a zoom level for the map camera.
h. Minimap Rect and Minimap Orthographic Size are the equivalent of the previous configurations but applied to the minimap.
4. Expand Render Config
The render configurations on the level determine when and how the level should be rendered. A level should not be rendered the same way when a character is inside or outside the level. When a character is outside the level, you want to render a small part of the level in advance, so when the character enters the level, he won’t see rooms appear suddenly. But you don’t have to render as many rooms since the character may not enter at all.
a. Begin Trigger determines when a level begins rendering.
Entry: if Entry is set on level A, then while character is in level B, only the rooms from level A that connect to level B will render and only when they are close enough (determined by outside range). This means that excluding the room from level A that is already rendered, the other rooms will only show up when the character enters the level. It is lighter to render while the character is outside the level, but rooms may appear suddenly when the character enters the level.
In Range: this option is irrelevant for the Dungeon Master Lite and behaves exactly like Entry, but if you decide to upgrade to the full version of the Dungeon Master it will allow cross-level rendering.
Always: if Always is set on a level, then the rooms from this level are always rendered. The location of the character has no importance at all. That is of course the heaviest option.
b. Shape determines which rooms around the character are rendered inside the level. They range from lightest (Diamond) to heaviest (Full). The idea is to take the lightest option to achieve the best result.
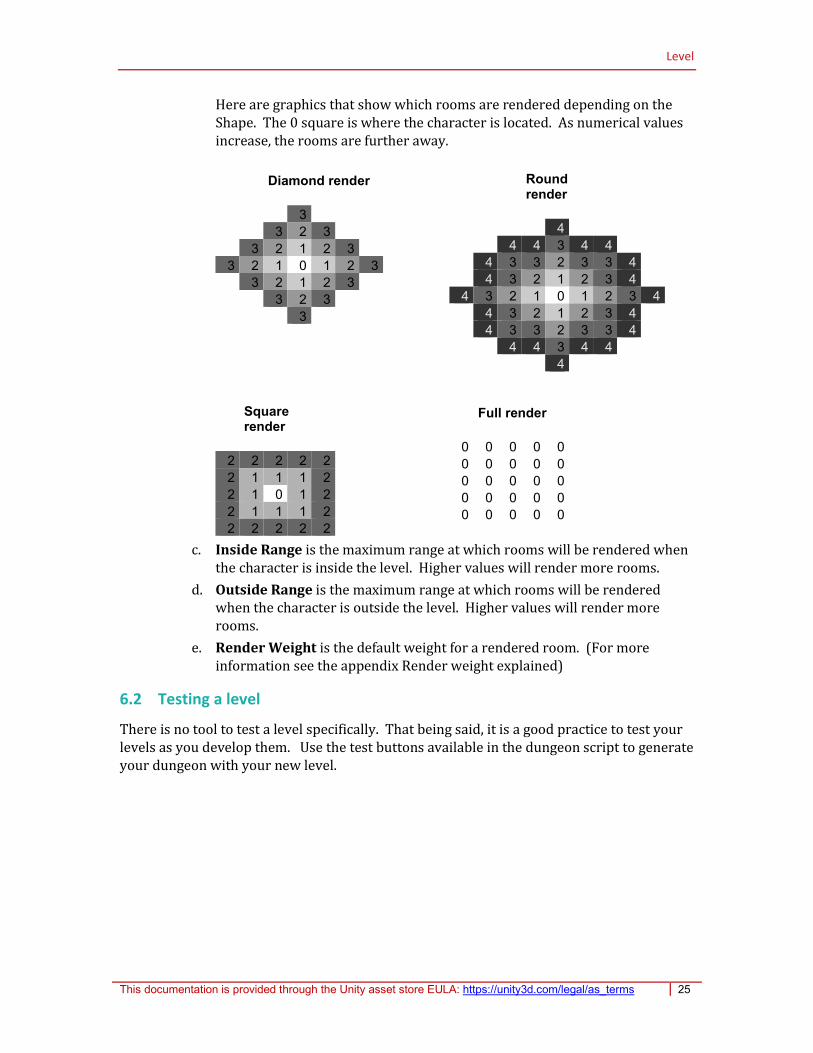
Level
This documentation is provided through the Unity asset store EULA: https://unity3d.com/legal/as_terms 25
Here are graphics that show which rooms are rendered depending on the Shape. The 0 square is where the character is located. As numerical values increase, the rooms are further away.
Diamond render
3
3 2 3
3 2 1 2 3
3 2 1 0 1 2 3
3 2 1 2 3
3 2 3
3
Round render
4
4 4 3 4 4
4 3 3 2 3 3 4
4 3 2 1 2 3 4
4 3 2 1 0 1 2 3 4
4 3 2 1 2 3 4
4 3 3 2 3 3 4
4 4 3 4 4
4
Square render
2 2 2 2 2
2 1 1 1 2
2 1 0 1 2
2 1 1 1 2
2 2 2 2 2
Full render
0 0 0 0 0
0 0 0 0 0
0 0 0 0 0
0 0 0 0 0
0 0 0 0 0
c. Inside Range is the maximum range at which rooms will be rendered when the character is inside the level. Higher values will render more rooms.
d. Outside Range is the maximum range at which rooms will be rendered when the character is outside the level. Higher values will render more rooms.
e. Render Weight is the default weight for a rendered room. (For more information see the appendix Render weight explained)
6.2 Testing a level
There is no tool to test a level specifically. That being said, it is a good practice to test your levels as you develop them. Use the test buttons available in the dungeon script to generate your dungeon with your new level.

Room
This documentation is provided through the Unity asset store EULA: https://unity3d.com/legal/as_terms 26
7 Room
The room is the basic building block used to generate levels. Everything in a dungeon is attached to a room. This is where you will create spawn points, connector points, scenery, physics, etc.
There really is no limit to the amount of customization you can do in a room: you can configure a lot of things to make it adapt to a lot of situations or you can configure only a few things so instances of this room in a dungeon will look more alike one another.
When you configure a room, keep in mind that you are configuring a room template. This template will be associated with a level and when rooms are added to a level, an instance (a copy) of this template is added to the level. Multiple instances of the same template can be added to a level. Modifying an instance of a room will not modify the room template directly. Modifying the room template will have an effect on the room instances at the next dungeon generation.
7.1 Create a room
Creating a new room should be done via the Create Room wizard. Once the room is created, it should be configured with the inspector panel. A room has child elements, like connector points and spawn points, that also need to be configured.
7.1.1 Create the room
1. Go to Tools | Chivalrous Games | Dungeon Master and click on Create Room.
2. Drag and drop your dungeon game object into the Dungeon field.
3. Drag and drop your level game object into the Level field. This game object should be the one from your project files.
4. Enter a name for your room into the Room field.
5. Enter the number of spawn points in your room in the Number Of Spawn Points field.
6. If you want this room to be able to connect to the outside world or if there is no outside world and you want this room to be a starting point in your dungeon, check the box Create Dungeon Connector Point.
NOTE: At this point it is not critical to know the exact number of spawn points you want in your room or even if you need dungeon and level connector points at all. All of this can be modified later on.
7. By adding the level game object in this wizard, the Room Size fields are auto-generated. Validate that this is the appropriate room size for this room. If not, then consider modifying the room prefab to fit within the room size, or modify the room size setting defined in the level generation config.
8. Drag and Drop your room prefab into the Room Prefab field.
9. Click on Create Room.
10. Your new room will be created in your DungeonMasterData folder and will be instantiated in the scene. Like a level, a room should not exist in the scene before the dungeon generates itself. But since configuring a room requires to edit its child
Room
This documentation is provided through the Unity asset store EULA: https://unity3d.com/legal/as_terms 27
elements and since it helps a lot to actually see what you are doing, the room is created in the scene by default so you can customize it right away. When you are done customizing the room, you should remove it from the scene.
7.2 Configure and test a room
Although there are level configurations shared for all the rooms, each room can override a lot of these configurations. The basic room configuration is done on the room game object.
Keep in mind that although room configuration and room testing are described as two separate steps in this section for reference sake, they really should go hand in hand. Test as you configure to see if your room behaves like you expect it to.
7.2.1 Configure the room
1. If the room is not already in the scene, create a prefab instance in your scene.
2. Select the room in the scene to display the Room script in the inspector panel.
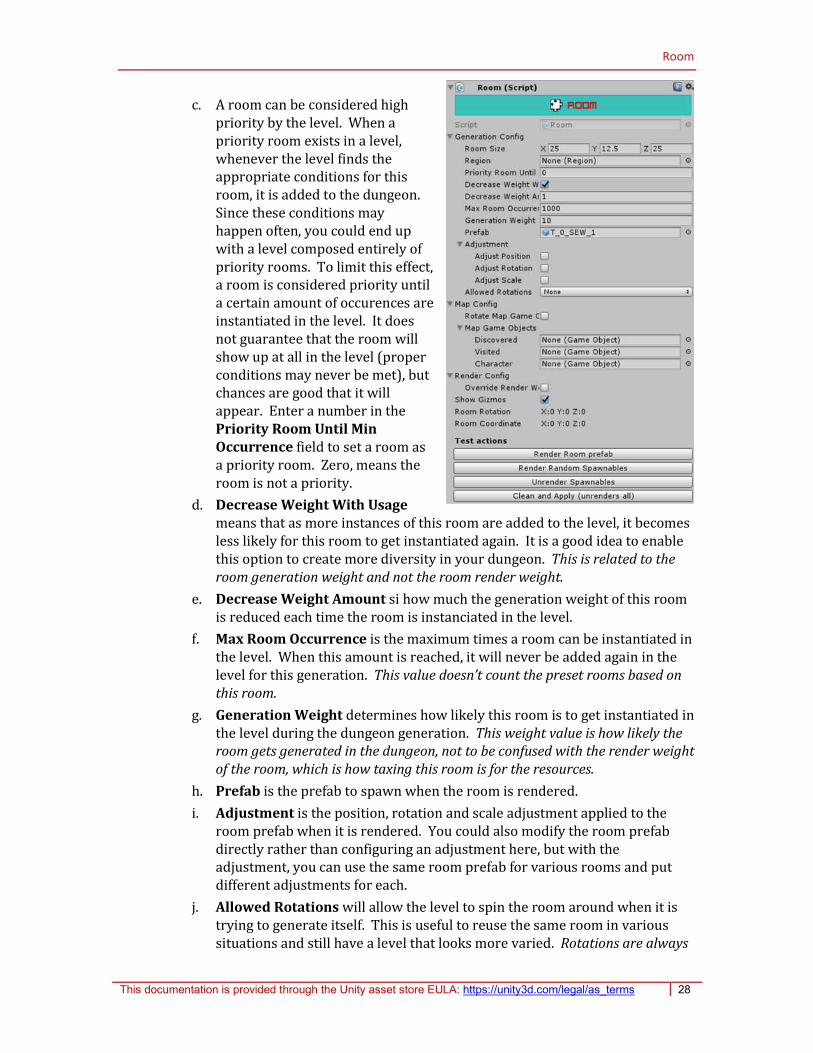
3. Expand Generation Config
a. The Room Size should already have the value that was entered in the Create Room wizard. If you ever change the room size in the level generation config, make sure that the room size for all the rooms of this level are modified accordingly.
b. If your room is part of a region, drag and drop it into the Region field. (For more information see the chapter Region)
Room
This documentation is provided through the Unity asset store EULA: https://unity3d.com/legal/as_terms 28
c. A room can be considered high priority by the level. When a priority room exists in a level, whenever the level finds the appropriate conditions for this room, it is added to the dungeon. Since these conditions may happen often, you could end up with a level composed entirely of priority rooms. To limit this effect, a room is considered priority until a certain amount of occurences are instantiated in the level. It does not guarantee that the room will show up at all in the level (proper conditions may never be met), but chances are good that it will appear. Enter a number in the Priority Room Until Min Occurrence field to set a room as a priority room. Zero, means the room is not a priority.
d. Decrease Weight With Usage means that as more instances of this room are added to the level, it becomes less likely for this room to get instantiated again. It is a good idea to enable this option to create more diversity in your dungeon. This is related to the room generation weight and not the room render weight.
e. Decrease Weight Amount si how much the generation weight of this room is reduced each time the room is instanciated in the level.
f. Max Room Occurrence is the maximum times a room can be instantiated in the level. When this amount is reached, it will never be added again in the level for this generation. This value doesn’t count the preset rooms based on this room.
g. Generation Weight determines how likely this room is to get instantiated in the level during the dungeon generation. This weight value is how likely the room gets generated in the dungeon, not to be confused with the render weight of the room, which is how taxing this room is for the resources.
h. Prefab is the prefab to spawn when the room is rendered.
i. Adjustment is the position, rotation and scale adjustment applied to the room prefab when it is rendered. You could also modify the room prefab directly rather than configuring an adjustment here, but with the adjustment, you can use the same room prefab for various rooms and put different adjustments for each.
j. Allowed Rotations will allow the level to spin the room around when it is trying to generate itself. This is useful to reuse the same room in various situations and still have a level that looks more varied. Rotations are always
Room
This documentation is provided through the Unity asset store EULA: https://unity3d.com/legal/as_terms 29
increments of 90 degrees. This field allows you to set on which axis a room is allowed to rotate. You can choose no rotations, one axis or all axes.
4. Expand Map Config
a. If you want the game objects that represent the room on the map to rotate so they match the room rotation, check the Rotate Map Game Objects box.
b. If you want to override the map game objects that are defined in the level map config for this room, add games objects references into the Discovered, Visited and Character fields.
5. Expand Render Config
a. If this room should have a higher or lower render weight than the one defined in the level render config, check the Override Render Weight box and enter this room weight value in the Render Weight field. You should do this if a room is much heavier or lighter resources-wise than the other rooms of the same level to optimize performance.
6. To help you visualize the various elements in your room, gizmos are added in the editor to point out direction of connectors, location of spawn points, etc. By default when a room is created, gizmos are shown. When you generate a dungeon, the coordinate and name of each room will be shown in the editor. But this may create a lot of gizmos at once and it may affect visibility or even performance. To disable room gizmos, uncheck the box Show Gizmos. It will hide gizmos for this room only.
7. Room Rotation and Room Coordinate are populated when a room is instantiated in a level. It is useful when you test out your dungeon, but not very useful when you are configuring a room.
7.2.2 Room Nav Mesh Manager
If you want to generate a dynamic NavMesh for your level, you should add a Room NavMesh
Manager script to your room. This can easily be done by clicking the Add Room NavMesh
Manager button displayed in the Room script. This button is hidden when a Room
NavMesh Manager script already exists for this. If you want to remove the script, you can
do it by using the usual Unity Remove Component option in the menu of the Room NavMesh
Manager script.
Once the Room NavMesh Manager script is added to your room, you can proceed to baking a
NavMesh for this room. Baking a NavMesh for a room is not mandatory for the level
dynamic NavMesh to work, but it will greatly improve performance. Furthermore, a room is
never limited by its baked NavMesh. If the Dungeon Master detects that the baked NavMesh
doesn’t fit the NavMesh requirements of the room, a new room NavMesh will be created at
runtime. It is highly recommended to bake a default version of the NavMesh for each of the
rooms within a level with a dynamic NavMesh. Unless you are 100% sure that the rooms in
the level will never match the baked NavMesh, there is no reason not to do so.
Keep in mind that NavMesh baking is only available on the room prefab in the project files.
A room instance in the scene is not able to bake a NavMesh.

Room
This documentation is provided through the Unity asset store EULA: https://unity3d.com/legal/as_terms 30
8. Add the Room NavMesh Manager script to your room prefab.
9. Modify your room to tag elements to include in the room NavMesh (For more information see the appendix Dynamic NavMesh in a Level explained)
10. Select the room prefab in your project files.
11. Click on the Bake button to bake a default version of this room’s NavMesh.
12. The information of the baked NavMesh should be updated in the scripts read-only fields. The amount of sources and computed hash should change to reflect the baked NavMesh data.
13. A NavMesh component (or multiple) should be added to your room prefab in the project files.
14. If you ever want to delete the baked NavMesh of a room, you can always do so by clicking on the Clean button. If you ever want to replace the current baked NavMesh, click on the Bake button right away, there is no need to use the Clean button beforehand.
15. If you expect the room NavMesh to change at runtime, you can check the option Track NavMesh. This has a negative impact on performance because the Dungeon Master will monitor changes to the NavMesh at runtime and if changes are detected, the NavMesh will be rebuilt. It allows you to modify the layout of your level at runtime, but it is a good idea to limit the usage of this feature if you need high performance.
7.2.3 Test the room
When a room is an instance in the scene, test actions will show up at the bottom of the
Room script. These actions are not available when the room is selected in your project
folder.
1. The Render Prefab button will spawn the room prefab at its currently configured location. This option is very useful to position the room prefab itself with the transform adjustment field in the Room script. You should also leave the room prefab in place when you position your connector points and spawn points to see exactly where your connectors and spawnables will appear in the scene. Clicking on the Render Prefab button again will simply update the room prefab. Keep in mind that the room will always appear with a (0,0,0) room rotation value. If you want to test your various room rotations, you should do it manually.
2. The Render Random Spawnables will go through all spawn points in the room, select a spawnable at random and spawn it. You can click this button multiple times in succession to see the various spawn possibilities in your room. Even if the generation weight of a spawnable configuration is lower than 100%, this button will always spawn a spawnable.
3. The Unrender Spawnables button will remove any spawnable in your room.

Room
This documentation is provided through the Unity asset store EULA: https://unity3d.com/legal/as_terms 31
4. The Clean and Apply button is a critical feature of the room! You should never use the default Apply button of the inspector panel to apply changes to your room. The Clean and Apply button ensures that your room is in the proper state for the dungeon generation. It unrenders anything, cleans up all your spawn points, connector points and room prefab. If you use the default Apply button from the inspector, you risk having elements appear in the room before they should be rendered byt the Dungeon Renderer, which defeats the purpose of the renderer. When you press Clean and Apply, your room prefab is updated in your project folder and you can safely remove the room from the scene.
NOTE: Always use the Clean and Apply button from the Room script. Do not use the default Apply button from the inspector panel.
7.3 Configure child elements of a room
When configuration is completed on the room, there is configuration to do in the child elements of the room.
Expand your room game object in the scene to reveal the hierarchy.
You need to configure the various connector points and spawn points of the rooms.
7.3.1 Configure a dungeon connector point
This setup is not mandatory. Rooms without
dungeon connector points are valid. But if you
want to add a dungeon connector in a room, this
step becomes mandatory.
1. Click on the DungeonConnectorPoint game object in the hierarchy to reveal the Dungeon Connector Point script in the inspector panel.
2. Enter the number of possible dungeon connector point configs you want to allow in this room in the Size field. (To get a better understanding of connector types, connectors, connector points and connector point configs, see the appendix Connectors explained)
3. Configure one of the elements under Configs (and repeat until all elements are configured).
4. If you need to adjust how the connector is spawned in the room, expand Adjustment. Here you can set position, rotation and scale adjustments. You can also add a
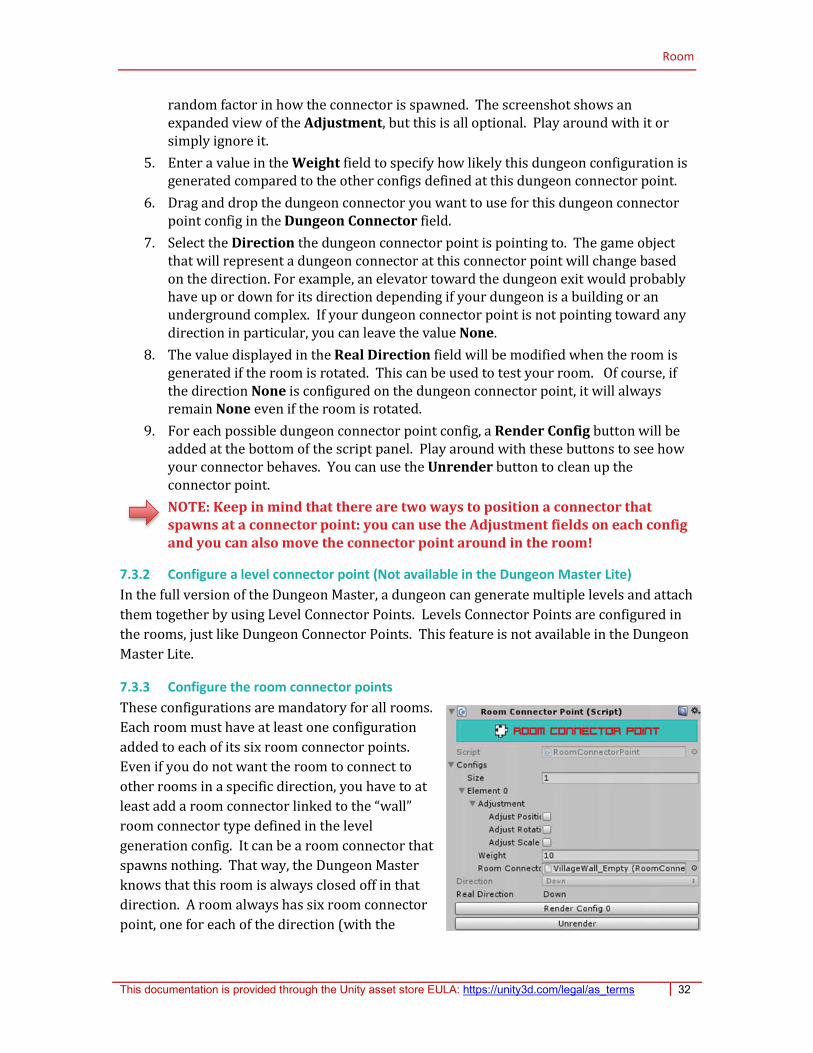
Room
This documentation is provided through the Unity asset store EULA: https://unity3d.com/legal/as_terms 32
random factor in how the connector is spawned. The screenshot shows an expanded view of the Adjustment, but this is all optional. Play around with it or simply ignore it.
5. Enter a value in the Weight field to specify how likely this dungeon configuration is generated compared to the other configs defined at this dungeon connector point.
6. Drag and drop the dungeon connector you want to use for this dungeon connector point config in the Dungeon Connector field.
7. Select the Direction the dungeon connector point is pointing to. The game object that will represent a dungeon connector at this connector point will change based on the direction. For example, an elevator toward the dungeon exit would probably have up or down for its direction depending if your dungeon is a building or an underground complex. If your dungeon connector point is not pointing toward any direction in particular, you can leave the value None.
8. The value displayed in the Real Direction field will be modified when the room is generated if the room is rotated. This can be used to test your room. Of course, if the direction None is configured on the dungeon connector point, it will always remain None even if the room is rotated.
9. For each possible dungeon connector point config, a Render Config button will be added at the bottom of the script panel. Play around with these buttons to see how your connector behaves. You can use the Unrender button to clean up the connector point.
NOTE: Keep in mind that there are two ways to position a connector that spawns at a connector point: you can use the Adjustment fields on each config and you can also move the connector point around in the room!
7.3.2 Configure a level connector point (Not available in the Dungeon Master Lite)
In the full version of the Dungeon Master, a dungeon can generate multiple levels and attach
them together by using Level Connector Points. Levels Connector Points are configured in
the rooms, just like Dungeon Connector Points. This feature is not available in the Dungeon
Master Lite.
7.3.3 Configure the room connector points
These configurations are mandatory for all rooms.
Each room must have at least one configuration
added to each of its six room connector points.
Even if you do not want the room to connect to
other rooms in a specific direction, you have to at
least add a room connector linked to the “wall”
room connector type defined in the level
generation config. It can be a room connector that
spawns nothing. That way, the Dungeon Master
knows that this room is always closed off in that
direction. A room always has six room connector
point, one for each of the direction (with the

Room
This documentation is provided through the Unity asset store EULA: https://unity3d.com/legal/as_terms 33
exception of the None direction that does not apply for room connector points). The steps
are the same to configure a room connector point whatever its direction is.
Configuring a room connector point works almost exactly like configuring a dungeon
connector point. The only difference is that the direction of a room connector point is
already defined and cannot be changed.
Please refer to the section Configure a dungeon connector point to see how to do this step
by step.
NOTE: You can edit multiple room connector points at the same time if you select them all at once. This is useful to massively edit some room connector points that all behave in the same way. For example, if you create a 2D game, it is likely that all the room connector points with direction forward and backward will never connect to other rooms. You can select them all at once, give them only one configuration and assign an empty room connector (doesn’t spawn anything) that is related to your wall connector type. And done!
7.3.4 Configure a spawn point
Although you can use spawn points to spawn any prefab you want, they usually spawn items, scenery or enemies.
Spawn points should always be named with a number and they should always start from 1 and increment by a value of 1. So 1, 2, 3 …
You can edit multiple spawn points at once by selecting them all together.
1. Click a spawn point game object located under the SpawnPoints game object in the hierarchy.
2. In the full version of the Dungeon Master, spawn points can be used to spawn keys for the Lock and Key system. This feature is not available for the Dungeon Master Lite.
3. Set the percentage of chances that this spawn point spawns something in the Percent Chances To Spawn field. 100% means something will always spawn and 0% means nothing ever spawns here.
4. Enter the number of possible spawn point configs you want to allow in this room in the Size field. (To get a better understanding of spawnables, spawnable types, spawn points and spawn point configs, see the appendix Spawnables explained)
5. For each spawn point config, drag and drop a spawnable in the Spawnable field.
6. Set the generation weight for this spawnable in the Weight field. A spawn point config with a high weight value has more chances of spawning than a spawn point config with a low weight value.

Room
This documentation is provided through the Unity asset store EULA: https://unity3d.com/legal/as_terms 34
The logic goes like this: if randomization determines that the spawn point spawns something (determined by the field Percent Chances To Spawn) then another randomization occurs to determine which spawnable will spawn based on each spawn point config Weight value.
7. If you need to adjust the location, rotation or scale of the whole spawnable, you can use the Adjustement fields.
8. For each possible spawn point config, a Render Config button will be added at the bottom of the script panel. Play around with these buttons to see how your spawnable behaves. You can use the Unrender button to clean up the spawn point.
NOTE: Keep in mind that there are two ways to position a spawnable that spawns at a spawn point: you can use the Adjustment fields on each config and you can also move the spawn point around in the room!
7.4 Add or remove child elements of a room
If you created a room with a certain amount of spawn points, with or without a dungeon connector point and then change your mind, you don’t have to create a new room from scratch. You can easily add or remove these elements from the room.
7.4.1 Removing a spawn point or dungeon connector point
To remove one of these elements from the room, simply select the element in the room
hierarchy in the scene and delete it. Don’t forget to click on the Clean and Apply button of
the room, to save your changes.
NOTE: Some elements of the room should not be deleted or the room will not work properly anymore. These are the required game objects that should not be deleted: “RoomPrefabHolder”, “ConnectorPoints”, “SpawnPoints” and the 6 RoomConnectorPoints.
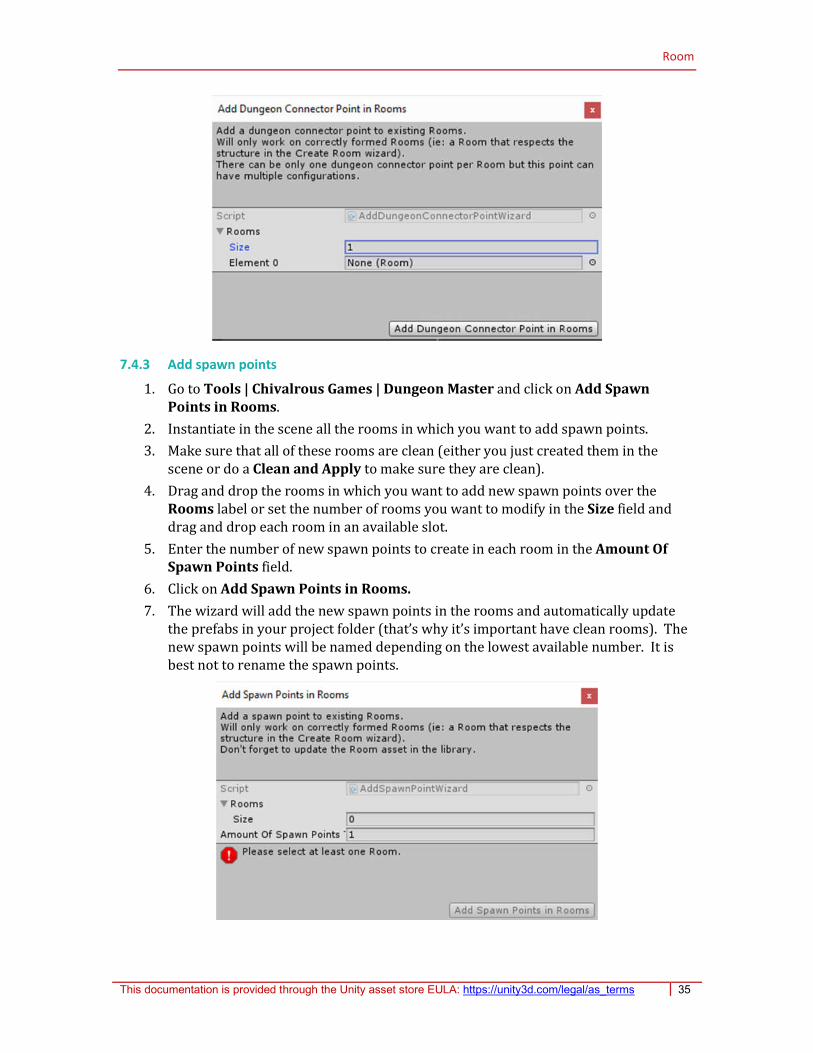
7.4.2 Add a dungeon connector point
1. Go to Tools | Chivalrous Games | Dungeon Master and click on Add Dungeon Connector Point in Rooms.
2. Instantiate in the scene all the rooms in which you want to add a dungeon connector point.
3. Make sure that all of these rooms are clean (either you just instantiated them in the scene or do a Clean and Apply to make sure they are clean).
4. Drag and drop the rooms in which you want to add a new dungeon connector point over the Rooms label or set the number of rooms you want to modify in the Size field and drag and drop each room in an available slot.
5. Click on Add Dungeon Connector Point in Rooms.
6. The wizard will add the dungeon connector point in the rooms and automatically update the prefabs in your project folder (that’s why it’s important have clean rooms).
NOTE: A room cannot have more than one dungeon connector point. If you want to add a dungeon connector point in a room that already has one, the wizard will prevent you from doing so.
Room
This documentation is provided through the Unity asset store EULA: https://unity3d.com/legal/as_terms 35
7.4.3 Add spawn points
1. Go to Tools | Chivalrous Games | Dungeon Master and click on Add Spawn Points in Rooms.
2. Instantiate in the scene all the rooms in which you want to add spawn points.
3. Make sure that all of these rooms are clean (either you just created them in the scene or do a Clean and Apply to make sure they are clean).
4. Drag and drop the rooms in which you want to add new spawn points over the Rooms label or set the number of rooms you want to modify in the Size field and drag and drop each room in an available slot.
5. Enter the number of new spawn points to create in each room in the Amount Of Spawn Points field.
6. Click on Add Spawn Points in Rooms.
7. The wizard will add the new spawn points in the rooms and automatically update the prefabs in your project folder (that’s why it’s important have clean rooms). The new spawn points will be named depending on the lowest available number. It is best not to rename the spawn points.

Connector type
This documentation is provided through the Unity asset store EULA: https://unity3d.com/legal/as_terms 36
8 Connector type
All the connectors in the Dungeon Master need to have a connector type. The connector type is used to validate that two connectors can connect together. The connector type also determines what game object to display on the map to represent a connector. In the full version of the Dungeon Master, connector types can be locked with the lock and key system, but this feature is not available in the Dungeon Master Lite.
Connector types are scriptable objects that will be stored in your project files, under the DungeonMasterData folder.
(For more information on connectors, connector types, connector points and connector point configs, see the appendix Connectors explained)
8.1 Create a connector type
1. Go to Tools | Chivalrous Games | Dungeon Master and click on Create Connector Type.
2. Enter a name for your new connector type. I usually add the suffix “_type” to this name so I can identify my connector types simply by looking at their name.
3. Click on the Create Connector Type button.
4. Your new connector type should appear into your project folders and should be auto-selected for you to configure upon creation.
8.2 Configure a connector type
1. Click on your connector type scriptable object in your project files to display the connector type inspector panel.
2. If you plan to display this element to a player (like in the journey system), you can enter a pretty name in the Display Name field.
3. In the full version of the Dungeon Master, connector types can be used to plan journeys. This feature is not available in the Dungeon Master Lite.
4. The Display Mode determines when the map game objects should appear on the map. You must select the appropriate room status.
Never means that the game objects will never show up on the map. It might seem useless at first, but if you want to hide some connectors on the map until certain conditions are met in the game (for example until the character gets a power to reveal these connectors), you can change this value later on in the game.

Connector type
This documentation is provided through the Unity asset store EULA: https://unity3d.com/legal/as_terms 37
Discovered means the game objects will show up on the map as soon as the character of the game has heard of or seen the room via a map (or any other mean you want) but has never visited the room in person.
Visited means the the game objects will show up on the map only when the character has visited the room in person.
5. If you want the game objects that represent this connector to rotate on the map to fit the rotation of the room, check the Rotate Map Objects box.
6. The game objects in the Map Objects section are used to represent any connector with this connector type. Drag and drop the appropriate game objects for each direction. If you know that your connectors will never face in a certain direction, you can leave some fields empty.

Dungeon connector
This documentation is provided through the Unity asset store EULA: https://unity3d.com/legal/as_terms 38
9 Dungeon connector
Dungeon connectors are the entrance / exit points of a dungeon, allowing the character to go to an outside world. If your whole game takes place in a dungeon, then the dungeon connector is the starting point of the game.
Every dungeon needs at least one unlocked dungeon connector.
A dungeon connector contains the game objects that will spawn in the game. If you want to connect an underground cave (your dungeon) to the outside world through a ladder, then the ladder prefab is contained in the dungeon connector.
Dungeon connectors are scriptable objects that will be stored in your project files, under the DungeonMasterData folder.
(For more information on connectors, connector types, connector points and connector point configs, see the appendix Connectors explained)
9.1 Create a dungeon connector
1. Go to Tools | Chivalrous Games | Dungeon Master and click on Create Dungeon Connector.
2. Enter a name for your new dungeon connector.
3. Click on the Create Dungeon Connector button.
4. Your new dungeon connector should appear into your project folders and should be auto-selected for you to configure upon creation.
9.2 Configure a dungeon connector
1. Click on your dungeon connector scriptable object in your project files to display the dungeon connector inspector panel.
2. If you plan to display this element to a player (like in the journey system), you can enter a pretty name in the Display Name field.
3. Enter the number of prefabs you want to spawn in the Size field. It will create a list of elements to configure.
4. For each element, drag and drop the prefab to spawn in the Prefab field.
5. You can configure how the elements are positioned in relation one to another with each element Adjustment fields. These position, rotation and scale adjustments will be applied everytime this connector is spawned. This is optional.
6. Drag and drop the connector type to associate in the Type field.

Dungeon connector
This documentation is provided through the Unity asset store EULA: https://unity3d.com/legal/as_terms 39
7. The Direction field is used to display the appropriate game object on the map. It is also used to position the connector near the edge of the level in the specified direction if the Position is Peripheral.
8. Position influences where the connector should be spawned in a level. By default, Random is used. This option would be good if something like a portal is used. But, if we go back to our cave and ladder example, it would make more sense for the ladder to spawn at the top of the cave rather than at the bottom. In this case, Peripheral would be a more logical choice.
9. If you select Peripheral for your Position, then the field Periphery Tolerance will show up. Periphery Tolerance is the range (in number of rooms) the dungeon has to place the connector at the level periphery. For example, if you select Direction: Top, Position: Peripheral and Periphery Tolerance: 2 then the Dungeon Master will try to position the connector in the top 3 floors of the level. Periphery Tolerance of 0 means only the top floor would be acceptable.
10. If you want this connector to be separated from other connectors in the level (to avoid having dungeon and level connectors show up in neighboring rooms) check the box Separate From Others.
11. If Separate From Others is checked, the field Separation Tolerance will show up. Values are in number of rooms. Higher values mean that the connectors should be more separated. A value of 1 would mean that it is okay to be a direct neighbor of another dungeon or level connector.

Room connector
This documentation is provided through the Unity asset store EULA: https://unity3d.com/legal/as_terms 40
10 Room connector
Room connectors allow characters to move from room to room. Room connectors also close off rooms with walls to prevent a character from leaving the room in an undesirable way. Each room has 6 connector points, one for each direction: left, right, up, down, forward and backward. Each connector point needs at least one configuration with one supplied room connector.
For each level, at least one wall room connector type must be defined so the level can close off rooms.
A room connector contains the game objects that will spawn in the game. If you want to connect a kitchen (room 1) to a dining room (room 2) through a doorway, then the doorway prefab should be in your room connector.
Room connectors are scriptable objects that will be stored in your project files, under the DungeonMasterData folder.
(For more information on connectors, connector types, connector points and connector point configs, see the appendix Connectors explained)
10.1 Create a room connector
1. Go to Tools | Chivalrous Games | Dungeon Master and click on Create Room Connector.
2. Enter a name for your new room connector.
3. Click on the Create Room Connector button.
4. Your new room connector should appear into your project folders and should be auto-selected for you to configure upon creation.
10.2 Configure a room connector
1. Click on your room connector scriptable object in your project files to display the room connector inspector panel.
2. If you plan to display this element to a player (like in the journey system), you can enter a pretty name in the Display Name field.
3. Enter the number of prefabs you want to spawn in the Size field. It will create a list of elements to configure.
4. For each element, drag and drop the prefab to spawn in the Prefab field.
5. You can configure how the elements are positioned in relation one to another with each element Adjustment fields. These position,
Room connector
This documentation is provided through the Unity asset store EULA: https://unity3d.com/legal/as_terms 41
rotation and scale adjustments will be applied everytime this connector is spawned. This is optional.
6. Drag and drop the connector type to associate in the Type field.
7. If this room connector is able to connect to a room from any region in this level, check the box Toward Any Region. (For more information on regions, see the chapter Regions)
8. If the box Toward Any Region is unchecked, you have to specify the regions toward which this room connector can be used to create a connection. Enter the number of appropriate regions in the Size field. Then drag and drop the regions from your project folder into the appropriate Element slots.

Spawnable type
This documentation is provided through the Unity asset store EULA: https://unity3d.com/legal/as_terms 42
11 Spawnable type
Spawnable types are scriptable objects that will be stored in your project files, under the DungeonMasterData folder.
A spawnable type is used to display game objects on the map to represent a spawnable and it is also used to regroup spawnables in logical categories so you can collect stats easily. A spawnable can have zero, one or many spawnable types. Spawnable types do not have to display objects on the map and you do not need to collect stats, but spawnable types are available if you want to do any of these things.
For example: you can display the presence of an item spawnable in a room with a small
icon. To achieve this, you would associate your item spawnable with the spawnable type
Item. This Item spawnable type has the icon game object to display on the map. If you want
to know how many items were spawned in a dungeon, you can use methods available on the
dungeon, level and room scripts such as:
CountGeneratedSpawnableWithType()
With this information, you can also display the player progress in a game. Example: you found 3 of the 10 items in the game.
You can read the reference documentation on the ChivalrousGames website to see all the available methods to collect stats or accomplish other tasks.
https://chivalrousgames.com/products/dungeonmaster/documentation/
(For more information on spawnables, see the appendix Spawnables explained)
11.1 Create a spawnable type
1. Go to Tools | Chivalrous Games | Dungeon Master and click on Create Spawnable Type.
2. Enter a name for your new spawnable type. I usually add the suffix “_type” to this name so I can identify my spawnable types simply by looking at their name.
3. Click on the Create Spawnable Type button.
4. Your new spawnable type should appear into your project folders and should be auto-selected for you to configure upon creation.
11.2 Configure a spawnable type
1. Click on your spawnable type scriptable object in your project files to display the spawnable type inspector panel.
2. If you plan to display this element to a player, you can enter a pretty name in the

Spawnable type
This documentation is provided through the Unity asset store EULA: https://unity3d.com/legal/as_terms 43
Display Name field.
3. In the full version of the Dungeon Master, you can use spawnalbe types to create journeys on the map. This feature is not available in the Dungeon Master Lite.
4. The Display Mode determines when the map game objects should appear on the map. You must select the appropriate room status.
Never means that the game objects will never show up on the map. It might seem useless at first, but if you want to hide some spawnables on the map until certain conditions are met in the game (for example until the character gets a power to reveal these spawnables), you can change this value later on in the game.
Discovered means the game objects will show up on the map as soon as the character of the game has heard of or seen the room via a map (or any other mean you want) but has never visited the room in person.
Visited means the the game objects will show up on the map only when the character has visited the room in person
5. Drag and drop a game object in the Map Object field if you want spawnables with this type to appear on the map.
NOTE: Some spawnables can be detached from their parent room through the property Detached. Keep in mind that the detached Spawnables will never be displayed on the map, even if they are associated with a spawnable type that says otherwise.

Spawnable
This documentation is provided through the Unity asset store EULA: https://unity3d.com/legal/as_terms 44
12 Spawnable
Spawnables are used to populate rooms randomly. They can be enemies, items, scenery, loot, obstacles, traps… In fact, you can spawn any prefab in a room by using a spawnable.
You can prevent too many instances of the same spawnable from appearing in the same room, level or dungeon by using limiters.
Spawnables will render and unrender with their parent room (the room in which they will spawn). If some of your spawnables can follow the character and leave their parent room, they should have the option Detached activated on them, so when their parent room is unrendered, they will remain in the level. The detached spawnables will be unrendered automatically when the character leaves the level.
Spawnables are scriptable objects that will be stored in your project files, under the DungeonMasterData folder.
(For more information on spawnables, see the appendix Spawnables explained)
12.1 Create a spawnable
1. Go to Tools | Chivalrous Games | Dungeon Master and click on Create Spawnable.
2. Enter a name for your new spawnable.
3. Click on the Create Spawnable button.
4. Your new spawnable should appear into your project folders and should be auto-selected for you to configure upon creation.
12.2 Configure a spawnable
1. Click on your spawnable scriptable object in your project files to display the spawnable inspector panel.
2. If you plan to display this element to a player (like in the journey system), you can enter a pretty name in the Display Name field. Enter the number of prefabs you want to spawn in the Size field. It will create a list of elements to configure.
3. For each element, drag and drop the prefab to spawn in the Prefab field.
4. You can configure how the elements are positioned in relation to one another with each element Adjustment fields. These position, rotation and scale adjustments will be applied everytime this spawnable is spawned. This is optional.

Spawnable
This documentation is provided through the Unity asset store EULA: https://unity3d.com/legal/as_terms 45
5. Enter the number of spawnable types you want to associate this spawnable with in the Size field. It will create a list of elements to configure.
6. Drag and drop the spawnable types to associate in the Element fields.
7. If you want to limit the amount of instances of this spawnable, select the Scope in which there should be a limit for this spawnable.
8. If you selected a limiter Scope, then enter the maximum amount of instances of this spawnable that should spawn in this scope in the Maximum Amount field.
9. If you want your spawnable to be detached from its parent room, check the box Detached.

Region
This documentation is provided through the Unity asset store EULA: https://unity3d.com/legal/as_terms 46
13 Region
Regions are scriptable objects that will be stored in your project files, under the DungeonMasterData folder.
Regions allow to separate rooms in a level in thematic group. It allows enhanced control over the level randomization and allows to group together rooms of the same region. It also helps to avoid connections between rooms that seem logical for the Dungeon Master but that make no sense for a human.
Example:
Let’s say you have rooms in the same level and on the same floor that do not have the same ground height. A small flight of 3 or 4 steps should connect the high room with the low room. You would define two room connectors for the high and low rooms.
The first room connectors would be invisible; it would simply be the floor that continues from one room to another. You can use this connector to connect a high room to another high room. You would use a similar connector to connect a low room to another low room.
Your second room connector would be the small flight of stairs and you would use this connector to connect a high room to a low room.
The assets on display here are part of the 3DForge TaD SewerKit: https://www.assetstore.unity3d.com/en/#!/search/page=1/sortby=popularity/query=publisher:2970

Region
This documentation is provided through the Unity asset store EULA: https://unity3d.com/legal/as_terms 47
When the dungeon master looks for a suitable neighbor, it will check the candidate rooms connector and try to match them with the room that is already in place. In the situation described above, the dungeon master would allow two high rooms to connect together with the flight of stairs because high rooms allow connections through this flight of stairs.
The assets on display here are part of the 3DForge TaD SewerKit: https://www.assetstore.unity3d.com/en/#!/search/page=1/sortby=popularity/query=publisher:2970
So how do you prevent that? With regions! You would create a “high rooms” region and a “low room” region.
You can configure your stair room connectors to specify that it should only connect a high room with a low room. This way, you won’t get two high rooms or two low rooms that connect through stairs.
13.1 Create a region
1. Go to Tools | Chivalrous Games | Dungeon Master and click on Create Region.
2. Enter a name for your new region.
3. Click on the Create Region button.
4. Your new region should appear into your project folders.
5. There is no need to configure a region; it holds no configuration beside its name. If you bring up the inspector panel for your region scriptable object, this is what you will see:

Preset rooms
This documentation is provided through the Unity asset store EULA: https://unity3d.com/legal/as_terms 48
14 Preset rooms (not available in Lite version)
The full version of the Dungeon Master allows to preset rooms inside a level so when a level is generated, the preset rooms are always there with the configurations you want. This feature is not available in the Dungeon Master Lite.

Map controller
This documentation is provided through the Unity asset store EULA: https://unity3d.com/legal/as_terms 49
15 Map controller
Each new dungeon you create comes with a default Map Controller script (for more information on this default script, see the chapter Dungeon). The default map controller is very lightweight and does not offer many features. Depending on the kind of game you want to make, you may want to offer more features. There are many combinations of features that are relevant and many different ways to display them and have the player interact with them. This makes for an infinite number of possibilities and the Dungeon Master does not provide a premade solution for each of them.
That being said, the Dungeon Master has a ton of useful helper methods to help you build your own map controller with your own UI components. You can find a lot of examples in the project provided with the Dungeon Master. Look for the Example Map Controller script.
I strongly suggest that you try to implement your own map controller. It’s not hard to do.
15.1 Implement your own Map Controller
1. Create a new script in your project and give it a relevant name. In my example, I call it MyMapController, but choose something more relevant for your project.
2. Since you probably want to reuse all the code that was done in the map controller, you should extend the existing map controller class. Here is an example of the first part of the script:
Using UnityEngine; Using ChivalrousGames.DungeonMaster; public class MyMapController: MapController { }
3. A common scenario is to prevent the character to move around when the full map is displayed. To achieve this, override the ToggleFullMap method in your own MapController class like so:
public override void ToggleFullMap { base.ToggleFullMap(); if(FullMapOpened) { //Here I disable my character controller since the full map is opened } else { //Here I enable my character controller since the full map is closed } }
You could also activate and deactivate UI elements when the full map is opened or closed.
4. If you want to display the current location of the character in the game or information on the map that is currently displayed, the map controller already contains the relevant values in the properties DisplayedLevel, DisplayedFloor and the field character. You can display this information in a UI component.
5. By exploring the character field contained in the map controller, you can get a lot of useful information, such as the collected keys, the current location of the character, etc.

Map controller
This documentation is provided through the Unity asset store EULA: https://unity3d.com/legal/as_terms 50
6. By exploring the dungeon field contained in the map controller, you can get access to a lot of useful helper methods to get data on the size of the dungeon, get the number of spawnables that were generated, which levels were discovered by the character, get a list of possible journey candidates… And of course from the dungeon you can drill down into each level and each room to collect additional data.
7. Don’t be afraid to try it out! You can get more information on each available field, property and method in the reference documentation on the Chivalrous Games website: https://chivalrousgames.com/products/dungeonmaster/documentation/
The most relevant sections to implement a new map controller should be (of course it depends on what you are trying to achieve):
Map Controller
Dungeon Character
Dungeon
Level
Room
8. To use your own map controller script, simply remove the DefaultMapController script component on your dungeon game object and add your own map controller script (MyMapController) in its place.

Dungeon generation report
This documentation is provided through the Unity asset store EULA: https://unity3d.com/legal/as_terms 51
16 Dungeon generation report
It is a good idea to frequently test your dungeon as you create it. As you work with the Dungeon Master, you will most certainly get to a stage where your dungeon doesn’t generate successfully anymore. This could be because you are just starting up your dungeon and are missing some key components or maybe you just added something that breaks your dungeon. (For common issues with dungeons, see section Test the dungeon in chapter Dungeon) Although the dungeon will log information such as messages, warnings and errors in the Unity editor console, it is sometimes useful to understand how the message happened and what the dungeon was trying to do when it logged the message.
The dungeon generation report is here to help you follow along what the Dungeon Master is doing so you can pinpoint the issue and solve it.
16.1 Create a dungeon generation report
It is sometimes useful to create a dungeon generation report. But this option should not remain activated in a released project; this is a debug feature only.
1. Select your dungeon game object in the hierarchy to bring up the dungeon script in the inspector panel.
2. Check the box Create Generation Report.
3. Generate your dungeon with the Generate button at the bottom of the script.
4. The field Report will contain a link toward an empty game object in the scene that contains the report.
16.2 Use a dungeon generation report
1. Click on the dungeon report game object in the hierarchy to bring up the dungeon generation report script in the inspector panel.
2. Click on the Open player button.
3. This will bring up the Dungeon Generation Report Player Wizard.
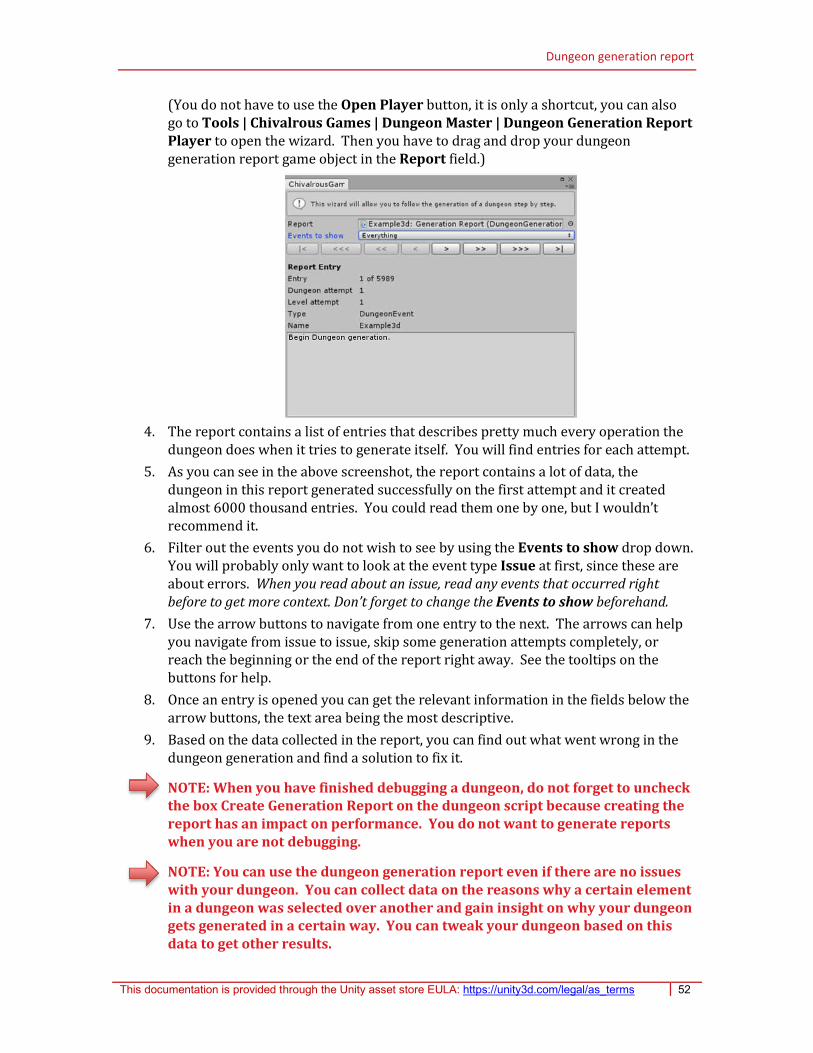
Dungeon generation report
This documentation is provided through the Unity asset store EULA: https://unity3d.com/legal/as_terms 52
(You do not have to use the Open Player button, it is only a shortcut, you can also go to Tools | Chivalrous Games | Dungeon Master | Dungeon Generation Report Player to open the wizard. Then you have to drag and drop your dungeon generation report game object in the Report field.)
4. The report contains a list of entries that describes pretty much every operation the dungeon does when it tries to generate itself. You will find entries for each attempt.
5. As you can see in the above screenshot, the report contains a lot of data, the dungeon in this report generated successfully on the first attempt and it created almost 6000 thousand entries. You could read them one by one, but I wouldn’t recommend it.
6. Filter out the events you do not wish to see by using the Events to show drop down. You will probably only want to look at the event type Issue at first, since these are about errors. When you read about an issue, read any events that occurred right before to get more context. Don’t forget to change the Events to show beforehand.
7. Use the arrow buttons to navigate from one entry to the next. The arrows can help you navigate from issue to issue, skip some generation attempts completely, or reach the beginning or the end of the report right away. See the tooltips on the buttons for help.
8. Once an entry is opened you can get the relevant information in the fields below the arrow buttons, the text area being the most descriptive.
9. Based on the data collected in the report, you can find out what went wrong in the dungeon generation and find a solution to fix it.
NOTE: When you have finished debugging a dungeon, do not forget to uncheck the box Create Generation Report on the dungeon script because creating the report has an impact on performance. You do not want to generate reports when you are not debugging.
NOTE: You can use the dungeon generation report even if there are no issues with your dungeon. You can collect data on the reasons why a certain element in a dungeon was selected over another and gain insight on why your dungeon gets generated in a certain way. You can tweak your dungeon based on this data to get other results.
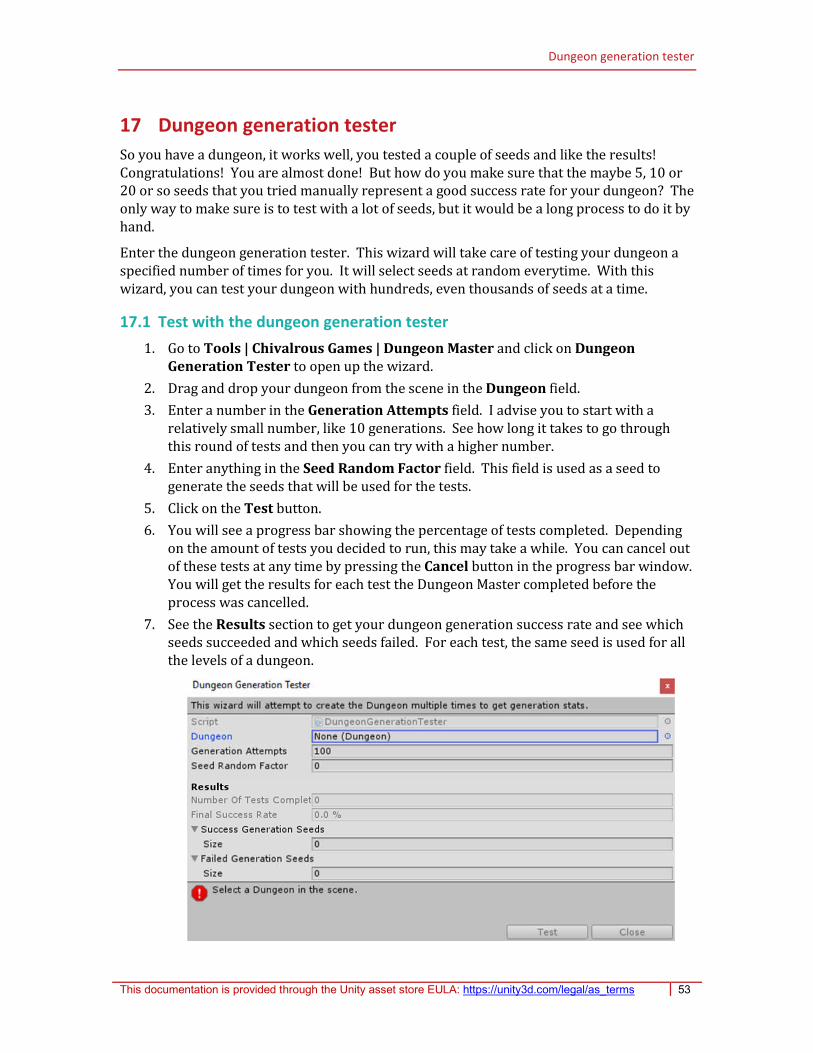
Dungeon generation tester
This documentation is provided through the Unity asset store EULA: https://unity3d.com/legal/as_terms 53
17 Dungeon generation tester
So you have a dungeon, it works well, you tested a couple of seeds and like the results! Congratulations! You are almost done! But how do you make sure that the maybe 5, 10 or 20 or so seeds that you tried manually represent a good success rate for your dungeon? The only way to make sure is to test with a lot of seeds, but it would be a long process to do it by hand.
Enter the dungeon generation tester. This wizard will take care of testing your dungeon a specified number of times for you. It will select seeds at random everytime. With this wizard, you can test your dungeon with hundreds, even thousands of seeds at a time.
17.1 Test with the dungeon generation tester
1. Go to Tools | Chivalrous Games | Dungeon Master and click on Dungeon Generation Tester to open up the wizard.
2. Drag and drop your dungeon from the scene in the Dungeon field.
3. Enter a number in the Generation Attempts field. I advise you to start with a relatively small number, like 10 generations. See how long it takes to go through this round of tests and then you can try with a higher number.
4. Enter anything in the Seed Random Factor field. This field is used as a seed to generate the seeds that will be used for the tests.
5. Click on the Test button.
6. You will see a progress bar showing the percentage of tests completed. Depending on the amount of tests you decided to run, this may take a while. You can cancel out of these tests at any time by pressing the Cancel button in the progress bar window. You will get the results for each test the Dungeon Master completed before the process was cancelled.
7. See the Results section to get your dungeon generation success rate and see which seeds succeeded and which seeds failed. For each test, the same seed is used for all the levels of a dungeon.
Dungeon generation tester
This documentation is provided through the Unity asset store EULA: https://unity3d.com/legal/as_terms 54
17.2 Proceed with the results of the test
If you have 100% generation success rate on a high number of tests, then you are probably good to go with this dungeon. Well done!
If not, you can probably improve your success rate. The best way to investigate what can be improved with your dungeon is to take note of which seeds failed during the tests. Then, apply one of these seeds to all of your levels in the dungeon and generate your dungeon with the dungeon generation report feature activated. (For more information, see the chapter Dungeon generation report). Use the report to find out what went wrong during the dungeon generation and fix it.
Chances are that this problem caused generation to fail with more than one seed during the tests done by the dungeon generation tester. Once each problem is solved, you can try to run another round of tests with the dungeon generation tester. Your generation success rate may increase substantially for each problem you solve.
From this point on, it’s pretty much rinse and repeat. You’re almost done!
NOTE: The dungeon generation tester uses the same seed for all the levels, but this is just to keep things simple. In your own dungeon, you can use different seeds for all levels if you want.
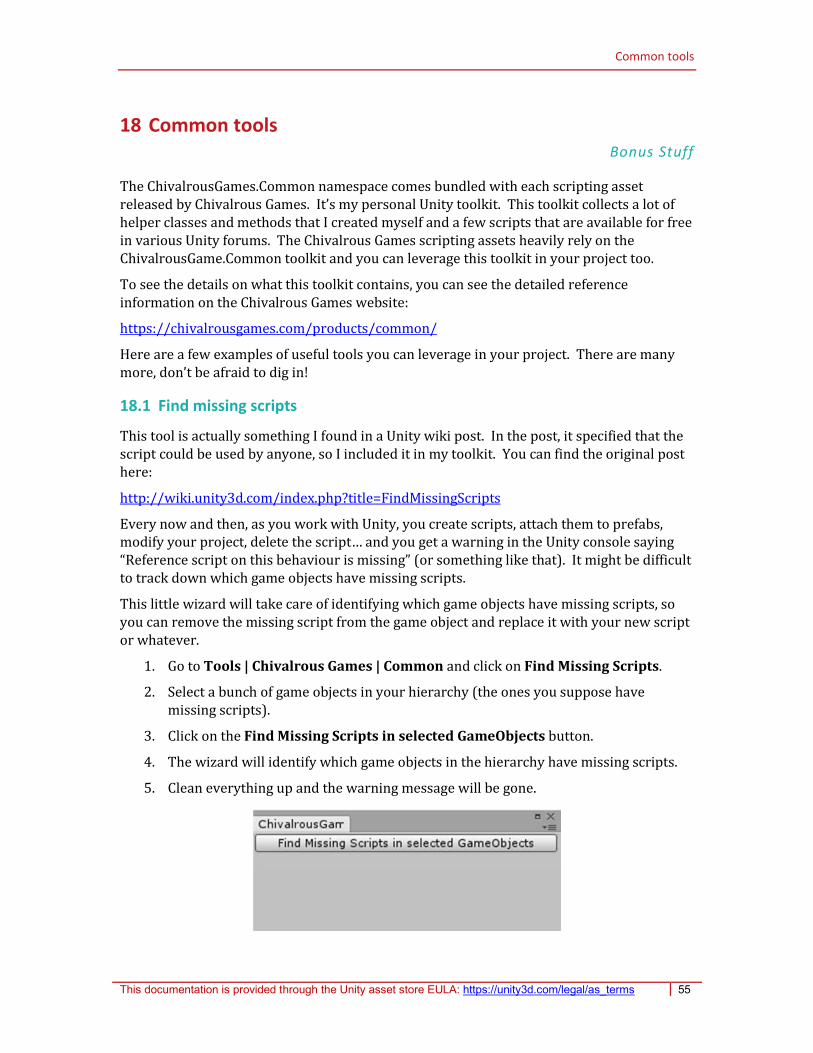
Common tools
This documentation is provided through the Unity asset store EULA: https://unity3d.com/legal/as_terms 55
18 Common tools Bonus Stuff
The ChivalrousGames.Common namespace comes bundled with each scripting asset released by Chivalrous Games. It’s my personal Unity toolkit. This toolkit collects a lot of helper classes and methods that I created myself and a few scripts that are available for free in various Unity forums. The Chivalrous Games scripting assets heavily rely on the ChivalrousGame.Common toolkit and you can leverage this toolkit in your project too.
To see the details on what this toolkit contains, you can see the detailed reference information on the Chivalrous Games website:
https://chivalrousgames.com/products/common/
Here are a few examples of useful tools you can leverage in your project. There are many more, don’t be afraid to dig in!
18.1 Find missing scripts
This tool is actually something I found in a Unity wiki post. In the post, it specified that the script could be used by anyone, so I included it in my toolkit. You can find the original post here:
http://wiki.unity3d.com/index.php?title=FindMissingScripts
Every now and then, as you work with Unity, you create scripts, attach them to prefabs, modify your project, delete the script… and you get a warning in the Unity console saying “Reference script on this behaviour is missing” (or something like that). It might be difficult to track down which game objects have missing scripts.
This little wizard will take care of identifying which game objects have missing scripts, so you can remove the missing script from the game object and replace it with your new script or whatever.
1. Go to Tools | Chivalrous Games | Common and click on Find Missing Scripts.
2. Select a bunch of game objects in your hierarchy (the ones you suppose have missing scripts).
3. Click on the Find Missing Scripts in selected GameObjects button.
4. The wizard will identify which game objects in the hierarchy have missing scripts.
5. Clean everything up and the warning message will be gone.

Common tools
This documentation is provided through the Unity asset store EULA: https://unity3d.com/legal/as_terms 56
18.2 Performance report
This is a tool a created myself. I used this tool a lot to identify performance issues with the Dungeon Master. You can use it yourself if you need to identify performance issues in your code. Find out where the bottlenecks are and then you can solve them. This allows you to spent time optimizing the parts that are really time consuming and you don’t have to guess where the issues are.
Setting up the performance report takes a bit of time. You probably don’t want to set it up from scratch everytime you want to use it. So I suggest you use a compiler switch to enable and disable the report in the code. This way, you can simply turn the report off when you don’t need it.
1. For each script you want to analyse, add the ChivalrousGames.Common usings and add a #define ANALYZE_PERF compiler switch over your usings in the script header, like so:
/* * Copyright 2017, Chivalrous Games * * Author: Vincent Chevalier * * This source code is provided through the Unity Asset Store EULA. * https://unity3d.com/legal/as_terms */ #define ANALYSE_PERF; using UnityEngine; using System; using System.Collections.Generic; using ChivalrousGames.Common; using ChivalrousGames.Common.Inspector; using ChivalrousGames.Common.Diagnostics;
2. Identify a method that gets called only once at the beginning of the process you want to analyze and enter these lines of code to begin collecting performance data. In my project, I added this code at the beginning of the GenerateDungeon method since I wanted to analyze the performance of the dungeon generation. Select a name for your report and pass it in the string parameter of the method.
#if ANALYSE_PERF PerformanceAnalyzer.BeginReport(“Dungeon generation perf report”); #endif
3. Identify a method that gets called only once at the end of your process and enter this lines of code to terminate the performance data collection. In my project, I added this code at the end of the GenerateDungeon method.
#if ANALYSE_PERF PerformanceAnalyzer.EndReport(); #endif

Common tools
This documentation is provided through the Unity asset store EULA: https://unity3d.com/legal/as_terms 57
4. At the beginning of each method you want to analyze, enter the following lines of code. Of course, the string parameter should be something relevant to your test, most probably the name of the method you are analyzing.
#if ANALYSE_PERF PerformanceAnalyzer.BeginEntryTracking(“PositionLevels”); #endif
5. At the end of each method you want to analyze, enter the following lines of code. Make sure you pass the same value in the string parameter that you passed in the BeginEntryTracking method.
#if ANALYSE_PERF PerformanceAnalyzer.EndEntryTracking(“PositionLevels”); #endif
6. If you want to analyze methods that are intertwined (you have a method that calls another method and want to analyze both of them separately), then you can pause the tracking on the caller method while you analyze the callee method and when the callee method is done, you can resume tracking on the caller method. Something like this:
public void MethodABC() { PerformanceAnalyzer.BeginEntryTracking(“MethodABC”); //do internal work PerformanceAnalyzer.PauseEntryTracking(“MethodABC”); CalleeMethod(); PerformanceAnalyzer.ResumeEntryTracking(“MethodABC”); //Some other work PerformanceAnalyzer.EndEntryTracking(“MethodABC”); } public void MethodXYZ() { PerformanceAnalyzer.BeginEntryTracking(“MethodXYZ”); //Do some work PerformanceAnalyzer.EndEntryTracking(“MethodXYZ”); }
This ensures that the time spent executing MethodXYZ is not factored in the time spent executing MethodABC.
7. Run your project and do the necessary actions in your project to launch the method that generates the performance report. In my project, I simply click on the Generate button of the dungeon game object.
8. A performance report game object will appear in your hierarchy with the name you have given to your report.
9. Click on the performance report game object in the hierarchy to display the inspector panel.
10. You will find a series of monobehaviours attached to this game object and they

Common tools
This documentation is provided through the Unity asset store EULA: https://unity3d.com/legal/as_terms 58
contain all the data collected during your performance tests.
11. The performance report monobehavior contains the total time spent during the test. But the most interesting data comes from each performance report entry.
12. Each entry contains a name (which is probably the name of the method you analyzed), the number of times the method was called during the test, the total time spent executing this method, an average time spent executing this method each time it was called and a percentage of time spent in this method for the whole test.
13. With this data, you can find out which method is too slow and which method is called often. Enhancing the performance of a slow method that doesn’t get called often won’t be as good an improvement as improving the performance of a slow method that gets called very often.
14. If you add all the duration of the performance report entries, you may not get to the total duration displayed in the performance report monobehaviour. This means that time was spent executing code that wasn’t tracked in the report. You can proceed to add more performance report entries in your code to find out where this processing occurs.
15. When you are done with your performance analysis, do not remove all the lines of code you added! You can simply comment out the #define ANALYZE_PERF compiler switch at the top of each script to deactivate this code. Like so:
* This source code is provided through the Unity Asset Store EULA. * https://unity3d.com/legal/as_terms */ //#define ANALYSE_PERF; using UnityEngine; using System;
It won’t be compiled and it won’t be executed anymore. It will remain dormant until you uncomment the line and analyse your project again.
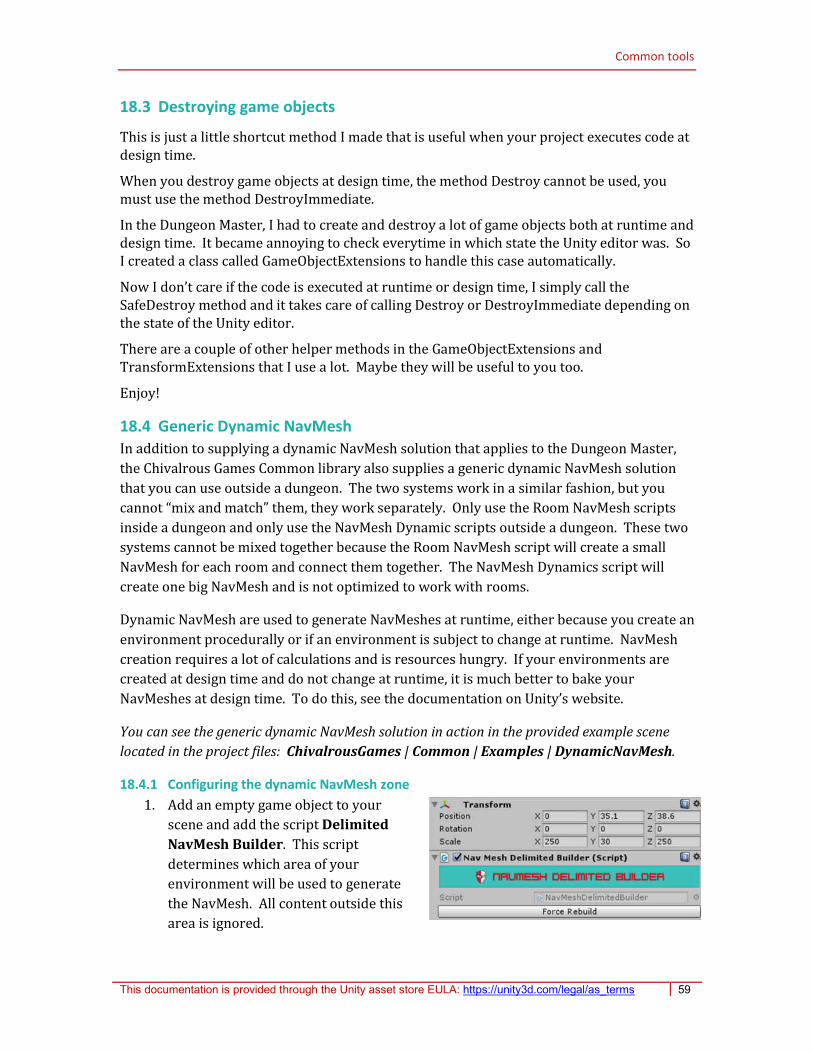
Common tools
This documentation is provided through the Unity asset store EULA: https://unity3d.com/legal/as_terms 59
18.3 Destroying game objects
This is just a little shortcut method I made that is useful when your project executes code at design time.
When you destroy game objects at design time, the method Destroy cannot be used, you must use the method DestroyImmediate.
In the Dungeon Master, I had to create and destroy a lot of game objects both at runtime and design time. It became annoying to check everytime in which state the Unity editor was. So I created a class called GameObjectExtensions to handle this case automatically.
Now I don’t care if the code is executed at runtime or design time, I simply call the SafeDestroy method and it takes care of calling Destroy or DestroyImmediate depending on the state of the Unity editor.
There are a couple of other helper methods in the GameObjectExtensions and TransformExtensions that I use a lot. Maybe they will be useful to you too.
Enjoy!
18.4 Generic Dynamic NavMesh
In addition to supplying a dynamic NavMesh solution that applies to the Dungeon Master,
the Chivalrous Games Common library also supplies a generic dynamic NavMesh solution
that you can use outside a dungeon. The two systems work in a similar fashion, but you
cannot “mix and match” them, they work separately. Only use the Room NavMesh scripts
inside a dungeon and only use the NavMesh Dynamic scripts outside a dungeon. These two
systems cannot be mixed together because the Room NavMesh script will create a small
NavMesh for each room and connect them together. The NavMesh Dynamics script will
create one big NavMesh and is not optimized to work with rooms.
Dynamic NavMesh are used to generate NavMeshes at runtime, either because you create an
environment procedurally or if an environment is subject to change at runtime. NavMesh
creation requires a lot of calculations and is resources hungry. If your environments are
created at design time and do not change at runtime, it is much better to bake your
NavMeshes at design time. To do this, see the documentation on Unity’s website.
You can see the generic dynamic NavMesh solution in action in the provided example scene
located in the project files: ChivalrousGames | Common | Examples | DynamicNavMesh.
18.4.1 Configuring the dynamic NavMesh zone
1. Add an empty game object to your
scene and add the script Delimited
NavMesh Builder. This script
determines which area of your
environment will be used to generate
the NavMesh. All content outside this
area is ignored.

Common tools
This documentation is provided through the Unity asset store EULA: https://unity3d.com/legal/as_terms 60
2. Position the center of the Delimited NavMesh Builder by using the transform
position and determine its size by using the scale value of the transform. The
Delimited NavMesh Builder shouldn’t have any child transforms.
3. Add Dynamic NavMesh scripts to your game objects located in your scene. (See the
following section: Tagging elements of the NavMesh with scripts for more
information)
4. When the game starts, the Delimited NavMesh Builder will collect all Dynamic
NavMesh scripts and generate the NavMesh accordingly.
18.4.2 Tagging elements of the NavMesh with scripts
The Delimited NavMesh Builder will collect elements in the scene. These elements must be
tagged (and sometimes configured) with specific scripts. Elements that are not tagged in
your scene will be ignored by the NavMesh.
18.4.2.1 NavMeshDynamicCollider
This tagging element will add a collider to the
NavMesh. It requires a collider on your game object.
You can configure which area of the NavMesh fits
with this collider.
In this example, a BoxCollider is used but many
other collider types will work just as well.
18.4.2.2 NavMeshDynamicMesh
This tagging element will add an item to the
NavMesh based on a mesh. It requires a mesh filter
on your game object. You can configure which area
of the NavMesh fits with this mesh.
18.4.2.3 NavMeshDynamicModifierBox
This tagging element allows you to configure a zone
in your NavMesh that should be part of a different
area. It will modify the area of the other NavMesh
elements but only in the volume of the modifier box.
You must configure the modifier box size and
determine which area should be used in the modifier box volume.
18.4.2.4 NavMeshDynamicPrimitive
This tagging element allows you to add an item to
the NavMesh that is not based on anything present
in your scene. You can add an element to your
NavMesh based on the available primitives (Box,
Capsule and Sphere). Each primitive has its own set
of configurations (size, radius, etc). You can
configure which area of the NavMesh fits with this primitive.
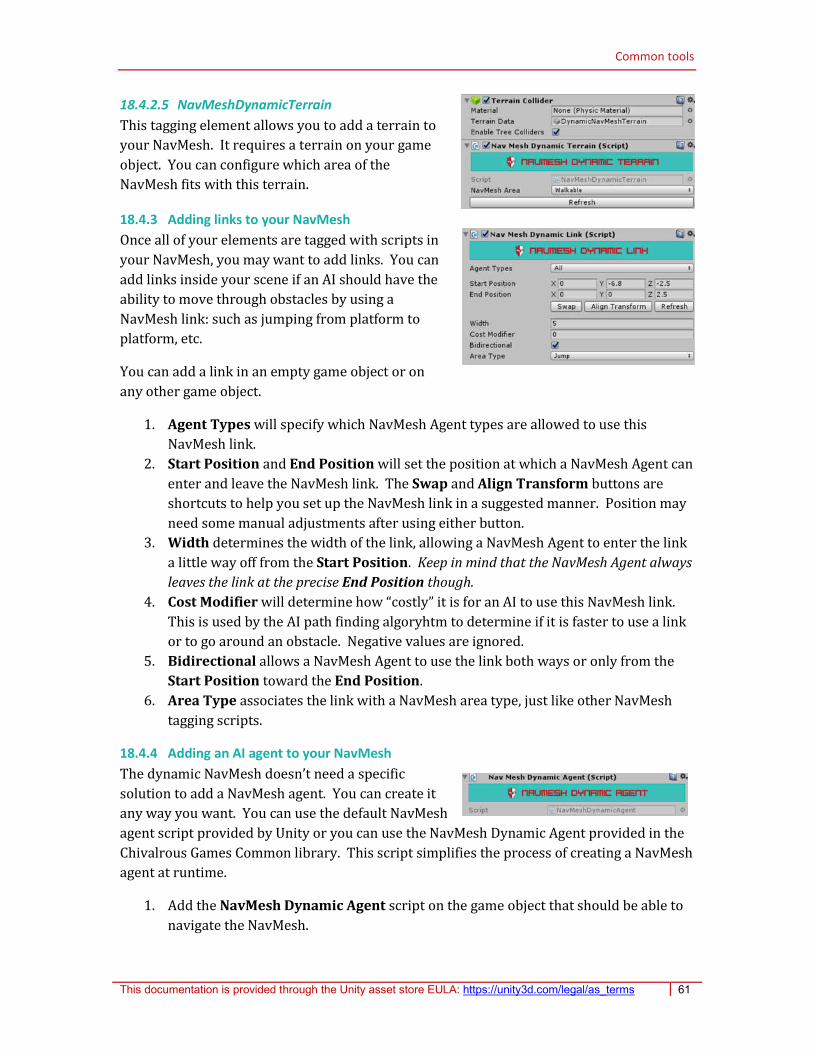
Common tools
This documentation is provided through the Unity asset store EULA: https://unity3d.com/legal/as_terms 61
18.4.2.5 NavMeshDynamicTerrain
This tagging element allows you to add a terrain to
your NavMesh. It requires a terrain on your game
object. You can configure which area of the
NavMesh fits with this terrain.
18.4.3 Adding links to your NavMesh
Once all of your elements are tagged with scripts in
your NavMesh, you may want to add links. You can
add links inside your scene if an AI should have the
ability to move through obstacles by using a
NavMesh link: such as jumping from platform to
platform, etc.
You can add a link in an empty game object or on
any other game object.
1. Agent Types will specify which NavMesh Agent types are allowed to use this
NavMesh link.
2. Start Position and End Position will set the position at which a NavMesh Agent can
enter and leave the NavMesh link. The Swap and Align Transform buttons are
shortcuts to help you set up the NavMesh link in a suggested manner. Position may
need some manual adjustments after using either button.
3. Width determines the width of the link, allowing a NavMesh Agent to enter the link
a little way off from the Start Position. Keep in mind that the NavMesh Agent always
leaves the link at the precise End Position though.
4. Cost Modifier will determine how “costly” it is for an AI to use this NavMesh link.
This is used by the AI path finding algoryhtm to determine if it is faster to use a link
or to go around an obstacle. Negative values are ignored.
5. Bidirectional allows a NavMesh Agent to use the link both ways or only from the
Start Position toward the End Position.
6. Area Type associates the link with a NavMesh area type, just like other NavMesh
tagging scripts.
18.4.4 Adding an AI agent to your NavMesh
The dynamic NavMesh doesn’t need a specific
solution to add a NavMesh agent. You can create it
any way you want. You can use the default NavMesh
agent script provided by Unity or you can use the NavMesh Dynamic Agent provided in the
Chivalrous Games Common library. This script simplifies the process of creating a NavMesh
agent at runtime.
1. Add the NavMesh Dynamic Agent script on the game object that should be able to
navigate the NavMesh.

Common tools
This documentation is provided through the Unity asset store EULA: https://unity3d.com/legal/as_terms 62
2. From a custom script, call the NavMeshDynamicAgent CreateAgent method when
you want to create your NavMesh agent.
The CreateAgent method will repeatedly try to create the NavMesh agent and
position it on your NavMesh. It is useful when you don’t know when the NavMesh
will be available, such as in a dynamic NavMesh scenario.
3. The NavMesh agent created by the CreateAgent method has all the default settings.
To configure this agent after it is created, the CreateAgent method needs a callback
method. When the agent is created, the callback method you supplied will be
invoked and the code within executed so you can configure the agent.
4. You can destroy the NavMesh agent at anytime by using the NavMeshDynamicAgent
destroyAgent method.
There is no default custom script supplied with the Chilvalrous Games Common library to
use the NavMesh Dynamic Agent script, but an example script is supplied in the example
scene. Look for the NpcAgent script. You can start from this script to create your own
custom script.
18.5 Prefab Helper
A prefab is a powerful tool in a Unity project. It is a template object from which many
instances are created in scenes. Modifying the prefab allows you to update other instances.
Unfortunately, Unity doesn’t provide a solution to nest prefabs into one another. Example:
you could have a building prefab composed of walls and windows. This building can be
used multiple times in a scene. If you modify the building prefab, all instances in your scene
can be easily updated to reflect the changes done on the prefab. But each building can be
composed of many identical windows. It would be logical to create a window prefab.
Updating the window prefab should update all buildings so their windows reflect the
changes done on the window prefab. But since the window prefab is nested inside a
building prefab, the link between window instances and the window prefab is lost. If you
want to change the windows inside the building prefab, you have to do it manually for each
window.
The prefab helper is a lightweight solution that allows working with nested prefabs. You
can add the prefab helper script on any game object. You then link the prefab helper on
your object with a prefab in project files. If you click on the Revert button, this object will
revert to the prefab it is linked to. You can include prefab helper objects in a standard
prefab. In our example, you could link all windows of the building prefab to the window
prefab through the prefab helper. So when the window prefab changes, you can select all

Common tools
This documentation is provided through the Unity asset store EULA: https://unity3d.com/legal/as_terms 63
the building windows and click on the Revert button so all of your windows reflect the
changes done in your window prefab.
You can also nest prefab helpers into one another. By clicking on Revert, a prefab helper
object will revert itself to the linked prefab but if it finds children prefab helper, it won’t
update these children. If you click on Revert Tree, then if children prefab helpers are
found, they will be reverted as well.
The prefab helper only offers revert functionality. The apply functionality was not included
into the prefab helper because it had very poor performance. But the revert option still
allows for a lot of time saving.
To avoid having you look throughout all of your scenes and project files, the prefab helper
also comes with a search wizard, which allows you to locate all instances of a prefab helper.
From there you can simply navigate to your prefab helpers and revert them using either
Revert or Revert Tree.
For some reasons, a prefab helper can become unlinked from its prefab. For example, this
can happen when the prefab is deleted. When this occurs, the prefab helper icon switches
from green to red. This means that you should relink your prefab helper to a prefab in your
project files.
18.5.1 Linking to a prefab with the prefab helper
1. Add the Prefab Helper script to the game object you want to link to a prefab. (This game object can already be an instance of the prefab or simply an empty game object, it doesn’t matter.) The Prefab Helper script should display a red icon, meaning that your game object is not linked to a prefab yet.
Common tools
This documentation is provided through the Unity asset store EULA: https://unity3d.com/legal/as_terms 64
2. Expand the Unlinked fold in the Prefab Helper script.
3. Drag and drop the prefab from your project files into the Prefab to link field. At this point the red icon should turn green, indicating that the prefab is linked. The Prefab field should be auto populated with the prefab you linked and the Prefab to link field should be emptied.
4. At any point, if you want to refresh your game object to mirror the prefab, you can click on Revert.
5. If Prefab Helpers are nested into one another, clicking Revert Tree will do a revert on the current Prefab Helper and all of its children. Clicking on Revert will revert the current Prefab Helper but not its children.
6. If you want to find all Prefab Helpers that are connected to the current linked prefab, you can click on Search to open the Prefab Helper Search wizard pre-configured to search for this prefab.
7. If you ever want to link this game object to another prefab or if for some reason the link toward your prefab is lost (icon turns red) simply drag and drop the prefab from your project files into the Prefab to link field again.
Once a prefab contains a prefab helper in its hierarchy (the script is either on itself or one of its children), a white Prefab Helper icon is displayed beside the prefab’s name in the project files. This icon is there to help you locate your prefab helpers if you want to revert them.
Once a game object contains a prefab helper (on itself only) it will display a green or red prefab helper icon beside its name in the scene hierarchy. This icon is there to help you locate your prefab helpers if you want to revert them. The green color indicates that the prefab is linked and the red color indicates that the prefab is not linked.
18.5.2 Searching for prefab helpers
It can be useful to locate prefab helpers in your project files and in your scenes. Since there is no apply functionality supplied with the prefab helper solution, if you want to apply changes you did to a prefab to all the prefab helpers linked to this prefab you need to locate them in an efficient manner. The Prefab Helper Search wizard aims to do just that.
1. Go to Tools | Chivalrous Games | Common and click on Prefab Helper Search.
2. At this point you have the option to do 3 different type of search.
a. The All mode will search for all prefab helper scripts in all of your scenes and project files. It doesn’t matter if these prefab helpers are unlinked or linked to various prefabs, all instances will be found and reported in the wizard.
b. The Unlinked mode will search for all prefab helpers that have no link with a prefab. This search mode is there to help you fix problems. Either you forgot to link some of these prefab helpers with their target prefab, or you deleted a prefab in your projects files that was targeted by some prefab helpers. Whatever the reason, prefab helpers are not useful when they are in the unlinked state.

Common tools
This documentation is provided through the Unity asset store EULA: https://unity3d.com/legal/as_terms 65
c. The Linked mode will search for all prefab helpers targeting the same prefab. You also need to supply the target prefab in the Linked to Prefab field for this search mode to work.
3. Click on the Search button to begin. Depending on the size of your project, this search will take more or less time to complete. A progress bar will be displayed to inform you of the search progress. You can cancel the search at anytime using the Cancel button in the progress window.
4. Once the search is completed, the Prefab Helper Search wizard will display the results under the Prefab Helper Search Results fold. The first level of the results will show where the found prefab helpers are located, either in your project files or in one of your scenes (in the case of a scene you also get the state of the scene at the moment of the search). You can expand further to get a link to each game object that contains a prefab helper.
Because of Unity limitations, clicking on a game object in the results will not always give you a direct link to the game object itself. For example, if you click on a game object that is not in a currently opened scene, clicking the object will not open the scene automatically. Also, clicking on a game object link that is nested in a prefab in your project files will not always automatically select the prefab in your project files, but it should at least expand it to help you locate it.
5. When you are done with your search, you can close the Prefab Helper Search wizard by using the Close button.
18.6 Mass Transform Adjustment
Sometimes it is useful to move around, rotate and scale multiple elements at the same time
in the editor. The editor allows it, but not always in a precise manner. The Chivalrous
Games Common library now includes a tool to apply relative modifications to a list of
transforms in the scene with precision.
Keep in mind that the adjustments are applied relatively to the current values of each
transform. For example: consider transform A located at position 0,0,0 and transform B
locatedat position 2,0,0. Applying a position adjustment of 2,0,0 will result in transform A
being related to 2,0,0 and transform B will be relocatedto 4,0,0.
1. Go to Tools | Chivalrous Games | Common and click on Mass Transform Adjustment.
2. Configure the adjustment you want to apply on your transforms. Click only on the options that apply Adjust Position, Adjust Rotation and/or Adjust Scale.
3. Configure the value of adjustment for position, rotation or scale, depending on the adjustment types you selected at the previous step.
Position adjustments are done in Unity units and will move your transforms around.
Rotation adjustments are done in degree angles and will rotate your transforms around their own center.
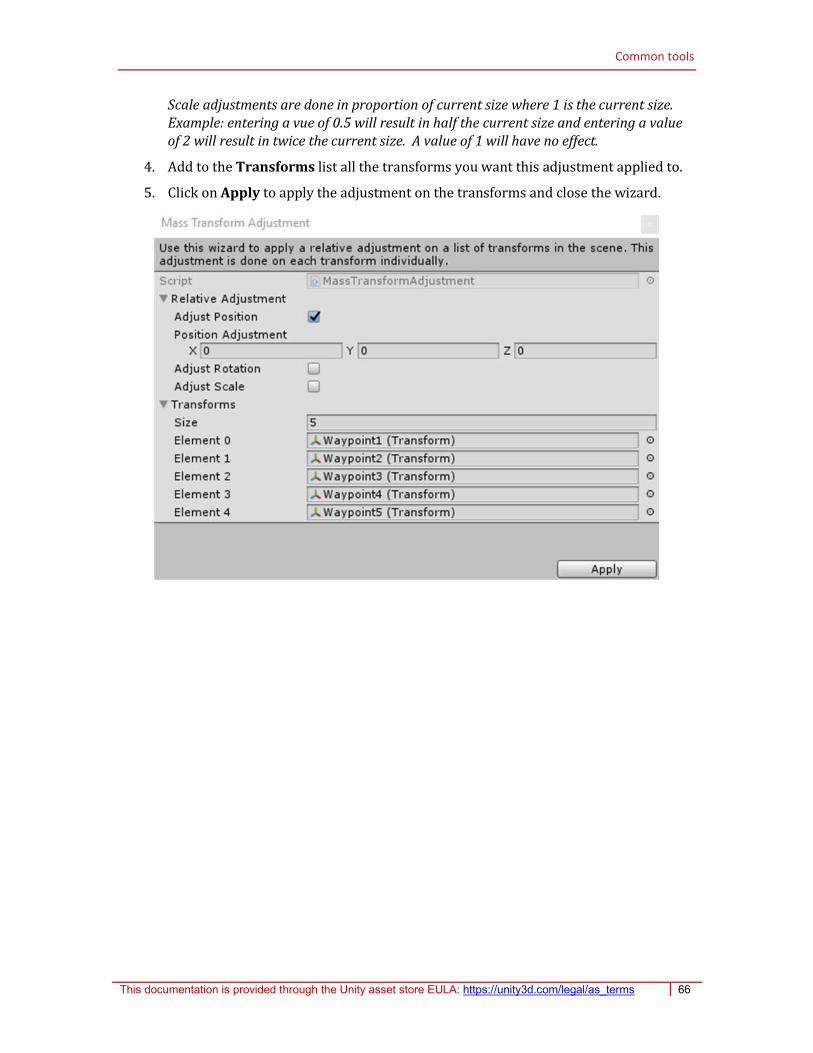
Common tools
This documentation is provided through the Unity asset store EULA: https://unity3d.com/legal/as_terms 66
Scale adjustments are done in proportion of current size where 1 is the current size. Example: entering a vue of 0.5 will result in half the current size and entering a value of 2 will result in twice the current size. A value of 1 will have no effect.
4. Add to the Transforms list all the transforms you want this adjustment applied to.
5. Click on Apply to apply the adjustment on the transforms and close the wizard.

Update guide
This documentation is provided through the Unity asset store EULA: https://unity3d.com/legal/as_terms 67
19 Update guide
This section describes how to update a project to a new version of the Dungeon Master Lite correctly. Following this guide will help you avoid problems when updating your project. Versions for which no user operation is necessary are not described in this guide.
To update the Dungeon Master Lite, simply go to the asset store window in your Unity project, download the latest version from your downloads page, and import the new version into your project.
NOTE: Some updates may require you to perform operations before you download the new version of the Dungeon Master Lite. You can get this guide on the Chivalrous Games website before downloading the Dungeon Master update.
See the chapter Upgrade guide if your project uses the Dungeon Master Lite and you wish to upgrade to the full version of the Dungeon Master.
NOTE: Everytime you update your project to a new version of the Dungeon Master Lite, don’t forget to take a backup of your project beforehand in case anything goes wrong!
19.1 Version 1.0.2
Version 1.0.2 is the first version of the Dungeon Master Lite. There is nothing to special to do for this version.
19.2 Update from 1.0.2 to 1.1.0
In the process of developing dynamic room NavMesh, a bug was detected in the adjustments
applied to rooms, spawn points and connectors points causing some adjustments to be
applied twice. If this is a feature you are using in your project, you may need to reset your
adjustments. To help you with this process, a new feature was added in the
ChilvarousGames.Common library called the Mass Transform Adjustment. Please see the
section Mass Transform Adjustment to lean more about this feature.

Upgrade guide
This documentation is provided through the Unity asset store EULA: https://unity3d.com/legal/as_terms 68
20 Upgrade guide
If you currently have the Dungeon Master Lite, want to upgrade to the full version of the Dungeon Master and use the features that only exist in the full version, you have to follow some steps to ensure you convert your existing dungeons correctly.
NOTE: Everytime you upgrade your project to the full version of the Dungeon Master, don’t forget to take a backup of your project beforehand in case anything goes wrong!
See the chapter Update guide if your project already uses the full version of the Dungeon Master and you wish to update to a new version.
To upgrade from Dungeon Master Lite to the full Dungeon Master version, simply go to the asset store window in your Unity project, download the latest version of the Dungeon Master from your downloads page, and import the Dungeon Master into your project.
NOTE: Some upgrades may require you to perform operations before you download the Dungeon Master. You can get this guide on the Chivalrous Games website before downloading the Dungeon Master upgrade.
20.1 Upgrading from Dungeon Master Lite 1.0.2 to Dungeon Master 1.0.2
Version 1.0.2 is the first version of the Dungeon Master Lite. Versions for both Dungeon Master and Dungeon Master Lite will be kept in-sync to simplify the upgrade process.
20.1.1 After upgrading
1. Your Dungeons can now generate multiple levels and attach them together. Under the Dungeon Generation Config of your dungeons, the “Level” property is replaced with a level list. Create a new entry in this list, drag and drop the level in that list. You dungeon should now work again like it did when using the Dungeon Master Lite version. You can now generate new entries in the level list to add other levels. The other features, such as the lock and key and journeys are also available to your upgraded dungeon. See this guide to learn how to configure them
2. If your scripts had any reference to Dungeon.generationConfig.level, they should be rewritten to Dungeon.generationConfig.levels[0].
3. If your scripts had any reference to Dungeon.Level, they should be rewritten to Dungeon.Levels[0].
20.2 Upgrading from Dungeon Master Lite 1.1.0 to Dungeon Master 1.1.0
Version 1.1.0 of the Dungeon Master and Dungeon Master Lite introduced the dynamic NavMesh generation, solved bugs and added PrefabHelper and Mass Transform Adjustment features. All of these changes are applied the same way for both versions of the Dungeon Master. This means that there is nothing special to do to convert from the Dungeon Master Lite 1.1.0 to Dungeon Master 1.1.0.
You still need to go through all changes described before this section to make sure the conversion works properly.
Appendices
This documentation is provided through the Unity asset store EULA: https://unity3d.com/legal/as_terms 69
21 Appendices
21.1 Dungeon generation explained
Here is a quick overview of the dungeon generation steps. The goal here is not to reveal what the code does every step of the way, but simply to give you a broad understanding so if you have trouble generating dungeons you can get an idea of what is going on under the hood.
First of all, it is possible (and it will most probably happen often at first) that a dungeon generation fails. Although a 100% success generation rate of a dungeon is preferable, it is not mandatory for a game to work.
You can setup a number of tries for the dungeon generation before the Dungeon Master says “ok, enough, I can’t get this to work”. This setting is found in the dungeon script Max Generation Attempts. Each time you ask a dungeon to generate itself, it will try multiple times until it succeeds or fails that many number of times.
Each time the dungeon tries to generate itself, it will attempt to generate its levels one by one. Each level also has a Max Generation Attempts. For each dungeon generation attempts, the level can try to generate itself that many number of times. So level generation attempts are basically multiplied by the dungeon generation attempts. Keep that in mind to avoid configuring 1,000 attempts on the dungeon and 1,000 attempts on the level, which could possibly result in 1,000,000 attempts to generate a single level. That would probably freeze Unity for a long time if your dungeon has a low success rate.
The default generation attempts of 10 for the level and 10 for the dungeon seem enough for a dungeon and a level with good generation success rates. Whatever happens, success or failure, you won’t wait too long.
When a level tries to generate itself, it will simply create rooms and connect them together. At this point, no level connector, dungeon connector, key or spawnable is placed.
Once the dungeon has succeeded in generating all the levels themselves, it will move on to create level connections (available only in the full version of the Dungeon Master), create dungeon connections, distribute the keys for the lock and key system and generate the spawnables in all levels, in that order.
Here are the usual reasons for a failed dungeon generation:
Rooms do not allow enough room connectors variety at their room connector points so the level has a hard time finding suitable room neighbors.
Rooms to not have enough spawn points that allow to spawn keys for the lock and key system. (Lock and key system is not available in the Dungeon Master Lite)
Not enough rooms allow walls to be used for the room connectors, meaning the level has a hard time closing itself off when it reaches a level limit or when it has all the rooms required to close the level.
Not enough rooms have level or dungeon connector points so the dungeon has a hard time connecting levels together or creating the dungeon entrances.

Appendices
This documentation is provided through the Unity asset store EULA: https://unity3d.com/legal/as_terms 70
Min Room Amount is too high for the Max Width, Max Height and Max Depth amounts in the level configuration.
Of course depending on the rooms , levels, connectors, locks and keys you use, your mileage may vary.
21.2 Render weight explained
The max render weight is the total weight of instantiated rooms the dungeon master considers acceptable before it starts destroying rooms.
Each time a room is rendered for the first time, it adds its weight to the current render weight of the dungeon. When this room is unrendered, it will not be destroyed, only deactivated. Rendering this room again won’t require the Dungeon Master to instantiate it again, it will simply reactivate the room.
When rooms are deactivated, they still consume resources (although not many). To prevent taking too much resource, the Dungeon Master will destroy unrendered rooms when its current render weight exceeds the max it falls below the max render weight.
NOTE: Be careful if you setup levels that are always rendered or have a full render shape: their rooms will always take up an amount of weight in the dungeon. You should raise the max render weight accordingly or reduce the number of rooms these levels hold. Otherwise, you may get in a situation where the dungeon destroys and recreates these rooms at each render pass, which would result in very poor performance. My recommendation would be to avoid these render options as much as possible.
21.3 Room coordinates explained
Room coordinates are integer based (coordinates never contains decimals).
The maximum size of a level is determined by its max width, max height and max depth in
number of rooms. Example: a level with max width = 4, max height = 3 and max depth = 5
would be a maximum of 4 rooms wide, 3 rooms high and 5 rooms deep.
The coordinate of a room is simply the location of the room in the level. The lowest possible
coordinate for a room in a level is always (0,0,0). The highest possible coordinate for a
room in a level is always (MaxWidth -1, MaxHeight – 1, MaxDepth -1). So if we go back to
our previous example, the maximum coordinate for a room in this level would be (3,2,4). A
specific coordinate cannot be used by more than one room in the same level.
21.4 Room size explained
The room size is a very important element of the Dungeon Master. It may seem restrictive
to force all rooms of a level to fit within a specific volume but it allows the Dungeon Master
to create maps automatically and to handle rendering automatically and efficiently. I
believe it is a great trade off.
Measure the rooms you want to add to a level and make sure you have a size that fits closely
for most of the rooms in your level. (I like to create a box collider and use it to measure the
rooms I want to use in a level.) If you have a big room that stands out from the others,
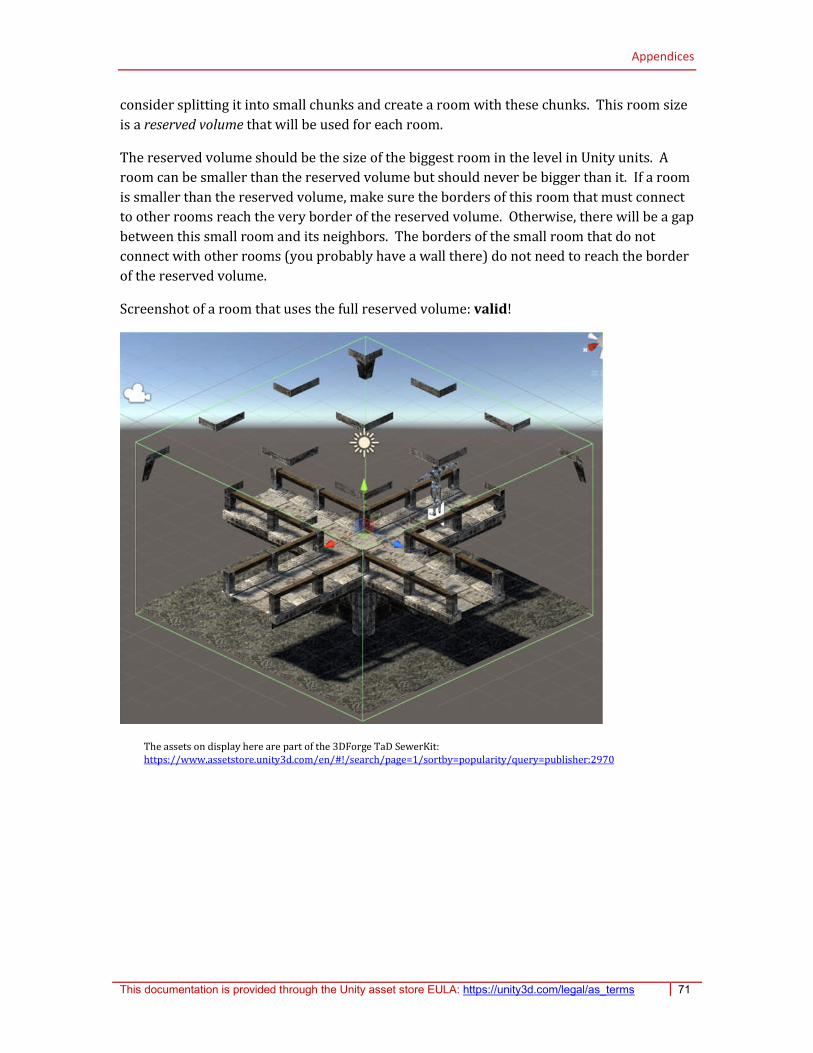
Appendices
This documentation is provided through the Unity asset store EULA: https://unity3d.com/legal/as_terms 71
consider splitting it into small chunks and create a room with these chunks. This room size
is a reserved volume that will be used for each room.
The reserved volume should be the size of the biggest room in the level in Unity units. A
room can be smaller than the reserved volume but should never be bigger than it. If a room
is smaller than the reserved volume, make sure the borders of this room that must connect
to other rooms reach the very border of the reserved volume. Otherwise, there will be a gap
between this small room and its neighbors. The borders of the small room that do not
connect with other rooms (you probably have a wall there) do not need to reach the border
of the reserved volume.
Screenshot of a room that uses the full reserved volume: valid!
The assets on display here are part of the 3DForge TaD SewerKit: https://www.assetstore.unity3d.com/en/#!/search/page=1/sortby=popularity/query=publisher:2970
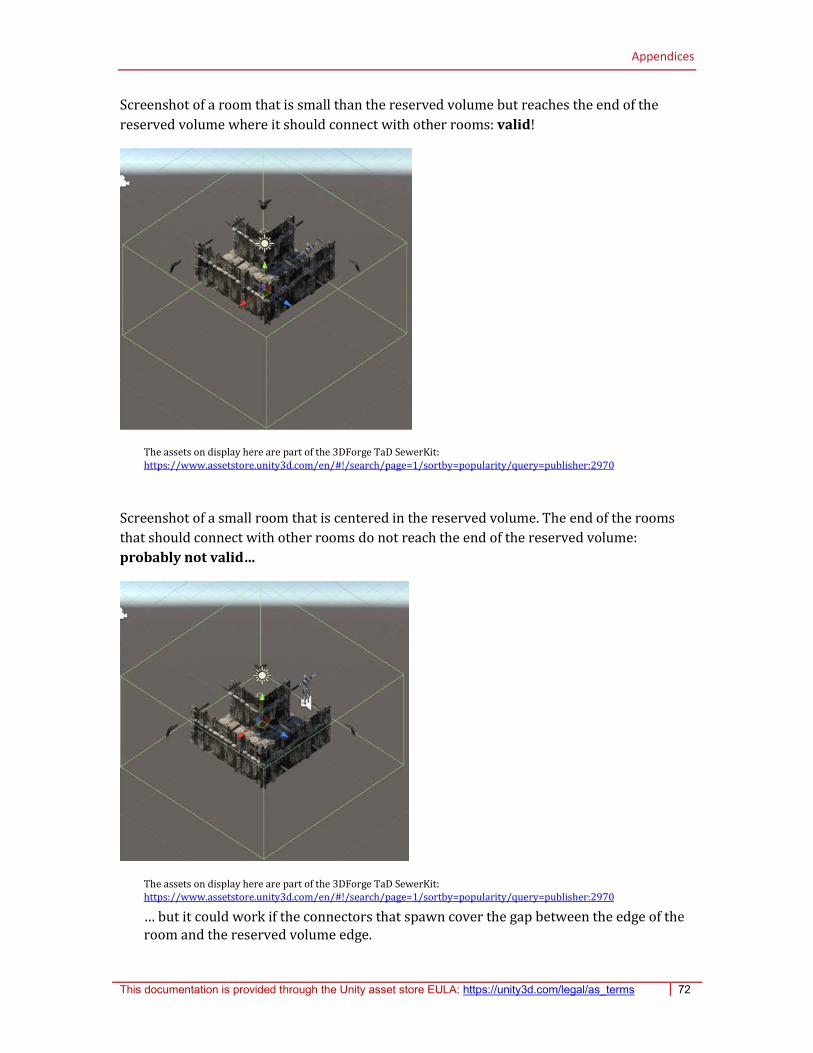
Appendices
This documentation is provided through the Unity asset store EULA: https://unity3d.com/legal/as_terms 72
Screenshot of a room that is small than the reserved volume but reaches the end of the
reserved volume where it should connect with other rooms: valid!
The assets on display here are part of the 3DForge TaD SewerKit: https://www.assetstore.unity3d.com/en/#!/search/page=1/sortby=popularity/query=publisher:2970
Screenshot of a small room that is centered in the reserved volume. The end of the rooms
that should connect with other rooms do not reach the end of the reserved volume:
probably not valid…
The assets on display here are part of the 3DForge TaD SewerKit: https://www.assetstore.unity3d.com/en/#!/search/page=1/sortby=popularity/query=publisher:2970
… but it could work if the connectors that spawn cover the gap between the edge of the room and the reserved volume edge.
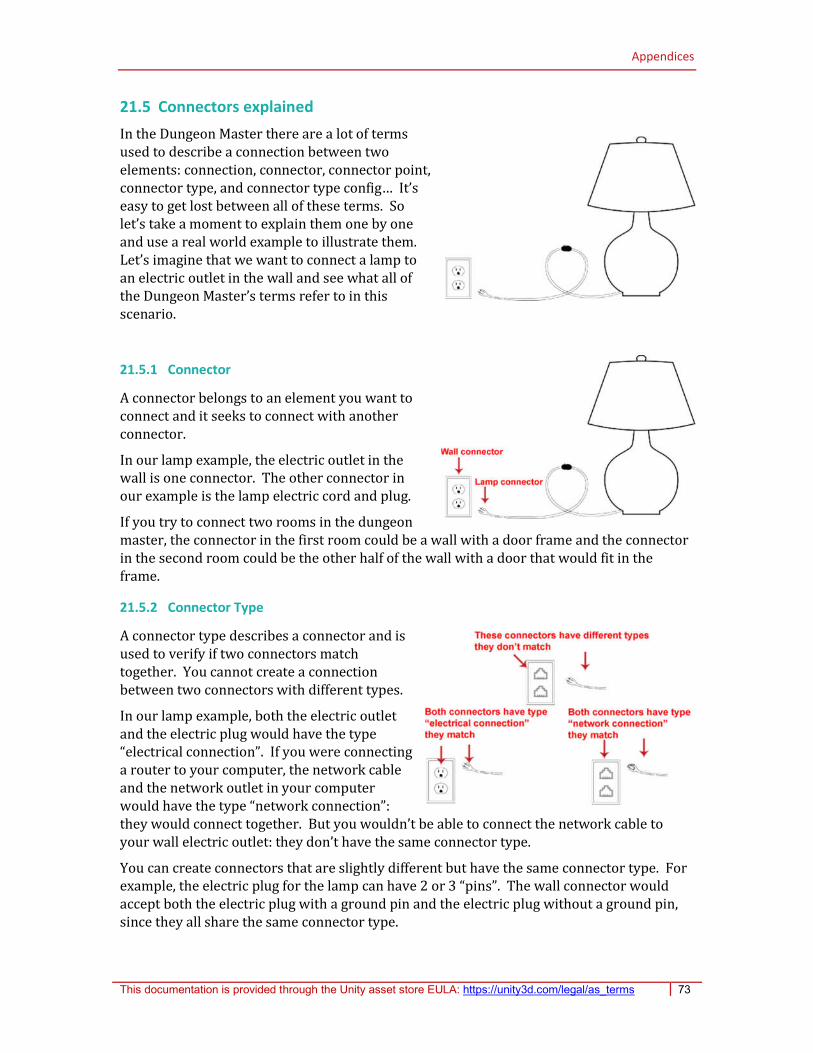
Appendices
This documentation is provided through the Unity asset store EULA: https://unity3d.com/legal/as_terms 73
21.5 Connectors explained
In the Dungeon Master there are a lot of terms used to describe a connection between two elements: connection, connector, connector point, connector type, and connector type config… It’s easy to get lost between all of these terms. So let’s take a moment to explain them one by one and use a real world example to illustrate them. Let’s imagine that we want to connect a lamp to an electric outlet in the wall and see what all of the Dungeon Master’s terms refer to in this scenario.
21.5.1 Connector
A connector belongs to an element you want to connect and it seeks to connect with another connector.
In our lamp example, the electric outlet in the wall is one connector. The other connector in our example is the lamp electric cord and plug.
If you try to connect two rooms in the dungeon master, the connector in the first room could be a wall with a door frame and the connector in the second room could be the other half of the wall with a door that would fit in the frame.
21.5.2 Connector Type
A connector type describes a connector and is used to verify if two connectors match together. You cannot create a connection between two connectors with different types.
In our lamp example, both the electric outlet and the electric plug would have the type “electrical connection”. If you were connecting a router to your computer, the network cable and the network outlet in your computer would have the type “network connection”: they would connect together. But you wouldn’t be able to connect the network cable to your wall electric outlet: they don’t have the same connector type.
You can create connectors that are slightly different but have the same connector type. For example, the electric plug for the lamp can have 2 or 3 “pins”. The wall connector would accept both the electric plug with a ground pin and the electric plug without a ground pin, since they all share the same connector type.
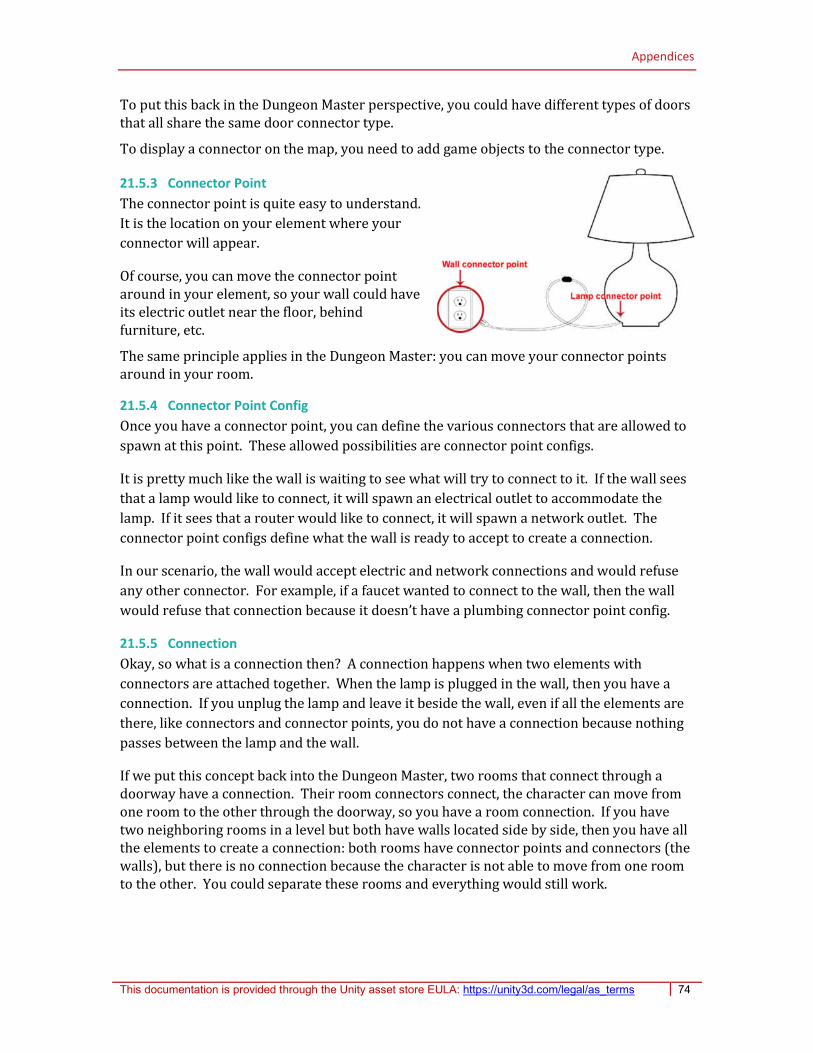
Appendices
This documentation is provided through the Unity asset store EULA: https://unity3d.com/legal/as_terms 74
To put this back in the Dungeon Master perspective, you could have different types of doors that all share the same door connector type.
To display a connector on the map, you need to add game objects to the connector type.
21.5.3 Connector Point
The connector point is quite easy to understand.
It is the location on your element where your
connector will appear.
Of course, you can move the connector point around in your element, so your wall could have its electric outlet near the floor, behind furniture, etc.
The same principle applies in the Dungeon Master: you can move your connector points around in your room.
21.5.4 Connector Point Config
Once you have a connector point, you can define the various connectors that are allowed to
spawn at this point. These allowed possibilities are connector point configs.
It is pretty much like the wall is waiting to see what will try to connect to it. If the wall sees
that a lamp would like to connect, it will spawn an electrical outlet to accommodate the
lamp. If it sees that a router would like to connect, it will spawn a network outlet. The
connector point configs define what the wall is ready to accept to create a connection.
In our scenario, the wall would accept electric and network connections and would refuse
any other connector. For example, if a faucet wanted to connect to the wall, then the wall
would refuse that connection because it doesn’t have a plumbing connector point config.
21.5.5 Connection
Okay, so what is a connection then? A connection happens when two elements with
connectors are attached together. When the lamp is plugged in the wall, then you have a
connection. If you unplug the lamp and leave it beside the wall, even if all the elements are
there, like connectors and connector points, you do not have a connection because nothing
passes between the lamp and the wall.
If we put this concept back into the Dungeon Master, two rooms that connect through a doorway have a connection. Their room connectors connect, the character can move from one room to the other through the doorway, so you have a room connection. If you have two neighboring rooms in a level but both have walls located side by side, then you have all the elements to create a connection: both rooms have connector points and connectors (the walls), but there is no connection because the character is not able to move from one room to the other. You could separate these rooms and everything would still work.

Appendices
This documentation is provided through the Unity asset store EULA: https://unity3d.com/legal/as_terms 75
21.5.6 Tight and loose connections
In a dungeon, there are tight and loose connections.
Tight connections are connections for which the connectors are physically located next to one another. Connections between rooms are tight connections: the rooms are located side by side and the character can move from room to room seamlessly, there is no gap between the connectors in this connection.
The vast majority of connections in a dungeon are room connections.
Loose connections are connections for which the connectors are separated from each other. There is a gap between the connectors. Dungeon connections are loose connections. When a character needs to move from the dungeon to the outside world, the connector must actually teleport the character from one connector to the other. To achieve this, you need a script. Depending on the type of character controller you use (physics or not?), the teleport script will differ. Level connectors used in the full version of the Dungeon Master are losse connections too.
Teleporting a character from one location to another in a game is a common scenario, but in case you haven’t done so already, here is a simple example of a teleport script. You can adapt it to fit in your game (this example can be found in the example project also):
public class TeleportScript : MonoBehaviour { public string destinationTag; //this means you need to tag the outside of your dungeon public bool isDungeonExit; void OnTriggerEnter(Collider other) { MyCharacterController char = other.gameObject.GetComponent<MyCharacterController>(); if(char != null) { GameObject destination = GameObject.FindGameObjectWithTag(destinationTag); if(!GameObjectExtensions.IsNull(destination)) { char.transform.position = destination.transform.position; if (isDungeonExit) { DungeonExit.LeaveDungeon ("Dungeon"); //important for the dungeon renderer } } } } }
21.6 Spawnables explained
In the Dungeon Master there are a lot of terms used to describe elements that can be spawned in a dungeon: spawnable, spawnable type, spawn point, spawn point config and detached spawnable. This appendix will explain all of them.
21.6.1 Spawnable
A spawnable is an element that will appear in a room at a spawn point. This spawnable can contain one or many prefabs. Spawnables can be used to create scenery, enemies, items, loot, non playable characters, etc. Spawnables can be associated with spawnable types.
21.6.2 Spawnable Type
A spawnable type is used to create a logical group of spawnables. An orc, a troll and a demon would probably all have the spawnable type “enemy”. You can use helper methods
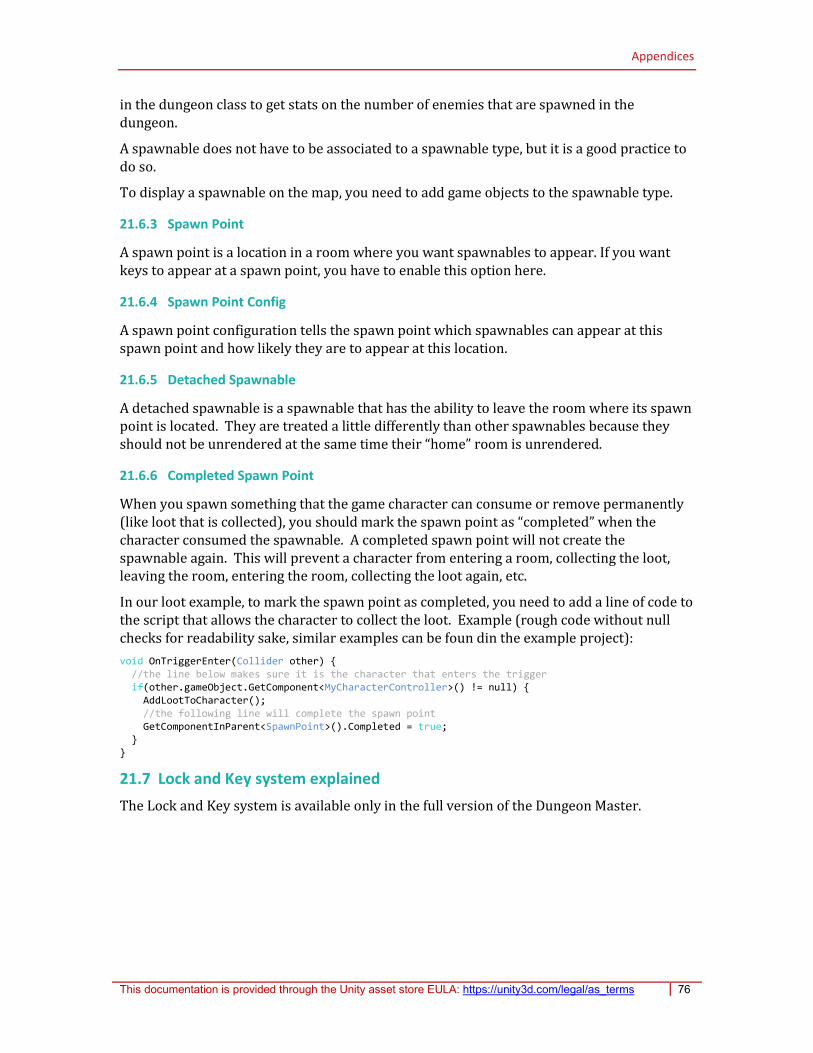
Appendices
This documentation is provided through the Unity asset store EULA: https://unity3d.com/legal/as_terms 76
in the dungeon class to get stats on the number of enemies that are spawned in the dungeon.
A spawnable does not have to be associated to a spawnable type, but it is a good practice to do so.
To display a spawnable on the map, you need to add game objects to the spawnable type.
21.6.3 Spawn Point
A spawn point is a location in a room where you want spawnables to appear. If you want keys to appear at a spawn point, you have to enable this option here.
21.6.4 Spawn Point Config
A spawn point configuration tells the spawn point which spawnables can appear at this spawn point and how likely they are to appear at this location.
21.6.5 Detached Spawnable
A detached spawnable is a spawnable that has the ability to leave the room where its spawn point is located. They are treated a little differently than other spawnables because they should not be unrendered at the same time their “home” room is unrendered.
21.6.6 Completed Spawn Point
When you spawn something that the game character can consume or remove permanently (like loot that is collected), you should mark the spawn point as “completed” when the character consumed the spawnable. A completed spawn point will not create the spawnable again. This will prevent a character from entering a room, collecting the loot, leaving the room, entering the room, collecting the loot again, etc.
In our loot example, to mark the spawn point as completed, you need to add a line of code to the script that allows the character to collect the loot. Example (rough code without null checks for readability sake, similar examples can be foun din the example project):
void OnTriggerEnter(Collider other) { //the line below makes sure it is the character that enters the trigger if(other.gameObject.GetComponent<MyCharacterController>() != null) { AddLootToCharacter(); //the following line will complete the spawn point GetComponentInParent<SpawnPoint>().Completed = true; } }
21.7 Lock and Key system explained
The Lock and Key system is available only in the full version of the Dungeon Master.

Appendices
This documentation is provided through the Unity asset store EULA: https://unity3d.com/legal/as_terms 77
21.8 Dynamic NavMesh in a Level explained
When working with AI, pathfinding through NavMesh is a great help. The AI components
supplied with Unity do a great job, but implementing a dynamic NavMesh solution is not
always easy to do. Fortunately the Dungeon Master can take care of that for you. It is as
simple as checking the option to generate a dynamic NavMesh in the level generation config
and identifying which elements should be part of the NavMesh. At this point, the Dungeon
Master will generate a dynamic NavMesh for your level. The level dynamic NavMesh is split
into little NavMesh islands (one per room instance in the level). These islands must be
connected with links.
For each room to be able to generate its own NavMesh, game objects in the room prefab
must be tagged with scripts. When the room generates its NavMesh, it will collect all game
objects tagged with these scripts and add them in the NavMesh data. Links will also be
collected. Whenever a room is rendered, its NavMesh will be added to the level. Room
connectors should contain links to allow NavMesh agents to move from room to another.
For more information on NavMesh agents or NavMesh information in general, please see
documentation on Unity’s website.
Since each room has to generate its own NavMesh, a couple of features are in place to
improve performance:
1. You can bake a default version of a room NavMesh. When the room instance is
rendered, it will verify if its content fit with the baked NavMesh and if it does, it will
simply use the baked NavMesh rather than creating another one which is a great
help on performance. (For more information, see chapter Room)
2. When a room generates its NavMesh, it will cache the generated NavMesh and make
it available for all other instances of this room. If another instance of this room
detects that a cached NavMesh fits the requirements, it will use the NavMesh from
the cache rather than generating a new one. As long as a NavMesh from the cache is
used by a room, it remains available. When a cached NavMesh is not used anymore,
it will eventually be removed from the cache.
When looking at the Room NavMesh
Manager script of a room instance at
runtime, you will know if the room is
using a NavMesh that was generated, that
was baked or taken from the NavMesh
cache.
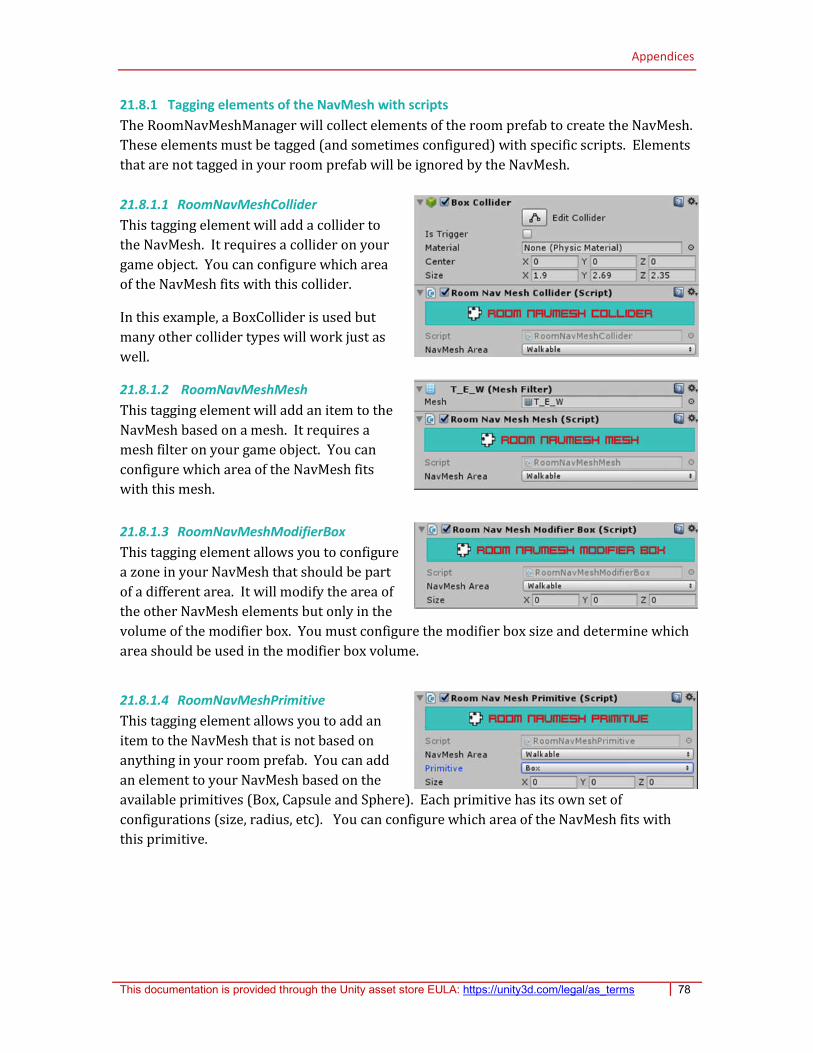
Appendices
This documentation is provided through the Unity asset store EULA: https://unity3d.com/legal/as_terms 78
21.8.1 Tagging elements of the NavMesh with scripts
The RoomNavMeshManager will collect elements of the room prefab to create the NavMesh.
These elements must be tagged (and sometimes configured) with specific scripts. Elements
that are not tagged in your room prefab will be ignored by the NavMesh.
21.8.1.1 RoomNavMeshCollider
This tagging element will add a collider to
the NavMesh. It requires a collider on your
game object. You can configure which area
of the NavMesh fits with this collider.
In this example, a BoxCollider is used but
many other collider types will work just as
well.
21.8.1.2 RoomNavMeshMesh
This tagging element will add an item to the
NavMesh based on a mesh. It requires a
mesh filter on your game object. You can
configure which area of the NavMesh fits
with this mesh.
21.8.1.3 RoomNavMeshModifierBox
This tagging element allows you to configure
a zone in your NavMesh that should be part
of a different area. It will modify the area of
the other NavMesh elements but only in the
volume of the modifier box. You must configure the modifier box size and determine which
area should be used in the modifier box volume.
21.8.1.4 RoomNavMeshPrimitive
This tagging element allows you to add an
item to the NavMesh that is not based on
anything in your room prefab. You can add
an element to your NavMesh based on the
available primitives (Box, Capsule and Sphere). Each primitive has its own set of
configurations (size, radius, etc). You can configure which area of the NavMesh fits with
this primitive.

Appendices
This documentation is provided through the Unity asset store EULA: https://unity3d.com/legal/as_terms 79
21.8.1.5 RoomNavMeshTerrain
This tagging element allows you to add a
terrain to your NavMesh. It requires a
terrain on your game object. You can
configure which area of the NavMesh fits
with this terrain.
21.8.2 Adding links to your NavMesh
Once all of your elements are tagged with
scripts in your NavMesh, you will need to
add links. Since all rooms are little NavMesh
islands detached from other rooms, an AI
needs to know how to move from one room
to another. The Dungeon Master connects
rooms through RoomConnectors and
RoomConnectors can spawn elements that
will be added into your rooms. You can add
NavMesh links into these RoomConnectors.
You can also add links inside the room prefab as well if an AI should have the ability to
move through obstacles by using a NavMesh link: such as jumping from platform to
platform, etc.
You can add a link in an empty game object or on any other game object.
7. Agent Types will specify which NavMesh Agent types are allowed to use this
NavMesh link.
8. Start Position and End Position will set the position at which a NavMesh Agent can
enter and leave the NavMesh link. The Swap and Align Transform buttons are
shortcuts to help you set up the NavMesh link in a suggested manner. Position may
need some manual adjustments after using either button.
9. Width determines the width of the link, allowing a NavMesh Agent to enter the link
a little way off from the Start Position. Keep in mind that the NavMesh Agent always
leaves the link at the precise End Position though.
10. Cost Modifier will determine how “costly” it is for an AI to use this NavMesh link.
This is used by the AI path finding algorythm to determine if it is faster to use a link
or to go around an obstacle. Negative values are ignored.
11. Bidirectional allows a NavMesh Agent to use the link both ways or only from the
Start Position toward the End Position.
12. Area Type associates the link with a NavMesh area type, just like other NavMesh
tagging scripts.
13. Track NavMesh Link works just like the RoomNavMeshManager Track NavMesh.
This has a negative impact on performance because the Dungeon Master will
monitor changes to the NavMesh Link at runtime and if changes are detected, the

Appendices
This documentation is provided through the Unity asset store EULA: https://unity3d.com/legal/as_terms 80
NavMesh Link will be rebuilt. It allows you to modify the link at runtime, but it is a
good idea to limit the usage of this feature if you need high performance. If you
already use the Track NavMesh option for the RoomNavMeshManager that
includes this link, it is usually not useful to enable the Track NavMesh Link as well.
21.8.3 Adding an AI agent to your NavMesh
The Dungeon Master doesn’t need a specific solution to add a NavMesh agent. You can
create it any way you want. You can use the default NavMesh agent script provided by
Unity or you can use the NavMesh Dynamic Agent provided in the Chivalrous Games
Common library. For more information on the NavMesh Dynamic Agent, see section
Generic Dynamic NavMesh.

Appendices
This documentation is provided through the Unity asset store EULA: https://unity3d.com/legal/as_terms 81
21.9 External ressources
If you need more information on the Dungeon Master, you can use the following resources:
21.9.1 The official Chivalrous Games YouTube channel
On the Chivalrous Game YouTube channel, you will find tutorials and examples for the Dungeon Master.
https://www.youtube.com/channel/UCLhEXhtT_eHmVTxcgqfrQPw
21.9.2 The official Chivalrous Games website
On the Chivalrous Games website, you will find the latest version of this user guide and extensive reference documentation for the Dungeon Master and other components.
https://chivalrousgames.com/
21.9.3 Email support
If you have any comments, questions, need help, want to request a new feature or want to
submit bug reports, I will be happy to help out. Send me an email at:
I will read every email and answer them as soon as possible. But please keep in mind that I
am a one man team and the realities of life will sometime prevent me from answering
immediately. I have a day time job and a family, so please be understanding.


![[D&D 4.0] Dungeon Tiles Master Set - The Wilderness](https://img.pdfslide.us/doc/110x75/577c7d541a28abe0549e5bba/dd-40-dungeon-tiles-master-set-the-wilderness.jpg)


![[D&D 4.0] Dungeon Tiles Master Set - The Dungeon.pdf](https://img.pdfslide.us/doc/110x75/577c7d541a28abe0549e5b8a/dd-40-dungeon-tiles-master-set-the-dungeonpdf.jpg)