Embed Size (px)
Citation preview

1
Dungeon Crawl Classics #51
Castle Whiterock LEVEL 1:
THE UPPER RUINS OF CASTLE WHITEROCK
Level Summary
About a year ago, the Slavers of the Iron Manacle settled in the upper ruins of Castle Whiterock. Disguised as Monks of the Dawning Sun, they claimed they were excavating the ruins for signs of the previous monastery. The band now seeks to reestablish its shattered organization by preying on the locals and selling them to the orcs on the levels below.
Encounter Table Loc Pg Type Encounter CR Difficulty XP
1-1 8 C 2 slavers, male human 1 Medium 150 1 slaver rogue, male human
1-3 11 C/T 2 slavers, male human 1/4 Trivial 50 Tent trap
1-4 12 C 4 giant centipedes 1 Hard (Situational) 200
1-7 14 C giant mantis 2 Hard (Situational) 450
1-8 15 C 2 slavers, male human 1 Medium 150 Hornet nest (insect swarm)
1-9 16 C Ikenvar, male human * 2 Hard 450
1-10 18 C Melchin, male human ** 1 Easy 200
1-12 20 C/T Owlbear skeleton 1 Easy 200 Poison needle trap
1-14a 22 C Rust spider 1 Easy (Situational) 200
1-14b 23 C 6 blood hawks 1 Medium (Situational) 150
1-14c 24 C/P Slaver rogue, male human 1/2 Trivial 100
2
Game Master’s Section
Scaling Information
This level of the dungeon is designed for 4-6 characters of 1st level, 5 being the optimal amount, but can be modified for parties of different sizes or levels. Consider adapting this dungeon level as follows: Weaker parties (3 or fewer characters): Remove half of the slavers encountered, and half the centipedes in area 1-4, and half the blood hawks in area 1-14b, and remove the giant mantis. Ikenvar should use the stats of a slaver rogue with 58 hitpoints. Stronger parties (7 or more characters, or higher than 1st level): Add another 25 hitpoints to Ikenvar and Melchin and give one a +2 to hit and damage, and the other +2 to his AC. Count each one as 1 CR higher. Covert half of the slavers to slaver rogues as appropriate. Increase the number of centipedes in area 1-4 to 6, and add another 25 hitpoints to the rust spider in area 1-14a and raise its to hit and damage by 2, change its CR to 2.
Background Story The Slavers of the Iron Manacle were based in the distant city of Punjar until last year. The operation was shut down after an escaped slave assisted authorities in locating their hidden base of operations. Most of the slavers were captured and brought to justice, but a few low-ranking members, such as Ikenvar and Ankiel (see the description of the Inn of the Slumbering Drake), managed to escape. In an effort to keep the organization and its twisted ideals alive, Ikenvar gathered as many supporters as he could muster, and set out for Cillamar to reunite with an orcish ally named Kaernga. The orc agreed to assist the Iron Manacle in “setting up shop” in Castle Whiterock in exchange for providing a non-stop supply of fresh workers for the orcish mines. They just needed a cover story. After some information gathering on the history of the ruins, Ankiel conceived the monkish front. The Iron Manacle allied itself with an evil monk named Melchin. He assisted the slavers in their charade to appear as Monks of the Dawning Sun.
They have since set up camp in the upper levels of Castle Whiterock under the pretense of searching the old Clynnoise Monastery ruins. All slavers encountered wear simple monk robes and carry quarterstaffs. Each has his own (fake) silverplated symbol representing the Order of the Dawning Sun. Meanwhile, Ankiel runs a very low-profile operation from Cillamar. He identifies potential targets and arranges for ambushes in the surrounding lands. Ankiel is paranoid about keeping his identity concealed, thus he will not show up at the ruins in person. All communication between him and the band occurs via messages delivered by his crow familiar. The slavers have been very successful over the last year, and they are contemplating stepping up operations. Ikenvar grows weary of his arrangement with the orcs, and feels the time is right for the Iron Manacle to resume its independence in an effort to maximize profits. Little does he realize the extent of the tangled web (spun by the operators of an Underdeep slave market on one of the lower levels) in which the orcs are entangled.
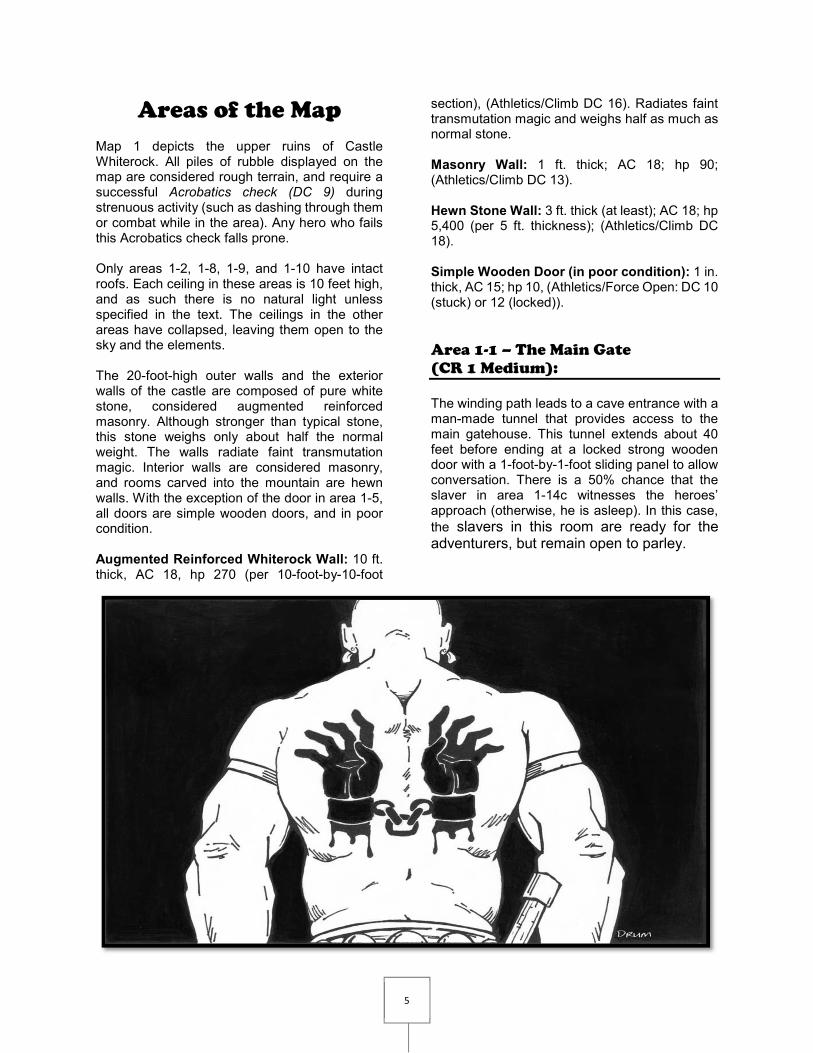
Detecting the Ruse The slavers are far from competent when playing the roles of monks. Should the heroes interact with the slavers for more than one minute, anyone with a Passive Perception of 13 or higher can discover the ruse. Assuming the slavers only altered minor details. If the PCs fail this initial check, they can be granted Insight checks (opposed by the slavers’ Deception roll) if they continue to interact with the slavers, at the GM’s discretion. If the adventurers examine the fake symbols of the Dawning Sun, a DC 15 Religion check reveals them as fake. If the PCs have located one of the real symbols from the ruins, they are granted advantage on this check. Each slaver sports an intricate tattoo on his back of a pair of iron manacles enclosed on severed wrists (show Player’s Handout A, above). A hero who makes a DC 16 History check will know that the tattoo is a symbol of the Slavers of the Iron Manacle.
3
On Alert If the adventurers are not careful, the slavers could be alerted to their presence. This occurs if any “monk” escapes a confrontation with the PCs or gets a chance to raise an alarm. See individual area descriptions for details. In this case, the slavers respond as follows: • The slavers in area 1-1 maintain their positions. • The slavers in area 1-3 move to area 1-5 to defend the great hall. • The slavers in area 1-8 take positions in the rubble along the north wall of area 1-5 with loaded crossbows from under the table in area 1-8.. • Melchin, Ikenvar, and the slaver rogue from area 1- 14c take positions in area 1-6 to support the defense of area 1-5 (through the archway).
Getting Captured There are many opportunities on this level for the adventurers to get captured, as the slavers are accustomed to using nonlethal tactics. If this happens, the heroes are led to level 2 and area 2-3, where they are stripped of their equipment (which is placed in area 2-4) and split up into separate cells. Obvious spellcasters are bound in average manacles and gagged for good measure. Over the next day or so in game time, the GM should provide a few opportunities for the PCs to escape, perhaps in the form of aid from the slaves already imprisoned in the slave pits. If they do not escape within a few days, they are transferred to the Bleak Theater (Level 10), where their short careers as adventurers comes to an end as they are fed to some terrible beast for the bloody pleasure of an Underdeep crowd.
Tracking
The upper ruins provide many opportunities for tracking. If the heroes search the road leading to the keep, they will detect many humanoid-sized tracks traveling in both directions (no check required), along with numerous deep wagon-wheel ruts and horse tracks. The courtyard area is riddled with tracks as well, depending on where the PCs search: • A DC 20 Survival check near the ruins of Clynnoise reveals fewer tracks, and these are
much older than those found in the rest of the courtyard. • In the courtyard in general, a DC 9 Survival check reveals routine traffic by Medium-sized sandaled feet. Most of the tracks pass from the main gate to area 1-5. The horse tracks and wagon wheel ruts lead to the stables (area 1-2). • A DC 16 Survival check near the fallen tower (area 1-7) reveals large vermin tracks (created by the giant mantis). • A DC 13 Survival check in areas 1-5 to 1-13 reveals assorted Medium-sized footprints.
Interrogation If the heroes capture any of the slavers, they might attempt to interrogate them. It requires a DC 13 Intimidate check to threaten information out of a captured slaver. A DC 16 Persuasion check, along with a bribe (of at least 10 gp), can also be effective in loosening a slaver’s tongue. The rank and fodder slavers (slavers and slaver rogues) all know the backstory of their operation, the layout of the upper ruins, the number of slavers in the band, and their reestablishment at Castle Whiterock. They are aware of the deal with the orcs on level 2 (and can lead them to the doorway down to level 2), but despise dealing with them. None of these slavers is aware of Ankiel. The named NPCs (Ikenvar and Melchin) can’t be so easily swayed to betray the organization. See individual descriptions for details on these NPCs’ motivations.
Wandering Monsters
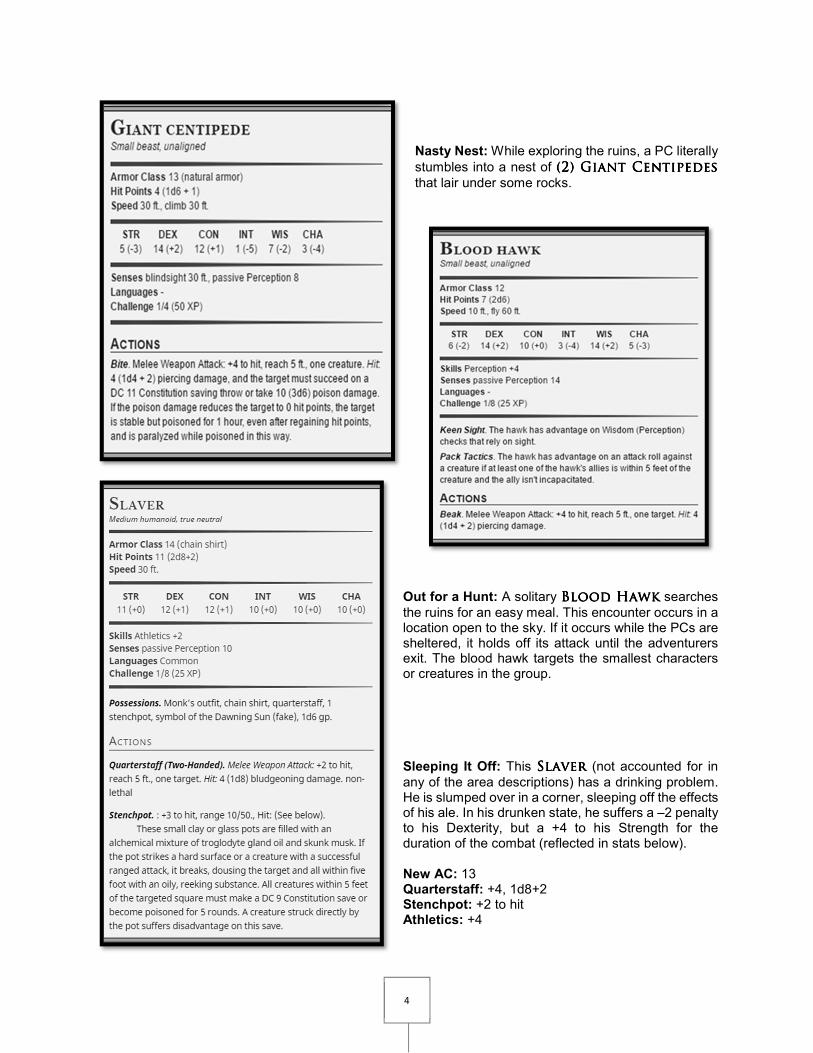
In each uninhabited location that the adventurers explore, there is only a 10% chance (1-2 on a d20) that they encounter a wandering monster. This chance increases to 15% (1-3 on a d20) if they make excessive noise. If an encounter is called for, roll 1d6 and consult the following table. Each encounter can happen only once. 1d6 Encounter 1-3 Nasty nest (CR 1/2 EASY) 4-5 Out for a hunt (CR 1/8 TRIVIAL) 6 Sleeping it off (CR 1/8 TRIVIAL) The following statistics blocks on the next page are provided for easy reference for the Game Master.
4
Nasty Nest: While exploring the ruins, a PC literally
stumbles into a nest of (2) (2) (2) (2) GGGGiantiantiantiant CCCCentipedesentipedesentipedesentipedes
that lair under some rocks.
Out for a Hunt: A solitary BBBBlood lood lood lood HHHHawkawkawkawk searches
the ruins for an easy meal. This encounter occurs in a location open to the sky. If it occurs while the PCs are sheltered, it holds off its attack until the adventurers exit. The blood hawk targets the smallest characters or creatures in the group.
Sleeping It Off: This SSSSlaverlaverlaverlaver (not accounted for in
any of the area descriptions) has a drinking problem. He is slumped over in a corner, sleeping off the effects of his ale. In his drunken state, he suffers a –2 penalty to his Dexterity, but a +4 to his Strength for the duration of the combat (reflected in stats below). New AC: 13 Quarterstaff: +4, 1d8+2 Stenchpot: +2 to hit Athletics: +4
5
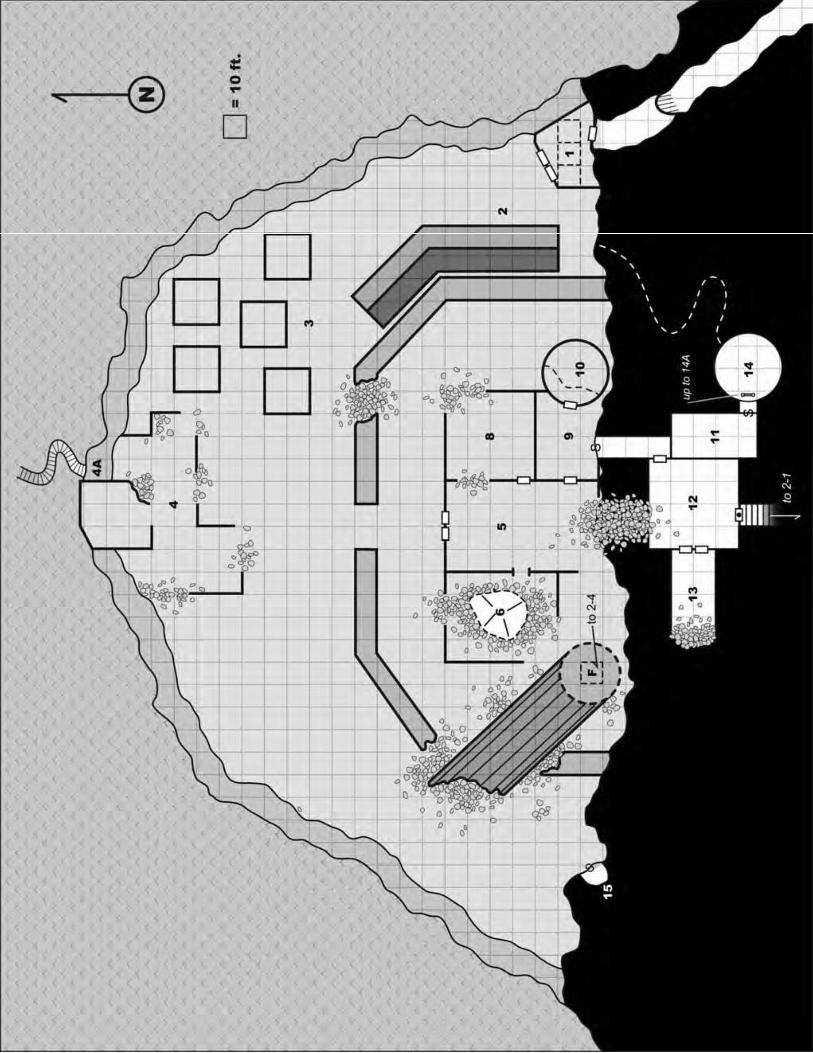
Areas of the Map Map 1 depicts the upper ruins of Castle Whiterock. All piles of rubble displayed on the map are considered rough terrain, and require a successful Acrobatics check (DC 9) during strenuous activity (such as dashing through them or combat while in the area). Any hero who fails this Acrobatics check falls prone. Only areas 1-2, 1-8, 1-9, and 1-10 have intact roofs. Each ceiling in these areas is 10 feet high, and as such there is no natural light unless specified in the text. The ceilings in the other areas have collapsed, leaving them open to the sky and the elements. The 20-foot-high outer walls and the exterior walls of the castle are composed of pure white stone, considered augmented reinforced masonry. Although stronger than typical stone, this stone weighs only about half the normal weight. The walls radiate faint transmutation magic. Interior walls are considered masonry, and rooms carved into the mountain are hewn walls. With the exception of the door in area 1-5, all doors are simple wooden doors, and in poor condition. Augmented Reinforced Whiterock Wall: 10 ft. thick, AC 18, hp 270 (per 10-foot-by-10-foot
section), (Athletics/Climb DC 16). Radiates faint transmutation magic and weighs half as much as normal stone. Masonry Wall: 1 ft. thick; AC 18; hp 90; (Athletics/Climb DC 13). Hewn Stone Wall: 3 ft. thick (at least); AC 18; hp 5,400 (per 5 ft. thickness); (Athletics/Climb DC 18). Simple Wooden Door (in poor condition): 1 in. thick, AC 15; hp 10, (Athletics/Force Open: DC 10 (stuck) or 12 (locked)).
Area 1-1 – The Main Gate
(CR 1 Medium):
The winding path leads to a cave entrance with a man-made tunnel that provides access to the main gatehouse. This tunnel extends about 40 feet before ending at a locked strong wooden door with a 1-foot-by-1-foot sliding panel to allow conversation. There is a 50% chance that the slaver in area 1-14c witnesses the heroes’ approach (otherwise, he is asleep). In this case,
the slavers in this room are ready for the adventurers, but remain open to parley.
6
Strong Wooden Door: 2 in. thick; AC 15; hp 20; (Athletics/Force Open: DC 20 (locked), Open Lock DC 16. Bluffing Their Way In: If the disguised slavers (see below) are aware of the adventurers’ approach, one of the warriors addresses them through the door panel. The heroes may try to convince him of their “benign” intentions (for instance, they desire to explore the Clynnoise ruins, they are lost travelers or perhaps even slave buyers). If they attempt this and succeed on a Deception check vs. the slaver’s opposed Insight roll, the warriors greet them as friends and lead them to area 1-3 (see that area for tactics). Meanwhile, the rogue sneaks off to inform the other slavers, and the ruins are considered On Alert. When the PCs enter the room, read or paraphrase the following:
This bare stone chamber is perhaps 40 feet wide and 20 feet long. The north wall is composed of large stone blocks, perhaps part of an immense wall. A pair of sturdy wooden doors is in the southwest corner. The ceiling is 10 feet high, but riddled with murder holes allowing the faint sunlight to penetrate the otherwise barren room.
This room was the first line of defense for Castle Whiterock, although it’s remote location and small access point is what truly prevented a traditional large-scale force from conquering its walls. Nevertheless, murder holes are in the ceiling, and a trio of pits is concealed on the floor. The pits can be detected if the players investigate the floor, with a Investigation check (DC 13), but due to age and recent seismic activity, they are jammed shut. A successful Intelligence check (DC 20) is needed to repair each pit trap, but don’t let the PCs know that! The player attempting would also need to be proficient in the use of the tools and have a set with them. The repair would take one full day. If the check was failed by five or more no further attempts can be made as the doors are too heavily damaged. If the check fails by less than five another attempt can be made the following day (requiring another days work). Other players can assist giving the mason advantage on this check. The Slavers: A trio of slavers, all disguised as
monks, are stationed here. There are (2) (2) (2) (2)
SSSSlaverslaverslaverslavers, while the third is a SSSSlaver roguelaver roguelaver roguelaver rogue....
If caught unaware, they are lounging on the rooftop, and it takes them 1d4 rounds to climb down the ladder to area 1-1, if alerted to the heroes’ presence. If the PCs are hostile, the warriors engage while the rogue retreats back up the ladder and peppers targets with arrows through the murder holes. If the PCs are not hostile, the slavers play the part of monks, and open a dialogue.
Tactics: If a fight breaks out here, the warriors inflict nonlethal damage with their quarterstaffs in an attempt to subdue the adventurers. The rogue readies a shot if one of the warriors falls in battle. Arrows do lethal damage. He can only target PCs
7
in the three squares in front of the double doors. If the second warrior falls, the rogue flees and tries to shout an alarm. Before fleeing, he attempts to drop a stenchpot in the room through the murder holes. SLAVER (2) CR 1/8
XP 25
Male human (See stats on page 4.)
hp 11
Languages Common
SLAVER ROGUE CR 1/2
XP 100
Male human (See stats on page 6.)
hp 16
Languages Common
Area 1-2 – The Stables:
When the party enters this area, read or paraphrase the following:
A long low wooden building is situated along the inner castle wall. The tickling smell of hay intermixed with the stench of sweaty animals betrays the building’s function as a stable.
When the slavers arrived at the castle, the first building they crudely repaired was the stable. Close examination reveals the weather-beaten structure has been shoddily repaired numerous times.
The stables house (14) Riding H(14) Riding H(14) Riding H(14) Riding Horsesorsesorsesorses and
a pair of wagons with cloth coverings. Under the coverings are iron-barred cages attached to the wagon frame. Each can hold six Medium-sized slaves. Fine quality manacles (Open Lock DC 16) are bolted to the floor of each cage. A Chance Encounter: There is a 20% chance one of the slavers from area 1-8 is here tending the horses, if no alarm has been raised. RIDING HORSE (14) CR 1/4
XP 50
Large Beast (See stats om page 7.)
hp 13
Languages ---
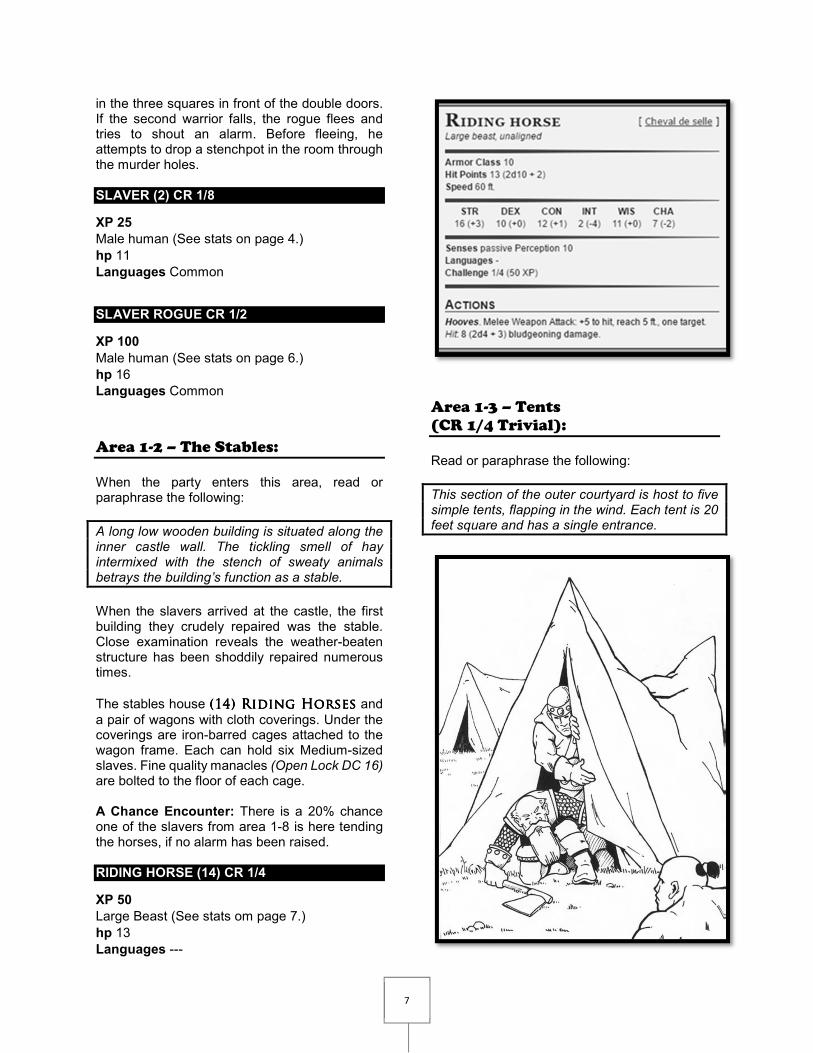
Area 1-3 – Tents
(CR 1/4 Trivial):
Read or paraphrase the following:
This section of the outer courtyard is host to five simple tents, flapping in the wind. Each tent is 20 feet square and has a single entrance.
8
The “monks” claim this area is their base of operations while they search the ruins of their ancestors. Three of the tents are set up for sleeping, and each contains five hammocks and footlockers. A quick search reveals the footlockers are all empty. The slavers set these tents up for show and instead reside in the ruins proper. One of the tents is used to store digging tools, but a successful Investigation check (DC 13) reveals the tools have not been used in several months. The final tent contains a large meeting table. On its surface are numerous rocks, bits of pottery, and other “artifacts” recovered from the ruins of Clynnoise. These are all fake and can be identified as such with a successful Intelligence
check (DC 14). (2)(2)(2)(2) SSSSlaverslaverslaverslavers are stationed here
at all times. They split their time poking through the ruins in area 1-4 and patrolling the courtyard. Tactics: If the PCs are “welcomed” by the slavers in area 1-1, they are led here. The two slavers ask for them to wait in the tent with the artifacts while the rogue summons their leader. Ikenvar arrives in 3d4 rounds with two more slavers from area 1-8. Ikenvar then leads his six warriors and one rogue in an ambush. The tent is rigged to collapse. Treat this as a net attack that automatically hits all those in the tent. The PCs can escape with a successful Acrobatics check (DC 13), but this requires the use of a action. The tent can also be burst with a successful Strength check (DC 23). If a PC has a light slashing weapon in hand, and inflicts 4 hit points of damage against the AC 11 tent, he can free himself with an attack. While the PCs try to escape, the slavers use nonlethal attacks and stenchpots to subdue them. All attacks against a foe that is still beneath the tent have advantage. Ikenvar falls back to the great hall (area 1-5) if the PCs get the upper hand. Consider the ruins to be On Alert. SLAVER (2) CR 1/4
XP 25
Male human (See stats on page 4.)
hp 11
Languages Common
Area 1-4 – The Ruins of Clynnoise
(CR 1 Hard, Situational):
When the party approaches this area, read or paraphrase the following:
This area of the outer courtyard is occupied by shattered ruins. Little more than the skeletal structure of the outer wall and a crumbling square tower remain, both clogged with piles of rubble.
These are the remains of Clynnoise, a monastery settled by the Monks of the Dawning Sun. The square tower was surrounded by stone walls and wooden framed buildings that served as living quarters for the monks. But these outer buildings have long since collapsed into a jagged mess of rubble and debris. Movement over any of these shifting piles of debris is considered difficult terrain. The square tower once had four levels, but they too have since collapsed, along with the roof. Poking Around: If the adventurers spend at least 20 minutes poking around the debris and make a successful Investigation check (DC 16), they find an authentic silver symbol of the Order of the Dawning Sun (worth 12 gp) and a small gold ring set with a ruby (worth 25 gp). However, they
also disturb a nest of (4) G(4) G(4) G(4) Giantiantiantiant CCCCentipedes.entipedes.entipedes.entipedes.
Tactics: The centipedes move toward the adventurer who finds the symbol, attacking mindlessly. If the heroes flee, the vermin do not pursue. Many of these monstrous vermin inhabit the ruins, and the GM can use additional brushes with nests to move the heroes along, if necessary. GIANT CENTIPEDES (4) CR 1/4
XP 50
Small beast (See stats on page 4..)
hp 4
Languages None
Area 1-4a – The Hidden Stairs:
At this location is a set of natural hewn stairs that once led to the lower courtyard of Castle Whiterock. However, when earthquakes plagued the region, causing the caldera wall to collapse and altering the water table, the lower ruins of
9
Castle Whiterock were flooded (see level 5). Now these stairs consist of little more than a few weathered steps that disappear into the depths of the lake. It requires a successful Perception check (DC 18) to even notice this route, but it is possible to follow them to area 5-7. However, if the heroes are still 1st-level PCs, the GM should subtly warn them away from this route. Perhaps a brief skirmish with the hydro-hydra from area 5-11 will encourage them to reconsider. (You can use the Hydra stats in the Monster Manual for now, but only deter, do not kill, first level PC’s are so fragile.)
Area 1-5 – The Great Hall:
Read or paraphrase the following:
Beyond a pair of repaired doors is a great hall with what was once a fine white flagstone floor. The ceiling is gone and the walls, once adorned with fine tapestries and exquisite art, are crumbling and show signs of vandalism. The north wall is partially collapsed and a huge pile of rubble clutters the eastern portion of the hall.
This area is normally uninhabited unless the ruins are On Alert. In this case, the slavers have planned an ambush here (see the details as presented in the section On Alert, at the beginning of the level). The rubble is considered difficult terrain.
Area 1-6 – The South Wing:
Read or paraphrase the following:
This room is dominated by a massive pile of rubble. The west wall has a gaping hole which peers into the courtyard. Half of the east wall has collapsed, apparently caused when the south tower fell. The center of the room is a large pit, mostly filled with rubble.
The slavers avoid this chamber due to the dangerous rubble pile and partially collapsed floor. The entire room is considered difficult terrain. Adventurers who approach within 5 feet of the pit must make a Dexterity save (DC 14) to avoid slipping on the shifting rubble and tumbling into the pit, suffering 1d6 points of bludgeoning damage from the fall. On the east wall is some
writing scrawled in Orcish. It reads, “Oh yeah, well yo Mama was a dagger!”
Area 1-7 – The Collapsed
South Tower (CR 2 Hard):
When the party enters this area, read or paraphrase the following:
The entire south tower has tumbled down, destroying part of the inner wall. The shattered remains of the tower are now sprawled over the courtyard like some discarded water pipe. All manner of debris and creeping vines clutter the surface.
The fallen tower can be entered, although it is considered difficult terrain. It is 30 feet in diameter and once contained four wooden floors, all since rotted away. If 10 man-hours of labor are spent removing the rubble, the adventurers can locate a hidden trapdoor in the floor with a DC 16 Investigation check. Under the trapdoor is a rusted ladder leading eventually to a winding stone staircase that provides access to area 2-4. The Unfortunate Victim: Lying on the rubble in the tower to the southwest is the remains of a slaver, dead for several days. The body sports massive slashing wounds (his armor is destroyed) and his monk’s outfit is bloodied. These wounds were caused by a giant praying mantis that lairs in the tower ruins. The body still has 14 gp and a pair of stenchpots in his belt
pouch. Hidden in his left boot is a dagger, which requires a DC 13 Investigation check to locate.
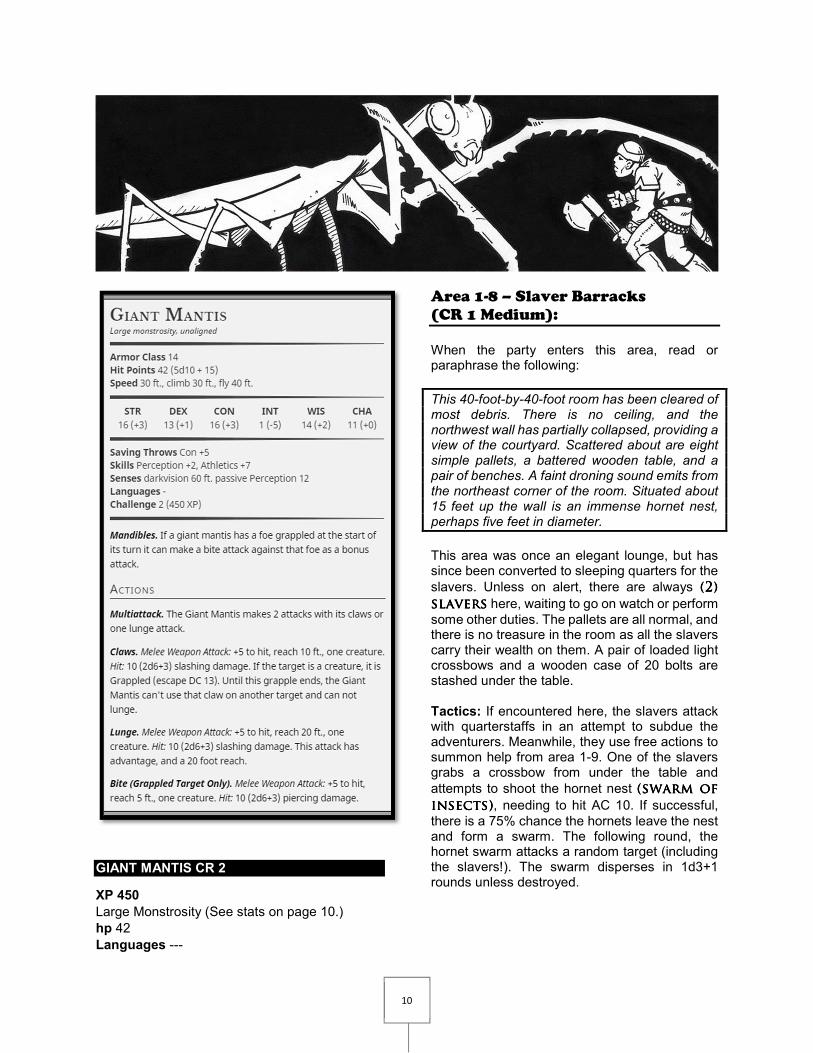
A GGGGiant iant iant iant MMMMantisantisantisantis lies in wait, near the
entrance to the tower. It attacks any PC who investigates the tower ruins (as it did to the unfortunate slaver), but normally it avoids humanoid-sized prey. Tactics: Due to the thickness of vines, the giant praying mantis has advantage on stealth checks to hide. If not noticed with an opposed Perception check, Any PC’s who fail the check do not get to act during the first round of combat and are surprised. If the adventurers retreat, it does not pursue, but it will fight to the death to protect its lair. Probably grabbing a smaller character and attempting to retreat into the fallen tower.
10
GIANT MANTIS CR 2
XP 450
Large Monstrosity (See stats on page 10.)
hp 42
Languages ---
Area 1-8 – Slaver Barracks
(CR 1 Medium):
When the party enters this area, read or paraphrase the following:
This 40-foot-by-40-foot room has been cleared of most debris. There is no ceiling, and the northwest wall has partially collapsed, providing a view of the courtyard. Scattered about are eight simple pallets, a battered wooden table, and a pair of benches. A faint droning sound emits from the northeast corner of the room. Situated about 15 feet up the wall is an immense hornet nest, perhaps five feet in diameter.
This area was once an elegant lounge, but has since been converted to sleeping quarters for the
slavers. Unless on alert, there are always (2) (2) (2) (2)
slaverslaverslaverslaverssss here, waiting to go on watch or perform
some other duties. The pallets are all normal, and there is no treasure in the room as all the slavers carry their wealth on them. A pair of loaded light crossbows and a wooden case of 20 bolts are stashed under the table. Tactics: If encountered here, the slavers attack with quarterstaffs in an attempt to subdue the adventurers. Meanwhile, they use free actions to summon help from area 1-9. One of the slavers grabs a crossbow from under the table and
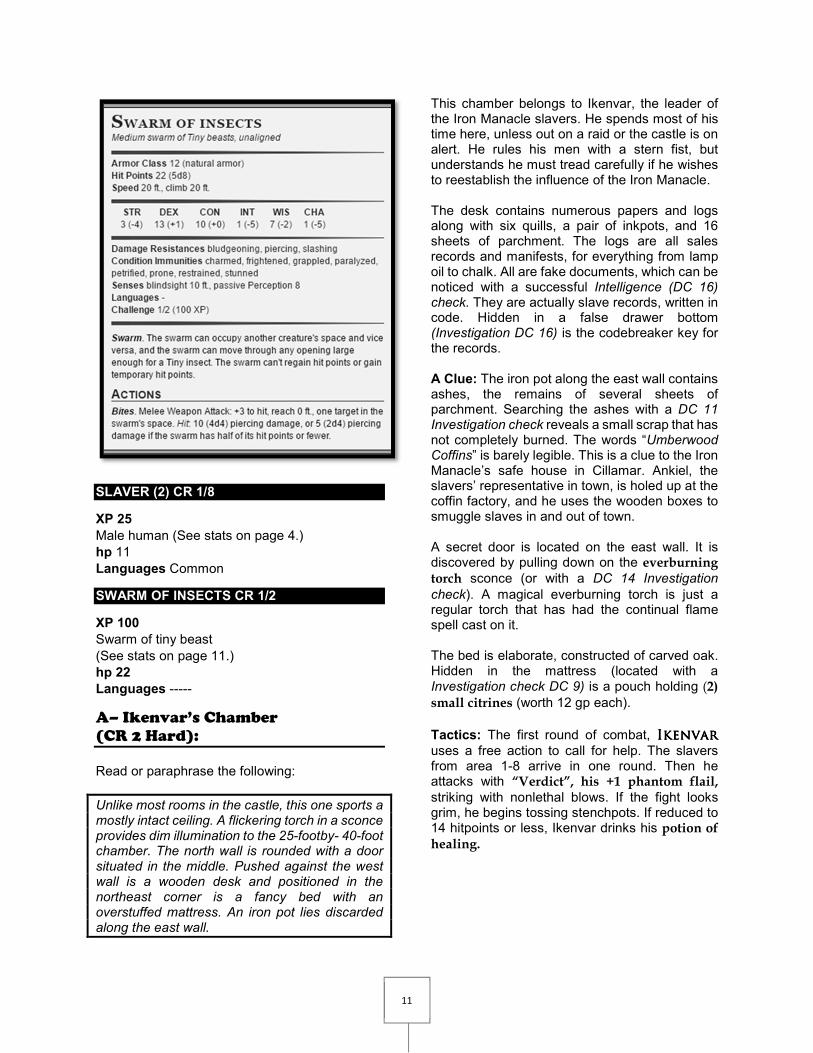
attempts to shoot the hornet nest (swarm of (swarm of (swarm of (swarm of
insects)insects)insects)insects), needing to hit AC 10. If successful,
there is a 75% chance the hornets leave the nest and form a swarm. The following round, the hornet swarm attacks a random target (including the slavers!). The swarm disperses in 1d3+1 rounds unless destroyed.
11
SLAVER (2) CR 1/8
XP 25
Male human (See stats on page 4.)
hp 11
Languages Common
SWARM OF INSECTS CR 1/2
XP 100
Swarm of tiny beast
(See stats on page 11.)
hp 22
Languages -----
A– Ikenvar’s Chamber
(CR 2 Hard):
Read or paraphrase the following:
Unlike most rooms in the castle, this one sports a mostly intact ceiling. A flickering torch in a sconce provides dim illumination to the 25-footby- 40-foot chamber. The north wall is rounded with a door situated in the middle. Pushed against the west wall is a wooden desk and positioned in the northeast corner is a fancy bed with an overstuffed mattress. An iron pot lies discarded along the east wall.
This chamber belongs to Ikenvar, the leader of the Iron Manacle slavers. He spends most of his time here, unless out on a raid or the castle is on alert. He rules his men with a stern fist, but understands he must tread carefully if he wishes to reestablish the influence of the Iron Manacle. The desk contains numerous papers and logs along with six quills, a pair of inkpots, and 16 sheets of parchment. The logs are all sales records and manifests, for everything from lamp oil to chalk. All are fake documents, which can be noticed with a successful Intelligence (DC 16) check. They are actually slave records, written in code. Hidden in a false drawer bottom (Investigation DC 16) is the codebreaker key for the records. A Clue: The iron pot along the east wall contains ashes, the remains of several sheets of parchment. Searching the ashes with a DC 11 Investigation check reveals a small scrap that has not completely burned. The words “Umberwood Coffins” is barely legible. This is a clue to the Iron Manacle’s safe house in Cillamar. Ankiel, the slavers’ representative in town, is holed up at the coffin factory, and he uses the wooden boxes to smuggle slaves in and out of town. A secret door is located on the east wall. It is discovered by pulling down on the everburning torch sconce (or with a DC 14 Investigation
check). A magical everburning torch is just a regular torch that has had the continual flame spell cast on it. The bed is elaborate, constructed of carved oak. Hidden in the mattress (located with a Investigation check DC 9) is a pouch holding (2) small citrines (worth 12 gp each).
Tactics: The first round of combat, IkenvarIkenvarIkenvarIkenvar
uses a free action to call for help. The slavers from area 1-8 arrive in one round. Then he attacks with “Verdict”, his +1 phantom flail, striking with nonlethal blows. If the fight looks grim, he begins tossing stenchpots. If reduced to 14 hitpoints or less, Ikenvar drinks his potion of healing.
12
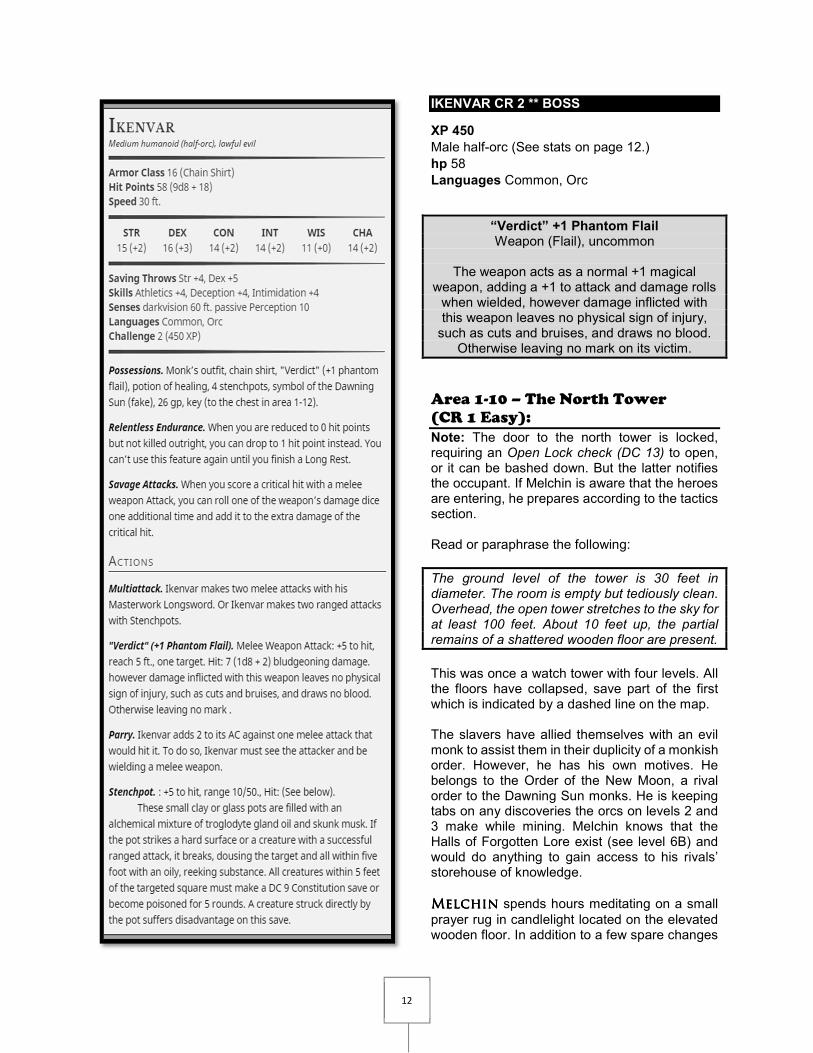
IKENVAR CR 2 ** BOSS
XP 450
Male half-orc (See stats on page 12.)
hp 58
Languages Common, Orc
“Verdict” +1 Phantom Flail Weapon (Flail), uncommon
The weapon acts as a normal +1 magical
weapon, adding a +1 to attack and damage rolls when wielded, however damage inflicted with this weapon leaves no physical sign of injury,
such as cuts and bruises, and draws no blood. Otherwise leaving no mark on its victim.
Area 1-10 – The North Tower
(CR 1 Easy):
Note: The door to the north tower is locked, requiring an Open Lock check (DC 13) to open, or it can be bashed down. But the latter notifies the occupant. If Melchin is aware that the heroes are entering, he prepares according to the tactics section. Read or paraphrase the following:
The ground level of the tower is 30 feet in diameter. The room is empty but tediously clean. Overhead, the open tower stretches to the sky for at least 100 feet. About 10 feet up, the partial remains of a shattered wooden floor are present.
This was once a watch tower with four levels. All the floors have collapsed, save part of the first which is indicated by a dashed line on the map. The slavers have allied themselves with an evil monk to assist them in their duplicity of a monkish order. However, he has his own motives. He belongs to the Order of the New Moon, a rival order to the Dawning Sun monks. He is keeping tabs on any discoveries the orcs on levels 2 and 3 make while mining. Melchin knows that the Halls of Forgotten Lore exist (see level 6B) and would do anything to gain access to his rivals’ storehouse of knowledge.
MelchinMelchinMelchinMelchin spends hours meditating on a small
prayer rug in candlelight located on the elevated wooden floor. In addition to a few spare changes
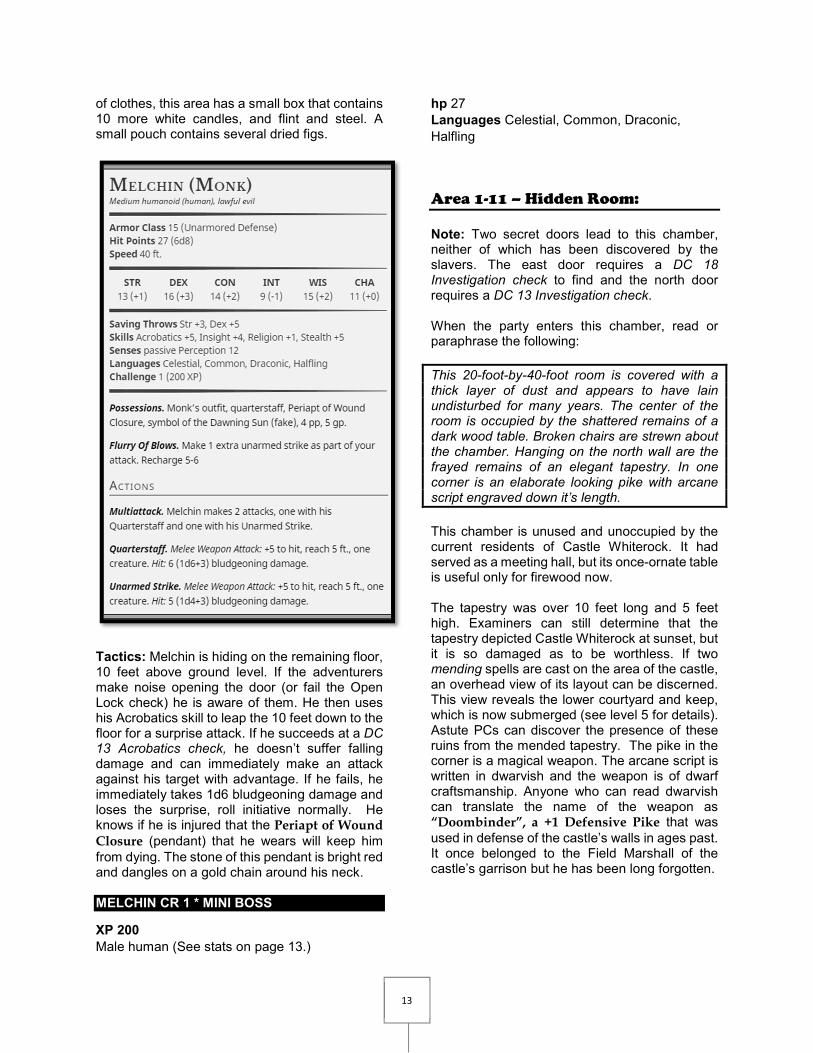
13
of clothes, this area has a small box that contains 10 more white candles, and flint and steel. A small pouch contains several dried figs.
Tactics: Melchin is hiding on the remaining floor, 10 feet above ground level. If the adventurers make noise opening the door (or fail the Open Lock check) he is aware of them. He then uses his Acrobatics skill to leap the 10 feet down to the floor for a surprise attack. If he succeeds at a DC 13 Acrobatics check, he doesn’t suffer falling damage and can immediately make an attack against his target with advantage. If he fails, he immediately takes 1d6 bludgeoning damage and loses the surprise, roll initiative normally. He knows if he is injured that the Periapt of Wound Closure (pendant) that he wears will keep him
from dying. The stone of this pendant is bright red and dangles on a gold chain around his neck. MELCHIN CR 1 * MINI BOSS
XP 200
Male human (See stats on page 13.)
hp 27
Languages Celestial, Common, Draconic,
Halfling
Area 1-11 – Hidden Room:
Note: Two secret doors lead to this chamber, neither of which has been discovered by the slavers. The east door requires a DC 18 Investigation check to find and the north door requires a DC 13 Investigation check. When the party enters this chamber, read or paraphrase the following:
This 20-foot-by-40-foot room is covered with a thick layer of dust and appears to have lain undisturbed for many years. The center of the room is occupied by the shattered remains of a dark wood table. Broken chairs are strewn about the chamber. Hanging on the north wall are the frayed remains of an elegant tapestry. In one corner is an elaborate looking pike with arcane script engraved down it’s length.
This chamber is unused and unoccupied by the current residents of Castle Whiterock. It had served as a meeting hall, but its once-ornate table is useful only for firewood now. The tapestry was over 10 feet long and 5 feet high. Examiners can still determine that the tapestry depicted Castle Whiterock at sunset, but it is so damaged as to be worthless. If two mending spells are cast on the area of the castle, an overhead view of its layout can be discerned. This view reveals the lower courtyard and keep, which is now submerged (see level 5 for details). Astute PCs can discover the presence of these ruins from the mended tapestry. The pike in the corner is a magical weapon. The arcane script is written in dwarvish and the weapon is of dwarf craftsmanship. Anyone who can read dwarvish can translate the name of the weapon as “Doombinder”, a +1 Defensive Pike that was
used in defense of the castle’s walls in ages past. It once belonged to the Field Marshall of the castle’s garrison but he has been long forgotten.
14
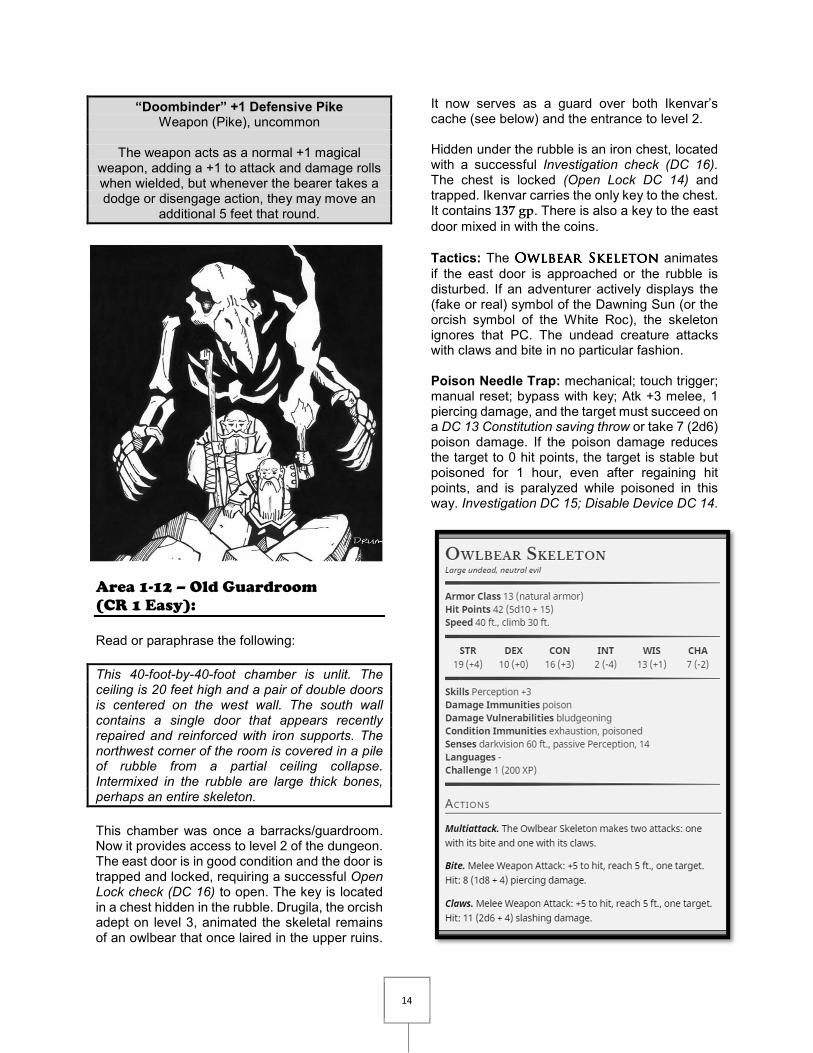
“Doombinder” +1 Defensive Pike Weapon (Pike), uncommon
The weapon acts as a normal +1 magical
weapon, adding a +1 to attack and damage rolls when wielded, but whenever the bearer takes a dodge or disengage action, they may move an
additional 5 feet that round.
Area 1-12 – Old Guardroom
(CR 1 Easy):
Read or paraphrase the following:
This 40-foot-by-40-foot chamber is unlit. The ceiling is 20 feet high and a pair of double doors is centered on the west wall. The south wall contains a single door that appears recently repaired and reinforced with iron supports. The northwest corner of the room is covered in a pile of rubble from a partial ceiling collapse. Intermixed in the rubble are large thick bones, perhaps an entire skeleton.
This chamber was once a barracks/guardroom. Now it provides access to level 2 of the dungeon. The east door is in good condition and the door is trapped and locked, requiring a successful Open Lock check (DC 16) to open. The key is located in a chest hidden in the rubble. Drugila, the orcish adept on level 3, animated the skeletal remains of an owlbear that once laired in the upper ruins.
It now serves as a guard over both Ikenvar’s cache (see below) and the entrance to level 2. Hidden under the rubble is an iron chest, located with a successful Investigation check (DC 16). The chest is locked (Open Lock DC 14) and trapped. Ikenvar carries the only key to the chest. It contains 137 gp. There is also a key to the east
door mixed in with the coins.
Tactics: The Owlbear SkeletonOwlbear SkeletonOwlbear SkeletonOwlbear Skeleton animates
if the east door is approached or the rubble is disturbed. If an adventurer actively displays the (fake or real) symbol of the Dawning Sun (or the orcish symbol of the White Roc), the skeleton ignores that PC. The undead creature attacks with claws and bite in no particular fashion. Poison Needle Trap: mechanical; touch trigger; manual reset; bypass with key; Atk +3 melee, 1 piercing damage, and the target must succeed on a DC 13 Constitution saving throw or take 7 (2d6) poison damage. If the poison damage reduces the target to 0 hit points, the target is stable but poisoned for 1 hour, even after regaining hit points, and is paralyzed while poisoned in this way. Investigation DC 15; Disable Device DC 14.
15
OWLBEAR SKELETON CR 1
XP 200
Large Undead (See stats on page 14.)
hp 42
Languages ---
Area 1-13 – The Hallway:
When the adventurers reach this area, read or paraphrase the following:
The double doors reveal a wide hallway about 20 feet wide with a 20-foot ceiling. The floor is covered with the rotting remains of once-fine carpeting. Stone pedestals, each about two feet high, are spaced along the walls. However, the hall ends after about 35 feet in a massive pile of rubble.
This great hall once displayed an impressive (and expensive) collection of antique armor and weapons. However, all the treasures were looted long ago. Nothing of interest remains. The underground portion of Castle Whiterock once continued to the south and west, but these chambers are now buried under tons of rubble. If the GM wishes to expand the adventure, this would be an excellent location to lead to more underground chambers.
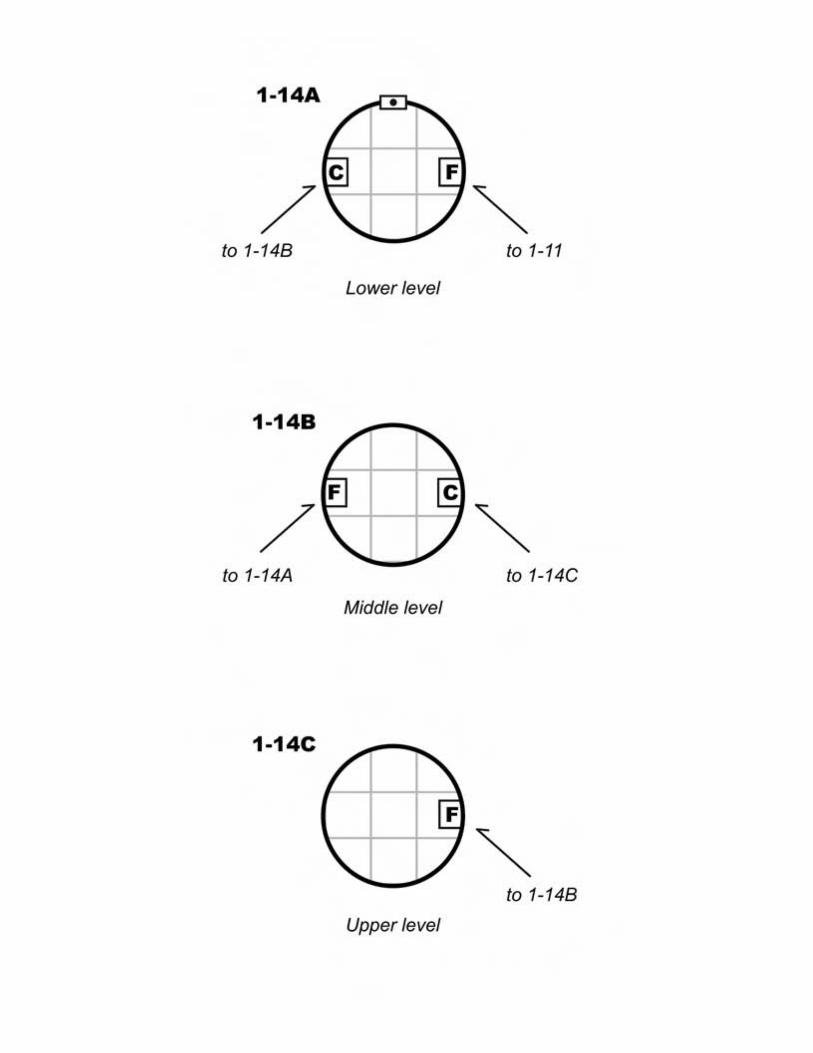
Area 1-14 – The Spire:
This lone tower is situated about 175 feet above the courtyard. It can be reached via a faint trail, discovered with a DC 10 Passive Perception check by anyone standing next to the area, or by the secret door in area 1-11. If the latter is used, it leads to a metal ladder in a shaft about 180 feet high. The ladder leads to the trapdoor in area 1-14a. The spire serves as the lair to several creatures, but the slavers use the top level as a watch post. The slavers use a rope bridge to scale the outside of the tower (avoiding areas 1-14a and b). Using the ladder requires a Athletics check (DC 5) or the outer wall can be scaled with a DC 16 Athletics check. See Map 2 for the layout of these locations.
Area 1-14a – Lower Level
(CR 1 Easy):
Note: The door to this area has been barred from the outside. Adventurers approaching from that side can easily remove it. Read or paraphrase the following:
The interior of this tower is a single large chamber 30 feet in diameter. Sunlight peeks through several arrow slits. A spiral staircase wraps around the wall and leads to an obvious trapdoor in the ceiling. The floor is coated with a thick layer of dust.
The trapdoor in the ceiling leads to area 1-14b. Hidden on the floor is a secret trapdoor (Investigation DC 18) that leads to a shaft that deposits PCs in area 1-11. There are webs strung up around most of this chamber, requiring a Perception check (DC 16) to notice. Failure indicates the victim has blundered into a web, and suffers the metal corroding effects described below.
A Rust SRust SRust SRust Spiderpiderpiderpider lairs in this chamber. Actually,
it is trapped here. The orcs on level 2 subdued the aberration and released it on this level as a practical joke. After the ensuing metallic destruction, Ikenvar took a liking to its unique ability, and had it placed here. The slavers hope to transport it to large city for sale, but in the meantime, they use it to dispose of unwanted metal scraps and bothersome slaves. In addition to the metal it eats, the spider supplements its diet with blood hawks from the next level up. Tactics: The rust spider doesn’t get as much metal as it craves, so it greedily attacks the heroes, targeting armor-clad foes, if possible. The spider is suspended in the webs and positions itself above the door when it hears the adventurers open the barred door or trapdoor. It hides and readies an action to throw a web glob at a PC. It attacks with surprise, webbing the first adventurer into the room and then jumping on the second one to deliver a bite attack. All Strung Up: Hanging from the ceiling are five webbed husks. Four of these are blood hawk bodies, but one is an annoying halfling rogue who was fed to the rust spider a few days ago. His leather armor is ruined, but the corpse still has a shortsword with a tiny ruby (overlooked by the
slavers) set on the pommel (worth 37 gp) and a
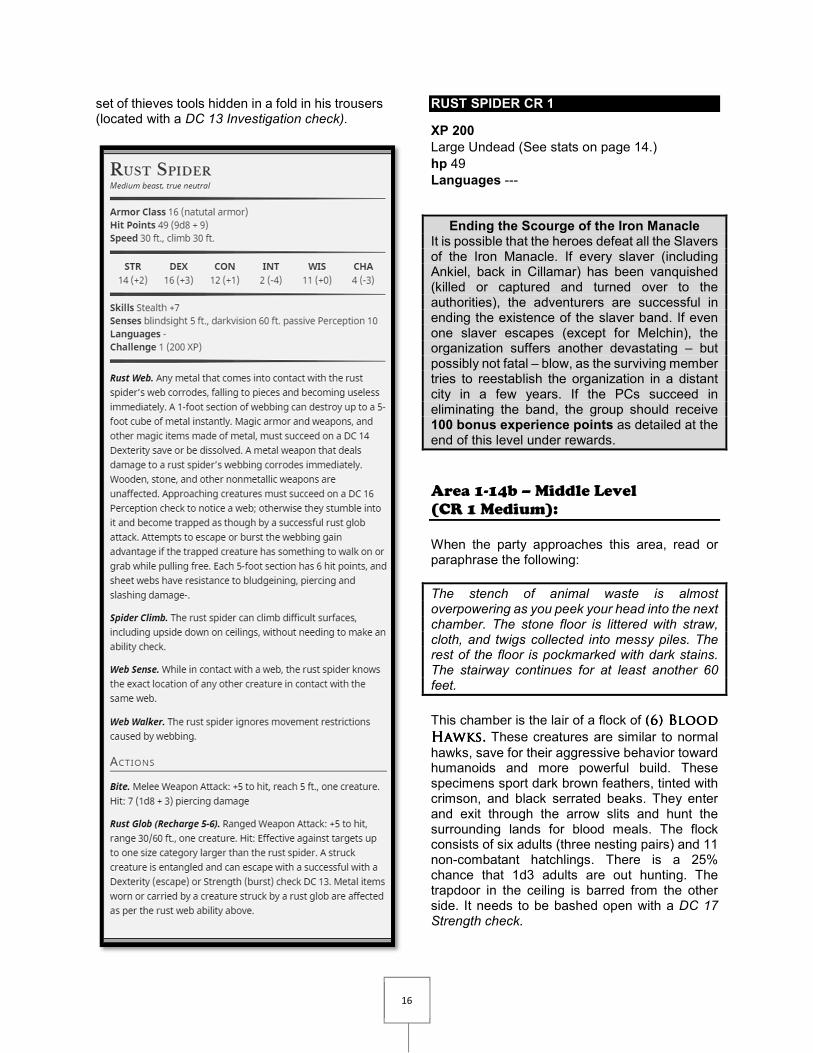
16
set of thieves tools hidden in a fold in his trousers (located with a DC 13 Investigation check).
RUST SPIDER CR 1
XP 200
Large Undead (See stats on page 14.)
hp 49
Languages ---
Ending the Scourge of the Iron Manacle It is possible that the heroes defeat all the Slavers of the Iron Manacle. If every slaver (including Ankiel, back in Cillamar) has been vanquished (killed or captured and turned over to the authorities), the adventurers are successful in ending the existence of the slaver band. If even one slaver escapes (except for Melchin), the organization suffers another devastating – but possibly not fatal – blow, as the surviving member tries to reestablish the organization in a distant city in a few years. If the PCs succeed in eliminating the band, the group should receive 100 bonus experience points as detailed at the end of this level under rewards.
Area 1-14b – Middle Level
(CR 1 Medium):
When the party approaches this area, read or paraphrase the following:
The stench of animal waste is almost overpowering as you peek your head into the next chamber. The stone floor is littered with straw, cloth, and twigs collected into messy piles. The rest of the floor is pockmarked with dark stains. The stairway continues for at least another 60 feet.
This chamber is the lair of a flock of (6) B(6) B(6) B(6) Blood lood lood lood
HHHHawks.awks.awks.awks. These creatures are similar to normal
hawks, save for their aggressive behavior toward humanoids and more powerful build. These specimens sport dark brown feathers, tinted with crimson, and black serrated beaks. They enter and exit through the arrow slits and hunt the surrounding lands for blood meals. The flock consists of six adults (three nesting pairs) and 11 non-combatant hatchlings. There is a 25% chance that 1d3 adults are out hunting. The trapdoor in the ceiling is barred from the other side. It needs to be bashed open with a DC 17 Strength check.
17
Treasure: Each of the three nests contains a random assortment of coins and shiny objects. If the adventurers spend a turn searching, they can recover a total of 3d6 cp, 2d4 sp, and 1d6gp, plus
odd (worthless) metal trinkets, such as buttons, belt buckles, and chain links. With a successful Investigation check (DC 13), they can also locate a single blue quartz (worth 20 gp).
Tactics: If disturbed (by the heroes entering the room or attempting to pass through it to reach the trapdoor), the blood hawks take to the air and attack targets by swooping at them. Meanwhile, the hatchlings attempt to escape out the arrow slits (they are old enough to fly). Grant the adults advantage on all attack rolls as they defend their nest, giving the hatchlings time to escape. BLOOD HAWKS (6) CR 1/8
XP 25
Small beast (See stats on page 4.)
hp 7
Languages --
Area 1-14c – Upper Level
(CR 1/2 TRIVIAL):
Read or paraphrase the following:
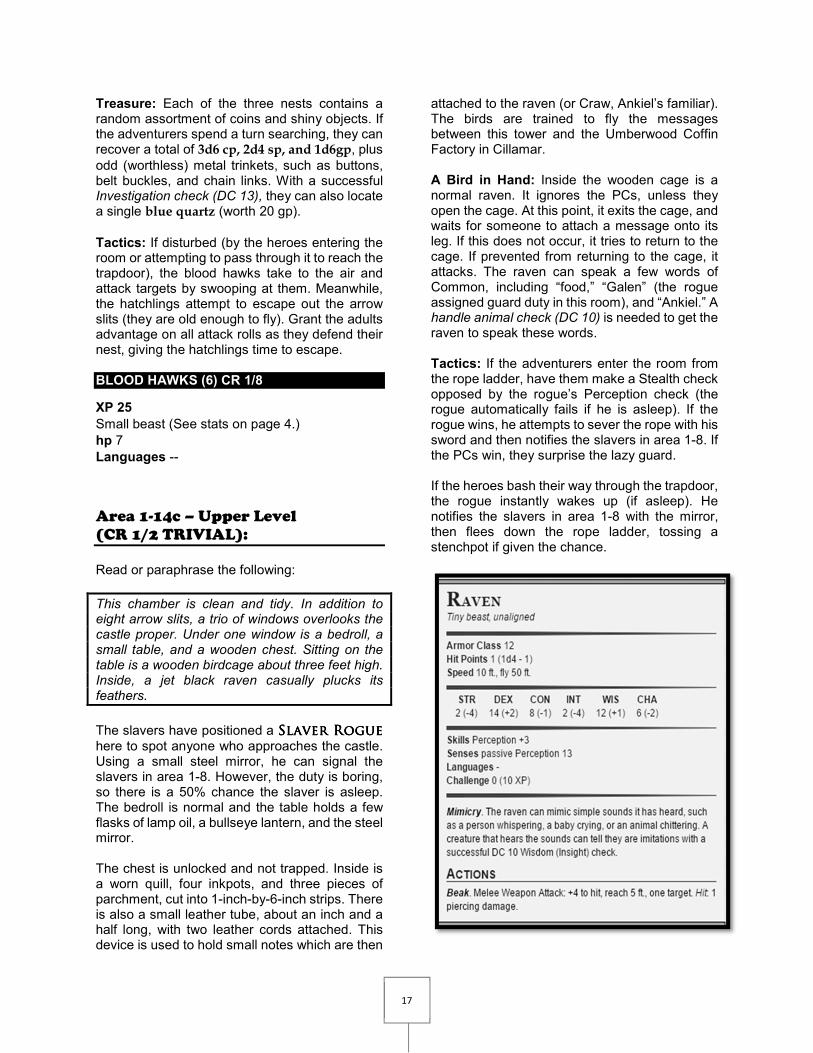
This chamber is clean and tidy. In addition to eight arrow slits, a trio of windows overlooks the castle proper. Under one window is a bedroll, a small table, and a wooden chest. Sitting on the table is a wooden birdcage about three feet high. Inside, a jet black raven casually plucks its feathers.
The slavers have positioned a SSSSlaver laver laver laver RRRRogueogueogueogue
here to spot anyone who approaches the castle. Using a small steel mirror, he can signal the slavers in area 1-8. However, the duty is boring, so there is a 50% chance the slaver is asleep. The bedroll is normal and the table holds a few flasks of lamp oil, a bullseye lantern, and the steel mirror. The chest is unlocked and not trapped. Inside is a worn quill, four inkpots, and three pieces of parchment, cut into 1-inch-by-6-inch strips. There is also a small leather tube, about an inch and a half long, with two leather cords attached. This device is used to hold small notes which are then
attached to the raven (or Craw, Ankiel’s familiar). The birds are trained to fly the messages between this tower and the Umberwood Coffin Factory in Cillamar. A Bird in Hand: Inside the wooden cage is a normal raven. It ignores the PCs, unless they open the cage. At this point, it exits the cage, and waits for someone to attach a message onto its leg. If this does not occur, it tries to return to the cage. If prevented from returning to the cage, it attacks. The raven can speak a few words of Common, including “food,” “Galen” (the rogue assigned guard duty in this room), and “Ankiel.” A handle animal check (DC 10) is needed to get the raven to speak these words. Tactics: If the adventurers enter the room from the rope ladder, have them make a Stealth check opposed by the rogue’s Perception check (the rogue automatically fails if he is asleep). If the rogue wins, he attempts to sever the rope with his sword and then notifies the slavers in area 1-8. If the PCs win, they surprise the lazy guard. If the heroes bash their way through the trapdoor, the rogue instantly wakes up (if asleep). He notifies the slavers in area 1-8 with the mirror, then flees down the rope ladder, tossing a stenchpot if given the chance.
18
SLAVER ROGUE CR 1/2
XP 100
Male human (See stats of page 6.)
hp 16
Languages Common
RAVEN CR 0
XP 10
Tiny Beast (See stats of page 17.)
hp 1
Languages Common
Area 1-15 – Hidden Chamber:
Note: This hidden chamber was very difficult to discover, and therefore has remained hidden for centuries. However, recent tectonic activity has caused a slight shift in the cliff wall, partially exposing this location. It still requires a successful Investigation check (DC 18) to locate the concealed door. When the heroes open the door, read or paraphrase the following:
With the sound of stone grinding on stone, the secret door begrudgingly opens to reveal a small tomb-like niche, perhaps 10 feet deep. Along the opposite wall is a stone shelf holding a pile of several books, their covers faded with age and pages warped from moisture. Slumped underneath this shelf is a skeletal form, clutching a book in its bony fingers.
This location was used by the monks of Clynnoise as both a bolt hole and a storage room for books. Centuries ago, during one of the many sackings of the monastery, a single wounded monk made his way here to ride out the invasion. His wounds soon became infected, and eventually he died, but not before leaving a valuable clue about how to enter the Halls of Forgotten Lore (see level 6B). The books on the shelf are all blank journals, quite water damaged. They were intended to be used to get past the guardian in area 6B-1, in order to enter the Halls of Forgotten Lore. The pages of the book clutched in the cradled arms of
the skeleton are filled with the same line, repeated in Common, Elven, Draconic, and Dwarven. The passage reads, “Knowledge is the Key.” It is a reference to the bizarre key, needed to bypass the door golem in area 6B-1. Treasure: Intermixed in the bones of the unfortunate monk is an authentic silver symbol of the Dawning Sun (worth 25 gp). Also
intermixed in his bones is a wand that is made from a bone, thus it requires a DC 10 investigation check to notice because of it being mixed in with the other bones. This is a Wand of Secrets, once used by the loremaster monk
Contacting Ankiel Astute PCs may consider using the raven to deliver a message to Ankiel, hoping to deceive him or possibly lure him into an ambush. First, they must write a message on one of the scraps of paper. The passage must be 10 words or less. A Deception check (opposing Ankiel’s Insight check) is required to dupe Ankiel. Adventurers receive disadvantage to this check since they are not familiar with any of the slavers’ handwriting. This penalty can be avoided if the forger examines the logs in area 1-9. The hereos can learn of Ankiel’s name from the raven, or if they succeed with a DC 18 Intimidate check on Ikenvar. If their note is a summons for Ankiel to come to Castle Whiterock, their Deception check automatically fails. Ankiel refuses to travel to the castle, and likely will flee Cillamar for a few months if he receives such a message. If the heroes devise a scheme to lure him somewhere else (in Cillamar, or the wilderness), he arrives with his four goons. The GM needs to handle the rest of this encounter. Note that if one of the adventurers has a familiar or an animal companion that can fly, the raven can be trailed to Umberwood Coffins. Thus, the heroes could bring the ambush to Ankiel, in this case.
19
Rewards Summary
Experience Points
XP: 1,300 Situational XP: 1,150 Possible Bonus XP: 300
Total Possible XP: 2,750
Bonus Experience To award experience points for this level, compute the total experience points for combat encounters overcome based on the challenge ratings of each individual creature. Next, add the group objective awards achieved during this level based on the chart below. The sum of the combat experience plus group objectives is then divided by the total number of PCs. This sum is the total experience gained by each PC. XP Points Objectives 25 Successfully convincing the slavers the adventurers are “buyers” 10 Avoiding the ambush in area 1-3 15 Locating an authentic symbol of the Dawning Sun (in area 1-4 or 1-15) 25 Deciphering the fake logs by finding the codebreaker book. 25 Locating area 1-11 25 Using mending on the tapestry to reveal the existence of the castle’s lower ruins 10 Overcoming the slaver in the spire without the alarm being raised 25 Getting the raven in area 1-14c to reveal Ankiel’s name 15 Sending a forged message to Ankiel and leading him into an ambush 25 Discovering area 1-15 and the clues located in the journal 100 Ending the scourge of the Iron Manacle (see sidebar) Total possible bonus points per group................300
Treasure
Coin and Valuables: Approx. 350 gold pieces
Magical Items (4 uncommon)
Location 1-10 (Melchin / level mini-boss) Periapt of Wound Closure
(Wondrous, Uncommon, Requires Attunement)
Location 1-9 (Ikenvar / level boss) “Verdict” +1 Phantom Flail (Weapon (flail), Uncommon)
Location 1-11 (Secret Room)
“Doombinder” +1 Defensive Pike (Weapon (pike), Uncommon)
Location 1-15 (Secret Room)
Wand of Secrets (Wand, Uncommon)
20
21