Embed Size (px)
Citation preview

DSNet
Signage Broadcast Network over Cat5 Cables
USER’S GUIDE
Version 1.0
July 2010

DSNET USER’S GUIDE
2
LEGAL NOTICES
Copyright © 2010 PROSUM. All Rights Reserved.
LIMITED WARRANTY
PROSUM warrants (i) the hardware products against material defects and workmanship, under normal use and service, for a period of ONE YEAR, (ii) that the software-programs will perform substantially in conformance to the specifications in the related manuals for a period of NINETY (90) DAYS. These warranties are operative from the date of delivery to the end user.
During the warranty period, PROSUM will repair or replace defective items at no charge.
The warranty does not apply if the product has been damaged by accident or misuse, or has been modified without the written authorization of PROSUM.
PROSUM shall not be liable for any loss, cost, or damage consequential to reliance on this manual.
PROSUM has no liability to the end user or to any third party for consequential damages (including, but not limited to, loss of profits, downtime, and damage of equipment or programs).
PROSUM makes no warranty that its software products are error free and will work in combination with any hardware or software products provided by third parties.
TRADEMARKS AND REGISTERED NAMES
All registered trademarks and registered product names mentioned herein, belong to their respective owners.
FCC STATEMENT
This equipment has been tested and found to comply with the regulations for a Class B digital device, pursuant to Part 15 of the FCC Rules. These limits are designed to provide reasonable protection against harmful interference when the equipment is operated in a commercial environment. This equipment generates, uses, and can radiate radio frequency energy and, if not installed and used in accordance with this User Guide, may cause harmful interference to radio communications. Operation of this equipment in a residential area is likely to cause harmful interference in which case, the user will be required to correct the interference at his/her own expense.
CE STATEMENT
This is a Class B product. In a domestic environment, this product may cause radio interference, in which case the user may be required to take adequate measures.
RoHS Compliant

DSNET USER’S GUIDE
3
CONTENTS
Legal Notice ....................................................................................................................................................... 2
Copyright © 2010 PROSUM .......................................................................................................................... 2
Trademarks and Registered Names .............................................................................................................. 2
FCC Statement ............................................................................................................................................... 2
CE Statement ................................................................................................................................................. 2
TABLE OF FIGURES ............................................................................................................................................. 4
1 Introduction .............................................................................................................................................. 5
1.1 DSNet Advantages ............................................................................................................................ 5
1.2 DSNet Network Architecture ........................................................................................................... 5
1.3 DSNet Manager ................................................................................................................................ 6
2 Installing DSNet Devices ........................................................................................................................... 8
2.1 Installing the Broadcaster Unit ........................................................................................................ 8
2.2 Adding Splitter and Receiver Units ................................................................................................ 10
2.3 Connecting Display Panels to the Receivers .................................................................................. 10
3 DSNet Manager ....................................................................................................................................... 11
3.1 Launching DSNet Manager ............................................................................................................. 11
3.2 DSNet Manager Main Window ...................................................................................................... 12
3.3 DSNet Manager Main Menu .......................................................................................................... 14
3.4 Changing the TCP/IP Settings ......................................................................................................... 15
3.5 Rescanning the Network ................................................................................................................ 16
3.6 Understanding the LEDs ................................................................................................................. 16
3.7 Optimizing the Cable Connections for Video ................................................................................. 17
3.7.1 Setting Up the Receiver or the Splitter for Best Video .............................................................. 17
3.7.2 Recommended Cables ............................................................................................................... 19
3.8 Setting up the Monitors ................................................................................................................. 20
3.9 Grouping Monitors ......................................................................................................................... 21
3.10 Sending Commands to Checked Monitors ..................................................................................... 22
3.11 Upgrading the Broadcaster Software ............................................................................................. 23
3.12 Updating the Firmware of Splitters and Receivers ........................................................................ 24
3.13 No Video Troubleshooting ............................................................................................................. 25
3.14 Getting Help ................................................................................................................................... 25

DSNET USER’S GUIDE
4
TABLE OF FIGURES
Figure 1: Networking Display Panels with DSNet .............................................................................................. 6
Figure 2: DSNet Manager Discovers the Network Architecture ........................................................................ 7
Figure 3: Broadcaster Connections.................................................................................................................... 8
Figure 4: DSNet Manager Main Window ......................................................................................................... 12
Figure 5: TCP/IP Settings ................................................................................................................................. 15
Figure 6: Rescan Network ................................................................................................................................ 16
Figure 7: Test image generated by screentest.exe .......................................................................................... 17
Figure 8: Receiver Selection for Cable Settings ............................................................................................... 18
Figure 9: Cable Settings ................................................................................................................................... 18
Figure 10: Before and After RGB shift Adjustment ......................................................................................... 19
Figure 11: Monitor Audio/Video Settings........................................................................................................ 20
Figure 12: Capture and Send Monitor DDC Information ................................................................................. 20
Figure 13: Create a Group of Monitors ........................................................................................................... 21
Figure 14: Checking Monitors .......................................................................................................................... 22
Figure 15: Send Commands to Checked Monitors .......................................................................................... 22
Figure 16: Software Upgrade ........................................................................................................................... 23
Figure 17: Force Firmware Update .................................................................................................................. 24
DSNET USER’S GUIDE
5
1 INTRODUCTION
1.1 DSNET ADVANTAGES
The DSNet Digital Signage Network is designed to be a simple, reliable yet ultra-scalable, audio video broadcasting network that is highly compatible to most, if not all, digital signage applications.
Depending on the requirements of your application, the DSNet system can easily be scaled up from several monitors to thousands of monitors, all outputting the same video and audio stream. Hence, it can be easily used in a small shop or in a large supermarket.
As simple and effective as an ultra-scalable structure, the DSNet system does not interfere in any way with your multimedia player or computer, or with any Digital Signage application running on it. Instead, the whole DSNet system just serves as a multimedia distribution network.
DSNet not only extends but also multiplies your display panels to where you want them to be, either at convenience stores, supermarkets, shopping malls, mega-stores, campus, theaters, or other application scenarios like those on large transport vehicles such as ocean liners, jumbo airplanes, mass transportation systems, etc.
DSNet can handle a quasi unlimited number of monitors distributed in an area of approximately 300m radius. The surface covered by DSNet is sufficient for a large supermarket. The audio-visual content is broadcasted at lower cost. With DSNet, at comparable price, you have more screens and thus you improve the impact of your digital signage campaigns.
DSNet also carries bi-directional RS-232 serial communications at up to 115200 bps to make possible the setup of display panels by the player and the return of information from touch screens.
1.2 DSNET NETWORK ARCHITECTURE
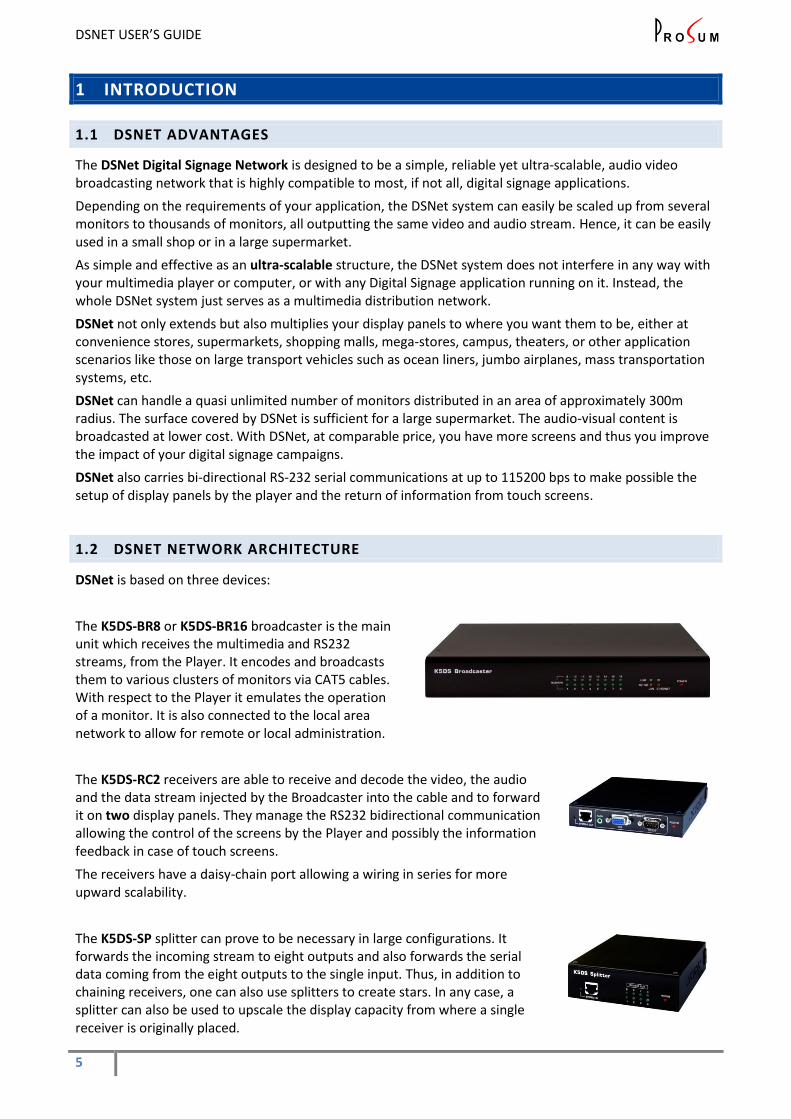
DSNet is based on three devices:
The K5DS-BR8 or K5DS-BR16 broadcaster is the main unit which receives the multimedia and RS232 streams, from the Player. It encodes and broadcasts them to various clusters of monitors via CAT5 cables. With respect to the Player it emulates the operation of a monitor. It is also connected to the local area network to allow for remote or local administration.
The K5DS-RC2 receivers are able to receive and decode the video, the audio and the data stream injected by the Broadcaster into the cable and to forward it on two display panels. They manage the RS232 bidirectional communication allowing the control of the screens by the Player and possibly the information feedback in case of touch screens.
The receivers have a daisy-chain port allowing a wiring in series for more upward scalability.
The K5DS-SP splitter can prove to be necessary in large configurations. It forwards the incoming stream to eight outputs and also forwards the serial data coming from the eight outputs to the single input. Thus, in addition to chaining receivers, one can also use splitters to create stars. In any case, a splitter can also be used to upscale the display capacity from where a single receiver is originally placed.

DSNET USER’S GUIDE
6
1.3 DSNET MANAGER
The receivers and splitters are in permanent communication with the broadcaster. The DSNet network can be managed remotely, over a local area network or over the Internet, by means of a Java program that can run on all popular platforms. This program discovers automatically the DSNet network architecture (Figure 2).
Everything, from the overall system settings down to group settings and to per-receiver settings, can be easily configured. The administrators can in a mouse click turn on and off monitors, either individually or group wise, or perform global actions on all the monitors, as well as carry out audio/video adjustments for audio/video output optimization.
Note: In case of large installation, we recommend you install DSNet Manager on a notebook or a laptop and you access the Broadcaster via wireless LAN or via the Internet by using a 3G key. All settings are sent by the Broadcaster to the Receivers and Splitters across the Cat5 cables. DSNet does not require you to risk your life climbing a ladder with a screw driver. The video and audio adjustments can be carried out in a few seconds looking at the display panels and moving the sliders of DSNet Management until the result is perfect. All settings are digitally saved into EEPROMs.
Figure 1: Networking Display Panels with DSNet
Internet
or LAN
Broadcaster
Splitter
Player
Receivers
1
16 1
8

DSNET USER’S GUIDE
7
Figure 2: DSNet Manager Discovers the Network Architecture

DSNET USER’S GUIDE
8
2 INSTALLING DSNET DEVICES
2.1 INSTALLING THE BROADCASTER UNIT
Figure 3: Broadcaster Connections
1. Connect the broadcaster unit to your Ethernet LAN. Note that the broadcaster features two Ethernet ports and an internal Ethernet switch. If your Player is already connected to the Ethernet network, use the Player Ethernet cable for the broadcaster and connect the Player to the broadcaster with a short patch cable. You don’t need an extra Ethernet cable.
2. Check the presence of the broadcaster on your network by pinging the broadcaster’s default IP address: 192.168.1.100.
3. Use the provided cables to connect the video and audio outputs of the Player to the VGA and audio ports of the region labeled PLAYER.

DSNET USER’S GUIDE
9
4. If your application requires an RS232 attachment, connect the Player RS232 port to the RS232 female port of the broadcaster. Note that we provide no RS232 cable in the package. You just need a simple straight-through male/female DSUB9 serial cable for this purpose.
5. If there was a display monitor connected to the Player, connect it to the VGA port of the broadcaster located in the region labeled MONITOR. You can also connect a set of speakers to the audio output port. Note that the monitor and the loudspeakers connected to the broadcaster will behave the same as the remote display panels.

DSNET USER’S GUIDE
10
2.2 ADDING SPLITTER AND RECEIVER UNITS
Interconnect the splitters and receivers with UTP CATx (preferably CAT5) cables in order to create a network similar to figure 1. The trunk of the network is the broadcaster. Splitters create 8-branch stars. The receivers can be wired in series thank to their “System Out” chaining port.
There is no official limit and it depends a lot on cable length and quality, but we recommend not creating more than 5 levels starting from the broadcaster, for example, 5 receivers, or 1 splitter and 4 receivers, or 2 splitters and 3 receivers.
The total length from the broadcaster port to the last receiver should not be greater than 300m. If the broadcaster is located at its best place, which is the center of the DSNet network, it means that you can cover an area of 600m of diameter. In fact it can certainly be more if you use splitters, but let’s keep 300m max as a rule of thumb.
2.3 CONNECTING DISPLAY PANELS TO THE RECEIVERS
The K5DS-RC2 receiver can support two display panels. Connect one or two display panels to each receiver by using the appropriate cables, same as if they were directly connected to the Player.
The receiver has DTE type RS232 ports, which means they are similar to those of a personal computer. These ports forward the serial data sent by the Player to the display panels (or any other device). If you set them as bidirectional into DSNet Manager, they can also transmit the data received from the display panel (or any other source) to the Player.
Note that the settings of the receiver RS232 ports don’t have to be identical to those of the broadcaster with respect to the player. This is not a direct connection. Data is carried at much higher speed into DSNet.

DSNET USER’S GUIDE
11
3 DSNET MANAGER
3.1 LAUNCHING DSNET MANAGER
After you have installed the DSNet networking devices and the display panels, you can run DSNet Manager to see if everything works properly.
You must have the JRE (Java Runtime Environment) installed on your client computer / notebook before you can run DSNet Manager.
The latest JRE is available for download at http://www.java.com
Copy the DSNet Manager application dsnetwork-dist.jar (a JAVA program) to the networked personal computer or notebook that has a network access to the broadcaster.
Run DSNet Manager either by clicking on dsnetwork-dist.jar. If it does not work, open an administrator
console and type: java –jar dsnetwork-dist.jar
Enter the IP address and port number in the format: IP_address:port_number
By default: 192.168.1.100:5000
Click OK.
The login prompt for user ID and password opens.
By default, the user ID and password are:
User ID: superuser
User Password: superu
Click OK to get access to the broadcaster.
The DSNet Manager main window opens.

DSNET USER’S GUIDE
12
3.2 DSNET MANAGER MAIN WINDOW
This window shows the architecture of the DSNet network, i.e., a tree starting from the broadcaster.
The title of the window is the name of the broadcaster to which you are connected.
Each device is symbolized by an icon. A bar menu gathers all network-level operations.
All device configuration boxes are accessed by left clicking on the device icon. Left clicking opens a local menu that depends on the device.
Concerning the broadcaster, local settings such as configuration of serial interfaces, are made by clicking on the broadcaster icon like other devices. More global settings such as TCP/IP and time settings are accessed from the window menu.
All device output ports are symbolized by a small RJ45 icon attached to the port number.
“nc” means no device connected.
The RJ45 icons get red in case of faulty cable.
Note that input ports are not drawn for sake of clarity.
The monitor icons are dynamic and can change according to the state of each monitor.
The blue color indicates that the video is enabled.
The grey color indicates that the video is disabled.
A small loudspeaker indicates that the audio is enabled.
A double arrow indicates that the serial connection is bidirectional.
Left click on a monitor icon to proceed to the monitor settings.
Note that a monitor with disabled video displays a black screen, but it is not powered down and the audio can still work.
A label is bound to each device. It permits to work by names. This label is kept in the device EEPROM so that it does not change if you modify the network architecture. If there is no name already defined, a default name based on the device type and location is suggested. You can change it any time by left clicking on the device icon and selecting “Change label…”
Figure 4: DSNet Manager Main Window

DSNET USER’S GUIDE
13
A check box is attached to each monitor. The purpose of this check box is to create groups of monitors that can receive group commands. For example, you can disable the audio or the video of a group of monitors corresponding to some area section. See 3.9.
You can check and uncheck the monitor check boxes independently by right clicking on the monitor icons.
If you right click on some higher-level device icon, such as a receiver, a splitter, or the broadcaster, you check or uncheck all monitors attached to this device. Hence, by right clicking on the broadcaster icon you can check or clear all monitors of the network.
Faulty cables can be detected by the broadcaster. The broadcaster port becomes red and the port is automatically disabled. Fix the problem and click on the port to re enable it.
Note: Checking boxes with right clicks and getting access to properties with left clicks may seem unusual. The purpose is to get easier access to main commands. The check boxes are just secondary in this application.
Here’s the icon convention for DSNet:
B8 means it is an 8-port Broadcaster.
S8 means it is an 8-port Splitter.
01 means it is the Receiver Port #1, and NC means “No device Connected”.
Faulty cable attached to Broadcaster port 8.
02 means it is the Splitter Port #2, and R2 means it is a 2-port Receiver that is currently connected to that port.
These icons represent all possible states of a monitor. Each monitor can have the video on (blue) or off (grey), the audio on (loud speaker) or off, and an unidirectional or bidirectional connection (double arrow)
Note that the monitor label is kept into the receiver memory. It does not follow the monitor if you attach it to another receiver.
Note: all labels attached to icons such as “8-port Broadcaster” or “8-port Splitter1” can be changed by the user

DSNET USER’S GUIDE
14
3.3 DSNET MANAGER MAIN MENU
<File>
o Save Settings to File: save all settings to a file for future uploading of the same configuration
o Restore Settings to File: use a previously saved configuration file to restore the DSNet system to the same configuration with all the same settings.
o Restore Factory Settings: restore the DSNet system to the factory default settings.
o Upgrade Software: upgrade the Broadcaster software by uploading the upgrade file via the DSNet Manager Software interface.
o Save User Name and Password: Save the user name and password, so that you won’t have to type in both every time you want to access the DSNet system via the DSNet manager software interface.
o Exit (Shift + X): close the DSNet Manager window
<Main>
o TCP/IP Settings: configure the TCP/IP settings such as Host Name, Domain Name, as well as IP address, network mask, Gateway, DSN, etc.. And, also you can configure the specific port base that you will use for the Broadcaster access (within a range of port 5000 ~ 5150). If you need to use DHCP, you can also specify DHCP usage.
o Date and Time: Set the date and time for the DSNet system. You can sync the Broadcaster time with the computer time. And also you can specify two NTP time servers to synchronize with.
o Rescan Network (F5): Rescan the network when you need to update he Network Tree.
o Update Receivers and Splitters: update the firmware on the Receivers and Splitters from the resident software/firmware on the Broadcaster.
o Default Network Tree: Clear all the monitor listing and reset all the labels to their default values, then proceed to a network rescan. You can do this when you need to reset all the labels and perform a rescan of the whole system.
o Redraw Network Tree (F6): Redraw the Network Tree.
<Log>
o Log (F7): the logging activity will record the client access IP and also the important system messages and error messages.
<Groups>
o New Group: set up a new Group. To join monitors to a group, you need first check them and then set up a new group.
o List of Groups: Give a listing of all Groups available.
o Send Command to Checked Monitors: Send commands such as Video ON/OFF, Audio ON/OFF and also the audio volume adjustment command to the Monitor itself via RS-232 interface. Also you can set the serial connection parameters on the Receiver side.
<Users>
o New User: Set up a new user account.
o Edit User: Edit a user account.

DSNET USER’S GUIDE
15
<Help>
o Contents ( F1): On Line Help Text for your detailed reference.
o About: Copyright page of the DSNet Manager.
3.4 CHANGING THE TCP/IP SETTINGS
In the main menu, select Main/TCP/IP settings to change the settings of the broadcaster TCP/IP network interface.
Note that just after you change the TCP/IP settings, you may lose the contact to the broadcaster and you may have to reconnect at new IP address and port base
Figure 5: TCP/IP Settings
The default settings are shown on figure above.
You can change the Port Base if it conflicts with another application of if there are several broadcasters on your LAN that are accessed via the same Internet IP address. In this last case, use different Port Base setting on each broadcaster and configure the port mapping of your gateway accordingly.
Use DHCP allows the broadcaster to automatically get its IP address/Network Mask/Gateway/DNS from the DHCP server in service on your LAN.
Host Name is the name that will appear as title of the DSNet main window when you connect to this broadcaster.

DSNET USER’S GUIDE
16
3.5 RESCANNING THE NETWORK
The DSNet audiovisual network is automatically scanned at first start. However each time you add some device, or if the network diagram is empty, or if all monitors are grey, or if you think that there are missing elements, proceed to a manual network rescan. To do this, select Main/Rescan Network into the menu, or simply press the F5 key. The broadcaster will enter in dialog with all networked devices in order to build a new network map. This operation does not remove labels that are written in device EEPROMs.
Figure 6: Rescan Network
Rescan provides an updated diagram of the network with all the downstream Splitters and Receivers as well as the current status of each device including the display panels and the audio speakers, etc. The listing also shows forth the port status of each Receiver Port.
If the rescan fails, just press F5 again until it works. However don’t press F5 while a rescan is going on.
3.6 UNDERSTANDING THE LEDS
All DSNet network ports of all devices have an LED indicator. The most important thing you must understand is DSNet is not an Ethernet network. The LEDs don’t indicate that there is a physical connection between two devices. As a DSNet connection is much more complex than an Ethernet one, the LEDs have a different meaning, which is a little bit more subtle.
The LEDs of audiovisual ports of DSNet devices indicate that the corresponding port (input or output) is open. They reflect the broadcaster internal network diagram.
Any cable can carry audiovisual stream only if both sides are connected to open ports, i.e. with LED lit on both sides. The LEDs show the enabled paths.
There is something wrong if a cable is connected to a disabled port. Remove the cable or run a Rescan (F5)
There is something wrong if the LED of a port that has no cable plugged is turned on. Proceed to a Rescan (F5)
Note: After a Rescan, the LEDs should be in accordance with the cabling. If not, check the cables and devices that make problems.

DSNET USER’S GUIDE
17
3.7 OPTIMIZING THE CABLE CONNECTIONS FOR VIDEO
Note: As monitor and receivers, might be hundreds of meters away from the Broadcaster unit. It is very convenient to run DSNet Manager on a notebook or laptop featuring a wireless access or equipped with a 3G key.
3.7.1 SETTING UP THE RECEIVER OR THE SPLITTER FOR BEST VIDEO
Manage so that the player sends a fixed image, preferably the image generated by the program screentest.exe available from the Prosum Web site.
Figure 7: Test image generated by screentest.exe
In the network diagram, locate the corresponding monitor icon, which represents the physical monitor that you want to adjust the video parameters of.
To make sure this is the right monitor you can click on the monitor icon and into the Properties… box, turn the video off and on. You should see the monitor reacting to your commands.
Then, click on the icon of the receiver to which the monitor is attached. Select Properties…
Note: Tuning the video for one receiver has no effect on the next receiver attached to the chaining port. With regard to cable settings, the receivers are independent. Thus the order in which the receivers are adjusted has no importance.

DSNET USER’S GUIDE
18
Figure 8: Receiver Selection for Cable Settings
Under the Cable Settings tab, you can adjust various parameters that will have an effect on the video quality of the two monitors attached to the receiver:
Compensation: video sharpness
Gain: video brightness
Red Shift: red shift versus green
Blue Shift: blue shift versus green
Move the sliders until you get the best image quality. It should not take more than 10 seconds. If you cannot get a perfect image, it means that your cable does not fit DSNet requirements.
Here are some possible reasons for not getting a perfect image up to 1080p60 format (1920x1080@60Hz):
bad quality cable (copper clad or AWG 26 for example)
not UTP cable
assembly of two or more cable types in series
damaged cable
Select this receiver
to adjust the video of these monitors
The settings have no effects on this monitor
Figure 9: Cable Settings

DSNET USER’S GUIDE
19
bad RJ45 connection
Figure 10: Before and After RGB shift Adjustment
3.7.2 RECOMMENDED CABLES
Since colors are carried in different twisted pairs, they may arrive at the end of the cable at slightly different timing because all pairs don’t have exactly same length. This shift effect called delay skew is more important in CAT5e and CAT6 cables because the difference of length is intentionally increased by cable makers to minimize the crosstalk between the pairs. Keeping the crosstalk low is one of the main challenges for high-speed Ethernet transmissions. We don’t have exactly same problems for carrying video, and cables rated for higher frequencies than 250MHz are not the best ones for DSNet.
Here are the characteristics of a good DSNet cable:
UTP Cat5
AWG 24 wires made of 100% solid copper (watch out copper clad cables)
Delay skew ≤ 0.20ns/m, i.e. 60ns for 300m.
Characteristic impedance = 100 Ω;
DC resistance ≤ 10 Ω/100m;
Capacitance ≤ 4.6nF/100m;
Attenuation at 50 MHz ≤ 52dB for 300m.

DSNET USER’S GUIDE
20
3.8 SETTING UP THE MONITORS
Click on any of the monitor icon and select Properties… Click on the Audio Video tab.
Check or uncheck Video ON to turn the video ON or OFF. When the video is off, the monitor displays a black screen; however it is not powered off.
Check or uncheck Audio ON to turn the audio ON or OFF. Use the slide bar to adjust the audio volume.
Note: The audio settings apply to both monitors. Since monitors attached to the same receiver are supposed to be close to each other, it is not necessary to have independent audio settings.
If your monitors have a serial attachment, click on the Connection tab. Chose the data rate and specify if the connection is bidirectional. The data rate can be different from the Player serial interface data rate.
Under the DDC tab you can capture the monitor DDC information and send it to the Broadcaster.
Under certain operating systems, personal computers need to get the DDC information provided by the connected monitor in order to adjust their video settings in accordance with the monitor capabilities. Without this information they use a default model that may prove to be very restrictive.
The Broadcaster will record this captured data and will use it for its DDC emulation, so that the Player behave exactly like if it is directly connected to the selected monitor.
Figure 11: Monitor Audio/Video Settings
Figure 12: Capture and Send Monitor DDC Information

DSNET USER’S GUIDE
21
3.9 GROUPING MONITORS
A group of monitors is just a list of monitors associated with a name and stored into the broadcaster Flash memory. Groups of monitors can overlap and there is no restriction about their content.
The purpose of groups is to send commands to several monitors in a single operation. For example, disable the audio or the video of a group located in some area section. If there are several tens of monitors in this area, it is not convenient to send the same command to each of them one by one. This is why DSNet Manager allows creating groups of monitors.
When you invoke a group, all monitors in the group (and only them) are checked in the network diagram. You can then send commands to the checked monitors.
To create a group, first check the monitors that will be members of the group. For example in the example provided on Figure 13, right click the receiver Left Wing Room to select all monitors of the branch. Then in the main menu select Groups/New Group. Fill in the name of the group and click OK.
Figure 13: Create a Group of Monitors
Note: Invoking a group does not prevent you to modify the check boxes before sending a command to checked monitors.

DSNET USER’S GUIDE
22
3.10 SENDING COMMANDS TO CHECKED MONITORS
Check the monitors by right clicking on their icon. You can check all monitors in a branch by right clicking on the device at the base of the branch. For example, click on Left Wing Room to check monitors MLF1, MLF2, M31 and M32. You can also invoke a group of monitors.
Figure 14: Checking Monitors
Then into the main menu select Groups/Send Commands to Checked Monitors…
You can enable or disable the audio and the video, set the audio volume and change the serial settings of all checked monitors in a single operation.
Note that audio settings are the same for both monitors connected to the same receiver.
Figure 15: Send Commands to Checked Monitors

DSNET USER’S GUIDE
23
3.11 UPGRADING THE BROADCASTER SOFTWARE
To upgrade the DSNet broadcaster software on the main menu, click on File/Upgrade Software… Use the Browse button to select the upgrade file and click Upgrade. Do not interrupt the upgrade process that can be long when performed through the Internet. There are several phases alternating data upload and Flash memory write. Please sit tight until the message telling the process is complete.
Figure 16: Software Upgrade
Note: The software upgrade file for the broadcaster contains the firmware for all models of splitters and receivers.

DSNET USER’S GUIDE
24
3.12 UPDATING THE FIRMWARE OF SPLITTERS AND RECEIVERS
On user request, the broadcaster can proceed to the upload of the firmware of all or any one of the splitters and receivers connected to the DSNet network.
To update the firmware of ALL devices on the DSNet network, select Main/Update Receivers and Splitters, and click OK in the confirmation box:
The broadcaster will update only the devices that have a firmware older than which one is into the broadcaster Flash memory.
To update the firmware of a single device, click on the device icon into the network diagram and select Properties…. Select the Maintenance tab and click on Force Firmware Update.
Figure 17: Force Firmware Update
Note: Unlike the global firmware update from the main menu, the Force Firmware Update command does not check the version. It just uploads the firmware to the device from the broadcaster. The firmware is uploaded anyway. It is the only way to downgrade firmware.
DSNET USER’S GUIDE
25
3.13 NO VIDEO TROUBLESHOOTING
1. Check the DSNet Manager Network diagram and see if the monitor and receiver that are in question have a corresponding icon on the network diagram. If you cannot find, try to perform a Rescan (F5) so that the DSNet system can find them correctly.
2. Check if the LEDs of all device ports that make the path to this monitor are turned on. If not, perform a Rescan (F5).
3. Check the power status of the receiver and the monitor to see whether they are powered on properly. If not, power up the receiver.
4. Check the cabling status from the broadcaster to the receiver. Fix any loose cable or dangling cable if any.
5. Check the Player computer attached to the broadcaster to see if it is now giving out any video contents. If not, you should run the Player again to give video contents.
6. Do you have video on other monitors on the same receiver, or on other monitors on different receivers? If you have normal video output on other monitors, then you can locate the problem within more limited segment specific to a receiver or monitor.
7. Check the resolution of the video from the Player to see if it is within 1080p specification.
8. Check the vertical refresh rate of the video to see if any peculiar refresh rate is now being used. If so, try a standard one such as 60Hz.
9. Check if the problematic monitor that is without video output is very different from other monitors that show normal video. If so, try to relocate the monitor to other monitor port on other receivers. Or you can try to capture the DDC data from that monitor and send it to the broadcaster for DDC emulation. Then restart the Player again to fit in the DDC emulation that is newly adopted by the broadcaster. However, you have to check the DDC data captured from that original problematic monitor can work fine with itself or other originally normal monitors.
10. Sometimes a good quality cable can drastically improve the video quality and reduce potential problem especially when the extension distance is longer.
11. Check if the CATx cabling follows the criteria of section 3.7.2.
After checking all these and you still cannot successfully troubleshoot, please contact the technical support.
3.14 GETTING HELP
For details about basic operations, please refer to the online Help of DSNet Manager. To access the online help, into the main menu select Help/Contents, or simply hit F1 key for quick access.
If you are experiencing unusual problems, contact your local dealer for technical support. If you are not satisfied with the support provided by your reseller, contact the PROSUM technical support at:
tel: 33 1 4590 6270
fax: 33 1 4590 6231
www.prosum.net/contact_E.html
We will do our best to help you.

DSNET USER’S GUIDE
26