Embed Size (px)
Citation preview

Drobo How-To Guide Drobo Apps - Configuring ElephantDrive
drobo.com | Configuring ElephantDrive on the Drobo 5N 1
The Drobo 5N provides simple and affordable network attached storage for the connected home or small office. ElephantDrive is a cloud-based service that provides real-time protection of all, or a subset of data stored on the Drobo.
ElephantDrive running natively on the 5N via a DroboApp provides continuous cloud backups of critical data without the requirement of a host computer or server. Once enabled, ElephantDrive provides:
• Expansive Storage – Store terabytes of documents and rich media in the cloud • Continuous Backup – Files added or modified on the Drobo are automatically synchronized for cloud
protection • File Versioning – Access previous versions of files stored in the cloud • Security – 256-bit AES encryption ensures data is secure at all times • Web Access – Easily access files or manage your account from any web browser • Mobile Access – Access all data stored in the cloud from any iOS or Android device • Content Sharing – Easily share files stored in the cloud with others
Topics Create a Share on the Drobo Enabling DroboApps and Installing Elephant Drive Configuring Elephant Drive Accessing Backup Data Stored in ElephantDrive
What You Will Need • Drobo 5N • The latest Drobo Dashboard and firmware release
http://www.drobo.com/start/drobo-‐5n-‐start.php
Prerequisites This document assumes that a Drobo storage device has been installed, configured, and is discoverable by the Drobo Dashboard. If these steps have not been completed, follow the Getting Started Guide available at the URL below.
http://www.drobo.com/start/download/doc/Drobo-‐5N-‐getting-‐started-‐en.pdf

Drobo How-To Guide Drobo Apps - Configuring ElephantDrive
drobo.com | Configuring ElephantDrive on the Drobo 5N 2
Create a Share on the Drobo This section outlines how to create a share on the Drobo that will be utilized with ElephantDrive. If the 5N has already been configured with a share(s) that will be synchronized with ElephantDrive, skip to the next section.
STEP 1
Load the Drobo Dashboard and select the 5N
STEP 2
On the Shares tab, click the Share Settings button to create a network share that will be used with ElephantDrive
NOTE –ElephantDrive does not require a dedicated share. It can be configured to use an existing and/or multiple shares on the 5N.

Drobo How-To Guide Drobo Apps - Configuring ElephantDrive
drobo.com | Configuring ElephantDrive on the Drobo 5N 3
STEP 3
Enter a name for the share that will be synchronized with ElephantDrive.
In this example the share name MyData will be used.
Click OK to continue.
STEP 4
Configure user access to the ElephantDrive share and click OK to complete the wizard.
NOTE – User access only effects share level access, and does not change roles on the ElephantDrive website.

Drobo How-To Guide Drobo Apps - Configuring ElephantDrive
drobo.com | Configuring ElephantDrive on the Drobo 5N 4
STEP 5
Click on the newly created share to map it to the host computer.
Once mapped, copy content to the newly created share.
NOTE – Drobo Dashboard on Windows hosts will prompt for a drive letter before mapping a share.
Enabling DroboApps and Installing ElephantDrive
STEP 1
Click the Drobo Settings link in the left column and then select Admin Settings.
Select the Enable Drobo Apps checkbox and then click OK.
Once DroboApps support has been enabled, a list of available applications will be automatically populated.

Drobo How-To Guide Drobo Apps - Configuring ElephantDrive
drobo.com | Configuring ElephantDrive on the Drobo 5N 5
STEP 2
Click the Drobo Apps link in the left column and then select ElephantDrive from the list of available Drobo Apps.
Click the Install button to begin the installation process.
ElephantDrive will be automatically downloaded from Drobo and installed on the 5N.
Configuring Elephant Drive
STEP 1
Once the ElephantDrive installation has completed, click Yes to being the configuration.
NOTE – Drobo Apps can be configured later using the gear icon.

Drobo How-To Guide Drobo Apps - Configuring ElephantDrive
drobo.com | Configuring ElephantDrive on the Drobo 5N 6
STEP 2
For a new account click Signup to continue.
Create a new account by entering an Email Address and Password that will be used for ElephantDrive.
For existing ElephantDrive customers, enter your login credentials and click Login.
NOTE – Drobo customers who signup via the Dashboard receive 50GB of free storage.
STEP 3
The account creation process will take up to 30 seconds to complete.
Once complete, click the Manage Cloud Backup button to configure an ElephantDrive backup job.

Drobo How-To Guide Drobo Apps - Configuring ElephantDrive
drobo.com | Configuring ElephantDrive on the Drobo 5N 7
STEP 4
Login with the same credentials like the previous step.
Once that is complete click Get Started.
STEP 5
ElephantDrive gives options for Service Provided Key and Personal Key. For the purpose of this guide we are doing Service Provided Key.
NOTE – Configuring a personal key is outside the scope of this document.
Drobo How-To Guide Drobo Apps - Configuring ElephantDrive
drobo.com | Configuring ElephantDrive on the Drobo 5N 8
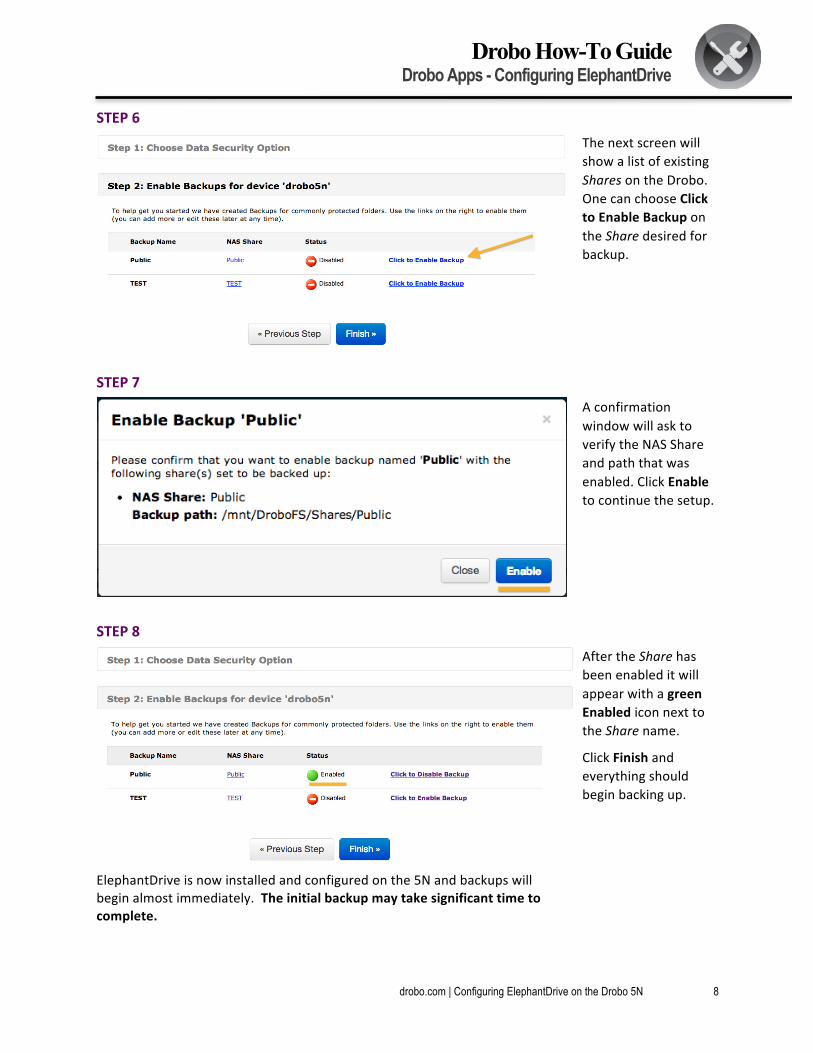
STEP 6
The next screen will show a list of existing Shares on the Drobo. One can choose Click to Enable Backup on the Share desired for backup.
STEP 7
A confirmation window will ask to verify the NAS Share and path that was enabled. Click Enable to continue the setup.
STEP 8
ElephantDrive is now installed and configured on the 5N and backups will begin almost immediately. The initial backup may take significant time to complete.
After the Share has been enabled it will appear with a green Enabled icon next to the Share name.
Click Finish and everything should begin backing up.

Drobo How-To Guide Drobo Apps - Configuring ElephantDrive
drobo.com | Configuring ElephantDrive on the Drobo 5N 9
Accessing Backup Data Stored in Elephant Drive Launch a web browser and navigate to https://vault.elephantdrive.com
STEP 1
Login to the ElephantDrive website using the credentials configured in a previous section.
On the Files tab, click My Computers.
STEP 2
From the list of computers listed, select the hostname of the Drobo 5N.
STEP 3
Navigate through the directory tree to the desired location.
Locate the file(s) to be recovered and click to select the file.

Drobo How-To Guide Drobo Apps - Configuring ElephantDrive
drobo.com | Configuring ElephantDrive on the Drobo 5N 10
STEP 4
Once the file is selected, click the Download icon to receive the file from ElephantDrive.
NOTE – ElephantDrive also supports file versioning. To review previous versions of the file, click Previous Versions.
This document is limited backup and recovery of data stored in the ElephantDrive cloud. To learn more about content sharing and other features, consult the URL below.
http://support.elephantdrive.com/forums/22120008-‐Drobo
Drobo 2460 North First Street, Suite 100, San Jose, CA www.drobo.com 1.866.97.DROBO Copyright 2013 Drobo, Inc. Data Robotics, Drobo, Drobo5N, BeyondRAID, and Smart Volumes are trademarks of
Drobo, Inc., which may be registered in some jurisdictions. All other trademarks used are owned by their respective owners. All rights reserved. Specifications subject to change without notice. November 2013