Embed Size (px)
Citation preview
Drobo How-To Guide Use Drobo and Pogoplug Software to Create a Personal Cloud
www.drobo.com | Use a Drobo and Pogoplug Software to Create a Personal Cloud 1
Users love Drobo® for the protection that Drobo provides for photos, videos, files, and your entire digital life at home or for your home office—and for its easy-of-use. And they often want to share these files with others or access them when they’re away from home. This makes the concept of personal cloud quite interesting: this document discusses Pogoplug and how you can use Pogoplug Software to create a personal cloud. Also included is a section describing cloud backup of selected content on a Drobo to the Pogoplug Cloud.
Like Drobo, Pogoplug Software is an easy-to-use application, which takes only a few minutes to install and configure. Pogoplug Remote Access Software enables remote access and sharing of files stored on a Drobo from a computer anywhere in the world. Remote access is free of charge with Pogoplug Remote Access Software; media streaming is available with a one-time unlimited license.
Benefits of Pogoplug Software include:
• Consolidate all your storage devices
• Access your files from anywhere
• Stream content to a remote device*
• Protect your data by syncing it to the cloud
* Requires premium membership upgrade with which a one-time fee buys a license for ALL your computers.
Topics Installing Pogoplug Software
Adding remote access for Drobo storage
Accessing files remotely and streaming files
Syncing data from your Drobo to the Pogoplug Cloud
What You Will Need • Drobo storage array (must remain powered on to access files)
Computer to which DAS or SAN Drobo is connected must also remain powered on.
• Computer for Pogoplug Remote Access Software (must remain powered on to access files) Operating Systems: Microsoft Windows XP/7 or Apple Mac OS X 10.6.6 or later
• Pogoplug account and Pogoplug Premium if you wish to stream to mobile or media devices.
• High-speed Internet access to the system on which Pogoplug Remote Access Software is installed and to which Drobo storage is connected
NOTE: Examples in this document show screen captures from a Windows computer. The procedures follow a similar flow on a Mac OS computer, but the some screens may look different.
Drobo How-To Guide Use Drobo and Pogoplug Software to Create a Personal Cloud
www.drobo.com | Use a Drobo and Pogoplug Software to Create a Personal Cloud 2
Installing Pogoplug Software
STEP 1
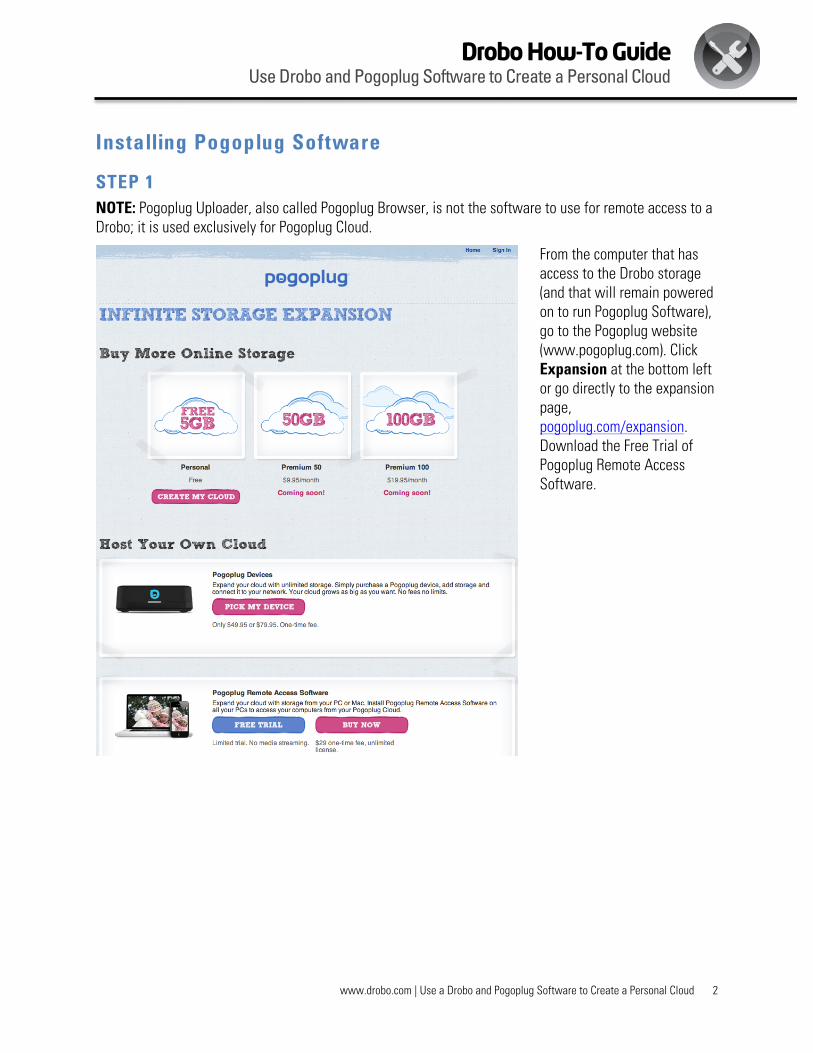
NOTE: Pogoplug Uploader, also called Pogoplug Browser, is not the software to use for remote access to a Drobo; it is used exclusively for Pogoplug Cloud.
From the computer that has access to the Drobo storage (and that will remain powered on to run Pogoplug Software), go to the Pogoplug website (www.pogoplug.com). Click Expansion at the bottom left or go directly to the expansion page, pogoplug.com/expansion. Download the Free Trial of Pogoplug Remote Access Software.
Drobo How-To Guide Use Drobo and Pogoplug Software to Create a Personal Cloud
www.drobo.com | Use a Drobo and Pogoplug Software to Create a Personal Cloud 3
STEP 2
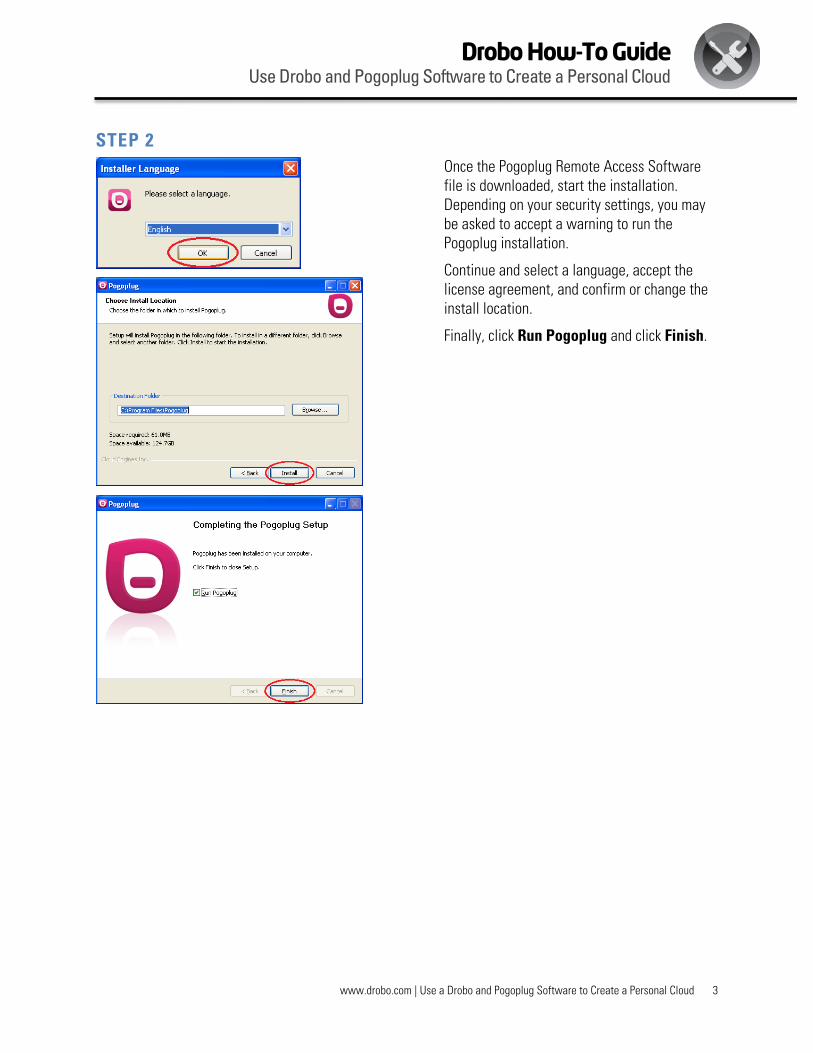
Once the Pogoplug Remote Access Software file is downloaded, start the installation. Depending on your security settings, you may be asked to accept a warning to run the Pogoplug installation.
Continue and select a language, accept the license agreement, and confirm or change the install location.
Finally, click Run Pogoplug and click Finish.
Drobo How-To Guide Use Drobo and Pogoplug Software to Create a Personal Cloud
www.drobo.com | Use a Drobo and Pogoplug Software to Create a Personal Cloud 4
STEP 3
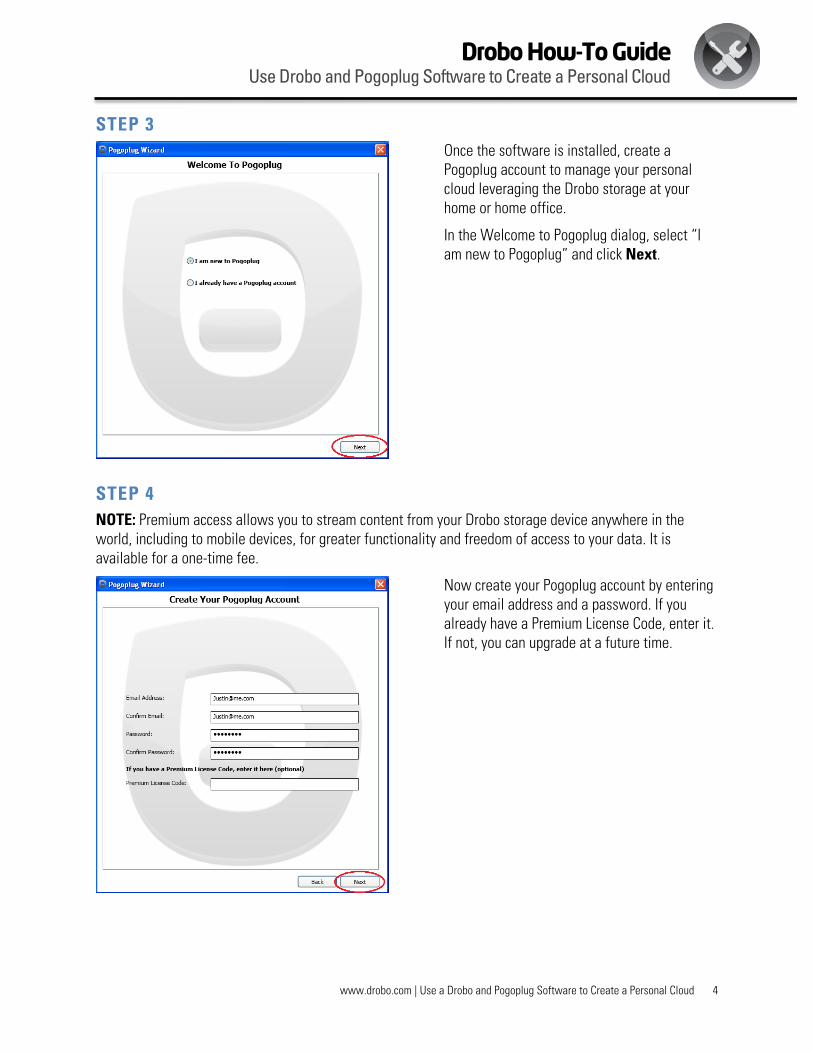
Once the software is installed, create a Pogoplug account to manage your personal cloud leveraging the Drobo storage at your home or home office.
In the Welcome to Pogoplug dialog, select “I am new to Pogoplug” and click Next.
STEP 4
NOTE: Premium access allows you to stream content from your Drobo storage device anywhere in the world, including to mobile devices, for greater functionality and freedom of access to your data. It is available for a one-time fee.
Now create your Pogoplug account by entering your email address and a password. If you already have a Premium License Code, enter it. If not, you can upgrade at a future time.
Drobo How-To Guide Use Drobo and Pogoplug Software to Create a Personal Cloud
www.drobo.com | Use a Drobo and Pogoplug Software to Create a Personal Cloud 5
STEP 5
NOTE ON IMAGE DATABASES: Some photo management software such as Apple Aperture and media management software such as Apple iTunes use a database for organizing files. Pogoplug Remote Access Software works with individual files in a folder structure and not on files in a database structure. For remote access, choose the file location where the source files reside and not the location of your management software database. Excluding the location of management software databases is recommended. If necessary, create a location for individual files not in a database to facilitate access via Pogoplug.
NOTE ON BACKUP: The data in the location(s) selected for remote access will not be backed up offsite to the Pogoplug Cloud following these instructions provided so far in this document. These instructions enable remote access and download of your files. If you want to back up your data to the Pogoplug Cloud, see the section entitled, “Syncing data from your Drobo to the Pogoplug Cloud.”
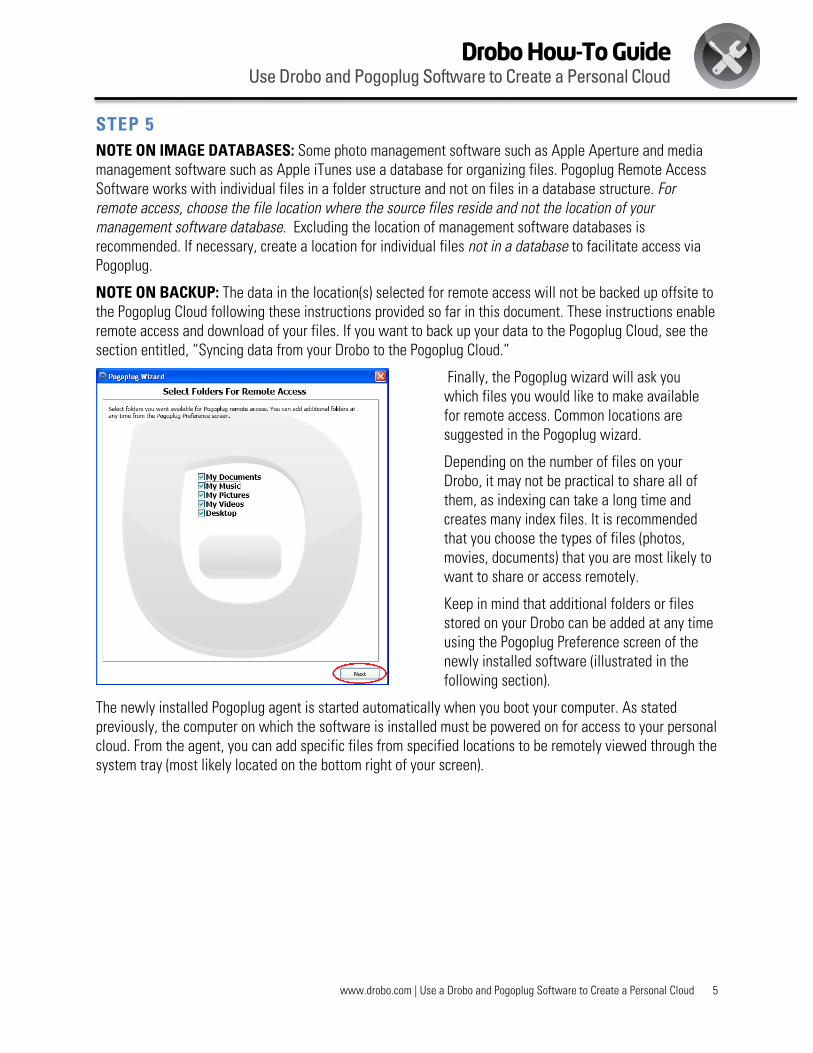
Finally, the Pogoplug wizard will ask you which files you would like to make available for remote access. Common locations are suggested in the Pogoplug wizard.
Depending on the number of files on your Drobo, it may not be practical to share all of them, as indexing can take a long time and creates many index files. It is recommended that you choose the types of files (photos, movies, documents) that you are most likely to want to share or access remotely.
Keep in mind that additional folders or files stored on your Drobo can be added at any time using the Pogoplug Preference screen of the newly installed software (illustrated in the following section).
The newly installed Pogoplug agent is started automatically when you boot your computer. As stated previously, the computer on which the software is installed must be powered on for access to your personal cloud. From the agent, you can add specific files from specified locations to be remotely viewed through the system tray (most likely located on the bottom right of your screen).
Drobo How-To Guide Use Drobo and Pogoplug Software to Create a Personal Cloud
www.drobo.com | Use a Drobo and Pogoplug Software to Create a Personal Cloud 6
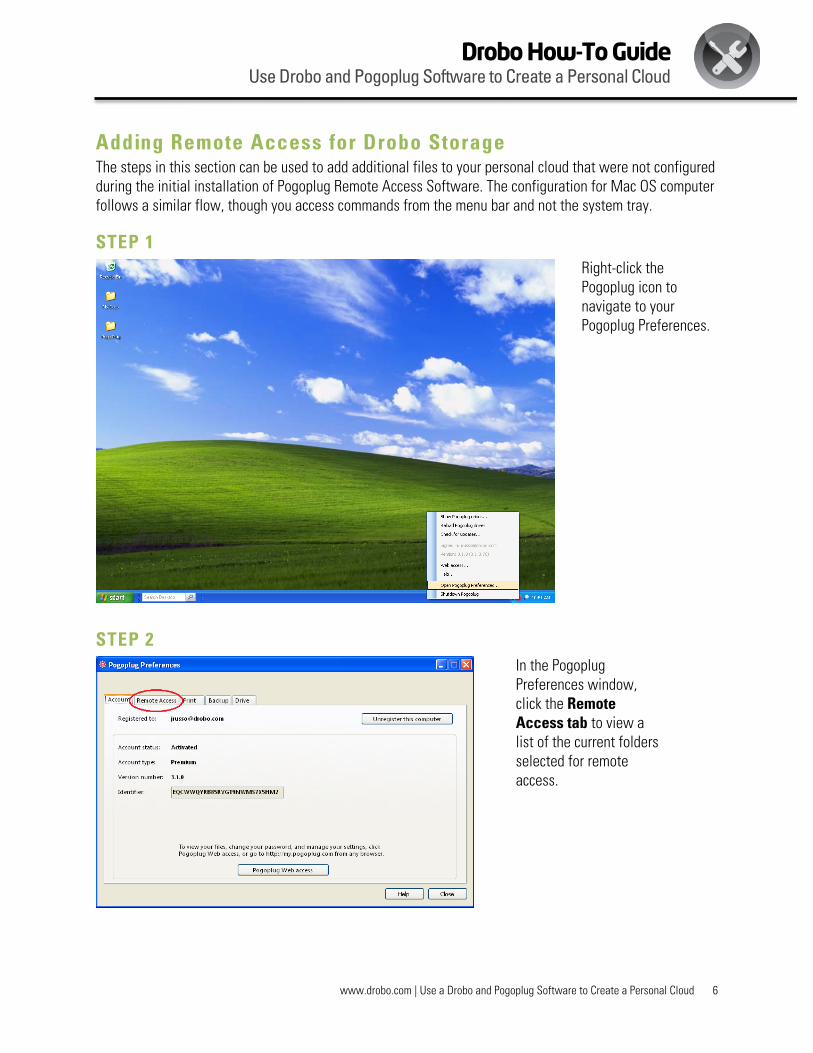
Adding Remote Access for Drobo Storage The steps in this section can be used to add additional files to your personal cloud that were not configured during the initial installation of Pogoplug Remote Access Software. The configuration for Mac OS computer follows a similar flow, though you access commands from the menu bar and not the system tray.
STEP 1
Right-click the Pogoplug icon to navigate to your Pogoplug Preferences.
STEP 2
In the Pogoplug Preferences window, click the Remote Access tab to view a list of the current folders selected for remote access.
Drobo How-To Guide Use Drobo and Pogoplug Software to Create a Personal Cloud
www.drobo.com | Use a Drobo and Pogoplug Software to Create a Personal Cloud 7
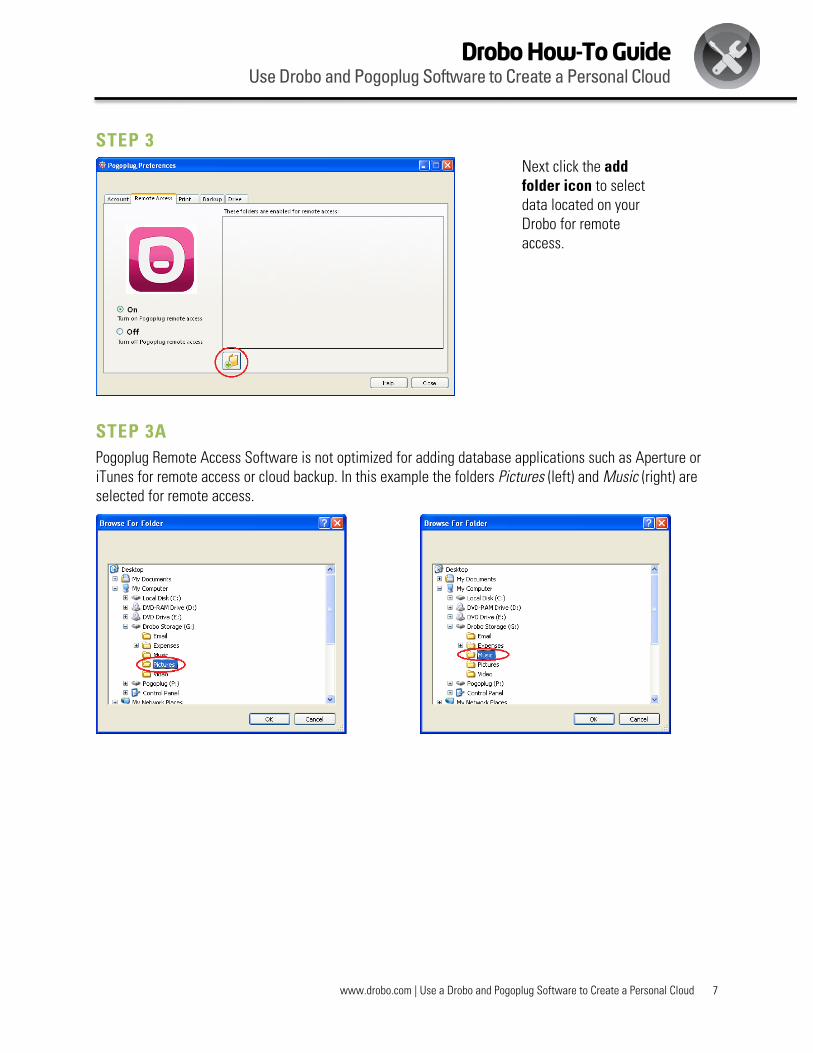
STEP 3
Next click the add folder icon to select data located on your Drobo for remote access.
STEP 3A
Pogoplug Remote Access Software is not optimized for adding database applications such as Aperture or iTunes for remote access or cloud backup. In this example the folders Pictures (left) and Music (right) are selected for remote access.
Drobo How-To Guide Use Drobo and Pogoplug Software to Create a Personal Cloud
www.drobo.com | Use a Drobo and Pogoplug Software to Create a Personal Cloud 8
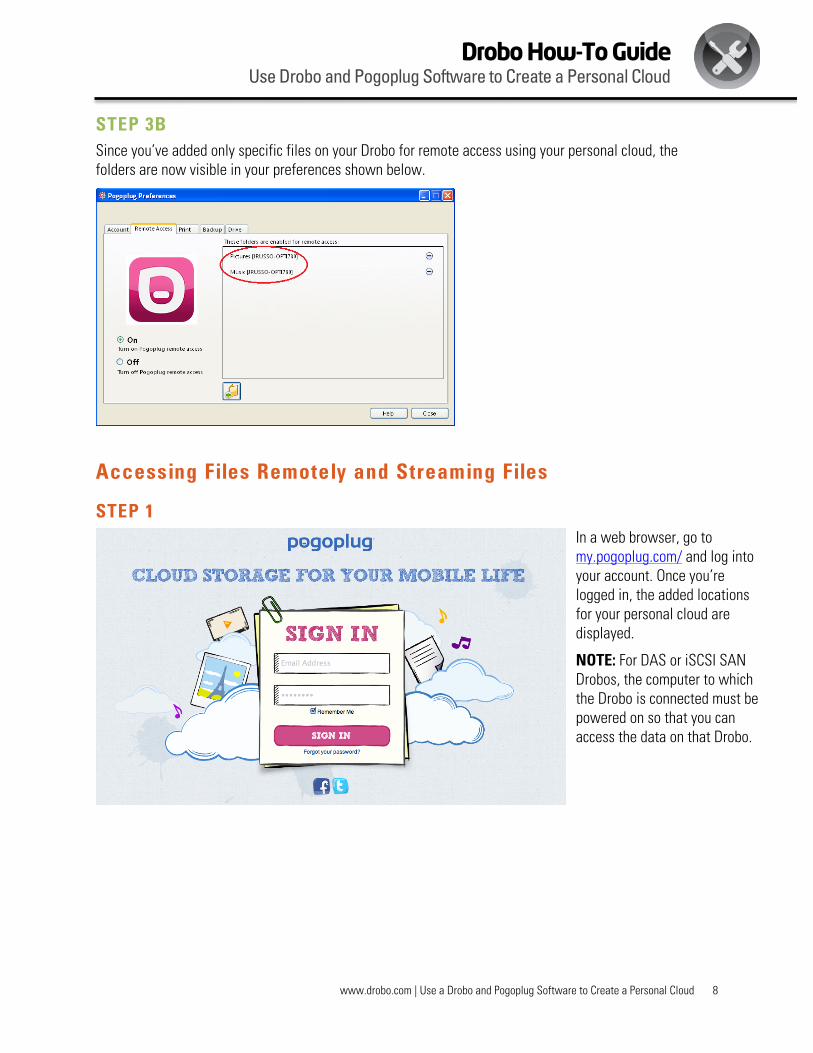
STEP 3B
Since you’ve added only specific files on your Drobo for remote access using your personal cloud, the folders are now visible in your preferences shown below.
Accessing Files Remotely and Streaming Files
STEP 1
In a web browser, go to my.pogoplug.com/ and log into your account. Once you’re logged in, the added locations for your personal cloud are displayed.
NOTE: For DAS or iSCSI SAN Drobos, the computer to which the Drobo is connected must be powered on so that you can access the data on that Drobo.
Drobo How-To Guide Use Drobo and Pogoplug Software to Create a Personal Cloud
www.drobo.com | Use a Drobo and Pogoplug Software to Create a Personal Cloud 9
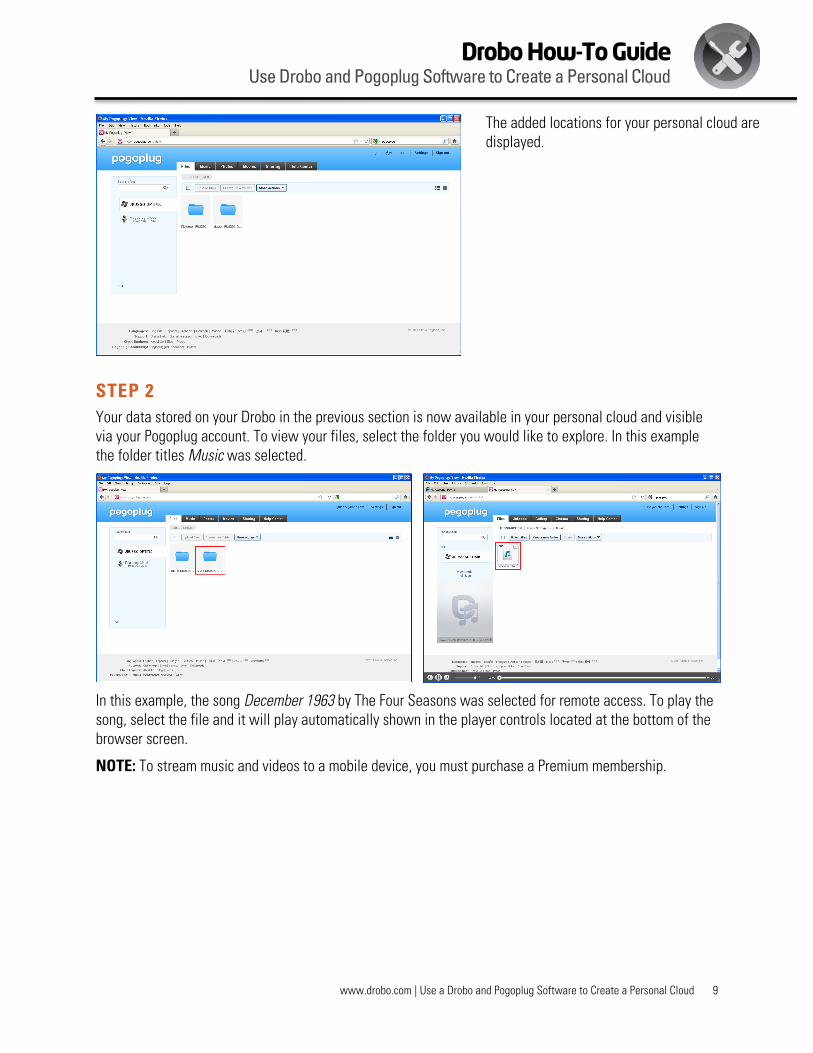
The added locations for your personal cloud are displayed.
STEP 2
Your data stored on your Drobo in the previous section is now available in your personal cloud and visible via your Pogoplug account. To view your files, select the folder you would like to explore. In this example the folder titles Music was selected.
In this example, the song December 1963 by The Four Seasons was selected for remote access. To play the song, select the file and it will play automatically shown in the player controls located at the bottom of the browser screen.
NOTE: To stream music and videos to a mobile device, you must purchase a Premium membership.
Drobo How-To Guide Use Drobo and Pogoplug Software to Create a Personal Cloud
www.drobo.com | Use a Drobo and Pogoplug Software to Create a Personal Cloud 10
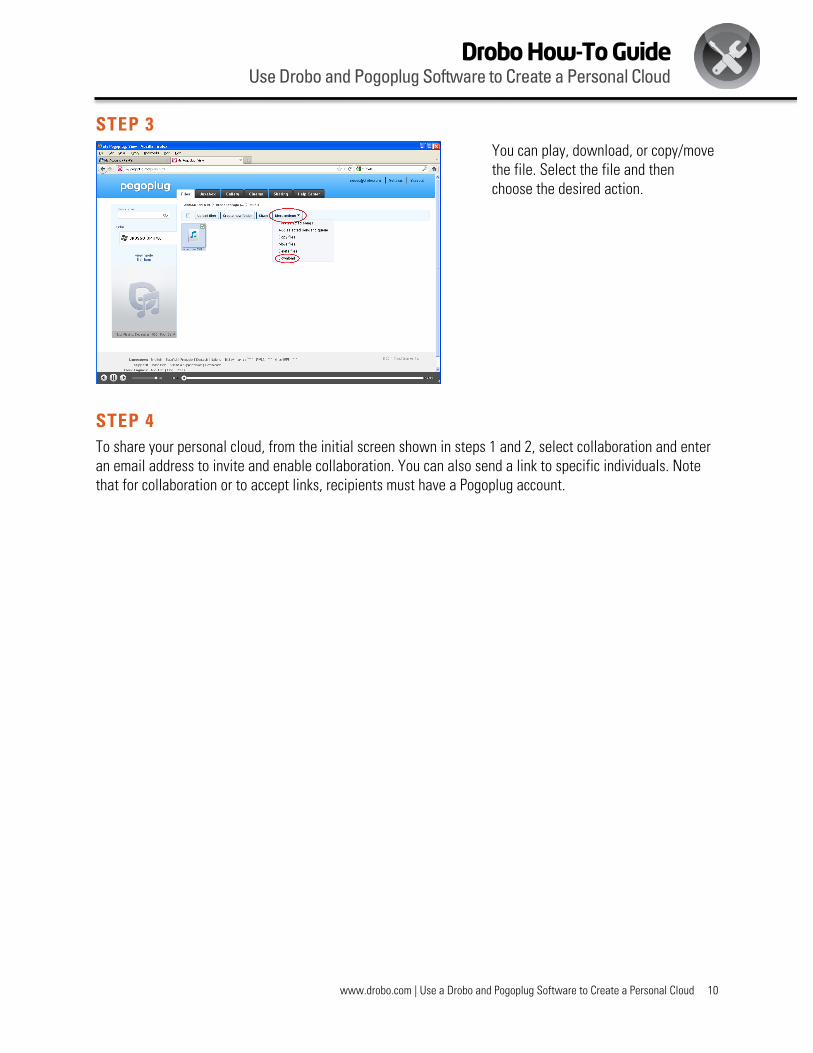
STEP 3
You can play, download, or copy/move the file. Select the file and then choose the desired action.
STEP 4
To share your personal cloud, from the initial screen shown in steps 1 and 2, select collaboration and enter an email address to invite and enable collaboration. You can also send a link to specific individuals. Note that for collaboration or to accept links, recipients must have a Pogoplug account.
Drobo How-To Guide Use Drobo and Pogoplug Software to Create a Personal Cloud
www.drobo.com | Use a Drobo and Pogoplug Software to Create a Personal Cloud 11
Syncing Data from Your Drobo to the Pogoplug Cloud In the previous sections, cloud referred to the “personal cloud” created for your Drobo storage, in which files and media existed only on the Drobo in your home or home office. This section discusses a different cloud, the “Pogoplug Cloud,” which, like other public cloud storage, is an online resource with a separate copy of data located on your Drobo. The Pogoplug Cloud can serve as a backup of the data on your Drobo.
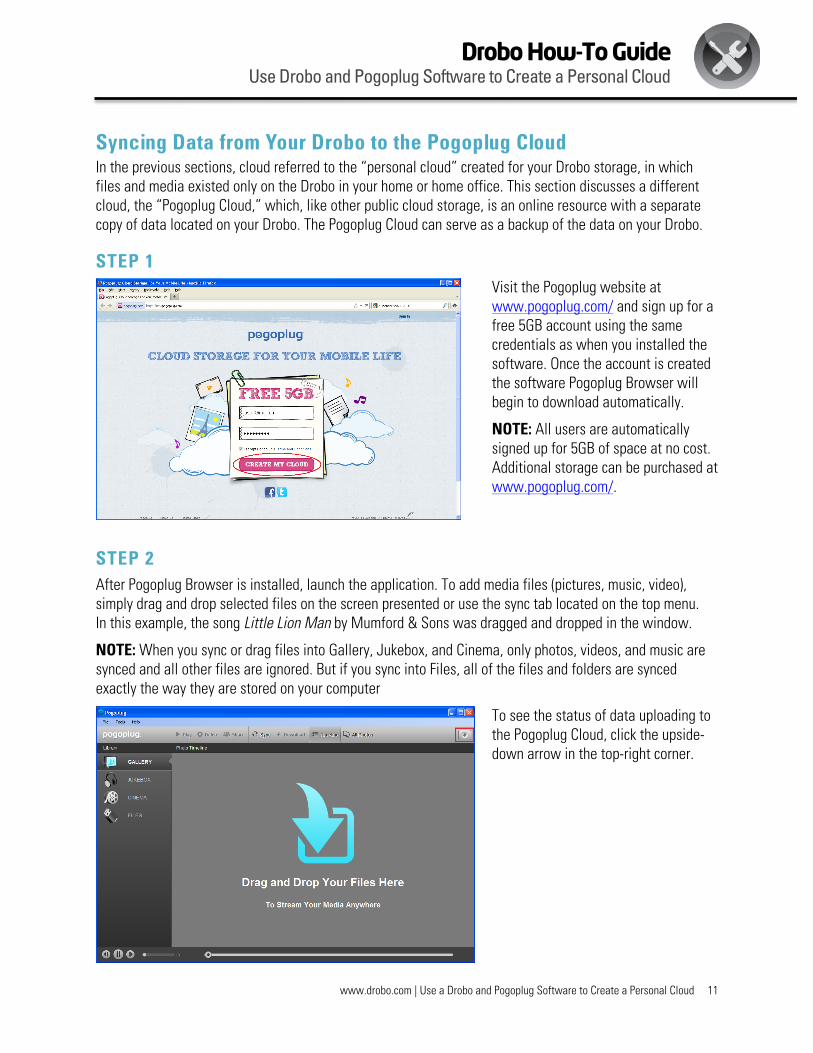
STEP 1
Visit the Pogoplug website at www.pogoplug.com/ and sign up for a free 5GB account using the same credentials as when you installed the software. Once the account is created the software Pogoplug Browser will begin to download automatically.
NOTE: All users are automatically signed up for 5GB of space at no cost. Additional storage can be purchased at www.pogoplug.com/.
STEP 2
After Pogoplug Browser is installed, launch the application. To add media files (pictures, music, video), simply drag and drop selected files on the screen presented or use the sync tab located on the top menu. In this example, the song Little Lion Man by Mumford & Sons was dragged and dropped in the window.
NOTE: When you sync or drag files into Gallery, Jukebox, and Cinema, only photos, videos, and music are synced and all other files are ignored. But if you sync into Files, all of the files and folders are synced exactly the way they are stored on your computer
To see the status of data uploading to the Pogoplug Cloud, click the upside-down arrow in the top-right corner.
Drobo How-To Guide Use Drobo and Pogoplug Software to Create a Personal Cloud
www.drobo.com | Use a Drobo and Pogoplug Software to Create a Personal Cloud 12
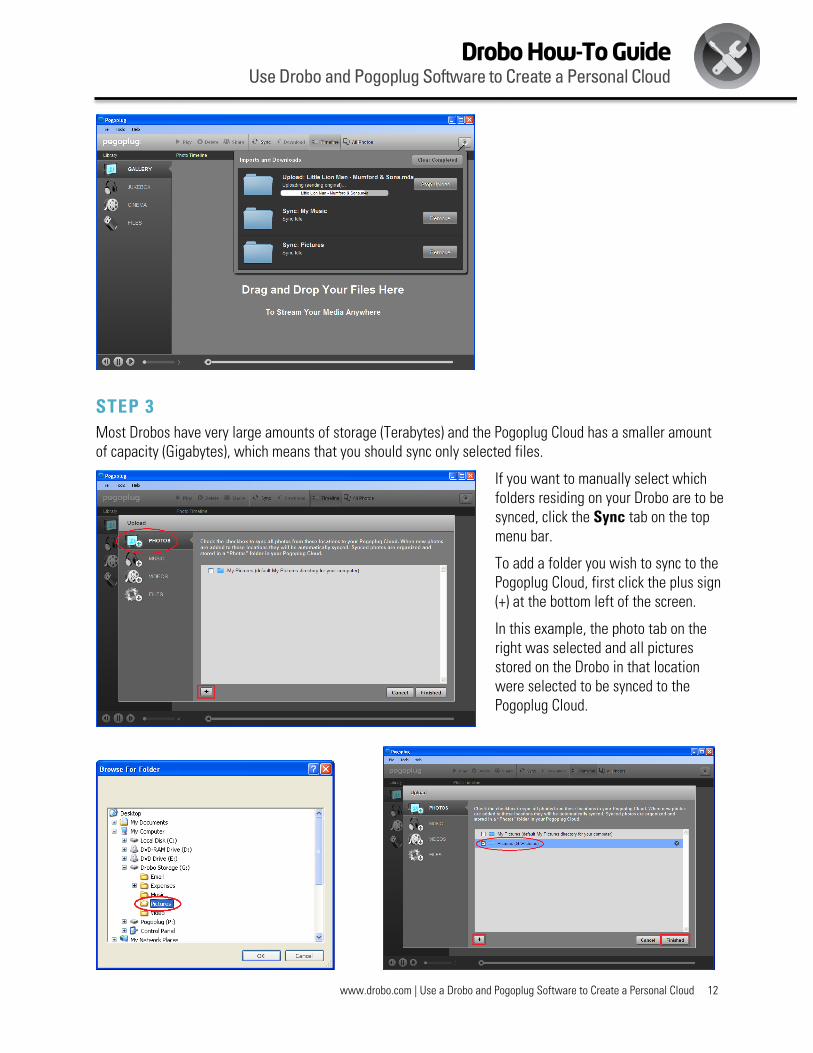
STEP 3
Most Drobos have very large amounts of storage (Terabytes) and the Pogoplug Cloud has a smaller amount of capacity (Gigabytes), which means that you should sync only selected files.
If you want to manually select which folders residing on your Drobo are to be synced, click the Sync tab on the top menu bar.
To add a folder you wish to sync to the Pogoplug Cloud, first click the plus sign (+) at the bottom left of the screen.
In this example, the photo tab on the right was selected and all pictures stored on the Drobo in that location were selected to be synced to the Pogoplug Cloud.

Drobo How-To Guide Use Drobo and Pogoplug Software to Create a Personal Cloud
www.drobo.com | Use a Drobo and Pogoplug Software to Create a Personal Cloud 13
STEP 4
To sync data other than media, simply select the Sync tab from the top menu bar and then the Files tab. To add a folder to sync to the Pogoplug Cloud, click the plus sign (+) at the bottom left of the screen.
STEP 5
Select the folder you wish to upload. In this example the folder Word Documents stored on the Drobo was selected for upload from your personal cloud to the Pogoplug Cloud.
Drobo How-To Guide Use Drobo and Pogoplug Software to Create a Personal Cloud
www.drobo.com | Use a Drobo and Pogoplug Software to Create a Personal Cloud 14
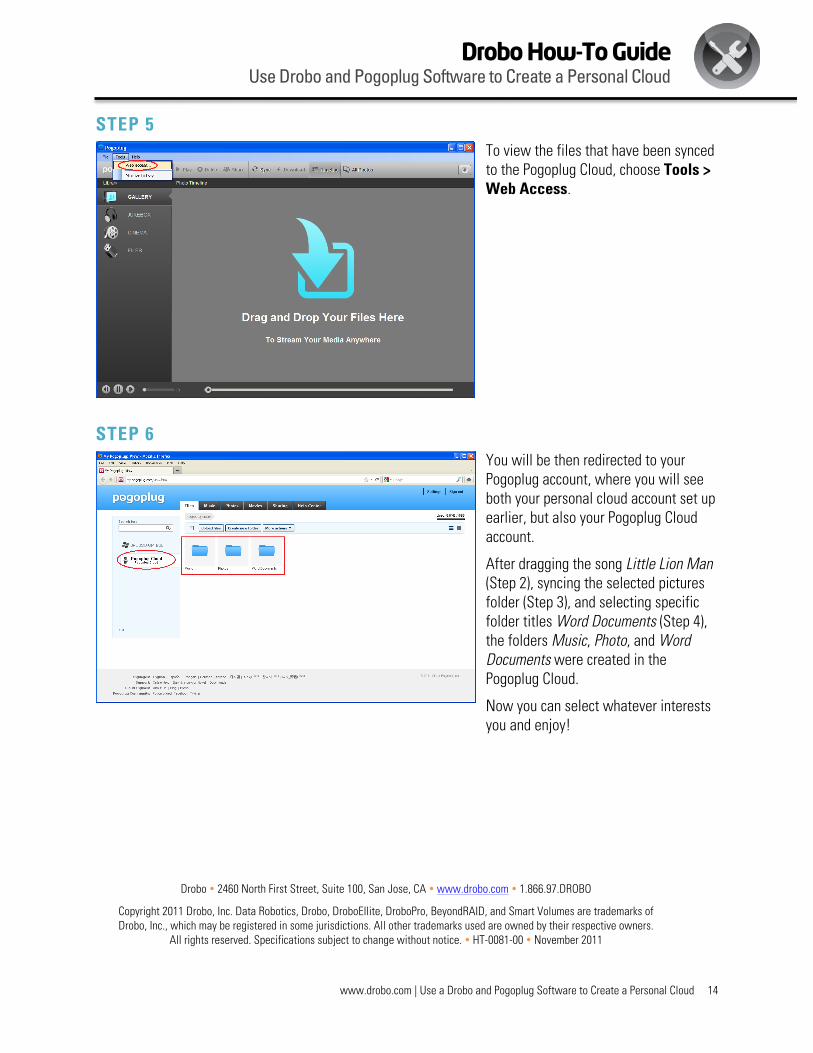
STEP 5
To view the files that have been synced to the Pogoplug Cloud, choose Tools > Web Access.
STEP 6
You will be then redirected to your Pogoplug account, where you will see both your personal cloud account set up earlier, but also your Pogoplug Cloud account.
After dragging the song Little Lion Man (Step 2), syncing the selected pictures folder (Step 3), and selecting specific folder titles Word Documents (Step 4), the folders Music, Photo, and Word Documents were created in the Pogoplug Cloud.
Now you can select whatever interests you and enjoy!
Drobo � 2460 North First Street, Suite 100, San Jose, CA � www.drobo.com � 1.866.97.DROBO
Copyright 2011 Drobo, Inc. Data Robotics, Drobo, DroboEllite, DroboPro, BeyondRAID, and Smart Volumes are trademarks of Drobo, Inc., which may be registered in some jurisdictions. All other trademarks used are owned by their respective owners.
All rights reserved. Specifications subject to change without notice. � HT-0081-00 � November 2011