Embed Size (px)
Citation preview
DP8 & DP9
SUPPORT DESK GUIDE
CRADEN P E R I P H E R A L S 7860 AIRPORT HIGHWAY TEL 856 488-0700 C O R P O R A T I O N PENNSAUKEN, NJ 08109 FAX 856 488-0925
WWW.CRADEN.COM
E-MAIL: [email protected]
1
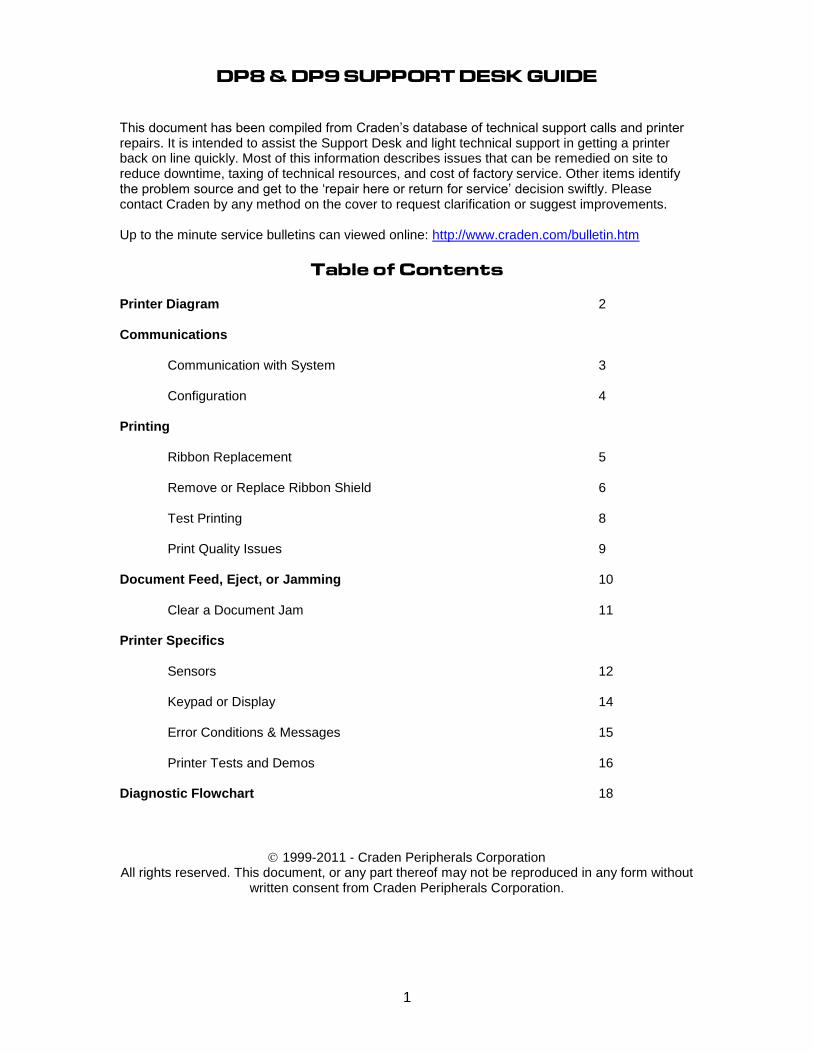
DP8 & DP9 SUPPORT DESK GUIDE
This document has been compiled from Craden’s database of technical support calls and printer repairs. It is intended to assist the Support Desk and light technical support in getting a printer back on line quickly. Most of this information describes issues that can be remedied on site to reduce downtime, taxing of technical resources, and cost of factory service. Other items identify the problem source and get to the ‘repair here or return for service’ decision swiftly. Please contact Craden by any method on the cover to request clarification or suggest improvements. Up to the minute service bulletins can viewed online: http://www.craden.com/bulletin.htm
Table of Contents Printer Diagram 2 Communications
Communication with System 3
Configuration 4
Printing
Ribbon Replacement 5 Remove or Replace Ribbon Shield 6 Test Printing 8 Print Quality Issues 9
Document Feed, Eject, or Jamming 10
Clear a Document Jam 11 Printer Specifics
Sensors 12 Keypad or Display 14 Error Conditions & Messages 15 Printer Tests and Demos 16
Diagnostic Flowchart 18
1999-2011 - Craden Peripherals Corporation All rights reserved. This document, or any part thereof may not be reproduced in any form without
written consent from Craden Peripherals Corporation.
2
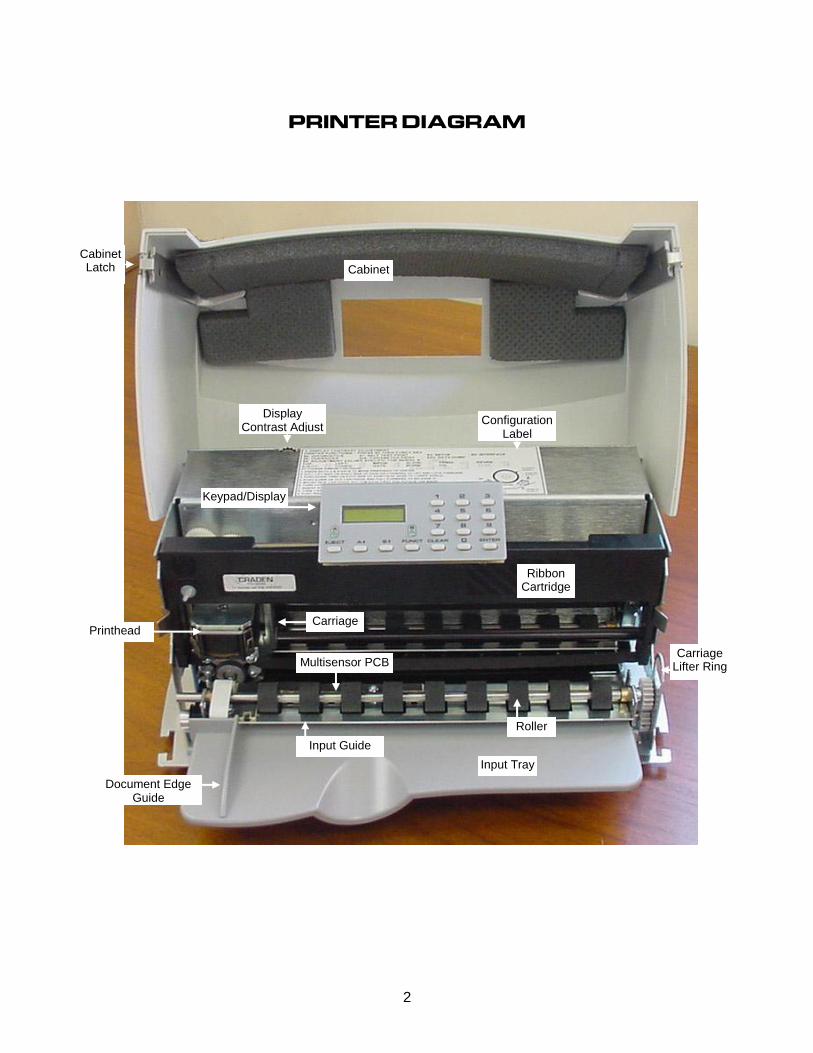
PRINTER DIAGRAM
Cabinet
Keypad/Display
Configuration Label
Ribbon Cartridge
Input Tray
Document Edge Guide
Printhead Carriage
Input Guide
Roller
Carriage Lifter Ring Multisensor PCB
Display Contrast Adjust
Cabinet Latch
3
COMMUNICATIONS
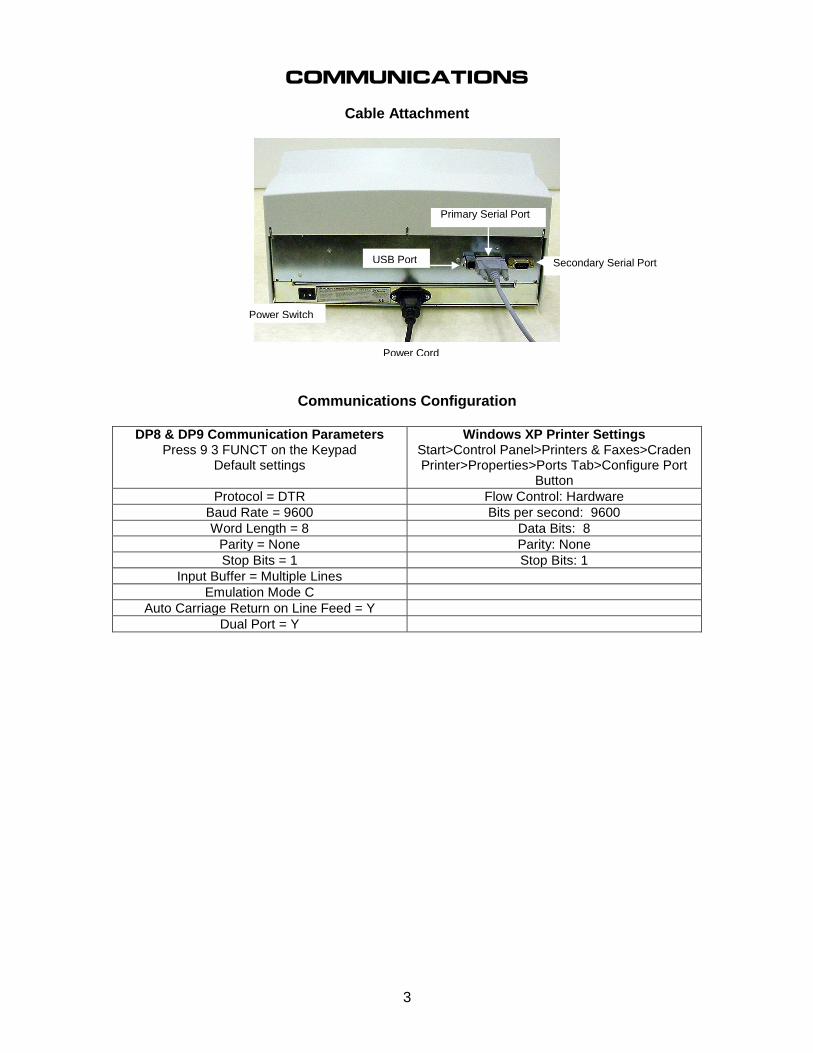
Cable Attachment
Communications Configuration
DP8 & DP9 Communication Parameters Press 9 3 FUNCT on the Keypad
Default settings
Windows XP Printer Settings Start>Control Panel>Printers & Faxes>Craden Printer>Properties>Ports Tab>Configure Port
Button
Protocol = DTR Flow Control: Hardware
Baud Rate = 9600 Bits per second: 9600
Word Length = 8 Data Bits: 8
Parity = None Parity: None
Stop Bits = 1 Stop Bits: 1
Input Buffer = Multiple Lines
Emulation Mode C
Auto Carriage Return on Line Feed = Y
Dual Port = Y
Power Cord
Primary Serial Port
USB Port Secondary Serial Port
Power Switch
4
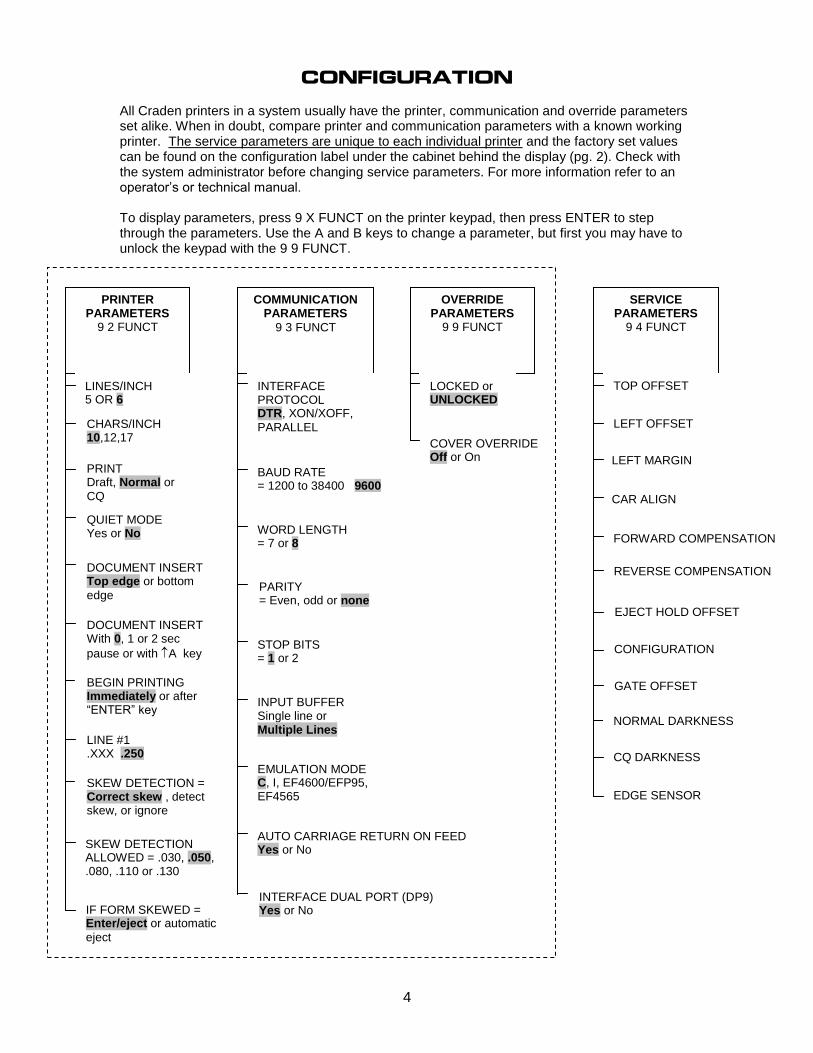
CONFIGURATION
All Craden printers in a system usually have the printer, communication and override parameters set alike. When in doubt, compare printer and communication parameters with a known working printer. The service parameters are unique to each individual printer and the factory set values can be found on the configuration label under the cabinet behind the display (pg. 2). Check with the system administrator before changing service parameters. For more information refer to an operator’s or technical manual. To display parameters, press 9 X FUNCT on the printer keypad, then press ENTER to step through the parameters. Use the A and B keys to change a parameter, but first you may have to unlock the keypad with the 9 9 FUNCT.
PRINTER PARAMETERS
9 2 FUNCT
LINES/INCH 5 OR 6
CHARS/INCH 10,12,17
PRINT Draft, Normal or
CQ
QUIET MODE Yes or No
DOCUMENT INSERT Top edge or bottom
edge
DOCUMENT INSERT With 0, 1 or 2 sec
pause or with A key
BEGIN PRINTING Immediately or after “ENTER” key
LINE #1 .XXX .250
COMMUNICATION PARAMETERS
9 3 FUNCT
INTERFACE PROTOCOL DTR, XON/XOFF,
PARALLEL
BAUD RATE = 1200 to 38400 9600
WORD LENGTH = 7 or 8
PARITY = Even, odd or none
STOP BITS = 1 or 2
INPUT BUFFER Single line or Multiple Lines
EMULATION MODE C, I, EF4600/EFP95, EF4565
AUTO CARRIAGE RETURN ON FEED Yes or No
oo
OVERRIDE PARAMETERS
9 9 FUNCT
LOCKED or UNLOCKED
COVER OVERRIDE Off or On
SKEW DETECTION = Correct skew , detect skew, or ignore
SKEW DETECTION ALLOWED = .030, .050, .080, .110 or .130
IF FORM SKEWED = Enter/eject or automatic
eject
INTERFACE DUAL PORT (DP9) Yes or No
oo
EDGE SENSOR
FORWARD COMPENSATION
REVERSE COMPENSATION
GATE OFFSET
SERVICE PARAMETERS
9 4 FUNCT
TOP OFFSET
LEFT OFFSET
LEFT MARGIN
CAR ALIGN
EJECT HOLD OFFSET
CONFIGURATION
CQ DARKNESS
NORMAL DARKNESS
5
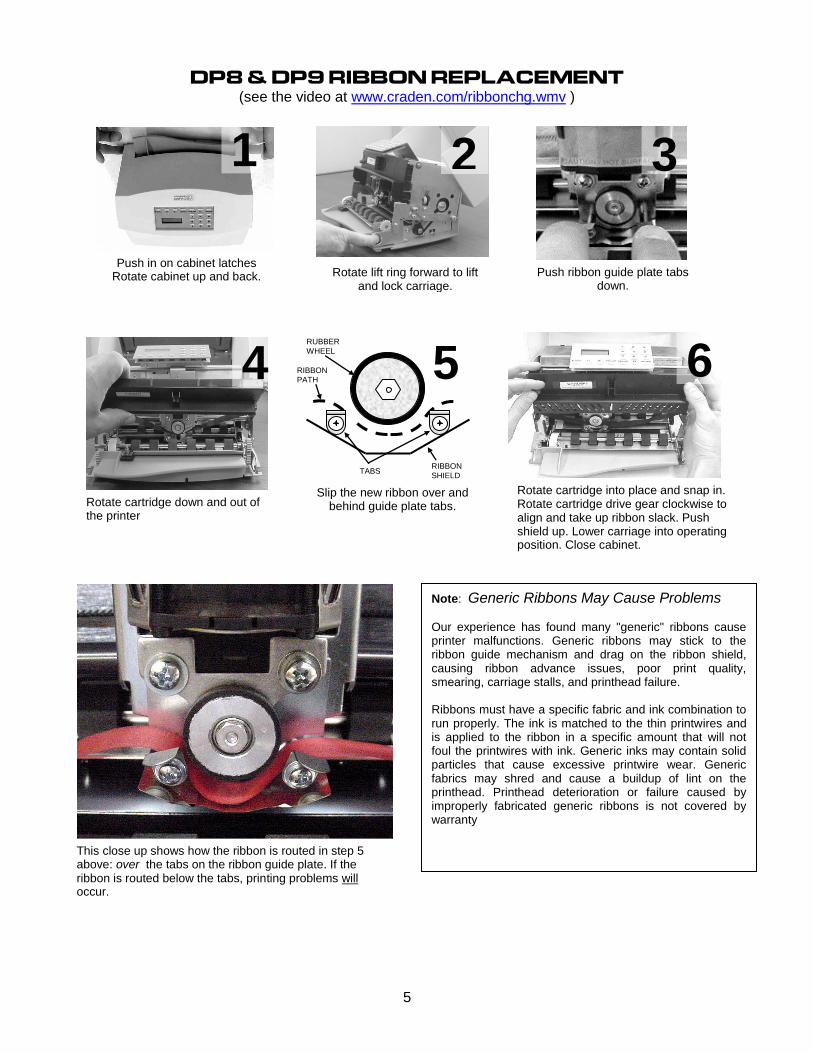
DP8 & DP9 RIBBON REPLACEMENT
(see the video at www.craden.com/ribbonchg.wmv )
Push in on cabinet latches Rotate cabinet up and back.
1
Rotate lift ring forward to lift and lock carriage.
3
Push ribbon guide plate tabs down.
4
Rotate cartridge into place and snap in. Rotate cartridge drive gear clockwise to align and take up ribbon slack. Push shield up. Lower carriage into operating position. Close cabinet.
6
2
5 RUBBER
WHEEL
RIBBON
SHIELD TABS
RIBBON PATH
Slip the new ribbon over and behind guide plate tabs. Rotate cartridge down and out of
the printer
This close up shows how the ribbon is routed in step 5 above: over the tabs on the ribbon guide plate. If the ribbon is routed below the tabs, printing problems will occur.
Note: Generic Ribbons May Cause Problems
Our experience has found many "generic" ribbons cause printer malfunctions. Generic ribbons may stick to the ribbon guide mechanism and drag on the ribbon shield, causing ribbon advance issues, poor print quality, smearing, carriage stalls, and printhead failure. Ribbons must have a specific fabric and ink combination to run properly. The ink is matched to the thin printwires and is applied to the ribbon in a specific amount that will not foul the printwires with ink. Generic inks may contain solid particles that cause excessive printwire wear. Generic fabrics may shred and cause a buildup of lint on the printhead. Printhead deterioration or failure caused by improperly fabricated generic ribbons is not covered by warranty
6
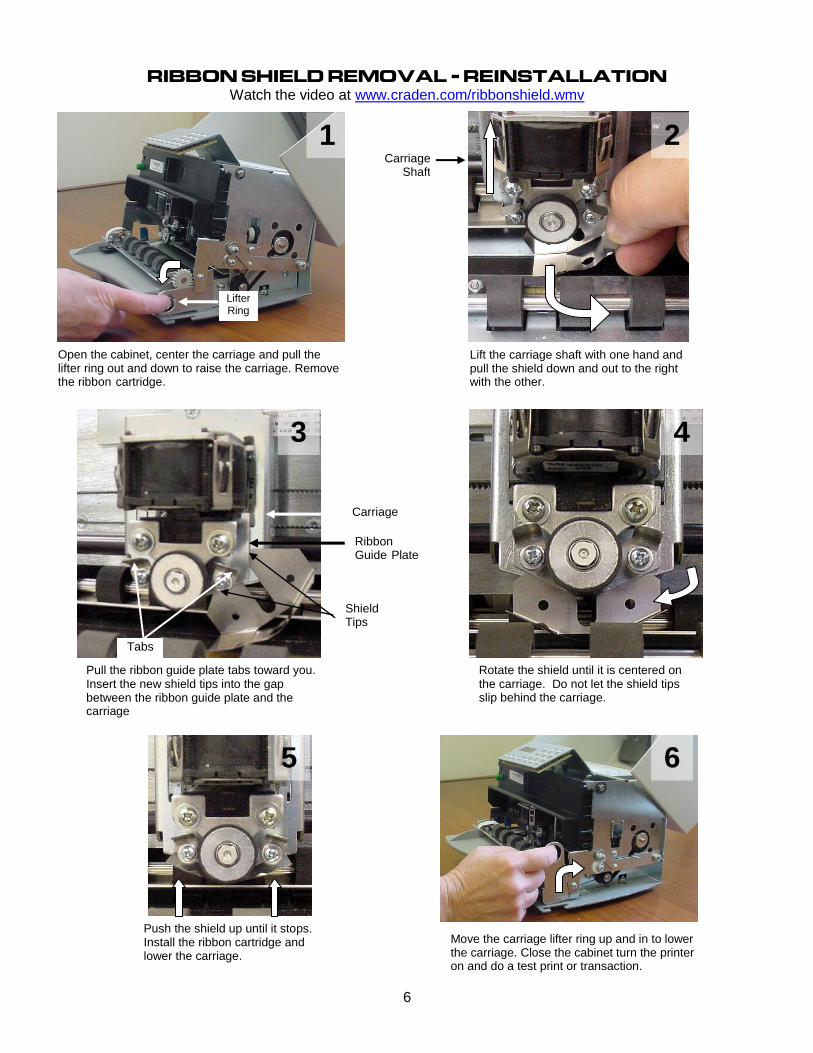
RIBBON SHIELD REMOVAL – REINSTALLATION Watch the video at www.craden.com/ribbonshield.wmv
Open the cabinet, center the carriage and pull the lifter ring out and down to raise the carriage. Remove the ribbon cartridge.
Lifter Ring
Carriage Shaft
Lift the carriage shaft with one hand and pull the shield down and out to the right with the other.
Shield Tips
Pull the ribbon guide plate tabs toward you. Insert the new shield tips into the gap between the ribbon guide plate and the carriage
Ribbon Guide Plate
Carriage
Tabs
Rotate the shield until it is centered on the carriage. Do not let the shield tips slip behind the carriage.
Push the shield up until it stops. Install the ribbon cartridge and lower the carriage.
Move the carriage lifter ring up and in to lower the carriage. Close the cabinet turn the printer on and do a test print or transaction.
6 5
4 3
2 1
7
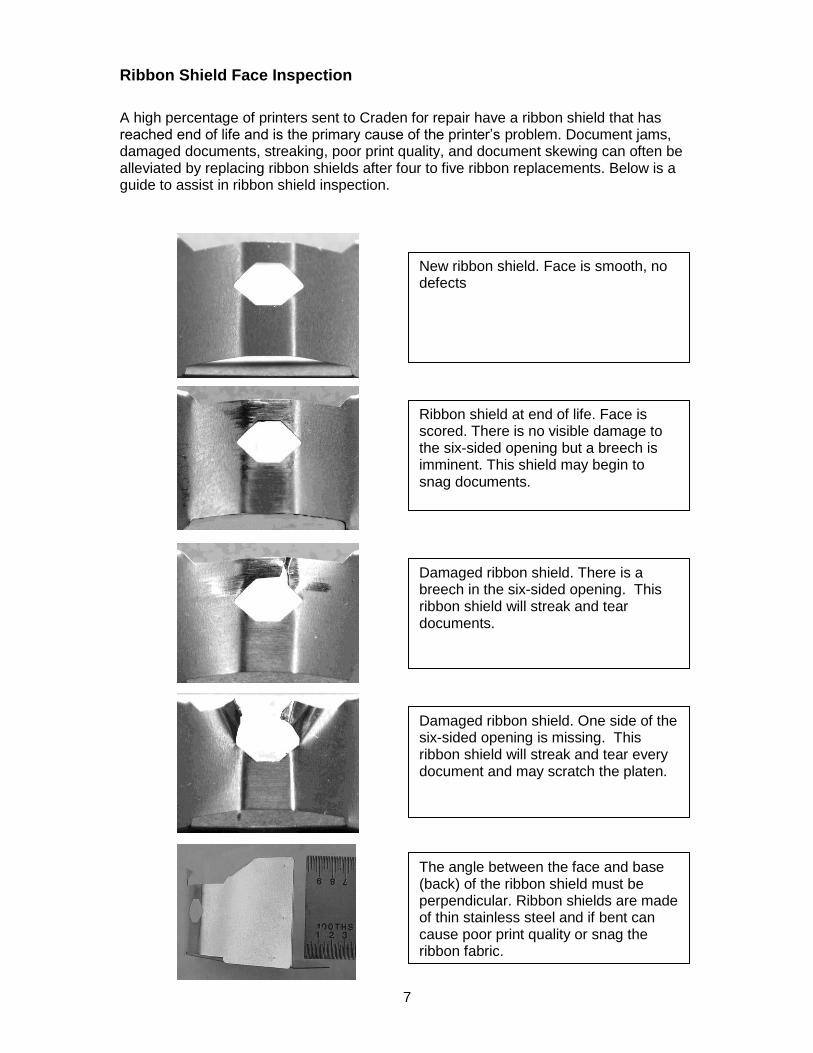
Ribbon Shield Face Inspection
A high percentage of printers sent to Craden for repair have a ribbon shield that has reached end of life and is the primary cause of the printer’s problem. Document jams, damaged documents, streaking, poor print quality, and document skewing can often be alleviated by replacing ribbon shields after four to five ribbon replacements. Below is a guide to assist in ribbon shield inspection.
New ribbon shield. Face is smooth, no defects
Ribbon shield at end of life. Face is scored. There is no visible damage to the six-sided opening but a breech is imminent. This shield may begin to snag documents.
Damaged ribbon shield. There is a breech in the six-sided opening. This ribbon shield will streak and tear documents.
Damaged ribbon shield. One side of the six-sided opening is missing. This ribbon shield will streak and tear every document and may scratch the platen.
The angle between the face and base (back) of the ribbon shield must be perpendicular. Ribbon shields are made of thin stainless steel and if bent can cause poor print quality or snag the ribbon fabric.
8
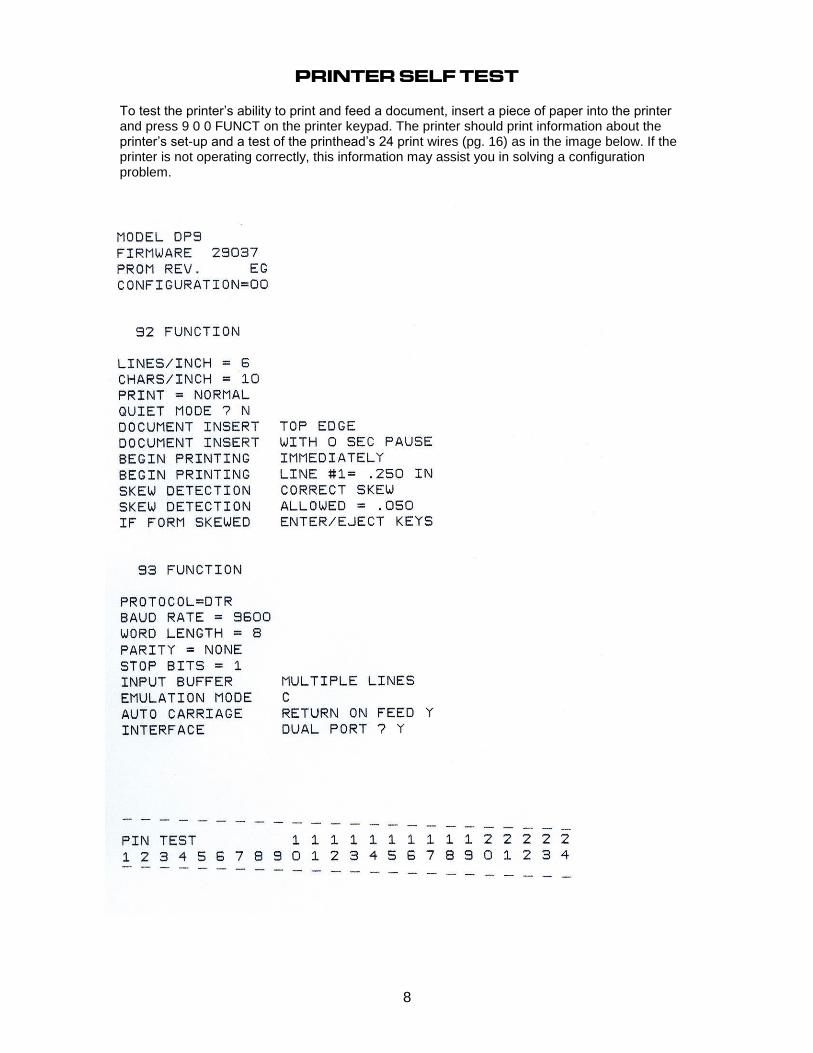
PRINTER SELF TEST To test the printer’s ability to print and feed a document, insert a piece of paper into the printer and press 9 0 0 FUNCT on the printer keypad. The printer should print information about the printer’s set-up and a test of the printhead’s 24 print wires (pg. 16) as in the image below. If the printer is not operating correctly, this information may assist you in solving a configuration problem.
9
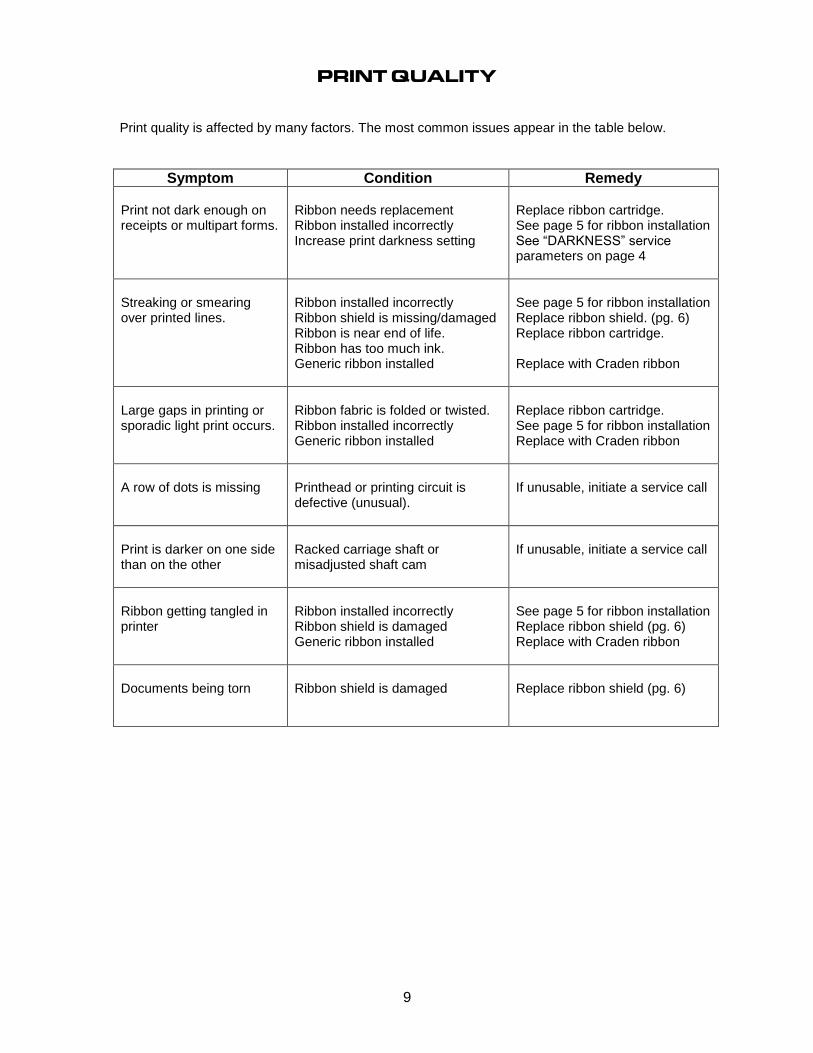
PRINT QUALITY Print quality is affected by many factors. The most common issues appear in the table below.
Symptom Condition Remedy Print not dark enough on receipts or multipart forms.
Ribbon needs replacement Ribbon installed incorrectly Increase print darkness setting
Replace ribbon cartridge. See page 5 for ribbon installation See “DARKNESS” service parameters on page 4
Streaking or smearing over printed lines.
Ribbon installed incorrectly Ribbon shield is missing/damaged Ribbon is near end of life. Ribbon has too much ink. Generic ribbon installed
See page 5 for ribbon installation Replace ribbon shield. (pg. 6) Replace ribbon cartridge. Replace with Craden ribbon
Large gaps in printing or sporadic light print occurs.
Ribbon fabric is folded or twisted. Ribbon installed incorrectly Generic ribbon installed
Replace ribbon cartridge. See page 5 for ribbon installation Replace with Craden ribbon
A row of dots is missing
Printhead or printing circuit is defective (unusual).
If unusable, initiate a service call
Print is darker on one side than on the other
Racked carriage shaft or misadjusted shaft cam
If unusable, initiate a service call
Ribbon getting tangled in printer
Ribbon installed incorrectly Ribbon shield is damaged Generic ribbon installed
See page 5 for ribbon installation Replace ribbon shield (pg. 6) Replace with Craden ribbon
Documents being torn
Ribbon shield is damaged
Replace ribbon shield (pg. 6)
10
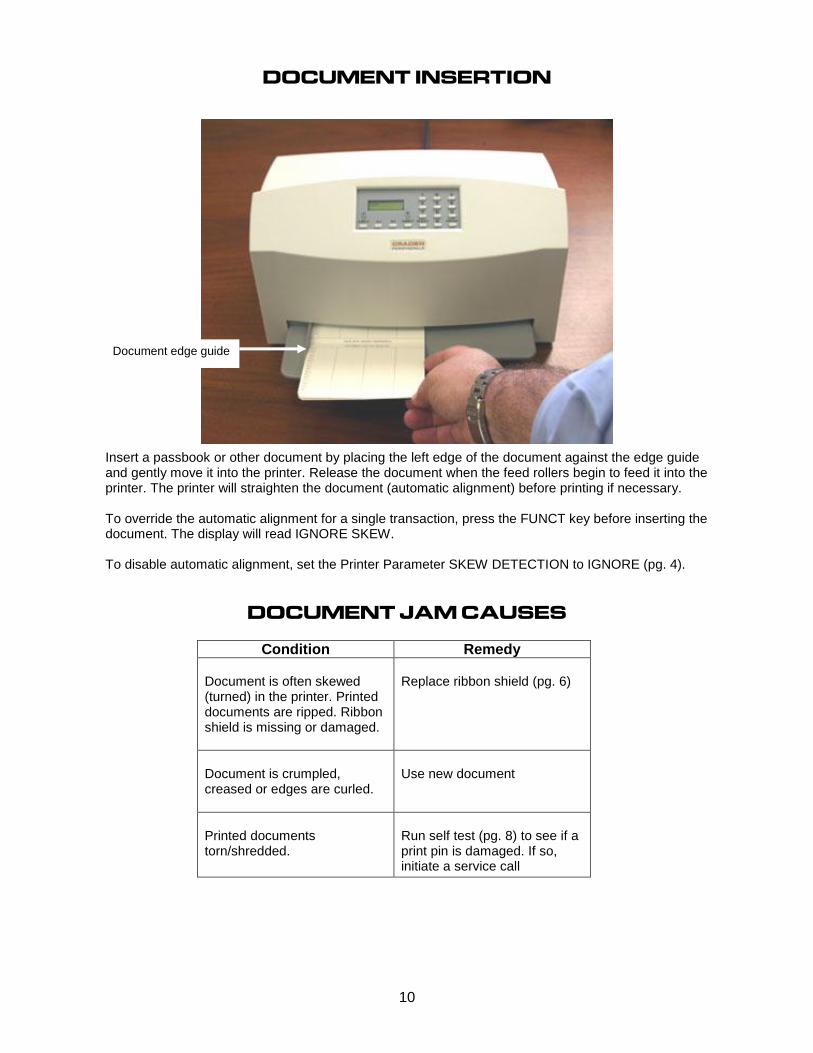
DOCUMENT INSERTION
DOCUMENT JAM CAUSES
Condition Remedy Document is often skewed (turned) in the printer. Printed documents are ripped. Ribbon shield is missing or damaged.
Replace ribbon shield (pg. 6)
Document is crumpled, creased or edges are curled.
Use new document
Printed documents torn/shredded.
Run self test (pg. 8) to see if a print pin is damaged. If so, initiate a service call
Insert a passbook or other document by placing the left edge of the document against the edge guide and gently move it into the printer. Release the document when the feed rollers begin to feed it into the printer. The printer will straighten the document (automatic alignment) before printing if necessary. To override the automatic alignment for a single transaction, press the FUNCT key before inserting the document. The display will read IGNORE SKEW. To disable automatic alignment, set the Printer Parameter SKEW DETECTION to IGNORE (pg. 4).
Document edge guide
11
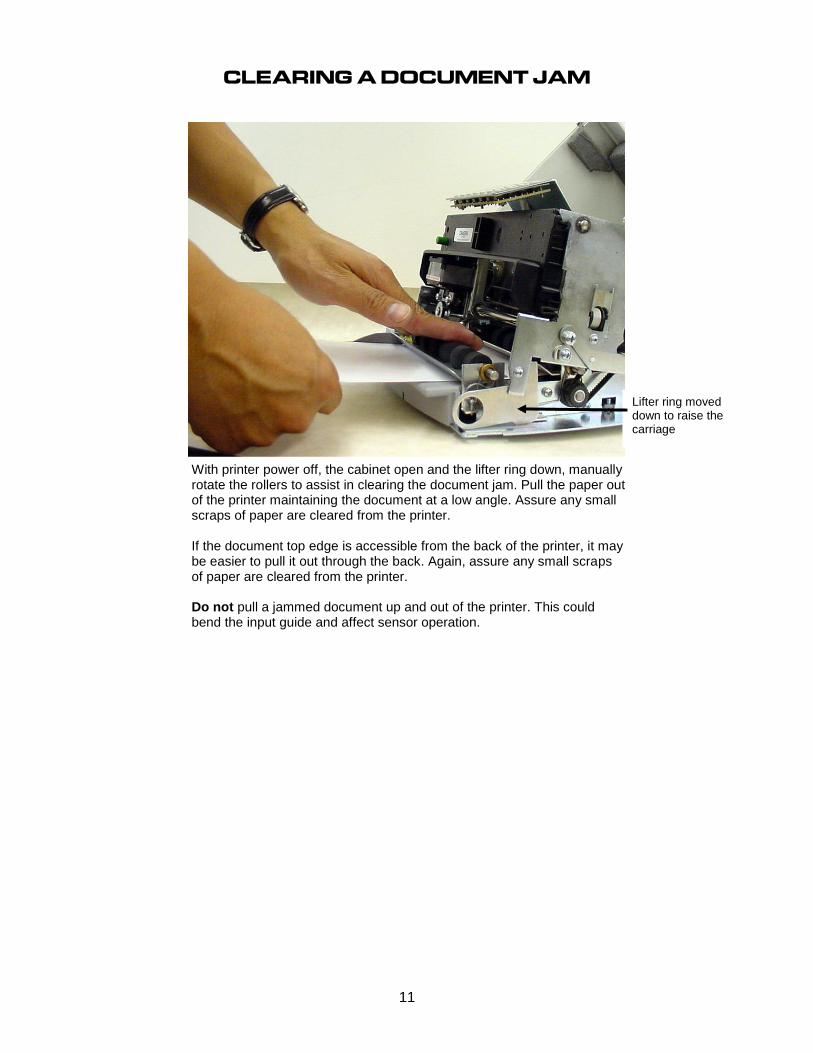
CLEARING A DOCUMENT JAM
With printer power off, the cabinet open and the lifter ring down, manually rotate the rollers to assist in clearing the document jam. Pull the paper out of the printer maintaining the document at a low angle. Assure any small scraps of paper are cleared from the printer. If the document top edge is accessible from the back of the printer, it may be easier to pull it out through the back. Again, assure any small scraps of paper are cleared from the printer. Do not pull a jammed document up and out of the printer. This could bend the input guide and affect sensor operation.
Lifter ring moved down to raise the carriage

12
SENSORS
To test all sensors, press 9 0 FUNCT on the keypad. The printer will cycle through diagnostics and then display “SENSORS” and a combination of the letters LFBMRCE. L is the carriage left home sensor, F and B are the front and back document sensors, M and R are the middle and right skew sensors, C is the cabinet open sensor and E is the document edge sensor. If no document is in the printer and the carriage is at left home, FBMR should be displayed. Placing an opaque object in any document or form sensor’s light path should remove the corresponding sensor letter from the display. Moving the carriage to the right should turn on L and E. Press the
A key to return to READY status.
Trouble Condition Remedy
Rollers run continuously before a document is inserted and no “F” on display during 90 FUNCT.
Front sensor light path is blocked by paper, paper dust, or a bent input guide. A sensor may be bent out of position.
Clear front sensor light path of paper scraps or blow sensor area with compressed air.
Rollers run continuously after a document is ejected and no “B” on display during 90 FUNCT.
Back sensor light path is blocked by paper, paper dust, or a bent input guide. Sensor may be bent out of position.
Clear back sensor light path of paper scraps or blow sensor area with compressed air.
Carriage drives into the left side of the printer.
94 FUNCT parameters are incorrect Disconnected sensor cable Defective left “home” sensor.
Check 94 FUNCT parameters against label under the cabinet behind to the alphanumeric display. Reinsert sensor cable Replace multi-sensor PCB
Display reads “Cover Open” even when cabinet is closed
Cover sensor cannot “see” reflective dot on inside of cabinet.
Override cover sensor using 99 FUNCT (pg. 4) or replace reflective foil dot
L - Left (Home) Sensor – synchronizes carriage motion
MultiSensor Cable Must be seated in connector properly
F -
Front Sensor Senses document insertion
B -
Back Sensor Senses document top edge
M -
Middle Sensor Detects skew
R -
Right Sensor Detects skew
Input Guide
13
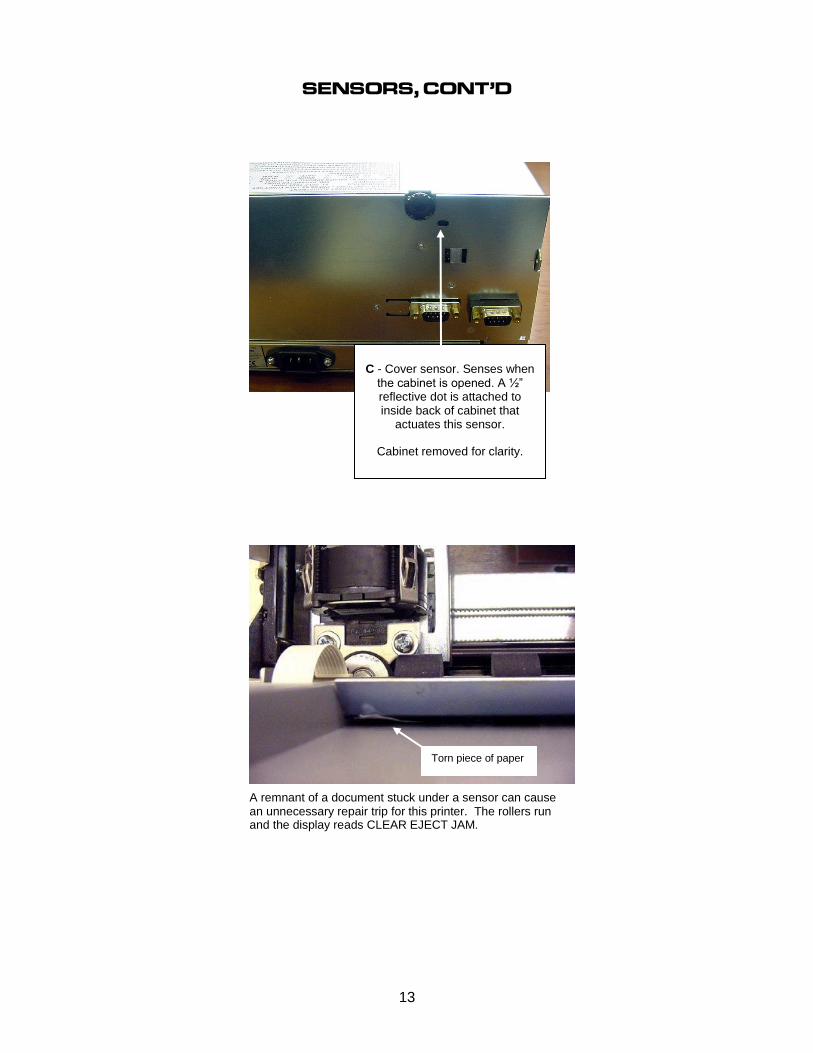
SENSORS, CONT’D
Torn piece of paper
A remnant of a document stuck under a sensor can cause an unnecessary repair trip for this printer. The rollers run and the display reads CLEAR EJECT JAM.
C - Cover sensor. Senses when
the cabinet is opened. A ½” reflective dot is attached to inside back of cabinet that
actuates this sensor.
Cabinet removed for clarity.
14
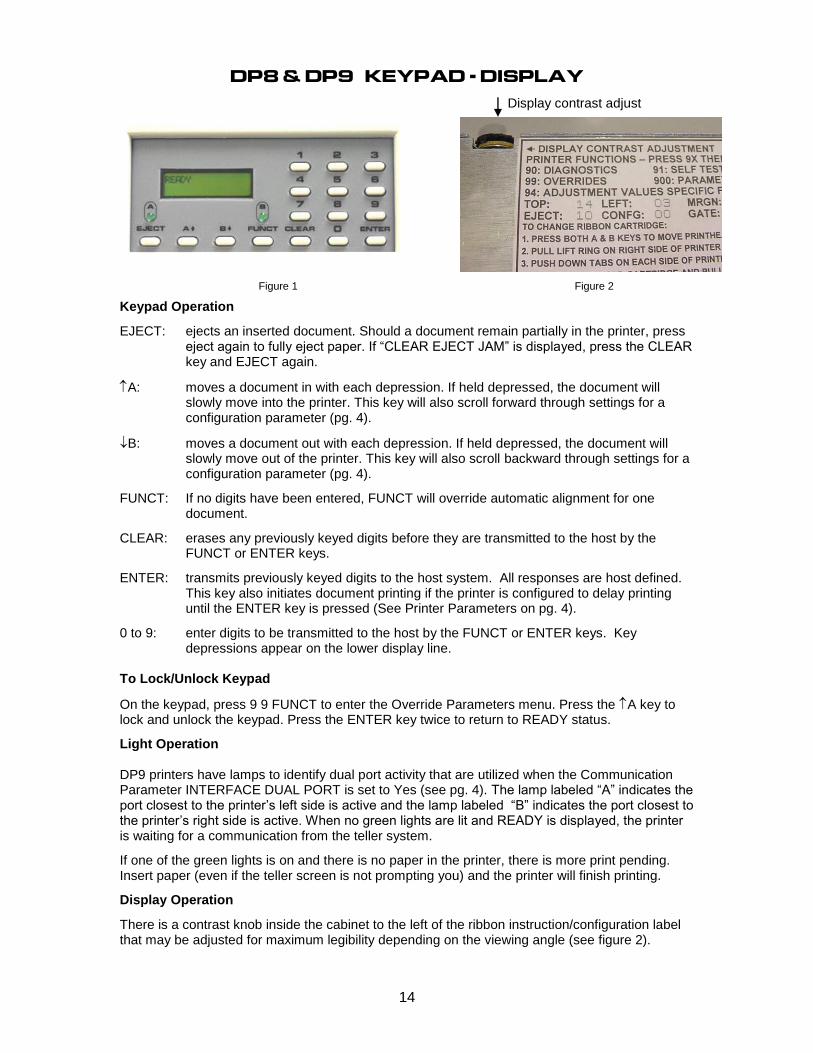
DP8 & DP9 KEYPAD - DISPLAY
Keypad Operation
EJECT: ejects an inserted document. Should a document remain partially in the printer, press eject again to fully eject paper. If “CLEAR EJECT JAM” is displayed, press the CLEAR key and EJECT again.
A: moves a document in with each depression. If held depressed, the document will slowly move into the printer. This key will also scroll forward through settings for a configuration parameter (pg. 4).
B: moves a document out with each depression. If held depressed, the document will slowly move out of the printer. This key will also scroll backward through settings for a configuration parameter (pg. 4).
FUNCT: If no digits have been entered, FUNCT will override automatic alignment for one document.
CLEAR: erases any previously keyed digits before they are transmitted to the host by the FUNCT or ENTER keys.
ENTER: transmits previously keyed digits to the host system. All responses are host defined. This key also initiates document printing if the printer is configured to delay printing until the ENTER key is pressed (See Printer Parameters on pg. 4).
0 to 9: enter digits to be transmitted to the host by the FUNCT or ENTER keys. Key depressions appear on the lower display line.
To Lock/Unlock Keypad
On the keypad, press 9 9 FUNCT to enter the Override Parameters menu. Press the A key to lock and unlock the keypad. Press the ENTER key twice to return to READY status.
Light Operation DP9 printers have lamps to identify dual port activity that are utilized when the Communication Parameter INTERFACE DUAL PORT is set to Yes (see pg. 4). The lamp labeled “A” indicates the port closest to the printer’s left side is active and the lamp labeled “B” indicates the port closest to the printer’s right side is active. When no green lights are lit and READY is displayed, the printer is waiting for a communication from the teller system.
If one of the green lights is on and there is no paper in the printer, there is more print pending. Insert paper (even if the teller screen is not prompting you) and the printer will finish printing.
Display Operation
There is a contrast knob inside the cabinet to the left of the ribbon instruction/configuration label that may be adjusted for maximum legibility depending on the viewing angle (see figure 2).
Display contrast adjust
Figure 1 Figure 2
15
ERROR MESSAGES Error messages are displayed when unexpected events occur.
Cover Open
If the printer cabinet is opened, “cover open” is displayed and printing is disabled. Printing will resume 3 seconds after the cover is closed. Page Overflow
If the printer is commanded to move past the last printable line on a document, it will eject the document and display “PAGE OVERFLOW INSERT NEXT PAGE”. Printing will resume when another document is inserted. Carriage Fault
This message will be displayed if the carriage could not move to the left margin and is probably caused by a jammed ribbon cartridge, a dirty gap wheel or a left home sensor that is not working. Check if the ribbon is installed properly and the cartridge knob can be rotated to advance the ribbon. Initiate a service call if the condition persists. Document Jam (see page 10)
In the event that a document becomes jammed in the printer, printing will stop and “DOCUMENT JAM” will be displayed. Turn the printer off. Clear the jam by opening the cabinet, raising the carriage with the carriage lifter ring and then turning the rollers by hand to clear the document. When pulling the document out of the printer, pull straight out. Do not pull up and out as there is the possibility of moving or damaging a document sensor. Be sure to remove all bits of paper as they can block sensor operation. Clear Eject Jam
If “CLEAR EJECT JAM” is displayed and a document is in the printer, press the CLEAR key and EJECT again. One of the sensors may have not detected the document. At power up or when all document sensors do not uncover, “CLEAR EJECT JAM” will be displayed. Assure no document is covering the sensors and the sensors are clean. Turn power off, open the cabinet and raise the lifter ring (see page 11) before manually removing a jammed document. If no document is in the printer, the condition may be cleared by pressing the ENTER key while powering the printer on. If the condition will not clear there may be a sensor failure. Initiate a service call.
Narrow Document
Not an error message. When documents less than 2.4” wide are inserted and the middle sensor does not “see” a document, “NARROW DOCUMENT” is displayed and the operator can press ENTER to proceed or EJECT to abort.
16
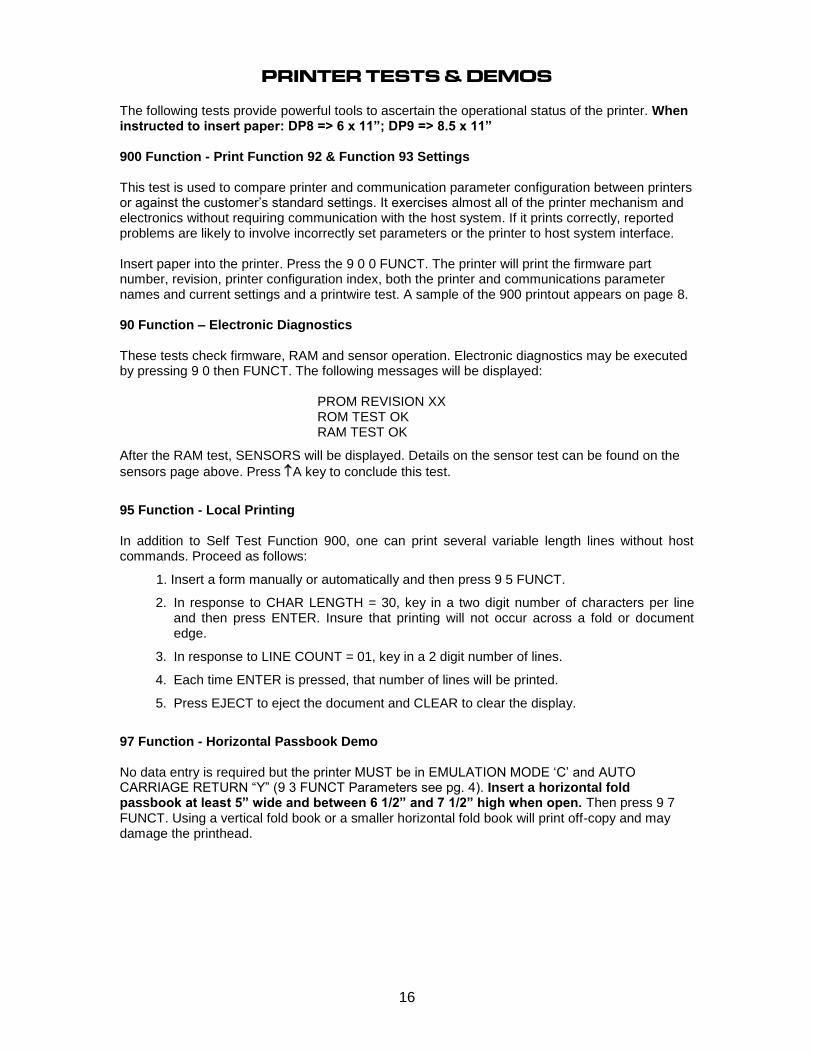
PRINTER TESTS & DEMOS The following tests provide powerful tools to ascertain the operational status of the printer. When instructed to insert paper: DP8 => 6 x 11”; DP9 => 8.5 x 11” 900 Function - Print Function 92 & Function 93 Settings This test is used to compare printer and communication parameter configuration between printers or against the customer’s standard settings. It exercises almost all of the printer mechanism and electronics without requiring communication with the host system. If it prints correctly, reported problems are likely to involve incorrectly set parameters or the printer to host system interface. Insert paper into the printer. Press the 9 0 0 FUNCT. The printer will print the firmware part number, revision, printer configuration index, both the printer and communications parameter names and current settings and a printwire test. A sample of the 900 printout appears on page 8. 90 Function – Electronic Diagnostics These tests check firmware, RAM and sensor operation. Electronic diagnostics may be executed by pressing 9 0 then FUNCT. The following messages will be displayed:
PROM REVISION XX ROM TEST OK RAM TEST OK
After the RAM test, SENSORS will be displayed. Details on the sensor test can be found on the
sensors page above. Press A key to conclude this test.
95 Function - Local Printing In addition to Self Test Function 900, one can print several variable length lines without host commands. Proceed as follows:
1. Insert a form manually or automatically and then press 9 5 FUNCT.
2. In response to CHAR LENGTH = 30, key in a two digit number of characters per line and then press ENTER. Insure that printing will not occur across a fold or document edge.
3. In response to LINE COUNT = 01, key in a 2 digit number of lines.
4. Each time ENTER is pressed, that number of lines will be printed.
5. Press EJECT to eject the document and CLEAR to clear the display.
97 Function - Horizontal Passbook Demo No data entry is required but the printer MUST be in EMULATION MODE ‘C’ and AUTO CARRIAGE RETURN “Y” (9 3 FUNCT Parameters see pg. 4). Insert a horizontal fold passbook at least 5” wide and between 6 1/2” and 7 1/2” high when open. Then press 9 7 FUNCT. Using a vertical fold book or a smaller horizontal fold book will print off-copy and may damage the printhead.

17
915 Function - Printwire Print Test This test determines the condition of the printhead and associated cables and drive electronics. Insert a 3 x 5” minimum single sheet of paper or multi-part form, press 9 1 5 FUNCT. The document will feed and print four lines that look like the following: _ _ _ _ _ _ _ _ _ _ _ _ _ _ _ _ _ _ _ _ _ _ _ _ 1 2 3 4 5 6 7 8 9 1 1 1 1 1 1 1 1 1 1 2 2 2 2 2 PIN TEST 0 1 2 3 4 5 6 7 8 9 0 1 2 3 4 _ _ _ _ _ _ _ _ _ _ _ _ _ _ _ _ _ _ _ _ _ _ _ _ This printout consists of numbers from 1 to 24 and a line above and below each number. The lines above and below each number are printed by that corresponding pin. Any missing lines indicate a missing/broken/bent/intermittent printwire. If all lines are present, the printhead, associated mechanical devices and electrical circuits are functioning properly. 942 Function - Buffer Print (Dump) This test is used by software and hardware engineers to determine exactly what commands were sent to the printer by the host system. Immediately after a transaction, insert paper and press 942 FUNCT on the keypad. The buffer contents will print. Even small transactions can result in multiple page printouts of printable data and control character information. 946 Function - Skew Calibration
This test calibrates the skew sensors. Press 9 4 6 FUNCT and insert known square paper. If the paper inserts square to the edge guide and the rollers, press ENTER. If the paper inserts skewed,
press EJECT and reinsert. (see the video at www.craden.com/skewsensor.wmv )
18
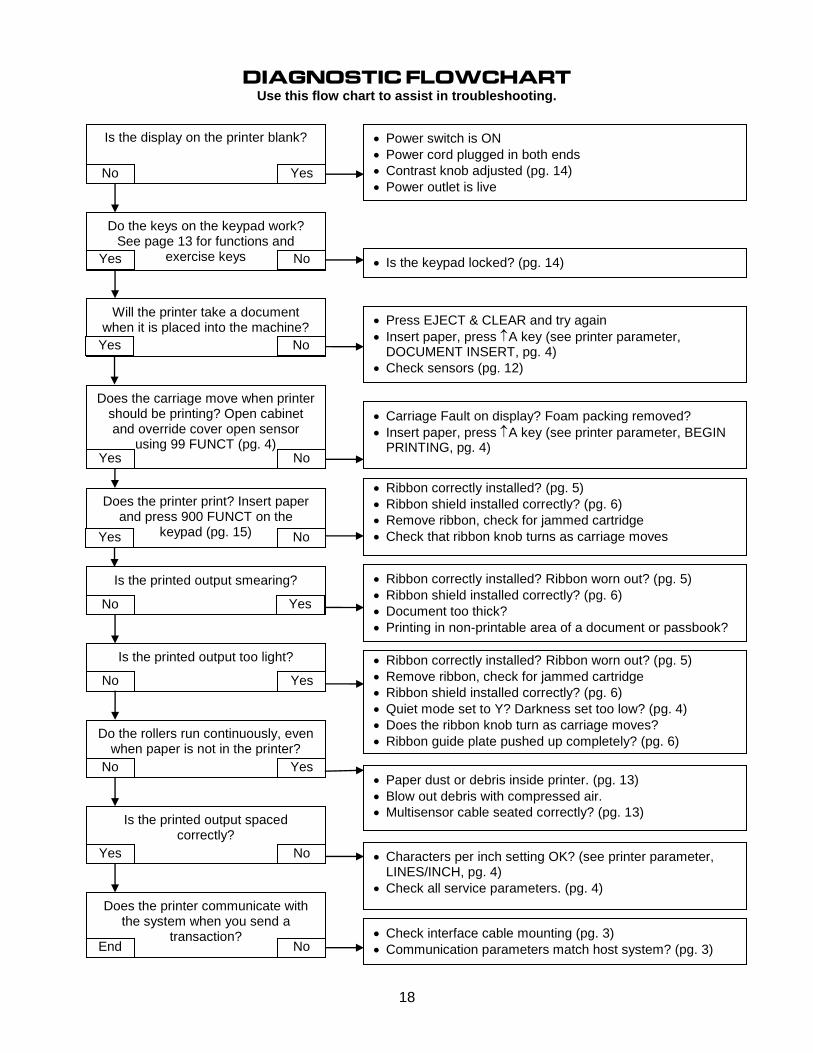
DIAGNOSTIC FLOWCHART Use this flow chart to assist in troubleshooting.
Is the display on the printer blank? No Yes
Do the keys on the keypad work? See page 13 for functions and
exercise keys
Yes No
Will the printer take a document when it is placed into the machine?
Yes No
Does the carriage move when printer should be printing? Open cabinet and override cover open sensor
using 99 FUNCT (pg. 4)
Yes No
Does the printer print? Insert paper and press 900 FUNCT on the
keypad (pg. 15)
Yes No
Do the rollers run continuously, even when paper is not in the printer?
Yes No
Is the printed output spaced correctly?
Yes No
Does the printer communicate with the system when you send a
transaction?
End No
Press EJECT & CLEAR and try again
Insert paper, press A key (see printer parameter, DOCUMENT INSERT, pg. 4)
Check sensors (pg. 12)
Is the printed output smearing?
No Yes
Power switch is ON
Power cord plugged in both ends
Contrast knob adjusted (pg. 14)
Power outlet is live
Carriage Fault on display? Foam packing removed?
Insert paper, press A key (see printer parameter, BEGIN PRINTING, pg. 4)
Is the printed output too light?
No Yes
Ribbon correctly installed? (pg. 5)
Ribbon shield installed correctly? (pg. 6)
Remove ribbon, check for jammed cartridge
Check that ribbon knob turns as carriage moves
Ribbon correctly installed? Ribbon worn out? (pg. 5)
Remove ribbon, check for jammed cartridge
Ribbon shield installed correctly? (pg. 6)
Quiet mode set to Y? Darkness set too low? (pg. 4)
Does the ribbon knob turn as carriage moves?
Ribbon guide plate pushed up completely? (pg. 6)
Ribbon correctly installed? Ribbon worn out? (pg. 5)
Ribbon shield installed correctly? (pg. 6)
Document too thick?
Printing in non-printable area of a document or passbook?
Paper dust or debris inside printer. (pg. 13)
Blow out debris with compressed air.
Multisensor cable seated correctly? (pg. 13)
Check interface cable mounting (pg. 3)
Communication parameters match host system? (pg. 3)
Is the keypad locked? (pg. 14)
Characters per inch setting OK? (see printer parameter, LINES/INCH, pg. 4)
Check all service parameters. (pg. 4)