Embed Size (px)
Citation preview

[1] Oracle® Retail Advanced Science EngineInstallation Guide
Release 14.1
E59124-01
December 2014
Oracle Retail Advanced Science Engine Installation Guide, Release 14.1
E59124-01
Copyright © 2014, Oracle and/or its affiliates. All rights reserved.
Primary Author: Judith Meskill
Primary Author: Jay Cummings
This software and related documentation are provided under a license agreement containing restrictions on use and disclosure and are protected by intellectual property laws. Except as expressly permitted in your license agreement or allowed by law, you may not use, copy, reproduce, translate, broadcast, modify, license, transmit, distribute, exhibit, perform, publish, or display any part, in any form, or by any means. Reverse engineering, disassembly, or decompilation of this software, unless required by law for interoperability, is prohibited.
The information contained herein is subject to change without notice and is not warranted to be error-free. If you find any errors, please report them to us in writing.
If this is software or related documentation that is delivered to the U.S. Government or anyone licensing it on behalf of the U.S. Government, then the following notice is applicable:
U.S. GOVERNMENT END USERS: Oracle programs, including any operating system, integrated software, any programs installed on the hardware, and/or documentation, delivered to U.S. Government end users are "commercial computer software" pursuant to the applicable Federal Acquisition Regulation and agency-specific supplemental regulations. As such, use, duplication, disclosure, modification, and adaptation of the programs, including any operating system, integrated software, any programs installed on the hardware, and/or documentation, shall be subject to license terms and license restrictions applicable to the programs. No other rights are granted to the U.S. Government.
This software or hardware is developed for general use in a variety of information management applications. It is not developed or intended for use in any inherently dangerous applications, including applications that may create a risk of personal injury. If you use this software or hardware in dangerous applications, then you shall be responsible to take all appropriate fail-safe, backup, redundancy, and other measures to ensure its safe use. Oracle Corporation and its affiliates disclaim any liability for any damages caused by use of this software or hardware in dangerous applications.
Oracle and Java are registered trademarks of Oracle and/or its affiliates. Other names may be trademarks of their respective owners.
Intel and Intel Xeon are trademarks or registered trademarks of Intel Corporation. All SPARC trademarks are used under license and are trademarks or registered trademarks of SPARC International, Inc. AMD, Opteron, the AMD logo, and the AMD Opteron logo are trademarks or registered trademarks of Advanced Micro Devices. UNIX is a registered trademark of The Open Group.
This software or hardware and documentation may provide access to or information about content, products, and services from third parties. Oracle Corporation and its affiliates are not responsible for and expressly disclaim all warranties of any kind with respect to third-party content, products, and services unless otherwise set forth in an applicable agreement between you and Oracle. Oracle Corporation and its affiliates will not be responsible for any loss, costs, or damages incurred due to your access to or use of third-party content, products, or services, except as set forth in an applicable agreement between you and Oracle.
Value-Added Reseller (VAR) Language
Oracle Retail VAR Applications
The following restrictions and provisions only apply to the programs referred to in this section and licensed to you. You acknowledge that the programs may contain third party software (VAR applications) licensed to Oracle. Depending upon your product and its version number, the VAR applications may include:
(i) the MicroStrategy Components developed and licensed by MicroStrategy Services Corporation (MicroStrategy) of McLean, Virginia to Oracle and imbedded in the MicroStrategy for Oracle Retail Data Warehouse and MicroStrategy for Oracle Retail Planning & Optimization applications.
(ii) the Wavelink component developed and licensed by Wavelink Corporation (Wavelink) of Kirkland, Washington, to Oracle and imbedded in Oracle Retail Mobile Store Inventory Management.
(iii) the software component known as Access Via™ licensed by Access Via of Seattle, Washington, and imbedded in Oracle Retail Signs and Oracle Retail Labels and Tags.
(iv) the software component known as Adobe Flex™ licensed by Adobe Systems Incorporated of San Jose, California, and imbedded in Oracle Retail Promotion Planning & Optimization application.
You acknowledge and confirm that Oracle grants you use of only the object code of the VAR Applications. Oracle will not deliver source code to the VAR Applications to you. Notwithstanding any other term or condition of the agreement and this ordering document, you shall not cause or permit alteration of any VAR

Applications. For purposes of this section, “alteration” refers to all alterations, translations, upgrades, enhancements, customizations or modifications of all or any portion of the VAR Applications including all reconfigurations, reassembly or reverse assembly, re-engineering or reverse engineering and recompilations or reverse compilations of the VAR Applications or any derivatives of the VAR Applications. You acknowledge that it shall be a breach of the agreement to utilize the relationship, and/or confidential information of the VAR Applications for purposes of competitive discovery.
The VAR Applications contain trade secrets of Oracle and Oracle's licensors and Customer shall not attempt, cause, or permit the alteration, decompilation, reverse engineering, disassembly or other reduction of the VAR Applications to a human perceivable form. Oracle reserves the right to replace, with functional equivalent software, any of the VAR Applications in future releases of the applicable program.


v
Contents
Preface ................................................................................................................................................................. xi
1 Overview
Introduction............................................................................................................................................... 1-1Roadmap for Installing ORASE ............................................................................................................ 1-2
2 Planning the Installation
Installation Prerequisites ........................................................................................................................ 2-1Oracle MDS Setup .............................................................................................................................. 2-1
Overview of the Planning Process ........................................................................................................ 2-2Planning Your Environment............................................................................................................. 2-2Planning for Optimal Performance ................................................................................................. 2-2
Supported Configurations...................................................................................................................... 2-3Network Requirements ..................................................................................................................... 2-3Database Requirements..................................................................................................................... 2-3Application Server Requirements.................................................................................................... 2-4Client System Requirements............................................................................................................. 2-5
Supported Oracle Retail Products......................................................................................................... 2-5
3 Setting Up the Database
Installing the Database ........................................................................................................................... 3-1Database Parameters................................................................................................................................ 3-2
Setting Parallel Processing Parameters ........................................................................................... 3-2JOB_QUEUE_PROCESSES Recommendation ............................................................................... 3-2
Creating the Default Tablespaces ......................................................................................................... 3-3Creating the Data User Accounts .......................................................................................................... 3-3
4 Setting Up the Application Server
Setting Up the WebLogic Server ........................................................................................................... 4-1Installing the WebLogic Server ........................................................................................................ 4-2Setting Up a WebLogic Domain....................................................................................................... 4-2
Prerequisites ................................................................................................................................ 4-2WebLogic Database Setup ......................................................................................................... 4-2WebLogic Domain Creation – GUI Mode ............................................................................... 4-3

vi
Listen Port Configuration .......................................................................................................... 4-5Setting Up the WebLogic Startup Script ......................................................................................... 4-5
Restarting the Application Server......................................................................................................... 4-5Setting Up JVM Memory Settings ........................................................................................................ 4-6Setting Up Users and Roles .................................................................................................................... 4-6Setting Up JTA Timeout Seconds ......................................................................................................... 4-8
5 Security and Authentication
Re-Associate Policy Store to Database ................................................................................................. 5-1Configure OID Authenticator in WebLogic Domain........................................................................ 5-1Load LDIF Files in LDAP ...................................................................................................................... 5-2
6 Setting Up Password Stores
Password Stores Configuration Overview .......................................................................................... 6-2Setting Up the Oracle Secret Store........................................................................................................ 6-2Setting Up Wallets for Database User Accounts ................................................................................ 6-3
Additional Database Wallet Commands ........................................................................................ 6-5Setting Up the Credential Storage Manager Password Store .......................................................... 6-6
7 Installing the Advanced Science Engine
Overview of the Installation Process.................................................................................................... 7-1Accessing the Installation Software ..................................................................................................... 7-1Setting Up the Installation Properties File.......................................................................................... 7-2Setting Up Environment Variables....................................................................................................... 7-6Installing ORASE ..................................................................................................................................... 7-7
Installing ORASE in Graphical or Text Mode................................................................................ 7-7Installing ORASE in Silent Mode.................................................................................................. 7-23
Post-Installation Updates..................................................................................................................... 7-24Update sia-so-bundle-manifest.xml ............................................................................................. 7-24Update MultiSolution.properties.................................................................................................. 7-25Start WebLogic ................................................................................................................................ 7-25
Logging In............................................................................................................................................... 7-25About install.sh...................................................................................................................................... 7-26ASO-APO Integration Deployment .................................................................................................. 7-26
Pre-Integration Check List ............................................................................................................. 7-26Deployment Steps ........................................................................................................................... 7-28Execution of the Interface............................................................................................................... 7-29APO-ASO interface ......................................................................................................................... 7-29ASO-APO Interface......................................................................................................................... 7-29Data Assumptions........................................................................................................................... 7-30
8 Patching Procedures
Oracle Retail Patching Process .............................................................................................................. 8-1Supported Products and Technologies ................................................................................................ 8-1Patch Concepts .......................................................................................................................................... 8-2
Patching Utility Overview ................................................................................................................ 8-3
vii
Oracle Retail Patch Assistant (ORPatch) ................................................................................. 8-3Oracle Retail Merge Patch (ORMerge)..................................................................................... 8-3Oracle Retail Compile Patch (ORCompile) ............................................................................. 8-3Oracle Retail Deploy Patch (ORDeploy) ................................................................................. 8-3
Changes with 14.1 .............................................................................................................................. 8-3MMHOME Changed to RETAIL_HOME ............................................................................... 8-3Java Batch Script Location ......................................................................................................... 8-4
Patching Considerations ......................................................................................................................... 8-4Patch Types ......................................................................................................................................... 8-4
Cumulative Patches .................................................................................................................... 8-4Incremental Patches.................................................................................................................... 8-4
Incremental Patch Structure ............................................................................................................. 8-4README File .............................................................................................................................. 8-4Manifest Files............................................................................................................................... 8-4
Version Tracking ................................................................................................................................ 8-5Apply All Patches with Installer or ORPatch ................................................................................ 8-5Environment Configuration ............................................................................................................. 8-5Retained Installation Files................................................................................................................. 8-5Reloading Content ............................................................................................................................. 8-5Java Hotfixes and Cumulative Patches........................................................................................... 8-6Backups................................................................................................................................................ 8-6Disk Space ........................................................................................................................................... 8-6
Patching Operations ................................................................................................................................ 8-6Running ORPatch............................................................................................................................... 8-7
Preparing for Patching ............................................................................................................... 8-7Single Patching Session....................................................................................................... 8-7Shutdown Applications ...................................................................................................... 8-7Backup Environment........................................................................................................... 8-7Log Files ................................................................................................................................ 8-7Unzip Patch Files ................................................................................................................. 8-8Location of ORPatch............................................................................................................ 8-8Command Line Arguments ............................................................................................... 8-8
Analyzing the Impact of a Patch............................................................................................ 8-10Applying a Patch...................................................................................................................... 8-11Restarting ORPatch.................................................................................................................. 8-12Listing the Patch Inventory .................................................................................................... 8-12Exporting Environment Metadata......................................................................................... 8-13Comparing Environment Metadata ...................................................................................... 8-14Reverting a Patch ..................................................................................................................... 8-15
Merging Patches .............................................................................................................................. 8-17Source and Destination Directories....................................................................................... 8-17
Source and Destination Directory Example.................................................................. 8-17Running the ORMerge Utility................................................................................................ 8-18
Compiling Application Components ........................................................................................... 8-18Running the ORCompile utility............................................................................................. 8-19ORCompile Examples ............................................................................................................. 8-20
Deploying Application Components ........................................................................................... 8-20

viii
Running the ORDeploy utility ............................................................................................... 8-21ORDeploy Examples ............................................................................................................... 8-21
Maintenance Considerations .............................................................................................................. 8-21Database Password Changes......................................................................................................... 8-21WebLogic Password Changes ....................................................................................................... 8-22Infrastructure Directory Changes ................................................................................................. 8-23DBManifest Table............................................................................................................................ 8-23RETAIL_HOME Relationship to Database and Application Server ....................................... 8-23Jar Signing Configuration Maintenance ...................................................................................... 8-23
Customization ........................................................................................................................................ 8-24Patching Considerations with Customized Files and Objects.................................................. 8-24
General Guidelines .................................................................................................................. 8-24Custom Database Objects ....................................................................................................... 8-24Custom Forms .......................................................................................................................... 8-25ADF Application Customization........................................................................................... 8-25Custom Compiled Java Code................................................................................................. 8-25Analyze Patches when Customizations are Present ........................................................... 8-25Manifest Updates ..................................................................................................................... 8-25
Registering Customized Files........................................................................................................ 8-26Running the orcustomreg Script............................................................................................ 8-26Examples That Use the orcustomreg Script ......................................................................... 8-27Examples That Use the orcustomreg Script ......................................................................... 8-27
Custom Compiled Java Code ........................................................................................................ 8-27Building Deployable ear Files ................................................................................................ 8-28Merging Custom Files ............................................................................................................. 8-28Analyzing Patches When Customizations are Present ...................................................... 8-29Customizations and Cumulative Patches ............................................................................ 8-29Changing Configuration Files................................................................................................ 8-29
Extending Oracle Retail Patch Assistant with Custom Hooks................................................. 8-30ORPatch Processing................................................................................................................. 8-30
Action ................................................................................................................................. 8-30Phase................................................................................................................................... 8-31
Configuring Custom Hooks ................................................................................................... 8-32Restarting with Custom Hooks.............................................................................................. 8-33Patch-Level Custom Hooks .................................................................................................... 8-33Example Custom Hook Definitions ...................................................................................... 8-33
Troubleshooting Patching ................................................................................................................... 8-34ORPatch Log Files ........................................................................................................................... 8-34Restarting ORPatch......................................................................................................................... 8-34Manual DBManifest Updates ........................................................................................................ 8-34
Running the ordbmreg Script ................................................................................................ 8-35Examples That Use the ordbmreg Script .............................................................................. 8-35Restarting After Registration.................................................................................................. 8-35
Manual Restart State File Updates................................................................................................ 8-36DISPLAY Settings When Compiling Forms................................................................................ 8-36JAVA_HOME Setting ..................................................................................................................... 8-36Patching Prior to First Install......................................................................................................... 8-36

ix
Providing Metadata to Oracle Support........................................................................................ 8-38
A Appendix: Installation Order
Enterprise Installation Order ................................................................................................................ A-1

x

xi
Preface
Oracle Retail Installation Guides contain the requirements and procedures that are necessary for the retailer to install Oracle Retail products.
AudienceThis document is intended for database administrators, system analysts and designers, and integrators and implementation staff.
Documentation AccessibilityFor information about Oracle's commitment to accessibility, visit the Oracle Accessibility Program website at http://www.oracle.com/pls/topic/lookup?ctx=acc&id=docacc.
Access to Oracle SupportOracle customers that have purchased support have access to electronic support through My Oracle Support. For information, visit http://www.oracle.com/pls/topic/lookup?ctx=acc&id=info or visit http://www.oracle.com/pls/topic/lookup?ctx=acc&id=trs if you are hearing impaired.
Related DocumentsFor more information, see the following documents in the Oracle Retail Advanced Science Engine documentation set:
■ Oracle Retail Advanced Science Engine Implementation Guide
■ Oracle Retail Advanced Science Engine Release Notes
■ Oracle Retail Advanced Science Engine Security Guide
■ Oracle Retail Assortment and Space Optimization User Guide
■ Oracle Retail Advanced Science Engine User Guide
Customer SupportTo contact Oracle Customer Support, access My Oracle Support at the following URL:
https://support.oracle.com
When contacting Customer Support, please provide the following:

xii
■ Product version and program/module name
■ Functional and technical description of the problem (include business impact)
■ Detailed step-by-step instructions to re-create
■ Exact error message received
■ Screen shots of each step you take
Review Patch DocumentationWhen you install the application for the first time, you install either a base release (for example, 14.1) or a later patch release (for example, 14.1.1). If you are installing the base release or additional patches, read the documentation for all releases that have occurred since the base release before you begin installation. Documentation for patch releases can contain critical information related to the base release, as well as information about code changes since the base release.
Improved Process for Oracle Retail Documentation CorrectionsTo more quickly address critical corrections to Oracle Retail documentation content, Oracle Retail documentation may be republished whenever a critical correction is needed. For critical corrections, the republication of an Oracle Retail document may at times not be attached to a numbered software release; instead, the Oracle Retail document will simply be replaced on the Oracle Technology Network Web site, or, in the case of Data Models, to the applicable My Oracle Support Documentation container where they reside.
This process will prevent delays in making critical corrections available to customers. For the customer, it means that before you begin installation, you must verify that you have the most recent version of the Oracle Retail documentation set. Oracle Retail documentation is available on the Oracle Technology Network at the following URL:
http://www.oracle.com/technetwork/documentation/oracle-retail-100266.html
An updated version of the applicable Oracle Retail document is indicated by Oracle part number, as well as print date (month and year). An updated version uses the same part number, with a higher-numbered suffix. For example, part number E123456-02 is an updated version of a document with part number E123456-01.
If a more recent version of a document is available, that version supersedes all previous versions.
Oracle Retail Documentation on the Oracle Technology NetworkDocumentation is packaged with each Oracle Retail product release. Oracle Retail product documentation is also available on the following Web site:
http://www.oracle.com/technetwork/documentation/oracle-retail-100266.html
(Data Model documents are not available through Oracle Technology Network. These documents are packaged with released code, or you can obtain them through My Oracle Support.)
Documentation should be available on this Web site within a month after a product release.

xiii
ConventionsThe following text conventions are used in this document:
Convention Meaning
boldface Boldface type indicates graphical user interface elements associated with an action, or terms defined in text or the glossary.
italic Italic type indicates book titles, emphasis, or placeholder variables for which you supply particular values.
monospace Monospace type indicates commands within a paragraph, URLs, code in examples, text that appears on the screen, or text that you enter.

xiv
1
Overview 1-1
1 Overview
This chapter provides an overview of Oracle Retail Advanced Science Engine (ORASE) and a road map for installing the application. It contains the following sections:
■ Introduction
■ Roadmap for Installing ORASE
IntroductionThe Oracle Retail Advanced Science Engine is comprised of Oracle Retail Assortment and Space Optimization (ASO), Customer Decision Trees (CDT), Demand Transference (DT), Advanced Clustering (AC), and Market Basket Analysis (MBA).
ASO is an analytical application that includes a collection of algorithms that can help users to solve Micro Space Optimization, that is, Micro Space physical retail space planning problems. Given a fixed amount of space on physical fixtures (for example, shelving) and a set of products (for example, cold cereal assortment), determine the optimal allocation of space (typically, a number of facings) for each product.
CDT, DT, AC, and MBA perform data mining and produce model parameters to support Category Management, Retail Demand Forecasting, and Retail Analytics.
■ CDT Customer Decision Trees identify the decisions a customer makes when choosing a particular product. The decision tree is produced by algorithms that analyze historical customer sales data. It illustrates how customers shop and how they evaluate the importance of different product attributes when making buying decisions. Such information can be useful to a retailer in terms of product selection and display.
■ DT Demand Transference helps you to compare products based on their similarities in order to determine what, if any, products customers might buy if the product they want to buy is for some reason unavailable. In this way, planning and ordering can be optimized. DT calculates similarities by comparing the attributes of the two products. If you are using CDT in conjunction with DT, you also have available the similarities calculated by CDT, which are based on customer-supplied transaction data.
■ AC Advanced Clustering lets you create store clusters based on common features such as customer demographics in order to manage merchandise assortments and pricing strategies in a targeted way. Clusters can help retailers to understand who shops in their stores and what their preferences are.
■ MBA Market Basket Analysis uses RA sales data to perform Association Rule Mining and Historic Promotion Baseline calculations and enable RA to present

Roadmap for Installing ORASE
1-2 Oracle Retail Advanced Science Engine Installation Guide
metrics on promotional sales lift. MBA uses RA sales data and interacts directly with RA for its inbound and outbound data interfaces.
Roadmap for Installing ORASEThis guide explains how you can install and set up the ORASE applications, along with the required and optional software.
The instructions in this guide assume knowledge of application servers, databases, and application installation or administration, and are intended for system administrators and experienced IT personnel. Before carrying out any of these activities, ensure that you understand UNIX commands (including shell configuration and scripting), directory operations, and symlinks.
In order to implement ORASE for production, you must perform the following installation tasks in a sequence:
Table 1–1 Road Map for Installing ORASE
Task Description
Pre-installation Tasks
1. Plan your environment, based on your business needs. For more information on the planning process and the supported configurations, see Chapter 2, "Planning the Installation".
When planning the environment, you must also review the security recommendations, and take the necessary steps to ensure secured deployment and configuration. For more information, see Oracle Retail Advanced Science Engine Security Guide.
2. Set up the application database. For more information, see Chapter 3, "Setting Up the Database".
3. Set up your application server. For more information, see Chapter 4, "Setting Up the Application Server".
4. Set up users and roles. For more information, see Chapter 4, "Setting Up the Application Server".
5. Set up the password stores. For more information, see Chapter 6, "Setting Up Password Stores".
Installation Task
6. Access the ORASE installation software, set up the install.properties file, and run the Oracle installer. For more information, see Chapter 7, "Installing the Advanced Science Engine".

2
Planning the Installation 2-1
2 Planning the Installation
Before installing ORASE, you must first determine the performance and availability goals for your business, and then plan the hardware, network, and storage requirements accordingly. This chapter provides some basic considerations for the installation. It also includes the list of hardware and software requirements.
This chapter includes the following sections:
■ Installation Prerequisites
■ Overview of the Planning Process
■ Supported Configurations
■ Supported Oracle Retail Products
Installation PrerequisitesThe application installer must be run from a Linux, AIX, or Solaris application server with the following installed:
■ WebLogic Server 12.1.3 with Enterprise Manager
■ ADF 12.1.3 Runtime
■ Oracle Database Client (sqlplus)
■ Java JDK 1.7.0_67 (or later) 64-bit
■ Oracle Metadata Services (MDS) setup
Oracle MDS SetupThe installation of the ORASE standalone application requires an Oracle MDS Repository. For information on managing the Metadata Repository, see http://docs.oracle.com/middleware/1213/core/ASADM/repos.htm#CIHDJFIA
Creating the MDS RepositoryIf an MDS Repository is not available for use by the application, then you must create one. For detailed instructions, see
https://docs.oracle.com/middleware/1213/core/FCCCR/custom_mds.htm#FCCCR2688

Overview of the Planning Process
2-2 Oracle Retail Advanced Science Engine Installation Guide
Overview of the Planning ProcessPlanning your process prior to an installation also gives you a better understanding of the environment, and enables you to adapt faster to any future changes in the environment setup.
This section contains the following topics:
■ Planning Your Environment
■ Planning for Optimal Performance
Planning Your EnvironmentUse the following steps to plan and prepare the product environment:
1. Plan and design the infrastructure, based on your business needs, for the installation. This includes:
■ Meeting the hardware and associated software requirements.
■ Acquiring the prerequisite software (and licensing).
■ Gathering the capacity data.
■ Planning the data security policies.
■ Designing the backup and recovery strategies.
2. Determine the size of the setup.
3. Identify source systems. Identify the systems that will exchange data with ORASE.
Planning for Optimal PerformanceConsider the following steps when planning and preparing the product environment:
1. Determine the ORASE metrics relevant to your business needs. These include:
■ The number of concurrent users
■ The number of planograms expected to be loaded
■ The number of stores or store clusters in a typical optimization run
■ The number of assortments and assortment clusters
■ The maximum number item-locations per assortment or assortment cluster
■ The expected number of variable POG lengths (as each POG length is essentially a new POG)
■ The assortment date of ranges (as longer periods require bigger forecast datasets)
Note that, for each run, the number of store clusters * the number of POG lengths equals the number of optimization problems for that run. Sizing for optimization run time and for storing run results must take this into account.
2. Plan and set up the file-based ETL scripts for data import and export. This also includes the data feeds needed from the external systems for nightly, weekly, and periodic batch updates and recycling.
3. Set up synchronization with historical data sources (such as merchandise, sales, calendar, and transaction). This also includes any nightly, weekly, and periodic batch updates and recycling.
Supported Configurations
Planning the Installation 2-3
Supported ConfigurationsThis section describes the hardware and network requirements for ORASE, and includes the following topics:
■ Network Requirements
■ Database Requirements
■ Application Server Requirements
■ Client System Requirements
Network RequirementsThis section describes basic requirements for your network infrastructure:
■ For connections between servers use the following:
– Minimum: 100 MBps switched ethernet.
– Recommended: 1000 MBps.
■ For connections to the desktop, 100 MBps is sufficient.
Database RequirementsORASE requires the use of the Oracle Database Server 12c Release 1 (12.1.0.1.4). Table 2–1 lists the supported database configuration:

Table 2–1 Database Requirements
Software Requirement
Database (64-bit) Oracle Database Enterprise Edition 12cR1 (12.1.0.1.4) with the following specifications:
Components:
■ Oracle Partitioning
■ Examples CD
Patches:
■ 18522516: 12.1.0.1.4 Database Patch Set Update
■ 18705901: 12.1.0.1.4 Database Patch Patch Set Update for Grid Infrastructure
One-Time Only
■ 18169693: ORA-28595: Extproc agent: Invalid DDL Path
■ 17815049: ORA-600 [KPONMARKCONN1] WHEN STARTING INSTANCE
■ 18404105: GETTING ORA-22345 WHILE TRYING TO RECOMPILE THE TYPE USING EXECUTE IMMEDIATE STM
■ 18273508 EXECUTING SELECT QUERY, UNNECESSARY DUPLICATE ROWS SHOWS ONLY 12.1
■ 18097476 ORA-4043 DROPPING PACKAGE WHEN SAME PACKAGE EXISTS IN ANOTHER USER
Other Components:
■ Perl interpreter 5.0 or later
■ X-Windows interface
Database Features Oracle Partitioning
Important: Although this database feature is available in the Oracle Database Enterprise Edition, you may need a separate license to use this feature. For more information, refer to the Oracle Database Licensing Information 12c Release 1.
Operating System (64-bit)
Operating System certified with Oracle Database 12cR1 Enterprise Edition. Options are:
■ Oracle Linux 6 for x86-64 (Actual hardware or Oracle virtual machine)
■ Red Hat Enterprise Linux 6 for x86-64 (Actual hardware or Oracle virtual machine
■ AIX 7.1 (Actual hardware or LPARs)
■ Solaris 11 SPARC (Actual hardware or logical domains)
■ HP-UX 11.31 Integrity (Actual hardware, HPVM, or vPars)
Utilities File Transfer Protocol utility (ftp or ssh/scp/rsync)
sudo utility
Supported Configurations
2-4 Oracle Retail Advanced Science Engine Installation Guide
Application Server RequirementsThe ORASE application requires the use of Oracle WebLogic Server 12c Release 1 (12.1.3), extended to use ADF 12.1.3. Table 2–2 lists the supported application server configuration:

Table 2–2 Application Server Requirements
Software Requirement
Operating Systems (64-bit)
Oracle Linux Release 6.3, x86-64 based
Oracle Solaris 11, u 11 SPARC-based
IBM AIX 7.1 Technology Level 3 SP1 (7.1 TL3 SP3) Power Processor-based
Red Hat Enterprise Linux 6 Update 3
JVM (64-bit) Oracle's JDK 1.7.0 Update 67
Oracle's JDK 1.7.0 Update 67
IBM JDK 1.7.sp1.FP1.64bit
Oracle's JDK 1.7.0 Update 67
Supported Oracle Retail Products
Planning the Installation 2-5
Client System RequirementsTable 2–3 lists the supported client system options:
Table 2–3 Client System Environment
Software Requirements
Microsoft Windows 7 Service Pack 1
or
Microsoft Windows 8.1
One of the following browsers:
■ Mozilla Firefox Enterprise Version 24.0
■ Microsoft Internet Explorer 11.0 (32-bit)
■ Chrome (latest version)
Supported Oracle Retail ProductsTable 2–4 lists the supported Oracle Retail products.
Table 2–4 Supported Oracle Retail Products
Product Version
Oracle Retail Analytics 14.1.0
Oracle Retail Demand Forecasting 14.1.0
Oracle Retail Advanced Inventory Planning 14.1.0
Oracle Retail Category Management 14.1.0

Supported Oracle Retail Products
2-6 Oracle Retail Advanced Science Engine Installation Guide
3
Setting Up the Database 3-1
3 Setting Up the Database
This chapter describes how you can set up your database and provides details about the various database components. It contains the following sections:
■ Installing the Database
■ Database Parameters
■ Creating the Default Tablespaces
■ Creating the Data User Accounts
Note: If your database requires multi-byte support, specify the following properties in your init.ora file:
CHARACTER_SET=AL32UTF8
NLS_LENGTH_SEMANTICS=CHAR
This chapter includes specific instructions required for ORASE. Since the installation instructions for the database may vary based on the operating system, Oracle recommends that you refer to the relevant installation documentation included with the database.
Installing the DatabaseThe application requires the use of Oracle Database Enterprise Edition 12cR1 (64-bit). In addition, you must install patches 18522516, 18705901, 18169693, 17815049, 18404105, 18273508 and 18097476 on top of 12.1.0.1.4.
Note: Before starting the installation, ensure that you have sufficient privileges to perform any database administrator (DBA) level tasks.
Install the database for the application, along with the software, referring to the Oracle Database 12c Release 1 Documentation.
Important: The database must be secured using the recommendations provided in the Oracle Database 12c Release 1 Security Guide. For additional specific guidance for securing the database for use with ORASE, refer to the Oracle Retail Advanced Science Engine Security Guide.

Database Parameters
3-2 Oracle Retail Advanced Science Engine Installation Guide
Time Zone ConsiderationEnsure that the time zone set up for the database matches the time zone set for the users. Oracle recommends that you set the TZ UNIX environment variable for the database instance and TNS listener to the time zone set for the end users.
Database ParametersThe database parameters shown in Table 3–1 are sample values that can be used with the test dataset included with ORASE. Tune these parameters to suitable values for your environment.
Table 3–1 Suggested Values for Database Parameters
Database Parameter Suggested Value
PARALLEL_MAX_SERVERS Customer determines. See Setting Parallel Processing Parameters.
PARALLEL_THREADS_PER_CPU Customer determines. See Setting Parallel Processing Parameters.
JOB_QUEUE_PROCESSES Set a value between 2 through 1000 based on the recommendation provided in the section JOB_QUEUE_PROCESSES Recommendation.
Note: The Oracle Installer provides an option to update these settings. When updating these parameters via the Installer, the DB Username provided must have the sysdba role.
Setting Parallel Processing ParametersThe settings for PARALLEL_MAX_SERVERS and PARALLEL_THREADS_PER_CPU database parameters are dependent on your specific hardware configuration. You should set these parameters so that a sufficient number of parallel resources are available for the various processes that are run by this application.
For example, if the various Degree of Parallelism (DOP) configuration parameters are set up so that ten threads can run simultaneously, but the combination of PARALLEL_MAX_SERVERS and PARALLEL_THREADS_PER_CPU are set up so that only five sessions can get parallel threads, then performance will be degraded for five of the parallel threads. Therefore, you should make sure that the number of sessions that can use parallel server resources are sufficient for the number of concurrent database processes that can be run. To do this, either increase the PARALLEL_MAX_SERVERS or decrease the PARALLEL_THREADS_PER_CPU, or decrease the various DOP configuration values, so that database resources are efficiently utilized without causing a bottleneck on the throughput for some processing.
Here is a suggested approach to setting the parameters. Allow a minimum of 12 concurrent processes to get some parallel resources. In this way the installer can set PARALLEL_THREADS_PER_CPU to a value that enables a comfortable setting for PARALLEL_MAX_SERVERS, where PARALLEL_MAX_SERVERS is set to 12* CPU_COUNT * PARALLEL_THREADS_PER_CPU.
JOB_QUEUE_PROCESSES RecommendationThe number of concurrent database threads for various application processes can be controlled by changing entries in the RSE_CONFIG table. These entry names typically

Creating the Data User Accounts
Setting Up the Database 3-3
will contain “DOP” as part of its PARAM_NAME. The JOB_QUEUE_PROCESSES value must be configured high enough to allow all DOP values to be executed without being constrained by the JOB_QUEUE_PROCESSES configuration. The actual number of concurrent threads is the lesser of the database configuration value for JOB_QUEUE_PROCESSES and the sum of all the “DOP” configuration parameter values.
Note that some processes can be run by multiple simultaneous users. Therefore, if the JOB_QUEUE_PROCESSES limit is defined at 6 and the maximum DOP configuration value is set at 2, then there will be an imposed limit of 3 processes running at a time. This limit can impact the performance of processing for some tasks, so make sure that the JOB_QUEUE_PROCESSES limit and the various DOP configuration values are set appropriately in order to work together efficiently while allowing proper use of database resources.
Note: JOB_QUEUE_PROCESSES *MUST* be set to greater than 2 or the application may hang.
Creating the Default TablespacesWhen you run the Oracle installer, schemas and tables for the application are installed on the database you create. For the schemas and tables to install successfully, the database must include certain default tablespaces.
ORASE uses the tablespace that is specified as the default tablespace for the schema. If you need to change the tablespace for individual tables or indexes, you should do this after the installation is complete. All tables whose names begin with "PROTO$" are used as prototypes to create transient tables (that is, tables that start with TMP$) for various database processes. If you want to keep these transient tables in a separate tablespace (for a different backup strategy) then you can move the tables whose names begin with "PROTO$" to another tablespace. All subsequent transient tables that are built off of these prototypes will be placed in that tablespace.
Use the Oracle 12c Database Configuration Assistant to create a default database with the tablespace mentioned in Table 3–2. For more information on using the Configuration Assistant, see the Installation documentation associated with the version of the Oracle database you are installing.
Table 3–2 Business Database Tablespace
Tablespace Description
<User-supplied Name> Required. Application tablespace for the ORASE tables.
Note: The recommended size of tablespace depends on the amount of data being stored and can change based on the size of your implementation.
Creating the Data User AccountsYou must either have the Oracle installer create one database user or create one database user yourself. This database user is what the Oracle installer uses during the installation to create staging tables, core hierarchy tables, and application-specific tables.
To have the Oracle installer create the database user, you specify:
■ Default tablespace name

Creating the Data User Accounts
3-4 Oracle Retail Advanced Science Engine Installation Guide
■ Oracle SID
■ Oracle schema user alias
To create the user account yourself:
1. Make a copy of the User Creation Script included in the ORASE Installation media. The script to create users and grant access privileges is available at <STAGING_DIR>/orase/installer/common/create-db-user/template/cr_orase_user.sql.
In your copy, you must replace the following tokens:
Token Value
@orase.schema.name@ ORASE Schema Username
@orase.schema.password@ ORASE Schema Password
@default.tablespace@ ORASE Schema Default Tablespace
2. Execute your copy of the script with a user that has the sysdba role.

4
Setting Up the Application Server 4-1
4 Setting Up the Application Server
Before installing ORASE, you must set up a domain on the application server. Based on your business needs, you must set up a domain to include one or more server instances and logically related resources and services.
ORASE supports the use of Oracle WebLogic Server 12c Release 1 (12.1.3), which includes the Oracle Application Development Runtime (ADF) Release 12.1.3. This chapter provides instructions on setting up the WebLogic server for your business. It contains the following sections:
■ Setting Up the WebLogic Server
■ Restarting the Application Server
■ Setting Up JVM Memory Settings
■ Setting Up Users and Roles
■ Setting Up JTA Timeout Seconds
Note: This chapter includes specific instructions required for ORASE. Since the installation instructions for an application server may vary based on the operating system, Oracle recommends that you refer to the relevant installation documentation included with the application server.
Setting Up the WebLogic ServerThis section describes how you can set up a domain on the WebLogic server. It contains the following sections:
■ Installing the WebLogic Server
■ Setting Up a WebLogic Domain
■ Setting Up the WebLogic Startup Script
Note: The WebLogic server must be secured using the security recommendations provided in the Oracle Fusion Middleware Information Roadmap for Oracle WebLogic Server. For additional specific guidance on securing the WebLogic server for ORASE, refer to the Oracle Retail Advanced Science Engine Security Guide.

Setting Up the WebLogic Server
4-2 Oracle Retail Advanced Science Engine Installation Guide
Installing the WebLogic ServerInstall the Oracle WebLogic Server Release 12gc Release 1 (12.1.3), referring to the Oracle WebLogic Server Documentation for guidance. In this guide, the WebLogic installation directory is referred to as the <WLS_HOME> directory.
Setting Up a WebLogic DomainThis section describes the detailed instructions on setting up a WebLogic 12c (12.1.3) domain with Enterprise Manager, for use with ORASE applications. This section also includes the creation of all required components new to 12c, such as the WLS database users.
PrerequisitesComplete the following:
1. Determine and verify access to the Application Server machine that will be used for hosting the domain by logging into the machine using PuTTY.
2. Verify that the Oracle database client is already installed and configured on your app server by running the following command:
sqlplus -version
3. Java JDK version 1.7.0_67 64-bit
4. Verify Cygwin (or any xterm/X11 software) is installed on the local Windows machine (or remote desktop machine) along with X11 packages. Refer to Appendix A for an example of connecting to a remote host and configuring the X11 terminal.
5. Export the following environment variables, if they have not already been configured:
export JAVA_HOME=<your java home from the above list>
export ORACLE_HOME=<your oracle client location, e.g. /opt/app/oracle/product/12.1.0.1>
export PATH=$JAVA_HOME/bin:$ORACLE_HOME/bin:$PATH
export DISPLAY=<local ip address of X11 window>:0.0
WebLogic Database SetupThe following steps describe setting up the WebLogic 12c database users for a new domain. Each new domain in WebLogic 12c requires a set of database users for storing various components and parameters. Database user creation is done with the Oracle RCU utility.
1. Navigate to the following directory within your WebLogic 12c server folder:
$WL_HOME/oracle_common/bin
2. $WL_HOME/oracle_common/bin/rcu -silent -createRepository -connectString <dbserver:portnum:dbname> -dbUser sys -dbRole sysdba -useSamePasswordForAllSchemaUsers true -schemaPrefix <SCHEMA_PREFIX> -component MDS -component IAU -component IAU_APPEND -component IAU_VIEWER -component OPSS -component UCSUMS -component WLS -component UCSCC -component STB <sys user password> <WLS Domain DB User password>
Setting Up the WebLogic Server
Setting Up the Application Server 4-3
The <SCHEMA_PREFIX> value must be a unique identifier that is associated with your domain. It cannot be more than 12 characters and must contain only numbers and letters.
After rcu executes, review the completion status in the resulting logs. The output should show lines like the following:
…Percent Complete: 100Repository Creation Utility: Create - Completion Summary…Repository Creation Utility - Create : Operation Completed
WebLogic Domain Creation – GUI ModeComplete the following:
1. Go to the following directory in your WebLogic home:
$WL_HOME/oracle_common/common/bin
2. Run the script bash config.sh.
bash config.sh
Make sure you are still in the same PuTTY session that has the DISPLAY variable exported. The domain creation GUI should now appear. Follow all the steps in the GUI to complete the domain creation.
3. The Configuration Type screen is displayed.
Select Create a new domain option, and enter the desired path to the domain.
For example:
/u01/oracle/middleware/user_projects/domains/orase_test
Click Next to continue.
4. The Templates screen is displayed.
Create a domain using product templates and select the option for Oracle Enterprise Manager. Oracle JRF and Coherence options should be selected automatically.
Click Next to continue.
5. The Application Location screen is displayed.
Enter the path to the applications folder used for your WLS domains.
For example:
/u01/oracle/middleware/user_projects/applications/orase_test
Click Next to continue.
6. The Administrator Account screen is displayed.
Enter the username and password for your WLS admin account.
Click Next to continue.
7. The Domain Mode and JDK screen is displayed.
Select Production Mode as the domain mode. Select your JDK for your OS or enter the path to it in the field provided.

Setting Up the WebLogic Server
4-4 Oracle Retail Advanced Science Engine Installation Guide
For example:
/u01/sw/java/1.7.0_65
Click Next to continue.
8. The Database Configuration Type screen is displayed.
Select RCU Data option and enter all details for the WLS DB users you created in the previous section WebLogic Database Setup.
Service: < WLS DB instance>
Host Name: <WLS DB server>
Port: 1521
Schema Owner: <Prefix>_STB
Schema Password: <WLS DB password>
Click Get RCU Configuration when done.
After the log message reports "successfully done", click Next to continue.
9. The JDBC Component Schema screen is displayed.
No changes are normally required to this screen.
Click Next to continue.
10. The JDBC Component Schema Test screen is displayed.
Check all check boxes and click Test Selected Connections. All tests should return a "successful" status in the log window.
Click Next to continue.
11. The Advanced Configuration screen is displayed.
Select the options desired for your domain.
Click Next to continue.
12. The Administration Server screen is displayed.
Ensure that the Listen Port value to be a unique value. See Listen Port Configuration for more information.
Click Next to continue.
13. The Configuration Summary screen is displayed.
Review all of your configuration options to confirm your domain has been set up as desired.
Click Next to create your domain.
14. The Configuration Progress screen is displayed.
Monitor your domain creation until it completes.
Click Next to continue after the domain is at 100%.
15. The Configuration Success screen is displayed.
Confirm the status of the domain creation and copy the URL if necessary for later use.
Click Finish to close the GUI.

Restarting the Application Server
Setting Up the Application Server 4-5
Listen Port ConfigurationOnce the WebLogic domain for ORASE is created, ensure that you manually disable the HTTP port and enable the HTTPS port. This ensures that only a secure channel is used for accessing ORASE.
You must also ensure that the secure HTTPS port number is changed to a non-default value. This value must be environment-specific, non-standard, and not easily predictable.
For more information on configuring the listen ports, refer to the Oracle Fusion Middleware Administrator's Guide.
Setting Up the WebLogic Startup ScriptTo set up the WebLogic Startup script:
■ Navigate to the <WLS_HOME>/user_projects/domains/<your domain name> /bin directory and ensure that the following parameters are set within the startWebLogic.sh script:
■ WLS_HOME – The WebLogic installation directory.
■ JAVA_VENDOR – The Java Development Kit (JDK) installed for the WebLogic Server. You can specify WebLogic, IBM, HP, or Sun.
■ JAVA_HOME – The location where the JDK is installed.
■ JAVA_OPTIONS – Only for diagnostics, such as verbose garbage collection logging.
■ ulimit – Add ulimit -c unlimited to enable the core dump.
For Example#!/bin/shWL_HOME=${WLS_HOME}/wlserver_10.3"<location where WebLogic Server is installed>"PRODUCTION_MODE="true"JAVA_VENDOR="<name of the JDK>"JAVA_HOME="<location where JDK is installed>". ${WL_HOME}/common/bin/commEnv.shSERVER_NAME="admin"CLASSPATH="${WEBLOGIC_CLASSPATH}:${POINTBASE_CLASSPATH}:${JAVA_HOME}/jre/lib/rt.jar:${WL_HOME}/server/lib/webservices.jar:${CLASSPATH}"CLASSPATH=${CLASSPATH}export CLASSPATH${JAVA_HOME}/bin/java ${JAVA_VM} ${MEM_ARGS} ${JAVA_OPTIONS} -Dweblogic.Name=${SERVER_NAME} -Dweblogic.ProductionModeEnabled=${PRODUCTION_MODE} -Dweblogic.management.username=${WLS_USER} -Dweblogic.management.password=${WLS_PW} -Djava.security.policy="${WL_HOME}/server/lib/weblogic.policy" weblogic.Server 2>> console.log >& 2 &
Restarting the Application ServerIf the application server needs to be restarted, you must first shut down the server. To do this:
1. Navigate to <WLS_Home>/user_projects/domains/<your domain name>/bin.
2. Run the command ./stopWebLogic.sh.
3. Enter the Administrator user name and password if prompted to.
Setting Up JVM Memory Settings
4-6 Oracle Retail Advanced Science Engine Installation Guide
4. After the server is successfully shut down, use startWebLogic.sh to restart the server.
If the server does not shut down using this procedure, you may need to kill the back-end process. To do this:
1. Obtain the process ID (PID) for that process.
2. Run the command: kill -9 <PID1>
3. After the server is successfully shut down, use startWebLogic.sh to restart the server.
Setting Up JVM Memory SettingsThe default WebLogic JVM memory settings may not be sufficient for your implementation to run the application. When running the application on memory settings that are too low, the user interface may freeze up and the following error may get logged in the WebLogic logs:
Exception in thread "JMX Framework document pooling thread" java.lang.OutOfMemoryError: GC overhead limit exceeded.Exception in thread "CacheCleaner" java.lang.OutOfMemoryError: GC overhead limit exceeded.
To prevent this from occurring, modify the MEM_ARGS settings to use a minimum of “1024m” in the <WebLogic domain directory>/bin/setDomainEnv.sh. Modify only the MEM_ARGS values for the JVM they are using for WebLogic.
For example,
For a 64-bit Sun JDK, modify the following values:
WLS_MEM_ARGS_64BIT="-Xms1024m –Xmx1024m"MEM_PERM_SIZE_64BIT="-XX:PermSize=1024m"MEM_MAX_PERM_SIZE_64BIT="-XX:MaxPermSize=1024m"
Once you change these values, restart the WebLogic server for them to take effect.
Setting Up Users and RolesOnce the WebLogic Server is installed, you must also set up security and authentication for the application using the WebLogic Administration Console. This process includes the setting up of roles (Global Roles), users and assigning the users to the relevant roles. For more information, refer to the WebLogic Administration Console Online Help.
Note: The ORASE Installer completes these steps automatically. This information is provided as a reference only. These steps do not have to be executed if you are using the Installer.
For ASO, you must create the following four user login roles:
■ Micro Space Optimization Analyst – main business user responsible for day-to-day micro-space optimization activities

Setting Up Users and Roles
Setting Up the Application Server 4-7
■ Category Management – product-assortment-centric user who is interested in viewing ASO results and in the translation of data between Category Management, Retail Analytics, and ASO
■ Administrator – responsible for general system setup and configuration tasks related to the business
■ Analytical Super User – responsible for analytical configuration, testing, and model diagnosis
Table 4–1 ASO User Roles and Permisssions
Privilege Data AccessMicro ASO Analyst
Category Management Administrator
Analytical Super User
Create ASO run All runs X X
Modify existing ASO run
Runs they created
X X
View existing ASO run
All runs X X X X
Submit or resubmit ASO run
Runs they created
X X
Runs with technical failures
X X
Delete or archive ASO run
Runs they created
X X
All runs X
View list of saved ASO runs
All runs X X X X
Manage list of saved ASO runs
Runs they created
X X
All runs X
For ORASE, you must create the following four user login roles:
■ Clustering Advanced Analyst (Role Name: AdvancedAnalyticRole) – responsible for analytical configuration, testing, and cluster analysis in the Clustering module of ORASE.
■ Clustering Business User (Role Name: BusinessRole) – responsible for analytical configuration, testing, and cluster analysis in the Clustering module of ORASE.
■ Customer Decision Tree Analyst (Role Name: ConsumerDecisionTreeRole) – responsible for analytical configuration, testing, and decision tree analysis in the CDT module of ORASE.
■ Demand Transference Analyst (Role Name: DemandTransferenceRole) – responsible for analytical configuration, testing, and model analysis in the DT module of ORASE.

Table 4–2 ORASE Users and Roles
Privilege Data Access
Clustering Advanced Analyst
Clustering Business Analyst
Customer Decision Tree Analyst
Demand Transference Analyst
Advanced Clustering
All X X
Customer Decision Tree
All X
Demand Transference
All X
Setting Up JTA Timeout Seconds
4-8 Oracle Retail Advanced Science Engine Installation Guide
Setting Up JTA Timeout SecondsFor ASO, you must also set the Java Transaction API (JTA) transaction timeout seconds for active transactions. To set up the JTA timeout seconds:
Note: The ORASE Installer completes these steps automatically. This information is provided as a reference only. These steps do not have to be executed if you are using the Installer.
1. Log on to the WebLogic Server Administration Console.
2. On the left navigation panel, under Domain Structure, expand Services, and then click JTA. The Settings page appear with JTA tab appearing within the Configuration tab.
3. On the JTA tab, set the value for the Timeout Seconds field to 60.
4. Click Save, and then log out.

5
Security and Authentication 5-1
5 Security and Authentication
This chapter describes security and authentication. It contains the following sections:
■ Re-Associate Policy Store to Database
■ Configure OID Authenticator in WebLogic Domain
■ Load LDIF Files in LDAP
Re-Associate Policy Store to DatabaseFollow these steps to re-associate a policy store to the database:
1. Log into the WebLogic EM console.
2. Go to WebLogic Domain and click ORASEDomain.
3. Select the drop-down WebLogic Domain > Security > Security Provider Configuration.
4. Click Change Store Type.
5. Select Oracle Database in the Store Type drop-down menu.
6. Click Select and select jndi/OPSSDS JNDI name. Click OK.
7. Enter the values:
■ Root DN= <cn=RASEPolicies>
■ Select Create New Domain
■ Domain Name=<RASEDomain> (This must be the domain name that was created earlier in this document)
■ User Name: <RASEIG_OPSS> Schema user name of the OPSS schema
8. Click OK.
9. Click Yes.
10. The message Configure Security Stores - Completed Successfully appears. Click Close.
11. Restart the WebLogic domain.
Configure OID Authenticator in WebLogic DomainThe OID (Oracle Internet Directory 11.1.1.7) must be set up in order to perform the configuration of OID Authenticator in WebLogic Domain.

Load LDIF Files in LDAP
5-2 Oracle Retail Advanced Science Engine Installation Guide
Follow these steps to configure WebLogic domain with OID Authenticator:
1. Log into Admin console of the domain (Example: RASEDomain).
2. Go to SecurityRealm.
3. Click the MyRealm > Providers tab.
4. Click DefaultAuthenticator.
5. Click Lock and Edit.
6. Select Control Flag=OPTIONAL. Click Save and Activate changes.
7. Go to Security Realms >MyRealm >Providers tab. Click New.
8. Enter the values:
■ Name: <OIDAuthenticator> (Provide a name for OID Authenticator. Example:OIDAuthenticator)
■ Type: OracleInternetDirectoryAuthenticator
9. Click OK.
10. Click OIDAuthenticator.
11. Select Type: SUFFICIENT and click Save.
12. Click the Provider Specific tab and enter the values:
■ Host: <OID Server name> (Example: msp12068.us.oracle.com)
■ Port: <OID port> (Example: 3060 or 389)
■ Principal: <cn=orcladmin> (provide the OID admin user)
■ Credential: <password> (provide the password of cn=orcladmin)
■ User Base DN: (Example: cn=Users,dc=us,dc=oracle,dc=com)
■ Group Base DN: (Example: cn=Groups,dc=us,dc=oracle,dc=com)
■ Select Ignore Duplicate Membership
■ Results Time Limit: 30000
13. Save the values and activate changes.
14. Go to Security Realms >Providers.
15. Click Lock and Edit and then click Reorder. Select OIDAuthenticator and move it to the top of the list. Click OK.
16. Click Activate Changes.
17. Restart the WebLogic Domain and Managed Server.
18. Log into WebLogic domain > Security Realms > MyRealm > Users and Groups and verify that the users in OID appear in this screen (Users and Groups). This confirms the OID authentication from WebLogic is successful.
Load LDIF Files in LDAP The OID (Oracle Internet Directory 11.1.1.7) must be set up in order to perform the configuration of OID Users.
Four example LDIF files are provided in the application zip file:
■ RASE-oid-create-groups.ldif

Load LDIF Files in LDAP
Security and Authentication 5-3
■ RASE-oid-create-users.ldif
■ RASE-oid-delete-groups.ldif
■ RASE-oid-delete-users.ldif
Note: You may use the existing users and existing groups if the enterprise users and groups are already available in the LDAP. The users provided in the LDIF files above may not be required to use the application.
The steps in this section can be used to import the Groups and Users into the LDAP using the LDIF files 'RASE-oid-create-groups.ldif' and 'RASE-oid-create-users.ldif'.
Note: If you are using the above LDIF files to set up the users and groups, you must update the 'RASE-oid-create-user.ldif' LDIF file with your password for the 'userpassword' attribute for all the users mentioned in the RASE-oid-create-user.ldif LDIF file. The changes must be done before importing the users LDIF file 'RASE-oid-create-users.ldif' into the LDAP. Once the users are imported into the LDAP, remove the 'userpassword' attribute value from the LDIF file. Refer to the Oracle Internet Directory Administration Guide for OID password policies for setting up passwords.
Note: LDIF files can also be imported in other ways, but the steps below are using ODSM console.
The delete LDIF 'RASE-oid-delete-groups.ldif' can be used as needed if you need to delete the groups created from the groups creation LDIF 'RASE-oid-create-groups.ldif'.
The delete LDIF 'RASE-oid-delete-users.ldif' can be used if you need to delete the users created from the users LDIF file 'RASE-oid-create-users.ldif'.
To run the LDIF Files, complete the following steps:
1. Log into the UNIX machine where the OID installed.
2. Export the ORACLE_HOME to the Oracle_IDM directory inside the WebLogic Oracle home used to install OID.
For example:
export ORACLE_HOME=/u00/webadmin/product/fmw/wls_idm/Oracle_IDM
3. Add the users into ldap by running the ldapadd command with the relevant inputs.
For example:
/ldapadd -h msp52651.us.oracle.com -p 3060 -D "cn=orcladmin" -f RASE-"oid-create-groups.ldif"
4. If you want to run the ldif scripts to delete entries from LDAP, run the ldapdelete command.
For example:

Load LDIF Files in LDAP
5-4 Oracle Retail Advanced Science Engine Installation Guide
./ ldapdelete -h msp52651.us.oracle.com -p 3060 -D "cn=orcladmin" -f RASE-oid-delete-groups.ldif"
5. You must run RASE-oid-create-groups.ldif and RASE-oid-create-users.ldif to create the example users and groups inside LDAP.

6
Setting Up Password Stores 6-1
6 Setting Up Password Stores
Password stores are secure software containers that store the encrypted user credentials. As part of the Oracle Software Security Assurance (OSSA) program, sensitive information such as user credentials must be encrypted and stored in a secure location called as the password stores. When the installation starts, all the necessary user credentials will be retrieved from the password stores based on the alias name associated with the user credentials. The relevant applications, installers, and scripts can retrieve the credentials using aliases that were set up when encrypting and storing the user credentials in the password store.
Once configured, the application installation and the other relevant scripts no longer need to use embedded user names and password. This reduces any security risks that may exist because user names and passwords are no longer exposed.
This chapter describes how you can set up the password stores. It includes the following steps:
1. Review and understand the required password stores configuration. See Password Stores Configuration Overview.
2. Set up a password store for the database user accounts using Oracle Wallet on the application database side. In this document, this password store is referred to as the Oracle Secret Store. See Setting Up the Oracle Secret Store.
3. Set up another password store for the application installation using the Credential Storage Manager. This password store will store the user credentials of the relevant application server and the database user accounts. In this document, this password store is referred to as the Credential Storage Manager Password Store. See Setting Up the Credential Storage Manager Password Store.
Note: In a clustered-based implementation, ensure that the password stores are installed at a location that is accessible to all the cluster nodes
Important ConsiderationBefore you start setting up the password stores, ensure that you have the set up the following:
■ Environment variables.
■ Latest supported JDK.
Password Stores Configuration Overview
6-2 Oracle Retail Advanced Science Engine Installation Guide
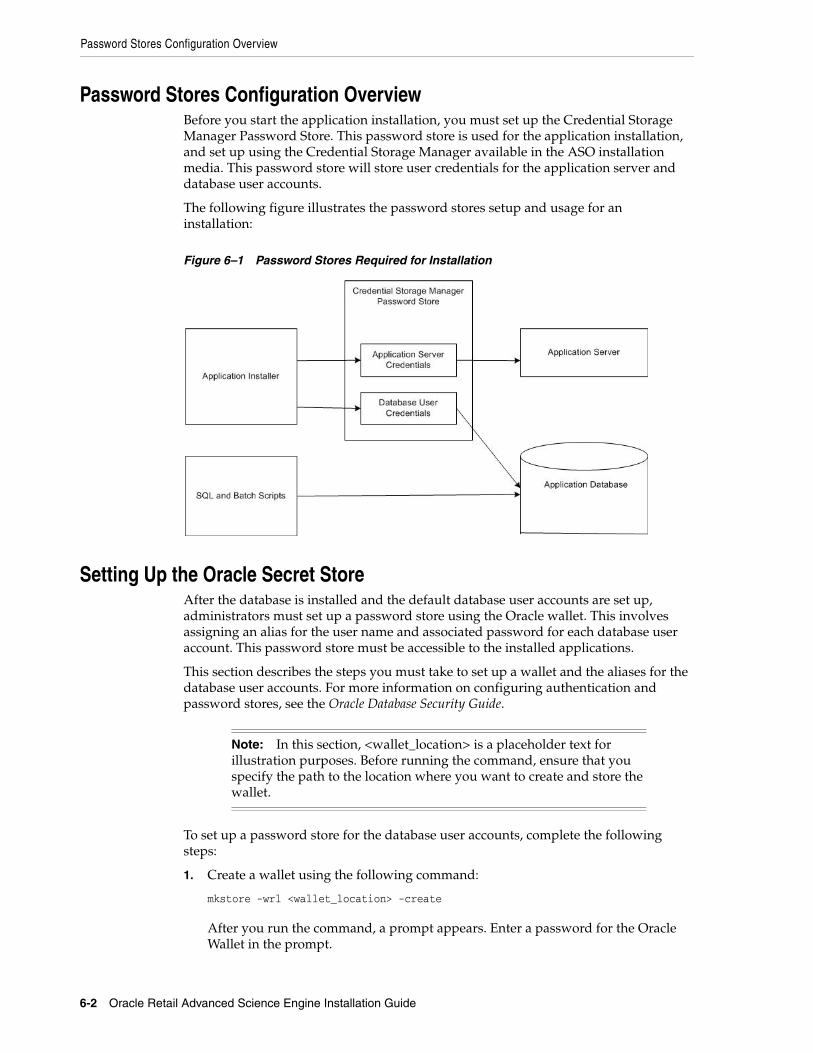
Password Stores Configuration OverviewBefore you start the application installation, you must set up the Credential Storage Manager Password Store. This password store is used for the application installation, and set up using the Credential Storage Manager available in the ASO installation media. This password store will store user credentials for the application server and database user accounts.
The following figure illustrates the password stores setup and usage for an installation:
Figure 6–1 Password Stores Required for Installation
Setting Up the Oracle Secret StoreAfter the database is installed and the default database user accounts are set up, administrators must set up a password store using the Oracle wallet. This involves assigning an alias for the user name and associated password for each database user account. This password store must be accessible to the installed applications.
This section describes the steps you must take to set up a wallet and the aliases for the database user accounts. For more information on configuring authentication and password stores, see the Oracle Database Security Guide.
Note: In this section, <wallet_location> is a placeholder text for illustration purposes. Before running the command, ensure that you specify the path to the location where you want to create and store the wallet.
To set up a password store for the database user accounts, complete the following steps:
1. Create a wallet using the following command:
mkstore -wrl <wallet_location> -create
After you run the command, a prompt appears. Enter a password for the Oracle Wallet in the prompt.

Note: The mkstore utility is included in the Oracle Database Client installation.
Setting Up Wallets for Database User Accounts
Setting Up Password Stores 6-3
The wallet is created with the auto-login feature enabled. This feature enables the database client to access the wallet contents without using the password. For more information, refer to the Oracle Database Advanced Security Administrator's Guide.
2. Create the database connection credentials in the wallet using the following command:
mkstore -wrl <wallet_location> -createCredential <alias-name> <database-user-name>
After you run the command, a prompt appears. Enter the password associated with the database user account in the prompt.
3. Repeat Step 2 for all the database user accounts.
4. Update the sqlnet.ora file to include the following statements:
WALLET_LOCATION = (SOURCE = (METHOD = FILE) (METHOD_DATA = (DIRECTORY = <wallet_location>)))SQLNET.WALLET_OVERRIDE = TRUESSL_CLIENT_AUTHENTICATION = FALSE
5. Update the tnsnames.ora file to include the following entry for each alias name to be set up.
<alias-name> = (DESCRIPTION = (ADDRESS_LIST = (ADDRESS = (PROTOCOL = TCP) (HOST = <host>) (PORT = <port>)) ) (CONNECT_DATA = (SERVICE_NAME = <service>) ) )
In the previous example, <alias-name>, <host>, <port>, and <service> are placeholder text for illustration purposes. Ensure that you replace these with the relevant values.
Setting Up Wallets for Database User AccountsThe following example shows how to set up wallets for database user accounts for ORASE.
To set up wallets for database user accounts, do the following.
1. Create a new directory called wallet under your folder structure.
mkdir /u00/product/oracle/orase/wallets/runtimemkdir .wallet

Note: The default permissions of the wallet allow only the owner to use it, ensuring the connection information is protected. If you want other users to be able to use the connection, you must adjust permissions appropriately to ensure only authorized users have access to the wallet.
Setting Up Wallets for Database User Accounts
6-4 Oracle Retail Advanced Science Engine Installation Guide
2. Create a sqlnet.ora in the wallet directory with the following content.
WALLET_LOCATION = (SOURCE = (METHOD = FILE) (METHOD_DATA = (DIRECTORY = /u00/product/oracle/oraso/runtime/wallet)) )SQLNET.WALLET_OVERRIDE=TRUESSL_CLIENT_AUTHENTICATION=FALSE
Note: WALLET_LOCATION must be on line 1 in the file.
3. Set up a tnsnames.ora in the wallet directory. This tnsnames.ora includes the standard tnsnames.ora file. Then, add two custom tns_alias entries that are only for use with the wallet. For example
ifile = /u00/oracle/product/11.2.0.1/network/admin/tnsnames.ora
orcsid04_orasouser = (DESCRIPTION = (ADDRESS_LIST = (ADDRESS = (PROTOCOL = tcp) (host = mspxxxxx.us.oracle.com) (Port = 1521))) (CONNECT_DATA = (SID = dvols29) (GLOBAL_NAME = dvols29)))
orcsid04_orasouser.world = (DESCRIPTION = (ADDRESS_LIST = (ADDRESS = (PROTOCOL = tcp) (host = mspxxxxx.us.oracle.com) (Port = 1521))) (CONNECT_DATA = (SID = dvols29) (GLOBAL_NAME = dvols29)))
Update the tnsnames.ora file for each of the database users. This includes the ORASE database user, RA database users, and MDS database user. If you are using the ORASE installer to perform any administrative tasks, you must also create an alias for the SYSDBA user.
Note: It is important to not just copy the tnsnames.ora file because it can quickly become out of date. The ifile clause (shown above) is key.
4. Create the wallet files. These are empty initially.
a. Ensure you are in the intended location.
$ pwd/u00/product/oracle/orase/wallets/runtime/.wallet
b. Create the wallet files.
$ mkstore -wrl . -create
c. Enter the wallet password you want to use. It is recommended that you use the same password as the UNIX user you are creating the wallet on.
d. Enter the password again.

Setting Up Wallets for Database User Accounts
Setting Up Password Stores 6-5
Two wallet files are created from the above command: ewallet.p12 and cwallet.sso.
5. Create the wallet entry that associates the user name and password to the custom tns alias that was setup in the wallet's tnsnames.ora file.
mkstore -wrl . -createCredential <tns_alias> <username> <password>
For example
mkstore -wrl . -createCredential orcsid04_oraseuser oraseuser oraseuser_passwd
6. Test the connectivity. The ORACLE_HOME used with the wallet must be the same version or higher than what the wallet was created with.
$ export TNS_ADMIN=/u00/product/oracle/orase/wallets/runtime/.wallet /* This is very important to use wallet to point at the alternate tnsnames.ora created in this example */ $ sqlplus /@orcsid04_oraseuser SQL*Plus: Release 11 Connected to:Oracle Database 11g SQL> show userUSER is "oraseuser"
Running batch programs or shell scripts would be similar:
Ex: dtesys /@orcsid04_oraseuserscript.sh /@orcsid04_oraseuser
As shown in the example above, users can ensure that passwords remain invisible.
Additional Database Wallet CommandsThe following is a list of additional database wallet commands.
■ Delete a credential on wallet
mkstore -wrl . -deleteCredential orcsid04_oraseuser
■ Change the password for a credential on wallet
mkstore -wrl . -modifyCredential orcsid04_oraseuser oraseuser oraseuser_new_passwd
■ List the wallet credential entries
mkstore -wrl . -list
This command returns values such as the following.
oracle.security.client.connect_string1oracle.security.client.user1oracle.security.client.password1
■ View the details of a wallet entry
mkstore -wrl . -viewEntry oracle.security.client.connect_string1
Returns the value of the entry:

Setting Up the Credential Storage Manager Password Store
6-6 Oracle Retail Advanced Science Engine Installation Guide
orcsid04_oraseuser
mkstore -wrl . -viewEntry oracle.security.client.user1
Returns the value of the entry:
oraseuser
mkstore -wrl . -viewEntry oracle.security.client.password1
Returns the value of the entry:
orcsid04_oraseuser_newpassword
Setting Up the Credential Storage Manager Password StoreBefore starting the application installer, you must set up the user credentials for the application server and database user accounts. The application installation includes a Credential Storage Manager that you can use to set up a password store for the application installation. In this document, this password store is referred to as the Credential Storage Manager Password Store.
To set up the Credential Storage Manager Password Store:
1. Navigate to the following subfolder in the <ORASE_CD_IMAGE> folder:
<OASO_CD_IMAGE>/cdm/installer/retail-public-security-api/bin
For more information on the <ORASE_CD_IMAGE> folder, see Chapter 7, "Installing the Advanced Science Engine."
2. Run the save_credential.sh script. You can add new or update using save-credential.sh as follows:
save_credential.sh -a <alias-name> -u <user-name> -p <partition-name> -l <locationOfWalletDir>

Note: In the command above, <alias-name>, <user-name>, <partition-name>, and <locationofwalletDir> are placeholder text for illustration purposes. For each set of user name and associated password, you must specify an unique alias name.
For the <alias-name> argument, you must specify the name you want for the alias. This is the information that you will give to the ORASE Installer.
For the <user-name> argument, you must specify the DB Schema Username or the WLS Domain Admin Username.
For the <partition-name> argument, you must specify the proper partition name used by the installer. Partition Name to be used for the ORASE Installer is "DEFAULT_KEY_PARTITION_NAME" (without the "").
For the <locationofwalletDir> argument, you must specify the location where you want to store the wallet file that contains the encrypted user credentials. Keep a note of this location.
This location must not be the same location as the wallet created with the mkstore utility. The Credential Store must be written to a different folder that does not already contain wallet files.
Setting Up the Credential Storage Manager Password Store
Setting Up Password Stores 6-7
Example:
./save_credential.sh -p DEFAULT_KEY_PARTITION_NAME -a ORASE_DB_ALIAS -u ORASE_PROD_DB -l /u00/product/oracle/oraso/wallet
----------------------------------------------------------------------------------------------------------------Retail Public Security API Utility----------------------------------------------------------------------------------------------------------------Enter password:Verify password:
Note: save_credential.sh can also be used to update the information in wallet.
3. If you are unsure about the information that is currently in the wallet, use dump_credentials.sh as follows:
./dump_credentials.sh <wallet-location>
Example:
./dump_credentials.sh /u00/product/oracle/orase/wallet
----------------------------------------------------------------------------------------------------------------------------Retail Public Security API Utility----------------------------------------------------------------------------------------------------------------------------

Setting Up the Credential Storage Manager Password Store
6-8 Oracle Retail Advanced Science Engine Installation Guide
----------------------------------------------------------------------------------------------------------------------------Below are the credentials found in the wallet at the location: /u00/product/oracle/orase/wallet----------------------------------------------------------------------------------------------------------------------------
Application level key partition name: DEFAULT_KEY_PARTITION_NAME
User Name Alias: ORASE_DB_ALIASUser Name:ORASE_PROD_DB
Important Considerations■ Alias names are case sensitive.
■ Keep a note of all the aliases you have set up. During the application installation, you will need to enter the alias names for the application installer to connect to the database and application server.
■ Aliases needed in the Credential Storage Manager Password Store
– Installer Orpatch User Alias
– ORASE Database User Alias
– ORASE MDS Alias
– ORASE WebLogic Admin Server Alias
– RADM Alias
7
Installing the Advanced Science Engine 7-1
7 Installing the Advanced Science Engine
After you have set up your database and application server, you can install the applications using the guidelines provided in this chapter. This chapter contains the following sections:
■ Overview of the Installation Process
■ Accessing the Installation Software
■ Setting Up the Installation Properties File
■ Setting Up Environment Variables
■ Installing ORASE
■ Post-Installation Updates
■ Logging In
■ About install.sh
■ ASO-APO Integration Deployment
Overview of the Installation ProcessIn order to install ORASE, your first task is to obtain the installation media. You can then choose the installation mode you prefer. Whichever mode you use, you first need to set up the ORASE properties file. The installation modes are as follows:
■ Graphical or Text mode – In the graphical or text mode, the Oracle Installer displays a graphical user interface and prompts you to enter or modify the value of the properties specified in the properties file.
■ Silent mode – In the silent mode, the installer processes the properties file without any manual intervention.
Accessing the Installation SoftwareIn order to install ORASE, you first need to obtain the software media, which is available on DVD or from a ZIP file. This section explains how to download the ORASE software ZIP file from the Oracle Software Delivery Cloud Web site.
To download the ORASE software:
1. From the application server where you will be installing ORASE, open a browser and navigate to the following URL:
http://edelivery.oracle.com/

Setting Up the Installation Properties File
7-2 Oracle Retail Advanced Science Engine Installation Guide
The Oracle Software Delivery Cloud download page displays.
Note: Installation media files for an Enterprise release (for example, 14.1) are available on the Oracle Software Delivery Cloud Web site (http://edelivery.oracle.com), and Patch releases (14.1.x) and Hot Fixes (14.1.x.y) are available on the My Oracle Support Web site (https://support.oracle.com).
2. On the Oracle Software Delivery Cloud page, click Sign In/Register.
3. On the Sign In page, log onto the Oracle Software Delivery Cloud Web site.
4. On the Terms & Restrictions page, review and accept the licensing agreement by selecting the check boxes.
5. Click Continue. The Media Pack Search window opens.
6. Respond to the following and click Go.
■ License List – Review the list to determine which Product Packs you need to download.
■ Product Pack – Select Oracle Retail Applications.
■ Platform – Select the desired operating system.
The Oracle Retail Category Management Media Pack window opens.
7. In the Select column, click Download next to Oracle Retail Advanced Science Engine.
8. Unpack the ZIP file to a temporary directory. In this guide, the directory that contains the installation media is referred to as the <ORASE_CD_IMAGE> directory.
Now you can set up your ORASE installation properties file.
Setting Up the Installation Properties FileIn order to install the ORASE application, you first need to specify the properties to use during the installation process. The ant.install.properties file, available for each installation, helps you specify the necessary properties for the installation.
To set up your ant.install.properties file:
1. Copy orase.14.1.0.installer.zip to a location where you can run the installer. This is referred to as STAGING_DIR.
2. Use an unzip utility to unzip orase.14.1.0.installer.zip. This creates the orase/installer subdirectories under STAGING_DIR.
3. Change directories to <STAGING_DIR>/orase/installer.
4. Copy the ant.install.properties.sample file and rename it ant.install.properties.
5. Edit the ant.install.properties file using any text editor, specifying values as described within the file, and save it. These properities are described in Table 7–1.
The ant.install.properties Parameters ReferenceThe following table describes the parameters in the ant.install.properties file that you must set up before you install the ORASE application:

Setting Up the Installation Properties File
Installing the Advanced Science Engine 7-3
Table 7–1 The ant.install.properties Parameters Reference
Parameter Description
ant.install.config.version = [Version Number]
The version of the ORASE 14.1.0 installer configuration.
Default = 1.1
input.retail.home = [full path to RETAIL_HOME directory]
Directory where the Oracle Retail files are installed. The ORASE Installer creates rse-home as a sub-directory of RETAIL_HOME.
Default = <Empty>
input.retrieve.credentials = [yes or no] Set to yes if using Oracle Wallet for credentials.
Default = yes
input.wallet.dir = [fullpath to wallet directory]
Directory that contains Oracle Wallet entries that were created using the Credential Store Manager.
Default = ./wallet
input.dbsetup = [true or false] Set Database Parameters
Default = false
input.schema.creation = [true or false] Create ORASE Database User
Default = false
input.parallel.maxservers = If 'input.dbsetup= true', enter the new value for PARALLEL_MAX_SERVERS
input.parallel.threads.percpu = If 'input.dbsetup= true', enter the new value for PARALLEL_THREADS_PER_CPU
input.jobqueue.processes = If 'input.dbsetup= true', enter the new value for JOB_QUEUE_PROCESSES
input.default.tablespace = If 'input.schema.creation = true', enter Default tablespace
input.datasource.sid = If 'input.schema.creation = true', enter Oracle SID for ORASE DB
(Same as WLS Datasource SID for ORASE DB)
input.datasource.alias = If 'input.schema.creation = true', enter Oracle Wallet Alias for ORASE DB
input.lang.code = [de, el, en, es, fr, hr, hu, it, ja, ko, nl, pl, pt, ru, sv, tr, zh, zh_TW]
Installed language selection.
Default = en
input.load.aso.seeddata = [true or false]
Load ASO Seed Data
Default = false
The seed data loaded by the installer is intended for use with the Demo dataset, as described in the Oracle Retail Advanced Science Engine Implementation Guide.
input.load.cdt.seeddata = [true or false]
Load CDT Seed Data
Default = false
The seed data loaded by the installer is intended for use with the Demo dataset, as described in the Oracle Retail Advanced Science Engine Implementation Guide.
input.load.cis.seeddata = [true or false]
Load AC Seed Data
Default = false
The seed data loaded by the installer is intended for use with the Demo dataset, as described in the Oracle Retail Advanced Science Engine Implementation Guide.

Setting Up the Installation Properties File
7-4 Oracle Retail Advanced Science Engine Installation Guide
input.load.dt.seeddata = [true or false] Load DT Seed Data
Default = false
The seed data loaded by the installer is intended for use with the Demo dataset, as described in the Oracle Retail Advanced Science Engine Implementation Guide.
input.load.mba.seeddata = [true or false]
Load MBA Seed Data
Default = false
The seed data loaded by the installer is intended for use with the Demo dataset, as described in the Oracle Retail Advanced Science Engine Implementation Guide.
input.aso.db = [true or false] Set to true to install the ASO DB Schema.
Default = false
input.cdt.dbinstall = [true or false] Set to true to install the CDT DB schema.
Default = false
input.cis.dbinstall = [true or false] Set to true to install the AC DB schema.
Default = false
input.dt.dbinstall = [true or false] Set to true to install the DT DB schema.
Default = false
input.mba.dbinstall = [true or false] Set to true to install the MBA DB schema.
Default = false
input.aso.microappwar.install = [true or false]
Set to true to install the ASO.MicroApp component.
Default = false
If installing ASO as a standalone application, this should be set to false.
input.aso.ui.install = [true or false] Set to true to install the ASO Standalone application.
Default = false
If installing ASO as a micro application within RPAS, this should be set to false.
input.cdt.war.install = [true or false] Set to true to install the CDT Shared Library application.
Default = false
input.cis.war.install = [true or false] Set to true to install the AC Shared Library application.
Default = false
input.dt.war.install = [true or false] Set to true to install the DT Shared Library application.
Default = false
input.rpasfc.home = [config path for fusion client]
Directory where the RPAS Fusion Client files are installed. Default = <Empty>. For example:
/oracle/product/rpas14/fusion14config/config/catman/
Note that the ORASE installer will create a directory below this path in /config.
input.is.multiple.hosts = [yes or no] If installing ASO MicroApp in a Clustered WLS Environment, set to yes.
Default = no.
Table 7–1 (Cont.) The ant.install.properties Parameters Reference
Parameter Description

Setting Up the Installation Properties File
Installing the Advanced Science Engine 7-5
input.targetMachines = localhost [target machines](comma separated)
Comma separated list of Hostnames which are the target machines where the RPAS Fusion Client has been installed. Use 'localhost' if cluster is not used.
Default = 'localhost'
input.ssh.authentication.mode = default
If installing ASO Micro App in a Clustered WLS Environment, this specifies the Authentication Mode to be used to communicate with Servers.
Default = default.
input.ssh.username.alias = Oracle Wallet Alias for ssh User.
Default = <Empty>
input.ssh.keyfile = If you selected the Passphrase option in the Authentication
Method field, enter the location of the SSH key file.
input.datasource.url = jdbc:oracle:thin:@[host]:[port]:[dbname]
WLS Datasource URL for ORASE DB.
Default = <Empty>
For pluggable DBs, you must enter the URL with a forward slash instead of a colon before [dbname].
input.datasource.sid = [Oracle SID/DB name]
WLS Datasource SID for ORASE DB
Default = <Empty>
input.datasource.alias = [schema Alias]
Oracle Wallet Alias for ORASE DB.
Default = <Empty>
input.radm.datasource.alias = [RADM user alias]
Oracle Wallet Alias for RADM DB.
Default = <Empty>
input.radm.datasource.sid = [Oracle SID/DB name]
Database SID for RADM DB.
Default = <Empty>
input.rabatch.grant.recipient = [RADM user alias or Role]
Oracle Wallet Alias for RADM DB or RADM Database Role that is to be granted DB privilege to run ORASE Batch Processes
input.rase.db.batch.user.alias = [ORASE user alias]
Oracle Wallet Alias for ORASE DB
input.tnsadmin.dir = [Oracle TNS Admin Directory]
Oracle Wallet directory where input.rase.db.batch.user.alias is defined
input.isMdsNeeded = [yes or no] Set to yes to Register MDS, otherwise no.
input.mds.hostname = Oracle Database MDS hostname
Default = <Empty>
input.mds.port = 1521 Oracle Database MDS port number.
Default = <Empty>
input.mds.dbname = Oracle Database MDS Database Name
Default = <Empty>
input.mds.user.alias = Oracle Database MDS User Alias
Default = <Empty>
input.wls.target = [Application Server Hostname]
WLS Application Server hostname.
Default = <Empty>
Table 7–1 (Cont.) The ant.install.properties Parameters Reference
Parameter Description

Setting Up Environment Variables
7-6 Oracle Retail Advanced Science Engine Installation Guide
Setting Up Environment VariablesBefore you start the installation, make sure that the following environment variables are set in the system:
■ JAVA_HOME
■ ORACLE_HOME
■ ORACLE_SID
■ TNS_ADMIN
■ PATH
■ LD_LIBRARY_PATH
■ WL_HOME
■ WEBLOGIC_DOMAIN_HOME
■ NLS_LANG
Although it is recommended that these variables be set up in relevant bash shell startup files (.bash_profile) of the system, you can also set up the variables using the export command at the UNIX prompt. For more information on setting up these variables in the startup files, refer to the operating system documentation.
To set up the environment variables for the current session, at the UNIX prompt type the following commands in sequence:
#Export JAVA_HOMEexport JAVA_HOME=<path where JVM is installed>#Example: export JAVA_HOME=/usr/lib/java/jdk1.7.0_67 #Export ORACLE_HOMEexport ORACLE_HOME=<path where the Oracle database is installed>#Example: export ORACLE_HOME=/u01/app/oracle/product/12.1.0.1
input.admin.port = [Admin Port Number]
WLS Application Server Administrative port number.
Default = <Empty>
If the SSL port is to be used for the installation, enter that here.
input.target.name = [Admin/Managed Server]
WLS Admin Server Name or WLS Managed Server Name.
Default = AdminServer
input.admin.username.alias = [Admin Alias]
Oracle Wallet Alias Name for WLS Admin User account.
Default = <Empty>
input.enable.ssl = [true or false] If using SSL Port to communicate with WLS Application Server, set to true.
Default = false
input.jbo.adflogger.level = [SEVERE WARNING INFO CONFIG FINE FINER FINEST]
ORASE ADF Logging Level. Set as one of
SEVERE WARNING INFO CONFIG FINE FINER FINEST
Default = INFO
input.create.usersgroups = [true or false]
Create Application Users and Groups and Map Application Roles.
Table 7–1 (Cont.) The ant.install.properties Parameters Reference
Parameter Description

Installing ORASE
Installing the Advanced Science Engine 7-7
#Export ORACLE_SIDexport ORACLE_SID=<Oracle System ID of ORASE DB Schema>#Example: export ORACLE_SID=ORASE_TEST #Export TNS_ADMINexport TNS_ADMIN=<the location where sql.ora and tnsnames.ora are stored>#Example: export TNS_ADMIN=${ORACLE_HOME}/network/admin #Update PATHexport PATH=${ORACLE_HOME}/bin:${PATH}export PATH=${JAVA_HOME}/bin:${PATH} #Update LD_LIBRARY_PATHexport LD_LIBRARY_PATH=${ORACLE_HOME}/lib:${LD_LIBRARY_PATH} #Export WL_HOMEexport WL_HOME=<the location where the WebLogic Server is installed>#Example: WL_HOME=/u00/middleware/oracle_home/wlserver #Export WEBLOGIC_DOMAIN_HOMEexport WEBLOGIC_DOMAIN_HOME=<the location where the WebLogic Domain is installed>WEBLOGIC_DOMAIN_HOME#Example: WEBLOGIC_DOMAIN_HOME=/u00/middleware/oracle_home/user_projects/domains_12_1_3 #Export NLS_LANGexport NLS_LANG=AMERICAN_AMERICA.AL32UTF8
Note: Once the ORACLE_HOME environment variable is set up, the password stores set up with the alias ensure that you can connect to the database via sqlplus using the following command:
$sqlplus /@<alias_name>
Installing ORASEThe ORASE installation media includes an Oracle installer that you must run to install the application. the installer installs the application based on the input specified in an application properties file, ant.install.properties.
You can install the ORASE application in one of the following ways:
■ Graphical or Text Mode: The installer prompts you to enter or modify the value of the properties specified in the installation properties file.
■ Silent Mode: The installer processes the values set in the properties file without any manual intervention from you.
Installing ORASE in Graphical or Text ModeTo install ORASE in graphical or text mode, complete the following steps. Although this section describes how you can install ORASE in graphical mode, the same instructions appear on the screen as text instructions if you are installing the application in text mode.

Note: Although you do not have to set up the installation properties file when you are installing the application in graphical or text mode, it can be helpful to do so. If you set up the values in the properties file, those values will be taken as the default values in the graphical or text mode dialog boxes. For information on setting up the properties file, see Setting Up the Installation Properties File.
Installing ORASE
7-8 Oracle Retail Advanced Science Engine Installation Guide
To install the ORASE application in graphical mode:
1. Ensure that the WebLogic application server software is running and that the database is accessible.
2. If you are viewing the installer from a Windows client:
■ On the Windows client, start an Xserver program that enables you to emulate the X terminal.
■ On the application server, set the display for the Windows client where you want the Oracle Installer to display as follows:
export DISPLAY=<IP address>:0.0
3. From the application server machine, enter the following command:
./install.sh
4. The ORASE Welcome window appears. Click Next.
Figure 7–1 Welcome
5. The RETAIL_HOME window appears. Enter the path to the location where you are installing the Oracle Retail application files and click Next.

Installing ORASE
Installing the Advanced Science Engine 7-9
Figure 7–2 Retail HOME Directory
6. The Credential Store Manager window appears. Select whether or not you want to retrieve user credentials from the Oracle Wallet:
■ Select Yes to indicate that the installer should read the user credentials from an Oracle Wallet and specify the location of the Oracle Wallet.
■ Select No to indicate that you are going to enter the user credentials in the user interface.
Figure 7–3 Credential Store Manager

Installing ORASE
7-10 Oracle Retail Advanced Science Engine Installation Guide
Enter the path to the location where your Credential Store Manager Files are and click Next.
7. The ORASE Database Setup window appears.
Figure 7–4 ORASE Database Setup
Check the Configure Container Database Parameters check box if you want to Configure Container Database Parameters via the Installer.
Check the Create ORASE Database User check box if you want to create the ORASE Database User via the Installer.
If you check either check box, enter the relevant information, as described in Table 7–2, and click Next.
Table 7–2 ORASE Database Setup
Field Description
ORASE Container Database SID The Oracle system ID for the ORASE Container Database.
Oracle Container Database User Alias The alias for the ORASE Container Database.
ORASE Container Database Username The user name for the ORASE Container Database.
ORASE Container Database Password The password associated with the user name for the ORASE Container Database.
8. The Configure ORASE Container Database Parameters window appears. If you want to modify any of the Database Parameters, enter the new values, as described in Table 7–3, and click Next.
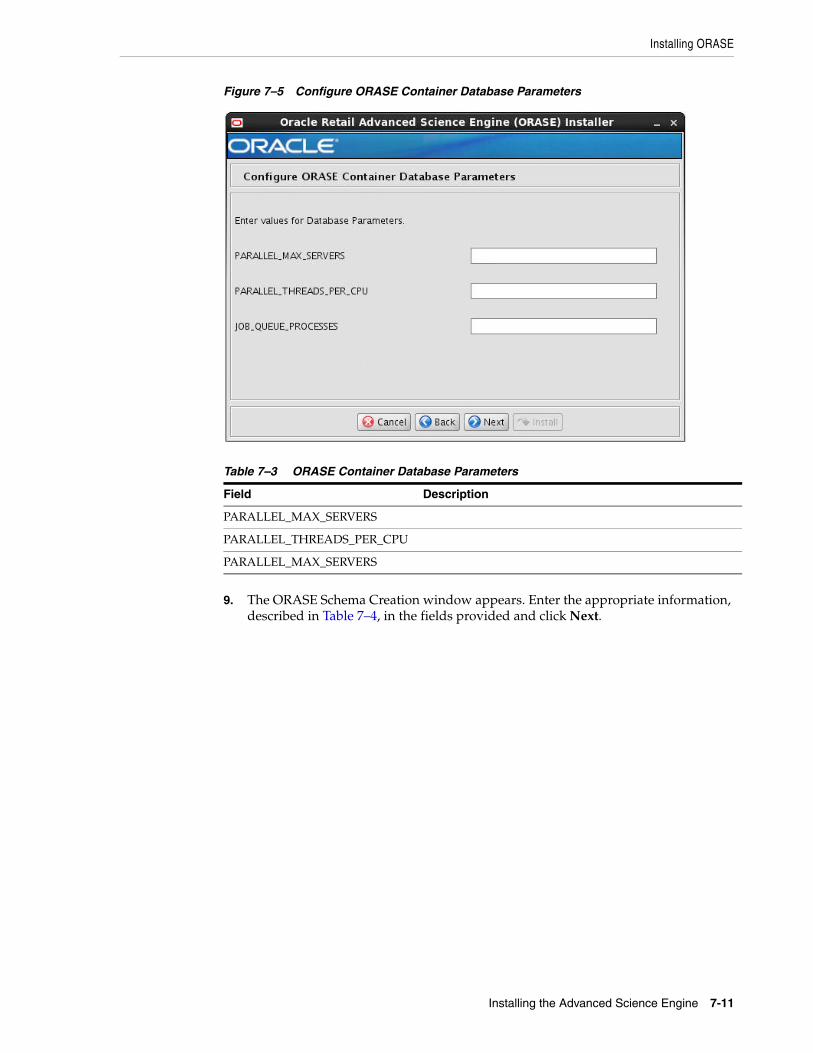
Installing ORASE
Installing the Advanced Science Engine 7-11
Figure 7–5 Configure ORASE Container Database Parameters
Table 7–3 ORASE Container Database Parameters
Field Description
PARALLEL_MAX_SERVERS
PARALLEL_THREADS_PER_CPU
PARALLEL_MAX_SERVERS
9. The ORASE Schema Creation window appears. Enter the appropriate information, described in Table 7–4, in the fields provided and click Next.

Installing ORASE
7-12 Oracle Retail Advanced Science Engine Installation Guide
Figure 7–6 ORASE Schema Creation
Table 7–4 ORASE Schema Creation
Field Description
Default Tablespace
Oracle SID
ORASE Schema User Alias
10. The Language window appears. Select the appropriate language from the drop-down list and click Next.
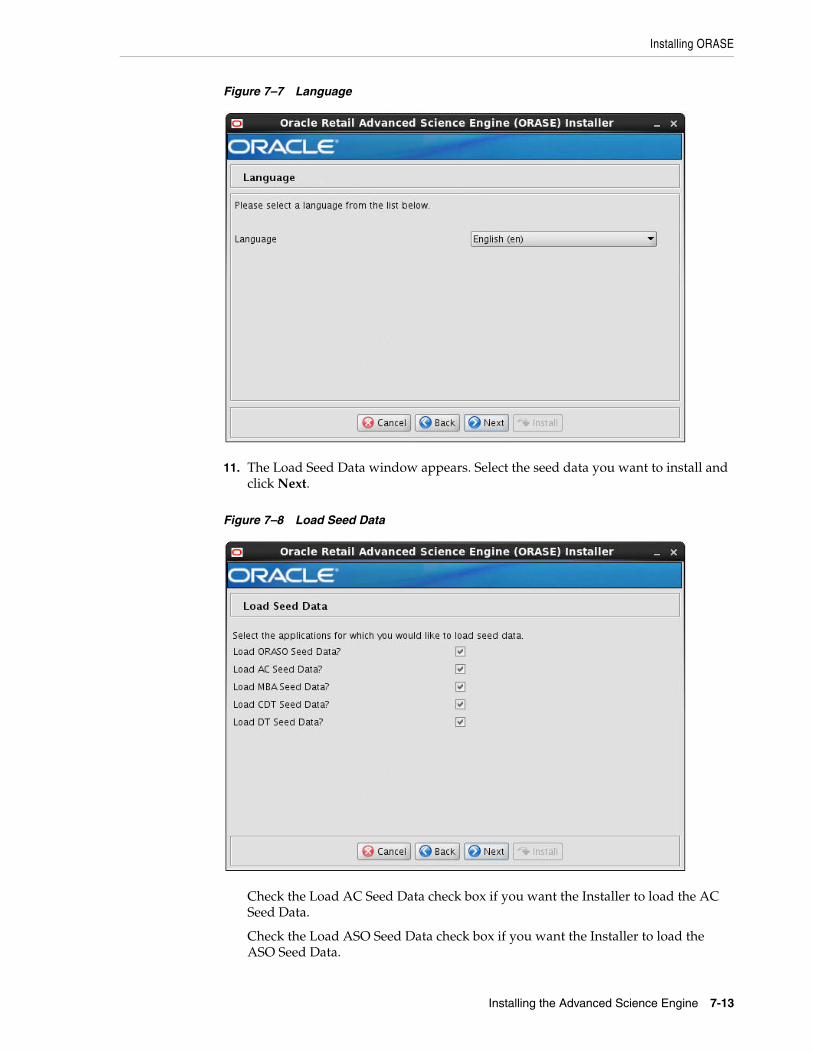
Installing ORASE
Installing the Advanced Science Engine 7-13
Figure 7–7 Language
11. The Load Seed Data window appears. Select the seed data you want to install and click Next.
Figure 7–8 Load Seed Data
Check the Load AC Seed Data check box if you want the Installer to load the AC Seed Data.
Check the Load ASO Seed Data check box if you want the Installer to load the ASO Seed Data.

Installing ORASE
7-14 Oracle Retail Advanced Science Engine Installation Guide
Check the Load CDT Seed Data check box if you want the Installer to load the CDT Seed Data.
Check the Load DT Seed Data check box if you want the Installer to load the DT Seed Data.
Check the Load MBA Seed Data check box if you want the Installer to load the MBA Seed Data.
12. The ORASE Database Components window appears. Select the ORASE Database Components you want to install and click Next.
Figure 7–9 ORASE Database Components
Check the AC Schema check box if you want the Installer to install the AC Schema.
Check the ASO Schema check box if you want the Installer to install the ASO Schema.
Check the CDT Schema check box if you want the Installer to install the CDT Schema.
Check the DT Schema check box if you want the Installer to install the DT Schema.
Check the MBA Schema check box if you want the Installer to install the MBA Schema.
13. The ORASE Application Components window appears. Select the ORASE Application Components you want to install and click Next.

Installing ORASE
Installing the Advanced Science Engine 7-15
Figure 7–10 ORASE Application Components
Check the AC Shared Library check box if you want the Installer to install the AC Shared Library.
Check the ASO Standalone App check box if you want the Installer to install the ASO Standalone App.
Check the ASO FC Micro App check box if you want the Installer to install the ASO FC Micro App.
Check the CDT Shared Library check box if you want the Installer to install the CDT Shared Library.
Check the DT Shared Library check box if you want the Installer to install the DT Shared Library.
14. The RPAS FC Details window appears.

Installing ORASE
7-16 Oracle Retail Advanced Science Engine Installation Guide
Figure 7–11 RPAS FC Details
Specify the location where the RPAS Fusion Client is installed.
Is RPAS FC installed to multiple servers?
■ Select Yes if this is a cluster installation. This is an installation in which at least one target managed server is running on a machine that is remote to the administration server machine.
■ Select No if you are deploying the ASO MicroApp to the administration server or managed servers on the same machine. This is an installation in which all of the target managed servers are running on the same machine as the administration server machine.
Provide the list of RPAS FC Server Hostnames.
Provide information about SSH, using the information in Table 7–5 as a guide.
Table 7–5 SSH Information
SSH Information Description
Authentication Method Select one of the following authentication methods:
■ Password: Use the specified password (associated with the SSH User Name) to connect to the remote hosts for copying the files.
■ Passphrase: Use the specified passphrase (associated with the SSH User Name) along with the SSH Key to connect to the remote hosts.
■ No need for password or passphrase: Default option; connect to the remote hosts without a user name, password, or passphrase.
SSH Username The SSH user name to connect to the remote hosts.

Installing ORASE
Installing the Advanced Science Engine 7-17
15. The ORASE Database Schema Details window appears. Enter the appropriate information, described inTable 7–6, in the fields provided and click Next.
Figure 7–12 ORASE Database Schema Details
Table 7–6 ORASE Database Schema Details
Field Description
ORASE JDBC URL The JDBC URL
ORASE SID The Oracle System ID
ORASE Database User Alias The Wallet Alias for the database user
16. The RADM Database Schema Details window appears. Enter the appropriate information, described in Table 7–7, in the fields provided and click Next.
SSH Username Alias The alias name associated with the SSH user name. Specifying an alias name enhances the security for the application. When left blank, the alias name will default to the administrative user name.
SSH Password or Passphrase
Based on the authentication method you selected, enter the relevant SSH password or passphrase. SSH Key File Path If you selected the Passphrase option in the Authentication Method field, enter the location of the SSH key file. If left blank, the installer will retrieve the file from ${user.home}/.ssh/id_dsa directory, where user.home is your home directory. To use this default location, ensure that you have the private DSA key stored at this location.
Table 7–5 (Cont.) SSH Information
SSH Information Description
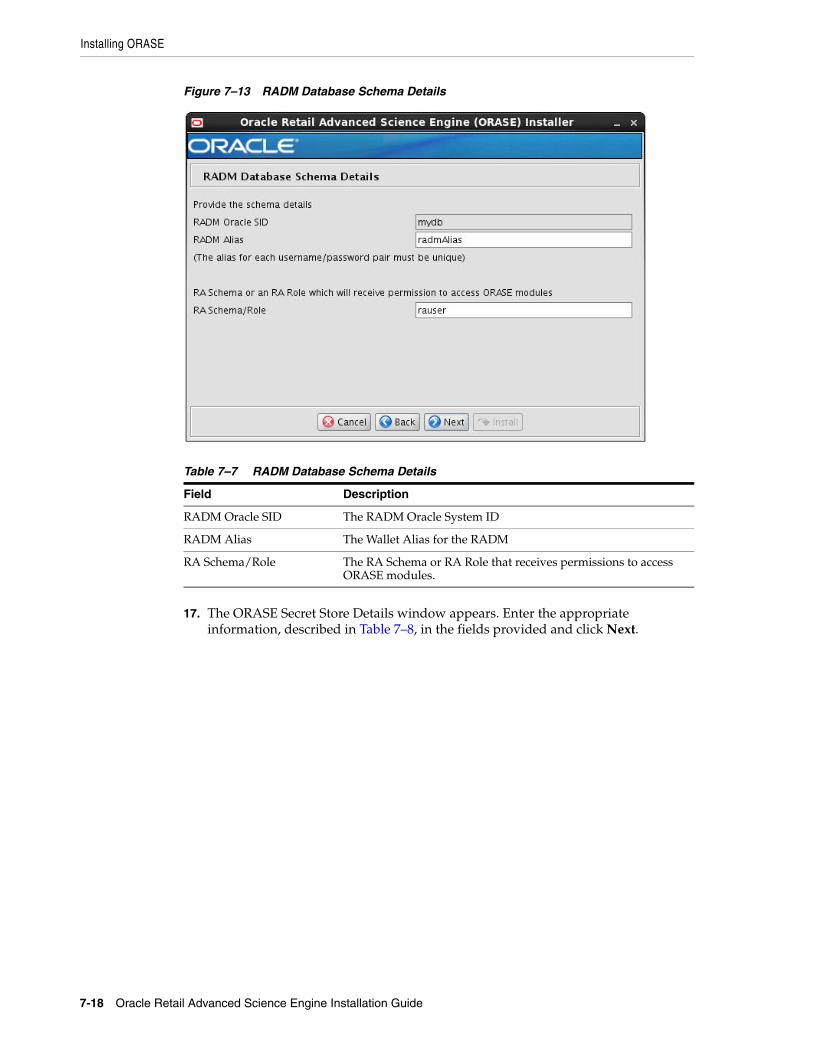
Installing ORASE
7-18 Oracle Retail Advanced Science Engine Installation Guide
Figure 7–13 RADM Database Schema Details
Table 7–7 RADM Database Schema Details
Field Description
RADM Oracle SID The RADM Oracle System ID
RADM Alias The Wallet Alias for the RADM
RA Schema/Role The RA Schema or RA Role that receives permissions to access ORASE modules.
17. The ORASE Secret Store Details window appears. Enter the appropriate information, described in Table 7–8, in the fields provided and click Next.

Installing ORASE
Installing the Advanced Science Engine 7-19
Figure 7–14 ORASE Secret Store Details
Table 7–8 ORASE Secret Store Details
Field Description
ORASE Database Batch User Alias
ORASE Secret Store Alias for the ORASE database batch user
TNS_ADMIN Directory The path to the directory containing the tnsnames.ora file that is used by the ORASE Secret Store
18. The MDS Configuration Details window appears.

Installing ORASE
7-20 Oracle Retail Advanced Science Engine Installation Guide
Figure 7–15 MDS Configuration Details
Select whether you want to register the MDS Repository:
■ Select Yes to indicate that the installer should register MDS Repository using the information entered in the rest of the fields on this window.
■ Select No to indicate that either you will register the MDS Repository manually or that the MDS Repository is already registered.
If you select Yes, enter the appropriate information, described in Table 7–9, in the fields provided and click Next.
Table 7–9 MDS Configuration Details
Field Description
Database Hostname The Database Hostname of the MDS Repository
Database Port Number The Database Port Number of the MDS Repository
Database Service Name The Database Service Name of the MDS Repository
Database Schema Name The Database Schema Name Alias of the MDS Repository. If left blank, it defaults to the database schema name.
19. The WebLogic Server Administrative Details window appears. Enter the appropriate information, described in Table 7–10, in the fields provided and click Next.

Installing ORASE
Installing the Advanced Science Engine 7-21
Figure 7–16 WebLogic Administrative Details
Table 7–10 WebLogic Administrative Details
Field Description
WebLogic Hostname The Hostname of the WebLogic Server
Admin Server Port Number The Port Number of the WebLogic Server
Target Server Name Server Name of the Target Server
Admin User Name Alias The Username Alias of the WebLogic Server
20. The WebLogic Configuration window appears.
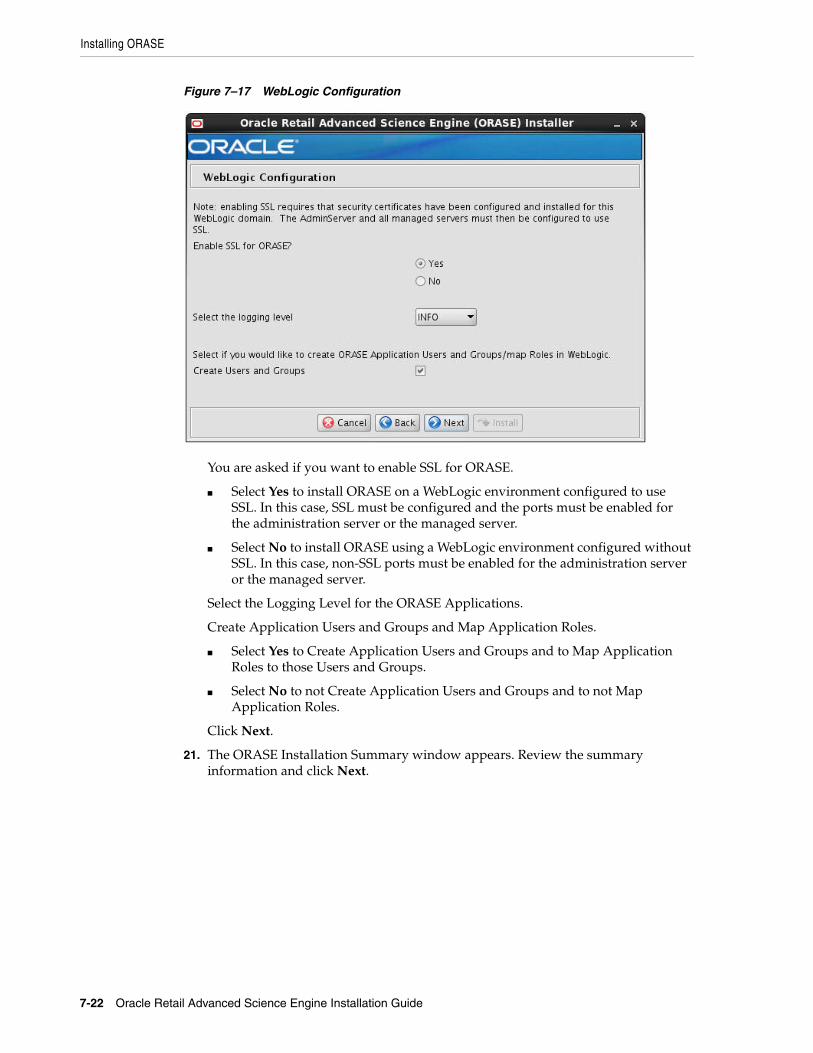
Installing ORASE
7-22 Oracle Retail Advanced Science Engine Installation Guide
Figure 7–17 WebLogic Configuration
You are asked if you want to enable SSL for ORASE.
■ Select Yes to install ORASE on a WebLogic environment configured to use SSL. In this case, SSL must be configured and the ports must be enabled for the administration server or the managed server.
■ Select No to install ORASE using a WebLogic environment configured without SSL. In this case, non-SSL ports must be enabled for the administration server or the managed server.
Select the Logging Level for the ORASE Applications.
Create Application Users and Groups and Map Application Roles.
■ Select Yes to Create Application Users and Groups and to Map Application Roles to those Users and Groups.
■ Select No to not Create Application Users and Groups and to not Map Application Roles.
Click Next.
21. The ORASE Installation Summary window appears. Review the summary information and click Next.

Installing ORASE
Installing the Advanced Science Engine 7-23
Figure 7–18 ORASE Installation Summary
22. The Installation Progress window appears. When installation is complete, click Next.
Figure 7–19 Installation Progress
Installing ORASE in Silent ModeSilent mode is not interactive. To install the ORASE application in silent mode:
1. Ensure that you have completed Setting Up the Installation Properties File.

Note: Make sure that the ant.install.properties file is available in the same directory as the install.sh script.
Post-Installation Updates
7-24 Oracle Retail Advanced Science Engine Installation Guide
2. Ensure that you have saved the following user credentials in an Oracle Wallet:
■ WebLogic domain administration user credential (if you are installing application components)
■ ORASE Database user credentials
■ RADM database user credentials (if you are installing database components)
■ SSH user credentials (if you are deploying MicroApp to multiple machines
■ MDS Database user credentials (if you are registering MDS)
The silent mode installer does not ask for user credentials. Instead, it retrieves the user credentials from the Oracle Wallet.
Note: The installation property input.retrieve.credentials must be set to a value of Yes.
3. Ensure that the WebLogic Server is running and that the database is accessible.
4. Navigate to the Dashboard installation folder and enter the following command:
./install.sh silent
Post-Installation UpdatesAfter you have completed the installation of ASO MicroApp, you must update two files: sia-so-bundle-manifest.xml and MultiSolution.properties. The procedures for making these changes are described in this section. Remember to start the WebLogic domain after you have completed making these changes.
Update sia-so-bundle-manifest.xmlTo update sia-so-bundle-manifest.xml, complete the following steps:
1. Make sure that the installation of ASO is complete and that the WebLogic domain is not in a running state.
2. Go to <FC install directory>/config/functionalmodulebundles/sia-so.
3. Edit sia-so-bundle-manifest.xml as follows:
a. Delete the following lines:
<menu_model> menu name="ASO CMDs"><menu_item name="Optimization List" event="asoOptListEvent"/><menu_item name="Assortment List" event="asoAssortListEvent"/><menu_item name="Execute Space Optimization" event="asoExecuteOptEvent"/><menu_item name="Assortment Mapping" event="asoAssortMapEvent"/></menu></menu_model>

Logging In
Installing the Advanced Science Engine 7-25
b. In the same location in the file where you just deleted the lines indicated in Step 3-a, add the following lines:
<menu_model> <menu name="aso.menu.label" application_roles="Administrator,AnalyticalSuperUser,CategoryManager,MicroSpaceOptAnalyst" resource_bundle="oracle.rgbu.ard.util.i18n.SolutionResourceBundle"> <menu_item name="aso.menuitem.optimizationlist.label" application_roles="Administrator,AnalyticalSuperUser,CategoryManager,MicroSpaceOptAnalyst" resource_bundle="oracle.rgbu.ard.util.i18n.SolutionResourceBundle" event="asoOptListEvent"/> <menu_item name="aso.menuitem.assortmentlist.label" application_roles="Administrator,AnalyticalSuperUser,CategoryManager,MicroSpaceOptAnalyst" resource_bundle="oracle.rgbu.ard.util.i18n.SolutionResourceBundle" event="asoAssortListEvent"/> <menu_item name="aso.menuitem.exespaceopt.label" application_roles="AnalyticalSuperUser,MicroSpaceOptAnalyst" resource_bundle="oracle.rgbu.ard.util.i18n.SolutionResourceBundle" event="asoExecuteOptEvent"/> <menu_item name="aso.menuitem.assortmentmapping.label" application_roles="Administrator,AnalyticalSuperUser,CategoryManager,MicroSpaceOptAnalyst" resource_bundle="oracle.rgbu.ard.util.i18n.SolutionResourceBundle" event="asoAssortMapEvent"/> </menu></menu_model>
Update MultiSolution.propertiesTo update MutiSolution.properties, complete the following steps:
1. After you have set up the RPAS Domain MultiSolution Taskflow, go to the following directory:
<FC install directory>/config/MultiSolution/resources
2. Edit each MultiSolutionBundle*.properties file as follows. (Note that there is one MultiSolutionBundle*.properties file for each language that is supported. The default file, MultiSolutionBundle.properties is English.)
Add these five lines to the end of the file.
aso.menu.label=ASO CMDsaso.menuitem.optimizationlist.label=Optimization Listaso.menuitem.assortmentlist.label=Assortment Listaso.menuitem.exespaceopt.label=Execute Space Optimizationaso.menuitem.assortmentmapping.label=Assortment Mapping
Start WebLogicAfter you have completed updating sia-so-bundle-manifest.xml and MultiSolution.properties, you must start the WebLogic domain so that the changes you have made to the two files take effect.
Logging InOnce the ASO MicroApp is installed, you can access the application using the following URL:
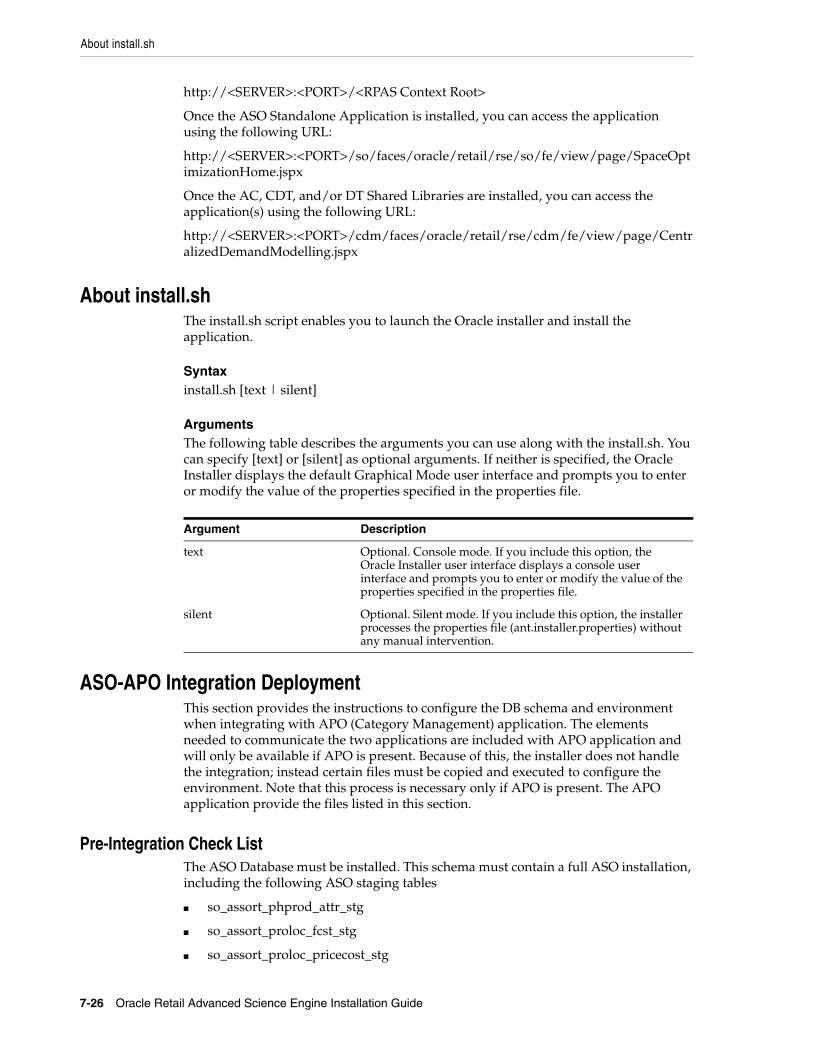
About install.sh
7-26 Oracle Retail Advanced Science Engine Installation Guide
http://<SERVER>:<PORT>/<RPAS Context Root>
Once the ASO Standalone Application is installed, you can access the application using the following URL:
http://<SERVER>:<PORT>/so/faces/oracle/retail/rse/so/fe/view/page/SpaceOptimizationHome.jspx
Once the AC, CDT, and/or DT Shared Libraries are installed, you can access the application(s) using the following URL:
http://<SERVER>:<PORT>/cdm/faces/oracle/retail/rse/cdm/fe/view/page/CentralizedDemandModelling.jspx
About install.shThe install.sh script enables you to launch the Oracle installer and install the application.
Syntaxinstall.sh [text | silent]
ArgumentsThe following table describes the arguments you can use along with the install.sh. You can specify [text] or [silent] as optional arguments. If neither is specified, the Oracle Installer displays the default Graphical Mode user interface and prompts you to enter or modify the value of the properties specified in the properties file.
Argument Description
text Optional. Console mode. If you include this option, the Oracle Installer user interface displays a console user interface and prompts you to enter or modify the value of the properties specified in the properties file.
silent Optional. Silent mode. If you include this option, the installer processes the properties file (ant.installer.properties) without any manual intervention.
ASO-APO Integration DeploymentThis section provides the instructions to configure the DB schema and environment when integrating with APO (Category Management) application. The elements needed to communicate the two applications are included with APO application and will only be available if APO is present. Because of this, the installer does not handle the integration; instead certain files must be copied and executed to configure the environment. Note that this process is necessary only if APO is present. The APO application provide the files listed in this section.
Pre-Integration Check ListThe ASO Database must be installed. This schema must contain a full ASO installation, including the following ASO staging tables
■ so_assort_phprod_attr_stg
■ so_assort_proloc_fcst_stg
■ so_assort_proloc_pricecost_stg

ASO-APO Integration Deployment
Installing the Advanced Science Engine 7-27
■ so_assort_cluster_member_stg
■ so_assort_cluster_stg
■ so_assort_phprod_like_prod_stg
■ so_assort_product_strcltr_stg
■ so_assortment_stg
■ so_assortment_finalized_stg
■ so_assort_phprod_finalized_stg
and the following ASO database views:
■ so_assort_int_vw
■ so_assort_cm_int_vw
■ so_assort_aiprepl_int_vw
The RPAS-HSA installation includes the following schemas:
■ RPAS_BATCH_USER
■ RPAS_DATA_MART
■ RPAS_DIMLOAD_USER
■ RPAS_ETL_USER schema
■ RPAS_FACTLOAD_USER
■ RPAS_HIERMGR_USER
■ RPAS_PATCH_USER
■ RPAS_WKBK_USER
The RPAS_DATA_MART schema must contain at least the following tables:
Dimension Tables■ rp_g_tdar_d
■ rp_g_tdar_tl_d
■ rp_g_clss_d
■ rp_g_strc_d
■ rp_g_strc_tl_d
■ rp_g_week_d
■ rp_g_week_tl_d
■ rp_g_day_d
■ rp_g_atn_d
■ rp_g_str_d
■ rp_g_qrtr_d
■ rp_g_sku_d
Fact Tables■ rp_g_qrtr_sku_ft
■ rp_g_qrtr_clss_str_ft

ASO-APO Integration Deployment
7-28 Oracle Retail Advanced Science Engine Installation Guide
■ rp_g_qrtr_clss_strc_ft
■ rp_g_qrtr_sku_str_ft
■ rp_g_qrtr_sku_strc_ft
■ rp_g_qrtr_sku_str_2_ft
■ rp_g_week_sku_str_ft
■ rp_g_qrtr_sku_atn_ft
■ rp_g_qrtr_clss_ft
■ rp_g_qrtr_clss_tdar_ft
■ rp_g_qrtr_sku_2_ft
■ rp_g_qrtr_sku_str_3_ft
The RPAS_DATA_MART schema must contain at least the following types:
■ varchar2_table
The RPSA-HSA Database packages must be compiled in the RPAS_DATA_MART schema and execute privilege must be granted to RPAS_ETL_USER:
■ RP_GLOBAL_PKG
■ RP_SCHEMA_INFO_PKG
■ RP_HIERMGR_PKG
■ RP_G_DATALOAD_API_PKG
■ RP_LOAD_DIMENSION_PKG
■ RP_LOAD_FACTS_PKG
■ RP_ETL_PKG
■ RP_WORKBOOK_COMMIT_PKG
Deployment StepsComplete the following steps:
1. Extract the files and directories in apo_aso_interface.zip to a local directory, for example, C:\apo_aso\
2. Under the db\grants directory, execute direct_aso_grants.sql on the ASO (or equivalent) schema to grant access to ASO objects to RPAS_ETL_USER.
3. Under the db\grants directory, execute direct_rdm_grants.sql on the RPAS_DATA_MART schema to grant access to RDM objects to RPAS_ETL_USER.
4. Under the root directory where you extracted, execute create_all.sql on the RPAS_ETL_USER schema to create all of the database objects for integration (includes synonyms).
The script can be executed from Cygwin, for example,
sqlplus RPAS_ETL_USER/[email protected]:1521/sidname
@create_all.sql
5. FTP the shell scripts to the appropriate UNIX directory from the scripts directory.
6. Two sub-directories are created under scripts: lib and bin (lib contains some generic libraries used by the executable shell scripts in bin).

ASO-APO Integration Deployment
Installing the Advanced Science Engine 7-29
7. Under scripts, create a new directory called log using the following:
mkdir log
8. In scripts/lib/int.env, change the following variables manually for your environment (eventually this step can be handled by the installer):
■ export INTF_HOME="%{INTF_HOME}%"
for example, export INTF_HOME="/home/apo_aso_interface"
■ export INTF_DB_BATCH_USER="/@%{INTF_DB_BATCH_USER}%"
for example, export INTF_DB_BATCH_USER="RPAS_ETL_USER/xxxxx@dbsid01"
Execution of the InterfaceTo execute the data movement from APO to ASO:
Execute the shell script: apo_aso_interface.ksh
To execute the data movement from ASO to APO:
Execute the shell script: aso_apo_interface.ksh <staging table type>
for example, aso_apo_interface.ksh staging
or aso_apo_interface.ksh gtt
Note that a single database table called apo_aso_int_loading_log tracks the progress and status of each of the steps in the integration process after each shell script is executed. The table is a useful debugging tool, as it records informational messages about each of the two processes: APO to ASO and ASO to APO.
APO-ASO interfaceThis interface is responsible for writing data to the ASO staging tables (only). A separate process picks up the data for further processing within ASO.
For convenience, any loading errors are displayed in the following database views in the RPAS_ETL_USER schema:
■ apo_aso_int_err_vw
■ apo_aso_int_err_fin_vw (finalization)
ASO-APO InterfaceThis interface is responsible for writing data to the RDM staging tables and for calling the RPAS-provided API to merge the data from those staging tables into the final RDM Fact tables.
The RPAS-provided API has two methods of merging data into the final fact tables. One method allows writing data through staging tables and the other allows writing through global temporary tables. Each approach has its advantages. Staging tables allow for a partition exchange, which may be useful with higher data volumes. However, the data in such a table must be managed in terms of being cleaned out for each execution (handled within the interface code). Global temporary tables do not allow for a partition exchange but have the advantage that the data in them is automatically cleaned out per session. The shell script allows for one or other approach to be chosen by using the input parameter.
There are two levels of data within the ASO views (used to expose the ASO data):

ASO-APO Integration Deployment
7-30 Oracle Retail Advanced Science Engine Installation Guide
■ Generated by assortment (APO's user requests); so_assortment_id is not null (specific results to be exported for a given request).
■ Finalization: assortment set level; (so_assortment_id is null), merged results across multiple assortments (user requests).
For convenience, any loading errors are displayed in the following database views in the RPAS_ETL_USER schema:
■ aso_apo_int_err_vw
■ aso_apo_int_err_fin_vw (finalization)
Data AssumptionsThe following are some assumptions about the data expected on each side of the interface:
APOData from APO must be in the following formats:
Column Data Format Example
ASSORTMENT_IDx {Category}~{First Qtr}~{Last Qtr} Category1~q1_2014~q4_2016
ASSORTMENT_SETx Set Number 10
ASSORTMENT_VERx Version Number 1
ASOData sent to the ASO staging tables must be in the following formats. Note that ASSORTMENT_SET_ID is used for the Finalization tables.
Column Data Format Example
ASSORTMENT_ID {Category}~{First Qtr}~{Last Qtr}~{Set_Number}~{Version}
Category1~q1_2014~q4_2016~10~1
ASSORTMENT_SET_ID {Category}~{First Qtr}~{Last Qtr}~{Set_Number}
Category1~q1_2014~q4_2016~10
PRODUCT_CATEGORY_KEY CLS~{dept}~{clss} CLS~201~2001
Note: ASSORTMENT_ID becomes ASSORTMENT_EXT_ID on the final ASO tables when populated from Staging.

8
Patching Procedures 8-1
8 Patching Procedures
This chapter describes the patching process.
Oracle Retail Patching ProcessThe patching process for many Oracle Retail products has been substantially revised from prior releases. Automated tools are available to reduce the amount of manual steps necessary when you apply patches. To support and complement this automation, more information about the environment is now tracked and retained between patches. This information is used to allow subsequent patches to identify and skip changes that have already been made to the environment. For example, the patching process uses a database manifest table to skip database change scripts that have already been executed.
The enhanced product patching process incorporates the following:
■ Utilities to automate the application of Oracle Retail patches to environments.
■ Unified patches so that a single patch can be applied against such installations as Database, Forms, Java applications, and Batch.
■ Database and Environment manifests track versions of files at a module level.
■ Centralized configuration distinguishes installation types (for example, Database, Forms, Java, and Batch).
■ Patch inventory tracks the patches applied to an environment.
These enhancements make installing and updating Oracle Retail product installations easier and reduce opportunities for mistakes. Some of these changes add additional considerations to patching and maintaining Oracle Retail product environments. Additional details on these considerations are found in this chapter.
Supported Products and TechnologiesWith version 14.1, several additional products and technologies are supported by the enhanced patching process. The utilities, processes and procedures described here are supported with the following products and listed technologies:

Table 8–1 Products and Supported Technologies
Product Supported Technologies
Oracle Retail Merchandising System (RMS) ■ Database scripts
■ Batch scripts
■ RETL scripts
■ Data conversion scripts
■ Forms
■ BI Publisher reports
Oracle Retail Warehouse Management System (RWMS
■ Database scripts
■ Batch scripts
■ Forms
■ BI Publisher reports
Oracle Retail Price Management (RPM) ■ Database scripts (included with RMS)
■ Java application
■ Batch scripts
Oracle Retail Invoice Matching (ReIM) ■ Database scripts (included with RMS)
■ Java application
■ Batch scripts
Oracle Retail Invoice Allocation ■ Database scripts (included with RMS)
■ Java application
■ Batch scripts
Oracle Retail Sales Audit (ReSA) ■ Database scripts (included with RMS)
■ Java application
Oracle Retail Analytics (RA) ■ Database scripts
Oracle Retail Advanced Science Engine (ORASE) ■ Database scripts
■ Batch scripts
Oracle Retail Application Security Role Manager (RASRM)
■ Java application
Patch Concepts
8-2 Oracle Retail Advanced Science Engine Installation Guide
Patch ConceptsDuring the life cycle of an Oracle Retail environment, patches are applied to maintain your system. This maintenance may be necessary to resolve a specific issue, add new functionality, update to the latest patch level, add support for new technologies, or other reasons.
A patch refers to a collection of files to apply to an environment. Patches can be cumulative, such as the 14.1.0 or 14.1.1 release, or incremental, such as a hot fix for just a few modules. Patches may contain updates for some or all components of a product installation including database, application code, forms, and batch. In a distributed architecture, the same patch may need to be applied to multiple systems in order to patch all of the components. For example, if a patch contains both database and application changes, the patch must be applied to both the database server and the application server.
The top-level directory for the installation of an Oracle Retail product is referred to as the RETAIL_HOME. Underneath RETAIL_HOME are all of the files related to that product installation, as well as configuration and metadata necessary for the Oracle

Patch Concepts
Patching Procedures 8-3
Retail Patch Assistant to maintain those files. In some cases, the runtime application files also exist under RETAIL_HOME. These include the compiled RMS forms, compiled RMS batch files, or Java Application batch scripts.
Patching Utility OverviewPatches are applied and tracked using utilities that are specifically designed for this purpose. The primary utility is described briefly below and additional information is available in later sections.
Oracle Retail Patch Assistant (ORPatch)ORPatch is the utility used to apply patches to an Oracle Retail product installation. It is used in the background by the installer when creating a new installation or applying a cumulative patch. It is used directly to apply an incremental patch to an environment.
Oracle Retail Merge Patch (ORMerge)ORMerge is a utility that allows multiple patches to be combined into a single patch. Applying patches individually may require that some steps be repeated. Merging multiple patches together allows these steps to be run only once. For example, applying several incremental patches to database packages recompiles invalid objects with each patch. Merging the patches into a single patch before applying them allows invalid objects to be recompiled only once.
Oracle Retail Compile Patch (ORCompile)ORCompile is the utility used to compile components of Oracle Retail products outside of a patch. It allows RMS Forms, RMS Batch, and RWMS Forms to be fully recompiled even if no patch has been applied. It also contains functionality to recompile invalid database objects in product schemas.
Oracle Retail Deploy Patch (ORDeploy)ORDeploy is the utility used to deploy components of Oracle Retail Java products outside of a patch. It allows RPM, ReIM, Allocation and ReSA java applications to be redeployed to WebLogic even if a patch has not been applied. It contains functionality to optionally include or not include Java customizations when redeploying.
Changes with 14.1Many products and technologies are supported by the enhanced patching process for the first time in 14.1. In these cases, all of the content in this chapter is new with 14.1.
MMHOME Changed to RETAIL_HOMEFor RMS and RWMS, which were previously supported in 14.0, there is a change when using ORPatch and related tools. Previously, the MMHOME environment variable was used to refer to the RMS and RWMS installation area. Starting with 14.1, RETAIL_HOME is now used to refer to the installation area. So, where previously, you had to set MMHOME before executing ORPatch, you must now set RETAIL_HOME.

Note: RMS Batch continues to use MMHOME to refer to the area where batch is installed and requires it to be set when executing batches. The change to using RETAIL_HOME relates only to ORPatch and related utilities.
Patching Considerations
8-4 Oracle Retail Advanced Science Engine Installation Guide
Java Batch Script LocationFor Java products with batch scripts, starting with 14.1, the location of batch scripts has been changed to $RETAIL_HOME/<app>-batch. Previously, batch scripts were stored within the WebLogic domain in the retail directory. Credential store files continue to be stored within the WebLogic domain.
Patching ConsiderationsThis section describes patching considerations.
Patch TypesOracle Retail produces two types of patches for their products: cumulative and incremental.
Cumulative PatchesA cumulative patch includes all of the files necessary to patch an environment to a specific level or build a new environment at that level. Examples of cumulative patches include 14.1.1, 14.1.2, and so on. Cumulative patches come with a standard Oracle Retail installer and so can be applied to an environment with the installer rather than with ORPatch or other utilities.
Incremental PatchesAn incremental patch includes only selected files necessary to address a specific issue or add a feature. Examples of incremental patches include a hot fix for a specific defect. Incremental patches do not include an installer and must be applied with ORPatch.
Incremental Patch StructureAn Oracle Retail incremental patch generally contains several files and one or more subdirectories. The subdirectories contain the contents of the patch, while the individual files contain information about the patch and metadata necessary for patching utilities to correctly apply the patch. The most important files in the top-level directory are the README.txt and the manifest files.
README FileThe README.txt file contains information about the incremental patch and how to apply it. This may include manual steps that are necessary before, after, or while applying the patch. It also contains instructions on applying the patch with ORPatch.
Manifest FilesEach patch contains manifest files that contain metadata about the contents of a patch and are used by ORPatch to determine the actions necessary to apply a patch. Patches should generally be run against all installations a product in an environment, and ORPatch only applies the changes from the patch that are relevant to that installation.

Note: Cumulative patches use a different patch structure because they include a full installer that runs ORPatch automatically.
Patching Considerations
Patching Procedures 8-5
Version TrackingThe patching infrastructure for 14.1 tracks version information for all files involved with a product installation. The RETAIL_HOME now contains files that track the revision of all files within the RETAIL_HOME, including batch, forms, database, Java archives, and other files. In addition, records of database scripts that have been applied to the product database objects are kept within each database schema.
Apply All Patches with Installer or ORPatchIn order to ensure that environment metadata is accurate, all patches must be applied to the Oracle Retail product installation using patching utilities. For cumulative patches, this is done automatically by the installer. For incremental patches, ORPatch must be used directly. This is especially important if database changes are being applied, in order to ensure that the database-related metadata is kept up-to-date.
Environment ConfigurationA configuration file in $RETAIL_HOME/orpatch/config/env_info.cfg is used to define the details of a specific Oracle Retail environment. This file defines:
■ The location of critical infrastructure components, such as the ORACLE_HOME on a database or middleware server.
■ The location of Oracle Wallets to support connecting to the database users.
■ The type of file processing that is relevant to a particular host. Examples include a host where database work should be done, a host where batch compilation should be done, or a host where Java applications should be deployed. This allows a single database, forms, and batch patch to be run against all types of hosts, applying only the relevant pieces on each server.
■ Other configuration necessary to determine proper behavior in an environment.
Retained Installation FilesThe RETAIL_HOME location of an Oracle Retail product installation contains all of the files associated with that installation. This can include database scripts, Java files, Forms, Batch, RETL and data conversion files, as with previous versions, and also includes all database scripts. This allows objects to be reloaded during patching, including any necessary dependencies.
Reloading ContentIn order to ensure that database contents and generated files exactly match patched versions, when applying cumulative patches, some content is regenerated even if it does not appear to have changed.
On a cumulative patch this includes:
■ All re-runnable database content is reloaded
– Packages and procedures
– Database types (excluding RIB objects)

Patching Operations
8-6 Oracle Retail Advanced Science Engine Installation Guide
– Control scripts
– Triggers
– WebService jars and packages
– Form elements
■ All RMS and RWMS forms files are recompiled
■ All RMS batch files are recompiled
When incremental patches are applied, only changed files are reloaded. However, this does not apply to RMS batch, which is fully recompiled with any change.
Java Hotfixes and Cumulative PatchesWhen cumulative patches are applied to Java applications components with ORPatch, all hotfixes related to base product ear files included with the patch are rolled back. This increases the likelihood of a successful deployment, because hotfixes may not be compatible with updated product ear files or may already be included with the ear. Before applying a cumulative patch to Java applications, check the patch documentation to determine which hotfixes are not included in the ear. Then work with Oracle Support to obtain compatible versions of the fixes for the updated ear version. In some cases this may be the same hotfix, in which case it can be re-applied to the environment. In other cases, a new hotfix may be required.
BackupsBefore applying a patch to an environment, you must take a full backup of both the RETAIL_HOME file system and the Oracle Retail database. Although ORPatch makes backups of files modified during patching, any database changes cannot be reversed. If a patch fails that contains database changes, and cannot be completed, the environment must be restored from backup.
Disk SpaceWhen patches are applied to an environment, the old version of files that are updated or deleted are backed up to $RETAIL_HOME/backups/backup-<timestamp>. When applying large patches, ensure there is sufficient disk space on the system where you unzip the patch or the patching process may fail. Up to twice as much disk space as the unzipped patch may be required during patching.
In addition to backups of source files, the existing compiled RMS or RWMS Forms and RMS Batch files are saved before recompilation. These backups may be created during patches:
■ Batch 'lib' directory in $RETAIL_HOME/oracle/lib/bin-<timestamp>
■ Batch 'proc' directory in $RETAIL_HOME/oracle/proc/bin-<timestamp>
■ Forms 'toolset' directory in $RETAIL_HOME/base/toolset/bin-<timestamp>
■ Forms 'forms' directory in $RETAIL_HOME/base/forms/bin-<timestamp>
Periodically, both types of backup files can be removed to preserve disk space.
Patching OperationsThis section describes patching operations.
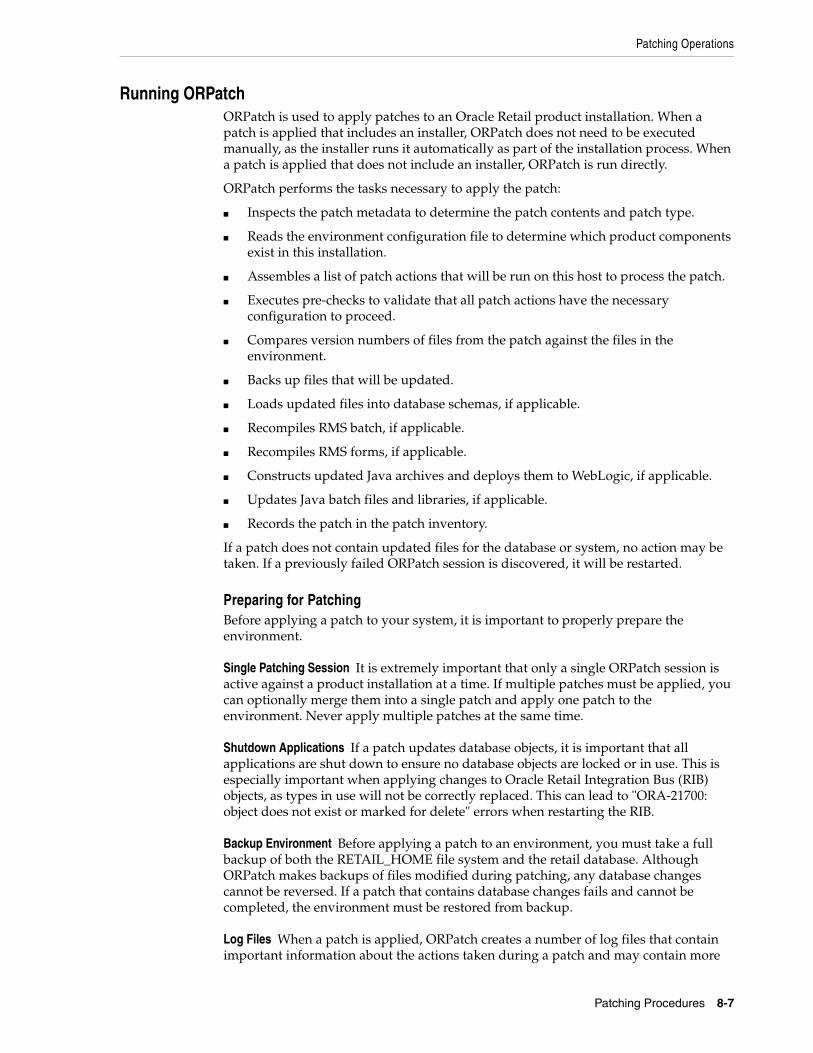
Patching Operations
Patching Procedures 8-7
Running ORPatchORPatch is used to apply patches to an Oracle Retail product installation. When a patch is applied that includes an installer, ORPatch does not need to be executed manually, as the installer runs it automatically as part of the installation process. When a patch is applied that does not include an installer, ORPatch is run directly.
ORPatch performs the tasks necessary to apply the patch:
■ Inspects the patch metadata to determine the patch contents and patch type.
■ Reads the environment configuration file to determine which product components exist in this installation.
■ Assembles a list of patch actions that will be run on this host to process the patch.
■ Executes pre-checks to validate that all patch actions have the necessary configuration to proceed.
■ Compares version numbers of files from the patch against the files in the environment.
■ Backs up files that will be updated.
■ Loads updated files into database schemas, if applicable.
■ Recompiles RMS batch, if applicable.
■ Recompiles RMS forms, if applicable.
■ Constructs updated Java archives and deploys them to WebLogic, if applicable.
■ Updates Java batch files and libraries, if applicable.
■ Records the patch in the patch inventory.
If a patch does not contain updated files for the database or system, no action may be taken. If a previously failed ORPatch session is discovered, it will be restarted.
Preparing for PatchingBefore applying a patch to your system, it is important to properly prepare the environment.
Single Patching Session It is extremely important that only a single ORPatch session is active against a product installation at a time. If multiple patches must be applied, you can optionally merge them into a single patch and apply one patch to the environment. Never apply multiple patches at the same time.
Shutdown Applications If a patch updates database objects, it is important that all applications are shut down to ensure no database objects are locked or in use. This is especially important when applying changes to Oracle Retail Integration Bus (RIB) objects, as types in use will not be correctly replaced. This can lead to "ORA-21700: object does not exist or marked for delete" errors when restarting the RIB.
Backup Environment Before applying a patch to an environment, you must take a full backup of both the RETAIL_HOME file system and the retail database. Although ORPatch makes backups of files modified during patching, any database changes cannot be reversed. If a patch that contains database changes fails and cannot be completed, the environment must be restored from backup.
Log Files When a patch is applied, ORPatch creates a number of log files that contain important information about the actions taken during a patch and may contain more

Patching Operations
8-8 Oracle Retail Advanced Science Engine Installation Guide
information in the event of problems. Log files are created in the $RETAIL_HOME/orpatch/logs directory. Logs should always be reviewed after a patch is applied.
After a patch session, the log directory contains at a minimum an ORPatch log file and may also contain other logs depending on the actions taken. The following table describes logs that may exist.
Table 8–2 Log Descriptions
Log File Used For
orpatch-<date>-<time>.log Primary ORPatch log file
detail_logs/dbsql_<component>/invalids/* Details on the errors causing a database object to be invalid
detail_logs/analyze/details Detail logs of files that are created/updated/removed when a patch is applied
detail_logs/compare/details Detail logs of the differences between two sets of environment metadata
orpatch_forms_<pid>_child_<num>.log Temporary logs from a child process spawned to compile forms in parallel. After the child process completes, the contents are append to the primary orpatch log file.
detail_logs/forms/rms_frm_toolset/* Detail logs of the compilation of each RMS Toolset file
detail_logs/forms/rms_frm_forms/* Detail logs of the compilation of each RMS Forms file
detail_logs/rmsbatch/lib/* Detail logs of the compilation of RMS Batch libraries
detail_logs/rmsbatch/proc/* Detail logs of the compilation of RMS Batch programs
detail_logs/dbsql_rms/rms_db_ws_consumer_jars/* Detail logs of the loadjava command to install RMS WebService Consumer objects
detail_logs/dbsql_rms/rms_db_ws_consumer_libs/* Detail logs of the loadjava command to install RMS WebService Consumer libraries
detail_logs/forms/rwms_frm_forms/* Detail logs of the compilation of each RWMS Forms file
detail_logs/dbsql_rwms/rwms_db_sp _jars/* Detail logs of the loadjava command to install RWMS SP jars
detail_logs/javaapp_<product>/deploy/* Detail logs of the deployment of a Java product
Unzip Patch Files Before ORPatch is executed, the patch files must be unzipped into a directory. This directory is passed to ORPatch as the "-s <source directory>" argument on the command-line when a patch is applyed or analyzed.
Location of ORPatch The ORPatch script is located in $RETAIL_HOME/orpatch/bin.
Command Line Arguments ORPatch behavior is controlled by several command-line arguments. These arguments may be actions or options. Command and option names can be specified in upper or lower case, and are converted to upper-case automatically. Arguments to options, for example the source directory patch, are be modified.
Table 8–3 ORPatch Command-Line Actions
Action Description
apply Tells ORPatch to apply a patch, requires the -s option.
Example: orpatch apply -s $RETAIL_HOME/stage/patch123456

Patching Operations
Patching Procedures 8-9
analyze Tells ORPatch to analyze a patch, requires the -s option.
Example: orpatch analyze -s $RETAIL_HOME/stage/patch123456
lsinventory Tells ORPatch to list the inventory of patches that have been applied to this installation.
exportmetadata Tells ORPatch to extract all metadata information from the environment and create a $RETAIL_HOME/support directory to contain it. Requires the -expname option.
diffmetadata Tells ORPatch to compare all metadata from the current environment with metadata exported from some other environment. Requires the -expname and -srcname options.
revert Tells ORPatch to revert the files related to a patch, requires the -s option.
Example: orpatch revert -s $RETAIL_HOME/backups/backup-09302013-153010
Note: An action is required, and only one action can be specified at a time.
Table 8–4 ORPatch Command-Line Arguments
ArgumentValid for Actions Description
-s <source dir> apply
analyze
Specifies where to find the top-level directory of the patch to apply or analyze. The source directory should contain the manifest.csv and patch_info.cfg files.
-new apply Forces ORPatch to not attempt to restart a failed ORPatch session.
-expname exportmetadata
diffmetadata
lsinventory
Defines the top-level name to be used for the export or comparison of environment metadata. When used with lsinventory, it allows an exported inventory to be printed.
-srcname diffmetadata When comparing metadata at a module-level, compares the dbmanifest information rather than the environment manifest. This method of comparing metadata is less accurate as it does not include non-database files.
-dbmodules diffmetadata When comparing metadata at a module-level, compares the dbmanifest information rather than the environment manifest. This method of comparing metadata is less accurate as it does not include non-database files.
Table 8–3 (Cont.) ORPatch Command-Line Actions
Action Description

Patching Operations
8-10 Oracle Retail Advanced Science Engine Installation Guide
Analyzing the Impact of a PatchIn some cases, it may be desirable to see a list of the files that will be updated by a patch, particularly if files in the environment have been customized. ORPatch has an 'analyze' mode that evaluates all files in the patch against the environment and report on the files that are updated, based on the patch.
To run ORPatch in analyze mode, include 'analyze' on the command line. It performs the following actions:
■ Identifies files in the environment that the patch would remove.
■ Compares version numbers of files in the patch to version numbers of files in the environment.
■ Prints a summary of the number of files that would be created, updated, or removed.
■ Prints an additional list of any files that would be updated that are registered as being customized.
■ Prints an additional list of any files that are in the environment and newer than the files included in the patch. These files are considered possible conflicts, as the modules in the patch may not be compatible with the newer versions already installed. If you choose to apply the patch, the newer versions of modules in the environment will not be overwritten.
■ If a Java custom file tree is detected, a detailed analysis of the modules within Java ear files that differ from the current ear file on the system are printed.
■ Saves details of the files that will be impacted in $RETAIL_HOME/orpatch/logs/detail_logs/analyze/details.
This list of files can then be used to assess the impact of a patch on your environment.
To analyze a patch, perform the following steps:
1. Log in as the UNIX user that owns the product installation.
2. Set the RETAIL_HOME environment variable to the top-level directory of your product installation.
-jarmodules analyze
diffmetadata
When used with analyze, requests a full comparison of the metadata of Java archives included in the patch versus the metadata of the Java archives in the environment. This behavior is automatically enabled when Java customizations are detected in the environment. Analyzing the contents of Java archives allows for detailed investigation of the potential impacts of installing a new Java ear to an environment with customizations.
When used with diffmetadata, causes metadata to be compared using jarmanifest information rather than the environment manifest. This provides more detailed information on the exact differences of the content of Java archives, but does not include non-Java files.
-selfonly apply
analyze
Only apply or analyze changes in a patch that relate to orpatch itself. This is useful for applying updates to orpatch without applying the entire patch to an environment.
-s <backup dir> revert Specifies the backup from a patch that should be reverted to the environment. This restores only the files modified during the patch. The database must be restored separately or the environment will be out-of-sync and likely unusable.
Table 8–4 (Cont.) ORPatch Command-Line Arguments
ArgumentValid for Actions Description
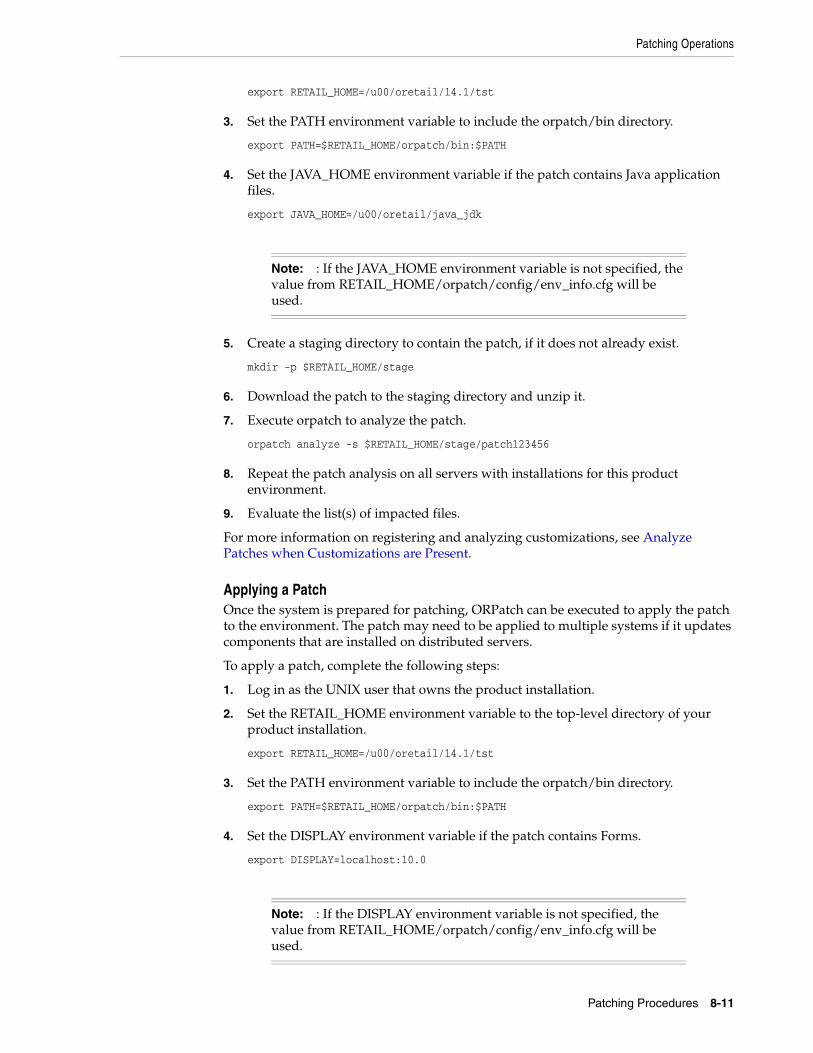
Patching Operations
Patching Procedures 8-11
export RETAIL_HOME=/u00/oretail/14.1/tst
3. Set the PATH environment variable to include the orpatch/bin directory.
export PATH=$RETAIL_HOME/orpatch/bin:$PATH
4. Set the JAVA_HOME environment variable if the patch contains Java application files.
export JAVA_HOME=/u00/oretail/java_jdk
Note: : If the JAVA_HOME environment variable is not specified, the value from RETAIL_HOME/orpatch/config/env_info.cfg will be used.
5. Create a staging directory to contain the patch, if it does not already exist.
mkdir -p $RETAIL_HOME/stage
6. Download the patch to the staging directory and unzip it.
7. Execute orpatch to analyze the patch.
orpatch analyze -s $RETAIL_HOME/stage/patch123456
8. Repeat the patch analysis on all servers with installations for this product environment.
9. Evaluate the list(s) of impacted files.
For more information on registering and analyzing customizations, see Analyze Patches when Customizations are Present.
Applying a PatchOnce the system is prepared for patching, ORPatch can be executed to apply the patch to the environment. The patch may need to be applied to multiple systems if it updates components that are installed on distributed servers.
To apply a patch, complete the following steps:
1. Log in as the UNIX user that owns the product installation.
2. Set the RETAIL_HOME environment variable to the top-level directory of your product installation.
export RETAIL_HOME=/u00/oretail/14.1/tst
3. Set the PATH environment variable to include the orpatch/bin directory.
export PATH=$RETAIL_HOME/orpatch/bin:$PATH
4. Set the DISPLAY environment variable if the patch contains Forms.
export DISPLAY=localhost:10.0
Note: : If the DISPLAY environment variable is not specified, the value from RETAIL_HOME/orpatch/config/env_info.cfg will be used.

Patching Operations
8-12 Oracle Retail Advanced Science Engine Installation Guide
5. Set the JAVA_HOME environment variable if the patch contains Java application files.
export JAVA_HOME=/u00/oretail/java_jdk
Note: If the JAVA_HOME environment variable is not specified, the value from RETAIL_HOME/orpatch/config/env_info.cfg will be used.
6. Create a staging directory to contain the patch, if it does not already exist.
mkdir -p $RETAIL_HOME/stage
7. Download the patch to the staging directory and unzip it.
8. Review the README.txt included with the patch. If manual steps are specified in the patch, execute those steps at the appropriate time.
9. Shut down the applications.
10. Execute ORPatch to apply the patch.
orpatch apply -s $RETAIL_HOME/stage/patch123456
11. After ORPatch completes, review the log files in $RETAIL_HOME/orpatch/logs.
12. Repeat the patch application on all servers with installations for this product environment.
13. Restart the applications.
Restarting ORPatchIf ORPatch is interrupted while applying a patch, or exits with an error, it saves a record of completed work in a restart state file in $RETAIL_HOME/orpatch/logs. Investigate and resolve the problem that caused the failure, then restart ORPatch.
By default, when ORPatch is started again, it restarts the patch process close to where it left off. If the patch process should not be restarted, add '-new' to the command-line of ORPatch.
Note that starting a new patch session without completing the prior patch may have serious impacts that result in a patch not being applied correctly. For example, if a patch contains database updates and batch file changes and ORPatch is aborted during the load of database objects, abandoning the patch session will leave batch without the latest changes compiled in the installation.
Listing the Patch InventoryAfter a patch is successfully applied by ORPatch, the patch inventory in $RETAIL_HOME/orpatch/inventory is updated with a record that the patch was applied. This inventory contains a record of the patches applied, the dates they were applied, the patch type and products impacted.
To list the patch inventory, complete the following steps:
1. Log in as the UNIX user that owns the product installation.
2. Set the RETAIL_HOME environment variable to the top-level directory of your product installation.
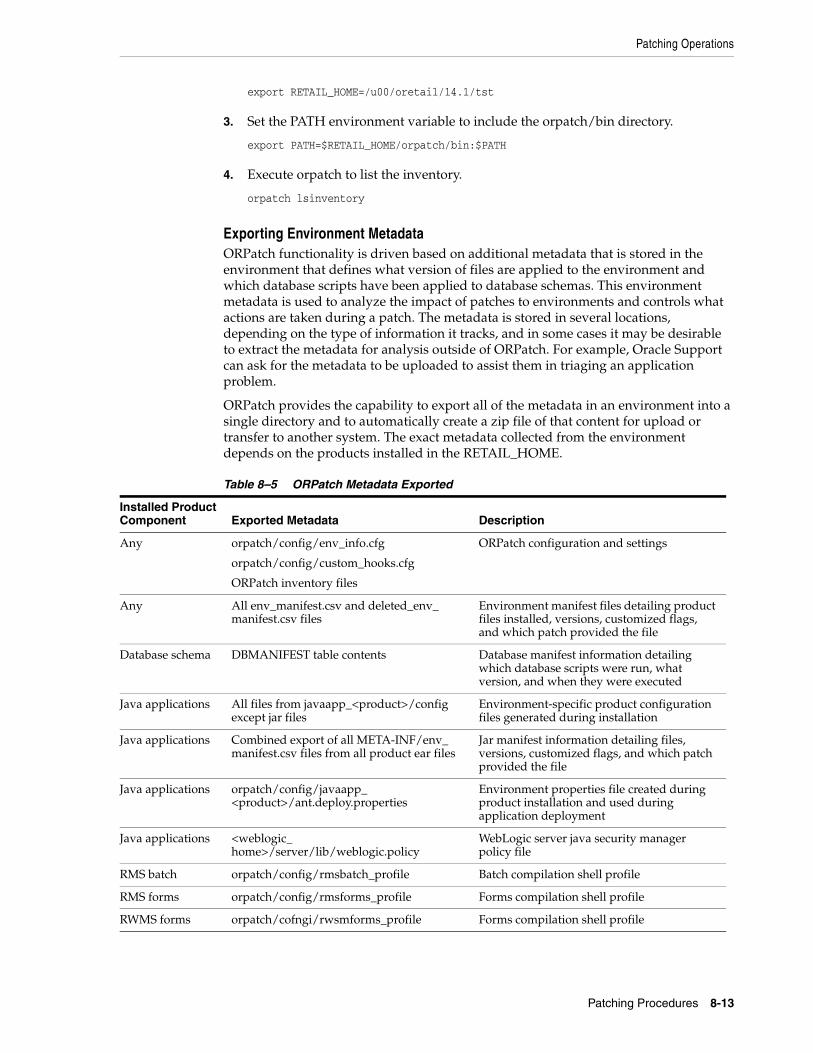
Patching Operations
Patching Procedures 8-13
export RETAIL_HOME=/u00/oretail/14.1/tst
3. Set the PATH environment variable to include the orpatch/bin directory.
export PATH=$RETAIL_HOME/orpatch/bin:$PATH
4. Execute orpatch to list the inventory.
orpatch lsinventory
Exporting Environment MetadataORPatch functionality is driven based on additional metadata that is stored in the environment that defines what version of files are applied to the environment and which database scripts have been applied to database schemas. This environment metadata is used to analyze the impact of patches to environments and controls what actions are taken during a patch. The metadata is stored in several locations, depending on the type of information it tracks, and in some cases it may be desirable to extract the metadata for analysis outside of ORPatch. For example, Oracle Support can ask for the metadata to be uploaded to assist them in triaging an application problem.
ORPatch provides the capability to export all of the metadata in an environment into a single directory and to automatically create a zip file of that content for upload or transfer to another system. The exact metadata collected from the environment depends on the products installed in the RETAIL_HOME.
Table 8–5 ORPatch Metadata Exported
Installed Product Component Exported Metadata Description
Any orpatch/config/env_info.cfg
orpatch/config/custom_hooks.cfg
ORPatch inventory files
ORPatch configuration and settings
Any All env_manifest.csv and deleted_env_manifest.csv files
Environment manifest files detailing product files installed, versions, customized flags, and which patch provided the file
Database schema DBMANIFEST table contents Database manifest information detailing which database scripts were run, what version, and when they were executed
Java applications All files from javaapp_<product>/config except jar files
Environment-specific product configuration files generated during installation
Java applications Combined export of all META-INF/env_manifest.csv files from all product ear files
Jar manifest information detailing files, versions, customized flags, and which patch provided the file
Java applications orpatch/config/javaapp_<product>/ant.deploy.properties
Environment properties file created during product installation and used during application deployment
Java applications <weblogic_home>/server/lib/weblogic.policy
WebLogic server java security manager policy file
RMS batch orpatch/config/rmsbatch_profile Batch compilation shell profile
RMS forms orpatch/config/rmsforms_profile Forms compilation shell profile
RWMS forms orpatch/cofngi/rwsmforms_profile Forms compilation shell profile

Patching Operations
8-14 Oracle Retail Advanced Science Engine Installation Guide
Exports of environment metadata are always done to the $RETAIL_HOME/support directory. When exporting metadata, you must specify the -expname argument and define the name that should be given to the export. The name is used for the directory within $RETAIL_HOME/support and for the name of the zip file.
To extract an environment's metadata, complete the following steps:
1. Log in as the UNIX user that owns the product installation.
2. Set the RETAIL_HOME environment variable to the top-level directory of your product installation.
export RETAIL_HOME=/u00/oretail/14.1/tst
3. Set the PATH environment variable to include the orpatch/bin directory.
export PATH=$RETAIL_HOME/orpatch/bin:$PATH
4. Execute orpatch to export the metadata.
orpatch exportmetadata -expname test_env
This example exports all metadata from the environment to the $RETAIL_HOME/support/test_env directory. A zip file of the metadata is created in $RETAIL_HOME/support/test_env.zip.
Note: The $RETAIL_HOME/support/<name> directory should be empty or not exist prior to running exportmetadata in order to ensure accurate results.
Comparing Environment MetadataOnce metadata has been exported from an environment, it can be used to compare the environment manifest metadata of two environments. ORPatch provides the capability to compare the metadata of the current environment with the exported metadata of another environment. Note that even though there are many types of metadata exported by ORPatch, only environment manifest metadata is evaluated during comparisons. Metadata comparison happens in four phases: product comparison, patch comparison, ORPatch action comparison, and module-level comparison.
Product comparison compares the products installed in one environment with the products installed in another environment. Patch comparison compares the patches applied in one environment with the patches applied in another environment, for common products. This provides the most summarized view of how environments differ. Patches that only apply to products on one environment are not included in the comparison.
Since each patch may impact many files, the comparison then moves on to a more detailed analysis. The third phase of comparison is to compare the enabled ORPatch actions between environments. These actions roughly correspond to the installed components of a product. For example, one environment may have database and forms components installed, while another has only forms. Action comparison identifies components that are different between environments. The final phase of comparison is at the module level for actions that are common between environments. Modules that exist only on one environment, that exist on both environments with different revisions, or that are flagged as customized, are reported during the comparison.
Differences between environment metadata are reported in a summarized fashion during the ORPatch execution. Details of the comparison results are saved in

Patching Operations
Patching Procedures 8-15
$RETAIL_HOME/orpatch/logs/detail_logs/compare/details. One CSV file is created for each phase of comparison: product_details.csv, patch_details.csv, action_details.csv, and module_details.csv.
In order to be compared by ORPatch, exported metadata must be placed in the $RETAIL_HOME/support directory. The metadata should exist in the same structure that it was originally exported in. For example, if the metadata was exported to $RETAIL_HOME/support/test_env on another system, it should be placed in $RETAIL_HOME/support/test_env on this system.
When reporting differences between two environments, ORPatch uses names to refer to the environments. These names are defined as part of the diffmetadata command. The -expname parameter, which defines the directory containing the metadata, is also used as the name when referring to the exported metadata. The -srcname parameter defines the name to use when referring to the current environment. For example, if you export the 'test' environment's metadata and copy it to the 'dev' environment's $RETAIL_HOME/support/test_env directory, you can run "orpatch diffmetadata -expname test_env -srcname dev_env". The detail and summary output then refers to things that exist on dev but not test, revisions in the test environment versus revisions in the dev environment, and so on.
ORPatch automatically exports the environment's current metadata to $RETAIL_HOME/support/compare prior to starting the metadata comparison.
To compare two environment's metadata, complete the following steps:
1. Export the metadata from another environment using orpatch exportmetadata.
2. Transfer the metadata zip from the other system to $RETAIL_HOME/support.
3. Log in as the UNIX user that owns the product installation.
4. Set the RETAIL_HOME environment variable to the top-level directory of your product installation.
export RETAIL_HOME=/u00/oretail/14.1/dev
5. Set the PATH environment variable to include the orpatch/bin directory.
export PATH=$RETAIL_HOME/orpatch/bin:$PATH
6. Unzip the metadata zip file.
unzip test_env.zip
7. Execute orpatch to compare the metadata.
orpatch diffmetadata -expname test_env -srcname dev_env
This example compares the current environment against the metadata extracted in $RETAIL_HOME/support/test_env directory.
Note: The $RETAIL_HOME/support/compare directory is automatically removed before environment metadata is exported at the start of the comparison.
Reverting a PatchIn general, it is best to either completely apply a patch or restore the entire environment from the backup taken before starting the patch. It is important to test patches in test or staging environments before applying to production. In the event of

Patching Operations
8-16 Oracle Retail Advanced Science Engine Installation Guide
problems, Oracle Retail recommends restoring the environment from backup if a patch is not successful.
Note: Reverting patches in an integrated environment can be extremely complex, and there is no fully automated way to revert all changes made by a patch. Restoring the environment from a backup is the recommended method to remove patches.
It is, however, possible to revert small patches using the backups taken by ORPatch during a patch. This restores only the files modified, and it is still necessary to restore the database if any changes were made to it.
Note: Reverting a patch reverts only the files modified by the patch, and does not modify the database or recompile forms or batch files after the change.
When multiple patches have been applied to an environment, reverting any patches other than the most recently applied patch is strongly discouraged as this will lead to incompatible or inconsistent versions of modules applied to the environment. If multiple patches are going to be applied sequentially, it is recommended to first merge the patches into a single patch that can be applied or reverted in a single operation.
To revert a patch, complete the following steps:
1. Log in as the UNIX user that owns the product installation.
2. Set the RETAIL_HOME environment variable to the top-level directory of your product installation.
export RETAIL_HOME=/u00/oretail/14.1/tst
3. Set the PATH environment variable to include the orpatch/bin directory.
export PATH=$RETAIL_HOME/orpatch/bin:$PATH
4. Identify the backup directory in $RETAIL_HOME/backups that contains the backup from the patch you want to restore.
■ The backup directory contains a patch_info.cfg file that contains the name of the patch the backup is from.
■ It is possible to have two directories for the same patch, if ORPatch was updated during the patch. It is not possible to revert the updates to ORPatch. Select the backup directory that does not contain orpatch files.
■ If it is not clear which backup directory to use, restore the environment from backup.
5. Execute orpatch to revert the environment using the contents of the backup directory.
orpatch revert -s $RETAIL_HOME/backups/backup-11232013-152059
6. Restore the database from backup if the patch made database changes.
7. Use the orcompile script to recompile forms if the patch included RMS or RWMS forms files.
orcompile -a RMS -t FORMS

Patching Operations
Patching Procedures 8-17
orcompile -a RWMS -t FORMs
8. Use the orcompile script to recompile batch if the patch included RMS batch files.
orcompile -a RMS -t BATCH
9. Use the ordeploy script to redeploy the appropriate Java applications if the patch included Java files.
ordeploy -a RPM -t JAVAordeploy -a REIM -t JAVAordeploy -a ALLOC -t JAVAordeploy -a RESA -t JAVA
Merging PatchesWhen patches are applied individually, some ORPatch tasks, such as compiling forms and batch files or deploying Java archives, are performed separately for each patch. This can be time-consuming. An alternative is to use the ORMerge utility to combine several patches into a single patch, reducing application downtime by eliminating tasks that would otherwise be performed multiple times. Patches merged with ORMerge are applied with ORPatch after the merge patch is created.
Source and Destination DirectoriesORMerge uses source and destination areas in order to merge patch files. The source area is a single directory that contains the extracted patches to merge. The destination area is the location where the merged patch is created. If a file exists in one or more source patches, only the highest revision will be copied to the merged patch.
The source and destination directories should exist under the same parent directory. That is, both the source and destination directories should be subdirectories of a single top-level directory.
The source directory must have all patches to be merged as immediate child directories. For example, if three patches must be merged, the directory structure looks like this:
Source and Destination Directory Example The following example shows the source and destination directory.
Figure 8–1 Source and Destination Directory Example
In the example above, the manifest.csv and patch_info.cfg files for each patch to be merged must exist in source/patch1, source/patch2, and source/patch3.
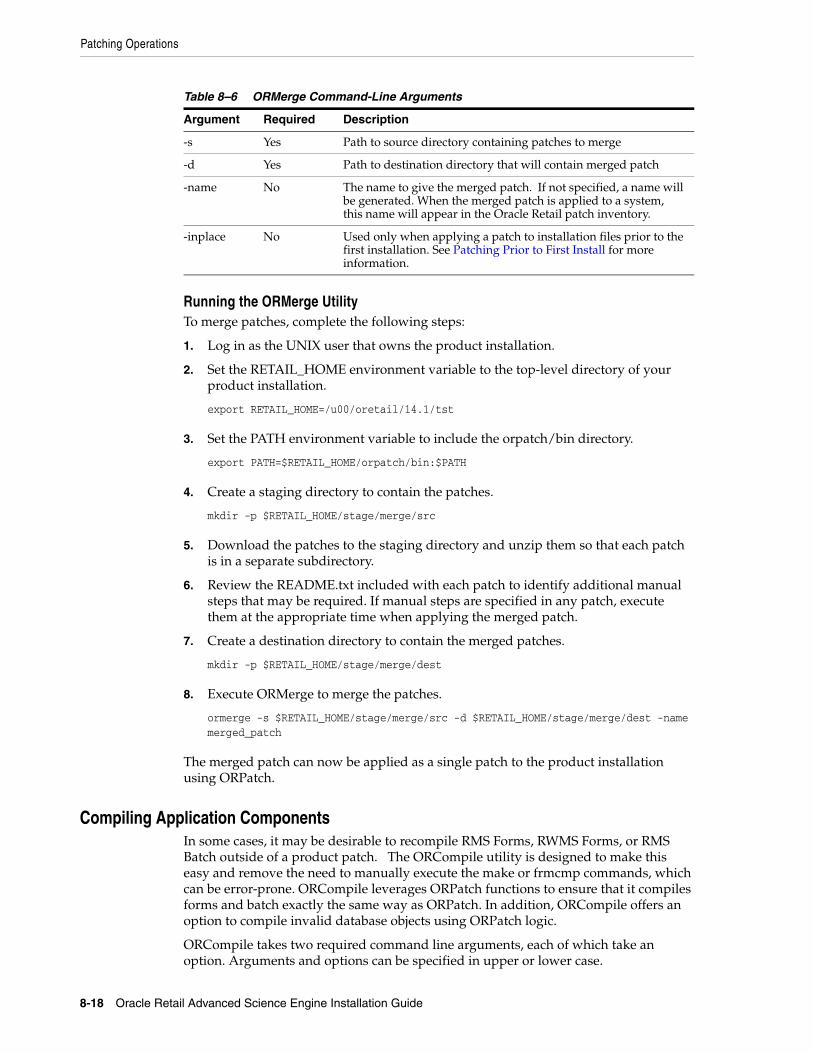
Table 8–6 ORMerge Command-Line Arguments
Argument Required Description
-s Yes Path to source directory containing patches to merge
-d Yes Path to destination directory that will contain merged patch
-name No The name to give the merged patch. If not specified, a name will be generated. When the merged patch is applied to a system, this name will appear in the Oracle Retail patch inventory.
-inplace No Used only when applying a patch to installation files prior to the first installation. See Patching Prior to First Install for more information.
Patching Operations
8-18 Oracle Retail Advanced Science Engine Installation Guide
Running the ORMerge UtilityTo merge patches, complete the following steps:
1. Log in as the UNIX user that owns the product installation.
2. Set the RETAIL_HOME environment variable to the top-level directory of your product installation.
export RETAIL_HOME=/u00/oretail/14.1/tst
3. Set the PATH environment variable to include the orpatch/bin directory.
export PATH=$RETAIL_HOME/orpatch/bin:$PATH
4. Create a staging directory to contain the patches.
mkdir -p $RETAIL_HOME/stage/merge/src
5. Download the patches to the staging directory and unzip them so that each patch is in a separate subdirectory.
6. Review the README.txt included with each patch to identify additional manual steps that may be required. If manual steps are specified in any patch, execute them at the appropriate time when applying the merged patch.
7. Create a destination directory to contain the merged patches.
mkdir -p $RETAIL_HOME/stage/merge/dest
8. Execute ORMerge to merge the patches.
ormerge -s $RETAIL_HOME/stage/merge/src -d $RETAIL_HOME/stage/merge/dest -name merged_patch
The merged patch can now be applied as a single patch to the product installation using ORPatch.
Compiling Application ComponentsIn some cases, it may be desirable to recompile RMS Forms, RWMS Forms, or RMS Batch outside of a product patch. The ORCompile utility is designed to make this easy and remove the need to manually execute the make or frmcmp commands, which can be error-prone. ORCompile leverages ORPatch functions to ensure that it compiles forms and batch exactly the same way as ORPatch. In addition, ORCompile offers an option to compile invalid database objects using ORPatch logic.
ORCompile takes two required command line arguments, each of which take an option. Arguments and options can be specified in upper or lower case.

Table 8–7 ORCompile Command Line Arguments
Argument Description
-a <app> The application to compile
-t <type> The type of application objects to compile
Table 8–8 ORCompile Argument Options
Application Type Description
RMS BATCH Compile RMS Batch programs
RMS FORMS Compile RMS Forms
RWMS FORMS Compile RWMS Forms
RMS DB Compile invalid database objects in the primary RMS schema
RMS DB-ASYNC Compile invalid database objects in the RMS_ASYNC_USER schema
ALLOC DB-ALC Compile invalid database objects in the Allocations user schema
ALLOC DB-RMS Compile invalid database objects in the RMS schema
REIM DB Compile invalid database objects in the RMS schema
RME DB Compile invalid database objects in the RME schema
ASO DB Compile invalid database objects in the ASO schema
RA DB-DM Compile invalid database objects in the RA DM schema
RA DB-RABATCH Compile invalid database objects in the RA batch schema
RA DB-RMSBATCH Compile invalid database objects in the RA RMS batch schema
RA DB-FEDM Compile invalid database objects in the RA front-end schema
Note: : Compiling RMS type DB, ReIM type DB, and Allocation type DB-RMS, are all identical, as they attempt to compile all invalid objects residing in the RMS schema.
Patching Operations
Patching Procedures 8-19
Running the ORCompile utilityTo compile files, complete the following steps:
1. Log in as the UNIX user that owns the product installation.
2. Set the RETAIL_HOME environment variable to the top-level directory of your product installation.
export RETAIL_HOME=/u00/oretail/14.1/tst
3. Set the PATH environment variable to include the orpatch/bin directory.
export PATH=$RETAIL_HOME/orpatch/bin:$PATH
4. Execute orcompile to compile the desired type of files.
orcompile -a <app> -t <type>

Patching Operations
8-20 Oracle Retail Advanced Science Engine Installation Guide
ORCompile ExamplesCompile RMS Batch.
orcompile -a RMS -t BATCH
Compile RWMS Forms.
orcompile -a RWMS -t FORMS
Compile invalid objects in the RA DM schema.
orcompile -a RA -t DB-DM
Compile invalid objects in the RMS owning schema.
orcompile -a RMS -t DB
Deploying Application ComponentsIn some cases, it may be desirable to redeploy Java applications outside of a product patch. This can include troubleshooting a problem or verifying the operation of the application with different WebLogic settings. Another situation might include wanting to deploy the application using the same settings, but without customizations to isolate behavior that could be related to customized functionality.
The ordeploy utility is designed to make this easy and remove the need to re-execute the entire product installer when no configuration needs to change. ORDeploy leverages Oracle Retail Patch Assistant functions to ensure that it deploys applications in exactly the same way as ORPatch. In addition, ORDeploy offers an option to include or not include custom Java files, in order to ease troubleshooting.
ORDeploy takes two required command line arguments, each of which takes an option. Arguments and options can be specified in upper or lower case.
Table 8–9 ORDeploy Command Line Arguments
Argument Description
-a <app> The application to deploy
-t <type> The type of application objects to deploy
Table 8–10 ORDeploy Argument Options
Application Type Description
ALLOC JAVA Deploy the Allocations Java application and Java batch files, including any custom Java files.
ALLOC JAVANOCUSTOM Deploy the Allocations Java application and Java batch files, not including any custom Java files.
REIM JAVA Deploy the REIM Java application and Java batch files, including any custom Java files.
REIM JAVANOCUSTOM Deploy the REIM Java application and Java batch files, not including any custom Java files.
RESA JAVA Deploy the RESA Java application, including any custom Java files.
RESA JAVANOCUSTOM Deploy the RESA Java application, not including any custom Java files.

Maintenance Considerations
Patching Procedures 8-21
Running the ORDeploy utilityTo deploy Java applications, complete the following steps:
1. Log in as the UNIX user that owns the product installation.
2. Set the RETAIL_HOME environment variable to the top-level directory of your product installation.
export RETAIL_HOME=/u00/oretail/14.1/tst
3. Set the PATH environment variable to include the orpatch/bin directory.
export PATH=$RETAIL_HOME/orpatch/bin:$PATH
4. Execute ORDeploy to deploy the desired Java application.
ordeploy -a <app> -t <type>
ORDeploy ExamplesORDeploy Examples
ordeploy -a RPM -t JAVA
Deploy ReIM without including Java customizations.
ordeploy -a REIM -t JAVANOCUSTOM
Maintenance ConsiderationsThe additional information stored within the RETAIL_HOME and within database schemas adds some considerations when performing maintenance on your environment.
Database Password ChangesOracle wallets are used to protect the password credentials for connecting to database schemas. This includes all database schemas used during an install. If the password for any of these users is changed, the wallet's entry must be updated.
The wallet location is configurable, but, by default, is in the following locations:
RPM JAVA Deploy the RPM Java application and Java batch files, including any custom Java files.
RPM JAVANOCUSTOM Deploy the RPM Java application and Java batch files, not including any custom Java files.
Table 8–11 Wallet Locations
Location Installation Type
$RETAIL_HOME/orpatch/rms_wallet RMS Database
RMS Batch
$RETAIL_HOME/orpatch/rms_wallet_app RMS Forms
$RETAIL_HOME/orpatch/rwms_wallet RWMS Database
$RETAIL_HOME/orpatch/rwms_wallet_app RWMS Forms
Table 8–10 (Cont.) ORDeploy Argument Options
Application Type Description

Maintenance Considerations
8-22 Oracle Retail Advanced Science Engine Installation Guide
The wallet alias for each schema is <username>_<dbname>. Standard mkstore commands can be used to update the password.
For example:
mkstore -wrl $RETAIL_HOME/orpatch/rms_wallet -modifyCredential rms_rmsdb rms01 rmspassword
This command updates the password for the RMS01 user to 'rmspassword' in the alias 'rms_rmsdb'.
The Oracle wallets are required to be present when executing ORPatch. Removing them prevents you from being able to run ORPatch successfully. In addition, the Oracle wallet location is referenced in the RMS batch.profile and in the default RMS and RWMS Forms URL configuration, so removing them requires the reconfiguration of batch and forms. If batch and forms were reconfigured after installation to use other wallet files, it is possible to back up and remove the wallets, then restore them when running ORPatch.
WebLogic Password ChangesJava wallets are used to protect the password credentials used when deploying Java products. This includes the WebLogic administrator credentials, LDAP connection credentials, batch user credentials, and any other credentials used during an install. If the password for any of these users is changed, the wallet's entry must be updated or the Java product installation can be run again.
The wallet is found in the following locations:
Table 8–12 Wallet Locations
Location Installation Type
$RETAIL_HOME/orpatch/config/javapp_rpm RPM Java
$RETAIL_HOME/orpatch/config/javapp_reim ReIM Java
$RETAIL_HOME/orpatch/config/javapp_alloc Allocation Java
$RETAIL_HOME/orpatch/config/javapp_resa RESA Java
$RETAIL_HOME/orpatch/config/javaapp_rasrm RASRM Java
The wallet aliases are stored in the retail_installer partition. The names of the aliases vary, depending on what was entered during initial product installation.
The dump_credentials.sh script can be used to list the aliases in the wallet.
For example:
cd $RETAIL_HOME/orpatch/deploy/retail-public-security-api/bin./dump_credentials.sh $RETAIL_HOME/orpatch/config/javapp_alloc Apapplication level key partition name:retail_installer
$RETAIL_HOME/orpatch/oraso_wallet ASO Database
$RETAIL_HOME/orpatch/orme_wallet RME Database
$RETAIL_HOME/orpatch/ra_wallet RA Database
Table 8–11 (Cont.) Wallet Locations
Location Installation Type

Maintenance Considerations
Patching Procedures 8-23
User Name Alias:dsallocAlias User Name:rms01appUser Name Alias:BATCH-ALIAS User Name:SYSTEM_ADMINISTRATORUser Name Alias:wlsAlias User Name:weblogic
The easiest way to update the credential information is to re-run the Java product installer. If you must manually update the password for a credential, you can use the save_credential.sh script.
For example:
cd $RETAIL_HOME/orpatch/deploy/retail-public-security-api/bin./save_credential.sh -l $RETAIL_HOME/orpatch/config/javapp_alloc -p retail_installer -a wlsAlias -u weblogic
This command prompts for the new password twice and updates the aslias wlsAlias, username weblogic with the new password.
Infrastructure Directory ChangesThe RETAIL_HOME/orpatch/config/env_info.cfg file contains the path to the database ORACLE_HOME on database or RMS Batch installations, to the WebLogic Forms and Reports ORACLE_HOME and ORACLE_INSTANCE on RMS or RWMS Forms installations, and to the WEBLOGIC_DOMAIN_HOME, WL_HOME and MW_HOME on Java product installations. If these paths change, the related configuration variables in the env_info.cfg file must be updated.
DBManifest TableThe table dbmanifest within Oracle Retail database schemas is used to track the database scripts that have been applied to the schema. It is critical not to drop or truncate this table. Without it, ORPatch will attempt to re-run scripts against the database that have already been applied that can destroy a working environment. Similarly, if copying a schema from one database to another database, ensure that the dbmanifest table is preserved during the copy.
RETAIL_HOME Relationship to Database and Application ServerThe RETAIL_HOME associated with an Oracle Retail product installation is critical due to the additional metadata and historical information contained within it. If a database or application installation is moved or copied, the RETAIL_HOME related to it should be copied or moved at the same time.
Jar Signing Configuration MaintenanceThe RPM product installation includes an option to configure a code signing certificate so that jar files modified during installation or patching are automatically re-signed. This configuration is optional, but recommended. If it is configured, the code signing keystore is copied during installation to $RETAIL_HOME/orpatch/config/jarsign/orpkeystore.jks. The keystore password and private key password are stored in a Java wallet in the $RETAIL_HOME/orpatch/config/jarsign directory. The credentials are stored in a wallet partition called orpatch:
Table 8–13 Orpatch Credentials
Alias Username Description
storepass discard Password for the keystore

Customization
8-24 Oracle Retail Advanced Science Engine Installation Guide
The keystore file and passwords can be updated using the product installer. This is the recommended way to update the signing configuration.
If only the credentials must be updated, the sign_jar.sh script can be used.
1. Log in as the UNIX user that owns the product installation.
2. Set the RETAIL_HOME environment variable to the top-level directory of your installation.
export RETAIL_HOME=/u00/oretail/14.1/tst
3. Change directories to the location of sign_jar.sh.
cd $RETAIL_HOME/orpatch/deploy/bin
4. Execute sign_jar.sh.
sign_jar.sh changepwd
5. When prompted, enter the new keystore password.
6. When prompted, enter the new private key password.
CustomizationThis section describes customization.
Patching Considerations with Customized Files and ObjectsIn general, the additional capabilities provided by the ORPatch should make it easier to evaluate the potential impacts of patches to your customizations of Oracle Retail products. However, the additional metadata maintained by the Oracle Retail patching utilities does add some considerations when making customizations.
General GuidelinesIt is always preferred to customize applications by extension rather than by direct modification. This includes adding new database objects and forms rather than modifying existing Oracle Retail objects and forms. You can also leverage built-in extension points such as User Defined Attributes, the Custom Flexible Attribute Solution, or seeded customization points in ADF Applications.
Directly modifying Oracle Retail database objects, especially tables, is strongly discouraged, as your changes may be lost during patching or may conflict with future updates. When you are adding or modifying database objects, Oracle Retail recommends that you add all objects with scripts to ensure that they can be rebuilt if necessary after a patch.
Custom Database ObjectsWhen you create new database objects, Oracle Retail recommends placing them in an Oracle database schema specifically for your customizations. You must use synonyms and grants to allow the Oracle Retail product schema owner and other users to access
keypass discard Password for the private key
Table 8–13 (Cont.) Orpatch Credentials
Alias Username Description

Customization
Patching Procedures 8-25
your objects, and use synonyms and grants to allow your customizations to access Oracle Retail objects. A separate schema ensures that your customizations are segregated from base Oracle Retail code.
ORPatch expects that there will be no invalid objects in the database schemas it manages after a patch is applied. For this reason, adding extra objects to the product schema can result in failures applying patches, as changes to base objects may cause custom objects to become invalid until they are updated. In such situations, manually update the custom objects so that they compile and restart the patch.
Custom FormsWhen you create new custom forms, Oracle Retail recommends that you place them in a separate directory specifically for your customizations. This directory should be added to the FORMS_PATH of your RMS or RWMS Forms URL configuration so that the forms can be found by the Forms Server. This ensures that your customizations are segregated from base Oracle Retail code. If you choose to place the customizations in the Forms bin directory, then your custom forms must be recopied each time Forms are fully recompiled.
ADF Application CustomizationOracle Retail ADF-based applications such as Allocation and ReSA can be customized using a process called seeded customization. The customization process involves using JDeveloper in Customizer mode to create changes to product configurations and then building a MAR archive containing the changes. The generated MAR is deployed to the MDS repository used by the application and applied to the application at runtime. These types of customizations are handled outside of ORPatch and are not reported during patch analysis or tracked by the custom file registration utility. More information can be found in the product customization guides.
Custom Compiled Java CodeWhen customizing Oracle Retail Java-based products such as RPM and ReIM via product source code, ORPatch supports automatically adding compiled customizations into the application ear file prior to deployment. This allows customizations to be applied to the application without directly modifying the base product ear, enabling customizations and defect hotfixes to coexist when they do not change the same file or a dependent file. See Custom Compiled Java Code for additional information and considerations.
Analyze Patches when Customizations are PresentWhenever you have customized a product by directly modifying Oracle Retail files or database objects, you must analyze each the files that will be updated by a patch before applying the patch. This allows you to identify any customized files that may be overwritten by the patch and either merge your customization with the new version of the file or reapply the customization after applying the patch.
Manifest UpdatesIf you choose to customize Oracle Retail files directly, it is extremely important not to update the revision number contained in the env_manifest.csv. This can cause future updates to the file to be skipped, invalidating later patch applications, as only a partial patch is applied. The customized revision number for modified files must be tracked separately.

Customization
8-26 Oracle Retail Advanced Science Engine Installation Guide
Registering Customized FilesThe ORPatch contains utilities and functionality that allow tracking of files that have been customized through direct modification. This process is referred to as registering a customized file. Registration only works for files that are shipped by Oracle Retail. It is not possible to register new files created in the environment as part of extensions or customizations.
When patches are analyzed with ORPatch, special reporting is provided if any registered files may be updated or deleted by the patch. Customized files impacted by the patch are listed at the end of the analysis report from ORPatch. The detail files generated during the analyze contains a column called customize' that has a Y for any files that were registered as customized. This allows easier identification of customizations that may be overwritten by a patch.
All files delivered by Oracle Retail are considered base and, when they are applied to an environment, any registrations of those files as customized reverts back to un-customized. Each time a patch overwrites customized files, you must reregister the files as customized once you have applied customizations.
To register customized files, use the $RETAIL_HOME/orpatch/bin/orcustomreg script.
The orcustomerg script operates in one of two modes: registration and list.
■ Registration mode registers or unregisters one or more files as customized.
■ List mode lists all files in the environment that are registered as customized.
Table 8–14 Command Line Arguments for Registration Mode
Argument Description
-f <file> Adds <file> to the list of files that will be registered. Can be specified more than once.
-bulk <file> Specifies a file to read, containing one filename per line. All filenames listed inside <file> will be registered.
-register Files specified with -f or -bulk will be registered as customized.
-unregister Files specified with -f or -bulk will be registered as base.
Note: Note the following:
At least one of -f or -bulk is required.
If neither -register nor -unregister is specified, the default is '-register'.
File names specified with -f must either be fully-qualified or be relative to RETAIL_HOME. The same is true for filenames specified within a -bulk file.
Table 8–15 Command Line Arguments for List Mode
Argument Description
-list List all files in the environment registered as customized
Running the orcustomreg ScriptComplete the following procedure to run the orcustomreg script:
Customization
Patching Procedures 8-27
1. Log in as the UNIX user that owns the product installation.
2. Set the RETAIL_HOME environment variable to the top-level directory of your product installation.
export RETAIL_HOME=/u00/oretail/14.1/tst
3. Set the PATH environment variable to include the orpatch/bin directory.
export PATH=$RETAIL_HOME/orpatch/bin:$PATH
4. Execute orcustomreg script to register the desired file(s).
orcustomreg -register -f <file>
Examples That Use the orcustomreg ScriptPerform the following procedure to run the orcustomreg script:
1. Log in as the UNIX user that owns the product installation.
2. Set the RETAIL_HOME environment variable to the top-level directory of your product installation.
export RETAIL_HOME=/u00/oretail/14.1/tst
3. Set the PATH environment variable to include the orpatch/bin directory.
export PATH=$RETAIL_HOME/orpatch/bin:$PATH
4. Execute orcustomreg script to register the desired file(s).
orcustomreg -register -f <file>
Examples That Use the orcustomreg ScriptRegister $RETAIL_HOME/dbsql_rms/Cross_Pillar/control_scripts/source/oga.sql as customized.
orcustomreg -f dbsql_rms/Cross_Pillar/control_scripts/source/oga.sql
Unregister customizations for $RETAIL_HOME/dbsql_rwms/Triggers/Source/TR_WAVE.trg.
orcustomreg -unregister -f $RETAIL_HOME/dbsql_rwms/Triggers/Source/TR_WAVE.trg
Bulk register several files as customized.
echo "$RETAIL_HOME/oracle/proc/src/mrt.pc" > custom.txtecho "$RETAIL_HOME/oracle/proc/src/saldly.pc" >> custom.txtecho "$RETAIL_HOME/oracle/proc/src/ccprg.pc" >> custom.txtorcustomreg -bulk custom.txt
List all files registered as customized.
orcustomreg -list
Custom Compiled Java CodeWhen Oracle Retail Java-based products such as RPM and ReIM are customized via product source code, ORPatch supports automatically adding compiled customizations into the application ear file prior to deployment. This allows customizations to be applied to the application without directly modifying the base

Customization
8-28 Oracle Retail Advanced Science Engine Installation Guide
product ear, so that customizations and defect hotfixes can coexist when they do not change the same file or a dependent file.
This functionality is enabled by creating a directory called $RETAIL_HOME/javaapp_<app>/custom, where <app> is the application the customizations apply to. Files stored within this directory are combined with the base product ear files before the application is deployed to WebLogic. ORPatch attempts to consider customizations stored within the custom directory during patch analysis by triggering more detailed ear file change analysis to assist with identifying which customizations might be impacted by changes in the patches.
Note: It is not possible, nor necessary, to register compiled Java customizations with the orcustomreg tool.
As with other customization techniques for other technologies, Oracle Retail recommends making Java customizations in new files as much as possible, instead of overwriting base product or configuration files. In the past, it was necessary to build complete replacement product ear files, but this method of customization is no longer required nor recommended. Replacement ear and jar files do not contain the META-INF/env_manifest.csv files that are required in order to be able to apply incremental patches. Instead, compile the specific Java classes being customized and place them along with any custom configuration files in $RETAIL_HOME/javaapp_<app>/custom.
Building Deployable ear FilesWhen constructing the product ear file to deploy to WebLogic, ORPatch applies changes to the ear file in a specific order, with files from later steps overwriting files in earlier steps. The resulting ear is stored in $RETAIL_HOME/javaapp_<app>/deploy, and then deployed to WebLogic.
Table 8–16 Sequence for ORPatch Java Product ear File Updates
Order File Type Location
1 Base product ear $RETAIL_HOME/javaapp_<app>/base
2 Updated configuration files $RETAIL_HOME/javaapp_<app>/config
3 Oracle Retail-supplied hotfixes $RETAIL_HOME/javaapp_<app>/internal
4 Compiled customizations $RETAIL_HOME/javaapp_<app>/custom
Merging Custom FilesWhen merging files from the custom directory with the product ear, ORPatch uses the directory path of the files within custom to calculate where the file should be stored within the ear. This allows the arbitrary nesting of files, even when files are placed within jars stored in jars, stored within the ear. The following examples use RPM, but also apply to compiled customizations added to any Java-based product.
Table 8–17 Custom Directory Location and Product ear Location Examples
File Path within javaapp_<app>/custom/ Final Ear File Location
rpm14.ear/company/ui/MyCustom.class In rpm14.ear:
/company/ui/MyCustom.class

Customization
Patching Procedures 8-29
Analyzing Patches When Customizations are PresentWhen analyzing a patch that contains a base product ear and the custom directory contains files, ORPatch automatically triggers a more detailed analysis of the changes coming in a patch. This includes calculating what files inside the product ear have been added, removed, or updated and which files appear to be customized based on the contents of the custom directory. The detailed results of the ear file comparison during patch analysis is saved in javaapp_<app>_archive_compare_details.csv. Any custom files tat appear to be impacted by the patch are saved in javapp_<app>_archive_custom_impacts.csv. Both files are in the $RETAIL_HOME/orpatch/logs/detail_logs/analyze/details directory.
Note: This detailed analysis is not available when analyzing individual hotfixes, so special care must be taken when applying hotfixes to a customized product installation, to ensure there are no conflicts between customizations and hotfix changes.
Customizations and Cumulative PatchesBy default, when applying a cumulative patch, ORPatch does not include customizations in the deployed product ear, even if they are present in the appropriate directory. This allows verification that the application is functioning properly using base code, before applying customizations. After verifying the initial deployment, use ORDeploy with the -t JAVA option to construct and deploy the product ear including customizations.
If customizations must be removed outside of a patch, use ORDeploy with the -t JAVANOCUSTOM option to create and deploy an ear containing only Oracle Retail code. To force ORPatch to include customizations in the deployed ear even when applying a cumulative patch, set JAVAAPP_<app>_INCLUDE_CUSTOM=Y in the $RETAIL_HOME/orpatch/config/env_info.cfg file.
Changing Configuration FilesIt is possible to directly change product configuration files in $RETAIL_HOME/javaapp_<app>/config. These updates can be deployed to the environment using the ORDeploy utility. However, the config directory is completely recreated each time the product installer is used. This means that modifications will be lost and must be manually reapplied after each installer run. It is recommended that you make configuration changes via the installer where possible and retain the ant.install.properties file for use in later installer sessions.
rpm14.ear/rpm14.jar/company/bc/MyCustom2.class In rpm14.ear:
In rpm14.jar:
/company/bc/MyCustom2.class
rpm14.ear/lib/ourcustomlibs.jar In rpm14.ear
/lib/ourcustomlibs.jar
rpm14.ear/WebLaunchServlet.war/lib/
rpm14.jar/company/bc/MyCustom2.class
In rpm14.ear:
In WebLaunchServlet.war:
In lib/rpm14.jar:
/company/bc/MyCustom2.class
Table 8–17 (Cont.) Custom Directory Location and Product ear Location Examples
File Path within javaapp_<app>/custom/ Final Ear File Location
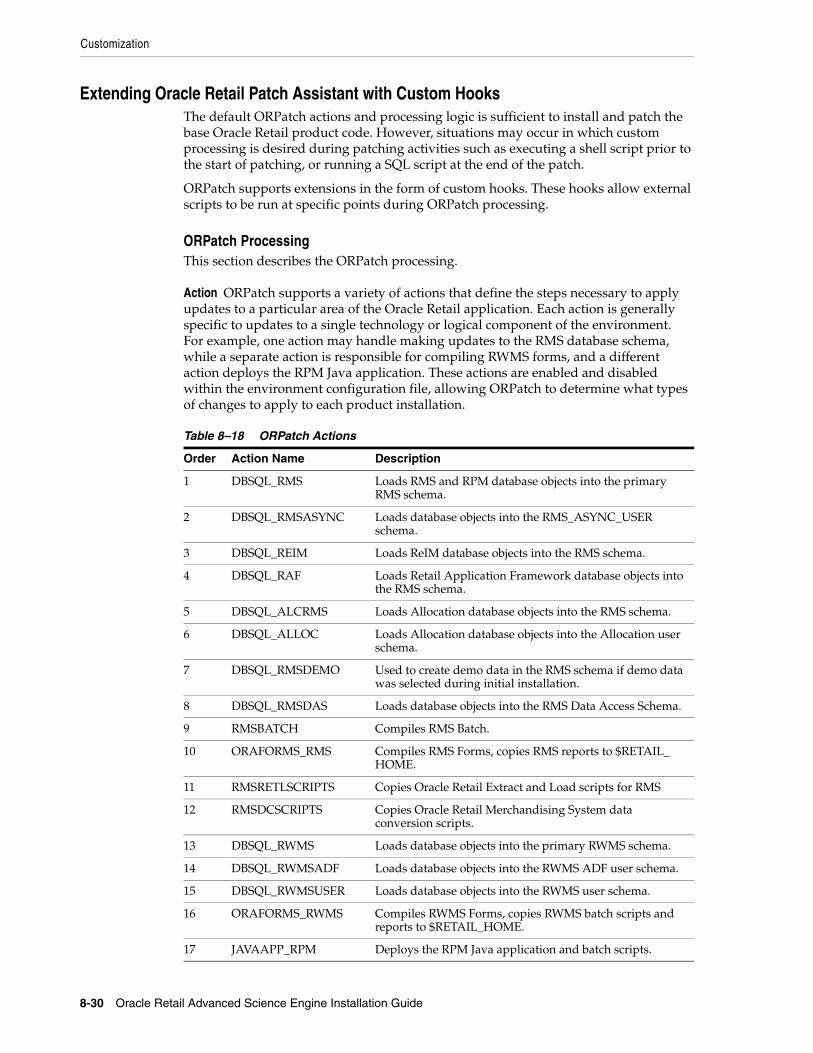
Customization
8-30 Oracle Retail Advanced Science Engine Installation Guide
Extending Oracle Retail Patch Assistant with Custom HooksThe default ORPatch actions and processing logic is sufficient to install and patch the base Oracle Retail product code. However, situations may occur in which custom processing is desired during patching activities such as executing a shell script prior to the start of patching, or running a SQL script at the end of the patch.
ORPatch supports extensions in the form of custom hooks. These hooks allow external scripts to be run at specific points during ORPatch processing.
ORPatch ProcessingThis section describes the ORPatch processing.
Action ORPatch supports a variety of actions that define the steps necessary to apply updates to a particular area of the Oracle Retail application. Each action is generally specific to updates to a single technology or logical component of the environment. For example, one action may handle making updates to the RMS database schema, while a separate action is responsible for compiling RWMS forms, and a different action deploys the RPM Java application. These actions are enabled and disabled within the environment configuration file, allowing ORPatch to determine what types of changes to apply to each product installation.
Table 8–18 ORPatch Actions
Order Action Name Description
1 DBSQL_RMS Loads RMS and RPM database objects into the primary RMS schema.
2 DBSQL_RMSASYNC Loads database objects into the RMS_ASYNC_USER schema.
3 DBSQL_REIM Loads ReIM database objects into the RMS schema.
4 DBSQL_RAF Loads Retail Application Framework database objects into the RMS schema.
5 DBSQL_ALCRMS Loads Allocation database objects into the RMS schema.
6 DBSQL_ALLOC Loads Allocation database objects into the Allocation user schema.
7 DBSQL_RMSDEMO Used to create demo data in the RMS schema if demo data was selected during initial installation.
8 DBSQL_RMSDAS Loads database objects into the RMS Data Access Schema.
9 RMSBATCH Compiles RMS Batch.
10 ORAFORMS_RMS Compiles RMS Forms, copies RMS reports to $RETAIL_HOME.
11 RMSRETLSCRIPTS Copies Oracle Retail Extract and Load scripts for RMS
12 RMSDCSCRIPTS Copies Oracle Retail Merchandising System data conversion scripts.
13 DBSQL_RWMS Loads database objects into the primary RWMS schema.
14 DBSQL_RWMSADF Loads database objects into the RWMS ADF user schema.
15 DBSQL_RWMSUSER Loads database objects into the RWMS user schema.
16 ORAFORMS_RWMS Compiles RWMS Forms, copies RWMS batch scripts and reports to $RETAIL_HOME.
17 JAVAAPP_RPM Deploys the RPM Java application and batch scripts.

Customization
Patching Procedures 8-31
Phase ORPatch processes patches in phases. Each action relevant to a patch and host is provided an opportunity to process the patch for each phase. The standard phases that allow hooks are:
18 JAVAAPP_REIM Deploys the REIM Java application and batch scripts.
19 JAVAAPP_ALLOC Deploys the Allocation Java application and batch scripts.
20 JAVAAPP_RESA Deploys the ReSA Java application.
21 JAVAAPP_RASRM Deploys the RASRM Java application.
22 DBSQL_RARMSBATCH Loads database objects into the RMS Batch schema for RA.
23 DBSQL_RADM Loads database objects into the RA Data Mart schema.
24 DBSQL_RAFEDM Loads database objects into the RA Front-end schema.
25 DBSQL_RABATCH Loads database objects into the RA Batch schema.
26 DBSQL_RASECORE Loads core database objects into the ORASE schema.
27 DBSQL_RASEASO Loads ASO database objects into the ORASE schema.
28 DBSQL_RASECDT Loads CDT database objects into the ORASE schema.
29 DBSQL_RASECIS Loads CIS database objects into the ORASE schema.
30 DBSQL_RASEDT Loads DT database objects into the ORASE schema.
31 DBSQL_RASEMBA Loads MBA database objects into the ORASE schema.
32 RASECOREBATCH Copies ORASE core batch scripts and libraries.
33 RASEASOBATCH Copies ORASE ASO batch scripts and libraries.
34 RASECDTBATCH Copies ORASE CDT batch scripts and libraries.
35 RASECISBATCH Copies ORASE CIS batch scripts and libraries.
36 RASEDTBATCH Copies ORASE DT batch scripts and libraries.
37 RASEMBABATCH Copies ORASE MBA batch scripts and libraries.
Table 8–19 Standard Phases
Restart Phase Number Phase Name Description
N/A PRECHECK Actions verify that their configuration appears complete and correct. This phase and the associated hooks are run every time orpatch is executed, even if processing will be restarted in a later phase.
10 PREACTION Actions do processing prior to when files are copied to the environment. Files are deleted during this phase.
20 COPYPATCH Actions copy files included in a patch into the destination environment and the environment manifest is updated.
30 PATCHACTION Actions take the more detailed steps necessary to apply the new files to the environment. For database actions in particular, this is the phase when new and updated sql files are loaded into the database.
Table 8–18 (Cont.) ORPatch Actions
Order Action Name Description
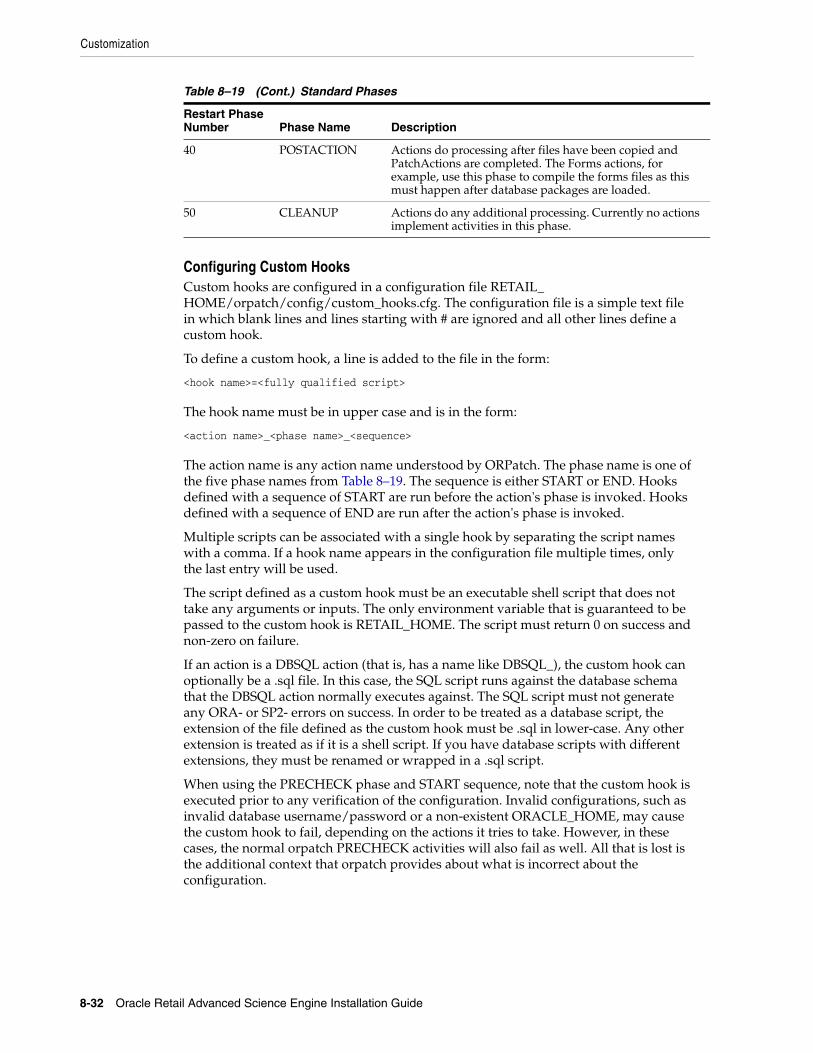
Customization
8-32 Oracle Retail Advanced Science Engine Installation Guide
Configuring Custom HooksCustom hooks are configured in a configuration file RETAIL_HOME/orpatch/config/custom_hooks.cfg. The configuration file is a simple text file in which blank lines and lines starting with # are ignored and all other lines define a custom hook.
To define a custom hook, a line is added to the file in the form:
<hook name>=<fully qualified script>
The hook name must be in upper case and is in the form:
<action name>_<phase name>_<sequence>
The action name is any action name understood by ORPatch. The phase name is one of the five phase names from Table 8–19. The sequence is either START or END. Hooks defined with a sequence of START are run before the action's phase is invoked. Hooks defined with a sequence of END are run after the action's phase is invoked.
Multiple scripts can be associated with a single hook by separating the script names with a comma. If a hook name appears in the configuration file multiple times, only the last entry will be used.
The script defined as a custom hook must be an executable shell script that does not take any arguments or inputs. The only environment variable that is guaranteed to be passed to the custom hook is RETAIL_HOME. The script must return 0 on success and non-zero on failure.
If an action is a DBSQL action (that is, has a name like DBSQL_), the custom hook can optionally be a .sql file. In this case, the SQL script runs against the database schema that the DBSQL action normally executes against. The SQL script must not generate any ORA- or SP2- errors on success. In order to be treated as a database script, the extension of the file defined as the custom hook must be .sql in lower-case. Any other extension is treated as if it is a shell script. If you have database scripts with different extensions, they must be renamed or wrapped in a .sql script.
When using the PRECHECK phase and START sequence, note that the custom hook is executed prior to any verification of the configuration. Invalid configurations, such as invalid database username/password or a non-existent ORACLE_HOME, may cause the custom hook to fail, depending on the actions it tries to take. However, in these cases, the normal orpatch PRECHECK activities will also fail as well. All that is lost is the additional context that orpatch provides about what is incorrect about the configuration.
40 POSTACTION Actions do processing after files have been copied and PatchActions are completed. The Forms actions, for example, use this phase to compile the forms files as this must happen after database packages are loaded.
50 CLEANUP Actions do any additional processing. Currently no actions implement activities in this phase.
Table 8–19 (Cont.) Standard Phases
Restart Phase Number Phase Name Description
Customization
Patching Procedures 8-33
Restarting with Custom HooksIf a custom hook fails (for example, a shell script hook returns non-zero or a sql script generates an ORA- error in its output) the custom hook will be treated as failing. A failing custom hook causes ORPatch to immediately stop the patching session.
When ORPatch is restarted, it always restarts with the same phase and action, including any START sequence custom hooks. If the START sequence custom hook fails, the action's phase is never executed. With an END sequence custom hook, the action's phase is re-executed when ORPatch is restarted and then the custom hook is re-executed. When an action's phase is costly (for example, the DBSQL_RMS action that does a lot of work) this can mean a lot of duplicate processing.
For this reason, you should use START sequence custom hooks whenever possible. If necessary, use a START sequence hook on a later phase or a later action, rather than an END sequence custom hook.
Patch-Level Custom HooksIn addition to action-specific hooks, two patch-level hook points are available. These hooks allow scripts to be run before any patching activities start and after all patching activities are completed. The hooks are defined in the same configuration file, with a special hook name.
To run a script before patching, define:
ORPATCH_PATCH_START=<fully qualified script>
To run a script after patching, define:
ORPATCH_PATCH_END=<fully qualified script>
These hooks only support executing shell scripts. Database scripts must be wrapped in a shell script. It is also important to note that these hooks are run on every execution of ORPatch to apply a patch, even when restarting a patch application. If the START sequence patch-level hook returns a failure, patching is aborted. If the END sequence patch-level hook returns a failure, it is logged but ignored, as all patching activities have already completed.
Note that the ORPATCH_PATCH_START hook is executed prior to any verification of the configuration. An invalid configuration may cause the custom hook to fail, depending on the actions it tries to take. However, in these cases, the normal ORPatchactivities would likely fail as well.
Example Custom Hook DefinitionsA shell script that is executed prior to the Pre-Action phase of RMS Batch:
RMSBATCH_PREACTION_START=/u00/oretail/prepare_custom_header.sh
A shell script that is executed after RETL script files are copied into the RETAIL_HOME:
RETLSCRIPTS_COPYPATCH_END=/u00/oretail/copy_custom_files.sh
A SQL script that is executed against the RWMS owning schema at the start of the Clean-up Phase:
DBSQL_RWMS_CLEANUP_START=/dba/sql/recompile_synonyms.sql

Troubleshooting Patching
8-34 Oracle Retail Advanced Science Engine Installation Guide
Troubleshooting PatchingNo general method is available for determining the cause of a patching failure. It is important to ensure that patches are thoroughly tested in a test or staging system several times prior to attempting to apply the patch to a production system, particularly if the patch is a large cumulative patch. After the test application is successful, apply the patch to the production system.
ORPatch Log FilesORPatch records extensive information about the activities during a patch to the log files in RETAIL_HOME/orpatch/logs. This includes a summary of the actions that are planned for a patch, information about all files that have been updated by the patch, and detailed information about subsequent processing of those files. The ORPatch log files also contain timestamps to assist in correlating log entries with other logs.
Even more detailed logs are available in RETAIL_HOME/orpatch/logs/detail_logs for some activities such as forms compilation, invalid database object errors, and output from custom hooks. If the standard ORPatch log information is not sufficient, it might be helpful to check the detailed log if it exists.
Restarting ORPatchThe restart mechanism in ORPatch is designed to be safe in nearly any situation. In some cases to ensure this, a portion of work may be redone. If the failure was caused by an intermittent issue that has been resolved, restarting ORPatch may be sufficient to allow the patch to proceed.
Manual DBManifest UpdatesA possible cause for database change script failures is that a database change has already been made manually to the database. In this event, you may need to update the dbmanifest table to record that a specific script does not need to be run. Before doing this, it is extremely important to ensure that all statements contained in the script have been completed.
Use the $RETAIL_HOME/orpatch/bin/ordbmreg script to register database scripts in the dbmanifest table.
Table 8–20 Command Line Arguments for ordbmreg
Argument Description
-f <file> Adds <file> to the list of files that will be registered. Can be specified more than once.
-bulk <file> Specifies a file to read, containing one filename per line. All filenames listed inside <file> will be registered.
-register Files specified with -f or -bulk will be registered in the dbmanifest table.
-unregister Files specified with -f or -bulk will be removed from the dbmanifest table.
Note: Note the following:
At least one of -f or -bulk is required.
If neither -register nor -unregister is specified, the default is '-register'.
File names specified with -f must either be fully-qualified or be relative to RETAIL_HOME. The same is true for filenames specified within a -bulk file.
Registering a file in the dbmanifest table causes it to be completely skipped. Before doing so, ensure that all commands contained in it have been completed.
Removing a file from the dbmanifest table will cause it to be run again. This will fail if the commands in the script cannot be re-run (for example if they create a table that already exists).
Troubleshooting Patching
Patching Procedures 8-35
Running the ordbmreg ScriptComplete the following steps to run the ordbmreg script:
1. Log in as the UNIX user that owns the product installation.
2. Set the RETAIL_HOME environment variable to the top-level directory of your product installation.
export RETAIL_HOME=/u00/oretail/14.1/tst
3. Set the PATH environment variable to include the orpatch/bin directory.
export PATH=$RETAIL_HOME/orpatch/bin:$PATH
4. Execute ordbmreg script to register the desired file(s).
ordbmreg -register -f <file>
Examples That Use the ordbmreg ScriptRegister $RETAIL_HOME/dbsql_rms/Cross_Pillar/db_change_scripts/source/000593_system_options.sql with the dbmanifest table.
ordbmreg -f dbsql_rms/Cross_Pillar/db_change_scripts/source/000593_system_options.sql
Remove the dbmanifest row for $RETAIL_HOME/dbsql_radm/ra_db/radm/database_change_scripts/000035_s12733240_w_party_per_d.sql.
ordbmreg -unregister -f $RETAIL_HOME/dbsql_radm/ra_db/radm/database_change_scripts/000035_s12733240_w_party_per_d.sql
Bulk register several files in the dbmanifest table.
echo "$RETAIL_HOME/dbsql_rwms/DBCs/Source/000294_container.sql" > dbcs.txtecho "$RETAIL_HOME/dbsql_rwms/DBCs/Source/000457_drop_object.sql" >> dbcs.txtordbmreg -bulk dbcs.txt
Restarting After RegistrationOnce the row has been added to the dbmanifest table, restart ORPatch and the script will be skipped. If the file is not skipped, there are several possibilities:
■ The script registered is not the failing script.

Troubleshooting Patching
8-36 Oracle Retail Advanced Science Engine Installation Guide
■ The file type is not a type that is filtered by the dbmanifest. The only file types that skip files listed in the dbmanifest are:
– Initial install DDL Files
– Installation scripts that cannot be rerun
– Database Change Scripts
Manual Restart State File UpdatesOracle Retail strongly discourages manually updating the ORPatch restart state files. Updating the file improperly can cause necessary steps in the patching process to be skipped or patches to be incorrectly recorded as applied.
DISPLAY Settings When Compiling FormsWhen compiling RMS or RWMS forms, it is necessary to have a valid X-Windows Display. ORPatch allows this setting to come from one of two places:
■ DISPLAY environment variable set before executing ORPatch
or
■ DISPLAY setting in RETAIL_HOME/orpatch/config/env_info.cfg
The DISPLAY variable in the environment overrides the env_info.cfg, if both are set. The destination X-Windows display must be accessible to the user running ORPatch, and for best compilation performance it should be on the network close to the server where RMS Forms are installed and compiled. Using a local display or VNC display is preferred. Compiling forms across a Wide-Area Network greatly increases the time required to apply patches to environments.
JAVA_HOME SettingWhen working with Java application jar, ear or war files, it is necessary to have a valid JAVA_HOME setting. ORPatch allows this setting to come from one of two places:
■ JAVA_HOME environment variable set before executing ORPatch
or
■ JAVA_HOME setting in RETAIL_HOME/orpatch/config/env_info.cfg
The JAVA_HOME variable in the environment overrides the env_info.cfg, if both are set. The specified Java home location must be accessible to the user running ORPatch and be a full Java Development Kit (JDK) installation. he JAVA_HOME must contain the jar utility and, if automatic Jar file signing is configured, must also contain the keytool and jarsigner utilities.
Patching Prior to First InstallIn some situations, it may be necessary to apply a patch to product installation files before the initial install. For example, if there is a defect with a script that is run during the install and prevents proper installation. In this rare situation, it may be necessary to apply a patch to the installation files prior to starting installation.
Note: These steps should only be undertaken at the direction of Oracle Support.
Troubleshooting Patching
Patching Procedures 8-37
Complete the following steps to patch installation files prior to starting an installation. The steps assume an RMS installation, but apply to any product supported by ORPatch:
1. Unzip the installation files to a staging area.
Note: The following steps assume the files are in /media/oretail14.1
2. Locate the patch_info.cfg within the product media. The directory it resides in will be used for later steps.
find /media/oretail14.1/rms/installer -name patch_info.cfg
Output Example:
/media/oretail14.1/rms/installer/mom14/patch_info.cfg
3. Get the PATCH_NAME for the standard product installation. The patch name to use in subsequent steps will be the portion following the "=" sign.
grep "PATCH_NAME=" /media/oretail14.1/rms/installer/mom14/patch_info.cfg
Output Example:
PATCH_NAME=MOM_14_1_0_0
4. Create a directory to contain the patch that must be applied, next to the directory with the product installation files.
Note: The following steps assume this directory is in /media/patch.
5. Unzip the patch into the directory created in step 2.
Note: This should place the patch contents in /media/patch/<patch num>.
6. Export RETAIL_HOME to point within the installation staging area.
export RETAIL_HOME=/media/oretail14.1/rms/installer/mom14/Build
7. Create a logs directory within the installation staging area.
mkdir $RETAIL_HOME/orpatch/logs
8. Ensure the ORMerge shell script is executable.
chmod u+x $RETAIL_HOME/orpatch/bin/ormerge
9. Run ORMerge to apply the patch to the installation media, using a -name argument that is the same as is found in step 3.
$RETAIL_HOME/orpatch/bin/ormerge -s /media/patch -d /media/oretail14.1/rms/installer/mom14 -name MOM_14_1_0_0 -inplace

Note: The -inplace argument is critical to ensure that the patching replaces files in the mom14 directory.
Troubleshooting Patching
8-38 Oracle Retail Advanced Science Engine Installation Guide
10. Unset the RETAIL_HOME environment variable.
unset RETAIL_HOME
At this point, the installation file have been updated with the newer versions of files contained within the patch. Log files for the merge are in /media/oretail14.1/rms/installer/mom14/Build/orpatch/logs.
Providing Metadata to Oracle SupportIn some situations, it may be necessary to provide details of the metadata from an environment to Oracle support in order to assist with investigating a patching or application problem. ORPatch provides built-in functionality through the exportmetadata action to extract and consolidate metadata information for uploading to Oracle Support or for external analysis. For more information, see Exporting Environment Metadata.

A
Appendix: Installation Order A-1
AAppendix: Installation Order
This section provides a guideline for the order in which the Oracle Retail applications should be installed. If a retailer has chosen to use only some of the applications, the order is still valid, less the applications not being installed.
Note: The installation order is not meant to imply integration between products.
Enterprise Installation Order1. Oracle Retail Merchandising System (RMS), Oracle Retail Trade Management
(RTM)
2. Oracle Retail Sales Audit (ReSA)
3. Oracle Retail Extract, Transform, Load (RETL)
4. Oracle Retail Active Retail Intelligence (ARI)
5. Oracle Retail Warehouse Management System (RWMS)
6. Oracle Retail Invoice Matching (ReIM)
7. Oracle Retail Price Management (RPM)
Note: During installation of RPM, you are asked for the RIBforRPM provider URL. Since RIB is installed after RPM, make a note of the URL you enter. If you need to change the RIBforRPM provider URL after you install RIB, you can do so by editing the remote_service_locator_info_ribserver.xml file.
8. Oracle Retail Allocation
9. Oracle Retail Central Office (ORCO)
10. Oracle Retail Returns Management (ORRM)
11. Oracle Retail Back Office (ORBO)
12. Oracle Retail Store Inventory Management (SIM)

Note: During installation of SIM, you are asked for the RIB provider URL. Since RIB is installed after SIM, make a note of the URL you enter. If you need to change the RIB provider URL after you install RIB, you can do so by editing the remote_service_locator_info_ribserver.xml file.
Enterprise Installation Order
A-2 Oracle Retail Advanced Science Engine Installation Guide
13. Oracle Retail Predictive Application Server (RPAS)
14. Oracle Retail Demand Forecasting (RDF)
15. Oracle Retail Category Management (RCM)
16. Oracle Retail Replenishment Optimization (RO)
17. Oracle Retail Analytic Parameter Calculator Replenishment Optimization (APC-RO)
18. Oracle Retail Regular Price Optimization (RPO)
19. Oracle Retail Merchandise Financial Planning (MFP)
20. Oracle Retail Size Profile Optimization (SPO)
21. Oracle Retail Assortment Planning (AP)
22. Oracle Retail Item Planning (IP)
23. Oracle Retail Item Planning Configured for COE (IP COE)
24. Oracle Retail Advanced Inventory Planning (AIP)
25. Oracle Retail Analytics
26. Oracle Retail Advanced Science Engine (ORASE)
27. Oracle Retail Integration Bus (RIB)
28. Oracle Retail Service Backbone (RSB)
29. Oracle Retail Financial Integration (ORFI)
30. Oracle Retail Point-of-Service (ORPOS)
■ Oracle Retail Mobile Point-of-Service (ORMPOS) (requires ORPOS)
31. Oracle Retail Markdown Optimization (MDO)
32. Oracle Retail Clearance Optimization Engine (COE)
33. Oracle Retail Analytic Parameter Calculator for Markdown Optimization (APC-MDO)
34. Oracle Retail Analytic Parameter Calculator for Regular Price Optimization (APC-RPO)
35. Oracle Retail Macro Space Planning (MSP)
The Oracle Retail Enterprise suite includes Macro Space Planning. This can be installed independently of and does not affect the installation order of the other applications in the suite. If Macro Space Planning is installed, the installation order for its component parts is:
■ Oracle Retail Macro Space Management (MSM)
■ Oracle Retail In-Store Space Collaboration (ISSC) (requires MSM)
■ Oracle Retail Mobile In-Store Space Collaboration (requires MSM and ISSC)