Embed Size (px)
Citation preview

Frequently Asked Questions Overview:
Do I have to register the software? Product registration is not required to preview the software but is recommended. Registration of the product will allow us to provide important product update notifications.
Why do I see other programs other than Thread Converter Pro? You can also preview any of our Floriani programs in Demo mode within the Thread Converter Pro software. All features within the six programs are fully functional and lack only the ability to save the stitch file. The demo option is available in your program menu: Start->All Programs->Floriani->Floriani Demo
How do I learn how to use Thread Converter Pro? Click here for detailed online support manual.
What happens if my download fails and I need to try to re-download? If the download fails after you register the product please email us at [email protected] We will provide a direct link for product access.
Download for update
Often the programs that are on some computers block the download feature.... Use this link: http:// www.florianisoftware.com/download/updates/FlorianiSetup.exe
Tip: please check your version
1. Click the Help on the top menu 2. Click About 3. Version Number..... 4. DO NOT INSTALL THE CURRENT UPDATE ON THE CURRENT VERSION!
Installations Instructions
Please print out these instructions so that you can read them as you do each step!
1. Open the Floriani Embroidery software program and go to Help and Registration.
2. Select (software purchased) and complete the form.
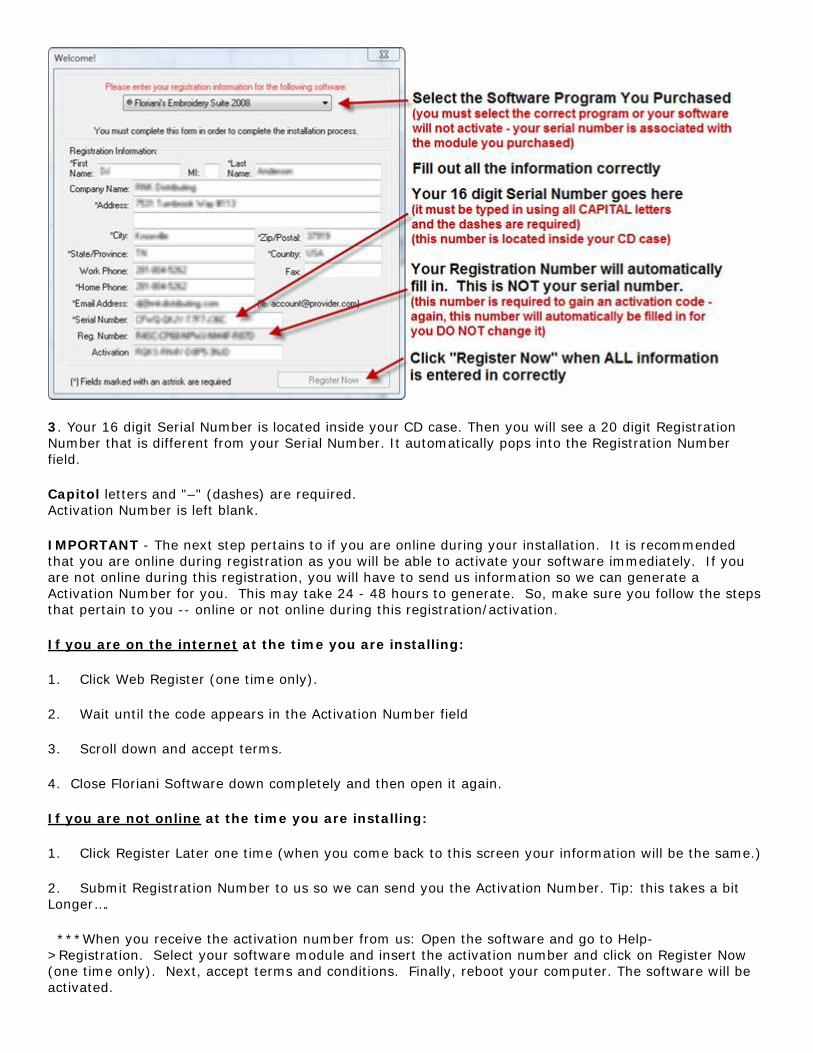
3. Your 16 digit Serial Number is located inside your CD case. Then you will see a 20 digit Registration Number that is different from your Serial Number. It automatically pops into the Registration Number field.
Capitol letters and "–" (dashes) are required. Activation Number is left blank.
IMPORTANT - The next step pertains to if you are online during your installation. It is recommended that you are online during registration as you will be able to activate your software immediately. If you are not online during this registration, you will have to send us information so we can generate a Activation Number for you. This may take 24 - 48 hours to generate. So, make sure you follow the steps that pertain to you -- online or not online during this registration/activation.
If you are on the internet at the time you are installing:
1. Click Web Register (one time only).
2. Wait until the code appears in the Activation Number field
3. Scroll down and accept terms.
4. Close Floriani Software down completely and then open it again.
If you are not online at the time you are installing:
1. Click Register Later one time (when you come back to this screen your information will be the same.)
2. Submit Registration Number to us so we can send you the Activation Number. Tip: this takes a bit Longer….
***When you receive the activation number from us: Open the software and go to Help->Registration. Select your software module and insert the activation number and click on Register Now (one time only). Next, accept terms and conditions. Finally, reboot your computer. The software will be activated.
Registering 2 or more software modules
These instructions apply only to those who have purchased two or more modules separately (the suite does NOT apply as it installs all modules at one time).
Please print out these instructions so that you can read them as you do each step!
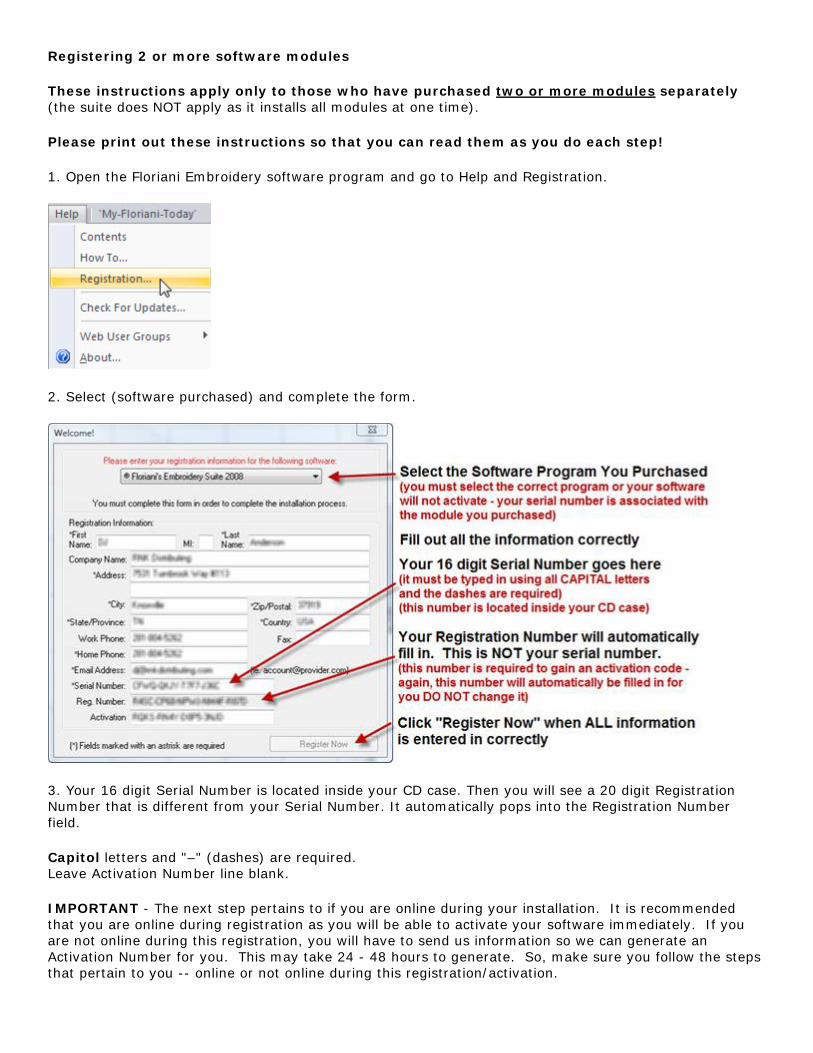
1. Open the Floriani Embroidery software program and go to Help and Registration.
2. Select (software purchased) and complete the form.
3. Your 16 digit Serial Number is located inside your CD case. Then you will see a 20 digit Registration Number that is different from your Serial Number. It automatically pops into the Registration Number field.
Capitol letters and "–" (dashes) are required. Leave Activation Number line blank.
IMPORTANT - The next step pertains to if you are online during your installation. It is recommended that you are online during registration as you will be able to activate your software immediately. If you are not online during this registration, you will have to send us information so we can generate an Activation Number for you. This may take 24 - 48 hours to generate. So, make sure you follow the steps that pertain to you -- online or not online during this registration/activation.

If you are on the internet at the time you are installing:
1. Click Web Register (one time only).
2. Wait until the code appears in the Activation Number field
3. Scroll down and accept terms.
4. Close Floriani Software down completely and then open it again.
If you are not online at the time you are installing:
1. Click Register Later one time (when you come back to this screen your information will be the same.)
2. Submit Registration Number to us so we can send you the Activation Number. Tip: this takes a bit Longer….
***When you receive the activation number from us: Open the software and go to Help->Registration. Select your software module and insert the activation number and click on Register Now (one time only). Next, accept terms and conditions. Finally, reboot your computer. The software will be activated.
Now, you have to Activate the second software program:
Do NOT reinstall the Floriani software.
Follow the same instructions as above, however, this time select the other software module from the drop down list and use the serial number that applies to this module.
Congrats...you are ready to use both modules....They will appear as 1 software package.
Additional Activation
Contact us on the HelpDesk with your SERIAL NUMBER:
http://www.florianisoftware.com/support/registration.htm
Give us your Serial Number and complete information and we will activate your software again.
Please print out these instructions so that you can read them as you do each step!
1. Open the software program and go to Help and Registration.
2. Click Register Now (One Time).

3. Close Floriani out completely.
4. Double click the icon on your desktop to start Floriani.
5. You are active!
Off Line Activation
If you do not have access to the internet during the activation process, please do the following:
Please print out these instructions so that you can read them as you do each step!
1. Open the software program and go to Help and Registration.
2. Select (software purchased) and complete the form (see below)
3. Your 16 digit Serial Number is located inside your CD case. Then you will see a 20 digit Registration Number that is different from your Serial Number. It automatically pops into the Registration Number field.
Capitol letters and "–" (dashes) are required. Leave the Activation Number blank.

IMPORTANT - The next step pertains to if you are online during your installation. It is recommended that you are online during registration as you will be able to activate your software immediately. If you are not online during this registration, you will have to send us information so we can generate a Activation Number for you. This may take 24 - 48 hours to generate.
If you are not online at the time you are installing:
1. Click Register Later one time (when you come back to this screen your information will be the same.)
2. Submit Registration Number to us so we can send you the Activation Number. Tip: this takes a bit longer….
3. When you receive the Activation Number from us: Open the software and go to Help->Registration. Select your software module and insert the Activation Number and click on Register Now (one time only). Next, accept terms and conditions. Finally, reboot your computer. The software will be activated.
Register Now Grey
The only reason that the “Register Now” button does not highlight is:
1. You may not have selected your software purchased in the drop down box
2. You may not have capital letters or dashes in the Serial Number area
3. You may not have filled in all of the required fields.
Upgrade and C2S Upgrade info
If you are interested in updating Floriani version which offers new features, please download the file here: http://www.florianisoftware.com/download/updates/FlorianiSetup.exe
Thread Converter Pro and the Demo
The Thread Converter Pro is a demo disk as well. So, you not only get the Thread Converter Pro, but you also can demo our Floriani Embroidery Modules!!! This demo will allow you to do everything you can do in the full version but will not give you the ability to save a design. In order to save a design and stitch it out you will need to purchase the module first.
To use the demo:
1. Click Start button on your computer
2. Click All Programs
3. Locate and Select the Floriani tab
4. Click Floriani Demo and select the program that you wish to demo. You are able enjoy all the features except Save.
Thread Converter Pro - How to use
Thread Converter Pro is in your software module automatically. There are no buttons to click on as it is integrated into the software program.
To utilize the features of the Thread Converter Pro do the following:

1. Open a design in the software
2. To change a color, select by left mouse clicking the color at the bottom of the screen that you do not like or wish to change within the design.
3. A popup color chart will appear on your screen.
4. Use the "Family" drop down box to select the Color Chart you would like to select your color from.
5. Select the color you would like to use (Hint - you can type the number in the upper right hand corner in the "Find" box for quicker access to your color).
6. Click OK to apply your new color. When you save the design, it will save it with the new color in it.
Webinars
If you would like to be notified when the Webinar DVDs are available or wish to order our past webinars:
Send us an email to:
[email protected] Please include the following information: Your Name Your Address Your Phone Number Your Preferred Email Address We do charge for the shipping. $10 per DVD.
Scan/Import Artwork

1. Go to File->Import Artwork
2. Import Artwork (a box will pop up)
3. At the top there is a drop down menu that says “Look in,” select the drop down arrow go the folder that has your artwork files (look above).
4. Select the file and click on the OPEN button
5. Your artwork should now be displayed whether it is vector or your .jpeg.
Decor Button
The Decor button (in the properties box) is for certain Monogram fonts only
To access monogram fonts:
1. Select the "Monogram" tool
2. In the properties box, type in the monogram text
3. Select a font containing a green "M" icon next to the font name (these are found at the bottom of your list of fonts)
4. Select a "Decor" style from the drop down list.

5. Select "Apply"
Magic Wand
To use the Magic Wand Tool (note: the magic wand is greyed out until you select a stitch type: "run," "satin," "steil," or "complex fill").
1. Open software program
2. Bring up a new document
3. Load your artwork
4. Select a stitch type tool (across the top tool bar) there is they are color coded, black = running stitch, red = satin stitch, orange = complex fill etc....
5. Once you select a stitch type you can now select the Magic Wand Tool.
Angle/Inclination Lines
1. Select the section of the design you wish to work change the angle lines of
2. Click on the Shape icon (third icon on the left hand tool bar)

3. The line with the black circles on each end is the inclination/angle line.
4. If you need to add more inclination/angle lines to satin stitched only right click on the line around the section, a menu will pop up select add angle line.
5. Left click on edge of section where you want another angle line.
How to transfer designs to machine
If your machine has a USB port, you can save your design to a jump drive and put it into the side of your machine.
1. Open the design in the software. 2. Select File->Save As 3. Click the "Save in" drop down box and select your Jump Drive from the list.
4. Save the file using the desired name and design format.

Save to a StitchLink Box (if you have one) It must be installed and setup PRIOR to use.
1. With the file open in the software, select File->Save As 2. From the "Save in" list, select the Stitch Link Box 3. Name the file in the "file name" box if necessary 4. Select your machine sew format type from the "Save as type" drop down menu. 5. Select "Save"
If you have a Magic Box (you must first create a link to your card box)
1. With the file open in the software, select the "Card Box" icon (see below)
2. Find your card box on your computer from the "Open" drop down box
3. Name your file
4. Select "Save"
Hoop Issue-Pfaff or other machine hoops
For your Pfaff or other machine hoops you can create a hoop in the software that is the size of your design field 360x200.
To create a 360x200 hoop:
1. Select Tools -> General Options from the menu bar
2. For the "Units" make sure that "Metric" is selected (see below)

3. Press OK when "Metric" is selected
4. Left click on the hoop icon on the left hand toolbar (see below)
5. Go to NEW, a dialog box will pop up enter in your width and height, select rectangle
(when you create your design make sure you don't have a stray stitch outside the embroidery area anywhere, then you should not have any trouble at all with your design fitting into your machine hoop).
Shopping Cart
To purchase this software all you need to do is go to our website, select the dealer of your choice and you will automatically be routed to our online shopping cart. To access this go to http://www.florianisoftware.com/retailersearch and key in your zip code and follow the screen information.
tempADWizColorize.bmp error message
This message indicates that your software is not pointed to a paint program. This happened in earlier versions of the software (prior 3.02 and Vista)
Please Click:
1. File 2. New 3. Tools 4. Autodigitize
You should see a design in the path line,ie; (C:/ProgramFiles/G7Solutions/Click2Stitch/Images/Bitmaps/airplane02.wmf)
We will use this design and path...
1. Click Next. 2. Click Next. 3. You should now be In the Color Reduction Page... 4. In the Image Editing line, there is a button with ... 5. Click the ...button. 6. Click your path into C:/windows/system32/mspaint.exe 7. When you Open the mspaint.exe, your design will open up. 8. Click the X in the upper right corner.

9. Click Finish. 10. Close out of Floriani. 11. You are done!!
Difference between Help Desk & Forum
For all of your Technical/Registration questions: http://www.florianisoftware.com/support/registration.htm
For all your how to questions use the forum: http://www.florianisoftware.com/forums/
CheckList for active Registrations
To Check your Registration:
1. Click Help 2. Click Registration 3. Click the drop down box located at the top of the popup window (see below)
4. If you are activated correctly, you will see an R with a circle around it (in front of the software you own) to let you know that you have registered and activated your software correctly.
If you DO NOT see an "R" (registered trademark) next to the module(s) you own, these are the possible reasons:
You are a new user of the software and have not registered the program during the installation
If you have had the software registered before and it no longer is registered:
Is this the original computer you loaded the software on and registered? Did you use a registry cleaner?

Did you use a System Restore Point? A registry cleaner and System Restore can disturb the Registry Keys and may make your software appear in a demo mode. Please contact us with your Serial Number and we will email you back.
PED Basic Issue
Your hoop must always be connected to your machine in the 130mm x 180mm format unless your machine ONLY sews in a 100mm x 100mm format, then you will need to select the 100mm x 100mm option in the top left corner of the PED Basic screen.
Start with that size/format and "apply" that size/format before you start importing any designs. Save. You will be able to write the designs to your PED Basic card. If your design is a bit large; rotate it to fit before you save the hoop and design information to the
card.
Tip: Are you using the updated software for the PED Basic?
3 kinds of Satin Stitch
We have three types of satin stitch:
The Steil (the blue icon on the top toolbar)
1. Left click the path you want the line to follow
2. When you have created the line needed, right mouse click to apply the stitches.
The Classic Satin (red and yellow icon) this is a block digitizing stitch that is created in a point-counter point method.
1. Left mouse click on the lower side of the line you want to create as a satin stitch.
2. Left mouse click on the upper side of the line above the first point.
3. Left mouse click on the lower side of the line just down from the first stitch
4. Left mouse click on the upper side of the line just above the previous stitch
5. Repeat this until you have created the entire line
6. Right mouse click to apply the stitch
The Satin stitch (red icon on the top toolbar)
1. Left mouse click down one side of your satin stitch object
2. Right mouse click to set the first side of your satin stitch and to begin the second side.
3. Begin creating the second side of your satin stitch object
4. When second line is created, right mouse click to apply the satin stitch
Bernina Format

Floriani Software can read the Art format.
We cannot write at this time to the Art format. The designs can be converted into designs/fonts via the *.exp, *.pes format. The Bernina 630 and 640 will only accept the EXP version and the Bernina 730 will accept the PES version.
Because the current Bernina Sewing machine models are not fast enough to keep up with the computers and the new Bernina V5 software, you will have to save in V4 (via the Bernina Software) for the time being.
Too Many Color Changes
When you have a color repeated in a design and wish to combine the colors so you do not have unnecessary thread changes.
1. Bring up design
2. Go to EDIT menu
3. Select RESEQUENCE BY COLOR
This will combine all possible colors in your design.
***Keep in mind that you may need to resequence you design for proper sewing. By using this method for resequencing you can end up with mixed results. For instance, a satin stitch border to an object may now stitch out before the fill stitch resulting in the fill stitch sewing over the top of the satin stitch border--covering the intended border stitch. You may still need to resequence the design some manually and add a few color changes.
Newsletter
If you wish to locate a newsletter
http://www.florianisoftware.com/products/*/*/5878
CCleaner
We do not endorse this software....some of us use it and are familiar with the specific settings.
Put this number GNCODER.SiteCodeCtrl.2 into CCleaner
Here is how:
1. Open CCleaner 2. Click Options (see below) 3. Click Exclude (see below) 4. Add Registry (see below) 5. Make sure "HKCR" is selected (see below) 6. Type this in as you see it: GNCODER.SiteCodeCtrl.2 (see below) 7. Select "OK"

Library
There are files being uploaded periodically for your educational viewing. You may want to review them and they could become a great resource for you.
http://www.florianisoftware.com/products/*/*/661
Purchase Info/Fonts Link
At this time, we do not offer any additioanl fonts.
Resources
There is an online manual: Click Help/Contents and follow the information to do tutorials. There is a free forum to ask questions and receive answers from Walt, Kathi, Stitch and many of
the members: http://www.florianisoftware.com/forums/ If you run into technical/installation difficulties you have this HelpDesk and we will be happy to
help you. http://www.florianisoftware.com/support/registration.htm There are Videos in the Library: http://www.florianisoftware.com/products/*/*/661

Vista - Install issues
For Install issue on computers containing Windows Vista:
1. First, restart your computer and see if that helps. If not, try to register again. 2. This time please close any adware, spyware, and/or the antivirus programs that you have open. 3. Then try to register the program again.