Embed Size (px)
Citation preview

DISSECTION METHODS
In order for genitalia and other features to be scrutinised,it is usually necessary for the moth to be killed (or atleast anaesthetised) and for it to be retained as a pinnedspecimen. The methodologies involved are dealt withby Heath and Emmet (1976) and most recently Mayand White (2006).
The aim of this section is to enable readers to developtheir skills, starting with the ‘easy’ species and working up to those with only slight and comparative differences.We recommend working on larger species first to gainexperience. Don’t be ambitious - dealing with small mothsis an art, but things do become easier with practice. Itshould also be emphasised that technique is, to someextent, down to individual preference and there may bescope for creative thinking in some areas. Indeed, weare aware that other workers have developed alternativetechniques. However, our purpose is to outline theimportant practices and principles rather than attempta definitive guide or an exhaustive list of alternatives.Although the taxonomic section of this book covers onlymacro-moths, these techniques apply also to micros,although in some cases with modifications.
Techniques may vary slightly according to species.For example, it is not necessary in many cases to carryout the full dissection procedure to examine featureson the valvae of the males, as these can be seen bysimply brushing the scales off this structure, oftenin situ. At the other extreme, in some cases very carefulmanipulation is necessary in order to see the diagnosticfeatures, or these can look different according to theirorientation or depending on whether a cover slip hasbeen applied. It is important, and may be crucial,that the specimen is presented in the correct wayfor successful identification. It may still be necessary to refer the moth and slide preparation for a secondopinion, especially in the case of suspected rarities.
Dissection – making a slide preparationEquipment:
Microscope. For dissection purposes this shouldbe binocular, giving magnifications of either 15xand 30x, or 20x and 40x, or have zoom magnificationsranging from (typically) 7x to 45x. Eyepieces withmagnification of 10x are usually supplied, but 20x canbe obtained. Lighting systems supplied are usuallyadequate, but can be supplemented with a fibre opticbox. Compound microscopes reveal much finer detailwhen examining slides, but as they see the image‘upside down’ are not suitable for dissecting. Modernmicroscopes can be fitted with a camera, which isa highly specialised and technical area, not coveredhere. A few other basic tools are needed. Some canbe obtained from entomological suppliers or otherretailers. In some cases they can be home-made.Here are some suggestions.
Fine forceps. Available from entomological suppliers.
Needles, brushes and probes. Used for manipulation.These can be either purchased or made using matchesor cocktail sticks to create handles. Carefully saw agroove into one end of the stick and insert a fine pin.Glue this in place and bind it with cotton. Once dry,apply a coat of varnish. Create a number of these witha variety of pins, some straight and others bent orhooked at the tip. Brushes can be made in the sameway, traditionally from a pin-feather of a Snipe orWoodcock. The shape and stiffness of these feathersmake them ideal for brushing off body scales, etc. and they can be obtained from game merchants orgamekeepers. There is only one suitable feather perwing, situated just beyond the carpal joint. Failingthese, experiment with other materials. The handleshould not be too long, as this would magnifymovements under the microscope.
Excavated glass blocks. Used for working on thedissection at the microscope and/or as staining baths.
Pipettes, glass tubes, glass slides and cover slips,syringe. A variety of these will prove useful.

Chemicals required:
Potassium Hydroxide (KOH), supplied as 10% solutionEuparalEuparal EssenceIso-propyl alcohol 1% Chlorazol Black (staining agent)Purified or distilled water
Technique:
Step 1. Removal of the abdomenMost examinations will involve dried specimens,in which case the abdomen should be carefully lifteduntil it detaches from the thorax. In some cases thehindwings may show signs of moving. Stop andcarefully place a small drop of wood glue onto theadjacent part of the thorax and let this dry beforeattempting to detach the abdomen. Alternatively, slightdownward pressure may then release the abdomenwithout bringing the hindwings with it. With soft,freshly-killed specimens, and where the moth is notbeing retained, use fine forceps to detach the abdomenor simply examine the intact moth if a full preparationis not required. Always remove the whole abdomen,since the genitalia (especially in females) may extendwell forward and could otherwise be damaged,and other useful features could be present.
Step 2. Dissolving the fat and soft tissuewithin the abdomenThis is achieved by heating the abdomen in 10%aqueous Potassium Hydroxide (KOH) solution. KOHwill work at room temperature but it can take manyhours, making it more difficult to regulate. The aim isto heat without boiling so that no liquid leaps from thetube. KOH is caustic and contact with skin and eyesshould be avoided. The Safety Data for this chemicalis available from suppliers and on various websites.The same solution can be used to treat a number ofmoths before it loses its strength. An open glass tubeis used, preferably one with a flat bottom. Tubesroughly 5 x 2.5 cm in size, no more than halffull with the KOH, are ideal. Top up with water everynow and again as evaporation will occur, causingthe solution to become too concentrated.
In one method, water is brought to the boil in asaucepan and removed from the heat, and the tubestood in the hot water, which should come no morethan halfway up the tube. Another method uses alight bulb fixed horizontally on a stand with a metalplate bolted on above it, upon which the tube sits.Since light bulb design has recently changed withthe introduction of low energy bulbs and the phasingout of bulbs utilising the traditional tungsten filament,some experimentation may be necessary to achievethe desired result without overheating or overlyprolonging the dissolving time. Take extra care, ifusing any kind of electrical heat source, that thesolution cannot come into contact with the electrics.
The time taken will vary according to the solutiontemperature, which itself will vary according to themethod, and as in all cooking, with the equipment used.However, 10-40 minutes is usually sufficient, dependingon the size of the moth. Again, experimentation willbe necessary. When ready, the abdomen will attain atranslucent appearance and may tend to sink unless air bubbles prevent it from doing so. If the abdomenis left in solution too long, the genitalia and othersclerotised parts can begin to soften and distort, whichmay confound the determination, so it isbetter to undercook than to overcook.
Step 3. Initial preparationRemove the now soft abdomen from the KOH solutionwith a hooked pin or pipette, and transfer to a dish orglass block containing water. It is best to use purifiedor distilled water as tap water can react with the acidsin the body cavity and make some structures fragile.This is most likely to happen in hard water areas.Under the microscope, use a combination of smallangled pins and a fine brush or pin-feather to removeas many scales as possible.
Lay the abdomen ventral side up. Using pins andbrushes, apply gentle pressure and stroking movementsto the abdomen to push out the dissolved fat andsoft tissue. If the water becomes excessively cloudyas a result (especially with larger specimens), transferto a dish containing clean water. Males have a pairof flattened structures (valvae) which open out at anangle (see figure I). In females there is no such structureand the ovipositor is the most immediately noticeablefeature. You should soon be able to see whether youhave a female or male, and the procedures for dealingwith them differ. It is sometimes possible to identifythe species at this stage.

Step 4 (males). Separating the genitaliafrom the abdomenThe male organs, including the valvae and aedeagus,are clustered together at one end of the abdomen,and these should now be obvious, the aedeaguslying horizontally in situ in the middle of the genitalia,usually above the juxta. The next step is to detachthem from the abdomen. Hold the other (anterior) endof the abdomen firmly with the heel of an angled pin orforceps and, with a second angled pin or forceps, gentlystroke towards the valvae. With luck the genitalia willfloat free of the body, but you may need to carefully tearthe cuticle until the genitalia have become detached.If enough scales have been removed, you shouldsee enough detail to avoid damaging anything ofvalue while doing this.
Step 5 (males). Preparing the genitaliaIt is recommended that the cuticle should be retained,in case it has features that may be useful in identification.Clean away as much soft tissue as possible. If theaedeagus is to be removed, do it at this stage. This maycause damage, so proceed with caution. With the valvaeclosed, hold down firmly with the heel of an angled pinor fine forceps around the base of the juxta, and use asecond pin or fine forceps to pull the aedeagus awayposteriorly. The aedeagus should pull clear of the outermembrane. Once it is free, any remaining membrane can be removed by cutting it off near the top of the juxta.If the aedeagus fails to pull free, this membrane can begently torn at the point of constriction, using two pairs of fine forceps, and the aedeagus removed as describedabove. If stain is to be used, it is recommended that itis applied at this stage. Staining with Chlorazol Blackenables better discrimination between importantstructures and those that can be discarded, such asmembranes. Use only a small amount as too muchcan mask diagnostic features.
Sometimes it is also desirable to evert the vesica,the soft tube inside the aedeagus, to see the thorn-likestructures known as cornuti, and in some cases it hasdiverticula, which can also be distinguishing features(see everting the vesica, below). In some families it isnot possible to detach the aedeagus, or to flatten thevalvae, or the parts may need to be presented froma certain angle.
Photography: the aedeagus can be photographed atthis stage, before using a cover-slip in the slide-makingstage, which can make the three-dimensional shapedifficult to discern. Alternatively, a ring slide or vinylprop (available from suppliers) can be used for the finalpreparation. These allow important features to bearranged in three dimensions.
Step 6 (males). Making a slide preparationThe valvae should be cleaned of scales and hairs,but stout spines should be left in place. Carefully openthe valvae, removing any tissue that prevents themfrom doing so. Immerse these (and the aedeagus) ina water/alcohol mixture in several stages, for example30%, 60% and finally 100% alcohol, for about 30seconds. This helps the cleaning process and preparesthe structure for the slide stage. It is important to gothrough the increasing strengths of alcohol. If thegenitalia are transferred directly from water to 100%alcohol, distortion can occur. At each stage open thevalvae, if necessary turning them upside down andwith the heel of a pin press down on the back, againstthe glass surface (but be careful as they can becomebrittle and break). The idea is to use the alcohol’sstiffening actions to encourage the valvae to remainfully open of their own accord.
At this stage, the genitalia can be transferredinto Euparal Essence for several seconds. This is thesolvent for Euparal, and it allows the preparation toclear and helps to remove air bubbles. Transfer toEuparal on a glass slide and if needed re-open thevalvae. Arrange the aedeagus close by. Alcohol andEuparal will make things very brittle, so care is neededwhilst manipulating the structure. Use Euparal Essenceif needed to keep the Euparal liquid and to finishoff the edges once the cover slip has been placed.Apply the cover slip at an angle to help prevent airbubbles. These usually disappear in Euparal. Labelthe slide, including a reference number to link it tothe specimen, and cross-reference the specimen.The slide preparation should be kept horizontal andallowed to dry on a level surface for several months,otherwise the cover slip will slowly drift across themicroscope slide.
Photography: valvae are normally displayed flatwith ventral side upwards, but in Euparal smallspecimens may be able to partially spring back,disguising their shape. Consider making a temporaryslide for photographic purposes: arrange the valvaeon a glass slide with alcohol as a mountant and applya cover slip, but keep feeding in alcohol as it willevaporate quickly. Once the shot has been taken,carefully remove the slip and apply Euparal to thespecimen, as above.

Step 4 (females). Separating the genitaliafrom the abdomenSince the female genitalia are more delicate, the nextstage will typically involve removing part of the cuticle,rather than applying pressure, which would damagethem. First you should identify the end bearing theovipositor, near to which will be found a ventral openingcalled the ostium. This part should remain intact, butthe segments anterior to this can usually be removed.Inside will be a bag-like structure called the bursacopulatrix (or corpus bursae) and from this to the ostiumis a tube called the ductus bursae. Try not to damageeither of these. Make a cut with a pin or fine scalpel ata junction between the two segments anterior to theone bearing the ostium. Place two angled pins insidethe end of the abdomen away from the tip of theovipositor and slit the skin open until you reach theinitial cuts. Remove the cuticle and hopefully you’ll beleft with the ovipositor, the last segment bearing theostium, along with the ductus bursae and bursacopulatrix (and appendix bursae if one is present in thatspecies). Note that spermatophores (packets of storedsperm) may be present in the bursa copulatrix. Thesemay cause clouding later but can, if necessary, beremoved by making a small slit in the end of the bursacopulatrix. If stain is to be used, it is recommended thatit is applied at this stage (see also Stage 5, males).
Photography: this is a good time for a photographas alcohol can distort some delicate structures.The genitalia can be turned in the water in order todisplay important details. This can provide a usefulreference for arranging the various structures on thefinal slide mount, which would normally show thegenitalia with the ventral side upwards.
Step 5 (females). Preparing the genitaliaThe genitalia should now be immersed in awater/alcohol mixture in several stages, for example30%, 60% (for approximately 30 seconds) and finally100% alcohol. This helps the cleaning process andprepares the body for the slide stage. As for males,the gradual increase in alcohol strength is important.In particular, the bursa copulatrix may collapse ifthe genitalia are transferred directly from waterto 100% alcohol.
Transfer to a glass slide and proceed as under thesecond paragraph of Step 6 (males), ensuring thatthe ductus bursae retains its natural shape and doesnot become twisted. It should be noted that if a femalehas not mated, the bursa copulatrix may not be inflatedand diagnostic features may not be visible as a result.Therefore, if a bred female is to be dissected it isa good idea to allow her to mate, if possible.
Everting the vesicaHardwick (1950) described a technique of eversionof the male vesica of noctuid moths, which led todiscoveries of vesical characters in noctuids and otherlarge Lepidoptera. The vesica structures, includingshapes, number and location of diverticula andcornuti, have proved to be very important in resolvingtaxonomically-difficult groups (reviewed andsummarised by Mikkola, 2007).
This procedure is analogous to turning a sock or gloveinside out. It is the most difficult procedure that mustbe undertaken, so must be practised on expendablespecimens before attempting it in order to make adetermination. After separation of the aedeagus fromthe rest of the genitalia, as much of the ductusejaculatorius (a narrow tube that enters the aedeagusthrough a split membranous tube near the base) shouldbe removed as possible, taking care not to remove ordamage any part of the vesica.
Now hold the aedeagus firmly with a pair of fine forceps,and gently push the remaining part of the ductus andthe vesica up inside the aedeagus with a blunt mountedneedle or, very carefully, with the tip of a syringe needle.The aedeagus or vesica must not be punctured duringthis process or it will not inflate.
The syringe, fitted with a 30 gauge needle and filledwith distilled or purified water, is then carefully insertedinto the aedeagus through what is left of the ductusejaculatorius. The aedeagus is then firmly, but carefully,clamped on to the hypodermic using a pair of fineforceps just above the entry point of the ductusejaculatorius in order to seal it, and gentle pressureapplied to the syringe.
The vesica should start to evert. When this happens,remove the syringe and transfer to a Petri dish previouslyfilled with iso-propyl alcohol and repeat the procedurewith the syringe filled with iso-propyl alcohol, this timefully inflating the vesica, increasing and maintaining fullpressure until the entire contents of the syringe are used.
The vesica should now be fully everted and sufficientlyhard so as not to collapse when mounted. If it failsto evert, usually due to a constriction in the vesica itself,or because some part of the internal armature (cornuti,etc.), is causing an obstruction, carefully tease out thevesica through the open, posterior end of the aedeagususing a pair of fine forceps. At this stage, if the vesicacontains several cornuti etc., it may be advantageous toadd a very small amount of liquid detergent to act as alubricant. Before mounting in Euparal, Euparal Essencecan be used to clear the preparation.
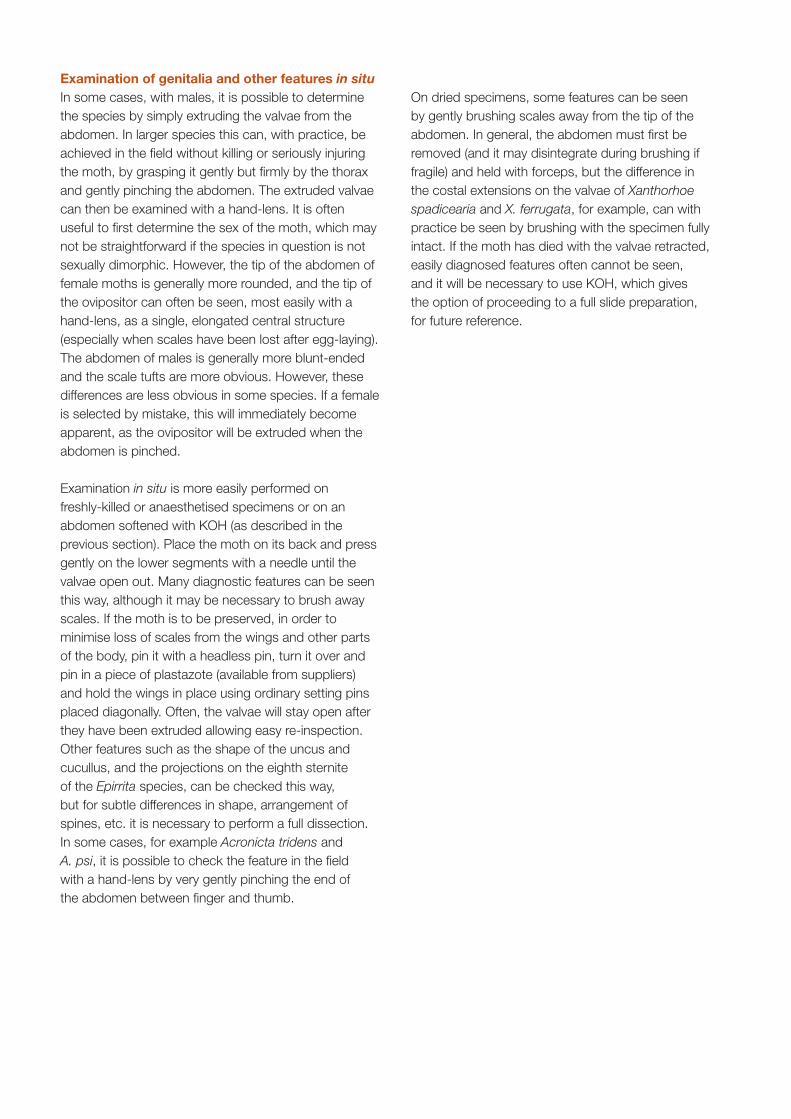
Examination of genitalia and other features in situIn some cases, with males, it is possible to determinethe species by simply extruding the valvae from theabdomen. In larger species this can, with practice, beachieved in the field without killing or seriously injuringthe moth, by grasping it gently but firmly by the thoraxand gently pinching the abdomen. The extruded valvaecan then be examined with a hand-lens. It is oftenuseful to first determine the sex of the moth, which maynot be straightforward if the species in question is notsexually dimorphic. However, the tip of the abdomen offemale moths is generally more rounded, and the tip ofthe ovipositor can often be seen, most easily with ahand-lens, as a single, elongated central structure(especially when scales have been lost after egg-laying).The abdomen of males is generally more blunt-endedand the scale tufts are more obvious. However, thesedifferences are less obvious in some species. If a femaleis selected by mistake, this will immediately becomeapparent, as the ovipositor will be extruded when theabdomen is pinched.
Examination in situ is more easily performed on freshly-killed or anaesthetised specimens or on anabdomen softened with KOH (as described in theprevious section). Place the moth on its back and pressgently on the lower segments with a needle until thevalvae open out. Many diagnostic features can be seenthis way, although it may be necessary to brush awayscales. If the moth is to be preserved, in order tominimise loss of scales from the wings and other partsof the body, pin it with a headless pin, turn it over andpin in a piece of plastazote (available from suppliers)and hold the wings in place using ordinary setting pinsplaced diagonally. Often, the valvae will stay open afterthey have been extruded allowing easy re-inspection.Other features such as the shape of the uncus andcucullus, and the projections on the eighth sterniteof the Epirrita species, can be checked this way, but for subtle differences in shape, arrangement ofspines, etc. it is necessary to perform a full dissection.In some cases, for example Acronicta tridens andA. psi, it is possible to check the feature in the fieldwith a hand-lens by very gently pinching the end ofthe abdomen between finger and thumb.
On dried specimens, some features can be seenby gently brushing scales away from the tip of theabdomen. In general, the abdomen must first beremoved (and it may disintegrate during brushing iffragile) and held with forceps, but the difference inthe costal extensions on the valvae of Xanthorhoespadicearia and X. ferrugata, for example, can withpractice be seen by brushing with the specimen fullyintact. If the moth has died with the valvae retracted,easily diagnosed features often cannot be seen,and it will be necessary to use KOH, which givesthe option of proceeding to a full slide preparation,for future reference.
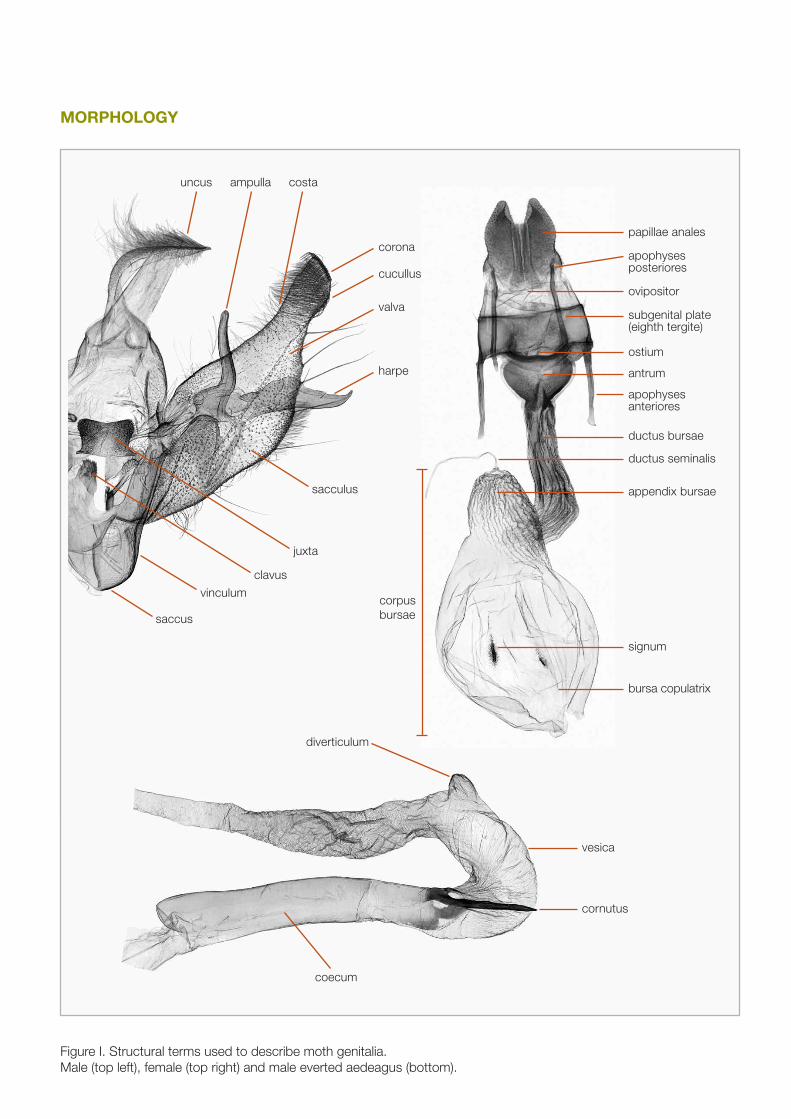
MORPHOLOGY
Figure I. Structural terms used to describe moth genitalia.Male (top left), female (top right) and male everted aedeagus (bottom).
ovipositor
uncus
ostium
antrum
apophysesanteriores
ductus bursae
ductus seminalis
appendix bursae
signum
corpusbursae
bursa copulatrix
papillae anales
subgenital plate(eighth tergite)
apophysesposteriores
ampulla costa
corona
cucullus
valva
harpe
sacculus
vinculum
saccus
juxta
clavus
vesica
coecum
cornutus
diverticulum
GLOSSARY OF TERMS
A cautionary note about anatomical terminology
Overleaf will be found a list of anatomical anddescriptive terms used in this book, along with namesof other major structures of the genitalia. The definitionshave been drawn from a number of sources, includingTorre-Bueno (1937 and later revisions) and Klots (1970).Where there may be ambiguity (see also below), furtherdetails are given. This is far from an exhaustive list ofterms either for Lepidoptera or insects in general, andmany others will be found in the aforementioned textsand elsewhere. Scoble (1992) describes the parts ofthe genitalia of Lepidoptera and their arrangement,and summarises our knowledge of the ways they arethought to have been derived from the terminalsegments of the abdomen.
As mentioned in the introduction, and noted byScoble (1992), a bewildering variety of anatomicalterms has been used by a number of authors overmany years, in an attempt to describe the various partsof moth genitalia, often inconsistently. The problemis especially acute in the males, and appears to bepartly as a result of uncertainty or disagreement asto the evolutionary origins of these structures. In somecases, the same term has been used to describeseveral different, usually related structures, or partsof them, and one structure has had several namesassigned to it by different authors. This is most notablythe case for names given to the processes on theventral surface of the valvae (clasping organs). In thisbook, we have avoided the use of the functionallydescriptive, but confused, term ‘clasper’, which isoften used to describe the whole clasping organ(i.e. the valva and cucullus) and equally often for aprojection on the ventral surface of the valva. Thesame can be said of the term ‘harpe’, but its use todescribe the whole structure is perhaps more afeature of the older literature.
In the case of Cyclophora, Hausmann (2004) usesthe term ‘fibula’ to describe the thin process arisingin the basal half of the valva in some species. Onedictionary definition of fibula is a “clasp or buckle”,and therefore the term may be synonymous with harpeor clasper. In other cases, the processes on the ventralsurface of the valvae are described as ‘extensions ofthe sacculus’. Here, the distinction from some usesof ‘harpe’ or ‘clasper’ may be unclear, but again wherethey are diagnostic we have generally followed themost recent authoritative works in describing thesefeatures. To further confuse the uninitiated, a long,narrow process under the valva is sometimes known as an ‘ampulla’, and in some instances the term‘pollex’ has been used to describe a similarly-shapedstructure. Confusion of terminology is not confinedto the male valvae. In the females, some authorsuse ‘bursa copulatrix’ to include the ductus bursaewhereas most keep them separate. The pointers usedon the figures in this book should preclude confusionwhen using the text to identify a specimen, but theabove discrepancies are worth bearing in mind if it isbeing used alongside other works or compared withthem. Readers should refer to the glossary providedtherein, or to the standard works listed above.Generalised diagrams showing the terminology forexternal features can be found in Skinner (2009).

GLOSSARY
Aedeagus tube-like organ of the male genitalialaying between the valves and functioning as a penis,often adorned with spines and useful in determiningthe species. It houses the vesica (sometimes referredto as the endophallus).
Allopatric referring to taxa occurring ingeographically separate areas.
Ampulla in the male, a process arising from the sacculus,usually thin and tubular and on the costal side.
Anal angle in ventral view, the anterior extremityof the cucullus (in the male).
Anellus in the male, the membranous coveringof the aedeagus.
Ante- before the middle, e.g. an antemedianline on the wing of a moth.
Anterior towards the front end of the body.
Antrum in the female, a chamber or cavity formedfrom part of the ostium in some species (see alsoostium bursae).
Apex (pl. apices), apical, apically referring to thefurthest point from the body or point of attachment.
Apophyses anteriores in the female, the pairof elongate processes arising from the eighth sternite.
Apophyses posteriores in the female, the pairof elongate processes arising from the ovipositor.
Appendix bursae in the female, a secondary swellingattached to the bursa copulatrix (which is then calledthe corpus bursae).
Basal, basally, basad closest to the body;towards the body or point of attachment.
Bifurcate partly divided into two, i.e. forked.
Bipectinate comb-like on both sides, e.g. antennae.
Biserrate saw-like on both sides, e.g. antennae.
Bursa copulatrix in the female, part of the bag-likestructure connected to the ductus bursae, which isused to store sperm. If an appendix bursae is alsopresent, this together with the bursa copulatrixconstitute the corpus bursae. It is often adornedwith spines, which may be distinguishingidentification features.
Carina an elevated ridge or keel, not necessarilyhigh or acute.
Cilium (pl. cilia) scale or scales resembling hairs,a row of which usually border the wings, or adornthe antennae or other organs.
Clasper(s) the valves in the male genitalia or partsof the armature thereof (usually on the median sectionor towards the base). In this book, use of the termhas been avoided. It is also synonymous, in bothmeanings, with harpe.
Claviform stigma a mark in the central area ofthe forewing of noctuid moths, often club-like.
Clavus in the male, a process arising at the costalside of the sacculus. E.g. in Mesapamea.
Cline an ecotype or form exhibiting gradual differencesover a geographical area.
Coecum in the male, a blind sac (part of the aedeagus).
Colliculum in the female, a small dorsal plate ornarrow ring-like sclerite of the ductus bursae.
Cornutus (pl. cornuti) in the male, a spine arisingfrom the aedeagus.
Corona in the male, a row of spines along the outermargin of the cucullus, extending across its inner face.
Corpus bursae in the female, the bag-like structureconnected to the ductus bursae, used to store sperm.Comprises the bursae copulatrix and appendix bursae(which may be absent). It is often adorned with spines,which may be distinguishing features.
Costa, costal in male genitalia, referring to theuppermost (i.e. posterior) margin of the valva in ventralview. On the wing of a moth, the leading edge.
Cucullus in male genitalia, the tip of the valva,often necked, rounded and bearing spines.
Cuticle the outer skin of the body (also knownas the integument).
Dentate toothed or strongly serrated.
Disc, discal referring to the central area,e.g. that of the wing of a moth.
Distal, distally, distad away from the bodyor point of attachment.
Diverticulum a blind side passage, forming a sacor swelling, e.g. in the vesica (as seen when everted)or bursa copulatrix.
Dorsum, dorsal, dorsally, dorsad referring to theback or upperside. On the wing of a moth, the dorsumis the back or trailing edge.
Ductus bursae in the female, the tube extendingfrom the ostium to the bursa copulatrix.
Ductus ejaculatorius in the male, the single ductor tube through which the seminal fluid is ejected intothe ostium of the female.
Ductus seminalis in the female, the tube connectingthe bursa copulatrix with the oviductus communis(the median outlet of the female genital system).
Endophallus see vesica.
Excavate having a rounded depression as if dug out.
Fascia a band.
Fasciculate clustered or tufted.
Fibula Under Cyclophora, used to describe oneof the processes of the valva in the males (possiblysynonymous with harpe and clasper).

Gnathos in male genitalia, a hardened part of thevinculum near the uncus, which supports the anal tube.
Harpe in male genitalia, the hardened clasping organ onthe inner face of the valva (see also clasper and valvae).
In situ (Latin) to examine the phenomenon exactlyin the place where it occurs.
Integument see cuticle.
Juxta in male genitalia, a hardened plate-like structurebetween the valvae which supports the aedeagus.
Lamella ante-vaginalis in the female, a hardenedplate partially surrounding the ostium placed anteriorly.
Lamella post-vaginalis in the female, a hardenedplate partially surrounding the ostium placed posteriorly.
Medial, medially, median middle; the central area(medio-distal = away, more distant from, the middle).
Octavals projections on the posterior marginof the eighth sternite.
Orbicular stigma a round or oval spot in the discalcell in the forewing of some noctuid moths.
Ostial plate in the female, a hardened platesurrounding the ostium.
Ostium in female genitalia, the external opening.
Ostium bursae a chamber or cavity formed frompart of the ostium (see also antrum).
Ovipositor in the female, the tubular or valvedstructure used to deposit the eggs, sometimesextendable beyond the apex of the abdomen.
Papillae anales in the female, a paired processat the apex of the ovipositor.
Pectinate comb-like (usually applied to antennae).
Phenotype an observable trait or characteristicor an organism.
Pollex in the male, a process on the valva, usuallyon the cucullus as an extension of the anal angle.Also sometimes used to describe a process arisingfrom the median section of the valva.
Post- after, beyond, e.g. post-median line onthe wing of a moth.
Posterior towards the hind end of the body.
Pre- before, e.g. pre-apical spine lies before the apex.
Produced drawn out, prolonged, extended from.
Proximal towards the body or point of attachment.
Quadrate square in shape.
Reniform stigma a kidney-shaped (or similar) markat the end of the discal cell, usually referring to theforewing of Noctuid moths.
Sacculus in male genitalia, dominant part of thebase of the valva, often adorned with spines.
Saccus in male genitalia, the lowest part of the vinculum.
Sclerite hardened part of the body forming a plate.
Sclerotised referring to a hardened part of the body.
Serrate saw-like; with notched edges like the teethof a saw.
Seta (pl. setae) stiff hair or bristle.
Setose possessing setae.
Sexual dimorphism a systematic difference in formbetween individuals of different sex in the same species.
Signum (pl. signa) in the female, sclerotised spinesand plates on the bursa copulatrix.
Simple unadorned (often applied to antennae).
Socius in the male, a paired extension of the vinculum.
Sternite(s) the ventral sclerotised plates of theabdominal segments.
Sub-basal near the base of.
Sub-elliptical roughly elliptical but with the broadestarea towards one end, i.e. egg-shaped.
Sub-genital plate the plate beneath the genitalia(eighth tergite).
Sub-quadrate nearly or approximately square.
Sub-rectangular approximately rectangular.
Sub-terminal situated towards the end, e.g.sub-terminal band on the wing of a moth.
Sympatric referring to taxa occurring in thesame geographical area.
Taxon (pl. taxa) a group of organisms adjudgedto be a unit.
Tegumen the dorsal half of the large centraltransverse ring-like part of the male genitalia.
Tergite(s) the dorsal sclerotised plates ofthe abdominal segments.
Termen the outer edge of the wing of a moth,adorned with cilia.
Truncate with a squared-off ending.
Uncus in the male, the top part of the vinculum,sometimes forming a large hooked or curved structure.
Valva (plural valvae, or informally ‘valves’) the largepair of laterally extending clasping organs of themale genitalia (see also clasper and harpe),articulating with the vinculum.
Ventral, ventrally the underside.
Vesica in the male, the inner sac of the aedeagus,also known as the endophallus.
Vinculum in the male, the ventral half of the largecentral transverse ring-like part of the male genitalia.