Embed Size (px)
Citation preview
Operating instructions
Dishwasher
017
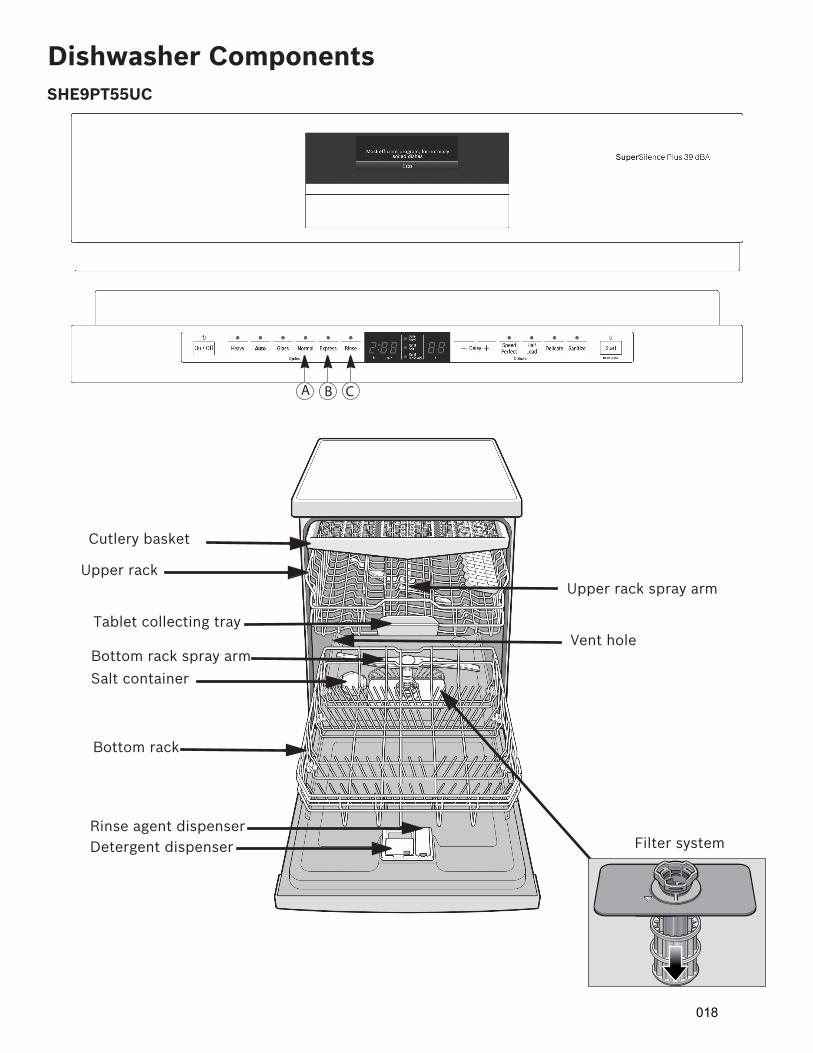
Dishwasher ComponentsSHE9PT55UC
CBA
Cutlery basket
Upper rackUpper rack spray arm
Tablet collecting tray
Bottom rack spray arm
Salt container
Bottom rack
Rinse agent dispenserDetergent dispenser Filter system
Vent hole
018
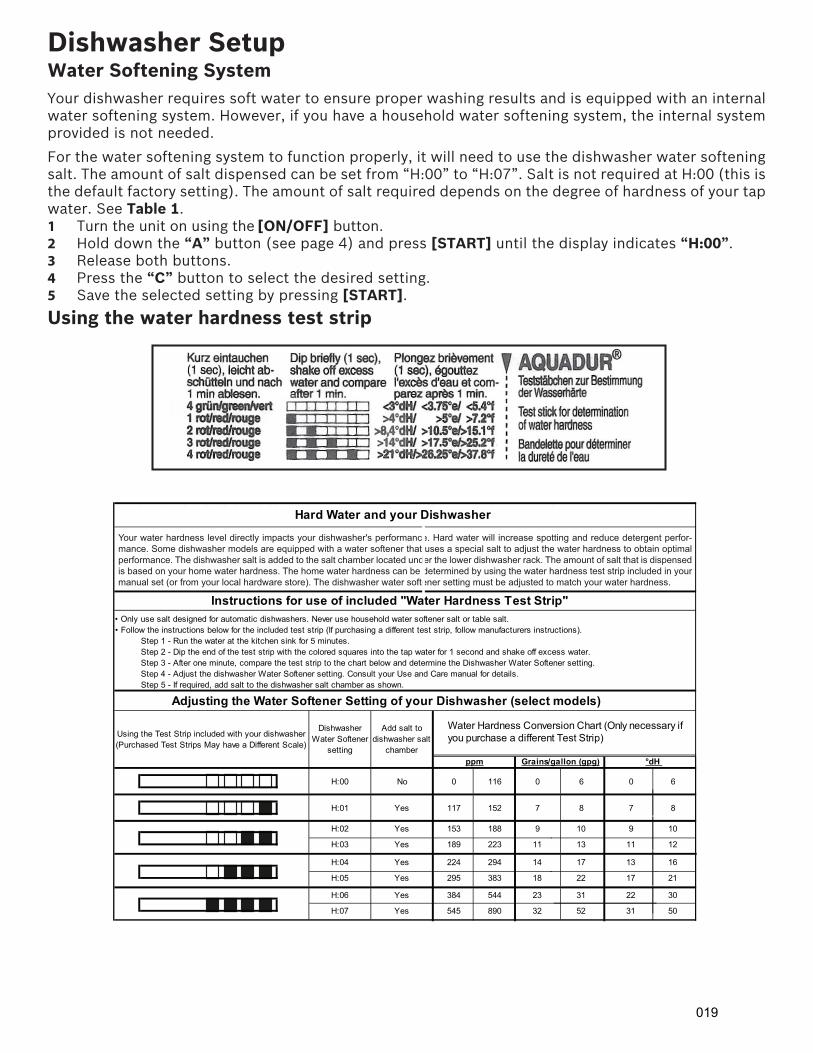
Step 1 - Run the water at the kitchen sink for 5 minutes.Step 2 - Dip the end of the test strip with the colored squares into the tap water for 1 second and shake off excess water.Step 3 - After one minute, compare the test strip to the chart below and determine the Dishwasher Water Softener setting. Step 4 - Adjust the dishwasher Water Softener setting. Consult your Use and Care manual for details.Step 5 - If required, add salt to the dishwasher salt chamber as shown.
H:00 No 0 116 0 6 0 6
H:01 Yes 117 152 7 8 7 8
H:02 Yes 153 188 9 10 9 10
H:03 Yes 189 223 11 13 11 12
H:04 Yes 224 294 14 17 13 16
H:05 Yes 295 383 18 22 17 21
H:06 Yes 384 544 23 31 22 30
H:07 Yes 545 890 32 52 31 50
� Only use salt designed for automatic dishwashers. Never use household water softener salt or table salt.
Instructions for use of included "Water Hardness Test Strip"
� Follow the instructions below for the included test strip (If purchasing a different test strip, follow manufacturers instructions).
Adjusting the Water Softener Setting of your Dishwasher (select models)
ppm Grains/gallon (gpg) °dH
Dishwasher Water Softener
setting
Add salt to dishwasher salt
chamber
Water Hardness Conversion Chart (Only necessary if you purchase a different Test Strip)
Hard Water and your Dishwasher
Using the Test Strip included with your dishwasher (Purchased Test Strips May have a Different Scale)
Your water hardness level directly impacts your dishwasher's performance. Hard water will increase spotting and reduce detergent perfor-mance. Some dishwasher models are equipped with a water softener that uses a special salt to adjust the water hardness to obtain optimal performance. The dishwasher salt is added to the salt chamber located under the lower dishwasher rack. The amount of salt that is dispensed is based on your home water hardness. The home water hardness can be determined by using the water hardness test strip included in your manual set (or from your local hardware store). The dishwasher water softener setting must be adjusted to match your water hardness.
Dishwasher SetupWater Softening SystemYour dishwasher requires soft water to ensure proper washing results and is equipped with an internalwater softening system. However, if you have a household water softening system, the internal systemprovided is not needed.
For the water softening system to function properly, it will need to use the dishwasher water softeningsalt. The amount of salt dispensed can be set from “H:00” to “H:07”. Salt is not required at H:00 (this isthe default factory setting). The amount of salt required depends on the degree of hardness of your tapwater. See Table 1.1 Turn the unit on using the [ON/OFF] button.2 Hold down the “A” button (see page 4) and press [START] until the display indicates “H:00”.3 Release both buttons.4 Press the “C” button to select the desired setting.5 Save the selected setting by pressing [START].
Using the water hardness test strip
019
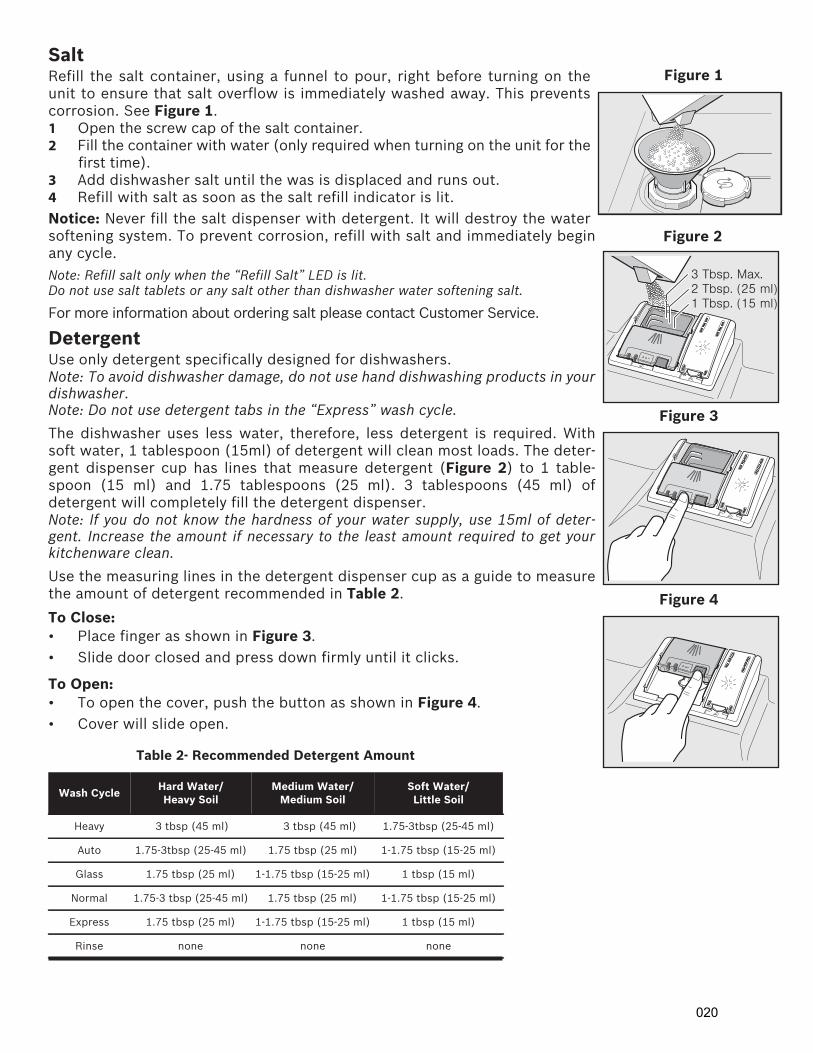
SaltRefill the salt container, using a funnel to pour, right before turning on theunit to ensure that salt overflow is immediately washed away. This preventscorrosion. See Figure 1. 1 Open the screw cap of the salt container.2 Fill the container with water (only required when turning on the unit for the
first time).3 Add dishwasher salt until the was is displaced and runs out.4 Refill with salt as soon as the salt refill indicator is lit. Notice: Never fill the salt dispenser with detergent. It will destroy the watersoftening system. To prevent corrosion, refill with salt and immediately beginany cycle.Note: Refill salt only when the “Refill Salt” LED is lit. Do not use salt tablets or any salt other than dishwasher water softening salt.
For more information about ordering salt please contact Customer Service.
DetergentUse only detergent specifically designed for dishwashers. Note: To avoid dishwasher damage, do not use hand dishwashing products in yourdishwasher.Note: Do not use detergent tabs in the “Express” wash cycle.
The dishwasher uses less water, therefore, less detergent is required. Withsoft water, 1 tablespoon (15ml) of detergent will clean most loads. The deter-gent dispenser cup has lines that measure detergent (Figure 2) to 1 table-spoon (15 ml) and 1.75 tablespoons (25 ml). 3 tablespoons (45 ml) ofdetergent will completely fill the detergent dispenser.Note: If you do not know the hardness of your water supply, use 15ml of deter-gent. Increase the amount if necessary to the least amount required to get yourkitchenware clean.
Use the measuring lines in the detergent dispenser cup as a guide to measurethe amount of detergent recommended in Table 2.
To Close:• Place finger as shown in Figure 3.• Slide door closed and press down firmly until it clicks.
To Open:• To open the cover, push the button as shown in Figure 4.• Cover will slide open.
Table 2- Recommended Detergent Amount
Wash CycleHard Water/Heavy Soil
Medium Water/Medium Soil
Soft Water/Little Soil
Heavy 3 tbsp (45 ml) 3 tbsp (45 ml) 1.75-3tbsp (25-45 ml)
Auto 1.75-3tbsp (25-45 ml) 1.75 tbsp (25 ml) 1-1.75 tbsp (15-25 ml)
Glass 1.75 tbsp (25 ml) 1-1.75 tbsp (15-25 ml) 1 tbsp (15 ml)
Normal 1.75-3 tbsp (25-45 ml) 1.75 tbsp (25 ml) 1-1.75 tbsp (15-25 ml)
Express 1.75 tbsp (25 ml) 1-1.75 tbsp (15-25 ml) 1 tbsp (15 ml)
Rinse none none none
Figure 2
Figure 3
Figure 4
Figure 1
������������������ �������������� ������
020
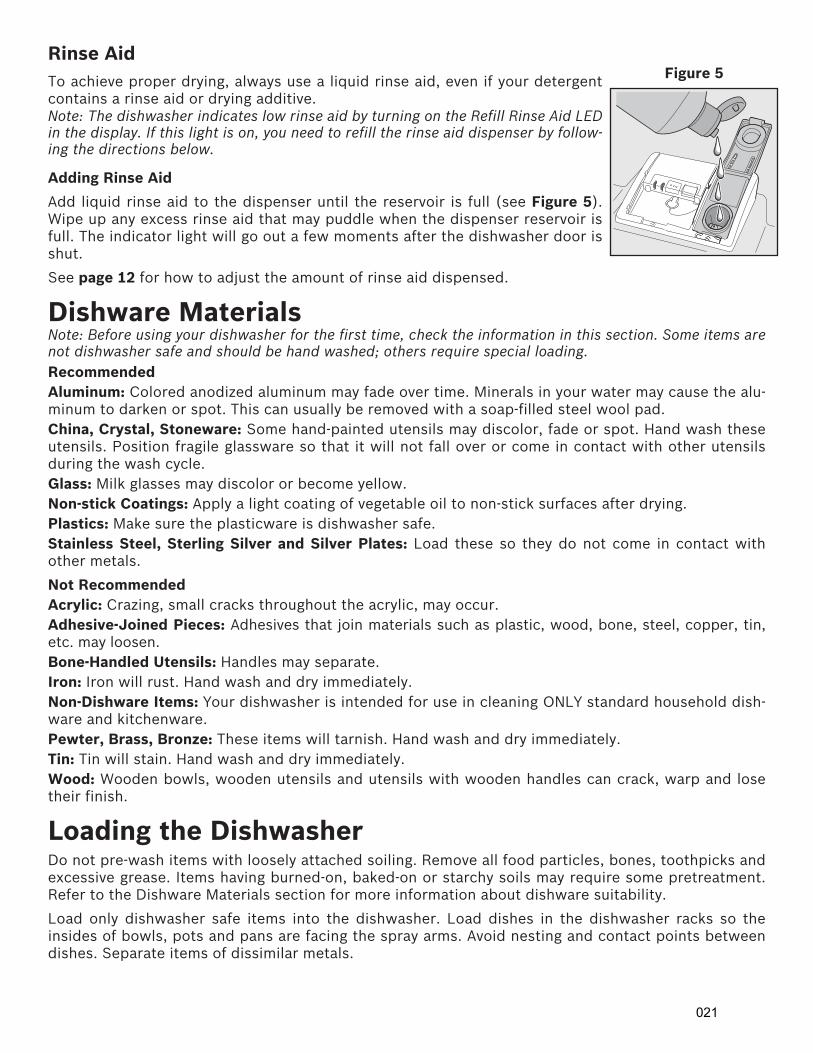
Rinse AidTo achieve proper drying, always use a liquid rinse aid, even if your detergentcontains a rinse aid or drying additive.Note: The dishwasher indicates low rinse aid by turning on the Refill Rinse Aid LEDin the display. If this light is on, you need to refill the rinse aid dispenser by follow-ing the directions below.
Adding Rinse Aid
Add liquid rinse aid to the dispenser until the reservoir is full (see Figure 5).Wipe up any excess rinse aid that may puddle when the dispenser reservoir isfull. The indicator light will go out a few moments after the dishwasher door isshut.
See page 12 for how to adjust the amount of rinse aid dispensed.
Dishware MaterialsNote: Before using your dishwasher for the first time, check the information in this section. Some items arenot dishwasher safe and should be hand washed; others require special loading.RecommendedAluminum: Colored anodized aluminum may fade over time. Minerals in your water may cause the alu-minum to darken or spot. This can usually be removed with a soap-filled steel wool pad.China, Crystal, Stoneware: Some hand-painted utensils may discolor, fade or spot. Hand wash theseutensils. Position fragile glassware so that it will not fall over or come in contact with other utensilsduring the wash cycle. Glass: Milk glasses may discolor or become yellow.Non-stick Coatings: Apply a light coating of vegetable oil to non-stick surfaces after drying.Plastics: Make sure the plasticware is dishwasher safe.Stainless Steel, Sterling Silver and Silver Plates: Load these so they do not come in contact withother metals.
Not RecommendedAcrylic: Crazing, small cracks throughout the acrylic, may occur.Adhesive-Joined Pieces: Adhesives that join materials such as plastic, wood, bone, steel, copper, tin,etc. may loosen.Bone-Handled Utensils: Handles may separate.Iron: Iron will rust. Hand wash and dry immediately.Non-Dishware Items: Your dishwasher is intended for use in cleaning ONLY standard household dish-ware and kitchenware.Pewter, Brass, Bronze: These items will tarnish. Hand wash and dry immediately.Tin: Tin will stain. Hand wash and dry immediately.Wood: Wooden bowls, wooden utensils and utensils with wooden handles can crack, warp and losetheir finish.
Loading the DishwasherDo not pre-wash items with loosely attached soiling. Remove all food particles, bones, toothpicks andexcessive grease. Items having burned-on, baked-on or starchy soils may require some pretreatment.Refer to the Dishware Materials section for more information about dishware suitability.
Load only dishwasher safe items into the dishwasher. Load dishes in the dishwasher racks so theinsides of bowls, pots and pans are facing the spray arms. Avoid nesting and contact points betweendishes. Separate items of dissimilar metals.
Figure 5
021

Flexible cupshelf side view
Bowl removed
Suggested Loading Pattern for Dishes
Upper Rack
3
4 4 4 4
1 1 1
11 1
2 2 2
2
2
222
2
2
2
2
1 1 1
6
76
5
5
5
5
5
5
5
5
5
5
5
5
11 1
4 4
4 4 4 4 4 4
3 3
3 3 3
3 3 3
3 3 3
Silverware Basket
1 2 3 4 5 6 7
1- Salad fork2- Teaspoon3- Dinner fork4- Knife5- Tablespoon6- Serving spoon7- Serving fork
Bottom Rack
Suggested Loading Pattern for Dishes (10 place settings)Upper Rack Bottom Rack Cutlery Basket
Cutlery Basket
022

Rack AccessoriesFlip Tines The racks consist of tines that can be folded down depending on what youmay need to load in the rack. To fold down, grasp the folding tine and releasefrom notch. Push folding tine downward to desired position as shown in Fig-ure 6.
Extra Tall Item SprinklerIf an item is too tall to be placed in the bottom rack even with the upperrack in the raised position, remove the empty upper rack by pulling it out ofthe dishwasher until it stops. Pull the front of the rack upward and out-ward until the rollers are completely free of the roller guides.
Set the upper rack aside. Push the roller guides back into the dishwasher.Insert the Extra Tall Item Sprinkler into the upper rack spray outlet andturn the sprinkler clockwise to lock into position. See Figure 7.
Note: Keep the vent on the tub’s left side clear by placing tall items such as plas-tic cutting boards and tall baking sheets on the bottom rack’s right side or cen-ter.
NOTICETo avoid dishwasher damage, do not reinstall the upper rack without remov-ing the Extra Tall Item Sprinkler.
Plastic Item ClipsLight-weight plastic accessories (cups, lids, etc.) can be held securely by theplastic item clips. See Figure 8.
RackMatic®The height of the upper rack can be adjusted in 3 steps to create more space.1 Pull the upper rack out of the dishwasher until it stops.2 To lower the rack, push the lever inward then upward.3 To raise the rack, hold the basket on the sides of the upper rack and lift
up.
Note: Before pushing the upper rack into the dishwasher, ensure the rack heightis the same on both sides. If the height is not the same on both sides, the dish-washer door will not shut and the upper rack spray arm will not connect to the water inlet.
Figure 6
Figure 7
Figure 8
Figure 9
� �
023
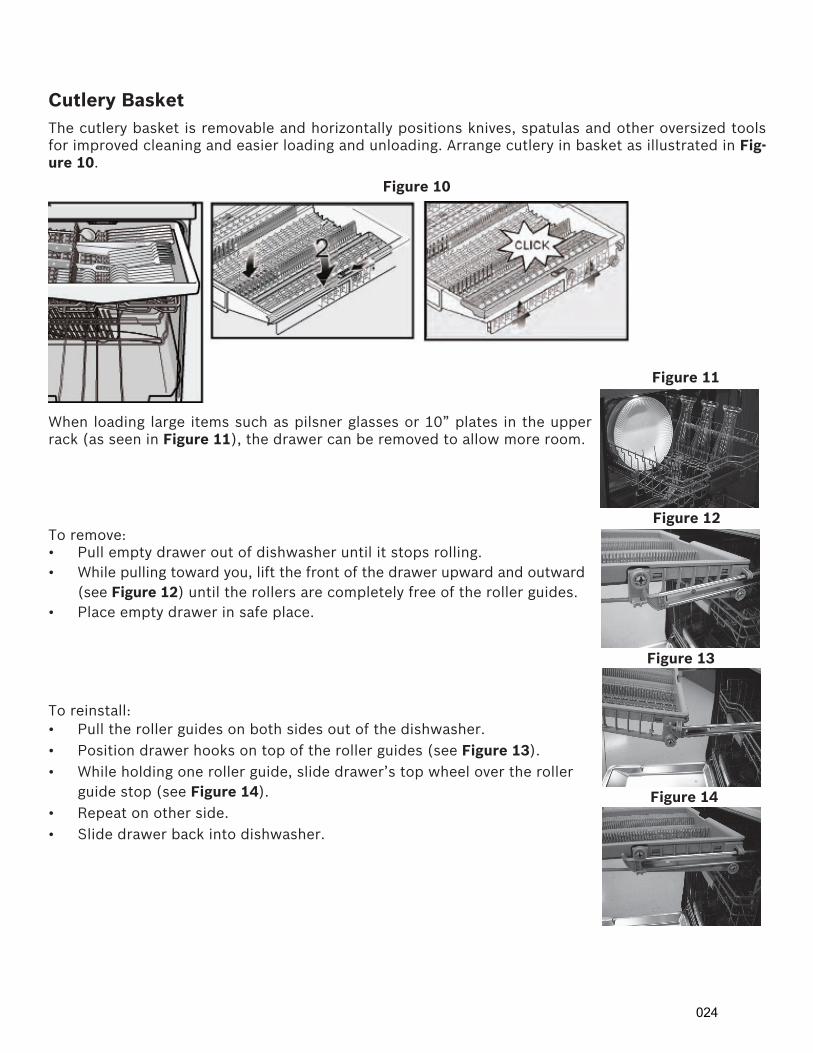
Cutlery BasketThe cutlery basket is removable and horizontally positions knives, spatulas and other oversized toolsfor improved cleaning and easier loading and unloading. Arrange cutlery in basket as illustrated in Fig-ure 10.
Figure 10
When loading large items such as pilsner glasses or 10” plates in the upperrack (as seen in Figure 11), the drawer can be removed to allow more room.
To remove:• Pull empty drawer out of dishwasher until it stops rolling.• While pulling toward you, lift the front of the drawer upward and outward
(see Figure 12) until the rollers are completely free of the roller guides.• Place empty drawer in safe place.
To reinstall:• Pull the roller guides on both sides out of the dishwasher.• Position drawer hooks on top of the roller guides (see Figure 13).• While holding one roller guide, slide drawer’s top wheel over the roller
guide stop (see Figure 14).• Repeat on other side.• Slide drawer back into dishwasher.
Figure 12
Figure 13
Figure 14
Figure 11
024
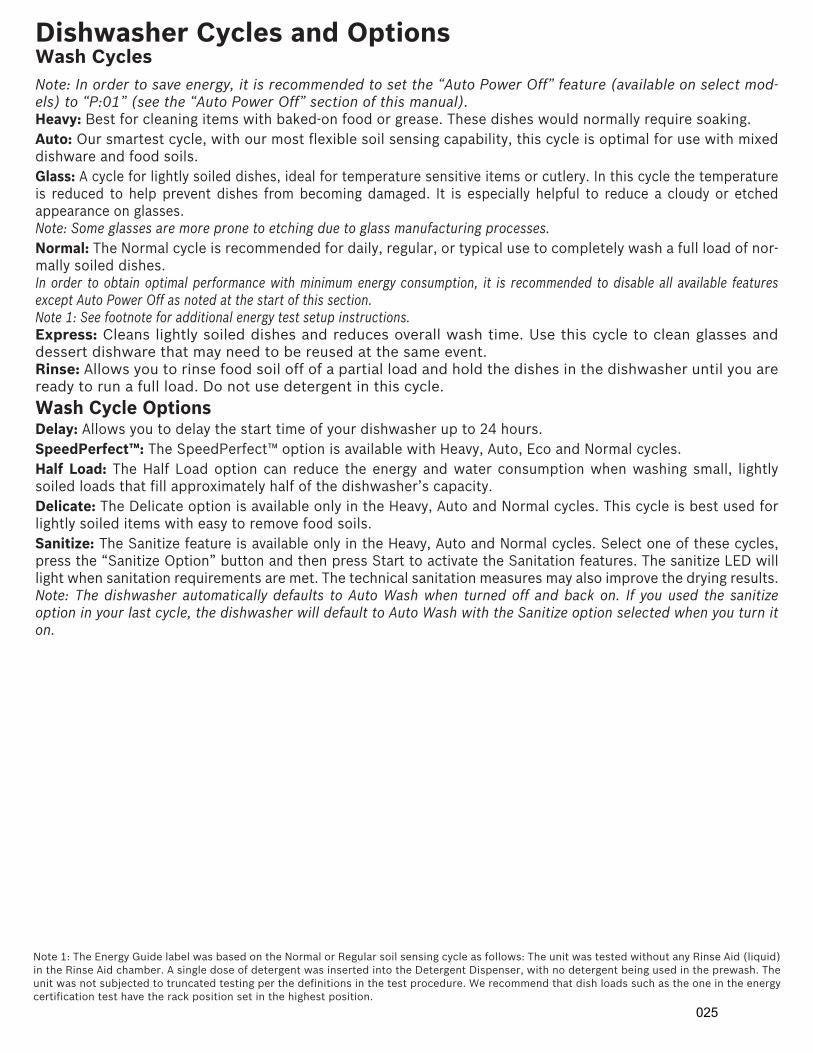
Dishwasher Cycles and OptionsWash CyclesNote: In order to save energy, it is recommended to set the “Auto Power Off” feature (available on select mod-els) to “P:01” (see the “Auto Power Off” section of this manual).Heavy: Best for cleaning items with baked-on food or grease. These dishes would normally require soaking.Auto: Our smartest cycle, with our most flexible soil sensing capability, this cycle is optimal for use with mixeddishware and food soils.Glass: A cycle for lightly soiled dishes, ideal for temperature sensitive items or cutlery. In this cycle the temperatureis reduced to help prevent dishes from becoming damaged. It is especially helpful to reduce a cloudy or etchedappearance on glasses. Note: Some glasses are more prone to etching due to glass manufacturing processes. Normal: The Normal cycle is recommended for daily, regular, or typical use to completely wash a full load of nor-mally soiled dishes.In order to obtain optimal performance with minimum energy consumption, it is recommended to disable all available featuresexcept Auto Power Off as noted at the start of this section.Note 1: See footnote for additional energy test setup instructions.Express: Cleans lightly soiled dishes and reduces overall wash time. Use this cycle to clean glasses anddessert dishware that may need to be reused at the same event.Rinse: Allows you to rinse food soil off of a partial load and hold the dishes in the dishwasher until you areready to run a full load. Do not use detergent in this cycle.
Wash Cycle OptionsDelay: Allows you to delay the start time of your dishwasher up to 24 hours. SpeedPerfect™: The SpeedPerfect™ option is available with Heavy, Auto, Eco and Normal cycles. Half Load: The Half Load option can reduce the energy and water consumption when washing small, lightlysoiled loads that fill approximately half of the dishwasher’s capacity. Delicate: The Delicate option is available only in the Heavy, Auto and Normal cycles. This cycle is best used forlightly soiled items with easy to remove food soils. Sanitize: The Sanitize feature is available only in the Heavy, Auto and Normal cycles. Select one of these cycles,press the “Sanitize Option” button and then press Start to activate the Sanitation features. The sanitize LED willlight when sanitation requirements are met. The technical sanitation measures may also improve the drying results.Note: The dishwasher automatically defaults to Auto Wash when turned off and back on. If you used the sanitizeoption in your last cycle, the dishwasher will default to Auto Wash with the Sanitize option selected when you turn iton.
Note 1: The Energy Guide label was based on the Normal or Regular soil sensing cycle as follows: The unit was tested without any Rinse Aid (liquid)in the Rinse Aid chamber. A single dose of detergent was inserted into the Detergent Dispenser, with no detergent being used in the prewash. Theunit was not subjected to truncated testing per the definitions in the test procedure. We recommend that dish loads such as the one in the energycertification test have the rack position set in the highest position.
025
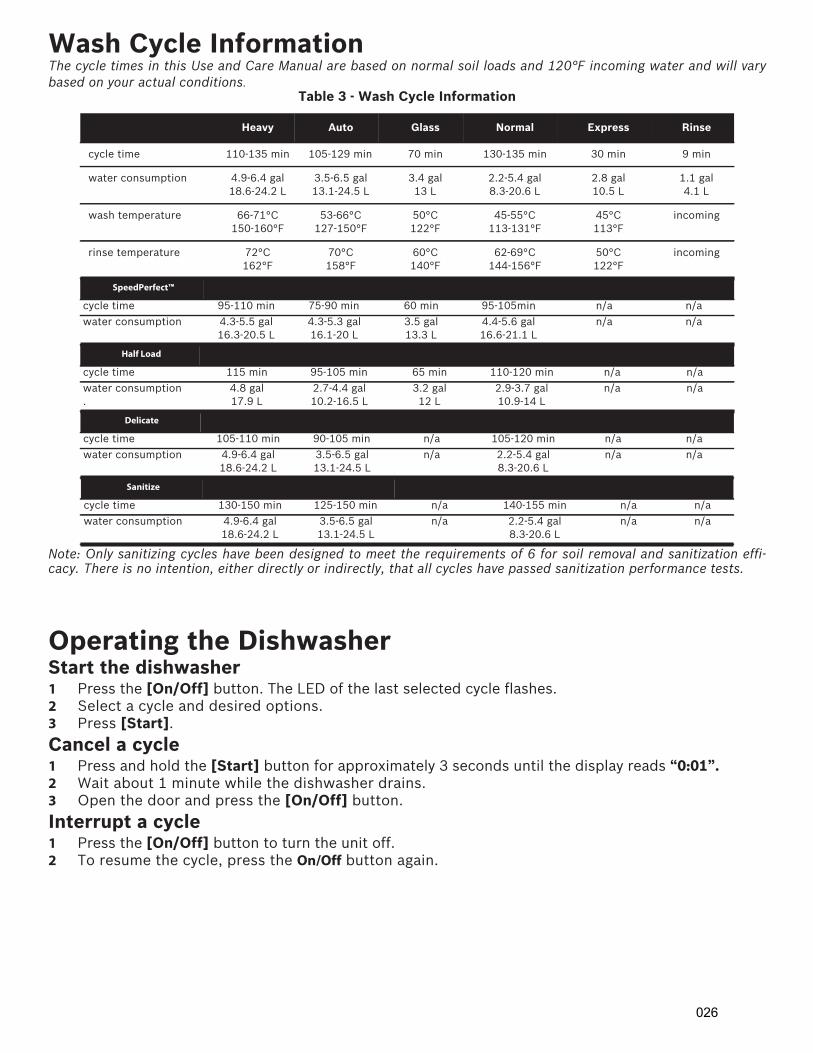
Wash Cycle InformationThe cycle times in this Use and Care Manual are based on normal soil loads and 120°F incoming water and will varybased on your actual conditions.
Note: Only sanitizing cycles have been designed to meet the requirements of 6 for soil removal and sanitization effi-cacy. There is no intention, either directly or indirectly, that all cycles have passed sanitization performance tests.
Operating the DishwasherStart the dishwasher1 Press the [On/Off] button. The LED of the last selected cycle flashes.2 Select a cycle and desired options. 3 Press [Start].
Cancel a cycle1 Press and hold the [Start] button for approximately 3 seconds until the display reads “0:01”.2 Wait about 1 minute while the dishwasher drains.3 Open the door and press the [On/Off] button.
Interrupt a cycle1 Press the [On/Off] button to turn the unit off.2 To resume the cycle, press the On/Off button again.
Table 3 - Wash Cycle Information
Heavy Auto Glass Normal Express Rinse
cycle time 110-135 min 105-129 min 70 min 130-135 min 30 min 9 min
water consumption 4.9-6.4 gal18.6-24.2 L
3.5-6.5 gal13.1-24.5 L
3.4 gal13 L
2.2-5.4 gal8.3-20.6 L
2.8 gal10.5 L
1.1 gal4.1 L
wash temperature 66-71°C150-160°F
53-66°C127-150°F
50°C122°F
45-55°C113-131°F
45°C113°F
incoming
rinse temperature 72°C162°F
70°C158°F
60°C140°F
62-69°C144-156°F
50°C122°F
incoming
SpeedPerfect™
cycle time 95-110 min 75-90 min 60 min 95-105min n/a n/a
water consumption 4.3-5.5 gal16.3-20.5 L
4.3-5.3 gal16.1-20 L
3.5 gal13.3 L
4.4-5.6 gal16.6-21.1 L
n/a n/a
Half Load
cycle time 115 min 95-105 min 65 min 110-120 min n/a n/a
water consumption.
4.8 gal17.9 L
2.7-4.4 gal10.2-16.5 L
3.2 gal12 L
2.9-3.7 gal10.9-14 L
n/a n/a
Delicate
cycle time 105-110 min 90-105 min n/a 105-120 min n/a n/a
water consumption 4.9-6.4 gal18.6-24.2 L
3.5-6.5 gal13.1-24.5 L
n/a 2.2-5.4 gal8.3-20.6 L
n/a n/a
Sanitize
cycle time 130-150 min 125-150 min n/a 140-155 min n/a n/a
water consumption 4.9-6.4 gal18.6-24.2 L
3.5-6.5 gal13.1-24.5 L
n/a 2.2-5.4 gal8.3-20.6 L
n/a n/a
026

Setting the amount of rinse aidThe amount of rinse aid dispensed can be set from “r:00” to “r:06”.To change the setting:1 Press the [On/Off] button.2 Hold down the “A” button (see page 4) and press [Start] until the display indicates “H:00”.3 Release both buttons.4 Press the “A” button until the display shows “r:05”.5 Press the “C” button to select the desired setting.
“r:00” = dispenser is OFF“r:01” = lowest setting“r:02” = low setting“r:03” = medium setting“r:04” = medium/high setting“r:05” = high setting“r:06” = highest setting
6 Press [Start] to save the setting.
Delay StartYou can delay the start of the cycle in one hour increments up to 24 hours.
To set delay start:1 Press the [On/Off] button.2 Press the [+] button until the display jumps to “h:01”.3 Press the [+] or [-] button until the displayed time corresponds with your requirements.
h:01 = 1 hour delay h:24 = 24 hour delay
4 Press [Start] to activate delay start.
To cancel delay start:1 Press the [+] or [-] button until “h:00” is indicated on the digital display.2 Press [Start] to save setting.
Cycle Completion Signal 1 Open the door and press the [On/Off] button.2 Hold down the “A” button (see page 4) and press [Start] until the display indicates “H:00”.3 Release both buttons.4 Press the “A” button until the display shows “b:02”.5 Press the “C” button to increase or decrease the tone “b:00” = OFF and “b:03” = LOUDEST 6 Press [Start] to save setting and close the door.
Intensive DryingThe final rinse uses a higher temperature which improves the drying results. The running time mayincrease slightly.
To turn intensive drying on:1 Press the [On/Off] button.2 Hold down the “A” button (see page 4) and press [Start] until the display indicates “H:00”.3 Release both buttons.4 Press the “A” button until the display shows “d:00”.5 Press the “C” button to turn intensive drying on or off. “d:01” = ON and “d:00” = OFF 6 Press [Start] to save setting and close the door.
027
Auto Power OffTo save energy, the dishwasher is turned off 1 minute after the wash cycle ends. Auto Power Off can beadjusted from P:00 to P:02.To change the setting:1 Press the [On/Off] button.2 Hold down the “A” button and press [Start] until the display indicates “H:00”.3 Release both buttons.4 Press the “A” button until the display indicates “P:00”.5 Press the “C” button until the display corresponds with your requirements.
P:00 = dishwasher does not turn off automaticallyP:01 = dishwasher turns off automatically after 1 minuteP:02 = dishwasher turns off automatically after 120 minutes (2 hours)
6 Press [Start] to save the setting.
Sapphire Glow®The interior light comes on when the door is opened, even if the unit is powered off. When the door isclosed or slightly ajar, the interior light is off.
To change the setting:1 Press the [On/Off] button.2 Hold down the “A” button and press [Start] until the display indicates “H:00”.3 Release both buttons.4 Press the “A” button until the display indicates “P:00”.5 Press the “C” button to switch between “P:00” = always ON, “P:01”= always OFF, and “P:02” =
always OFF and press [Start] to save the setting.
Onboard ComputerYou can switch the onboard computer (additional program information) off or on. Proceed as follows:1 Press the [On/Off] button.2 Hold down the “A” button and press [Start] until H:0.. is indicated on the digital display.3 Release both buttons. The LED for button “A” flashes and the digital display shows the factory set-
ting H:04.4 Press the “A” button until the factory set value C:01 is indicated on the digital display.
To change the setting:1 Press the “C” button to switch the onboard computer (additional program information) to C:00 =
OFF or C:01 = ON.2 Press [Start] to save the setting.
028
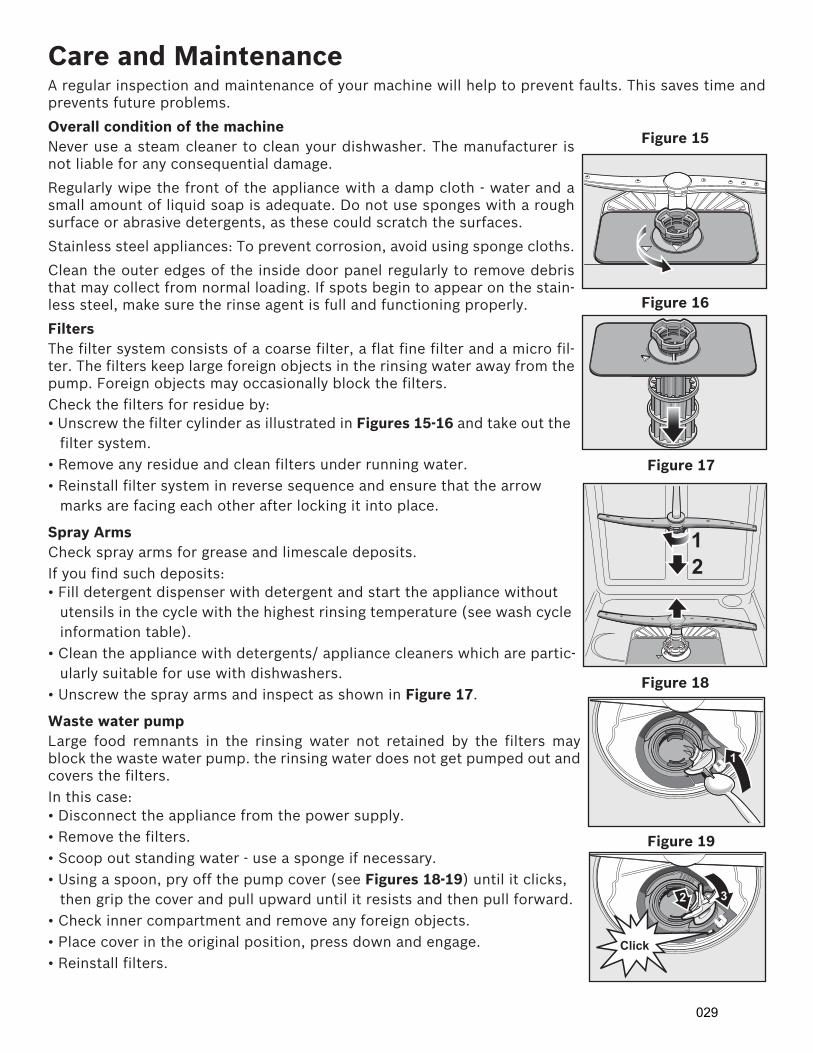
Care and MaintenanceA regular inspection and maintenance of your machine will help to prevent faults. This saves time andprevents future problems.
Overall condition of the machineNever use a steam cleaner to clean your dishwasher. The manufacturer isnot liable for any consequential damage.
Regularly wipe the front of the appliance with a damp cloth - water and asmall amount of liquid soap is adequate. Do not use sponges with a roughsurface or abrasive detergents, as these could scratch the surfaces.
Stainless steel appliances: To prevent corrosion, avoid using sponge cloths.
Clean the outer edges of the inside door panel regularly to remove debristhat may collect from normal loading. If spots begin to appear on the stain-less steel, make sure the rinse agent is full and functioning properly.
FiltersThe filter system consists of a coarse filter, a flat fine filter and a micro fil-ter. The filters keep large foreign objects in the rinsing water away from thepump. Foreign objects may occasionally block the filters. Check the filters for residue by:• Unscrew the filter cylinder as illustrated in Figures 15-16 and take out the
filter system.• Remove any residue and clean filters under running water.• Reinstall filter system in reverse sequence and ensure that the arrow
marks are facing each other after locking it into place.
Spray ArmsCheck spray arms for grease and limescale deposits.If you find such deposits:• Fill detergent dispenser with detergent and start the appliance without
utensils in the cycle with the highest rinsing temperature (see wash cycleinformation table).
• Clean the appliance with detergents/ appliance cleaners which are partic-ularly suitable for use with dishwashers.
• Unscrew the spray arms and inspect as shown in Figure 17.
Waste water pumpLarge food remnants in the rinsing water not retained by the filters mayblock the waste water pump. the rinsing water does not get pumped out andcovers the filters.In this case:• Disconnect the appliance from the power supply.• Remove the filters.• Scoop out standing water - use a sponge if necessary.• Using a spoon, pry off the pump cover (see Figures 18-19) until it clicks,
then grip the cover and pull upward until it resists and then pull forward.• Check inner compartment and remove any foreign objects.• Place cover in the original position, press down and engage.• Reinstall filters.
Figure 15
Figure 16
Figure 17
Figure 18
Figure 19
�
� �
����
��
029
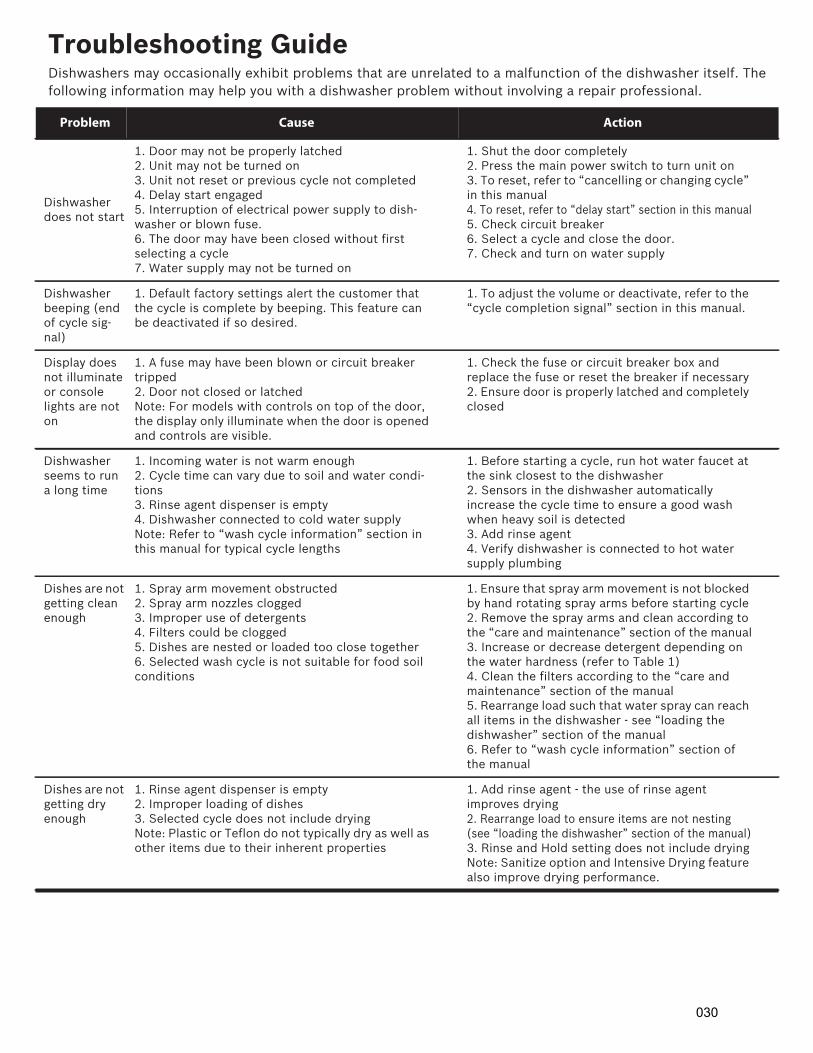
Troubleshooting GuideDishwashers may occasionally exhibit problems that are unrelated to a malfunction of the dishwasher itself. Thefollowing information may help you with a dishwasher problem without involving a repair professional.
Problem Cause Action
Dishwasher does not start
1. Door may not be properly latched2. Unit may not be turned on3. Unit not reset or previous cycle not completed4. Delay start engaged5. Interruption of electrical power supply to dish-washer or blown fuse.6. The door may have been closed without firstselecting a cycle7. Water supply may not be turned on
1. Shut the door completely2. Press the main power switch to turn unit on3. To reset, refer to “cancelling or changing cycle”in this manual4. To reset, refer to “delay start” section in this manual5. Check circuit breaker6. Select a cycle and close the door.7. Check and turn on water supply
Dishwasher beeping (end of cycle sig-nal)
1. Default factory settings alert the customer thatthe cycle is complete by beeping. This feature canbe deactivated if so desired.
1. To adjust the volume or deactivate, refer to the“cycle completion signal” section in this manual.
Display does not illuminate or console lights are not on
1. A fuse may have been blown or circuit breakertripped2. Door not closed or latchedNote: For models with controls on top of the door,the display only illuminate when the door is openedand controls are visible.
1. Check the fuse or circuit breaker box andreplace the fuse or reset the breaker if necessary2. Ensure door is properly latched and completelyclosed
Dishwasher seems to run a long time
1. Incoming water is not warm enough2. Cycle time can vary due to soil and water condi-tions3. Rinse agent dispenser is empty4. Dishwasher connected to cold water supplyNote: Refer to “wash cycle information” section inthis manual for typical cycle lengths
1. Before starting a cycle, run hot water faucet atthe sink closest to the dishwasher2. Sensors in the dishwasher automaticallyincrease the cycle time to ensure a good washwhen heavy soil is detected3. Add rinse agent4. Verify dishwasher is connected to hot watersupply plumbing
Dishes are not getting clean enough
1. Spray arm movement obstructed2. Spray arm nozzles clogged3. Improper use of detergents4. Filters could be clogged5. Dishes are nested or loaded too close together6. Selected wash cycle is not suitable for food soilconditions
1. Ensure that spray arm movement is not blockedby hand rotating spray arms before starting cycle2. Remove the spray arms and clean according tothe “care and maintenance” section of the manual3. Increase or decrease detergent depending onthe water hardness (refer to Table 1)4. Clean the filters according to the “care andmaintenance” section of the manual5. Rearrange load such that water spray can reachall items in the dishwasher - see “loading thedishwasher” section of the manual6. Refer to “wash cycle information” section ofthe manual
Dishes are not getting dry enough
1. Rinse agent dispenser is empty2. Improper loading of dishes3. Selected cycle does not include dryingNote: Plastic or Teflon do not typically dry as well asother items due to their inherent properties
1. Add rinse agent - the use of rinse agentimproves drying2. Rearrange load to ensure items are not nesting(see “loading the dishwasher” section of the manual)3. Rinse and Hold setting does not include dryingNote: Sanitize option and Intensive Drying featurealso improve drying performance.
030
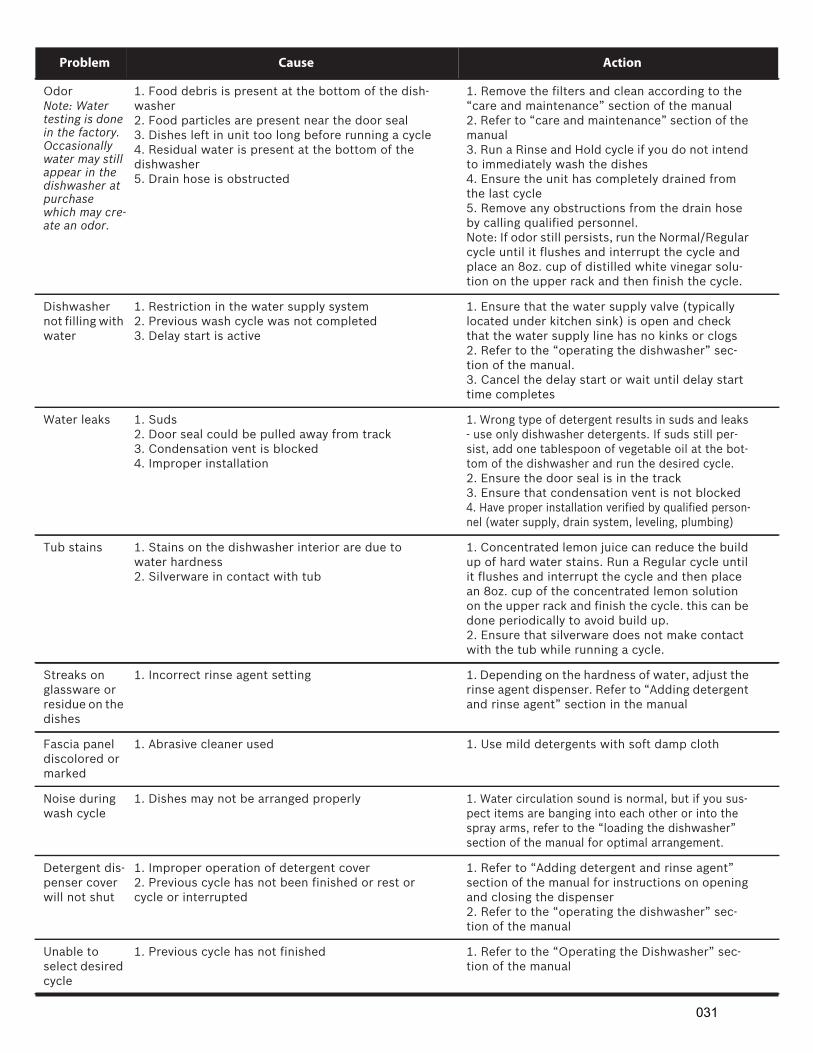
OdorNote: Water testing is done in the factory. Occasionally water may still appear in the dishwasher at purchase which may cre-ate an odor.
1. Food debris is present at the bottom of the dish-washer2. Food particles are present near the door seal3. Dishes left in unit too long before running a cycle4. Residual water is present at the bottom of thedishwasher5. Drain hose is obstructed
1. Remove the filters and clean according to the“care and maintenance” section of the manual2. Refer to “care and maintenance” section of themanual3. Run a Rinse and Hold cycle if you do not intendto immediately wash the dishes4. Ensure the unit has completely drained fromthe last cycle5. Remove any obstructions from the drain hoseby calling qualified personnel.Note: If odor still persists, run the Normal/Regularcycle until it flushes and interrupt the cycle andplace an 8oz. cup of distilled white vinegar solu-tion on the upper rack and then finish the cycle.
Dishwasher not filling with water
1. Restriction in the water supply system2. Previous wash cycle was not completed3. Delay start is active
1. Ensure that the water supply valve (typicallylocated under kitchen sink) is open and checkthat the water supply line has no kinks or clogs2. Refer to the “operating the dishwasher” sec-tion of the manual.3. Cancel the delay start or wait until delay starttime completes
Water leaks 1. Suds2. Door seal could be pulled away from track3. Condensation vent is blocked4. Improper installation
1. Wrong type of detergent results in suds and leaks- use only dishwasher detergents. If suds still per-sist, add one tablespoon of vegetable oil at the bot-tom of the dishwasher and run the desired cycle.2. Ensure the door seal is in the track3. Ensure that condensation vent is not blocked4. Have proper installation verified by qualified person-nel (water supply, drain system, leveling, plumbing)
Tub stains 1. Stains on the dishwasher interior are due towater hardness2. Silverware in contact with tub
1. Concentrated lemon juice can reduce the buildup of hard water stains. Run a Regular cycle untilit flushes and interrupt the cycle and then placean 8oz. cup of the concentrated lemon solutionon the upper rack and finish the cycle. this can bedone periodically to avoid build up.2. Ensure that silverware does not make contactwith the tub while running a cycle.
Streaks on glassware or residue on the dishes
1. Incorrect rinse agent setting 1. Depending on the hardness of water, adjust therinse agent dispenser. Refer to “Adding detergentand rinse agent” section in the manual
Fascia panel discolored or marked
1. Abrasive cleaner used 1. Use mild detergents with soft damp cloth
Noise during wash cycle
1. Dishes may not be arranged properly 1. Water circulation sound is normal, but if you sus-pect items are banging into each other or into thespray arms, refer to the “loading the dishwasher”section of the manual for optimal arrangement.
Detergent dis-penser cover will not shut
1. Improper operation of detergent cover2. Previous cycle has not been finished or rest orcycle or interrupted
1. Refer to “Adding detergent and rinse agent”section of the manual for instructions on openingand closing the dispenser2. Refer to the “operating the dishwasher” sec-tion of the manual
Unable to select desired cycle
1. Previous cycle has not finished 1. Refer to the “Operating the Dishwasher” sec-tion of the manual
Problem Cause Action
031