Embed Size (px)
Citation preview
© SAISD/Office of Instructional Technology Services http://itls.saisd.net/
Page—1
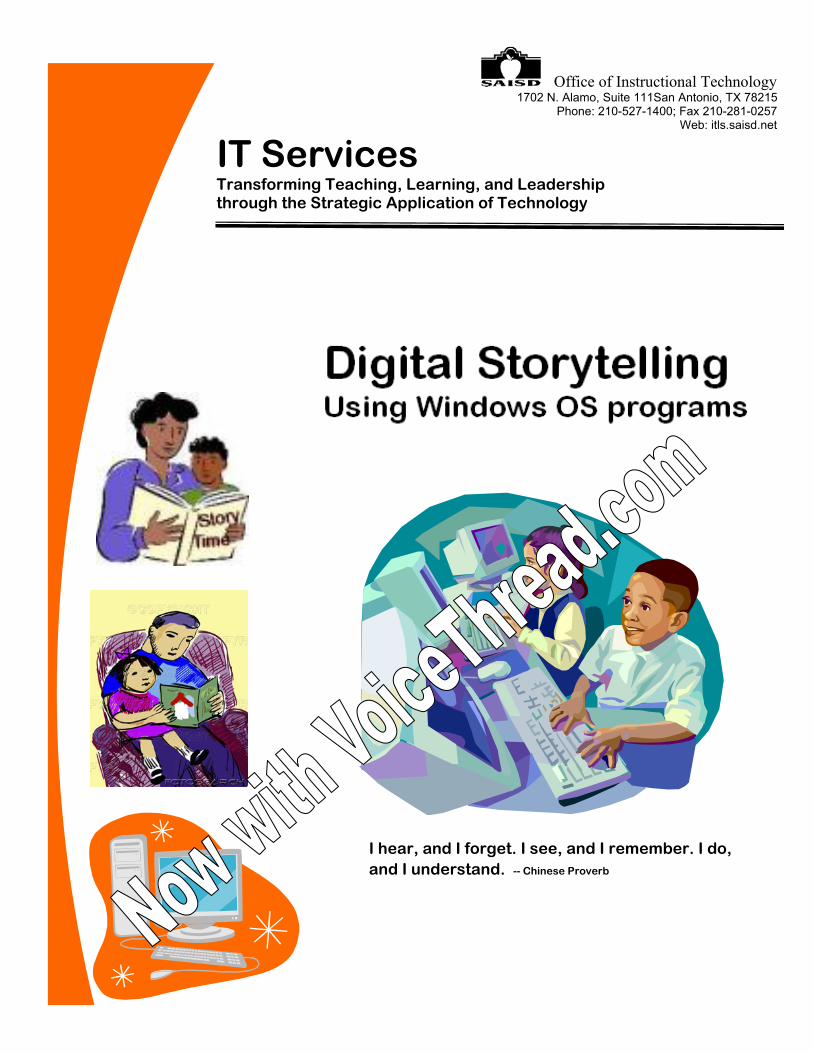
I hear, and I forget. I see, and I remember. I do, and I understand. -- Chinese Proverb
Office of Instructional Technology 1702 N. Alamo, Suite 111San Antonio, TX 78215
Phone: 210-527-1400; Fax 210-281-0257 Web: itls.saisd.net
IT Services Transforming Teaching, Learning, and Leadership through the Strategic Application of Technology

© SAISD/Office of Instructional Technology Services http://itls.saisd.net/
Page—2
Published by: The Office of Instructional Technology Services San Antonio ISD 406 Barrera Street, Room 23 San Antonio, Texas 78215 Copyright © 2008 San Antonio ISD. May be reproduced for non-profit, educational use so long as credit is given. For general information on Instructional Technology products and services please contact: Miguel Guhlin, Director Instructional Technology Services Phone: (210) 527-1400 Fax: (210) 228-3097 Email: [email protected] Web site: http://itls.saisd.net Direct any questions, comments to [email protected] or Office of Instructional Technology staff at 527-1400. Digital Story images from The Food Chain by Jo Castillo and Carmen Garzes
Digital Storytelling (now with VoiceThread.com)
© SAISD/Office of Instructional Technology Services http://itls.saisd.net/
Page—3
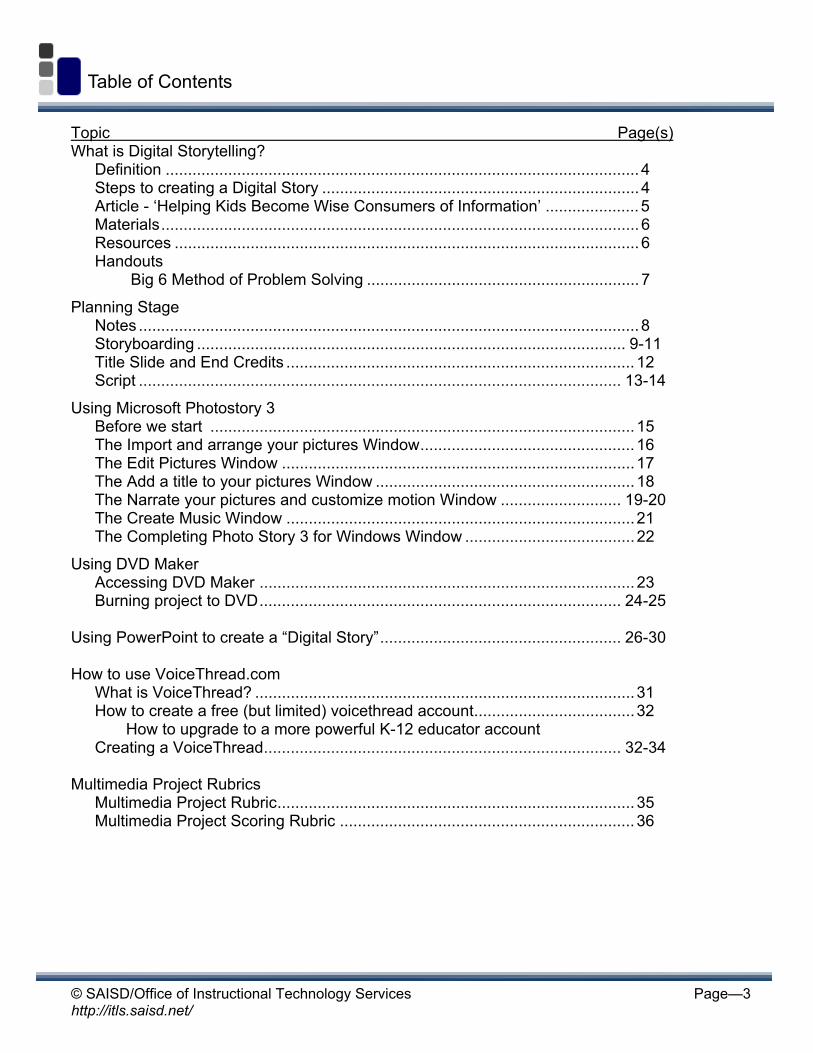
Table of Contents
Topic Page(s) What is Digital Storytelling? Definition .......................................................................................................... 4 Steps to creating a Digital Story ....................................................................... 4 Article - ‘Helping Kids Become Wise Consumers of Information’ ..................... 5 Materials........................................................................................................... 6 Resources ........................................................................................................ 6 Handouts Big 6 Method of Problem Solving ............................................................. 7
Planning Stage Notes ................................................................................................................ 8 Storyboarding ................................................................................................ 9-11 Title Slide and End Credits .............................................................................. 12 Script ............................................................................................................ 13-14
Using Microsoft Photostory 3 Before we start ............................................................................................... 15 The Import and arrange your pictures Window................................................ 16 The Edit Pictures Window ...............................................................................17 The Add a title to your pictures Window .......................................................... 18 The Narrate your pictures and customize motion Window ........................... 19-20 The Create Music Window ..............................................................................21 The Completing Photo Story 3 for Windows Window ...................................... 22
Using DVD Maker Accessing DVD Maker .................................................................................... 23 Burning project to DVD................................................................................. 24-25 Using PowerPoint to create a “Digital Story”...................................................... 26-30 How to use VoiceThread.com What is VoiceThread? .....................................................................................31 How to create a free (but limited) voicethread account....................................32 How to upgrade to a more powerful K-12 educator account Creating a VoiceThread................................................................................ 32-34 Multimedia Project Rubrics Multimedia Project Rubric................................................................................ 35 Multimedia Project Scoring Rubric .................................................................. 36
© SAISD/Office of Instructional Technology Services http://itls.saisd.net/
Page—4
What is Digital Storytelling?
What is Digital Storytelling? From Wikipedia, a free on-line encyclopedia at http://en.wikipedia.org
Digital Storytelling reflects both a broad reference to the emergent new forms of digital narratives (web-based stories, interactive stories, hypertexts, and narrative computer games) as well as the specific approach of creating short digital films developed by the Center for Digital Storytelling. As an emerging area of creative work, the definition of digital storytelling is still the subject of much debate.
The broad definition has been used by innumerable artists and producers to link their practices with traditions of oral storytelling and often to delineate work from the highly produced commercial or conceptual projects by focusing on authorship and humanistic or emotionally provocative content. Some of the artists that have self-described as digital storytellers included Abbe Don, Brenda Laurel, Dana Atchley, and Pedro Meyer.
The short narrated films definition of digital storytelling relates back to the development of a production workshop by Dana Atchley at the American Film Institute in 1993 that was adapted and refined by Joe Lambert in the mid-1990's into a method of training promoted by the San Francisco Bay Area-based Center for Digital Storytelling. Typically, digital stories are produced in intensive workshops. The product is a 2-5 minute film that combines a narrated piece of personal writing, photographic images and a musical soundtrack. The philosophy behind this type of digital storytelling is one of using technology to enable those without a technical background to produce works that tell a story using moving images and sound.
Steps to creating a Digital Story
Consider following these basic steps when creating your movies: 1. Plan your movie by using storyboards, notes, and scripts. 2. Open the Photo Story 3 program 3. Import and arrange your photos 4. Add titles to your pictures 5. Record your narration and customize your effects 6. Add your background music (use sites such as, http://www.royalityfreemusic.com/) 7. Save your story
© SAISD/Office of Instructional Technology Services http://itls.saisd.net/
Page—5
Taken from http://www.youthlearn.org/learning/activities/multimedia/medialit.asp Teaching Media Literacy: In our media-saturated world, kids are constantly bombarded by messages, images, opinions and ideas. Add the Internet, Web, email and wireless devices into the mix, and it's difficult for any of us to escape the information—and misinformation—glut. Adults increasingly are finding that they need to teach the important skills of analyzing messages and information for validity and bias. Analyzing and assessing sources is an essential part of all inquiry-based learning projects, but our multimedia world means that we have to teach kids not just how to assess data and arguments, but also how to discern emotional appeals made through pictures, music and video. This important topic is too big to thoroughly cover here, but we can give you a few pointers and resources for further explanation:
!" When we teach how to do photography, we're also teaching kids to really look at the images they see. They come to understand the emotional effects inherent in a photographer's choices about angle, focus and other aesthetic elements.
!" When we teach image-editing programs like PhotoShop, we show kids how images can be changed to distort the truth or fabricate untruths.
!" When we teach about video (with programs like Movie Maker, iMovie, Final Cut Pro), kids learn more about the differences between reality and acting and how subconscious elements like music or setting can alter the emotional reactions to a scene.
Just as we try to teach kids to read with deeper awareness and conscious analysis, in a visual world we must teach them to look closely at the images that sometimes pass by them in a flash. You can use some of the following activities to reinforce those skills:
!" Bring photographs from newspapers and magazines to class occasionally for brief discussions about what they show and mean. Combine this activity with vocabulary exercises in which you show the kids a picture and ask them to write as many words as they can to describe the picture or its effects. Do the same thing with TV commercials or bits from TV newscasts.
!" Show kids photos and ask them to write captions for them. !" Take a photograph that has emotional power and make a copy. Now make copies that show
just parts of the image. Make several more copies that show a gradually larger area of the image from each of the focal points, until you have the entire image showing again. Show the kids the smaller images, and ask for their impressions of what each image shows or means. Then show the larger images and ask for impressions until you've finally shown the complete photo. Talk about how their impressions changed as they saw different parts of the photo.
!" Show kids part of a TV situation comedy that includes music and a laugh track. Ask them how hearing the music and the laughing affects their impressions.
!" Find some photo-based advertisements in magazines and copy them, taping over the words and text. Ask the kids what they think the ads are selling. After discussion, show them the full ad.
!" Take extreme close-up photographs of parts of everyday objects and see if the kids can figure out what they are. For a twist, use objects in your classroom and hand several photos to teams of kids and see if they can find the objects.
Helping Kids Become Wise Consumers of Information
Media Literacy article
© SAISD/Office of Instructional Technology Services http://itls.saisd.net/
Page—6
Resources: Center for Digital Storytelling - http://www.storycenter.org/ The Center for Digital Storytelling is a California-based non-profit 501(c)3 arts organization rooted in the art of personal storytelling. We assist young people and adults in using the tools of digital media to craft, record, share, and value the stories of individuals and communities, in ways that improve all our lives. The elements of Digital Storytelling - http://www.inms.umn.edu/elements/ A project of the University of Minnesota School of Journalism and Mass Communication’s Institute for New Media Studies and New Directions for News. Tech Head Stores - http://tech-head.com/dstory.htm Contains links divided into several categories: Key Digital Storytelling Web Sites, Digital Storytelling Educational Programs, Books, Articles & Research about Digital Storytelling, Digital Storytelling Tools and Resources, Digital Stories, Digital Story Archives, Dramatic Storytelling in Electronic Games, Interactive Story Environments, Memorial Journals and Story Archives, Interactive and Hypertextual Fiction, Corporate Storytelling, Digital Photojournals, Personal Journals Online, Travel Journals, Historic Journals, Story Webs, Health Stories and Journals, Educational Journals/Roleplaying, Teenager's Journals/Stories, Educational Projects, Community Projects, Online Comics, Animation, Story Resources Online, Tools for Digital Storytelling, and Online Storytelling Tests. Digital Storytelling - http://www.teachingteachers.com Contains the following sections: Overview, Storytelling, Planning, Creating, Delivering.
Materials needed / Resources
Materials: Handouts - Big 6 Method of Problem Solving (Organizational Chart)
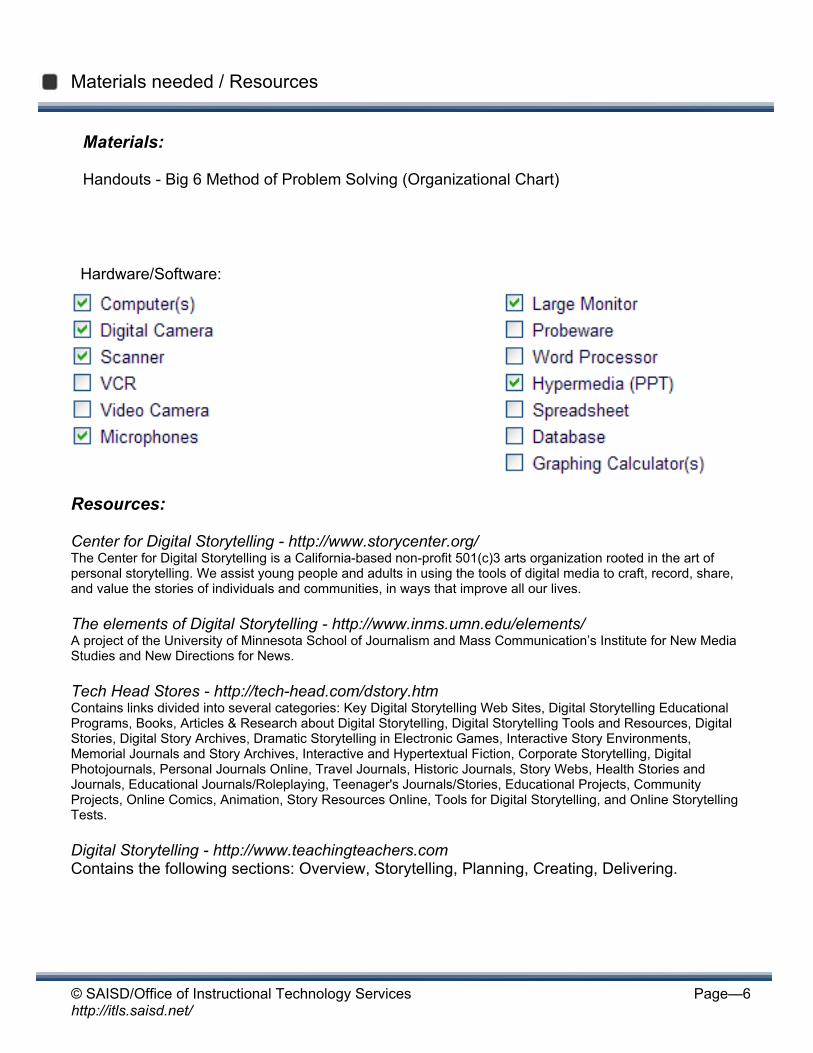
Hardware/Software:
© SAISD/Office of Instructional Technology Services http://itls.saisd.net/
Page—7
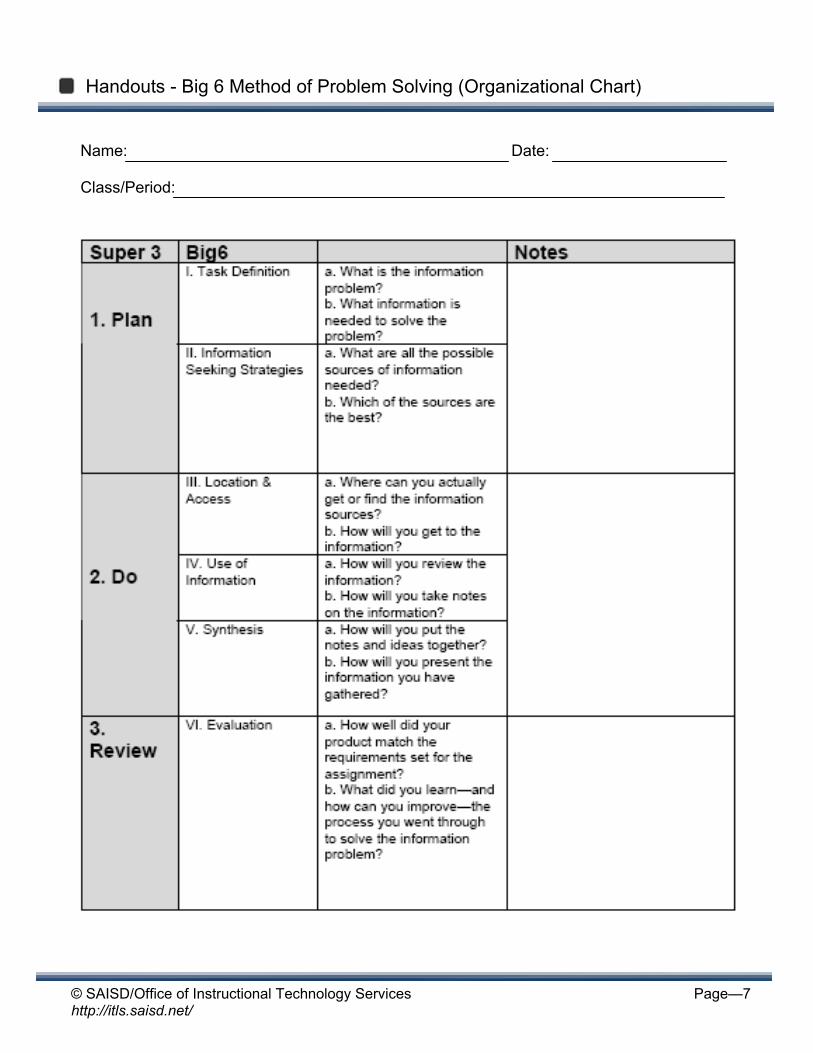
Handouts - Big 6 Method of Problem Solving (Organizational Chart)
Name: Date: Class/Period:
© SAISD/Office of Instructional Technology Services http://itls.saisd.net/
Page—8
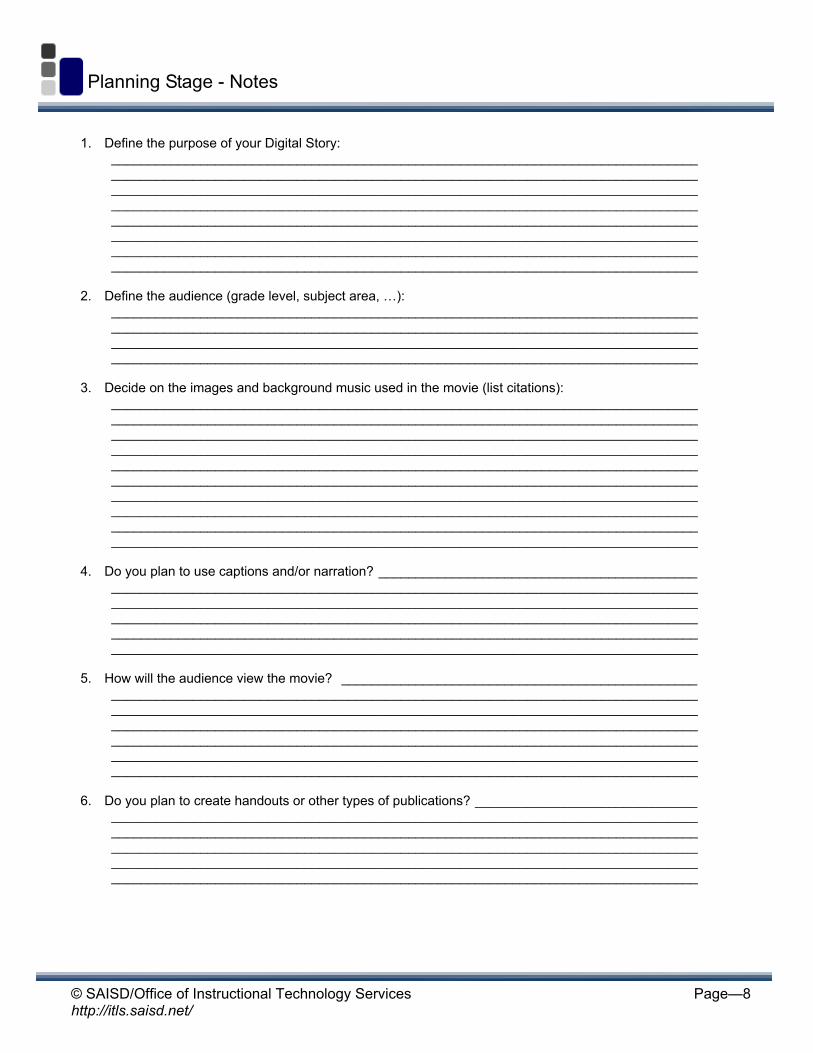
Planning Stage - Notes
1. Define the purpose of your Digital Story: _______________________________________________________________________________ _______________________________________________________________________________ _______________________________________________________________________________ _______________________________________________________________________________ _______________________________________________________________________________ _______________________________________________________________________________ _______________________________________________________________________________ _______________________________________________________________________________ 2. Define the audience (grade level, subject area, …): _______________________________________________________________________________ _______________________________________________________________________________ _______________________________________________________________________________ _______________________________________________________________________________ 3. Decide on the images and background music used in the movie (list citations): _______________________________________________________________________________ _______________________________________________________________________________ _______________________________________________________________________________ _______________________________________________________________________________ _______________________________________________________________________________ _______________________________________________________________________________ _______________________________________________________________________________ _______________________________________________________________________________ _______________________________________________________________________________ _______________________________________________________________________________ 4. Do you plan to use captions and/or narration? ___________________________________________ _______________________________________________________________________________ _______________________________________________________________________________ _______________________________________________________________________________ _______________________________________________________________________________ _______________________________________________________________________________ 5. How will the audience view the movie? ________________________________________________ _______________________________________________________________________________ _______________________________________________________________________________ _______________________________________________________________________________ _______________________________________________________________________________ _______________________________________________________________________________ _______________________________________________________________________________ 6. Do you plan to create handouts or other types of publications? ______________________________ _______________________________________________________________________________ _______________________________________________________________________________ _______________________________________________________________________________
______________________________________________________________________________________________________________________________________________________________
© SAISD/Office of Instructional Technology Services http://itls.saisd.net/
Page—9
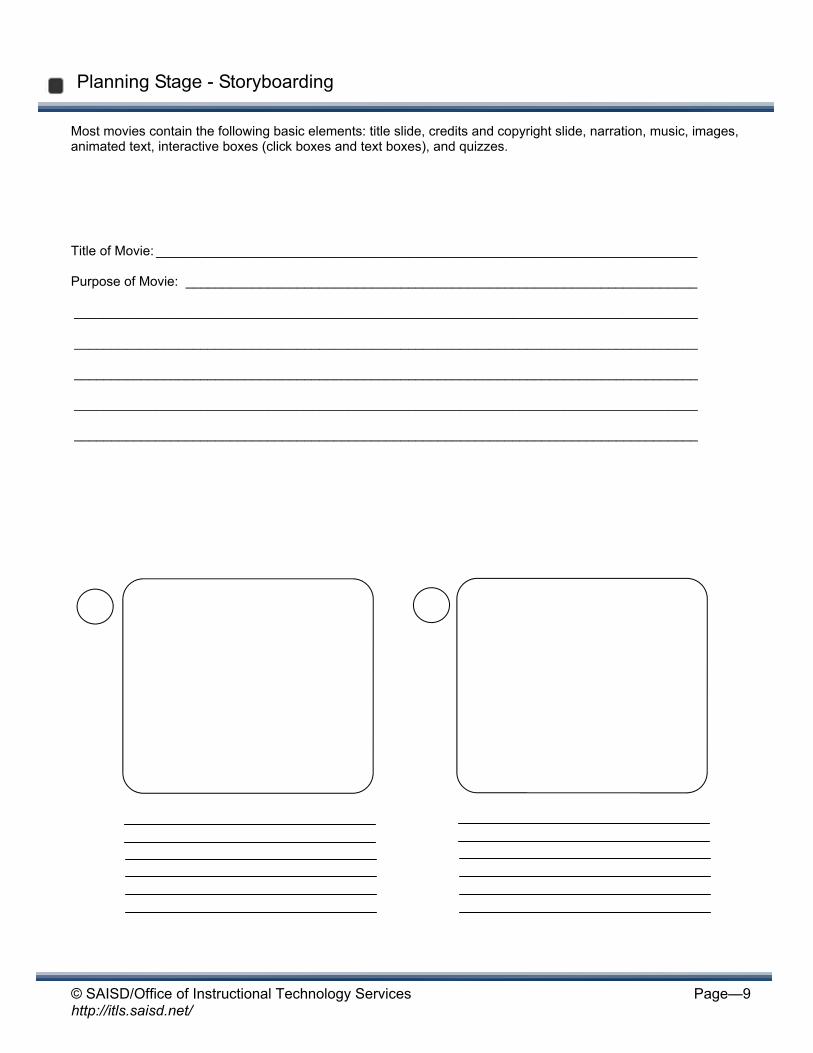
Title of Movie: _________________________________________________________________________ Purpose of Movie: _____________________________________________________________________ ____________________________________________________________________________________ ____________________________________________________________________________________ ____________________________________________________________________________________ ____________________________________________________________________________________ ____________________________________________________________________________________
Most movies contain the following basic elements: title slide, credits and copyright slide, narration, music, images, animated text, interactive boxes (click boxes and text boxes), and quizzes.
Planning Stage - Storyboarding
© SAISD/Office of Instructional Technology Services http://itls.saisd.net/
Page—10
Slides ________ to _______

© SAISD/Office of Instructional Technology Services http://itls.saisd.net/
Page—11
Slides ________ to _______
© SAISD/Office of Instructional Technology Services http://itls.saisd.net/
Page—12
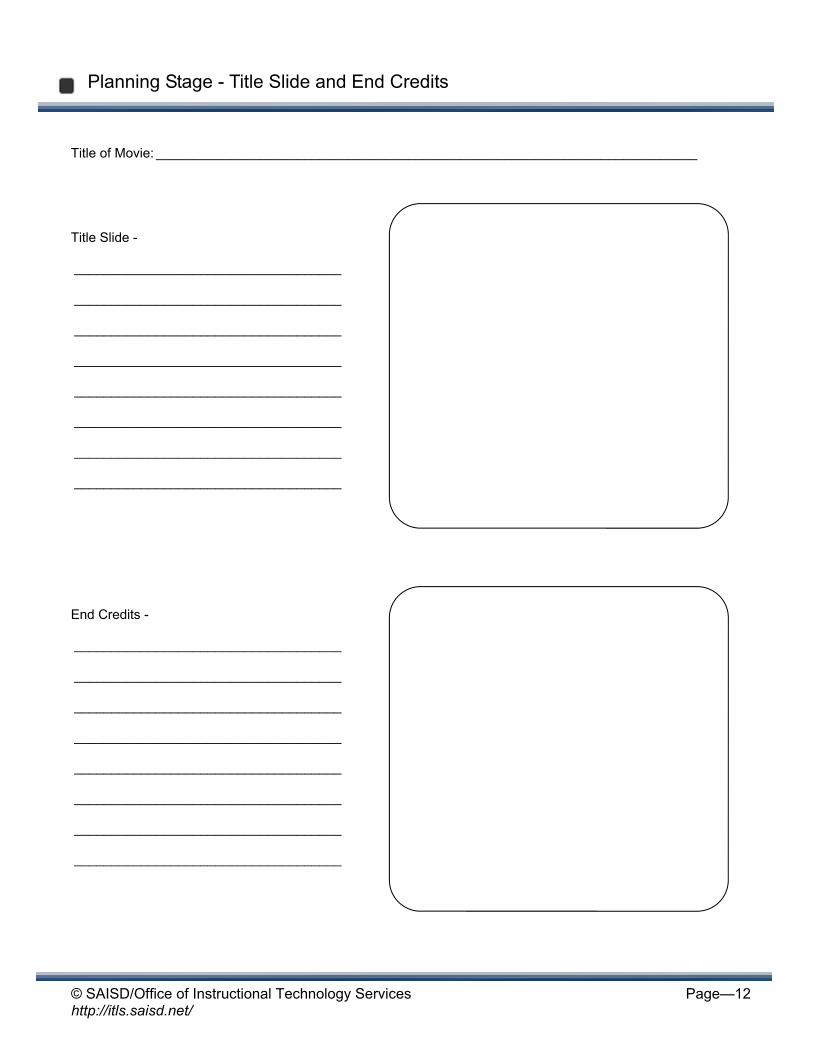
Title of Movie: _________________________________________________________________________
Title Slide - ____________________________________ ____________________________________ ____________________________________ ____________________________________ ____________________________________ ____________________________________ ____________________________________ ____________________________________
End Credits - ____________________________________ ____________________________________ ____________________________________ ____________________________________ ____________________________________ ____________________________________ ____________________________________ ____________________________________
Planning Stage - Title Slide and End Credits
© SAISD/Office of Instructional Technology Services http://itls.saisd.net/
Page—13
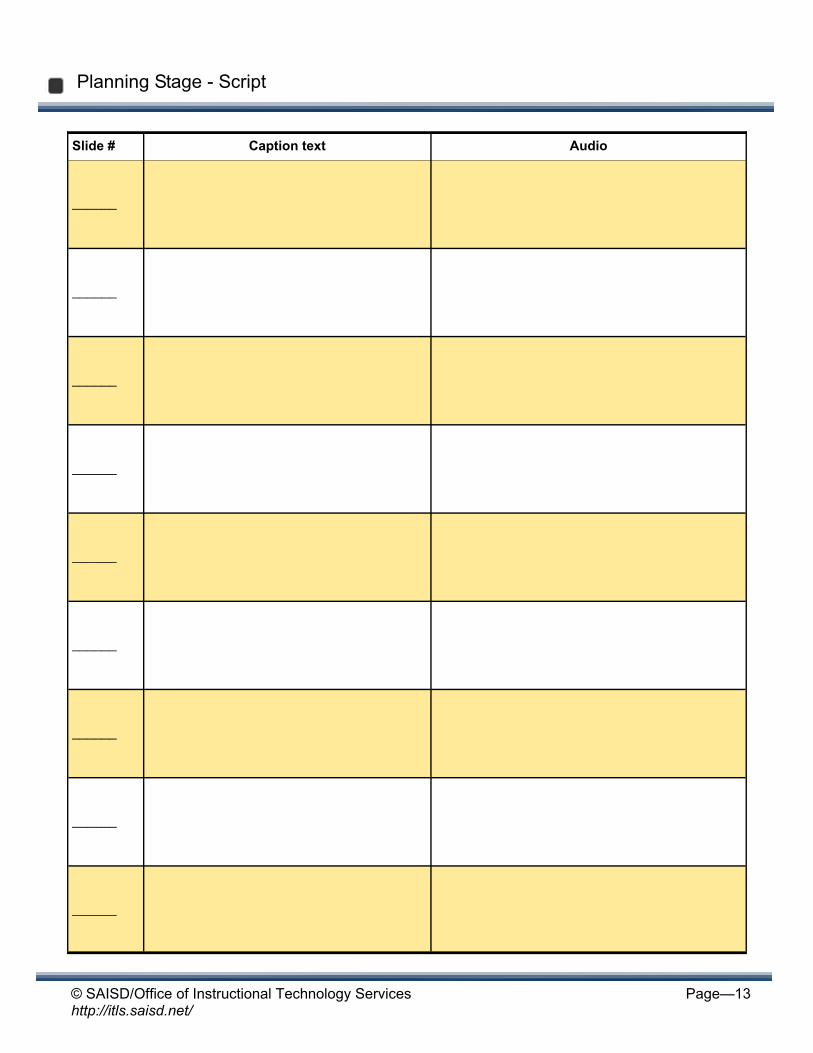
Planning Stage - Script
Slide # Caption text Audio
______
______
______
______
______
______
______
______
______
© SAISD/Office of Instructional Technology Services http://itls.saisd.net/
Page—14
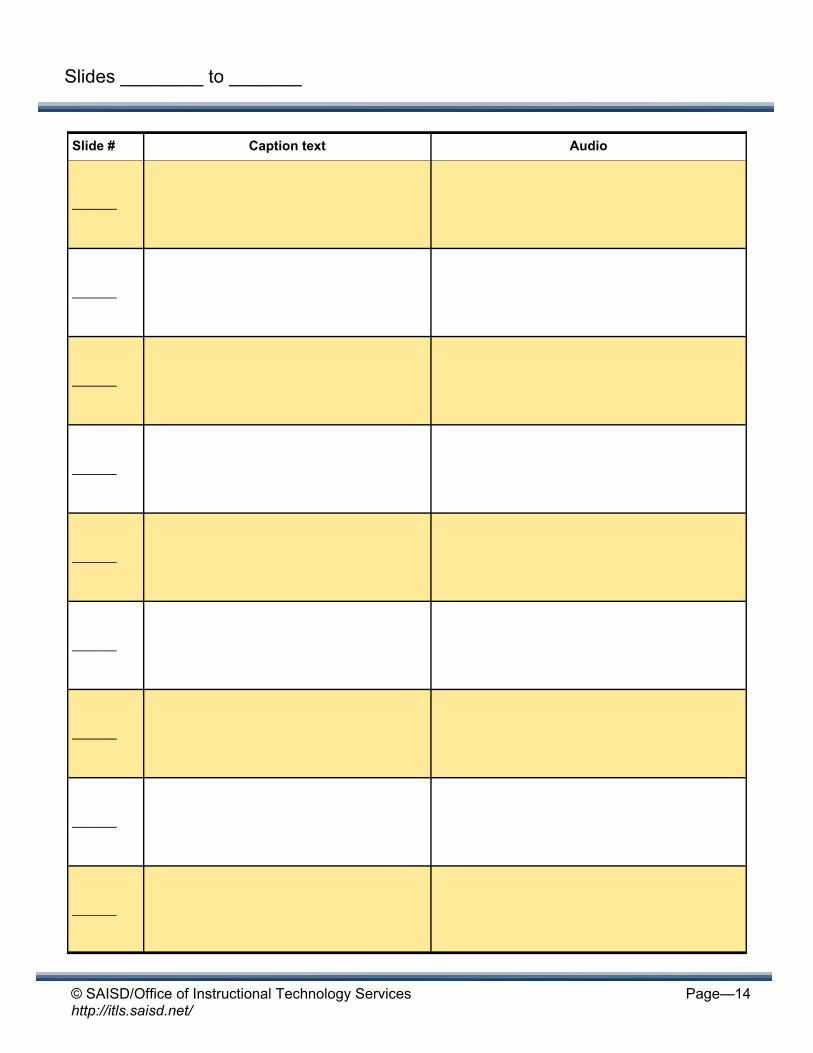
Slide # Caption text Audio
______
______
______
______
______
______
______
______
______
Slides ________ to _______
© SAISD/Office of Instructional Technology Services http://itls.saisd.net/
Page—15
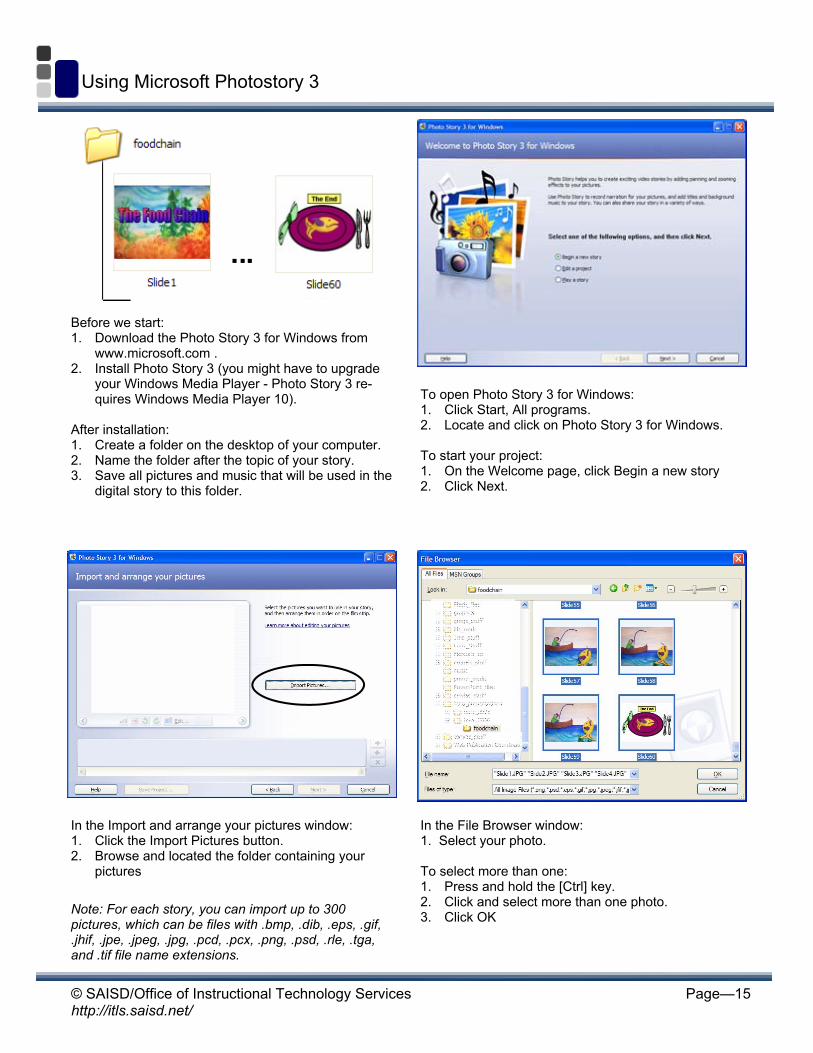
Using Microsoft Photostory 3
Before we start: 1. Download the Photo Story 3 for Windows from
www.microsoft.com . 2. Install Photo Story 3 (you might have to upgrade
your Windows Media Player - Photo Story 3 re-quires Windows Media Player 10).
After installation: 1. Create a folder on the desktop of your computer. 2. Name the folder after the topic of your story. 3. Save all pictures and music that will be used in the
digital story to this folder.
To open Photo Story 3 for Windows: 1. Click Start, All programs. 2. Locate and click on Photo Story 3 for Windows. To start your project: 1. On the Welcome page, click Begin a new story 2. Click Next.
In the Import and arrange your pictures window: 1. Click the Import Pictures button. 2. Browse and located the folder containing your
pictures
Note: For each story, you can import up to 300 pictures, which can be files with .bmp, .dib, .eps, .gif, .jhif, .jpe, .jpeg, .jpg, .pcd, .pcx, .png, .psd, .rle, .tga, and .tif file name extensions.
In the File Browser window: 1. Select your photo. To select more than one: 1. Press and hold the [Ctrl] key. 2. Click and select more than one photo. 3. Click OK
© SAISD/Office of Instructional Technology Services http://itls.saisd.net/
Page—16
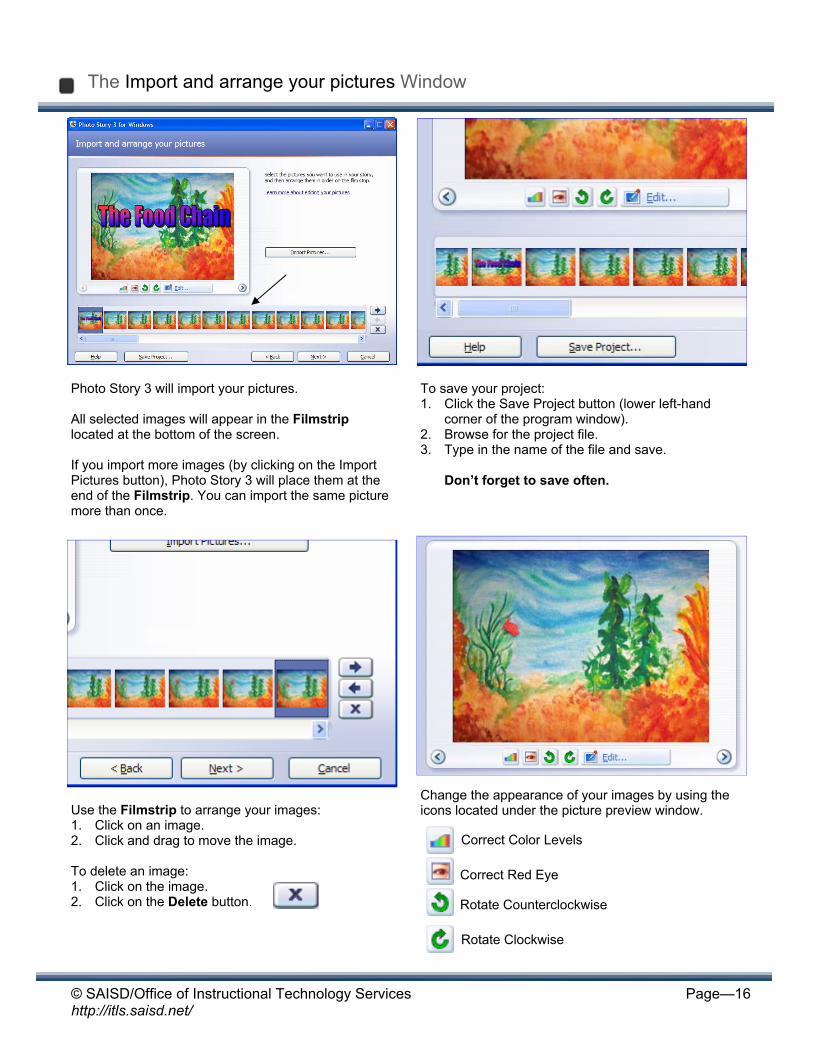
Photo Story 3 will import your pictures. All selected images will appear in the Filmstrip located at the bottom of the screen. If you import more images (by clicking on the Import Pictures button), Photo Story 3 will place them at the end of the Filmstrip. You can import the same picture more than once.
Use the Filmstrip to arrange your images: 1. Click on an image. 2. Click and drag to move the image. To delete an image: 1. Click on the image. 2. Click on the Delete button.
Change the appearance of your images by using the icons located under the picture preview window.
The Import and arrange your pictures Window
Correct Color Levels
Correct Red Eye
Rotate Counterclockwise
Rotate Clockwise
To save your project: 1. Click the Save Project button (lower left-hand
corner of the program window). 2. Browse for the project file. 3. Type in the name of the file and save. Don’t forget to save often.
© SAISD/Office of Instructional Technology Services http://itls.saisd.net/
Page—17
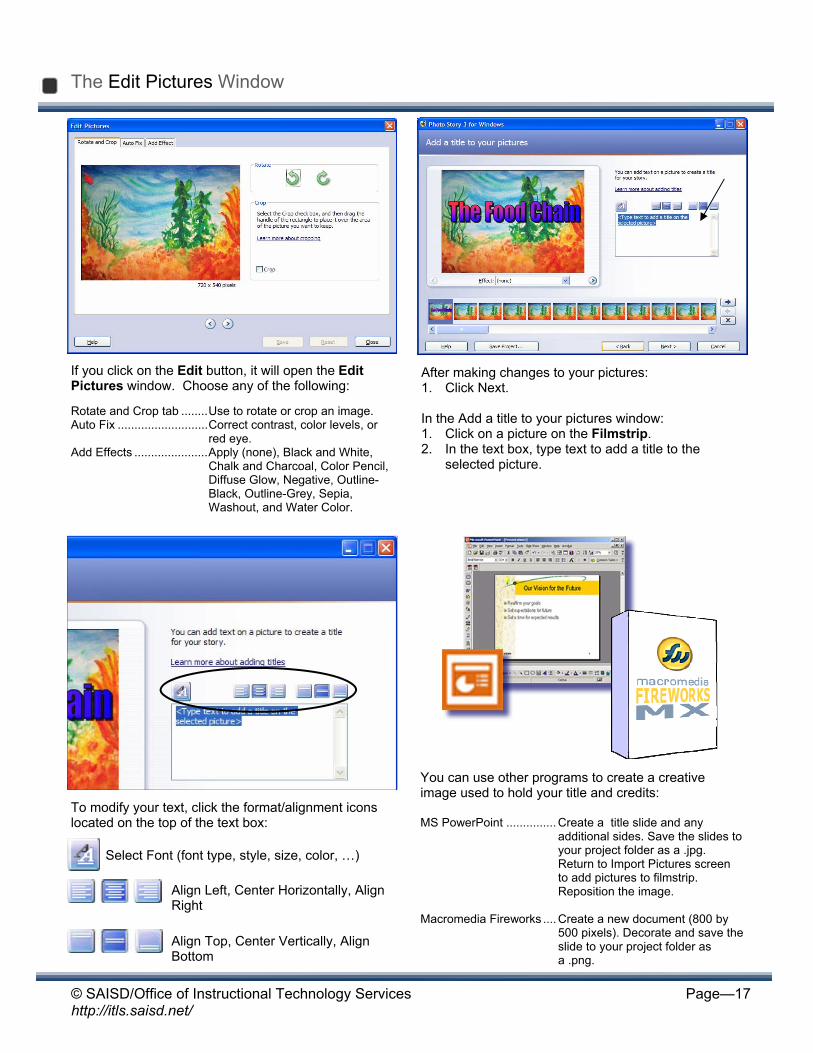
If you click on the Edit button, it will open the Edit Pictures window. Choose any of the following: Rotate and Crop tab ........Use to rotate or crop an image. Auto Fix ...........................Correct contrast, color levels, or
red eye. Add Effects ......................Apply (none), Black and White,
Chalk and Charcoal, Color Pencil, Diffuse Glow, Negative, Outline-Black, Outline-Grey, Sepia, Washout, and Water Color.
After making changes to your pictures: 1. Click Next. In the Add a title to your pictures window: 1. Click on a picture on the Filmstrip. 2. In the text box, type text to add a title to the
selected picture.
The Edit Pictures Window
To modify your text, click the format/alignment icons located on the top of the text box:
Select Font (font type, style, size, color, …)
Align Left, Center Horizontally, Align Right
Align Top, Center Vertically, Align Bottom
You can use other programs to create a creative image used to hold your title and credits: MS PowerPoint ............... Create a title slide and any
additional sides. Save the slides to your project folder as a .jpg. Return to Import Pictures screen to add pictures to filmstrip. Reposition the image.
Macromedia Fireworks .... Create a new document (800 by
500 pixels). Decorate and save the slide to your project folder as a .png.
© SAISD/Office of Instructional Technology Services http://itls.saisd.net/
Page—18
The Add a title to your pictures Window
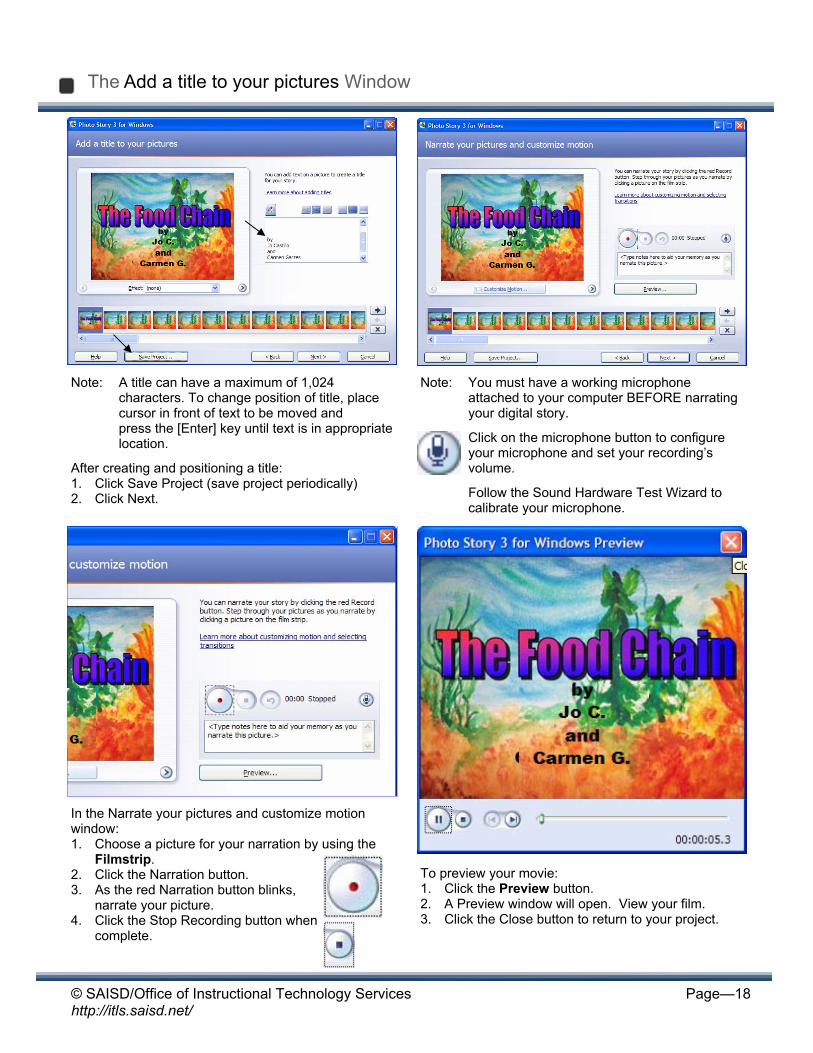
Note: A title can have a maximum of 1,024 characters. To change position of title, place cursor in front of text to be moved and
press the [Enter] key until text is in appropriate location.
After creating and positioning a title: 1. Click Save Project (save project periodically) 2. Click Next.
Note: You must have a working microphone attached to your computer BEFORE narrating your digital story.
Click on the microphone button to configure your microphone and set your recording’s volume.
Follow the Sound Hardware Test Wizard to calibrate your microphone.
In the Narrate your pictures and customize motion window: 1. Choose a picture for your narration by using the
Filmstrip. 2. Click the Narration button. 3. As the red Narration button blinks,
narrate your picture. 4. Click the Stop Recording button when
complete.
To preview your movie: 1. Click the Preview button. 2. A Preview window will open. View your film. 3. Click the Close button to return to your project.
© SAISD/Office of Instructional Technology Services http://itls.saisd.net/
Page—19
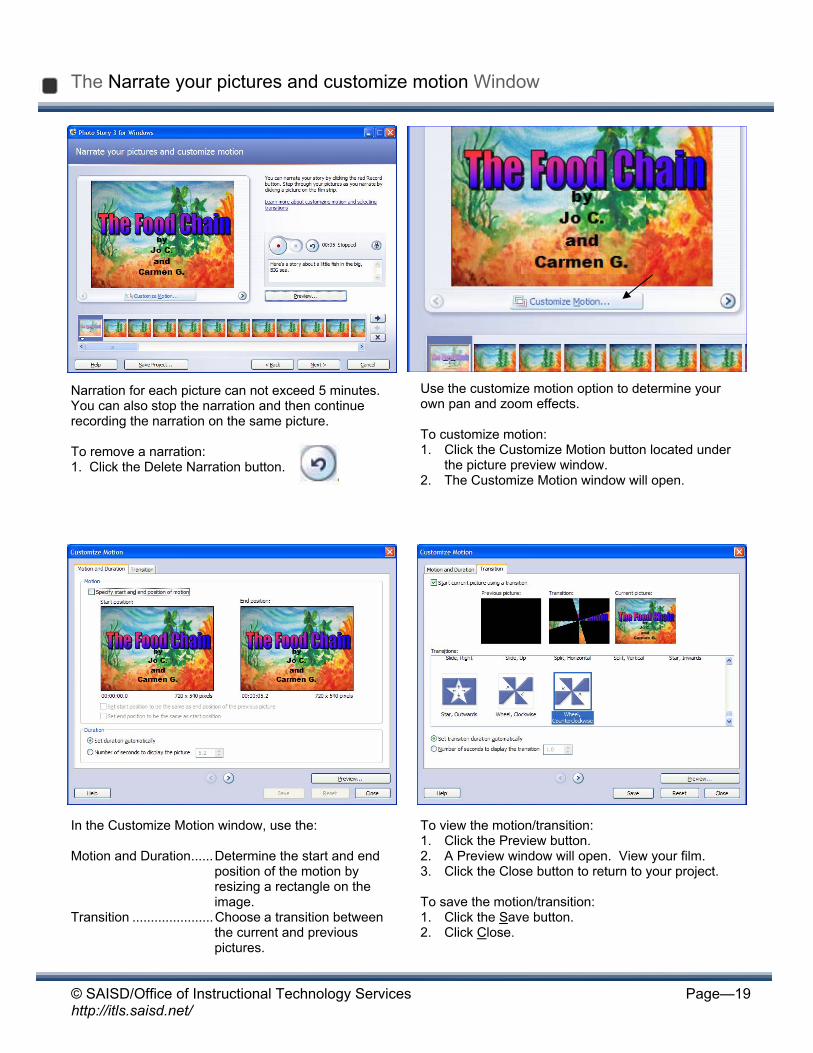
Narration for each picture can not exceed 5 minutes. You can also stop the narration and then continue recording the narration on the same picture. To remove a narration: 1. Click the Delete Narration button.
The Narrate your pictures and customize motion Window
Use the customize motion option to determine your own pan and zoom effects. To customize motion: 1. Click the Customize Motion button located under
the picture preview window. 2. The Customize Motion window will open.
In the Customize Motion window, use the: Motion and Duration......Determine the start and end
position of the motion by resizing a rectangle on the image.
Transition ......................Choose a transition between the current and previous pictures.
To view the motion/transition: 1. Click the Preview button. 2. A Preview window will open. View your film. 3. Click the Close button to return to your project. To save the motion/transition: 1. Click the Save button. 2. Click Close.
© SAISD/Office of Instructional Technology Services http://itls.saisd.net/
Page—20
The Narrate your pictures and customize motion Window
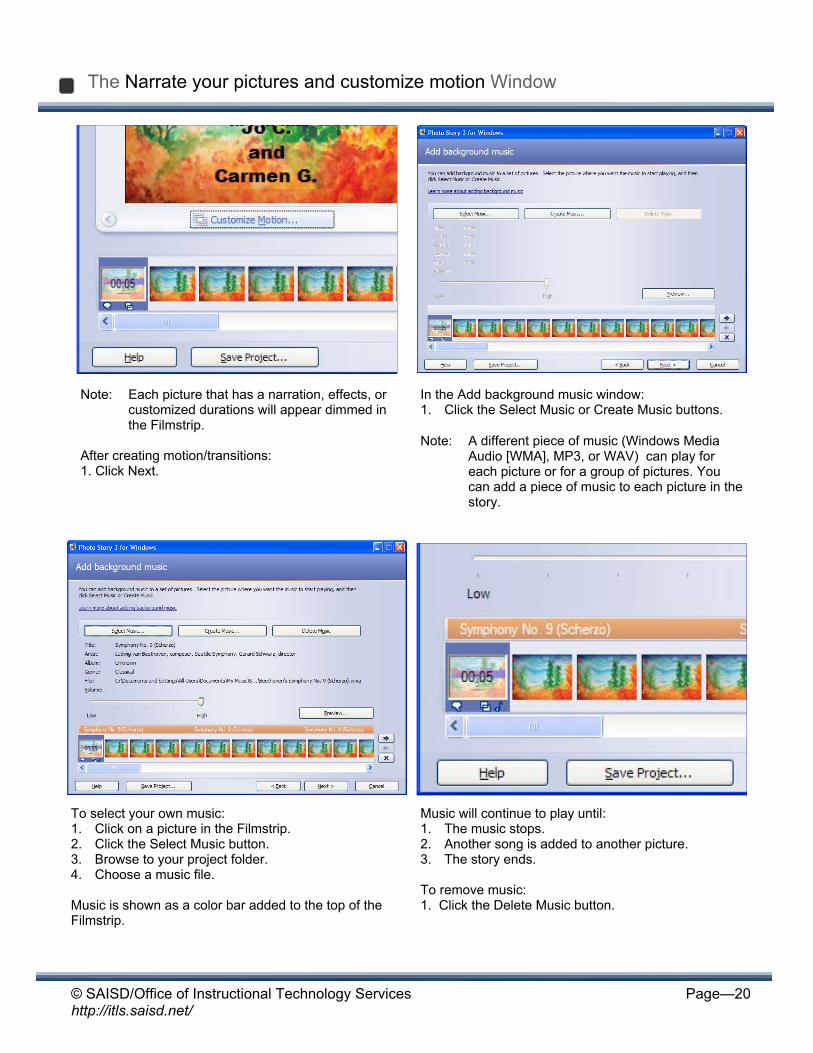
Note: Each picture that has a narration, effects, or customized durations will appear dimmed in the Filmstrip.
After creating motion/transitions: 1. Click Next.
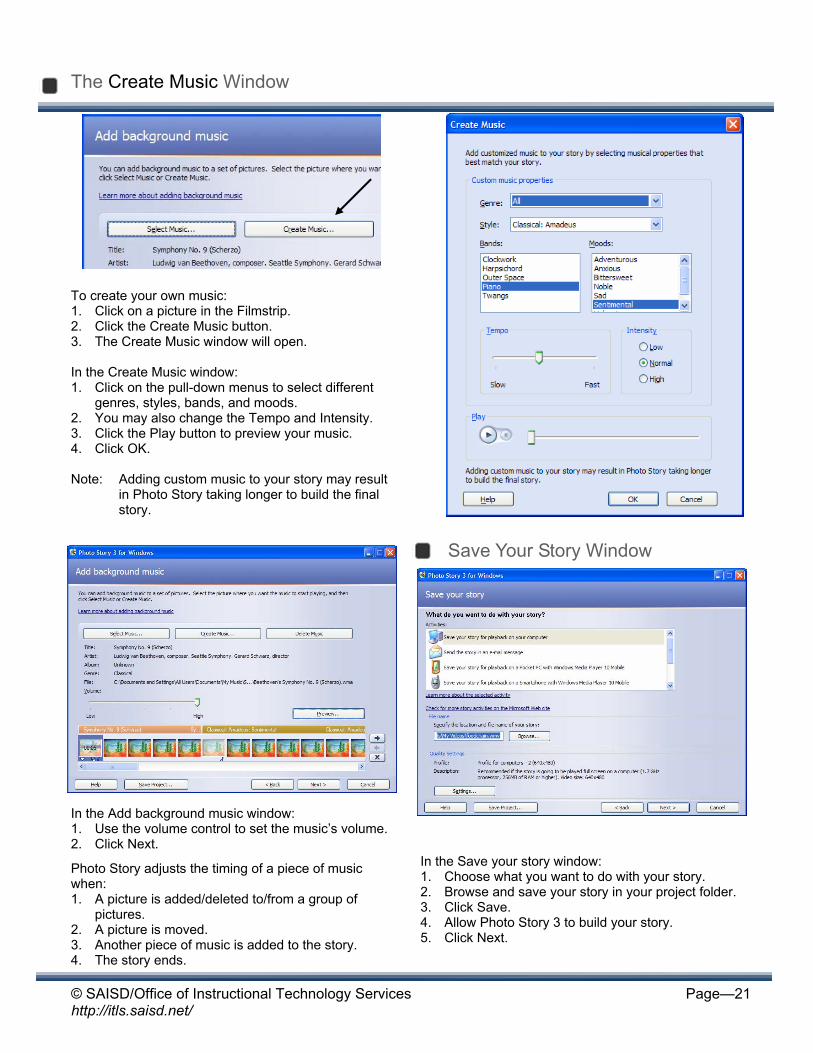
In the Add background music window: 1. Click the Select Music or Create Music buttons.
Note: A different piece of music (Windows Media Audio [WMA], MP3, or WAV) can play for each picture or for a group of pictures. You can add a piece of music to each picture in the story.
To select your own music: 1. Click on a picture in the Filmstrip. 2. Click the Select Music button. 3. Browse to your project folder. 4. Choose a music file. Music is shown as a color bar added to the top of the Filmstrip.
Music will continue to play until: 1. The music stops. 2. Another song is added to another picture. 3. The story ends. To remove music: 1. Click the Delete Music button.
© SAISD/Office of Instructional Technology Services http://itls.saisd.net/
Page—21
The Create Music Window
To create your own music: 1. Click on a picture in the Filmstrip. 2. Click the Create Music button. 3. The Create Music window will open. In the Create Music window: 1. Click on the pull-down menus to select different
genres, styles, bands, and moods. 2. You may also change the Tempo and Intensity. 3. Click the Play button to preview your music. 4. Click OK. Note: Adding custom music to your story may result
in Photo Story taking longer to build the final story.
In the Add background music window: 1. Use the volume control to set the music’s volume. 2. Click Next.
Photo Story adjusts the timing of a piece of music when: 1. A picture is added/deleted to/from a group of
pictures. 2. A picture is moved. 3. Another piece of music is added to the story. 4. The story ends.
In the Save your story window: 1. Choose what you want to do with your story. 2. Browse and save your story in your project folder. 3. Click Save. 4. Allow Photo Story 3 to build your story. 5. Click Next.
Save Your Story Window
© SAISD/Office of Instructional Technology Services http://itls.saisd.net/
Page—22
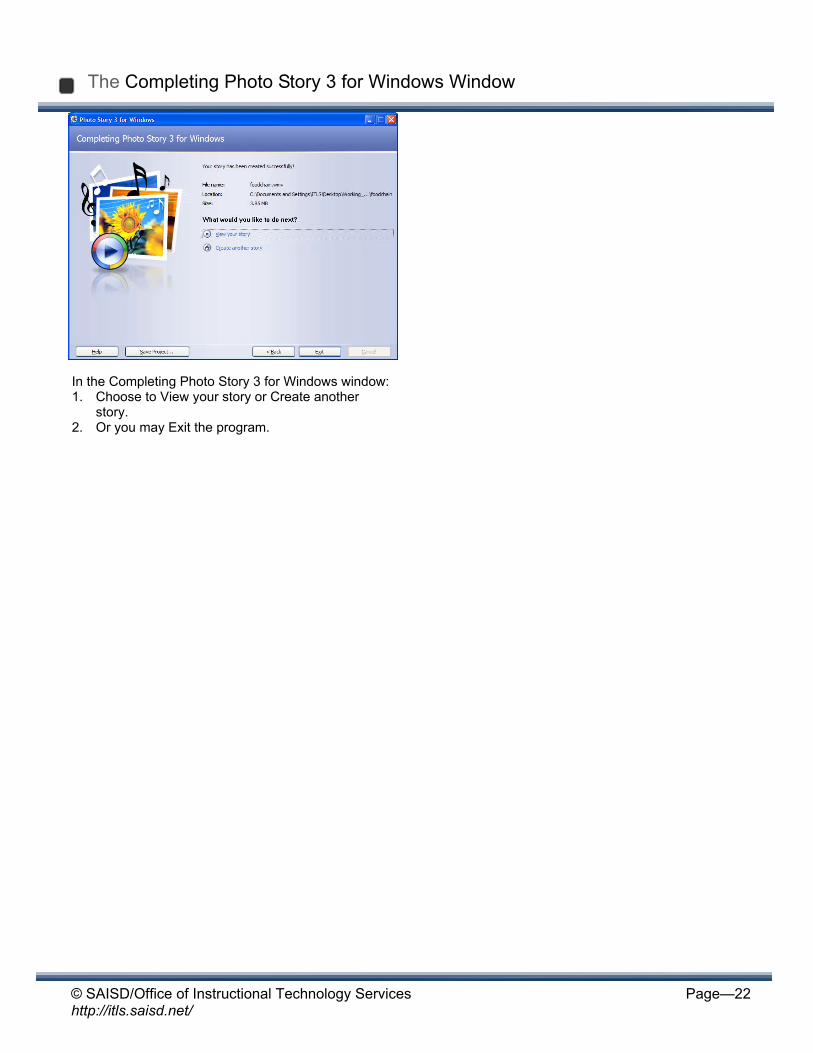
In the Completing Photo Story 3 for Windows window: 1. Choose to View your story or Create another
story. 2. Or you may Exit the program.
The Completing Photo Story 3 for Windows Window
© SAISD/Office of Instructional Technology Services http://itls.saisd.net/
Page—23
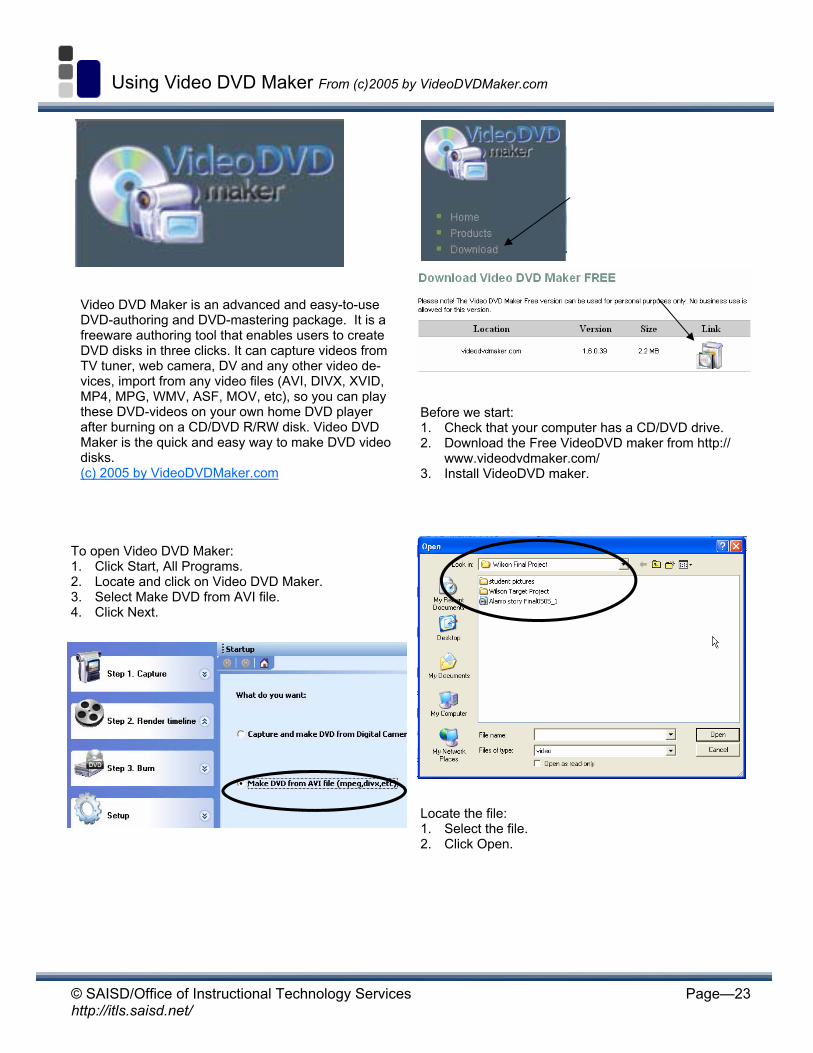
Using Video DVD Maker From (c)2005 by VideoDVDMaker.com
Video DVD Maker is an advanced and easy-to-use DVD-authoring and DVD-mastering package. It is a freeware authoring tool that enables users to create DVD disks in three clicks. It can capture videos from TV tuner, web camera, DV and any other video de-vices, import from any video files (AVI, DIVX, XVID, MP4, MPG, WMV, ASF, MOV, etc), so you can play these DVD-videos on your own home DVD player after burning on a CD/DVD R/RW disk. Video DVD Maker is the quick and easy way to make DVD video disks. (c) 2005 by VideoDVDMaker.com
Before we start: 1. Check that your computer has a CD/DVD drive. 2. Download the Free VideoDVD maker from http://
www.videodvdmaker.com/ 3. Install VideoDVD maker.
To open Video DVD Maker: 1. Click Start, All Programs. 2. Locate and click on Video DVD Maker. 3. Select Make DVD from AVI file. 4. Click Next.
Locate the file: 1. Select the file. 2. Click Open.
© SAISD/Office of Instructional Technology Services http://itls.saisd.net/
Page—24
Burning Project to DVD
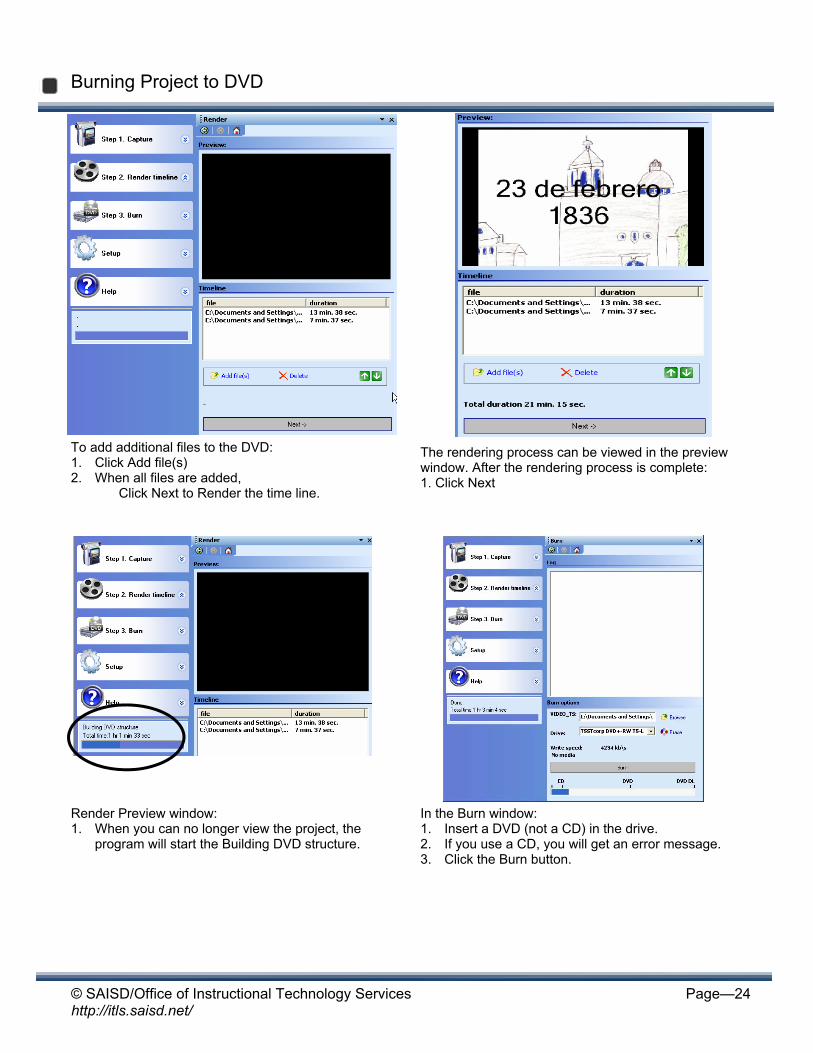
To add additional files to the DVD: 1. Click Add file(s) 2. When all files are added, Click Next to Render the time line.
Render Preview window: 1. When you can no longer view the project, the
program will start the Building DVD structure.
In the Burn window: 1. Insert a DVD (not a CD) in the drive. 2. If you use a CD, you will get an error message. 3. Click the Burn button.
The rendering process can be viewed in the preview window. After the rendering process is complete: 1. Click Next
© SAISD/Office of Instructional Technology Services http://itls.saisd.net/
Page—25
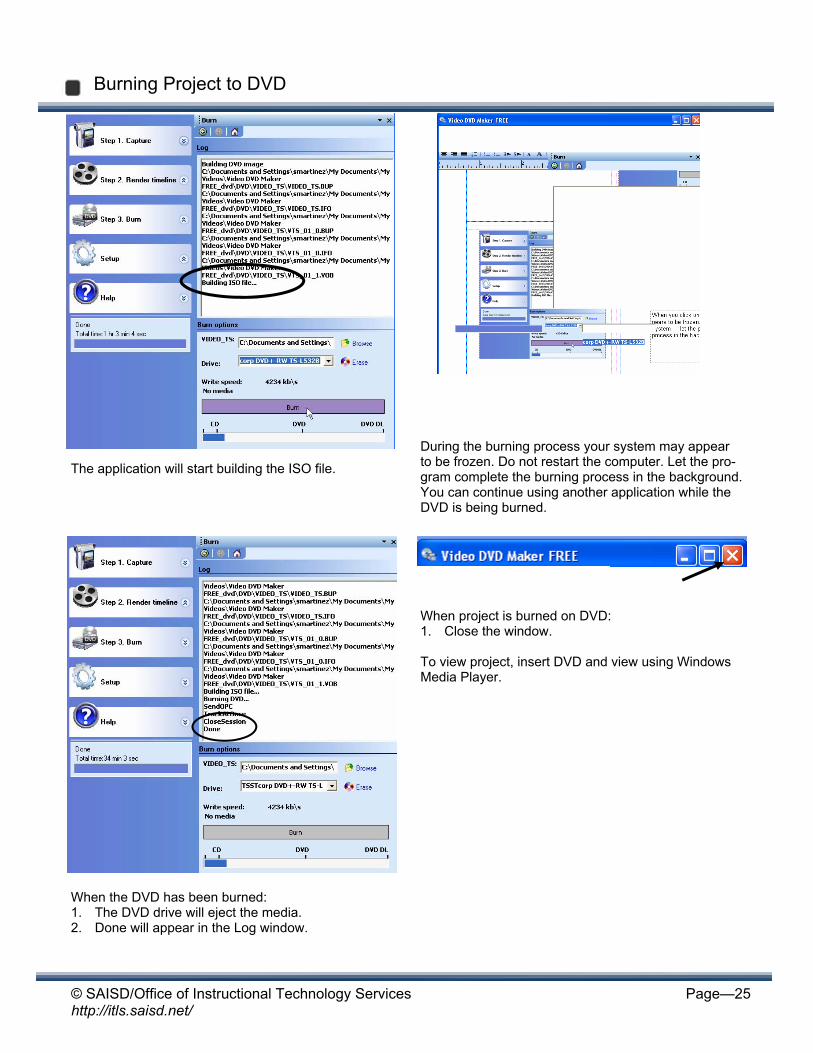
During the burning process your system may appear to be frozen. Do not restart the computer. Let the pro-gram complete the burning process in the background. You can continue using another application while the DVD is being burned.
The application will start building the ISO file.
When the DVD has been burned: 1. The DVD drive will eject the media. 2. Done will appear in the Log window.
When project is burned on DVD: 1. Close the window. To view project, insert DVD and view using Windows Media Player.
Burning Project to DVD
© SAISD/Office of Instructional Technology Services http://itls.saisd.net/
Page—26
Using PowerPoint to create a “Digital Story”
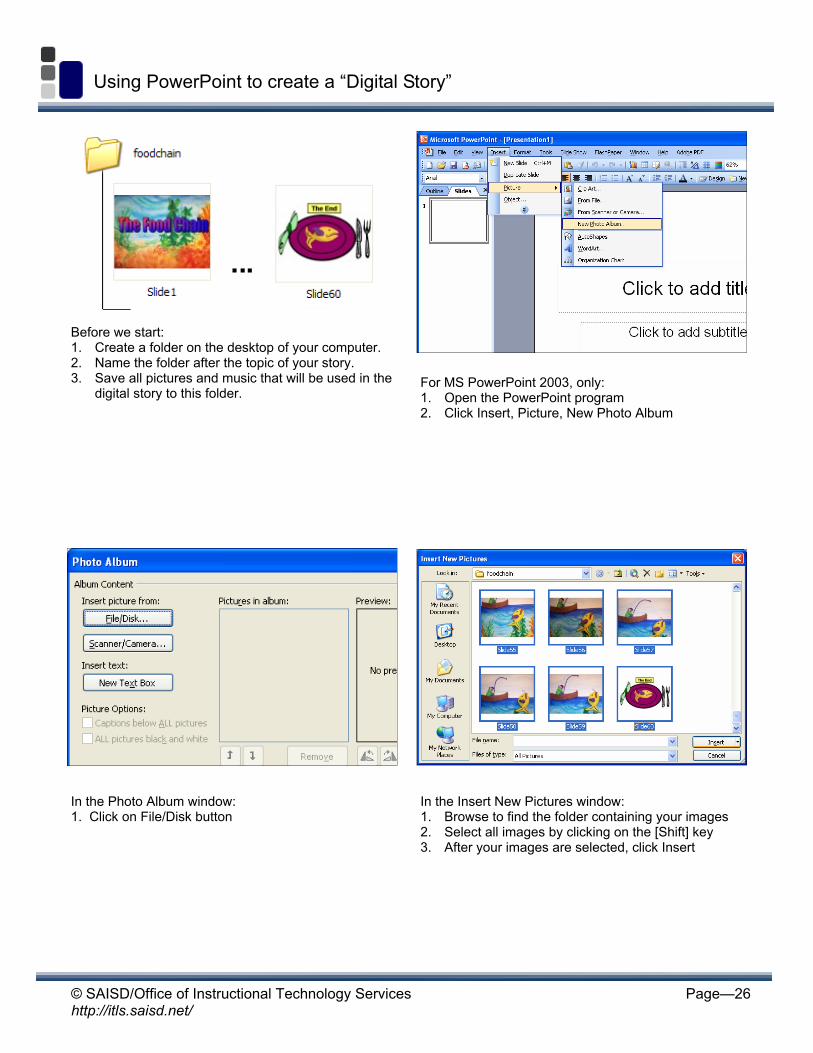
Before we start: 1. Create a folder on the desktop of your computer. 2. Name the folder after the topic of your story. 3. Save all pictures and music that will be used in the
digital story to this folder. For MS PowerPoint 2003, only: 1. Open the PowerPoint program 2. Click Insert, Picture, New Photo Album
In the Photo Album window: 1. Click on File/Disk button
In the Insert New Pictures window: 1. Browse to find the folder containing your images 2. Select all images by clicking on the [Shift] key 3. After your images are selected, click Insert
© SAISD/Office of Instructional Technology Services http://itls.saisd.net/
Page—27
Insert your images
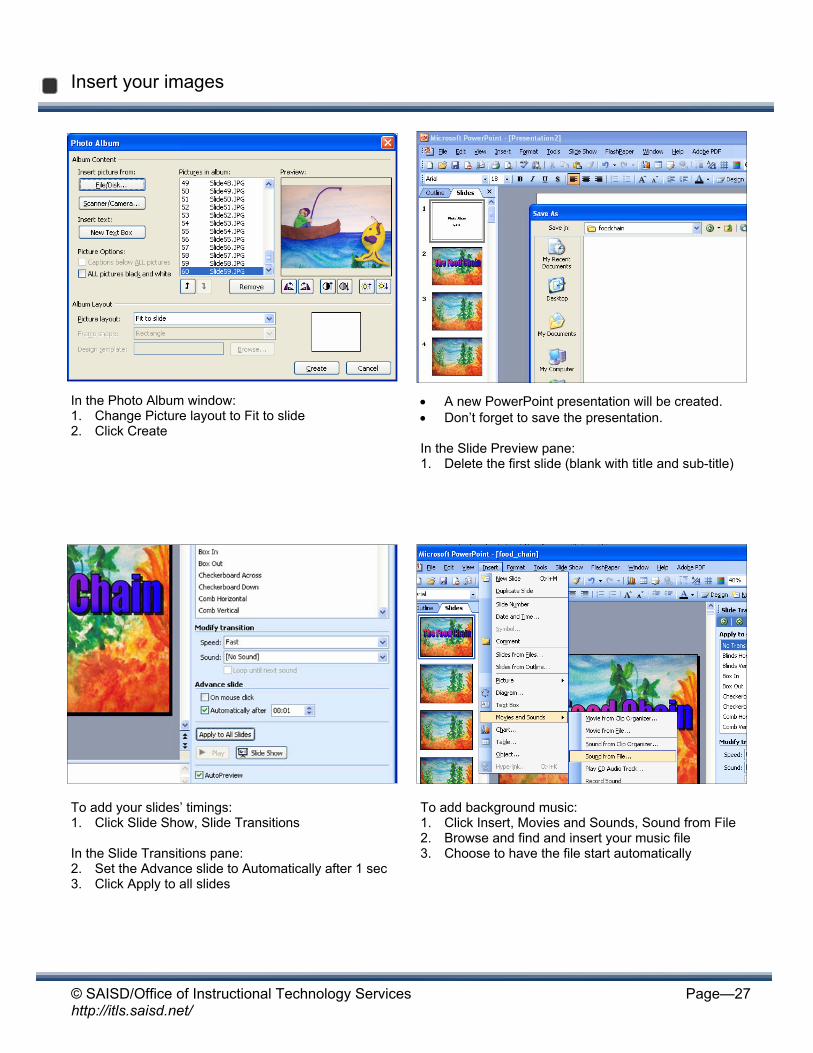
In the Photo Album window: 1. Change Picture layout to Fit to slide 2. Click Create
!" A new PowerPoint presentation will be created. !" Don’t forget to save the presentation. In the Slide Preview pane: 1. Delete the first slide (blank with title and sub-title)
To add your slides’ timings: 1. Click Slide Show, Slide Transitions In the Slide Transitions pane: 2. Set the Advance slide to Automatically after 1 sec 3. Click Apply to all slides
To add background music: 1. Click Insert, Movies and Sounds, Sound from File 2. Browse and find and insert your music file 3. Choose to have the file start automatically
© SAISD/Office of Instructional Technology Services http://itls.saisd.net/
Page—28
Looping your music (to play continuously in the background)
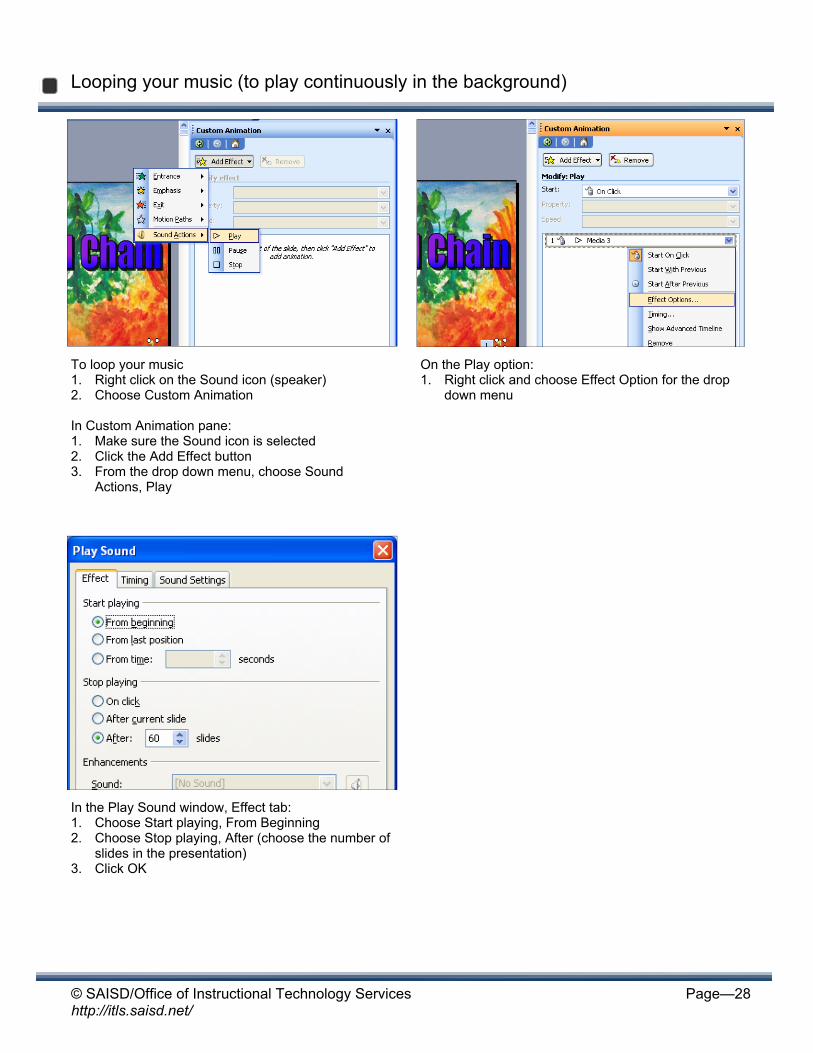
To loop your music 1. Right click on the Sound icon (speaker) 2. Choose Custom Animation In Custom Animation pane: 1. Make sure the Sound icon is selected 2. Click the Add Effect button 3. From the drop down menu, choose Sound
Actions, Play
On the Play option: 1. Right click and choose Effect Option for the drop
down menu
In the Play Sound window, Effect tab: 1. Choose Start playing, From Beginning 2. Choose Stop playing, After (choose the number of
slides in the presentation) 3. Click OK
© SAISD/Office of Instructional Technology Services http://itls.saisd.net/
Page—29
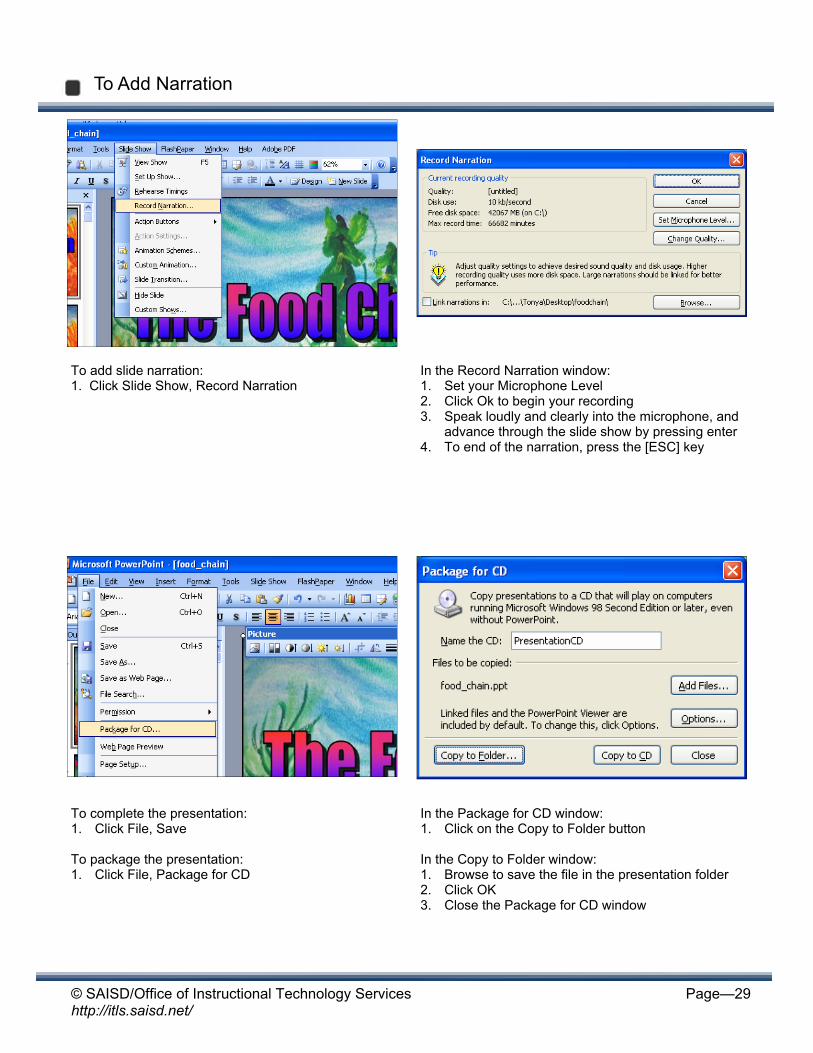
To Add Narration
To add slide narration: 1. Click Slide Show, Record Narration
In the Record Narration window: 1. Set your Microphone Level 2. Click Ok to begin your recording 3. Speak loudly and clearly into the microphone, and
advance through the slide show by pressing enter 4. To end of the narration, press the [ESC] key
To complete the presentation: 1. Click File, Save To package the presentation: 1. Click File, Package for CD
In the Package for CD window: 1. Click on the Copy to Folder button In the Copy to Folder window: 1. Browse to save the file in the presentation folder 2. Click OK 3. Close the Package for CD window
© SAISD/Office of Instructional Technology Services http://itls.saisd.net/
Page—30
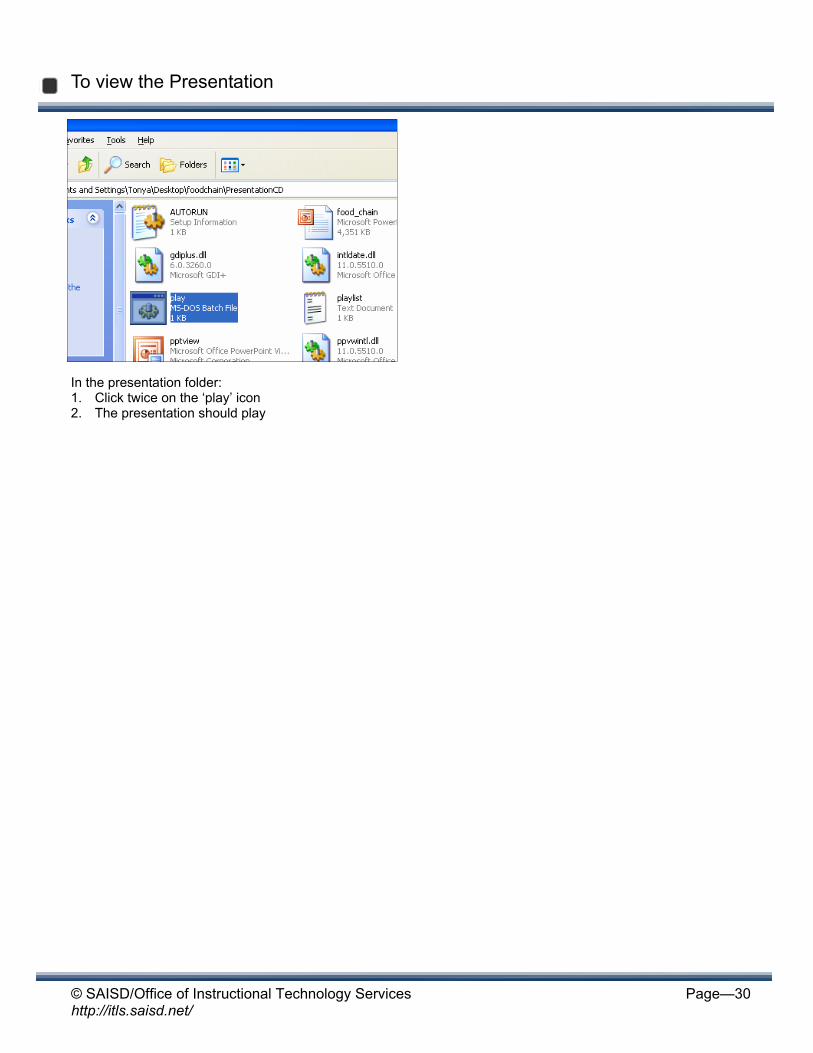
To view the Presentation
In the presentation folder: 1. Click twice on the ‘play’ icon 2. The presentation should play
© SAISD/Office of Instructional Technology Services http://itls.saisd.net/
Page—31
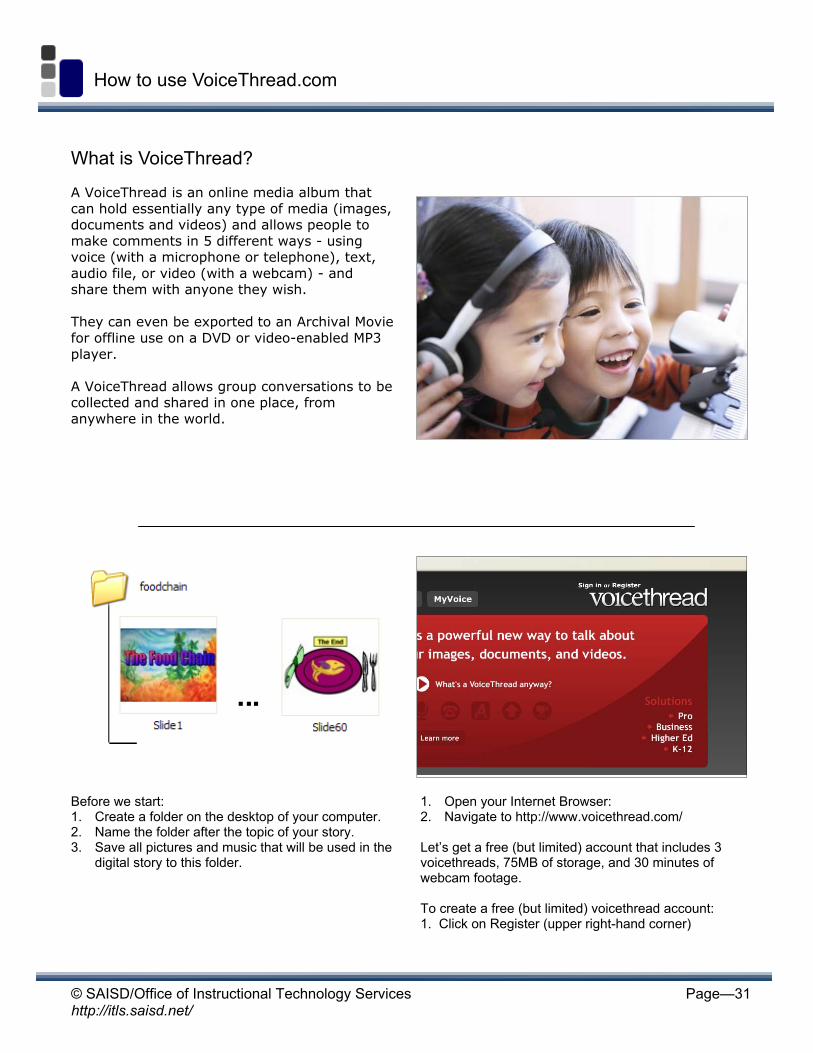
How to use VoiceThread.com
What is VoiceThread? A VoiceThread is an online media album that can hold essentially any type of media (images, documents and videos) and allows people to make comments in 5 different ways - using voice (with a microphone or telephone), text, audio file, or video (with a webcam) - and share them with anyone they wish. They can even be exported to an Archival Movie for offline use on a DVD or video-enabled MP3 player. A VoiceThread allows group conversations to be collected and shared in one place, from anywhere in the world.
Before we start: 1. Create a folder on the desktop of your computer. 2. Name the folder after the topic of your story. 3. Save all pictures and music that will be used in the
digital story to this folder.
1. Open your Internet Browser: 2. Navigate to http://www.voicethread.com/ Let’s get a free (but limited) account that includes 3 voicethreads, 75MB of storage, and 30 minutes of webcam footage. To create a free (but limited) voicethread account: 1. Click on Register (upper right-hand corner)
© SAISD/Office of Instructional Technology Services http://itls.saisd.net/
Page—32
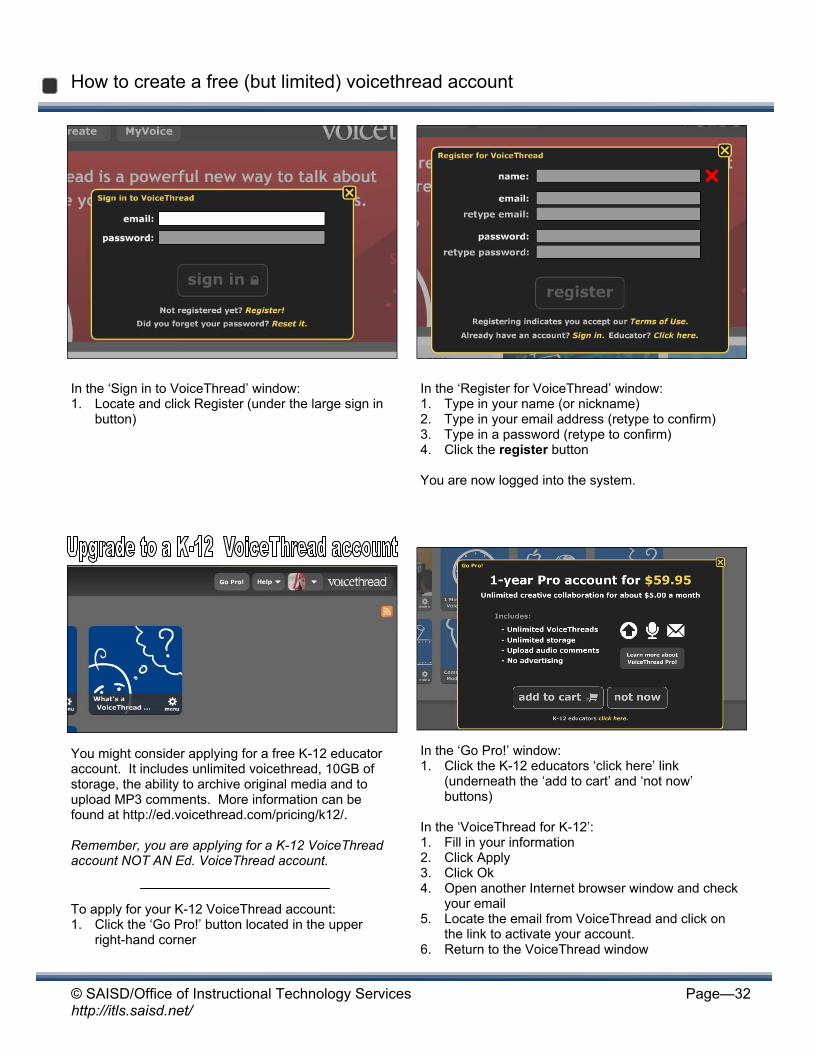
In the ‘Sign in to VoiceThread’ window: 1. Locate and click Register (under the large sign in
button)
How to create a free (but limited) voicethread account
In the ‘Register for VoiceThread’ window: 1. Type in your name (or nickname) 2. Type in your email address (retype to confirm) 3. Type in a password (retype to confirm) 4. Click the register button You are now logged into the system.
You might consider applying for a free K-12 educator account. It includes unlimited voicethread, 10GB of storage, the ability to archive original media and to upload MP3 comments. More information can be found at http://ed.voicethread.com/pricing/k12/. Remember, you are applying for a K-12 VoiceThread account NOT AN Ed. VoiceThread account.
To apply for your K-12 VoiceThread account: 1. Click the ‘Go Pro!’ button located in the upper
right-hand corner
In the ‘Go Pro!’ window: 1. Click the K-12 educators ‘click here’ link
(underneath the ‘add to cart’ and ‘not now’ buttons)
In the ‘VoiceThread for K-12’: 1. Fill in your information 2. Click Apply 3. Click Ok 4. Open another Internet browser window and check
your email 5. Locate the email from VoiceThread and click on
the link to activate your account. 6. Return to the VoiceThread window
© SAISD/Office of Instructional Technology Services http://itls.saisd.net/
Page—33
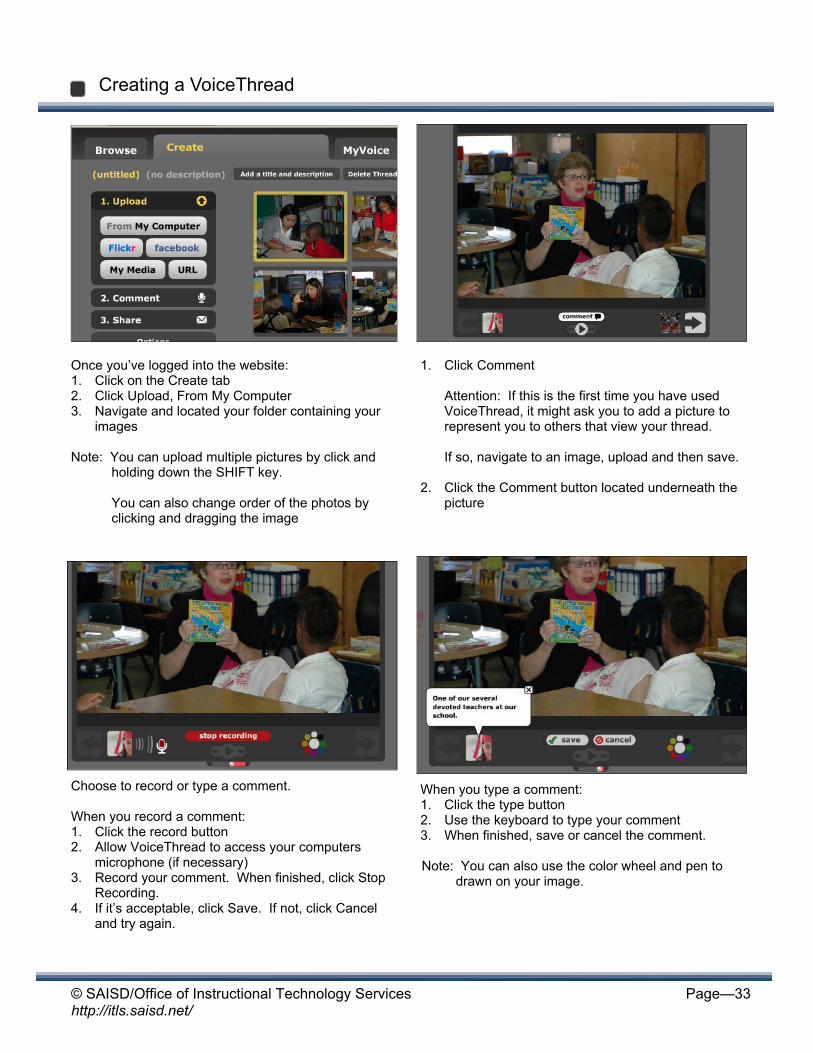
Once you’ve logged into the website: 1. Click on the Create tab 2. Click Upload, From My Computer 3. Navigate and located your folder containing your
images Note: You can upload multiple pictures by click and
holding down the SHIFT key.
You can also change order of the photos by clicking and dragging the image
1. Click Comment Attention: If this is the first time you have used VoiceThread, it might ask you to add a picture to represent you to others that view your thread. If so, navigate to an image, upload and then save.
2. Click the Comment button located underneath the picture
Creating a VoiceThread
Choose to record or type a comment. When you record a comment: 1. Click the record button 2. Allow VoiceThread to access your computers
microphone (if necessary) 3. Record your comment. When finished, click Stop
Recording. 4. If it’s acceptable, click Save. If not, click Cancel
and try again.
When you type a comment: 1. Click the type button 2. Use the keyboard to type your comment 3. When finished, save or cancel the comment. Note: You can also use the color wheel and pen to
drawn on your image.
© SAISD/Office of Instructional Technology Services http://itls.saisd.net/
Page—34
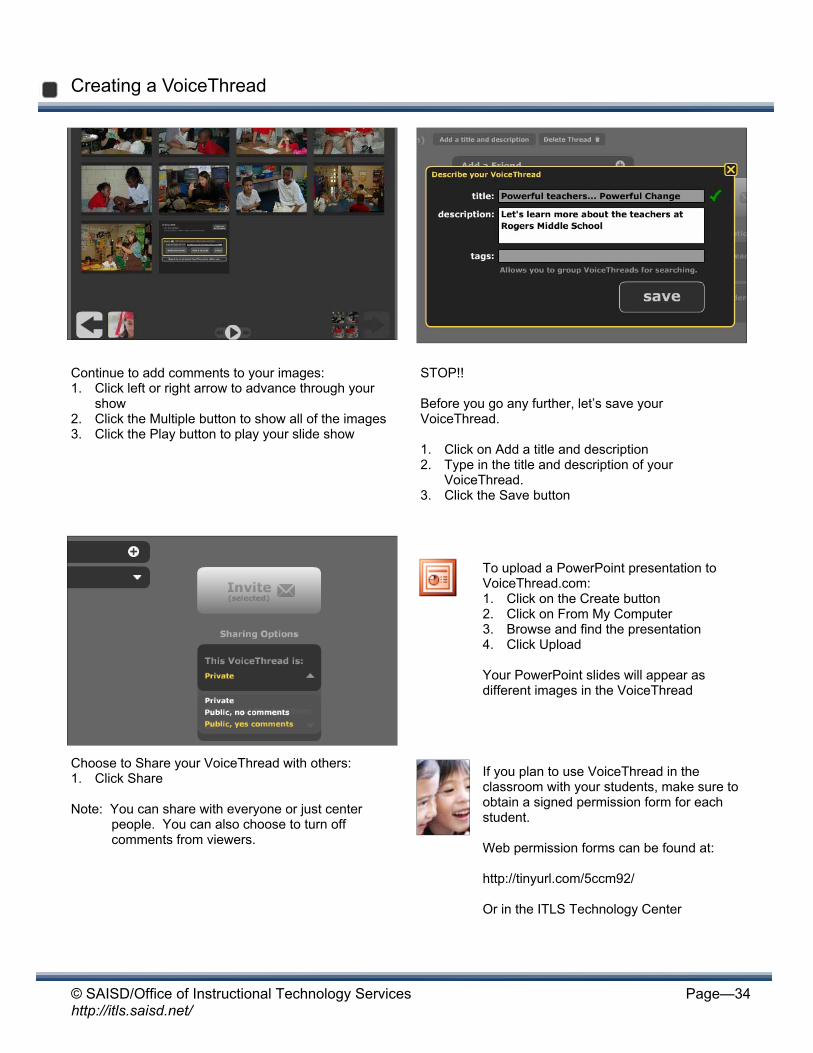
Continue to add comments to your images: 1. Click left or right arrow to advance through your
show 2. Click the Multiple button to show all of the images 3. Click the Play button to play your slide show
STOP!! Before you go any further, let’s save your VoiceThread. 1. Click on Add a title and description 2. Type in the title and description of your
VoiceThread. 3. Click the Save button
Choose to Share your VoiceThread with others: 1. Click Share
Note: You can share with everyone or just center
people. You can also choose to turn off comments from viewers.
If you plan to use VoiceThread in the classroom with your students, make sure to obtain a signed permission form for each student. Web permission forms can be found at: http://tinyurl.com/5ccm92/ Or in the ITLS Technology Center
To upload a PowerPoint presentation to VoiceThread.com: 1. Click on the Create button 2. Click on From My Computer 3. Browse and find the presentation 4. Click Upload Your PowerPoint slides will appear as different images in the VoiceThread
Creating a VoiceThread
© SAISD/Office of Instructional Technology Services http://itls.saisd.net/
Page—35
Multimedia Project Rubrics
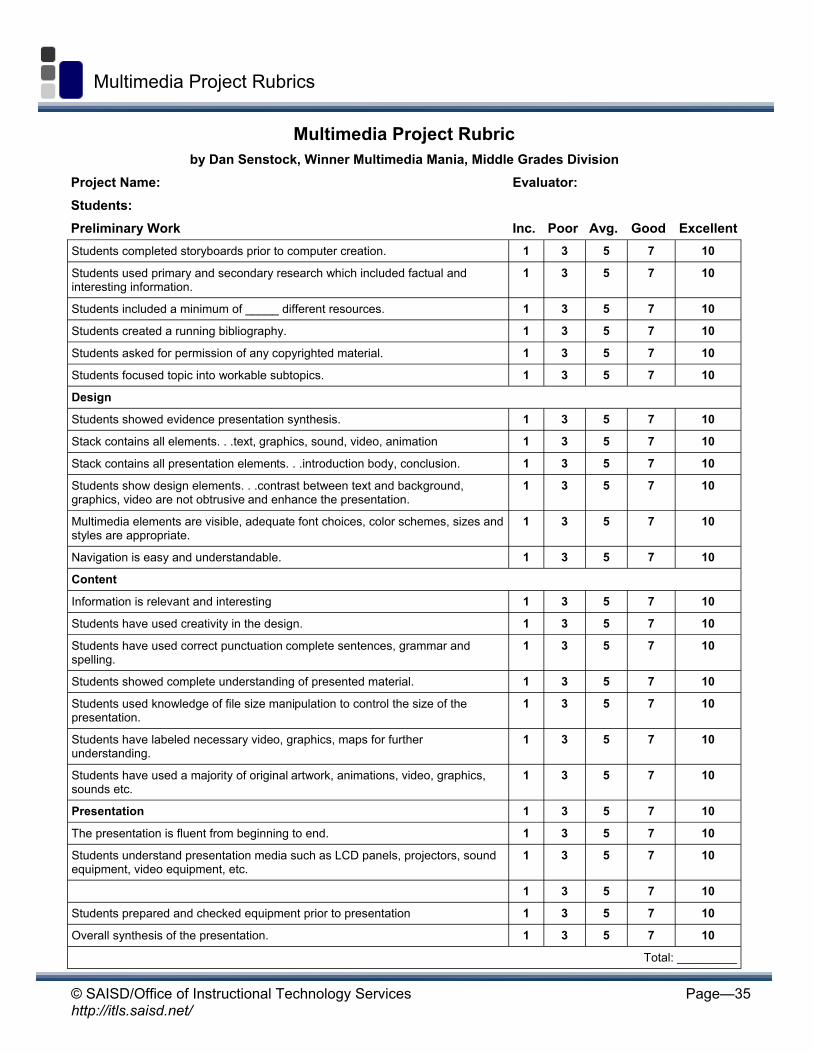
Multimedia Project Rubric by Dan Senstock, Winner Multimedia Mania, Middle Grades Division
Project Name: Evaluator: Students: Preliminary Work Inc. Poor Avg. Good Excellent Students completed storyboards prior to computer creation. 1 3 5 7 10
Students used primary and secondary research which included factual and interesting information.
1 3 5 7 10
Students included a minimum of _____ different resources. 1 3 5 7 10
Students created a running bibliography. 1 3 5 7 10
Students asked for permission of any copyrighted material. 1 3 5 7 10
Students focused topic into workable subtopics. 1 3 5 7 10
Design
Students showed evidence presentation synthesis. 1 3 5 7 10
Stack contains all elements. . .text, graphics, sound, video, animation 1 3 5 7 10
Stack contains all presentation elements. . .introduction body, conclusion. 1 3 5 7 10
Students show design elements. . .contrast between text and background, graphics, video are not obtrusive and enhance the presentation.
1 3 5 7 10
Multimedia elements are visible, adequate font choices, color schemes, sizes and styles are appropriate.
1 3 5 7 10
Navigation is easy and understandable. 1 3 5 7 10
Content
Information is relevant and interesting 1 3 5 7 10
Students have used creativity in the design. 1 3 5 7 10
Students have used correct punctuation complete sentences, grammar and spelling.
1 3 5 7 10
Students showed complete understanding of presented material. 1 3 5 7 10
Students used knowledge of file size manipulation to control the size of the presentation.
1 3 5 7 10
Students have labeled necessary video, graphics, maps for further understanding.
1 3 5 7 10
Students have used a majority of original artwork, animations, video, graphics, sounds etc.
1 3 5 7 10
Presentation 1 3 5 7 10
The presentation is fluent from beginning to end. 1 3 5 7 10
Students understand presentation media such as LCD panels, projectors, sound equipment, video equipment, etc.
1 3 5 7 10
1 3 5 7 10
Students prepared and checked equipment prior to presentation 1 3 5 7 10
Overall synthesis of the presentation. 1 3 5 7 10
Total: _________
© SAISD/Office of Instructional Technology Services http://itls.saisd.net/
Page—36
Multimedia Project Rubrics
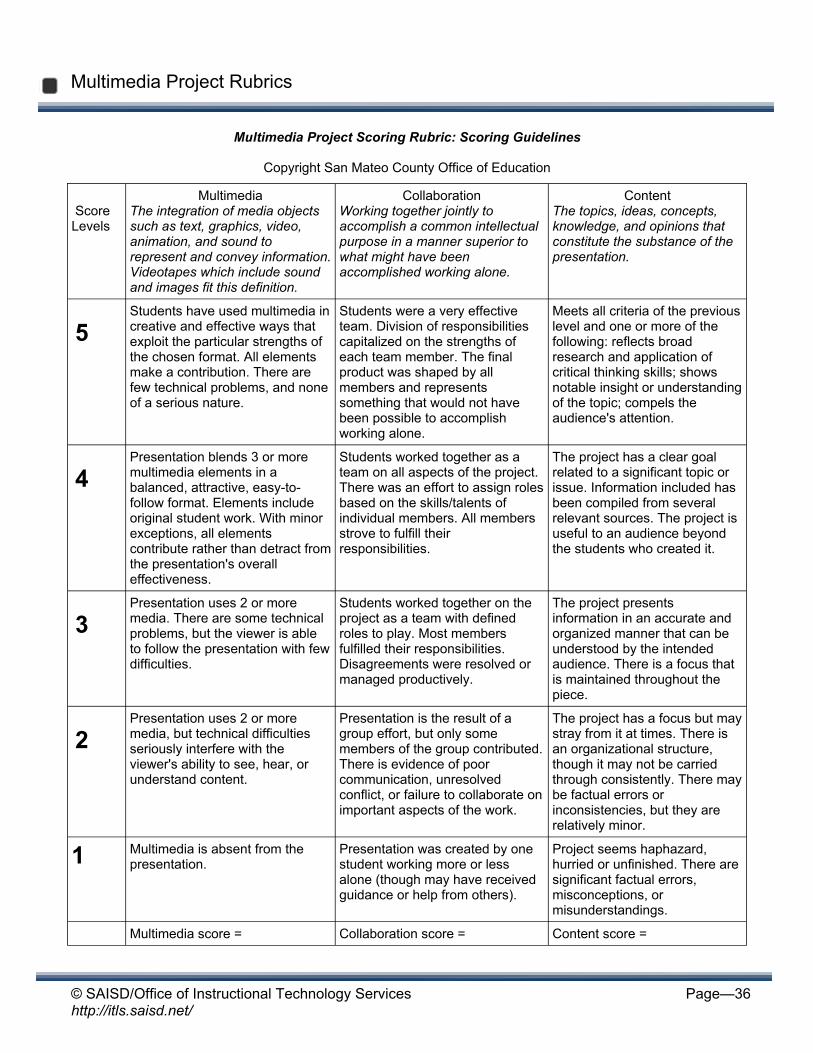
Multimedia Project Scoring Rubric: Scoring Guidelines
Copyright San Mateo County Office of Education
Score Levels
Multimedia The integration of media objects such as text, graphics, video, animation, and sound to represent and convey information. Videotapes which include sound and images fit this definition.
Collaboration Working together jointly to accomplish a common intellectual purpose in a manner superior to what might have been accomplished working alone.
Content The topics, ideas, concepts, knowledge, and opinions that constitute the substance of the presentation.
5 Students have used multimedia in creative and effective ways that exploit the particular strengths of the chosen format. All elements make a contribution. There are few technical problems, and none of a serious nature.
Students were a very effective team. Division of responsibilities capitalized on the strengths of each team member. The final product was shaped by all members and represents something that would not have been possible to accomplish working alone.
Meets all criteria of the previous level and one or more of the following: reflects broad research and application of critical thinking skills; shows notable insight or understanding of the topic; compels the audience's attention.
4 Presentation blends 3 or more multimedia elements in a balanced, attractive, easy-to-follow format. Elements include original student work. With minor exceptions, all elements contribute rather than detract from the presentation's overall effectiveness.
Students worked together as a team on all aspects of the project. There was an effort to assign roles based on the skills/talents of individual members. All members strove to fulfill their responsibilities.
The project has a clear goal related to a significant topic or issue. Information included has been compiled from several relevant sources. The project is useful to an audience beyond the students who created it.
3 Presentation uses 2 or more media. There are some technical problems, but the viewer is able to follow the presentation with few difficulties.
Students worked together on the project as a team with defined roles to play. Most members fulfilled their responsibilities. Disagreements were resolved or managed productively.
The project presents information in an accurate and organized manner that can be understood by the intended audience. There is a focus that is maintained throughout the piece.
2 Presentation uses 2 or more media, but technical difficulties seriously interfere with the viewer's ability to see, hear, or understand content.
Presentation is the result of a group effort, but only some members of the group contributed. There is evidence of poor communication, unresolved conflict, or failure to collaborate on important aspects of the work.
The project has a focus but may stray from it at times. There is an organizational structure, though it may not be carried through consistently. There may be factual errors or inconsistencies, but they are relatively minor.
1 Multimedia is absent from the presentation.
Presentation was created by one student working more or less alone (though may have received guidance or help from others).
Project seems haphazard, hurried or unfinished. There are significant factual errors, misconceptions, or misunderstandings.
Multimedia score = Collaboration score = Content score =