Embed Size (px)
Citation preview
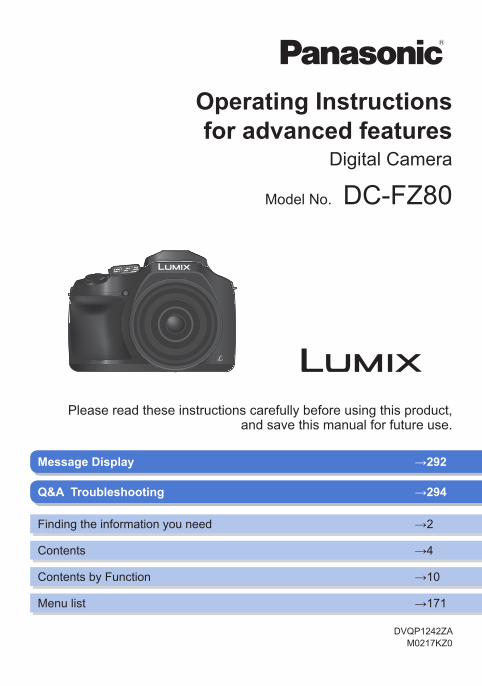
Operating Instructions for advanced features
Digital Camera
Model No. DC-FZ80
DVQP1242ZAM0217KZ0
Message Display →292
Please read these instructions carefully before using this product, and save this manual for future use.
Q&A Troubleshooting →294
Finding the information you need →2
Contents →4
Contents by Function →10
Menu list →171
2DVQP1242
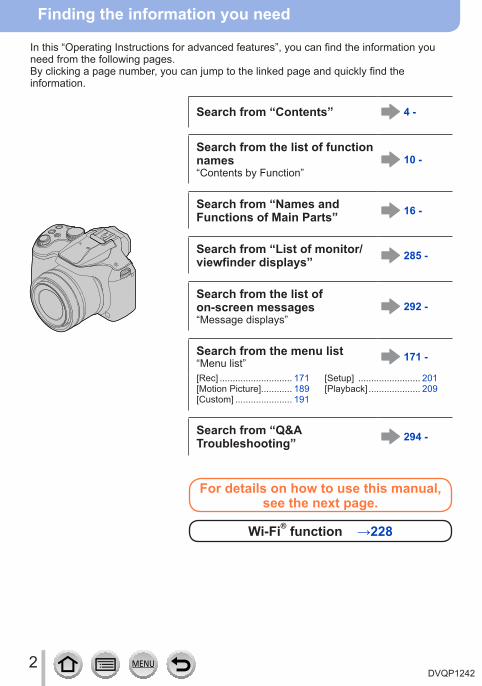
Finding the information you need
In this “Operating Instructions for advanced features”, you can find the information you need from the following pages.By clicking a page number, you can jump to the linked page and quickly find the information.
Search from “Contents” 4 -
Search from the list of function names“Contents by Function”
10 -
Search from “Names and Functions of Main Parts” 16 -
Search from “List of monitor/viewfinder displays” 285 -
Search from the list of on-screen messages“Message displays”
292 -
Search from the menu list“Menu list” 171 -
[Rec] ............................ 171[Motion Picture]............ 189[Custom] ...................... 191
[Setup] ........................ 201[Playback] .................... 209
Search from “Q&A Troubleshooting” 294 -
For details on how to use this manual, see the next page.
Wi-Fi® function →228
3DVQP1242
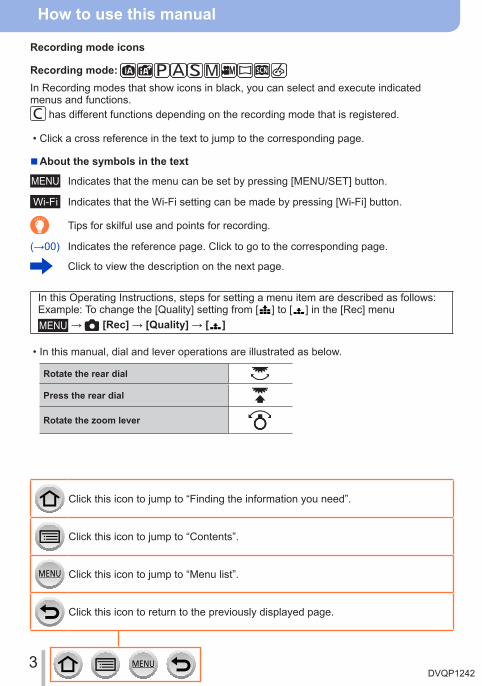
How to use this manual
Click this icon to jump to “Finding the information you need”.
Click this icon to jump to “Contents”.
Click this icon to jump to “Menu list”.
Click this icon to return to the previously displayed page.
Recording mode icons
Recording mode: In Recording modes that show icons in black, you can select and execute indicated menus and functions.
has different functions depending on the recording mode that is registered.
• Click a cross reference in the text to jump to the corresponding page.
■About the symbols in the text
Indicates that the menu can be set by pressing [MENU/SET] button.
Indicates that the Wi-Fi setting can be made by pressing [Wi-Fi] button.
Tips for skilful use and points for recording.
(→00) Indicates the reference page. Click to go to the corresponding page.
Click to view the description on the next page.
In this Operating Instructions, steps for setting a menu item are described as follows:Example: To change the [Quality] setting from [ ] to [ ] in the [Rec] menu
→ [Rec] → [Quality] → [ ]
• In this manual, dial and lever operations are illustrated as below.
Rotate the rear dial
Press the rear dial
Rotate the zoom lever
4DVQP1242
Contents
■ Finding the information you need ..... 2 ■ How to use this manual ...................... 3
■ Before use ......................................... 13 ■ Standard Accessories ...................... 15
Before Use
■ Names and Functions of Main Parts ..................................... 16
Preparations
■ Attaching the Lens Cap/ Shoulder Strap .................................. 18
Attaching the Lens Cap .............................18Attaching the Shoulder Strap .....................19
■ Charging battery ............................... 20Inserting the battery ...................................21Charging the battery ..................................22
■ Inserting and removing the card (optional) ............................................ 26
■ About the Card .................................. 27Formatting the card (initialisation)..............28Estimated recording capacity (number of pictures/recording time) ...........28
■ Setting the clock ............................... 30Changing time settings ..............................31
■ Contents by Function ....................... 10
■ Holding the camera ........................... 32 ■ Buttons/Dials/Levers Used for Recording ........................... 33
[LVF] button (Recording pictures using the viewfinder) ...33Zoom Lever (Use Zoom)............................34Shutter button (Taking pictures) .................35Motion picture button (Recording motion pictures).......................36Mode dial (Select the recording mode) ......36Rear Dial ....................................................37Cursor button / [MENU/SET] button (Selecting/setting items) ............................37[DISP.] button (Switching the display information) ............38
■ Touch screen (Touch operations).... 40Touching the screen and recording (Touch Shutter function).............................41Easily Optimising the Brightness for a Specified Area ([Touch AE]) .......................42
Basics
■ Setting the menu ............................... 43 ■ Calling frequently-used menus instantly (Quick Menu) ..................................... 45
Change the Quick Menu to your preferred item ............................................46
■ Assigning frequently used functions to the buttons (Function buttons) ............................ 47
Using the function buttons during recording ....................................................48Using the function buttons during playback.....................................................49
■ Entering Text ..................................... 50
5DVQP1242
Contents
Recording mode
■ Taking pictures with automatic settings (Intelligent Auto Mode) ..................... 51
Taking pictures using a handheld camera ([iHandheld Night Shot]) ............................54Combining pictures into a single still picture with rich gradation ([iHDR]) ............55Setting colouring ........................................55Setting brightness (exposure)/ blurriness of the background (Defocus control function) ..........................56
■ Taking pictures after automatically setting the aperture value and shutter speed (Programme AE Mode) ..................... 57
■ Taking pictures by setting the aperture value and shutter speed ... 58
Taking pictures by setting the aperture value (Aperture-Priority AE Mode) .............58Taking pictures by setting the shutter speed (Shutter-Priority AE Mode) ..............59Taking pictures by setting the aperture value and shutter speed (Manual Exposure Mode) ..........................60Checking the effects of the aperture value and shutter speed (Preview Mode) ............62Easily set aperture value / shutter speed for suitable exposure (One Push AE) ........64
■ Recording panorama pictures (Panorama Shot Mode) ..................... 65
■ Taking pictures according to the scene (Scene Guide Mode) ......................... 68
Types of Scene Guide Mode .....................69 ■ Taking Pictures with different picture effects (Creative Control Mode) ................... 72
Types of picture effects ..............................73 ■ Recording motion pictures by setting the aperture/ shutter speed/ISO sensitivity (Creative Video Mode) ...................... 78
Recording Slow Motion Pictures ([High Speed Video]) .................................79Minimising operational sounds during motion picture recording ............................80
■ Registering your own settings and recording (Custom Mode) .................................. 81
Registering your own settings ([Cust.Set Mem.]).......................................81Recording using registered custom set .....82
6DVQP1242
Contents
Focus, Brightness (Exposure) and Colour tone Settings
■ Taking pictures with Auto Focus ..... 83Set the focusing operation to be performed when the shutter button is pressed halfway (AFS, AFF, AFC) .............84Switching [AF Mode] ..................................85Changing the position and size of the AF area ............................................91Setting the AF area position with the touch pad ...................................................94Optimising the focus and brightness for a touched position ................................95
■ Taking close-up pictures (Macro recording) ............................. 96
■ Taking pictures with Manual Focus .................................... 97
■ Taking pictures by locking the focus and/or exposure (AF/AE Lock) ..................................... 99
■ Taking pictures with Exposure Compensation ................ 100
■ Setting the ISO Sensitivity ............. 101 ■ Adjusting the White Balance ......... 103
4K Photo and Drive Settings
■ Recording with the 4K Photo function and selecting pictures to save .............................................. 107
Recording with the 4K Photo function .....107Selecting pictures from 4K burst file and saving ...................................................... 110Notes on the 4K Photo function ............... 114
■ Adjusting the focus after recording ([Post Focus]/[Focus Stacking]) .... 117
Recording using [Post Focus] .................. 117Select the focus point and save the picture ([Post Focus])............................... 119Select the focus range to combine and create a single picture ([Focus Stacking]) ....................................120Notes on the [Post Focus]/ [Focus Stacking] ......................................122
■ Selecting a Drive Mode ................... 123Burst function ...........................................124Taking pictures with self-timer..................126
■ Taking Pictures While Adjusting a Setting Automatically (Bracket Recording) ........................ 127
Exposure Bracket ....................................128 ■ Taking pictures automatically at set intervals [Time Lapse Shot] ........................... 129
■ Creating stop motion animation [Stop Motion Animation] ................ 131
7DVQP1242
Contents
Stabiliser, Zoom and Flash
■ Correcting jitter ............................... 134 ■ Using Zoom ..................................... 136
Zoom types and use ................................136Using the zoom by performing touch operations (Touch zoom) .........................139
■ Taking pictures with flash .............. 140
■ Setting the Flash Functions ........... 142Changing the firing mode (Manual flash) ..........................................142Changing Flash Mode..............................143Setting the 2nd curtain sync ....................146Adjusting the flash output ........................147Synchronising the flash output with the camera during Exposure Compensation..........................................147
■ Taking Pictures with Wireless Flashes ............................. 148
Recording motion pictures
■ Recording Motion Picture/ 4K Motion Picture ........................... 151
Setting the format, picture size and recording frame rate ................................153Adjusting the focus while recording motion pictures ([Continuous AF]) ...........155
■ Pan or zoom while recording with the camera in a fixed position [4K Live Cropping] .......................... 156
■ Taking still pictures while a motion picture is being recorded ............... 159
■ Recording Snap Movies ................. 160
Playing Back and Editing Pictures
■ Viewing your pictures ..................... 163 ■ Viewing motion pictures ................ 164
Capturing still pictures from motion pictures ........................................165
■ Switching the Playback Method .... 166Zooming in and viewing “Playback Zoom”......................................166Viewing a list of pictures “Multi Playback” .......................................166Viewing pictures by their recording date “Calendar Playback” ................................167
■ Viewing group pictures .................. 168 ■ Deleting pictures ............................. 170
8DVQP1242
Contents
Wi-Fi
■ What you can do with the Wi-Fi® function ................................ 228
■ Wi-Fi Function ................................. 229 ■ Operating the camera by connecting it to a smartphone ....... 232
Installing the smartphone/tablet app “Panasonic Image App” ...........................232Connecting to a smartphone....................233Taking pictures via a smartphone (remote recording) ...................................237Playing back pictures in the camera on a smartphone ...........................................238Saving pictures in the camera to a smartphone ..............................................238Sending pictures in the camera to social networking services .......................239Adding location information to pictures in the camera from a smartphone ............239Combining motion pictures recorded with Snap Movie according to your preference on a smartphone....................241
■ Displaying still pictures on a TV .... 242
■ Sending pictures ............................. 243 ■ Sending pictures to a smartphone ..................................... 246
■ Wireless printing ............................. 247 ■ Sending pictures to AV device ....... 248 ■ Sending pictures to a PC ............... 249 ■ Using WEB services ....................... 251
When sending images to WEB service....251When sending images to [Cloud Sync. Service] ..............................254
■ Using “LUMIX CLUB” ..................... 255About the [LUMIX CLUB] .........................255
■ About connections ......................... 259Connecting via a wireless access point ([Via Network]) .........................................260Connecting directly ([Direct]) ...................263Connecting quickly with the same settings as used previously ([Select a destination from History] / [Select a destination from Favorite]) ........264
■ [Wi-Fi Setup] .................................... 266
Using Menu Functions
■ Menu list .......................................... 171[Rec] ........................................................171[Motion Picture] ........................................189
[Custom] ..................................................191[Setup] .....................................................201[Playback] ................................................209
9DVQP1242
Contents
Connecting with other devices
■ Enjoying 4K motion pictures ......... 267Viewing 4K motion pictures .....................267Storing 4K motion pictures.......................268
■ Viewing on TV screen ..................... 269VIERA Link (HDMI) (HDAVI Control™) ....271
■ Storing recorded still pictures and motion pictures on your PC ........... 272
Downloading software .............................273Copying still pictures and motion pictures ........................................275
■ Storing recorded still pictures and motion pictures in the recorder ..... 277
■ Printing ............................................ 278Printing with date and text .......................280
Others
■ Optional accessories ...................... 281Conversion Lens (optional) ......................281External Flash (optional) ..........................283AC adaptor (optional) / DC coupler (optional) ...............................284Filter (optional) .........................................284
■ List of monitor/viewfinder displays ............................................ 285
■ Message displays ........................... 292 ■ Q&A Troubleshooting .................... 294 ■ Usage cautions and notes ............. 303
10DVQP1242
Contents by Function
RecordingRecording mode ...........................................36[Preview] .......................................................62Panorama Shot Mode ...................................65Macro recording ............................................96[Time Lapse Shot] .......................................129[Stop Motion Animation] ..............................131[Multi Exp.] ..................................................181[Silent Mode] ...............................................191
4K Photo[4K PHOTO]................................................107[Post Focus] recording ................................ 117
Focus (AF/MF)Auto Focus ...................................................83AF Mode .......................................................85Adjusting the AF area position ......................91Manual Focus ...............................................97AF/AE Lock ...................................................99
DriveDrive Mode .................................................123Burst function ..............................................124[Self Timer] .................................................126
RecordingExposure
[Touch AE] ....................................................42[One Push AE] ..............................................64AF/AE Lock ...................................................99Exposure Compensation ............................100ISO sensitivity .............................................101Exposure Bracket .......................................128[Metering Mode] ..........................................177
Picture Quality and Colour ToneWhite Balance ............................................103[Photo Style] ...............................................172[Filter Settings] ............................................174[Picture Size] ..............................................176[Quality] ......................................................176[Highlight Shadow] ......................................178[i.Dynamic] ..................................................179[i.Resolution] ...............................................179[HDR] ..........................................................180[Diffraction Compensation] .........................184[Color Space] ..............................................184
Flash[Flash Mode] ...............................................1432nd curtain synchro ....................................146[Flash Adjust.] .............................................147Wireless flash settings ........................148, 149
Motion PictureCreative Video Mode ....................................78[High Speed Video] .......................................79[Silent Operation] ..........................................80Motion pictures in 4K ..................................151[Rec Format] ...............................................153[Rec Quality] ...............................................153[4K Live Cropping] ......................................156Taking still pictures while a motion picture is being recorded ........................................159[Snap Movie] ...............................................160
Motion PictureAudio
[Wind Noise Canceller] ...............................189Screen settings
[Center Marker] ...........................................196[Zebra Pattern] ............................................197[Monochrome Live View] ............................197
11DVQP1242
Contents by Function
PlaybackPicture playback .........................................163Motion picture playback ..............................164Playback Zoom ...........................................166Multi Playback ............................................166Delete .........................................................170[Auto Review] .............................................199
Display/playback settings[Slide Show] ................................................210[Rotate]/[Rotate Disp.] ........................223, 224
Edit[Post Focus] ................................................ 119[Focus Stacking] .........................................120[RAW Processing] .......................................213[4K PHOTO Bulk Saving] ...........................216[Light Composition] .....................................216[Clear Retouch] ...........................................218[Resize] .......................................................222[Cropping] ...................................................223
PlaybackAdding information
[Location Logging] ......................................212[Title Edit] ....................................................219[Text Stamp] ................................................220
Image settings[Favorite] .....................................................224[Print Set] ....................................................225[Protect] ......................................................226
Basic settings[Format] ........................................................28[Clock Set] ....................................................30Display switching ....................................38, 39Diopter adjustment. ......................................33How to set menu items .................................43[Q.MENU] .....................................................45[Beep] .........................................................203[Economy] ...................................................205[Reset] (initialisation) ..................................208
Setup/CustomCustomisation
[CUSTOM] in the Quick Menu ......................46Function buttons ...........................................47Custom Mode ...............................................81[Custom] menu ...........................................191
12DVQP1242
Contents by Function
PCTransferring images to a PC .......................272PHOTOfunSTUDIO ....................................273SILKYPIX ....................................................274
TVPlaying back pictures on a TV screen ........269[VIERA Link] ...............................................271
Connecting with other devicesRecorder
Dubbing ......................................................277Printer
PictBridge ...................................................278
Connect“Image App” ................................................232[WPS (Push-Button)] ..........................260, 263Direct connection ........................................263
Image AppRemote recording .......................................237Saving images ............................................238Sending images ..................................239, 246Sending and adding location information ...239Combining motion pictures recorded with [Snap Movie] ...............................................241
Wi-FiIn combination with other devices
Playing back pictures on a TV ....................242Printing images ...........................................247Sending images to an AV device ................248Sending images to a PC .............................249Sending images to a WEB service .............251Using [Cloud Sync. Service] .......................254
13DVQP1242
Before Use
Before use ■Camera handling
Keep the camera away from excessive vibration, force, or pressure. ●Avoid using the camera under the following conditions, which may damage the lens, monitor, viewfinder, or camera body. This may also cause the camera to malfunction or prevent recording.
• Dropping or hitting the camera against a hard surface • Pushing with excessive force on the lens or monitor
Do not hold the lens barrel as you take pictures. There is a risk that your finger will be trapped as the lens retracts.There are times when rattling sounds or vibrations will come from the camera, but these are due to the motion of the aperture, the zoom and the motor and do not indicate a defect.The camera is not dust resistant, splash resistant, or waterproof.Avoid using the camera in places with excessive dust or sand, or where water can come into contact with the camera.
●Avoid using the camera under the following conditions, which present a risk that sand, water, or foreign material may enter the camera through the lens or openings around buttons. Be especially careful because these conditions may damage the camera, and such damage may not be repairable.
• In extremely dusty or sandy places • In the rain or by the shore, where the camera may be exposed to water
■Condensation (When the lens, the monitor, or viewfinder, is fogged up) ●Condensation may occur when the camera is exposed to sudden changes of temperature or humidity. Avoid these conditions, which may make the lens, monitor, or viewfinder dirty, cause mould, or damage the camera. ●If condensation does occur, turn off the camera and wait about two hours before using it. Once the camera adjusts to the surrounding temperature, the fogging will clear naturally.
14DVQP1242
Before Use
Before use
■Always take a test shot firstBefore important events when you will use the camera (at weddings, for example), always take a test shot to make sure that pictures and sound record correctly.
■No compensation for missed shotsWe cannot compensate for missed shots if technical problems with the camera or card prevent recording.
■Carefully observe copyright lawsUnauthorised use of recordings that contain works with copyright for purposes other than personal use is prohibited under copyright law. Recording of certain material may be restricted even for the purpose of personal use.
■Also refer to “Usage cautions and notes” (→303)
■Before using the camera, make sure all accessories specified in the attached “Basic Operating Instructions” are supplied.
For details on optional accessories (→281)
15DVQP1242
Before Use
Standard AccessoriesCheck that all the accessories are supplied before using the camera.
●The accessories and their shape will differ depending on the country or area where the camera was purchased. For details on the accessories, refer to “Basic Operating Instructions”. ●Battery Pack is indicated as battery pack or battery in the text. ●SD Memory Card, SDHC Memory Card and SDXC Memory Card are indicated as card in the text. ●Cards are optional. ●Please dispose of all packaging appropriately. ●Keep small parts in a safe place out of the reach of children.
■Optional accessories (→281)
16DVQP1242
Before Use
Names and Functions of Main Parts
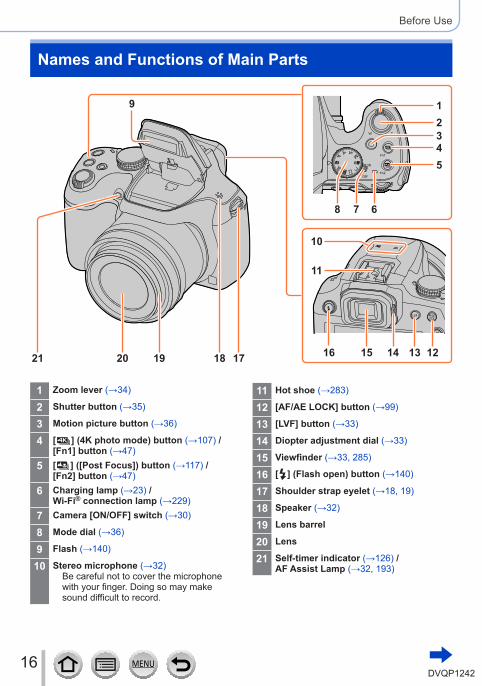
1 Zoom lever (→34)
2 Shutter button (→35)
3 Motion picture button (→36)
4 [ ] (4K photo mode) button (→107) /[Fn1] button (→47)
5 [ ] ([Post Focus]) button (→117) /[Fn2] button (→47)
6 Charging lamp (→23) /Wi-Fi® connection lamp (→229)
7 Camera [ON/OFF] switch (→30)
8 Mode dial (→36)
9 Flash (→140)
10 Stereo microphone (→32)Be careful not to cover the microphone with your finger. Doing so may make sound difficult to record.
11 Hot shoe (→283)
12 [AF/AE LOCK] button (→99)
13 [LVF] button (→33)
14 Diopter adjustment dial (→33)
15 Viewfinder (→33, 285)
16 [ ] (Flash open) button (→140)
17 Shoulder strap eyelet (→18, 19)
18 Speaker (→32)
19 Lens barrel
20 Lens
21 Self-timer indicator (→126) /AF Assist Lamp (→32, 193)
12345
678
9
10
11
121314151621 20 19 18 17
17DVQP1242
Before Use
Names and Functions of Main Parts
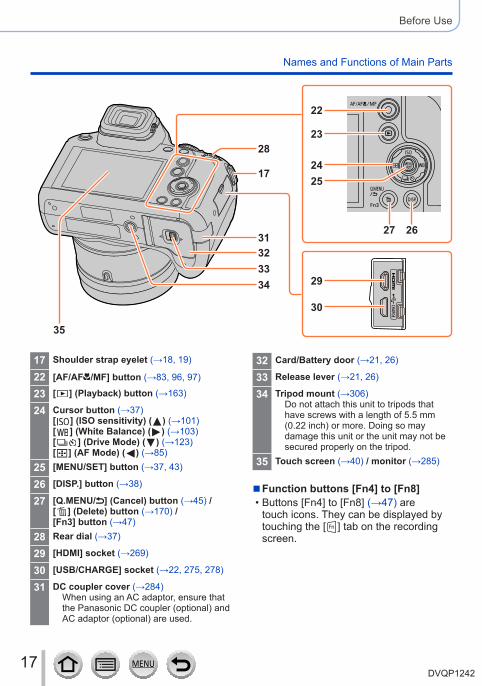
17 Shoulder strap eyelet (→18, 19)
22 [AF/AF /MF] button (→83, 96, 97)
23 [ ] (Playback) button (→163)
24 Cursor button (→37)[ ] (ISO sensitivity) ( ) (→101)[ ] (White Balance) ( ) (→103)[ ] (Drive Mode) ( ) (→123)[ ] (AF Mode) ( ) (→85)
25 [MENU/SET] button (→37, 43)
26 [DISP.] button (→38)
27 [Q.MENU/ ] (Cancel) button (→45) /[ ] (Delete) button (→170) /[Fn3] button (→47)
28 Rear dial (→37)
29 [HDMI] socket (→269)
30 [USB/CHARGE] socket (→22, 275, 278)
31 DC coupler cover (→284)When using an AC adaptor, ensure that the Panasonic DC coupler (optional) and AC adaptor (optional) are used.
32 Card/Battery door (→21, 26)
33 Release lever (→21, 26)
34 Tripod mount (→306)Do not attach this unit to tripods that have screws with a length of 5.5 mm (0.22 inch) or more. Doing so may damage this unit or the unit may not be secured properly on the tripod.
35 Touch screen (→40) / monitor (→285)
■Function buttons [Fn4] to [Fn8] • Buttons [Fn4] to [Fn8] (→47) are touch icons. They can be displayed by touching the [ ] tab on the recording screen.
22
23
2425
2627
29
30
17
28
31323334
35
18DVQP1242
Preparations
Attaching the Lens Cap/Shoulder Strap
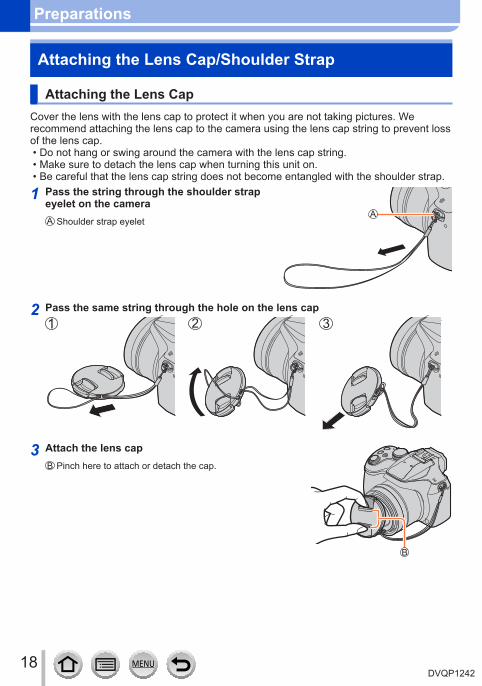
Attaching the Lens CapCover the lens with the lens cap to protect it when you are not taking pictures. We recommend attaching the lens cap to the camera using the lens cap string to prevent loss of the lens cap.
• Do not hang or swing around the camera with the lens cap string. • Make sure to detach the lens cap when turning this unit on. • Be careful that the lens cap string does not become entangled with the shoulder strap.
1 Pass the string through the shoulder strap eyelet on the camera
Shoulder strap eyelet
2 Pass the same string through the hole on the lens cap
3 Attach the lens capPinch here to attach or detach the cap.
19DVQP1242
Preparations
Attaching the Lens Cap/Shoulder Strap
Attaching the Shoulder StrapWe recommend attaching the shoulder strap when using the camera to prevent it from dropping.
1 Pass the shoulder strap through the hole at the shoulder strap eyelet
• Attach the shoulder strap so that the “LUMIX” Logo is on the outside.Shoulder strap eyelet
2 Pass the end of the shoulder strap through the stopper
3 Pass the end of the shoulder strap through the hole on the other side of the stopper
Pull the shoulder strap 2 cm (0.066 feet) or more.
4 Pull the shoulder strap and then check that it will not come out
• Perform steps 1 to 4 and then attach the other side of the shoulder strap.
• Use the shoulder strap around your shoulder. – Do not wrap the strap around your neck. It may result in injury or accident.
• Do not leave the shoulder strap where an infant can reach it.
– It may result in an accident by mistakenly wrapping around the neck.
20DVQP1242
Preparations
Charging batteryAlways use the dedicated AC adaptor (supplied), USB connection cable (supplied), and battery for this camera.
• Always charge before first use! (battery shipped uncharged) • Charge the battery while it is in the camera.
Camera status ChargeTurn off YesTurn on No
About batteries that you can use with this unit
It has been found that counterfeit battery packs which look very similar to the genuine products are made available to purchase in some markets. Some of these battery packs are not adequately protected with internal protection to meet the requirements of appropriate safety standards. There is a possibility that these battery packs may lead to fire or explosion. Please be advised that we are not liable for any accident or failure occurring as a result of use of a counterfeit battery pack. To ensure that safe products are used we recommend that a genuine Panasonic battery pack is used.
21DVQP1242
Preparations
Charging battery
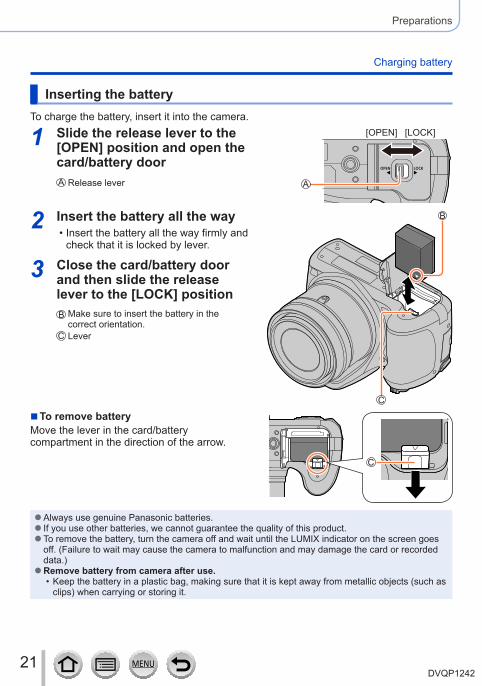
Inserting the batteryTo charge the battery, insert it into the camera.
1 Slide the release lever to the [OPEN] position and open the card/battery door
Release lever
[OPEN] [LOCK]
2 Insert the battery all the way • Insert the battery all the way firmly and check that it is locked by lever.
3 Close the card/battery door and then slide the release lever to the [LOCK] position
Make sure to insert the battery in the correct orientation.Lever
■To remove batteryMove the lever in the card/battery compartment in the direction of the arrow.
●Always use genuine Panasonic batteries. ● If you use other batteries, we cannot guarantee the quality of this product. ●To remove the battery, turn the camera off and wait until the LUMIX indicator on the screen goes off. (Failure to wait may cause the camera to malfunction and may damage the card or recorded data.) ●Remove battery from camera after use.
• Keep the battery in a plastic bag, making sure that it is kept away from metallic objects (such as clips) when carrying or storing it.
22DVQP1242
Preparations
Charging battery
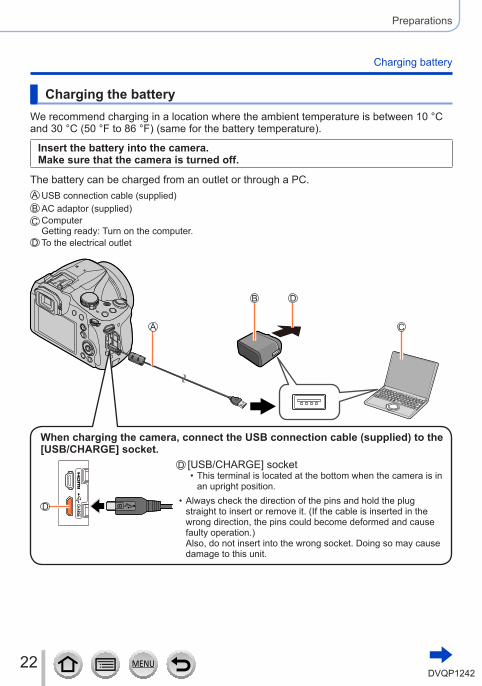
Charging the batteryWe recommend charging in a location where the ambient temperature is between 10 °C and 30 °C (50 °F to 86 °F) (same for the battery temperature).
Insert the battery into the camera.Make sure that the camera is turned off.
The battery can be charged from an outlet or through a PC.USB connection cable (supplied)AC adaptor (supplied)ComputerGetting ready: Turn on the computer.To the electrical outlet
When charging the camera, connect the USB connection cable (supplied) to the [USB/CHARGE] socket.
[USB/CHARGE] socket • This terminal is located at the bottom when the camera is in an upright position.
• Always check the direction of the pins and hold the plug straight to insert or remove it. (If the cable is inserted in the wrong direction, the pins could become deformed and cause faulty operation.)Also, do not insert into the wrong socket. Doing so may cause damage to this unit.
23DVQP1242
Preparations
Charging battery
● If the computer enters sleep mode during charging, charging may be stopped. ● If a notebook computer that is not connected to an electrical outlet is connected to the camera, the battery of the notebook computer will be depleted. Do not leave the camera and notebook connected for a long period of time. ●Always connect the USB connection cable to the USB connector on your computer. Do not connect the USB connection cable to the USB connector of the monitor, keyboard, printer, or USB hub.
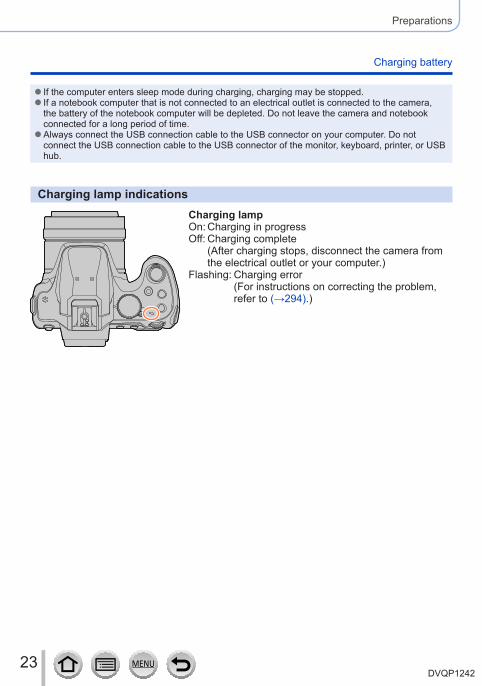
Charging lamp indicationsCharging lampOn: Charging in progressOff: Charging complete
(After charging stops, disconnect the camera from the electrical outlet or your computer.)
Flashing: Charging error (For instructions on correcting the problem, refer to (→294).)
24DVQP1242
Preparations
Charging battery
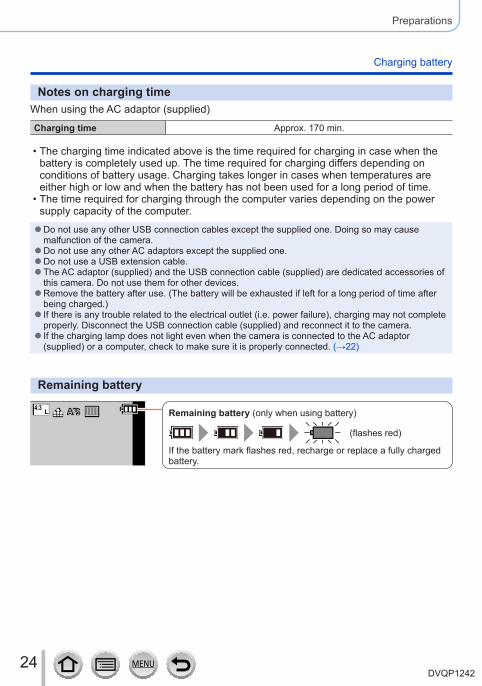
Notes on charging timeWhen using the AC adaptor (supplied)
Charging time Approx. 170 min.
• The charging time indicated above is the time required for charging in case when the battery is completely used up. The time required for charging differs depending on conditions of battery usage. Charging takes longer in cases when temperatures are either high or low and when the battery has not been used for a long period of time.
• The time required for charging through the computer varies depending on the power supply capacity of the computer.
●Do not use any other USB connection cables except the supplied one. Doing so may cause malfunction of the camera. ●Do not use any other AC adaptors except the supplied one. ●Do not use a USB extension cable. ●The AC adaptor (supplied) and the USB connection cable (supplied) are dedicated accessories of this camera. Do not use them for other devices. ●Remove the battery after use. (The battery will be exhausted if left for a long period of time after being charged.) ●If there is any trouble related to the electrical outlet (i.e. power failure), charging may not complete properly. Disconnect the USB connection cable (supplied) and reconnect it to the camera. ● If the charging lamp does not light even when the camera is connected to the AC adaptor (supplied) or a computer, check to make sure it is properly connected. (→22)
Remaining battery
50p Remaining battery (only when using battery)
(flashes red)
If the battery mark flashes red, recharge or replace a fully charged battery.

25DVQP1242
Preparations
Charging battery
Estimated number of recordable pictures and operating timeBy CIPA (Camera & Imaging Products Association) standardWhen a Panasonic SDHC memory card and the supplied battery are used.
■Recording still pictures (When using monitor)Number of recordable pictures Approx. 330 picturesRecording time Approx. 165 min.
■Recording still pictures (When using viewfinder (LVF))Number of recordable pictures Approx. 240 picturesRecording time Approx. 120 min.
■Recording motion pictures (When using monitor)[Rec Format] [AVCHD] [MP4] [MP4]
[Rec Quality] [FHD/17M/50i] [FHD/28M/60p][FHD/28M/50p]
[4K/100M/30p][4K/100M/25p]
Available recording time Approx. 100 min. Approx. 100 min. Approx. 80 min.Actual available recording time* Approx. 50 min. Approx. 50 min. Approx. 40 min.
* The time you can actually record when repeatedly turning the camera on and off, starting and stopping recording and using zoom.
■Viewing pictures (When using monitor)Playback time Approx. 260 min.
●The operating times and number of recordable pictures will differ according to the environment and the operating conditions. For example, in the following cases, the operating times shorten and the number of recordable pictures is reduced.
• In low-temperature environments, such as on ski slopes. • When operations such as the flash and zoom are used repeatedly.
● If available battery power is significantly reduced, battery is reaching end of lifespan. Please purchase a new battery.
26DVQP1242
Preparations
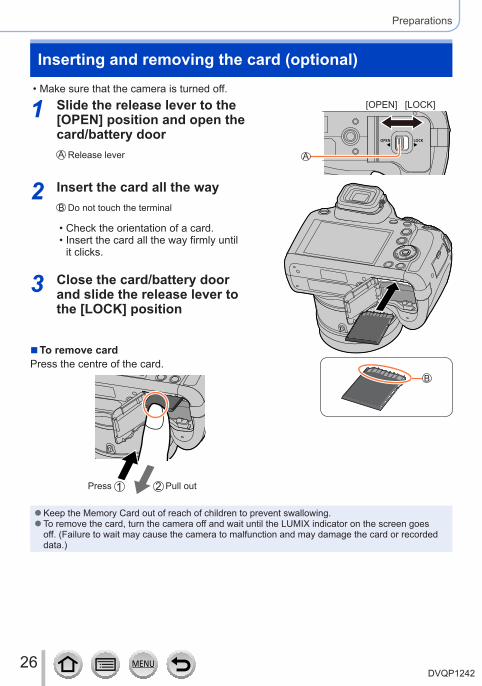
Inserting and removing the card (optional) • Make sure that the camera is turned off.
1 Slide the release lever to the [OPEN] position and open the card/battery door
Release lever
2 Insert the card all the wayDo not touch the terminal
• Check the orientation of a card. • Insert the card all the way firmly until it clicks.
3 Close the card/battery door and slide the release lever to the [LOCK] position
■To remove cardPress the centre of the card.
Press Pull out
[OPEN] [LOCK]
●Keep the Memory Card out of reach of children to prevent swallowing. ●To remove the card, turn the camera off and wait until the LUMIX indicator on the screen goes off. (Failure to wait may cause the camera to malfunction and may damage the card or recorded data.)
27DVQP1242
Preparations
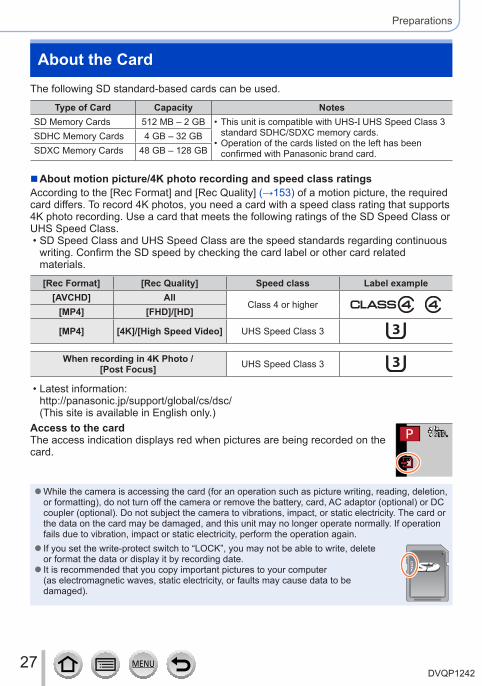
About the CardThe following SD standard-based cards can be used.
Type of Card Capacity NotesSD Memory Cards 512 MB – 2 GB • This unit is compatible with UHS-Ι UHS Speed Class 3
standard SDHC/SDXC memory cards. • Operation of the cards listed on the left has been confirmed with Panasonic brand card.
SDHC Memory Cards 4 GB – 32 GBSDXC Memory Cards 48 GB – 128 GB
■About motion picture/4K photo recording and speed class ratingsAccording to the [Rec Format] and [Rec Quality] (→153) of a motion picture, the required card differs. To record 4K photos, you need a card with a speed class rating that supports 4K photo recording. Use a card that meets the following ratings of the SD Speed Class or UHS Speed Class.
• SD Speed Class and UHS Speed Class are the speed standards regarding continuous writing. Confirm the SD speed by checking the card label or other card related materials.
[Rec Format] [Rec Quality] Speed class Label example[AVCHD] All
Class 4 or higher [MP4] [FHD]/[HD]
[MP4] [4K]/[High Speed Video] UHS Speed Class 3
When recording in 4K Photo / [Post Focus] UHS Speed Class 3
• Latest information: http://panasonic.jp/support/global/cs/dsc/ (This site is available in English only.)
Access to the cardThe access indication displays red when pictures are being recorded on the card.
50p
●While the camera is accessing the card (for an operation such as picture writing, reading, deletion, or formatting), do not turn off the camera or remove the battery, card, AC adaptor (optional) or DC coupler (optional). Do not subject the camera to vibrations, impact, or static electricity. The card or the data on the card may be damaged, and this unit may no longer operate normally. If operation fails due to vibration, impact or static electricity, perform the operation again. ● If you set the write-protect switch to “LOCK”, you may not be able to write, delete or format the data or display it by recording date. ● It is recommended that you copy important pictures to your computer (as electromagnetic waves, static electricity, or faults may cause data to be damaged).
28DVQP1242
Preparations
About the Card
Formatting the card (initialisation)Format the card before recording a picture with this unit.Since data cannot be recovered after formatting, make sure to back up necessary data in advance.
→ [Setup] → [Format]
●This requires a sufficiently charged battery, or an AC adaptor (optional) and DC coupler (optional). ●Do not turn off the camera or perform other operations during formatting. ●Always format cards with this camera. Please reformat the card with this camera if it has already been formatted with a computer or another device.
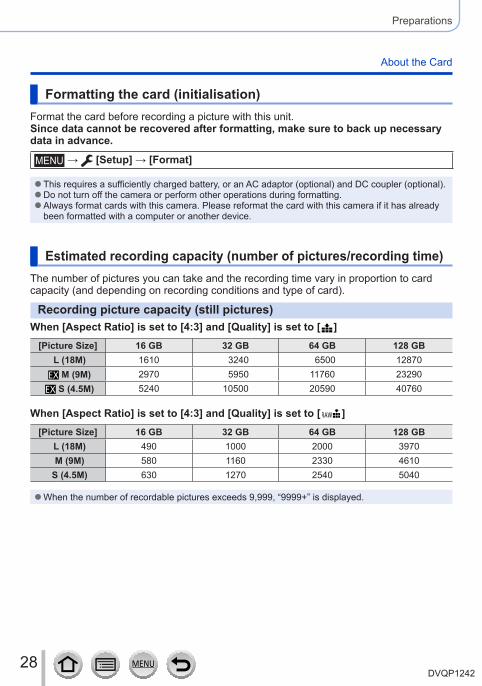
Estimated recording capacity (number of pictures/recording time)The number of pictures you can take and the recording time vary in proportion to card capacity (and depending on recording conditions and type of card).
Recording picture capacity (still pictures)When [Aspect Ratio] is set to [4:3] and [Quality] is set to [ ]
[Picture Size] 16 GB 32 GB 64 GB 128 GBL (18M) 1610 3240 6500 12870
M (9M) 2970 5950 11760 23290 S (4.5M) 5240 10500 20590 40760
When [Aspect Ratio] is set to [4:3] and [Quality] is set to [ ][Picture Size] 16 GB 32 GB 64 GB 128 GB
L (18M) 490 1000 2000 3970M (9M) 580 1160 2330 4610
S (4.5M) 630 1270 2540 5040
●When the number of recordable pictures exceeds 9,999, “9999+” is displayed.
29DVQP1242
Preparations
About the Card
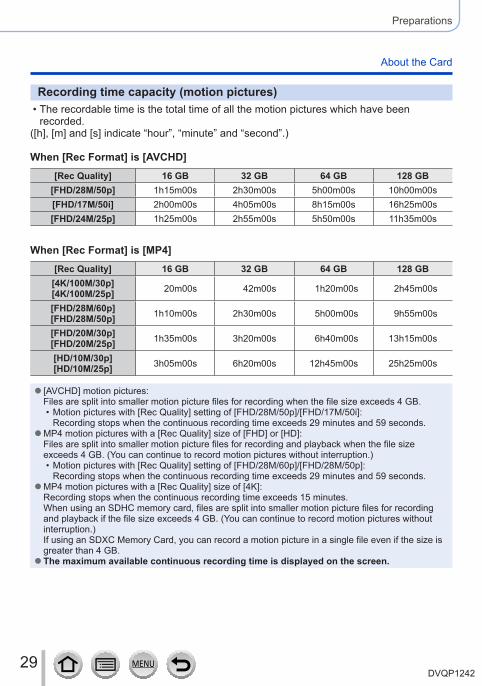
Recording time capacity (motion pictures) • The recordable time is the total time of all the motion pictures which have been recorded.
([h], [m] and [s] indicate “hour”, “minute” and “second”.)
When [Rec Format] is [AVCHD][Rec Quality] 16 GB 32 GB 64 GB 128 GB
[FHD/28M/50p] 1h15m00s 2h30m00s 5h00m00s 10h00m00s[FHD/17M/50i] 2h00m00s 4h05m00s 8h15m00s 16h25m00s[FHD/24M/25p] 1h25m00s 2h55m00s 5h50m00s 11h35m00s
When [Rec Format] is [MP4][Rec Quality] 16 GB 32 GB 64 GB 128 GB[4K/100M/30p][4K/100M/25p] 20m00s 42m00s 1h20m00s 2h45m00s
[FHD/28M/60p][FHD/28M/50p] 1h10m00s 2h30m00s 5h00m00s 9h55m00s
[FHD/20M/30p][FHD/20M/25p] 1h35m00s 3h20m00s 6h40m00s 13h15m00s
[HD/10M/30p][HD/10M/25p] 3h05m00s 6h20m00s 12h45m00s 25h25m00s
● [AVCHD] motion pictures:Files are split into smaller motion picture files for recording when the file size exceeds 4 GB.
• Motion pictures with [Rec Quality] setting of [FHD/28M/50p]/[FHD/17M/50i]: Recording stops when the continuous recording time exceeds 29 minutes and 59 seconds.
●MP4 motion pictures with a [Rec Quality] size of [FHD] or [HD]:Files are split into smaller motion picture files for recording and playback when the file size exceeds 4 GB. (You can continue to record motion pictures without interruption.)
• Motion pictures with [Rec Quality] setting of [FHD/28M/60p]/[FHD/28M/50p]: Recording stops when the continuous recording time exceeds 29 minutes and 59 seconds.
●MP4 motion pictures with a [Rec Quality] size of [4K]:Recording stops when the continuous recording time exceeds 15 minutes.When using an SDHC memory card, files are split into smaller motion picture files for recording and playback if the file size exceeds 4 GB. (You can continue to record motion pictures without interruption.)If using an SDXC Memory Card, you can record a motion picture in a single file even if the size is greater than 4 GB. ●The maximum available continuous recording time is displayed on the screen.
30DVQP1242
Preparations
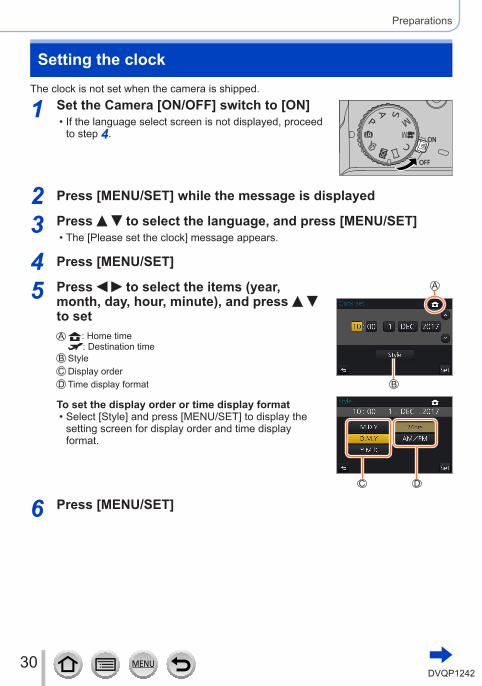
Setting the clockThe clock is not set when the camera is shipped.
1 Set the Camera [ON/OFF] switch to [ON] • If the language select screen is not displayed, proceed to step 4.
2 Press [MENU/SET] while the message is displayed
3 Press to select the language, and press [MENU/SET] • The [Please set the clock] message appears.
4 Press [MENU/SET]
5 Press to select the items (year, month, day, hour, minute), and press to set
: Home time: Destination time
StyleDisplay orderTime display format
To set the display order or time display format • Select [Style] and press [MENU/SET] to display the setting screen for display order and time display format.
6 Press [MENU/SET]
31DVQP1242
Preparations
Setting the clock
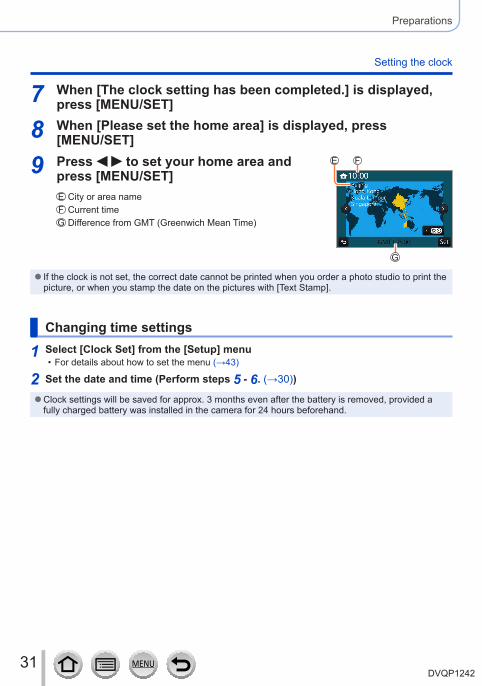
7 When [The clock setting has been completed.] is displayed, press [MENU/SET]
8 When [Please set the home area] is displayed, press [MENU/SET]
9 Press to set your home area and press [MENU/SET]
City or area nameCurrent timeDifference from GMT (Greenwich Mean Time)
● If the clock is not set, the correct date cannot be printed when you order a photo studio to print the picture, or when you stamp the date on the pictures with [Text Stamp].
Changing time settings
1 Select [Clock Set] from the [Setup] menu • For details about how to set the menu (→43)
2 Set the date and time (Perform steps 5 - 6. (→30))
●Clock settings will be saved for approx. 3 months even after the battery is removed, provided a fully charged battery was installed in the camera for 24 hours beforehand.
32DVQP1242
Basics
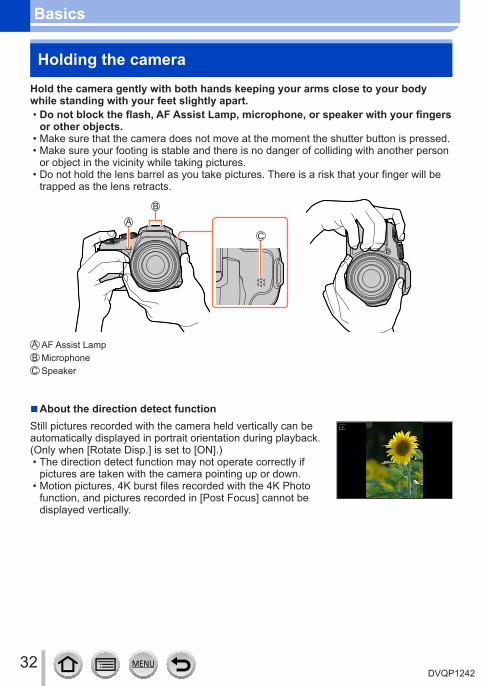
Holding the cameraHold the camera gently with both hands keeping your arms close to your body while standing with your feet slightly apart.
• Do not block the flash, AF Assist Lamp, microphone, or speaker with your fingers or other objects.
• Make sure that the camera does not move at the moment the shutter button is pressed. • Make sure your footing is stable and there is no danger of colliding with another person or object in the vicinity while taking pictures.
• Do not hold the lens barrel as you take pictures. There is a risk that your finger will be trapped as the lens retracts.
AF Assist LampMicrophoneSpeaker
■About the direction detect functionStill pictures recorded with the camera held vertically can be automatically displayed in portrait orientation during playback. (Only when [Rotate Disp.] is set to [ON].)
• The direction detect function may not operate correctly if pictures are taken with the camera pointing up or down.
• Motion pictures, 4K burst files recorded with the 4K Photo function, and pictures recorded in [Post Focus] cannot be displayed vertically.
33DVQP1242
Basics
Buttons/Dials/Levers Used for Recording
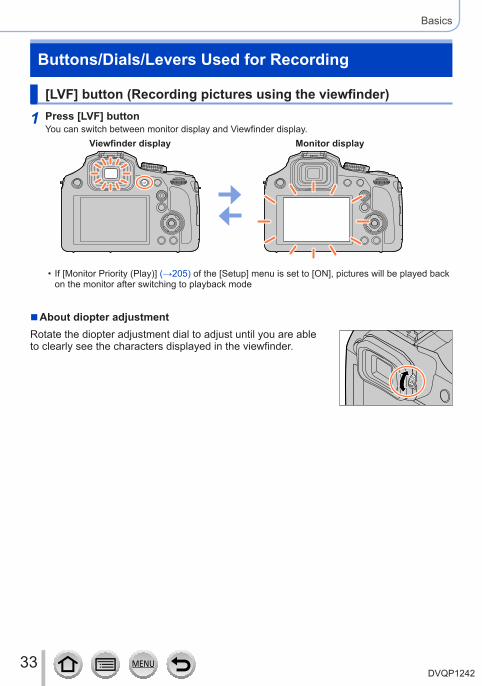
[LVF] button (Recording pictures using the viewfinder)
1 Press [LVF] buttonYou can switch between monitor display and Viewfinder display.
Viewfinder display Monitor display
• If [Monitor Priority (Play)] (→205) of the [Setup] menu is set to [ON], pictures will be played back on the monitor after switching to playback mode
■About diopter adjustmentRotate the diopter adjustment dial to adjust until you are able to clearly see the characters displayed in the viewfinder.
34DVQP1242
Basics
Buttons/Dials/Levers Used for Recording
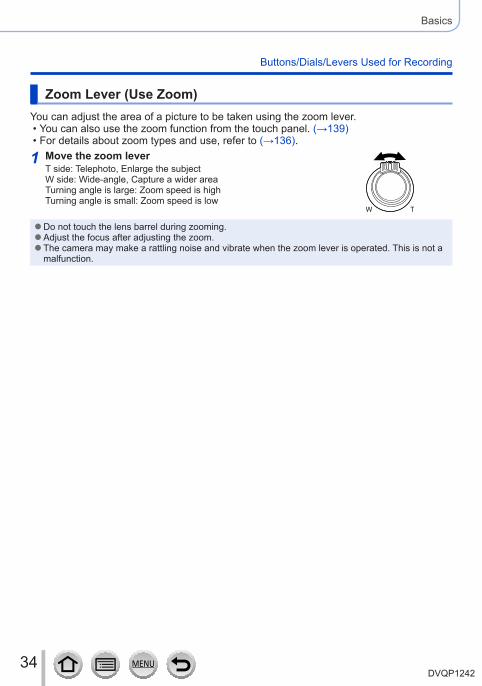
Zoom Lever (Use Zoom)You can adjust the area of a picture to be taken using the zoom lever.
• You can also use the zoom function from the touch panel. (→139) • For details about zoom types and use, refer to (→136).
1 Move the zoom leverT side: Telephoto, Enlarge the subjectW side: Wide-angle, Capture a wider areaTurning angle is large: Zoom speed is highTurning angle is small: Zoom speed is low
●Do not touch the lens barrel during zooming. ●Adjust the focus after adjusting the zoom. ●The camera may make a rattling noise and vibrate when the zoom lever is operated. This is not a malfunction.
35DVQP1242
Basics
Buttons/Dials/Levers Used for Recording
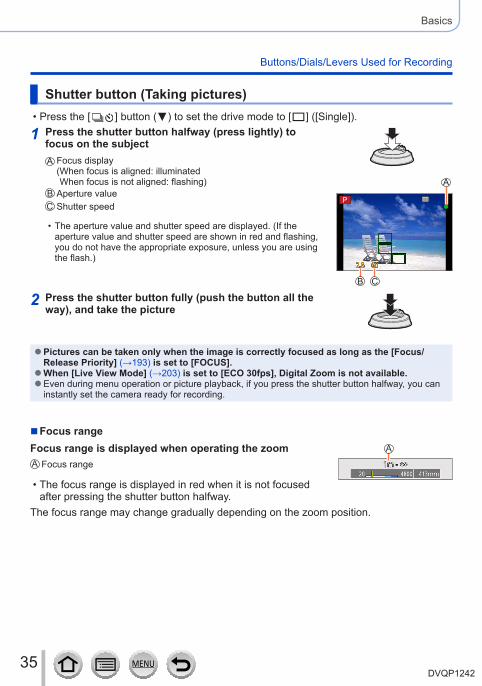
Shutter button (Taking pictures) • Press the [ ] button ( ) to set the drive mode to [ ] ([Single]).
1 Press the shutter button halfway (press lightly) to focus on the subject
Focus display( When focus is aligned: illuminated When focus is not aligned: flashing)
Aperture valueShutter speed
• The aperture value and shutter speed are displayed. (If the aperture value and shutter speed are shown in red and flashing, you do not have the appropriate exposure, unless you are using the flash.)
2 Press the shutter button fully (push the button all the way), and take the picture
●Pictures can be taken only when the image is correctly focused as long as the [Focus/Release Priority] (→193) is set to [FOCUS]. ●When [Live View Mode] (→203) is set to [ECO 30fps], Digital Zoom is not available. ●Even during menu operation or picture playback, if you press the shutter button halfway, you can instantly set the camera ready for recording.
■Focus rangeFocus range is displayed when operating the zoom
Focus range
• The focus range is displayed in red when it is not focused after pressing the shutter button halfway.
The focus range may change gradually depending on the zoom position.
36DVQP1242
Basics
Buttons/Dials/Levers Used for Recording
Motion picture button (Recording motion pictures)
1 Press the motion picture button to start recording • Immediately release the motion picture button after pressing it.
2 Press the motion picture button again to end recording
Mode dial (Select the recording mode)
1 Set to the desired recording mode • Rotate the mode dial slowly to select the desired mode.
Intelligent Auto Mode (→51)
Intelligent Auto Plus Mode (→51)
Programme AE Mode (→57)
Aperture-Priority AE Mode (→58)
Shutter-Priority AE Mode (→59)
Manual Exposure Mode (→60)
Creative Video Mode (→78)
Custom Mode (→81)
Panorama Shot Mode (→65)
Scene Guide Mode (→68)
Creative Control Mode (→72)
37DVQP1242
Basics
Buttons/Dials/Levers Used for Recording
Rear DialThere are 2 ways to operate the rear dial, rotating left or right, and deciding by pressing.Rotating:Selection of items or setting of values is performed during the various settings.
Pressing:Operations that are the same as [MENU/SET] button, such as determine settings, etc., are performed during the various settings.
Cursor button / [MENU/SET] button (Selecting/setting items)Pressing the cursor button: Selection of items or setting of values etc., is performed.Pressing [MENU/SET]: Confirmation of setting contents, etc., is performed.
• These operating instructions expresses the up, down, left, and right of the cursor button as .
• About [Cursor Button Lock] (→48)
38DVQP1242
Basics
Buttons/Dials/Levers Used for Recording
[DISP.] button (Switching the display information)
1 Press [DISP.] button to switch the display • If the information on the screen is not displayed any longer because no operation was performed for some time, press the [DISP.] button or touch the screen to display the information again.
During recordingYou can switch the monitor/viewfinder display method.
→ [Custom] → [Monitor Disp. Style] / [LVF Disp.Style]
Settings: [ ] (Monitor style display layout) / [ ] (Live View Finder style display layout)
■ [ ] Monitor style display layout (Example of monitor style display)
With information Without informationMonitor recording
information screen*50p
Turned off
* This screen is displayed only when [Monitor Info. Disp.] in the [Custom] menu is set to [ON]. Settings can be adjusted directly by touching each of the items displayed on the screen.
39DVQP1242
Basics
Buttons/Dials/Levers Used for Recording
■ [ ] Live View Finder style display layout (Example of viewfinder style display)With information
(Detailed information) With information50p
During playbackWith information Detailed information display Histogram display
100-0001
10:00 1.DEC.2017
100-00011/98
R
G
B
Y
Without informationWithout information
([Highlight])*
* This screen is displayed only when [Highlight] (→196) in the [Custom] menu is set to [ON].
●Some screens cannot be displayed during playback of certain files, for example motion picture and 4K burst files.
40DVQP1242
Basics
Touch screen (Touch operations)Touch screen of this unit is capacitive. Touch the panel directly with your bare finger.TouchTo touch and release the touch screen.
DragTo touch and slide your finger across the touch screen.
Pinch (spread/pinch)On the touch screen, spread (pinch out) your 2 fingers to zoom in, and pinch (pinch in) your 2 fingers to zoom out.
●Touch the screen with the clean and dry finger. ● If you use a commercially available monitor protection sheet, please follow the instructions that accompany the sheet. (Some monitor protection sheets may impair visibility or operability.) ●The touch screen may not function normally in the following cases.
• When touched by a gloved hand • When the touch screen is wet
41DVQP1242
Basics
Touch screen (Touch operations)
Touching the screen and recording (Touch Shutter function)
Recording mode: This function enables you to focus and record still pictures simply by touching the subjects that appear on the screen.
1 Touch [ ]
2 Touch [ ] • The icon changes to [ ] and you can now proceed with touch shutter recording.
3 Touch the subject you want to record
■To release the touch shutter functionTouch [ ]
● If shooting with the touch shutter fails, the AF area turns red and disappears.
42DVQP1242
Basics
Touch screen (Touch operations)
Easily Optimising the Brightness for a Specified Area ([Touch AE])
Recording mode: You can easily optimise the brightness for a touched position. When the face of the subject appears dark, you can brighten the screen according to the brightness of the face.
1 Touch [ ]
2 Touch [ ] • The setting screen for the brightness optimisation position is displayed.
• [Metering Mode] is set to [ ], which is used exclusively for the [Touch AE].
3 Touch the subject you want to optimise the brightness for
• Touching [Reset] will bring the brightness optimisation position back to the centre.
SetSetResetReset
4 Touch [Set]
■Cancelling the [Touch AE] functionTouch [ ]
• [Metering Mode] returns to the original setting, and the brightness optimisation position is cancelled.
●This function is not available in the following cases: • When using the Digital Zoom • When [High Speed Video] is set • When [4K Live Cropping] is set • When [Touch AF] in [Touch Settings] of the [Custom] menu has been set to [AF+AE] (→95)
43DVQP1242
Basics
Setting the menuYou can use the menu to set camera and recording functions, operate playback functions, and perform other operations.
• Menu settings can be made either by button or touch operation.
1 Press [MENU/SET] to bring up the menu
[Rec](→171)
You can perform settings for the aspect ratio, number of pixels, 4K Photo, etc.
[Motion Picture](→189)
You can select the recording format and picture quality and other settings.
[Custom](→191)
Operation of the unit, such as displaying of the screen and button operations, can be set up according to your preferences.
[Setup](→201)
You can perform settings that make usage more convenient, such as the changing the clock settings and beep volume. You can also perform Wi-Fi function-related settings.
[Playback](→209)
You can specify picture protection, cropping, print settings, and other settings for pictures you have taken.
■Switching menu typeMenu type
Press Press to select a tab such as [ ]Press [MENU/SET]
With touch screen operationsTouch a tab, such as [ ]
44DVQP1242
Basics
Setting the menu
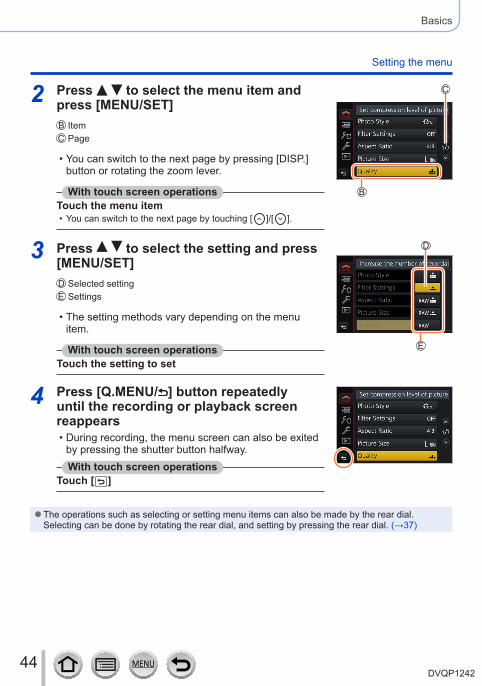
2 Press to select the menu item and press [MENU/SET]
ItemPage
• You can switch to the next page by pressing [DISP.] button or rotating the zoom lever.
With touch screen operationsTouch the menu item
• You can switch to the next page by touching [ ]/[ ].
3 Press to select the setting and press [MENU/SET]
Selected settingSettings
• The setting methods vary depending on the menu item.
With touch screen operationsTouch the setting to set
4 Press [Q.MENU/ ] button repeatedly until the recording or playback screen reappears
• During recording, the menu screen can also be exited by pressing the shutter button halfway.With touch screen operations
Touch [ ]
●The operations such as selecting or setting menu items can also be made by the rear dial. Selecting can be done by rotating the rear dial, and setting by pressing the rear dial. (→37)
45DVQP1242
Basics
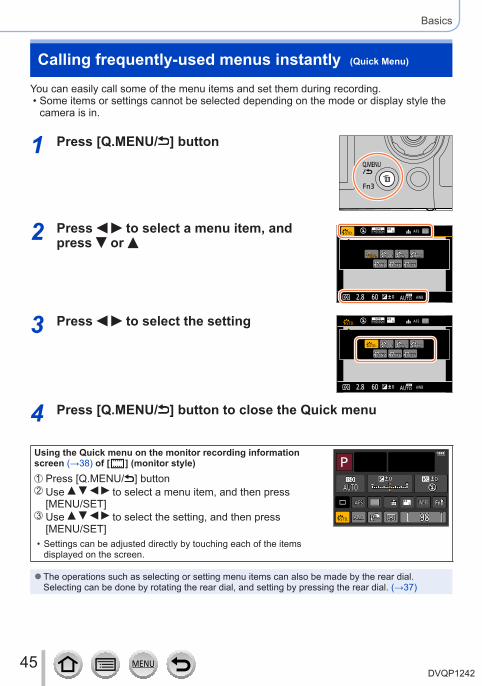
Calling frequently-used menus instantly (Quick Menu)
You can easily call some of the menu items and set them during recording. • Some items or settings cannot be selected depending on the mode or display style the camera is in.
1 Press [Q.MENU/ ] button
2 Press to select a menu item, and press or
50p50p
3 Press to select the setting 50p50p
4 Press [Q.MENU/ ] button to close the Quick menu
Using the Quick menu on the monitor recording information screen (→38) of [ ] (monitor style)
Press [Q.MENU/ ] buttonUse to select a menu item, and then press [MENU/SET]Use to select the setting, and then press [MENU/SET]
• Settings can be adjusted directly by touching each of the items displayed on the screen.
●The operations such as selecting or setting menu items can also be made by the rear dial. Selecting can be done by rotating the rear dial, and setting by pressing the rear dial. (→37)
46DVQP1242
Basics
Calling frequently-used menus instantly (Quick Menu)
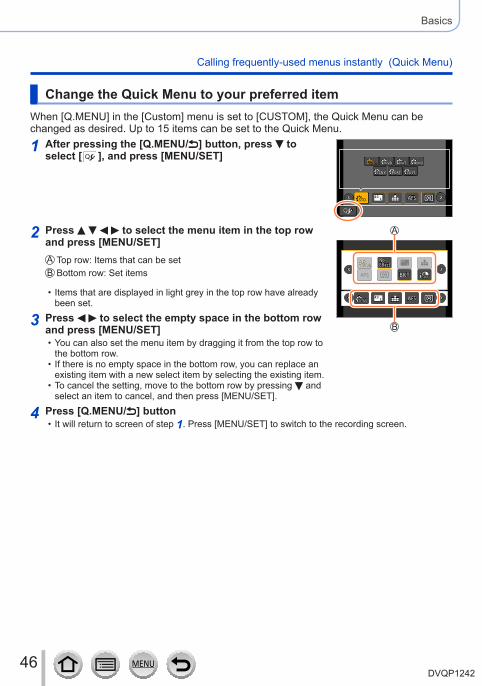
Change the Quick Menu to your preferred itemWhen [Q.MENU] in the [Custom] menu is set to [CUSTOM], the Quick Menu can be changed as desired. Up to 15 items can be set to the Quick Menu.
1 After pressing the [Q.MENU/ ] button, press to select [ ], and press [MENU/SET]
2 Press to select the menu item in the top row and press [MENU/SET]
Top row: Items that can be setBottom row: Set items
• Items that are displayed in light grey in the top row have already been set.
3 Press to select the empty space in the bottom row and press [MENU/SET]
• You can also set the menu item by dragging it from the top row to the bottom row.
• If there is no empty space in the bottom row, you can replace an existing item with a new select item by selecting the existing item.
• To cancel the setting, move to the bottom row by pressing and select an item to cancel, and then press [MENU/SET].
4 Press [Q.MENU/ ] button • It will return to screen of step 1. Press [MENU/SET] to switch to the recording screen.
47DVQP1242
Basics
You can assign frequently-used functions to particular buttons ([Fn1] - [Fn3]) or icons displayed on the screen ([Fn4] - [Fn8]).
• Certain functions cannot be assigned to some function buttons. • The function assigned to the function button may not work in some modes or on some display screens.
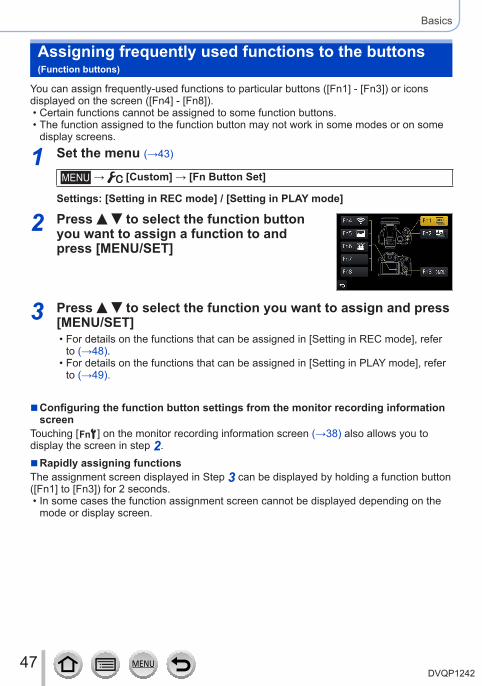
1 Set the menu (→43)
→ [Custom] → [Fn Button Set]
Settings: [Setting in REC mode] / [Setting in PLAY mode]
2 Press to select the function button you want to assign a function to and press [MENU/SET]
3 Press to select the function you want to assign and press [MENU/SET]
• For details on the functions that can be assigned in [Setting in REC mode], refer to (→48).
• For details on the functions that can be assigned in [Setting in PLAY mode], refer to (→49).
■Configuring the function button settings from the monitor recording information screen
Touching [ ] on the monitor recording information screen (→38) also allows you to display the screen in step 2.
■Rapidly assigning functionsThe assignment screen displayed in Step 3 can be displayed by holding a function button ([Fn1] to [Fn3]) for 2 seconds.
• In some cases the function assignment screen cannot be displayed depending on the mode or display screen.
Assigning frequently used functions to the buttons (Function buttons)
48DVQP1242
Basics
Assigning frequently used functions to the buttons (Function buttons)
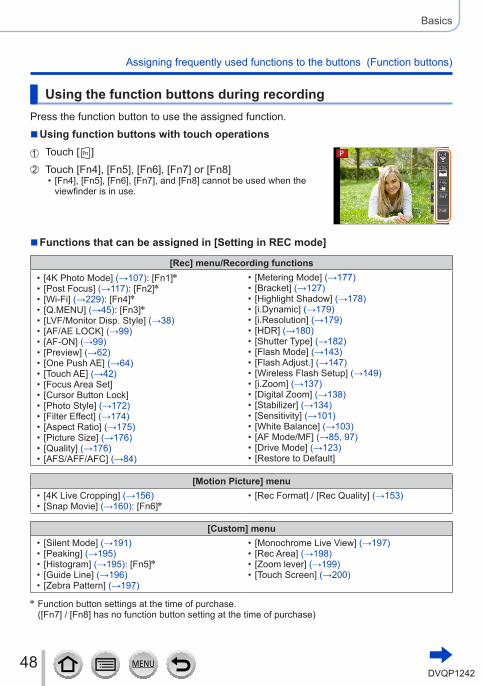
Using the function buttons during recordingPress the function button to use the assigned function.
■Using function buttons with touch operationsTouch [ ]Touch [Fn4], [Fn5], [Fn6], [Fn7] or [Fn8]
• [Fn4], [Fn5], [Fn6], [Fn7], and [Fn8] cannot be used when the viewfinder is in use.
■Functions that can be assigned in [Setting in REC mode]
[Rec] menu/Recording functions • [4K Photo Mode] (→107): [Fn1]* • [Post Focus] (→117): [Fn2]* • [Wi-Fi] (→229): [Fn4]* • [Q.MENU] (→45): [Fn3]* • [LVF/Monitor Disp. Style] (→38) • [AF/AE LOCK] (→99) • [AF-ON] (→99) • [Preview] (→62) • [One Push AE] (→64) • [Touch AE] (→42) • [Focus Area Set] • [Cursor Button Lock] • [Photo Style] (→172) • [Filter Effect] (→174) • [Aspect Ratio] (→175) • [Picture Size] (→176) • [Quality] (→176) • [AFS/AFF/AFC] (→84)
• [Metering Mode] (→177) • [Bracket] (→127) • [Highlight Shadow] (→178) • [i.Dynamic] (→179) • [i.Resolution] (→179) • [HDR] (→180) • [Shutter Type] (→182) • [Flash Mode] (→143) • [Flash Adjust.] (→147) • [Wireless Flash Setup] (→149) • [i.Zoom] (→137) • [Digital Zoom] (→138) • [Stabilizer] (→134) • [Sensitivity] (→101) • [White Balance] (→103) • [AF Mode/MF] (→85, 97) • [Drive Mode] (→123) • [Restore to Default]
[Motion Picture] menu • [4K Live Cropping] (→156) • [Snap Movie] (→160): [Fn6]*
• [Rec Format] / [Rec Quality] (→153)
[Custom] menu • [Silent Mode] (→191) • [Peaking] (→195) • [Histogram] (→195): [Fn5]* • [Guide Line] (→196) • [Zebra Pattern] (→197)
• [Monochrome Live View] (→197) • [Rec Area] (→198) • [Zoom lever] (→199) • [Touch Screen] (→200)
* Function button settings at the time of purchase. ([Fn7] / [Fn8] has no function button setting at the time of purchase)
49DVQP1242
Basics
Assigning frequently used functions to the buttons (Function buttons)
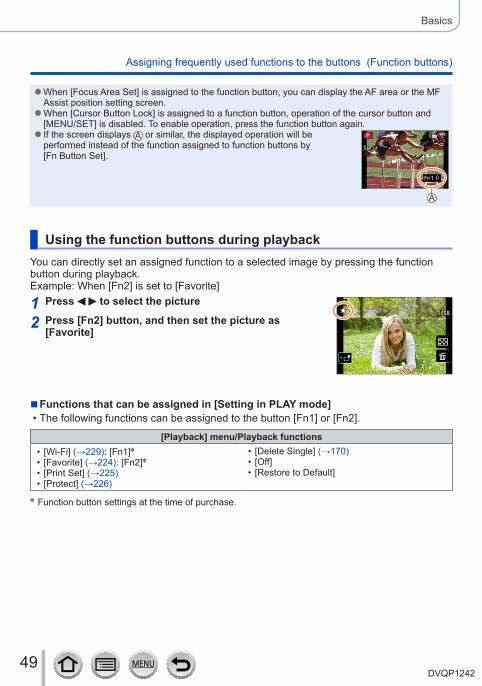
●When [Focus Area Set] is assigned to the function button, you can display the AF area or the MF Assist position setting screen. ●When [Cursor Button Lock] is assigned to a function button, operation of the cursor button and [MENU/SET] is disabled. To enable operation, press the function button again. ● If the screen displays or similar, the displayed operation will be performed instead of the function assigned to function buttons by [Fn Button Set].
Using the function buttons during playbackYou can directly set an assigned function to a selected image by pressing the function button during playback.Example: When [Fn2] is set to [Favorite]
1 Press to select the picture
2 Press [Fn2] button, and then set the picture as [Favorite]
■Functions that can be assigned in [Setting in PLAY mode] • The following functions can be assigned to the button [Fn1] or [Fn2].
[Playback] menu/Playback functions • [Wi-Fi] (→229): [Fn1]* • [Favorite] (→224): [Fn2]* • [Print Set] (→225) • [Protect] (→226)
• [Delete Single] (→170) • [Off] • [Restore to Default]
* Function button settings at the time of purchase.
50DVQP1242
Basics
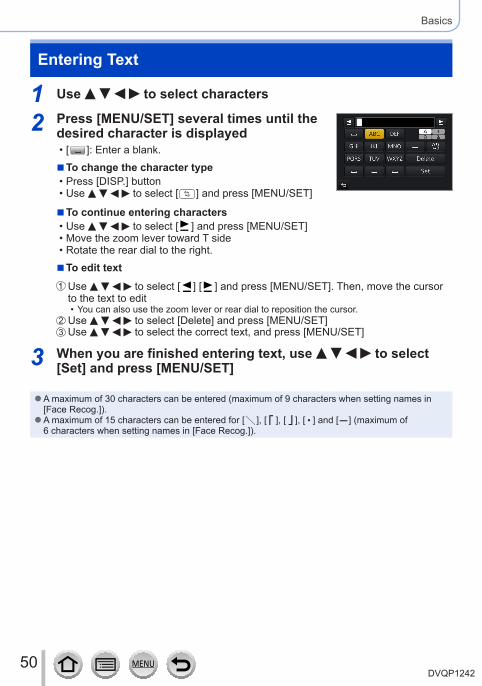
Entering Text
1 Use to select characters
2 Press [MENU/SET] several times until the desired character is displayed
• [ ]: Enter a blank. ■To change the character type • Press [DISP.] button • Use to select [ ] and press [MENU/SET]
■To continue entering characters • Use to select [ ] and press [MENU/SET] • Move the zoom lever toward T side • Rotate the rear dial to the right. ■To edit textUse to select [ ] [ ] and press [MENU/SET]. Then, move the cursor to the text to edit
• You can also use the zoom lever or rear dial to reposition the cursor.Use to select [Delete] and press [MENU/SET]Use to select the correct text, and press [MENU/SET]
3 When you are finished entering text, use to select [Set] and press [MENU/SET]
●A maximum of 30 characters can be entered (maximum of 9 characters when setting names in [Face Recog.]). ●A maximum of 15 characters can be entered for [ ], [ ], [ ], [ ] and [ ] (maximum of 6 characters when setting names in [Face Recog.]).
51DVQP1242
Recording mode
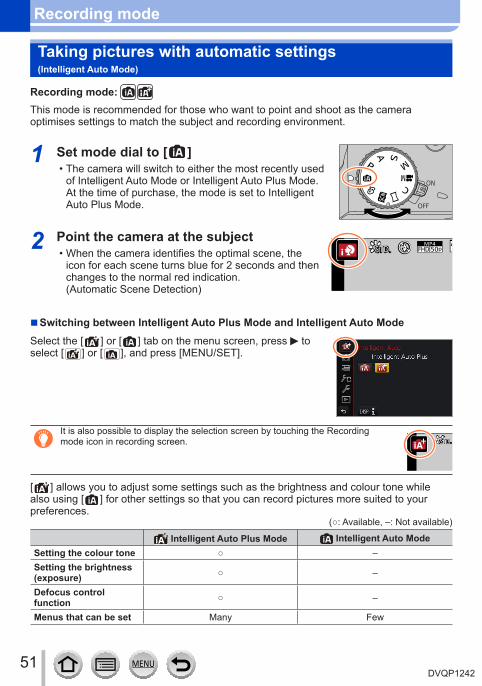
Taking pictures with automatic settings (Intelligent Auto Mode)
Recording mode: This mode is recommended for those who want to point and shoot as the camera optimises settings to match the subject and recording environment.
1 Set mode dial to [ ] • The camera will switch to either the most recently used of Intelligent Auto Mode or Intelligent Auto Plus Mode. At the time of purchase, the mode is set to Intelligent Auto Plus Mode.
2 Point the camera at the subject • When the camera identifies the optimal scene, the icon for each scene turns blue for 2 seconds and then changes to the normal red indication. (Automatic Scene Detection)
50p
■Switching between Intelligent Auto Plus Mode and Intelligent Auto ModeSelect the [ ] or [ ] tab on the menu screen, press to select [ ] or [ ], and press [MENU/SET].
It is also possible to display the selection screen by touching the Recording mode icon in recording screen. 50p
[ ] allows you to adjust some settings such as the brightness and colour tone while also using [ ] for other settings so that you can record pictures more suited to your preferences.
(○: Available, –: Not available)
Intelligent Auto Plus Mode Intelligent Auto ModeSetting the colour tone ○ –Setting the brightness (exposure) ○ –
Defocus control function ○ –
Menus that can be set Many Few
52DVQP1242
Recording mode
Taking pictures with automatic settings (Intelligent Auto Mode)
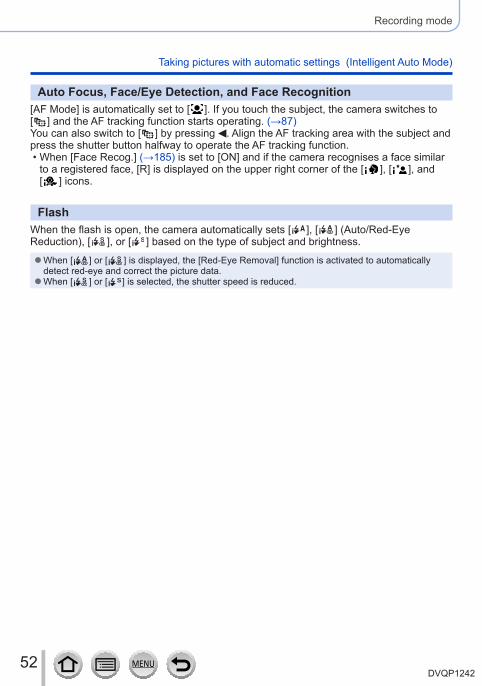
Auto Focus, Face/Eye Detection, and Face Recognition[AF Mode] is automatically set to [ ]. If you touch the subject, the camera switches to [ ] and the AF tracking function starts operating. (→87)You can also switch to [ ] by pressing . Align the AF tracking area with the subject and press the shutter button halfway to operate the AF tracking function.
• When [Face Recog.] (→185) is set to [ON] and if the camera recognises a face similar to a registered face, [R] is displayed on the upper right corner of the [ ], [ ], and [ ] icons.
FlashWhen the flash is open, the camera automatically sets [ ], [ ] (Auto/Red-Eye Reduction), [ ], or [ ] based on the type of subject and brightness.
●When [ ] or [ ] is displayed, the [Red-Eye Removal] function is activated to automatically detect red-eye and correct the picture data. ●When [ ] or [ ] is selected, the shutter speed is reduced.

53DVQP1242
Recording mode
Taking pictures with automatic settings (Intelligent Auto Mode)
Automatic Scene DetectionWhen taking pictures
[i-Portrait] [i-Scenery] [i-Macro] [i-Night Portrait]*1
[i-Night Scenery] [i-Handheld Night Shot]*2 [i-Food] [i-Baby]*3
[i-Sunset] When scene does not correspond to any of the above
*1 Displayed only when using flash.*2 When [iHandheld Night Shot] is [ON]. (→54)*3 When children (that are registered in the camera with Face Recognition) under 3 years old are
recognised. • When the camera identifies [ ] as the optimal scene and if the camera determines that jitter is reduced by the use of a tripod or by other means, a shutter speed that is slower than usual is selected. After pressing the shutter button, do not move the camera while recording.
• When recording 4K photos or when recording using [Post Focus], Scene Detection works the same way as when recording motion pictures.
When recording motion pictures
[i-Portrait] [i-Scenery] [i-Low Light] [i-Macro]
When scene does not correspond to any of the above
●Depending on recording conditions, different scene types may be determined for the same subject.
About Backlight Compensation
Backlight compensation is automatically activated in Intelligent Auto Plus Mode or Intelligent Auto Mode. Backlight is a condition where a light shines from behind a subject. When there is a backlight, the subject appears darker and the camera will automatically attempt to correct it by increasing the brightness of the picture.
54DVQP1242
Recording mode
Taking pictures with automatic settings (Intelligent Auto Mode)
Taking pictures using a handheld camera ([iHandheld Night Shot])
Recording mode: If a night scene is detected automatically while the unit is being handheld, [iHandheld Night Shot] can record a still picture with less jitter and less noise without using a tripod by combining a burst of pictures.
→ [Rec] → [iHandheld Night Shot]
Settings: [ON] / [OFF] ●The angle of view becomes narrow slightly. ●After the shutter button has been pressed, do not move the camera during the burst operation. ●The flash is fixed to the [ ] (Forced Flash Off) setting. ●This function will not work for still pictures while motion pictures are being recorded. ●This function is not available in the following cases:
• When using [Burst] • When recording 4K photos • When recording using [Post Focus] • When recording using [Bracket] • When [Quality] is set to [ ], [ ] or [ ] • When using [Time Lapse Shot] • When [Auto Shooting] of [Stop Motion Animation] is set to [ON]
55DVQP1242
Recording mode
Taking pictures with automatic settings (Intelligent Auto Mode)
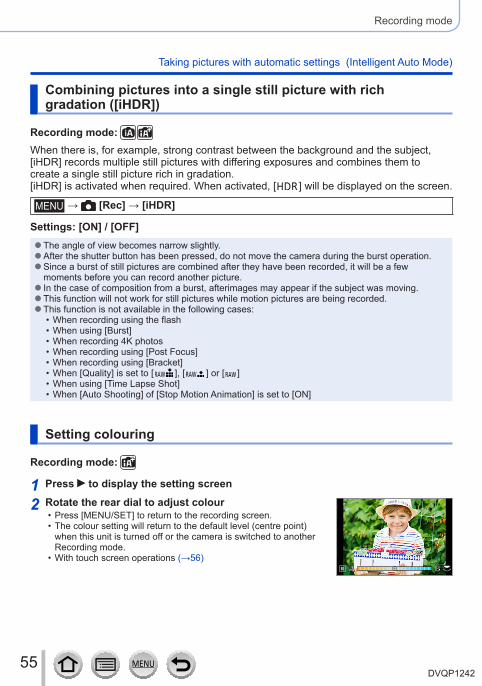
Combining pictures into a single still picture with rich gradation ([iHDR])
Recording mode: When there is, for example, strong contrast between the background and the subject, [iHDR] records multiple still pictures with differing exposures and combines them to create a single still picture rich in gradation.[iHDR] is activated when required. When activated, [ ] will be displayed on the screen.
→ [Rec] → [iHDR]
Settings: [ON] / [OFF] ●The angle of view becomes narrow slightly. ●After the shutter button has been pressed, do not move the camera during the burst operation. ●Since a burst of still pictures are combined after they have been recorded, it will be a few moments before you can record another picture. ● In the case of composition from a burst, afterimages may appear if the subject was moving. ●This function will not work for still pictures while motion pictures are being recorded. ●This function is not available in the following cases:
• When recording using the flash • When using [Burst] • When recording 4K photos • When recording using [Post Focus] • When recording using [Bracket] • When [Quality] is set to [ ], [ ] or [ ] • When using [Time Lapse Shot] • When [Auto Shooting] of [Stop Motion Animation] is set to [ON]
Setting colouring
Recording mode:
1 Press to display the setting screen
2 Rotate the rear dial to adjust colour • Press [MENU/SET] to return to the recording screen. • The colour setting will return to the default level (centre point) when this unit is turned off or the camera is switched to another Recording mode.
• With touch screen operations (→56)
56DVQP1242
Recording mode
Taking pictures with automatic settings (Intelligent Auto Mode)
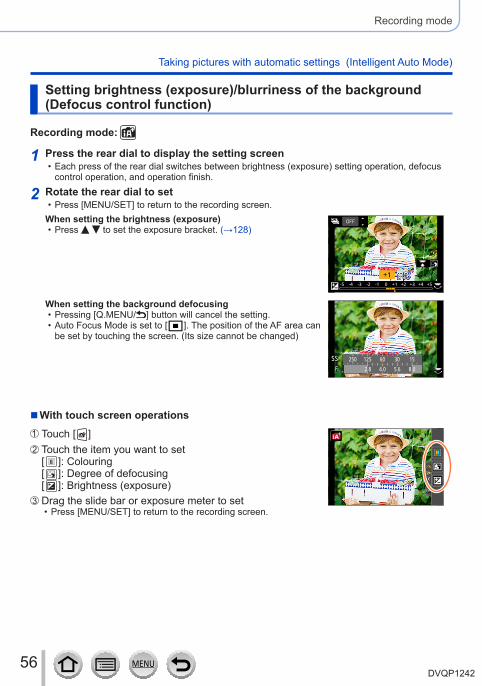
Setting brightness (exposure)/blurriness of the background (Defocus control function)
Recording mode:
1 Press the rear dial to display the setting screen • Each press of the rear dial switches between brightness (exposure) setting operation, defocus control operation, and operation finish.
2 Rotate the rear dial to set • Press [MENU/SET] to return to the recording screen.
When setting the brightness (exposure) • Press to set the exposure bracket. (→128)
OFF
When setting the background defocusing • Pressing [Q.MENU/ ] button will cancel the setting. • Auto Focus Mode is set to [ ]. The position of the AF area can be set by touching the screen. (Its size cannot be changed)
250 125 60 30 15
8.05.62.8 4.0
■With touch screen operationsTouch [ ]Touch the item you want to set[ ]: Colouring[ ]: Degree of defocusing[ ]: Brightness (exposure)Drag the slide bar or exposure meter to set
• Press [MENU/SET] to return to the recording screen.
57DVQP1242
Recording mode
Taking pictures after automatically setting the aperture value and shutter speed (Programme AE Mode)
Recording mode: Take pictures using automatic aperture values and shutter speed settings in accordance with the brightness of a subject.
1 Set mode dial to [ ]
2 Press the shutter button halfway • If the aperture value and shutter speed flash red, you do not have the correct exposure.
3 While the numeric values are displayed (approximately 10 seconds), rotate the rear dial to change the values using Programme Shift
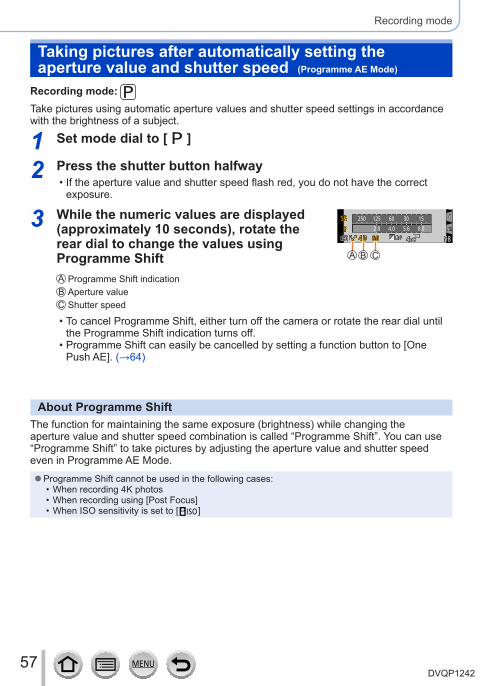
Programme Shift indicationAperture valueShutter speed
250 125 60 30 15
8.05.62.8 4.0
50p
• To cancel Programme Shift, either turn off the camera or rotate the rear dial until the Programme Shift indication turns off.
• Programme Shift can easily be cancelled by setting a function button to [One Push AE]. (→64)
About Programme ShiftThe function for maintaining the same exposure (brightness) while changing the aperture value and shutter speed combination is called “Programme Shift”. You can use “Programme Shift” to take pictures by adjusting the aperture value and shutter speed even in Programme AE Mode.
●Programme Shift cannot be used in the following cases: • When recording 4K photos • When recording using [Post Focus] • When ISO sensitivity is set to [ ]
58DVQP1242
Recording mode
Recording mode: • The effect of the aperture value and shutter speed you have set is not applied to the recording screen. To check the effect on the recording screen, use Preview Mode. (→62)
• The brightness of the screen may vary from the actual pictures recorded. Check the brightness of pictures using the playback screen.
• When you adjust the aperture value and shutter speed, an exposure meter is displayed. If aperture and shutter speed are shown in red, you do not have appropriate exposure.
• If the correct exposure is not achieved when you press the shutter button halfway, the numeric values of the aperture and shutter speed are displayed in flashing red.
Taking pictures by setting the aperture value (Aperture-Priority AE Mode)
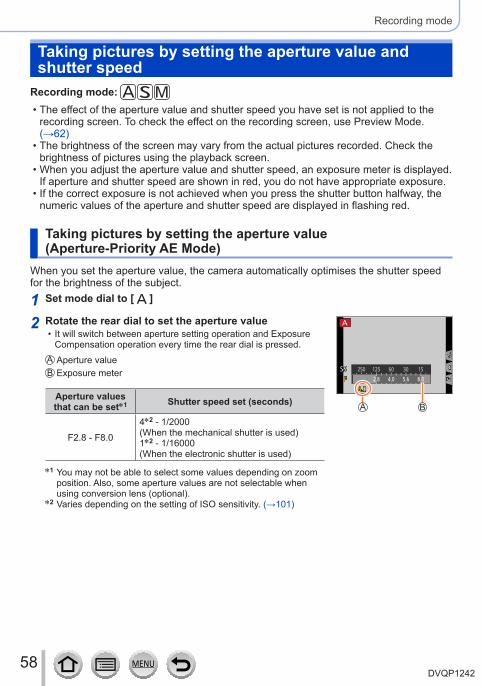
When you set the aperture value, the camera automatically optimises the shutter speed for the brightness of the subject.
1 Set mode dial to [ ]
2 Rotate the rear dial to set the aperture value • It will switch between aperture setting operation and Exposure Compensation operation every time the rear dial is pressed.Aperture valueExposure meter
Aperture values that can be set*1 Shutter speed set (seconds)
F2.8 - F8.04*2 - 1/2000(When the mechanical shutter is used)1*2 - 1/16000(When the electronic shutter is used)
*1 You may not be able to select some values depending on zoom position. Also, some aperture values are not selectable when using conversion lens (optional).
*2 Varies depending on the setting of ISO sensitivity. (→101)
250 125 60 30 15
8.05.62.8 4.0
Taking pictures by setting the aperture value and shutter speed
59DVQP1242
Recording mode
Taking pictures by setting the aperture value and shutter speed
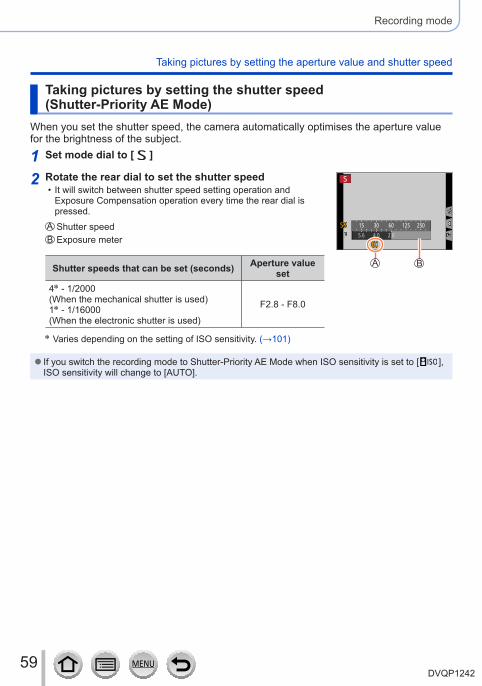
Taking pictures by setting the shutter speed (Shutter-Priority AE Mode)
When you set the shutter speed, the camera automatically optimises the aperture value for the brightness of the subject.
1 Set mode dial to [ ]
2 Rotate the rear dial to set the shutter speed • It will switch between shutter speed setting operation and Exposure Compensation operation every time the rear dial is pressed.Shutter speedExposure meter
Shutter speeds that can be set (seconds) Aperture value set
4* - 1/2000(When the mechanical shutter is used)1* - 1/16000(When the electronic shutter is used)
F2.8 - F8.0
* Varies depending on the setting of ISO sensitivity. (→101)
15 30 60 125 250
4.0 2.85.6
● If you switch the recording mode to Shutter-Priority AE Mode when ISO sensitivity is set to [ ], ISO sensitivity will change to [AUTO].
60DVQP1242
Recording mode
Taking pictures by setting the aperture value and shutter speed
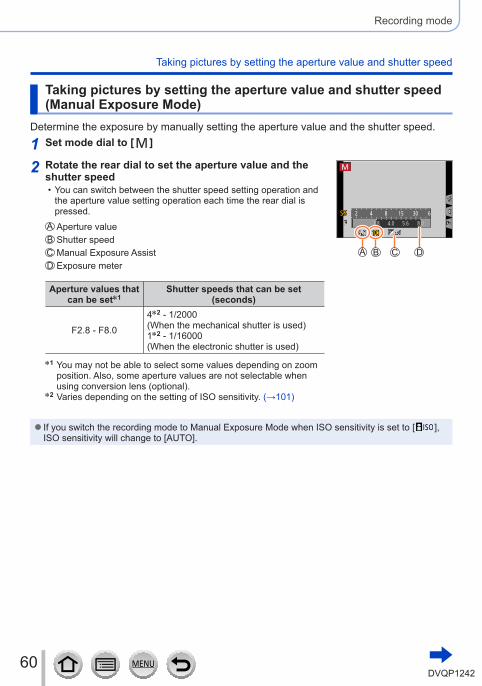
Taking pictures by setting the aperture value and shutter speed (Manual Exposure Mode)
Determine the exposure by manually setting the aperture value and the shutter speed.
1 Set mode dial to [ ]
2 Rotate the rear dial to set the aperture value and the shutter speed
• You can switch between the shutter speed setting operation and the aperture value setting operation each time the rear dial is pressed.Aperture valueShutter speedManual Exposure AssistExposure meter
Aperture values that can be set*1
Shutter speeds that can be set (seconds)
F2.8 - F8.04*2 - 1/2000(When the mechanical shutter is used)1*2 - 1/16000(When the electronic shutter is used)
*1 You may not be able to select some values depending on zoom position. Also, some aperture values are not selectable when using conversion lens (optional).
*2 Varies depending on the setting of ISO sensitivity. (→101)
2 4 8 15 30 6
8.05.62.8 4.0
● If you switch the recording mode to Manual Exposure Mode when ISO sensitivity is set to [ ], ISO sensitivity will change to [AUTO].
61DVQP1242
Recording mode
Taking pictures by setting the aperture value and shutter speed
Optimising the ISO sensitivity for the aperture value and shutter speed
When the ISO sensitivity is set to [AUTO], the camera sets the ISO sensitivity automatically so that the exposure will be appropriate for the aperture value and shutter speed.
• Depending on recording conditions, an appropriate exposure may not be set or the ISO sensitivity may become higher.
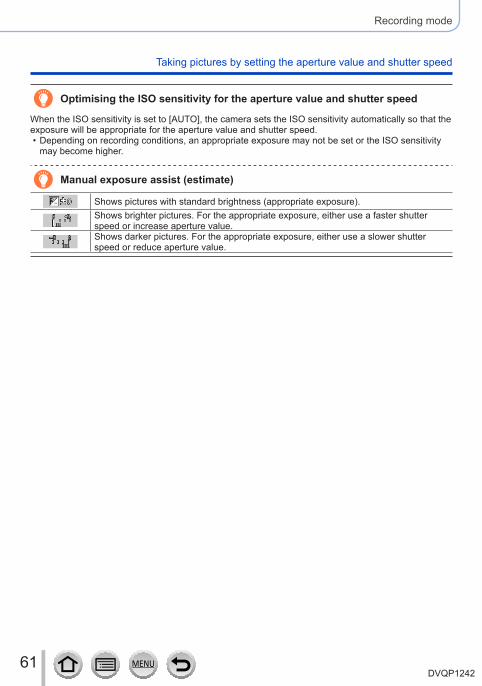
Manual exposure assist (estimate)
Shows pictures with standard brightness (appropriate exposure).Shows brighter pictures. For the appropriate exposure, either use a faster shutter speed or increase aperture value.Shows darker pictures. For the appropriate exposure, either use a slower shutter speed or reduce aperture value.
62DVQP1242
Recording mode
Taking pictures by setting the aperture value and shutter speed
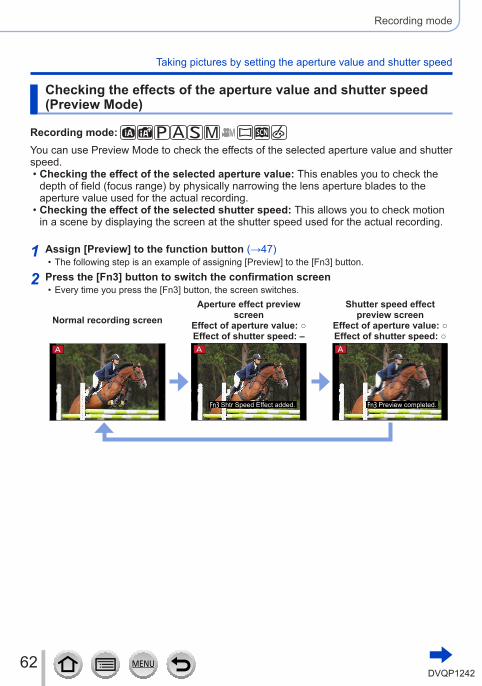
Checking the effects of the aperture value and shutter speed (Preview Mode)
Recording mode: You can use Preview Mode to check the effects of the selected aperture value and shutter speed.
• Checking the effect of the selected aperture value: This enables you to check the depth of field (focus range) by physically narrowing the lens aperture blades to the aperture value used for the actual recording.
• Checking the effect of the selected shutter speed: This allows you to check motion in a scene by displaying the screen at the shutter speed used for the actual recording.
1 Assign [Preview] to the function button (→47) • The following step is an example of assigning [Preview] to the [Fn3] button.
2 Press the [Fn3] button to switch the confirmation screen • Every time you press the [Fn3] button, the screen switches.
Normal recording screenAperture effect preview
screenEffect of aperture value: ○Effect of shutter speed: –
Shutter speed effect preview screen
Effect of aperture value: ○Effect of shutter speed: ○
Fn3 Shtr Speed Effect added. Fn3 Preview completed.
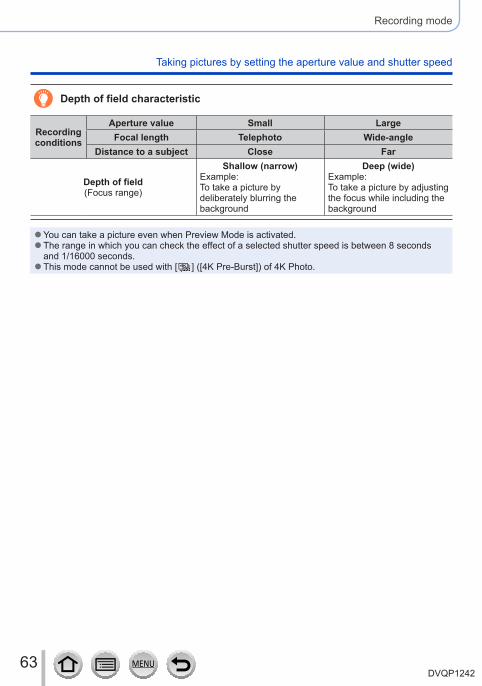
63DVQP1242
Recording mode
Taking pictures by setting the aperture value and shutter speed
Depth of field characteristic
Recording conditions
Aperture value Small LargeFocal length Telephoto Wide-angle
Distance to a subject Close Far
Depth of field(Focus range)
Shallow (narrow)Example:To take a picture by deliberately blurring the background
Deep (wide)Example:To take a picture by adjusting the focus while including the background
●You can take a picture even when Preview Mode is activated. ●The range in which you can check the effect of a selected shutter speed is between 8 seconds and 1/16000 seconds. ●This mode cannot be used with [ ] ([4K Pre-Burst]) of 4K Photo.
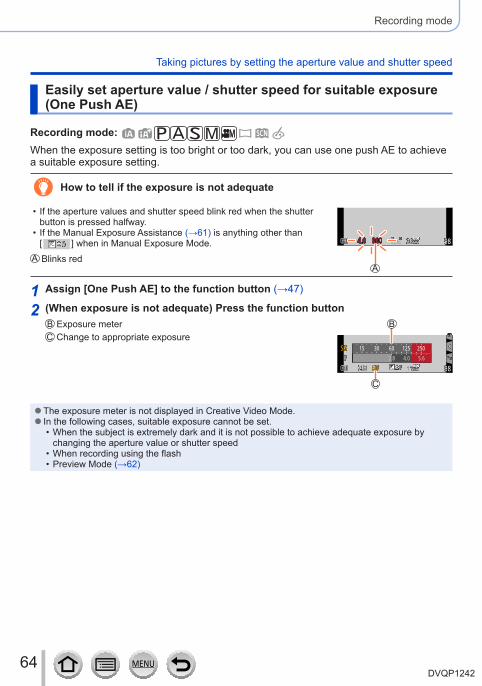
64DVQP1242
Recording mode
Taking pictures by setting the aperture value and shutter speed
Easily set aperture value / shutter speed for suitable exposure (One Push AE)
Recording mode: When the exposure setting is too bright or too dark, you can use one push AE to achieve a suitable exposure setting.
How to tell if the exposure is not adequate
• If the aperture values and shutter speed blink red when the shutter button is pressed halfway.
• If the Manual Exposure Assistance (→61) is anything other than [ ] when in Manual Exposure Mode.Blinks red
1 Assign [One Push AE] to the function button (→47)
2 (When exposure is not adequate) Press the function buttonExposure meterChange to appropriate exposure
60
2.8 4.0 5.6
15 30 125 250
●The exposure meter is not displayed in Creative Video Mode. ● In the following cases, suitable exposure cannot be set.
• When the subject is extremely dark and it is not possible to achieve adequate exposure by changing the aperture value or shutter speed
• When recording using the flash • Preview Mode (→62)
65DVQP1242
Recording mode
Recording mode: Consecutive photos taken while the camera is moved are combined to form a panorama.
1 Set mode dial to [ ]
2 Press the shutter button halfway to focus
3 Press the shutter button fully and pan the camera in a small circular motion to the recording direction to start recording
Horizontal/vertical guide lineRecording direction and progress status (approximate)
Taking pictures from left to right
Image size: [STANDARD] Image size: [WIDE] • Pan the camera at a constant speed. • You may not be able to take pictures successfully if you move the camera too quickly or too slowly.
4 Press the shutter button fully again to end recording • You can also end recording if you stop panning the camera while taking pictures. • Recording can also be ended by moving the camera to the end of the guide.
Recording panorama pictures (Panorama Shot Mode)
66DVQP1242
Recording mode
Recording panorama pictures (Panorama Shot Mode)
■Changing the recording direction and angle of view (image size) of panorama pictures
→ [Rec] → [Panorama Settings]
[Direction] Sets the recording direction.
[Picture Size] Sets the angle of view (image size).[STANDARD] / [WIDE]
• The number of recording pixels per horizontal line and vertical line of a panorama picture varies depending on the picture size, recording direction and number of stitched pictures. The maximum number of recording pixels is as follows:
Image size Recording direction Horizontal Resolution Vertical Resolution
[STANDARD]Horizontal 8176 pixels 1920 pixels
Vertical 2560 pixels 7680 pixels
[WIDE]Horizontal 8176 pixels 960 pixels
Vertical 1280 pixels 7680 pixels
Tips
●Pan the camera in the recording direction as steadily as possible.(If the camera shakes too much, it may not be able to take pictures or may end up creating a narrow (small) panorama picture.)
Pan the camera to a point slightly ahead of the point that you want to take.(However, the last frame is not recorded to the end.)
67DVQP1242
Recording mode
Recording panorama pictures (Panorama Shot Mode)
■About panorama picture playbackPressing will start scrolling playback automatically in the same direction as the recording.
• The following operations can be performed during scrolling playback.
Start panorama playback / Pause*
Stop
* When the playback is paused, you can scroll forwards and backwards by dragging the screen. When the scroll bar is touched, the playback position jumps to the touched position.
●The zoom position is fixed to the W end. ●The focus, exposure and White Balance are all fixed to optimal values for the first picture. If the focusing or brightness of pictures recorded as part of a panorama picture after the first picture are significantly different from those of the first picture, the panorama picture as a whole (when all pictures are stitched together) may not have consistent focus and brightness. ●Since several pictures are stitched together to create a panorama picture, some subjects may be distorted or the joining portions of successively taken pictures that are stitched may be noticeable. ● [Shutter Type] is fixed to [ESHTR]. ●Panorama pictures may not be created or pictures may not be recorded properly when taking pictures of the following subjects or when taking pictures in the following recording conditions:
• Subjects that have a continuous monotone or pattern (sky, beach, etc.) • Moving subjects (person, pet, vehicle, waves, or flowers swaying in the wind, etc.) • Subjects whose colours or patterns change quickly (such as an image appearing on a display) • Dark locations • Locations with a flickering light source (fluorescent lamp, candle light, etc.)
68DVQP1242
Recording mode
Recording mode: If you select a scene to suit the subject and recording conditions with reference to the example images, the camera will set optimal exposure, colour, and focus, allowing you to record in a manner appropriate to the scene.
1 Set mode dial to [ ]
2 Press to select the scene • The scene can also be selected by dragging an example image or the slide bar.
3 Press [MENU/SET]
It is also possible to display the selection screen by touching the Recording mode icon in recording screen. 50p
8
●Depending on the scene, the recording screen may seem as if frames are missed. ●To change the Scene Guide Mode, select the [ ] tab on the menu screen, select [Scene Switch], and then press [MENU/SET]. You can return to step 2. ●The following items cannot be set in Scene Guide Mode because the camera automatically adjusts them to the optimal setting. – [Sensitivity], Items other than the picture quality adjustment in [Photo Style], [Filter Settings], [Metering Mode], [Highlight Shadow], [HDR] and [Multi Exp.]
●Although White Balance is fixed to [AWB] for certain types of scene, you can fine tune the White Balance or use White Balance bracketing by pressing the cursor button on the recording screen. (→105, 106)
Taking pictures according to the scene (Scene Guide Mode)
69DVQP1242
Recording mode
Taking pictures according to the scene (Scene Guide Mode)
Types of Scene Guide Mode
Displaying the description of each scene and recording tips
Press [DISP.] button while the scene selection screen is displayed • When it is set to the guide display, detailed explanations and tips for each scene are displayed.
Normal display Guide display List display
1: [Clear Portrait]
2: [Silky Skin] ● If a part of the background etc. is a colour close to skin colour, this part is also smoothed. ●This mode may not be effective when there is insufficient brightness.
3: [Backlit Softness]
4: [Clear in Backlight]
5: [Relaxing Tone]
6: [Sweet Child’s Face] ●When you touch the face, a still picture is recorded with the focus and exposure set for the touched location.
7: [Distinct Scenery]
70DVQP1242
Recording mode
Taking pictures according to the scene (Scene Guide Mode)
8: [Bright Blue Sky]
9: [Romantic Sunset Glow]
10: [Vivid Sunset Glow]
11: [Glistening Water] ●Star filter used in this mode may cause glistening effects on the objects other than water surface.
12: [Clear Nightscape]
13: [Cool Night Sky]
14: [Warm Glowing Nightscape]
15: [Artistic Nightscape] ●You can change the shutter speed by rotating the rear dial.
16: [Glittering Illuminations]
17: [Handheld Night Shot] ●After the shutter button has been pressed, do not move the camera during the burst operation. ●The angle of view becomes narrow slightly.
18: [Clear Night Portrait] ●Tripod, self-timer recommended. ●When [Clear Night Portrait] is selected, keep the subject still for about 1 second after taking the picture.
19: [Soft Image of a Flower] ●For close-up recording, we recommend that you avoid using the flash.
71DVQP1242
Recording mode
Taking pictures according to the scene (Scene Guide Mode)
20: [Appetizing Food] ●Degree of background defocusing can be changed by adjusting the aperture using the rear dial. ●For close-up recording, we recommend that you avoid using the flash.
21: [Cute Dessert] ●For close-up recording, we recommend that you avoid using the flash.
22: [Freeze Animal Motion] ●Default [AF Assist Lamp] setting is [OFF].
23: [Clear Sports Shot]
24: [Monochrome]
72DVQP1242
Recording mode
Taking Pictures with different picture effects (Creative Control Mode)
Recording mode: This mode records with additional picture effects. You can set the effects to be applied to a picture by selecting a sample picture and checking them simultaneously on the screen.
1 Set mode dial to [ ]
2 Press to select the picture effect (filters)
Preview display
• You can also select the picture effects (filters) by touching the example images.
3 Press [MENU/SET]
It is also possible to display the selection screen by touching the Recording mode icon in recording screen. 50p
●Depending on the picture effect, the recording screen may seem as if frames are missed. ● [White Balance] will be fixed to [AWB] and ISO sensitivity to [AUTO]. ●The following menu items can be set in the [ ] menu.
– [Filter Effect]: Allows you to set the picture effect (filter). – [Simultaneous record w/o filter]: Allows you to set the camera to take a picture with and without an picture effect simultaneously. (→175)
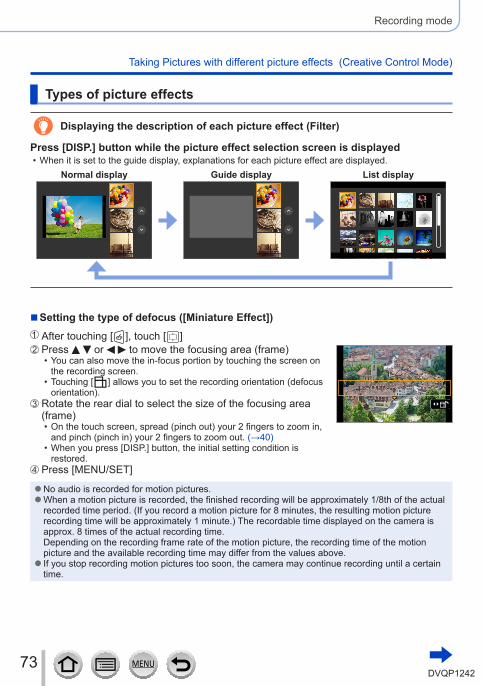
73DVQP1242
Recording mode
Taking Pictures with different picture effects (Creative Control Mode)
Types of picture effects
Displaying the description of each picture effect (Filter)
Press [DISP.] button while the picture effect selection screen is displayed • When it is set to the guide display, explanations for each picture effect are displayed.
Normal display Guide display List display
■Setting the type of defocus ([Miniature Effect])After touching [ ], touch [ ]Press or to move the focusing area (frame)
• You can also move the in-focus portion by touching the screen on the recording screen.
• Touching [ ] allows you to set the recording orientation (defocus orientation).
Rotate the rear dial to select the size of the focusing area (frame)
• On the touch screen, spread (pinch out) your 2 fingers to zoom in, and pinch (pinch in) your 2 fingers to zoom out. (→40)
• When you press [DISP.] button, the initial setting condition is restored.
Press [MENU/SET]
●No audio is recorded for motion pictures. ●When a motion picture is recorded, the finished recording will be approximately 1/8th of the actual recorded time period. (If you record a motion picture for 8 minutes, the resulting motion picture recording time will be approximately 1 minute.) The recordable time displayed on the camera is approx. 8 times of the actual recording time.Depending on the recording frame rate of the motion picture, the recording time of the motion picture and the available recording time may differ from the values above. ● If you stop recording motion pictures too soon, the camera may continue recording until a certain time.
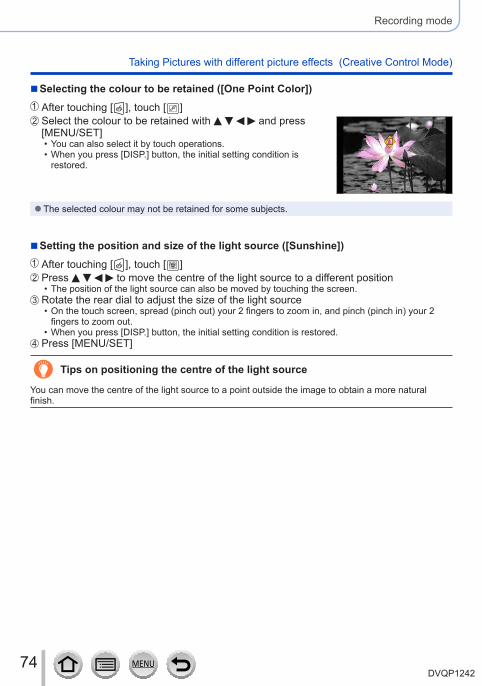
74DVQP1242
Recording mode
Taking Pictures with different picture effects (Creative Control Mode)
■Selecting the colour to be retained ([One Point Color])After touching [ ], touch [ ]Select the colour to be retained with and press [MENU/SET]
• You can also select it by touch operations. • When you press [DISP.] button, the initial setting condition is restored.
●The selected colour may not be retained for some subjects.
■Setting the position and size of the light source ([Sunshine])After touching [ ], touch [ ]Press to move the centre of the light source to a different position
• The position of the light source can also be moved by touching the screen.Rotate the rear dial to adjust the size of the light source
• On the touch screen, spread (pinch out) your 2 fingers to zoom in, and pinch (pinch in) your 2 fingers to zoom out.
• When you press [DISP.] button, the initial setting condition is restored.Press [MENU/SET]
Tips on positioning the centre of the light source
You can move the centre of the light source to a point outside the image to obtain a more natural finish.

75DVQP1242
Recording mode
Taking Pictures with different picture effects (Creative Control Mode)
Adjusting the picture effects according to your preferencesYou can easily adjust the setting conditions (such as degree and colouring of an effect) of the picture effects according to your preferences.
1 Press to display the setting screen
2 Rotate the rear dial to adjust the setting conditions of the picture effects
• Press [MENU/SET] to return to the recording screen.
Picture effect Items that can be set[Expressive] Vividness
Subdued colouring Gaudy colouring[Retro] Colouring
Yellowish colouring Reddish colouring[Old Days] Contrast
Low contrast High contrast[High Key] Colouring
Pinkish colouring Light-bluish colouring[Low Key] Colouring
Reddish colouring Bluish colouring[Sepia] Contrast
Low contrast High contrast[Monochrome] Colouring
Yellowish colouring Bluish colouring[Dynamic Monochrome] Contrast
Low contrast High contrast[Rough Monochrome] Grainy picture effect
Weak grainy picture effect Strong grainy picture effect[Silky Monochrome] Degree of defocusing
Slight defocusing Strong defocusing[Impressive Art] Vividness
Black & white Gaudy colouring[High Dynamic] Vividness
Black & white Gaudy colouring
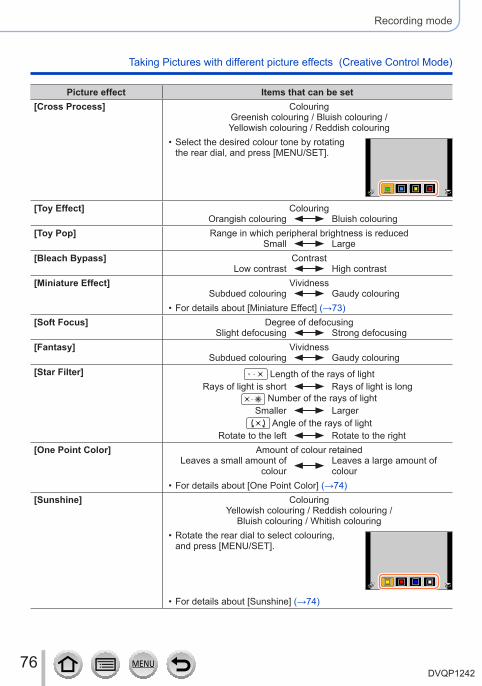
76DVQP1242
Recording mode
Taking Pictures with different picture effects (Creative Control Mode)
Picture effect Items that can be set[Cross Process] Colouring
Greenish colouring / Bluish colouring / Yellowish colouring / Reddish colouring
• Select the desired colour tone by rotating the rear dial, and press [MENU/SET].
[Toy Effect] ColouringOrangish colouring Bluish colouring
[Toy Pop] Range in which peripheral brightness is reducedSmall Large
[Bleach Bypass] ContrastLow contrast High contrast
[Miniature Effect] VividnessSubdued colouring Gaudy colouring
• For details about [Miniature Effect] (→73)[Soft Focus] Degree of defocusing
Slight defocusing Strong defocusing[Fantasy] Vividness
Subdued colouring Gaudy colouring[Star Filter] Length of the rays of light
Rays of light is short Rays of light is long Number of the rays of light
Smaller Larger Angle of the rays of light
Rotate to the left Rotate to the right[One Point Color] Amount of colour retained
Leaves a small amount of colour
Leaves a large amount of colour
• For details about [One Point Color] (→74)[Sunshine] Colouring
Yellowish colouring / Reddish colouring / Bluish colouring / Whitish colouring
• Rotate the rear dial to select colouring, and press [MENU/SET].
• For details about [Sunshine] (→74)
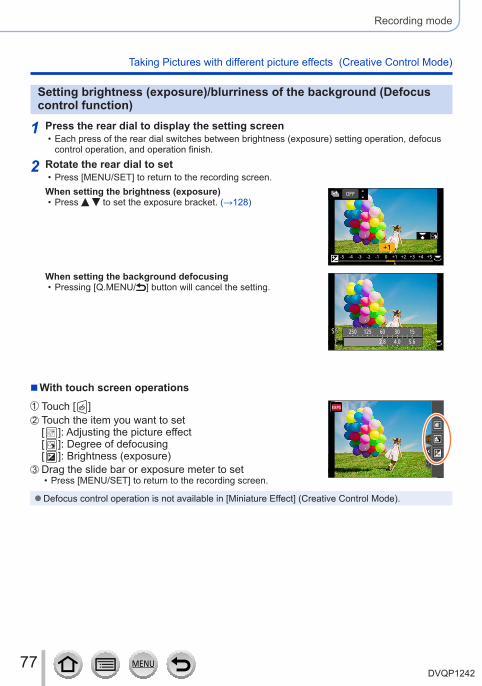
77DVQP1242
Recording mode
Taking Pictures with different picture effects (Creative Control Mode)
Setting brightness (exposure)/blurriness of the background (Defocus control function)
1 Press the rear dial to display the setting screen • Each press of the rear dial switches between brightness (exposure) setting operation, defocus control operation, and operation finish.
2 Rotate the rear dial to set • Press [MENU/SET] to return to the recording screen.
When setting the brightness (exposure) • Press to set the exposure bracket. (→128)
OFF
When setting the background defocusing • Pressing [Q.MENU/ ] button will cancel the setting.
250 125 60 30 15
5.64.02.8
■With touch screen operationsTouch [ ]Touch the item you want to set[ ]: Adjusting the picture effect[ ]: Degree of defocusing[ ]: Brightness (exposure)Drag the slide bar or exposure meter to set
• Press [MENU/SET] to return to the recording screen.
●Defocus control operation is not available in [Miniature Effect] (Creative Control Mode).
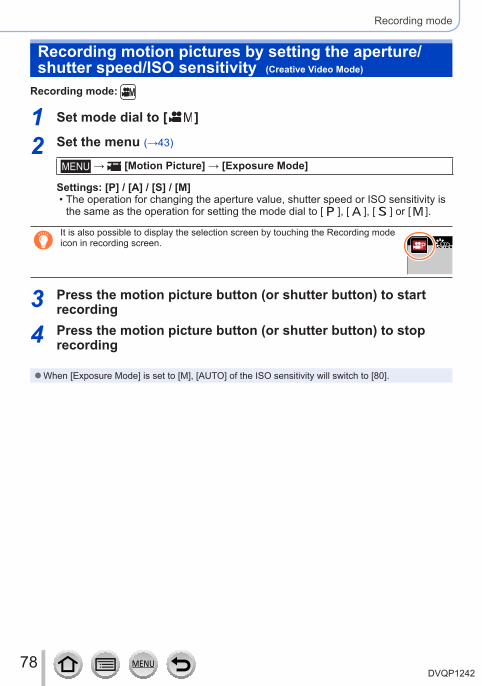
78DVQP1242
Recording mode
Recording motion pictures by setting the aperture/shutter speed/ISO sensitivity (Creative Video Mode)
Recording mode:
1 Set mode dial to [ ]
2 Set the menu (→43)
→ [Motion Picture] → [Exposure Mode]
Settings: [P] / [A] / [S] / [M] • The operation for changing the aperture value, shutter speed or ISO sensitivity is the same as the operation for setting the mode dial to [ ], [ ], [ ] or [ ].
It is also possible to display the selection screen by touching the Recording mode icon in recording screen. 50p
3 Press the motion picture button (or shutter button) to start recording
4 Press the motion picture button (or shutter button) to stop recording
●When [Exposure Mode] is set to [M], [AUTO] of the ISO sensitivity will switch to [80].

79DVQP1242
Recording mode
Recording motion pictures by setting the aperture/shutter speed/ISO sensitivity (Creative Video Mode)
Recording Slow Motion Pictures ([High Speed Video])Slow motion pictures can be recorded by performing recording at a super high speed. When these recordings are played back, the motion is displayed slowly.
• To record pictures, use a UHS Speed Class 3 card. (→27)
1 Set mode dial to [ ]
2 Set the menu (→43)
→ [Motion Picture] → [High Speed Video]
[200fps/VGA] Recording is done at 200 frames/second with [VGA] in [MP4]. • The angle of view becomes narrower.
[100fps/HD] Recording is done at 100 frames/second with [HD] in [MP4].
3 Press the motion picture button (or shutter button) to start recording
4 Press the motion picture button (or shutter button) to stop recording
●No sound is recorded. ●Files are split into smaller motion picture files for recording and playback when the file size exceeds 4 GB. (You can continue to record motion pictures without interruption.)Recording stops when the continuous recording time exceeds 29 minutes and 59 seconds. (In terms of playback time, you can record up to approximately 120 minutes.) ●The settings for the focus, zoom, exposure and White Balance are fixed to the settings specified when recording was started. ●Flickering or horizontal stripes may appear while recording under fluorescent lighting.
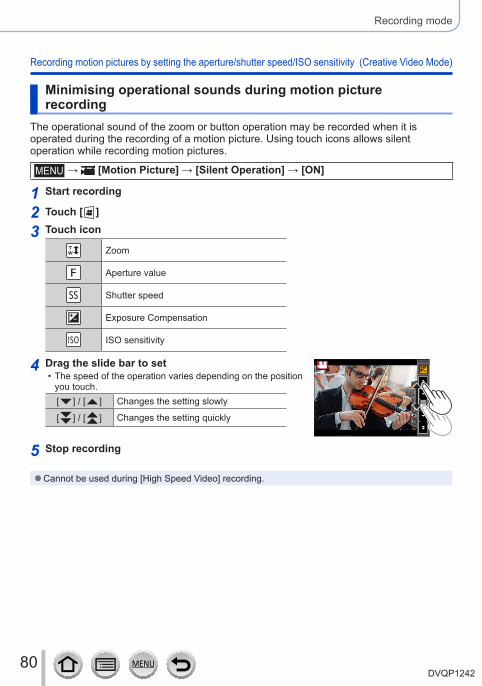
80DVQP1242
Recording mode
Recording motion pictures by setting the aperture/shutter speed/ISO sensitivity (Creative Video Mode)
Minimising operational sounds during motion picture recording
The operational sound of the zoom or button operation may be recorded when it is operated during the recording of a motion picture. Using touch icons allows silent operation while recording motion pictures.
→ [Motion Picture] → [Silent Operation] → [ON]
1 Start recording
2 Touch [ ]
3 Touch icon
Zoom
Aperture value
Shutter speed
Exposure Compensation
ISO sensitivity
4 Drag the slide bar to set • The speed of the operation varies depending on the position you touch.[ ] / [ ] Changes the setting slowly
[ ] / [ ] Changes the setting quickly
5 Stop recording
●Cannot be used during [High Speed Video] recording.
81DVQP1242
Recording mode
Registering your own settings and recording (Custom Mode)
Recording mode:
Registering your own settings ([Cust.Set Mem.])Up to 3 sets of current camera settings can be registered using [Cust.Set Mem.]. ([ ], [ ], [ ])
• Initial setting of the Programme AE Mode is registered as the custom settings initially.PreparationsSelect in advance the recording mode you wish to register and set the desired menu settings on the camera.
→ [Custom] → [Cust.Set Mem.] → Custom set where you want to register settings
●The following menu items are not registered as custom settings.[Rec] menu [Setup] menu
• Data registered with [Face Recog.] • The [Profile Setup] setting
• All menus
[Custom] menu [Playback] menu • [Touch Scroll] • [Menu Guide]
• [Rotate Disp.] • [Picture Sort]

82DVQP1242
Recording mode
Registering your own settings and recording (Custom Mode)
Recording using registered custom set
1 Set mode dial to [ ] • The custom set you used last time will be called up.
■To change a custom setSet mode dial to [ ]Press [MENU/SET] to bring up the menuPress to select the custom set you want to use, and press [MENU/SET]
• The settings are switched to those settings you selected for the custom set. 50p
It is also possible to display the selection screen by touching the Recording mode icon in recording screen. 50p
■Changing the registered contentEven if the menu settings are changed temporarily when the mode dial has been set to [ ], the currently registered settings will remain unchanged. To change the currently registered settings, overwrite the registered data using [Cust.Set Mem.] on the [Custom] menu.
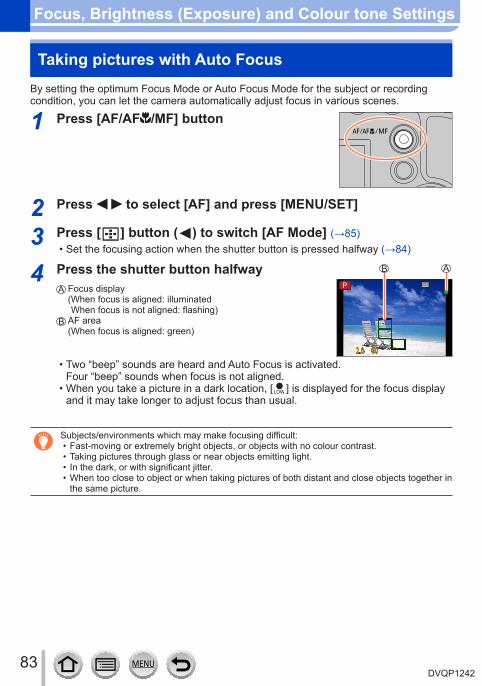
83DVQP1242
Focus, Brightness (Exposure) and Colour tone Settings
Taking pictures with Auto FocusBy setting the optimum Focus Mode or Auto Focus Mode for the subject or recording condition, you can let the camera automatically adjust focus in various scenes.
1 Press [AF/AF /MF] button
2 Press to select [AF] and press [MENU/SET]
3 Press [ ] button ( ) to switch [AF Mode] (→85) • Set the focusing action when the shutter button is pressed halfway (→84)
4 Press the shutter button halfwayFocus display( When focus is aligned: illuminated When focus is not aligned: flashing)
AF area(When focus is aligned: green)
• Two “beep” sounds are heard and Auto Focus is activated.Four “beep” sounds when focus is not aligned.
• When you take a picture in a dark location, [ ] is displayed for the focus display and it may take longer to adjust focus than usual.
Subjects/environments which may make focusing difficult: • Fast-moving or extremely bright objects, or objects with no colour contrast. • Taking pictures through glass or near objects emitting light. • In the dark, or with significant jitter. • When too close to object or when taking pictures of both distant and close objects together in the same picture.
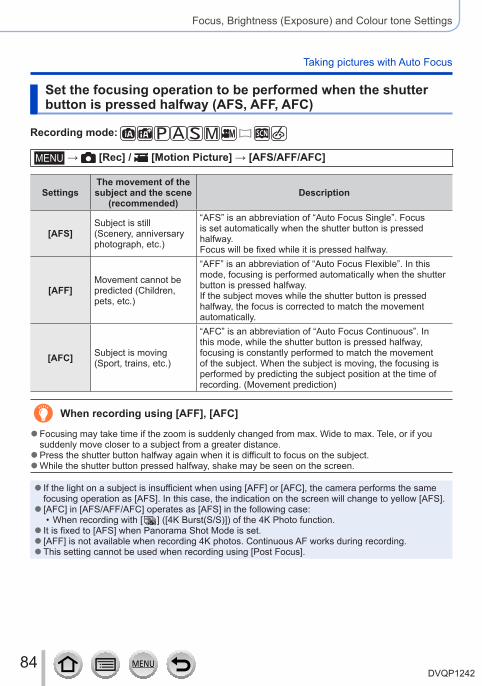
84DVQP1242
Focus, Brightness (Exposure) and Colour tone Settings
Taking pictures with Auto Focus
Set the focusing operation to be performed when the shutter button is pressed halfway (AFS, AFF, AFC)
Recording mode:
→ [Rec] / [Motion Picture] → [AFS/AFF/AFC]
SettingsThe movement of the subject and the scene
(recommended)Description
[AFS]Subject is still (Scenery, anniversary photograph, etc.)
“AFS” is an abbreviation of “Auto Focus Single”. Focus is set automatically when the shutter button is pressed halfway.Focus will be fixed while it is pressed halfway.
[AFF]Movement cannot be predicted (Children, pets, etc.)
“AFF” is an abbreviation of “Auto Focus Flexible”. In this mode, focusing is performed automatically when the shutter button is pressed halfway.If the subject moves while the shutter button is pressed halfway, the focus is corrected to match the movement automatically.
[AFC] Subject is moving (Sport, trains, etc.)
“AFC” is an abbreviation of “Auto Focus Continuous”. In this mode, while the shutter button is pressed halfway, focusing is constantly performed to match the movement of the subject. When the subject is moving, the focusing is performed by predicting the subject position at the time of recording. (Movement prediction)
When recording using [AFF], [AFC]
●Focusing may take time if the zoom is suddenly changed from max. Wide to max. Tele, or if you suddenly move closer to a subject from a greater distance. ●Press the shutter button halfway again when it is difficult to focus on the subject. ●While the shutter button pressed halfway, shake may be seen on the screen.
● If the light on a subject is insufficient when using [AFF] or [AFC], the camera performs the same focusing operation as [AFS]. In this case, the indication on the screen will change to yellow [AFS]. ● [AFC] in [AFS/AFF/AFC] operates as [AFS] in the following case:
• When recording with [ ] ([4K Burst(S/S)]) of the 4K Photo function. ● It is fixed to [AFS] when Panorama Shot Mode is set. ● [AFF] is not available when recording 4K photos. Continuous AF works during recording. ●This setting cannot be used when recording using [Post Focus].
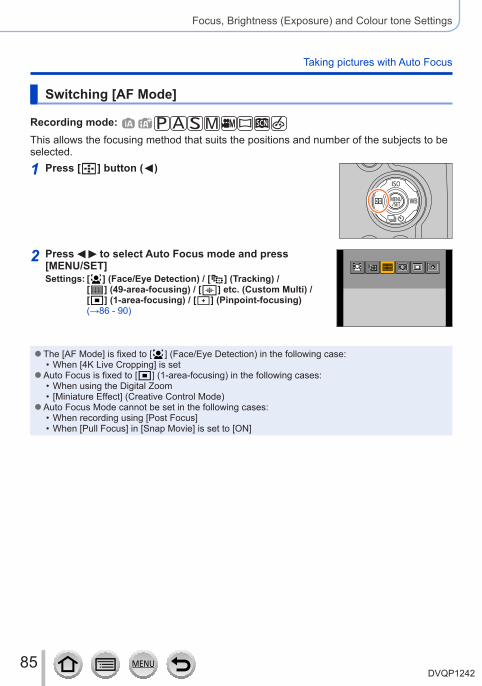
85DVQP1242
Focus, Brightness (Exposure) and Colour tone Settings
Taking pictures with Auto Focus
Switching [AF Mode]
Recording mode: This allows the focusing method that suits the positions and number of the subjects to be selected.
1 Press [ ] button ( )
2 Press to select Auto Focus mode and press [MENU/SET]Settings: [ ] (Face/Eye Detection) / [ ] (Tracking) /
[ ] (49-area-focusing) / [ ] etc. (Custom Multi) / [ ] (1-area-focusing) / [ ] (Pinpoint-focusing) (→86 - 90)
●The [AF Mode] is fixed to [ ] (Face/Eye Detection) in the following case: • When [4K Live Cropping] is set
●Auto Focus is fixed to [ ] (1-area-focusing) in the following cases: • When using the Digital Zoom • [Miniature Effect] (Creative Control Mode)
●Auto Focus Mode cannot be set in the following cases: • When recording using [Post Focus] • When [Pull Focus] in [Snap Movie] is set to [ON]
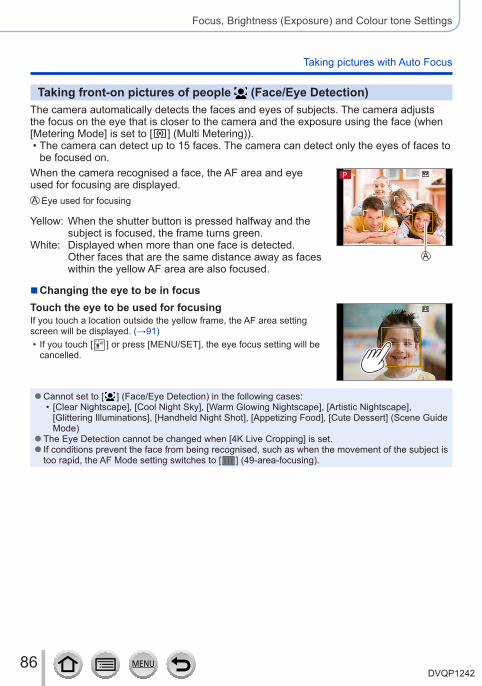
86DVQP1242
Focus, Brightness (Exposure) and Colour tone Settings
Taking pictures with Auto Focus
Taking front-on pictures of people (Face/Eye Detection)The camera automatically detects the faces and eyes of subjects. The camera adjusts the focus on the eye that is closer to the camera and the exposure using the face (when [Metering Mode] is set to [ ] (Multi Metering)).
• The camera can detect up to 15 faces. The camera can detect only the eyes of faces to be focused on.
When the camera recognised a face, the AF area and eye used for focusing are displayed.
Eye used for focusing
Yellow: When the shutter button is pressed halfway and the subject is focused, the frame turns green.
White: Displayed when more than one face is detected. Other faces that are the same distance away as faces within the yellow AF area are also focused.
■Changing the eye to be in focusTouch the eye to be used for focusingIf you touch a location outside the yellow frame, the AF area setting screen will be displayed. (→91)
• If you touch [ ] or press [MENU/SET], the eye focus setting will be cancelled.
●Cannot set to [ ] (Face/Eye Detection) in the following cases: • [Clear Nightscape], [Cool Night Sky], [Warm Glowing Nightscape], [Artistic Nightscape], [Glittering Illuminations], [Handheld Night Shot], [Appetizing Food], [Cute Dessert] (Scene Guide Mode)
●The Eye Detection cannot be changed when [4K Live Cropping] is set. ● If conditions prevent the face from being recognised, such as when the movement of the subject is too rapid, the AF Mode setting switches to [ ] (49-area-focusing).

87DVQP1242
Focus, Brightness (Exposure) and Colour tone Settings
Taking pictures with Auto Focus
Automatically locking the focus on a moving subject (tracking)
With cursor button operationsAlign the AF Tracking area with the subject and press the shutter button halfway
AF Tracking area
When the subject is recognised, the AF tracking area turns green. When you release the shutter button, the AF tracking area turns yellow and the subject is automatically kept in focus.
• To release AF Tracking → Press [MENU/SET]. • Focus range: same as macro recording [ ]
With touch screen operationsTouch the subjectPerform these operations with the touch shutter function released.The AF Tracking area turns yellow while the subject is locked.
• To release AF Tracking → Touch [ ].
● If AF Lock fails, a red frame flashes for a while and then turns off. ●When you set [Metering Mode] to [ ] (Multi Metering), the camera adjusts the exposure using a locked subject. (→177) ●Under certain recording conditions, such as when the subject is small or dark, AF Tracking may not operate correctly. When AF Tracking does not work, focus will be on [ ] (1-area-focusing). ●This function is not available in the following case:
• When using [Time Lapse Shot] ● In the following cases, [ ] performs the operation of [ ] (1-area-focusing).
• [Glistening Water], [Glittering Illuminations], [Soft Image of a Flower], [Monochrome] (Scene Guide Mode)
• [Sepia], [Monochrome], [Dynamic Monochrome], [Rough Monochrome], [Silky Monochrome], [Soft Focus], [Star Filter], [Sunshine] (Creative Control Mode)
• [Monochrome] ([Photo Style])

88DVQP1242
Focus, Brightness (Exposure) and Colour tone Settings
Taking pictures with Auto Focus
Subject not centred in picture (49-area-focusing)Focuses on the subject in the wide range area (up to 49-area-focusing) on the recording screen.
Setting the shape of an AF area , etc. (Custom Multi)You can set the preferred shape of an AF area by selecting 49 points in the AF area, based on the subject.
1 Press [ ] button ( )
2 Select a Custom Multi icon ([ ], etc.), and press Current AF area shape
3 Use to select the setting item
([Horizontal Pattern])
Horizontal line shapeIdeal shape for panning, etc.
([Vertical Pattern])
Vertical line shapeIdeal shape for recording structures, etc.
([Central Pattern])
Shape distributed over the centreIdeal shape for focusing around the centre.
/ / (Custom)
You can set a custom registration shape.
4 Press • The AF area setting screen appears.
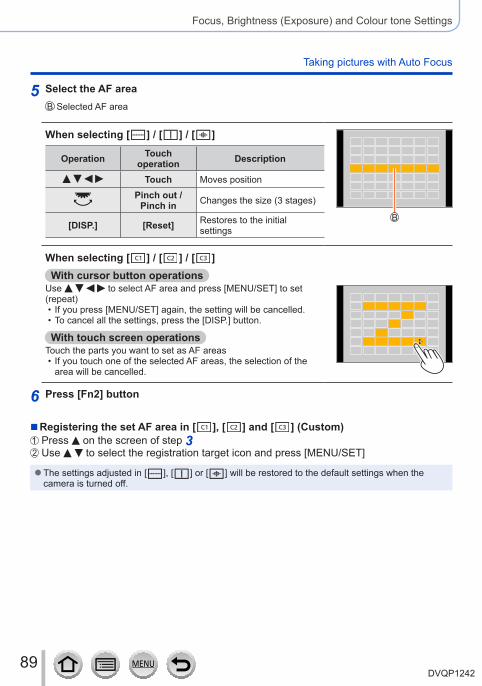
89DVQP1242
Focus, Brightness (Exposure) and Colour tone Settings
Taking pictures with Auto Focus
5 Select the AF areaSelected AF area
When selecting [ ] / [ ] / [ ]
Operation Touch operation Description
Touch Moves positionPinch out /
Pinch in Changes the size (3 stages)
[DISP.] [Reset] Restores to the initial settings
When selecting [ ] / [ ] / [ ]With cursor button operations
Use to select AF area and press [MENU/SET] to set (repeat)
• If you press [MENU/SET] again, the setting will be cancelled. • To cancel all the settings, press the [DISP.] button.
With touch screen operationsTouch the parts you want to set as AF areas
• If you touch one of the selected AF areas, the selection of the area will be cancelled.
6 Press [Fn2] button
■Registering the set AF area in [ ], [ ] and [ ] (Custom)Press on the screen of step 3Use to select the registration target icon and press [MENU/SET]
●The settings adjusted in [ ], [ ] or [ ] will be restored to the default settings when the camera is turned off.
90DVQP1242
Focus, Brightness (Exposure) and Colour tone Settings
Taking pictures with Auto Focus
Determined position for focus (1-area-focusing) / (Pinpoint-focusing)
(1-area-focusing)Focuses on AF area in centre of picture. (Recommended when focus is difficult to align)
When the subject is not in the centre of the composition in [ ], you can bring the subject into the AF area, fix the focus and exposure by pressing the shutter button halfway, move the camera to the composition you want with the shutter button pressed halfway, and then take the picture. (Only when [AFS/AFF/AFC] in [Rec] menu is set to [AFS].)
(Pinpoint-focusing)Enables more precise focusing on a smaller point than [ ] (1-area-focusing). When you press the shutter button halfway, an enlarged display of the focus position appears.
● If [ ] (Pinpoint-focusing) is selected while recording motion pictures or 4K photos, the setting is changed to [ ] (1-area-focusing). ●Cannot set to [ ] (Pinpoint-focusing) in the following case:
• When [AFS/AFF/AFC] in [Rec] menu is set to [AFF] or [AFC]
91DVQP1242
Focus, Brightness (Exposure) and Colour tone Settings
Taking pictures with Auto Focus
Changing the position and size of the AF area
Recording mode: When [ ], [ ], [ ], or [ ] in Auto Focus Mode is selected, you can change the position and size of the AF area.
• Perform these operations with the touch shutter function released. • You can also display the AF area setting screen by touching the recording screen. (When [Touch AF] in [Touch Settings] of the [Custom] menu has been set to [AF].)
●When you set [Metering Mode] (→177) to [ ] (spot-focusing), the metering target will move along with the AF area. ●The position and size of the AF area cannot be changed in the Digital Zoom range.
■When selecting [ ] / [ ]You can change the position and size of the AF area.
Press [ ] button ( )Select [ ] or [ ] and press
• The AF area setting screen appears.
To change the AF area
Operation Touch operation Description
Touch To move the position of the AF area.
— Pinch out / Pinch in Enlarges/reduces the AF area in small steps.
— Enlarges/reduces the AF area in large steps.
[DISP.] [Reset]Resets the AF area back to the centre.
• If you press the button again, the frame size will be reset to the initial setting.
Press [MENU/SET] • AF area with the same function as [ ] is displayed in the touched position, when the [ ] is selected. Setting of the AF area is cleared when [MENU/SET] is pressed or [ ] is touched.
92DVQP1242
Focus, Brightness (Exposure) and Colour tone Settings
Taking pictures with Auto Focus
■When selecting [ ]You can set the focus position by selecting an AF area group. The AF area, which is configured with 49 points, is divided into groups consisting of 9 points each (6 points or 4 points for the groups located at the edges of the screen).
Press [ ] button ( ) Examples of groupSelect [ ] and press
• The AF area setting screen appears.Press to select an AF area groupPress [MENU/SET]
• Only the [+] indications (centre points of the selected group) remain on the screen.
• Setting of the AF area is cleared when [MENU/SET] is pressed or [ ] is touched.
93DVQP1242
Focus, Brightness (Exposure) and Colour tone Settings
Taking pictures with Auto Focus
■When selecting [ ]You can enlarge the screen to perform more precise settings of the focus position.
• You cannot set the focus position at the edges of the screen.Press [ ] button ( )Select [ ] and press Use to set the focus position and press [MENU/SET]
• The enlarged assist screen will appear for setting the focus position.
Move [+] to the focus position
Operation Touch operation Description
Touch Moves [+].— Pinch in / Pinch out Enlarges/reduces the screen in small steps.
— Enlarges/reduces the screen in large steps.
—
Switches the enlarged display. (windowed/full screen)
[DISP.] [Reset] Resets [+] back to the centre.
• The image of a part of the screen can be enlarged or reduced approximately 3 to 6 times. The image of the entire screen can be enlarged or reduced approximately 3 to 10 times.
• On the assist screen, it is also possible to record a picture by touching [ ].Press [MENU/SET]
94DVQP1242
Focus, Brightness (Exposure) and Colour tone Settings
Taking pictures with Auto Focus
Setting the AF area position with the touch pad
Recording mode:
You can move the AF area displayed on the viewfinder by touching the monitor.
→ [Custom] → [Touch Settings] → [Touch Pad AF]
[EXACT] Moves the AF area of the viewfinder by touching a desired position on the touch pad.
[OFFSET] Moves the AF area of the viewfinder according to the distance you drag the touch pad (→40).
[OFF] —
• Press the shutter button halfway to determine the focus position. If you press the [DISP.] button before determining the focus position, the focus position returns to the centre.
• To cancel the settings for the AF area when the Auto Focus Mode (→85) is set to [ ] (Face/Eye Detection), [ ] (tracking), or [ ] (49-area-focusing), press [MENU/SET].
●The Touch Shutter function (→41) is disabled when using [Touch Pad AF]. ●The [Touch Pad AF] does not function in the following cases:
• When [4K Live Cropping] is set • When [Pull Focus] in [Snap Movie] is set to [ON]
95DVQP1242
Focus, Brightness (Exposure) and Colour tone Settings
Taking pictures with Auto Focus
Optimising the focus and brightness for a touched position
Recording mode: You can optimise the focus and brightness for the position you have touched.
→ [Custom] → [Touch Settings] → [Touch AF] → [AF+AE]
1 Touch the subject you want to optimise the brightness for
• The AF area setting screen appears. (→91) • The brightness optimisation position is displayed on the centre of the AF area. The position follows the movement of the AF area.
• [Metering Mode] is set to [ ], which is used exclusively for the [Touch AE].
• Touching [Reset] returns the brightness optimisation position and the AF area to the centre.
SetSetResetReset
2 Touch [Set] • The AF area with the same function as [ ] is displayed on the touched position. • If you touch [ ] (touch [ ] when [ ] is set), the setting of [AF+AE] is cancelled.
When the background has become too bright, etc., the brightness contrast with the background can be adjusted by compensating the exposure.
●When recording with the Touch Shutter, the focus and brightness are optimised for the touched position before recording takes place. ●At the edge of the screen, the metering may be affected by the brightness around the touched location. ●The [AF+AE] does not function in the following cases:
• When using the Digital Zoom • When [4K Live Cropping] is set
96DVQP1242
Focus, Brightness (Exposure) and Colour tone Settings
Taking close-up pictures (Macro recording)
Recording mode: This mode allows you to take close-up pictures of a subject, e.g. when taking pictures of flowers.
1 Press [AF/AF /MF] button
2 Press to select the item and press [MENU/SET][ ]([AF Macro])
You can take pictures of a subject as close as 1 cm (0.033 feet) from the lens by rotating the zoom lever upmost to Wide.
[ ]([Macro Zoom])
Use this setting to get close to the subject and then further enlarge when taking the picture. You can take a picture with the Digital Zoom up to 3x while maintaining the distance to the subject for the extreme Wide position (1 cm (0.033 feet)).
• Note that enlarging will decrease picture quality. • Zoom range will be displayed in blue. (digital zoom range)
●When recording a subject close to the camera, we recommend taking a picture without using the flash. ●A picture may be out of focus when the subject is out of focus range, even if the focus display is lit. ●When a nearby subject is to be recorded
• Using a tripod and [Self Timer] (→126) is recommended. • The effective focus range (depth of field) is significantly narrowed. Therefore, if the distance between the camera and the subject is changed after focusing on the subject, it may become difficult to focus on it again.
• Resolution may be slightly reduced around the edges of the picture. This is not a malfunction. ●Cannot set to [Macro Zoom] in the following cases:
• [Handheld Night Shot] (Scene Guide Mode) • Panorama Shot Mode • During [High Speed Video] recording • [Impressive Art], [Toy Effect], [Toy Pop], [Miniature Effect] (Creative Control Mode) • When [HDR] is set to [ON] • When [Multi Exp.] is set • When [Quality] is set to [ ], [ ] or [ ] • When [Conversion] is set to [ ] or [ ]
97DVQP1242
Focus, Brightness (Exposure) and Colour tone Settings
Taking pictures with Manual Focus
Recording mode: Manual Focus is convenient when you want to lock the focus to take pictures or when it is difficult to adjust focus using Auto Focus.
1 Press [AF/AF /MF] button
2 Press to select [MF] and press [MENU/SET]
3 Press [ ] button ( ) • The focus adjusting screen will be displayed. • When [MF Assist] is set to [ON], MF Assist (enlarged screen) is displayed (→194). You can move the enlarged part by dragging the screen (→40).
• You can also enlarge the display by pinching out or touching the screen twice. (→40)
4 Adjust the focusMF Assist (Enlarged screen)MF Guide PeakingSlide bar
Focuses on nearby subjectFocuses on distant subjects
• Pressing and holding will increase the focus speed.
• Focus can also be adjusted by dragging the slide bar. • Colour is added to the portions of the image that are in focus. (Peaking) (→195)
• About the MF Guide (→194)
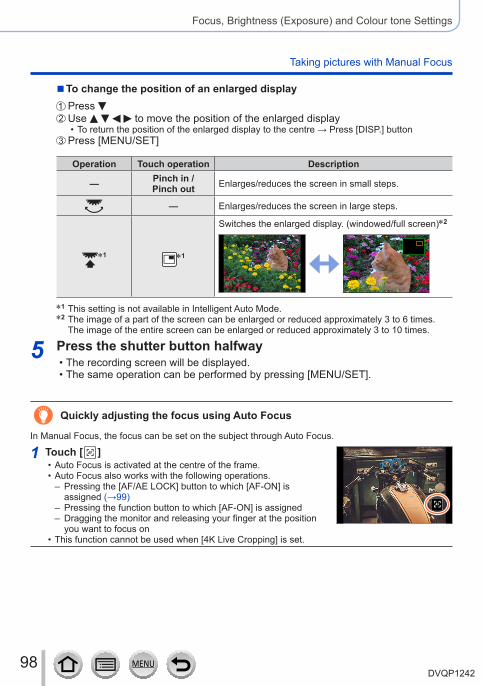
98DVQP1242
Focus, Brightness (Exposure) and Colour tone Settings
Taking pictures with Manual Focus
■To change the position of an enlarged displayPress Use to move the position of the enlarged display
• To return the position of the enlarged display to the centre → Press [DISP.] buttonPress [MENU/SET]
Operation Touch operation Description
— Pinch in / Pinch out Enlarges/reduces the screen in small steps.
— Enlarges/reduces the screen in large steps.
*1 *1
Switches the enlarged display. (windowed/full screen)*2
*1 This setting is not available in Intelligent Auto Mode.*2 The image of a part of the screen can be enlarged or reduced approximately 3 to 6 times.
The image of the entire screen can be enlarged or reduced approximately 3 to 10 times.
5 Press the shutter button halfway • The recording screen will be displayed. • The same operation can be performed by pressing [MENU/SET].
Quickly adjusting the focus using Auto Focus
In Manual Focus, the focus can be set on the subject through Auto Focus.
1 Touch [ ] • Auto Focus is activated at the centre of the frame. • Auto Focus also works with the following operations.
– Pressing the [AF/AE LOCK] button to which [AF-ON] is assigned (→99)
– Pressing the function button to which [AF-ON] is assigned – Dragging the monitor and releasing your finger at the position you want to focus on
• This function cannot be used when [4K Live Cropping] is set.
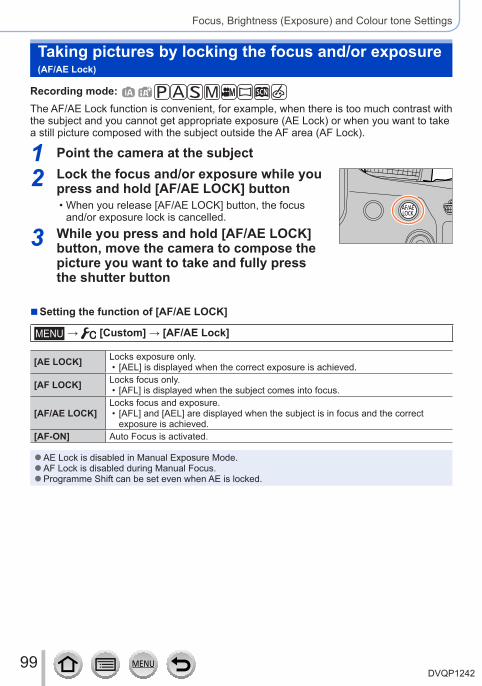
99DVQP1242
Focus, Brightness (Exposure) and Colour tone Settings
Taking pictures by locking the focus and/or exposure (AF/AE Lock)
Recording mode: The AF/AE Lock function is convenient, for example, when there is too much contrast with the subject and you cannot get appropriate exposure (AE Lock) or when you want to take a still picture composed with the subject outside the AF area (AF Lock).
1 Point the camera at the subject
2 Lock the focus and/or exposure while you press and hold [AF/AE LOCK] button
• When you release [AF/AE LOCK] button, the focus and/or exposure lock is cancelled.
3 While you press and hold [AF/AE LOCK] button, move the camera to compose the picture you want to take and fully press the shutter button
■Setting the function of [AF/AE LOCK]
→ [Custom] → [AF/AE Lock]
[AE LOCK] Locks exposure only. • [AEL] is displayed when the correct exposure is achieved.
[AF LOCK] Locks focus only. • [AFL] is displayed when the subject comes into focus.
[AF/AE LOCK]Locks focus and exposure.
• [AFL] and [AEL] are displayed when the subject is in focus and the correct exposure is achieved.
[AF-ON] Auto Focus is activated.
●AE Lock is disabled in Manual Exposure Mode. ●AF Lock is disabled during Manual Focus. ●Programme Shift can be set even when AE is locked.
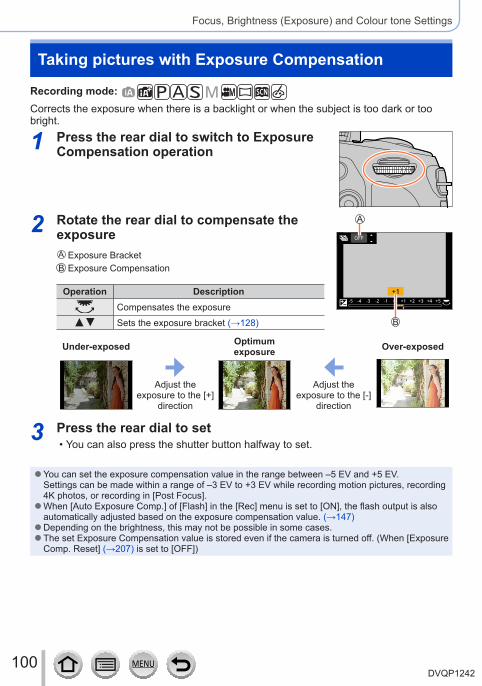
100DVQP1242
Focus, Brightness (Exposure) and Colour tone Settings
Taking pictures with Exposure Compensation
Recording mode: Corrects the exposure when there is a backlight or when the subject is too dark or too bright.
1 Press the rear dial to switch to Exposure Compensation operation
2 Rotate the rear dial to compensate the exposure
Exposure BracketExposure Compensation
Operation DescriptionCompensates the exposure
Sets the exposure bracket (→128)
OFF
Under-exposed Optimum exposure Over-exposed
Adjust the exposure to the [+]
direction
Adjust the exposure to the [-]
direction
3 Press the rear dial to set • You can also press the shutter button halfway to set.
●You can set the exposure compensation value in the range between –5 EV and +5 EV.Settings can be made within a range of –3 EV to +3 EV while recording motion pictures, recording 4K photos, or recording in [Post Focus]. ●When [Auto Exposure Comp.] of [Flash] in the [Rec] menu is set to [ON], the flash output is also automatically adjusted based on the exposure compensation value. (→147) ●Depending on the brightness, this may not be possible in some cases. ●The set Exposure Compensation value is stored even if the camera is turned off. (When [Exposure Comp. Reset] (→207) is set to [OFF])
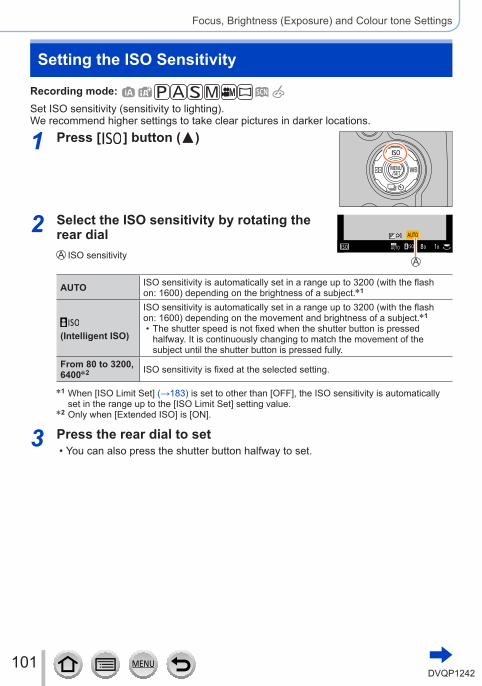
101DVQP1242
Focus, Brightness (Exposure) and Colour tone Settings
Setting the ISO Sensitivity
Recording mode: Set ISO sensitivity (sensitivity to lighting).We recommend higher settings to take clear pictures in darker locations.
1 Press [ ] button ( )
2 Select the ISO sensitivity by rotating the rear dial
ISO sensitivity
AUTO ISO sensitivity is automatically set in a range up to 3200 (with the flash on: 1600) depending on the brightness of a subject.*1
(Intelligent ISO)
ISO sensitivity is automatically set in a range up to 3200 (with the flash on: 1600) depending on the movement and brightness of a subject.*1
• The shutter speed is not fixed when the shutter button is pressed halfway. It is continuously changing to match the movement of the subject until the shutter button is pressed fully.
From 80 to 3200, 6400*2 ISO sensitivity is fixed at the selected setting.
*1 When [ISO Limit Set] (→183) is set to other than [OFF], the ISO sensitivity is automatically set in the range up to the [ISO Limit Set] setting value.
*2 Only when [Extended ISO] is [ON].
3 Press the rear dial to set • You can also press the shutter button halfway to set.
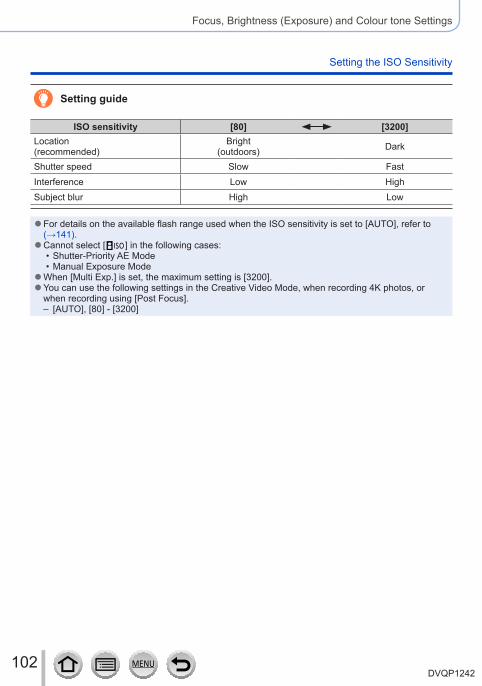
102DVQP1242
Focus, Brightness (Exposure) and Colour tone Settings
Setting the ISO Sensitivity
Setting guide
ISO sensitivity [80] [3200]Location(recommended)
Bright(outdoors) Dark
Shutter speed Slow FastInterference Low HighSubject blur High Low
●For details on the available flash range used when the ISO sensitivity is set to [AUTO], refer to (→141). ●Cannot select [ ] in the following cases:
• Shutter-Priority AE Mode • Manual Exposure Mode
●When [Multi Exp.] is set, the maximum setting is [3200]. ●You can use the following settings in the Creative Video Mode, when recording 4K photos, or when recording using [Post Focus].
– [AUTO], [80] - [3200]
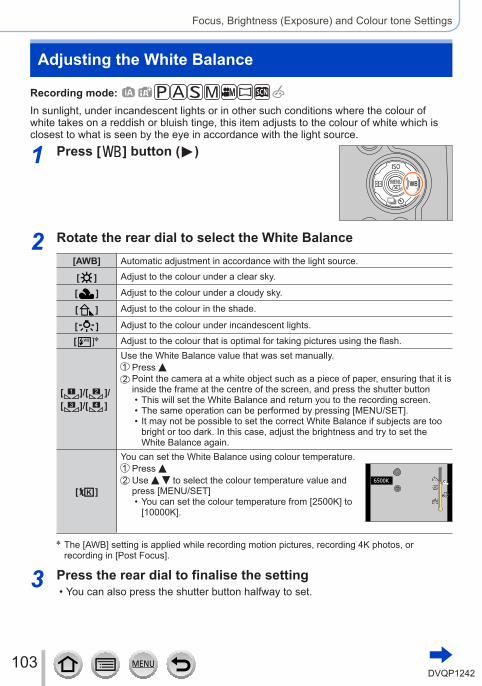
103DVQP1242
Focus, Brightness (Exposure) and Colour tone Settings
Adjusting the White Balance
Recording mode: In sunlight, under incandescent lights or in other such conditions where the colour of white takes on a reddish or bluish tinge, this item adjusts to the colour of white which is closest to what is seen by the eye in accordance with the light source.
1 Press [ ] button ( )
2 Rotate the rear dial to select the White Balance[AWB] Automatic adjustment in accordance with the light source.
[ ] Adjust to the colour under a clear sky.
[ ] Adjust to the colour under a cloudy sky.
[ ] Adjust to the colour in the shade.
[ ] Adjust to the colour under incandescent lights.
[ ]* Adjust to the colour that is optimal for taking pictures using the flash.
[ ]/[ ]/[ ]/[ ]
Use the White Balance value that was set manually.Press Point the camera at a white object such as a piece of paper, ensuring that it is inside the frame at the centre of the screen, and press the shutter button
• This will set the White Balance and return you to the recording screen. • The same operation can be performed by pressing [MENU/SET]. • It may not be possible to set the correct White Balance if subjects are too bright or too dark. In this case, adjust the brightness and try to set the White Balance again.
[ ]
You can set the White Balance using colour temperature.Press Use to select the colour temperature value and press [MENU/SET]
• You can set the colour temperature from [2500K] to [10000K].
* The [AWB] setting is applied while recording motion pictures, recording 4K photos, or recording in [Post Focus].
3 Press the rear dial to finalise the setting • You can also press the shutter button halfway to set.

104DVQP1242
Focus, Brightness (Exposure) and Colour tone Settings
Adjusting the White Balance
Under fluorescent lighting, LED lighting fixtures, etc., the optimal White Balance will vary depending on the lighting type, so use [AWB], [ ], [ ], [ ] or [ ].
●The White Balance may not operate correctly if you take pictures using a flash and the subject is recorded outside of the effective flash range (→141). ● In Scene Guide Mode, changing the scene or recording mode will return White Balance settings (including the White Balance fine adjustment setting) back to [AWB]. ● In the Scene Guide Mode, settings suitable for each scene are made.
■Auto White BalanceWhen [AWB] (Automatic White Balance) is set, the colouring is adjusted in accordance with the light source. However, if the scene is too bright or too dark or if other extreme conditions apply, the pictures may appear reddish or bluish. The White Balance may not operate correctly if there is a multiple number of light sources. In that case, set the [White Balance] to settings other than [AWB] to adjust the colouring.
: [AWB] operational range10000K
9000K
8000K
7000K
6000K5000K
4000K
3000K
2000K
Cloudy sky (rain)Shade
Incandescent lightingSunset/sunriseCandlelight
SunlightWhite fluorescent lighting
Blue sky
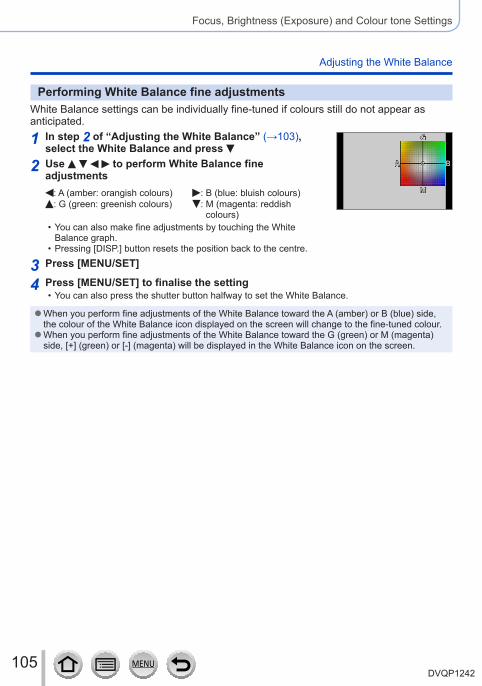
105DVQP1242
Focus, Brightness (Exposure) and Colour tone Settings
Adjusting the White Balance
Performing White Balance fine adjustmentsWhite Balance settings can be individually fine-tuned if colours still do not appear as anticipated.
1 In step 2 of “Adjusting the White Balance” (→103), select the White Balance and press
2 Use to perform White Balance fine adjustments
: A (amber: orangish colours) : B (blue: bluish colours): G (green: greenish colours) : M (magenta: reddish
colours) • You can also make fine adjustments by touching the White Balance graph.
• Pressing [DISP.] button resets the position back to the centre.
3 Press [MENU/SET]
4 Press [MENU/SET] to finalise the setting • You can also press the shutter button halfway to set the White Balance.
●When you perform fine adjustments of the White Balance toward the A (amber) or B (blue) side, the colour of the White Balance icon displayed on the screen will change to the fine-tuned colour. ●When you perform fine adjustments of the White Balance toward the G (green) or M (magenta) side, [+] (green) or [-] (magenta) will be displayed in the White Balance icon on the screen.
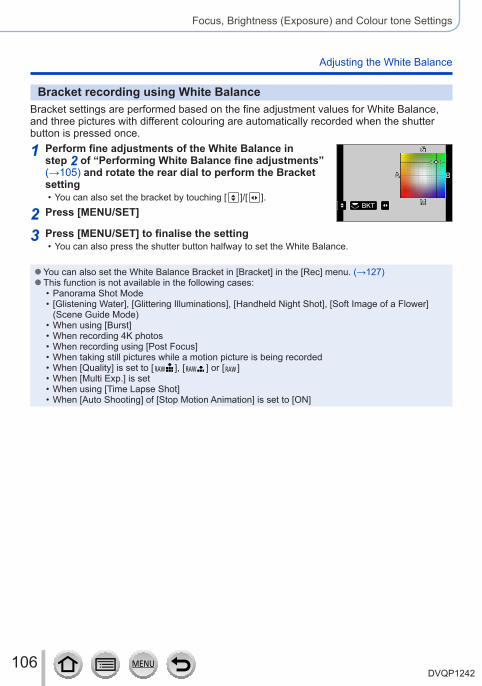
106DVQP1242
Focus, Brightness (Exposure) and Colour tone Settings
Adjusting the White Balance
Bracket recording using White BalanceBracket settings are performed based on the fine adjustment values for White Balance, and three pictures with different colouring are automatically recorded when the shutter button is pressed once.
1 Perform fine adjustments of the White Balance in step 2 of “Performing White Balance fine adjustments” (→105) and rotate the rear dial to perform the Bracket setting
• You can also set the bracket by touching [ ]/[ ].BKTBKT
2 Press [MENU/SET]
3 Press [MENU/SET] to finalise the setting • You can also press the shutter button halfway to set the White Balance.
●You can also set the White Balance Bracket in [Bracket] in the [Rec] menu. (→127) ●This function is not available in the following cases:
• Panorama Shot Mode • [Glistening Water], [Glittering Illuminations], [Handheld Night Shot], [Soft Image of a Flower] (Scene Guide Mode)
• When using [Burst] • When recording 4K photos • When recording using [Post Focus] • When taking still pictures while a motion picture is being recorded • When [Quality] is set to [ ], [ ] or [ ] • When [Multi Exp.] is set • When using [Time Lapse Shot] • When [Auto Shooting] of [Stop Motion Animation] is set to [ON]
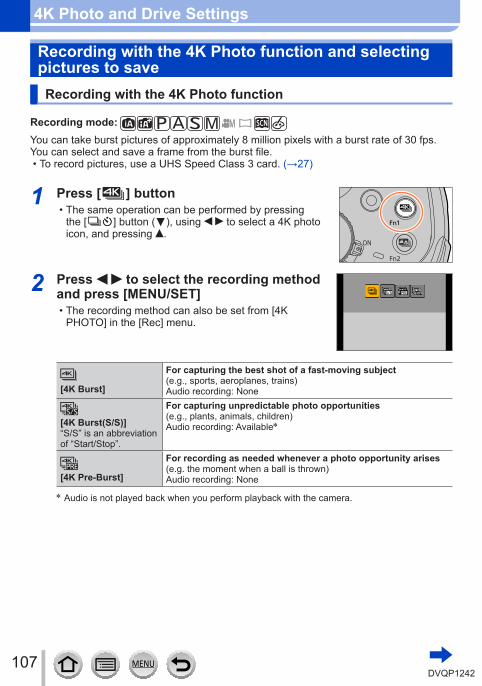
107DVQP1242
Recording with the 4K Photo function and selecting pictures to save
Recording with the 4K Photo function
Recording mode: You can take burst pictures of approximately 8 million pixels with a burst rate of 30 fps. You can select and save a frame from the burst file.
• To record pictures, use a UHS Speed Class 3 card. (→27)
1 Press [ ] button • The same operation can be performed by pressing the [ ] button ( ), using to select a 4K photo icon, and pressing .
2 Press to select the recording method and press [MENU/SET]
• The recording method can also be set from [4K PHOTO] in the [Rec] menu.
[4K Burst]
For capturing the best shot of a fast-moving subject (e.g., sports, aeroplanes, trains)Audio recording: None
[4K Burst(S/S)]“S/S” is an abbreviation of “Start/Stop”.
For capturing unpredictable photo opportunities (e.g., plants, animals, children)Audio recording: Available*
[4K Pre-Burst]
For recording as needed whenever a photo opportunity arises (e.g. the moment when a ball is thrown)Audio recording: None
* Audio is not played back when you perform playback with the camera.
4K Photo and Drive Settings
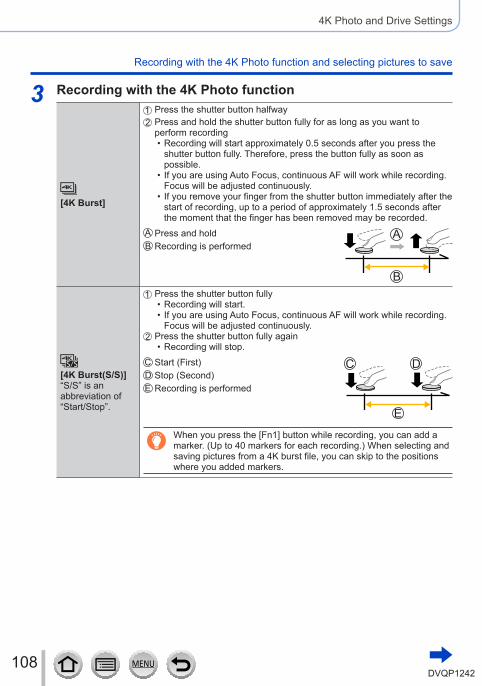
108DVQP1242
4K Photo and Drive Settings
Recording with the 4K Photo function and selecting pictures to save
3 Recording with the 4K Photo function
[4K Burst]
Press the shutter button halfwayPress and hold the shutter button fully for as long as you want to perform recording
• Recording will start approximately 0.5 seconds after you press the shutter button fully. Therefore, press the button fully as soon as possible.
• If you are using Auto Focus, continuous AF will work while recording. Focus will be adjusted continuously.
• If you remove your finger from the shutter button immediately after the start of recording, up to a period of approximately 1.5 seconds after the moment that the finger has been removed may be recorded.
Press and holdRecording is performed
[4K Burst(S/S)]“S/S” is an abbreviation of “Start/Stop”.
Press the shutter button fully • Recording will start. • If you are using Auto Focus, continuous AF will work while recording. Focus will be adjusted continuously.
Press the shutter button fully again • Recording will stop.
Start (First)Stop (Second)Recording is performed
When you press the [Fn1] button while recording, you can add a marker. (Up to 40 markers for each recording.) When selecting and saving pictures from a 4K burst file, you can skip to the positions where you added markers.
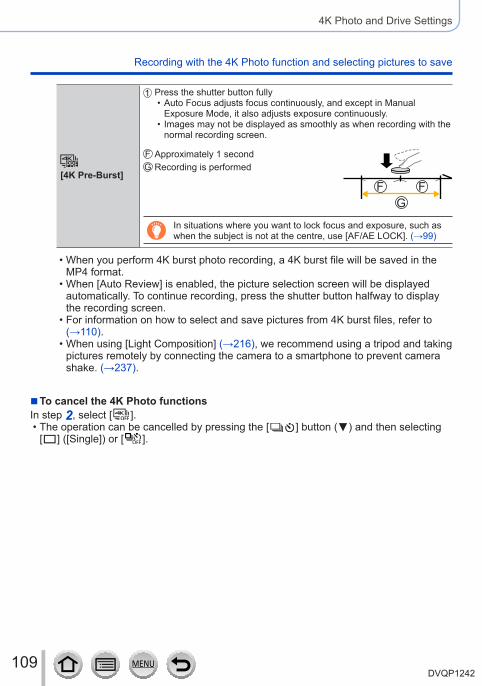
109DVQP1242
4K Photo and Drive Settings
Recording with the 4K Photo function and selecting pictures to save
[4K Pre-Burst]
Press the shutter button fully • Auto Focus adjusts focus continuously, and except in Manual Exposure Mode, it also adjusts exposure continuously.
• Images may not be displayed as smoothly as when recording with the normal recording screen.
Approximately 1 secondRecording is performed
In situations where you want to lock focus and exposure, such as when the subject is not at the centre, use [AF/AE LOCK]. (→99)
• When you perform 4K burst photo recording, a 4K burst file will be saved in the MP4 format.
• When [Auto Review] is enabled, the picture selection screen will be displayed automatically. To continue recording, press the shutter button halfway to display the recording screen.
• For information on how to select and save pictures from 4K burst files, refer to (→110).
• When using [Light Composition] (→216), we recommend using a tripod and taking pictures remotely by connecting the camera to a smartphone to prevent camera shake. (→237).
■To cancel the 4K Photo functionsIn step 2, select [ ].
• The operation can be cancelled by pressing the [ ] button ( ) and then selecting [ ] ([Single]) or [ ].
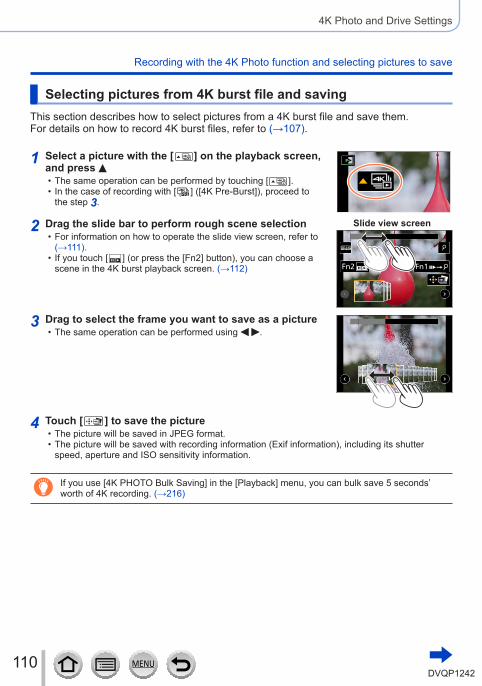
110DVQP1242
4K Photo and Drive Settings
Recording with the 4K Photo function and selecting pictures to save
Selecting pictures from 4K burst file and savingThis section describes how to select pictures from a 4K burst file and save them.For details on how to record 4K burst files, refer to (→107).
1 Select a picture with the [ ] on the playback screen, and press
• The same operation can be performed by touching [ ]. • In the case of recording with [ ] ([4K Pre-Burst]), proceed to the step 3.
2 Drag the slide bar to perform rough scene selection • For information on how to operate the slide view screen, refer to (→111).
• If you touch [ ] (or press the [Fn2] button), you can choose a scene in the 4K burst playback screen. (→112)
Slide view screen
3 Drag to select the frame you want to save as a picture • The same operation can be performed using .
4 Touch [ ] to save the picture • The picture will be saved in JPEG format. • The picture will be saved with recording information (Exif information), including its shutter speed, aperture and ISO sensitivity information.
If you use [4K PHOTO Bulk Saving] in the [Playback] menu, you can bulk save 5 seconds’ worth of 4K recording. (→216)
111DVQP1242
4K Photo and Drive Settings
Recording with the 4K Photo function and selecting pictures to save
<Slide view screen>Position of the displayed frame
Operation Touch operation Description
Drag
Selects the frame you want to save as a picture • You can select a frame from 60 frames (continuous burst time of approximately 2 seconds).
Select with
→ [MENU/SET]
Display the previous or next 45 frames • Pressing the same button again will display the frames following the next ones or the ones preceding the previous ones.
— Touch / DragSelects the frames to be displayed
• Frames preceding and following the selected frame will be displayed.
Pinch out / Pinch in Enlarges/reduces the display
Drag Moves the enlarged area (during enlarged display)
[Fn1] Switches to marker operation
[Fn2] Displays the 4K burst playback screen
— / Adds/deletes a marker
—In-focus portions are highlighted with colour. ([Peaking])
• Switches in order of [ ] → [ ] ([LOW]) → [ ] ([HIGH]).
[MENU/SET] Saves the picture
• During marker operation, you can skip to the markers that you added or the beginning or end of the 4K burst file. Press [Fn1] button again to return to the original operation.
Operation Touch operation Description
Moves to the next marker.
Moves to the previous marker.
112DVQP1242
4K Photo and Drive Settings
Recording with the 4K Photo function and selecting pictures to save
<4K burst playback screen>
During pause During continuous playback
Operation Touch operation Description / Continuous playback / Pause (during continuous playback)
/ Continuous rewind / Pause (during continuous rewind)
/ Fast forward playback / Single-frame forward (while paused)
/ Fast rewind playback / Single-frame rewind (while paused)
— Touch / Drag Selects the frames to be displayed (while paused)
Pinch out / Pinch in Enlarges/reduces the display (while paused)
Drag Moves the enlarged area (during enlarged display)
[Fn1] Switches to marker operation (→111)
[Fn2] Displays the slide view screen (while paused)
— / Adds/deletes a marker
—In-focus portions are highlighted with colour. ([Peaking])
• Switches in order of [ ] → [ ] ([LOW]) → [ ] ([HIGH]).
[MENU/SET] Saves the picture (while paused)
• If you touch the screen twice, the screen will be enlarged. To return to the original display, touch the enlarged screen twice.
113DVQP1242
4K Photo and Drive Settings
Recording with the 4K Photo function and selecting pictures to save
■Selecting and saving pictures on the TV screen • Set [HDMI Mode (Play)] to [AUTO] or [4K]. When connecting to a TV that does not support 4K motion picture, select [AUTO].
• Set [VIERA Link] of [TV Connection] in the [Setup] menu to [OFF]. • If you connect the camera to a TV and display 4K burst files on the TV, they will be displayed only on the 4K burst playback screen.
• Even if you insert the SD card to a 4K-compatible TV with an SD card slot, you cannot play back 4K burst files recorded with [Aspect Ratio] set to an option other than [16:9]. (As of February 2017)
• Depending on the TV to be connected, 4K burst files may not be played back correctly.
114DVQP1242
4K Photo and Drive Settings
Recording with the 4K Photo function and selecting pictures to save
Notes on the 4K Photo function
■To change the aspect ratioSelecting [Aspect Ratio] in the [Rec] menu allows you to change the aspect ratio for 4K photos.
■To record the subject with reduced blurYou can reduce the blur of the subject by setting a faster shutter speed.
Set mode dial to [ ]Set the shutter speed by rotating the rear dial
• Approximate shutter speed for outdoor recording in fine weather conditions: 1/1000 seconds or faster.
• If you increase the shutter speed, the ISO sensitivity becomes higher, which may increase the noise on the screen.
■Shutter sound for 4K photo recordingWhen using [ ] ([4K Burst]) or [ ] ([4K Pre-Burst]), recording is performed with the electronic shutter. You can change the electronic shutter sound settings in [Shutter Vol.] and [Shutter Tone]. (→203)When recording with [ ] ([4K Burst(S/S)]), you can set the start/stop tone volume in [Beep Volume].
• You can perform high speed burst recording quietly using the 4K Photo function in combination with [Silent Mode]. (→191)
■Scenes not suitable for the 4K Photo functionRecording indoorsWhen recording under fluorescent lighting or LED lighting fixtures, etc., the colours and brightness may change or horizontal striping may appear on the screen. The striping may be reduced by setting a slower shutter speed.Fast-moving subjectsSubjects moving fast may appear distorted when recorded.
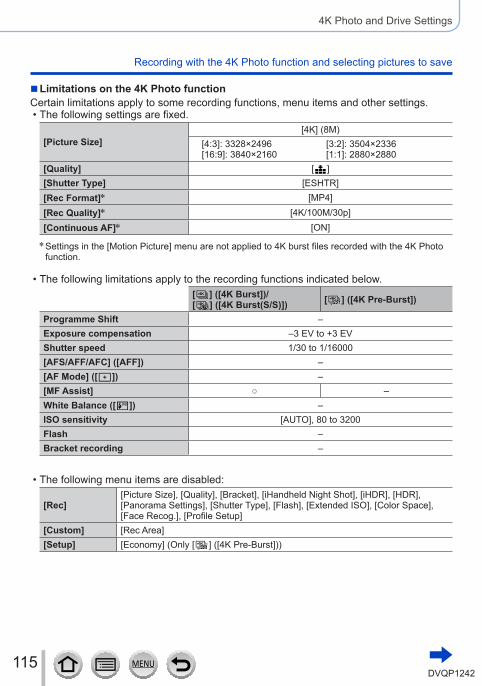
115DVQP1242
4K Photo and Drive Settings
Recording with the 4K Photo function and selecting pictures to save
■Limitations on the 4K Photo functionCertain limitations apply to some recording functions, menu items and other settings.
• The following settings are fixed.
[Picture Size][4K] (8M)
[4:3]: 3328×2496 [3:2]: 3504×2336[16:9]: 3840×2160 [1:1]: 2880×2880
[Quality] [ ][Shutter Type] [ESHTR][Rec Format]* [MP4][Rec Quality]* [4K/100M/30p][Continuous AF]* [ON]
* Settings in the [Motion Picture] menu are not applied to 4K burst files recorded with the 4K Photo function.
• The following limitations apply to the recording functions indicated below.[ ] ([4K Burst])/[ ] ([4K Burst(S/S)]) [ ] ([4K Pre-Burst])
Programme Shift –Exposure compensation –3 EV to +3 EVShutter speed 1/30 to 1/16000[AFS/AFF/AFC] ([AFF]) –[AF Mode] ([ ]) –[MF Assist] ○ –White Balance ([ ]) –ISO sensitivity [AUTO], 80 to 3200Flash –Bracket recording –
• The following menu items are disabled:
[Rec][Picture Size], [Quality], [Bracket], [iHandheld Night Shot], [iHDR], [HDR], [Panorama Settings], [Shutter Type], [Flash], [Extended ISO], [Color Space], [Face Recog.], [Profile Setup]
[Custom] [Rec Area][Setup] [Economy] (Only [ ] ([4K Pre-Burst]))
116DVQP1242
4K Photo and Drive Settings
Recording with the 4K Photo function and selecting pictures to save
Battery drainage and camera temperature
● If the surrounding temperature is high or 4K photos are recorded continuously, [ ] may be displayed and recording may be stopped halfway through. Wait until the camera cools down. ●When [ ] ([4K Pre-Burst]) is set, the battery drains faster and the camera temperature rises. (to protect itself, the camera may switch to [ ] ([4K Burst]))Select [ ] ([4K Pre-Burst]) only when recording.
●Recording stops when the continuous recording time exceeds 15 minutes. When using an SDHC memory card, files are split into smaller picture files for recording and playback if the file size exceeds 4 GB. (You can continue to record pictures without interruption.) If using an SDXC Memory Card, you can record pictures in a single file even if the size is greater than 4 GB. ●When recording, the angle of view becomes narrower. ●The following changes occur when recording 4K photos:
• The [i.Resolution] setting changes from [EXTENDED] to [LOW]. • [Destination] in [Travel Date] cannot be recorded. • [Simultaneous record w/o filter] is not available.
●When recording using the [ ] ([4K Pre-Burst]) function, [Step Zoom] does not operate. ●Scene Detection in Intelligent Auto Mode works the same way as when recording motion pictures. ●The 4K Photo function is disabled when using the following settings:
• [Clear in Backlight], [Glistening Water], [Artistic Nightscape], [Glittering Illuminations], [Handheld Night Shot], [Clear Night Portrait], [Soft Image of a Flower] (Scene Guide Mode)
• [Rough Monochrome], [Silky Monochrome], [Miniature Effect], [Soft Focus], [Star Filter], [Sunshine] (Creative Control Mode)
• During motion picture recording • When [Multi Exp.] is set • When using [Time Lapse Shot] • When using [Stop Motion Animation]
●To select and save pictures from 4K burst files on a PC, use the software “PHOTOfunSTUDIO”. (→273) Please note that it is not possible to edit a 4K burst file as a motion picture.
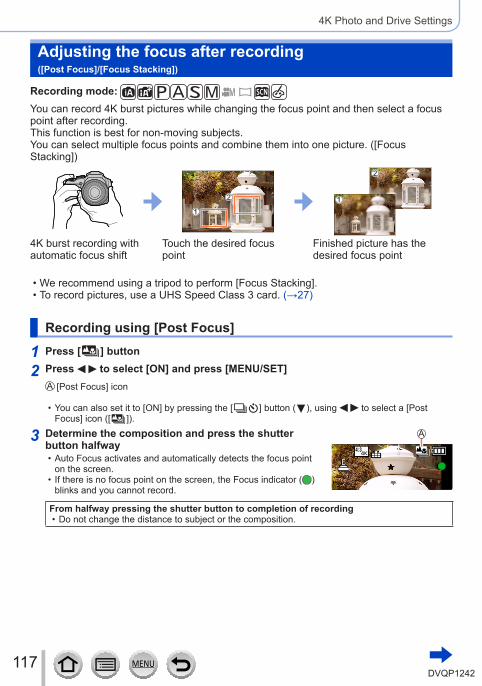
117DVQP1242
4K Photo and Drive Settings
Adjusting the focus after recording ([Post Focus]/[Focus Stacking])
Recording mode: You can record 4K burst pictures while changing the focus point and then select a focus point after recording.This function is best for non-moving subjects.You can select multiple focus points and combine them into one picture. ([Focus Stacking])
4K burst recording with automatic focus shift
Touch the desired focus point
Finished picture has the desired focus point
• We recommend using a tripod to perform [Focus Stacking]. • To record pictures, use a UHS Speed Class 3 card. (→27)
Recording using [Post Focus]
1 Press [ ] button
2 Press to select [ON] and press [MENU/SET][Post Focus] icon
• You can also set it to [ON] by pressing the [ ] button ( ), using to select a [Post Focus] icon ([ ]).
3 Determine the composition and press the shutter button halfway
• Auto Focus activates and automatically detects the focus point on the screen.
• If there is no focus point on the screen, the Focus indicator ( ) blinks and you cannot record.
From halfway pressing the shutter button to completion of recording • Do not change the distance to subject or the composition.
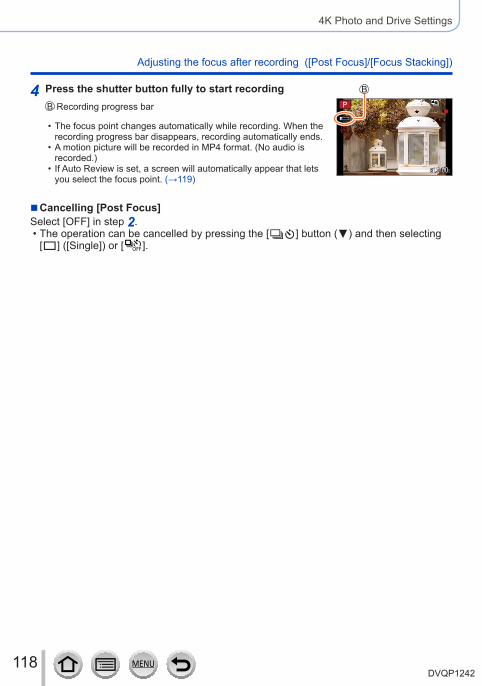
118DVQP1242
4K Photo and Drive Settings
Adjusting the focus after recording ([Post Focus]/[Focus Stacking])
4 Press the shutter button fully to start recordingRecording progress bar
• The focus point changes automatically while recording. When the recording progress bar disappears, recording automatically ends.
• A motion picture will be recorded in MP4 format. (No audio is recorded.)
• If Auto Review is set, a screen will automatically appear that lets you select the focus point. (→119)
■Cancelling [Post Focus]Select [OFF] in step 2.
• The operation can be cancelled by pressing the [ ] button ( ) and then selecting [ ] ([Single]) or [ ].
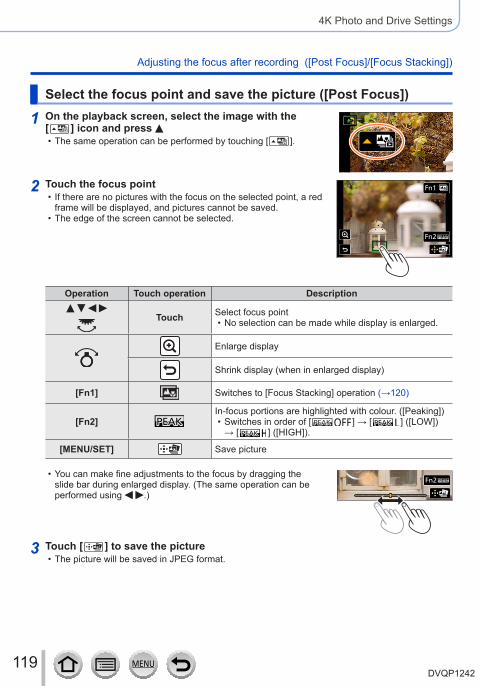
119DVQP1242
4K Photo and Drive Settings
Adjusting the focus after recording ([Post Focus]/[Focus Stacking])
Select the focus point and save the picture ([Post Focus])
1 On the playback screen, select the image with the [ ] icon and press
• The same operation can be performed by touching [ ].
2 Touch the focus point • If there are no pictures with the focus on the selected point, a red frame will be displayed, and pictures cannot be saved.
• The edge of the screen cannot be selected.
Operation Touch operation Description
Touch Select focus point
• No selection can be made while display is enlarged.
Enlarge display
Shrink display (when in enlarged display)
[Fn1] Switches to [Focus Stacking] operation (→120)
[Fn2]In-focus portions are highlighted with colour. ([Peaking])
• Switches in order of [ ] → [ ] ([LOW]) → [ ] ([HIGH]).
[MENU/SET] Save picture
• You can make fine adjustments to the focus by dragging the slide bar during enlarged display. (The same operation can be performed using .)
3 Touch [ ] to save the picture • The picture will be saved in JPEG format.
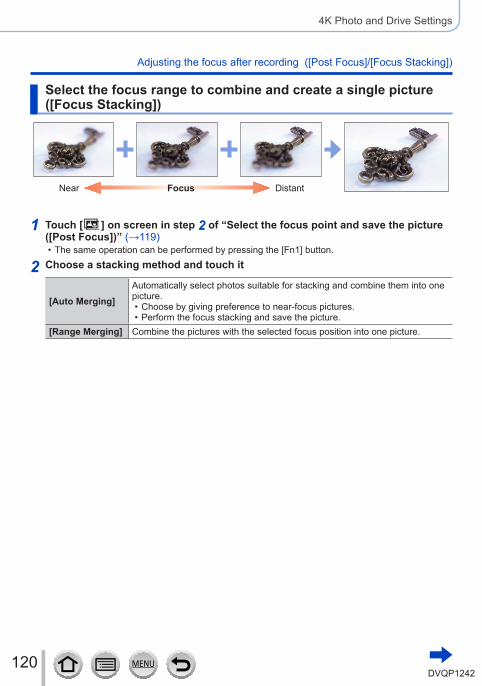
120DVQP1242
4K Photo and Drive Settings
Adjusting the focus after recording ([Post Focus]/[Focus Stacking])
Select the focus range to combine and create a single picture ([Focus Stacking])
Near Focus Distant
1 Touch [ ] on screen in step 2 of “Select the focus point and save the picture ([Post Focus])” (→119)
• The same operation can be performed by pressing the [Fn1] button.
2 Choose a stacking method and touch it
[Auto Merging]Automatically select photos suitable for stacking and combine them into one picture.
• Choose by giving preference to near-focus pictures. • Perform the focus stacking and save the picture.
[Range Merging] Combine the pictures with the selected focus position into one picture.
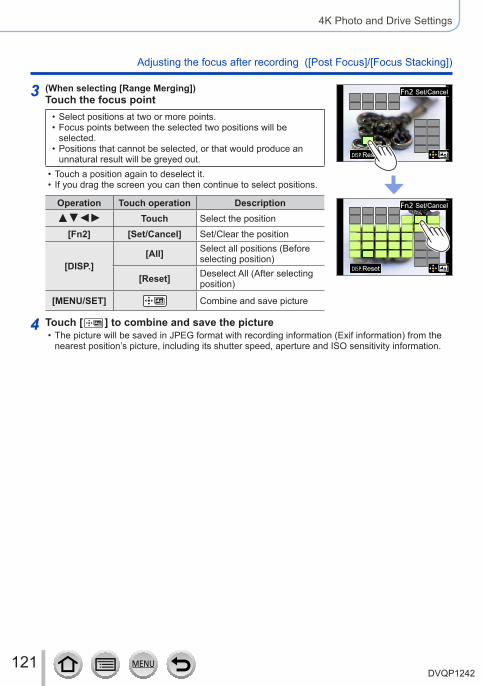
121DVQP1242
4K Photo and Drive Settings
Adjusting the focus after recording ([Post Focus]/[Focus Stacking])
3 (When selecting [Range Merging])Touch the focus point
• Select positions at two or more points. • Focus points between the selected two positions will be selected.
• Positions that cannot be selected, or that would produce an unnatural result will be greyed out.
• Touch a position again to deselect it. • If you drag the screen you can then continue to select positions.
Operation Touch operation Description
Touch Select the position[Fn2] [Set/Cancel] Set/Clear the position
[DISP.][All] Select all positions (Before
selecting position)
[Reset] Deselect All (After selecting position)
[MENU/SET] Combine and save picture
ResetReset
Set/CancelSet/Cancel
ResetReset
Set/CancelSet/Cancel
4 Touch [ ] to combine and save the picture • The picture will be saved in JPEG format with recording information (Exif information) from the nearest position’s picture, including its shutter speed, aperture and ISO sensitivity information.
122DVQP1242
4K Photo and Drive Settings
Adjusting the focus after recording ([Post Focus]/[Focus Stacking])
Notes on the [Post Focus]/[Focus Stacking]
■Limitations in [Post Focus] recording • Since recording is performed in the same picture quality as 4K photos, certain limitations apply to recording functions and menu settings. For details, refer to “Limitations on the 4K Photo function” (→115).
• In addition to the limitations of the 4K Photo function, the following limitations apply to [Post Focus] recording: – Auto Focus Mode is not available. – Manual Focus cannot be used. – The following menu items are disabled:[Rec] menu ([AFS/AFF/AFC]/[Digital Zoom])[Custom] menu ([Shutter AF]/[Remaining Disp.]/[Video Button])
– Motion pictures cannot be recorded.
About camera temperature
If the surrounding temperature is high or [Post Focus] recording is performed continuously, [ ] may be displayed and recording may be stopped halfway through. Wait until the camera cools down.
●During recording, the angle of view will be narrower. ●The [Post Focus] function is disabled when using the following settings:
• [Clear in Backlight], [Glistening Water], [Artistic Nightscape], [Glittering Illuminations], [Handheld Night Shot], [Clear Night Portrait], [Soft Image of a Flower] (Scene Guide Mode)
• [Rough Monochrome], [Silky Monochrome], [Miniature Effect], [Soft Focus], [Star Filter], [Sunshine] (Creative Control Mode)
• When [Multi Exp.] is set • When using [Time Lapse Shot] • When using [Stop Motion Animation]
●When selecting the focus and saving pictures, you cannot select and save the picture from a TV screen even if the camera is connected to a TV through an HDMI micro cable. ● In the following cases, [Focus Stacking] may produce an unnatural picture:
• If the subject is in motion • If there are large differences in distance to the subject • If there is significant blurring (recording with a larger aperture might make the picture less unnatural)
• If a conversion lens (optional) is used for recording ●During focus stacking, auto compensation is applied to deviations among pictures due to camera shake. In such cases, the angle of view will be slightly narrower at the time of focus stacking. ●Only pictures taken using [Post Focus] are eligible for [Focus Stacking].
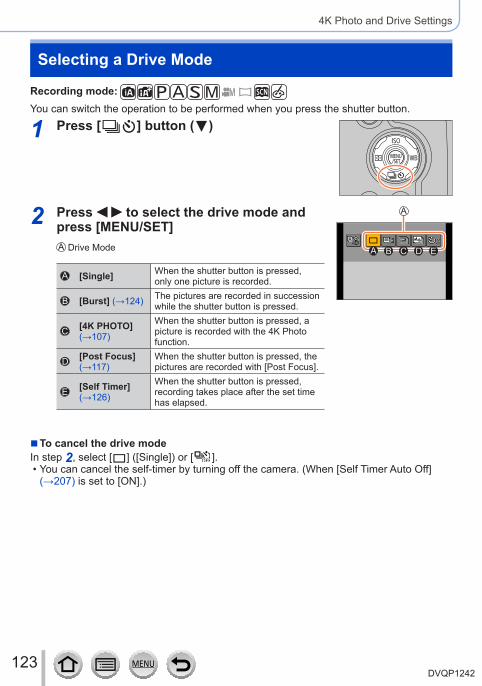
123DVQP1242
4K Photo and Drive Settings
Selecting a Drive Mode
Recording mode: You can switch the operation to be performed when you press the shutter button.
1 Press [ ] button ( )
2 Press to select the drive mode and press [MENU/SET]
Drive Mode
[Single] When the shutter button is pressed, only one picture is recorded.
[Burst] (→124) The pictures are recorded in succession while the shutter button is pressed.
[4K PHOTO] (→107)
When the shutter button is pressed, a picture is recorded with the 4K Photo function.
[Post Focus] (→117)
When the shutter button is pressed, the pictures are recorded with [Post Focus].
[Self Timer] (→126)
When the shutter button is pressed, recording takes place after the set time has elapsed.
■To cancel the drive modeIn step 2, select [ ] ([Single]) or [ ].
• You can cancel the self-timer by turning off the camera. (When [Self Timer Auto Off] (→207) is set to [ON].)
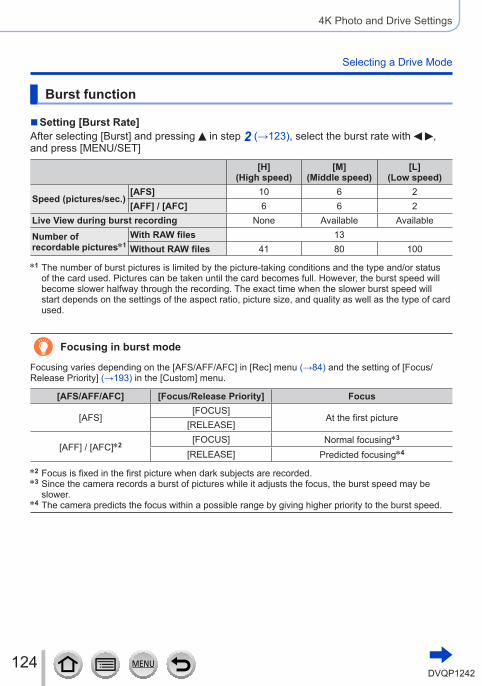
124DVQP1242
4K Photo and Drive Settings
Selecting a Drive Mode
Burst function
■Setting [Burst Rate]After selecting [Burst] and pressing in step 2 (→123), select the burst rate with , and press [MENU/SET]
[H](High speed)
[M](Middle speed)
[L](Low speed)
Speed (pictures/sec.)[AFS] 10 6 2[AFF] / [AFC] 6 6 2
Live View during burst recording None Available Available
Number of recordable pictures*1
With RAW files 13Without RAW files 41 80 100
*1 The number of burst pictures is limited by the picture-taking conditions and the type and/or status of the card used. Pictures can be taken until the card becomes full. However, the burst speed will become slower halfway through the recording. The exact time when the slower burst speed will start depends on the settings of the aspect ratio, picture size, and quality as well as the type of card used.
Focusing in burst mode
Focusing varies depending on the [AFS/AFF/AFC] in [Rec] menu (→84) and the setting of [Focus/Release Priority] (→193) in the [Custom] menu.
[AFS/AFF/AFC] [Focus/Release Priority] Focus
[AFS][FOCUS]
At the first picture[RELEASE]
[AFF] / [AFC]*2 [FOCUS] Normal focusing*3
[RELEASE] Predicted focusing*4
*2 Focus is fixed in the first picture when dark subjects are recorded.*3 Since the camera records a burst of pictures while it adjusts the focus, the burst speed may be
slower.*4 The camera predicts the focus within a possible range by giving higher priority to the burst speed.
125DVQP1242
4K Photo and Drive Settings
Selecting a Drive Mode
●The burst speed may become slower depending on the following settings:[Sensitivity], [Picture Size], [Quality], [AFS/AFF/AFC], [Focus/Release Priority] ●When the burst speed is set to [H] and if many burst pictures are taken, the burst speed may be reduced while burst pictures are being taken. ●When the burst speed is set to [H] ([AFS/AFF/AFC] in [Rec] menu is set to [AFS] or the focus mode is set to [MF]), and the exposure and White Balance are fixed to those of the first picture. When the burst speed is set to [H] ([AFS/AFF/AFC] in [Rec] menu is set to [AFF] or [AFC]), [M], or [L], and the exposure and White Balance are adjusted individually for each still picture. ● It may take a while to store still pictures that were taken using the burst function. If you continue to record while storing, the number of burst pictures that can be taken will be reduced. A high-speed card is recommended when recording using the burst function. ●This function is not available in the following cases:
• [Glistening Water], [Glittering Illuminations], [Handheld Night Shot], [Soft Image of a Flower] (Scene Guide Mode)
• [Rough Monochrome], [Silky Monochrome], [Miniature Effect], [Soft Focus], [Star Filter], [Sunshine] (Creative Control Mode)
• When recording using the flash • During motion picture recording • When [Multi Exp.] is set • When using [Time Lapse Shot] • When [Auto Shooting] of [Stop Motion Animation] is set to [ON]
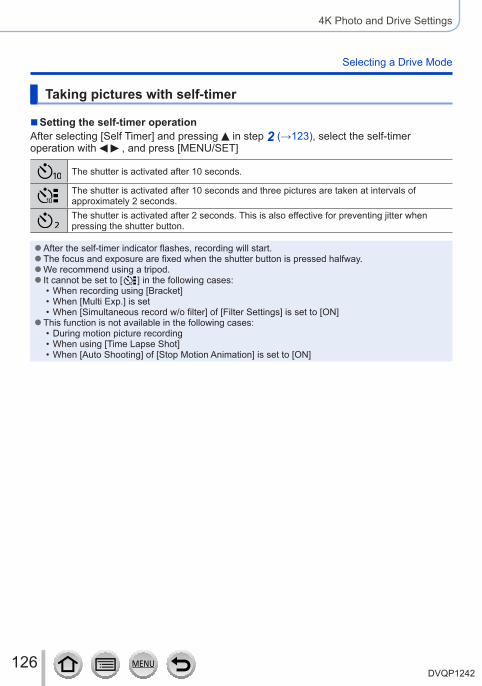
126DVQP1242
4K Photo and Drive Settings
Selecting a Drive Mode
Taking pictures with self-timer
■Setting the self-timer operationAfter selecting [Self Timer] and pressing in step 2 (→123), select the self-timer operation with , and press [MENU/SET]
The shutter is activated after 10 seconds.
The shutter is activated after 10 seconds and three pictures are taken at intervals of approximately 2 seconds.The shutter is activated after 2 seconds. This is also effective for preventing jitter when pressing the shutter button.
●After the self-timer indicator flashes, recording will start. ●The focus and exposure are fixed when the shutter button is pressed halfway. ●We recommend using a tripod. ● It cannot be set to [ ] in the following cases:
• When recording using [Bracket] • When [Multi Exp.] is set • When [Simultaneous record w/o filter] of [Filter Settings] is set to [ON]
●This function is not available in the following cases: • During motion picture recording • When using [Time Lapse Shot] • When [Auto Shooting] of [Stop Motion Animation] is set to [ON]
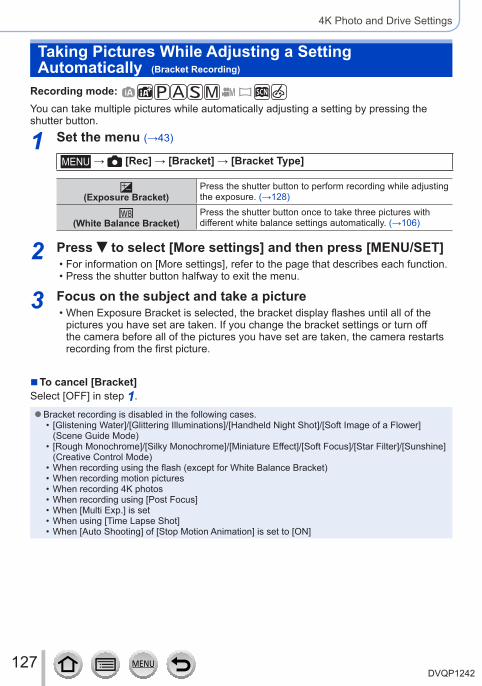
127DVQP1242
4K Photo and Drive Settings
Taking Pictures While Adjusting a Setting Automatically (Bracket Recording)
Recording mode: You can take multiple pictures while automatically adjusting a setting by pressing the shutter button.
1 Set the menu (→43)
→ [Rec] → [Bracket] → [Bracket Type]
(Exposure Bracket)Press the shutter button to perform recording while adjusting the exposure. (→128)
(White Balance Bracket)Press the shutter button once to take three pictures with different white balance settings automatically. (→106)
2 Press to select [More settings] and then press [MENU/SET] • For information on [More settings], refer to the page that describes each function. • Press the shutter button halfway to exit the menu.
3 Focus on the subject and take a picture • When Exposure Bracket is selected, the bracket display flashes until all of the pictures you have set are taken. If you change the bracket settings or turn off the camera before all of the pictures you have set are taken, the camera restarts recording from the first picture.
■To cancel [Bracket]Select [OFF] in step 1.
●Bracket recording is disabled in the following cases. • [Glistening Water]/[Glittering Illuminations]/[Handheld Night Shot]/[Soft Image of a Flower] (Scene Guide Mode)
• [Rough Monochrome]/[Silky Monochrome]/[Miniature Effect]/[Soft Focus]/[Star Filter]/[Sunshine] (Creative Control Mode)
• When recording using the flash (except for White Balance Bracket) • When recording motion pictures • When recording 4K photos • When recording using [Post Focus] • When [Multi Exp.] is set • When using [Time Lapse Shot] • When [Auto Shooting] of [Stop Motion Animation] is set to [ON]
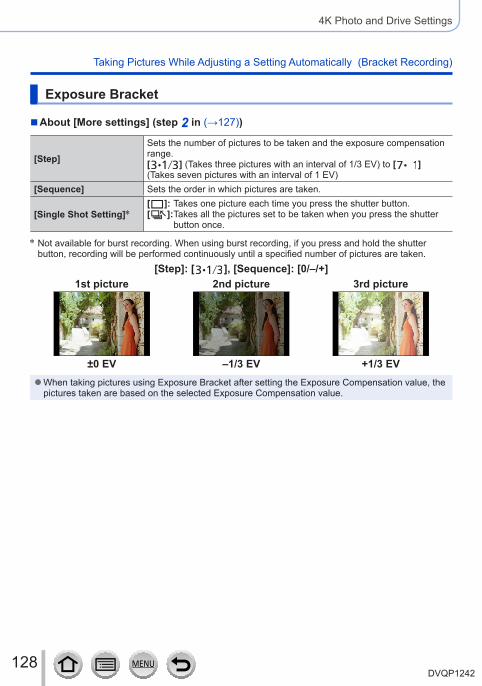
128DVQP1242
4K Photo and Drive Settings
Taking Pictures While Adjusting a Setting Automatically (Bracket Recording)
Exposure Bracket
■About [More settings] (step 2 in (→127))
[Step]Sets the number of pictures to be taken and the exposure compensation range.[ ] (Takes three pictures with an interval of 1/3 EV) to [ ] (Takes seven pictures with an interval of 1 EV)
[Sequence] Sets the order in which pictures are taken.
[Single Shot Setting]*[ ]: Takes one picture each time you press the shutter button.[ ]: Takes all the pictures set to be taken when you press the shutter
button once.
* Not available for burst recording. When using burst recording, if you press and hold the shutter button, recording will be performed continuously until a specified number of pictures are taken.
[Step]: [ ], [Sequence]: [0/–/+]1st picture 2nd picture 3rd picture
±0 EV –1/3 EV +1/3 EV ●When taking pictures using Exposure Bracket after setting the Exposure Compensation value, the pictures taken are based on the selected Exposure Compensation value.
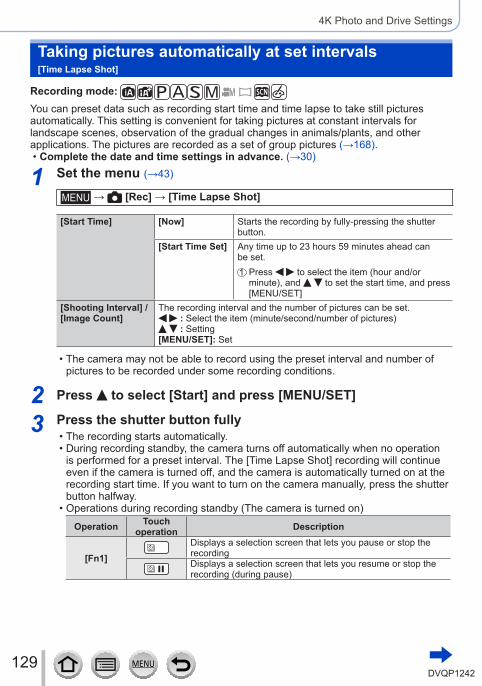
129DVQP1242
4K Photo and Drive Settings
Taking pictures automatically at set intervals [Time Lapse Shot]
Recording mode: You can preset data such as recording start time and time lapse to take still pictures automatically. This setting is convenient for taking pictures at constant intervals for landscape scenes, observation of the gradual changes in animals/plants, and other applications. The pictures are recorded as a set of group pictures (→168).
• Complete the date and time settings in advance. (→30)
1 Set the menu (→43)
→ [Rec] → [Time Lapse Shot]
[Start Time] [Now] Starts the recording by fully-pressing the shutter button.
[Start Time Set] Any time up to 23 hours 59 minutes ahead can be set.
Press to select the item (hour and/or minute), and to set the start time, and press [MENU/SET]
[Shooting Interval] / [Image Count]
The recording interval and the number of pictures can be set. : Select the item (minute/second/number of pictures) : Setting
[MENU/SET]: Set
• The camera may not be able to record using the preset interval and number of pictures to be recorded under some recording conditions.
2 Press to select [Start] and press [MENU/SET]
3 Press the shutter button fully • The recording starts automatically. • During recording standby, the camera turns off automatically when no operation is performed for a preset interval. The [Time Lapse Shot] recording will continue even if the camera is turned off, and the camera is automatically turned on at the recording start time. If you want to turn on the camera manually, press the shutter button halfway.
• Operations during recording standby (The camera is turned on)Operation Touch
operation Description
[Fn1]Displays a selection screen that lets you pause or stop the recordingDisplays a selection screen that lets you resume or stop the recording (during pause)
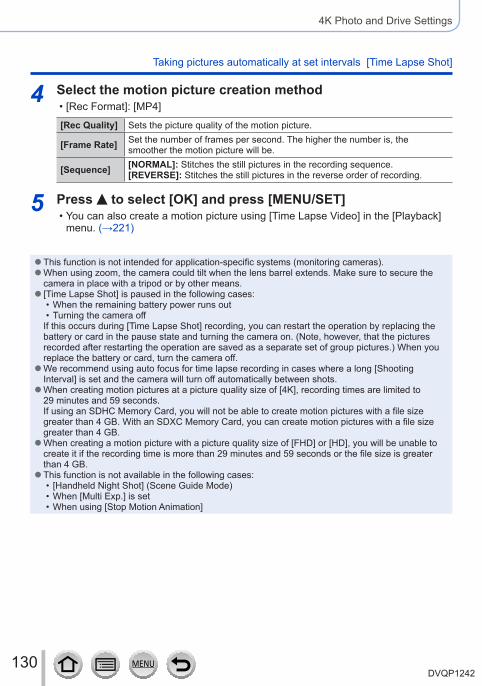
130DVQP1242
4K Photo and Drive Settings
Taking pictures automatically at set intervals [Time Lapse Shot]
4 Select the motion picture creation method • [Rec Format]: [MP4]
[Rec Quality] Sets the picture quality of the motion picture.
[Frame Rate] Set the number of frames per second. The higher the number is, the smoother the motion picture will be.
[Sequence] [NORMAL]: Stitches the still pictures in the recording sequence.[REVERSE]: Stitches the still pictures in the reverse order of recording.
5 Press to select [OK] and press [MENU/SET] • You can also create a motion picture using [Time Lapse Video] in the [Playback] menu. (→221)
●This function is not intended for application-specific systems (monitoring cameras). ●When using zoom, the camera could tilt when the lens barrel extends. Make sure to secure the camera in place with a tripod or by other means. ● [Time Lapse Shot] is paused in the following cases:
• When the remaining battery power runs out • Turning the camera off
If this occurs during [Time Lapse Shot] recording, you can restart the operation by replacing the battery or card in the pause state and turning the camera on. (Note, however, that the pictures recorded after restarting the operation are saved as a separate set of group pictures.) When you replace the battery or card, turn the camera off. ●We recommend using auto focus for time lapse recording in cases where a long [Shooting Interval] is set and the camera will turn off automatically between shots. ●When creating motion pictures at a picture quality size of [4K], recording times are limited to 29 minutes and 59 seconds.If using an SDHC Memory Card, you will not be able to create motion pictures with a file size greater than 4 GB. With an SDXC Memory Card, you can create motion pictures with a file size greater than 4 GB. ●When creating a motion picture with a picture quality size of [FHD] or [HD], you will be unable to create it if the recording time is more than 29 minutes and 59 seconds or the file size is greater than 4 GB. ●This function is not available in the following cases:
• [Handheld Night Shot] (Scene Guide Mode) • When [Multi Exp.] is set • When using [Stop Motion Animation]
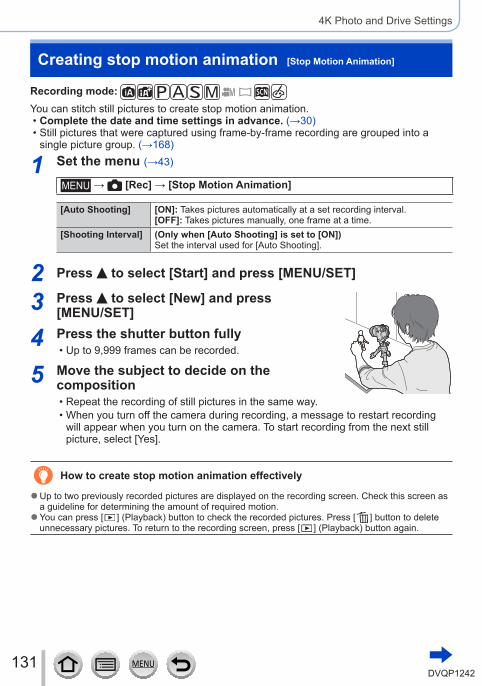
131DVQP1242
4K Photo and Drive Settings
Creating stop motion animation [Stop Motion Animation]
Recording mode: You can stitch still pictures to create stop motion animation.
• Complete the date and time settings in advance. (→30) • Still pictures that were captured using frame-by-frame recording are grouped into a single picture group. (→168)
1 Set the menu (→43)
→ [Rec] → [Stop Motion Animation]
[Auto Shooting] [ON]: Takes pictures automatically at a set recording interval.[OFF]: Takes pictures manually, one frame at a time.
[Shooting Interval] (Only when [Auto Shooting] is set to [ON])Set the interval used for [Auto Shooting].
2 Press to select [Start] and press [MENU/SET]
3 Press to select [New] and press [MENU/SET]
4 Press the shutter button fully • Up to 9,999 frames can be recorded.
5 Move the subject to decide on the composition
• Repeat the recording of still pictures in the same way. • When you turn off the camera during recording, a message to restart recording will appear when you turn on the camera. To start recording from the next still picture, select [Yes].
How to create stop motion animation effectively
●Up to two previously recorded pictures are displayed on the recording screen. Check this screen as a guideline for determining the amount of required motion. ●You can press [ ] (Playback) button to check the recorded pictures. Press [ ] button to delete unnecessary pictures. To return to the recording screen, press [ ] (Playback) button again.
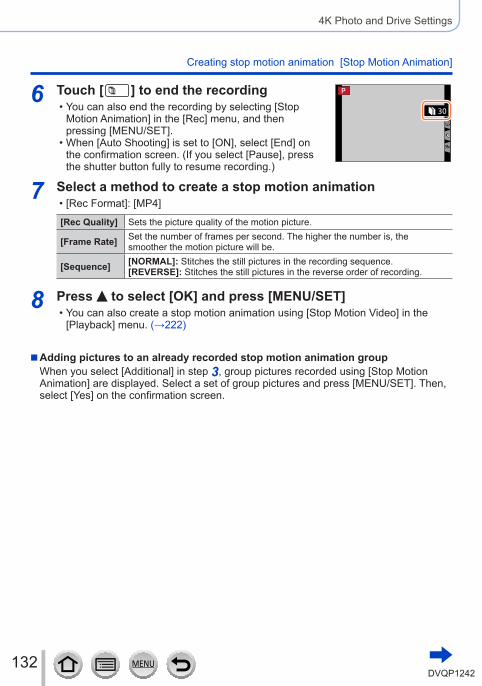
132DVQP1242
4K Photo and Drive Settings
Creating stop motion animation [Stop Motion Animation]
6 Touch [ ] to end the recording • You can also end the recording by selecting [Stop Motion Animation] in the [Rec] menu, and then pressing [MENU/SET].
• When [Auto Shooting] is set to [ON], select [End] on the confirmation screen. (If you select [Pause], press the shutter button fully to resume recording.)
7 Select a method to create a stop motion animation • [Rec Format]: [MP4]
[Rec Quality] Sets the picture quality of the motion picture.
[Frame Rate] Set the number of frames per second. The higher the number is, the smoother the motion picture will be.
[Sequence] [NORMAL]: Stitches the still pictures in the recording sequence.[REVERSE]: Stitches the still pictures in the reverse order of recording.
8 Press to select [OK] and press [MENU/SET] • You can also create a stop motion animation using [Stop Motion Video] in the [Playback] menu. (→222)
■Adding pictures to an already recorded stop motion animation groupWhen you select [Additional] in step 3, group pictures recorded using [Stop Motion Animation] are displayed. Select a set of group pictures and press [MENU/SET]. Then, select [Yes] on the confirmation screen.
133DVQP1242
4K Photo and Drive Settings
Creating stop motion animation [Stop Motion Animation]
● [Auto Shooting] may not be performed according to the preset interval because recording could take time under some recording conditions, such as when pictures are taken using a flash. ●When creating motion pictures at a picture quality size of [4K], recording times are limited to 29 minutes and 59 seconds.If using an SDHC Memory Card, you will not be able to create motion pictures with a file size greater than 4 GB. With an SDXC Memory Card, you can create motion pictures with a file size greater than 4 GB. ●When creating a motion picture with a picture quality size of [FHD] or [HD], you will be unable to create it if the recording time is more than 29 minutes and 59 seconds or the file size is greater than 4 GB. ●You cannot select only one recorded still picture using [Additional]. ●This function is not available in the following cases:
• When [Multi Exp.] is set • When using [Time Lapse Shot]
● [Auto Shooting] in [Stop Motion Animation] cannot be used in the following case: • [Handheld Night Shot] (Scene Guide Mode)
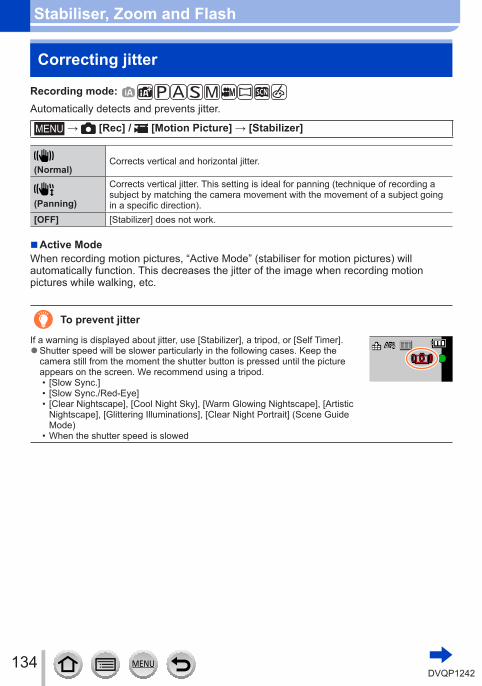
134DVQP1242
Stabiliser, Zoom and Flash
Correcting jitter
Recording mode: Automatically detects and prevents jitter.
→ [Rec] / [Motion Picture] → [Stabilizer]
(Normal)Corrects vertical and horizontal jitter.
(Panning)
Corrects vertical jitter. This setting is ideal for panning (technique of recording a subject by matching the camera movement with the movement of a subject going in a specific direction).
[OFF] [Stabilizer] does not work.
■Active ModeWhen recording motion pictures, “Active Mode” (stabiliser for motion pictures) will automatically function. This decreases the jitter of the image when recording motion pictures while walking, etc.
To prevent jitter
If a warning is displayed about jitter, use [Stabilizer], a tripod, or [Self Timer]. ●Shutter speed will be slower particularly in the following cases. Keep the camera still from the moment the shutter button is pressed until the picture appears on the screen. We recommend using a tripod.
• [Slow Sync.] • [Slow Sync./Red-Eye] • [Clear Nightscape], [Cool Night Sky], [Warm Glowing Nightscape], [Artistic Nightscape], [Glittering Illuminations], [Clear Night Portrait] (Scene Guide Mode)
• When the shutter speed is slowed
50p
135DVQP1242
Stabiliser, Zoom and Flash
Correcting jitter
●When you use a tripod, we recommend setting [Stabilizer] to [OFF]. ● [Stabilizer] cannot be used by selecting [ ] (Normal) in Panorama Shot Mode. ● In the following cases, the [Stabilizer] will switch to [ ] (Normal), even if it is set to [ ] (Panning):
• During motion picture recording • When 4K Photo function has been set • When recording using [Post Focus]
● [Stabilizer] cannot be used when recording with [High Speed Video]. ● In “Active Mode”, stronger effect of the correction can be achieved at the wide end. ●Cases where the stabiliser function may be ineffective:
• When there is a lot of jitter • When the zoom magnification is high (also in the Digital Zoom range) • When taking pictures while following a moving subject • When the shutter speed becomes slower to take pictures indoors or in dark places
●The panning effect by selecting [ ] is not fully achieved in the following cases: • Bright summer days or other bright locations • When the shutter speed is higher than 1/100 seconds • When the motion of a subject is slow and the speed with which the camera is moved is too slow (a nice background blur is not achieved)
• When the camera is not adequately tracking the motion of a subject
136DVQP1242
Stabiliser, Zoom and Flash
Using Zoom
Zoom types and useThe zoom ratio changes when the picture size is changed.
Optical Zoom
Recording mode: You can zoom in without degrading the picture quality.Maximum magnification: 60x
●This function is not available in the following case: • When recording with [Macro Zoom]
Extra optical zoom
Recording mode: This function works when picture sizes with [ ] have been selected in [Picture Size] (→176). Extra optical zoom allows you to zoom in using a higher zoom ratio than Optical Zoom, without degrading the picture quality. The maximum zoom ratio varies depending on the picture size.Maximum magnification: 122x
●This function is not available in the following cases: • [Handheld Night Shot] (Scene Guide Mode) • [Toy Effect], [Toy Pop] (Creative Control Mode) • When recording 4K photos • When recording using [Post Focus] • When [HDR] is set to [ON] • When [Multi Exp.] is set • When [iHandheld Night Shot] is set to [ON] • When [iHDR] is set to [ON] • When [Quality] is set to [ ], [ ] or [ ] • When recording with [Macro Zoom] • During motion picture recording
137DVQP1242
Stabiliser, Zoom and Flash
Using Zoom
To increase the zoom ratio further, the following zoom can be used in combination.
[i.Zoom]
Recording mode: You can use the camera’s Intelligent Resolution technology to increase the zoom ratio up to 2x higher than the original zoom ratio with limited deterioration of picture quality.
→ [Rec] / [Motion Picture] → [i.Zoom]
Settings: [ON] / [OFF] ●When [Picture Size] is set to [S], the zoom ratio can be increased to up to 1.5x the original zoom ratio. ● [i.Zoom] works automatically in Intelligent Auto Mode or Intelligent Auto Plus Mode. ●This function is not available in the following cases:
• [Handheld Night Shot] (Scene Guide Mode) • [Impressive Art], [Toy Effect], [Toy Pop] (Creative Control Mode) • During [Macro Zoom] recording • When [HDR] is set to [ON] • When [Multi Exp.] is set • When [iHandheld Night Shot] is set to [ON] • When [iHDR] is set to [ON] • When [Quality] is set to [ ], [ ] or [ ]
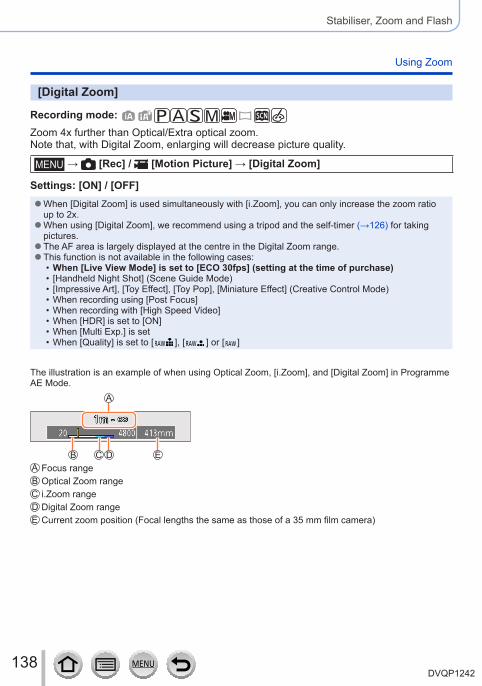
138DVQP1242
Stabiliser, Zoom and Flash
Using Zoom
[Digital Zoom]
Recording mode: Zoom 4x further than Optical/Extra optical zoom.Note that, with Digital Zoom, enlarging will decrease picture quality.
→ [Rec] / [Motion Picture] → [Digital Zoom]
Settings: [ON] / [OFF] ●When [Digital Zoom] is used simultaneously with [i.Zoom], you can only increase the zoom ratio up to 2x. ●When using [Digital Zoom], we recommend using a tripod and the self-timer (→126) for taking pictures. ●The AF area is largely displayed at the centre in the Digital Zoom range. ●This function is not available in the following cases:
• When [Live View Mode] is set to [ECO 30fps] (setting at the time of purchase) • [Handheld Night Shot] (Scene Guide Mode) • [Impressive Art], [Toy Effect], [Toy Pop], [Miniature Effect] (Creative Control Mode) • When recording using [Post Focus] • When recording with [High Speed Video] • When [HDR] is set to [ON] • When [Multi Exp.] is set • When [Quality] is set to [ ], [ ] or [ ]
The illustration is an example of when using Optical Zoom, [i.Zoom], and [Digital Zoom] in Programme AE Mode.
Focus rangeOptical Zoom rangei.Zoom rangeDigital Zoom rangeCurrent zoom position (Focal lengths the same as those of a 35 mm film camera)
139DVQP1242
Stabiliser, Zoom and Flash
Using Zoom
Using the zoom by performing touch operations (Touch zoom)
1 Touch [ ]
2 Touch [ ] • The slide bar is displayed.
3 Perform zoom operations by dragging the slide bar
• The zoom speed varies depending on the touched position.[ ] / [ ] Slow zooming
[ ] / [ ] Fast zooming
• Touch [ ] again to end touch zoom operations.
●This function is not available in the following cases: • When [High Speed Video] is set • When recording using [4K Live Cropping]
140DVQP1242
Stabiliser, Zoom and Flash
Taking pictures with flash
Recording mode:
■Open/Close the built-in flash To open the flash
Press [ ] (Flash open) button. • Be careful when opening the flash as the flash will jump out.
To close the flashPress the flash until it clicks.
• Be careful not to catch a finger or any other part of your body or any object when you close the flash.
• Forcibly closing the flash can damage the camera. • Be sure to close the built-in flash when not in use. • The flash setting is fixed to [ ] (Forced Flash Off) while the flash is closed.
●The flash is fixed to [ ] (Forced Flash Off) in the following cases: • During motion picture recording • When recording 4K photos • When recording using [Post Focus] • When using the electronic shutter • When [HDR] is set to [ON] • When [Silent Mode] is set to [ON] • When a picture effect in [Filter Effect] of [Filter Settings] is set • When [Conversion] is set to [ ] or [ ]
141DVQP1242
Stabiliser, Zoom and Flash
Taking pictures with flash
■The available flash rangeEdges of a picture may become slightly dark if using flash at short distances without using zoom (close to max. Wide). This may be remedied by using a little zoom.
Max. Wide Max. TeleApprox. 0.3 m - 14.1 m (0.98 feet - 46 feet) Approx. 1.5 m - 6.1 m (4.9 feet - 20 feet)
• These ranges are obtained, the ISO sensitivity is set to [AUTO], and [ISO Limit Set] is set to [OFF].
●Avoid doing the following, as the heat or light could cause deformation or discolouration. • Putting the flash close to objects • Covering the flash with your hand as it is firing • Closing the flash as it is firing
●Do not close the flash immediately after the preliminary flash is operated prior to taking pictures for Forced ON/Red-Eye Reduction and other flash settings. If you close the flash immediately, it will cause a malfunction. ●Flash charging may take time if battery is low or if using flash repeatedly. When the flash is being charged, the flash icon flashes red, and you cannot take a picture even when you fully press the shutter button. ●When connected to Wi-Fi, recording with the flash for a long period of time may cause the Wi-Fi connection to turn off after [ ] is displayed. Wait until the camera cools down. ●When an External Flash is attached, it will have priority over the built-in flash. For information about external flash, refer to (→283).
142DVQP1242
Stabiliser, Zoom and Flash
Setting the Flash Functions
Changing the firing mode (Manual flash)
Recording mode: You can select whether the flash output is set automatically or manually.This item is available only when the built-in flash is being used.
→ [Rec] → [Flash] → [Firing Mode]
[TTL] The camera automatically sets the flash output.
[MANUAL]You can set the flash ratio manually. Even in the case of dark scenes where the flash output tends to be higher in [TTL], this mode allows you to take a picture as intended. The flash ratio (such as [1/1]) is displayed on the flash icon.
■Setting the flash ratio (When [MANUAL] is selected)
→ [Rec] → [Flash] → [Manual Flash Adjust.]
Press to select an item and press [MENU/SET] • You can set the flash ratio from [1/1] (flash firing full power) to [1/128] in 1/3 steps.
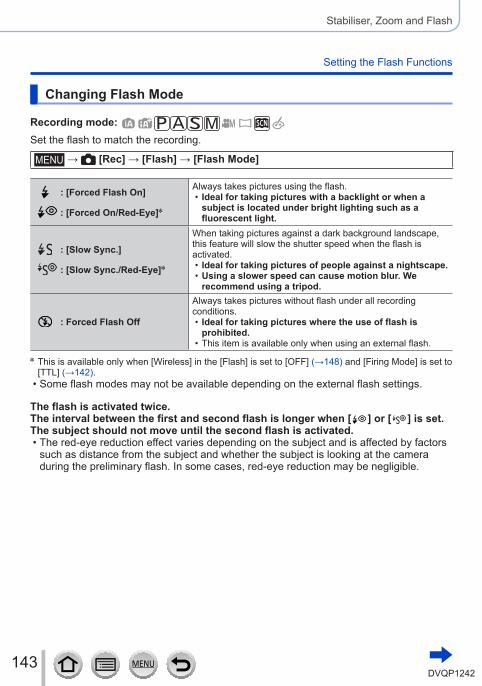
143DVQP1242
Stabiliser, Zoom and Flash
Setting the Flash Functions
Changing Flash Mode
Recording mode: Set the flash to match the recording.
→ [Rec] → [Flash] → [Flash Mode]
: [Forced Flash On]
: [Forced On/Red-Eye]*
Always takes pictures using the flash. • Ideal for taking pictures with a backlight or when a subject is located under bright lighting such as a fluorescent light.
: [Slow Sync.]
: [Slow Sync./Red-Eye]*
When taking pictures against a dark background landscape, this feature will slow the shutter speed when the flash is activated.
• Ideal for taking pictures of people against a nightscape. • Using a slower speed can cause motion blur. We recommend using a tripod.
: Forced Flash Off
Always takes pictures without flash under all recording conditions.
• Ideal for taking pictures where the use of flash is prohibited.
• This item is available only when using an external flash.
* This is available only when [Wireless] in the [Flash] is set to [OFF] (→148) and [Firing Mode] is set to [TTL] (→142). • Some flash modes may not be available depending on the external flash settings.
The flash is activated twice.The interval between the first and second flash is longer when [ ] or [ ] is set. The subject should not move until the second flash is activated.
• The red-eye reduction effect varies depending on the subject and is affected by factors such as distance from the subject and whether the subject is looking at the camera during the preliminary flash. In some cases, red-eye reduction may be negligible.
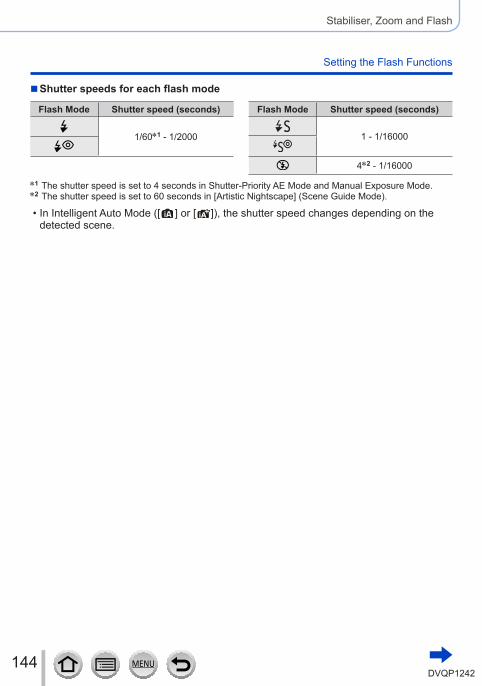
144DVQP1242
Stabiliser, Zoom and Flash
Setting the Flash Functions
■Shutter speeds for each flash mode
Flash Mode Shutter speed (seconds)
1/60*1 - 1/2000
Flash Mode Shutter speed (seconds)
1 - 1/16000
4*2 - 1/16000
*1 The shutter speed is set to 4 seconds in Shutter-Priority AE Mode and Manual Exposure Mode.*2 The shutter speed is set to 60 seconds in [Artistic Nightscape] (Scene Guide Mode).
• In Intelligent Auto Mode ([ ] or [ ]), the shutter speed changes depending on the detected scene.
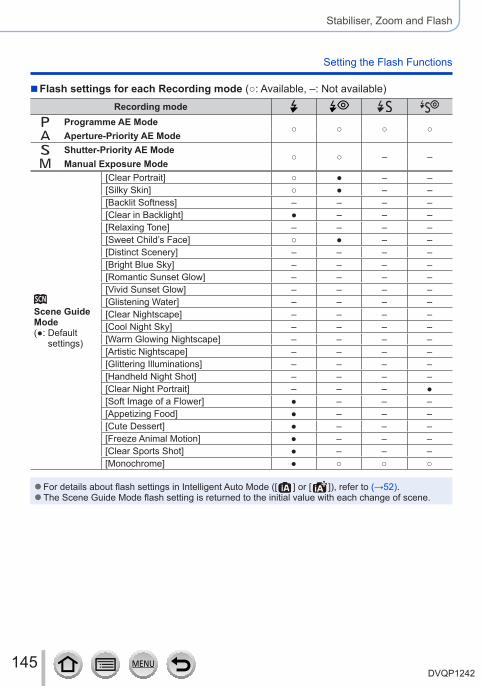
145DVQP1242
Stabiliser, Zoom and Flash
Setting the Flash Functions
■Flash settings for each Recording mode (○: Available, –: Not available)Recording mode
Programme AE Mode○ ○ ○ ○
Aperture-Priority AE ModeShutter-Priority AE Mode
○ ○ – –Manual Exposure Mode
Scene Guide Mode(●: Default
settings)
[Clear Portrait] ○ ● – –[Silky Skin] ○ ● – –[Backlit Softness] – – – –[Clear in Backlight] ● – – –[Relaxing Tone] – – – –[Sweet Child’s Face] ○ ● – –[Distinct Scenery] – – – –[Bright Blue Sky] – – – –[Romantic Sunset Glow] – – – –[Vivid Sunset Glow] – – – –[Glistening Water] – – – –[Clear Nightscape] – – – –[Cool Night Sky] – – – –[Warm Glowing Nightscape] – – – –[Artistic Nightscape] – – – –[Glittering Illuminations] – – – –[Handheld Night Shot] – – – –[Clear Night Portrait] – – – ●[Soft Image of a Flower] ● – – –[Appetizing Food] ● – – –[Cute Dessert] ● – – –[Freeze Animal Motion] ● – – –[Clear Sports Shot] ● – – –[Monochrome] ● ○ ○ ○
●For details about flash settings in Intelligent Auto Mode ([ ] or [ ]), refer to (→52). ●The Scene Guide Mode flash setting is returned to the initial value with each change of scene.
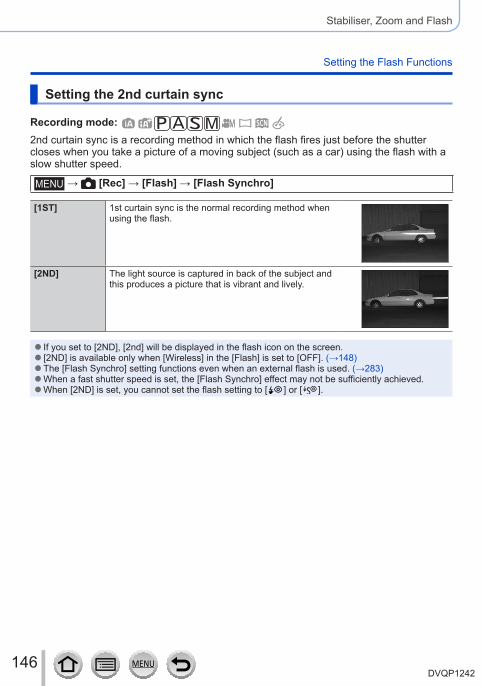
146DVQP1242
Stabiliser, Zoom and Flash
Setting the Flash Functions
Setting the 2nd curtain sync
Recording mode: 2nd curtain sync is a recording method in which the flash fires just before the shutter closes when you take a picture of a moving subject (such as a car) using the flash with a slow shutter speed.
→ [Rec] → [Flash] → [Flash Synchro]
[1ST] 1st curtain sync is the normal recording method when using the flash.
[2ND] The light source is captured in back of the subject and this produces a picture that is vibrant and lively.
● If you set to [2ND], [2nd] will be displayed in the flash icon on the screen. ● [2ND] is available only when [Wireless] in the [Flash] is set to [OFF]. (→148) ●The [Flash Synchro] setting functions even when an external flash is used. (→283) ●When a fast shutter speed is set, the [Flash Synchro] effect may not be sufficiently achieved. ●When [2ND] is set, you cannot set the flash setting to [ ] or [ ].
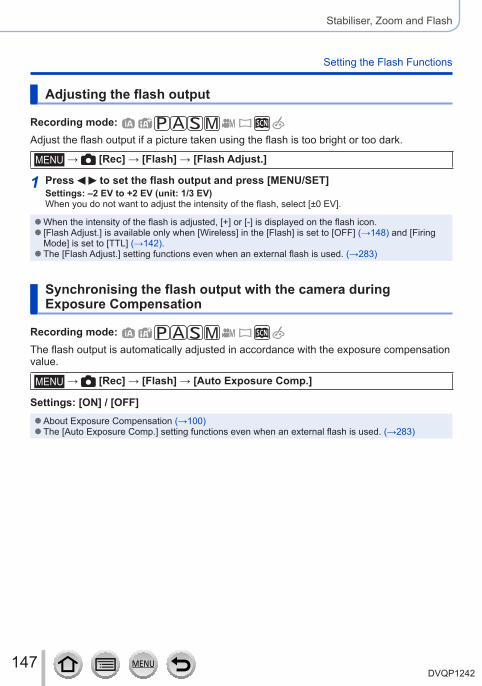
147DVQP1242
Stabiliser, Zoom and Flash
Setting the Flash Functions
Adjusting the flash output
Recording mode: Adjust the flash output if a picture taken using the flash is too bright or too dark.
→ [Rec] → [Flash] → [Flash Adjust.]
1 Press to set the flash output and press [MENU/SET]Settings: –2 EV to +2 EV (unit: 1/3 EV)When you do not want to adjust the intensity of the flash, select [±0 EV].
●When the intensity of the flash is adjusted, [+] or [-] is displayed on the flash icon. ● [Flash Adjust.] is available only when [Wireless] in the [Flash] is set to [OFF] (→148) and [Firing Mode] is set to [TTL] (→142). ●The [Flash Adjust.] setting functions even when an external flash is used. (→283)
Synchronising the flash output with the camera during Exposure Compensation
Recording mode: The flash output is automatically adjusted in accordance with the exposure compensation value.
→ [Rec] → [Flash] → [Auto Exposure Comp.]
Settings: [ON] / [OFF] ●About Exposure Compensation (→100) ●The [Auto Exposure Comp.] setting functions even when an external flash is used. (→283)
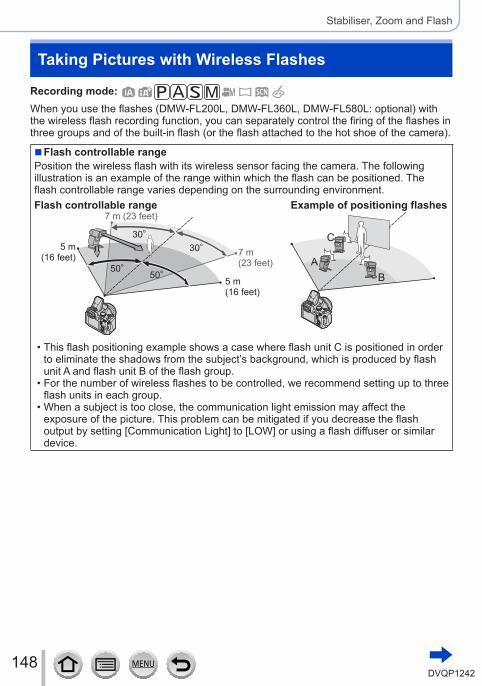
148DVQP1242
Stabiliser, Zoom and Flash
Recording mode: When you use the flashes (DMW-FL200L, DMW-FL360L, DMW-FL580L: optional) with the wireless flash recording function, you can separately control the firing of the flashes in three groups and of the built-in flash (or the flash attached to the hot shoe of the camera).
■Flash controllable rangePosition the wireless flash with its wireless sensor facing the camera. The following illustration is an example of the range within which the flash can be positioned. The flash controllable range varies depending on the surrounding environment.Flash controllable range Example of positioning flashes
7 m (23 feet)
7 m (23 feet)
5 m (16 feet)
5 m (16 feet)
• This flash positioning example shows a case where flash unit C is positioned in order to eliminate the shadows from the subject’s background, which is produced by flash unit A and flash unit B of the flash group.
• For the number of wireless flashes to be controlled, we recommend setting up to three flash units in each group.
• When a subject is too close, the communication light emission may affect the exposure of the picture. This problem can be mitigated if you decrease the flash output by setting [Communication Light] to [LOW] or using a flash diffuser or similar device.
Taking Pictures with Wireless Flashes
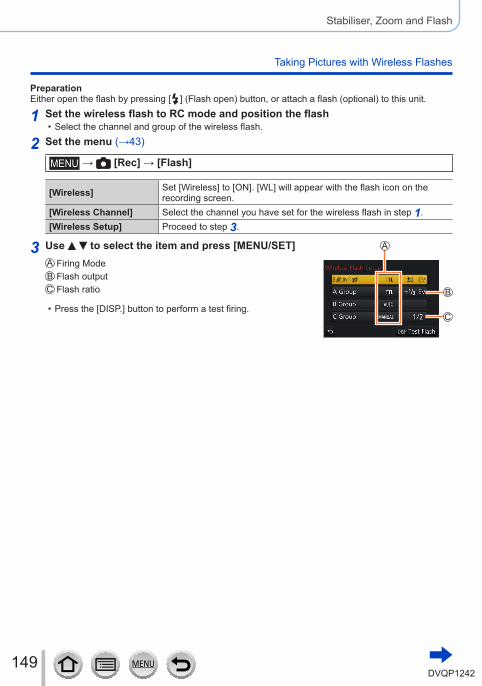
149DVQP1242
Stabiliser, Zoom and Flash
Taking Pictures with Wireless Flashes
PreparationEither open the flash by pressing [ ] (Flash open) button, or attach a flash (optional) to this unit.
1 Set the wireless flash to RC mode and position the flash • Select the channel and group of the wireless flash.
2 Set the menu (→43)
→ [Rec] → [Flash]
[Wireless] Set [Wireless] to [ON]. [WL] will appear with the flash icon on the recording screen.
[Wireless Channel] Select the channel you have set for the wireless flash in step 1.[Wireless Setup] Proceed to step 3.
3 Use to select the item and press [MENU/SET]Firing ModeFlash outputFlash ratio
• Press the [DISP.] button to perform a test firing.
150DVQP1242
Stabiliser, Zoom and Flash
Taking Pictures with Wireless Flashes
[Built-in Flash] /[External Flash]
[Firing Mode]
[TTL]: The flash output is automatically adjusted.[AUTO]*: Sets the flash output using an external flash.[MANUAL]: Manually sets the flash ratio of an external flash.[OFF]: The flash of this unit fires only for a communication
light emission.
[Flash Adjust.] Adjusts the flash output of the flash of this unit manually when [Firing Mode] is set to [TTL].
[Manual Flash Adjust.]
Sets the flash ratio of an external flash when [Firing Mode] is set to [MANUAL].
• You can set the flash ratio from [1/1] (flash firing full power) to [1/128] in 1/3 steps.
[A Group]/[B Group]/[C Group]
[Firing Mode]
[TTL]: The flash output is automatically adjusted.[AUTO]: The wireless flash automatically sets the flash
output.[MANUAL]: Manually sets the flash ratio of the wireless flash.[OFF]: The wireless flashes of the set group do not fire.
[Flash Adjust.] Adjusts the flash output of the wireless flash manually when [Firing Mode] is set to [TTL].
[Manual Flash Adjust.]
Sets the flash ratio of the wireless flash when [Firing Mode] is set to [MANUAL].
• You can set the flash ratio from [1/1] (flash firing full power) to [1/128] in 1/3 steps.
* This option is not available when the flash (DMW-FL200L: optional) is attached to the camera.
■Setting the communication light emission to be used when wireless flash recording is performed
→ [Rec] → [Flash] → [Communication Light]
Settings: [HIGH] / [STANDARD] / [LOW]
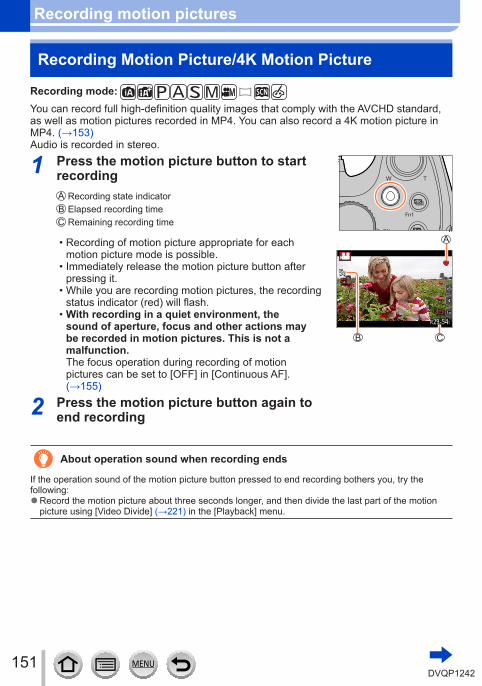
151DVQP1242
Recording motion pictures
Recording Motion Picture/4K Motion Picture
Recording mode: You can record full high-definition quality images that comply with the AVCHD standard, as well as motion pictures recorded in MP4. You can also record a 4K motion picture in MP4. (→153)Audio is recorded in stereo.
1 Press the motion picture button to start recording
Recording state indicatorElapsed recording timeRemaining recording time
• Recording of motion picture appropriate for each motion picture mode is possible.
• Immediately release the motion picture button after pressing it.
• While you are recording motion pictures, the recording status indicator (red) will flash.
• With recording in a quiet environment, the sound of aperture, focus and other actions may be recorded in motion pictures. This is not a malfunction.The focus operation during recording of motion pictures can be set to [OFF] in [Continuous AF]. (→155)
2 Press the motion picture button again to end recording
About operation sound when recording ends
If the operation sound of the motion picture button pressed to end recording bothers you, try the following:
●Record the motion picture about three seconds longer, and then divide the last part of the motion picture using [Video Divide] (→221) in the [Playback] menu.
152DVQP1242
Recording motion pictures
Recording Motion Picture/4K Motion Picture
● If the surrounding temperature is high, or a motion picture is recorded continuously, [ ] is displayed and recording may be stopped halfway through. Wait until the camera cools down. ● If Extra optical zoom is used before pressing the motion picture button, these settings will be cleared, and the recordable area will be changed significantly. ● If the aspect ratio is different for still pictures and motion pictures, the angle of view will change when starting to record a motion picture. When you set [Rec Area] to [ ], the angle of view setting used for recording motion pictures is displayed. ●Note that if you perform operations such as zoom, using buttons or dials, while recording a motion picture, operation noise may be recorded. ●The zoom speed will be slower than normal during motion picture recording. ●Depending on the type of the card, the card access indication may appear for a while after recording motion pictures. This is not a malfunction. ● ISO sensitivity is set to [AUTO] (for motion pictures) while a motion picture is being recorded. You can set ISO sensitivity and record motion pictures in Creative Video Mode. ●The below-mentioned motion picture recording modes are set in the following cases:
Selected Scene Guide Mode Recording mode at the time of recording motion pictures
[Clear in Backlight] Portrait Mode[Clear Nightscape], [Artistic Nightscape], [Handheld Night Shot], [Clear Night Portrait] Low Light Mode
●This function is not available in the following cases: • [Glistening Water], [Glittering Illuminations], [Soft Image of a Flower] (Scene Guide Mode) • [Rough Monochrome], [Silky Monochrome], [Soft Focus], [Star Filter], [Sunshine] (Creative Control Mode)
• When [Post Focus] is set • When using [Time Lapse Shot] • When using [Stop Motion Animation]
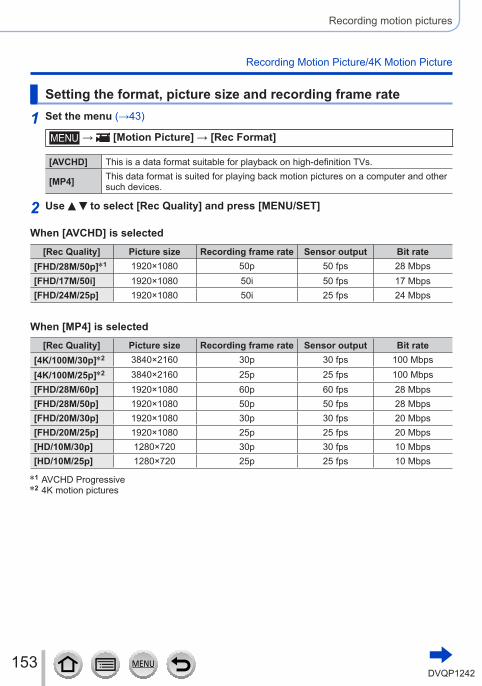
153DVQP1242
Recording motion pictures
Recording Motion Picture/4K Motion Picture
Setting the format, picture size and recording frame rate
1 Set the menu (→43)
→ [Motion Picture] → [Rec Format]
[AVCHD] This is a data format suitable for playback on high-definition TVs.
[MP4] This data format is suited for playing back motion pictures on a computer and other such devices.
2 Use to select [Rec Quality] and press [MENU/SET]
When [AVCHD] is selected[Rec Quality] Picture size Recording frame rate Sensor output Bit rate
[FHD/28M/50p]*1 1920×1080 50p 50 fps 28 Mbps[FHD/17M/50i] 1920×1080 50i 50 fps 17 Mbps[FHD/24M/25p] 1920×1080 50i 25 fps 24 Mbps
When [MP4] is selected[Rec Quality] Picture size Recording frame rate Sensor output Bit rate
[4K/100M/30p]*2 3840×2160 30p 30 fps 100 Mbps[4K/100M/25p]*2 3840×2160 25p 25 fps 100 Mbps[FHD/28M/60p] 1920×1080 60p 60 fps 28 Mbps[FHD/28M/50p] 1920×1080 50p 50 fps 28 Mbps[FHD/20M/30p] 1920×1080 30p 30 fps 20 Mbps[FHD/20M/25p] 1920×1080 25p 25 fps 20 Mbps[HD/10M/30p] 1280×720 30p 30 fps 10 Mbps[HD/10M/25p] 1280×720 25p 25 fps 10 Mbps
*1 AVCHD Progressive*2 4K motion pictures
154DVQP1242
Recording motion pictures
Recording Motion Picture/4K Motion Picture
• The quality becomes higher when the number of bit rate gets bigger. This unit uses the “VBR” recording method, and the bit rate is changed automatically depending on the subject to record. Therefore, the recording time is shortened when a subject with fast movement is recorded.
• 4K motion picture cannot be set when using [Miniature Effect] (Creative Control Mode). • To record 4K motion pictures, use a UHS Speed Class 3 card. (→27) • When you record 4K motion pictures, the angle of view will be narrower than motion pictures of other sizes.
• To ensure highly accurate focus, 4K motion pictures are recorded at reduced Auto Focus speeds. It may be difficult to focus on the subject with Auto Focus, but this is not a malfunction.
• Limitations on continuous recording (→29)
■About the compatibility of the recorded motion picturesMotion pictures recorded in [AVCHD] or [MP4] may be played back with poor picture or sound quality or playback may not be possible even when played back with equipment compatible with these formats. Also, the recording information may not be displayed properly.
• When you play back and import motion pictures recorded with [FHD/28M/50p], or [FHD/24M/25p] in [AVCHD] using a device other than this unit, a compatible Blu-ray disc recorder or PC installed with “PHOTOfunSTUDIO” software (→273) is required.
• For details on motion pictures recorded with [4K/100M/30p], or [4K/100M/25p] in the [MP4] format, refer to “Enjoying 4K motion pictures” (→267).
155DVQP1242
Recording motion pictures
Recording Motion Picture/4K Motion Picture
Adjusting the focus while recording motion pictures ([Continuous AF])
Recording mode: Focusing varies depending on the setting of focus and the setting of [Continuous AF] in the [Motion Picture] menu.
→ [Motion Picture] → [Continuous AF]
Focus setting [Continuous AF] Setting
[AFS]/[AFF]/[AFC] (→84)
[ON] Allow the focus to be constantly adjusted automatically while recording motion pictures.
[OFF] Fix focus position at the start of motion picture recording.
[MF] (→97) [ON] / [OFF] Allow the focus to be adjusted manually.
●When the focus setting is set to [AFS], [AFF], or [AFC], the camera will refocus if the shutter button is pressed halfway while recording motion pictures. ●When Auto Focus is activated while you are recording motion pictures, the focusing operation sound may be recorded under some conditions. If you want to suppress this sound, we recommend taking pictures after setting [Continuous AF] to [OFF] in the [Motion Picture] menu. ●When using zoom while recording motion pictures, it may take some time to focus. ●This function is not available in the following cases:
• While [Pull Focus] in [Snap Movie] is in operation. • When recording using [4K Live Cropping]
156DVQP1242
Recording motion pictures
Pan or zoom while recording with the camera in a fixed position [4K Live Cropping]
Recording mode: By cropping your motion picture down from the 4K angle of view to Full High Definition, you can record a motion picture that pans and zooms in/out while leaving the camera in a fixed position.
• Hold the camera firmly in place while recording. • A motion picture will be recorded at [FHD/20M/25p] under [MP4].
Pan Zoom in • When you want to zoom in/out, set different angles of view for the cropping start and end frames. For example, to zoom in, set a larger angle of view for the start frame and a smaller angle of view for the end frame.
1 Set mode dial to [ ]
2 Set the menu (→43)
→ [Motion Picture] → [4K Live Cropping]
Settings: [40SEC] / [20SEC] / [OFF] • The angle of view narrows.
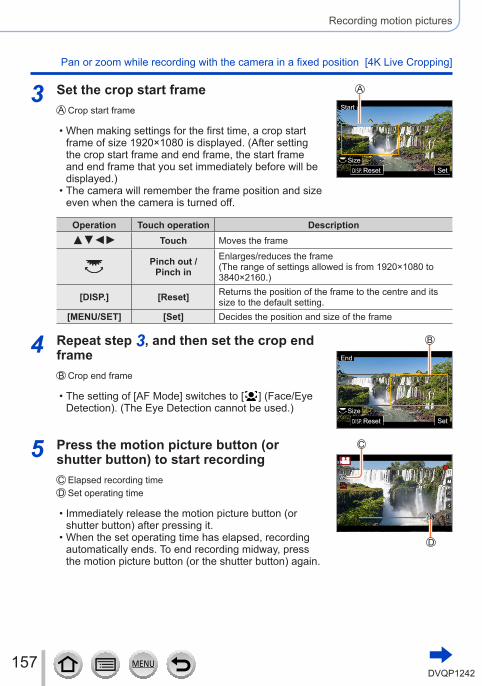
157DVQP1242
Recording motion pictures
Pan or zoom while recording with the camera in a fixed position [4K Live Cropping]
3 Set the crop start frameCrop start frame
• When making settings for the first time, a crop start frame of size 1920×1080 is displayed. (After setting the crop start frame and end frame, the start frame and end frame that you set immediately before will be displayed.)
• The camera will remember the frame position and size even when the camera is turned off.
SetSetSizeSize
ResetReset
StartStart
Operation Touch operation Description
Touch Moves the frame
Pinch out / Pinch in
Enlarges/reduces the frame(The range of settings allowed is from 1920×1080 to 3840×2160.)
[DISP.] [Reset] Returns the position of the frame to the centre and its size to the default setting.
[MENU/SET] [Set] Decides the position and size of the frame
4 Repeat step 3, and then set the crop end frame
Crop end frame
• The setting of [AF Mode] switches to [ ] (Face/Eye Detection). (The Eye Detection cannot be used.)
ResetReset
EndEnd
SetSetSizeSize
5 Press the motion picture button (or shutter button) to start recording
Elapsed recording timeSet operating time
• Immediately release the motion picture button (or shutter button) after pressing it.
• When the set operating time has elapsed, recording automatically ends. To end recording midway, press the motion picture button (or the shutter button) again.
158DVQP1242
Recording motion pictures
Pan or zoom while recording with the camera in a fixed position [4K Live Cropping]
■Changing the position and size of a crop framePress [Fn1] button while the recording screen is displayed, and perform steps 3 and 4.
■To cancel [4K Live Cropping] recordingSet [OFF] in step 2.
● [4K Live Cropping] recording cannot be performed when [High Speed Video] is set. ●Focus is adjusted and fixed in the crop start frame. ● [Continuous AF] is set to [OFF]. ● [Metering Mode] will be [ ] (Multi Metering).
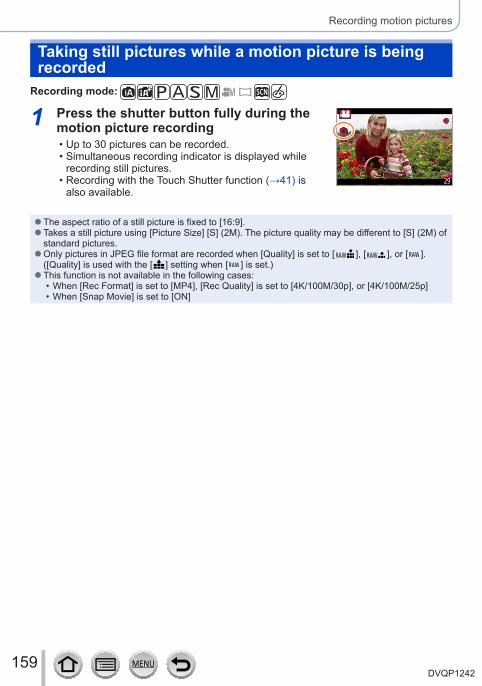
159DVQP1242
Recording motion pictures
Taking still pictures while a motion picture is being recorded
Recording mode:
1 Press the shutter button fully during the motion picture recording
• Up to 30 pictures can be recorded. • Simultaneous recording indicator is displayed while recording still pictures.
• Recording with the Touch Shutter function (→41) is also available.
●The aspect ratio of a still picture is fixed to [16:9]. ●Takes a still picture using [Picture Size] [S] (2M). The picture quality may be different to [S] (2M) of standard pictures. ●Only pictures in JPEG file format are recorded when [Quality] is set to [ ], [ ], or [ ]. ([Quality] is used with the [ ] setting when [ ] is set.) ●This function is not available in the following cases:
• When [Rec Format] is set to [MP4], [Rec Quality] is set to [4K/100M/30p], or [4K/100M/25p] • When [Snap Movie] is set to [ON]
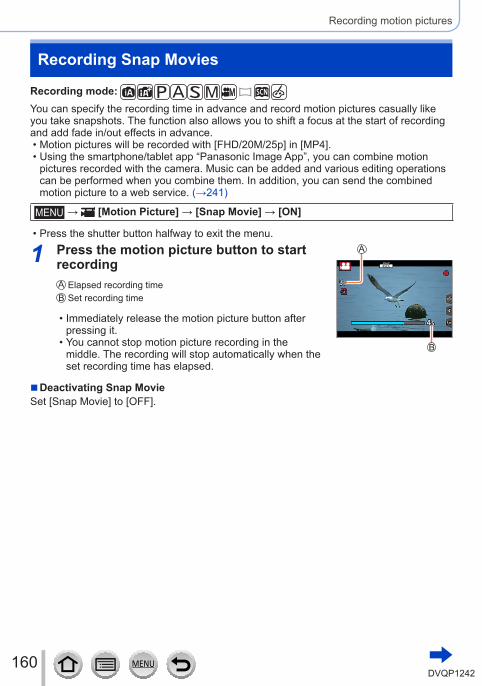
160DVQP1242
Recording motion pictures
Recording Snap Movies
Recording mode: You can specify the recording time in advance and record motion pictures casually like you take snapshots. The function also allows you to shift a focus at the start of recording and add fade in/out effects in advance.
• Motion pictures will be recorded with [FHD/20M/25p] in [MP4]. • Using the smartphone/tablet app “Panasonic Image App”, you can combine motion pictures recorded with the camera. Music can be added and various editing operations can be performed when you combine them. In addition, you can send the combined motion picture to a web service. (→241)
→ [Motion Picture] → [Snap Movie] → [ON]
• Press the shutter button halfway to exit the menu.
1 Press the motion picture button to start recording
Elapsed recording timeSet recording time
• Immediately release the motion picture button after pressing it.
• You cannot stop motion picture recording in the middle. The recording will stop automatically when the set recording time has elapsed.
■Deactivating Snap MovieSet [Snap Movie] to [OFF].
161DVQP1242
Recording motion pictures
Recording Snap Movies
■Changing the settings
→ [Motion Picture] → [Snap Movie] → [SET]
[Record time] Sets the recording time of motion pictures.[Pull Focus] Allows dramatic imaging expression by shifting focus gradually at the start of
recording. (→162)[Fade] Adds a fade-in (gradual appearance) effect to an image and audio as recording
starts or adds a fade-out (gradual disappearance) effect to them as recording ends.[WHITE-IN] / [WHITE-OUT]:Adds a fade-in or fade-out effect that uses a white screen.[BLACK-IN] / [BLACK-OUT]:Adds a fade-in or fade-out effect that uses a black screen.[COLOR-IN] / [COLOR-OUT]:Adds an effect that fades in from black-and-white to colour or an effect that fades out from colour to black-and-white. Audio will be recorded normally.[OFF]
●Motion pictures recorded with [WHITE-IN] or [BLACK-IN] are displayed as all-white or all-black thumbnails in Playback Mode. ● If you assign [Snap Movie] to [Fn Button Set] in [Custom] menu (→47), you can display a screen that lets you switch [Snap Movie] between [ON]/[OFF] by pressing the assigned function button. If you press [DISP.] button while the screen is displayed, you can change the settings for Snap Movie. ● [Snap Movie] will be set to [OFF] when you connect to Wi-Fi with [Remote Shooting & View]. ●This function is not available in the following cases:
• [Miniature Effect] (Creative Control Mode) • When [4K PHOTO] is set • When [Post Focus] is set • When [4K Live Cropping] is set • During [High Speed Video] recording

162DVQP1242
Recording motion pictures
Recording Snap Movies
Setting up [Pull Focus]Set the frames that specify the positions where the [Pull Focus] starts (first position) and stops (second position).
Touch operationTouch a subject (first position), drag your finger to the desired location (second position), and release the finger.
• To cancel the frame settings, touch [ ].
Button operationPress Press to move the frame, and press [MENU/SET] (First position)
• If you press [DISP.] button before pressing [MENU/SET], the frame will return to the centre.Repeat step (Second position)
• To cancel the frame settings, press [MENU/SET].
●A greater effect can be achieved by creating a striking contrast of focus between the start and end positions, for example by shifting focus from the background to foreground, or vice versa. ●After setting focus, try to keep the distance between the subject and the camera constant.
●When the camera fails to set the frame, it returns to the first position. ●When [Pull Focus] is set to [ON]
• Auto Focus Mode will be switched to [ ], a setting specially designed for [Pull Focus]. • If you take a picture, the Auto Focus operation [ ] will take place at the first frame position.
●Even when [Metering Mode] (→177) is set to [ ] (Spot), the spot metering target does not move with focus. The target is fixed at the start position (first position) of [Pull Focus]. ●This function is not available in the following cases:
• In Manual Focus • When using the Digital Zoom
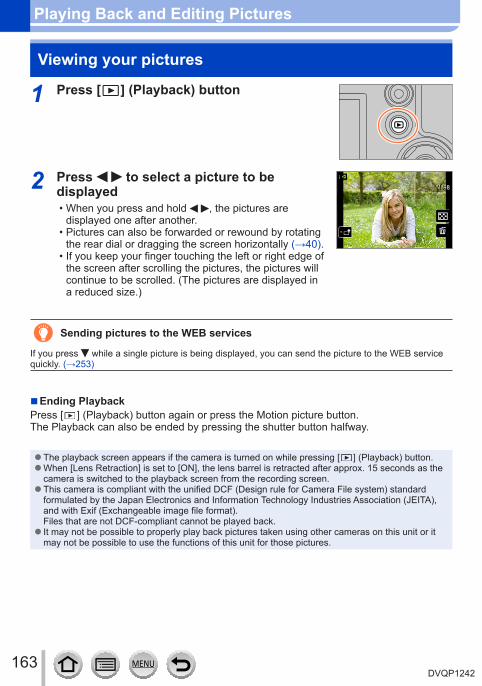
163DVQP1242
Playing Back and Editing Pictures
Viewing your pictures
1 Press [ ] (Playback) button
2 Press to select a picture to be displayed
• When you press and hold , the pictures are displayed one after another.
• Pictures can also be forwarded or rewound by rotating the rear dial or dragging the screen horizontally (→40).
• If you keep your finger touching the left or right edge of the screen after scrolling the pictures, the pictures will continue to be scrolled. (The pictures are displayed in a reduced size.)
Sending pictures to the WEB services
If you press while a single picture is being displayed, you can send the picture to the WEB service quickly. (→253)
■Ending PlaybackPress [ ] (Playback) button again or press the Motion picture button.The Playback can also be ended by pressing the shutter button halfway.
●The playback screen appears if the camera is turned on while pressing [ ] (Playback) button. ●When [Lens Retraction] is set to [ON], the lens barrel is retracted after approx. 15 seconds as the camera is switched to the playback screen from the recording screen. ●This camera is compliant with the unified DCF (Design rule for Camera File system) standard formulated by the Japan Electronics and Information Technology Industries Association (JEITA), and with Exif (Exchangeable image file format). Files that are not DCF-compliant cannot be played back. ● It may not be possible to properly play back pictures taken using other cameras on this unit or it may not be possible to use the functions of this unit for those pictures.
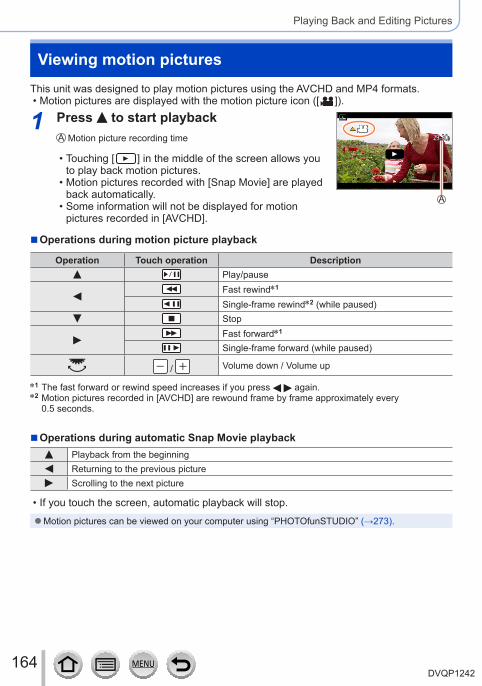
164DVQP1242
Playing Back and Editing Pictures
Viewing motion picturesThis unit was designed to play motion pictures using the AVCHD and MP4 formats.
• Motion pictures are displayed with the motion picture icon ([ ]).
1 Press to start playbackMotion picture recording time
• Touching [ ] in the middle of the screen allows you to play back motion pictures.
• Motion pictures recorded with [Snap Movie] are played back automatically.
• Some information will not be displayed for motion pictures recorded in [AVCHD].
■Operations during motion picture playback
Operation Touch operation DescriptionPlay/pauseFast rewind*1
Single-frame rewind*2 (while paused)StopFast forward*1
Single-frame forward (while paused)
/ Volume down / Volume up
*1 The fast forward or rewind speed increases if you press again.*2 Motion pictures recorded in [AVCHD] are rewound frame by frame approximately every
0.5 seconds.
■Operations during automatic Snap Movie playbackPlayback from the beginningReturning to the previous pictureScrolling to the next picture
• If you touch the screen, automatic playback will stop.
●Motion pictures can be viewed on your computer using “PHOTOfunSTUDIO” (→273).
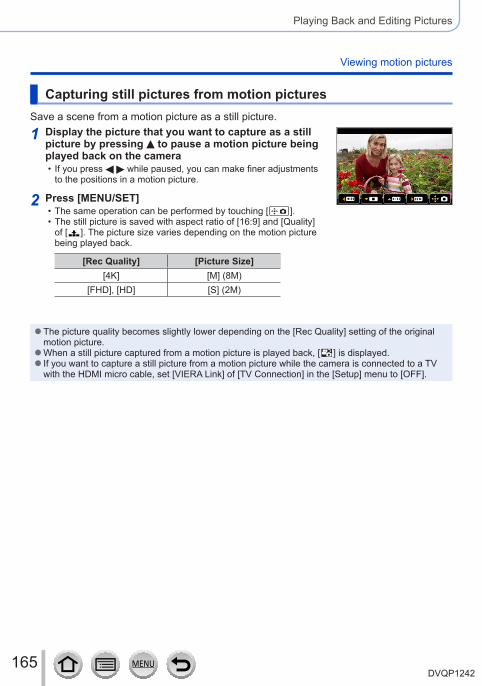
165DVQP1242
Playing Back and Editing Pictures
Viewing motion pictures
Capturing still pictures from motion picturesSave a scene from a motion picture as a still picture.
1 Display the picture that you want to capture as a still picture by pressing to pause a motion picture being played back on the camera
• If you press while paused, you can make finer adjustments to the positions in a motion picture.
2 Press [MENU/SET] • The same operation can be performed by touching [ ]. • The still picture is saved with aspect ratio of [16:9] and [Quality] of [ ]. The picture size varies depending on the motion picture being played back.
[Rec Quality] [Picture Size][4K] [M] (8M)
[FHD], [HD] [S] (2M)
●The picture quality becomes slightly lower depending on the [Rec Quality] setting of the original motion picture. ●When a still picture captured from a motion picture is played back, [ ] is displayed. ● If you want to capture a still picture from a motion picture while the camera is connected to a TV with the HDMI micro cable, set [VIERA Link] of [TV Connection] in the [Setup] menu to [OFF].
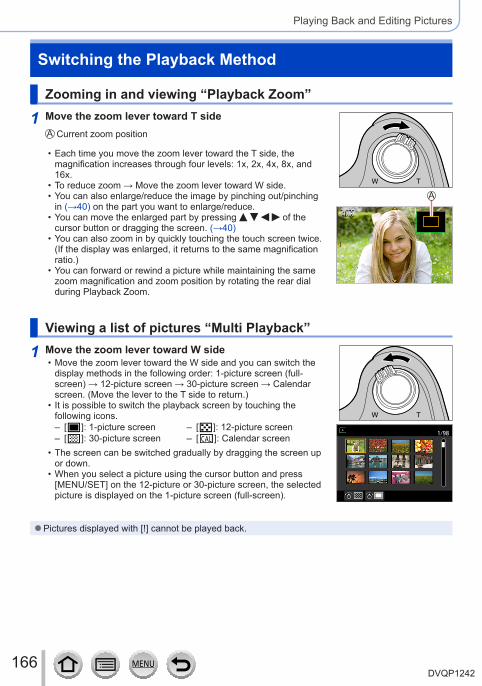
166DVQP1242
Playing Back and Editing Pictures
Switching the Playback Method
Zooming in and viewing “Playback Zoom”
1 Move the zoom lever toward T sideCurrent zoom position
• Each time you move the zoom lever toward the T side, the magnification increases through four levels: 1x, 2x, 4x, 8x, and 16x.
• To reduce zoom → Move the zoom lever toward W side. • You can also enlarge/reduce the image by pinching out/pinching in (→40) on the part you want to enlarge/reduce.
• You can move the enlarged part by pressing of the cursor button or dragging the screen. (→40)
• You can also zoom in by quickly touching the touch screen twice. (If the display was enlarged, it returns to the same magnification ratio.)
• You can forward or rewind a picture while maintaining the same zoom magnification and zoom position by rotating the rear dial during Playback Zoom.
Viewing a list of pictures “Multi Playback”
1 Move the zoom lever toward W side • Move the zoom lever toward the W side and you can switch the display methods in the following order: 1-picture screen (full-screen) → 12-picture screen → 30-picture screen → Calendar screen. (Move the lever to the T side to return.)
• It is possible to switch the playback screen by touching the following icons. – [ ]: 1-picture screen – [ ]: 12-picture screen – [ ]: 30-picture screen – [ ]: Calendar screen
• The screen can be switched gradually by dragging the screen up or down.
• When you select a picture using the cursor button and press [MENU/SET] on the 12-picture or 30-picture screen, the selected picture is displayed on the 1-picture screen (full-screen).
●Pictures displayed with [!] cannot be played back.
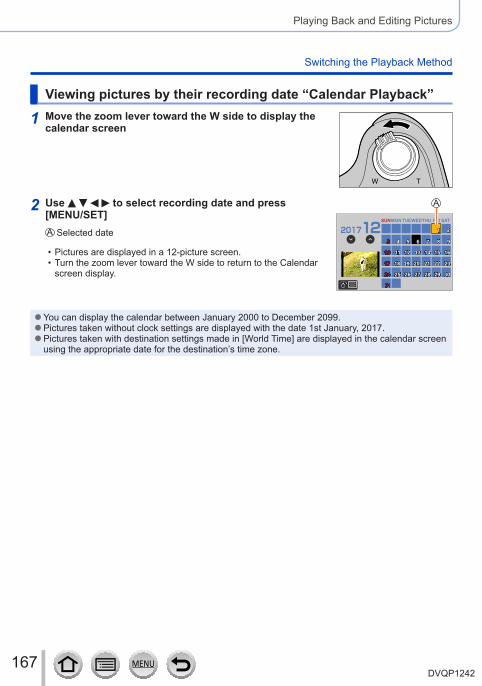
167DVQP1242
Playing Back and Editing Pictures
Switching the Playback Method
Viewing pictures by their recording date “Calendar Playback”
1 Move the zoom lever toward the W side to display the calendar screen
2 Use to select recording date and press [MENU/SET]
Selected date
• Pictures are displayed in a 12-picture screen. • Turn the zoom lever toward the W side to return to the Calendar screen display.
MONSUN TUEWEDTHU FRI SAT
●You can display the calendar between January 2000 to December 2099. ●Pictures taken without clock settings are displayed with the date 1st January, 2017. ●Pictures taken with destination settings made in [World Time] are displayed in the calendar screen using the appropriate date for the destination’s time zone.
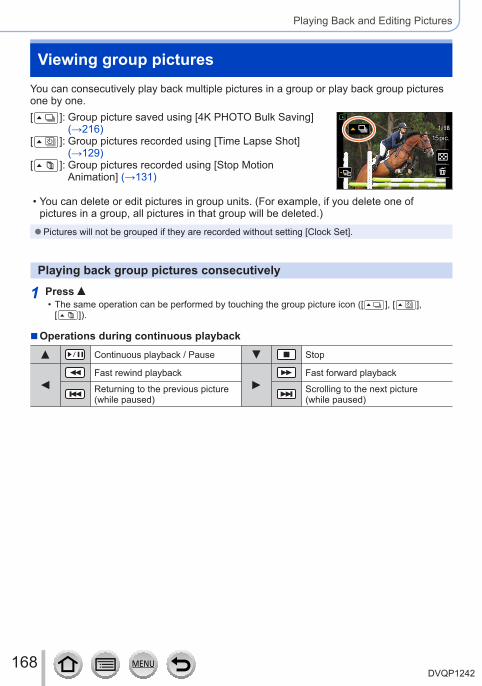
168DVQP1242
Playing Back and Editing Pictures
You can consecutively play back multiple pictures in a group or play back group pictures one by one.[ ]: Group picture saved using [4K PHOTO Bulk Saving]
(→216)[ ]: Group pictures recorded using [Time Lapse Shot]
(→129)[ ]: Group pictures recorded using [Stop Motion
Animation] (→131)
15 pic.15 pic.
• You can delete or edit pictures in group units. (For example, if you delete one of pictures in a group, all pictures in that group will be deleted.)
●Pictures will not be grouped if they are recorded without setting [Clock Set].
Playing back group pictures consecutively
1 Press • The same operation can be performed by touching the group picture icon ([ ], [ ], [ ]).
■Operations during continuous playbackContinuous playback / Pause Stop
Fast rewind playback Fast forward playback
Returning to the previous picture(while paused)
Scrolling to the next picture(while paused)
Viewing group pictures
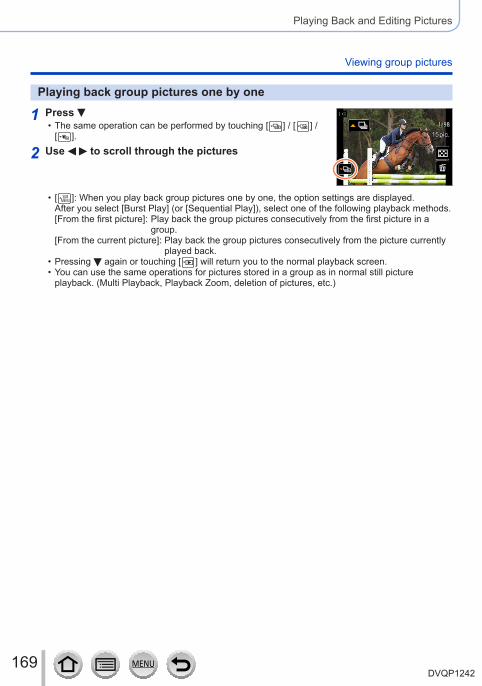
169DVQP1242
Playing Back and Editing Pictures
Viewing group pictures
Playing back group pictures one by one
1 Press • The same operation can be performed by touching [ ] / [ ] / [ ]. 15 pic.15 pic.
2 Use to scroll through the pictures
• [ ]: When you play back group pictures one by one, the option settings are displayed.After you select [Burst Play] (or [Sequential Play]), select one of the following playback methods.[From the first picture]: Play back the group pictures consecutively from the first picture in a
group.[From the current picture]: Play back the group pictures consecutively from the picture currently
played back. • Pressing again or touching [ ] will return you to the normal playback screen. • You can use the same operations for pictures stored in a group as in normal still picture playback. (Multi Playback, Playback Zoom, deletion of pictures, etc.)
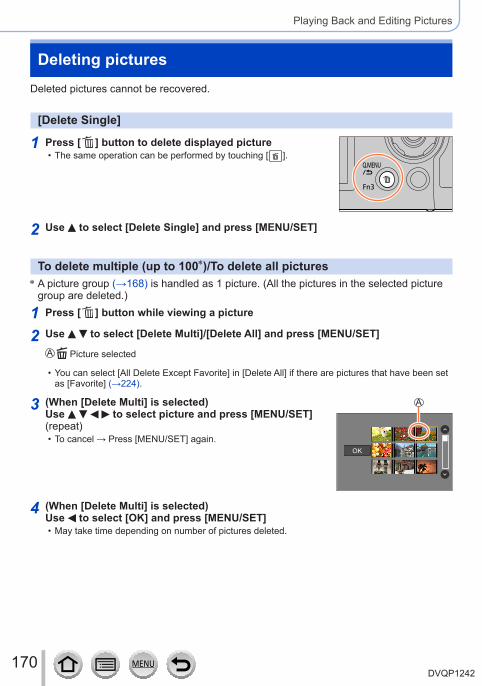
170DVQP1242
Playing Back and Editing Pictures
Deleting picturesDeleted pictures cannot be recovered.
[Delete Single]
1 Press [ ] button to delete displayed picture • The same operation can be performed by touching [ ].
2 Use to select [Delete Single] and press [MENU/SET]
To delete multiple (up to 100*)/To delete all pictures* A picture group (→168) is handled as 1 picture. (All the pictures in the selected picture
group are deleted.)
1 Press [ ] button while viewing a picture
2 Use to select [Delete Multi]/[Delete All] and press [MENU/SET]
Picture selected
• You can select [All Delete Except Favorite] in [Delete All] if there are pictures that have been set as [Favorite] (→224).
3 (When [Delete Multi] is selected) Use to select picture and press [MENU/SET] (repeat)
• To cancel → Press [MENU/SET] again.OK
4 (When [Delete Multi] is selected) Use to select [OK] and press [MENU/SET]
• May take time depending on number of pictures deleted.
171DVQP1242
Using Menu Functions
Menu list
[Rec] →171 [Custom] →191 [Playback] →209
[Motion Picture] →189 [Setup] →201
[Rec] • The [Photo Style], [Filter Settings], [AFS/AFF/AFC], [Metering Mode], [Highlight Shadow], [i.Dynamic], [i.Resolution], [Diffraction Compensation], [i.Zoom], [Digital Zoom], [Stabilizer], and [Conversion] menu items are common for both [Rec] and [Motion Picture] menus. If a setting in one menu is changed, the setting with the same name in other menu will also be changed automatically.
• [Photo Style] (→172) • [Filter Settings] (→174) • [Aspect Ratio] (→175) • [Picture Size] (→176) • [Quality] (→176) • [AFS/AFF/AFC] (→84) • [Metering Mode] (→177) • [Burst Rate] (→124) • [4K PHOTO] (→107) • [Bracket] (→127) • [Self Timer] (→126) • [Highlight Shadow] (→178) • [i.Dynamic] (→179) • [i.Resolution] (→179) • [iHandheld Night Shot] (→54) • [iHDR] (→55) • [HDR] (→180) • [Multi Exp.] (→181)
• [Time Lapse Shot] (→129) • [Stop Motion Animation] (→131) • [Panorama Settings] (→66) • [Shutter Type] (→182) • [Flash] (→142 - 150) • [Red-Eye Removal] (→183) • [ISO Limit Set] (→183) • [ISO Increments] (→183) • [Extended ISO] (→184) • [Diffraction Compensation] (→184) • [i.Zoom] (→137) • [Digital Zoom] (→138) • [Conversion] (→282) • [Color Space] (→184) • [Stabilizer] (→134) • [Face Recog.] (→185) • [Profile Setup] (→188)
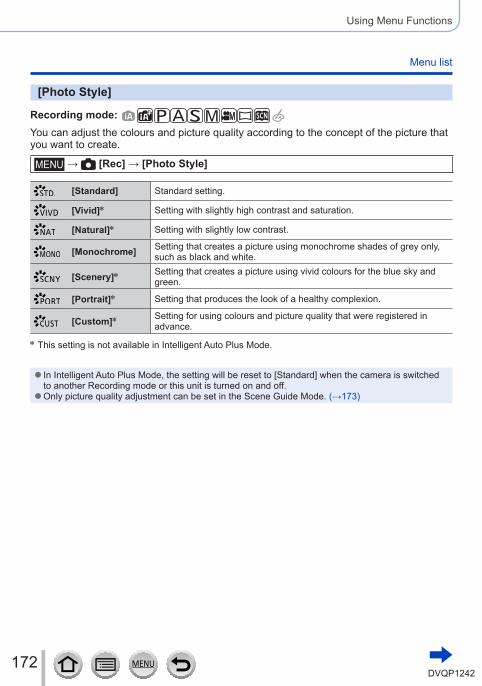
172DVQP1242
Using Menu Functions
Menu list
[Photo Style]
Recording mode: You can adjust the colours and picture quality according to the concept of the picture that you want to create.
→ [Rec] → [Photo Style]
[Standard] Standard setting.
[Vivid]* Setting with slightly high contrast and saturation.
[Natural]* Setting with slightly low contrast.
[Monochrome] Setting that creates a picture using monochrome shades of grey only, such as black and white.
[Scenery]* Setting that creates a picture using vivid colours for the blue sky and green.
[Portrait]* Setting that produces the look of a healthy complexion.
[Custom]* Setting for using colours and picture quality that were registered in advance.
* This setting is not available in Intelligent Auto Plus Mode.
● In Intelligent Auto Plus Mode, the setting will be reset to [Standard] when the camera is switched to another Recording mode or this unit is turned on and off. ●Only picture quality adjustment can be set in the Scene Guide Mode. (→173)
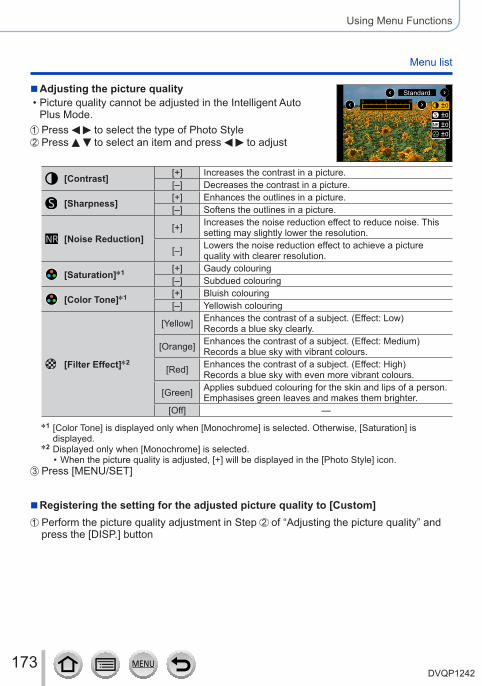
173DVQP1242
Using Menu Functions
Menu list
■Adjusting the picture quality • Picture quality cannot be adjusted in the Intelligent Auto Plus Mode.
Standard
Press to select the type of Photo StylePress to select an item and press to adjust
[Contrast] [+] Increases the contrast in a picture.[–] Decreases the contrast in a picture.
[Sharpness] [+] Enhances the outlines in a picture.[–] Softens the outlines in a picture.
[Noise Reduction][+] Increases the noise reduction effect to reduce noise. This
setting may slightly lower the resolution.
[–] Lowers the noise reduction effect to achieve a picture quality with clearer resolution.
[Saturation]*1 [+] Gaudy colouring[–] Subdued colouring
[Color Tone]*1 [+] Bluish colouring[–] Yellowish colouring
[Filter Effect]*2
[Yellow] Enhances the contrast of a subject. (Effect: Low)Records a blue sky clearly.
[Orange] Enhances the contrast of a subject. (Effect: Medium)Records a blue sky with vibrant colours.
[Red] Enhances the contrast of a subject. (Effect: High)Records a blue sky with even more vibrant colours.
[Green] Applies subdued colouring for the skin and lips of a person. Emphasises green leaves and makes them brighter.
[Off] —
*1 [Color Tone] is displayed only when [Monochrome] is selected. Otherwise, [Saturation] is displayed.
*2 Displayed only when [Monochrome] is selected. • When the picture quality is adjusted, [+] will be displayed in the [Photo Style] icon.
Press [MENU/SET]
■Registering the setting for the adjusted picture quality to [Custom]Perform the picture quality adjustment in Step of “Adjusting the picture quality” and press the [DISP.] button
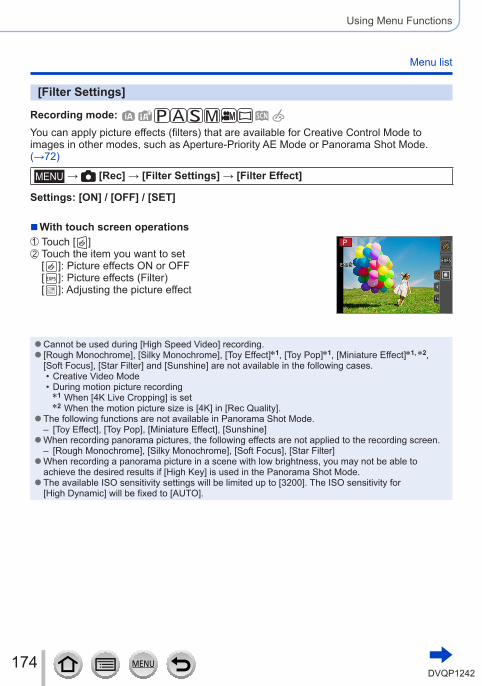
174DVQP1242
Using Menu Functions
Menu list
[Filter Settings]
Recording mode: You can apply picture effects (filters) that are available for Creative Control Mode to images in other modes, such as Aperture-Priority AE Mode or Panorama Shot Mode. (→72)
→ [Rec] → [Filter Settings] → [Filter Effect]
Settings: [ON] / [OFF] / [SET]
■With touch screen operationsTouch [ ]
EXPSEXPS
Touch the item you want to set[ ]: Picture effects ON or OFF[ ]: Picture effects (Filter)[ ]: Adjusting the picture effect
●Cannot be used during [High Speed Video] recording. ● [Rough Monochrome], [Silky Monochrome], [Toy Effect]*1, [Toy Pop]*1, [Miniature Effect]*1, *2, [Soft Focus], [Star Filter] and [Sunshine] are not available in the following cases.
• Creative Video Mode • During motion picture recording*1 When [4K Live Cropping] is set*2 When the motion picture size is [4K] in [Rec Quality].
●The following functions are not available in Panorama Shot Mode. – [Toy Effect], [Toy Pop], [Miniature Effect], [Sunshine]
●When recording panorama pictures, the following effects are not applied to the recording screen. – [Rough Monochrome], [Silky Monochrome], [Soft Focus], [Star Filter]
●When recording a panorama picture in a scene with low brightness, you may not be able to achieve the desired results if [High Key] is used in the Panorama Shot Mode. ●The available ISO sensitivity settings will be limited up to [3200]. The ISO sensitivity for [High Dynamic] will be fixed to [AUTO].
175DVQP1242
Using Menu Functions
Menu list
■Taking two still pictures with and without picture effects ([Simultaneous record w/o filter])
You can take two still pictures at the same time by pressing the shutter button once; one with effects and one without effects.
→ [Rec] → [Filter Settings] → [Simultaneous record w/o filter]
Settings: [ON] / [OFF] • The camera will take a still picture with the effects applied and then a still picture without the effects.
• After taking the picture, [Auto Review] will display only the still picture with the effects applied.
●This function is not available in the following cases: • Panorama Shot Mode • When using [Burst] • When recording 4K photos • When recording using [Post Focus] • Taking still pictures while a motion picture is being recorded. • When [Quality] is set to [ ], [ ] or [ ] • When recording using [Bracket] • When using [Time Lapse Shot] • When using [Stop Motion Animation]
[Aspect Ratio]
Recording mode: This allows you to select the aspect ratio of the pictures to suit printing or the playback method.
→ [Rec] → [Aspect Ratio]
[4:3] Aspect ratio of a 4:3 TV[3:2] Aspect ratio of standard film cameras[16:9] Aspect ratio of high-definition TV, etc.[1:1] Aspect ratio of a square image
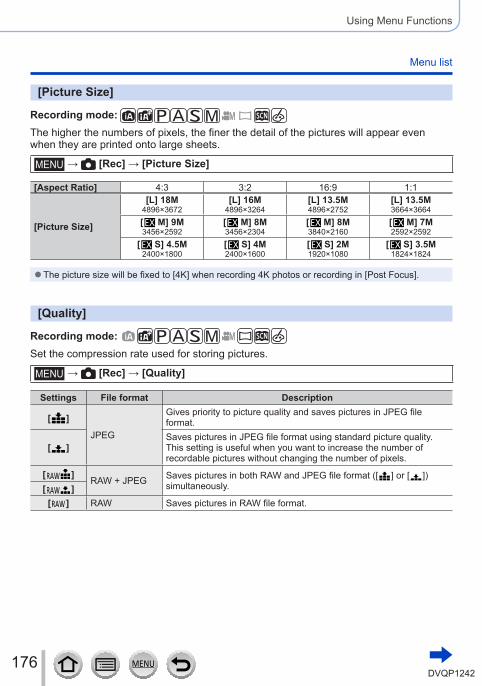
176DVQP1242
Using Menu Functions
Menu list
[Picture Size]
Recording mode: The higher the numbers of pixels, the finer the detail of the pictures will appear even when they are printed onto large sheets.
→ [Rec] → [Picture Size]
[Aspect Ratio] 4:3 3:2 16:9 1:1
[Picture Size]
[L] 18M4896×3672
[L] 16M4896×3264
[L] 13.5M4896×2752
[L] 13.5M3664×3664
[ M] 9M3456×2592
[ M] 8M3456×2304
[ M] 8M3840×2160
[ M] 7M2592×2592
[ S] 4.5M2400×1800
[ S] 4M2400×1600
[ S] 2M1920×1080
[ S] 3.5M1824×1824
●The picture size will be fixed to [4K] when recording 4K photos or recording in [Post Focus].
[Quality]
Recording mode: Set the compression rate used for storing pictures.
→ [Rec] → [Quality]
Settings File format Description
[ ]
JPEG
Gives priority to picture quality and saves pictures in JPEG file format.
[ ]Saves pictures in JPEG file format using standard picture quality.This setting is useful when you want to increase the number of recordable pictures without changing the number of pixels.
[ ] RAW + JPEG Saves pictures in both RAW and JPEG file format ([ ] or [ ]) simultaneously.[ ]
[ ] RAW Saves pictures in RAW file format.

177DVQP1242
Using Menu Functions
Menu list
About RAW file
In RAW file format the data is saved without any picture processing by the camera. To play back and edit RAW file pictures, you must use this unit or dedicated software.
• You can develop the RAW file pictures using [RAW Processing] in the [Playback] menu. (→213) • To develop and edit RAW file pictures on a PC, use the software (Ichikawa Soft Laboratory’s “SILKYPIX Developer Studio”). To get this software, download it from the supplier’s website and install it on your PC. (→274)
●A RAW still picture is always recorded at [4:3] (4896×3672). ● If you delete a picture recorded in [ ] or [ ] from the camera, the corresponding RAW and JPEG pictures are also deleted. ●When you play back a picture recorded with [ ], the grey area is displayed according to the aspect ratio of the picture during recording. ●The setting is fixed to [ ] when recording 4K photos or recording in [Post Focus]. ●You cannot set to [ ], [ ] or [ ] in the following cases:
• Panorama Shot Mode • [Handheld Night Shot] (Scene Guide Mode)
[Metering Mode]
Recording mode: You can change the metering method used for measuring brightness.
→ [Rec] → [Metering Mode]
[Metering Mode] Brightness measurement position Conditions
(Multiple)Whole screen Normal usage
(produces balanced pictures)
(Centre weighted)Centre and surrounding area Subject in centre
(Spot)
Centre of [+] (spot metering target)Great difference between brightness of subject and background(e.g. person in spotlight on stage, backlighting)
● If you set the spot metering target on the edge of the screen, the metering may be affected by the brightness around the location.

178DVQP1242
Using Menu Functions
Menu list
[Highlight Shadow]
Recording mode: You can adjust the highlights and shadows in a picture while confirming the brightness of these areas on the screen.
1 Set the menu (→43)
→ [Rec] → [Highlight Shadow]
([Standard]) No adjustments.
([Higher contrast]) Makes the highlighted areas brighter and shadowed areas darker.
([Lower contrast]) Makes the highlighted areas darker and shadowed areas brighter.
([Brighten shadows]) Makes the shadowed areas brighter.
/ / (Custom) You can set a custom registration shape.
2 Rotate the rear dial to adjust the brightness of the highlighted and shadowed areas
Highlighted areaShadowed areaPreview display
• Each press of the rear dial switches between highlighted area adjustment and shadowed area adjustment.
• To register your preferred settings, press to select the registration target icon (Custom 1, Custom 2, and Custom 3).
• Adjustments can also be made by dragging the graph.
3 Press [MENU/SET]
●You can press the [DISP.] button on the brightness adjustment screen to switch the screen display.
●The settings adjusted in [ ], [ ], [ ], or [ ] will be restored to the default settings when the camera is turned off.
179DVQP1242
Using Menu Functions
Menu list
[i.Dynamic]
Recording mode: Automatically adjusts contrast and exposure to give more lifelike colours when there is significant contrast between background and subject.
→ [Rec] → [i.Dynamic]
Settings: [AUTO] / [HIGH] / [STANDARD] / [LOW] / [OFF] ●This function is not available in the following cases:
• When [HDR] is set to [ON] • When [Sensitivity] is set to [H.6400]
[i.Resolution]
Recording mode: You can use the camera’s Intelligent Resolution technology to record still pictures with sharper outlines and clearer resolution.
→ [Rec] → [i.Resolution]
Settings: [HIGH] / [STANDARD] / [LOW] / [EXTENDED] / [OFF] ●When [EXTENDED] is set, you can take more natural pictures with the impression of high-resolution. ●The [EXTENDED] setting will automatically change to the [LOW] setting while recording motion pictures, recording 4K photos, or recording in [Post Focus].
180DVQP1242
Using Menu Functions
Menu list
[HDR]
Recording mode: The camera can combine 3 still pictures taken at different exposures into a single properly exposed picture with rich gradation. The individual pictures used to create the HDR picture are not saved. You can minimise the loss of gradations in bright areas and dark areas when, for example, the contrast between the background and the subject is large.A combined HDR picture is saved in JPEG format.
→ [Rec] → [HDR]
Settings: [ON] / [OFF] / [SET]
■Changing the settings
[Dynamic Range][AUTO]: Takes pictures after automatically setting the adjustment range of
the exposure based on the contrast of a subject.[±1EV] / [±2EV] / [±3EV]: Takes pictures using the adjustment range of the
exposure being set.
[Auto Align]
[ON]: Automatically adjusts the displacement of pictures caused by jitter, etc. We recommend using this setting to take pictures with a handheld camera.
[OFF]: Does not adjust the displacement of pictures. We recommend using this setting when you use a tripod.
●After the shutter button has been pressed, do not move the camera during the burst operation. ●Since a burst of still pictures are combined after they have been recorded, it will be a few moments before you will be able to record another picture. ●A subject that was in motion when it was recorded may be recorded as an afterimage. ●When [Auto Align] is set to [ON], the angle of view narrows slightly. ●When you take pictures using a flash, the flash mode is fixed to [ ] (Forced Flash Off). ●This function will not work for still pictures while motion pictures are being recorded. ●This function is not available in the following cases:
• When using [Burst] • When recording 4K photos • When recording using [Post Focus] • When recording using [Bracket] • When [Quality] is set to [ ], [ ] or [ ] • When using [Time Lapse Shot] • When [Auto Shooting] of [Stop Motion Animation] is set to [ON]
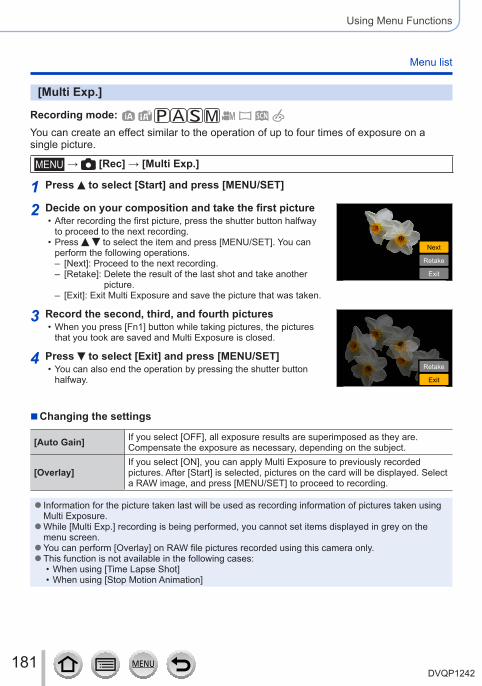
181DVQP1242
Using Menu Functions
Menu list
[Multi Exp.]
Recording mode: You can create an effect similar to the operation of up to four times of exposure on a single picture.
→ [Rec] → [Multi Exp.]
1 Press to select [Start] and press [MENU/SET]
2 Decide on your composition and take the first picture • After recording the first picture, press the shutter button halfway to proceed to the next recording.
• Press to select the item and press [MENU/SET]. You can perform the following operations.
– [Next]: Proceed to the next recording. – [Retake]: Delete the result of the last shot and take another
picture. – [Exit]: Exit Multi Exposure and save the picture that was taken.
Next
Retake
Exit
3 Record the second, third, and fourth pictures • When you press [Fn1] button while taking pictures, the pictures that you took are saved and Multi Exposure is closed.
Retake
Exit
4 Press to select [Exit] and press [MENU/SET] • You can also end the operation by pressing the shutter button halfway.
■Changing the settings
[Auto Gain] If you select [OFF], all exposure results are superimposed as they are. Compensate the exposure as necessary, depending on the subject.
[Overlay]If you select [ON], you can apply Multi Exposure to previously recorded pictures. After [Start] is selected, pictures on the card will be displayed. Select a RAW image, and press [MENU/SET] to proceed to recording.
● Information for the picture taken last will be used as recording information of pictures taken using Multi Exposure. ●While [Multi Exp.] recording is being performed, you cannot set items displayed in grey on the menu screen. ●You can perform [Overlay] on RAW file pictures recorded using this camera only. ●This function is not available in the following cases:
• When using [Time Lapse Shot] • When using [Stop Motion Animation]
182DVQP1242
Using Menu Functions
Menu list
[Shutter Type]
Recording mode: You can take pictures using two types of shutter modes: the mechanical shutter and electronic shutter.
Mechanical shutter Electronic shutterFlash ○ –Shutter Speed (seconds) 4*1 - 1/2000 1*1 - 1/16000
Shutter soundMechanical shutter sound
+Electronic shutter sound*2
Electronic shutter sound*2
*1 Varies depending on the setting of ISO sensitivity. (→101)*2 You can use [Shutter Vol.] and [Shutter Tone] to adjust the volume of the electronic shutter sound.
(→203)
→ [Rec] → [Shutter Type]
[AUTO]
The shutter mode automatically switches based on the recording conditions and shutter speed.
• The mechanical shutter mode has higher priority over the electronic shutter mode because the mechanical shutter has less function-related restrictions when recording with a flash, etc.
[MSHTR] Uses only the mechanical shutter mode to take a picture.[ESHTR] Uses only the electronic shutter mode to take a picture.
● In the following cases, recording is performed with an electronic shutter. • [ ] is displayed on the screen • When recording 4K photos • When recording using [Post Focus] • When [Silent Mode] is set to [ON]
● If you take a picture of a moving subject using the electronic shutter, the subject in the picture may be skewed in some cases. ●When you take a picture under a fluorescent or LED lighting fixture using the electronic shutter, the recorded picture may have horizontal stripes. If you use a slower shutter speed, the horizontal stripes may be reduced. (→59)

183DVQP1242
Using Menu Functions
Menu list
[Red-Eye Removal]
Recording mode: Automatically detects red-eye and corrects still picture data when recording with flash red-eye reduction ([ ], [ ]).
→ [Rec] → [Red-Eye Removal]
Settings: [ON] / [OFF] ●When this function is set to [ON], the flash icon changes to [ ]/[ ]. ●Depending on the circumstance, it may not be possible to correct red-eye.
[ISO Limit Set]
Recording mode: You can set the upper limit of ISO sensitivity when ISO sensitivity is set to [AUTO] or [ ].
→ [Rec] → [ISO Limit Set]
Settings: [200] / [400] / [800] / [1600] / [3200] / [OFF] ●This function is not available in the following cases:
• [Clear Nightscape], [Cool Night Sky], [Warm Glowing Nightscape], [Handheld Night Shot] (Scene Guide Mode)
• During motion picture recording
[ISO Increments]
Recording mode: You can change the setting to increase ISO sensitivity by 1 EV or 1/3 EV.
→ [Rec] → [ISO Increments]
Settings: [1/3EV] / [1 EV]
184DVQP1242
Using Menu Functions
Menu list
[Extended ISO]
Recording mode: You can extend the numeric values that can be set for ISO Sensitivity.
→ [Rec] → [Extended ISO]
Settings: [ON] / [OFF] ●The setting cannot be made during 4K photo recording or recording in [Post Focus].
[Diffraction Compensation]
Recording mode: The camera raises the resolution by correcting the blurriness caused by diffraction when the aperture is closed.
→ [Rec] → [Diffraction Compensation]
Settings: [AUTO] / [OFF] ●Noise in the periphery of the picture may stand out with higher ISO sensitivity.
[Color Space]
Recording mode: You can set the method for reproducing the colours to correctly display the recorded pictures on the screens of a PC or printer, etc.
→ [Rec] → [Color Space]
[sRGB] Sets the sRGB colour space. This setting is widely used for devices such as PCs.
[AdobeRGB]Sets the AdobeRGB colour space.AdobeRGB colour space has a wider colour reproduction range than sRGB colour space. Therefore, AdobeRGB colour space is mainly used for business applications such as commercial printing.
●Select [sRGB] if you do not have expert knowledge about AdobeRGB colour space. ●The setting is fixed to [sRGB] while recording motion pictures, recording 4K photos, or recording in [Post Focus].
185DVQP1242
Using Menu Functions
Menu list
[Face Recog.]
Recording mode: The Face Recognition function recognises a face similar to a registered face and automatically adjusts focus and exposure for the face with higher priority. Even if a person you want to focus on is standing at the back or corner in a group photo, the camera will automatically recognise the person and record this person’s face clearly.
→ [Rec] → [Face Recog.]
Settings: [ON] / [OFF] / [MEMORY]
■How the Face Recognition function worksDuring recording
• The camera recognises a registered face and adjusts focus and exposure.
• When registered faces that have set names are recognised, the names are displayed (max. 3 people).
During playback • The name and age are displayed.
● [Face Recog.] functions only when Auto Focus mode is set to [ ]. ●Only the first picture of the burst recording will contain Face Recognition information. ●The name of the person recognised in the first picture is displayed in the case of group pictures. ●You can rename the person in these pictures in [REPLACE] in [Face Rec Edit] (→226). ●This function is not available in the following cases:
• [Miniature Effect] (Creative Control Mode) • During motion picture recording • When recording 4K photos • When recording using [Post Focus] • When using [Time Lapse Shot]
186DVQP1242
Using Menu Functions
Menu list
■Registering face picturesUp to 6 people’s face pictures can be registered along with such information as name and birthdate.
Use to select [MEMORY] and press [MENU/SET]
32
654
1KEN
NewUse to select [New] and press [MENU/SET]
Align the face with the guide and record • Faces of subjects other than people (e.g. pets) cannot be registered.
• When is pressed or [ ] is touched, an explanation is displayed.
Use to select the item for editing and press [MENU/SET]
[Name] Set the name. • For details on how to enter characters, refer to “Entering Text” (→50)
[Age] Set the birthdate.[Add Images] Use to select [Add] and press [MENU/SET]
• When a registered face picture is selected with cursor button, a screen to confirm deletion is displayed. Select [Yes] to delete the face picture.
Record the picture (step )
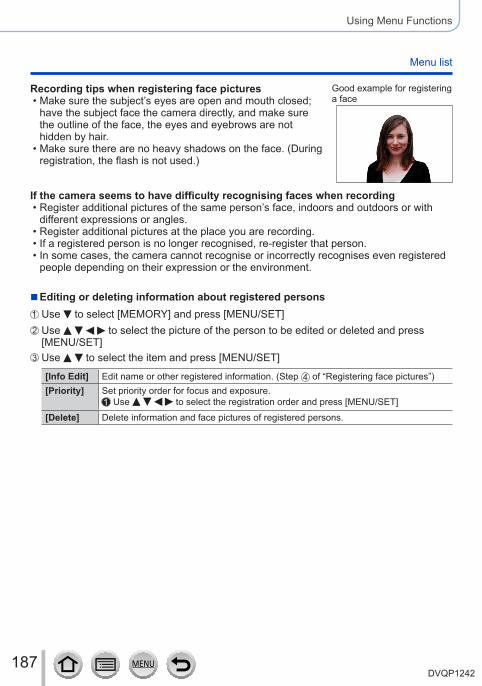
187DVQP1242
Using Menu Functions
Menu list
Recording tips when registering face pictures • Make sure the subject’s eyes are open and mouth closed; have the subject face the camera directly, and make sure the outline of the face, the eyes and eyebrows are not hidden by hair.
• Make sure there are no heavy shadows on the face. (During registration, the flash is not used.)
Good example for registering a face
If the camera seems to have difficulty recognising faces when recording • Register additional pictures of the same person’s face, indoors and outdoors or with different expressions or angles.
• Register additional pictures at the place you are recording. • If a registered person is no longer recognised, re-register that person. • In some cases, the camera cannot recognise or incorrectly recognises even registered people depending on their expression or the environment.
■Editing or deleting information about registered personsUse to select [MEMORY] and press [MENU/SET]Use to select the picture of the person to be edited or deleted and press [MENU/SET]Use to select the item and press [MENU/SET]
[Info Edit] Edit name or other registered information. (Step of “Registering face pictures”)[Priority] Set priority order for focus and exposure.
Use to select the registration order and press [MENU/SET][Delete] Delete information and face pictures of registered persons.
188DVQP1242
Using Menu Functions
Menu list
[Profile Setup]
Recording mode: You can set a name or birthday of a baby or pet before taking a picture to record the name or age in months/years in the picture.
■Setting the name and age in months/years
→ [Rec] → [Profile Setup]Settings: [ ] ([Baby1]) / [ ] ([Baby2]) / [ ] ([Pet]) / [OFF] / [SET]
Use to select [SET] and press [MENU/SET]Use to select [Baby1], [Baby2] or [Pet] and press [MENU/SET]Use to select [Age] or [Name] and press [MENU/SET]Use to select [SET] and press [MENU/SET]Enter the [Age].Enter the [Name].
• For details on how to enter characters, refer to “Entering Text” (→50)Use to select [Exit] and press [MENU/SET] to finish
■Cancelling the display of the name and age in months/yearsSet [Profile Setup] to [OFF].
● [Name] and [Age] print settings can be made on your computer using “PHOTOfunSTUDIO” software (→273), which you download from a website. Text may also be stamped onto the still picture using the camera’s [Text Stamp]. ● [Profile Setup] is not available for 4K photo recording or recording in [Post Focus]. ●You cannot record the name or age in months/years in the following cases:
• During motion picture recording • Still pictures that are taken while recording motion pictures (→159)

189DVQP1242
Using Menu Functions
Menu list
[Motion Picture] • The [Photo Style], [Filter Settings], [AFS/AFF/AFC], [Metering Mode], [Highlight Shadow], [i.Dynamic], [i.Resolution], [Diffraction Compensation], [i.Zoom], [Digital Zoom], [Stabilizer], and [Conversion] menu items are common for both [Rec] and [Motion Picture] menus. If a setting in one menu is changed, the setting with the same name in other menu will also be changed automatically.For details, refer to the corresponding item of the [Rec] menu.
• [4K Live Cropping] (→156) • [Snap Movie] (→160) • [Rec Format] (→153) • [Rec Quality] (→153) • [Exposure Mode] (→78) • [High Speed Video] (→79)
• [Continuous AF] (→155) • [Flkr Decrease] (→189) • [Silent Operation] (→80) • [Wind Noise Canceller] (→189) • [Zoom Mic] (→190)
[Flkr Decrease]
Recording mode: The shutter speed can be fixed to reduce the flicker or striping in the motion picture.
→ [Motion Picture] → [Flkr Decrease]
Settings: [1/50] / [1/60] / [1/100] / [1/120] / [OFF]
[Wind Noise Canceller]
Recording mode: This will reduce the wind noise coming into the built-in microphone while maintaining sound quality.
→ [Motion Picture] → [Wind Noise Canceller]
Settings: [HIGH] / [STANDARD] / [OFF] • [HIGH] effectively reduces the wind noise by minimising the low-pitched sound when a strong wind is detected.
• [STANDARD] extracts and reduces only the wind noise without deteriorating the sound quality.
●You may not see the full effect depending on the recording conditions.
190DVQP1242
Using Menu Functions
Menu list
[Zoom Mic]
Recording mode: Coupled to the zoom operation, it will more clearly record far sounds during enlarging image, and surrounding sounds with wide-angle.
→ [Motion Picture] → [Zoom Mic]
Settings: [ON] / [OFF] ●When set to [ON] and performing zoom, the operation sound may be recorded enhanced in accordance with the surrounding sounds. Also, audio recording level will be lower compared to when [OFF]. ●The stereo effect of the audio is reduced during enlarging image.
191DVQP1242
Using Menu Functions
Menu list
• [Cust.Set Mem.] (→81) • [Silent Mode] (→191) • [AF/AE Lock] (→99) • [AF/AE Lock Hold] (→192) • [Shutter AF] (→192) • [Half Press Release] (→192) • [Quick AF] (→192) • [Pinpoint AF Time] (→192) • [Pinpoint AF Display] (→192) • [AF Assist Lamp] (→193) • [Direct Focus Area] (→193) • [Focus/Release Priority] (→193) • [AF+MF] (→194) • [MF Assist] (→194) • [MF Assist Display] (→194) • [MF Guide] (→194) • [Peaking] (→195) • [Histogram] (→195) • [Guide Line] (→196) • [Center Marker] (→196) • [Highlight] (→196)
• [Zebra Pattern] (→197) • [Monochrome Live View] (→197) • [Constant Preview] (→197) • [Expo.Meter] (→198) • [Dial Guide] (→198) • [LVF Disp.Style] (→38) • [Monitor Disp. Style] (→38) • [Monitor Info. Disp.] (→38) • [Rec Area] (→198) • [Remaining Disp.] (→198) • [Auto Review] (→199) • [Fn Button Set] (→47) • [Zoom lever] (→199) • [Lens Position Resume] (→199) • [Lens Retraction] (→199) • [Q.MENU] (→46) • [Video Button] (→200) • [Touch Settings] (→200) • [Touch Scroll] (→200) • [Menu Guide] (→200)
[Silent Mode]Disabling the beeps and flash at the same time.
• This mode will mute beeps, set the flash to [ ] (Forced Flash Off), and disable AF Assist Lamp. The settings for the following functions are fixed: – [Shutter Type]: [ESHTR] – Flash: [ ] (Forced Flash Off) – [AF Assist Lamp]: [OFF] – [Beep Volume]: [ ] (Off) – [Shutter Vol.]: [ ] (Off)
●Even when this mode is set to [ON], the following lamps/indicators will light or flash. • Self-timer indicator • Wi-Fi connection lamp
●The operation sounds of this camera such as the lens aperture sound are not muted.
→ [Custom]
[Custom]
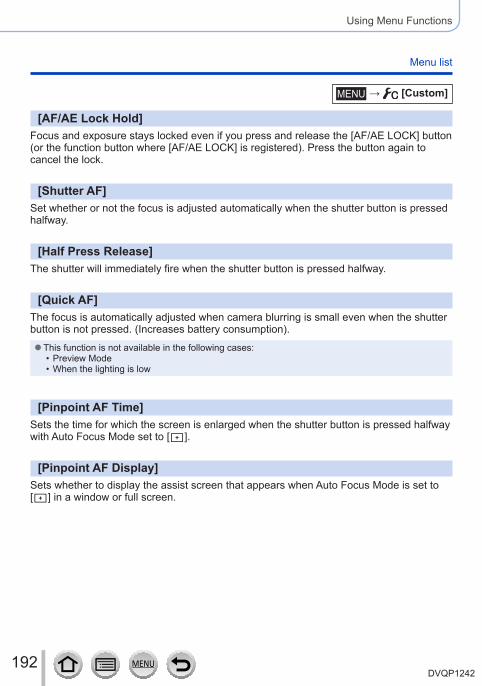
192DVQP1242
Using Menu Functions
Menu list
[AF/AE Lock Hold]Focus and exposure stays locked even if you press and release the [AF/AE LOCK] button (or the function button where [AF/AE LOCK] is registered). Press the button again to cancel the lock.
[Shutter AF]Set whether or not the focus is adjusted automatically when the shutter button is pressed halfway.
[Half Press Release]The shutter will immediately fire when the shutter button is pressed halfway.
[Quick AF]The focus is automatically adjusted when camera blurring is small even when the shutter button is not pressed. (Increases battery consumption).
●This function is not available in the following cases: • Preview Mode • When the lighting is low
[Pinpoint AF Time]Sets the time for which the screen is enlarged when the shutter button is pressed halfway with Auto Focus Mode set to [ ].
[Pinpoint AF Display]Sets whether to display the assist screen that appears when Auto Focus Mode is set to [ ] in a window or full screen.
→ [Custom]
193DVQP1242
Using Menu Functions
Menu list
→ [Custom]
[AF Assist Lamp]Illuminates the AF Assist Lamp when the shutter button is pressed halfway when it is too dark to facilitate focusing.
●The AF Assist Lamp has an effective distance of 1.5 m (4.9 feet). ●The setting is fixed to [OFF] in the following cases:
• [Distinct Scenery], [Bright Blue Sky], [Romantic Sunset Glow], [Vivid Sunset Glow], [Glistening Water], [Clear Nightscape], [Cool Night Sky], [Warm Glowing Nightscape], [Artistic Nightscape], [Handheld Night Shot] (Scene Guide Mode)
• When [Silent Mode] is set to [ON] • When [Conversion] is set to [ ] or [ ]
[Direct Focus Area]Moves the AF area or MF assist using the cursor button while recording.
●When [ ], [ ], [ ], or [ ] is selected, you can move the AF area and when [ ] is selected, you can move the enlarged position. ●Use the Quick menu (→45) to set functions to be assigned to the cursor button, such as White Balance and ISO Sensitivity. ● [Direct Focus Area] is fixed to [OFF] in the following cases:
• [Glistening Water] (Scene Guide Mode) • Creative Control Mode • When [4K Live Cropping] is set
[Focus/Release Priority]Disables recording when a subject is out of focus.
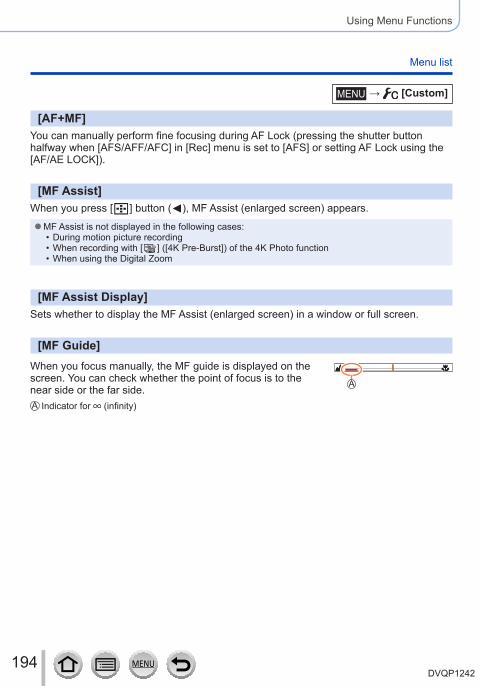
194DVQP1242
Using Menu Functions
Menu list
[AF+MF]You can manually perform fine focusing during AF Lock (pressing the shutter button halfway when [AFS/AFF/AFC] in [Rec] menu is set to [AFS] or setting AF Lock using the [AF/AE LOCK]).
[MF Assist]When you press [ ] button ( ), MF Assist (enlarged screen) appears.
●MF Assist is not displayed in the following cases: • During motion picture recording • When recording with [ ] ([4K Pre-Burst]) of the 4K Photo function • When using the Digital Zoom
[MF Assist Display]Sets whether to display the MF Assist (enlarged screen) in a window or full screen.
[MF Guide]When you focus manually, the MF guide is displayed on the screen. You can check whether the point of focus is to the near side or the far side.
Indicator for (infinity)
→ [Custom]
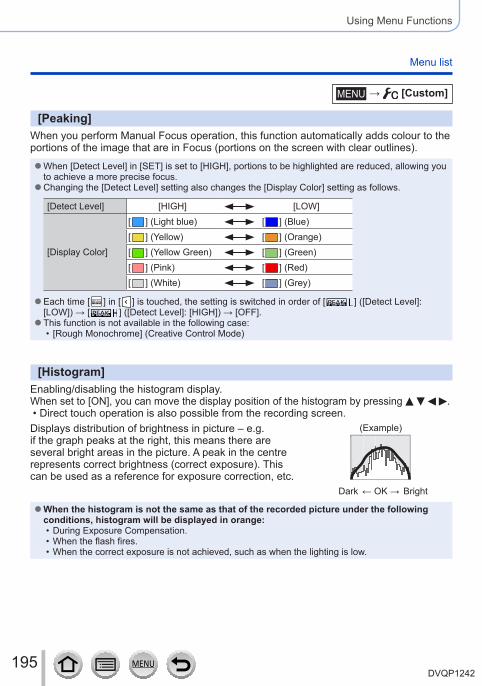
195DVQP1242
Using Menu Functions
Menu list
→ [Custom]
[Peaking]When you perform Manual Focus operation, this function automatically adds colour to the portions of the image that are in Focus (portions on the screen with clear outlines).
●When [Detect Level] in [SET] is set to [HIGH], portions to be highlighted are reduced, allowing you to achieve a more precise focus. ●Changing the [Detect Level] setting also changes the [Display Color] setting as follows.
[Detect Level] [HIGH] [LOW]
[Display Color]
[ ] (Light blue) [ ] (Blue)[ ] (Yellow) [ ] (Orange)[ ] (Yellow Green) [ ] (Green)[ ] (Pink) [ ] (Red)[ ] (White) [ ] (Grey)
●Each time [ ] in [ ] is touched, the setting is switched in order of [ ] ([Detect Level]: [LOW]) → [ ] ([Detect Level]: [HIGH]) → [OFF]. ●This function is not available in the following case:
• [Rough Monochrome] (Creative Control Mode)
[Histogram]Enabling/disabling the histogram display.When set to [ON], you can move the display position of the histogram by pressing .
• Direct touch operation is also possible from the recording screen.Displays distribution of brightness in picture – e.g. if the graph peaks at the right, this means there are several bright areas in the picture. A peak in the centre represents correct brightness (correct exposure). This can be used as a reference for exposure correction, etc.
(Example)
Dark ← OK → Bright
●When the histogram is not the same as that of the recorded picture under the following conditions, histogram will be displayed in orange:
• During Exposure Compensation. • When the flash fires. • When the correct exposure is not achieved, such as when the lighting is low.
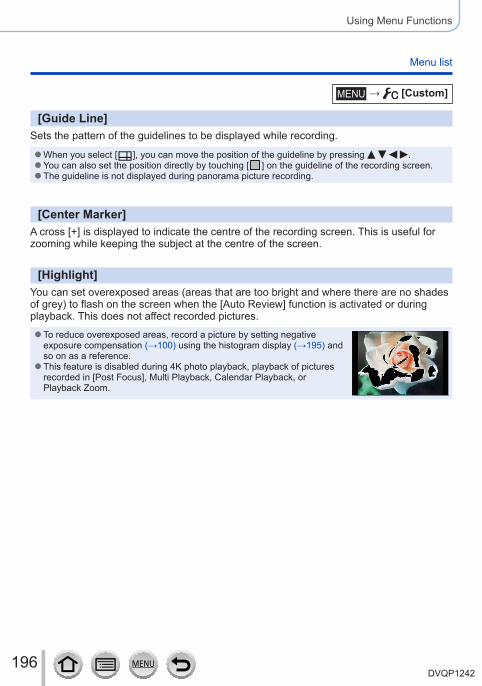
196DVQP1242
Using Menu Functions
Menu list
→ [Custom]
[Guide Line]Sets the pattern of the guidelines to be displayed while recording.
●When you select [ ], you can move the position of the guideline by pressing . ●You can also set the position directly by touching [ ] on the guideline of the recording screen. ●The guideline is not displayed during panorama picture recording.
[Center Marker]A cross [+] is displayed to indicate the centre of the recording screen. This is useful for zooming while keeping the subject at the centre of the screen.
[Highlight]You can set overexposed areas (areas that are too bright and where there are no shades of grey) to flash on the screen when the [Auto Review] function is activated or during playback. This does not affect recorded pictures.
●To reduce overexposed areas, record a picture by setting negative exposure compensation (→100) using the histogram display (→195) and so on as a reference. ●This feature is disabled during 4K photo playback, playback of pictures recorded in [Post Focus], Multi Playback, Calendar Playback, or Playback Zoom.
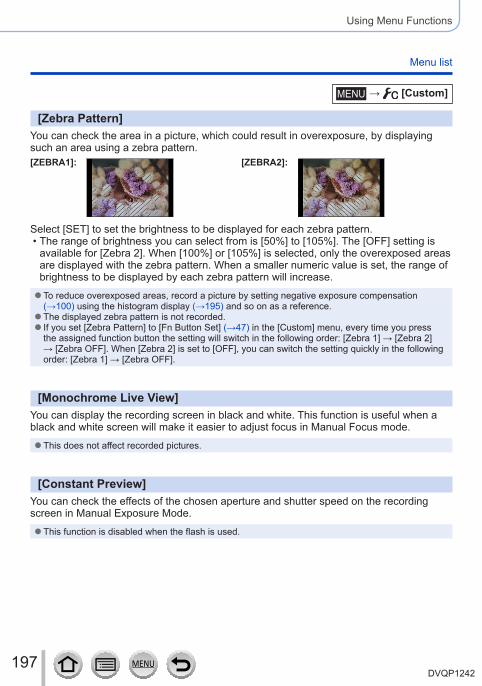
197DVQP1242
Using Menu Functions
Menu list
→ [Custom]
[Zebra Pattern]You can check the area in a picture, which could result in overexposure, by displaying such an area using a zebra pattern.[ZEBRA1]: [ZEBRA2]:
Select [SET] to set the brightness to be displayed for each zebra pattern. • The range of brightness you can select from is [50%] to [105%]. The [OFF] setting is available for [Zebra 2]. When [100%] or [105%] is selected, only the overexposed areas are displayed with the zebra pattern. When a smaller numeric value is set, the range of brightness to be displayed by each zebra pattern will increase.
●To reduce overexposed areas, record a picture by setting negative exposure compensation (→100) using the histogram display (→195) and so on as a reference. ●The displayed zebra pattern is not recorded. ● If you set [Zebra Pattern] to [Fn Button Set] (→47) in the [Custom] menu, every time you press the assigned function button the setting will switch in the following order: [Zebra 1] → [Zebra 2] → [Zebra OFF]. When [Zebra 2] is set to [OFF], you can switch the setting quickly in the following order: [Zebra 1] → [Zebra OFF].
[Monochrome Live View]You can display the recording screen in black and white. This function is useful when a black and white screen will make it easier to adjust focus in Manual Focus mode.
●This does not affect recorded pictures.
[Constant Preview]You can check the effects of the chosen aperture and shutter speed on the recording screen in Manual Exposure Mode.
●This function is disabled when the flash is used.
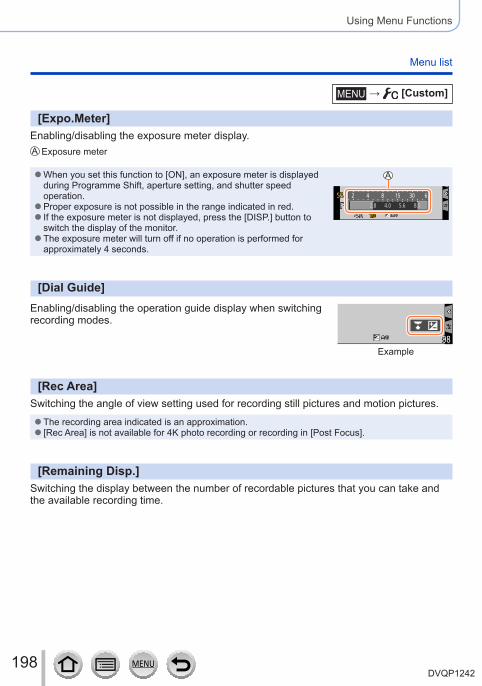
198DVQP1242
Using Menu Functions
Menu list
[Expo.Meter]Enabling/disabling the exposure meter display.
Exposure meter
●When you set this function to [ON], an exposure meter is displayed during Programme Shift, aperture setting, and shutter speed operation. ●Proper exposure is not possible in the range indicated in red. ● If the exposure meter is not displayed, press the [DISP.] button to switch the display of the monitor. ●The exposure meter will turn off if no operation is performed for approximately 4 seconds.
2 4 8 15 30 6
8.05.62.8 4.0
[Dial Guide]Enabling/disabling the operation guide display when switching recording modes.
Example
[Rec Area]Switching the angle of view setting used for recording still pictures and motion pictures.
●The recording area indicated is an approximation. ● [Rec Area] is not available for 4K photo recording or recording in [Post Focus].
[Remaining Disp.]Switching the display between the number of recordable pictures that you can take and the available recording time.
→ [Custom]
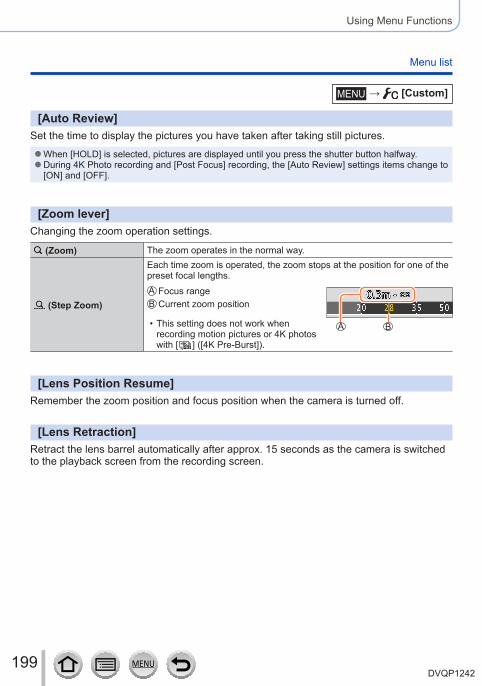
199DVQP1242
Using Menu Functions
Menu list
→ [Custom]
[Auto Review]Set the time to display the pictures you have taken after taking still pictures.
●When [HOLD] is selected, pictures are displayed until you press the shutter button halfway. ●During 4K Photo recording and [Post Focus] recording, the [Auto Review] settings items change to [ON] and [OFF].
[Zoom lever]Changing the zoom operation settings.
(Zoom) The zoom operates in the normal way.
(Step Zoom)
Each time zoom is operated, the zoom stops at the position for one of the preset focal lengths.
Focus rangeCurrent zoom position
• This setting does not work when recording motion pictures or 4K photos with [ ] ([4K Pre-Burst]).
[Lens Position Resume]Remember the zoom position and focus position when the camera is turned off.
[Lens Retraction]Retract the lens barrel automatically after approx. 15 seconds as the camera is switched to the playback screen from the recording screen.
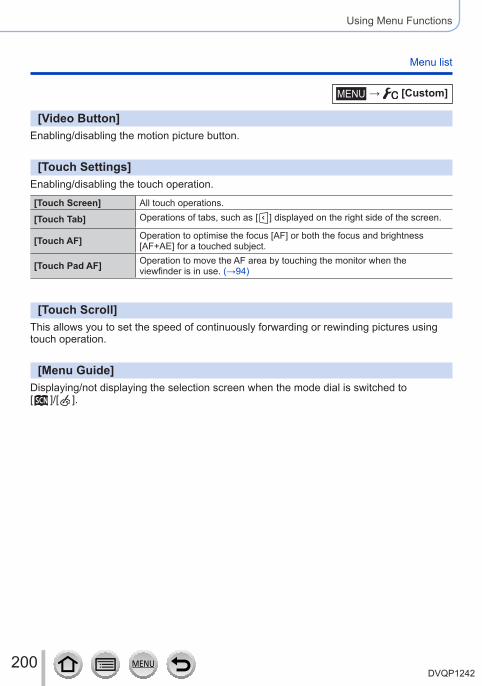
200DVQP1242
Using Menu Functions
Menu list
→ [Custom]
[Video Button]Enabling/disabling the motion picture button.
[Touch Settings]Enabling/disabling the touch operation.
[Touch Screen] All touch operations.
[Touch Tab] Operations of tabs, such as [ ] displayed on the right side of the screen.
[Touch AF] Operation to optimise the focus [AF] or both the focus and brightness [AF+AE] for a touched subject.
[Touch Pad AF] Operation to move the AF area by touching the monitor when the viewfinder is in use. (→94)
[Touch Scroll]This allows you to set the speed of continuously forwarding or rewinding pictures using touch operation.
[Menu Guide]Displaying/not displaying the selection screen when the mode dial is switched to [ ]/[ ].

201DVQP1242
Using Menu Functions
Menu list
• [Online Manual] (→201) • [Clock Set] (→30) • [World Time] (→201) • [Travel Date] (→202) • [Wi-Fi] (→202) • [Beep] (→203) • [Live View Mode] (→203) • [Monitor Display] / [Viewfinder] (→204) • [Monitor Luminance] (→204) • [Monitor Priority (Play)] (→205) • [Economy] (→205) • [USB Mode] (→206) • [TV Connection] (→206)
• [Menu Resume] (→207) • [Menu Background] (→207) • [Menu Information] (→207) • [Language] (→207) • [Version Disp.] (→207) • [Exposure Comp. Reset] (→207) • [Self Timer Auto Off] (→207) • [No.Reset] (→208) • [Reset] (→208) • [Reset Wi-Fi Settings] (→208) • [Demo Mode] (→208) • [Format] (→28)
[Online Manual]Settings: [URL display] / [QR Code display]
[World Time]Sets the times for the region where you live and your travel destination.
• You can set [Destination] after setting [Home].Settings: [Destination] / [Home]
1 Use to select [Destination] or [Home] and press [MENU/SET]
2 Use to select area and press [MENU/SET]
When [Destination] has been selected When [Home] has been selected
Current time at selected destinationCity/area nameDifference with home time
→ [Setup]
[Setup]
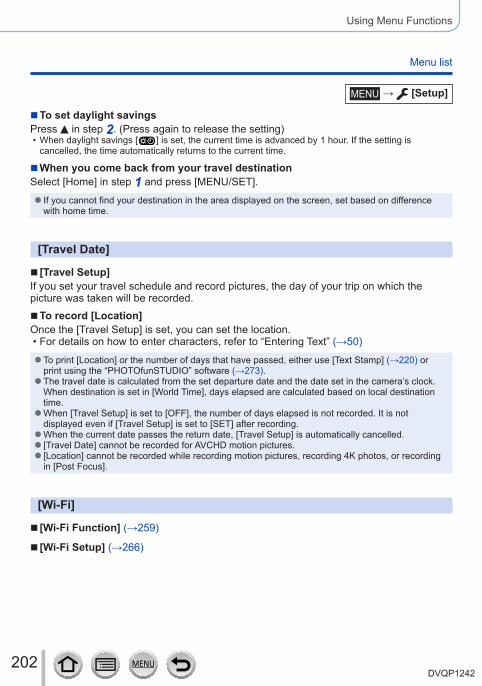
202DVQP1242
Using Menu Functions
Menu list
■To set daylight savingsPress in step 2. (Press again to release the setting)
• When daylight savings [ ] is set, the current time is advanced by 1 hour. If the setting is cancelled, the time automatically returns to the current time.
■When you come back from your travel destinationSelect [Home] in step 1 and press [MENU/SET].
● If you cannot find your destination in the area displayed on the screen, set based on difference with home time.
[Travel Date]
■ [Travel Setup]If you set your travel schedule and record pictures, the day of your trip on which the picture was taken will be recorded.
■To record [Location]Once the [Travel Setup] is set, you can set the location.
• For details on how to enter characters, refer to “Entering Text” (→50)
●To print [Location] or the number of days that have passed, either use [Text Stamp] (→220) or print using the “PHOTOfunSTUDIO” software (→273). ●The travel date is calculated from the set departure date and the date set in the camera’s clock. When destination is set in [World Time], days elapsed are calculated based on local destination time. ●When [Travel Setup] is set to [OFF], the number of days elapsed is not recorded. It is not displayed even if [Travel Setup] is set to [SET] after recording. ●When the current date passes the return date, [Travel Setup] is automatically cancelled. ● [Travel Date] cannot be recorded for AVCHD motion pictures. ● [Location] cannot be recorded while recording motion pictures, recording 4K photos, or recording in [Post Focus].
[Wi-Fi]
■ [Wi-Fi Function] (→259)
■ [Wi-Fi Setup] (→266)
→ [Setup]
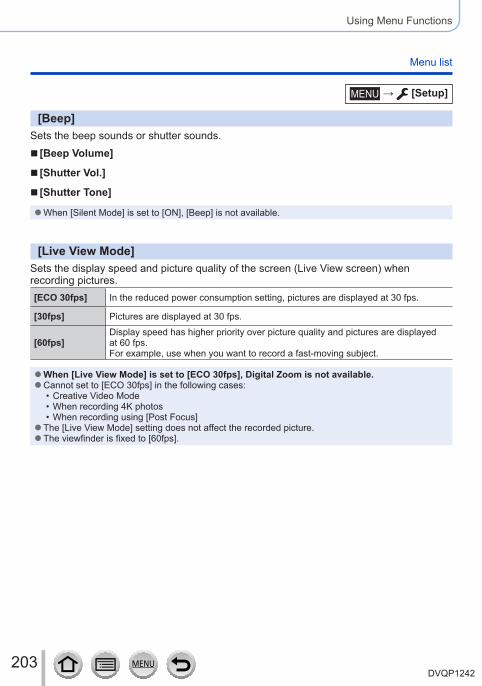
203DVQP1242
Using Menu Functions
Menu list
[Beep]Sets the beep sounds or shutter sounds.
■ [Beep Volume]
■ [Shutter Vol.]
■ [Shutter Tone]
●When [Silent Mode] is set to [ON], [Beep] is not available.
[Live View Mode]Sets the display speed and picture quality of the screen (Live View screen) when recording pictures.[ECO 30fps] In the reduced power consumption setting, pictures are displayed at 30 fps.
[30fps] Pictures are displayed at 30 fps.
[60fps]Display speed has higher priority over picture quality and pictures are displayed at 60 fps.For example, use when you want to record a fast-moving subject.
●When [Live View Mode] is set to [ECO 30fps], Digital Zoom is not available. ●Cannot set to [ECO 30fps] in the following cases:
• Creative Video Mode • When recording 4K photos • When recording using [Post Focus]
●The [Live View Mode] setting does not affect the recorded picture. ●The viewfinder is fixed to [60fps].
→ [Setup]

204DVQP1242
Using Menu Functions
Menu list
[Monitor Display] / [Viewfinder]Adjust brightness and colour of the monitor or viewfinder.
[Brightness] Adjusts the brightness.
[Contrast] Adjusts the contrast.
[Saturation] Adjusts the vividness of colours.
[Red Tint] Adjusts red hues.
[Blue Tint] Adjusts blue hues.
● It will adjust the monitor when the monitor is in use, and the viewfinder when the viewfinder is in use. ●Some subjects may look different from their actual appearance, but the recorded picture will not be affected.
[Monitor Luminance]Sets the monitor brightness according to the ambient light level.
The brightness is adjusted automatically depending on how bright it is around the camera.
The brightness is increased.
The brightness is standard.
The brightness is decreased.
●Some subjects may look different from their actual appearance, but the recorded picture will not be affected. ● [ ] returns to ordinary brightness if there is no operation for 30 seconds when recording. (Press any button or touch the screen to make the screen brighter again.) ●Setting [ ] or [ ] reduces the operating time. ●Cannot select [ ] during playback. ●When the AC adaptor (optional) and DC coupler (optional) are used, the initial setting is [ ].
→ [Setup]
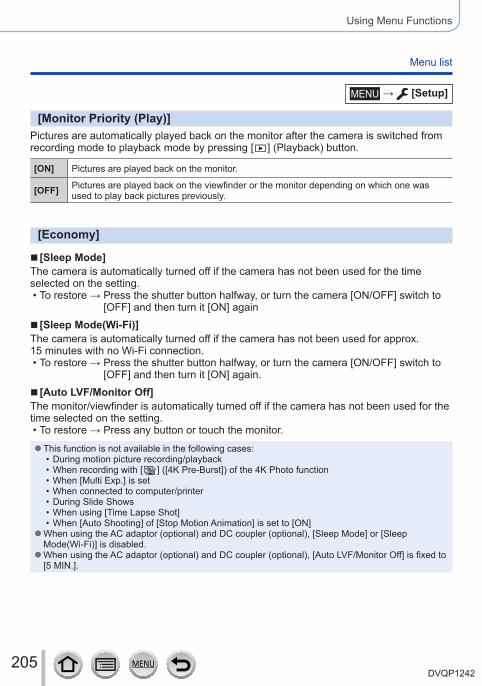
205DVQP1242
Using Menu Functions
Menu list
[Monitor Priority (Play)]Pictures are automatically played back on the monitor after the camera is switched from recording mode to playback mode by pressing [ ] (Playback) button.
[ON] Pictures are played back on the monitor.
[OFF] Pictures are played back on the viewfinder or the monitor depending on which one was used to play back pictures previously.
[Economy]
■ [Sleep Mode]The camera is automatically turned off if the camera has not been used for the time selected on the setting.
• To restore → Press the shutter button halfway, or turn the camera [ON/OFF] switch to [OFF] and then turn it [ON] again
■ [Sleep Mode(Wi-Fi)]The camera is automatically turned off if the camera has not been used for approx. 15 minutes with no Wi-Fi connection.
• To restore → Press the shutter button halfway, or turn the camera [ON/OFF] switch to [OFF] and then turn it [ON] again.
■ [Auto LVF/Monitor Off]The monitor/viewfinder is automatically turned off if the camera has not been used for the time selected on the setting.
• To restore → Press any button or touch the monitor.
●This function is not available in the following cases: • During motion picture recording/playback • When recording with [ ] ([4K Pre-Burst]) of the 4K Photo function • When [Multi Exp.] is set • When connected to computer/printer • During Slide Shows • When using [Time Lapse Shot] • When [Auto Shooting] of [Stop Motion Animation] is set to [ON]
●When using the AC adaptor (optional) and DC coupler (optional), [Sleep Mode] or [Sleep Mode(Wi-Fi)] is disabled. ●When using the AC adaptor (optional) and DC coupler (optional), [Auto LVF/Monitor Off] is fixed to [5 MIN.].
→ [Setup]
206DVQP1242
Using Menu Functions
Menu list
[USB Mode]Select communication method for when connecting camera to a computer or printer with USB connection cable (supplied).
[Select on connection] Select communication method each time you connect to a computer or PictBridge-compatible printer.
[PictBridge(PTP)] Select when connecting to a PictBridge-compatible printer.
[PC] Select when connecting to a computer.
[TV Connection]
■ [HDMI Mode (Play)]Set the format for the output.
[AUTO] Automatically sets the output resolution based on information from a connected TV.
[4K] Outputs pictures with a output resolution of 3840×2160 pixels using a progressive scan method for the number of effective scanning lines (2,160 lines).
[1080p] Outputs pictures using a progressive scan method for the number of effective scanning lines (1,080 lines).
[1080i] Outputs pictures using an interlace scan method for the number of effective scanning lines (1,080 lines).
[720p] Outputs pictures using a progressive scan method for the number of effective scanning lines (720 lines).
[576p]Outputs pictures using a progressive scan method for the number of effective scanning lines (576 lines).Depending on the connected TV, 480 available scan lines may be used for output.
● If no image appears on the TV with [AUTO], switch the setting to a constant setting other than [AUTO] to set a format supported by your TV. (Please read the operating instructions for the TV.)
■ [VIERA Link]If you select [ON], operations of the camera and the VIERA Link compatible equipment connected to the camera with an HDMI micro cable are automatically linked, enabling you to control the camera with the remote control of the VIERA Link compatible equipment. (→271)
→ [Setup]
207DVQP1242
Using Menu Functions
Menu list
[Menu Resume]Save the last operated menu position.
[Menu Background]Set the background colour for the menu screen.
[Menu Information]Explanations of the menu items and settings are displayed on the menu screen.
[Language]Set the language displayed on the screen.
● If you set a different language by mistake, select [ ] from the menu icons to set the desired language.
[Version Disp.]Check the firmware version of the camera.
●When you press [MENU/SET] while the version is displayed, software information for this unit, such as the licence, is displayed.
[Exposure Comp. Reset]If the recording mode is changed or the camera is turned off, the exposure compensation setting is reset.
[Self Timer Auto Off]The self-timer is cancelled if the unit is turned off.
→ [Setup]
208DVQP1242
Using Menu Functions
Menu list
[No.Reset]Reset picture file numbers. (The folder number is updated and the file number starts from 0001.)
• To reset folder number to 100: First, format the card, and reset the file numbers using [No.Reset]. Then, select [Yes] on the folder number reset screen.
●A folder number between 100 and 999 can be assigned. Numbers cannot be reset once folder number reaches 999. In this case, save all necessary pictures to your computer, and format the card (→28).
[Reset]The following settings are reset to the default:
■Recording settings (except for [Face Recog.] and [Profile Setup] settings) and drive mode
■Recording settings ([Face Recog.] and [Profile Setup] settings)
■Setup/custom settings
●When the setup/custom settings are reset, the following settings are also reset: • The [World Time] setting • The [Travel Date] setting (Departure date, Return date, [Location]) • The settings of [Rotate Disp.] and [Picture Sort] in the [Playback] menu
●Folder numbers and clock settings will not be reset.
[Reset Wi-Fi Settings]Returns [Wi-Fi] settings to default settings.(Excluding [LUMIX CLUB])
[Demo Mode]You can try focusing, peaking, etc. in [Post Focus] (→117), with the image picture.
→ [Setup]
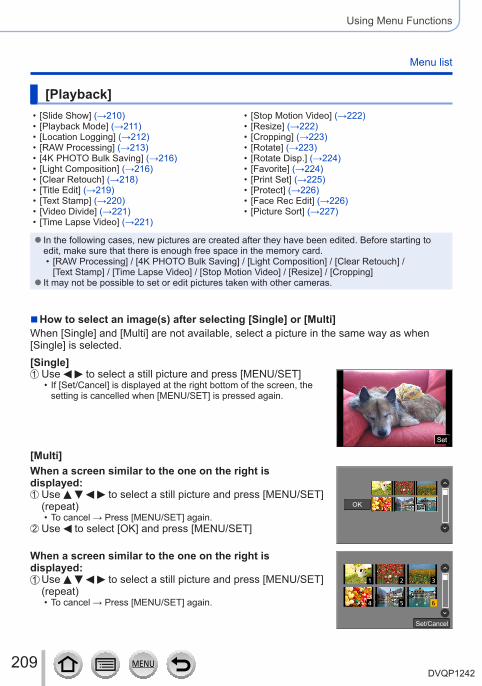
209DVQP1242
Using Menu Functions
Menu list
[Playback] • [Slide Show] (→210) • [Playback Mode] (→211) • [Location Logging] (→212) • [RAW Processing] (→213) • [4K PHOTO Bulk Saving] (→216) • [Light Composition] (→216) • [Clear Retouch] (→218) • [Title Edit] (→219) • [Text Stamp] (→220) • [Video Divide] (→221) • [Time Lapse Video] (→221)
• [Stop Motion Video] (→222) • [Resize] (→222) • [Cropping] (→223) • [Rotate] (→223) • [Rotate Disp.] (→224) • [Favorite] (→224) • [Print Set] (→225) • [Protect] (→226) • [Face Rec Edit] (→226) • [Picture Sort] (→227)
● In the following cases, new pictures are created after they have been edited. Before starting to edit, make sure that there is enough free space in the memory card.
• [RAW Processing] / [4K PHOTO Bulk Saving] / [Light Composition] / [Clear Retouch] / [Text Stamp] / [Time Lapse Video] / [Stop Motion Video] / [Resize] / [Cropping]
● It may not be possible to set or edit pictures taken with other cameras.
■How to select an image(s) after selecting [Single] or [Multi]When [Single] and [Multi] are not available, select a picture in the same way as when [Single] is selected.[Single]
Use to select a still picture and press [MENU/SET] • If [Set/Cancel] is displayed at the right bottom of the screen, the setting is cancelled when [MENU/SET] is pressed again.
SetSet
[Multi]When a screen similar to the one on the right is displayed:
OKUse to select a still picture and press [MENU/SET] (repeat)
• To cancel → Press [MENU/SET] again.Use to select [OK] and press [MENU/SET]
When a screen similar to the one on the right is displayed:
2 3
4 5 6
1
Set/Cancel
Use to select a still picture and press [MENU/SET] (repeat)
• To cancel → Press [MENU/SET] again.

210DVQP1242
Using Menu Functions
Menu list
[Slide Show]Automatically plays back recorded pictures, one after another. You can organise slide shows composed of only still pictures or only motion pictures. Recommended when viewing on TV screen.
→ [Playback] → [Slide Show]
1 Use to select the item and press [MENU/SET] • If you select [Video Only], 4K burst files and pictures recorded using [Post Focus] will also be played back.
• Only an in-focus representative image will be played back from pictures recorded using [Post Focus].
2 Use to select [Start] and press [MENU/SET]
■Operations during Slide Show
Operation Touch operation DescriptionPlay/Pause
Previous
Stop
Next
/ Volume down / Volume up
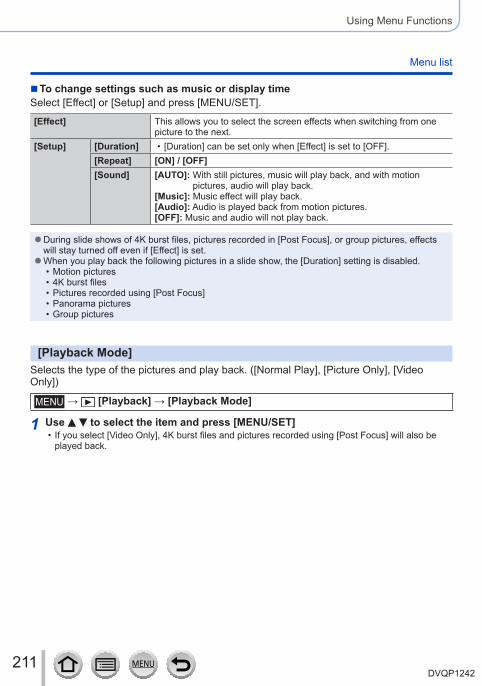
211DVQP1242
Using Menu Functions
Menu list
■To change settings such as music or display timeSelect [Effect] or [Setup] and press [MENU/SET].
[Effect] This allows you to select the screen effects when switching from one picture to the next.
[Setup] [Duration] • [Duration] can be set only when [Effect] is set to [OFF].[Repeat] [ON] / [OFF][Sound] [AUTO]: With still pictures, music will play back, and with motion
pictures, audio will play back.[Music]: Music effect will play back.[Audio]: Audio is played back from motion pictures.[OFF]: Music and audio will not play back.
●During slide shows of 4K burst files, pictures recorded in [Post Focus], or group pictures, effects will stay turned off even if [Effect] is set. ●When you play back the following pictures in a slide show, the [Duration] setting is disabled.
• Motion pictures • 4K burst files • Pictures recorded using [Post Focus] • Panorama pictures • Group pictures
[Playback Mode]Selects the type of the pictures and play back. ([Normal Play], [Picture Only], [Video Only])
→ [Playback] → [Playback Mode]
1 Use to select the item and press [MENU/SET] • If you select [Video Only], 4K burst files and pictures recorded using [Post Focus] will also be played back.
212DVQP1242
Using Menu Functions
Menu list
[Location Logging]After you send location information (latitude and longitude) obtained by your smartphone/tablet to this unit, you can write this information on pictures using the unit.
PreparationSend location information to this unit from your smartphone/tablet. (→239)
• You must install “Panasonic Image App” on your smartphone/tablet. (→232)
→ [Playback] → [Location Logging]
1 Use to select [Add Location Data] and press [MENU/SET]
2 Use to select a period for writing location information, and press [MENU/SET]
• [ ] is displayed for pictures that have location information written to it.
■Abort writing location informationPress [MENU/SET] while location information is being written
• [ ] is displayed for the period of the abort operation. If selected again while [ ] is displayed, writing location information will resume where it left off.
■Delete received location informationUse to select [Delete Location Data] and press [MENU/SET]Use to select a period for deleting location information, and press [MENU/SET]
●The location information cannot be written in the following cases: • Pictures that were recorded after you sent the location information (→239) • Pictures that already have location information • Motion pictures recorded in [AVCHD] format
When you use your smartphone/tablet as a remote controller for this unit, you can write the location information on pictures using the smartphone/tablet. (→240)

213DVQP1242
Using Menu Functions
Menu list
[RAW Processing]You can use the camera to develop still pictures that were recorded in RAW format. The created still pictures are saved in JPEG format.
→ [Playback] → [RAW Processing]
1 Press to select RAW file and press [MENU/SET]
2 Press to select the item and then press [MENU/SET] to set
• The following items can be set. The settings used during recording are applied at the time of setting.
• The setting methods vary depending on the item. For details, refer to “Setting each item” (→214).
[White Balance]You can select White Balance to make adjustments. When you select an item with [ ], you can develop the pictures using the same settings that were applied for recording.
[Exposure Comp.] You can perform Exposure Compensation in the range from –1 EV to +1 EV.
[Photo Style] You can select the [Photo Style] effects ([Standard], [Vivid], [Natural], [Monochrome], [Scenery], or [Portrait]).
[i.Dynamic] You can select the [i.Dynamic] settings ([HIGH], [STANDARD], [LOW], or [OFF]).
[Contrast] You can adjust the contrast.[Highlight] You can adjust the brightness of a highlighted area.[Shadow] You can adjust the brightness of a shadowed area.[Saturation] / [Color Tone]
You can adjust the saturation. (You can adjust the colouring when [Monochrome] is selected for [Photo Style].)
[Filter Effect] You can select a Filter effect. (Only when [Monochrome] is selected for [Photo Style].)
[Noise Reduction] You can set noise reduction.
[i.Resolution] You can select the [i.Resolution] settings ([HIGH], [STANDARD], [LOW], [EXTENDED], or [OFF]).
[Sharpness] You can adjust the impression of resolution.
[Setup]
Use to select items and press [MENU/SET] to perform the following operations.[Reinstate Adjustments]: You can restore the settings to the ones used
during recording.[Color Space]: You can select [Color Space] from either [sRGB] or
[AdobeRGB].[Picture Size]: You can select the picture size ([L], [M], or [S]) of a JPEG
file when saving pictures.
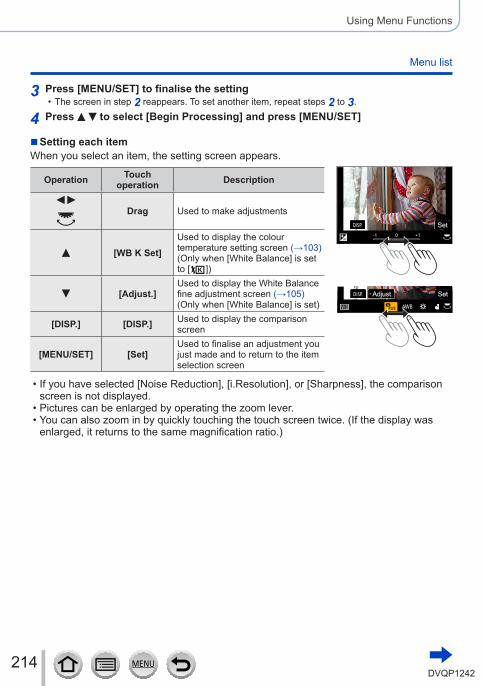
214DVQP1242
Using Menu Functions
Menu list
3 Press [MENU/SET] to finalise the setting • The screen in step 2 reappears. To set another item, repeat steps 2 to 3.
4 Press to select [Begin Processing] and press [MENU/SET]
■Setting each itemWhen you select an item, the setting screen appears.
Operation Touch operation Description
Drag Used to make adjustments
[WB K Set]Used to display the colour temperature setting screen (→103)(Only when [White Balance] is set to [ ])
[Adjust.]Used to display the White Balance fine adjustment screen (→105)(Only when [White Balance] is set)
[DISP.] [DISP.] Used to display the comparison screen
[MENU/SET] [Set]Used to finalise an adjustment you just made and to return to the item selection screen
SetSet
SetSetAdjust.Adjust.
• If you have selected [Noise Reduction], [i.Resolution], or [Sharpness], the comparison screen is not displayed.
• Pictures can be enlarged by operating the zoom lever. • You can also zoom in by quickly touching the touch screen twice. (If the display was enlarged, it returns to the same magnification ratio.)
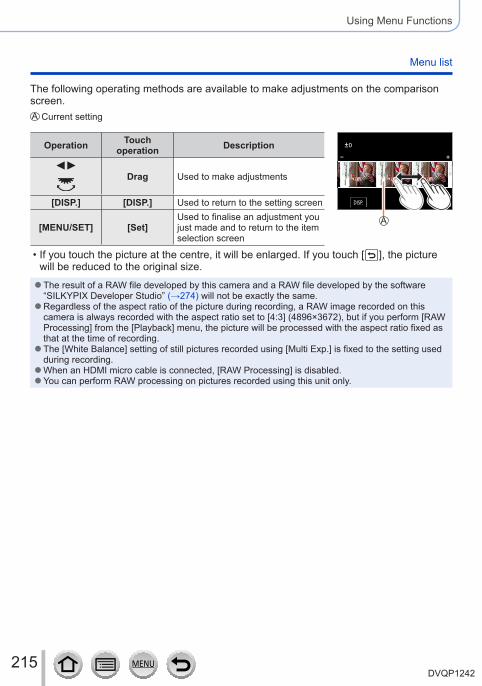
215DVQP1242
Using Menu Functions
Menu list
The following operating methods are available to make adjustments on the comparison screen.
Current setting
Operation Touch operation Description
Drag Used to make adjustments
[DISP.] [DISP.] Used to return to the setting screen
[MENU/SET] [Set]Used to finalise an adjustment you just made and to return to the item selection screen
SetSet
• If you touch the picture at the centre, it will be enlarged. If you touch [ ], the picture will be reduced to the original size.
●The result of a RAW file developed by this camera and a RAW file developed by the software “SILKYPIX Developer Studio” (→274) will not be exactly the same. ●Regardless of the aspect ratio of the picture during recording, a RAW image recorded on this camera is always recorded with the aspect ratio set to [4:3] (4896×3672), but if you perform [RAW Processing] from the [Playback] menu, the picture will be processed with the aspect ratio fixed as that at the time of recording. ●The [White Balance] setting of still pictures recorded using [Multi Exp.] is fixed to the setting used during recording. ●When an HDMI micro cable is connected, [RAW Processing] is disabled. ●You can perform RAW processing on pictures recorded using this unit only.

216DVQP1242
Using Menu Functions
Menu list
[4K PHOTO Bulk Saving]You can bulk save 5 seconds’ worth of 4K recording from a 4K burst file.
→ [Playback] → [4K PHOTO Bulk Saving]
1 Use to select the 4K burst files and press [MENU/SET] • If the burst time is 5 seconds or less, all the frames can be saved as a picture.
2 Select the first frame to be bulk saved as a picture • The picture will be saved in JPEG format as a single burst picture group (→168).
[Light Composition]Select multiple frames from 4K burst files that you wish to combine. Parts of the image that are brighter than the preceding frame will be superimposed on the preceding frame to combine the frames into one picture.
→ [Playback] → [Light Composition]
1 Use to select the 4K burst files and press [MENU/SET]
2 Choose the combining method and press [MENU/SET]
■ [Composite Merging]: Selecting frames to combineDrag the slide bar or use to select the frames to combinePress [MENU/SET]
• The selected frames are remembered, and the display goes to the preview screen.
• Use to select items and press [MENU/SET] to perform the following operations. – [Next]: Lets you select more frames for combining. – [Reselect]: Discards the frame selected immediately before
and lets you select a different image.Repeat steps - to select more frames to combine (up to 40 frames)Press to select [Save], and then press [MENU/SET]
217DVQP1242
Using Menu Functions
Menu list
■ [Range Merging]: Selecting a range to combineSelect the frame of the first picture and then press [MENU/SET]
• The selection method is the same as in step of [Composite Merging] setting.Select the frame of the last picture and then press [MENU/SET]
3 Select [Yes] at the confirmation screen and press [MENU/SET] • Pictures are saved in JPEG format. Recording information (Exif information) of the first frame such as shutter speed, aperture, and ISO sensitivity are also registered.
218DVQP1242
Using Menu Functions
Menu list
[Clear Retouch]You can erase unnecessary parts recorded on the pictures taken.
• The erasure operation can only be performed by touching. [Clear Retouch] automatically enables the touch operation.
→ [Playback] → [Clear Retouch]
1 Use to select a still picture and press [MENU/SET]
SetSetUndoUndo
SCALINGSCALING
REMOVEREMOVE
2 Drag your finger over the part you want to erase • The parts to be erased are coloured. • Touching [Undo] will return the coloured part back to its previous state.
Erasing details (enlarging the display)
SetSetUndoUndo
SCALINGSCALING
REMOVEREMOVE
Touch [SCALING] • On the touch screen, pinch out your two fingers to zoom in, and pinch in your two fingers to zoom out (→40).
• Dragging the screen allows you to move the enlarged part.Touch [REMOVE]
• This will bring you back to the operation of dragging your finger over the part you want to erase. The part you want to erase can be dragged even while the picture is enlarged.
3 Touch [Set]
4 Touch [Save] or press [MENU/SET]
●Pictures may appear unnatural because the background of deleted parts is artificially created. ●For group pictures, perform [Clear Retouch] on each picture. (They cannot be edited at once.) ●When [Clear Retouch] is performed on group pictures, they are saved as new pictures separate from the original ones. ●Not available when the viewfinder is in use. ●This function is not available in the following cases:
• Panorama pictures • Motion pictures • 4K burst files • Pictures recorded using [Post Focus] • Still pictures recorded with the [Quality] setting [ ]
219DVQP1242
Using Menu Functions
Menu list
[Title Edit]You can enter characters (titles etc.) on a recorded picture. After text has been registered, it can be stamped in prints using [Text Stamp] (→220).
→ [Playback] → [Title Edit]
1 Select a still picture (→209) • [ ] is displayed for pictures with texts already stamped.
2 Enter characters • For details on how to enter characters, refer to “Entering Text” (→50) • To delete texts, delete all the characters in the character input screen.
●You can print out texts using the “PHOTOfunSTUDIO” software (→273). ●You can set up to 100 pictures at one time with [Multi]. ●This function is not available in the following cases:
• Motion pictures • 4K burst files • Pictures recorded using [Post Focus] • Still pictures recorded with the [Quality] setting [ ], [ ] or [ ]
220DVQP1242
Using Menu Functions
Menu list
[Text Stamp]You can stamp the recording date and time, names, travel destination, travel dates, etc. on the recorded still pictures.
→ [Playback] → [Text Stamp]
1 Select a still picture (→209) • [ ] appears on screen if the picture is stamped with text.
2 Use to select [Set] and press [MENU/SET]
[Shooting Date] [W/O TIME]: Stamp recording date[WITH TIME]: Stamp recording date and time
[Name] : Stamp name registered in Face Recognition : Stamp name registered in [Profile Setup]
[Location] Stamp location registered in [Setup] menu’s [Travel Date][Travel Date] Stamp number of days that have elapsed since the travel date set in [Setup]
menu’s [Travel Date][Title] Stamp text registered in [Title Edit]
3 Press [Q.MENU/ ] button
4 Use to select [OK] and press [MENU/SET]
●Do not request date printing in store or make date printing on printer for still pictures with date stamps. (Date printing may be overlapped.) ●You can set up to 100 pictures at one time with [Multi]. ●The picture quality may be coarser. ● If you stamp text on the pictures in a group, those pictures are saved as new pictures. ●This function is not available in the following cases:
• Motion pictures • 4K burst files • Pictures recorded using [Post Focus] • Still pictures recorded with the [Quality] setting [ ] • Panorama pictures • Still pictures that other texts had already been stamped • Still pictures taken without setting clock

221DVQP1242
Using Menu Functions
Menu list
[Video Divide]A single motion picture can be split into 2 parts. This is convenient when you want to keep just the necessary scenes, or if you wish to delete unnecessary scenes to increase free space on your card, such as when travelling.
→ [Playback] → [Video Divide]
1 Use to select a motion picture to split and press [MENU/SET]
2 Press at where you want to split a motion picture to pause it
• If you press while paused, you can make finer adjustments to the splitting positions in a motion picture.
3 Press • The original motion picture that was split does not remain. (There will only be the 2 motion pictures that were created after the split.)
●During dividing, do not turn off the camera or remove the card or battery. If you do so, the motion picture may be deleted. ●Motion pictures cannot be divided at a location close to the start or end of the motion picture. ●This function is not available in the following case:
• Motion pictures with a short recording time
[Time Lapse Video]You can create a motion picture from the pictures in a group that was recorded using [Time Lapse Shot]. The motion picture you created is saved in the MP4 recording format.
→ [Playback] → [Time Lapse Video]
1 Use to select the [Time Lapse Shot] picture group and press [MENU/SET]
2 Create a motion picture after selecting a production method • For details, refer to step 4 and the subsequent steps (→130). For details on the motion picture you created, refer to (→130).
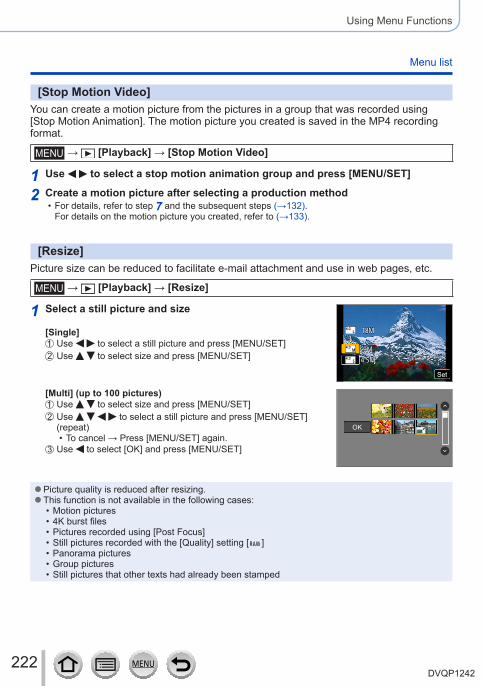
222DVQP1242
Using Menu Functions
Menu list
[Stop Motion Video]You can create a motion picture from the pictures in a group that was recorded using [Stop Motion Animation]. The motion picture you created is saved in the MP4 recording format.
→ [Playback] → [Stop Motion Video]
1 Use to select a stop motion animation group and press [MENU/SET]
2 Create a motion picture after selecting a production method • For details, refer to step 7 and the subsequent steps (→132). For details on the motion picture you created, refer to (→133).
[Resize]Picture size can be reduced to facilitate e-mail attachment and use in web pages, etc.
→ [Playback] → [Resize]
1 Select a still picture and size
[Single]Use to select a still picture and press [MENU/SET]Use to select size and press [MENU/SET]
SetSet
[Multi] (up to 100 pictures)Use to select size and press [MENU/SET]Use to select a still picture and press [MENU/SET] (repeat)
• To cancel → Press [MENU/SET] again.Use to select [OK] and press [MENU/SET]
OK
●Picture quality is reduced after resizing. ●This function is not available in the following cases:
• Motion pictures • 4K burst files • Pictures recorded using [Post Focus] • Still pictures recorded with the [Quality] setting [ ] • Panorama pictures • Group pictures • Still pictures that other texts had already been stamped
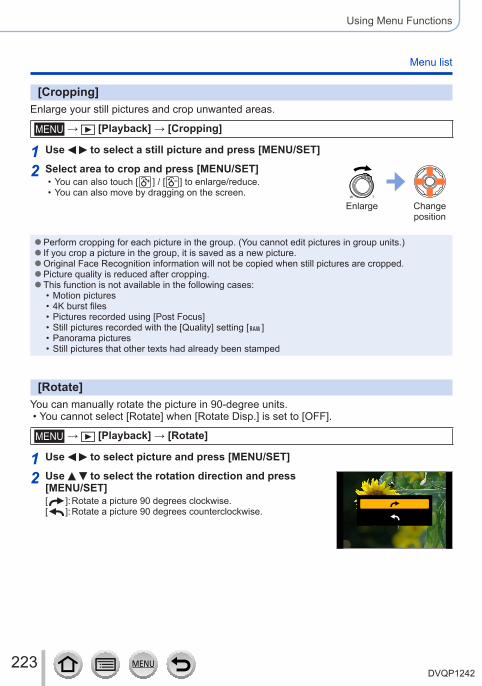
223DVQP1242
Using Menu Functions
Menu list
[Cropping]Enlarge your still pictures and crop unwanted areas.
→ [Playback] → [Cropping]
1 Use to select a still picture and press [MENU/SET]
2 Select area to crop and press [MENU/SET] • You can also touch [ ] / [ ] to enlarge/reduce. • You can also move by dragging on the screen.
Enlarge Change position
●Perform cropping for each picture in the group. (You cannot edit pictures in group units.) ● If you crop a picture in the group, it is saved as a new picture. ●Original Face Recognition information will not be copied when still pictures are cropped. ●Picture quality is reduced after cropping. ●This function is not available in the following cases:
• Motion pictures • 4K burst files • Pictures recorded using [Post Focus] • Still pictures recorded with the [Quality] setting [ ] • Panorama pictures • Still pictures that other texts had already been stamped
[Rotate]You can manually rotate the picture in 90-degree units.
• You cannot select [Rotate] when [Rotate Disp.] is set to [OFF].
→ [Playback] → [Rotate]
1 Use to select picture and press [MENU/SET]
2 Use to select the rotation direction and press [MENU/SET][ ]: Rotate a picture 90 degrees clockwise.[ ]: Rotate a picture 90 degrees counterclockwise.
224DVQP1242
Using Menu Functions
Menu list
[Rotate Disp.]This mode allows you to display pictures vertically if they were recorded holding the camera vertically.
→ [Playback] → [Rotate Disp.] → [ON]
●When you play back pictures on a PC, they cannot be displayed in the rotated direction unless the OS or software is compatible with Exif. Exif is a file format for still pictures which allows recording information, etc. to be added. It was established by “JEITA (Japan Electronics and Information Technology Industries Association)”.
[Favorite]You can label your favourite pictures with a star [ ]. (This lets you collectively delete all pictures except your favourites when deleting pictures.)
→ [Playback] → [Favorite]
1 Select picture (→209)
■To clear allSelect [Favorite] → [Cancel] → [Yes], and then press [MENU/SET]
●Up to 999 pictures can be set. ●Only when [Playback Mode] is set to [Normal Play], you can select [Cancel]. ●This function is not available in the following case:
• Still pictures recorded with the [Quality] setting [ ]
225DVQP1242
Using Menu Functions
Menu list
[Print Set]Picture/picture no./date printing settings can be made for when printing with DPOF print-compatible shops or printers. (Contact the local photo printing store or read operating instructions of the printer to check if DPOF is supported.)
→ [Playback] → [Print Set]
1 Select a still picture (→209)
2 Use to set number of still pictures and press [MENU/SET] (up to 999 pictures)(Repeat steps 1 and 2 when using [Multi])
• Date print setting/release → Press .
■To clear allSelect [Print Set] → [Cancel] → [Yes], and then press [MENU/SET]
●When you have performed [Print Set] for pictures in a group, the setting for how many prints to make applies to all pictures in the group, and the number of prints set and total number of prints are shown on the print settings icon of the first picture. If the total number of pictures is 1,000 or higher, [999+] is displayed. ●Date print setting cannot be made for pictures with a [Text Stamp] applied. ●Depending on the type of printer, the printer settings may take priority over camera settings. ●This function is not available in the following cases:
• Motion pictures • 4K burst files • Pictures recorded using [Post Focus] • Still pictures recorded with the [Quality] setting [ ]
226DVQP1242
Using Menu Functions
Menu list
[Protect]Set protection to disable picture deletion. Prevents deletion of important pictures.
→ [Playback] → [Protect]
1 Select picture (→209)
■To clear allSelect [Protect] → [Cancel] → [Yes], and then press [MENU/SET]
When you set the write-protect switch on the card to the “LOCK” position, the picture is not erased.
●The picture is erased when formatting, even if it is protected. ●May not be effective when using other devices.
[Face Rec Edit]Edit or delete the recognition information for pictures with incorrect information.
→ [Playback] → [Face Rec Edit] → [REPLACE] or [DELETE]
1 Use to select picture and press [MENU/SET]
2 Use to select a person and press [MENU/SET] • If [DELETE], go to step 4.
3 Use to select the person to replace for another and press [MENU/SET]
4 Use to select [Yes] and press [MENU/SET]
●When Face Recognition information is deleted, it cannot be restored. ●Edit the Face Recognition information in group units for a picture group. (You cannot edit the information for each picture in a group.) ●You can edit only the first picture in a group.
227DVQP1242
Using Menu Functions
Menu list
[Picture Sort]You can set the display sequence used for playing back pictures on this unit.
→ [Playback] → [Picture Sort]
[FILE NAME]Displays pictures in the folder name or file name sequence. This display format allows you to find the storage location of a picture on a card more easily.
[DATE/TIME]Displays pictures according to the date and time that the pictures were taken in chronological order. When the pictures are taken using several cameras and stored on the same card, this display format allows you to find a specific picture more easily.
●Pictures may not be displayed according to the [DATE/TIME] sequence immediately after a card is inserted into this unit. In that case, wait a while, and the pictures will be displayed in the [DATE/TIME] sequence.
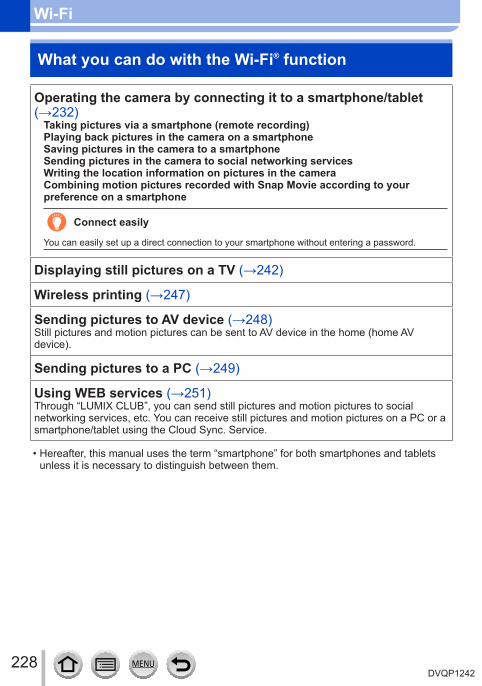
228DVQP1242
Wi-Fi
What you can do with the Wi-Fi® function
Operating the camera by connecting it to a smartphone/tablet (→232)
Taking pictures via a smartphone (remote recording)Playing back pictures in the camera on a smartphoneSaving pictures in the camera to a smartphoneSending pictures in the camera to social networking servicesWriting the location information on pictures in the cameraCombining motion pictures recorded with Snap Movie according to your preference on a smartphone
Connect easily
You can easily set up a direct connection to your smartphone without entering a password.
Displaying still pictures on a TV (→242)
Wireless printing (→247)
Sending pictures to AV device (→248)Still pictures and motion pictures can be sent to AV device in the home (home AV device).
Sending pictures to a PC (→249)
Using WEB services (→251)Through “LUMIX CLUB”, you can send still pictures and motion pictures to social networking services, etc. You can receive still pictures and motion pictures on a PC or a smartphone/tablet using the Cloud Sync. Service.
• Hereafter, this manual uses the term “smartphone” for both smartphones and tablets unless it is necessary to distinguish between them.
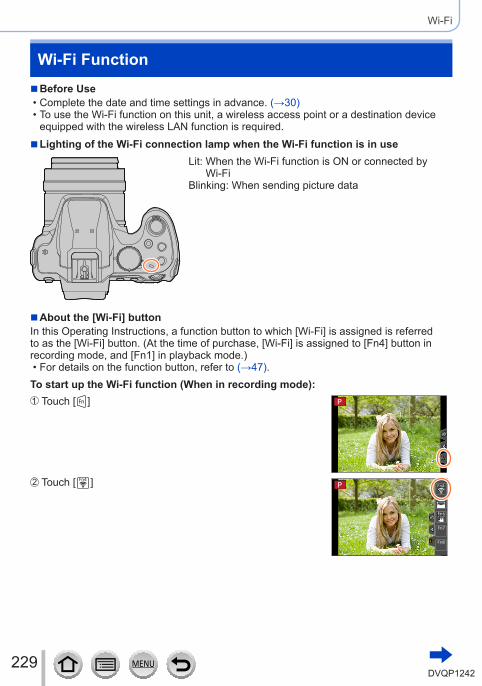
229DVQP1242
Wi-Fi
Wi-Fi Function ■Before Use • Complete the date and time settings in advance. (→30) • To use the Wi-Fi function on this unit, a wireless access point or a destination device equipped with the wireless LAN function is required. ■Lighting of the Wi-Fi connection lamp when the Wi-Fi function is in use
Lit: When the Wi-Fi function is ON or connected by Wi-Fi
Blinking: When sending picture data
■About the [Wi-Fi] buttonIn this Operating Instructions, a function button to which [Wi-Fi] is assigned is referred to as the [Wi-Fi] button. (At the time of purchase, [Wi-Fi] is assigned to [Fn4] button in recording mode, and [Fn1] in playback mode.)
• For details on the function button, refer to (→47).To start up the Wi-Fi function (When in recording mode):
Touch [ ]
Touch [ ]
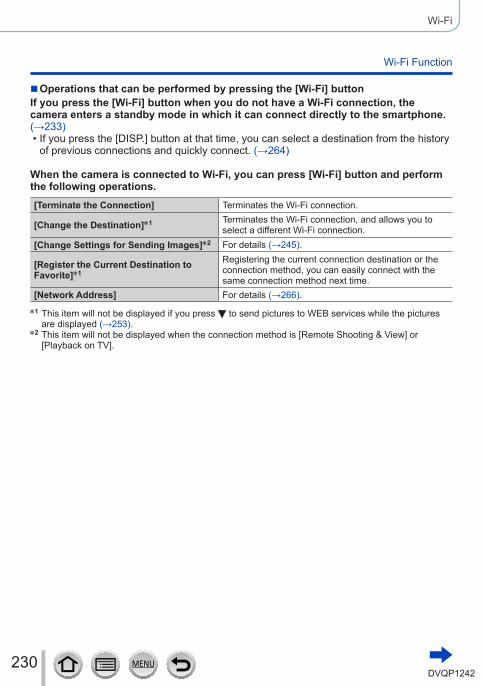
230DVQP1242
Wi-Fi
Wi-Fi Function
■Operations that can be performed by pressing the [Wi-Fi] buttonIf you press the [Wi-Fi] button when you do not have a Wi-Fi connection, the camera enters a standby mode in which it can connect directly to the smartphone. (→233)
• If you press the [DISP.] button at that time, you can select a destination from the history of previous connections and quickly connect. (→264)
When the camera is connected to Wi-Fi, you can press [Wi-Fi] button and perform the following operations.[Terminate the Connection] Terminates the Wi-Fi connection.
[Change the Destination]*1 Terminates the Wi-Fi connection, and allows you to select a different Wi-Fi connection.
[Change Settings for Sending Images]*2 For details (→245).
[Register the Current Destination to Favorite]*1
Registering the current connection destination or the connection method, you can easily connect with the same connection method next time.
[Network Address] For details (→266).
*1 This item will not be displayed if you press to send pictures to WEB services while the pictures are displayed (→253).
*2 This item will not be displayed when the connection method is [Remote Shooting & View] or [Playback on TV].
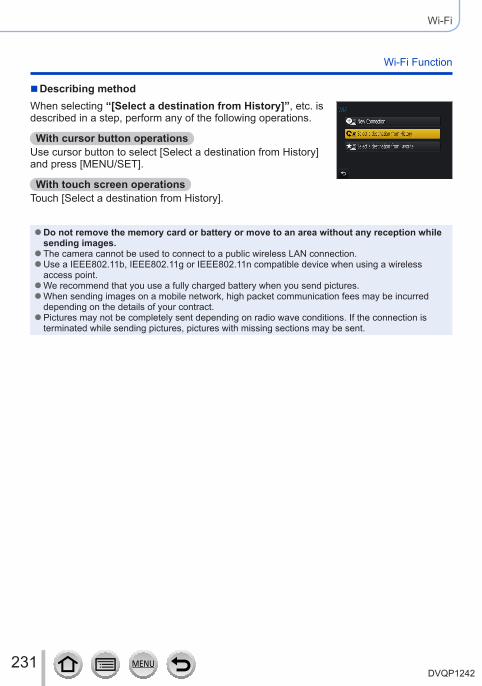
231DVQP1242
Wi-Fi
Wi-Fi Function
■Describing methodWhen selecting “[Select a destination from History]”, etc. is described in a step, perform any of the following operations.
With cursor button operationsUse cursor button to select [Select a destination from History] and press [MENU/SET].
With touch screen operationsTouch [Select a destination from History].
●Do not remove the memory card or battery or move to an area without any reception while sending images. ●The camera cannot be used to connect to a public wireless LAN connection. ●Use a IEEE802.11b, IEEE802.11g or IEEE802.11n compatible device when using a wireless access point. ●We recommend that you use a fully charged battery when you send pictures. ●When sending images on a mobile network, high packet communication fees may be incurred depending on the details of your contract. ●Pictures may not be completely sent depending on radio wave conditions. If the connection is terminated while sending pictures, pictures with missing sections may be sent.
232DVQP1242
Wi-Fi
Operating the camera by connecting it to a smartphone
You can remotely operate the camera using a smartphone.The “Panasonic Image App” (hereafter “Image App”) must be installed on your smartphone.
Installing the smartphone/tablet app “Panasonic Image App”
Supported OS Android™: Android 4.0 or lateriOS: iOS 7.0 or later
Installation procedure
Connect your device to a network(Android) Select “Google Play™ Store”(iOS) Select “App Store”Enter “Panasonic Image App” or “LUMIX” to search for the appSelect “Panasonic Image App” and install it
• Use the latest version. • Supported OS versions as of February 2017. Supported OS versions may be changed without prior notice.
• The service may not be able to be used properly depending on the type of smartphone being used.For the latest information on the “Image App”, refer to the support site below. http://panasonic.jp/support/global/cs/dsc/ (This site is available in English only.)
• When downloading the app on a mobile network, high packet communication fees may be incurred depending on the details of your contract.
• For details about the operating procedure, etc., refer to [Help] in the “Image App” menu. • When you operate the “Image App” on the smartphone that is connected to the camera via Wi-Fi, [Help] in the “Image App” may not be displayed depending on the smartphone. In this case, after terminating the connection to the camera, reconnect the smartphone to a mobile phone network such as the 3G or LTE network or to a Wi-Fi router, and then display [Help] in the “Image App”.
• Some of the screens and information provided in this document may be different depending on the supported operating system and “Image App” version.
233DVQP1242
Wi-Fi
Operating the camera by connecting it to a smartphone
Connecting to a smartphone
Connecting without using the passwordYou can easily establish a Wi-Fi connection on this unit without entering a password on your smartphone.
(On the camera)
→ [Setup] → [Wi-Fi] → [Wi-Fi Function] → [New Connection] → [Remote Shooting & View]
SSID
• The information required for directly connecting your smartphone to this unit (SSID) is displayed.
• You can also display the information by pressing [Wi-Fi] button on the camera.
(On your smartphone)
1 Turn on the Wi-Fi function in the setting menu
2 Select the SSID displayed on the screen of the camera
3 Start “Image App” (→232) • When the connection confirmation screen appears on the camera, select [Yes] and press [MENU/SET]. (Only when making a connection for the first time.)
[Wi-Fi Password] is set to [OFF] at the time of purchase. When you start a Wi-Fi connection, be sure to verify that the device displayed on the camera’s connection confirmation screen is really the device you want to connect to. Even if the wrong device is displayed, you will still be connected to it if you select “Yes”.If there seem to be other Wi-Fi enabled devices in the vicinity, we recommend that you set [Wi-Fi Password] to [ON]. (→234, 235, 266).
234DVQP1242
Wi-Fi
Operating the camera by connecting it to a smartphone
Using a password to set up a connectionWhen [Wi-Fi Password] is set to [ON], you can strengthen security by using manual input or a QR code for password authentication.
Preparation(On the camera) Set [Wi-Fi Password] to [ON]. (→266)
■When reading a QR Code to connect(On the camera)
→ [Setup] → [Wi-Fi] → [Wi-Fi Function] → [New Connection] → [Remote Shooting & View]
SSID and PasswordQR Code
• The information (QR Code, SSID and Password) required for directly connecting your smartphone to this unit is displayed.
• You can also display the information by pressing [Wi-Fi] button on the camera.
(On your smartphone)Start “Image App” (→232)Select “QR code”
• When the smartphone is connected to a wireless access point, it may take time to display QR code.
• (For iOS devices) A confirmation screen will be displayed. Select [OK] to proceed.Use the “Image App” to scan the QR code displayed on the screen of the camera
• If you press [MENU/SET] on the camera, the QR code will be enlarged. • For iOS devices onlyInstall the profile
• If the smartphone is locked with a passcode, enter the passcode to unlock the smartphone.Press the home button to close the browserTurn on the Wi-Fi function in the setting menuOn the Wi-Fi setting screen, select the SSID displayed on the cameraStart “Image App”
• (iOS devices) Steps through are not required from the second time on.
235DVQP1242
Wi-Fi
Operating the camera by connecting it to a smartphone
■Manually entering a password to set up a connection(On the camera)
→ [Setup] → [Wi-Fi] → [Wi-Fi Function] → [New Connection] → [Remote Shooting & View]
SSID and PasswordQR Code
• The information (QR Code, SSID and Password) required for directly connecting your smartphone to this unit is displayed.
• You can also display the information by pressing [Wi-Fi] button on the camera.
(On your smartphone)Turn on the Wi-Fi function in the setting menuOn the Wi-Fi setting screen, select the SSID displayed on the cameraEnter the password displayed on the camera (For first time connection only)
• If you are using an Android device, marking the box for password display will allow the device to display the password as you enter it.
Start “Image App” (→232)
Changing the connection methodTo change the connection method, follow the steps below:
→ [Setup] → [Wi-Fi] → [Wi-Fi Function] → [New Connection] → [Remote Shooting & View] → [DISP.] button
or
→ [DISP.] button → [New Connection] → [Remote Shooting & View] → [DISP.] button
236DVQP1242
Wi-Fi
Operating the camera by connecting it to a smartphone
■When connecting with [Via Network](On the camera)
Select [Via Network] and press [MENU/SET] • Connect the camera to a wireless access point by following the connection method (→260).
(On your smartphone)Set Wi-Fi function to “ON”Select the wireless access point you connected to the camera, and setStart “Image App” (→232)
■When connecting with [Direct](On the camera)
Select [Direct] and press [MENU/SET] • Connect the camera to the smartphone by following the connection method (→263).
(On your smartphone)Start “Image App” (→232)
Closing the connection
1 Set the camera to Recording Mode • Press the shutter button halfway to return to recording mode.
2 Select the camera’s menu items to terminate the Wi-Fi connection
→ [Setup] → [Wi-Fi] → [Wi-Fi Function] → [Yes]
• You can also terminate the connection by pressing [Wi-Fi] button on the camera (→230).
3 On the smartphone, close “Image App”<Using an iOS device>From the “Image App” screen, press the home button to close the app<Using an Android device>From the “Image App” screen, press the back button twice to close the app
• When recording with 4K Pre-Burst with the smartphone, terminate the connection only after switching to 4K Burst recording by pressing [Q.MENU/ ] button on the camera.
237DVQP1242
Wi-Fi
Operating the camera by connecting it to a smartphone
Taking pictures via a smartphone (remote recording)
1 Connect to a smartphone (→233)
2 Operate the smartphoneSelect [ ]Take pictures
• The recorded images are saved in the camera. • Some settings are not available.
●When using zoom, the camera could tilt when the lens barrel extends. Make sure to secure the camera in place with a tripod or by other means. ●This function is not available in the following cases:
• Panorama Shot Mode • When using [Time Lapse Shot]
Taking a picture while jumping
When you hold your smartphone and jump, the camera’s shutter can be released automatically as the smartphone detects the peak of the jump.
1 Operate the smartphone[ ] → [ ] → Select the sensitivity
• [ ] will be displayed on the remote recording screen of the smartphone. • We recommend that you take test pictures. • For details about the operating procedure, refer to [Help] in the “Image App”.
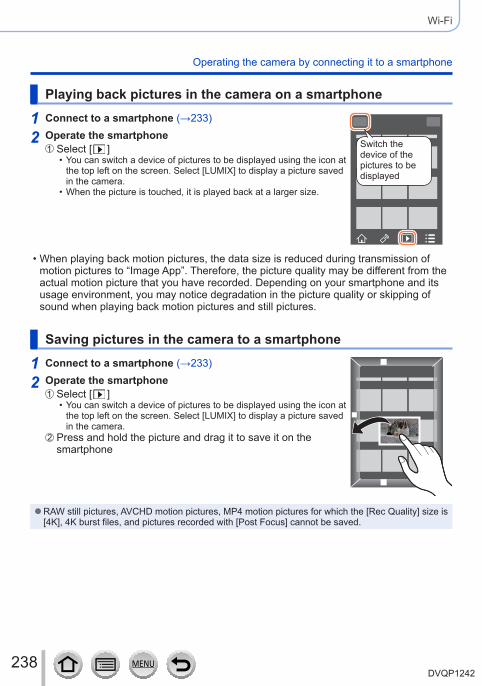
238DVQP1242
Wi-Fi
Operating the camera by connecting it to a smartphone
Playing back pictures in the camera on a smartphone
1 Connect to a smartphone (→233)
Switch the device of the pictures to be displayed
2 Operate the smartphoneSelect [ ]
• You can switch a device of pictures to be displayed using the icon at the top left on the screen. Select [LUMIX] to display a picture saved in the camera.
• When the picture is touched, it is played back at a larger size.
• When playing back motion pictures, the data size is reduced during transmission of motion pictures to “Image App”. Therefore, the picture quality may be different from the actual motion picture that you have recorded. Depending on your smartphone and its usage environment, you may notice degradation in the picture quality or skipping of sound when playing back motion pictures and still pictures.
Saving pictures in the camera to a smartphone
1 Connect to a smartphone (→233)
2 Operate the smartphoneSelect [ ]
• You can switch a device of pictures to be displayed using the icon at the top left on the screen. Select [LUMIX] to display a picture saved in the camera.
Press and hold the picture and drag it to save it on the smartphone
●RAW still pictures, AVCHD motion pictures, MP4 motion pictures for which the [Rec Quality] size is [4K], 4K burst files, and pictures recorded with [Post Focus] cannot be saved.

239DVQP1242
Wi-Fi
Operating the camera by connecting it to a smartphone
Sending pictures in the camera to social networking services
1 Connect to a smartphone (→233)
Switch the device of the pictures to be displayed
2 Operate the smartphoneSelect [ ]
• You can switch a device of pictures to be displayed using the icon at the top left on the screen. Select [LUMIX] to display a picture saved in the camera.
Press and hold the picture and drag it to send it to the social networking service, etc.
• The picture will be sent to the social networking service or other WEB services.
Adding location information to pictures in the camera from a smartphone
You can send the location information acquired from a smartphone to the camera. After the information is sent, you can write it on the pictures in the camera.
GPS
Starts location information recording
Start the recording
Ends location information recording
Sends and writes the location information
• You can also use [Location Logging] in the [Playback] menu to write the sent location information to the pictures.
• Location information that is different from the information acquired during recording may be written. Take care regarding the following matters. – Set [Home] of [World Time] of the camera to your home area. – Once a smartphone starts recording the location information, do not change the [Home] setting of [World Time] of the camera.
• The location information cannot be written to pictures recorded without setting [Clock Set].
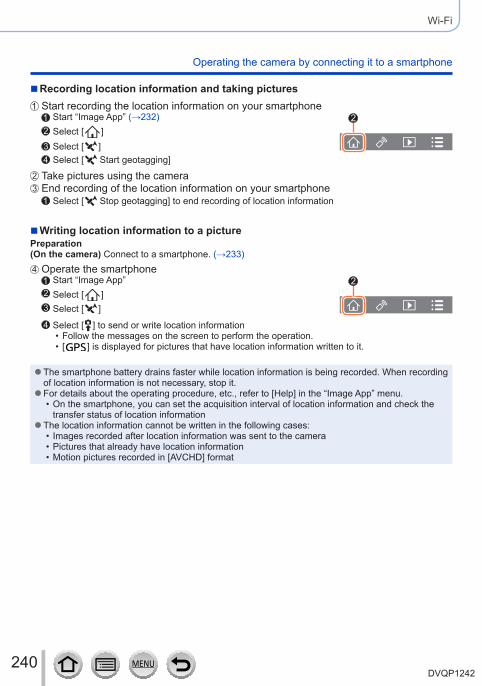
240DVQP1242
Wi-Fi
Operating the camera by connecting it to a smartphone
■Recording location information and taking picturesStart recording the location information on your smartphone
Start “Image App” (→232)Select [ ]Select [ ]Select [ Start geotagging]
Take pictures using the cameraEnd recording of the location information on your smartphone
Select [ Stop geotagging] to end recording of location information
■Writing location information to a picturePreparation(On the camera) Connect to a smartphone. (→233)
Operate the smartphoneStart “Image App”Select [ ]Select [ ]
Select [ ] to send or write location information • Follow the messages on the screen to perform the operation. • [ ] is displayed for pictures that have location information written to it.
●The smartphone battery drains faster while location information is being recorded. When recording of location information is not necessary, stop it. ●For details about the operating procedure, etc., refer to [Help] in the “Image App” menu.
• On the smartphone, you can set the acquisition interval of location information and check the transfer status of location information
●The location information cannot be written in the following cases: • Images recorded after location information was sent to the camera • Pictures that already have location information • Motion pictures recorded in [AVCHD] format
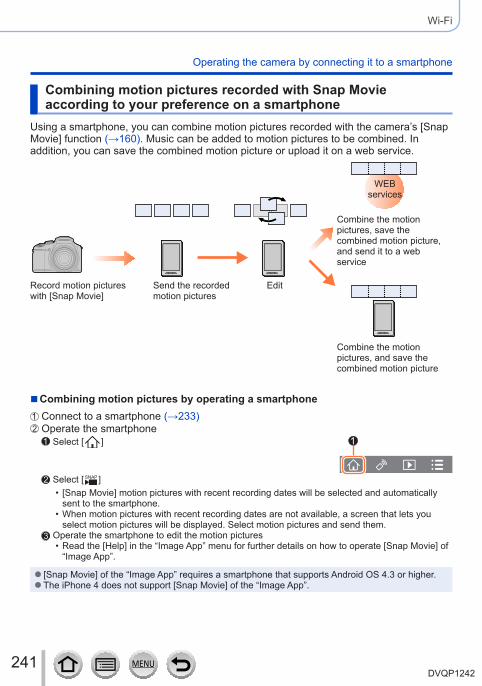
241DVQP1242
Wi-Fi
Operating the camera by connecting it to a smartphone
Combining motion pictures recorded with Snap Movie according to your preference on a smartphone
Using a smartphone, you can combine motion pictures recorded with the camera’s [Snap Movie] function (→160). Music can be added to motion pictures to be combined. In addition, you can save the combined motion picture or upload it on a web service.
Record motion pictures with [Snap Movie]
Send the recorded motion pictures
Edit
WEB services
Combine the motion pictures, save the combined motion picture, and send it to a web service
Combine the motion pictures, and save the combined motion picture
■Combining motion pictures by operating a smartphoneConnect to a smartphone (→233)Operate the smartphone
Select [ ]
Select [ ] • [Snap Movie] motion pictures with recent recording dates will be selected and automatically sent to the smartphone.
• When motion pictures with recent recording dates are not available, a screen that lets you select motion pictures will be displayed. Select motion pictures and send them.
Operate the smartphone to edit the motion pictures • Read the [Help] in the “Image App” menu for further details on how to operate [Snap Movie] of “Image App”.
● [Snap Movie] of the “Image App” requires a smartphone that supports Android OS 4.3 or higher. ●The iPhone 4 does not support [Snap Movie] of the “Image App”.
242DVQP1242
Wi-Fi
Displaying still pictures on a TVYou can display still pictures on a TV that is compatible with a DLNA certified digital media renderer (DMR) function.
PreparationSet the TV to DLNA waiting Mode.
• Read the operating instructions for your TV.
→ [Setup] → [Wi-Fi] → [Wi-Fi Function] → [New Connection] → [Playback on TV]
1 Select [Via Network] or [Direct] to connect (→260, 263)
2 Select the device you wish to connect to • When the connection is established, the screen is displayed.
3 Take or play back still pictures on this unit • To terminate the connection, follow the steps below:
→ [Setup] → [Wi-Fi] → [Wi-Fi Function] → [Yes](You can also close the connection by pressing the [Wi-Fi] button. (→230))
●When you display the pictures on a TV using the Wi-Fi function, they are not output using 4K resolution. To output pictures using 4K resolution, connect this unit to the TV using an HDMI micro cable. (→269) ●When a TV is connected to this unit, the TV screen may temporarily return to the status before the connection. Pictures are displayed again when you take or play back pictures. ●Even if [Effect] and [Sound] are set on this unit, these settings are disabled when the pictures are played back on a TV during Slide Show playback. ●Motion pictures and 4K burst files cannot be played back. ●During Multi Playback, Calendar Playback, or when selecting a focus position from a picture recorded in [Post Focus], pictures displayed on the screen of the camera are not displayed on the TV.
243DVQP1242
Wi-Fi
When sending pictures, first select [New Connection], then select the method of sending pictures.After you have completed connecting, you can also change the sending settings, such as the size of pictures to be sent.
■ Images that can be sent
Destination JPEG RAW MP4*1 AVCHD*1, *24K Burst File*1
Pictures recorded in [Post Focus]*1
[Smartphone] (→246) ○ – ○*3 – –[PC] (→249) ○ ○ ○ ○ ○[Cloud Sync. Service] (→254) ○ – ○*3 – –
[Web service] (→251) ○ – ○*3 – –[AV device] (→248) ○ – – – –[Printer]*1 (→247) ○ – – – –
*1 Sending by [Send Images While Recording] is not available.*2 Files larger than 4 GB cannot be sent.*3 Excluding motion pictures recorded with [Rec Quality] of [4K].
• Some images may not be played back or sent depending on the device. • For more information about picture playback, see the operating instructions of the destination device, or check the WEB service to which you will send the pictures.
[Send Images While Recording]A picture can be automatically sent to a specified device every time you take it.
• [ ] is displayed on the recording screen while connected by [Send Images While Recording], and [ ] is displayed while files are being sent.
• To terminate the connection, follow the steps below: → [Setup] → [Wi-Fi] → [Wi-Fi Function] → [Yes]
11
• You can terminate the connection or change the send settings by pressing [Wi-Fi] button. (→230) You cannot change the settings while sending a still picture. Wait until sending is complete.
Sending pictures
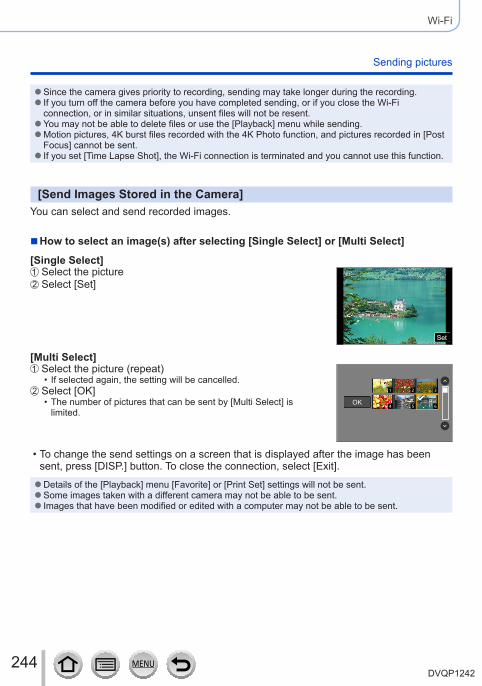
244DVQP1242
Wi-Fi
Sending pictures
●Since the camera gives priority to recording, sending may take longer during the recording. ● If you turn off the camera before you have completed sending, or if you close the Wi-Fi connection, or in similar situations, unsent files will not be resent. ●You may not be able to delete files or use the [Playback] menu while sending. ●Motion pictures, 4K burst files recorded with the 4K Photo function, and pictures recorded in [Post Focus] cannot be sent. ● If you set [Time Lapse Shot], the Wi-Fi connection is terminated and you cannot use this function.
[Send Images Stored in the Camera]You can select and send recorded images.
■How to select an image(s) after selecting [Single Select] or [Multi Select]
[Single Select]Select the picture
SetSet
Select [Set]
[Multi Select]Select the picture (repeat)
• If selected again, the setting will be cancelled.2 3
4 5 6
1
OKSelect [OK]
• The number of pictures that can be sent by [Multi Select] is limited.
• To change the send settings on a screen that is displayed after the image has been sent, press [DISP.] button. To close the connection, select [Exit].
●Details of the [Playback] menu [Favorite] or [Print Set] settings will not be sent. ●Some images taken with a different camera may not be able to be sent. ● Images that have been modified or edited with a computer may not be able to be sent.
245DVQP1242
Wi-Fi
Sending pictures
Changing the settings for sending imagesAfter you have completed connecting, you can change the sending settings, such as the size of pictures to be sent, by pressing the [DISP.] button.
[Size]
Resize the image to send.[Original] / [Auto]*1 / [Change]
• If you select [Auto], the image size is determined by the circumstances at the destination.
• You can select the image size for [Change] from [M], [S], or [VGA]. The aspect ratio does not change.
[File Format]*2 [JPG] / [RAW+JPG] / [RAW]
[Delete Location Data]*3
Select whether to delete the location information from images before sending them.[ON]: Delete the location information, then send.[OFF]: Keep the location information and send.
• This operation only deletes the location information from the images that are set to be sent. (The location information will not be deleted from the original images stored in this unit.)
[Cloud Limit]*4
You can select whether to send images when the Cloud Folder runs out of free space.[ON]: Do not send images.[OFF]: Delete images from the oldest ones, then send new images.
*1 Only available when the destination is set to [Web service].*2 Only available when the destination is set to [PC].*3 Only available when the destination is set to [Cloud Sync. Service] or [Web service].*4 Only available when the destination is set to [Cloud Sync. Service].
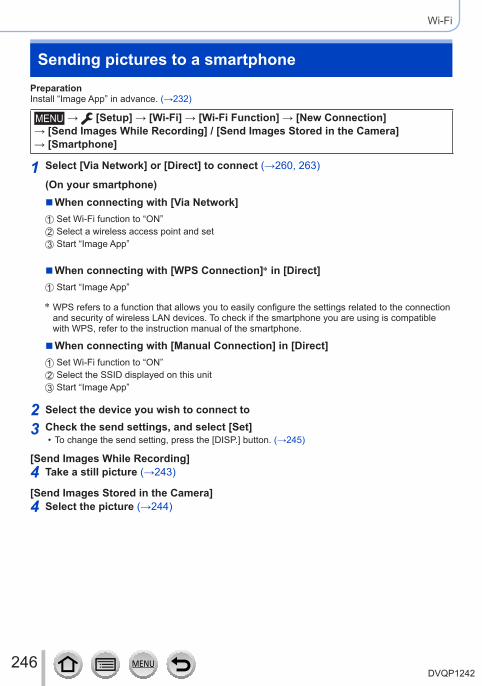
246DVQP1242
Wi-Fi
PreparationInstall “Image App” in advance. (→232)
→ [Setup] → [Wi-Fi] → [Wi-Fi Function] → [New Connection] → [Send Images While Recording] / [Send Images Stored in the Camera] → [Smartphone]
1 Select [Via Network] or [Direct] to connect (→260, 263)
(On your smartphone) ■When connecting with [Via Network]Set Wi-Fi function to “ON”Select a wireless access point and setStart “Image App”
■When connecting with [WPS Connection]* in [Direct]Start “Image App”
* WPS refers to a function that allows you to easily configure the settings related to the connection and security of wireless LAN devices. To check if the smartphone you are using is compatible with WPS, refer to the instruction manual of the smartphone.
■When connecting with [Manual Connection] in [Direct]Set Wi-Fi function to “ON”Select the SSID displayed on this unitStart “Image App”
2 Select the device you wish to connect to
3 Check the send settings, and select [Set] • To change the send setting, press the [DISP.] button. (→245)
[Send Images While Recording]4 Take a still picture (→243)
[Send Images Stored in the Camera]4 Select the picture (→244)
Sending pictures to a smartphone
247DVQP1242
Wi-Fi
Wireless printingYou can print out recorded still pictures wirelessly from a PictBridge (wireless LAN-compatible)* printer.* Compliant with the DPS over IP standards.
Contact the printer manufacturers for details on PictBridge (wireless LAN-compatible) printers.
→ [Setup] → [Wi-Fi] → [Wi-Fi Function] → [New Connection] → [Send Images Stored in the Camera] → [Printer]
1 Select [Via Network] or [Direct] to connect (→260, 263)
2 Select a printer you want to connect
3 Select the still picture and print • Pictures are selected the same way as when connecting by USB connection cable. For details (→278).
• To terminate the connection, press [Q.MENU/ ] button.
●Motion pictures, 4K burst files, and pictures recorded with [Post Focus] cannot be printed.
248DVQP1242
Wi-Fi
Sending pictures to AV deviceStill pictures and motion pictures can be sent to AV devices in the home (home AV devices), such as DLNA compatible recorders.
Wireless access point
Home AV device
PreparationsWhen sending a picture to AV devices, set your device to DLNA waiting Mode.
• Read the operating instructions of your device for details.
→ [Setup] → [Wi-Fi] → [Wi-Fi Function] → [New Connection] → [Send Images While Recording] / [Send Images Stored in the Camera] → [AV device]
1 Select [Via Network] or [Direct] to connect (→260, 263)
2 Select the device you wish to connect to
3 Check the send settings, and select [Set] • To change the send setting, press the [DISP.] button. (→245)
[Send Images While Recording]4 Take a still picture (→243)
[Send Images Stored in the Camera]4 Select the picture (→244)
●Sending may fail depending on the operational status of the AV device. Also, sending may take a while.
249DVQP1242
Wi-Fi
Sending pictures to a PCStill pictures and motion pictures recorded by the camera can be sent to a PC.
Preparations • Turn the computer on. • Prepare folders for receiving images on the PC before sending a picture to the PC (below). • If the standard settings are changed for the workgroup on the connected PC, you must change settings in [PC Connection] on this unit. (→266)
To create a folder that receives images • Create a PC user account (account name (up to 254 characters) and password (up to 32 characters)) consisting of alphanumeric characters. An attempt to create a receive folder may fail if the account includes non-alphanumeric characters.
■When using “PHOTOfunSTUDIO” Install “PHOTOfunSTUDIO” on the PC (→273)Create a folder that receives images with “PHOTOfunSTUDIO”
• For details, refer to the operating instructions of “PHOTOfunSTUDIO” (PDF).
■When not using “PHOTOfunSTUDIO”(For Windows)Supported OS: Windows 10 / Windows 8.1 / Windows 8 / Windows 7Example: Windows 7
Select a folder you intend to use for receiving, then right-clickSelect [Properties], then enable sharing of the folder
• For details, refer to the operating instructions of your PC or Help on the operating system.
(For Mac)Supported OS: OS X v10.5 to v10.12Example: OS X v10.8
Select a folder you intend to use for receiving, then click on the items in the following order [File] → [Get Info]Enable sharing of the folder
• For details, refer to the operating instructions of your PC or Help on the operating system.
250DVQP1242
Wi-Fi
Sending pictures to a PC
Sending pictures to a PC
→ [Setup] → [Wi-Fi] → [Wi-Fi Function] → [New Connection] → [Send Images While Recording] / [Send Images Stored in the Camera] → [PC]
1 Select [Via Network] or [Direct] to connect (→260, 263)
2 Select the PC you want to connect to • If the PC you want to connect to is not displayed, select [Manual Input], then enter the computer name (for Mac, enter the NetBIOS name).
3 Select the folder you want to send to
4 Check the send settings, and select [Set] • To change the send setting, press the [DISP.] button. (→245)
[Send Images While Recording]5 Take a still picture (→243)
[Send Images Stored in the Camera]5 Select the picture (→244)
●Folders sorted by the sent date are created in the specified folder, and pictures are saved in those folders. ● If the screen for a user account and password entry appears, enter the one you set on your PC. ●If the computer name (for Mac, the NetBIOS name) contains spaces, etc., the name may not be properly recognised. If you cannot connect, we recommend changing the computer name (for Mac, the NetBIOS name) to a combination of 15 or less alphanumeric characters only. ● If a firewall is enabled by the OS or security software, this unit may be unable to connect to the computer.
251DVQP1242
Wi-Fi
Using WEB servicesThrough “LUMIX CLUB”, you can send still pictures and motion pictures to social networking services, etc. By selecting the setting to automatically transfer still pictures and motion pictures to [Cloud Sync. Service], you can receive the transferred still pictures and motion pictures on a PC or a smartphone.
Wireless access point
WEB services
Cloud synchronisation services
LUMIX CLUB
When sending images to WEB servicePreparationYou need to register to “LUMIX CLUB” (→255) to send a picture to a WEB service.To send images to a WEB service, you need to register the WEB service. (→252)
●Panasonic assumes no responsibility for the damages resulting from the leakage, loss, etc. of images uploaded on WEB services. ●When uploading images to the WEB service, do not delete images from this camera, even after they have finished sending, until you have checked that they have been properly uploaded to the WEB service. Panasonic assumes no responsibility for the damages resulting from the deletion of images stored in this unit. ● Images uploaded to the WEB service cannot be displayed or deleted with this camera. Check images by accessing the WEB service with your smartphone or computer. ● If sending images fails, a report email outlining the failure will be sent to the email address registered with “LUMIX CLUB”.
252DVQP1242
Wi-Fi
Using WEB services
Registering the WEB service to “LUMIX CLUB”Check the “FAQ/Contact us” on the following site for compatible WEB services. http://lumixclub.panasonic.net/eng/c/lumix_faqs/
PreparationMake sure that you have created an account on the WEB service you want to use, and have the login information available.
1 Connect to the “LUMIX CLUB” site using a smartphone or computerhttp://lumixclub.panasonic.net/eng/c/
2 Enter your “LUMIX CLUB” login ID and password and log in to the service
3 If you have not registered your email address with “LUMIX CLUB”, register the email address
4 Select the WEB service to be used for WEB service link settings and register it • Follow the instructions on the screen to register the service.
Sending pictures
→ [Setup] → [Wi-Fi] → [Wi-Fi Function] → [New Connection] → [Send Images While Recording] / [Send Images Stored in the Camera] → [Web service]
1 Select [Via Network] and connect (→260)
2 Select a WEB service you want to connect
3 Check the send settings, and select [Set] • To change the send setting, press the [DISP.] button. (→245)
[Send Images While Recording]4 Take a still picture (→243)
[Send Images Stored in the Camera]4 Select the picture (→244)
253DVQP1242
Wi-Fi
Using WEB services
■Quickly sending pictures in the camera to WEB servicesOnce you send a picture, you can send pictures to the WEB service as quickly and easily as using a smartphone, only when the environment for connecting to a wireless access point is available.(The instructions below assume that you are already registered to “LUMIX CLUB” and the camera has a record of a connection to a wireless access point.)
Display the picturePress , and then press to select [Yes] (When you play back group pictures one by one, press and then select [Upload(Wi-Fi)] or [Upload All(Wi-Fi)].)
• The same operation can be performed by touching [ ].(When selecting a group picture, touch [ ], [ ], [ ], and then [ ], and then select [Upload(Wi-Fi)] or [Upload All(Wi-Fi)])
Select a WEB service you want to connectCheck the send settings, and select [Set]The camera is connected to the previously used wireless access point and the pictures are sent to the WEB service.
• Step , are not necessary when you continue to send another image. • To change the transmission setting for the picture, press the [DISP.] button. (→245) • To terminate the connection, press [MENU/SET] or operate other controls to exit the playback screen. You can also terminate the connection by pressing [Wi-Fi] button on the camera. (→230)
To change the settings for sending images or web serviceTerminate the Wi-Fi connection, and follow step and onwards again.
• You can also change the send settings by pressing [Wi-Fi] button while using a Wi-Fi connection. (→230)
● If the camera has no records of connections to wireless access points that are available, a screen that asks you to select a connection method is displayed. Select the connection method and connect the camera to a wireless access point. (→260) ●When you are not registered to “LUMIX CLUB”, a screen that asks you to acquire a new login ID is displayed. Get a login ID and set a password. (→256) ●When pictures are displayed as a group, they are all sent. When a single picture in a group is displayed, only the picture being displayed is sent.
254DVQP1242
Wi-Fi
Using WEB services
When sending images to [Cloud Sync. Service]PreparationYou need to register to “LUMIX CLUB” (→255) and configure the Cloud Sync. setting to send a picture to a Cloud Folder. Use “PHOTOfunSTUDIO” (→273) on a PC or “Image App” on a smartphone to configure the Cloud Sync. settings.
■About the images sent to a Cloud Folder by the use of [Cloud Sync. Service] (Current as of February 2017)
• If you set the picture destination to [Cloud Sync. Service], sent pictures are temporarily saved in the cloud folder, and they can be synchronised with the device in use, such as the PC or smartphone.
• A Cloud Folder stores transferred images for 30 days (up to 1,000 pictures). Transferred images are deleted automatically 30 days after the transfer. Furthermore, when the number of stored images exceeds 1,000, some images may be deleted depending on the [Cloud Limit] (→245) setting even within 30 days after the transfer.
• When the download of images from a Cloud Folder to all specified devices is complete, images may be deleted from the Cloud Folder even within 30 days after the transfer.
→ [Setup] → [Wi-Fi] → [Wi-Fi Function] → [New Connection] → [Send Images While Recording] / [Send Images Stored in the Camera] → [Cloud Sync. Service]
1 Select [Via Network] and connect (→260)
2 Check the send settings, and select [Set] • To change the send setting, press the [DISP.] button. (→245)
[Send Images While Recording]3 Take a still picture (→243)
[Send Images Stored in the Camera]3 Select the picture (→244)
255DVQP1242
Wi-Fi
Using “LUMIX CLUB”
About the [LUMIX CLUB]Acquire a “LUMIX CLUB” login ID (free).If you register this unit to the “LUMIX CLUB”, you can synchronise images between the devices you are using, or transfer these images to WEB services.Use the “LUMIX CLUB” when uploading pictures to WEB services.
• You can set the same “LUMIX CLUB” login ID for this unit and a smartphone. (→257)
Refer to the “LUMIX CLUB” site for details.http://lumixclub.panasonic.net/eng/c/
Please note; • The service may be suspended due to regular maintenance or unexpected problems, and service contents may be changed or added to, without prior notice to the users.
• The service may be stopped in whole or in part with a reasonable period of advance notice.
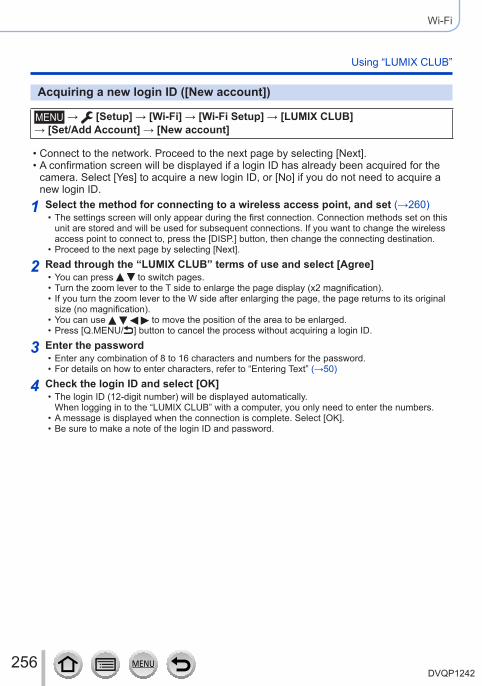
256DVQP1242
Wi-Fi
Using “LUMIX CLUB”
Acquiring a new login ID ([New account])
→ [Setup] → [Wi-Fi] → [Wi-Fi Setup] → [LUMIX CLUB] → [Set/Add Account] → [New account]
• Connect to the network. Proceed to the next page by selecting [Next]. • A confirmation screen will be displayed if a login ID has already been acquired for the camera. Select [Yes] to acquire a new login ID, or [No] if you do not need to acquire a new login ID.
1 Select the method for connecting to a wireless access point, and set (→260) • The settings screen will only appear during the first connection. Connection methods set on this unit are stored and will be used for subsequent connections. If you want to change the wireless access point to connect to, press the [DISP.] button, then change the connecting destination.
• Proceed to the next page by selecting [Next].
2 Read through the “LUMIX CLUB” terms of use and select [Agree] • You can press to switch pages. • Turn the zoom lever to the T side to enlarge the page display (x2 magnification). • If you turn the zoom lever to the W side after enlarging the page, the page returns to its original size (no magnification).
• You can use to move the position of the area to be enlarged. • Press [Q.MENU/ ] button to cancel the process without acquiring a login ID.
3 Enter the password • Enter any combination of 8 to 16 characters and numbers for the password. • For details on how to enter characters, refer to “Entering Text” (→50)
4 Check the login ID and select [OK] • The login ID (12-digit number) will be displayed automatically. When logging in to the “LUMIX CLUB” with a computer, you only need to enter the numbers.
• A message is displayed when the connection is complete. Select [OK]. • Be sure to make a note of the login ID and password.
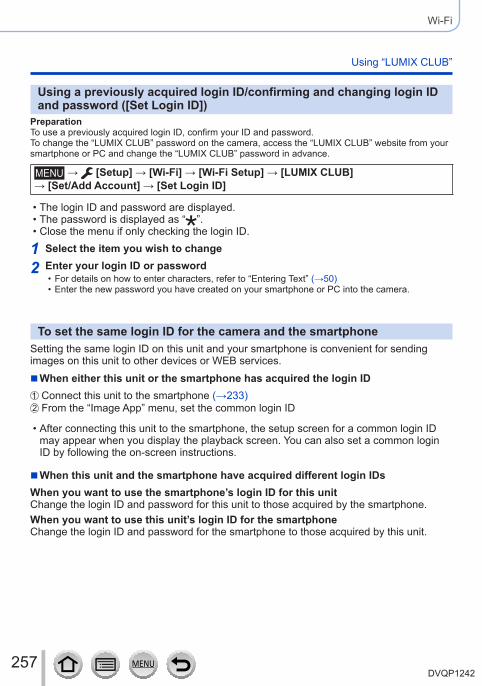
257DVQP1242
Wi-Fi
Using “LUMIX CLUB”
Using a previously acquired login ID/confirming and changing login ID and password ([Set Login ID])
PreparationTo use a previously acquired login ID, confirm your ID and password.To change the “LUMIX CLUB” password on the camera, access the “LUMIX CLUB” website from your smartphone or PC and change the “LUMIX CLUB” password in advance.
→ [Setup] → [Wi-Fi] → [Wi-Fi Setup] → [LUMIX CLUB] → [Set/Add Account] → [Set Login ID]
• The login ID and password are displayed. • The password is displayed as “ ”. • Close the menu if only checking the login ID.
1 Select the item you wish to change
2 Enter your login ID or password • For details on how to enter characters, refer to “Entering Text” (→50) • Enter the new password you have created on your smartphone or PC into the camera.
To set the same login ID for the camera and the smartphoneSetting the same login ID on this unit and your smartphone is convenient for sending images on this unit to other devices or WEB services.
■When either this unit or the smartphone has acquired the login IDConnect this unit to the smartphone (→233)From the “Image App” menu, set the common login ID
• After connecting this unit to the smartphone, the setup screen for a common login ID may appear when you display the playback screen. You can also set a common login ID by following the on-screen instructions.
■When this unit and the smartphone have acquired different login IDsWhen you want to use the smartphone’s login ID for this unitChange the login ID and password for this unit to those acquired by the smartphone.When you want to use this unit’s login ID for the smartphoneChange the login ID and password for the smartphone to those acquired by this unit.
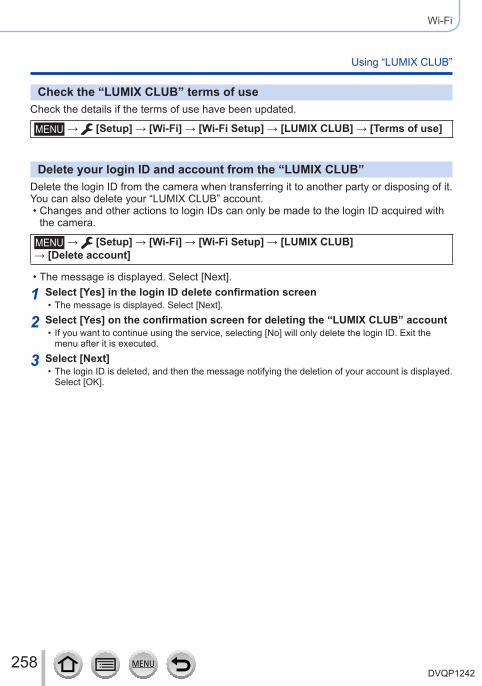
258DVQP1242
Wi-Fi
Using “LUMIX CLUB”
Check the “LUMIX CLUB” terms of useCheck the details if the terms of use have been updated.
→ [Setup] → [Wi-Fi] → [Wi-Fi Setup] → [LUMIX CLUB] → [Terms of use]
Delete your login ID and account from the “LUMIX CLUB”Delete the login ID from the camera when transferring it to another party or disposing of it. You can also delete your “LUMIX CLUB” account.
• Changes and other actions to login IDs can only be made to the login ID acquired with the camera.
→ [Setup] → [Wi-Fi] → [Wi-Fi Setup] → [LUMIX CLUB] → [Delete account]
• The message is displayed. Select [Next].
1 Select [Yes] in the login ID delete confirmation screen • The message is displayed. Select [Next].
2 Select [Yes] on the confirmation screen for deleting the “LUMIX CLUB” account • If you want to continue using the service, selecting [No] will only delete the login ID. Exit the menu after it is executed.
3 Select [Next] • The login ID is deleted, and then the message notifying the deletion of your account is displayed. Select [OK].
259DVQP1242
Wi-Fi
About connectionsThe following types of connections are available.
[New Connection] Connect after selecting the Wi-Fi function and destination. (→233, 242, 243)
[Select a destination from History]
Connect using the same settings as a previous Wi-Fi connection.
(→264)[Select a destination from Favorite]
Connect using settings registered to Favourite.
When a screen similar to the one below is displayed, select a connection method. • Example of operation for displaying a screen:
→ [Setup] → [Wi-Fi] → [Wi-Fi Function] → [New Connection] → [Send Images While Recording] → [Smartphone]
Wireless access point
[Via Network] Connects through a wireless access point. (→260)
[Direct]
Your device connects directly to this unit.(If you are out and unable to use your wireless access point, or temporarily connecting to equipment you do not ordinarily use, or in a similar situation, it is convenient to make a direct connection.)
(→263)
260DVQP1242
Wi-Fi
About connections
Connecting via a wireless access point ([Via Network])Select a connection method to the wireless access point.
• WPS refers to a function that allows you to easily configure the settings related to the connection and security of wireless LAN devices. To check if the wireless access point you are using is compatible with WPS, refer to the instruction manual of the wireless access point.
[WPS (Push-Button)]
Save push button type wireless access point that is compatible with Wi-Fi Protected Setup™ with a WPS mark.
1 Press the wireless access point WPS button until it switches to WPS Mode
• Refer to the wireless access point instruction manual for details.
[WPS (PIN code)]
Save PIN code type wireless access point that is compatible with Wi-Fi Protected Setup with a WPS mark.
1 On the camera screen, select the wireless access point you are connecting to
2 Enter the PIN code displayed on the camera screen into the wireless access point
3 Press [MENU/SET] on the camera • Refer to the wireless access point instruction manual for details.
[From List]Select this option when you are not sure about the WPS compatibility, or when you want to search for and connect to a wireless access point. (→261)
261DVQP1242
Wi-Fi
About connections
If you are not sure about the WPS compatibility (connecting by [From List])
Search for available wireless access points. • Confirm encryption key of the selected wireless access point if the network authentication is encrypted.
• When connecting by [Manual Input], confirm SSID, network authentication type, encryption type, encryption key of the wireless access point you are using.
1 Select the wireless access point you are connecting to • Pressing [DISP.] button will search for a wireless access point again.
• If no wireless access point is found, refer to “When connecting with [Manual Input]” (→262).
2 (If network authentication is encrypted)Enter the encryption key
• For details on how to enter characters, refer to “Entering Text” (→50)
262DVQP1242
Wi-Fi
About connections
■When connecting with [Manual Input]On the screen of step 1 of “If you are not sure about the WPS compatibility (connecting by [From List])”, select [Manual Input] (→261)Enter the SSID of the wireless access point you are connecting to, then select [Set]
• For details on how to enter characters, refer to “Entering Text” (→50)Select the network authentication type
• For information on network authentication, see the instruction manual of the wireless access point.
Select the encryption type • The type of settings that can be changed may vary depending on the details of network authentication settings.
Network authentication type Encryption types that can be set[WPA2-PSK] / [WPA-PSK] [TKIP] / [AES][Common Key] [WEP][Open] [No Encryption] / [WEP]
(When an option other than [No Encryption] is selected)Enter the encryption key
●Check the wireless access points instruction manual and settings when saving a wireless access point. ● If no connection can be established, the wireless access point’s radio waves may be too weak. Refer to “Message displays” (→293) and “Q&A Troubleshooting” (→299) for details. ●Transmission speed may decrease, or may not be usable depending on the environment it is used in.
263DVQP1242
Wi-Fi
About connections
Connecting directly ([Direct])Select a connection method with which your equipment is compatible.
• Read the operating instructions of your device for details.
[WPS Connection]
[WPS (Push-Button)]
1 Select [WPS (Push-Button)]
2 Set the device to WPS mode • You can wait longer for a connection by pressing the [DISP.] button on this unit.
[WPS (PIN code)]
1 Select [WPS (PIN code)]
2 Enter the PIN code of the device into the camera
[Manual Connection]
1 Enter the SSID and password into the device. The SSID and password are displayed on the connection waiting screen of this unit
SSID and Password
• If a device to be connected is [Smartphone], the password is not displayed. Select SSID to connect. (→233)
264DVQP1242
Wi-Fi
About connections
Connecting quickly with the same settings as used previously ([Select a destination from History] / [Select a destination from Favorite])
The camera keeps a History of times you used the Wi-Fi function. You can register items in the History to Favourite.You can easily connect with the same settings as used previously by connecting from History or Favourite.
• If the Wi-Fi settings of the device to connect to have been changed, it may not be possible to connect to the device.
1 Set the menu (→43)
→ [Setup] → [Wi-Fi] → [Wi-Fi Function]
[Select a destination from History] Connects using the same settings as used previously.[Select a destination from Favorite] Connects using settings registered in Favourite.
2 Select the desired connection setting
Registering History items to Favourite
→ [Setup] → [Wi-Fi] → [Wi-Fi Function] → [Select a destination from History]
1 Select the item you wish to register and press
2 Enter a registration name • For details on how to enter characters, refer to “Entering Text” (→50) • Up to 30 characters can be entered. A double-byte character will be treated as two characters.
265DVQP1242
Wi-Fi
About connections
Editing items registered in Favourite
→ [Setup] → [Wi-Fi] → [Wi-Fi Function] → [Select a destination from Favorite]
1 Select the Favourite item you wish to edit and press
[Remove from Favorite] —[Change the Order in Favorite] Select the destination.
[Change the Registered Name] • For details on how to enter characters, refer to “Entering Text” (→50)
• Up to 30 characters can be entered. A double-byte character will be treated as two characters.
Registering and saving frequently used Wi-Fi connection settings to Favourites (→264)
The number of settings that can be saved in the history is limited.
Checking connection details of History or Favourite
When selecting History or Favourite items, you can view connection details by pressing the [DISP.] button.
●Performing [Reset Wi-Fi Settings] deletes content registered in History and Favourite. ●If the device you want to connect to (smartphone, etc.) is connected to a wireless access point other than the camera, you cannot connect the device to the camera using [Direct]. Change the Wi-Fi settings of the device you want to connect to so that the access point to be used is set to the camera. You can also select [New Connection] and reconnect the devices. (→233, 243) ●When using [Select a destination from History] or [Select a destination from Favorite] to connect to a network to which many PCs are connected, it may be difficult to make the connection because the camera searches for previously connected equipment out of a large number of equipment pieces. If you cannot connect, retry the connection using [New Connection].

266DVQP1242
Wi-Fi
[Wi-Fi Setup]Configure the settings required for the Wi-Fi function.[Wi-Fi Setup] cannot be changed when connected to Wi-Fi.
→ [Setup] → [Wi-Fi] → [Wi-Fi Setup]
[Wi-Fi Password]You can improve security by enabling password entry for a direct connection to a smartphone.
[ON]: Connects the camera and a smartphone using an SSID and password. (→234)
[OFF]: Connects the camera and a smartphone using an SSID. (→233)
• When [ON] is selected, you can also set up a connection by scanning a QR code. (→234)
[LUMIX CLUB] Acquires or changes the “LUMIX CLUB” login ID. (→255)[PC Connection]You can set the workgroup.
You must connect to the same workgroup as the destination computer when sending pictures to the computer.(The default is set to “WORKGROUP”)[Change Workgroup Name]:Enter the workgroup of the connecting computer.[Restore to Default]:Returns settings to default settings.
• For details on how to enter characters, refer to “Entering Text” (→50)
• To use with a computer of the standard settings, you do not have to change the workgroup.
[Device Name]You can change the name (SSID) of this unit.
Press [DISP.] buttonEnter the desired device name (Up to 32 characters can be entered)
• For details on how to enter characters, refer to “Entering Text” (→50)
[Wi-Fi Function Lock]To prevent incorrect operation or use of the Wi-Fi function by a third party and to protect saved personal information, it is recommended that you protect the Wi-Fi function with a password.
Setting a password will automatically display the password input screen when the Wi-Fi function is used.[Setup]: Enter any 4-digit numbers as the password.[Cancel]
• For details on how to enter characters, refer to “Entering Text” (→50)
• Make a copy of password. If you forget the password, you can reset it with [Reset Wi-Fi Settings] in the [Setup] menu, however other settings will also be reset. (excluding [LUMIX CLUB])
[Network Address]Displays the MAC address and IP address of this unit.
• A “MAC Address” is a unique address that is used to identify network equipment.
• “IP address” refers to a number that identifies a PC connected to a network such as the Internet. Usually, the addresses for homes are automatically assigned by the DHCP function such as a wireless access point. (Example: 192.168.0.87)
267DVQP1242
Connecting with other devices
Enjoying 4K motion pictures
Viewing 4K motion pictures
■Viewing on TV screenWhen you connect this unit to a 4K-compatible TV and play back a motion picture recorded with [Rec Quality] of [4K], you can enjoy high-resolution 4K motion pictures. Although resolution output will be lower, you can also play back 4K motion pictures by connecting to a high-definition TV and other devices that do not have 4K support.Preparations
• Set [HDMI Mode (Play)] (→206) to [AUTO] or [4K]. • When connecting to a TV that does not support 4K motion picture, select [Auto].Connect this unit to a 4K-compatible TV using an HDMI micro cable and display the playback screen (→269)
• When the [VIERA Link] setting on the camera is set to [ON] and the camera is connected to a VIERA Link (HDMI)-compatible Panasonic television (VIERA), the television automatically switches its input and the playback screen is displayed. For details (→271).
• When you have motion pictures recorded with [Rec Format] set to [MP4] and their size set to [4K] in [Rec Quality], you can also play them back by inserting the card into the SD card slot of a TV that supports motion pictures in 4K.
• Read the operating instructions for the TV.
■Viewing 4K motion pictures on a PC screenTo play back motion pictures recorded with [Rec Quality] of [4K] on a PC, use the software “PHOTOfunSTUDIO” (→273).
• To play back and edit 4K motion pictures, a high-performance PC environment is required.
• For details, refer to the operating instructions of “PHOTOfunSTUDIO” (PDF).
268DVQP1242
Connecting with other devices
Enjoying 4K motion pictures
Storing 4K motion picturesYou cannot transfer or copy motion pictures recorded in [Rec Quality] with [4K] to a Blu-ray disc or DVD using a Panasonic recorder. (Current as of February 2017)
■Storing 4K motion pictures on your PCFor details, refer to (→272).You can use the software “PHOTOfunSTUDIO” (→273) to convert the file size of a motion picture to a smaller size or copy it to a DVD.
• For details, refer to the operating instructions of “PHOTOfunSTUDIO” (PDF).
269DVQP1242
Connecting with other devices
Viewing on TV screenYou can view pictures on a TV screen by connecting your camera to your TV with the HDMI micro cable.
PreparationTurn off both camera and TV.
1 Connect camera to TVCheck the plug direction and insert it straight in. (If the cable is inserted in the wrong direction, the plug could become deformed and cause faulty operation.) Also, do not insert into the wrong socket. Doing so may cause damage to this unit.
HDMI micro cableUse a “High Speed HDMI micro cable” with the HDMI logo. Cables that do not comply with the HDMI standards will not work.“High Speed HDMI micro cable” (Type D-Type A plug, up to 2 m (6.6 feet) long)[HDMI] socketTo HDMI video/audio input socket
2 Turn on the TV and switch the TV input source to match the connection socket
3 Turn on the camera and press [ ] (Playback) button
270DVQP1242
Connecting with other devices
Viewing on TV screen
●Bars may appear at the sides or at the top and bottom of the screen, depending on the aspect ratio setting. ●Change the screen mode on your TV if the picture is displayed with the top or bottom cut off. ●Depending on the TV to be connected, motion picture files or 4K burst files may not be played back correctly. ●Check the [HDMI Mode (Play)]. (→206) ●Pictures are not displayed on the camera screen. ●HDMI output will be cancelled if a USB connection cable (supplied) is connected simultaneously. ●Read the operating instructions for the TV.
The recorded pictures can be played back on a TV with an SD Memory Card slot
●Proper playback (aspect ratio) will be dependent on the TV used for viewing. ●The file format of the motion pictures that can be played back differs depending on the TV model. ●You may not be able to play back panorama pictures. Also you cannot perform automatic scrolling playback of panorama pictures. ●For cards compatible with playback, refer to the operating instructions of the TV.
271DVQP1242
Connecting with other devices
Viewing on TV screen
VIERA Link (HDMI) (HDAVI Control™)
What is VIERA Link (HDMI)? ●VIERA Link is a function that automatically links this camera to VIERA Link-compatible devices by connecting HDMI micro cables for enabling easy operation with the VIERA remote control. (Some operations are not available.) ●VIERA Link (HDMI) is an exclusive Panasonic function added to the industry- standard HDMI control functions known as HDMI CEC (Consumer Electronics Control). Operation is not guaranteed when connecting with non-Panasonic HDMI CEC-compatible devices. Refer to your product manual to verify compatibility with VIERA Link (HDMI). ●This camera supports VIERA Link (HDMI) Version 5. This is the Panasonic standard that also supports previous Panasonic VIERA Link devices.
PreparationSet [VIERA Link] to [ON] (→206).
1 Connect the camera to a VIERA Link (HDMI)-compatible Panasonic television (VIERA) with an HDMI micro cable (→269)
2 Turn on the camera and press [ ] (Playback) button
3 Operate with the remote control for the TV
Turning the unit OFF • The camera can also be turned off when the television is turned off with the remote control.
Automatic input select • When the camera and TV are connected by HDMI micro cable, the camera is turned ON, and the camera’s [ ] (Playback) button is pressed, the television input automatically switches to the camera’s screen. The television can also be switched on via the camera from Standby Mode (if “Power on link” on the television is set to “on”).
●Operations via the camera buttons will be limited. ●To play back the audio of the motion pictures in a slide show, set the [Sound] in the Slide Show setting screen to [AUTO] or [Audio]. ●Use a “High Speed HDMI micro cable” with the HDMI logo. Cables that do not comply with the HDMI standards will not work.“High Speed HDMI micro cable” (Type D-Type A plug, up to 2 m (6.6 feet) long) ●If VIERA Link (HDMI) does not function correctly (→301)
272DVQP1242
Connecting with other devices
Storing recorded still pictures and motion pictures on your PC
Still/motion pictures can be copied from the camera to your computer by connecting the two together.
• Some computers can read directly from the camera’s memory card.For details, see the instruction manual for your computer.
■Computer specificationsYou can connect the camera to a computer that can detect a mass storage device (device that stores a large volume of data).
• Windows: Windows 10 / Windows 8.1 / Windows 8 / Windows 7 • Mac: OS X v10.5 - v10.12
Some motion pictures recorded in [AVCHD] may not be scanned correctly by copying a file or folder
●When using Windows, be sure to use the “PHOTOfunSTUDIO” software (→273) to copy motion pictures recorded in [AVCHD]. ●When using Mac, you can copy motion pictures recorded in [AVCHD] using “iMovie”. Note, however, that it may not be possible to copy pictures depending on the picture quality settings. (For details about iMovie, please contact Apple Inc.)
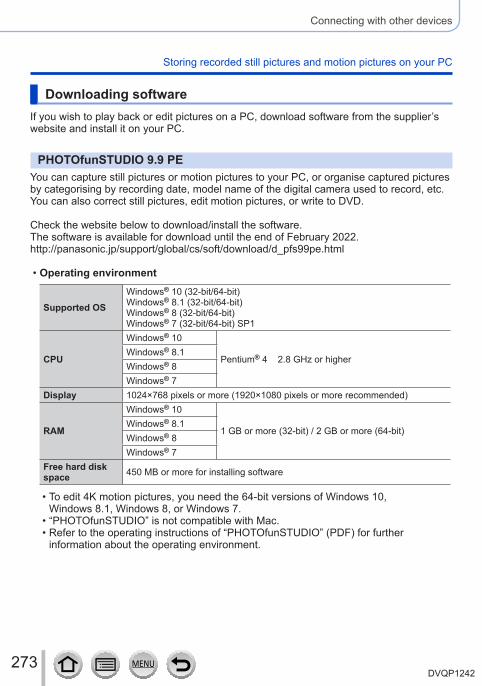
273DVQP1242
Connecting with other devices
Storing recorded still pictures and motion pictures on your PC
Downloading softwareIf you wish to play back or edit pictures on a PC, download software from the supplier’s website and install it on your PC.
PHOTOfunSTUDIO 9.9 PEYou can capture still pictures or motion pictures to your PC, or organise captured pictures by categorising by recording date, model name of the digital camera used to record, etc. You can also correct still pictures, edit motion pictures, or write to DVD.
Check the website below to download/install the software.The software is available for download until the end of February 2022.http://panasonic.jp/support/global/cs/soft/download/d_pfs99pe.html
• Operating environment
Supported OSWindows® 10 (32-bit/64-bit)Windows® 8.1 (32-bit/64-bit)Windows® 8 (32-bit/64-bit)Windows® 7 (32-bit/64-bit) SP1
CPU
Windows® 10
Pentium® 4 2.8 GHz or higherWindows® 8.1Windows® 8Windows® 7
Display 1024×768 pixels or more (1920×1080 pixels or more recommended)
RAM
Windows® 10
1 GB or more (32-bit) / 2 GB or more (64-bit)Windows® 8.1Windows® 8Windows® 7
Free hard disk space 450 MB or more for installing software
• To edit 4K motion pictures, you need the 64-bit versions of Windows 10, Windows 8.1, Windows 8, or Windows 7.
• “PHOTOfunSTUDIO” is not compatible with Mac. • Refer to the operating instructions of “PHOTOfunSTUDIO” (PDF) for further information about the operating environment.
274DVQP1242
Connecting with other devices
Storing recorded still pictures and motion pictures on your PC
SILKYPIX Developer Studio SEThis software develops and edits RAW file pictures. Edited pictures can be saved in a file format such as JPEG or TIFF that can be displayed on a PC, etc.
Check the website below to download/install the software.http://www.isl.co.jp/SILKYPIX/english/p/
• Operating environment
Supported OS
Windows® 10Windows® 8.1Windows® 8Windows® 7Mac OS X v10.6 - v10.12
• For details on the operating environment and how to use the SILKYPIX Developer Studio, refer to the “Help” or the Ichikawa Soft Laboratory’s support website.
LoiLoScope 30 day full trial version(Windows 10 / 8.1 / 8 / 7)
Motion pictures can be edited easily.
Check the website below to download/install the software.http://loilo.tv/product/20
• For more information on how to use LoiLoScope and its operating environment, read the LoiLoScope manual available for download at the website.
• “LoiLoScope” is not compatible with Mac.
●To download the software, the PC must be connected to the Internet. ● It may take time to download the software in some communication environments.
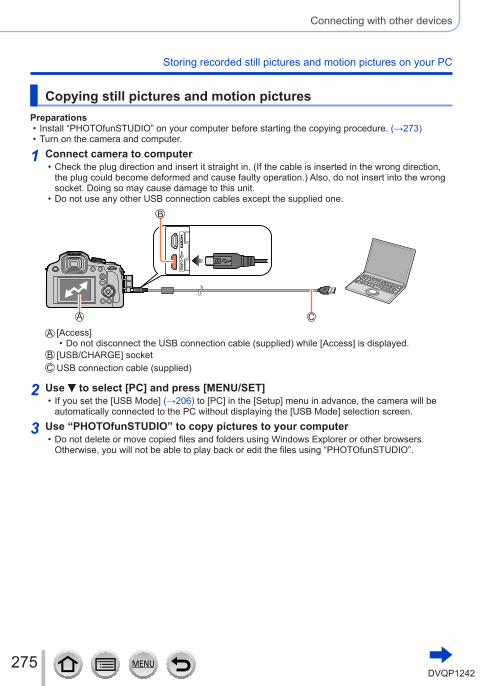
275DVQP1242
Connecting with other devices
Storing recorded still pictures and motion pictures on your PC
Copying still pictures and motion picturesPreparations
• Install “PHOTOfunSTUDIO” on your computer before starting the copying procedure. (→273) • Turn on the camera and computer.
1 Connect camera to computer • Check the plug direction and insert it straight in. (If the cable is inserted in the wrong direction, the plug could become deformed and cause faulty operation.) Also, do not insert into the wrong socket. Doing so may cause damage to this unit.
• Do not use any other USB connection cables except the supplied one.
[Access] • Do not disconnect the USB connection cable (supplied) while [Access] is displayed.
[USB/CHARGE] socketUSB connection cable (supplied)
2 Use to select [PC] and press [MENU/SET] • If you set the [USB Mode] (→206) to [PC] in the [Setup] menu in advance, the camera will be automatically connected to the PC without displaying the [USB Mode] selection screen.
3 Use “PHOTOfunSTUDIO” to copy pictures to your computer • Do not delete or move copied files and folders using Windows Explorer or other browsers. Otherwise, you will not be able to play back or edit the files using “PHOTOfunSTUDIO”.

276DVQP1242
Connecting with other devices
Storing recorded still pictures and motion pictures on your PC
■Copying to your computer without using “PHOTOfunSTUDIO”You can save pictures to use on your computer by dragging and dropping folders and files into separate folders on your computer.
• The card of this unit contains the following files (folder structure).
*2
●WindowsDrive (“LUMIX”) is displayed in “Computer”.
●MacDrive (“LUMIX”) is displayed on the desktop.
DCIM (Still/motion pictures)100_PANA (Up to 999 pictures/folder)
Folder number
P1000001.JPG*1
File number
P1000999.JPG
101_PANA
999_PANA
MISC (DPOF files, Favourite)
PRIVATEAVCHD (Motion pictures in AVCHD)
Colour Space P: sRGB _: AdobeRGB
Card
*1 .JPG: Still pictures .RW2: Still pictures recorded in RAW file .MP4: [MP4] Motion Pictures
*2 New folders are created in the following cases: • When there is a picture with file number 999 inside the folder. • When using cards already containing the same folder number (for example, pictures taken with other cameras, etc.).
• When recording after performing [No.Reset]. (→208)
●Before inserting or removing a card, turn the camera off and disconnect the USB connection cable. Otherwise, data may be destroyed. ●Use a battery with sufficient battery power or the AC adaptor (optional) and DC coupler (optional). ●When the battery begins to run out during communication, a warning beep sounds. Remove the USB connection cable safely. Otherwise, data may be destroyed.
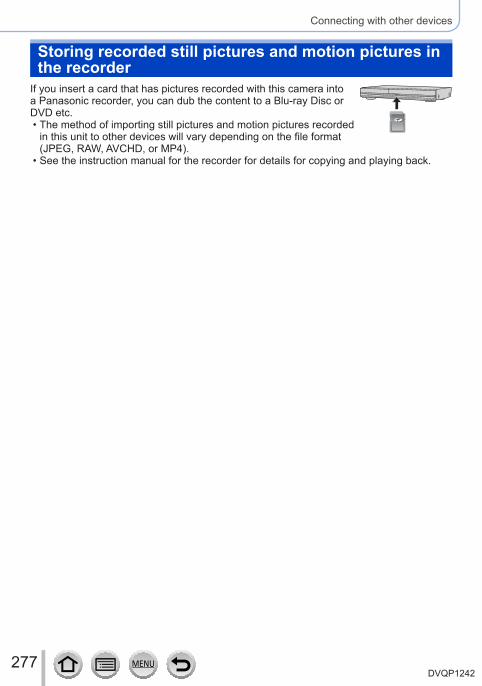
277DVQP1242
Connecting with other devices
Storing recorded still pictures and motion pictures in the recorder
If you insert a card that has pictures recorded with this camera into a Panasonic recorder, you can dub the content to a Blu-ray Disc or DVD etc.
• The method of importing still pictures and motion pictures recorded in this unit to other devices will vary depending on the file format (JPEG, RAW, AVCHD, or MP4).
• See the instruction manual for the recorder for details for copying and playing back.
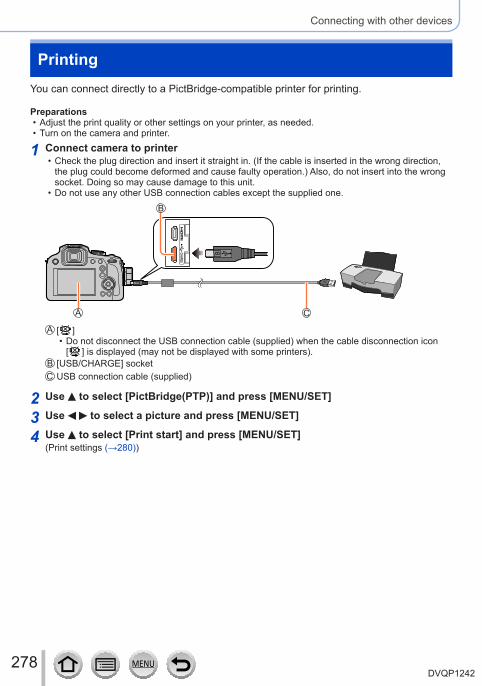
278DVQP1242
Connecting with other devices
PrintingYou can connect directly to a PictBridge-compatible printer for printing.
Preparations • Adjust the print quality or other settings on your printer, as needed. • Turn on the camera and printer.
1 Connect camera to printer • Check the plug direction and insert it straight in. (If the cable is inserted in the wrong direction, the plug could become deformed and cause faulty operation.) Also, do not insert into the wrong socket. Doing so may cause damage to this unit.
• Do not use any other USB connection cables except the supplied one.
[ ] • Do not disconnect the USB connection cable (supplied) when the cable disconnection icon [ ] is displayed (may not be displayed with some printers).
[USB/CHARGE] socketUSB connection cable (supplied)
2 Use to select [PictBridge(PTP)] and press [MENU/SET]
3 Use to select a picture and press [MENU/SET]
4 Use to select [Print start] and press [MENU/SET](Print settings (→280))
279DVQP1242
Connecting with other devices
Printing
Printing multiple picturesMultiple pictures are printed at one time.
1 Press to select [Multi Print] in step 3 of “Printing” (→278)
2 Use to select the item and press [MENU/SET]
[Multi Select] Scroll between pictures with , select pictures to print with [MENU/SET] (Press [MENU/SET] again to release selection.)Use to select [OK], and press [MENU/SET]
[Select All] Print all pictures.[Print Set (DPOF)] Print pictures selected in [Print Set]. (→225)[Favorite] Print pictures selected as [Favorite]. (→224)
3 Use to select [Print start] and press [MENU/SET](Print settings (→280))
●The group pictures are displayed one by one instead of all pictures at the same time. ●Use a battery with sufficient battery power or the AC adaptor (optional) and DC coupler (optional). When the battery begins to run out during communication, a warning beep sounds. Cancel printing and disconnect USB connection cable (supplied). ●Before inserting or removing a card, turn the camera off and disconnect the USB connection cable. ●Some printers can print directly from the camera’s memory card. For details, see the manual for your printer. ●An orange “●” displayed during printing indicates an error message. ●Print may be divided into several pictures if printing a large amount of pictures. (Remaining sheets display may differ from the number of pictures set for printing.) ●Motion pictures, 4K burst files, and pictures recorded with [Post Focus] cannot be printed. ●Still pictures recorded in a RAW file cannot be printed. (The still pictures recorded in JPEG file format at the same time as the RAW file can be printed.)
280DVQP1242
Connecting with other devices
Printing
■Making print settings on the cameraSetting options include the number of printed pictures and their size. Make settings before selecting [Print start].
[Print with Date] [ON] / [OFF][Num.of prints] Set number of pictures (up to 999 pictures)[Paper Size] Sets the paper size.
[Page Layout] Sets whether or not to add borders and how many pictures to be printed on each sheet of paper.
● If the printer does not support date printing, the date cannot be printed on the picture. ●When setting [Print with Date] to [ON], check the date printing settings on the printer (printer settings may be prioritised). ● Items may not be displayed if incompatible with printer. ●To print to paper sizes/layouts not supported by this camera, set to [ ] and make settings on the printer. (Consult your printer’s operating manual.) ●Even with completed [Print Set] settings, dates may not be printed, depending on the shop or printer used.
Printing with date and textTime and date can be set to be printed on the picture when taking the picture by activating the [Text Stamp] function in the [Playback] menu. (→220)
■Printing date without [Text Stamp]Printing in store:Only recording date can be printed. Request date printing in store.
• Making [Print Set] (→225) settings on the camera in advance allows settings for numbers of copies and date printing to be designated before giving the card to the store.
• You cannot request a store to print the characters entered for [Age] or [Name] of [Profile Setup] or [Face Recog.], [Travel Date], [Location], and [Title Edit].
Using computer:Print settings for recording date and text information can be made using “PHOTOfunSTUDIO” software (→273).
Using printer:Recording date can be printed by setting [Print Set] on the camera, or by setting [Print with Date] (→280) to [ON] when connecting to a printer compatible with date printing.
281DVQP1242
Others
Optional accessories
Conversion Lens (optional)With the optional conversion lenses, you can record even more faraway pictures and take close-up pictures of smaller subjects. Set the [Rec] menu after mounting the lens.
■Mounting the conversion lens
PreparationRemove the lens cap.
Attach the lens adaptor (DMW-LA8: optional) • Rotate the lens adaptor slowly and carefully
Attach the tele conversion lens (DMW-LT55: optional) • Close-up lens (DMW-LC55: optional) can be attached in a similar manner.
Lens adaptorTele conversion lens
Tele conversion lens Close-up lensFocal distance when converted to a 35 mm film camera*1
(Max. number of pixels*2)700 mm to 1,200 mm 154 mm to 1,200 mm
Recordable rangeW side
5.5 m (18 feet) to
18 cm (0.59 feet) to 50 cm (1.6 feet)
T side 37 cm (1.2 feet) to 50 cm (1.6 feet)
*1 When you zoom, the actual focal distance becomes 1.7x that of the display*2 When the [Aspect Ratio] is set to [4:3] (→175)
282DVQP1242
Others
Optional accessories
■Set the [Rec] menu
Recording mode: Set the menu (→43)
→ [Rec] / [Motion Picture] → [Conversion]
When you attach the tele conversion lens.
When you attach the close-up lens.
[OFF] —
• Always set to [OFF] when the conversion lens is taken off.
Example: How to hold the camera during handheld recording when the tele conversion lens is attached
●Lens adaptor (DMW-LA8: optional) is needed to use the conversion lens. ●Do not use with anything other than DMW-LC55 or DMW-LT55. ●MC protector (optional) or ND filters (optional) cannot be used together with the conversion lens. Remove them before attaching the conversion lens. ●When using the tele conversion lens:
• We recommend using a tripod. • The Stabiliser function may not work sufficiently. • The focus indication may light due to the jitter even if the subject is not focused. • The time required for focusing may become longer than usual.
●Refer to the operating instructions of the conversion lens for further details.

283DVQP1242
Others
Optional accessories
External Flash (optional)After attaching the flash (DMW-FL200L, DMW-FL360L, DMW-FL580L: optional), the effective range will be increased when compared to the camera’s built-in flash.
PreparationClose the built-in flash and set the camera [ON/OFF] switch to [OFF].
1 Attach the external flash to the hot shoe and then turn on the camera and the external flash
• Refer to (→143) for changing the settings for external flashes on the camera. • Refer to (→148) about the settings for the wireless flash.
When using other commercially available external flashes that don’t offer direct communication with the camera (DC-FZ80) • It is necessary to set the exposure on the external flash when it is used. When you use an external flash in Auto Mode, use an external flash that allows you to set the aperture value and ISO sensitivity to match the same settings on the camera.
• Set the camera to Aperture-Priority AE Mode or Manual Exposure Mode and then set the same aperture value and ISO sensitivity on the external flash. (The proper exposure cannot be achieved because the aperture value changes in Shutter-Priority AE Mode. The light of the external flash cannot be properly adjusted since the aperture value cannot be fixed in Programme AE Mode.)
●You can set the aperture value, shutter speed and ISO sensitivity on the camera even when the external flash is attached. ●Some commercially available external flashes have synchro terminals with high-voltage or reversed polarity. If such flashes are used, they could cause a malfunction or hinder normal operation of the camera. ●Be sure to hold both the camera and the external flash when it is attached to the camera. If you hold only the external flash, it could become detached from the camera. ● If you take pictures close to the subject while taking wide-angle pictures, the light of the flash is obstructed by the lens and the bottom of the screen may be dark. ●Refer to the operating instructions of the external flash for further details.
284DVQP1242
Others
Optional accessories
AC adaptor (optional) / DC coupler (optional)By using the AC adaptor (DMW-AC10: optional) and DC coupler (DMW-DCC6: optional), you can record and play back without worrying about the remaining battery charge.The optional DC coupler can only be used with the designated Panasonic AC adaptor.
●Always use a genuine Panasonic AC adaptor (optional). ●Also read the AC adaptor and DC coupler operating instructions.
Filter (optional)PL filter (DMW-LPL55: optional) will suppress the reflected light from a metal or non spherical surfaces (flat non-metallic surfaces, water vapour or invisible particles in the air), making it possible to take a picture with enhanced contrast.The ND filter (DMW-LNDH55: optional) reduces the amount of light to approximately 1/8th (equal to adjusting the aperture value 3 increments) without affecting the colour balance.The MC protector (DMW-LMCH55: optional) is a transparent filter which affects neither the colours nor the amount of light, so it can always be used to protect the camera’s lens.
●Do not attach multiple filters at the same time. ●You can attach the lens cap when the filter is attached. ●Refer to the operating instructions for each filter for details.
285DVQP1242
Others
List of monitor/viewfinder displays • The following images are examples of when the display screen is set to [ ] (monitor style) in the monitor.
• The information displayed, such as histograms, magnifications, and numeric values, are only for the purpose of reference.
In recording
Recording mode (→36)
Custom Set (→81)
[Photo Style] (→172)
[Flash] (→142, 148)
50p[Rec Format]/[Rec Quality] (→153)[Snap Movie] (→160)[Aspect Ratio] (→175)/ [Picture Size] (→176)
Image size (Panorama Shot Mode) (→65)Picture effect (Filter) adjustment display (→75, 174)
EXPS Types of picture effects (Filter) (→174)Card (displayed only during recording) (→27)
XXhXXmXXs Elapsed recording time*1 (→151)Simultaneous recording indicator (→159)
[Peaking] (→195)[Highlight Shadow] (→178)[HDR] (→180)/[iHDR] (→55)[Multi Exp.] (→181)
[Conversion] (→282)Electronic shutter (→182)Overheat indicator (→296)
50p
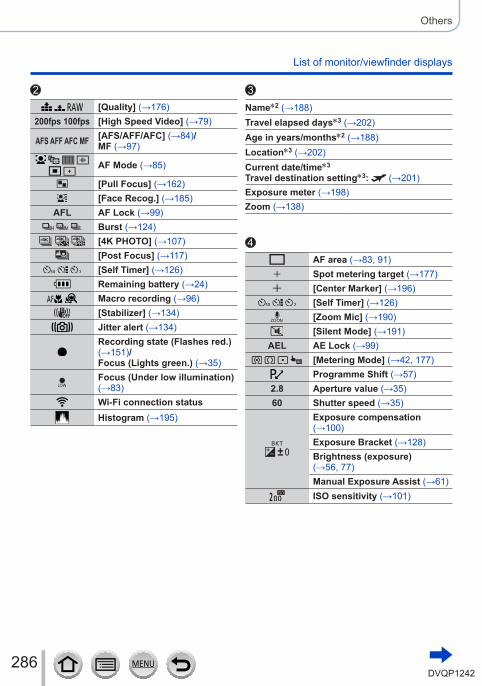
286DVQP1242
Others
List of monitor/viewfinder displays
[Quality] (→176)200fps 100fps [High Speed Video] (→79)
AFS AFF AFC MF [AFS/AFF/AFC] (→84)/ MF (→97)
AF Mode (→85)
[Pull Focus] (→162)[Face Recog.] (→185)
AFL AF Lock (→99) Burst (→124)
[4K PHOTO] (→107)[Post Focus] (→117)
[Self Timer] (→126)Remaining battery (→24)
Macro recording (→96)[Stabilizer] (→134)Jitter alert (→134)Recording state (Flashes red.) (→151)/Focus (Lights green.) (→35)Focus (Under low illumination) (→83)Wi-Fi connection statusHistogram (→195)
Name*2 (→188)Travel elapsed days*3 (→202)Age in years/months*2 (→188)Location*3 (→202)Current date/time*3
Travel destination setting*3: (→201)Exposure meter (→198)Zoom (→138)
AF area (→83, 91)Spot metering target (→177)[Center Marker] (→196)
[Self Timer] (→126)[Zoom Mic] (→190)[Silent Mode] (→191)
AEL AE Lock (→99) [Metering Mode] (→42, 177)
Programme Shift (→57)2.8 Aperture value (→35)60 Shutter speed (→35)
Exposure compensation (→100)Exposure Bracket (→128)Brightness (exposure) (→56, 77)Manual Exposure Assist (→61)ISO sensitivity (→101)
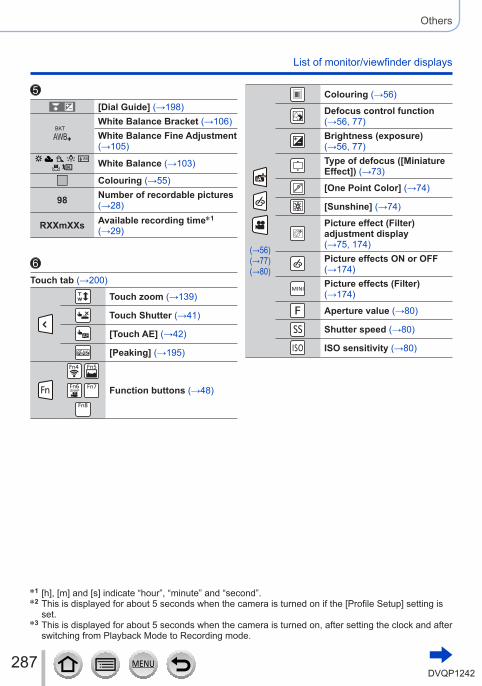
287DVQP1242
Others
List of monitor/viewfinder displays
(→56)(→77)(→80)
Colouring (→56)
Defocus control function (→56, 77)Brightness (exposure) (→56, 77)Type of defocus ([Miniature Effect]) (→73)
[One Point Color] (→74)
[Sunshine] (→74)
Picture effect (Filter) adjustment display (→75, 174)Picture effects ON or OFF (→174)Picture effects (Filter) (→174)
Aperture value (→80)
Shutter speed (→80)
ISO sensitivity (→80)
[Dial Guide] (→198)White Balance Bracket (→106)White Balance Fine Adjustment (→105)
White Balance (→103)
Colouring (→55)
98 Number of recordable pictures (→28)
RXXmXXs Available recording time*1 (→29)
Touch tab (→200)
Touch zoom (→139)
Touch Shutter (→41)
[Touch AE] (→42)
[Peaking] (→195)
Function buttons (→48)
*1 [h], [m] and [s] indicate “hour”, “minute” and “second”.*2 This is displayed for about 5 seconds when the camera is turned on if the [Profile Setup] setting is
set.*3 This is displayed for about 5 seconds when the camera is turned on, after setting the clock and after
switching from Playback Mode to Recording mode.
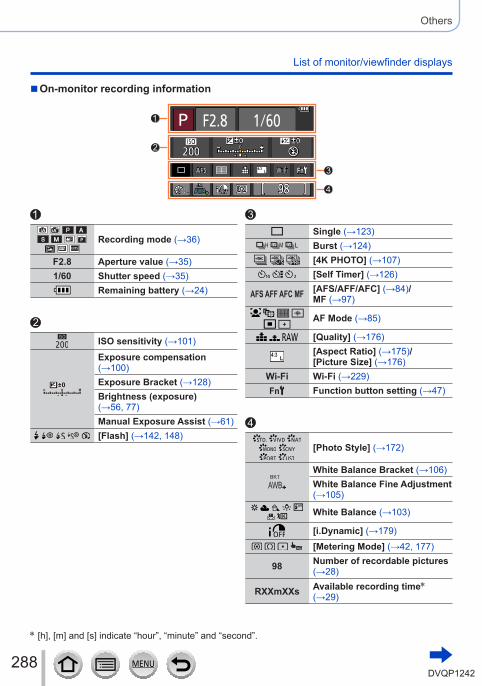
288DVQP1242
Others
List of monitor/viewfinder displays
■On-monitor recording information
Recording mode (→36)
F2.8 Aperture value (→35)1/60 Shutter speed (→35)
Remaining battery (→24)
ISO sensitivity (→101)
Exposure compensation (→100)Exposure Bracket (→128)Brightness (exposure) (→56, 77)Manual Exposure Assist (→61)
[Flash] (→142, 148)
Single (→123) Burst (→124)
[4K PHOTO] (→107) [Self Timer] (→126)
AFS AFF AFC MF [AFS/AFF/AFC] (→84)/ MF (→97)
AF Mode (→85)
[Quality] (→176)[Aspect Ratio] (→175)/ [Picture Size] (→176)
Wi-Fi Wi-Fi (→229)Function button setting (→47)
[Photo Style] (→172)
White Balance Bracket (→106)White Balance Fine Adjustment (→105)
White Balance (→103)
[i.Dynamic] (→179)
[Metering Mode] (→42, 177)
98 Number of recordable pictures (→28)
RXXmXXs Available recording time* (→29)
* [h], [m] and [s] indicate “hour”, “minute” and “second”.
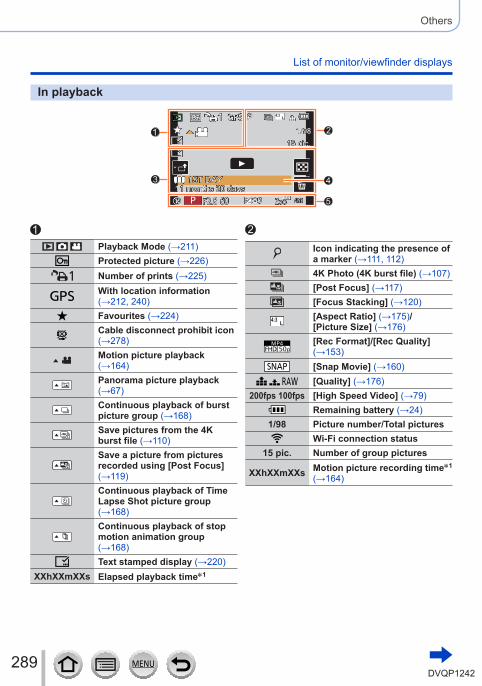
289DVQP1242
Others
List of monitor/viewfinder displays
In playback
Playback Mode (→211)Protected picture (→226)Number of prints (→225)With location information (→212, 240)Favourites (→224)Cable disconnect prohibit icon (→278)Motion picture playback (→164)Panorama picture playback (→67)Continuous playback of burst picture group (→168)Save pictures from the 4K burst file (→110)Save a picture from pictures recorded using [Post Focus] (→119)Continuous playback of Time Lapse Shot picture group (→168)Continuous playback of stop motion animation group (→168)Text stamped display (→220)
XXhXXmXXs Elapsed playback time*1
Icon indicating the presence of a marker (→111, 112)4K Photo (4K burst file) (→107)[Post Focus] (→117)[Focus Stacking] (→120)[Aspect Ratio] (→175)/ [Picture Size] (→176)
50p[Rec Format]/[Rec Quality] (→153)[Snap Movie] (→160)
[Quality] (→176)200fps 100fps [High Speed Video] (→79)
Remaining battery (→24)1/98 Picture number/Total pictures
Wi-Fi connection status15 pic. Number of group pictures
XXhXXmXXs Motion picture recording time*1 (→164)
15 pic.15 pic.
1ST DAY1ST DAY11 months 20 days11 months 20 days
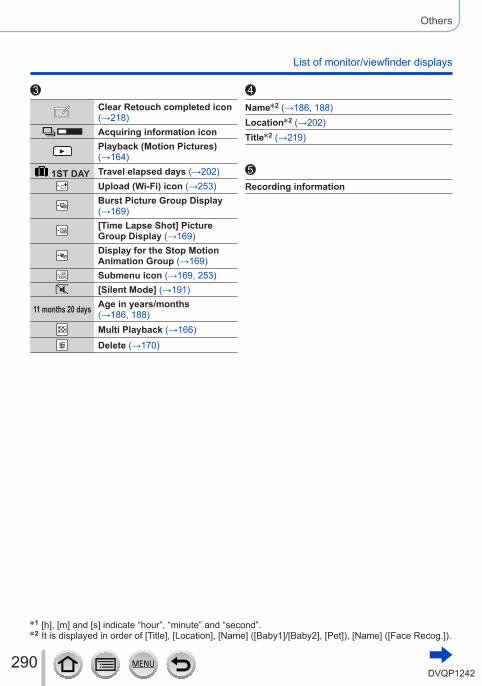
290DVQP1242
Others
List of monitor/viewfinder displays
Clear Retouch completed icon (→218)Acquiring information icon Playback (Motion Pictures) (→164)
1ST DAY Travel elapsed days (→202)Upload (Wi-Fi) icon (→253)Burst Picture Group Display (→169)[Time Lapse Shot] Picture Group Display (→169)Display for the Stop Motion Animation Group (→169)Submenu icon (→169, 253)[Silent Mode] (→191)
11 months 20 days Age in years/months (→186, 188)Multi Playback (→166)Delete (→170)
Name*2 (→186, 188)Location*2 (→202)Title*2 (→219)
Recording information
*1 [h], [m] and [s] indicate “hour”, “minute” and “second”.*2 It is displayed in order of [Title], [Location], [Name] ([Baby1]/[Baby2], [Pet]), [Name] ([Face Recog.]).
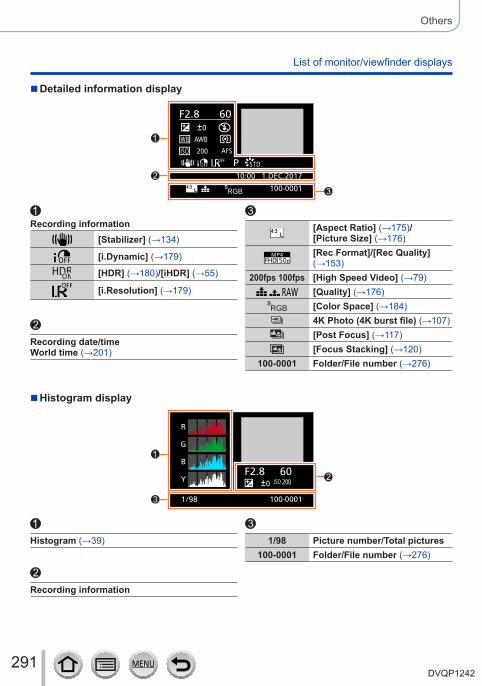
291DVQP1242
Others
List of monitor/viewfinder displays
Histogram (→39)
Recording information
1/98 Picture number/Total pictures100-0001 Folder/File number (→276)
■Histogram display
100-00011/98
R
G
B
Y
Recording information[Stabilizer] (→134)
[i.Dynamic] (→179)
[HDR] (→180)/[iHDR] (→55)
[i.Resolution] (→179)
Recording date/timeWorld time (→201)
[Aspect Ratio] (→175)/ [Picture Size] (→176)
50p[Rec Format]/[Rec Quality] (→153)
200fps 100fps [High Speed Video] (→79) [Quality] (→176)
[Color Space] (→184)4K Photo (4K burst file) (→107)[Post Focus] (→117)[Focus Stacking] (→120)
100-0001 Folder/File number (→276)
■Detailed information display
100-0001
10:00 1.DEC.2017
292DVQP1242
Others
Message displaysThe following explains the meaning of major messages displayed on the screen, and how to respond to them.
■Memory cards
[Memory Card Error] [Format this card?] • Save needed data on a computer or other device, and then use [Format] on the camera. (→28) • Try with a different card.
[Read Error] / [Write Error] [Please check the card] • Check whether card has been inserted correctly (→26). • Turn off the camera and remove the card. Reinsert the card and turn the camera on again. • Try with a different card.
[Motion recording was cancelled due to the limitation of the writing speed of the card] • The speed class of a required card varies depending on [Rec Format] and [Rec Quality] of a motion picture. 4K photo recording requires a card that meets a particular speed class rating. Use a card that meets the rating. Be sure to use a card of the recommended speed class. For details, refer to “About motion picture/4K photo recording and speed class ratings” (→27).
• If recording stops even when using a card of the recommended speed class (→27), the data writing speed has dropped. If this happens, we recommend backing up the data on the memory card and formatting it (→28). Depending on the type of the card, recording may stop in the middle.
[Memory Card Error] [This memory card cannot be used] • Use a compatible card. (→27)
■Battery
[This battery cannot be used] • Use a genuine Panasonic battery. Consult the dealer or your nearest Service Centre if display still remains.
• Wipe any dirt away from the battery terminal.
293DVQP1242
Others
Message displays
■Wi-Fi function
[Failed to connect wireless access point] / [Connection failed] / [No destination found] • The wireless access point information set on this unit is wrong. Check the authentication type, encryption type, and encryption key. (→261)
• Radio waves from other devices may block the connection to a wireless access point. Check other devices that are connected to the wireless access point and devices that use the 2.4 GHz band.
[Connection failed. Please retry in a few minutes.] / [Network disconnected. Transfer stopped.] • Radio waves from the wireless access point are getting weak. Perform the connection closer to the wireless access point.
• Depending on the wireless access point, connection may be automatically disconnected after specific time has passed. Reconnect the connection again.
[Connection failed] • Change the access point to connect to in the smartphone Wi-Fi settings to this camera.
[Cannot connect to server] • If a message is displaying asking to update the root certificate, agree to update the root certificate.
■Others
[Some pictures cannot be deleted] [This picture cannot be deleted] • Non-DCF pictures (→163) cannot be deleted. Save needed data on a computer or other device, and then use [Format] on the camera. (→28)
[Cannot be set on this picture] • [Print Set], [Title Edit], [Text Stamp], and other functions cannot be used for pictures that are not compliant with the DCF standard (→163).
[Please turn camera off and then on again] [System Error] • Turn the camera on again. (Consult the dealer or your nearest Service Centre if display still remains.)
294DVQP1242
Others
Q&A Troubleshooting
Try checking these items (→294 - 302) first.
If the problem persists,Performing [Reset] in the [Setup] menu may resolve the issue (→208).Also, see the Panasonic support site for the latest support information. http://panasonic.jp/support/global/cs/dsc/(This site is available in English only.)
■Battery, power
The charging lamp blinks. • Charging is being performed in a place with extremely high or low temperature.
→ Reconnect the USB connection cable (supplied) and retry charging in a place where ambient temperature is 10 °C to 30 °C (50 °F to 86 °F) (temperature conditions also apply to the battery itself).
• Charging is not possible if the power supply capacity of the computer is low.
Camera does not work even if the camera is turned on. Camera switches off as soon as the camera is turned on.
• Battery needs recharging. → Charge the battery. (→20)
This unit is turned off automatically. • [Economy] is activated. (→205)
The battery runs down quickly. • [4K PHOTO] is set to [ ] ([4K Pre-Burst]).
→ When [ ] ([4K Pre-Burst]) has been selected, the battery drains faster.Select [ ] ([4K Pre-Burst]) only when recording.
• The Wi-Fi connection has been on for a long time. → The battery is used up faster with a Wi-Fi connection. Turn off the camera as often as possible using [Economy] (→205) or other methods.
295DVQP1242
Others
Q&A Troubleshooting
■Recording
Cannot record pictures. The shutter will not operate immediately when the shutter button is pressed.
• When [Focus/Release Priority] is set to [FOCUS], the camera will not record until proper focusing is achieved. (→193)
Recorded pictures look white. • Lens is dirty (fingerprints, etc.).
→ Turn the camera off and clean the lens surface with a soft dry cloth.
Recorded pictures are too bright/too dark. • AE Lock (→99) is set inappropriately.
Some pictures are taken when I press the shutter button just once. • Cancel the following settings:
– [Simultaneous record w/o filter] (→175) – Drive Mode (→123) – Bracket recording (→127)
Focus not aligned correctly. • Subject outside of focus range. • [Focus/Release Priority] is set to [RELEASE]. (→193) • [Shutter AF] is set to [OFF]. (→192) • AF Lock (→99) is set inappropriately. • If there are fingerprints or dirt on the lens, the focus may be set to the lens and not the subject.
Recorded pictures are blurred. The stabiliser function ineffective. • Shutter speed is slower in dark locations and the stabiliser function is less effective.
→ Use a tripod and the self-timer when using a slower shutter speed (→126).
Recorded pictures appear coarse, or there is interference. • We recommend trying the following methods.
→ Lower ISO sensitivity (→101). → Either adjust [Noise Reduction] of [Photo Style] to a higher setting or set each item other than [Noise Reduction] to a lower setting. (→173)
Subject appears skewed in pictures. • If you take a picture of a moving subject in the electronic shutter mode, motion picture recording mode, or 4K photo recording mode, the subject in the picture may be skewed in some cases. This is characteristic of MOS sensors which serve as the camera’s pickup sensors. This is not a malfunction.
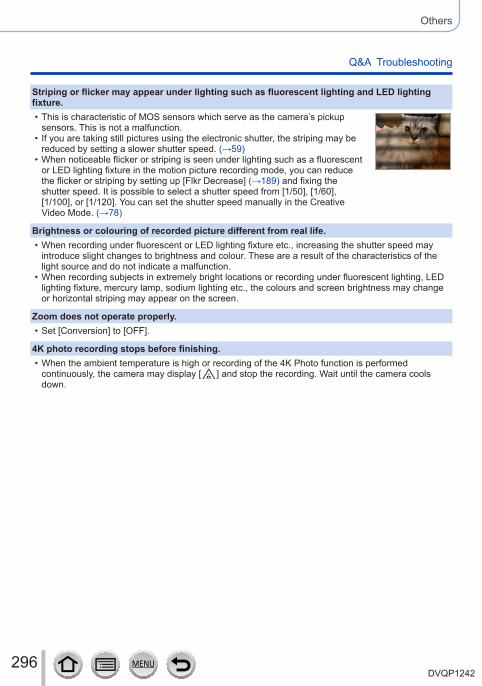
296DVQP1242
Others
Q&A Troubleshooting
Striping or flicker may appear under lighting such as fluorescent lighting and LED lighting fixture.
• This is characteristic of MOS sensors which serve as the camera’s pickup sensors. This is not a malfunction.
• If you are taking still pictures using the electronic shutter, the striping may be reduced by setting a slower shutter speed. (→59)
• When noticeable flicker or striping is seen under lighting such as a fluorescent or LED lighting fixture in the motion picture recording mode, you can reduce the flicker or striping by setting up [Flkr Decrease] (→189) and fixing the shutter speed. It is possible to select a shutter speed from [1/50], [1/60], [1/100], or [1/120]. You can set the shutter speed manually in the Creative Video Mode. (→78)
Brightness or colouring of recorded picture different from real life. • When recording under fluorescent or LED lighting fixture etc., increasing the shutter speed may introduce slight changes to brightness and colour. These are a result of the characteristics of the light source and do not indicate a malfunction.
• When recording subjects in extremely bright locations or recording under fluorescent lighting, LED lighting fixture, mercury lamp, sodium lighting etc., the colours and screen brightness may change or horizontal striping may appear on the screen.
Zoom does not operate properly. • Set [Conversion] to [OFF].
4K photo recording stops before finishing. • When the ambient temperature is high or recording of the 4K Photo function is performed continuously, the camera may display [ ] and stop the recording. Wait until the camera cools down.
297DVQP1242
Others
Q&A Troubleshooting
■Motion PictureCannot record motion pictures.
• When a large capacity card is used, you may not be able to take a picture for a while after you turn on the camera.
Motion picture recording stops midway. • When the ambient temperature is high or motion picture is recorded continuously, the camera may display [ ] and stop the recording. Wait until the camera cools down.
• The speed class of a required card varies depending on [Rec Format] and [Rec Quality] of a motion picture. Be sure to use a card of the recommended speed class. For details, refer to “About motion picture/4K photo recording and speed class ratings” (→27).
Sometimes focus adjustment with Auto Focus mode is difficult while recording 4K motion pictures.
• This may occur when taking a picture by reducing the Auto Focus speed in order to adjust the focus at high precision. This is not a malfunction.
A noise, such as a clicking or buzzing noise, is recorded on a motion picture. Audio is recorded at low volumes.
• With recording in a quiet environment, the sound of aperture, focus and other actions may be recorded in motion pictures. This is not a malfunction. The focus operation during recording of motion pictures can be set to [OFF] in [Continuous AF] (→155).
• If you block the microphone with your fingers while motion pictures are being recorded, the audio may be recorded at a low volume or may not be recorded at all. In this case, the camera may pick up the lens operating sounds more easily.
Operating sounds are recorded in a motion picture. • Use of [Silent Operation] is recommended if you are concerned about operational sounds. (→80)
■Flash
No flash emitted. • The flash becomes unavailable in the following cases.
– The flash is closed. (→140) • Set [Shutter Type] to [AUTO] or [MSHTR]. (→182) • Set [Silent Mode] to [OFF]. (→191)
298DVQP1242
Others
Q&A Troubleshooting
■Monitor/viewfinder
The monitor/viewfinder is turned off although the camera is turned on. • If no operations are performed during the set time period [Auto LVF/Monitor Off] (→205) is activated, and the monitor/viewfinder turns off.
It may flicker for an instant or the brightness of the screen may change significantly for an instant.
• This occurs due to the aperture of the lens changing when the shutter button is pressed halfway, or when the brightness of the subject changes. This is not a malfunction.
Cannot switch between the monitor and viewfinder when pressing [LVF] button. • When it is connected to a computer or printer, the camera can display pictures on the monitor only.
■Playback
Cannot view pictures. There are no recorded pictures. • A card is not inserted in the camera. • Has the file name of the picture been changed on a computer? If so, it cannot be played back on the camera.
→ It is recommended to use the “PHOTOfunSTUDIO” software (→273) to write pictures from PC to card.
• Set [Playback Mode] to [Normal Play]. (→211)
Red areas in pictures appear blackened. • When the digital red-eye correction ([ ], [ ]) is operating, red areas may be blackened.
→ We recommend closing the built-in flash, setting the flash mode to [ ], or turning [Red-Eye Removal] to [OFF] before recording. (→183)
299DVQP1242
Others
Q&A Troubleshooting
■Wi-Fi function
It cannot connect to the wireless LAN. Radio waves get disconnected. Wireless access point is not displayed.General tips for using a Wi-Fi connection
• Use within the communication range of the wireless LAN network. • Is any device, such as microwave oven, cordless phone, etc., that uses 2.4 GHz frequency operated nearby?
→ Radio waves may get interrupted when used simultaneously. Use them sufficiently away from the device.
• When the battery indicator is flashing red, the connection with other equipment may not start or the connection may be disrupted. (A message such as [Communication error] is displayed.)
• When this unit is placed on a metal table or shelf, the connection may not be established easily. Use the camera away from metal surfaces.
About a wireless access point • Check if the wireless access point to connect is in operating state. • Check the radio wave condition of the wireless access point.
→ Perform the connection closer to the wireless access point. → Move the location or change the angle of the wireless access point.
• It may not display even if the radio waves exist depending on the setting of the wireless access point.
→ Turn off the wireless access point and then turn it back on. • Is the network SSID of the wireless access point set not to broadcast?
→ It may not be detected when it is set not to broadcast. Enter and set the network SSID. (→261) Alternatively, set the network SSID of the wireless access point to broadcast.
This unit is not displayed in the Wi-Fi setting screen of the smartphone. • Try switching the ON/OFF of the Wi-Fi function in the Wi-Fi settings of the smartphone.
I am having a problem connecting to my Windows 8 PC. The user name and password are not recognised.
• Depending on the OS version, on Windows 8, for example, there are two types of user account (local account/Microsoft account).
→ Be sure to set the local account and use the user name and password for the local account.
300DVQP1242
Others
Q&A Troubleshooting
The Wi-Fi connection is not recognising my PC.The camera cannot be connected to Mac computer/Windows PC via Wi-Fi connection.
• By default, the Wi-Fi connection uses the default workgroup name of “WORKGROUP”. If the name of the workgroup has been changed, it will not be recognised.
→ Select [PC Connection] then [Change Workgroup Name] in the [Wi-Fi Setup] to change the workgroup name to match that of your PC. (→266)
• Please confirm login name and password are correctly typed. • When the system time of Mac computer or Windows PC connected to a camera differs severely from that of the camera, the camera cannot be connected to the computer or PC in some OSs.
→ Please confirm clock set and world time of the camera matches with time, date and time zone in Windows PC or Mac computer. When both settings do not match severely, please match them.
Images cannot be transmitted to the WEB service. • Confirm that the login information (login ID/user name/email address/password) is correct.
It takes time to transmit an image to the WEB service.Transmission of the image fails midway. There is an image that could not be transmitted.
• Is the size of the image too large? → Transmit after dividing the motion picture with [Video Divide] (→221). → Reduce the image size at [Size] (→245), and then send.
• It may take longer time to transmit when distance to the wireless access point is far. → Transmit closer to the wireless access point.
• File format of the picture that can be sent differs depending on the destination. (→243)
I have forgotten the password for the Wi-Fi. → Execute the [Reset Wi-Fi Settings] in the [Setup] menu. (→208) However, the information you have set on the [Wi-Fi Setup] will be reset.
301DVQP1242
Others
Q&A Troubleshooting
■TV, computer, printer
No image appears on TV. Image blurred or not coloured. • Not connected correctly (→269). • The television has not been switched to auxiliary input.
VIERA Link (HDMI) is not working. • Is the camera’s [VIERA Link] setting set to [ON]? (→206)
→ Check the VIERA Link (HDMI) settings on the device you are connecting to. → Turn the camera off and on again.
Cannot communicate with the computer. • Set [USB Mode] to [PC] (→206, 275). • Turn the camera off and then on again.
Computer does not recognise card. (When using an SDXC Memory Card) • Check whether your computer is compatible with SDXC Memory Cards. http://panasonic.net/avc/sdcard/information/SDXC.html
• A message prompting you to format the card may appear when you connect it. Do not format the card.
• If the [Access] indicator on the screen does not go off, turn the camera off before disconnecting the USB connection cable.
Cannot print when connecting to printer. • Printer not compatible with PictBridge. • Set [USB Mode] to [PictBridge(PTP)] (→206, 278).
The edges of pictures are cut off when printing. • Release any trimming or edgeless printing settings on printer before printing. • The aspect ratio of pictures is different from that of paper used for printing.
→ If printing in shop, check if 16:9 sizes can be printed.
302DVQP1242
Others
Q&A Troubleshooting
■Others
The lens makes a clicking noise. • When the camera is turned on or off, the lens is moved, or an aperture operation is performed, such a noise may be heard. This is not a malfunction.
• When the brightness changes after a zooming operation or moving the camera, the lens may make a noise while adjusting the aperture. This is not a malfunction.
Zooming stops instantaneously. • When using the Extra Optical Zoom, the zooming action will stop temporarily. This is not a malfunction.
Red lamp illuminated when pressing shutter button halfway in dark locations. • [AF Assist Lamp] is set to [ON] (→193).
Camera is hot. • Camera may become a little warm during use, but this does not affect performance or quality.
Clock is incorrect. • If you do not use the camera for a long time, the clock may be reset.
→ Reset the clock (→31).
When using zoom, picture becomes slightly warped and the edges of the subject become coloured.
• Pictures may be slightly warped or coloured around the edges, depending on the zoom ratio, but this is not a fault.

303DVQP1242
Others
Usage cautions and notes
When in use ●Keep this unit as far away as possible from electromagnetic equipment (such as microwave ovens, TVs, video games etc.).
• If you use this unit on top of or near a TV, the pictures and/or sound on this unit may be disrupted by electromagnetic wave radiation.
• Do not use this unit near cell phones because doing so may result in noise adversely affecting the pictures and/or sound.
• Recorded data may be damaged, or pictures may be distorted, by strong magnetic fields created by speakers or large motors.
• Electromagnetic wave radiation may adversely affect this unit, disturbing the pictures and/or sound.
• If this unit is adversely affected by electromagnetic equipment and stops functioning properly, turn this unit off and remove the battery or disconnect AC adaptor (supplied)/AC adaptor (optional). Then reinsert the battery or reconnect AC adaptor and turn this unit on.
Do not use this unit near radio transmitters or high-voltage lines. • If you record near radio transmitters or high-voltage lines, the recorded pictures and/or sound may be adversely affected.
●Do not extend the supplied cord or cable. ●Do not allow camera to come into contact with pesticides or volatile substances (can cause surface damage or coating to peel). ●Never leave the camera and the battery in a car or on a car hood in the summer. Doing so may cause leakage of the battery electrolyte, overheating, fire or a battery explosion due to the high temperature.
304DVQP1242
Others
Usage cautions and notes
Caring for your cameraTo clean your camera, remove the battery, the DC coupler (optional) or a card, or disconnect the power plug from the outlet, and wipe with a soft, dry cloth.
●Use a damp cloth to remove stubborn stains, before wiping with a dry cloth. ●Do not use benzine, thinners, alcohol, or kitchen detergent, as these may damage the outer casing and finish of the camera. ●If using a chemically-treated cloth, read the supplied instructions carefully.
When not using for a while ●Turn off the camera before removing battery and card (ensure that battery is removed to prevent damage through over-discharge). ●Do not leave in contact with rubber or plastic bags. ●Store together with a drying agent (silica gel) if leaving in drawer, etc. Store batteries in cool (15 °C to 25 °C (59 °F to 77 °F)) places with low humidity (40%RH to 60%RH) and no major temperature changes. ●Charge battery once per year and use completely before storing again. ●Check all the parts before taking pictures when you have not used the camera for a long period of time.
Monitor/viewfinder ●Do not press hard on the monitor. This may cause uneven display and damage the monitor. ●In cold climates or other situations when the camera becomes cold, the monitor or the viewfinder may appear slightly darker than normal immediately after the camera is turned on. Normal brightness will return once the internal components have warmed up.
The monitor and viewfinder are made with extremely high precision technology. However there may be some dark or bright spots (red, blue or green) on the screen. This is not a malfunction. The monitor and viewfinder screens are controlled with extremely high precision, but some pixels may be inactive. The spots will not be recorded on pictures on a card.
305DVQP1242
Others
Usage cautions and notes
Lens ●Do not press the lens with excessive force. ●When there is dirt (water, oil, and fingerprints, etc.) on the surface of the lens, the picture may be affected. Lightly wipe the surface of the lens with a soft, dry cloth before and after taking pictures. ●Do not leave the camera with the lens facing the sun as rays of light from the sun may cause it to malfunction. Also, be careful when placing the camera outside or near a window. ●Retract the lens when carrying the camera.
BatteryThe battery is a rechargeable lithium ion battery.This battery is easily affected by temperature and humidity, and is affected more when the temperature is high or low.
●The time required for charging varies depending on conditions of battery usage. Charging takes longer at high or low temperatures and when the battery has not been used in some time. ●Battery will be warm during charging and for some time thereafter. ●Battery will run out if not used for long periods of time, even after being charged. ●Do not leave any metal items (such as clips) near the contact areas of the power plug. Otherwise, a fire and/or electric shocks may be caused by short-circuiting or the resulting heat generated. ●Frequently charging up battery is not recommended. (Frequently charging battery reduces maximum usage time and can cause battery to expand.) ●If available battery power is significantly reduced, battery is reaching end of lifespan. Please purchase a new battery. ●When charging:
• Wipe dirt from the battery terminal with a dry cloth. • Keep at least 1 m (3.3 feet) away from AM radio (may cause radio interference).
●Do not use a damaged or dented battery (especially connectors), e.g. by dropping (can cause faults).
306DVQP1242
Others
Usage cautions and notes
AC adaptor (supplied) ●Keep at least 1 m (3.3 feet) away from AM radio (may cause radio interference). ●The AC adaptor (supplied) may generate whirring sounds when it is being used. This is not a malfunction. ●After use, be sure to disconnect the power supply device from the electrical outlet. (A very small amount of current is consumed if it is left connected.)
Memory cards ●To prevent damage to cards and data
• Avoid high temperatures, direct sunlight, electromagnetic waves, and static electricity. • Do not bend, drop, or expose to strong impacts. • Put the card in the card case or the storage bag after use and when storing or carrying the card.
• Do not touch terminals on reverse of card or allow them to become dirty or wet. ●Recorded data may be damaged or lost if the camera breaks down due to inappropriate handling. Panasonic will not be liable for any damage caused due to loss of recorded data. ●When disposing of/transferring memory cards
• If using the “format” or “delete” functions on your camera or computer, this only changes the file management information, and does not completely delete the data from within the memory card. When disposing of or transferring your memory cards, we recommend physically destroying them, or using commercially available computer data erasing software to completely delete the data from the card. Data within memory cards should be managed responsibly.
When using a tripod or unipod ●Do not apply excessive force or tighten screws when they are crooked. (This may damage the camera, screw hole, or label.) ●Ensure that the tripod is stable. (Refer to the tripod instructions.) ●You may not be able to remove the card or the battery when using a tripod or unipod.
307DVQP1242
Others
Usage cautions and notes
Personal InformationTo protect personal information, we recommend that you set a Wi-Fi password or a Wi-Fi function lock. (→266)If names or birthdays are set in [Profile Setup] or in the [Face Recog.] function, keep in mind that the camera and recorded pictures will contain personal information.Be sure to pay special attention to the privacy, likeness rights, etc. of a subject and take your own responsibility when you use the [Silent Mode], or use functions such as writing the location information and changing the shutter noise, etc.
●Disclaimer • Data containing personal information can be altered or lost due to malfunction, static electricity, accidents, breakdowns, repairs, or other operations. Panasonic will not be liable for any damage that occurs, direct or indirect, as a result of the alteration or loss of data containing personal information.
●When ordering repairs or transferring/disposing of the camera • After you make a note of the personal information, perform [Reset Wi-Fi Settings]/[Delete account] to delete data containing personal information such as wireless LAN connection settings that you registered or set in this unit. (→208, 258)
• To protect your personal information, please reset the settings. (→208) • Remove the memory card from the camera. • When ordering repairs, settings may be returned to the initial purchase state. • If the above operations cannot be performed because of a camera malfunction, consult with the dealer or nearest Service Centre.
●When transferring or disposing of your memory card, see “When disposing of/transferring memory cards” in the previous section. (→306) ●Uploading pictures to WEB services
• Pictures may contain personal information that can be used to identify the user, such as titles, recording dates and times, and location information. Before uploading the pictures to WEB services, check the pictures carefully for information that should not be disclosed.
308DVQP1242
Others
Usage cautions and notes
Wi-Fi function
■Use the camera as a wireless LAN deviceWhen using equipment or computer systems that require more reliable security than wireless LAN devices, ensure that the appropriate measures are taken for safety designs and defects for the systems used. Panasonic will not take any responsibility for any damage that arises when using the camera for any purpose other than as a wireless LAN device.
■Use of the Wi-Fi function of this camera is presumed to be in countries where this camera is sold
There is the risk that the camera violates the radio wave regulations if used in countries other than those where this camera is sold, and Panasonic takes no responsibility for any violations.
■There is the risk that data sent and received via radio waves may be interceptedPlease note that there is the risk that data sent and received via radio waves may be intercepted by a third party. We strongly recommend that you enable encryption in the settings of your wireless access point to ensure information security.
■Do not use the camera in areas with magnetic fields, static electricity or interference
• Do not use the camera in areas with magnetic fields, static electricity or interference, such as near microwave ovens. Radio waves may not reach the camera.
• Using the camera near devices such as microwave ovens or cordless telephones that use the 2.4 GHz radio wave band may cause a decrease in performance in both devices. ■Do not connect to the wireless network you are not authorised to use
When the camera utilises its Wi-Fi function, wireless networks will be searched automatically. When this happens, wireless networks that you are not authorised to use (SSID*) may be displayed, however do not attempt to connect to the network as it may be considered as unauthorised access.* SSID refers to the name that is used to identify a network over a wireless LAN connection. If the
SSID matches for both devices, transmission is possible.
309DVQP1242
Others
Usage cautions and notes
●SDXC Logo is a trademark of SD-3C, LLC. ●The terms HDMI and HDMI High-Definition Multimedia Interface, and the HDMI Logo are trademarks or registered trademarks of HDMI Licensing, LLC in the United States and other countries. ●HDAVI Control™ is a trademark of Panasonic Corporation. ● “AVCHD”, “AVCHD Progressive” and the “AVCHD Progressive” logo are trademarks of Panasonic Corporation and Sony Corporation. ●Dolby, Dolby Audio, and the double-D symbol are trademarks of Dolby Laboratories. ●Adobe is a trademark or registered trademark of Adobe Systems Incorporated in the United States and/or other countries. ●Pentium is a trademark of Intel Corporation in the U.S. and/or other countries. ●Windows is either registered trademark or trademark of Microsoft Corporation in the United States and/or other countries. ● iMovie, Mac and Mac OS are trademarks of Apple Inc., registered in the U.S. and other countries. ● iPad, iPhone, iPod, and iPod touch are trademarks of Apple Inc., registered in the U.S. and other countries. ●App Store is a service mark of Apple Inc. ●Android and Google Play are trademarks or registered trademarks of Google Inc. ●The Wi-Fi CERTIFIED™ Logo is a certification mark of Wi-Fi Alliance®. ●The Wi-Fi Protected Setup™ Identifier mark is a certification mark of Wi-Fi Alliance®. ● “Wi-Fi®” is a registered trademark of Wi-Fi Alliance®. ●“Wi-Fi Protected Setup™”, “WPA™”, and “WPA2™” are trademarks of Wi-Fi Alliance®. ●DLNA, the DLNA Logo and DLNA CERTIFIED are trademarks, service marks, or certification marks of the Digital Living Network Alliance. ●QR Code is a registered trademark of DENSO WAVE INCORPORATED. ●This product uses “DynaFont” from DynaComware Corporation. DynaFont is a registered trademark of DynaComware Taiwan Inc. ●Other names, company names, and product names mentioned in these instructions are trademarks or registered trademarks of the companies concerned.

310DVQP1242
Others
Usage cautions and notes
This product is licensed under the AVC Patent Portfolio License for the personal use of a consumer or other uses in which it does not receive remuneration to (i) encode video in compliance with the AVC Standard (“AVC Video”) and/or (ii) decode AVC Video that was encoded by a consumer engaged in a personal activity and/or was obtained from a video provider licensed to provide AVC Video. No license is granted or shall be implied for any other use. Additional information may be obtained from MPEG LA, L.L.C.See http://www.mpegla.com
311DVQP1242
Others
Usage cautions and notes
This product incorporates the following software:
(1) the software developed independently by or for Panasonic Corporation,(2) the software owned by third party and licensed to Panasonic Corporation, and/or(3) open source software
The software categorised as (3) is distributed in the hope that it will be useful, but WITHOUT ANY WARRANTY, without even the implied warranty of MERCHANTABILITY or FITNESS FOR A PARTICULAR PURPOSE.Please refer to the detailed terms and conditions thereof displayed by selecting [MENU/SET] → [Setup] → [Version Disp.] → [Software info].