Embed Size (px)
Citation preview

DGP-PG2-A Product User Manual | Released: 12/17 Rev. H | ©2017 Diamond Ground Products
2651 Lavery Court • Newbury Park, CA 91320Tel: 805.498.3837 • Fax: 805.498.9347
DGP-PG2-AUSER MANUAL
since 1992

DGP-PG2-A Product User Manual | Released: 12/17 Rev. H | ©2017 Diamond Ground Products
TABLE OF CONTENTS
1. INTRODUCTION 3
2. SPECIFICATIONS 4
3. WARRANTY 4
4. SAFETY 4
5. UNPACKING AND MOUNTING 5
6. PREPARING ELECTRODES 5
7. WHEEL REPLACEMENT 8 8. EXPLODED ASSEMBLY DRAWING 9
9. PIRANHA II PARTS LIST 10
10. TUNGSTEN OPTIONS AND ALTERNATIVES 11
11. OPTIONAL COLLET KIT W/PART LIST 12
Page 2
PIRANHA DGP-PG2-ATUNGSTEN GRINDER
USER MANUAL

DGP-PG2-A Product User Manual | Released: 12/17 Rev. H | ©2017 Diamond Ground Products
Page 3
1. INTRODUCTIONThank you and congratulations on your purchase of the Piranha II™ Tungsten Grinder, manufactured by Diamond Ground Products in Newbury Park, CA, U.S.A. We appreciate your choice of this quality product and expect that it will provide you with many years of reliable service. It is built to last and comes with a one-year warranty against manufacturing defects.
FEATURES:• Easy set-up, optimal consistency and near-perfect repeatability.• Compact, durable and solid design.• Longitudinal 20 RA grinding for maximum arc starting, arc stability, electrode life & weld penetration.• Universal collet arm for 3 electrode sizes - .040” (1.0mm), 1/16” (1.6mm), 3/32” (2.4mm) - with no equipment changes.• Angle scale included for angles from 10° - 60° • Precision tip flat gauge & depth adjustment stop ensures exact tungsten points every time - enabling consistent, repeatable arc performance and welding output.• Containment baffle to keep dust inside the grinder housing, for safety and easy disposal.• Tip flat block for square end grinding and removing bad tips.• Electrode notching station for simple cut-off.• Double-sided grinding wheel for maximum wheel life and value.• Sliding dust shield for 100% dust containment.• Integrated receptacle area for ease of handling electrodes.• Recessed handle for better form & function.• On/off switch with LED light for improved display of unit operation.• Lightened chassis for reduced weight.• Signature blue powdercoat• Detailed manual for valuable engineering data and welding recommendations.
BENEFITS:
• SAFETY• WELD QUALITY• PRODUCTIVITY• VALUE
DGP-PG2-A Product User Manual | Released: 12/17 Rev. H | ©2017 Diamond Ground Products
Page 4
2. SPECIFICATIONS
Range of Included Angle: 10° - 60°Electrode Diameters: .040 (1.0mm), 1/16” (1.6mm), 3/32” (2.4mm)Minimum Electrode Length: 1.75” (44.5mm)Voltage: 110/220 VAC, 50/60HzPower Consumption: 40 WattsMotor: 2,500 rpm, .5 ampsLength: 7.750” (196.85mm)Width: 4.750” (120.65 mm)Height: 6.000” (152.4 mm)Weight: 10 lbs (4.54 kg)
3. WARRANTYThe Piranha II Tungsten Grinder comes with a one-year warranty on parts and labor, excluding the diamond-grinding wheel that is a consumable part that naturally wears over time. This warranty also excludes abuse to the machine, dropping of the unit or improper handling by the operator.
4. SAFETYBefore any work is done, read the caution below carefully. Working safely prevents accidents.
• When not in use, turn the grinder off for safety purposes and to decrease wear on the machine.• Wear proper apparel. Do not wear loose clothing, gloves, neckties, rings, bracelets, or other jewelry, which may get caught, in moving parts of the machine.• Wear protective hair covering to contain long hair.• Wear safety glasses and a facemask.• Be alert and think clearly. Never operate power tools when tired, intoxicated, or when taking medication that may cause drowsiness.• Work area should have sufficient lighting.• A proper electrical outlet should be available for the tools. A three-prong plug should be plugged directly into a three-prong outlet. Extension cord should be the correct gauge.• Keep visitors at a safe distance from work area.• Always unplug grinder prior to inspection.• Read this manual thoroughly for specific adjustments and operating procedures.• Do not perform “make-shift” repairs. Any part that is damaged should be promptly replaced.• Only use the grinder for its intended purpose. Do not use it for a job it was not designed for.• Make sure that the grinder is off before plugging it in.• Do not apply extreme force on the tungsten while grinding. This may cause your grinder to jam or cause pre-mature grinding wheel wear.• Never leave the grinder unattended. Turn the grinder off first and do not leave it until it comes to a complete stop.• Keep hands away from moving parts.• Know your grinder; learn its operation, applications, and specific limitations.
DGP-PG2-A Product User Manual | Released: 12/17 Rev. H | ©2017 Diamond Ground Products
Page 5
5. UNPACKING & MOUNTINGThe first thing you should do is check for shipping damage. Diamond Ground Products, Inc. takes great pride in producing quality products. If for some reason you find anything to be defective, please contact the Service Department at (805) 498-3837 and we will work with you to rectify the problem to your satisfaction.
After unpacking the box you should have these items:• The Piranha II Tungsten Grinder.• Three Allen wrenches, sizes 3/32”, 7/64” & 1/8” for replacing wheels.• PII Manual• Pin Vise
Mounting of the grinder is as follows. Place the unit on a flat surface allowing enough space for the operator to work in. This also provides proper ventilation. Make sure the power switch is in the off position and plug it into the electrical outlet. Switch the power on and the unit is ready to operate.
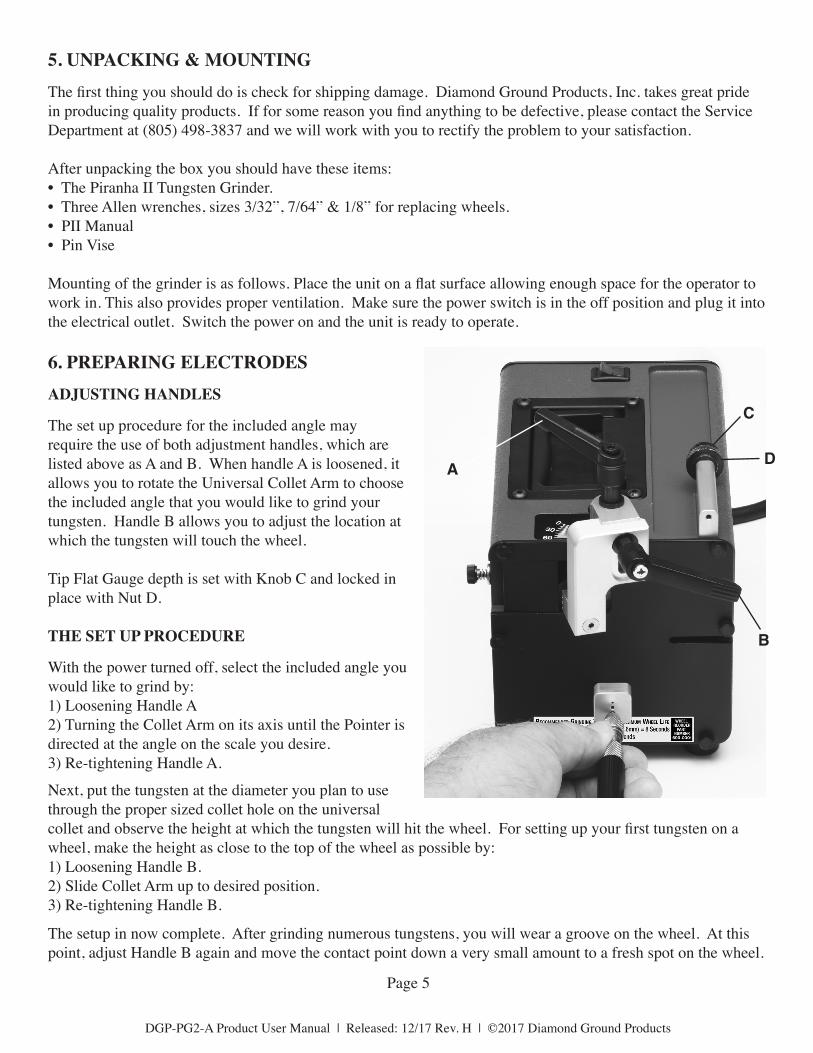
6. PREPARING ELECTRODESADJUSTING HANDLES
The set up procedure for the included angle may require the use of both adjustment handles, which are listed above as A and B. When handle A is loosened, it allows you to rotate the Universal Collet Arm to choose the included angle that you would like to grind your tungsten. Handle B allows you to adjust the location at which the tungsten will touch the wheel.
Tip Flat Gauge depth is set with Knob C and locked in place with Nut D.
THE SET UP PROCEDURE
With the power turned off, select the included angle you would like to grind by: 1) Loosening Handle A2) Turning the Collet Arm on its axis until the Pointer is directed at the angle on the scale you desire. 3) Re-tightening Handle A.
Next, put the tungsten at the diameter you plan to use through the proper sized collet hole on the universal collet and observe the height at which the tungsten will hit the wheel. For setting up your first tungsten on a wheel, make the height as close to the top of the wheel as possible by:1) Loosening Handle B. 2) Slide Collet Arm up to desired position.3) Re-tightening Handle B.
The setup in now complete. After grinding numerous tungstens, you will wear a groove on the wheel. At this point, adjust Handle B again and move the contact point down a very small amount to a fresh spot on the wheel.
D
C
B
A

DGP-PG2-A Product User Manual | Released: 12/17 Rev. H | ©2017 Diamond Ground Products
Page 6
BODY STOP GAUGE SETUP: Once the desired Pin Vise electrode stick-out is determined, set the Body Stop Gauge as follows:
Initial Gauge setup:1) With electrode extending to the desired length, tighten Pin Vise lock collar.2) Loosen Nut D on the Body Stop Gauge.3) Insert electrode into Body Stop Gauge.4) Rotate Knob C until the Stop makes contact with electrode tip. Lock the Stop in place with Nut D.
To duplicate electrode Tip Flat diameter (with Body Stop Gauge depth set per above):1) Insert electrode into Pin Vise. Extension should be beyond the desired final length.2) Adjust Pin Vise collar so there is a slight drag on the extended electrode.3) Insert electrode into Body Stop Gauge. Slide until nose of the Pin Vise contacts the Gauge face.4) Secure electrode in position by tightening Pin Vise collar.
NOTE: Diamond Ground Products (DGP) Diamond Grinding wheels are specifically designed for optimum wheel life for grinding tungsten electrodes.
GRINDING TECHNIQUESAfter the short set up procedure is finished you are ready to prepare your electrode quickly and easily. Turn the power switch on; slide the tungsten into the proper collet hole on the universal collet. From top to bottom the holes are: 3/32”/2.4mm, 1/16”/1.6mm, .040”/1.0mm.Lightly touch the wheel with the tungsten and rotate it in your fingers in a steady manner until you have ground to a point or left the proper sized flat you desire. Be patient and do not gouge the wheel by trying to grind the electrode too quickly. Gouging the wheel will wear a groove much faster and cause excessive wear. The approximate recommended grinding times for each of the diameters is:
3/32” / 2.4mm 15 seconds1/16” / 1.6mm 8 seconds.040” / 1.0mm 5 seconds
REMOVING A TIP FROM AN ELECTRODEAfter welding, it is beneficial to remove a bad tip before regrinding. To do this, turn on the power and insert the tungsten in the proper sized hole from the choices you see on the Tip/Flat Block. Slowly push the tip against the wheel until the point is removed. Once again, be patient and do not gouge the wheel. A burr can form if too much pressure is exerted on the tungsten.
DGP-PG2-A Product User Manual | Released: 12/17 Rev. H | ©2017 Diamond Ground Products
Page 7
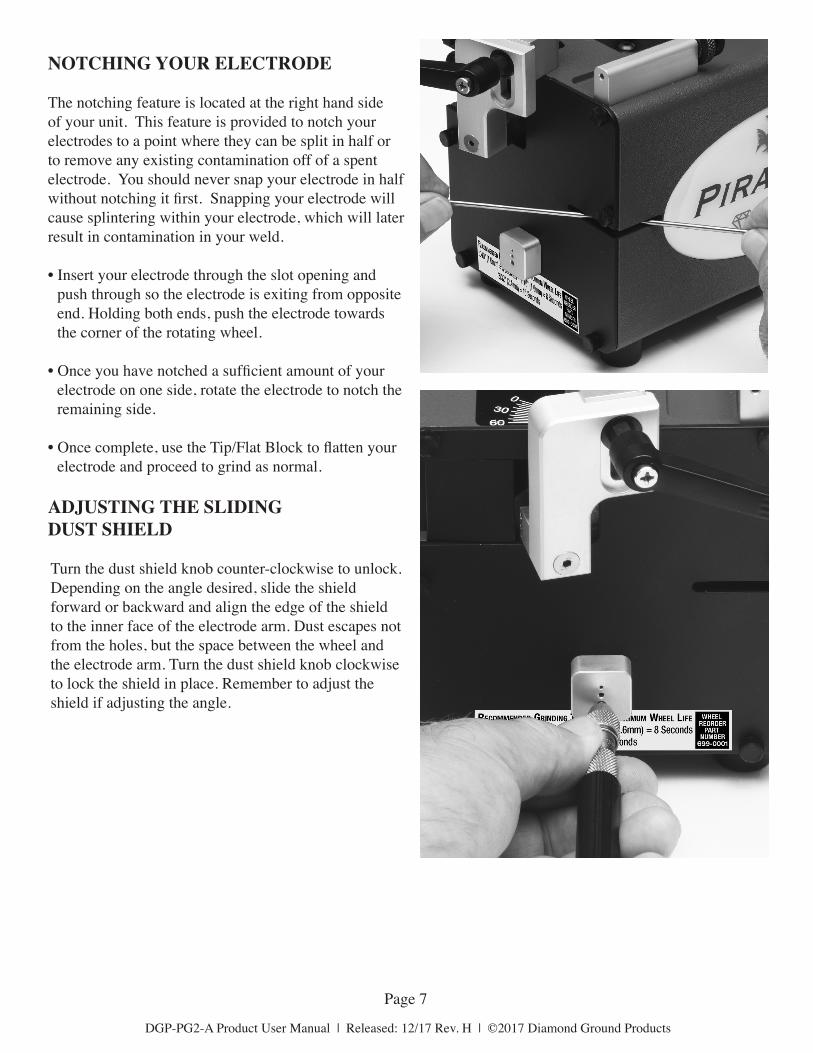
NOTCHING YOUR ELECTRODE
The notching feature is located at the right hand side of your unit. This feature is provided to notch your electrodes to a point where they can be split in half or to remove any existing contamination off of a spent electrode. You should never snap your electrode in half without notching it first. Snapping your electrode will cause splintering within your electrode, which will later result in contamination in your weld.
• Insert your electrode through the slot opening and push through so the electrode is exiting from opposite end. Holding both ends, push the electrode towards the corner of the rotating wheel.
• Once you have notched a sufficient amount of your electrode on one side, rotate the electrode to notch the remaining side.
• Once complete, use the Tip/Flat Block to flatten your electrode and proceed to grind as normal.
ADJUSTING THE SLIDING DUST SHIELD
Turn the dust shield knob counter-clockwise to unlock. Depending on the angle desired, slide the shield forward or backward and align the edge of the shield to the inner face of the electrode arm. Dust escapes not from the holes, but the space between the wheel and the electrode arm. Turn the dust shield knob clockwise to lock the shield in place. Remember to adjust the shield if adjusting the angle.

DGP-PG2-A Product User Manual | Released: 12/17 Rev. H | ©2017 Diamond Ground Products
Page 8
7. WHEEL REPLACEMENT
HOW TO ORDER REPLACEMENT WHEELS
The Piranha II replacement diamond wheels are available either directly through Diamond Ground Products or through local distributors who sell our products. The part number to use when ordering are listed below in the “Piranha Grinder Accessories” Chart. These wheels are in stock for immediate delivery. In manufacturing replacement wheels, a special process is used to bond the diamond to the wheel which makes these wheels last as long as possible when used for grinding tungsten. Grinding wheels other than DGP wheels will not only offer less longevity, but may be dangerous and may void the warranty on this equipment.
HOW TO INSTALL REPLACEMENT GRINDING WHEELS
Please use the following steps to remove and replace the Diamond Grinding wheels:
1. Turn the power off, unplug the electrical outlet, and wait until the motor has come to a complete stop.2. Completely unscrew and remove Handle A (see picture at adjusting handles). Lift up and remove the Arm, taking care not to lose the washer between the Arm and the Handle. Set them aside.3. Unscrew the four thumbscrews on the wheel cover. Remove the Wheel Cover to fully expose the Wheel.4. Using the supplied Allen Wrench, loosen the four screws on the front of the Grinding Disk.5. Remove the old Wheel and mount the replacement wheel on the arbor.6. Replace all of the other parts in reverse order the exact same methods you used to remove them.
** IMPORTANT ***DO NOT REMOVE OR OVER TIGHTEN ARBOR
WHEN CHANGING WHEEL, ONLY REMOVE 4 SCREWS
• For optimum surface finish on .040 through 3/32, use a 300 Grit Diamond Wheel (699-0001) (3.15” Diameter)
PART NO. PIRANHA GRINDER ACCESSORIES699-0004 Piranha II Grinding Wheel – 600 Grit Single Sided (3.15” diameter)699-0003 Piranha II Grinding Wheel – 150 Grit Single Sided (3.15” diameter)
All prices are FOB Factory.
Products listed above are normally stock items- consult factory to confirm.
Net 30 terms available O.A.C for deliveries in the U.S. International orders by wire transfer.
Prices that are listed are subject to change without notice.

DGP-PG2-A Product User Manual | Released: 12/17 Rev. H | ©2017 Diamond Ground Products
Page 9
PIRANHA IITUNGSTEN GRINDERExploded Assem
bly

DGP-PG2-A Product User Manual | Released: 12/17 Rev. H | ©2017 Diamond Ground Products
Page 10
REF. BOM for Piranha II Top Assembly PN: DGP-PG2-A Rev. A 2017
PIRANHA IITUNGSTEN GRINDER
Parts List
QTY ITEM PART NUMBER DESCRIPTION1 1 551-0001 SWITCH - ROCKER A/C
1 2* (See table below) DISK - DIAMOND WHEEL
1 3 DGP-P355-A POWER CORD WITH GROMMET
1 4 DGP-P410 HANDLE - ADJ/CLAMPING #10-32
1 5 DGP-P460 KNOB - SHEAR LOCK - #10 BLK
2 6 DGP-P730 WASHER - FLAT - #10
1 7 DGP-PG1000 HANDLE - ADJ/CLAMPING #10-32
1 8* (See table below) MOTOR AC/DC 8K RPM
1 9 DGP-PG1301-A REAR COVER
1 10 DGP-PG1302-A FRONT COVER
1 11 DGP-PG1303-A MOTOR MOUNT - RIGHT
1 12 DGP-PG1304-A MOTOR MOUNT - LEFT
1 13 DGP-PG1305 BLOCK PIVOT
1 14 DGP-PG1307-A POINTER - INDEX
1 15 DGP-PG1309 COLLAR - PIVOT #10-32UNF
1 16 DGP-PG1310-A HANDLE
1 17 DGP-PG1312 HOLDER -FUSE 125V/5AMP
6 18 DGP-PG1317 SCREW - THUMB #4-40 X 5/16
10 19 DGP-PG1318 SHCS - #4-40 X 5/16” LG
2 20 DGP-PG1320-A BHCS - #6-32UNC X 1/2 LG
4 21 DGP-PG1322-A BHCS - #10-32UNC X 1/2 LG
8 22 DGP-PG1327-A WASHER - FLAT #10
1 23 DGP-PG1330-A PARTITION PLATE
1 24 DGP-PG1331-A DISC ARBOR
3 25 DGP-PG1332-A BHCS- #6-32UNC X 7/16 LG
QTY ITEM PART NUMBER DESCRIPTION4 26 DGP-PG1334-A WASHER - 5/16 ID X 1 OD X .050 THK
7 27 DGP-PG1335 BHCS - #8-32UNC X 3/8 LG
4 28 DGP-PG1338-A BHCS - #8-32UNC X 5/16 LG
1 29 DGP-PG1353 BLOCK - TIP FLAT
5 30 DGP-PG1354-A SHCS #6-32 X 1/4 LG
1 31 DGP-PG1356-A DEG PLATE
1 32 DGP-PG1357-A STUD - #10-32 X 1-1/2 LG
1 33 DGP-PG1359-A DUST SHIELD
1 34 DGP-PG1363-A SHCS- #10-32UNC X 1-1/2 LG
1 35 DGP-PG1364-A FELT WASHER SMALL F1
1 36 DGP-PG1365-A KNOB - KNURLED - #10-32
1 37 DGP-PG1371-A BODY MACHINE
1 38 DGP-PG1374-A ELECTRODE ARM
1 39 DGP-PG1380 COPPER GROUND
1 40 DGP-PG1381-A NUT - #6-32UNC 5/16 W X 7/64 H
1 41 DGP-PG1382-A BHCS - #6-32UNC X 3/4 LG
4 42 DGP-PG1383-A BHCS - #10-32UNC X 7/16 LG
1 43 DGP-PG1384-A COMPRESSION SPRING
1 44 DGP-PG1385-A GROMMET 5/16 ID-1/2 OD
1 45 DGP-PG1386-A WASHER - #6 X 3/8 DIA
1 46 DGP-PG1387-A KNOB - #6 X 3/8 DIA
4 47 DGP-PG1433 BUMPER - RECESSED 3/4” DIA X 9/16”
1 48 DGP-PG1445-A SHCS #6-32 X 7/16 LG
2 49 DGP-PG1452-A LABEL - P-II MAIN
1 50 DGP-PG1503-A ADJUSTABLE STOP BLOCK
ITEM NO. PART NUMBER DESCRIPTION
699-0001 GRINDING WHEEL DISK DOUBLE SIDED, 3.15” OD – 300 GRIT (STANDARD)
2 699-0003 GRINDING WHEEL DISK DOUBLE SIDED, 3.15” OD – 150 GRIT
699-0004 GRINDING WHEEL DISK DOUBLE SIDED, 3.15” OD – 600 GRIT
DGP-PG1080 PIRANHA II MOTOR – 110 VOLT / 60 HERTZ
8 DGP-PG1086 PIRANHA II MOTOR – 110 VOLT / 50 HERTZ
DGP-PG1082 PIRANHA II MOTOR – 220 VOLT / 60 HERTZ
DGP-PG1084 PIRANHA II MOTOR – 220 VOLT / 50 HERTZ
*

DGP-PG2-A Product User Manual | Released: 12/17 Rev. H | ©2017 Diamond Ground Products
10. TUNGSTEN OPTIONSDiamond Ground Products stocks the following tungsten electrode types in 7” lengths with diameters ranging from .040” to ¼”. Custom diameters and lengths also available by special order. Contact us for pricing and availability.
TRI-MIX- WS2 Non-Radioactive – Color Code: CreamTri-Mix™ tungsten is non-radioactive tungsten with the similar performance to 2% Thoriated tungsten. Three Oxides scientifically balanced promote migration and evaporation rates that result in extended tungsten life. This tungsten offers stability and consistency not seen on most other tungsten. Results commonly received in some applications include an increase in the quality of welds, a dramatic increase in service life as well as, an increase in arc starts before resharpening and fewer misfires saving the customer money and time.
CRYO-TRadioactive – Color Code: PinkCryogenically treated thoriated tungsten which provides a more dense structure of the thoriated blend. Easier starting as compared to 2% Thoriated. Performance includes easier arc starts as well as extended tungsten life.
2% THORIATED & 4% THORIATEDRadioactive element – Color Code: Red / Orange2% Thoriated material is the primary tungsten used in the United States. Used primarily for DC Welding, it has a low work function and provides high load and amperage capability. Vapors, grinding dust and disposal of thorium dioxide raise health, safety and environmental concerns.
1.5% LANTHANATED & 2% LANTHANATED Non-Radioactive – Color Code: Gold / BlueThe most commonly used, non-radioactive tungsten used as an alternative to 2% Thoriated tungsten. 2% Lanthanated offers a long electrode life under heavy or pulsing amperage loads. Common results include, improved and stable arc starts at any amperage level, good resistance to contamination and long service life. Because of its high ability to resist thermal shock, the user receives excellent ignition with a lower burn-off rate.
2% CERIATEDNon-Radioactive – Color Code: Grey / Formerly OrangeRecommended for short welding cycles on low-amp, DC orbital tube, pipe, thin sheet, and small part applications. Provides low current capacity and arc ignition with good arc stability. Ceriated tungsten is not recommended for higher applications, because the oxides contained in ceriated material tend to migrate very quickly to the heat at the tip of the electrode.
ZIRCONIATEDNon-Radioactive – Color Code: Brown / WhiteRecommended for use in radiographic-quality welding, where tungsten contamination must be minimized. Zirconiated material tends to ball-up easily in AC applications. Performance includes good arc starting and current capacity. Not recommended for DC Welding.
PURE TUNGSTENNon-Radioactive – Color Code: GreenNon-Radioactive with a low current capacity. Recommended for use in AC welding of aluminum.
Page 11
DGP-PG2-A Product User Manual | Released: 12/17 Rev. H | ©2017 Diamond Ground Products
Page 12
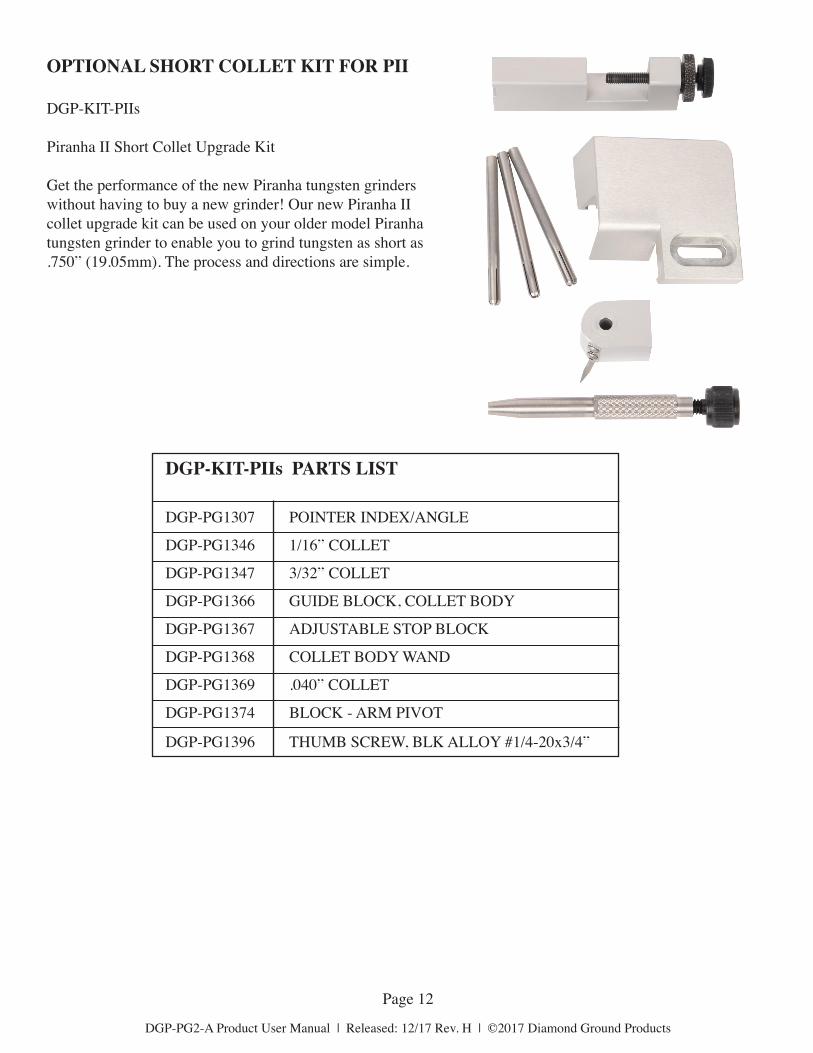
OPTIONAL SHORT COLLET KIT FOR PII
DGP-KIT-PIIs
Piranha II Short Collet Upgrade Kit
Get the performance of the new Piranha tungsten grinders without having to buy a new grinder! Our new Piranha II collet upgrade kit can be used on your older model Piranha tungsten grinder to enable you to grind tungsten as short as .750” (19.05mm). The process and directions are simple.
DGP-KIT-PIIs PARTS LIST
DGP-PG1307 POINTER INDEX/ANGLE
DGP-PG1346 1/16” COLLET
DGP-PG1347 3/32” COLLET
DGP-PG1366 GUIDE BLOCK, COLLET BODY
DGP-PG1367 ADJUSTABLE STOP BLOCK
DGP-PG1368 COLLET BODY WAND
DGP-PG1369 .040” COLLET
DGP-PG1374 BLOCK - ARM PIVOT
DGP-PG1396 THUMB SCREW, BLK ALLOY #1/4-20x3/4”